Walkthrough Menu
- General Tips & Information
- Story 1: The Key To The Forgotten City
- Story 2: The Ghost Of Artifacts Past
- Story 3: Artifacts From Afar
General Tips & Information
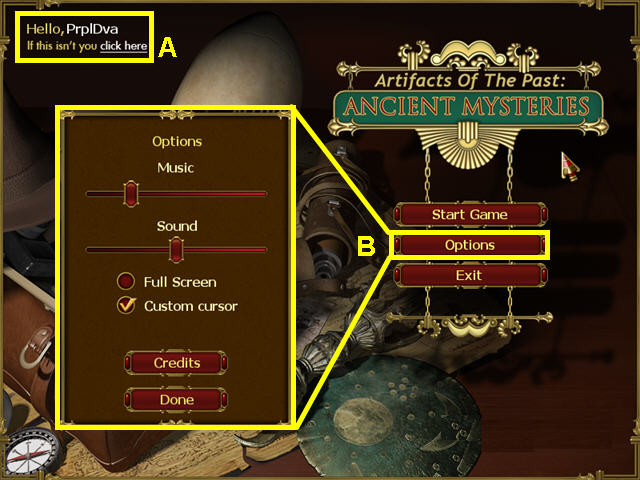
- From the main screen you may manage player profiles (A).
- The options menu allows for the adjustment of music and sound volume (B).
- You may play this game in windowed or full screen mode.
- The custom cursor may be disabled.
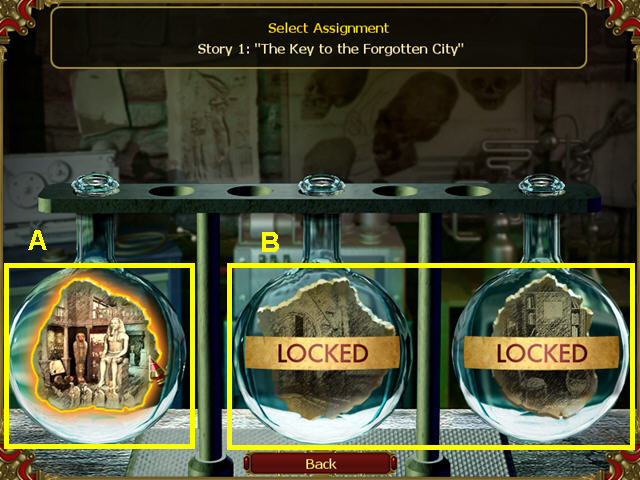
- Select the first bottle to begin the game (A).
- The other two bottles are locked until you finish the previous story (B).
- Select the difficulty level of the game.
- Easy mode offers more hints for hidden object scenes and shorter recharge times for the hint and skip buttons.
- Normal mode has no obvious hints for hidden object scenes and longer recharge times for the hint and skip buttons.
- You have the option of a brief tutorial once you start the game.
- You may skip mini-games once the skip meter is full.
- After you have completed the game you may return to, and play, any game scenes.
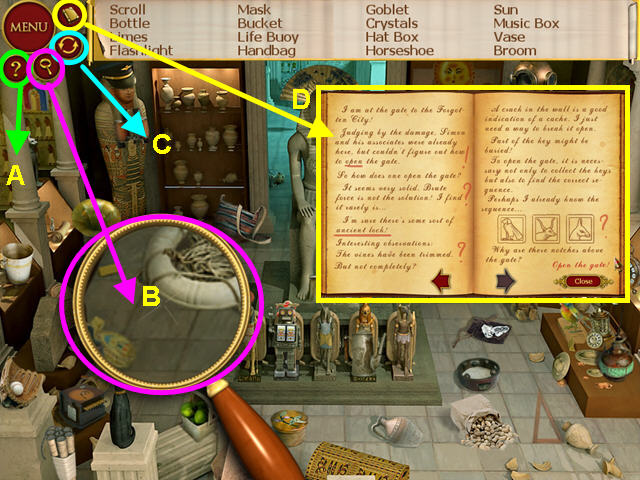
- Click on the question mark to get a hint (A).
- Select the magnifier to use the tool (B).
- Click on the magnifier again to put it away.
- Select the arrows to shuffle the hidden objects on your list (C).
- Click on the book symbol to view the journal (D).
- The clues you gather are automatically noted in the journal.
Story 1: The Key to the Forgotten City
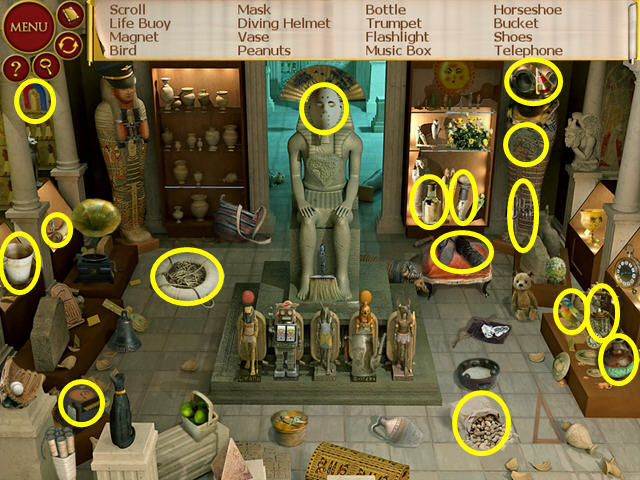
- Locate all the hidden objects on the list.
- The hidden object lists throughout the game are randomized. Your lists may not match those in this guide!
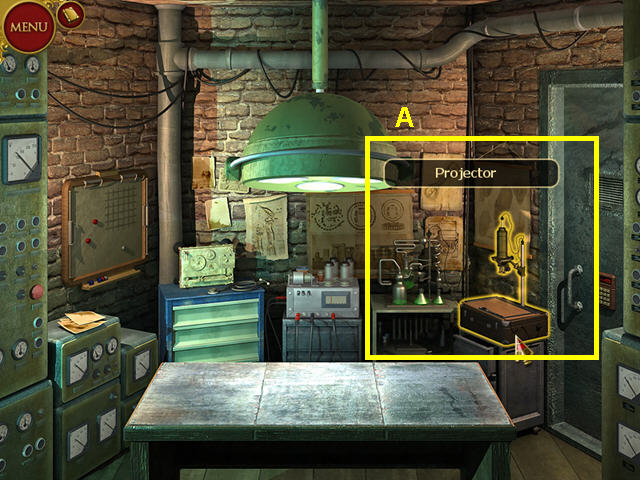
- Once in the lab, select the projector (A).
- You will use the other equipment later in the game.
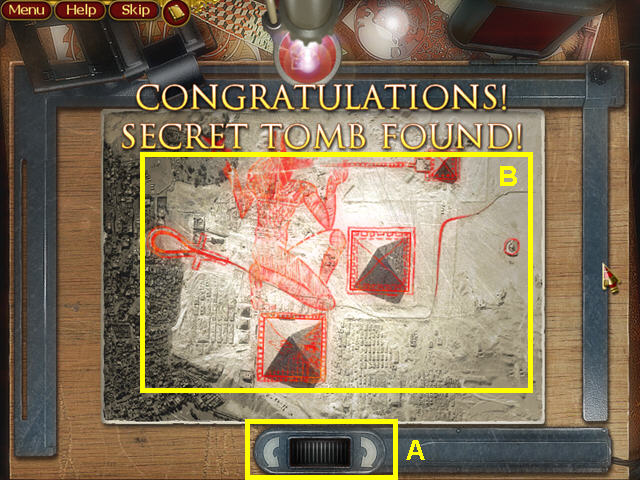
- Use the control at the bottom to rotate the red overlay left and right (A).
- Left-click, hold and drag the overlay into position so that it matches the photograph (B).
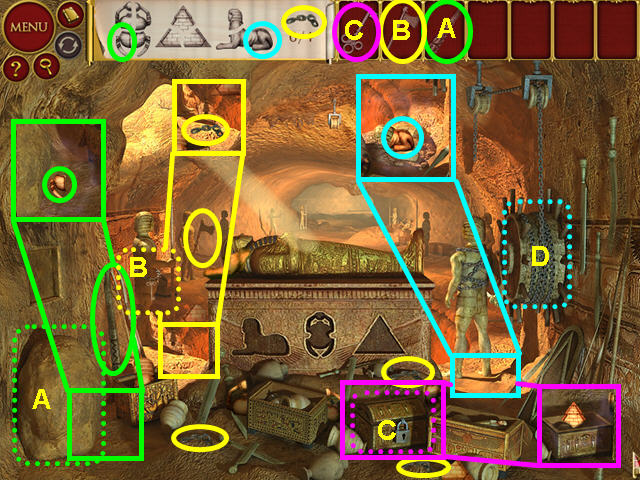
- Locate the LEVER and use it on the boulder to find a SCARAB PIECE (A).
- Locate the AXE and use it on the chain to get the KEY (B).
- The KEY will go automatically into your inventory.
- Use the KEY on the chest and take the PYRAMID PIECE (C).
- Take the PIECE of CHAIN that fell to the ground when you used the axe.
- Locate the other 3 CHAIN PIECES.
- The CHAIN PIECES will automatically attach to the chain over the statue.
- Once you have found all the CHAIN PIECES, click on the wheel to raise the statue (D).
- Take the SPHINX PIECE that is revealed when the statue falls.
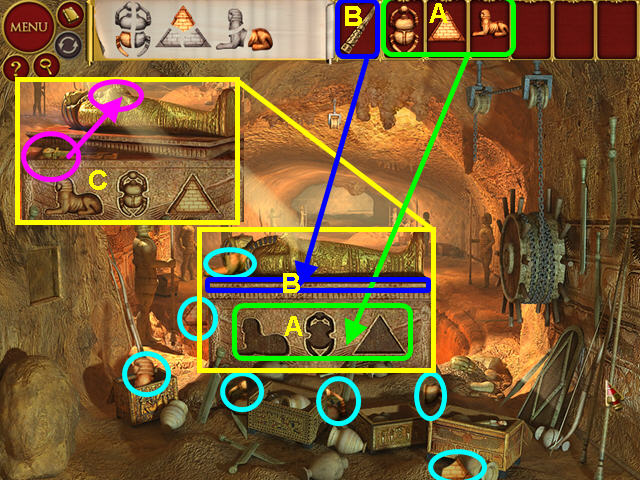
- Locate the remaining pieces of the SPHINX, PYRAMID, and SCARAB.
- Place the SPHINX, PYRAMID, and SCARAB into the niches on the sarcophagus (A).
- Use the LEVER to open the lid (B).
- Take the ANKH from inside the sarcophagus and place it in the Pharaoh's hand (C).
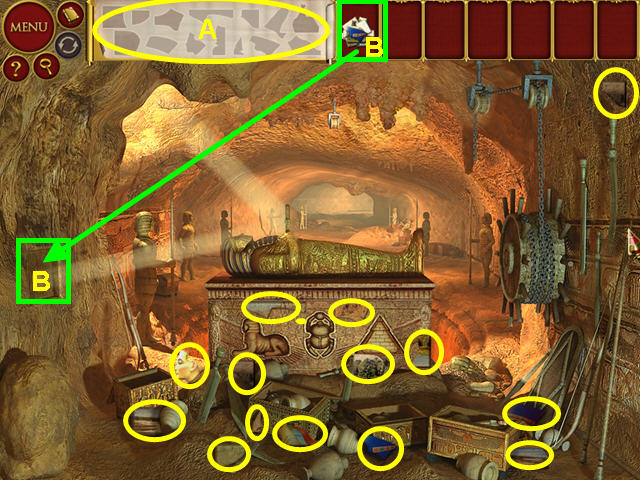
- Locate all the KEY PIECES (A).
- Take the KEY PIECES from inventory and use them on the niche in the wall (B).
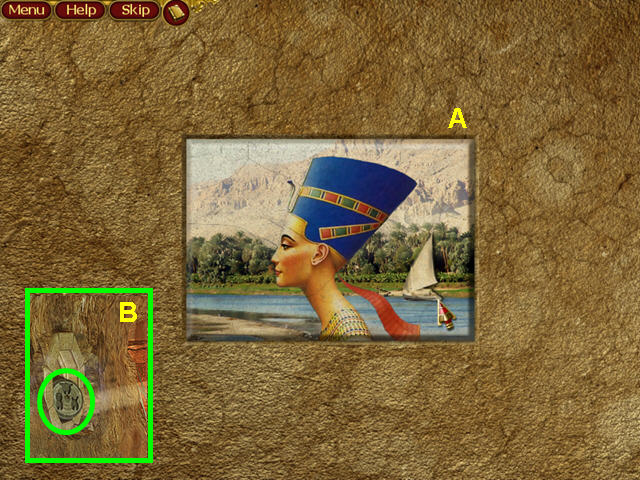
- Repair the picture in this jigsaw-style mini-game (A).
- Left-click to pick up or place a piece.
- Right-click to rotate a piece.
- Pieces will snap into place when correct.
- After solving the puzzle, you’ll return to the chamber.
- Take the STONE DISC from the niche (B).
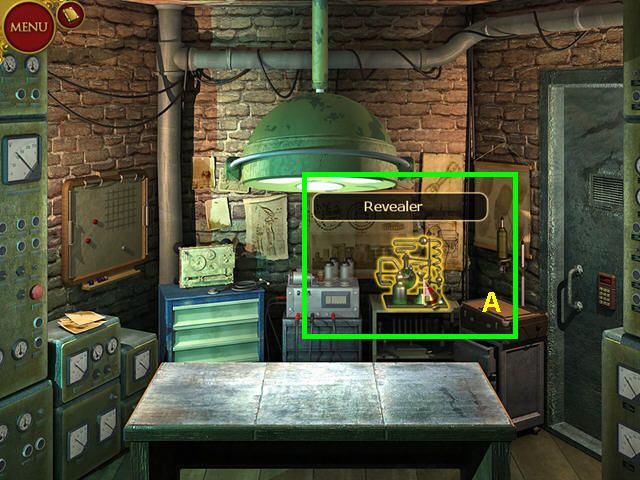
- Select the revealer to perform a test (A).
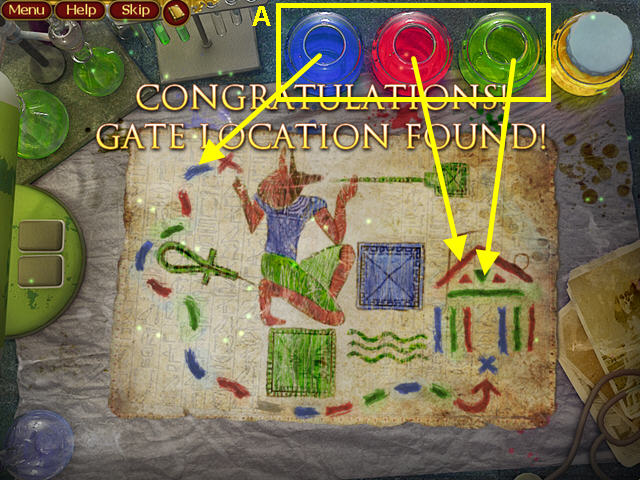
- Click on one of the jars of dye then click on the lines without color on the parchment (A).
- You can only color the lines that are meant to be the color you are using.
- Click on the other jars to change color.
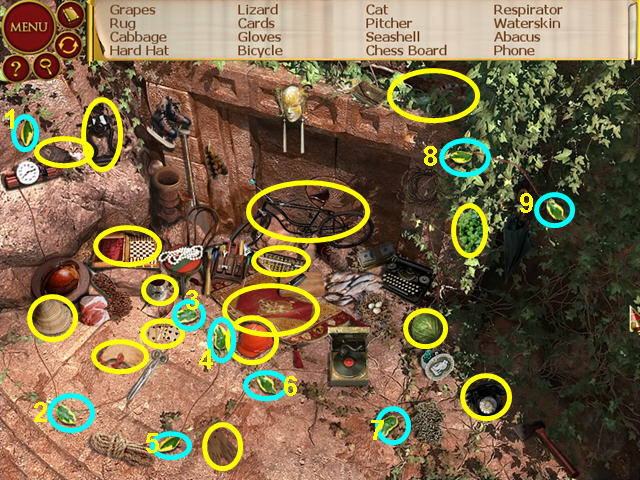
- Find all the items on the hidden object list.
- Click on the leaves in sequence (1-9).
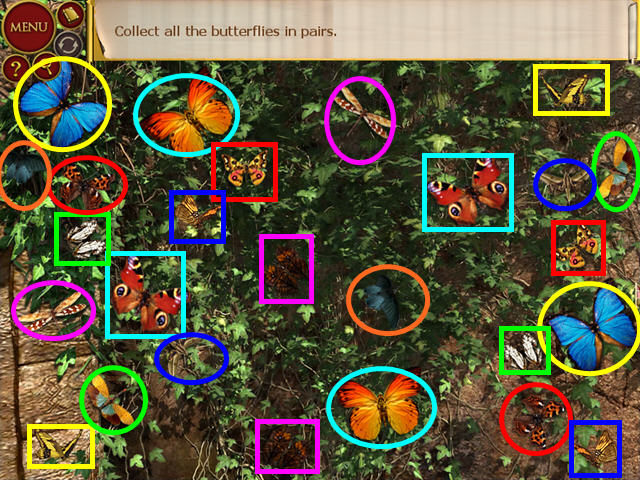
- Click on matching pairs of butterflies to remove them from the scene.
- Take the God Head that appears on the left, once all the butterflies are gone.
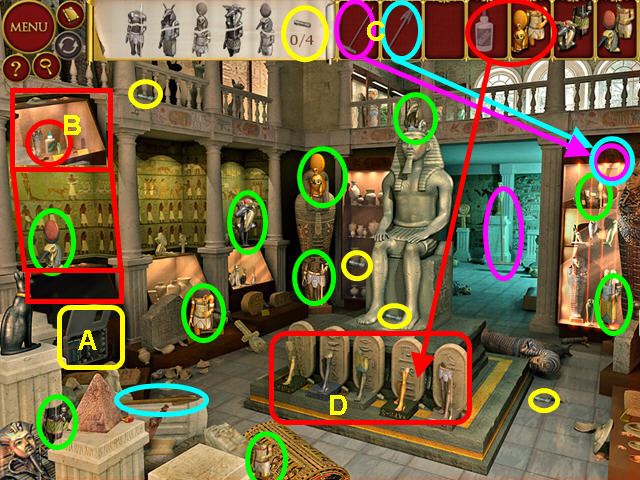
- Locate the 4 FUSES to activate the mini-game (A).
- After solving the mini-game, take the glue from the case (B).
- Find the BROOM and SPEARHEAD: combine them inside your inventory.
- Use the BROOM/SPEAR on the glass cabinet to deactivate the lasers (C).
- Find all the STATUE PIECES.
- Use the GLUE on each set of STATUE PIECES in your inventory.
- Place the repaired statues in front of the center dais (D).
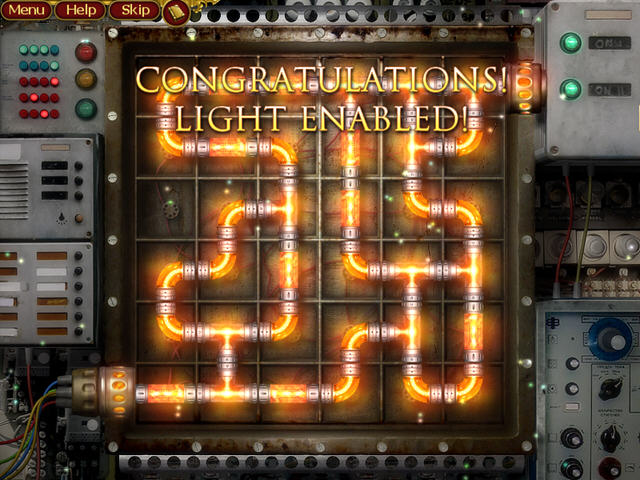
- Click on each pipe to rotate it into position.
- Complete the path to turn on the case lights.
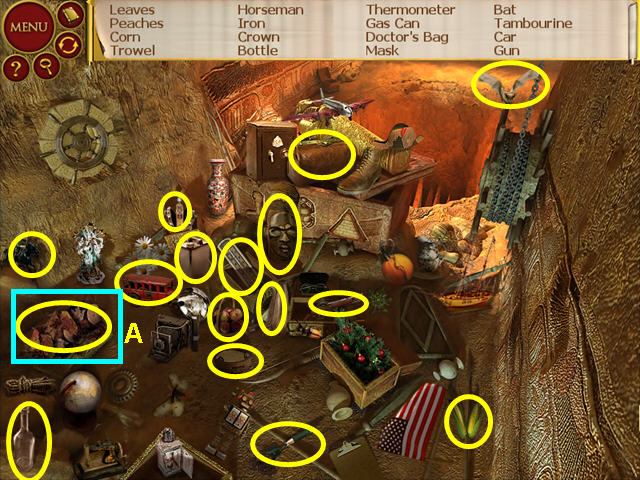
- Locate all the hidden objects on the list.
- Click on the chest that was covered with leaves (A).
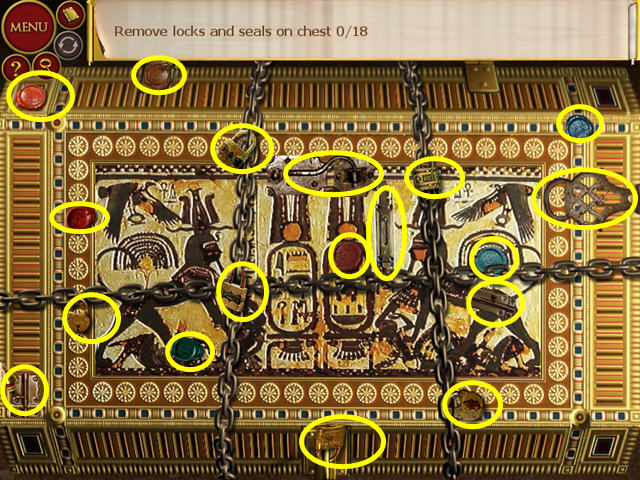
- Remove all the seals and locks from the chest.
- Take the God Head from inside the chest.
- Select the projector on the right side of the lab.
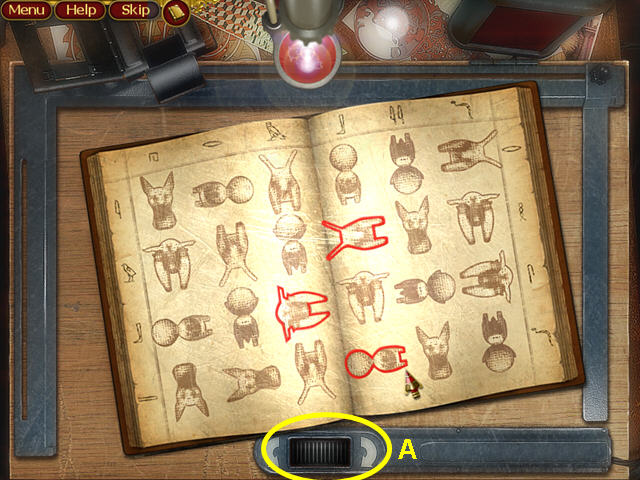
- Use the control to rotate the overlay (A).
- Left-click and drag it into place.
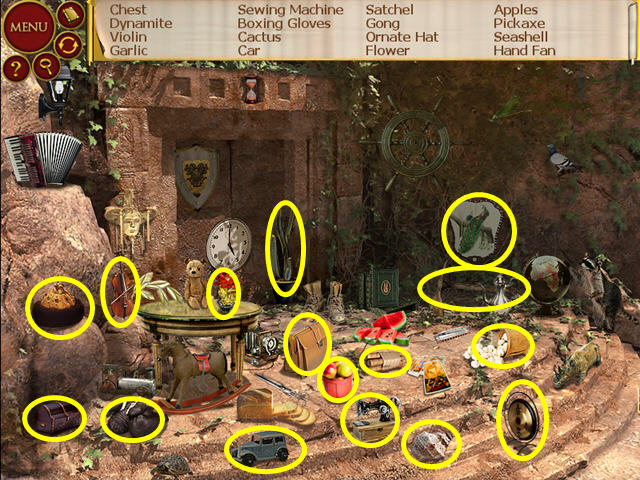
- Locate all the hidden objects on the list.
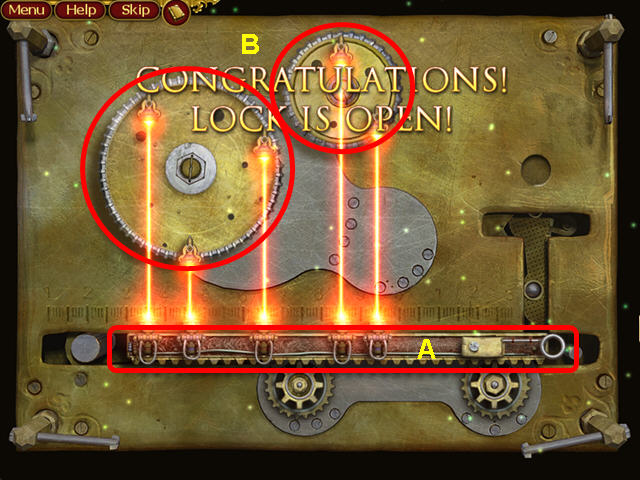
- Once in the lab, select the opener (the second machine from the left).
- Move the bar (A) and the two gears (B) to make all the gems on the bar light up.
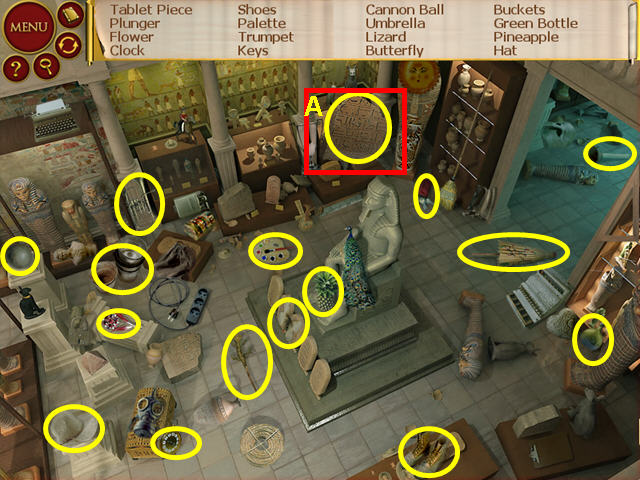
- Locate all the hidden objects on the list.
- Click on the display case that was hidden by the tablet.
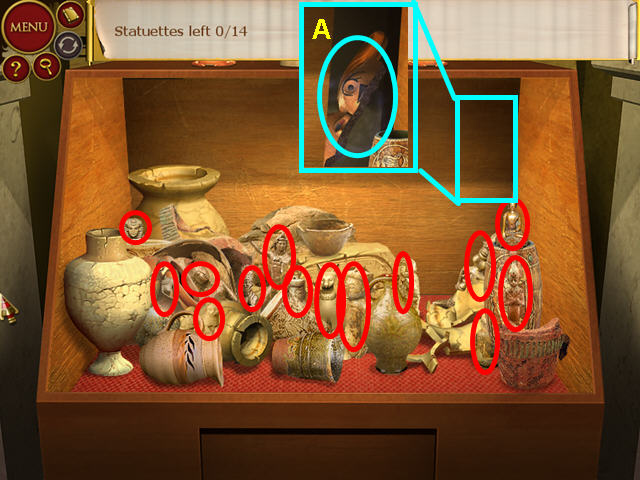
- Locate all the statues.
- Take the head piece that appears in the back panel.
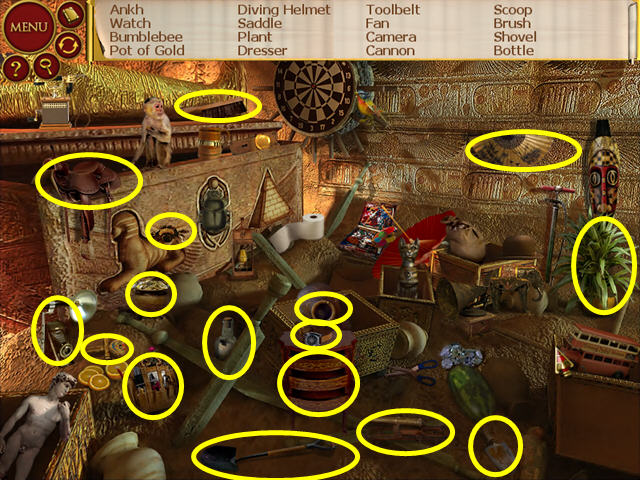
- Locate all the hidden objects on the list.
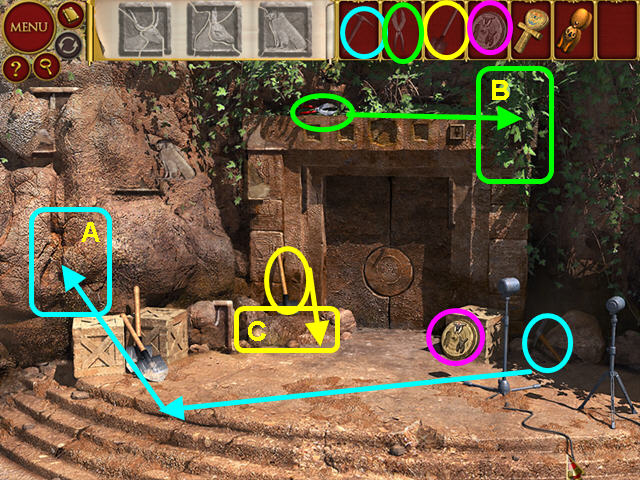
- Collect the three tools and the STONE DISC.
- Use the PICK on the rock face (A).
- Use the CLIPPERS on the hanging vines (B).
- Use the SHOVEL on the rock (C).
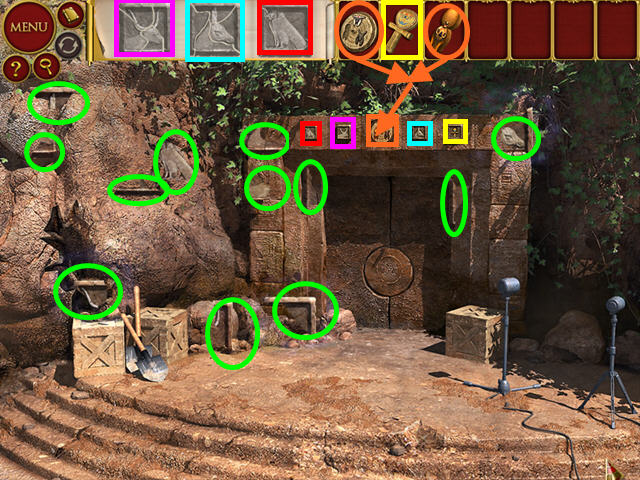
- Collect all the tile pieces.
- Combine the ANUBIS HEAD with the STONE DISC.
- Place the EAGLE TILE, BULL TILE, STONE DISC, DONKEY TILE, and ANKH, from left to right, over the door.
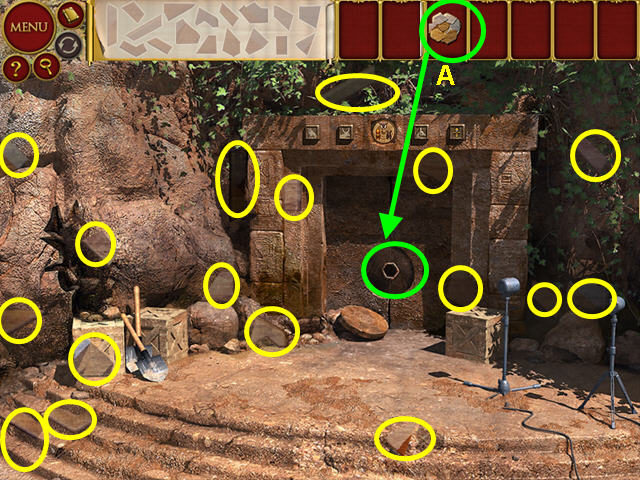
- Collect all the fragments.
- Use the fragments on the hex lock (A).
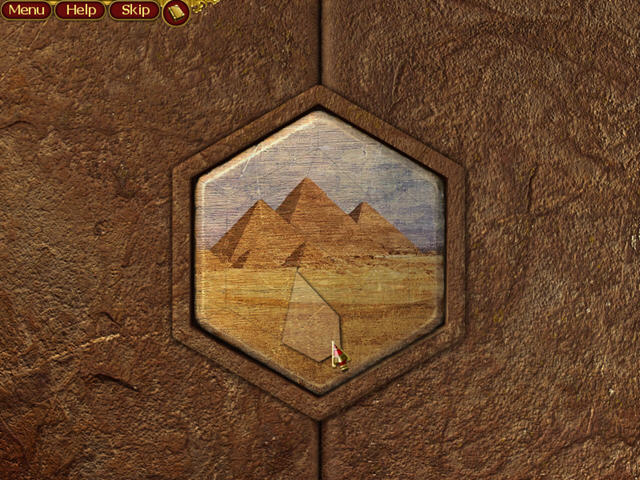
- Repair the picture in this jigsaw-style mini-game.
- Left-click to pick up or place a piece.
- Right-click to rotate a piece.
- Pieces will snap into place when correct.
Story 2: The Ghost of Artifacts Past
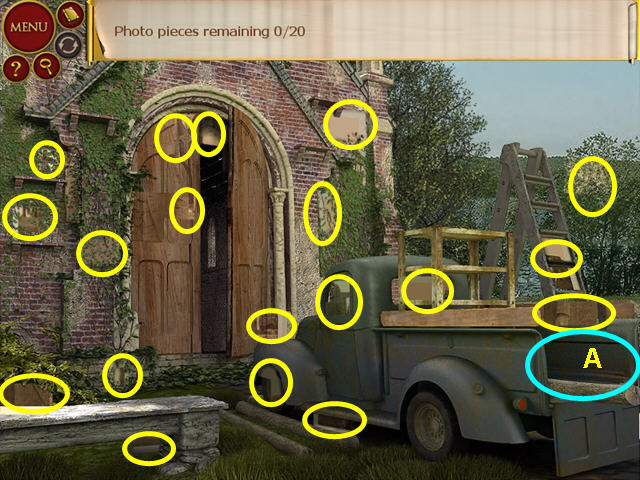
- Locate 19 of the 20 photo scraps.
- Select the bed of the truck for an additional scene (A).
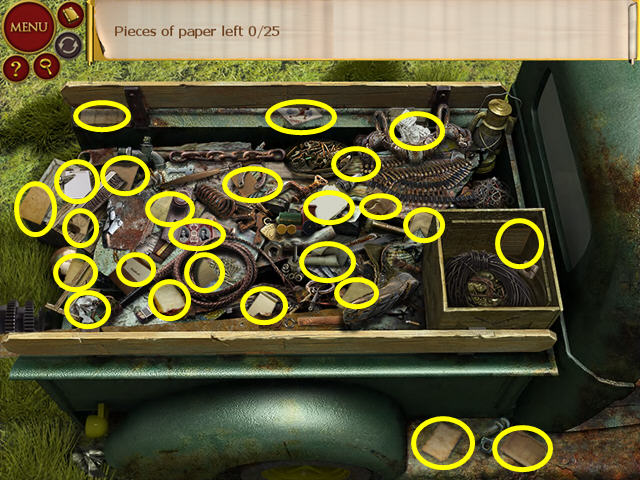
- Locate all the paper scraps to earn the final photo scrap.
- Once at the lab, select the leftmost machine, the Integrator.
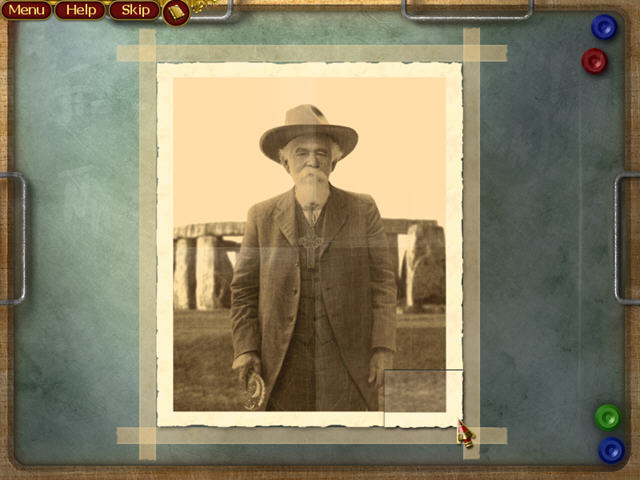
- Repair the picture in this jigsaw-style mini-game.
- Left-click to pick up or place a piece.
- Right-click to rotate a piece.
- Pieces will snap into place when correct.
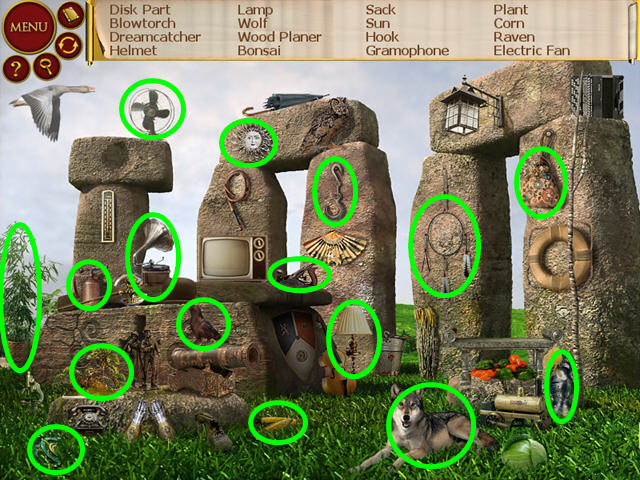
- Locate all the hidden objects on the list.
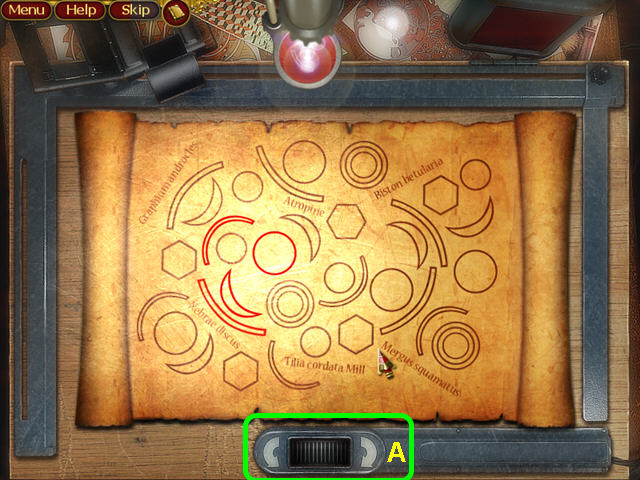
- Select the projector, which is the rightmost machine.
- Use the control to rotate the overlay (A).
- Left-click and drag into place.
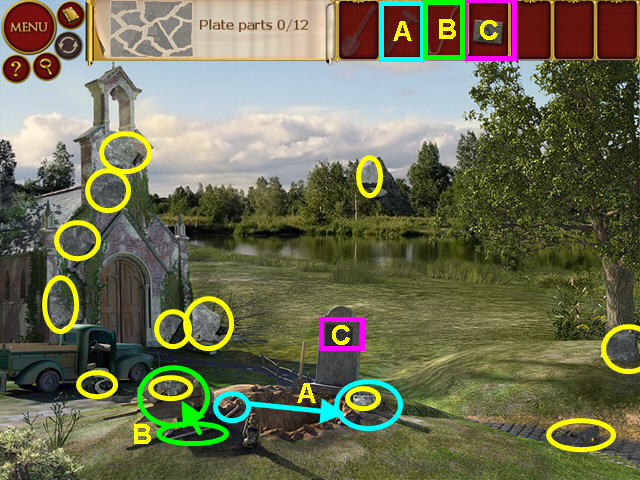
- Find the HAMMER and the CROWBAR.
- Use the HAMMER on the bottom right corner of the headstone.
- Use the CROWBAR on the side of the wheelbarrow.
- Collect all the plate parts.
- Place the PLATE on the headstone (C).
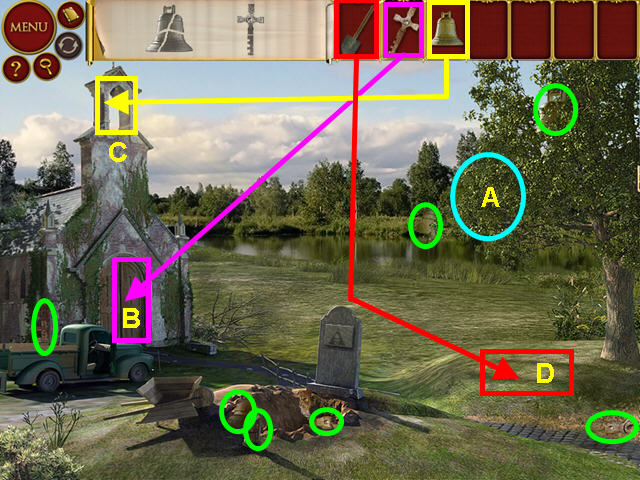
- Look at the 3 branches for a hidden object game (A).
- Find all the KEY and BELL pieces.
- Use the KEY on the door (B).
- Use the BELL on the belfry (C).
- Use the SHOVEL on the spot highlighted (D).
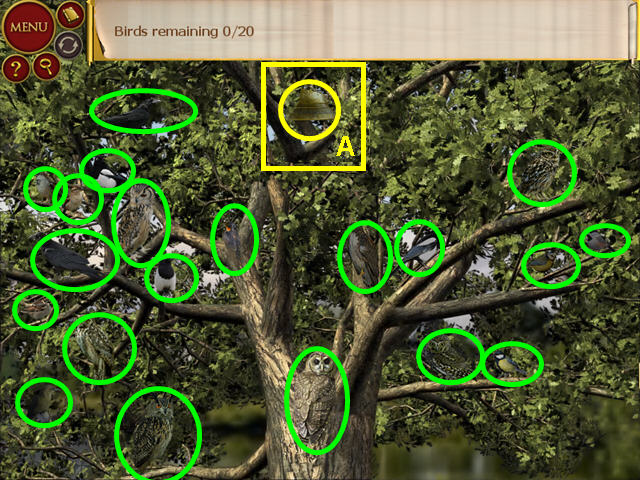
- Find all the birds.
- Take the BELL piece.
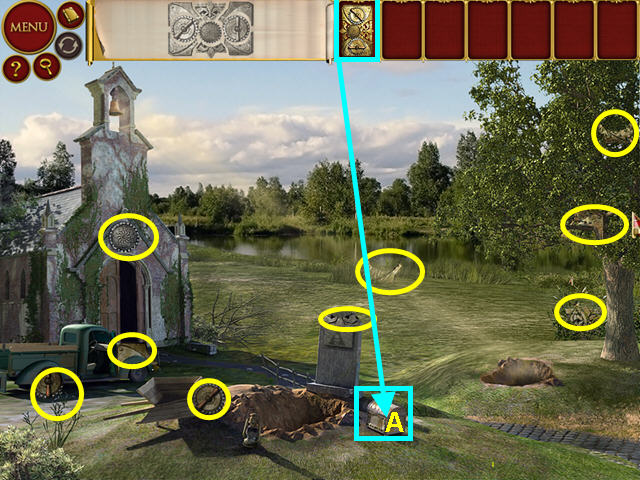
- Locate all the LOCK pieces.
- Place the LOCK on the chest (A).
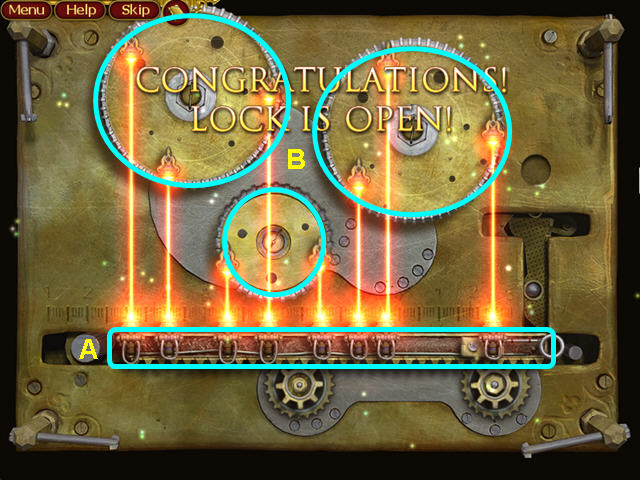
- Move the bar (A) and the 3 gears (B) to make all the gems on the bar light up.
- Take the NEBRAE DISC piece from the chest.
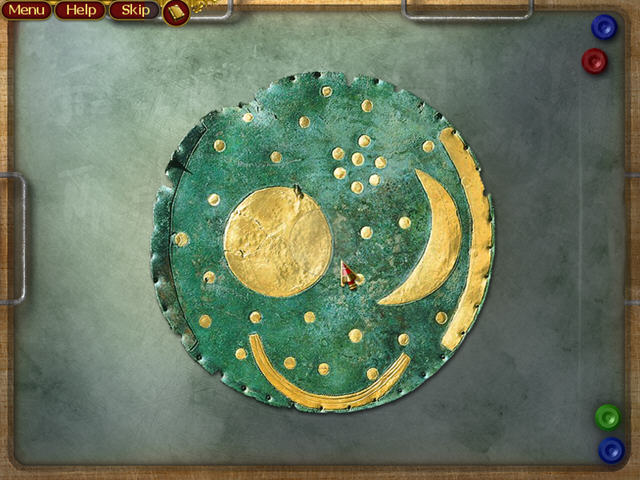
- Back at the lab, select the leftmost machine, the Integrator.
- Rotate the rings to reform the disk.
- Click, hold and drag to rotate the rings.
- The outer ring does not move; start with the next smallest.
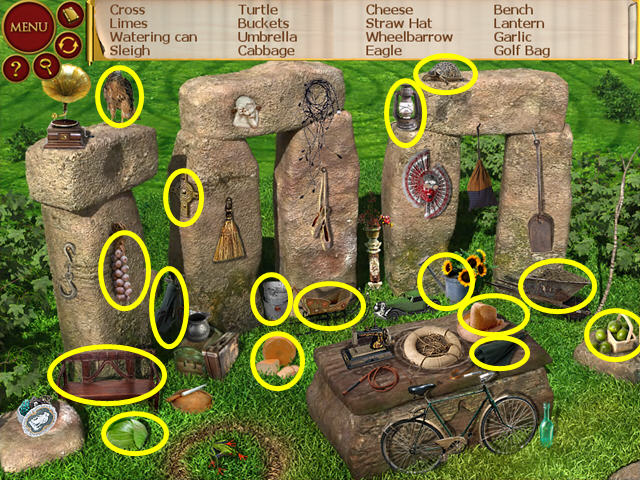
- Locate all the hidden objects on the list.
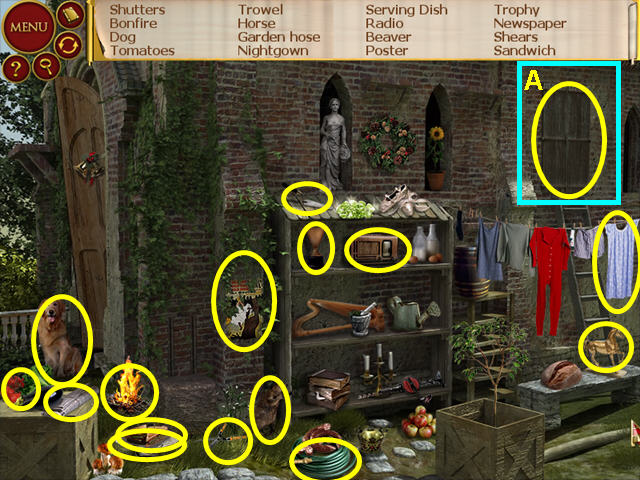
- Locate all the hidden objects on the list.
- Select the stained glass window that was behind the shutters (A).
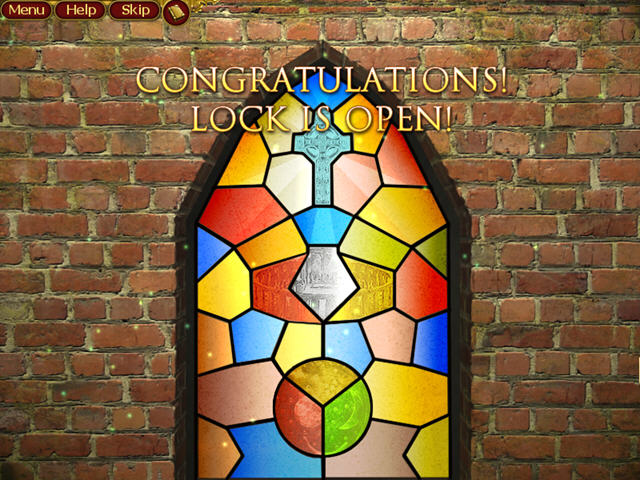
- Repair the picture in this jigsaw-style mini-game.
- Left-click to pick up or place a piece.
- Right-click to rotate a piece.
- Pieces will snap into place when correct.
- Lift up the hatch that appears near the door.
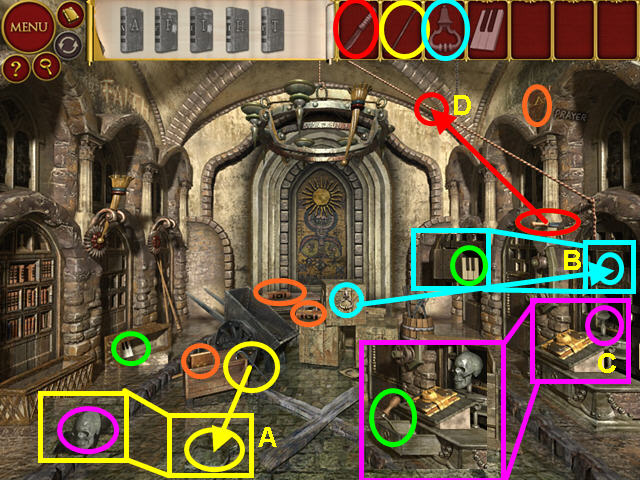
- Locate 4 BOOKS, the CROWBAR, HANDLE, KNIFE, and ORGAN KEY.
- Use the CROWBAR on the loose floor and find the SKULL (A).
- Use the HANDLE on the cubbyhole and take the ORGAN KEY (B).
- Use the SKULL on the stand and take the CRANK (C).
- Use the KNIFE to cut the rope (D).
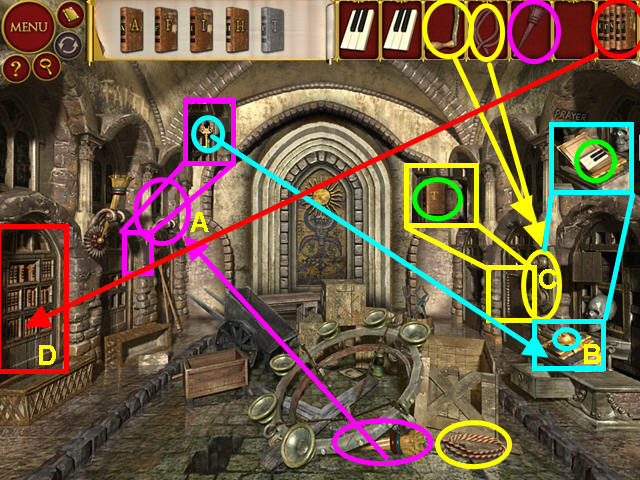
- Take the TORCH and place it in the holder to find the KEY (A).
- Use the KEY on the book to find an ORGAN KEY (B).
- Place the ROPE and the CRANK on the mechanism (C).
- Turn the crank and find the last BOOK.
- Use the STACK of BOOKS on the bookshelf (D).
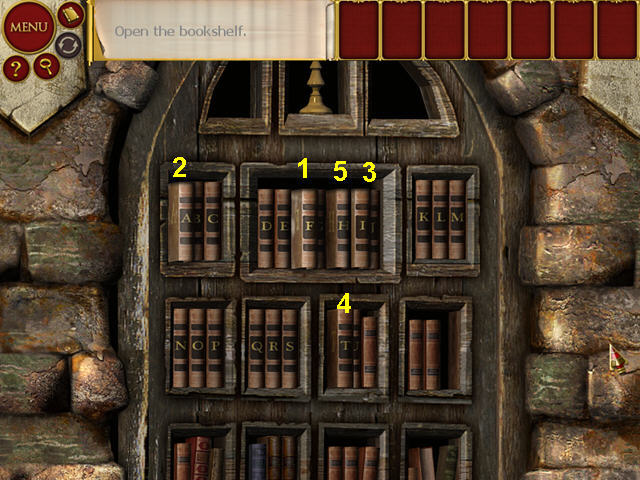
- Place the books on the shelf in alphabetical order.
- Click on the books to spell F – A – I – T – H (1-5).
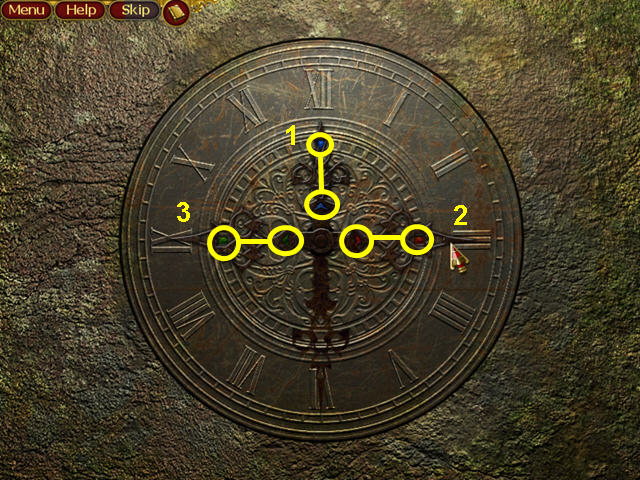
- Move the hand with the blue stone to 12 (1).
- Move the hand with the red stone to 3 (2).
- Move the hand with the green stone to 9 (3).
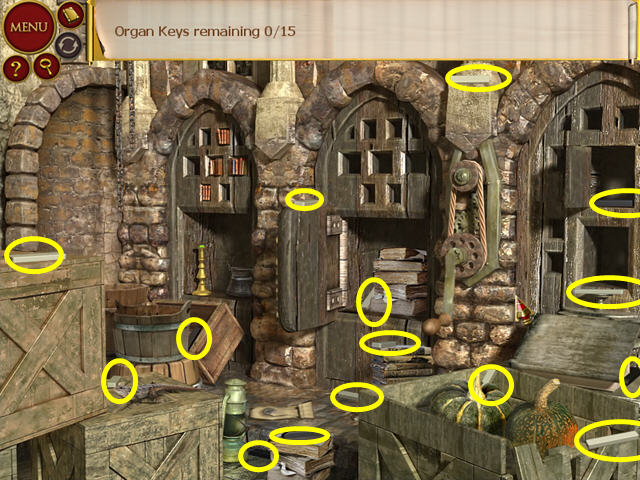
- Click on the right, center cubbyhole.
- Find all the organ keys.
- Click on the organ keyboard to look closer.
- Place an ORGAN KEY on the keyboard.
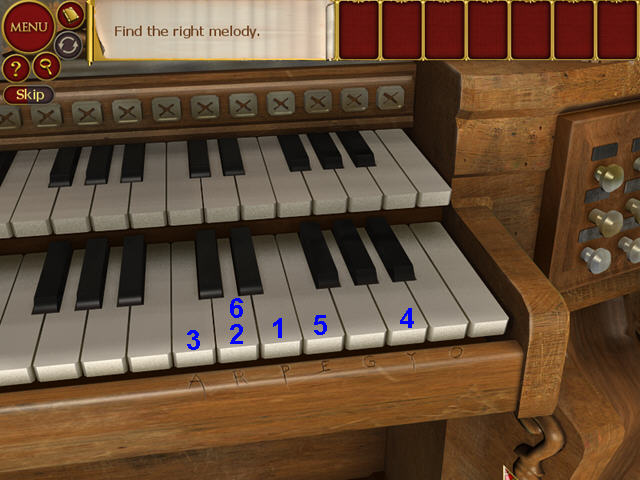
- Press the keys to spell P – R – A – Y – E – R (1-6).
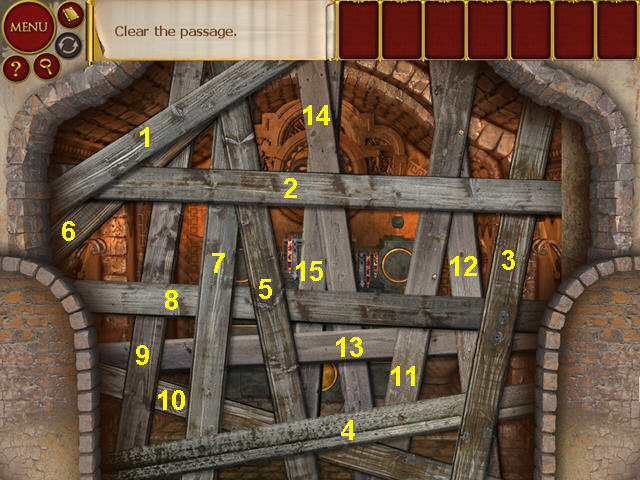
- Remove the boards in numerical order (1 – 15).
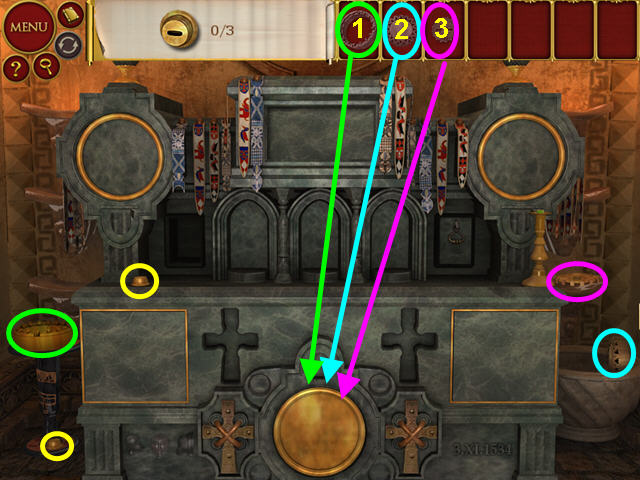
- Locate 2 of the brass parts and the 3 round items.
- Place the round items into the center circle in numerical order (1 – 3).
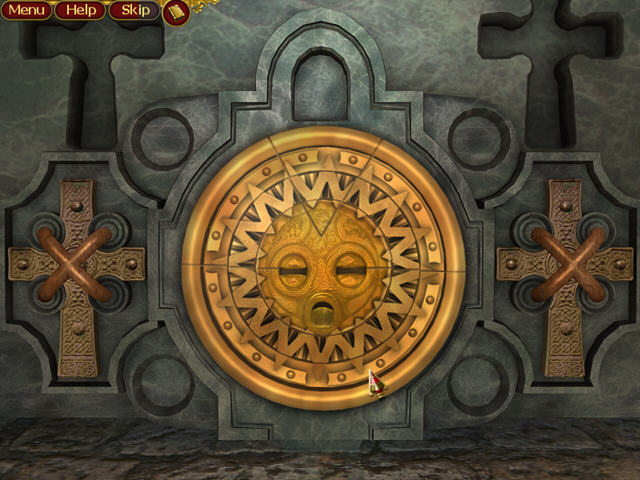
- Rotate the 3 pieces to restore the sun.
- Left-click, hold and drag to move the rings.
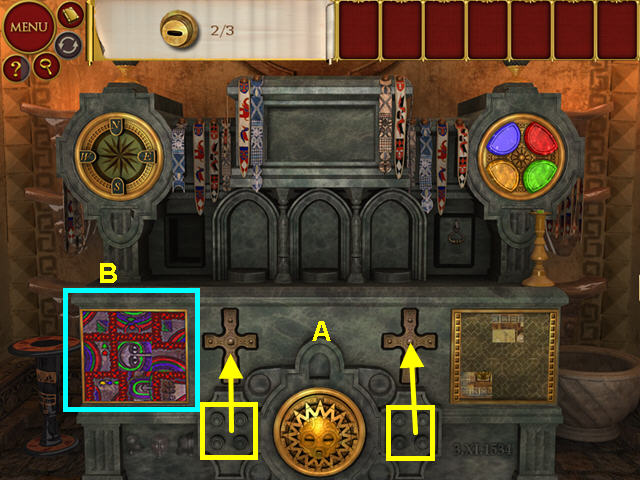
- Take the 2 CROSSES and move them to the niches (A).
- Click on the lower left side of the altar to open a mini-game (B).
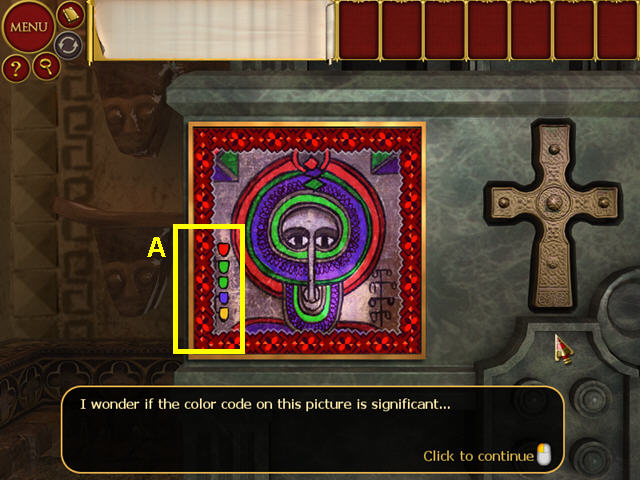
- Click on the tiles to rotate them into place and restore the picture.
- Make note of the color sequence on the left (A).
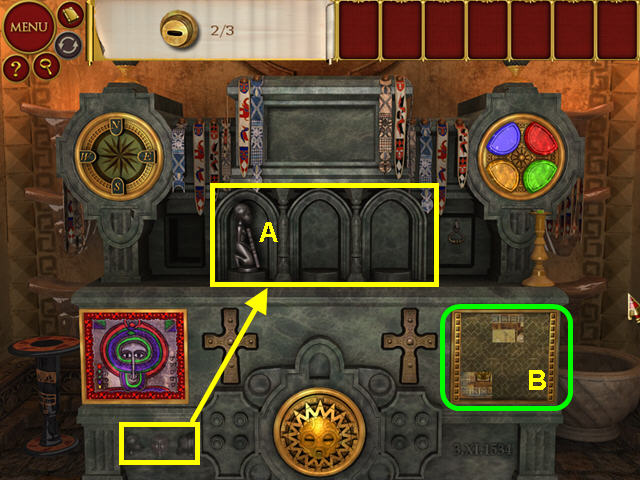
- Take the STATUE and place it in the middle left niche.
- Click on the statue to turn it to face left (A).
- Select the lower left side of the altar (B).
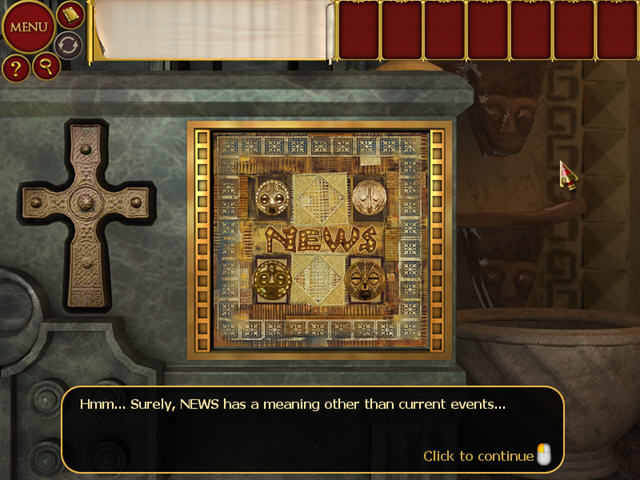
- This puzzle is randomized; solutions are varied.
- Click on the squares to fill in the entire grid.
- Take the STATUE.
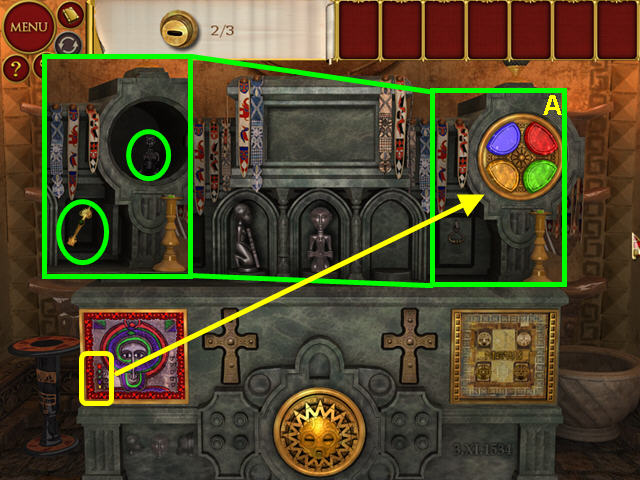
- Using the sequence found on the first puzzle, press the buttons: Red – Green – Green – Blue – Yellow (A).
- Take the STATUE and the COMPASS NEEDLE.
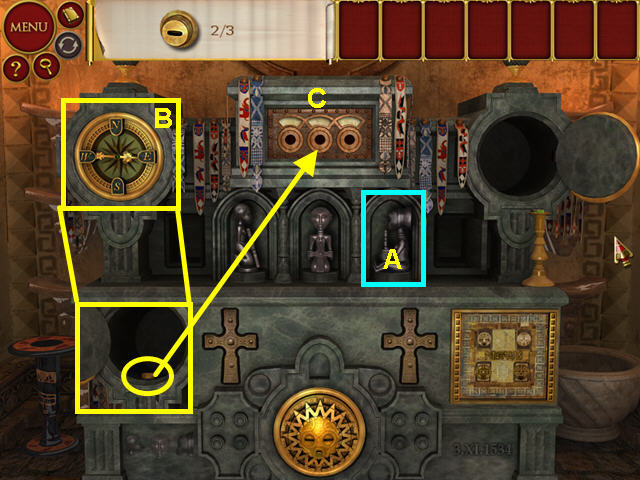
- Place the statue in the left niche; click to make it face inward (A).
- Place the COMPASS NEEDLE on the compass (B).
- Click on the points: N – E – W – S.
- Take the third safe handle.
- Place the SAFE HANDLES on the safe (C).
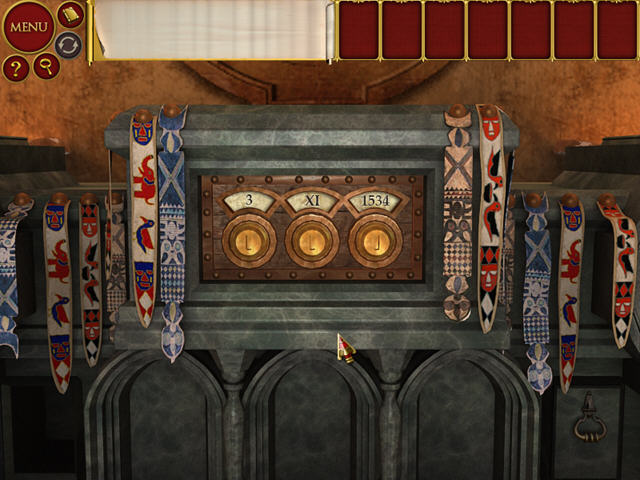
- Turn the handle to read: 3 – XI – 1594.
- Take the manuscript page from inside the safe.
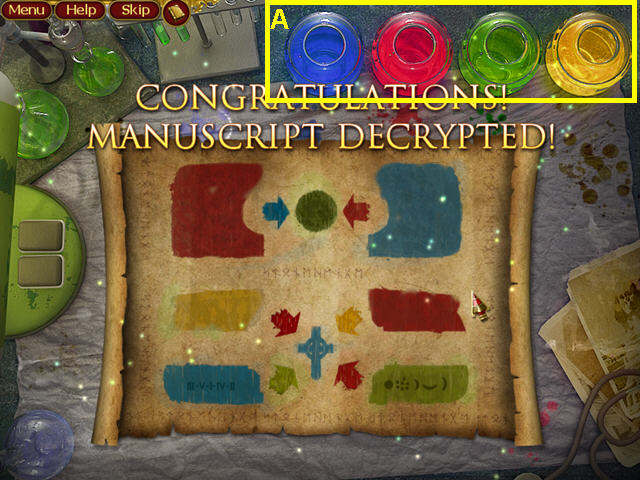
- Back at the lab, select the Revealer Machine, second from the right.
- Click on a jar of dye; then paint the empty spots on the parchment (A).
- Do this with all 4 colors until all the spots are filled.
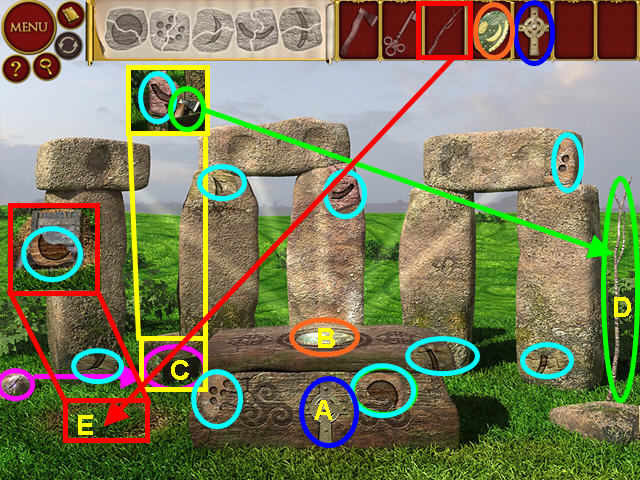
- Place the CROSS in the front of the altar (A).
- Place the NEBRAE DISC on top of the altar (B).
- Find the KEY and unlock the chest (C).
- Take the TILE PIECE and the AXE.
- Use the AXE on the STICK (D).
- Use the STICK on the loose piece of grass (E).
- Take the TILE PIECE.
- Locate the remaining TILE PIECES.
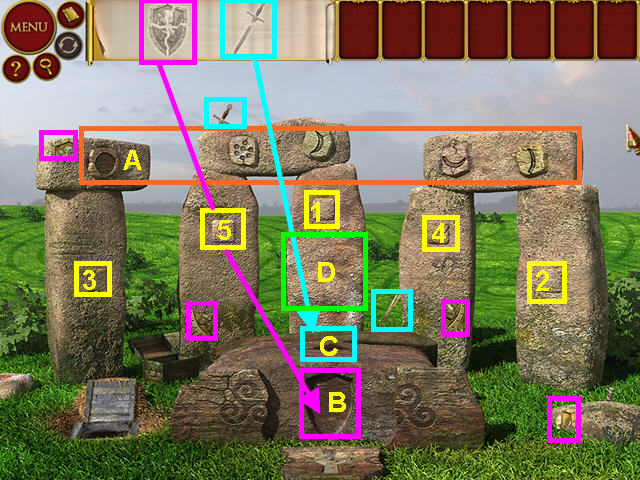
- Place the TILES in the top niches of the stone in the order from the parchment (A).
- Press the stone buttons in numerical order (1 – 5).
- Locate the SWORD and SHIELD pieces.
- Place the SHIELD in the front of the altar (B).
- Place the SWORD in the top of the altar (C).
- Select the center monolith (D).
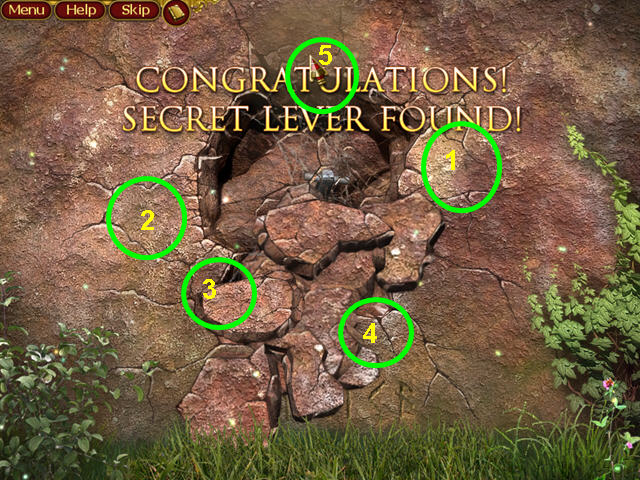
- Use the HAMMER to find the weak spots.
- Listen for a deeper sound and lots of dirt flying up.
- You will need to find 5 spots.
Story 3: Artifacts from Afar
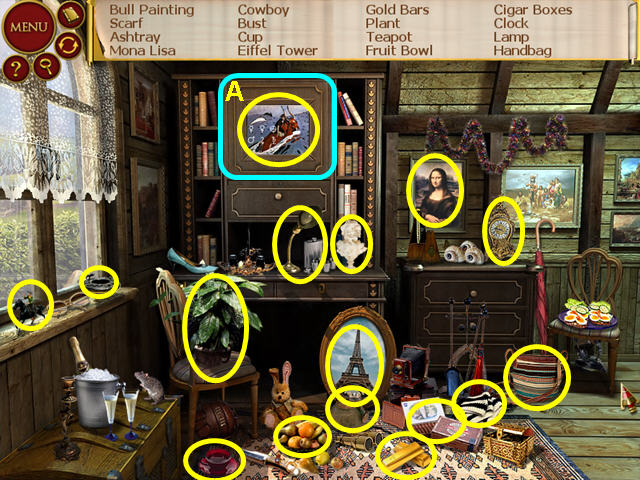
- Locate all the hidden objects on the list.
- Select the map that was behind the bull painting (A).
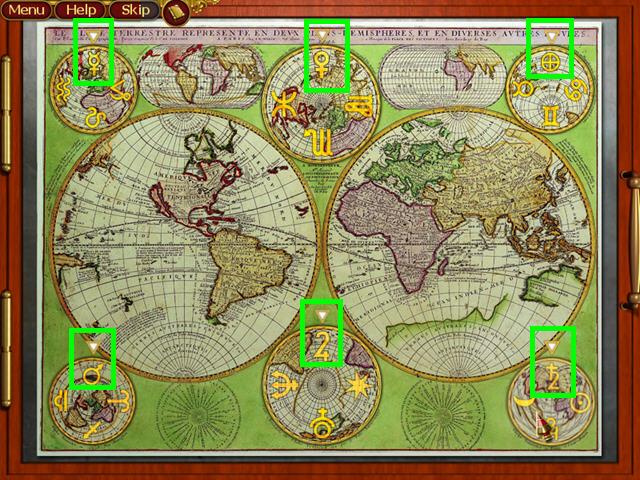
- Turn the dials so the symbols match your journal.
- Take the PARCHMENT.
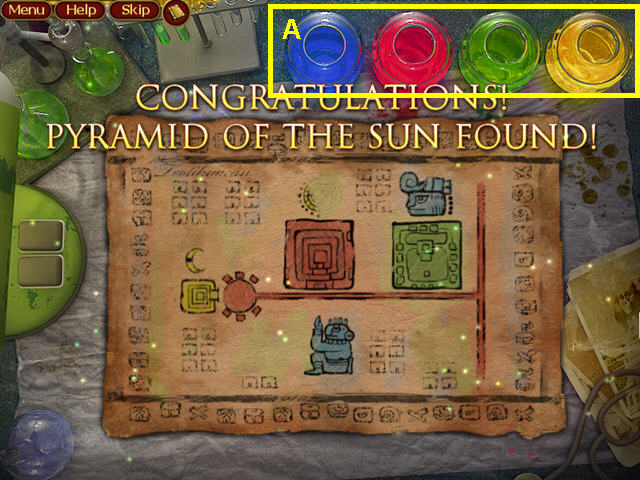
- Back at the lab, select the Revealer Machine, second from the right.
- Click on a jar of dye then paint the empty spots on the parchment (A).
- Do this with all 4 colors until all the spots are filled.
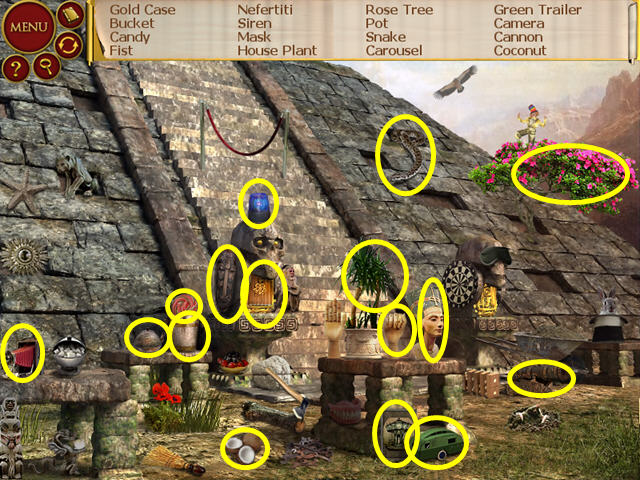
- Locate all the hidden objects on the list.
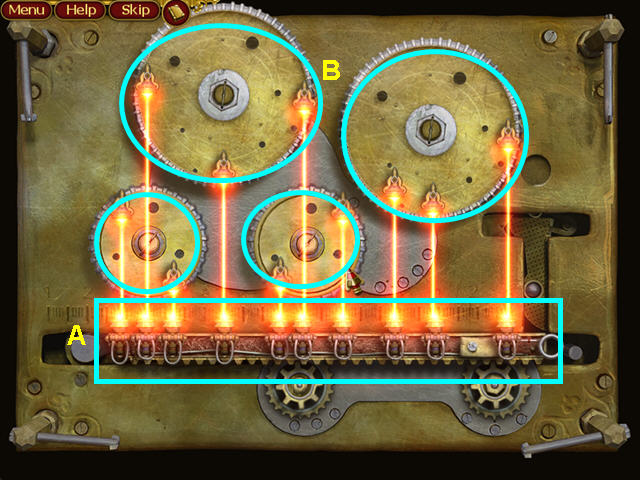
- Once in the lab, select the Opener which is the second machine from the left.
- Move the bar (A) and the 4 gears (B) to make all the gems on the bar light up.
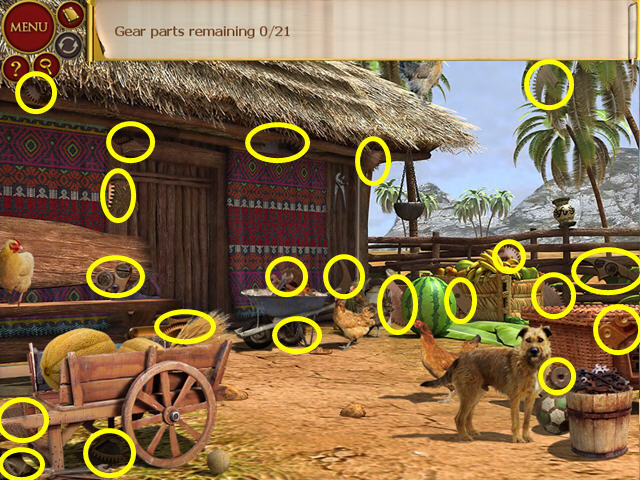
- Find all the gear parts.
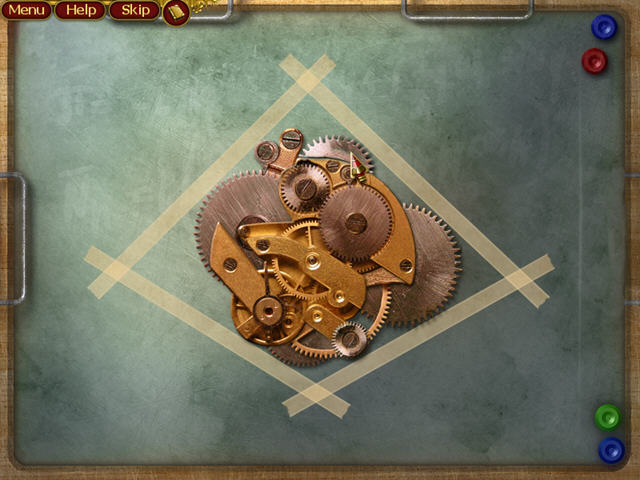
- Back in the lab, select the Integrator, the leftmost machine.
- Repair the gears in this jigsaw-style mini-game.
- Left-click to pick up or place a piece.
- Right-click to rotate a piece.
- Pieces will snap into place when correct.
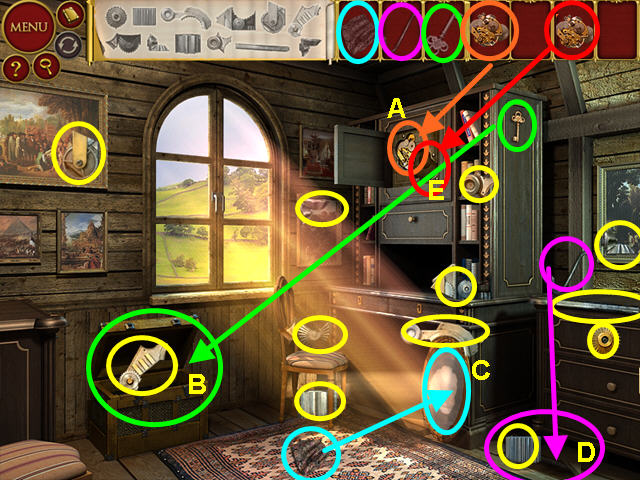
- Place the GEARS onto the safe (A).
- Find the KEY and unlock the chest (B).
- Locate the DUST RAG and clean the mirror (C).
- Find the CROWBAR and use it on the floorboard (D).
- Locate all the GEAR PARTS.
- Place the second set of GEAR PARTS into the safe (E).
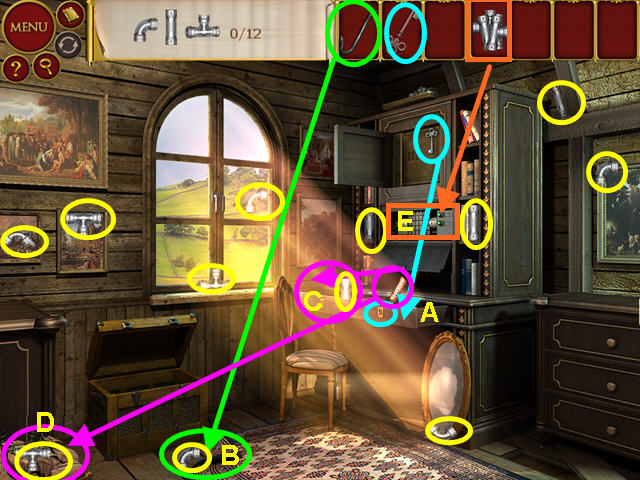
- Take the KEY and use it on the right drawer to get the KNIFE (A).
- Use the CROWBAR on the corner of the carpet (B).
- Use the KNIFE on the left drawer (C).
- Use the KNIFE to cut the seat of the chair (D).
- Find all the fuses.
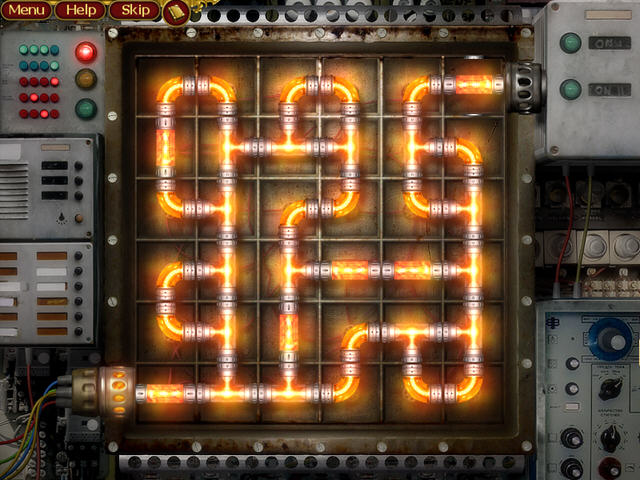
- Click on each pipe to rotate it into position.
- Complete the path to open the electric lock.
- Take the page from the safe.
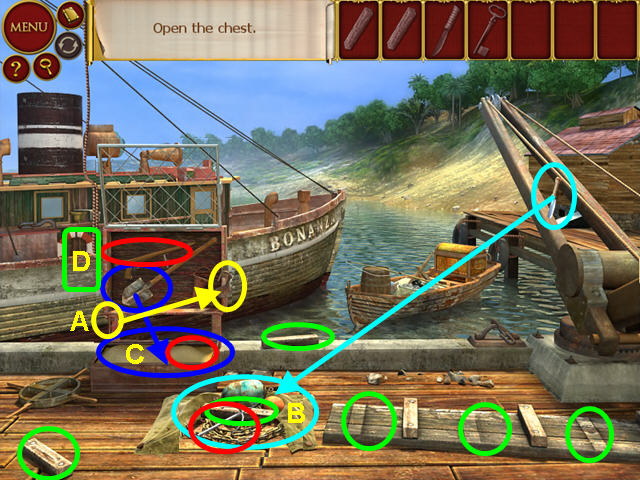
- Take the KEY and open the tool cage (A).
- Take the WOOD GUN BUTT and the SHOVEL.
- Find the KNIFE and cut open the tarp on the dock (B).
- Take the ANCHOR and the WOOD STEP.
- Open the box below the tool cage.
- Use the SHOVEL in the box of sand to find the HARPOON BARREL(C).
- Collect all the WOOD STEPS and place them on the plank.
- Take the GANGPLANK and use it on the left boat (D).
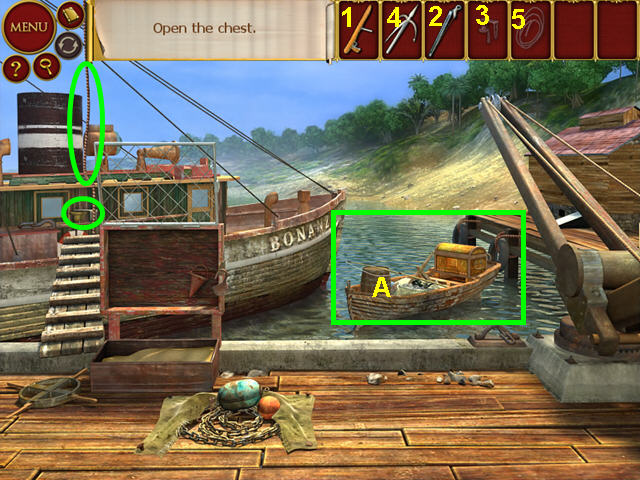
- Take the ROPE and the ROPE REEL from the left boat.
- Combine the RIFLE BUTT and the HARPOON BARREL (1-2).
- Use the ROPE REEL on the UNLOADED HARPOON RIFLE (3).
- Combine the ROPE and the ANCHOR and use them on the UNLOADED HARPOON RIFLE AND REEL (4-5).
- Use the LOADED HARPOON RIFLE on the boat (A).
- Click when you see the bullseye and then click on the boat to reel it in.
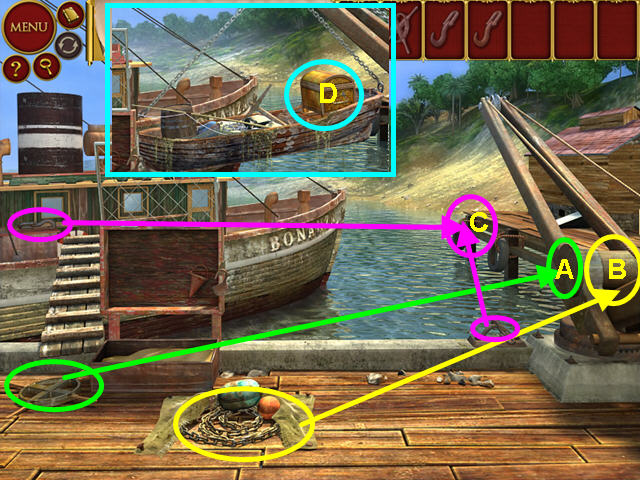
- Find the LARGE HANDLE and place it on the winch (A).
- Take the CHAIN and put it on the reel of the winch (B).
- Find the 2 hooks and put them on the hanging chains (C).
- Click on the large handle to raise the boat.
- Take the chest from the boat (D).
- Click on the chest to learn you need a KEY.
- Click on the boat for a hidden object area.
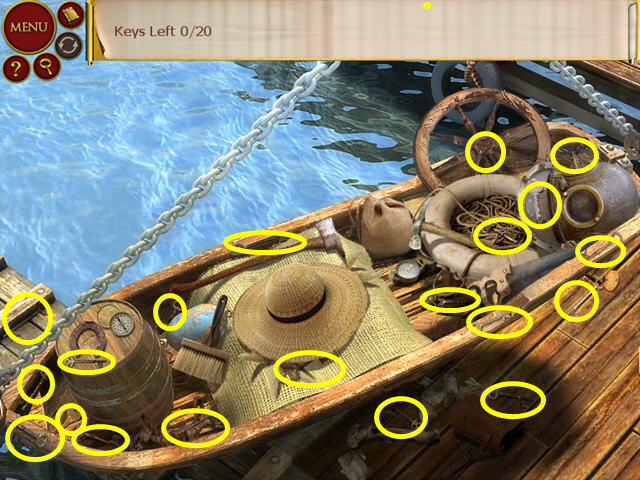
- Find all the keys.
- Use the KEY on the chest.
- Take the periscope piece.
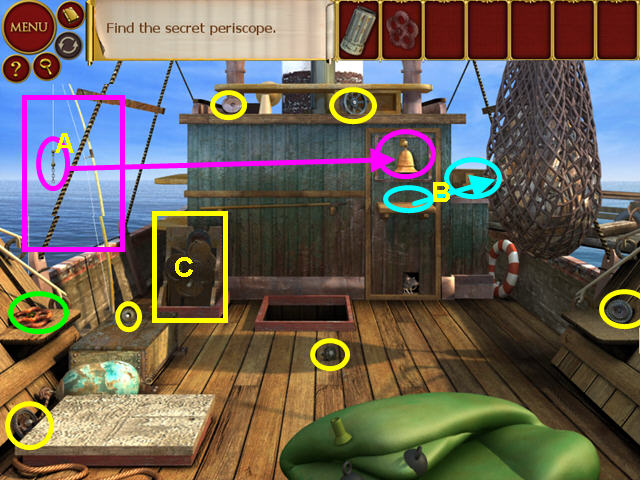
- Find the RED HANDLE.
- Click on the fishing pole to bring it up (A).
- Take the BOBBER from the end of the line and use it on the bell.
- Ring the bell and take the KEY.
- Use the KEY on the lunch box to get the KNIFE and CHEESE (B).
- Click on the gear mechanism; find all the GEARS (C).
- Place the GEARS on the mechanism for a mini-game.
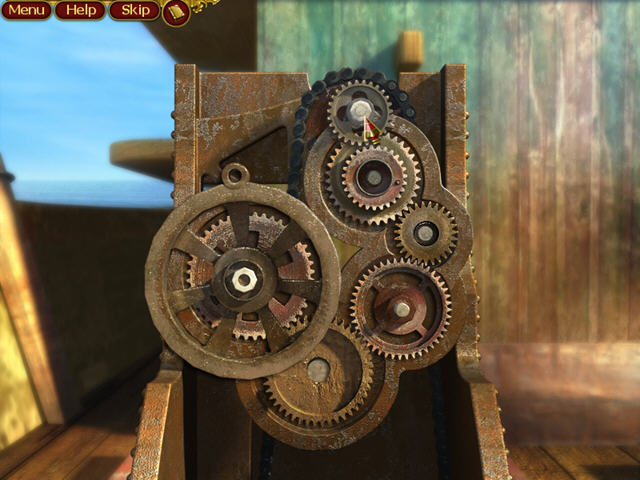
- Place the gears into the spaces.
- The gears will click into place when correctly positioned.
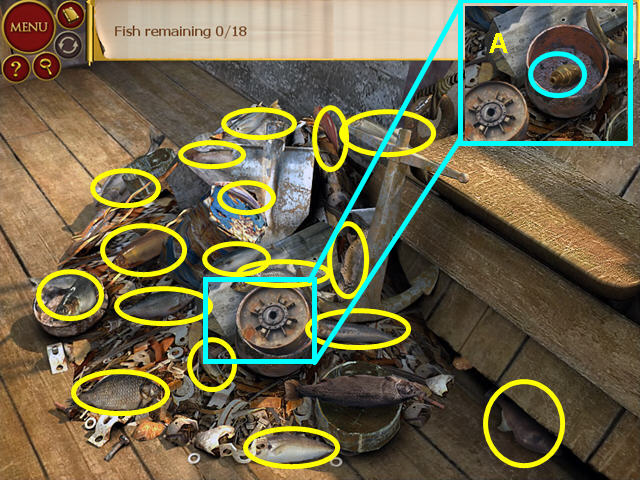
- Use the KNIFE on the net and click on the garbage for a hidden object scene.
- Find all the fish.
- Take the RAFT PIECE (A).
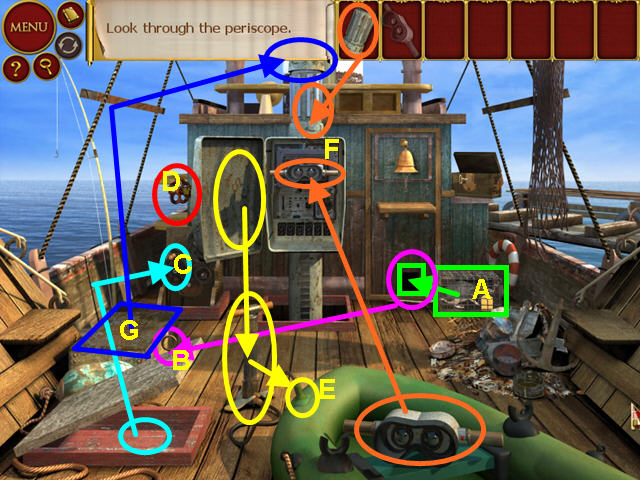
- Take the CAGE and use it on the rat (A).
- Place the CHEESE in the CAGE.
- Take the RING HANDLE that was behind the rat and use it on the hatch (B).
- Take the GEAR HANDLE and use it on the mechanism (C).
- Place the RED HANDLE on the cabinet to open it (D).
- Use the RAFT PIECE on the nub of the raft (E).
- Take the PUMP from the cabinet and use it on the nub of the raft.
- Take the EYEPIECE and use it on the periscope (F).
- Use the PERISCOPE PIPE on top of the cabinet.
- Open the left wooden box to find another PERISCOPE PIPE; place it on top of the other pipe.
- Look in the eyepiece.
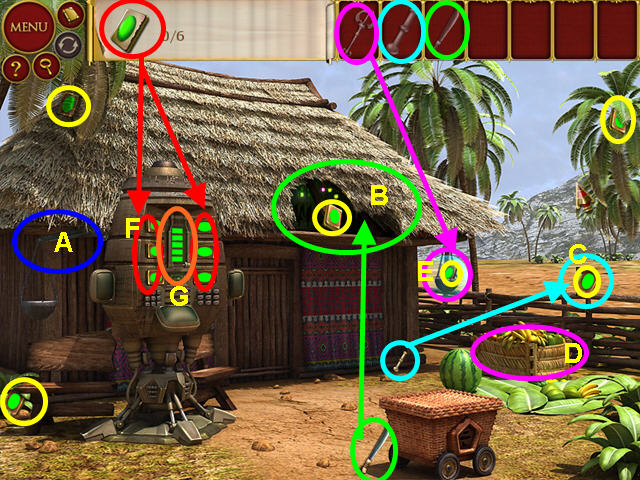
- Pull the lever on the left side of the hut (A).
- Find the MACHETE and cut the thatched roof (B).
- Find the PESTLE and use it to break the vase (C).
- Look at the crate of fruit for a hidden object scene where you will find the ALIEN TOOL (D).
- Use the ALIEN TOOL on the force field (E).
- Collect the 6 green BATTERIES and place them in the machine (F).
- Pull the handle (G).
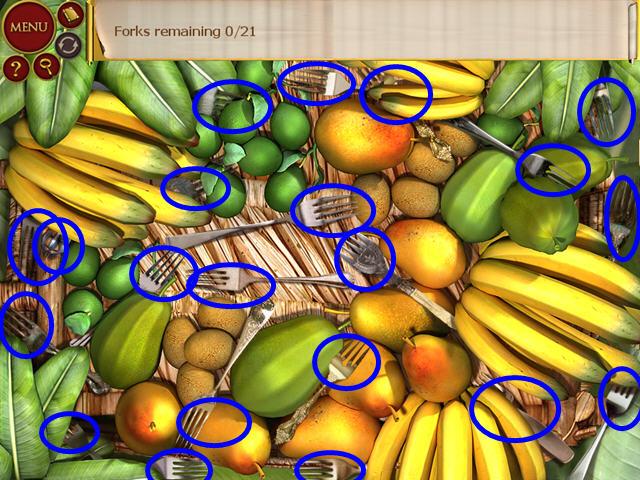
- Find all the forks.
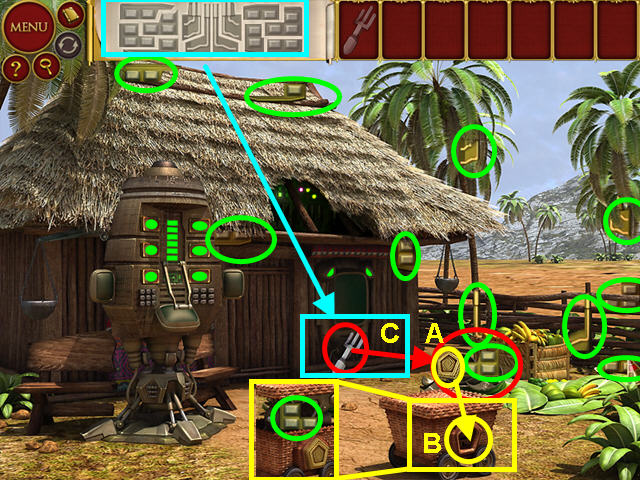
- Find the ALIEN TOOL and use it on the watermelon (A).
- Take the PETRA KEY and use it on the basket (B).
- Collect all the CONSOLE PIECES.
- Place the CONSOLE under the TV screen (C).
- Press the red button.
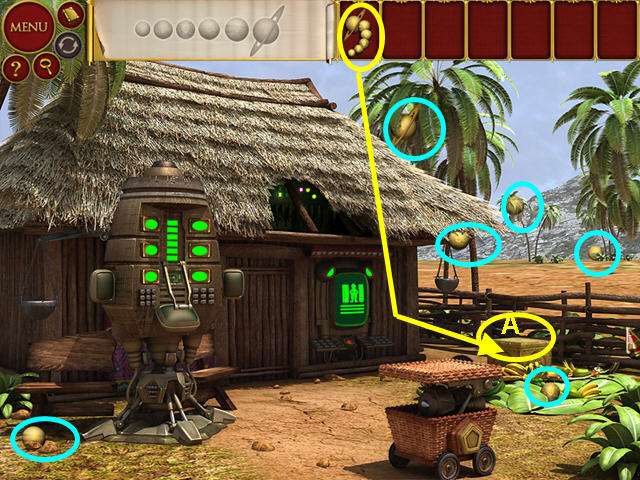
- Collect all the PLANETS.
- Use the PLANETS on the gold box (A).
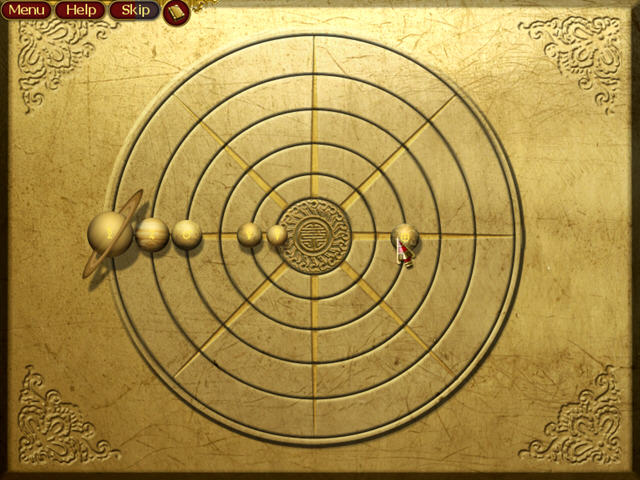
- Position the planets following the notes in the journal.
- Take the skull from the box.
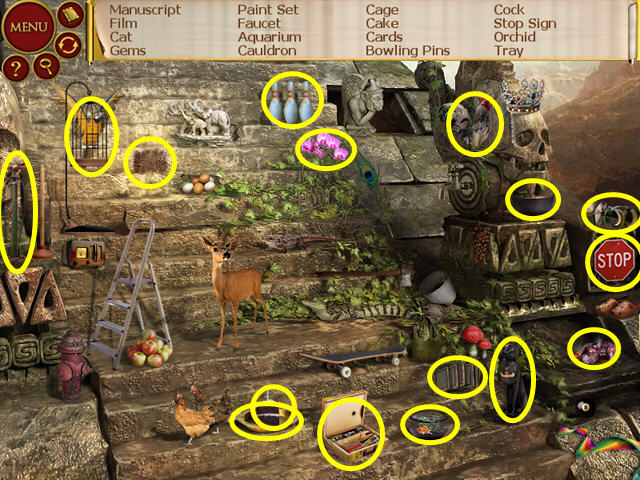
- Locate all the hidden objects on the list.
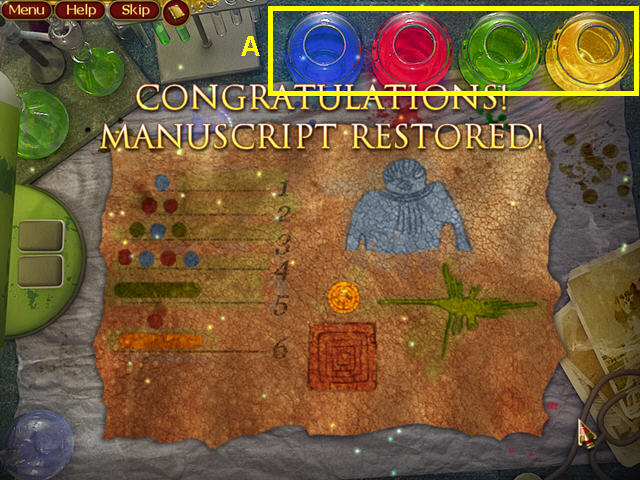
- Select the Revealer Machine, second from the right.
- Click on one of the jars of dye then click on the lines without color on the parchment (A).
- You can only color the lines that are meant to be the color you are using.
- Click on the other jars to change color.
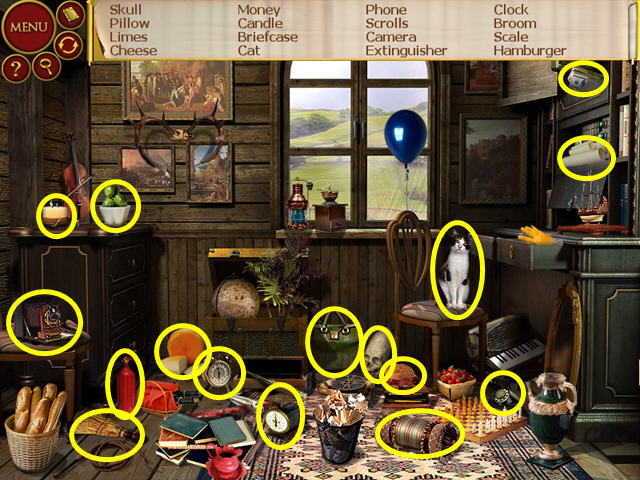
- Locate all the hidden objects on the list.
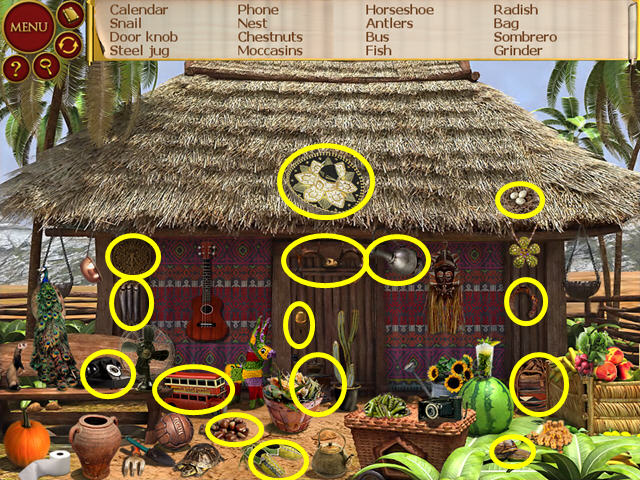
- Locate all the hidden objects on the list.
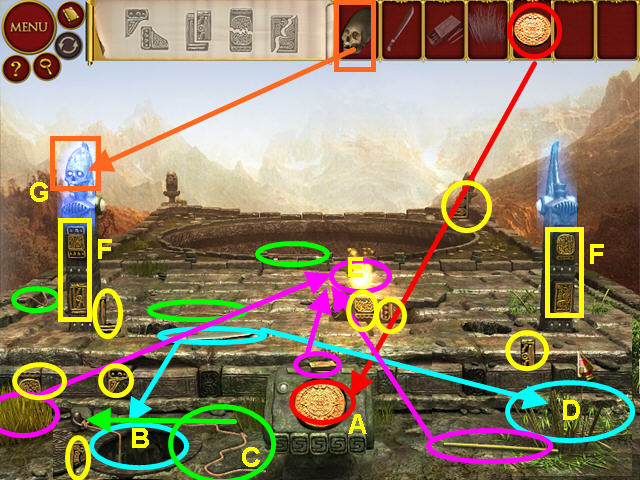
- Place the CALENDAR into the center circle of the podium (A).
- Take the MACHETE and pry open the manhole (B).
- Find the 3 pieces of ROPE; then click on the ROPE to use it on the manhole (C).
- Use the MACHETE to cut down the bush on the right and take the STICK (D).
- Take the HAY and combine it with the stick.
- Place the TORCH by the hole (E).
- Take the MATCHES and light the torch.
- Collect all the TILE pieces.
- Place the TILES into the 2 columns, following your journal (F).
- Place the SKULL on the left column (G).
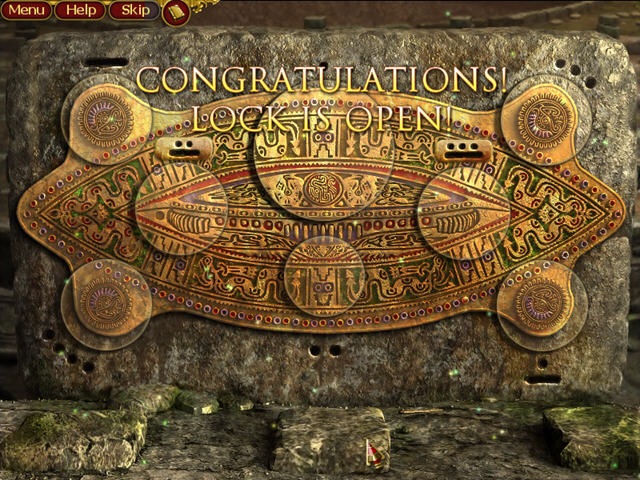
- Click on the control that appeared over the calendar.
- Rotate the discs to complete the picture.
- Left-click, hold and drag to move the discs.
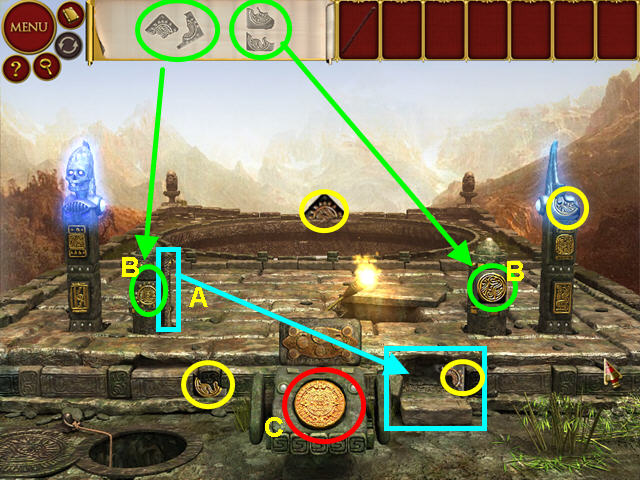
- Take the LEVER and pry open the stone (A).
- Locate the 4 TILE PIECES.
- Place the TILES in the 2 inner columns, following the journal (B).
- Select the calendar disc (C).
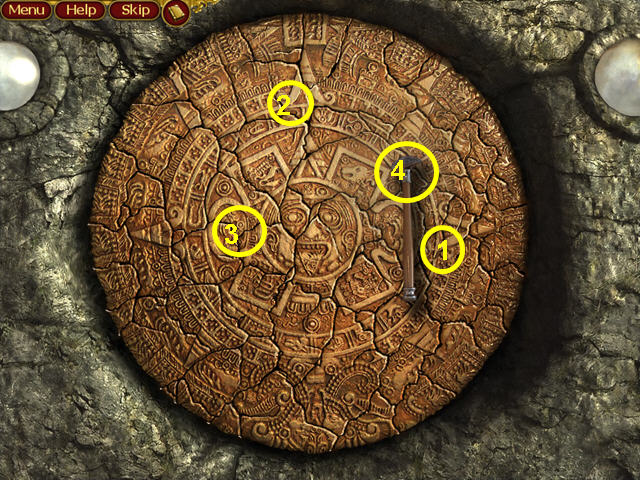
- Use the hammer to find the weak spots.
- Listen for a deeper sound and lots of dirt flying up.
- You will need to find 4 spots.
- Congratulations! You have completed Artifacts of the Past: Ancient Mysteries!
Created at: 2010-07-10

