

Walkthrough Menu
- General Tips & Information
- Part 1: Crossing the River
- Part 2: Night in Moonfell Wood
- Part 3: Through the Gate of Sun and Moon
- Part 4: Return to the Night
- Part 5: Across the Moonbridge
- Part 6: Search for the Witch
General Tips & Information
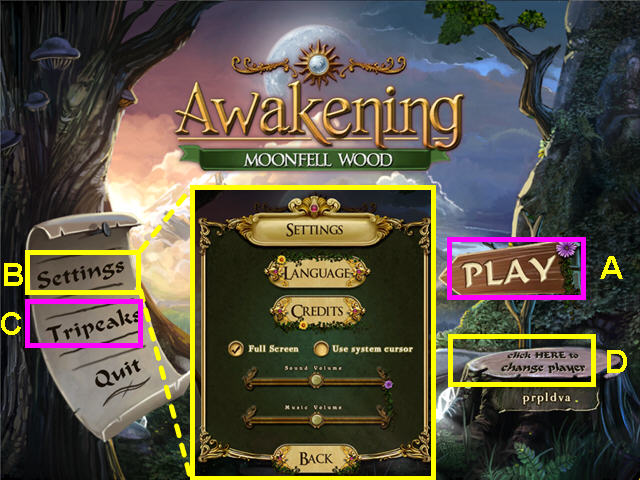
- Select profiles on the main screen to add or delete player profiles (D).
- You may play this game in full screen or windowed mode, adjust the volume of sounds and music, view credits, and enable the custom cursor in the Settings menu (B).
- The Settings menu is accessible from both the main screen and the in-game menu.
- Once you complete the game you will have access to the card game Tripeaks (C).
- Select Play to start your game (A).
- When you first start playing, you must choose between Normal or Casual difficulty levels.
- Hints, skip meters, and goals will all progress normally in the Normal Mode.
- For faster filling hints and skips, select the Casual Mode.
- Once you start the game, you will have the option of a brief tutorial.
- Hidden object lists and mini-games may be random, your solutions may vary.
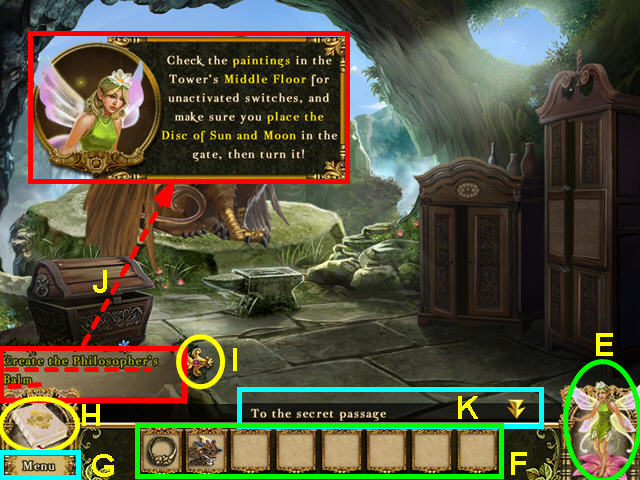
- Hints are unlimited, but you must wait for the fairy to wake.
- Click on the fairy in the lower right corner for a hint (E).
- Your inventory is located in the lower bar and will be hidden when not in use. (F).
- There are scroll buttons to move your inventory left or right.
- When playing a mini-game the Skip button will appear at the bottom of the screen.
- You may skip a mini-game once the button fills.
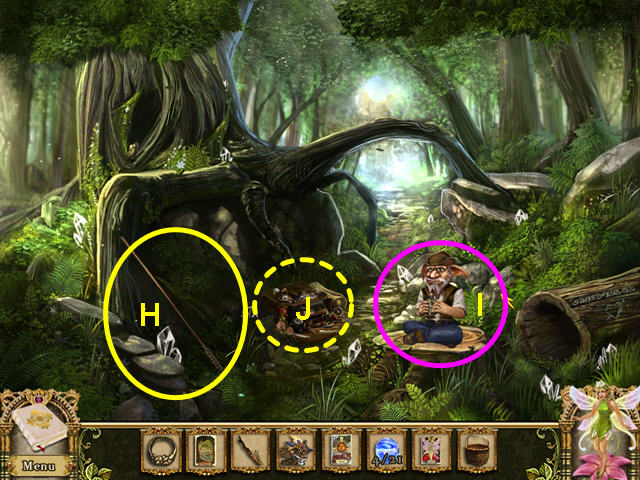
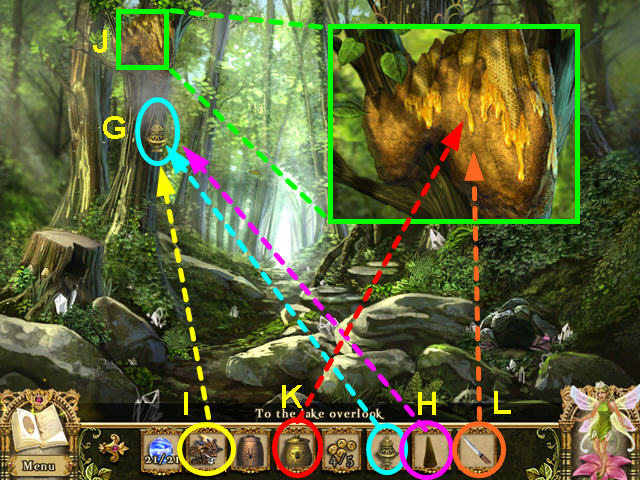
- Use the Menu button to access options or to return to the main menu (G).
- Above the Menu button is the journal and task list (H).
- Click on the gold arrow just above the journal to see the most immediate task if you are playing casual mode (I).
- Click on the task for instructions on how to complete the task (J).
- When you move your cursor over the path to another scene, it will display over your inventory (K).
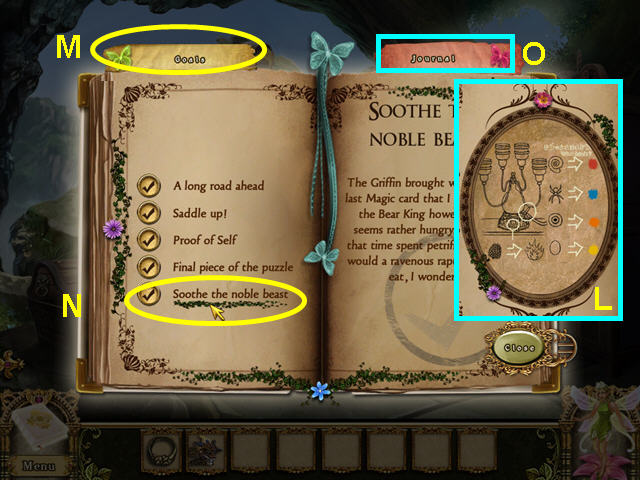
- The journal will track your journey and make note of clues you may uncover.
- Refer to the journal for clues to mini-games (L).
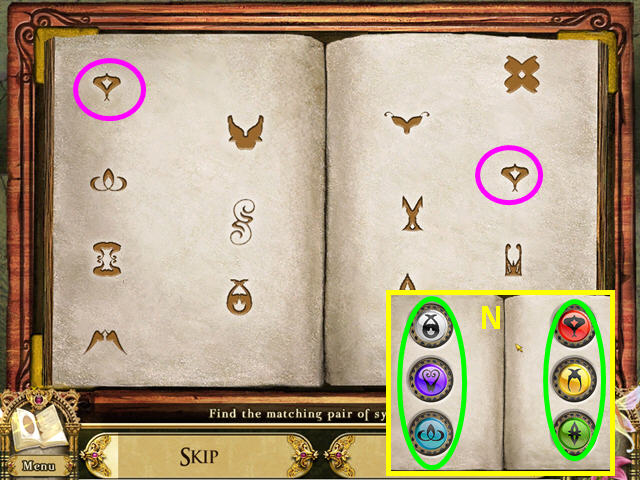
- Select the Goals tab to see your current tasks (M).
- Click on a goal for hints on how to proceed (N).
- Completed goals will have a check mark.
- Select Journal to return to that part of the book (O).
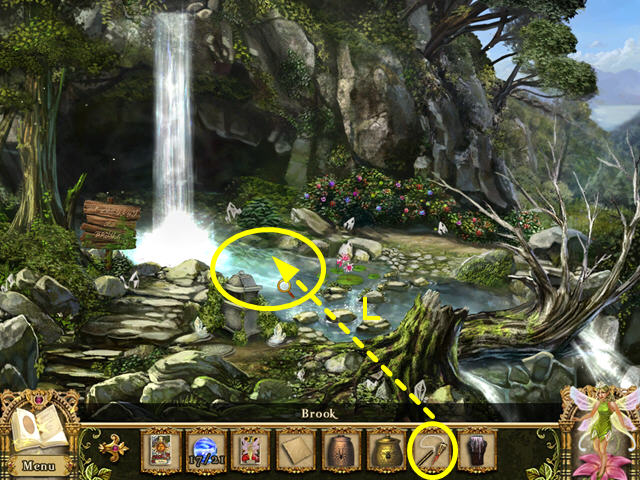
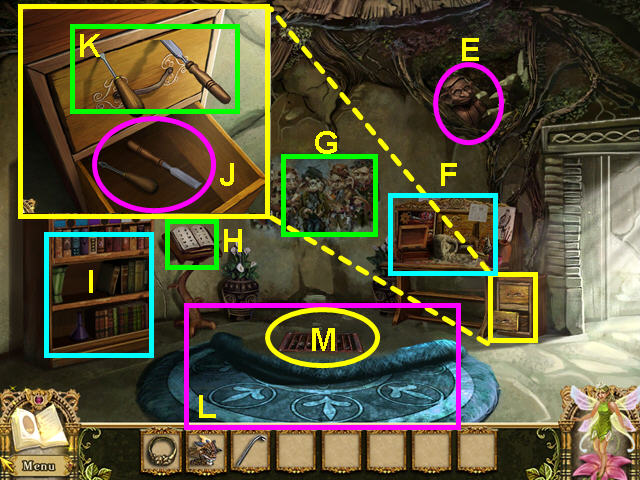
Part 1: Crossing the River
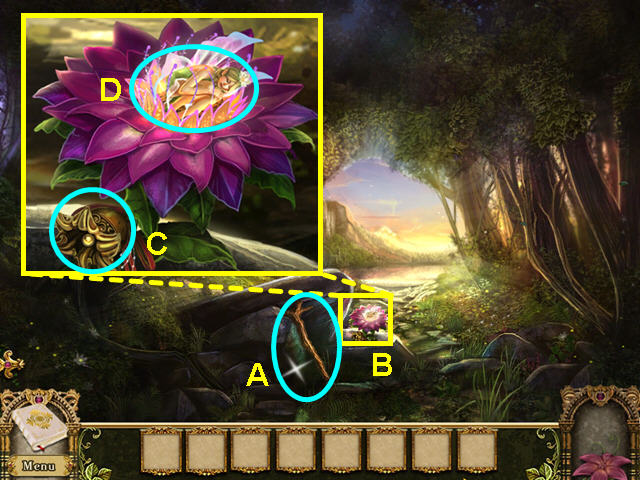
- Take the STICK (A).
- Look at the close-up of the flower (B).
- Click on the bellflower (C).
- Click on Mira (D).
- Walk forward.
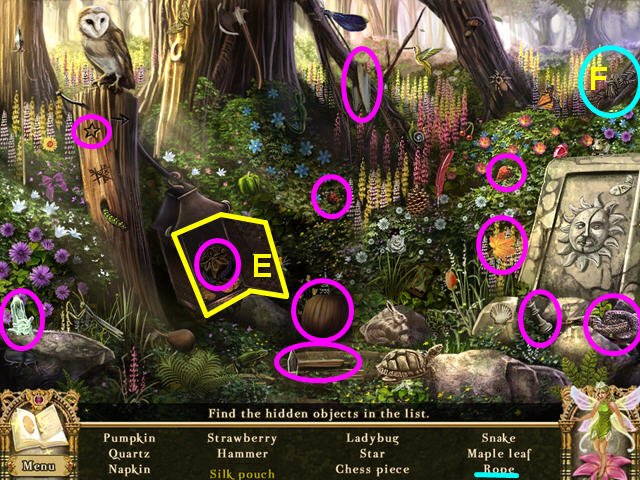
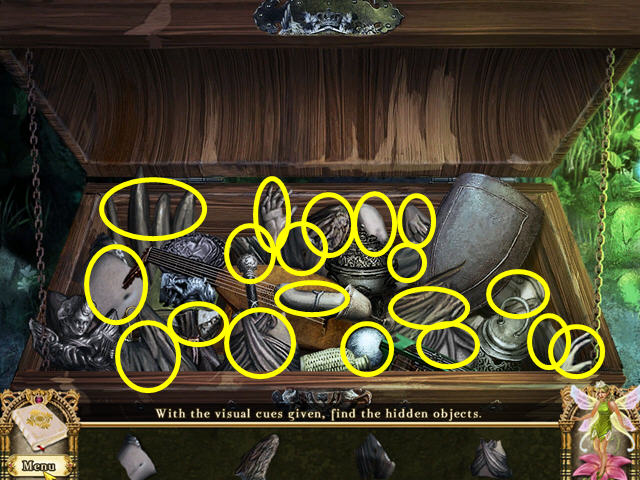
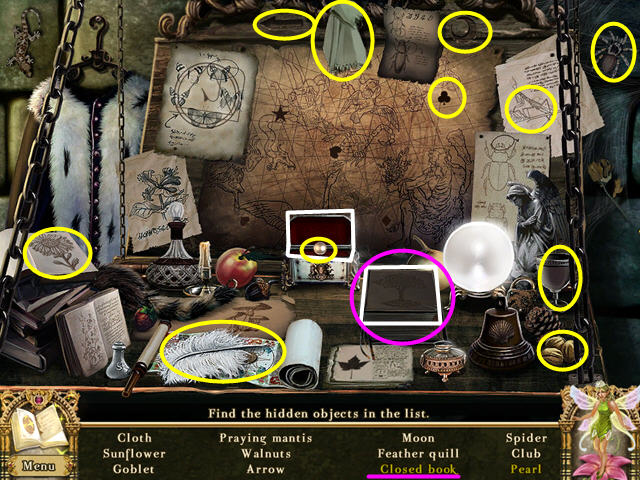
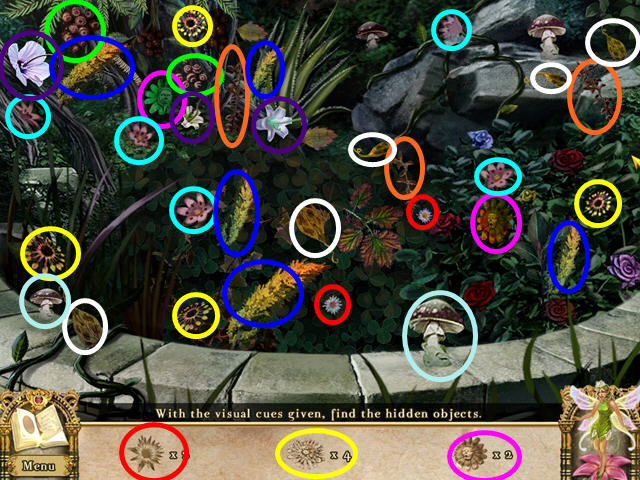
- Select the flowering bush on the right for a hidden object scene.
- Locate all the items on the list.
- Items in yellow require an additional step to be visible.
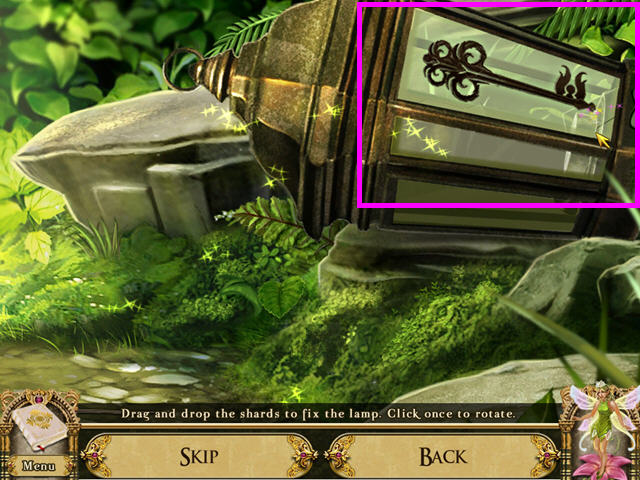
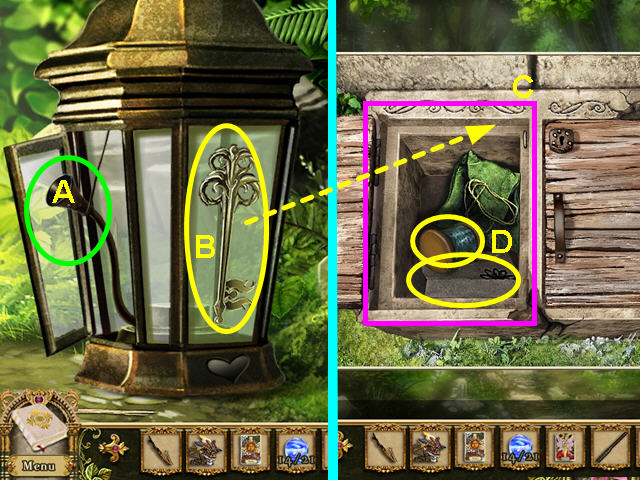
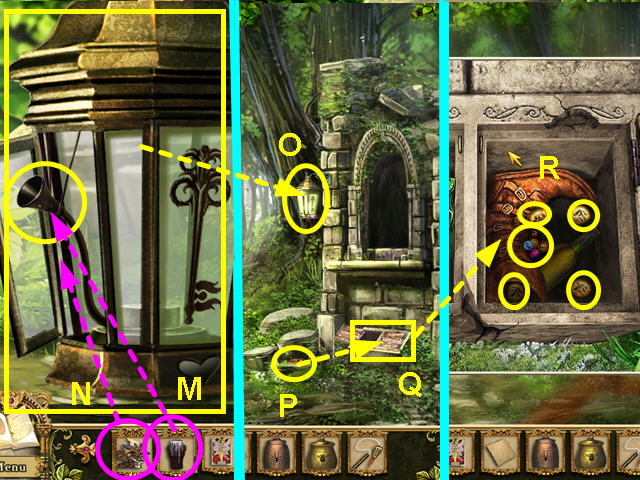
- Open the lantern door (E).
- The ROPE will be added to your inventory (F).
- Look at the large stone on the left (G).
- Place the STICK on the rock, then use the ROPE to make the OAR (H).
- Take the OAR.
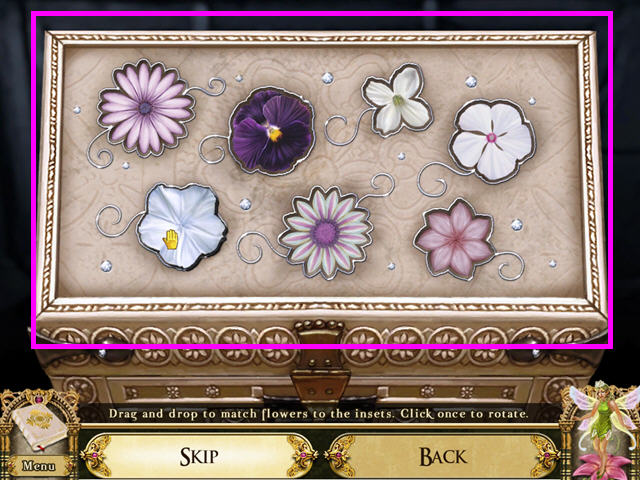
- Take the 4 PAINTED TILES (I).
- Exit the close-up and look in the boat (J).
- Pick-up the 4 PAINTED TILES (K).
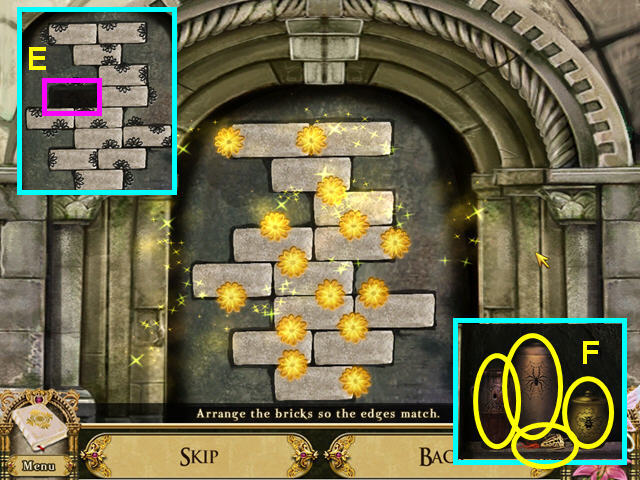
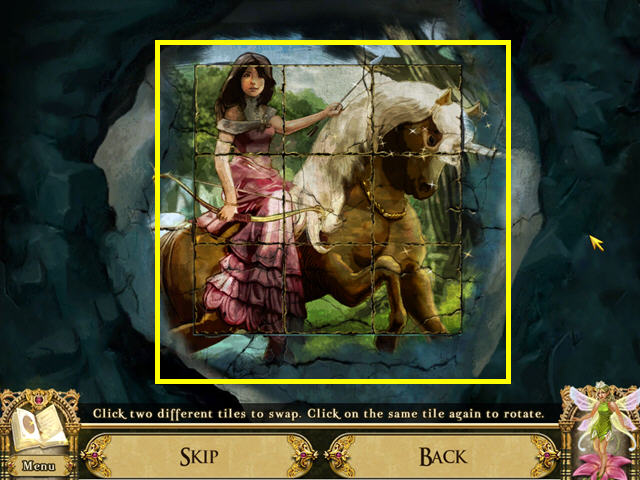
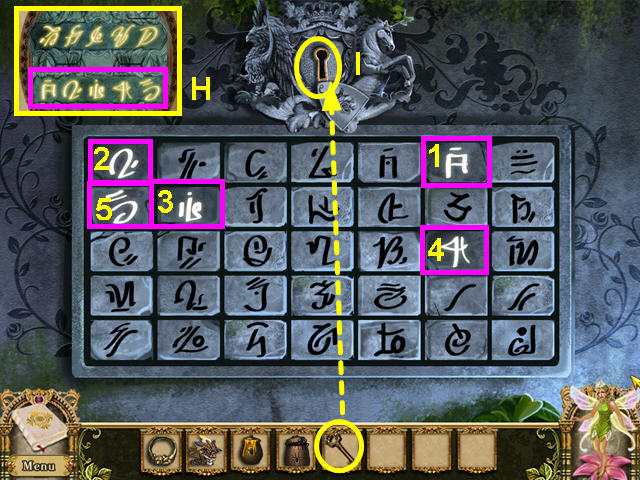
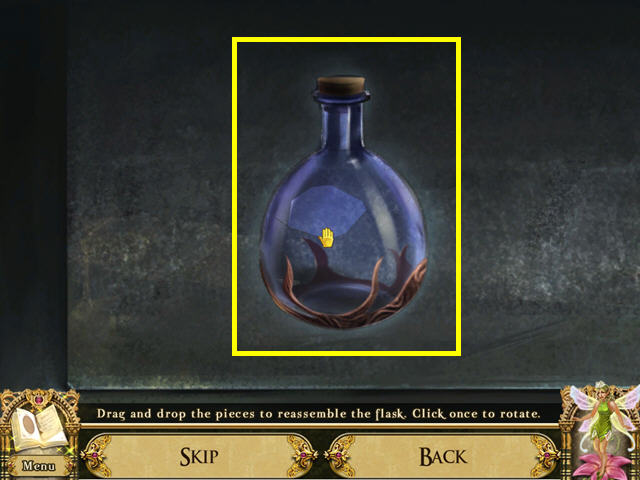
- Use the 8 PAINTED TILES on the box for a mini-game (L).
- The object is to restore the emblem on the box.
- Click on 2 tiles to swap locations.
- Click on a single tile to rotate it in place.
- Once solved, the box will open.
- Take the SIGNET RING and the MAGIC CARD: THE FOREST (M).
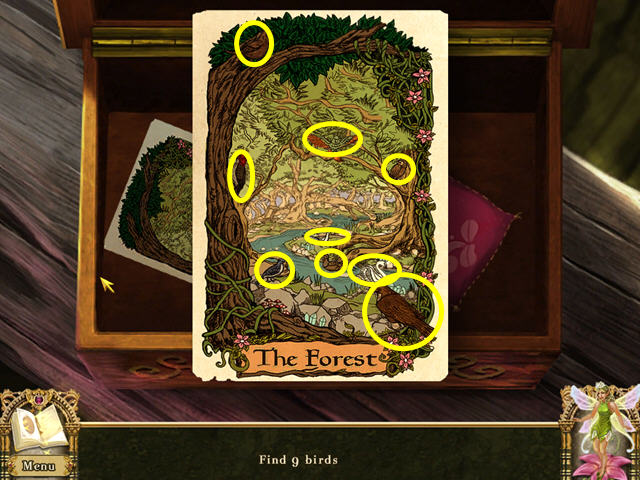
- Locate the 9 birds on the card.
- Use the OAR on the boat to leave the shore.
Part 2: Night in Moonfell Wood
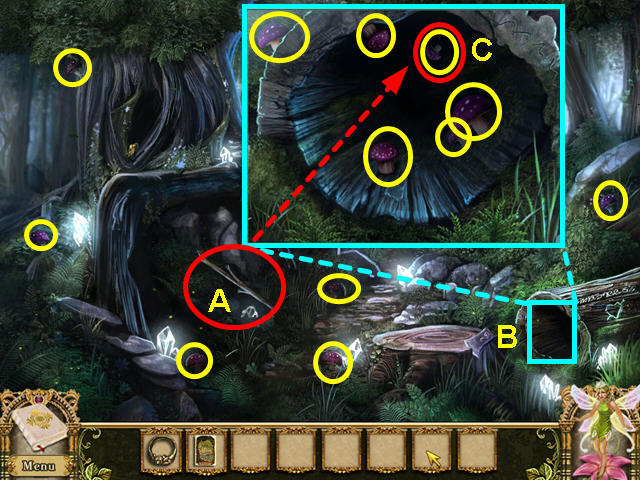
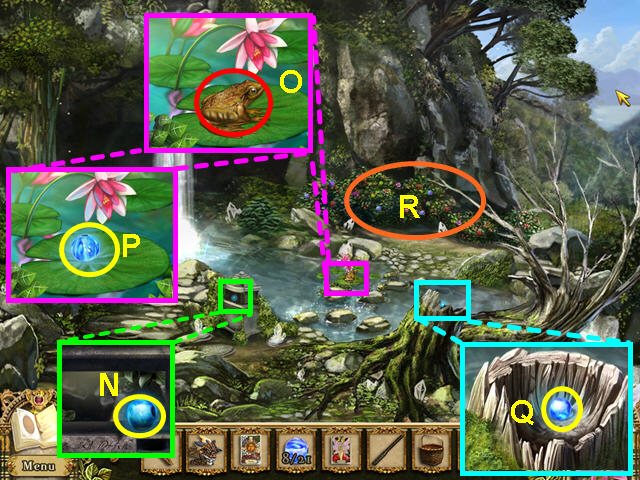
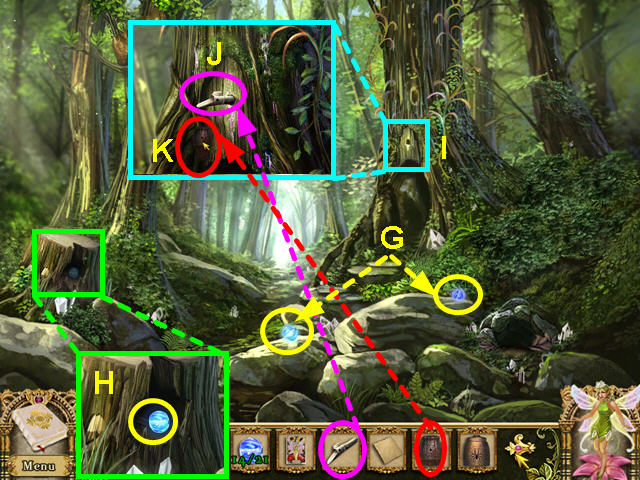
- Take the WOODEN STICK (A).
- Collect the 6 PURPLE MUSHROOMS (circled in yellow).
- Look in the hollow log (B).
- Use the stick to collect the farthest PURPLE MUSHROOM (C).
- Collect the remaining 5 PURPLE MUSHROOMS.
- Walk forward, then take the path left of the waterfall.
- Walk forward once more to arrive at the cliffside pool.
- Look at the close-up of the stone lantern (D).
- Note the figures in the opening (E).
- Take the broken figures for a mini-game (F).
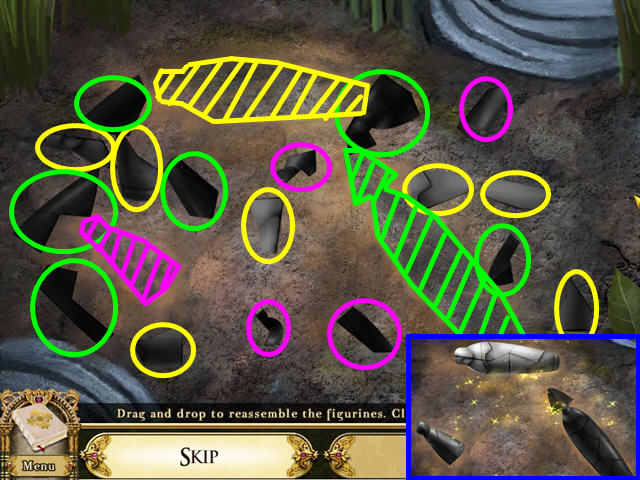
- Repair the 3 broken figurines.
- Click on a piece to take or place.
- Click again to rotate a piece.
- The fragments are color-coded to show with which figurine they belong.
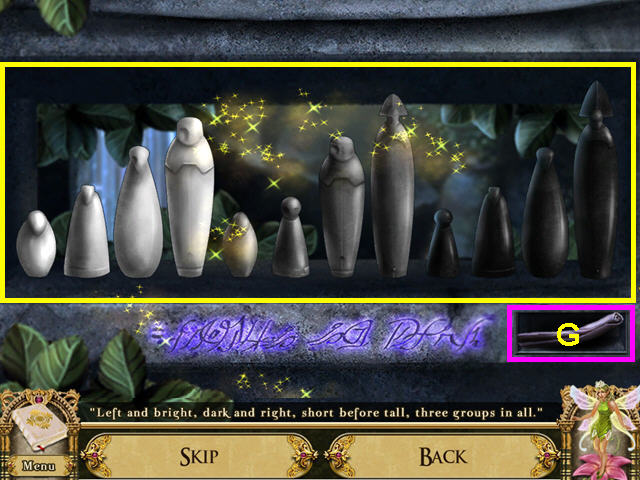
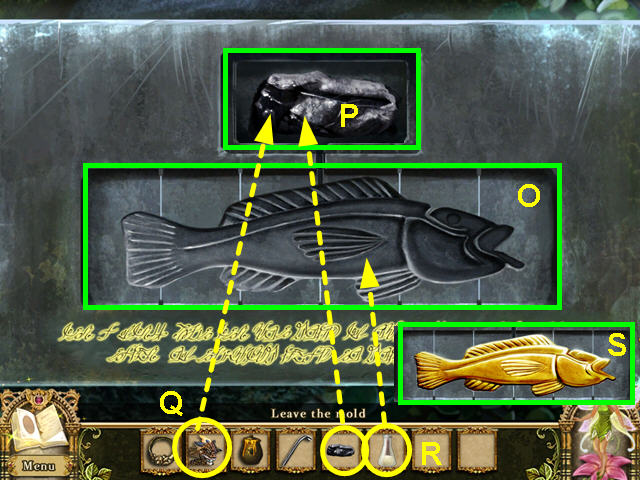
- Place the STONE LANTERN FIGURINES into the stone lantern for a mini-game.
- Hover your mouse over the engraving to learn the figurines need to be placed from light to dark, small to large, from left to right.
- Click on 2 figurines to swap positions.
- Take the scroll from the hidden compartment (G).
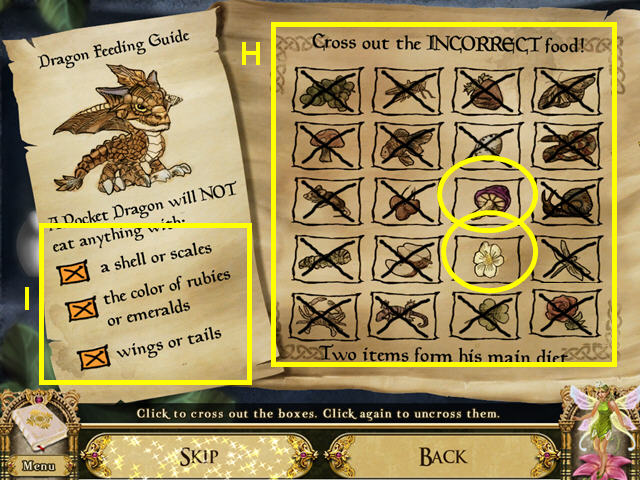
- Click on squares (H) to cross them out per the list on the left (I).
- The 2 remaining squares will be the purple mushroom and mossflower.
- Take the POTION OF MOONDEW that appears.
- Walk down to exit the cliffside pool.
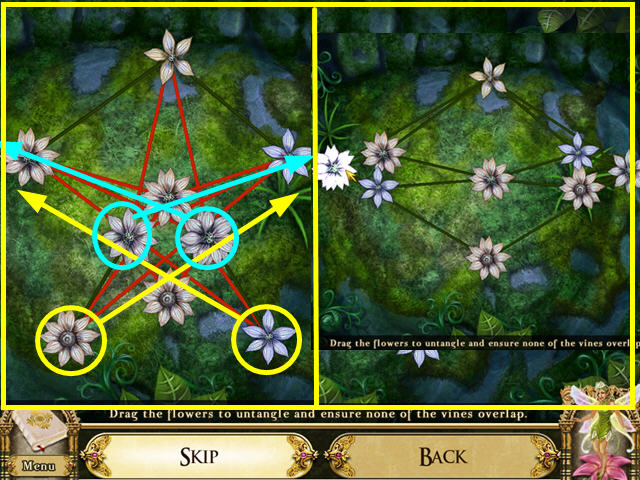
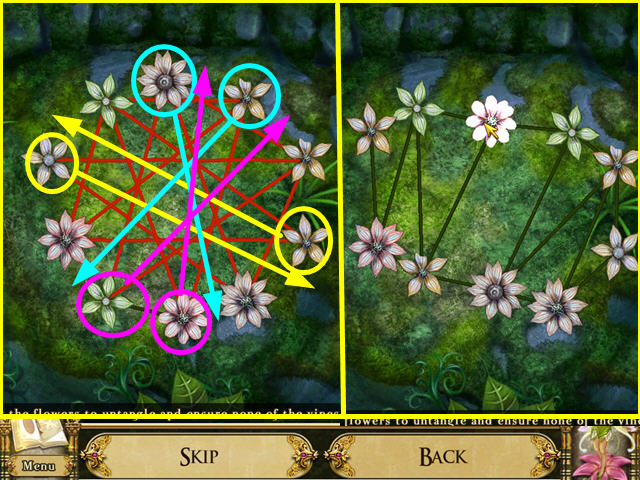
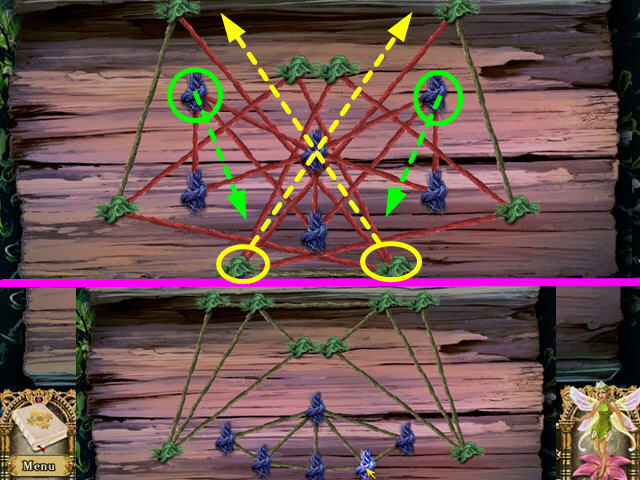
- Use the POTION OF MOON DEW on the mossflowers on the right for a mini-game.
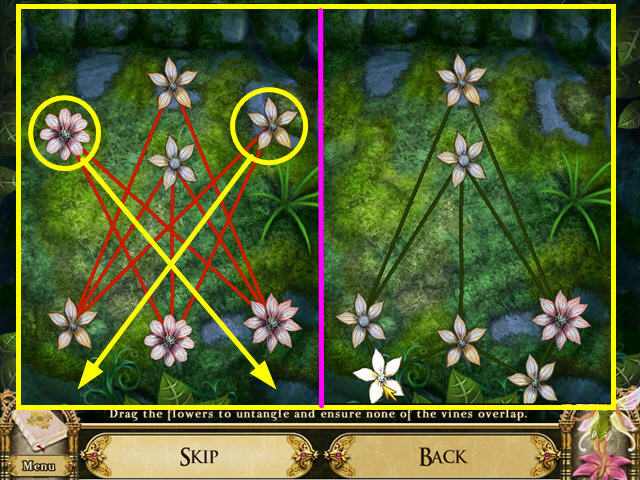
- Untangle the flowers so that no vines are crossing each other.
- Click and drag a flower to move it to another position.
- There are 5 levels to this mini-game.
- This is the solution for the first level.
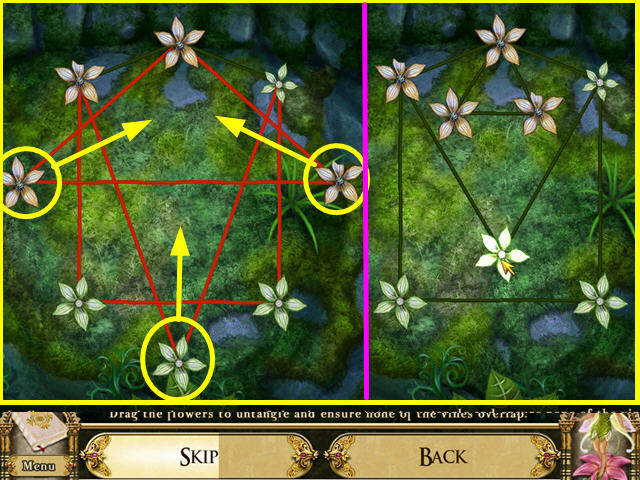
- This is the solution for the second level.

- This is the solution for the third level.
- This is the solution for the fourth level.
- This is the solution for the fifth level.
- Once all 5 levels are solved, the MOSSFLOWERS will be added to your inventory.
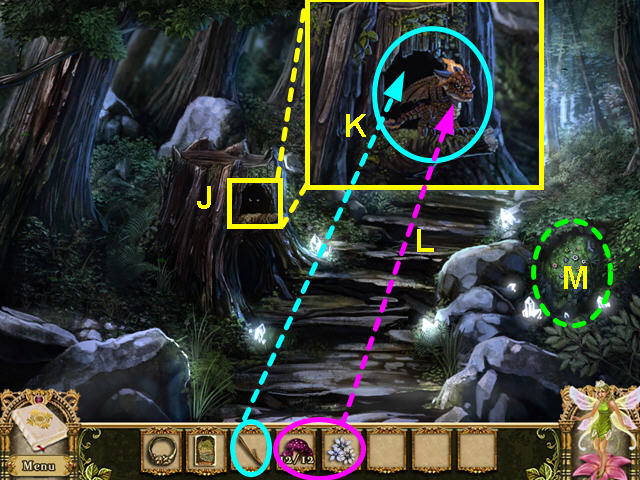
- Look at the close-up of the hole in the tree stump (J).
- Use the WOODEN BRANCH on the hole (K).
- The pocket dragon will burn the branch, creating the BURNT BRANCH.
- Once the pocket dragon appears, give him the MOSSFLOWERS and the PURPLE MUSHROOMS (L).
- The POCKET DRAGON will be added to your inventory.
- The mossflowers are on the right (M).
- Walk down once to the waterfall.
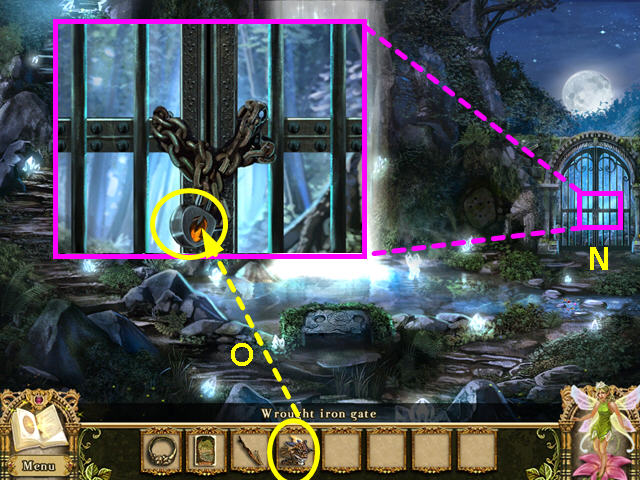
- Look at the lock on the gate (N).
- Use the POCKET DRAGON on the lock twice to break the lock and open the gate (O).
- Walk through the gate.
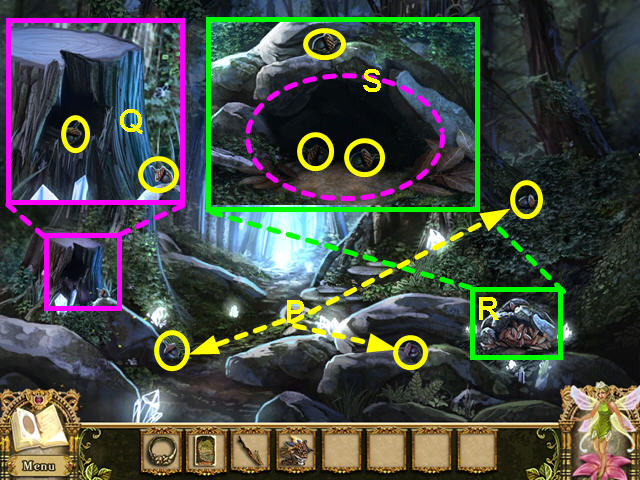
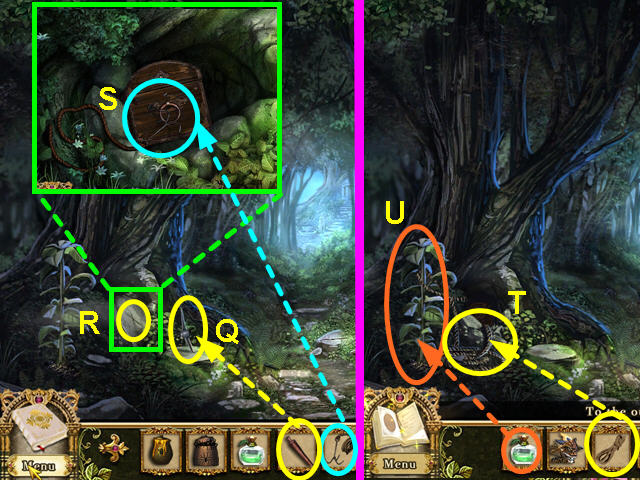
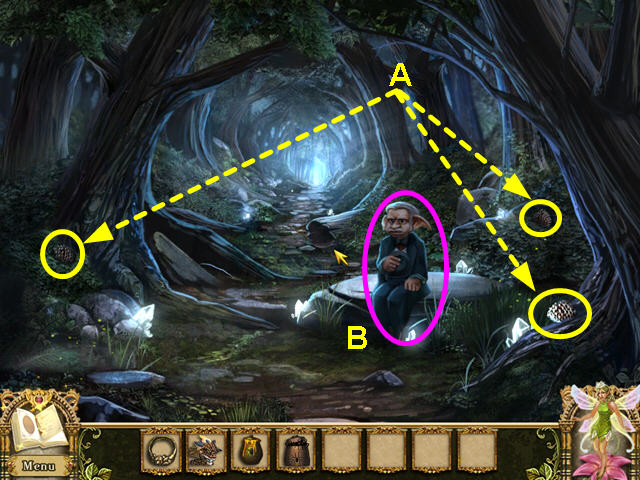
- Collect the 3 ACORNS (P).
- Look at the close-up of the stump and collect 2 more ACORNS (Q).
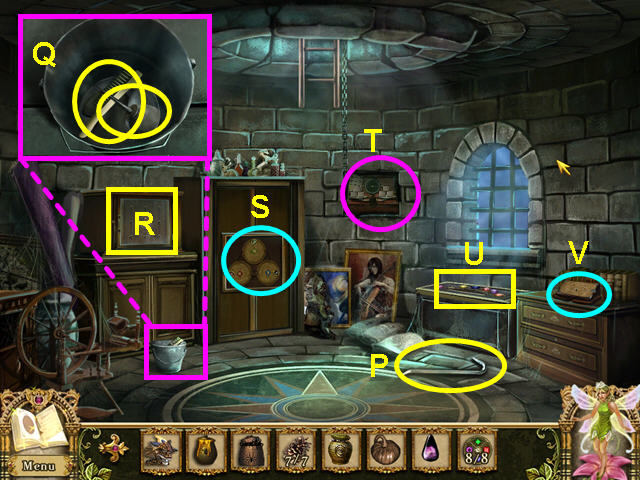
- Look at the close-up of the rock pile on the right (R).
- Click on the leaves to move them aside and take the 3 ACORNS (S).
- Walk forward.
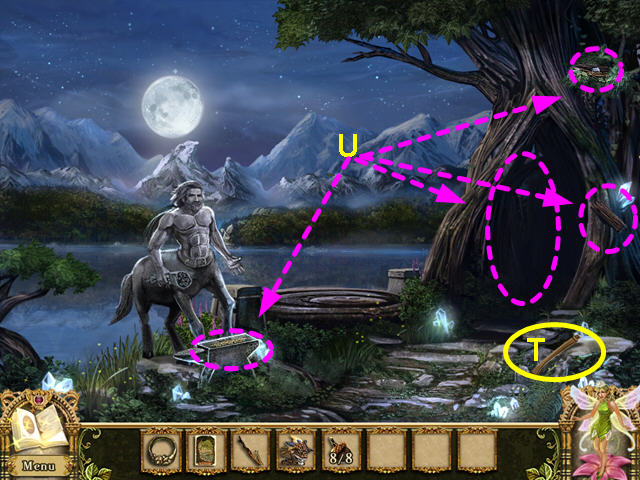
- Take the AXE HANDLE (T).
- There are other items to note, but you can't finish them yet (U).
- Walk down 3 times to return to the path to the waterfall.
- Use the AXE HANDLE on the axe head to make the AXE (V).
- Take the AXE.
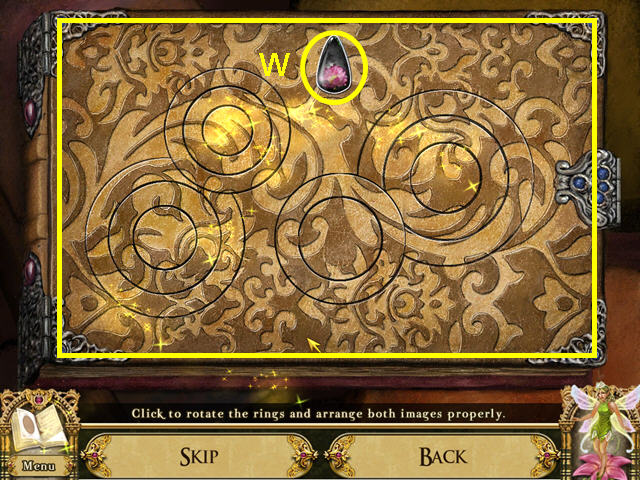
- Look at the close-up of the hole in the tree (W).
- Use the POCKET DRAGON to light the candle (X).
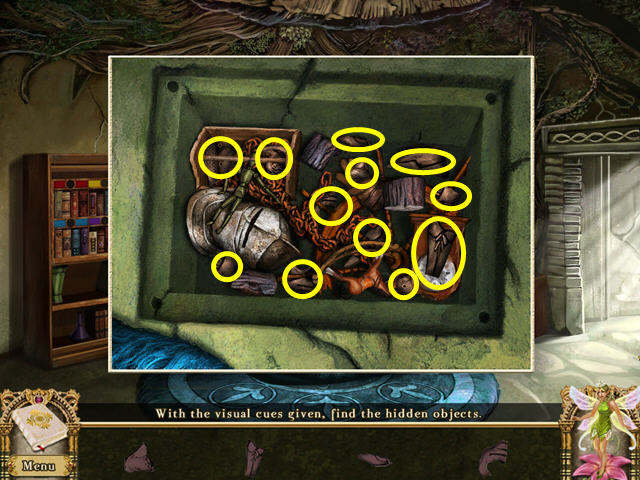
- Give the squirrel the 8 ACORNS to trigger a hidden object scene (Y).

- Locate all the items on the list.
- The CLAW HAMMER will be added to your inventory.
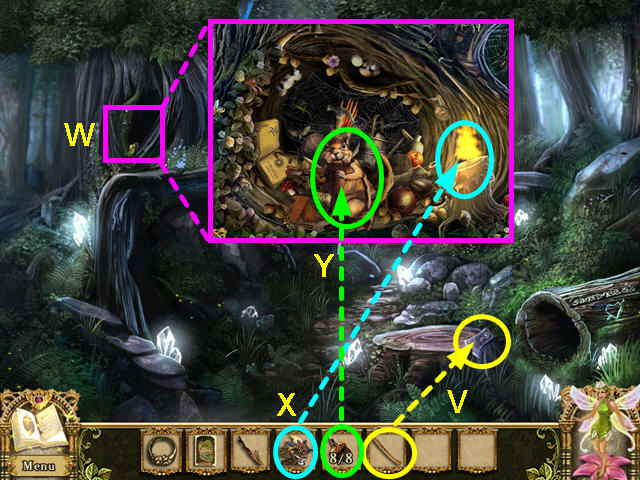
- Walk forward, then take the left path at the waterfall.
- Walk forward again to the cliffside pool.
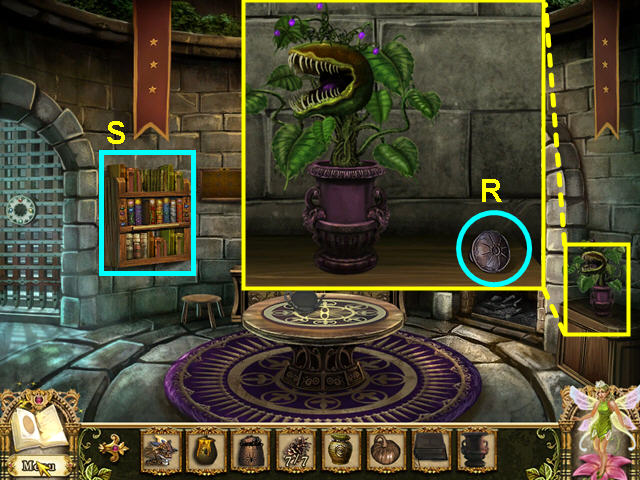
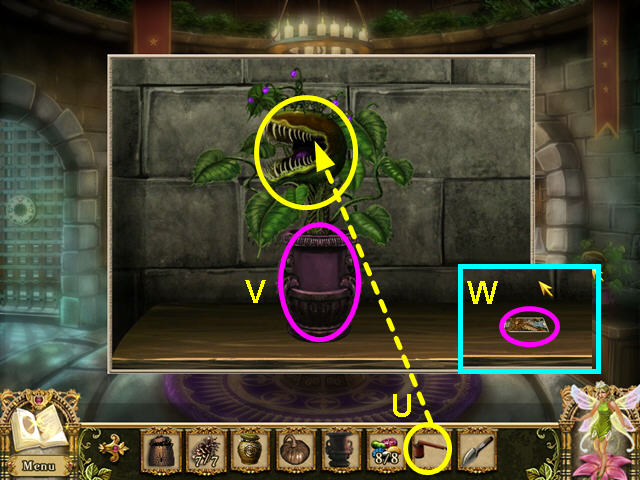
- Use the AXE to cut down the rotten tree (A).
- Use the CLAW HAMMER on each of the 3 boards (B).
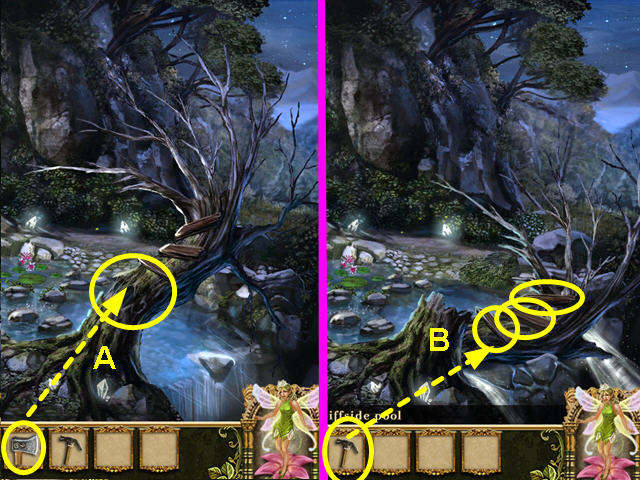
- Walk down twice to the waterfall.
- Take the right path through the gate and go forward again.
- Use the BOARDS on the right side of the tree (C).
- Use the CLAW HAMMER 4 times on the boards (D).
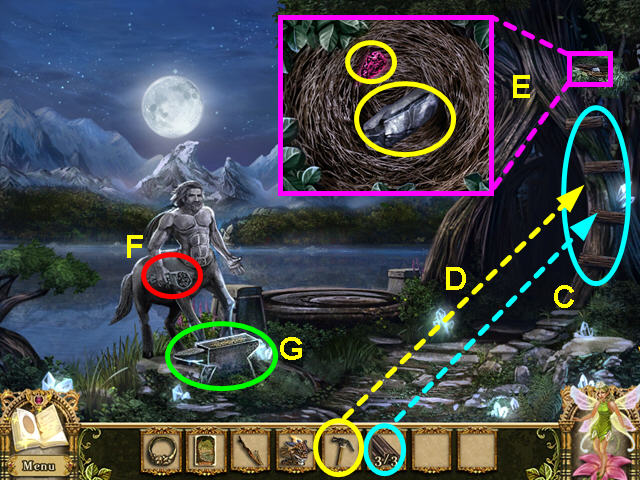
- Look in the nest and take the GEM KEYSTONE and the BLOCK of TIN (E).
- Note the Centaur is missing a flower from his bouquet (F).
- Look at the anvil for a mini-game (G).
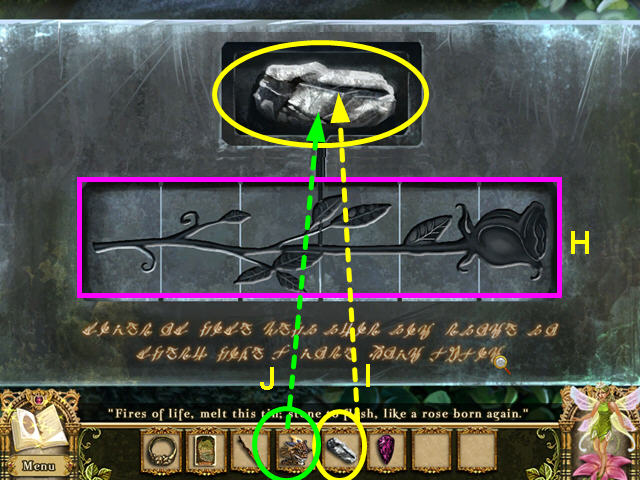
- Click on each section to find the rose pieces (H).
- Place the BLOCK of TIN in the receptacle (I).
- Use the POCKET DRAGON 4 times to melt the tin (J).
- Take the TIN ROSE.
- Give the TIN ROSE to the Centaur and he will give you the SUNSTONE.
- Walk down twice to return to the falls.
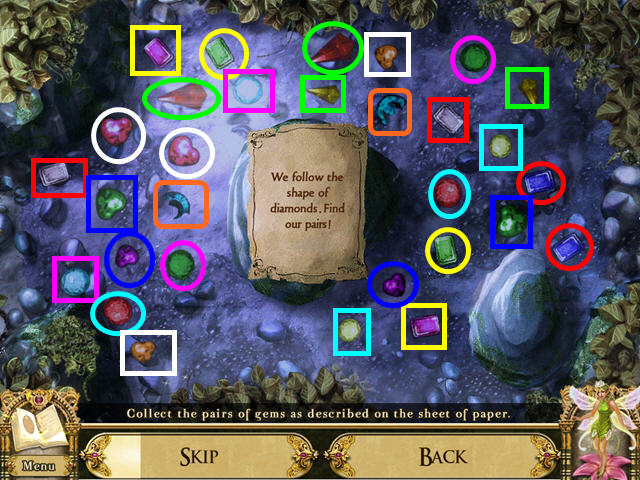
- Select the glittering pool directly in front of the gate on the right.
- Place the GEM KEYSTONE in the indentation (K).
- The object of this mini-game is to remove pairs of gems per the instructions.
- The placement of gems is random; your solution may vary.
- Pairs of diamond-shaped gems are asked for first; they are marked in green.
- Next gems that have as many sides as human limbs are needed; they are marked in yellow and red.
- The next requested pairs are whole like the sun and moon; these are marked in pink and aqua.
- Next, find the pairs shaped like hearts; they are marked in blue and white.
- Lastly, find the gem broken in half; the 2 pieces are marked in orange.
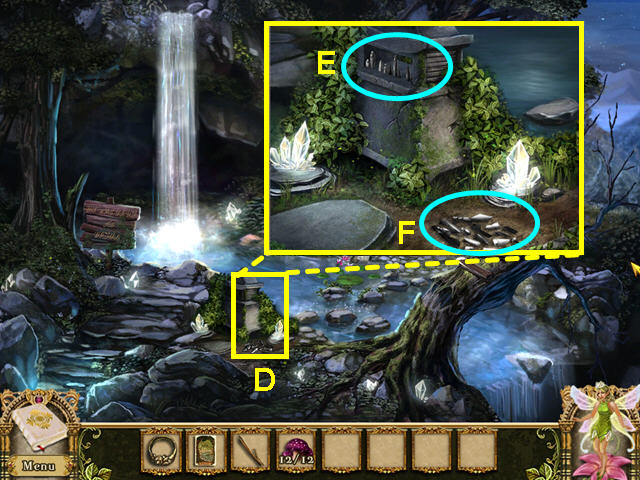
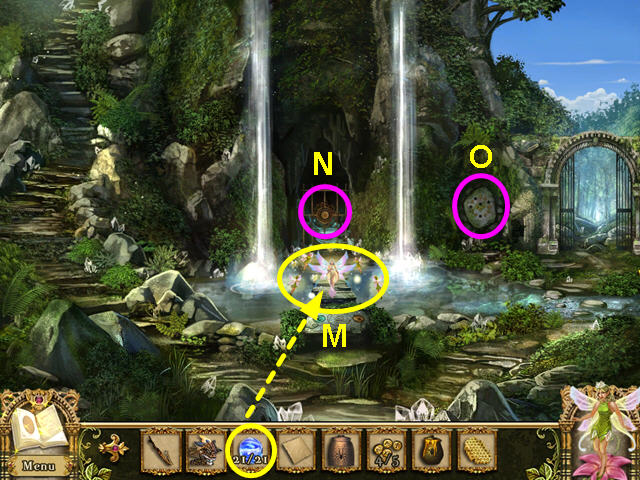
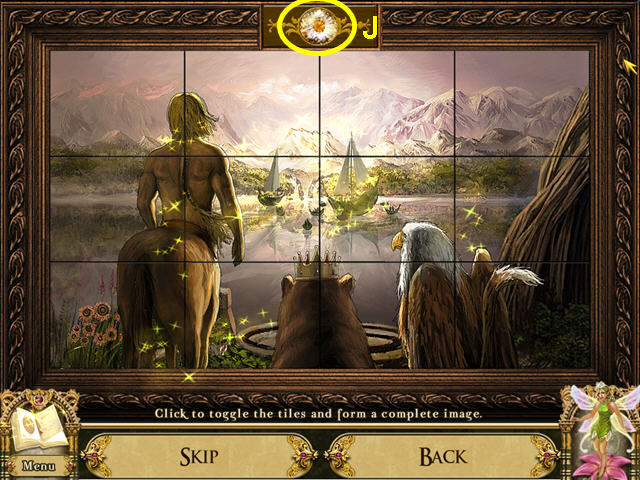
- You now have the WATERFALL MOONSTONE.

- Note the entrance under the waterfall (K).
- Look at the stone plinth (L).
- Place the WATERFALL MOONSTONE into the left indentation (M).
- Place the SUNSTONE into the right indentation (N).
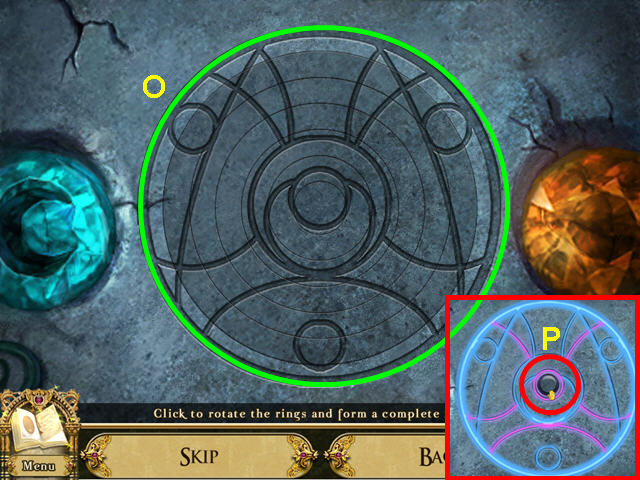
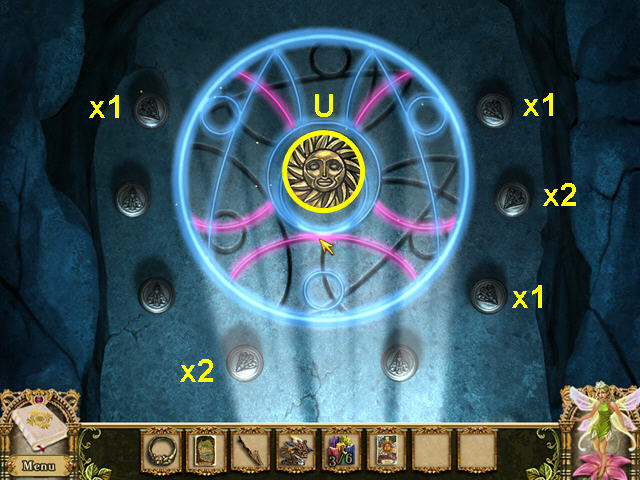
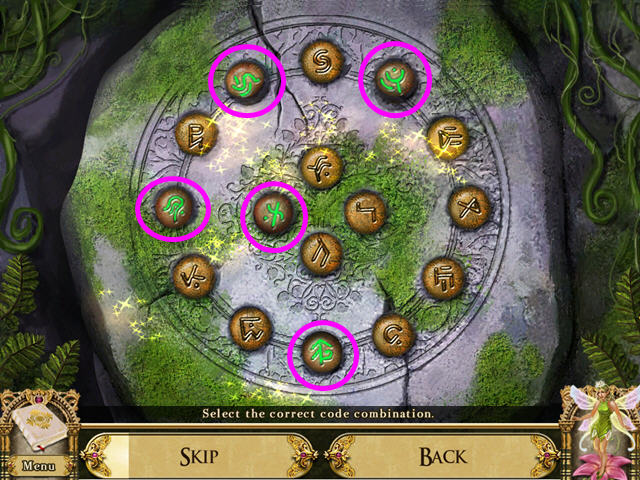
- Click on each of the rings until the pattern is formed (O).
- Once the symbol starts glowing, press the button in the center (P).
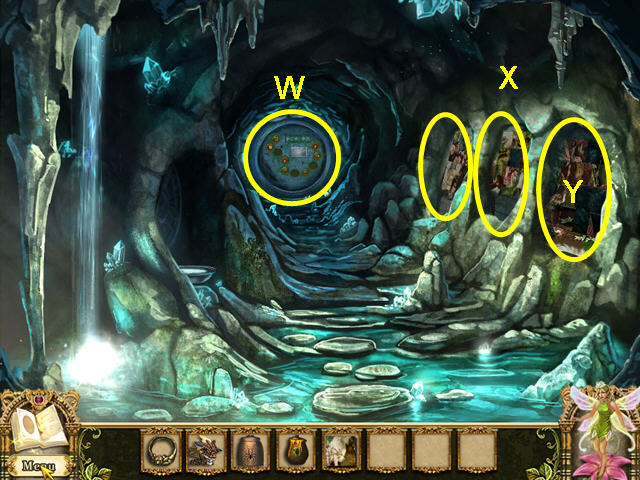
- Enter the doorway under the waterfall.
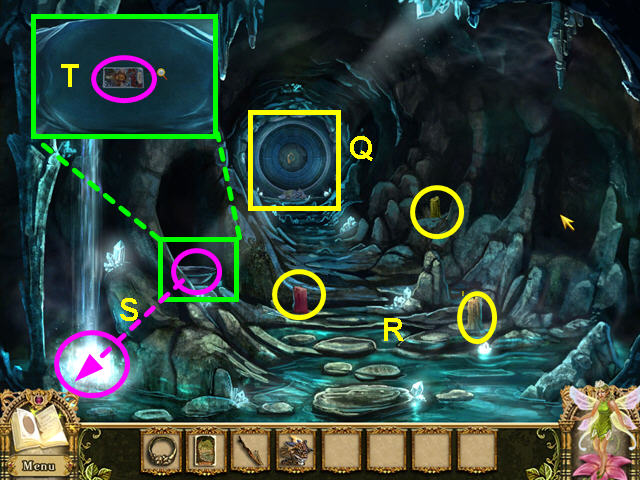
- Note the circular door in the rear of the cave (Q).
- Take the 3 CANDLES (R).
- Take the SILVER BASIN and fill it with water (S).
- Take the MAGIC CARD: THE MOON for a hidden object scene (T).

- Find the 12 butterflies.
- Place the SILVER BASIN with WATER back where it once was to trigger a mini-game.
- Click on the buttons to recreate the colored pattern on the stone plinth.
- Refer to your journal for a picture.
- The first click of a button will light a part of the pattern blue.
- Click a second time to change the color to pink.
- The third click will turn off the light.
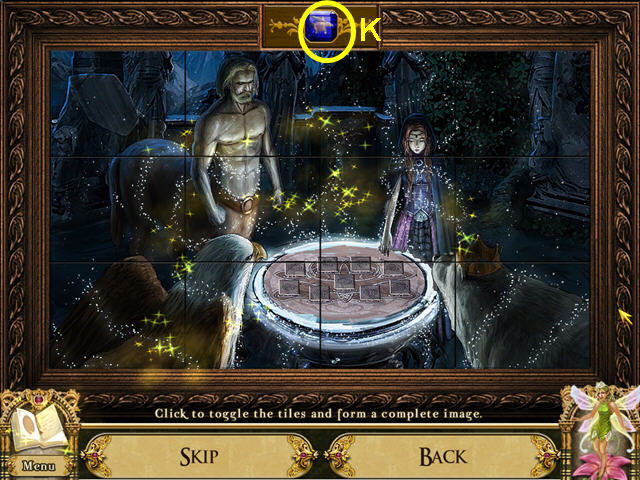
- Take the SUN MEDALLION from the center (U).
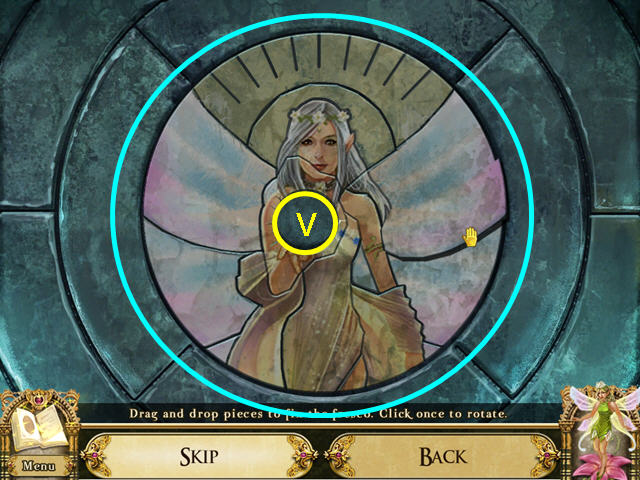
- Look at the circular portal in the rear of the cave.
- Repair the fresco by replacing the broken pieces.
- Click to take or place a piece; click again to rotate a piece.
- Place the SUN MEDALLION into the center niche (V).
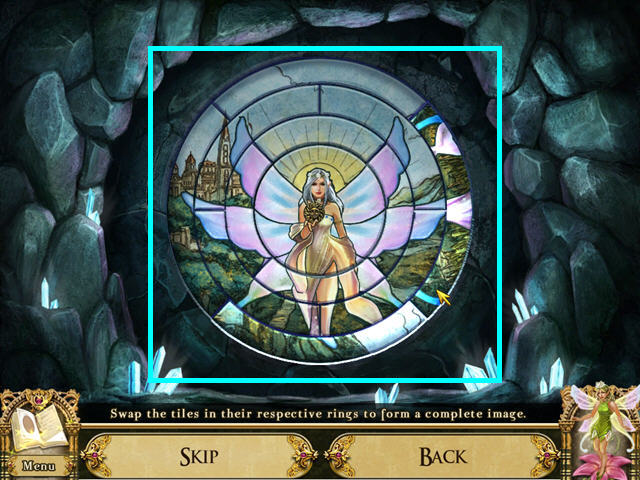
- Repair the image by swapping pieces.
- Click on 2 pieces to swap locations.
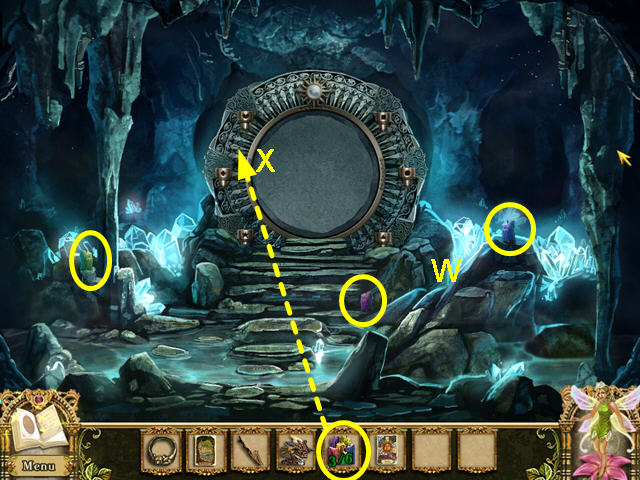
- Collect the 3 CANDLES (W).
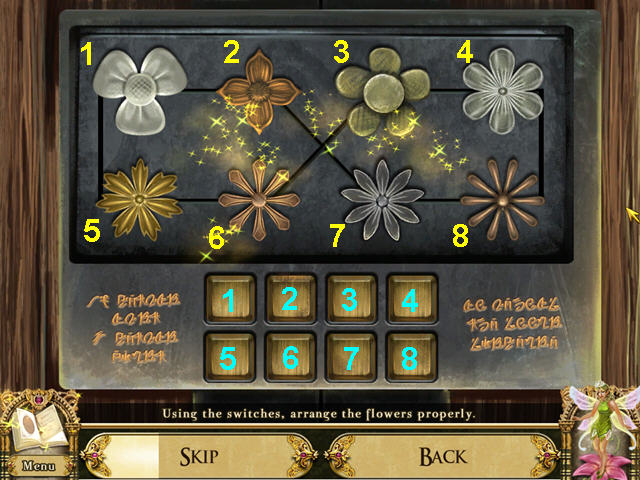
- Use the 6 CANDLES on the gate (X).
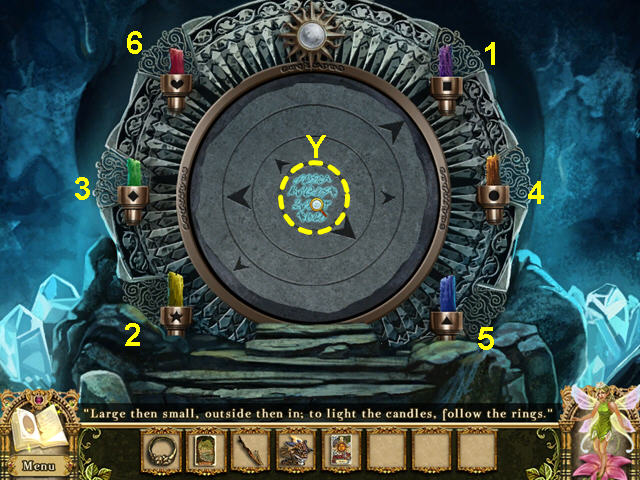
- Light the candle according to the placement of the arrows on the rings and the directions in the center (Y).
- Light the candle to which the largest arrow in the outermost ring points.
- Next, light the candle to which the smaller arrow in the outermost ring points.
- Continue this pattern with the second and third rings.
- Use the POCKET DRAGON to light the candles in numerical order (1-6).
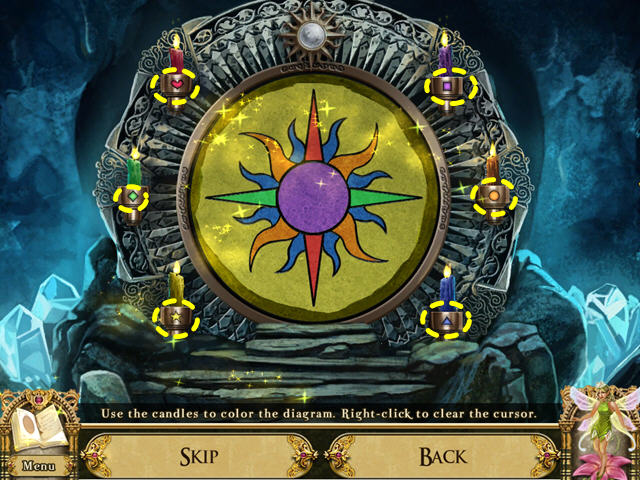
- Using the symbols on the candles and in the diagram as a guide, color the diagram.
- Click on a different candle to change colors.
- Enter the portal.
Part 3: Through the Gate of Sun and Moon
- Walk down once to the lake overlook.
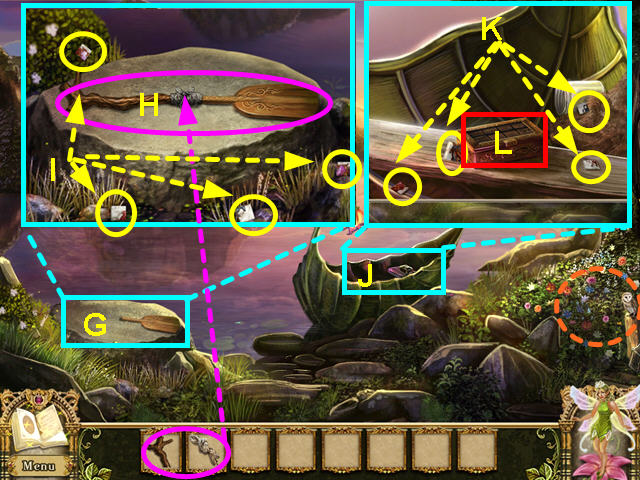
- Collect the 3 FAIRY BEADS (A).
- Look in the nest for a FAIRY BEAD (B).
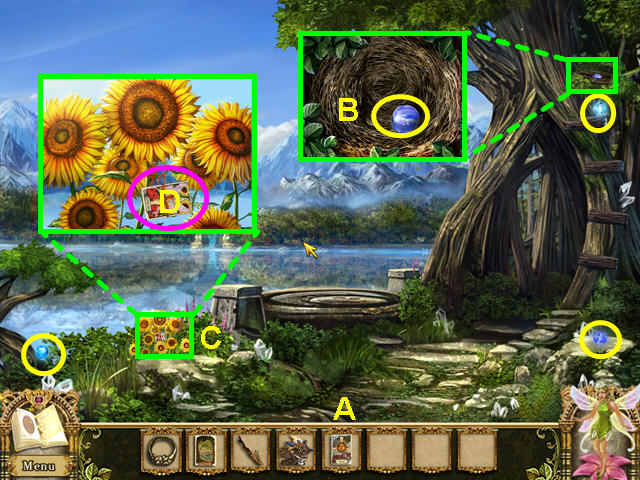
- Look at the close-up of the sunflowers (C).
- Take the MAGIC CARD: THE FAIRY QUEEN for a hidden object scene (D).
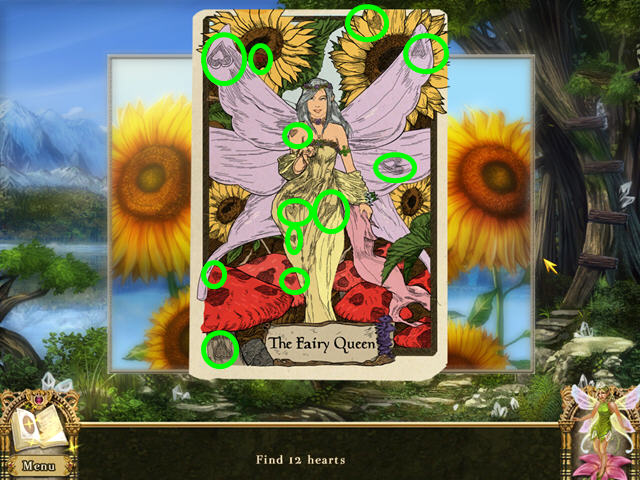
- Locate the 12 hearts.
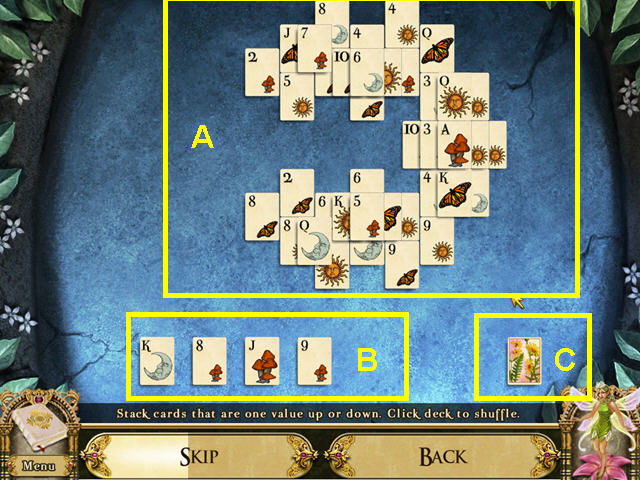
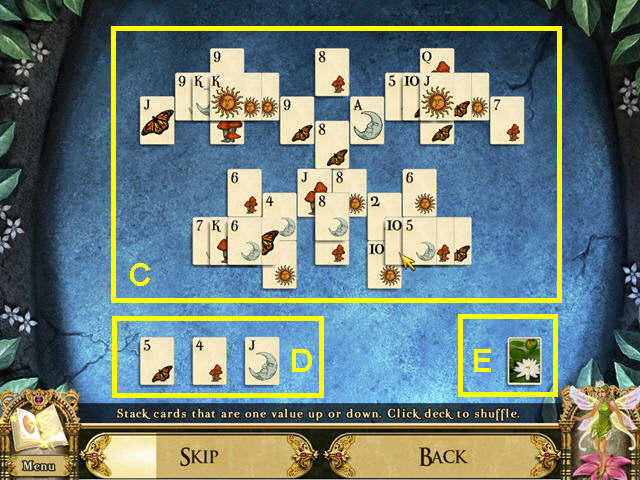
- Walk down 3 times and talk to the goblin woodsman sitting on the tree stump.
- The goblin woodsman would like to play Tripeaks.
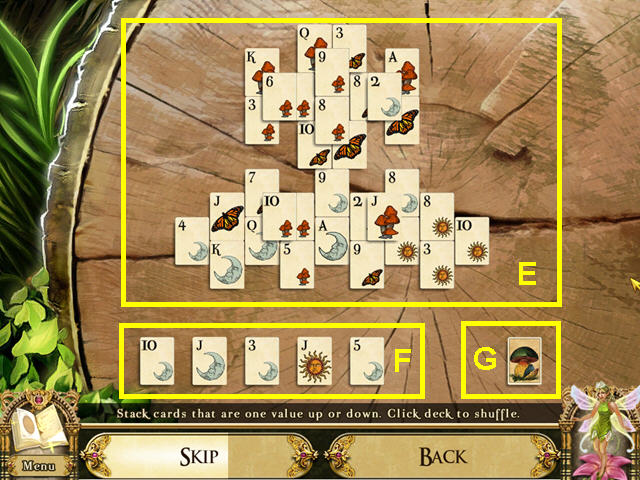
- Click on cards in the upper tableau (E) that are one higher or lower than a card in the bottom row (F).
- Click on the deck of cards to shuffle them if you run out of moves (G).
- If you run out of cards and have not cleared the tableau, a new game will be dealt.
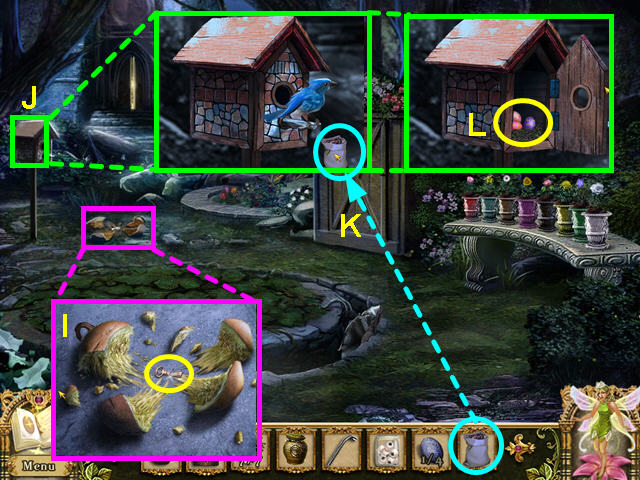
- The goblin will give you a CHERRY BERRY BASKET to collect some berries for him.
- Take the WOODEN POLE (H).
- The goblin waits for you to return with berries (I).
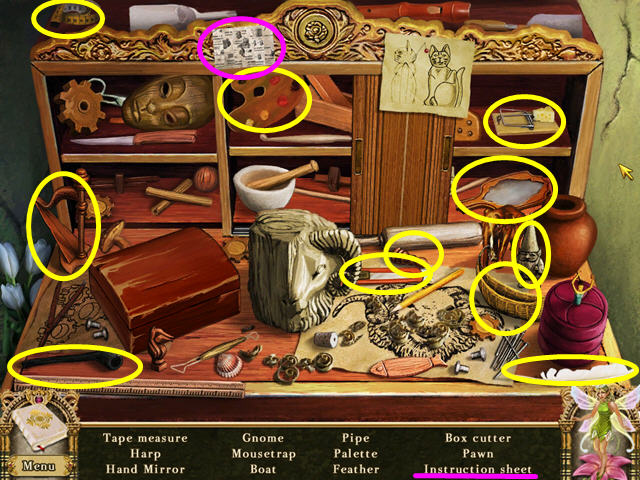
- Look at the backpack for a hidden object scene (J).
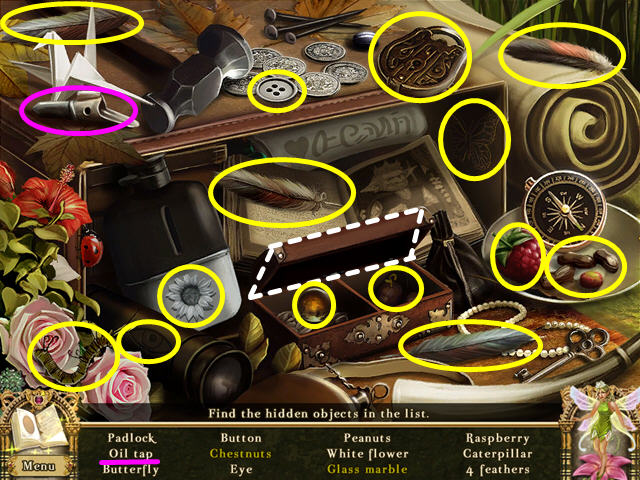
- Collect all the items on the list.
- Open the lid of the wooden box to reveal the chestnuts and the glass marble (K).
- The OIL TAP will be added to your inventory.
- Walk forward, then take the path to the left of the waterfall.
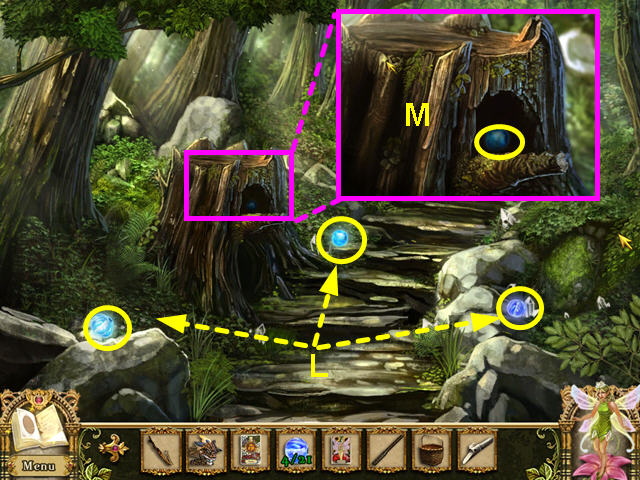
- Collect the 3 FAIRY BEADS (L).
- Look at the close-up of the stump and take the FAIRY BEAD (M).
- Walk forward.
- Look at the close-up of the stone lantern and take the FAIRY BEAD (N).
- Look at the close-up of the lily pad and click on the frog (O).
- Take the FAIRY BEAD (P).
- Look at the close-up of the stump and take the FAIRY BEAD (Q).
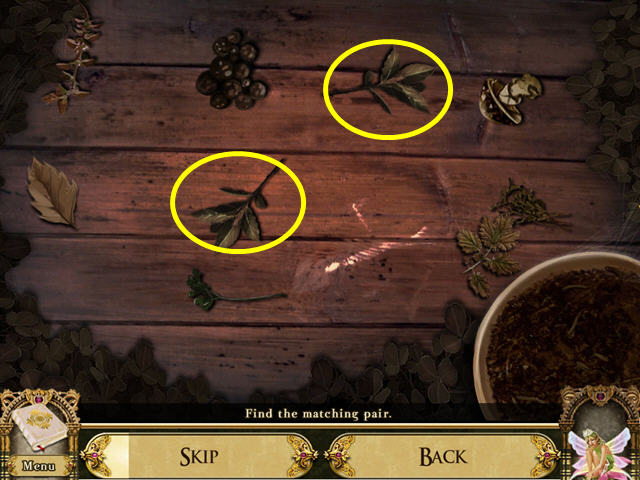
- Look at the flower bush for a mini-game (R).
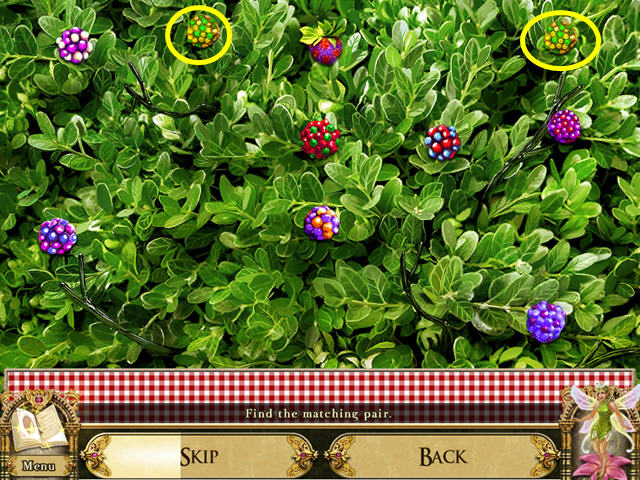
- Find the matching pairs of berries.
- Click on the 2 matching berries to progress to the next screen.
- You need to find 7 pairs of berries.
- These screens are random; your solutions may differ.
- The CHERRY BERRY BASKET is now full.
- Walk down 3 times.
- Give the goblin woodsman the full CHERRY BERRY BASKET.
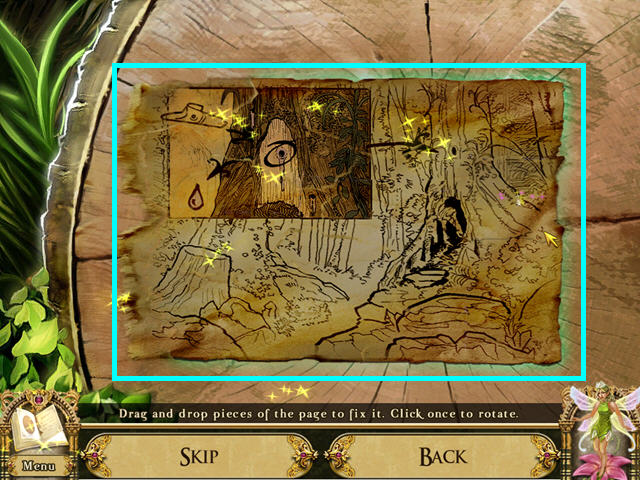
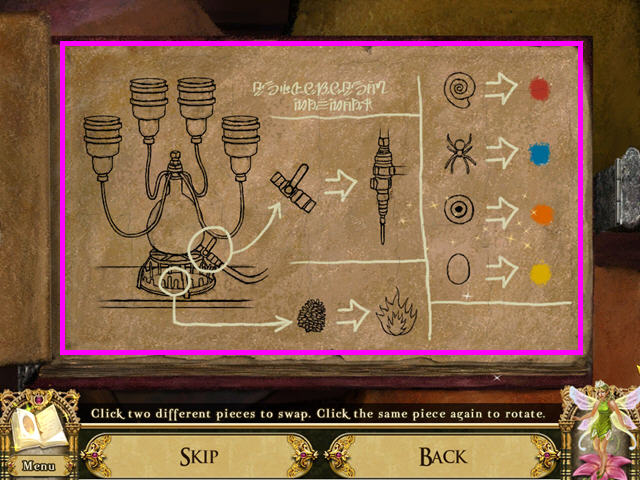
- The goblin gives you a BLANK SHEET of PAPER and some torn scraps.
- Click to take or drop a scrap.
- Click again to rotate a scrap.
- Repair the paper to learn how to collect Everlasting Oil.
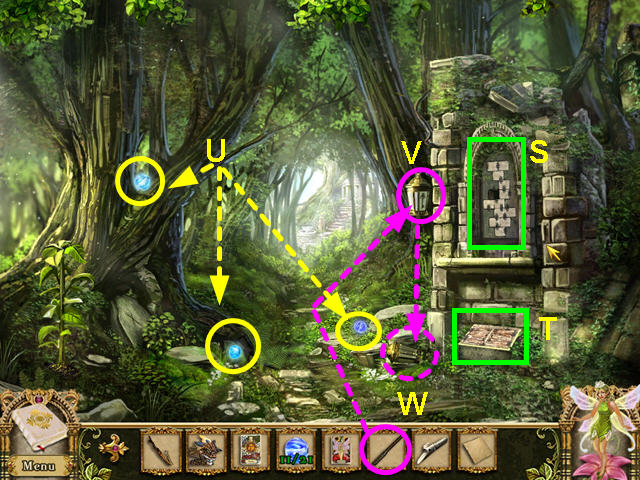
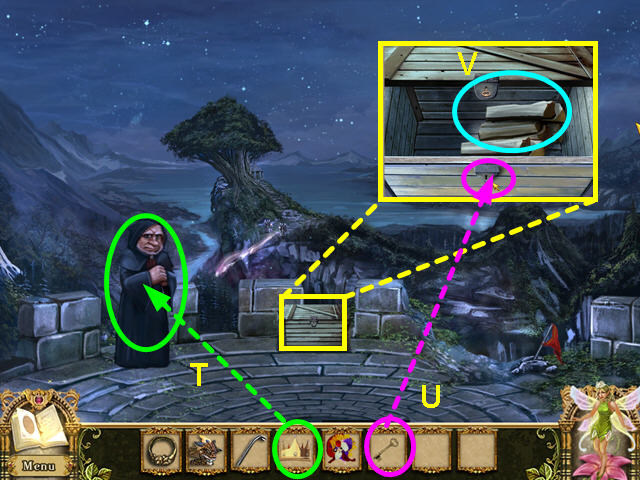
- Walk forward; take the right path through the gate.
- Walk forward to the lake; enter the path through the tree on the right.
- Note the brick alcove (S).
- Note the storage box (T).
- Take the 3 FAIRY BEADS (U).
- Use the WOODEN POLE on the oil lamp (V).
- Click on the oil lamp once it falls to the ground (W).
- Use the pieces of glass to repair the lamp.
- Click to take or place a glass piece.
- Click again to rotate a piece.
- Note the funnel to fill the lamp with oil (A).
- Take the BRASS KEY from the lamp (B).
- Look at the close-up of the storage box and use the BRASS KEY on the left compartment (C).
- Take the FISHING LINE and the DECORATIVE BRICK (D).
- The fishing line will combine with the wooden pole, creating the FLEXIBLE POLE WITH STRING.
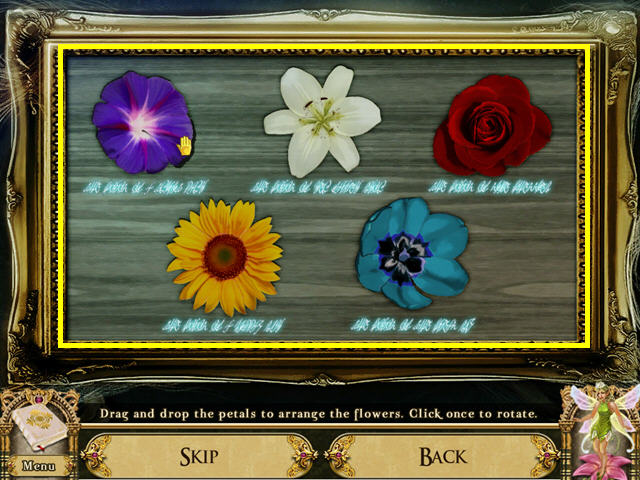
- Look at the brick alcove and place the DECORATIVE BRICK into the empty slot (E).
- Complete all the flowers.
- Click on 2 bricks to swap their positions.
- Once complete, take the EMPTY SPIDER JAR, EMPTY HONEY POT, EMPTY OIL FLASK, and FISHING LURE (F).
- The FISHING LURE will combine with the FLEXIBLE POLE WITH STRING, creating the FISHING ROD.
- Walk down twice.
- Take the 2 FAIRY BEADS (G).
- Look at the stump and take the FAIRY BEAD (H).
- Look at the close-up of the right tree (I).
- Use the OIL TAP on the hole in the tree (J).
- Use the EMPTY OIL FLASK on the tap (K).
- Walk down to return to the waterfalls.
- Walk forward on the left path and continue forward to the cliffside pool.
- Use the FISHING ROD on the pool to catch a FISH (L).
- Walk down twice, then right through the gate.
- Walk forward to the lake vista.
- Take the path through the tree on the right.
- Look at the close-up of the lamp.
- Use the OIL FLASK on the funnel (M).
- Use the POCKET DRAGON to light the lamp (N).
- Hang the LIT OIL LAMP on the hook where you first found the lamp (O).
- Take the COPPER KEY that falls to the ground (P).
- Look at the close-up of the storage box (Q).
- Unlock the right compartment with the COPPER KEY.
- Take the GLASS MARBLES and the 4 RUNES (R).
- Exit the close-up and walk forward.
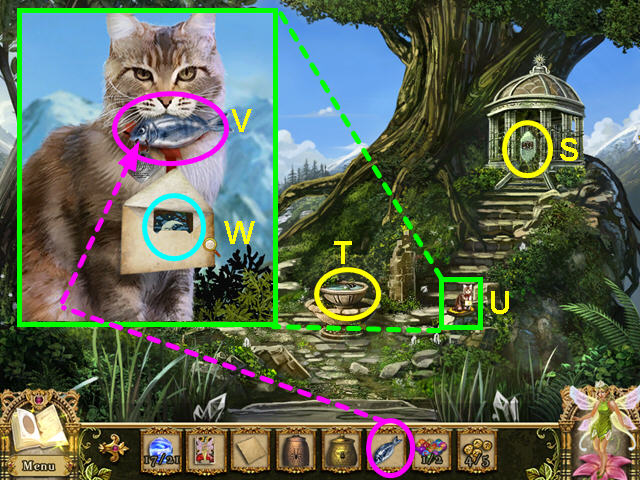
- Note the pavilion gate (S).
- Note the stone fountain (T).
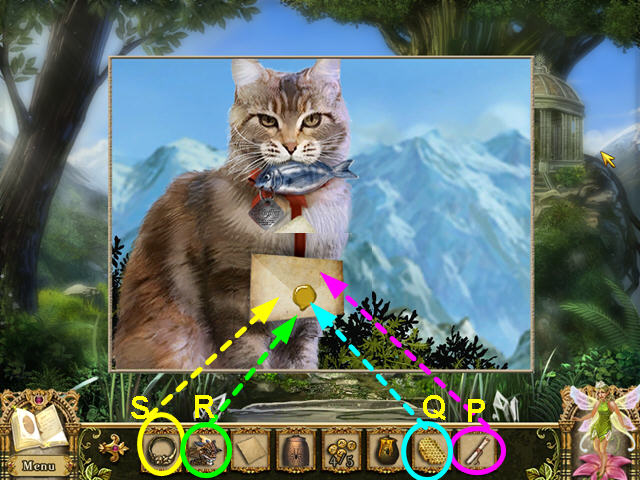
- Look at the close-up of the cat (U).
- Give the FISH to the cat (V).
- Click on the envelope to open it and take the MAGIC CARD: THE MOON (W).
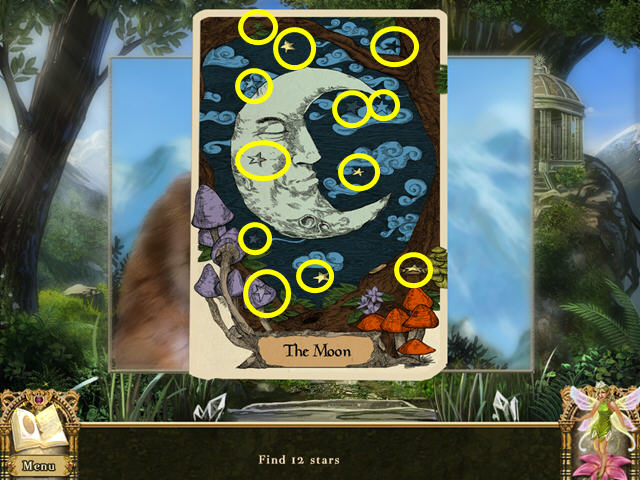
- Locate the 12 stars.
- Look at the stone fountain for a hidden object scene.
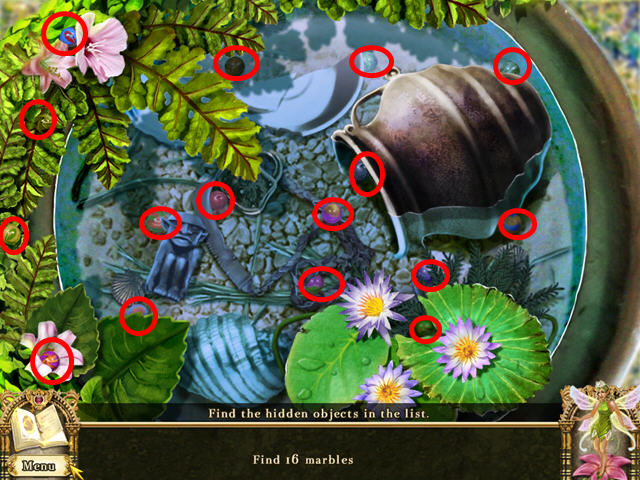
- Find the 16 marbles.
- The GLASS MARBLES will be added to your inventory.
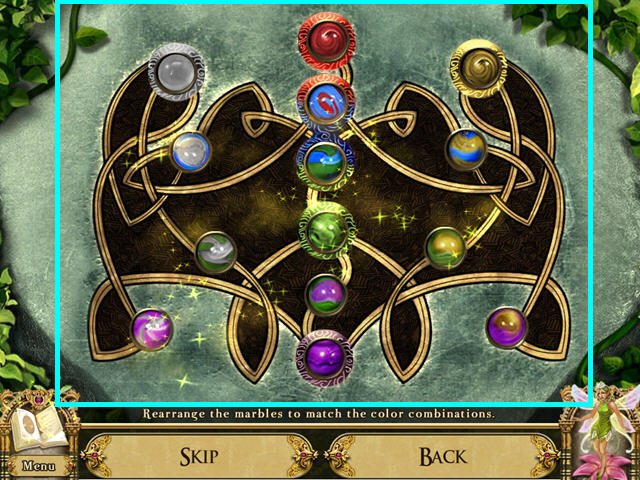
- Look at the pavilion gate.
- Use the COLLECTION of GLASS MARBLES on the diagram to start a mini-game.
- Place the marbles in the matching color slots.
- Some slots have a colored ring and some do not.
- The slot with the red and blue ring should hold the red and blue marble.
- For those slots with no rings, follow the 2 lines leaving the slot to determine which 2 colors the marble should be (i.e. the slot between the purple and the gold marble should be purple and gold).
- Click on 2 marbles to swap positions.
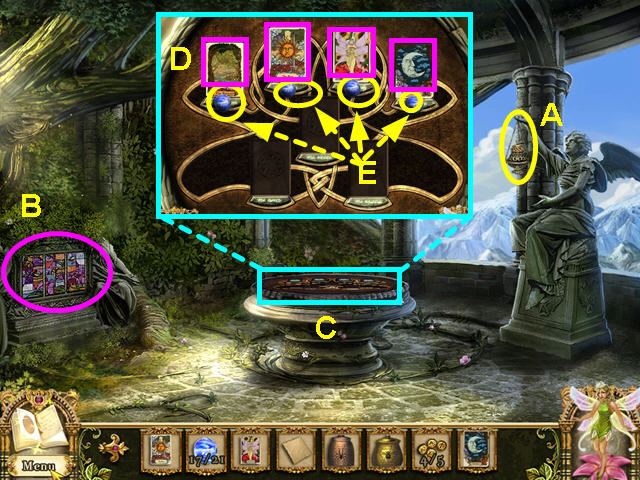
- Enter the pavilion.
- Take the INCENSE CENSER from the statue (A).
- Note the mini-game on the left (B).
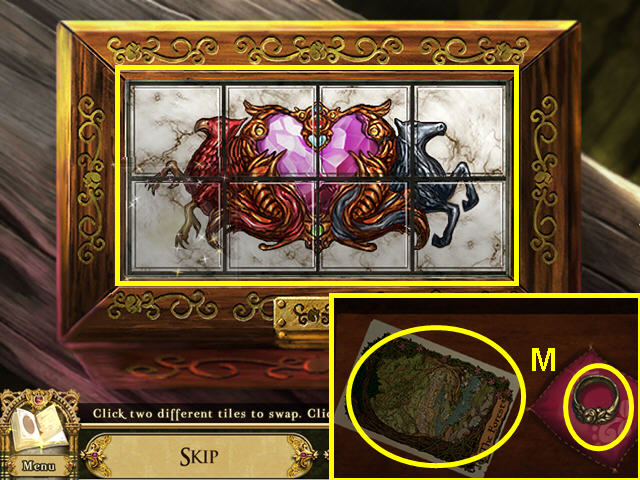
- Look at the close-up of the center pedestal (C).
- Place the MAGIC CARDS into the slots (D).
- From left to right the cards are: THE FOREST, THE SUN, THE FAIRY QUEEN, and THE MOON.
- Take the 4 FAIRY BEADS that appear and exit the close-up (E).
- Look at the mini-game on the left.
- Form the 3 pictures in chronological order (the bottom piece for each picture does not move).
- Click on 2 pieces to swap their positions.
- When complete, the center panel will open.
- Take the WAX KNIFE and the SMOKEY INCENSE (F).
- Exit the pavilion and walk down 3 times.
- Hang the INCENSE CENSER on the hook (G).
- Place the SMOKEY INCENSE into the censer (H).
- Light the incense with the POCKET DRAGON (I).
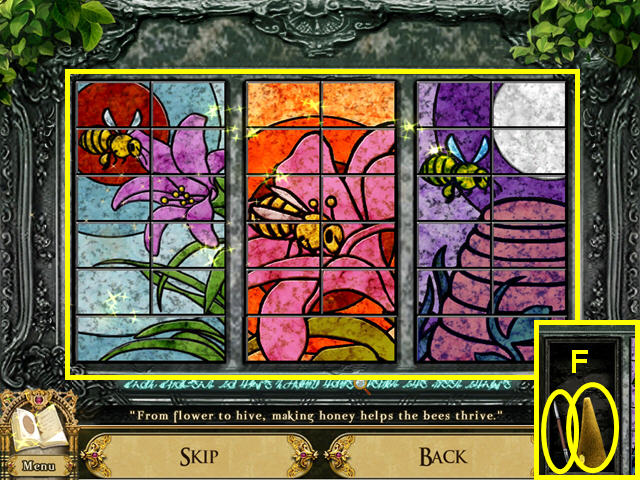
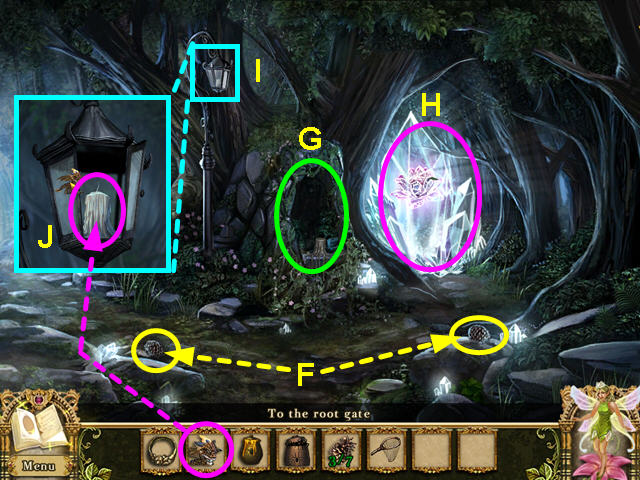
- Look at the close-up of the hive (J).
- Use the EMPTY HONEY POT on the hive (K).
- Use the WAX KNIFE on the hive to collect some BEESWAX (L).
- Walk down to return to the falls.
- Give the 21 FAIRY BEADS to the Fairy Queen (M).
- She will give you a LETTER TO THE WITCH.
- Note the locked gate (N).
- Note the mini-game (O).
- Walk through the right gate.
- Go forward to the lake overlook.
- Take the path through the tree on the right and walk forward to the pavilion area.
- Look at the close-up of the cat.
- Place the LETTER TO THE WITCH into the envelope (P).
- Use the BEESWAX on the envelope (Q).
- Use the POCKET DRAGON on the wax (R).
- Use the SIGNET RING on the heated wax (S).
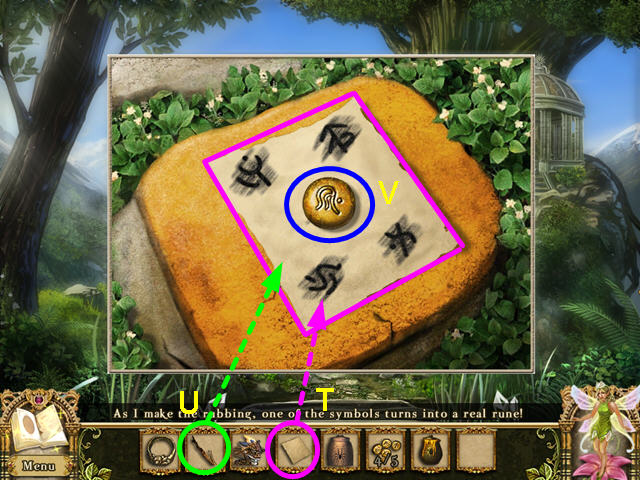
- After the cat flees, place the SHEET of PAPER onto the flat stone (T).
- Use the BURNT BRANCH to make a rubbing (U).
- Take the RUNE from the center (V).
- The symbols will be noted in your journal.
- Walk down 4times to return to the falls.
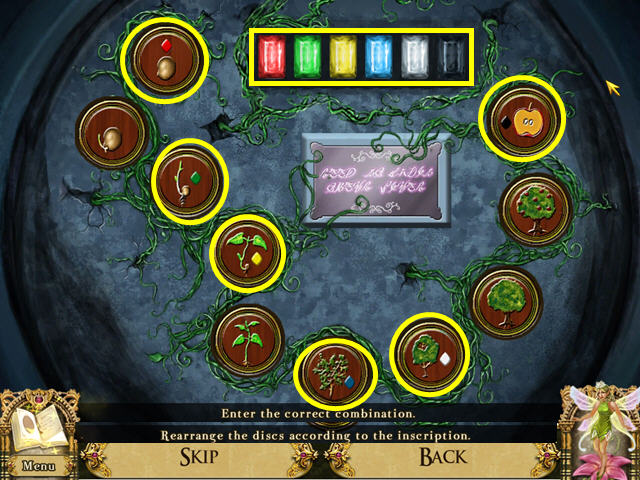
- Look at the mini-game to the left of the gate.
- Use the 5 RUNES on the board to start the mini-game.
- Press the runes you found on the rubbing.
- Check your journal for the correct 5 runes.
- Take the ORNATE KEY and the STONE TILE.
- Use the ORNATE KEY to open the gate beneath the water falls.
- Enter the cave.
- Note the stone portal in the back of the cave (W).
- There are 3 alcoves (X).
- Start with the alcove on the right (Y).
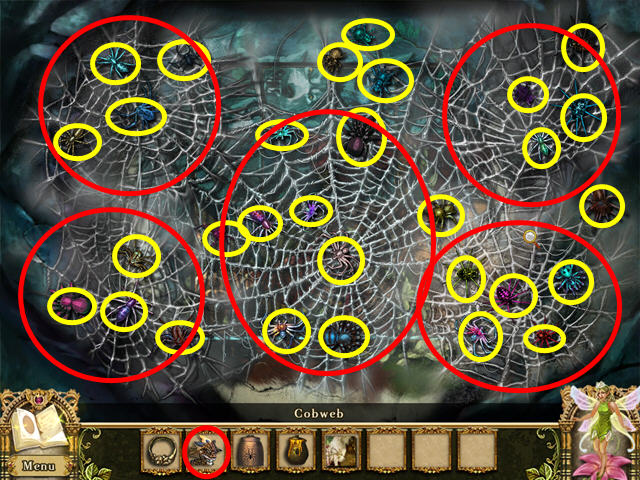
- Click on the 30 spiders marked in yellow, collecting them in the SPIDER JAR.
- Use the POCKET DRAGON on the center of each of the 5 webs marked in red.
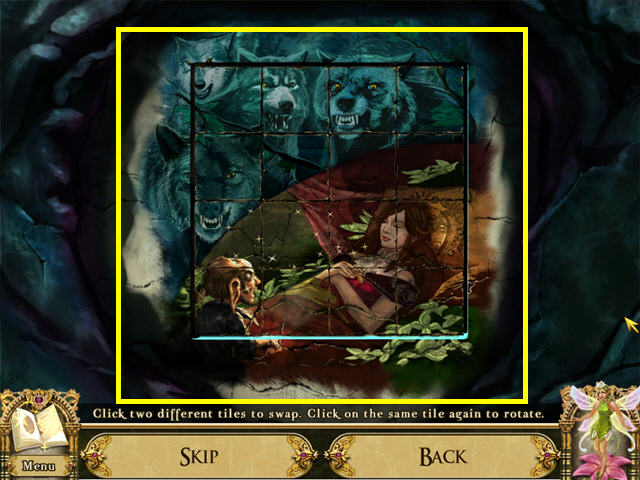
- Reform the fresco by swapping and rotating tiles.
- Click on 2 tiles to swap positions.
- Click again on a single tile to rotate it in place.
- Take the WOODEN DISC that appears.
- Look at the second alcove.
- Use the STONE TILE to trigger a mini-game.
- Reform the fresco by swapping and rotating tiles.
- Click on 2 tiles to swap positions.
- Click again on a single tile to rotate it in place.
- Take the WOODEN DISC that appears.
- Look at the third alcove.
- Reform the fresco by swapping and rotating tiles.
- Click on 2 tiles to swap their positions.
- Click again on a single tile to rotate it in place.
- Take the WOODEN DISC that appears.
- Look at the stone portal.
- Use the 3 WOODEN DISCS on the diagram to trigger a mini-game.
- Place the discs in chronological order from seed to stem.
- Click on two discs to swap positions.
- Reading the discs from left to right, find the correct color sequence of the colored diamonds on the discs and enter it at the top.
- Click on each gem until it is the proper color.
- Enter the portal.
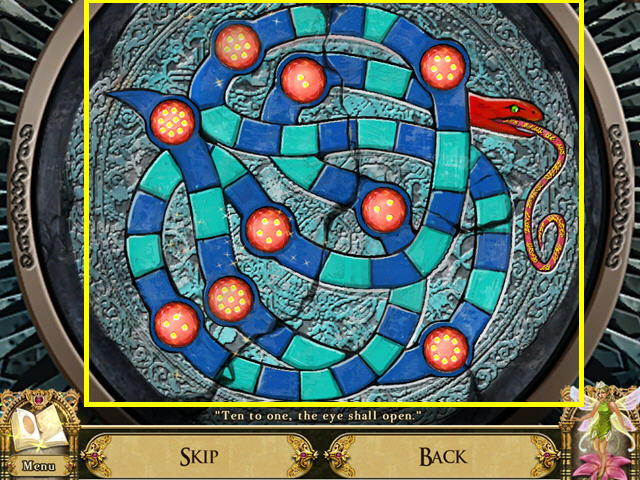
- Look at the Sun and Moon gate.
- The inscription on the snake's tongue requests the eyes go from 10 to 1.
- Since 1 is the snake's eye, 10 is the tail.
- Click on the red balls of eyes to swap their positions.
Part 4: Return to the Night
- Walk down from the vista.
- Talk to the goblin on the right to play Tripeaks.
- Click on cards in the upper tableau (A) that are one higher or lower than a card in the bottom row (B).
- Click on the deck of cards to shuffle if you run out of moves (C).
- If you run out of cards and have not cleared the tableau, a new game will be dealt.
- The goblin gives you the POTION OF RAPID GROWTH.
- Take the path through the right tree.
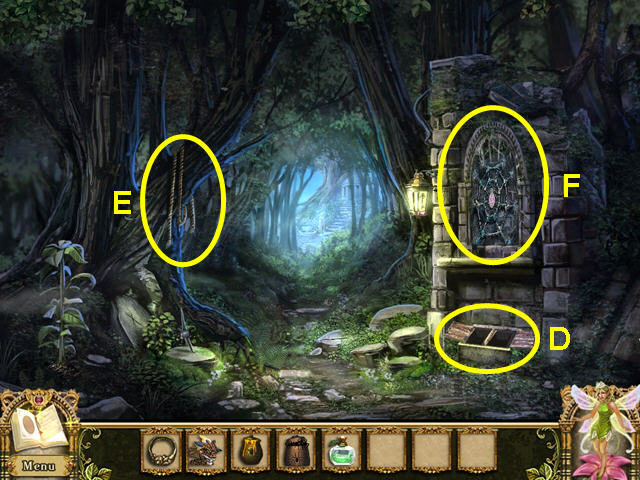
- Note the storage area near the ground (D).
- Note the rope hanging in the tree (E).
- Select the cobwebbed alcove for a mini-game (F).
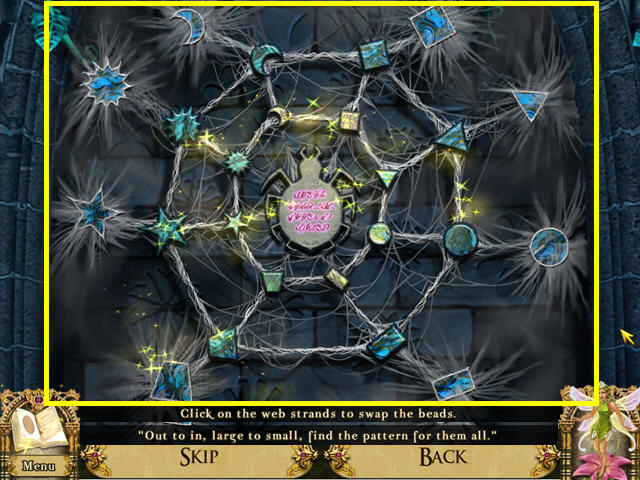
- Move the pieces so that the 3 on each ray are the same type and they get smaller towards the center.
- Click on the web between 2 pieces to swap those positions.

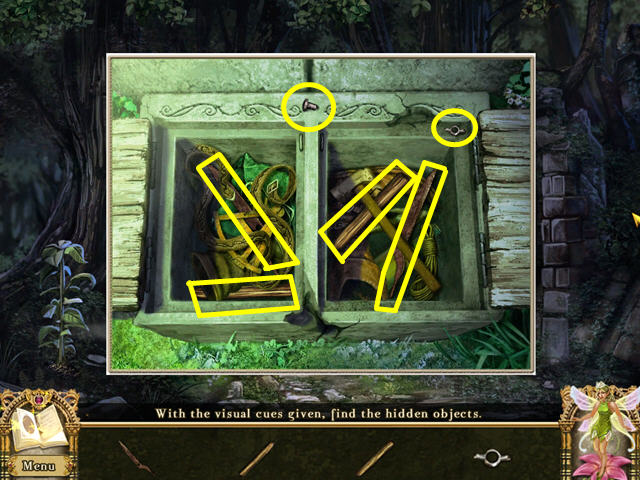
- Move the bricks around so that all the flowers are complete.
- Click on 2 bricks to swap their positions.
- When the panel opens, take the BLACK ORB and the GRAPPLING HOOK HEAD.
- Look at the close-up of the storage box for a hidden object scene.
- Locate all the items.
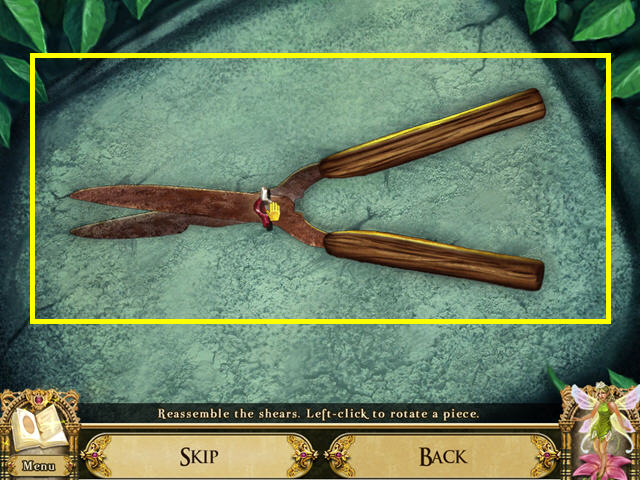
- Assemble the garden shears by placing the pieces into the outline.
- Click to take or drop, then click again to rotate.
- Note the colors on the bolt.
- Cut the ROPE from the tree with the GARDENING SHEARS.
- The ROPE will combine with the GRAPPLING HOOK HEAD.
- Walk forward.

- Cut free the PICKAXE HANDLE with the GARDENING SHEARS (G).
- Select the flowering area for a mini-game (H).
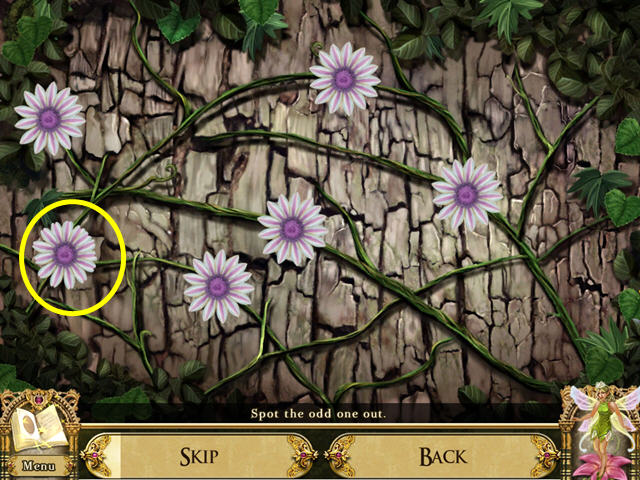
- Find the flower that is different from the others.
- You will have 7 sets of flowers.
- This mini-game is random; your solution may differ.
- You will earn a BOUQUET OF MOONFLOWERS.
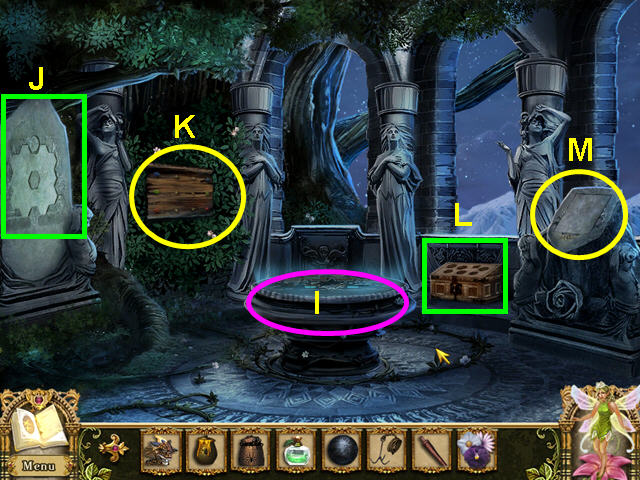
- Note the stone table where the Magic Cards are placed (I).
- Note the mini-game on the left (J).
- Remember the tangled rope board (K).
- Note the ivory chest (L).
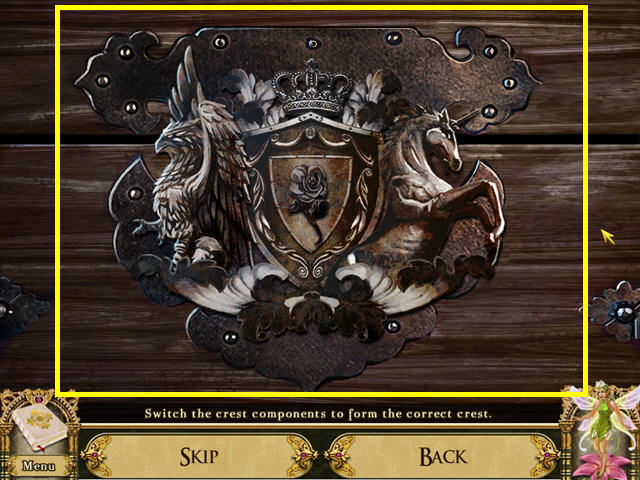
- Select the stone slab for a mini-game (M).
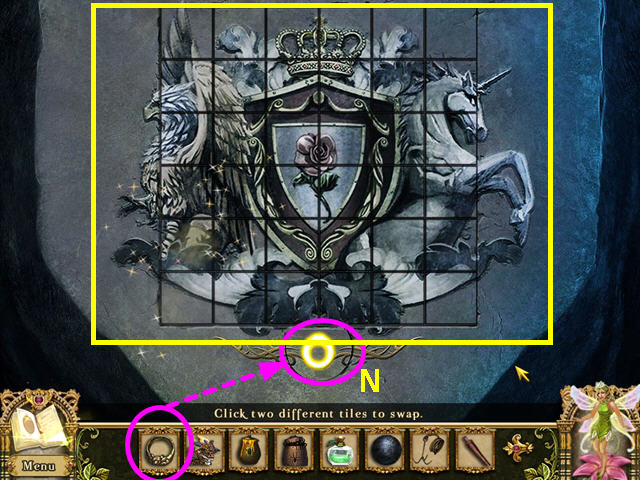
- Place the SIGNET RING into the indentation at the bottom (N).
- Restore the crest by swapping tiles.
- Click on 2 tiles to swap their positions.
- Read the treasure map hidden under the ring indentation.
- Both the crest and the map are recorded into your journal.
- Exit the close-up and select the ivory chest.
- Use the BOUQUET OF MOONFLOWERS on the chest.
- Click on a flower to rotate it to the correct position.
- Drag and drop the flowers into the matching indentations.
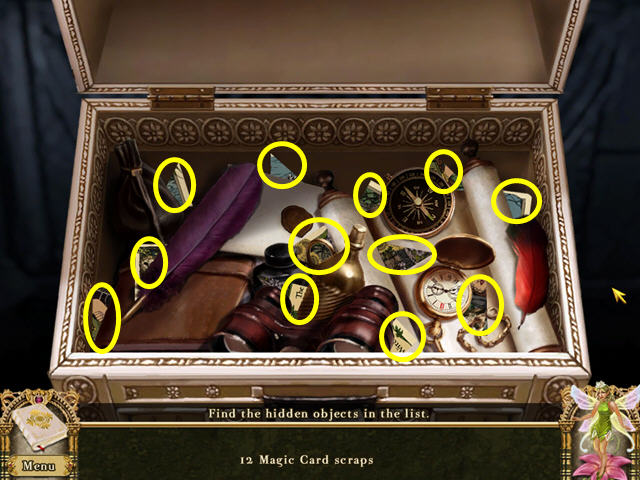
- Locate the 12 Magic Card scraps.
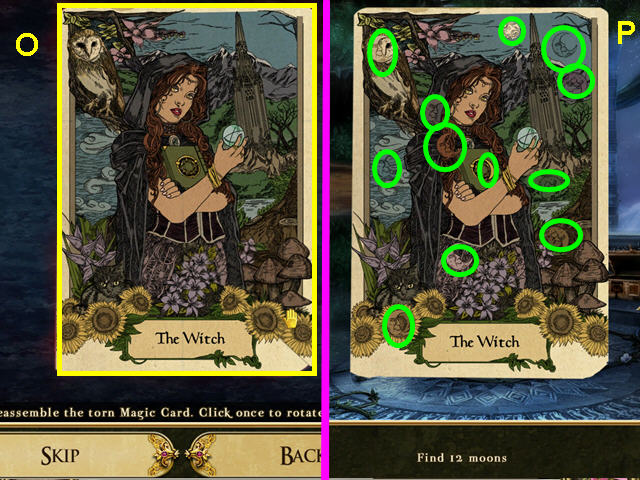
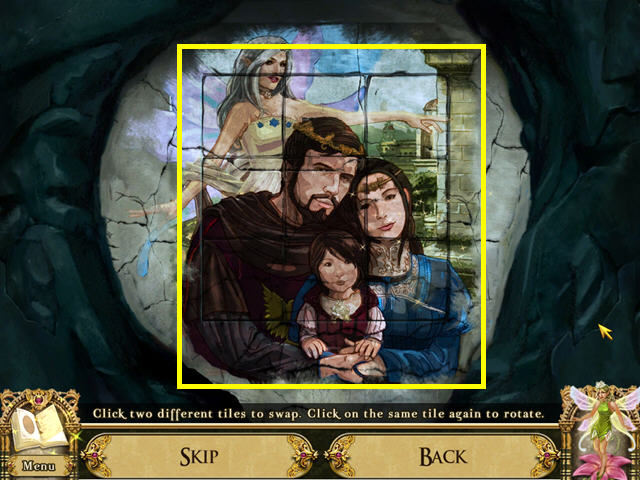
- Assemble the Magic Card (O).
- Click to take or place a piece, click again to rotate a piece.
- Locate the 12 moons (P).
- The MAGIC CARD: THE WITCH will be added to your inventory.
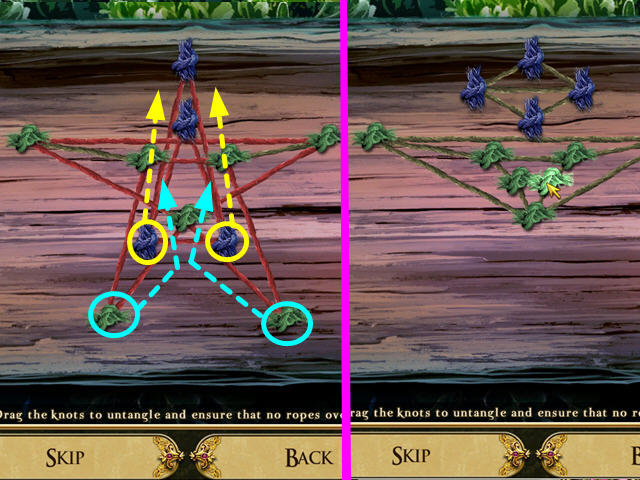
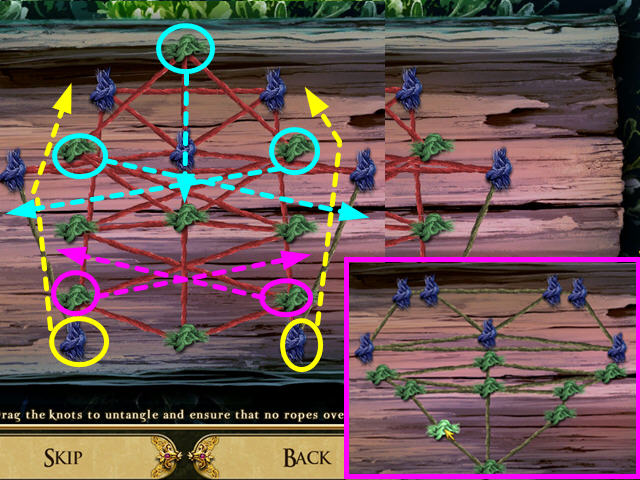
- Look at the tangled rope board for a mini-game.
- Untangle the knots so that no ropes are crossing each other.
- Click and drag a knot to move it to another position.
- There are 3 levels to this mini-game.
- This is the solution for the first level.
- This is the solution for the second level.
- This is the solution for the third level.
- You will earn the HEMP ROPE.
- Exit the pavilion and walk down once.
- Use the PICKAXE HANDLE on the pickaxe head (Q).
- Take the PICKAXE and use it on the “X” in the slab (R).
- Look in the hole and use the GRAPPLING HOOK on the chest. (S).
- Exit the close-up.
- Use the HEMP ROPE on the end of the grappling hook rope (T).
- Use the POTION OF RAPID GROWTH on the sapling (U).
- Look at the chest for a mini-game.
- Recreate the family coat of arms.
- Click on the different sections to change the content.
- Refer to your journal for a picture of the crest.
- Locate all the items.
- The WHITE ORB and STATUE FRAGMENTS will go into your inventory.
- Walk forward to the pavilion area.
- Look at the foot of the bridge, just under the moon.
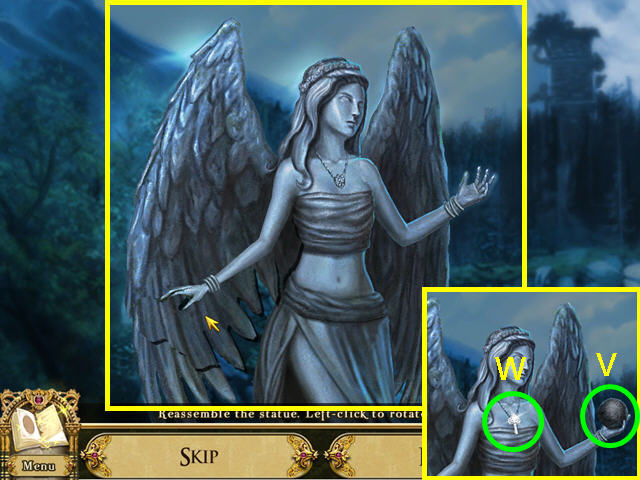
- Look at the left statue.
- Reassemble the statue.
- Click to take or place a piece, click again to rotate a piece.
- Place the BLACK ORB in the statue's hand (V).
- Take the SMALL SILVER KEY that appears around her neck (W).

- Use the STATUE FRAGMENTS on the right statue.
- Reassemble the statue.
- Click to take or place a piece, click again to rotate a piece.
- Place the WHITE ORB in the statue's hand (X).
- Take the MOON MEDALLION that appears around her neck (Y).
- Leave the foot of the bridge and enter the pavilion.
- Look at the mini-game on the left.
- Place the MOON MEDALLION into the upper niche to activate the mini-game (A).
- Reassemble the scene by clicking to take or place a piece, and clicking again to rotate a piece (B).
- Make note of the glyphs that appear; they will be noted in your journal (C).
- Exit the close-up.

- Look at the stone table.
- Place the MAGIC CARD: THE WITCH into the lower left position (D).
- Take the SMALL GOLD KEY that appears (E).
- Exit the close-up and the pavilion.
- Return to the base of the bridge and the statues.
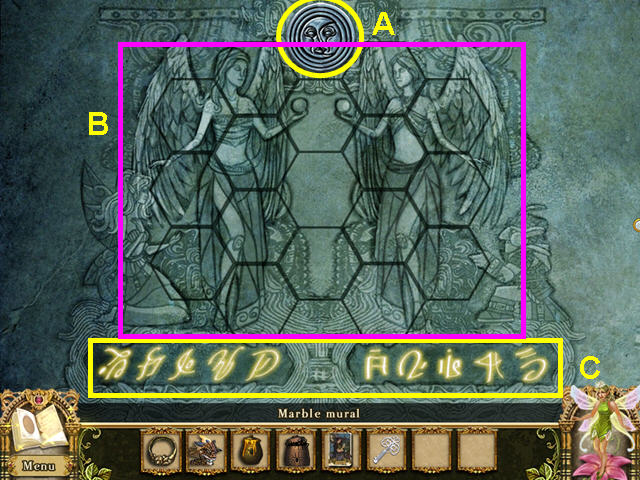
- Look at the base of the left statue.
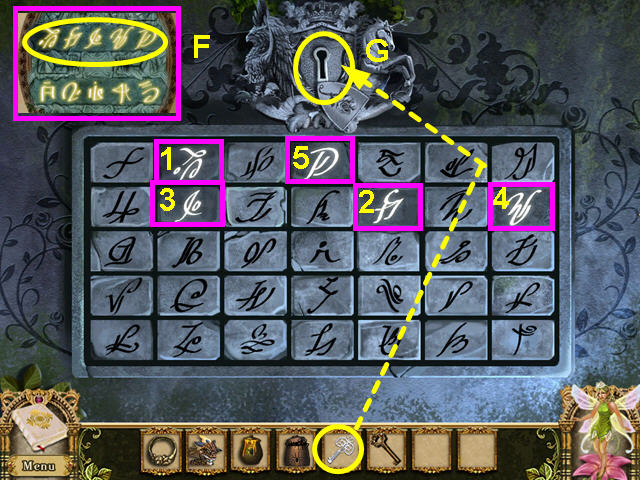
- Using the top half of the code from your journal, enter the symbols (F).
- Press the symbols in the same order as they are written (1-5).
- Use the SMALL SILVER KEY on the lock that appears at the top (G).
- Look at the base of the left statue.
- Using the bottom half of the code from your journal, enter the symbols (H).
- Press the symbols in the same order as they are written (1-5).
- Use the SMALL GOLD KEY on the lock that appears at the top (I).
- Walk forward across the bridge.
Part 5: Across the Moonbridge
- Collect the 3 PINE CONES (A).
- Talk to the goblin for a game of Tripeaks (B).
- Click on cards in the upper tableau (C) that are one higher or lower than a card in the bottom row (D).
- Click on the deck of cards to shuffle if you run out of moves (E).
- If you run out of cards and have not cleared the tableau, a new game will be dealt.
- You will earn a BUTTERFLY NET.
- Collect the 2 PINE CONES (F).
- Note the unlit alcove (G).
- Note the crystal barrier (H).
- Look at the unlit lamp (I).
- Open the door of the lamp.
- Light the lamp with the POCKET DRAGON (J).
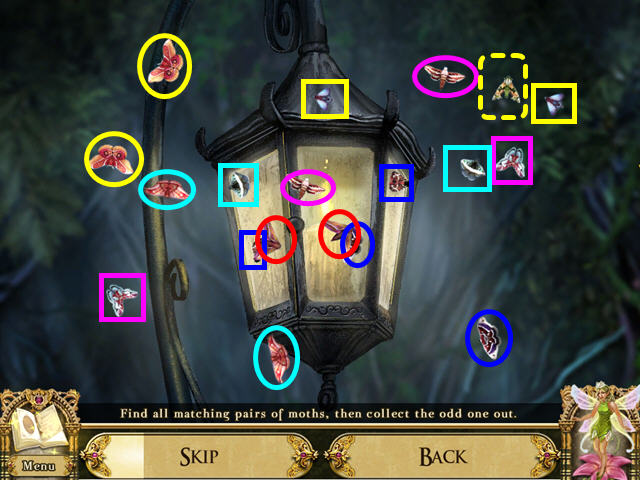
- Click on matching pairs of moths, and then collect the remaining moth.
- You now have a NET FULL OF MOTHS.
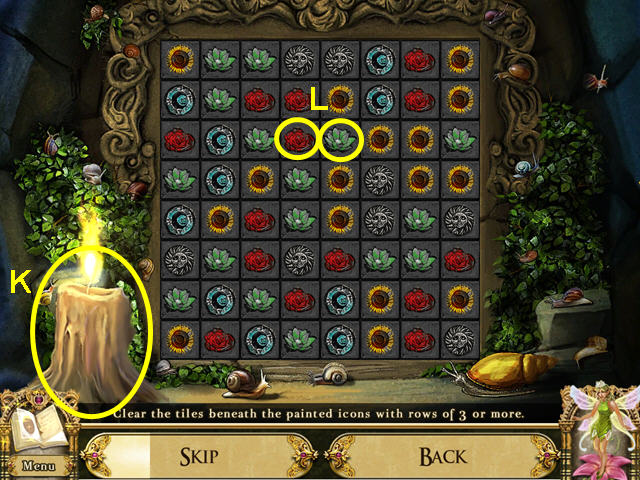
- Look at the unlit alcove.
- Light the candle with the POCKET DRAGON (K).
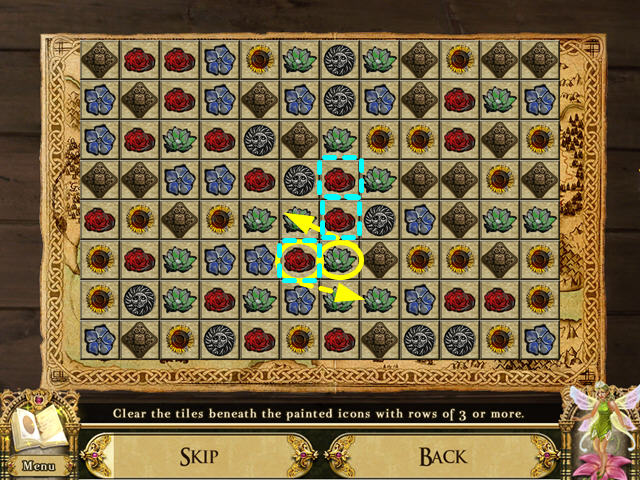
- Break all the tiles by making chains of 3 or more.
- Click on 2 adjacent tiles to swap their positions and make a chain (L).
- Take the EMPTY SNAIL POT (M).
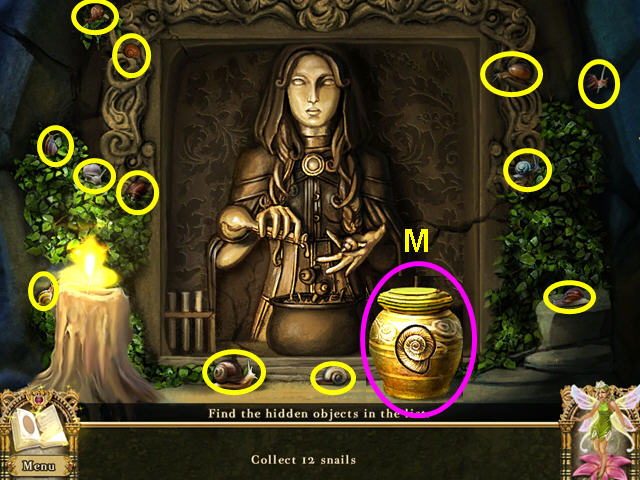
- Collect the 12 snails.
- Take the left path.
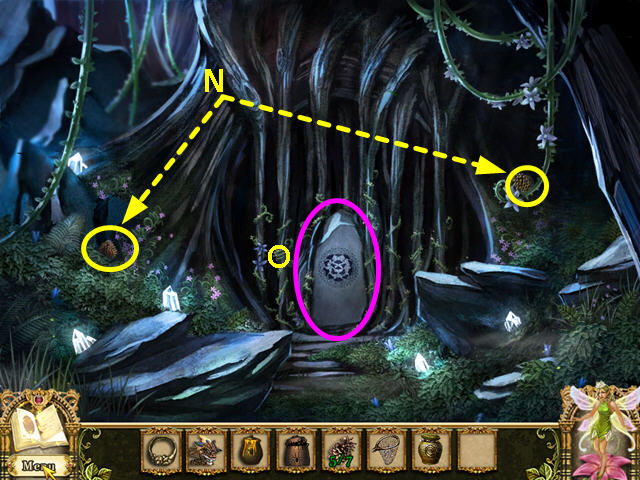
- Collect the 2 PINE CONES (N).
- Look at the stone door (O).
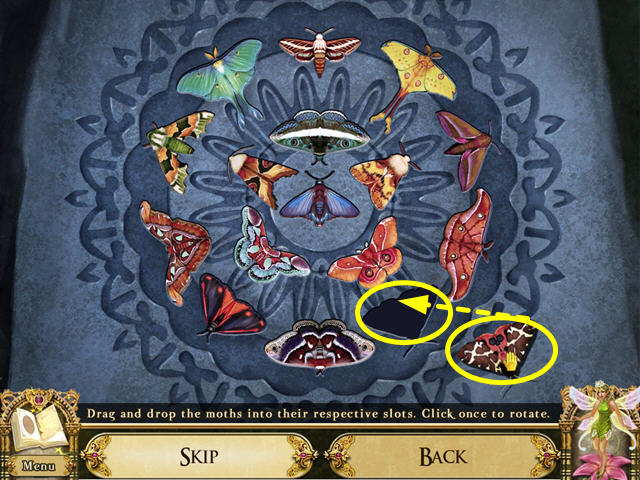
- Use the NET FULL OF MOTHS on the stone surface.
- Drag and drop the moths into the matching outlines.
- Click to rotate the moth into position.
- Walk forward to the herb garden.
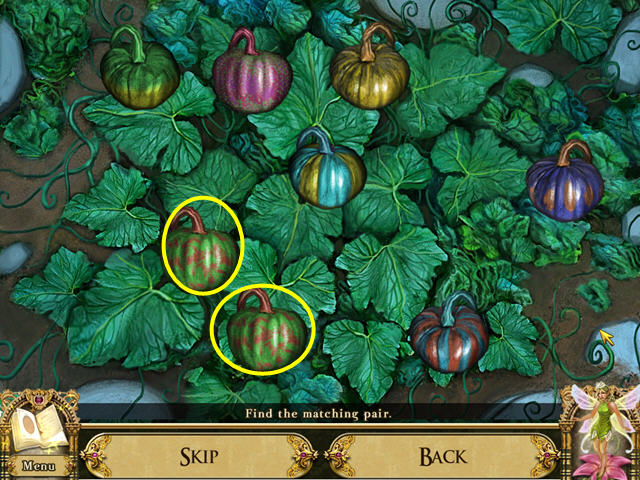
- Select the colorful patch of gourds for a mini-game.
- Find the matching pair in each group.
- You will have to find 6 pairs of gourds.
- Take the GIANT GOURD that appears.
- Look at the bench with the pots on the right.
- Locate all the pieces.
- The KEY FRAGMENTS will go into your inventory.
- Exit the close-up and walk forward to the door.
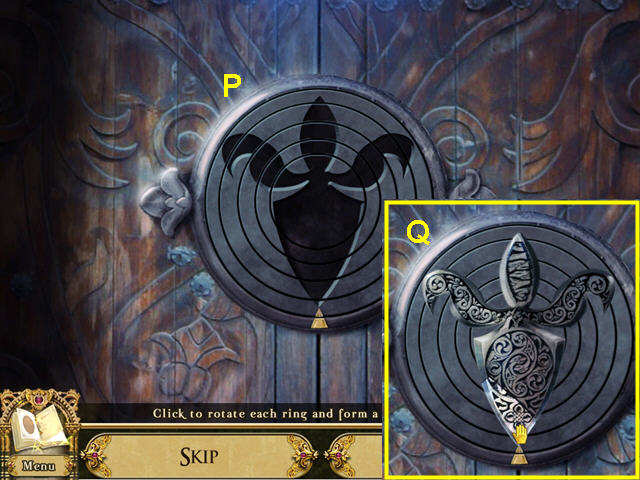
- Click on the rings to rotate them into position to form the symbol (P).
- Place the KEY FRAGMENTS on the symbol (Q).
- Drag and drop the fragments into the outline.
- Click to rotate the fragment into position.
- Walk forward and enter the tower.
- Take the GARDEN TROWEL from the edge of the well.
- Select the desk on the right for a hidden object game.
- Click on the book to close it.
- Click on the jewel chest to find the pearl.
- The BOTANY BOOK will go into your inventory.

- Select the broken clay pot on the left for a mini-game.
- Drag and drop the fragments into the outline.
- Click to rotate the fragment into position.
- Walk up the stairs.
- Look at the close-up of the plant on the right and take the DOORKNOB (R).
- Look at the bookcase on the right for a mini-game.
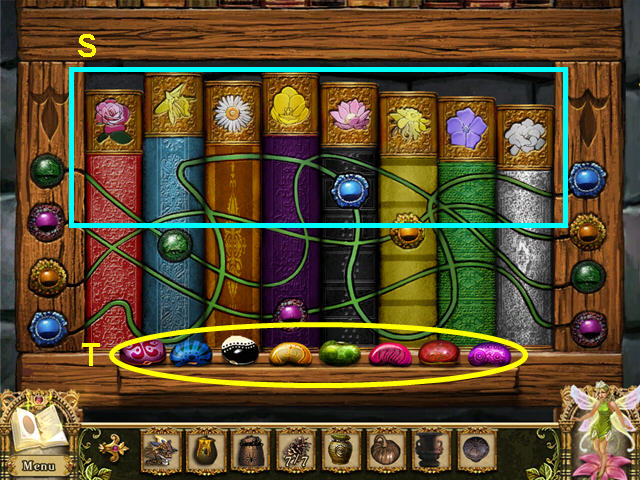
- Place the BOTANY BOOK on the shelf to trigger the mini-game.
- Swap the books until all the vines are complete.
- Click on 2 books to swap their positions.
- Note the color of the books and the flowers at the top of each (S).
- This information will be in your journal.
- Take the MAGIC BEANS (T).
- Walk downstairs and exit the tower.

- Look at the wooden shed and use the DOORKNOB on the hole for a hidden object scene.
- Locate all the items on the list.
- The WEEDKILLER SPRAY will be added to your inventory.
- Enter the tower and go up the stairs.
- Look at the plant on the right and use the WEEDKILLER SPRAY (U).
- Take the POT FULL OF DIRT (V).
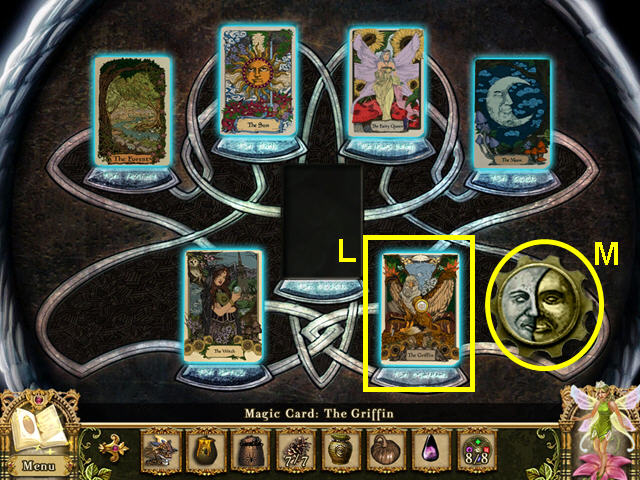
- Take the MAGIC CARD: THE GRIFFIN (W).
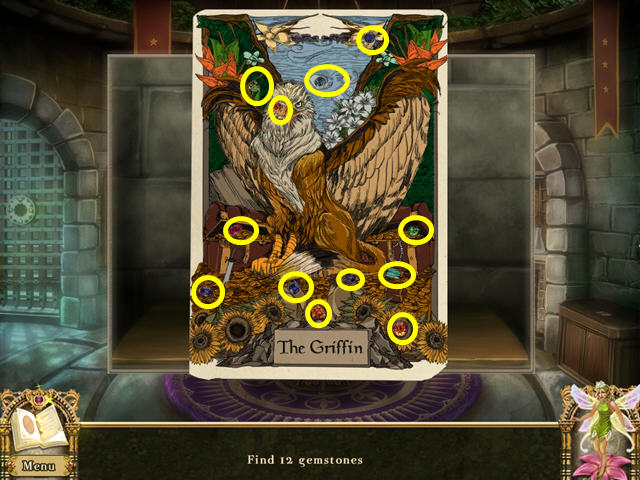
- Locate the 12 gemstones.
- Walk down the stairs and exit the tower.
- Look at the bench of pots on the right.
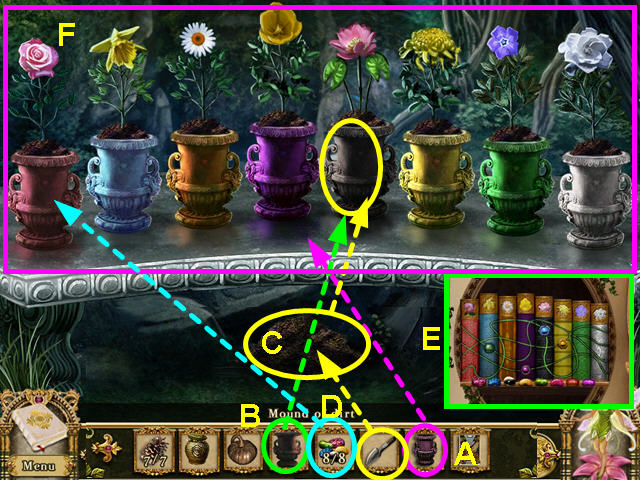
- Place the POT FULL OF DIRT on the bench (A).
- Place the EMPTY POT on the bench (B).
- Use the GARDEN TROWEL on the dirt pile and place it into the empty pot 3 times (C).
- Use the MAGIC BEANS on the pots (D).
- Using the orders from the bookshelf (E), rearrange the pots and flowers to match (F).
- Click on 2 pots or flowers to swap positions.
- Take the gems that appear on the 5 left flowers.
- Enter the tower and go up the stairs.
- There are 4 frames on the wall, look at the left one.
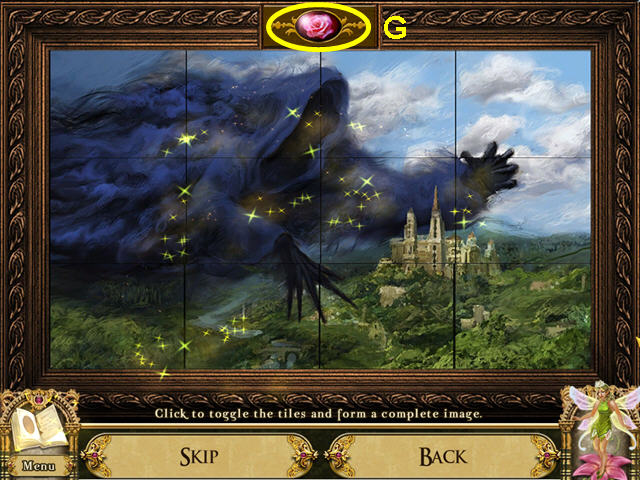
- Place the rose QUARTZ in the top niche (G).
- Click on each of the tiles to form a picture.
- Behind the picture, push the red switch and take the 2 ROTARY DIALS.
- Exit the close-up.
- Look at the frame second from the left.
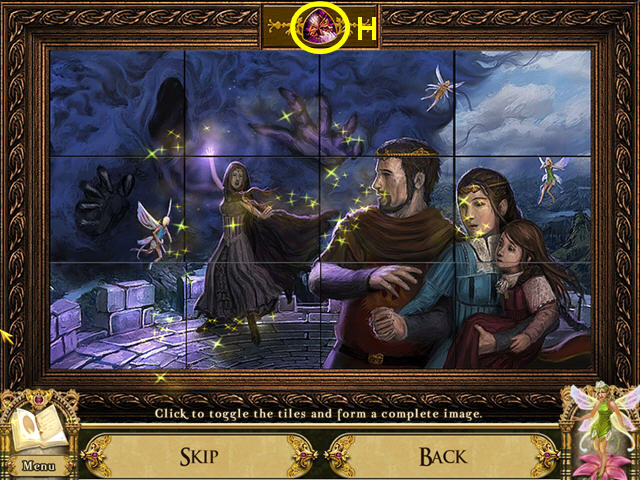
- Place the AMETHYST in the top niche (H).
- Click on each of the tiles to form a picture.
- Behind the picture, push the blue switch and take the 2 ROTARY DIALS.
- Exit the close-up.
- Look at the frame second from the right.
- Place the CITRINE in the top niche (J).
- Click on each of the tiles to form a picture.
- Behind the picture, push the yellow switch and take the 2 ROTARY DIALS.
- Exit the close-up.
- Look at the second frame from the right.
- Place the SAPPHIRE in the top niche (K).
- Click on each of the tiles to form a picture.
- Behind the picture, push the green switch and take the 2 ROTARY DIALS.
- Exit the close-up.
- Walk down 7 times and enter the pavilion.
- Look at the stone table.
- Place the MAGIC CARD: THE GRIFFIN in the lower, right slot (L).
- Take the DISC OF SUN AND MOON that appears (M).
- Exit the pavilion and return to the middle floor of the witch’s tower.
- Look at the close-up of the door on the left.
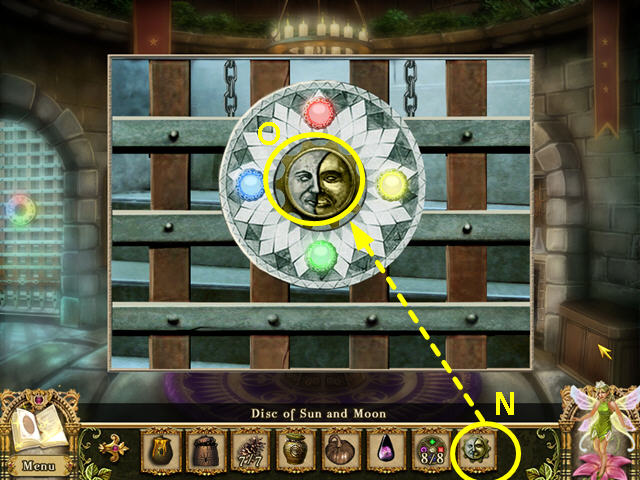
- Use the DISC OF SUN AND MOON in the center of the gems (N).
- Press on the disc to open the door (O).
- Walk up the stairs.
- Take the CROWBAR (P).
- Look in the bucket and take the OIL CAN and the WIRE BRUSH (Q).
- Note the cabinet mini-game (R).
- Note the utility cupboard (S).
- Note the weighing device (T).
- Note the alchemy chest (U).
- Look at the grimoire (V).
- Place the ONYX gem into the upper niche (W).
- Rotate the rings to restore the pattern on the cover.
- The object of this mini-game is to restore the diagram.
- Click on two pieces of paper to swap positions; click again to rotate a paper.
- The diagram will go in your journal.
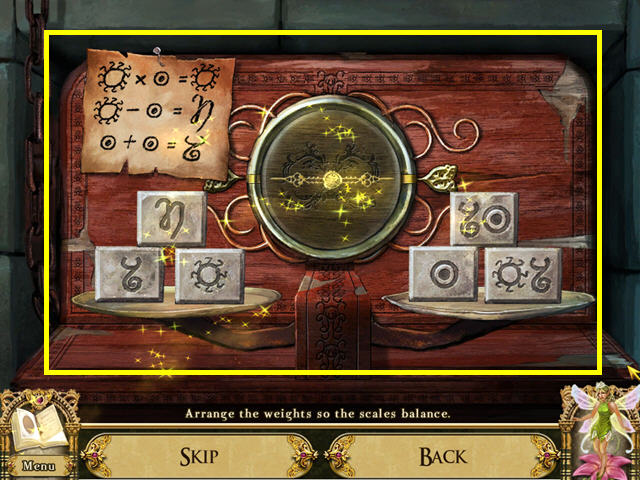
- Look at the weighing device on the back wall.
- Balance the scales.
- Click on 2 tiles to swap positions.
- This will lower the ladder to the ventilation shaft.
- Look at the cabinet on the left.
- Click to open the glass door.
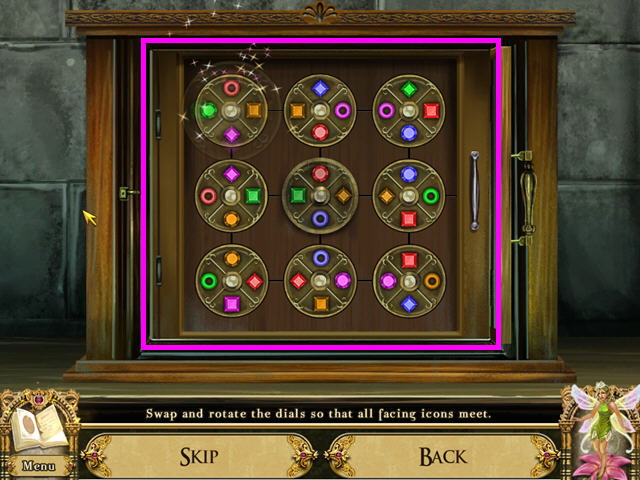
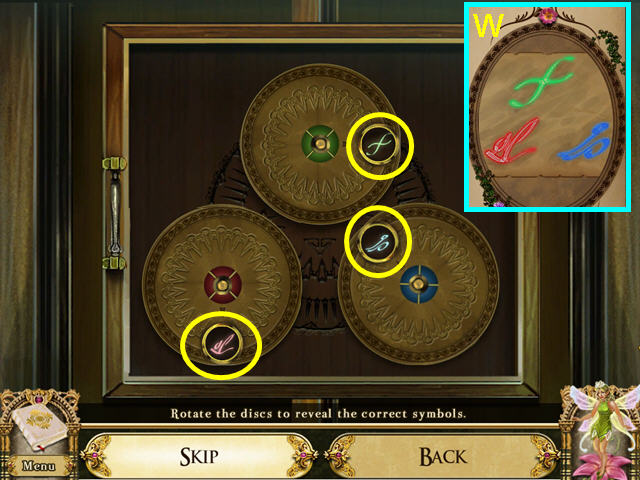
- Use the 5 ROTARY DIALS on the device.
- The object is to arrange the dials so that all touching gems match.
- Click on 2 dials to swap positions.
- Click again on a dial to rotate it in place.
- The center dial does not move.
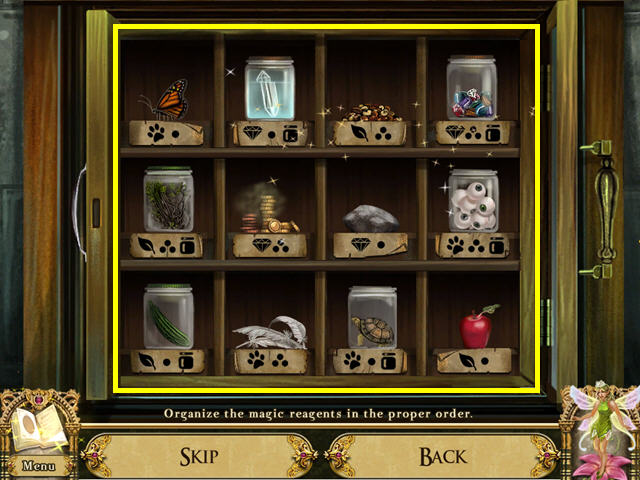
- Arrange the items according to the labels.
- The labels indicate whether an item is plant, animal, or mineral.
- One dot indicates one of the item; 3 dots means more than one.
- Some positions also require the item be in a jar.
- Click on 2 items to swap positions.
- Once an item is in the correct position, it will lock in place.
- Take the JAR OF EYEBALLS that remains.
- Climb up the ladder.
- Look at the close-up of the nest (A).
- Take the BIRD'S EGG and the PACKET OF SEED (B).
- Look at the window (C).
- Use the CROWBAR 4 times to remove the boards (D).
- Climb out the window.
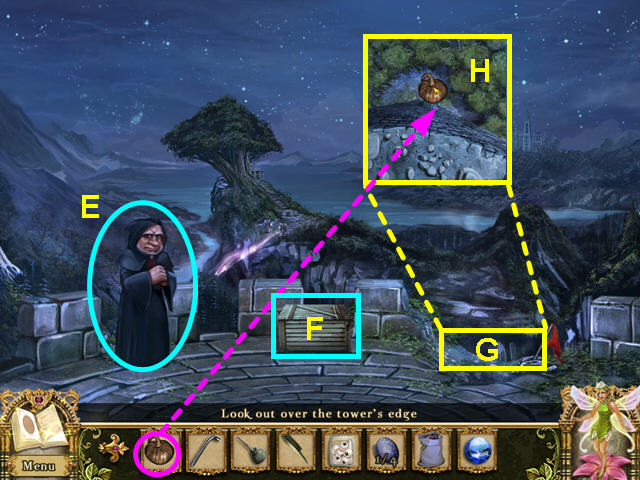
- Talk to the goblin and he will give you the TWILIGHT GEM (E).
- Note the locked box (F).
- Look over the edge of the building (G).
- Drop the GIANT GOURD over the entry stone (H).
- Exit the rooftop and go down the ladder.
- Look at the alchemy chest.

- Use the TWILIGHT GEM on the chest to trigger a mini-game.
- Arrange the gems from left to right, lightest to darkest.
- Click on 2 gems to swap their locations.
- Inside the chest, take the STEEL WEIGHT.
- Select the broken flask for a mini-game.
- The object of this mini-game is to restore the flask.
- Click on 2 pieces of glass to swap positions; click again to rotate a piece of glass.
- The ALCHEMICAL FLASK will go into your inventory.
- Walk down the stairs twice and exit the tower.
- Look at the smashed gourd and take the SMALL BRONZE KEY (I).
- Look at the birdhouse (J).
- Use the PACKET OF BIRD SEED on the bird (K).
- Once the bird flies away, open the front of the birdhouse and take the 3 BIRD'S EGGS (L).
- Enter the tower and look at the night stand.
- Use the SMALL BRONZE key to unlock the nightstand drawer.
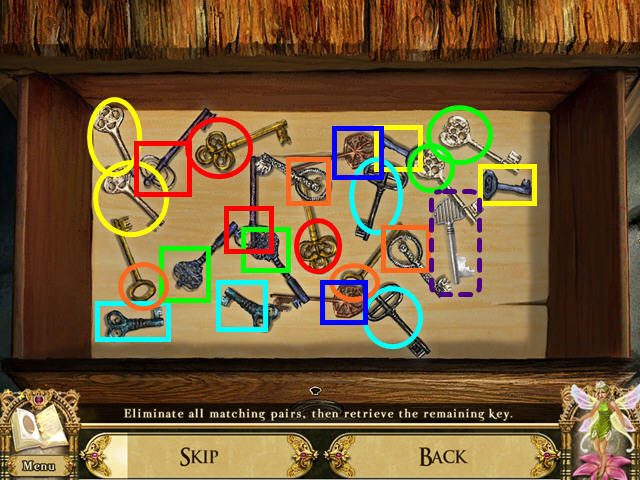
- Select matching pairs of keys until only one key remains.
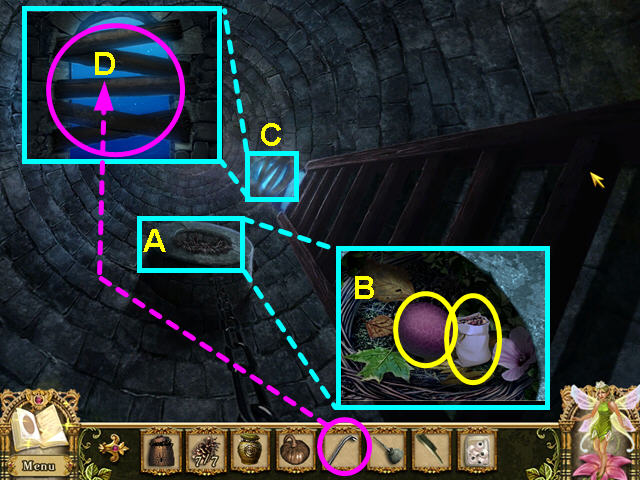
- Look at the close-up of the well.
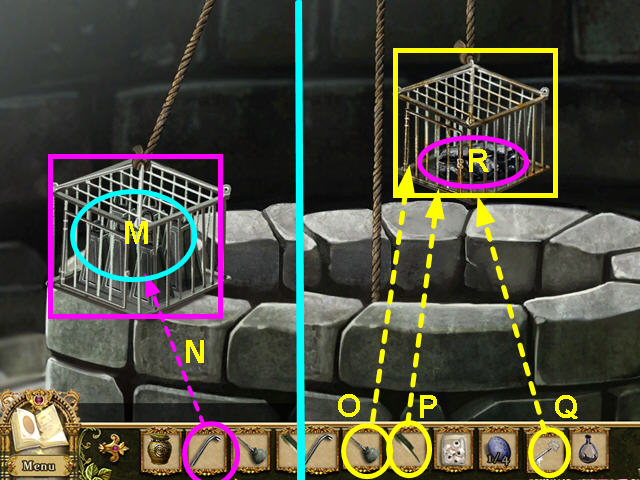
- Place the STEEL WEIGHTS into the cage (M).
- Use the CROWBAR to tip the cage into the well (N).
- Once the other cage appears, use the OIL CAN on the hinges (O).
- Use the WIRE BRUSH to clean off the rust (P).
- Use the IRON KEY to open the cage (Q).
- Take the LEAD BLOCK (R).
- Walk up the stairs and look at the alchemy set.
- Use the JAR OF SNAILS on the left receptacle (A).
- Use the JAR OF SPIDERS on the second from the left receptacle (B).
- Use the JAR OF EYEBALLS on the next receptacle (C).
- Place the 4 BIRD'S EGGS into the right receptacle (D).
- Place the FLASK on the burner (E).
- Put the PINE CONES below the flask (F).
- Light the pine cones with the POCKET DRAGON (G).
- Look at your journal for the correct settings (H).
- Turn the pointers to match the journal diagram (I).
- Take the PHILOSOPHER'S BALM (J).
- Take the CRYSTAL GEM (K).
- Walk down twice to exit the tower.
- Walk down twice to return to the crossroads.
- Use the CRYSTAL GEM on the crystal barrier (L).
- Take the right path to the Bear King's clearing.
- Collect the 6 pieces of the petrified bear (M).
- Use the pieces on the pedestal for a mini-game (N).
- Restore the petrified bear.
- Click on a piece of the bear to take or place it; click again to rotate the piece in place.
- Look at the base of the petrified bear.
- Click on the panels to restore the fish (O).
- Place the LEAD BLOCK in the upper receptacle (P).
- Use the POCKET DRAGON on the lead block 4 times to melt it into the fish mold (Q).
- Use the PHILOSOPHER'S BALM on the lead fish (R).
- Take the GOLD FISH (S).
- Use the GOLD FISH on the petrified bear.
- Give the Bear King the HONEY POT.
- The Bear King will give you his GOLDEN CROWN.
- Walk down to the crossroads.
- Take the left path and walk forward.
- Continue to the tower roof.
- Give the goblin the GOLDEN CROWN (T).
- The goblin will give you the FIRE WOOD BOX KEY and FLOWERS.
- Unlock the box with the FIRE WOOD BOX KEY (U).
- Take the FIREWOOD (V).
- Leave the roof and go down 3 levels to the ground floor.
- Look at the herb chest at the foot of the stairs.
- Use the FLOWERS on the lid to trigger a mini-game.
- Restore the 5 flowers to the correct niches.
- Move your cursor over the script for clues about which flower goes where.
- Click to take or place a flower piece; click again to rotate it in place.
- Click the 2 matching herbs.
- You will have 7 screens with one match to find in each.
- Take the EMPTY IRON KETTLE and the HERB GUIDE.
- Exit the tower and look at the herb garden left of the shed.
- Locate all the items on the list.
- The POSY OF HERBS will go into your inventory.
- Walk down 5 times and use the EMPTY IRON KETTLE on the Moon fountain to collect some water.
- Cross the Moonbridge and return to the third floor of the witch’s tower.
- Look at the cabinet for a mini-game.
- Refer to your journal for the combination (W).
- Click on each dial to rotate it to the correct symbol.

- Locate all the hidden objects on the list.
- TONGS and OVEN GLOVES will go into your inventory.
- Walk down the stairs.
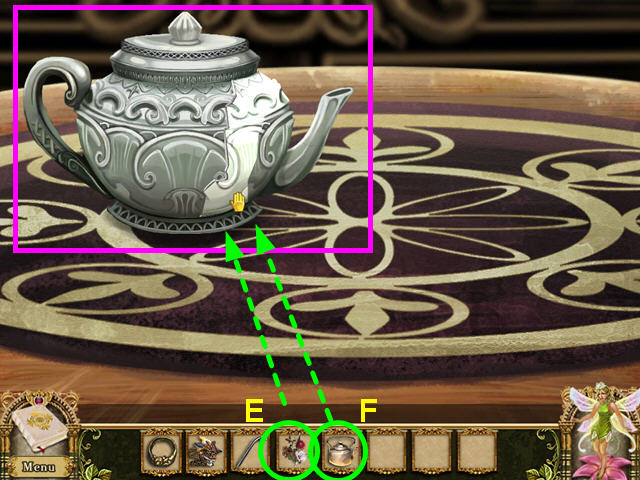
- Use the TONGS on the fireplace for a hidden object scene.
- Locate all the teapot fragments.
- The BROKEN TEAPOT FRAGMENTS will go into your inventory.
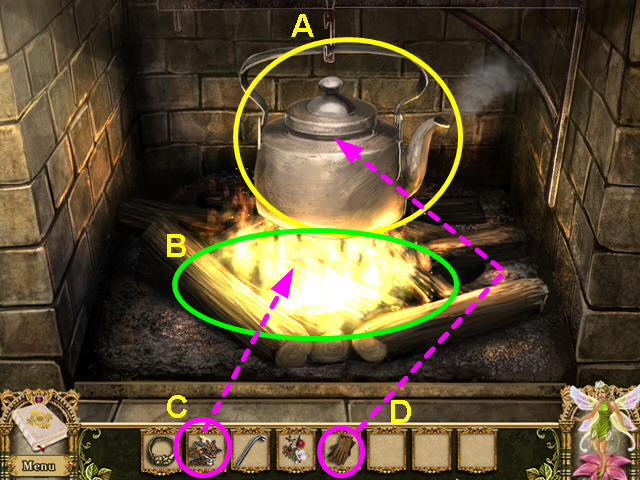
- Place the FIREWOOD in the fireplace (A).
- Hang the KETTLE on the hook (B).
- Light the fire with the POCKET DRAGON (C).
- Take the BOILED WATER KETTLE with the OVEN GLOVES (D).
- Look at the round table in the center of the room.
- Use the BROKEN TEAPOT FRAGMENTS on the broken teapot.
- Repair the teapot.
- Click to take or place a fragment; click again to rotate it in place.
- Use the POSY OF HERBS on the teapot (E).
- Use the BOILED WATER KETTLE on the teapot (F).
- The TEAPOT will go into your inventory.
- Walk up the stairs and continue to the roof.
- Give the TEAPOT to the goblin to play a game of Tripeaks.
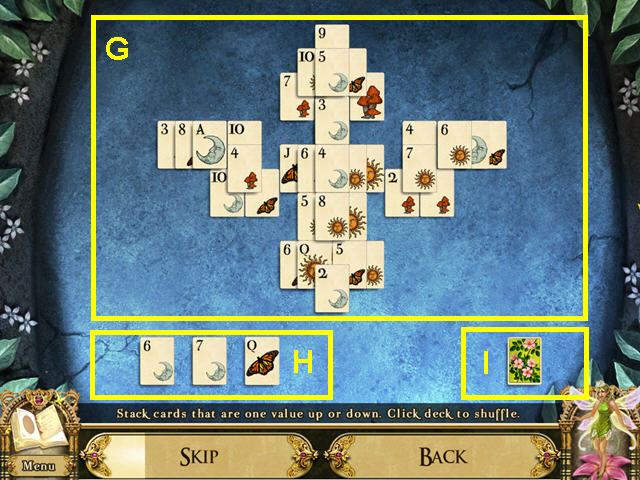
- Click on cards in the upper tableau (G) that are one higher or lower than a card in the bottom row (H).
- Click on the deck of cards to shuffle if you run out of moves (I).
- If you run out of cards and have not cleared the tableau, a new game will be dealt.
Part 6: Search for the Witch
- The goblin has escorted you back to the pavilion and daylight.
- The gift of a HAND SCYTHE was given by the goblin.
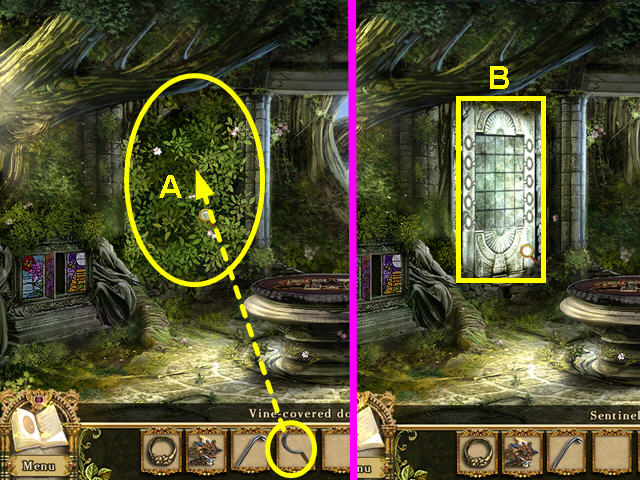
- Use the HAND SCYTHE on the Vines (A).
- Select the uncovered door for a mini-game (B).
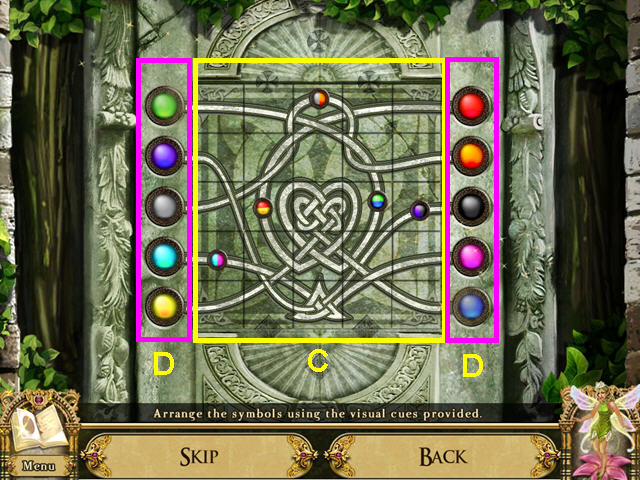
- Part one of this mini-game is restoring the center diagram (C).
- Click on 2 tiles to swap their locations; click on a single tile to rotate it in place.
- Once all the tiles are properly placed, colored marbles will appear in the 2 outer columns (D).
- Use the balls in the center diagram to show where the colored marbles should be placed.
- Click on 2 marbles to swap their positions.
- Enter the root shaft and go down the ladder.
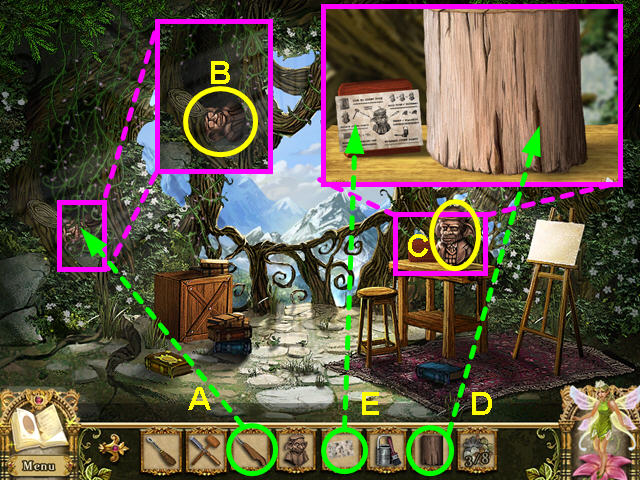
- Take the BUST of CRAFTSMAN JACQUES (E).
- Note the workbench (F).
- Note the mural (G).
- Take note of the lectern (H).
- Note the bookshelf (I).
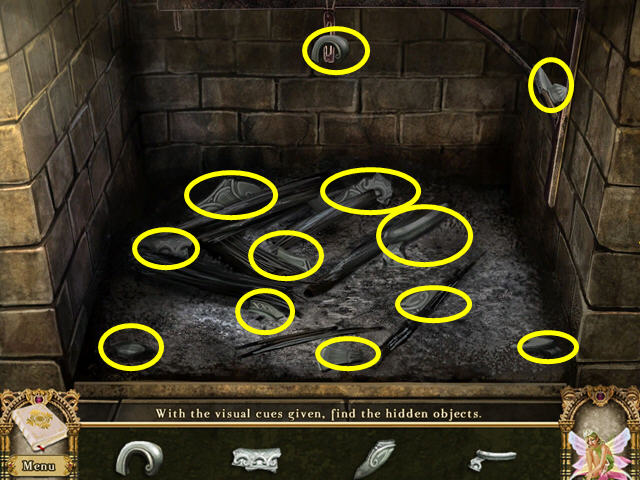
- Open the bottom drawer; take the CHISEL and the SCREWDRIVER (J).
- Use the CHISEL and the SCREWDRIVER on the top drawer (K).
- Open the top drawer; take the HAMMER and the WOODCARVING KNIFE.
- The hammer will combine with the chisel to form the WOOD SCULPTING KIT.
- Pull back the rug (L).
- Look at the grate and use the SCREWDRIVER on the 4 screws (M).
- Open the grate with the CROWBAR to trigger a hidden object scene.
- Locate the 12 bust fragments.
- The BUST FRAGMENTS will go into your inventory.
- Look at the workbench for a hidden objects scene.
- Locate all the items on the list.
- Open the 2 cabinets to reveal the hidden items.
- You will earn the WOODCARVER'S GUIDE.
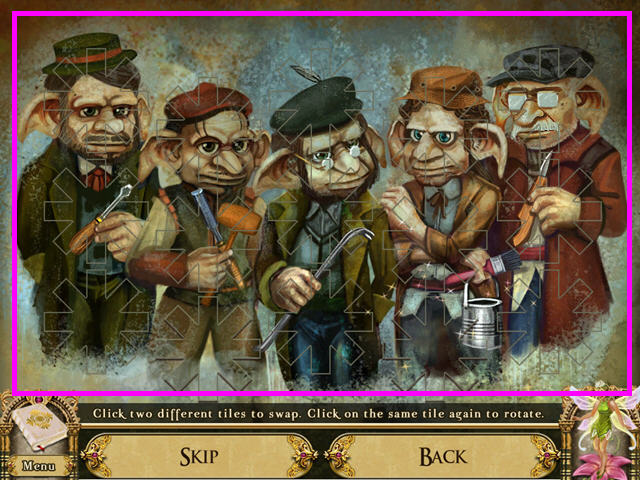
- Look at the wall mural for a mini-game.
- Restore the mural of the goblins.
- Click on 2 puzzle pieces to swap their positions; click on one piece to rotate it in place.
- A secret compartment will open; take the VARNISH KIT within.
- Look at the lectern for a mini-game.
- Locate the matching pair of symbols.
- There are 7 sets of pairs.
- Take the 6 MAGIC CIRCLES (N).
- Look at the bookshelf.
- Use the 6 MAGIC CIRCLES on the 6 round holes.
- Place the circle in the hole that has the same color on its bar.
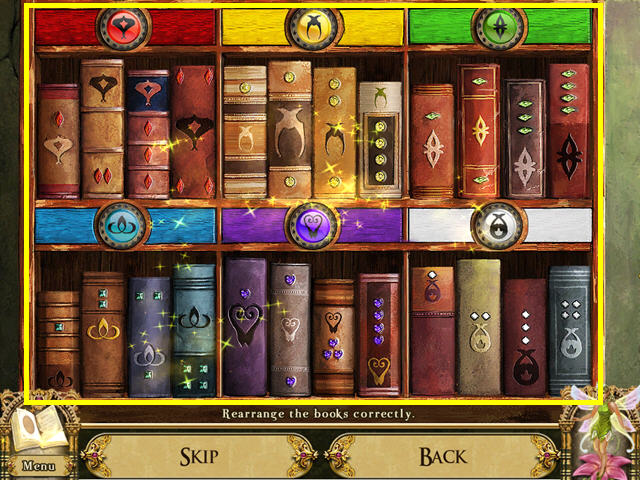
- Now rearrange the books.
- Move all the books to the section that has the matching symbol.
- Click on 2 books to swap positions.
- Put the books in numerical order in each section.
- Each book has 1, 2, 3, or 4 gems.

- Enter the secret chamber behind the bookshelf.
- Light the 7 braziers with the POCKET DRAGON (O).
- Note the grand doors in the rear of the chamber (P).
- Note the stone pillars on the left (Q).
- Look at the stone pedestals on the right (R).
- Take the WOOD BLOCK (S).
- Use the BUST FRAGMENTS on the broken bust (T).
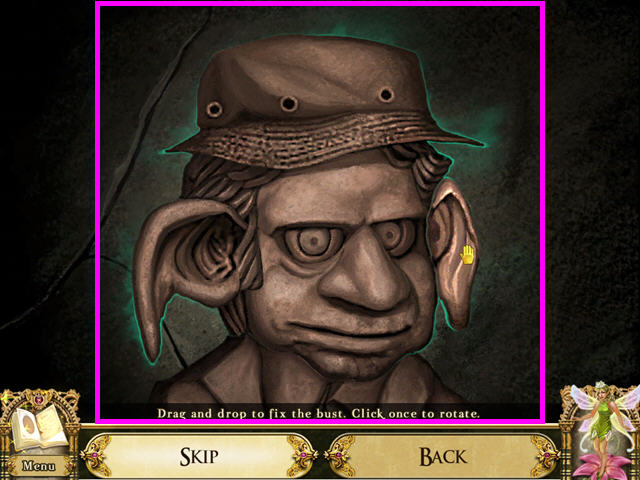
- Restore the bust head.
- Click on a piece to take or place it; click again to rotate the piece in place.
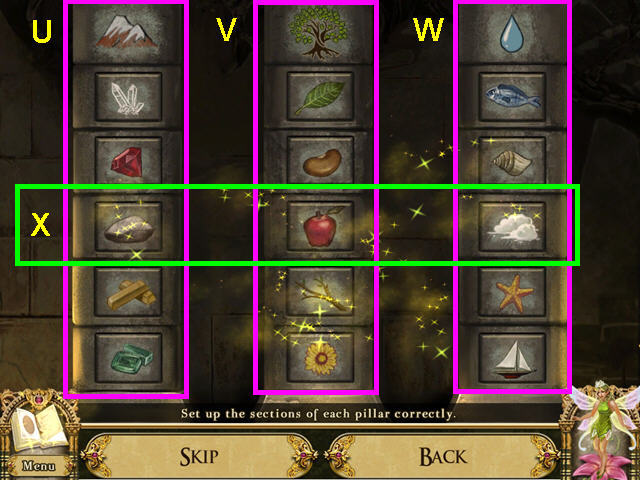
- Look at the stone pillars left of the chamber.
- Click on the tiles in each column to change each to an item that relates to the header.
- The items in the left column are all minerals found in a mountain (U).
- The middle column should have items related to a tree (V).
- The right column holds items related to water (W).
- Take the 3 BRASS PARTS that will appear in the center tile of each column (X).
- Walk down to exit the chamber.
- Walk through the door on the right to the root balcony.
- Cut the vines on the left with the WOOD CARVING KNIFE (A).
- Look at the close-up and take the BUST OF CRAFTSMAN ALBERT (B).
- Look at the workbench and take the BUST OF CRAFTSMAN GREGOR (C).
- Take the SANDPAPER that was underneath the bust.
- Place the BLOCK OF WOOD on the workbench (D).
- Place the WOODCARVER'S GUIDE on the stand on the left (E).

- Restore the instruction guide.
- Click on 2 pieces of paper to swap their locations.
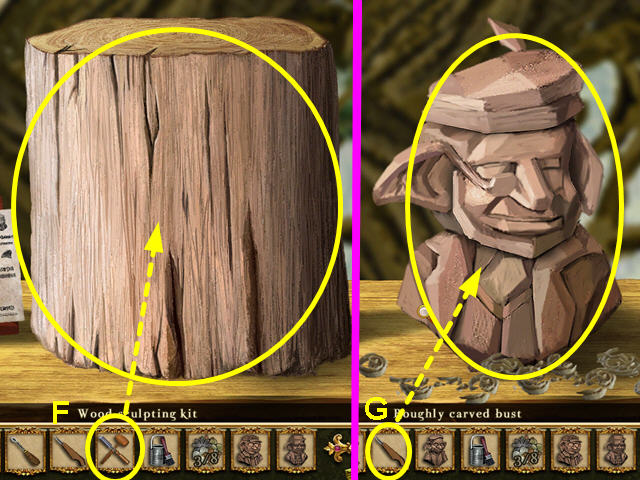
- Carve the block of wood.
- Use the WOOD SCULPTING KIT (hammer and chisel) on the block of wood 5 times (F).
- Next, use the WOOD CARVING KNIFE on the bust (G).
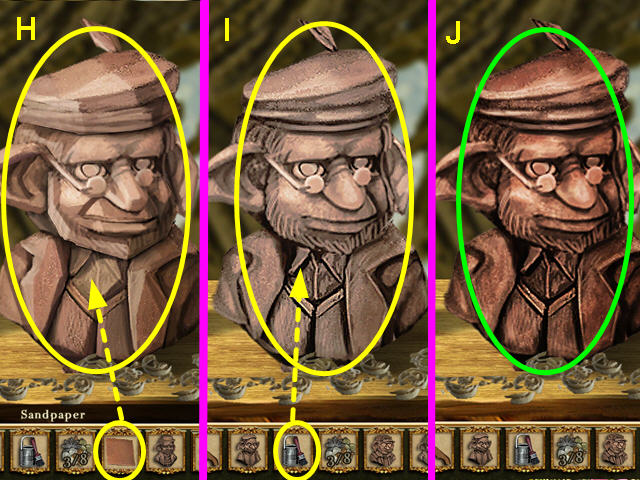
- Use the SANDPAPER on the bust (H).
- Use the VARNISH KIT on the bust (I).
- Take the BUST OF CRAFTSMAN GEORGE (J).
- Exit the room and enter the secret chamber on the left.
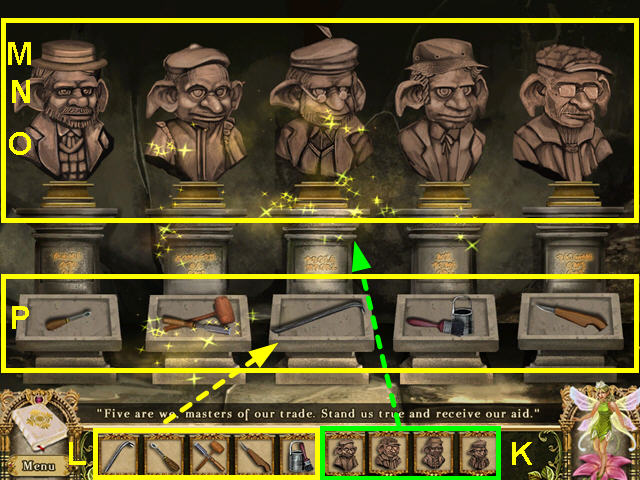
- Look at the stone pedestals on the right.
- Place the 4 BUSTS in your inventory on the pedestals (K).
- Place the SCREWDRIVER, WOOD SCULPTING KIT, WOOD CARVING KNIFE, VARNISH KIT, and CROWBAR onto the lower platforms (L).
- Using the picture of the fresco from your journal, put the hats (M), heads (N), upper torso (O), and tools (P) into the correct order.
- Click on 2 like items to swap positions.
- Once the pedestals open, take the 5 BRASS PARTS.
- Look at the grand doors in the rear of the chamber.
- Use the 8 BRASS PARTS on the mechanism to trigger a mini-game.
- Press the buttons to move the flowers in numerical order based on the petals.
- The upper left flower will have 3 petals, while the lower right will have 10 petals.
- This puzzle is random; your solution may vary.
- Each button swaps 2 flowers (Q).
- Button 1 swaps the flowers at the 1 and 2 positions.
- Button 2 swaps the flowers at the 2 and 6 positions.
- Button 3 swaps the flowers at the 3 and 6 positions.
- Button 4 swaps the flowers at the 3 and 4 positions.
- Button 5 swaps the flowers at the 5 and 6 positions.
- Button 6 swaps the flowers at the 2 and 7 positions.
- Button 7 swaps the flowers at the 3 and 7 positions.
- Button 8 swaps the flowers at the 7 and 8 positions.
- The sample solution was buttons: 2, 4, 8, 7, 3, 5, 3, 8, 7, 3, and 7.
- Walk forward through the doors.
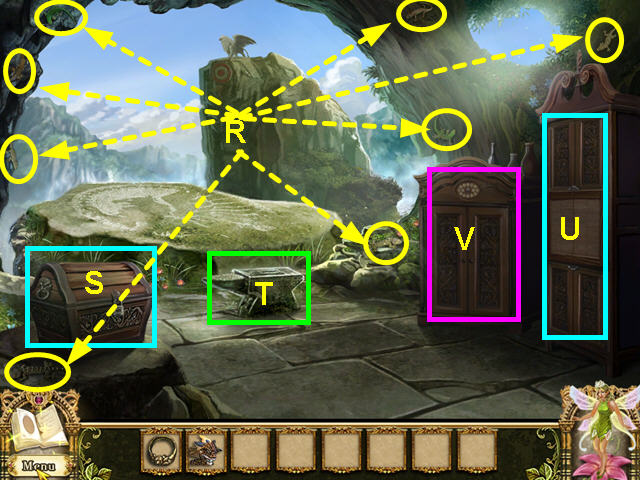
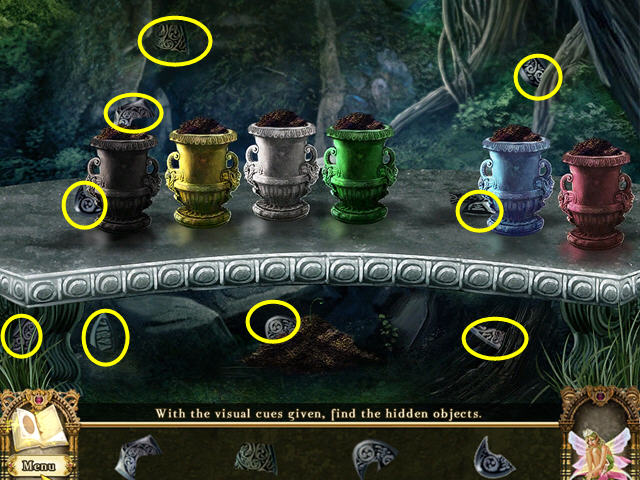
- Collect the 8 LIZARDS (R).
- Note the locked chest on the left (S).
- Make note of the griffin's mold on the anvil (T).
- Note the armory cabinet on the right (U).
- Look at the curio cabinet for a mini-game (V).
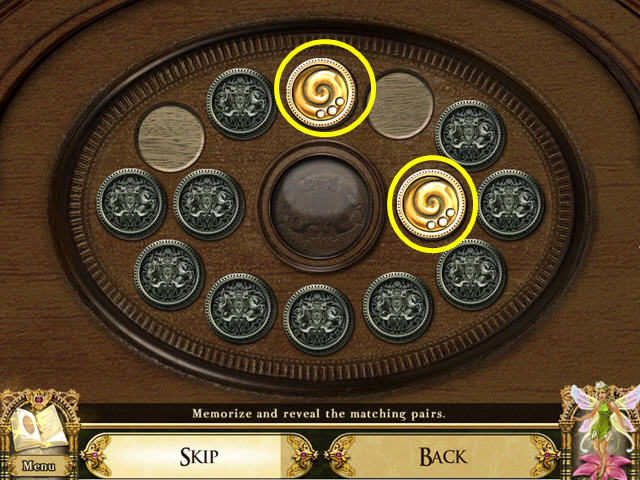
- Find all the matching pairs.
- Turn over 2 discs at a time and memorize each location.
- Turn over matching discs to clear the board.
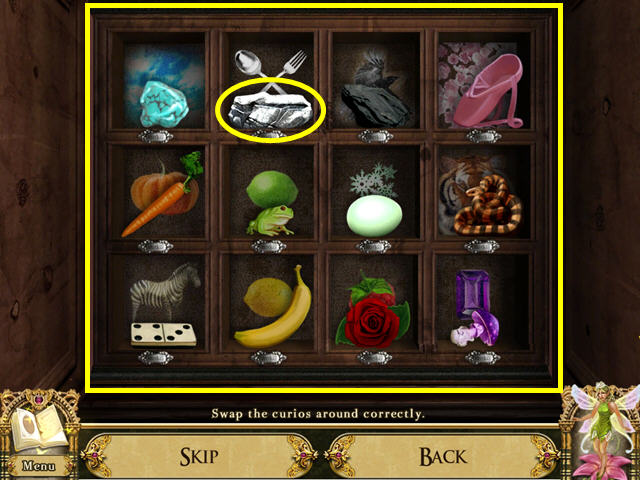
- Move the items into the correct nook.
- Match the color of the item with the picture in the nook.
- Click on 2 items to swap their positions.
- Once complete, take the SILVER INGOT.
- Look at the armory cabinet on the right.
- Slide the tiles to restore the picture.
- This puzzle is randomly generated.
- Click and drag an adjacent tile into the empty spot.
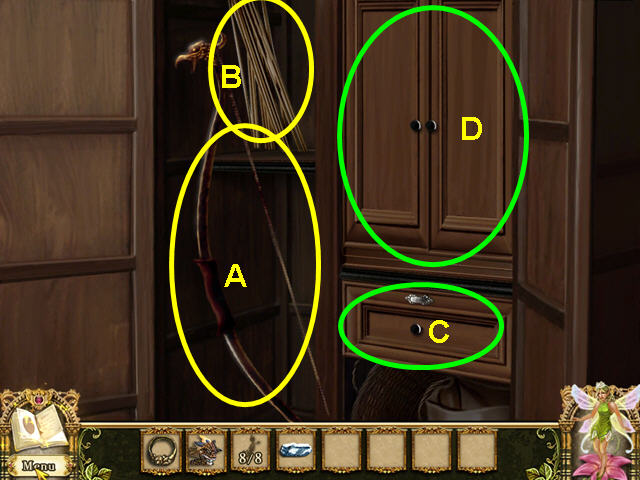
- Take the BOW (A) and the ARROW SHAFTS (B).
- Note the drawer on the right (C).
- Open the upper right cabinet (D).
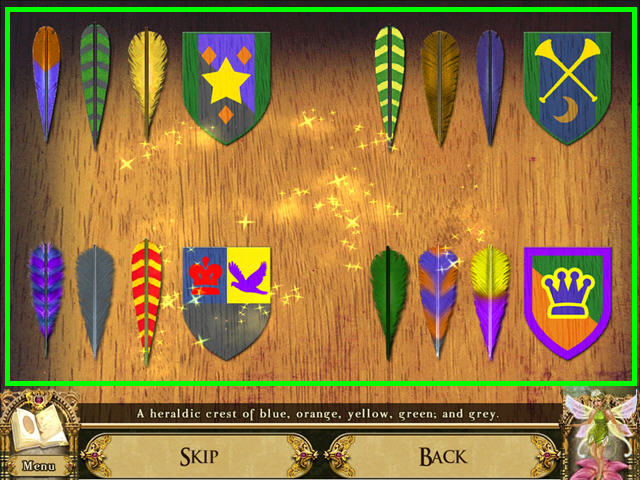
- Swap the feathers so that each color in the coat of arms is represented in the 3 feathers.
- Click on 2 feathers to swap their positions.
- You will earn FLETCHING FEATHERS.
- Click on the symbols etched in the wood to add them to your journal.
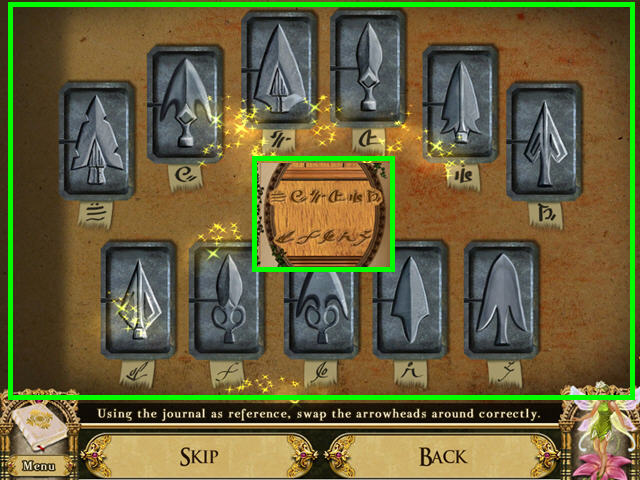
- Open the bottom drawer.
- Use the order of the symbols in your journal to arrange the arrowheads.
- Click on 2 arrowheads to swap their positions.
- You will earn the ARROWHEAD MOLD.
- Look at the griffin's mold on the anvil.
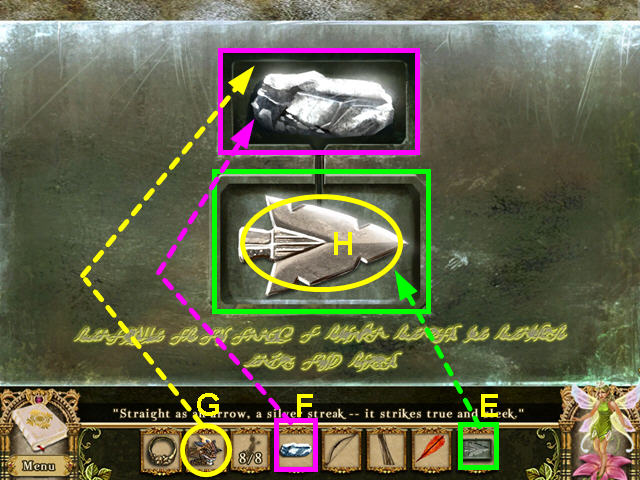
- Place the ARROWHEAD MOLD in the bottom indentation (E).
- Place the SILVER INGOT in the upper indentation (F).
- Use the POCKET DRAGON 4 times on the silver ingot (G).
- Take the SILVER ARROHEAD (H).
- The SILVER ARROWHEAD will combine with the BOW, ARROW SHAFTS, and FLETCHING FEATHERS, creating the BOW and SILVER ARROW.
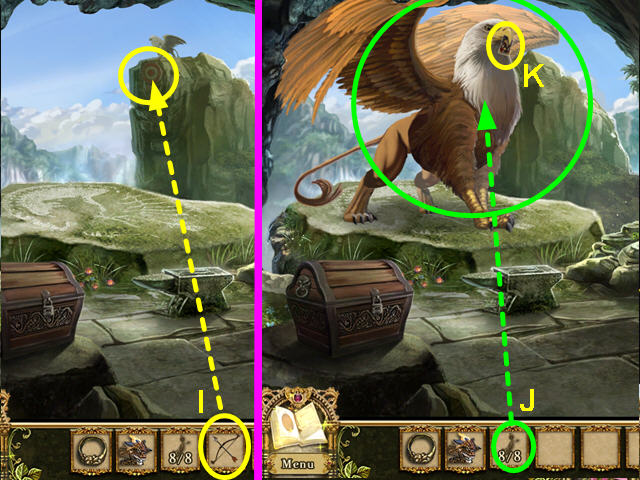
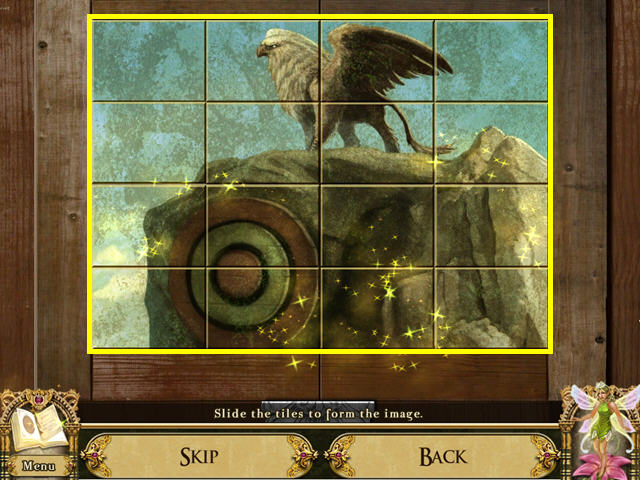
- Use the BOW and SILVER ARROW on the distant target (I).
- Give the 8 LIZARDS to the griffin (J).
- Take the MAGIC CARD: THE GOBLIN KING (K).
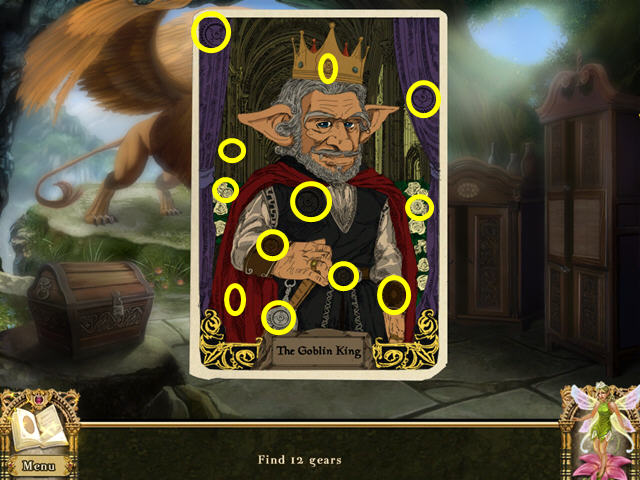
- Locate the 12 gears.
- Walk down 4 times to return to the pavilion.
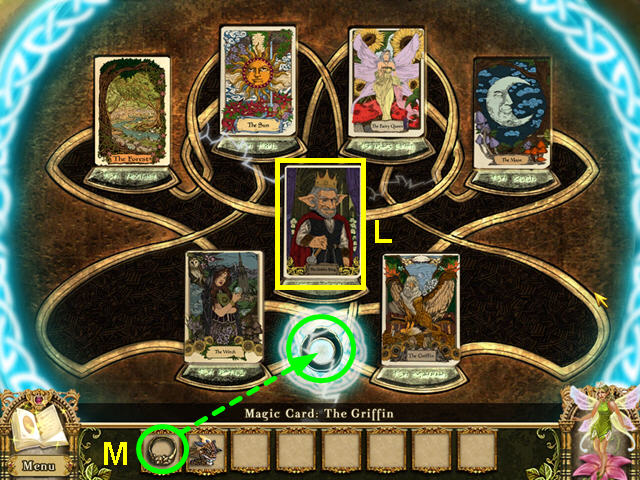
- Look at the stone table.
- Place the MAGIC CARD: THE GOBLIN KING in the center spot (L).
- Use the SIGNET RING on the niche that appears (M).
- After the witch speaks to you, she will give you the WOODEN KEY.
- Enter the root shaft and return to the griffin.
- Open the chest on the left with the WOODEN KEY.
- Take the GRIFFIN'S SADDLE.
- Take the MAP to the GOBLIN KINGDOM to trigger a mini-game.
- Break all the tiles by matching 3 or more.
- Click on 2 items to swap their positions.
- Show the MAP of the GOBLIN KINGDOM to the griffin.
- Use the GRIFFIN'S SADLE on the griffin to depart.
- Congratulations! You have completed Awakening: Moonfell Wood!
Created at: 2010-12-25