
Walkthrough Menu
- General Tips & Information
- World 1: Hidden Temple of Parennefer
- World 2: The British Museum
- World 3: Paris
- World 4: Antarctic Temple
- World 5: South American Jungle
- World 6: Japanese Palace
- World 7: African Coast Shipwreck
- World 8: Fort Carter Ruins
- World 9: Hidden Temple of Parennefer
General Tips & Information
- You may play this game in full screen or windowed mode.
- A tutorial plays automatically and can be disabled in the options menu or in the game.
- Each location on the map will show what it needs to be completed.
- Green means the level is open and a lock indicates the level is closed.
- It will show the number of objects you still need to find, the number of coins you have found and if there are actions to perform.
- The lower left corner shows which Tears of Sekhmet have been located.
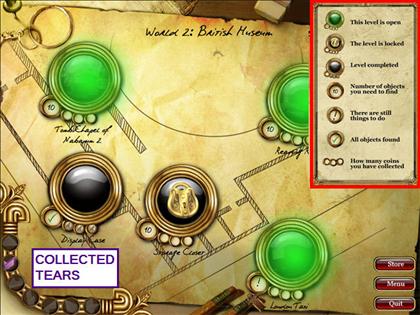
- At each location you may need to find three coins and a mask piece.
- Make note of the legend to keep track of the mask and coins.
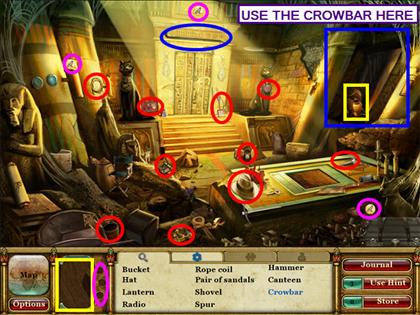
- Inventory items are in blue and puzzle items are in red.
- Select the journal button to read the previous entries.
- Click on the map button to change locations.

- Find coins to purchase additional hints. You may also get additional hints by clicking on Wipi when he appears on the edges of your screen.
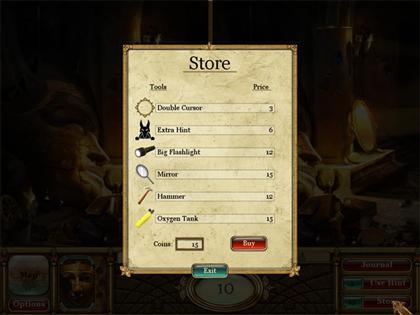
- Use the coins to purchase valuable tools throughout the game.
- Collect all the mask pieces to be awarded hints and coins.
- The hidden object lists are random, so your solution may vary.
- Many of the puzzles are randomized, so your solution may vary.
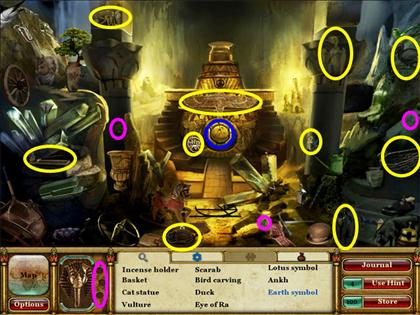
World 1: Hidden Temple of Parennefer
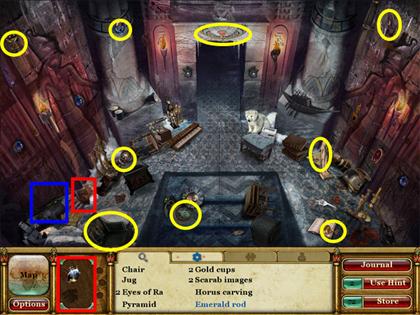
Sanctum
- Locate the hidden objects on the list.
- Find the three coins.
- Use the crowbar on the walled up door.
- Take the mask piece.
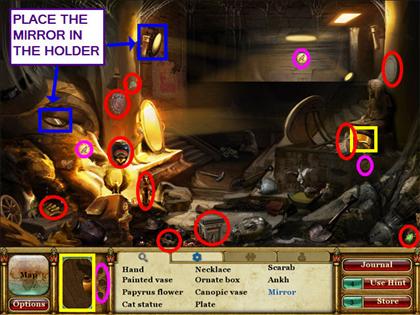
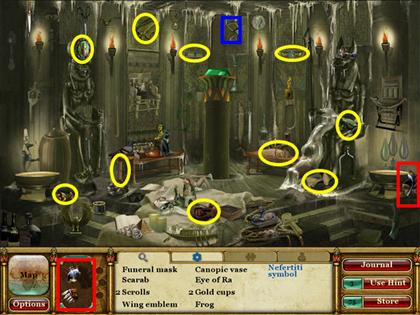
Hallway
- Locate the hidden objects on the list.
- Take the mask piece.
- Place the mirror into the holder.
- Take the three coins.
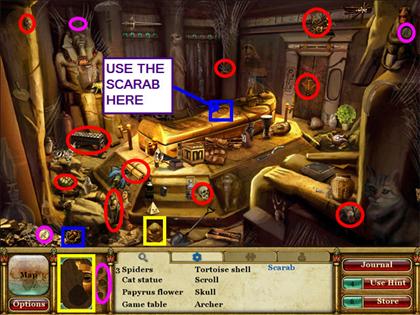
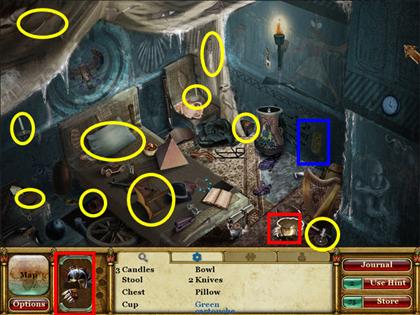
Burial Room
- Locate the hidden objects on the list.
- Take the mask piece.
- Place the scarab into the niche on the sarcophagus.
- Take the three coins.
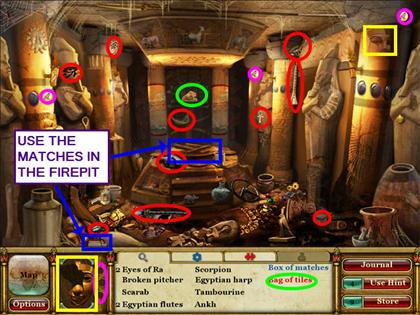
Ritual Room
- Locate the hidden objects on the list.
- Take the mask piece.
- Use the matches on the fire pit to open the niche.
- Take the bag of tiles from the niche.
- Take the three coins.
- You are automatically returned to the map.
- You need to revisit the first three locations.
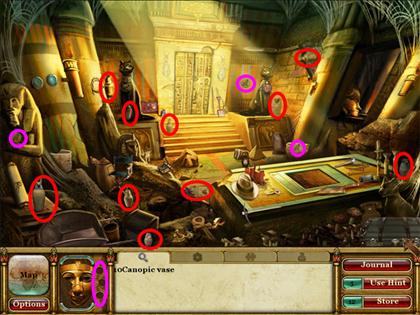
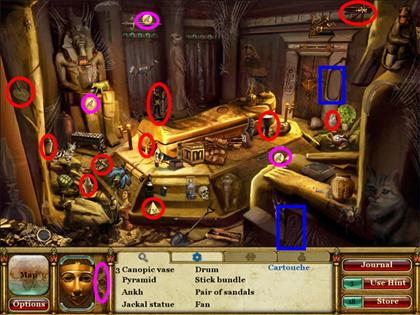
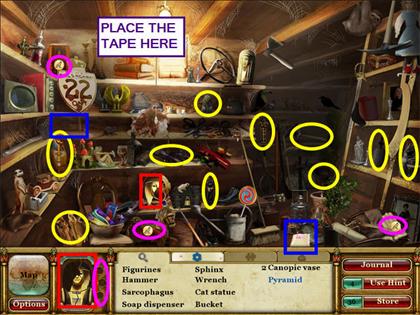
Sanctum 2
- Locate the ten canopic jars.
- Find the three coins.
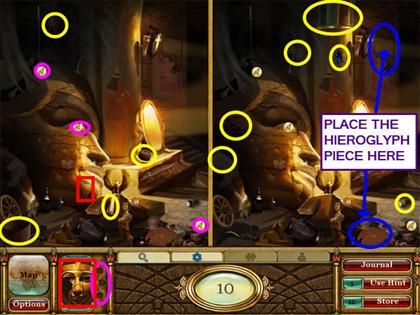
Hallway 2
- You should purchase the double cursor from the store to help with this level.
- Locate the ten differences.
- Take the hieroglyph piece.
- Place the hieroglyph piece into the wall mural to make the coins appear.
- Take the mask piece.
- Find the three coins.
Burial Room 2
- Locate the hidden objects from the list.
- Place the cartouche into the niche by the door.
- Find the three coins.
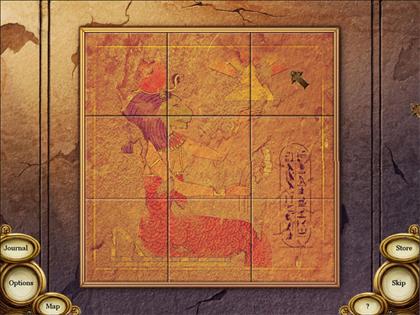
Puzzle Room
- From the map, select the unnamed area.
- Place the bag of tiles onto the playing area.
- Swap adjacent tiles to arrange them into the picture.
- After reading the journal, click 'Done' to move to the next world.
World 2: The British Museum
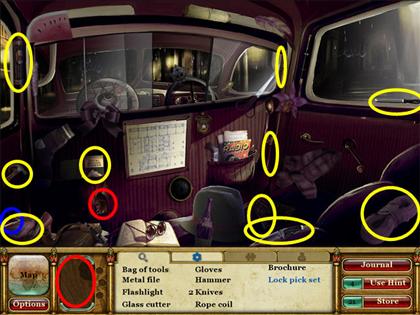
London Taxi
- Locate the hidden items on the list.
- Take the mask piece.
- You cannot complete this location at this time.
- Automatically return to the map.
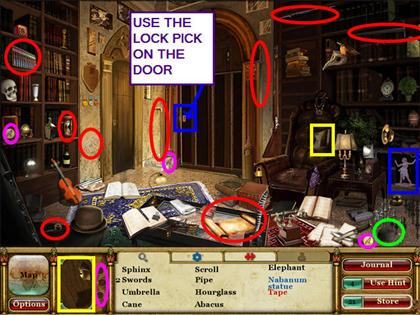
Reading Room
- Locate the hidden items on the list.
- Take the mask piece.
- Find the three coins.
- Use the lock pick on the door.
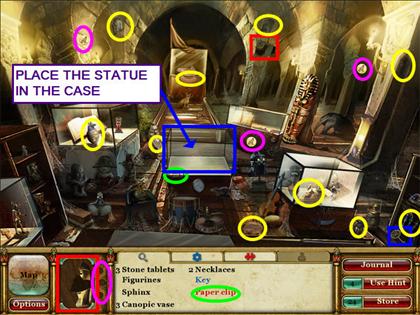
Tomb Chapel of Nabanum
- Locate the hidden items on the list.
- Take the mask piece.
- Place the statue in the display case.
- Find the three coins.
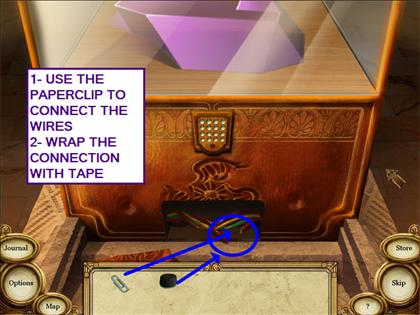
Display Case
- From the map, select the unnamed area.
- Use the paper clip to connect the wires.
- Wrap the connection with tape to open the mini-game.
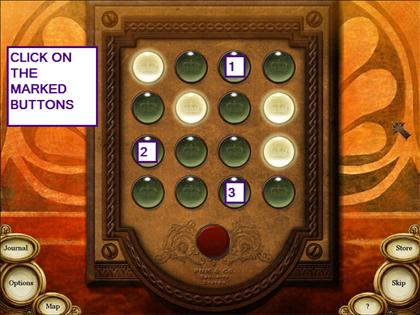
- The object of this mini-game is to light the entire grid.
- Click on the three marked buttons to complete the puzzle.
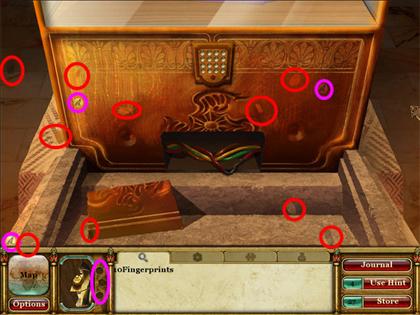
Display Case 2
- Locate the ten fingerprints.
- Find the three coins.
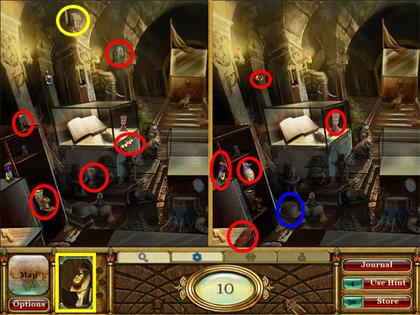
Tomb Chapel of Nabanum 2
- Spot the ten differences between the two pictures.
- Take the mask piece.
- Take the tape.
- You cannot complete this location now.
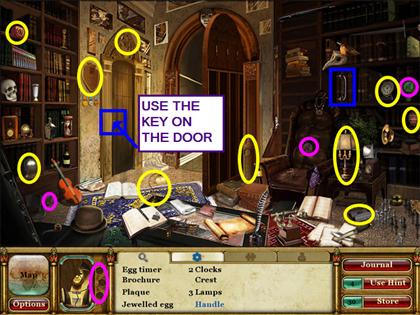
Reading Room 2
- Locate the hidden items on the list.
- Find the three coins.
- Use the key on the door.
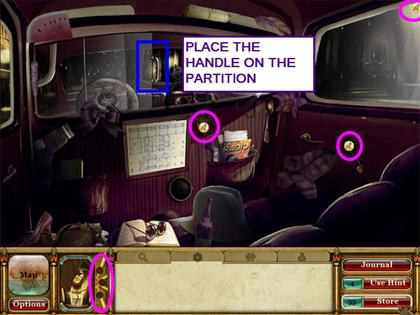
London Taxi 2
- Place the handle on the partition.
- Find the three coins.
Storage Room
- Locate the hidden items on the list.
- Find the three coins.
- Take the mask piece.
- Place the tape on the shelf.
Tomb Chapel of Nabanum 2-Revisited
- Place the pyramid in the display case.
- Find the three coins.
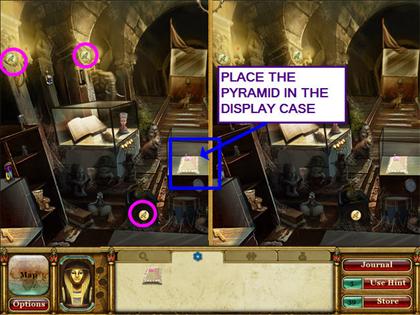
- After reading the journal, click 'Done' to move to the next world.
World 3: Paris
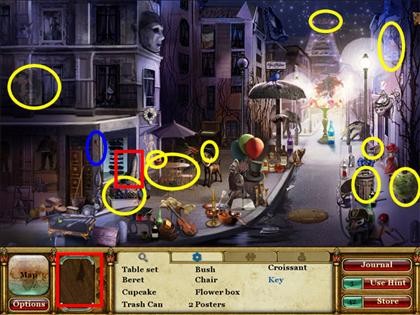
Street
- Locate the hidden items on the list.
- Take the mask piece.
- You cannot complete this location at this time.
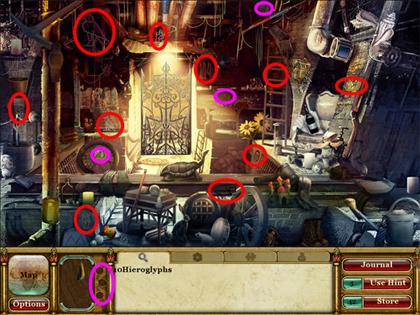
Sewer
- Locate the ten hieroglyphs.
- Find the three coins.
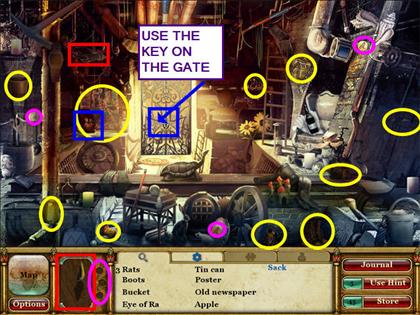
Sewer 2
- Locate the hidden items on the list.
- Find the three coins.
- Take the mask piece.
- Use the key to unlock the gate.
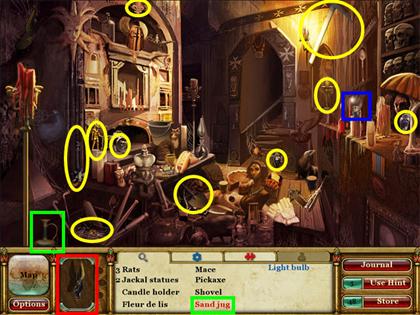
Catacombs Hallway
- Locate the hidden items on the list.
- Take the mask piece.
- You cannot complete this location at this time.
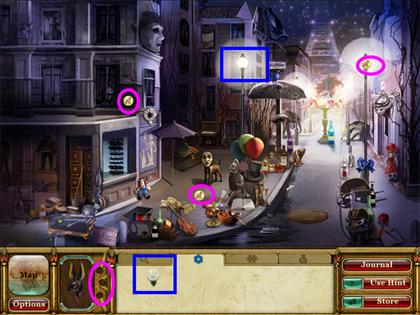
Street 2
- Place the light bulb in the street light.
- Find the three coins.
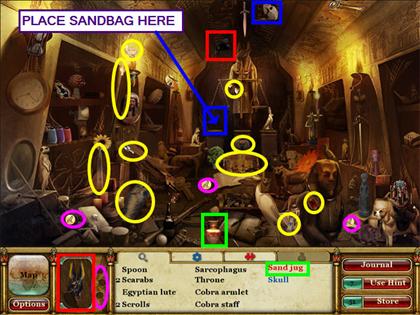
Catacombs Main Chamber
- Locate the hidden items on the list.
- Place the sand bag on the pedestal.
- Find the three coins.
- Take the mask piece.
Catacombs Hallway Revisited
- Place the skull on the skeleton.
- Take the three coins.

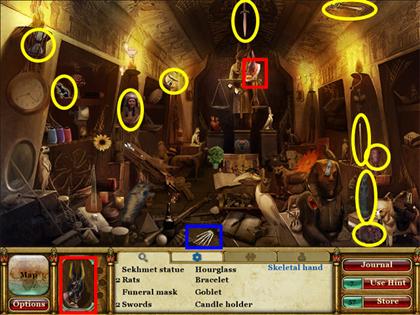
Catacombs Main Chamber 2
- Locate the hidden items on the list.
- Take the mask piece.
- You cannot complete this location at this time.
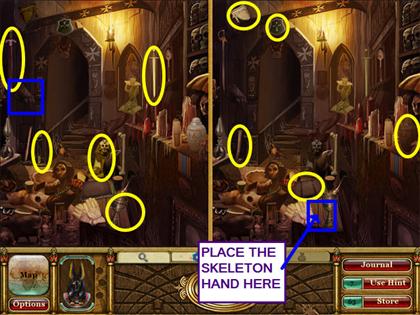
Catacombs Hallway 2
- Spot the ten differences between the two pictures.
- Take the sphinx paw.
- Place the skeleton hand on the skeleton arm.
- You cannot complete this location now.
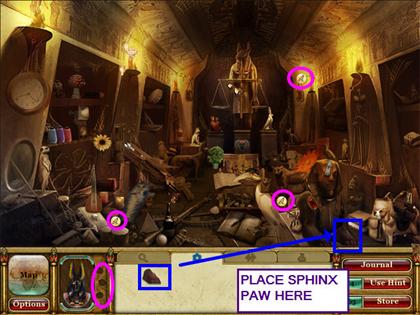
Catacombs Main Chamber 2- Revisited
- Place the sphinx paw on the sphinx.
- Take the three coins.
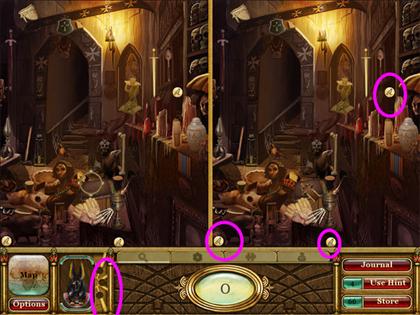
Catacombs Hallway 2- Revisited
- Find the three coins.
Puzzle Room
- From the map, select the unnamed area.
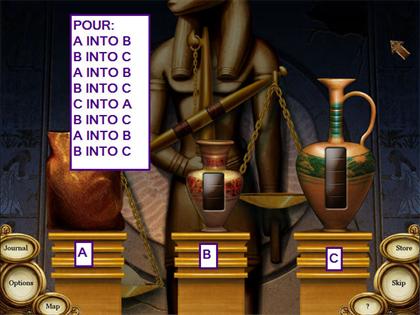
- Place the jugs onto the pedestals.
- The object of this mini-game is to get four measures of sand into the last jug.
- Naming A through C, from left to right, pour:A into B B into C A into B B into C C into A B into C A into B B into C
- After reading the journal, click 'Done' to move to the next world.
World 4: Antarctic Temple
Temple Entrance
- Locate the hidden items on the list.
- Take the mask piece.
- You cannot complete this location now.
Puzzle Room
- From the map, select the unnamed area.
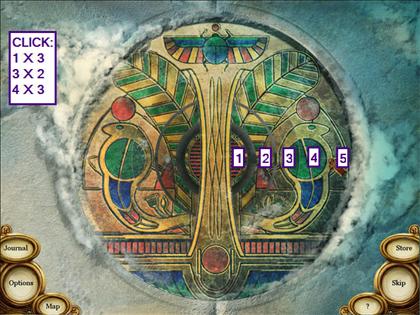
- Place the ring onto the circle.
- The object of this mini-game is rotate the rings to complete the pattern.
- This puzzle is randomly generated, so your solution ,may differ.
- Numbering the rings from the inside out, click:1 x 3 3 x 2 4 x 3
Antechamber
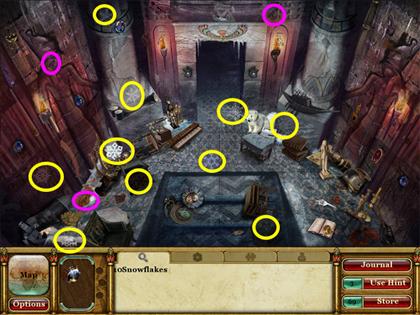
- Locate the ten snowflakes.
- Find the three coins.
Antechamber 2
- You are automatically returned to the antechamber.
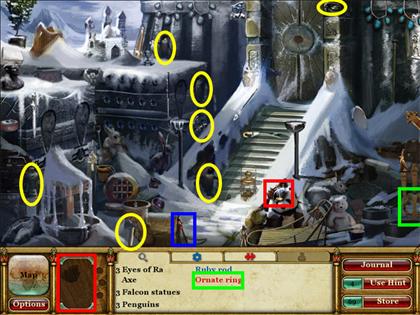
- Locate the hidden items on the list.
- Take the mask piece.
- Place the ruby rod into the lever slot.
- Pull the lever.
- Take the three gold coins.
Sacred Chamber
- Locate the hidden items on the list.
- Take the mask piece.
- You cannot complete this location now.
Living Quarters
- Locate the hidden items on the list.
- Take the mask piece.
- You cannot complete this location now.
- Exit to the map
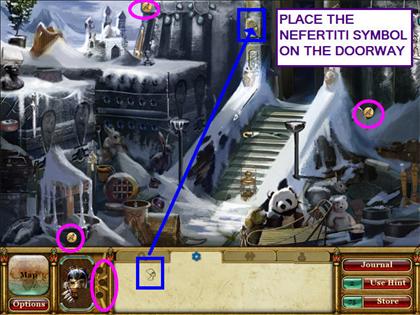
Temple Entrance- Revisited
- Place the Nefertiti symbol on the doorway.
- Find the three coins.
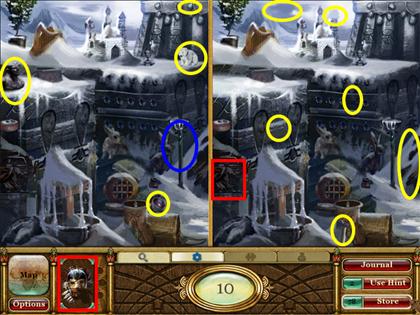
Temple Entrance 2
- You are automatically taken to this scene.
- Spot the ten differences between the two pictures.
- Take the mask piece.
- Take the sapphire rod.
- You cannot complete this location now.
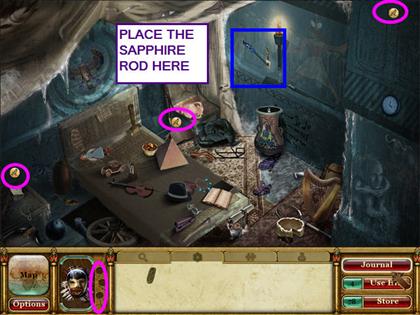
Living Quarters- Revisited
- Place the sapphire rod in the wall slot.
- Pull the lever.
- Take the three coins.
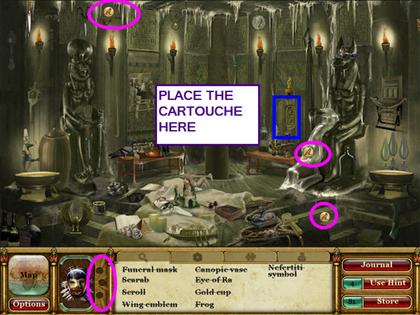
Sacred Chamber- Revisited
- Place the cartouche in the wall niche.
- Find the three coins.
- You cannot complete this location now.
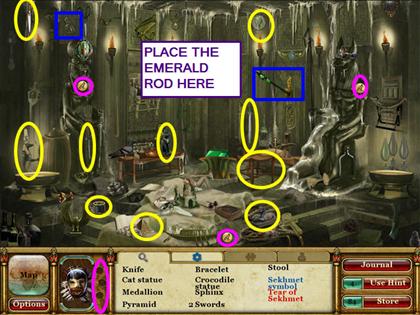
Sacred Chamber 2
- Use the emerald rod in the lever hole.
- Pull the lever.
- Find the three coins.
- Locate the hidden items on the list.
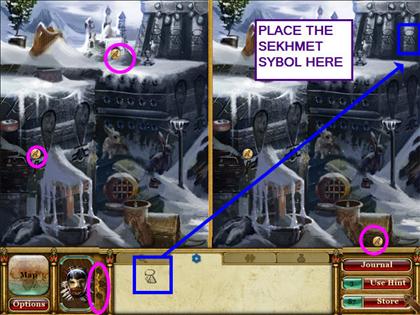
Temple Entrance 2-Revisited
- Place the Sekhmet symbol on the wall.
- Take the three coins.
- After reading the journal, click 'Done' to move to the next world.
World 5: South American Jungle
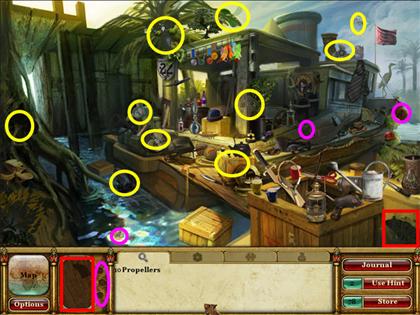
Riverboat
- Locate the ten propellers.
- Take the three coins.
- Find the mask piece.
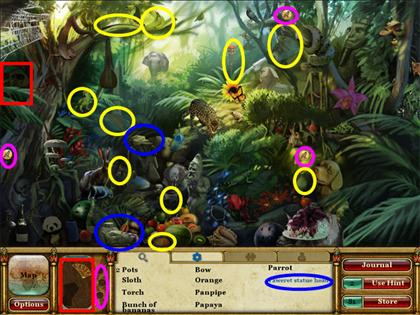
Jungle Trail
- Locate the hidden objects on the list.
- Place the Taweret statue head on the statue.
- Find the three coins.
- Take the mask piece.
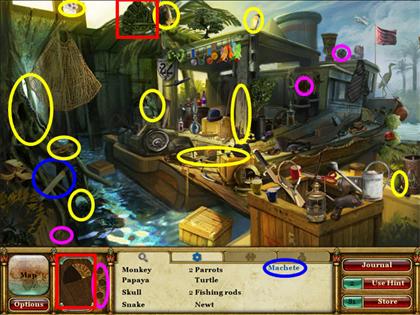
Riverboat 2
- Locate the hidden objects on the list.
- Take the three coins.
- Find the mask piece.
- You cannot complete this location yet.
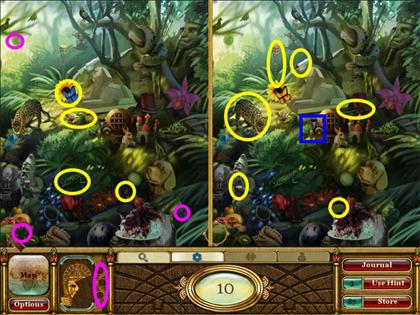
Jungle Trail 2
- Use the machete on the bushes in the center of the picture.
- Spot the ten differences between the two pictures.
- Find the three coins.
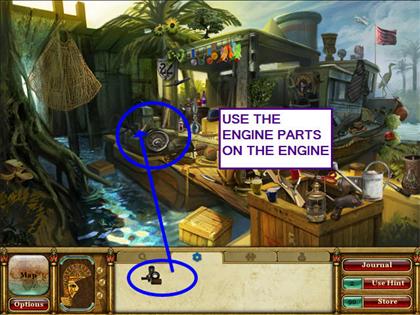
Riverboat 2- Revisited
- Use the engine parts on the engine.
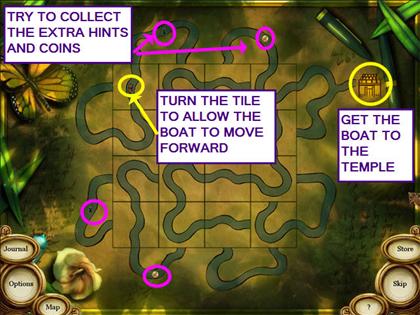
Puzzle Room
- From the map, select the unnamed area.
- The object of this mini-game is to turn the tiles so that the boat travels to the temple.
- If the boat reaches a dead end, the boat will re-set in a different location.
- Visiting the outer loops will earn extra coins and hints.
- There is no set solution as you must travel on some pieces in different directions to collect all the extras.
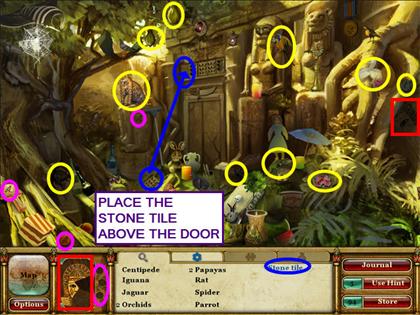
Temple Entrance
- Locate the hidden objects on the list.
- Take the three coins.
- Find the mask piece.
- Place the stone tile above the door.
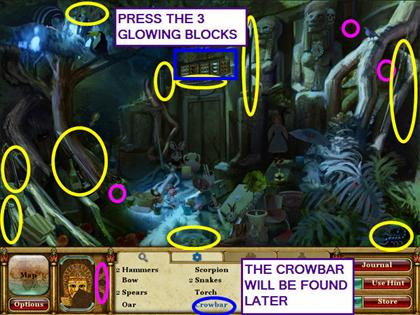
Temple Entrance 2
- Locate the hidden objects on the list except for the crowbar.
- Take the three coins.
- Press the glowing stone tiles from left to right above the door.
Temple Interior
- Locate the hidden objects on the list except for the note.
- Take the three coins.
- Find the mask piece.

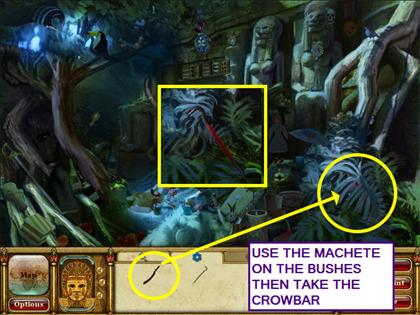
Temple Entrance 2- Revisited
- Use the machete on the bushes.
- Take the crowbar.
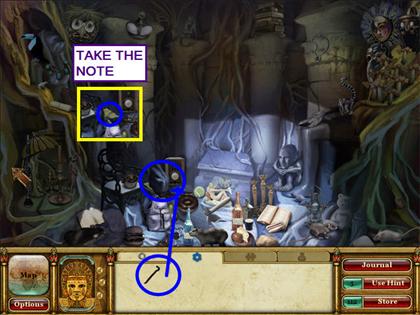
Temple Interior- Revisited
- Use the crowbar on the stone.
- Take the note.
- After reading the journal, click 'Done' to move to the next world.
World 6: Japanese Palace
Main Gate
- Locate the hidden objects on the list.
- Find the mask piece.
- You cannot complete this location now.
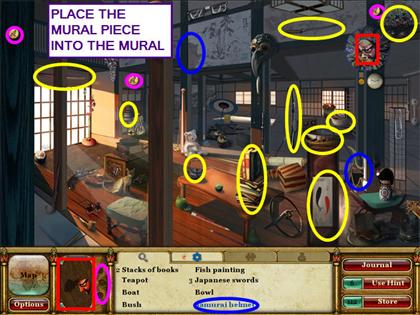
Foyer
- Locate the hidden objects on the list.
- Place the mural piece in the mural.
- Take the three coins.
- Find the mask piece.
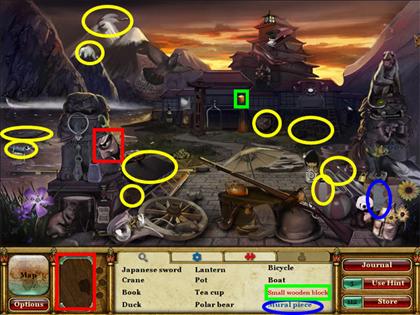
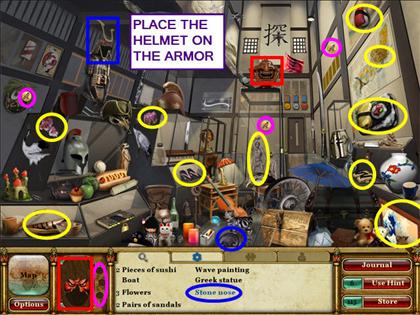
Display Room
- Locate the hidden objects on the list.
- Place Samurai helmet on the suit of armor.
- Take the three coins.
- Find the mask piece.
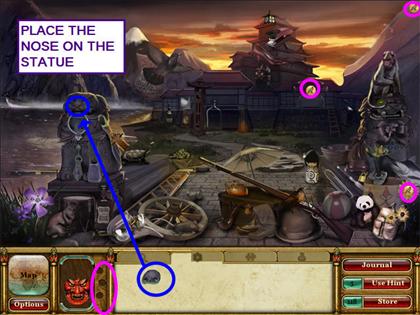
Main Gate- Revisited
- Place the nose on the statue.
- Fond the three coins.
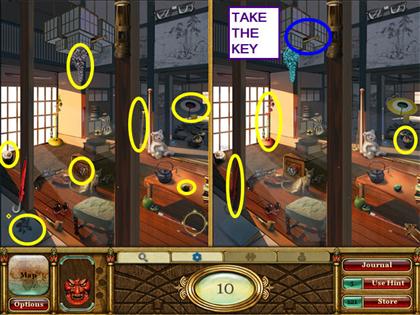
Foyer 2
- Spot the ten differences between the two pictures.
- Take the ornate key.
- You cannot finish this location now.
Display Room 2
- Locate the hidden objects on the list.
- Use the key on the door.
- Take the three coins.
- Find the mask piece.

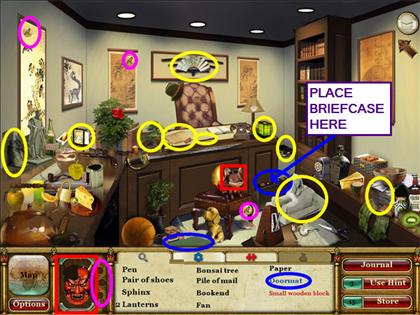
Office
- Locate the hidden objects on the list.
- Place the briefcase by the desk.
- Take the three coins.
- Find the mask piece.
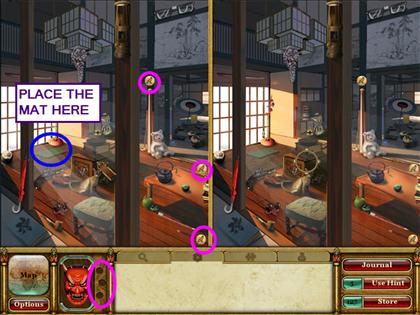
Foyer 2- Revisited
- Place the mat in the entrance.
- Take the three coins.
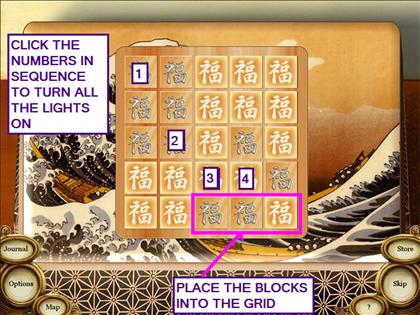
Puzzle Room
- From the map, select the unnamed area.
- The object of this mini-game is to light all the tiles.
- Place all the blocks into the grid.
- Click on the four blocks in sequence.
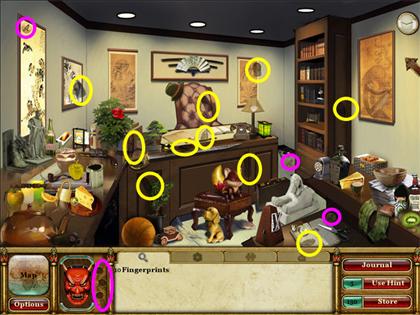
Office 2
- Locate the ten fingerprints.
- Take the three coins.
- Find the mask piece.
- After reading the journal, click 'Done' to move to the next world.
World 7: African Coast Shipwreck
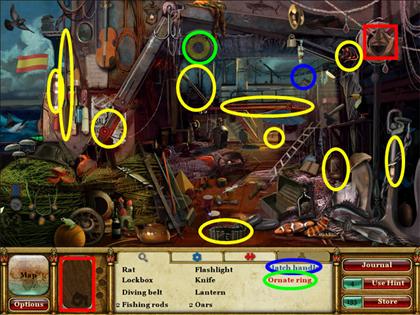
Fishing Boat
- Locate the hidden objects on the list.
- Find the mask piece.
- You cannot finish this location now.
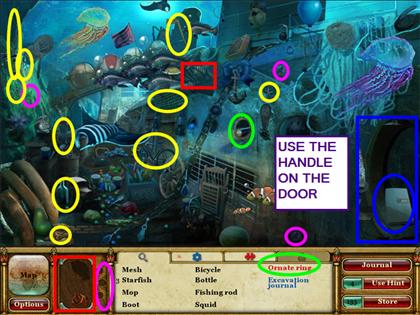
Sunken Ship Main Deck
- If you need extra time underwater, you can purchase air tanks with your coins.
- Take the tank from the tools tab and click on the raising water.
- Place the handle on the door.
- Locate the hidden objects on the list.
- Find the mask piece.
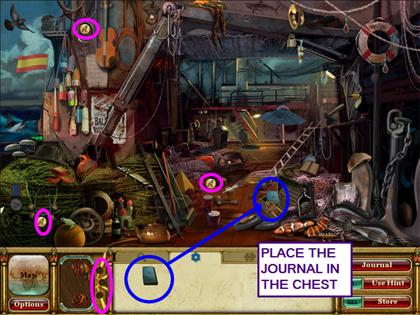
Fishing Boat- Revisited
- Place the journal into the chest.
- Find the three coins.
Fishing Boat 2
- Locate the hidden objects on the list.
- Find the mask piece.
- You cannot finish this location now.

Sunken Ship Hallway
- Locate the ten differences in the two pictures.
- Find the three coins.
- Take the ornate ring.
- You cannot finish this location now.
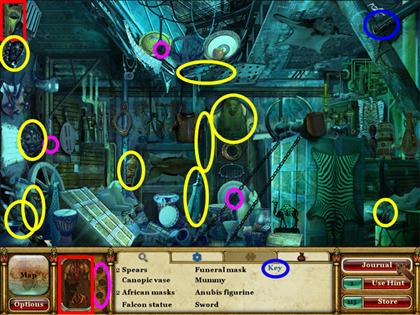
Sunken Ship Cargo Hold
- Locate the hidden objects on the list.
- Find the three coins.
- Take the mask piece.
- You cannot finish this location now.
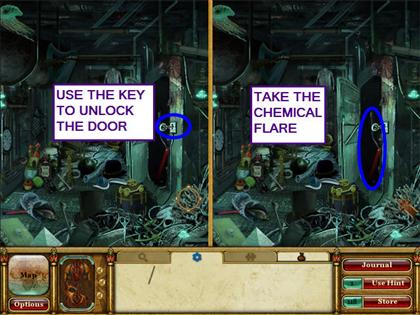
Sunken Ship Hallway- Revisited
- Use the key to unlock the door.
- Take the chemical flare.
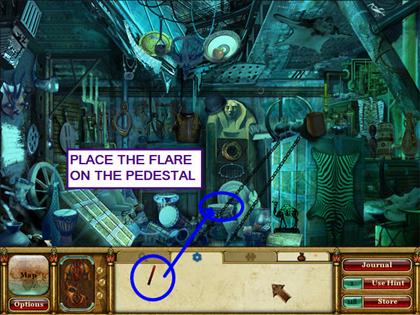
Sunken Ship Cargo Hold- Revisited
- Place the chemical flare on the pedestal.
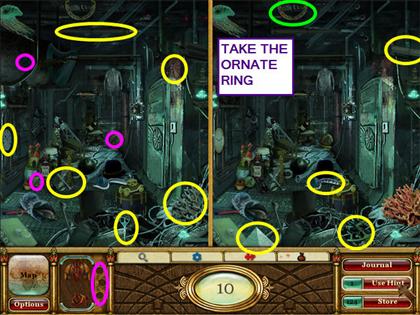
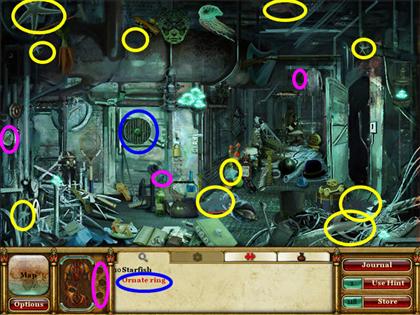
Sunken Ship Cargo Hallway 2
- Locate the ten starfish.
- Take the ornate ring.
- Find the three coins.
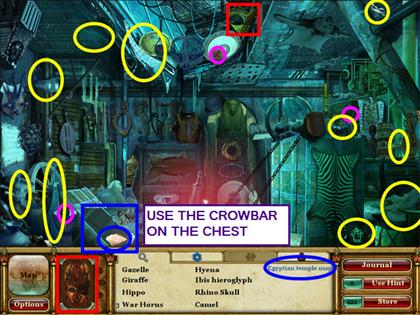
Sunken Ship Cargo Hallway 2
- Use the crowbar on the chest.
- Locate the hidden objects on the list.
- Take the mask piece.
- Find the three coins.
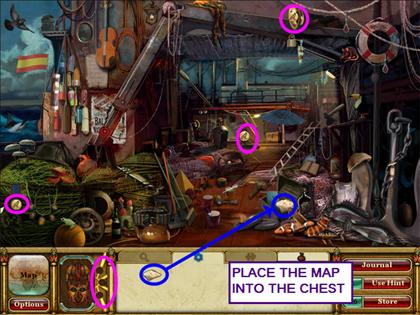
Fishing Boat 2- Revisited
- Place the map into the chest.
- Find the three coins.
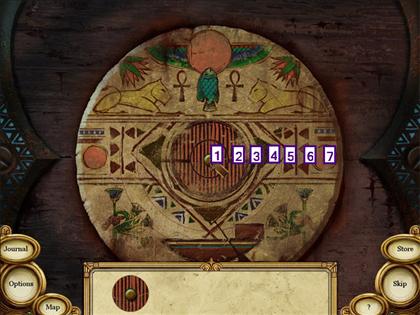
Puzzle Room
- From the map, select the unnamed area.
- The object of this mini-game is to align all the rings to form a picture.
- Place all the rings into the grid.
- Click on the rings to rotate.
- This puzzle is randomly generated, so your solution may vary.
- One solution is to click on the following rings:6 x 2 3 x 4 2 x 1 1 x 2 7 x 4
World 8: Fort Carter Ruins
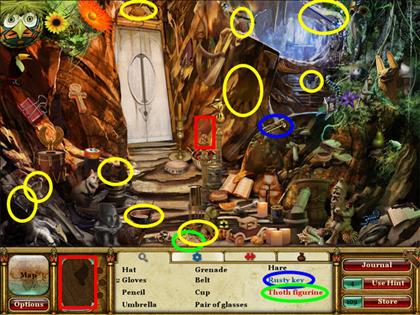
Cave Entrance
- Locate the hidden objects on the list.
- Take the mask piece.
- You cannot finish this location now.
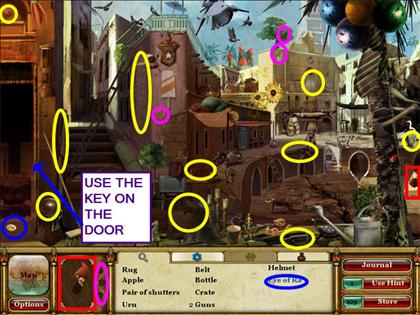
Courtyard
- Use the key on the door.
- Locate the hidden objects on the list.
- Take the mask piece.
- Find the three coins.
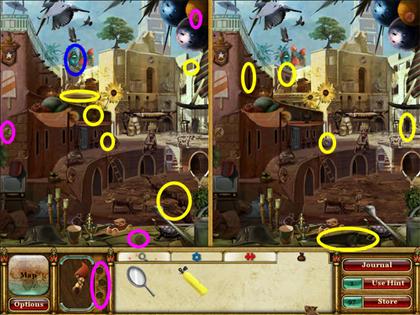
Courtyard 2
- You can purchase the mirror from the store to return a mirrored level to normal.
- Take the mirror from tools and click it onto the picture.
- Find the ten differences between the two pictures.
- Take the scarab sigil.
- Find the three coins.
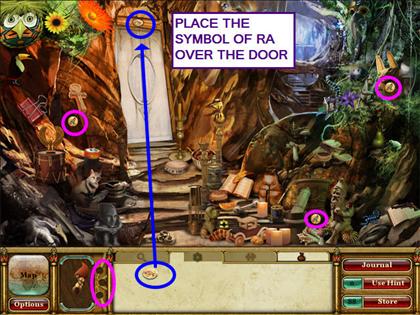
Cave Entrance- Revisited
- Place the symbol of Ra in the niche over the door.
- Find the three coins.
- You cannot finish this location now.
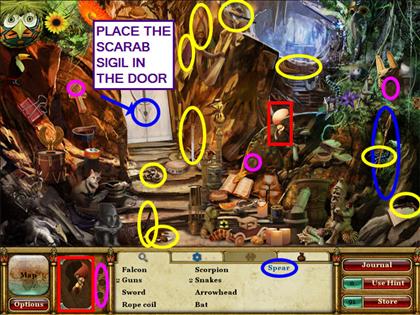
Cave Entrance 2
- Locate the hidden objects on the list.
- Place the scarab sigil in the door.
- Take the mask piece.
- Find the three coins.
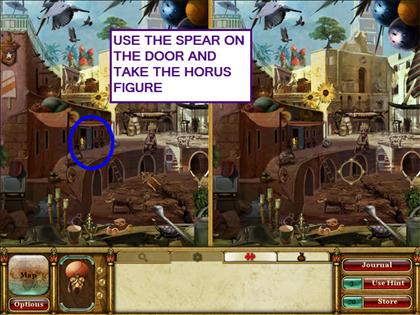
Courtyard 2- Revisited
- Use the spear on the door.
- Take the Horus figure.
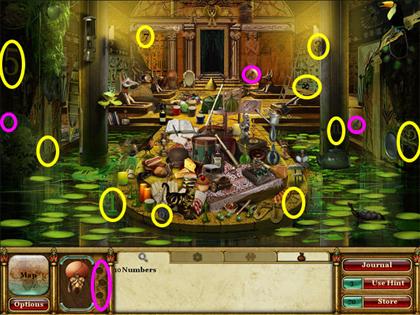
Antechamber
- Locate the ten numbers.
- Find the three coins.
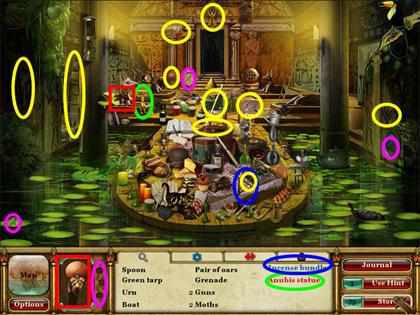
Antechamber 2
- Locate the hidden objects on the list.
- Take the mask piece.
- Find the three coins.
- You cannot complete this location now.
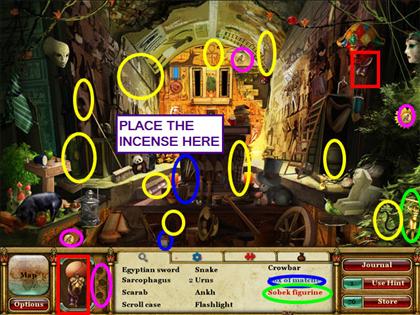
Ritual Room
- Place the incense in the burner.
- Locate the hidden objects on the list.
- Take the mask piece.
- Find the three coins.
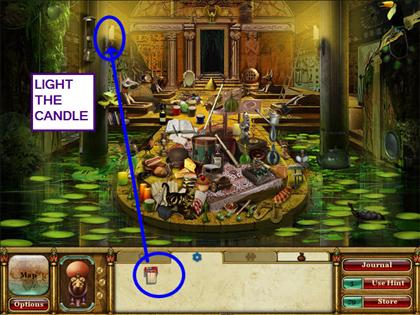
Antechamber 2- Revisited
- Use the matches to light the candle.
Puzzle Room
- From the map, select the unnamed area.
- The object of this mini-game is to place the statues in the correct order.
- Follow the clues and stack the statues in the left alcove.

- For part two of the mini-game, you must move the statues to the right alcove.
- In this Hanoi Tower style game, lower ranked statues cannot be placed atop higher ranked ones.
- Numbering the statues 1-4 from top to bottom and the alcoves A-C from left to right, make the following moves:1-B, 2-C, 1-C, 3-B, 1-A, 2-B, 4-C, 1-C, 2-A, 1-A, 3-C, 1-B, 2-C, 1-C.

- After reading the journal, click 'Done' to move to the next world.
World 9: Hidden Temple of Parennefer
Path of Earth
- Locate the hidden objects on the list.
- Take the mask piece.
- Find the three coins.
- You cannot complete this location now.
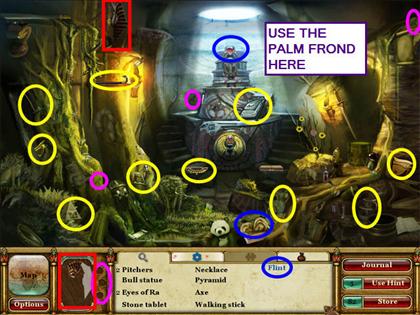
Path of Air
- Use the palm frond to fan the altar.
- Locate the hidden objects on the list.
- Take the mask piece.
- Find the three coins.
Path of Air 2
- Locate the hidden objects on the list.
- Find the three coins.
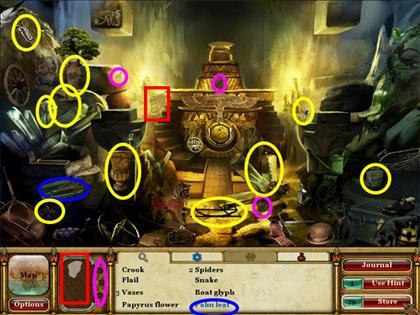
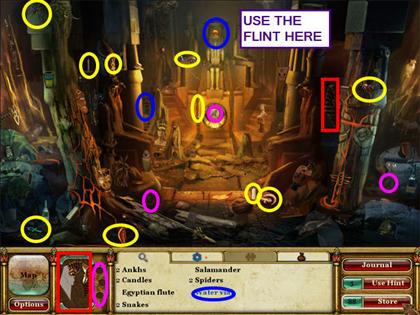
Path of Fire
- Use the flint to light the altar.
- Locate the hidden objects on the list.
- Take the mask piece.
- Find the three coins.
Path of Fire 2
- Locate the hidden objects on the list.
- Find the three coins.

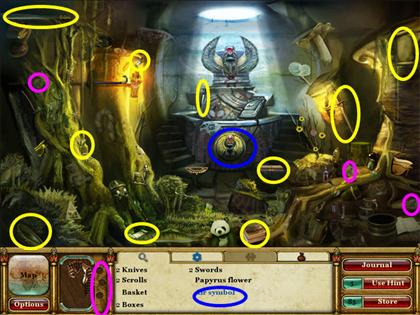
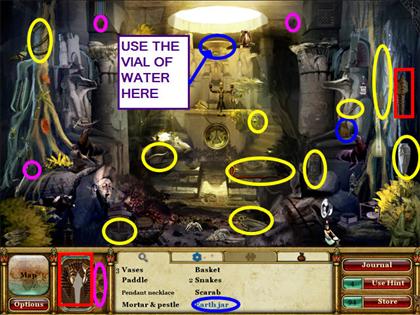
Path of Water
- Pour the water onto the altar.
- Locate the hidden objects on the list.
- Take the mask piece.
- Find the three coins.
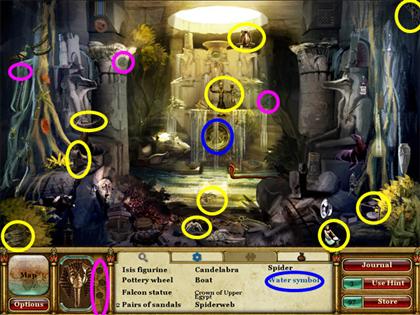
Path of Water 2
- Locate the hidden objects on the list.
- Find the three coins.
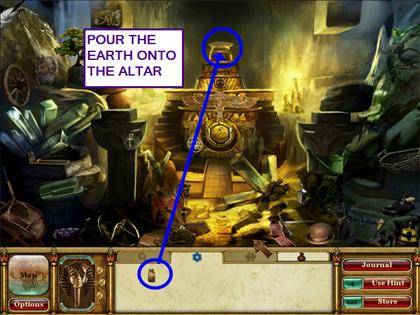
Path of Earth- Revisited
- Pour the earth onto the altar.
Path of Earth 2
- Locate the hidden objects on the list.
- Find the three coins.
Altar of Tuat
- Locate the ten spades.
- Take the mask piece.
- Find the three coins.
- Hover your mouse over the niches in the altar to show which symbol belongs.
- Place the Air symbol in the lower left niche.
- Place the Water symbol in the upper left niche.
- Place the Fire symbol in the upper right niche.
- Place the Earth symbol into the lower right niche.

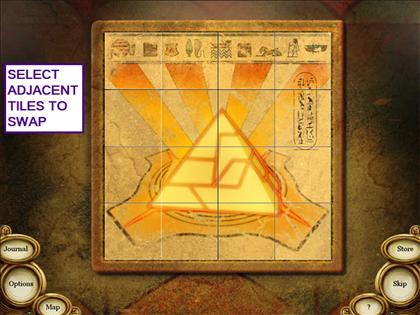
Puzzle Room
- From the map, select the unnamed area.
- The object of this mini-game is to move the tiles to form the picture.
- Click on adjacent tiles to swap.
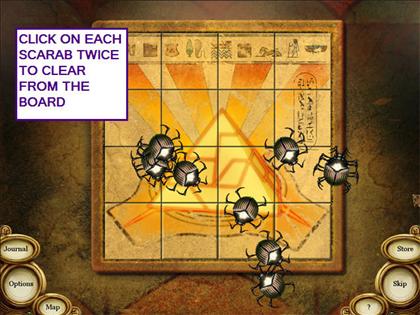
- For part two of this mini-game, click on each scarab twice to clear them from the board.
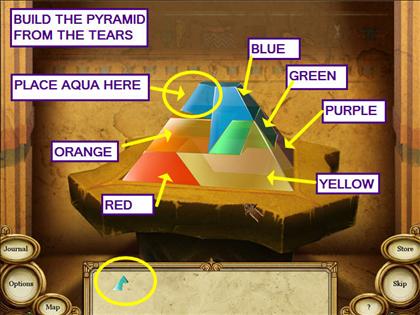
- For part three, use the Tears of Sekhmet to build a pyramid.
 Congratulations! You have just completed Curse of the Pharaoh: Tears of Sekhmet!
Created at: 2009-10-11