Walkthrough Menu
- General Tips
- Introduction
- Chapter 1
- Chapter 2
- Chapter 3
- Chapter 4
- Chapter 5
- Chapter 6
- Chapter 7
- Chapter 8
- Chapter 9
- Chapter 10
- Chapter 11
- Chapter 12
- List of Cursed Morphing Objects
- Hard Mode
- Bonus Adventures
General Tips
- There are no timers in the game.
- Once you complete the game, you can replay it in Hard Mode. In Hard Mode the Hint and Skip Buttons will be totally unavailable.
- Click on the Inspect Icon, in the lower left corner, to see a list of searchable items that will be useful in your quest.
- When you click randomly in the Hidden Object Scenes, your cursor will be adorned with roses and made unavailable for a few seconds.
- There are no penalties for clicking randomly in regular scenes.
- When your cursor turns into a magnifying glass icon, you can pick up objects, or take a closer look at something.
- Clicking downwards in a scene can help you navigate back to previous locations or exit Hidden Object Scenes.
Collector’s Edition Extras
- Dark Parables: Curse of Briar Rose Collector’s Edition contains a built-in Strategy Guide. The Strategy Guide can be accessed during play by clicking on the Red “Strategy Guide” Button in the lower right.
- To scroll through the pages of the built-in Strategy Guide, click on the arrows at the bottom of each page. From the Table of Contents, you can click on a Chapter number to skip to that section.
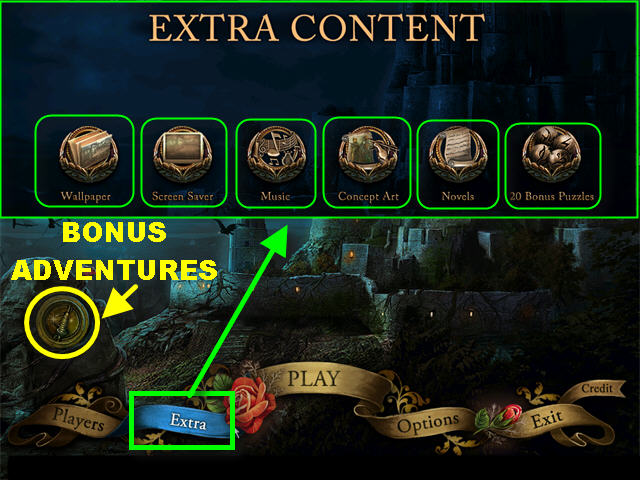
- Once you complete the game, you will unlock the Bonus Adventures for the Collector’s Edition. You can access these Bonus Adventures by going to the Main Menu and clicking on the round icon on the left. The solutions for the Bonus Adventures will be located at the end of this walkthrough.
- At the end of the game, you will also unlock the Extra Content; this can be accessed through the Main Menu by clicking on the word “Extra.” These extras include:20 Bonus Puzzles 5 Assorted Wallpapers Screen Saver Music Concept Art Novels
- Click on the “20 Bonus Puzzles” icon in the Extra Content section to play the new levels of the Ball Puzzle. The game will keep track of your best moves in each round.
- The Novels section lets you read through 3 different versions of the Sleeping Beauty story.
Cursed Morphing Objects
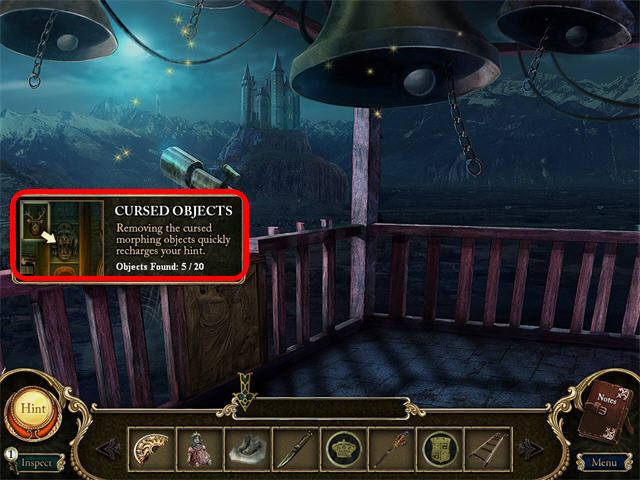
- The Cursed Morphing Objects are items that morph from one form to another, like a cup into a bottle, or a sign that changes its signage.
- There are a total of 20 Cursed Morphing Objects in the game.
- Collecting the Cursed Morphing Objects will not affect the outcome of the game; they are only used for recharging your hints.
- Some of the Cursed Objects can be easy to spot; others require you to pay very close attention.
- You may have to pass through a location several times before the Cursed Morphing Objects appear.
- Each time you click on a Cursed Morphing Object, a sign will appear showing you how many Cursed Morphing Objects you’ve found so far.
- The Cursed Morphing Objects can only be found in regular scenes, they will never be part of a Hidden Object Scene.
User Interface
- Your Inventory Items will be placed at the bottom of the scene.
- Click on the arrows on each end of the Inventory Tray to scroll through all available items.
- Place your mouse over an Inventory Item to read its name in the small window attached to the Inventory Tray.
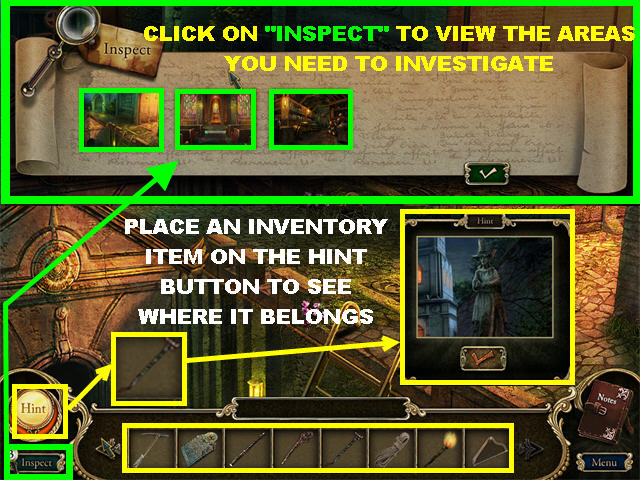
- The Inspect Button is located in the lower left corner of the scene. Pressing this button allows you to see the locations that need investigating.
- The Inspect Button can also show you your next objective. For example, clicking the Objective Hint Button will show you the picture of your next location along with the Inventory Item that needs to be used there. This action will disable your Hints for 3 minutes.
- Using a Hint during a Hidden Object Scene will show you a random item from the list.
- Using a Hint in a puzzle can help you view a partial solution for that puzzle.
- You can use a Hint in a regular scene to figure out what you have to do with an Inventory Item. Grab an Inventory Item and place it on the Hint button. An image of the location in which that item belongs will appear on your screen.
Puzzles
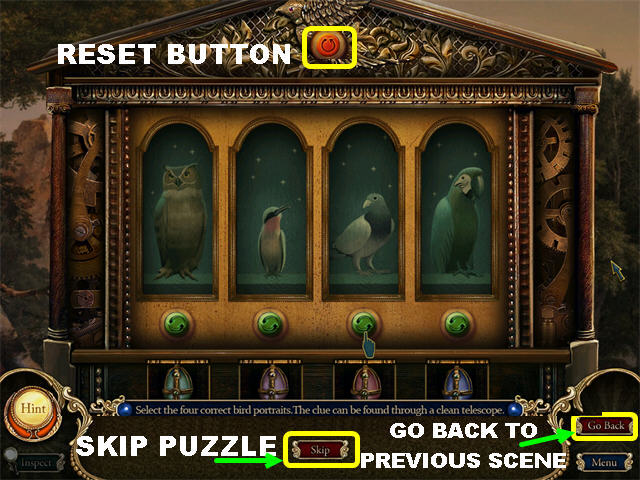
- The puzzles are not timed and can be skipped by clicking on the Skip button at the bottom of the page. Skipping a puzzle will lock up the Hint functionality for 5 minutes.
- Puzzles cannot be skipped in Hard Mode.
- The instructions can be found at the bottom of each puzzle.
- You can exit a puzzle at anytime by clicking the “Go Back” button in the lower right.
- Some puzzles have a red Reset Button that will return the puzzle to its original state.
Transportation Device
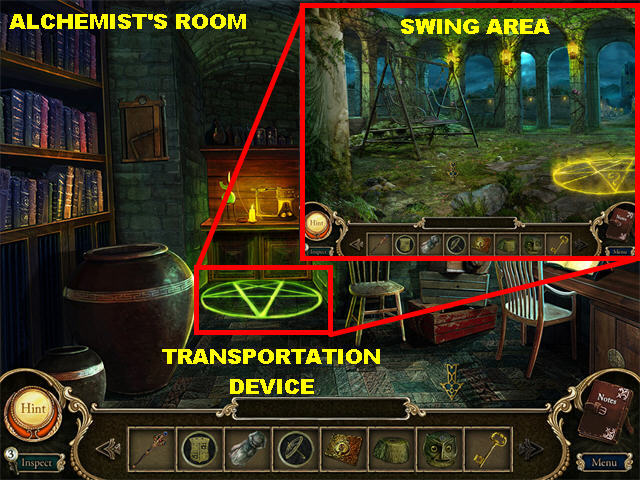
- The Transportation Device can be used to quickly travel between the inside and outside of the Castle.
- The Transportation Device inside the Castle is located in the Alchemist’s Room. The one outside is located in the Swing Area.
- This function will not be available until you unlock the Alchemist’s Room in Chapter 6.
Introduction
Briar Rose Statue Garden
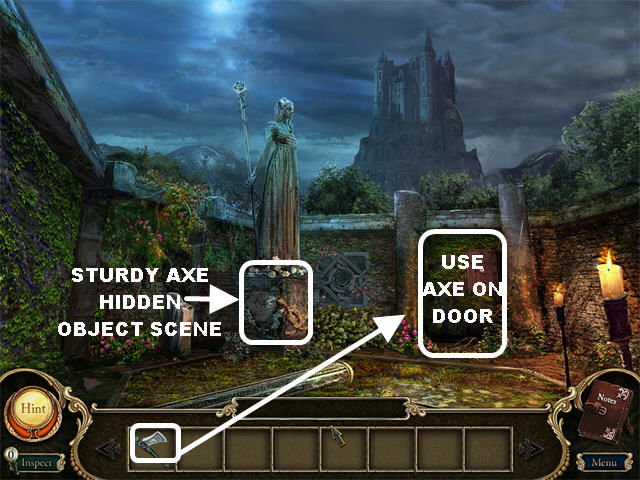
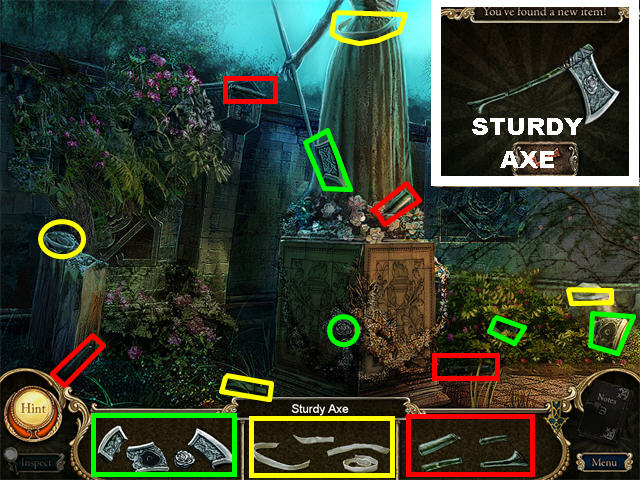
- Click at the bottom of the statue to trigger a Hidden Object Scene.
- Find all the fragmented pieces in the scene.
- The STURDY AXE will be added to your inventory after all the items have been found.
- Place the STURDY AXE on the door so you can cut through the vegetation growing on the door.
- Go through the door.
Chapter 1
The Stairs
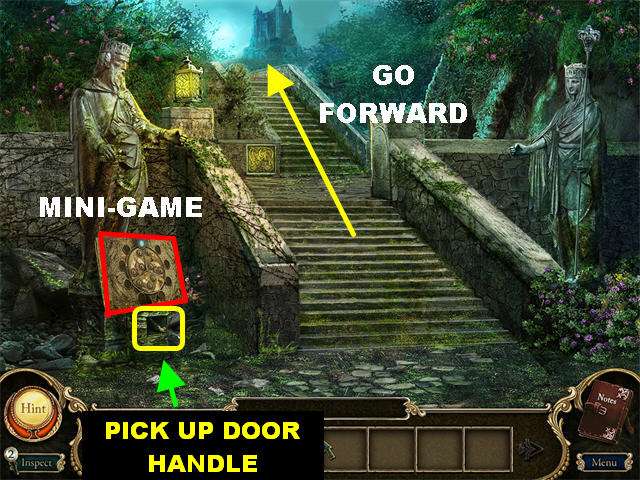
- Click at the base of the King’s Statue to trigger a puzzle.
- Your goal is to place the tokens in the right spots.
- There are 3 main pictures in the scene, the King, the Queen, and the Knight.
- Each picture has the same 3 icons, a hand, a head, and a shirt. You have to figure out what goes in each section of that picture according to the character in the background.
- Click on the owl in the top right corner; a secret niche with a token will appear. Use that token as part of the solution.
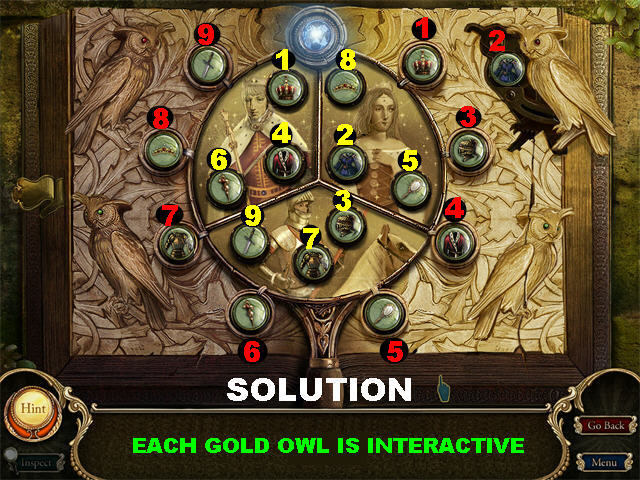
- Place the Crown on the King’s head.
- Place the Scepter in the King’s hand.
- Place the Robe on the King’s shirt.
- Place the Tiara on the Queen’s head.
- Place the Mirror in the Queen’s hand.
- Place the Dress on the Queen’s shirt.
- Place the Helmet on the Knight’s head.
- Place the Sword in the Knight’s hand.
- Place the Armor on the Knight’s shirt.
- After the puzzle has been solved, a secret niche will appear at the base of the statue.
- Pick up the DOOR HANDLE in that niche.
- Click on top of the steps to access the next location.
The Fountain
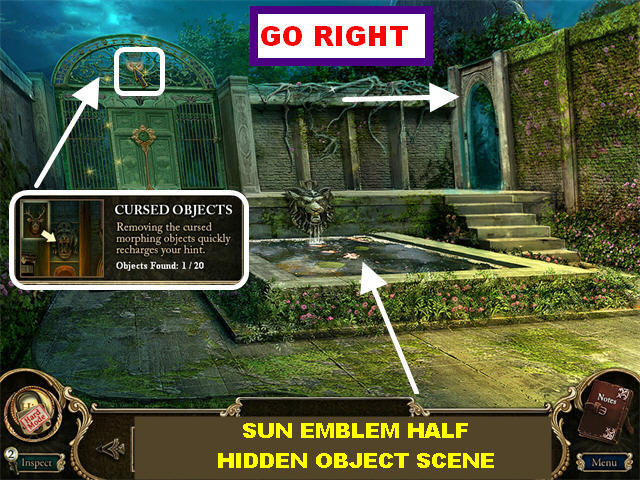
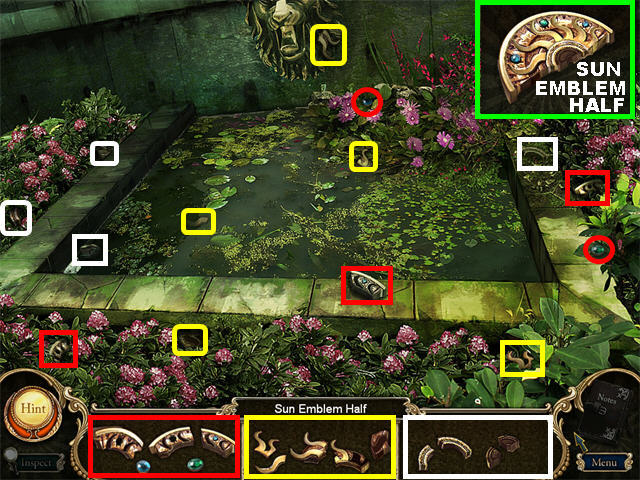
- Click on the MORPHING SIGN above the gate on the left. This is the first Cursed Morphing Object.
- Click on the fountain to enter a Hidden Object Scene.
- Find all the fragmented pieces in the scene.
- The SUN EMBLEM HALF will be added to your inventory after all the items have been found.
- Go through the entryway on the upper right side of the scene.
The Swing
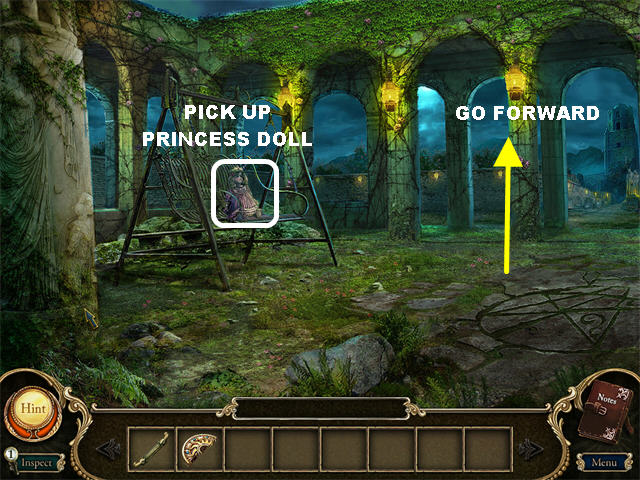
- Pick up the PRINCESS DOLL on the swing.
- Go forward to access the next location.
The Graveyard
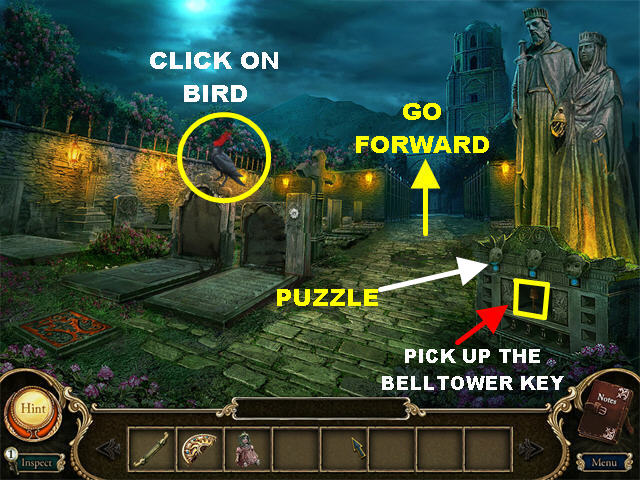
- Click on the bird on top of the tombstone. Recognize the voice?
- Click on the base of the King and Queen statues to trigger a puzzle.
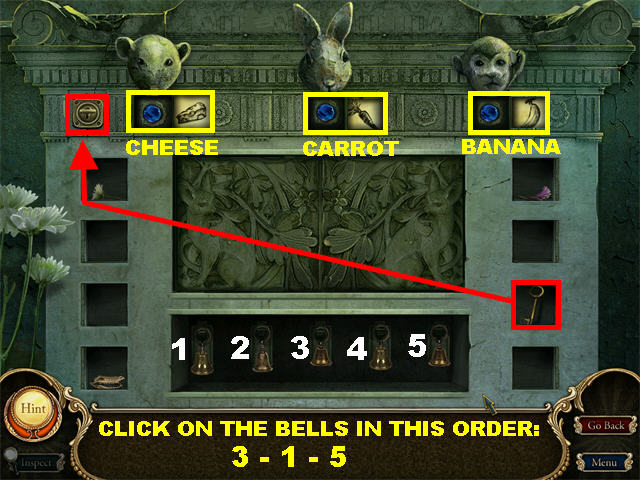
- Your goal in this puzzle is to figure out which symbols will solve the puzzle.
- Click on the small doors on each end of the puzzle to see what is behind them.
- Pick up the KEY on the second to the last door on the right.
- Place the KEY in the keyhole, in the upper left corner, to unlock the sketches below each animal’s head. Click on each sketch to scroll through them until you find the right ones.
- Place the CHEESE sketch below the mouse.
- Place the CARROT sketch below the rabbit.
- Place the BANANA sketch below the monkey.
- Bells have been unlocked below the puzzle. Your goal in this stage is to ring the bells in a particular order.
- The bells have been numbered 1 to 5, from left to right. Click on 3 – 1 – 5.
- You will be taken back to the Graveyard.
- Pick up the BELL TOWER KEY that appears in the niche at the base of the statues of the King and Queen.
- Go towards the back of the scene.
Bell Tower
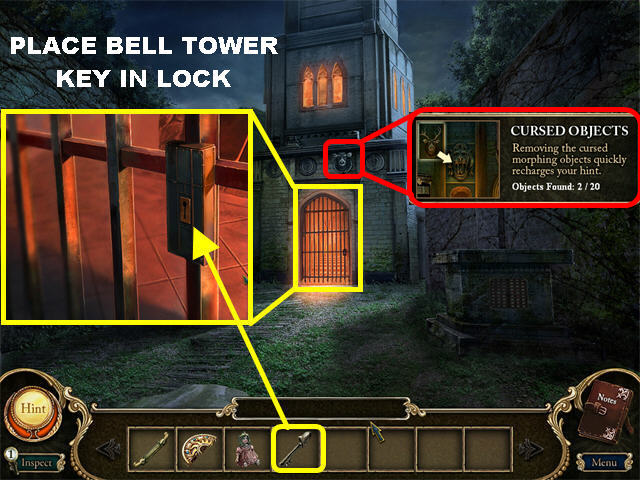
- Click on the Gate for a closer view.
- Place the BELL TOWER KEY in the lock and go through the door.
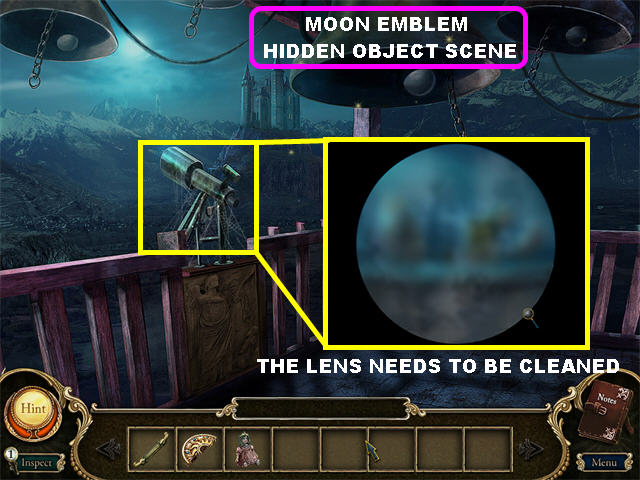
- Click on the MORPHING HEAD above the doorway. This is Cursed Morphing Object #2.
- Click on the telescope on the left; you cannot see anything because the glass is too dirty. Close that view for now.
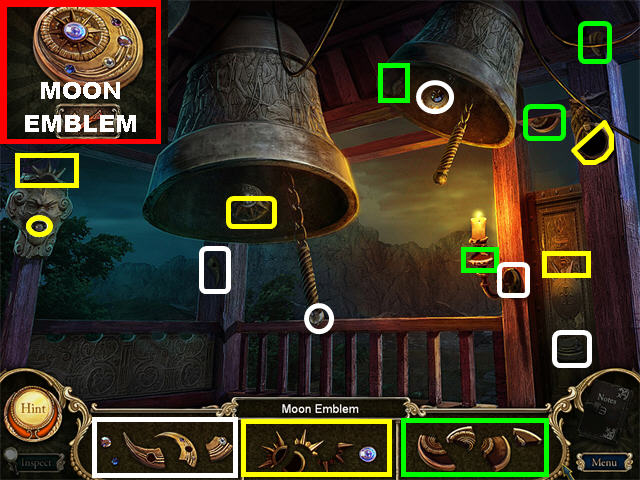
- Click on the large bell in the center of the scene to trigger a Hidden Object Scene.
- Find all the fragmented pieces in the scene.
- The MOON EMBLEM will be added to your inventory after all the items have been found.
- Go back to the Fountain area.
Fountain
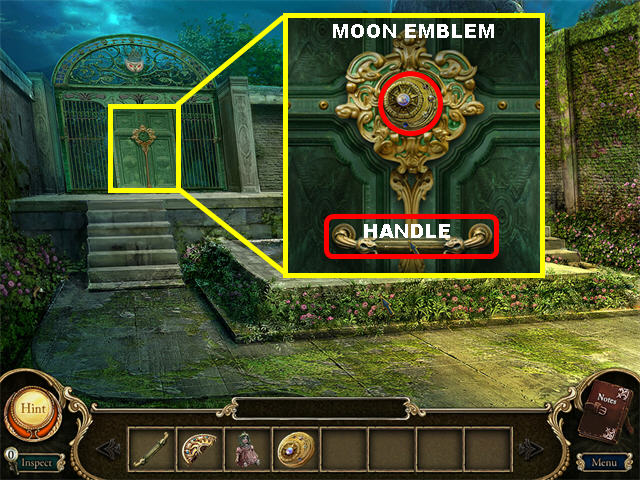
- Click on the door for a closer view.
- Place the MOON EMBLEM on the lock.
- Place the HANDLE on the lock.
- Go through the door.
Chapter 2
Main Gate
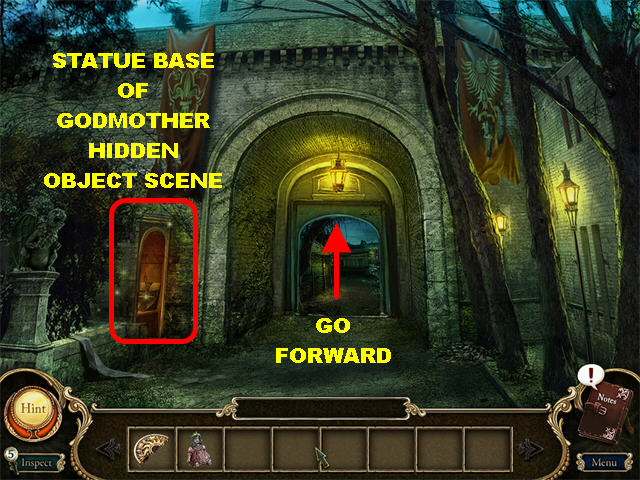
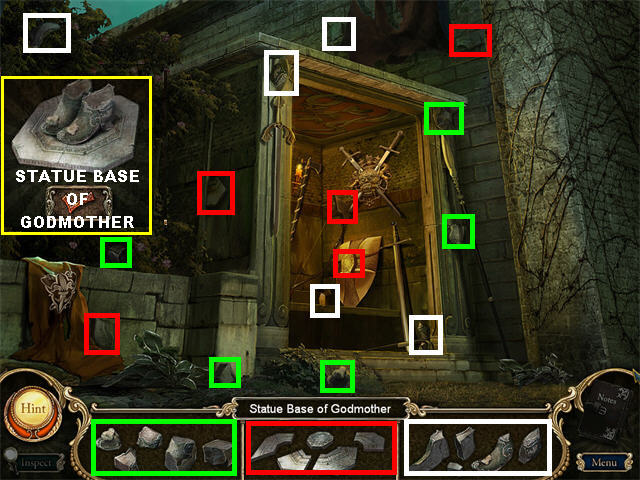
- Click on the sparkly door on the left.
- Find all the fragmented pieces in the scene.
- The BASE OF GODMOTHER STATUE will be added to your inventory after all the items have been found.
- Go forward.
Courtyard
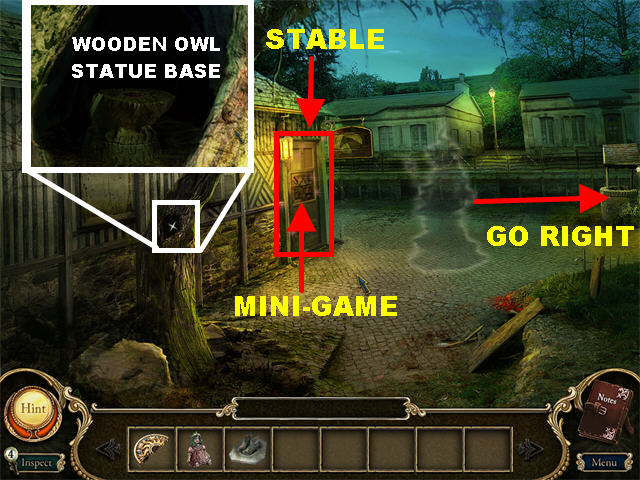
- When you click on the hole in the tree, you will find a wooden owl statue base. You can’t do anything with that area at this time.
- Click on the sparkling door on the left to trigger a puzzle.
Stable Door Puzzle
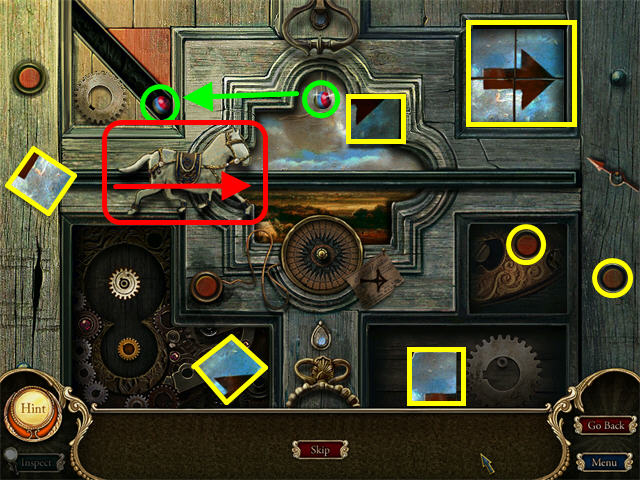
- Your goal is to unlock the door by moving the horse all the way to the right.
- Grab the red & blue ball in the upper center; place it on the slot in the upper left.
- As the ball falls, it will make the horse move towards the right.
- To move the horse a bit farther, you have to assemble the image of the arrow in the upper right panel. Find and place the 4 picture squares to accomplish this task. When placing the squares in the panel, make sure you place your cursor (not the square) where you want to place the panel.
- Click on the red button in the lower right to open the 2 panels at the bottom of the puzzle.
- Click on the red button that appears inside the lower panel on the right. This button opens the panel in the lower left corner.
- Pick up the picture square in the panel in the lower right before the panel closes. Place that picture square in the upper right panel.
- Pick up the picture square in the panel in the lower left before the panel closes. Place that square in the upper right panel as well.
- Complete the image of the arrow by picking up the other 2 squares, marked in yellow in the screenshot, and placing them in the upper right slot.
- The horse moves towards the middle of the scene after the image of the arrow has been assembled.
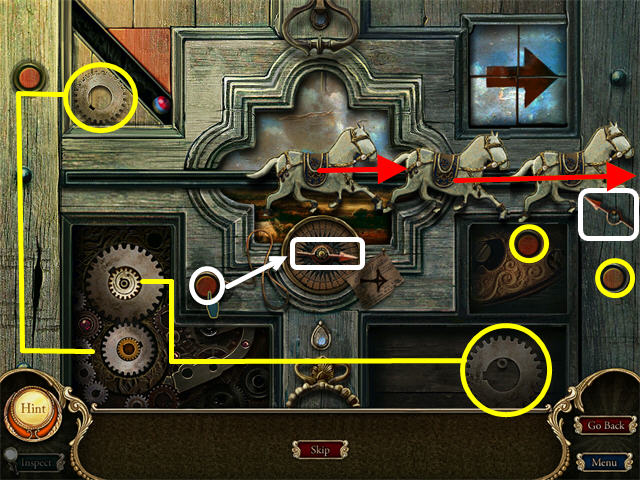
- Click on the red button in the lower right.
- Click on the red button that appears in the lower right panel.
- Grab the gear in the lower right panel before it closes; place it in the panel in the lower left.
- Pick up the gear in the upper left; place it in the panel in the lower left.
- The horse moves three quarters of the way to the right.
- Pick up the arrow on the right edge of the scene.
- Place the arrow in the circle in the middle of the puzzle.
- Click on the red button next to the circle until the arrow is facing right.
- The Stable door is now open; go into the Stable.
The Stable
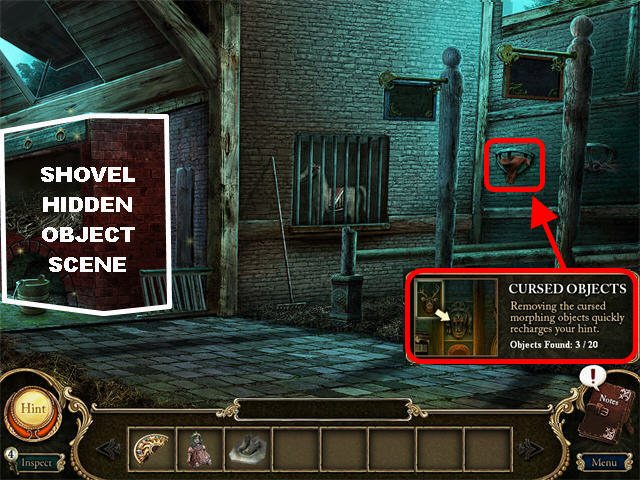
- Click on the MORPHING HOLDER on the right side of the wall. This is Cursed Morphing Object #3.
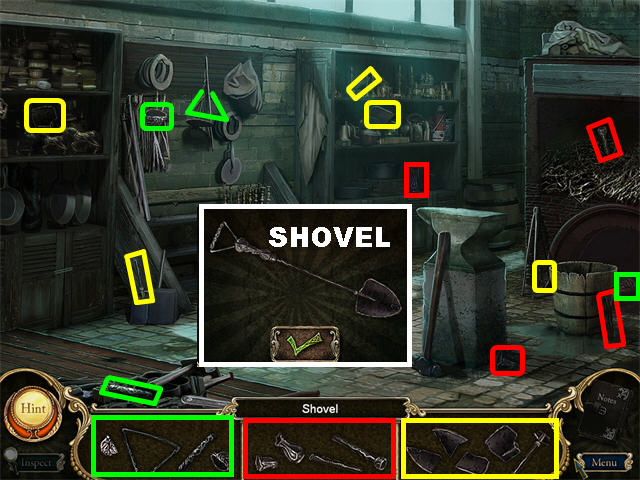
- Click on the brick wall on the left to trigger a Hidden Object Scene.
- Find all the fragmented pieces in the scene.
- The SHOVEL will be added to your inventory after all the items have been found.
- Exit the stable; go to the right.
The Well
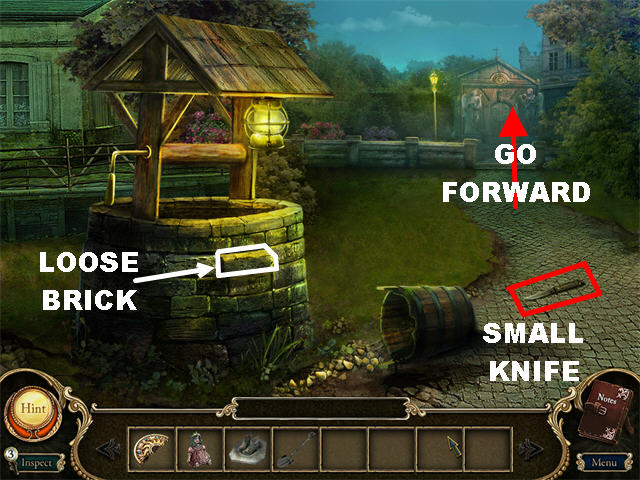
- Pick up the SMALL KNIFE on the right side of the road.
- There is nothing else to do in this scene at this time. Click on the archway on the upper right side.
Chapel Entrance
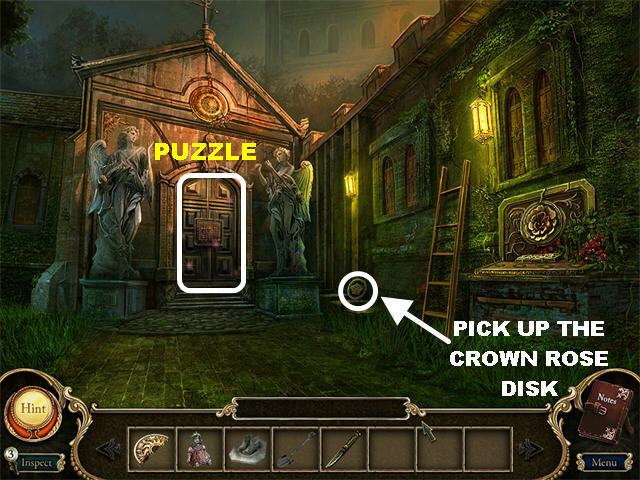
- Pick up the Crown Rose Disk on the far right.
- Remember the ladder and the monument on the right side of the scene. You will return to this area later.
- Click on the door to trigger a puzzle.
Chapel Door Puzzle
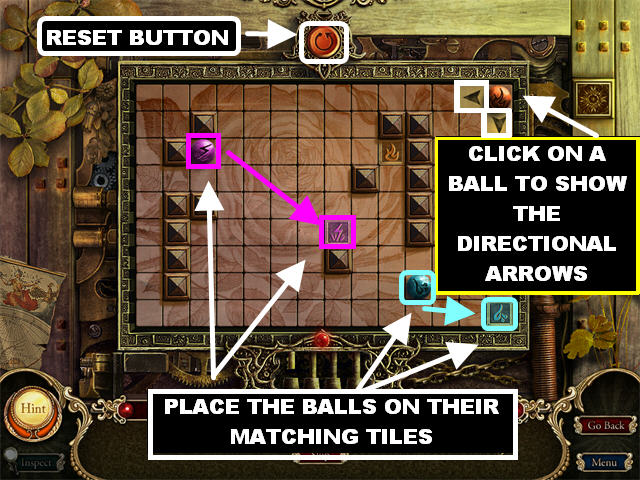
- Your goal is to move the balls into their matching colored slots.
- Click on a ball; arrows will appear to show you how many directions in which that ball can travel. Click an arrow to make the ball travel in that direction.
- Sometimes you will need to use the balls to block each other to solve the puzzle.
- Move all the balls to the correct slots to win the game. Please look at screenshots for the solution.
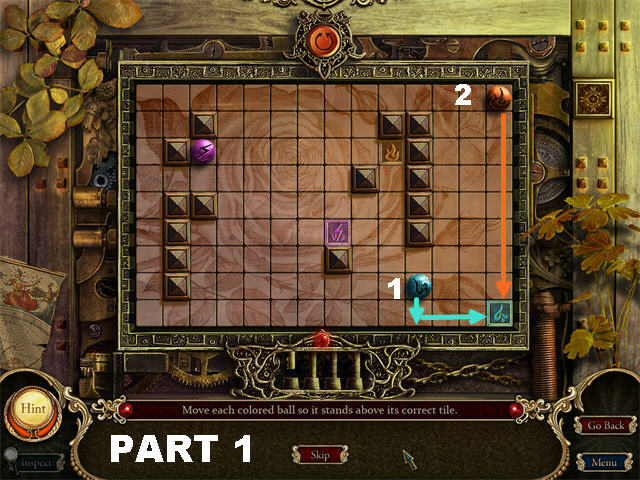
- Move the blue ball first; then move the orange ball (as shown in the screenshot).
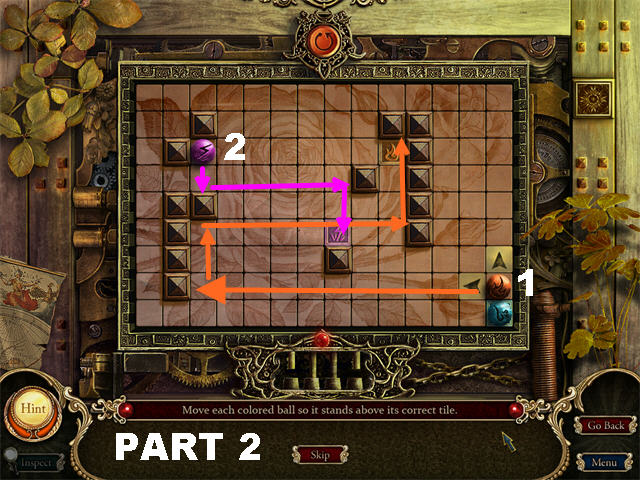
- Move the orange ball first (as shown in the screenshot); then move the purple ball.
- Go through the door after the puzzle has been solved.
Chapel
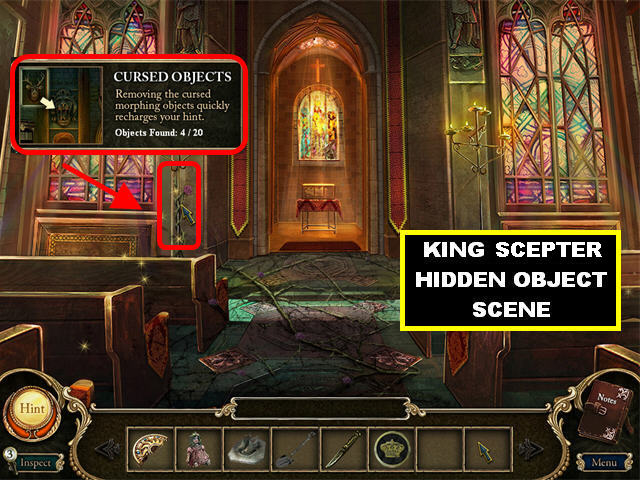
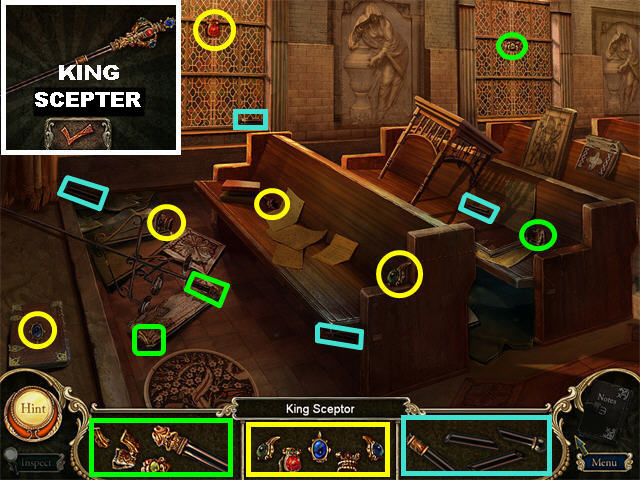
- Click on the MORPHING ROSE by the left window. This is Cursed Morphing Object #4.
- Click on the right pew to trigger a Hidden Object Scene.
- Find all the fragmented pieces in the scene.
- The KING SCEPTER will be added to your inventory after all the items have been found.
- You can go forward, but you can’t do anything there at this moment.
- Go back to the Main Gate by clicking downwards 4 times.
Main Gate
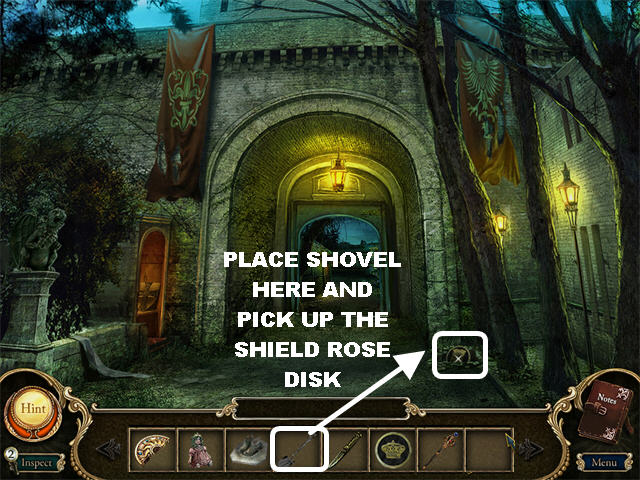
- Place the SHOVEL on the patch of dirt, on the far right.
- Pick up the SHIELD ROSE DISK inside the hole.
- Go back to the Fountain Area.
The Fountain
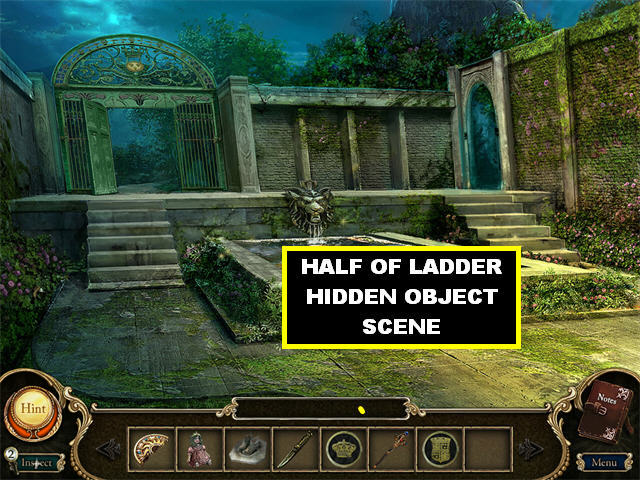
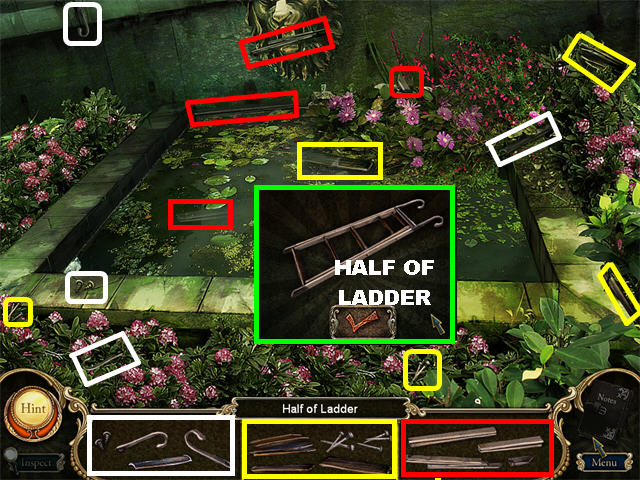
- Click on the fountain to trigger a Hidden Object Scene.
- Find all the fragmented pieces in the scene.
- The HALF OF LADDER will be added to your inventory after all the items have been found.
- Go back to the Bell Tower by clicking on the right doorway and going forward 3 times.
Bell Tower
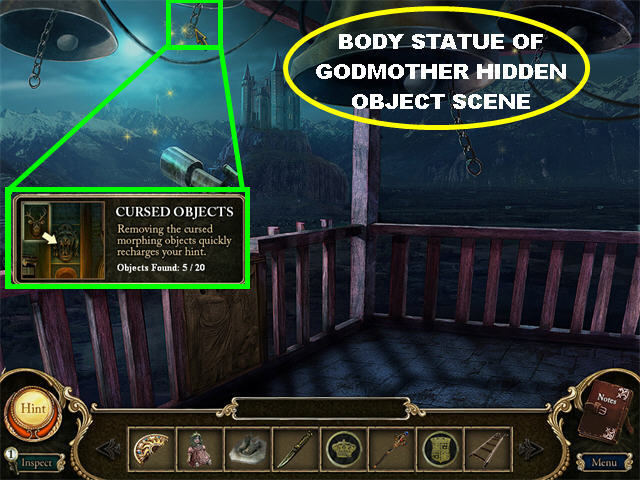
- Click on the MORPHING CHAIN in the upper left. This is Cursed Morphing Object #5.
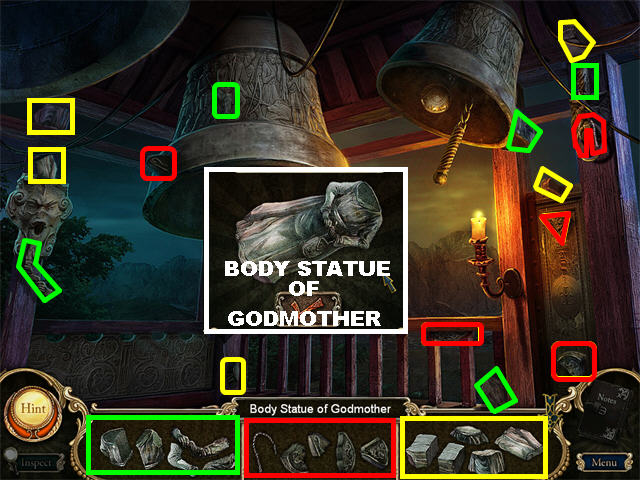
- Click on the large bell in the upper center to trigger a Hidden Object Scene.
- Find all the fragmented pieces in the scene.
- The BODY OF GODMOTHER STATUE will be added to your inventory after all the items have been found.
- Go back to the Chapel Entrance. Go back 4 times, enter the gate on the left, go forward, right, and forward one last time.
Chapel Entrance
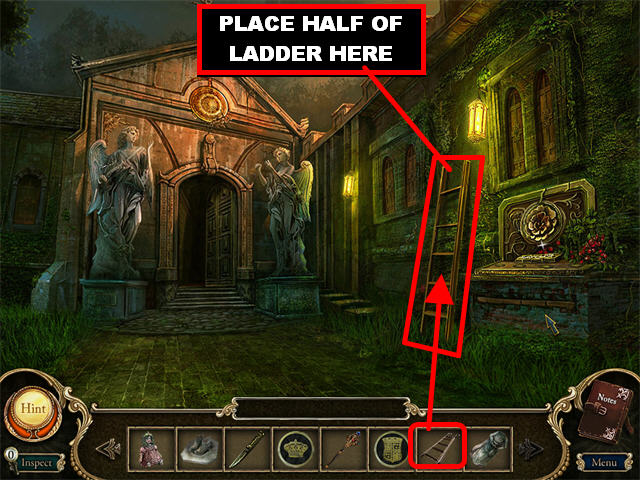
- Place the HALF OF LADDER on top of the Half Ladder on the right side of the wall.
- Climb the Ladder to reach the Roof.
Chapter 3
The Roof
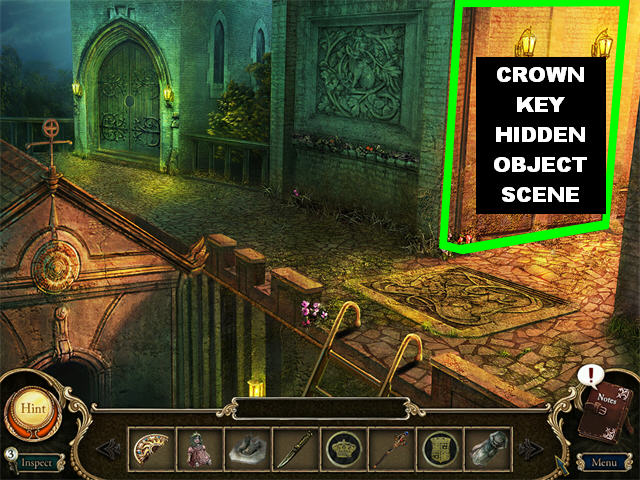
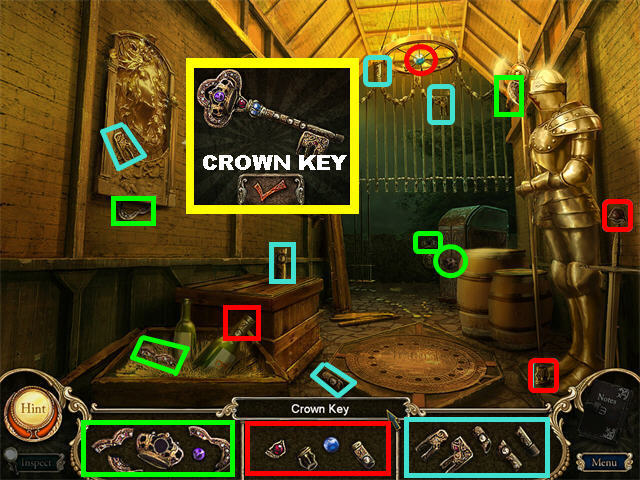
- Click on the right side of the scene to trigger a Hidden Object Scene.
- Find all the fragmented pieces in the scene.
- The CROWN KEY will be added to your inventory after all the items have been found.
- Go back to the Main Gate. Go down the steps; click downwards 3 times.
Main Gate
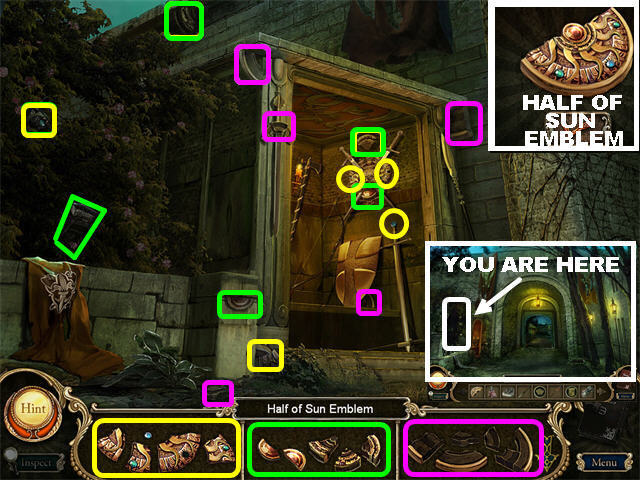
- Click on the sparkling spot on the left to access the Hidden Object Scene.
- Find all the fragmented pieces in the scene.
- The HALF OF SUN EMBLEM will be added to your inventory after all the items have been found.
- Go back to the Chapel Entrance; go up the ladder.
The Roof
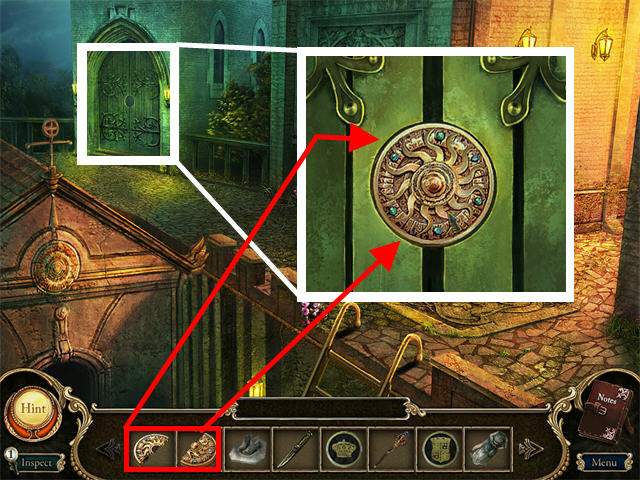
- Click on the door on the left for a closer view.
- Place the HALF OF SUN EMBLEM on the door.
- Place the SUN EMBLEM HALF on the door to unlock it.
- Go through the door.
Dining Room
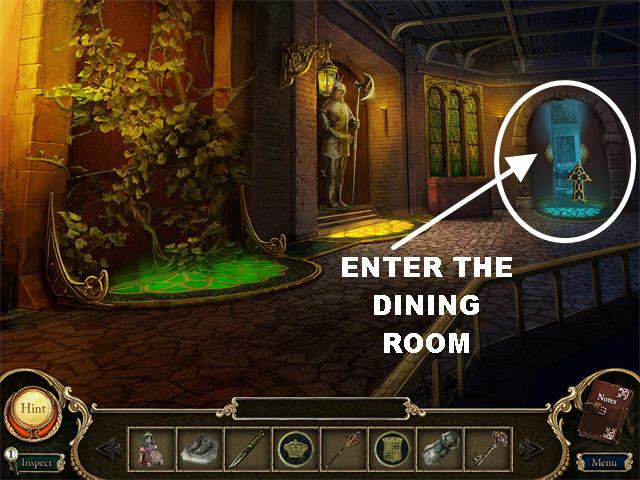
- Click on the door in the back of the corridor to open it.
- Go through the door.
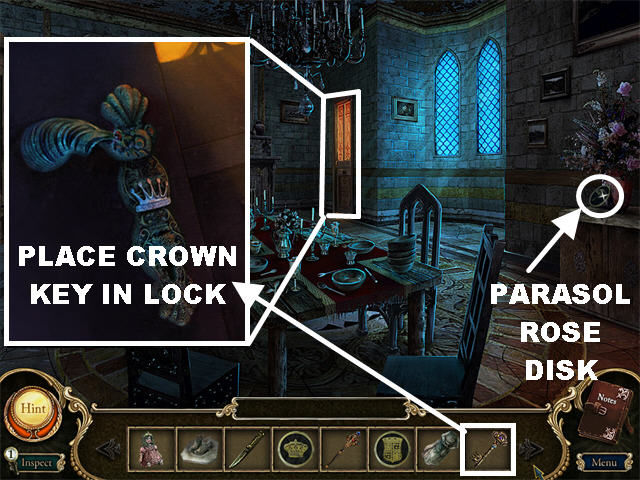
- Pick up the PARASOL ROSE DISK on the counter on the right.
- Click on the door in the back of the scene for a closer look.
- Place the CROWN KEY on the lock.
- Go through the door to access the Throne Room.
Throne Room
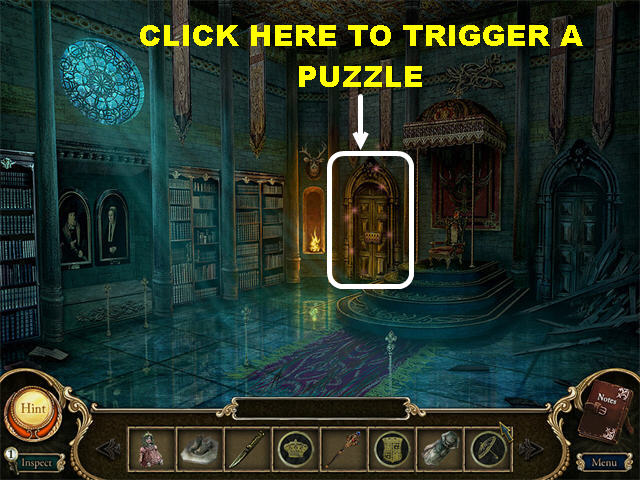
- Click on the glittering door to trigger a puzzle.
- Your goal is to match all the appropriate items in the scene.
- Look at the image above the puzzle; then try to find the 2 items behind the curtains that are related to those images.
- When you’ve made a correct match, a bell will ring and a new set of items will appear.
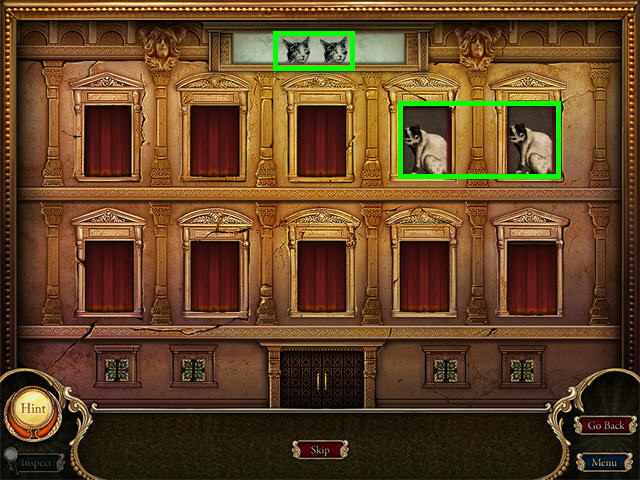
- Find the 2 black and white cats behind the curtains.
- Please look at the screenshot for the solution (the locations of the images may vary).
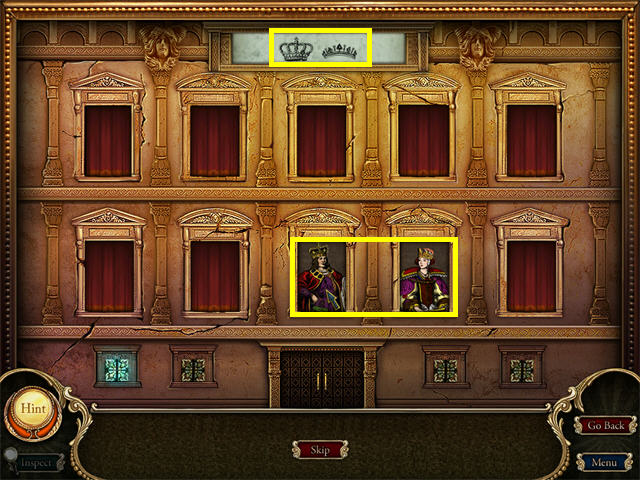
- Search for the King and Queen behind the curtains.
- Please look at the screenshot for the solution (the locations of the images may vary).
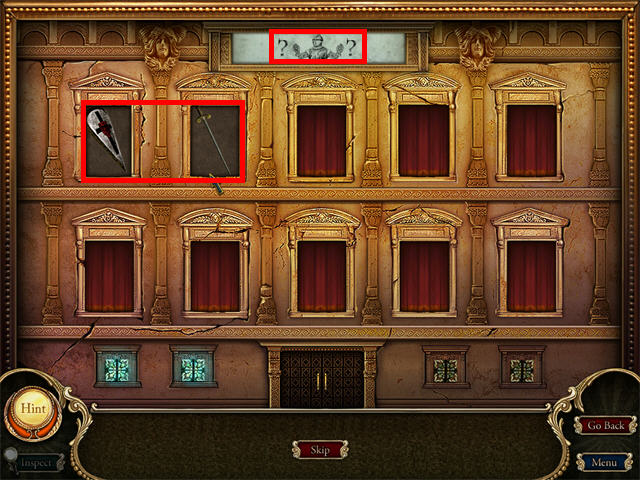
- Search for the Shield and Sword behind the curtains.
- Please look at the screenshot for the solution (the locations of the images may vary).
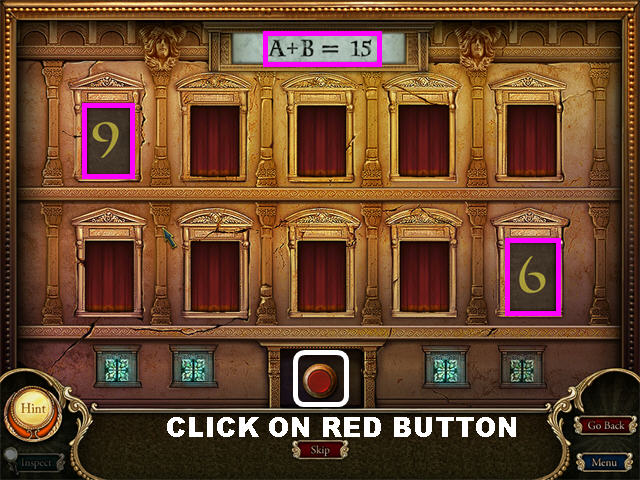
- Search for the “9” and the “6” behind the curtains.
- Please look at the screenshot for the solution (the locations of the images may vary).
- Once the puzzle has been solved, a red button will appear below; click that button to open the door.
- Go through the door to access the Godmother’s Room.
Godmother’s Room
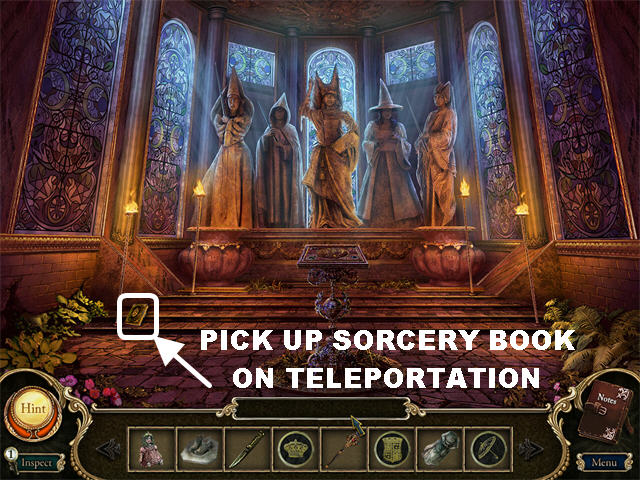
- Pick up the SORCERY BOOK ON TELEPORTATION on the left side of the steps.
- Go back to the Stable by clicking downwards until you reach it.
Stable
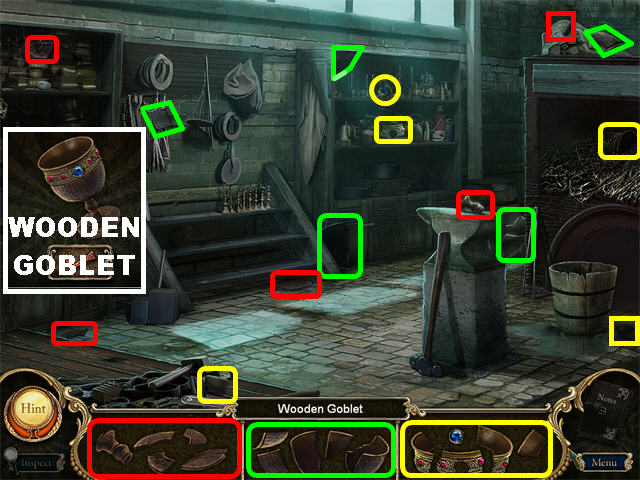
- Click on the left to access the Hidden Object Scene.
- Find all the fragmented pieces in the scene.
- The WOODEN GOBLET will be added to your inventory after all the items have been found.
- Go back to the Dining Room by climbing the ladder outside the Chapel. Enter the door at the end of the hallway in the Castle.
Chapter 4
Dining Room
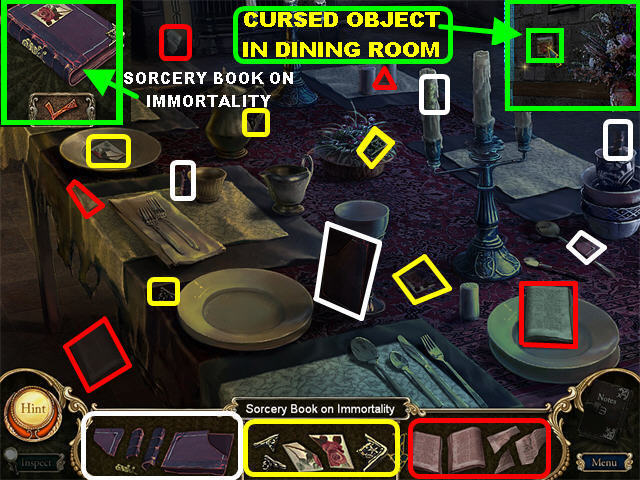
- Click on the MORPHING PICTURE on the right wall. This is Cursed Morphing Object #6.
- Click on the dining room table to trigger a Hidden Object Scene.
- Find all the fragmented pieces in the scene.
- The SORCERY BOOK ON IMMORTALITY will be added to your inventory after all the items have been found.
- Go to the Throne Room by entering the door in the back of the Dining Room.
Throne Room
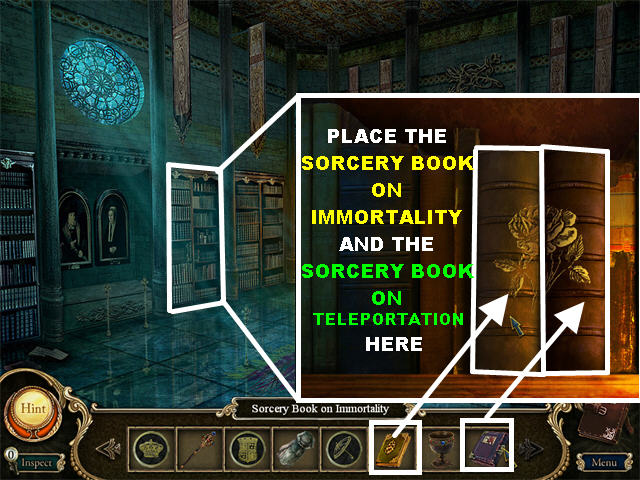
- Click on the books on the left side of the scene for a closer view.
- Place the SORCERY BOOK ON IMMORTALITY in the empty slot.
- Place the SORCERY BOOK ON TELEPORTATION in the other empty slot.
- Go through the secret passageway.
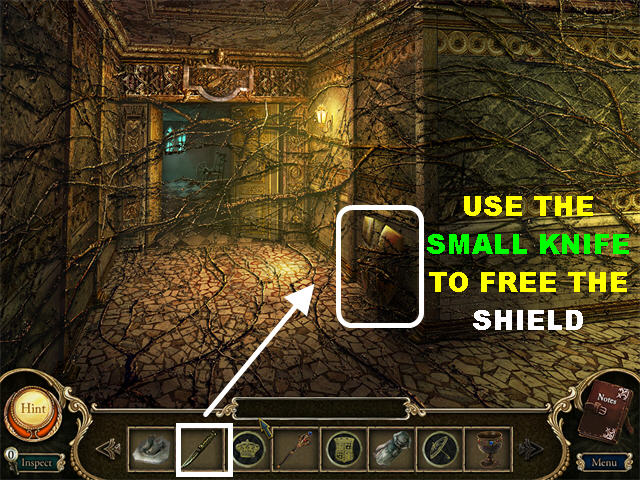
- You’ve entered the Spindle Room Hallway but you cannot access it because the vines are too sharp.
- Use the SMALL KNIFE to cut the vines around the Shield on the wall.
- Click the SHIELD to add it to your inventory.
- Go back to the Dining Room.
Chapter 5
Dining Room
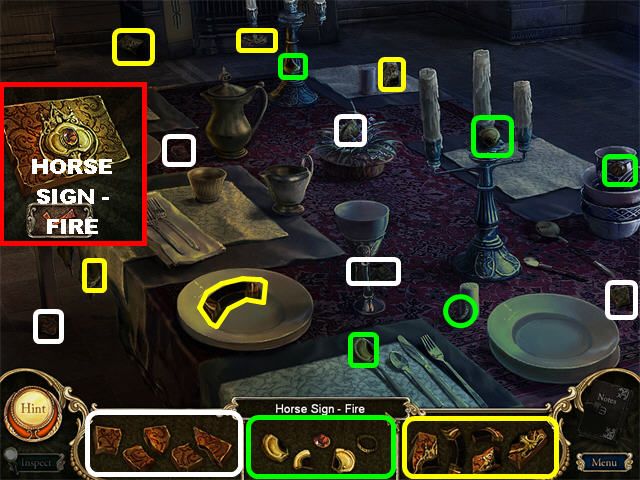
- Click on the dining room table to trigger a Hidden Object Scene.
- Find all the fragmented pieces in the scene.
- The HORSE SIGN – FIRE will be added to your inventory after all the items have been found.
- Go back to the Corridor.
Corridor
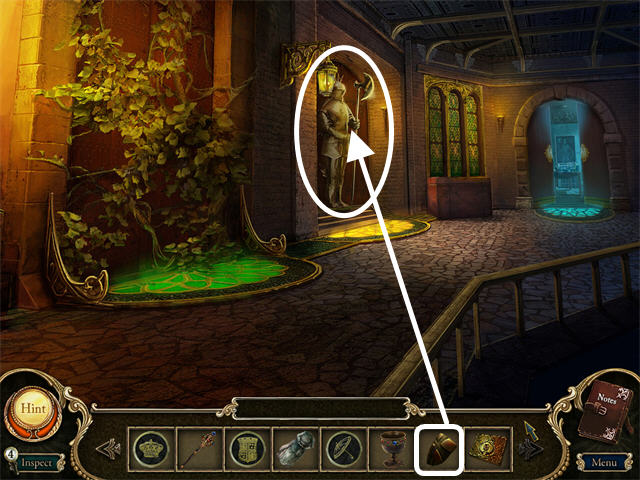
- Place the KNIGHT’S SHIELD on the suit of armor by the middle door; it will move aside.
- Click on the door to open it. Go through the door.
Music Room
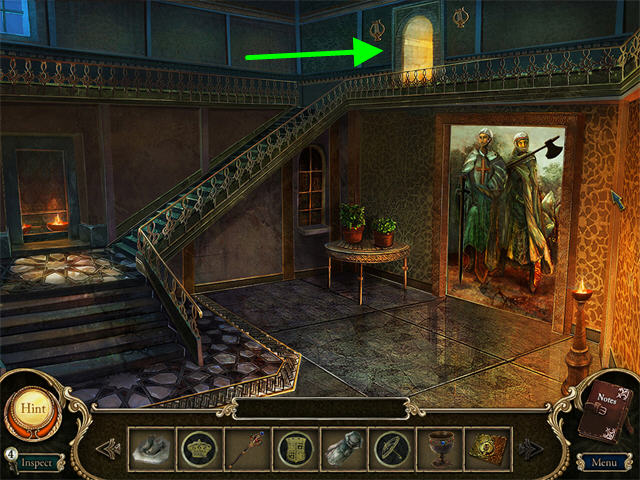
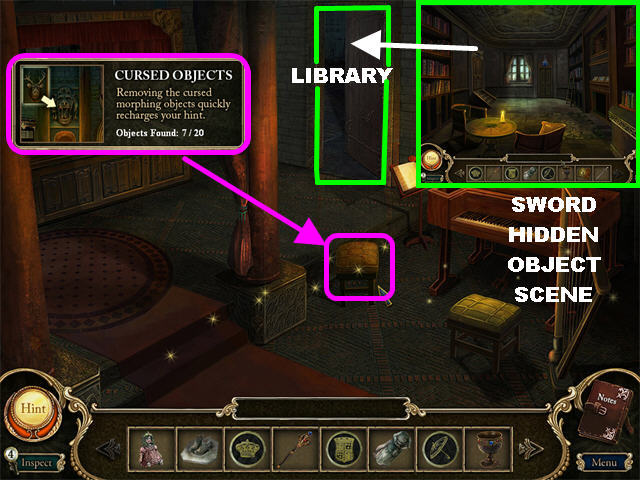
- Enter the door at the top of the stairs.
- Click on the MORPHING STOOL to the left of the piano. This is Cursed Morphing Object #7.
- Click on the piano to trigger a Hidden Object Scene.
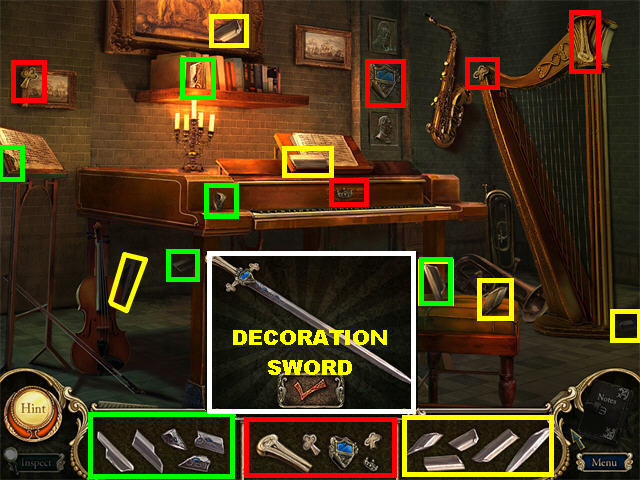
- Find all the fragmented pieces in the scene.
- The DECORATION SWORD will be added to your inventory after all the items have been found.
- Go into the Library by entering the door by the piano. There is not much you can do here now.
- Go back to the Roof.
Roof
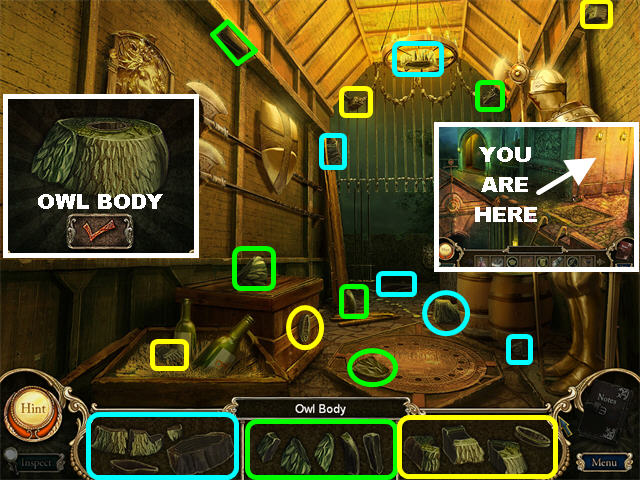
- Click on the Hidden Object Scene on the right.
- Find all the fragmented pieces in the scene.
- The OWL BODY will be added to your inventory after all the items have been found.
- Go down the ladder; enter the Chapel.
Chapel
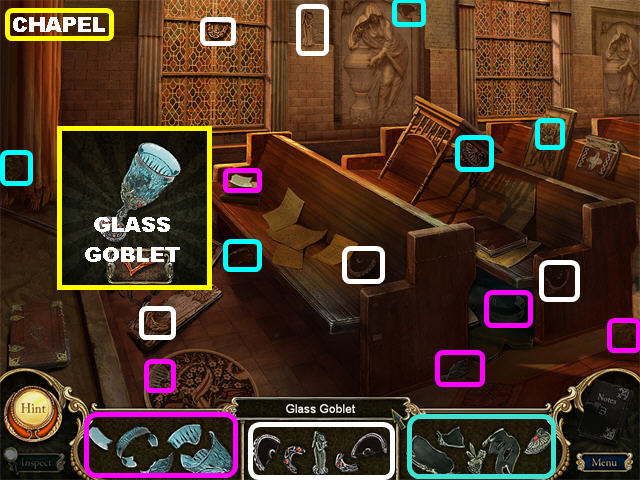
- Click on the Hidden Object Scene on the right.
- Find all the fragmented pieces in the scene.
- The GLASS GOBLET will be added to your inventory after all the items have been found.
- Click in the back of the scene to access the Stained Glass Window.
Stained Glass Window
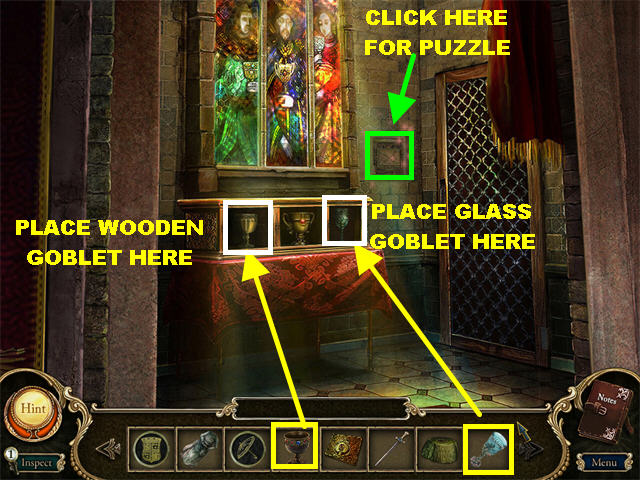
- Place the GLASS GOBLET in the third cubbyhole.
- Place the WOODEN GOBLET in the first cubbyhole.
- As soon as the Goblets are placed, a puzzle appears on the right side of the back wall; click on it.
Chapel Marble Puzzle
- Your goal is to move the balls into their matching colored slots.
- Click on a ball; arrows will appear to show you in how many directions that ball can travel. Click an arrow to make the ball travel in that direction.
- Sometimes you will need to use the balls to block each other to solve the puzzle.
- Move all the balls to the correct slots to win the game. Please look at the next set of screenshots for the solution.
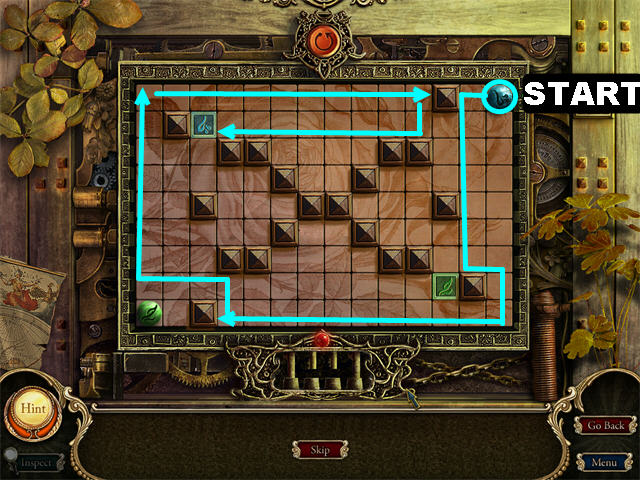
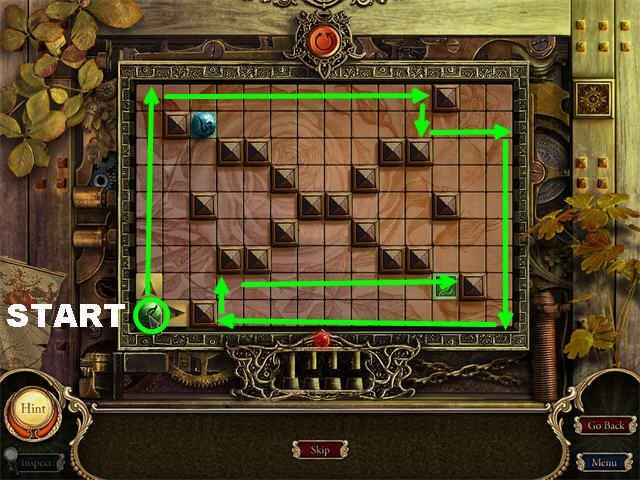
- Move the blue ball (as shown in the first screenshot).
- Move the green ball (as shown in the second screenshot).
Dungeon
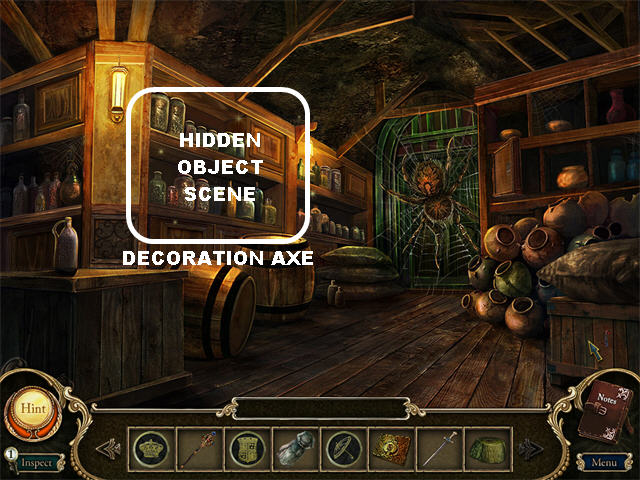
- When you first enter the Dungeon, you encounter a giant spider blocking the door. You will have to get rid of it later.
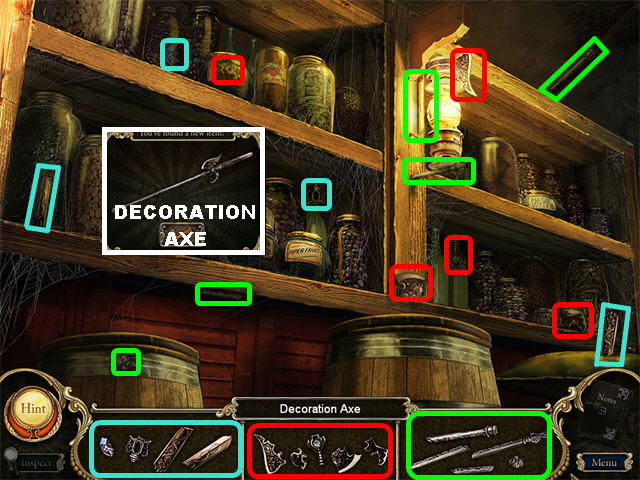
- Click on the Hidden Object Scene.
- Find all the fragmented pieces in the scene.
- The DECORATION AXE will be added to your inventory after all the items have been found.
- Leave the chapel; go up the ladder and enter through the middle door of the Castle’s hallway.
Corridor
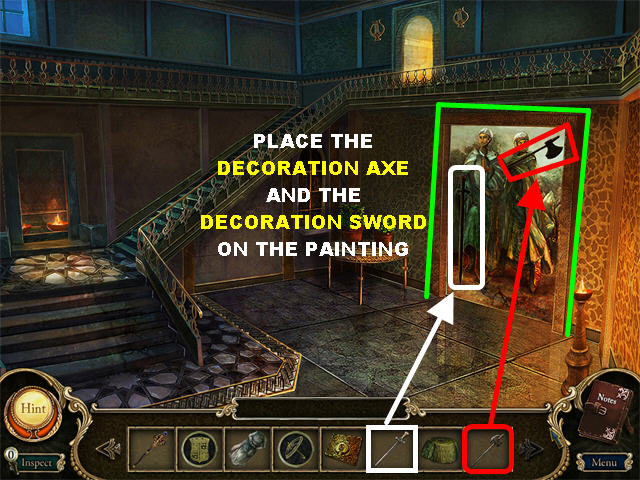
- Place the DECORATION AXE on the Knight Painting on the right.
- Place the DECORATION SWORD on the Knight Painting on the right.
- Click on the painting to discover a secret doorway. Go through the door.
Chapter 6
Armory
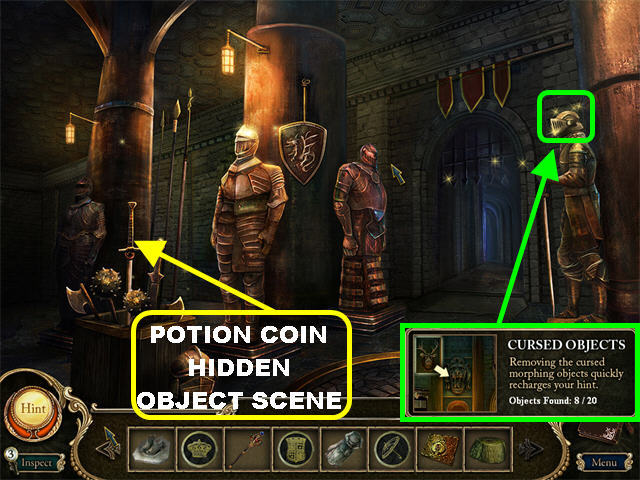
- Click on the MORPHING HELMET on the knight on the right side of the scene. This is Cursed Morphing Object #8.
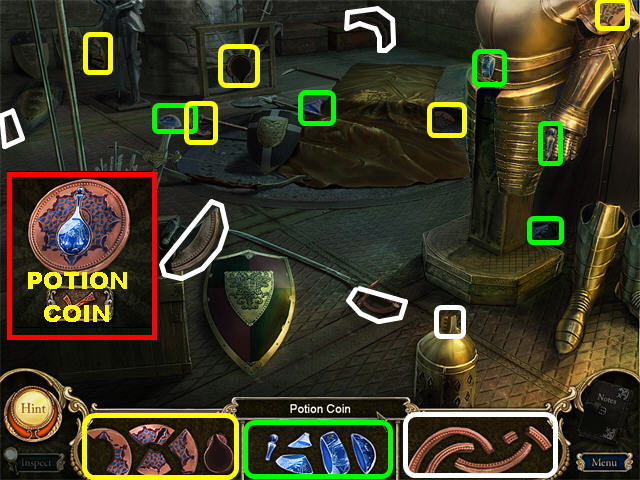
- Click on the Hidden Object Scene.
- Find all the fragmented pieces in the scene.
- The POTION COIN will be added to your inventory after all the items have been found.
- Once you find all the items, you can go straight ahead to the Prison; but you can’t do anything there at the moment.
- Go back to the Staircase, go up the steps and enter the Music Room.
Music Room
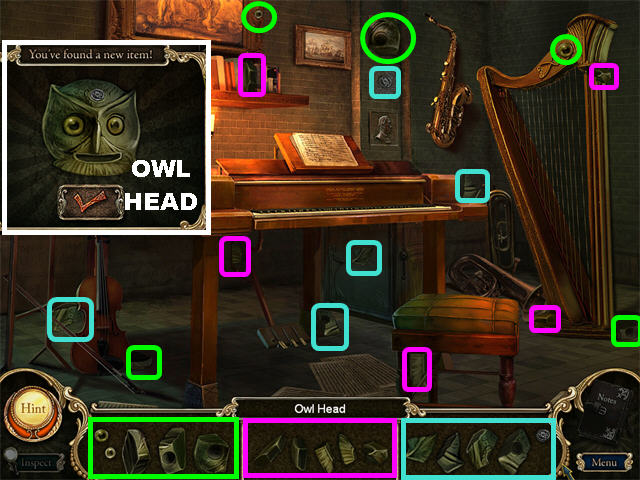
- Click on the piano to enter a Hidden Object Scene.
- Find all the fragmented pieces in the scene.
- The OWL HEAD will be added to your inventory after all the items have been found.
- Enter the door next to the piano to access the Library.
Library
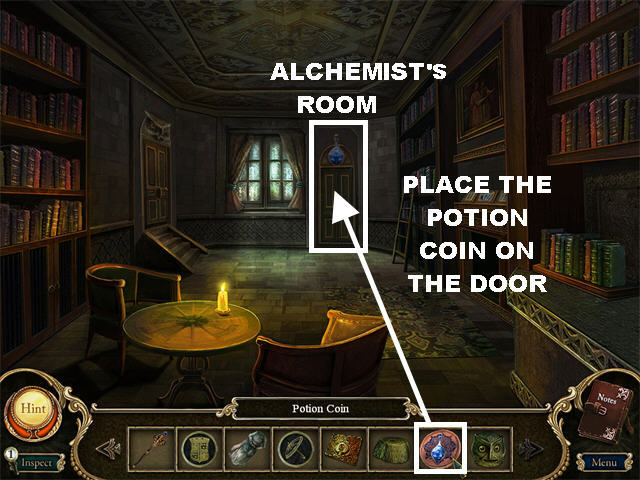
- Place the POTION COIN on the door in the back of the scene to unlock it.
- Go through the door to access the Alchemist’s Room.
Alchemist’s Room
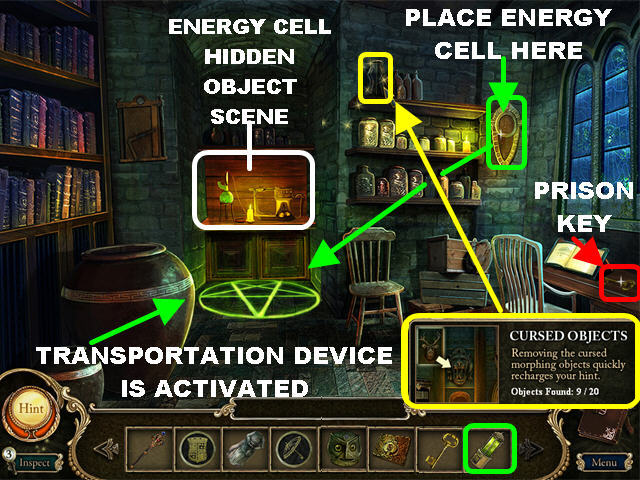
- Click on the MORPHING BOTTLE on the top shelf, on the right side of the room. This is Cursed Morphing Object #9.
- Pick up the PRISON KEY on the desk in the lower right.
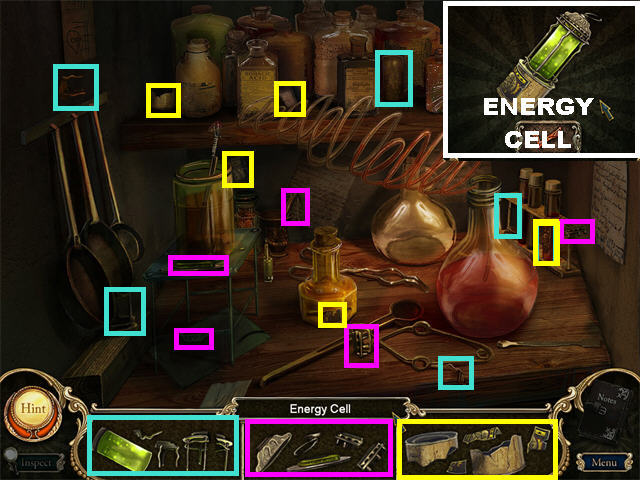
- Click on the Hidden Object Scene on the left.
- Find all the fragmented pieces in the scene.
- The ENERGY CELL will be added to your inventory after all the items have been found.
- Place the ENERGY CELL in the slot in the upper right side of the back wall. This action activates the Transportation Device.
- The Transportation Device can be used to go in and out of the Castle.
- When you click on the Transportation Device while in the Alchemist’s Room, you will be taken straight to the Swing Area.
- Go to the Swing Area now; then go to the Fountain by clicking downwards.
Chapter 7
The Fountain
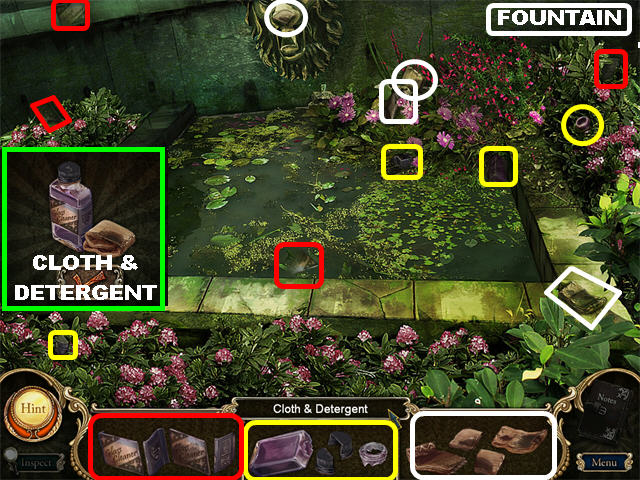
- Click on the fountain to access the Hidden Object Scene.
- Find all the fragmented pieces in the scene.
- The CLOTH & DETERGENT will be added to your inventory after all the items have been found.
- From the fountain area, click downwards twice to go back to the Briar Rose Statue Garden.
Briar Rose Statue Garden
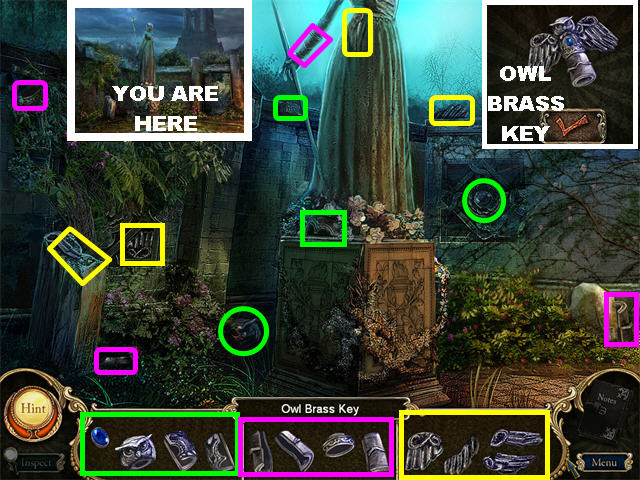
- Click on the Hidden Object Scene at the base of the statue.
- Find all the fragmented pieces in the scene.
- The OWL BRASS KEY will be added to your inventory after all the items have been found.
- Go back to the Main Gate by clicking forward twice and going through the gate on the left
Main Gate
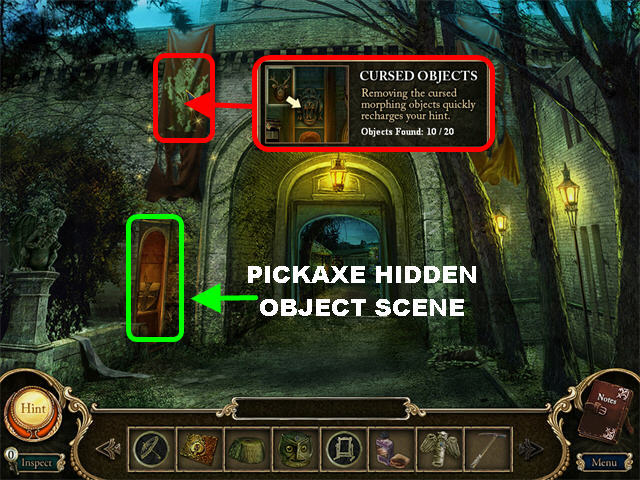
- Click on the MORPHING FLAG in the upper left. This is Cursed Morphing Object #10.
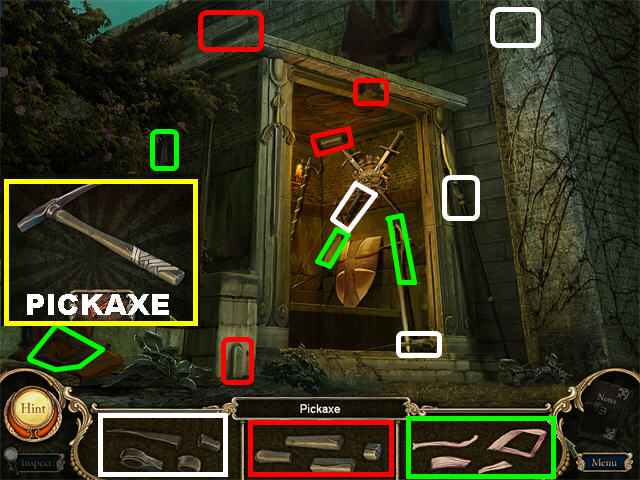
- Click on the Hidden Object Scene on the left.
- Find all the fragmented pieces in the scene.
- The PICKAXE will be added to your inventory after all the items have been found.
- Go forward.
Courtyard
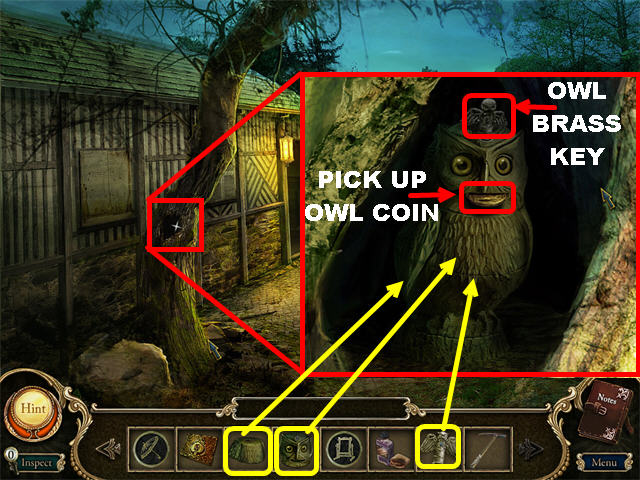
- Click on the hole in the tree for a closer view.
- Place the OWL BODY on the owl statue base.
- Place the OWL HEAD on top of the owl body.
- Place the OWL BRASS KEY on the owl.
- Pick up the OWL COIN that appears inside the owl’s mouth.
- Go back to the Castle by turning right and then forward. Go up the ladder, through the door on left, and into the back room.
Chapter 8
Dining Room
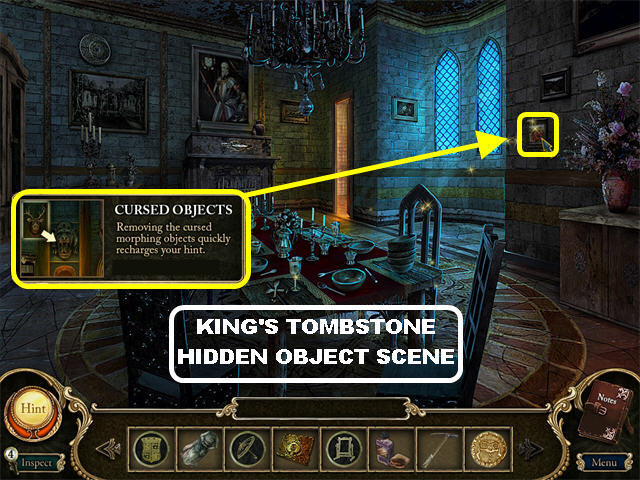
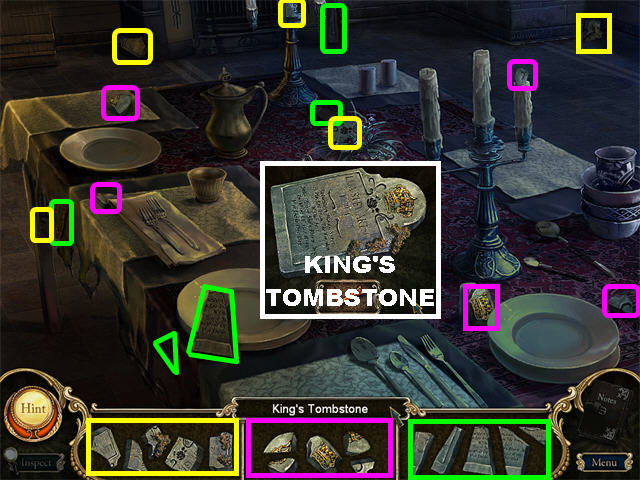
- Click on the MORPHING PICTURE on the right side of the wall if you haven’t already done so.
- Click on the dining room table to enter a Hidden Object Scene.
- Find all the fragmented pieces in the scene.
- The KING’S TOMBSTONE will be added to your inventory after all the items have been found.
- Go back to the Corridor; enter through the knight’s door and go right to enter the Armor Room.
Armor Room
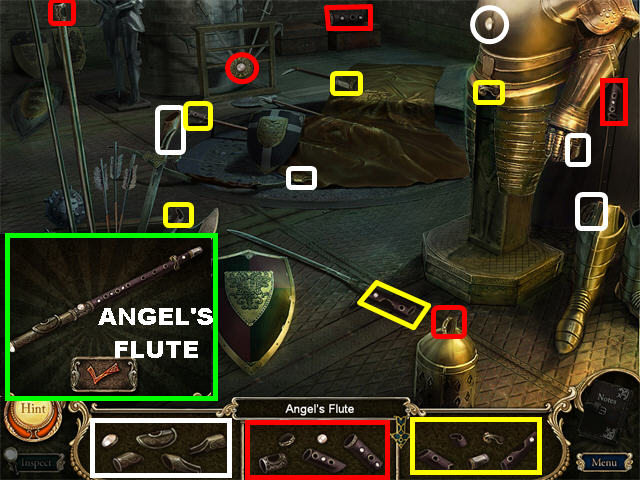
- Click on the Hidden Object Scene on the left.
- Find all the fragmented pieces in the scene.
- The ANGEL’S FLUTE will be added to your inventory after all the items have been found.
- Go forward.
Prison
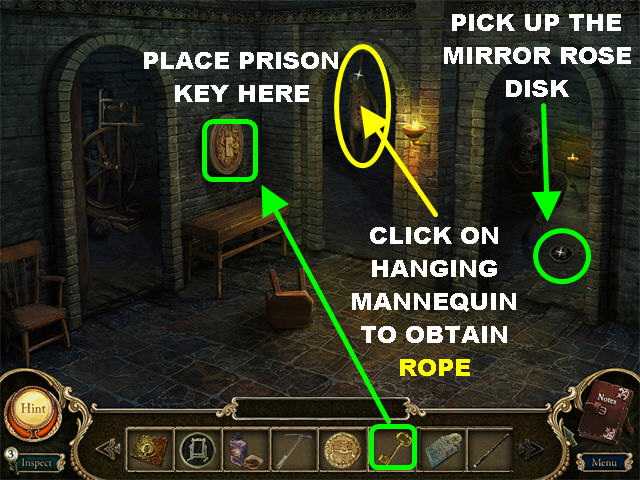
- Place the PRISON KEY on the lock on the left side of the room to open all 3 cells.
- Pick up the MIRROR ROSE DISK inside of the third cell.
- Click on the hanging mannequin in the center cell; it will fall to the ground. The STURDY ROPE will be added to your inventory.
- Go back to the Music Room.
Music Room
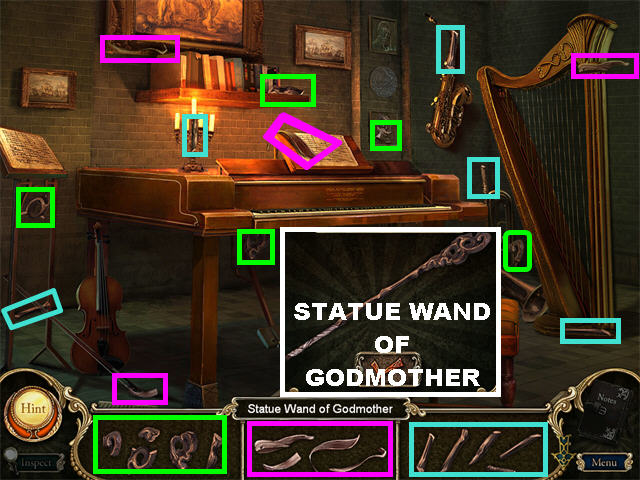
- Click on the Hidden Object Scene on the right.
- Find all the fragmented pieces in the scene.
- The WAND OF GODMOTHER STATUE will be added to your inventory after all the items have been found.
- Go to the Alchemist’s Room by clicking on the door next to the piano; then entering the door in the back.
Alchemist’s Room
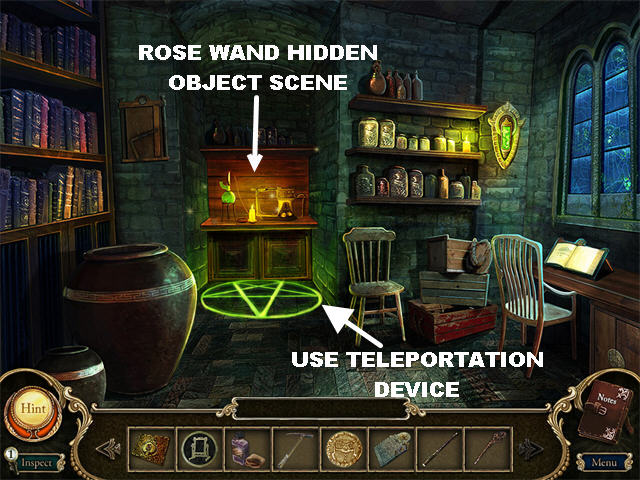
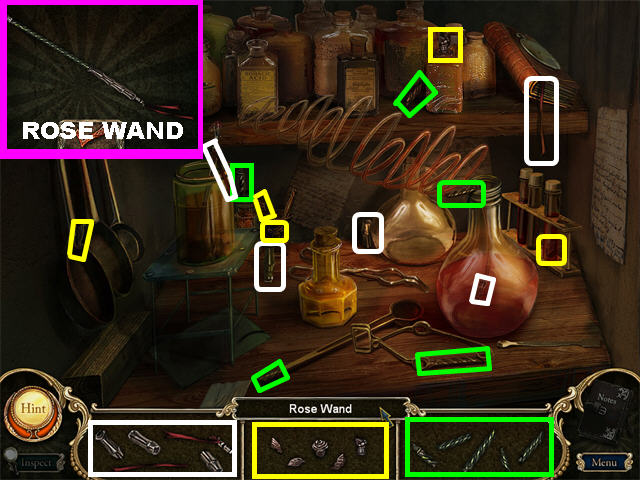
- Click on the Hidden Object Scene.
- Find all the fragmented pieces in the scene.
- The ROSE WAND will be added to your inventory after all the items have been found.
- Click on the Transportation Device to go back to the Swing Area. Return to the Bell Tower by going forward 3 times.
Bell Tower
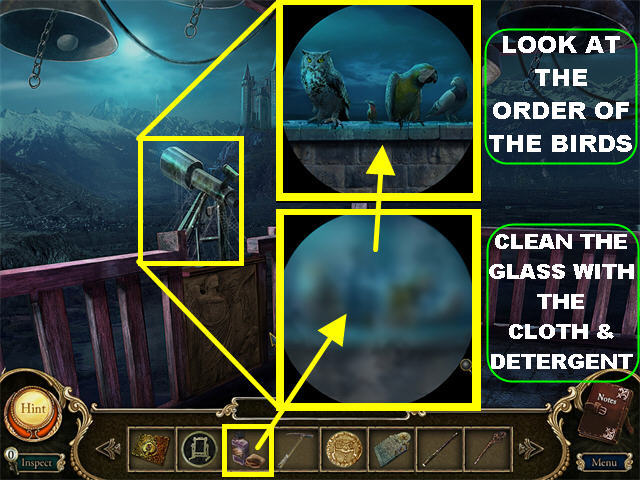
- Click on the telescope on the left for a closer view. The glass piece is dirty.
- Place the CLOTH & DETERGENT on the glass to clean it.
- You will see an image of birds. Pay close attention to the positions of the birds for a later puzzle.
- Go back to the Alchemist’s Room by using the Transportation Device by the Swing. Exit the Alchemist’s Room to access the Library.
Library
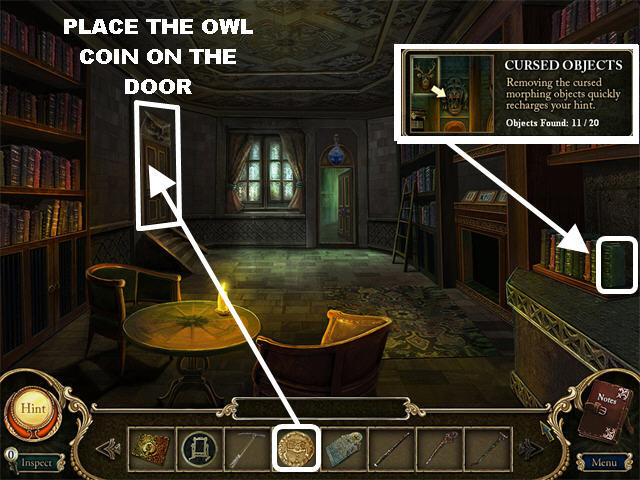
- Click on the MORPHING BOOK in the lower right. This is Cursed Morphing Object #11.
- Place the OWL COIN on the left door to open it.
- Go through the door.
Aviary Room
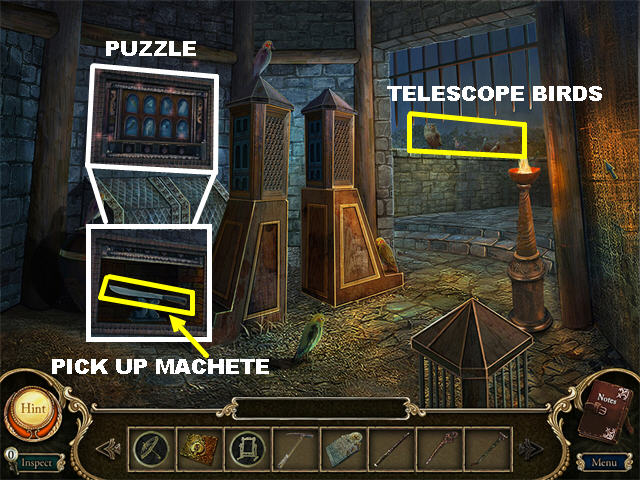
- The birds you saw in the telescope are in the balcony.
- Click on the sparkling frame on the left to trigger a puzzle.
Bird Puzzle
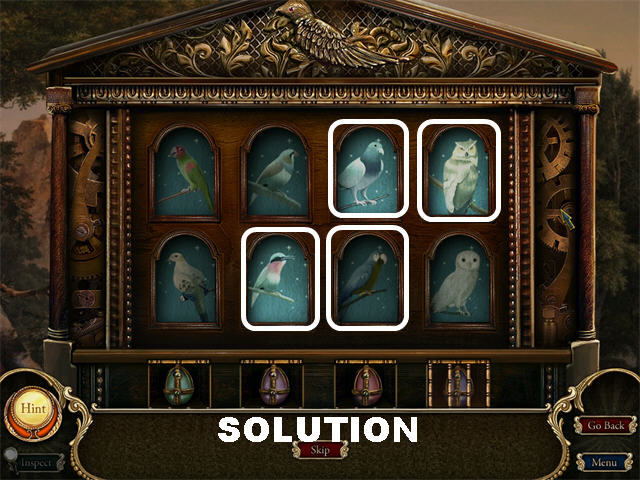
- Your goal is to click on the birds according to the telescope image in the Bell Tower.
- The solution is always the same, but the birds may appear in different positions each time you play.
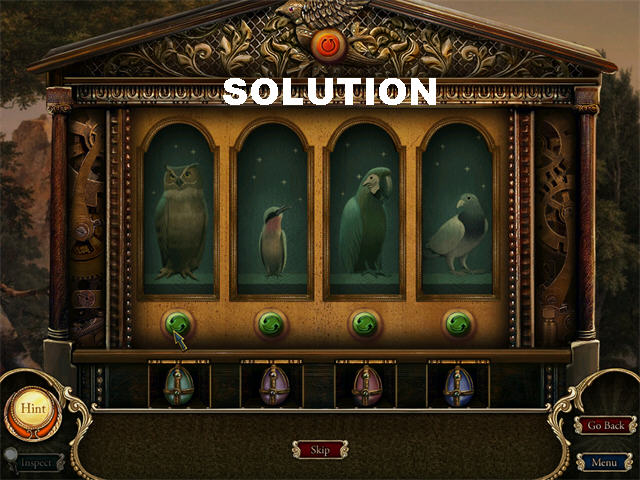
- Your goal is to place the birds in the same positions as in the balcony.
- Click on any two green buttons to swap the positions of the birds.
- Once the puzzle has been solved, a secret niche will appear behind the picture.
- Pick up the MACHETE in the niche in the wall.
- Go to the Corridor.
Corridor
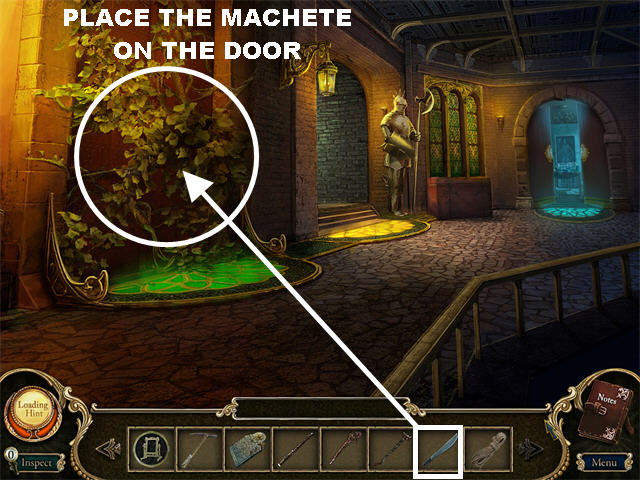
- Place the MACHETE on the vine-covered door.
- Click on the door to trigger a puzzle.
Marble Puzzle
- Your goal is to move the balls into their matching colored slots.
- Click on a ball and arrows will appear, showing you in how many directions that ball can travel. Click an arrow to make the ball travel in that direction.
- Sometimes you will need to use the balls to block each other to solve the puzzle.
- Move all the balls to the correct slots to win the game. Please look at the next sets of screenshots for the solution.
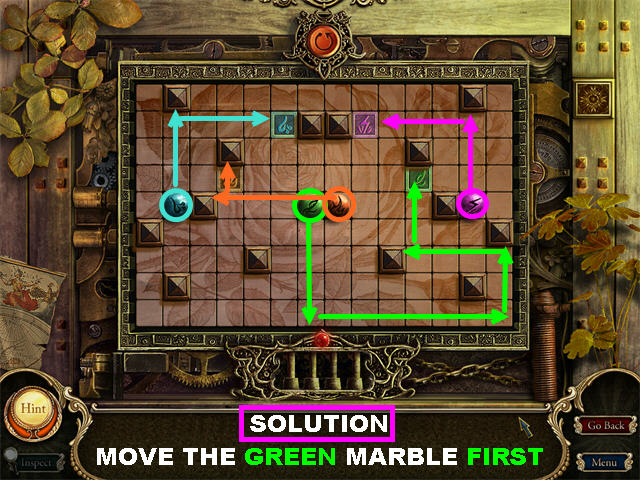
- Start with the green marble first.
- You can then proceed with any of the other marbles.
- Go through the door once it opens.
Chapter 9
Outside Corridor
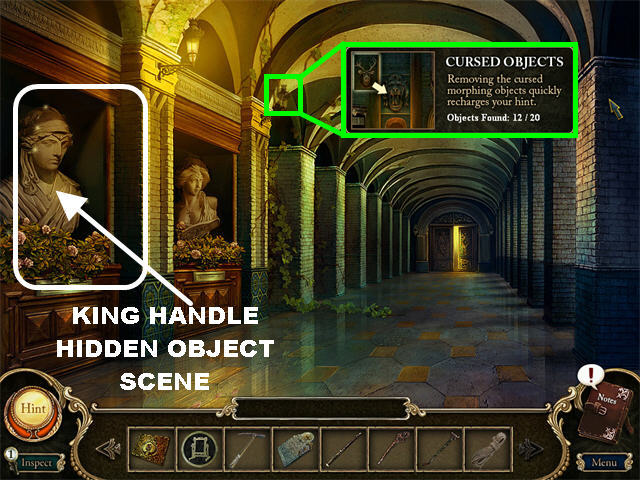
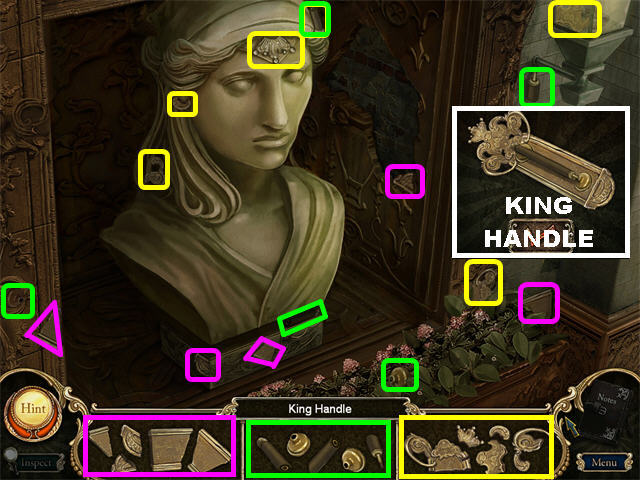
- Click on the MORPHING LANTERN in the upper left. This is Cursed Morphing Object #12.
- Click on the sparkling bust to enter a Hidden Object Scene.
- Find all the fragmented pieces in the scene.
- The KING HANDLE will be added to your inventory after all the items have been found.
- Go straight back to access the Hall of Statues.
Hall of Statues
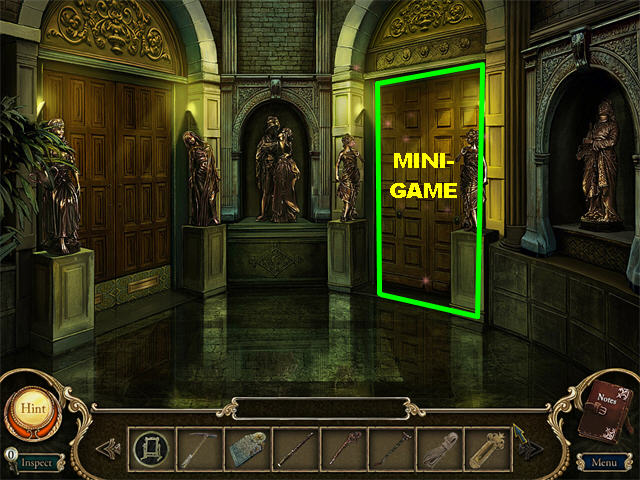
- Click on the right door to trigger a puzzle.
Marble Mini Game
- Your goal is to move the balls into their matching colored slots.
- Click on a ball and arrows will appear, showing you in how many directions that ball can travel. Click an arrow to make the ball travel in that direction.
- Sometimes you will need to use the balls to block each other to solve the puzzle.
- Move all the balls to the correct slots to win the game. Please look at the next set of screenshots for the solution.
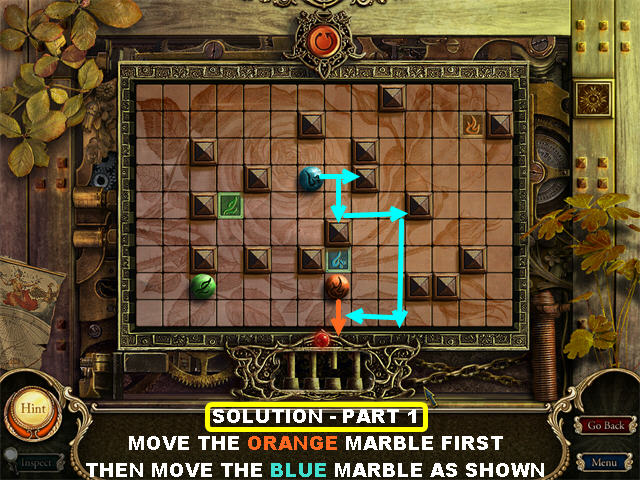
- Move the orange marble to the position shown. You want to place it so the blue ball can land next to it.
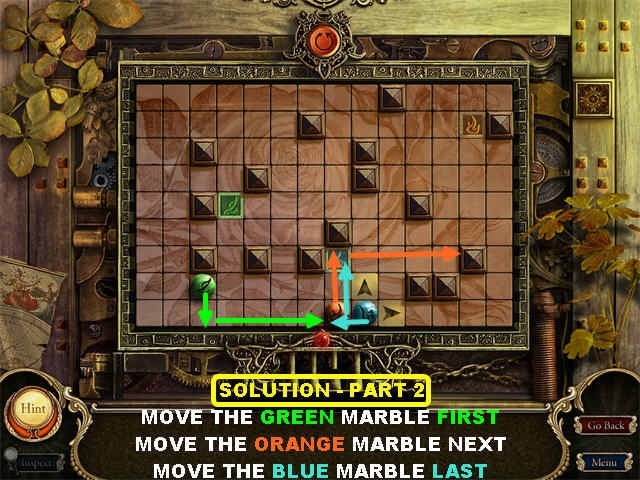
- Move the green marble down once and to the right. It will land next to the orange marble.
- Move the orange marble as shown.
- Move the blue marble to the left once; then upwards.
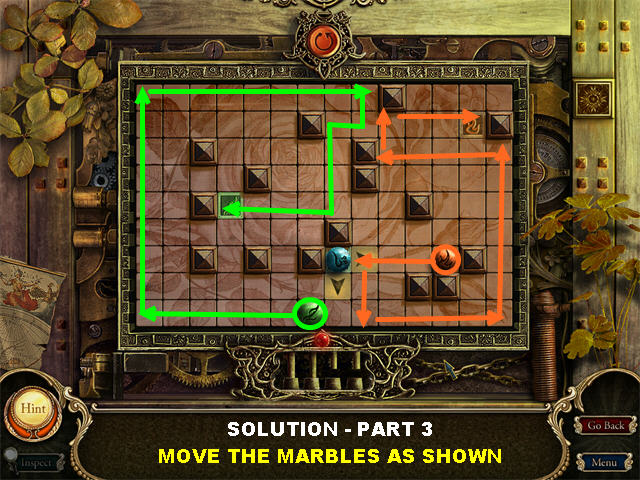
- For this last step, you can start with whichever marble you prefer.
- Once the door opens, go through it to access the Princess’ Room.
Princess’ Room
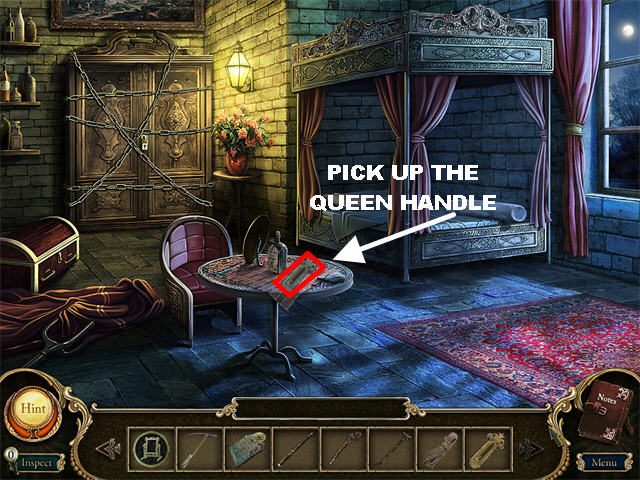
- Pick up the QUEEN HANDLE on the table.
- There is a chained cabinet in the back. You don’t have the tools to open it right now.
- Go back to the Hall of Statues.
Hall of Statues
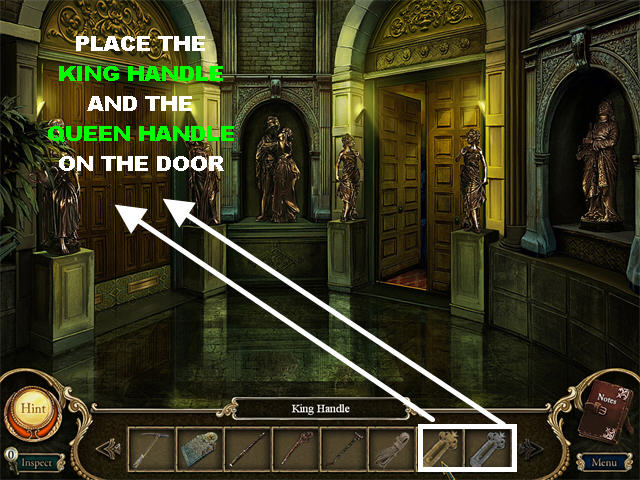
- Place the KING HANDLE on the left door.
- Place the QUEEN HANDLE on the left door.
- Go through the door to access the Royal Bedroom.
Royal Bedroom
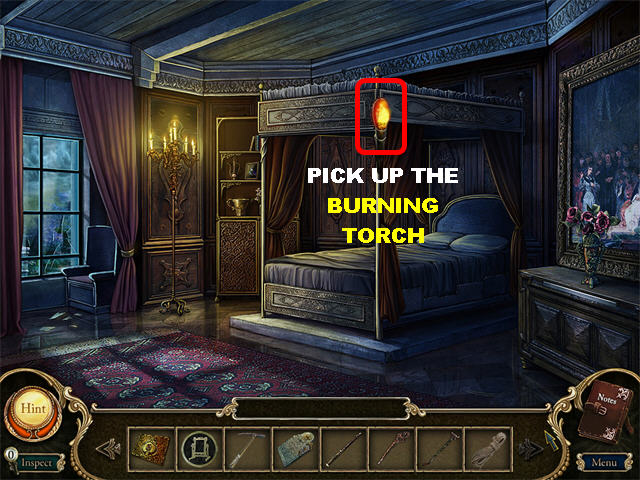
- Pick up the BURNING TORCH above the bed.
- Leave the room; go back to the Outside Corridor.
Chapter 10
Outside Corridor
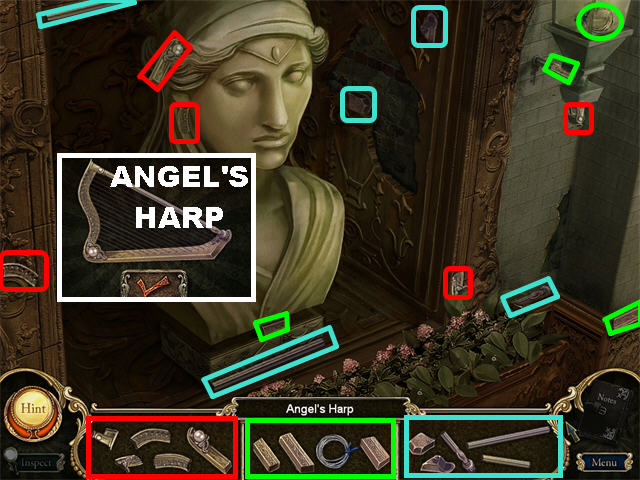
- This is the corridor with the 2 large busts.
- Click on the left bust to play a Hidden Object Scene.
- Find all the fragmented pieces in the scene.
- The ANGEL’S HARP will be added to your inventory after all the items have been found.
- Go back to the Roof.
Roof
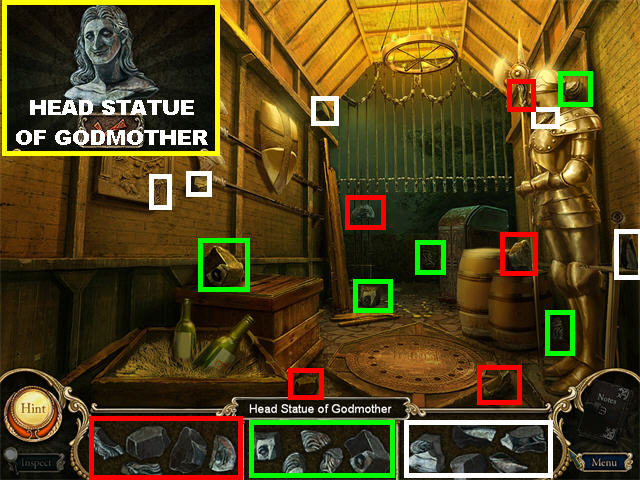
- This is the wall outside the Castle, by the ladder. Click on the Hidden Object Scene on the right.
- Find all the fragmented pieces in the scene.
- The HEAD OF GODMOTHER STATUE will be added to your inventory after all the items have been found.
- Go back down to the Chapel Entrance by using the ladder.
Chapel
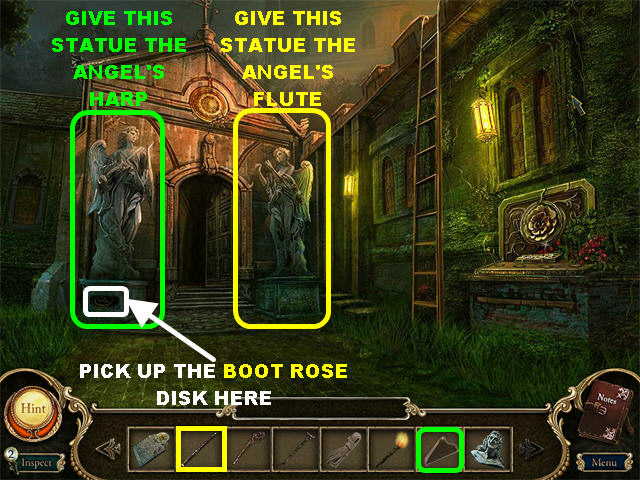
- Place the ANGEL’S FLUTE on the right angel statue.
- Place the ANGEL’S HARP on the left angel statue.
- The base of the angel statue on the left opens up.
- Pick up the BOOT ROSE DISK at the base of the left statue.
- Go into the Chapel.
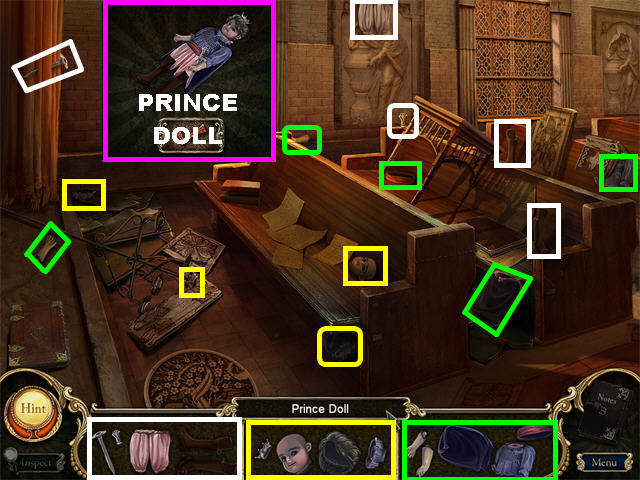
- Click on the Hidden Object Scene.
- Find all the fragmented pieces in the scene.
- The PRINCE DOLL will be added to your inventory after all the items have been found.
- Go to the back of the chapel and enter the door on the right.
Dungeon
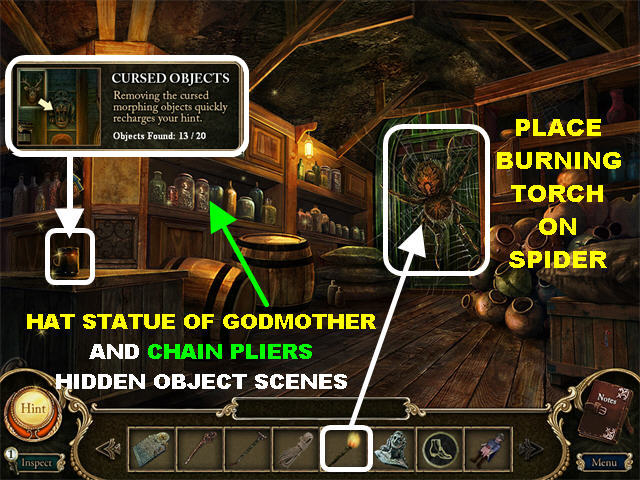
- Click on the MORPHING BOTTLE in the lower left, on top of the crate. This is Cursed Morphing Object #13.
- Place the BURNING TORCH on the giant spider.
- Click on the door to open it after the spider disappears. You can go through this door now, or after you complete the Hidden Object Scenes.
- Click on the Hidden Object Scene.
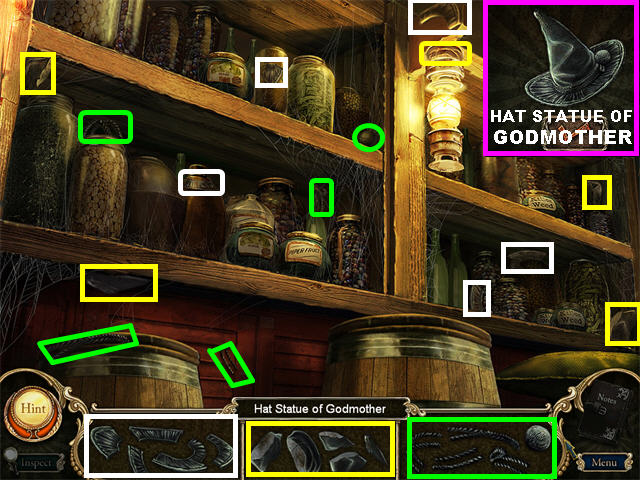
- Find all the fragmented pieces in the scene.
- The HAT OF GODMOTHER STATUE will be added to your inventory after all the items have been found.
- The Hidden Object Scene is activated in this room again; click on it.
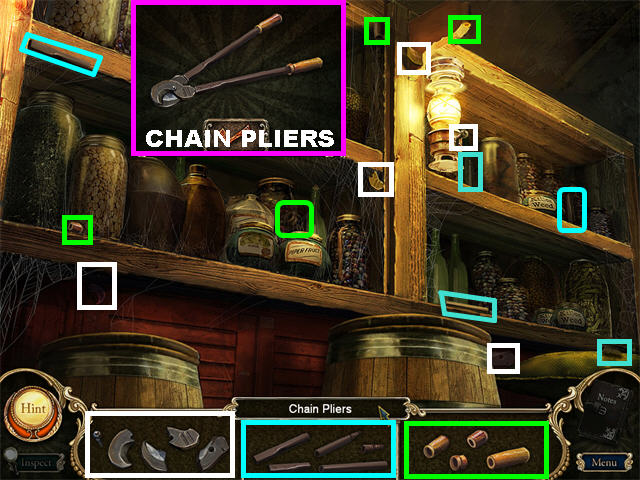
- Find all the fragmented pieces in the scene.
- The CHAIN PLIERS will be added to your inventory aftter all the items have been found.
- Go through the door in the back of the scene now that the spider has been removed.
Chapter 11
Kitchen
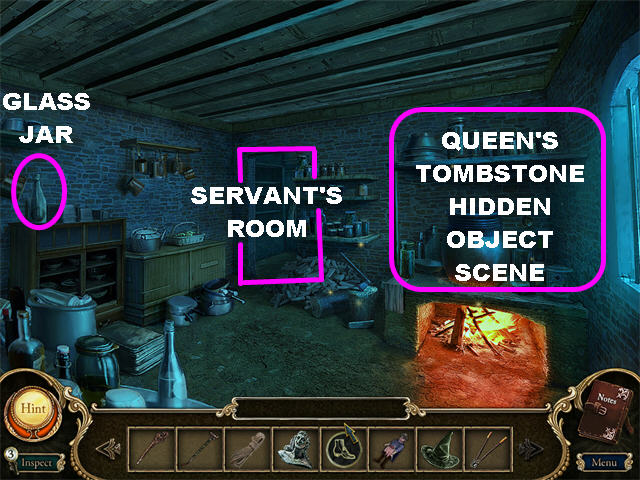
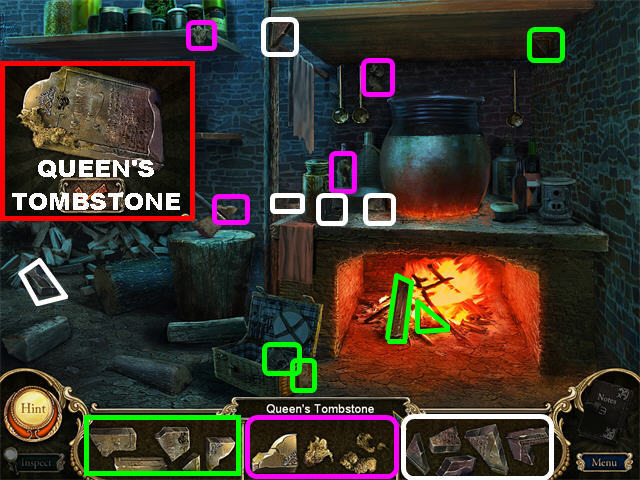
- Click on the Hidden Object Scene.
- Find all the fragmented pieces in the scene.
- The QUEEN’S TOMBSTONE will be added to your inventory after all the items have been found.
- You can go into the Servant’s Room in the back, but there’s not much you can do there now.
- Go back to the Corridor with the large busts in the Castle.
Outside Corridor
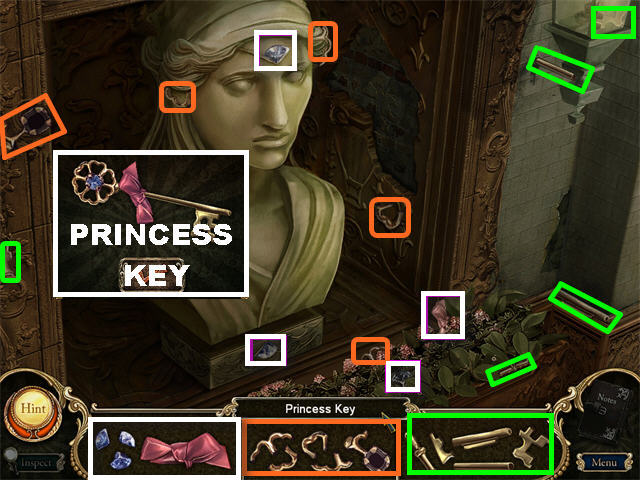
- Click on the Hidden Object Scene.
- Find all the fragmented pieces in the scene.
- The PRINCESS KEY will be added to your inventory after all the items have been found.
- Go forward and enter the door on the right.
Princess’ Room
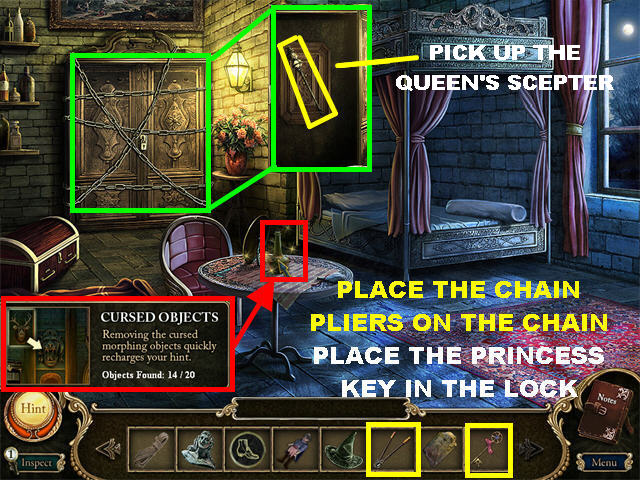
- Click on the MORPHING BOTTLE on the table. This is Morphing Object #14.
- Place the CHAIN PLIERS on the chains, on the cabinet in the back of the room.
- Place the PRINCESS KEY on the lock attached to the cabinet.
- Pick up the QUEEN’S SCEPTER inside the cabinet.
- Go back to the Courtyard by clicking downwards until you reach it.
Courtyard
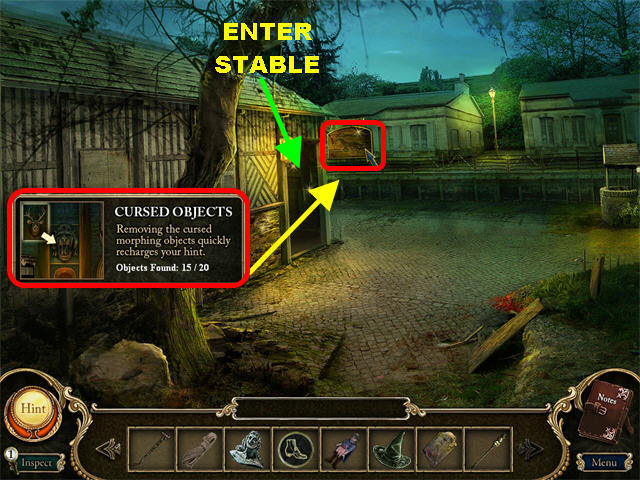
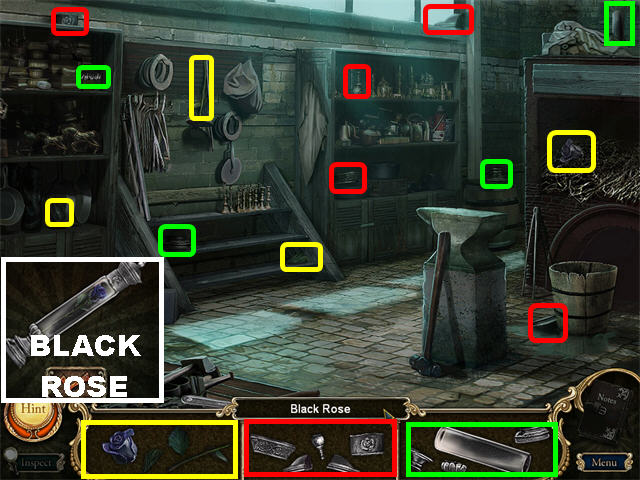
- Click on the MORPHING SIGN outside the stable. This is Cursed Morphing Object #15.
- Enter the Stable through the door on the left.
- Click on the Hidden Object Scene.
- Find all the fragmented pieces in the scene.
- The BLACK ROSE will be added to your inventory after all the items have been found.
- Go back to the Outside of the Bell Tower.
Bell Tower
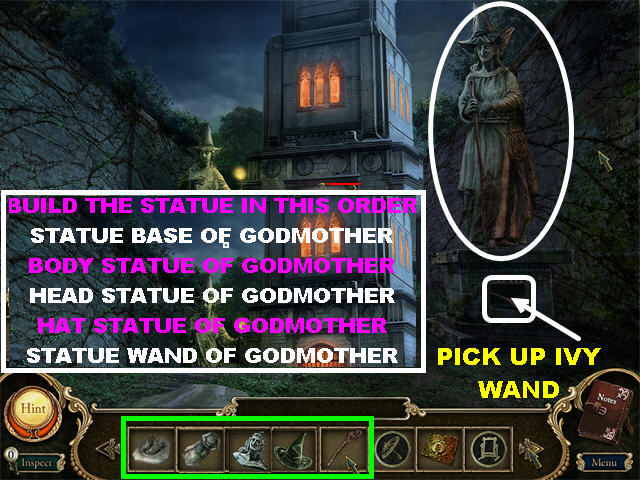
- Your goal is to start building the Statue of the Godmother on the podium located on the right.
- You have to start from the bottom and work your way up.
- Place the statue pieces in the following order:BASE OF GODMOTHER STATUE BODY OF GODMOTHER STATUE HEAD OF GODMOTHER STATUE HAT OF GODMOTHER STATUE WAND OF GODMOTHER STATUE
- The base of the statue will open up.
- Pick up the IVY WAND at the base of the statue.
- Go back to the Briar Rose Statue Garden by clicking downwards until you get there.
Briar Rose Statue Garden
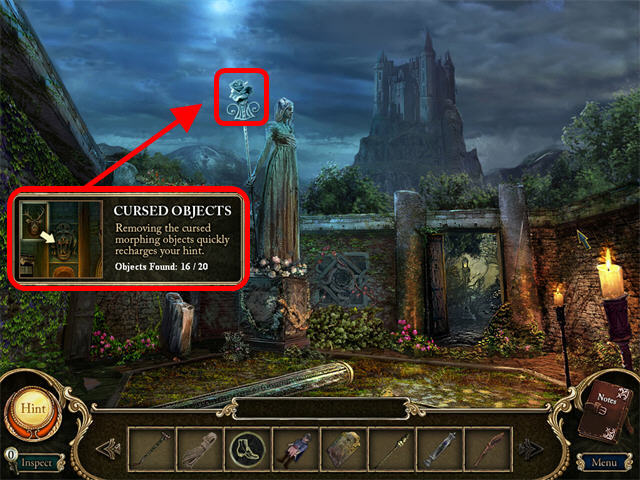
- Click on the MORPHING ROSE in the upper left. This is Cursed Morphing Object #16.
- Step through the entryway to reach the Stairs.
The Stairs
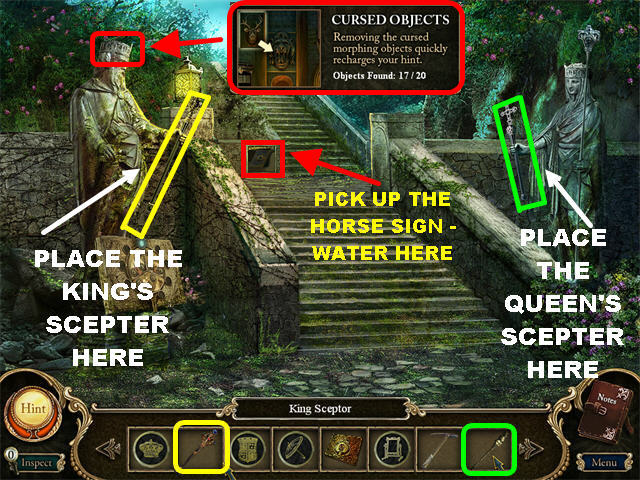
- Click on the MORPHING CROWN on the King’s head. This is Cursed Morphing Object #17.
- Place the KING’S SCEPTER on the statue on the left.
- Place the QUEEN’S SCEPTER on the statue on the right.
- Pick up the HORSE SIGN – WATER that appears in the niche above the steps.
- Go to the Courtyard and enter the Stable.
Stable
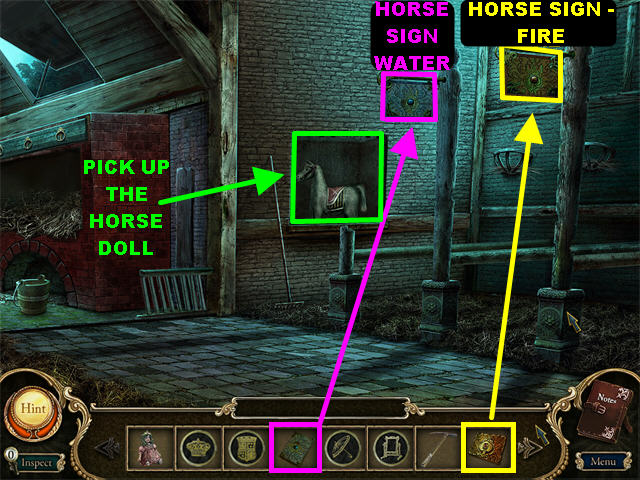
- Place the HORSE SIGN – FIRE on the red plaque in the upper right.
- Place the HORSE SIGN – WATER on the blue plaque in the upper right.
- Pick up the HORSE DOLL on the side of the wall after the bars have lifted.
- Go to the Music Room in the Castle.
Chapter 12
Music Room
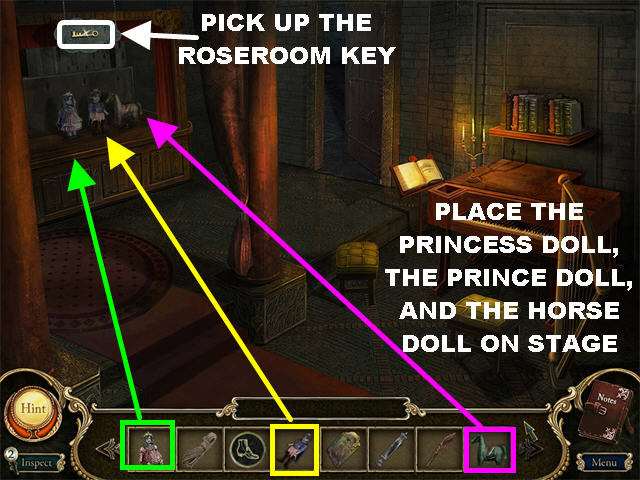
- These next steps need to be performed in the order described below.
- Place the PRINCESS DOLL on the marionette stage on the left.
- Place the PRINCE DOLL on the marionette stage on the left.
- Place the HORSE DOLL on the marionette stage on the left.
- Pick up the ROSEROOM KEY that appears above the dolls.
- Go to the Alchemist’s Room.
Alchemist’s Room
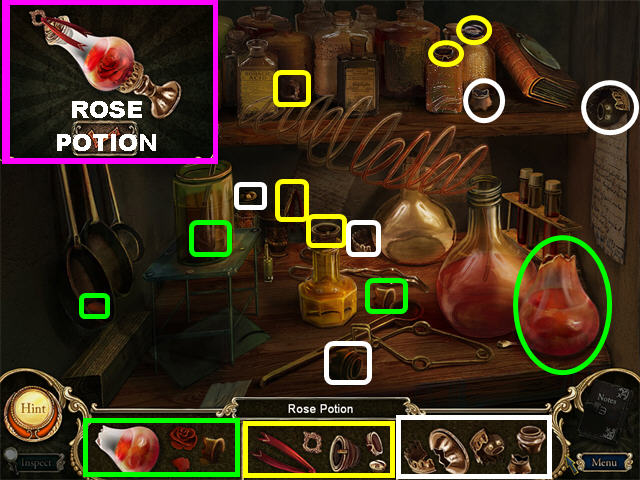
- Click on the Hidden Object Scene.
- Find all the fragmented pieces in the scene.
- The ROSE POTION will be added to your inventory after all the items have been found.
- Go back to the Kitchen by way of the Chapel.
Kitchen
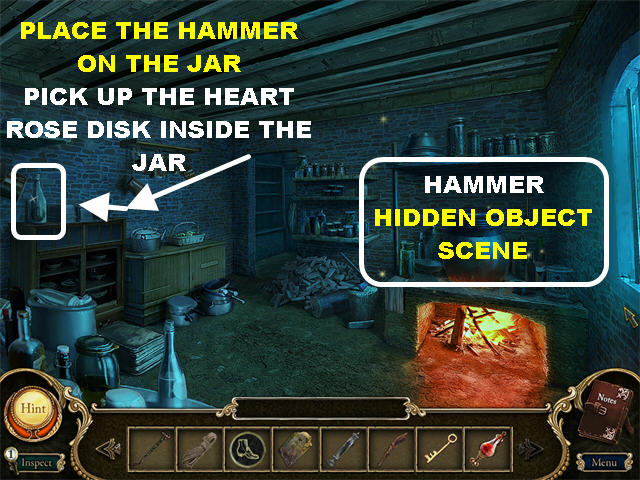
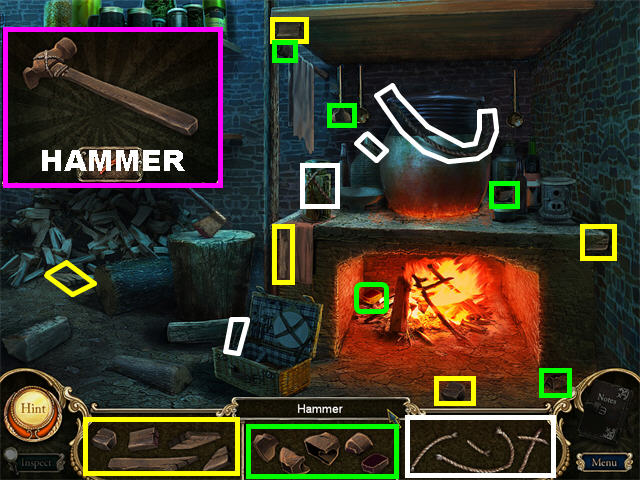
- Click on the Hidden Object Scene.
- Find all the fragmented pieces in the scene.
- The HAMMER will be added to your inventory after all the items have been found.
- Place the HAMMER on the glass jar on the upper left side of the Kitchen.
- Pick up the HEART ROSE DISK inside the broken jar.
- Go back into the Throne Room through the door in the Dining Room.
Throne Room
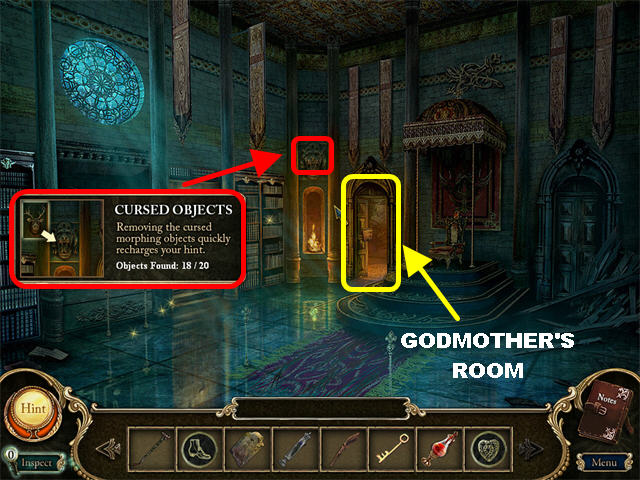
- Click on the MORPHING ANIMAL HEAD above the doorway. This is Cursed Morphing Object #18.
- Go into the Godmother’s Room on the right.
Godmother’s Room
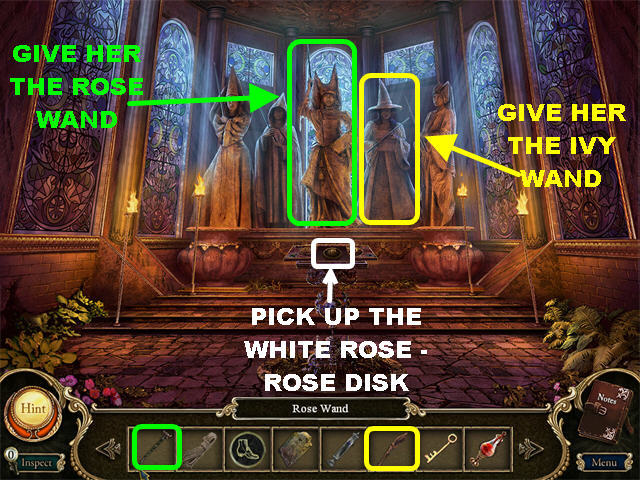
- Place the ROSE WAND on the Godmother in the center.
- The IVY WAND goes on the hand of the 4th Godmother.
- Pick up the WHITE ROSE – ROSE DISK in the center of the podium.
- Keep clicking downwards until you reach the Well.
The Well
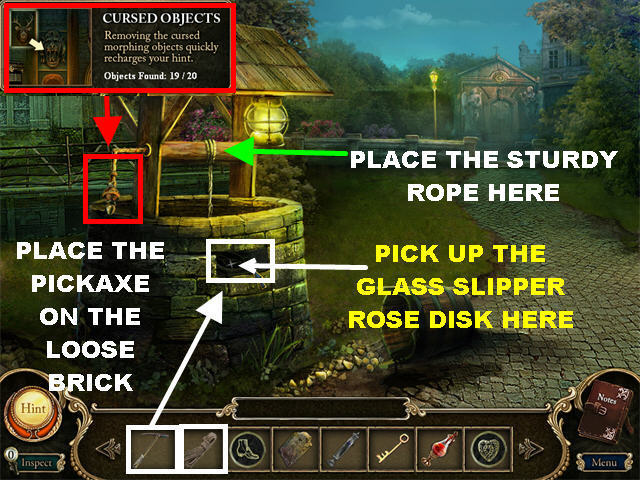
- Click on the MORPHING HANDLE on the left side of the well. This is Cursed Morphing Object #19.
- Place the PICKAXE on the loose brick on the well.
- Pick up the GLASS SLIPPER ROSE DISK behind the brick.
- Place the STURDY ROPE on the well.
- Click inside the well.
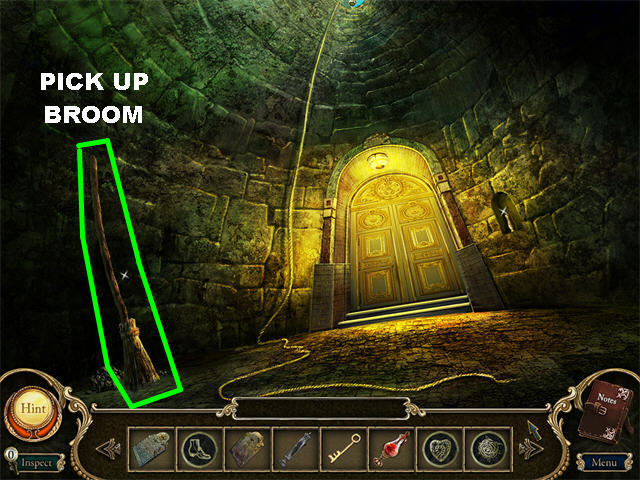
- Pick up the BROOM on the left.
- In HARD MODE you would place the GOLDEN ROSE on the Gold Vase on the right to unlock the door. You have to complete the game once to have access to Hard Mode and the Secret Room.
- Go to the Servant’s Room located after the Kitchen in the Chapel.
Servant’s Room
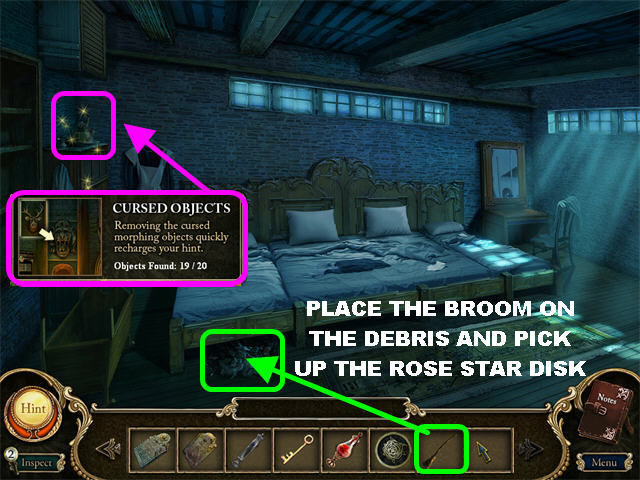
- Click on the MORPHING PITCHER in the upper left. This is Cursed Morphing Object #20.
- Place the BROOM on the debris below the first bed.
- Pick up the ROSE STAR DISK below the bed.
- Go back to the Chapel’s Entrance.
Chapel Entrance
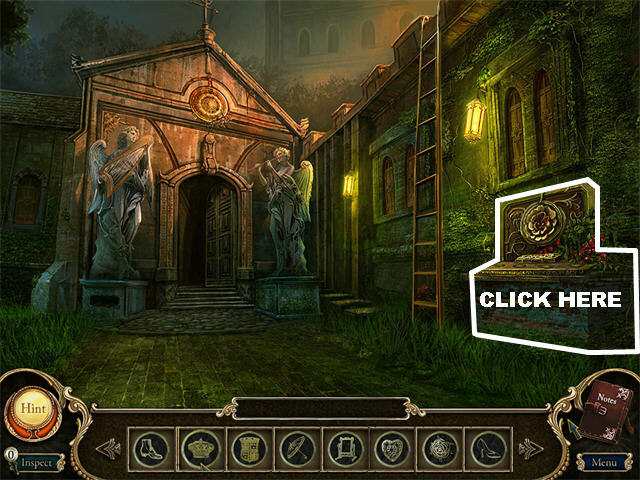
- Click on the altar on the right side of the scene for a closer view.
- This next section has to be done in order.
- You can only place the disks on the spot in which you see the rose.
- Each time a disk is placed correctly, the rose will move to another position.
- Keep repeating the same steps until all the disks are in place.
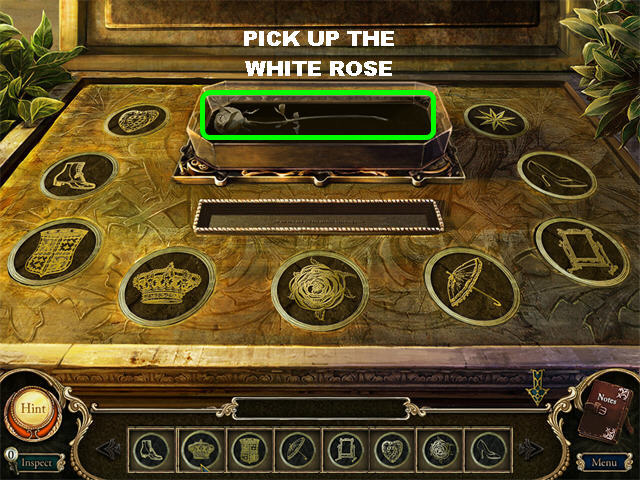
- The disks should be placed in the following order:
- Pick up the WHITE ROSE that appears inside the compartment on top of the altar.
- Go to the Graveyard.
Graveyard
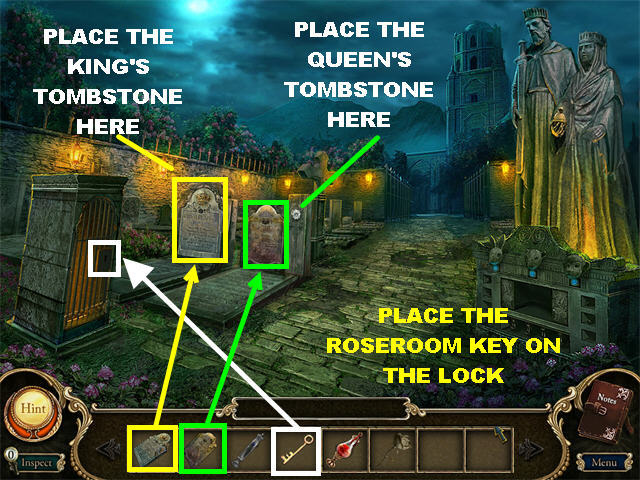
- Place the KING’S TOMBSTONE on the left.
- Place the QUEEN’S TOMBSTONE on the right.
- A door appears on the left.
- Place the ROSEROOM KEY on the door.
- Click on the door to enter it.
Rose Room
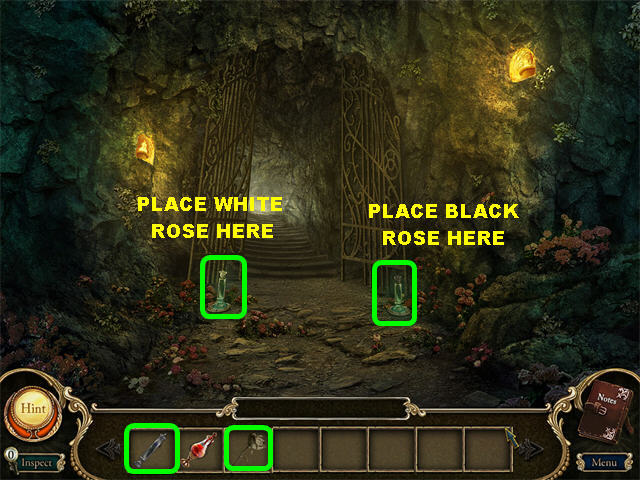
- Place the BLACK ROSE on the container on the right side of the gate.
- Place the WHITE ROSE on the left side of the gate.
- Go through the gate.
Spinning Room
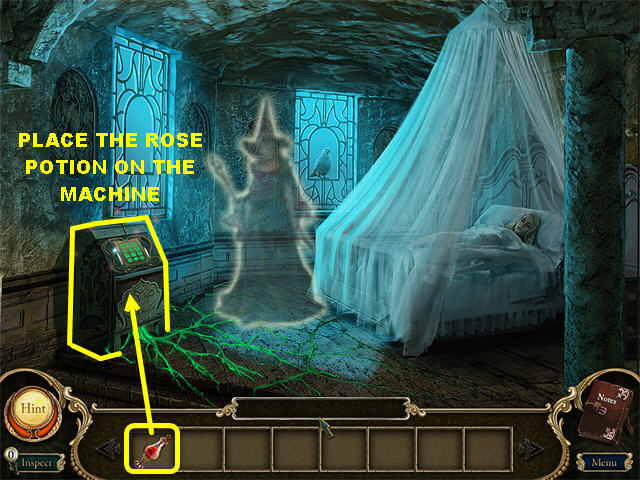
- Place the ROSE POTION on the machine on the left.
- Click on the machine to trigger a puzzle.
Potion Puzzle
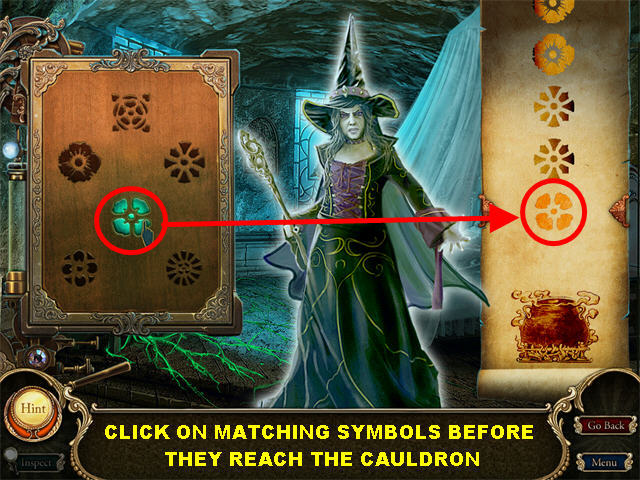
- Your goal is to click on as many of the matching designs as you can.
- As the game progresses, more designs will appear.
- When you click on an incorrect piece, it will make the images descend faster.
- If any of the symbols on the right fall into the cauldron, you will have to start the process over.
- Click on Sleeping Beauty on the bed to end the game.
- Watch the ending scenes!
- Please continue reading to view the extras you’ve unlocked in the game, like the puzzles and the Hard Mode.
Locations of the Cursed Morphing Objects
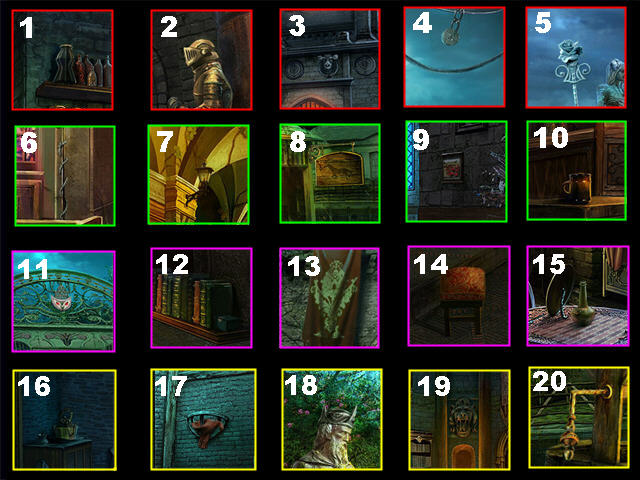
- Here is a complete list of the locations of all the Cursed Morphing Objects in the game.
Hard Mode
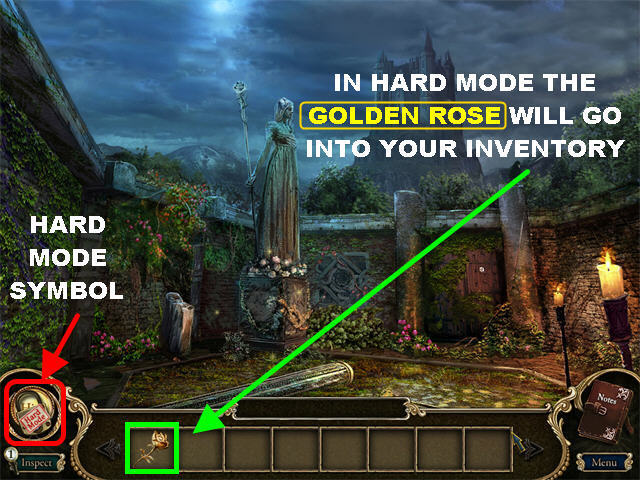
- Once you’ve completed the game, you can access Hard Mode.
- In Hard Mode you will not be given access to Hints, or the option to skip Puzzles.
- You will be given the Golden Rose at the beginning of the game; it will be used for unlocking the room at the bottom of the Well.
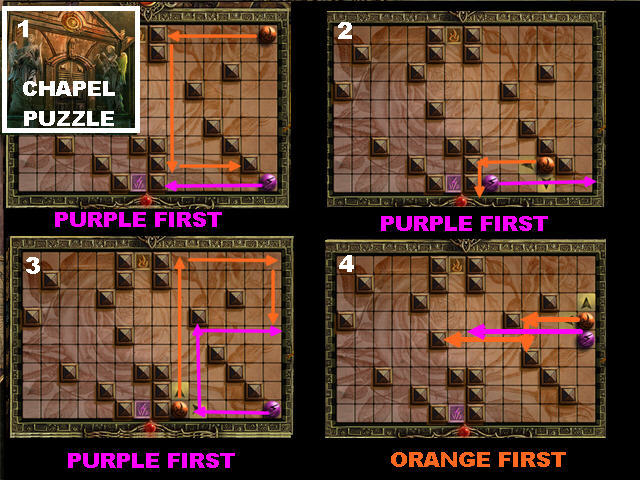
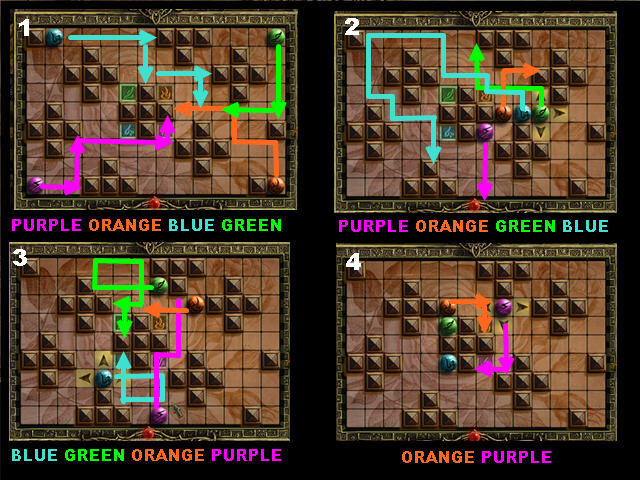
Hard Mode Marble Solutions
- The first solution is for the Marble Puzzle outside the Chapel door.
- Please follow the order shown on the screenshots to solve this puzzle.
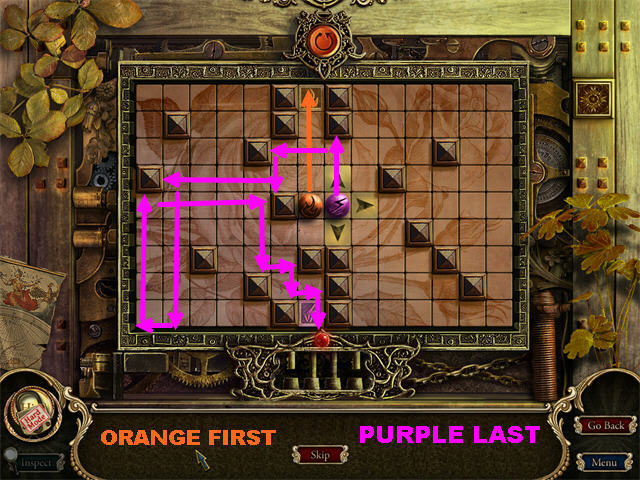
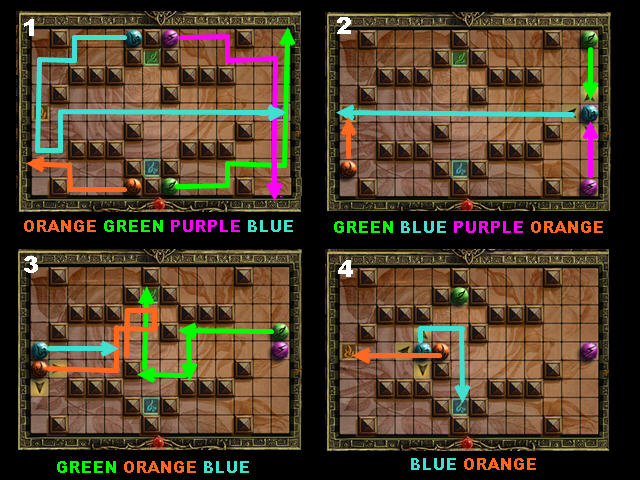
- This solution is for the Marble Puzzle in the Stained Glass Window section in the Chapel.
- Please follow the order shown on the screenshots to solve this puzzle.
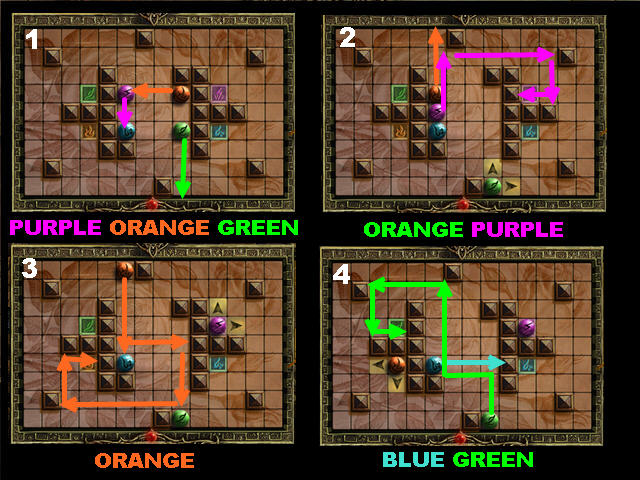
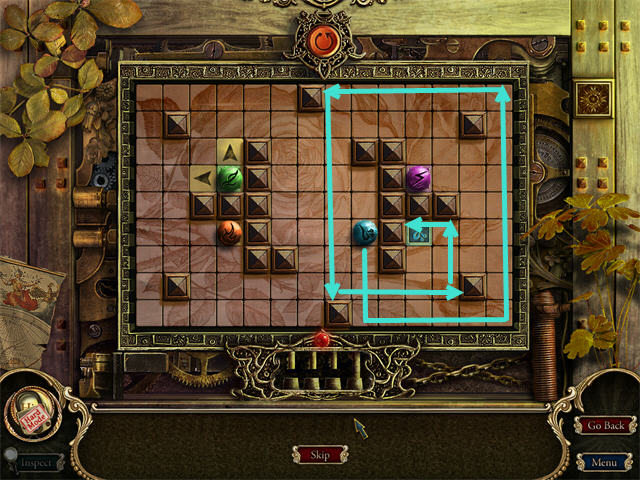
- This solution is for the Marble Puzzle for the Ivy covered door in the Castle’s Corridor.
- Please follow the order shown on the screenshot to solve this puzzle.
- This solution is for the Marble Puzzle outside the Princess’ door.
- Please follow the order shown on the screenshot to solve this puzzle.
The Well
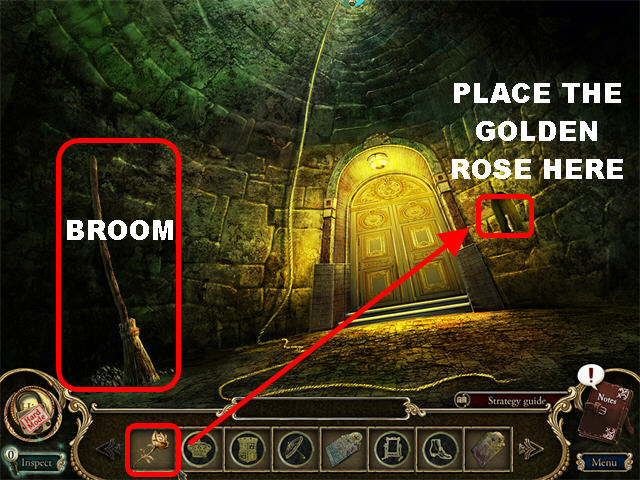
- In Hard Mode you will use the GOLDEN ROSE inside the Well.
- Pick up the BROOM on the left.
- Place the GOLDEN ROSE in the Golden Vase on the right side of the wall to unlock the door.
- Go through the door.
Secret Room
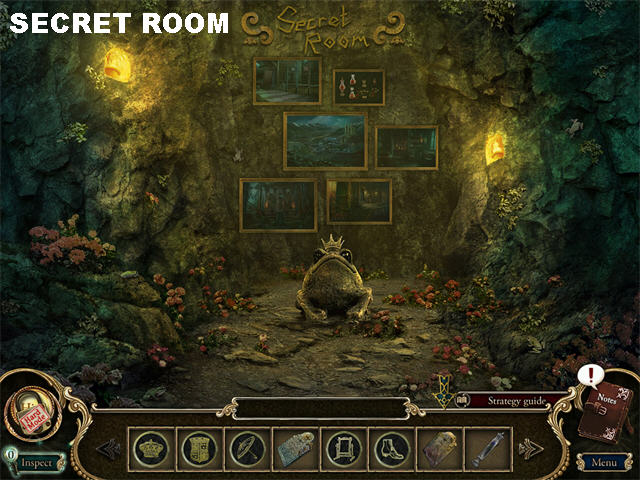
- In this room you can click on the picture frames on the back wall to learn more about the creation of Dark Parables: Curse of Briar Rose.
Bonus Adventure
Main Room
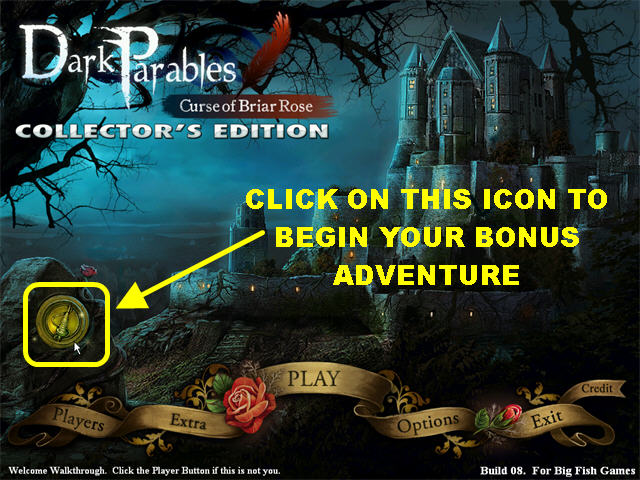
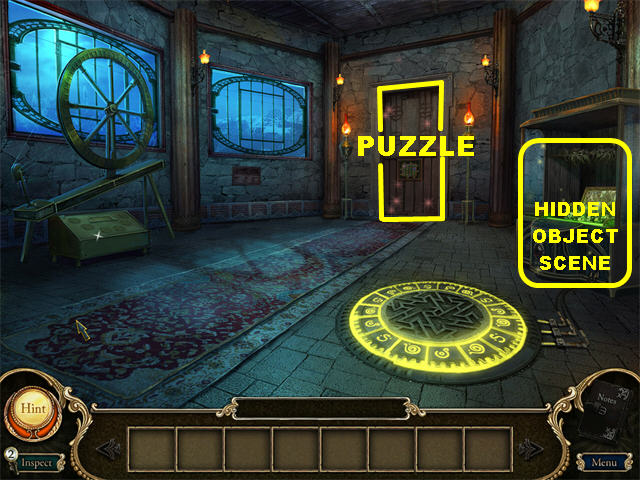
- Once you’ve completed the game, click the round icon on the left side of the Main Menu to access the Bonus Adventure.
- There is a Hidden Object Scene on the right and a puzzle by the door.
- There are other areas to explore here as well, but you have to obtain Inventory Items before you can interact with them.
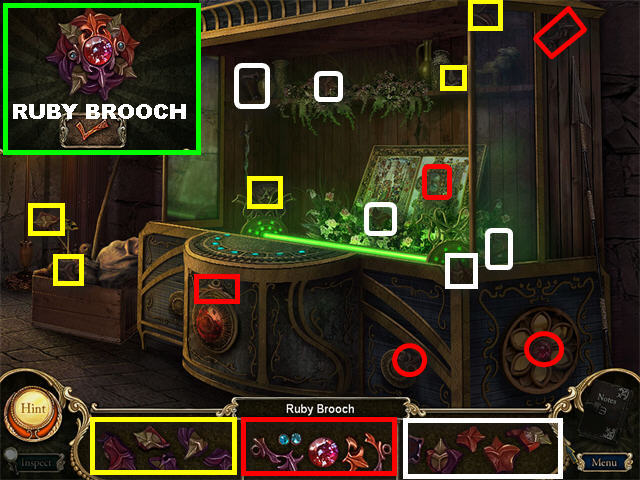
- Click on the Hidden Object Scene on the right.
- You will obtain the RUBY BROOCH at the end of your search.
Symbols Puzzle
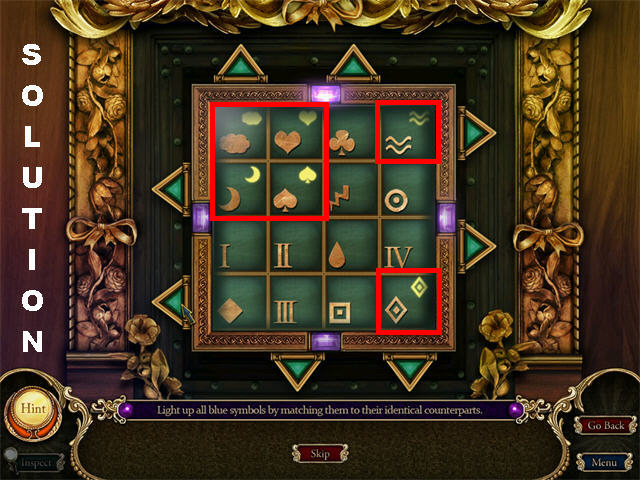
- Click on the sparkling door to trigger a puzzle.
- Your goal is to light up all the blue symbols on the board by placing their matching symbols next to them.
- Use the arrows surrounding the puzzle to help you move the symbols around.
- You can only move the bar in the direction the arrow is pointing.
- Once a symbol is in the correct spot, it will light up.
- The solution to this puzzle may vary.
- Go through the door after the puzzle has been solved.
Memorial Tomb
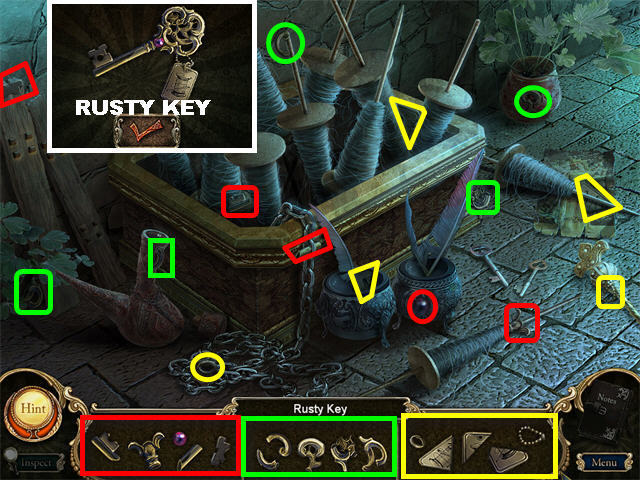
- Click on the Hidden Object Scene on the left.
- You will obtain the RUSTY KEY after your search has been completed.
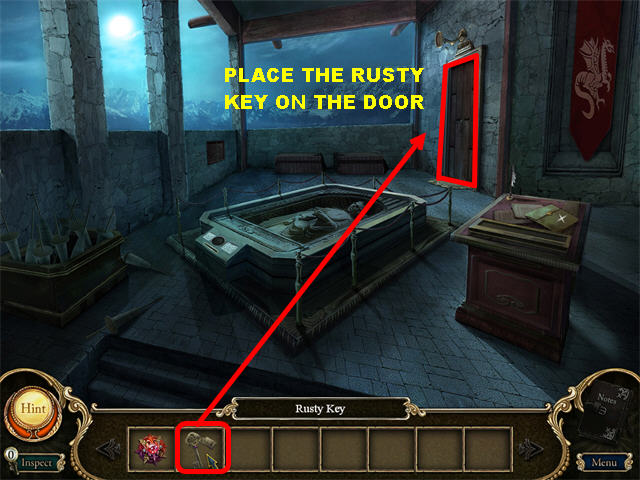
- Place the RUSTY KEY on the door on the right to open it.
- Go through the door.
Sewing Room
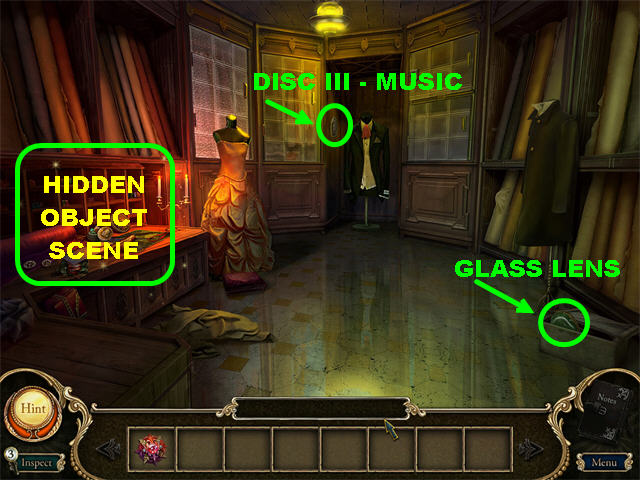
- Pick up DISC III – MUSIC on the left side of the back wall, next to the suit.
- Pick up the GLASS LENS in the lower right, inside the toolbox.
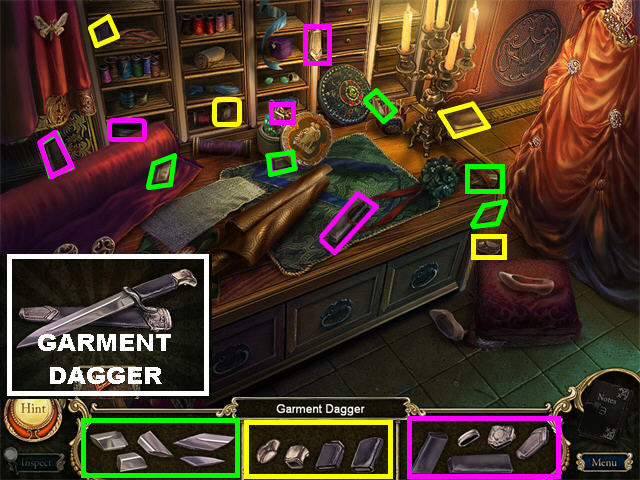
- Click on the Hidden Object Scene on the left.
- You will obtain the GARMENT DAGGER at the end of your search.
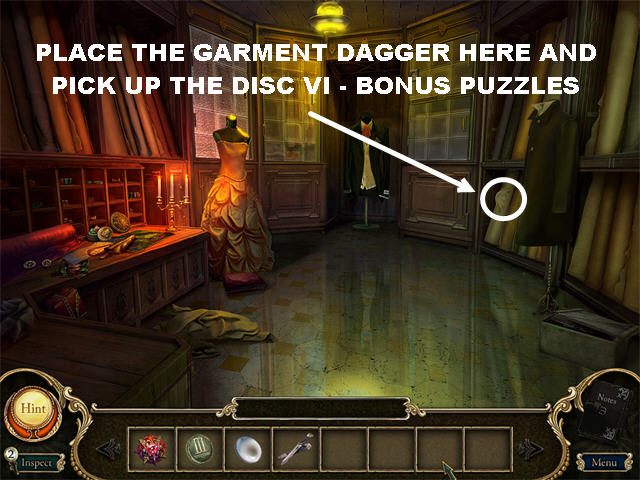
- Place the GARMENT DAGGER on the bulging fabric on the far right.
- Pick up the DISC VI – BONUS PUZZLES inside the fabric.
- Place your cursor downwards to go back to the Tomb.
Memorial Tomb
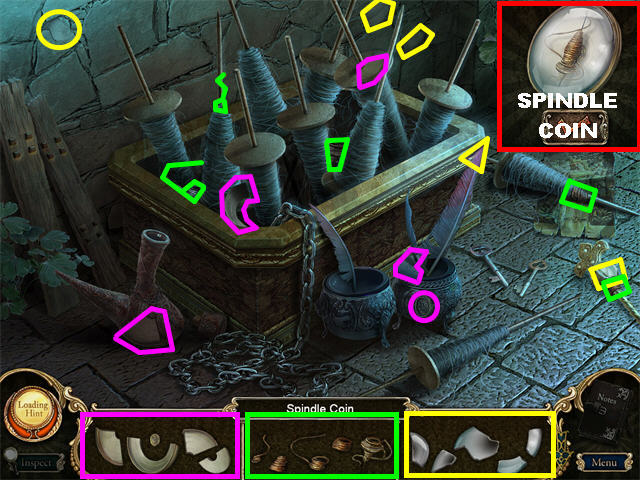
- Click on the Hidden Object Scene on the left.
- The SPINDLE COIN will be added to your inventory once the search has been completed.
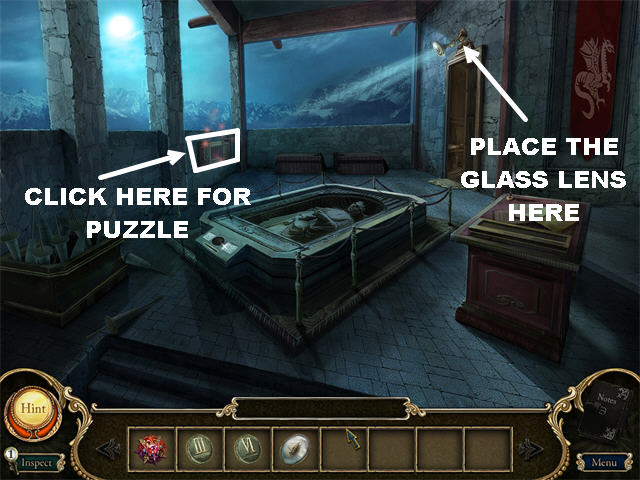
- Place the GLASS LENS on the device above the door. A light will shine on the opposite side of the wall.
- Click on the illuminated spot to trigger a puzzle.
Sequence Puzzle
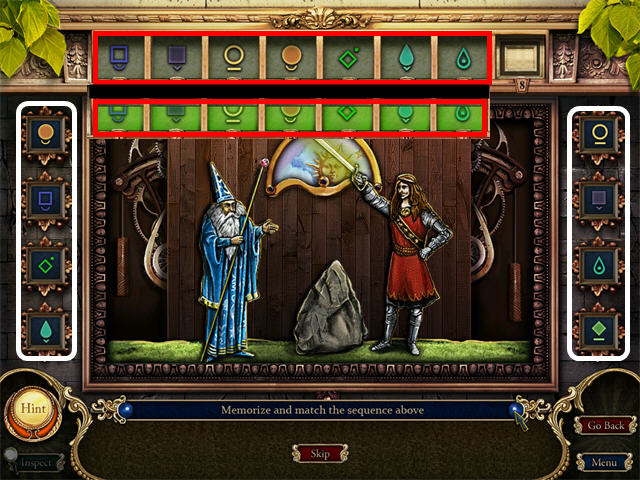
- Click on the curtain to begin the puzzle.
- Your goal is to repeat the sequence shown in the box above the puzzle with the symbols on the left and right sides of the puzzle.
- The correct symbols will light up green; incorrect symbols will light up red.
- The solutions for this puzzle are random. If you guess incorrectly, you will have to start over with a new sequence.
- You will have to play 3 rounds of this game in order to beat it.
- The first sequence will consist of 3 symbols.
- The second sequence will consist of 5 symbols.
- The third sequence will consist of 7 symbols.
- You may want a piece of paper next to you on which to record the sequences of symbols.
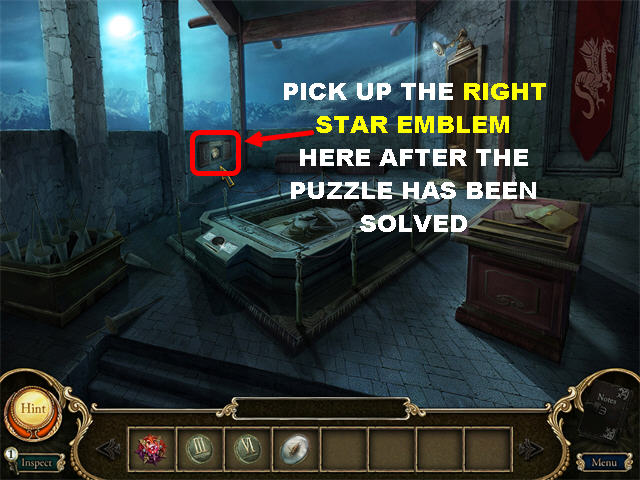
- Pick up the RIGHT STAR EMBLEM inside the niche after the puzzle has been solved.
- Go back to the Main Room by clicking at the bottom of the scene.
Main Room
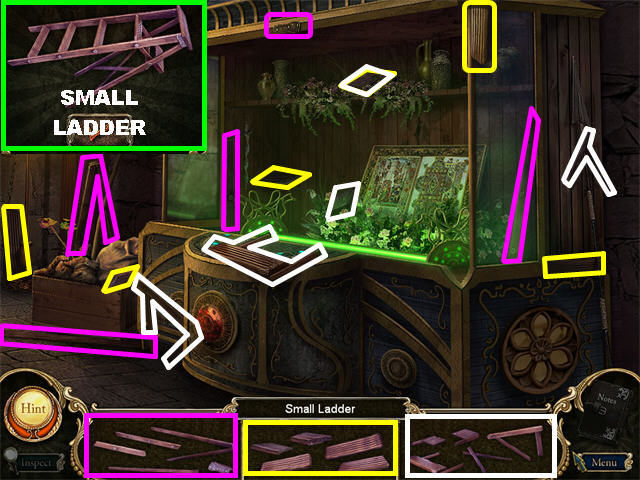
- Click on the Hidden Object Scene on the right.
- The SMALL LADDER will be added to your inventory once you complete your search.
- Go back to the Sewing Room.
Sewing Room
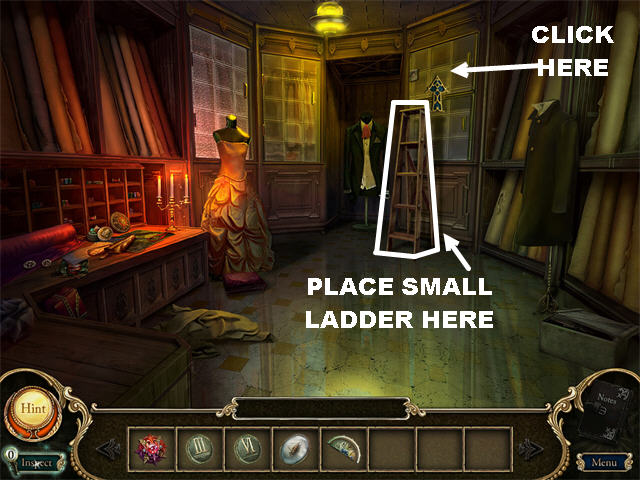
- Place the SMALL LADDER by the cabinet on the right.
- Click on the cabinet above the ladder for a closer look.
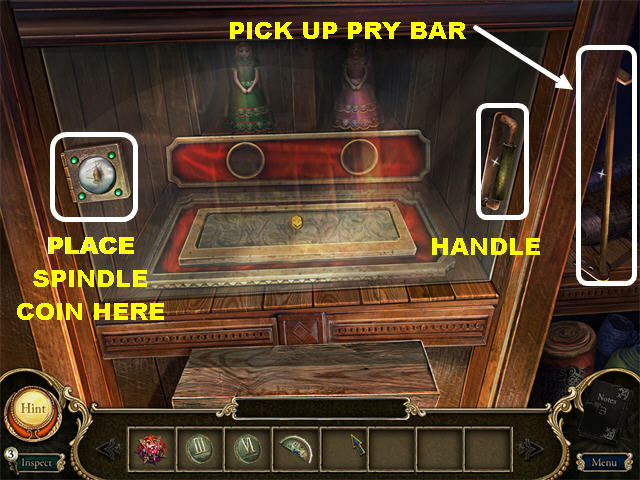
- Place the SPINDLE COIN in the slot on the left.
- Click on the HANDLE on the right side of the cabinet to open it.
- Pick up the PRY BAR on the right. Exit that view for now.
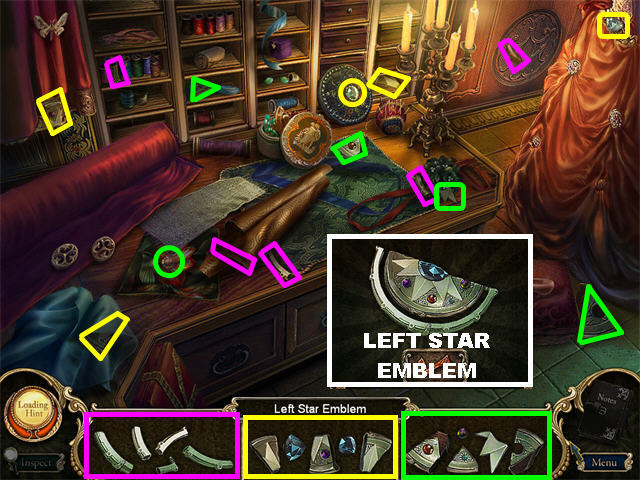
- Click on the Hidden Object Scene on the left side of the Sewing Room.
- You will obtain the LEFT STAR EMBLEM once you complete your search.
- Go back to the Memorial Tomb.
Memorial Tomb
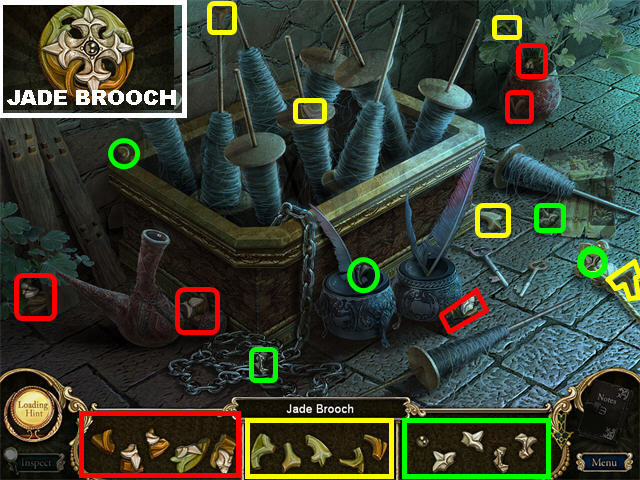
- Click on the Hidden Object Scene on the left.
- You will obtain the JADE BROOCH at the end of your search.
- Go back to the Main Room.
Main Room
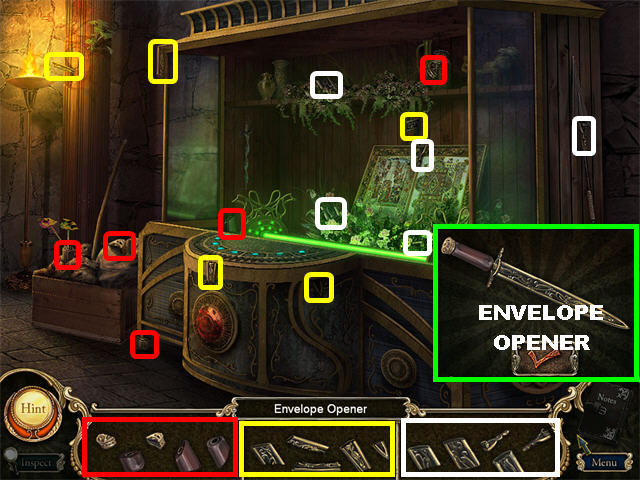
- Click on the Hidden Object Scene on the right.
- You will obtain the ENVELOPE OPENER at the end of your search.
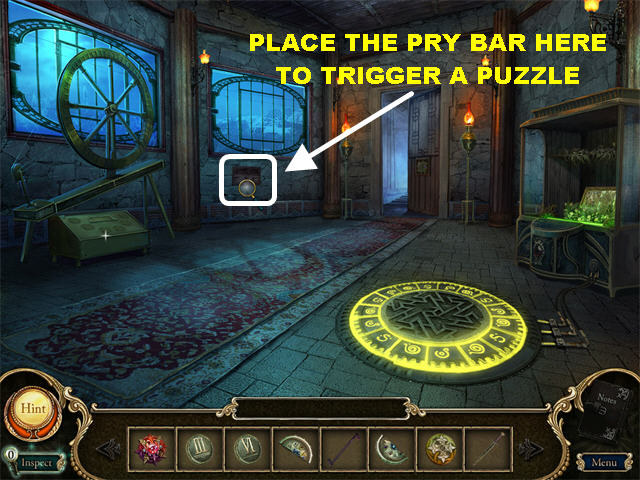
- Place the PRY BAR on the niche on the left side of the wall.
- Click on the niche in the wall to trigger a puzzle.
Sequence Puzzle
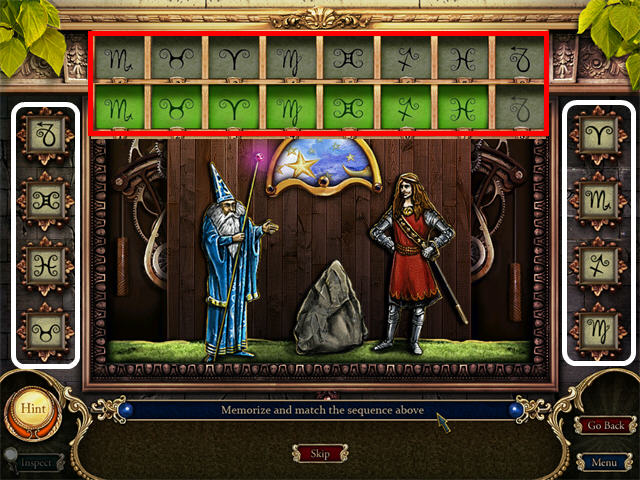
- Click on the curtain to begin.
- Your goal is to repeat the sequence shown in the box above the puzzle with the symbols on the left and right sides of the puzzle.
- The correct symbols will light up green; incorrect symbols will light up red.
- The solutions for this puzzle are random. If you guess incorrectly, you will have to start over with a new sequence.
- You will have to play 3 rounds of this game in order to beat it.
- The first sequence will consist of 4 symbols.
- The second sequence will consist of 6 symbols.
- The third sequence will consist of 8 symbols.
- You may want a piece of paper next to you on which to record the sequences of symbols.
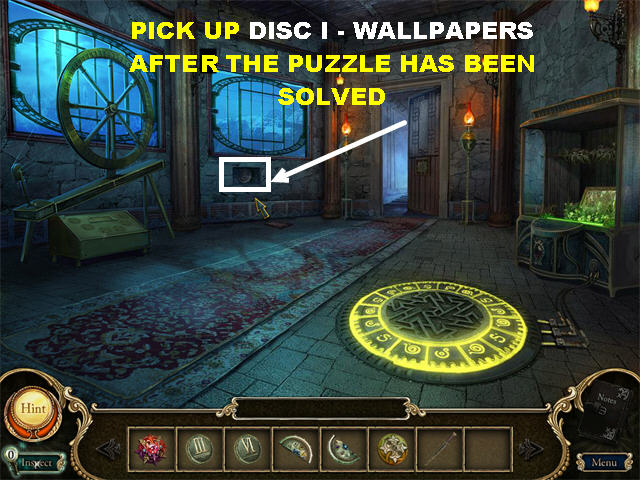
- Pick up the DISC 1 – WALLPAPERS inside the niche after the puzzle has been solved.
- Go through the door.
Memorial Tomb
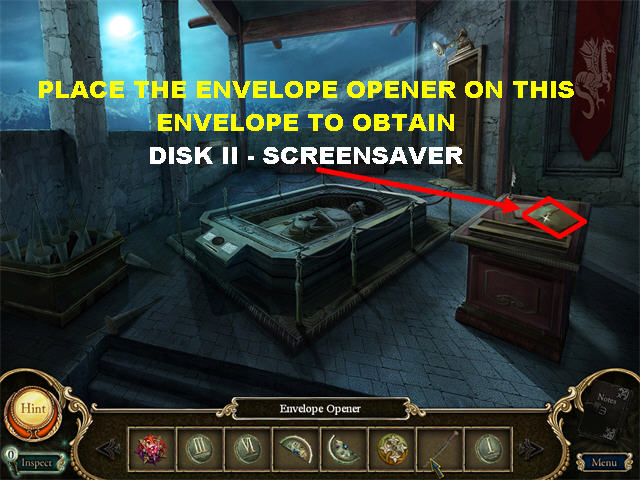
- Place the ENVELOPE OPENER on the letter on the right.
- Pick up DISK II – SCREENSAVER inside the envelope.
- Go through the door on the right.
Sewing Room
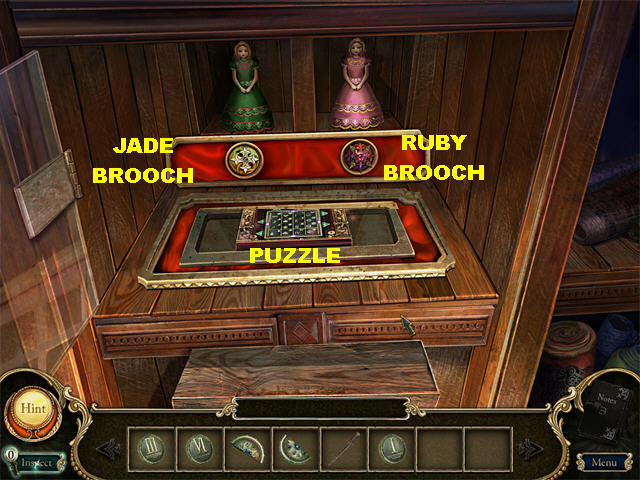
- Click on the cabinet in the upper right.
- Place the JADE BROOCH on the left slot.
- Place the RUBY BROOCH on the right slot.
- Click on the puzzle in the center of the scene.
Symbols Puzzle
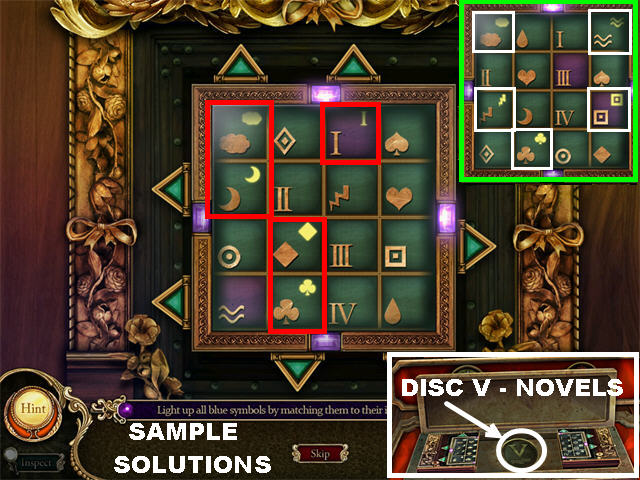
- This puzzle is similar to the last puzzle, except the purple blocks cannot be moved through the edges of the puzzle.
- Your goal is to light up all the blue symbols on the board by placing their matching symbols next to them.
- Use the arrows surrounding the puzzle to help you move the symbols around.
- You can only move the bars in the direction to which the arrow is pointing.
- Once a symbol is in the correct spot, it will light up.
- The solution to this puzzle is variable.
- Pick up the DISC V – NOVELS at the end of this puzzle.
- Go back to the Memorial Tomb.
Memorial Tomb
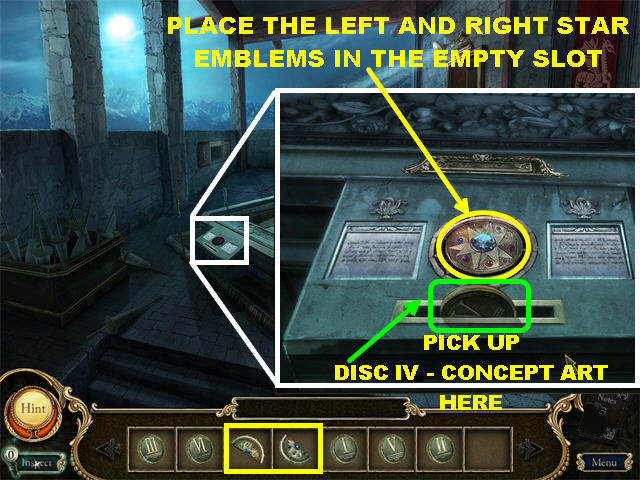
- Click on the slot at the bottom of the tomb for a closer look.
- Place the LEFT STAR EMBLEM on the empty slot.
- Place the RIGHT STAR EMBLEM on the empty slot.
- Pick up the DISC IV – CONCEPT ART below the Star Emblem.
- Go back to the Main Room.
Spindle Room Secrets
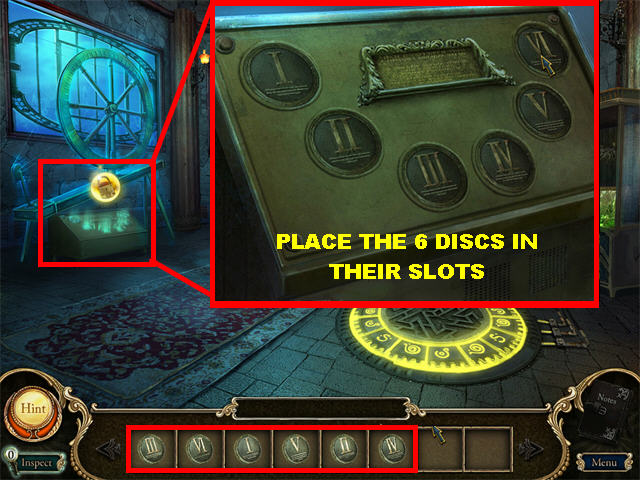
- Click on the display on the lower left.
- Place the discs in the display in the following order:DISC I – WALLPAPERS DISC II – SCREENSAVER DISC III – MUSIC DISC IV – CONCEPT ART DISC V – NOVELS DISC VI – BONUS PUZZLES
- A LOCK appears on the display. Click on it to receive the message that the Bonus Adventure has been completed and the extra content has been unlocked.
- You will be automatically taken back to the Main Menu.
Extra Content
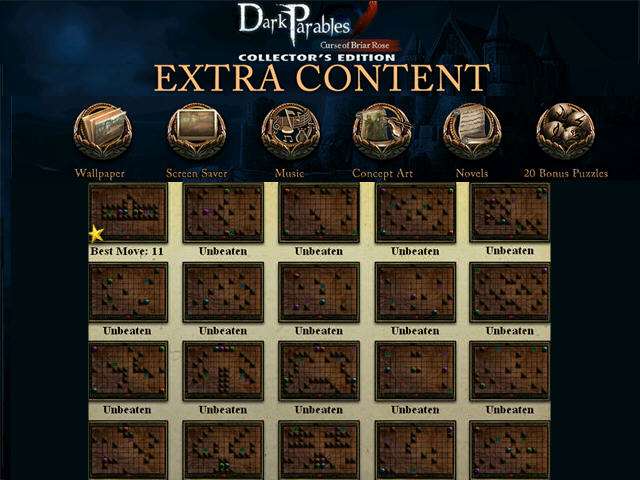
- Click on the word “Extra” in the Main Menu to access all your bonus materials.
- You can click on the “20 Bonus Puzzles” icon to play 20 new levels of the Marble Game.
- You also have access to all of the Bonus Materials from this section.
Created at: 2010-03-11

