Walkthrough Menu
- General Tips
- Chapter One: The Restaurant
- Chapter Two: The Fire
- Chapter Three: The Cheese Shop
- Chapter Four: The Service Station
- Chapter Five: The Cemetery
- Chapter Six: Inside the Crypt
- Chapter Seven: The Underground Hall
- Chapter Eight: The Director
- Chapter Nine: The Movie Set
- Chapter Ten: Hollywood
- Chapter Eleven: The Producer
- Chapter Twelve: Outside the Mansion
- Chapter Thirteen: Inside the Mansion
- Chapter Fourteen: The Devil's Office
General Tips
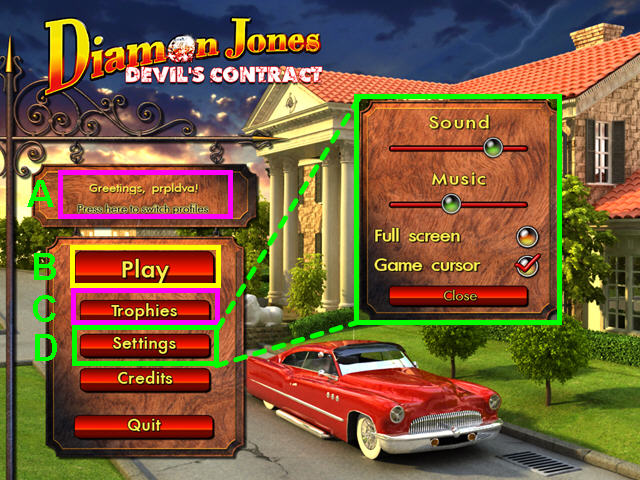
- Click on the profile panel on the main screen to add or delete player profiles (A).
- Select 'Play' to begin or continue your game (B).
- The 'Trophies' button will show all the artifacts you have collected over the course of the game (C).
- You may play this game in full screen or windowed mode by changing the options in the Settings menu (D).
- You may adjust the volume of sounds, music, and turn off the custom cursor in the Settings menu.
- The Settings menu is accessible from both the main screen and the in-game menu.
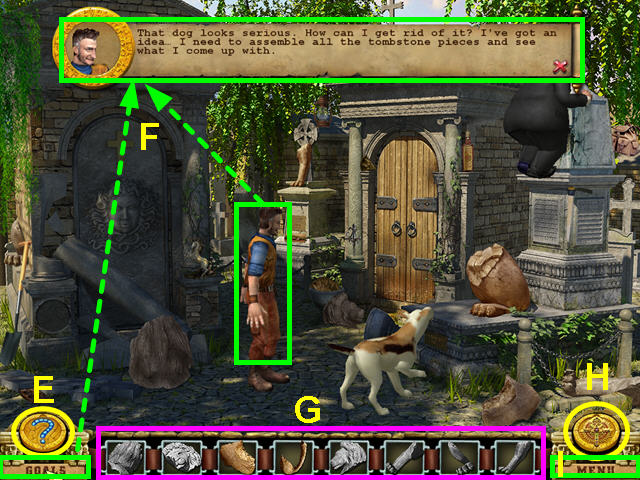
- Hints are unlimited, but you must wait for the question mark to re-fill (E).
- The Goals button will give you a hint on what need to be done (F).
- You can also talk to Diamon for information.
- Your inventory/hidden object list is at the bottom center (G).
- Grayed-out items have not yet been found.
- The gold disc on the right will take you to the Trophy room (H).
- Click the menu button to access the settings menu (I).
- There is a brief tutorial at the start of the game.
Chapter One: The Restaurant
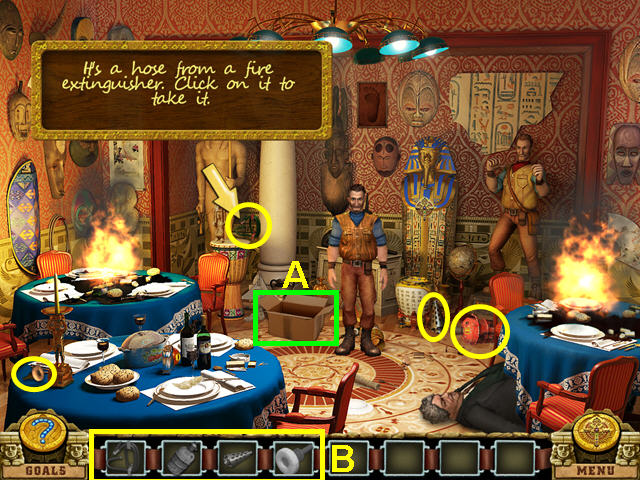
- Select the cardboard box (A).
- Locate each item and place it in the box per the tutorial (B).
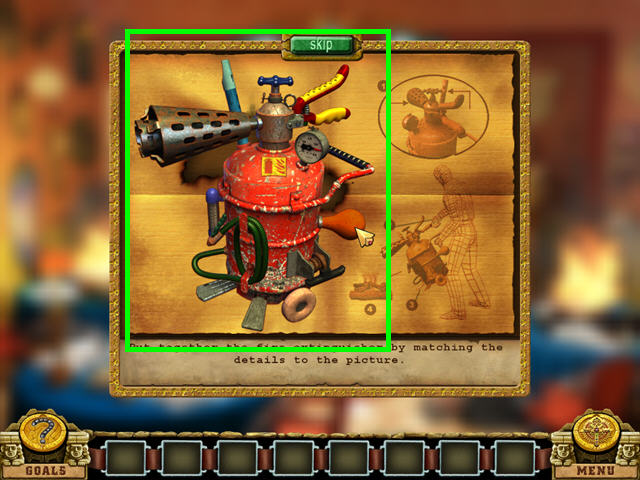
- Drag the extinguisher components to the matching outlined areas.
- Left-click to take or place a piece.
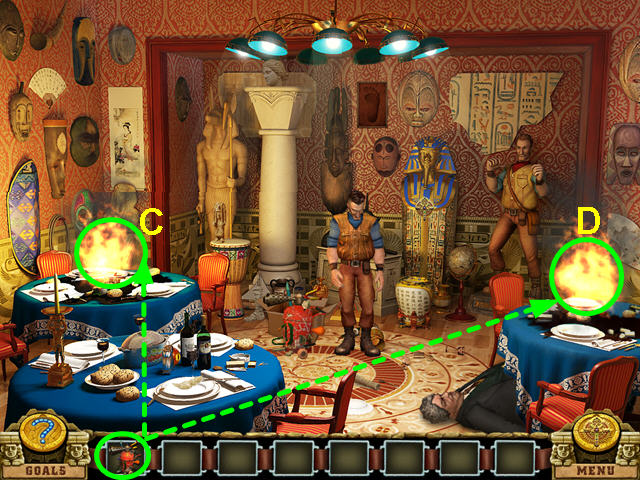
- Take the FIRE EXTINGUISHER and use it on the left table (C).
- Take the FIRE EXTINGUISHER and use it on the right table (D).
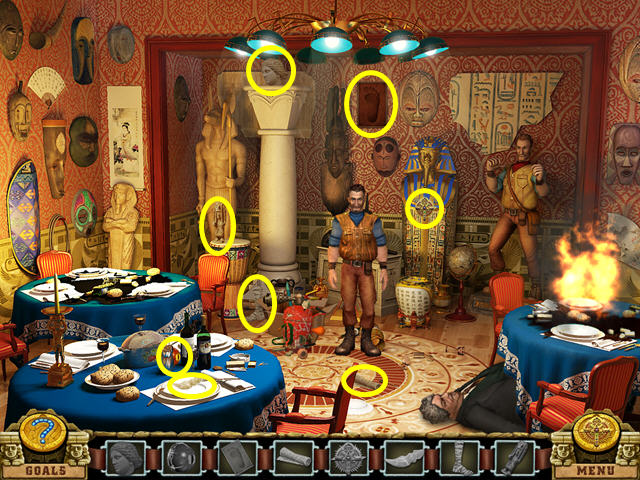
- Locate all the hidden objects.
Chapter Two: The Fire
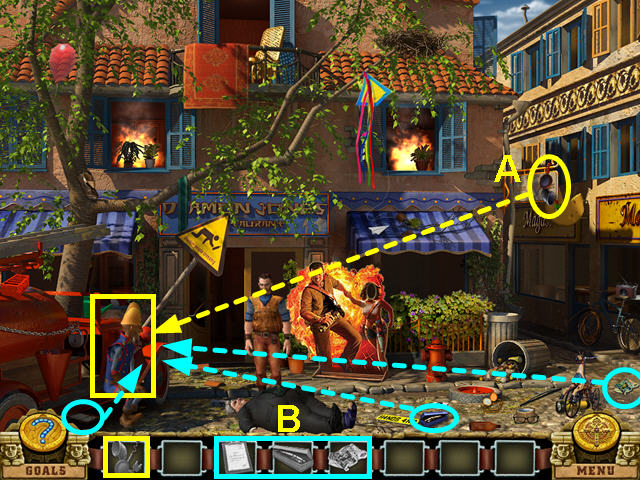
- Find the HEARING AID and give it to the fireman (A).
- Locate the 3 items and give them to the fireman (B).
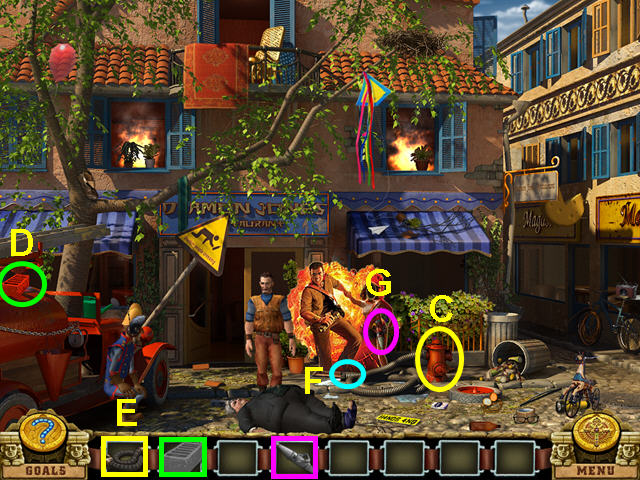
- After the fireman give you the HOSE, look at the hydrant (C).
- Find the BRICK and use it on the hydrant (D).
- Use the HOSE on the hydrant (E).
- Look at the end of the hose (F).
- Locate the HOSE END CAP and use it on the hose (G).
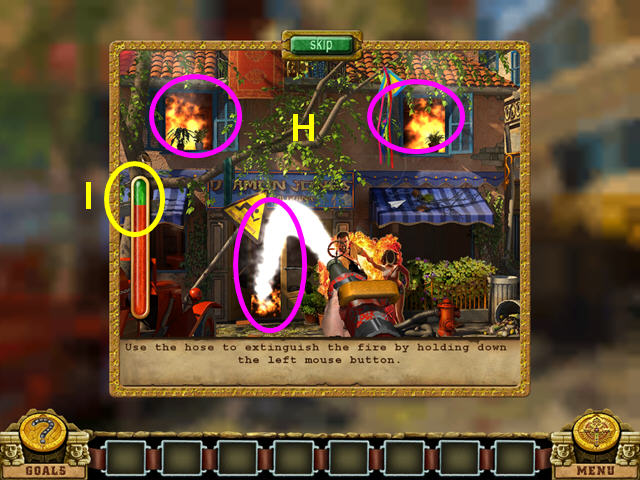
- The object of this mini-game is to put out the 3 fires (H).
- Hold down the left mouse button and aim the water so it arcs into each area.
- You will see the meter add green when you are correct (I).
- If you take too long on the next areas, a previous area can spark back to life.
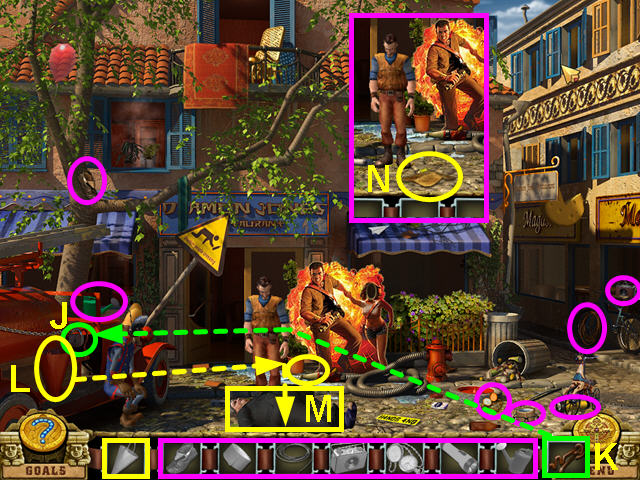
- Look at the lock holding the bucket in place (J).
- Locate all the items.
- Use the LOCKPICK on the lock (K).
- Take the BUCKET and use it on the hose (L).
- Use the BUCKET with WATER on the man (M).
- Look at the map the man dropped (N).
Chapter Three: The Cheese Shop
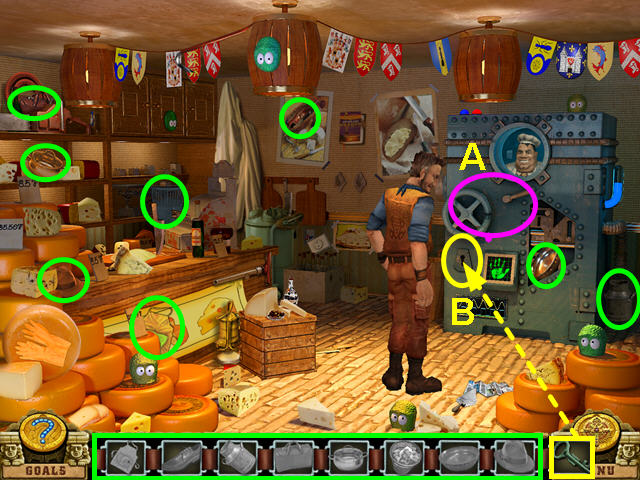
- Try to open the chamber (A).
- Locate all the items.
- Use the key on the lock (B).
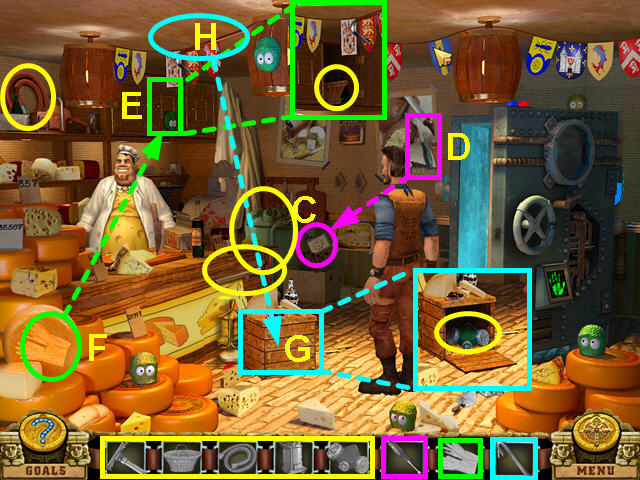
- Look at the wall socket (C).
- Find the SCREWDRIVER and use if on the wall socket (D).
- Look at the cabinet (E).
- Find the GLOVES and use them to open the cabinet (F).
- Look at the crate (G).
- Find the CROWBAR and open the crate (H).
- Locate the remainder of the items.
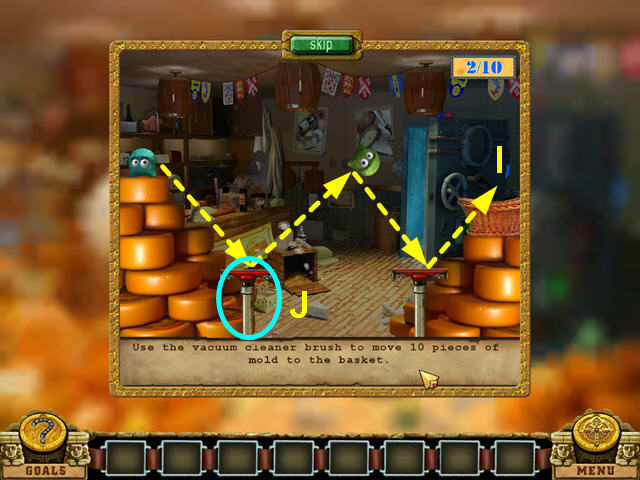
- The object of this mini-game is to bounce the 10 cheese molds into the basket (I).
- Move your cursor so that the mold bounces on the vacuum brush (J).
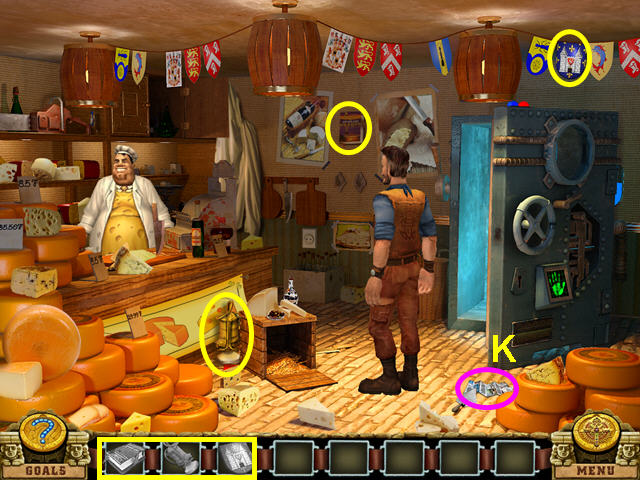
- Look at the brochure (K).
- Locate all the items.
Chapter Four: The Service Station
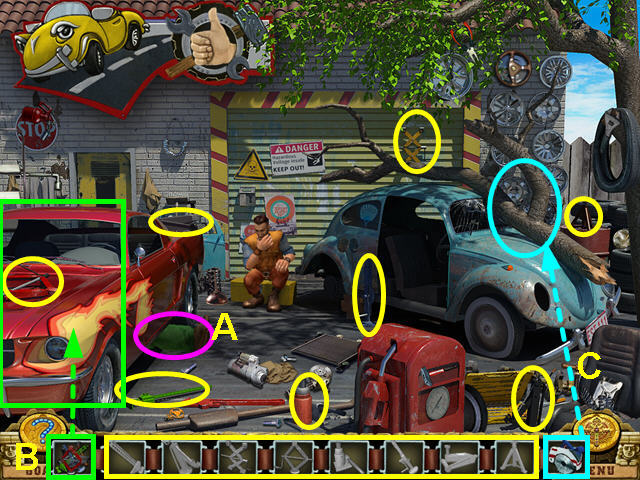
- Talk to the mechanic (A).
- Locate all the jacks.
- Use the JACKS on the car (B).
- Use the SAW to cut the tree (C).
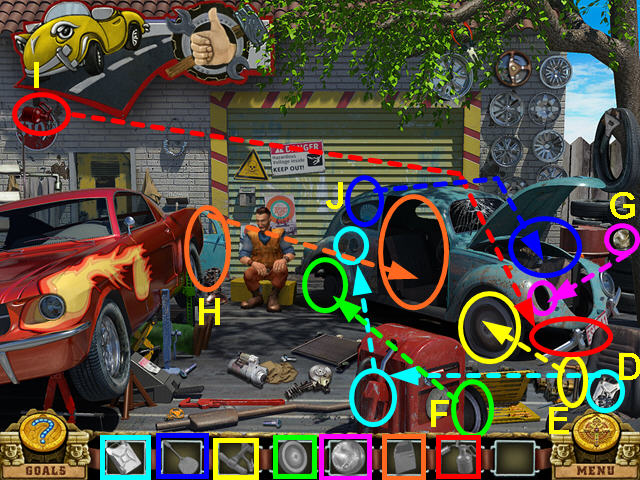
- Locate the GAS CAN, use it on the gas pump, then pour the gas in the car. (D).
- Find the PUMP and use it on the flat tire (E).
- Find the WHEEL and place it on the car (F).
- Locate the HEADLIGHT and place it on the car (G).
- Find the DOOR and place it on the car (H).
- Find the BURNER and use is on the front bumper (I).
- Locate the FLYSWATTER and use it on the engine for a mini-game (J).
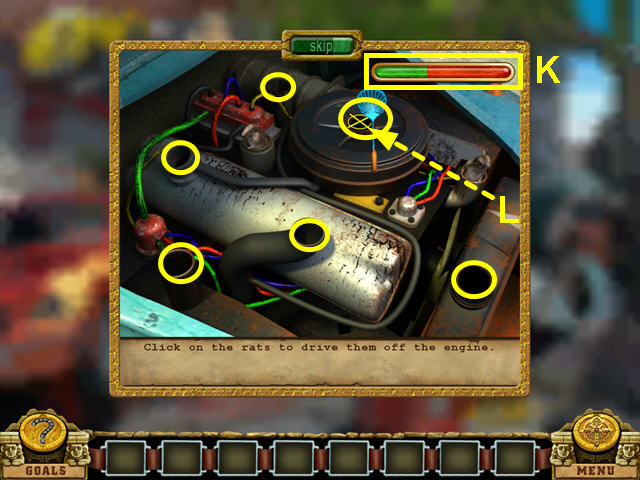
- The object of this mini-game is to get rid of the rats.
- Use the flyswatter on the rats as they pop out of the 6 holes.
- Fill the meter to full green to win the mini-game (K).
- Use the yellow cross-hair to aim and click the left mouse button to hit the rats(L).
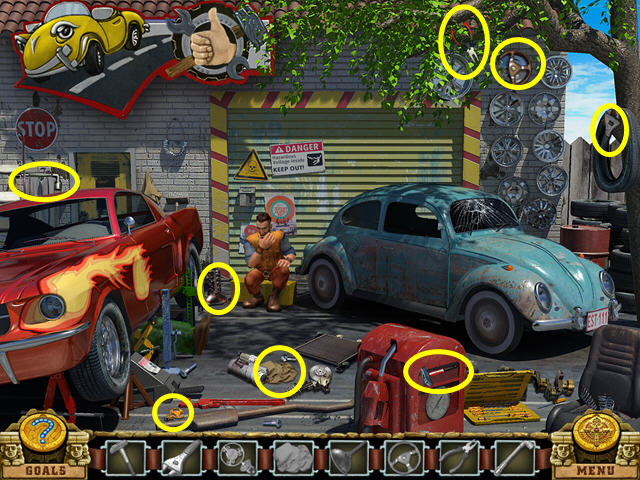
- Locate all the items.
Chapter Five: The Cemetery
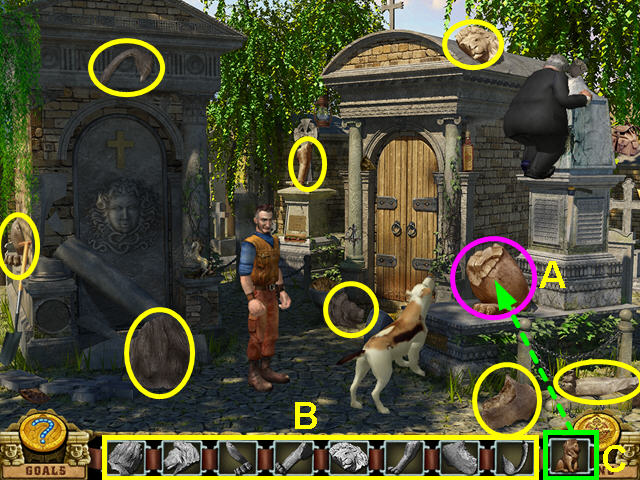
- Look at the statue base under the strange man (A).
- Locate all the lion statue pieces (B).
- Place the LION STATUE on the base (C).
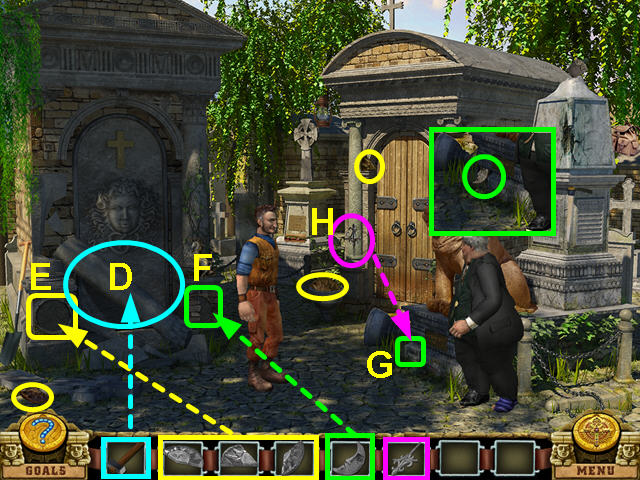
- Use the SLEDGEHAMMER on the pillar (D).
- Look at the circular indentation (E).
- Locate the 3 pieces and place them into the indentation.
- Look at the moon indentation (F).
- Look at the loose stone (G).
- Find the FENCE ROD and pry the stone open (H).
- Take the MOON and place it into the indentation.
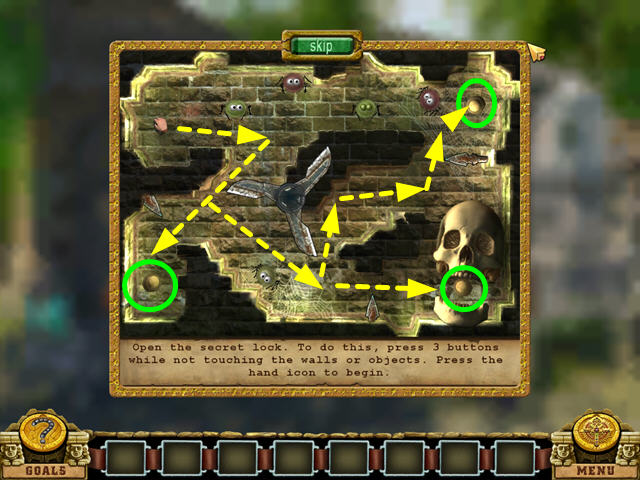
- Move the hand through the maze without touching anything.
- You must push down the 3 buttons.
- If you touch anything your hand will go back to the beginning.
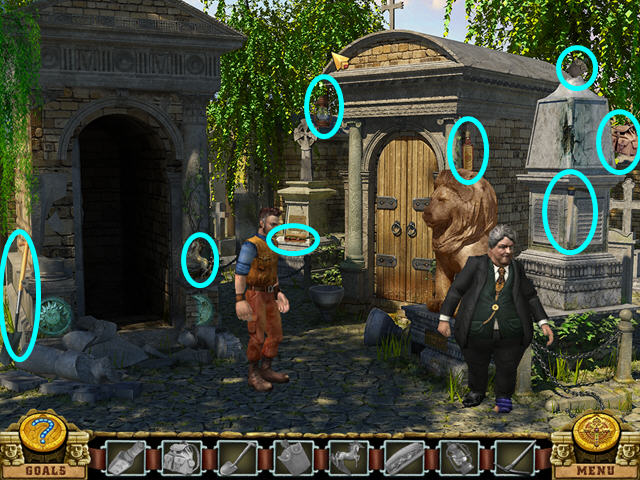
- Locate all the items.
Chapter Six: Inside the Crypt
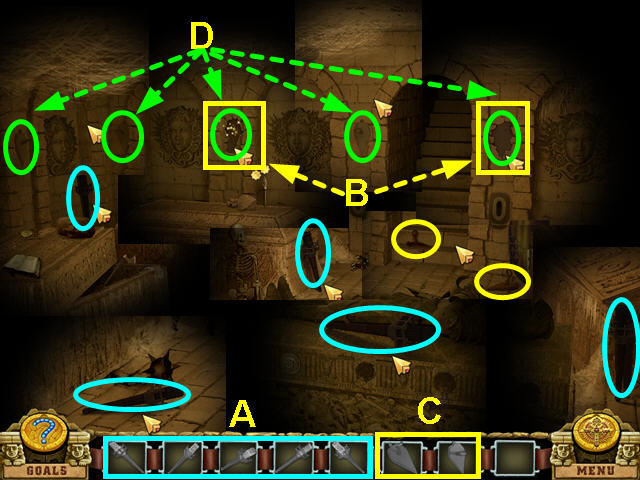
- Locate the 5 torches (A).
- Look where the 2 holders are missing (B).
- Find the 2 holders and place them back on the wall (C).
- Place the torches in the holders (D).
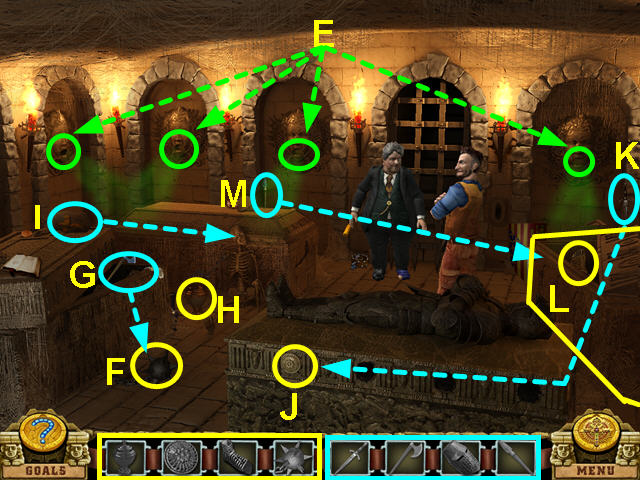
- Look at one of the Medusa head's mouths (E).
- Look at the MACE (F).
- Find the AXE and use it on the MACE (G).
- Look at the BOWL (H).
- Find the HELMET and place it on the skeleton (I).
- Look at the PATTERN PIECE (J).
- Find the DAGGER and use it on the pattern piece (K).
- Look at the sarcophagus (L).
- Find the SPEAR and use it to open the sarcophagus (M).
- Collect all the items .
- Place an item in each Medusa mouth.
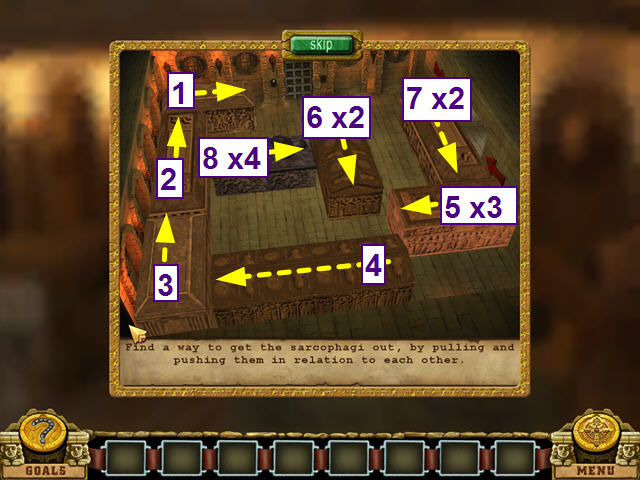
- The object of this mini-game is to remove the black sarcophagus from the room.
- Move the other pieces by clicking on a directional arrow that appears when you place you mouse over the piece.
- Move the pieces in numerical order (1-8).
Chapter Seven: The Underground Hall
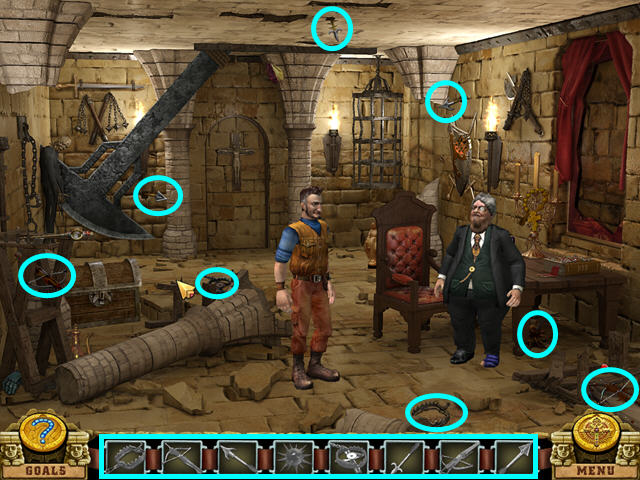
- Locate all the traps.
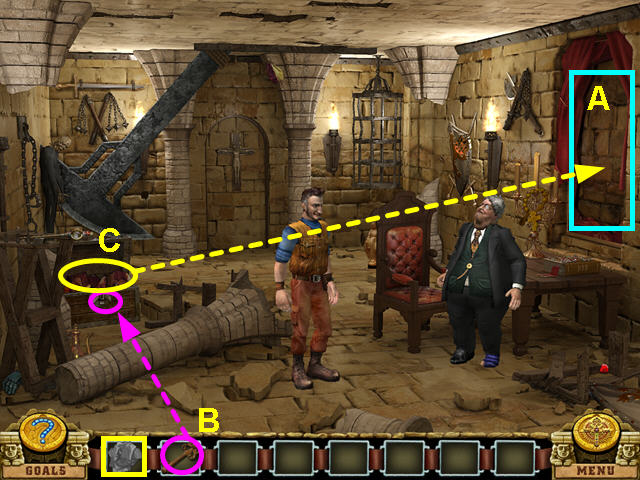
- Look at hole in the wall (A).
- Use the KEY on the chest (B).
- Take the MOSAIC PIECES and use them on the hole in the wall (C).
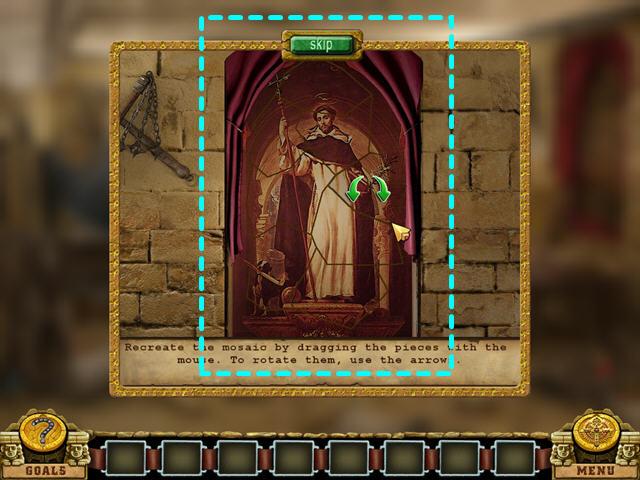
- Recreate the mosaic by replacing the pieces.
- Left-click, hold and drag a piece into place.
- Use the arrows to rotate a piece.
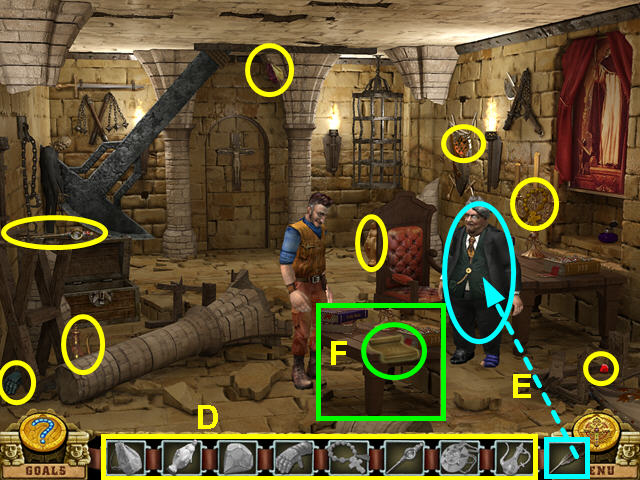
- Locate all the items (D).
- Give the PEN to the man (E).
- Look at the parchment he left behind (F).
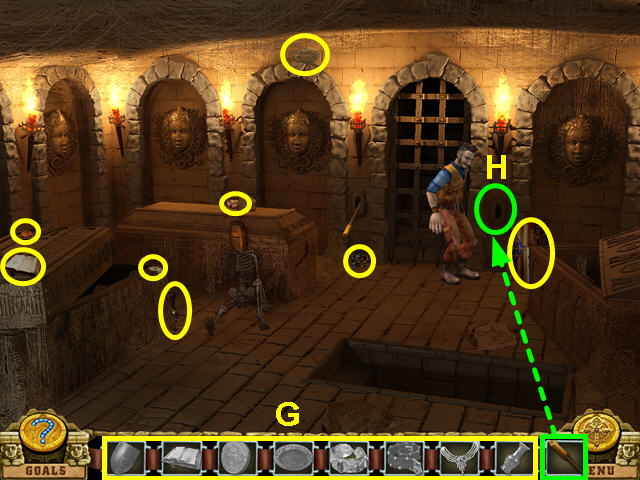
- Locate all the items (G).
- Use the LEVER in the slot (H).
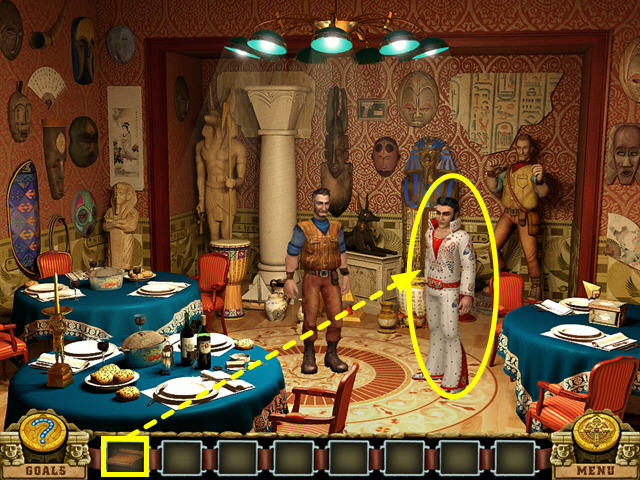
- Give the contract to the Devil (I).
Chapter Eight: The Director
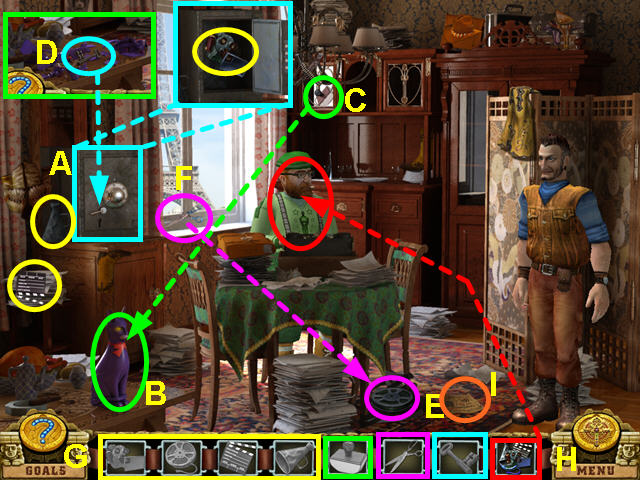
- Look at the safe (A).
- Look at the cat (B).
- Find the PAPERWEIGHT and use it on the cat (C).
- Take the KEY and use it on the safe (D).
- Look at the FILE REEL (E).
- Find the SCISSORS and use them on the FILM REEL (F).
- Locate all the items (G).
- Give the EQUIPMENT to the director (H).
- Look at the script (I).
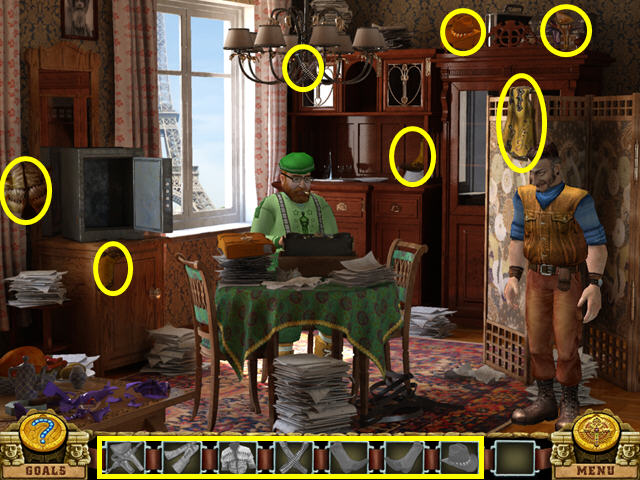
- Locate all the items.
Chapter Nine: The Movie Set
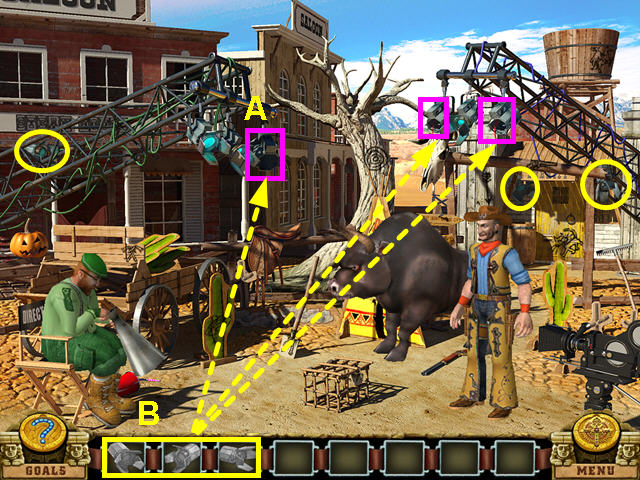
- Look at the empty light holder (A).
- Find the lights and place them in the holders (B).
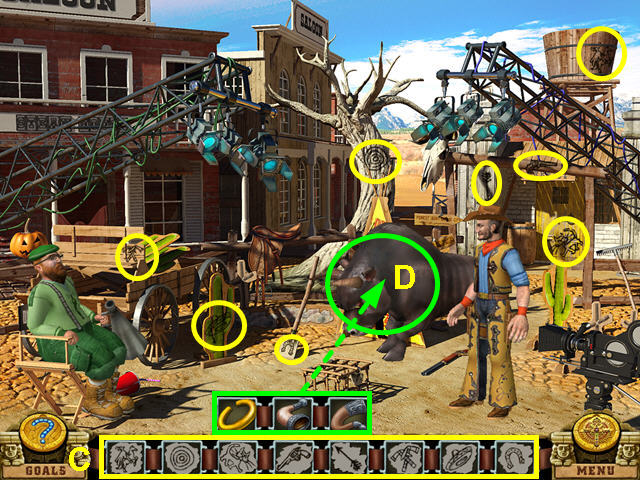
- Locate all the graffiti (C).
- Place the 2 horns and the ring on the bull (D).
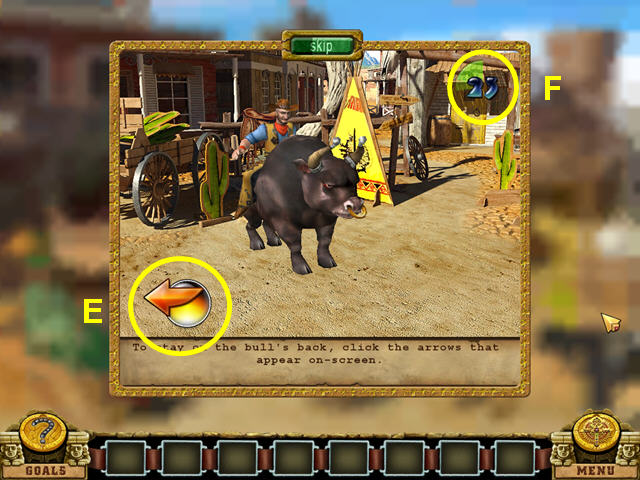
- Click on the arrows as they appear to stay on the bull (E).
- You need to stay on the bull for 30 seconds (F).
- Miss 3 arrows and you will be thrown and have to start over.
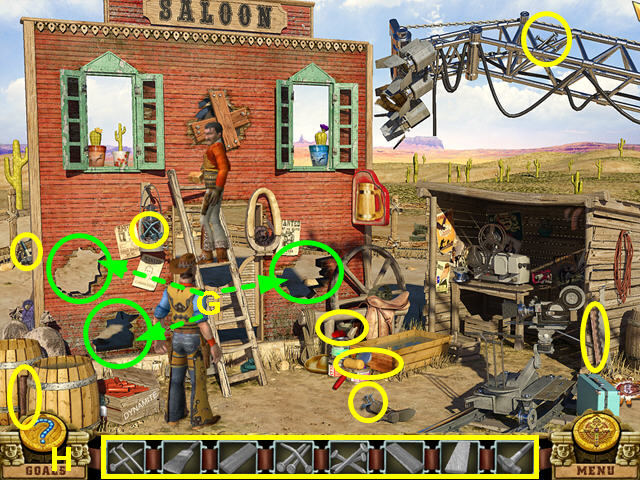
- Look at the holes in the set (G).
- Collect all the items (H).
- Place a BOARD on each hole, followed by NAILS.
- Use the HAMMER on each hole.
- Use the PAINTBRUSH on each hole.
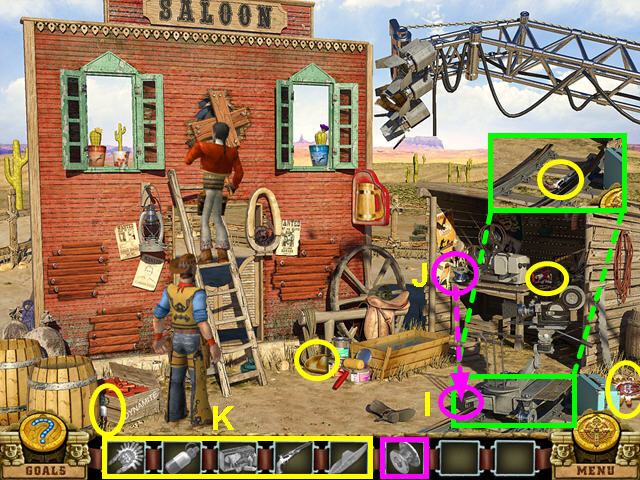
- Look at the camera trolley (I).
- Find the WHEEL and place it on the trolley (J).
- Locate all the items (K).
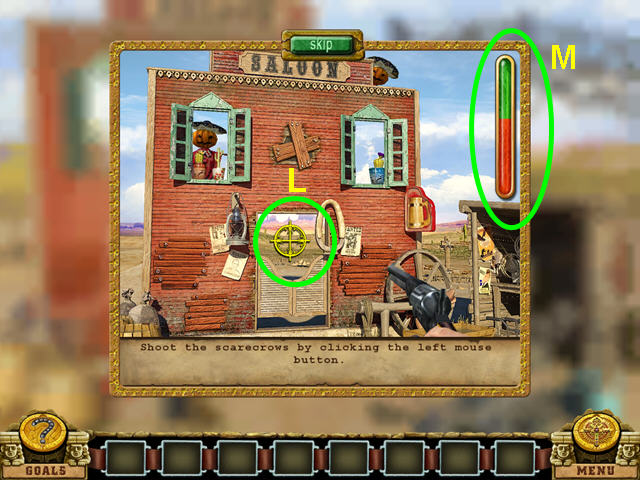
- The object of this mini-game is to shoot all the scarecrows.
- Use the yellow cross-hair to aim and click the left mouse button to fire (L).
- Fill the meter with green to win (M).
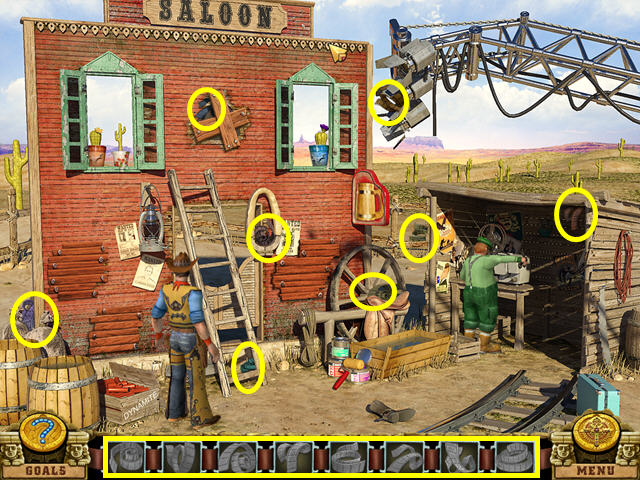
- Locate all the film pieces.
Chapter Ten: Hollywood
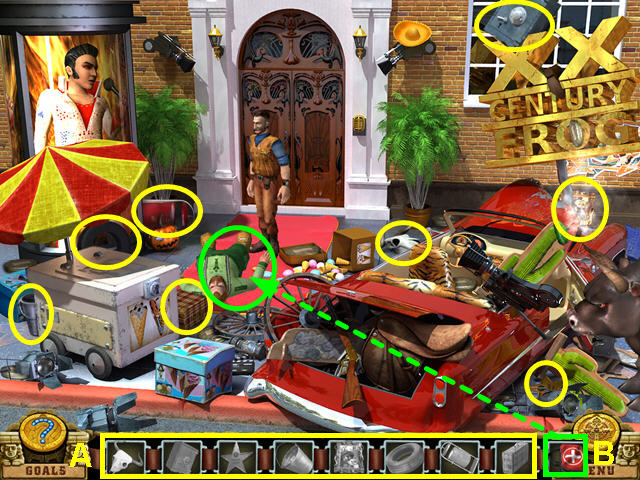
- Locate all the items on the list (A).
- Use the FIRST AID KIT on the director (B).
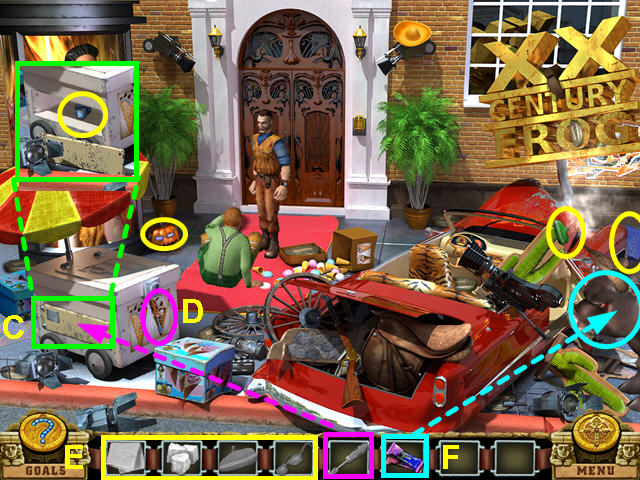
- Look at the side panel on the ice cream cart (C).
- Find the SCREWDRIVER and use it on the panel (D).
- Locate all the items (E).
- Use the BERET, GLASSES and COMPRESS on the director.
- Give the CHOCOLATES to the bull (F).
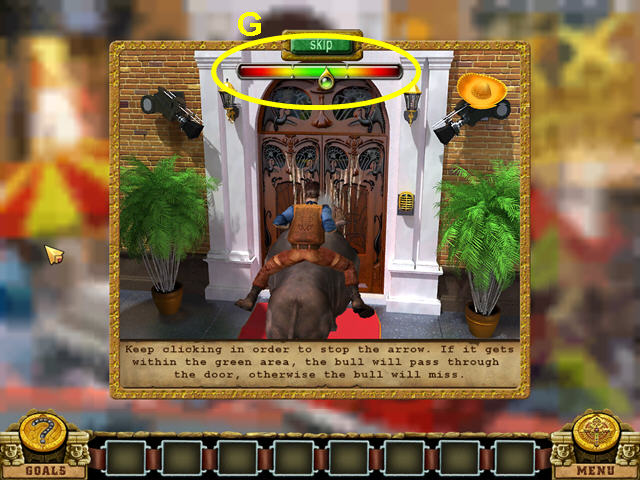
- The object is to break down the door with the bull.
- Click when the pointer is in the green area to have the bull hit the door (G).
- You must hit the door about 6 times.
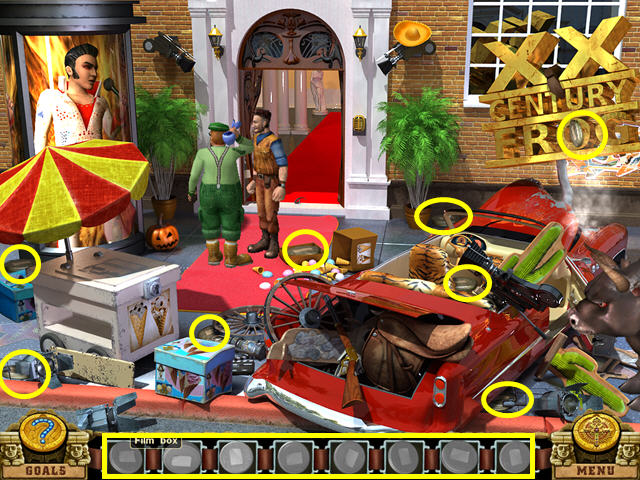
- Locate all the film reels.
Chapter Eleven: The Producer
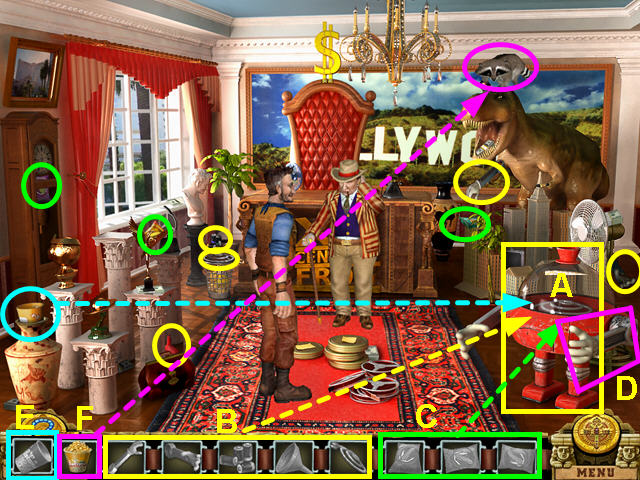
- Look at the popcorn machine (A).
- Locate the 5 parts and use them on the machine (B).
- Find the 3 POPCORN BAGS and use them on the machine (C).
- Pull the arm of the machine to pop the corn (D).
- Locate the SMALL CUP and use it on the machine (E).
- Give the POPCORN to the raccoon (F).
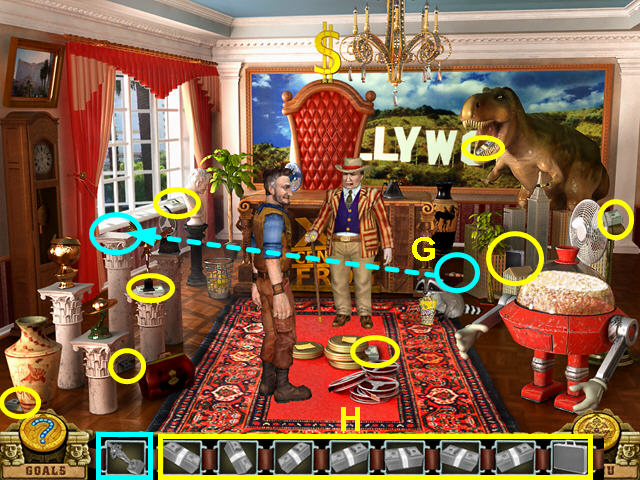
- Find the OSCAR and place it on the pedestal (G).
- Locate the cash and the case (H).
Chapter Twelve: Outside the Mansion
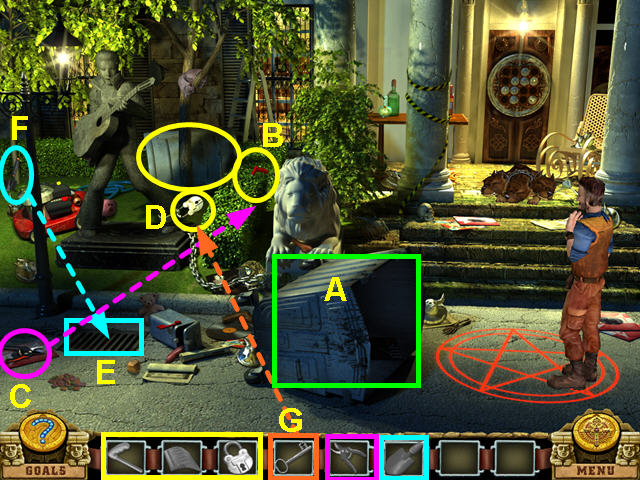
- Look at the trash can (A).
- Look at the LAWNMOWER HANDLE stuck in the bushes (B).
- Find the PRUNING SHEARS and cut the bushes (C).
- Look at the LOCK (D).
- Look at the grate (E).
- Find the GARDEN TROWEL and use it on the grate (F).
- Use the KEY on the LOCK (G).
- Find the GARBAGE CAN COVER and the LAWNMOWER HANDLE and place them on the garbage can.
- Place the lock on the garbage can.
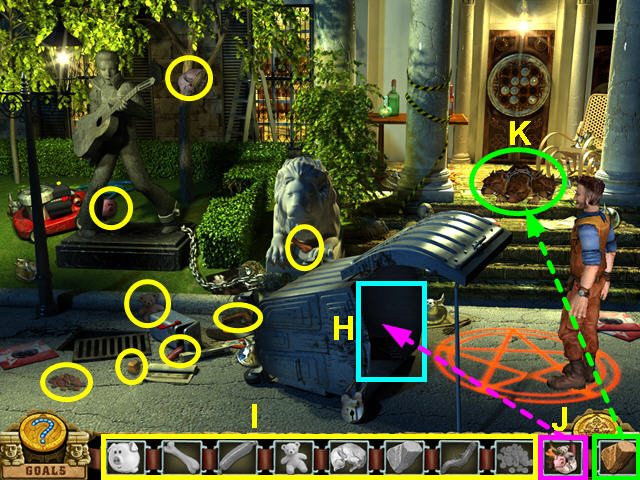
- Look at the inside of the garbage can (H).
- Locate all the items on the list (I).
- Use the BAIT on the garbage can (J).
- Toss the STONE at the 3-headed dog (K).
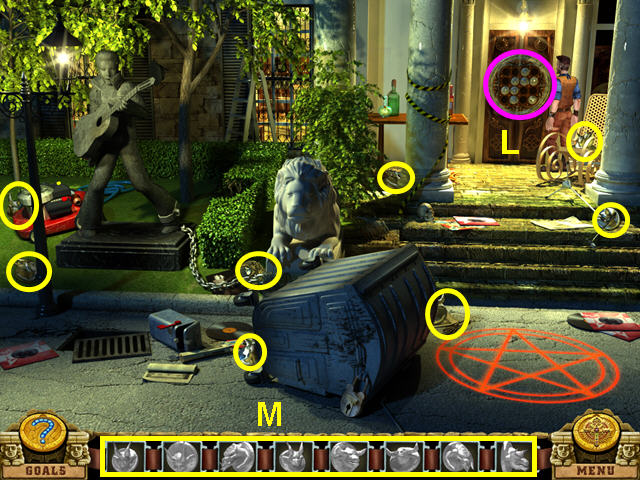
- Look at the door (L).
- Locate the 8 heads (M).
- Use the heads on the door.
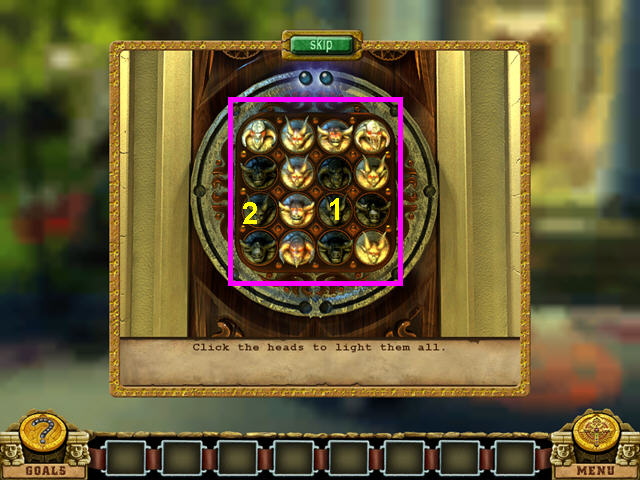
- The object is to turn on all the lights.
- Press the heads in numerical order (1-2).
- This is the first of 4 in this mini-game.
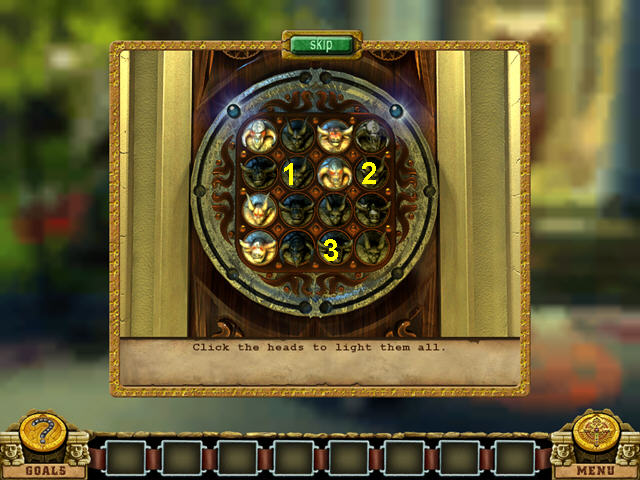
- Press the heads in numerical order (1-3).
- This is the second of 4 in this mini-game.
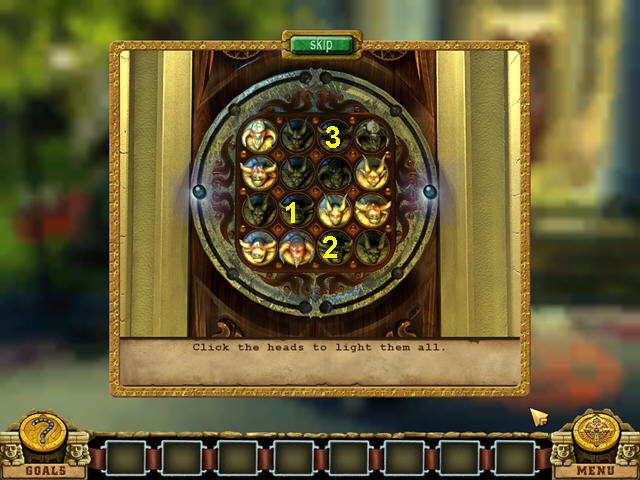
- Press the heads in numerical order (1-3).
- This is the third of 4 in this mini-game.
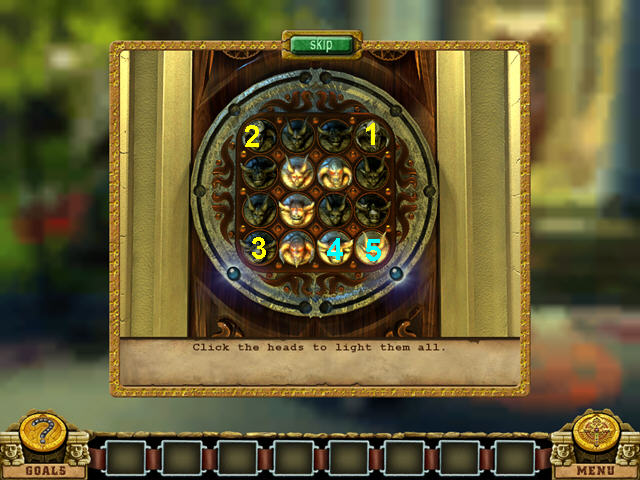
- Press the heads in numerical order (1-5).
- This is the fourth of 4 in this mini-game.
Chapter Thirteen: Inside the Mansion
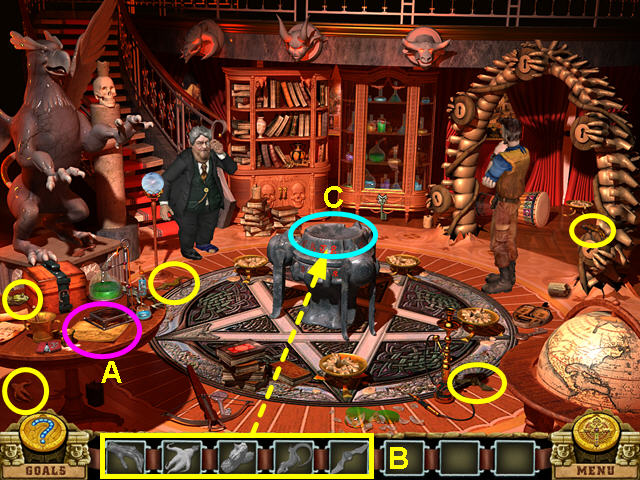
- Look at the instructions on the table (A).
- Collect the items (B).
- Place the items on the altar (C).
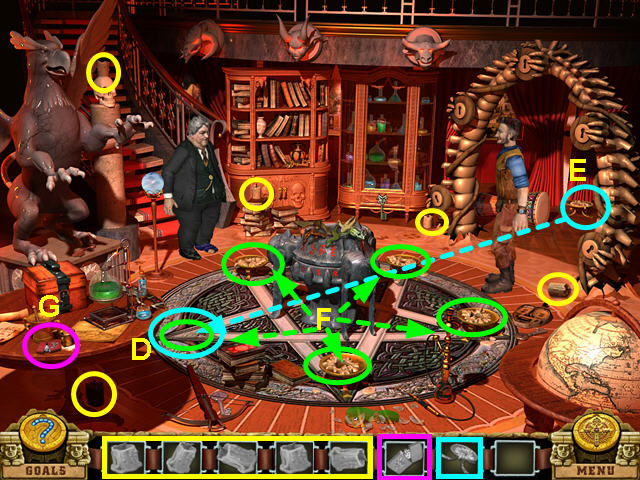
- Look at the spot missing a CANDLE HOLDER (D).
- Find the CANDLE HOLDER and place it on the spot (E).
- Locate all the CANDLES and place them into the candle holders (F).
- Use the LIGHTER to light all the candles (G).
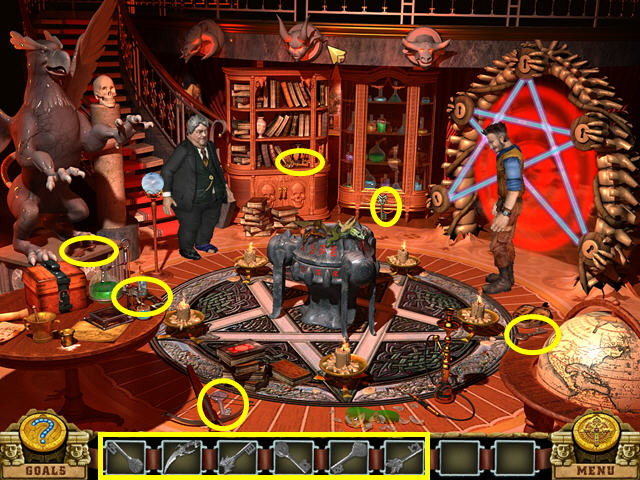
- Locate all the items.
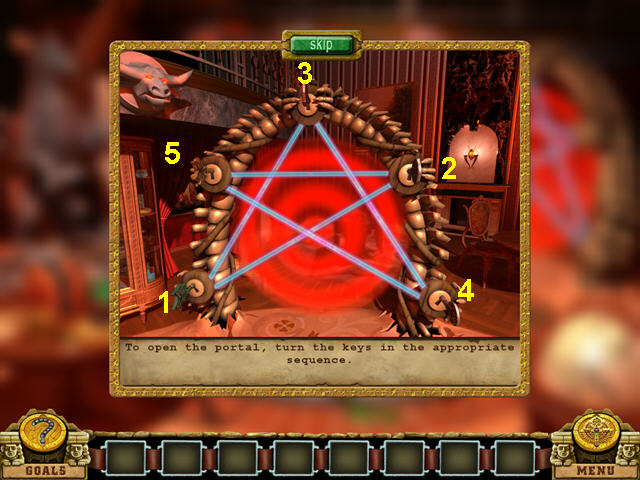
- The object of this mini-game is to turn the keys in the correct order.
- Should you turn the wrong key, it will reset and you need to start over.
- Try a key until you find one that stays turned.
- Turn the keys in numerical order (1-5).
Chapter Fourteen: The Devil's Office
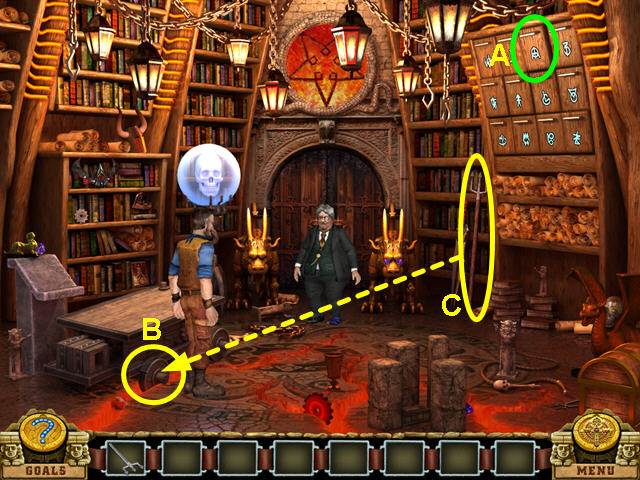
- Look at the high drawer (A).
- Look at the elevator wheel (B).
- Find the TRIDENT and use it on the stuck wheel (C).
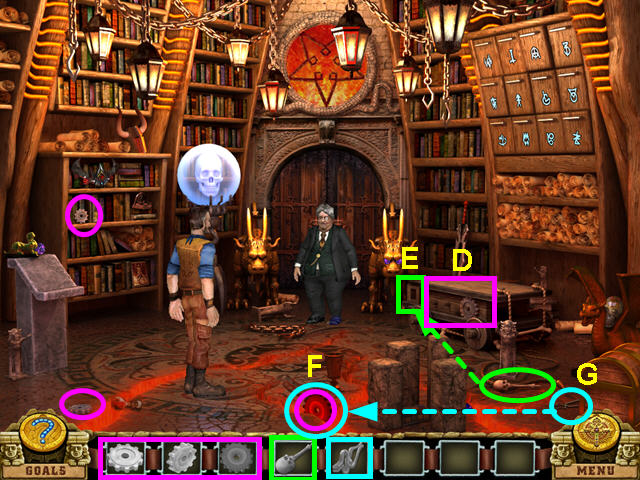
- Look at the side of the elevator by the gear (D).
- Look at the far left side of the elevator (E).
- Look at the GEAR stuck in the lava (F).
- Find the PINCERS and use them on the GEAR in the lava (G).
- Locate the 2 remaining GEARS and the ELEVATOR LEVER.
- Place the 3 GEARS on the side of the elevator.
- Place the ELEVATOR LEVER on the far left side of the elevator.
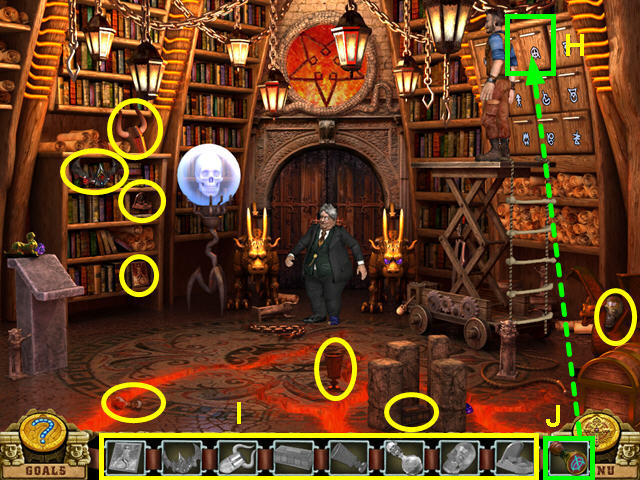
- Look at the drawer (H).
- Locate all the items (I).
- Use the SEAL on the drawer (J).
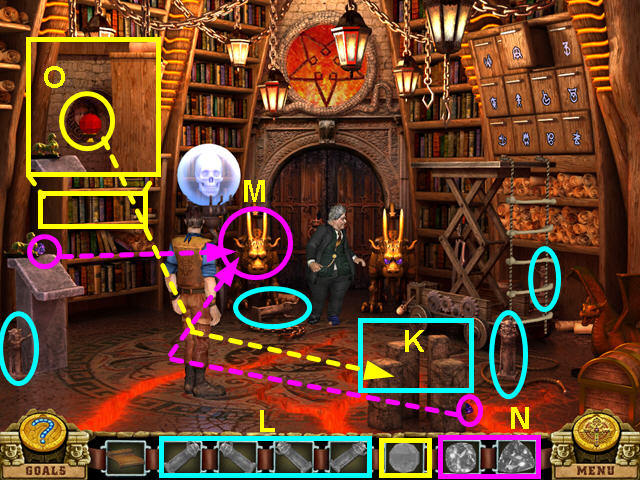
- Look at the stone pillars (K).
- Locate the 4 STATUES and place them on the pillars (L).
- Look at the left chimera (M).
- Locate the 2 EYE GEMS and place them in the chimera (N).
- Take the CRYSTAL and use it on the stone pillars (O).
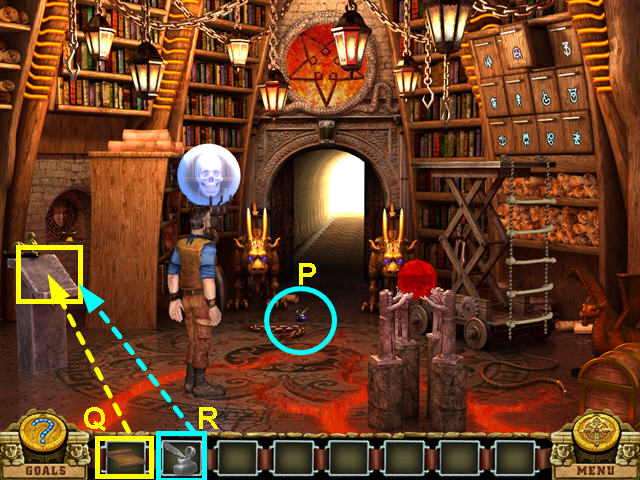
- Take the SACRED INK (P).
- Place the CONTRACT on the book stand (Q).
- Use the SACRED INK on the contract (R).
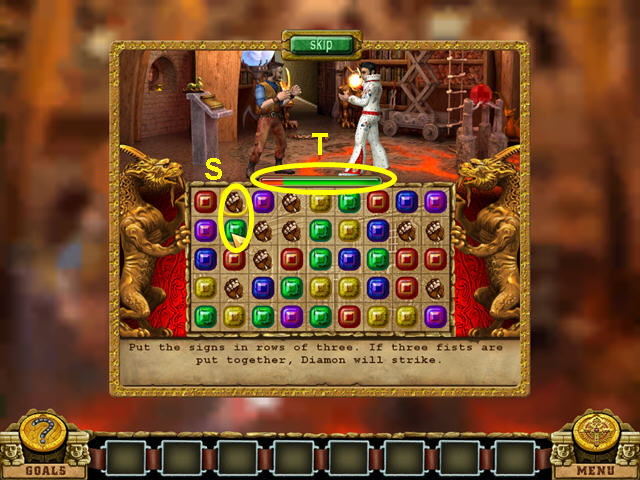
- The object of this mini-game is to make chains of 3 or more fists.
- Swap two adjacent items to make chains (S).
- Deplete the green bar to defeat the devil (T).
- Congratulations! You have completed Diamon Jones: Devil's Contract!
Created at: 2011-04-27

