Walkthrough Menu
General Tips
- This game is a Hidden Object Puzzle Adventure.
- If you need a hint you can click on Dominic’s icon in the lower left corner. His bubble has to be full before he will grant you a hint.
- The Hint can be used in a Hidden Object Scene as well as in regular scenes. However, at some point Dominic will no longer give you hints and you will have to figure things out on your own.
- Inventory items can be found in Hidden Object Scenes as well as in regulars scenes and they will be stored in the tray at the bottom of the scene.
- When you click on 3 incorrect items in a Hidden Object Scene your cursor will disappear for a few seconds.
- Areas of interest will sparkle when your mouse passes over them.
- Click on the Red “X” Button in the upper right to exit out of scenes.
Chapter 1
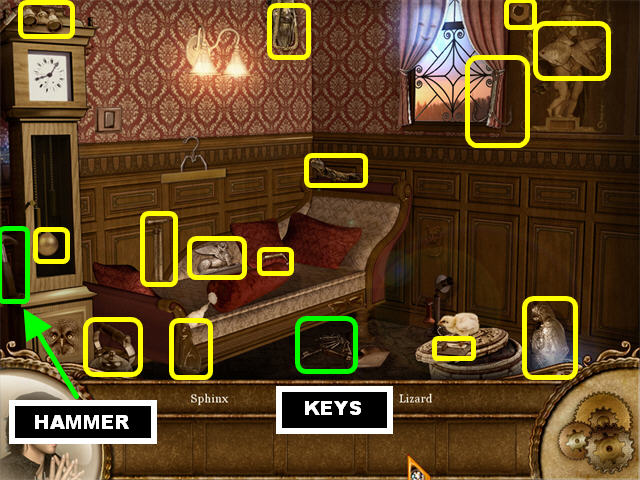
- Click on the left edge of the scene to enter the next area.
- Click on the LIGHT SWITCH in the upper left to turn on the lights and trigger a Hidden Object Scene.
- Find all the items on the list.
- The KEYS are in the lower center and will be added to inventory.
- The HAMMER is on the left edge of the scene.
- Go to the right.
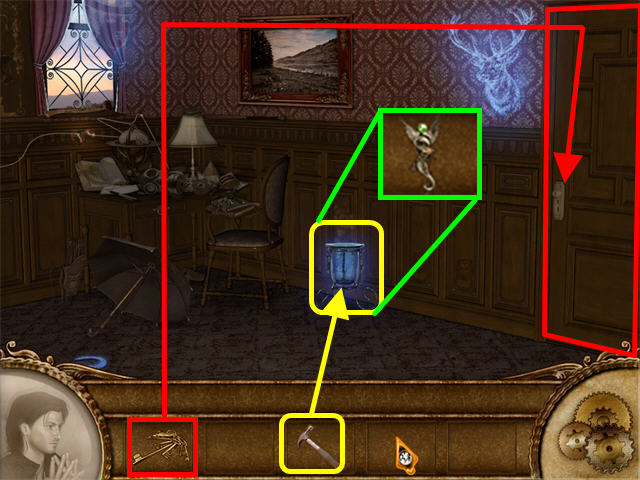
- Crack the BLUE VASE with the HAMMER and pick up the PEWTER ANGEL inside.
- Use the KEYS on the door on the right to trigger a puzzle.
Key Puzzle
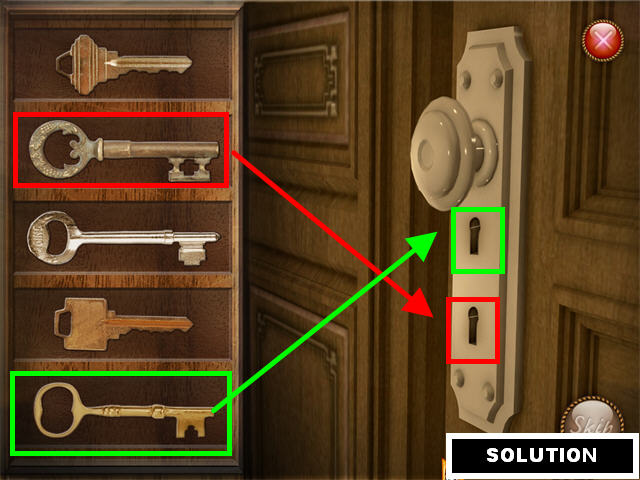
- Place the 2 correct keys in the lock.
- The second key belongs in the lower keyhole.
- The last key belongs in the first keyhole.
- Go through the door.
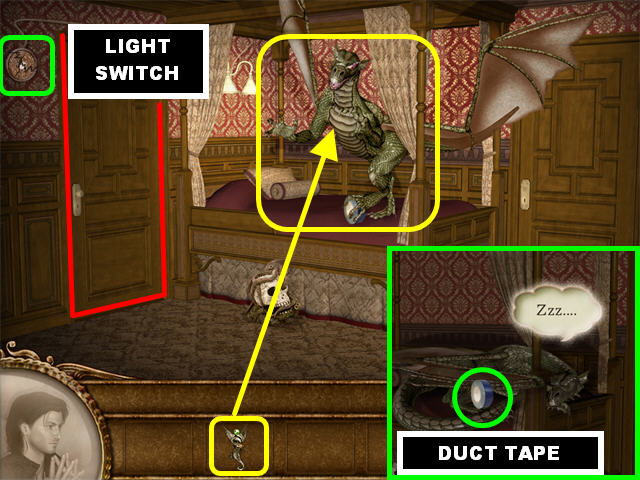
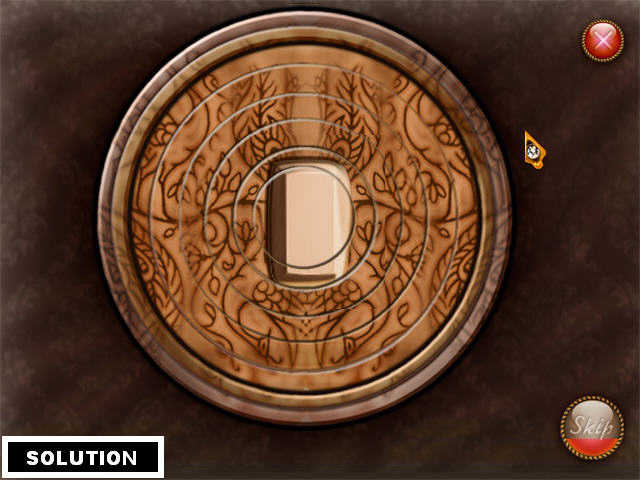
- Place the PEWTER ANGEL on the dragon.
- Click on the LIGHT SWITCH in the upper left to trigger a puzzle.
- Drag the circles around until they form the image shown on the screenshot.
- When you return to the room the lights are off and the dragon is asleep. Pick up the DUCT TAPPE from the dragon.
- Go back to the previous scene by clicking on the left door.
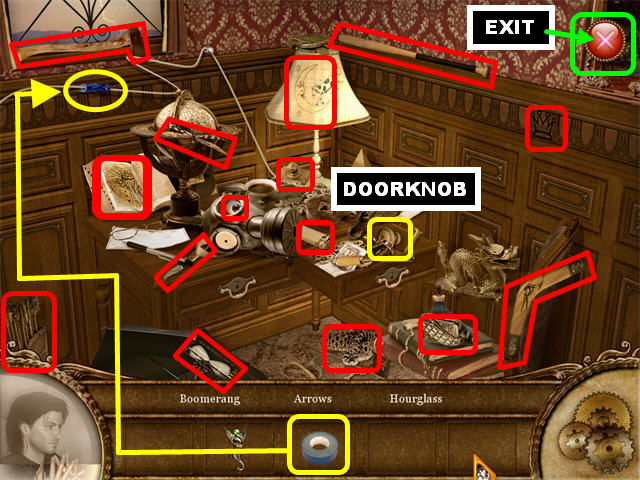
- Click on the table for a closer look.
- Place the DUCT TAPE on the WIRES in the upper left to turn on the lights and trigger a Hidden Object Scene.
- The DOORKNOB is inside the drawer.
- Click on the Red “X” Button in the upper right to exit out of that scene.
- Go back to the Dragon’s Room.
- Place the DOORKNOB on the door on the right.
- Go through the door to enter a Hidden Object Scene.
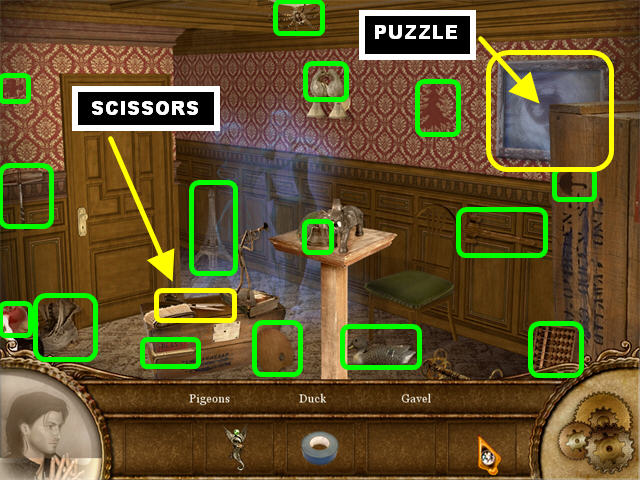
- Find all the items in the scene.
- The SCISSORS are in the lower left.
- Click on the large painting in the upper right to trigger a puzzle after your search has been completed.
Puzzle
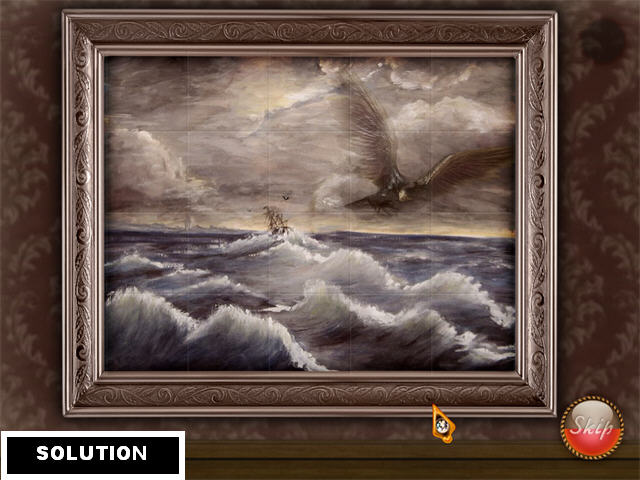
- Assemble the puzzle by swapping the tiles into their correct positions.
- Click on any 2 tiles to swap their positions.
- Please look at the screenshot for the solution.
- A SAFE appears behind the painting. You must find the code to solve it.
- Go through 2 LEFT DOORS and then click on the left edge of the scene.
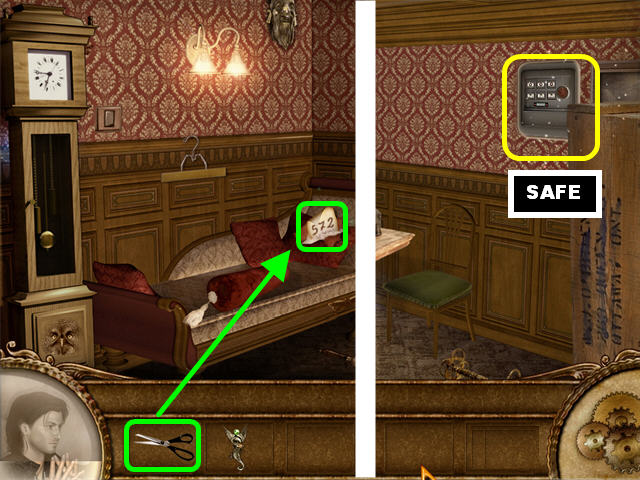
- Cut the SOFA PILLOW with the SCISSORS.
- The CODE 572 appears in the pillow.
- Go right and then go through the next 2 RIGHT DOORS to return back to the room with the safe.
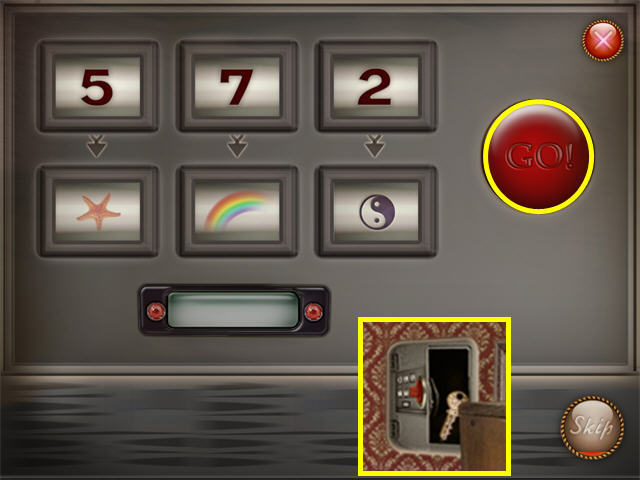
- Click on the safe for a closer look.
- Use the code “572” found in the previous room to solve this puzzle.
- Change the numbers on top from left to right to “572”.
- Now you have to find the items that have the same amount of items as the numbers above them.
- From left to right change the dials to:”STARFISH, RAINBOW & YIN-YANG”.
- Click on the Red “Go” Button in the upper right to enter your selections.
- Pick up the KEY inside the safe.
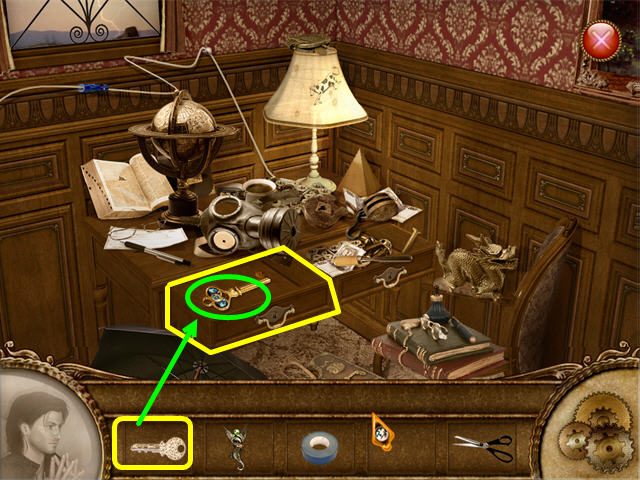
- Go through 2 LEFT DOORS and click on the table for a closer look.
- Use the KEY to open the drawer on the left.
- Pick up the FIRST KEY inside the drawer to end the chapter.
Chapter 2
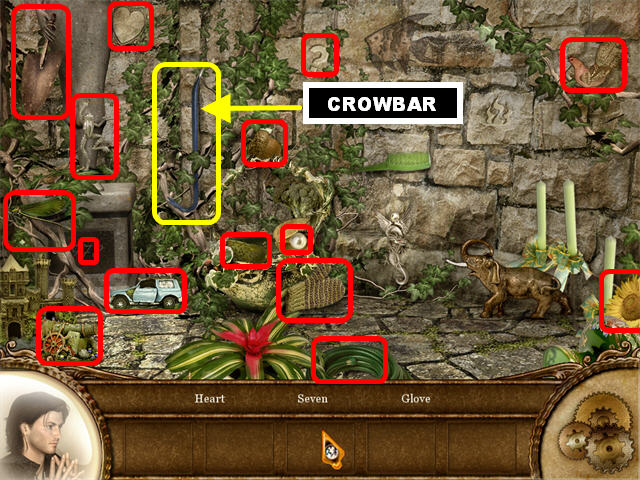
- Click on the lady and she tells you that she needs to find her key.
- Click in the back of the scene to trigger a Hidden Object Scene.
- Pick up the CROWBAR on the left.
- Exit out of that scene and go LEFT.
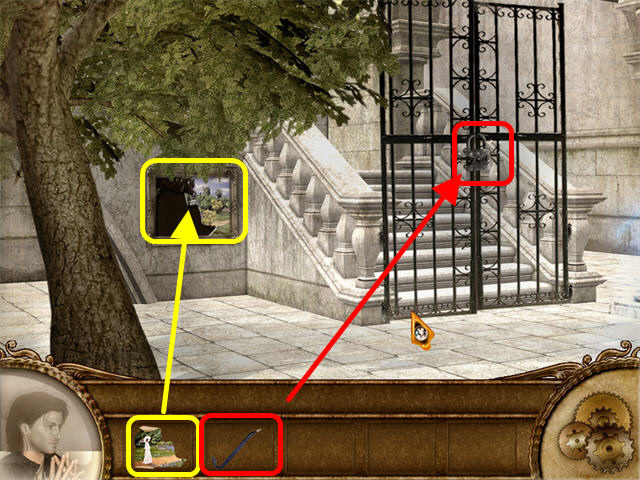
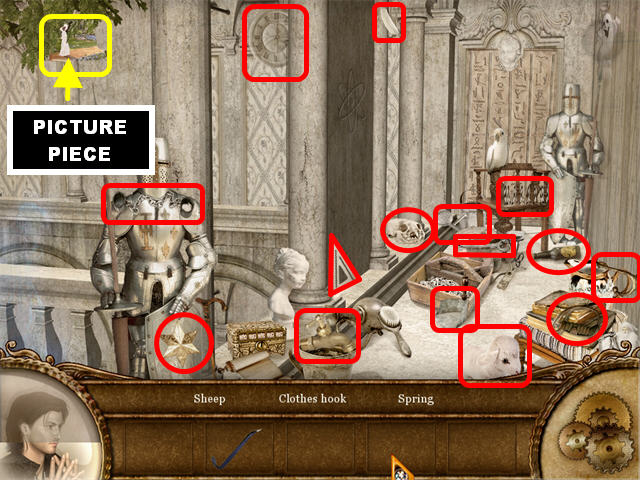
- Place the CROWBAR on the LOCK on the gate and go through there to enter a Hidden Object Scene.
- Pick up the PICTURE PIECE in the upper left corner.
- Exit out of that scene.
- Place the PICTURE PIECE in the picture on the left side of the gate and click on the picture to trigger a puzzle.
Puzzle
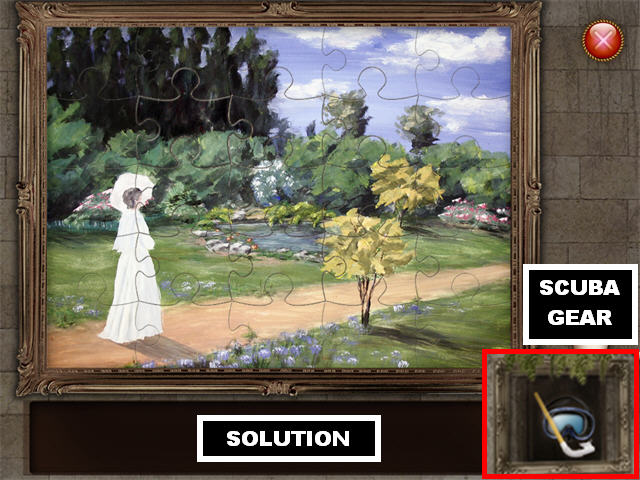
- Assemble the puzzle by placing the correct pieces of the painting in place.
- Pick up the puzzle piece and right-click it to rotate it.
- Left-click on a piece to put it in place.
- Please look at the screenshot for the solution.
- Pick up the SCUBA GEAR that appears on the wall after the puzzle has been solved.
- Go LEFT to enter a Hidden Object Scene.
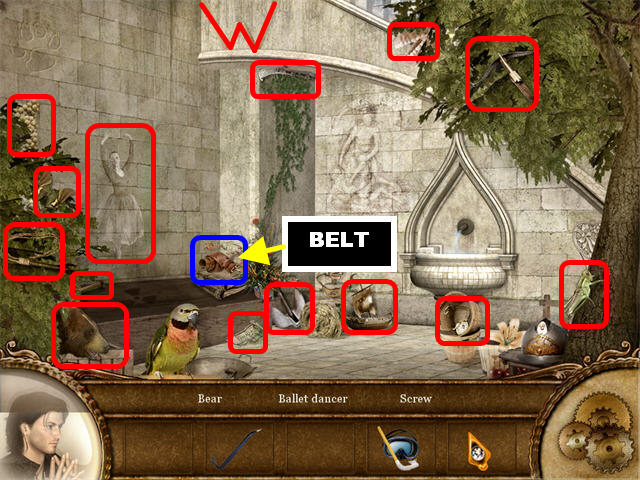
- Pick up the items on the list.
- The BELT is in the far left side.
- Go RIGHT 2 Times.
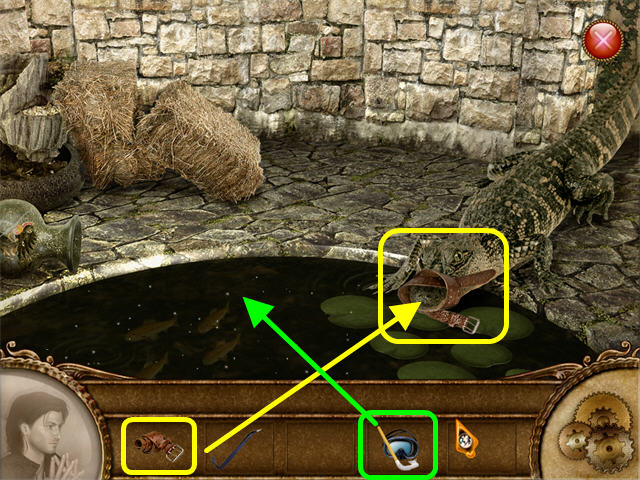
- Click on the water for a closer look.
- Place the BELT on the ALLIGATOR on the right.
- Place the SCUBA GEAR into the water to trigger a puzzle.
Slider Puzzle
- Your goal is to slide the ring out of the box by sliding the stones out of the way.
- The stones can only slide in the direction they are facing. Click on the edges of the stones to slide them.
- You have to beat 3 stages of this game.
Stage 1 Solution
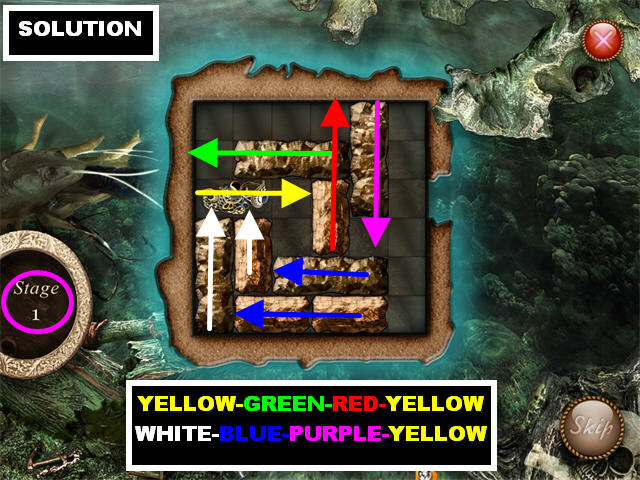
- Move the stones in this order, follow the directions of the arrows:
Stage 2 Solution
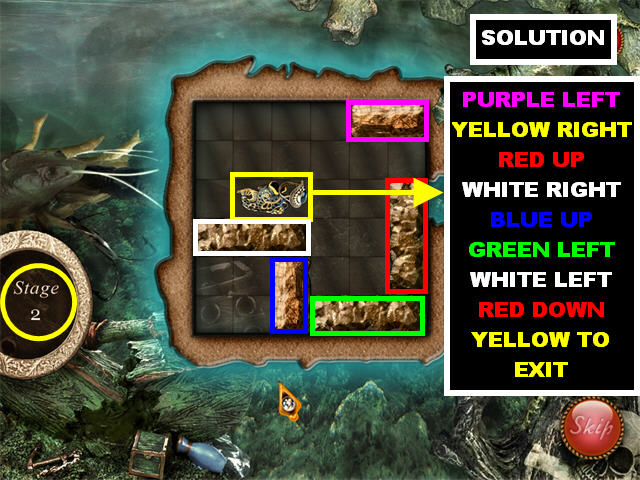
- Please move the stones in the following order:
Stage 3 Solution
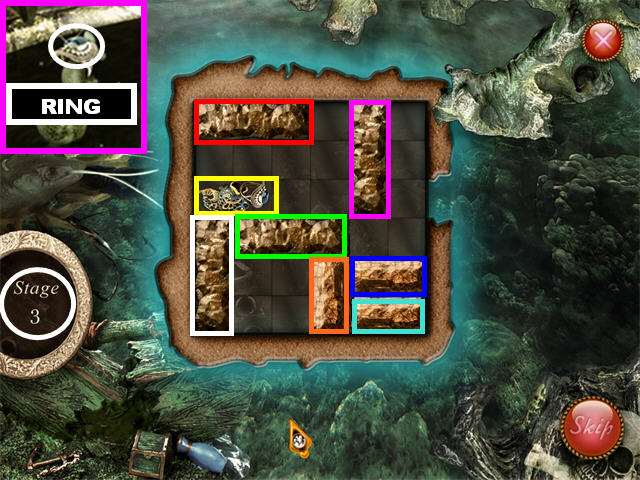
- Please move the stones in the following order:
- Pick up the RING on the left side of the water and exit out of that view.
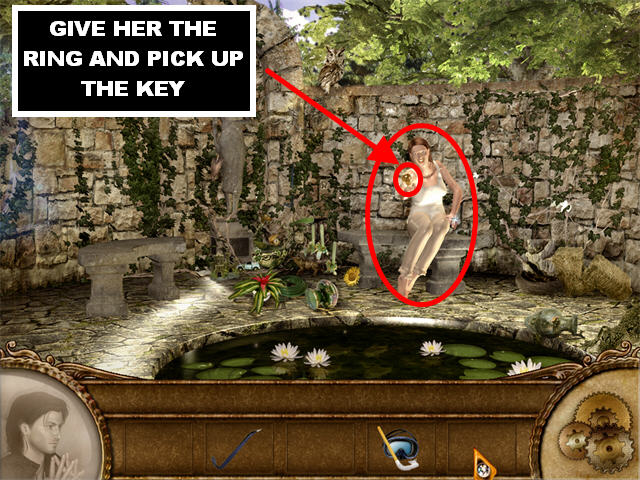
- Give the RING to the lady by the water.
- Take the KEY from her hand.
- Go left and go through the gate.
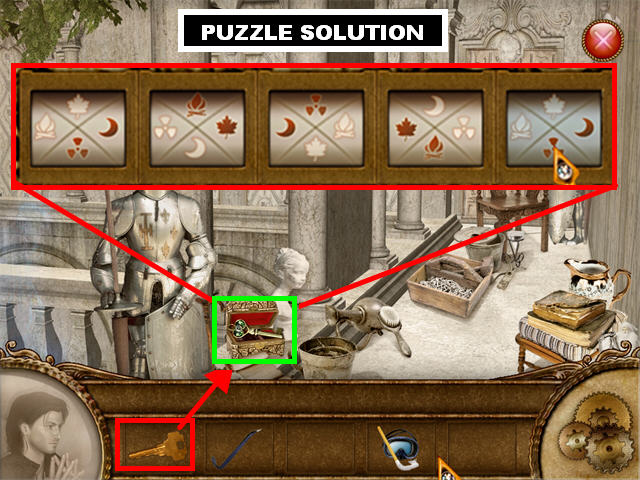
- Place the KEY in the LOCKED BOX in the lower left to trigger a puzzle.
- Your goal is to guess the right symbol sequence by glancing at the first 2 locked slots on the box.
- Click on the slots to change the symbols.
- Please look at the screenshot for the solution.
- Pick up the SECOND KEY inside the box after the puzzle has been solved.
Chapter 3
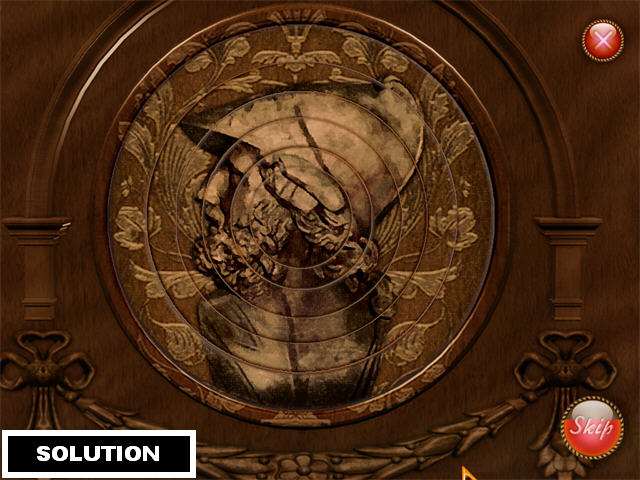
- Click on the puzzle above the door with the laser beams.
- Rotate the circles by clicking on them.
- Please look at the screenshot for the solution.
- Go through the door to trigger a Hidden Object Scene.
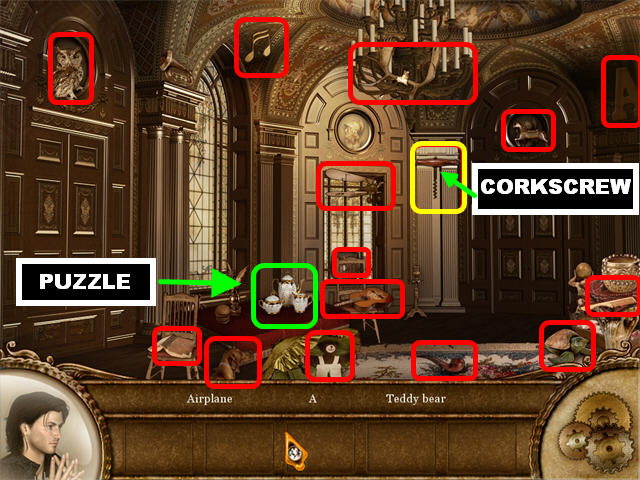
- Pick up all the items on the list.
- The CORKSCREW is in between the 2 doors in the back.
- Click on the TEA SET on the table to trigger a puzzle.
Tea Set Puzzle
- Your goal is to switch the positions of the TEA KETTLE and the SUGAR POT.
- Click on an item and it will fall into one of the empty spaces.
- Please watch the video for a step-by-step solution for this puzzle.
- Grab the KEY from the dragon’s mouth. It tells you to remember how many wings he has.
- Go through the left door and then click on the left edge of the screen for a Hidden Object Scene to appear.
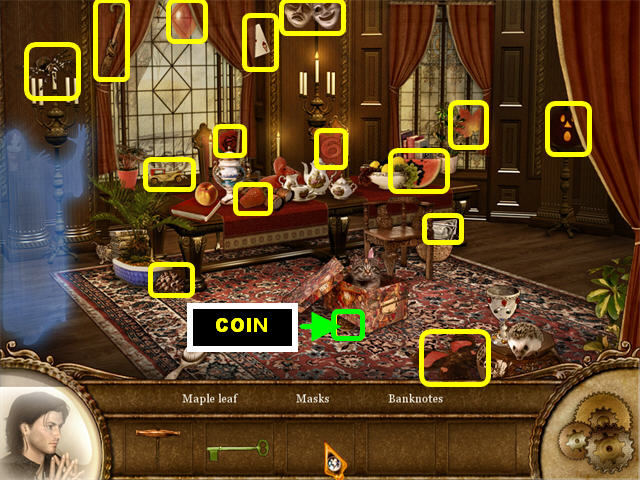
- Find all the items on the list.
- The COIN is below the box in the center of the rug.
- Go to the right and go through the right door.
- Place the GREEN KEY on the lock of the door on the right.
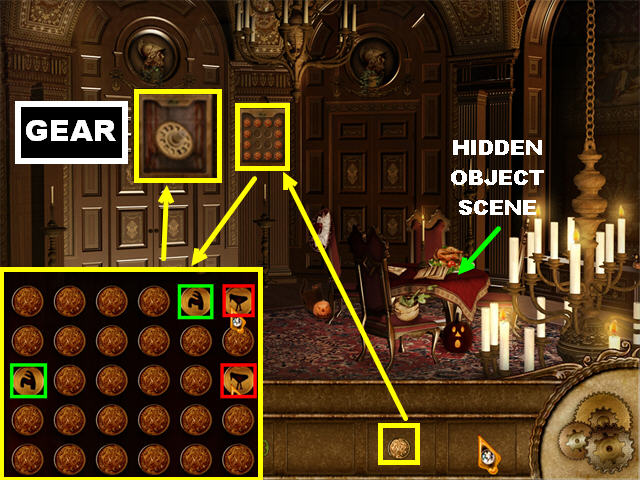
- Place the COIN on the puzzle in the back of the scene. Click on the puzzle to begin playing.
- Your goal is to match 2 identical coins as you flip them over.
- Pick up the GEAR after the puzzle has been solved.
- Click on the table to trigger another Hidden Object Scene.
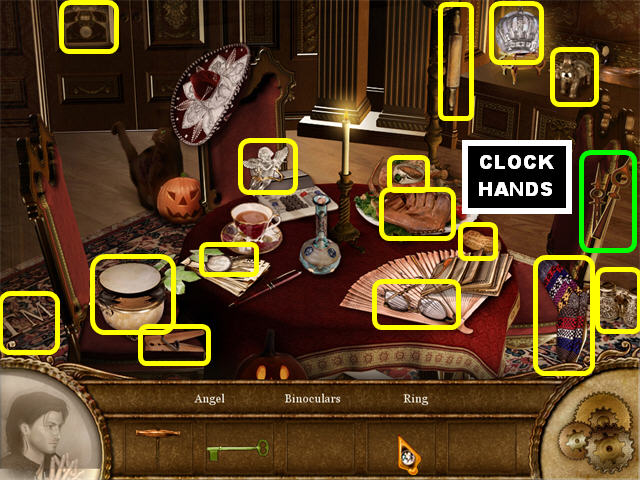
- Find all the items on the list.
- Pick up the CLOCK HANDS on the right edge of the scene.
- Exit out of that location and go through the next 2 LEFT DOORS.
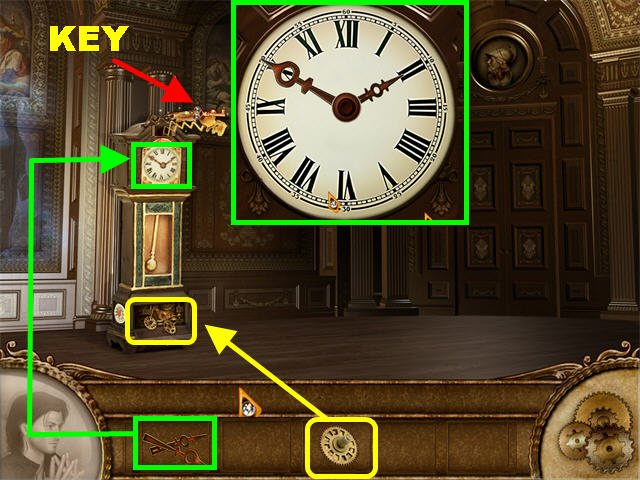
- Place the CLOCK HANDS on the clock face.
- Change the time to 2:50 by dragging the clock hands to the correct positions.
- Click at the bottom of the clock to open the compartment.
- Place the GEAR at the bottom of the clock to trigger a puzzle.
Gear Puzzle
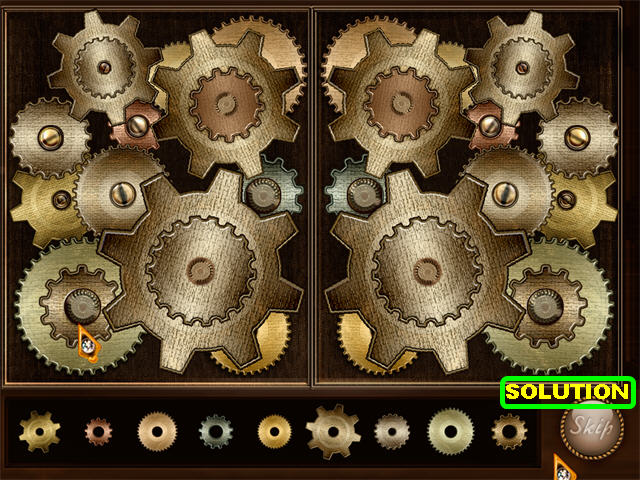
- Your goal is to place all the gears in the right spots.
- Keep in mind that the images are mirror images of each other.
- Drag the gears from the bottom of the scene to the right spots in the left or right side of the puzzle.
- Please look at the screenshot for the solution.
- Pick up the THIRD KEY above the clock.
Chapter 4:
Pyramid Puzzle
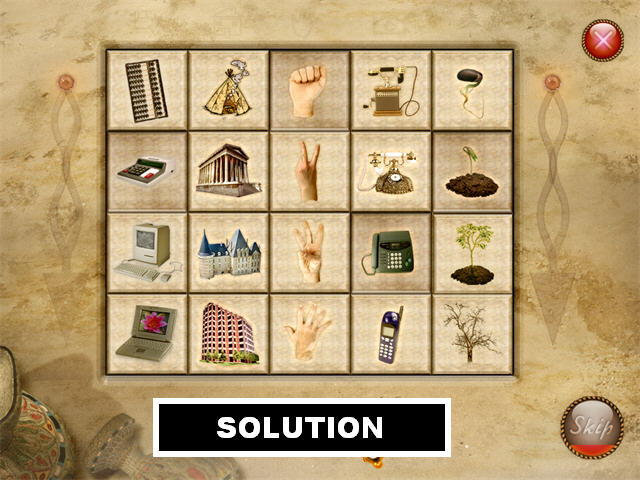
- The elephant says that if you give it some water it will help you.
- Click on the pyramid for a closer look.
- Click on the puzzle on the ground.
- You must arrange the symbols according to their evolution stages from earliest to most recent.
- There are several pieces that cannot be moved used those as your guide.
- Click on 2 tiles to swap their locations.
- Please look at the screenshot for the solution.
- Enter the pyramid after the puzzle has been solved.
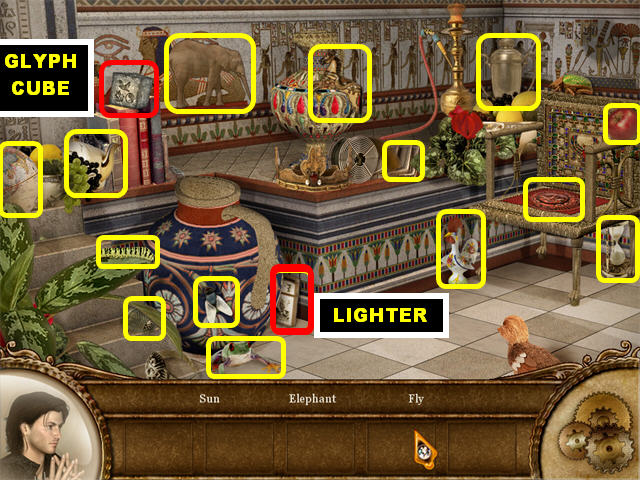
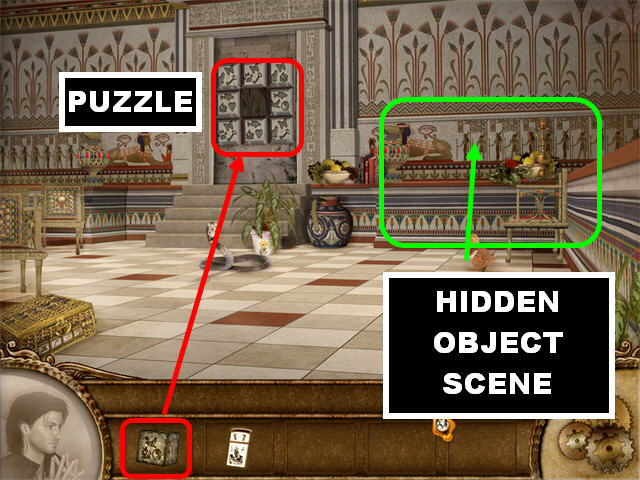
- Click on the right side of the screen for a Hidden Object Scene.
- Pick up the LIGHTER in the lower left.
- The GLYPH CUBE is in the upper left.
- Exit out of that scene.
- Place the GLYPH CUBE on the puzzle in the back wall.
- Click on the puzzle to begin playing.
Glyph Puzzle
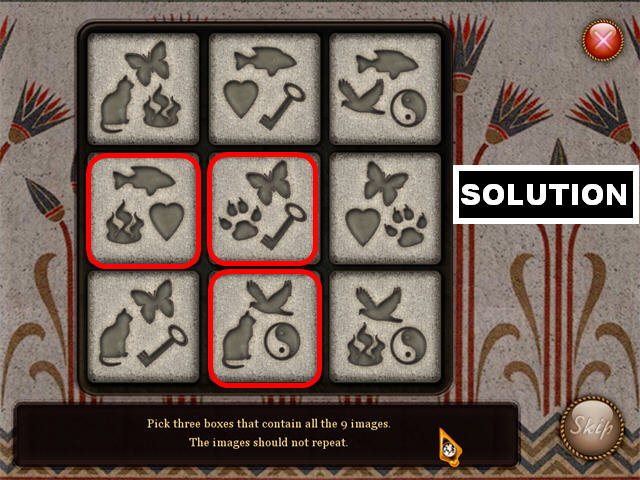
- Your goal in this puzzle is to find the 3 cubes that contain one of each of the 9 images without any of them repeating.
- Select the 3 cubes you want to choose to enter your selection. If it’s incorrect you will have to start over.
- Please look at the screenshot for the solution.
- The solution is always the same but the positions of the glyphs may vary per game.
- Go through the door to enter a Hidden Object Scene.
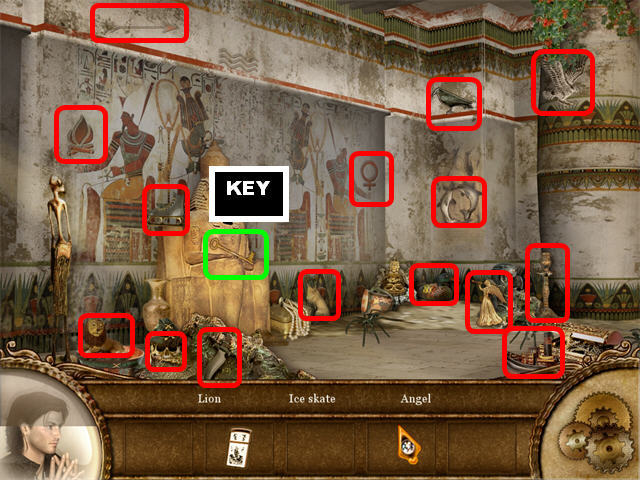
- Find all the items on the list.
- Pick up the KEY held by the large statue.
- Go left.
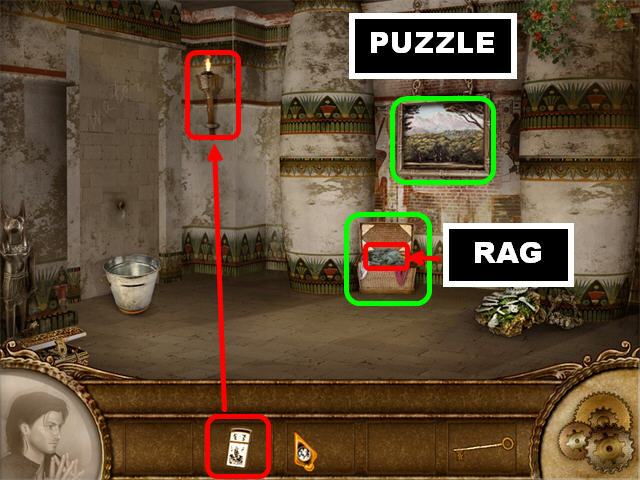
- Place the LIGHTER in the torch to light up the room. Pay attention to the bucket on the left.
- Click on the chest in the lower center to open it and pick up the RAG inside.
- Click on the picture on the back wall to trigger a puzzle.
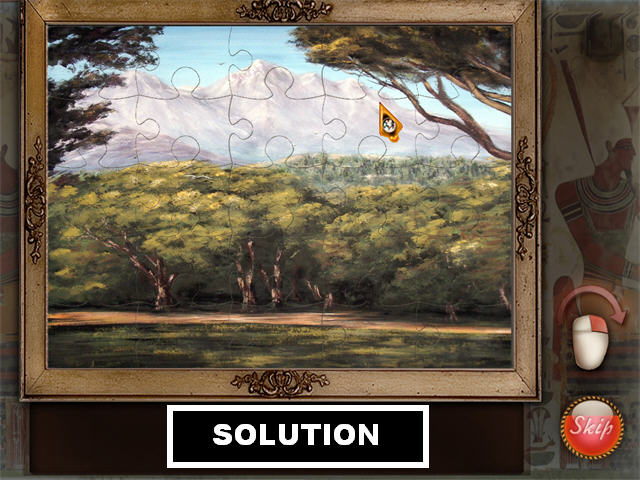
- Assemble the puzzle by placing the correct pieces of the painting in place.
- Pick up the puzzle piece and right-click it to rotate it.
- Left-click on a piece to put it in place.
- Please look at the screenshot for the solution.
- There is something behind the wall. You need to go find something to break it.
- Go right twice and click on the lower right side of the floor to go outside.
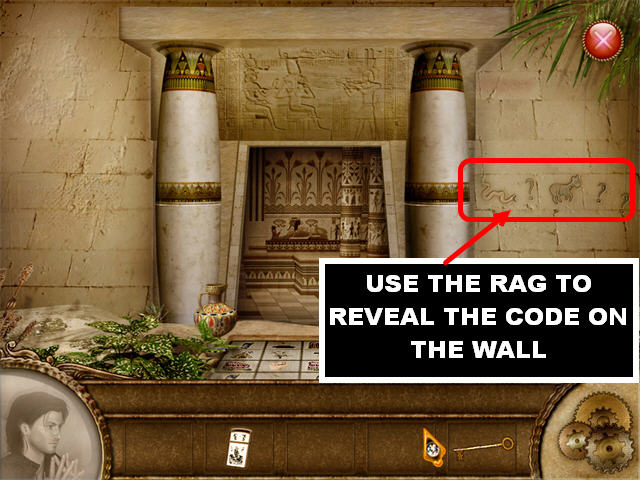
- Use the RAG to reveal the code on the right side of the wall.
- Go back inside.
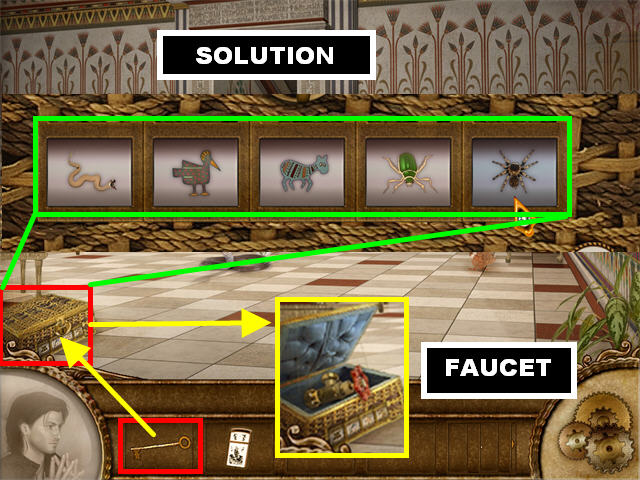
- Use the KEY on the locked box in the lower left to trigger a puzzle.
- Your goal is to find the right sequence using the images you saw on the wall outside.
- Click on the images to change them.
- Please look at the screenshot for the solution.
- Pick up the FAUCET inside the box.
- Go through the door in the back and go left.
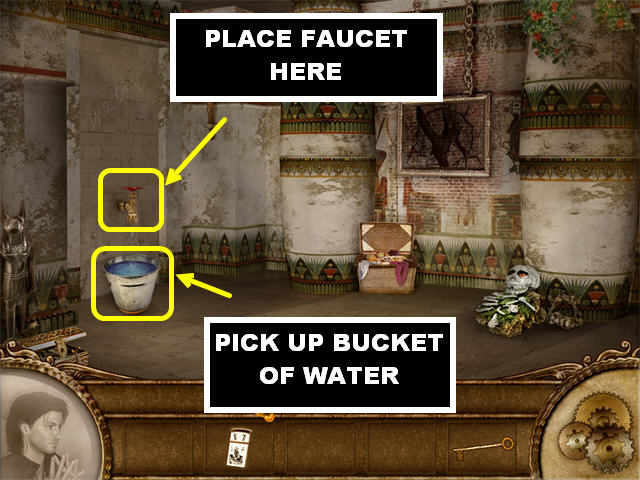
- Place the FAUCET on the left side of the wall to turn the water on.
- Pick up the BUCKET OF WATER.
- Go right twice, click on the right side of the floor. Click on the Red “X” Button in the upper right to go back outside.
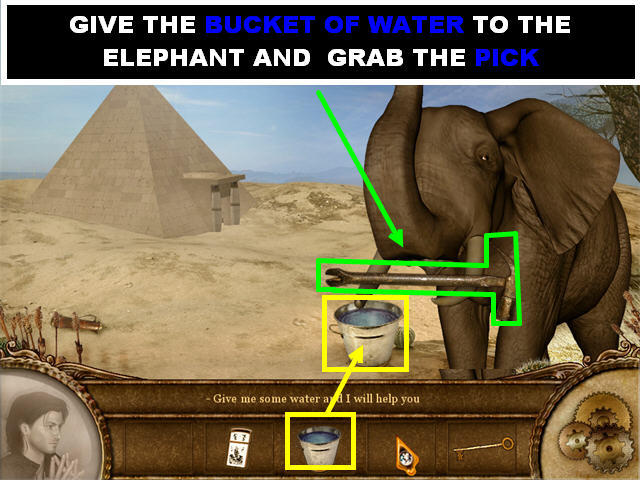
- Give the BUCKET OF WATER to the ELEPHANT.
- Go back to the room with the faucet.
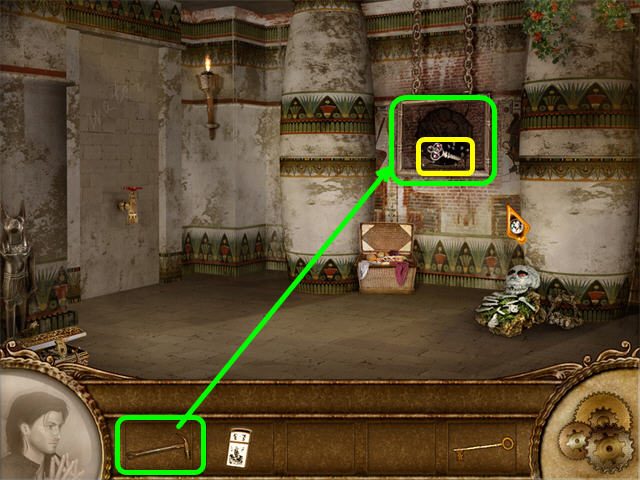
- Place the PICK in the same spot as shown in the screenshot and pick up the FOURTH KEY.
Chapter 5
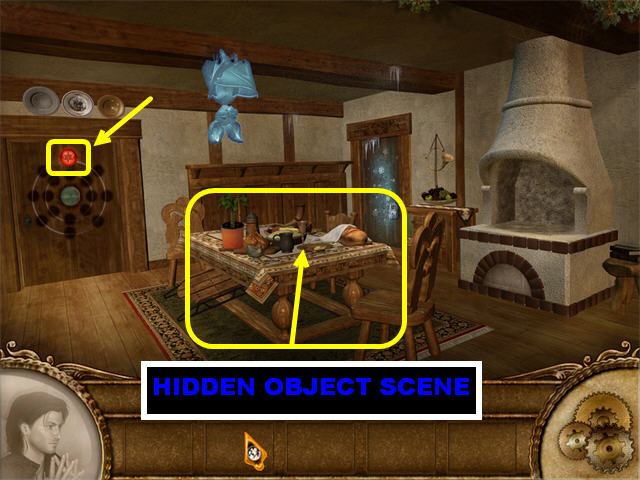
- Go through the door on the right.
- Pay attention to the symbol above the door on the left.
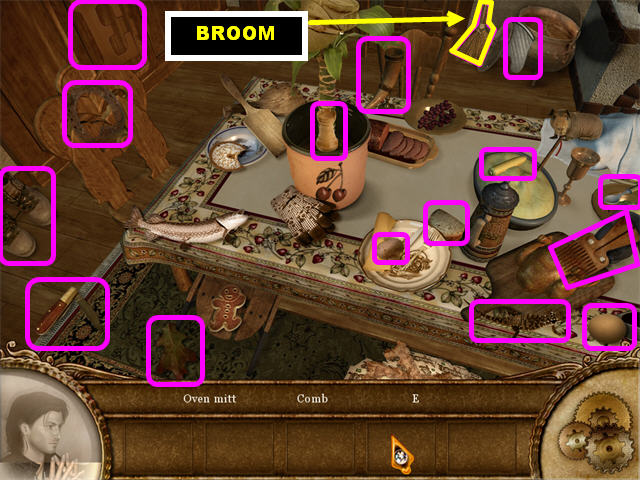
- Click on the table for a Hidden Object Scene.
- Find all the items on the list.
- Pick up the BROOM in the upper right.
- Exit out of that scene and go through the left door.
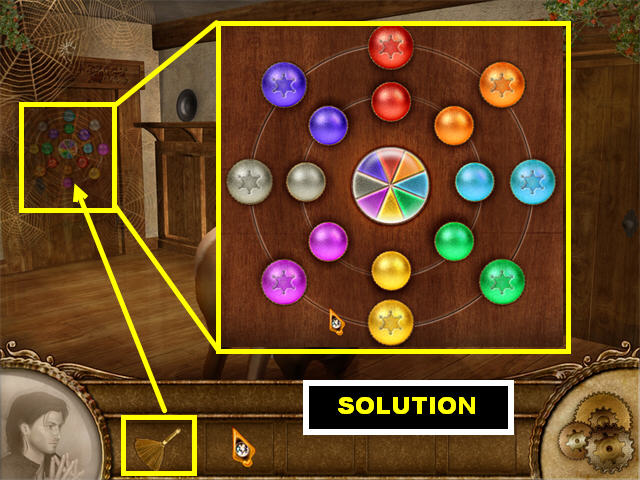
- Place the Broom on the left door to trigger a puzzle.
- Using the color above the door in the previous room, move the wheel in the center so the red piece is on top.
- Now you must move the rest of the balls to be next to their matching colors.
- The large balls must be on the outside ring and the small plain balls must be on the inside ring.
- Click on any 2 balls to swap their positions.
- Please look at the screenshot for the solution.
- Go through the left door.
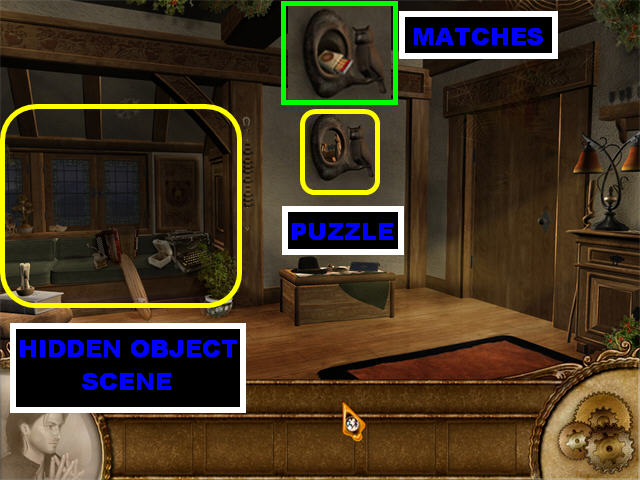
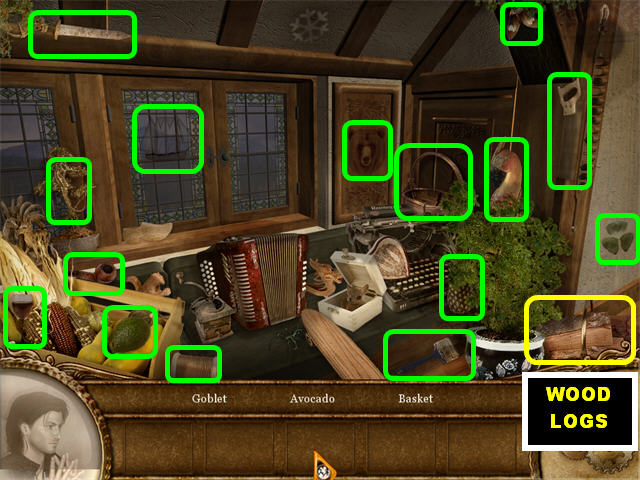
- Click on the couch for a Hidden Object Scene.
- Find all the items on the list.
- Pick up the WOODEN LOGS in the lower right.
- Exit out of that view.
- Click on the oval picture on the center of the wall to trigger a puzzle.
Puzzle
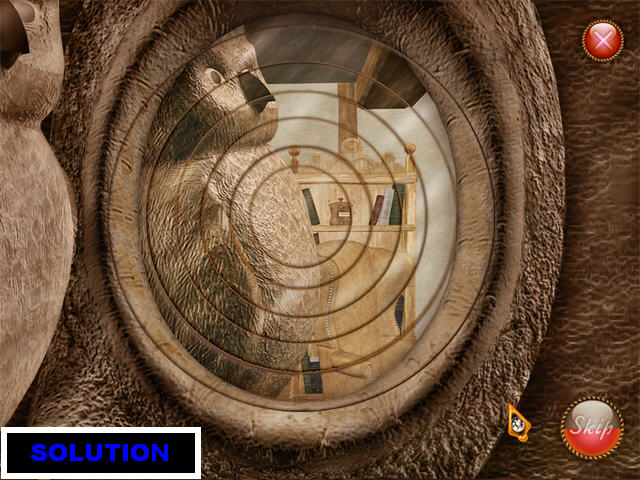
- Drag the circles around until they form the image shown on the screenshot.
- Pick up the MATCHES after the puzzle has been solved.
- Go through 2 right doors.
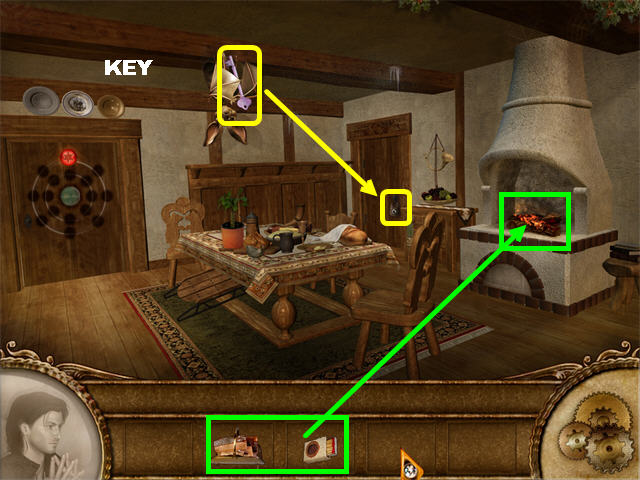
- Place the WOODEN LOGS and the MATCHES into the fireplace.
- The fire melts the ice on the door and the bat hanging from the ceiling.
- Pick up the KEY from the bat and place it on the door on the right to unlock it.
- Go through the door.
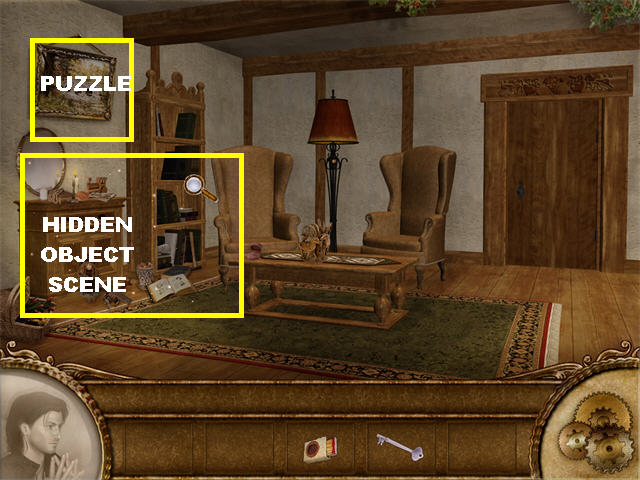
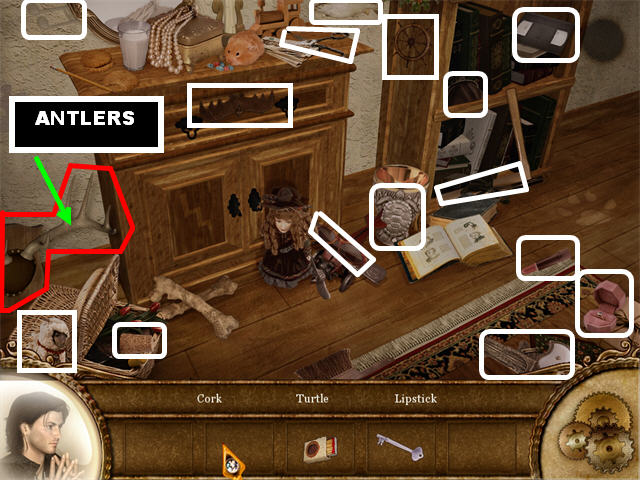
- Click on the cabinet to trigger a Hidden Object Scene.
- Find all the items on the list.
- Pick up the ANTLERS in the lower left.
- Exit out of that scene.
- Click on the picture above the fireplace to trigger a puzzle.
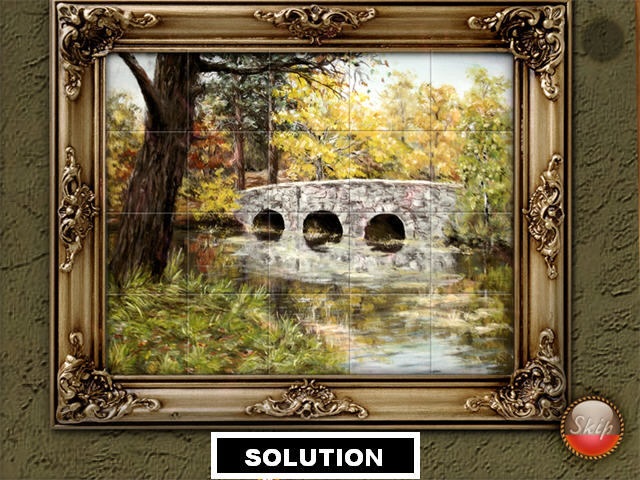
- Assemble the picture by swapping the tiles around.
- Click on any 2 tiles to swap their positions.
- Please look at the screenshot for the solution.
- Go through right door and then through the left door.
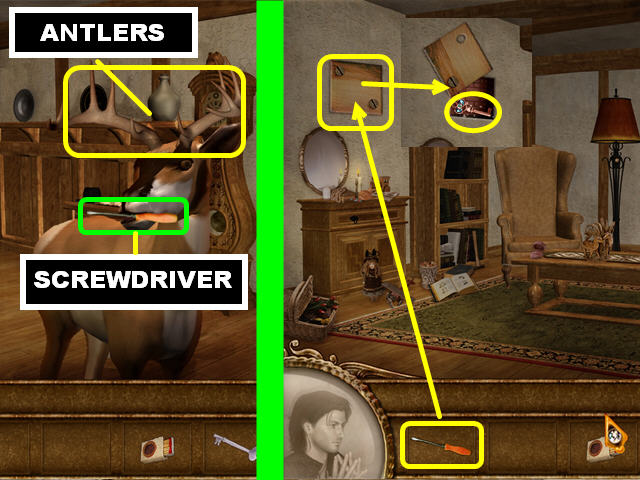
- Give the ANTLERS to the DEER and pick up the SCREWDRIVER from its mouth.
- Go through 2 right doors.
- Place the SCREWDRIVER on the screws on the panel in the upper left and pick up the FIFTH KEY.
Chapter 6
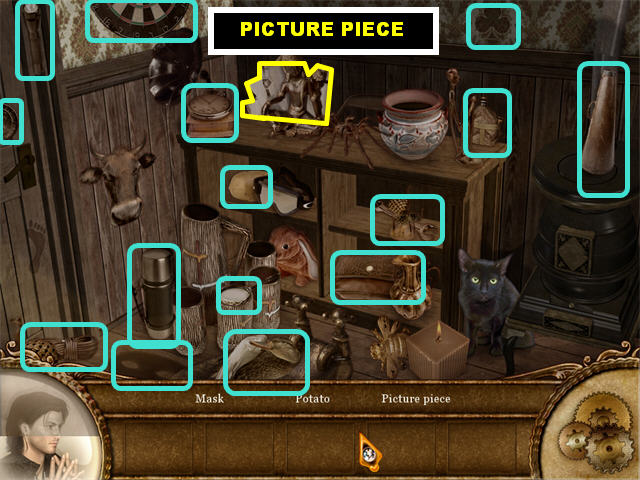
- Click on the right to trigger a Hidden Object Scene.
- Pick up all the items on the list.
- The PICTURE PIECE is in the upper center.
- Exit out of that scene.
- Go to the right to enter a Hidden Object Scene.
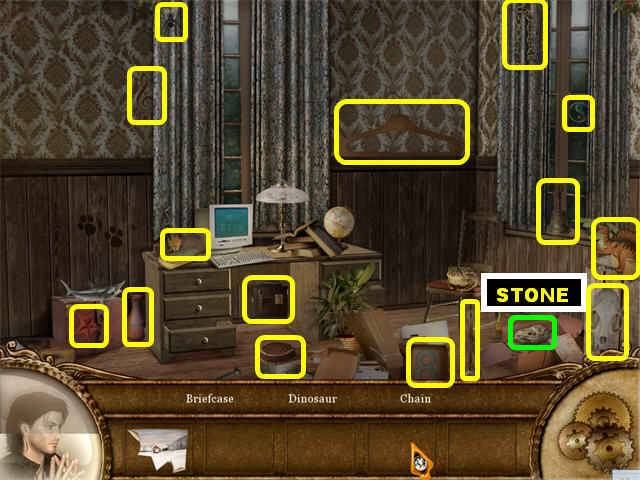
- Find all the items on the list.
- Pick up the STONE in the lower right.
- Go left.
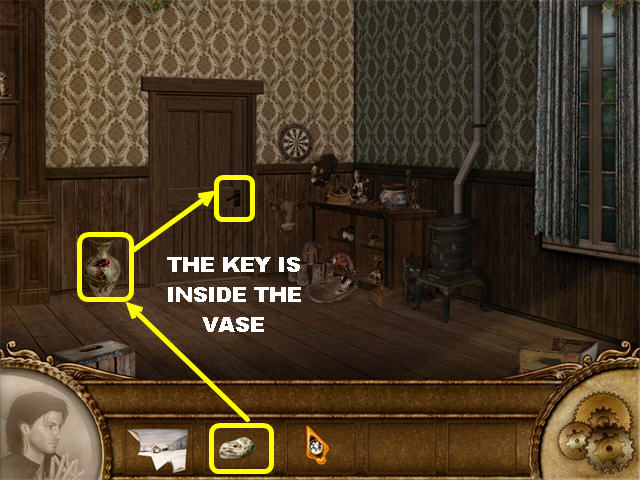
- Break the VASE next to the door with the STONE.
- Pick up the KEY inside the vase and place it on the DOOR to unlock it.
- Go through the door.
- Place the PICTURE PIECE on the picture above the fireplace. Click on the picture to trigger a puzzle.
Picture Puzzle
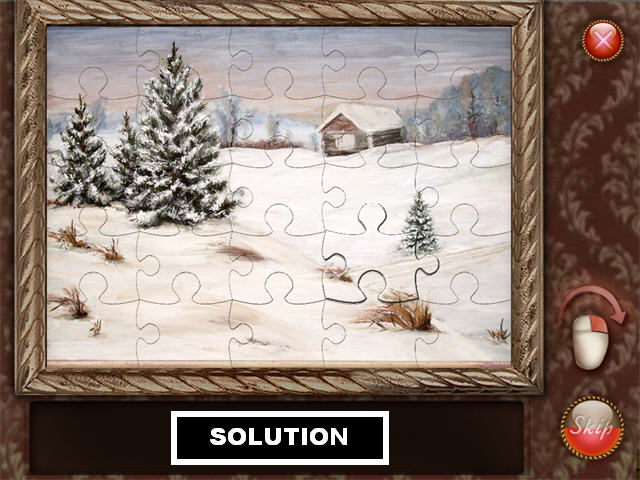
- Assemble the puzzle by placing the correct pieces of the painting in place.
- Pick up the puzzle piece and right-click it to rotate it.
- Left-click on a piece to put it in place.
- Please look at the screenshot for the solution.
- A safe appears above the fireplace. You must look for the code.
- Go left to enter a Hidden Object Scene.
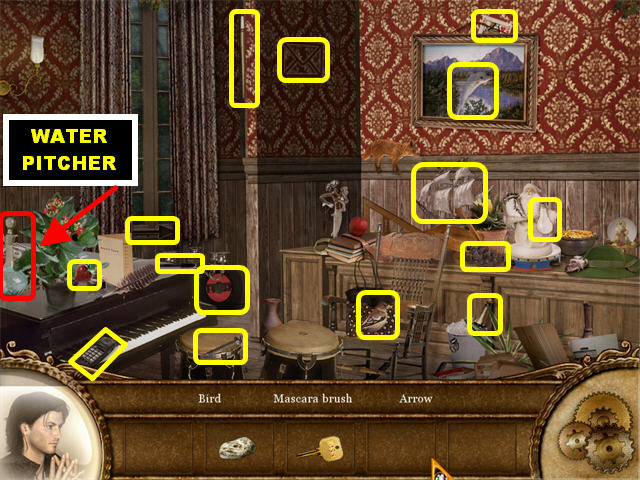
- Find all the items on the list.
- The WATER PICTHER is on the lower left side.
- Go right to go back to the fireplace.
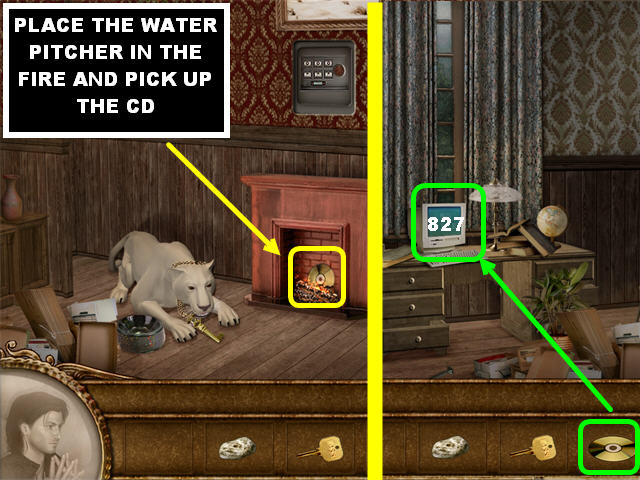
- Place the WATER PICTHER over the fire and pick up the CD inside the fireplace.
- Go right twice.
- Place the CD in the computer on the desk and click on it to trigger a puzzle.
Computer Puzzle
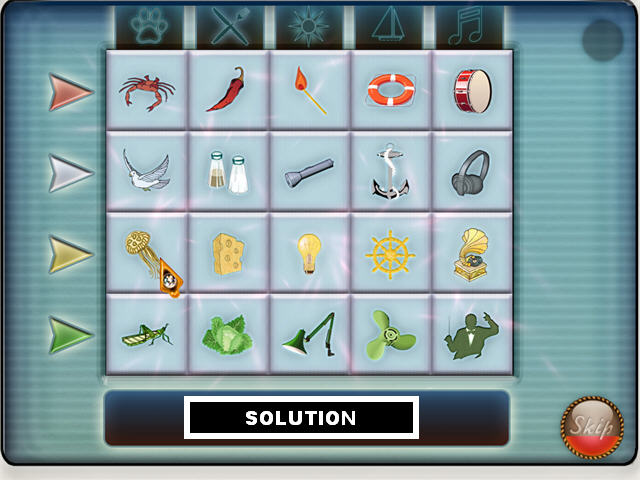
- Your goal is to place the correct images in place according to the picture in the top row.
- Click on any 2 tiles to swap their positions.
- The colors of the arrows indicate the color of the item for that row.
- Please look at the screenshot for the solution.Red = Crab-Chili-Match-Life Ring-Drum Grey = Bird-Salt & Pepper-Flashlight-Anchor-Headphones Yellow = Jellyfish-Cheese-Light Bulb-Wheel-Gramophone Green = Grasshopper-Lettuce-Lamp-Fan Blade-Conductor
- The code “827” appears on the computer screen.
- Go left and enter the door on the left.
- Click on the safe for a closer look.
Safe Puzzle
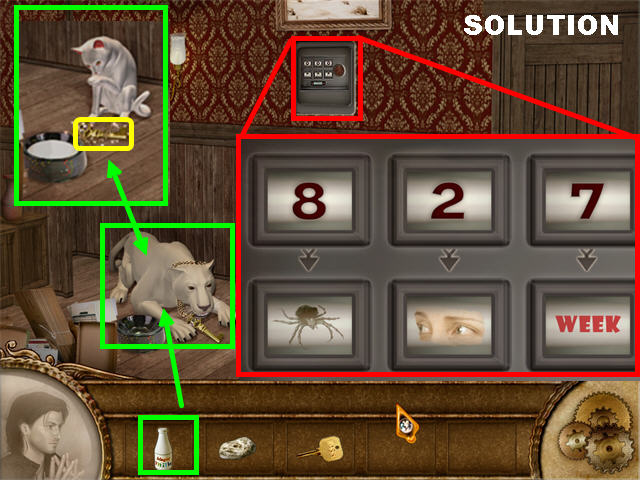
- Your goal is to solve the puzzle using the code found on the computer monitor.
- Enter the numbers “827” in the top slots.
- In the bottom slots enter the items that are related to the numbers above them.
- From left to right the solution for the bottom row is:” Spider-Eyes-Week”.
- Click on the Red Go Button to enter your selection.
- Pick up the BEVERAGE inside the safe.
- Give the BEVERAGE to the WHITE LEOPARD and it will turn into a kitty.
- Pick up the SIXTH KEY on the floor.
Chapter 7
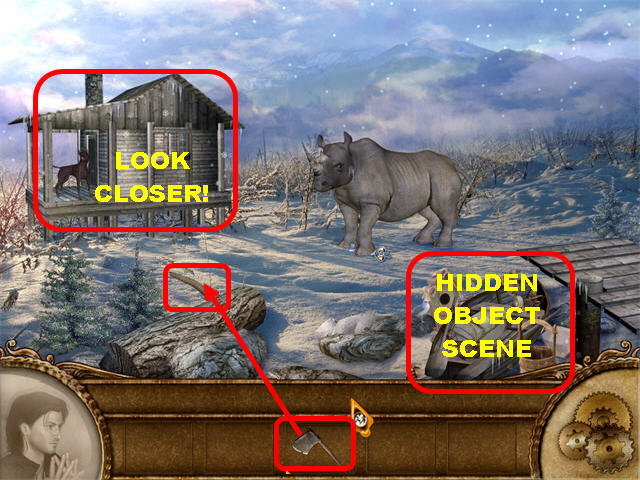
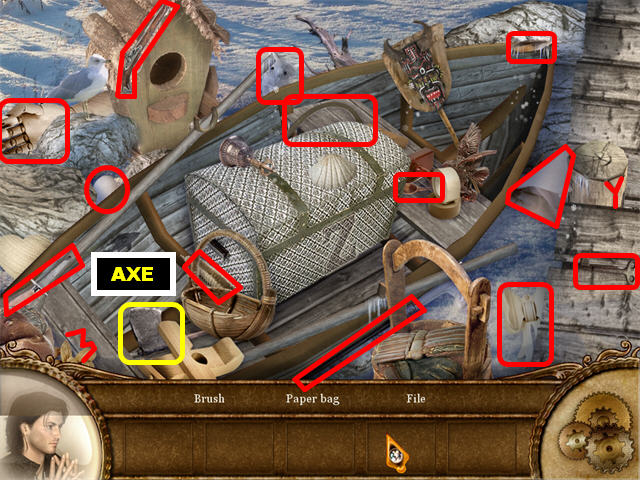
- Click on the boat in the lower right to trigger a Hidden Object Scene.
- Find all the items on the list.
- Pick up the AXE in the lower left. Exit out of that view.
- Place the AXE on the log in the lower left to place a STICK in your inventory.
- Click on the cabin for a closer look.
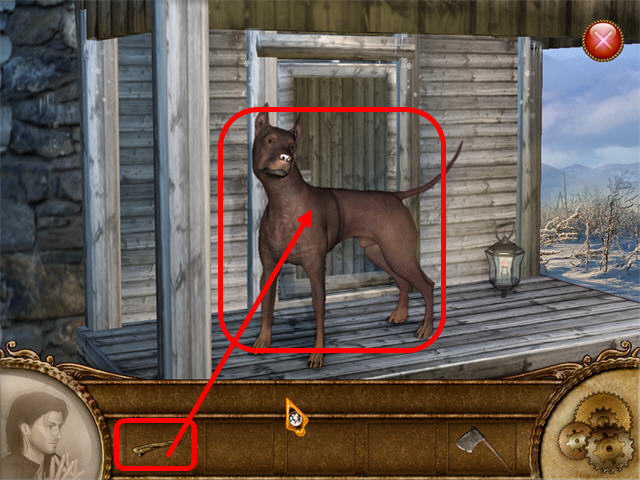
- Give the STICK to the dog.
- Go through the door and go right to enter a Hidden Object Scene.
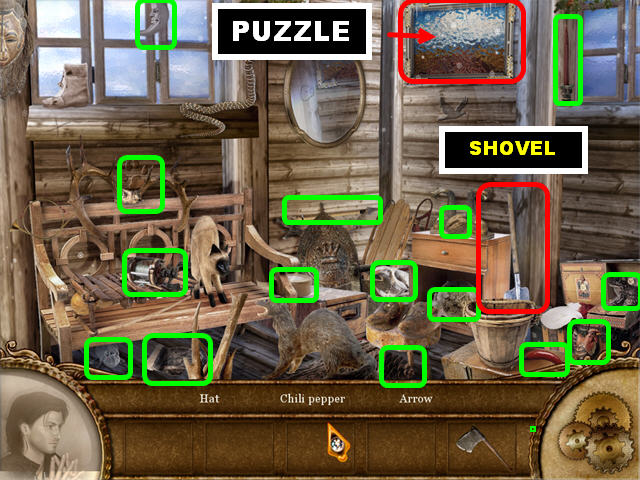
- Find all the items on the list.
- Pick up the SHOVEL on the right.
- Click on the PICTURE in the upper right after your search has been completed to trigger a puzzle.
Puzzle
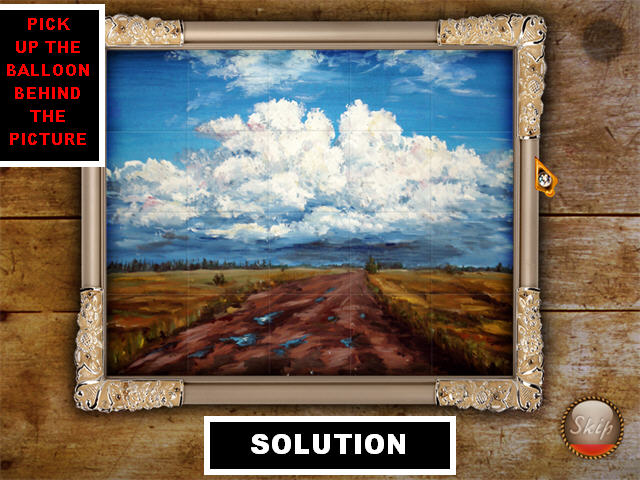
- Assemble the picture by putting the tiles in the right spots.
- Click on any 2 tiles to swap their positions.
- Please look at the screenshot for the solution.
- Pick up the BALLOON behind the picture.
- Go left, through the door and click on the Red “X” button to go back outside.
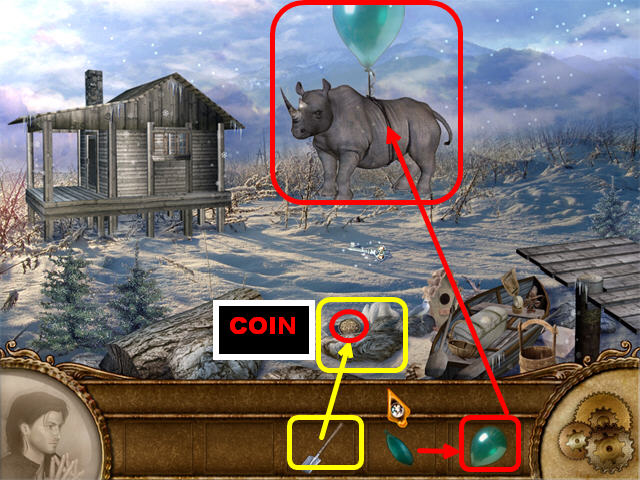
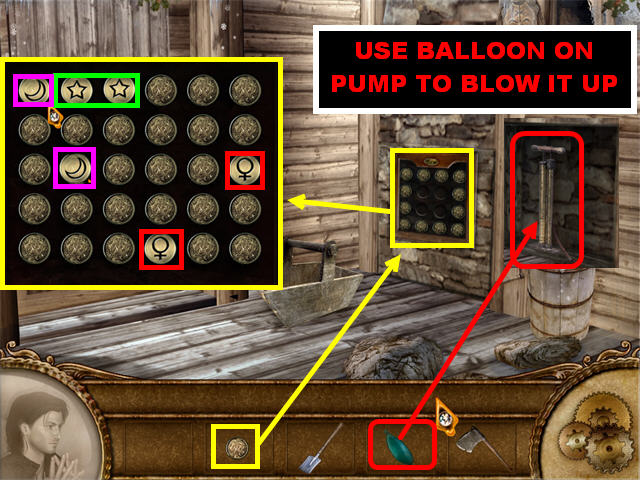
- Place the SHOVEL on the spot shown on the screenshot and pick up the COIN in the snow.
- Click on the cabin and go through the door.
- Place the COIN on the puzzle in the lower right and click on it to begin the puzzle.
- Your goal is to find the 2 coins with the identical images.
- Click on 2 coins to flip them over.
- A pump appears after the puzzle has been solved.
- Place the BALLOON on the pump to inflate it and then pick it up.
- Go through the door and click on the Red “X” Button to go back outside.
- Place the INFLATED BALLOON on the RHINO to lift it up.
- Pick up the SEVENTH KEY on the ground.
Chapter 8
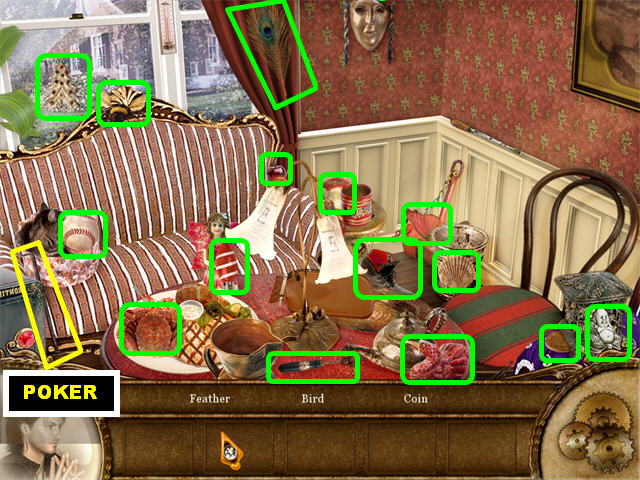
- Go to the left.
- Click on the table to trigger a Hidden Object Scene.
- Find all the items on the list.
- Pick up the POKER in the lower left corner.
- Exit out of that view and go left to enter another Hidden Object Scene.
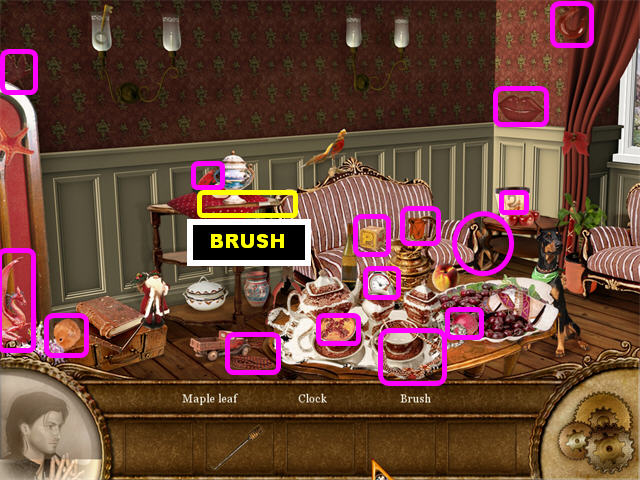
- Find all the items on the list.
- Pick up the BRUSH on the left.
- Go right.
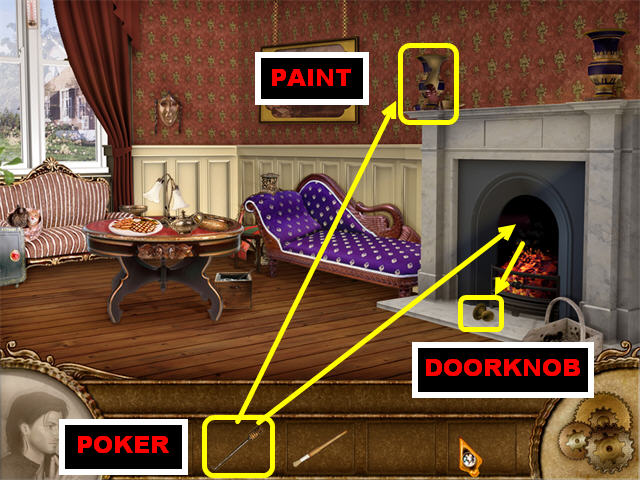
- Break the VASE above the left side of the fireplace using the POKER.
- Pick up the PAINT CAN inside the vase.
- Place the POKER in the FIREPLACE and pick up the DOORKNOB that falls in front of the fireplace.
- Go to the right.
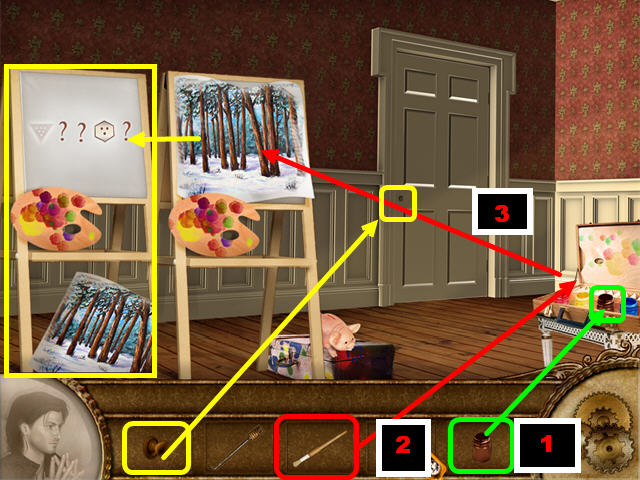
- Place the PAINT in the case in the lower right.
- Dip the BRUSH into PAINT on the right and place it on the canvas piece on the easel.
- Click on the picture to trigger a puzzle.
Picture Puzzle
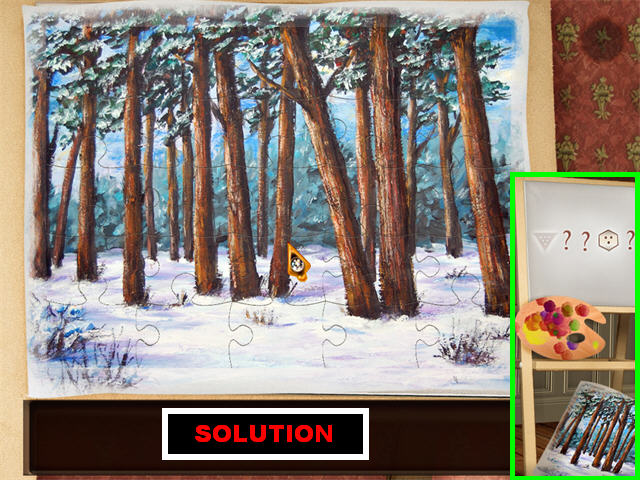
- Assemble the puzzle by placing the correct pieces of the painting in place.
- Pick up the puzzle piece and right-click it to rotate it.
- Left-click on a piece to put it in place.
- Please look at the screenshot for the solution.
- A CODE for the next puzzle appears on your palette.
- Place the DOORKNOB on the door on the right to open it.
- Click on the desk to trigger a Hidden Object Scene.
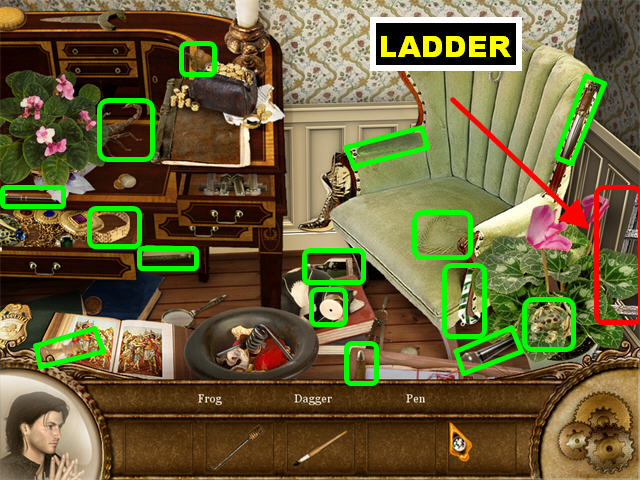
- Find all the items on the list.
- Pick up the LADDER in the lower right.
- Exit out of that scene, go through the door and go left 2 TIMES.
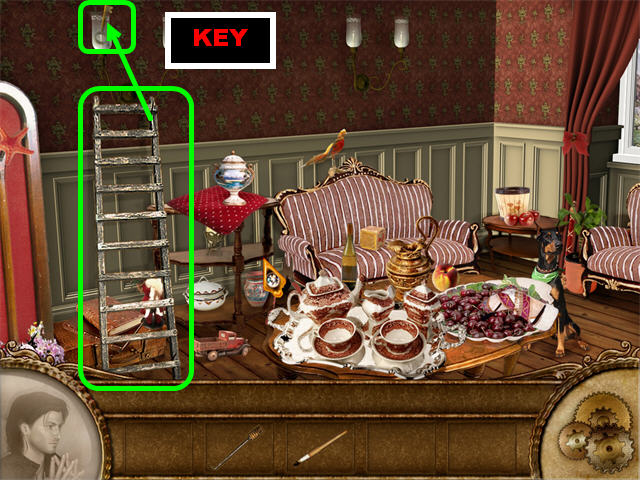
- Place the LADDER on the left side of the scene.
- Pick up the KEY in the sconce in the upper left.
- Go right twice and go through the right door.
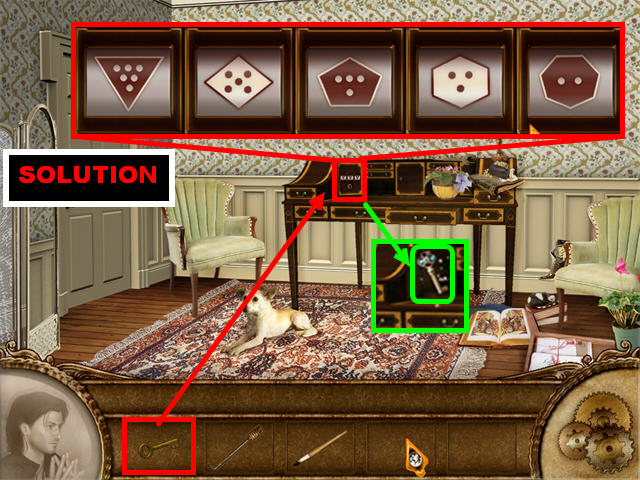
- Place the KEY on the locked drawer marked in red to trigger a puzzle.
- Using the code on the palette find the right sequence for the puzzle.
- Click on the slots to change their images.
- Please look at the screenshot for the solution.
- Pick up the EIGHTH KEY from the desk.
Chapter 9
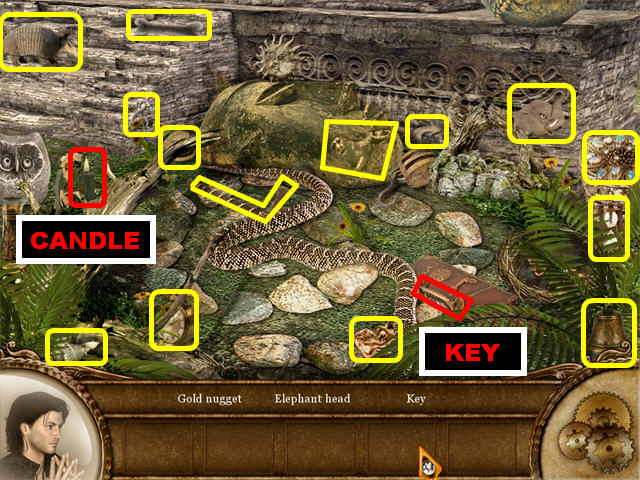
- Click in the back of the scene to trigger a Hidden Object Scene.
- Find all the items on the list.
- Pick up the KEY in the lower right.
- Pick up the CANDLE on the left.
- Exit out of that view and go left.
- Click in the back of the scene to trigger a Hidden Object Scene.
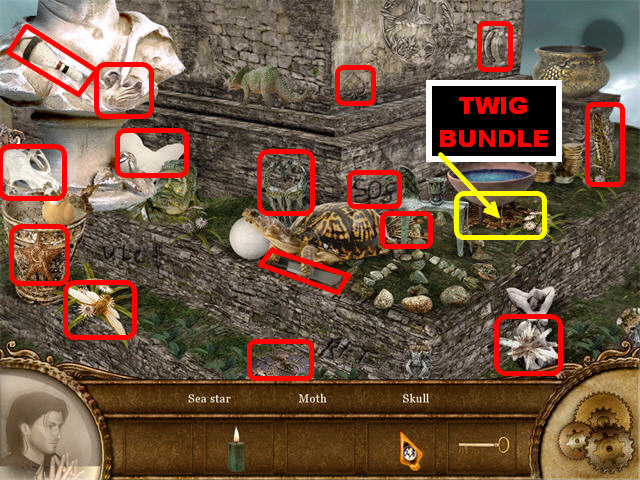
- Find all the items on the list.
- Pick up the TWIG BUNDLE below the bowl on the right.
- Exit out of that scene and go right.
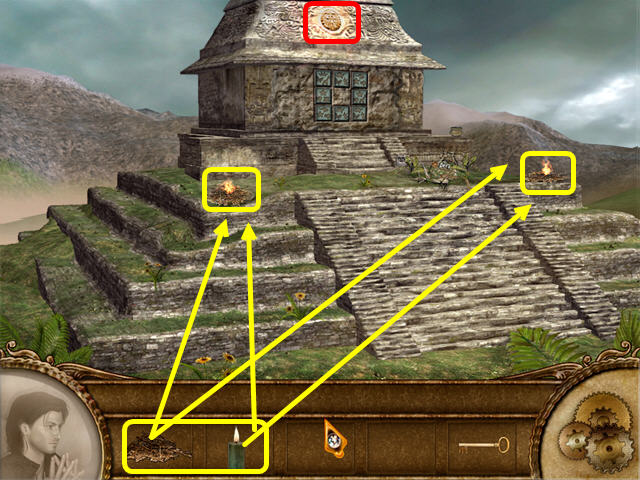
- Place the TWIG BUNDLE on the left hole above the steps.
- Place the TWIG BUNDLE on the right hole above the steps.
- Place the CANDLE on the 2 spots with the TWIGS.
- Click on the LIT SUN above the temple to trigger a puzzle.
Stone Puzzle
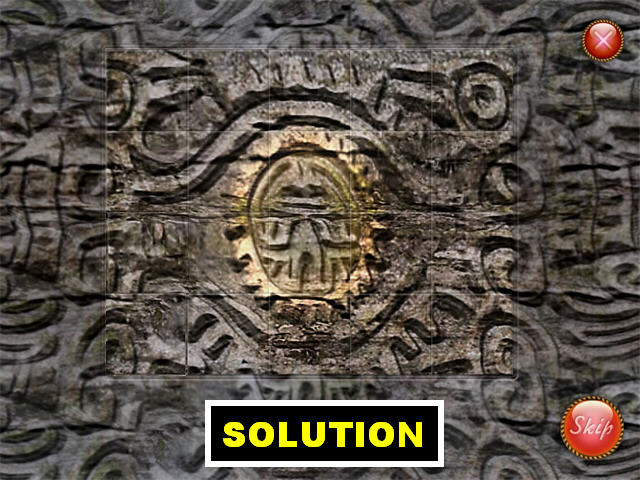
- Click on 2 tiles to swap their positions until you form the correct image.
- Please look at the screenshot for the solution.
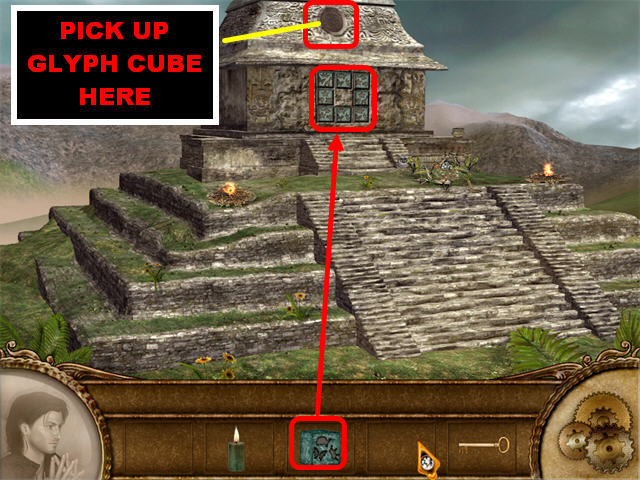
- Pick up the GLYPH CUBE above the temple.
- Place the GLYPH CUBE on the puzzle above the steps and click on it to start the puzzle.
Glyph Puzzle
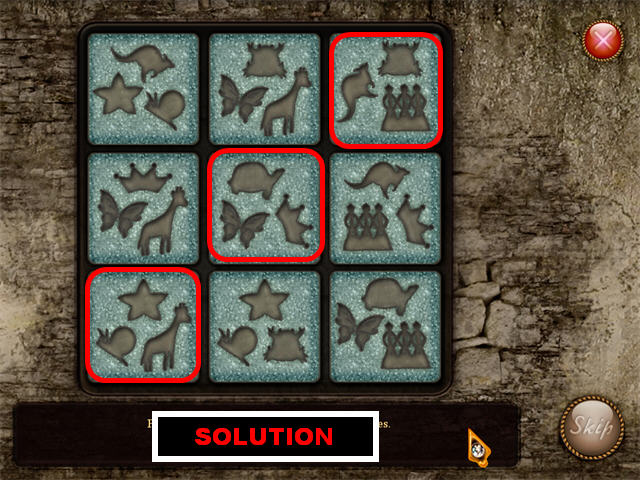
- Your goal is to pick the 3 boxes that contain all 9 images with no repeats.
- Click on the 3 boxes you want to select to highlight them.
- Please look at the screenshot for the solution. The solution is always the same but the positions of the glyphs may be different in each game.
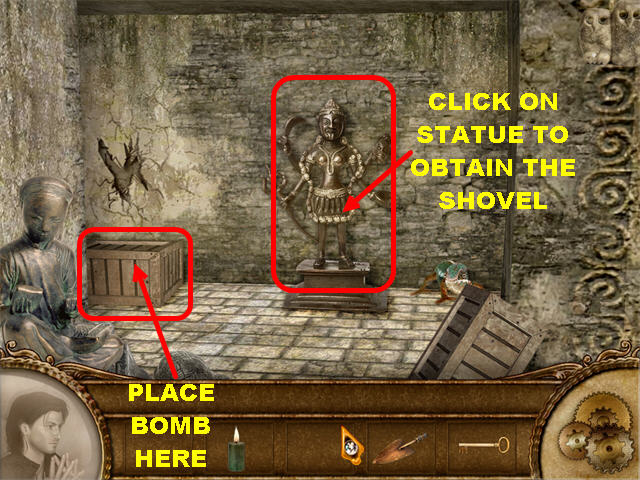
- Go into the temple.
- Click on the statue on the back wall and you will receive a SHOVEL in your inventory.
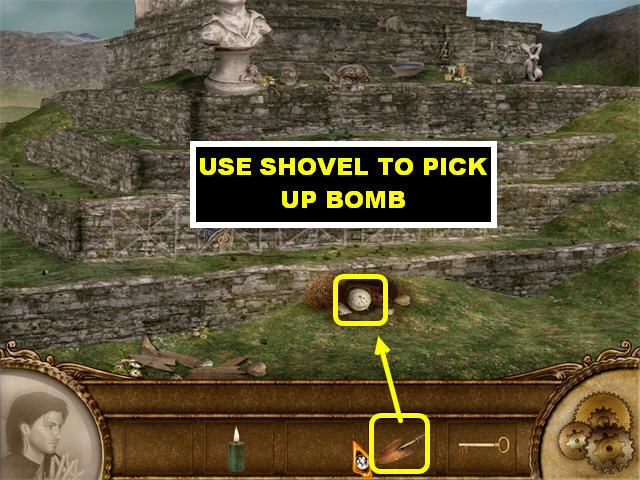
- Go down and then left.
- Place the SHOVEL on the rocks in the lower center and pick up the BOMB in the ground.
- Go back to the temple.
- Place the BOMB on the crate on the left. The bomb will explode and put a hole on the wall.
- Go through the hole in the wall to access the next location.
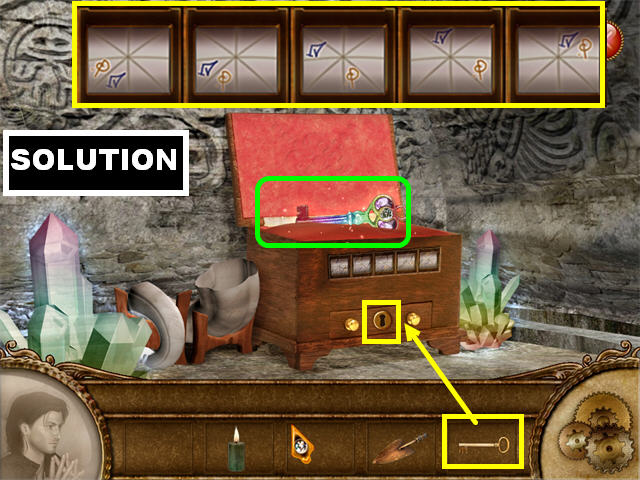
- Place the KEY in the lock to trigger a puzzle.
- You must place the images in the right positions using the blocks that cannot move as your guide.
- Please look at the screenshot for the solution.
- Pick up the NINTH KEY from inside the chest.
- Click on the locks in the back of the scene to trigger the last puzzle.
Key Puzzle
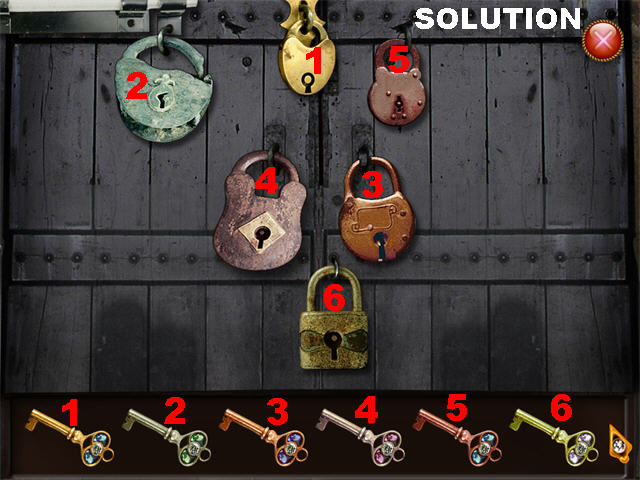
- Your goal is to place the keys into the right locks.
- Match the colors of the keys with the colors of the locks.
- Please look at the screenshot for the solution.
- Congratulations! You’ve Completed Dominic Crane’s Dreamscape Mystery!
Created at: 2010-04-09

