Walkthrough Menu
- General Tips
- Chapter 1: The Petrified Nanny
- Chapter 2: The Enchanted Gardener
- Chapter 3: The Court Tailor & the Cook
- Chapter 4: The Coffin-maker
- Chapter 5: The Princess
- Chapter 6: The Prince
General Tips
- Glowing areas indicate a Hidden Object scene.
- The navigation arrows allow you to travel to different parts of the game. Placing your cursor at the bottom of each scene will always take you out of any scene.
- Certain areas are blocked; you will not be able to enter them until certain tasks have been completed first.
- The items written in red are items in which you need to solve a mini-puzzle in order to find them.
- You can zoom into areas in which you see a magnifying glass appear.
- Use your Journal in the upper left to gain valuable information about the game and to read the story as it unfolds.
Inventory
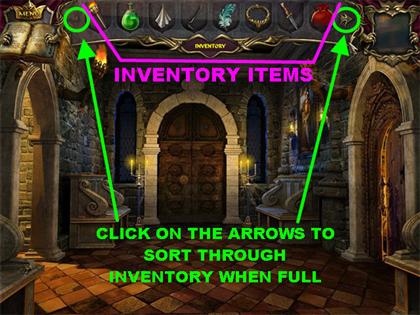
- The items you find throughout the game will be stored in your Inventory Tray located above each scene.
- The inventory tray will be hidden most of the time. To make it appear, place your cursor on top of a scene.
- To use an Inventory Item, drag it to the area in which you wish to use it and click it in place.
- Certain items will automatically merge together when 2 compatible items are found. You will see a swirly light appear in your inventory tray when items are in the process of merging.
- If your inventory tray gets full, use the arrows on the left and right side of the tray to sort through all items.
Magic Mirror/ Hints
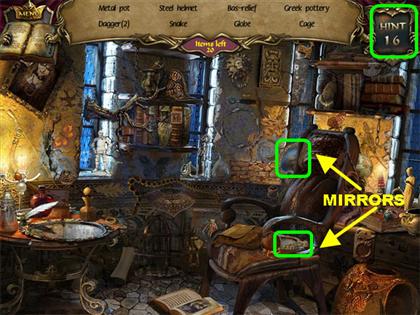
- The Mirror is in the upper right side of each scene. The Mirror will be used as your hint system in the game.
- If you want to know the name of a room you're in, you can click on the Mirror in the upper right to find the answer. On other occasions the mirror will give you clues about the game.
- In Hidden Object scenes, the mirror will act as a hint, click on it to find a random item on your list.
- The game starts you off with 10 free hints. In order to obtain more hints you have to find the 2 Mirrors hidden in each new Hidden Object scene.
- Each Mirror that you find adds one extra hint to your game.
Chapter 1: The Petrified Nanny
Throne Room
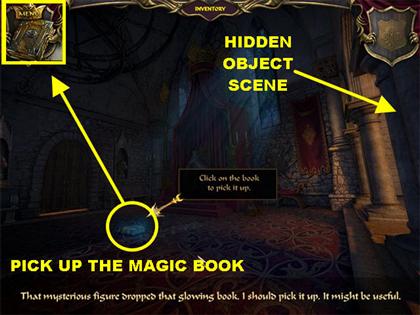
- The game starts with being asked to pick up the book on the left side of the floor.
- The Journal goes in the upper left corner of your scene. You can review items added to the Journal.
- You are immediately asked to go to the other room and search the list of hidden items. Click on the right side of the scene to access the Studio.
The Studio
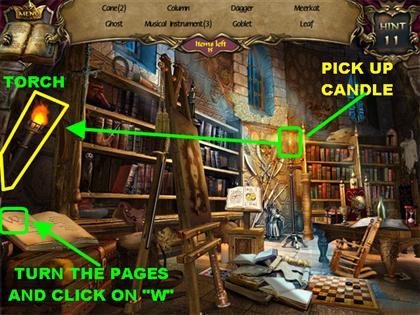
- The game will show you the locations of the mirrors in this Hidden Object scene.
- Letter "W" – Click on the book in the lower left corner to turn its pages. Click on the letter "W" that appears on the page to eliminate it off your list.
- Pick up the Candle in the upper right side of the scene.
- Place the Candle on the Torch on the left side of the scene to light it.
- Click on the Torch to enter it into inventory.
- Click at the bottom of the scene to go back to the Throne Room.
Throne Room
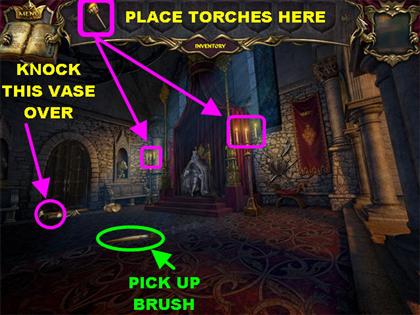
- Grab the Torch from inventory and place it on the candles to the right side of the door.
- Grab the Torch again and place it on the candles to the right side of the throne.
- Click on the vase on the left side of the door and the vase will fall and break.
- Pick up the Brush that falls on the left side of the carpet.
- Click on the left door for a closer view.
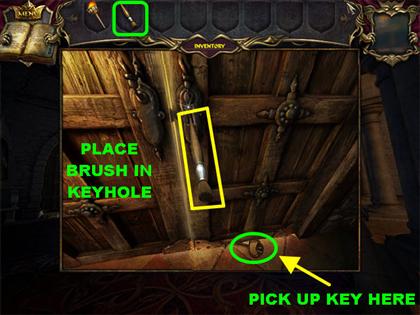
- Place the Brush in the Keyhole.
- Pick up the Key that appears below the door.
- Place the Key in the lock.
- Go through the door.
Hallway
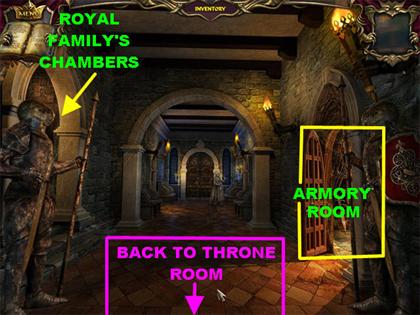
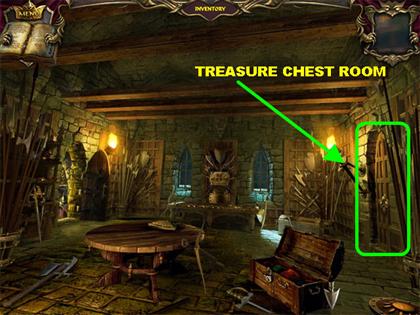
- You can reach the Armory Room through the door on the right.
- You can reach the Royal Family's Chambers through the door on the left, but it is locked for now.
- Go forward to reach the end of the hallway.
Petrified Nanny Hallway
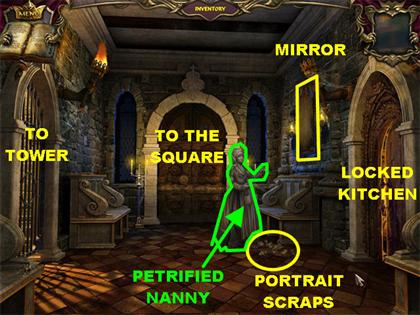
- You can reach the Kitchen through the right door, the Tower through the left door and the Square through the door in the back. All these doors are locked at the moment.
- Pick up the Portrait Scraps in the lower right, next to the statue.
- Click on the frame in the upper right side of the wall for a closer view.
Portrait Scraps Puzzle
- Grab the Portrait Scraps from inventory and place them anywhere on the scene.
- The pieces will fall below the frame.
- Click on a piece to attach it to your cursor.
- Move the piece to the inside of the frame, the paper will open up, click it onto the spot you think it needs to go into.
- If the piece is in the right place it will stick in place. If the piece is incorrectly placed it will fall below the frame.
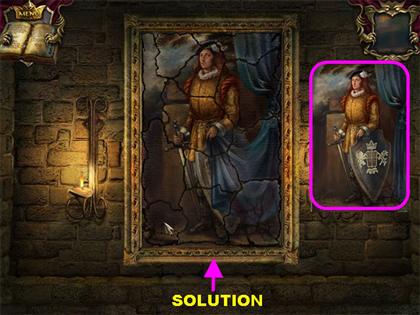
- Please look at the screenshot for the solution.
- Once the puzzle has been completed, notice the images on the shield. The images have been added to your Journal.
- Exit that scene and click downwards one more time. Enter the door on the right.
Armory Room
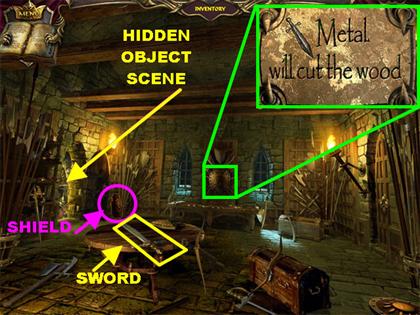
- Click on all the weapons on the round table and they will fall off one by one to the ground.
- Grab the last Sword on the table and it will go into your inventory.
- Click twice on the sign in the middle of the back wall for a closer view. You will see the following message:"Metal will cut the wood".
- Pick up the Shield on the lower left corner of the back wall.
- Click on the Hidden Object scene on the left.
Stock Room
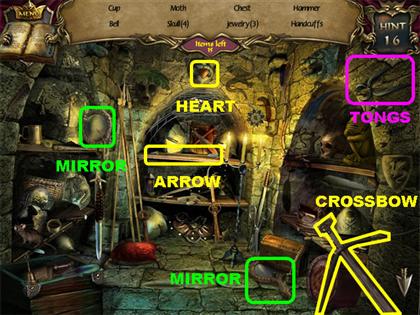
- Heart with an Arrow - Pick up the arrow in the center of the scene.
- Place the Arrow on the Crossbow in the lower right.
- The Crossbow will shoot the Arrow to the Heart in the upper center.
- Pick up the Heart with an Arrow in the upper center to take it off your list.
- Pick up the Tongs in the upper right corner.
- Leave the scene and go back to the Hallway.
Hallway
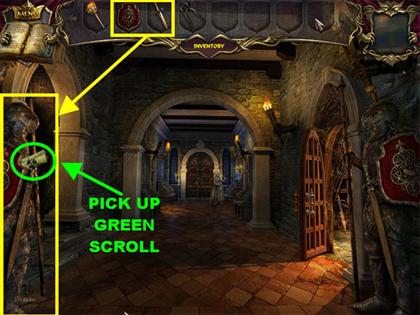
- Give the Knight on the left the Shield.
- Give the Knight on the left the Sword.
- Pick up the Green Scroll that appears in the knight's hand.
- Enter the door on the left.
The Royal Family's Chambers
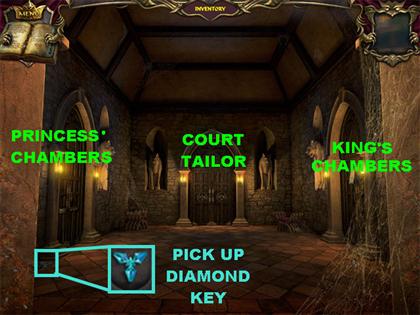
- Pick up the Diamond Key in the lower left.
- Click on the back door to trigger a puzzle.
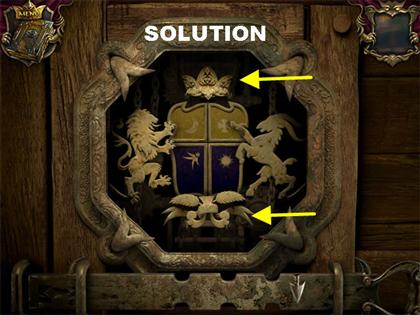
- Your goal is to place the symbols in the right positions.
- You can look at page 10 on your Journal for the correct positions of the symbols.
- There are several items that you need to change in this section.
- The 4 symbols in the center need to be moves. Click on them to change the symbols and the colors.
- You need to change the shape of the crown above and the shape at the bottom of the crest.
- Lastly, make sure you change the images of the animals in the scene.
- Please look at the screenshot for the solution.
- Once all the pieces are in the right place, the door will open.
Court Tailor
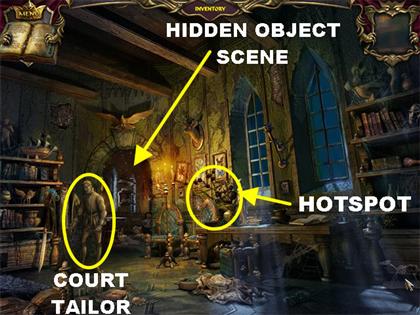
- There is a hotspot close to the left window. You can come back to it later since you don't have all the necessary tools to complete it at this time.
- The Petrified Court Tailor is on the left side of the scene.
- Enter the Hidden Object scene on the left.
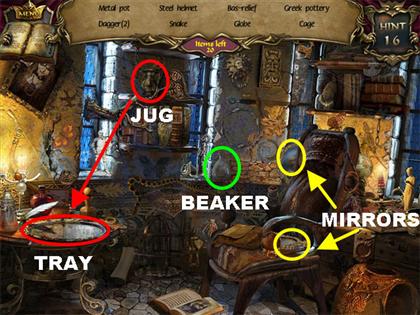
- Jug Shadow – Pick up the Jug in the upper left and place it on the tray in the lower left.
- Click on the Jug's Shadow on the tray to take that item off your list.
- Click on the Empty Beaker in the center of the scene.
- Leave this scene and go back to the Throne Room.
Throne Room
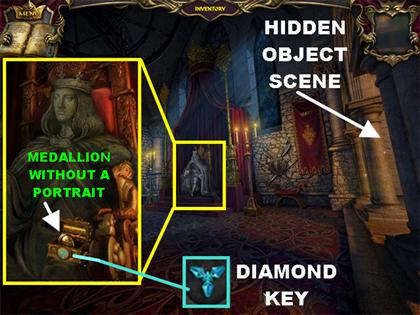
- Click on the Prince on the throne for a closer view.
- Place the Diamond Key on the Small Chest and it will open.
- Pick up the Medallion without a Portrait inside the chest.
- Click on the Hidden Object scene on the right.
King Symbols
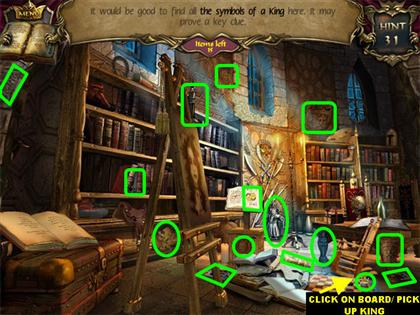
- Find all the items that relate to anything associated with a king.
- Click on the chessboard on the floor and the pawns will jump over each other. Click on the King at the end of the board.
- Please look at the screenshot for the locations of all the items.
- Once all the pieces have been found a puzzle will appear.
Matching Mini-puzzle
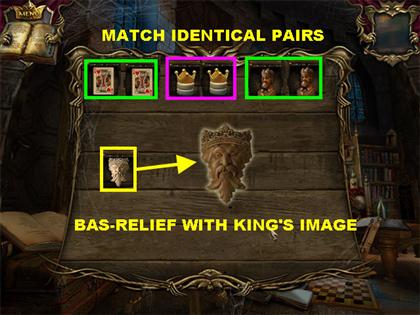
- Your goal is to eliminate all the matching pieces until only 1 piece is left.
- Click on 2 doors to see what is underneath. If the pieces match the doors will disappear.
- Once the puzzle has been solved, the Bas-relief with King's Image will go into your inventory.
- Go back to the Royal Family's Chambers by exiting the studio and going left twice.
Royal Family's Chambers
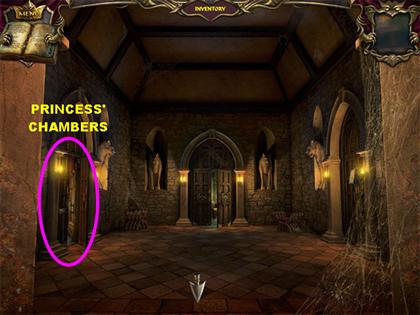
- Click on the left door for a closer view.
- A page will be entered into your Journal. The page talks about a green scroll.
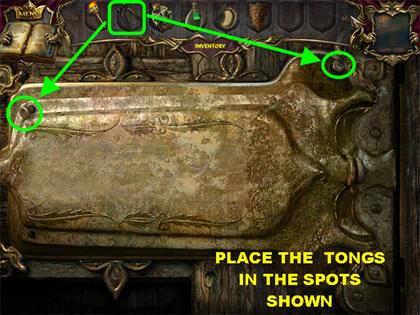
- Place the Tongs on the screws in the upper left and upper right side of the panel to take it off.
Key Block Puzzle
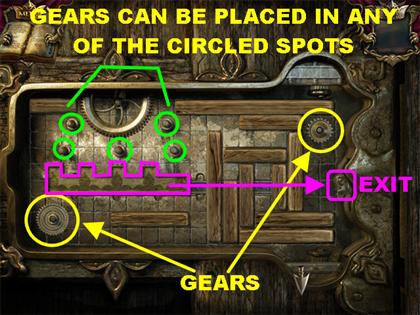
- Your goal is to unlock the key block by moving the wooden bars and gears in order to open the latch.
- The wooden bars can go into the spots in which nothing is blocking them. You can see a white outline behind the bars when they are in a spot you can place them in.
- You may have to move the wooden bars and gears a couple of time in order to complete the puzzle.
- Please look at the next 2 screenshots for the solution.
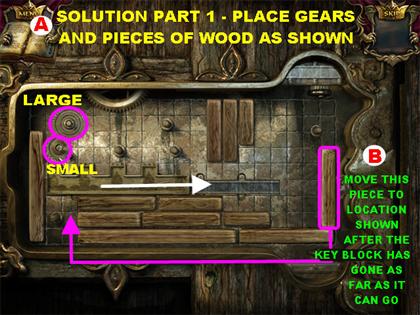
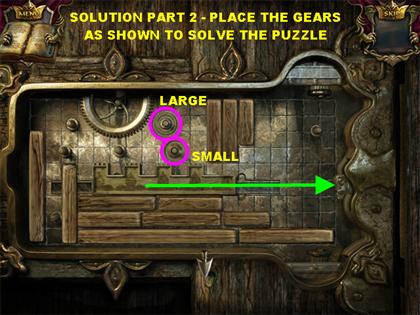
- After the puzzle has been solved, the door will open, go through it.
Princess Chamber
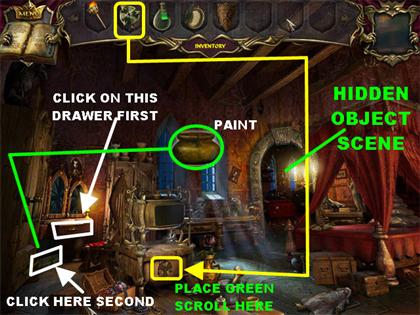
- Click on the drawer next to the mirrors on the left to open it.
- Click on the green chest in the lower left to open it.
- Pick up the Paint inside the green chest.
- Place the Green Scroll on the device in the lower center of the scene.
- Click on the device again for a closer view.
- Place the Empty Beaker on the screen to trigger a puzzle.
Green Beaker Mini-puzzle
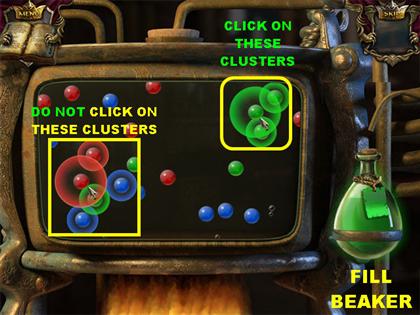
- Your goal is to collect only the green elements into the beaker.
- Hover your mouse over an element and a sphere or spheres will appear over all the elements which are touching.
- If you click on the elements with the spheres, all those elements will pop.
- You only want to click on the elements when the green ones are the only ones highlighted. Doing so successfully will add the green liquid to the beaker.
- If you click on the wrong colors, the liquid you've collected will evaporate and you will have to start over again.
- Click on the Magic Liquid once the beaker has been filled up.
- Click on the Hidden Object scene on the right.
Boudoir
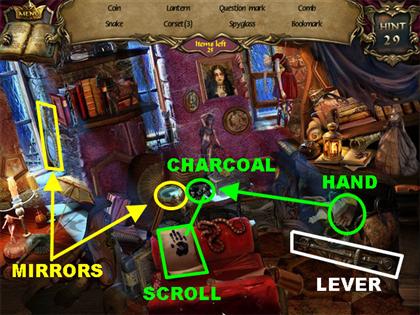
- Pick up the Hand in the lower right.
- Place the Hand on the charcoal on the table in the center of the scene. The Hand will be soiled with charcoal.
- Place the Charcoal-soiled Hand on the Scroll on the chair on the left.
- Click on the Handprint on the Scroll to take it off inventory.
- Pick up the Lever in the lower right.
- Go back to the Royal Family's Chambers by clicking downwards 2 times.
Paint Puzzle
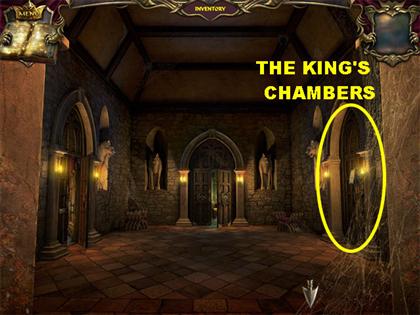
- Click on the door on the right for a closer view.
- Place the Paint from inventory anywhere in the scene.
- Your goal is to paint the cells so that the cells of the same color do not touch.
- The paintbrush is automatically added to your cursor. The paints are on top of the scene.
- Click on the color you want to use and it will be added to your paintbrush.
- Click the color onto the spot you want it to go into.
- If you want to clear a color you can paint over it or dip your brush in the water jar in the lower right corner.
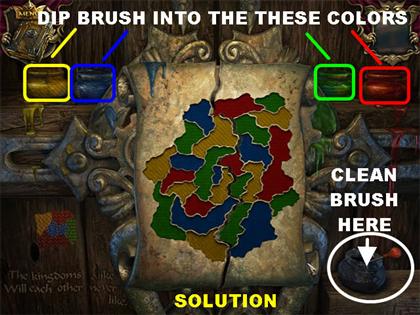
- There are many ways to solve this puzzle, please look at the screenshot for the solution.
- Enter through the door on the right after the puzzle has been solved.
The King's Chamber
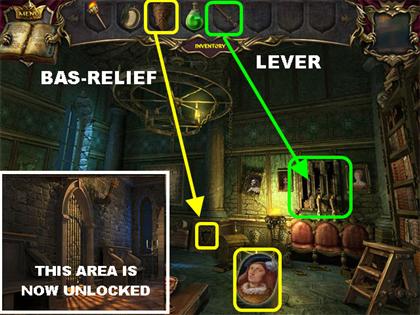
- This room contains certain mechanisms that locks and unlocks certain doors within the castle.
- Place the Bas-relief with King's Image in the lower center of the back wall.
- Pick up the Portrait that appears in the niche.
- The Portrait will automatically merge with the Medallion without a Portrait in your inventory to form a Medallion with a Portrait.
- Place the Lever in the mechanism on the right side of the back wall. You will see a quick cut scene of the left door being unlocked in the hallway where the Petrified Nanny is located.
- Go back to the hallway with the Petrified Nanny by clicking downwards twice and then clicking on the back of the scene once.
Petrified Nanny Hallway
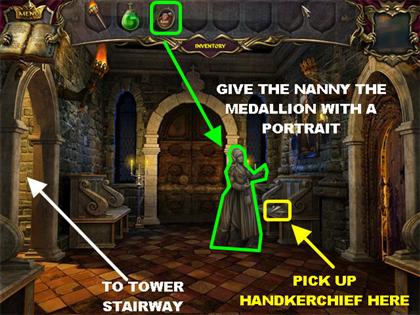
- Give the petrified nanny the Medallion with a Portrait. This action will free the Nanny and she will no longer be petrified.
- The nanny hands you a Handkerchief at the end of the cut scene.
- Pick up the Handkerchief on the bench in the lower right.
- Click on the left to enter a stairway that leads to the Tower.
Chapter 2: The Enchanted Gardener
Tower Stairway
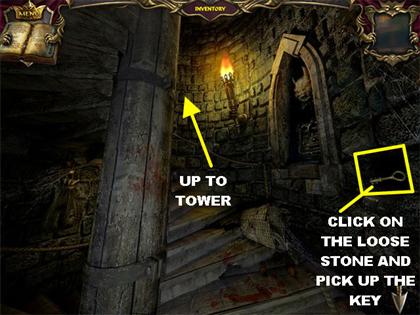
- Click on the loose stone in the lower right several times until it falls to the ground.
- Pick up the Chest Key in the niche in the spot of the loose stone.
- Click on the center of the stairway to go upstairs.
Prince's Tower
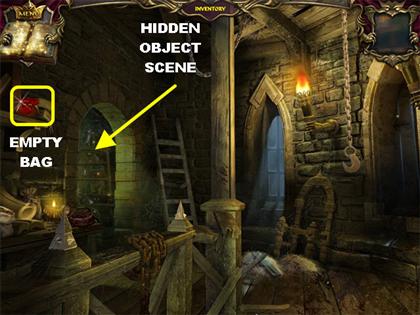
- Pick up the red Empty Bag in the upper left corner.
- Click on the Hidden Object scene on the left.
Alchemist's Laboratory
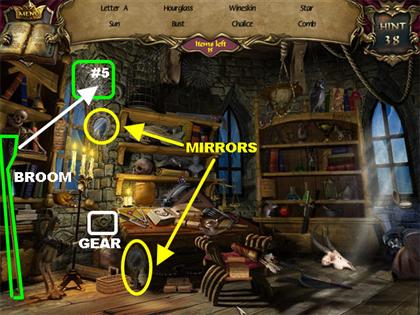
- Number Five - Pick up the Broom in the lower left.
- Place the Broom on the cobwebs in the upper left to reveal some numbers.
- Click on the number 5 towards the end of the numbers.
- Pick up the Gear in the lower left side of the wall.
- Go back to the Stairway.
Tower Stairway - Weights Mini-puzzle
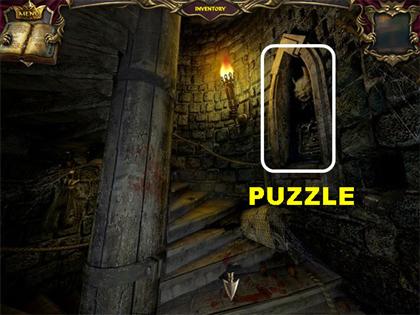
- Click on the mechanism on the right side of the wall.
- Place the Gear in the center of the mechanism.
- Different shapes correspond to different weights.
- Place gears on the pedestals in the upper center to bring the gears to the correct positions so they can move.
- Click on a weight to pick it up and attach it to your cursor.
- To remove a weight simply click on it and place it in another spot, or at the bottom of the scene.
- You can only place one weight in each spot.
- If you look at each pedestal you will notice a geometrical shape. There are also some etchings in the lower left with the same shapes.
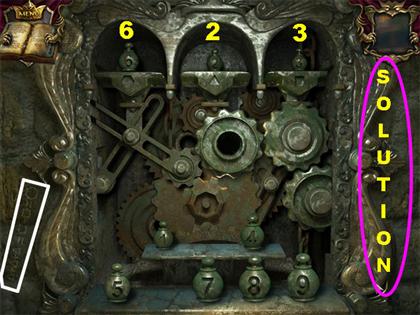
- The solution from left to right is: "6-2-3".
- As soon as the puzzle has been completed, you will see the image of the door that leads to the Square opening.
- Go into the Armory Room by clicking downwards twice. Enter the right door.
Armory Room
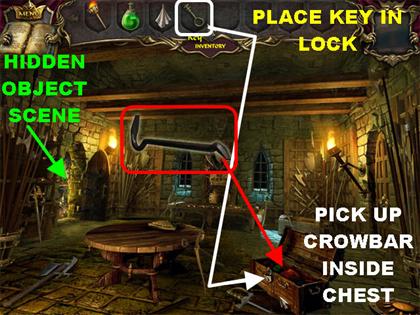
- Click on the chest in the lower right to remove the item on top. Click on the chest again and it is locked.
- Use the Key from inventory on the chest in the lower right to unlock it.
- Pick up the Crowbar inside the chest.
- Click on the Hidden Object scene on the left.
Collect 16 Feathers
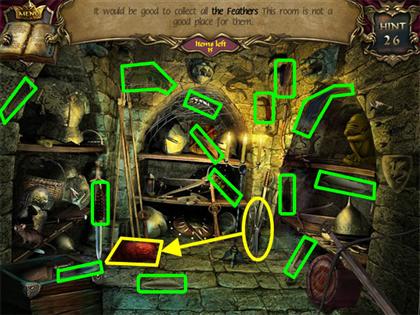
- Please look at the screenshot for the locations of all the feathers.
- Pick up the Scissors in the lower right.
- Place the Scissors on the red Pillow in the lower left.
- Pick up the Feather inside the pillow.
Feather Mini-puzzle
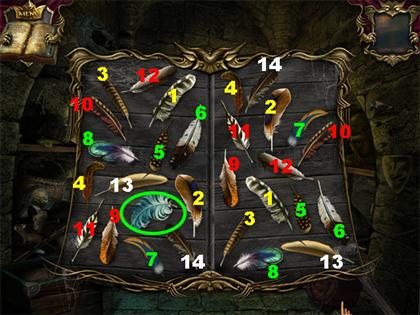
- Your goal is to eliminate all the matching feathers until all that is left is the one without a pair.
- Click on 2 matching feathers and they will disappear.
- Click on the last Feather and it will go into your inventory.
- Go back up to the Prince's Tower.
Prince's Tower
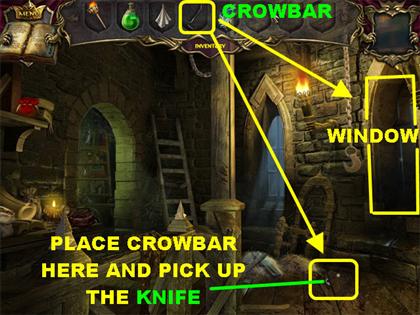
- Take the Crowbar from inventory and place it on the loose board on the right side of the ground.
- Pick up the Knife in the niche in the ground.
- Click on the window on the left for a closer view.
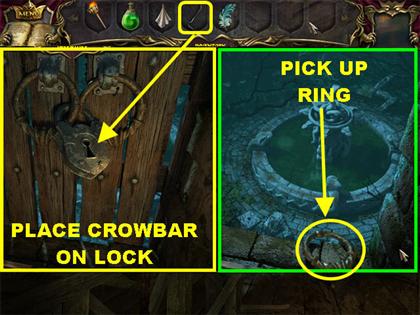
- Place the Crowbar on the window to open it.
- Grab the Ring that appears on the ledge of the window.
- Go to the Court Tailor's room. Go downwards 3 times, make a left and enter the door in the back.
Court Tailor
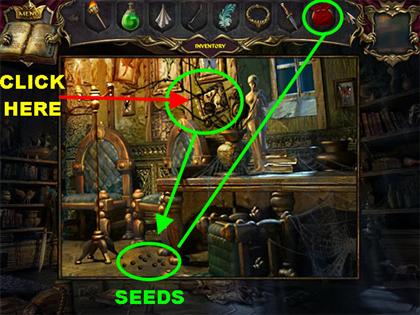
- Click on the small plant in the lower center for a closer look.
- Click on the tree for the seeds to fall to the ground.
- Take the red Empty Bag from inventory and place it on the seeds to pick them up.
- Pick up the Bag with Seeds from the floor.
- Click on the Hidden Object scene on the left.
Collect 16 Rings
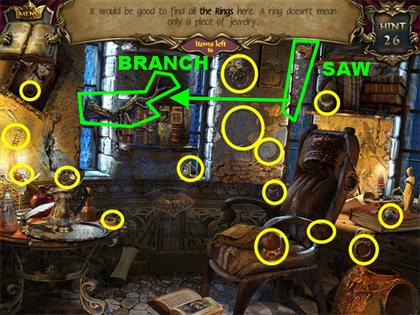
- Please look at the screenshot for the locations of all the rings.
- Pick up the Saw in the upper right corner.
- Place the Saw on the branch in the upper left side.
- Click on the Ring the cut branch left behind.
- After you find the last ring, a mini-puzzle will appear.
Rings Mini-puzzle
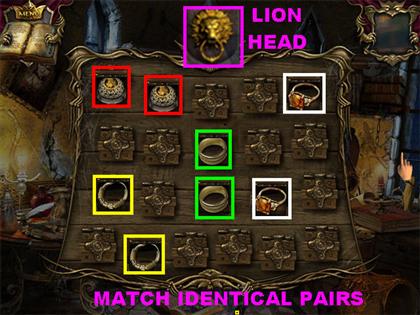
- Your goal is to eliminate all the matching rings until only 1 ring is left.
- Click on 2 doors to see what is underneath. If the pieces match, the doors will disappear.
- You will receive the Lion's Head after the puzzle has been solved.
- Go back to the Hallway in which the Petrified Nanny was located.
Petrified Nanny Hallway
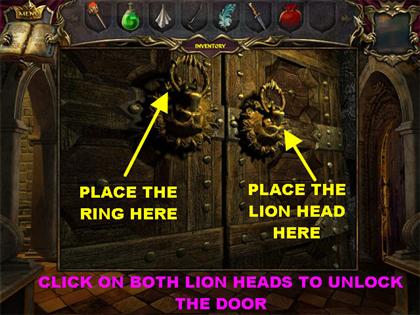
- Click on the door in the back for a closer view.
- Place the Lion's Head on the right side of the door.
- Click on the Lion's Head on the right one time.
- Place the Ring from inventory on the Lion's Head on the left.
- Click on the Lion's Head on the left one time.
- The door will open; go through it to access the Square.
Chapter 3: The Court Tailor & The Cook
The Square
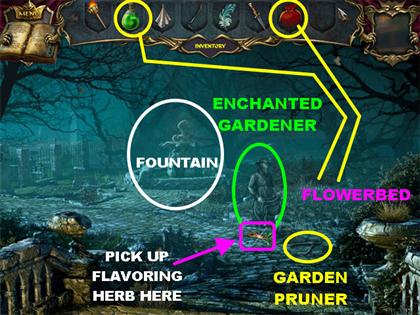
- Pick up the Garden Pruner on the right.
- Place the Bag with Seeds on the flowerbed on the right.
- Place the green Magic Liquid over the flowerbed to make the flowers grow faster.
- The spell on the Enchanted Gardener has been broken. Watch a brief cut scene.
- Pick up the Flavoring Herbs left in the spot in which the Gardener was standing.
- Click on the Fountain for a closer view.
Fountain
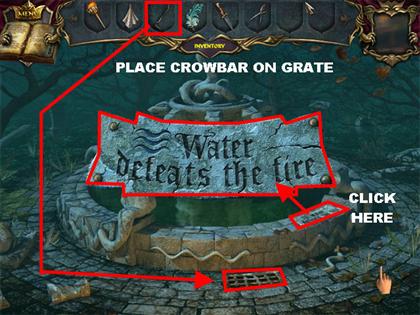
- Click on the tablet on the right side of the Fountain. The sign says:" Water defeats the Fire".
- Use the Crowbar on the grating on the ground to remove it.
- Click on the hole on the ground to trigger a puzzle.
Pipe Mini-puzzle
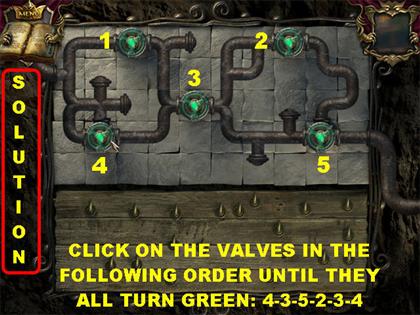
- Your goal in this game is to assemble the pipes and turn on all the taps.
- Drag the pipe pieces at the bottom of the puzzle and place them on the taps.
- Pipes in the right spots will darken and lock themselves in.
- Pipes in incorrect locations will stay light and can be moved around.
- Please look at the screenshot for the solution.
- Once the pipes are in place, you have to click on the valves in the right order until they are lit in green.
- I will number the valves from 1 through 5. Please look at the screenshot for the locations of the numbers.
- In order for this solution to work you have to follow these steps before you touch any valves. Please click on the vales in the following order:4-3-5-2-3-4
- Exit the fountain view.
- You can click on either the left or right side of the scene to reach other areas of the garden.
- Click on the right to go to the Backyard.
Backyard
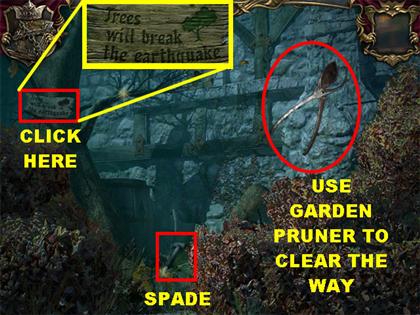
- Use your Garden Pruner on the vines to eliminate them. You have to click the Garden Pruner on the scene 3 times to eliminate everything.
- Pick up the Spade in the lower center.
- Click on the tablet in the upper left. The tablet says:"Trees will break the earthquake".
- Leave this scene and go left at the Square to reach the Alley.
Statue Alley
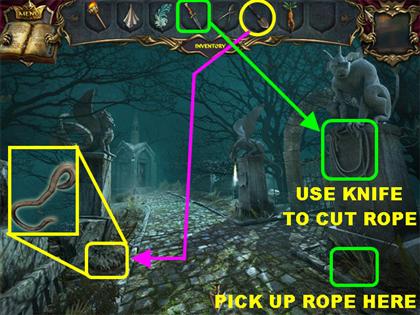
- Use the Spade on the lower left side of the ground.
- Pick up the Hook that appears in the ground.
- Use the Knife to cut the Rope on the statue on the right.
- The Rope falls in the lower right corner; pick it up.
- The Rope and the Hook will automatically merge in your inventory to form Climbing Irons.
- Click on the statue on the far right for a closer view.
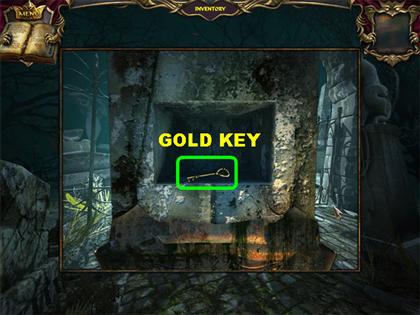
- Click on the tablet for a closer view and it says:"Earth will stop the water".
- Click on the same tablet to remove it.
- Pick up the gold Key that appears behind the tablet.
- Go back to the backyard.
Backyard
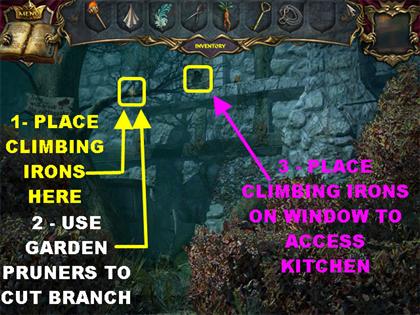
- Place the Climbing Irons on the branch on the left.
- Use the Garden Pruner to cut the branch.
- Place the Climbing Irons in the window.
- Click on the window to enter the Kitchen.
Kitchen
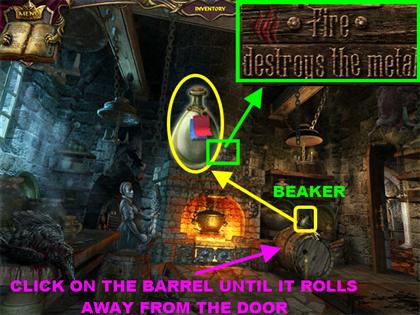
- Click on the cobwebs above the fireplace. Click on the sign above the cauldron and it reads:" Fire removes the metal".
- Pick up the Empty Beaker on the lower right side of the back wall.
- The Barrel is blocking the door. Click on the Barrel several times until it rolls completely away from the door.
- Notice that Oil is coming out of the barrel.
- Exit through the door on the right to go back to the Hallway. Click on the left door and go up the stairway to reach the Tower.
Find the Messages
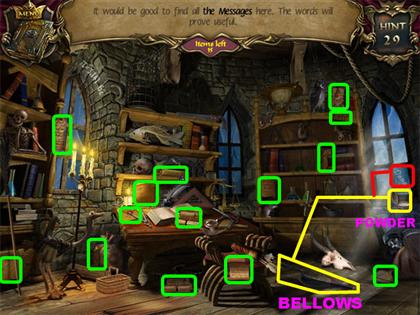
- Click on the Hidden Object scene on the left.
- In this scene you have to find all the pieces of papers and the words written throughout the scene.
- Pick up the Bellows in the lower right.
- Place the Bellows on the powder compact by the right window.
- Please look at the screenshot for the solution.
Sort the Messages Mini-puzzle
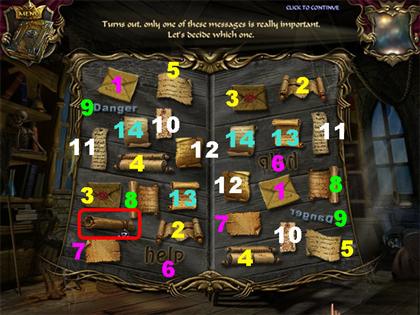
- Click on 2 identical items to eliminate them from the board.
- Click on the last item on the board.
- You will receive the Violet Scroll in your inventory. The scroll says: "Violet powder will make the old look new".
- Go back to the Princess' Chambers by going downwards 4 times; go through the next 2 left doors.
Violet Beaker Mini-puzzle
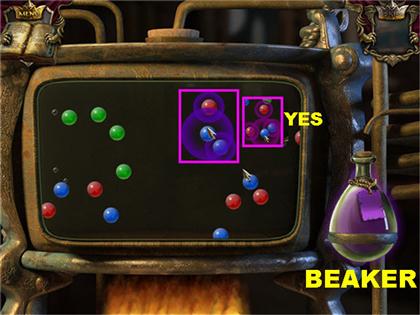
- Place the Violet Scroll at the bottom of the device in the lower center of the scene.
- Click on the device again for a closer view.
- Place the Empty Beaker anywhere on the scene.
- Your goal is to collect only the RED and BLUE elements into the beaker.
- Hover your mouse over an element and a sphere or spheres will appear over all the elements which are touching.
- If you click on the elements with the spheres, all those elements will pop.
- Click on clusters that have the same amount of red and blue colors in them to obtain the color you need.
- If you click on the wrong colors, the liquid you've collected will evaporate and you will have to start over again.
- Click on the Magic POWDER once the beaker has been filled up.
- Exit out of that scene and go to the door in the back of the Hallway.
Court Tailor
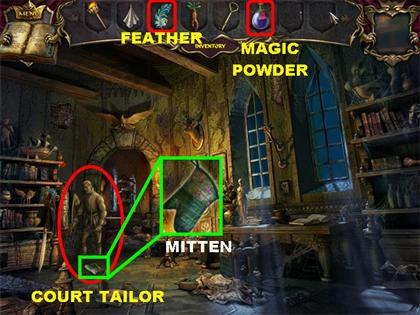
- Give the Petrified Court Tailor the Feather from inventory.
- Give the Magic Powder to the Court Tailor.
- The spell on the Court Tailor has been broken.
- Pick up the Mitten left behind by the Court Tailor in the lower left side of the ground.
- Go back to the Kitchen by clicking downwards twice, click in the back of the scene and enter the Kitchen through the door on the right.
Kitchen
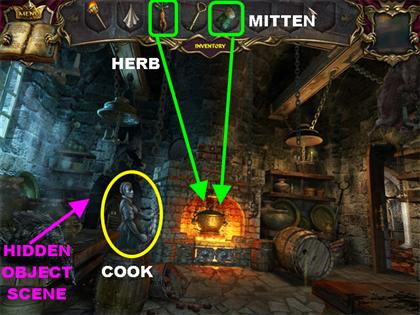
- Place the Mitten on the lid of the cauldron to remove it.
- Put the Flavoring Herb in the Cauldron.
- The spell has been broken and now the Cook is free.
- Go into the Wine Cellar on the left side of the scene.
Wine Cellar
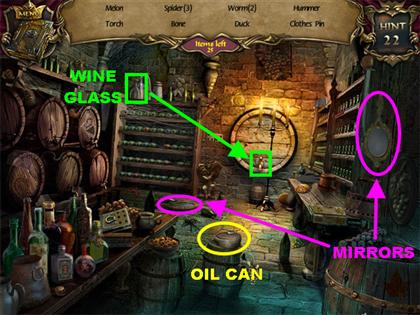
- Glass of Wine – Pick up the Wine Glass in the upper left corner.
- Place the Wine Glass on the tap of the large barrel on the back wall.
- Grab the Glass of Wine to take it off your list.
- Pick up the Empty Oil Can in the lower center, on top of the barrel.
- Go back to the Kitchen.
Kitchen
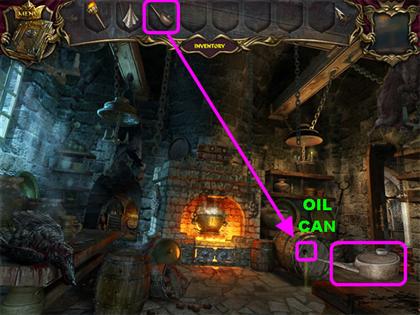
- The barrel that you pushed out of the door earlier is oozing with oil.
- Grab the Empty Oil Can and place it on the leak in the barrel to fill up the Oil Can.
- Pick up the Oil Can after it has been filled.
- Go back to the Alley by leaving the Castle and turning left at the Square.
Chapter 4: The Coffin-maker
Cemetery Gates
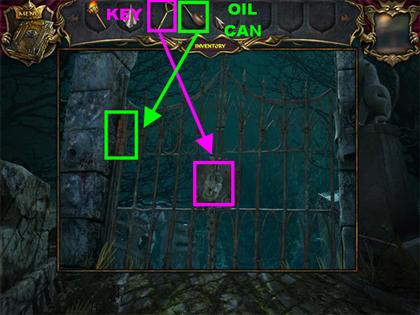
- Click on the Gate on the right for a closer view.
- Place the gold Key in the lock to open it.
- Place the FULL Oil Can on the rusty hinges on the upper left side of the gate.
- Go through the gate once it opens to enter a Hidden Object scene.
Cemetery
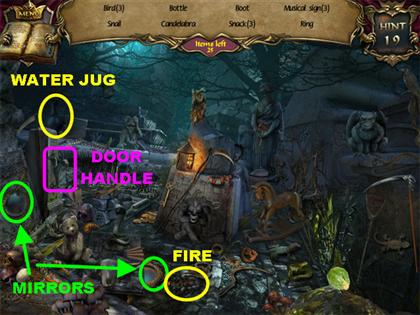
- Smoke - Pick up the Water Jug in the upper left.
- Place the Water Jug on the fire in the lower center.
- Click on the Smoke above the fire to eliminate that item off your list.
- Pick up the Door Handle on the left center side of the scene.
- Go back to the Fountain.
Fountain Symbols
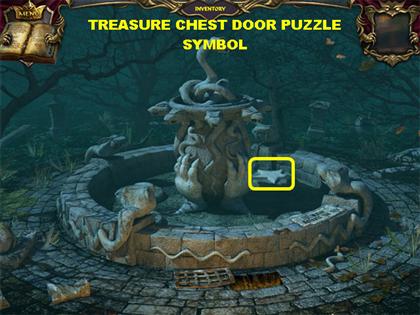
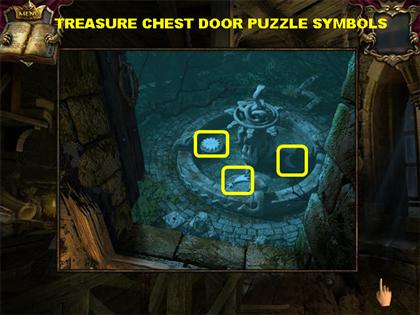
- Click on the Fountain and you will notice the sun symbol inside the Fountain.
- Go to the Tower and click on the window. Notice the symbols inside the Fountain when you are up in the Tower, they are much clearer now since the water has been drained.
- Go to the Armory Room.
Armory Door Lock
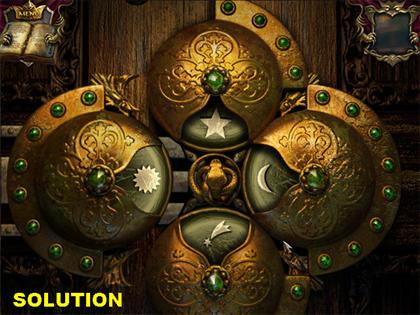
- Click on the right door for a closer view.
- Your goal is to place the symbols on the right order on the door. The order of the symbols can be found by looking at the fountain from the window in the Tower and up close in the Square.
- Click on the symbols in order to change them.
- Please place the symbols in the following order:Top Center: Large Star Lower Center: Shooting Star Left: Sun Right: Half Moon
- Once the door opens it will trigger a Hidden Object scene.
Treasure Chest Room
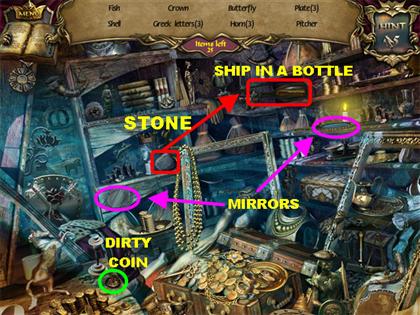
- Letter – Grab the Stone on the left side of the shelf.
- Place the Stone on the Ship in a bottle in the upper right.
- Grab the Letter inside the bottle.
- Pick up the Dirty Coin in the lower left corner of the scene.
- As soon as the Dirty Coin goes into your inventory it will be wiped clean with the Handkerchief.
- Go to the Crypt Entrance by exiting the Castle, go left by the Square and click in the back of the Alley.
Crypt Entrance
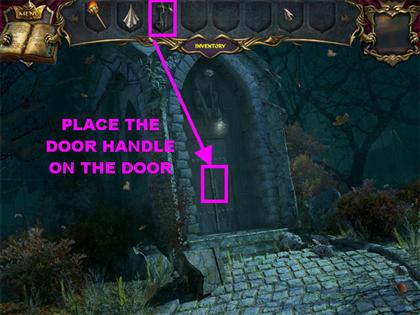
- Place the Door Handle on the door.
- Click on the door to open it. Go through the door.
Crypt
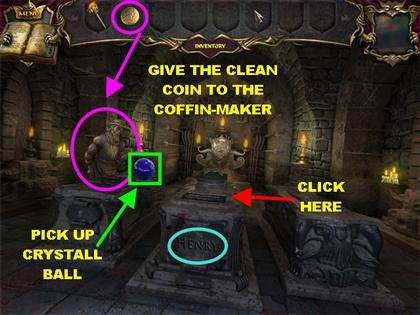
- Give the Clean Coin to the Petrified Coffin-maker on the left.
- You will be taken to a brief cut scene.
- Pick up the Crystal Ball the Coffin-maker left behind on top of the left coffin.
- Click on the center coffin for a closer view.
Crypt Puzzle
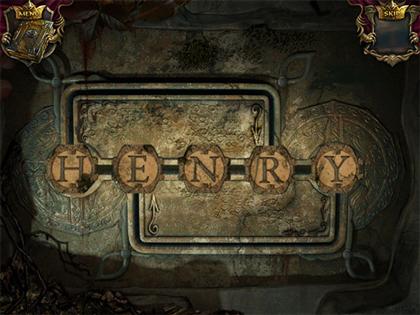
- Please watch the video for a step-by-step solution for this puzzle.
- Your goal is to decipher the King's Name by rearranging the letters.
- You can only click on the letters at the right and left ends of the puzzle.
- When you click on a letter on the left end, it will travel through the top bar and land on the next to last slot.
- When you click on a letter on the right end, it will travel through the bottom slot and land in the 2nd slot.
- The solution is: "HENRY".
- The coffin will open once the puzzle has been solved.
Chapter 5: The Princess
Underground Stairs
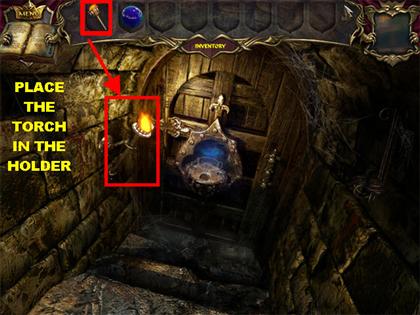
- Click on the open coffin to enter it.
- Place the Torch on the left side of the coffin.
- You receive a message that the underground stairs lead to a secret room. Only the crystal ball will unlock it. The parts of the stand are scattered all over the castle.
- Go back to the Alley and turn right to go into the Cemetery and enter a Hidden Object scene.
Find 18 Reptiles
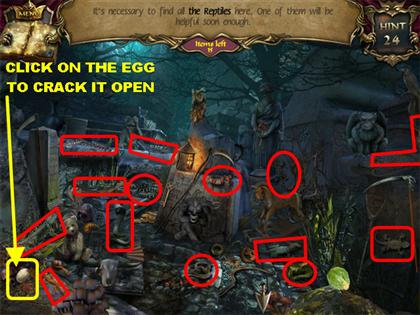
- Please look at the screenshot for the locations of all the reptiles.
- Click on the Egg in the lower left corner several times to crack it.
- Click on the reptile to find the last reptile on the list.
Reptile Mini-puzzle
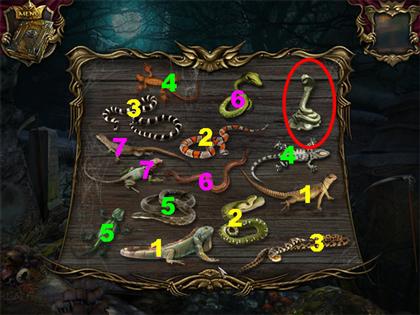
- Click on a reptile and musical symbols will appear above it. Your goal is to match the 2 reptiles with the same musical symbols.
- Please look at the screenshot for the solution.
- Click on the last reptile that does not have a match to end the puzzle.
- The last reptile will go into your inventory as a Metal Decoration.
- Go into the Kitchen and enter the Wine Cellar on the left.
Grapes – Wine Cellar
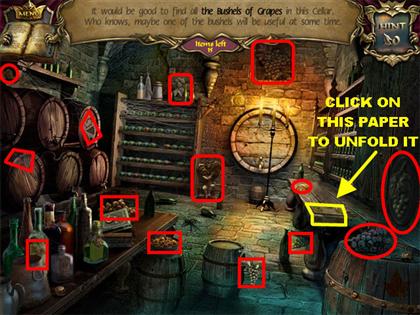
- Enter the Hidden Object section on the left side of the Kitchen.
- Please look at the screenshot for the locations of all the grapes.
- Click on the folded paper on the table on the right 2 times to unfold it. Click on it a third time to pick it up.
Match the Items
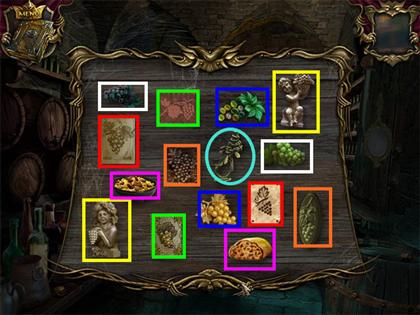
- Click on the 2 items that are similar in nature. Like 2 grape clusters, grape drawings or grape plaques.
- Click on the last item without a match and it will be entered into your inventory as a Metal Decoration.
- Go back into the Armory Room.
Flowers – Armory Room
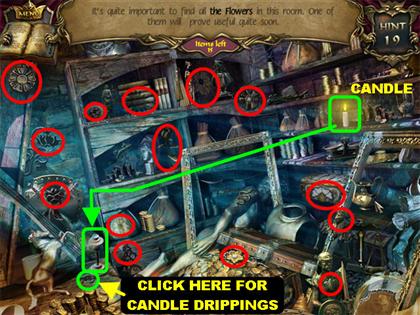
- Go through the door on the right.
- Please look at the screenshot for the locations of all the flowers.
- Pick up the Candle in the upper right side.
- Place the Candle in the Candleholder in the lower left side.
- The wax drippings from the candle will fall in the flower carving on the table.
- Click on the wax flower to take it off your list.
Flowers Mini-puzzle
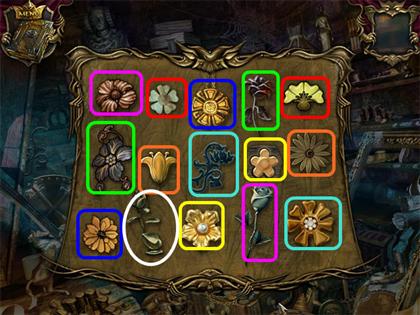
- Click on a flower and musical symbols will appear above it. Your goal is to match the 2 flowers with the same musical symbols.
- Please look at the screenshot for the solution.
- Click on the last flower that does not have a match to end the puzzle.
- The last flower will go into your inventory as a Metal Decoration.
- Go into the Princess' Chamber.
Frames – Princess' Chambers
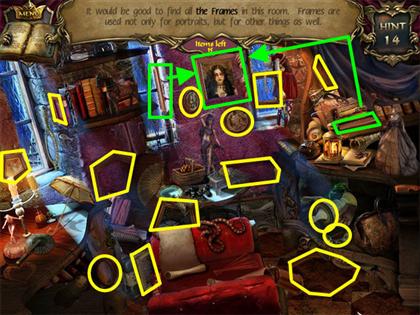
- Click on the Hidden Object scene on the right.
- Please look at the screenshot for the locations of all the frames. You have to click on the frames themselves in order to pick them up.
- If you try to click on the picture inside the frame the game will not accept it.
- Pick up the wooden piece next to the window in the middle.
- Place the wooden piece on the frame in the upper center of the scene.
- Pick up the second wooden piece on the right side of the scene, on the desk by the books.
- Place the second wooden piece on the frame in the upper center of the scene.
- Click on the completed frame to take it off your inventory.
Match the Frames Mini-puzzle
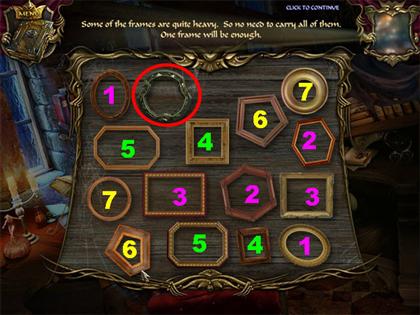
- Click on the 2 frames that have the same shape and they will be taken off the list.
- Please look at the screenshot to see all the matching pairs.
- Click on the last piece and it will go into your inventory as a Special Frame.
- Go back to the Crypt by exiting the Castle, going left, and then clicking in the back of the Alley.
Crypt
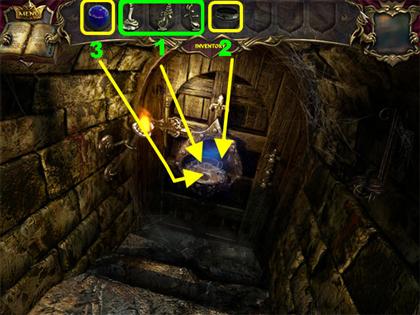
- Click on the middle coffin to go inside.
- Place the 3 Metal Decorations in the center of the door.
- Place the Special Frame in the center of the door.
- Place the Crystal Ball on the stand on the door.
- Go through the door.
Secret Room
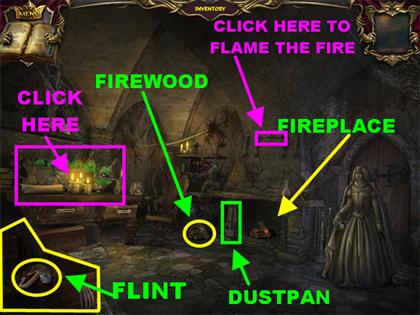
- As soon as you enter the Secret Room you will find the Enchanted Princess.
- Click on the chest in the lower left corner to open it.
- Pick up the Flint inside the chest.
- Pick up the Firewood in the lower center.
- Pick up the Dustpan next to the fireplace.
- Click on the fireplace cover to remove it.
- Place the Firewood and the Flint inside the fireplace to start a fire.
- Click on the Lever that comes out of the wall above the fireplace to flame the fire.
- Place the Dustpan into the fireplace.
- Click on the Dustpan and it will go into inventory as a Dustpan with Coals.
- Click on the strange device on the left side of the scene for a closer view.
Beaker Mini-puzzle
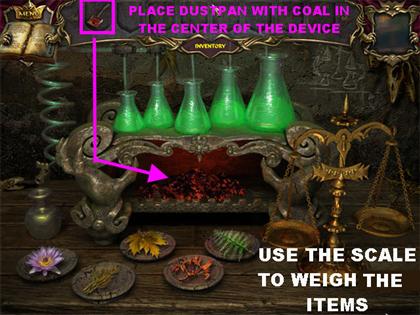
- Place the Dustpan with Coals in the center of the device.
- Your goal is to make the magic potion by placing the lightest items in the smallest beakers and the heaviest ones in the largest beakers.
- Use the scale on the right to determine the weight of the items.
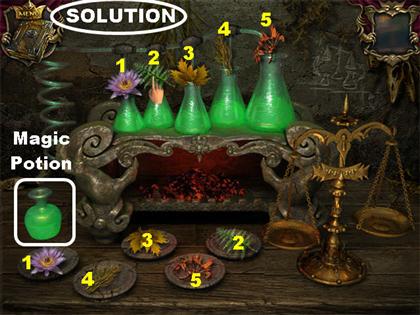
- Please look at the screenshot for the solution.
- As soon as the right ingredients have been selected, the magic potion will begin brewing.
- Click on the Magic Potion on the left side of the scene to enter it into inventory.
Free Princess
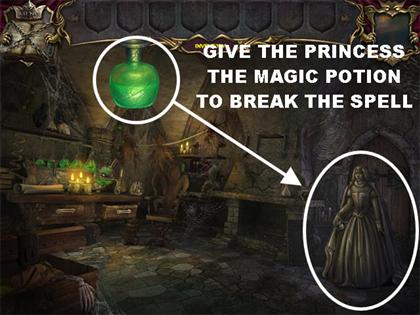
- Give the Magic Potion to the Princess Statue on the right in order to break the spell.
- After watching a few cut scenes, the Princess will give you an Amulet that should help free the Prince.
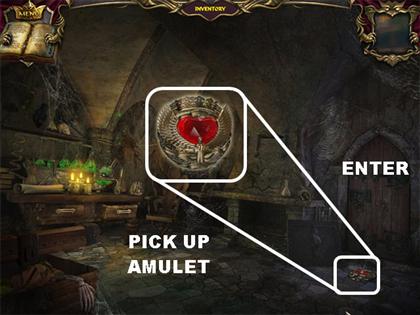
- Pick up the Amulet on the right side of the floor.
- Enter the door on the right.
Chapter 6: The Prince
Gargoyle Room
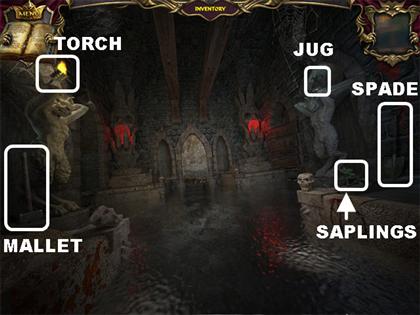
- The door closes behind you and the room is filled with water.
- Pick up the Saplings in the lower right.
- Grab the Torch in the upper left side.
- Grab the Spade on the right.
- Pick up the Jug in the upper right.
- Pick up the Mallet in the lower left.
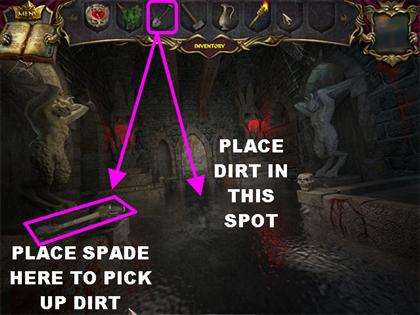
- Place the Spade in the spot in the lower left to dig up some dirt.
- Click on the Spade again and it will be entered into inventory as a Spade with Dirt. The sign in the Alley stated that Earth will stop the water.
- Place the Spade with Dirt in the sparkly spot in the water to stop the flood.
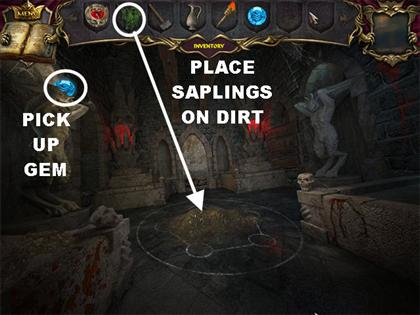
- Pick up the Blue Gem in the upper left side.
- An earthquake will begin shortly after you pick up the gem. Rocks and debris will begin falling.
- We read a sign earlier in the Backyard that stated that the trees would break the earthquake.
- Place the Saplings on the Earth Hill in the center of the water to stop the earthquake.
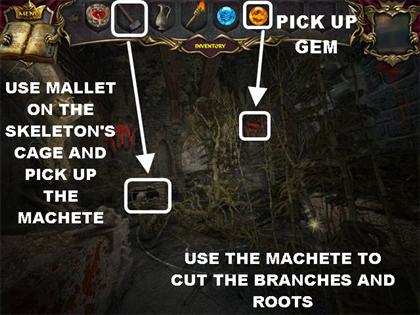
- Pick up the Yellow Gem on the far right side.
- The room begins to fill with roots and branches. The sign in the Armory said that the metal will cut the wood.
- The skeleton on the far left is holding a machete.
- Use the Hammer on the cage on the left that encases the skeleton.
- Pick up the Machete on the left side of the ground.
- Place the Machete anywhere on the scene to cut the branches and roots.
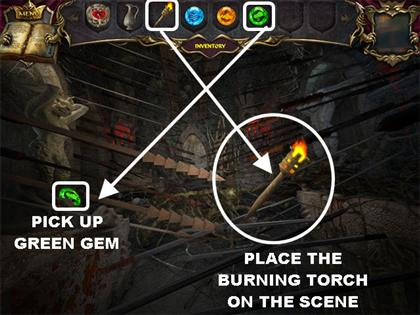
- Pick up the Green Gem on the lower left.
- Spears and spikes overtake the room after the Gem has been picked up. The sign in the Kitchen stated that fire destroys the metal.
- Place the Burning Torch anywhere on the scene.
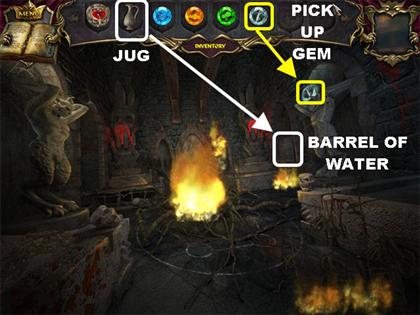
- Pick up the Light Blue Gem in the upper right side.
- In a few seconds the fire will overtake the room and some parts of the scene will be uncovered. The sign by the Fountain said that the water defeats the fire.
- Place the Jug on the Barrel of Water on the far right side of the scene. The Jug will break open the Barrel and water will flow out of it extinguishing the fire.
Five Elements
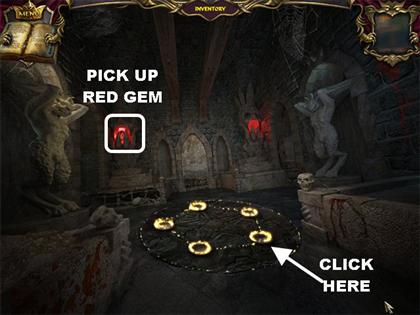
- Pick up the Red Gem on the far left side of the scene.
- Click on the center of the ground.
- Click on it again for a closer view.
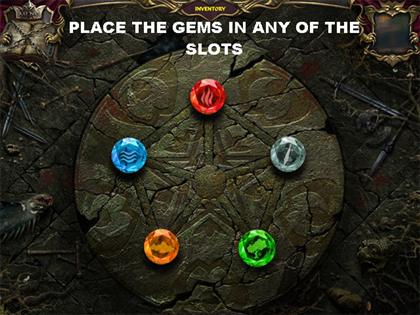
- Place the 5 Elements anywhere on the board.
- As soon as the five elements are placed, you will have to move them into the right slots.
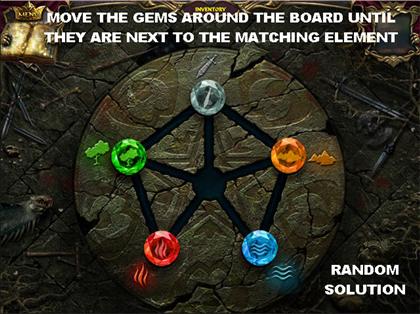
- Please watch the video for a step-by-step solution for this puzzle.
- Use the lines on the board to move the gems around. Click on a gem and it will move to an empty spot.
- The solution for this puzzle is random. The final placement of the elements depends upon where you placed the elements in the first place.
- Once the puzzle has been solved you will be taken to another cut scene.
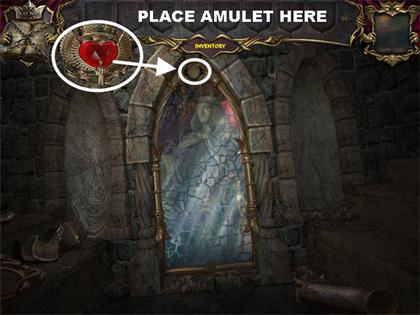
- Click on the mirror in the back of the scene for a closer view.
- Place the Amulet in the slot on top of the mirror.
- Congratulations! You've completed Echoes of the Past: Royal House of Stone!
Created at: 2009-11-29

