Walkthrough Menu
- General Tips
- Chapter 1 – The Prophet
- Chapter 2 – The Princess
- Chapter 3 – The Prince
- Chapter 4 – The Fisherman
- Chapter 5 – The Scientist
General Tips
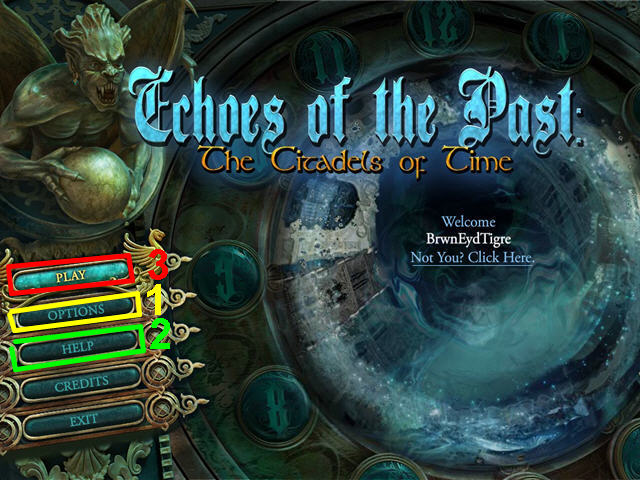
- Click on Options (1) to adjust the Music and Sound Volume, Full Screen, Widescreen and Custom Cursor.
- Click on Help (2) to access the game directions.
- After clicking Play (3) the first time, you have a choice of playing in Regular or Advanced Mode.
- Regular Mode has additional hints and sparkles in active areas. Advanced Mode does not have sparkles.
- There are no penalties for random clicking.
- Clicking on Hints in the upper right of the puzzles will give you the instructions.
- Click on Hints to see if there is anything left to do in a room.
- Some puzzles may be skipped by clicking on the top skip button after a short wait.
- Hints are unlimited after a short recharge period.
- The gameplay is not linear and actions in other areas may need to be done before triggering a Hidden Object Scene.
- In some Hidden Object Scenes you are required to put items back in their appropriate spots. Some items need to be placed before others can be placed.
- Click on menu in the upper left to exit the game.
Chapter 1 – The Prophet
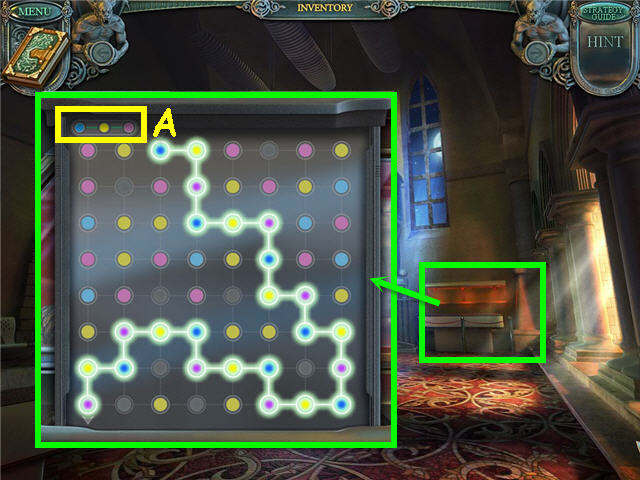
- Examine the display cabinet; push the button to trigger a puzzle.
- The goal is to make a path from the top arrow to the bottom arrow by clicking on the dots in the color order of the top left sample (A). See screenshot for solution.
- Take the MACE.
- Head right.
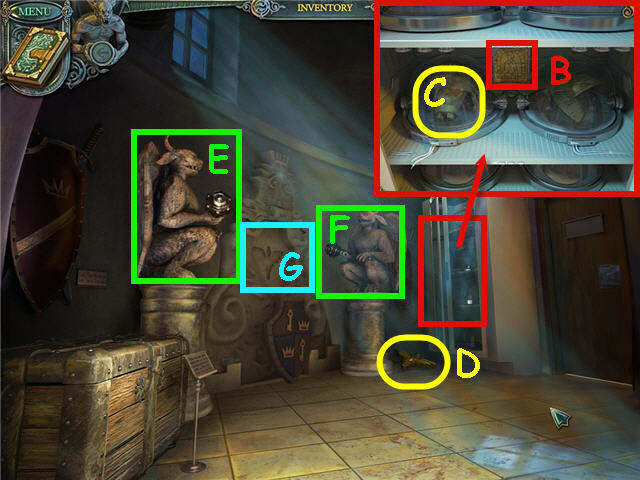
- Examine the cabinet, take the magic book update (B) and the STATUE'S HEAD (C).
- Take the BAS-RELIEF (D).
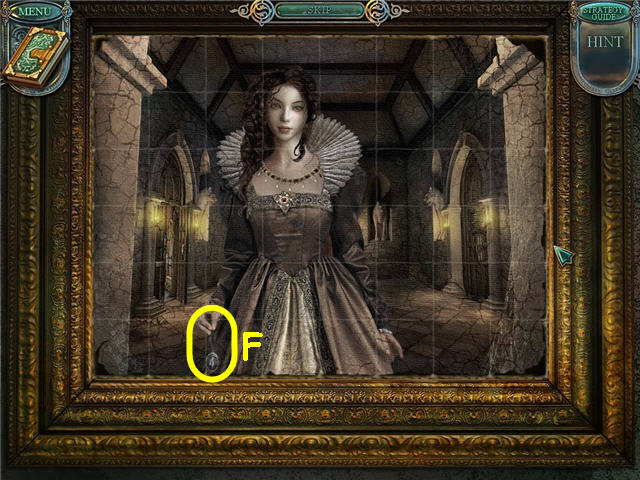
- Give the MACE to the left statue (E); click on the right statue (F).
- Place the BAS-RELIEF on the slot (G) and enter the portal.
- Examine the chest area to access a Hidden Object Scene.
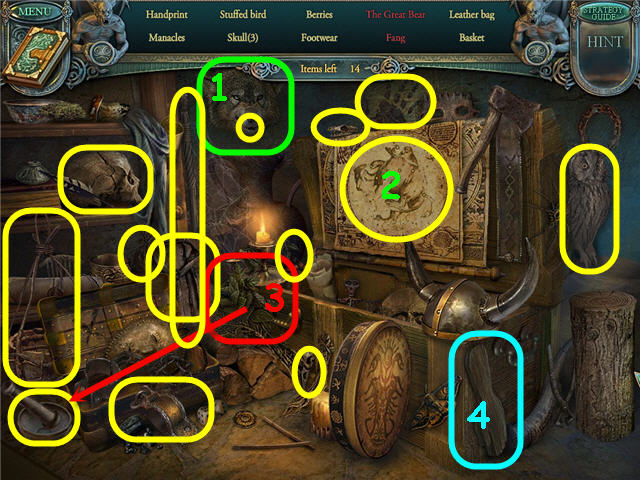
- Click on the bear head to get the fang (1).
- Rotate the rings on the parchment to get the great bear (2).
- Place the herbs in the mortar and pestle to get the herbal powder (3).
- Take the STATUE'S ARM (4).
- Head right.
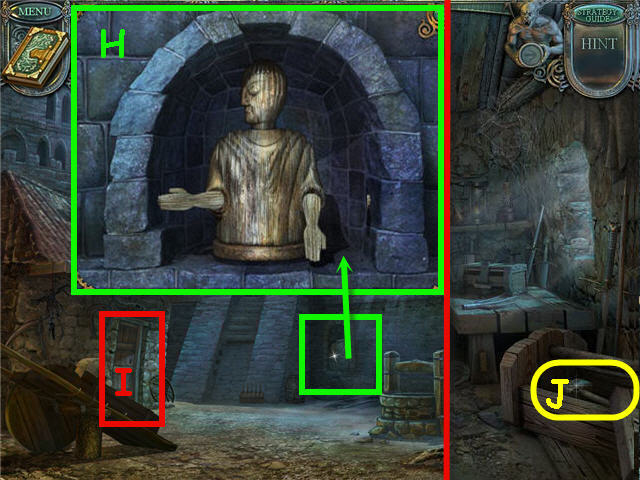
- Examine the alcove; place the STATUE'S HEAD and STATUE'S ARM on the statue.
- Set the arms and head using the code from the cabinet in your magic book. See screenshot for solution (H).
- Take the SMITHY KEY.
- Examine the door (I); use the SMITHY KEY and enter.
- Remove the lid; take the HAMMER (J).
- Exit the smithy.
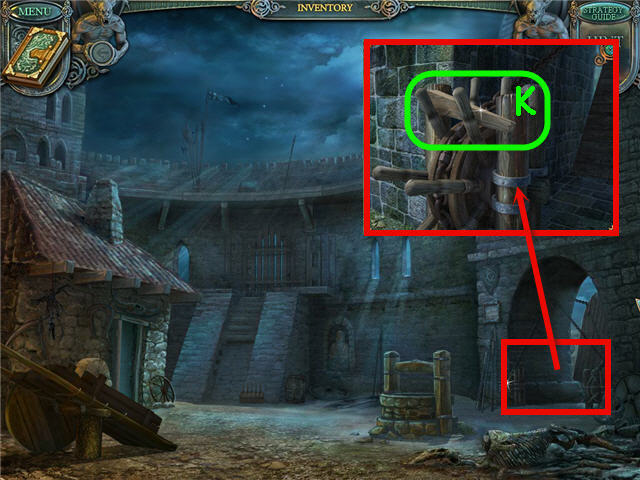
- Examine the right archway; use the HAMMER on the lodged wood (K).
- Head right.
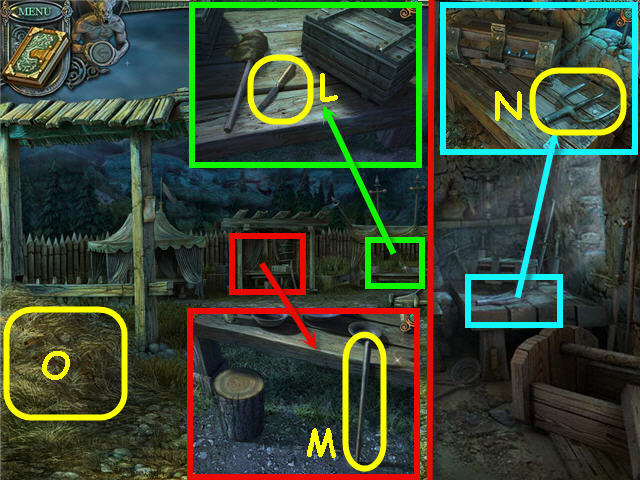
- Examine the area left of the targets; take the CHISEL (L).
- Examine the middle area; take the PITCHFORK HANDLE (M).
- Back out; head into the smithy.
- Examine the table; use the PITCHFORK HANDLE on the fork (N) and take the PITCHFORK.
- Back out and head right.
- Use the PITCHFORK on the hay (O); take the WHEEL.
- Back out.
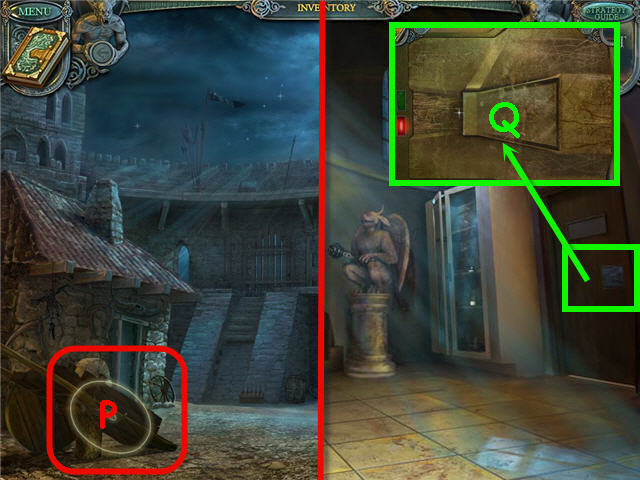
- Place the WHEEL on the cart (P).
- Back out two times.
- Examine the door; use the CHISEL on the panel (Q) to trigger a puzzle.
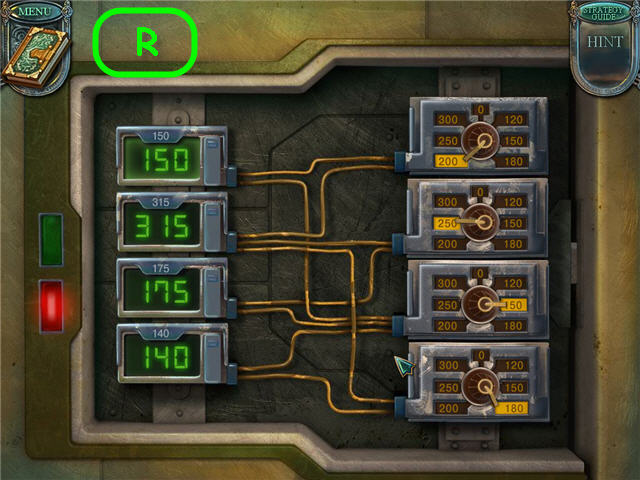
- Set the dials on the right so that the number on the left corresponds with the number on the panel. See screenshot (R) for solution.
- Head right.
- Examine the right desk drawers to access a Hidden Object Scene.
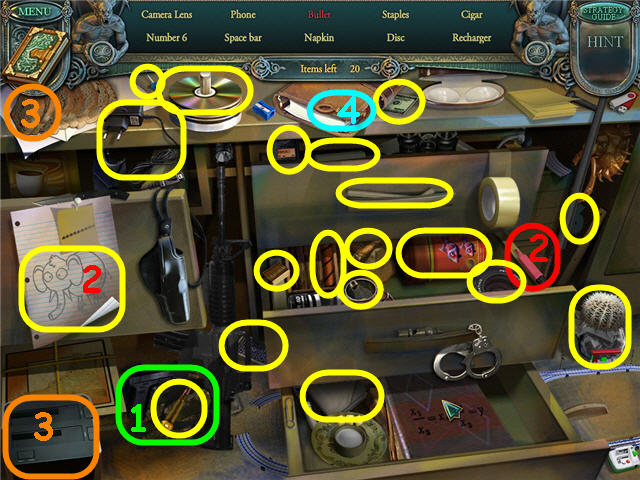
- Click on the gun to get the bullet (1).
- Use the pink marker on the elephant to get a pink elephant (2).
- Place the bread in the toaster to get toast (3).
- Take the CHEST KEY (4).
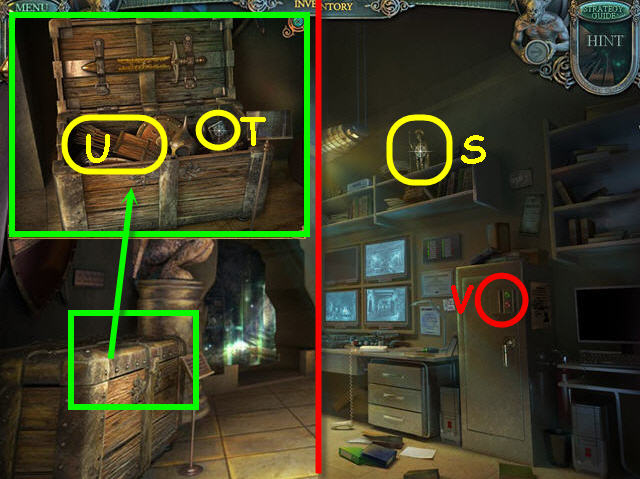
- Take the SOLDIER (S).
- Back out.
- Examine and use the CHEST KEY on the chest; take the MAGNETIC CARD (T) and ARROWS (U).
- Head right.
- Use the MAGNETIC CARD on the safe (V).
- Examine the area right of the safe to access a Hidden Object Scene.
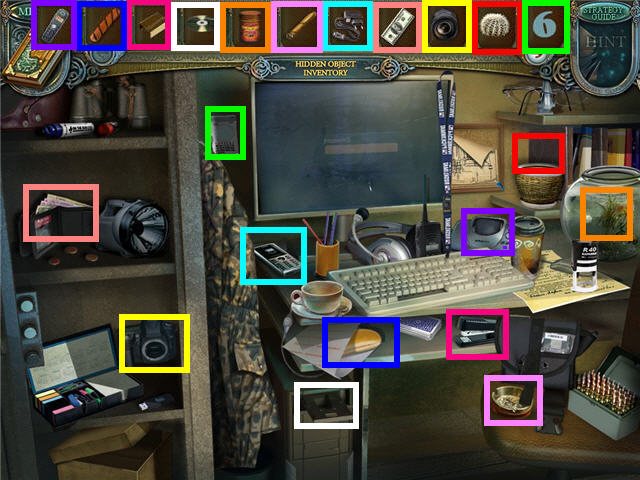
- Place the inventory items in their proper places and get a STRAP.
- Back out, head forward and right twice.
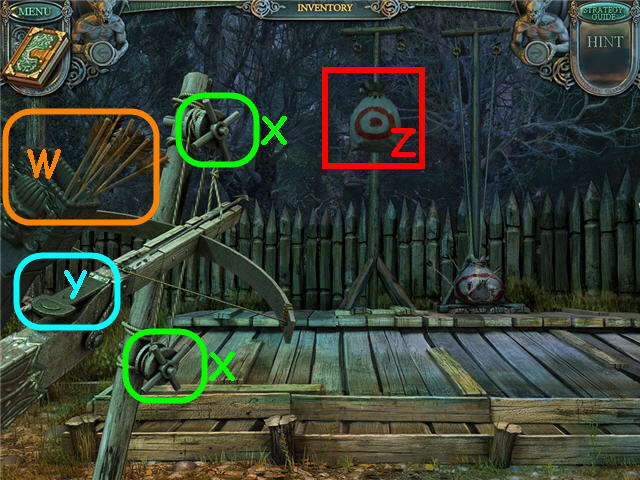
- Examine the archery range.
- Place the ARROWS in the quiver (W) to trigger a puzzle.
- Turn the levers (X) to raise and lower the bow and press the trigger (Y) to shoot the target (Z) three times.
- Solution: Turn the upper lever twice, shoot, turn the lower lever 2 times, shoot, lower the bow completely and turn the upper lever 3x and shoot.
- Take the BLUNT KNIFE from the ground.
- Back out.
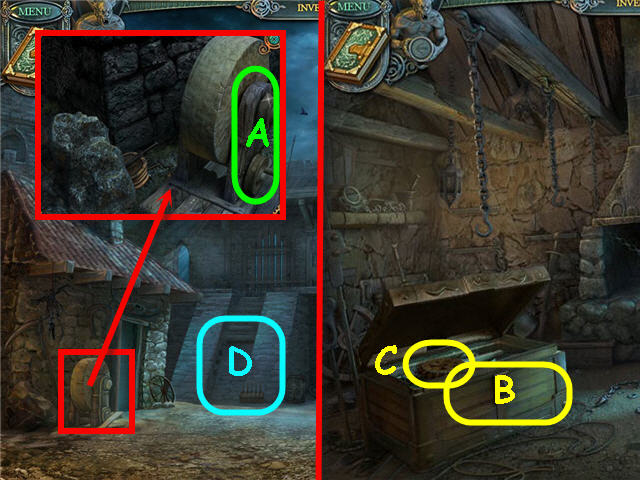
- Examine the grindstone.
- Place the STRAP on the wheels (A).
- Sharpen the BLUNT KNIFE on the grindstone; take the SHARP KNIFE.
- Head into the smithy.
- Use the SHARP KNIFE on the roped chest; take the ROPE (B).
- Open the chest; take the LEVER (C).
- Back out and examine the staircase (D).
- Place the lever in the right slot to trigger a puzzle.
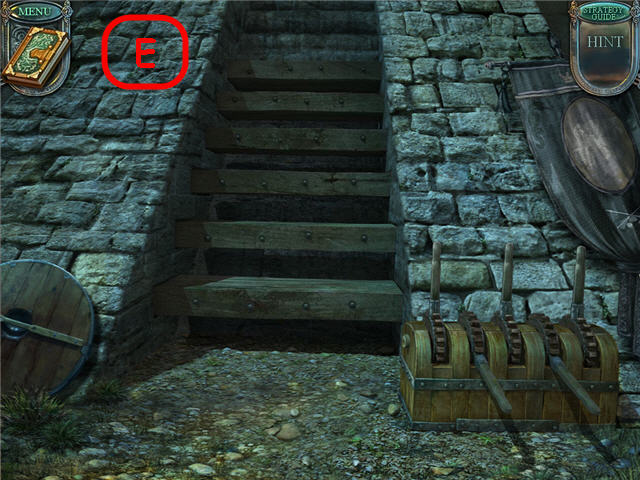
- Position the levers so that all the stairs are accessible.
- Each lever controls 3 stairs.
- Solution: Move the 2nd and 4th levers down. See screenshot (E) for solution.
- Head up the stairs.
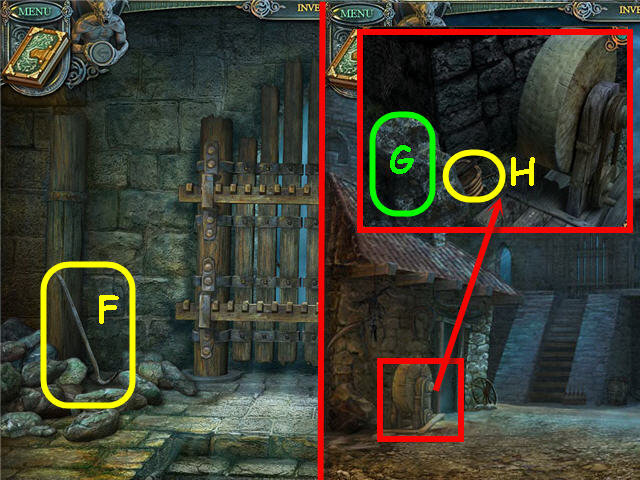
- Click on the stones twice; take the CROWBAR (F).
- Back out.
- Examine the grindstone; use the CROWBAR on the boulder (G).
- Take the BELLOWS (H).
- Head right.
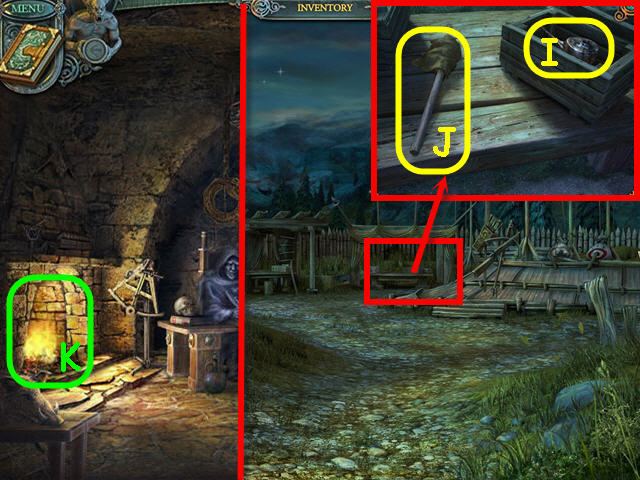
- Examine the right table.
- Use the CROWBAR on the box; take the FULL OIL CAN (I).
- Use the ROPE on the torch; take the UNLIT TORCH (J).
- Back out two times.
- Use the UNLIT TORCH on the fire (K); take the BURNING TORCH.
- Examine the chest to access a Hidden Object Scene.
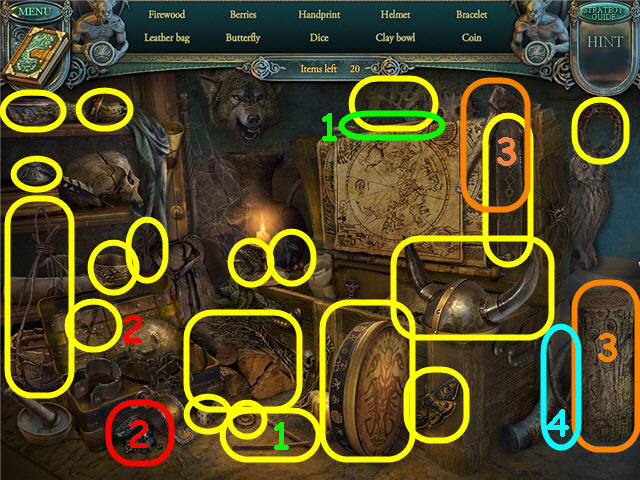
- Use the stick on the sticks to get a triangle (1).
- Use the charcoal on the X to get a nine (2).
- Use the axe on the log to get a wooden doll (3).
- Take the METAL TONGS (4).
- Head right and left into the smithy.
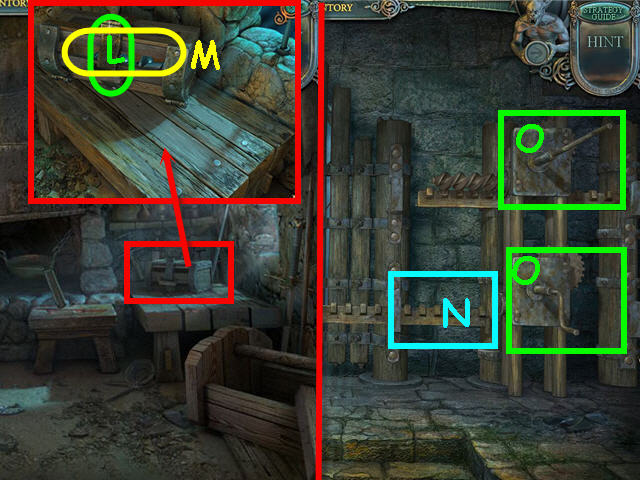
- Examine the table.
- Use the FULL OIL CAN on the hinges (L); take the SCREW (M).
- Back out and head up the stairs.
- Place the SCREW on the bottom mechanism (N).
- Crank the levers (O); take the AXE.
- Back out and head right.
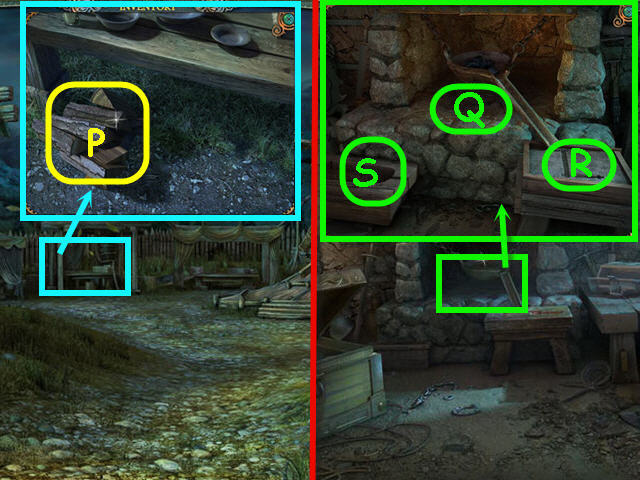
- Examine the middle table.
- Use the AXE on the log; take the FIREWOOD (P).
- Back out and enter the smithy.
- Examine and use the FIREWOOD and BURNING TORCH in the kiln (Q).
- Use the BELLOWS on the embers.
- Use the METAL TONGS to get the hot lever (R); place the lever in the water (S).
- Take the WELL HANDLE.
- Back out.
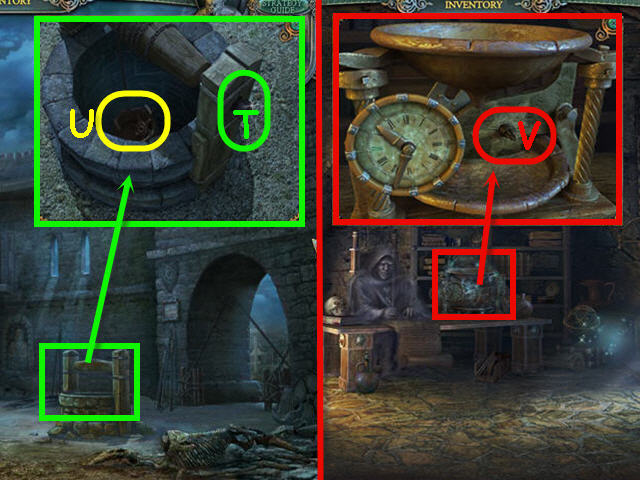
- Examine the well.
- Place the WELL HANDLE on the crank (T); take the GEAR (U).
- Back out.
- Examine the clock; place the GEAR on the spindle (V).
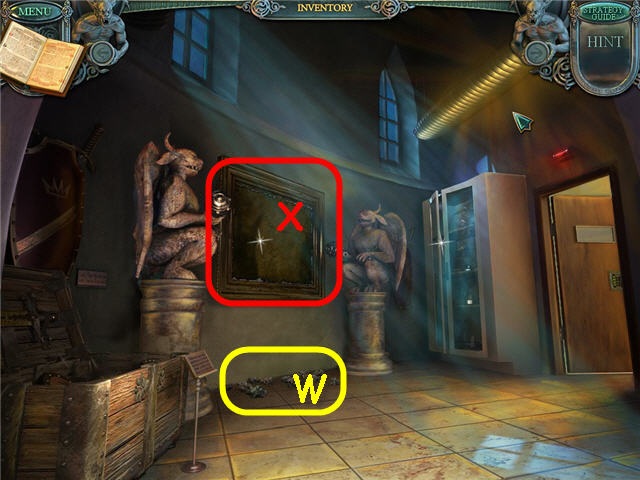
- Pick up the PICTURE SCRAPS (W).
- Examine the picture frame (X); place the PICTURE SCRAPS in the frame to trigger a puzzle.
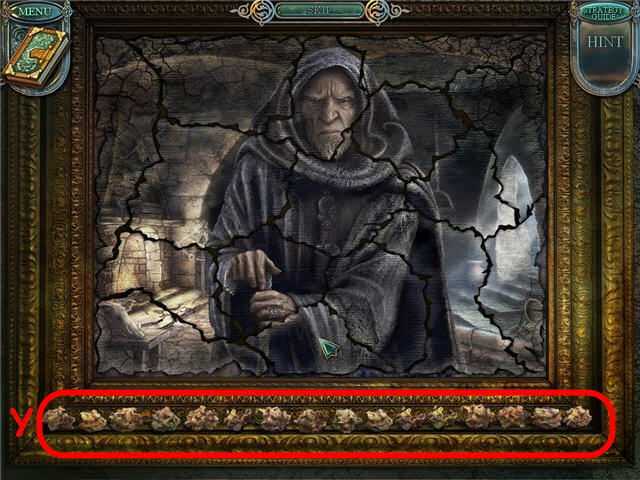
- Assemble the painting by placing the crumbled pieces (Y) in the frame. See screenshot for solution.
- Take the CLOCK NUMBER.
Chapter 2 – The Princess
- Head right.
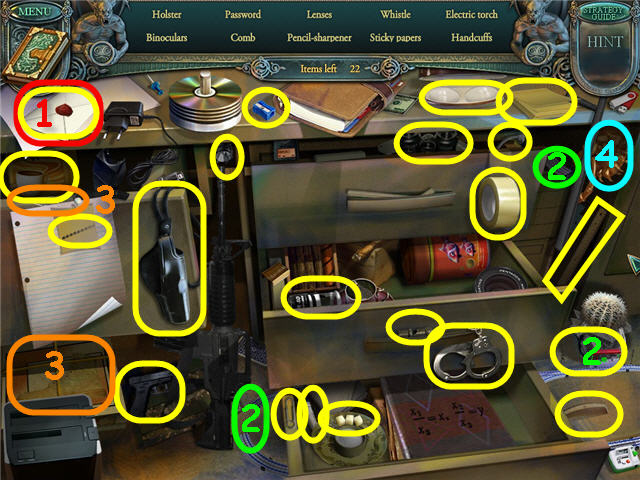
- Examine the desk drawer to access a Hidden Object Scene.
- Open the envelope to get the letter (1).
- Place the track on the tracks to get a train (2).
- Use the knife on the shoebox to get the laces (3).
- Take the DOOR RING (4).
- Back out two times.
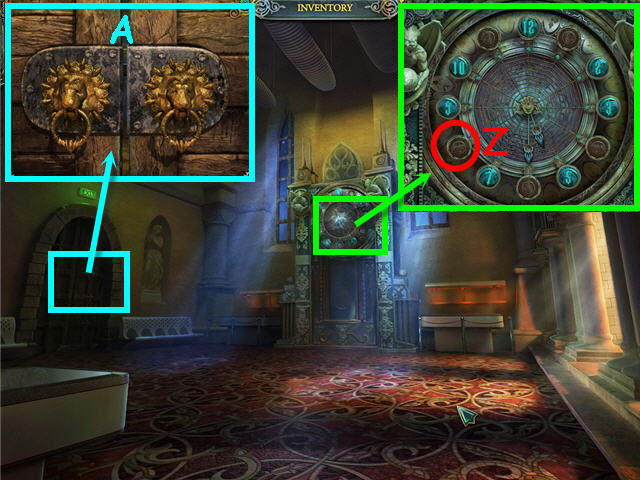
- Examine the clock; place the CLOCK NUMBER on the clock (Z) and back out.
- Examine the door; place the DOOR RING on the left.
- Turn both of the rings so that the rings are down (A).
- Head left two times.
- Examine the grandfather clock to get a magic book update and back out.
- Back out and head forward.
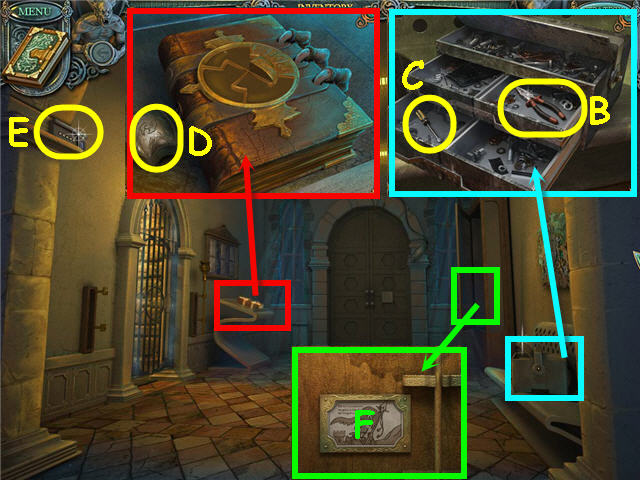
- Examine the box; open the drawer and take the PLIERS (B) and SCREWDRIVER (C).
- Examine the bookstand; take the BUTTON (D).
- Take the MONITOR CONTROL BLOCK (E).
- Examine the cabinet; take the magic book update (F).
- Back out twice.
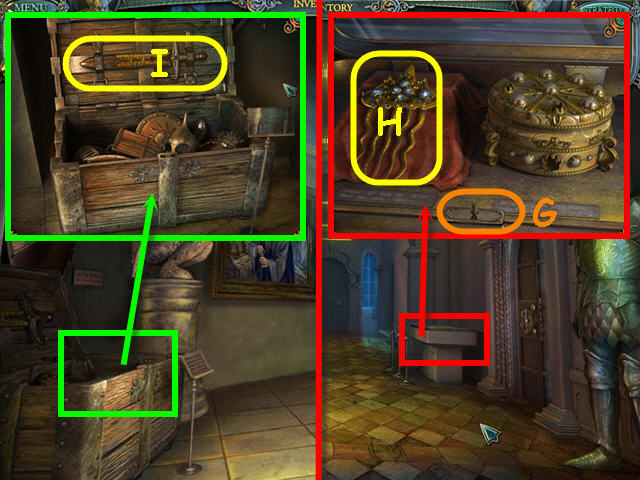
- Examine the display; use the PLIERS on the stuck key (G).
- Take the COMB (H).
- Back out and head right.
- Examine the trunk.
- Use the SCREWDRIVER on the screws; take the DAGGER (I).
- Head right.
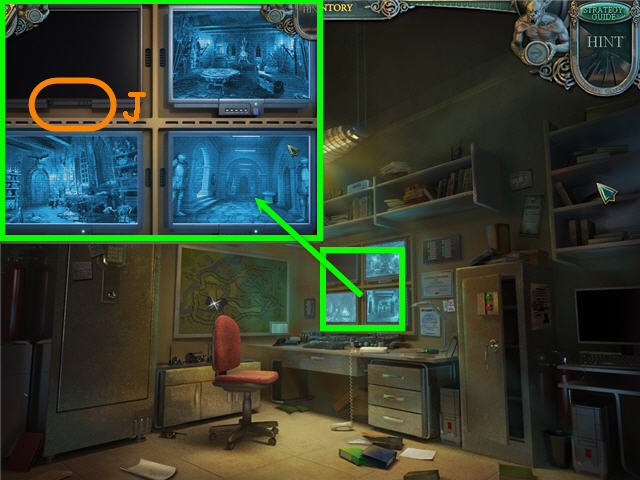
- Examine the monitors.
- Place the MONITOR CONTROL BLOCK under the first monitor (J) to get a magic book update.
- Back out three times, head left three times and, go straight through the doorway.
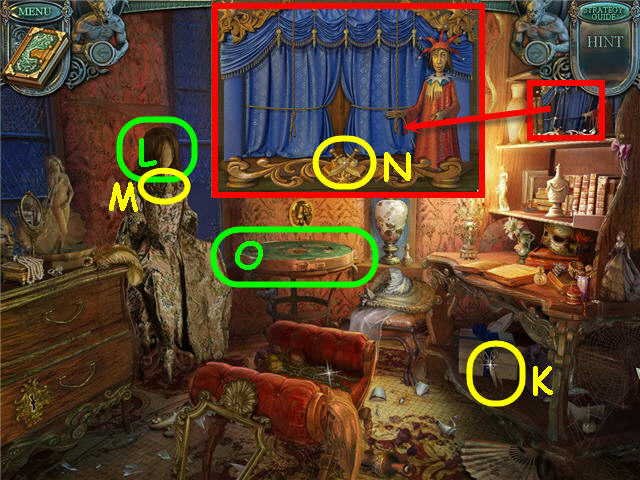
- Move the items on the shelf; take the SCISSORS (K).
- Place the COMB on the hair (L); take the PEARL (M).
- Examine the puppet show; take the SWORDS. (N).
- Examine the table (O) to trigger a puzzle.
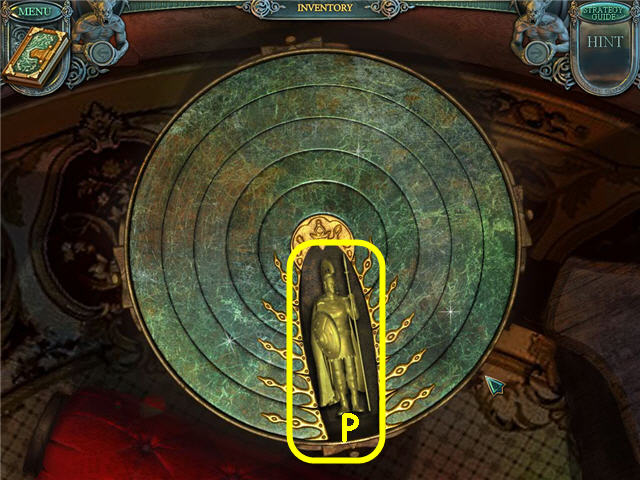
- Rotate the rings to align the holes over the soldier.
- Rotating one ring will turn others.
- Solution: click the middle ring 1 time, 2nd from outer ring 1 time, outer ring 2 times. See screenshot for solution.
- Take the 2nd SOLDIER (P).
- Back out.
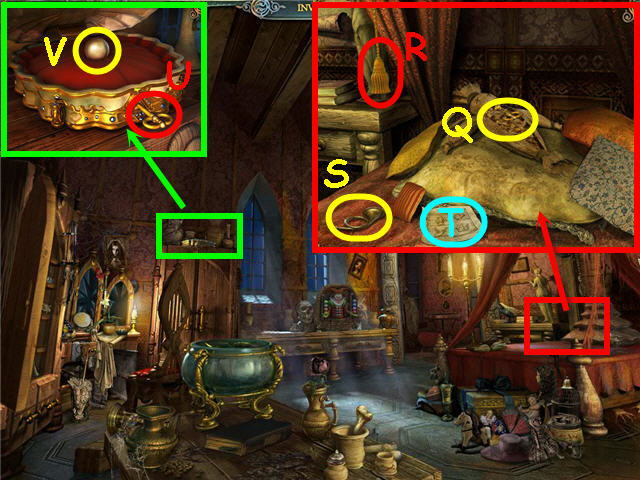
- Examine the bed; knock the pillows off twice.
- Use the SCISSORS on the voodoo doll; take the GOLDEN KEY (Q).
- Pull the cord (R) a few times; take the HORN (S).
- Take the clue (T) to get a magic book update.
- Examine the top of the cupboard; use the GOLDEN KEY on the lock (U).
- Take the 2nd PEARL (V).
- Click on the vanity to access a Hidden Object Scene.
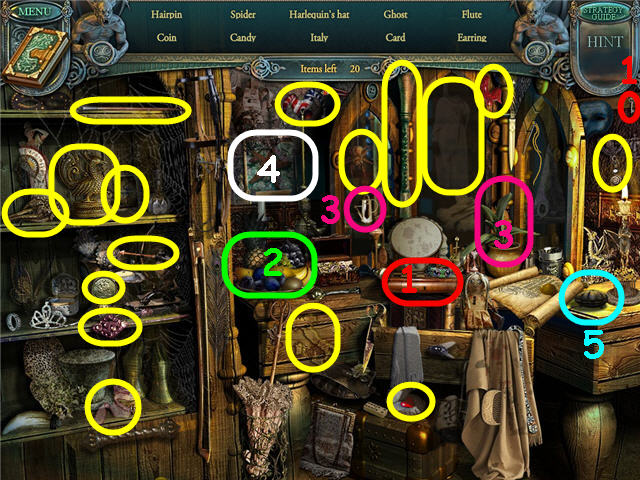
- Use the key on the board to get chess piece(1).
- Click the tray three times to get the apple (2).
- Use the water jug on the plant to get a flower (3).
- Click in the frame until you get the fish (4).
- Open the clamshell and take the 3rd PEARL (5).
- Use the SCISSORS on the present at the foot of the bed.
- Examine the opened present to access a Hidden Object Scene.
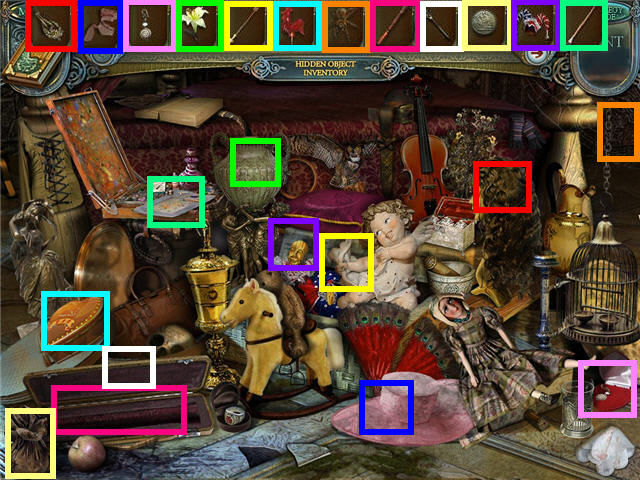
- Place the inventory items in their proper places and get LEAVES.
- Back out two times.
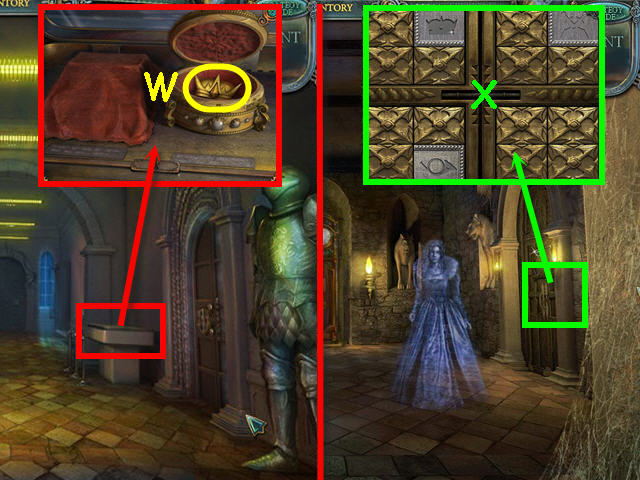
- Examine the display case; place the 3 PEARLS on the case.
- Take the CROWN (W).
- Head left.
- Examine the door.
- Place the CROWN, HORN and SWORDS in the matching slots to trigger a puzzle (X).
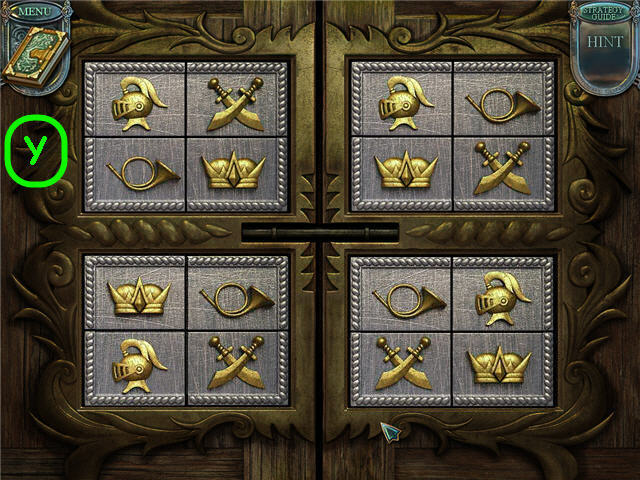
- Arrange the squares so that each of the 4 sections contains one of each symbol and the edges make a frame.
- Click on any two to switch them. See screenshot for solution (Y).
- Head right.
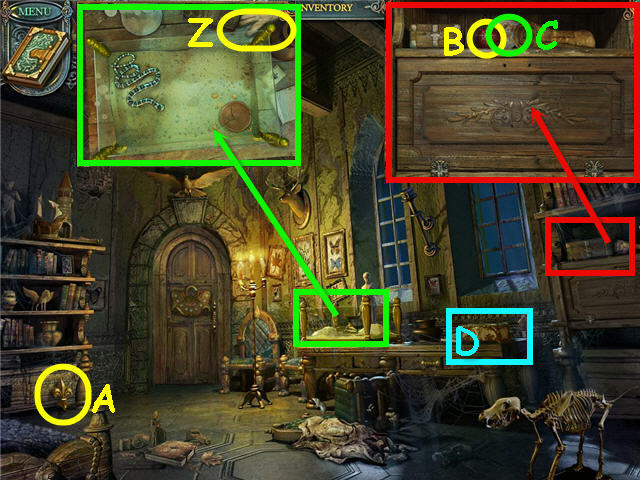
- Examine the terrarium; take the GLOVE (Z).
- Take the HERALDIC LILY (A).
- Examine the cupboard.
- Take the BALL (B) and magic book update (C) and back out.
- Examine the box (D); place the LEAVES on the bottom to trigger a puzzle.
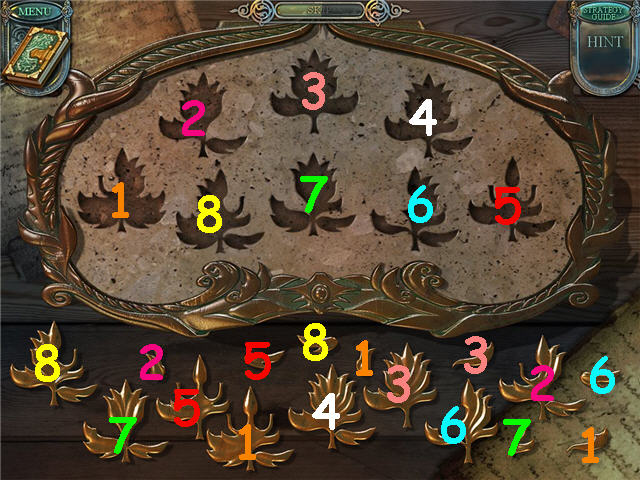
- Place the leaf pieces in their corresponding slots. See screenshot for solution.
- Take the METAL PLATE on the far left.
- Back out and head left.
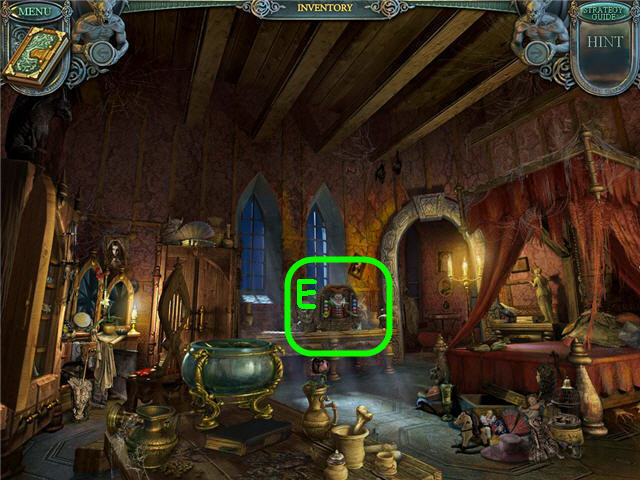
- Examine the juggler (E).
- Place the BALL on the juggler to trigger a puzzle.
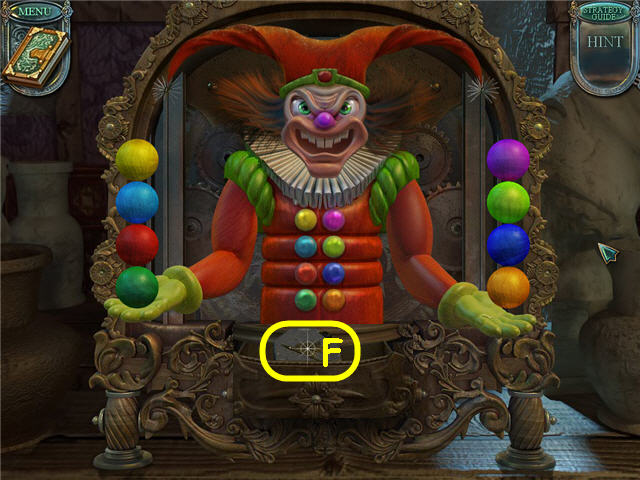
- The goal is to arrange the balls in each hand to match the buttons on his suit.
- Click on a ball in one hand to send it to the top of the stack in the other hand.
- Solution: Click on dark green, orange, red, dark blue, light blue 2 times, light green two times, yellow, purple. See screenshot for solution.
- Take the 2nd METAL PLATE (F).
- Head straight through the door.
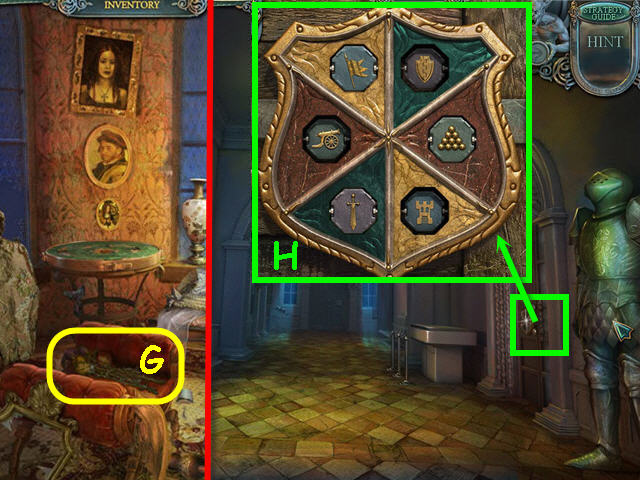
- Use the GLOVE to move the roses (G); take the 3rd METAL PLATE.
- Back out three times.
- Examine the door.
- Place the 3 METAL PLATES on the lock to trigger a puzzle.
- Click on the 3 moveable metal plates until the symbol corresponds with the opposite plate. See screenshot (H) for solution.
- Head right.
Chapter 3 – The Prince
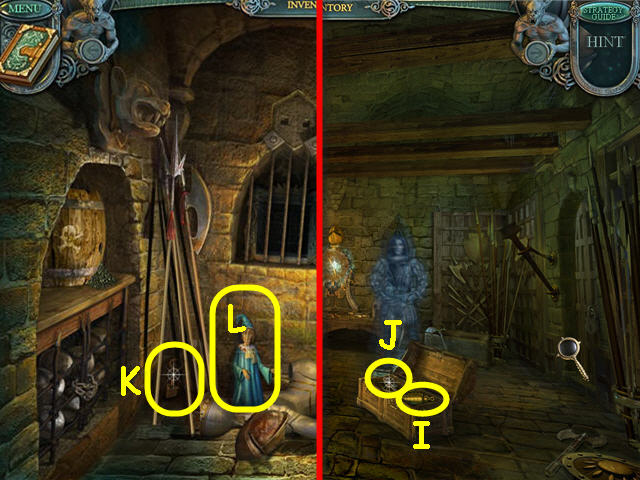
- Open the chest; take the WEIGHT (I) and ANCHOR (J).
- Head left.
- Take the TRIANGULAR KEY (K).
- Move the armor; take the PUPPET (L).
- Back out two times and head left twice.
- Examine the vanity in the corner to access a Hidden Object Scene.
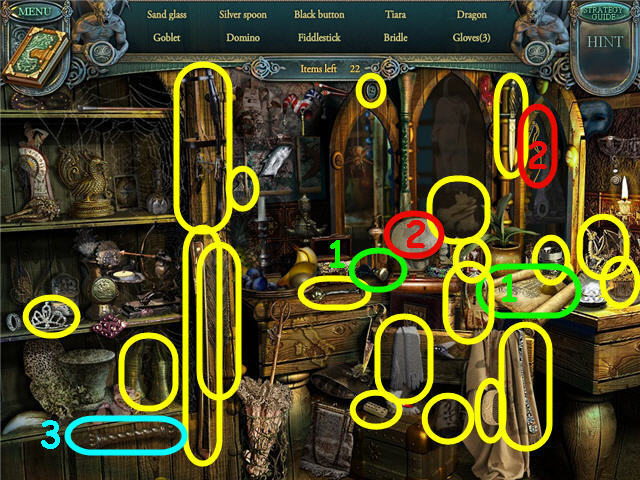
- Use the stamp on the seal of the decree to get a certified decree (1).
- Use the needle and thread on the cloth to get a sun (2).
- Take the CUPBOARD HANDLE (3).
- Head straight through the doorway.
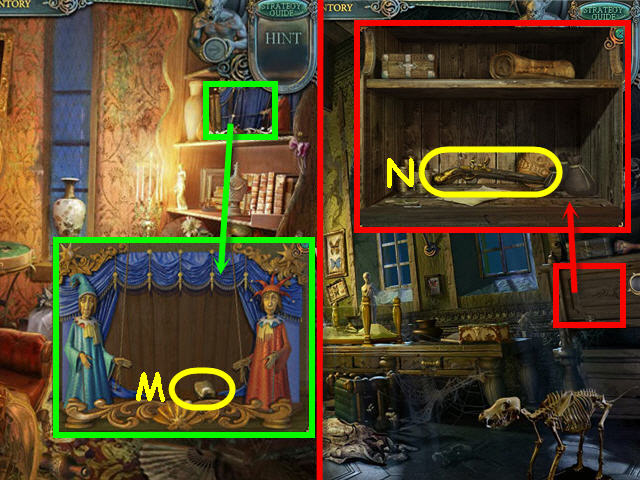
- Examine the puppet show.
- Place the PUPPET on the left; take the BUTTON (M).
- Back out two times and head right.
- Examine the cupboard.
- Place the CUPBOARD HANDLE on the cupboard; take the PISTOL (N).
- Back out two times and head right.
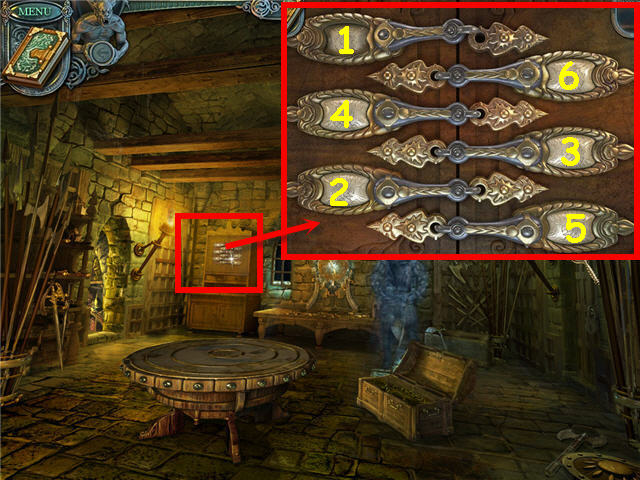
- Examine the cupboard.
- Place the two BUTTONS on the empty slots to trigger a puzzle.
- Click the buttons in the correct sequence to open the lock. See screenshot for solution.
- Take the BOOK.
- Head left.
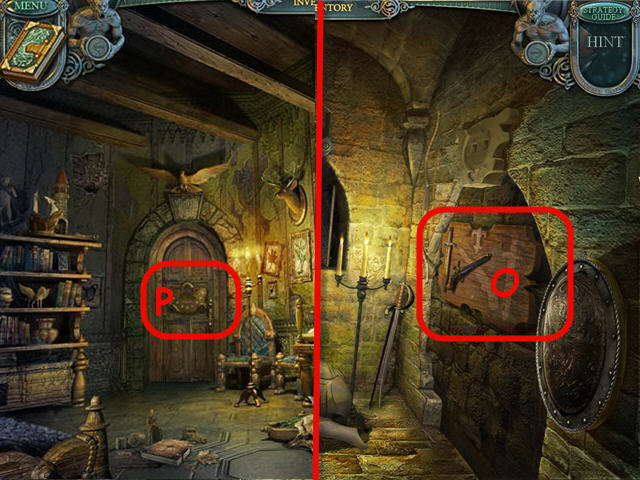
- Place the DAGGER, HERALDIC LILY and PISTOL on the rack (O).
- Take the LOCK PART.
- Back out twice and head left and right through the door.
- Examine the door (P).
- Place the LOCK PART in the slot to trigger a puzzle.
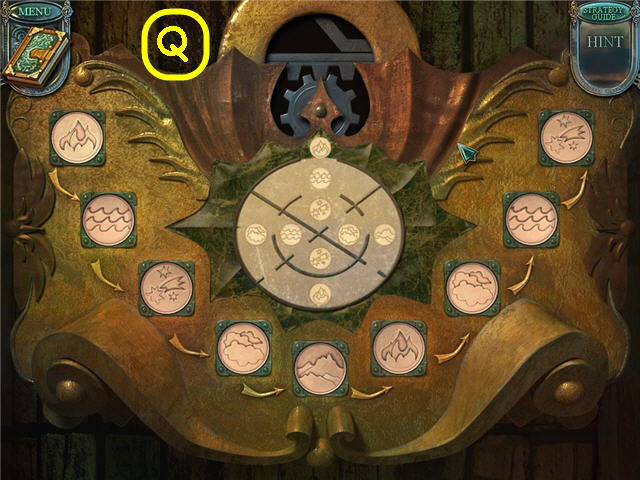
- Click on the images to change them so they appear in the order of the images on the labyrinth in the center.
- See screenshot (Q) for solution.
- Head straight through the door.
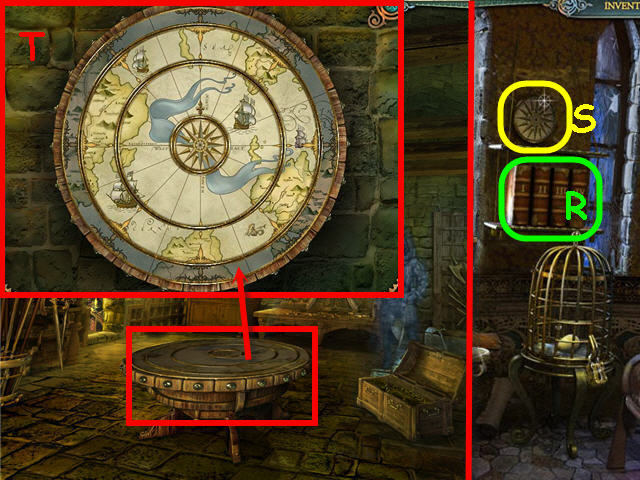
- Place the BOOK on the bookshelf (R); take the TABLE PART (S).
- Back out 3 times and head right.
- Examine the table.
- Place the TABLE PART in the center to trigger a puzzle.
- Solution: Click the center ring two times, 2nd from center one time, 3rd from center three times. See screenshot (T) for solution.
- Take the SHIP and FLAG POINT.
- Back out and head left two times.
- Examine the foot of the bed to access a Hidden Object Scene.
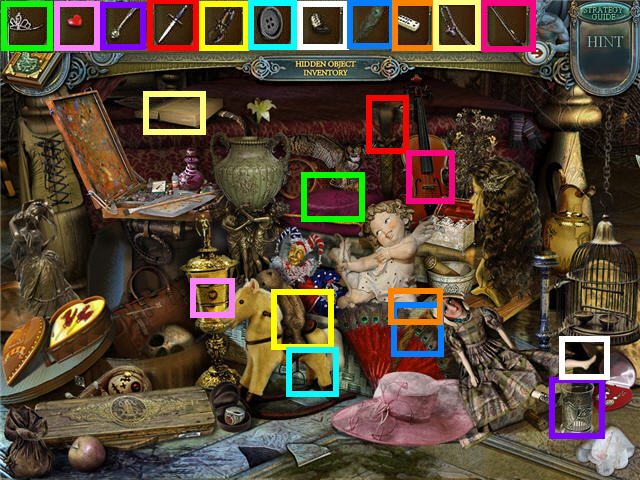
- Place the inventory items in their proper places and get PART OF THE GLOBE.
- Back out and head right.
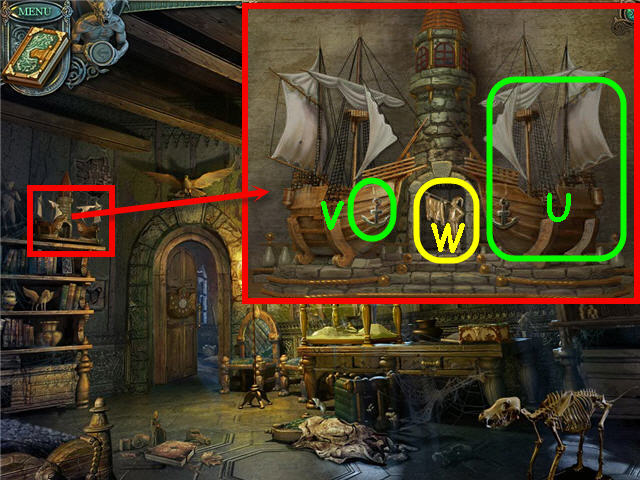
- Examine the top shelf.
- Place the SHIP on the right (U) and the ANCHOR on the left ship (V); take the 3rd SOLDIER (W).
- Head straight through the door.
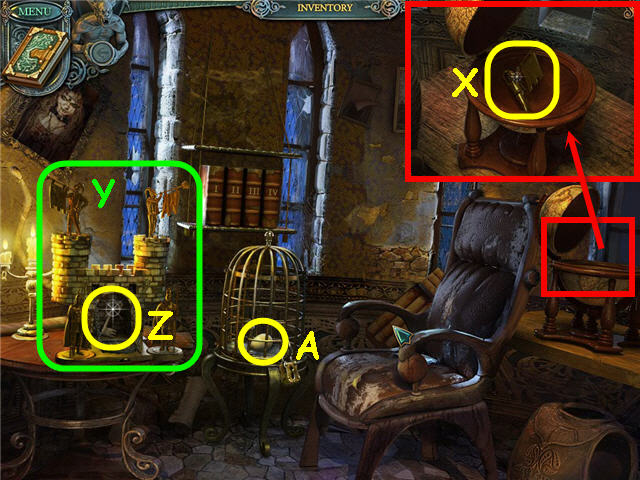
- Examine the globe.
- Place the PART OF THE GLOBE on the hole; take the 4th SOLDIER (X).
- Place the 4 SOLDIERS on the castle (Y); take the CAGE KEY (Z).
- Use the CAGE KEY on the cage; take the EGG (A).
- Back out.
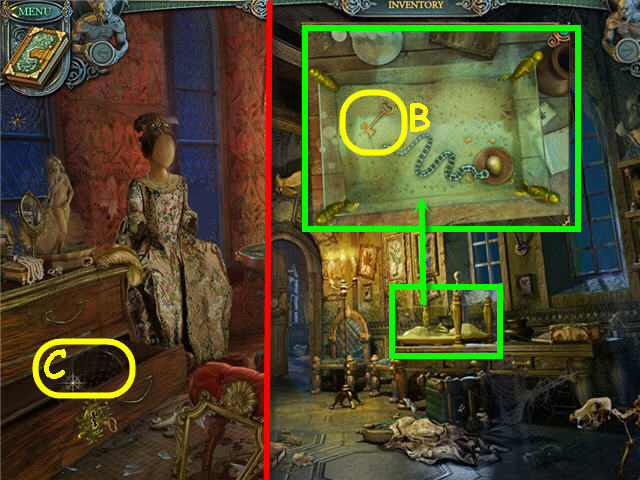
- Examine the terrarium.
- Place the EGG in the dish; take the DRAWER KEY (B).
- Back out, head left and head straight through the door.
- Use the DRAWER KEY on the drawer; take the LANDING NET (C).
- Back out.
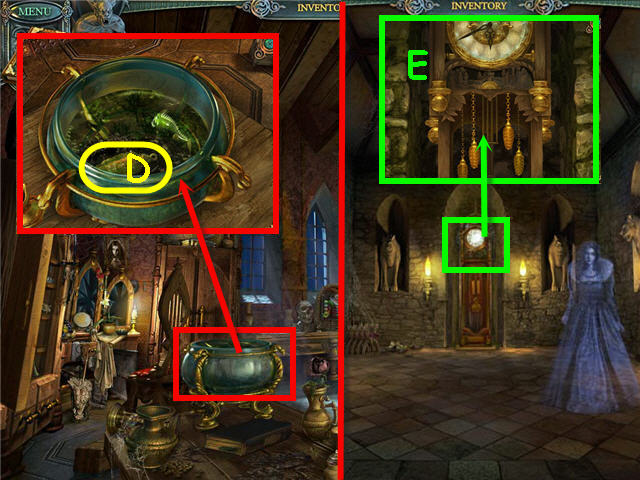
- Examine the fish bowl.
- Use the LANDING NET on the bowl; take the 2nd WEIGHT (D).
- Back out.
- Examine the clock; hang the 2 WEIGHTS (E).
- Examine the painting on the left to trigger a puzzle.
- Swap the pieces to complete the picture. See screenshot for solution.
- Take the CLOCK NUMBER (F).
- Back out.
- Examine the clock; place the CLOCK NUMBER on the clock and back out.
- Head right two times.
- Examine the computer to access a Hidden Object Scene.
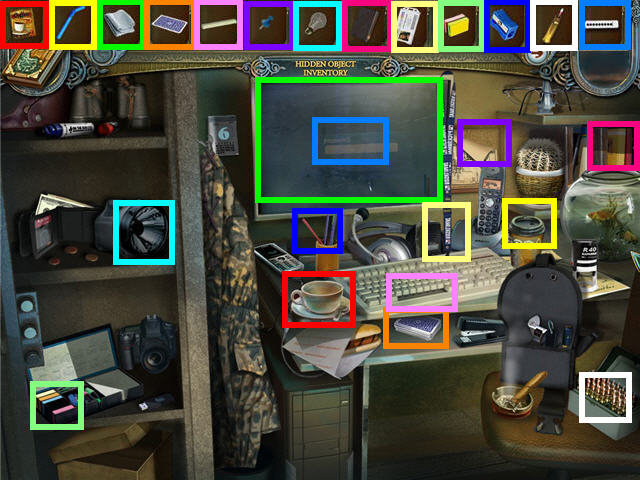
- Place the inventory items in their proper places and get a HANDLE.
- Back out twice, head left and forward.
- Examine the door straight ahead.
- Place the HANDLE on the left to trigger a puzzle.
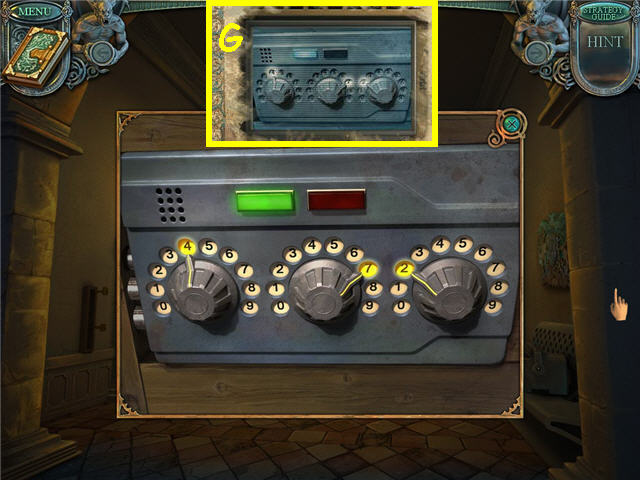
- Rotate the dials to match the code found on the surveillance monitors (G).
- Solution from left; 4-7-2. See screenshot for solution.
- Head straight.
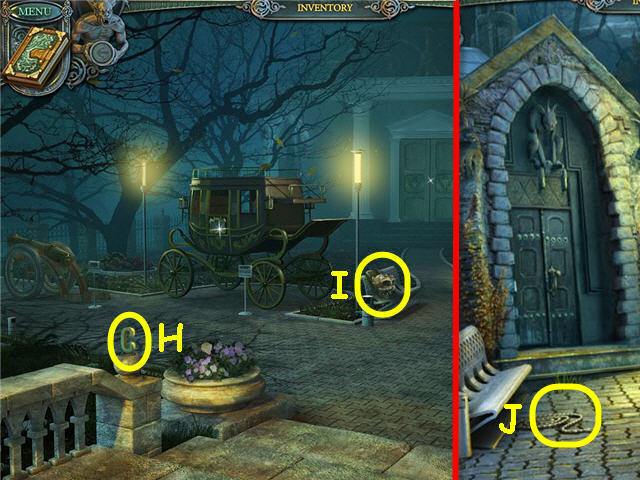
- Take the LETTER C (H) and STONE HEAD (I).
- Head left.
- Take the ROPE (J).
- Back out three times, head right and left through the door.
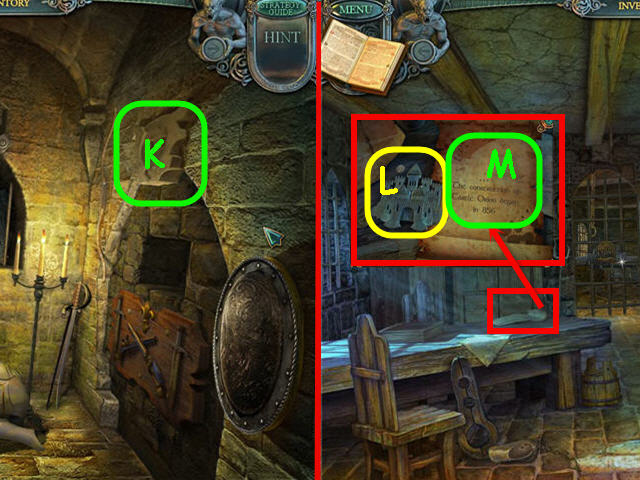
- Place the STONE HEAD above the niche (K).
- Head right.
- Examine the right side of the table.
- Take the STONE BAS-RELIEF (L) and see the magic book update (M).
- Examine the right chair to access a Hidden Object Scene.
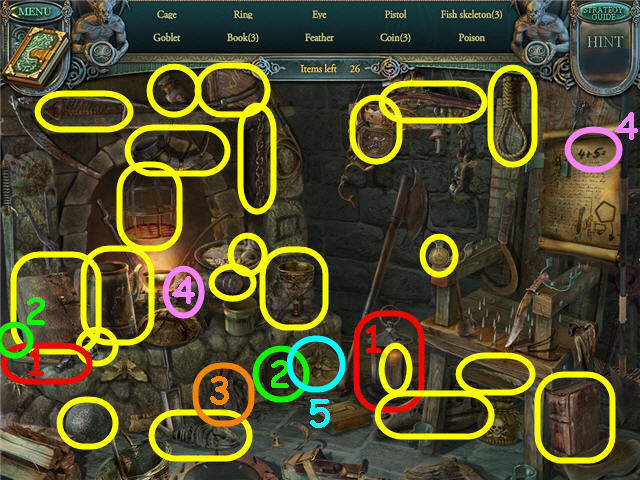
- Use the hammer on the lantern to get the burning candle (1).
- Place the cheese by the hole to get the rat (2).
- Click on the pouch (3) to get a coin.
- Use the coal on the scroll to get the number 9 (4).
- Take the HEXAGONAL BAS-RELIEF (5).
- Back out.
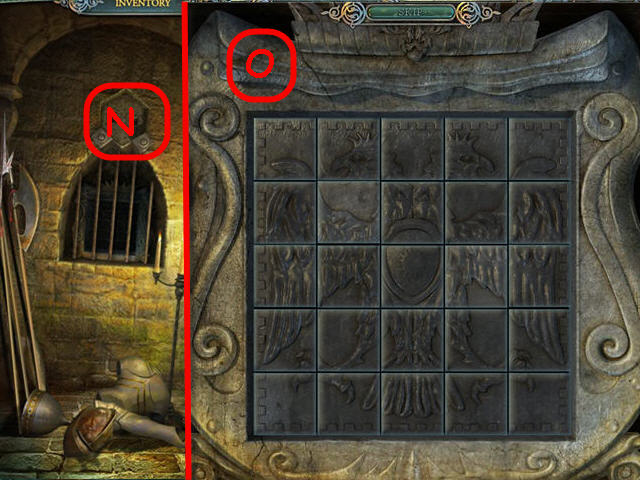
- Place the HEXAGONAL BAS-RELIEF above the bars (N).
- Examine the niche to trigger a puzzle.
- Swap any two pieces to complete the picture. See screenshot for solution (O).
- Take the CROWN PART.
- Back out twice.
- Examine the mechanism next to the painting on the left wall.
- Place the STONE BAS-RELIEF in the center to trigger a puzzle.
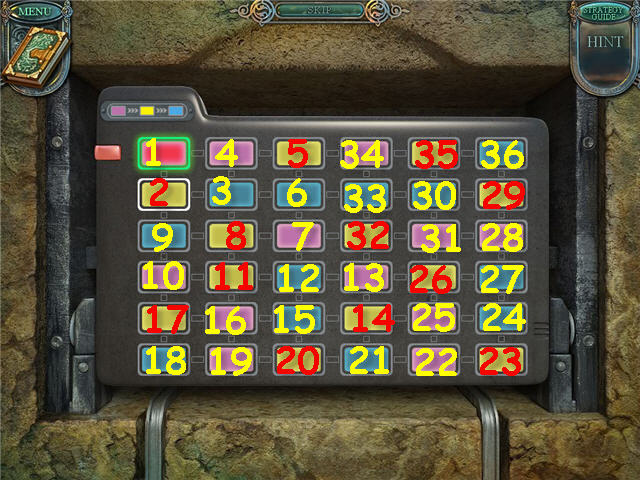
- Complete the circuit by following the sequence of colors pink-yellow-blue to light up all the buttons.
- Clicking on a lit up button will reset what you did after that button. See screenshot for solution.
- Take the SAFE HANDLE.
- Back out and head right twice.
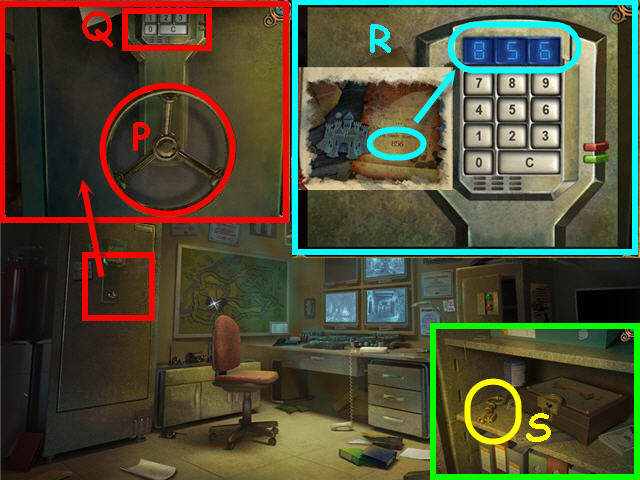
- Examine and place the SAFE HANDLE on the safe (P).
- Click on the keypad (Q).
- Using the code from the table, which is in your magic book, enter the code (R).
- Solution: 856.
- Examine the safe; take the TREASURE HOUSE KEY (S) and exit out.
- Back out twice, head left and then right.
- Examine the door to the right; use the TREASURE HOUSE KEY on the lock.
- Head right.
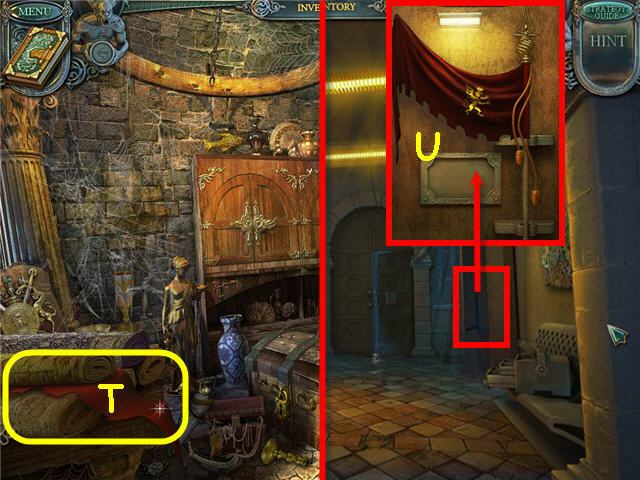
- Pull the cloth a few times and get a FLAG CLOTH (T).
- Back out twice, head straight.
- Examine the cabinet.
- Place the FLAG CLOTH and FLAG POINT on the hanger; take the FLAG (U).
- Head straight.
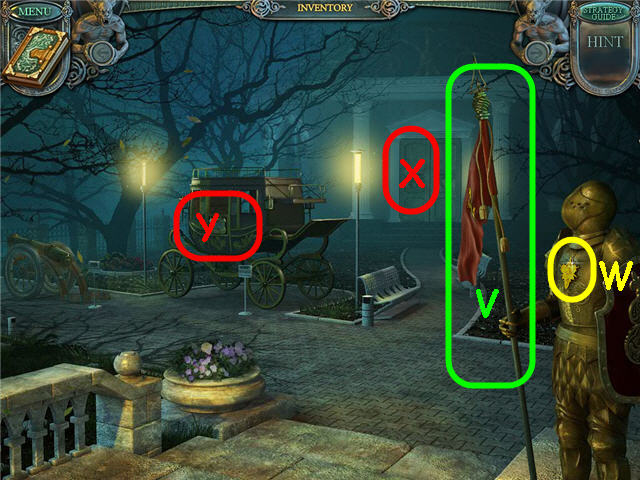
- Place the FLAG in the guards hand (V); take the METAL EMBLEM (W).
- Examine the door (X); place the METAL EMBLEM in the slot.
- Examine the carriage (Y).
- Place the CROWN PART in the slot to trigger a puzzle.
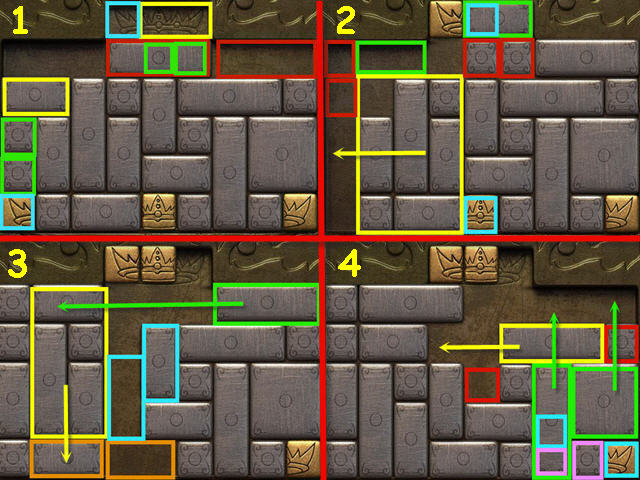
- Slide the pieces to move the three gold crown pieces to the top to form a crown.
- Solution: Move the pieces to the corresponding colored spaces or in the direction of the arrow in the screenshot.
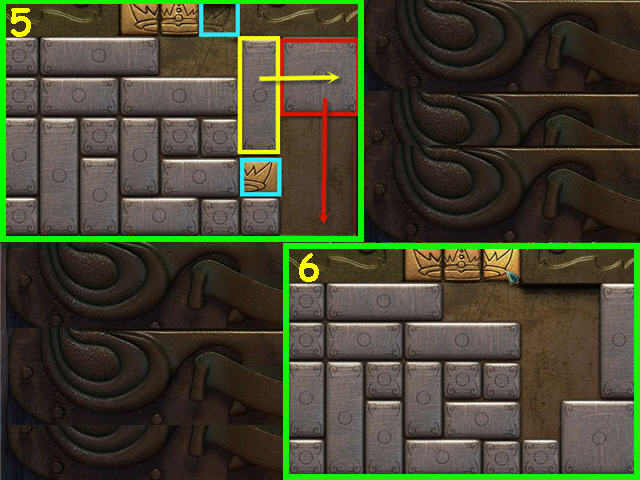
- See screenshot for the first 4 set of moves; see the following screen for the final moves (1-4).
- Solution: Move the pieces to the corresponding colored tiles or in the direction of the arrow in the screenshot (5 and 6).
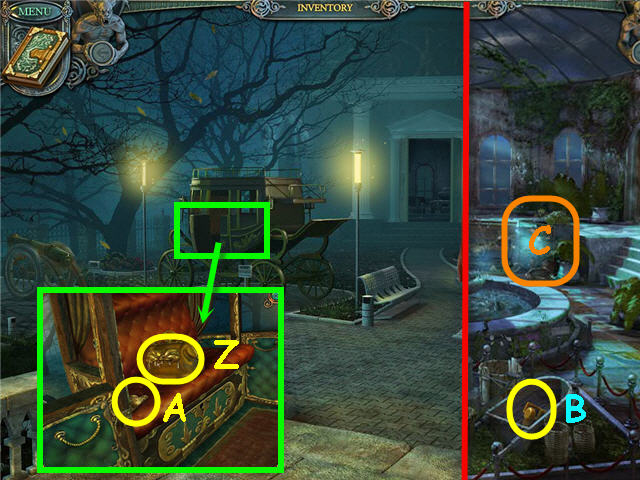
- Examine the carriage.
- Open the handbag (Z); take the METAL BLOCKS.
- Take the PENDULUM PART (A).
- Head straight.
- Take the LOCK PART (B).
- Examine the shelves (C) to access a Hidden Object Scene.
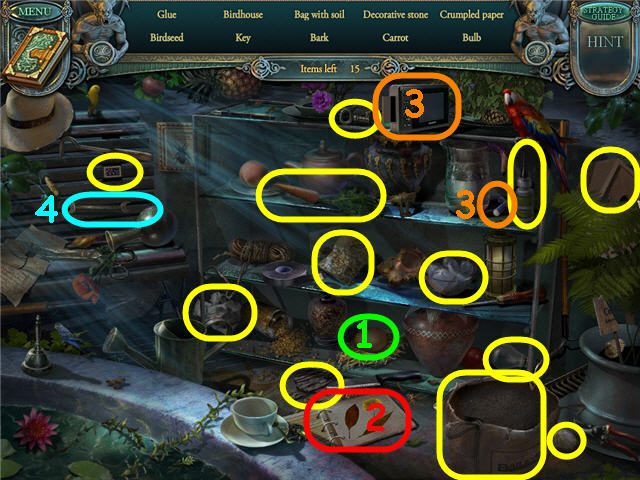
- Crack the egg to hatch the chicken (1).
- Flip the pages to get the maple leaf (2).
- Place the batteries in the camera; click to take a photo of a flower (3).
- Take the WRENCH (4).
- Back out four times; head right twice.
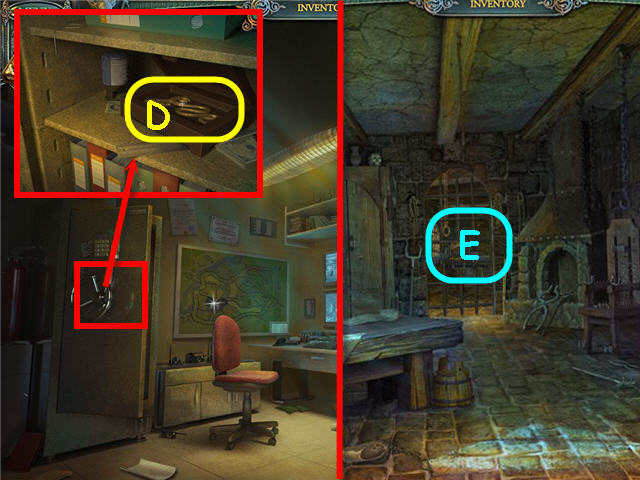
- Examine the safe.
- Use the LOCK PART on the box; take the SNAKE SYMBOL (D).
- Back out twice, head left, right, left and right.
- Examine the gate (E).
- Place the METAL BLOCKS on the lock to trigger a puzzle.
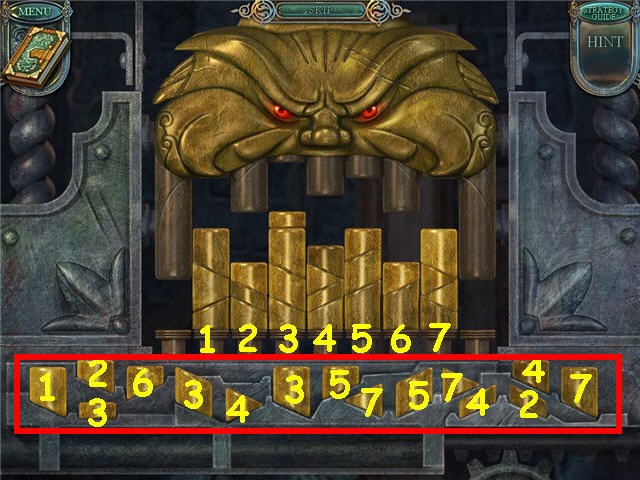
- Place the blocks on that pedestals so that they all get pressed down when you click on the upper part of the lock.
- Click on the upper portion when complete. See screenshot for solution.
- Head straight.
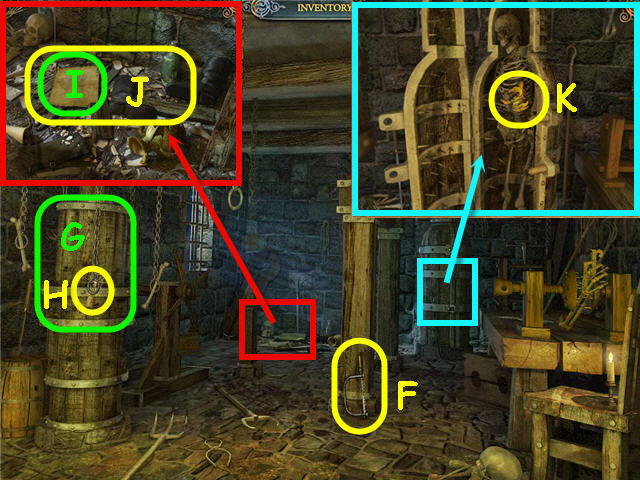
- Take the HACK SAW (F).
- Turn the wheel (G); take the QUANDRANGULAR KEY (H).
- Examine the corner.
- Take the magic book update (I).
- Move the wood (J) a few times and take the BROOM.
- Examine the coffin; use the WRENCH on the bolts.
- Take the GOLDEN STATUETTE (K).
- Back out three times and head right.
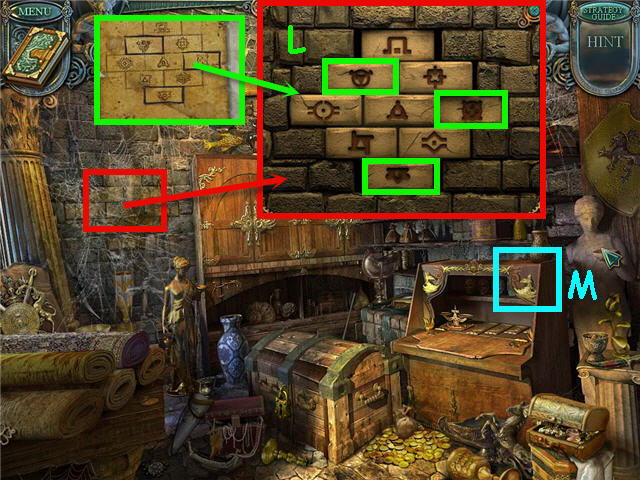
- Use the BROOM on the wall and examine the wall.
- Push in the tiles according to the note in the magic book from the garbage pile (L).
- Solution: Push in second row – left, third row – right, bottom row.
- Take the ROUND KEY.
- Place the GOLDEN STATUETTE on the upper right of the desk (M).
- Examine the desk to trigger a puzzle.
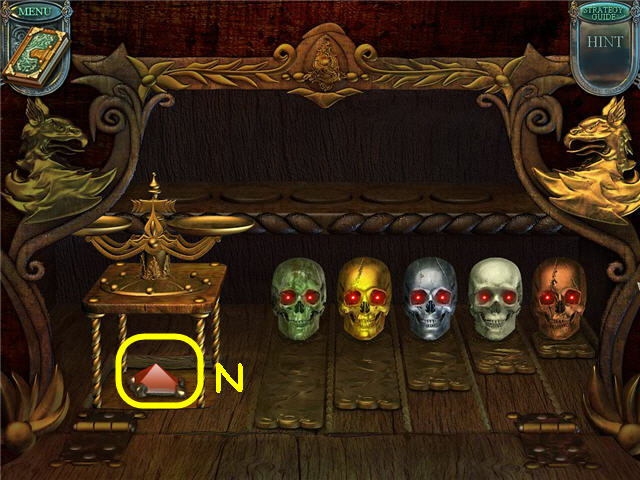
- Arrange the skulls in the order of heaviest to lightest, by weighing them on the scale.
- Solution from left; green, gold, silver, white, peach. See screenshot for solution.
- Take the RUBY (N).
- Back out, head left and head right.
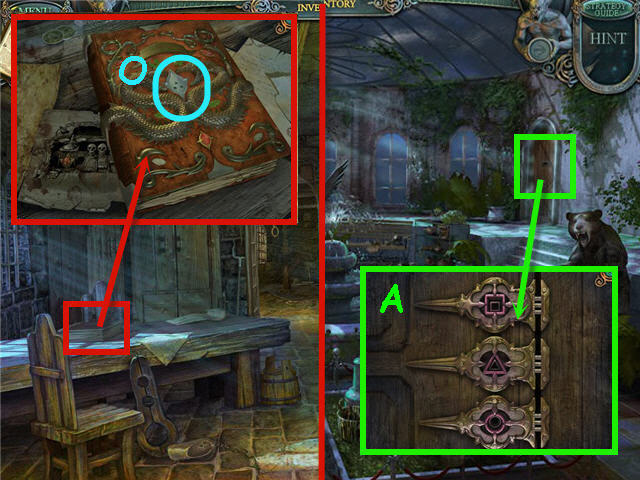
- Examine the book.
- Place the RUBY in the slot (O); take the LETTER H.
- Back out three times; head forward three times.
- Examine the door; place the ROUND KEY, QUANDRANGULAR KEY, and TRIANGULAR KEY in their matching locks (A).
- Enter through the portal.
Chapter 4 – The Fisherman
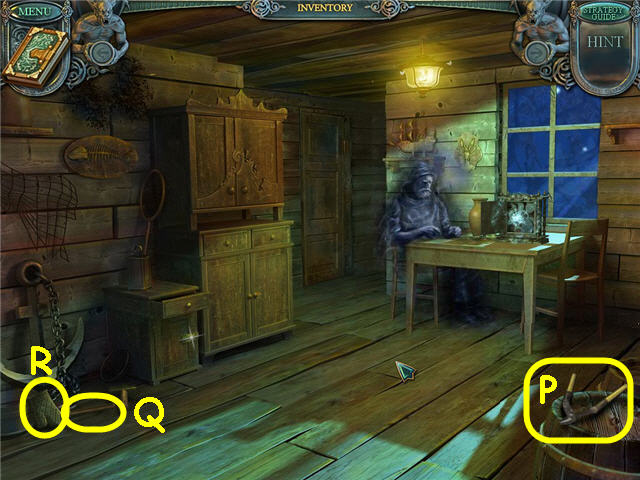
- Take the PRUNING SHEARS (P).
- Remove the debris; take the VICE LEVER (Q) and MITTEN (R).
- Back out.
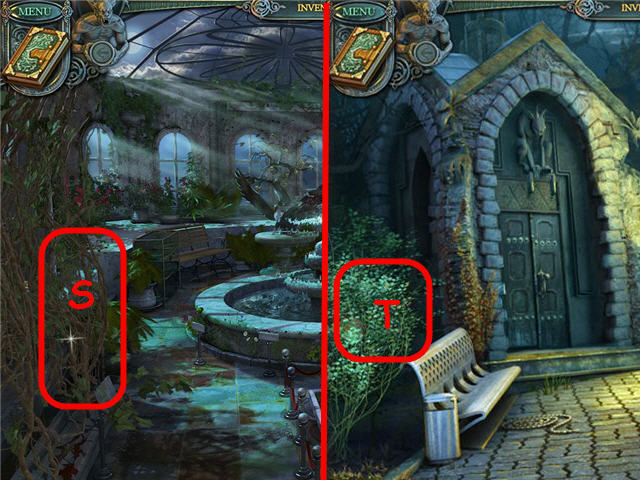
- Use the PRUNING SHEARS on the shrubbery (S); take the ZODIAC SIGN.
- Back out and head left.
- Use the PRUNING SHEARS on the shrubbery (T); take the TIN COVER.
- Back out three times, head right, left, right and straight.
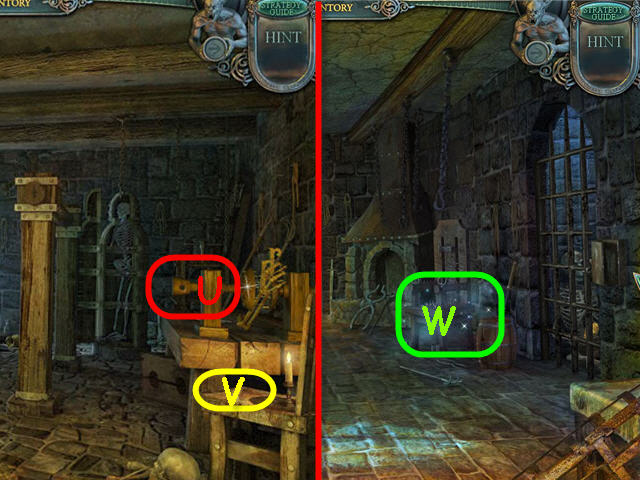
- Use the VICE LEVER on the vice (U); take the LETTER R (V).
- Back out.
- Examine the chair (W) to access a Hidden Object Scene.
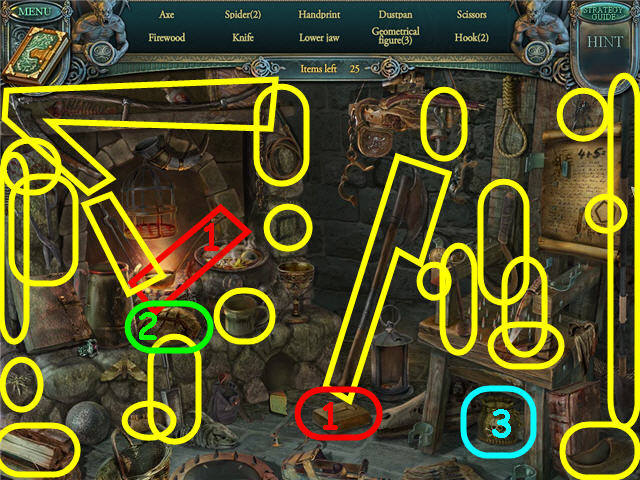
- Use the LADLE on the mold to get the key (1).
- Break the bread to get a rasp (2).
- Take the EMPTY POWDER BAG (3).
- Back out.
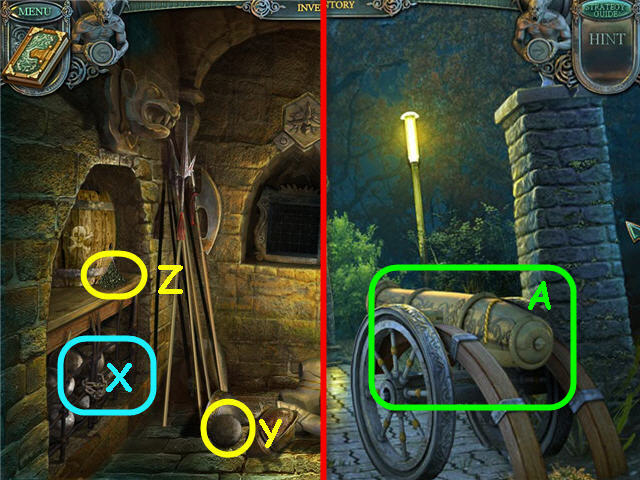
- Use the HACK SAW on the chains (X); take the CANNONBALL (Y).
- Pull the cork.
- Use the EMPTY POWDER BAG on the gunpowder (Z); take the FULL POWDER BAG.
- Back out twice, head forward twice, go left.
- Use the FULL POWDER BAG, CANNONBALL and BURNING TORCH on the cannon (A).
- Head straight.
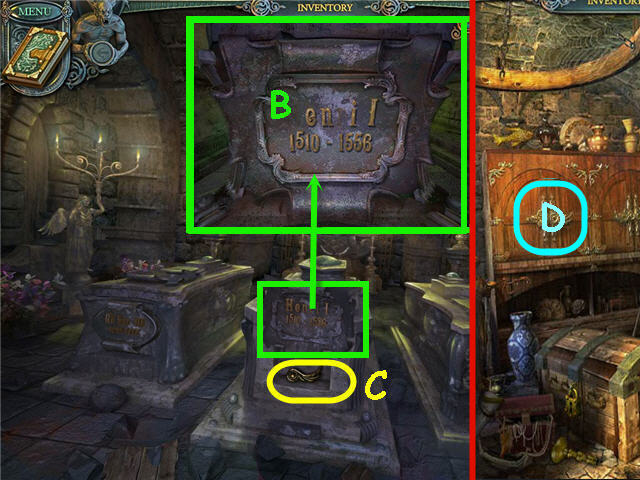
- Examine the center crypt.
- Place the LETTER H and the LETTER R on the plate (B); take the CUPBOARD HANDLE (C).
- Back out four times, head right twice.
- Examine the cupboard (D).
- Place the CUPBOARD HANDLE on the cupboard to trigger a puzzle.
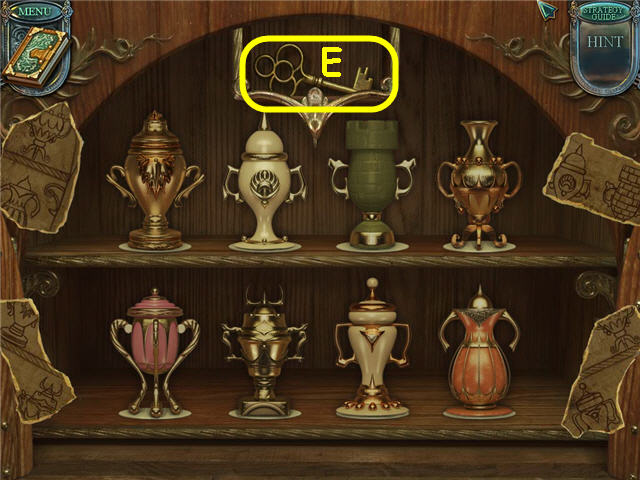
- Arrange the urns according to the clues in the pieces of paper on the sides.
- See screenshot for solution.
- Take the CHEST KEY (E).
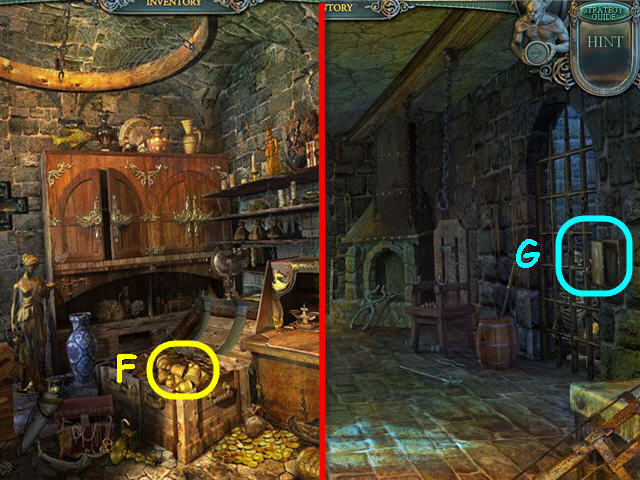
- Use the CHEST KEY on the chest; take the WEIGHTS (F).
- Back out, head left and head right.
- Examine the gate (G).
- Place the WEIGHTS on the lock to trigger a puzzle.
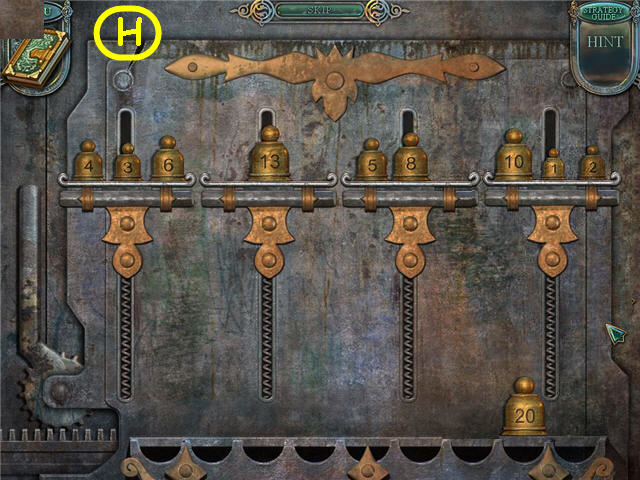
- Arrange the weights to balance all the columns.
- Solution: Place weights totaling 13 on each. See screenshot (H) for solution.
- Take the PENDULUM PART.
- Back out twice.
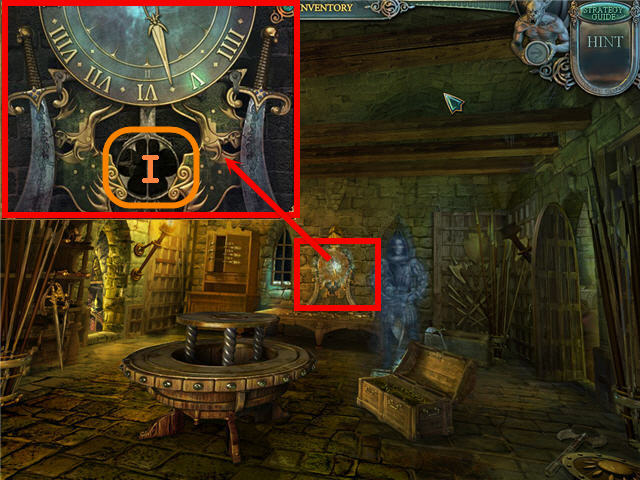
- Examine the clock.
- Place the 2 PENDULUM PARTS in the slots (I).
- Examine the painting on the right to trigger a puzzle.
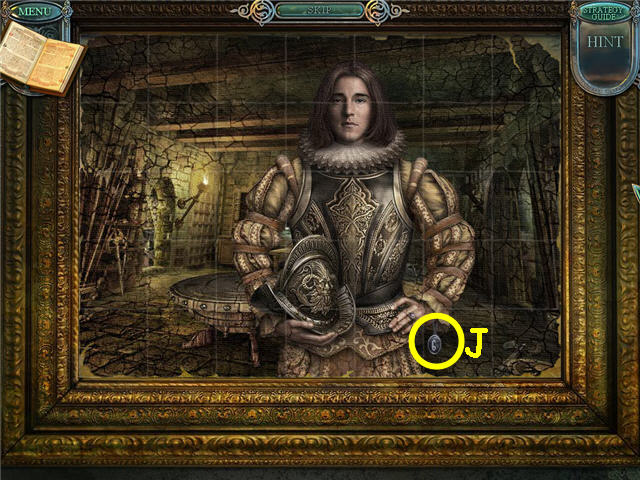
- Rotate the pieces to complete the picture. See screenshot for solution.
- Take the CLOCK NUMBER (J).
- Back out.
- Examine the clock; place the CLOCK NUMBER on the clock and back out.
- Head left and go forward three times.
- Examine the shelves to access a Hidden Object Scene.
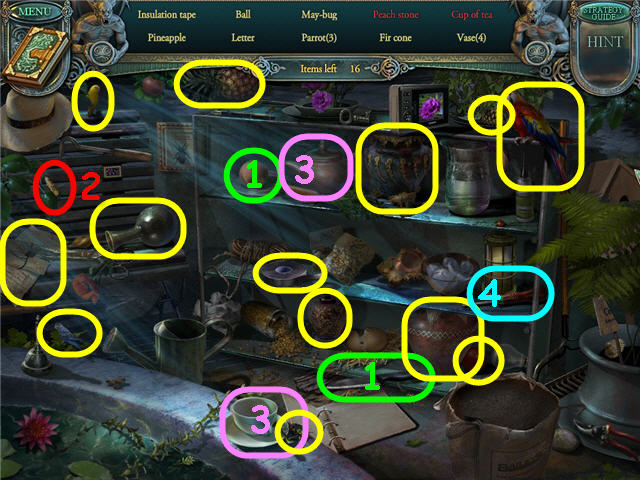
- Use the KNIFE on the peach to get the peach stone (1).
- Click on the cocoon a few times to get the butterfly (2).
- Use the teapot on the cup to get a cup of tea (3).
- Take the AWL (4).
- Head right.
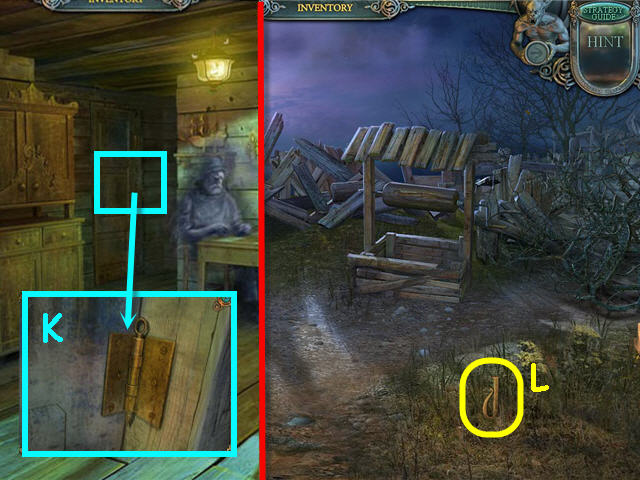
- Examine the door; use the AWL on the hinge (K).
- Head left out the door.
- Take the LETTER D (L).
- Back out three times, head left and straight.
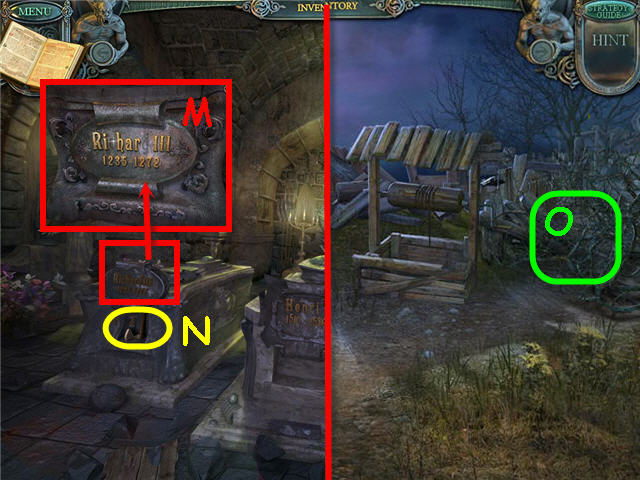
- Examine the left crypt.
- Place the LETTER C and LETTER D on the plate (M); take the SMALL AXE (N).
- Back out twice, head forward, right and then left.
- Use the SMALL AXE on the branches (O); head up the path.
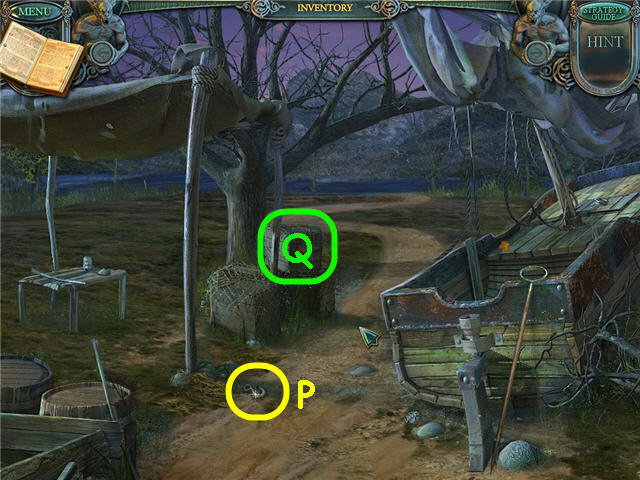
- Move the moss; take the HOOK (P).
- Examine the crate (Q) to trigger a puzzle.
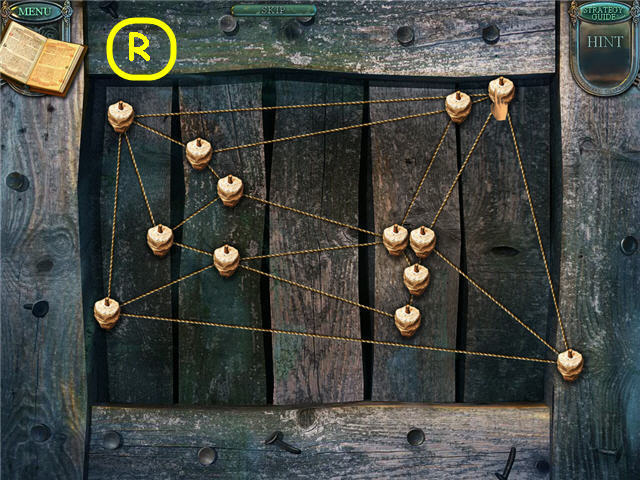
- Detangle the net so that no lines cross. See screenshot (R) for solution.
- Get a FISHING NET.
- Head forward.
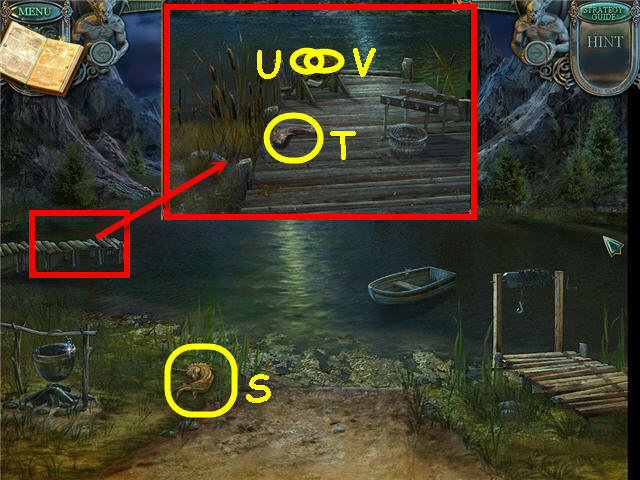
- Take the UNICORN HEAD (S).
- Examine the pier; take the WOODEN FISH (T).
- Place the FISHING NET on the winch; take the ZODIAC BAS-RELIEF (U) and DOOR KEY (V).
- Back out six times.
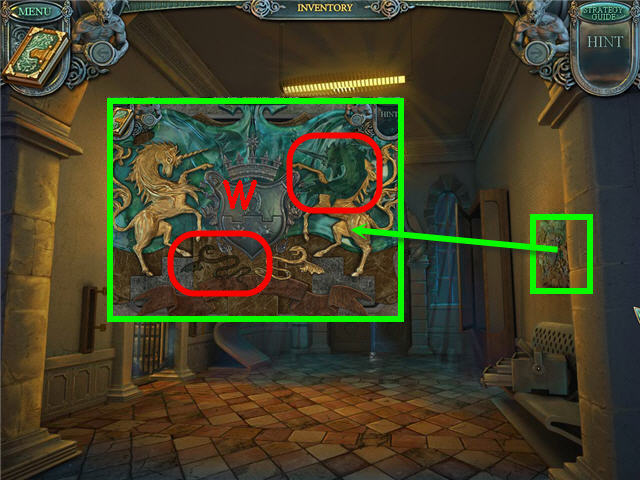
- Examine the crest.
- Place the UNICORN HEAD and SNAKE SYMBOL on the crest (W) to trigger a puzzle.
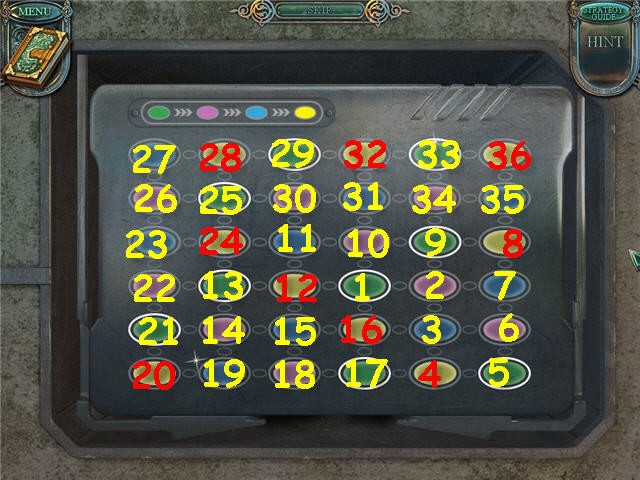
- Complete the circuit by following the sequence of colors green - pink- blue - yellow to light up all the buttons.
- Clicking on a lit button will reset what you did after that button. See screenshot for solution.
- Take the SKULL.
- Head forward, left and straight.
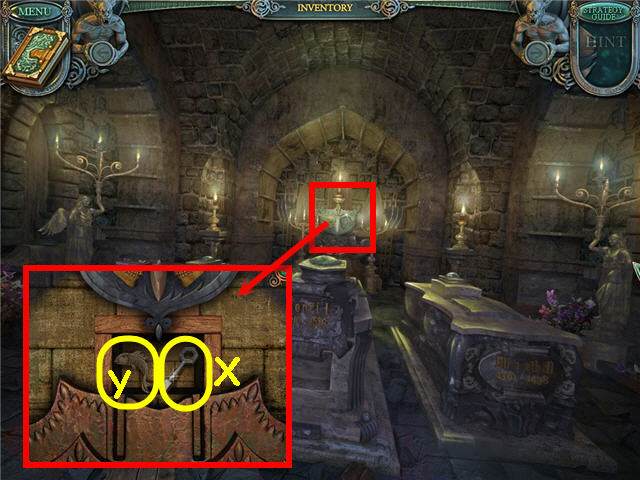
- Examine the alcove.
- Place the SKULL in the slot; take the HEXAGONAL KEY (X) and 2nd WOODEN FISH (Y).
- Back out twice; go forward, right, left and up the right.
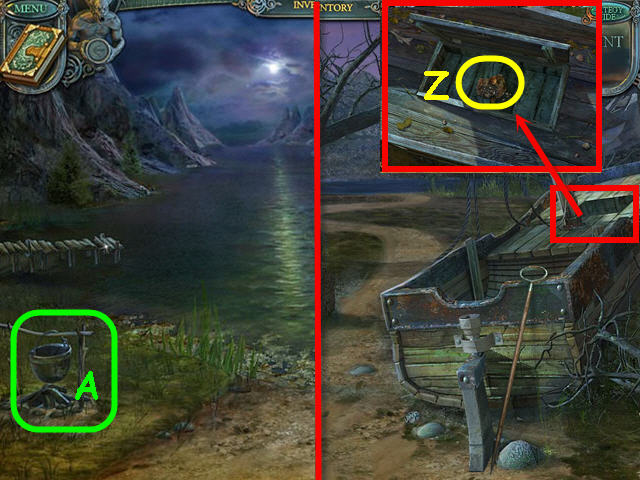
- Examine the hatch.
- Use the HEXAGONAL KEY on the lock; take the RESIN (Z).
- Head forward.
- Place the RESIN in the pot; use the BURNING TORCH on the firewood (A).
- Use the MITTEN on the pot; take the TAR.
- Back out twice.
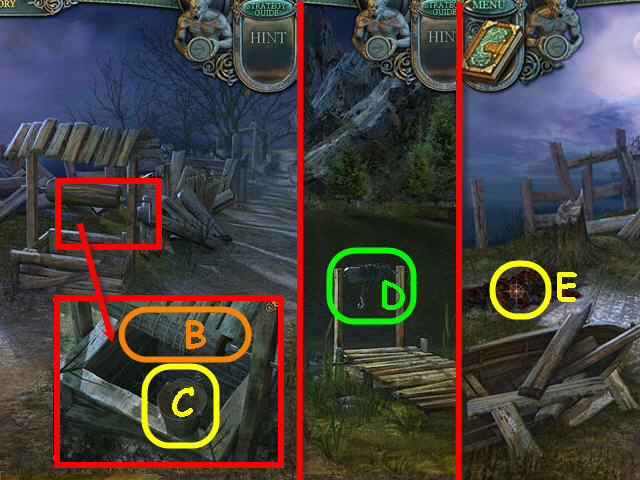
- Examine the well.
- Use the ROPE and the HOOK on the winch (B).
- Place the TIN COVER and TAR in the bucket; take the BUCKET (C).
- Head up right and straight.
- Hang the BUCKET on the winch (D); take the BUCKET WITH WATER.
- Back out twice.
- Use the BUCKET WITH WATER on the fire; take the SMOLDERING WOOD (E).
- Head left.
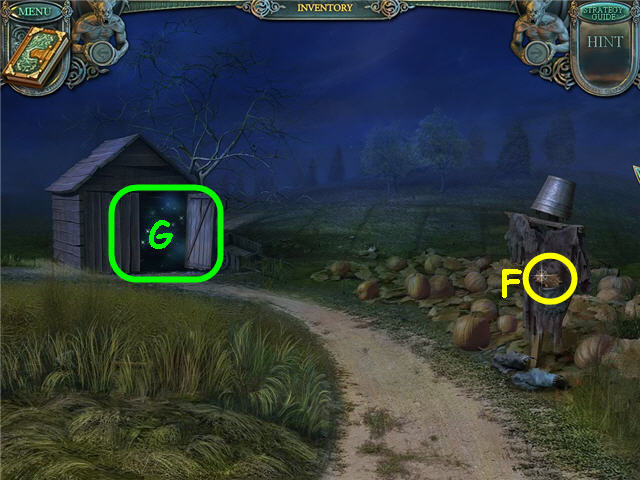
- Take the clothes off the scarecrow; take the 3rd WOODEN FISH (F).
- Examine the shed (G) to access a Hidden Object Scene.
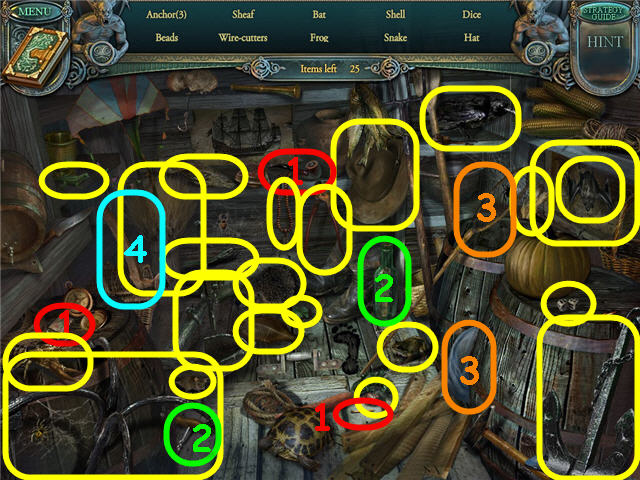
- Use the match on the matchbook and light the pipe to get a let pipe (1).
- Use the corkscrew on the bottle to get a letter (2).
- Place the net on the handle to get a landing net (3).
- Take the STEERING CONTROL (4).
- Back out and head up right.
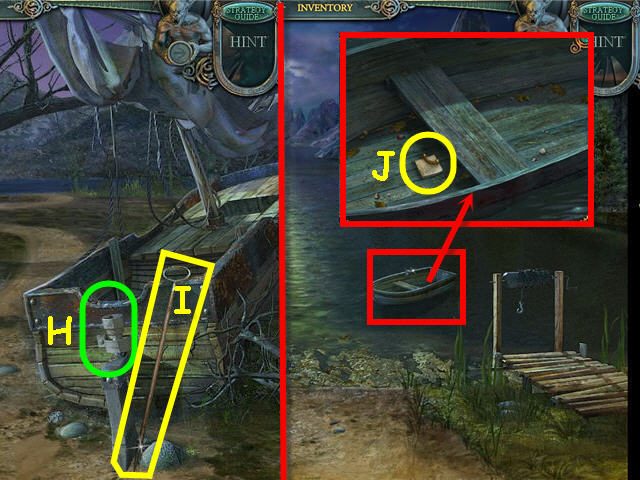
- Place the STEERING CONTROL on the boat (H); take the BOAT HOOK (I).
- Head forward.
- Use the BOAT HOOK on the boat.
- Examine the boat; take the PART OF THE ELECTRIC PANEL (J).
- Back out three times.
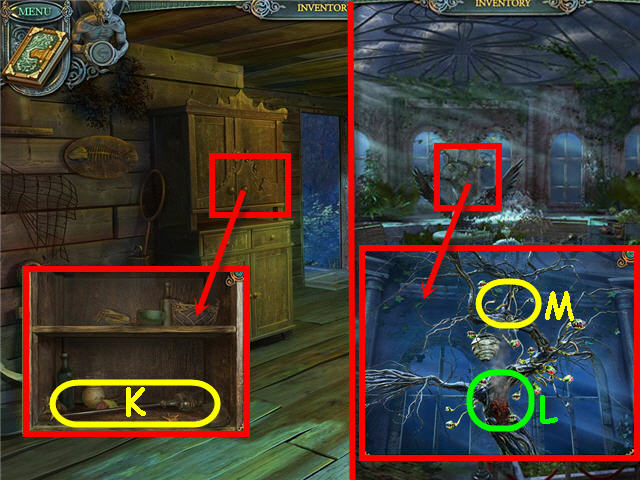
- Examine the cabinet.
- Place the three WOODEN FISH on the right door; take the CANDLESTICK (K).
- Back out.
- Examine the beehive.
- Place the SMOLDERING WOOD on the trunk (L); take the FISHING LINE (M).
- Back out twice.
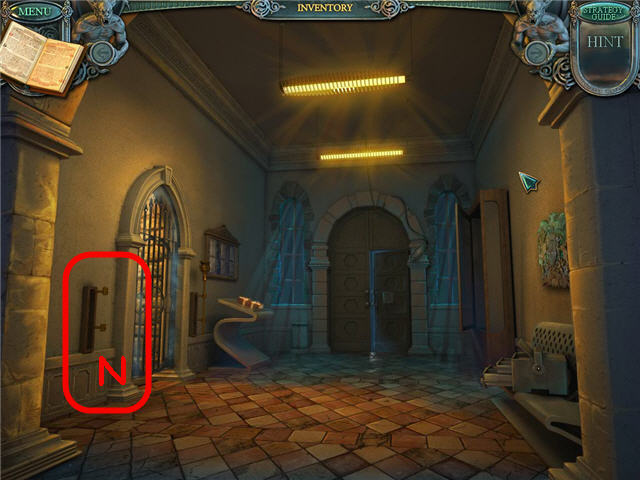
- Place the CANDLESTICK on the holder (N).
- Head left and then go downstairs.
Chapter 5 – The Scientist
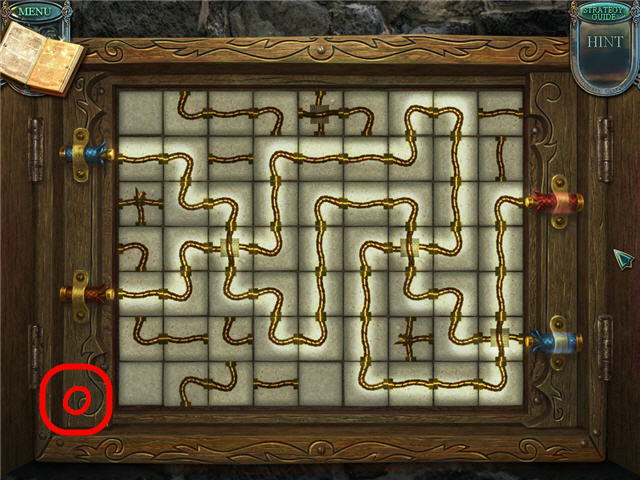
- Examine the cabinet.
- Place the PART OF THE ELECTRIC PANEL on the panel to trigger a puzzle.
- Complete the circuits between the red and blue outlets. See screenshot (O) for solution.
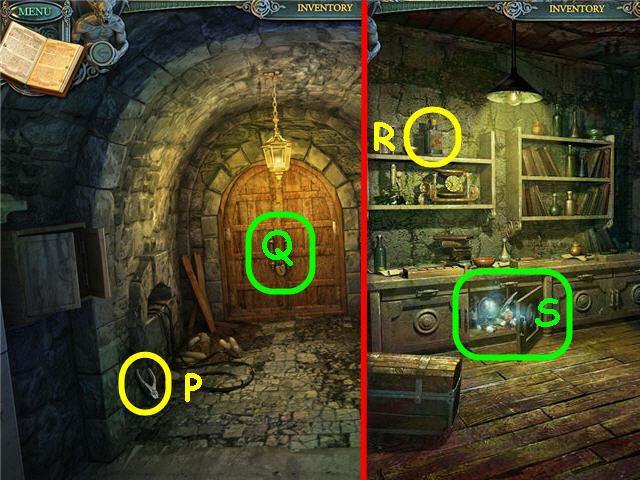
- Take the CUTTING PLIERS (P).
- Examine the door (Q); use the DOOR KEY on the lock.
- Head forward.
- Take the ANTI-RUST LIQUID (R).
- Open and examine the cabinet (S) to access a Hidden Object Scene.
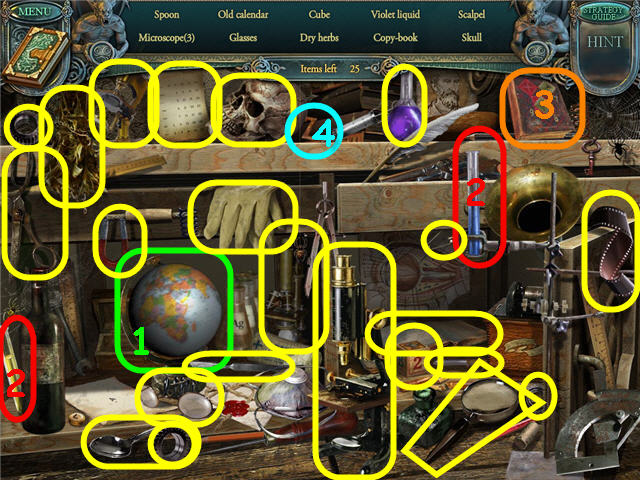
- Turn the globe to get Australia (1).
- Use the yellow liquid on the blue liquid to get green liquid (2).
- Turn the pages to get Pythagorean theory (3).
- Take the LETTER Z (4).
- Back out twice; head up.
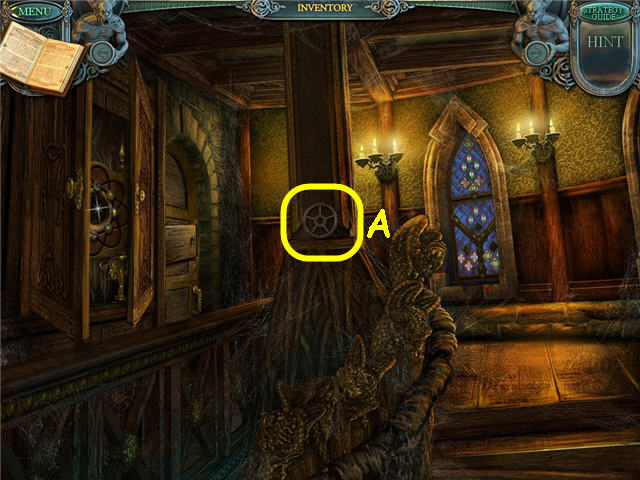
- Take the GEAR (A).
- Back out four times and head right.
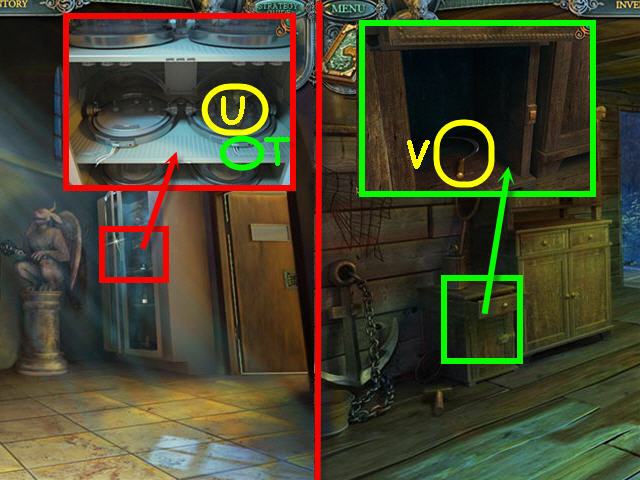
- Examine the cabinet.
- Use the CUTTING PLIERS on the wires (T).
- Lift the lid and take the 2nd ZODIAC BAS-RELIEF (U).
- Back out, head left, head forward three times and go right.
- Examine the cabinet.
- Use the ANTI-RUST LIQUID on the bolt; take the SICKLE (V).
- Head left twice.
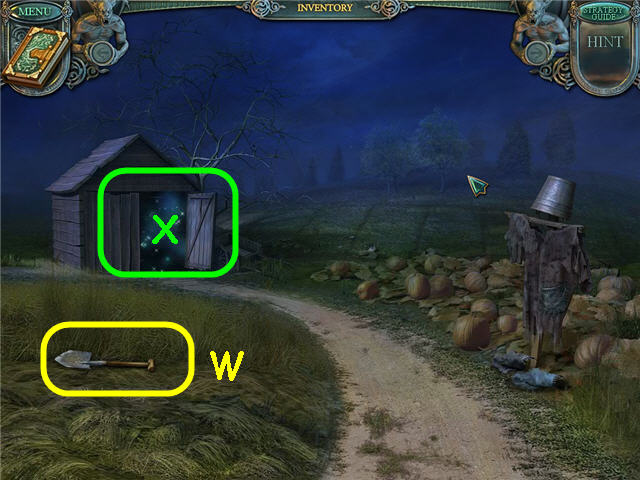
- Use the SICKLE on the grass.
- Take the SPADE (W).
- Examine the shed (X) to access a Hidden Object Scene.
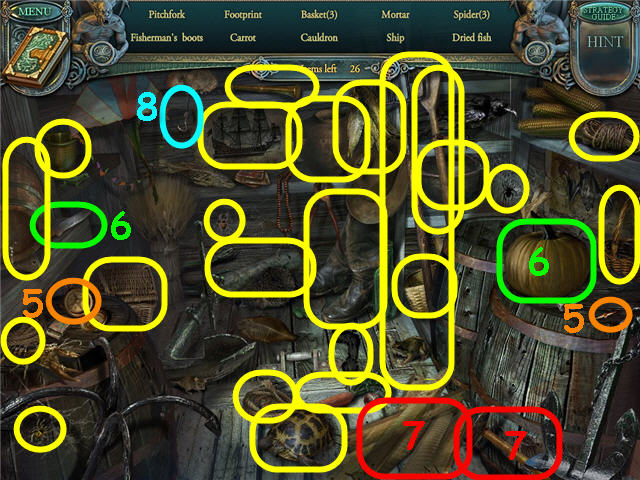
- Place the needle on the compass to get a compass (5).
- Use the knife on the pumpkin to get a Halloween pumpkin (6).
- Use the hammer on the boards to make a wooden box (7).
- Take the FISHHOOK (8).
- Back out.
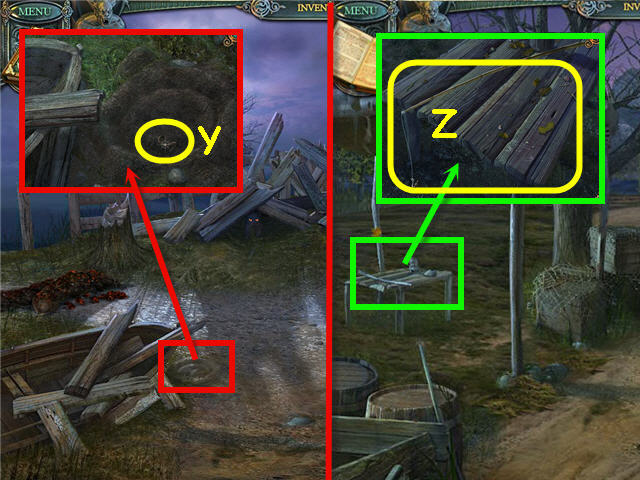
- Examine and use the SPADE on the hole; take the WORM (Y).
- Head up right.
- Examine the table.
- Place the FISHING LINE on the pole, the FISHHOOK on the end of the line and the WORM on the hook.
- Take the FISHING ROD (Z).
- Head straight.
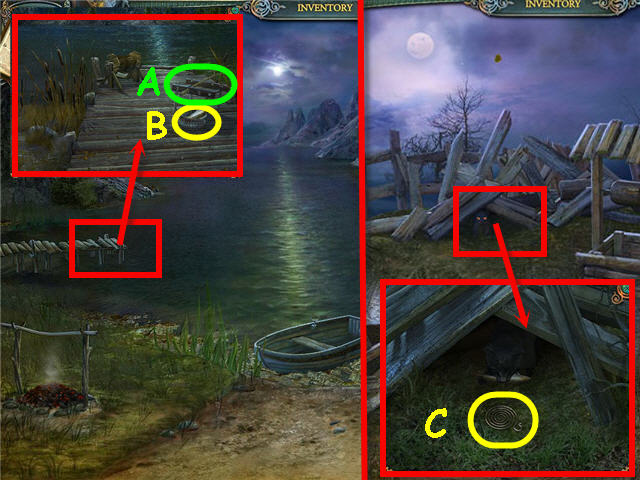
- Examine the pier.
- Place the FISHING ROD on the stand (A); take the FISH (B).
- Back out twice.
- Examine the cat.
- Give the FISH to the cat; take the SPRING (GEAR) (C).
- Back out.
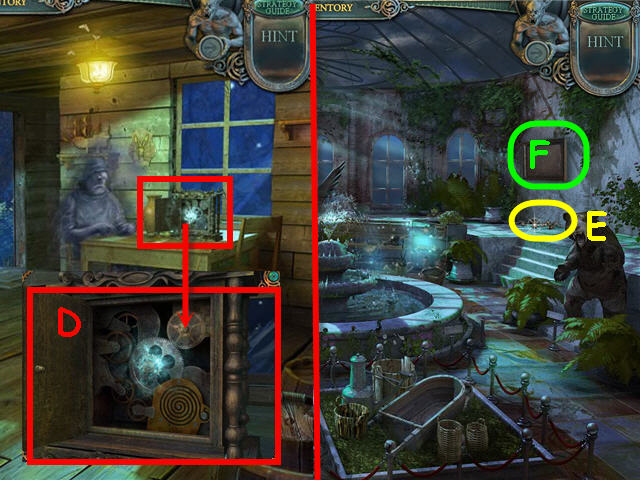
- Examine and place the SPRING (GEAR) and GEAR on the clock (D).
- Take the PICTURE SCRAPS (E).
- Examine the picture (F).
- Place the PICTURE SCRAPS in the frame to trigger a puzzle.
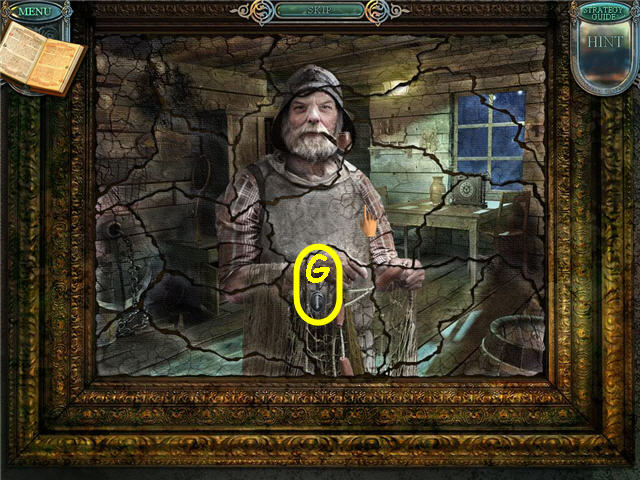
- Assemble the pieces to complete the picture.
- Click to rotate. See screenshot for solution.
- Take the CLOCK NUMBER (G).
- Examine the shelf to access a Hidden Object Scene.
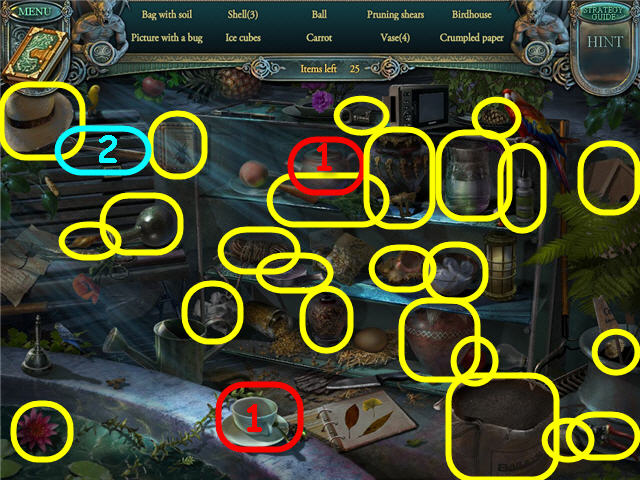
- Use the teapot on the cup to get a cup of tea (1).
- Take the NAIL PULLER (2).
- Back out four times.
- Examine the clock; place the CLOCK NUMBER on the face and back out.
- Head left, straight, left and up the stairs.
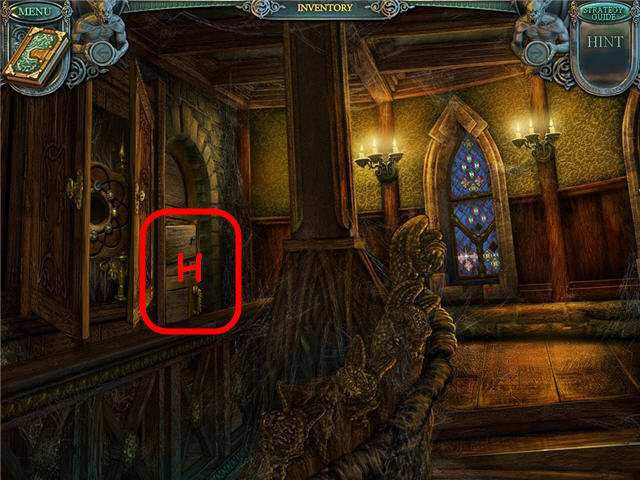
- Examine the boards (H).
- Use the NAIL PULLER on the nails to trigger a puzzle.
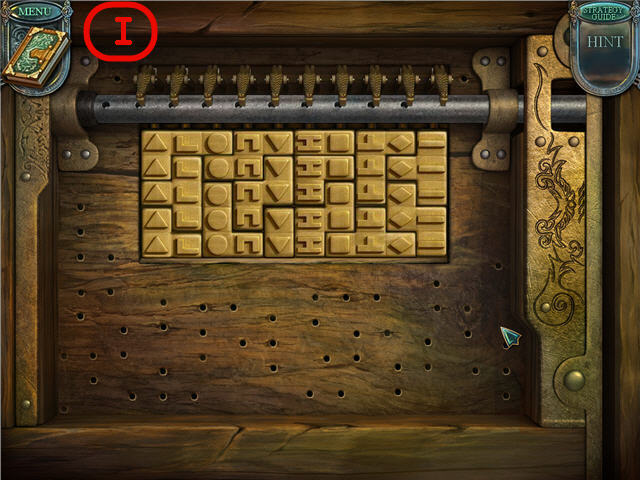
- Arrange the pieces on the board so that all symbols in a column match.
- See screenshot (I) for solution.
- Head left.
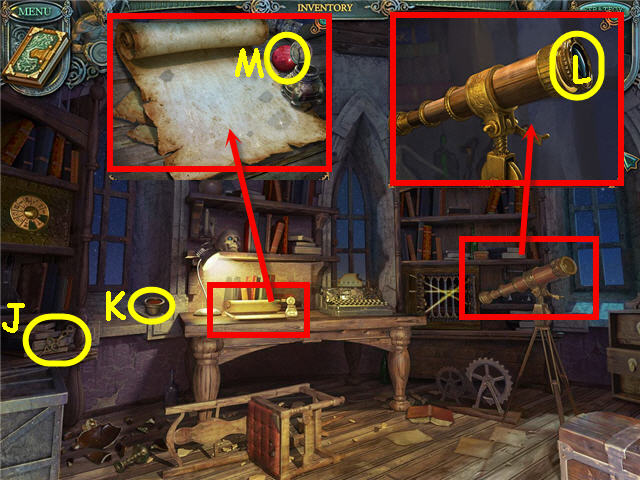
- Take the PAINT (K) and CLOCK HAND (J).
- Examine the telescope.
- Click to unscrew and take the LENS (L).
- Examine the scroll; take the BALL (M) and exit.
- Back out twice; head downstairs and straight.
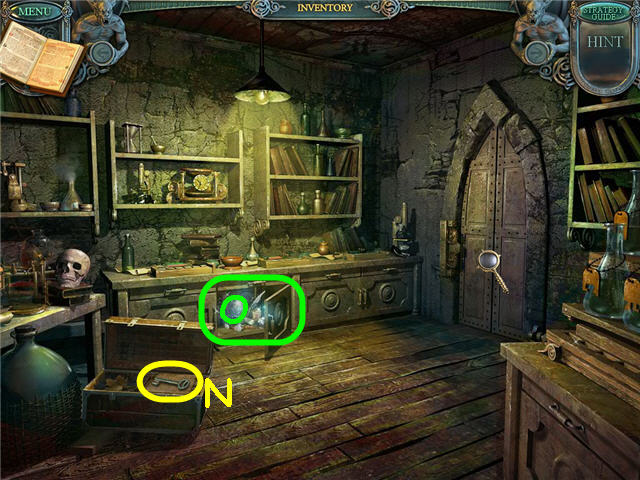
- Use the NAIL PULLER on the trunk; click and take the CARRIAGE KEY (N).
- Examine the cabinet (O) to access a Hidden Object Scene.
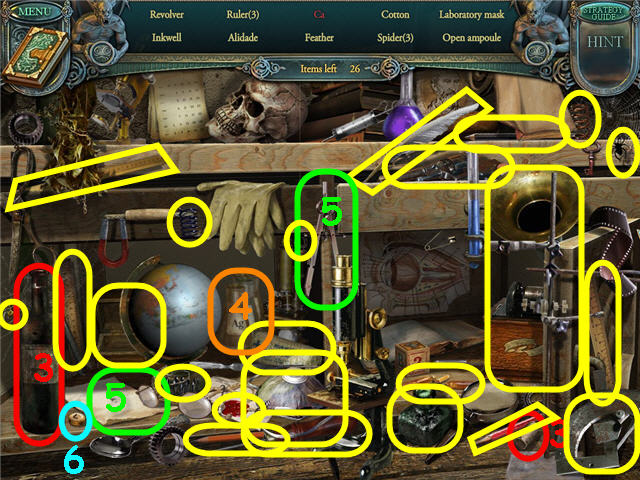
- Use the cork on the bottle to get a closed bottle (3).
- Move the beakers to get Ca (4).
- Use the compass on the paper to get a circle (5).
- Take the TYPEWRITER KEY (6).
- Back out three times, head straight.
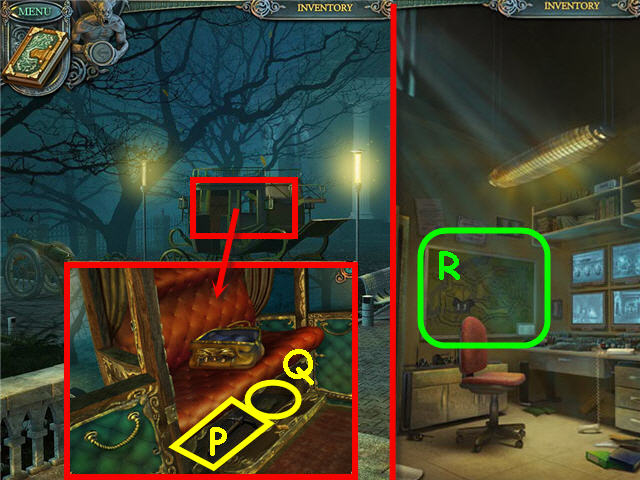
- Examine the carriage.
- Use the CARRIAGE KEY on the compartment; take the PICK (P) and PART OF MAP (Q).
- Back out three times, head right twice.
- Examine the map (R).
- Place the PART OF MAP in the slot to trigger a puzzle.
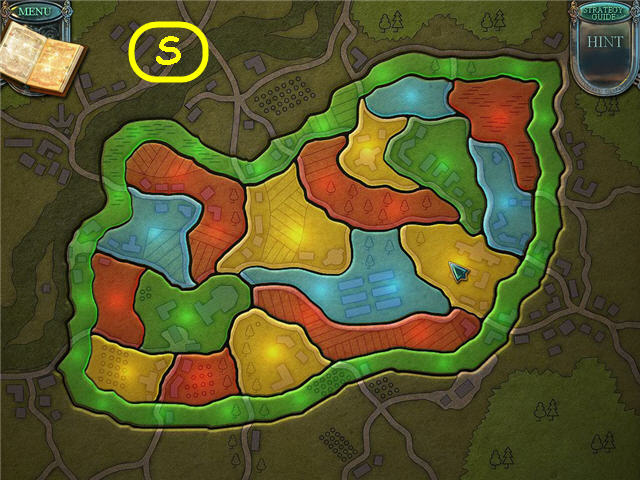
- Swap the colors on the map so that no two of the same colors touch.
- See screenshot for solution (S).
- Take the LEVER.
- • Back out twice, head left, forward, left and go downstairs.
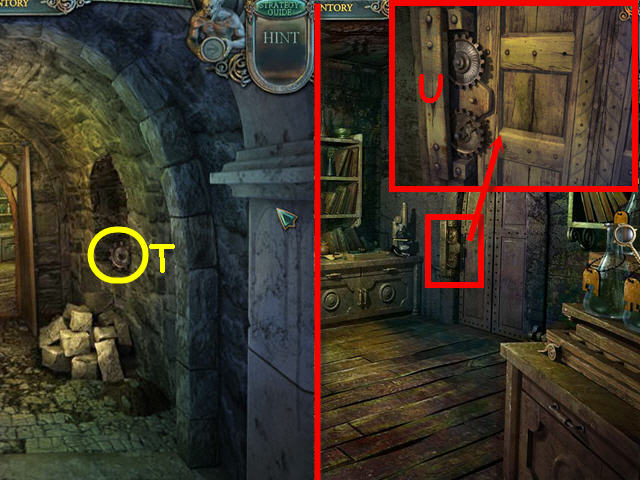
- Use the PICK on the bricks; take the BIG GEAR (T).
- Head straight.
- Examine the door.
- Place the BIG GEAR and LEVER on the lock (U).
- Head right.
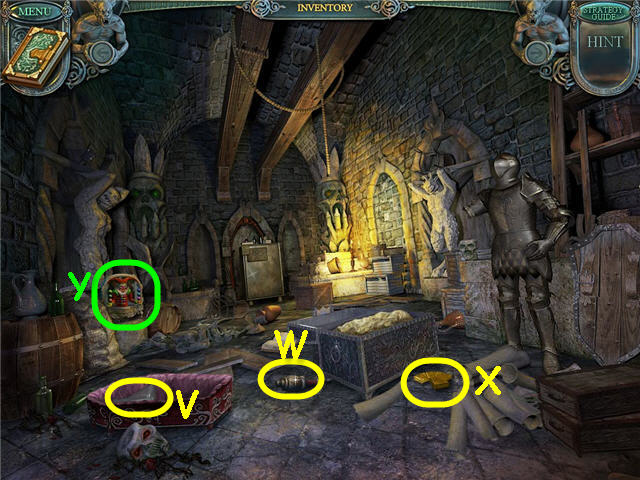
- Take the EMPTY BEAKER (V) and LEVER (W).
- Scatter the scrolls; take the 3rd ZODIAC BAS-RELIEF (X).
- Examine the juggler (Y).
- Place the BALL on the right to trigger a puzzle.
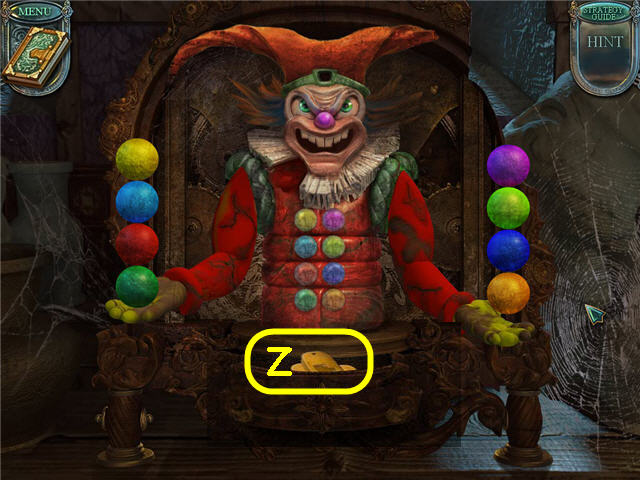
- Arrange the balls in each hand to match the buttons on his suit.
- Click on a ball in one hand to send it to the top of the stack in the other hand.
- Solution: Click on orange, light green, light blue, dark green, dark blue, red, light blue, light green, yellow, purple. See screenshot for solution.
- Take the TAGS (Z).
- Back out.
- Examine the beakers on the right.
- Place the TAGS on the beakers to trigger a puzzle.
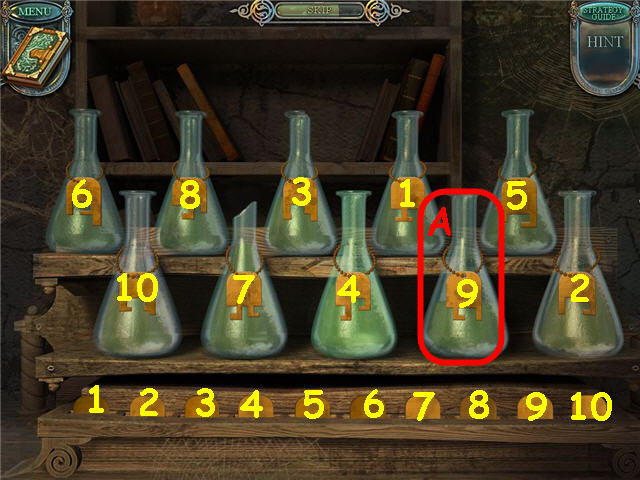
- Match the bottom of the tags to the tops. See screenshot for solution.
- Take the H20 (A).
- Back out three times.
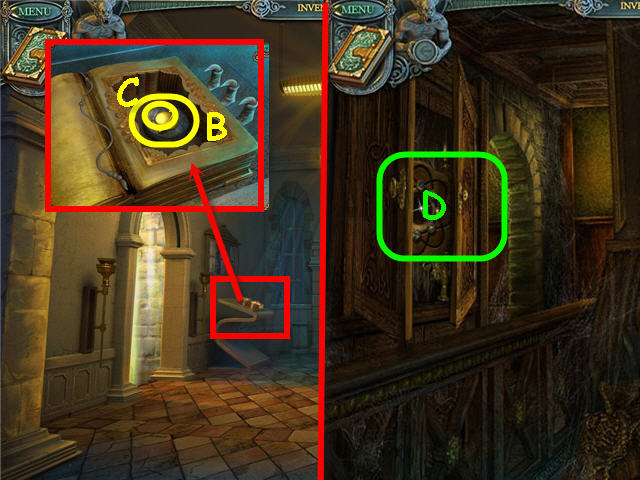
- Examine the book.
- Place the 3 ZODIAC BAS-RELIEFS on the book; take the PLANET (B) and CLOCK HAND (C).
- Head left and go upstairs.
- Open and examine the cupboard (D).
- Place the LENS and PLANET in the slots to trigger a puzzle.
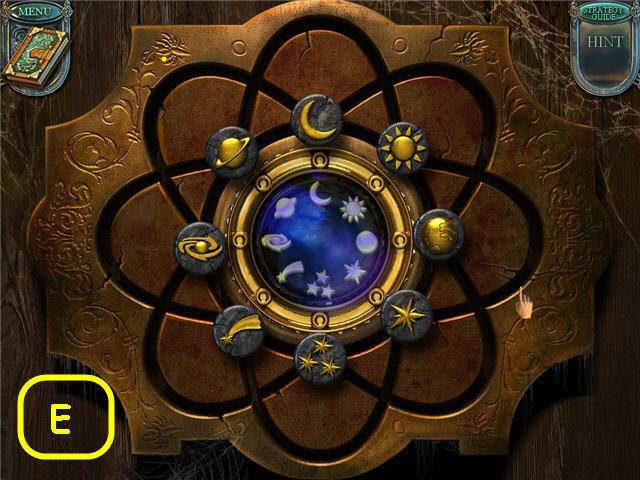
- Align the outer planets with their matching planets in the center.
- Solution: click on the moon 3x, Saturn 4x, shooting star 1x, earth 3x, sun 1x, moon 1x, Saturn 1x, 3 stars 1x, shooting star 1x. See screenshot (E) for solution.
- Take the ROLLER.
- Back out, go downstairs and straight.
- Examine the leftmost coloring station on the counter.
- Place the PAINT on the right to trigger a puzzle.
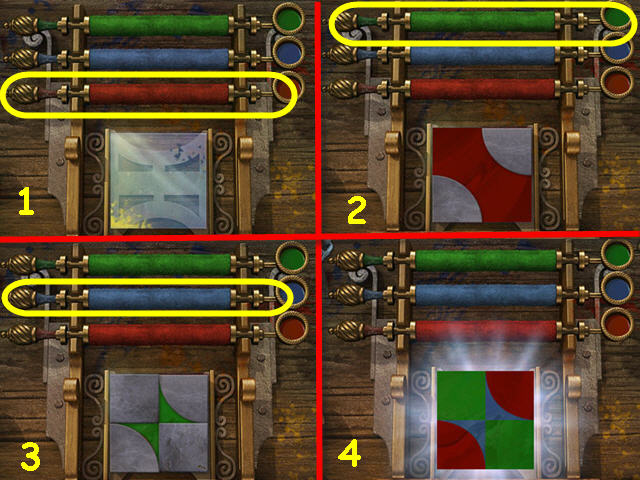
- Duplicate the pattern on the left by using the plates to cover up areas you do not wish to paint.
- Solution: See screenshot for plate placement; 1 - red roller, 2 – green, 3 – blue.
- Take the STAINED GLASS. (4).
- Examine the center coloring station.
- Place the LEVER on the left to trigger a puzzle.
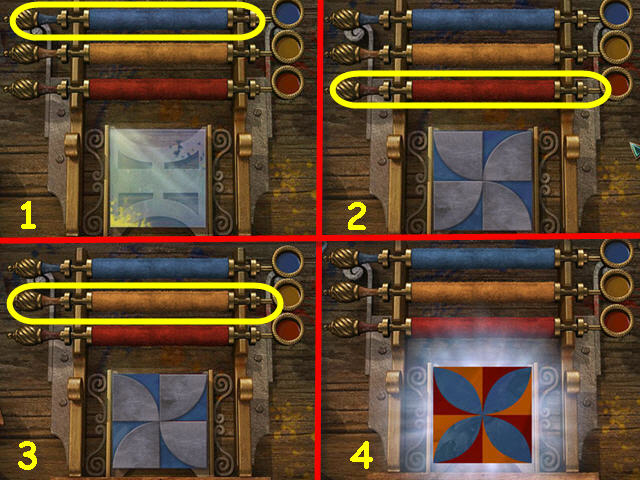
- Duplicate the pattern on the left by using the plates to cover up areas you do not want to paint.
- Solution: See screenshot for plate placement; 1 - blue roller, 2 – red, 3 – orange.
- Take the 2nd STAINED GLASS (4).
- Examine the right coloring station.
- Place the ROLLER in the center to trigger a puzzle.
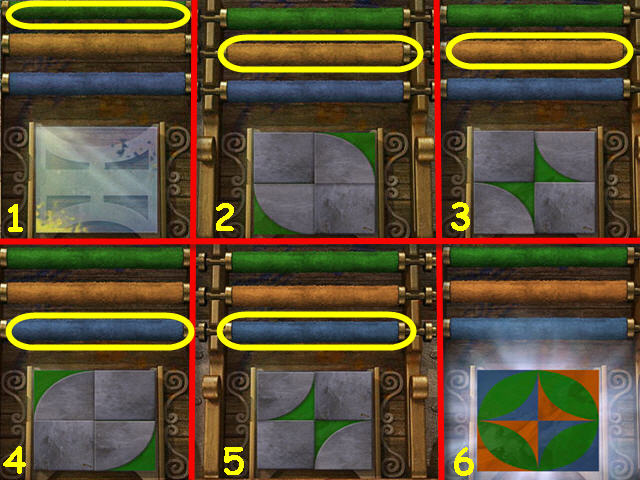
- Duplicate the pattern on the left by using the plates to cover up areas you do not want to paint.
- Solution: See screenshot for plate placement; 1 – green roller, 2 – orange, 3 – orange, 4 – blue, 5 – blue.
- Take the 3rd STAINED GLASS. (6).
- Back out twice and head upstairs.
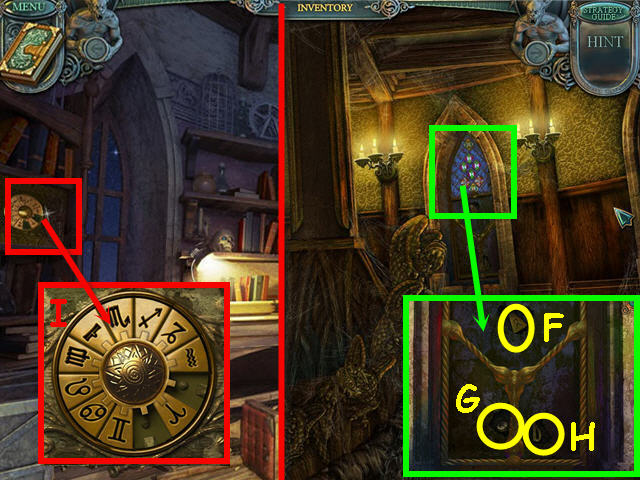
- Examine the stained glass window.
- Place the 3 STAINED GLASS on the matching window panels; take the 2nd ZODIAC SIGN (F), 2nd TYPEWRITER KEY (G) and LETTER B (H).
- Head left.
- Examine the zodiac.
- Place the 2 ZODIAC SIGNS in the slots (I) to trigger a puzzle.
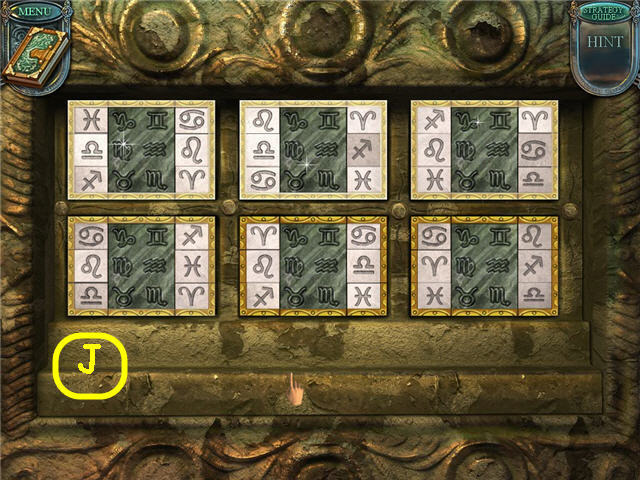
- Arrange the bottom pieces in the top spaces so that no two symbols are repeated in any of the groups. See screenshot for solution (J).
- Take the 3rd TYPEWRITER KEY.
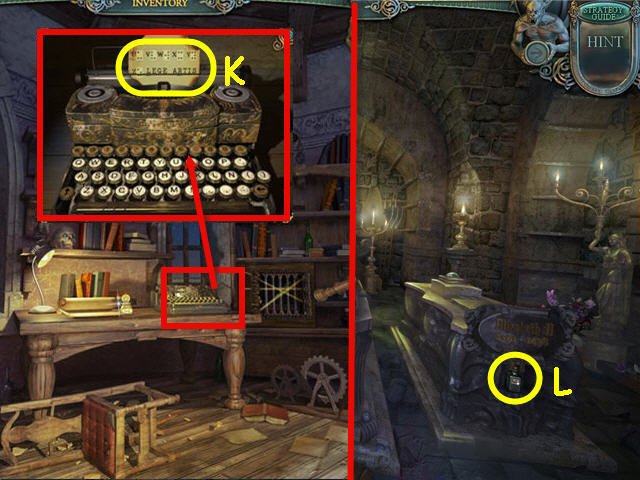
- Examine the typewriter.
- Place the 3 TYPEWRITER KEYS on the typewriter; take the PART OF THE CODE (K).
- Back out three times, head straight, left and straight.
- Examine the right crypt.
- Place the LETTER Z and LETTER B on the plate; take the FECI3 (L).
- Back out three times, head left, down and straight.
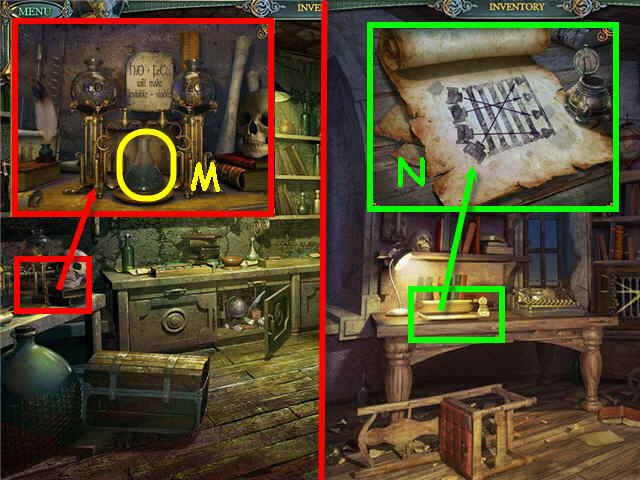
- Examine the left counter.
- Place the EMPTY BEAKER, H20, and FEC13 on the lab.
- Take the CHEMICAL SOLUTION (M).
- Back out twice, head up and left.
- Examine the scroll.
- Place the CHEMICAL SOLUTION on the paper to automatically get a magic book update (N).
- Back out twice, go down, straight and right.
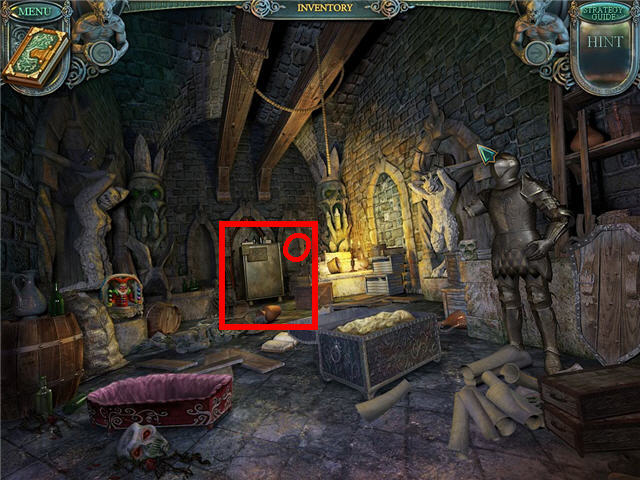
- Examine the cabinet (O).
- Place the PART OF THE CODE on the code to trigger a puzzle.
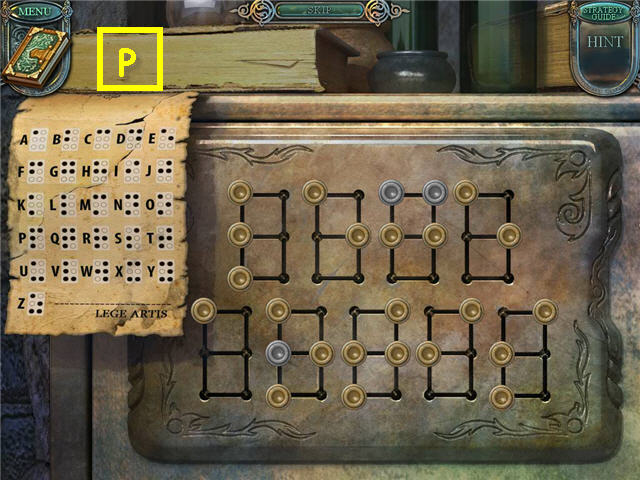
- Move the buttons to spell out the message on the bottom of the code.
- See screenshot (P) for solution.
- Take the SAFE HANDLE.
- Back out three times, head up and left.
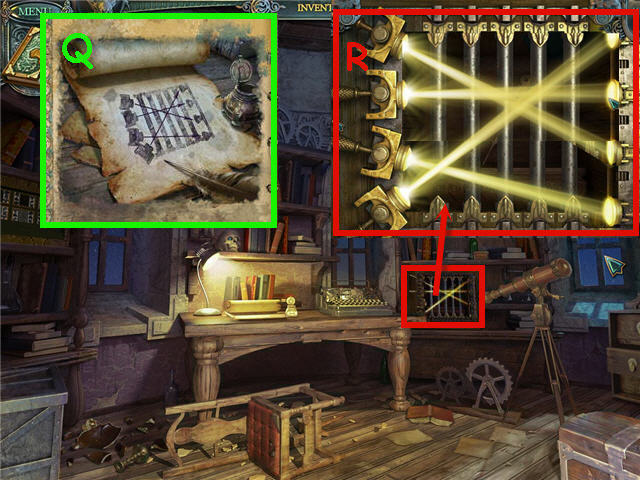
- Examine the safe.
- Place the SAFE HANDLE on the safe.
- Move the handles on the left to point the beams in the direction of the code in the magic book (Q). See screenshot for solution (R).
- Take the 3rd CLOCK HAND.
- Back out twice.
- Examine the clock; place the 3 CLOCK HANDS on the face.
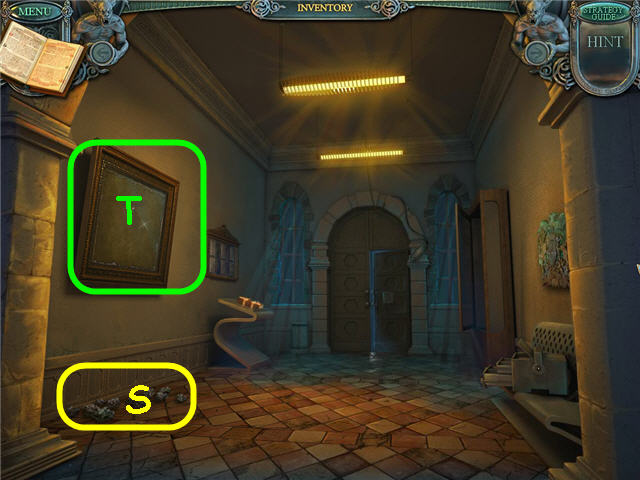
- Pick up the PICTURE SCRAPS (S).
- Examine the painting (T); place the PICTURE SCRAPS in the frame to trigger a puzzle.
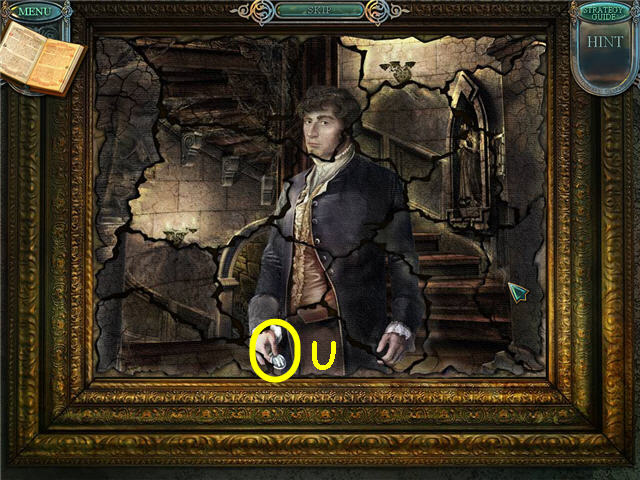
- Arrange the puzzle pieces in the frame to complete the picture.
- Take the CLOCK NUMBER (U).
- Back out twice.
- Examine the clock; place the CLOCK NUMBERS on the clock.
- Enter through the clock portal.
- Click on the console above the stairs to trigger a puzzle.
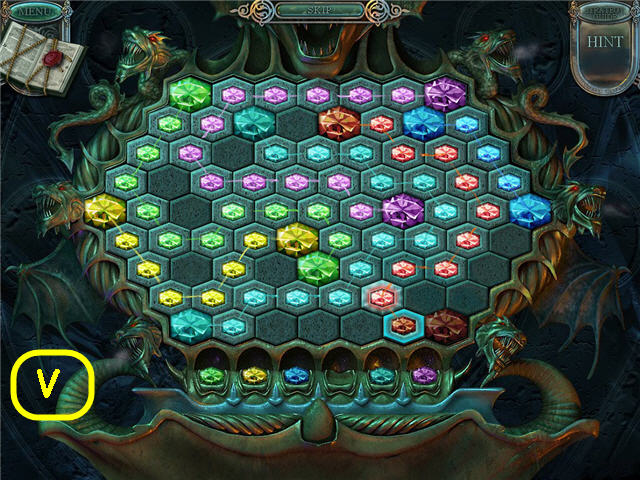
- Connect the larger crystals by using the smaller matching crystals below to connect them.
- See screenshot (V) for solution.
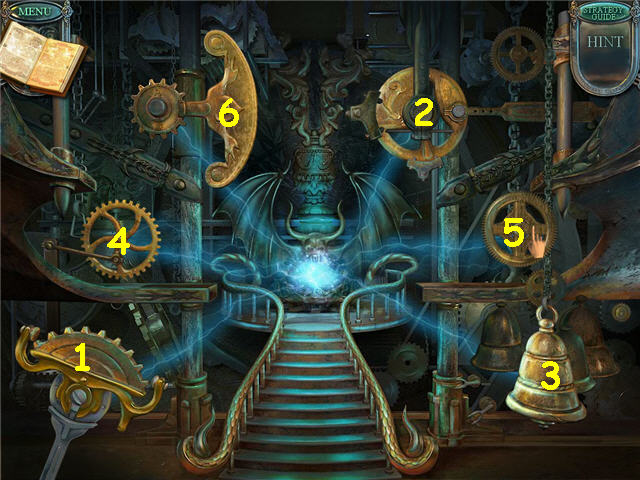
- Click on the mechanisms in the correct order to get them all moving.
- See screenshot for solution.
- Congratulations! You have successfully completed Echoes of the Past: The Citadels of Time.
Created at: 2011-10-28

