Walkthrough Menu
- General Tips
- Chapter 1 – Enter the Afterlife
- Chapter 2 – Explore the Afterlife
- Chapter 3 - The Sphinx
- Chapter 4 – Ra
- Chapter 5 – Defeat Set
General Tips
- This is a Hidden Object Puzzle Adventure Game.
- Click on Options in the main screen to choose Fullscreen, Music Volume and Sound FX volume.
- A hand cursor means you can pick up the item.
- The pointing finger cursor allows you to move or manipulate an item.
- A magnifying glass means you can inspect an area or item closer.
- You need to collect tablets in the game to learn magic recipes. They will be numbered in the screenshots.
- Your ingredients needed for your recipes are located in the lower right circling the scarab.
- Click on tasks in the lower left corner to find your goals. Click on the name of the task to expand what is needed to accomplish your goals.
- Click on hints to find out the next step needed to complete your goal.
- Random clicking will cause you to lose your cursor for a few seconds.
- Areas that contain puzzles will sparkle.
- Inventory items are in capital letters in the walkthrough.
- Use the arrows on the ends of your inventory bar to scroll through your items when it gets full.
- Some items will need to be combined in inventory to complete them.
- There is an option to skip the puzzles.
Chapter 1- Enter the Afterlife
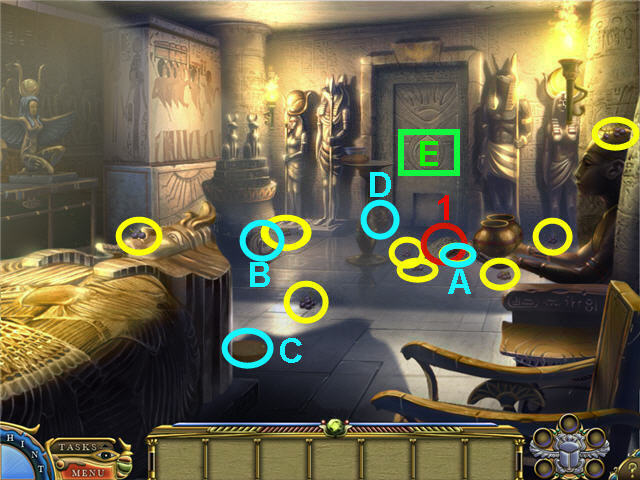
- Find the 8 GRAPES circled in yellow on the screenshot.
- Pick up the TABLET (1).
- Pick up the MEAT (A), CHARM STONE (B), CHEESE (C) and BEER (D).
- Place the MEAT, CHEESE and BEER on the pedestal you stood upright.
- Place the CHARM STONE on the glowing slot (E) in the door.
- Click on the door to trigger a puzzle.
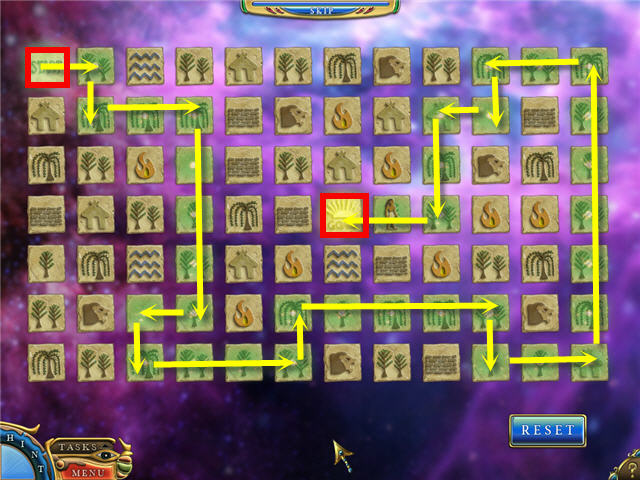
- The goal is to advance from the upper left start tile to the goal in the center by moving along the tiles.
- Stepping on a boat tile will allow you to cross the next water you come across.
- Stepping on a machete tile will allow you to step on the next lion tile.
- See screenshot for solution.
- Enter the portal and watch the cutscene.
- Click on the sparkling area on the right to trigger a hidden object scene.
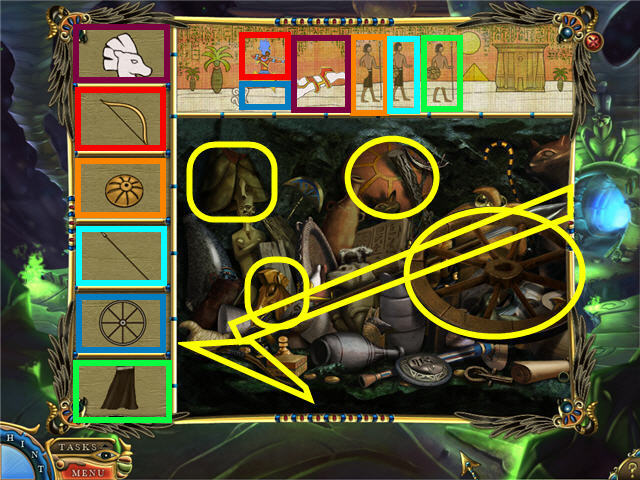
- Find the 6 items in the large picture that complete the glyphs above it.
- The items will appear in the spaces to the left when found.
- Click on the item on the left and place it by the correct glyph to complete them. See screenshot for solution.
- You will get a SHOVEL HEAD in inventory when complete.
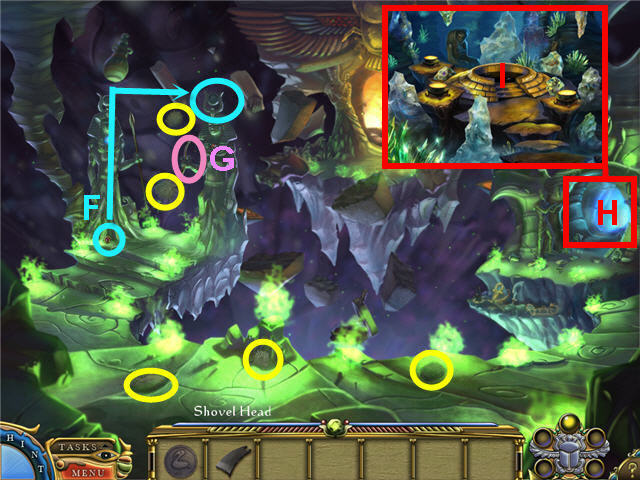
- Collect the 5 FUR pieces circled in yellow in the screenshot.
- Pick up the RED JEWEL (F) and place it on the top of the statue on the right of the walkway.
- Take the HANDLE (G) from the statue’s hand.
- Combine the SHOVEL HANDLE with the SHOVEL HEAD in inventory to get a SHOVEL.
- Click on the blue cavern on the right (H) and use the CHARM STONE in the pool of black ink (I) to get a BLACK CHARM STONE.
- Click on the glowing scarab on the bottom right to trigger a puzzle.
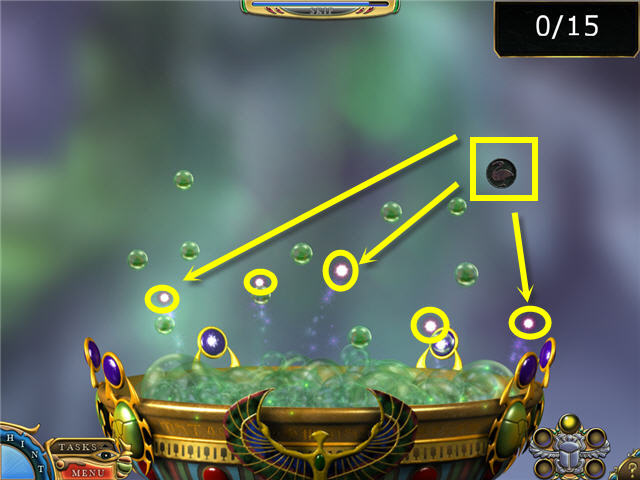
- The object is to catch 15 pink glowing bubbles with the charm.
- You do not need to click the charm on the pink bubbles, just pass them over.
- If a green bubble touches the charm some of your progress will be lost. You can see how many you have by the counter in the upper right corner.
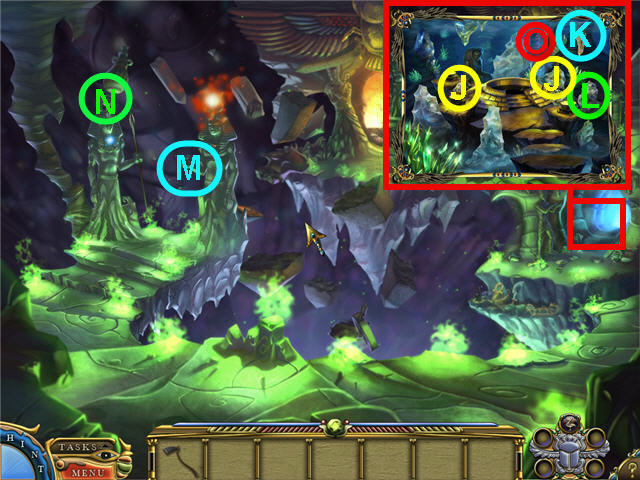
- Click on the blue cavern and click on the ice to get 2 GEMS (J), SPEAR (K) and a BLUE JEWEL (L).
- Click on the lost soul (O) or jar of seeds next to him to trigger a conversation.
- Place the SPEAR in the hand (M) of the statue on the right.
- Place the BLUE JEWEL on the top of the statue on the left (N).
- Click on the statue on the left (N) to trigger a puzzle.
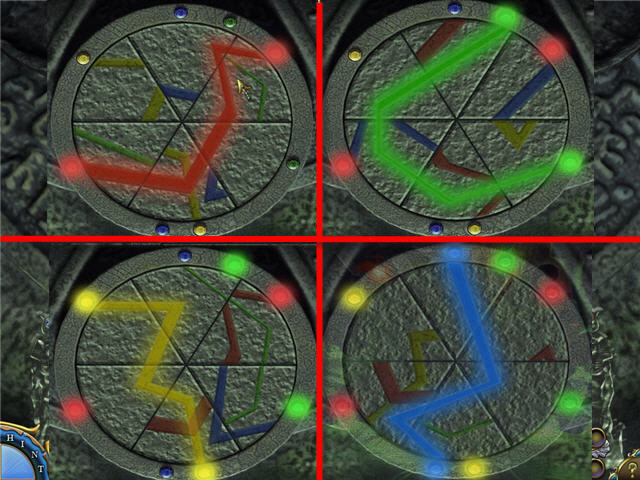
- The goal is to create a continuous path of light for each color, one at a time.
- Click on any tile to flip the top half over and use the arrows on the right to rotate the disk.
- To complete the red, click on the down arrow 1x and click on any tile to flip.
- To complete the green after the red, click the down arrow 1x, click any tile to flip, down arrow 2x, click any tile to flip, up arrow 1x.
- To complete the yellow after the green, click any tile to flip, click the up arrow 2x.
- To complete the blue after the yellow, click any tile to flip, down arrow 1x.
- See screenshot for solution.
- Click on the fiery entrance across the new path.
Chapter 2 – Explore the Afterlife
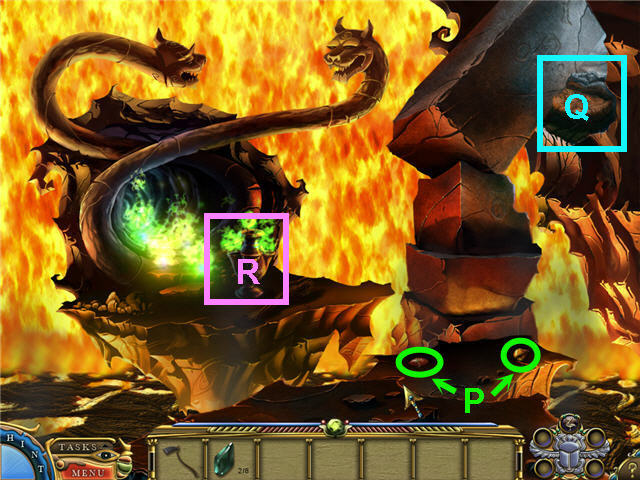
- Click on the urn (R) by the serpents.
- Pick up the 2 GEMS (P).
- Use the SHOVEL on the dirt in the upper right (Q).
- Click on the area where the dirt was to be transported.
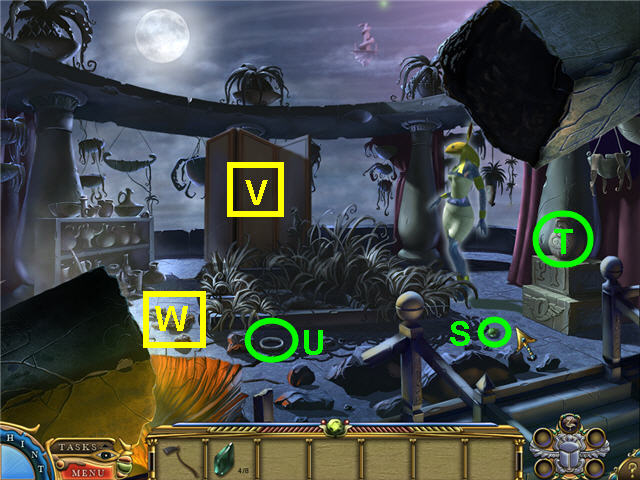
- Click on the goddess to get your task.
- Pick up the GEM (S).
- Click on the vase (T) and get a BRAZIER CODE.
- Pick up the METAL RING (U).
- Click on the screen (V) to move it.
- Click on the snake (W).
- Head down the stairs on the lower right.
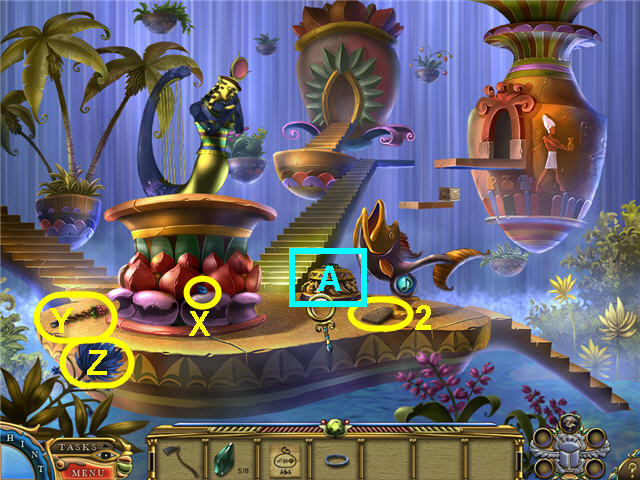
- Pick up the TABLET (2) to get your new list of charm ingredients.
- Pick up the GEM (X).
- Pick up the LEVER (Y).
- Pick up the BLUE FLOWER (Z).
- Place the LEVER on the stand (A).
- Click on the fish with the musical note to get Hathor to sing.
- Click on the area on the top of the middle staircase.
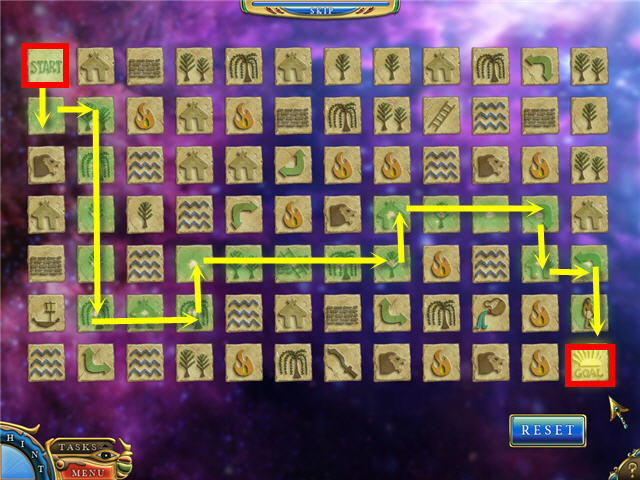
- The goal is to advance from the upper left start tile to the goal in the bottom right by moving along the tiles.
- Stepping on a boat will allow you to cross the next water you come across.
- Stepping on a machete will allow you to step on the next lion tile.
- Stepping on a water flask will allow you to douse the next fire tile.
- Stepping on a ladder will allow you to step over the next wall.
- Stepping on an arrow will force you to go in the direction of the arrow.
- See screenshot for solution.
- Enter into the newly opened middle portal.
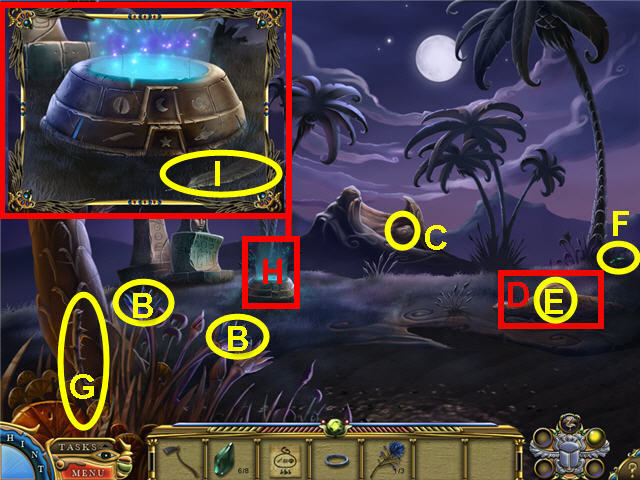
- Pick the 2 BLUE FLOWERS (B).
- Take the CLAY (C).
- Use the SHOVEL on the dirt (D) and take the SKULL (E).
- Pick up the GEM (F).
- Pick the THORNY STEM (G).
- Click on the blue glowing ring (H) and take the FEATHER (I).
- Exit the area via the bottom of the screen to return to the singing fish and head up to stairs to the right.
- Click on the pottery on the floor in front of the right bookshelf to open a hidden object scene.
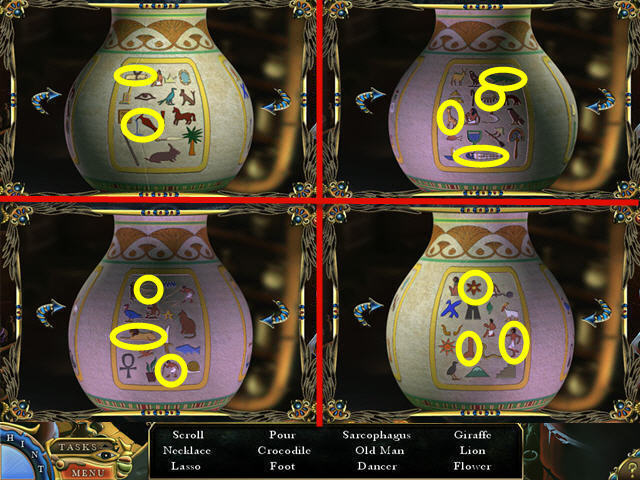
- Find the items listed.
- Rotate the pottery using the arrows on either side to find all the items.
- Get a NECKLACE when complete.
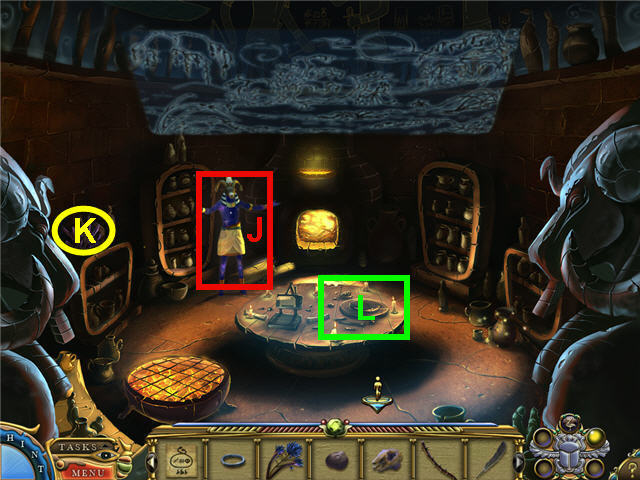
- Click on Khnum (J) to get another task.
- Give the CLAY to Khnum.
- Take the CORAL (K) from the shelf on the left.
- Click on the pottery wheel (L) to trigger a puzzle.
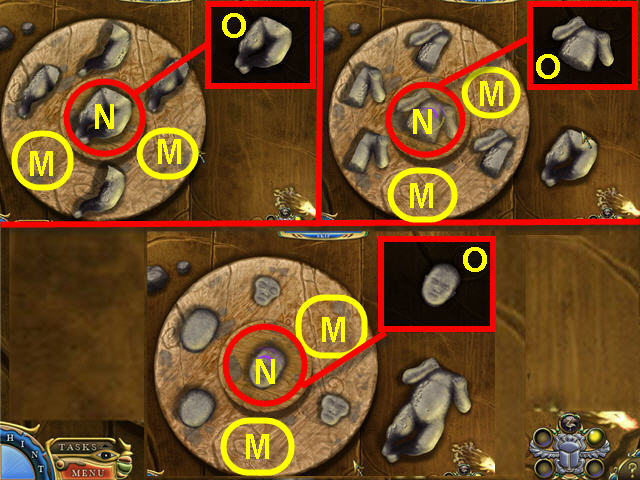
- Click on the two pieces on the wheel that make up the picture on the upper right.
- Click on the correct pieces (M) so that they go into the middle (N) to complete the pictures on the upper right (O).
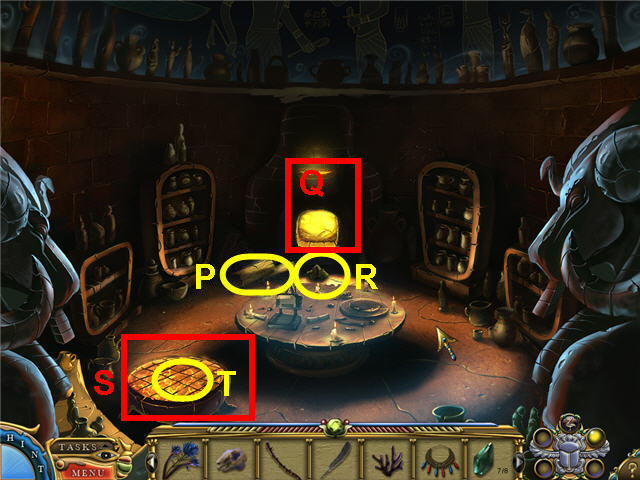
- Take a LOG (P) from the log pile left of the fireplace.
- Place the LOG in the fireplace (Q) and take the ASH (R) on the floor in front of the fireplace.
- Place the BLUE FLOWERS on the grill (S) and take the DRIED FLOWERS (T).
- Head back to the lost soul by the blue cave entrance by backing out of the pottery room, up the stairway to the left, down the yellow glowing hole on the lower left, and then back out via the bottom of the screen.
- Click on the blue cave entrance.
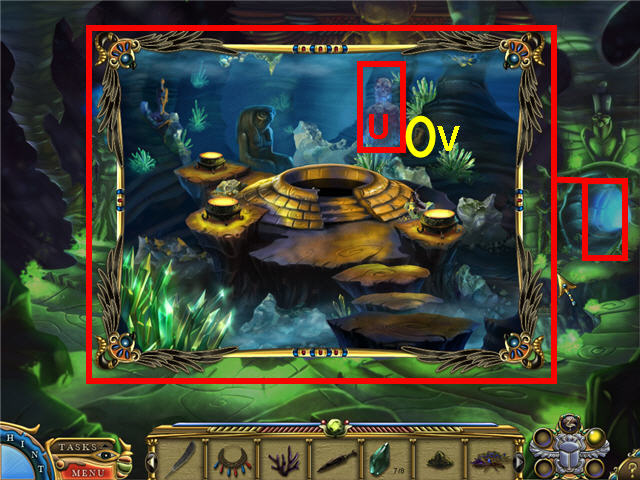
- Give the NECKLACE to the lost soul (U) and take the MOONFLOWER SEEDS (V).
- Head back up to the goddess.
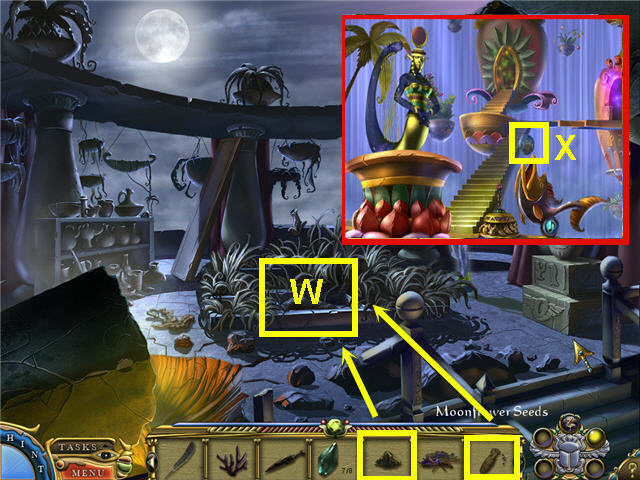
- Place the ASH on the garden area (W).
- Place the MOONFLOWER SEEDS on the ASH.
- Click on the goddess and watch the cutscene.
- You will get a HARP STRING and a new task.
- Head down the stairs on the lower right.
- Place the HARP STRING on Hathor.
- Click on Hathor and he will give you another task.
- Click on the fish and hear them sing.
- Take the BLUE CHARM STONE (X) from the mouth of the fish.
- Click on the scarab on the bottom right now that you have all the ingredients.
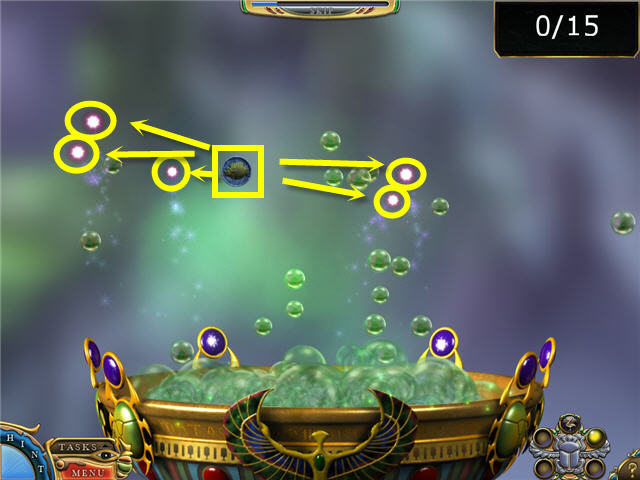
- The object is to catch 15 pink glowing bubbles with the charm.
- You do not need to click the charm on the pink bubbles, just pass them over.
- If a green bubble touches the charm some of your progress will be lost. You can see how many you have by the counter in the upper right corner.
- Head into the pottery room via the upper right stairs.
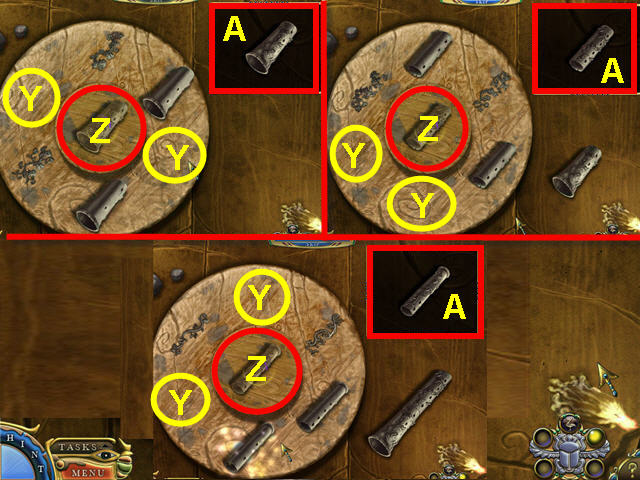
- Click on the pottery wheel to trigger the flute puzzle. If you don’t have the task you need to go back and click on Hathor.
- Click on the two pieces on the wheel that make up the picture on the upper right.
- Click on the correct pieces (Y) so they go into the middle (Z) to complete the pictures on the upper right (A).
- You will get a CLAY FLUTE in inventory when complete.
- Click on the craft area to the left of the pottery wheel and note the ingredients for the flute.
- Back out of the room and go down the stairs on the right into the water.
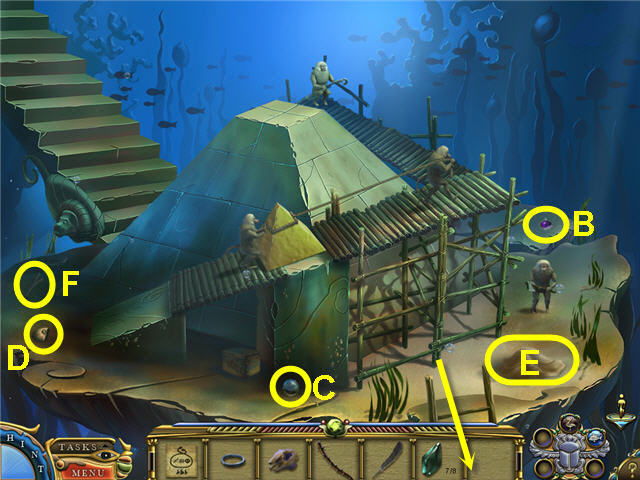
- Take the GEM (B), the METAL SPHERE (C), the SEA SHELL PIECE (D), the SAND (E), and the STICK (F).
- Combine the METAL SPHERE and the METAL RING in inventory to get a METAL SATURN.
- Click on the chest under the ramp and on each of the sea monkeys.
- Head down the ladder on the bottom of the screen.
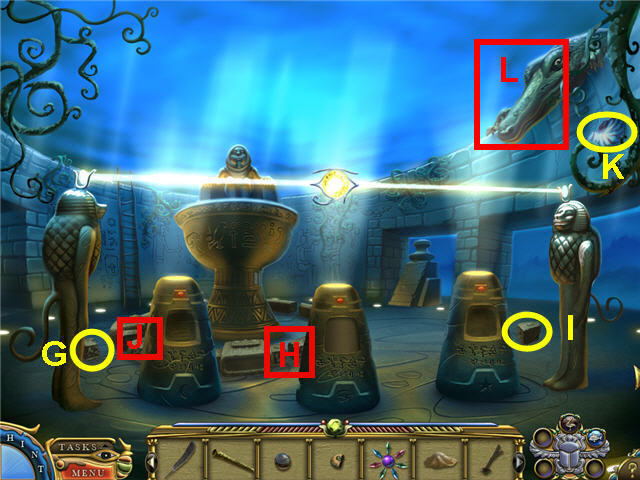
- Take the PORTAL PIECE (G) and place it in the gap (H).
- Take the PORTAL PIECE (I) and place it in the gap (J).
- Take the SEA SHELL PIECE (K).
- Combine the 2 SEA SHELL PIECES in inventory to get a SEASHELL.
- Place the STICK on the alligator (L) on top of the right wall to hold open its mouth.
- Click on the alligator to trigger a hidden object scene.
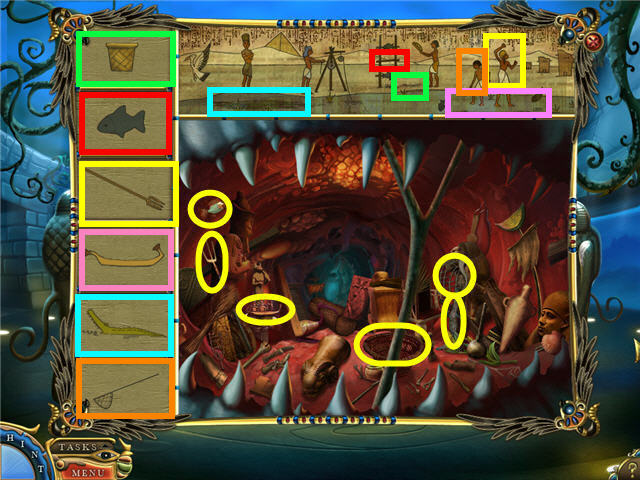
- Find the items in the large picture that complete the glyphs above it.
- The items will appear in the spaces to the left when found.
- Click on the item on the left and place it by the correct glyph to complete them. See screenshot for solution.
- You will get a MAGIC POTION in inventory.
- Return to the pottery room by heading up the ladder on the left wall, then up the stairs on the left and the up to the room on the top of the right staircase.
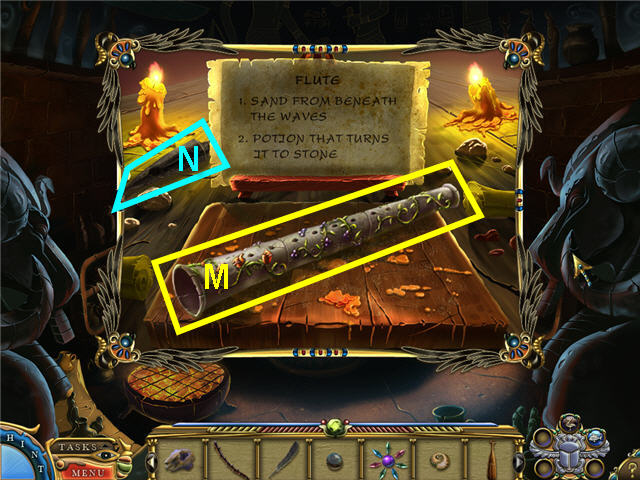
- Click on the craft area to the left of the pottery wheel.
- Place the CLAY FLUTE on the table.
- Place the SAND on the CLAY FLUTE.
- Place the MAGIC POTION on the CLAY FLUTE.
- Take the FLUTE (M) and the CHISEL (N).
- Exit the room and give the FLUTE to Hathor.
- Hathor automatically gives you a CAT’S EYE STONE.
- Exit the area via the left staircase to get back to the garden.
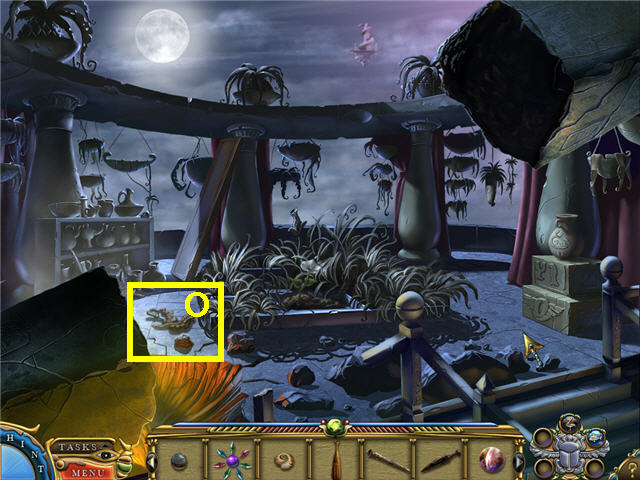
- Use the FLUTE on the snake (O).
- Take the KNIFE that was under the snake.
- Exit the area via the stairs on the right and then again on the next set of stairs on the right into the water.
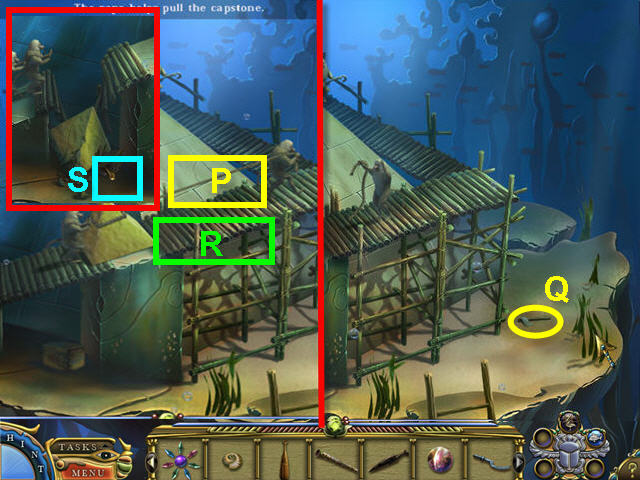
- Use the KNIFE on the rope (P).
- Pick up the AXE (Q).
- Use the AXE on the wooden walkway (R).
- Try and take the scepter from the broken chest (S).
- Head down the ladder to the right.
- Click on the sparkling alligator on the wall to trigger a hidden object scene.
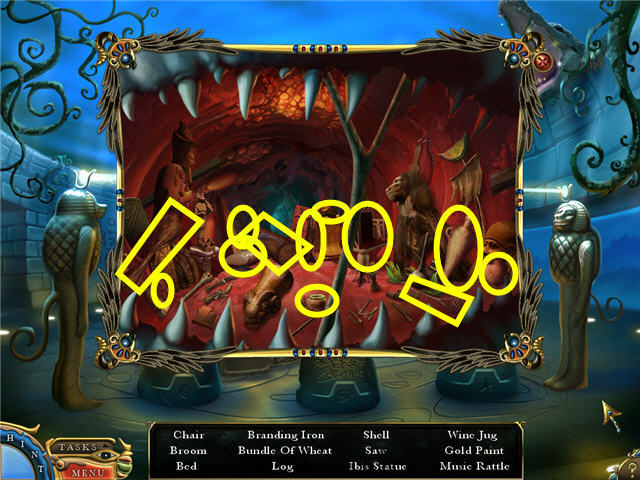
- Find the items on the list and you will get GOLD PAINT.
- Head back up to Hathor and go right up the stairs to the pottery room.
- Click on the sparkling pottery area on the right to trigger a hidden object area.
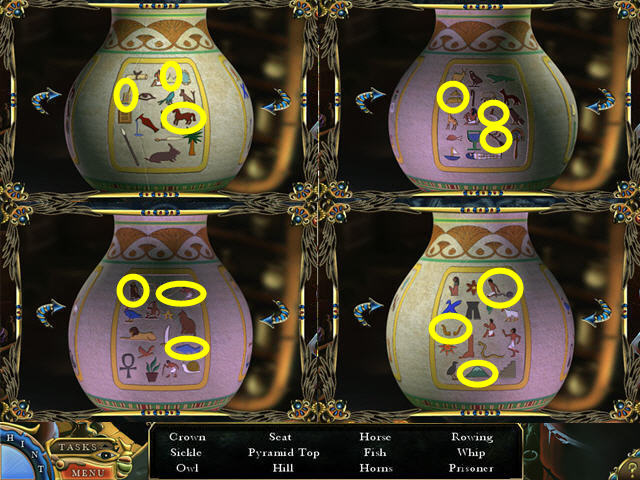
- Find the items listed.
- Rotate the pottery using the arrows on either side to find all the items.
- Get a ROUGH CAPSTONE when complete.
- Click on the craft area next to the pottery wheel.
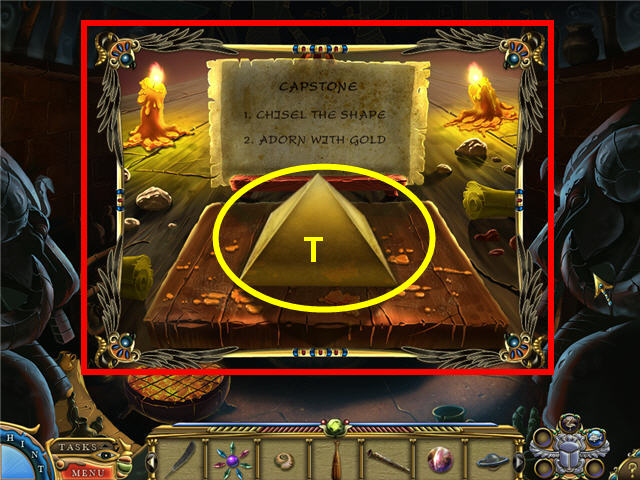
- Place the ROUGH CAPSTONE on the craft area.
- Use the CHISEL on the ROUGH CAPSTONE.
- Use the GOLD PAINT on the CAPSTONE.
- Take the CAPSTONE (T).
- Exit out of the room and down the stairs to the sea monkeys.
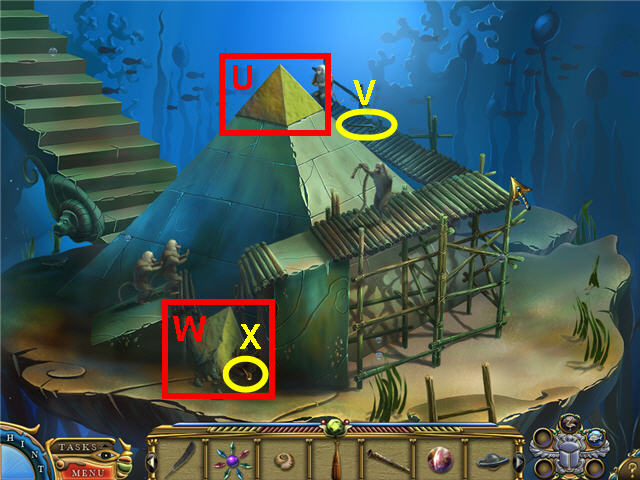
- Place the CAPSTONE on the top of the pyramid (U).
- Take the PRY BAR (V) that the sea monkey dropped.
- Use the PRY BAR on the smashed chest (W) and take the ROYAL SCEPTER (X).
- Head up to Hathor and go up the middle staircase to the river.
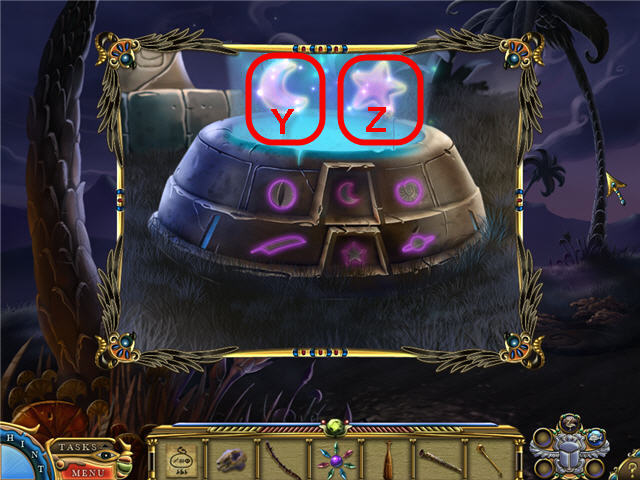
- Click on the blue glowing ring.
- Place the CAT’S EYE STONE, METAL SATURN, SEA SHELL and the FEATHER on the ring.
- Take the GLOWING STAR (Y) and the GLOWING MOON (Z).
- Exit out of the area and head down the stairs to the area where the alligator is.
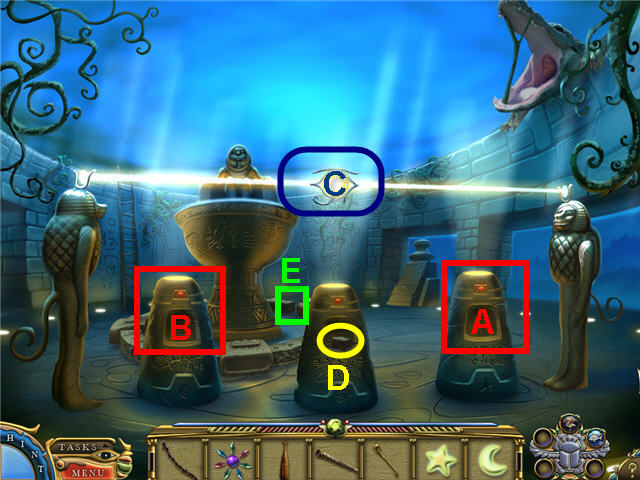
- Place the GLOWING STAR on the right pedestal (A).
- Place the GLOWING MOON on the left pedestal (B).
- Take the EYE OF HORUS (C).
- Take the PORTAL PIECE (D) from the now opened center pedestal.
- Place the PORTAL PIECE on the broken ring (E).
- Click on the KING (F) and note that he is missing his crown.
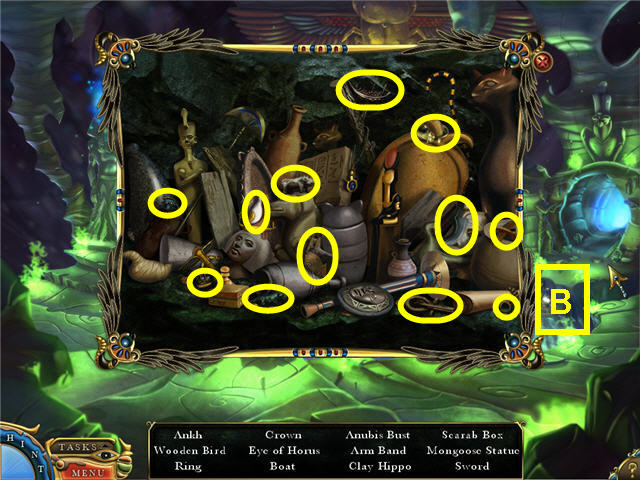
- Head back to the entrance to the afterlife.
- Click on the sparkling ledge (B) under the blue cave entrance to trigger a hidden object scene.
- Find the items listed and get a CROWN WITHOUT GEMS.
- Combine the CROWN WITHOUT GEMS with the GEMS to get a CROWN.
- Head back to the underwater area by the King.
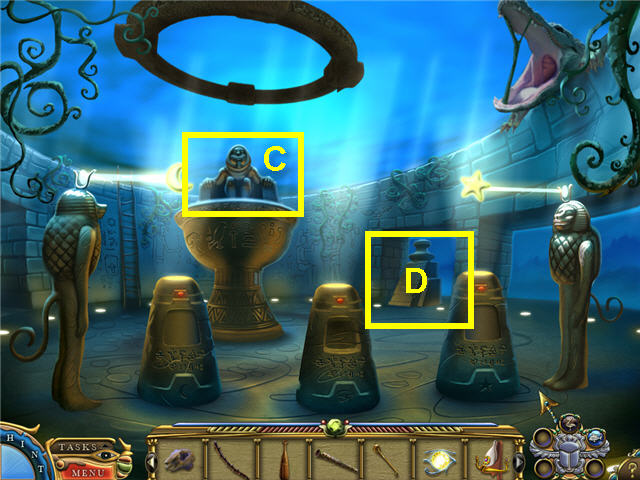
- Place the CROWN on the King (C) and he extends his arm.
- Place the ROYAL SCEPTER in his hand.
- Click on the sparkling pedestal (D) under the archway to trigger a puzzle.
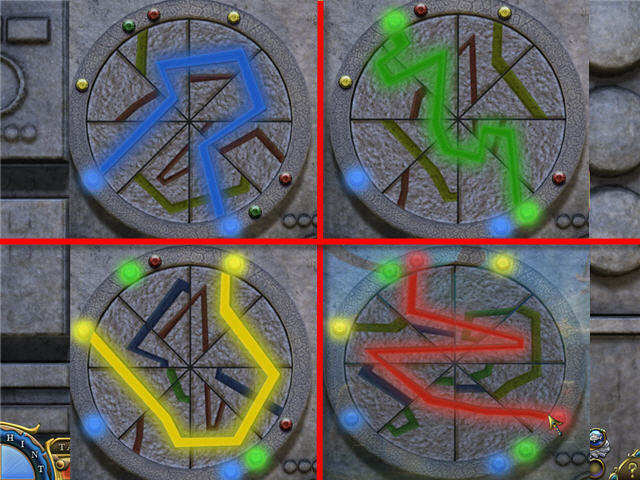
- The goal is to create a continuous path of light for each color, one at a time.
- Click on any tile to flip the top half over and use the arrows on the right to rotate the disk.
- To complete the blue; click on any tile to flip, down arrow 1x, click on any tile to flip, down arrow 2x.
- To complete the green after the blue; down arrow 1x, click any tile to flip, down arrow 4x, click any tile to flip, down arrow 2x.
- To complete the yellow after the green; click any tile to flip, up arrow 2x, click any tile to flip, down arrow 2x.
- To complete the red after the yellow; down arrow 1x, click on any tile to flip, up arrow 2x, click any tile to flip, up arrow 1x.
- See screenshot for solution.
- Head back to the serpent lava crossing.
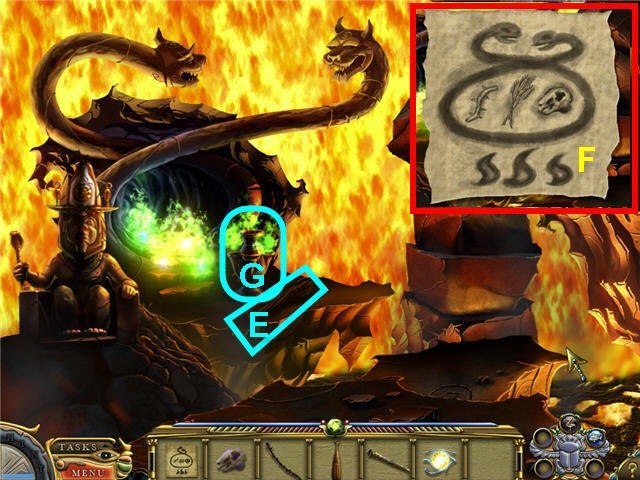
- Take the BARLEY (E).
- Click on the BRAZIER CODE (F) in inventory and see the code.
- Place the THORNY STEM on the flaming urn (G). Do not worry if it stays in inventory, it will leave when all 3 items are placed.
- Place the BARLEY on the flaming urn.
- Place the SKULL on the flaming urn.
- Leave the underworld through the newly opened exit.
Chapter 3 - The Sphinx
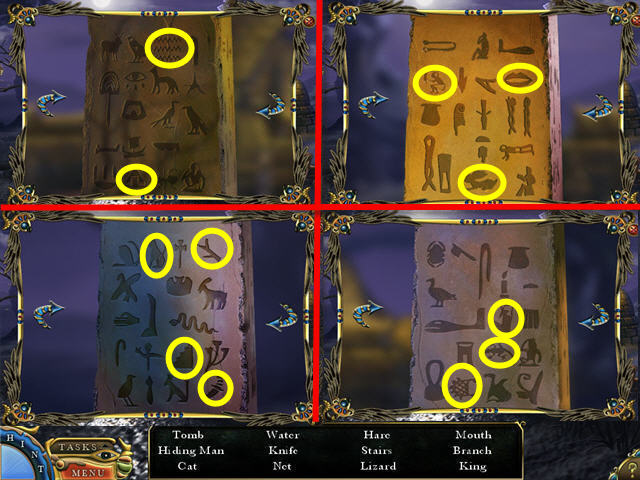
- Click on the sparkling pillar.
- Find the items listed.
- Rotate the pillar using the arrows on either side to find all the items.
- Get a NET when complete.
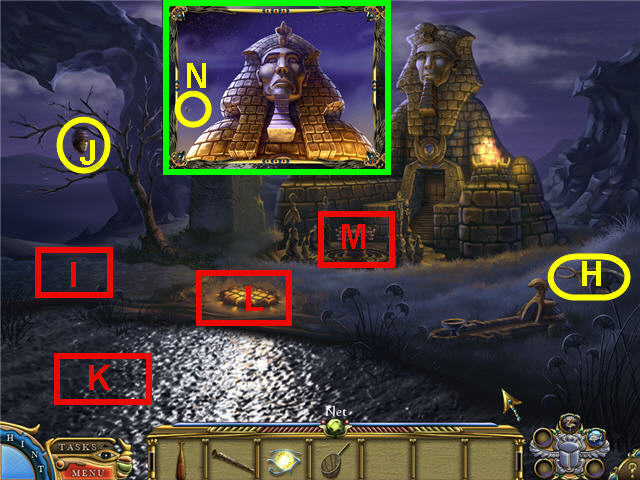
- Click on the Sphinx’s head and note that he wants an offering.
- Take the TONGS (H).
- Click on the beehive but you can’t get it.
- Use the MAGIC POTION on the quicksand (I) under the beehive.
- Click on the beehive and get HONEY (J).
- Use the NET in the RIVER (K) and get a FISH.
- Place the FISH on the grill (L).
- Use the TONGS to take the fish off the grill and get COOKED FISH.
- Place the COOKED FISH on the offering table (M) before the Sphinx.
- Click on the Sphinx’s head to get a close-up and click again to hear him speak and get a task.
- Click on the Sphinx’s head again and catch the flying BUG (N).
- Enter the Sphinx.
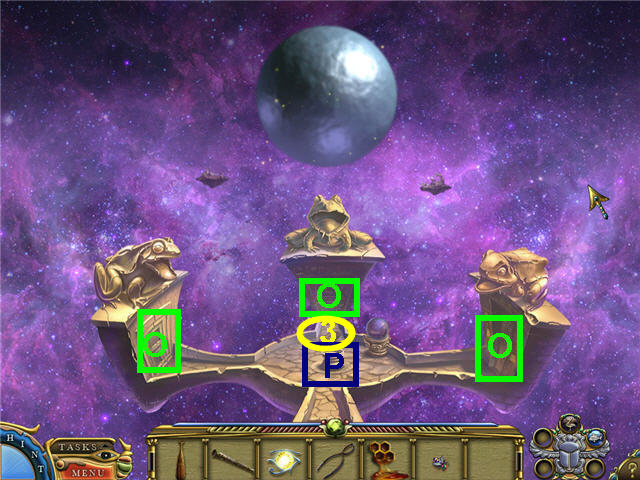
- Pick up the tablet (3) to get the recipe for a strength charm.
- Click on each of the 3 doors (O) under the frogs to light them up.
- Place the BUG on the offering plate (P).
- If you feed the bug to the frogs before clicking on the doors and lighting them up, the bug will remain in your inventory and you will have to do it again.
- Head straight into the middle entranceway.
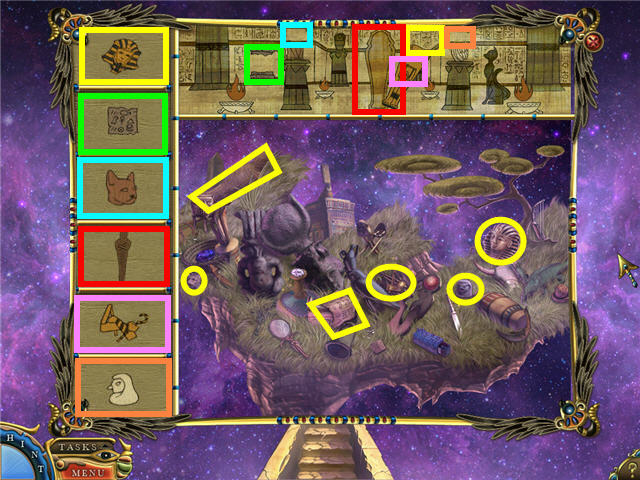
- Find the items in the large picture that complete the glyphs above it.
- The items will appear in the spaces to the left when found.
- Click on the item on the left and place it by the correct area in the glyph to complete them. See screenshot for solution.
- You will get a TOY MOUSE when complete.
- Head into the doorway on the right.
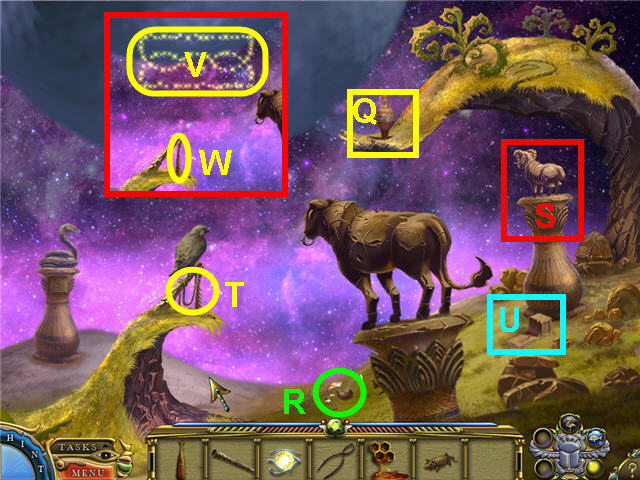
- Knock the vase (Q) off the overhang and take the STINGER (R) from the broken vase on the ground.
- Click on the ram (S) on the pedestal on the right to activate a beam of light.
- Take the ROPE (T) that is tied to the falcon leg and note the leg that it is sitting on.
- Combine the TOY MOUSE and the ROPE in inventory to get a MOUSE WITH STRING.
- Place the MOUSE WITH STRING on the mouse hole (U).
- Wait till the falcon is done flying and then take the FALCON PATTERN (V) and the GRASSHOPPER LEG (T).
- Exit the area and head back into the middle doorway.
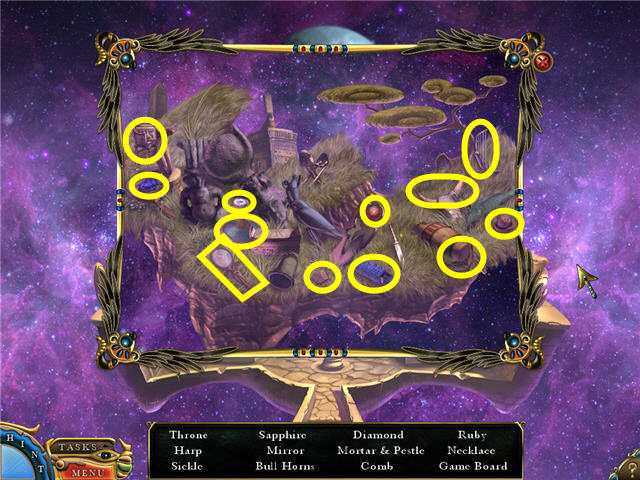
- Find the items listed and get BULL HORNS.
- Head into the left doorway.
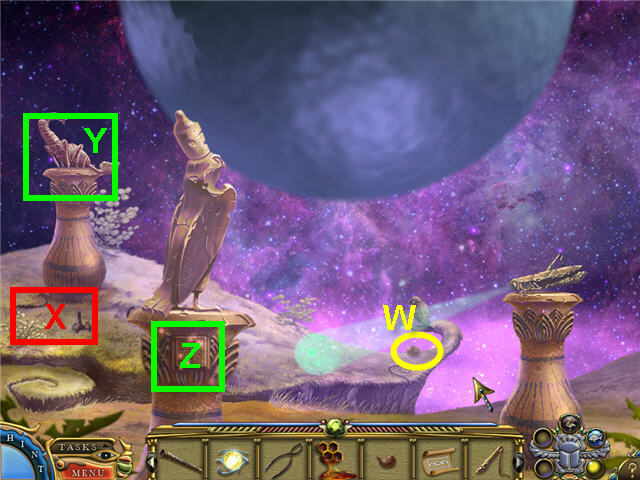
- Pick up the FALCON EGG (W).
- Place the HONEY on the scorpions (X).
- Use the TONGS to take one of the SCORPIONS stuck in the honey (X).
- Place the STINGER on the scorpion statue (Y).
- Click on the pedestal of the statue in the middle (Z) to trigger a puzzle.
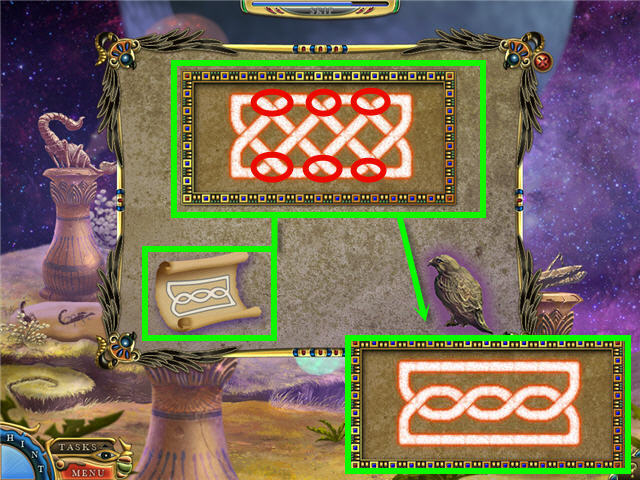
- The goal is to duplicate the FALCON PATTERN, which is automatically taken from your inventory, by clicking on the bends in the pattern.
- Click on the 6 bends marked in red in the screenshot.
- Exit the area and head back to the Sphinx area.
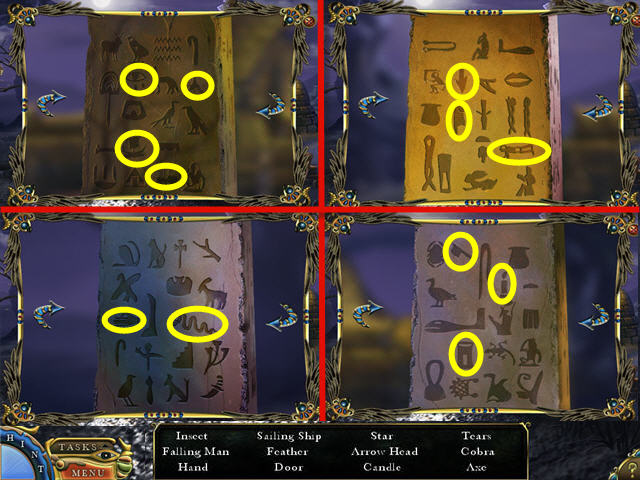
- Click on the sparkling pillar.
- Find the items listed.
- Rotate the pillar using the arrows on either side to find all the items.
- Find the items listed and get a RED CHARM STONE.
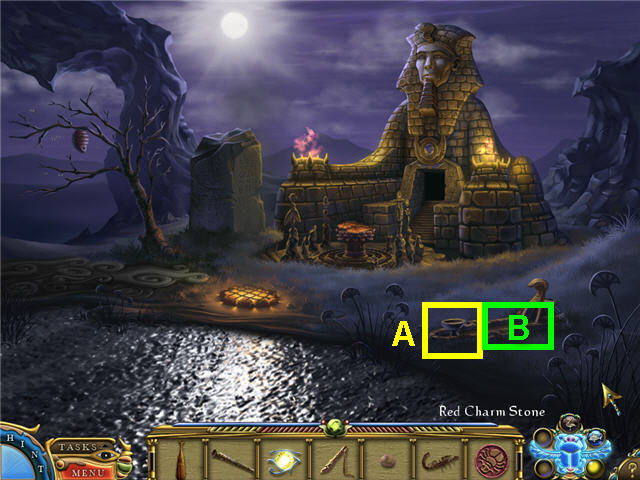
- Place the FALCON EGG on the offering table for the snake (A).
- Take the SNAKE PATTERN (B).
- Click on the glowing scarab in the lower right to activate the strength charm.
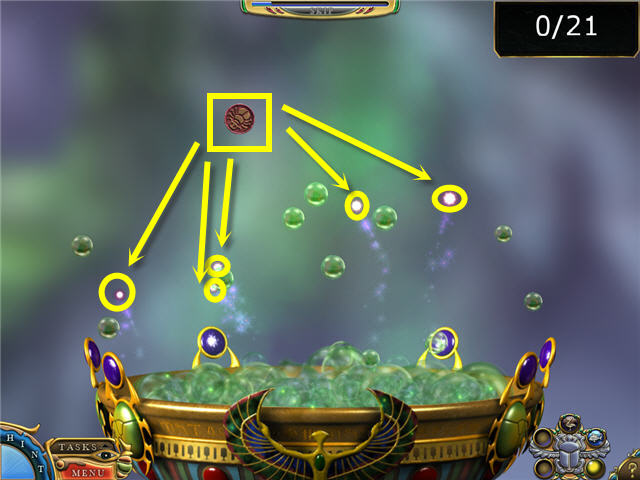
- The object is to catch 21 pink glowing bubbles with the charm.
- You do not need to click the charm on the pink bubbles, just pass them over.
- If a green bubble touches the charm some of your progress will be lost. You can see how many you have by the counter in the upper right corner.
- Head back into the Sphinx and go into the left doorway.
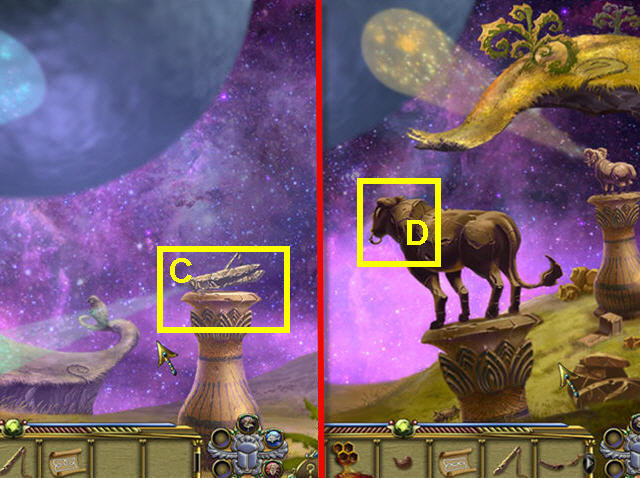
- Place the GRASSHOPPER LEG on the grasshopper (C).
- Exit out of the area and head into the door on the right.
- Place the BULL HORNS on the bull (D).
- Click on the snake pedestal on the left.
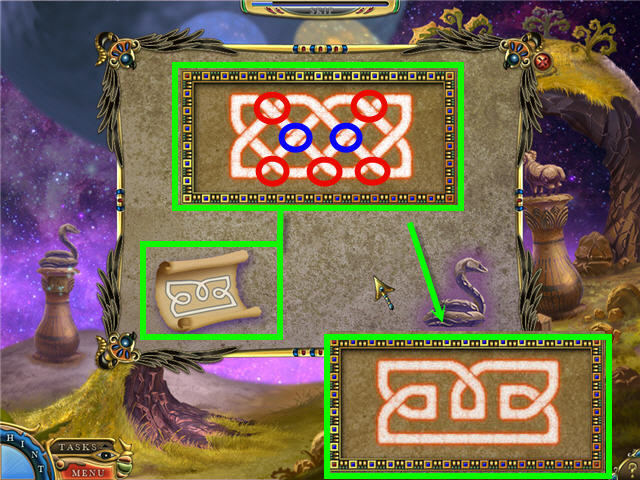
- The goal is to duplicate the SNAKE PATTERN, which is automatically taken from your inventory, by clicking on the bends in the pattern.
- Click on the bends in the screenshot that are marked in red 1x, and the bends in blue 2x.
- Exit the area one time.
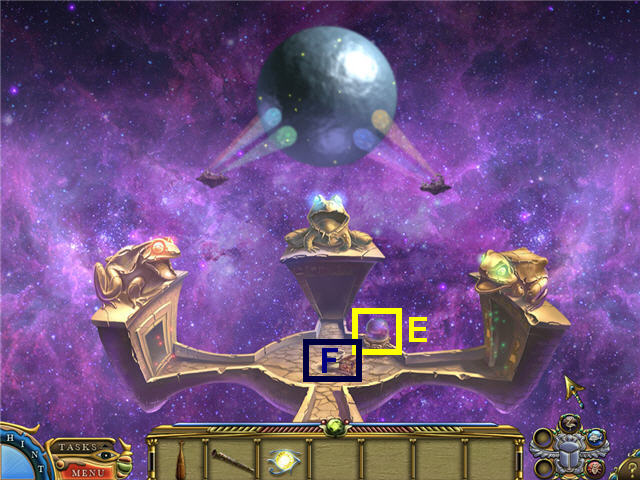
- Click the sphere (E) and watch the reaction.
- Take the MAGIC BOX (F) that drops from the blown up sphere.
- Exit out of the area and watch the cutscene.
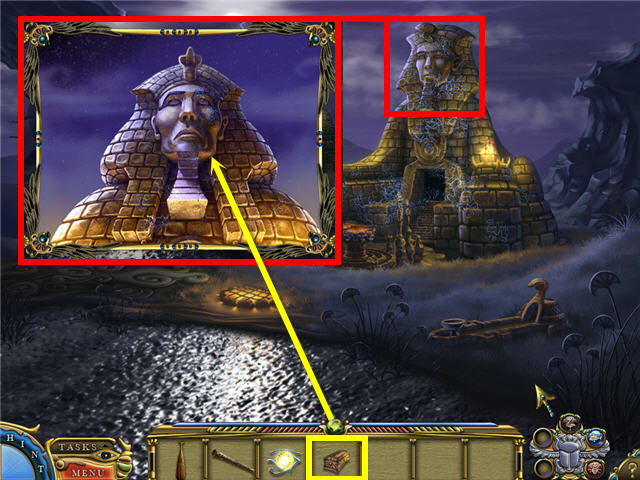
- Click on the head of the Sphinx to get a close-up.
- Give the MAGIC BOX to the Sphinx in close-up.
- The Sphinx will automatically give you the BREATH OF THE SPHINX in your inventory.
- Click on the closed entrance of the Sphinx to trigger a puzzle.
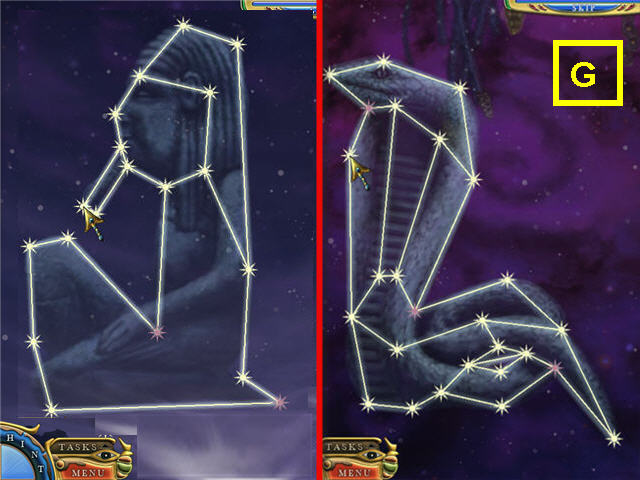
- The goal is to place the stars on the constellation with no lines crossed.
- The pink stars cannot be moved and make a great starting point. See screenshot (G) for solution.
- You will get a WHITE CHARM STONE.
Chapter 4 – Ra
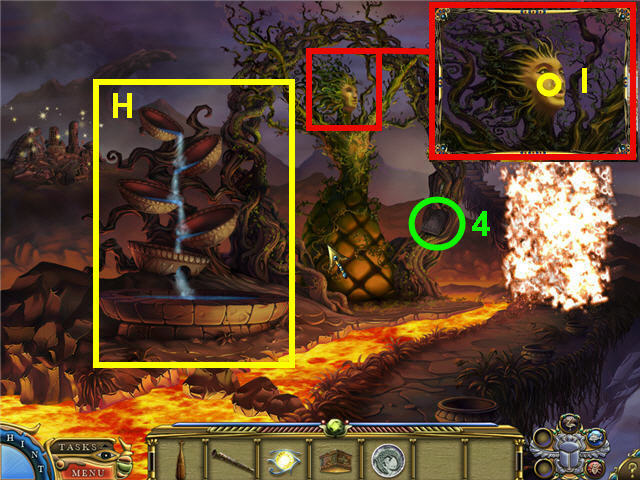
- Click on the pans in the waterfall so that they all face inwards (H) and the water cascades to the bottom.
- Take the tablet (4) to get the recipe for the fire charm.
- Click on the tree goddess’s face to get a close up and click again to get GODDESS TEARS (I).
- Click on the sparkling ruins on the upper left to trigger a hidden object scene.
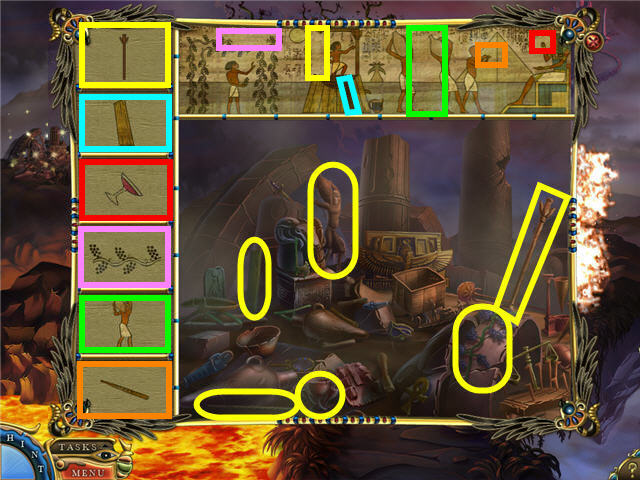
- Find the items in the large picture that complete the glyphs above it.
- The items will appear in the spaces to the left when found.
- Click on the item on the left and place it by the correct area in the glyph to complete them. See screenshot for solution.
- You will get a PITCHER when complete.
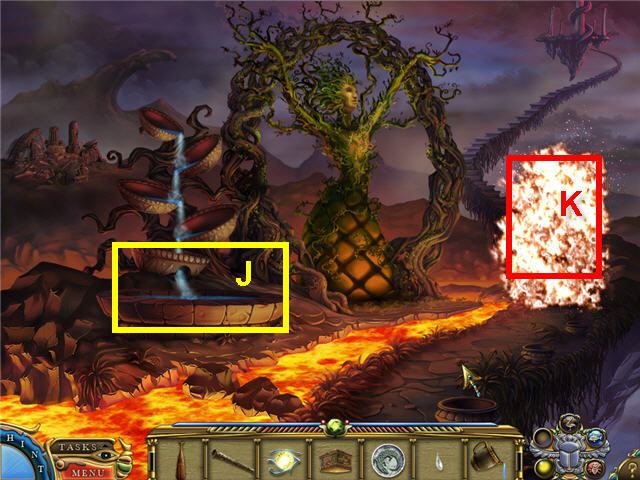
- Use the PITCHER on the fountain (J) to get a FULL PITCHER.
- Use the FULL PITCHER on the fire (K) to get a STEAMING PITCHER.
- Click on the glowing scarab in the lower left to activate the fire charm.
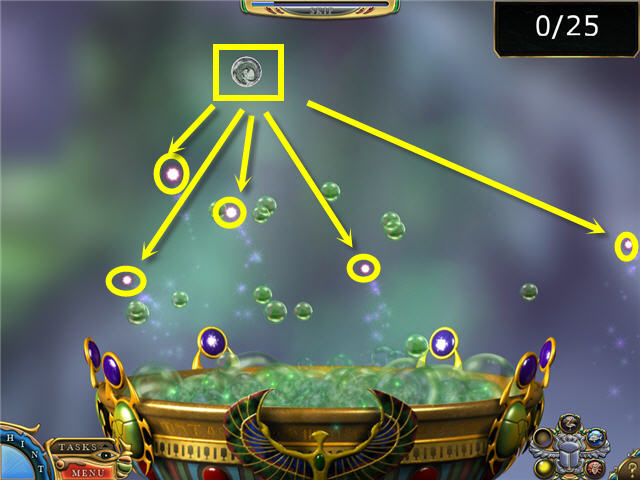
- The object is to catch 25 pink glowing bubbles with the charm.
- You do not need to click the charm on the pink bubbles, just pass them over.
- If a green bubble touches the charm some of your progress will be lost. You can see how many you have by the counter in the upper right corner.
- Click on the fire wall when complete and head up the stairs.
Chapter 5 – Defeat Set
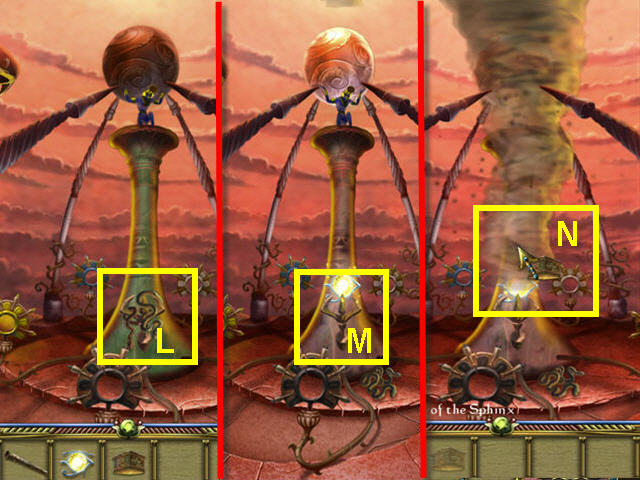
- Use the FLUTE on the snakes (L) in the middle of the green pedestal.
- Place the EYE OF HORUS on the now exposed hook (M).
- Use the BREATH OF THE SPHINX on the wind (N) created by Set.
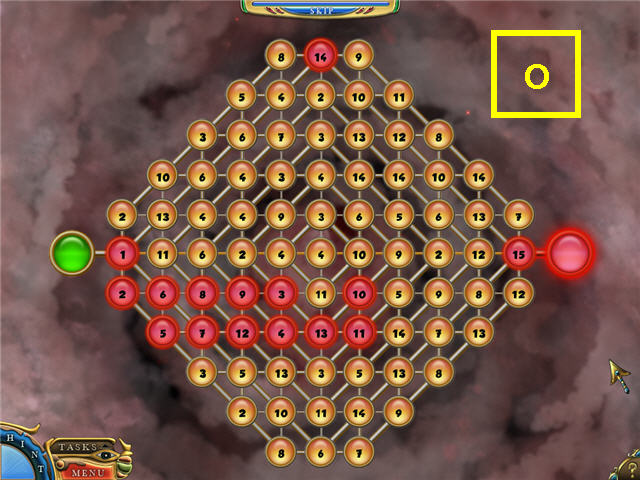
- The object is to click on the numbered tiles in numerical order from 1-15.
- All tiles must be connected by a straight line; you can jump over used or unused numbers.
- See screenshot (O) for one solution.
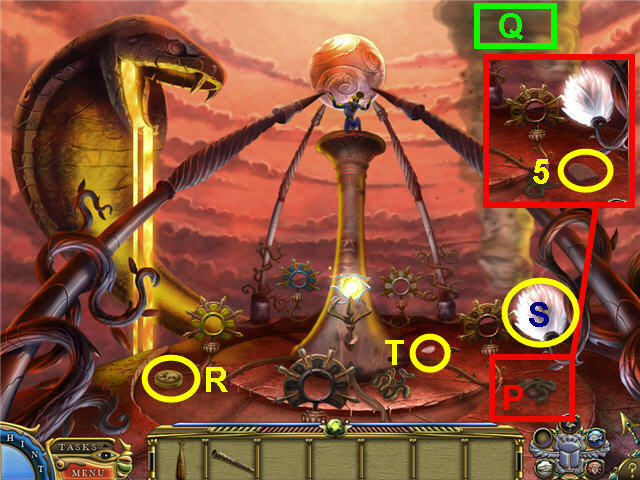
- Use the FLUTE on the snakes (P).
- Take the tablet (5) for the recipe for the rebirth charm.
- Use the MAGIC POTION on the whirling wind (Q) holding Set.
- Pick up the GOLD CHARM STONE (R).
- Take the WHITE FLOWER (S).
- Pick up the SNAKE SCALE (T).
- Click on the glowing scarab in the lower right to activate the rebirth charm.
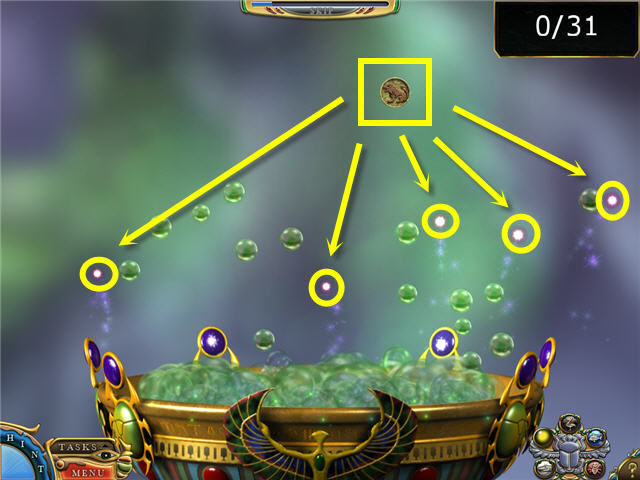
- The object is to catch 31 pink glowing bubbles with the charm.
- You do not need to click the charm on the pink bubbles, just pass them over.
- If a green bubble touches the charm some of your progress is lost. You can see how many you have by the counter in the upper right corner.
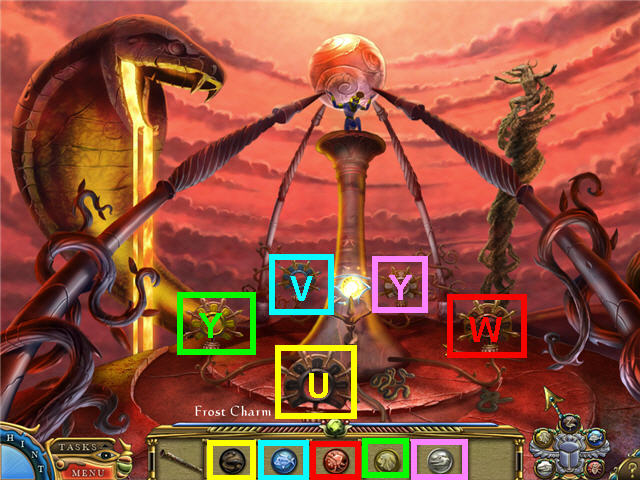
- Place the FROST CHARM on the black flower (U).
- Place the WATERBREATHING CHARM on the blue flower (V).
- Place the STRENGTH CHARM on the red flower (W).
- Place the REBIRTH CHARM on the yellow flower (X).
- Place the FIRE CHARM on the white flower (Y) and watch the cutscene.
- Congratulations! You have successfully completed Eternal Night: Realm of Souls.
Created at: 2011-01-17

