

Walkthrough Menu
- General Tips
- Chapter 1: The Graveyard
- Chapter 2: Entering the Castle
- Chapter 3: Sophia Rainheart
- Chapter 4: Daniela Rainheart
- Chapter 5: Rosemary Rainheart
- Chapter 6: Larena Rainheart
General Tips
- This is the Official Guide for Gravely Silent: House of Deadlock.
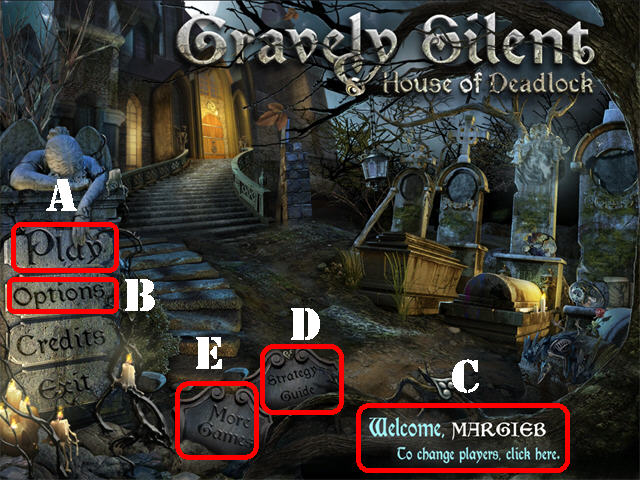
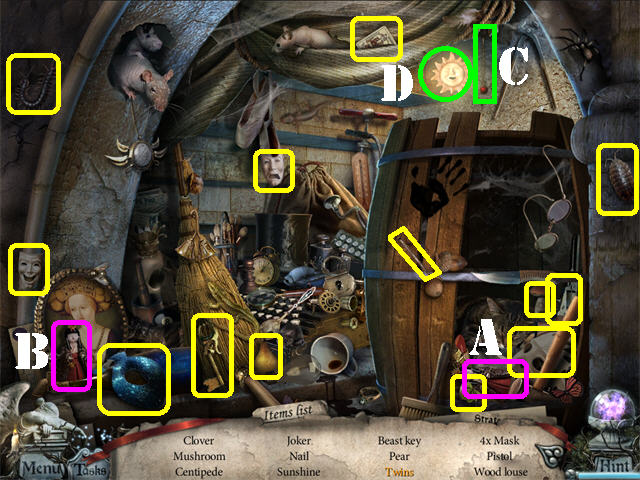
- Click on ‘Play’(A) to access the main chapters in the game.
- The ‘Options’ (B) button allows you to adjust the screen, music, cursor, and sound.
- The ‘To change players, click here’ button (C) can be used to manage player profiles.
- The ‘STRATEGY GUIDE’ (D) button takes you to the purchase page for the guide.
- Click on the ‘More Games’ (E) button to view additional titles for this developer.
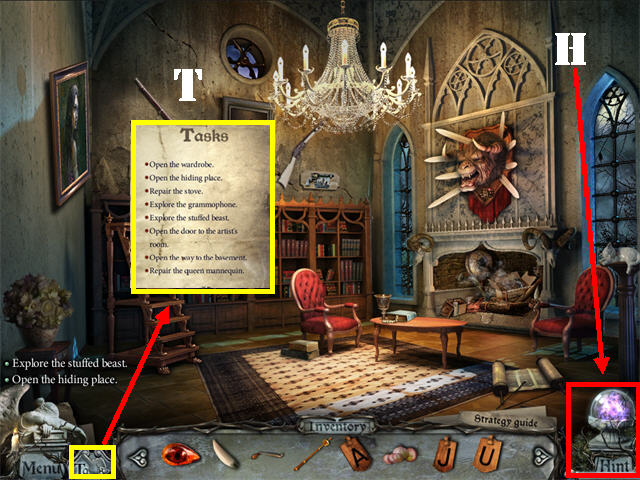
- The Hint (H) button is in the lower right corner of each scene.
- You have unlimited Hints in the Hidden Object Scenes and in regular scenes, but you must wait for them to recharge between uses.
- A cluster of sparkles indicates a Hidden Object Scene which will grant an inventory item upon completion.
- Click on the ‘Tasks’ (T) button in the lower left to view the missions you need to accomplish in the game.
- Inventory items will appear at the bottom of the scene. To use an inventory item, select it and drag it to the desired location; click it into the spot in which you want it used.
- Inventory items in Hidden Object Scenes are marked in red.
- You can skip a puzzle once the ‘SKIP’ button fills. The ‘SKIP’ button only appears in puzzle sections; it is located in the upper center.
Chapter 1: The Graveyard
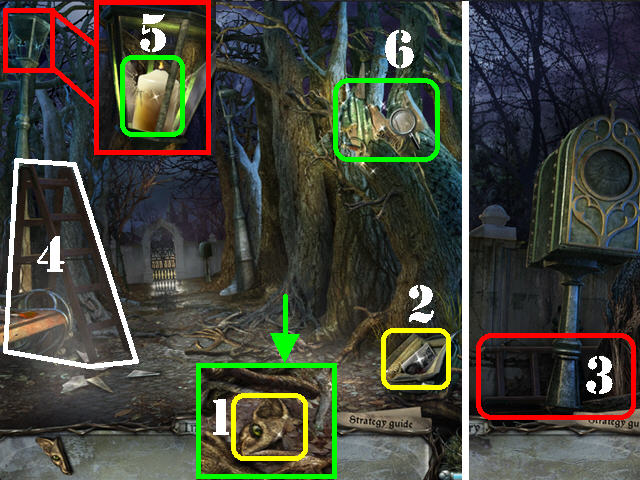
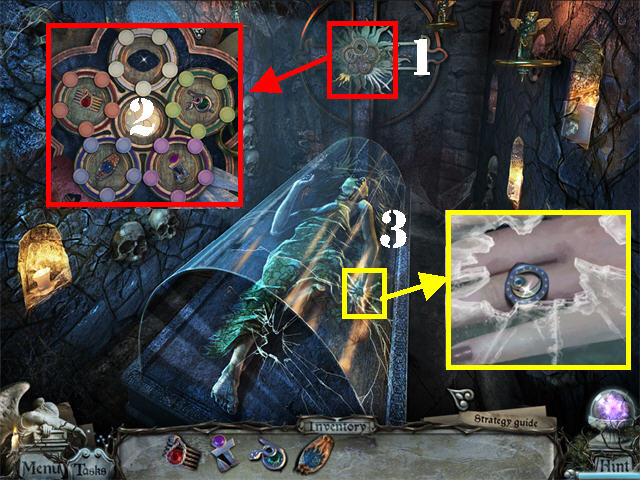
- Zoom into the pile of branches; click on them 5 times to push them aside.
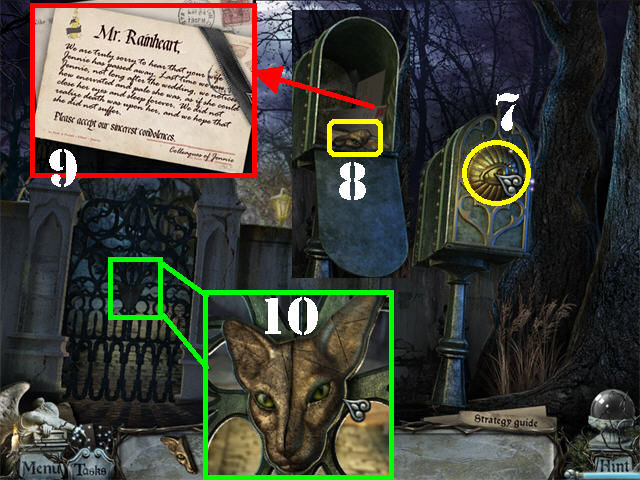
- Take the LEFT CAT HEAD (1).
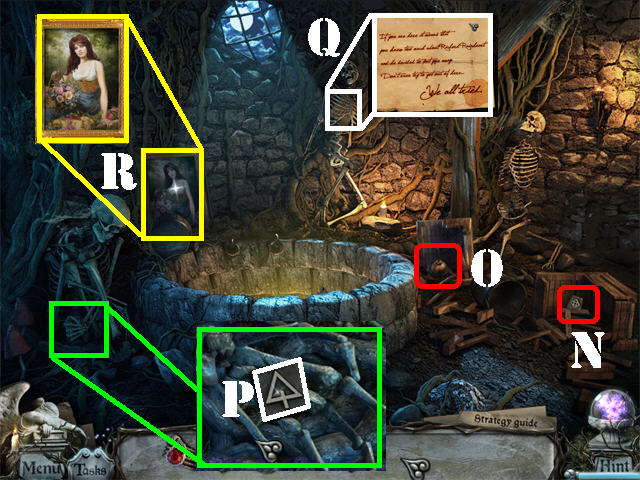
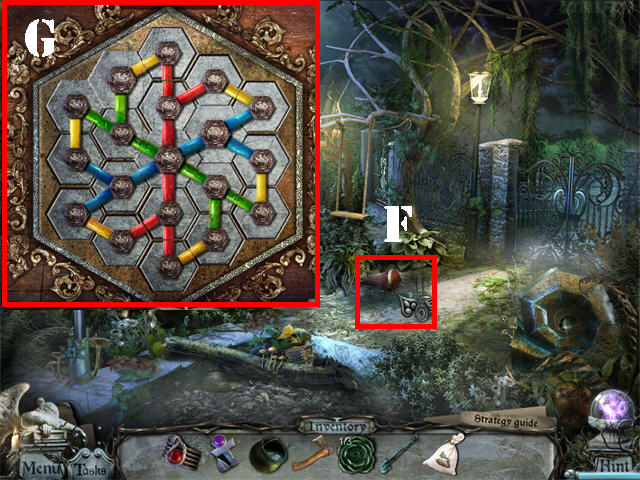
- Read the note in the lower right (2).
- Head towards the gate.
- Grab the LADDER on the right (3).
- Click down.
- Place the LADDER against the lamppost (4).
- Zoom into the top of the lamppost; take the BRIGHT CANDLE (5).
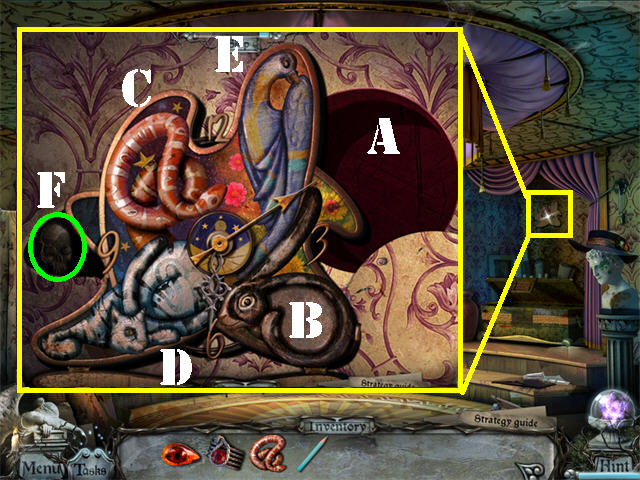
- Place the BRIGHT CANDLE on top of the right tree (6) to activate a Hidden Object Scene; play it.
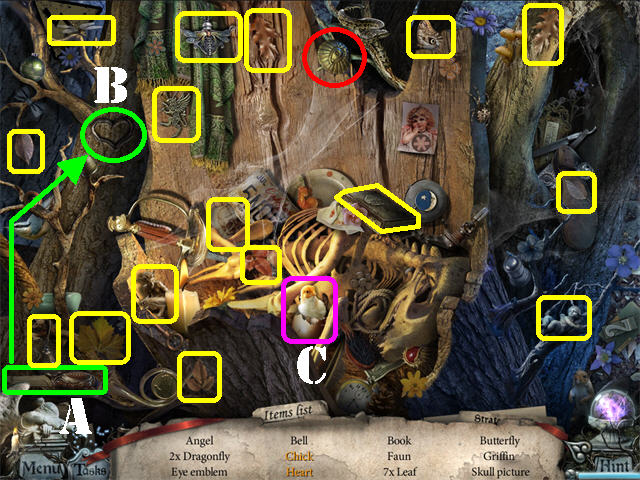
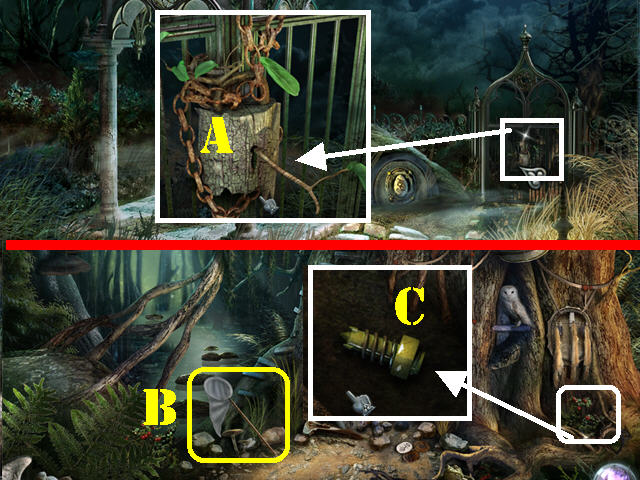
- Grab the KNIFE (A) in the lower left and place it on the tree in the upper left(); take the HEART (B) carved into the tree.
- Click on the egg in the lower center; take the CHICK (C).
- The EYE EMBLEM will be added to inventory.
- Head forward.
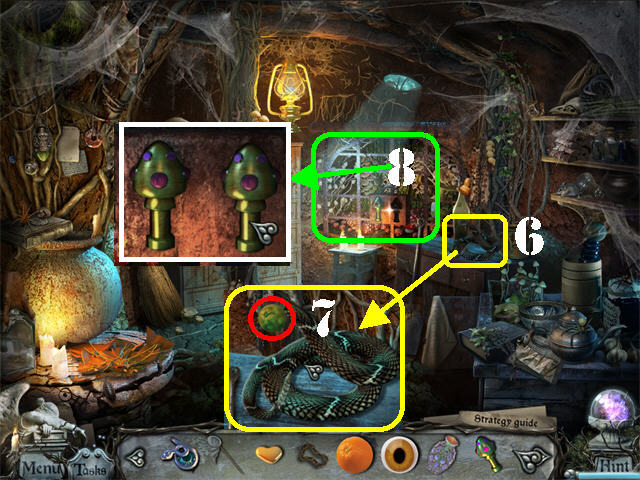
- Place the EYE EMBLEM (7) on the mailbox to open it.
- Take the RIGHT CAT HEAD (8) from inside the mailbox.
- Zoom into the mailbox for a letter to appear (9).
- Zoom into the gate; place the LEFT CAT HEAD and the RIGHT CAT HEAD on the gate (10).
- Go through the gate.
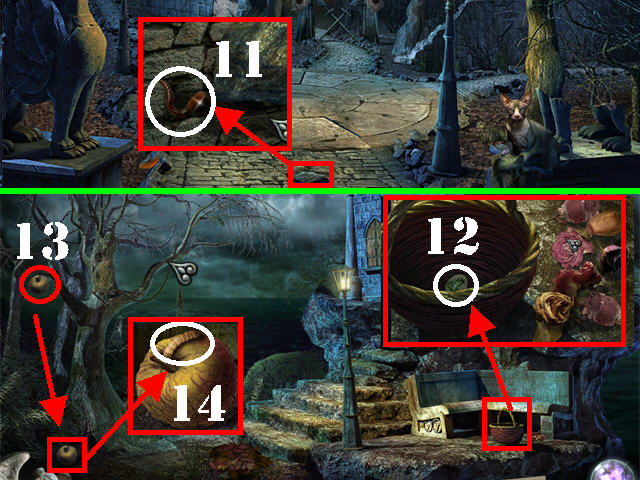
- Zoom into the loose brick on the ground; click on it and take the WORM 1 of 3 (11).
- Head right.
- Zoom into the basket in the lower right; remove all the flowers and place them on the ground.
- Take the GREEN CRYPT TOKEN at the bottom of the basket (12).
- Click on the apple on the tree to make it fall (13).
- Zoom into the fallen apple and take WORM 2 of 3 (14).
- Click down and head left.
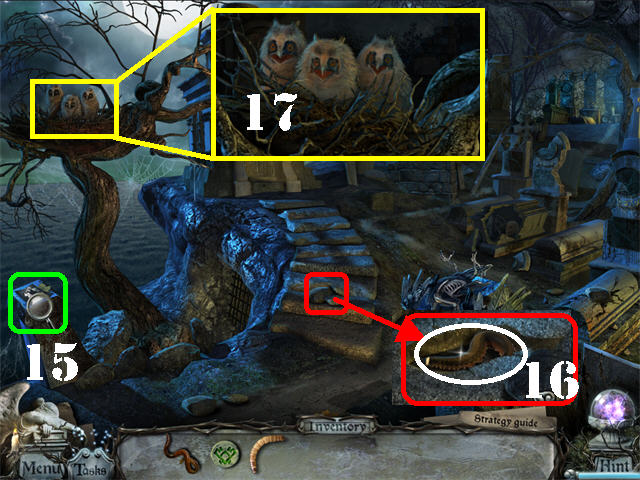
- Examine the picture in the lower left (15).
- Zoom into the bottom of the steps; click on the 3 stones to remove them and take WORM 3 of 3 (16).
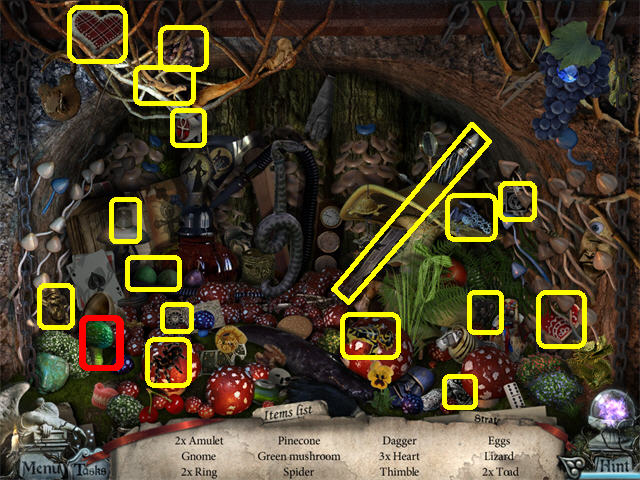
- Zoom into the 3 owlets in the upper left; give each owlet one of the 3 WORMS to activate a Hidden Object Scene; play it (17).
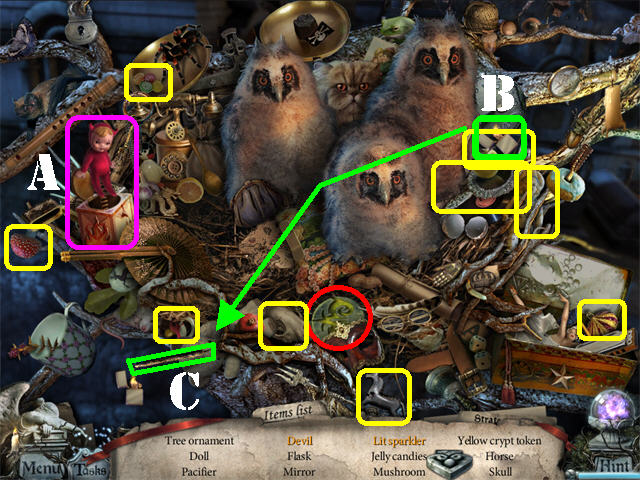
- Click on the box on the left; take the DEVIL (A).
- Click on the LIGHTER (B) in the upper right to open it and drag it to the SPARKLER (C) in the lower left; take the LIT SPARKLER.
- The YELLOW CRYPT TOKEN will be added to inventory.
- Head towards the upper right side of the scene.
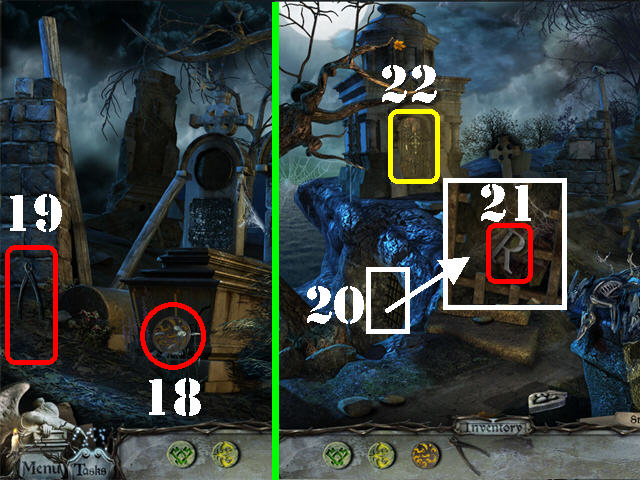
- Take the YELLOW GLASS FLOWER (18) and the PLIERS (19) in the lower left.
- Click down.
- Zoom into the grate next to the steps; cut the grating with the PLIERS (20) and take the LEFT SHIELD LOGO (21).
- Zoom into the mausoleum’s gate in the back of the scene (22).
- Place the YELLOW CRYPT TOKEN and the GREEN CRYPT TOKEN on the gate to activate a puzzle.
- Move the tokens onto the cross arm of the same color. Use the space in the middle to jump over to opposite sides.
- Tokens can only jump over a piece into an empty space.
- Please look at the screenshot for the final solution and the video for a step-by-step solution.
- Check out our video solution!

- Enter the mausoleum after the puzzle has been solved.
- Click on the ghost after you finish reading her message.
- Grab the FLASHLIGHT in the far right (23).
- Take the MECHANICAL SPIDER (24) on the left side of the wall.
- Click down twice and head right.
- Zoom into the door (25).
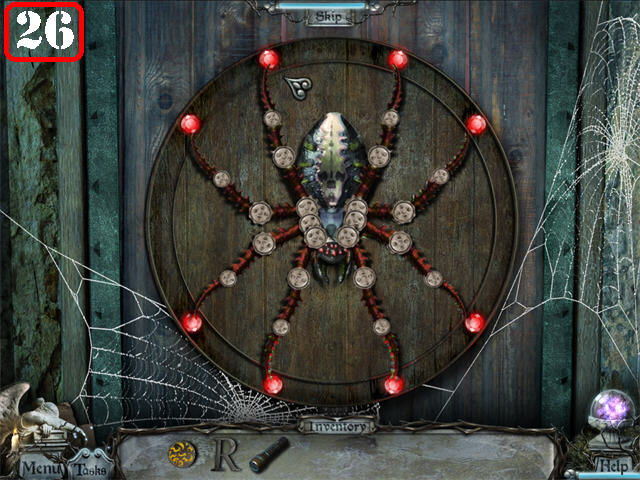
- Place the MECHANICAL SPIDER on the lock to activate the puzzle.
- Click on the legs to move them and re-position the legs into the right spots.
- Click on the small circles or on the tentacles to move them into position.
- A leg placed correctly will turn red.
- Please look at the screenshot for the solution (26).
- Go through the door after the puzzle has been solved to access the house.
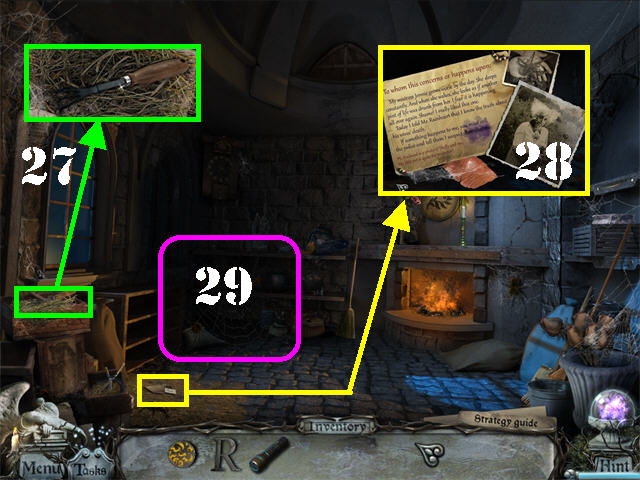
- Zoom into the crate on left; take the RAKE (27).
- Examine the paper on the left side of the ground; read the note (28).
- Place the FLASHLIGHT on the dark corner to activate a Hidden Object Scene; play it (29).
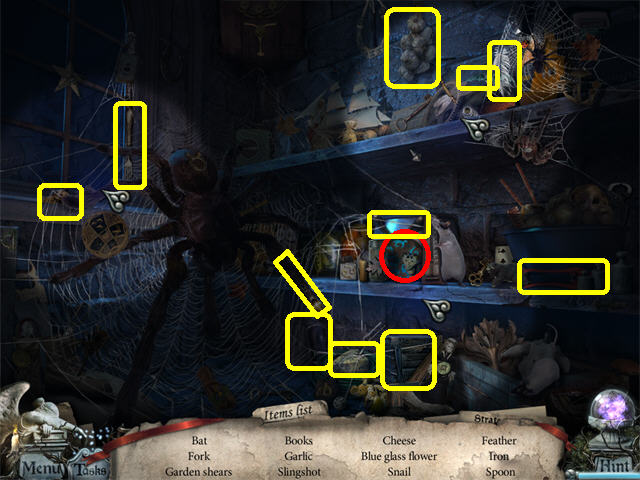
- Use the FLASHLIGHT to illuminate the Hidden Object Scene.
- The BLUE GLASS FLOWER will be added to inventory.
- Click down.
- Zoom into the pile of leaves in the lower left.
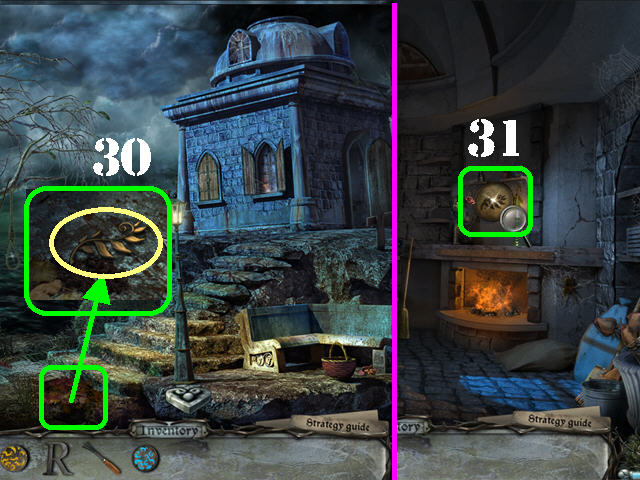
- Use the RAKE on the leaves3 times to remove them; take the HERBARIUM STEM (30).
- Return to the house.
- Zoom into the area above the fireplace (31).
- Place the HERBARIUM STEM in its silhouette to activate the puzzle.
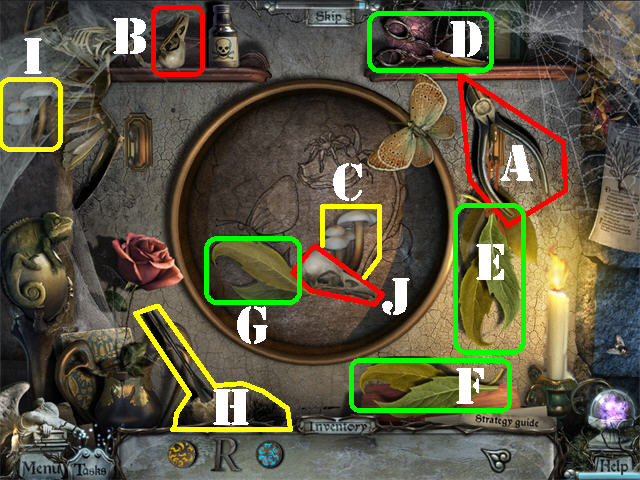
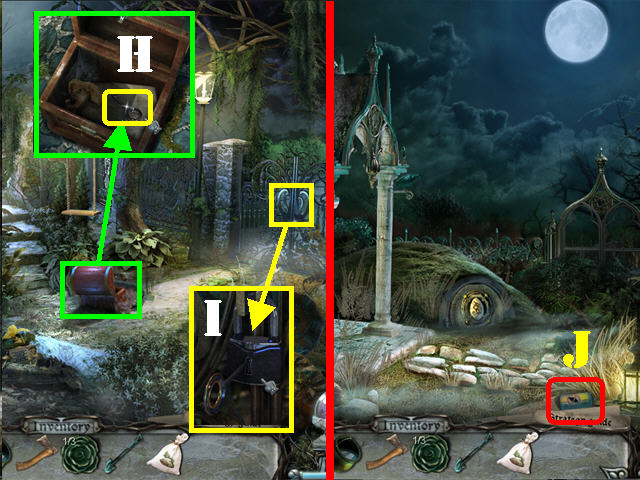
- Take the PLIERS (A) in the upper right and use them to cut the SKULL loose (B).
- Place the SKULL in its matching spot in the center (J).
- Grab the SHEARS (D) in the upper right and use them to cut the string attached to the LEAVES (E) on the right.
- Grab the cut LEAVES (F) and place them in their matching spot (G).
- Grab the FEATHER DUSTER (H) in the lower left and use it to clean the cobwebs in the upper left.
- Grab the MUSHROOMS (I) in the upper left and place them in their matching spot (C).
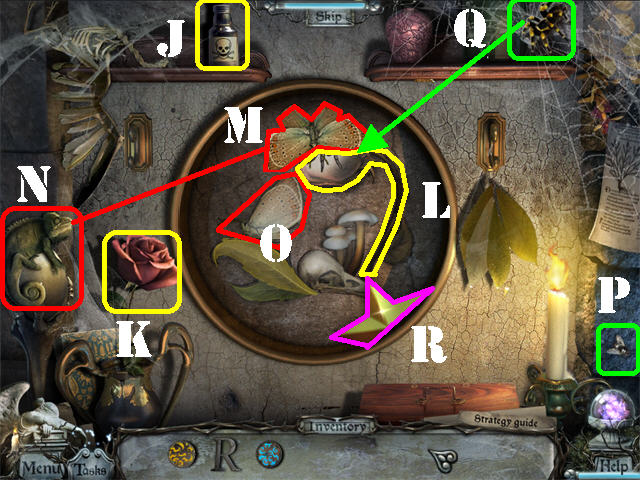
- Pick up the POISON (J) in the upper left and use it on the ROSE (K) on the lower left.
- Place the DRIED ROSE in its matching spot (L).
- Click on the BUTTERFLY to make it fly. Click on it again once it rests; it should land in the upper center (M).
- Click on the CHAMELEON (N) on the left and the chameleon will grab it with its tongue.
- Take the BUTTERFLY and place it in its right spot (O).
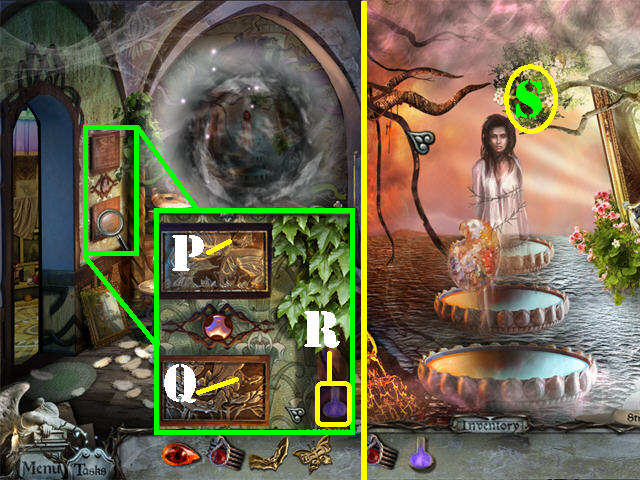
- Click on the FLY (P) in the lower right and it will fly to the spider web in the upper right.
- Grab the SPIDER (Q) that comes after the fly; place the spider above the dried rose to complete the puzzle.
- Take the LEFT STAR PIECE (R) after the puzzle has been solved.
- Click down twice, head left and go into the mausoleum.
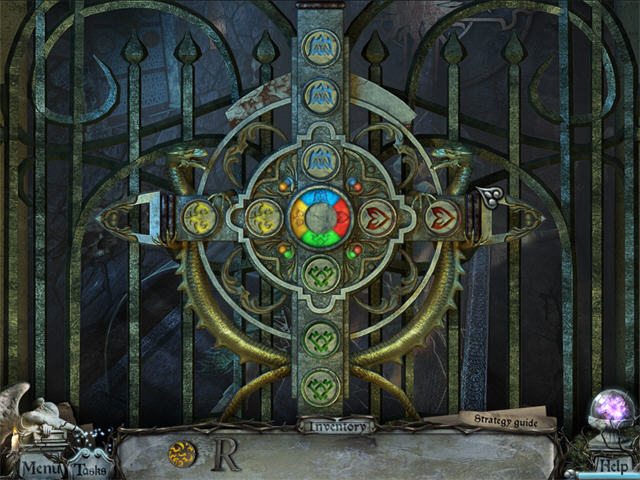
- Zoom into the left window.
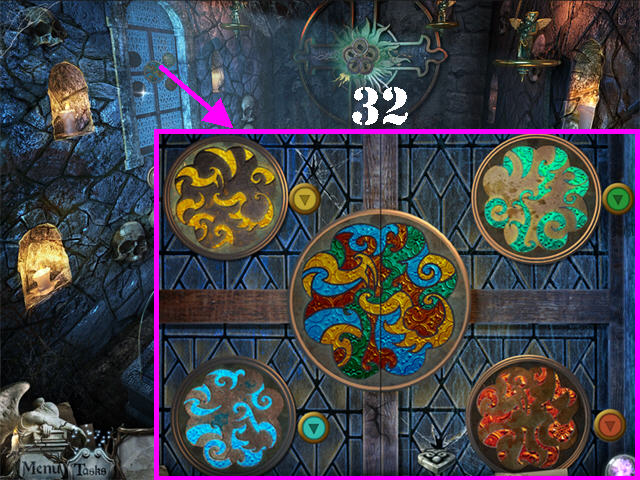
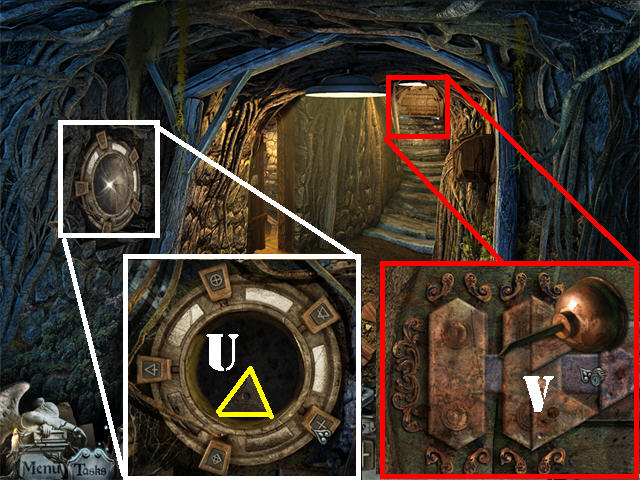
- Place the BLUE GLASS FLOWER and the YELLOW GLASS FLOWER on the window to activate a puzzle.
- Click on the arrows next to each disk to rotate them.
- Rotate the disk so the pattern of a particular color is in the same position as the large disk in the center.
- Once all disks have been rotated correctly they will light up as shown in the screenshot (32).
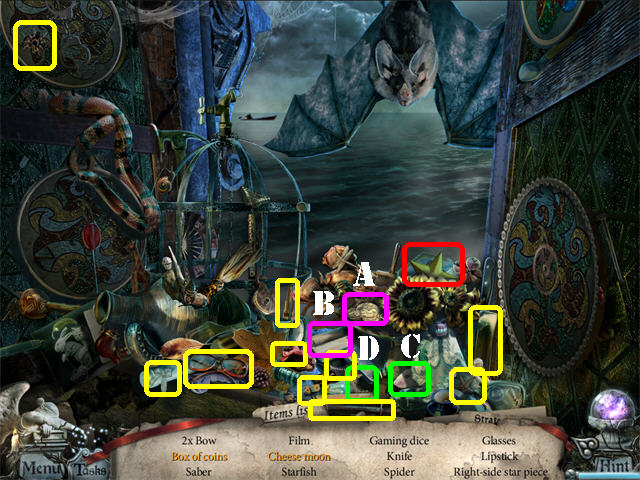
- A Hidden Object Scene will activate after the puzzle has been solved; play it.
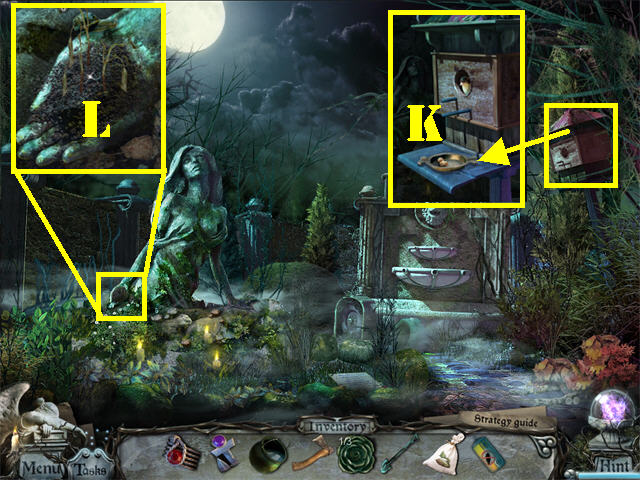
- Drag the COINS (A) to the box (B); take the BOX OF COINS.
- Click on the PARTIALLY-HIDDEN MOUSE (C); take the CHEESE MOON (D).
- The RIGHT STAR PIECE will be added to inventory.
- Click down twice and head right.
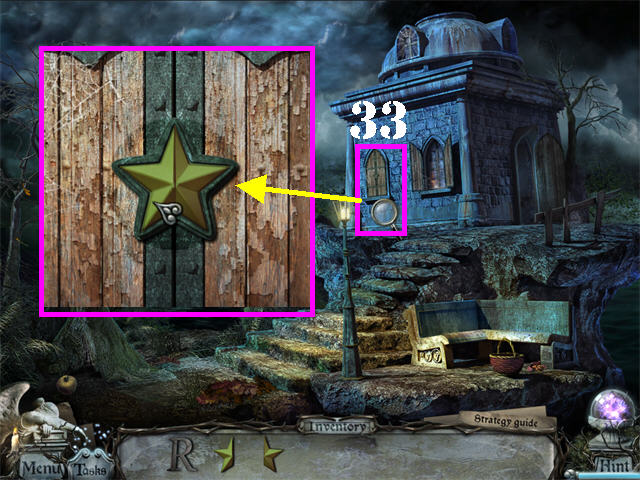
- Zoom into the lower left shutter (33).
- Place the LEFT STAR PIECE and the RIGHT STAR PIECE on the star silhouette. This action turns the lights ion in the house.
- Go into the house.
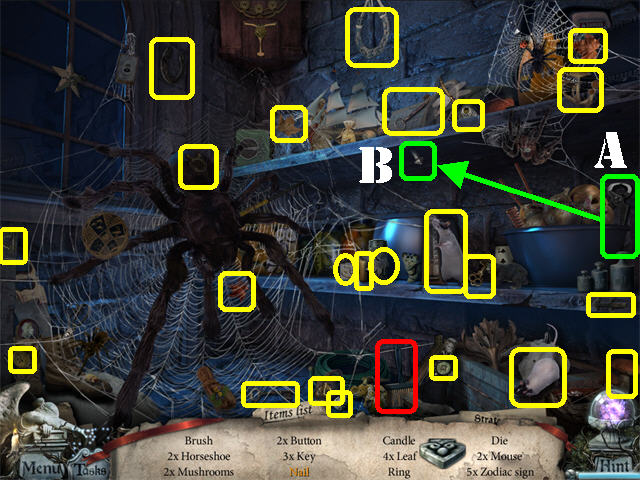
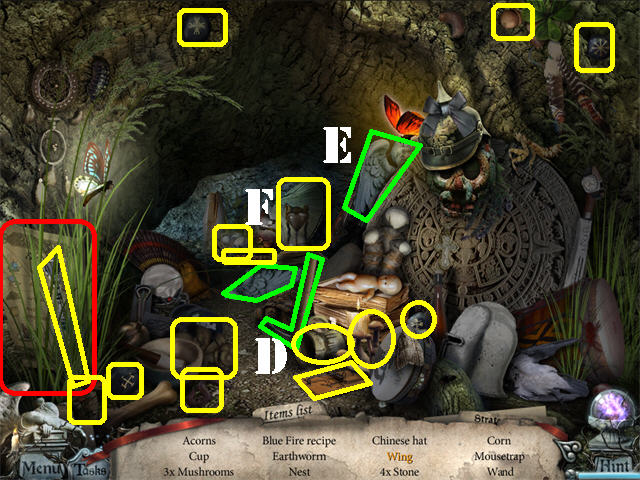
- Play the Hidden Object Scene.
- Place the PLIERS (A) on the NAIL (B) on the shelf; take the NAIL.
- The BRUSH will be added to inventory.
- Click down twice.
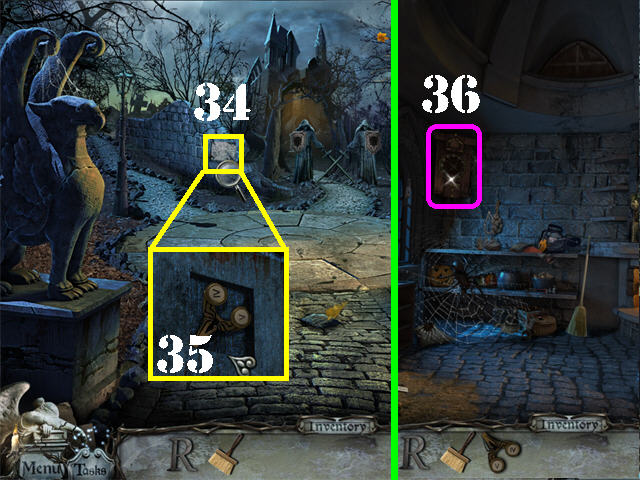
- Zoom onto the left side of the wall; clean the dirt with the BRUSH (34).
- Take the CLOCK PART in the wall (35).
- Return to the house.
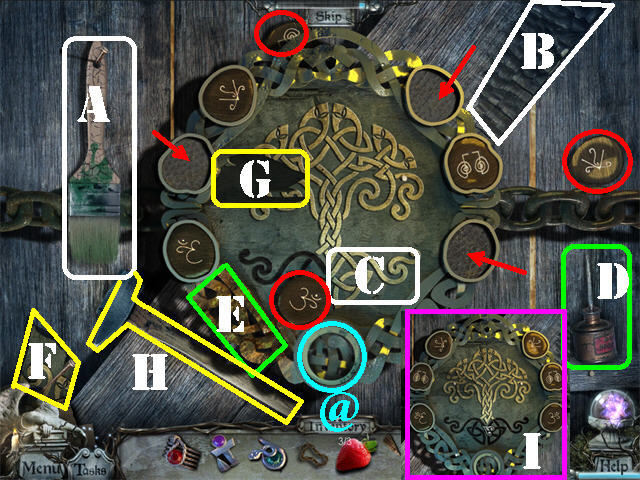
- Zoom into the clock on the back wall (36).
- Place the CLOCK PART on the clock to activate a puzzle.
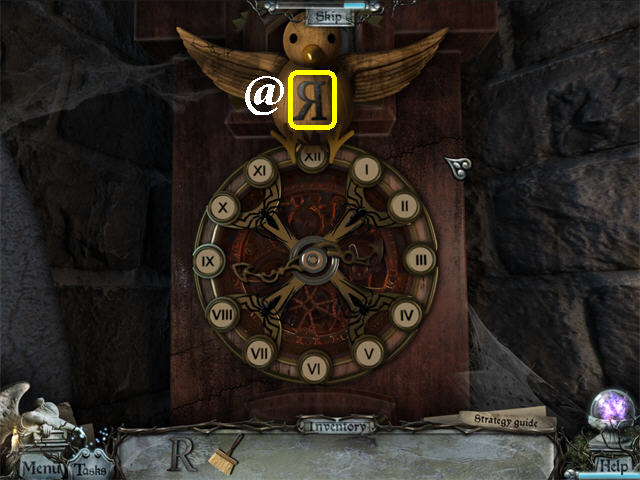
- Arrange the numbers in the correct order by clicking on the arrows to rotate them and on the spider to swap them.
- The screenshot shows the final image. Please look at the video for s step-by-step solution.
- Check out our video solution!
- Take the RIGHT SHIELD LOGO (@) after the puzzle has been solved.
Chapter 2: Enter the Castle
- Click down twice from the house to arrive at the outside of the Castle.
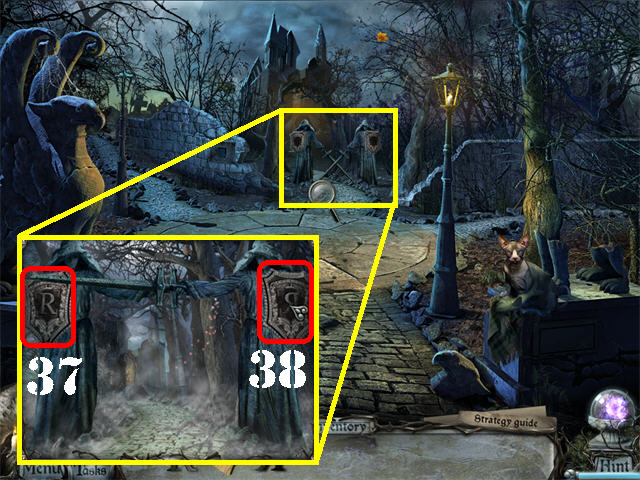
- Zoom into the 2 stone guardians in the back.
- Place the LEFT SHIELD LOGO on the left shield (37).
- Place the RIGHT SHIELD LOGO on the right shield (38).
- Go through the gate.
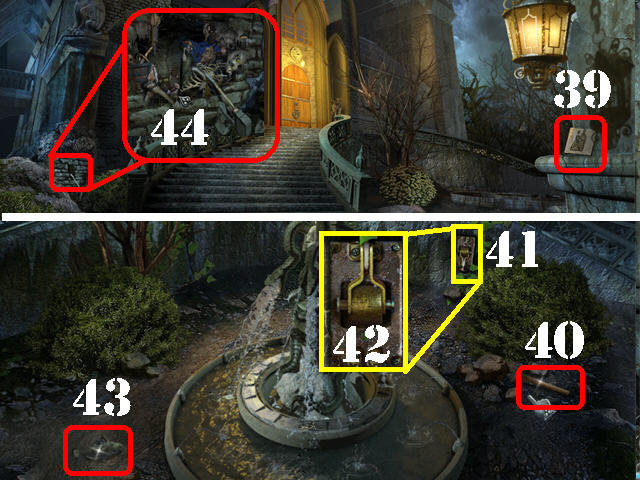
- Take BLOCK CRIPTIX 2 (39) on the right.
- Head right.
- Grab the SLEDGEHAMMER (40) in the lower right.
- Click on the vines on the right 3 times (41).
- Zoom into the vines and flip the switch to bring up the fountain (42) and a fish will fly out of the fountain.
- Take the FISH in the lower left (43).
- Click down.
- Zoom onto the lower left side of the wall (44); break the wall with the SLEDGEHAMMER to activate a Hidden Object Scene; play it.
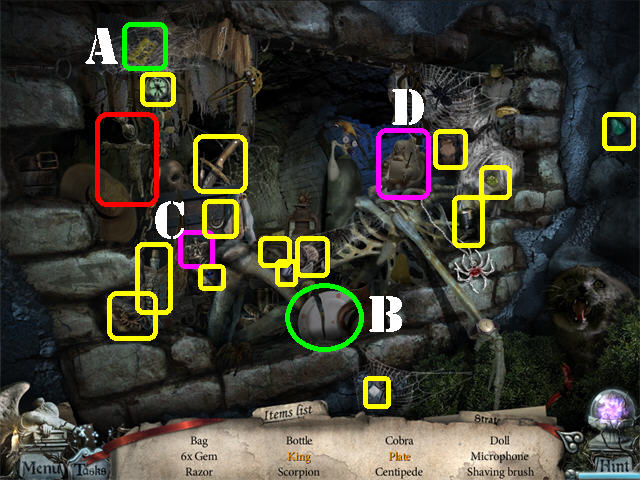
- Grab the GLUE (A) in the upper left and place it on the BROKEN PLATE (B); take the PLATE.
- Place the CROWN (C) on the CHESS PIECE (D); take the KING.
- The DOLL will be added to inventory.
- Click down.
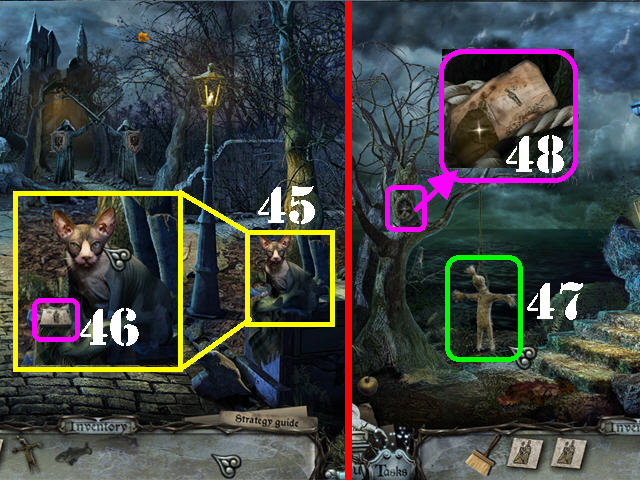
- Zoom into the CAT on the right (45) and give it the FISH; take the BLOCK CRIPTIX 1(46).
- Head right.
- Place the DOLL on the NOOSE hanging from the left tree (47).
- Zoom into the tree hollow; take the CRYPTIX PROMPT (48).
- Click down, head forward and towards the door.
- Zoom into the left gargoyle.
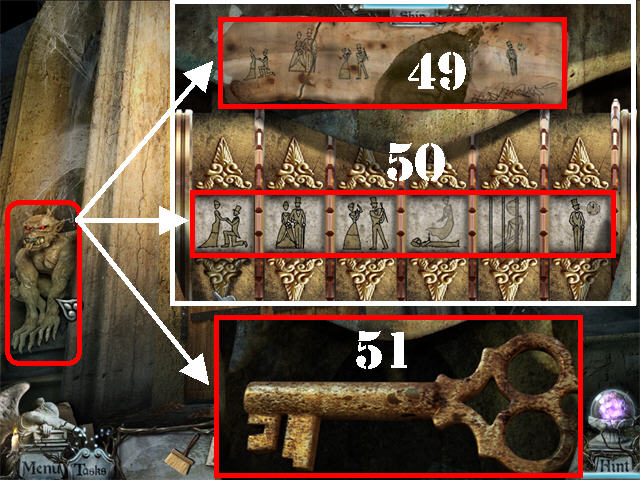
- Place the CRYPTIX PROMPT next to the torn paper (49).
- Place the 2 BLOCK CRYPTIX in the empty slots to activate the puzzle.
- Using the paper above place the pictures in the correct sequence. Use the arrows to scroll through the pictures.
- Please look at the screenshot for the solution (50).
- Take the KEY (51) after the puzzle has been solved.
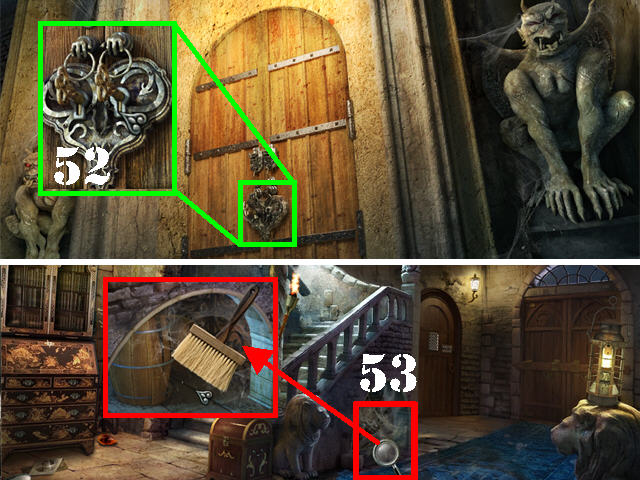
- Zoom into the door; place the KEY in the keyhole (52).
- Go through the door.
- Zoom into the area below the steps (53).
- Clean it with the BRUSH to activate a Hidden Object Scene; play it.
- Drag the DOLL in the lower right (A) next to the DOLL in the lower left (B); take the TWINS.
- Pull the STRING (C) in the upper right; take the SUNSHINE (D).
- The GALLERY KEY will be added to inventory.
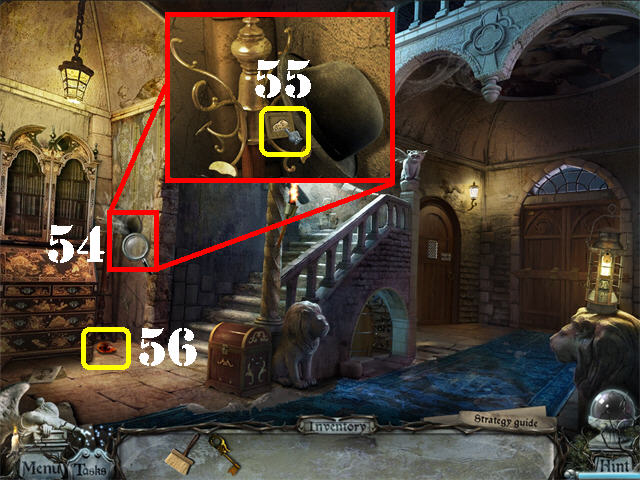
- Examine the cobweb on the left side of the wall (54).
- Remove the cobwebs with the BRUSH; take KITCHEN DOOR DETAIL 1 of 4 (55).
- Take the GARGOYLE’S RIGHT EYE (56) on the ground.
- Go up the steps.
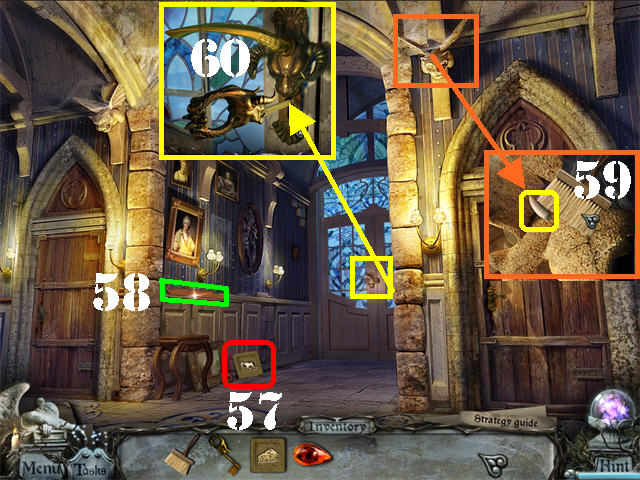
- Take KITCHEN DOOR DETAIL 2 of 4 (57) in the hallway.
- Grab STEP 1 of 4 on the left side of the wall (58).
- Zoom into the stone head above the right door; remove the cobwebs with the BRUSH; take FANG 1 of 2 (59).
- Examine the back door; place the GALLERY KEY in the lock (60).
- Enter the Gallery.
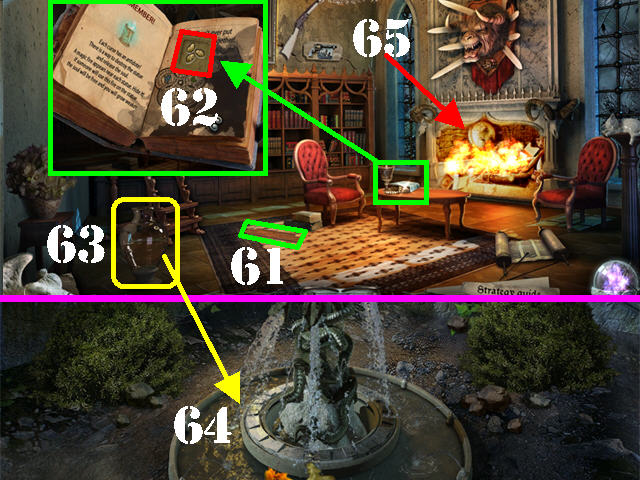
- Grab STEP 2 of 4 on the carpet (61).
- Zoom into the BOOK on the coffee table; turn the page and take KITCHEN DOOR DETAIL 3 of 4 (62).
- Take the EMPTY VASE (63) on the left side of the ground.
- Exit the castle and head right.
- Place the EMPTY VASE in the fountain to automatically obtain the VASE OF WATER (64).
- Return to the Gallery inside the Castle.
- Place the VASE OF WATER into the fireplace to activate a Hidden Object Scene; play it (65).
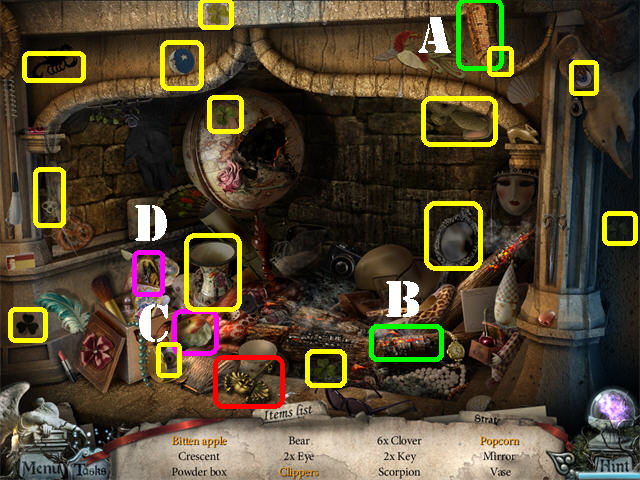
- Drag the EAR OF CORN (A) onto the LIT LOG (B); take the POPCORN.
- Click on the APPLE; take the BITTEN APPLE (C).
- Open the VASE on left; take the CLIPPERS (D).
- The ACTRESS’ DRESSING ROOM KEY will be added to inventory.
Chapter 3: Sophia Rainheart
- Exit the Gallery to return to the hallway.
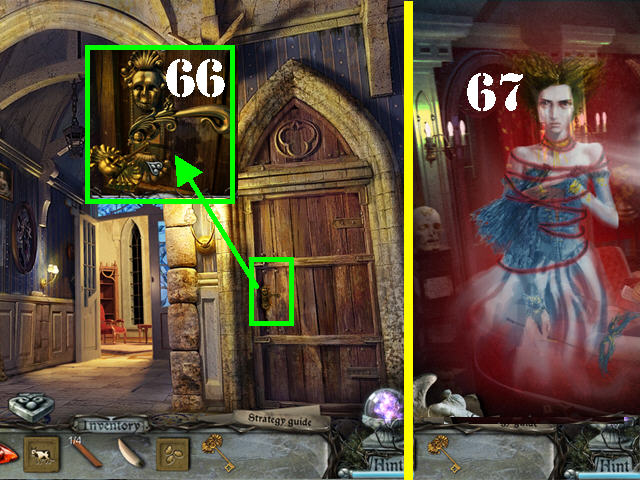
- Zoom into the right door; place the ACTRESS’ DRESSING ROOM KEY in the lock (66).
- Go through the door.
- The Statue of Sophia Rainheart will start to shake; she wants you to restore her sculpture so she can open the portal to the Netherworld.
- Click on Sophia’s image to take her off the screen (67).
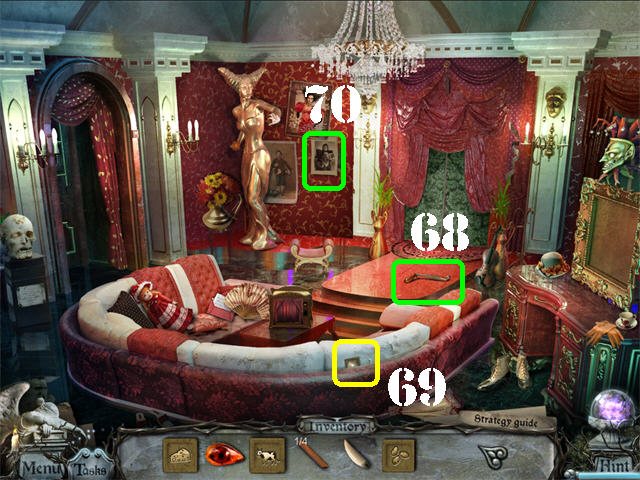
- Take the GRAMOPHONE HANDLE (68) on the stage.
- Grab KITCHEN DOOR DETAIL 4 of 4 on the back of the couch (69).
- Click on the picture on the back wall to remove it. Zoom into the area behind the picture to activate a puzzle (70).
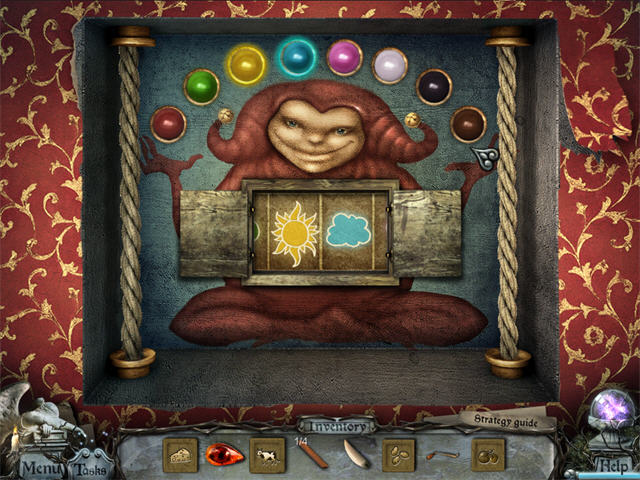
- Open the doors in the center to view a list of objects passing by.
- In order of appearance, place the colored balls that match the items in the doors into the spots above the puzzle.
- The solution is: Heart (RED)-Leaf (GREEN)-Sun (YELLOW)-Cloud (BLUE)-Flamingo (PINK)-Snowflake (WHITE)-Bat (BLACK) and Chocolate (BROWN).
- Solving the puzzle opens the curtains; go through them.
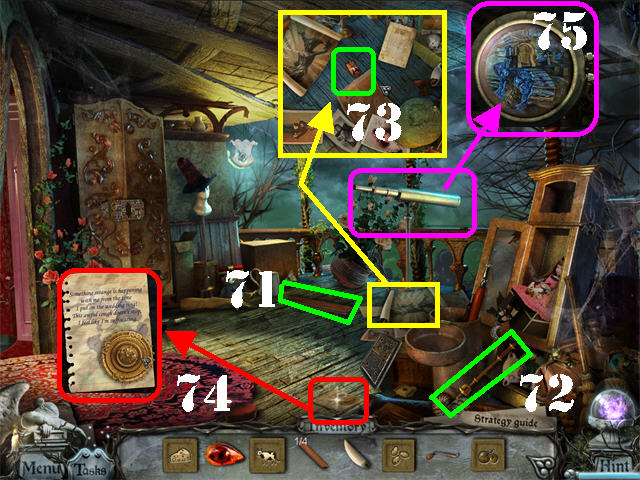
- Grab STEP 3 of 4 (71) on the ground.
- Take the SCEPTER (72) in the lower right.
- Zoom into the papers on the ground; click on the 6 papers and photos to move them out of the way. Grab the LETTER A (73) on the ground.
- Read the NOTE (74) in the lower center.
- Zoom into the telescope; click on the 2 knobs to bring the view into focus (75).

- Head left and click down twice.
- Zoom into the door behind the steps (76); place the 4 KITCHEN DOOR DETAILS on the lock to activate a puzzle.
- The pictures above and below the center image must have something in common with the center picture.
- Click on two pictures in the lower or top row to swap them.
- Please look at the screenshot for the solution.
- Enter the Kitchen.
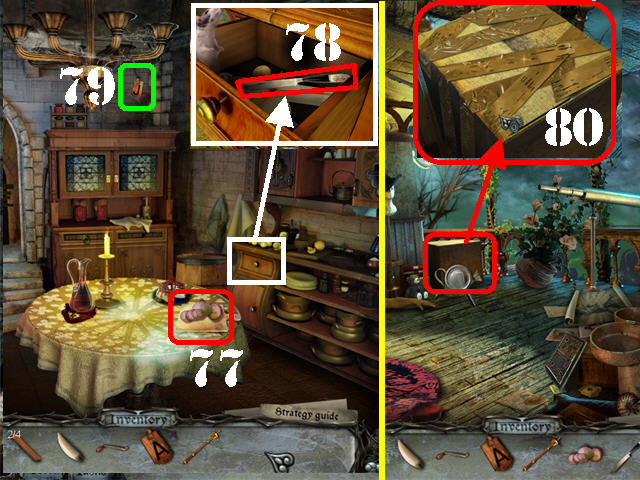
- Grab the ONION on the table (77).
- Open the drawer close to the table; zoom into it and take the KNIFE (78).
- Take the LETTER J (79) hanging from the chandelier.
- Return to the Actress’ room and go through the back curtains.
- Zoom into the box on the ground; cut it open with the KNIFE (80) to activate a Hidden Object Scene; play it.
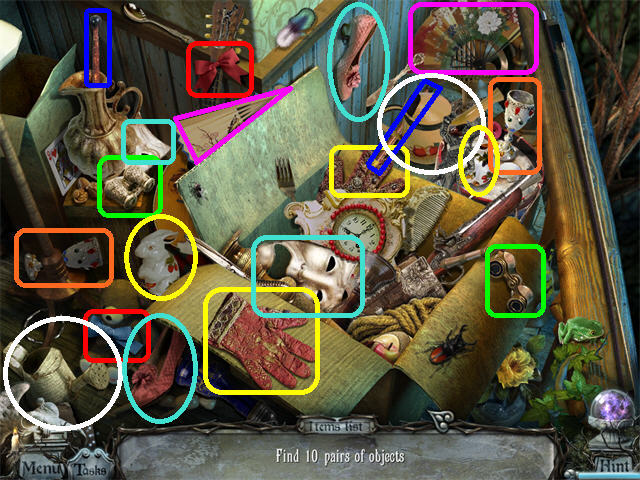
- Find the 10 pairs of objects in the scene that have something in common.
- To solve this scene pair up the items marked in the same color and shape in the screenshot to eliminate them.
- The TWO MASKS will be added to inventory.
- Head left and zoom into the door behind the left curtain.
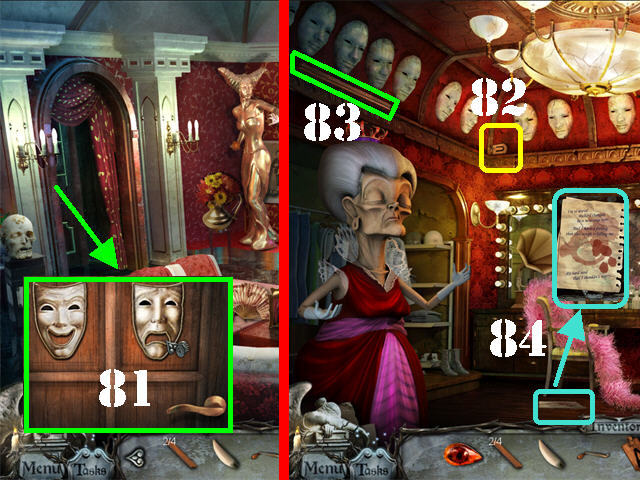
- Place the TWO MASKS on the door to unlock it; go through the door (81).
- Grab the LETTER U (82) in the upper left.
- Take STEP 4 of 4 (83) in the upper left corner.
- Read the NOTE (84) below the chair.
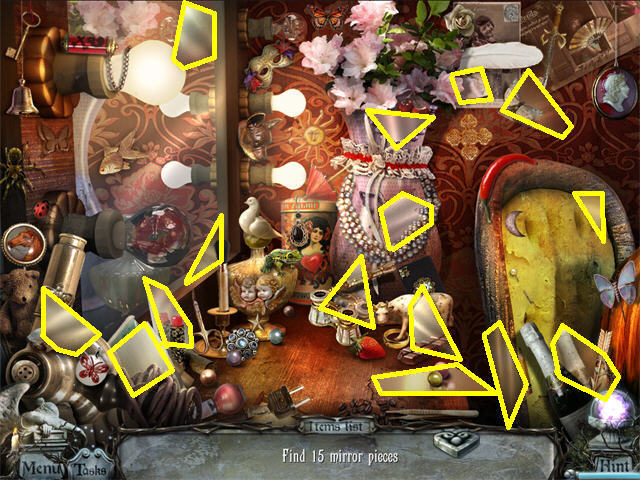
- Play the Hidden Object Scene by the mirror.
- Find the 15 Mirror pieces marked in yellow in the screenshot.
- The MIRROR PIECES will be added to inventory.
- Click down.
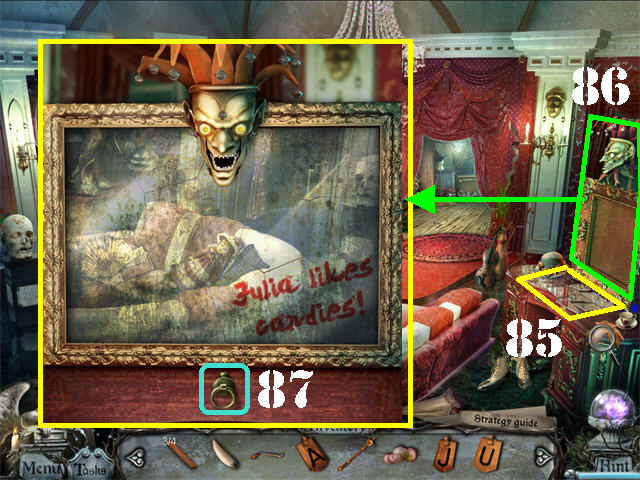
- Place the MIRROR PIECES on the dresser on the right (85).
- Zoom into the mirror on the right to activate a puzzle (86).
- Place the mirror pieces into the right spots. Correct pieces will lock in place.
- Please look at the screenshot for the solution. The mirror says ‘Julia likes candies!’.
- Take the DRAWER PULL (87) that falls on the dresser after the puzzle has been solved.
- Exit the close-up.
- Return to the Kitchen.
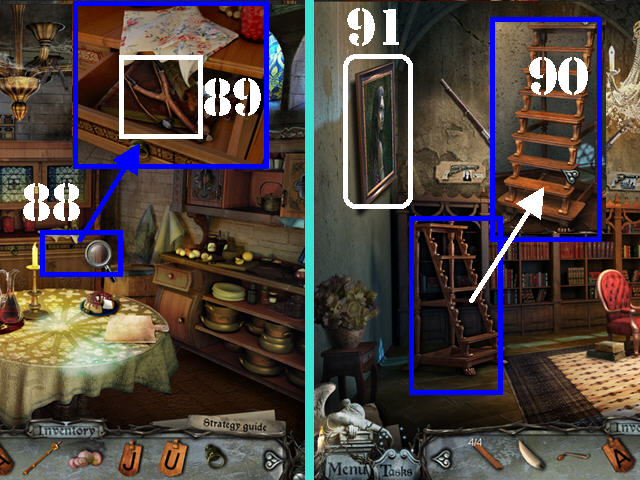
- Zoom into the cabinet close to the door (88).
- Place the DRAWER PULL on the drawer.
- Click on the handle to open the drawer; take the SLINGSHOT (89).
- Return to the Gallery.
- Zoom into the ladder on left (90); place the 4 STEPS on the ladder.
- Zoom into the portrait in the upper left side of the wall; click on it to knock it to the floor (91).
- Zoom into the cavity on the left side of the wall to activate a puzzle.
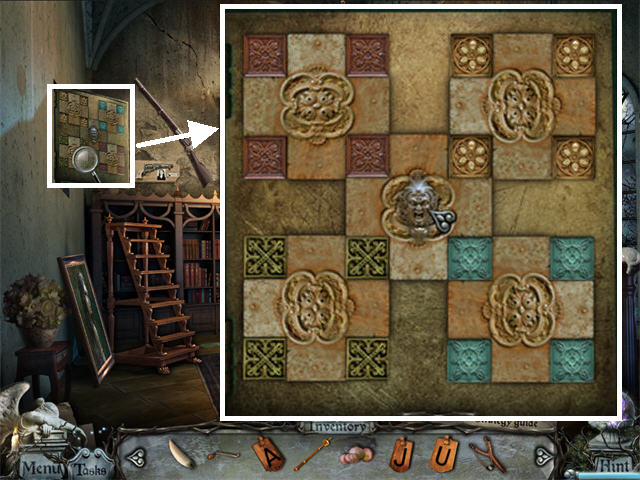
- Click on the center of the large squares to rotate them.
- Place the squares so that each large square in the corner has 4 squares of the same color. The center square should have one of each color as shown in the screenshot.
- Check out our video solution!
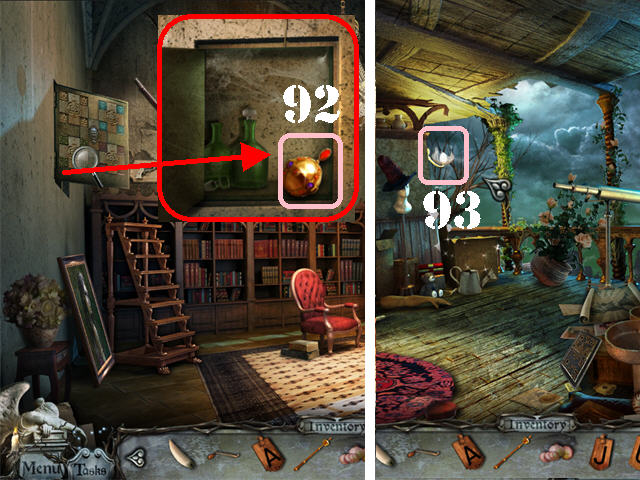
- Zoom into the area by the puzzle board after it has been solved; take the SPHERE (92).
- Return to the Actress’ room and go through the back curtains.
- Place the SLINGSHOT on the lamp (93) in the back to activate a Hidden Object Scene; play it.
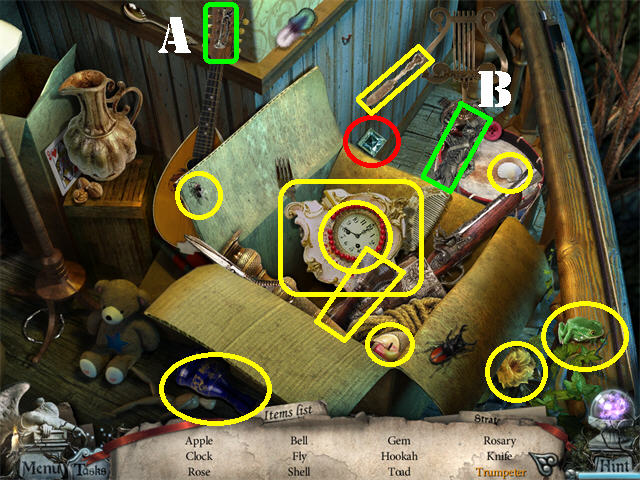
- Grab the TRUMPET (A) and place it on the silver statue (B); take the TRUMPETER.
- GEMSTONE 3 will be added to inventory.
- Return to the actress’ dressing room.
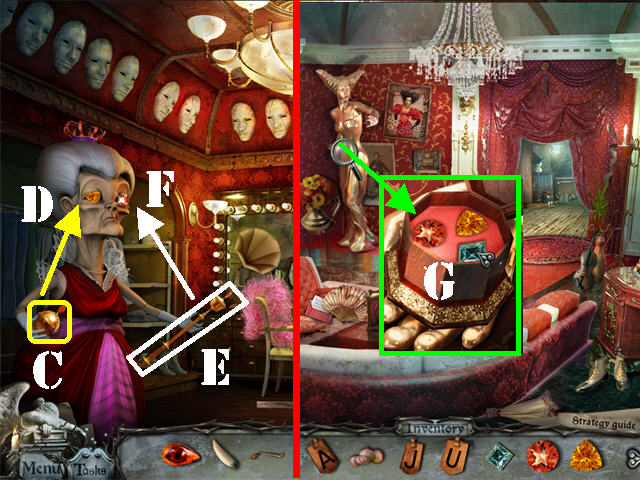
- Place the SPHERE (C) on the mannequin’s right hand; take GEMSTONE no.1 (D) from her right eye.
- Place the SCEPTER (E) on the mannequin’s left hand; take GEMSTONE no.2 (F) from her left eye.
- Click down.
- Zoom into the sculpture’s hand in the back of the room; place GEMSTONES 1, 2, and 3 in the box to activate the portal (G).
- Enter the Netherworld.
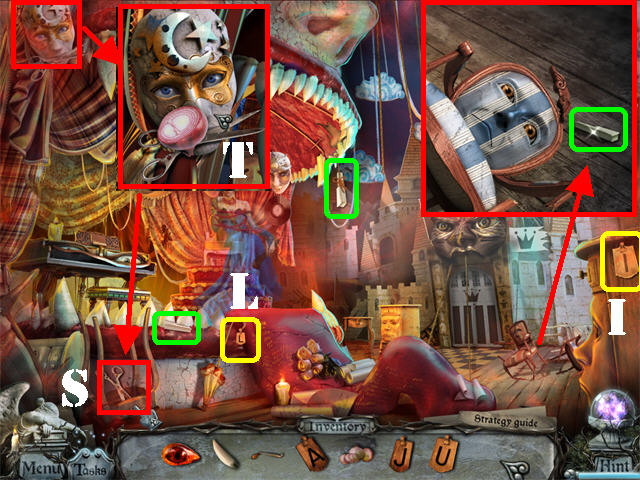
- Grab the PIANO KEYS 1 and 2 of 3 marked in green.
- Head towards the fallen chairs in the lower right; take PIANO KEY 3 of 3 marked in green.
- Take the LETTER L (L) below the stage.
- Grab the LETTER I (I) on the right edge of the scene.
- Zoom into the tragedy mask in the upper left; place the ONION on its eyes to make it drop the SCISSORS (T).
- Grab the SCISSORS (S) on the lower left side.
- Return to the actress’ dressing room.
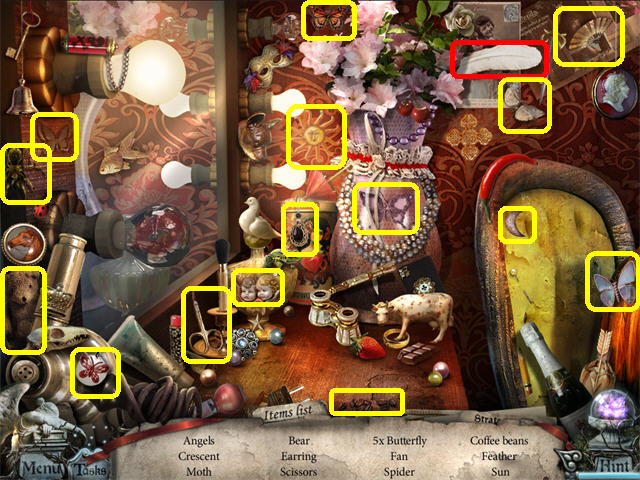
- Play the Hidden Object Scene to obtain the FEATHER.
- Return to the Netherworld.
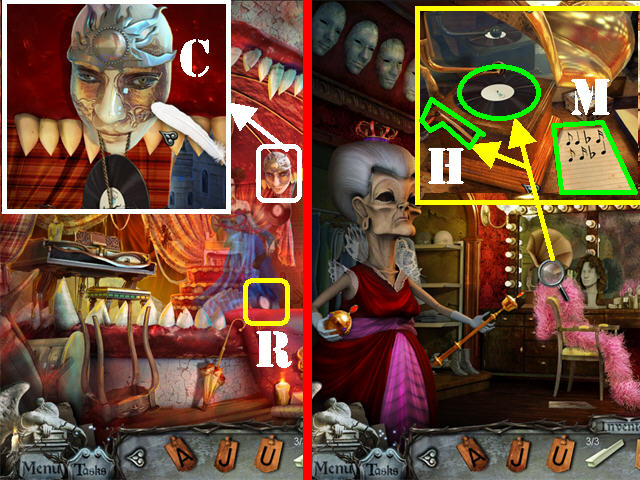
- Zoom into the comedy mask on the right; place the FEATHER on its nose and it will drop the RECORD (C).
- Pick up the RECORD next to Sophia (R).
- Return to the actress’ dressing room.
- Zoom into the gramophone; place the RECORD and the GRAMOPHONE HANDLE on the gramophone.
- Click on the handle to activate the gramophone (H).
- Take the MUSIC SHEET (M) next to the gramophone after it stops playing.
- Return to the Netherworld.
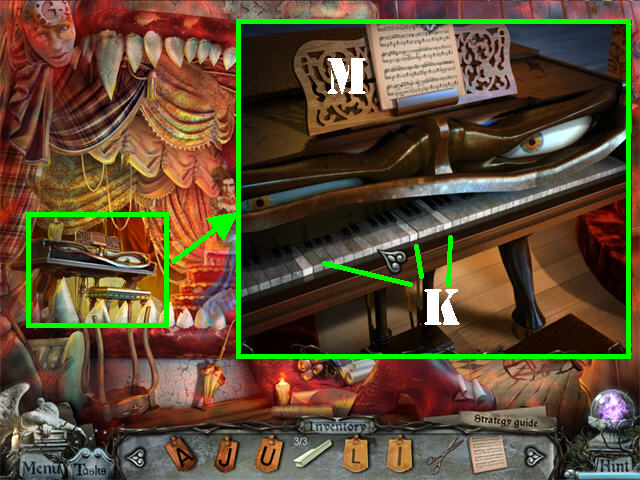
- Zoom into the piano.
- Place the 3 PIANO KEYS on the keyboard (K).
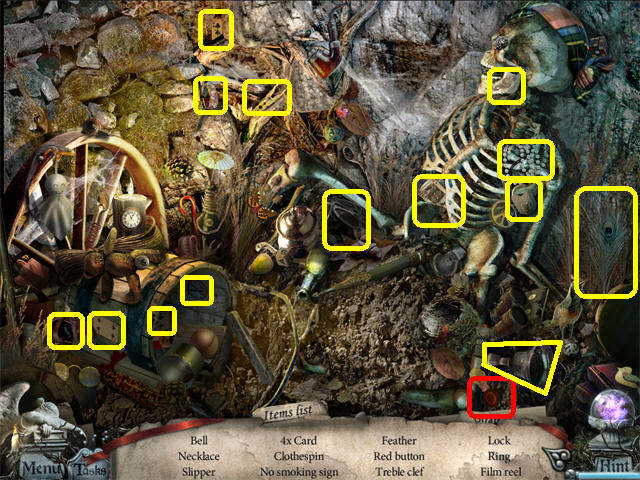
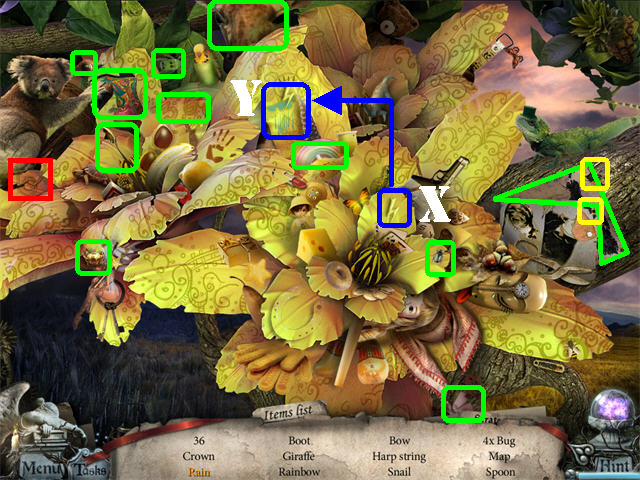
- Put the MUSIC SHEET (M) on the stand above the piano to activate a Hidden Object Scene; play it.
- Find the items on the list.
- The QUEEN will be added to inventory.
- Zoom into the castle; place the QUEEN by the door (Q).
- Take the CANDY (C) after the QUEEN returns with it.
- Return to the actress’ dressing room.
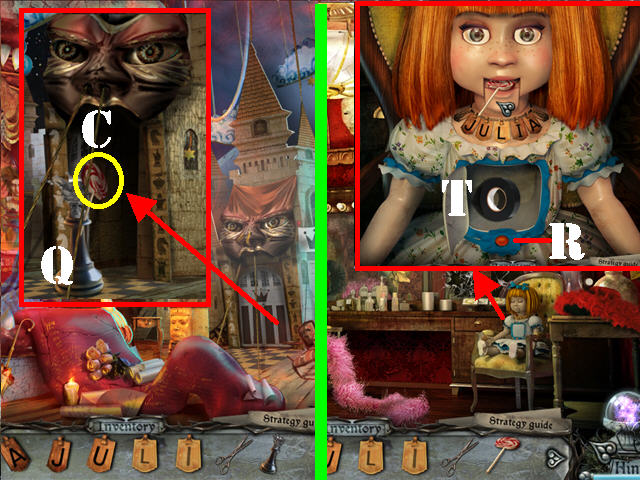
- Zoom into the doll on the chair.
- Press the RED BUTTON (R) and her thought bubble will say ‘What’s my name?”
- Place the LETTER J, LETTER U, LETTER L, LETTER I, and LETTER A on her necklace and her mouth will open.
- Place the CANDY in her mouth; take the INSULATING TAPE (T) in her stomach area.
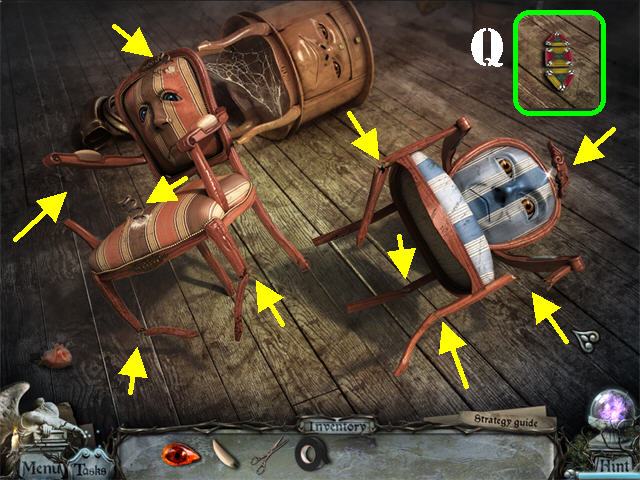
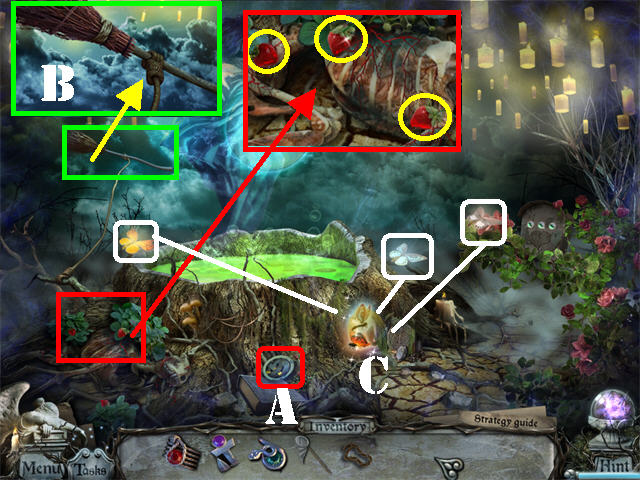
- Return to the Netherworld and head towards the fallen chairs in the lower right.
- Repair the chairs with the INSULATIING TAPE on the 10 areas marked with arrows in the screenshot.
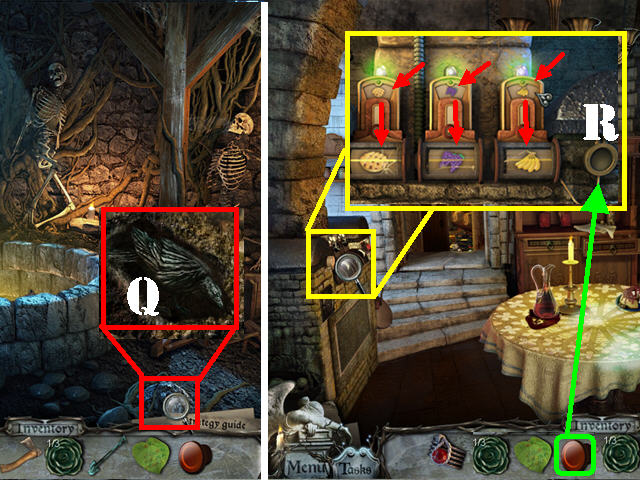
- Take the PUZZLE PIECE (Q) on the ground after the chairs have been repaired.
- Exit the Netherworld and go through the curtains in the back.
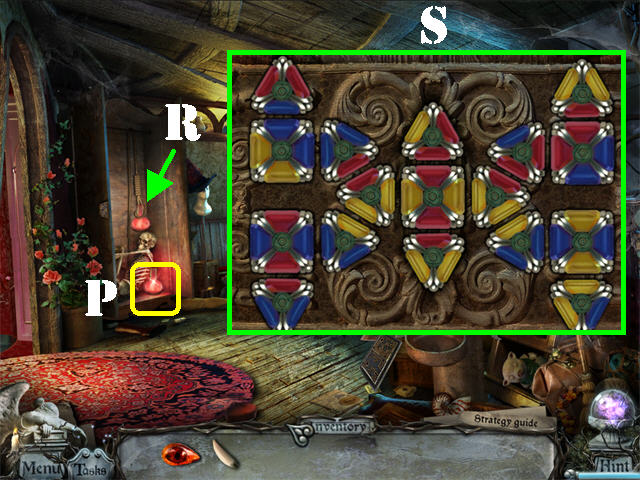
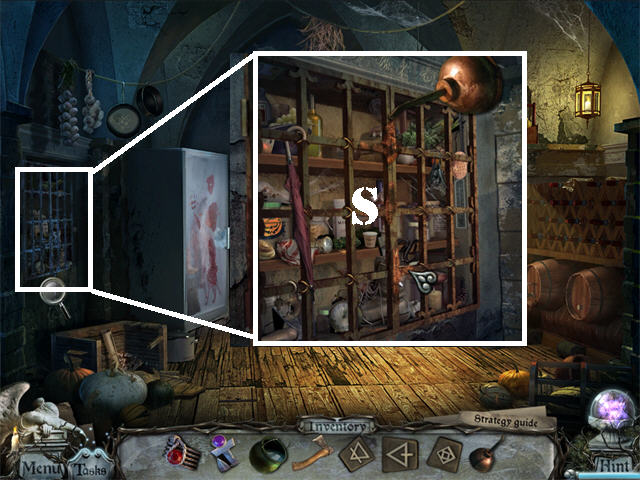
- Zoom into the armoire on left; place the PUZZLE PIECE on the puzzle to activate it.
- Rotate the symbols by clicking on them until all adjacent pieces are of the same color.
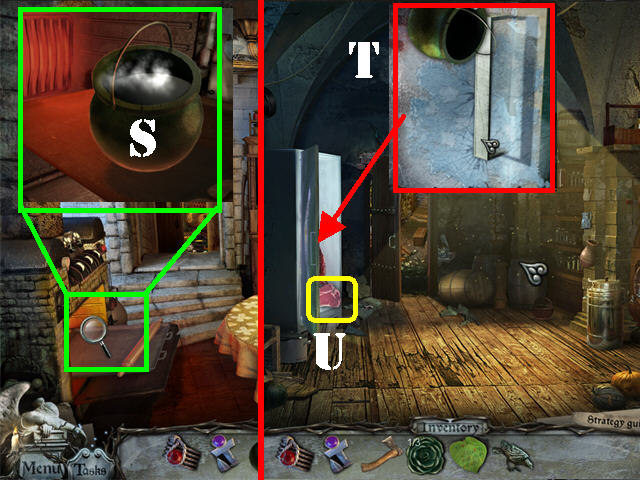
- Please look at the screenshot for the solution (S).
- Cut the ROPE (R) attached to the CRIMSON POTION with the SCISSORS .
- Take the CRIMSON POTION (P) next to the skeleton.
- Return to the Netherworld.
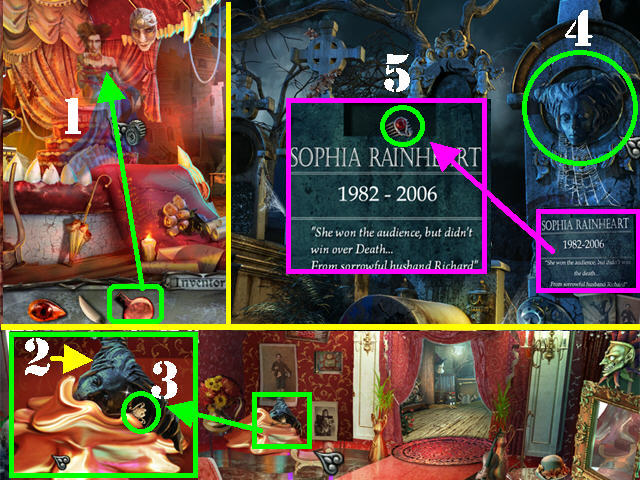
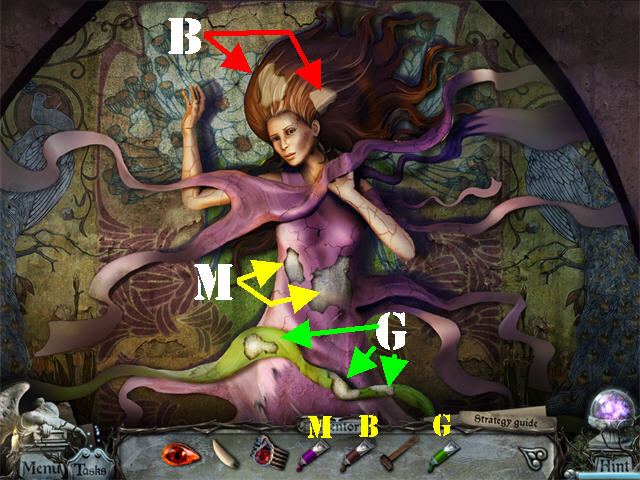
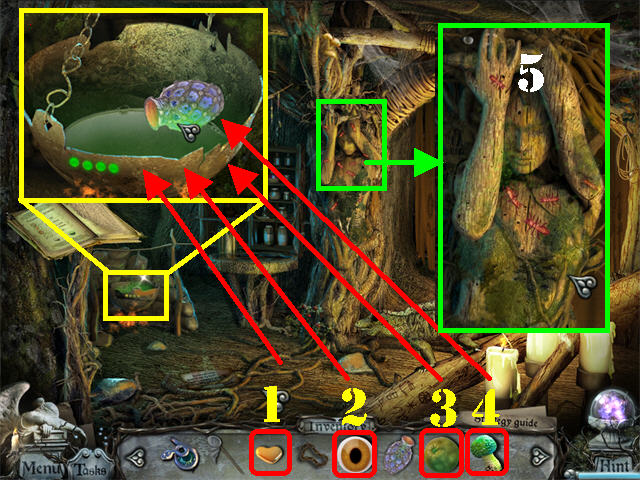
- Give the CRIMSON POTION to Sophia (1).
- Zoom into the melted sculpture on the ground; take the ACTRESS’ FACE (2) and the ARTIST’S STUDIO KEY (3).
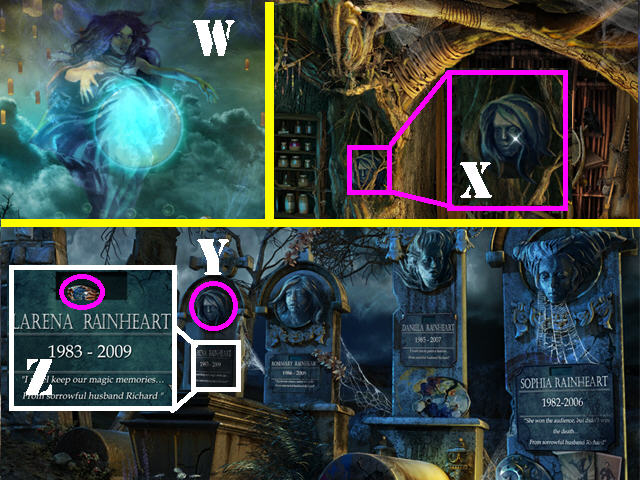
- Go through the cemetery portal.
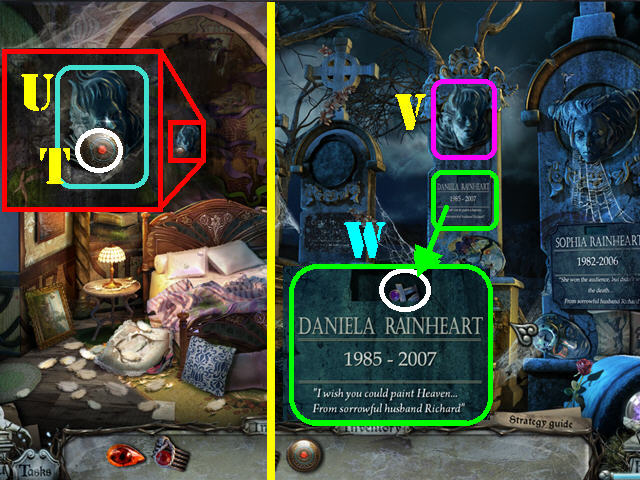
- Place the ACTRESS’ FACE on the last gravestone (4).
- Zoom into the nameplate; take the ACTRESS’ RING (5).
Chapter 4: Daniela Rainheart
- Go through the portal to return to the Actress’ room.
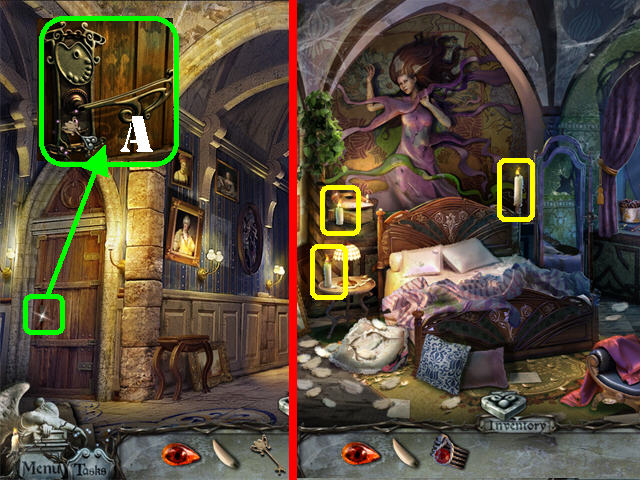
- Click down to access the hallway.
- Zoom into the left door; place the ARTIST’S STUDIO KEY in the lock; go through the door (A).
- Take the 3 CANDLELIGHTS marked in yellow.
- Zoom into the window. Place the CANDLELIGHTS into the candlestick.
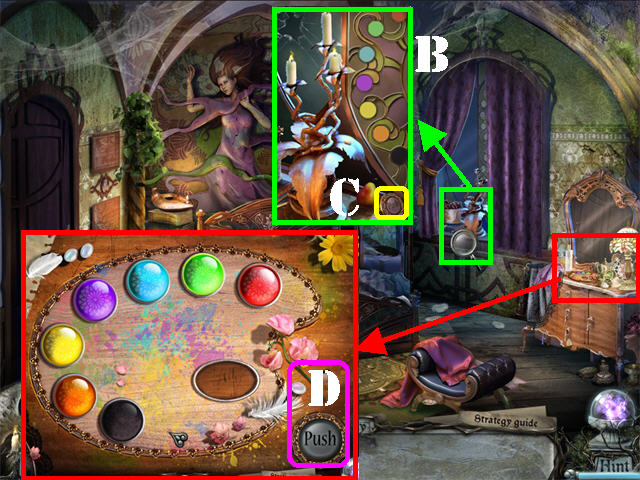
- Note the colored dots on the window (B).
- Grab the BUTTON (C); close the pop-up view.
- Zoom into the dresser on the right; place the BUTTON (D) in the lower right to activate the puzzle.
- Using the scheme in the window, click on two buttons to swap their positions.
- Please look at the screenshot for the solution. Click on the ‘Push’ (D) button to enter the solution and activate a Hidden Object Scene; play it.
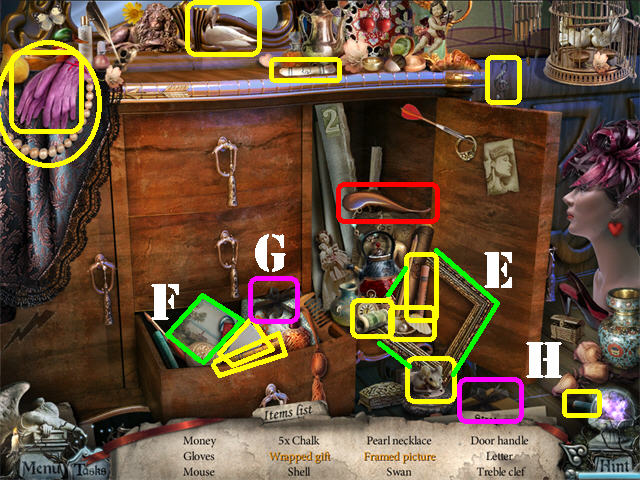
- Grab the FRAME (E) and place it over the PICTURE (F); take the FRAMED PICTURE.
- Place the BOW (G) on the WRAPPED GIFT (H) in the lower right; take the BOX.
- The DOOR HANDLE will be added to inventory.

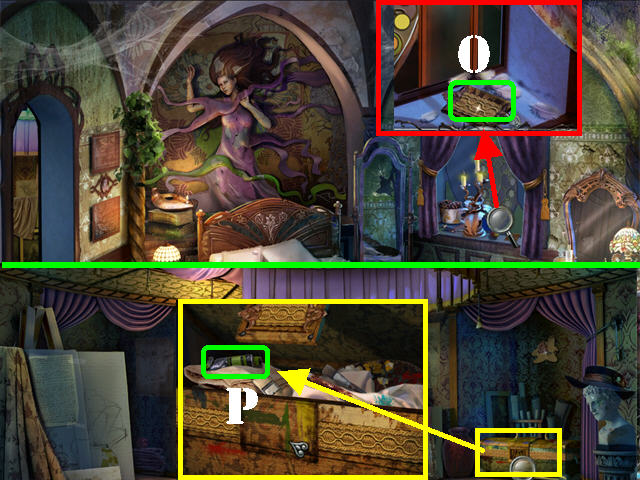
- Zoom into the left door; place the DOOR HANDLE on the door to unlock it (I).
- Go through the door.
- Grab the MAGENTA PAINT (J) in the lower left.
- Take the BROWN PAINT (K) in the lower right.
- Pick up the HAMMER (L) in the lower left.
- Grab the ROPE (M) in the upper left.
- Read the NOTE (N) in the lower left.
- Click down.
- Place the ROPE on the curtain.
- Zoom into the window sill; take the BOX LOCK (O).
- Head left.
- Zoom into the box on the right; place the BOX LOCK on the latch.
- Take the GREEN PAINT (P) from inside the opened box.
- Click down.
- Zoom into the sculpture on the back wall.
- Place the MAGENTA PAINT (M) on the spots on the torso.
- Place the GREEN PAINT (G) on the 3 spots on the green band at the bottom.
- Place the BROWN PAINT (B) on the 2 spots on the hair.
- Exit the sculpture.
- Go through the Portal.
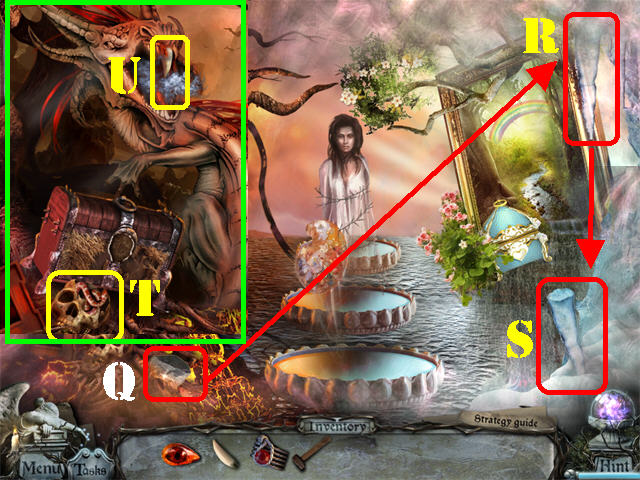
- Take the STONE (Q) in the lower left.
- Knock down the ICICLE in the upper right with the STONE (R).
- Grab The ICICLE in the lower right (S).
- Zoom into the dragon painting on left.
- Break the SKULL with the SLEDGEHAMMER; take the SNAKE (T).
- Place the ICICLE in the dragon’s mouth; take FANG 2 of 2 (U) in the dragon’s mouth.
- Return to the Gallery.
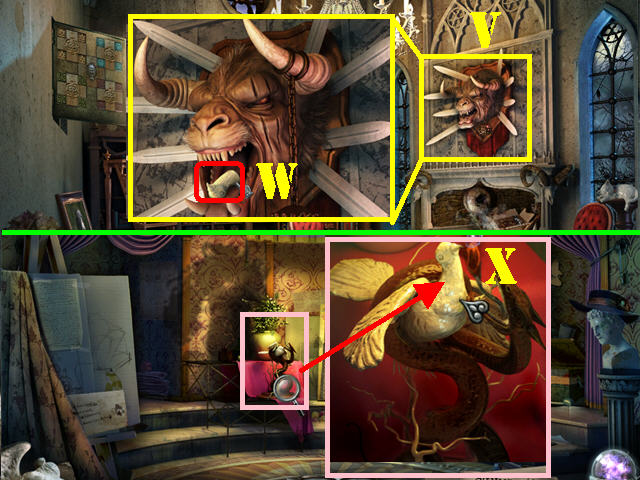
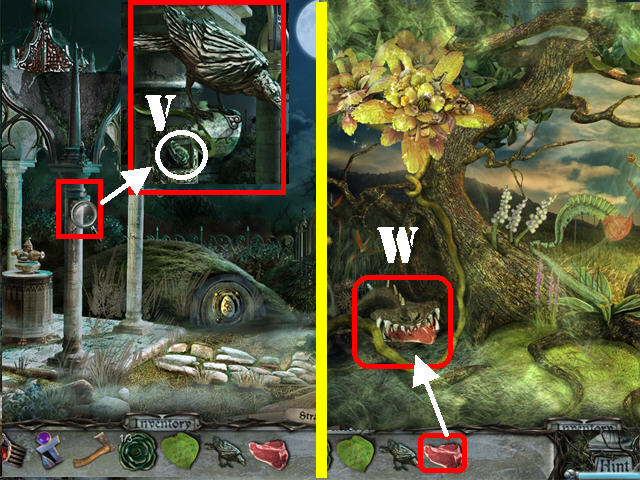
- Zoom into the ANIMAL HEAD (V) on the wall.
- Place the 2 FANGS in the animal’s mouth.
- Take the HEAD OF A DOVE (W) in the animal’s mouth.
- Return to the Artist’s room and head left.
- Zoom into the sculpture by the red cloth; place the HEAD OF A DOVE on the broken statue to activate a Hidden Object Scene; play it (X).
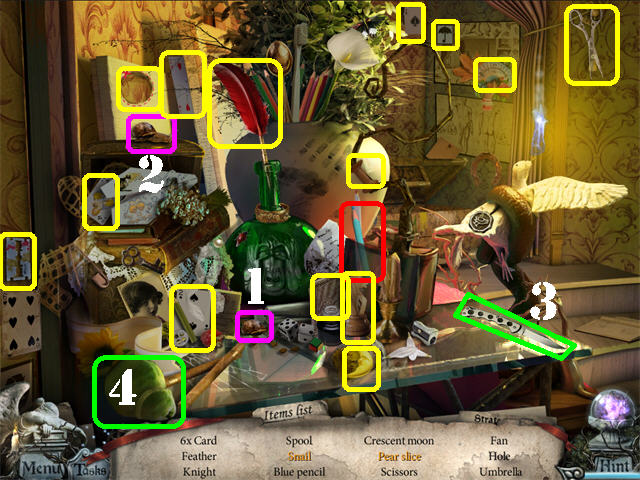
- Grab the SNAIL SHELL (1) and place it over the SNAIL’S BODY (2); take the SNAIL.
- Cut the PEAR with the KNIFE (3); take the PEAR SLICE (4).
- The BLUE PENCIL will be added to inventory.
- Zoom into the clock on the back wall.
- Place the SNAKE in the clock to activate a puzzle.
- Grab all the pieces from SECTION A and place them in the right spots in sections B, C, D and E.
- Correct pieces will lock in place.
- Please look at the screenshot for the solution.
- Take the SKULL (F) after the puzzle has been solved.
- Return to the Portal and go into the dragon painting.
- Place the SKULL on the chest to activate a Hidden Object Scene; play it.
- Click on the SNAKE; take the TONGUE (G).
- The BAT will be added to inventory.
- Click down.
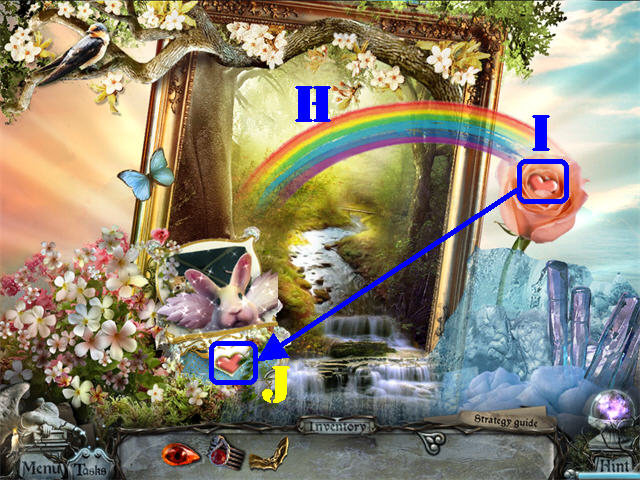
- Zoom into the rainbow painting on the right.
- Place the BLUE PENCIL on the rainbow (H); it will melt the snow revealing a ROSE.
- Take the HEART (I) in the center of the rose.
- Place the HEART on the blue chest in the lower left to activate a Hidden Object Scene; play it (J).
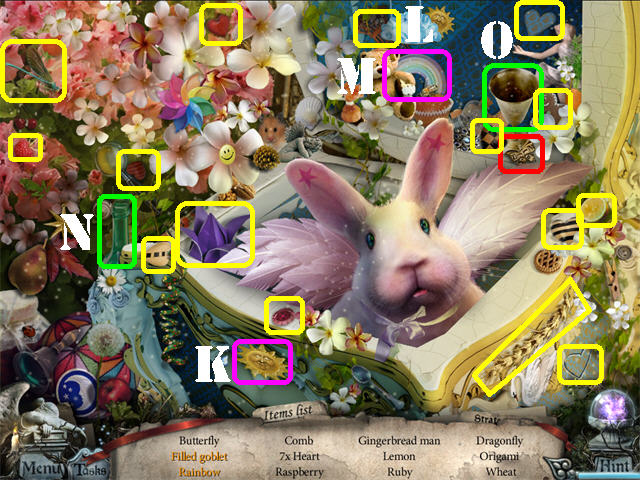
- Grab the SUN (K) and place it next to the CLOUD (L); take the RAINBOW (M).
- Place the GREEN BOTTLE (N) on the GLASS (O); take the FILLED GOBLET.
- The BUTTERFLY will be added to inventory.
- Click down twice.
- Zoom into the pictures by the left doorway.
- Place the BUTTERFLY in the top picture (P).
- Put the BAT in the bottom picture (Q).
- Take the VIOLET POTION in the lower right (R).
- Return to the Portal.
- Give the VIOLET POTION to Daniela Rainheart (S).
- Zoom into the back wall; take the CHEST ELEMENT (T) and the ARTIST’S FACE (U).
- Go through the cemetery portal.
- Place the ARTIST’S FACE on the third tombstone (V).
- Zoom into Daniela’s nameplate; grab the ARTIST’S RING (W).
Chapter 5: Rosemary Rainheart
- Go through the Portal to return to the Artist’s room.
- Click down twice.
- Zoom into the chest on the ground.
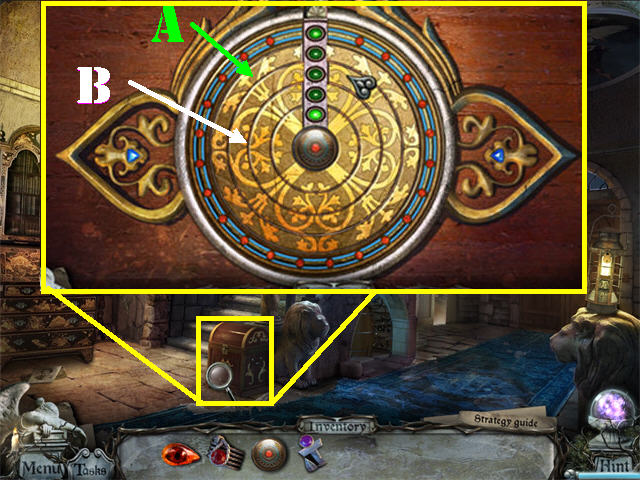
- Place the CHEST ELEMENT on the chest to activate the puzzle.
- Rotate the circles so that the green gems are visible.
- To solve the puzzle click on RING ‘A’ 3 times. Then click on RING ‘B’ a total of 8 times.
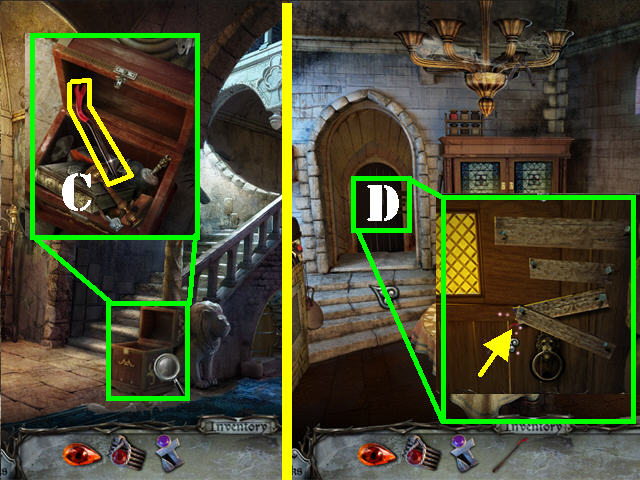
- Zoom into the open chest; take the CROWBAR (C).
- Go into the Kitchen next to the steps.
- Zoom into the back door (D).
- Remove the 7 NAILS with the CROWBAR starting with the nail the arrow is pointing to. To remove the nails place the tip of your cursor on the nail.
- Go through the door to access the Cellar.
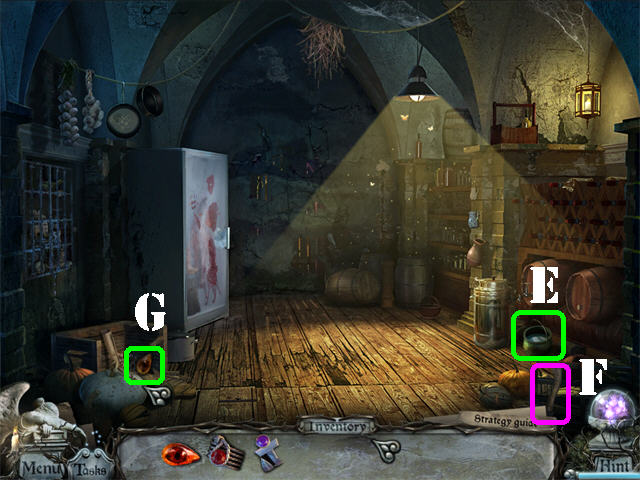
- Grab the COLD WATER (E) in the lower right.
- Take the AXE (F) in the lower right.
- Break the crate in the lower left with the AXE; take the GARGOYLE’S LEFT EYE (G) from inside the crate.
- Click down 3 times.
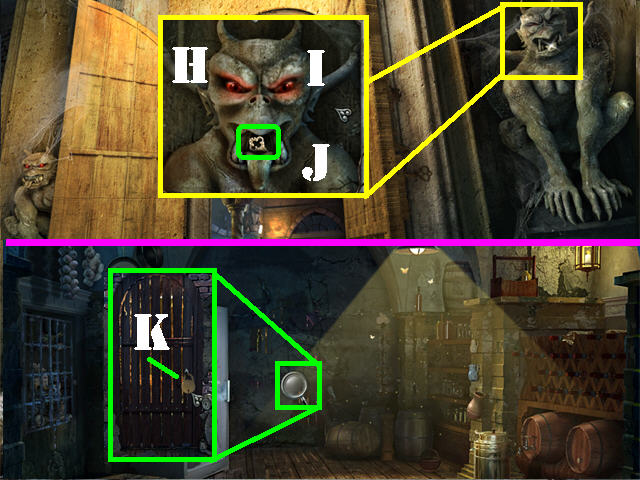
- Zoom into the gargoyle on the right.
- Place the GARGOYLE’S RIGHT EYE and the GARGOYLE’S LEFT EYE into the right eye socket (H and I).
- Take the SECRET KEY from the gargoyle’s mouth (J).
- Return to the Cellar.
- Zoom into the back door; break the wall with the AXE 3 times.
- Place the SECRET KEY in the lock (K).
- Go through the door.
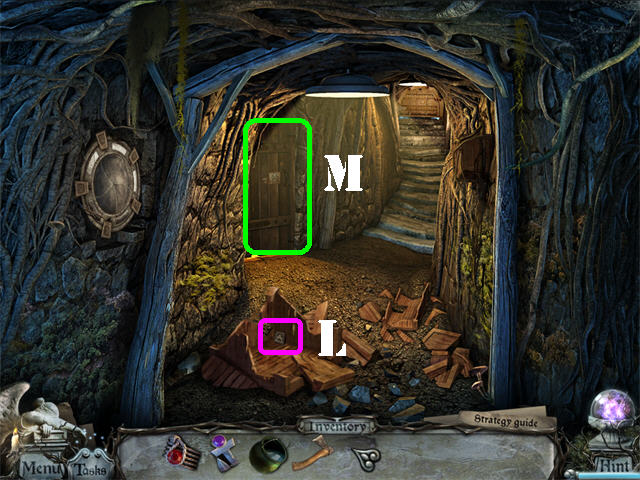
- Break the crate with the AXE; take the HIDDEN ITEM no. 0 (L).
- Zoom into the left door to access a puzzle (M).
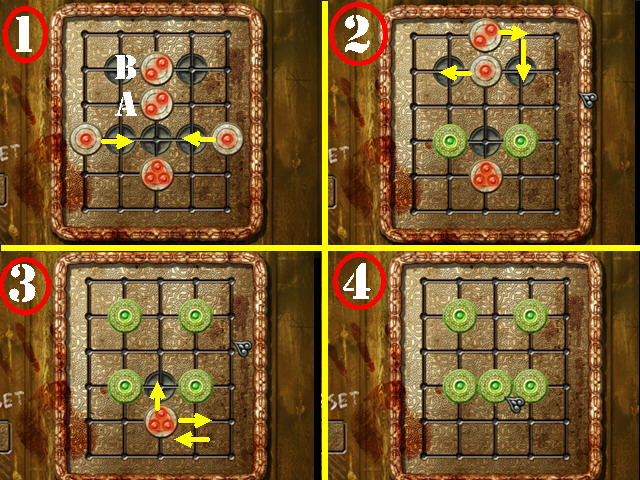
- Move all the circles to one of the darker spots. Circles placed correctly will light up green.
- You can only move a circle by the amount of red dots on it.
- If you make too many moves the circle will no longer move. Press the ‘RESET’ button when this happens.
- Please look at the screenshot for the solution and move the circles in the order shown. In section 1, click on ‘A’ first and then on ‘B’ to push the 2 pieces upward.
- In section 3, move the piece right, left, and then up to complete the puzzle. Section 4 shows the final image.
- Go through the door after the puzzle has been solved.
- Break the crate on right with the AXE; take HIDDEN ITEM no. 2 (N).
- Break the crate on far right with the AXE; take the OILER (O).
- Zoom into the skeleton’s hand on left; open its hand and take HIDDEN ITEM no. 3 (P).
- Examine the skeleton’s chest on the back wall; read the note (Q).
- Look at the portrait (R) in the back.
- Click down twice.
- Zoom into the cage on the left; place the OILER on the bars to activate a Hidden Object Scene; play it (S).
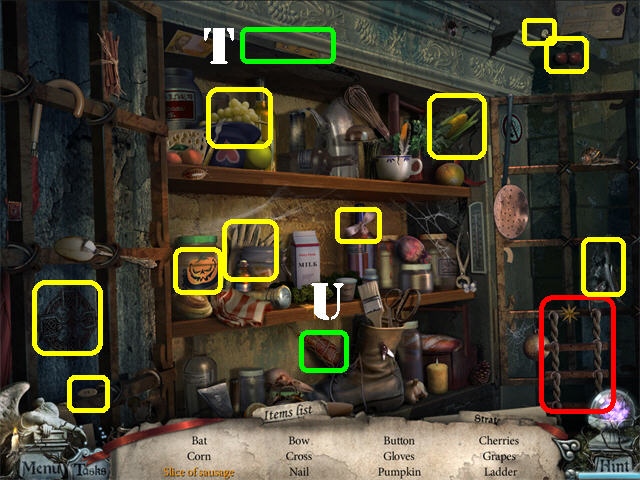
- Grab the KNIFE (T) in the upper center and place it on the SAUSAGE (U); take the SLICE OF SAUSAGE.
- The ROPE LADDER will be added to inventory.
- Go forward and through left door.
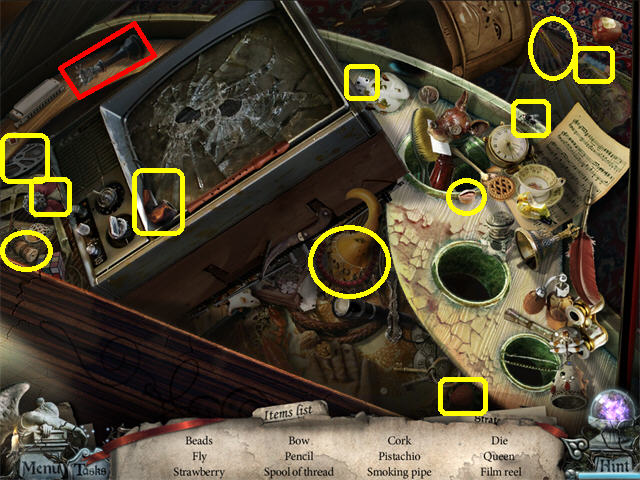
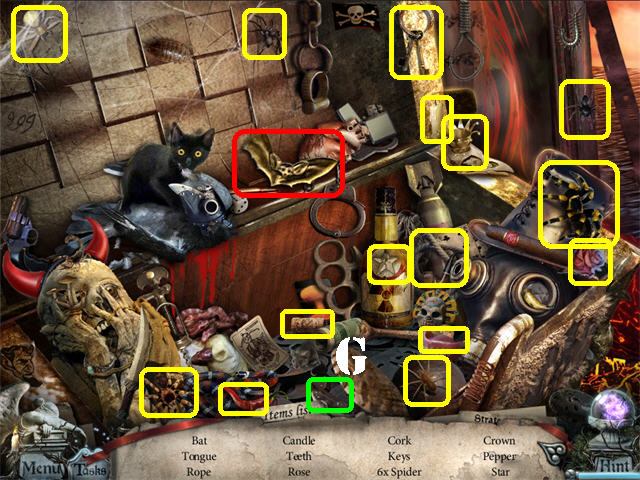
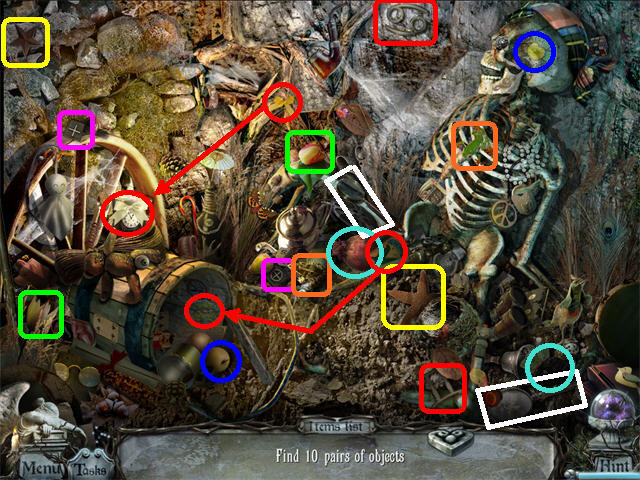
- Place the ROPE LADDER in the well to activate a Hidden Object Scene; play it.
- Find the 10 pairs of objects in the scene that have something in common.
- To solve this scene pair up the items marked in the same color and shape.
- The HIDDEN OBJECT PAIRS will be added to inventory.
- Click down.
- Zoom into the device on the left side of the wall.
- Place HIDDEN ITEM no. 0, HIDDEN ITEM no. 2, HIDDEN ITEM no. 3, and the HIDDEN OBJECT PAIRS into the empty spots.
- Take the HATCH LOCK PART (U).
- Zoom into the back door; place the OILER on the rusty lock (V).
- Put the HATCH LOCK PART on the lock to activate the puzzle.
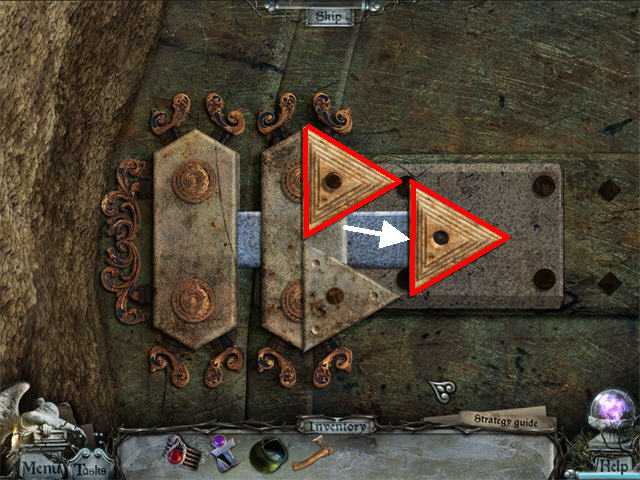
- Move the triangles to the right part of the pyramid (silver piece).
- A large piece cannot be placed over a smaller piece.
- Check out our video solution!
- Go through the door after the puzzle has been solved.
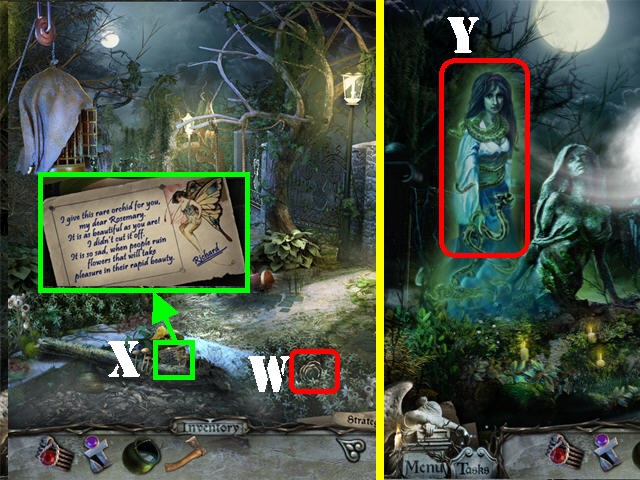
- Take ROSE 1 of 3 (W) on the right side of the ground.
- Read the NOTE (X) on the ground.
- Head forward.
- Click on Rosemary Roseheart (Y).
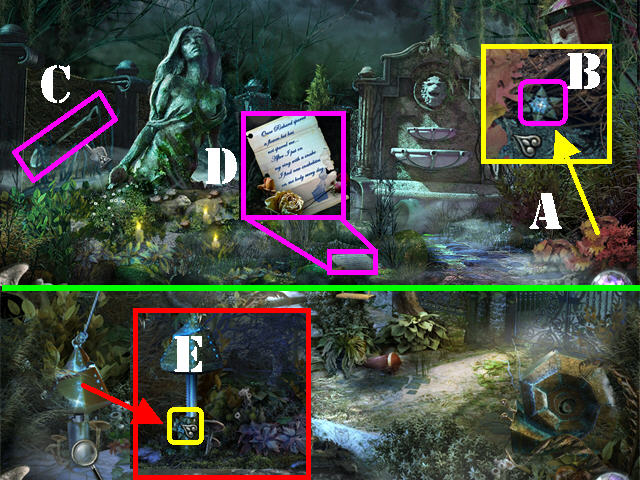
- Zoom into the pile of leaves in the lower right (A).
- Click on the leaves 3 times to move them aside; take the FAUCET HANDLE (B).
- Place the AXE on the left fence twice; take the SHOVEL (C).
- Read the NOTE (D) on the ground.
- Click down.
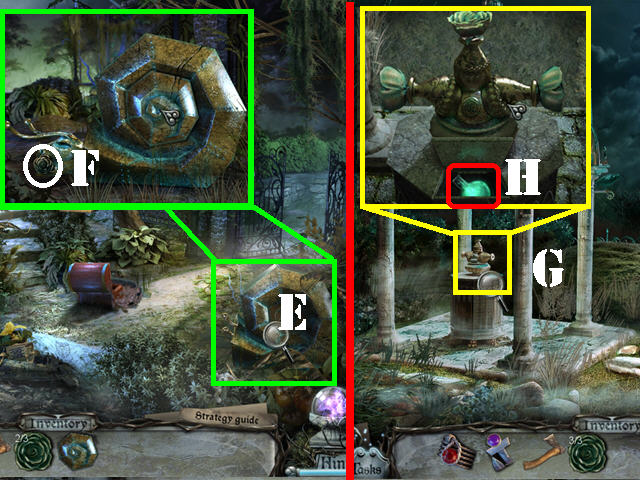
- Zoom into the device in the lower left; place the FAUCET HANDLE on the device (E).
- Click on the FAUCET HANDLE 3 times to lower the cage.

- Zoom into the cage to activate a Hidden Object Scene.
- Find the items on the list.
- The BAG OF SEEDS will be added to inventory.
- Place the SHOVEL next to the buried chest on right 2 times (F).
- Click on the chest to activate a puzzle.
- Click on any 2 pieces to swap their positions.
- All adjacent pieces must have matching lines.
- Please look at the screenshot for the solution (G).
- Zoom into the box after the puzzle has been solved; take the GATE KEY (H).
- Zoom into the right gate; place the GATE KEY (I) in the lock and turn the key once to unlock it.
- Go through the gate.
- Take the BUG KILLER (J) on the lower right.
- Click down and head forward.
- Zoom into the birdhouse in the upper right; place the BAG OF SEEDS on the plate for the bird to appear.
- Take the THREE SEEDS after the bird stops eating (K).
- Zoom into the statue’s hand; remove the 3 plants (L).
- Place the THREE SEEDS in the soil to open the portal to Rosemary’s Netherworld.
- Go through the Portal.
- Zoom into the animal in the lower left; grab STAMEN 1 of 2 (M).
- Examine the upper right side of the tree leaves; spray the leaves with the BUG KILLER (N).
- Take STAMEN 2 of 2 (O).
- Zoom into the bluebells in the lower right; place the 2 STAMENS in the bluebells.
- Click on any STAMEN for notes to appear on the large leaf.
- Take the NOTES (P).
- Click down 3 times and go into the left door.
- Play the Hidden Object Scene in the well.
- Find the items on the list.
- The RED BUTTON will be added to inventory.
- Zoom into the pile of dirt in the lower right; use the SHOVEL on the dirt 3 times and take the RAVEN (Q).
- Return to the Kitchen.
- Examine the stove on the left; place the RED BUTTON on the right to activate a puzzle (R).
- Push the RED BUTTON to change the images on the tumblers.
- Click on the small tumblers above to change the image to match the ones in the center tumblers.
- Keep pressing the RED BUTTON until you find the right combination.
- Please look at the screenshot for a random solution.
- Examine the oven.
- Place the COLD WATER in the oven.
- Take the HOT WATER after the pot comes back out (S).
- Go through the back door.
- Zoom into the freezer; pour the HOT WATER on the handle (T).
- Grab the MEAT inside the freezer (U).
- Go through the back door, forward and head right.
- Zoom into the column; place the RAVEN on it and take ROSE 2 of 3 (V).
- Return to the Netherworld.
- Zoom into the monster in the lower left (W); give the monster the MEAT to activate a Hidden Object Scene in the upper left; play it.
- Place the LIGHTNING BOLT (X) on the CLOUD; take the RAIN (Y).
- The HARP STRING will be added to inventory.
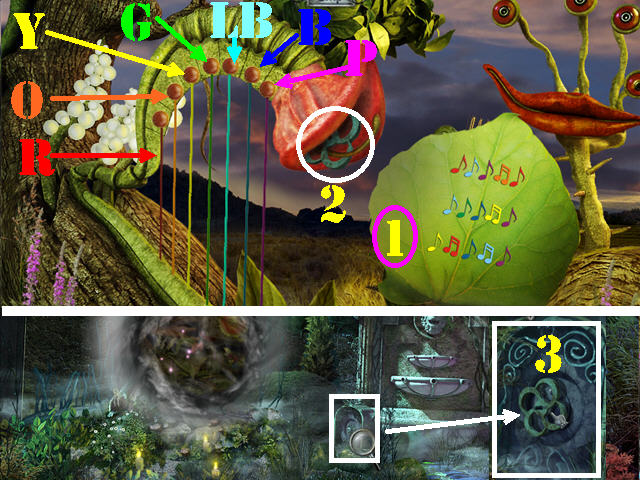
- Zoom into the harp in the center.
- Place the NOTES on the stand (1).
- Place the HARP STRING on the harp on left.
- Duplicate the sequence shown on the leaf. Even though some notes appear once you may have to click on them twice to solve the puzzle.
- Click on the strings in this order; R-LB-P-O-O-R-LB-G-B-Y-Y-P-Y-R-R-B-LB-LB-P-R-G-Y-Y-B-LB-LB.
- Grab the FOUNTAIN FAUCET HANDLE (2) after the puzzle has been solved.
- Click down.
- Zoom into the device in the lower center; place the FOUNTAIN FAUCET HANDLE on the device (3).
- Click on the handle to activate a Hidden Object Scene; play it.

- Click on the BIRD (A); take the FEATHER (B).
- Click on the FISHING ROD (C); take the FISH (D) in the water.
- The SPIRAL will be added to inventory.
- Click down.
- Zoom into the device in the lower right; place the SPIRAL in the device (E).
- Click on the SPIRAL 3 times; take ROSE 3 of 3 (F) in the snail’s mouth.
- Head right.
- Zoom into the device on left (G); place the 3 ROSES on the device.
- Take the EMERALD POTION (H).
- Return to the Portal.
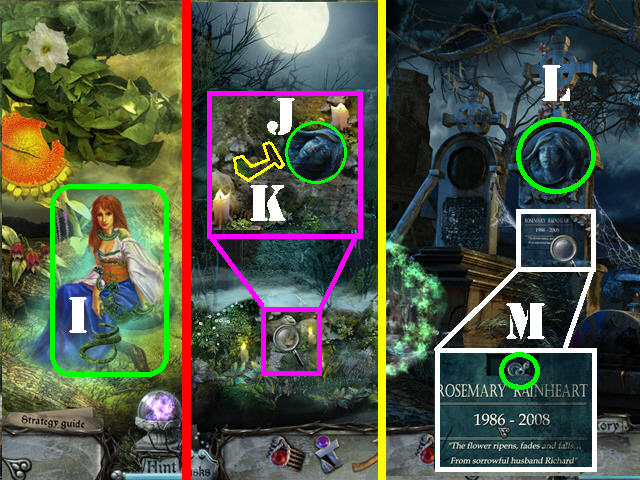
- Give the EMERALD POTION to Rosemary Rainheart (I).
- Examine the left side of the ground; take the FLORIST FACE (J) and the KEY TO THE BLACK TREE (K).
- Go through the cemetery portal.
- Place the FLORIST FACE on the second tombstone (L).
- Zoom into Rosemary’s nameplate; grab the FLORIST’S RING (M).
Chapter 6: Larena Rainheart
- Go through the portal to return to the cemetery. Click down and head right.
- Place the AXE twice on the twigs covering the right gate.
- Zoom into the gate; place the KEY TO THE BLACK TREE on the lock (A).
- Click on the key once and go through the gate.
- Grab the NET (B) on left.
- Zoom into the tree root; cut it with the AXE until the roots disappear and take the SHARP BOLT (C).
- Head left.
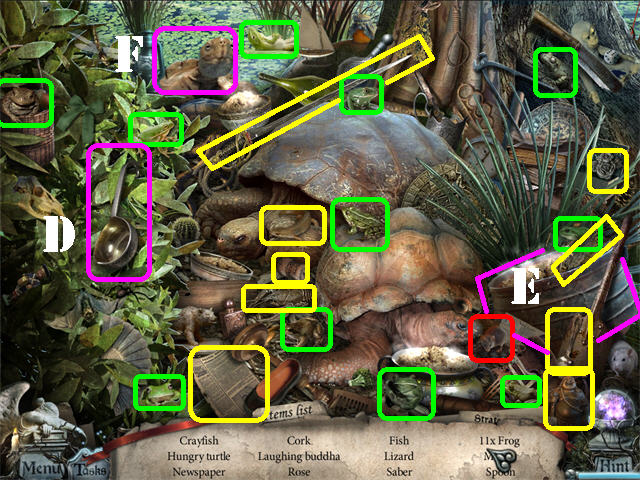
- Play the Hidden Object Scene.
- The 11 FROGS are marked in green.
- Grab the LADLE (D) on the left and place it in the BARREL (E) on the right; click on the HUNGRY TURTLE (F) that appears in the upper left.
- The WHITE MOUSE will be added to inventory.
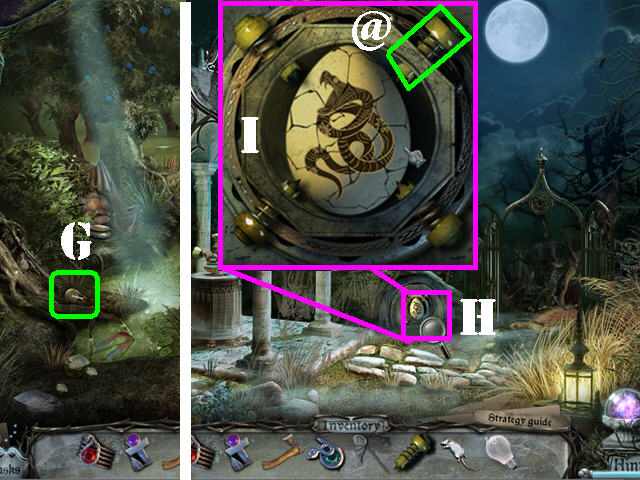
- Take LIGHTBULB 1 of 3 in the lower left (G).
- Click down twice.
- Zoom into the small cave next to the gate (H).
- Place the SHARP BOLT on the lock to crack the egg (@).
- Click on parts of the egg to change the image until you see image shown in the screenshot appear (I).
- Go into the cave.
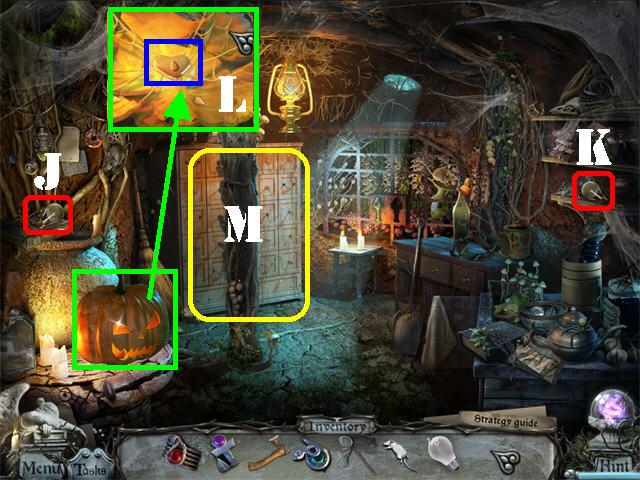
- Take LIGHTBULB 2 of 3 on the left (J).
- Take LIGHTBULB 3 of 3 on the right (K).
- Examine the pumpkin on left; break it with the AXE and take the HEART PUZZLE PIECE (L).
- Zoom into the file cabinet in the back to access a puzzle (M).
- Click on the drawers in the correct order until all of them are closed.
- Please look at the screenshot for a random solution. Sometimes if you exit out of the puzzle and return to it right away this solution will work for you.
- Take the CHEESE (N) after the puzzle has been solved.
- Exit the cave, go into the right gate and head left.
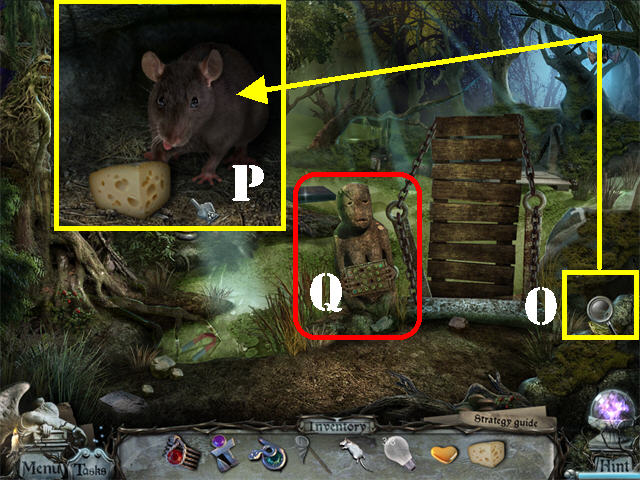
- Zoom into the hole in the lower right; place the CHEESE on the ground to lure the MOUSE out (O).
- Take the BLACK MOUSE (P).
- Zoom into the statue (Q).
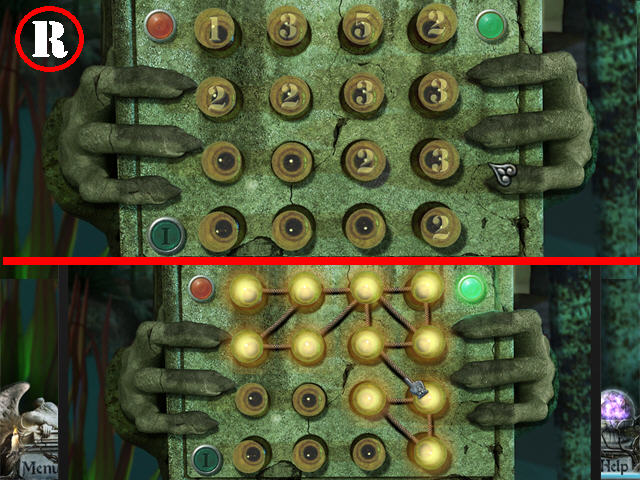
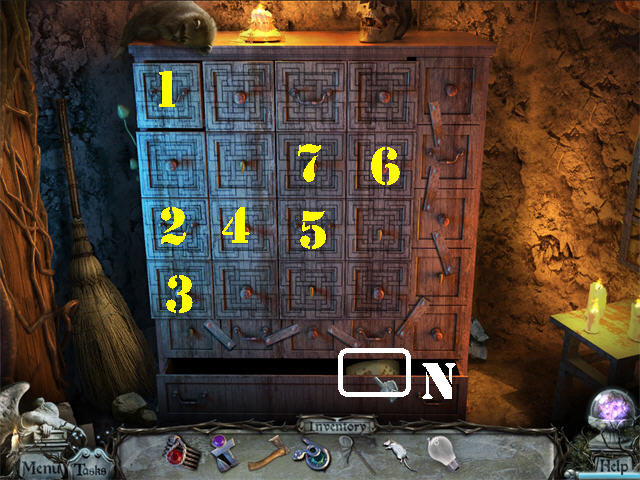
- Place the 3 LIGHT BULBS on the board to activate a puzzle.
- Connect all the lamps so the wires attached to them match the number in the center. If the section is blank, do not attach any wires to it.
- Click on the area in between 2 buttons to place a wire.
- The solution is random. The screenshot shows the original configuration above and the solution below (R).
- The bridge will lower after the puzzle has been solved.
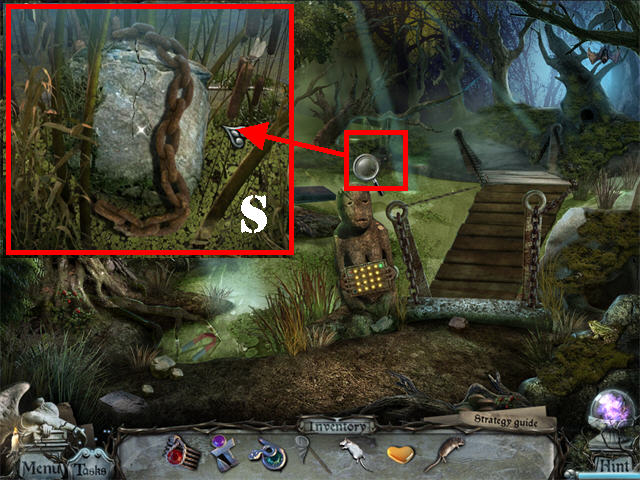
- Zoom into the tree in the back; take the CHAIN (S).
- Click down.
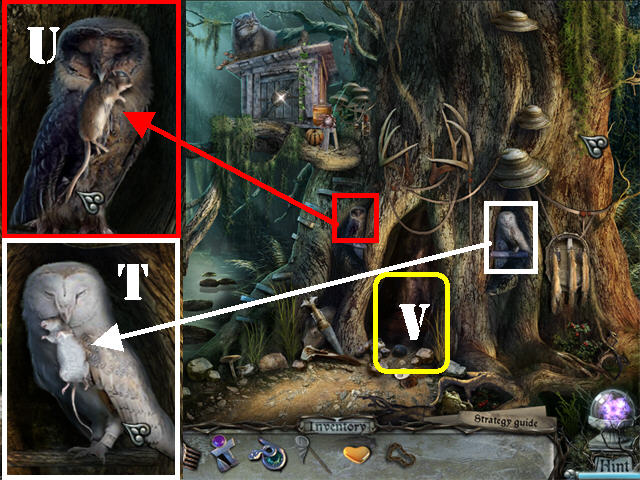
- Zoom into the WHITE OWL; give it the WHITE MOUSE to open the gate slightly (T).
- Zoom into the BLACK OWL; give it the BLACK MOUSE to open the gate completely (U).
- Enter the tree (V).
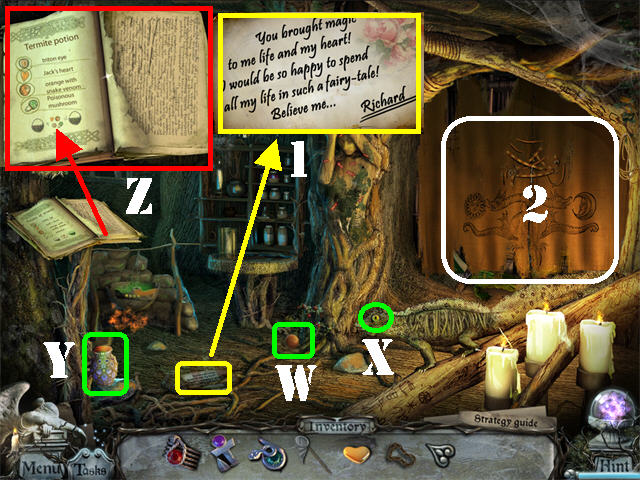
- Take the ORANGE (W) on the ground.
- Take the NEWT’S EYE from the newt on the ground (X).
- Take the EMPTY VIAL (Y) in the lower left.
- Zoom into the book on left; note the TERMITE POTION ingredients (Z).
- Read the NOTE (1) on the ground.
- Zoom into the curtain to trigger a puzzle (2).
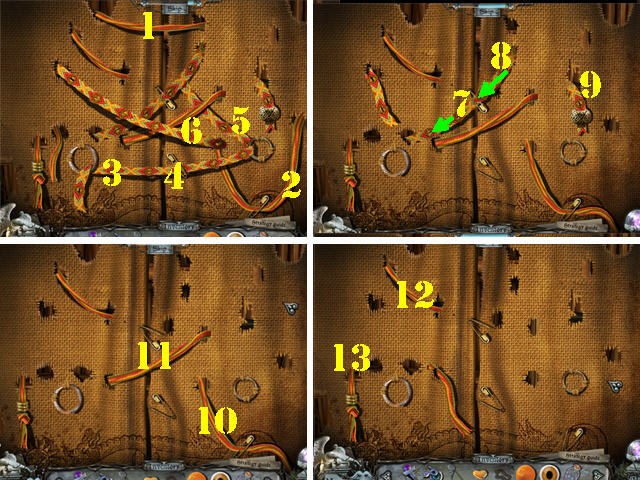
- Remove the ropes in the correct order to untie them.
- A hand icon appears when you can click on a section of the rope.
- Click on the ropes in the order shown in the screenshot.
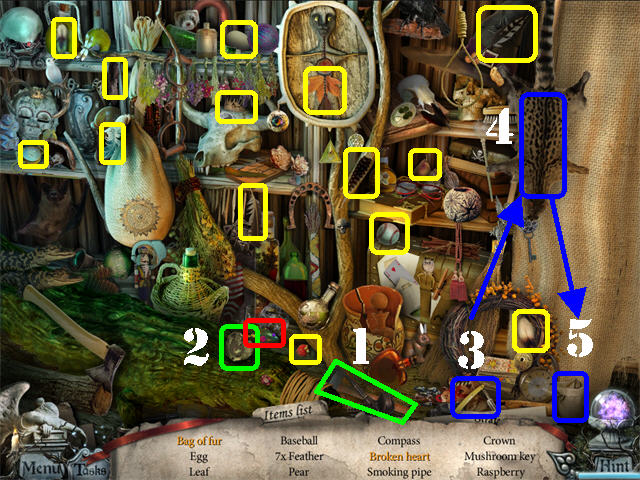
- A Hidden Object Scene activates after the puzzle has been solved; play it.
- Place the HAMMER (1) on the HEART (2); take the BROKEN HEART.
- Place the RAZORBLADE (3) on the animal’s back (4); take the BAG WITH FUR (5) in the lower right.
- The MUSHROOM KEY will be added to inventory.
- Return to the cave.
- Zoom into the SNAKE on the table (6).
- Give the SNAKE the ORANGE; take the ORANGE POISON (7).
- Zoom into the lattice in the back (8).
- Place the MUSHROOM KEY in the empty spot to activate a Hidden Object Scene; play it.
- Find the items on the list.
- The AMANITA will be added to inventory.
- Return to the tree house.
- Examine the cauldron.
- Place the NEWT’S EYE (2), HEART PUZZLE PIECE (1), AMANITA (4), and the ORANGE POISON (3) into the cauldron.
- Place the EMPTY VIAL into the cauldron to automatically receive the TERMITE POISON.
- Zoom into the tree; give the TERMITE POISON to the tree sculpture (5).
- Go through the Portal.
- Take the CIRCULAR TILE in the lower center (A).
- Zoom into the lower left corner; grab the 3 STRAWBERRIES marked in yellow.
- Examine the broom in the upper left; click on the KNOT 3 times to untie it and take the BROOM (B).
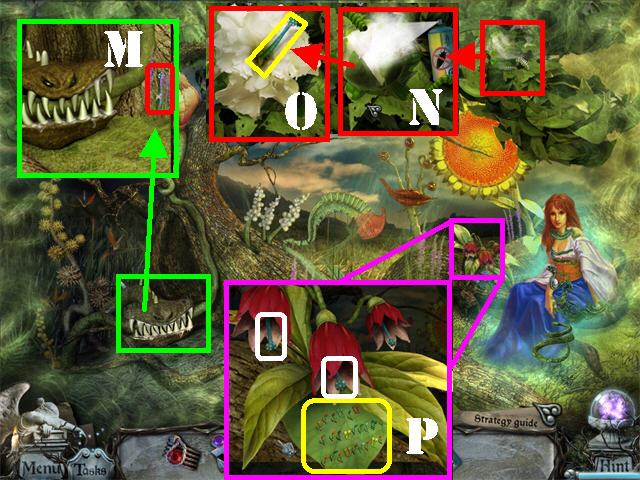
- Use the NET to catch the 3 MAGIC BUTTERFLIES marked in white. Place the tip of your cursor on a butterfly to pick it up.
- Place the 3 MAGIC BUTTERFLIES on the bottom of the tree trunk to activate a Hidden Object Scene; play it (C).
- Place the HAMMER (D) on the WING (E) to make it fall; grab the WING (F) on the ground.
- The TURQUOISE POTION RECIPE will be added to inventory.

- Exit the Portal.
- Zoom into the book on left; place the TURQUOISE POTION RECIPE on the right page. Note the ingredients needed (G).
- Click down.
- Zoom into the door in the upper center; place the CIRCULAR TILE on the door to activate a puzzle (H).
- Use the items around the door to complete the image in the center.
- Place the CIRCULAR TILE (@) in the lower center.
- Grab the BRUSH (A) on the left and place it on the BLACK PAINT STREAK (B) on the upper right.
- Place the BRUSH WITH BLACK PAINT in section (C) at the bottom.
- Move the 3 TOKENS marked in red into the spots the arrows are pointing to.
- Place the OIL CAN (D) on the rusty part in lower left (E).
- Drag the PIECE OF WOOD (F) in the lower left and place it in spot (G).
- Place the HAMMER (H) on the NAIL in spot (G).
- Letter ‘I’ shows the final image.
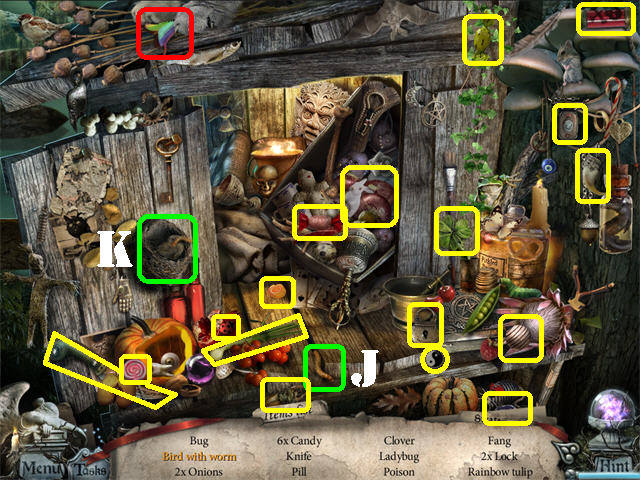
- Solving the last puzzle activates a Hidden Object Scene; play it.
- Place the WORM (J) in the NEST (K); take the BIRD WITH WORM (0.
- The RAINBOW TULIP will be added to inventory.
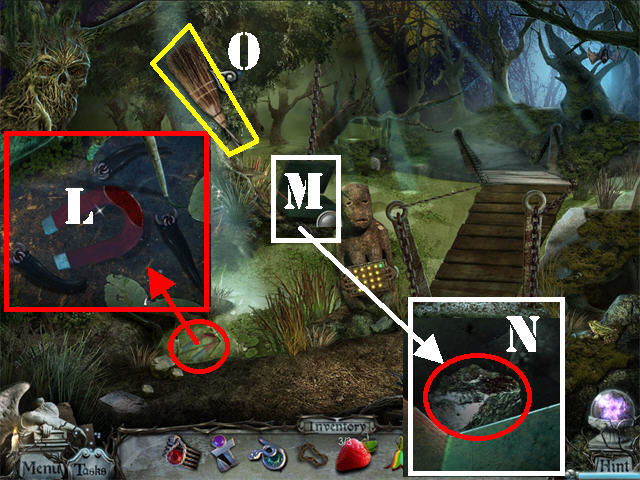
- Head left.
- Zoom into the magnet in the lower left.
- Place the 3 STRAWBERRIES in the water to eliminate the leeches; take the MAGNET (L).
- Place the MAGNET on the bog (M).
- Put the CHAIN over the MAGNET to open the box. (If you haven’t done so already, pick up the chain in the pop-up window to the left of the bridge).
- Zoom into the open box; take the CARBIDE (N).
- Place the BROOM on the berries in the upper left to activate a Hidden Object Scene; play it (O).
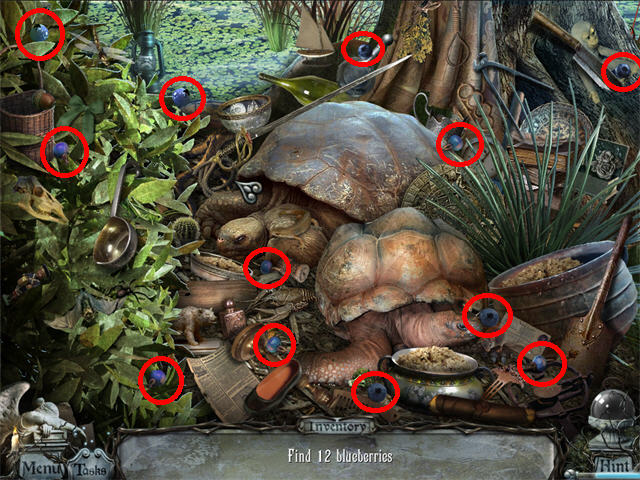
- Take the 12 BLUEBERRIES marked in red.
- The BLUEBERRIES will be added to inventory.
- Return to the Portal.
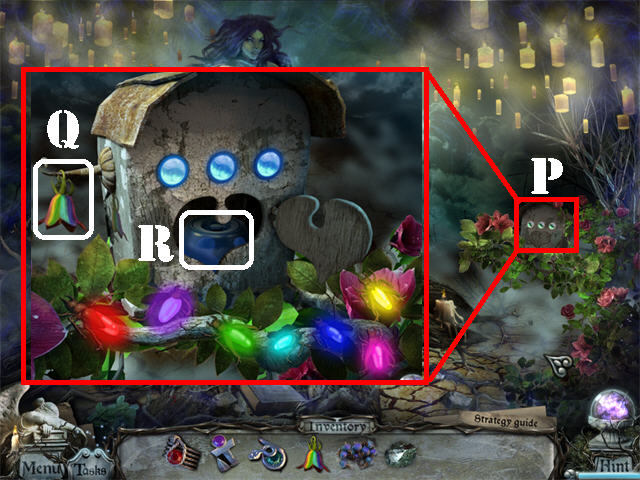
- Zoom into the device on the right (P).
- Place the RAINBOW TULIP on the birdhouse to activate a puzzle (Q).
- Ring the bell and the lightning bugs will light up in a particular sequence; duplicate the correct sequence to move on to the next round.
- Beat 3 rounds to win the game. The solution is random.
- Take the NECTAR (R) after the puzzle has been solved.
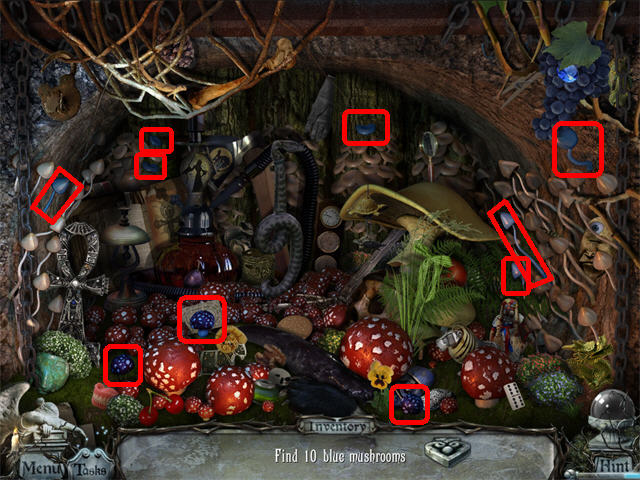
- Return to the cave.
- Play the Hidden Object Scene.
- Grab the 10 BLUE MUSHROOMS marked in red.
- The BLUE MUSHROOMS will be added to inventory.
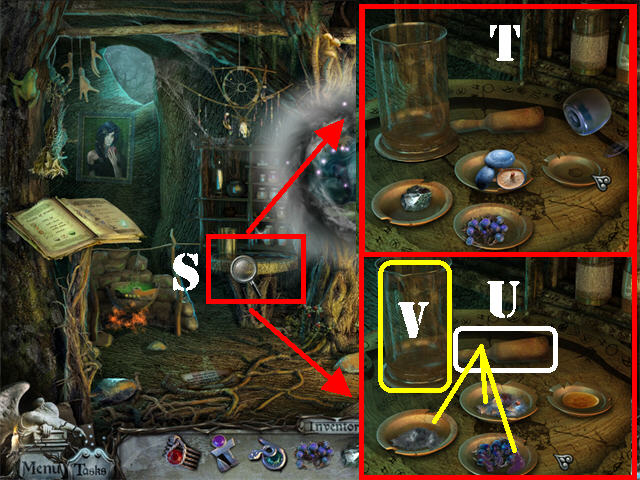
- Head back to the tree house.
- Zoom into the table next to the Portal (S).
- Place the BLUEBERRIES, CARBIDE, BLUE MUSHROOMS, and the NECTAR on the plates (T).
- Use the PESTLE to crush the BLUEBERRIES, CARBIDE, and BLUE MUSHROOMS on the plate (U).
- Pour the crushed BLUEBERRIES, CARBIDE, and BLUE MUSHROOMS into the container (V).
- Drag the NECTAR plate into the container.
- Take the TURQUOISE POTION.
- Enter the Portal.
- Give the TURQUOISE POTION to Larena (W).
- Zoom into the tree hollow; take the WITCH FACE (X).
- Go through the cemetery portal.
- Place the WITCH FACE on the first tombstone (Y).
- Zoom into Larena’s nameplate; grab the WITCH RING (Z).
- Click down.
- Enter the mausoleum.
- Zoom into the back wall (1).
- Place the WITCH RING, ARTIST’S RING, ACTRESS’ RING, and the FLORIST’S RING into their appropriate slots (2).
- Zoom into hole on the glass casket after the 4 rings have been placed; take JENNIE’S RING (3).
- Zoom into the back wall again.
- Place JENNIE’S RING into the last slot to activate a puzzle.
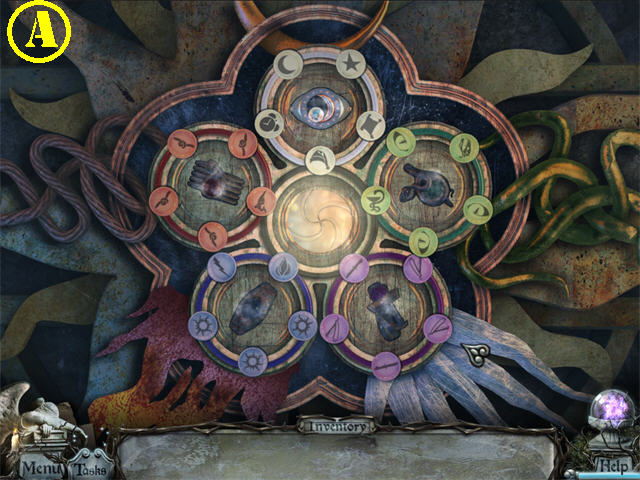
- Place all the tokens so that all the ones with the same color are inside of the matching ring.
- Click inside of the large circle to rotate it.
- Please look at the screenshot (A) for the final solution or the video for a step-by-step solution.
- Check out our video solution!
- Congratulations! You have completed Gravely Silent: House of Deadlock!
Created at: 2011-05-14