

Walkthrough Menu
- General Tips & Information
- Corridor
- Electrical Room
- Living Room
- Basement
- Cellar
- Pantry
- Dining Room
- Kitchen
- Nursery
- Wardrobe Room
- Study
- Garage
- Greenhouse
- Armoury Room
- Observatory
- Bedroom
- Sarcophagus
General Tips & Information
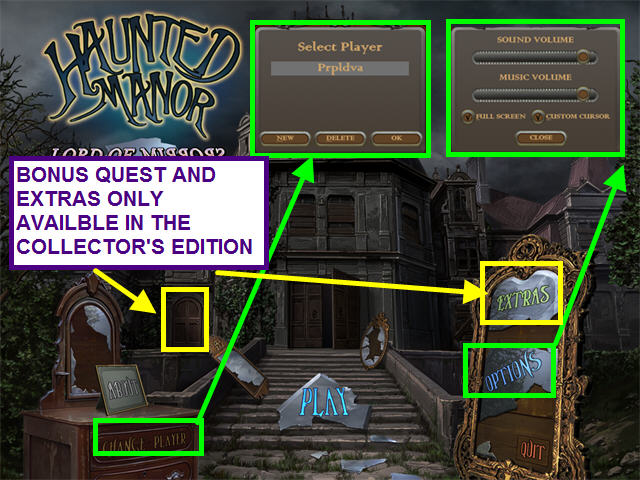
- From the Main Menu you may manage player profiles.
- The Options Menu allows for the adjustment of music and sound volume.
- You may play this game in windowed or full screen mode.
- You may disable the custom cursor.
- The extras menus and bonus quest door are only available with the Collector's edition.
- Too many incorrect clicks will cause the screen to “crack” for a short time.
- Hints are unlimited, but you must wait for the meter to refill.
- You may skip mini-games after the Skip Meter fills.
- This game is not timed.
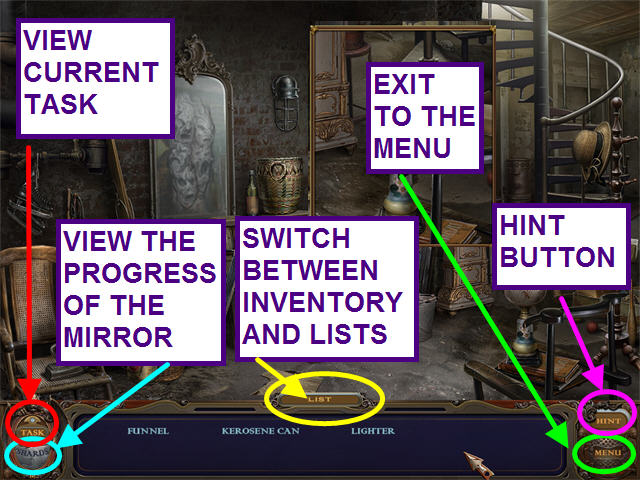
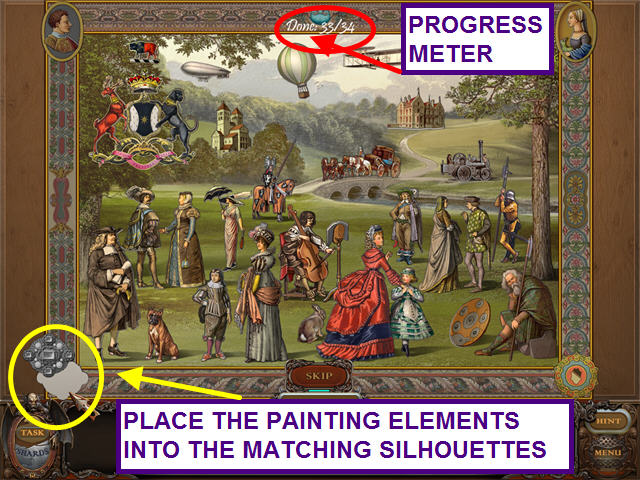
- The lower left of the game screen has a Task button to view the current task.
- Below the Task button is the Shards button with which you can view the progress of the mirror.
- The lower right of the game screen has the Hint and Menu buttons.
- The bottom center of the screen shows your current Inventory or item list.
- Click on the tab to switch between the two.
Corridor
- You may choose to allow some interactive help in the beginning of the game.
- TASK: Turn on all 6 wall lamps.
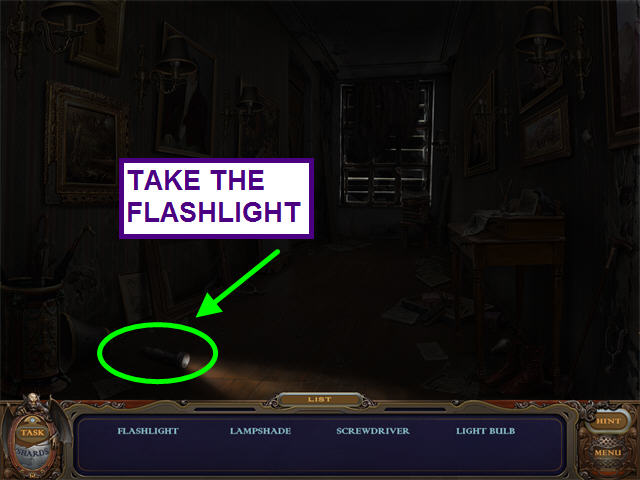
- Take the blinking FLASHLIGHT from the floor.
- Pick up the LIGHT BULB; use it on the far left lamp.
- Click on the bulb to turn on the light.
- Take the LAMPSHADE; place it on the middle right lamp.
- Take the SCREWDRIVER; use it on the broken switch on the right.
- Select the sparkling hidden object scene.
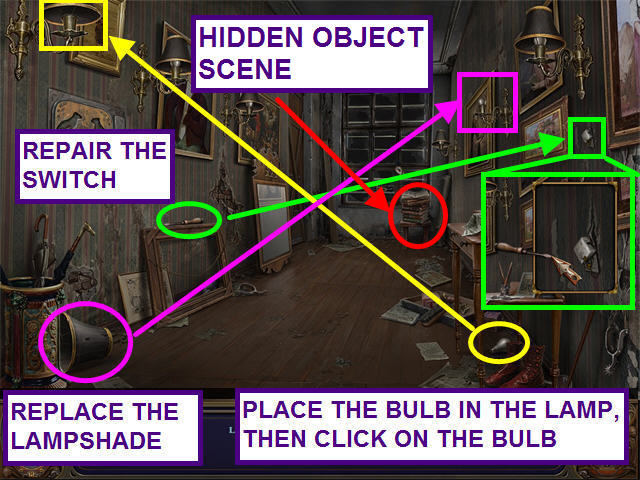
- Locate all the items in the hidden object list.
- Collect the ELECTRICAL TAPE.
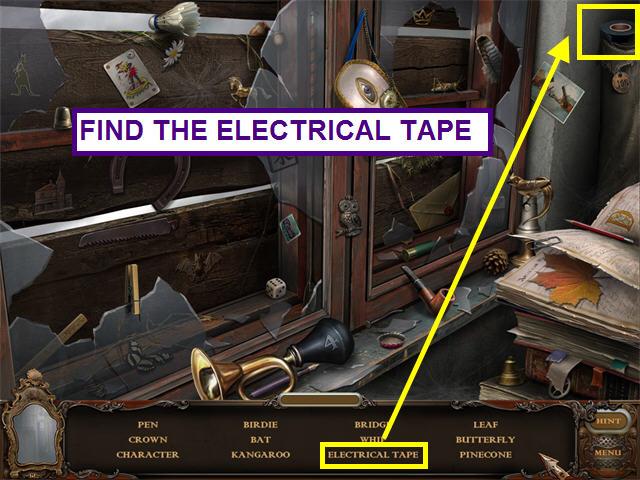
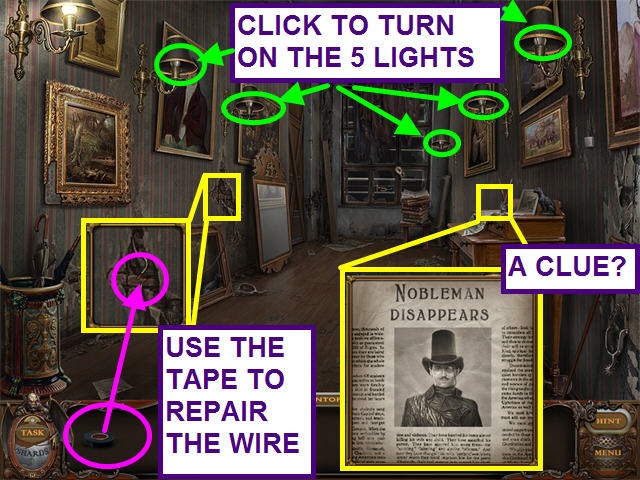
- Use the ELECTRICAL TAPE to repair the wire on the left wall.
- Find an old newspaper article about a missing nobleman.
- Click on the light bulbs in the 5 remaining lights to turn them on.
- The ghost of a hooded figure appears and warns that you are forever trapped.
- TASK: Find the safe hidden in the corridor.
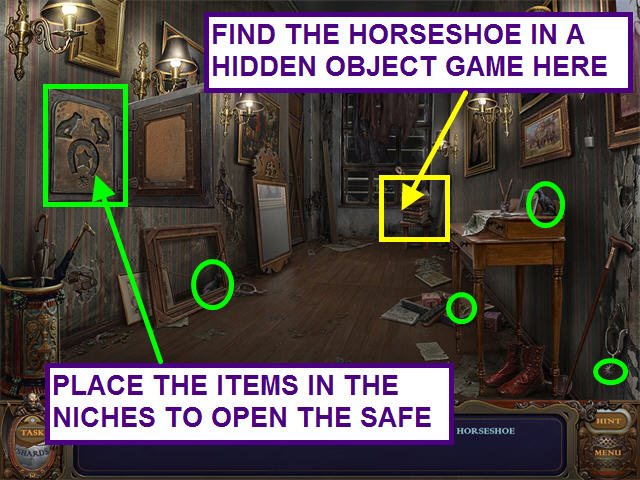
- Click on the leftmost painting to reveal the safe.
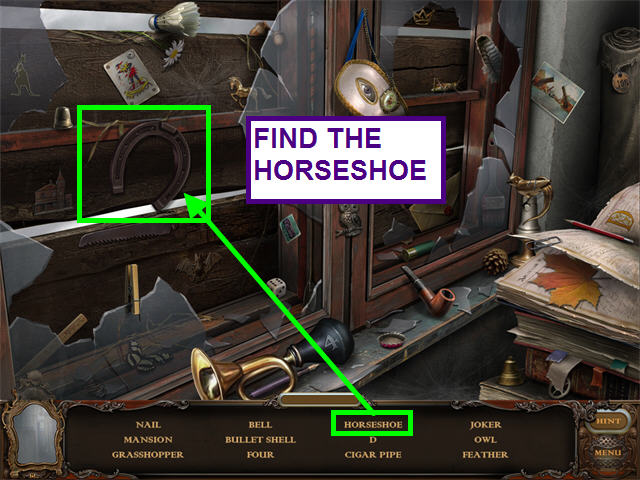
- Click on the sparkling area to open a hidden object game and find the HORSESHOE.
- Locate the SPUR, STAR, and 2 CAT FIGURINES in the scene.
- Place the 5 items into the niches on the safe.
- After placing the items into the niches, the safe will open.
- Click on the roll of paper to trigger a mini-game.
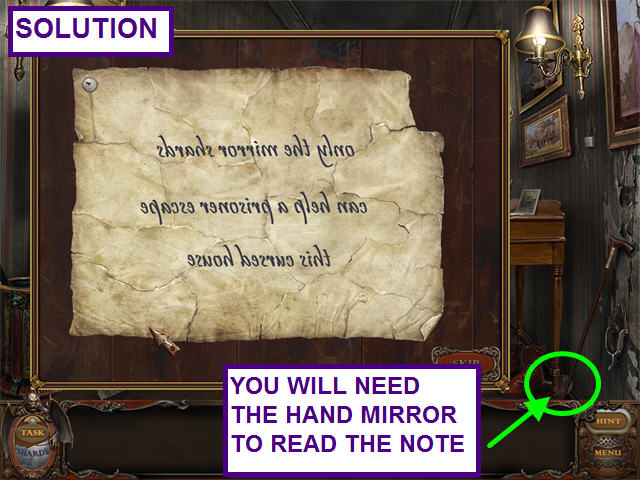
- TASK: Reassemble the note to read the message.
- Drag and drop pieces of the note to piece it back together.
- The upper left piece is stationary, so it is best to start there.
- The message is reversed! Find the MIRROR in the lower right corner of the corridor.
- Use the mirror on the message to reveal that “Only the mirror shards can help a prisoner escape this cursed house.”
- Exit the message by clicking anywhere outside.
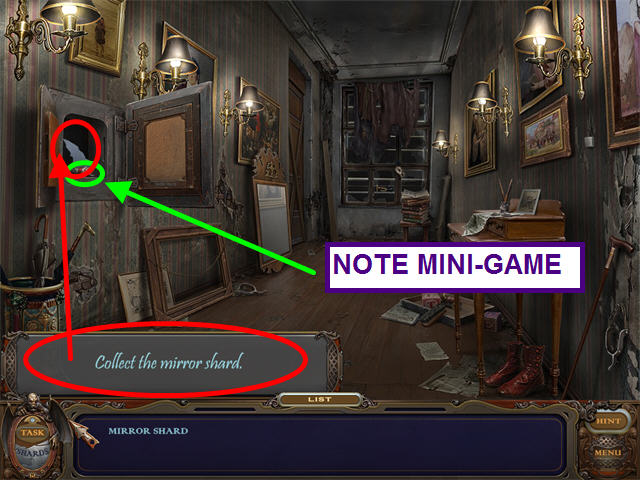
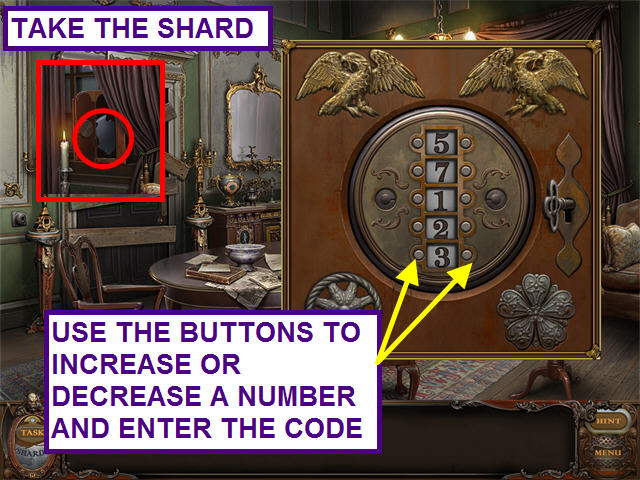
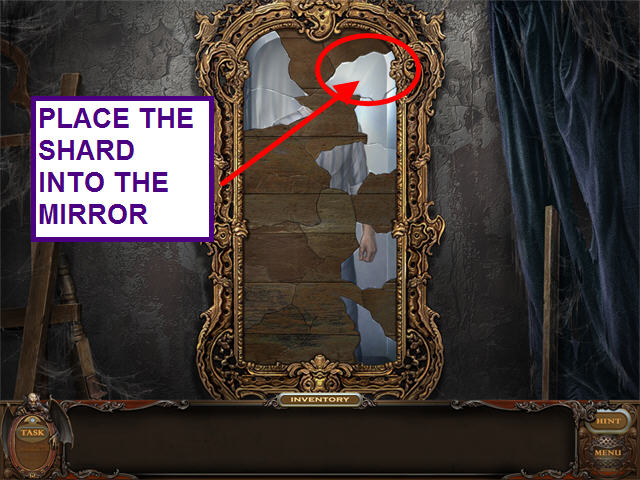
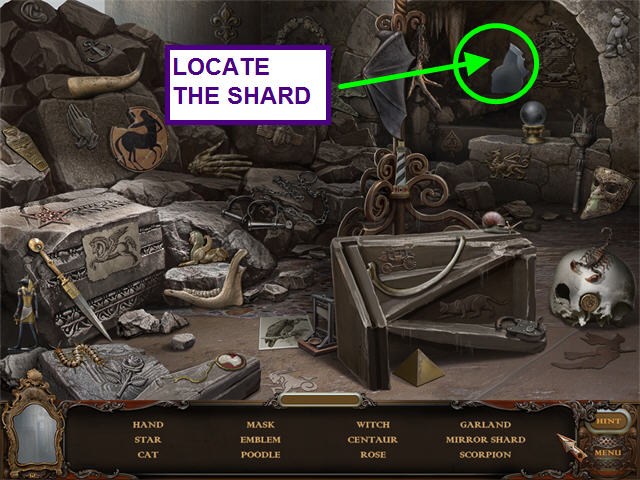
- TASK: Collect the mirror shard.
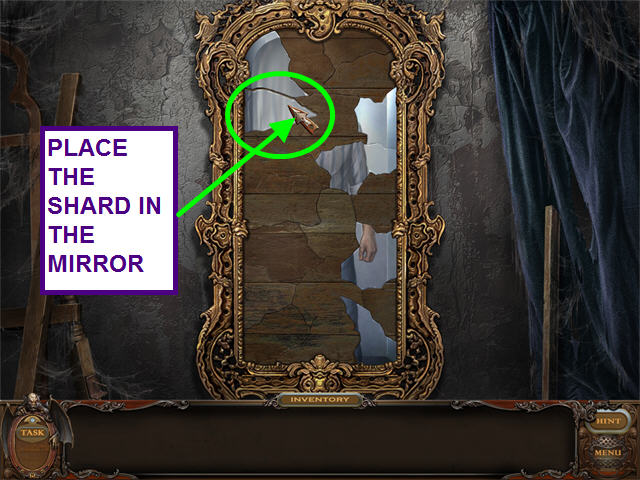
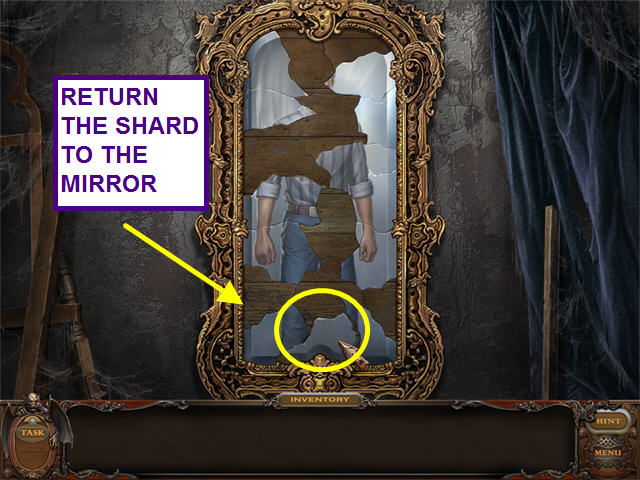
- Take the SHARD that appears in the safe.
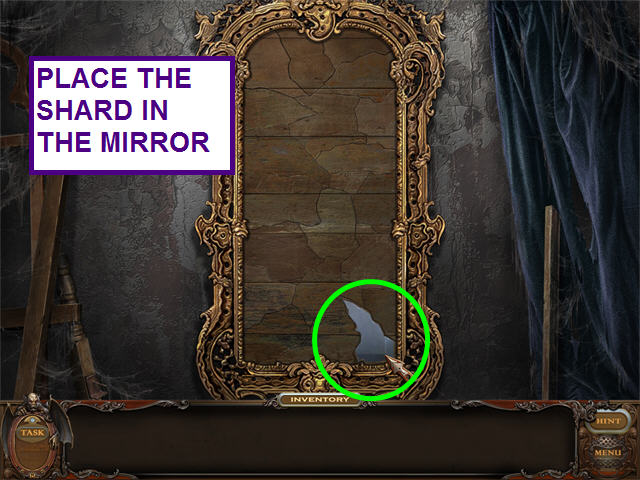
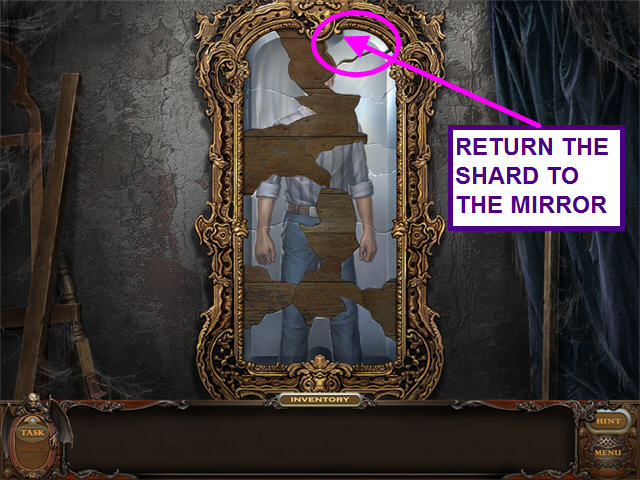
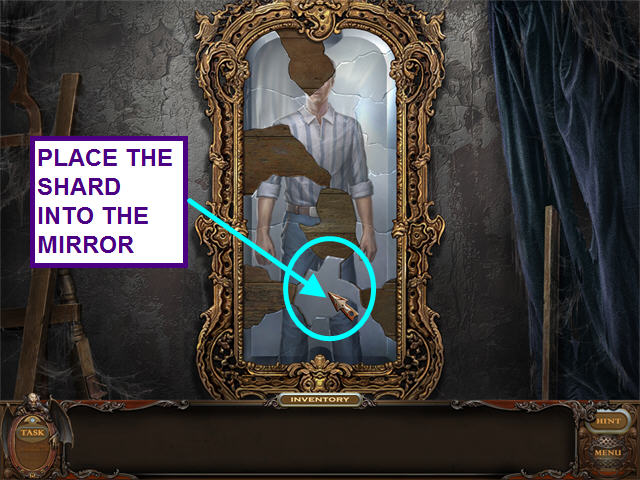
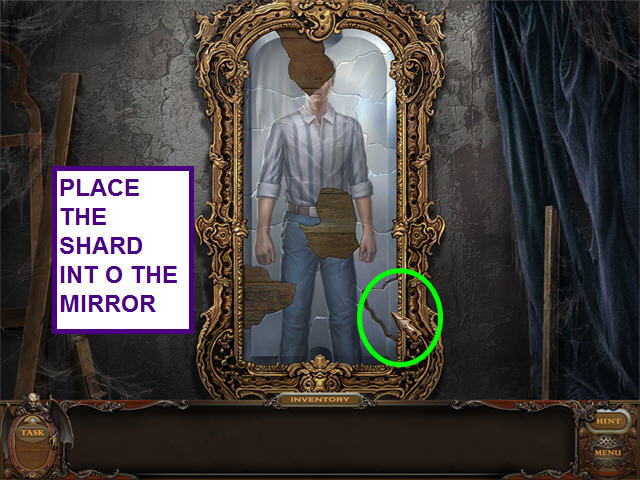
- You are transported to the mirror that shattered and trapped you in the mansion.
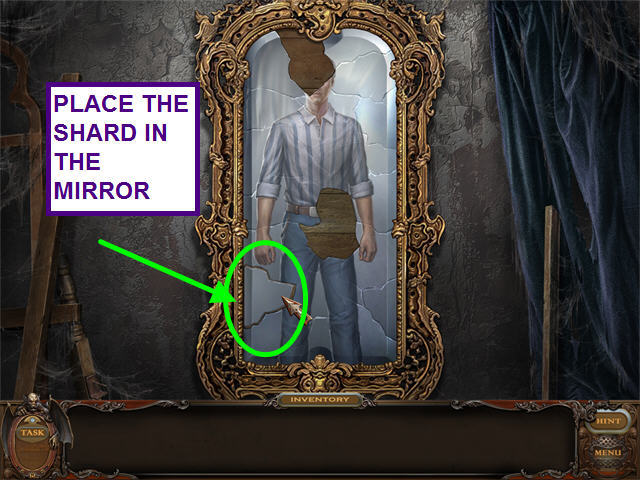
- Place the SHARD in the matching space in the mirror.
- Click anywhere to return to the corridor.
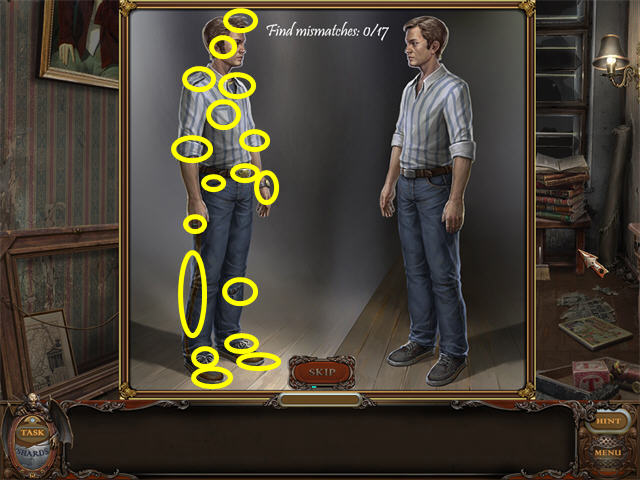
- Click on the mirror on the left to reveal a mini-game.
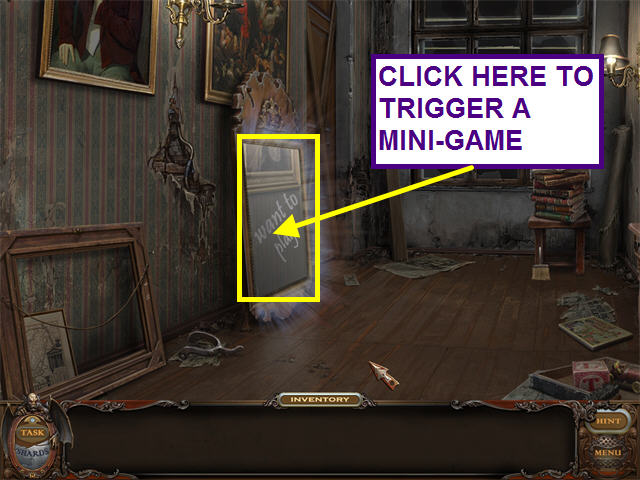
- TASK: Spot the 17 differences in Stan's reflection.
- You may only click on the left figure.
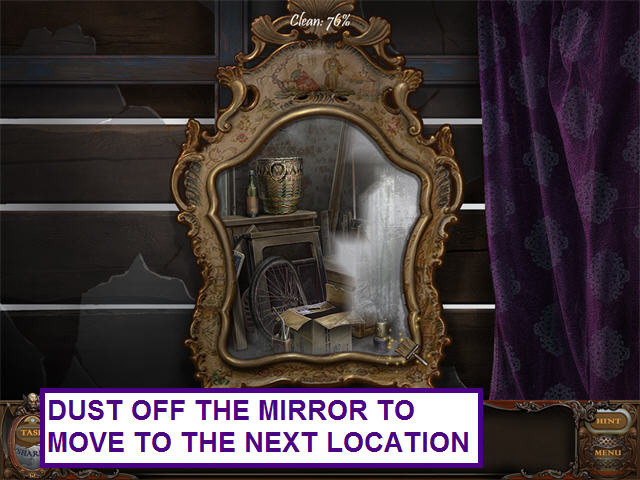
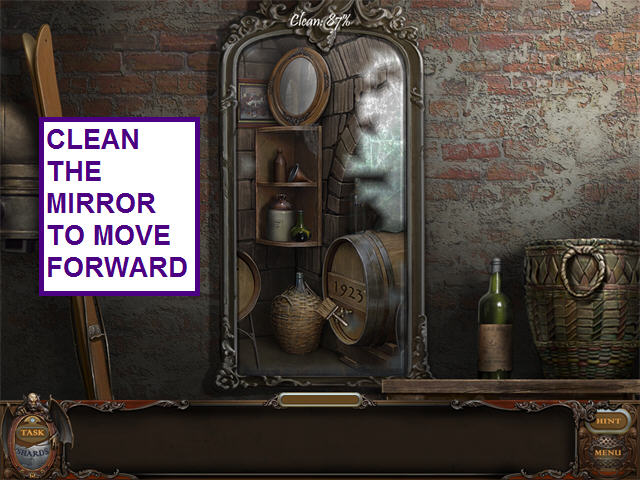
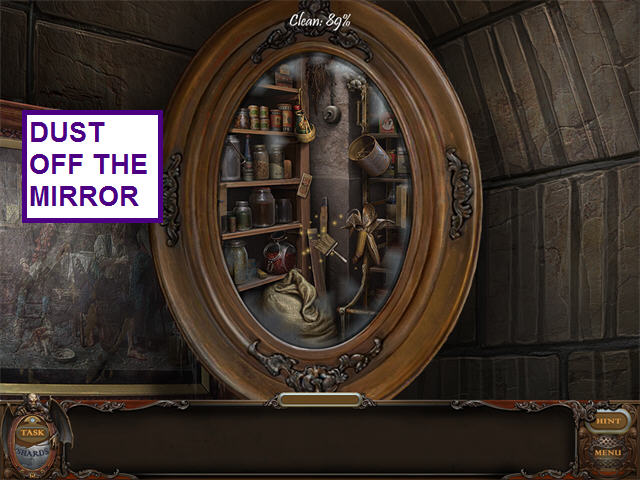
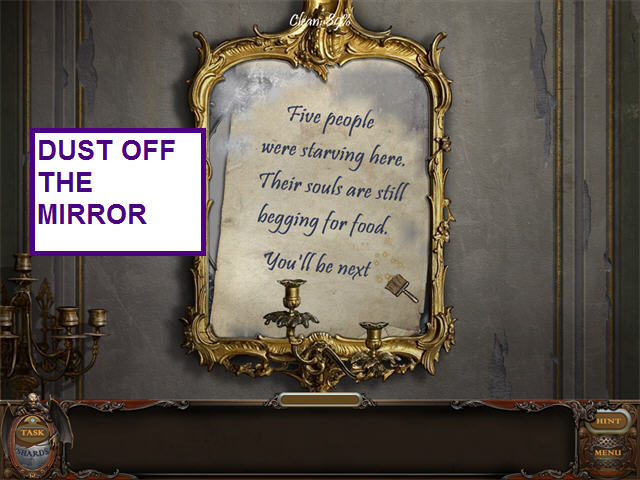
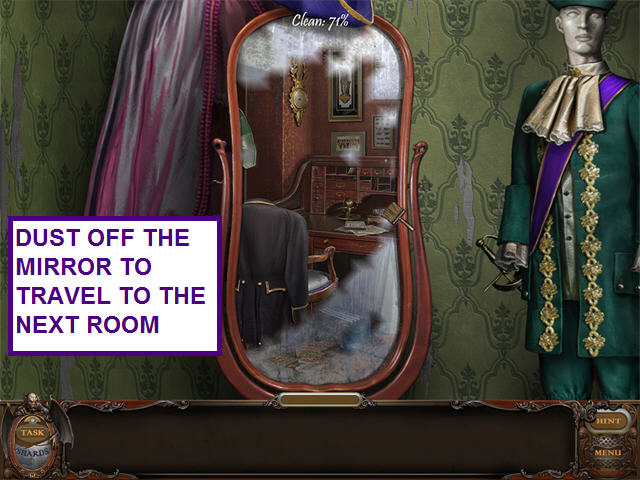
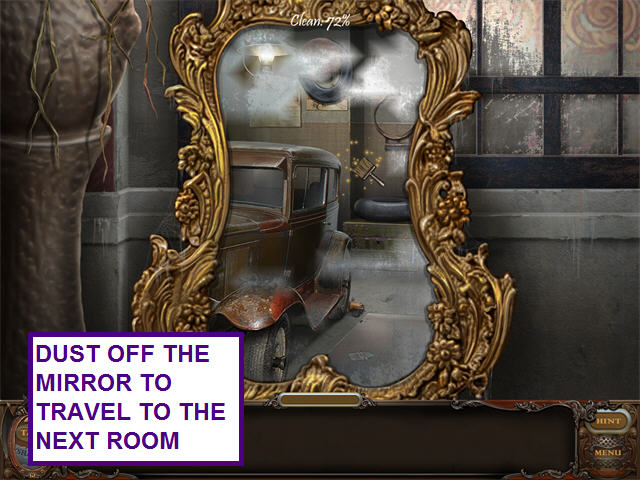
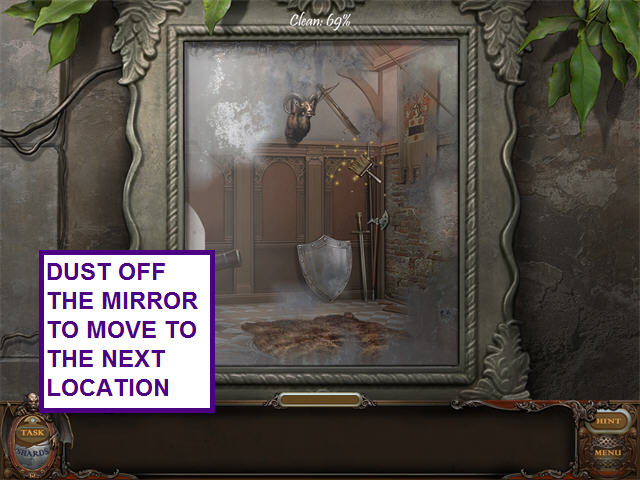
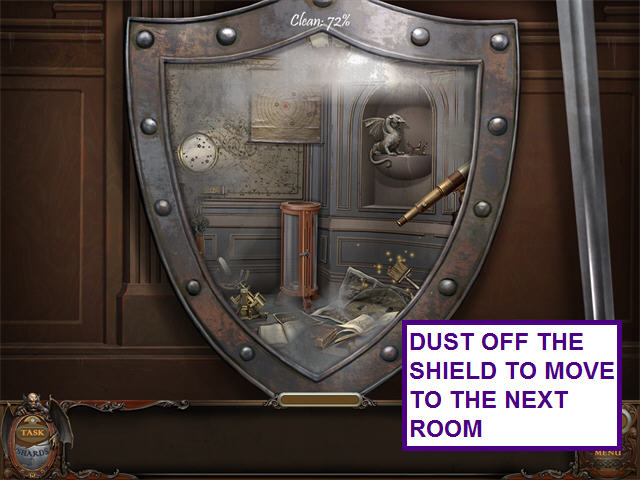
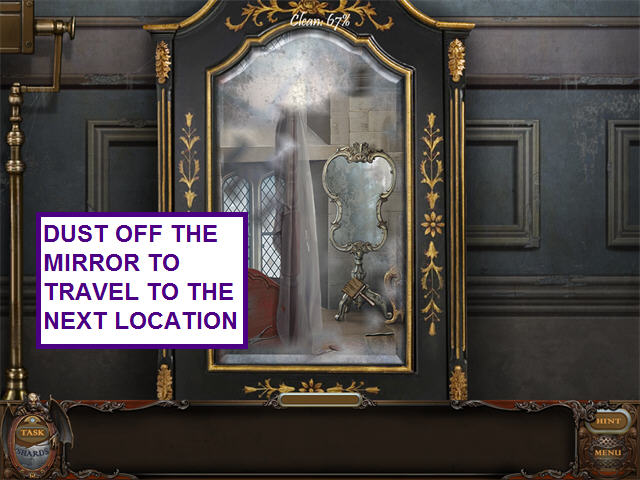
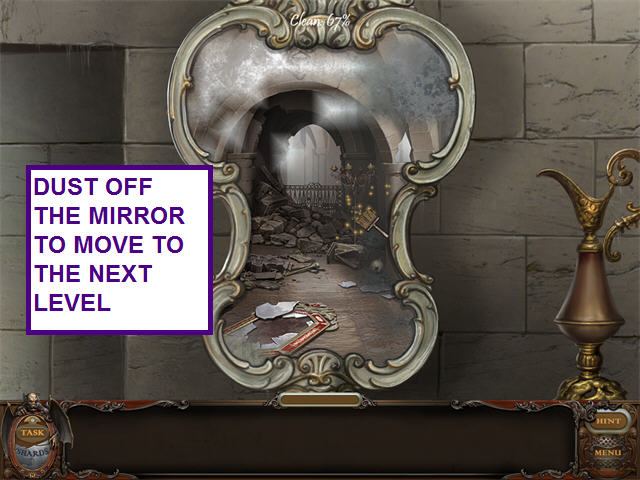
- TASK: Dust off the mirror to travel to the next room.
- Find the BRUSH.
- Use the BRUSH on the mirror.
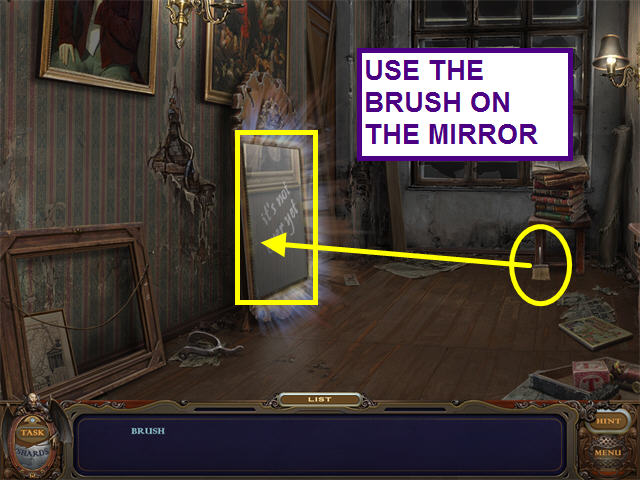
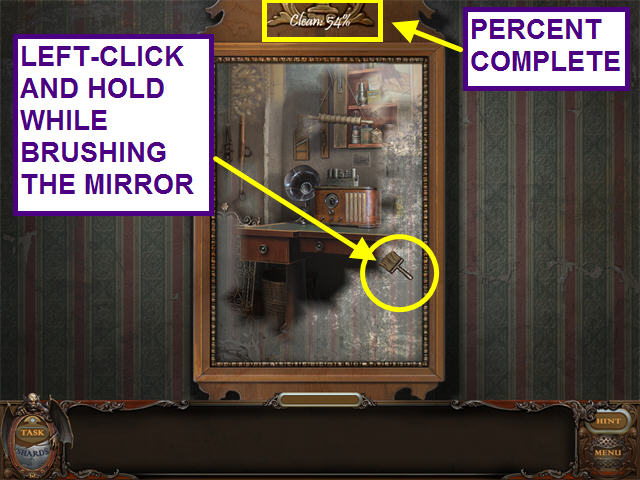
- Left-click and hold while brushing the mirror to clear away all the dust.
- You will see the percent complete at the top of the mirror.
- When the mirror is clean, click anywhere to enter the next room.
Electrical Room
- TASK: Light the gasoline lamp.
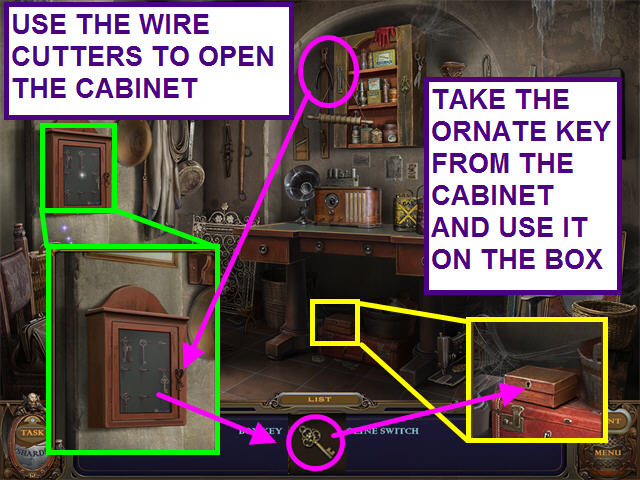
- Take the WIRE CUTTERS; use them to open the key cabinet.
- Open the cabinet; take the ornate BOX KEY.
- Use the BOX KEY to open the small box.
- Click on the sparkling suitcase, just below the key cabinet, for a hidden object screen.
- Locate the hidden objects on the list and the LIGHTER.
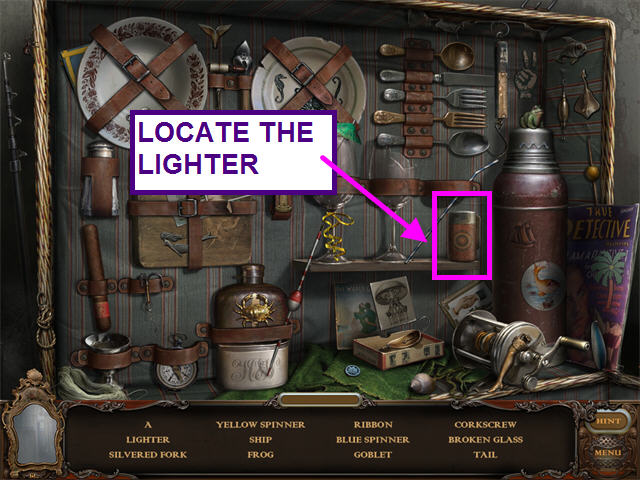
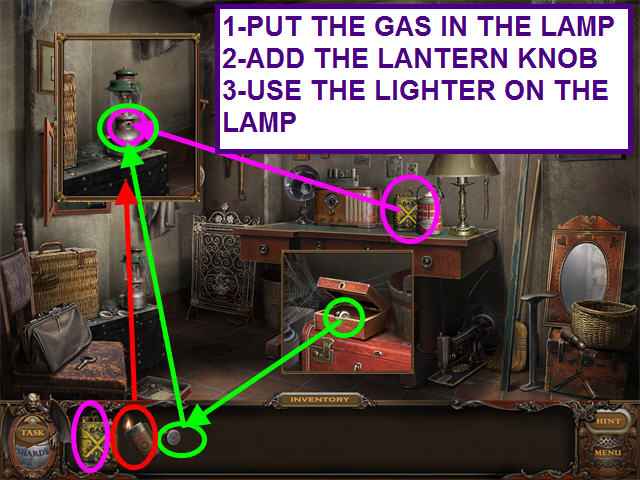
- Take the GAS from the desk; use it in the lamp.
- Locate the LANTERN KNOB in the small box; use it on the lamp.
- Take the LIGHTER; light the lamp with it.
- The ghost of the nanny warns you about little Johnny.
- She will help if you get the electricity running again.
- TASKS: Fix the fuse box; find the fuse box diagram.
- Locate the red GLOVE on top of the cabinet; use it on the hand-print to reveal a hiding place.
- Look at the fuse box diagram in the hiding place.
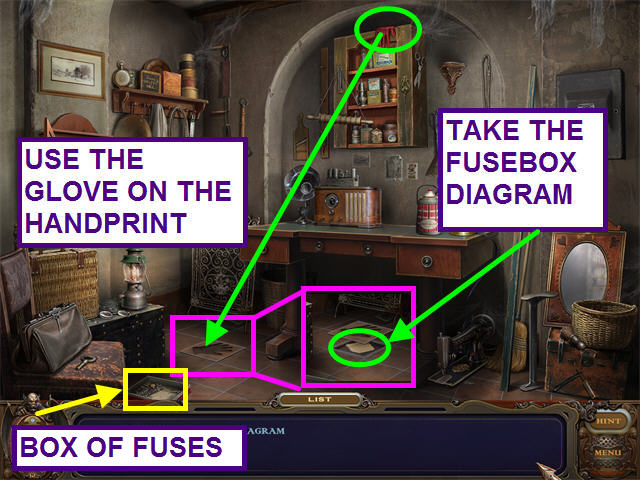
- TASKS: Fix the fuse box; find the fuses.
- Click on the box of fuses in the lower left corner.
- Locate the 12 FUSES in the box.
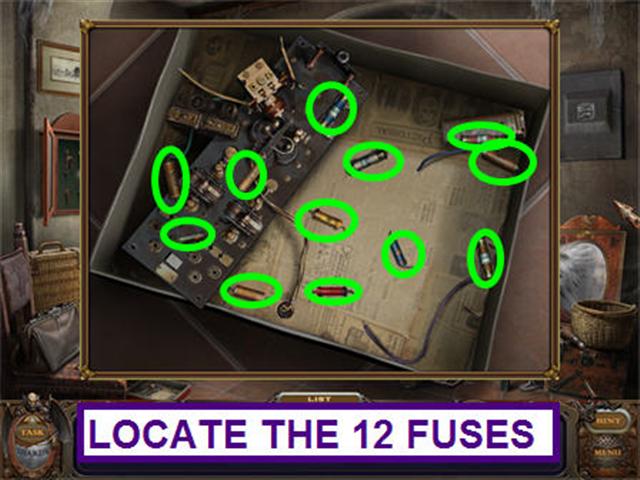
- Pick up the FUSE BOX KEY and use it to unlock the fuse box.
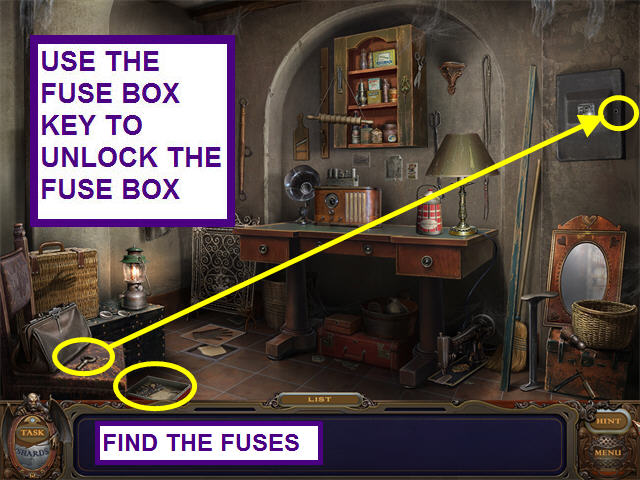
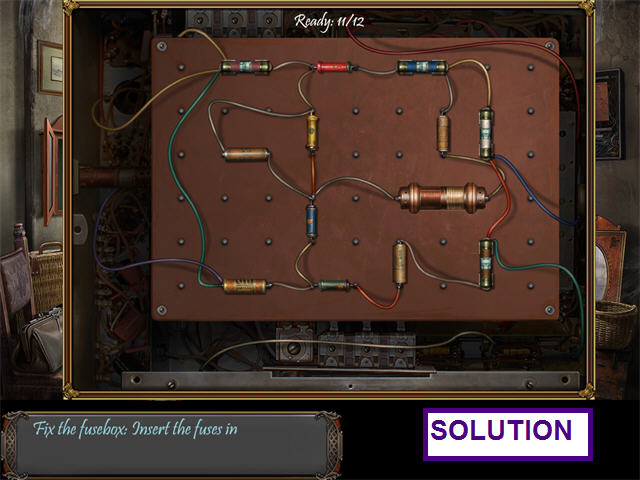
- TASK: Fix the fuse box: insert the fuses into the correct positions.
- Place the 12 FUSES in the correct positions.
- Left-click, hold and drag the fuses into position.
- The fuses will lock in place when correctly positioned.
- Click on the mirror to trigger the next task.
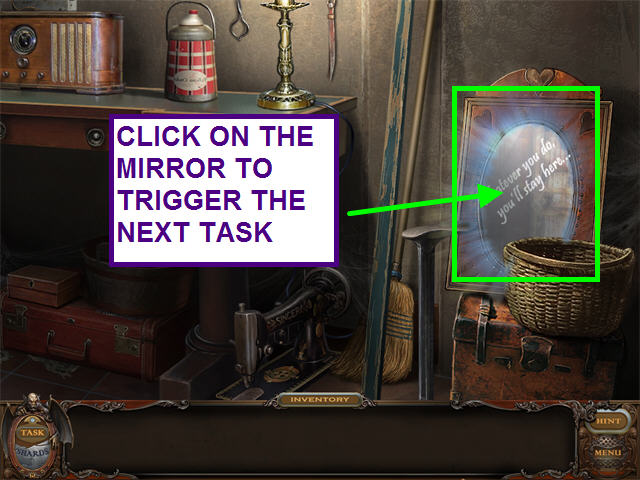
- TASK: Find the listed items in the room; place them according to their reflections in the mirror.
- You will see a tableau of items with 3/13 placed in reflection.
- Click outside the mirror to return to the room.
- Click on the sparkling suitcase for a hidden object scene.
- Locate the items on the list and find the BUTTON.
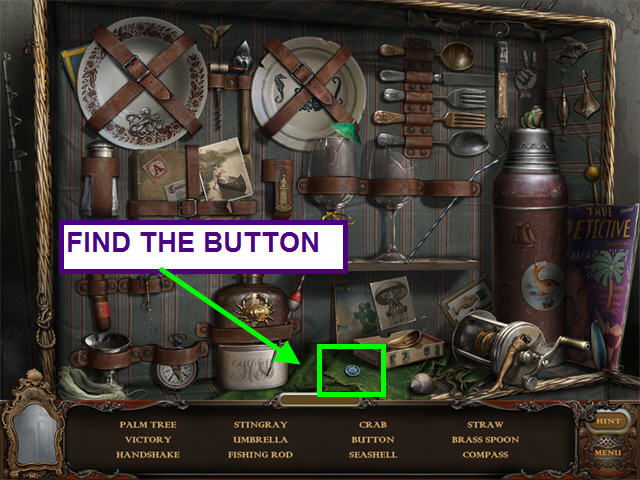
- Open the leather bag to find the CIGAR CASE.
- Find the remaining items on the list.
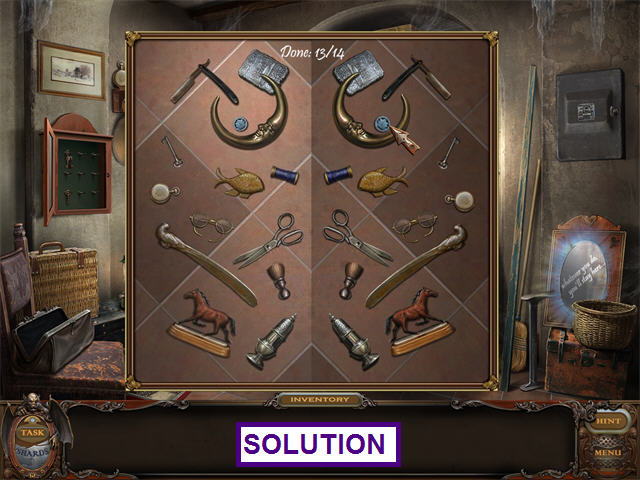
- Click on the mirror to place the items.
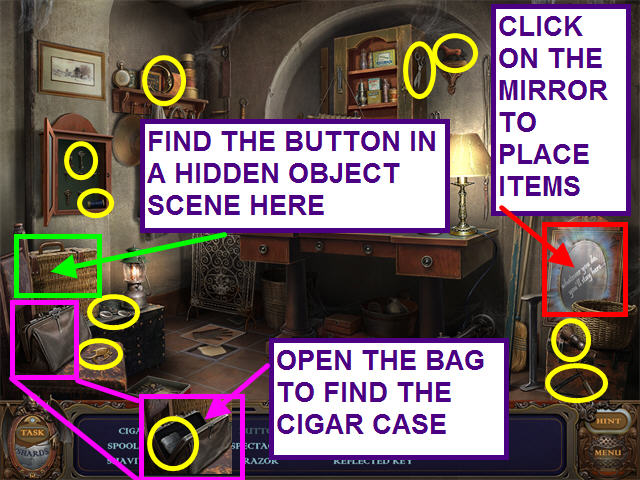
- Drag and drop the items so that they reflect the opposite side.
- The nanny appears, warning you that the dark ones don't like the light and that humans travel by clean mirrors.
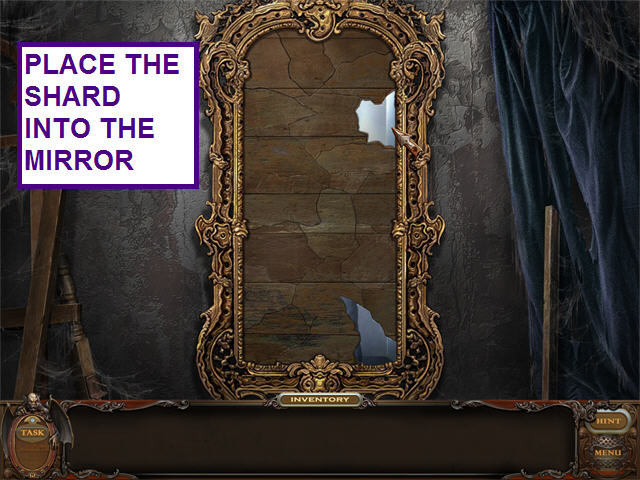
- TASK: Collect the mirror shard and move forward.
- Take the SHARD from the left corner.

- You are transported to the mirror that shattered and trapped you in the mansion.
- Place the SHARD in the matching space in the mirror.
- Click anywhere to return to the electrical room.
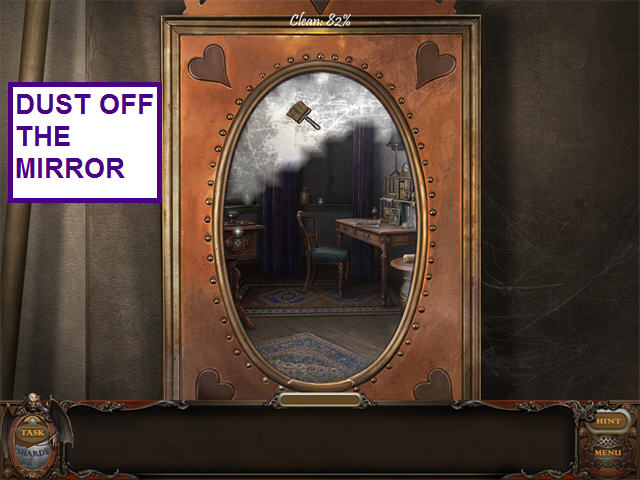
- Click on the mirror for a close-up view.
- TASK: Dust off the mirror.
- Left-click and hold while brushing the mirror to clear away all the dust.
- You will see the percent complete at the top of the mirror.
- When the mirror is clean, click anywhere to enter the next room.
Living Room
- TASK: Light the fireplace.
- Click on the sparkling desk for a hidden object scene.
- Locate the items on the list and find the MATCHES.
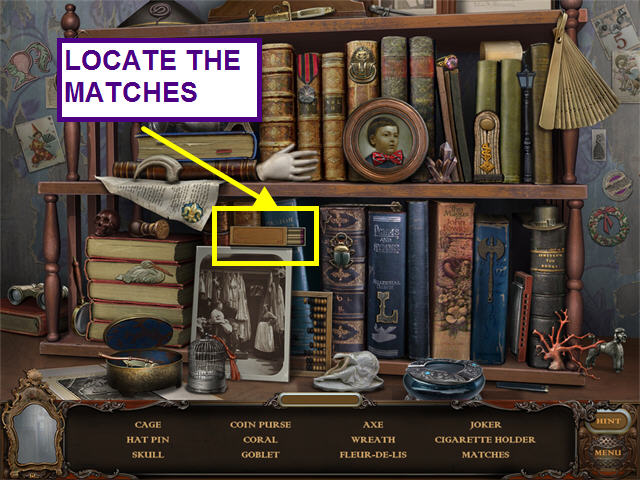
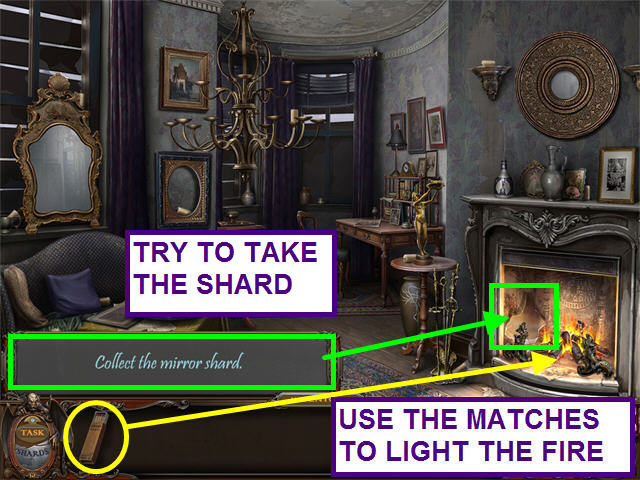
- Use the MATCHES on the fireplace.
- The nobleman from the article in the corridor appears, telling you about a shard in the fireplace.
- TASK: Collect the mirror shard.
- If you try to take the SHARD from the fireplace, you are thwarted by a metal grate!
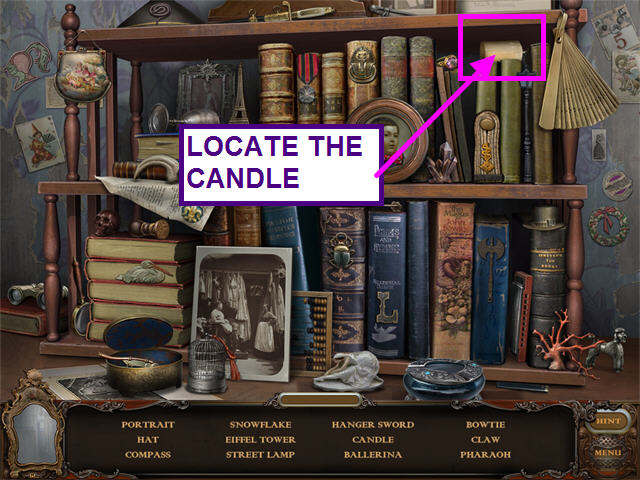
- TASK: Light the chandelier.
- Locate the 10 CANDLES in the main scene.
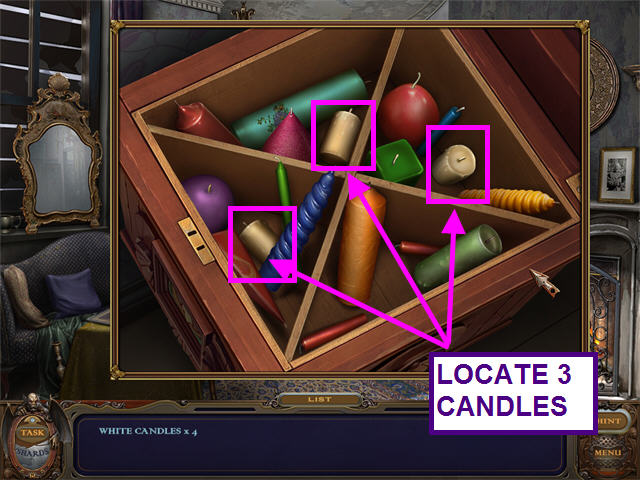
- Look at the small table under the chandelier.
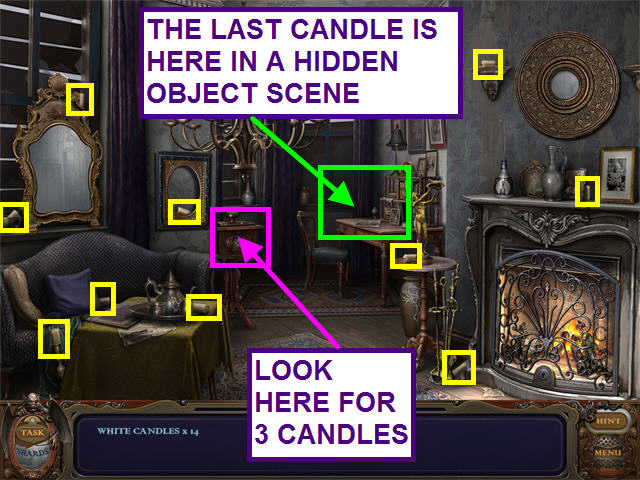
- Find the 3 CANDLES in the small table.
- The final CANDLE is in the hidden object scene at the desk.
- Click on the sparkling desk.
- Locate the hidden objects on the list and find the CANDLE.
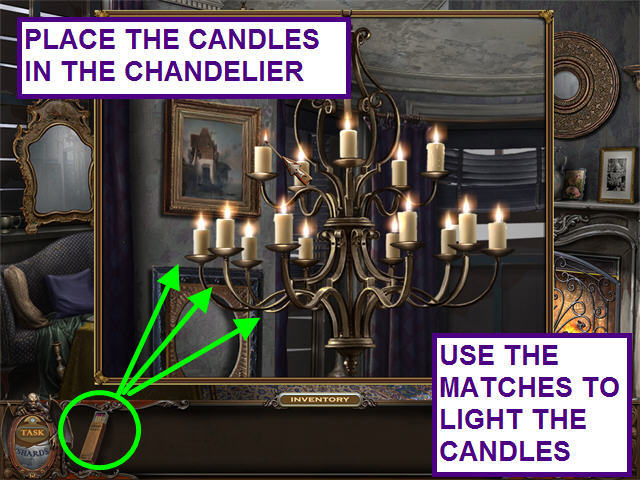
- Look at the close-up of the chandelier.
- Place the CANDLES into position on the chandelier.
- Use the MATCHES to light the CANDLES.
- You can only light about 5 or 6 before the MATCH runs out.
- TASK: Find and open a secret stash.
- Click on the blue bottle, left of the fireplace mantle.
- Collect the 4 BLUE PAPERS.
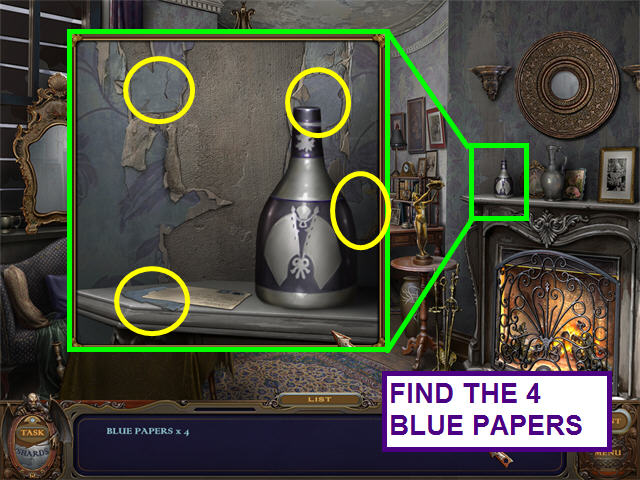
- Put the 4 pieces together to reveal a code.
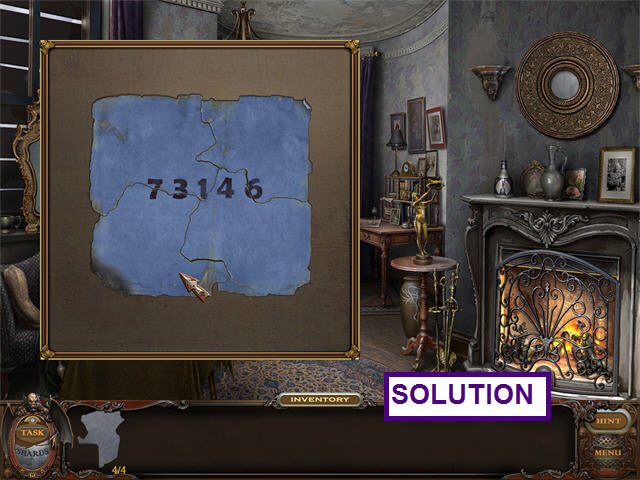
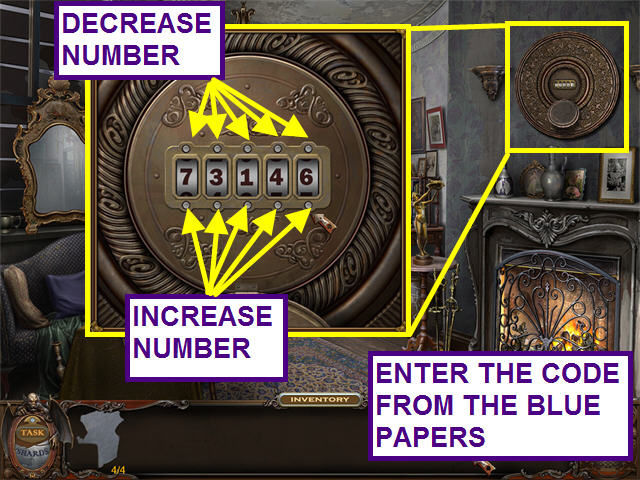
- Click on the center of the mirror over the fireplace to reveal a safe.
- Enter the code from the BLUE PAPERS: 73146.
- The buttons above the numbers will decrease a number, while the buttons below will increase a number.
- The numbers do not cycle around.
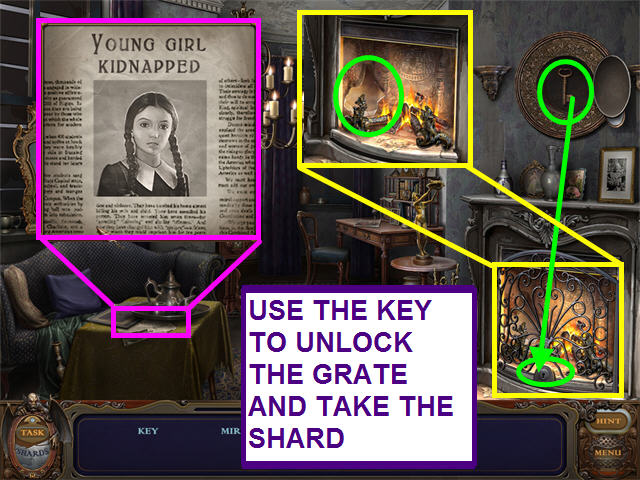
- TASK: Collect the mirror shard.
- Take note of the news article on the table.
- Take the key from the safe; unlock the grate with it.
- Take the SHARD.
- You are transported to the mirror that shattered and trapped you in the mansion.
- Place the SHARD in the matching space in the mirror.
- Click anywhere to return to the living room.

- TASK: Move forward through the mirror.
- Click on the mirror to trigger a mini-game.
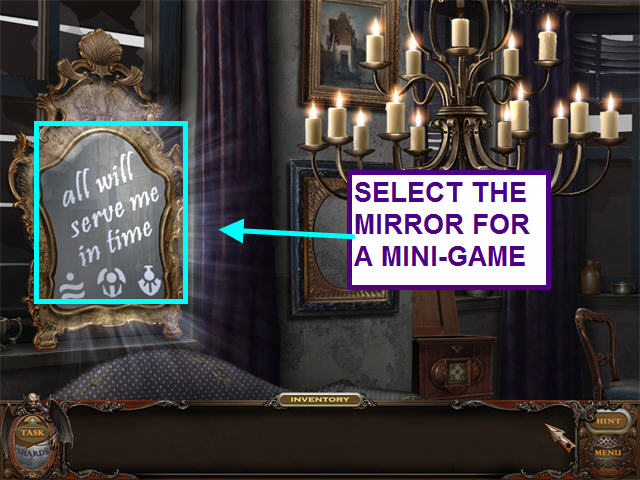
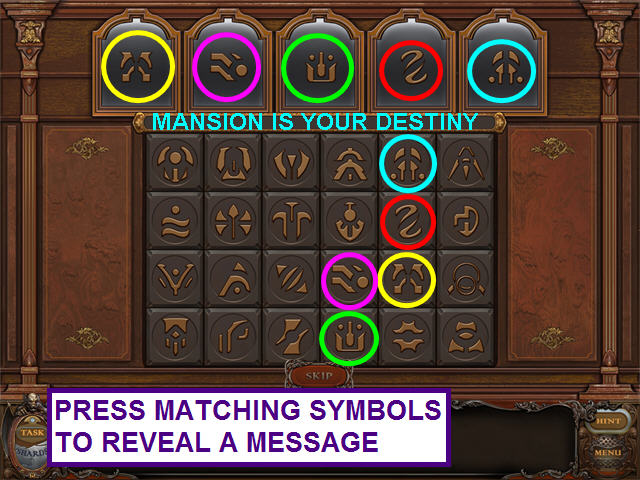
- Find the symbols from the upper line on the panels below.
- As you click on each symbol, a message will begin to appear.
- After successfully deciphering a number of these puzzles, the clue, “Mansion is your destiny,” will appear.
- TASK: Dust off the mirror to travel to the next room.
- Left-click and hold while brushing the mirror to clear away all the dust.
- You will see the percent complete at the top of the mirror.
- When the mirror is clean, click anywhere to enter the next room.
Basement
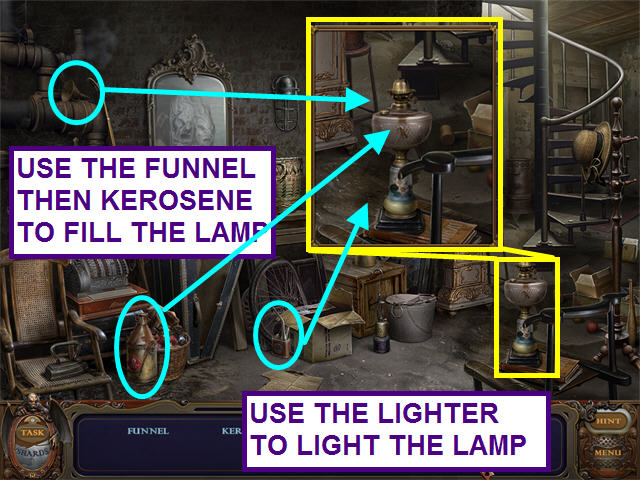
- TASK: Light the kerosene lamp.
- Take the FUNNEL, KEROSENE CAN, and the LIGHTER.
- Look at the lamp to see the close-up view.
- Place the FUNNEL on the lamp; then pour the KEROSENE into it.
- Use the LIGHTER to light the lamp.
- The watch maker appears and warns you that there is no way out!
- He wants your help repairing the clock.
- TASK: Fix the clock; install the clock hand.
- Click on the sparkling area on the right.
- Locate the hidden objects on the list and find the CLOCK HAND.
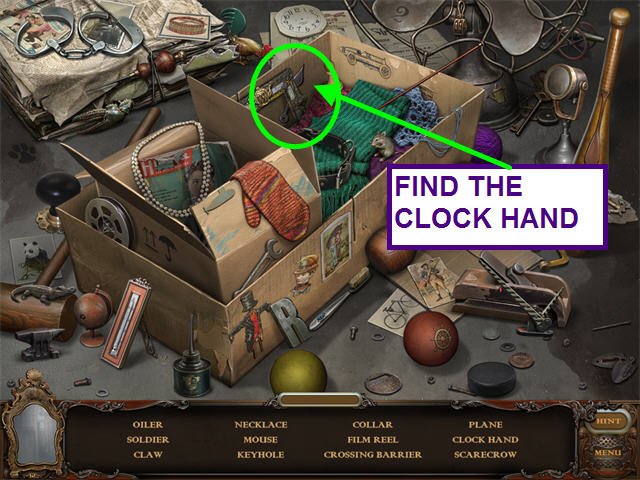
- Click on the clock to see a close-up view.
- Place the CLOCK HAND on the clock.

- TASK: Fix the clock; find all the gears.
- Find the BULB and place it in the wall light to make the GEARS appear.
- Locate the 5 GEARS.
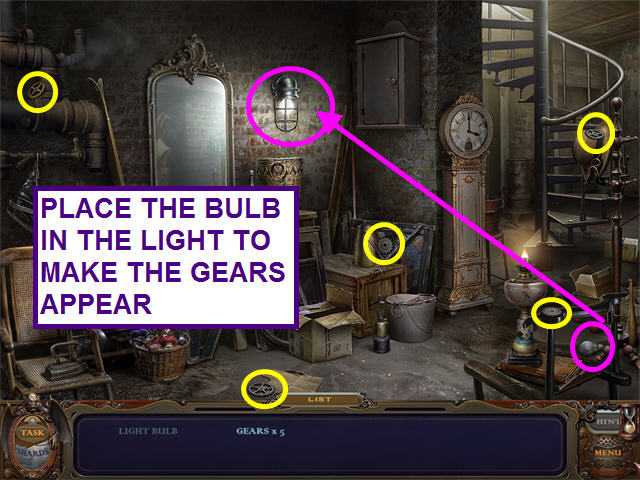
- Look at the clock in close-up view.
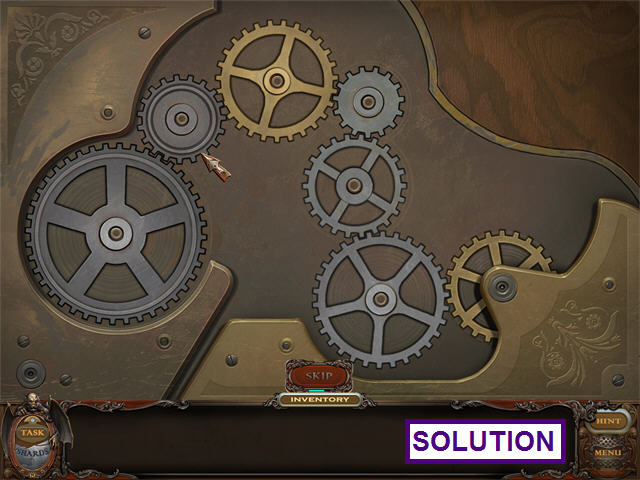
- Drag the gears to the clock to trigger a mini-game.
- TASK: Install all the gears.
- Place the GEARS so that all are moving.
- TASK: Fix the clock; find and set the correct time.
- Click on the sparkling area on the right.
- Locate the hidden objects and the KEY.
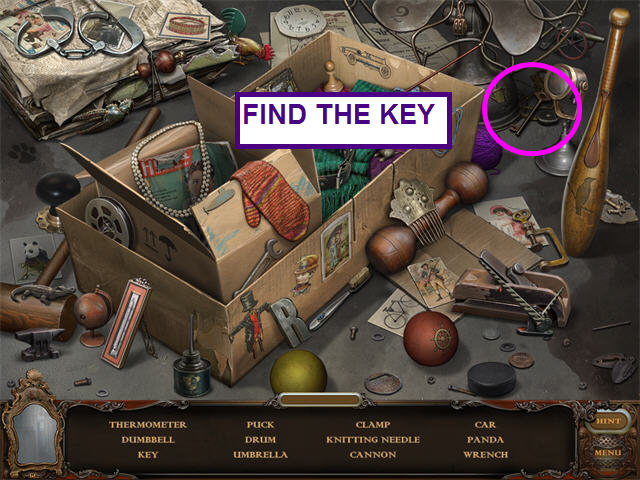
- Use the KEY to open the cabinet.
- Click on the paper to see the time: 11:55.
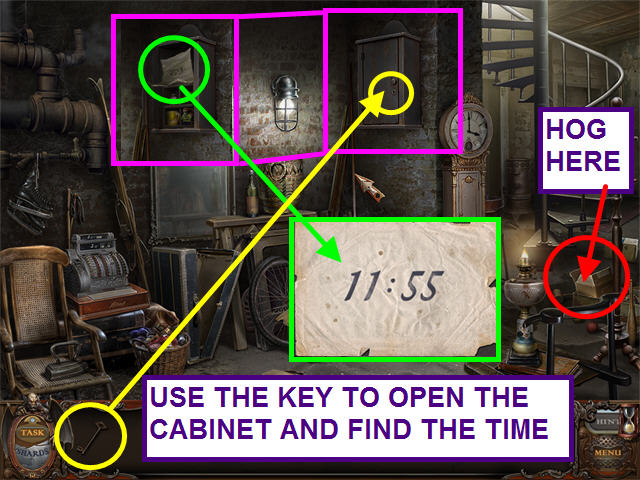
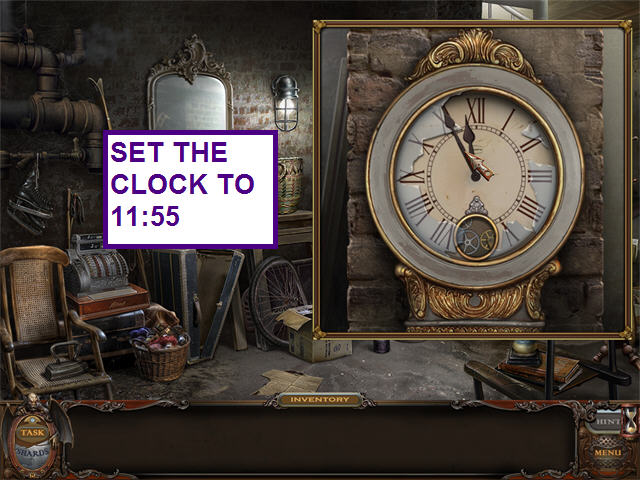
- Look at the clock face again and turn the hands to 11:55.
- The watch maker appears and tells you he hid a shard in the register, but forgot the code.
- Look inside the bottom of the clock to find the code on a PIECE OF WOOD.
- The code is: 8917.
- Look at the close-up of the register.
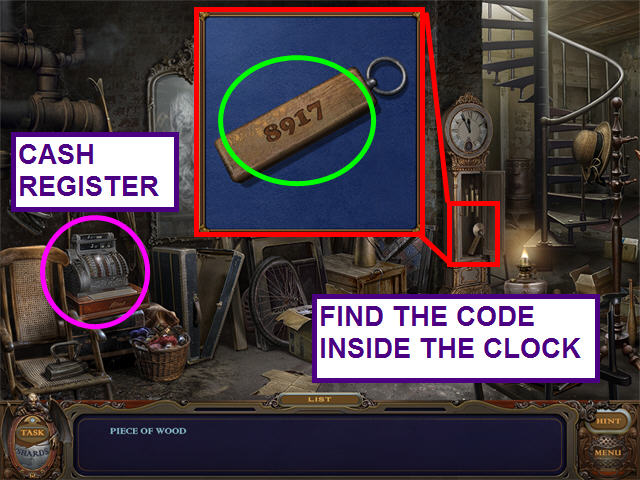
- TASK: Open the register.
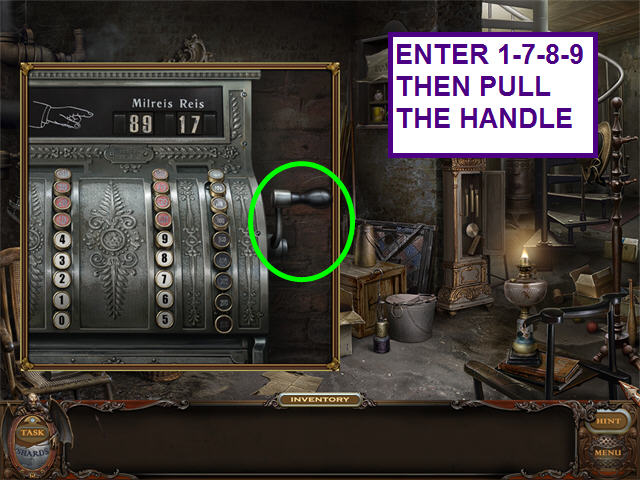
- Press the numbers 8, 9, 1, and 7; pull the lever on the right.
- Sometimes the register is broken and the keys will work for different positions.
- The first and second numbers you enter show up in the third and fourth positions.
- The third and fourth numbers you enter show up in the first and second positions.
- So instead of entering 8917, enter 1, 7, 8, and 9.
- Pull the handle on the right side of the register.
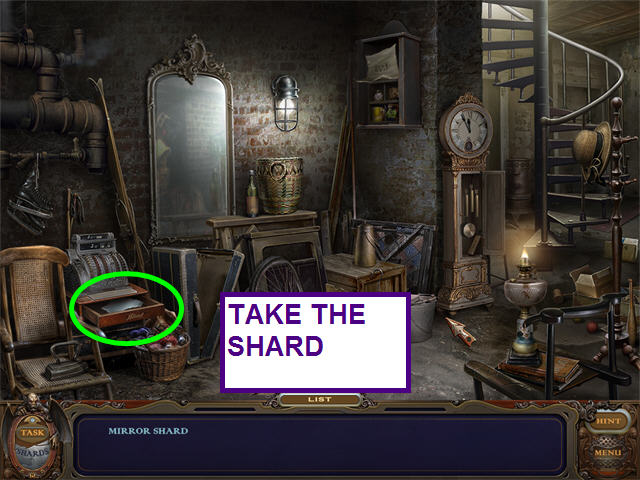
- Make sure to take the figurine before the shard.
- TASK: Take the mirror shard.
- Take the SHARD out of the register drawer.
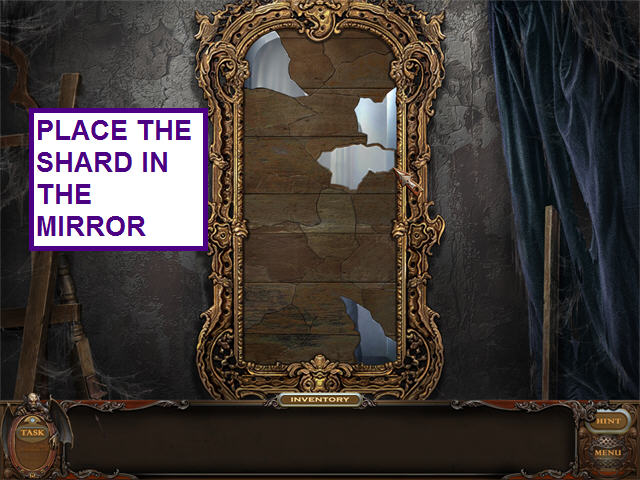
- You are transported to the mirror that shattered and trapped you in the mansion.
- Place the SHARD in the matching space in the mirror.
- Click anywhere to return to the basement.
- TASK: Move forward.
- Click on the mirror.
- Left-click and hold while brushing the mirror to clear away all the dust.
- You will see the percent complete at the top of the mirror.
- When the mirror is clean, click anywhere to enter the next room.
Cellar
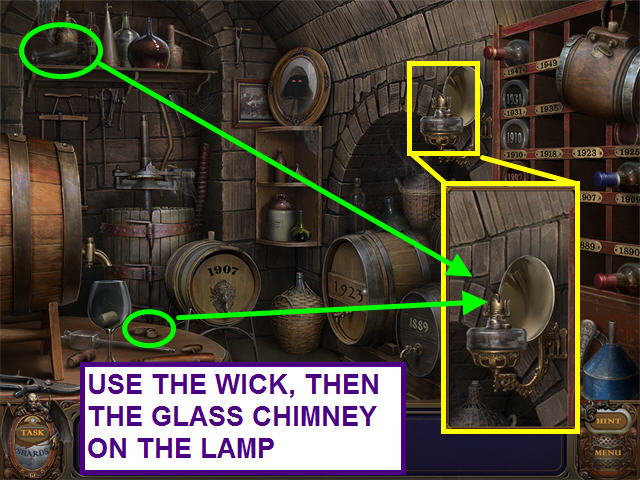
- TASK: Light the gasoline lamp.
- Take the WICK and the GLASS CHIMNEY.
- Click on the gasoline lamp to see the close-up view.
- Place the WICK in the top center of the lamp; then add the GLASS CHIMNEY.
- A drunken ghost appears, telling you he was trapped when he went looking for 3 bottles of wine.
- TASK: Fill the empty bottles with wine from the barrels and cork them according to date.
- Locate the 3 BOTTLES and the CORKSCREW.
- Click on the sparkling area for a hidden object scene.
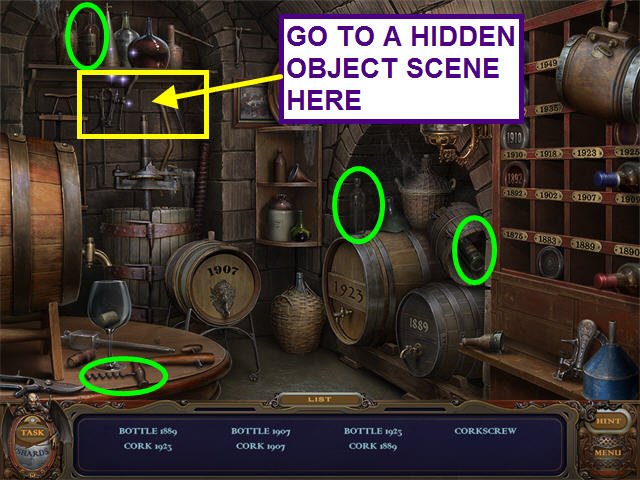
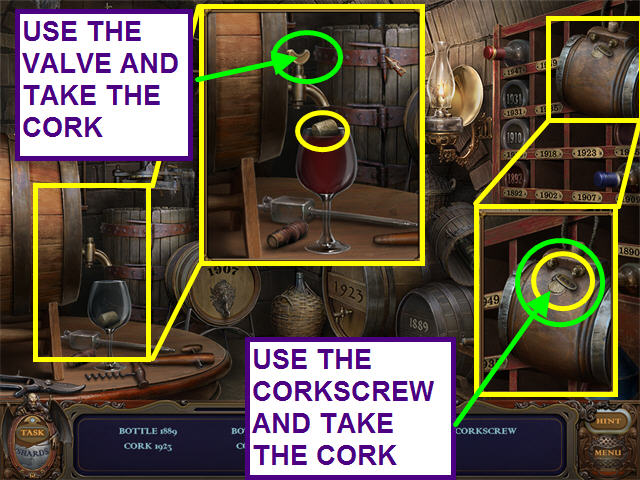
- Locate the hidden objects on the list and the VALVE.
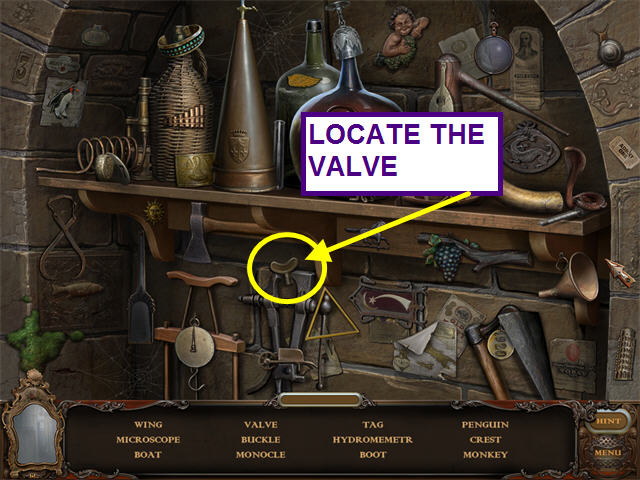
- Look at the close-up of the barrel on the left.
- Place the VALVE in the top of the spout.
- Take the 1923 CORK out of the filled wine glass.
- Look at the close-up of the hanging barrel in the upper right.
- Use the CORKSCREW to loosen the 1889 CORK.
- Take the 1889 CORK.
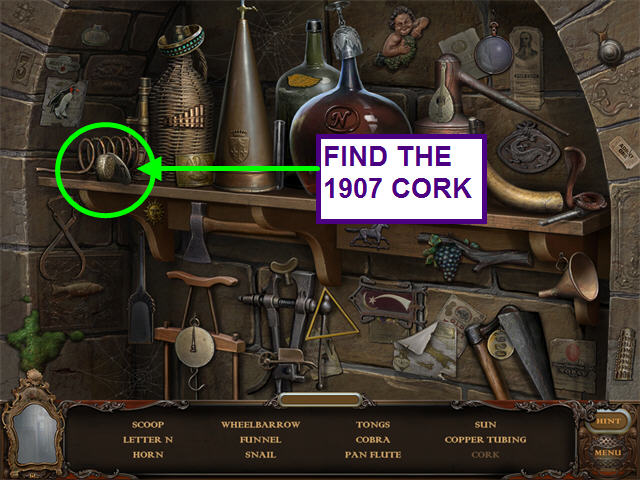
- Return to the sparkling area for a hidden object scene.
- Locate the hidden objects on the list and the 1907 CORK.
- Look at the close-up of the wine casks in the center of the room.
- Place the 1923 BOTTLE under the spigot of the cask labeled 1923; then turn the spigot.
- Place the other 2 bottles under the matching spigots; open the valves to fill the bottles with wine.
- Place the matching year CORKS on each bottle to return them to your inventory.
- TASK: Place the bottles in the wine collection.
- Place each bottle into the matching year's slot.
- A compartment will open below the bottles.
- TASK: Collect the mirror shard.
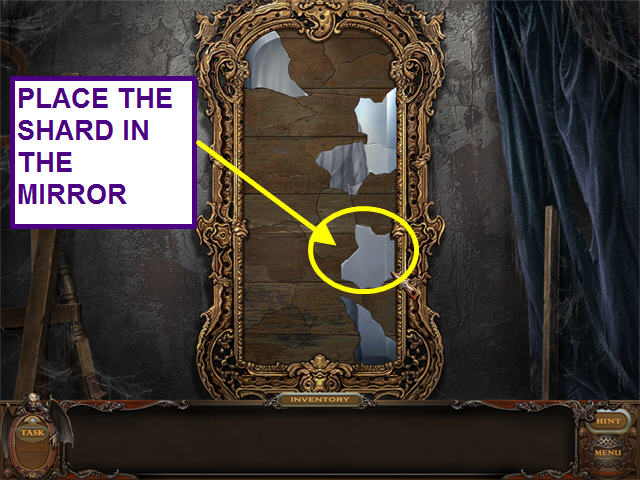
- Take the SHARD.

- You are transported to the mirror that shattered and trapped you in the mansion.
- Place the SHARD in the matching space in the mirror.
- Click anywhere to return to the cellar.
- TASK: Move forward.
- Click on the mirror.
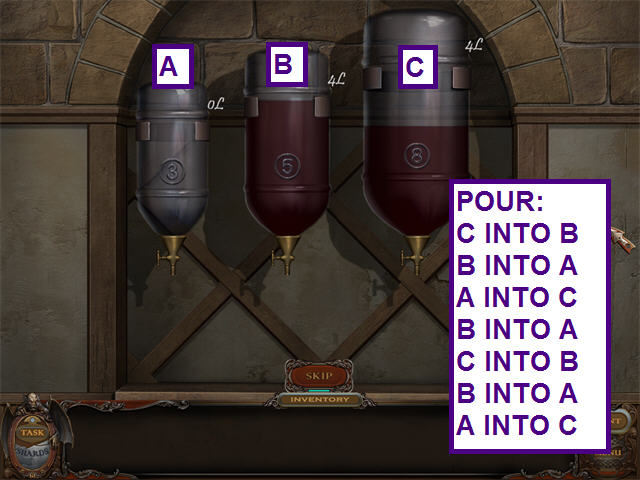
- TASK: You have 3 bottles: 3L, 5L, 8L. Divide 8L by 2.
- The object of this mini-game is to pour the wine until you have two measures of 4L.
- Labeling the bottles A through C, from left to right, pour C into B, B into A, A into C, B into A, C into B, B into A, and A into C.
- TASK: Dust off the mirror.
- Left-click and hold while brushing the mirror to clear away all the dust.
- You will see the percent complete at the top of the mirror.
- When the mirror is clean, click anywhere to enter the next room.
Pantry
- TASK: Turn the lights on.
- Try the light switch, but the bulb is too dirty.
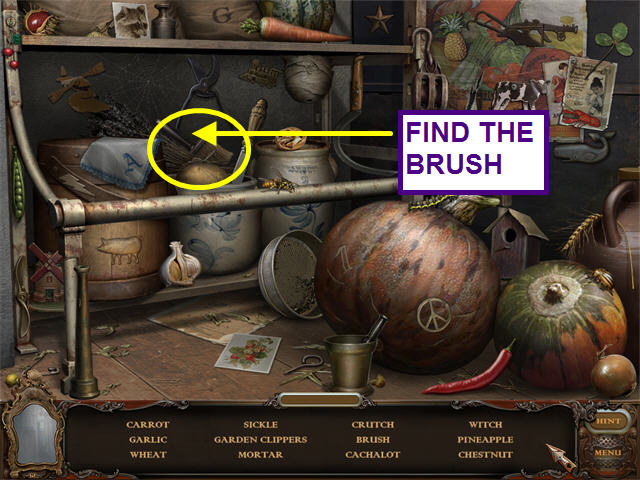
- Click on the sparkling area to enter a hidden object area.
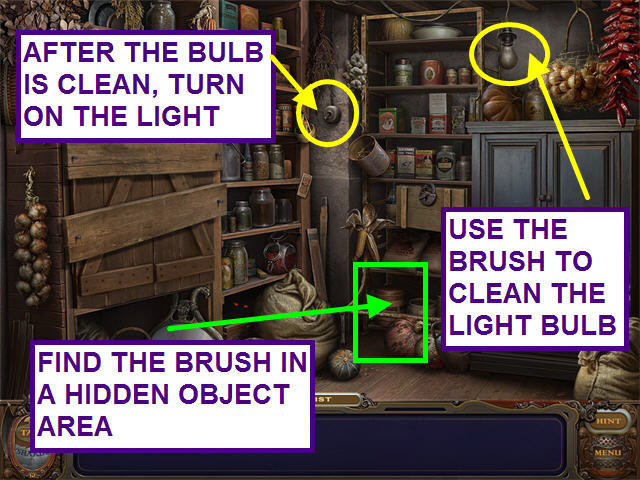
- Locate the hidden objects on the list and the BRUSH.
- Use the BRUSH on the light bulb.
- Look at the light switch close-up; flip the switch.
- The ghost of a young girl appears and demands all your shards!
- She changes to a mouse and runs off.
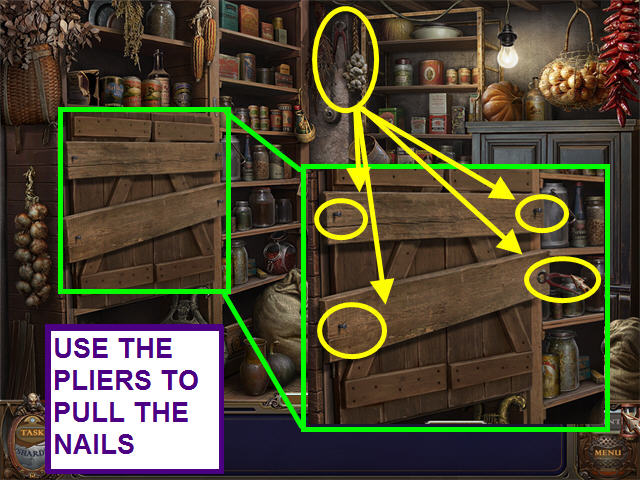
- TASK: Open the blocked cupboard.
- Find the PLIERS.
- Look at the close-up view of the boarded cupboard.
- Use the PLIERS on the 4 nails.
- Open the cupboard.
- TASK: Catch the mouse; get the CUPBOARD KEY.
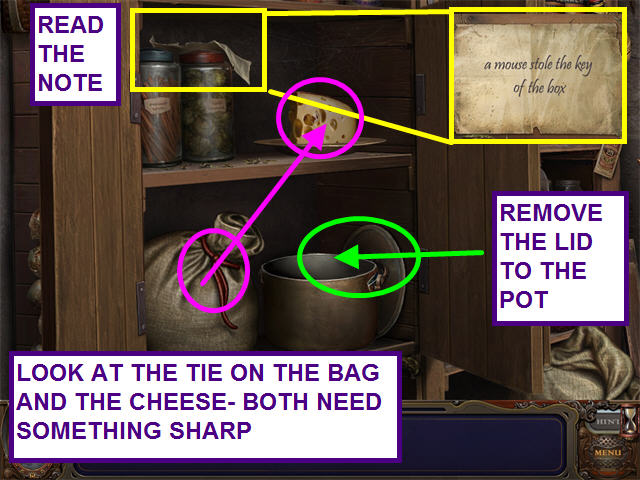
- Look at the note; learn the mouse stole the CUPBOARD KEY.
- Look at the cheese and the tie on the bag to learn you need something sharp.
- Remove the lid to the pot.
- To exit this close-up scene, move the cursor to the bottom of the screen, past the bottom edge.
- You may have to wait a few seconds for the cursor to change to a down arrow.
- Take the SCISSORS; return to the cupboard.
- Use the SCISSORS on the bag tie.
- Exit the close-up scene.

- Open the bottom drawer on the right cabinet.
- Take the SCOOP.
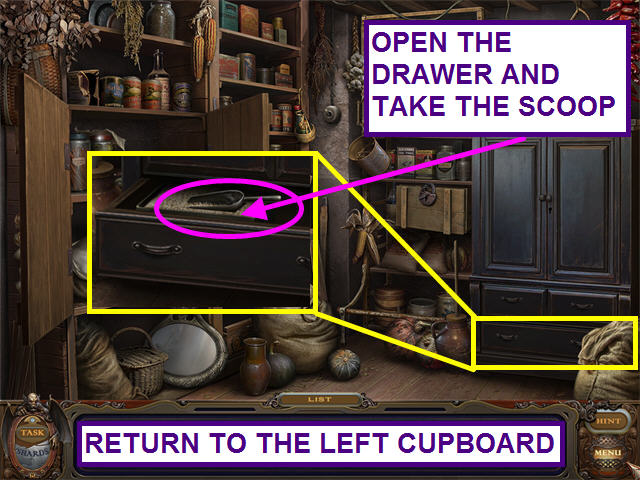
- Return to the close-up of the left cabinet.
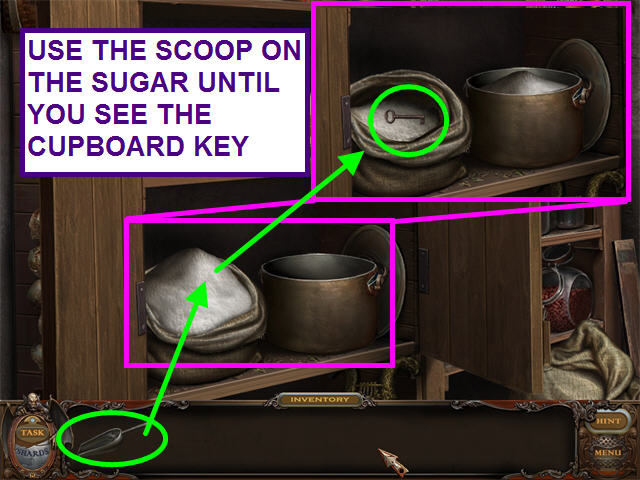
- Use the SCOOP on the sugar until you see the CUPBOARD KEY.
- Take the CUPBOARD KEY and exit the close-up view.
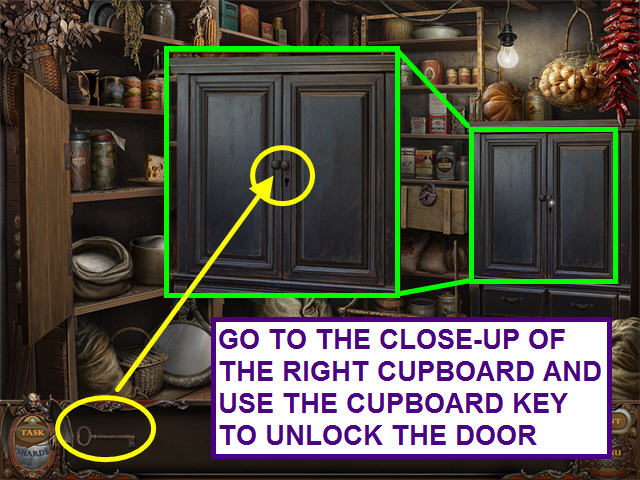
- Look at the close-up of the upper right cabinet.
- Use the CUPBOARD KEY to unlock the door.
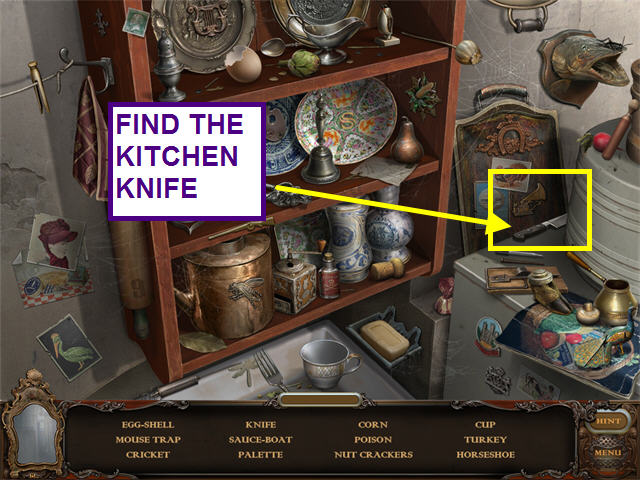
- TASK: Catch the mouse; add food to the trap.
- Try to take some cheese from the left cupboard to learn you need a knife.
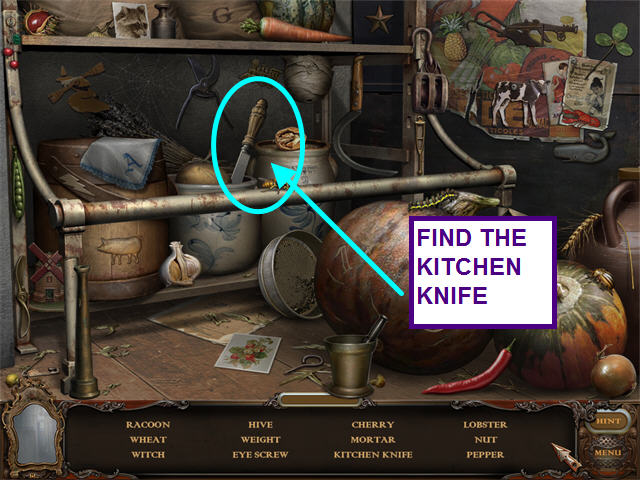
- Click on the sparkling area center screen for a hidden object area.
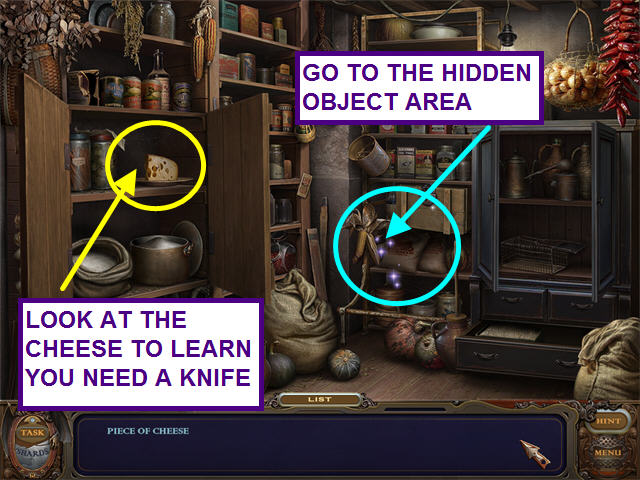
- Locate all the hidden objects on the list and find the KITCHEN KNIFE.
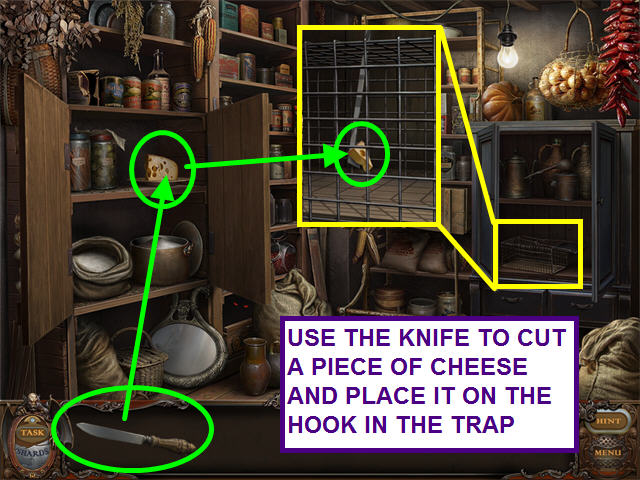
- Look at the close-up of the left cabinet.
- Use the KITCHEN KNIFE to cut a piece of CHEESE.
- Exit the close-up of the cabinet and go to the close-up of the cage.
- Place the CHEESE on the hook.
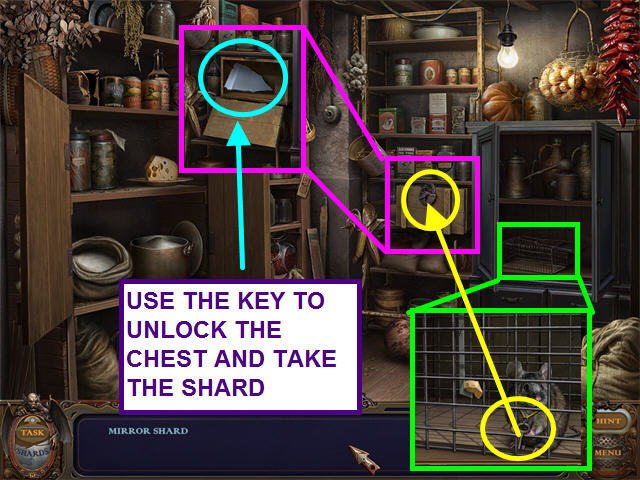
- Take the CUPBOARD KEY from the mouse.
- TASK: Collect the mirror shard.
- Look at the close-up of the chest; use the CUPBOARD KEY to open the lock.
- Take the SHARD from the chest.
- You are transported to the mirror that shattered and trapped you in the mansion.
- Place the SHARD in the matching space in the mirror.
- Click anywhere to return to the pantry.
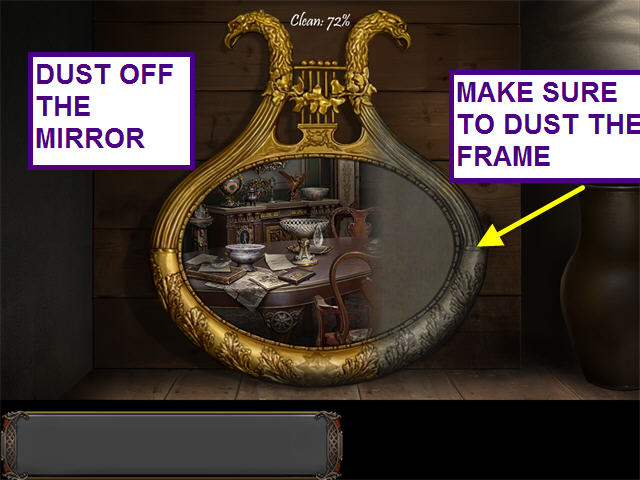
- TASK: Dust off the mirror.
- Left-click and hold while brushing the mirror to clear away all the dust (make sure you dust the frame).
- You will see the percent complete at the top of the mirror.
- When the mirror is clean, click anywhere to enter the next room.
Dining Room
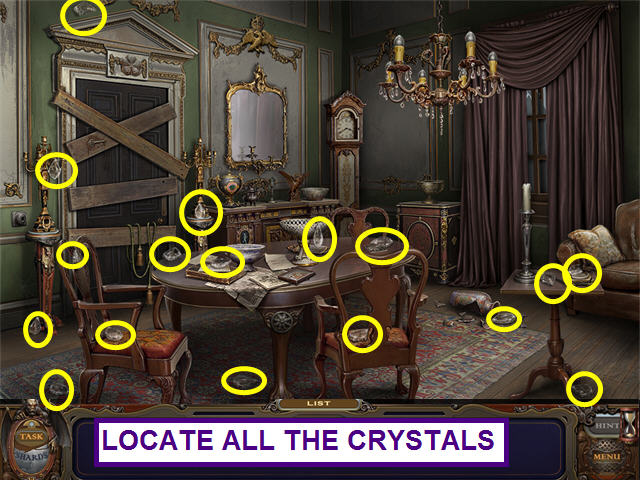
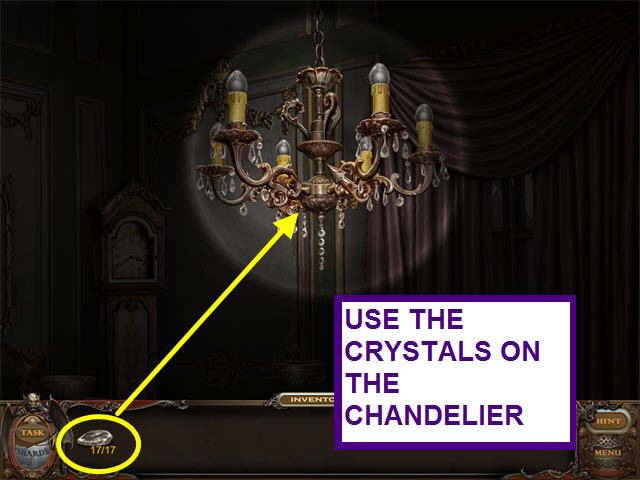
- TASK: Find the magic CRYSTALS and light the chandelier.
- Locate the 17 CRYSTALS.
- The ghost of a woman appears and tells you the trouble began on Johnny's wedding day.
- TASK: Find the secret place.
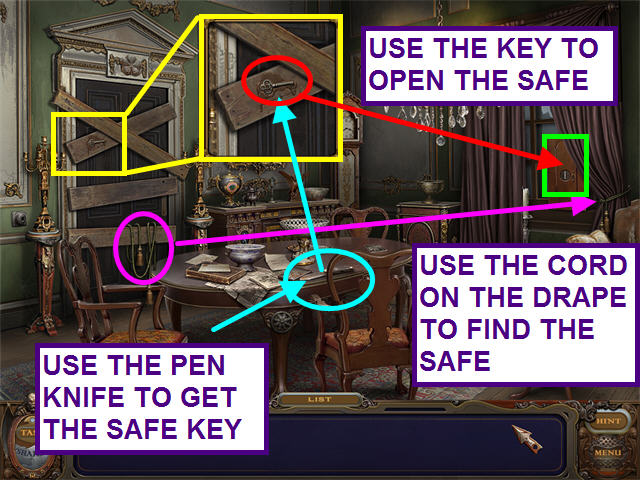
- Take the CORD from the chair.
- Use the CORD on the right drape to reveal a safe.
- Look at the safe to discover you need a key.
- TASK: Open the safe; put the key in the safe.
- Take the PEN KNIFE off the table.
- Look at the close-up of the KEY.
- Use the PEN KNIFE to remove the KEY.
- Look at the close-up of the safe; insert the KEY.
- TASK: Open the safe; find and install other items.
- Find the CLOVER, FLOWER, and EAGLE LEFT.
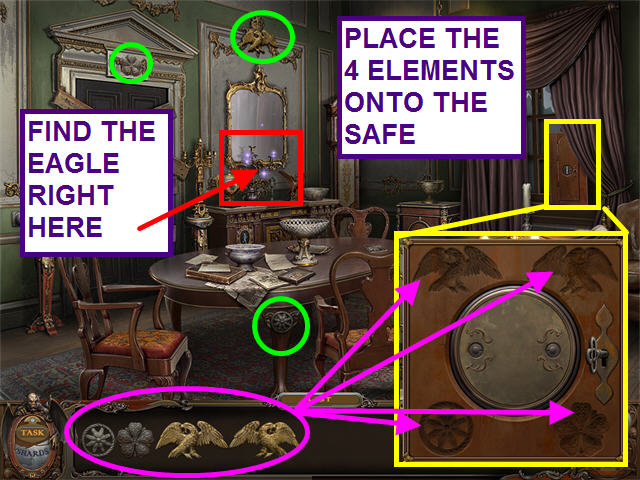
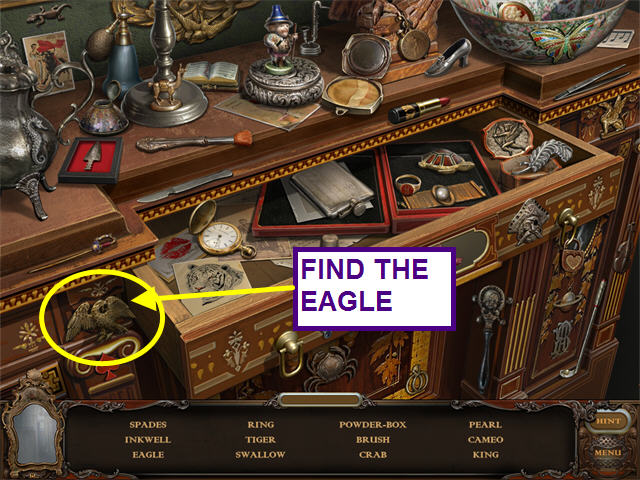
- Click on the sparkling area for a hidden object scene.
- Find the hidden objects on the list and the EAGLE RIGHT.
- Look at the close-up of the safe; insert the 4 items into the niches.
- TASK: Open the safe; find the code.
- Read the NOTE on the dining table.
- Move the pillow to find the PAPER.
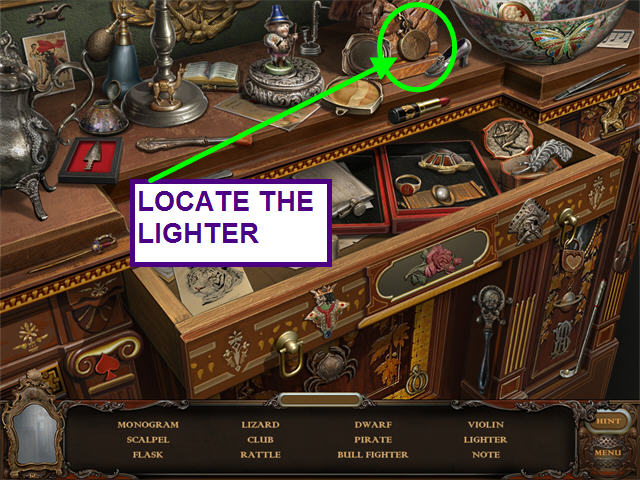
- Click on the sparkling area for a hidden object scene.

- Locate the hidden objects on the list and the LIGHTER.
- Look at the close-up of the candle.
- Use the LIGHTER to light the candle.
- Hold the PAPER over the flame to reveal the code: 57123.
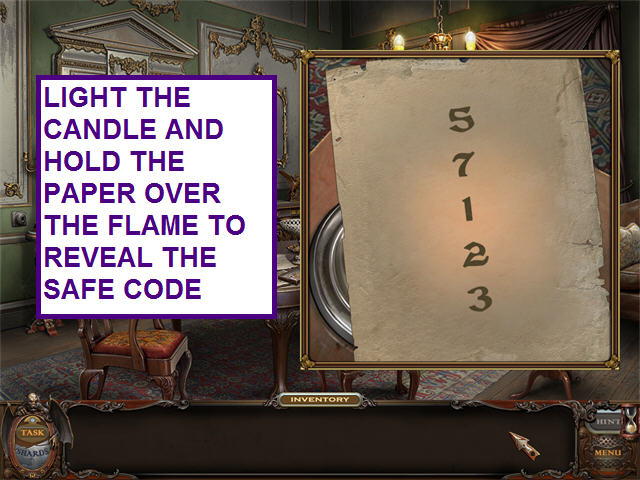
- Look at the close-up of the safe.
- Use the buttons to increase or decrease a number and enter the numbers 5, 7, 1, 2, and 3.
- The ghost appears and asks you to help Laura.
- TASK: Collect the mirror shard.
- Take the shard from the safe.
- You are transported to the mirror that shattered and trapped you in the mansion.
- Place the SHARD in the matching space in the mirror.
- Click anywhere to return to the dining room.
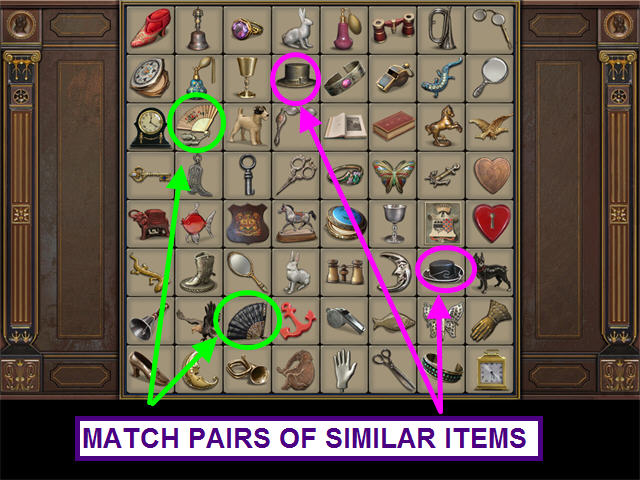
- TASK: Leave the room.
- Click on the mirror to trigger a mini-game.
- The object of this mini-game is to find pairs of similar items.
- Click on the pairs to remove them from the board.
- TASK: Dust off the mirror.
- Left-click and hold while brushing the mirror to clear away all the dust.
- You will see the percent complete at the top of the mirror.
- When the mirror is clean, click anywhere to enter the next room.
Kitchen
- The ghost of a woman appears and asks you to help her family.
- TASK: Find the recipe.
- Click on the plates 3 times to remove them.
- Take the RECIPE.
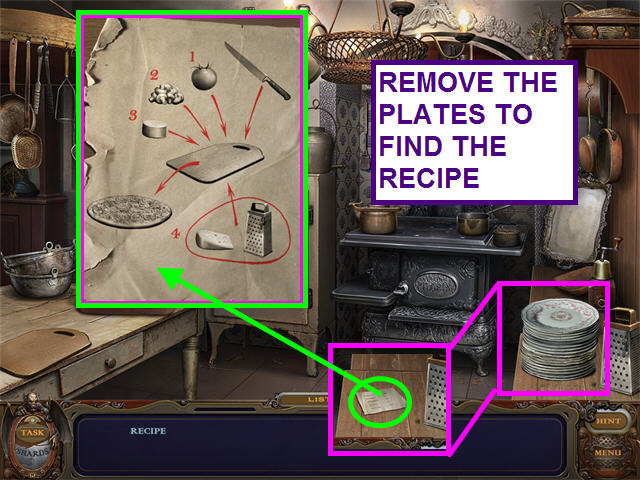
- TASK: Find the items; prepare them according to the recipe.
- Click on the sparkling cabinet in the upper left for a hidden object area.
- Find the hidden objects and the KNIFE.
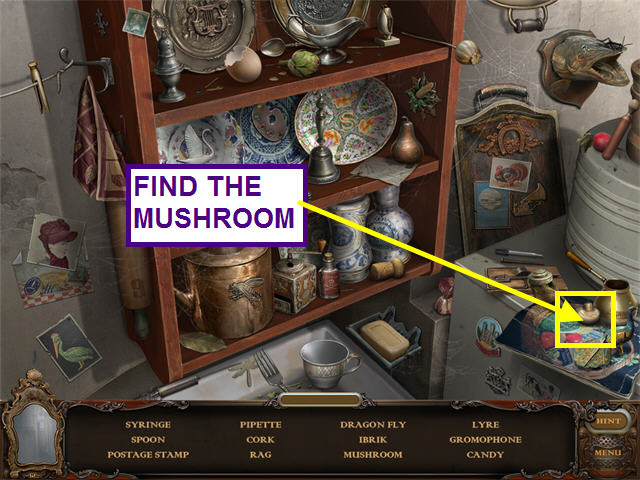
- Again, click on the sparkling cabinet in the upper left for a hidden object area.
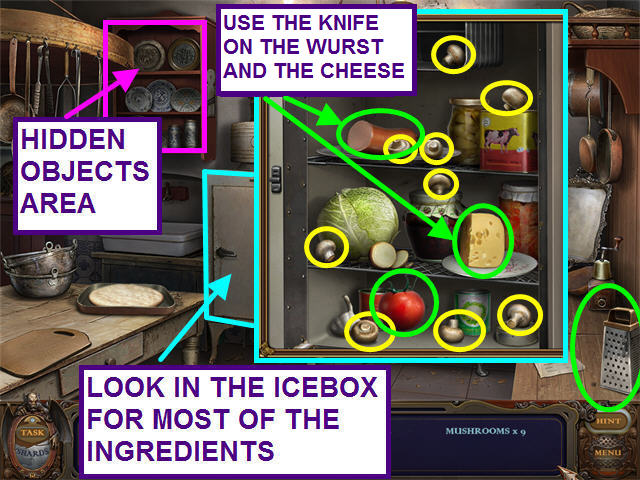
- Find the hidden objects and the MUSHROOM.
- Take the GRATER off the counter.
- Look in the ice box for the remaining ingredients.
- Use the KNIFE to cut the WURST and the CHEESE.
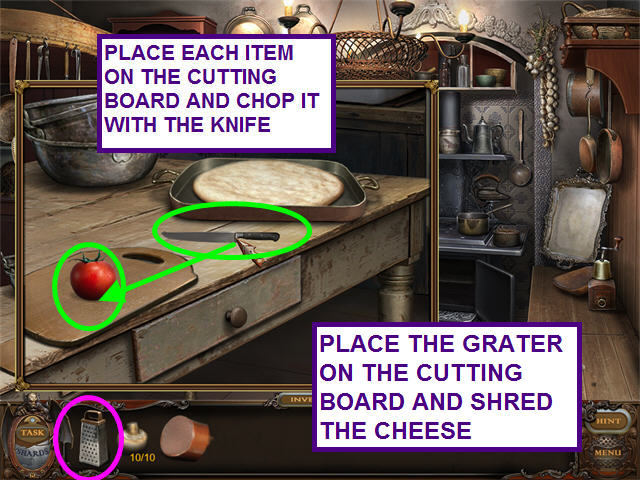
- Look at the close-up of the table.
- Place the TOMATO on the cutting board; cut it with the KNIFE.
- Place the WURST on the cutting board; cut it with the KNIFE.
- Place the MUSHROOMS on the cutting board; cut it with the KNIFE.
- Place the GRATER on the cutting board; shred the CHEESE with it.
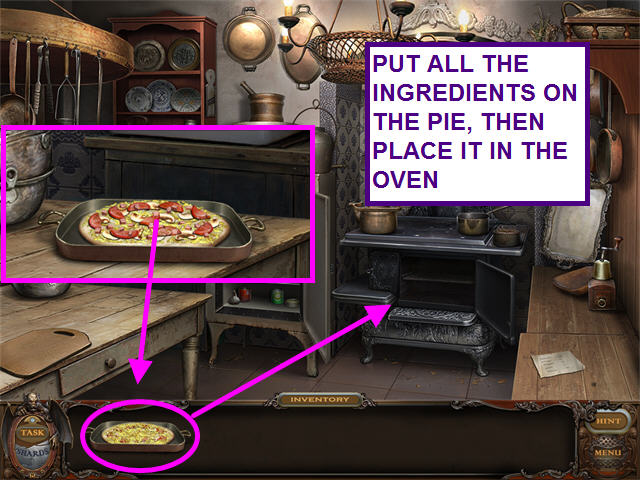
- Put all the ingredients on the PIZZA PIE; place it into the oven.
- Close the oven door to trigger a mini-game.
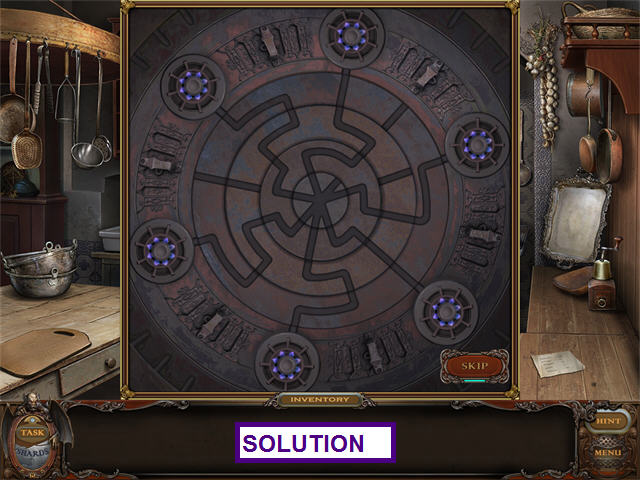
- TASK: Repair the oven; rotate discs with pipes in order to deliver gas to all four burners.
- Click on each of the rings until all the burners are connected to the center.
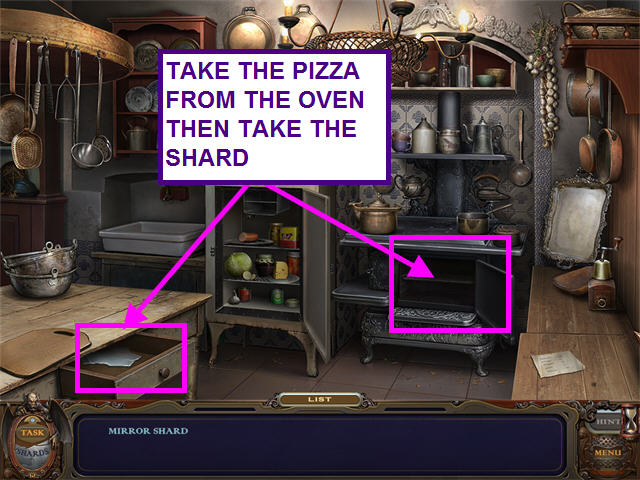
- TASK: Take the pizza.
- Take the PIZZA out of the oven.
- TASK: Collect the mirror shard.
- Open the drawer on the kitchen table; take the SHARD.
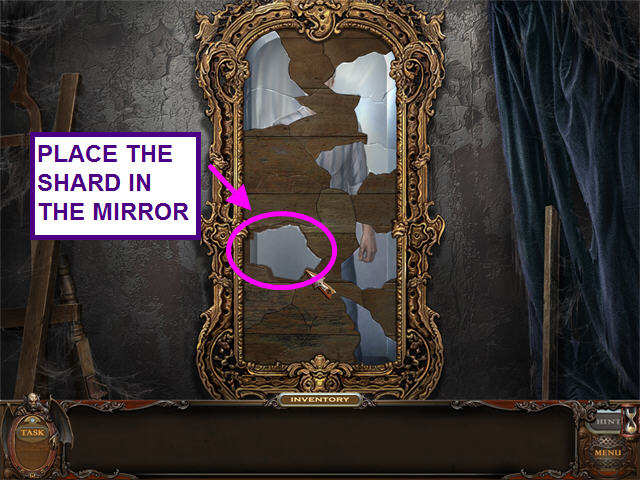
- You are transported to the mirror that shattered and trapped you in the mansion.
- Place the SHARD in the matching space in the mirror.
- Click anywhere to return to the kitchen.
- Click on the silver platter.
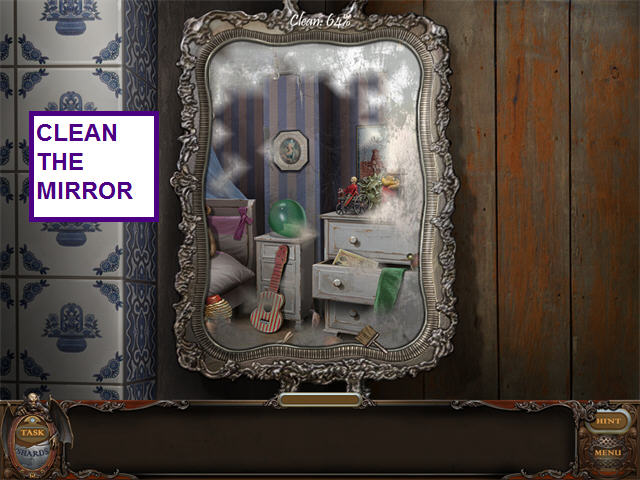
- TASK: Dust off the mirror.
- Left-click and hold while brushing the mirror to clear away all the dust.
- You will see the percent complete at the top of the mirror.
- When the mirror is clean, click anywhere to enter the next room.
Nursery
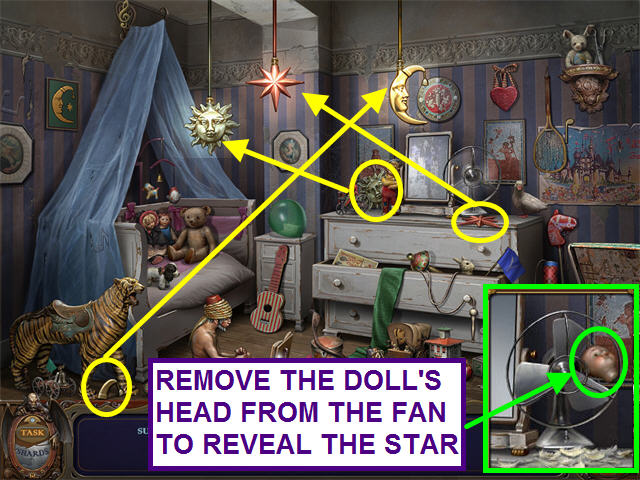
- TASK: Install the 3 lampshades.
- Look at the close-up of the fan; remove the doll's head from the fan blades.
- Take the SUN, STAR, and MOON HAT; place them on the hanging light swags.
- The ghost of a young girl appears and tells you that you will need a tool to find the shard in this room.
- TASK: Open the snake catcher's box; find the key.
- Look at the sparkling toy chest on the right for a hidden object scene.
- Locate the hidden objects on the list and take the ICE PICK.
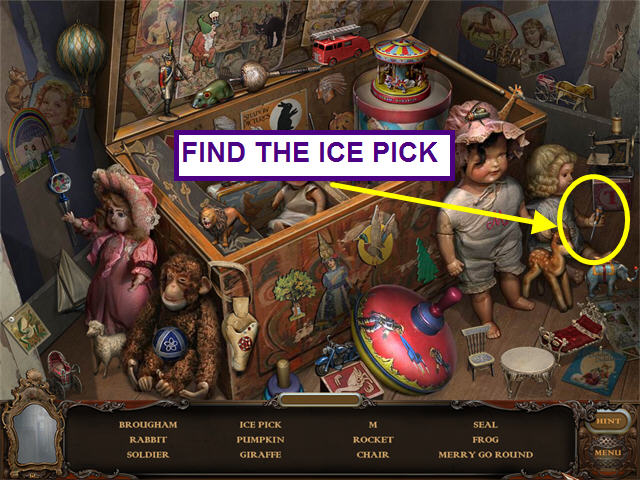
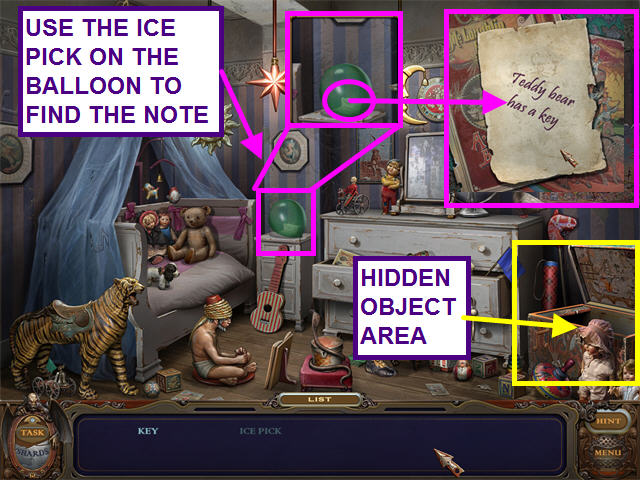
- Use the ICE PICK to pop the balloon.
- Look at the note to learn that the teddy bear has the KEY.
- Take the SCISSORS.
- Look at the close-up of the teddy bear.
- Use the SCISSORS to cut open the bear; take the KEY inside.

- TASK: Open the snake catcher's box; make the snake sleep.
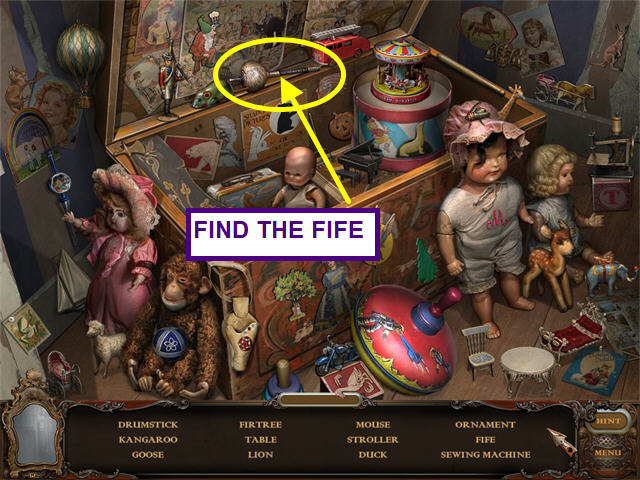
- Look at the sparkling toy chest for a hidden object scene.
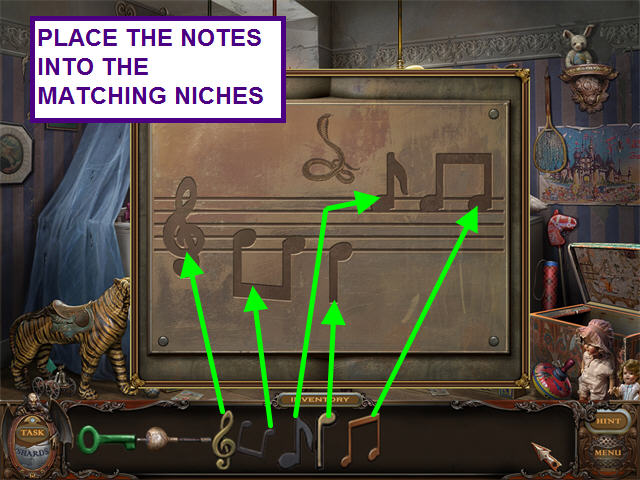
- Locate the hidden objects on the list and take the FIFE.
- Find the 5 NOTES in the room.
- One NOTE is a treble clef.
- Look at the close-up of the snake charmer; look at his book.
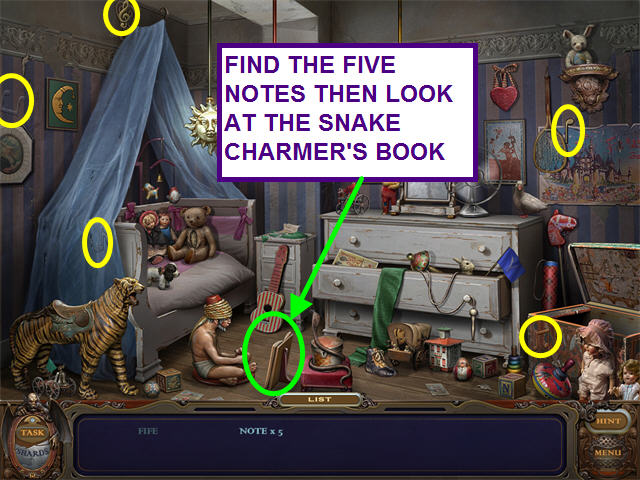
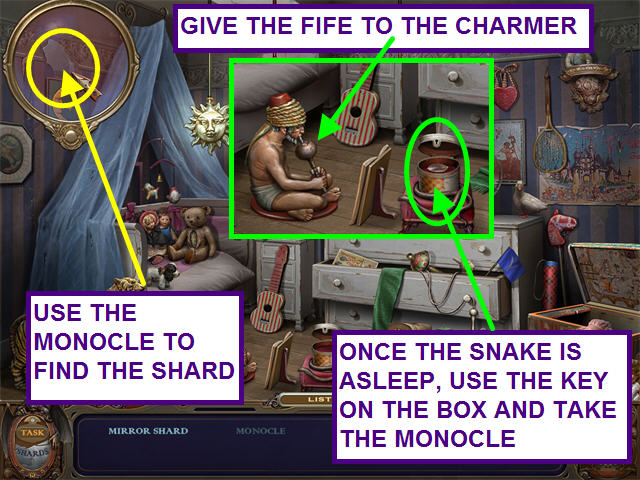
- Place the NOTES into the matching niches on the book.
- Give the FIFE to the charmer.
- Once the snake is asleep, use the KEY to open the box.
- TASK: Take the Shard.
- Take the MONOCLE from the box; use it to locate the SHARD.
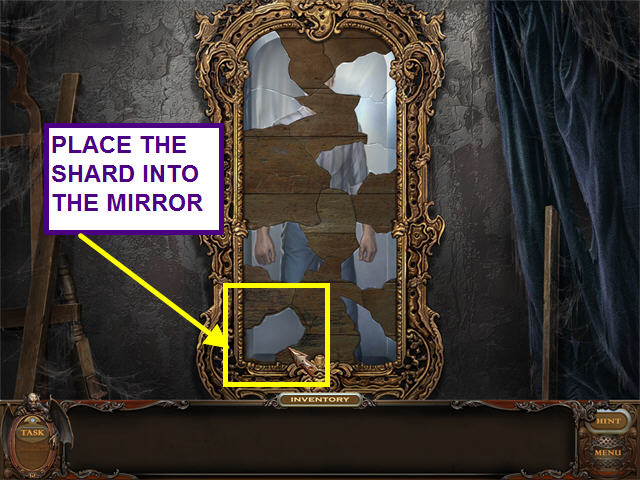
- You are transported to the mirror that shattered and trapped you in the mansion.
- Place the SHARD in the matching space in the mirror.
- Click anywhere to return to the nursery.
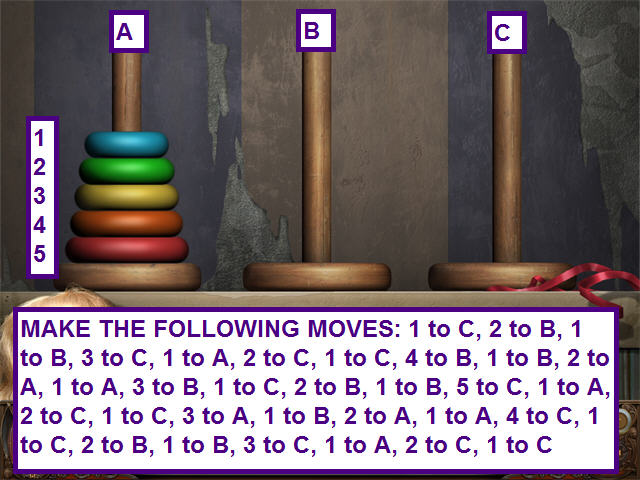
- Click on the mirror to trigger a mini-game.
- The object of this game is to move the rings from the left pole to the right pole.
- Rings can only rest on larger rings.
- Numbering the rings 1 through 5, from smallest to largest, and the poles A through C, from left to right, move 1 to C, 2 to B, 1 to B, 3 to C, 1 to A, 2 to C, 1 to C, 4 to B, 1 to B, 2 to A, 1 to A, 3 to B, 1 to C, 2 to B, 1 to B, 5 to C, 1 to A, 2 to C, 1 to C, 3 to A, 1 to B, 2 to A, 1 to A, 4 to C, 1 to C, 2 to B, 1 to B, 3 to C, 1 to A, 2 to C, 1 to C.
- TASK: Dust off the mirror.
- Left-click and hold while brushing the mirror to clear away all the dust.
- You will see the percent complete at the top of the mirror.
- When the mirror is clean, click anywhere to enter the next room.

Wardrobe Room
- The ghost of a nobleman appears and asks for your help.
- TASK: Find the last will of the soul that is moaning here.
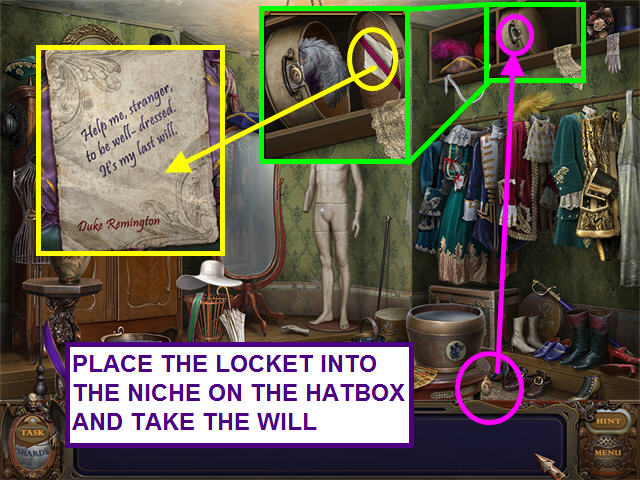
- Look at the close-up of the right table.
- Take the LOCKET.
- Look at the close-up of the hat box; place the LOCKET into the indentation.
- Take and read the will.
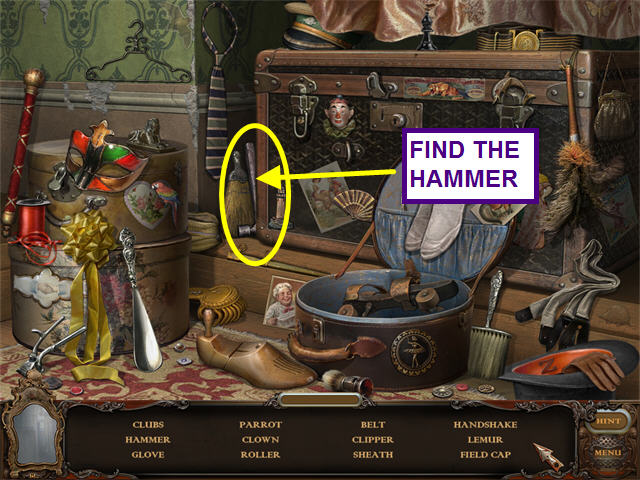
- TASK: Find the sketch of Duke Remington's desired wardrobe.
- Look at the sparkling shoes on the lower right for a hidden object scene.
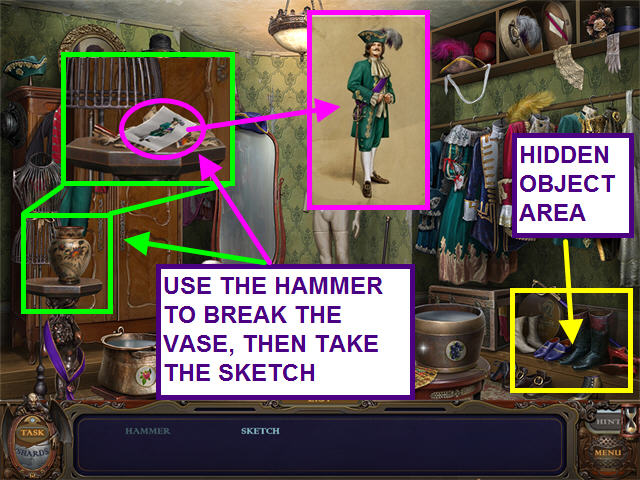
- Locate the hidden objects on the list and take the HAMMER.
- Look at the close-up of the vase.
- Use the HAMMER to break the vase.
- Look at the sketch of the Duke.
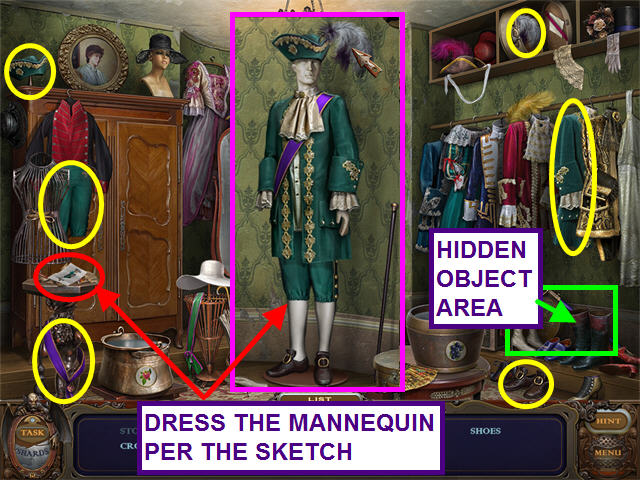
- TASK: Put the clothes on the mannequin according to the sketch.
- Look at the sparkling shoes on the lower right for a hidden object scene.
- Locate the hidden objects on the list and take the STOCKINGS.

- Place the STOCKINGS on the mannequin.
- Locate the remaining articles of clothing; dress the mannequin with them.
- You can refer to the sketch at any time.
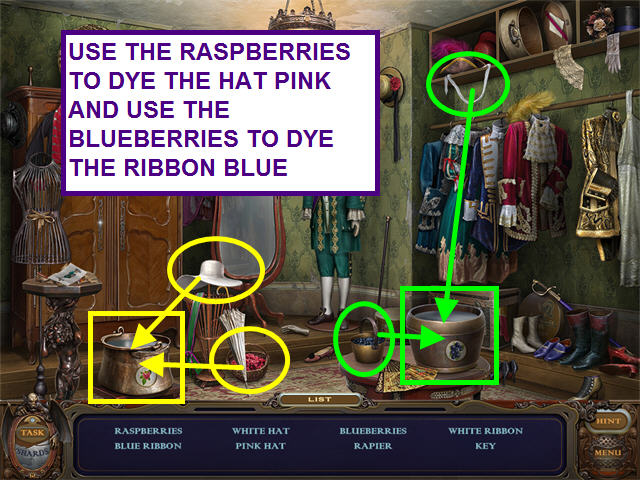
- TASK: Find the rapier for the mannequin; help the portrait get dressed.
- Take the RASPBERRIES; place them in the left bucket.
- Take the WHITE HAT; place it in the left bucket to make the PINK HAT.
- Take the BLUEBERRIES; place them into the right bucket.
- Take the WHITE RIBBON; use it in the right bucket to make the BLUE RIBBON.
- Look at the close-up of the portrait over the cabinet.
- Use the PINK HAT and the BLUE RIBBON on the portrait to obtain the KEY.
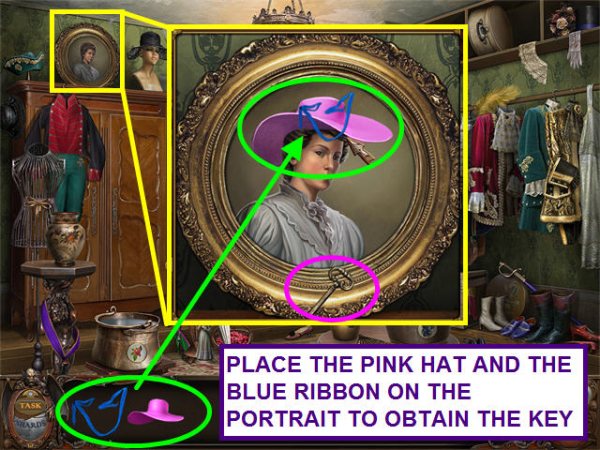
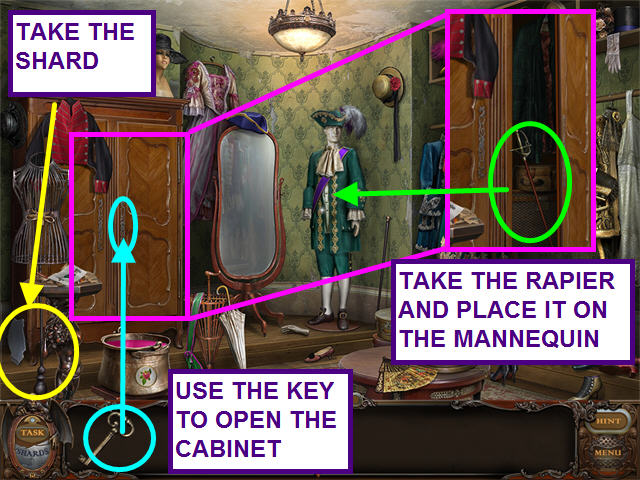
- Use the KEY to open the cabinet.
- Take the RAPIER; place it on the mannequin.
- The ghost is pleased and reveals the location of the shard.
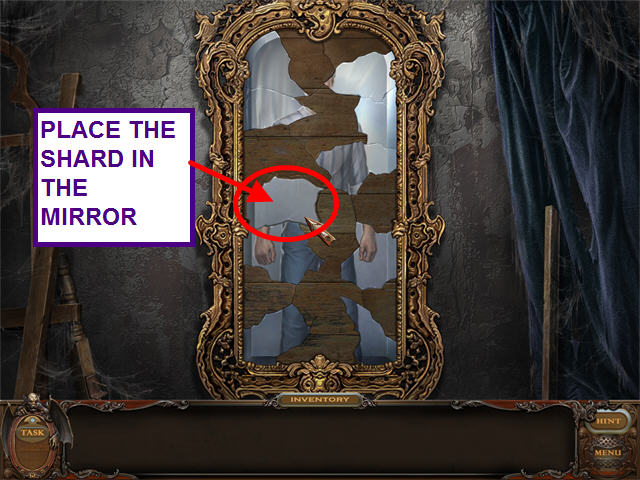
- Take the SHARD.
- You are transported to the mirror that shattered and trapped you in the mansion.
- Place the SHARD in the matching space in the mirror.
- Click anywhere to return to the wardrobe.
- Click on the mirror to trigger a mini-game.
- Repair the painting by placing elements into the correct silhouettes.
- The elements will saturate with color when correctly placed.
- The meter at the top tells you the number of correctly placed elements.
- TASK: Dust off the mirror.
- Left-click and hold while brushing the mirror to clear away all the dust.
- You will see the percent complete at the top of the mirror.
- When the mirror is clean, click anywhere to enter the next room.
Study
- The ghost of the Lord of the Manor's father appears, urging Stan to quit his search.
- TASK: Grow the plant.
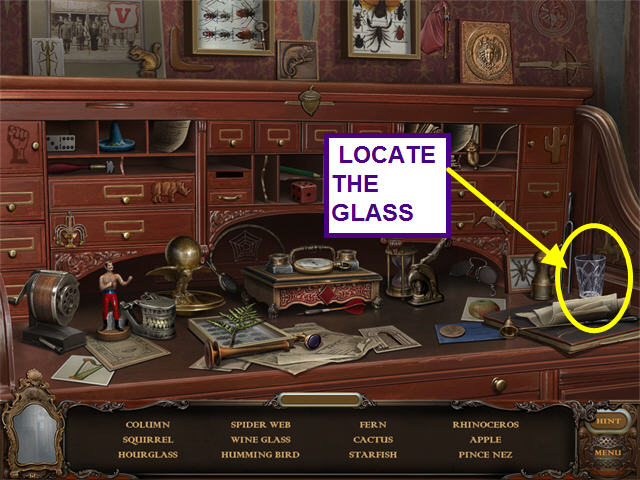
- Look at the sparkling area on the desk for a hidden object scene.
- Locate the hidden objects on the list and take the GLASS.
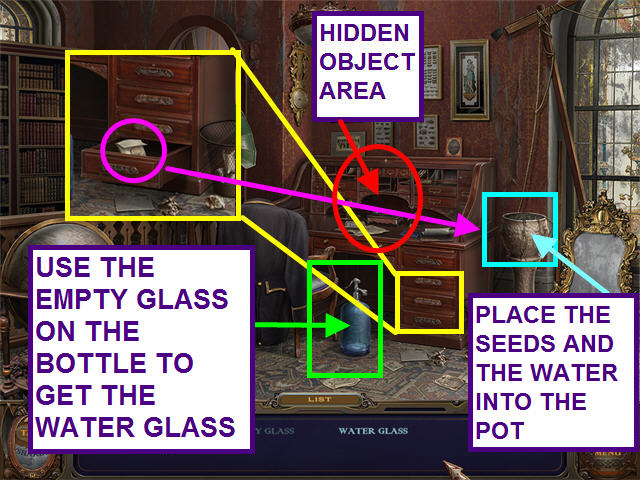
- Open the drawer on the desk to find the SEEDS.
- Place the EMPTY GLASS under the water bottle to get the WATER GLASS.
- Use the SEEDS and the WATER GLASS on the plant pot.
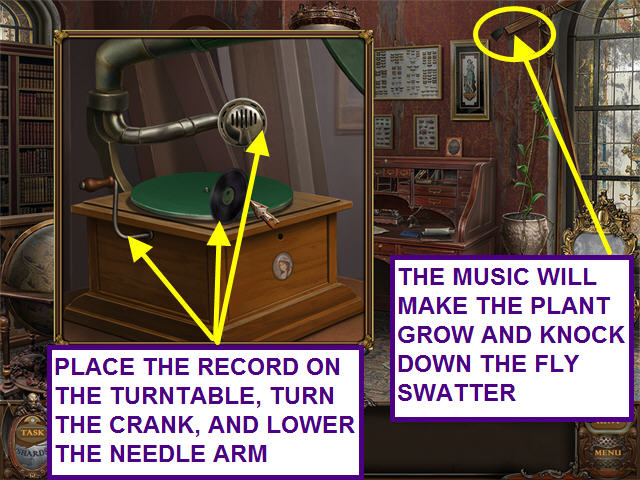
- Take the RECORD that appears atop the bookcase on the left.
- Look at the close-up of the phonograph.
- Place the RECORD on the turntable and turn the crank.
- Click on the needle arm to play the record.
- The music will make the plant grow and knock the FLYSWATTER from the wood beam.
- TASK: Take the shard.
- Use the FLYSWATTER on the coat to find the MOTH.
- Look at the close-up of the moth collection.
- Place the MOTH in the empty spot on the collection board.

- The moth collection moves to reveal a window that highlights a keyhole on the base of the globe.
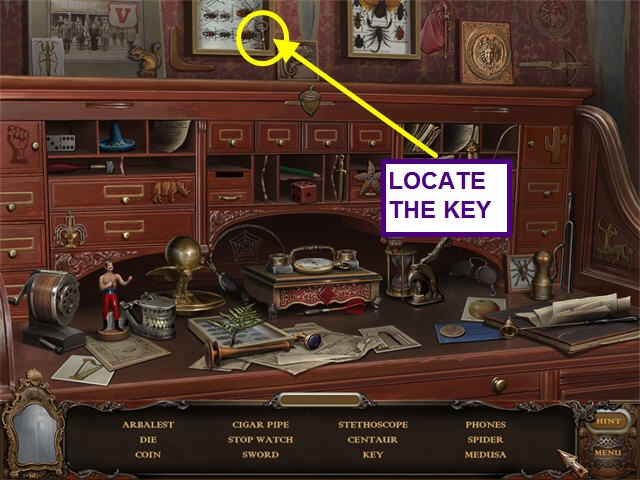
- Look at the sparkling area on the desk for a hidden object scene.
- Locate the hidden objects on the list and take the KEY.
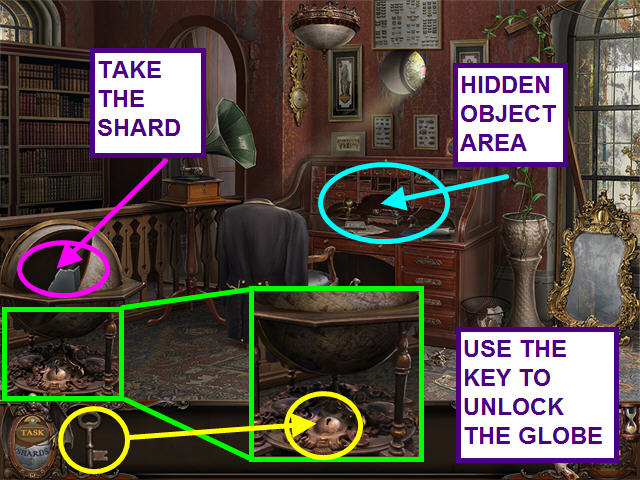
- Look at the close-up of the globe.
- Use the KEY on the keyhole.
- The ghost appears again to ell you your search is futile.
- Take the SHARD from the open globe.
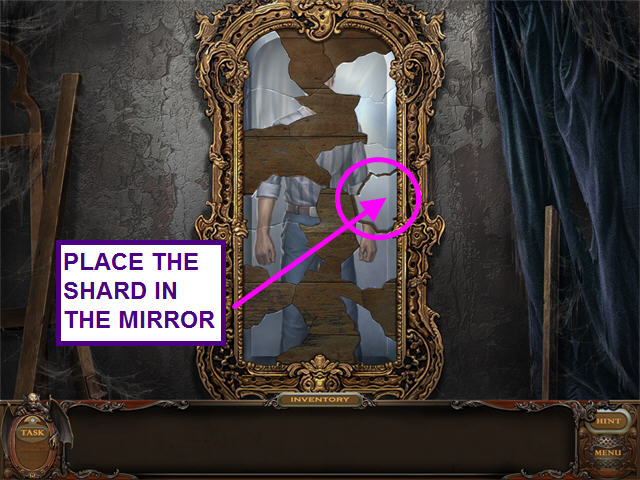
- You are transported to the mirror that shattered and trapped you in the mansion.
- Place the SHARD in the matching space in the mirror.
- Click anywhere to return to the study.
- Click on the mirror to trigger a mini-game.
- The object of this mini-game is to place the objects into the chest with the correct symbol.
- Open the first chest to see it has a circle on the lid.
- Click on all the circular objects to place them in that chest.
- The second chest has a square on the lid.
- Click on all the square objects to place them in that chest.
- The third chest has a triangle.
- Click on all the triangular shaped objects.
- You may only have 1 chest open at a time.

- TASK: Dust off the mirror.
- Left-click and hold while brushing the mirror to clear away all the dust.
- You will see the percent complete at the top of the mirror.
- When the mirror is clean, click anywhere to enter the next room.
Garage
- The ghost of the mechanic offers to help you find a shard in return for finding his car collection.
- TASK: Collect all the cars.
- Look at the sparkling area on the right for a hidden object scene.
- Locate the hidden objects on the list and take the CAR.
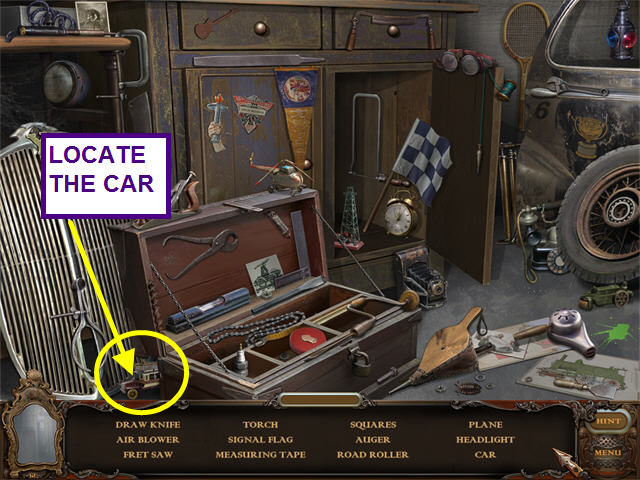
- Find the remaining 9 CARS in the garage.
- Click on the display case on the right.
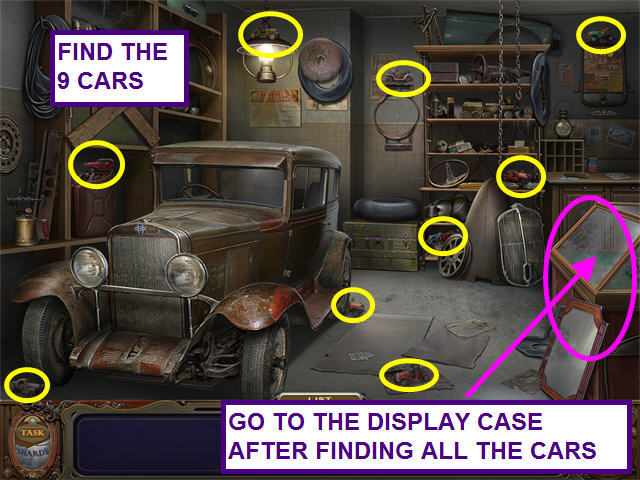
- Place the cars into the display case above their pictures.
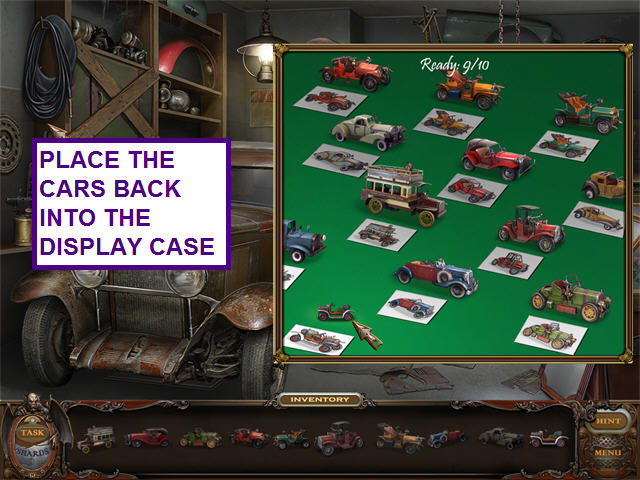
- The ghost appears and tells you that the shard is under the car.
- TASK: Pump the tires; get the jack.
- Click on the sparkling area on the right for a hidden object scene.
- Locate the hidden objects on the list and take the PUMP.
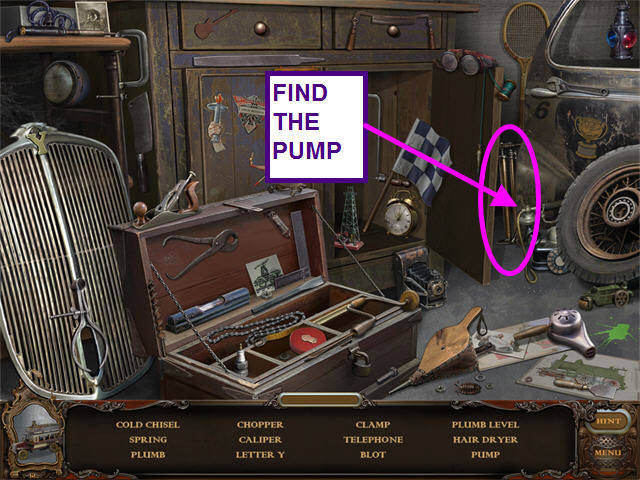
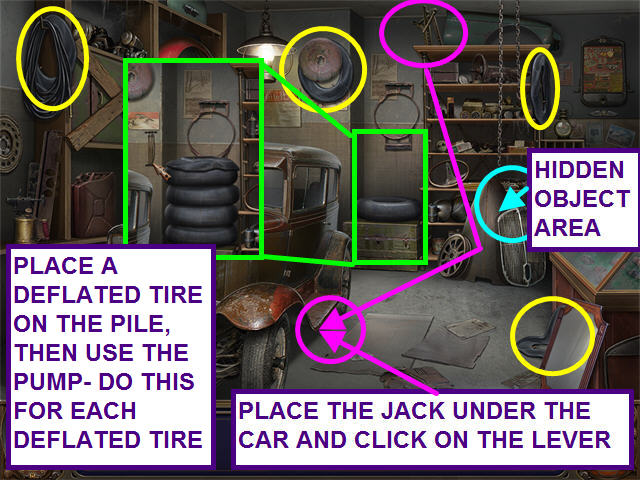
- Find the 4 TIRES.
- Look at the close-up of the inflated tire along the back wall.
- Place a TIRE on the pile; use the PUMP to inflate the TIRE.
- Repeat this for the remaining 3 TIRES.
- Take the JACK; place it under the car.
- Click on the lever to raise the car.
- TASK: collect the mirror shard.
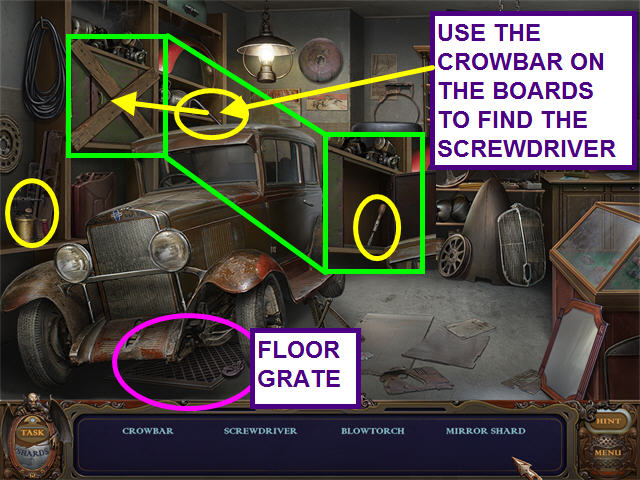
- Take the CROWBAR; use it on the boarded-up cabinet to find the SCREWDRIVER.
- Locate the BLOWTORCH.
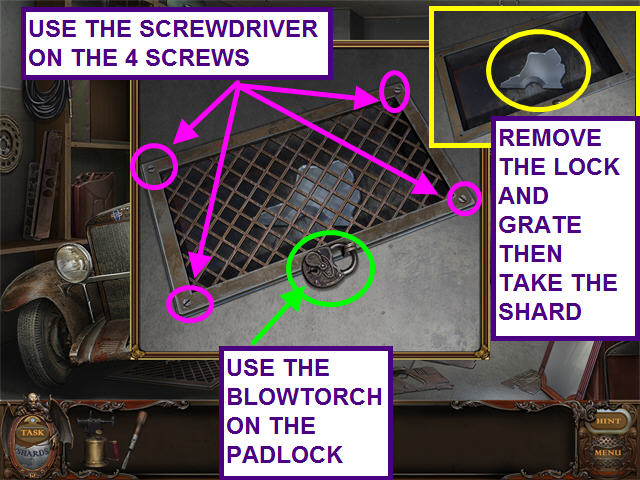
- Look at the grate below the car.
- Use the SCREWDRIVER to remove the 4 screws.
- Use the BLOWTORCH on the padlock.
- Click on the lock and the grate to remove them and take the SHARD.
- You are transported to the mirror that shattered and trapped you in the mansion.
- Place the SHARD in the matching space in the mirror.
- Click anywhere to return to the garage.
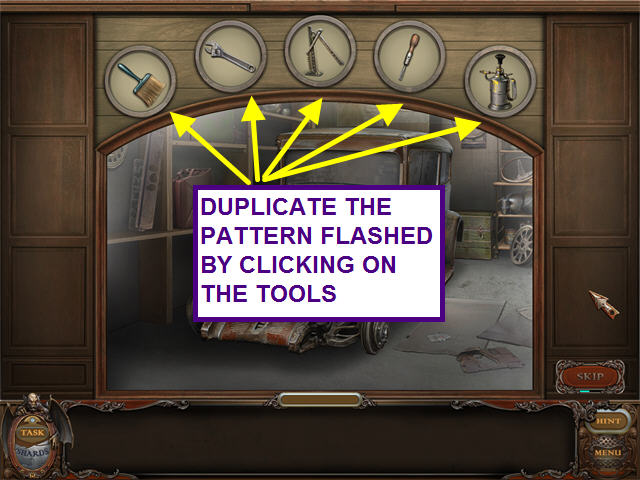
- Click on the mirror to trigger a mini-game.
- The object of this mini-game is to repeat the pattern flashed by the tools at the top of the screen.
- Click anywhere to begin; watch the sequence of tools lighting up.
- Click on the tools to repeat the sequence; a portion of the car will be restored.
- There are several sequences, up to 7 in a row.
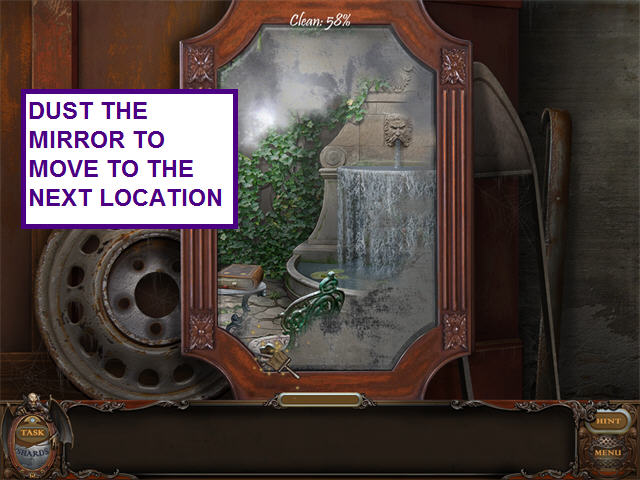
- TASK: Dust off the mirror.
- Left-click and hold while brushing the mirror to clear away all the dust.
- You will see the percent complete at the top of the mirror.
- When the mirror is clean, click anywhere to enter the next room.
Greenhouse
- TASK: Get the thing from the aquarium.
- Look at the close-up of the tree trunk on the right.
- Take the WORM.
- Look at the close-up of the Venus Flytrap.
- Feed the WORM to the plant and take the STONE.
- Use the STONE to break the aquarium bowl on the bench.

- The CHIMERA appears and wants you to help in collecting souls.
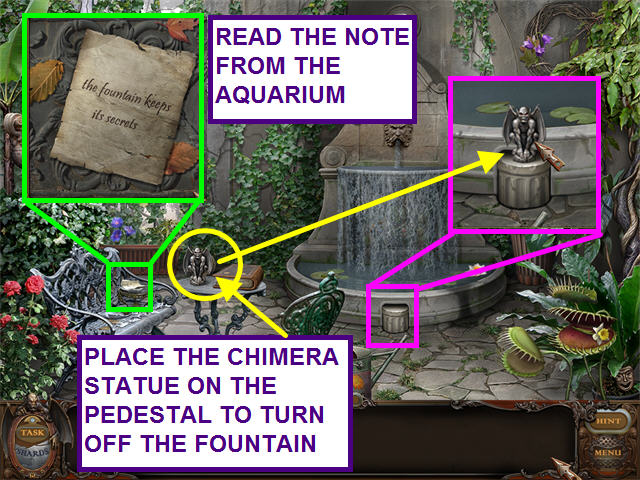
- Look at the note in the broken aquarium.
- TASK: Turn off the fountain.
- Take the CHIMERA statue off the table.
- Look at the close-up of the front of the fountain.
- Place the CHIMERA statue on the pedestal to turn off the fountain.
- TASK: Resolve the secret of the flowers.
- Select the sparkling area just to the left of the fountain for a hidden object scene.
- Locate all the hidden objects and find the CLIPPERS.
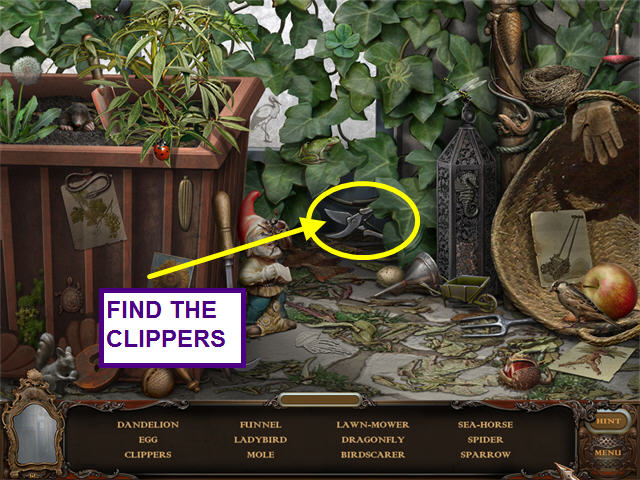
- You will need to move, or open, items to find the flowers (10 DAISIES).
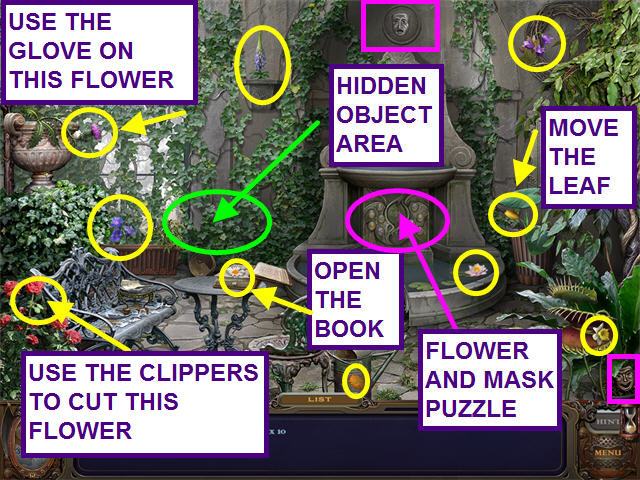
- Open the book on the table to find a FLOWER.
- Move the large leaf to the right of the fountain to find a FLOWER.
- Use the CLIPPERS on the rose.
- Once you have collected 9 flowers, the hidden object scene will reappear.
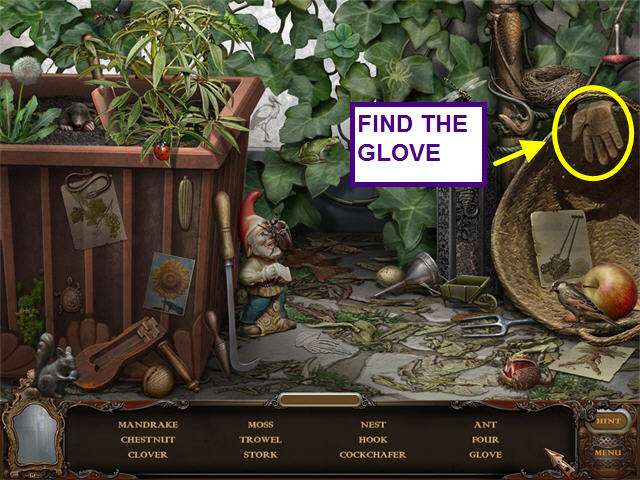
- Select the sparkling area just to the left of the fountain for a hidden object scene.
- Locate all the hidden objects and find the glove.
- Once you are back in the garden, use the GLOVE to take the purple thistle on the left.
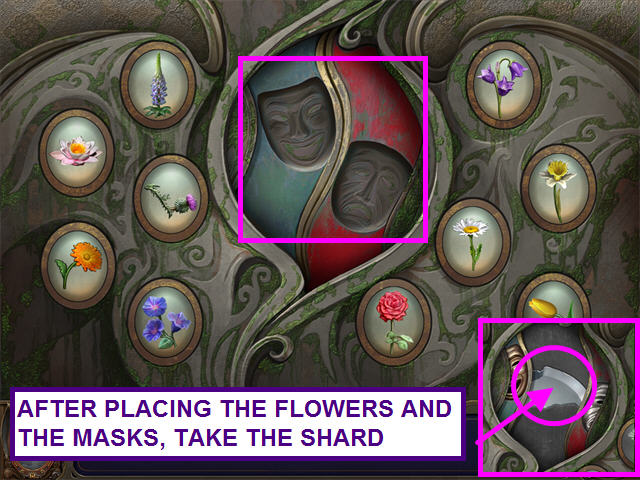
- Click on the center of the fountain to find the flower puzzle.
- Place the flowers on their matching pictures.
- The center will open.
- Move your cursor down to the bottom edge of the screen until it changes to a down arrow.
- Click to return to the main room.
- Collect the 2 MASKS; return to the puzzle.
- Place the MASKS into the matching niches.
- After you place the masks, the center will open again.
- Take the mirror SHARD.
- You are transported to the mirror that shattered and trapped you in the mansion.
- Place the SHARD in the matching space in the mirror.
- Click anywhere to return to the greenhouse.
- Click on the mirror.
- TASK: Dust off the mirror.
- Left-click and hold while brushing the mirror to clear away all the dust.
- You will see the percent complete at the top of the mirror.
- When the mirror is clean, click anywhere to enter the next room.
Armoury Room
- The ghost of a hunter appears! He tells you there are lots of secrets in this room.
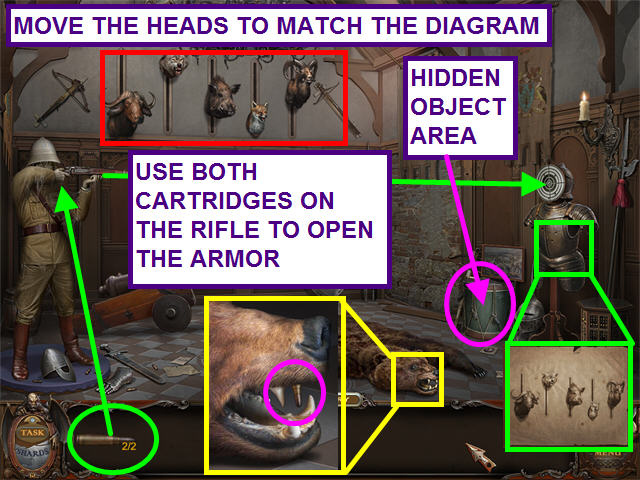
- TASK: Set the animal heads in the right positions.
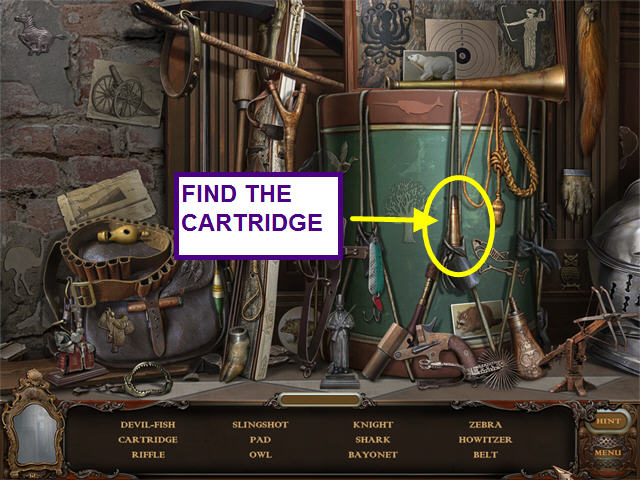
- Click on the sparkling drum on the right for a hidden object scene.
- Locate all the hidden objects on the list and find the CARTRIDGE.
- Look at the close-up of the bear rug head; take the other CARTRIDGE there.
- Look at the close-up of the hunter on the left.
- Use the 2 CARTRIDGES on the rifle.
- After the 2 shots, a cabinet will open with the correct positions for the animal heads.
- From left to right, move the water buffalo to the down position.
- Move the wolf to the up position.
- Move the warthog to the center position.
- Move the fox to the bottom position.
- Move the gazelle to the up position.
- A secret compartment opens below the trophy heads.
- TASK: Charge cannon; install the powder and cannonball.
- Click on the sparkling drum on the right for a hidden object scene.
- Locate all the hidden objects on the list and find the RAMROD.
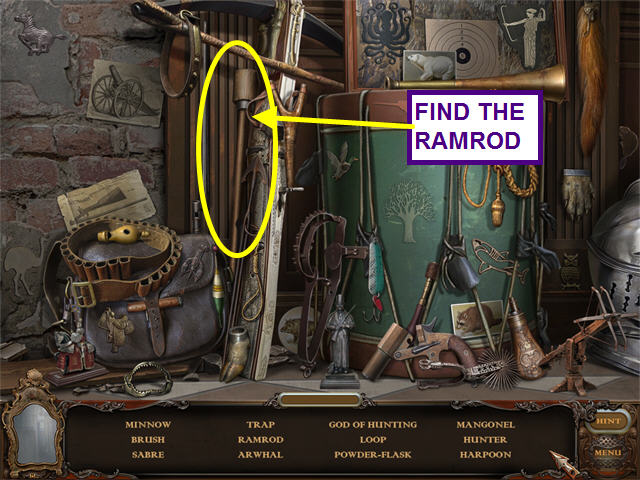
- Open the helmet to find the POWDER.
- Take the CANDLESTICK; place it on the right wall under the chandelier rope.
- Take the CANDLE; place it in the CANDLESTICK.

- Take the CANNONBALL from the fallen chandelier.
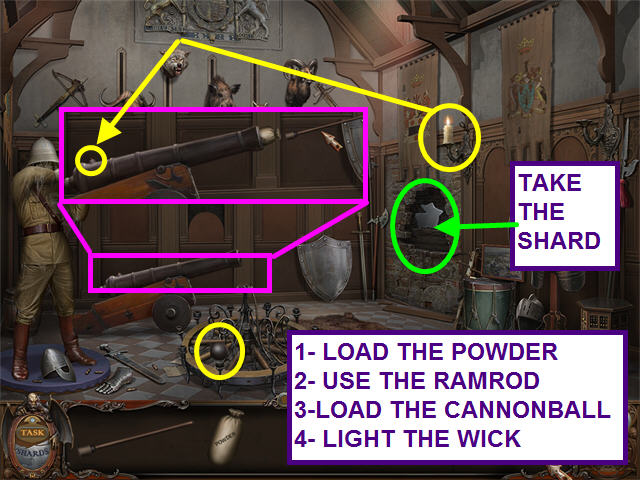
- Look at the close-up of the cannon.
- Place the POWDER into the end of the cannon.
- Use the RAMROD to push the powder into the cannon.
- Add the CANNONBALL to the cannon.
- TASK: Light the wick of the cannon.
- Take the CANDLE from the candlestick; use it on the wick of the cannon.
- TASK: Take the shard.
- Take the SHARD from the hole in the wall.
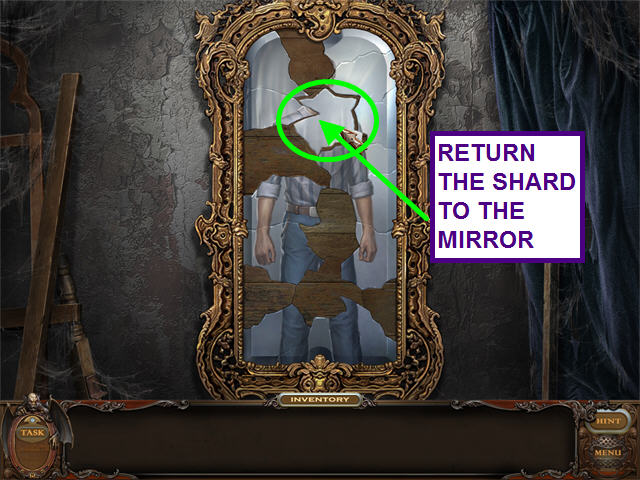
- You are transported to the mirror that shattered and trapped you in the mansion.
- Place the SHARD in the matching space on the mirror.
- Click anywhere to return to the Armoury Room.
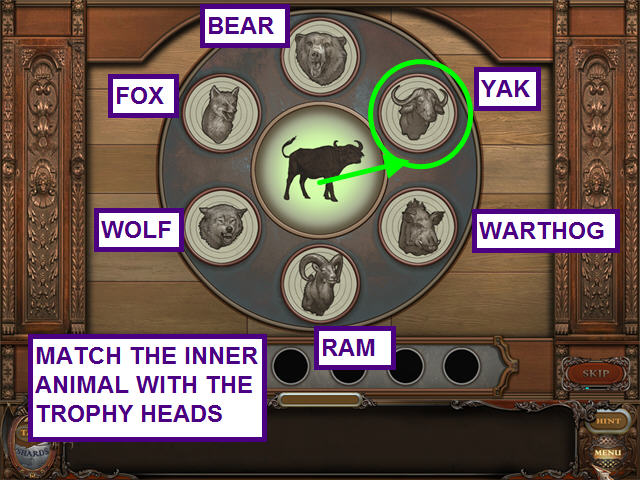
- Click on the shield to trigger a mini-game.
- An animal is shown in the center of the shield.
- Click on the matching trophy heads as each appears.
- One sequence was yak – wolf – warthog – ram – fox – fox.
- TASK: Dust off the mirror.
- Left-click and hold while brushing the mirror to clear away all the dust.
- You will see the percent complete at the top of the mirror.
- When the mirror is clean, click anywhere to enter the next room.
Observatory
- The ghost of a scholarly man requests your help in repairing the telescope.
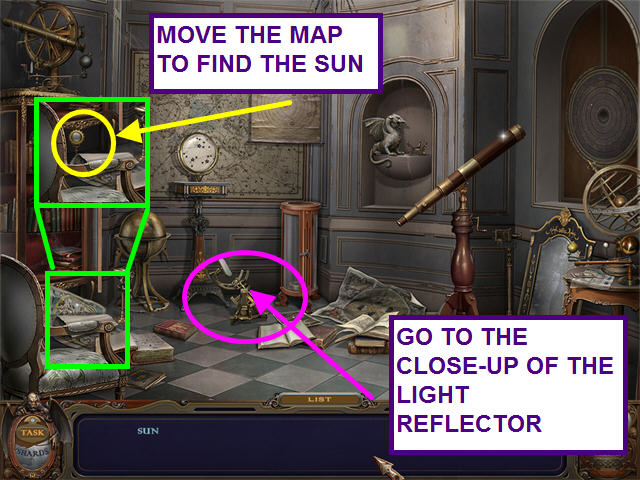
- TASK: Open the window; install the sun.
- Move the map on the floor just above the chair to find the SUN.
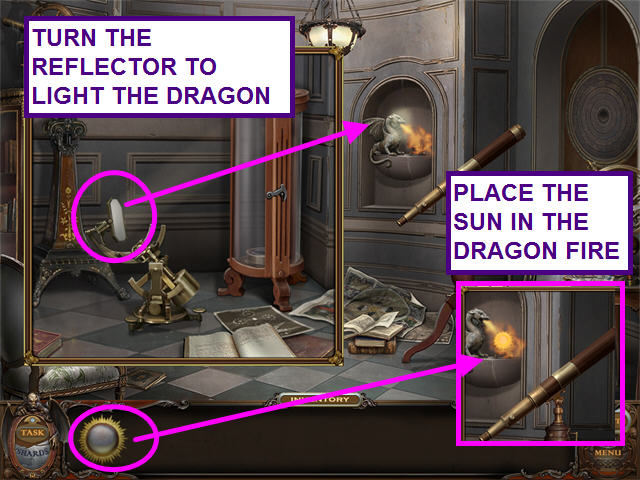
- Look at the close-up of the light reflector.
- Click on the reflector until the beam of light hits the dragon and he is shooting fire.
- Place the SUN into the stand next to the dragon.
- Once the SUN is glowing, take it from the fire.
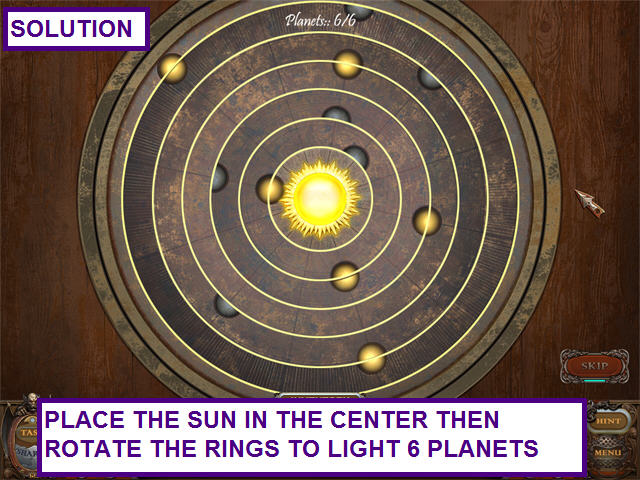
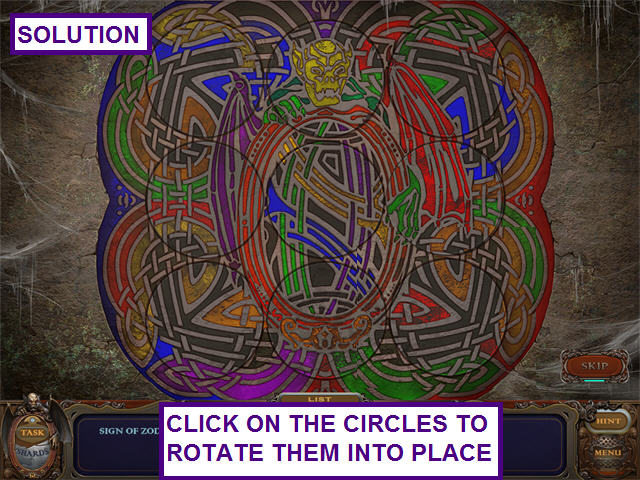
- Look at the close-up of the round puzzle on the right.
- Place the SUN in the center of the puzzle.
- Click on the rings to rotate them into position so that 6 planets are golden.
- TASK: Repair the telescope.
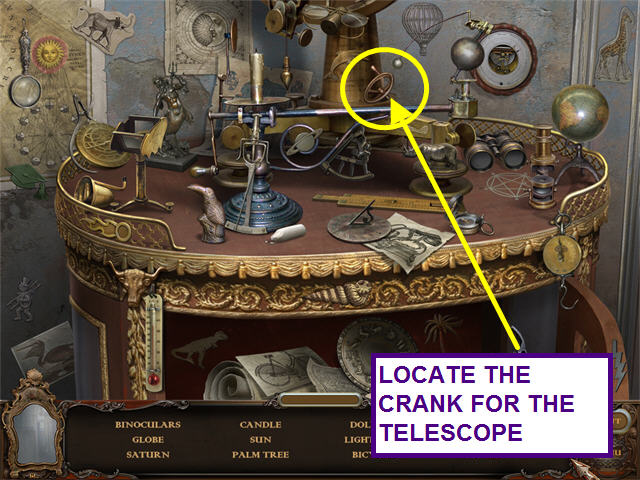
- Click on the sparkling area on the left for a hidden object scene.
- Locate all the hidden objects on the list and find the CRANK.
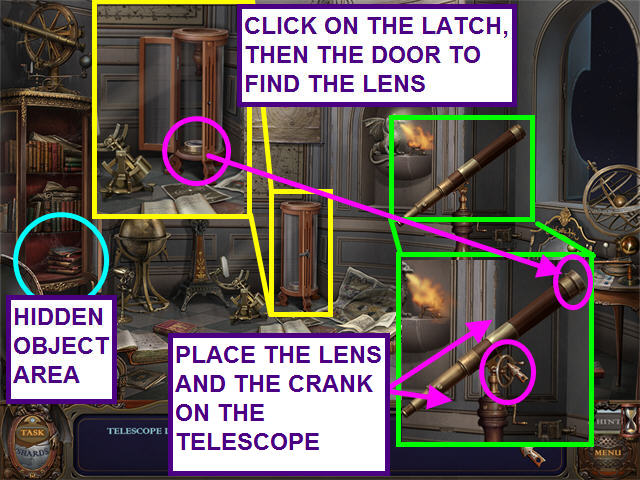
- Look at the close-up of the glass case against the back wall.
- Click on the latch, then the door, to open the case.
- Take the LENS lying at the bottom of the cabinet.
- Look at the close-up of the telescope.
- Place the LENS on the end and the CRANK in the center.
- Look at the chart magnifier on the wall map.
- Look through the telescope.
- Click about 5 times to move the telescope to the matching position.

- TASK: Take the shard.
- Click on the sparkling area on the left for a hidden object scene.
- Locate all the hidden objects on the list and find the ICE AXE.
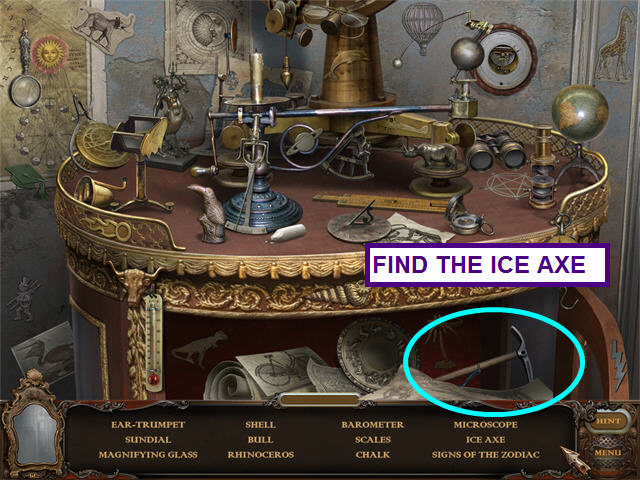
- Use the ICE AXE on the tile that the telescope has marked with light.
- Take the SHARD.

- You are transported to the mirror that shattered and trapped you in the mansion.
- Place the SHARD in the matching space on the mirror.
- Click anywhere to return to the Observatory.
- Click on the mirror.
- TASK: Dust off the mirror.
- Left-click and hold while brushing the mirror to clear away all the dust.
- You will see the percent complete at the top of the mirror.
- When the mirror is clean, click anywhere to enter the next room.
Bedroom
- TASK: Restore the photo on the floor.
- Click on the photo that is just above the right end of the inventory bar.
- Drag the photo fragments into place to restore the photo.
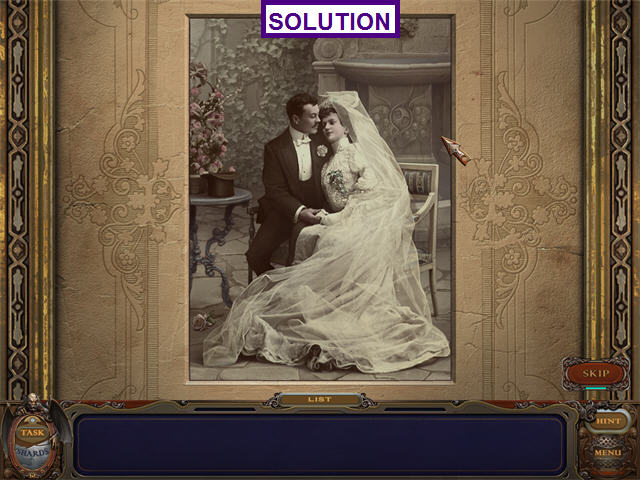
- The ghost of a bride appears and requests you find her wedding ring.
- TASK: Open the box.
- Click on the sparkling area on the green chair for a hidden object scene.
- Locate all the hidden objects and find the BRIDEGROOM.
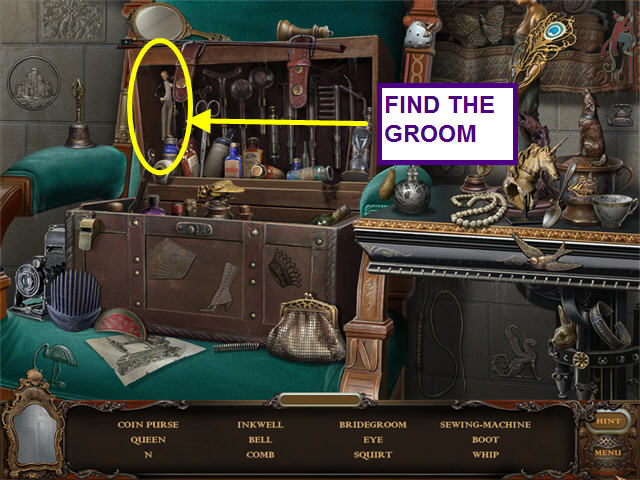
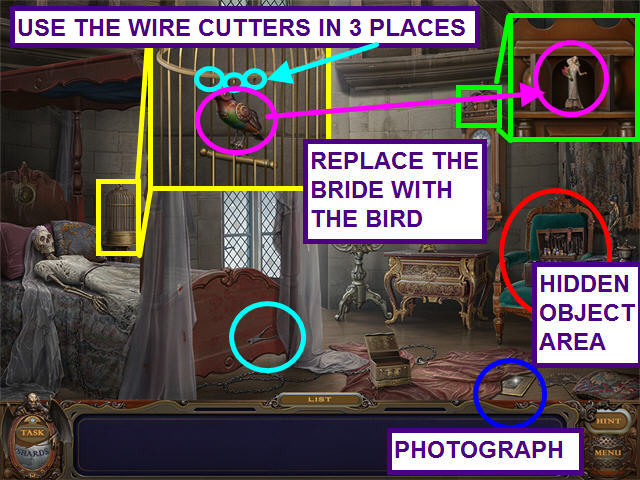
- Take the WIRE CUTTERS.
- Look at the close-up of the cage and use the WIRE CUTTERS to cut away 3 bars.
- Take the BIRD.
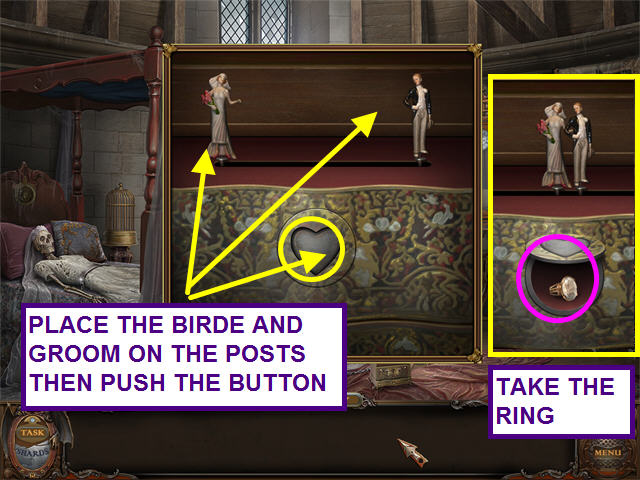
- Look at the close-up of the clock.
- Replace the BRIDE with the BIRD.
- Look at the close-up of the music box on the floor.
- Place the BRIDE on the left spindle; place the BRIDEGROOM on the right spindle.
- Push the button.
- Once the figures meet in the center, a compartment will open.
- Take the RING.
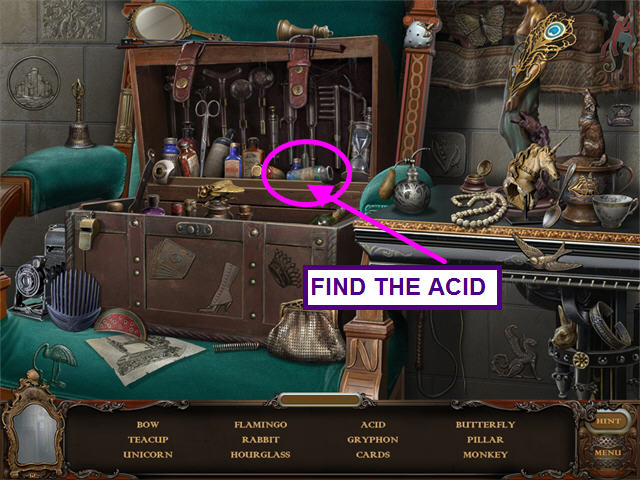
- TASK: Free the bride.
- Click on the sparkling hidden object area on the green chair.
- Locate all the hidden objects and find the ACID.
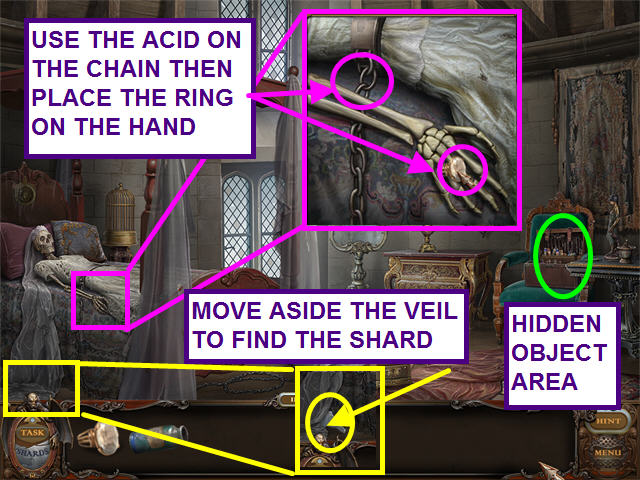
- Look at the close-up of the skeleton on the bed.
- Use the ACID on the chain.
- Place the RING on the finger.
- The ghostly bride thanks you with the shard.
- Move the veil aside; take the SHARD beyond.
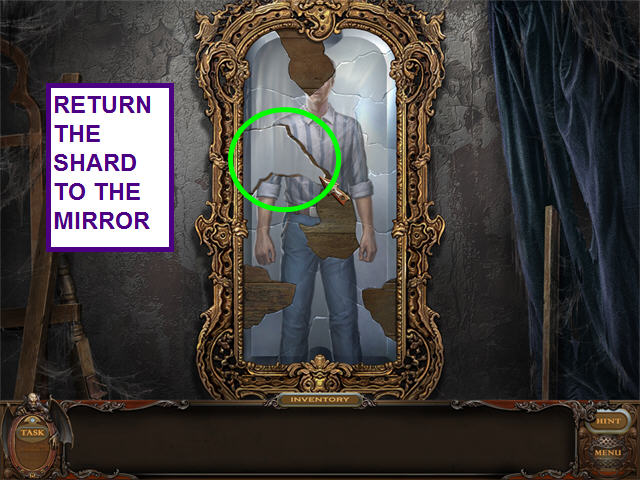
- You are transported to the mirror that shattered and trapped you in the mansion.
- Place the SHARD in the matching space on the mirror.
- Click anywhere to return to the Bedroom.
- Click on the mirror.
- TASK: Dust off the mirror.
- Left-click and hold while brushing the mirror to clear away all the dust.
- You will see the percent complete at the top of the mirror.
- When the mirror is clean, click anywhere to enter the next room.
Sarcophagus
- TASK: Open the sarcophagus.
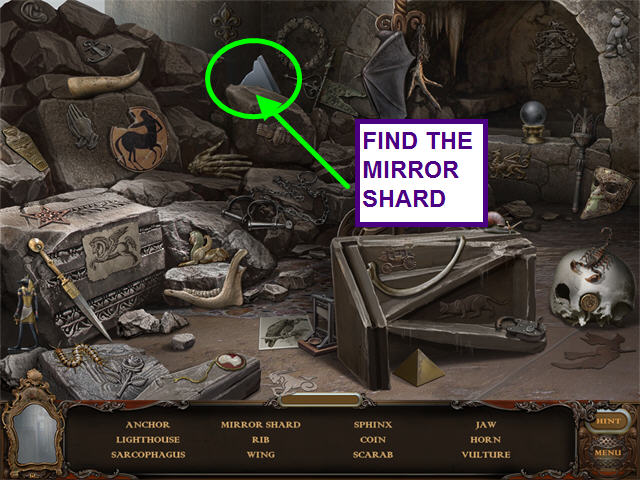
- Click on the sparkling area in the center for a hidden object area.
- Find all the hidden objects and locate the SHARD.
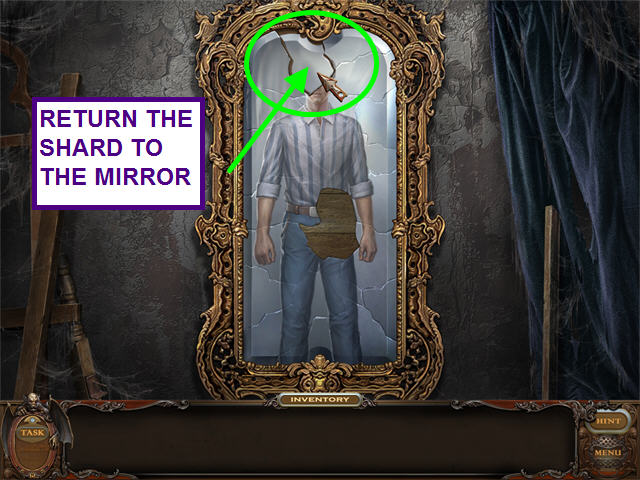
- You are transported to the mirror that shattered and trapped you in the mansion.
- Place the SHARD in the matching space on the mirror.
- Click anywhere to return to the Sarcophagus.
- Click on the carved stone decoration in the upper right corner.
- Click on each of the circles to rotate them into place and complete the design.
- The chimera appears! It is not pleased that you are refusing its gifts.
- You earn another mirror SHARD.
- You are transported to the mirror that shattered and trapped you in the mansion.
- Place the SHARD in the matching space on the mirror.
- Click anywhere to return to the Sarcophagus.
- Click on the sparkling area in the center again for a hidden object area.
- Find all the hidden objects and locate the SHARD.
- You are transported to the mirror that shattered and trapped you in the mansion.
- Place the SHARD in the matching space on the mirror.
- Click anywhere to return to the Sarcophagus.
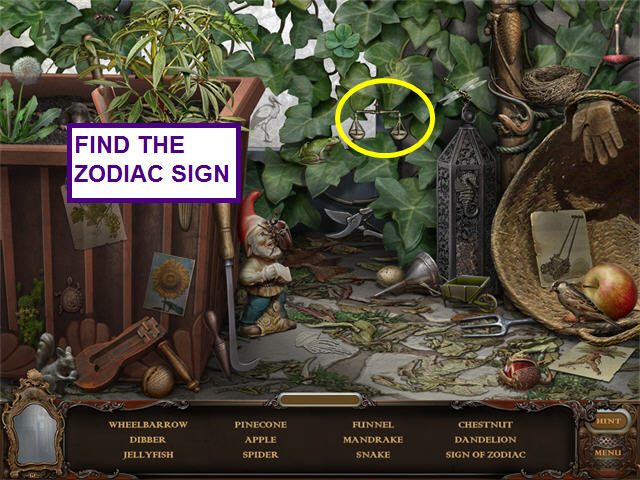
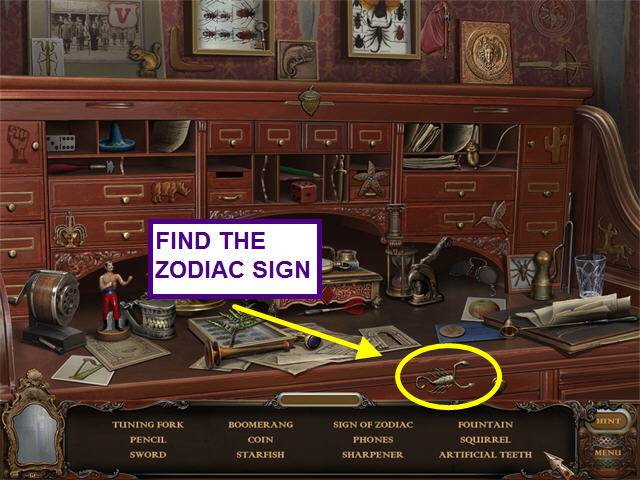
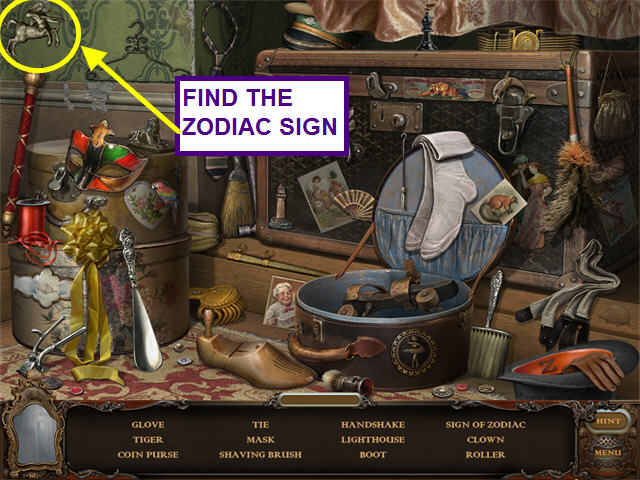
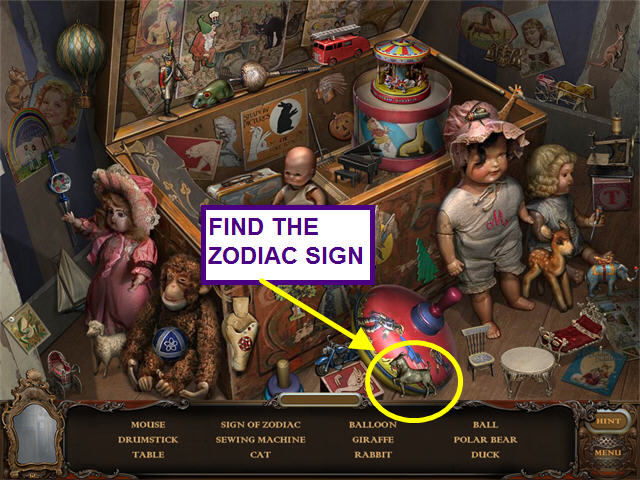
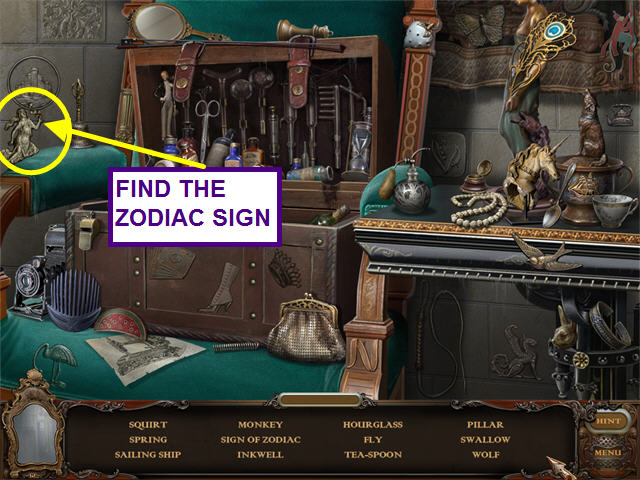
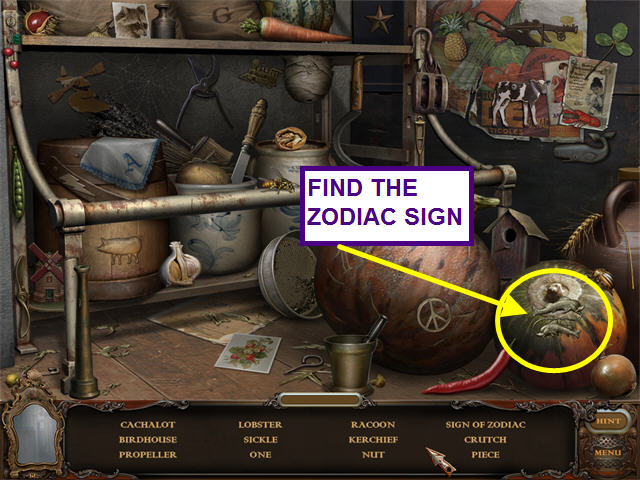
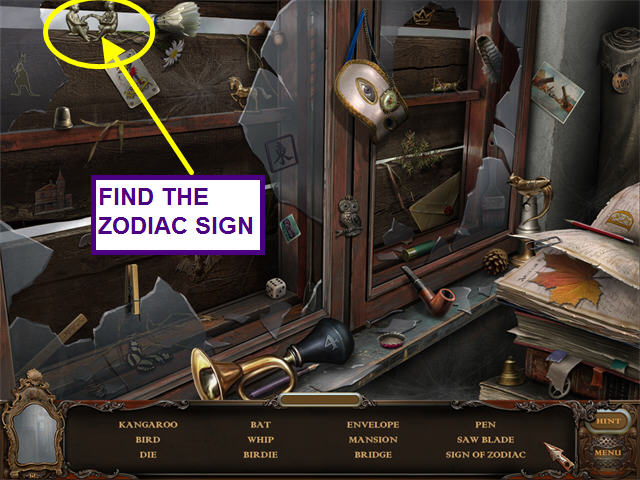
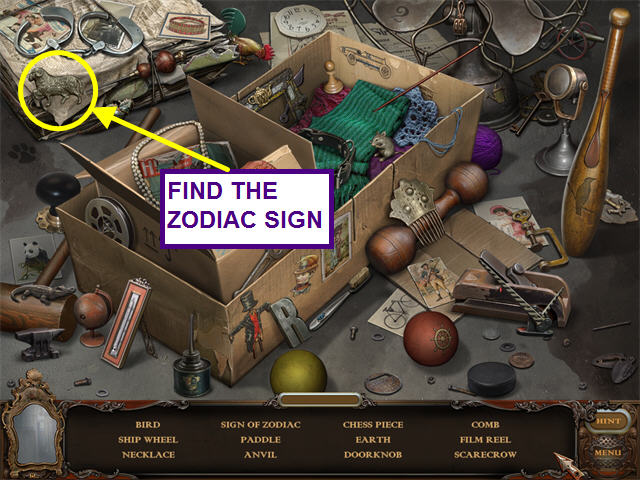
- Find the 2 ZODIAC SIGNS.
- Each of the 10 glowing shards will take you back to another location.
- Look for the sparkling hidden object areas.
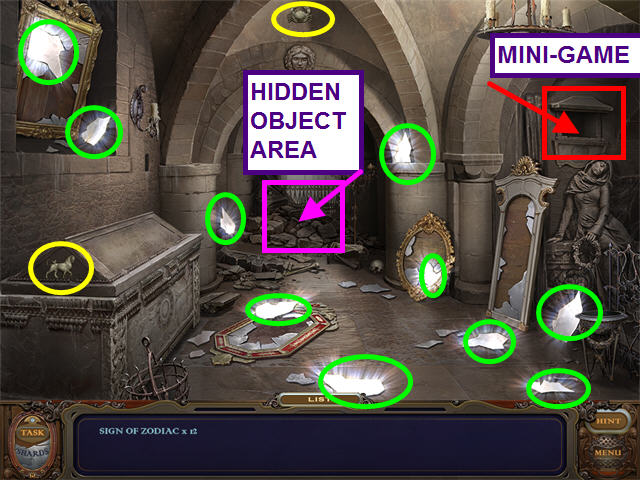
- The hidden object scenes may be experienced in any order.
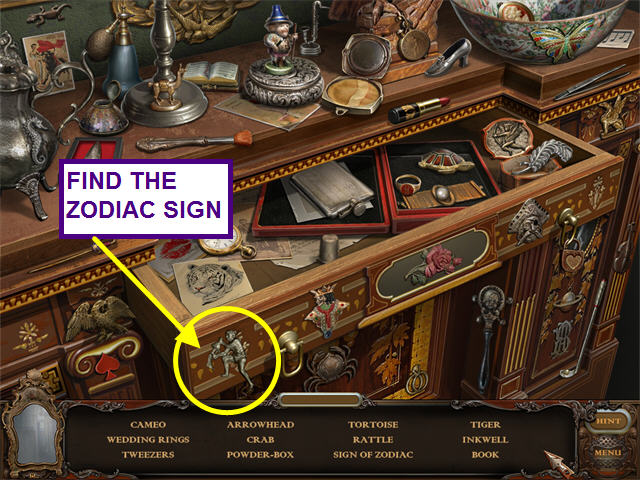

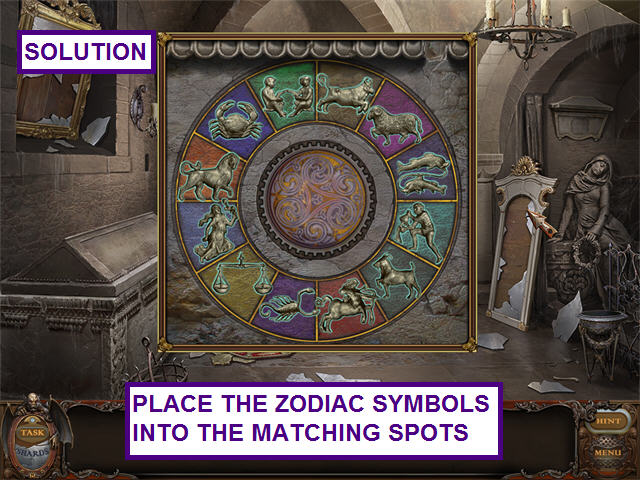
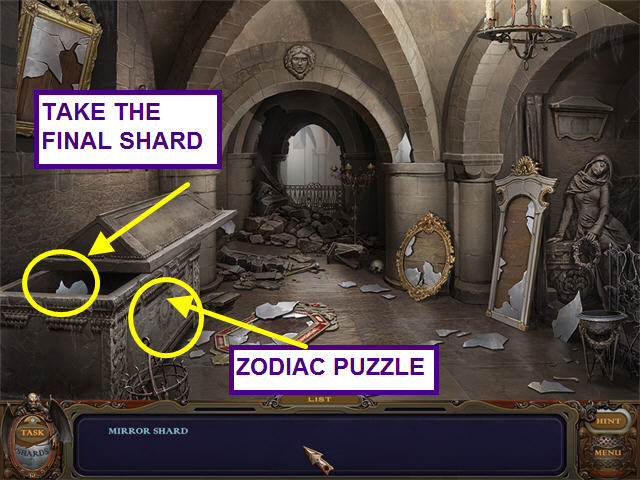
- Click on the front of the sarcophagus.
- Place the ZODIAC SIGNS into the matching sections.
- The spirit appears! It tries to persuade you to become its minion.
- Take the final mirror SHARD.
- You are transported to the mirror that shattered and trapped you in the mansion.
- Place the SHARD in the matching space on the mirror.
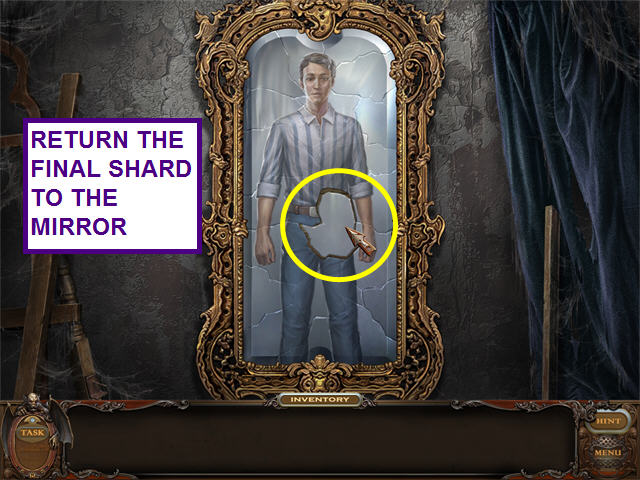
- Stan riddle escaped the mansion ... or did he?
Created at: 2010-04-09