Walkthrough Menu
- General Tips
- Free the 1st Girl
- Free the 2nd Girl
- Free the 3rd Girl
- Free the 4th Girl
- The Witch
- Appendix: Town Map
General Tips
- Hidden Mysteries: Salem Secrets is a Hidden Object Puzzle Adventure game.
- There is no timer.
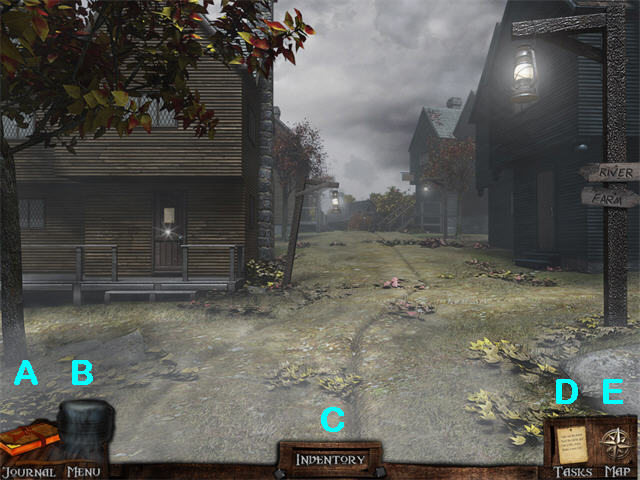
- The “JOURNAL” (A) has the notes your character makes in the adventure. It will blink if new information has been added.
- The “MENU” icon (B) returns you to the Main Menu so you can exit the game.
- Click on the “INVENTORY” tab (C) to open or close your Inventory Tray.
- The “TASKS” list (D) is a list of the current tasks you are working on. From this screen you can also access the Journal or Map.
- The “MAP” icon (E) opens the Map, showing the locations you have visited in the game.
- The game saves automatically.
- The Find List for the Hidden Object Scenes will be different for different players, but the Important Items will be the same for everyone.
- There is no incorrect click penalty.
- Arrows show exits from the scene.
- A Magnifying Glass denotes a place where you can zoom in, usually a Hidden Object Scene. It can also be a place where you get a text clue.
- Text clues appear at the top of the screen when you click on certain items.
- A Hand Cursor denotes an item that you can pick up.
- The Gears cursor appears when clicking on that item causes it to move in the scene. It does not mean an inventory item should be used there.
- If you hold an inventory item over a location and it pulsates, click to use it there.
- If you right-click in any main scene, the hot spots in that scene will be revealed. This includes items to collect, zoom locations, and exits.
- When your Task List is open, you will see a list of Tasks to be completed. If you click on the ? next to any task, you will get a hint about that task.
- Your Journal has information you have collected during your investigations. Look there for codes and recipes.
- If you are in a Hidden Object scene, click on the “HINT” button in the lower right and one of the items from the list will be circled briefly. It takes a few seconds for the hints to recharge each time.
- Tutorial Tips will pop up from time to time. You can turn these on or off on the Options on the Main Menu.
- The Map fills in as you go through the game. A sparkle on the Map indicates a Hidden Object scene you have not completed yet.
- You may also see a white sparkle in a main scene. This indicates an area you can investigate further.
- The red dot on the Map shows your current position.
- Since this is a nonlinear game, players can do things in different order. It is important that you examine everything you can, since doing something in one part of town may unlock an activity elsewhere.
- If you’re not sure what to do next, check the “TASKS” list and the “MAP” to get ideas. Right-click to reveal hot spots in individual scenes.
- The red question mark in the upper left corner has the instructions for the mini-game.
- You can skip a mini-game by clicking the Skip Button once it has recharged.
Free the 1st Girl
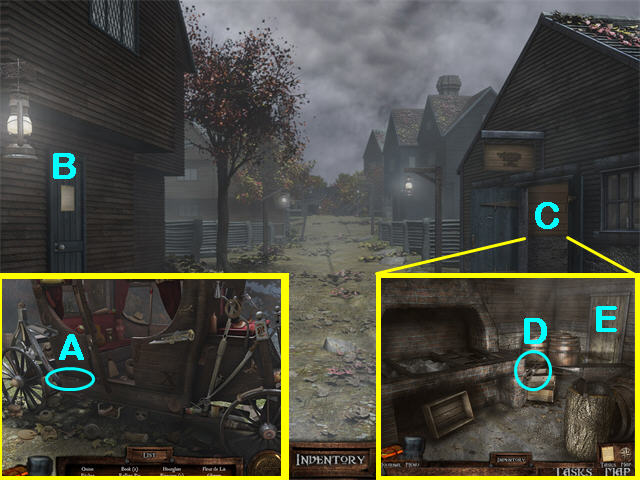
- Zoom in on the Carriage to collect the KEY (A).
- Exit right.
- Read the Funeral Notice (B).
- Enter the Forge (C).
- Collect the METAL CUTTERS (D).
- Zoom in on the Door (E) and use the KEY from the Carriage to unlock it.
- Go through the Door into the Stables.
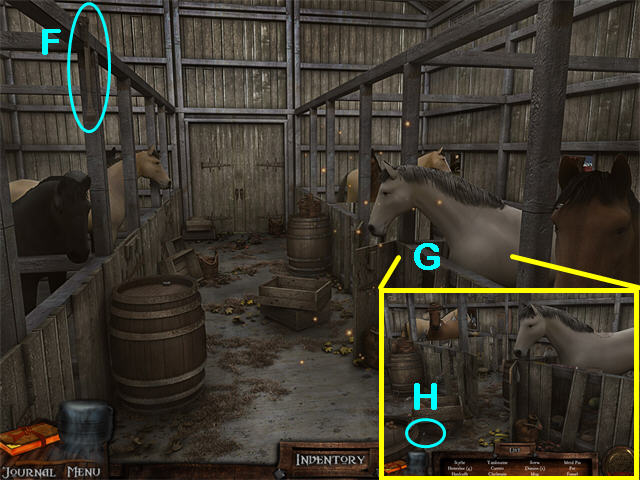
- Collect the HORSESHOE BAR (F).
- Zoom in on the right (G) and collect the CANCER METAL PIN (H).
- Go down 2 to return to the Main Road.
- Go forward 1 to reach the Goldsmith House.
- Read the notice (H).
- Go forward 1 to reach the Tailor Shop.
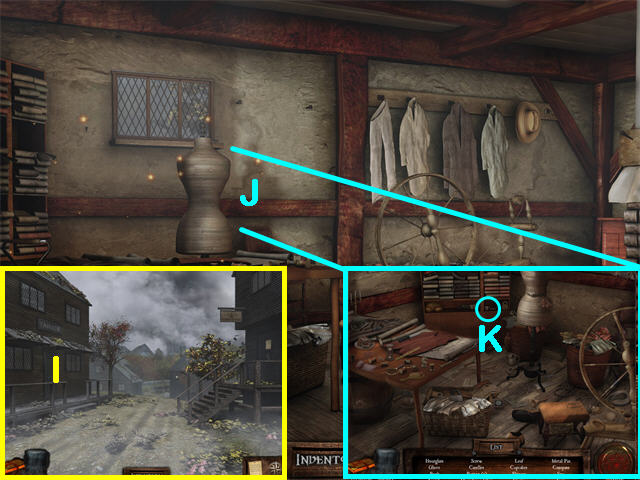
- Zoom in on the door (I).
- Use the HORSESHOE BAR (from the Stables) near the Door Knob to open the door.
- Enter the Tailor Shop.
- Zoom in by the Tailor’s Dummy (J) and collect the PISCES METAL PIN (K).
- Exit the shop.
- Read the Notice on the Courthouse.
- Go Forward.
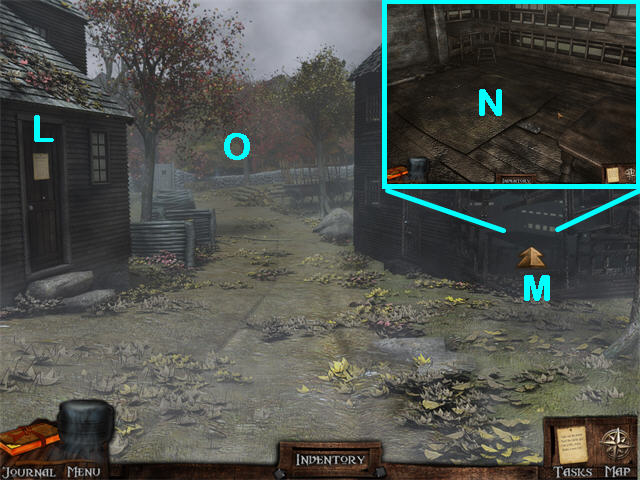
- Read the notice (L). The woman who is missing is not one of the 4 Girls you are looking for—she is the widow of the man in the first funeral notice.
- Enter the Burnt-Out House through the open wall on the right side (M).
- Move the rug on the floor (N), then zoom in on the trapdoor. There is a padlock made of bone. You cannot do any more here at this time.
- Exit the house and continue up to the North Gate (O).
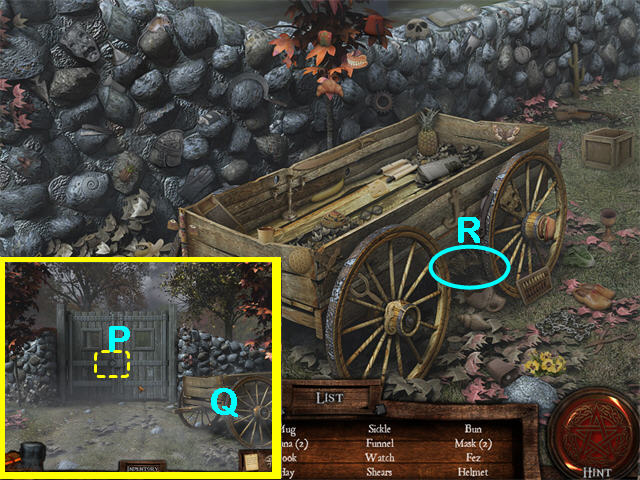
- Zoom in and see that part of the Lock is missing.
- Zoom in on the Wagon (Q) and collect the HAY (R).
- Go down 2 to the Town Crossroads.
- Go right on the East Road.
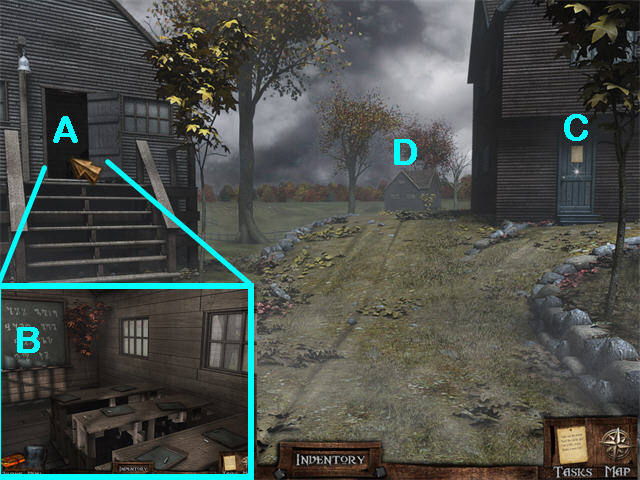
- Go inside the Schoolhouse (A) and examine the Chalkboard (B).
- Read the Quarantine Notice (C).
- Continue forward toward the Farm (D).
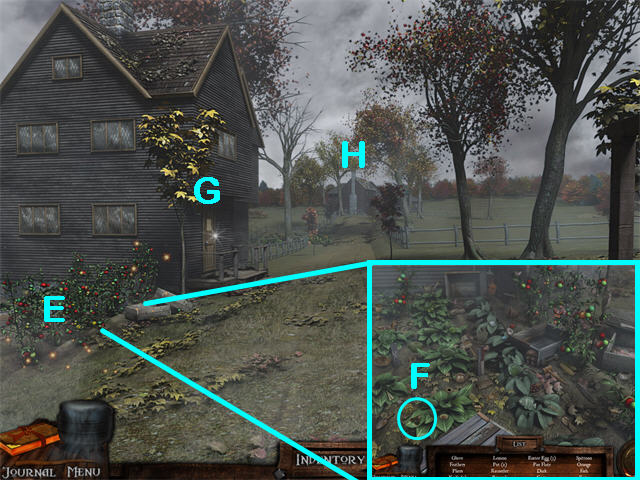
- Zoom in on the Garden (E) to collect the FEATHERS (F).
- Read the Notice (G).
- Continue to the Farm (H).
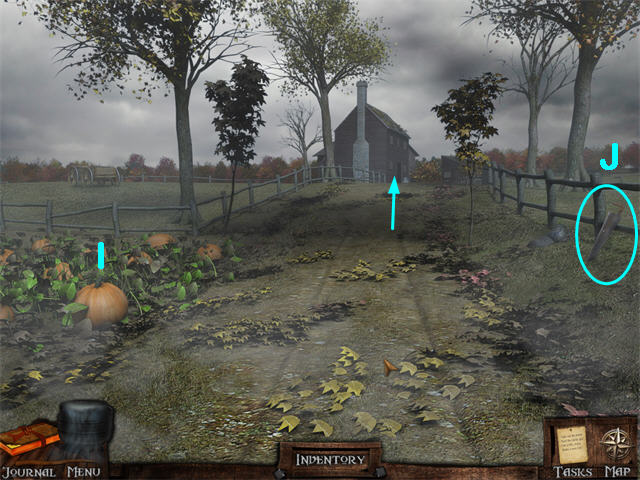
- Zoom in on the Pumpkin Patch (I). You can’t do anything here yet.
- Collect the SAW (J).
- Continue up the East Road.
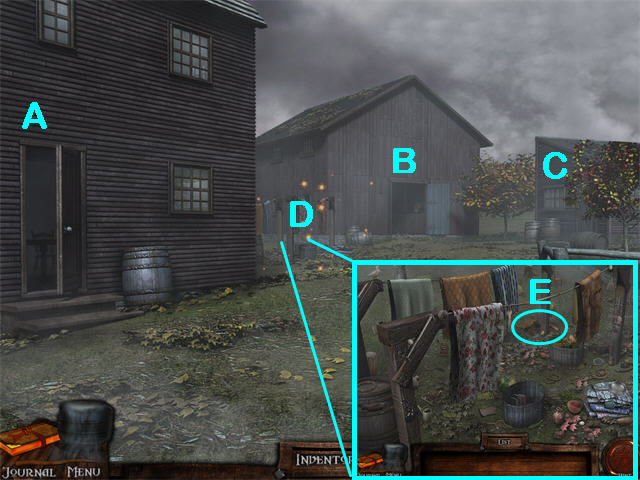
- There are 3 buildings here: the Farmhouse (A), the Barn (B), and the Toolshed (C).
- Zoom in on the Clothesline (D) and collect the TATTERED CLOTHES (E).
- Enter the Farmhouse (A).
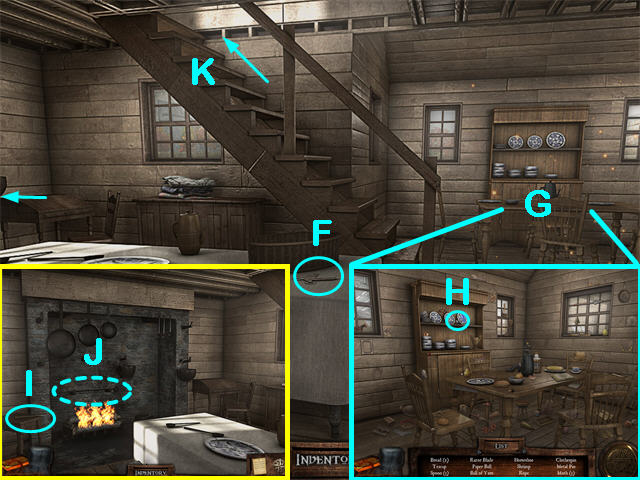
- Take the SCISSORS (F).
- Zoom in on the right Table (G) to collect the TAURUS PIN (H).
- Go left to the Fireplace.
- Collect the KNIFE (I).
- Examine the TOASTING FORK (J). It is too hot to pick up.
- Go right to the main Farmhouse view.
- Go upstairs (K).
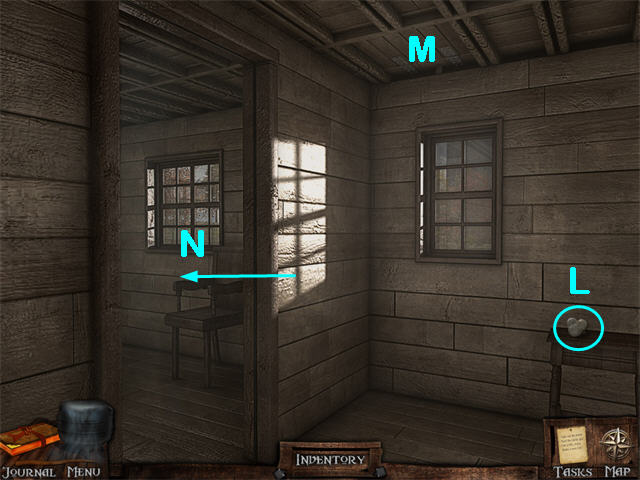
- Collect the COTTON FIBERS (L).
- Examine the Ceiling. There is a Trapdoor to the Attic (M), but it is missing a Latch.
- Go into the Bedroom (N).
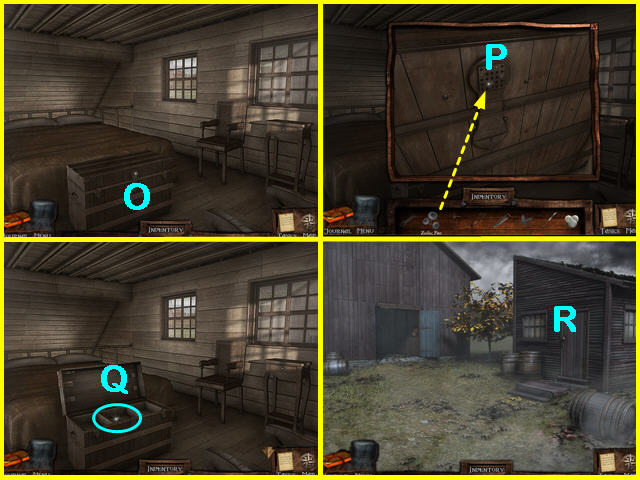
- You must have all 3 ZODIAC PINS to unlock the Chest: the CANCER PIN (from the Stables), the PISCES PIN (from the Tailor Shop), and the TAURUS PIN (from downstairs in this building).
- Zoom in twice on the Chest at the end of the Bed.
- Put the ZODIAC PINS on the lock. This will trigger a mini-game.
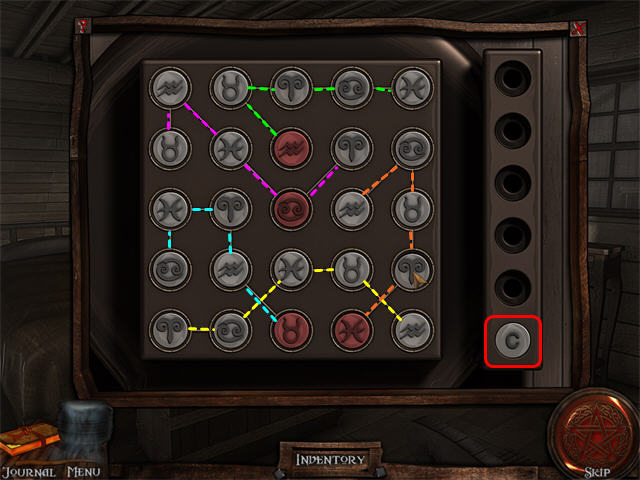
- Complete the puzzle. In addition to the rows and columns, each symbol is on a grouped set connected by a line. Each of the 5 symbols can appear only once in each column, each row, and each grouped set.
- The C at the bottom of the right column is a Clear Button. If you click on it, the whole puzzle will reset.
- There are many possible solutions. We show an example solution in the screenshot.
- The Chest will open revealing the SCREW KEY (Q).
- Go downstairs and out to the Farmyard. Walk towards the Toolshed.
- Zoom in on the Toolshed Door (R).
- Put the SCREW KEY (from the Farmhouse Bedroom) in the Lock.
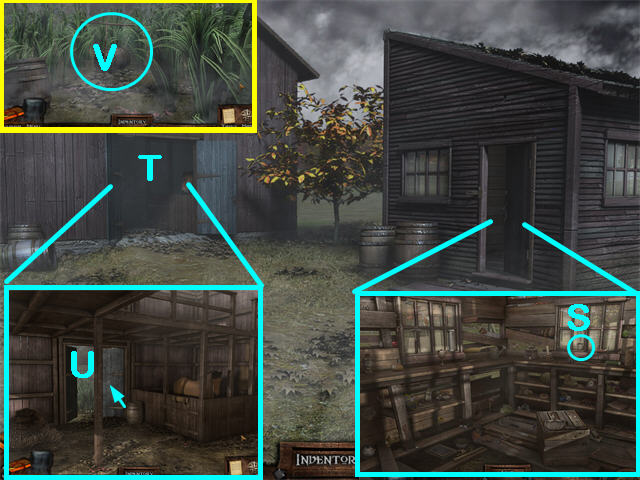
- Go in the Toolshed to collect the LATCH RING (S).
- Return to the Farmyard.
- Enter the Barn (T). Look around. There’s some Hay here, but nothing you can do with it.
- Walk out the Back Door (U).
- Collect the WOODEN FRAME (V).
- Walk back into the Barn, out to the Farmyard, one step down, and then re-enter the Farmhouse on the left.
- Go upstairs.
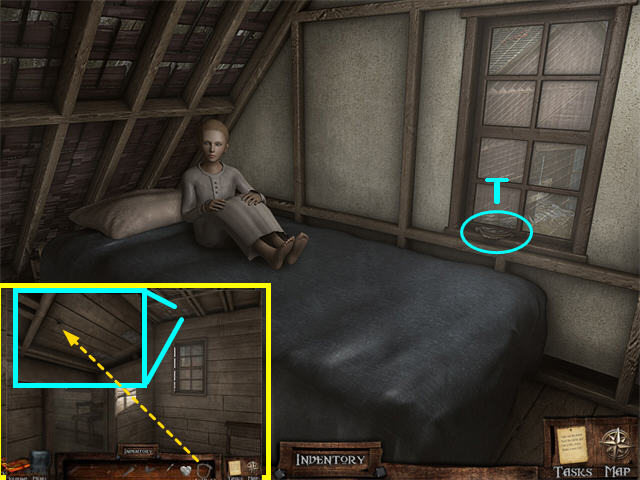
- Zoom in twice on the Trapdoor in the Ceiling.
- Put the LATCH HANDLE (from the Toolshed) on the Trapdoor.
- Go through the Trapdoor.
- One of the 4 missing Girls is here! Talk to her several times. She is having vivid nightmares.
- Take the MEDALLION PIECE (T) off the Windowsill.
- Read your Journal.
- Go out to the Farmyard.
- There is nothing more to do here now, so start walking back toward town.
- Go past the Pumpkin Patch to the House with the Garden.
- This time, go right.
- There is a Well here. When you zoom in you can see the Bucket at the bottom of the Well, but there is no way to get it out now.
- Go left, back to the House with the Garden.
- Go down to the Schoolhouse and then down to the Town Crossroads.
- Start at the Town Crossroads and go left.
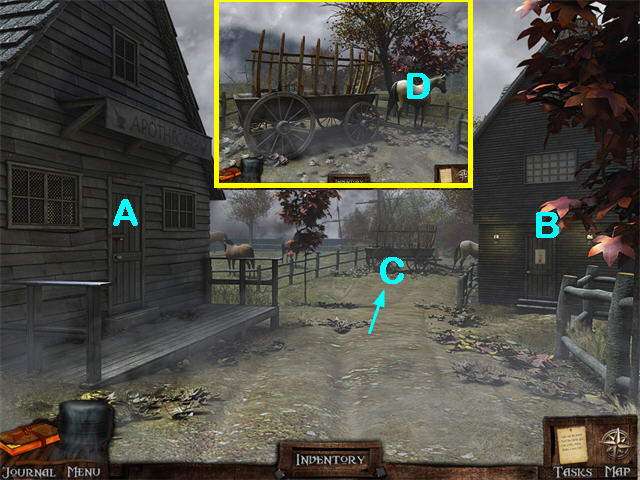
- Examine the Apothecary’s Door (A). It is locked, and part of the Handle is missing.
- Read the Notice (B).
- Continue up the West Road (C).
- There is a Wagon blocking the West Road. Examine the Horse (D)—it has become detached from the Wagon so you can’t move it.
- Return to the Town Crossroads.
- You must have the 1st MEDALLION PIECE from the Farmhouse Attic before continuing.
- From the Town Crossroads, go down to the Town Sign.
- Zoom in on the Carriage to collect the second MEDALLION PIECE.
- Go back to the Town Crossroads.
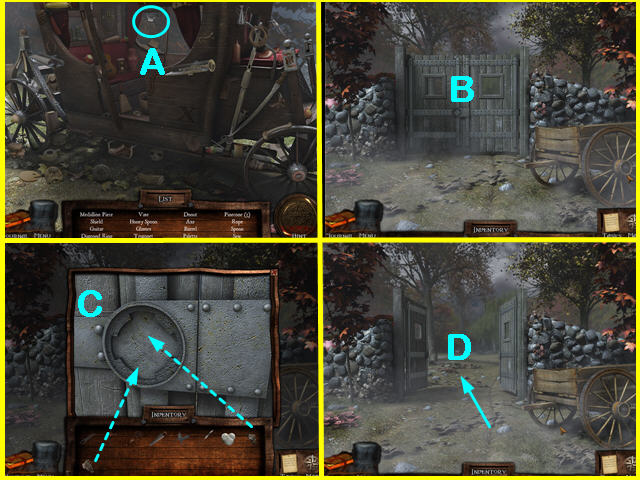
- Go to the North Gate, then zoom in on the Lock.
- Place the MEDALLION PIECES (one from the Farmhouse Attic, one from the Carriage) in the Lock (C) and the Gate will open.
- The North Gate is now open (D). Go through.
- Go up 1 to the Willow Tree.
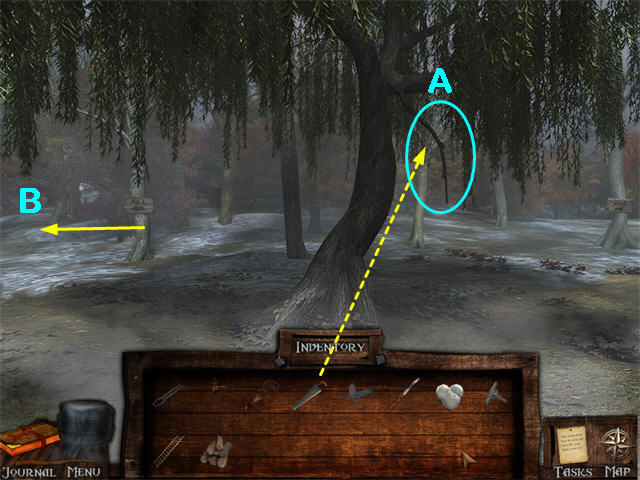
- Use the SAW (from the Pumpkin Patch) to collect the BRANCH (A).
- Go left (B).
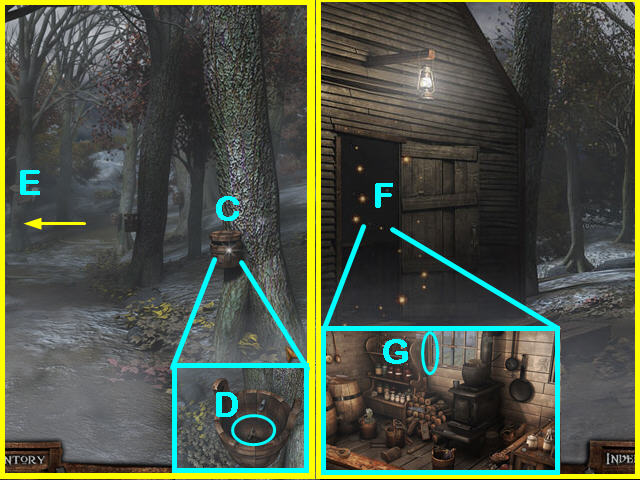
- There is a Maple Tree with a Bucket (C) attached. Click on the top of the Bucket to remove it. Collect the KNOB KEY (D).
- Go left (E) to the Maple Shed.
- Go inside the Maple Shed (F) to collect the LADDER (G).
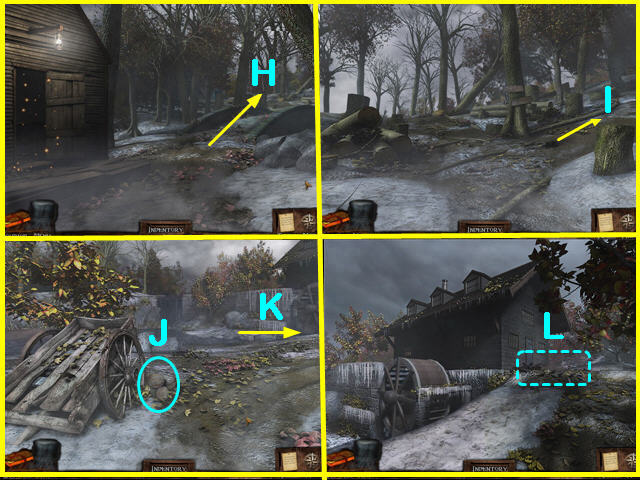
- Go up from the Maple Shed. (H) You come to a Logging Junction where the road branches.
- The left branch goes to the top of the Waterfall. There is nothing to do here yet.
- The right branch (I) goes towards the Sawmill. Take the LOGS (J) that are piled outside.
- Go right (K) to the Sawmill. You would like to go in, but there are Crows (L) guarding the door.
- Go down 3 times to return to the Maple Shed.
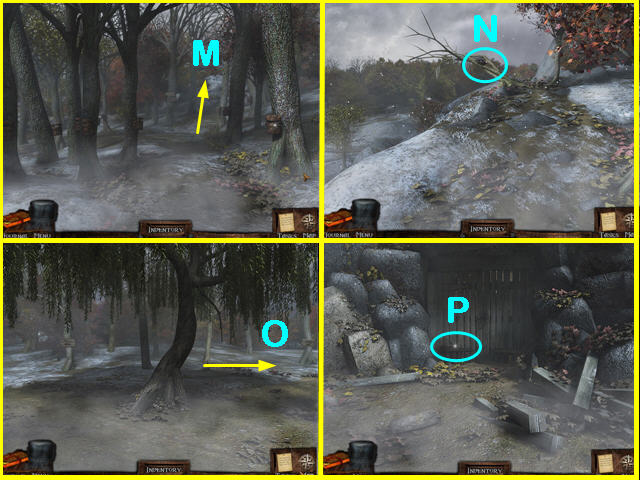
- Go down one more time and you will be at the Maple Tree with the Bucket. This time go straight ahead (M) twice on the Mountain Path.
- Zoom in on the tree and you will see an Eagle’s Nest (N), but you can’t reach it.
- Go down 3 times to the Willow Tree. This time go right (O) to the Mine.
- Examine the Mine (P). The Door is screwed shut.
- Return to the North Gate by going left and then down.
- Go down until you get to the Tailor Shop.
- Enter the Tailor Shop.
- Put the COTTON FIBERS (from the Farmhouse) on the Spinning Wheel to make the BALL OF YARN.
- You need 3 items for the DREAMCATCHER: the FEATHERS (from the Garden on the East Road), the BALL of YARN (that you just made), and the WILLOW BRANCH (from the Willow Tree above the North Gate).
- Go down to the Town Crossroads, then go East all the way to the Farmhouse.
- Go upstairs and through the Trapdoor.
- Give the DREAMCATCHER to the Girl with Nightmares and she will give you the SKELETON KEY.
Free the 2nd Girl
- Go to the Farmyard.
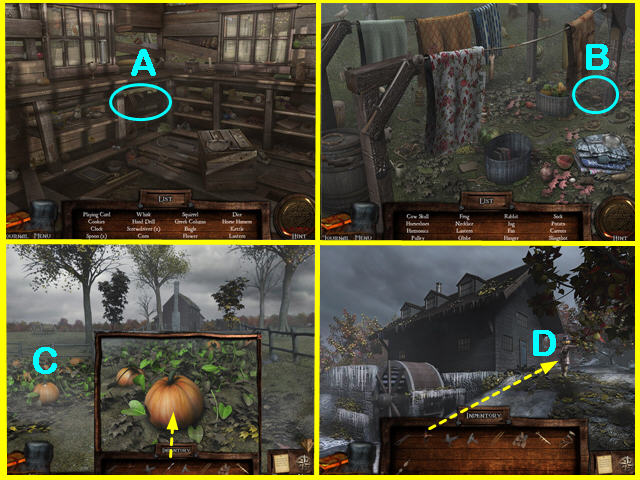
- Zoom in on the Toolshed and collect the HORSE HARNESS (A).
- Return to the Farmyard. Go down one.
- Zoom in on the Clothesline and collect the PULLEY (B).
- Walk down to the Pumpkin Patch.
- Zoom in on the Pumpkin (C) twice.
- Use the KNIFE (from the Farmhouse) to carve the Pumpkin and it will complete the SCARECROW.
- The SCARECROW consists of the CARVED PUMPKIN (you just made), the WOODEN FRAME (from behind the Barn), the TATTERED CLOTHES (from the Clothesline in the Farmyard), and the HAY (from the Wagon by the North Gate).
- Go to the Sawmill in the Northwest.
- Put the SCARECROW in front of the Sawmill (D) and it will scare away the Crows.
- Enter the Main Floor.
- Look at the Mill equipment. It is missing a part and doesn’t work.
- Go upstairs.
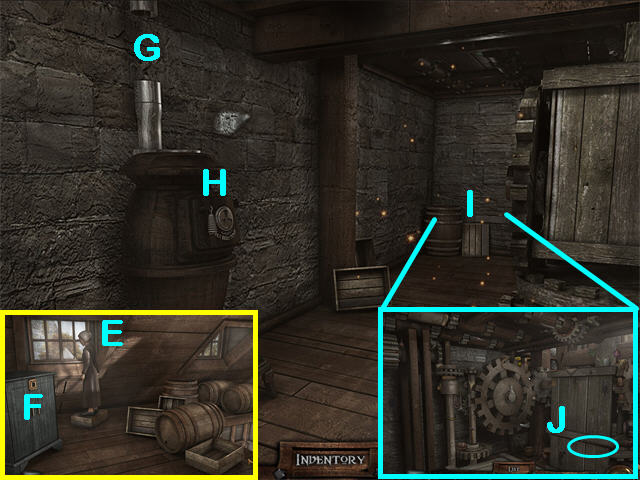
- Talk to the Girl (E) who is frightened of the Birds.
- Examine the Lock on the Blue Cabinet (F).
- Go downstairs 2 floors to the Sawmill Basement.
- Examine the Stove. It is missing a pipe (G).
- Open the Door on the Stove (H).
- Zoom in on the Hidden Object Scene (I) and collect the HORSE WHIP (J).
- Go to the North Gate.
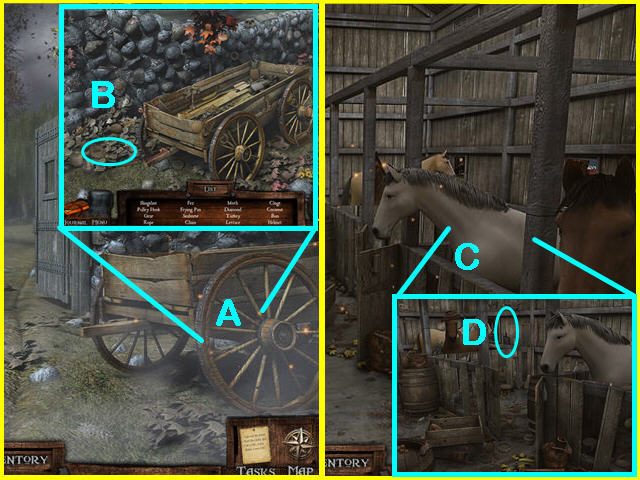
- Zoom in on the Wagon (A) and complete the Hidden Object Scene and collect the PULLEY HOOK (B).
- Go to the Forge in the South. Enter, then go through the back door to the Stables.
- Complete the Hidden Object Scene (C) and collect the PITCHFORK (D).
- Go up to the Town Crossroads.
- Go right until you come to the Farmyard.
- Enter the Barn.
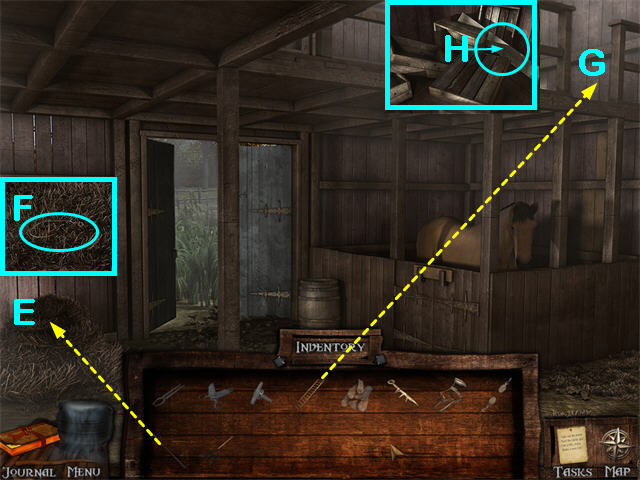
- Use the PITCHFORK (from the Stables) on the Pile of Hay (E) until you clear it all.
- Zoom in and collect the WEIGHTED FISH HOOK (F).
- Use the LADDER (from the Maple Shed) on the Loft Entrance (G) in the upper right.
- Go up into the Loft. Collect the PLANK (H).
- Exit the Barn and return to the Town Crossroads.
- Start at the Town Crossroads.
- Go left to the Apothecary.
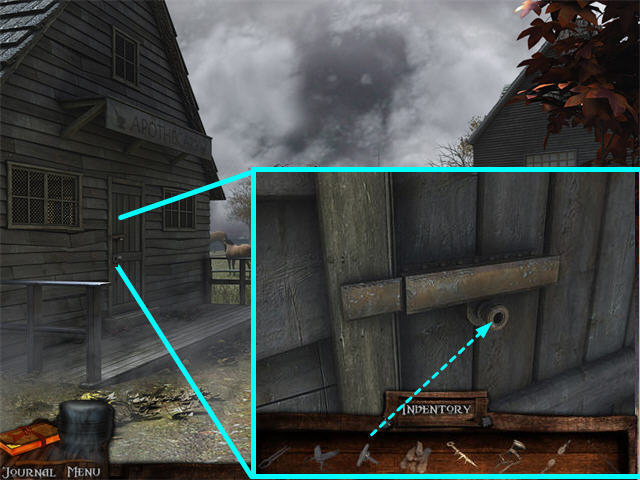
- Zoom in on the Apothecary Door and use the KNOB KEY (from the Maple Tree).
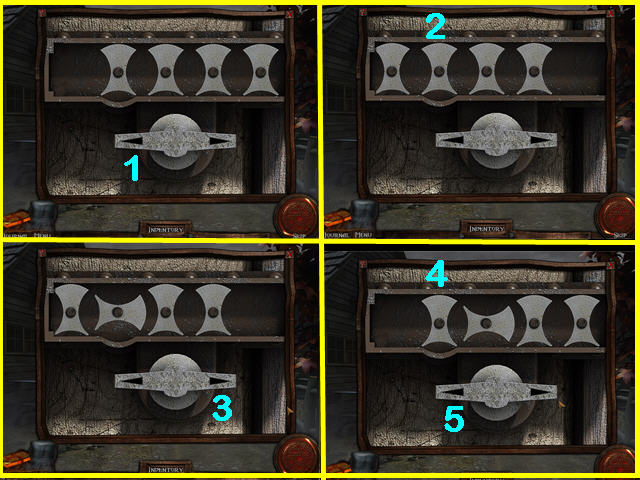
- This will trigger a mini-game. Turn all four locks horizontal and then slide them left to open the door.
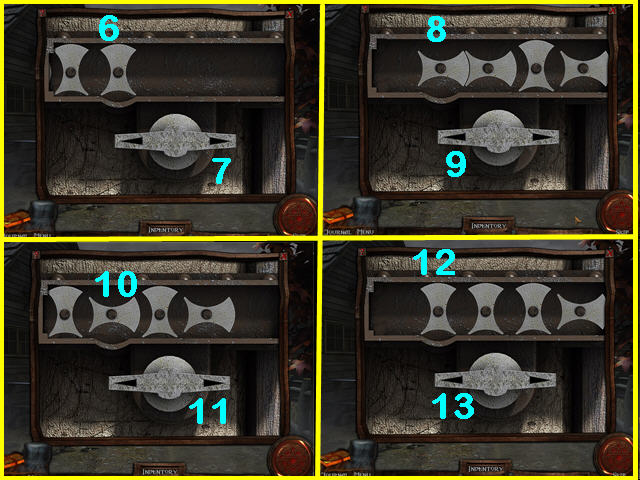
- You can only turn the lock that is just above the indentation.
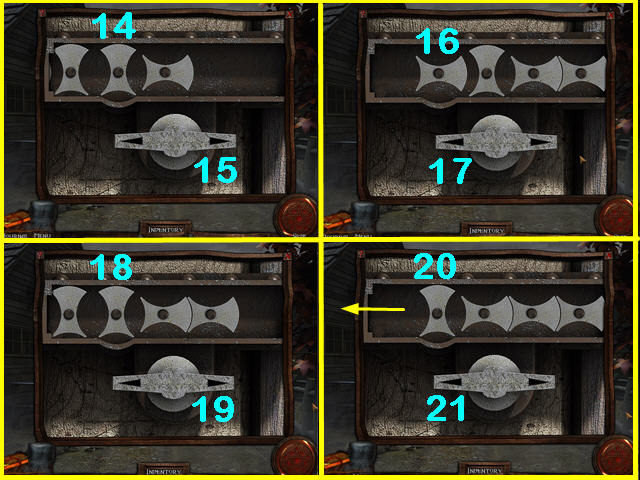
- Use the left and right arrows to slide the entire group of locks.
- See the screenshot for a solution.
- Enter the shop and look around.
- You need a cabinet handle.
- Go back outside.
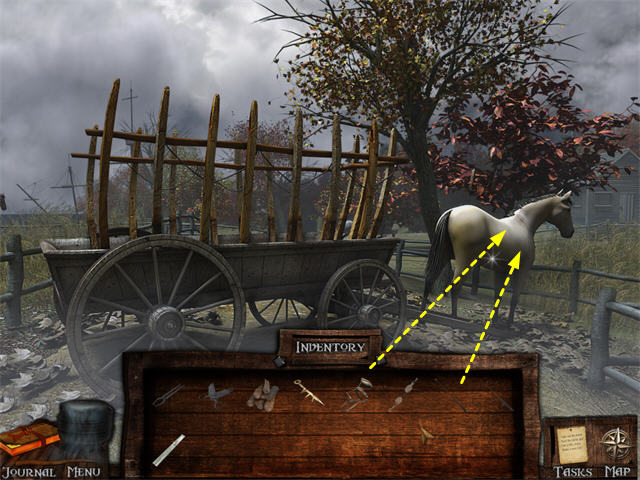
- Put the HARNESS (from the Toolshed) on the Horse.
- Use the HORSE WHIP (from the Sawmill Basement) on the Horse and it will move, clearing the West Road.
- Go up one.
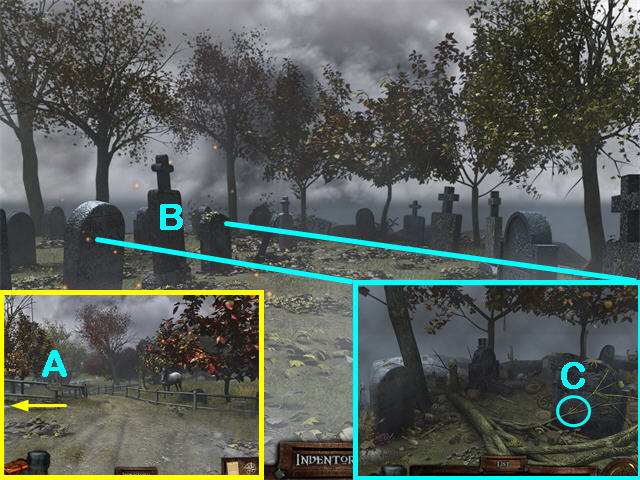
- From the Cemetery Sign (A), go left to the Cemetery.
- Zoom in on the Hidden Object scene (B) and collect the MATCHES (C).
- Exit the Cemetery.
- From the Cemetery Sign, go straight ahead to the Dock.
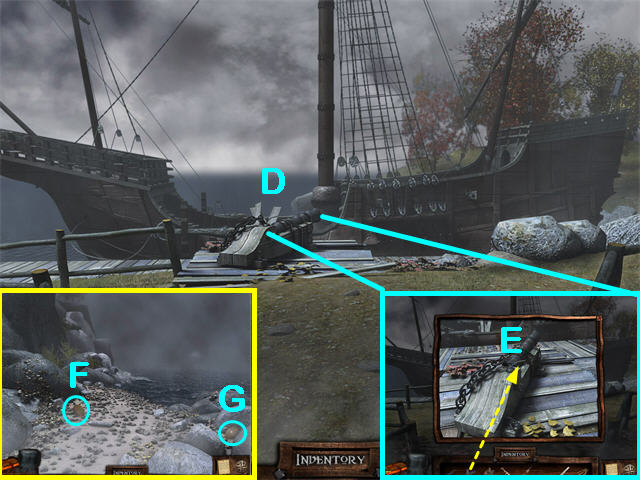
- There is a Ship there. Examine the Cannon (D) on board.
- Use the SCISSORS (from the Farmhouse) on the Fuse (E) and you will collect a short FUSE.
- Go left from the Dock to the Shore. Collect the COCONUT (F) and the COCONUT WITH A HOLE (G).
- The SHORT FUSE and the COCONUT WITH A HOLE are part of the COCONUT BOMB.
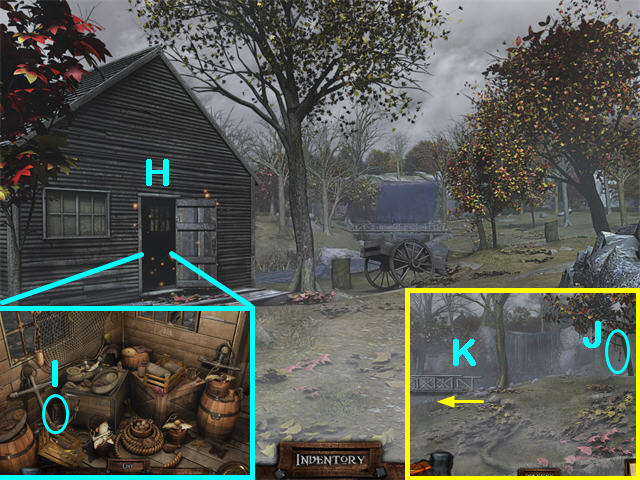
- Return to the Ship, then go right to the Fishing Hut (H).
- Do the Hidden Object Scene and collect the LANTERN (I) which will go into your inventory as a “Lamp Shell” since it is only part of the OIL LANTERN.
- Continue forward to the Bridge.
- Collect the VINE (J) hanging from the right tree. It is part of the PAN FLUTE.
- Go left onto the Bridge (K).
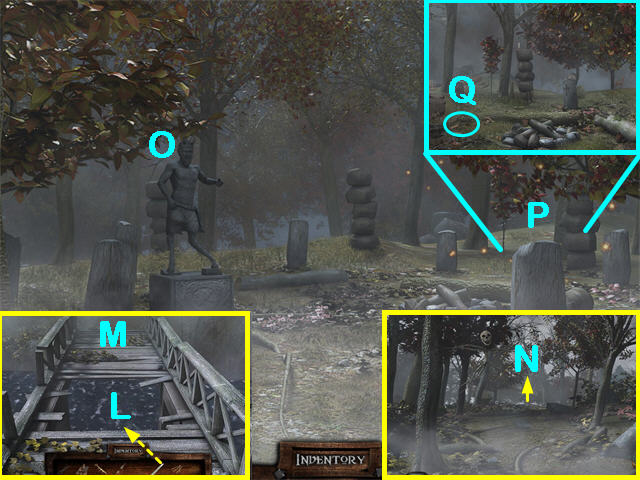
- Put the PLANK (from the Barn) on the hole in the Bridge (L), then click on the far side (M) to cross.
- Go one forward (N) to the Ritual Ground.
- Read your Journal.
- Examine the Pan Statue (O).
- Zoom in on the Hidden Object Scene on the right (P) and collect the AXE (1).
- The AXE plus the LOGS from outside the Sawmill give you FIREWOOD.
- Return to the Bridge and cross it so you are back where you picked up the VINE.
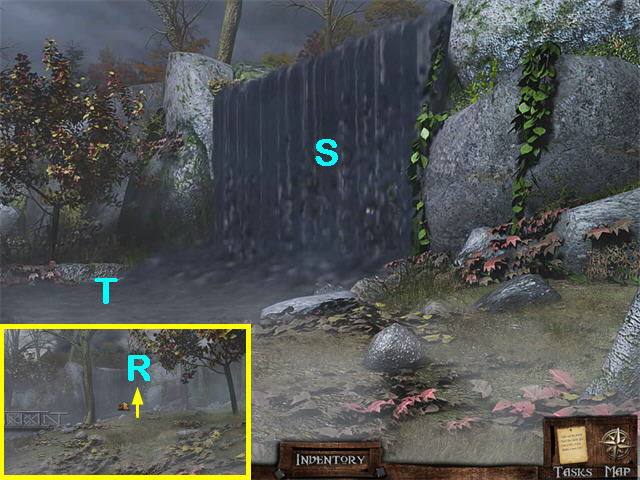
- Go one up (R) to the Waterfall.
- Examine the area. There may be something behind the Waterfall (S).
- You will also notice you could probably fish in the River (T).
- Go down until you get to the Cemetery sign.
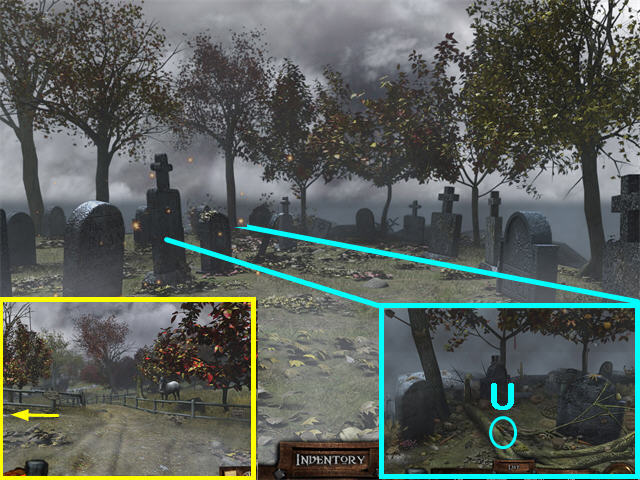
- Go left to the Cemetery.
- Zoom in on the Hidden Object Scene to collect the SCREWDRIVER (U).
- Return to the Cemetery Sign.
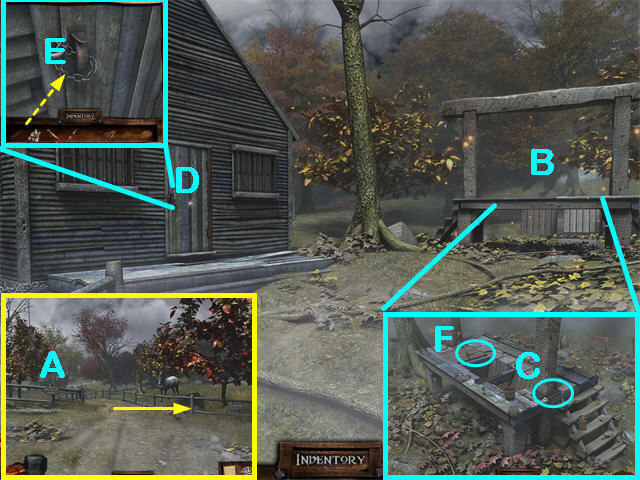
- Go right (A).
- Zoom in on the Gallows (B) and collect the ROPE (C).
- The ROPE is part of the PULLEY SYSTEM.
- Zoom in on the Jail Lock (D).
- Use the METAL CUTTERS from the Forge to cut the Chain (E) off the lock.
- Enter the Jail.
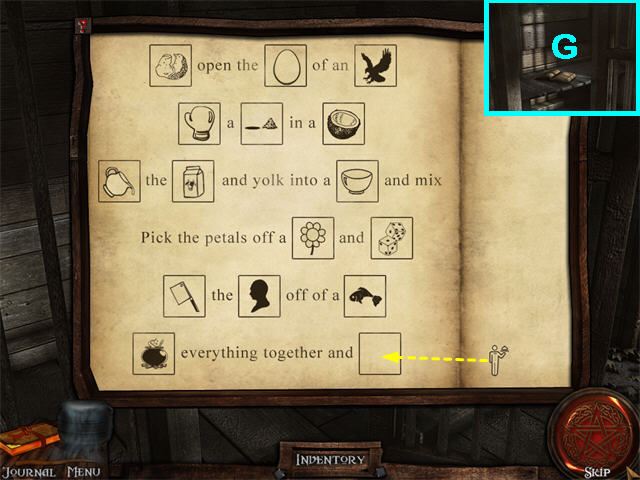
- Click on the Book (G) to trigger a mini-game.
- This is a rebus recipe. The solution is:
- Break open the egg of an eagle.
- Punch a hole in a coconut.
- Pour the milk and the yolk into a bowl and mix.
- Pick the petals off a sunflower and roll.
- Chop the head off of a fish.
- Cook everything together and serve.
- Read your Journal.
- Exit the Jail.
- The Hidden Object Scene at the Gallows will be available again. This time you will collect the PICKAXE (F).
- From the Town Crossroads, go right to the House with the Garden.
- Go right to the Well.
- To complete the next step you must have the PULLEY SYSTEM. It is made of the PULLEY HOOK (from the Wagon by the North Gate), the ROPE (from the Gallows), and the PULLEY (from the Clothesline by the Farmhouse).
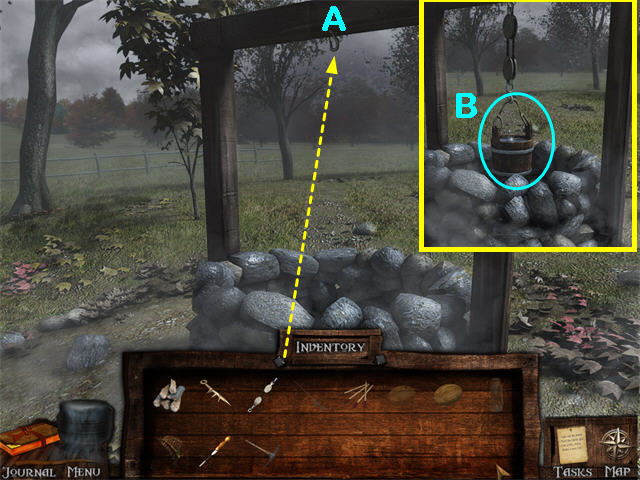
- Put the PULLEY SYSTEM on the Hook (A) at the top of the Well.
- Click until the BUCKET OF WATER appears. Collect it (B).
- Go down to the House with the Garden.
- Enter the Farmhouse at the end of the East Road.
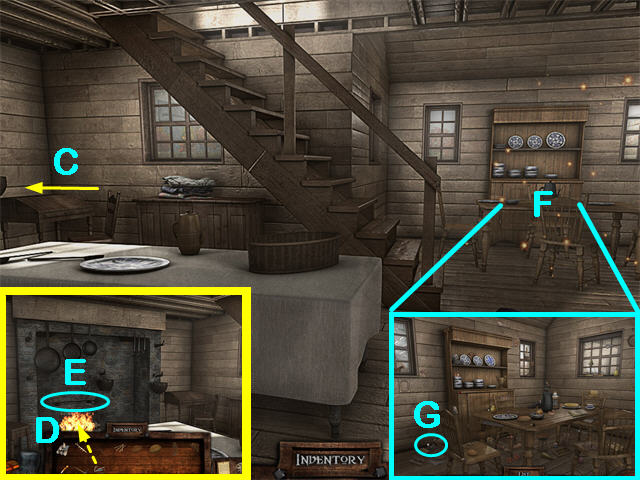
- Go left (C) to see the Fireplace.
- Put the BUCKET OF WATER (from the Well) on the Fire (D).
- Collect the TOASTING FORK (E).
- The EMPTY BUCKET will return to your inventory.
- Go down so you are facing the right Table again.
- Zoom in on the Hidden Object scene (F) and collect the METAL KNOBS (G). Once they are in your inventory tray they will be called CABINET KNOBS.
- Go back to the Town Crossroads.
- From the Town Crossroads, go up one to the Tailor Shop and enter.
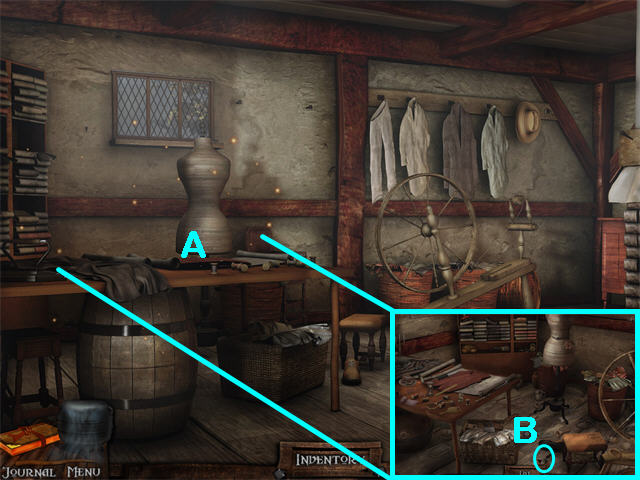
- Zoom in on the Tailor’s Dummy (A) and collect the LANTERN WICK (B).
- Exit the shop.
- Go down 2 to the Forge and go inside.
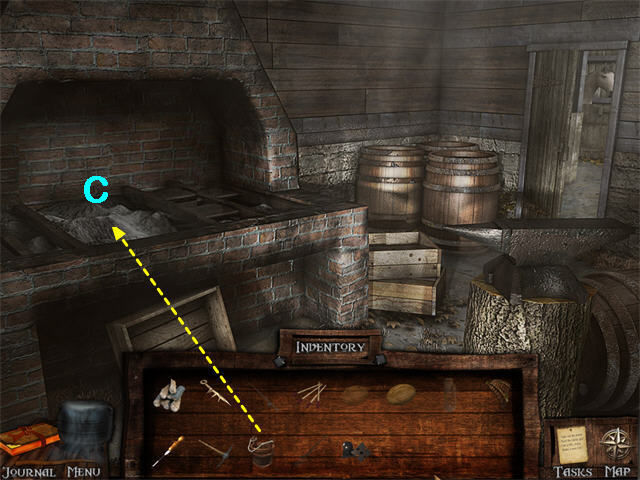
- Use the EMPTY BUCKET (from the Farmhouse) on the Soot (C) to get a BUCKET OF SOOT.
- Exit the Forge.
- Go up to the Town Crossroads.
- Go left one to the Apothecary Shop and go inside.
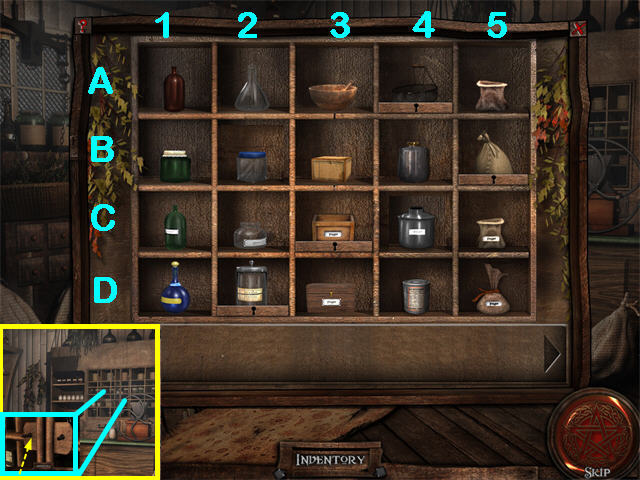
- Zoom in on the right Cabinet.
- Use the CABINET KNOBS from the Farmhouse to trigger a mini-game.
- The screenshot shows the solution.
- 1 = Ceramic, 2 = Glass, 3 = Wood, 4 = Metal, 5 = Fabric.
- A = Open and Unlabeled; B = Closed and Unlabeled, C = Open and Labeled, D = Closed and Labeled.
- Once you complete the puzzle you will receive the FISH OIL which is part of the OIL LANTERN.
- You can examine the puzzle on the left side of the shop, but you don’t have the ingredients to do it yet.
- Exit the shop.
- Go down to the Town Crossroads.
- Go to the North Gate.
- Go up one to the Willow Tree.
- Go right to the Mine.
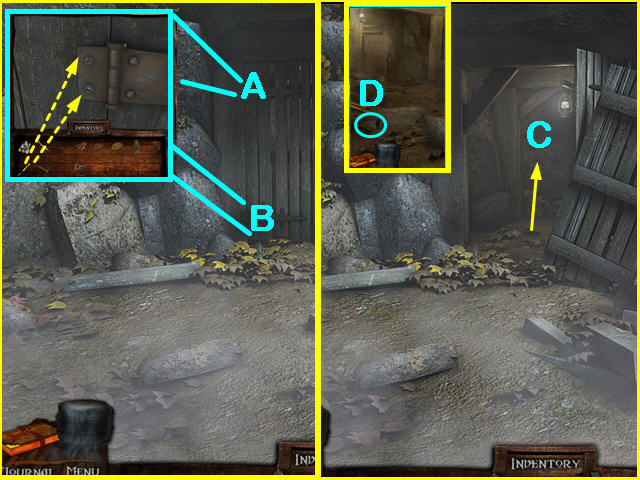
- The entrance is boarded up. You need the SCREWDRIVER from the Cemetery.
- There are Hinges on the top (A) and the bottom (B).
- Zoom in on the top Hinge (A).
- Use the Screwdriver on both screws.
- Zoom in on the Bottom Hinge (B).
- Use the SCREWDRIVER on both Screws.
- The Door will open.
- Enter the Mine (C).
- Collect the STOVE PIPE (D) from the ground on the left.
- That is all we will do here now.
- Exit the Mine and return to the Willow Tree.
- From the Willow Tree, go left to the Maple Tree.
- Go left to the Maple Shed.
- Go forward to the Logging Junction.
- Go right twice to the Sawmill.
- Go inside the Sawmill.
- Go down to the Sawmill Basement.
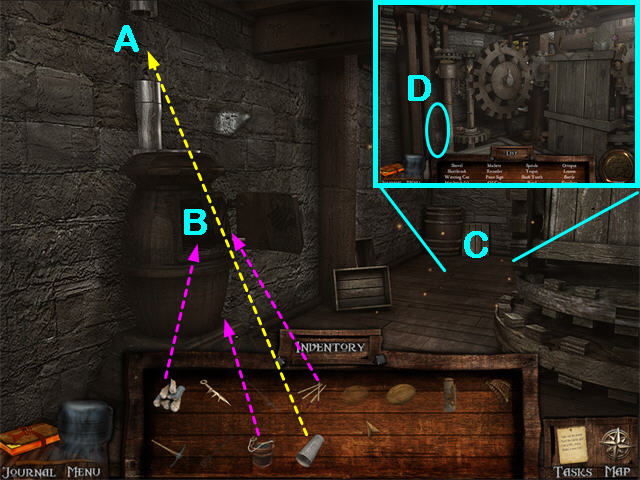
- For this step you need the STOVEPIPE (from the Mine), the MATCHES (from the Cemetery), the FIREWOOD combination item and the BUCKET WITH SOOT (from the Forge).
- The FIREWOOD is made up of the LOGS (from the Wagon by the Sawmill) and the AXE (from the Cemetery).
- Put the STOVEPIPE on the Stove (A).
- Put the FIREWOOD into the Stove (B).
- Light the FIREWOOD with a MATCH.
- Put the BUCKET OF SOOT on the Fire.
- The Girl will be disenchanted.
- Zoom in on the Hidden Object Scene (C) and collect the SHOVEL (D).
- Go upstairs twice and talk to the Girl.
- She will give you the RED DISC.
- Leave the Sawmill and the Girl will follow you.
- Go back to the Willow Tree.
Free the 3rd Girl
- From the Willow Tree, go right to the Mine.
- Enter the Mine.
- Take the left Tunnel.
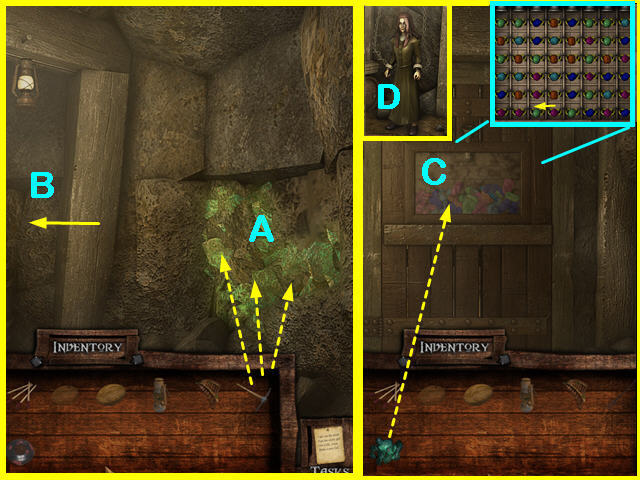
- Use the PICKAXE on the right wall (A) until you have collected all the MINERALS.
- Continue left (B).
- Put the MINERALS on the Puzzle (C). This will trigger a mini-game.
- This is a Match-3 game. Swap adjacent beads to make sets of 3 or more of the same color.
- When you make a match, the gold links on those beads will disappear. The black links will remain.
- Continue making matches until all of the gold links are gone.
- The Door will open.
- You have found the 3rd Girl (D). She is angry all the time.
- You will have to find the ingredients for the CALMING POTION and give it to her.
- Go back to the Mine Entrance.
- Take the right Tunnel.
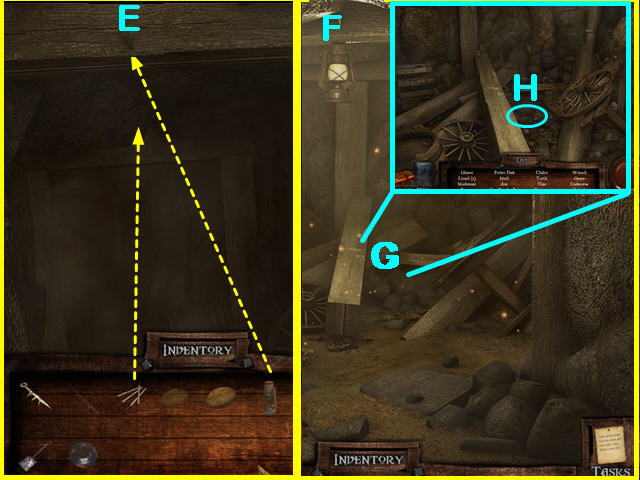
- Hang the LANTERN composite item from the Hook (E).
- The LANTERN is made from the LANTERN SHELL (from the Fishing Hut), the LANTERN WICK (from the Tailor Shop) and the FISH OIL (from the Apothecary).
- Use the MATCHES (from the Cemetery) on the LANTERN.
- Go forward one.
- This section is also dark, but there is already a Lantern in place.
- Use the MATCHES (from the Cemetery) on the Lantern (F).
- Zoom in on the Hidden Object Scene (G) and collect the GUNPOWDER BAG (H).
- The GUNPOWDER is part of the COCONUT BOMB composite item.
- Return to the Mine Entrance.
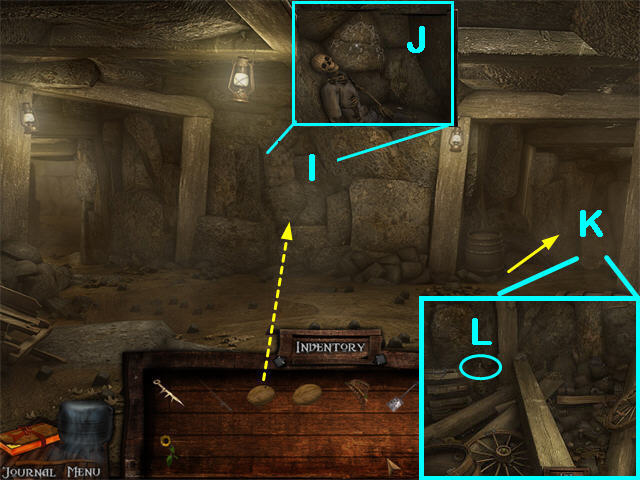
- Use the COCONUT BOMB composite item on the Far Wall (I).
- The COCONUT BOMB is made of the COCONUT WITH A HOLE (from the Shore), the SHORT FUSE (from the Ship at the Dock) and the GUNPOWDER BAG (from the right Mine tunnel).
- Zoom in and study the Cemetery Map (J). It will be copied to your Journal.
- Go back down the right tunnel (K) again.
- Zoom in on the Hidden Object scene (L) and collect the FISHING LINE (I).
- Exit the mine.
- Go back to the Willow Tree.
- From the Willow Tree go left to the Maple Tree.
- Go up until you see the Eagle Nest.
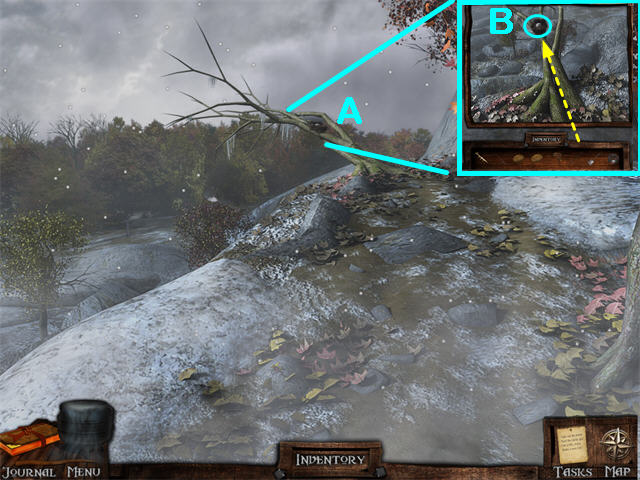
- Zoom in on the Nest.
- Use the TOASTING FORK from the Farmhouse Fireplace to get the EAGLE EGG (B).
- Return to the North Gate.
- Return to the Town Crossroads.
- From the Town Crossroads go right to the House with the Garden.
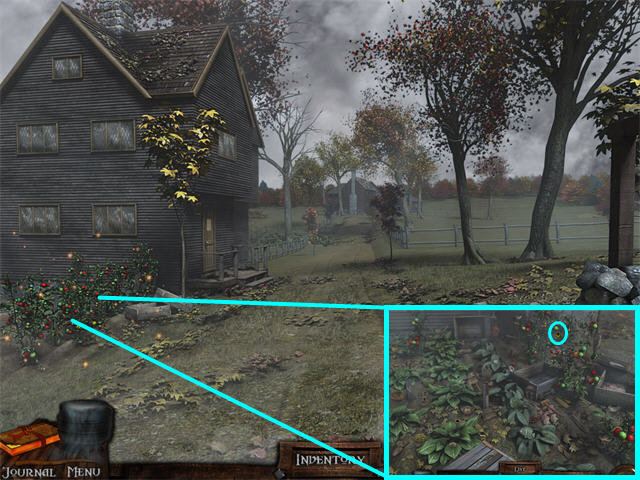
- Zoom in on the Garden and collect the Sunflower.
- Return to the Town Crossroads.
- From the Town Crossroads go left to the Cemetery sign.
- Go forward to the Docks.
- Go right to the Fishing Hut.
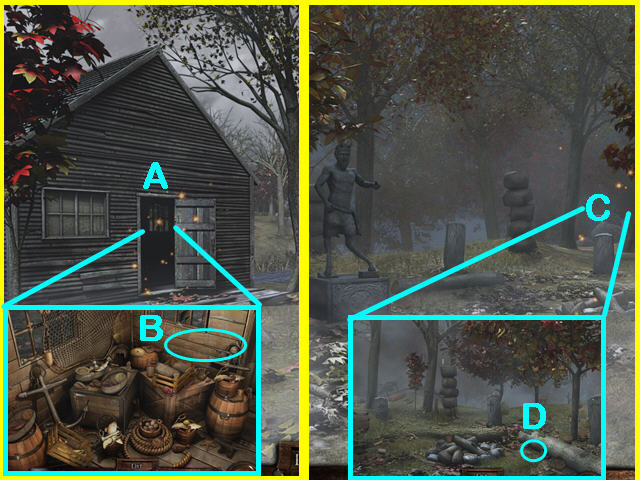
- Enter the Fishing Hut (A) and collect the FISHING POLE (B).
- Go up one to the Bridge.
- Go left across the bridge and continue to the Ritual Fields.
- Complete the Hidden Object Scene (C) and collect the WORM (D).
- Return to the Bridge.
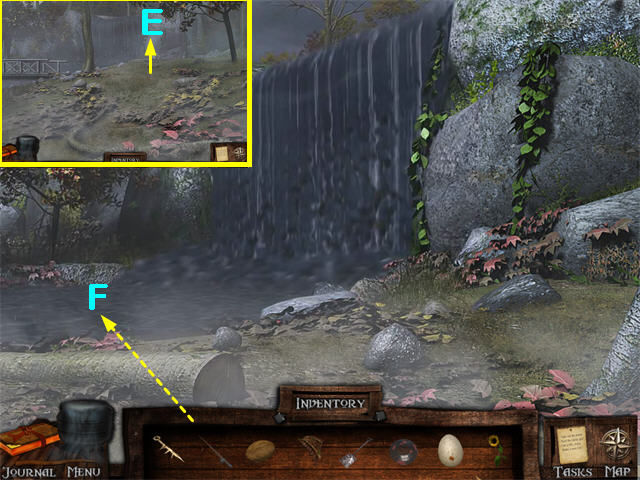
- Go forward one to the Waterfall (E).
- You need the Composite item the FISHING ROD. This is made of the WEIGHTED HOOK (from the Barn), the FISHING LINE (from the right Mine tunnel), the FISHING POLE (from the Fishing Hut), and the WORM (from the Ritual Fields).
- Find the spot in the river (F) where it says it’s a good place to fish. Use the FISHING ROD there to catch the FISH.
- Go down to the Cemetery Sign.
- Continue down to the Apothecary Shop.
- Enter the Apothecary Shop.
- Zoom in on the left side of the Counter.
- You must have the EAGLE EGG (from the Eagle Nest), the SUNFLOWER (from the House with the Garden), COCONUT (from the Shore) and the FISH (Below the Waterfall).
- You must also have solved the CALMING POTION puzzle at the Jail.
- The instructions are in your Journal.
- In this puzzle, every time the cursor turns to gears, click to move that item.
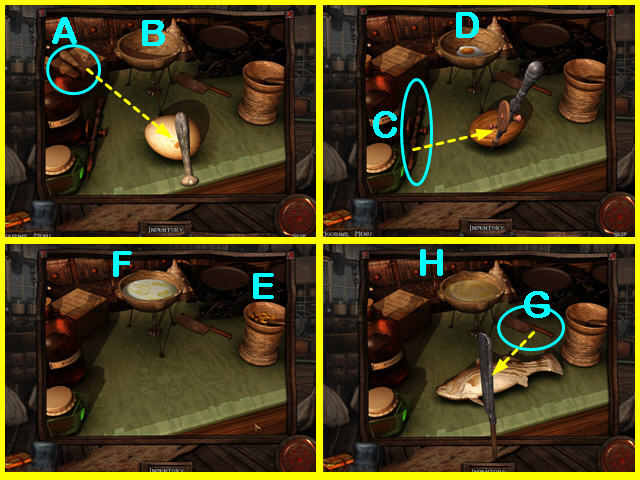
- Put the EGG on the counter in the zoom scene.
- Hit it with the ROD (A) to break it.
- Click on the BROKEN EGG to put it in the Bowl (B).
- Put the COCONUT on the counter.
- Use the HANDDRILL (C) on the COCONUT.
- Click on it to put it the Bowl (D) with the Egg.
- Put the SUNFLOWER in the Mortar (E) on the right. It changes to seed.
- Use the PESTLE which was already in the MORTAR to grind the SUNFLOWER SEEDS to powder.
- Click on the Powder to put it in the Bowl (F) with the Egg mixture.
- Put the FISH on the counter and cut it with the CLEAVER (G).
- Click on the FISH to put it in the Egg Mixture (H).
- Click on the Egg Mixture to collect the CALMING POTION.
- Exit the shop.
- Return to the Town Crossroads.
- Go to the Mine and enter.
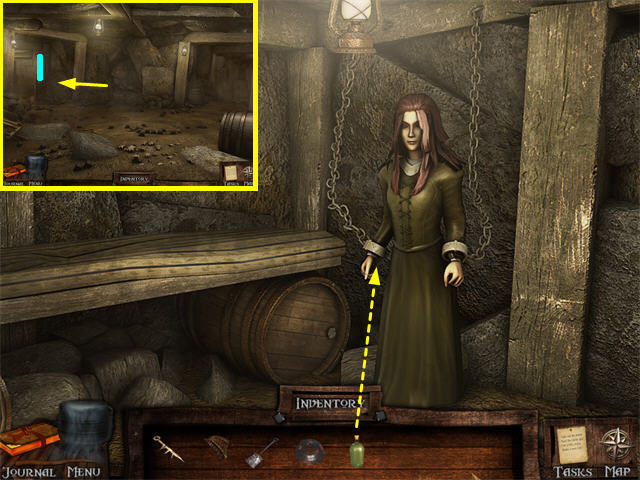
- Take the left Tunnel (I).
- Give the CALMING POTION to the Enraged Girl and she will give you the GREEN DISC.
- Exit the Mine and return to the Town Crossroads.
Free the 4th Girl
- You must have already discovered the CEMETERY MAP in the Mine.
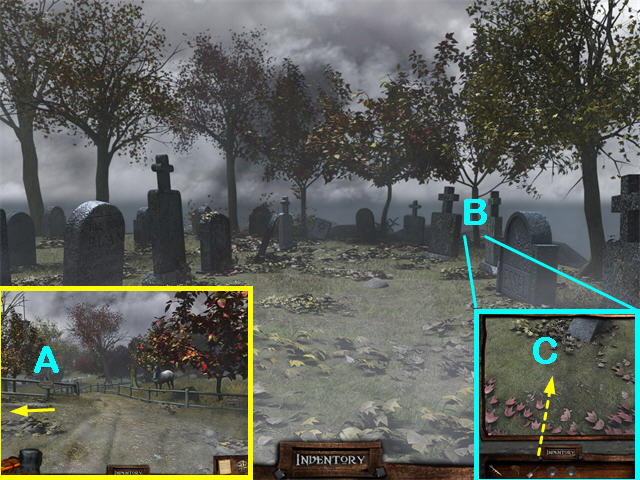
- Start at the Cemetery Sign (A) on the West side.
- Go left to the Cemetery.
- Zoom in on the Tree (B) in the back right.
- Use the SHOVEL (from the Sawmill) to dig up the ground (C).
- Collect the WOODEN BLOCK. You should recognize it as the key to the Sawmill Chest.
- Go to the Sawmill and go upstairs.
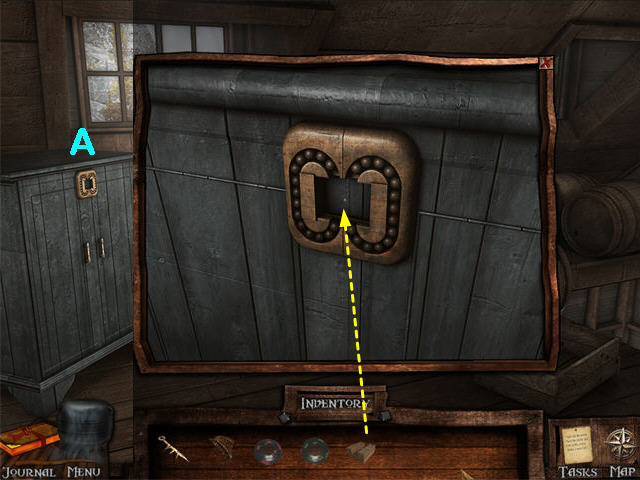
- Zoom in on the Lock (A) on the Blue Chest.
- Put the WOODEN BLOCK (from the Cemetery) in place.
- This will trigger a mini-game.
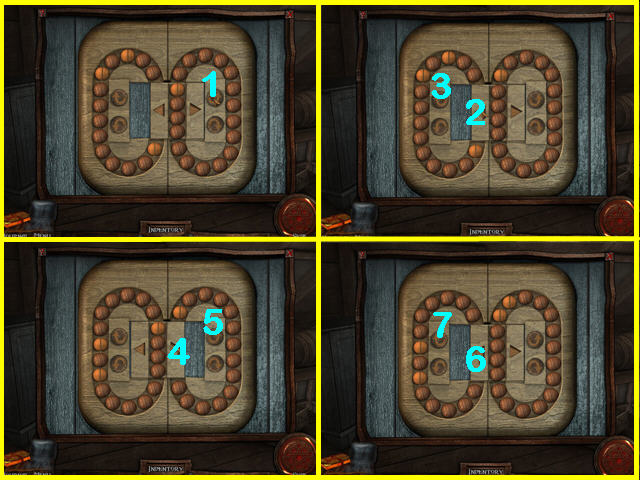
- There are many ways to do this, but the easiest is to first put 3 light beads on the left side.
- Use the upper right arrow to turn the right side until the light bead there is just above the center area.
- Swap the center block to the left.
- Turn the left side until there is one light bead in the center area just below the light bead in the top right.
- Swap the block to the right.
- Rotate the right side until there are 2 light beads just above the center area.
- Switch the center block to the left.
- Rotate the left side until there is one light bead at the top of the center area.
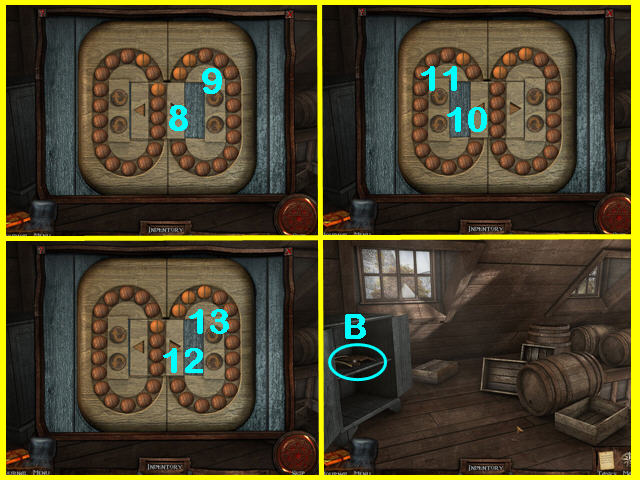
- Switch the center block to the right.
- Rotate the right side until there are 3 beads right above the center area.
- Switch the center block to the left.
- Rotate the left side until the last light bead is at the top of the center area.
- Switch the center block to the right.
- Rotate the right side until the 4 light beads are all in the center area.
- The Cabinet will open.
- Collect the BAMBOO (B). This BAMBOO is part of the PAN FLUTE.
- Exit the Sawmill.
- Go back to the North Gate.
- Go down to the Town Crossroads.
- You must have the PAN FLUTE composite item. It is made from the BAMBOO (from the Blue Chest in the Sawmill) and the VINE (near the Bridge).
- Start at the Town Crossroads.
- Go left and continue to the Dock.
- Go right and continue to the Bridge.
- Go left across the Bridge and continue to the Ritual Grounds.
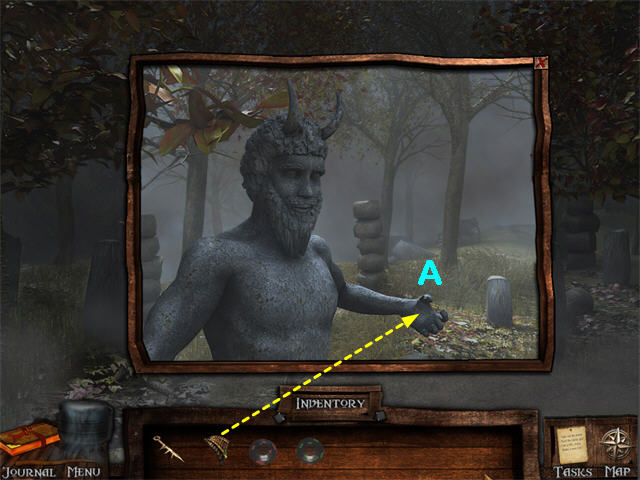
- Zoom in on the Pan Statue.
- Give the PAN FLUTE to the Pan Statue (A).
- This will trigger a mini-game.
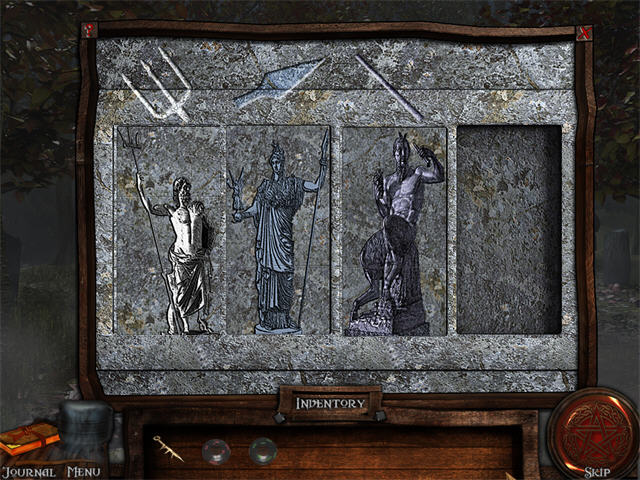
- You must move the tiles so they form 3 figures and one blank column.
- Each figure matches its symbol above the column: White, Blue, and Purple.
- Tiles can move up or down one square at a time, but when you move them horizontally, the whole row moves.
- The horizontal rows circle around and come in again from the opposite side.
- The easiest way to solve this is to work on one row at a time, not 1 column.
- Pieces must be adjacent to each other in the correct order with no gaps, since you can’t slide a tile horizontally into a gap space.
- Collect the GEAR.
- Return to the Town Crossroads.
- It can take a while, but eventually you should figure out that the only way to find out what’s behind the Waterfall is to reduce the flow of water from above.
- You must have the GEAR (from the Pan Statue).
- Go to the Sawmill.
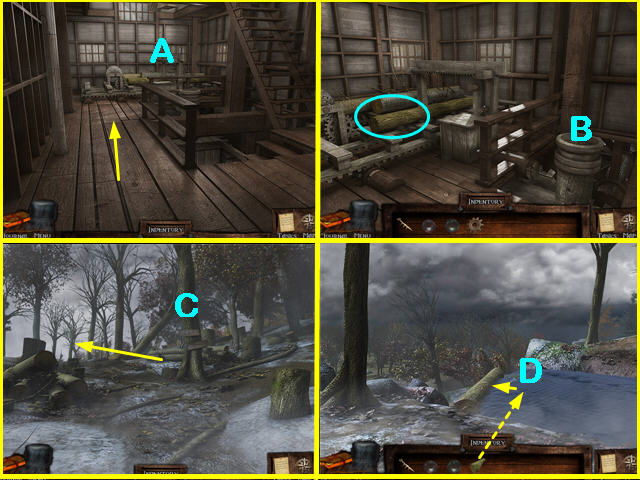
- Go the machinery (A) at the back of the main floor.
- A piece is missing from the right side (B). Put the GEAR there.
- Collect the CUT LOG.
- Exit the Sawmill.
- Go down twice to the Logging Junction (C).
- This time, go left to the top of the Waterfall.
- Put the Cut Log there (D) in the water and it will interrupt the water flow.
- Return to the Town Crossroads.
- Go left and continue up the Coast Road to the Bridge.
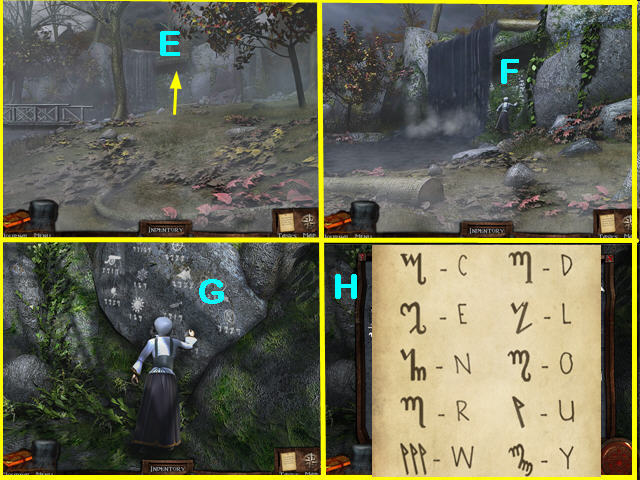
- You can see the Waterfall ahead (E).
- Continue, and you will see the 4th Girl (F).
- Zoom in and talk to the Girl. She is speaking “in tongues” (gibberish).
- Examine the Wall (G) where she is writing for a puzzle.
- This will bring up a cipher puzzle.
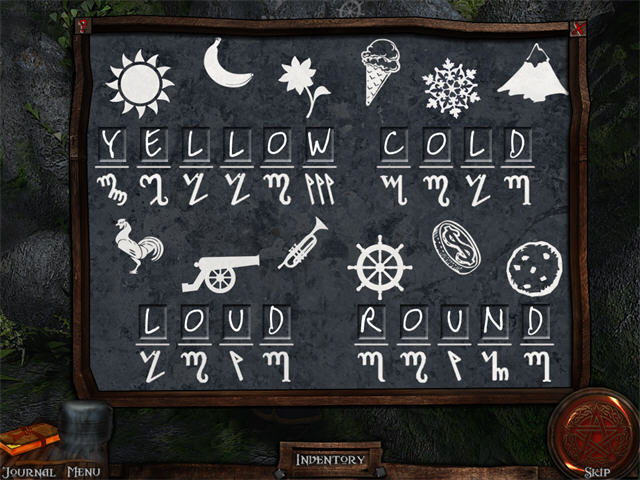
- Look at one set of pictures and decide what they all have in common.
- Then click on the letters below that set of pictures to spell the word you want.
- Sun/Banana/Flower = YELLOW
- Ice Cream/Snowflake/Mountaintop = COLD
- Rooster/Cannon/Trumpet = LOUD
- Wheel/Coin/Cookie = ROUND
- Read your Journal—you now know some of the runes (H).
- Return to the Town Crossroads.
- You must have completed the puzzle behind the Waterfall before you can continue.
- From the Town Crossroads, go right one.
- Enter the Schoolhouse.
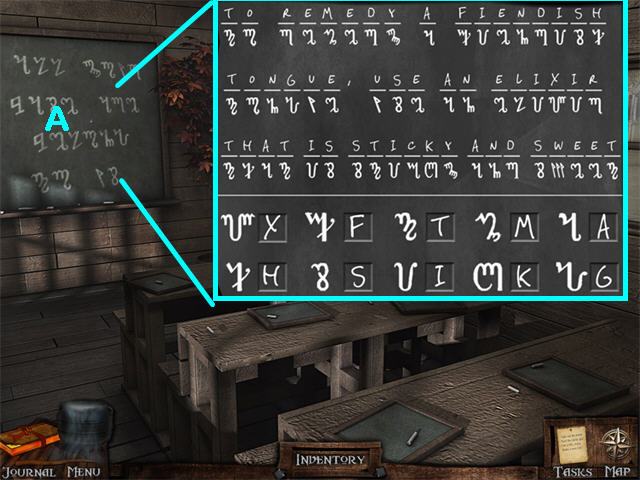
- Zoom in on the Chalkboard (A).
- Complete the puzzle by selecting the correct letters for the Runes at the bottom. You can use your Journal page or just figure the words out that are on the chalkboard.
- The answer is: “To remedy a fiendish tongue, use an elixir that is sticky and sweet.”
- Return to the Town Crossroads.
- You must have deciphered the code on the Schoolhouse Chalkboard before continuing.
- From the Town Cross roads, go north to the North Gate.
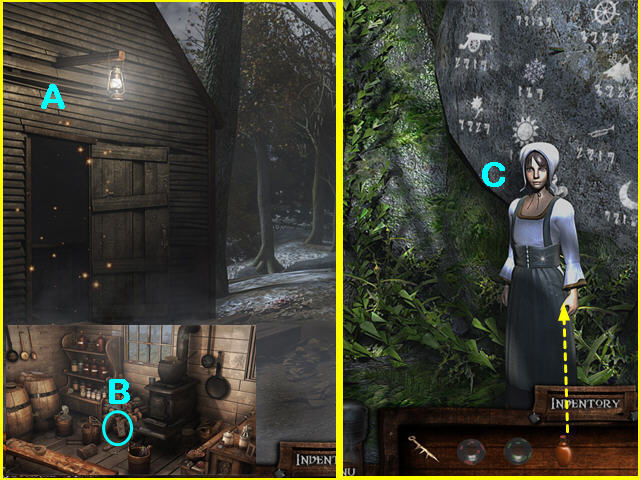
- Go to the Maple Shed (A) and enter.
- Do the Hidden Object scene and collect the Maple Syrup (B).
- Return to the Town Crossroads.
- Go left and continue to the Waterfall.
- Give the Maple Syrup to the Girl (C).
- She will give you the SKULL SHAFT.
- Return to the Town Crossroads.
The Witch
- You must have the SKELETON KEY (from the Girl in the Farmhouse), the RED WITCH DISC (from the Girl in the Sawmill), the GREEN WITCH DISC (from the Girl in the Mine), and the SKULL SHAFT (from the Girl at the Waterfall) to continue.
- Enter the Burnt-out House through the side where the wall has burned away.
- Pull back the Rug on the floor if you haven’t already.
- Zoom in on the Bone Lock.
- Use the SKELETON KEY on the Bone Lock.
- Go downstairs.
- Use the RED WITCH DISC and the GREEN WITCH DISC on the door to trigger a puzzle.
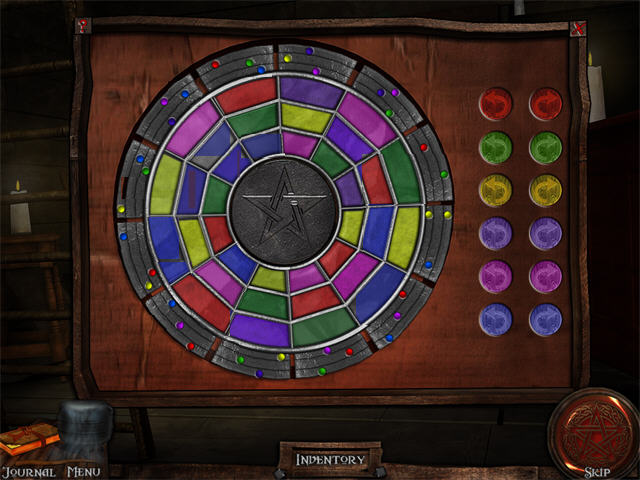
- The puzzle is made from color disks that are lying on top of each other.
- Each color disk has two solid squares of its color in each of the 3 rows. The rest of its squares are clear.
- When you click on the arrow buttons you are rotating the color disk that matches that color.
- The tiny dots in the outermost section show which color disks have solid squares in that column.
- To complete the puzzle you must rotate the disks so that there is only one dot in each section.
- There are many possible solutions.
- This solution features the following sequence in the outermost ring: Purple, Pink, Green, Yellow, Blue, Green, Purple, Red, Blue, Yellow, Pink, Red.
- To use this solution, rotate each color one at a time until you have this sequence.
- This will fill in all the squares and complete the pattern.
- The door will open.
- Go down another level.
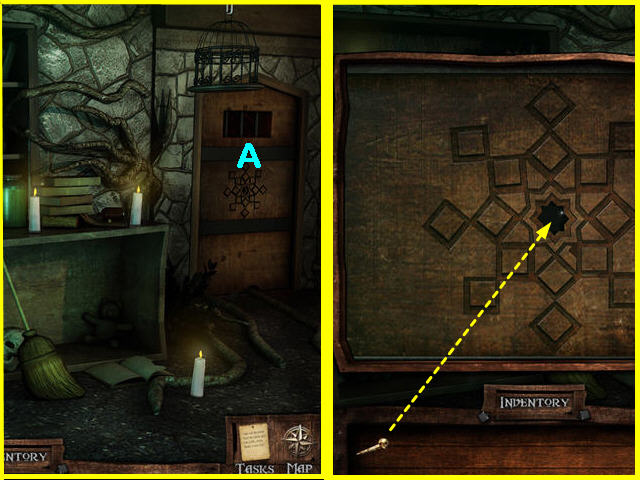
- Zoom in on the door on the right (A).
- Use the SKELETON SHAFT on the door to trigger another puzzle.
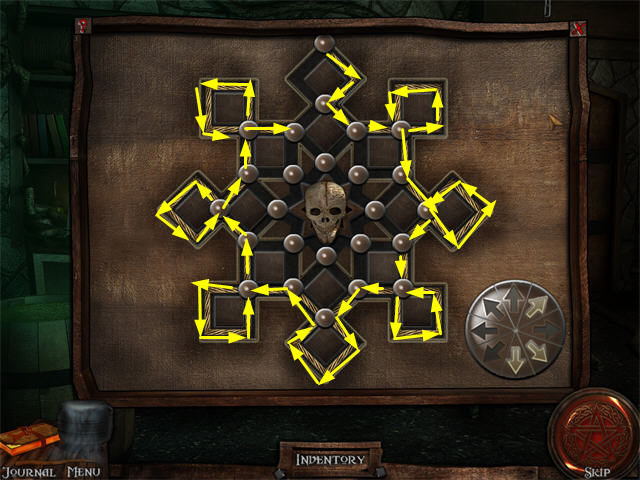
- There are many possible solutions. One of the simplest is to go around the outside clockwise, then do the middle section counterclockwise, and then finish doing the innermost section clockwise again.
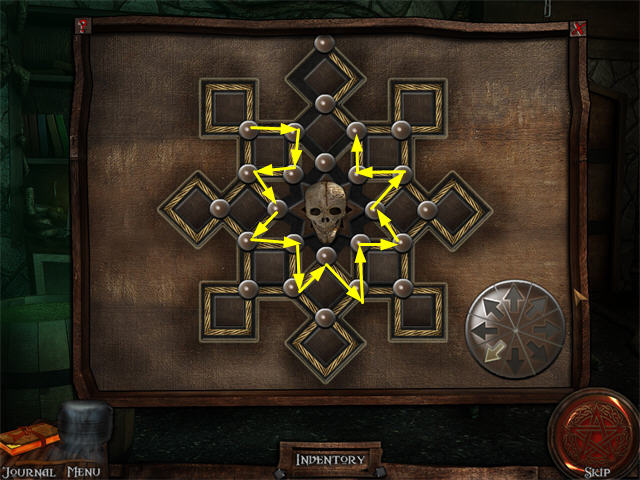
- The screenshots show each path.
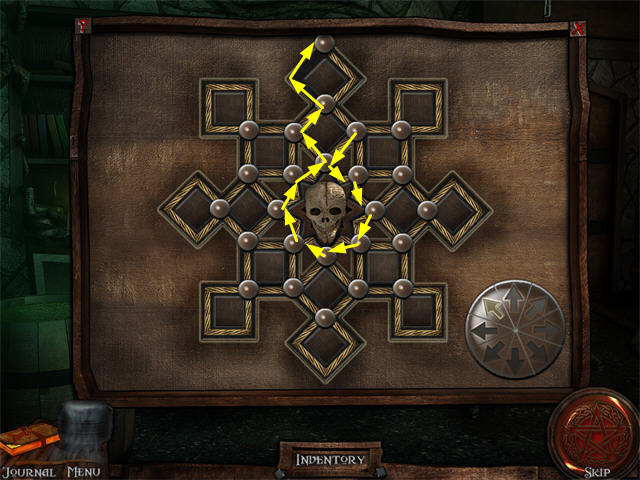
- When you are on a single peg in a loop, going right or left will circle the loop and return to that peg.
- Go through the door that has opened on the right.
- Confront the Witch.
Appendix: Town Map
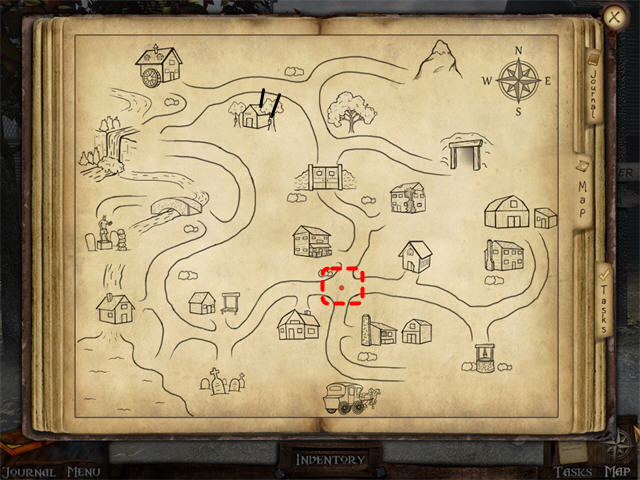
- The Map fills in as you explore.
- The red dot shows your current position.
- The Map is not drawn to scale, and a few roads and buildings are missing.
- Most directions in the Walkthrough are given from the Town Crossroads, the red square where the East Road and the North Road intersect.
- The House with Garden is not shown on the map. It is on the East Road just before the turn to the Well.
- The Top of the Waterfall can only be accessed by going through the North Gate to the Maple Shed and then turning left at the Logging Junction.
- The Base of the Waterfall is accessed by coming up the West Coast and going past the Bridge.
- Access the Stables by entering the Forge and going out the back door.
- The Maple Shed is drawn backwards on the Map. You get there by going through the North Gate, turning left at the Willow Tree and then left at the Maple Tree.
Created at: 2010-11-26

