Walkthrough Menu
- General Tips
- Chapter 1: Aunt Rosie’s House
- Chapter 2: Miss Pennywell’s Shop
- Chapter 3: The Church
- Chapter 4: The Cemetery
- Chapter 5: The Lighthouse
- Chapter 6: The Hospital
- Chapter 7: Creepy Motel
- Chapter 8: Aunt Rosie’s House Revisited
- Chapter 9: The Swamp
- Chapter 10: The Dungeon
General Tips
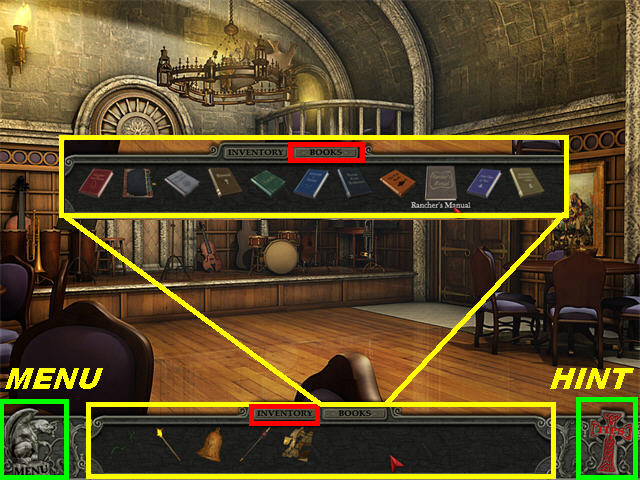
- This game is a Hidden Object Puzzle Adventure which contains 10 chapters.
- You can toggle between the Inventory and Book Tray by clicking on the appropriate tab at the bottom of the screen.
- There are 10 books to pick up in the game; they are located in Hidden Object Scenes. There is also a Diary that will be added to your Book Tray at the end of the first chapter.
- The Books contain valuable information for solving puzzles; make sure you open them all. Some puzzles cannot be solved unless the book has been picked up first.
- Click on sparkling clusters to access Hidden Object Scenes. Click on a hint (cross in lower right) and a circle will appear around a random object.
- In regular scenes the Tips Button will show you all accessible areas with red arrows and items that can be picked up with a Hand Icon.
- Hints are unlimited but must be charged before each use.
- The instructions for the mini-games are always located at the bottom of the screen. You can skip any mini-game once the skip button in the lower right is completely red.
- Inventory items will be added to your tray at the bottom of the screen after completing Hidden Object Scenes. You can also pick up an inventory item in a regular scene whenever you see a Hand Icon appear.
- Some items will automatically combine in your inventory once 2 corresponding pieces have been picked up.
- The Magnifying Glass Icon allows you to take a closer look at an area.
Chapter 1: Aunt Rosie’s Diary
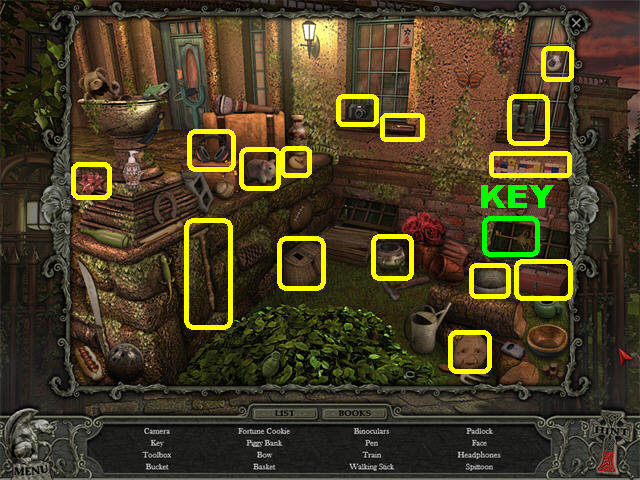
- Play the Hidden Object Scene by the bushes on the right.
- The KEY will be added to inventory.
- Zoom into the door and unlock it with the KEY to enter the Foyer.
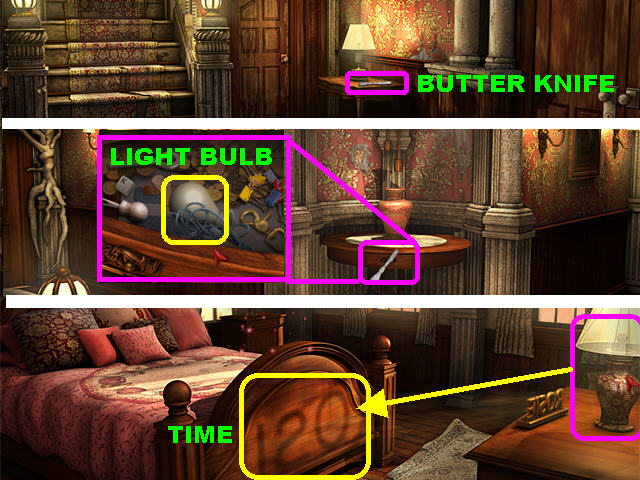
- Pick up the BUTTER KNIFE on the small table.
- Go up the steps.
- Pry open the drawer in the lower center with the BUTTER KNIFE; pick up the LIGHT BULB.
- Go right.
- Place the LIGHT BULB on the lamp on the right, the numbers “120” are reflected at the foot of the bed.
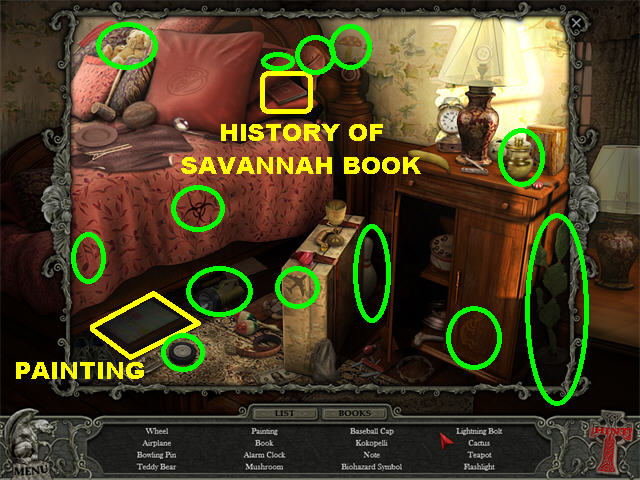
- Play the Hidden Object Scene by the bed.
- Pick up the HISTORY OF SAVANNAH BOOK on the bed.
- The PAINTING will be added to inventory.
- Click down.
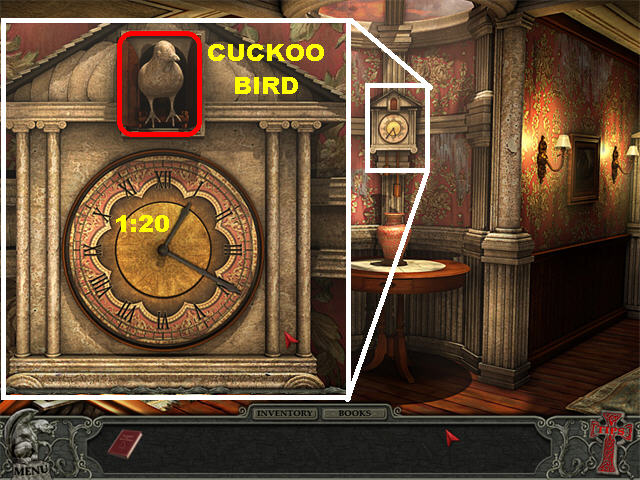
- Zoom into the clock and change the time to “1:20.”
- Pick up the CUCKOO BIRD that appears after the puzzle has been solved.
- Go downstairs.
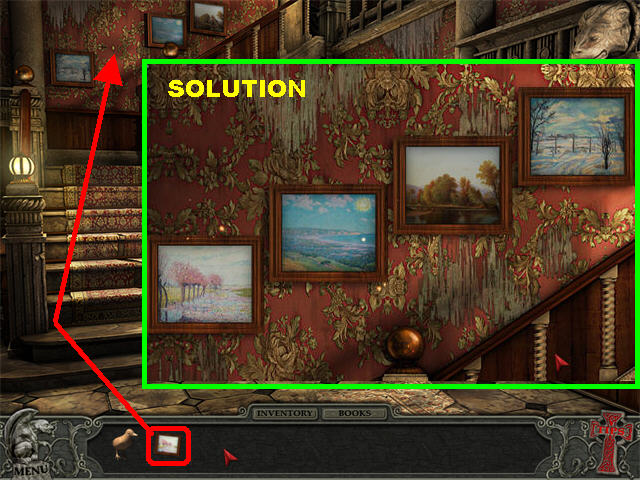
- Place the PAINTING in the upper left side of the back wall.
- Click on any 2 pictures to swap their positions. The clues to solving this puzzle can be found in the HISTORY OF SAVANNAH BOOK.
- Arrange the pictures as shown in the screenshot.
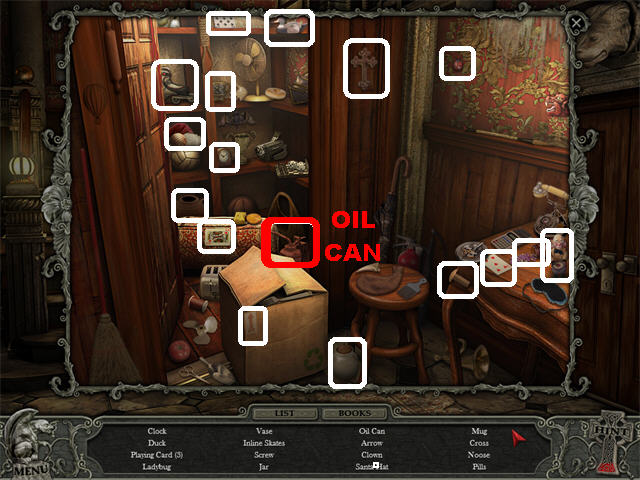
- The door below the steps has been unlocked; click on it to play a Hidden Object Scene.
- The OIL CAN has been added to inventory.
- Go upstairs and turn left.
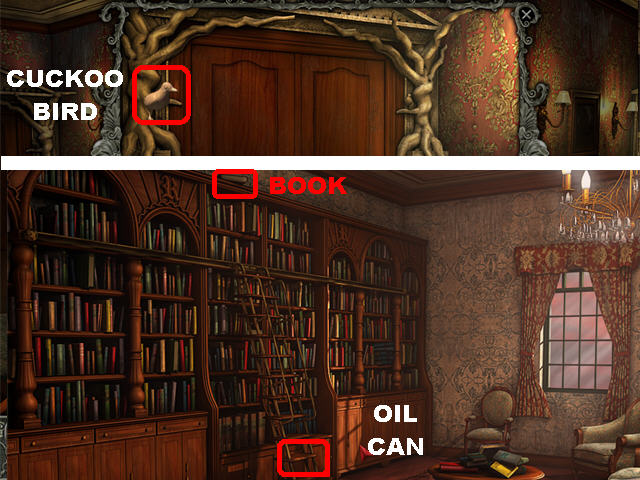
- Place the CUCKOO BIRD on the upper left side of the door to unlock it and access the Library.
- Place the OIL CAN on the ladder to eliminate the rust from the wheels and automatically move it to the right.
- Click on the book above the ladder to trigger a puzzle.
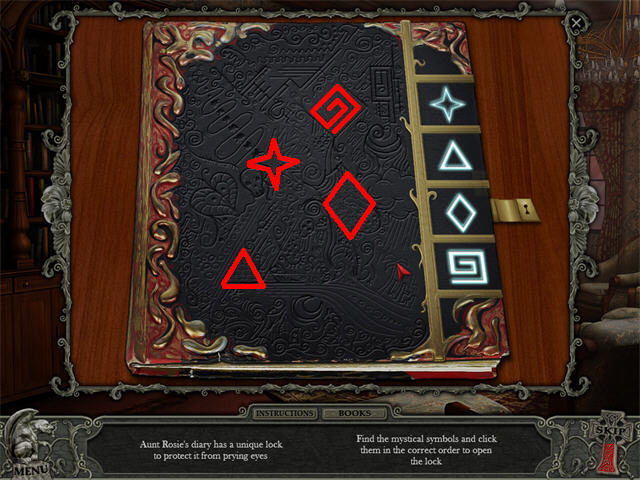
- Find the flashing symbols on the book cover; click on them in the sequence shown in your game. The order is random.
- Read the diary and “X” out of it after you finish.
- AUNT ROSIE’S DIARY will be entered into the Book Tray after the puzzle has been solved.
Chapter 2: Miss Pennywell’s Shop
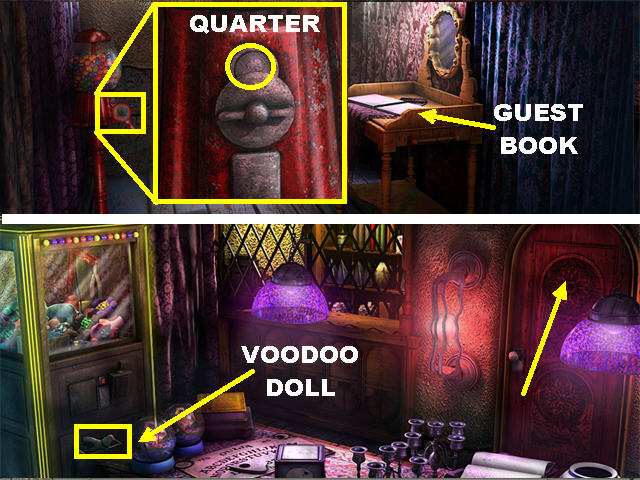
- Zoom into the gumball machine on the left and pick up the QUARTER in the slot.
- Look at the guest book on the right; the stamp is missing from the pad.
- Go through the door.
- Place the QUARTER in the crane machine on the left to activate it.
- Pick up the VOODOO DOLL at the bottom compartment of the machine.
- Go through the door on the right.
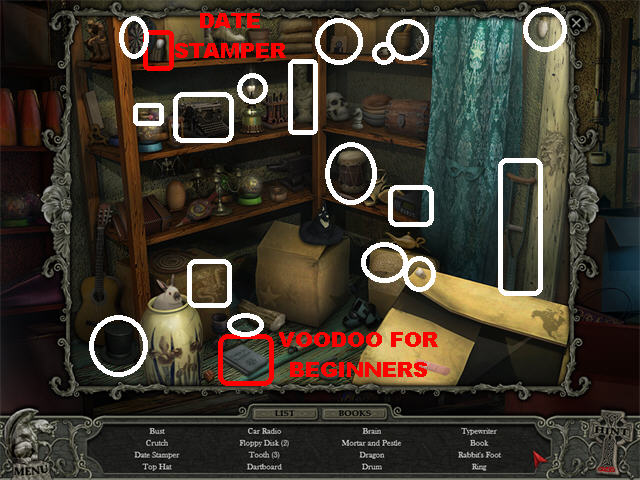
- Play the Hidden Object Scene by the shelves.
- Pick up the VOODOO FOR BEGINNERS BOOK on the left side of the ground.
- The DATE STAMPER will be added to inventory.
- Click down twice.
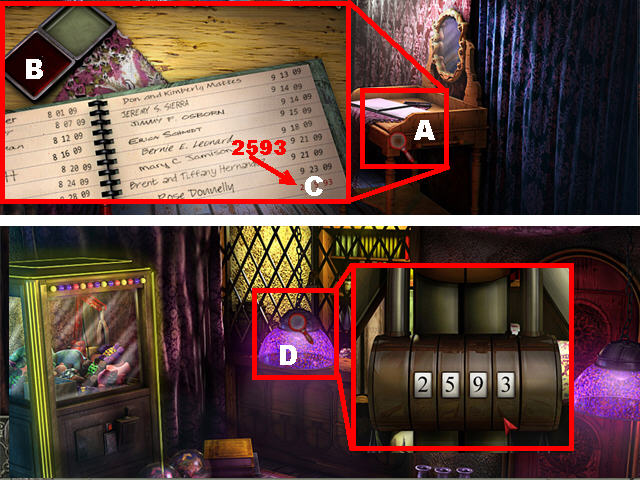
- Zoom into the guest book (A) on the right; place the DATE STAMPER on the pad (B).
- Place the INKED STAMPER on the right side of the book (C) and the numbers: “2 – 5 – 93” will appear in red.
- Exit the pop-up window and go through the door.
- Zoom into the light fixture (D) in the upper center and enter the numbers:”2593.”
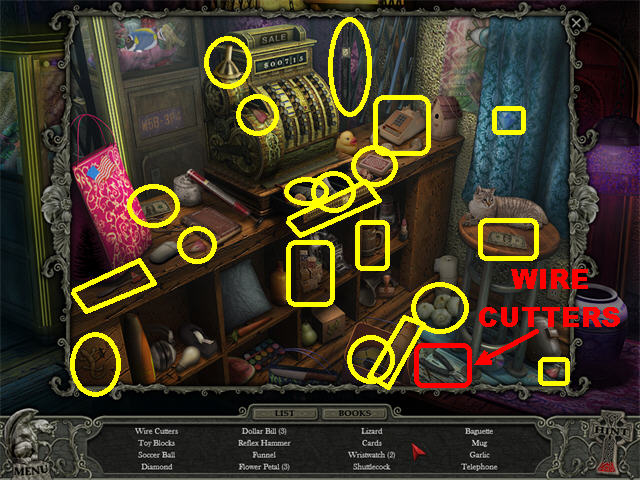
- Click on the Hidden Object Scene by the cash register to obtain the WIRE CUTTERS.
- Go through the right door.
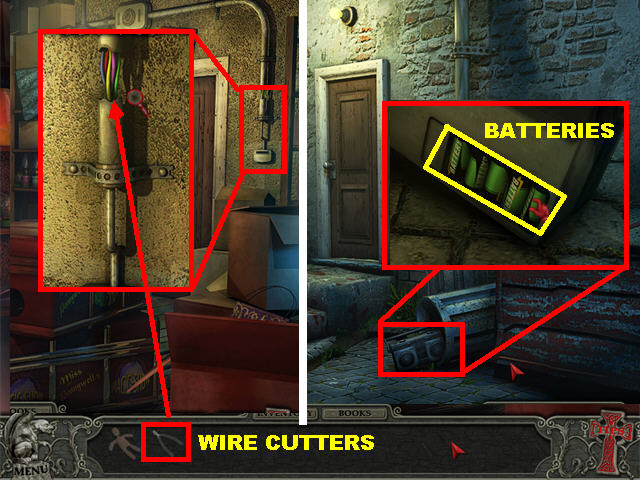
- Zoom into the alarm system in the upper right; cut the wires with the WIRE CUTTERS.
- Go through the door to access the Alley.
- Zoom into the boom box on the ground; click on the cover to open it and pick up the BATTERIES.
- Go back inside.
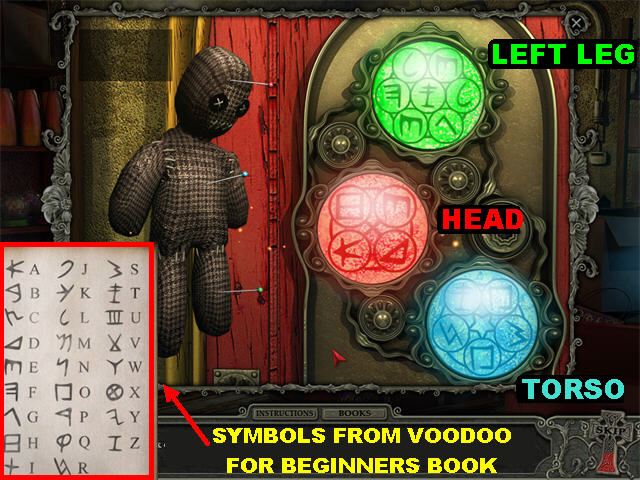
- Click on the left door to automatically use your VOODOO DOLL.
- Your goal is to stick the pins in the correct spots on the doll. Decipher the symbols on the right using your VOODOO DOLL FOR BEGINNERS BOOK.
- Once you decipher the code you will know that Green corresponds to the Left Leg, Red corresponds to the Head, and Blue corresponds to the Torso.
- Please look at the screenshot for the solution.
- You will automatically enter the next room as soon as the puzzle is solved.
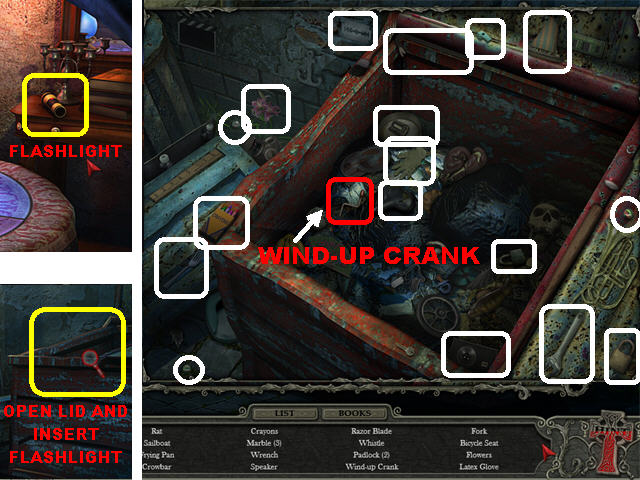
- Place the BATTERIES in the FLASHLIGHT on the right to enter it into inventory.
- Click down and go to the right door to return to the Alley.
- Open the left side of the dumpster lid.
- Place the FLASHLIGHT in the dumpster to trigger a Hidden Object Scene.
- The WIND-UP CRANK is entered into inventory.
- Exit the scene and click down.
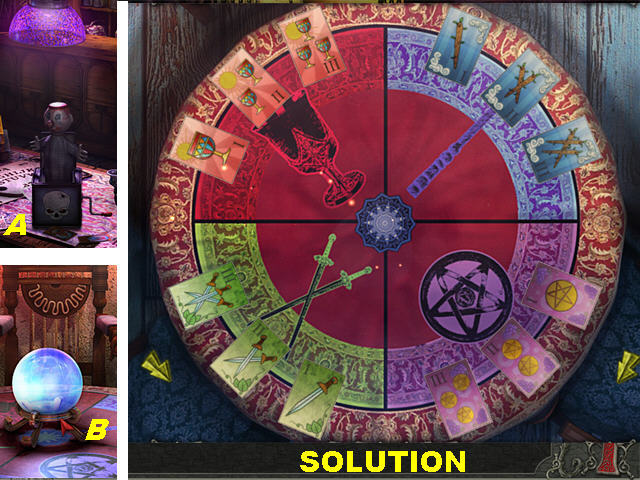
- Place the WIND-UP CRANK on the Jack-in-the-box on the table.
- Pick up the TAROT CARDS (A) that fall on the table.
- Go through the right door first; then through left door.
- Place the TAROT CARDS on the crystal ball (B) to trigger a puzzle.
- Place the tarot cards by color and numerical order.
- Click on the outside arrows to move the outer circle.
- Click on the inside arrows to place the cards on 1 of the 4 holding spots in the inner circle, or to place a card back on the outer circle.
- Use the holding spots in the center to help you move the cards to a desired spot.
- The cards must be placed in the section of the same color.
- Please look at the screenshot for the final solution. Pay attention to the order of the symbols in each section.
Chapter 3: The Church
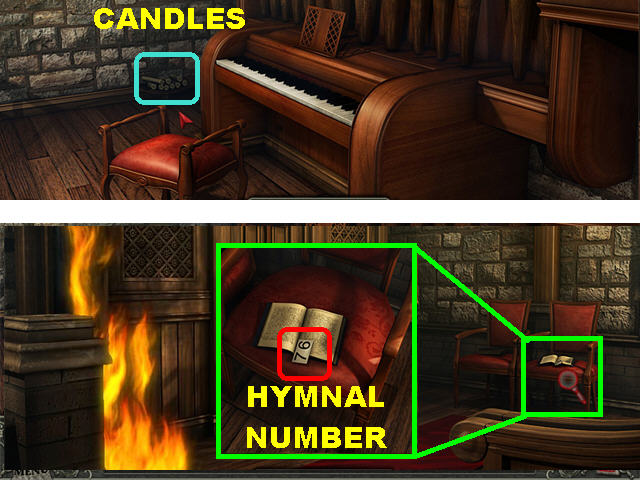
- Go through the right door and head left.
- Pick up the CANDLES on the left side of the ground.
- Click down and then head right.
- Zoom into the chair on the right; pick up the HYMNAL NUMBER on the book.
- Click down and go forward.
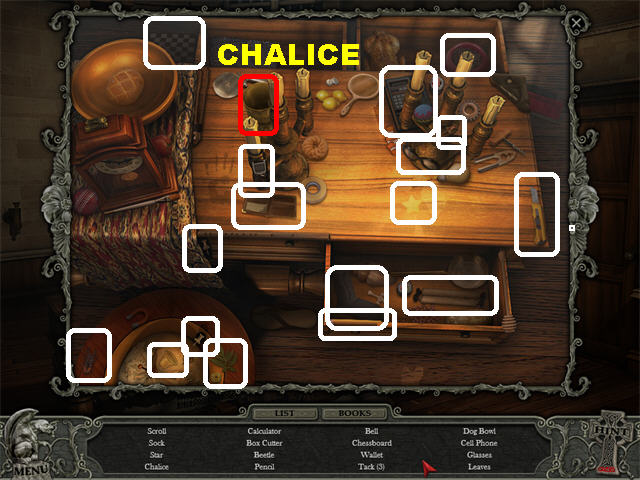
- Play the Hidden Object Scene.
- The CHALICE will be added to inventory.
- Click down twice.
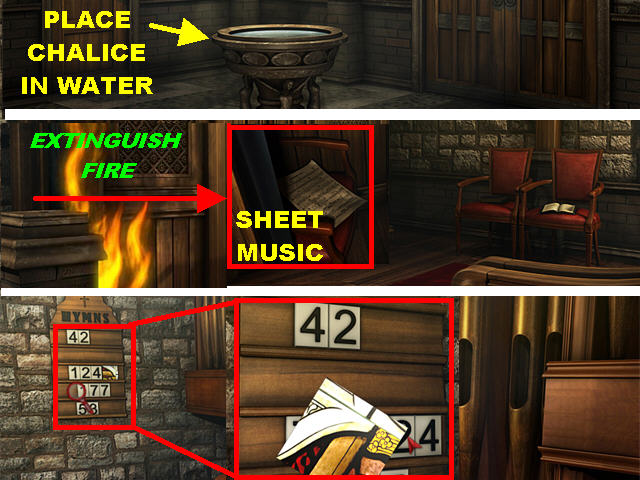
- Place the CHALICE in the fountain to obtain the CHALICE OF WATER.
- Go through the right door and turn right.
- Extinguish the fire with the CHALICE OF WATER.
- Zoom into the left side of the scene; pick up the SHEET MUSIC on the chair.
- Click down and go left.
- Zoom into the Hymnal on the left.
- Place the HYMNAL NUMBER on the Hymnal to obtain the STAINED GLASS PIECE.
- Click down twice.
- Place the STAINED GLASS PIECE on the left door to trigger a puzzle.
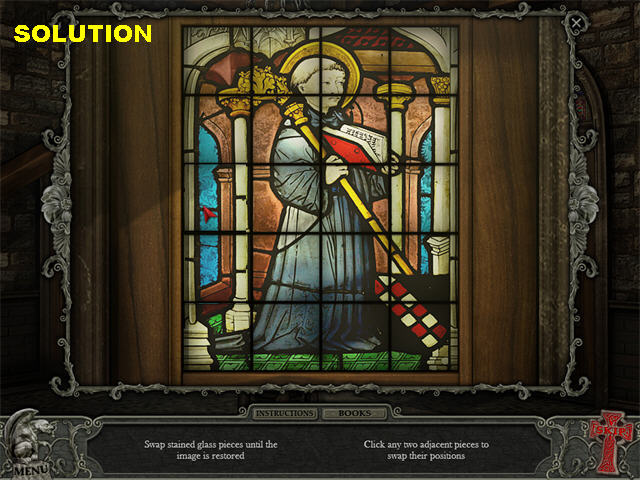
- Click on 2 adjacent pieces to swap their positions until they form the image shown on the screenshot.
- Click on the door to trigger a Hidden Object Scene after the puzzle has been solved.
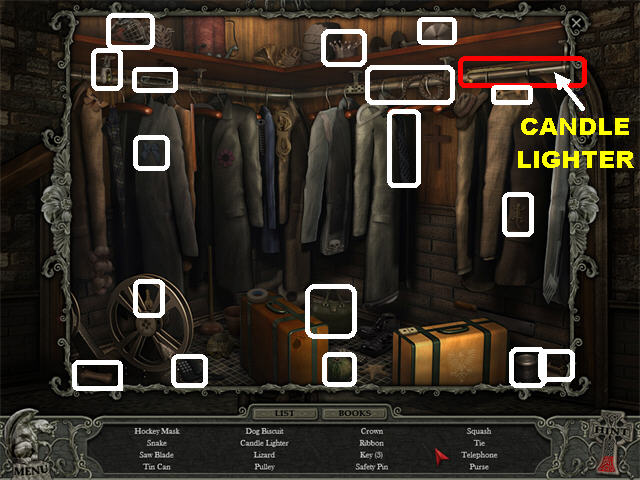
- The CANDLE LIGHTER will be added to inventory.
- Go through the right door and go forward.
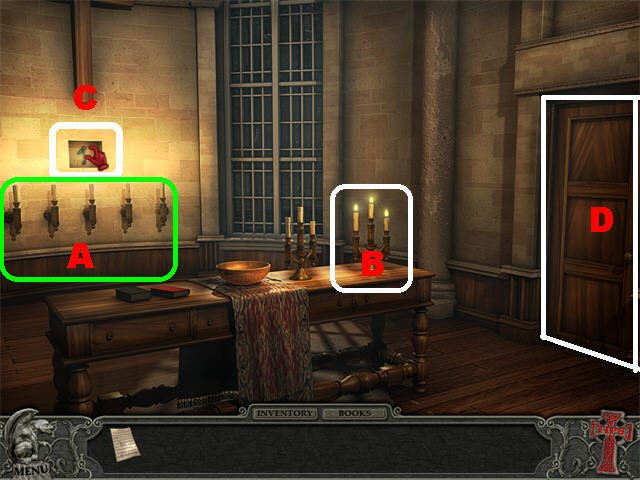
- Place the CANDLES on the candleholders (A) on the left side of the wall.
- Light the CANDLE LIGHTER with the lit candles on the candelabra (B).
- Light the Candles on the wall with the LIT CANDLE LIGHTER.
- Click on the secret compartment (D) that appears on the wall and pick up the SACRISTY KEY.
- Open the door (D) on the right with the SACRISTY KEY.
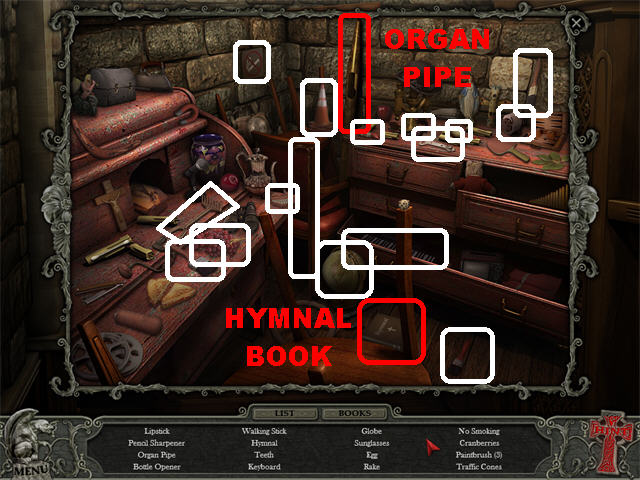
- Play the Hidden Object Scene.
- Pick up the HYMNAL BOOK on the right side of the ground.
- The ORGAN PIPE will be added to inventory.
- Click down twice and go left.
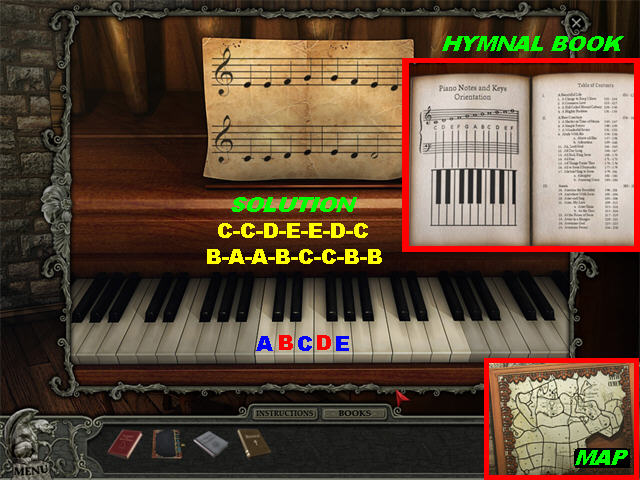
- Place the ORGAN PIPE on the empty slot on the right side of the back wall.
- Place the SHEET MUSIC above the piano.
- Click on the piano to trigger a puzzle.
- You must recreate the right song on the piano using the clues found in the HYMNAL BOOK.
- For the solution, please look at the screenshot and click on the keys in the following order:
- C-C-D-E-E-D-C.
- B-A-A-B-C-C-B-B.
- Pick up the MAP PIECE in the pipe on the right after the puzzle has been solved.
- Click down; go forward and enter the right door.
- Place the MAP PIECE on the map, on the back wall, to end the chapter.
Chapter 4: The Cemetery
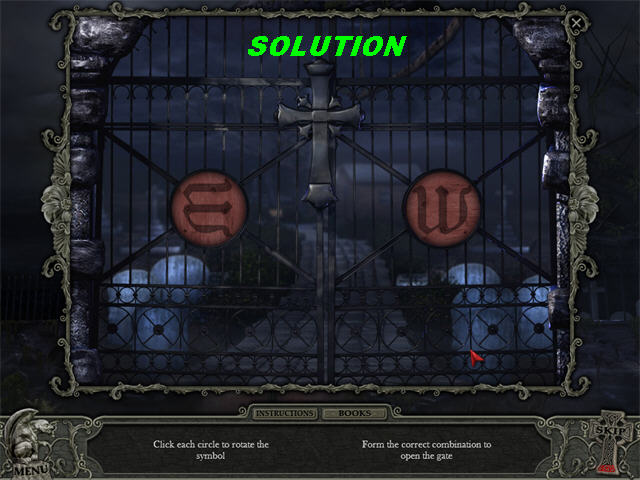
- Zoom into the gates.
- Rotate the symbols to form the correct combination.
- The one on the left should look like an “E” and the one on the right should look like a “W.” Please look at the screenshot for the solution.
- Go through the gate and turn left towards the Mausoleum.
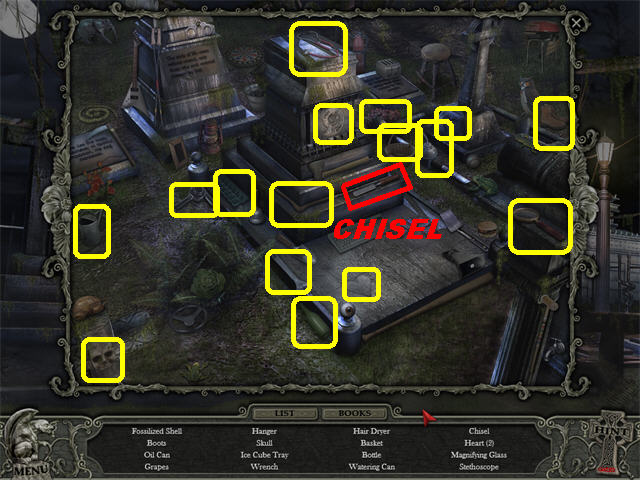
- Play the Hidden Object Scene.
- The CHISEL will be added to inventory.
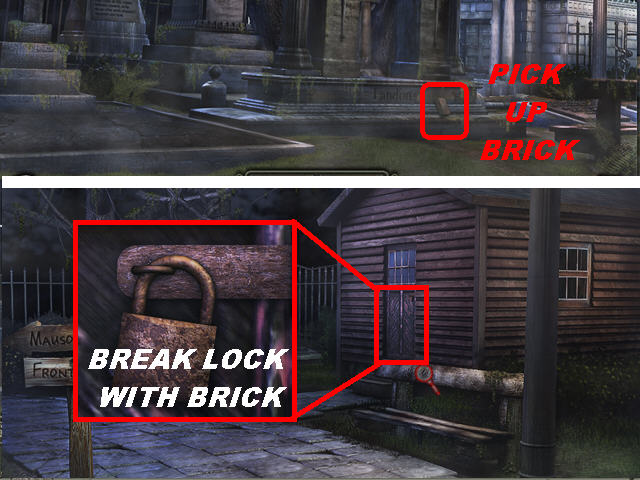
- Pick up the BRICK in the lower right corner of the arch.
- Click down.
- Zoom into the door; break the lock with the BRICK and go inside.
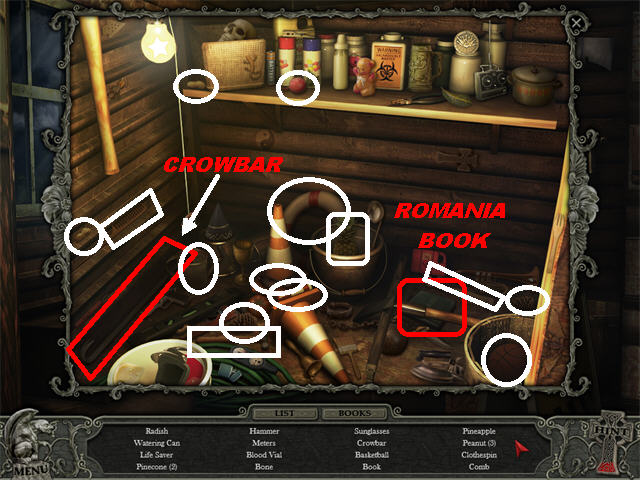
- Play the Hidden Object Scene inside.
- Pick up the ROMANIA BOOK on the right side of the ground.
- The CROWBAR will be added to inventory.
- Click down twice to return outside the gate.
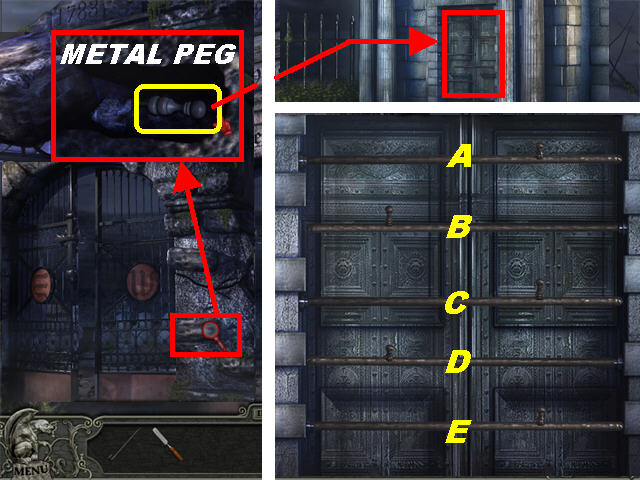
- Zoom into the loose brick on the lower right side of the gate; use the CHISEL to remove the brick and pick up the METAL PEG.
- Go through the gate; go left and click on the mausoleum on the right.
- Place the METAL PEG on the door to trigger a puzzle.
- Your goal is to slide the bars out of the way. Each bar you click affects another.
- To solve the puzzle please click on the bars in the following order:
- B - D (2x) - C (2x) - E - A (2x) - B - A.
- Go into the Mausoleum.
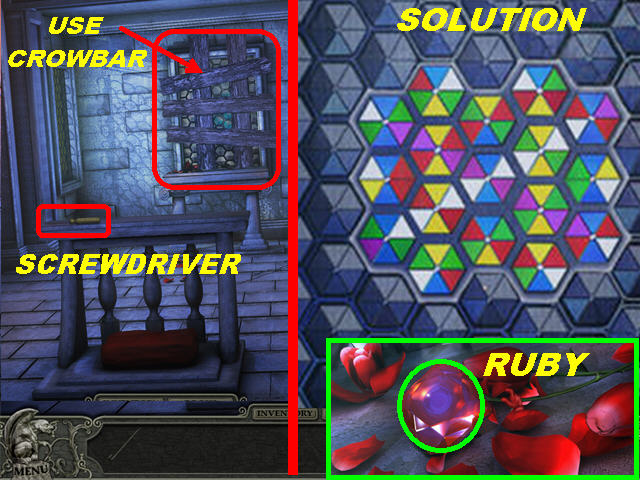
- Pick up the SCREWDRIVER on the stand.
- Remove all the boards from the back window with the CROWBAR.
- Click on the back window to trigger a puzzle.
- Rotate the hexagons until each side has a matching color.
- Please look at the screenshot for the solution.
- Pick up the RUBY at the base of the puzzle after it has been solved.
- Click down and zoom into the gate on the right.
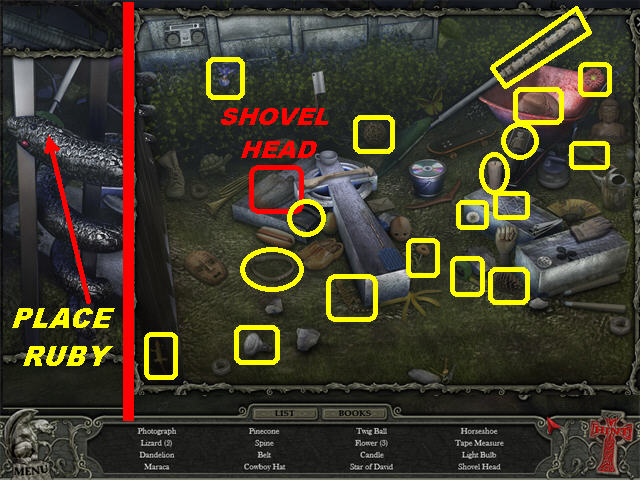
- Place the RUBY on the snake’s eye to trigger the Hidden Object Scene.
- The SHOVEL HEAD will be added to inventory.
- Click down twice and go through the door.
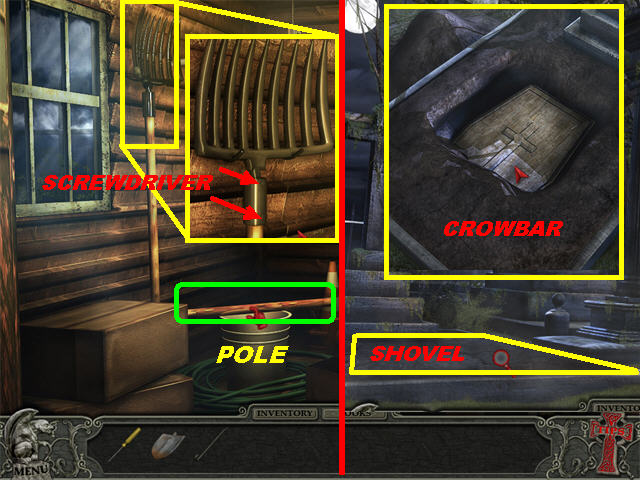
- Zoom into the pitchfork; take the 2 screws off with the SCREWDRIVER (place your cursor over each screw, not the tip of the screwdriver).
- Click on the pole that falls on the bucket and it will combine with the SHOVEL HEAD in inventory to create the SHOVEL.
- Click down and go left.
- Place the SHOVEL on the lower left side of the ground.
- Open the lid with the CROWBAR and it will be empty.
Chapter 5: The Lighthouse
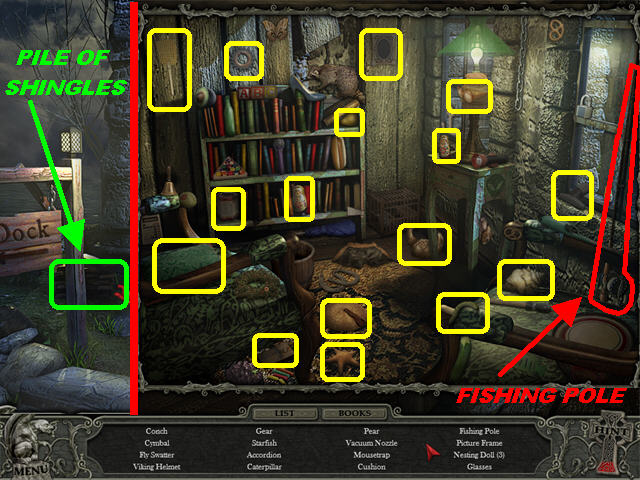
- Pick up the PILE OF SHINGLES on the lower left side.
- Go through the door.
- Play the Hidden Object Scene.
- The FISHING POLE will be added to inventory.
- Click on the left door and then click on the steps.
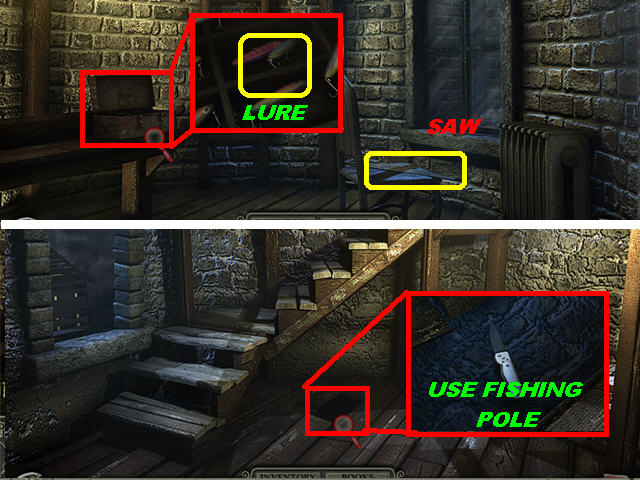
- Zoom into the tackle box in the lower left; pick up the LURE and it will automatically combine with the FISHING POLE to create a FISHING POLE WITH LURE.
- Pick up the SAW on the chair.
- Click down.
- Zoom into the crack on the floor; place the POLE WITH LURE in the hole to obtain the SWITCHBLADE.
- Click down twice and head left towards the dock.
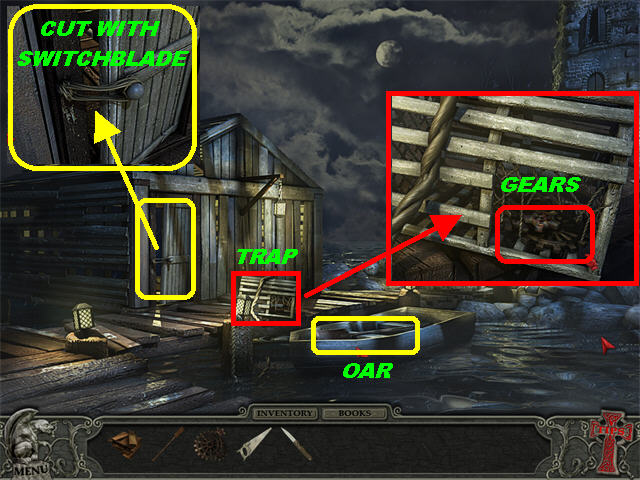
- Pick up the OAR in the boat.
- Click on the trap on the dock to open it; click on it once more to zoom into it; pick up the GEARS.
- Zoom into the door; cut the rope with the SWITCH BLADE to trigger a Hidden Object Scene.
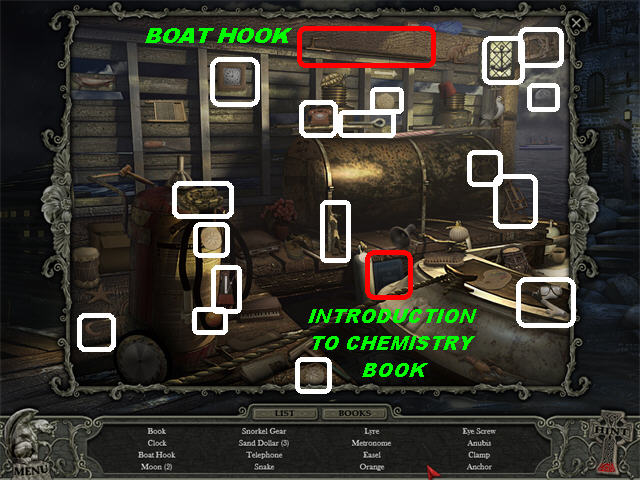
- Pick up the INTRODUCTION TO CHEMISTRY BOOK in the lower center.
- The BOAT HOOK will be added to inventory.
- Go right and enter the Lighthouse.
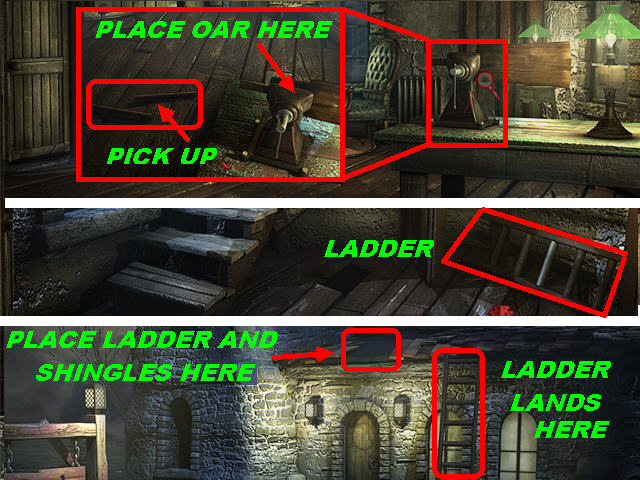
- Zoom into the workbench.
- Place the OAR on the vice grip; use the SAW to cut the oar.
- Pick up the OAR PIECES on the ground, adding them to inventory.
- Go through the door on left.
- Place the OAR PIECES on the broken ladder in the lower right to fix it; pick up the LADDER once it’s been repaired.
- Click down twice to go back outside.
- Place the LADDER on the roof (on the spot shown on the screenshot).
- Place the PILE OF SHINGLES on the roof to trigger a puzzle.
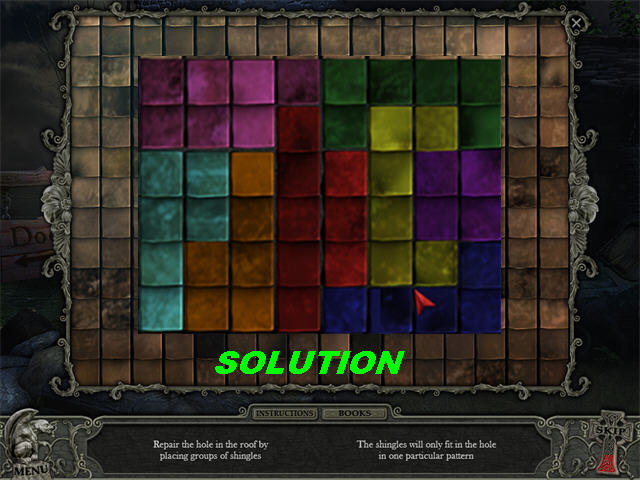
- Arrange the shingles so that all the pieces fit into the box.
- Please look at the screenshot for the solution.
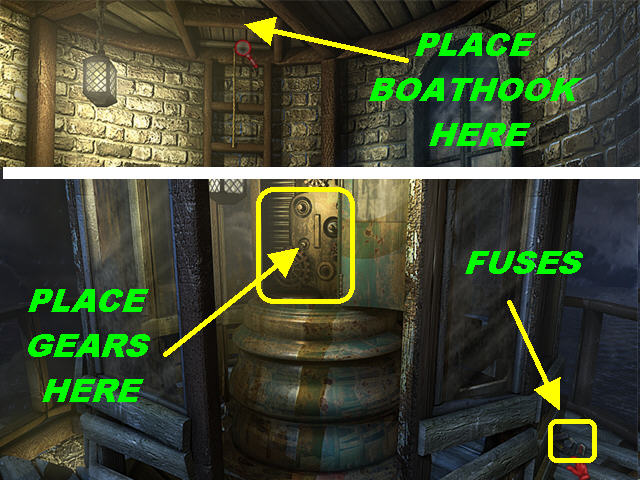
- Go through door; once inside you’ll notice the leak has stopped. Go through left door and up the steps.
- Place the BOAT HOOK on the door above the ladder.
- Go through the door to enter the lighthouse’s lantern.
- Pick up the FUSES in the lower right.
- Place the GEARS in the lantern to trigger a puzzle.
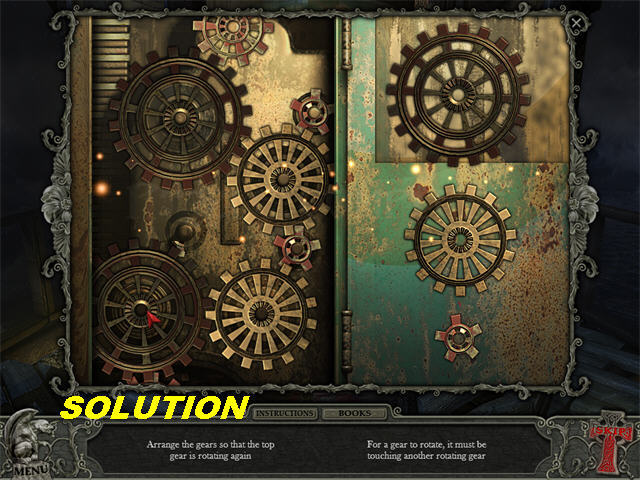
- Arrange the gears on the correct pegs.
- Grab a gear, put in place and another piece will appear on the right side of the screen.
- Please look at the screenshot for the solution.
- Click down 3 times.
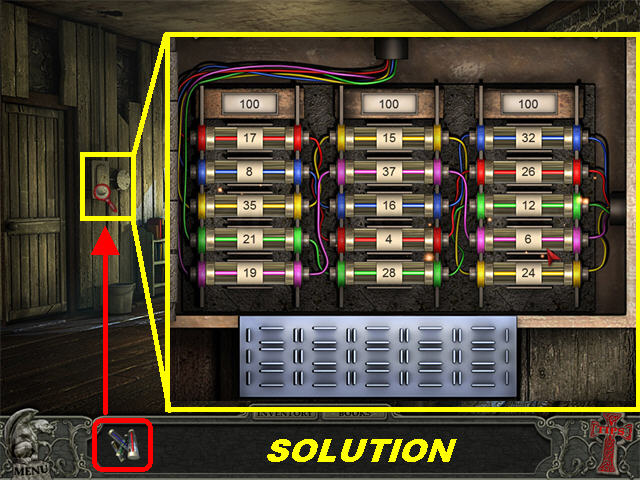
- Place the FUSES in the fuse box to trigger a puzzle.
- Arrange the fuses on the board so that each column adds up to 100.
- You can only place fuses in a matching spot of the same color.
- The total will be displayed above each column.
- The solution for the Left Column is 17-8-35-21-19.
- The solution for the Middle Column is 15-37-16-4-28.
- The solution for the Right Column is 32-26-12-6-24.
- Please look at the screenshot for the image.
- Go back up to the tower to end the chapter.
Chapter 6: The Hospital
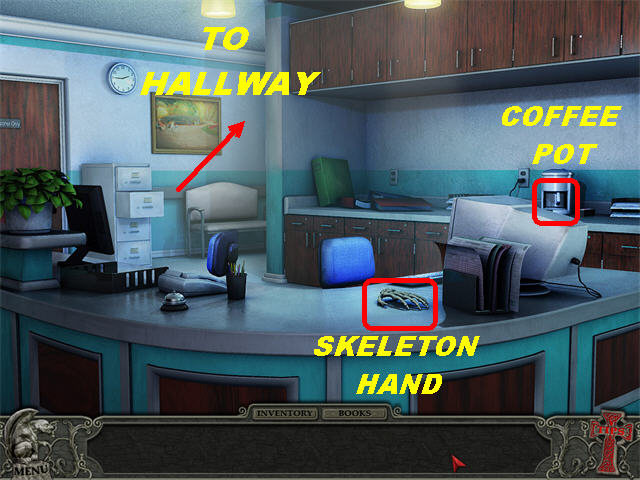
- Pick up the SKELETON HAND on the counter.
- Pick up the COFFEE POT on the right side of the back counter.
- Click by the painting on the wall to reach the hallway.
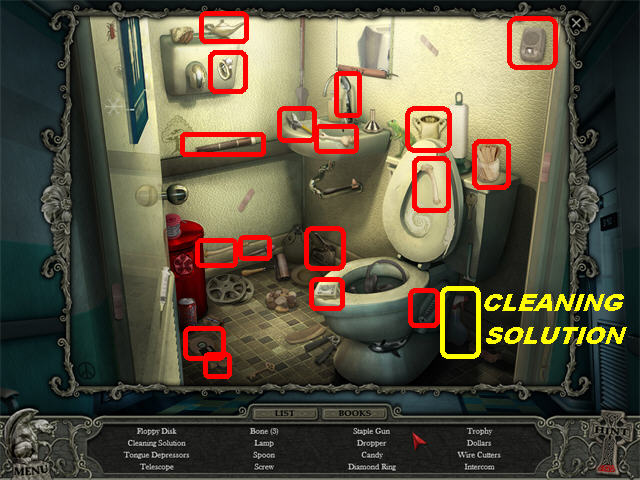
- Play the Hidden Object Scene on the left.
- The CLEANING SOLUTION will be added to inventory.
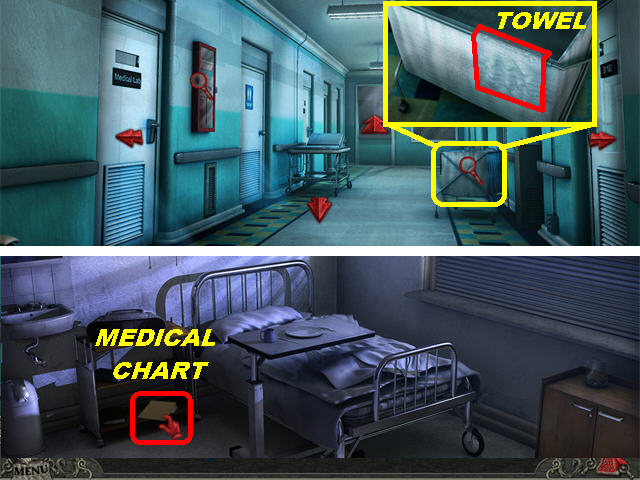
- Zoom into the hamper on the right; pick up the TOWEL.
- Click on the right door.
- Pick up the MEDICAL CHART below the rolling cabinet.
- Click down and then click on the back doors.
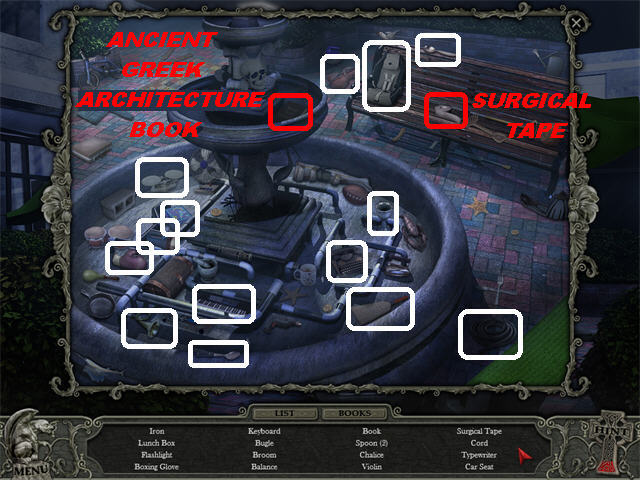
- Play the Hidden Object Scene.
- Pick up the ANCIENT GREEK ARCHITECTURE BOOK by the top of the fountain.
- The SURGICAL TAPE will be added to inventory.
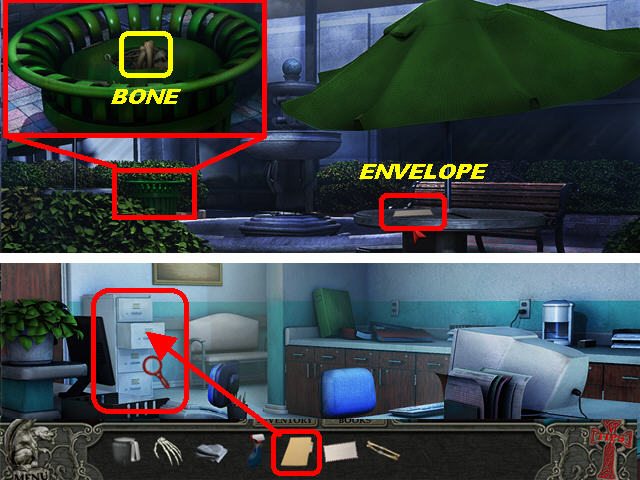
- Pick up the ENVELOPE on the right table.
- Zoom into the green trashcan; pick up the BONE.
- The BONE will automatically merge with the SURGICAL TAPE to create a TAPED BONE.
- Click down twice.
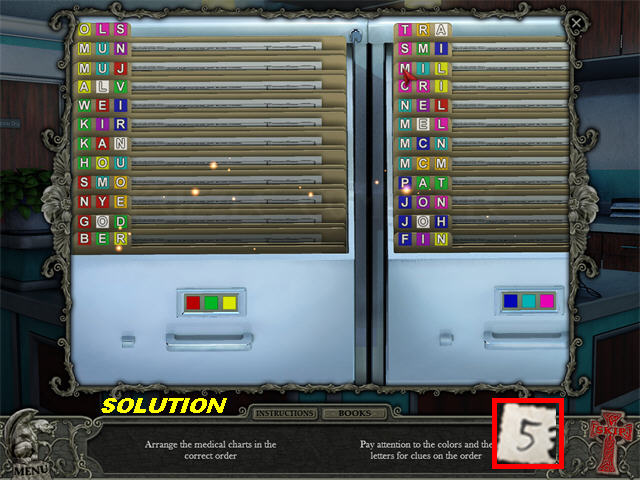
- Place the MEDICAL CHARTS on the file cabinet to trigger a puzzle.
- Arrange the medical charts in the correct order.
- Click on any 2 files to swap their locations.
- The colors at the bottom of each file show you the order in which the files should be placed in the drawers.
- Place the files in alphabetical order according to the colors in front of each drawer. Look at the drawer as if you were standing in front of it.
- Please look at the screenshot for the solution.
- The TORN PAPER (#5) will be added to inventory.
- Return to the Hallway and go into the first door on the left.
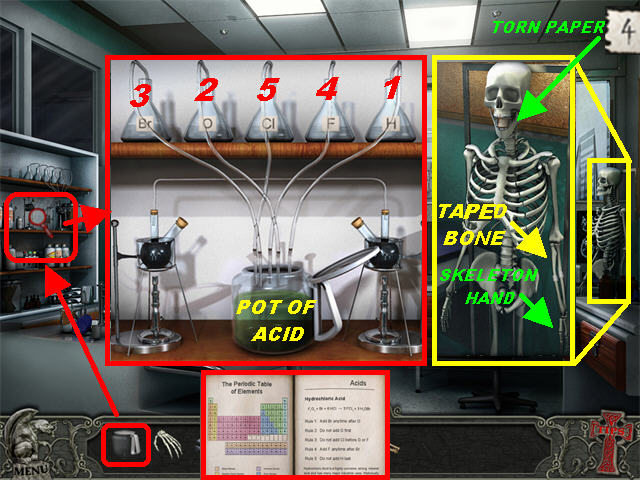
- Place the COFFEE POT on the left shelves to trigger a puzzle.
- The solution to this puzzle is contained in the “Introduction to Chemistry” book in your book section. The Rules in the book state:
- Rule 1: Add Br anytime after O.
- Rule 2: Do not add O first.
- Rule 3: Do not add CI before O or F.
- Rule 4: Add F anytime after Br.
- Rule 5: Do not add H last.
- To solve the puzzle add the chemicals in this order: H – O – BR – F – CL.
- The POT OF ACID will be added to inventory.
- Zoom into the skeleton on the right; place the TAPED BONE and the SKELETON HAND on the skeleton’s arm.
- Pick up the TORN PAPER (4) inside the skeleton’s mouth.
- Click down to exit.
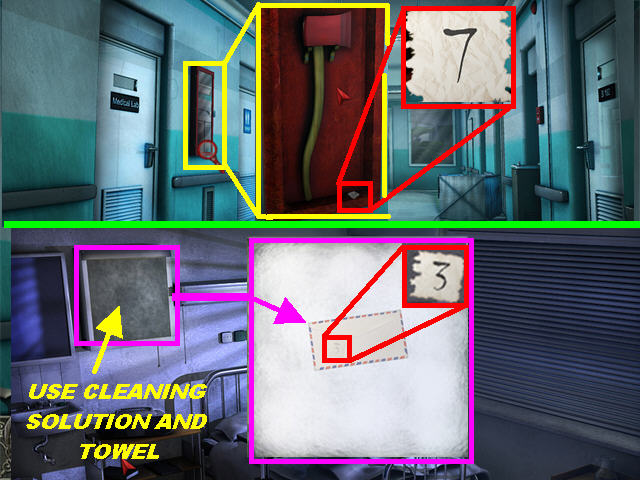
- Zoom into the GLASS CASE on the left.
- Pour the POT OF ACID onto the case; pick up the TORN PAPER (7) at the bottom of the case.
- Go into the door on the right.
- Clean the lightbox with the CLEANING SOLUTION and the TOWEL. Zoom into the lightbox.
- Place the ENVELOPE on the lightbox; click on the envelope to obtain TORN PAPER (3).
- Go back to the hallway and enter the Medical Lab through the left door.
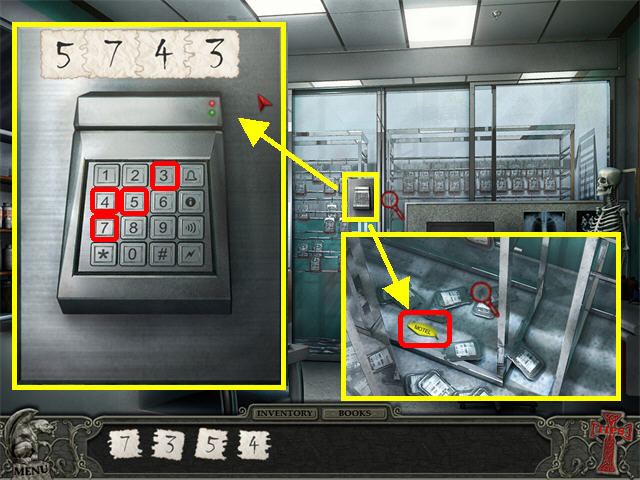
- Click on the keypad on the back wall and the 4 TORN PAPERS will be automatically used.
- Drag the TORN PAPERS together to form the numbers: 5743.
- Press the numbers 5743 onto the keypad to complete the puzzle.
- Click on the MOTEL KEY CHAIN to end the chapter.
Chapter 7: Creepy Motel
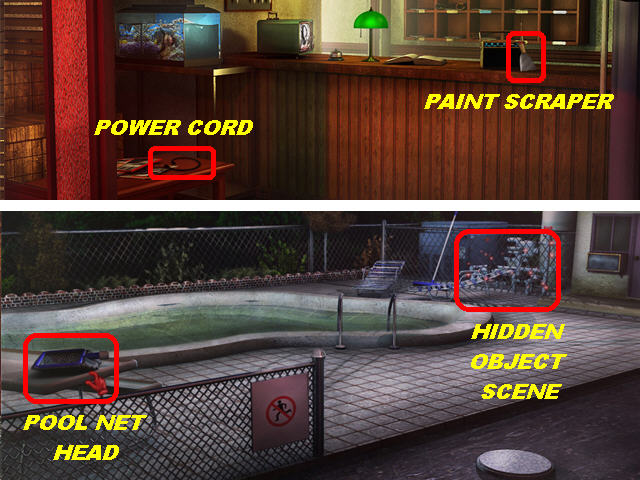
- Go into the door on the right.
- Pick up the PAINT SCRAPER on the desk, next to the radio.
- Pick up the POWER CORD in the lower left.
- Click down and go through the fence to access the pool area.
- Pick up the POOL NET HEAD on the left.
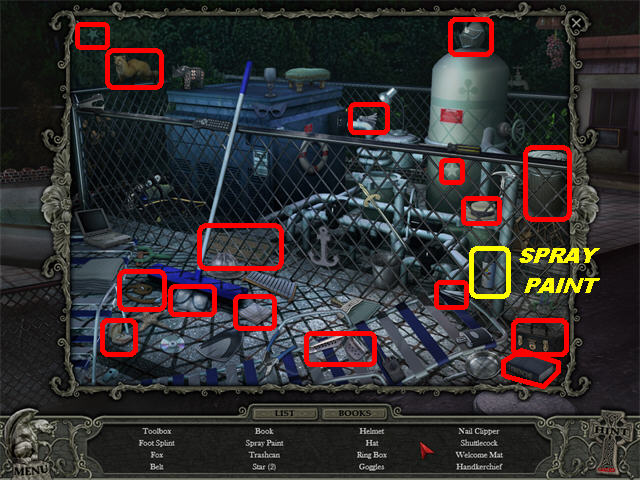
- Play the Hidden Object Scene.
- The SPRAY PAINT will be added to inventory.
- Click down and enter the motel on the right.
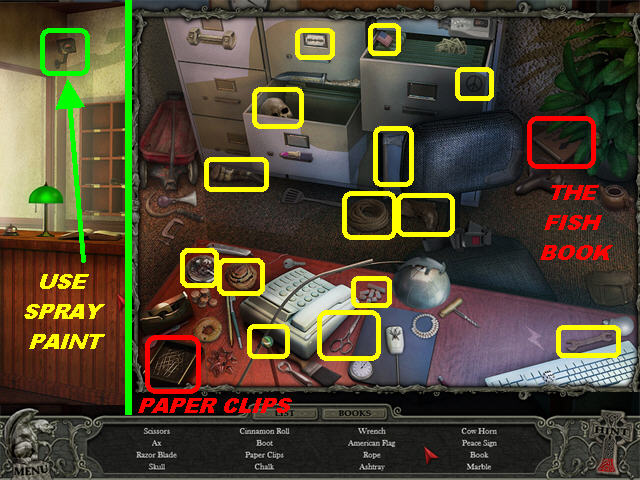
- Zoom into the security camera on the ceiling and use the SPRAY PAINT to disable the view.
- Enter the office behind the counter.
- Play the Hidden Object Scene.
- Pick up THE FISH BOOK in the upper right.
- The PAPER CLIPS will be added to inventory.
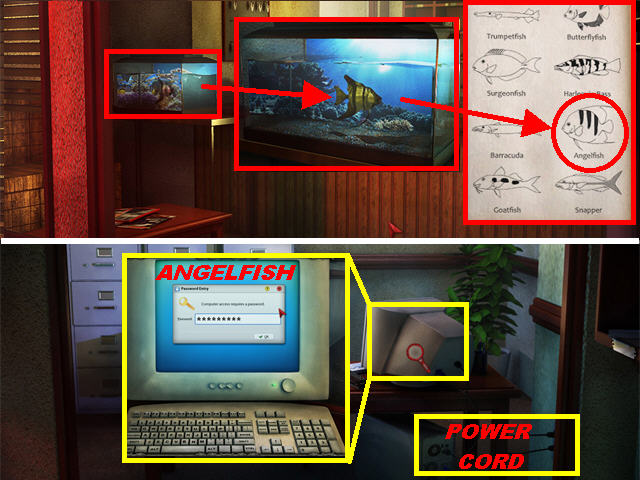
- Click down and zoom into the fish tank on the left.
- Open the FISH BOOK and look for the name of the fish that is in the fish tank (Angelfish).
- Return to the office.
- Place the POWER CORD on the computer tower below the desk.
- Zoom into the computer monitor; enter the password “ANGELFISH” on your keyboard and click “ENTER” on your keyboard as well.
- The monitor shows that someone has been staying in room 102 for a while.
- Go outside.
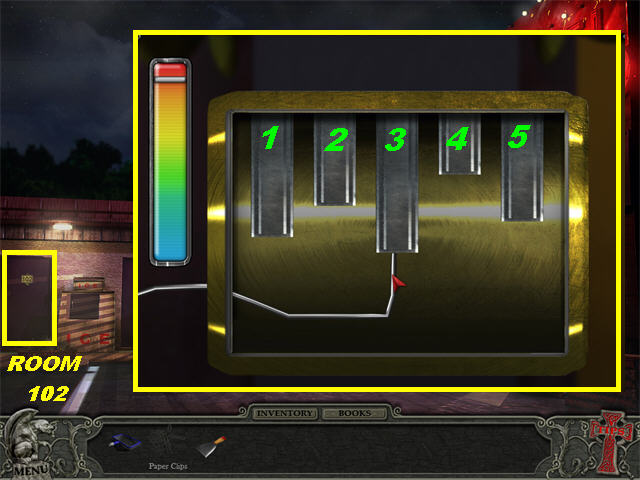
- Use the PAPERCLIPS on room 102 on the left to trigger a puzzle.
- You must click on the meter at the right time to raise the bars in place.
- Click on any of the bars to put the paper clip below it and start the meter.
- The color of the meter represents how much pressure will be applied. The higher you get (closer to red) the more pressure it will apply.
- For the longer bars you have to repeat the process more than once, experimenting with different colors.
- To reset the puzzle, exit out of it. To solve the puzzle, click on the bars in the following areas.
- Bar 1 = Red and Low Yellow.
- Bar 2 = Low Yellow 2 Times.
- Bar 3 = Red, High Green, and Low Blue.
- Bar 4 = Yellow and Low Blue.
- Bar 5 = Red and Green.
- You will enter the room automatically as soon as the puzzle is solved.
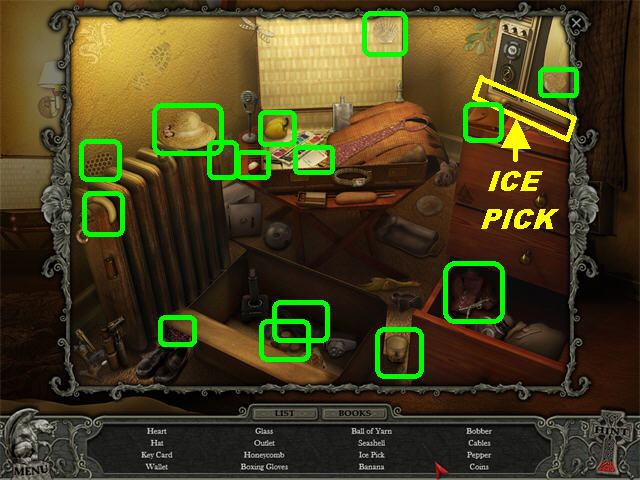
- Play the Hidden Object Scene on left.
- The ICE PICK will be added to inventory.
- Go into the bathroom.
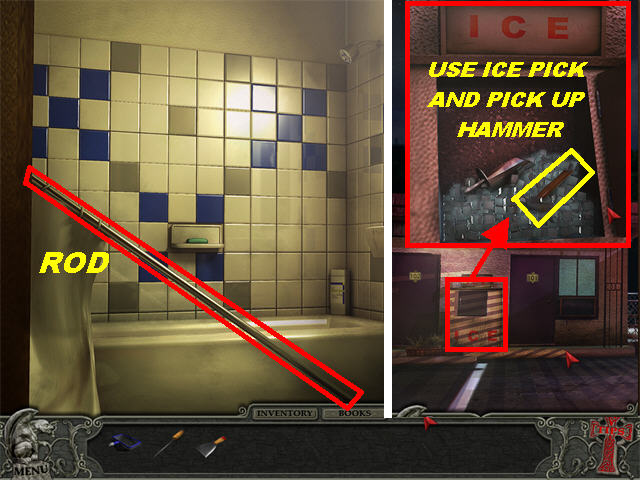
- Pick up the CURTAIN ROD and it will combine with the POOL NET HEAD to form a POOL NET.
- Go outside.
- Zoom into the ice machine; use the ICE PICK on the cover and pick up the HAMMER inside.
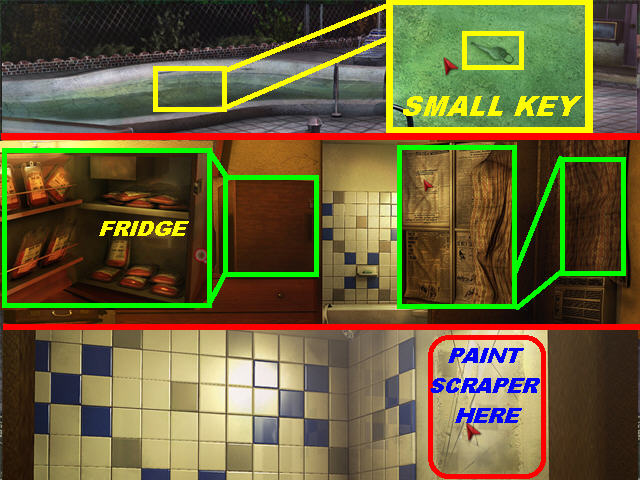
- Return to the pool area; zoom into the pool.
- Pick up the SMALL KEY using the POOL NET.
- Return to room 102.
- Zoom into the curtains on the right.
- Remove the nails from the curtains with the HAMMER to find newspaper clippings on the wall.
- Zoom into the fridge on the left; open the fridge with the SMALL KEY and you will find blood from the hospital inside.
- Return to the bathroom.
- Use the PAINT SCRAPER on the upper right side of the wall to remove the wallpaper.
Chapter 8: Aunt Rosie’s House Revisited
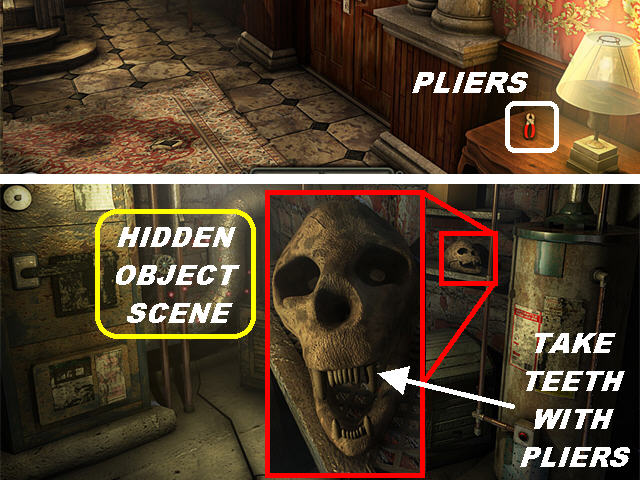
- Pick up the PLIERS in the lower right.
- Click down and enter the basement through the doors in the ground.
- Zoom into the skull on the right; take its TEETH with the PLIERS.
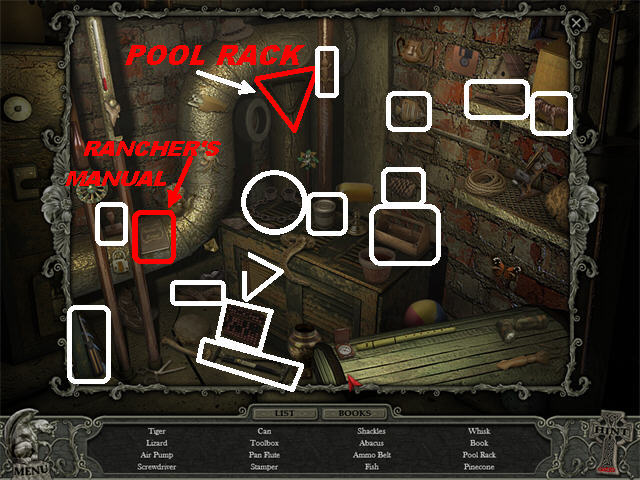
- Play the Hidden Object Scene.
- Pick up the RANCHER’S MANUAL BOOK on the left.
- The POOL RACK will be added to inventory.
- Return to the foyer area.
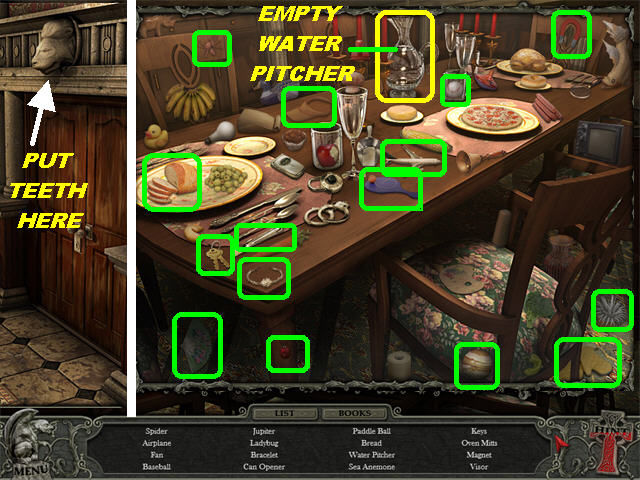
- Zoom into the lion head above the right door; place the TEETH on the head to unlock the door below it.
- Go through the door.
- Play the Hidden Object Scene.
- The EMPTY WATER PITCHER will be added to inventory.
- Go through the door in the back to reach the pool room.
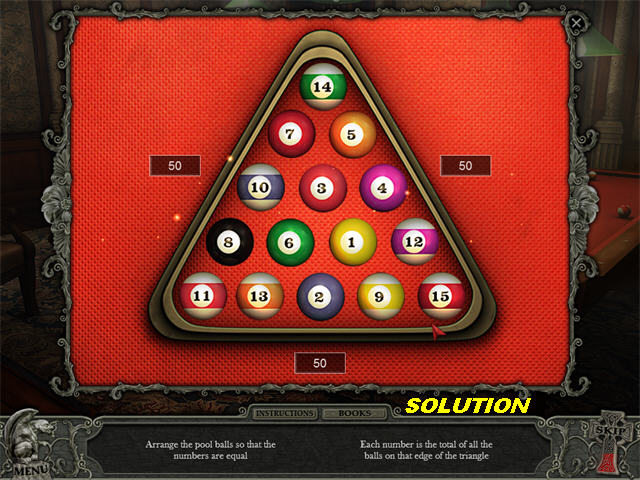
- Place the POOL RACK on the pool table to trigger a mini-game.
- Click on any pool balls to switch their places.
- You must arrange the balls so that all the numbers are equal to 50 on each side of the rack. The 3 balls in the middle do not count toward your total.
- The numbers on each corner will count toward the totals of the sides they touch. In the example shown in the screenshot, the number 14 counts towards the left and right side totals.
- The solution for the Left Side is 14-7-10-8-11.
- The solution for the Right Side: 14-5-4-12-15.
- The solution for the Bottom is: 11-13-2-9-15.
- Please look at the screenshot for the final image.
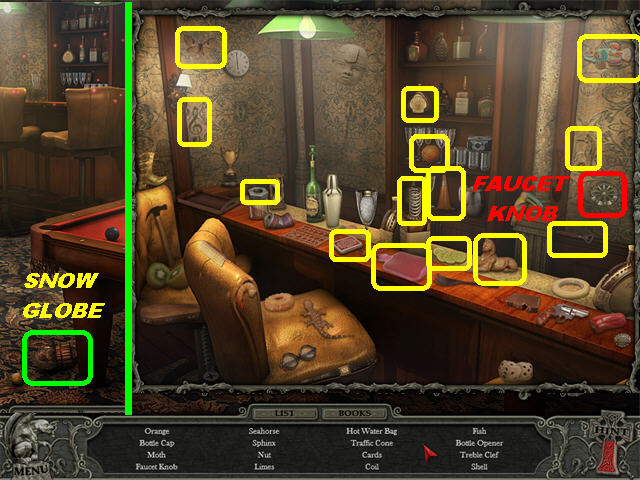
- Pick up the POOL CUE on the back wall after the puzzle has been solved.
- Place the POOL CUE back on the pool table and something will fall on the ground; pick up the SNOWGLOBE on the ground.
- Play the Hidden Object Scene in the back.
- The FAUCET KNOB will be added to inventory.
- Return outside.
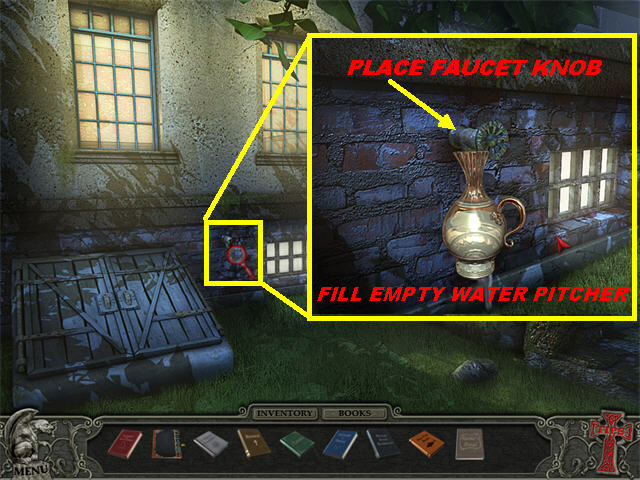
- Zoom into the faucet on the wall; place the FAUCET KNOB on the faucet to make the water run.
- Place the EMPTY WATER PITCHER on the water to fill it and create the WATER PITCHER.
- Return to the dining room.
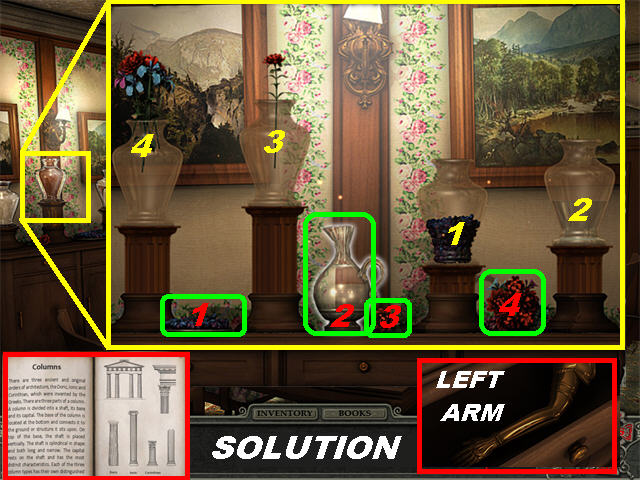
- Place the WATER PITCHER on the left, next to the other pitchers to trigger a puzzle.
- To solve the puzzle you must open the ANCIENT GREEK ARCHITECTURE BOOK to view the heights needed for each vase.
- Pick up the items marked in green and place them in the vases to change their height.
- Place the items in each pitcher, as shown in the screenshot, to solve the puzzle.
- Zoom into the drawer below the pitchers; pick up the LEFT ARM.
- Exit and go up the steps to the library.
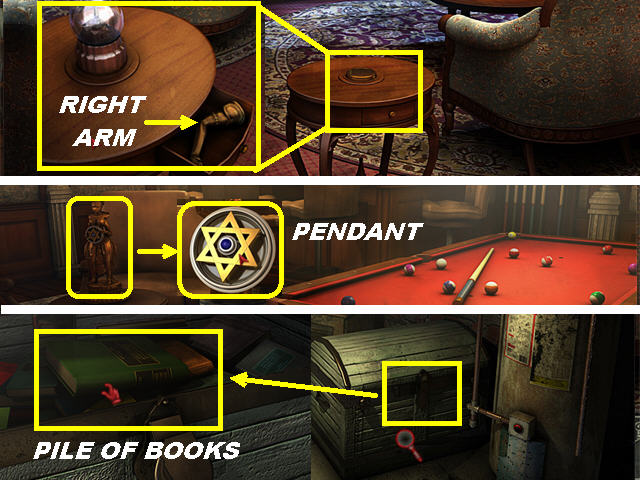
- Zoom into the small round table and place the SNOWGLOBE on the pedestal.
- Pick up the RIGHT ARM that appears in the drawer below the table.
- Return to the pool room.
- Zoom into the statue on the left; place the LEFT ARM and RIGHT ARM on the statue to obtain the PENDANT.
- Return to the basement.
- Zoom into the chest; place the PENDANT on the latch. Pick up the PILE OF BOOKS inside the chest.
- Return to the library.
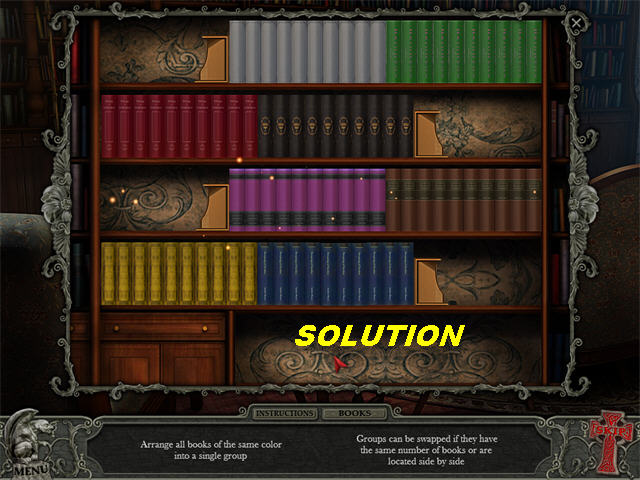
- Place the PILE OF BOOKS on the bookcase in the back to trigger a puzzle.
- You must place all the books of the same color into the same group.
- Click on 2 books, or 2 sets of books, to swap their locations.
- You can swap the spots of any set of books that have equal numbers. In other words, you can swap a double set of books for another double set of books anywhere on the bookcase.
- You can only swap books that are not of the same number if they are next to each other. Slide them through the same shelf to move them.
- There are many different solutions for this puzzle. Please look at the screenshot for our solution.
- Zoom into the niche on the back wall to view the map and end the chapter.
Chapter 9: The Swamp
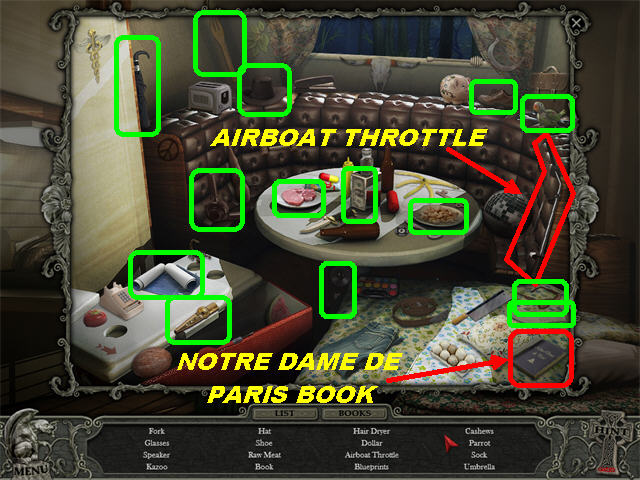
- Go into the trailer and play the Hidden Object Scene.
- Pick up the NOTRE DAME DE PARIS BOOK in the lower right.
- The AIRBOAT THROTTLE will be added to inventory.
- Exit the trailer and go forward.
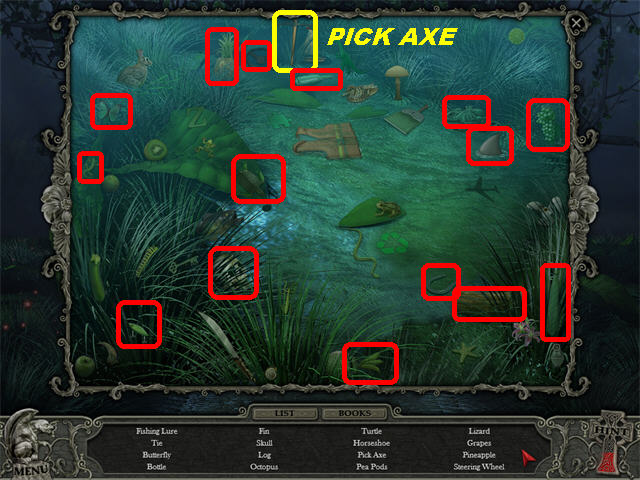
- Play the Hidden Object Scene on the left.
- The PICK AXE will be added to inventory.
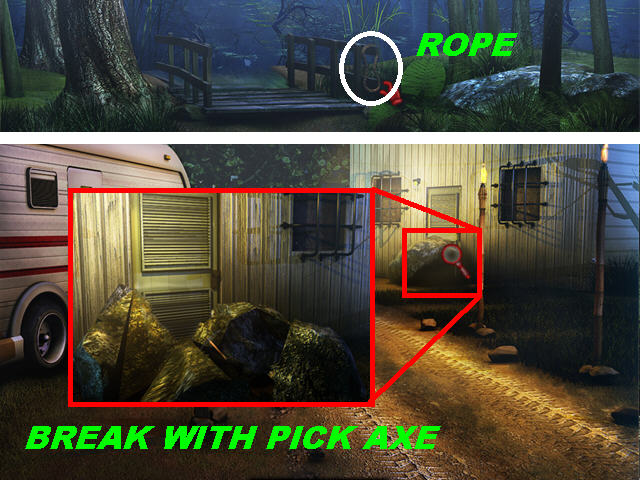
- Go left towards the bridge.
- Pick up the ROPE next to the bridge.
- Click down twice.
- Zoom into the large boulder blocking the door on the right; use the PICK AXE on the boulder 2 times to break it.
- Go through the door.
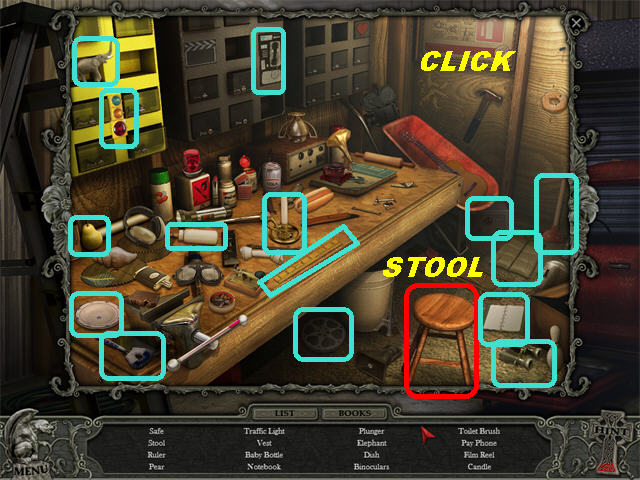
- Play the Hidden Object Scene on left.
- The STOOL will be added to inventory.
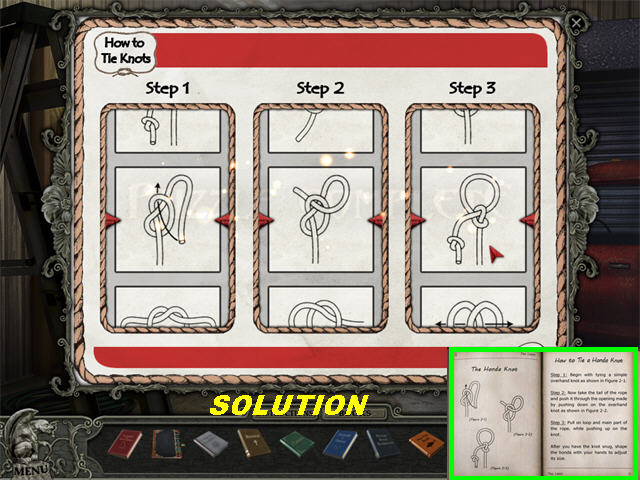
- Click on the board in the back to trigger a puzzle.
- You must select the diagrams that correctly show you how to tie a lasso. Open the RANCHER’S MANUAL to view the steps necessary for making a lasso.
- Click on each slot once the correct image is shown through the center of the window.
- If you choose incorrectly, the puzzle will reset.
- Please look at the screenshot for the solution.
- The LASSO will be entered into inventory.
- Exit, go forward, and right to the dock.
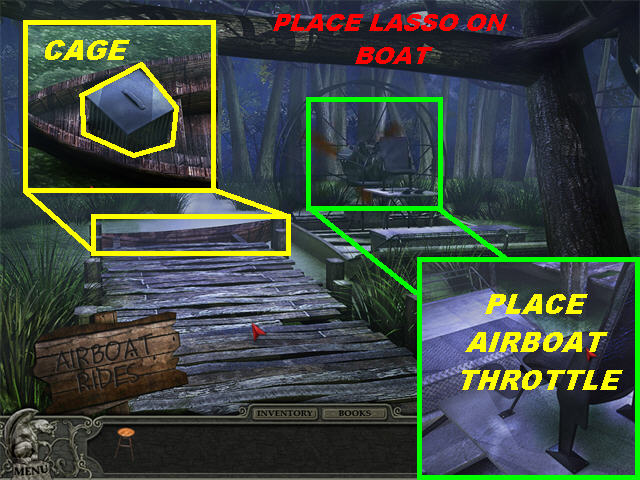
- Zoom into the airboat on the right; place the AIRBOAT THROTTLE on the lower left side of the ground.
- Use the LASSO on the boat to bring it closer.
- Zoom into the boat and pick up the CAGE.
- Return to the trailer interior.
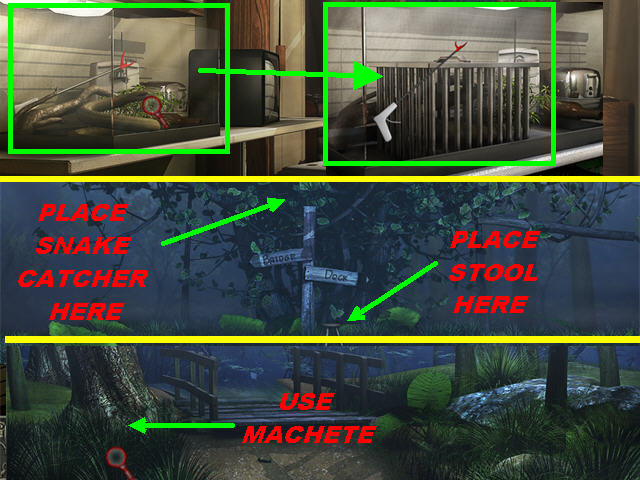
- Zoom into the tank; use the CAGE in the tank to contain the snake and the SNAKE CATCHER will be added to inventory.
- Exit and go forward.
- Place the STOOL by the signs in the back to zoom in; use the SNAKE CATCHER above the sign to obtain the MACHETE.
- Go left.
- Cut the bush on the left with the MACHETE.
- Go left to enter a maze.
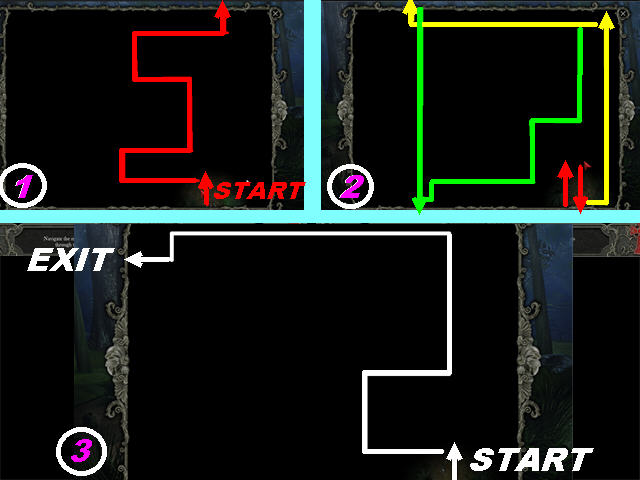
- You will have to travel several paths to exit the maze. Click on the path in the direction you want to head.
- Please look at the screenshot and follow the next set of directions to complete the maze. If you need to reset the puzzle (to follow these directions) exit out of it.
- Follow the pattern in Diagram 1, starting in the lower right corner. Once you reach the top right side, go all the way up and the maze will drop back down to the lower right corner.
- Follow the pattern in Diagram 2; the red arrow represents the starting point. Go up then go back down to be taken back up to the top right corner (first yellow arrow).
- Follow the direction of the yellow arrow, which takes you left and leads you to the upper left side; click up where you see the tip of the second yellow arrow.
- The green arrow represents the path that occurs when you clicked up on the second yellow arrow, which takes you back down to the lower left. Follow the green line to the top right side and once again you will fall to the lower right corner.
- For the last part of the solution, follow Diagram 3 (white pattern) to the upper left side of the screen. Exit on the left to escape the maze.
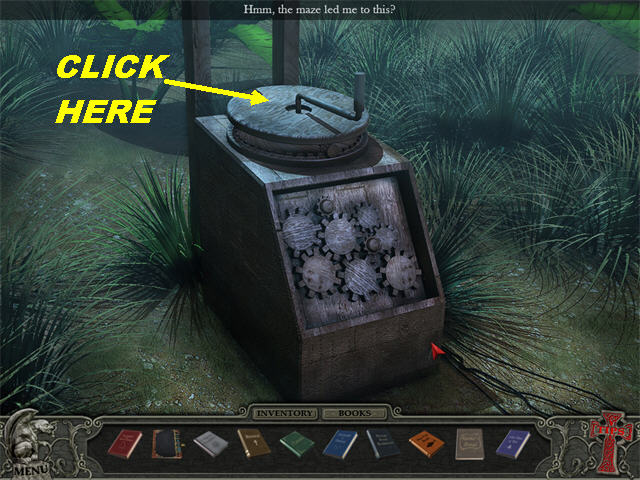
- Click on the crank of the device that appears after the puzzle has been solved to raise the bridge out of the water.
- Exit to return to the bridge. Click on the bridge to view a cut scene.
Chapter 10: The Dungeon
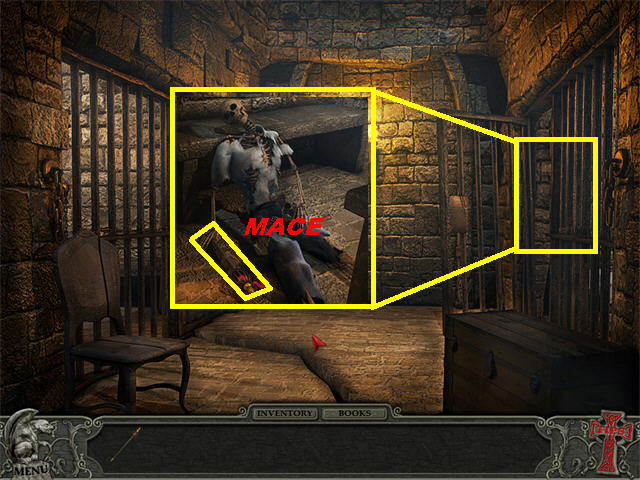
- Zoom into the right cell; pick up the MACE.
- Exit and enter the leftmost door.
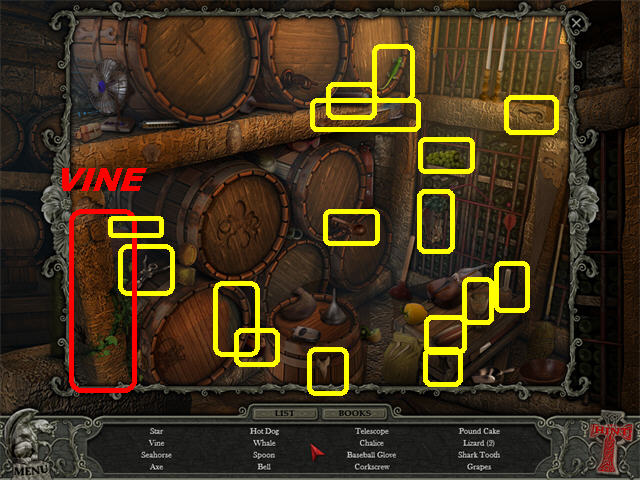
- Play the Hidden Object Scene.
- The VINE will be added to inventory.
- Exit and zoom into the chains on the back wall to trigger a mini-game.
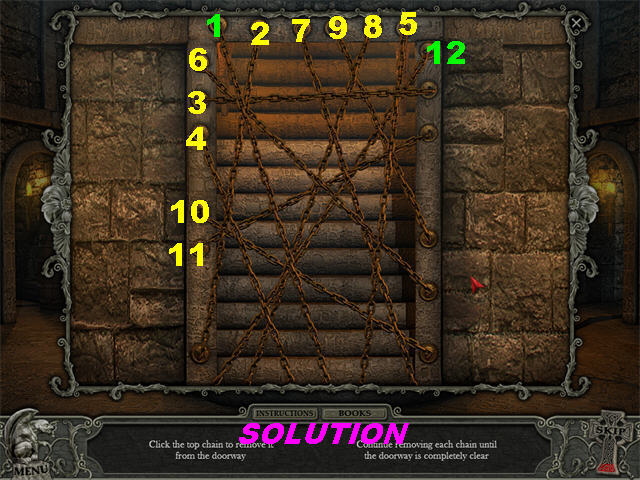
- You must remove the chains in the correct order. Only the top chain can be removed.
- If you make a mistake, you will have to start the puzzle over.
- Please look at the screenshot for the solution.
- Go up the steps after the puzzle has been solved.
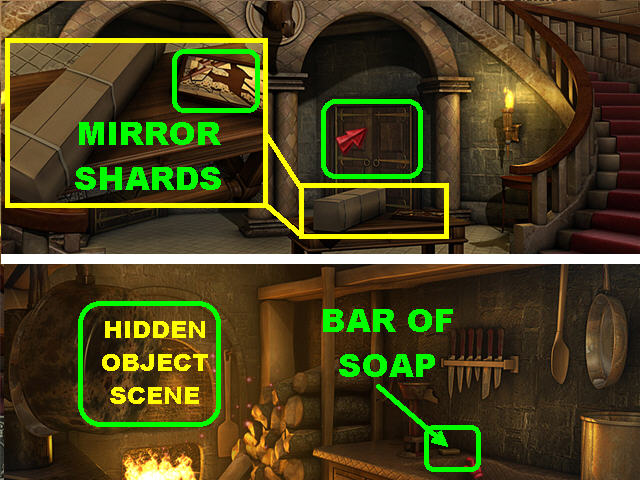
- Zoom into the table; pick up the MIRROR SHARDS.
- Zoom out of the package; go into the lower right door and then enter the door in the back.
- Pick up the BAR OF SOAP on the right.
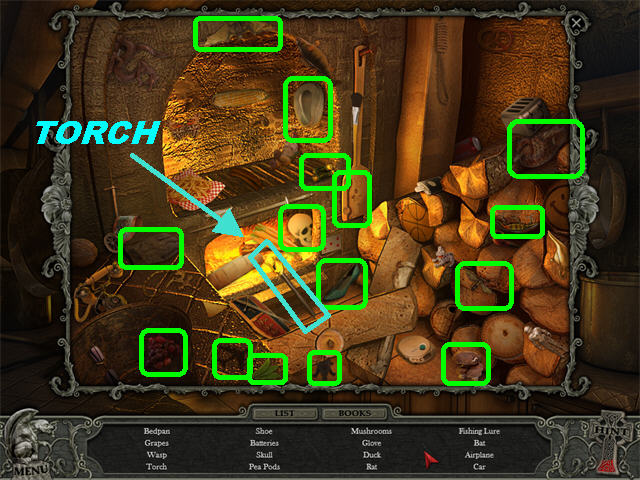
- Play the Hidden Object Scene.
- The TORCH will be added to inventory.
- Click down twice and enter the door on the lower left.
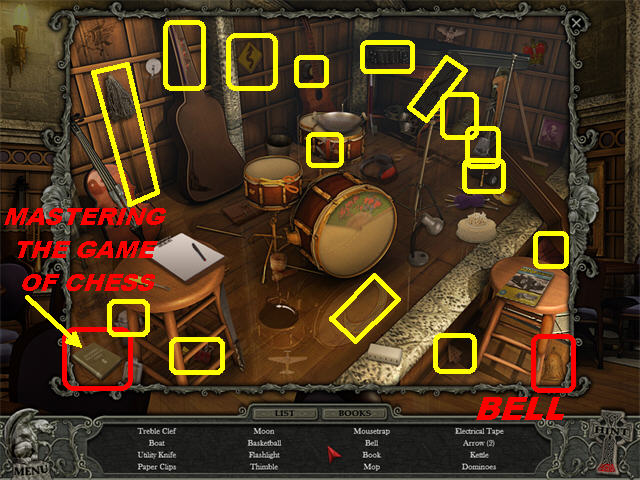
- Play the Hidden Object Scene.
- Pick up the MASTERING THE GAME OF CHESS BOOK in the lower left corner.
- The BELL will be added to inventory.
- Click down to exit; then click on the door in the upper center.
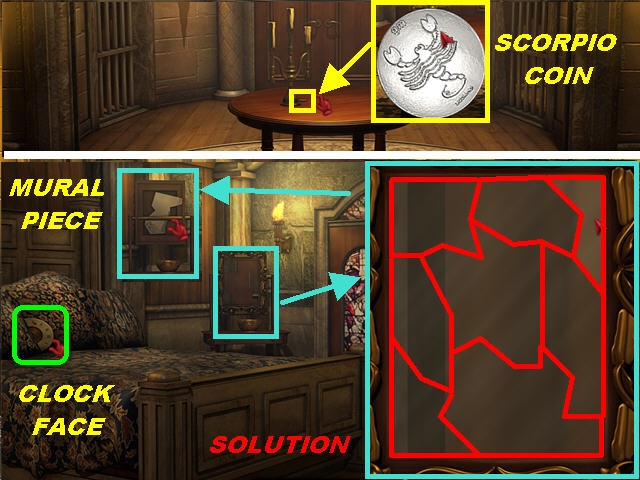
- Pick up the SCORPIO COIN at the bottom of the candelabra on the table.
- Go through the back door.
- Pick up the CLOCK FACE on the bed.
- Place the MIRROR SHARDS on the mirror to trigger a puzzle.
- Arrange the mirror as shown in the screenshot.
- Correct pieces will lock into place.
- Pick up the MURAL PIECE located on the other side of the mirror.
- Go through the stained glass balcony door.
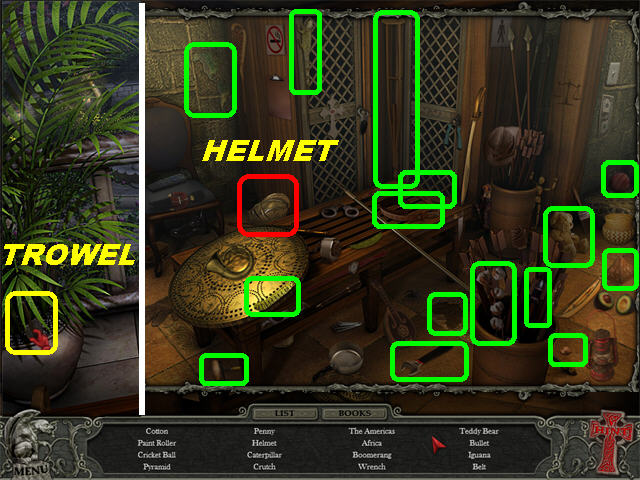
- Pick up the TROWEL on the lower left.
- Click down twice and go right.
- Play the Hidden Object Scene.
- The HELMET will be added to inventory.
- Click down and go to the hallway on the left.
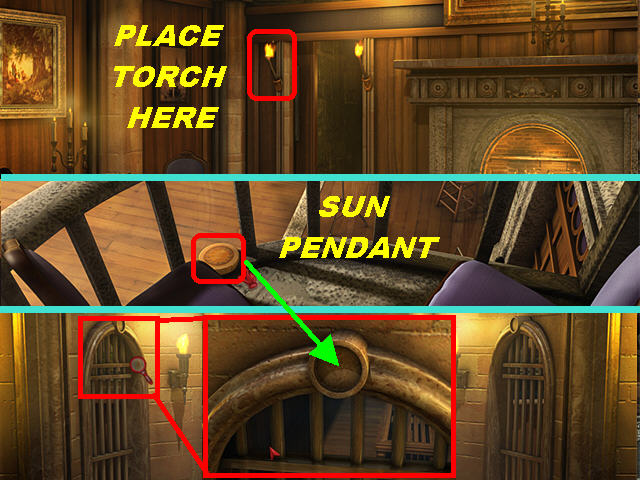
- Place the TORCH on the holder by the locked door to open it; go through the door.
- Pick up the SUN PENDANT on the balcony.
- Click down twice and zoom into the left cell; place the SUN PENDANT in the slot above the cell to trigger a Hidden Object Scene.
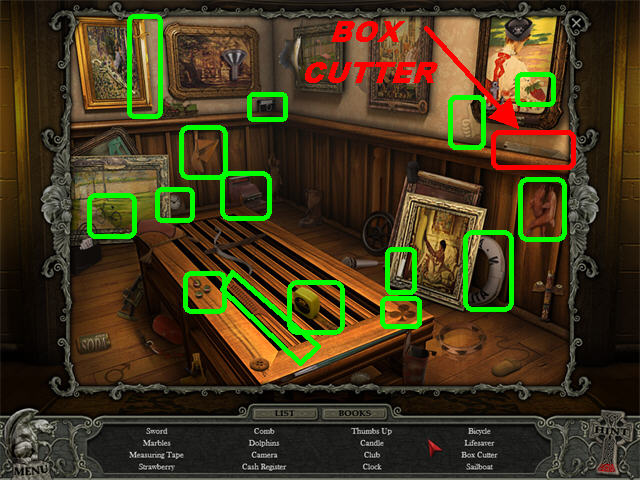
- The BOX CUTTER will be added to inventory.
- Click down and enter the lower right door.
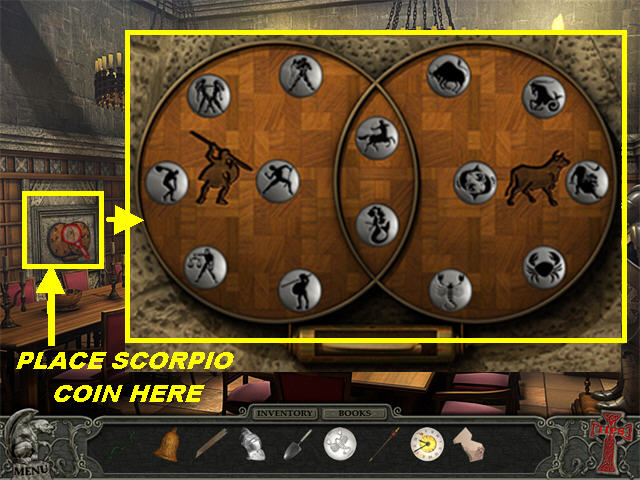
- Place the SCORPIO COIN on the contraption on the left side of the wall to trigger a puzzle.
- Place the coins according to the image on the screenshot.
- The zodiac signs with the people on them belong on the left.
- The zodiac signs featuring animals belong on the right.
- The zodiac signs that have a combination of humans and animals belong in the 2 slots that meet in the middle.
- Please look at the screenshot for the solution.
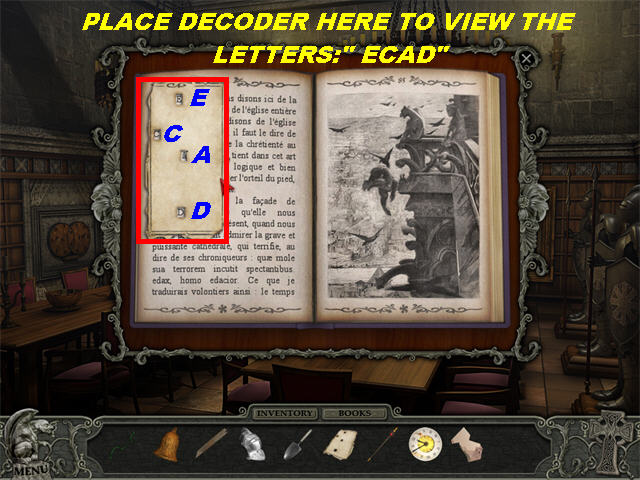
- The DECODER will be added to the NOTRE DAME DE PARIS BOOK.
- Place the decoder in the upper left side, as shown in the screenshot, until you see the 4 letters: (ECAD).
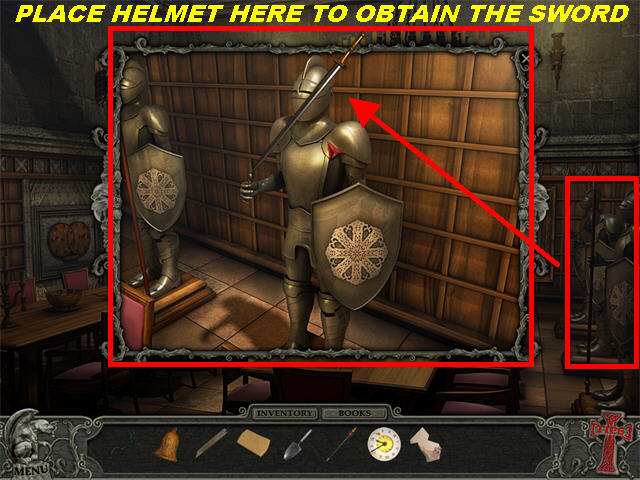
- Zoom into the knights on the right.
- Place the HELMET on the headless knight to obtain the SWORD.
- Click down to exit.
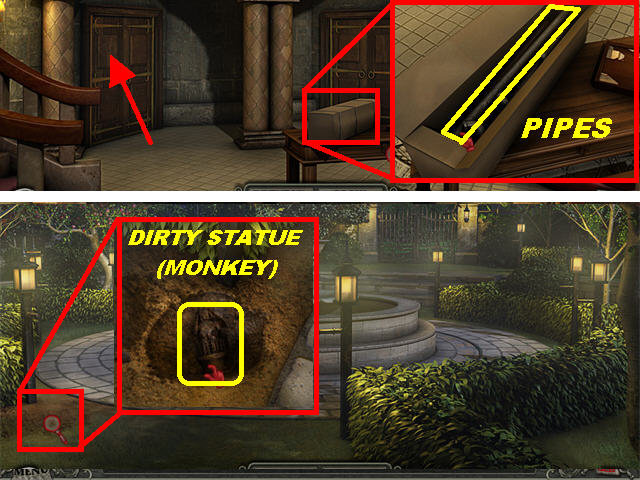
- Zoom into the package on the table; cut it open with the BOX CUTTER and pick up the PIPES inside.
- Go through the lower left door and then go through the back door to reach the back gate.
- Zoom into the patch of dirt in the lower left corner; use the TROWEL on the dirt to obtain the DIRTY STATUE (MONKEY).
- Click down 3 times and enter the rightmost door.
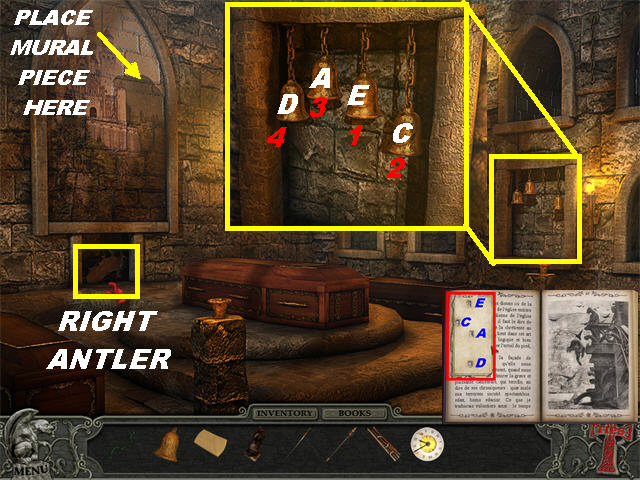
- Place the MURAL PIECE on the upper left side of the wall to open a niche; pick up the RIGHT ANTLER in the niche below the mural.
- Place the BELL on the right side of the wall to trigger a puzzle.
- You must click on the bells in the correct order. The solution is given in the NOTRE DAME DE PARIS BOOK.
- Click on “ECAD” to solve the puzzle and trigger a Hidden Object Scene on the coffin; click on it to play it.
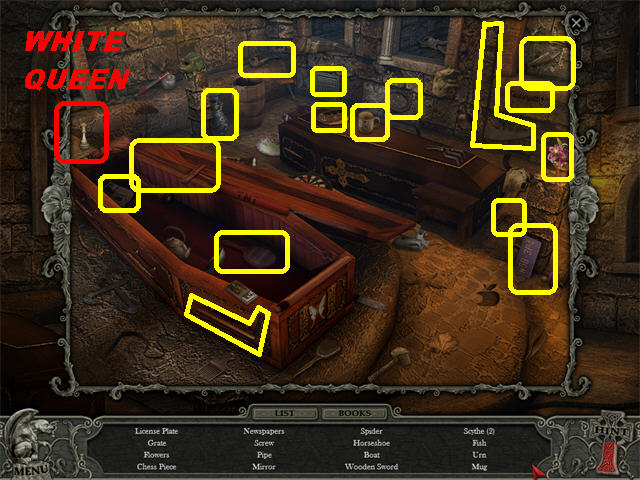
- The WHITE QUEEN will be added to inventory.
- Click down and enter the right door closest to the stairs.
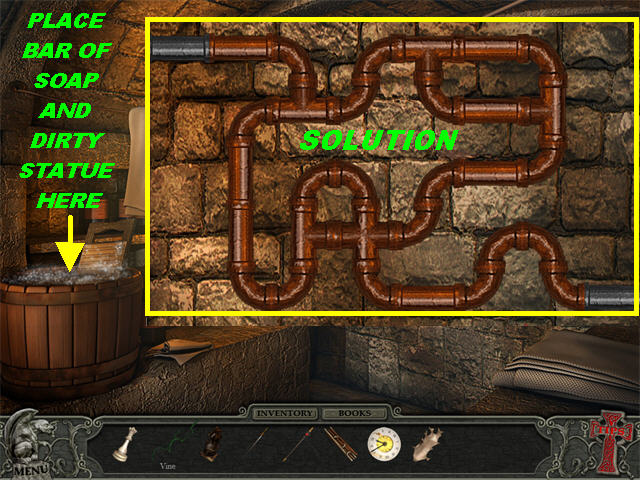
- Place the BAR OF SOAP and the DIRTY STATUE (MONKEY) in the bucket on the left to obtain the clean MONKEY STATUE.
- Place the PIPES on the right side of the wall to trigger a puzzle.
- Click on the pipes to rotate their positions.
- Connect the pipes according to the image on the screenshot.
- The water for the fountain will be restored after the puzzle has been solved.
- Exit and zoom into the monkeys in the center of the room.
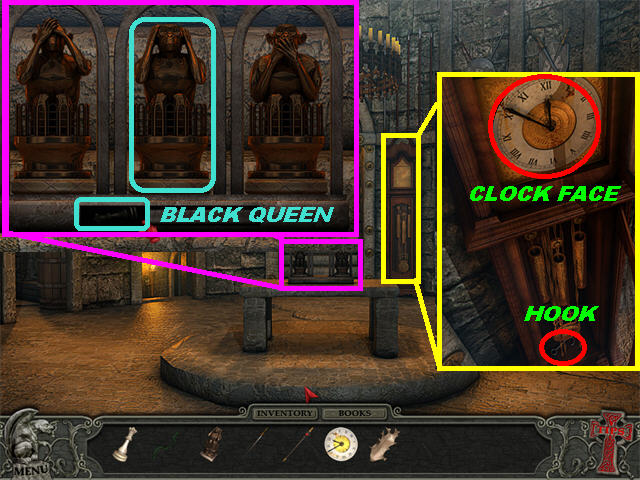
- Place the STATUE MONKEY in the empty slot.
- Pick up the BLACK QUEEN below the monkey statues and it will merge with the WHITE QUEEN in inventory to create the PAIR OF QUEENS.
- Zoom into the grandfather clock; place the CLOCK FACE on the clock.
- Pick up the HOOK at the bottom of the clock and it will go into inventory, merging with the VINE to form a GRAPPLING HOOK.
- Go up the steps; enter the door in the lower left.
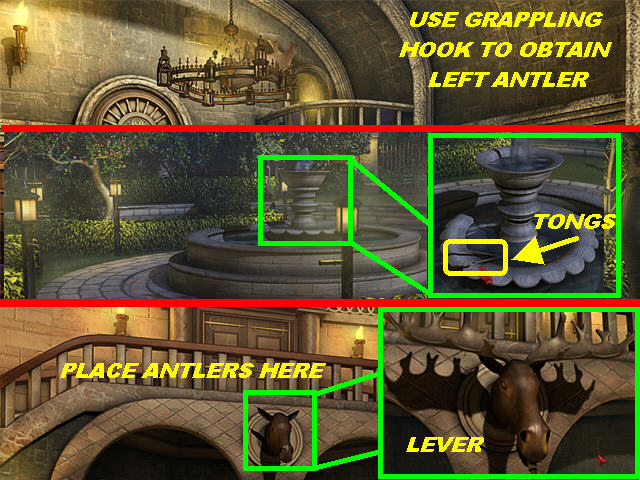
- Place the GRAPPLING HOOK on the chandelier to obtain the LEFT ANTLER.
- Go through the back door.
- Zoom into the fountain; pick up the TONGS in the water.
- Click down twice to return to the lobby.
- Zoom into the moose head in the upper center; place the RIGHT and LEFT ANTLERS on the head.
- Pick up the LEVER 1/3 from the moose’s mouth.
- Go through the door in the upper center and turn right.
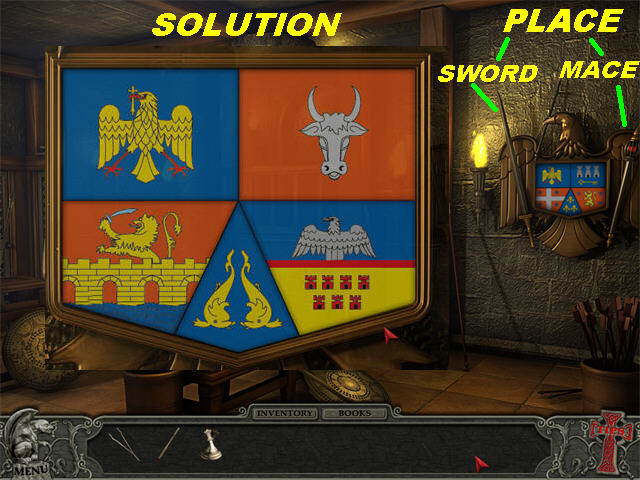
- Place the MACE and the SWORD in the eagle’s claws to trigger a puzzle.
- Click on each symbol on the coat of arms to change it to the appropriate image.
- The solution for this puzzle can be found in the ROMANIA BOOK. You can also look at the screenshot for the solution.
- The FIRE POKER will be added to inventory after the puzzle has been solved.
- Exit this room and go left.
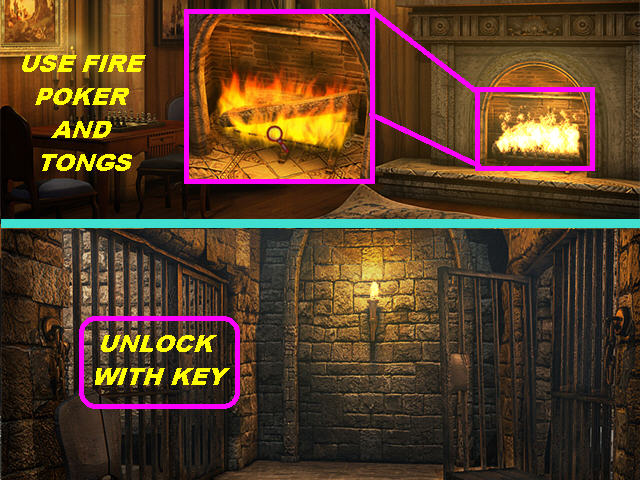
- Zoom into the fireplace; put the FIRE POKER in the fireplace.
- Use the TONGS in the fire to retrieve the KEY.
- Click down 3 times and enter the left door, closest to the steps.
- Open the locked cell on left with the KEY to trigger a Hidden Object Scene.
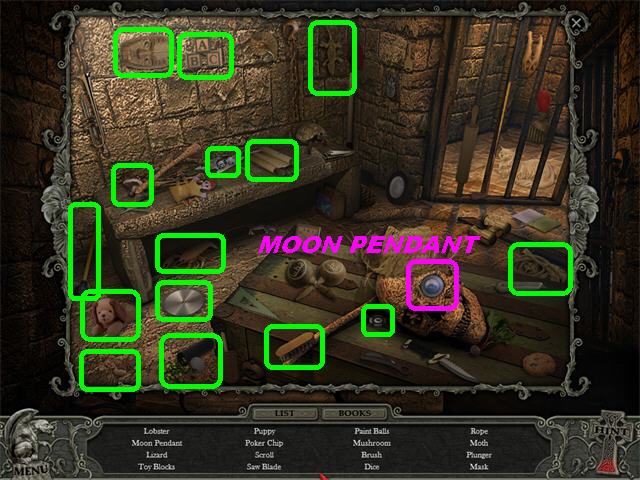
- The MOON PENDANT will be added to inventory.
- Exit this room; go up the steps and through the door in the upper center.
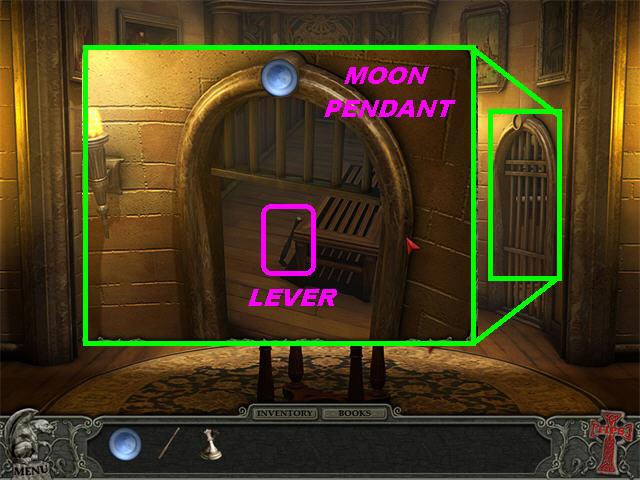
- Zoom into the right cell; place the MOON PENDANT on the slot above door.
- Pick up LEVER 2/3 inside the cell.
- Go left.
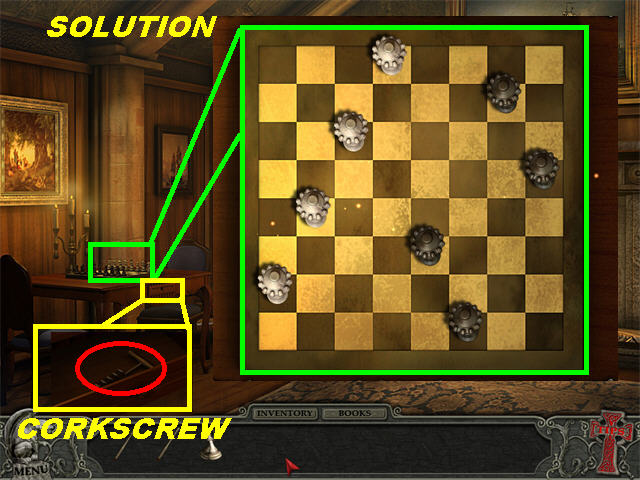
- Place the PAIR OF QUEENS on the chess set on the left to trigger a puzzle.
- Place the Queens on the board so that none of them are attacking any other.
- You can look at the book MASTERING THE GAME OF CHESS for hints on what to do.
- Please look at the screenshot for the solution.
- Pick up the CORKSCREW in the bottom drawer.
- Go all the way back down and enter the leftmost door.
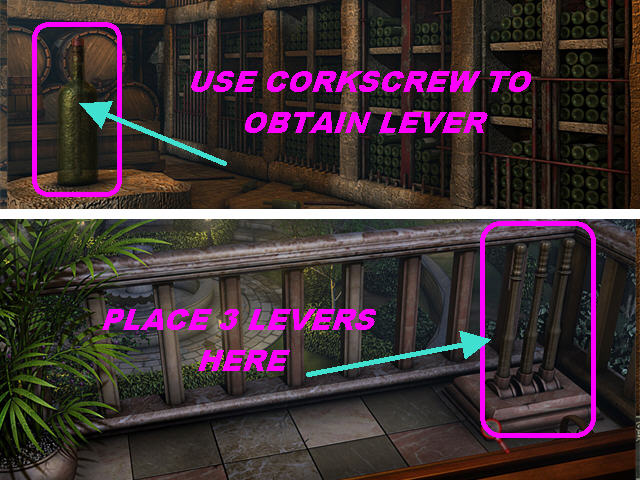
- Zoom into the large green bottle; open the bottle with the CORKSCREW and LEVER 3/3 will go into your inventory.
- Go all the way back up, go through the door in back, and then go into the stained glass door.
- Place the 3 LEVERS on the mechanism in the lower right to trigger a puzzle.
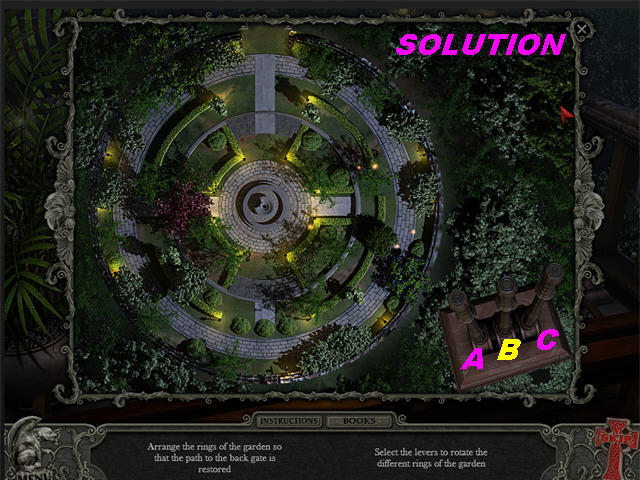
- Use all 3 levers to adjust the image to the correct configuration.
- Click on the levers AAA – BB – CC – BBB – A to solve the puzzle.
- Look at the screenshot for the final image.
- Congratulations! You’ve completed Hidden Mysteries: Vampire Secrets!
Created at: 2010-07-17

