

Walkthrough Menu
- General Tips
- Chapter 1
- Chapter 2
- Chapter 3
- Chapter 4
- Chapter 5
- Chapter 6
- Chapter 7
- Chapter 8
- Chapter 9
- Chapter 10
- Chapter 11
- Chapter 12
- Chapter 13
- Chapter 14
- Chapter 15
- Chapter 16
- Chapter 17
- Chapter 18
General Tips
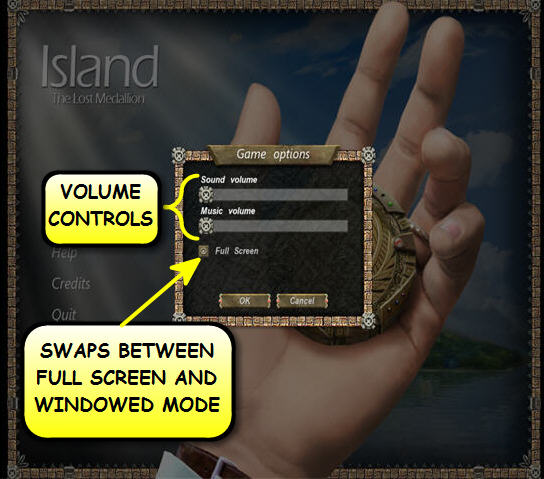
- You may play this game in full screen or windowed mode by pressing “Alt + Enter”.
- From the option menu you can adjust a variety of settings like screen mode, music and sound volume.
- You are given the option to use a Tutorial at the beginning of the game.
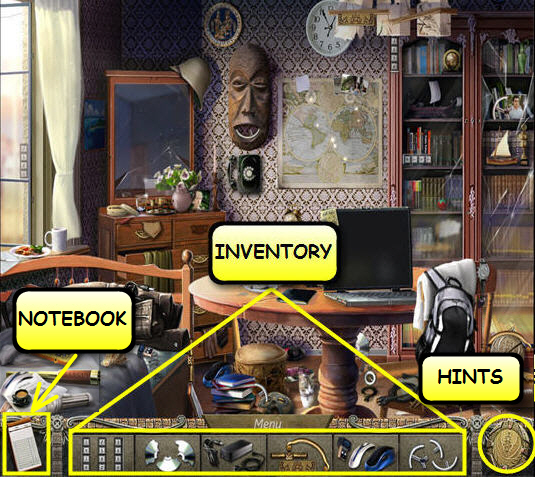
- The inventory items will be stored in the tray at the bottom of each scene.
- You can use an inventory item by picking it up and click it onto the area you wish to use it in.
- There may be some interactive elements in the scenes. The cursor will change when you move the mouse over the active area.
- There is a notebook on the bottom left corner of the screen. When it sparkles and you see a writing pen above it, it means that new information has been added.
- Click on the medallion at the bottom right corner of the screen and then on the item you are looking for to access hints.
- Hints are unlimited but they need to recharge before they can be used again.
- Some of the mini-games are randomized so your solution may vary.
- You can skip any cut scene by pressing the skip button.
Chapter 1
- The game starts with a cut scene.
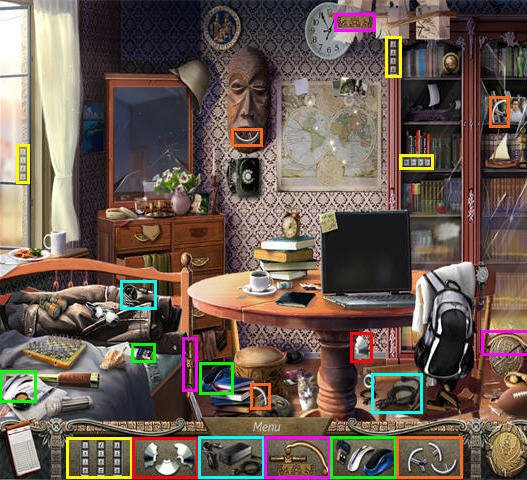
- Find all the pieces that will complete each of the inventory items.
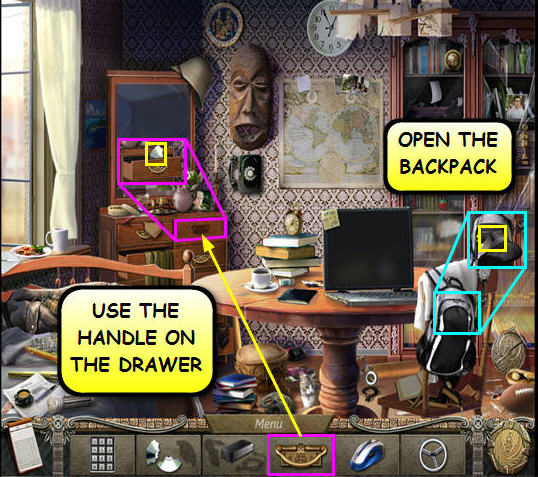
- Open the backpack to find the last piece of the laptop’s POWER SUPPLY.
- Use the DRAWER HANDLE from the inventory on the drawer to find the second piece of the CD.
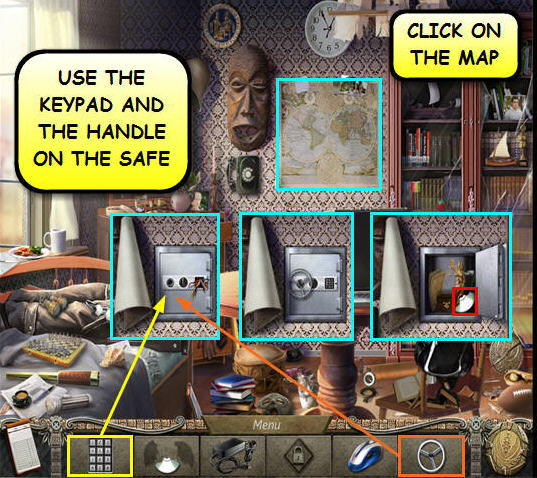
- Click on the map on the wall to reveal a safe.
- Use the SAFE KEYPAD and the SAFE HANDLE from the inventory on the safe to open it.
- Get the last piece of the CD from the safe.
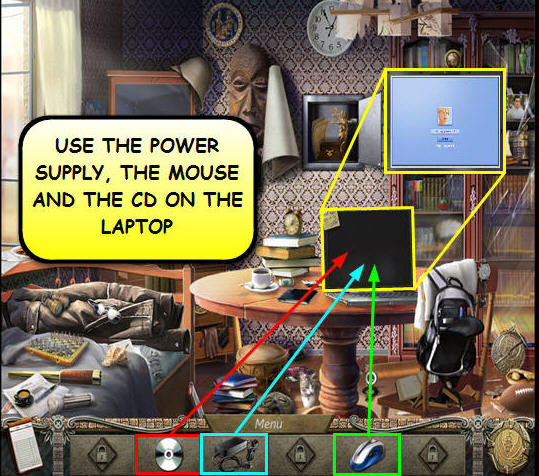
- Use the POWER SUPPLY, the MOUSE and the CD from the inventory on the laptop to turn it on and activate a password screen that will trigger a puzzle.
- The puzzle consists of collecting all the password’s characters.
- Left-click on the laptop screen to catch the moving characters.
- Some characters will move faster than others so make sure to time it right.
- You can skip the puzzle by clicking on the hint button.

Chapter 2
- Find all the hidden objects in the scene.
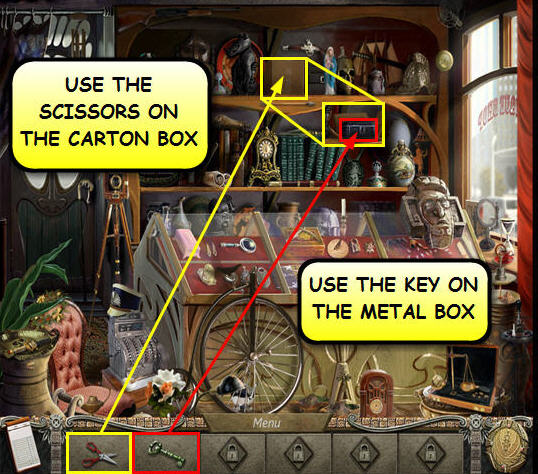
- Use the SCISSORS from the inventory on the carton box to open it.
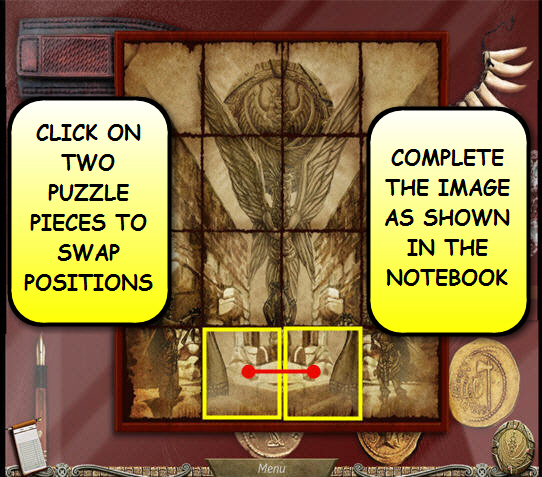
- Use the KEY from the inventory on the metal box to open it and trigger a puzzle.
- Complete the image as shown in the notebook.
- Click on two puzzle pieces to swap positions.
- You can skip the puzzle by clicking on the hint button.
Chapter 3
- Find all the pieces that will complete each of the inventory items.
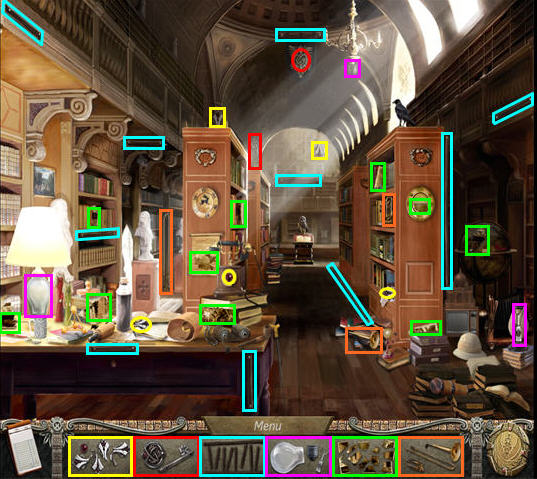
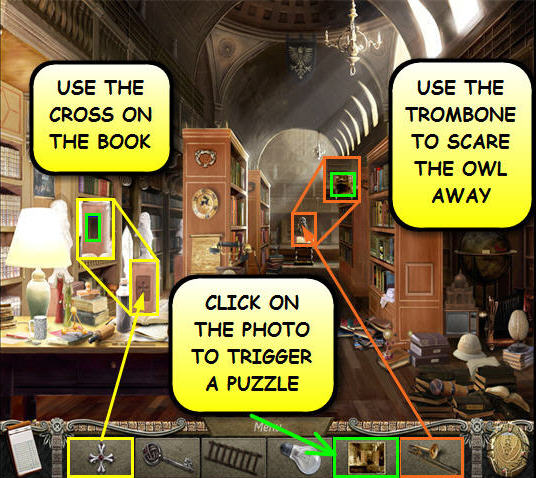
- Use the CROSS from the inventory on the book to find a piece of the photo.
- Use the TROMBONE from the inventory to scare the owl away and get the last piece of the photo.
- Click on the PHOTO in the inventory to trigger the next puzzle.
- The puzzle consists of putting a photo together.
- Click and drag the photo pieces to the correct location.
- Right-click to rotate a photo piece.
- You can skip the puzzle by clicking on the hint button.

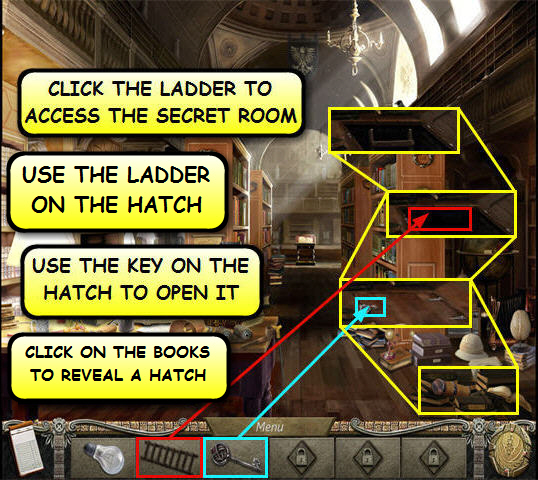
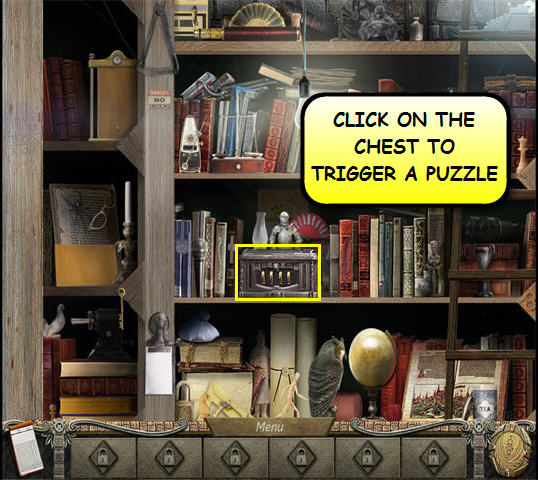
- Click on the books on the floor to reveal a hatch.
- Use the KEY from the inventory on the hatch to open it.
- Use the LADDER from the inventory on the opened hatch.
- Click on the LADDER to access the secret room.
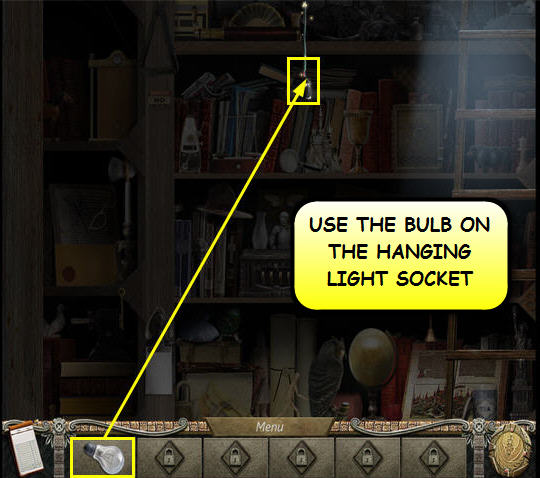
- Use the BULB from the inventory on the hanging light socket.
- Find all the hidden objects in the scene.
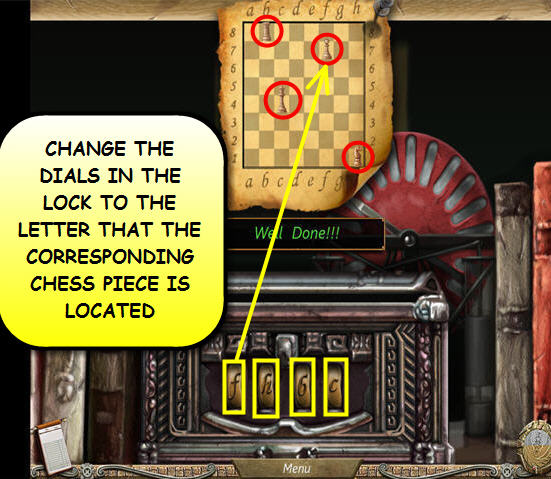
- Click on the chest to trigger the next puzzle.
- Change the dials in the lock to the letter that the corresponding chess piece is located.
- You can rotate the lock wheels by clicking on them.
- Our solution for this puzzle is: f - h - b - c.
- You can skip the puzzle by clicking on the hint button.
Chapter 4
- Find all the hidden objects in the scene.
- Click on the car to look for the bike keys.
- Find all the pieces that will complete each of the inventory items.
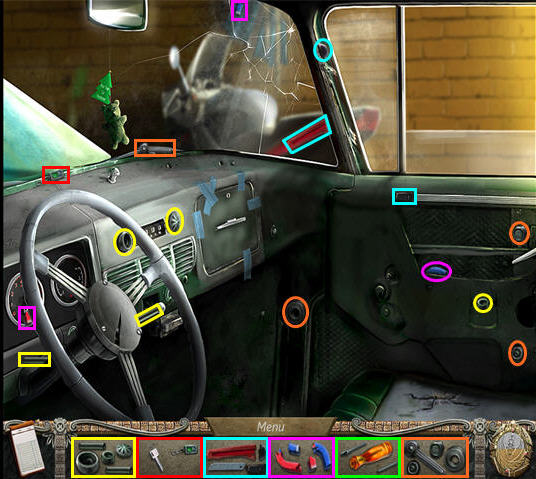
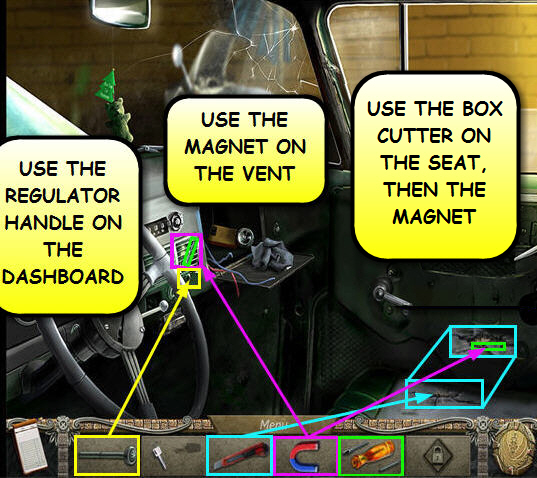
- Use the WINDOW HANDLE from the inventory on the window crank to find the last piece of the BOX CUTTER.
- Use the BOX CUTTER from the inventory on the glove box to open it and find the last piece of the MAGNET from the inventory and a piece of the SCREWDRIVER.

- Use the BOX CUTTER from the inventory on the car seat to cut it open.
- Use the MAGNET from the inventory on the car seat to find a piece of the SCREWDRIVER.
- Use the REGULATOR HANDLE from the inventory on the dashboard.
- Use the MAGNET from the inventory on the vent to find the last piece of the SCREWDRIVER.
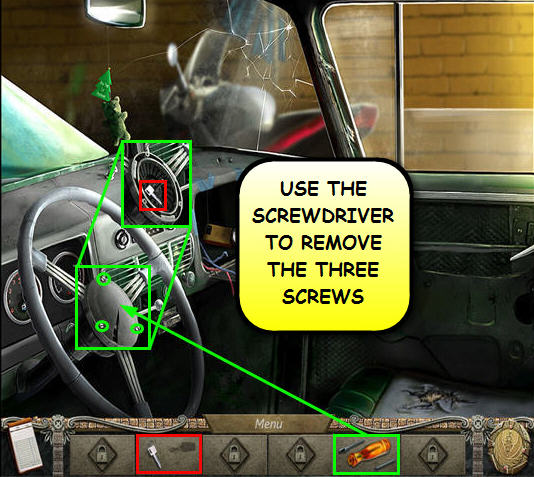
- Use the SCREWDRIVER from the inventory on the three screws on the wheel to find the KEY.
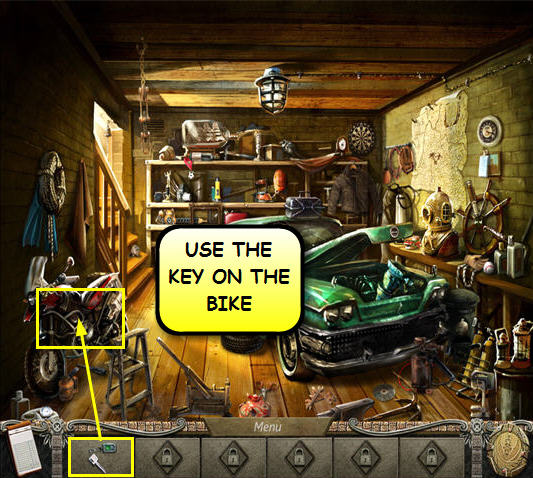
- Use the KEY from the inventory on the bike.
Chapter 5
- Find all the hidden objects in the scene.
- Find all the pieces that will complete each of the inventory items.
- Open the small cabinet to find the last piece of the ELECTRICAL TAPE.
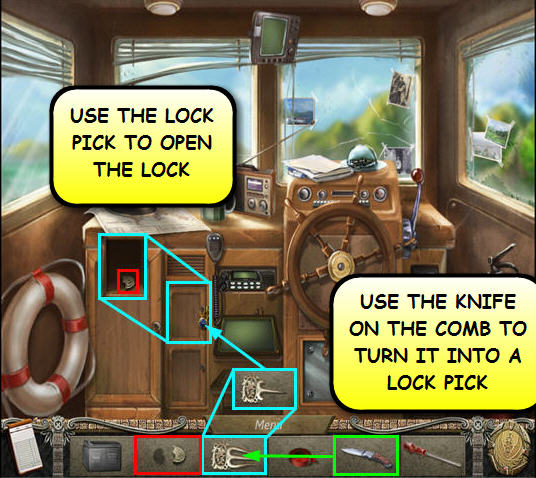
- Use the KNIFE from the inventory on the COMB from the inventory to trim it and turn it into a LOCK PICK.
- Use the LOCK PICK from the inventory on the lock to open it and find the last piece of the COIN.
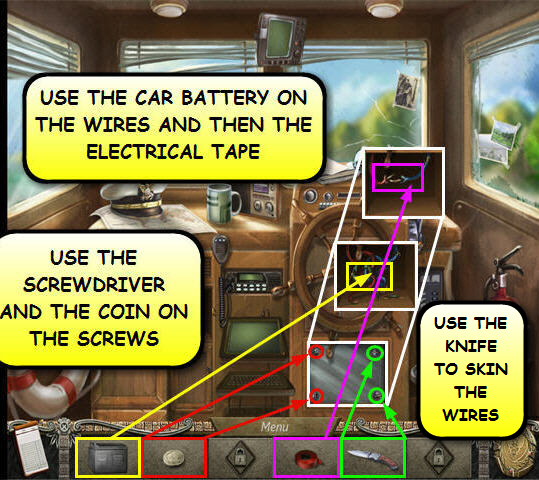
- Use the SCREWDRIVER from the inventory on any two screws on the metal panel below the wheel.
- Use the COIN from the inventory on the last two screws on the metal panel below the wheel.
- Use the KNIFE from the inventory to skin the wires.
- Use the CAR BATTERY from the inventory on the wires.
- Use the ELECTRICAL TAPE from the inventory on the wires.
Chapter 6
- Find all the hidden objects in the scene.
Chapter 7
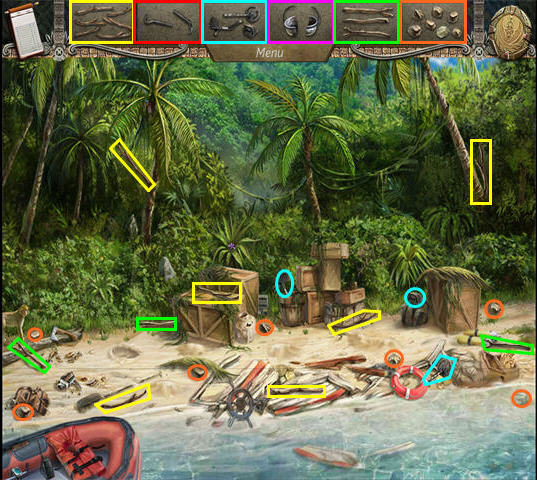
- Find all the pieces that will complete each of the inventory items.
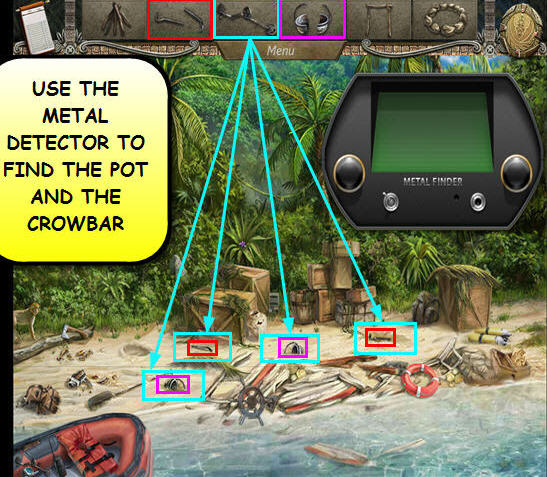
- Use the METAL DETECTOR from the inventory on the areas shown in the following screenshot to find the POT and the CROWBAR.
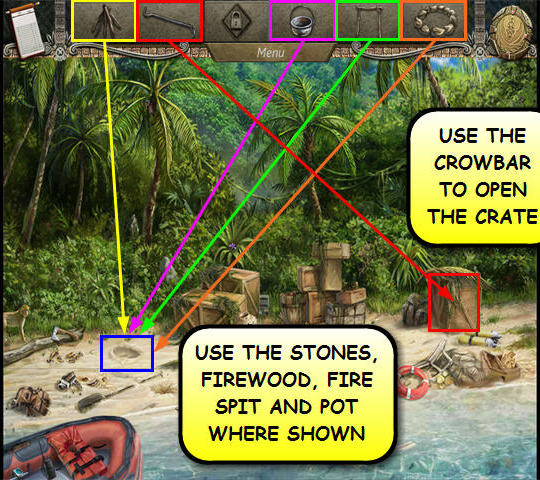
- Use the CAMPFIRE STONES, the FIREWOOD, the FIRE SPIT and the POT from the inventory on the area shown in the following screenshot.
- Use the CROWBAR from the inventory on the big crate to open it.
- Find all the hidden objects in the scene.
- Use the WATER BOTTLE from the inventory on the pot to fill it with water.
- Use the MATCH BOX from the inventory on the firewood to light it up.
- Use the CORKSCREW from the inventory on the TIN CAN to open it.
- Use the CANNED FOOD from the inventory on the pot.

Chapter 8
- Find all the hidden objects in the scene.
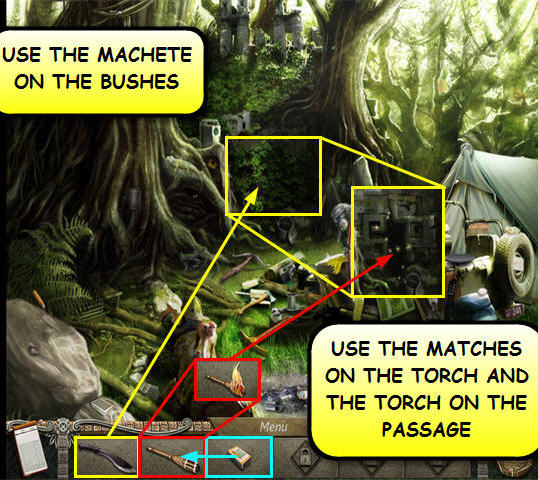
- Use the MACHETE from the inventory three times on the bushes to find a secret passage.
- Use the MATCHES from the inventory on the TORCH to light it up.
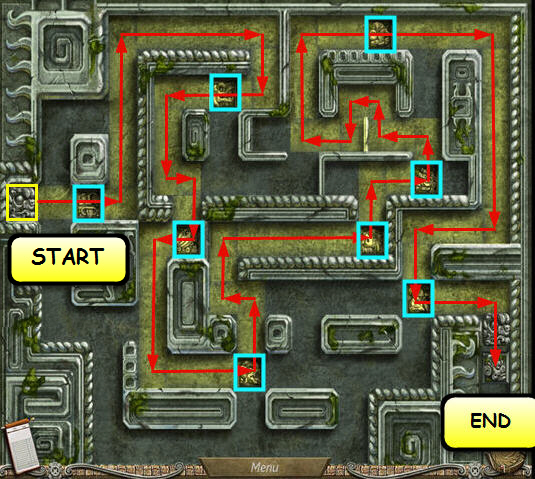
- Use the LIT TORCH from the inventory on the secret passage to trigger a puzzle.
- For this puzzle you have to press all the standing stones in the maze without crossing your own path in order to activate an inner mechanism and enter the cave.
- Click on the stone at the start point and drag it thru the maze.
- The puzzle will reset if you make a mistake.
- You can skip the puzzle by clicking on the hint button.
- Find all the pieces that will complete each of the inventory items.
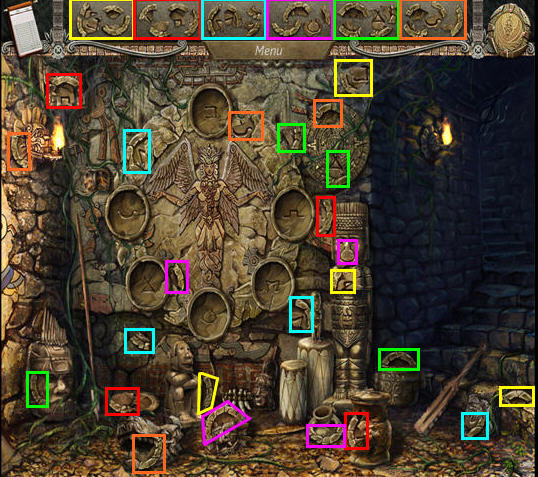
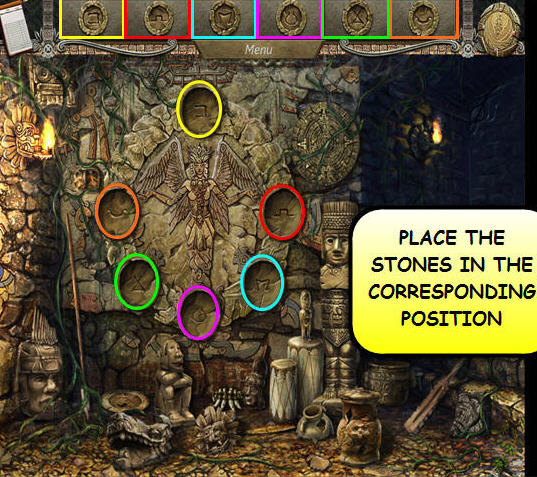
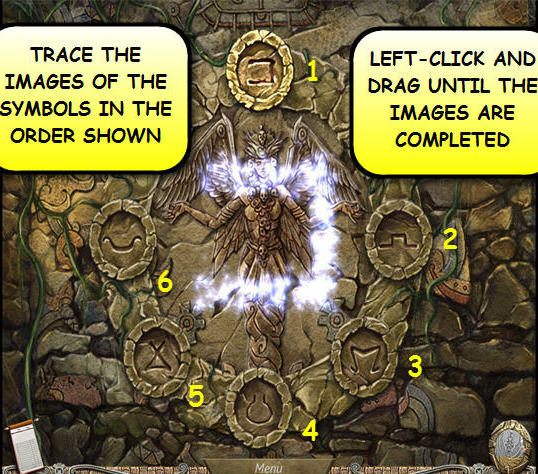
- Pick up the STONE SYMBOLS from the inventory and place them in the corresponding position to trigger the next puzzle.
- Trace the images of the stone symbols in the order shown.
- Left-click and drag until the images are completed.
- You can skip the puzzle by clicking on the hint button.
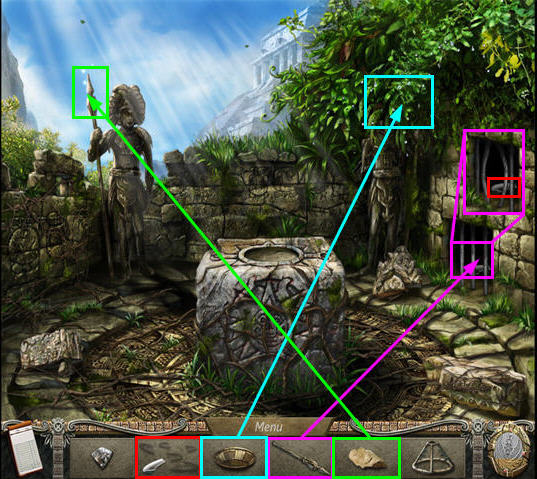
- Find all the pieces that will complete each of the inventory items.
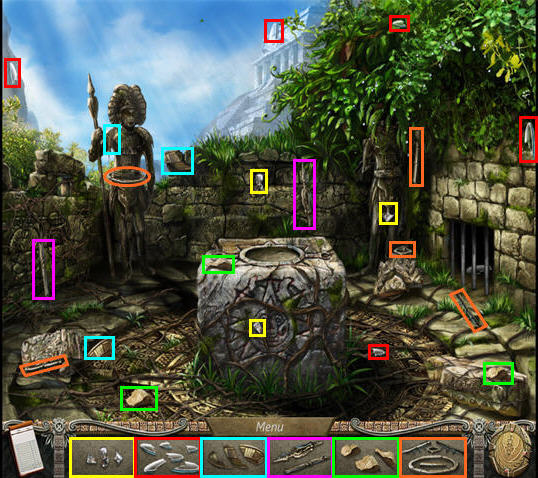
- Use the SPEAR from the inventory on the bars to pry them open and grab the LENS piece.
- Use the BOWL from the inventory on the tree to collect the dew.
- Use the STONE from the inventory on the spear three times to remove the plaster.
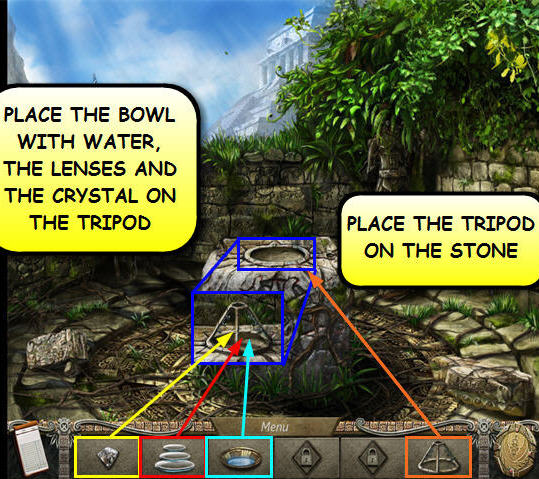
- Use the TRIPOD from the inventory and place it on top of the square stone.
- Use the BOWL WITH WATER and the LENSES from the inventory on the tripod.
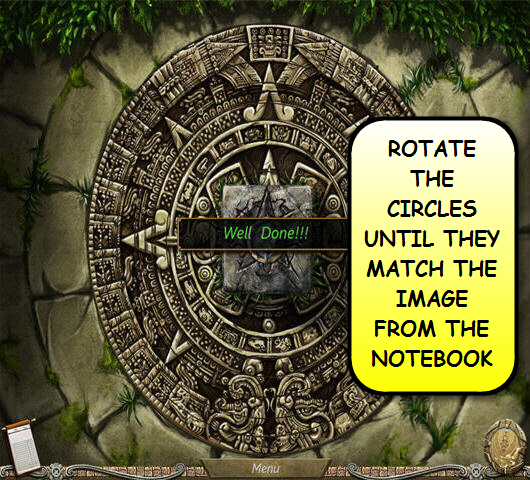
- Use the CRYSTAL from the inventory on the tripod to trigger the next puzzle.
- Rotate the circles until they match the image from the notebook.
- Left-click a circle to rotate right or right-click to rotate left.
- You can skip the puzzle by clicking on the hint button.
Chapter 9
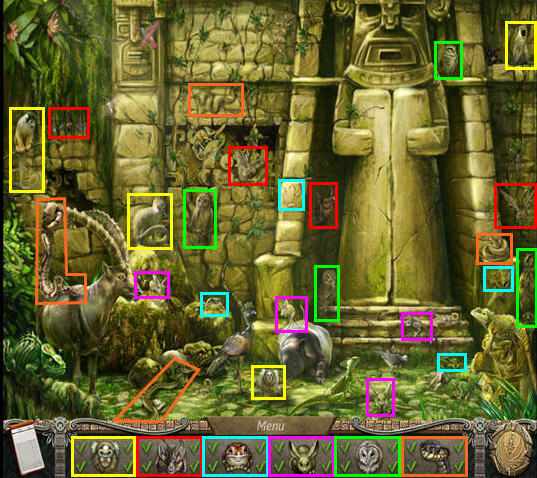
- Find all the hidden objects in the scene.
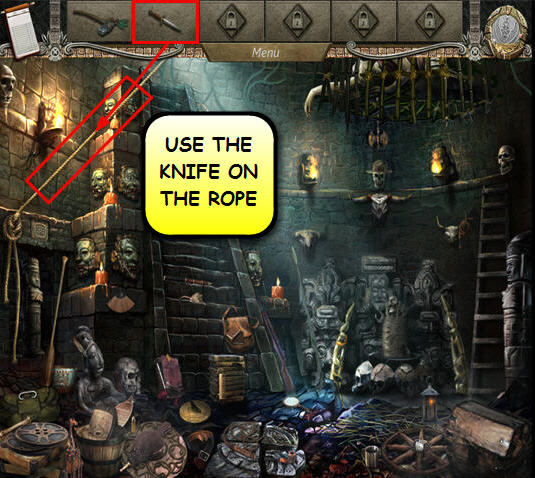
- Use the KNIFE from the inventory on the rope to lower the cage.
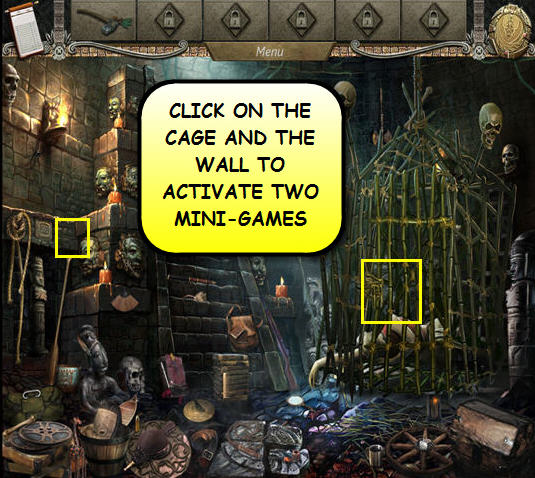
- Click on the cage and the wall to activate two puzzles.
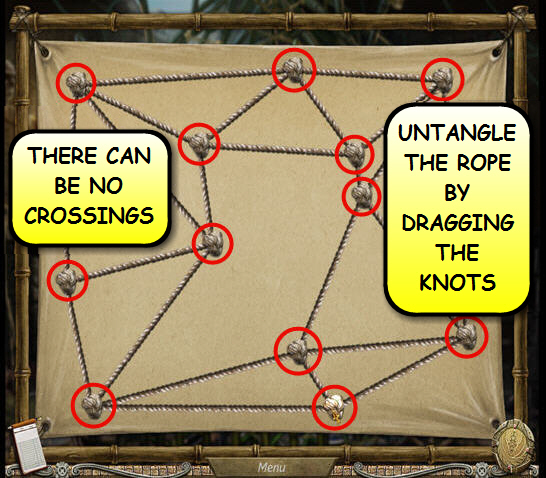
- Untangle the rope lock by dragging the knots.
- There can be no crossing.
- Refer to the next screenshot for a possible solution.
- You can skip the puzzle by clicking on the hint button.
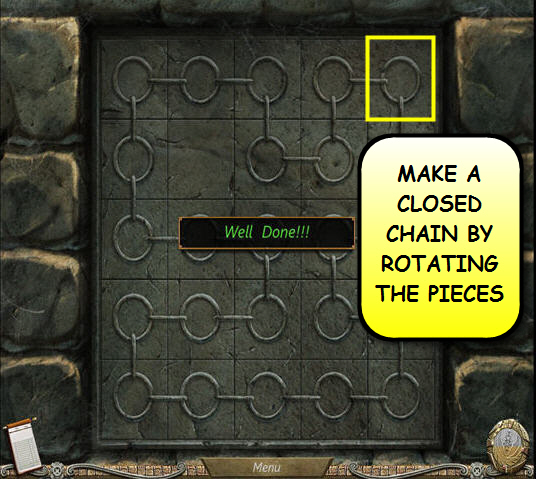
- Make a closed chain to open the lock by rotating its pieces.
- Left-click on a piece to rotate it clockwise or right-click to rotate it counterclockwise.
- Make sure to unite not only the chain pieces but the cracks on the stone surface as well.
- You can skip the puzzle by clicking on the hint button.
- Find all the pieces that will complete each of the inventory items.
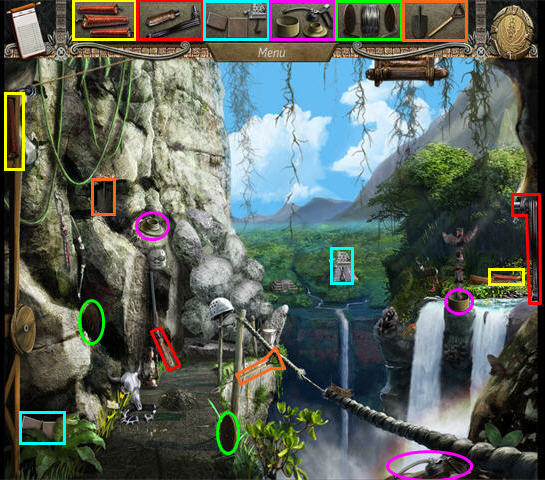
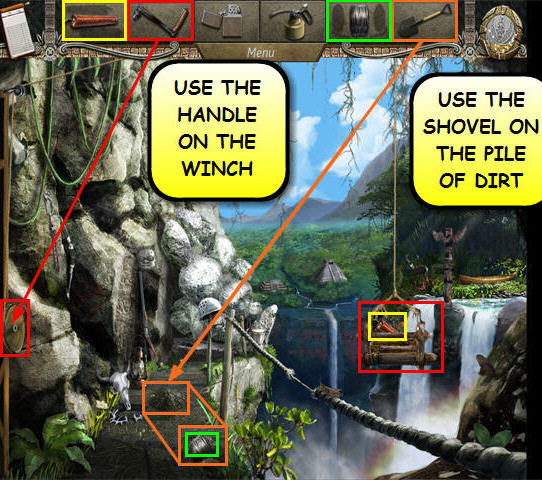
- Use the SHOVEL from the inventory on the pile of dirt to find the DETONATING CORD.
- Use the HANDLE from the inventory on the winch to find the DYNAMITE.
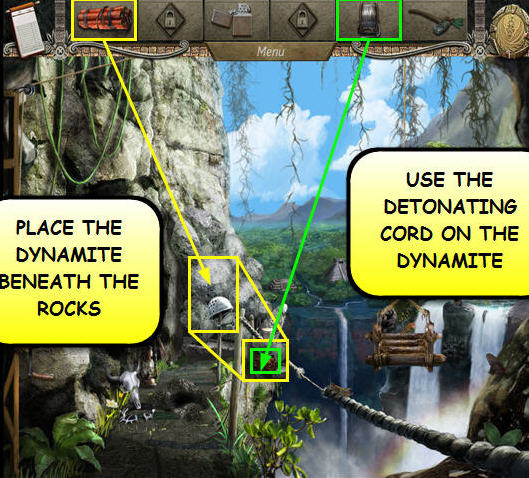
- Pick up the DYNAMITE from the inventory and use it on the stones.
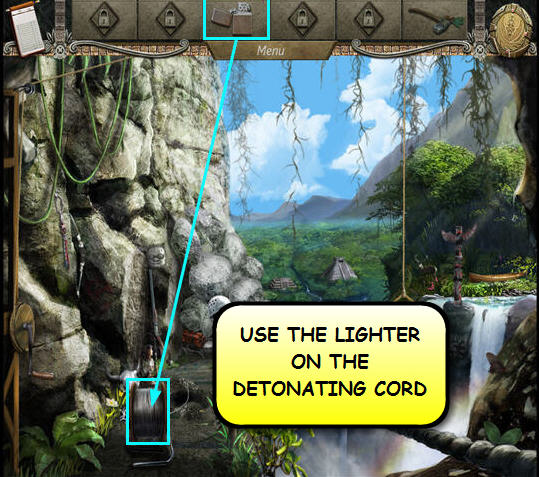
- Use the DETONATING CORD from the inventory on the DYNAMITE.
- Use the LIGHTER from the inventory on the DETONATING CORD.
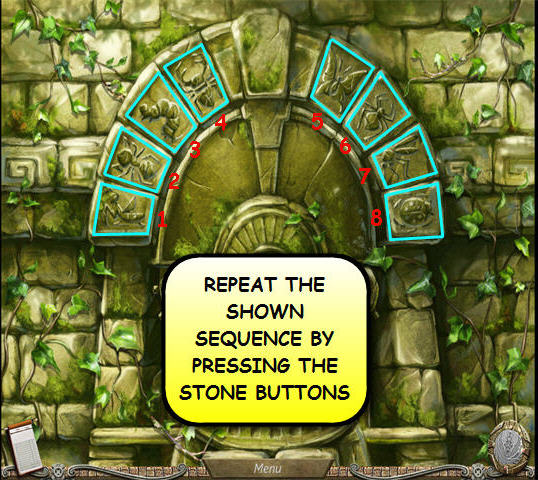
Chapter 10
- Find all the pieces that will complete each of the inventory items.
- For the next puzzle you have to repeat the shown sequence by pressing the stone buttons.
- The puzzle consists of two sequences.
- Our solution for the first sequence is: 3-5-1-3-7.
- Our solution for the second sequence is: 4-3-1-8-3-8.
- You can skip the puzzle by clicking on the hint button.
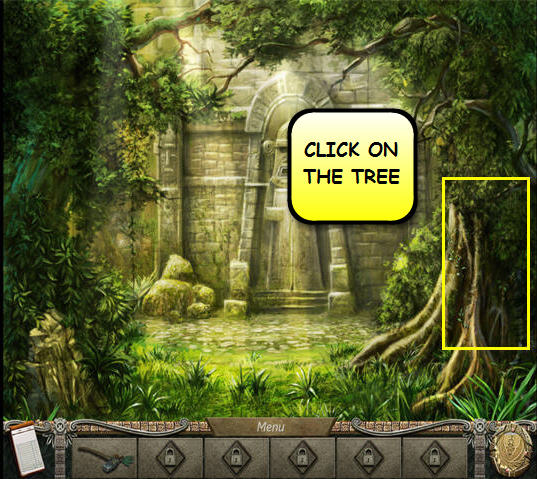
- Click on the tree to the right.
- Find all the pieces that will complete each of the inventory items.

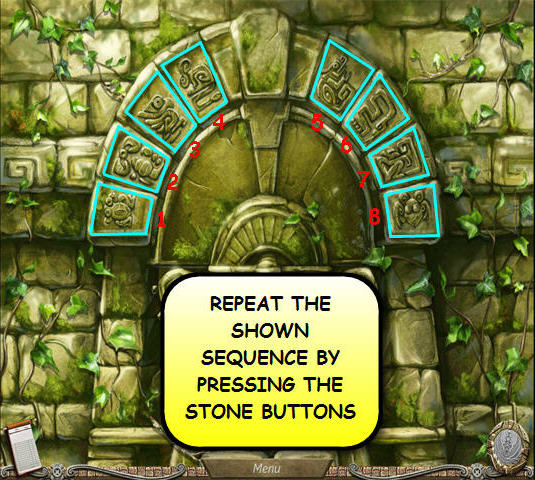
- For the next puzzle you have to repeat the shown sequence by pressing the stone buttons.
- The puzzle consists of two sequences.
- Our solution for the first sequence is: 4-6-7-4-1.
- Our solution for the second sequence is: 5-7-2-6-4-7.
- You can skip the puzzle by clicking on the hint button.
Chapter 11
- Find all the pieces that will complete each of the inventory items.
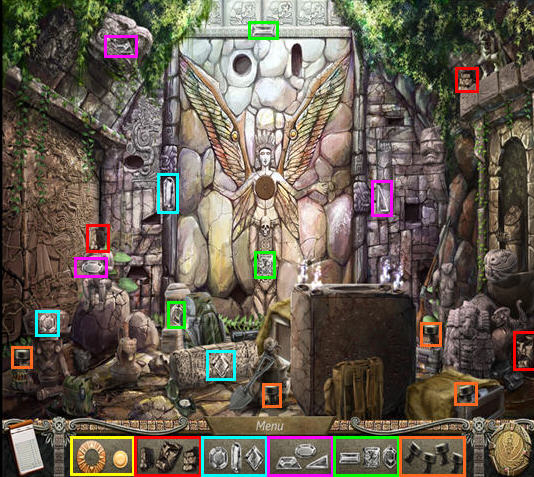
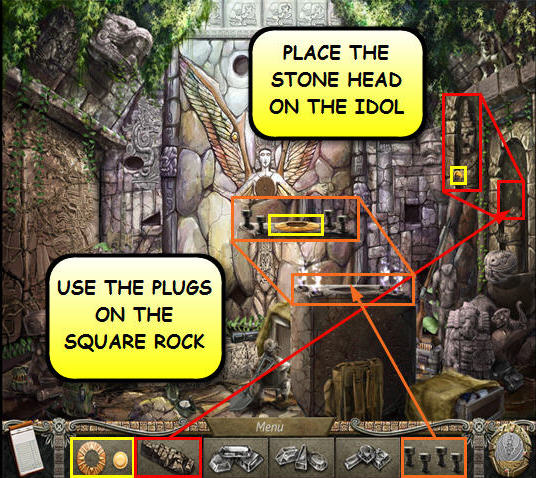
- Use the STONE IDOL HEAD from the inventory and use it on the headless stone idol to find a piece of the GOLDEN DISK.
- Use the PLUGS from the inventory on the square rock with the steam to find the last piece of the GOLDEN DISK.
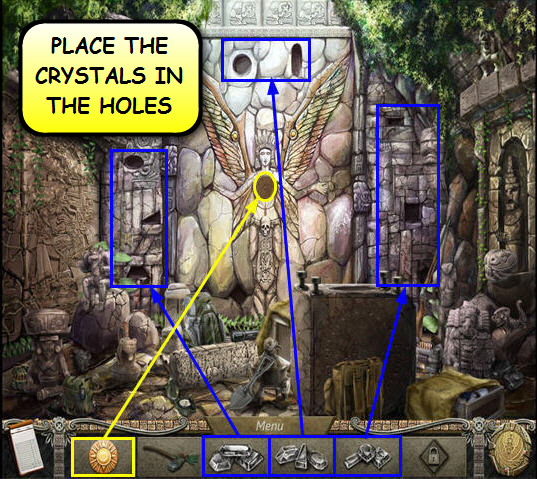
- Use the CRYSTALS from the inventory and place them in the holes on the wall.
- Use the GOLDEN DISK from the inventory and place it at the center of the fresco.
Chapter 12
- Find all the hidden objects in the scene.
Chapter 13
- Find all the pieces that will complete each of the inventory items.
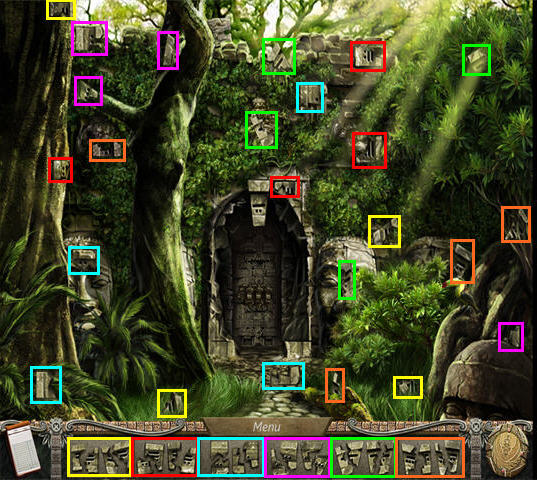
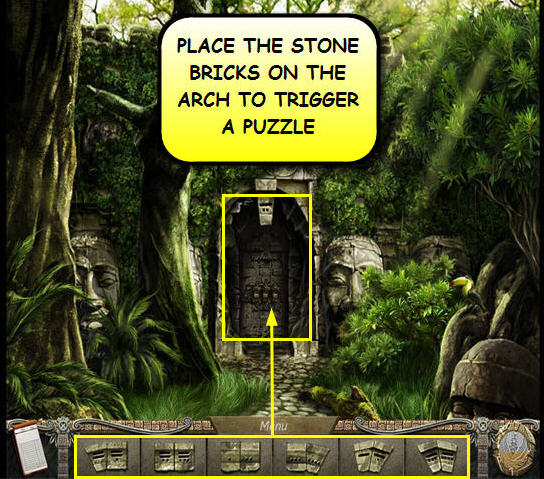
- Use the STONE BRICKS from the inventory on the arch to trigger a puzzle.
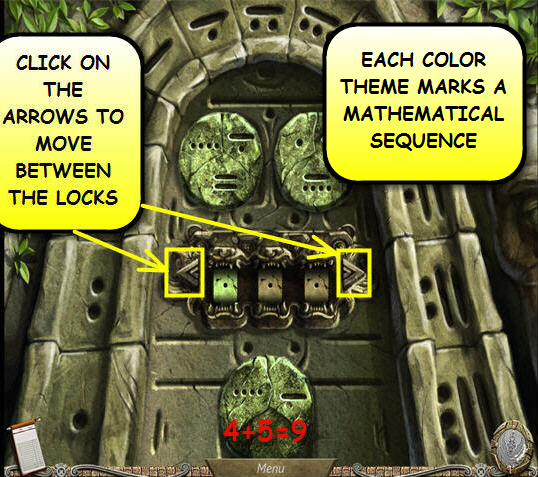
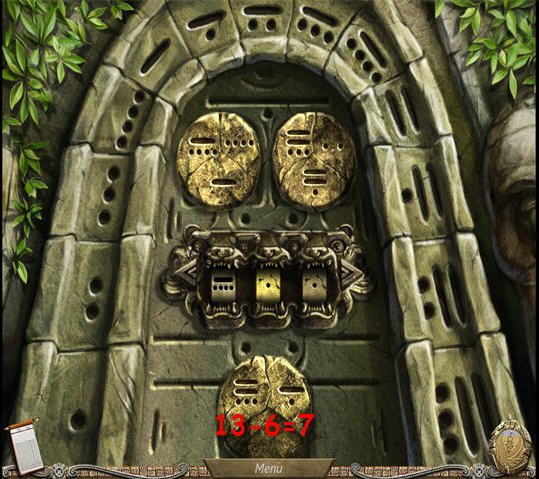
- Each color theme marks a mathematical sequence.
- Solve the three puzzles to open the door.
- The symbols around the arch represent the numbers from 1 to13 starting from the bottom left.
- The first two circles tells you if its addition, subtraction or multiplication.
- Solve the equation on the third circle and use the answer on the corresponding lock.
- Click on the arrows to move between locks.
- You can skip the puzzle by clicking on the hint button.
- Our solution to the first sequence is: 4+5=9.
- Our solution for the second sequence is 13-6=7.
- Our solution for the third sequence is: 3x4=12.
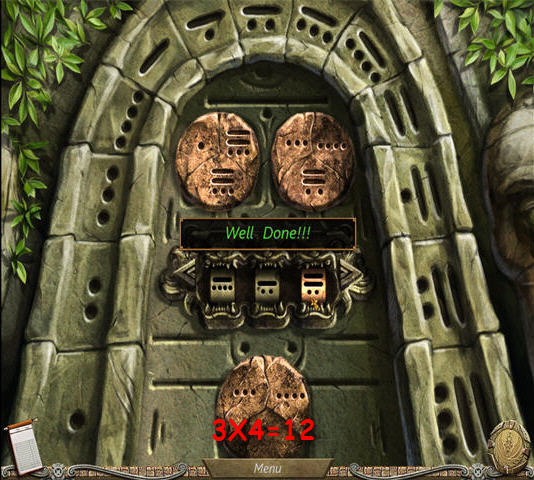
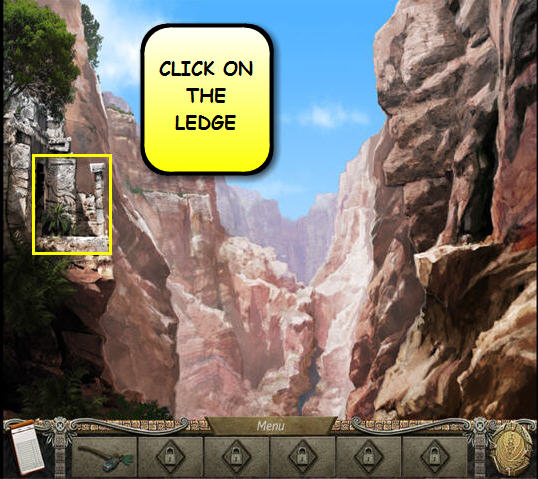
- Click on the left ledge to continue.
- Find all the pieces that will complete each of the inventory items.
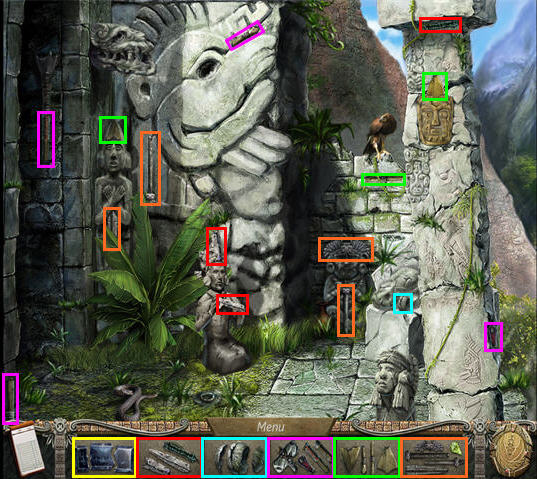
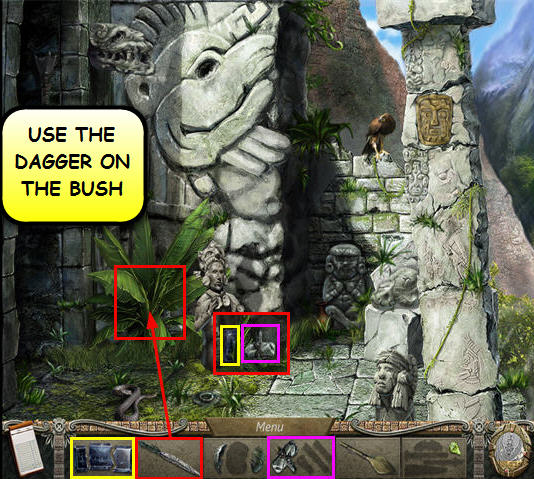
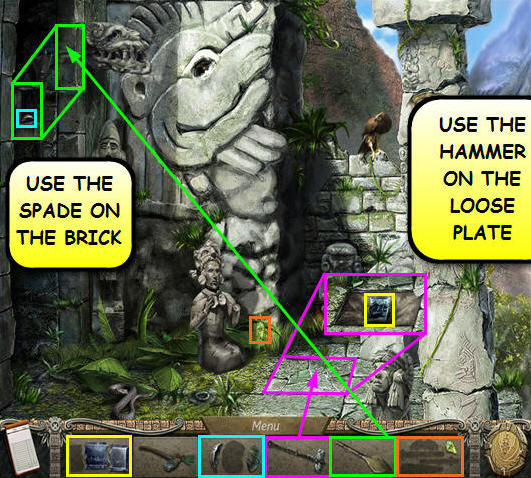
- Use the DAGGER from the inventory on the bush to find the last piece of the HAMMER and a piece of the STONE FRESCO.
- Use the HAMMER from the inventory on the loose plate to find another piece of the STONE FRESCO.
- Use the SPADE from the inventory on the brick to find a piece of the STONE EYE.
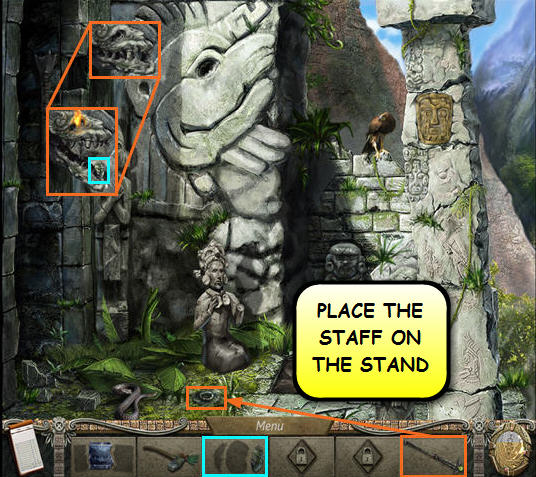
- Grab the last piece of the STAFF.
- Use the STAFF from the inventory on the circular stand on the floor to find the last piece of the STONE EYE.
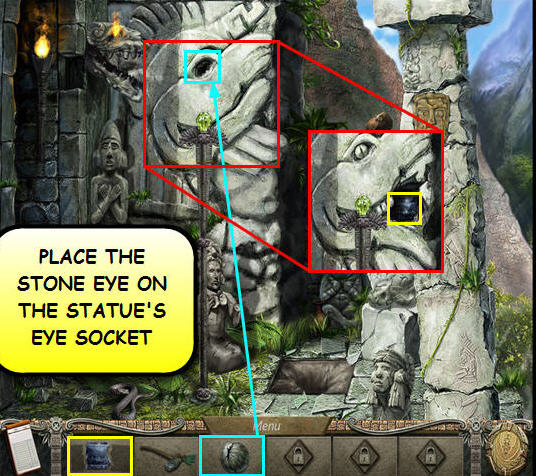
- Place the STONE EYE from the inventory on the statue’s eye socket to find the last piece of the STONE FRESCO.
Chapter 14
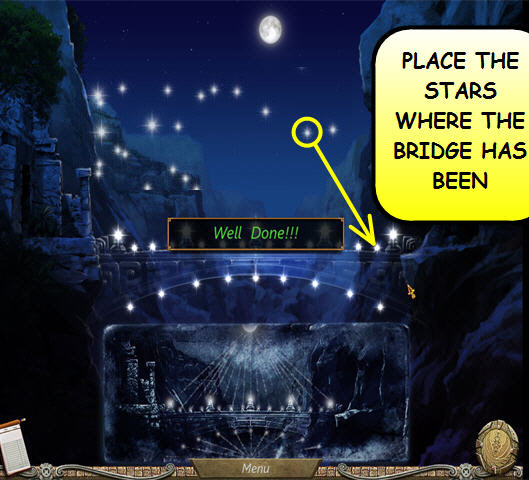
- For the next puzzle you have to make the bridge visible by selecting the stars and placing them where the bridge has been.
- Select a star by left-clicking on it then drag it to the desired location.
- You can skip the puzzle by clicking on the hint button.
Chapter 15
- Find all the pieces that will complete each of the inventory items.
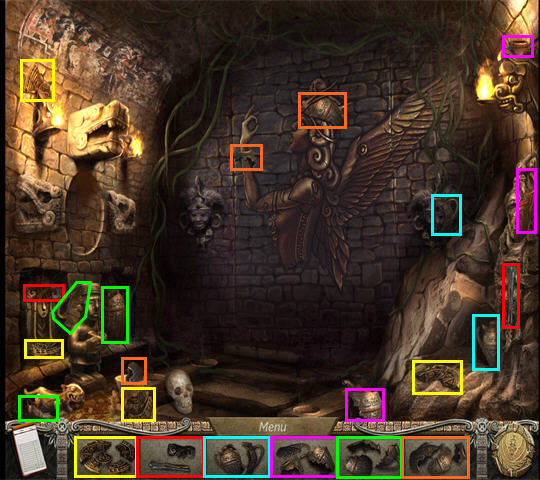
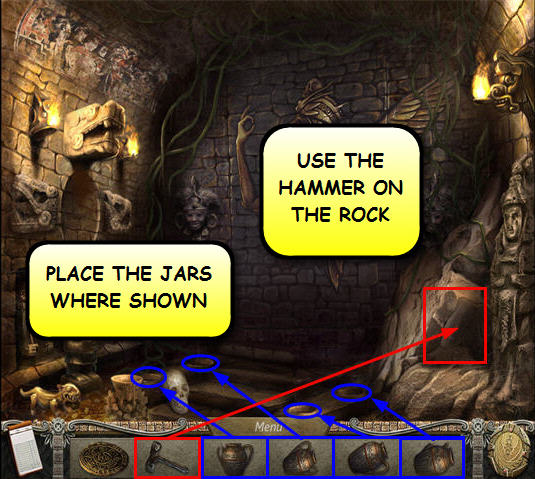
- Pick up the JARS from the inventory and place them in the holes on the floor in any order.
- Use the HAMMER from the inventory on the rock.
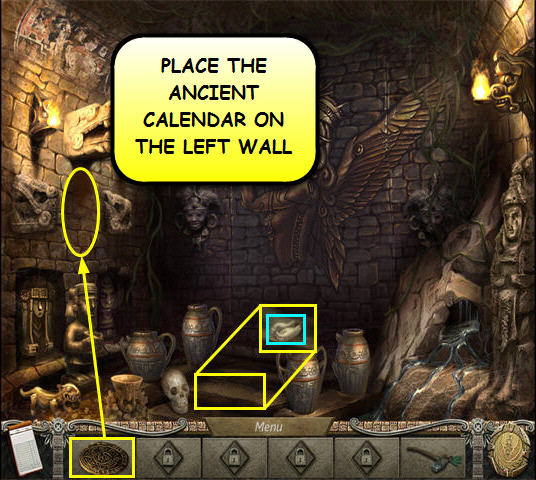
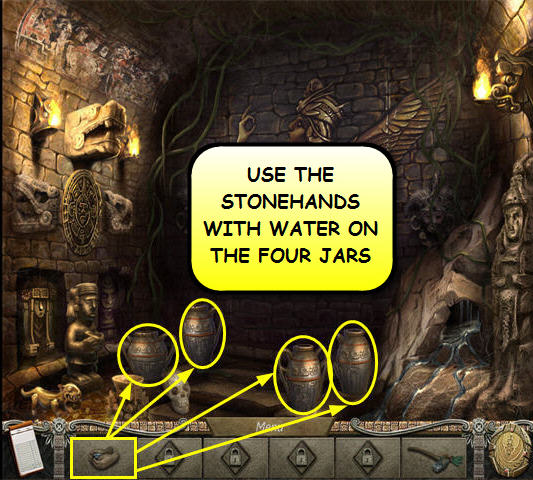
- Pick up the ANCIENT CALENDAR from the inventory and use it on the left wall to find a pair of STONE HANDS.
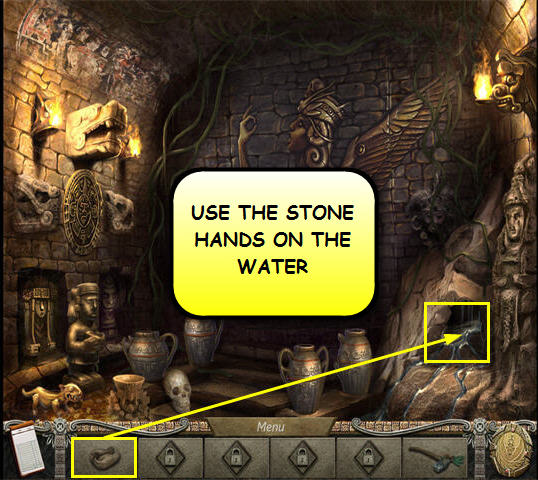
- Use the STONE HANDS from the inventory on the water.
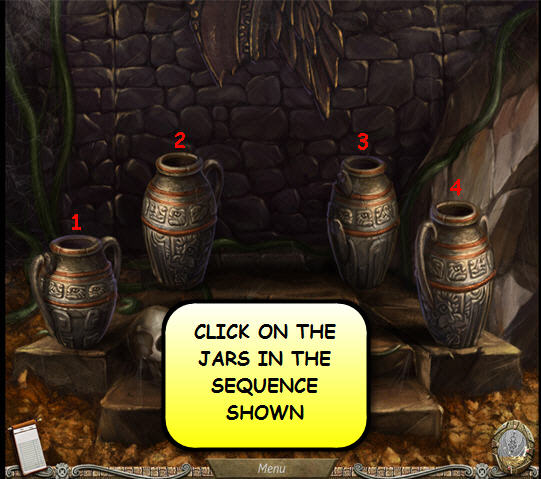
- Use the STONE HANDS WITH WATER on the four jars to trigger the next puzzle.
- The puzzle consists of lighting up four jars in the sequence shown.
- Our solution for the first sequence is: 1-2-4-3.
- Our solution for the second sequence is: 2-3-2-4-3.
- Our solution for the third sequence is: 1-2-4-1-3-1.
- Our solution for the fourth sequence is: 2-1-2-3-4-3-1.
- You can skip the puzzle by clicking on the hint button.
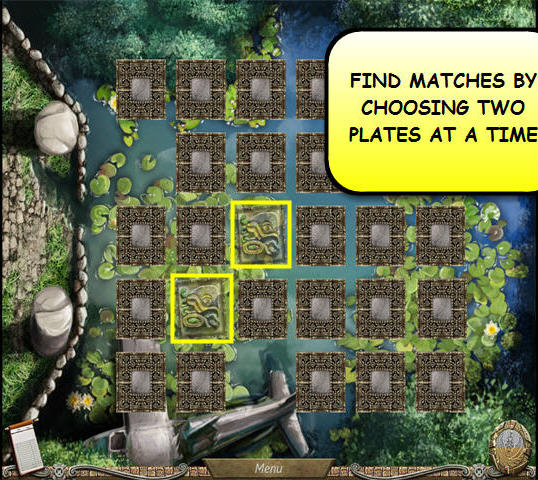
- Find all the hidden objects in the scene to activate the next puzzle.
- Match identical plate ornaments by clicking on two plates at a time.
- You can skip the puzzle by clicking on the hint button.
Chapter 16
- Find all the pieces that will complete each of the inventory items.
- Open the pot on the bottom right corner of the screen to find a STONE DISK piece.
- Use the TORCH from the inventory on the dry lianas to find the last piece of the WINGED FIGURE.
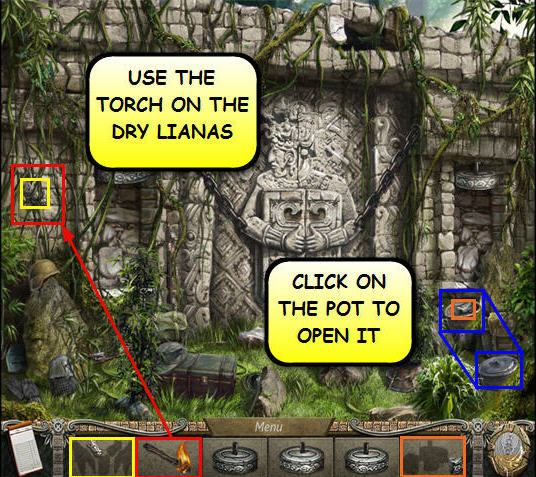
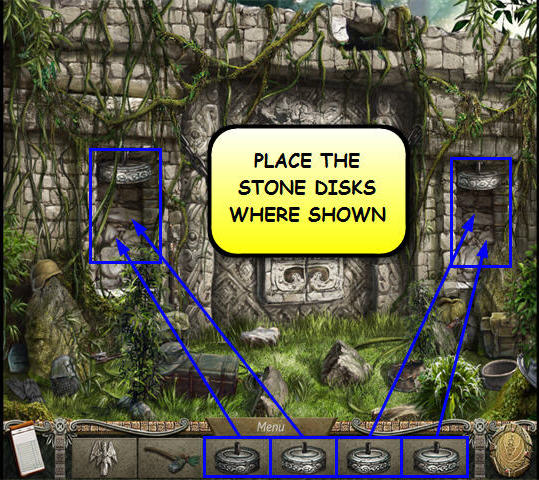
- Pick up the STONE DISKS from the inventory and use them on the disks at both sides of the entrance.
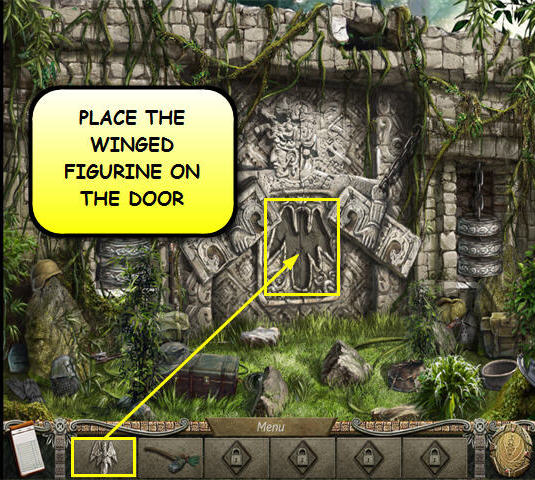
- Use the WINGED FIGURINE from the inventory on the door.
Chapter 17
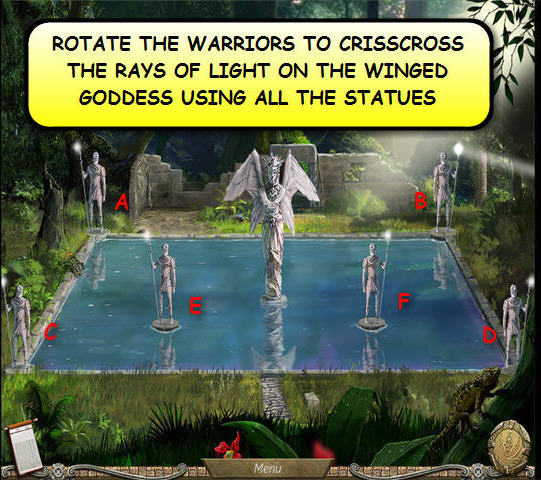
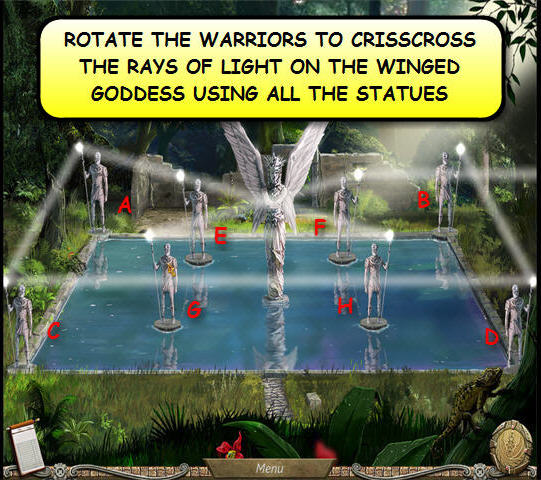
- For the next puzzle you have to rotate the warriors to crisscross the rays of light on the Winged Goddess using all the statues.
- You can skip the puzzle by clicking on the hint button.
- Click on the statues in the following sequence: AAA-BB-CCCCC-D.
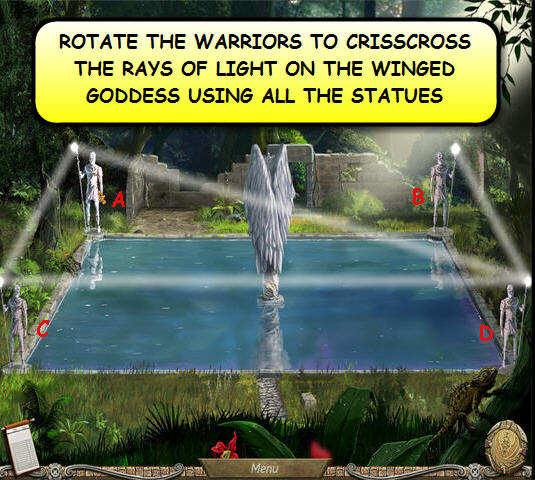
- Click on the statues in the following sequence: AAAA-BB-CCCCCCC-EEEE-FFFFF.
- Click on the statues in the following sequence: AAA-B-CCCCC-D-EEEEE-GGG-HHHH.
Chapter 18
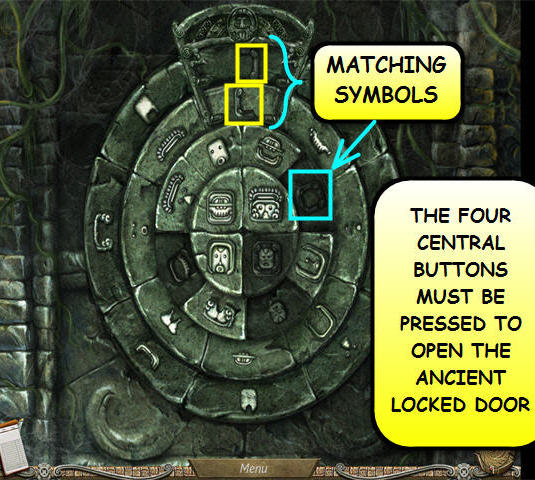
- Find all the hidden objects in the scene to trigger a puzzle.
- Rotate the two outer rings so that the two symbols shown inside the upper guide equal a symbol on the third ring.
- Click on the identified symbol on the third ring. The tile will stay down if correct.
- Find a symbol in the center that contains that combination and determine the two additional symbols needed to complete it.
- Rotate the outer two rings until the two missing elements are in the upper guide.
- Find the symbol on the third ring that contains those two elements and click on it. The tile will stay down if correct.
- Click on the symbol in the center that combines the two previously marked symbols on the third ring. All three tiles will stay down if correct.
- Repeat this process for the remaining center tiles.
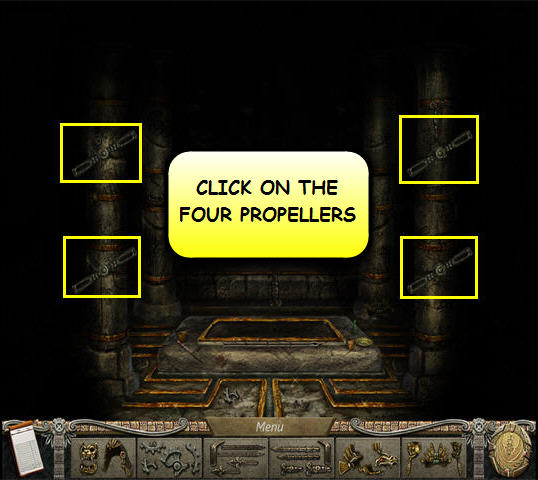
- Click on the four propellers.
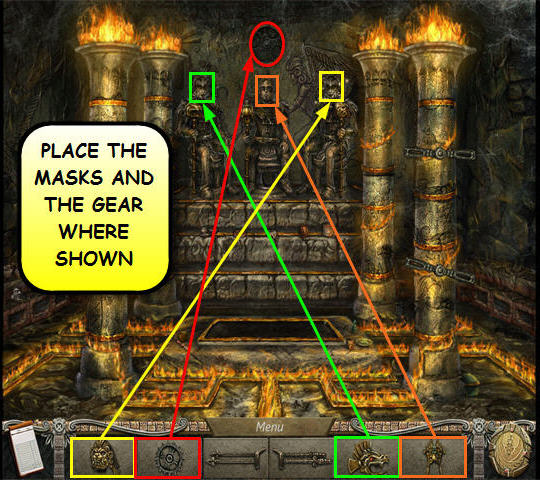
- Find all the pieces that will complete each of the inventory items.
- Pick up the MASKS from the inventory and place them on the corresponding statue.
- Use the GEAR from the inventory on the slot.
- Use the HANDLES from the inventory and place them on the stone box.
Created at: 2010-03-30