Walkthrough Menu
- At the Lawyer’s Office
- On the Train
- The Long Road Home
- The First Part
- The Second Part
- The Third Part
- The Fourth Part
- The Enemy and the Unlikely Friend
- The Fifth Part
- The Missing Keeper
- The Sixth Part
- At Tesla’s
- The Search
- Tesla’s Secret Machine
At the Lawyer’s Office
Stage 1: Signing the Contract
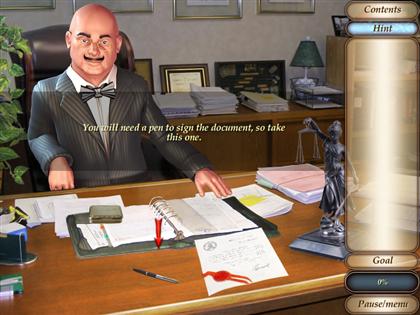
- Click and drag the pen over the contract to sign it.
On the Train
Stage 1: Find the Ferret
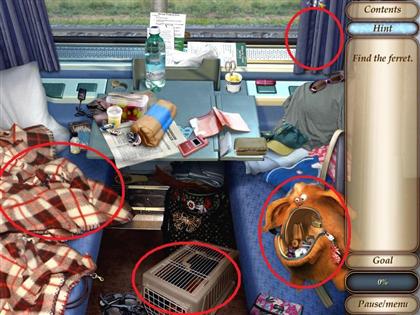
- Click on items to move them, revealing where the ferret is hiding.
- First, click on the purse to reveal the ferret.
- Second, click on the blanket to reveal the ferret.
- Third, click on the right blue curtain to reveal the ferret.
Stage 2: Rearrange the Globes
- You may skip this level, and do a hidden object scene instead.
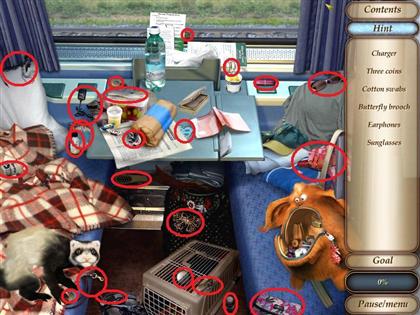
- Find all of the hidden items in the inventory list.
- As you collect objects, more will appear in the list.
- You cannot collect an item until it is visible on the list.
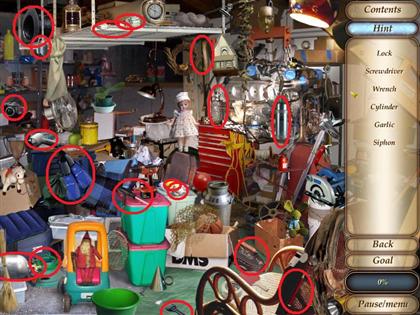
- See the screenshot for item locations.
- There are eight globes, number them 1 through 8, beginning with the first globe on the far left.
- Keeping the first globe in its position, Australia is in the lower left corner; click and drag the seventh globe to the second position.
- Click and drag the globe that is now in the sixth position to the third position.
- Click and drag the globe currently in the fifth position to the fourth position.
- Click and drag the glob that is currently in the sixth position to the eighth position.
- All the globes are now in their correct positions, and you may collect the hidden letter.
Stage 3: Repair the Cell Phone.
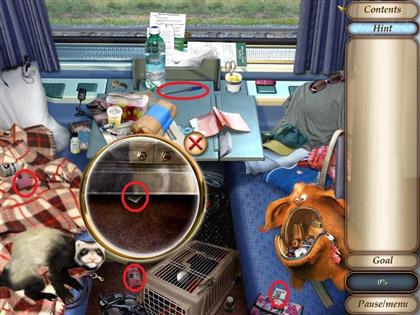
- First, collect all of the necessary pieces. Once you have located a piece, double-click it so that it will go to your inventory box. You will need the sim card, the battery, the back, and the main phone body. See the screenshot for each item’s location.
- The sim card is under the table. You will need to click and drag the pen, located on the table, to help dig the card out.
- After you have collected all the missing pieces, click and drag the sim card over the phone body.
- Click and drag the phone body over the battery, then the back, and then you are done.
- See the screenshot for each item’s location.
Stage 4: Gather Items
- Gather all of the objects listed on the right side; as you collect items, more will appear in the list. You will need to collect 23 items all together.
- You cannot collect any item until it appears on the list.
- Use the screenshot for reference as to the positions of these objects.
The Long Road Home
Stage 1: Make a Call
- Drag the board, located next to the manhole, over the puddle at the base of the stairs.
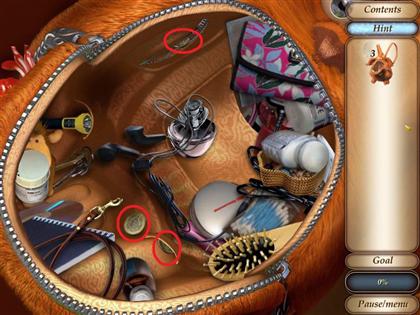
- Click on the purse to collect three coins.
- Click and drag the items in the purse out of the way to reveal the three coins.
- See the screenshot for the coins’ locations. Click on the coins to collect them.
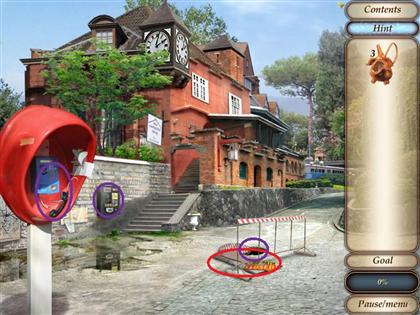
- Click on the phone card machine and drag the coins to the coin slot.
- Click on the button below the phone card emblem to retrieve the phone card.
- Click on the manhole to get tape from the construction worker.
- Drag the tape over the phone booth to repair the broken cable.
- Drag the phone card over the phone booth to make the call.
- See the screenshot for each item’s location.
Stage 2: The Central Square
- Drag the contents of the purse around to reveal the necessary items in the list.
- See the screenshot for locations of necessary items.
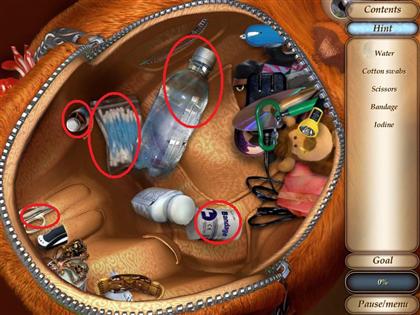
- Drag the water over the hurt finger.
- Drag the cotton swabs over the Iodine, and then drag it over the hurt finger.
- Drag the scissors over the bandage, and then over the hurt finger.
Stage 3: Grandma’s Gate
- First, click on the gate and ring the bell.
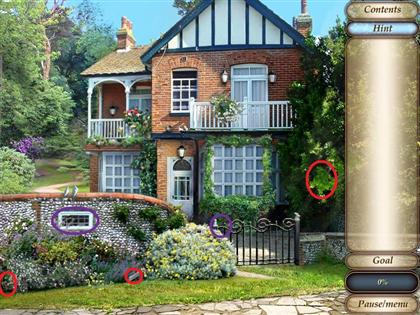
- Collect the two bricks, the rope, and the magnet. See the screenshot for each item’s location.
- The second brick and magnet are hidden in the grass under the bush, second from the right of the gate.
- You will need to click on the bush to reveal a magnified window to collect them.
- You will first need to click the swaying tree branch located just to the left of the gate.
- Place the red brick on the ground to the left of the gate, and then place the gray one on top.
- Click the tree branch again to collect it.
- Click on the window located in the middle of the rock wall, to the right of the gate.
- Your purse will now be in play. Click on it to find the flashlight..
- Click and drag the contents of the purse out of the way to reveal the flashlight.
- See the screenshot for the flashlight’s location.
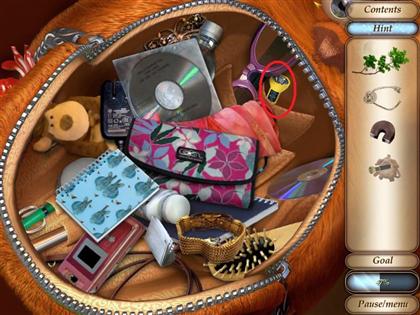
- Click on the window and drag the flashlight over it to reveal the keys.
- Drag the branch over the window to regain access to your purse.
- Click on the purse to find the penknife.
- Click and drag the contents of the purse around until you locate the penknife.
- See the screenshot for the location of the penknife.
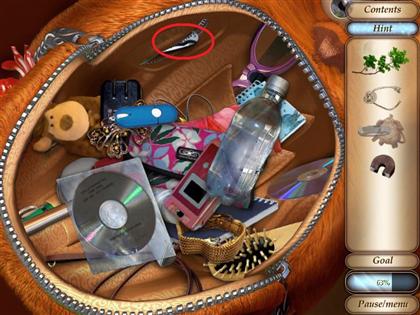
- After collecting the penknife, drag it over the branch to remove the leaves.
- Drag the branch over the window to knock the keys down.
- Drag the rope over the magnet, and then over to the window to collect the keys.
- Drag the smaller key over the gate to unlock it.
- Drag the larger key over the door of the house to open it.
- See the screenshot for all of the needed items’ locations.
The First Part
Stage 1: The Souvenir Shop
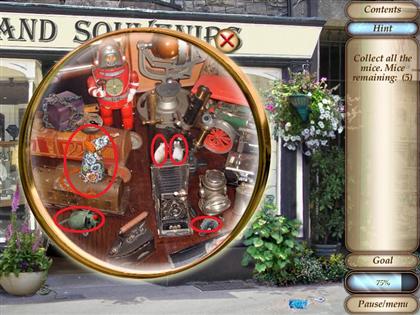
- First, you will need to collect all 20 mice. Some are stationary while others are hiding and will pop out for a few seconds.
- In the screenshot all of the mice that are stationary are circled in red. The non-stationary mice are in purple to denote where they will pop out.
- See the screenshot for the locations of the first 15 mice.
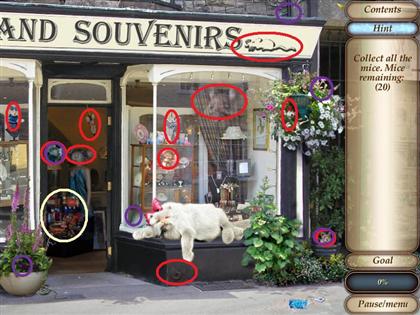
- To find the last five mice, you will need to click on the chest in the open doorway..
- See the screenshot for the remaining five mice's locations.
Stage 2: Assemble the Mouse Toy
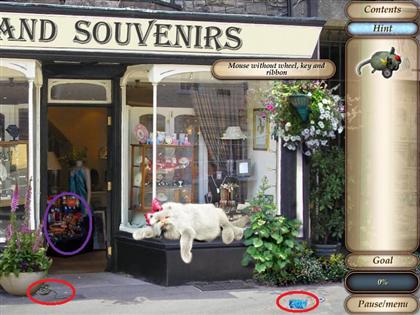
- Now you need to collect a wheel, a key, and a ribbon to assemble the mouse toy.
- Collect the blue piece of paper on the sidewalk to the lower left of the screen.
- Collect the string at the base of the planter, to the right of the doorway.
- See the screenshot for each item’s location.
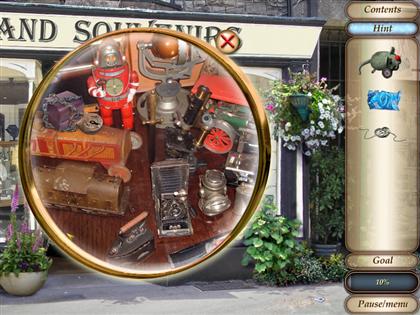
- Click on the chest in the doorway.
- First, collect the screwdriver to the left of the camera and drag it over the red and grey wheel just above it.
- Click on the iron to reveal the hidden key and collect it.
- Drag it over the locked box to open it and reveal a ball bearing.
- Collect the ball bearing and drag it over the red wind-up robot toy.
- See the screenshot for each item’s location.
- To get the ball to the center of the maze, click and hold the mouse while moving the ball bearing through the maze.
- Use the screenshot for the path to the middle; there may be more than one route.
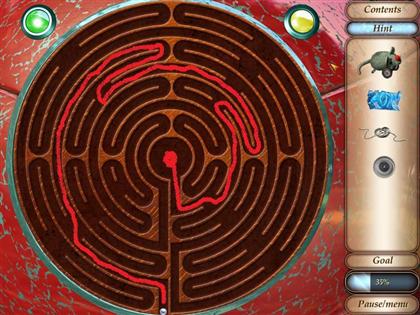
- Hint: If you are having trouble controlling the ball bearing, only turn the wheel slightly to keep it moving slowly. Rotate it back and forth slightly to slow it down, but keep it going in the same direction.
- Now click on the key in the robot’s hand to collect it.
- Drag the key over the mouse, and then the wheel..
- Drag the string, and then the piece of paper, over the mouse.
- Your mouse toy is now completely assembled. Drag and release the toy over the cat.
Stage 3: Find the Jewelry
- Collect all of the items that are outlined in the inventory box. As you collect items, more will appear in the inventory box. .
- Use the screenshot for the locations of the first set of items.
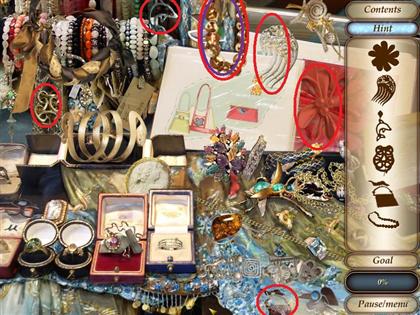
- When you click on the beaded necklace, circled in purple in the screenshot, it will fall apart. Find all of the beads to reassemble the necklaces, and then click on it to collect it.
- Use the screenshot for the locations of the beads, circled in purple, and the next five items, circled in red.
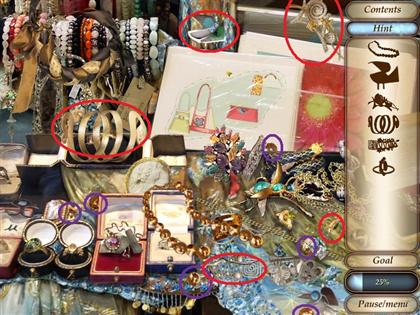
- Use the screenshot for the locations of the next eight items circled in red.
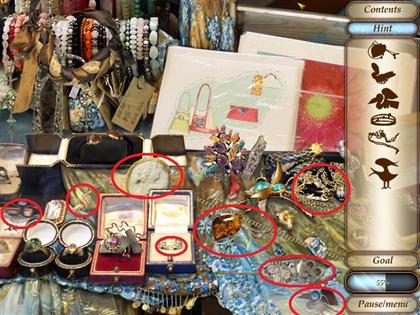
- Hidden behind the cameo broach is your final object; collect it and you are done.
The Second Part
Stage 1: Grandma's Kitchen
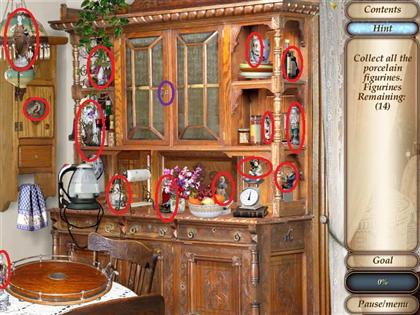
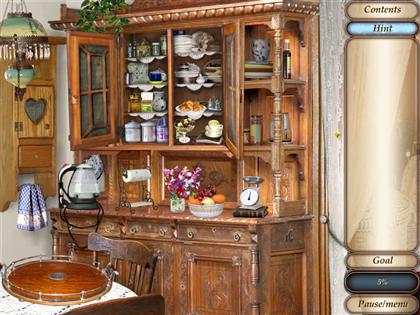
- Find all of the porcelain figurines.
- After collecting all the figurines, click on the key that reveals itself.
- Drag it over the keyhole in the cabinet door, circled in purple, to open it.
- See the screenshot for the figurines and keyhole locations.
- Click on the tea bag box two times to collect two tea bags.
- Collect the two teacups at the lower left corner of the cabinet.
- Collect the candies and the croissants.
- Put one tea bag in each cup and drag the water kettle over them to fill each one with hot water.
- Place all the items on the table.
- See the screenshot for each item’s location.
Stage 2: The Green Piglet Bar
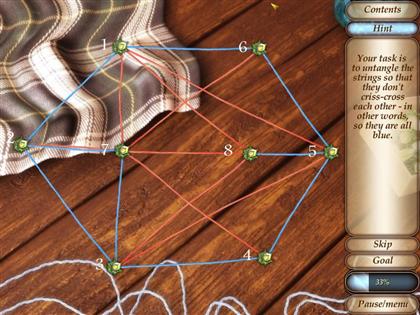
- Untangle the strings, by dragging the lights around, so that they do not cross each other..
- When a string is no longer crossing another, it will turn blue.
- Using the hint button will not help you with the answer, only with the gameplay.
- You may skip this level and do a hidden object scene instead.
- Find all of the hidden items in the inventory list.
- As you collect objects, more will appear in the list.
- You cannot collect an item until it is visible on the list.
- See the screenshot for item locations.
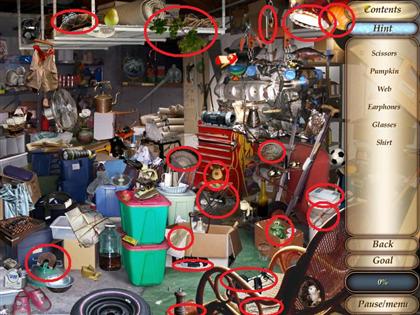
- There may be several formations that will achieve the final goal.
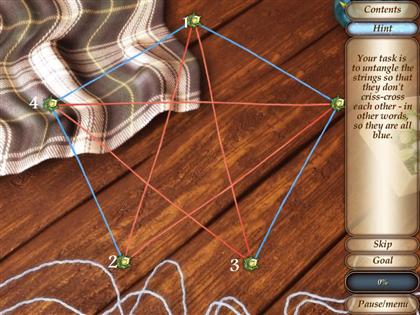
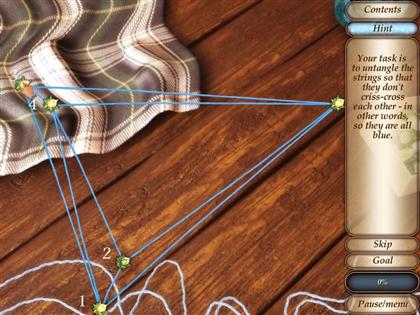
- In the first puzzle, you can achieve this by first moving the top most middle light (1 in the screenshot) to the outside of the lower left light (2 in the screenshot).
- Next, drag the lower right light (3 in the screenshot) to the outside of the current top left light (4 in the screenshot.).
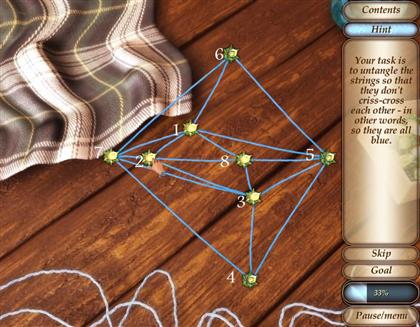
- See the two screenshots for original positions and final positions.
- Drag the top left light (1 in the screenshot) to the middle of the upper four lights at the left (6, 7, 8, and 5 in the screenshot).
- Drag the lower left light (3 in the screenshot) to the middle of the four lower right lights (7, 8, 5, and 4 in the screenshot).
- Drag the currently left-most light (2 in the screenshot) to the middle of the current positions of 7, 8, 2, and 3, in the screenshot.
- Drag the light that is currently furthest to the left (2 in the screenshot) to the other side of the light just to its left (7 in the screenshot)..
- See the two screenshots for original positions and final positions.
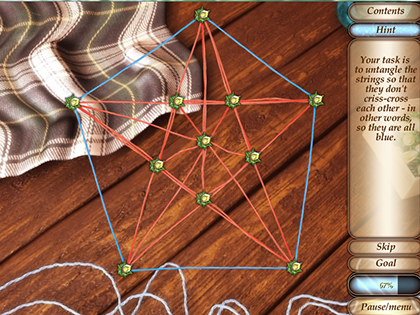
- For the third and final string puzzle you may use the hint button.
Stage 3: By the Piglet Bar
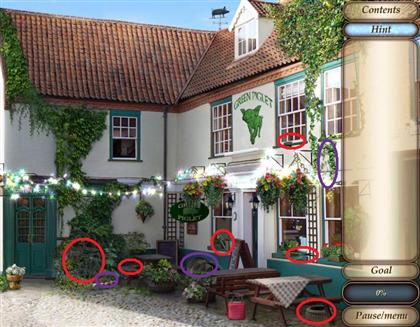
- Collect the pot stand, pot, garden shears, trowel, wire cutters, and watering can, all circled in red on the screenshot.
- Drag the pot over the stand.
- Drag the trowel over the dirt, circled in purple in the screenshot, and place it in the pot.
- Drag the garden shears over the wire ball, circled in purple in the screenshot, and place the wire in the pot.
- Drag the garden shears over the vine hanging on the building, circled in purple in the screenshot, and place the vine on the wire in the pot.
- Place the watering can in the pot.
Stage 4: Inside the Green Piglet Bar
- Move the crystal catcher around by clicking on the screen until you have captured all of the crystals. This will change the pivot point of the catcher.
- You may skip the level and do a hidden object scene instead.
- Find all of the hidden items in the inventory list.
- As you collect objects, more will appear in the list.
- You cannot collect an item until it is visible on the list.
- See the screenshot for item locations.
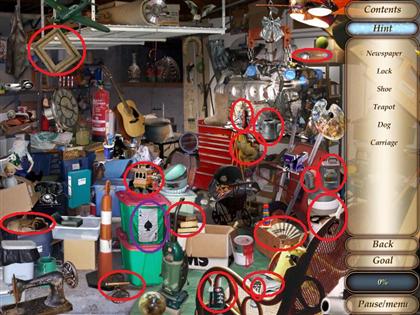
Stage 5: Outside the Piglet Bar
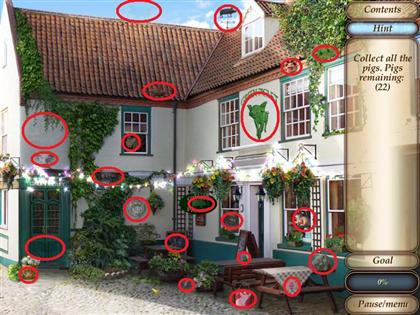
- Find all twenty-two pigs.
- See the screenshot for locations.
Stage 6: Inside the Green Piglet Bar
- Move the crystal catcher around by clicking on the screen until you have captured all of the crystals. This will change the pivot point of the catcher.
- You may skip the level and do a hidden object scene instead.
- Find all of the hidden items in the inventory list.
- As you collect objects more will appear in the list.
- You cannot collect an item until it is visible on the list.
- See the screenshot for item locations.
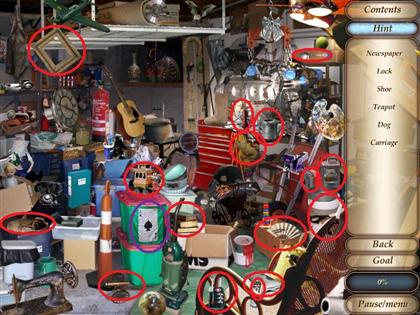
Stage 7: Steve’s Leather Jacket
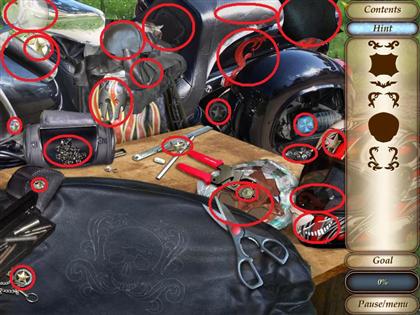
- Find the shapes outlined in the inventory box, and they will automatically be placed on the jacket. You cannot collect any items until you see its outline in the inventory box.
- See the screenshot for item locations.
The Third Part
Stage 1: Find the Ferret
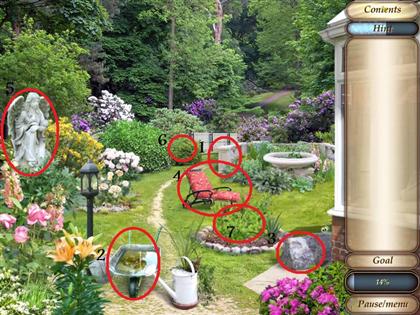
- Click on objects in the yard to reveal where the ferret is hiding. You will need to click on the ferret to catch him.
- The ferret’s first hiding spot is behind the stonewall surrounding the fountain.
- The ferret’s second hiding place is behind the wheelbarrow.
- The third hiding place is behind the rock at the bottom left of the screen.
- The fourth hiding spot is behind the lounge chair.
- His fifth hiding spot is behind the angel statue.
- The sixth hiding spot is behind the bush, just behind the lounge chair.
- The ferret’s seventh and final hiding spot is in the rock-ringed flower garden.
- See the screenshot for locations.
Stage 2: Find the Bugs
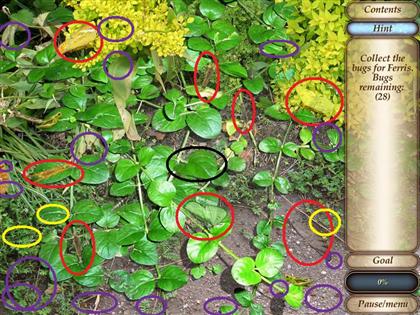
- In this scene some of the bugs are stationary, three become stationary, one is hidden, and the rest are constantly moving.
- In the screenshot, the stationary bugs are circled in red.
- The yellow circles represent where three bugs become stationary.
- For all of the mobile bugs the purple circles in the screenshot show the original locations of the bugs. They will cycle through the same paths over and over.
- The final bug is hidden under a leaf, circled in black. You must first hit the leaf to knock the bug out and the collect it.
Stage 3: The Amusement Park
- You will need to find five keys and repair the machine.
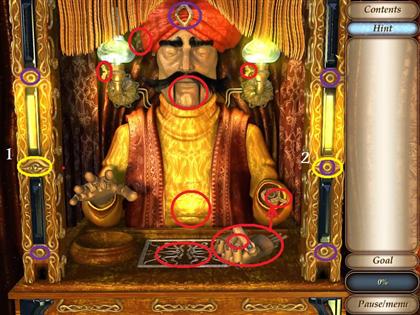
- The first key is in the arm with the missing hand. Grab the key and place it in one of the keyholes, circled in purple.
- Drag the hand over the arm to repair it.
- Find the gear hidden behind the turban.
- Click on the fortuneteller’s stomach and collect another key; place it in one of the keyholes, and then place the gear inside.
- Hold the mouse key down over the gear; turn it to open the hand and reveal a sapphire.
- Place the sapphire in the fortuneteller’s turban.
- Hold the mouse key down over the gear again and turn it to open his mouth, revealing another key. Collect the key and place it in one of the keyholes.
- The fourth and fifth keys are located on the two lamps. Collect them and place them in the final keyholes.
- Now you will need to turn all of the lights on. Each key will change a different set of lights on or off.
- From the beginning formation, wherein the middle lights on both sides are on and the top and bottom of both sides are off, click the middle key on the left side of the screen.
- Next, click the middle key on the right side of the screen. Now all the lights should be on.
- Click on the Roman numerals in the left and right bottom corners until they read VII and V to acquire the crystal ball.
- Place the crystal ball in its holder under the fortuneteller’s right hand.
Stage 4: Hangman
- Click on the typewriters’ keys to guess letters to form the secret words. You can make up to eight wrong guesses before you will need to try a new word.
- You will need to get three correct answers before moving on. If you cannot figure out a word, your hint button works nicely here.
- The words are random and any number of different words may appear.
The Fourth Part
Stage 1: The Chinese Restaurant
- Find all of the hidden items in the inventory list.
- As you collect objects, more will appear in the list.
- You cannot collect an item until it is visible on the list.
- See the screenshot for item locations.
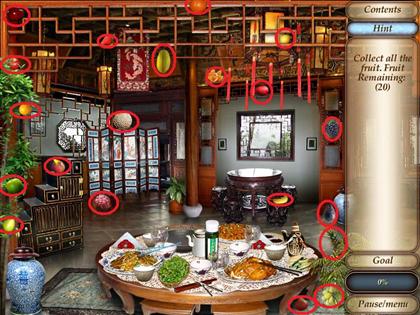
Stage 2: Find all of the Fruit
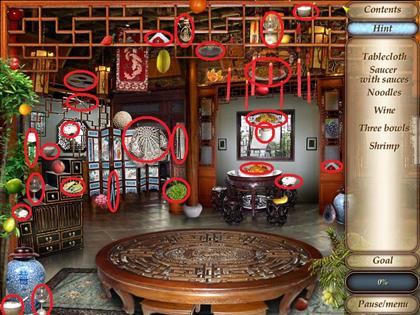
- Collect all of the hidden fruit in the scene.
- See the screenshot for the fruits’ locations.
Stage 3: Outside the Restaurant
- Move the basket from the left to the right with your curser; catch the eggs as they fall.
- After you catch 20 eggs, you can move on to the next stage.
Stage 4: The Chinese Quarter
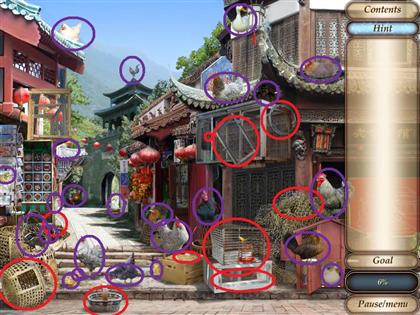
- To complete this round you will first need to repair the cages and make a net.
- Locate the cage door, rope, a lock, and some wire.
- The cage door is located on the crate in the lower middle of the scene (see the screenshot).
- Collect the door and place it over the wicker cage in the lower left corner of the scene.
- Click on the wire cage, next to the crate where you found the door, to set it upright.
- Now, click on the white cage just underneath the wire cage to open the door. Click inside to collect the rope; place it on the cage hanging overhead to fix its door.
- Click on the egg basket to move it, revealing the lock. Place the lock on the hanging cage’s door.
- Locate the frame for the net to the left of the scene (see the screenshot for its location). Collect the netting above the pink hen house in the bottom right corner, and the wire hanging on the cage with the tied door.
- First, drag the frame over the wire, and then over the netting. Now you are ready to catch some chickens!
- See the screenshot for all of the chickens’ locations.
Stage 6: Balance the Scales
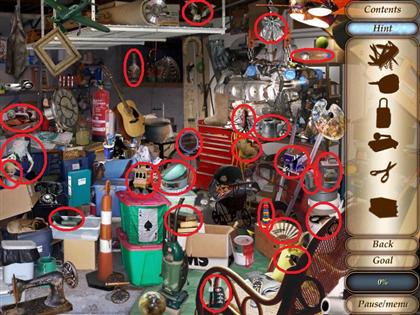
- You may skip this level and do a hidden object scene instead.
- Find all of the hidden items in the inventory list.
- As you collect objects, more will appear in the list.
- You cannot collect an item until it is visible on the list.
- See the screenshot for item locations.
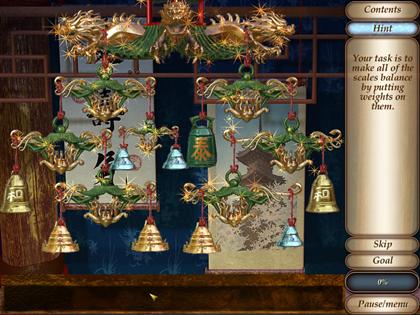
- To complete this stage you will need to place the different size bells on the scale until it is balanced.
- When one level of the scale is balanced, it will sparkle. Note: there may be more than one possible solution.
- You have nine bells with four different sizes: small, medium, large, and extra large. Five will hang on the left side of the scale, and four will hang on the right side of the scale.
- Place three medium bells and one small bell across the bottom tier, with the small one at the far right.
- Begin the second tier at the far left; hang one large bell, and then moving right, hang two small bells.
- In the fourth position from the right, on the second tier, place the green, extra large bell.
- Finish off with a large bell at the far right of the second tier.
The Enemy and the Unlikely Friend
Stage 1: The Chinese Quarter
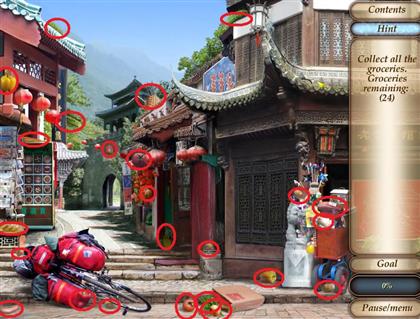
- Help the Hippie collect all of his groceries
- Collect all of the hidden groceries in the scene.
- See the screenshot for the locations of the groceries.
Stage 2: The Chinese Park
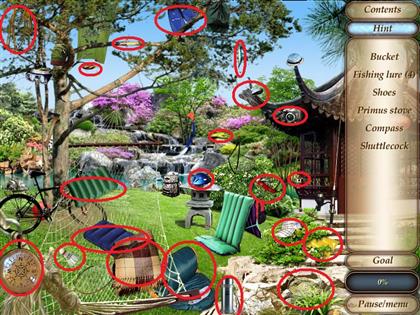
- Find all of the hidden items in the inventory list.
- As you collect objects, more will appear in the list.
- You cannot collect an item until it is visible on the list.
- The last item is the blanket on the hammock. Underneath the blanket is the air horn.
- See the screenshot for item locations.
The Fifth Part
Stage 1: Grandma’s Kitchen
- You may skip the level and do a hidden object scene instead.
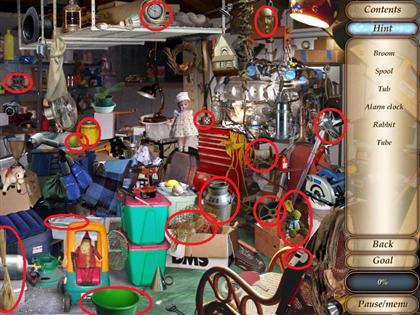
- Find all of the hidden items in the inventory list.
- As you collect objects, more will appear in the list.
- You cannot collect an item until it is visible on the list.
- See the screenshot for item locations.
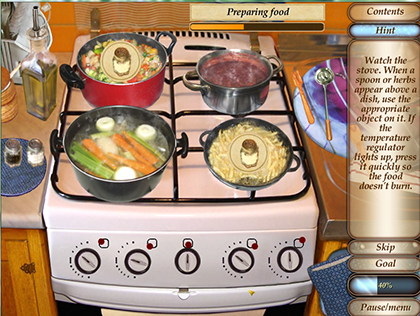
- In this stage you have four pots on the stove into which you will need to add different ingredients; stir and change the temperature.
- If a pot begins to burn and the burner dial turns red, you will need to click on it to change the temperature.
- On the left side of the stove are salt, pepper, and oil. Add the ingredients as the image of the item appears over the pot. For instance, if salt appears drag the salt over the post and click on it to add salt.
- On the right side of the stove are a fork and spoon. Stir as needed, indicated by a spoon or fork symbol over the pot.
Stage 2: Grandma’s Room
- Find all of the hidden items in the inventory list.
- As you collect objects, more will appear in the list.
- You cannot collect an item until it is visible on the list.
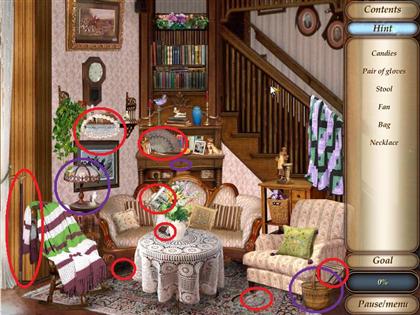
- Click on the basket, circled in purple in the screenshot, and move the items around until you find two gloves and a red string.
- Place the red string on the lamp sitting on the table to the left of the scene.
- Now you can look under the couch to find a key.
- Place the key in the keyhole of the drawer behind the couch.
- Move the items in the drawer around and click on the green box. Behind it you will find the "business card."
Stage 3: At the Hotel
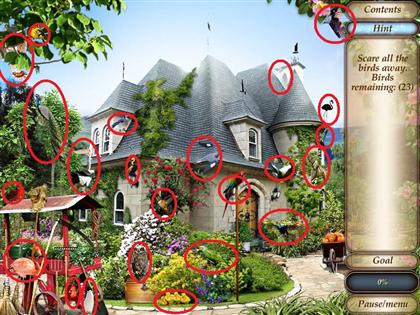
- Collect all of the hidden birds in the scene.
- See the screenshot for all of the birds’ locations.
Stage 4: Make a Scarecrow
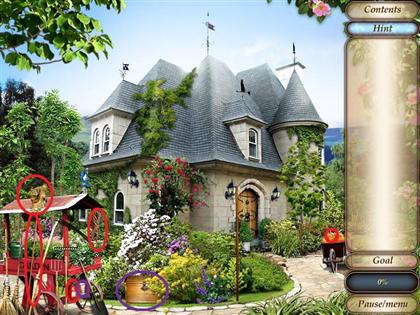
- You will need to collect a straw hat, a pumpkin, a pole, some rope, a bolt, an oilcan, and a shirt.
- The hat, pole, oilcan, and rope are all located on the red wagon, and the pumpkin is in the wheelbarrow to the right of the scene. See the screenshot for each item’s location.
- Next to the red oilcan is a tin can. Click on it and move items out of the way to reveal a bolt. The bolt is behind the large black clip.
- Place the bolt on the chest’s hinge, located near the red wagon.
- Grab the oilcan and drag it over the hinge to loosen it, and then slide the hinge open. Hint: Click and drag to the right directly over the bolt’s head.
- Collect a shirt from the chest.
- To assemble the scarecrow, place the pumpkin on the freestanding pole to the right of the chest, followed by the hat.
- Place the pole that you found earlier under the pumpkin and then tie it with the rope.
- Finish the scarecrow off by placing the shirt over it.
Stage 5: Find all the Mice
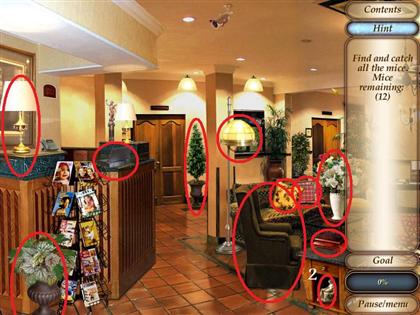
- Collect all of the hidden mice in the scene.
- Click on objects and move them to scare the mice out of hiding.
- At least one object will have two mice hiding behind it.
- See the screenshot for each mouse’s location.
Stage 6: Catch all the Mice
- Click on the hat to drop it over the mice until you have caught all of them.
- Repeat this three times.
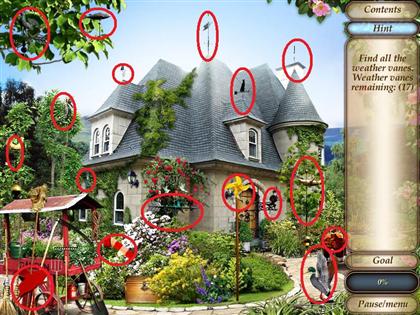
Stage 7: Find the Weathervanes
- Collect all of the hidden weathervanes in the scene.
- See the screenshot for the locations of the weathervanes.
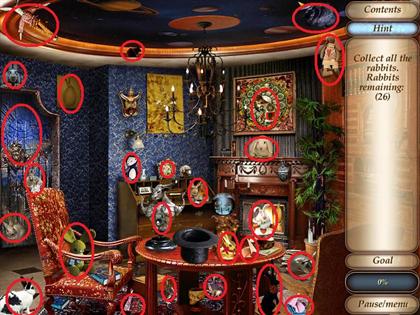
Stage 8: The Illusionist’s Room
- Collect all of the hidden rabbits in the scene.
- See the screenshot for the locations of the rabbits.
Stage 9: Unlock the Zodiac Painting
- Collect the key hidden in the chandelier.
- Locate the pencil which is on the floor in the lower left corner of the scene.
- Drag the pencil across the notebook located on the right side of the table to reveal the correct order for the zodiac painting.
- Click on the zodiac painting above the fireplace and rearrange the zodiac symbols as they are shown on the notepad.
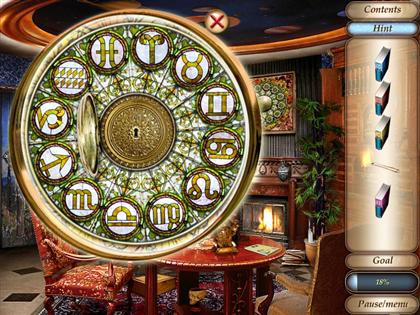
- When all the symbols are in the correct positions, the painting will open to reveal a keyhole. Insert the key and collect the jewel hidden inside.
- Place the jewel on the doorknocker located at the back left of the scene.
- Collect four books. See the screenshot for each book’s location.
- Click on the fireplaces mantel and place the books in order, 1 to 4 from left to right.
- Collect the horn and place it on the statue sitting on the table to get another jewel.
- Place the jewel on the doorknocker.
- Grab a piece of kindling located next to the fireplace and stick it in the fire.
- Drag the kindling across the candelabra sitting on the table, to light the candles, and then click on the crystal ball.
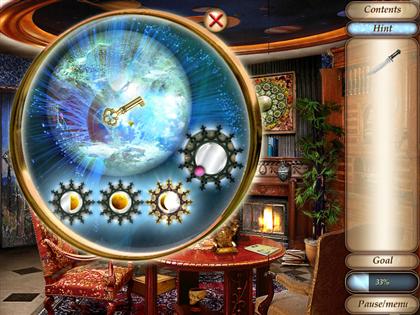
- You will need to put all of the moons in the circles in the correct moon phase.
- First click on a moon at the bottom until it lights up. Spin the dial at the top right until the moon is in the correct phase. Repeat this step for the other two moons to collect a key. Hint: pay attention to what side the shadow is on when the three moons appear in the center. For instance, the crescent moon may be waxing or waning.
- See the screenshot for the proper moon phases.
- Collect the knife that is located in the planter next to the fireplace.
- Use the key to open the box under the table, and then use the knife to pry the lid open.
- Collect the handle for the door and place it on the doorknocker.
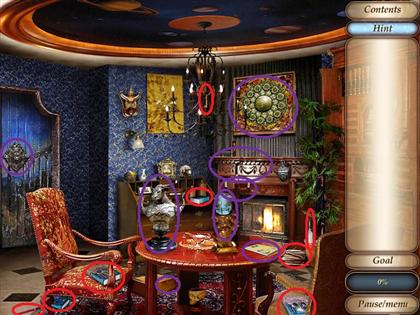
Stage 10: Open the Lock
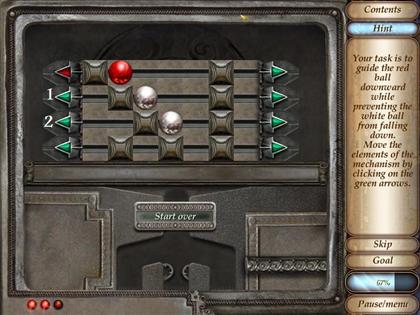
- Move the red ball down by clicking on the green arrows to move the blocks left or right. You cannot let the white ball fall all the way through.
- You may skip the level and do a hidden object scene instead.
- Find all of the hidden items in the inventory list.
- As you collect objects, more will appear in the list.
- You cannot collect an item until it is visible on the list.
- See the screenshot for item locations.
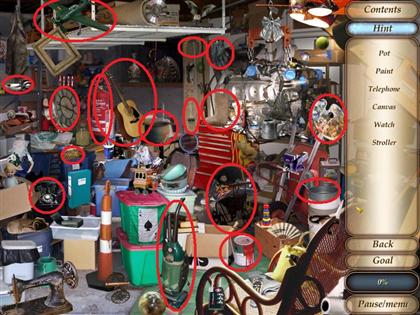
- There may be more than one possible solution for the following puzzles.
- In the first trial, click the lower right green arrow.
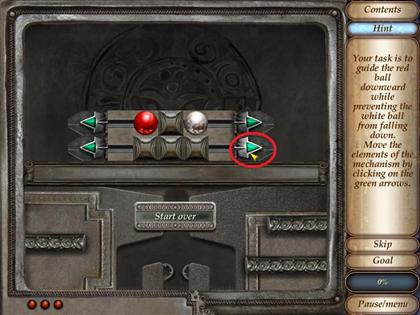
- See the screenshot for a numbered move chart.
- In the second trial, first click the top right green arrow, followed by the fourth from the top on the left side.
- Next, click the bottom green arrow on the left side, followed by the third from the top on the right side.
- Finish by clicking on the fourth from the top green arrow on the right side.
- See the screenshot for a numbered 1 through 5 move chart.
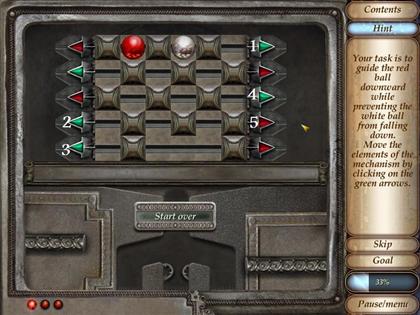
- In the third and last trial, first click on the green arrow second form the top on the left side, followed by the third from the top on the left side.
The Missing Keeper
Stage 1: Grandma’s Garden
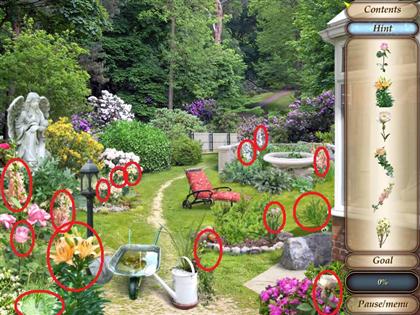
- Collect all of the flowers shown in the item list.
- As you collect the flowers, more will appear in the list.
- You cannot collect an item until it is visible on the list.
- See the screenshot for the locations of the different flowers.
Stage 2: The Green Piglet Bar
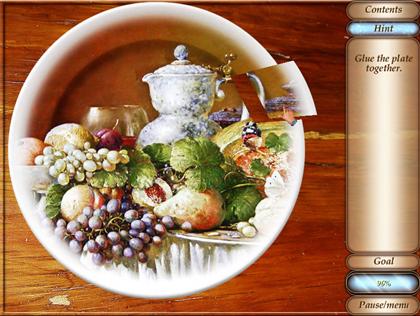
- Reassemble the plate by dragging pieces next to its corresponding piece. Hint: Use the outside rim as a beginning point.
- See the screenshot for the plate’s final design.
Stage 3: Clean up the Room
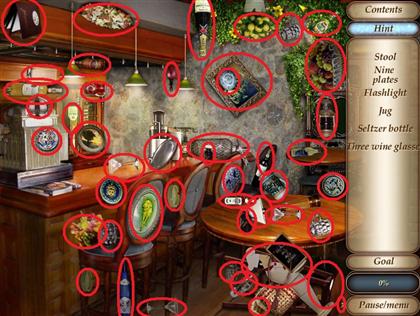
- Find all of the hidden items in the inventory list to clean up the room.
- As you collect objects, more will appear in the list.
- You cannot collect an item until it is visible on the list.
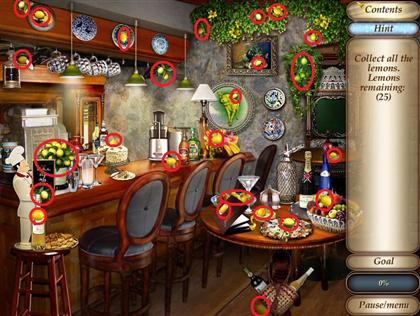
Stage 4: Find the Lemons
- Collect all of the hidden lemons in the scene.
- See the screenshot for the locations of the lemons.
Stage 5: Make a Lemon Soda
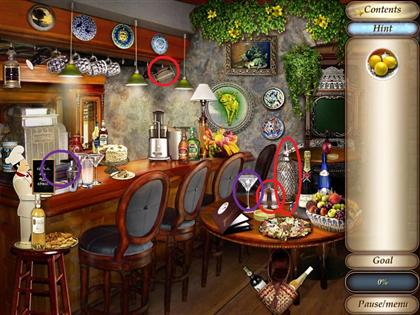
- Locate and collect the soda and the sugar on the table; locate a juice cup hanging over the bar.
- You will need a knife and spoon (both located in the register). Click on the register to open it and retrieve both the knife and the spoon.
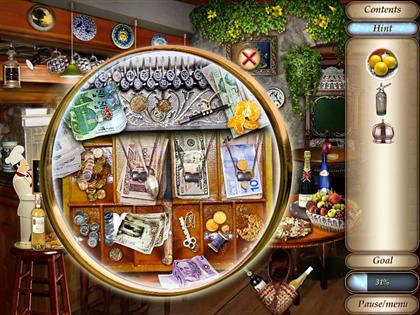
- Locate the juicer on the bar and place the juice cup next to it.
- Drag the knife over the lemons located in your inventory list to cut them in half.
- Grab the lemons and place them in the juicer.
- Grab the glass of juice and pour it into the martini glass located on the table, and then add the soda.
- Finally, drag the spoon over the sugar bowl, and then over the drink to complete the task.
Stage 6: The Central Square
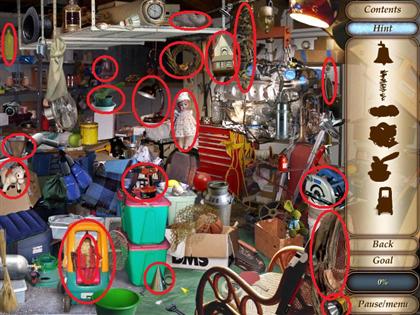
- You may skip the level and do a hidden object scene instead.
- Find all of the hidden items in the inventory list.
- As you collect objects, more will appear in the list.
- You cannot collect an item until it is visible on the list.
- See the screenshot for item locations.
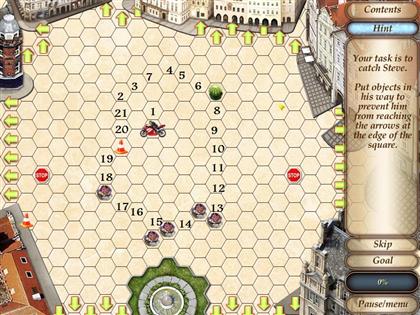
- In order to keep Steve from reaching the outside border, you will need to block his path by surrounding him with objects.
- To place an object in his way, simply click on the tile you wish to block.
- Every time you place an object, Steve moves one space towards the perimeter. Note: there may be several other successful strategies.
- See the screenshot and follow the numerical sequence to beat the level. Hint: If you do not start from the beginning scene, the sequences will not work. Simply go back to the main menu and hit play. Choose this level to start over from the beginning sequence.
Stage 7: Replace Steve’s Pairings
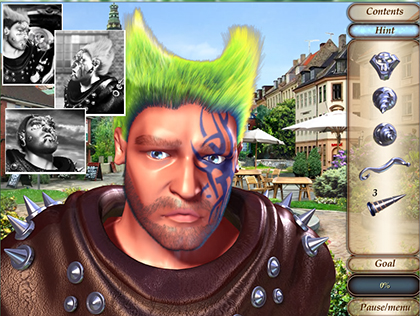
- Grab the differently-shaped earrings from the inventory list and place them on Steve’s face where they should be. Pan over the photos in the top left corner for reference as to each earring’s location.
The Sixth Part
Stage 1: The Square by the Station
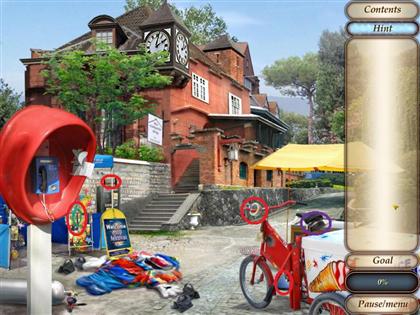
- You will need to find all of the clock’s parts to repair it.
- Find all of the hidden clock parts in the inventory list.
- As you collect the parts, more will appear in the list.
- You cannot collect an item until it is visible on the list.
- See the screenshot for the different part’s locations.
Stage 2: Repair the Mechanism
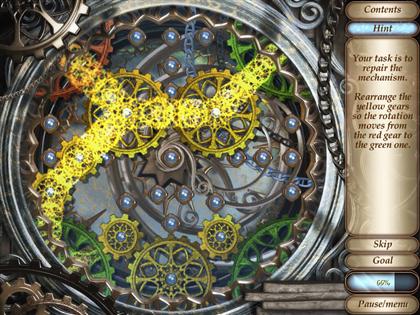
- Rearrange the yellow gears to make a connection between the red and green gears so that they all rotate. Hint: When you pick up one gear, the only possible moves will light up in green; however, if you move another gear out of the way, other options will open up.
- There may be more than one possible arrangement.
- See the screenshots for the three different levels’ arrangements.
Stage 3: Inflate the Clown
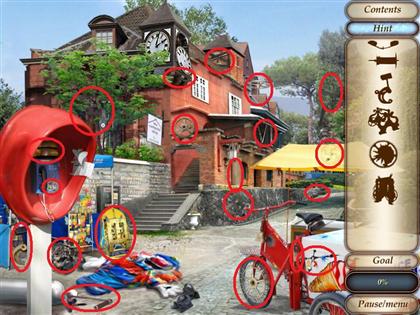
- Locate the tape and drag it over the clown.
- Locate the connecting pipe and drop it over the air canister.
- Collect the weight that is under the bicycle and place it next to the clown.
- Collect the string and drag it over the weight to attach it to the clown.
- Click on the bag that is under the bike seat to collect the wrench, and drag it over the air canister to turn it on.
- See the screenshot for each of the item’s locations.
Stage 4: Tesla’s Box
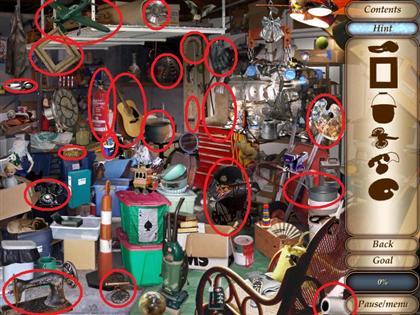
- You may skip the level and do a hidden object scene instead.
- Find all of the hidden items in the inventory list.
- As you collect objects, more will appear in the list.
- You cannot collect an item until it is visible on the list.
- See the screenshot for item locations.
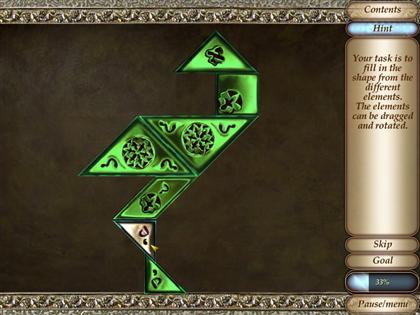
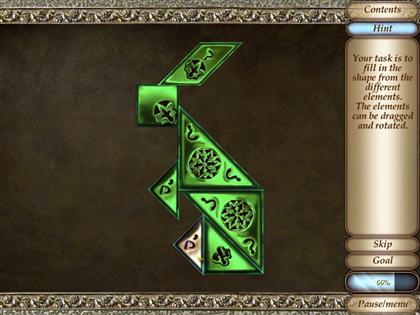
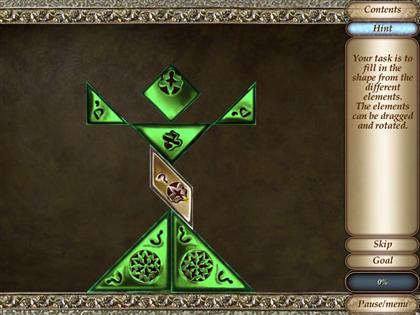
- Use the different shapes to fill in the outline. Click on each individual shape to rotate it.
- You will need to complete three puzzles for this round.
- See the screenshots for the solutions.
At Tesla’s
Stage 1: Nikola Tesla’s museum
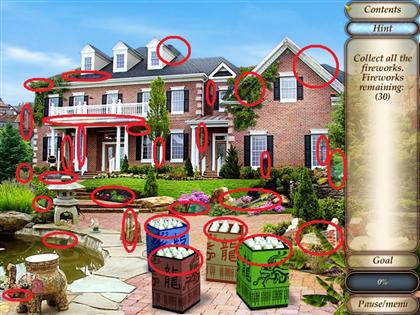
- Locate all of the hidden fireworks in the scene.
- See the screenshot for all of the fireworks’ locations.
Stage 2: Make a Dragon
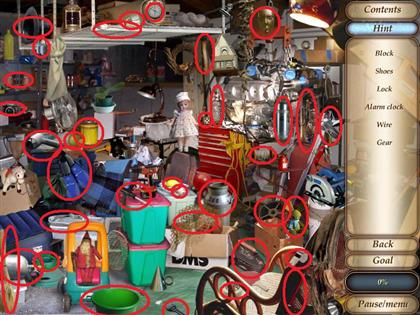
- You may skip the level and do a hidden object scene instead.
- Find all of the hidden items in the inventory list.
- As you collect objects, more will appear in the list.
- You cannot collect an item until it is visible on the list.
- See the screenshot for item locations.
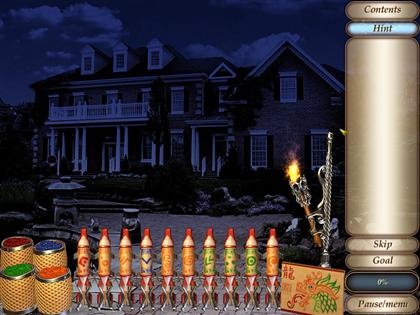
- For this purpose we will number the fireworks 1 through 10 beginning with the top row, right to left. So 1 through 4 are on the top row, 5 through 8 are in the middle row, and 9 and 10 are on the bottom.
- Move each firework and place it in positions 1 through 10, beginning with the far left and working right.
- Grab firework 1 and drag it over the blue die; click to change its color. Place it in the fourth position from the left.
- Grab firework 2 and place it in the second position from the left.
- Grab firework 3 and die it green, and then place it in the eighth position from the left.
- Die the fourth firework orange and place it in the tenth position from the left.
- Die the fifth firework orange and place it in the third position from the left.
- Die the sixth firework green and place it in the seventh position from the left.
- Place the seventh firework in the first position from the left.
- Die the eighth firework orange and place it in the sixth position from the left.
- Die the ninth firework green and place it in the ninth position from the left.
- Die the tenth firework orange and place it in the fifth position from the left.
- Grab the torch and light all of the fireworks by dragging it across the wicks, and you have created a dragon.
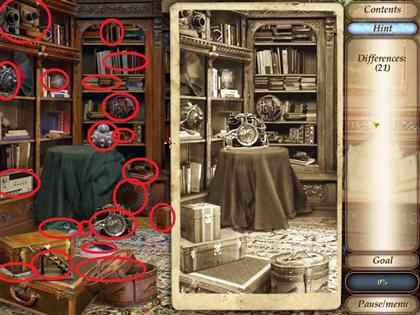
Stage 4: Spot the Difference
- Find the 21 differences between the two shots.
- Use the screenshot for the locations of all of the differences.
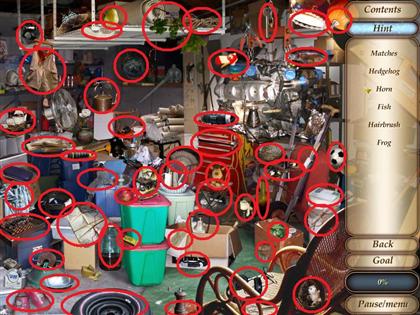
Stage 5: Turn out all of the Lights
- You may skip the level and do a hidden object scene instead.
- Find all of the hidden items in the inventory list.
- As you collect objects, more will appear in the list.
- You cannot collect an item until it is visible on the list.
- See the screenshot for item locations.
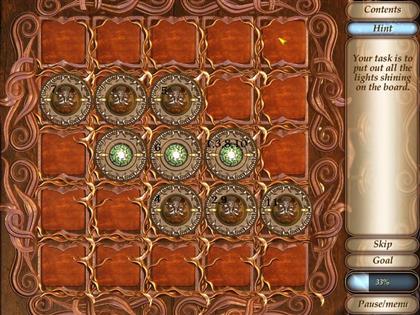
- In this stage you will need to turn out all of the lights.
- You can only click on a light that is on. Each one will affect a different set of lights to turn them on or off.
- There may be more than one solution to these puzzles.
- The first board has six lights, which can be numbered 1 through 6 beginning with the top row left to right.
- First, click light 6 followed by light 1. Then, click 2, 3, and 4.
- Click 2 one more time, and all the lights should turn off.
- See the screenshot for the numerical sequence.
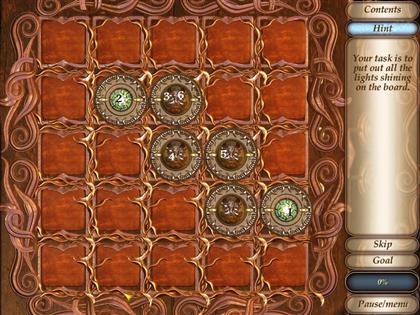
- The second screen has nine lights, which we will number 1 through 9, beginning with the top row left to right.
- Click the sixth light once followed by the eighth light, and then the sixth light again.
- Click the seventh light followed by the third light, and then the fifth light.
- Click the first light followed by the sixth light, and then the eighth light.
- Click the sixth light again, and then finish with the ninth light; all the lights should be off.
- See the screenshot for the numerical sequence.
- The third and final board has 11 lights, which we will number 1 through 11, beginning with the top row left to right.
- Click the fourth light followed by the ninth light, and then the tenth light.
- Click the ninth light again followed by the sixth light, and then the first light.
- Click the third light and finish with the second. All of the lights should be out.
- See the screenshot for the numerical sequence.
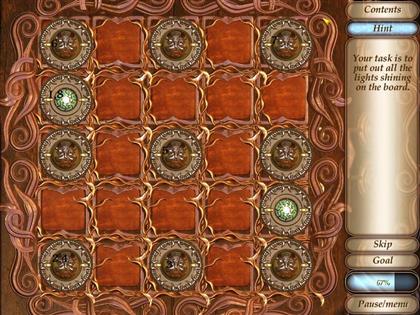
The Search
Stage 1: Find the Video Feed
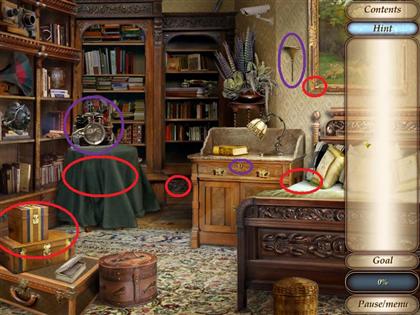
- Move the boxes off of the chest on the floor, and then click on it to open it. Collect the vase inside and place it on the wall sconce circled in purple in the screenshot.
- This will make the frame over the sconce drop, and you will be able to collect the key behind it.
- Drag the key over the drawer in the dry sink, just below the sconce, and collect the handle from inside.
- Click on the machine located on the table and spin the crank clockwise until it opens, revealing a key.
- Use the key to open the box that is now on the bed to collect the "connecter."
- Click on the green tablecloth, lying over the table, and then click the table itself.
- Click on the tabletop and, while holding down the mouse, spin it clockwise until the top is fully opened.
- Solve the puzzle on top (to collect a key) by putting the numbers in the correct sequence so that each equation equals the next. For example (5-2) + (2+1).
- See the screenshot for the correct arrangement.
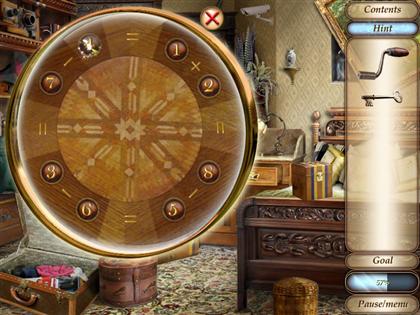
- Click on the lower right corner of the large shelf between the table and the dry sink, and then insert the key.
- Drag the connecter over the handle and insert it in the triangle hole next to the keyhole.
- See the screenshot for all of the objects locations.
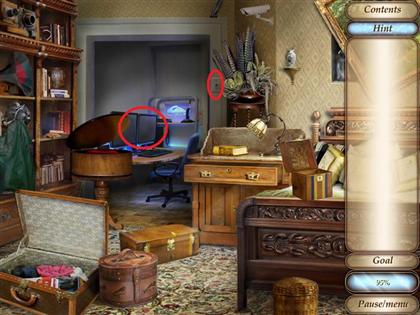
- Click on the light switch, and then the computer screens.
- See the screenshot for the locations.
Stage 2: Find the Code
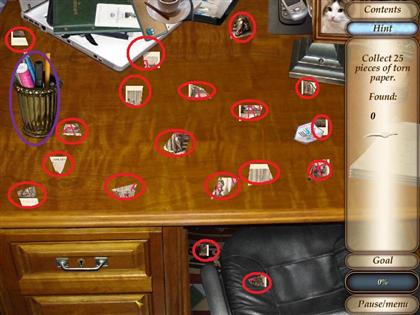
- Move the objects on the desk around to find the pieces of the torn picture.
- Use the screenshot for the locations of the scraps.
- Click on the cup to knock it over, uncovering a key and two pieces of the torn picture.
- Use the key to open the drawer to find the last five pieces of the picture.
Stage 3: Assemble the Picture
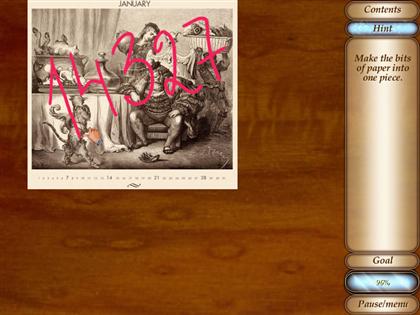
- Click and drag the different pieces around to assemble the picture. Hint: begin by assembling the perimeter; it is outlined with a white border.
- Use the screenshot for reference as to the final image.
Stage 4: Enter the Code
- Enter the code by clicking on the keyboard, and then hit the enter key on the same keyboard.
Tesla’s Secret Machine
Stage 1: Untie all of the Balloons
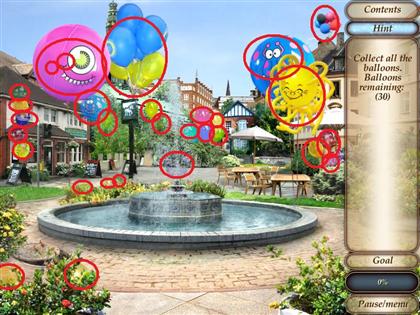
- Click on all of the balloons hidden in the scene. Hint: there is one bunch of balloons that will float around after you click on them. You will need to click on each individual balloon to fully release them.
- See the screenshot for all of the hidden balloon locations.
Stage 2: Under the Fountain
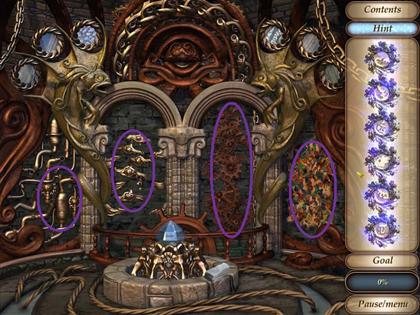
- First, click on the pipes to the far left of the scene to enter the first mini-puzzle of this stage.
- Click on each individual pipe section to rotate it until all of the pipe sections connect, and there are no open ends.
- See the screenshot for the correct configuration.
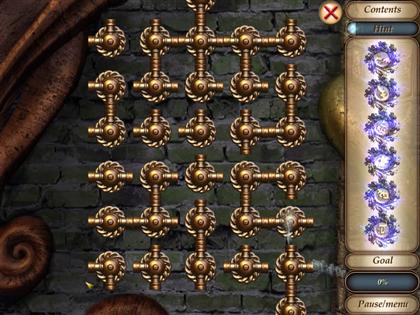
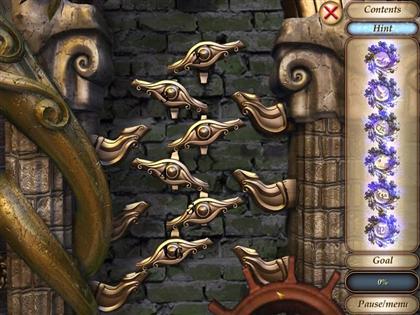
- Next click on the eye-shaped pipes located in the left archway to enter the second mini-puzzle in this stage.
- You will need to flip the pipes so that the water flows to the wheel.
- There are six pipe sections that we will number 1 through 6, top to bottom.
- Each pipe section will switch one to two other pipe sections’ directions, as well as its own.
- There may be more than one solution to this puzzle.
- First, click the sixth section followed by the first section, and then the second section.
- Next, click the fourth section followed by the fifth, and then finish with the sixth section.
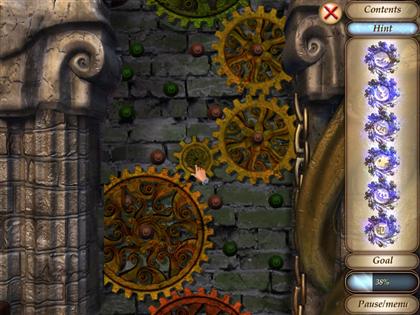
- Next, click on the broken gears inside of the right archway.
- Rearrange the yellow gears to make a connection between the red and green gears so that they all rotate. Hint: when you pick up one gear, the only possible moves will light up in green; however, if you move another gear out of the way, other options will open up.
- There may be more than one possible arrangement.
- See the screenshots for the correct gear arrangements.
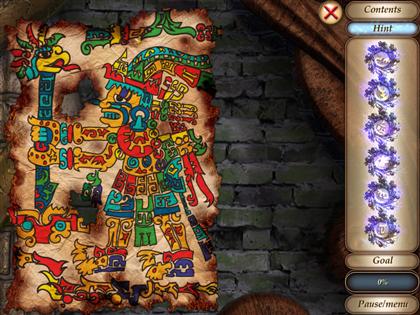
- Next, click on the colorful paper pieces to the right of the right archway.
- Assemble the picture by dragging the pieces next to their matching pieces. Hint: use the burnt edges to help assemble the perimeter first; however, there is a small burnt hole in the middle.
- See the screenshot for the image’s final arrangement.
- Once you have the picture repaired, it will have six glowing circles on it. Each circle shows you a shape and its color. Use this to help you make the final arrangement of the machine pieces you have collected throughout the game.
- The six pieces are in your inventory list which we will number 1 through 6 from top to bottom.
- 1 = red, 2 = green, 3 = Yellow, 4 = orange, 5 = dark blue, 6 = light blue.
- Place each piece in the slot with the corresponding color.
- See the screenshot for the final arrangement.
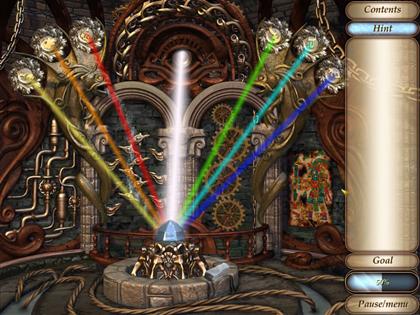
- The last thing to do is hit him over the head with the brick located in your inventory list, and then you have won the game.
Created at: 2009-05-07

