Walkthrough Menu
General Tips
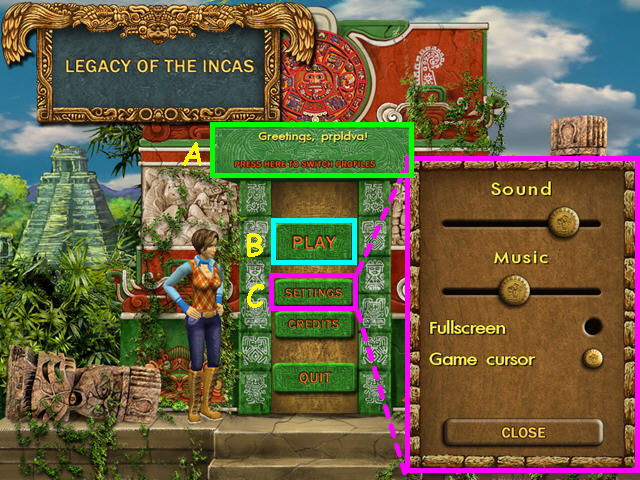
- Click on the profile panel on the main screen to add or delete player profiles (A).
- Select 'Play' to begin or continue your game (B).
- You may play this game in full screen or windowed mode by changing the options in the Settings menu (C).
- You may adjust the volume of effects and music in the Settings menu.
- You may also revert to the system cursor from the Settings menu.
- The Settings menu is accessible from both the main screen and the in-game menu.
- The best way to use this walkthrough is by clicking on the 'CTRL' and 'F' keys on your keyboard to simultaneously bring up a search box.
- Type the keyword into the search box at the bottom of your screen and click on 'NEXT' to find the section you need help with. Clicking 'NEXT' again will bring up all instances in which that keyword was mentioned in the guide.
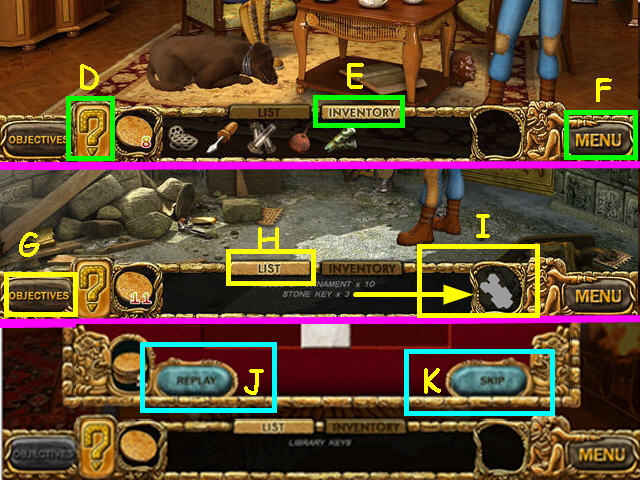
- Hints are unlimited, but you must wait for the question mark meter to re-fill (D).
- Click on the inventory tab at the bottom to show your inventory (E).
- Click the menu button to access the settings menu (F).
- The objectives button will tell you the current goals (G).
- Click on the item tab at the bottom to show the items you need to locate (H).
- Hover your mouse over an item to see its shape (I).
- Should you get stuck in a mini-game, press the replay button to start over (J).
- Collect the gold coins you find to buy mini-game skips (K).
- Coins appear at random intervals, sometimes just waiting will make one appear.
- Coins will be circled in white throughout this guide.
Part 1: Charleston Manor
- There will be a brief tutorial.
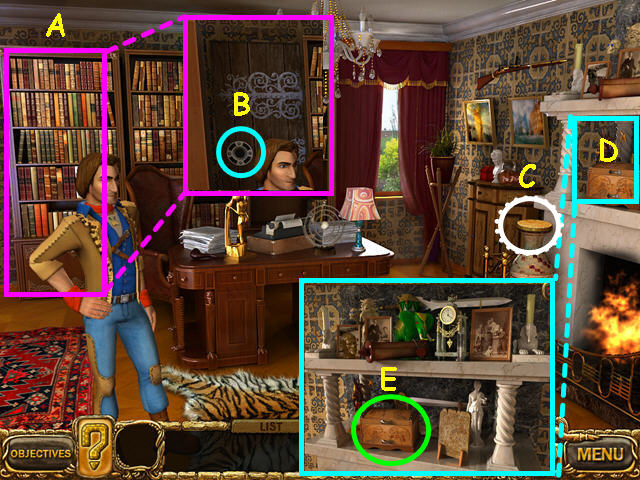
- Look at the left bookcase (A).
- Look at the lock on the secret door to learn you need keys(B).
- Make sure to click on items with the gears cursor twice to activate the goal.
- Take the coin on the vase (C).
- Coins will be circled in white dots throughout this guide.
- Look at the close-up of the mantle (D).
- Select the box for a mini-game (E).
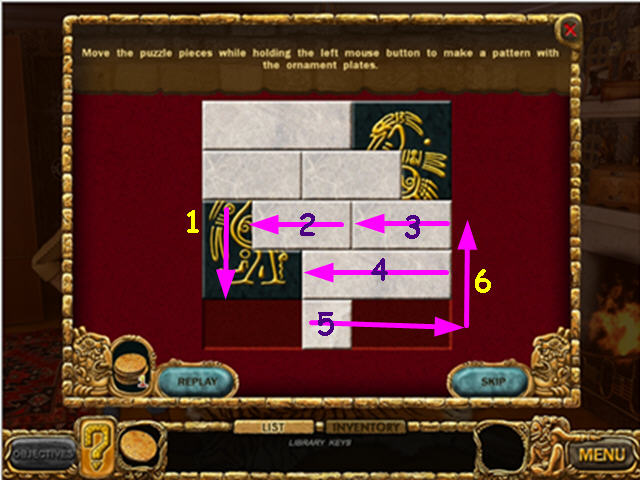
- The object is to move the two colored tiles together to create a picture.
- Left-click and drag to move a piece into position.
- There are several solutions to this mini-game, yours may differ.
- Move the pieces in numerical order.
- This mini-game will cost 1 coin to skip.
- Moves 1 through 6 are shown here.
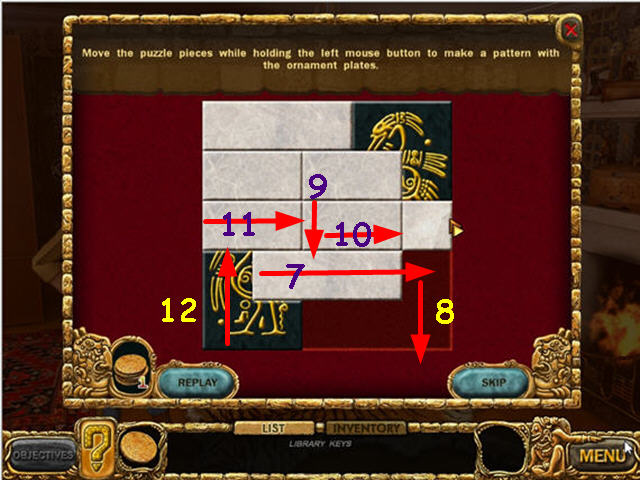
- Moves 7 through 12 are shown here.
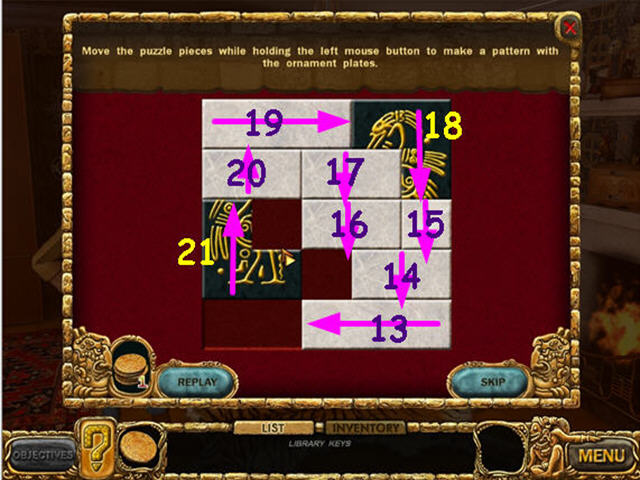
- Moves 13 through 21 are shown here.
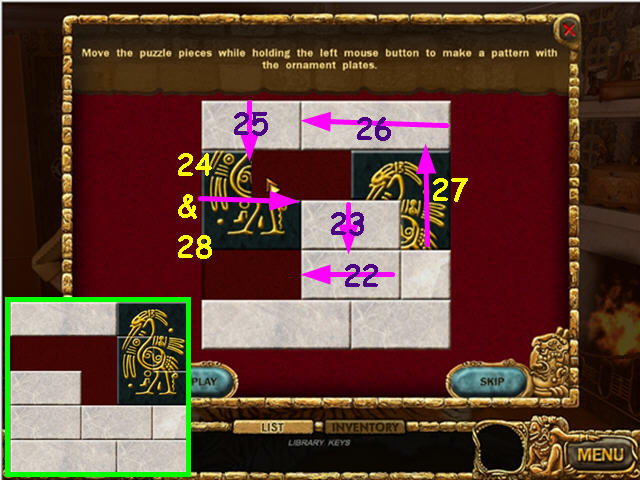
- Moves 22 through 28 are shown here.
- The LIBRARY KEYS will go into your inventory.
- Use the LIBRARY KEYS on the door lock, then enter the library.
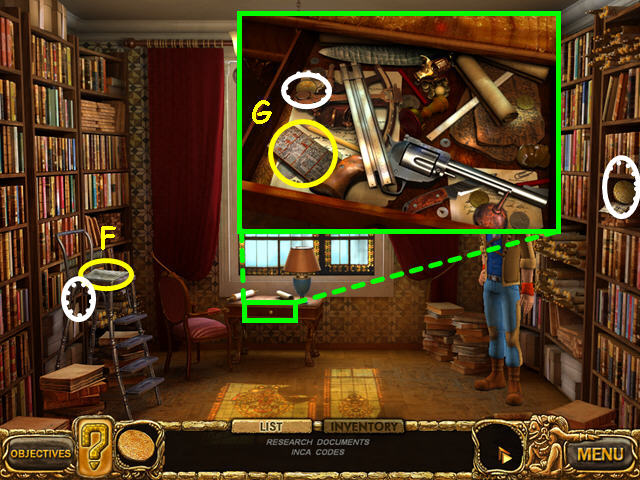
- Take the RESEARCH DOCUMENTS from the step ladder (F).
- Look in the drawer and take the INCA CODE (G).
- Walk down twice.
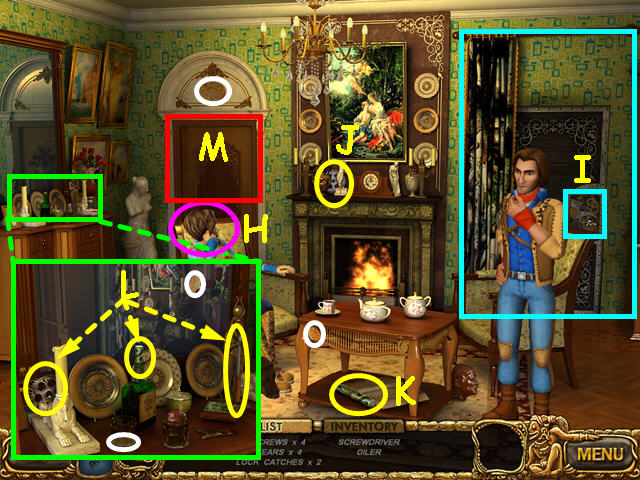
- Speak with Alice (H).
- Open the curtain on the back wall and look at the lock (I).
- Take the GEAR from the mantle (J).
- Take the LOCK CATCHES from the coffee table (K).
- Look at the close-up of the sideboard and take the GEAR, LOCK CATCHES, and SCREWDRIVER (L).
- Walk forward through the left door (M).
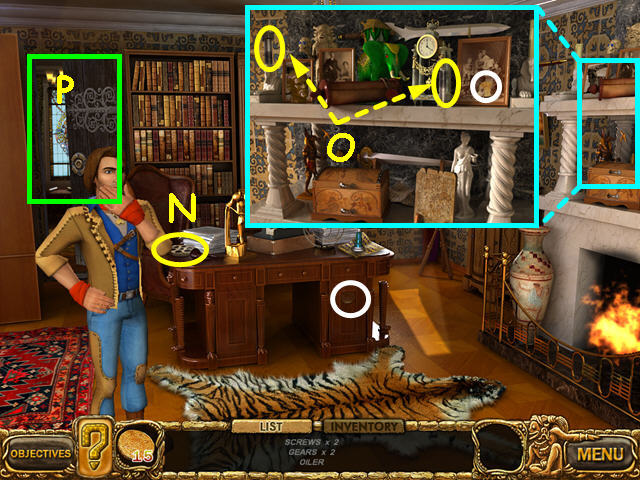
- Take the GEAR from the desk (N).
- Look at the close-up over the mantle and take the 2 SCREWS (O).
- Walk forward to enter the library (P).
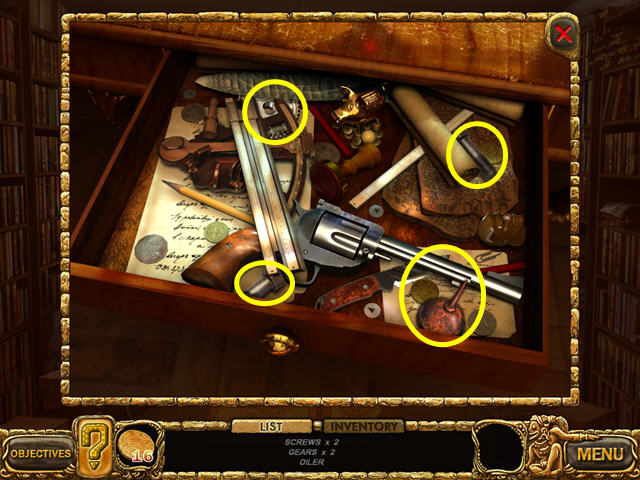
- Look at the close-up of the desk drawer.
- Take the OIL CAN, GEAR, AND 2 SCREWS.
- Walk down twice to return to the sitting room.
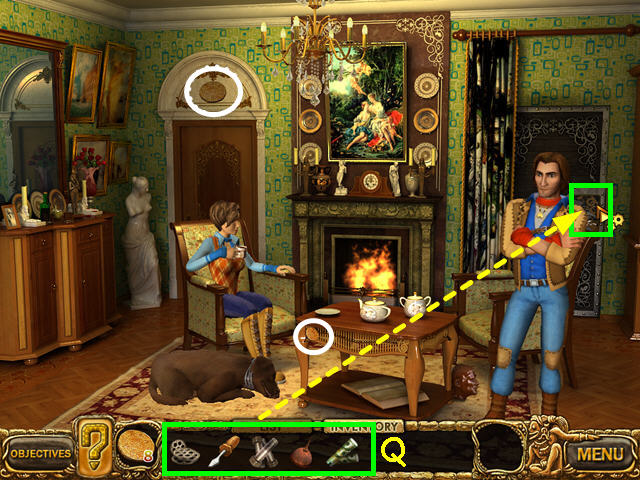
- Use the SCREWS, OIL CAN, SCREWDRIVER, LOCK CATCHES, and GEARS on the lock mechanism to trigger a mini-game (Q).
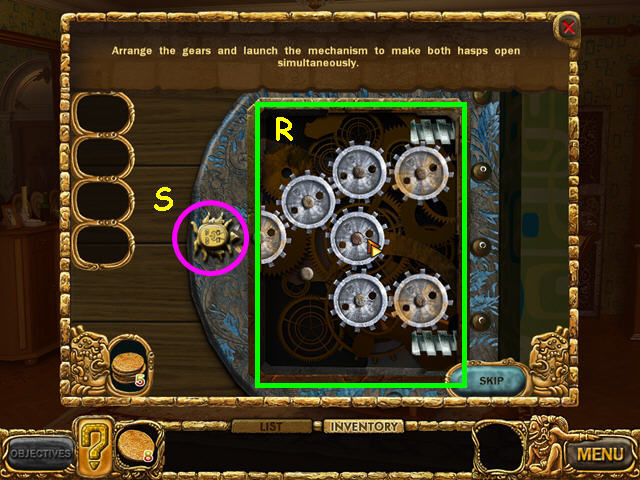
- The object is to place the gears so that both tumblers will open.
- Place the gears as shown, dragging them from the left (R).
- Press the 'Sun' button to activate the mechanism (S).
- This mini-game costs 5 coins to skip.
- Walk forward and enter the vault door on the right.
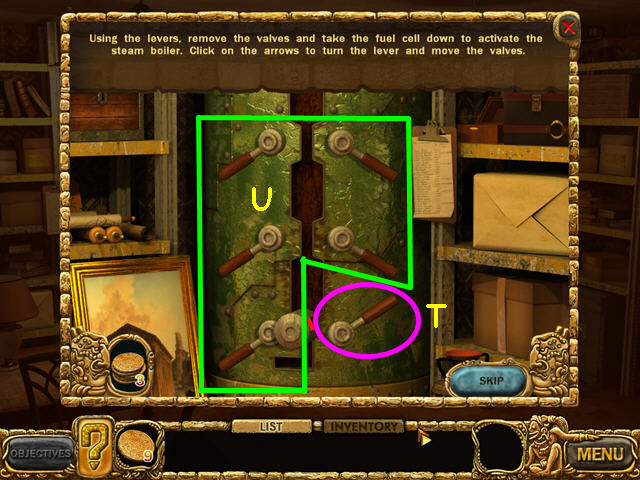
- Look at the green boiler for a mini-game.
- Move the levers up or down to allow the fuel cell to travel to the bottom.
- Move the lower right lever to the up position (T).
- Turn the remaining right levers to the down position, followed by the 3 left levers (U).
- This mini-game costs 3 coins to skip.
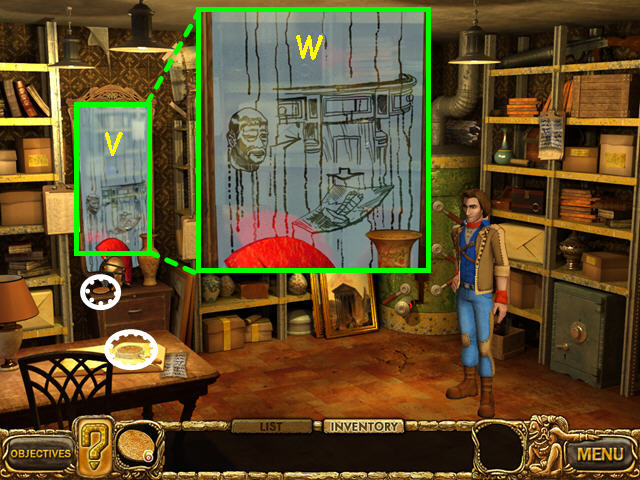
- Look at the close-up of the mirror (V).
- Click on the mirror to learn you need to collect table ornaments (W).
- Walk down to exit the vault.
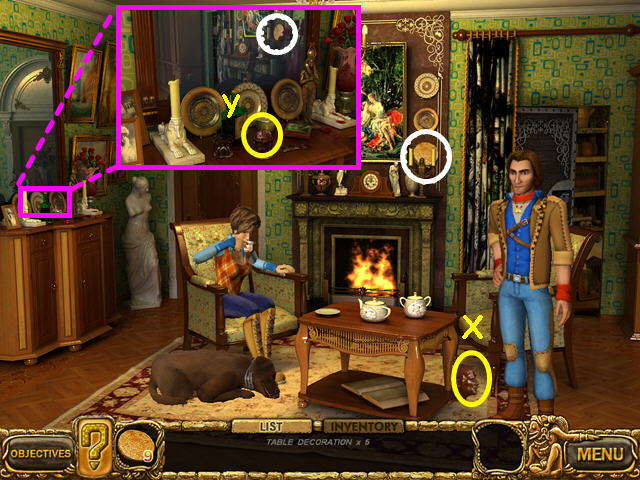
- Take the TABLE ORNAMENT from the floor, near the coffee table (X).
- Look at the close-up of the sideboard and take the TABLE ORNAMENT (Y).
- Walk up through the left door.
- Walk up again to enter the library.
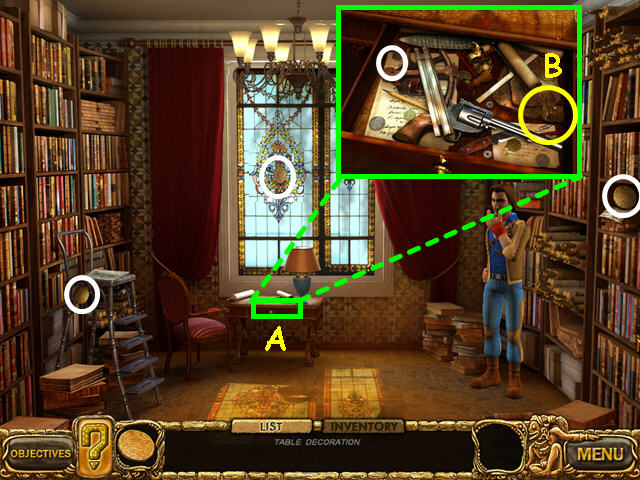
- Look at the close-up of the drawer (A).
- Take the TABLE ORNAMENT (B).
- Walk down to exit the library.
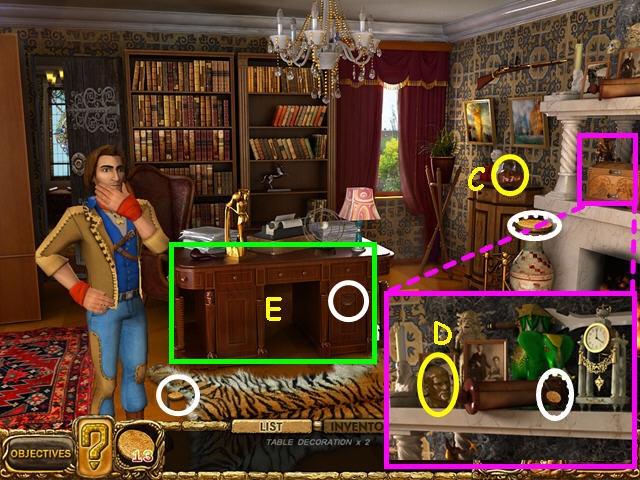
- Take the TABLE ORNAMENT from the table (C).
- Look at the close-up of the mantle and take the TABLE ORNAMENT (D).
- Use the TABLE ORNAMENTS on the desk (E).
- After looking at the documents, walk down to return to the sitting room.
- Talk to Alice.
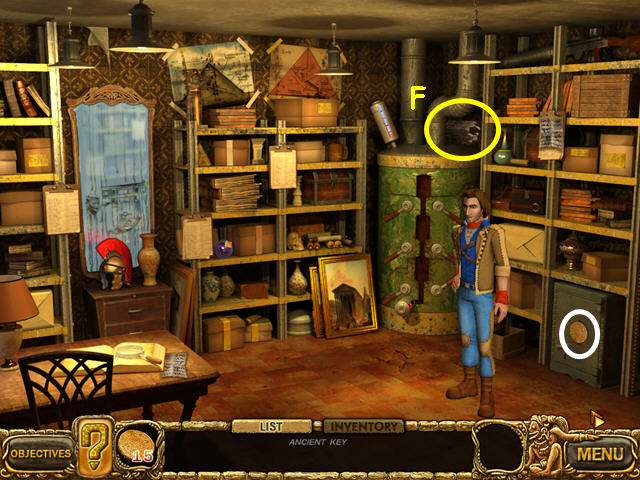
- Walk up and enter the right door to return to the vault.
- Take the ANCIENT KEY (F).
- Exit the vault and talk to Alice to learn you need her father's diary fragments.
- Return to the vault.
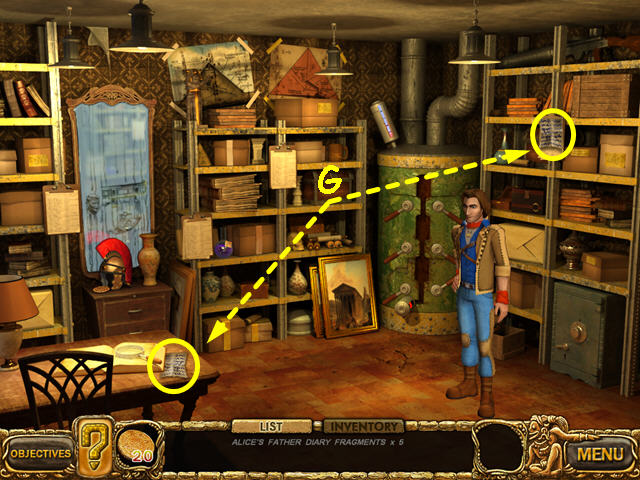
- Take the 2 DIARY FRAGMENTS (G).
- Walk down to exit the vault.
- Walk up, using the left door.
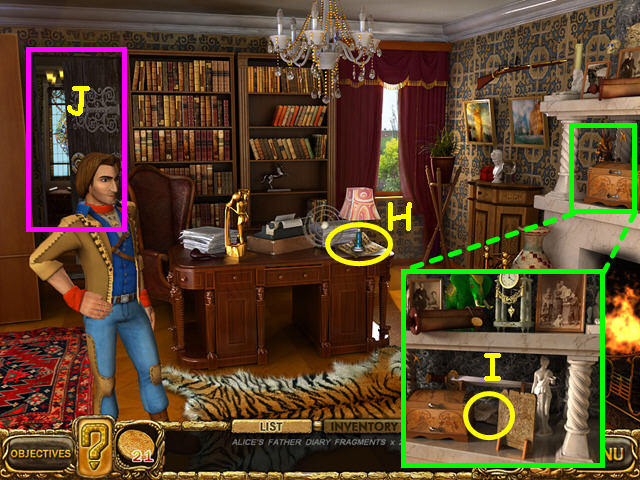
- Take the DIARY FRAGMENT from the desk (H).
- Look at the close-up of the mantle and take the DIARY FRAGMENT (I).
- Exit the close-up, then walk up to the library (J).
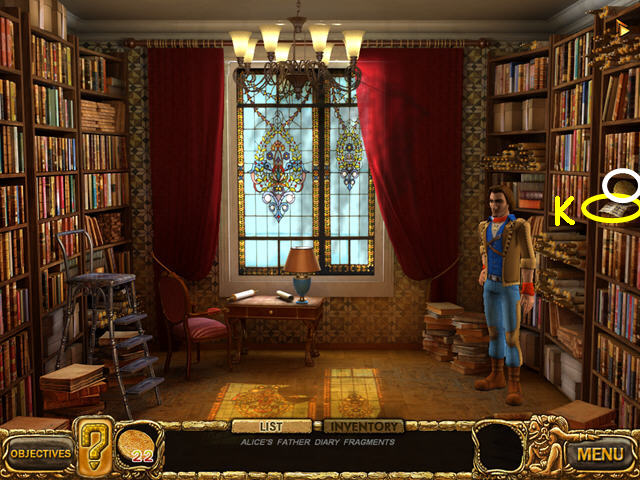
- Take the DIARY FRAGMENT from the bookcase (K).
- Walk down twice and talk to Alice.
Part 2: Machu Picchu
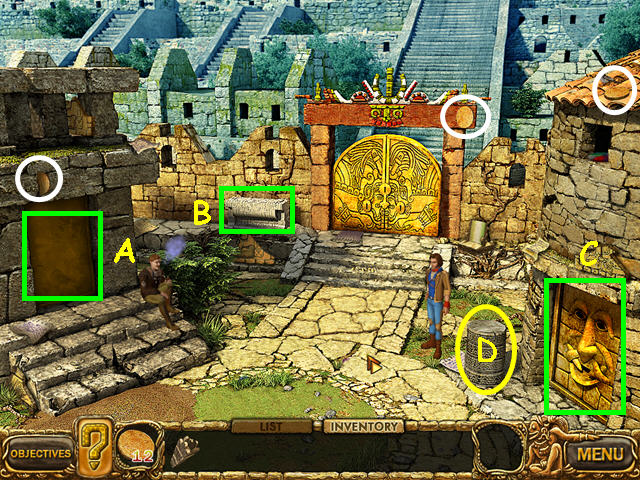
- Look at the door to the right temple (A).
- Look at the stone control to the left of the gate (B).
- Look at the door to the right temple (C).
- Look at the pedestal for a mini-game (D).
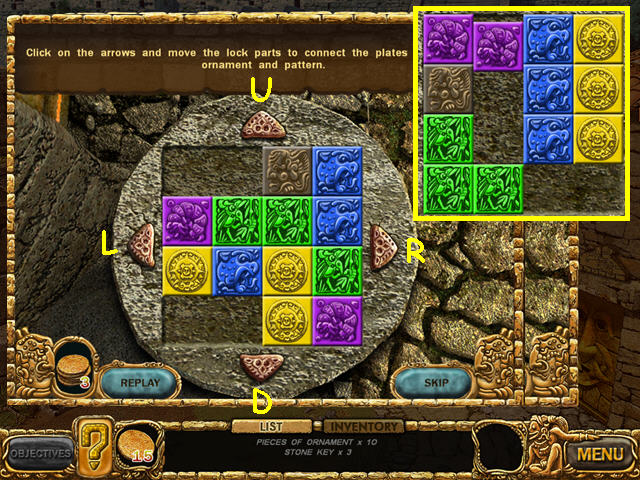
- The object is to combine the tiles of the same color.
- Push one of the 4 buttons to slide the tiles in that direction.
- The solution is: U-R-D-L-U-R-D-L-U-R-D-L-U.
- This mini-game will cost 3 coins to skip.
- Enter the right temple.
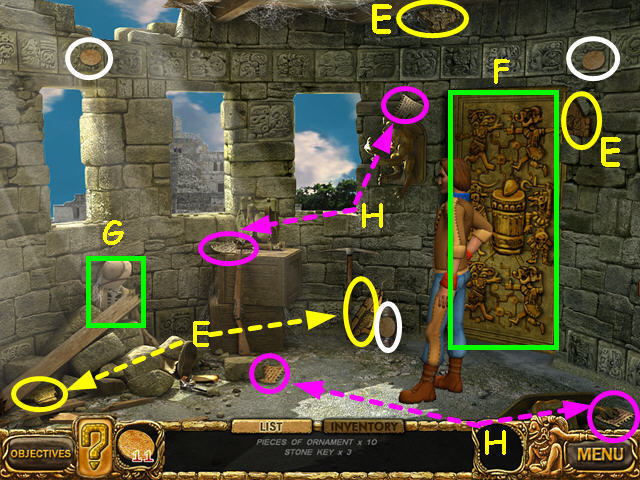
- Collect the 4 PIECES OF ORNAMENT (E).
- Note the door (F).
- Look at the skeleton to learn about the journal pages (G).
- Collect the 4 JOURNAL PAGES (H).
- Look at the close-up of the skeleton.
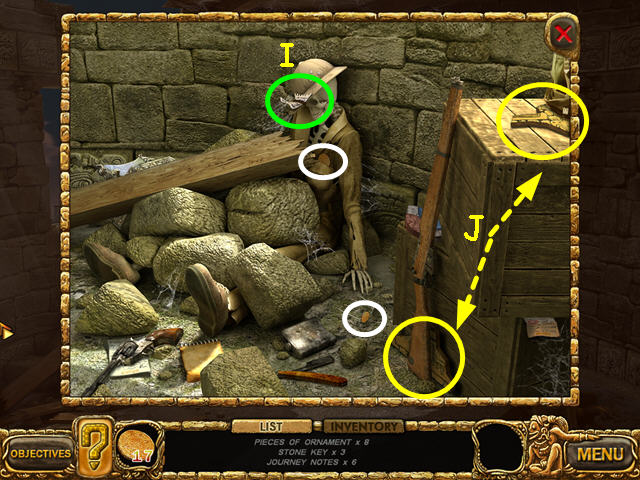
- Take the JOURNAL PAGE (I).
- Collect the 2 PIECES OF ORNAMENT (J).
- Exit the close-up.
- Walk down to exit the temple.
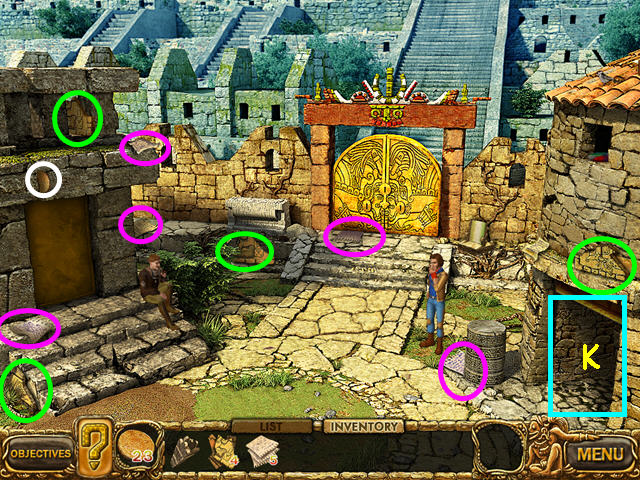
- Collect the 5 journal pages (Pink).
- Learn from the journal how to configure the door inside the right temple.
- Find the 4 PIECES OF ORNAMENT (Green).
- Enter the right temple (K).
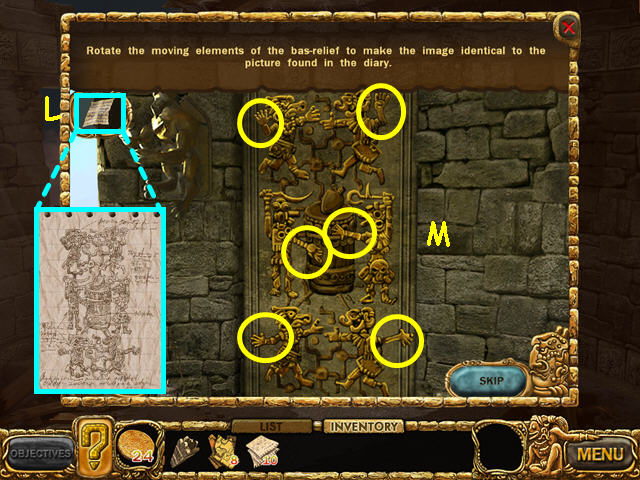
- Look at the close-up of the ornate door.
- Use the journal drawing as reference to configure the door (L).
- Move the arms of the figures to match the drawing (M).
- Enter the door.
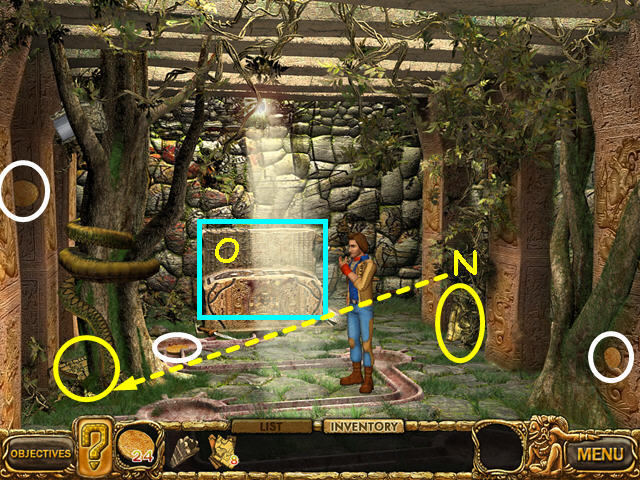
- Take the 2 PIECES OF ORNAMENT (N).
- Look at the close-up of the altar (O).
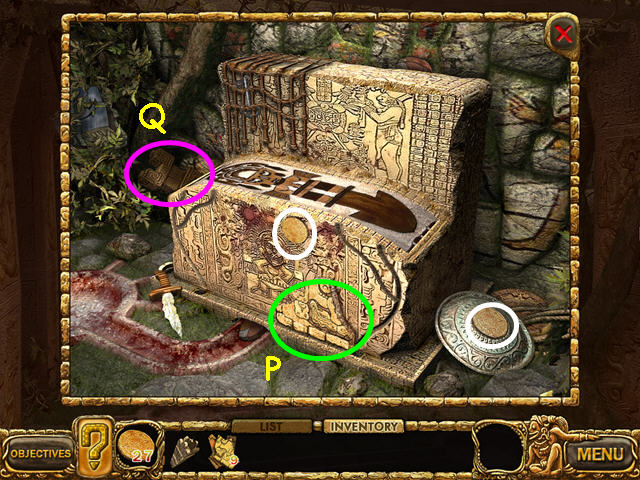
- Take the PIECE OF ORNAMENT (P).
- Take the STONE KEY (Q).
- Exit the close-up and walk down twice to leave the temple.
- Place the 13 PIECES OF ORNAMENT on the left temple door.
- Enter the left temple.
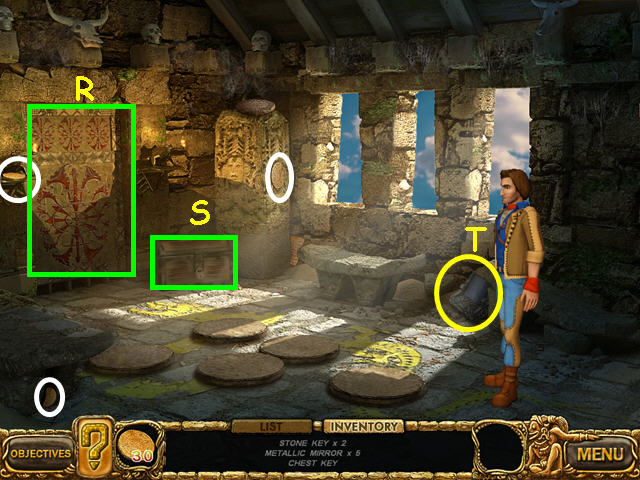
- Look at the inner temple door to learn you need mirrors (R).
- Look at the locked chest (S).
- Take the METALLIC MIRROR (T).
- Walk left to exit the temple.
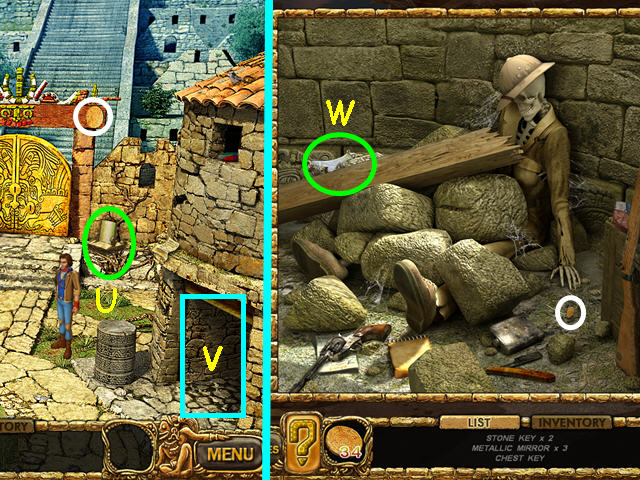
- Take the METALLIC MIRROR (U).
- Enter the right temple (V).
- Look at the close-up of the skeleton.
- Take the METALLIC MIRROR (W).
- Exit the close-up and enter the inner temple.
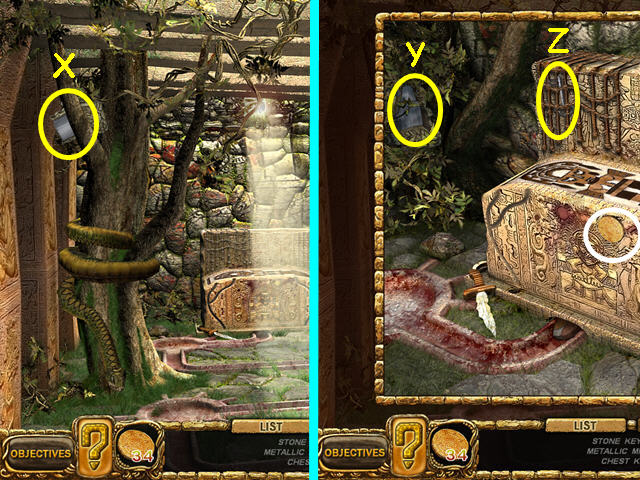
- Take the METALLIC MIRROR (X).
- Look at the close-up of the altar.
- Take the METALLIC MIRROR (Y).
- Take the CHEST KEY (Z).
- Exit the close-up then walk down twice.
- Enter the left temple.
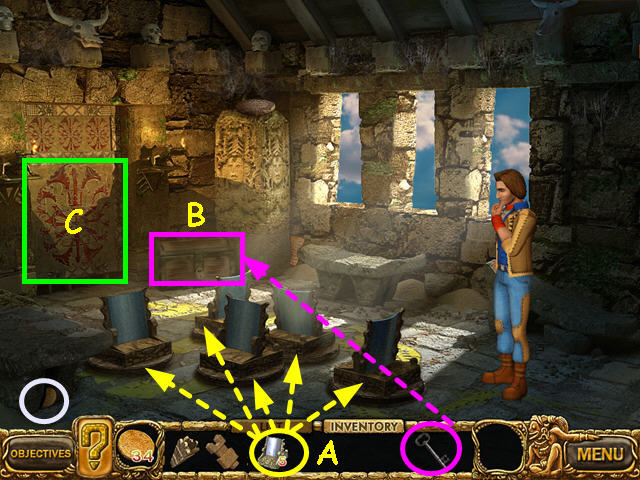
- Place the 5 METALLIC MIRRORS onto the 5 round pedestals (A).
- Use the CHEST KEY to open the chest (B).
- Take the STONE KEY from the chest.
- Look at the inner temple door for a mini-game (C).
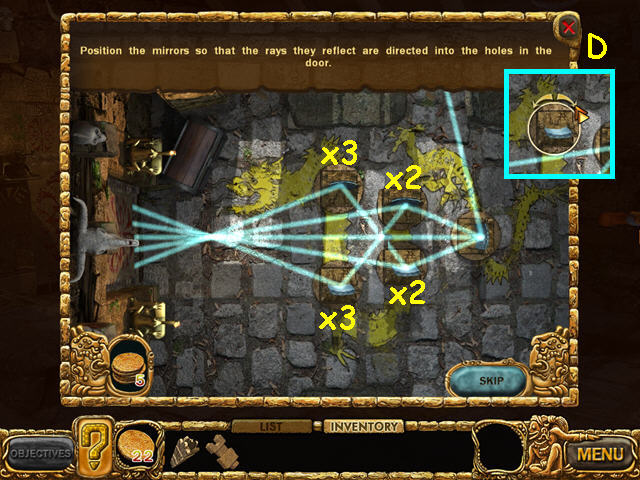
- The object is to rotate the mirrors to reflect the light to the door.
- The right-most mirror does not move.
- Move your mouse over a mirror to see the movement arrows (D).
- Move each mirror 2 or 3 times in one direction to solve.
- Skipping this mini-game will cost 5 coins.
- Enter the inner temple.
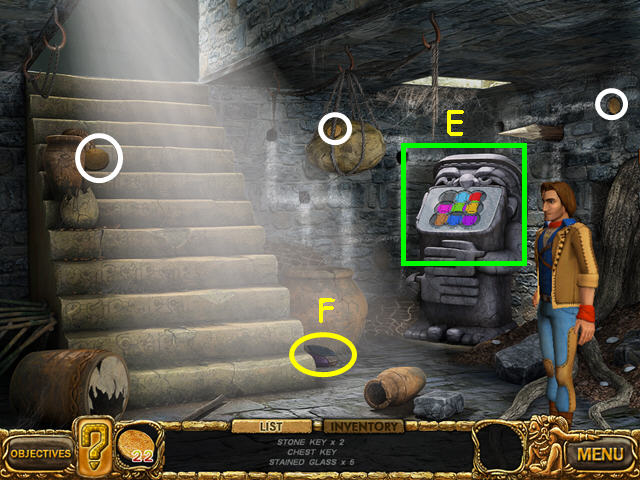
- Look at the idol to learn you need stained glass (E).
- Take the STAINED GLASS (F).
- Walk up the stairs.
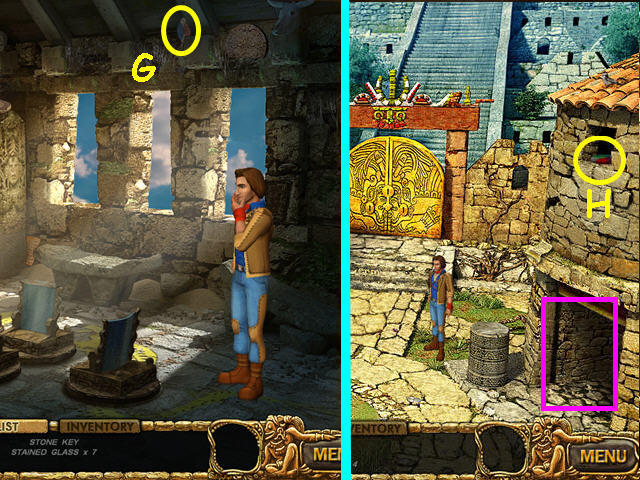
- Take the STAINED GLASS (G).
- Walk right to exit the temple.
- Take the STAINED GLASS (H).
- Enter the right temple.
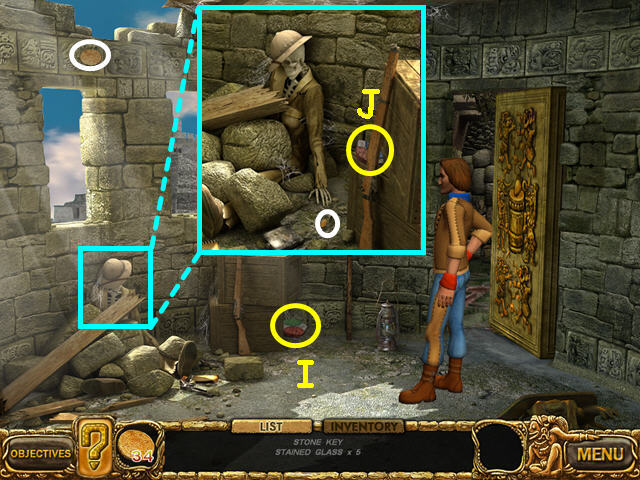
- Take the STAINED GLASS (I).
- Look at the close-up of the skeleton.
- Take the STAINED GLASS (J).
- Exit the close-up, then enter the right door.
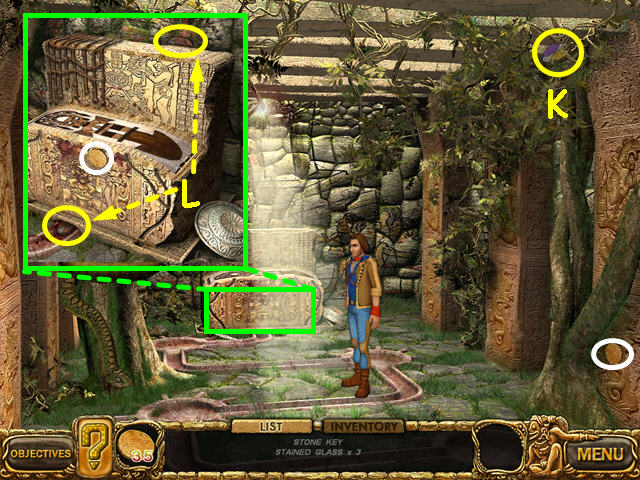
- Take the STAINED GLASS (K).
- Look at the close-up of the altar.
- Take the 2 STAINED GLASS pieces (L).
- Exit the close-up and walk down twice to exit the temple.
- Enter the left temple and walk through the left door.
- Use the STAINED GLASS on the idol for a mini-game.
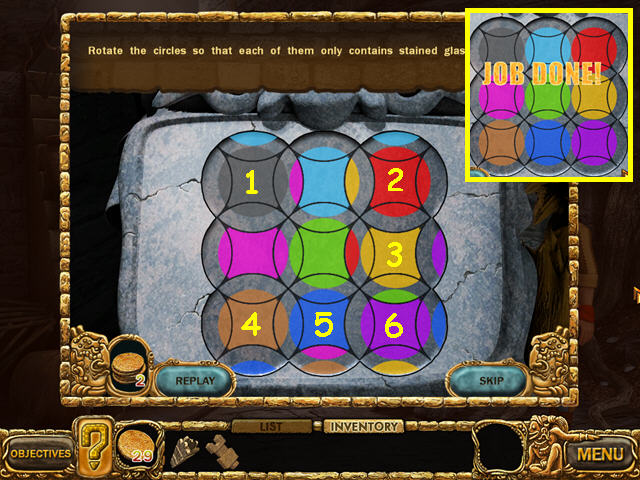
- The object is to complete the circles of color by rotating the discs.
- To rotate a disc, click in the center, hold and drag in the direction you want the disc to rotate.
- Using 'R' and 'L' to indicate right and left, make the following moves: 1R-2L-3R-5R-4L-5L-7Rx2.
- Skipping this mini-game will cost 2 coins.
- Take the STONE KEY that is inside the idol.
- After the cut-scene you are back outside.
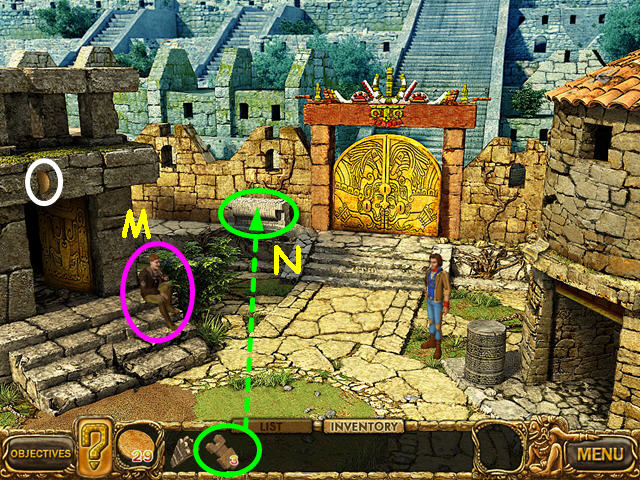
- Talk to the pilot on the steps (M).
- Use the STONE KEYS on the stone console for a mini-game (N).
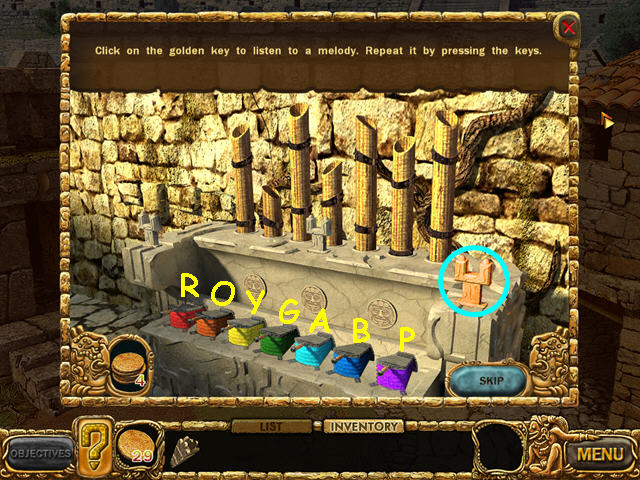
- The object is to repeat the musical sequences as played by the machine.
- Click on the golden right key to start a sequence.
- Press the colored keys to replay the sequence.
- You will have 3 sequences to play.
- Using letters to represent colors, the first sequence is: A-Y-R.
- The second sequence is: O-P-A-R.
- The third sequence is: A-B-O-Y-R.
- Skipping this mini-game will cost 4 coins.
- Enter the open golden gates.
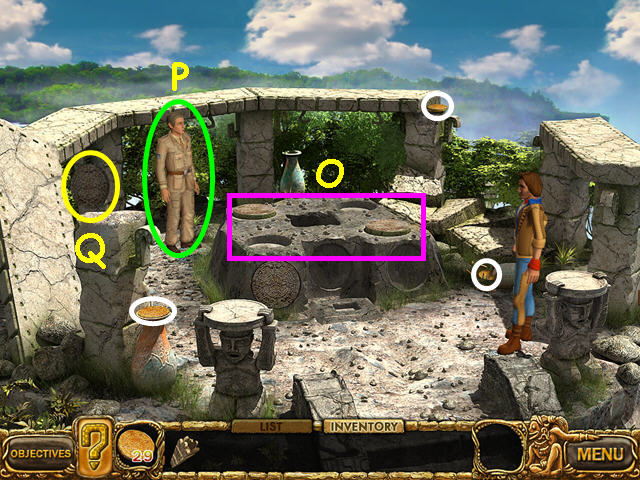
- Look at the center altar to learn you need to collect decorations (O).
- Talk to Hansel until he gives you a DECORATION (P).
- Take the DECORATION on the pillar to the left of Hansel (Q).
- Walk down to return to the temples.
- Talk to the pilot until he gives you a DECORATION.
- Enter the right temple and go through the inner door.
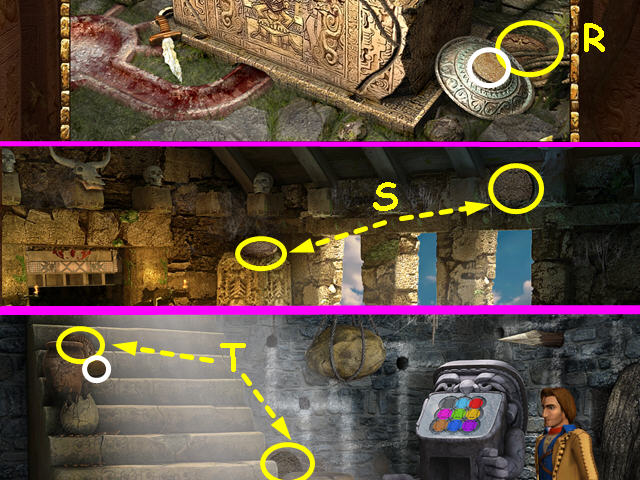
- Look at the close-up of the altar.
- Take the DECORATION (R).
- Exit the close-up, then walk down twice.
- Enter the temple on the left.
- Take the 2 DECORATIONS (S).
- Walk through the inner door.
- Take the 2 DECORATIONS (T).
- Walk up, left, then up through the golden gates.
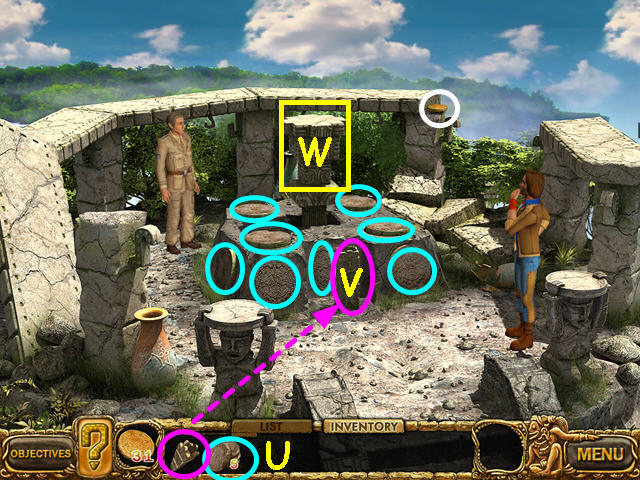
- Place each of the 8 DECORATIONS into the empty circular indentations (U).
- Place the ANCIENT key in the front niche (V).
- Look at the stone tower that rises for a mini-game (W).
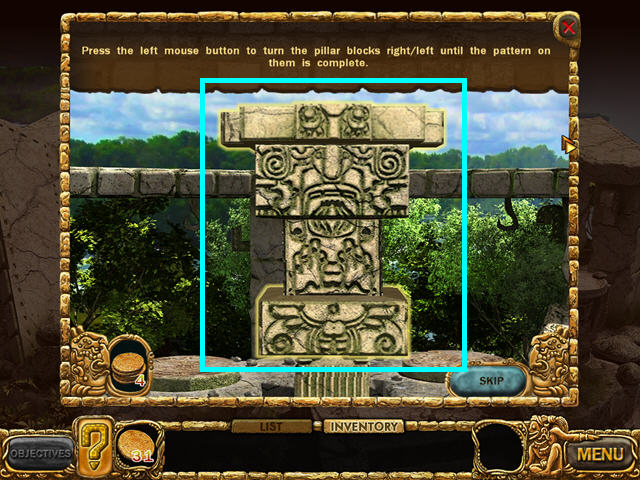
- The object is to reform the figure on the stones.
- Click, hold and drag a stone into position.
- This puzzle will cost 4 coins to skip.
- Click on the map that appears.
Part 3: Paititi
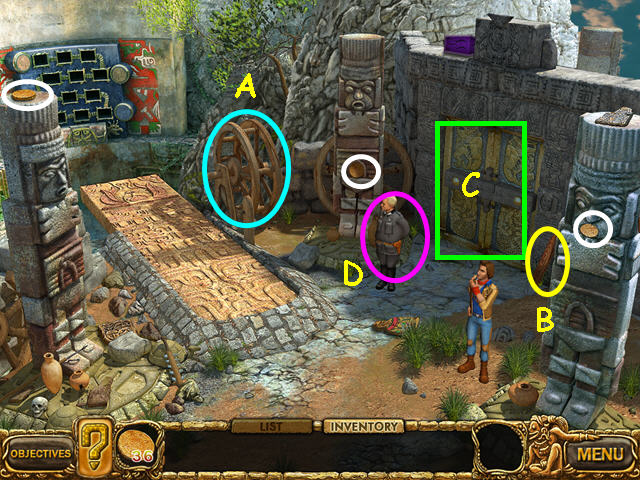
- Look at the wheel device to learn you need lever parts (A).
- Take the LEVER PART (B).
- Look at the stone doors (C).
- Talk to the officer until you get the SLEDGEHAMMER (D).
- Use the SLEDGEHAMMER on the stone doors.
- Walk right through the doors.
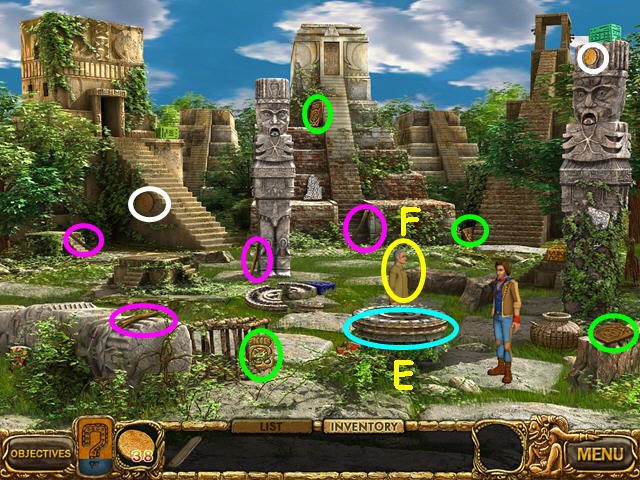
- Collect the 4 LEVER PIECES (pink).
- Look at the round device (E).
- Talk to the archeologist to learn you need to find calendar pieces (F).
- Collect the 4 CALENDAR PIECES (green).
- Walk down to exit the scene.
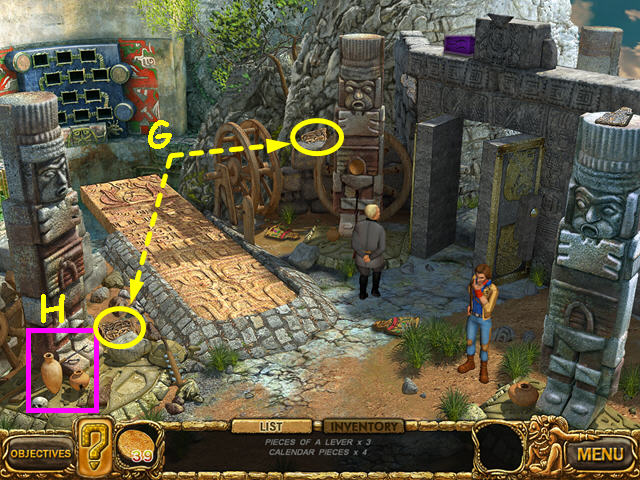
- Take the 2 CALENDAR PIECES (G).
- Look at the the close-up at the base of the left column (H).
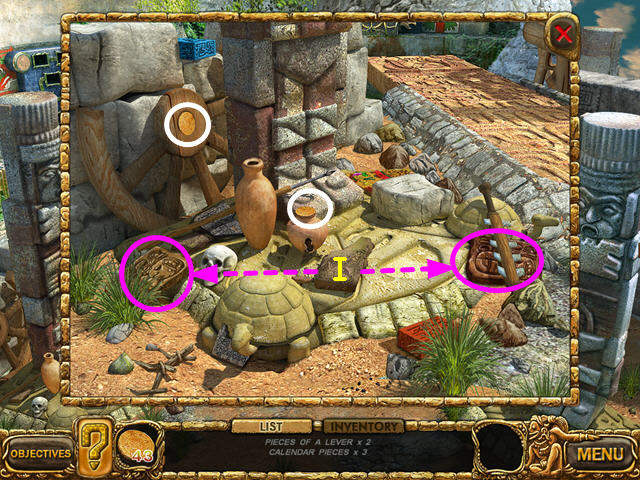
- Take the 2 CALENDAR PIECES (I).
- Exit the close-up scene.
- Walk right through the stone doors.
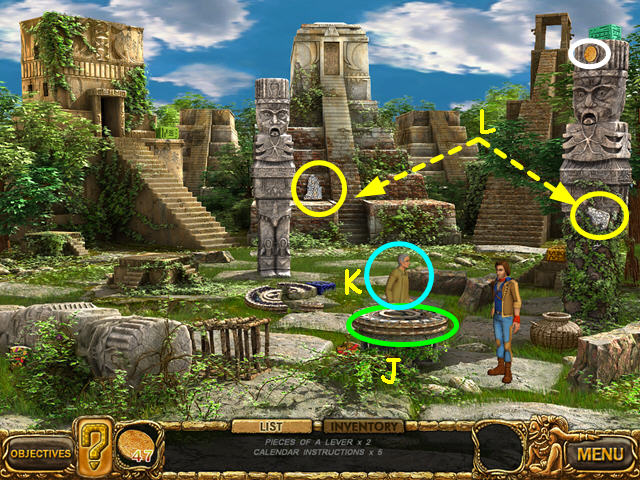
- Use the CALENDAR PIECES on the round device (J).
- Talk to the archeologist to learn you need instructions (K).
- Take the 2 CALENDAR INSTRUCTIONS (L).
- Walk down to exit the area.
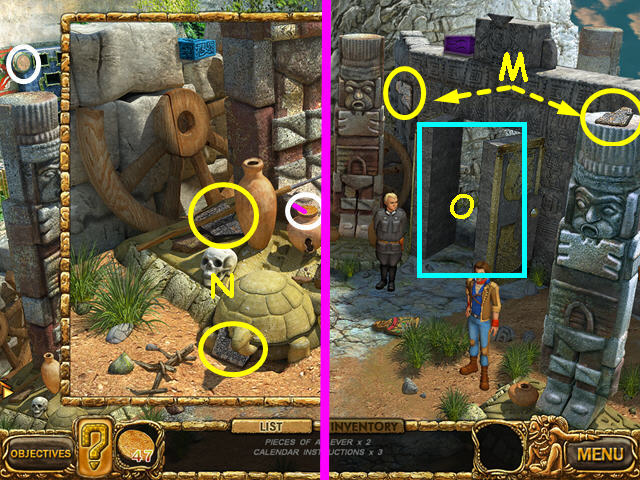
- Take the 2 CALENDAR INSTRUCTIONS (M).
- Look at the close-up at the base of the left pillar.
- Take the 2 CALENDAR INSTRUCTIONS (N).
- Exit the close-up, then walk through the stone doors (O).
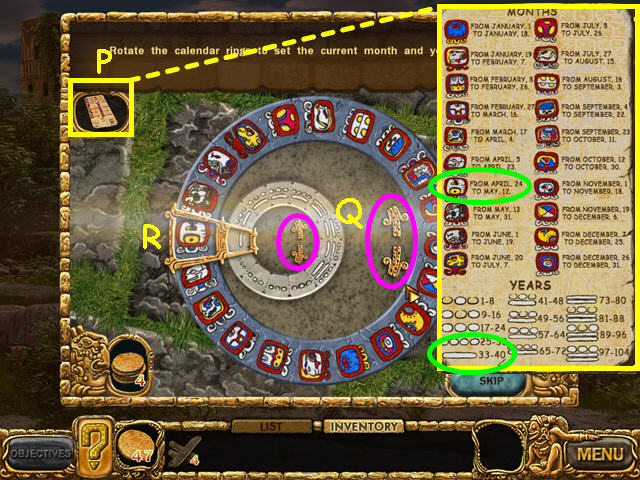
- Use the CALENDAR INSTRUCTIONS on the calendar device.
- Talk to the Archeologist.
- Look at the calendar device for a mini-game.
- The object is to set the date to May, 1937.
- Look at the instructions and find the first symbol for May, and the white bar for 37 (P).
- Use the arrow buttons (Q) to move the rings so that May and 37 are in the frame (R).
- Skipping this puzzle will cost 4 coins.
- Enter the center, raised temple, once the door opens.
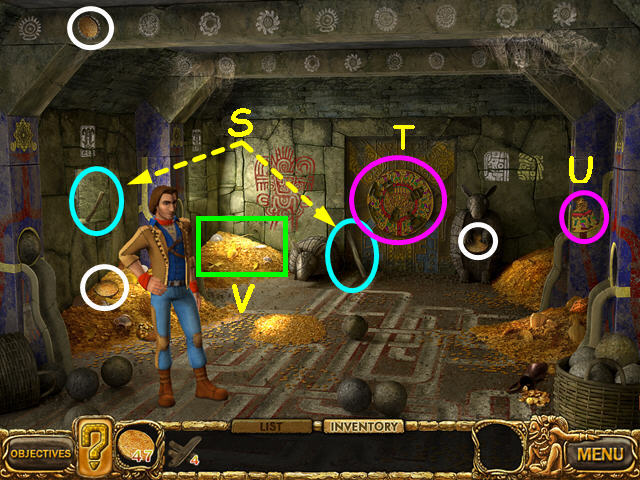
- Take the 2 LEVER PIECES (S).
- Look at the door to learn you need puzzle pieces (T).
- Take the PUZZLE PIECE (U).
- Look at the close-up in the left corner (V).
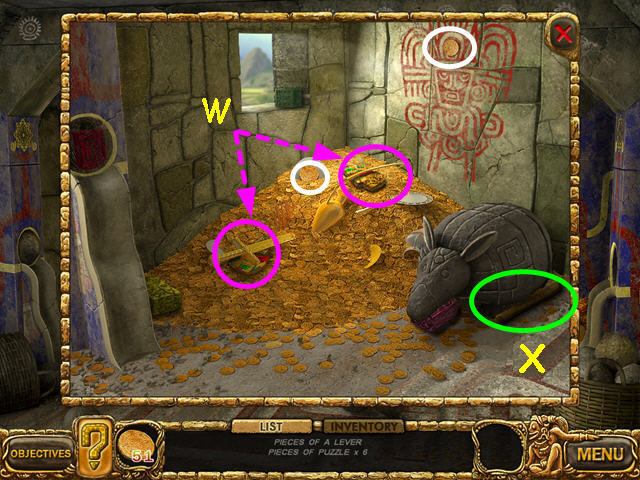
- Take the 2 PUZZLE PIECES (W).
- Take the LEVER PIECE (X).
- Exit the close-up, then walk down to leave the temple.
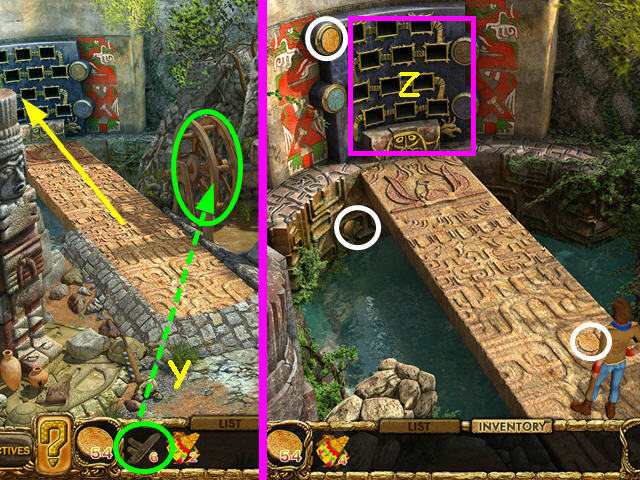
- Use the LEVER PIECES on the wheel (Y).
- Walk across the bridge.
- Look at the device on the wall to learn you need pictograph plates (Z).
- Walk down to return to the entrance.
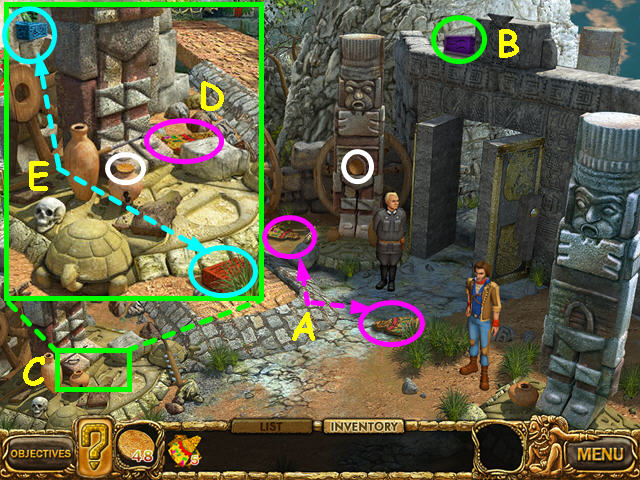
- Take the 2 PUZZLE PIECES (A).
- Take the PICTOGRAPH PLATE (B).
- Look at the close-up at the base of the left pillar (C).
- Take the PUZZLE PIECE (D).
- Take the 2 PICTOGRAPH PLATES (E).
- Exit the close-up and walk through the stone doors.
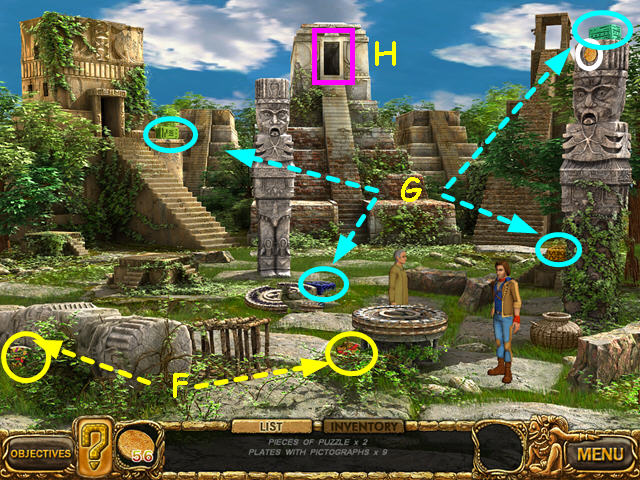
- Take the 2 PUZZLE PIECES (F).
- Take the 4 PICTOGRAPH PLATES (G).
- Enter the center temple (H).
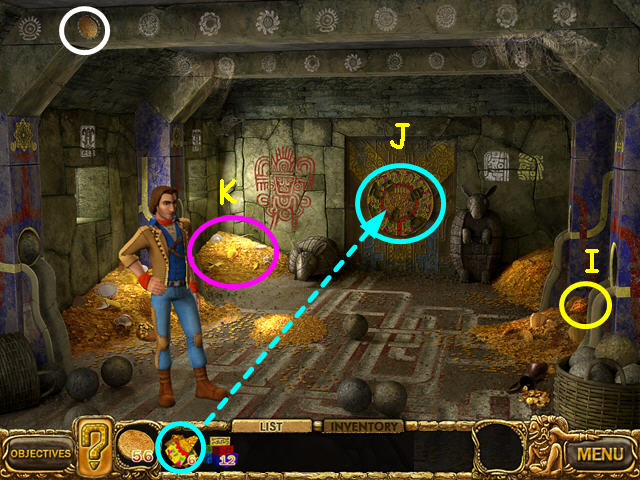
- Take the PICTOGRAPH PLATE (I).
- Use the PUZZLE PIECES on the door (J).
- Look at the door to learn you need a key.
- Look at the close-up of the corner (K).
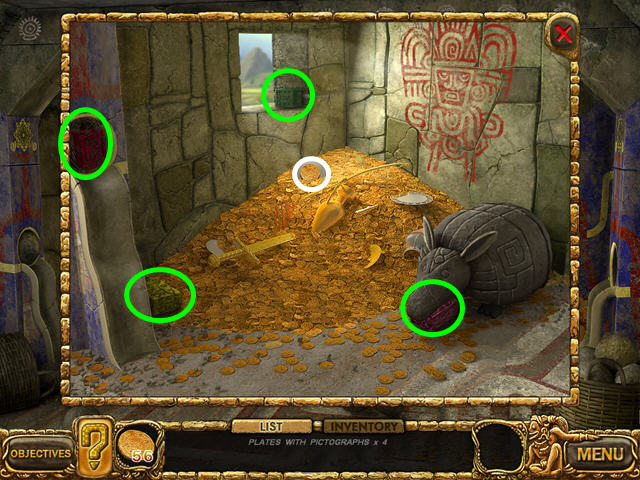
- Take the 4 PICTOGRAPH PLATES.
- Exit the close-up and walk down twice to return to the entrance.
- Cross the bridge.
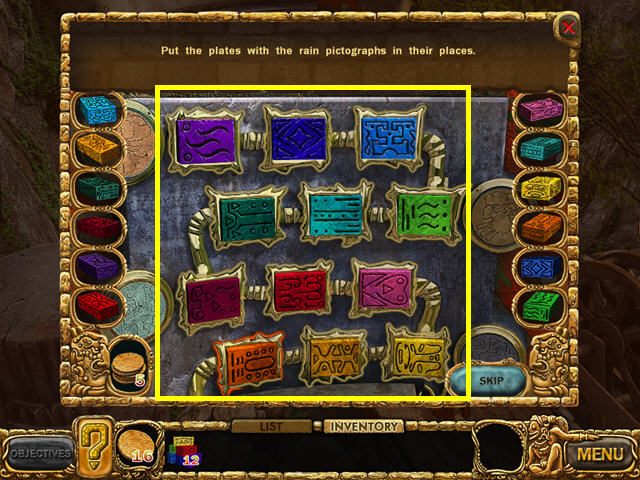
- Use the PICTOGRAPH PLATES on the wall for a mini-game.
- Place the plates from both sides into the niches by color.
- Skipping this puzzle will cost 5 coins.
- Take the TOMB DOOR KEY from the compartment that opens.
- Walk down, then enter the stone doors.
- Enter the center temple.
- Use the TOMB DOOR KEY on the inner door to trigger a mini-game.
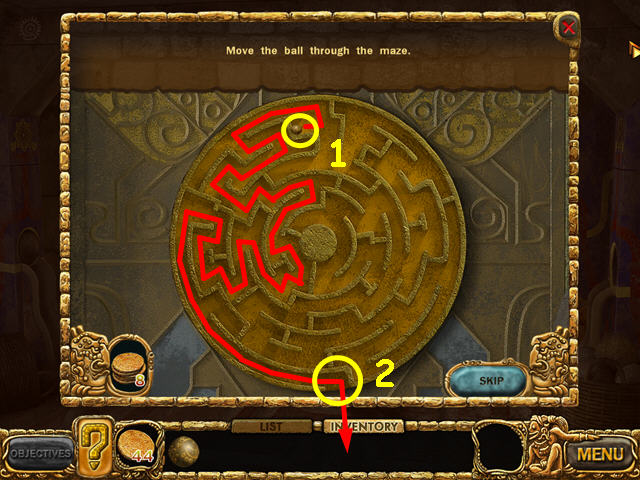
- The object of this mini-game is to move the ball from the start (1) to the exit (2).
- Left-click on the maze, hold and rotate it to move the ball through the paths.
- Enter the tomb.
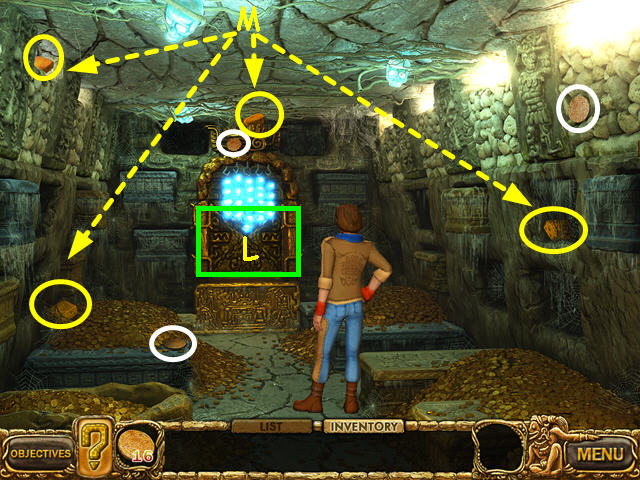
- Look at the device in the center to learn you need the 4 keys (L).
- Take the 4 STASH KEYS (M).
- Use the STASH KEYS on the device for a mini-game.
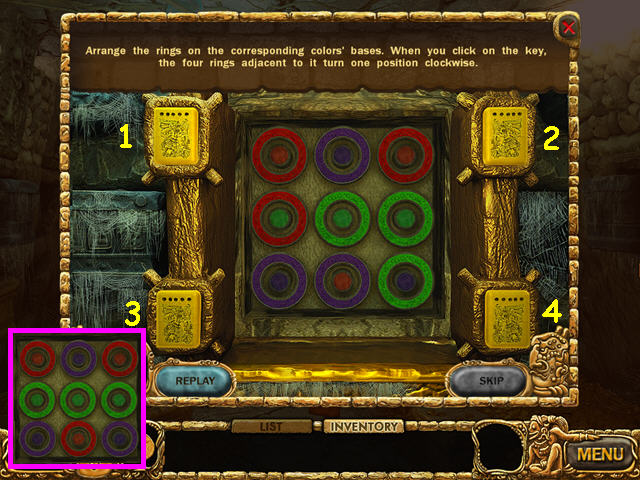
- The object is to move the rings onto the same color posts.
- Use the 4 controls to rotate the 4 rings in that corner.
- Note: This mini-game is randomly generated- your solution may vary.
- Numbering the controls 1-4, press the following: 2-2-4-4-4-2-1-2.
- Skipping this mini-game will cost 3 coins.
- Click on the mask that appears in the opening.
- Continue talking to the spirit for a mini-game.
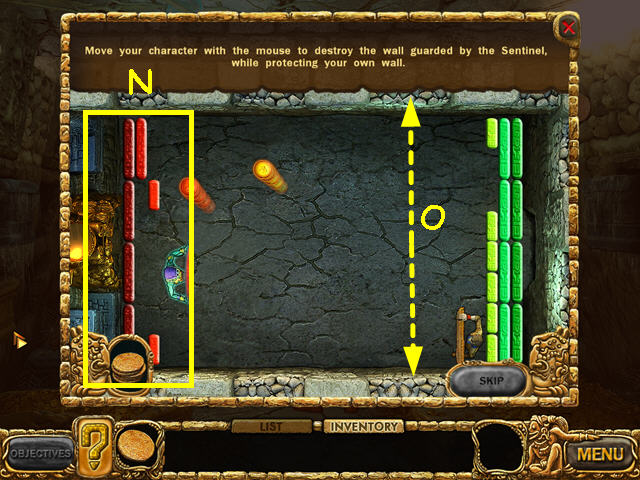
- The object is to destroy the guard's wall completely (N).
- Move your man up and down to send the balls bouncing into his wall (O).
- There is no skip option for this game.
- Your wall will never be completely destroyed, it will replenish bricks.
- Congratulations! You have completed Legacy Of The Incas!
Created at: 2011-05-17

