Walkthrough Menu
- General Tips
- Chapter 1 – The Beach House
- Chapter 2 – The Beach
- Chapter 3 – The Magic Cave
- Chapter 4 – The Boat
- Chapter 5 – The Lighthouse
- Chapter 6 – Charlie's House
General Tips
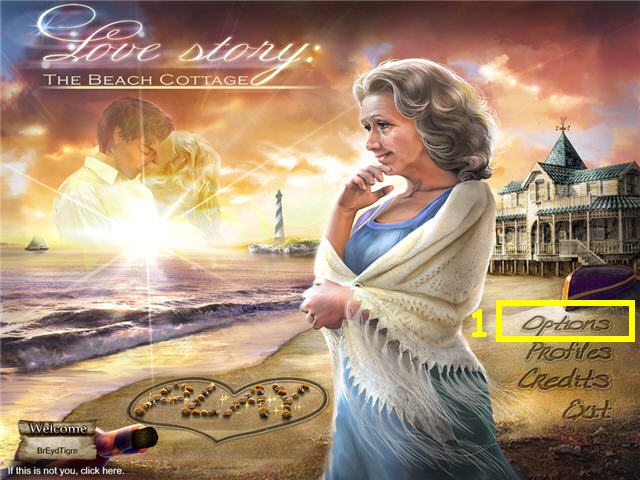
- Click on Options (1) to adjust the Ambient, Effects, Music Volume, Full Screen and Custom Cursor.
- After entering your profile the first time, you have a choice of Casual or Expert Mode.
- Casual Mode has hints and sparkles in active areas. Hints and skips recharge faster and quests prompt the objects to be found.
- Expert mode has no sparkles and quests have no prompts.
- Memory Items collected throughout the game are stored in a chest in the lower left.
- Messages from the message in a bottles collected are located next to hints in the lower right.
- The magnifying glass cursor indicates you can examine the area closer.
- The gear cursor indicates you need to use an inventory item there.
- Random clicking will cause you to lose control of the cursor.
- Some of the puzzles are random.
- Most puzzles can be skipped after a short wait.
- Hints are unlimited after a short recharge period.
- Click on 'menu' in the bottom left to exit the game.
Chapter 1 – The Beach House
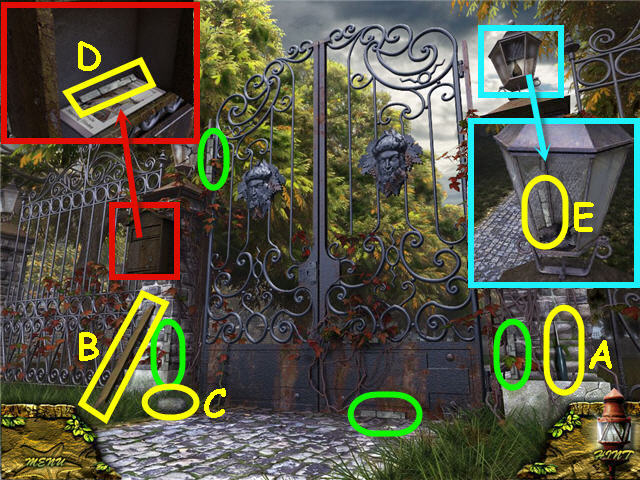
- Pick up the SCREWDRIVER (A), WOODEN PLANK (B), PLATE (4 marked in green), and STONE (C).
- Examine the mailbox; open the door and take the 5th PLATE (D).
- Examine the lamp; use the STONE on the glass; take the 6th PLATE (E).
- Examine the gate lock; use the SCREWDRIVER on the 4 screws.
- Place the 6 PLATES on the lock to trigger a puzzle.
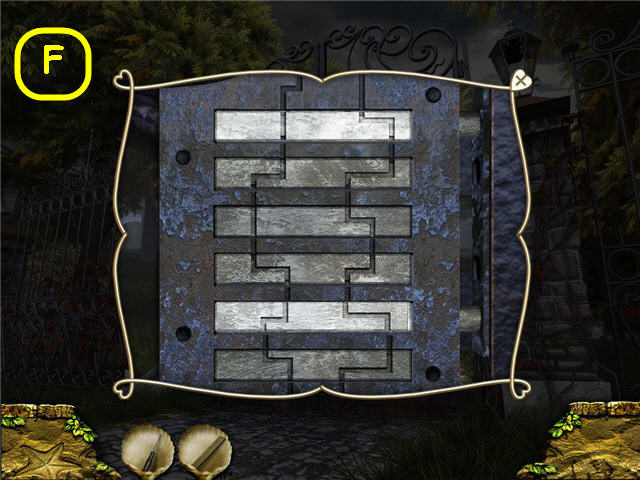
- Arrange the PLATES so that the pattern is complete. See screenshot (F) for solution.
- Head forward.
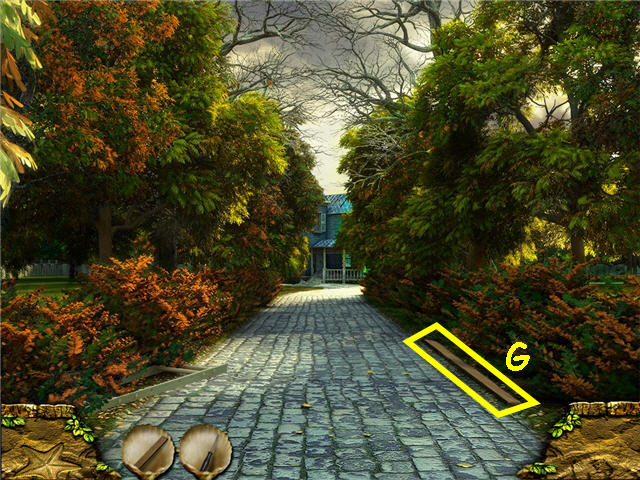
- Take the WOODEN PLANK (G).
- Head forward and right.
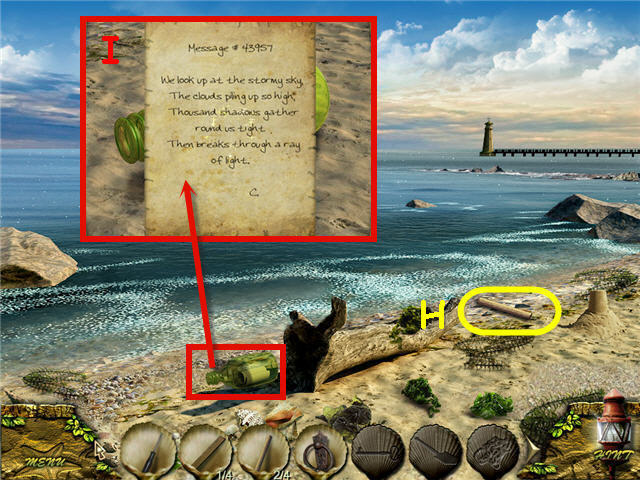
- Take the WOODEN STICK (H).
- Examine the bottle; click the message (I) to get a note added to the left of the hint button.
- Back out and head left.
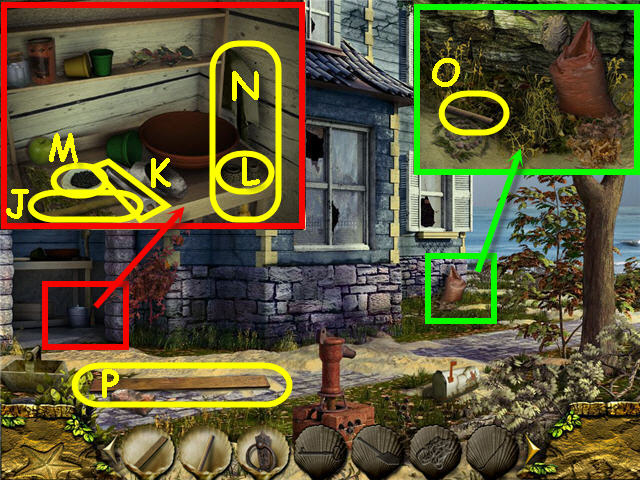
- Examine the alcove; take the HAMMER (J), WRENCH (K) and ROPE (L), SEEDS (M) and SHOVEL (N).
- Examine the bag; take the WOODEN STICK (O).
- Take the WOODEN PLANK (P).
- Head right.
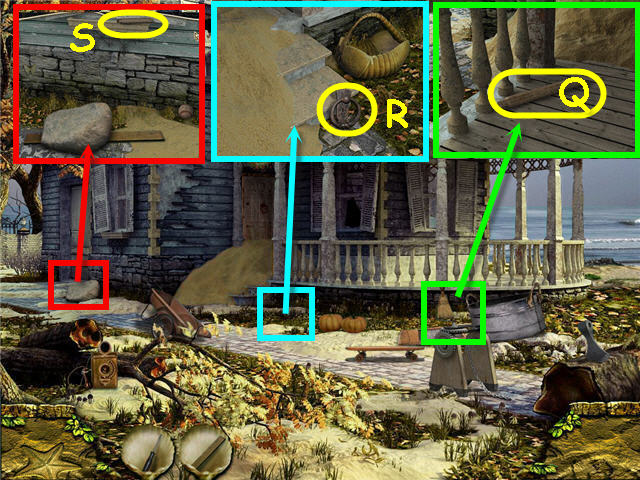
- Examine the porch; take the WOODEN STICK (Q).
- Examine the stairs; take the HANDLE (R).
- Examine the rock; take the WOODEN STICK (S).
- Back out.
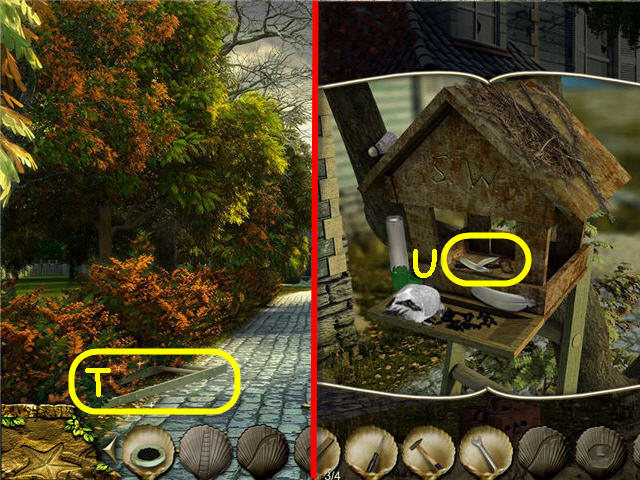
- Examine and use the 4 WOODEN STICK and ROPE on the LADDER (T).
- Head forward and left.
- Set the LADDER by the birdhouse.
- Place the SEEDS on the tray; take the KEY (U).
- Head right.
- Examine the front door.
- Place the HANDLE on the holes in the door.
- Use the SHOVEL on the sand three times.
- Use the KEY on the door and enter.
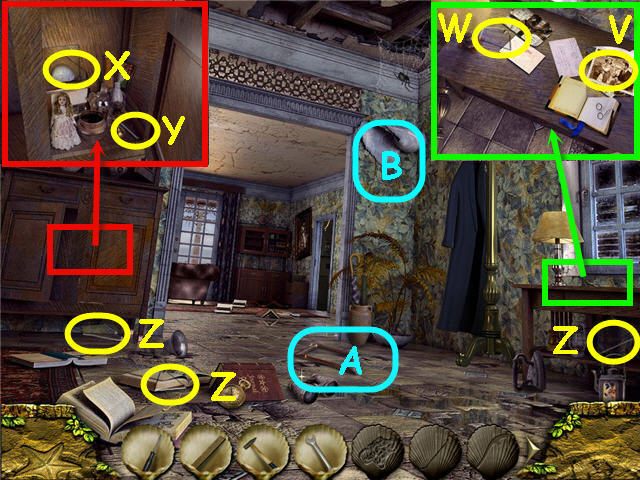
- Examine the table; take to PHOTO (V) and PIECE OF GLASS (W).
- Open and examine the cabinet; take the GLASS (X) and NAIL (Y).
- Take the 3 pieces of GLASS (Z).
- Examine and place the PHOTO; arrange the 5 PIECES OF GLASS in the frame (A) to get a FRAME WITH PHOTO.
- Examine the wall (B); use the NAIL, HAMMER and FRAME WITH PHOTO on the wall.
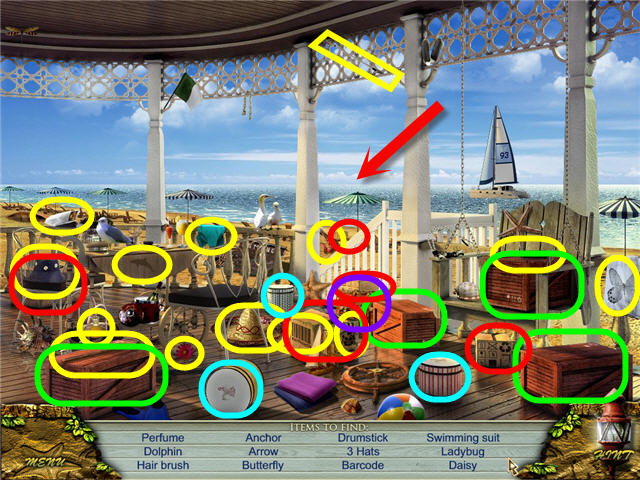
- Find the 5 sets of items listed; solutions circled in set order - yellow, green, red, cyan and purple.
- Head down to the beach.
Chapter 2 – The Beach
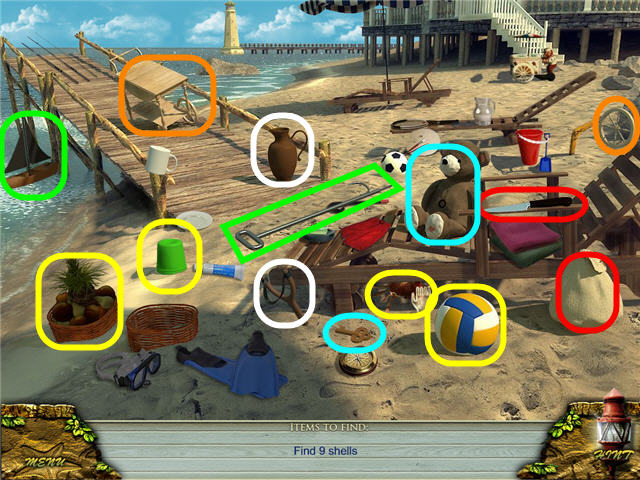
- Find the shells.
- Move the items in yellow to get 4 shells.
- The remaining can be found by doing the following; use the knife on the sack, key on the bear, wheel on the cart, hook on the sailboat, slingshot on the jug.
- Examine and use the seashells on the chest to trigger a puzzle.
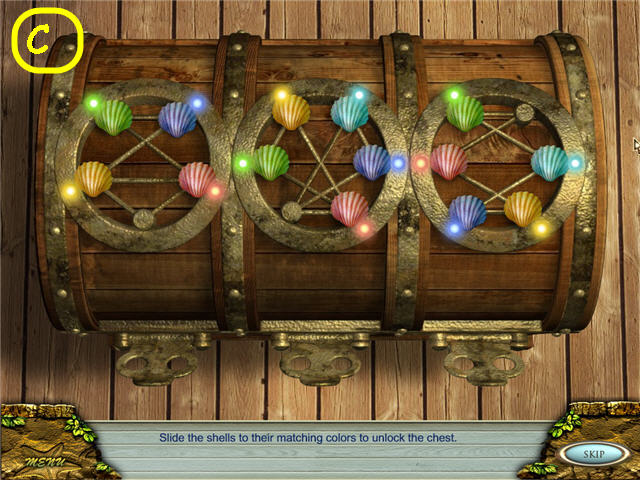
- Move the shells to their corresponding colored slots.
- This puzzle is random; your solution may be different from mine.
- My Solution: Left; click blue, pink, yellow, green, blue, yellow, pink.
- Middle; light blue, dark blue, light blue, pink, green, yellow, green, pink.
- Right; dark blue, yellow, pink, green, light blue, dark blue, yellow, pink.
- See screenshot (C) for solution.
- Take the SCROLL.
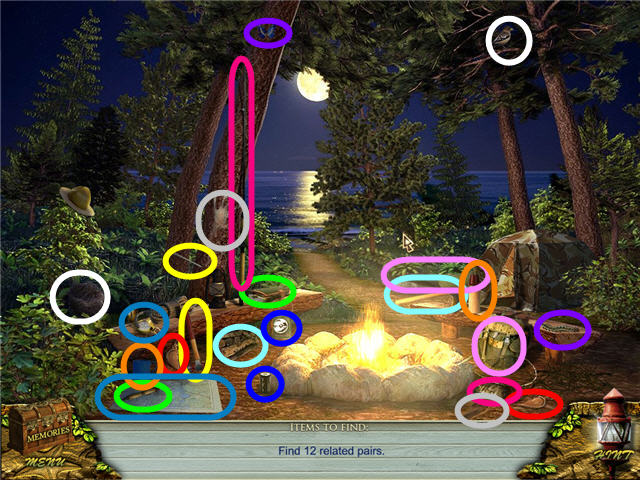
- Find the 12 related pairs.
- Take the locket from the memory chest; give to Charlie.
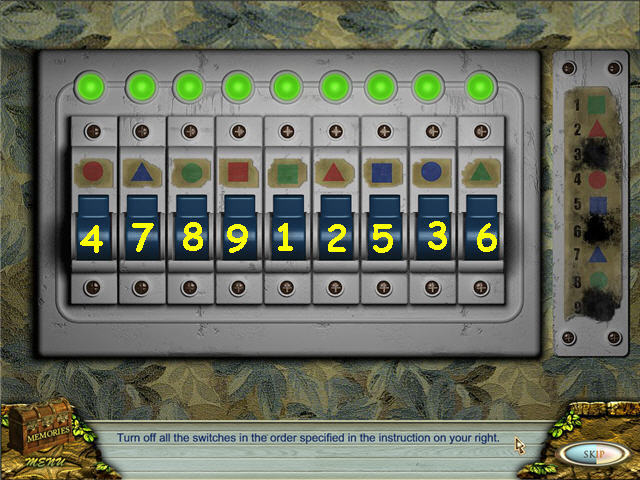
- Examine the panel on the wall to trigger a puzzle.
- Flip the switches in the correct order by using the guide on the right.
- See screenshot for solution.
- Head straight.
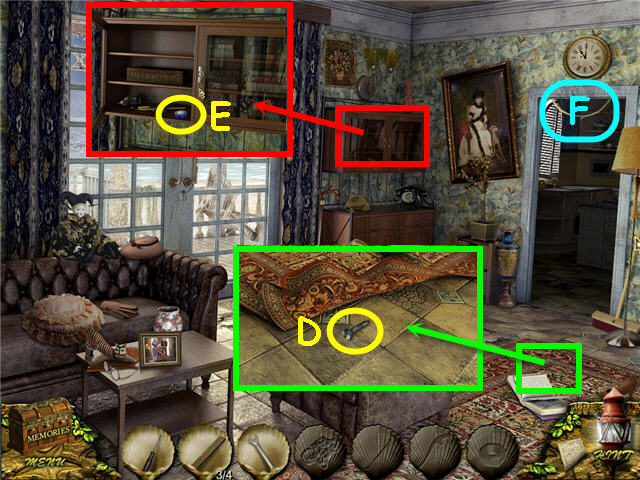
- Examine the book; move the rug and take the SCREW (D).
- Examine the cabinet; open the left side and take the TAPE (E).
- Use the TAPE on the wire (F).
- Head right.
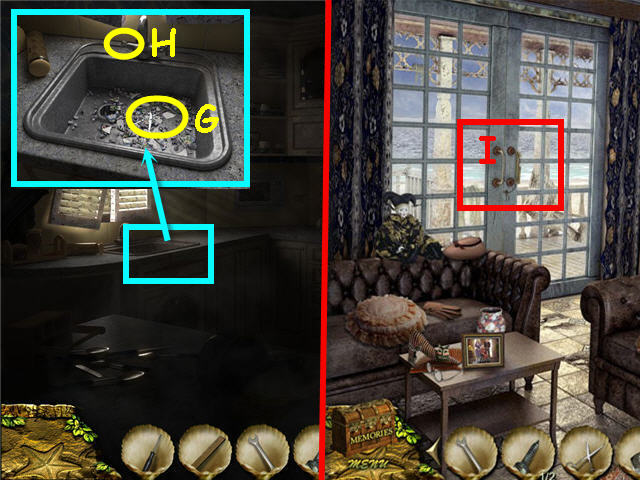
- Examine the sink; take the SCISSORS (G) and PUMP NUT (H).
- Back out.
- Examine the double doors; use the SCISSORS on the rope (I).
- Head through the doors.
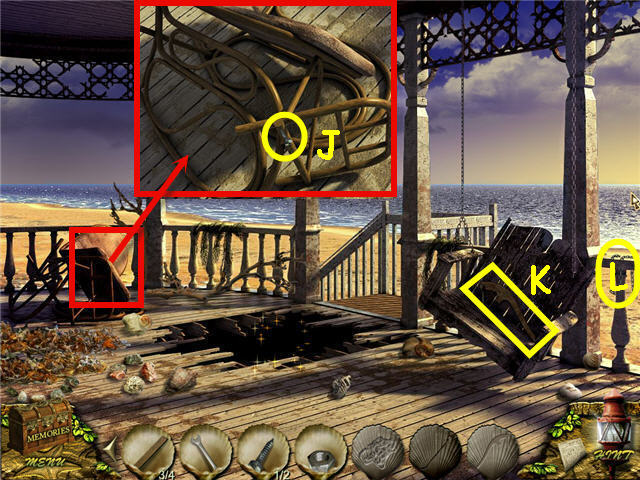
- Examine the chair; take the SCREW (J).
- Take the PUMP HANDLE (K) and CHAIN (L).
- Back out and head right.
- Examine the shutter.
- Place the 2 SCREWS in the holes, use the SCREWDRIVER to tighten.
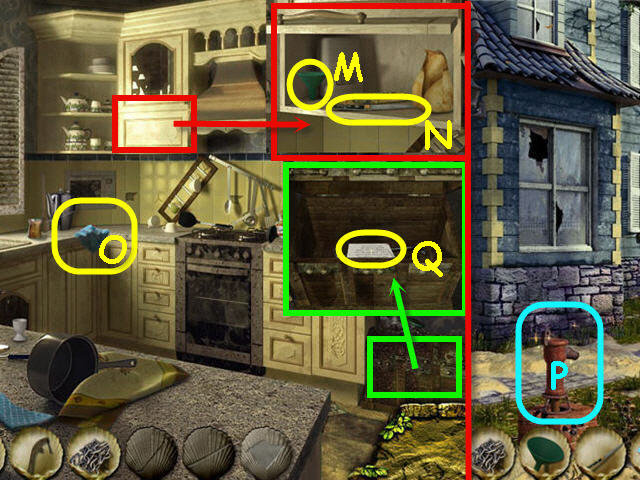
- Examine and open the cabinet; take the FUNNEL (M) and KNIFE (N).
- Take the DRY RAG (O).
- Back out three times, head left.
- Examine the pump (P); place the PUMP HANDLE, PUMP NUT and WRENCH on the pump.
- Click the pump handle; use the DRY RAG on the water to get a WET RAG.
- Head right twice; examine the bottle.
- Head to the kitchen.
- Examine the chest in the right.
- Use the WET RAG on the top of the chest.
- Use the KNIFE on the two left locks, click to open the 3 locks.
- Take the note (Q).
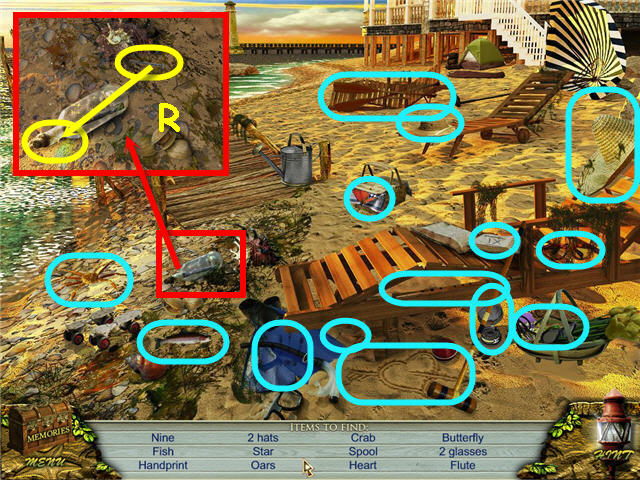
- Find the items listed.
- Examine the bottle; use the nail on the cork and read the message (R).
- Head straight.
Chapter 3 – The Magic Cave
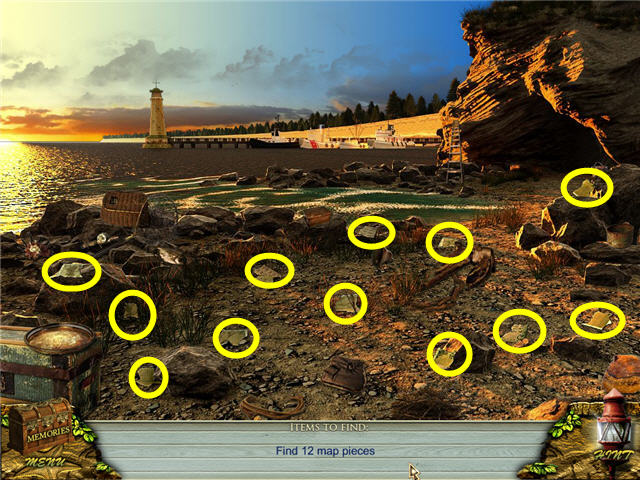
- Find the 12 map pieces marked in yellow.
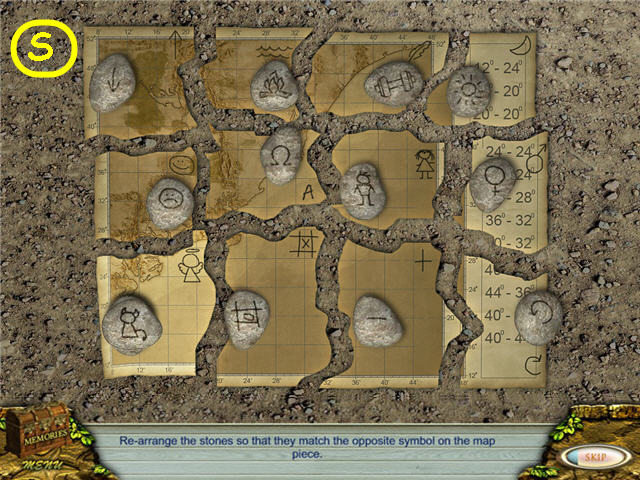
- Arrange the stones so that the symbol of the stone is the opposite of the symbol on the map pieces.
- There must be a stone on each paper at all times; use the empty stone on the left to start. See screenshot (S) for solution.
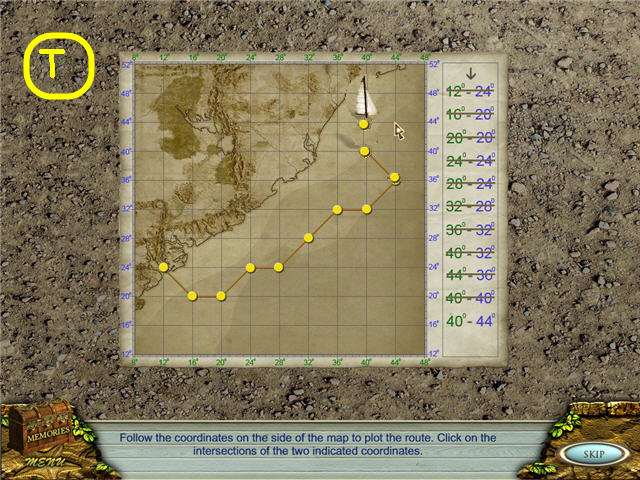
- Map out the coordinates on the grid. See screenshot (T) for solution.
- Enter into the cave.
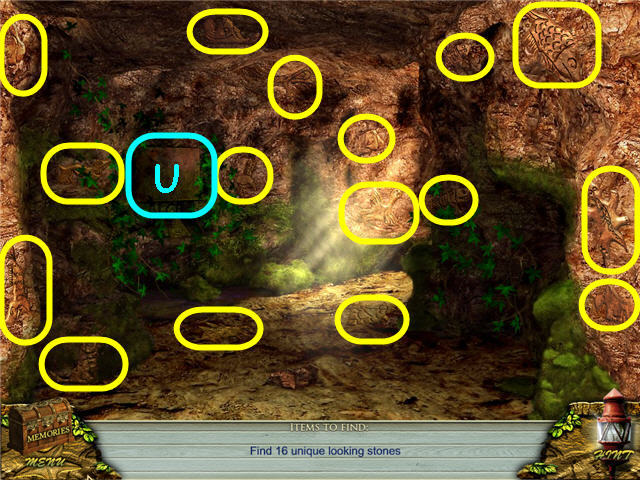
- Find the stones.
- Examine the secret storage (U).
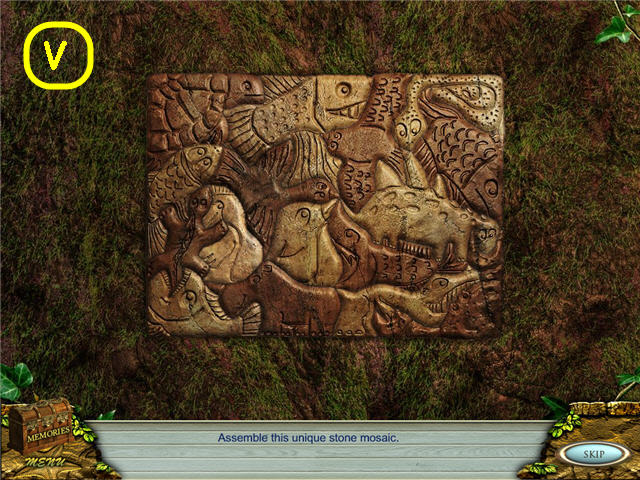
- Place the stone pieces in the center to complete the mosaic. See screenshot (V) for solution.
- Place the memory chest map in the secret storage.
- Examine the chest in the corner; take the CROWBAR. .
- Back out three times.
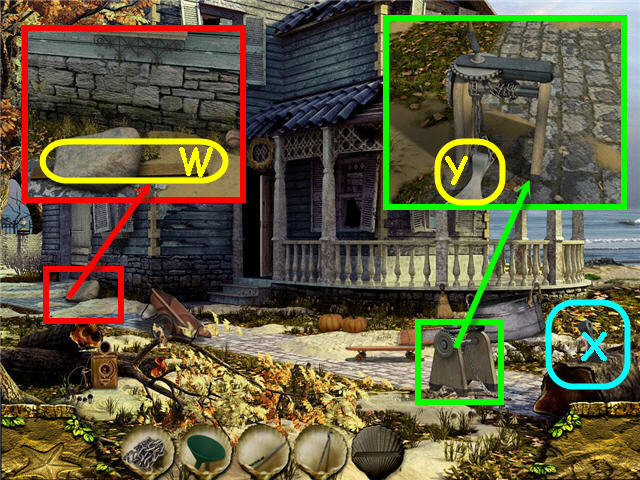
- Examine and use the CROWBAR on the rock; take the PLANK (W).
- Use the CHAIN on the axe head (X).
- Examine and crank the winch; take the AXE BLADE (Y).
- Head to the porch; click to go down the stairs.
- Examine the hole; place the 4 PLANKS on the hole.
- Head down the stairs.
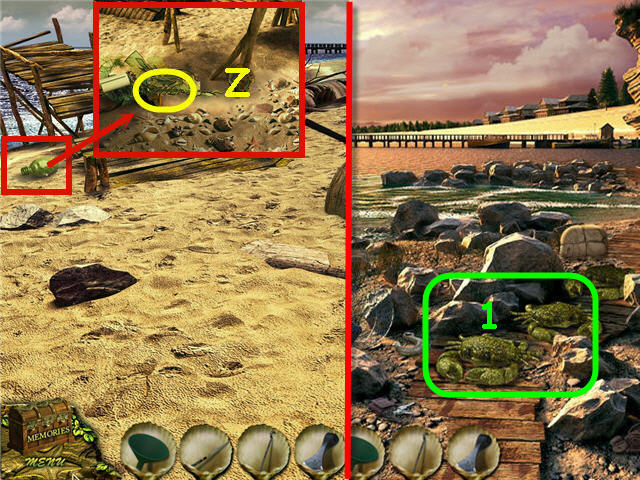
- Examine the bottle; smash the BOTTLE on the stone.
- Take the note and half of LOCKET (Z) for the memory chest.
- Click on the crabs (1) to trigger a puzzle.
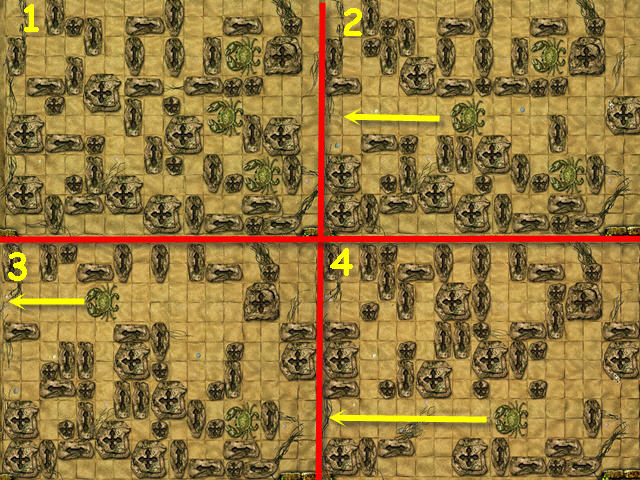
- Move the stones to clear a path for the crabs.
- The stones can be moved in the direction of the arrows. See screenshot for solution.
- Head straight.
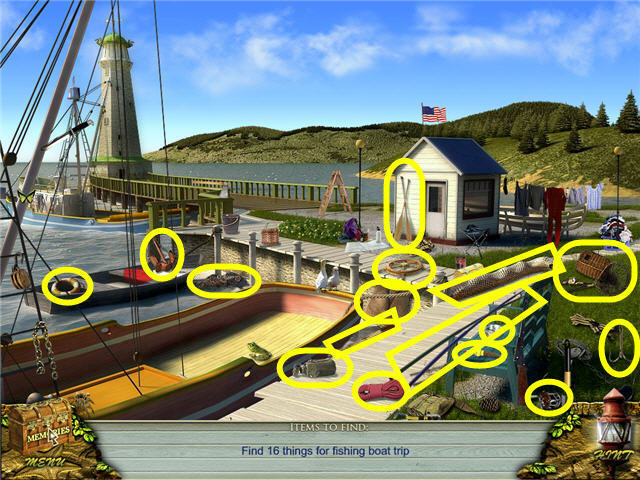
- Find the 16 fishing items marked in yellow.
- Head into the boathouse.
Chapter 4 – The Boat
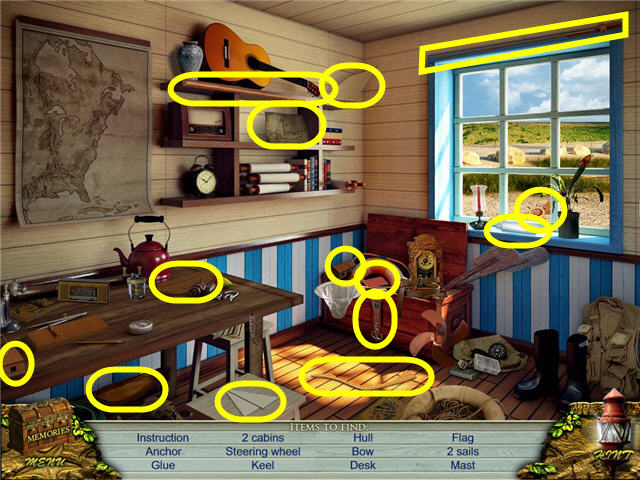
- Find the items listed.
- Give the boat to Charlie.
- Examine the table to trigger a puzzle.
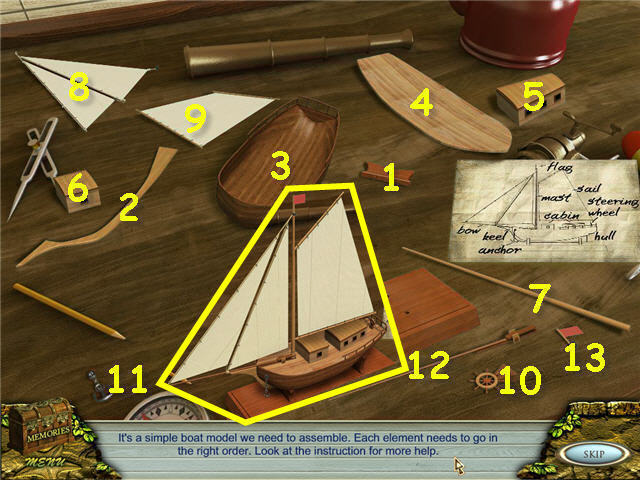
- Assemble the boat per the directions on the right.
- See screenshot for one solution.
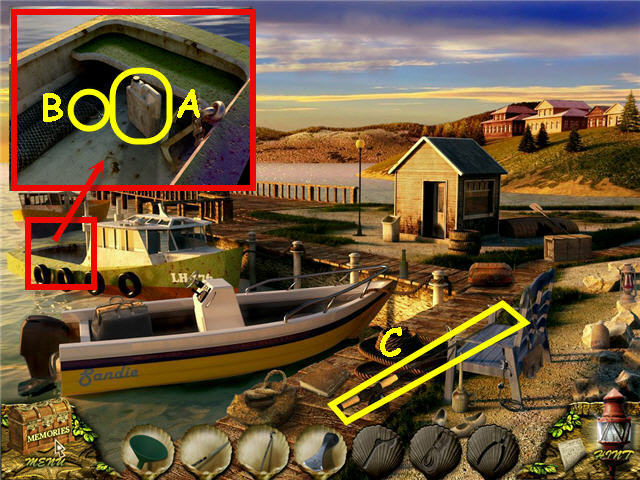
- Examine the boat; take the FUEL CANISTER (A) and WIRE CUTTERS (B).
- Take the ROD (C).
- Back out.
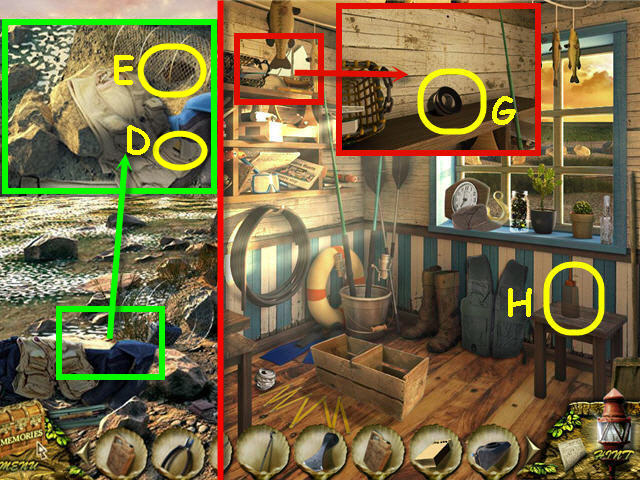
- Examine the net; take the MATCHES (D).
- Use the WIRE CUTTERS on the net; take the TELESCOPE PIECE (E).
- Head into the boathouse.
- Examine the upper shelf; take the BOAT for the memory box and TELESCOPE PIECE (G).
- Examine the oil can (H); unscrew the top.
- Use the FUNNEL and FUEL CANISTER on the can; click the top and take the OIL CAN.
- Back out, head right.
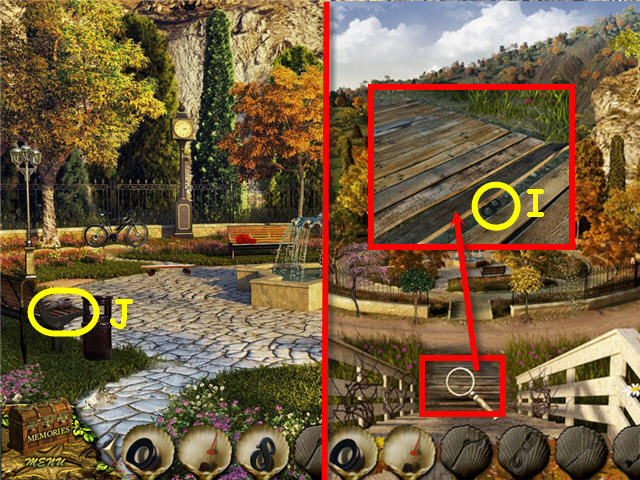
- Examine the landing.
- Use the CROWBAR on the board; take the NUMBER 8 (I).
- Head forward.
- Take the ROPE (J).
- Back out four times.
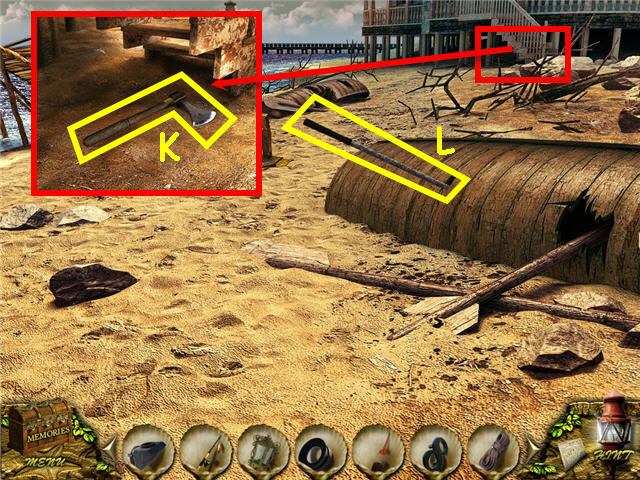
- Examine under the deck.
- Place the AXE BLADE and ROPE on the handle; take the AXE (K).
- Use the AXE on the hull; take the NET (L).
- Head forward twice, head left.
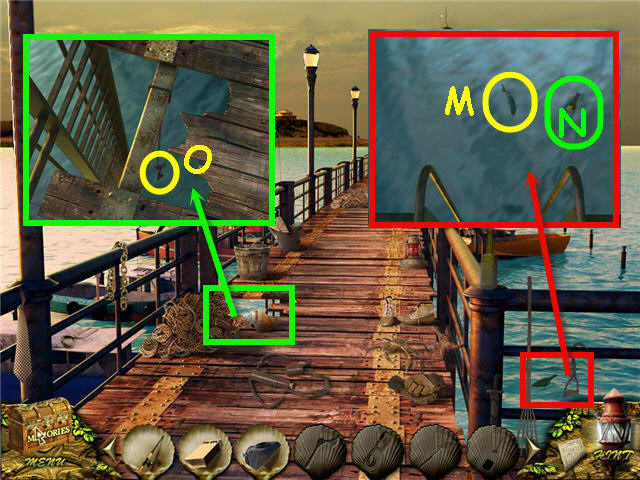
- Examine the water.
- Use the ROD on the fish (M); get a ROD WITH FISH.
- Use the NET on the bottle (N) to get a note.
- Examine the hole; use the NET on the key (O).
- Use the KNIFE on the rope to get the KEY.
- Head forward.
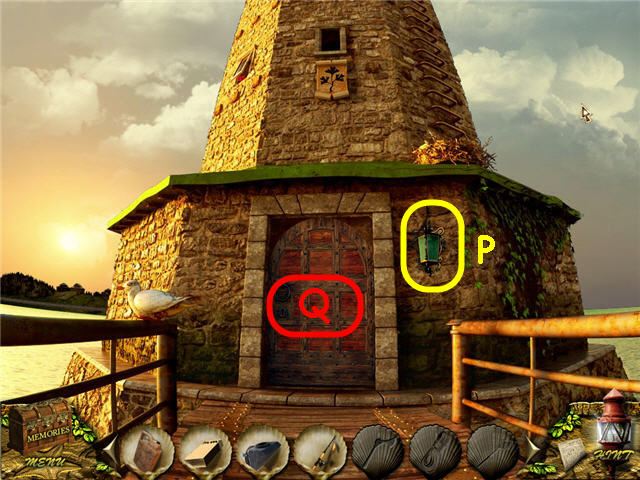
- Take the LANTERN (P).
- Examine the door (Q).
- Use the OIL CAN on the hinges and the KEY in the lock.
- Examine the door to trigger a puzzle.
Chapter 5 – The Lighthouse
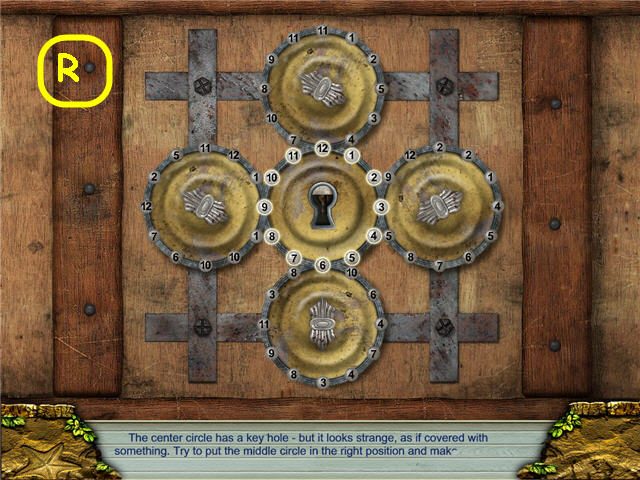
- Arrange the numbers on the center circle in numerical order by rotating the outer and center circles.
- The puzzle is random; your solution may be different from mine.
- Solution: click top to 7, right to 10, bottom to 1, left to 4, click center, left to 3, click center, left to 2, top to 5, right to 8, bottom to 11, click center two times, bottom to 9, center three times.
- See screenshot (R) for solution.
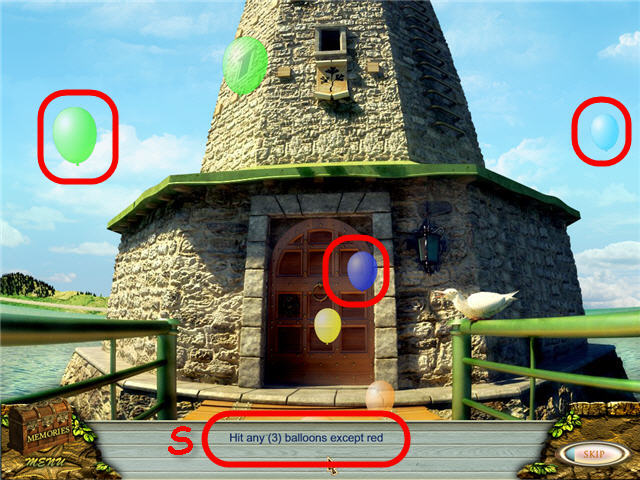
- Click on the balloons per the directions given (S).
- Solution: The combo of yellow and blue = green; the order of Richard Of York Gave Battle In Vain = Red, Orange, Yellow, Green, Blue, Indigo, Violet.
- Get the KEY.
- Examine the lock; use the KEY.
- Click on the scrapbook to trigger a Hidden Object Scene.
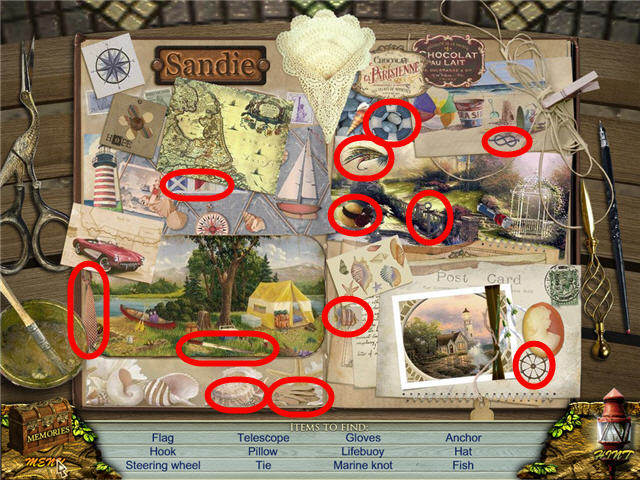
- Find the items listed.
- Place the telescope from the memory chest on the tripod to trigger a puzzle.
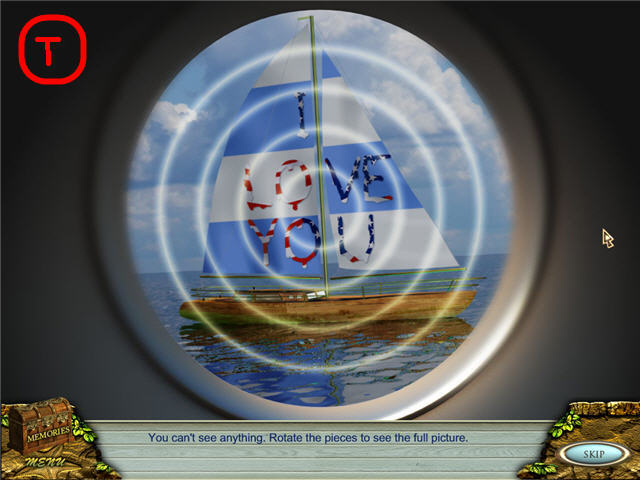
- Rotate the rings to complete the picture.
- See screenshot (T) for solution.
- Enter the lighthouse.
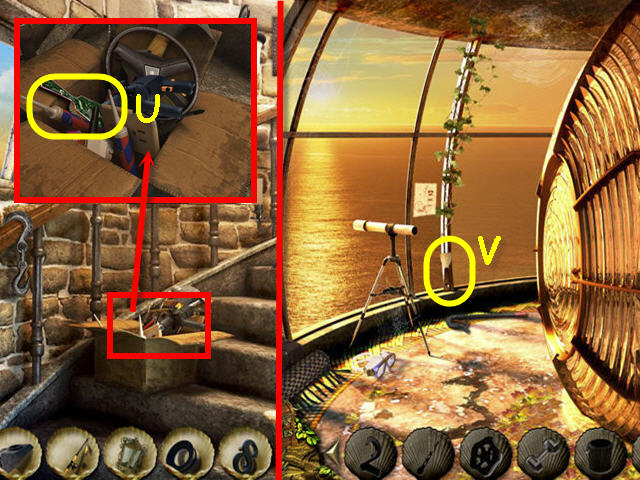
- Examine the box; take the BRUSH (U).
- Head upstairs.
- Take the SPATULA (V).
- Back out four times, head right, forward twice into the cave.
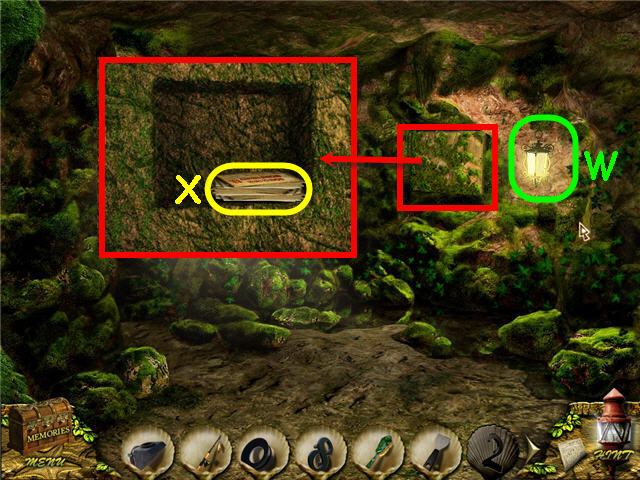
- Examine the wall (W); hang the LANTERN.
- Open and light the LANTERN with the MATCHES.
- Examine the secret place.
- Use the BRUSH and SPATULA on the door; take the letters (X).
- Back out twice, head left.
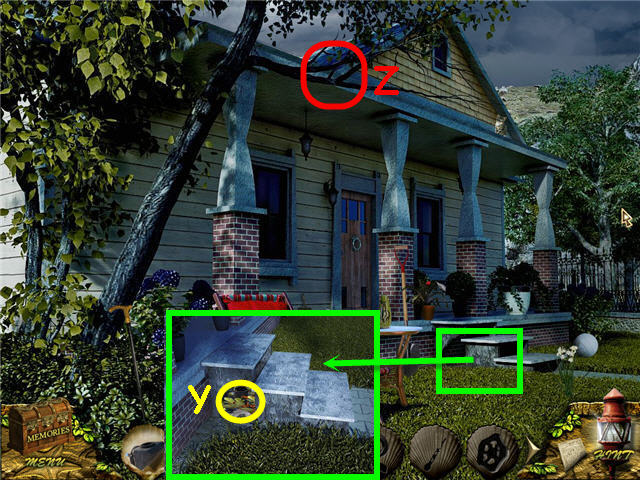
- Examine the porch; take the TELESCOPE PIECE (Y).
- Use the ROD WITH FISH on the tree (Z).
- Enter the house and head straight.
Chapter 6 – Charlie's House
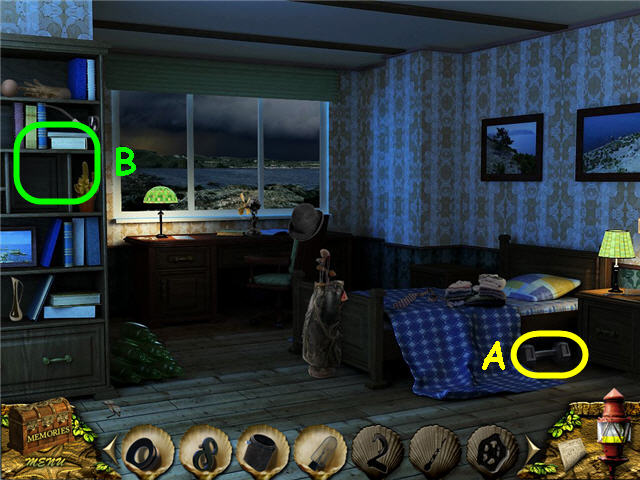
- Take the DUMBBELL (A).
- Examine the bookshelf to trigger a puzzle (B).
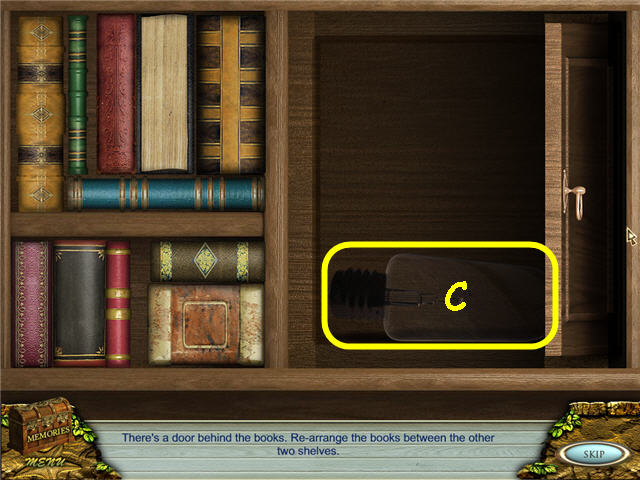
- Move the books from the right to the left. See screenshot for solution.
- Take the LIGHT BULB (C).
- Head into the boathouse.
- Examine the coffee pot to trigger a puzzle.
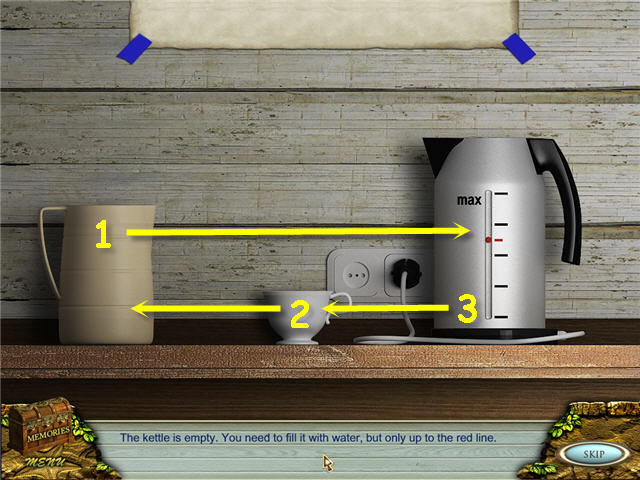
- Fill the pot with water to the red line.
- Solution: Pitcher to kettle, cup to pitcher, kettle to cup. See screenshot for solution.
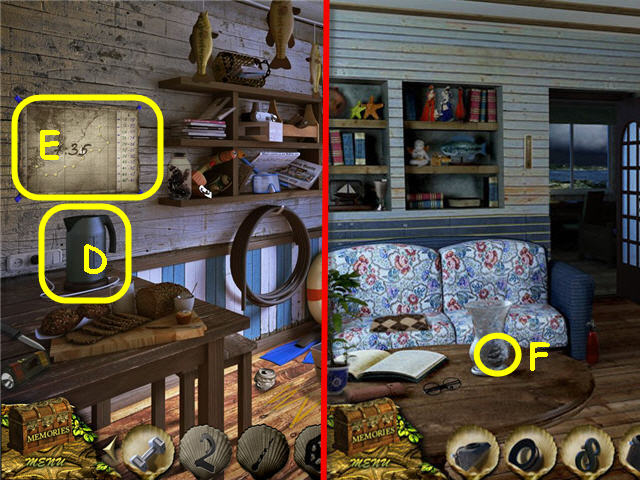
- Take the KETTLE (D), the MAP for the memory box (E) and the NUMBER 2 behind the MAP.
- Head into Charlie's cottage.
- Examine and use the KETTLE on the vase; take the TELESCOPE PIECE (F).
- Head into the lighthouse stairwell.
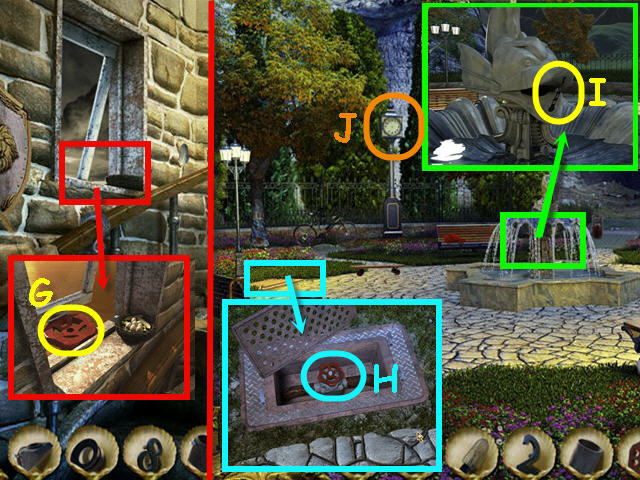
- Examine the window.
- Use the DUMBBELL on the window; take the VALVE (G).
- Head to the park.
- Examine the grate; unhook the 4 clamps.
- Remove the cover; place the VALVE on the stem (H).
- Turn the VALVE.
- Examine the fountain; take the MINUTE HAND (I).
- Examine and place the NUMBER 2, NUMBER 8 and MINUTE HAND on the clock (J).
- Click the clock gears to trigger a puzzle.
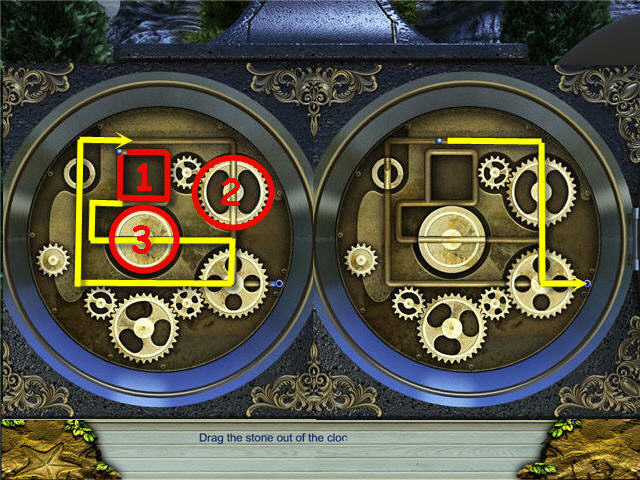
- Remove the blue stone from the mechanism.
- Solution: Drag the blue stone around the square (1) until the gears (2 and 3) are aligned with the path and then follow the yellow line on the screenshot to the exit.
- The starting point is random, but the solution will work regardless of where you begin. See screenshot for alignment and path.
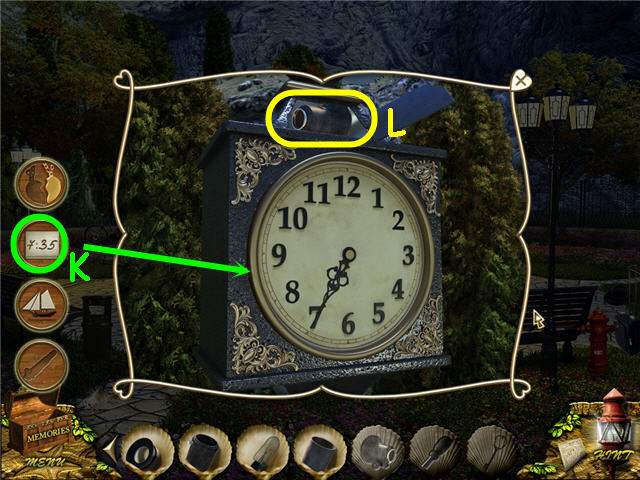
- Set the clock to the time on the map from the boathouse in your memory chest (K).
- Solution: 7:35.
- Take the TELESCOPE PIECE (L).
- Head to the top of the lighthouse.
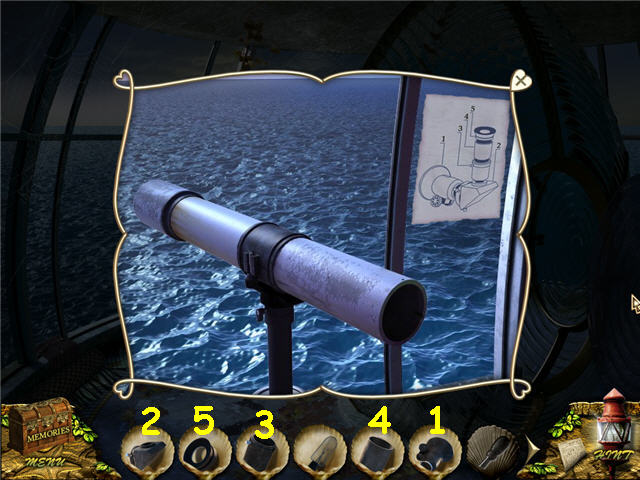
- Examine the telescope.
- Place the 5 TELESCOPE PIECES on the telescope. See screenshot for solution.
- Look through the telescope; take the TELESCOPE for the memory box.
- Back out one time.
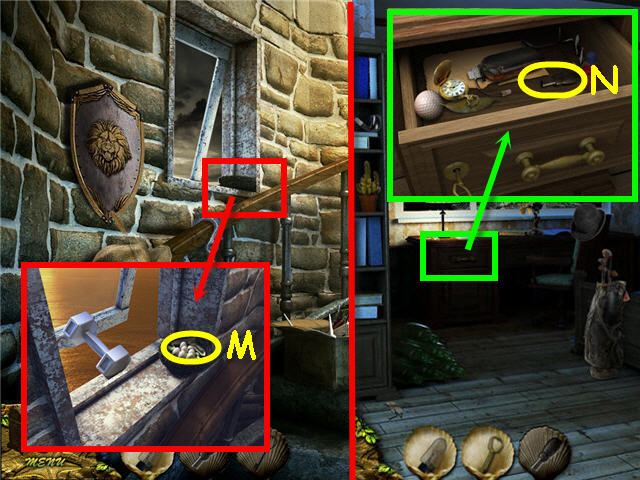
- Examine the window; take the KEY (M).
- Head to the bedroom in Charlie's house.
- Examine and use the KEY on the desk drawer; take the TOGGLE SWITCH (N).
- Head to the top of the lighthouse.
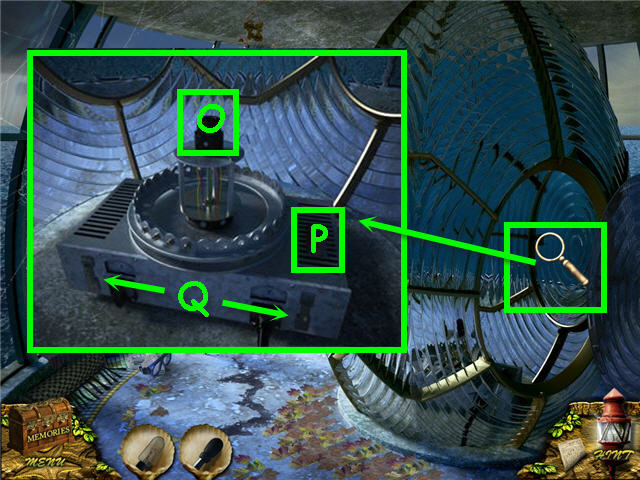
- Examine the light.
- Place the LIGHTBULB (O) and TOGGLE SWITCH (P) on the controls.
- Open the two clips (Q); click to open.
- Examine the wires to trigger a puzzle.
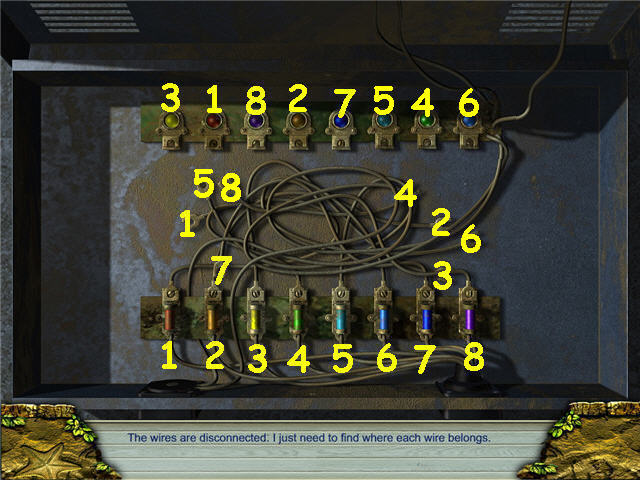
- Connect the wires from the bottom to the top.
- See screenshot for solution.
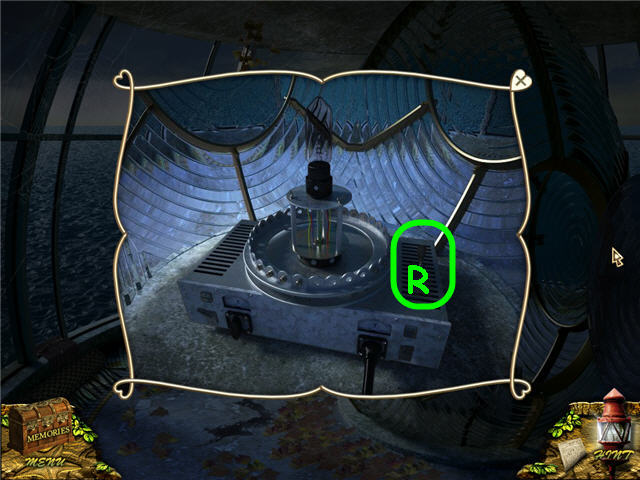
- Flip the TOGGLE SWITCH (R).
- Click anywhere to continue.
- Congratulations! You have successfully completed Love Story: The Beach Cottage.
Created at: 2011-10-01

