Walkthrough Menu
General Tips
- From the main menu you can change your profile, adjust settings like full screen and audio volume, see the credits, see the help, or start the game.
- When you first start the game you will be offered a tutorial.
- This guide follows the exact same order as the tutorial.
- In this game you will click on something in the environment and receive hunts to look for more objects that have to do with fixing the environment or doing some task.
- The objects you are looking for will be displayed at the bottom of the screen.
- When you find them, they will go into your inventory on the left of the screen.
- You can get many hunts going at once, and they will all enter your hunt menu at the bottom of the screen.
- There is a hint button on the very right which will turn into a skip button during mini-games.
- In mini-games you can click the question mark in the top corner of the screen to get an explaination of what you need to do.
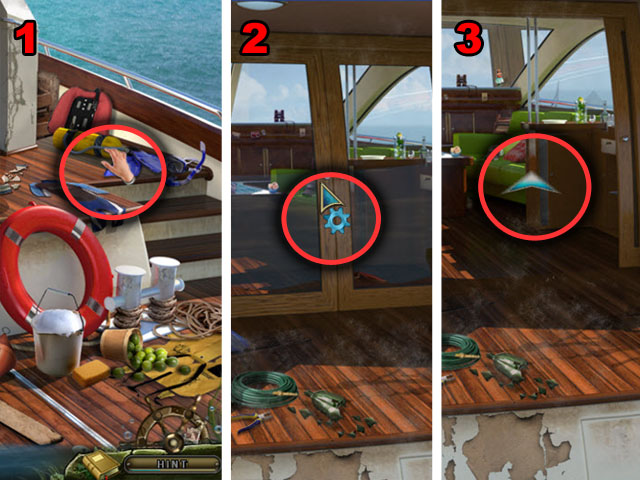
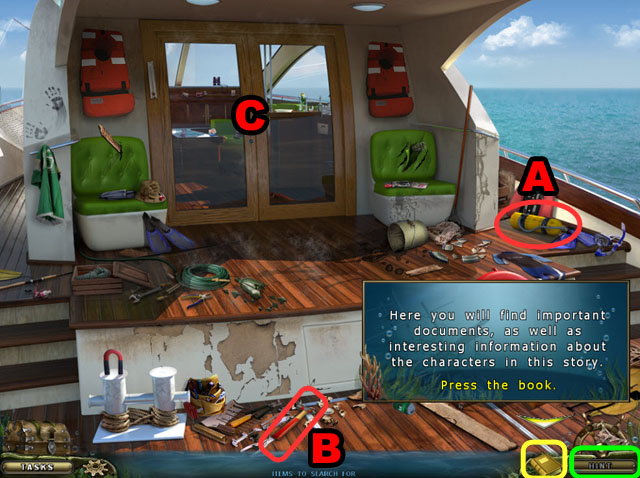
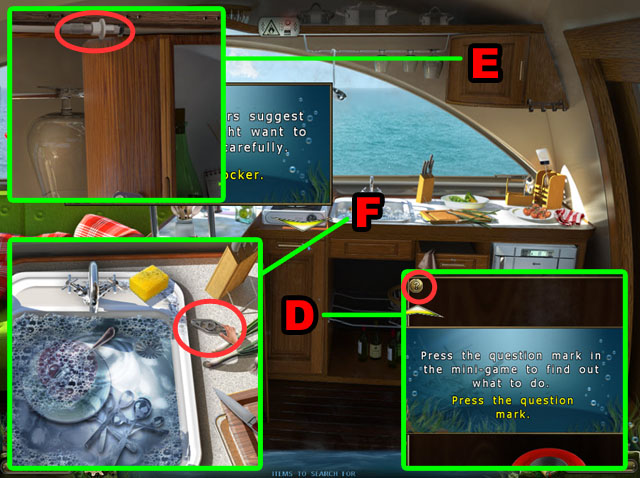
- There are three cursors in the game, the hand cursor for when you can take something (1), the gears cursor for when you can use and INVENTORY ITEM on the object (2) and the arrow cursors for movement (3).
- The hidden objects are not randomized in this game, but the starting positions of the puzzles are.
- There are documents to the left of the hint button that can also help you solve some puzzles.
Chapter 1
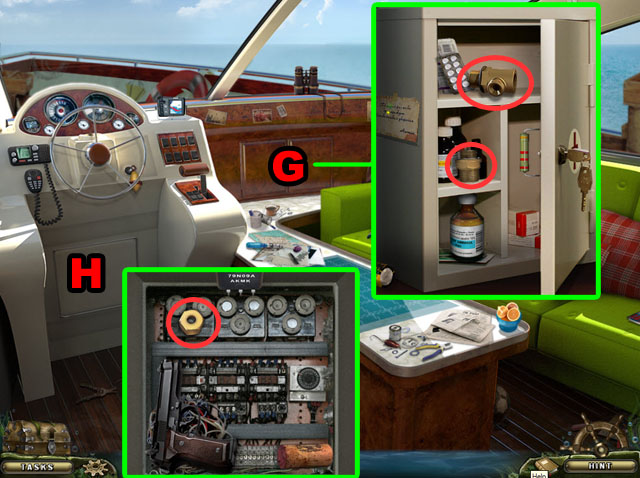
- Check the book highlighted in yellow in the bottom right corner.
- Find the scuba set (A).
- Check the hint button highlighted in green in the bottom right corner.
- Find the HAMMER (B).
- Break the glass with the HAMMER (C).
- Enter the next room.
- Click on the shelf (D).
- Click on the question mark circled in red in the upper left corner.
- Open the locker and find the STOP (E).
- Click on the sink and find the FLAPPER VALVE (F).
- Click on the left side to move to the next room.
- Open the shelf (G).
- Collect the two parts.
- Open the control panel (H).
- Collect the SCREW.
- Return to the previous room.
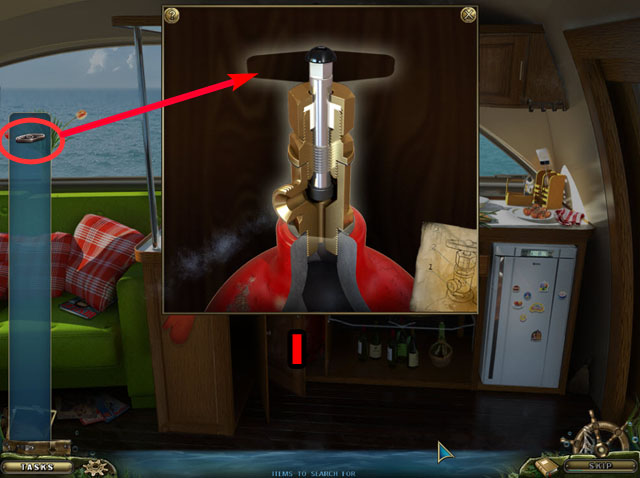
- Open the shelf (I).
- Put the part together correctly.
- The correct order is the GATE VALUE, BUSHING, STOP, SCREW, and FLAPPER VALVE.
- Return to the deck.
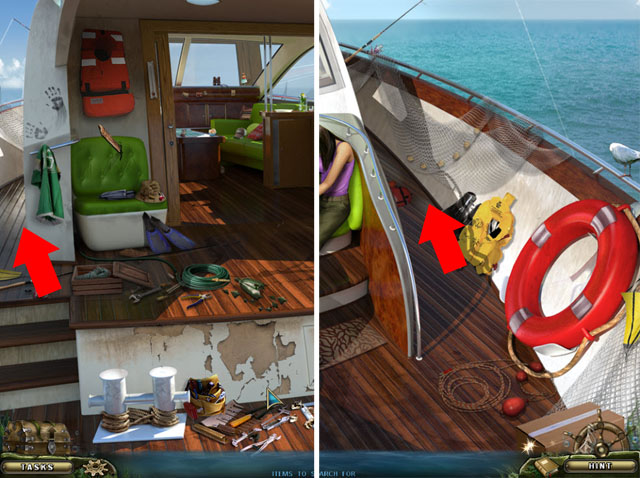
- Go through the left side of the deck.
- Talk with Elizabeth.
- Return to the previous room from the right side of the deck.
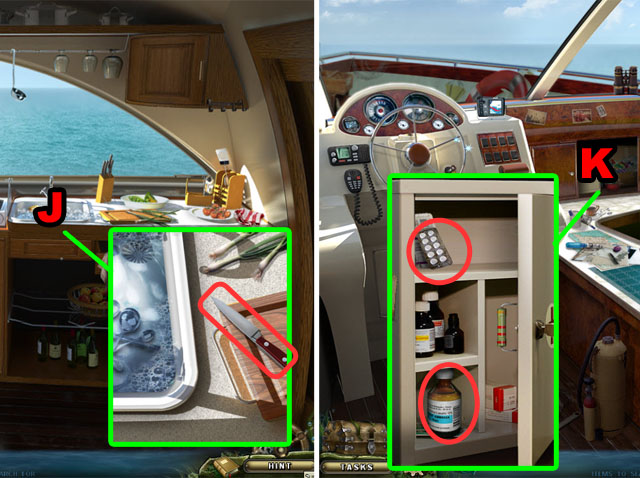
- Click on the sink and collect the KNIFE (J).
- Return to the next room.
- Click on the FIRST AID KIT (K).
- Collect the PILL and the SMELLING SALTS.
- Return to the Elizabeth.
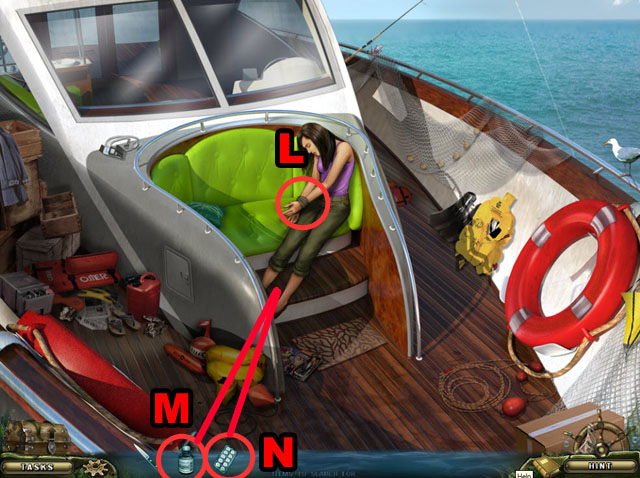
- Cut the robe with the KNIFE (L).
- Give the SMELLING SALTS to her (M).
- Give the PILLS (N).
- Return to the control room.
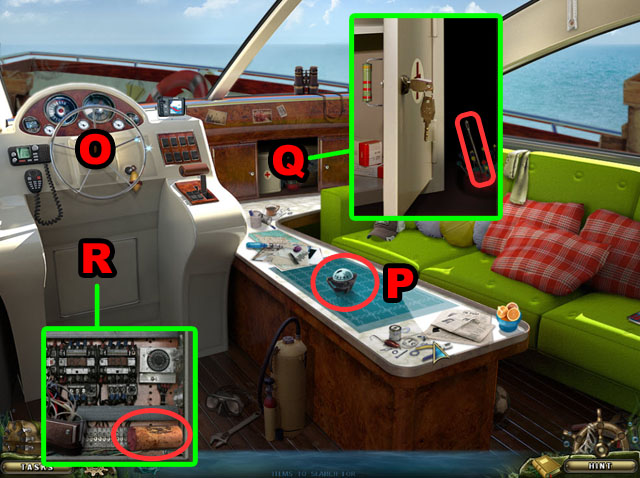
- Click on the steering wheel (O).
- Click on the compass in the middle of the table to start the next hunt (P).
- Click on the first aid kit (Q).
- Collect the NEEDLE.
- Open the control panel.
- Collect the CORK (R).
- Return to the kitchen.
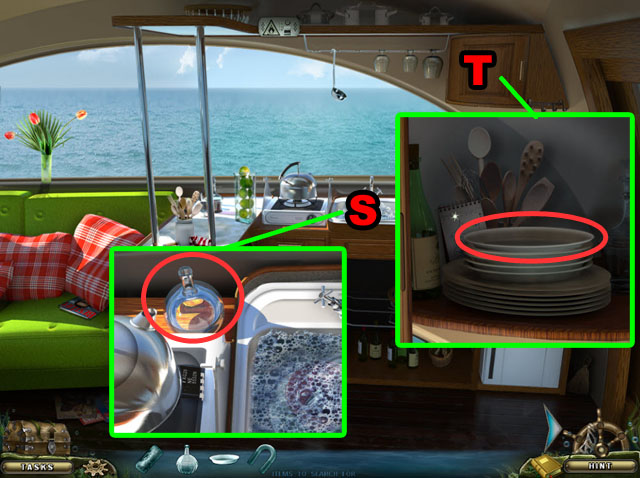
- Click on the sink (S) and collect the FLASK.
- Open the locker (T) and collect the PLATE.
- Return to the deck.
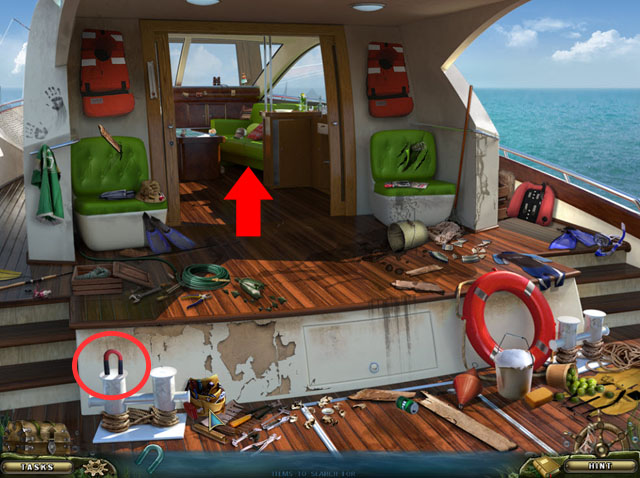
- Collect the MAGNET.
- Return to the control room.
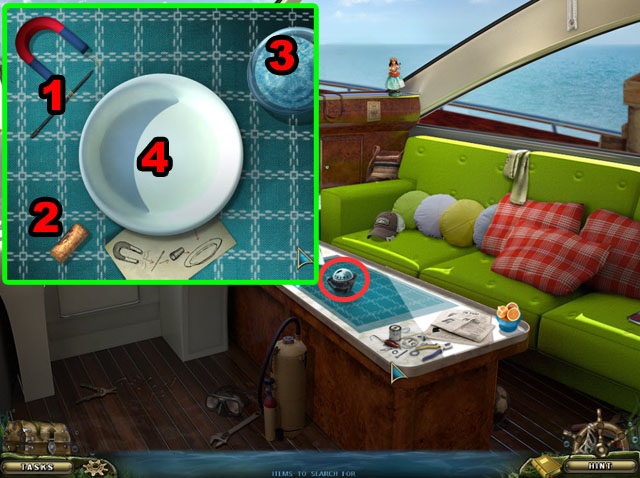
- Click on the compass.
- Click on the COMPASS PARTS and drag them to the compass to start the next mini-game.
- Place the needle on the magnet (1).
- Put the cork on the needle (2).
- Pour the water in the plate (3).
- Place the combined thing on the water (4).
Chapter 2
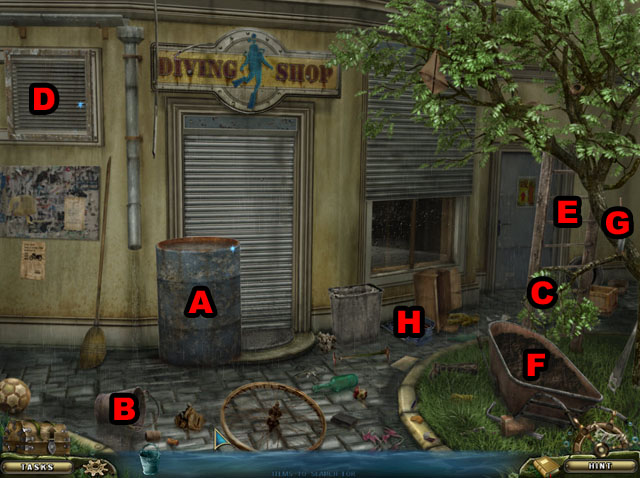
- Click on the steel drum (A).
- Collect the BUCKET (B).
- Click on the BUCKET and click on the steel drum three times.
- Click on the steel drum again.
- Find the BRANCH (C).
- Click on the vent (D).
- Collect the LADDER (E) and place the LADDER under the vent.
- Click on the vent again.
- Click on the dirt in the wheelbarrow (F).
- Collect the SHOVEL (G).
- Zoom in on the tool box (H).
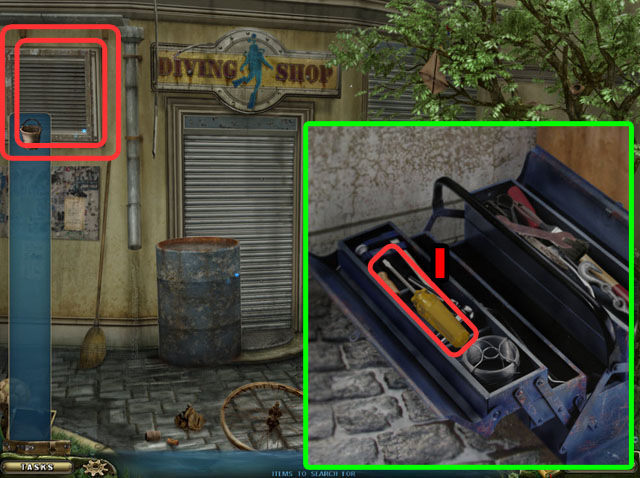
- Find the SCREWDRIVER (I).
- Click on the vent and open the cover with the SCREWDRIVER.
- Collect the LOCK PICK.
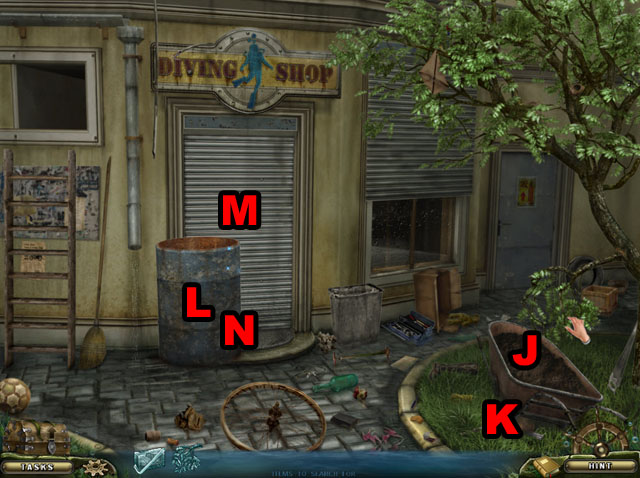
- Dig the dirt with the SHOVEL three times (J).
- Collect the HOOK AND BRICK from under the wheelbarrow (K).
- Place the BRANCH on the steel drum (L).
- Click on the shutter door (M).
- Zoom in on the mat (N) at the bottom of the shuttered door.
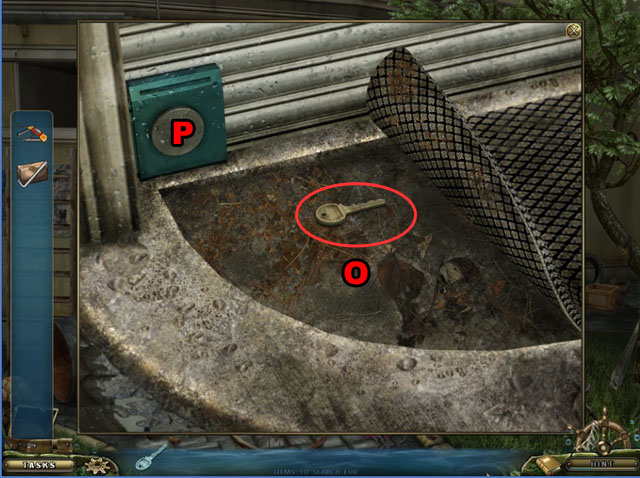
- Collect the KEY (O).
- Open the shutter with the KEY (P).
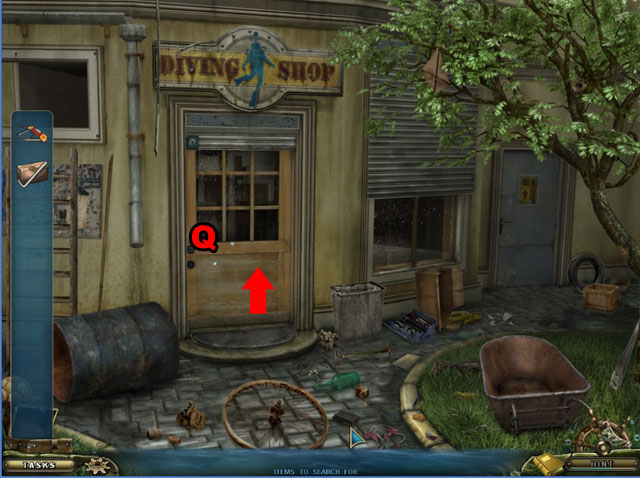
- Open the door with the hook and brick (q).
- Enter the door.
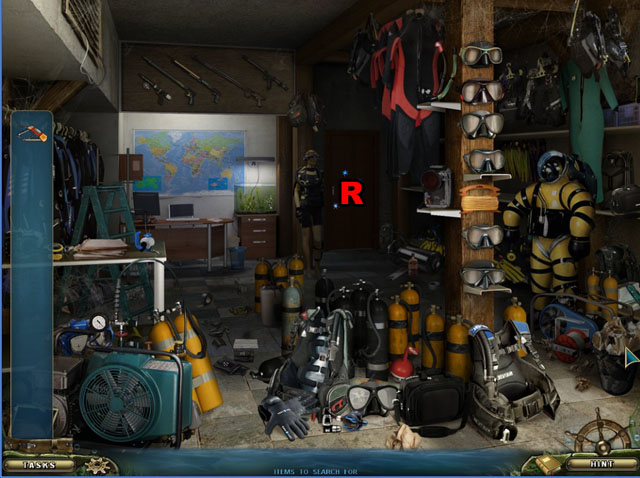
- Click on the door (R) in the back of the room.
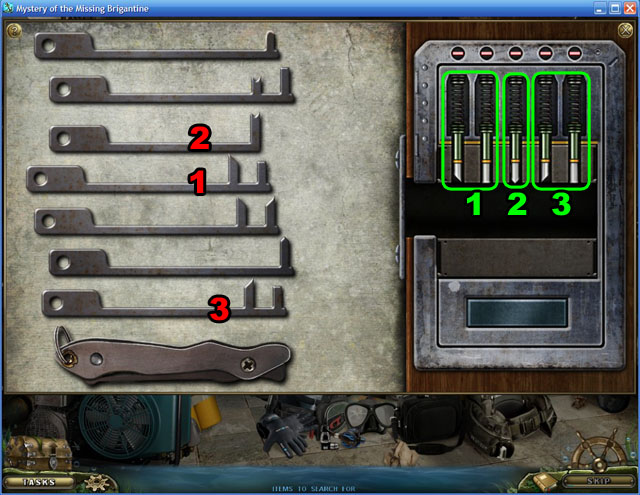
- Click and drop the LOCK PICKS on the area to the left of the lock springs.
- Choose the correct lock picks and use them on the springs to the right.
- Click a lock pick to pick it up and the click again to place it. Match the teeth of the lock pick with the shape under the lock spring.
- See the screenshot for the correct 3 lock picks to use and their correct placement.
- Once you finish, click the desk to the left of the door.
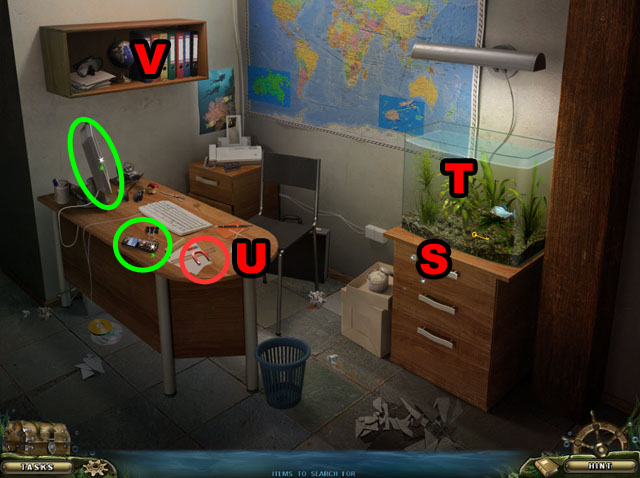
- Click on the drawer (S).
- Click on the computer monitor and the cell phone on the desk.
- Click on the aquarium (T).
- Find the MAGNET (U).
- Click on the shelf (V).
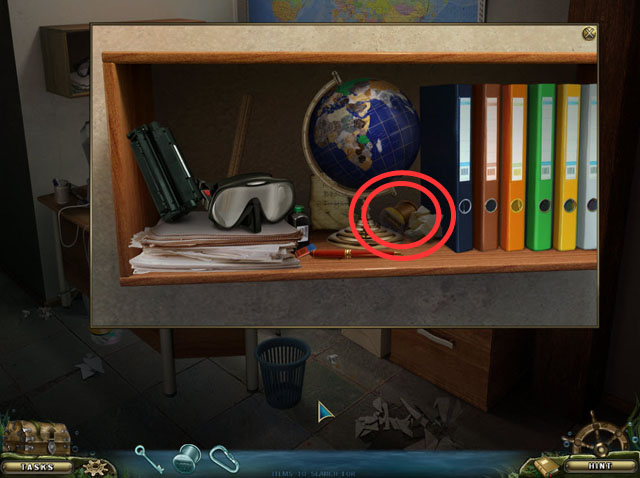
- Collect the STRING.
- Return to the previous room.
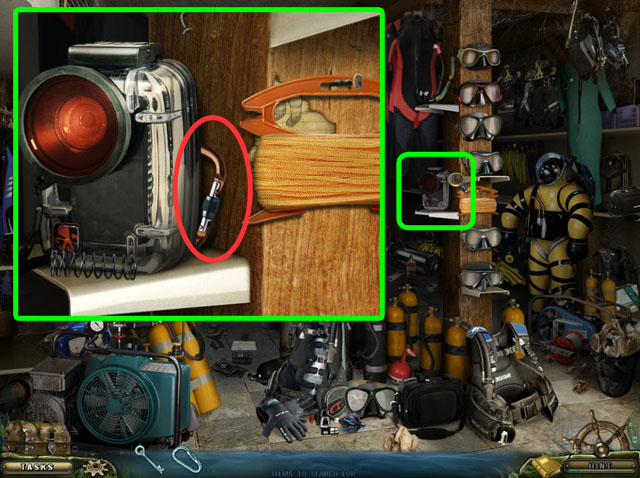
- Collect the CARABINER.
- Return to the desk.
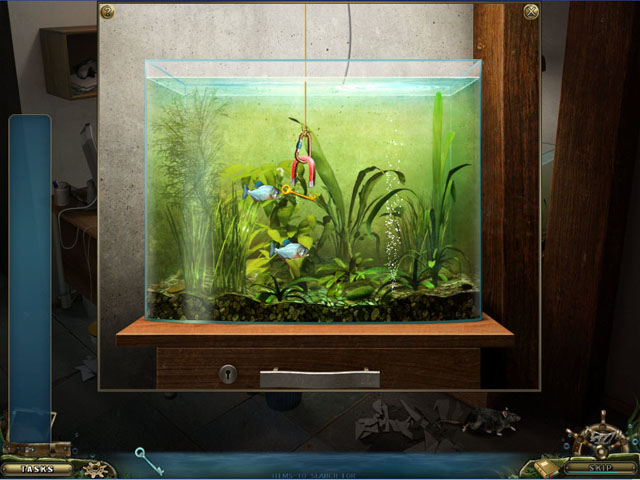
- Place the items on the aquarium.
- Use your mouse to set the position if the magnet above the key.
- Left click to send the magnet down to get the key.
- If you touch the fish with the key, it will fall back down to the bottom.
- The trick is that touching the fish on the way down does not effect the magnet. Click to send the magnet down with the fish is directly below you. Then it will not touch the key on the way back up.
- Collect the KEY.
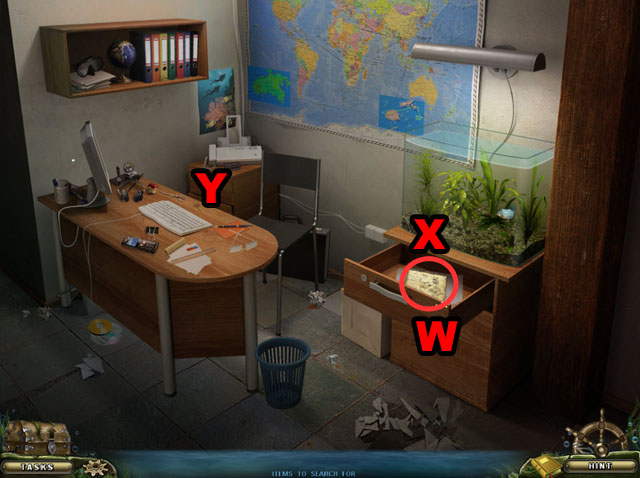
- Open the drawer with the KEY (W).
- Click on the paper (X).
- Zoom in on the spot behind the desk (Y).
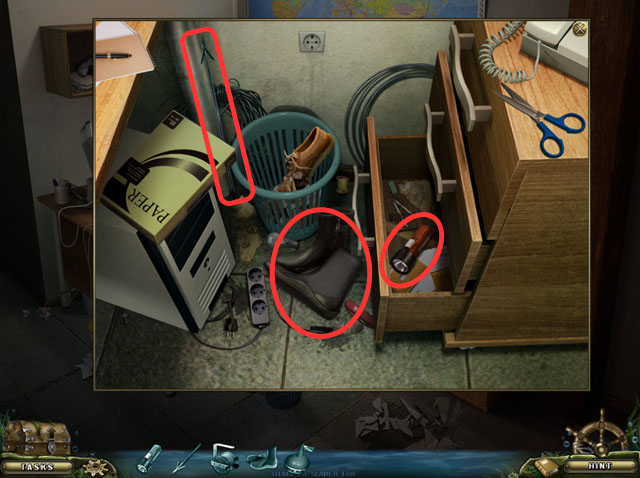
- Collect the BOOTS, FLASH LIGHT and ARROW.
- Return to the previous room.
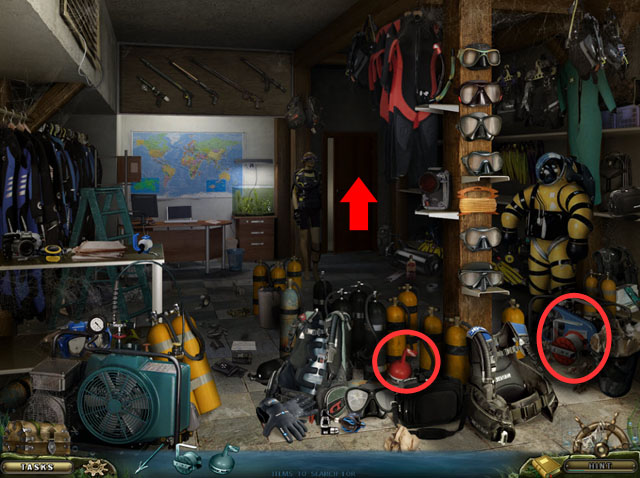
- Collect the BUOY and REEL.
- Enter the next room from the door on the right.
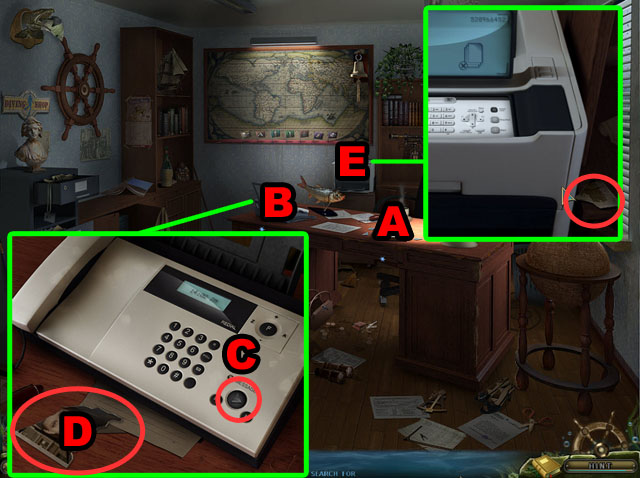
- Click on the frame on top of the desk (A).
- Zoom in on the phone (B) and play the message (C).
- Collect the RIPPED PHOTO (D).
- Zoom in on the printer (E).
- Collect the RIPPED PHOTO.
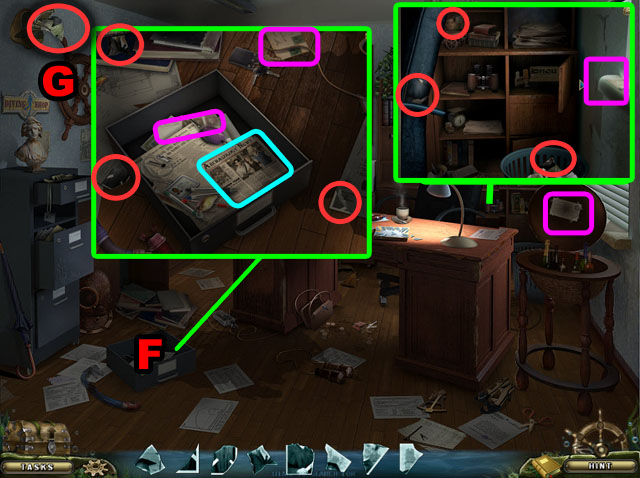
- Click on the globe to the right and collect the LETTER.
- Click on the drawer (F) on the ground.
- Find the pieces of PHOTO highlighted in red.
- Collect two LETTERS highlighted in purple.
- Collect the piece of photo (G).
- Zoom in the book shelf.
- Collect the LETTER and the RIPPED PHOTOS.
- Click on the frame on the desk again.
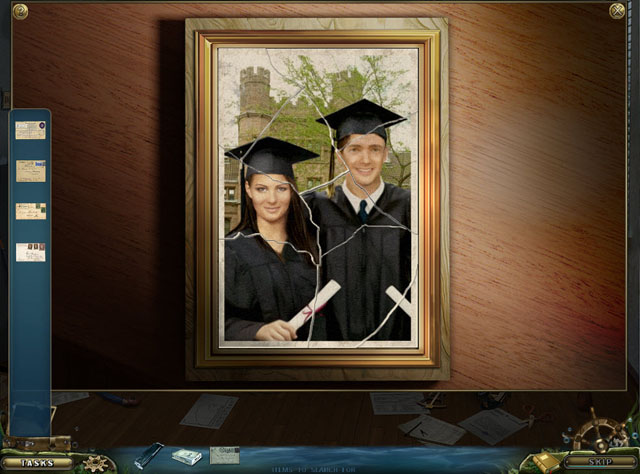
- Click and drop the PHOTO SCRAPS on the frame.
- Reconstruct the scraps by clicking and placing them in the correct position.
- When they are placed correctly they will lock to the frame.
- See the screenshot for the complete image.
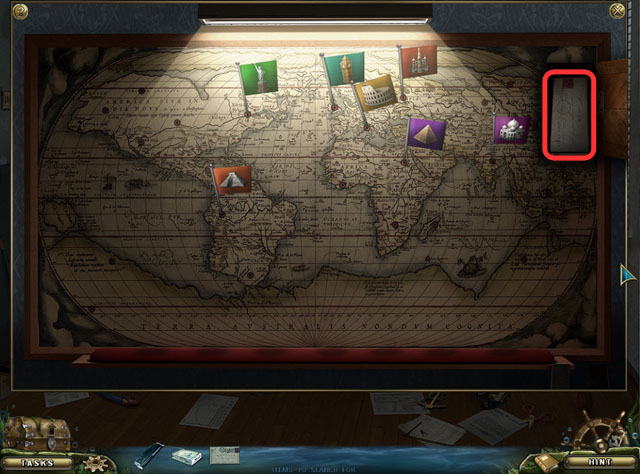
- Click on the world map.
- Place the flags in correct spots on the world map.
- Each flag has a famous landmark drawn on it. Match the landmarks with their location on the earth.
- See the screenshot for the complete solution.
- Take the LETTER.
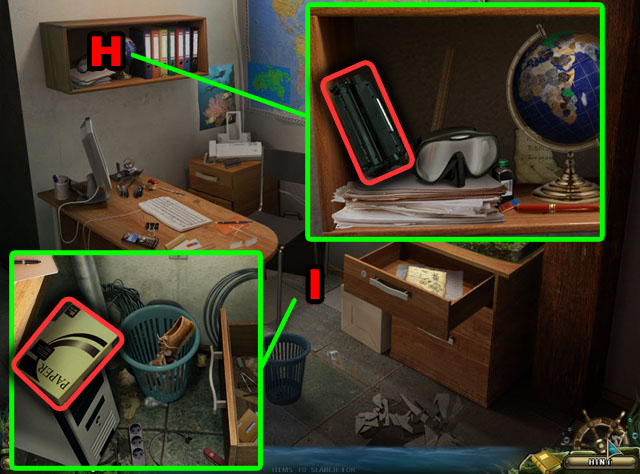
- Return to the desk in the previous room.
- Zoom in on the shelf (H) and collect the TONER.
- Zoom in on the floor (J) and collect the PAPER.
- Return to the office.
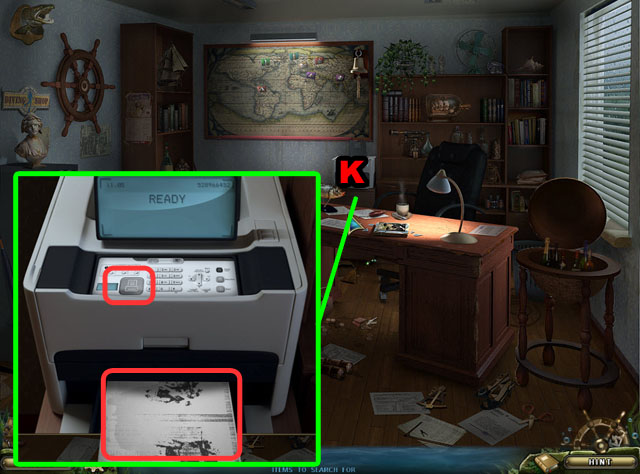
- Click on the printer (K).
- Click and drag the PAPER and TONER on the printer.
- Press the print button (L).
- Take the copied paper.
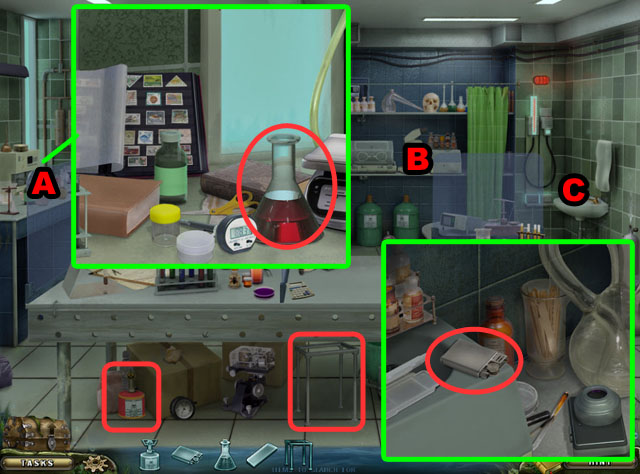
- Collect the BASE and BURNER highlighted in red.
- Zoom in on the table (A) and collect the FLASK.
- Click on the shelf (B) and collect the LIGHTER.
- Zoom in on the sink.
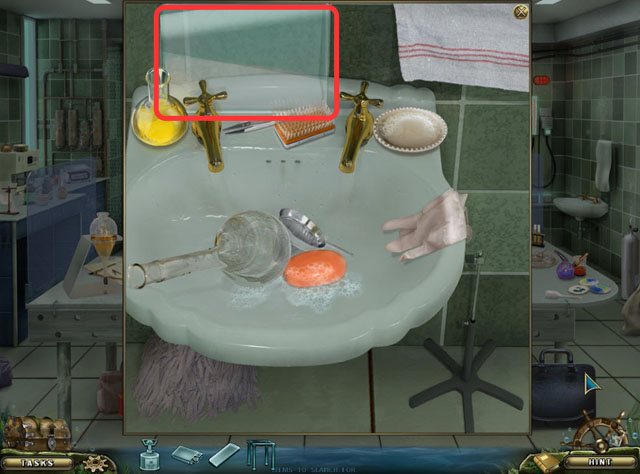
- Collect the GLASS PLATE.
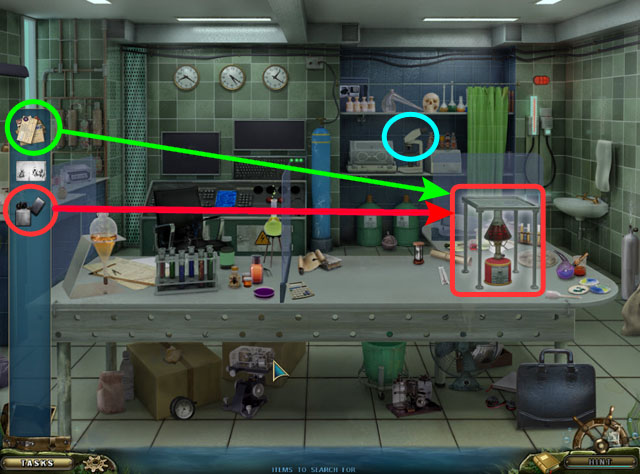
- Place the items you have collected in the correct order.
- First place the BASE, then the BURNER, then the FLASK, then the GLASS PLATE.
- Use the LIGHTER to light the burner.
- Place the LETTERS on top of the glass plate.
- Take the STAMPS.
- Take the MICROSCOPE highlighted in light blue on the shelf.
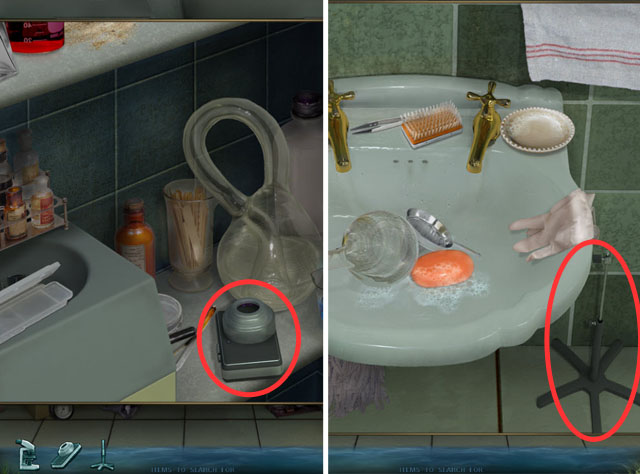
- Zoom in on the shelf and collect the LENS.
- Zoom in the sink and collect the BASE.
- Collect the CAMERA from the shelf in the back right.
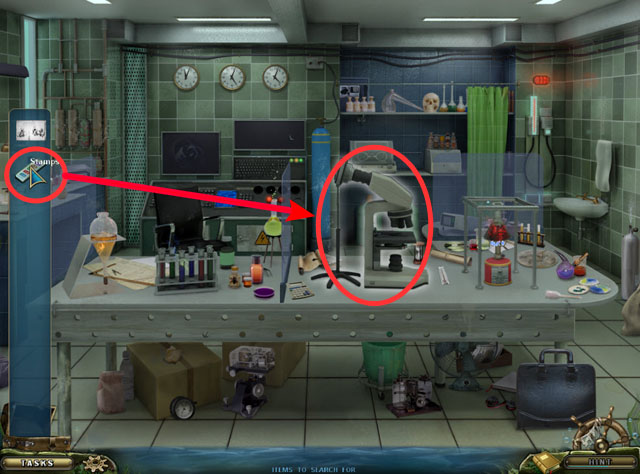
- Combine the items in the correct order.
- First place the MICROSCOPE, then the BASE and lastly the CAMERA.
- Use the STAMPS on the microscope.
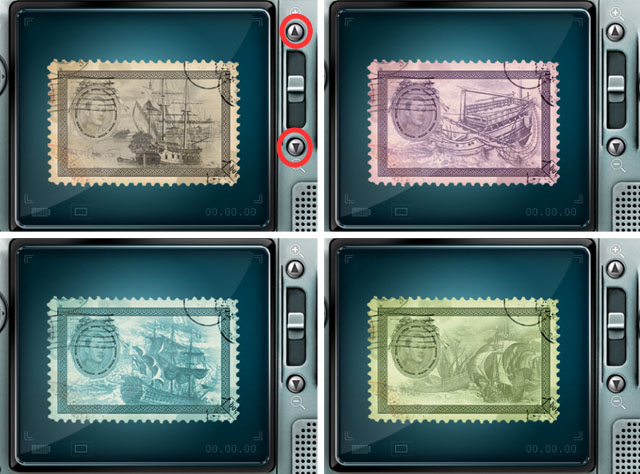
- Solve the puzzle by clicking the arrow buttons until the stamp is in focus.
- Once the stamp is in focus click on the large button to the right to take a picture.
- The correct answers will be 2 down for the first stamp, 2 down for the next, 1 up, 2 up, and then 1 down.
- See the screenshot for the in focus stamps.
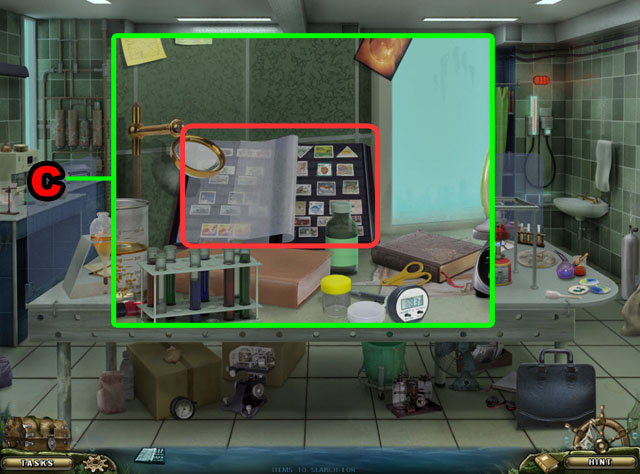
- Zoom in on the table (C) to the left.
- Click on the album.
- Place the PICTURE on the upper left corner of the album.
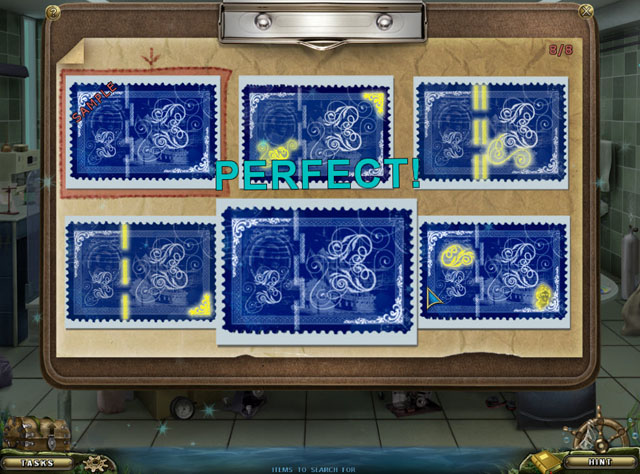
- Find 8 differences between the 6 stamps.
- Click on the differences to highlight them in yellow.
- See the screenshot for all of their locations.
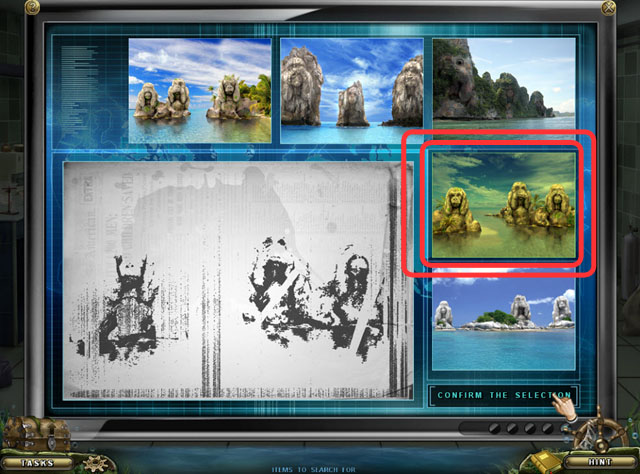
- Find the correct photograph that matches the photocopy in the bottom left side corner.
- See the screenshot for the correct answer.
Chapter 3
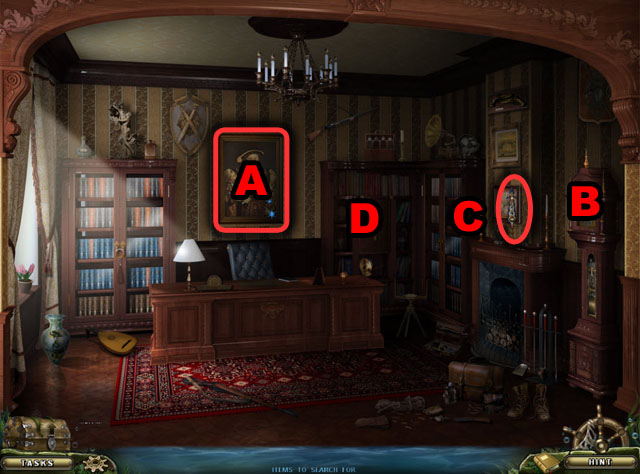
- Click on the painting (A) to get a search list.
- Click on the clock (B) to get another.
- Collect the CLOCK HAND (C).
- Zoom in on the bookshelf (D).
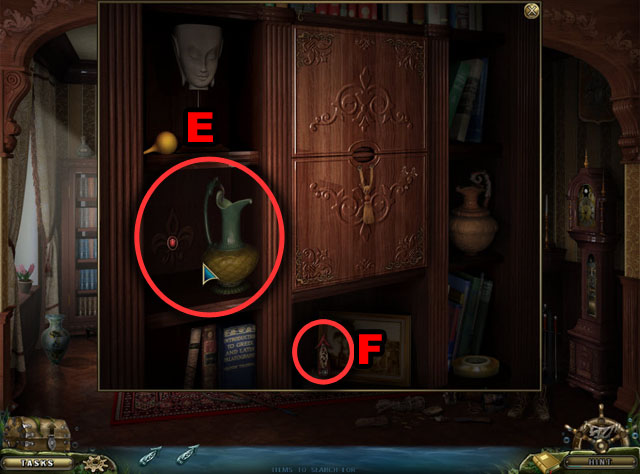
- Move the vase (E) and press the red button.
- Collect the CLOCK HAND (F).
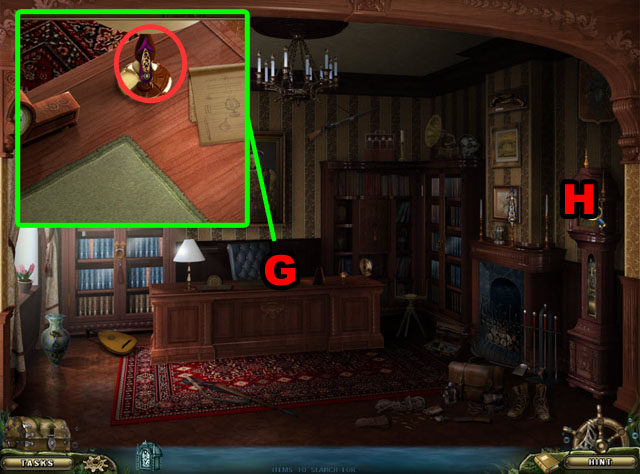
- Zoom in on the table (G).
- Collect the CLOCK HAND.
- Click on the clock (H).
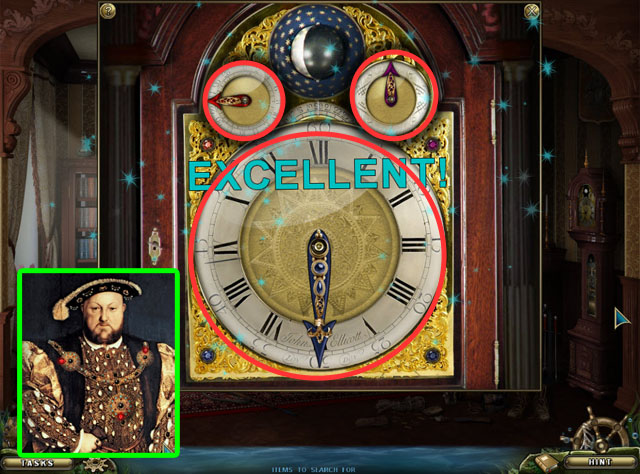
- Use the CLOCK HANDS on the clock and then rotate them to the correct position.
- Clicking the hand will rotate them clockwise.
- The clue for the solution is in the painting, see the screenshot for the correct answer.
- Click on the safe that is now open.
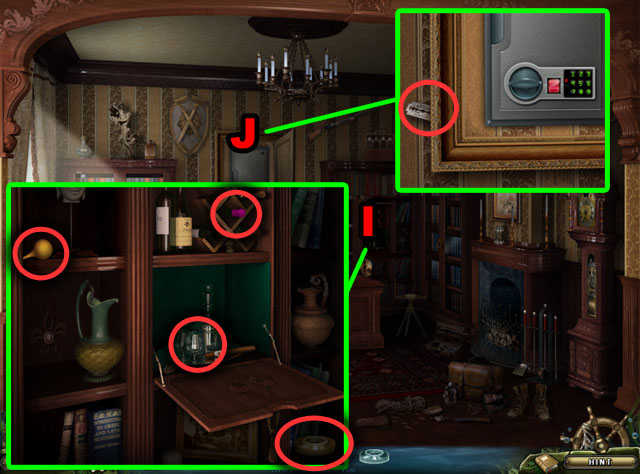
- Click on the bookshelf (I).
- Take the GLASS, CORK, DUCT TAPE, and BULB SYRINGE.
- Click on the safe (J) again and take the RAZOR.
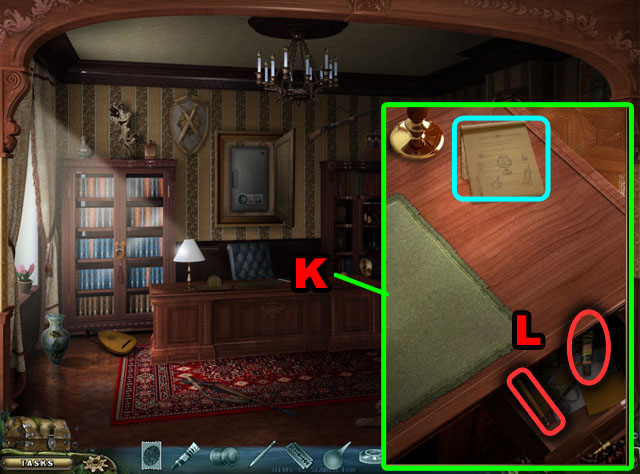
- Click on the desk (K).
- Open the drawer (L).
- Collect the GLUE and the PENCIL.
- There are also some instructions laying on the desk, highlighted in blue.
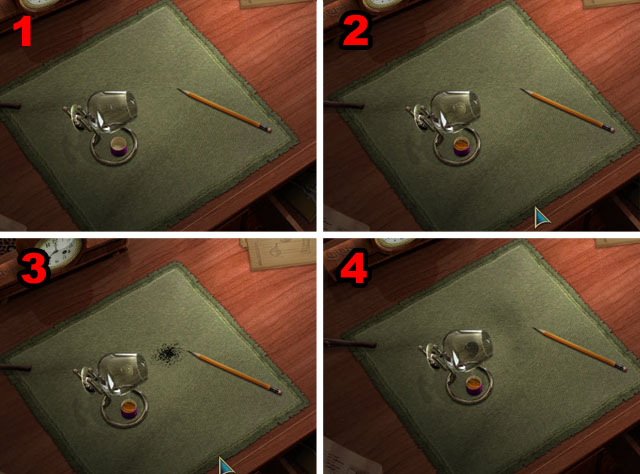
- Place the PENCIL, GLASS and CORK on the desk.
- Put the GLUE the cork (1).
- Place the RAZOR on the pencil (2).
- Place the graphite on the fingerprint (3).
- Use the syringe for the fingerprint (4).
- Take the fingerprint with the DUCT TAPE.
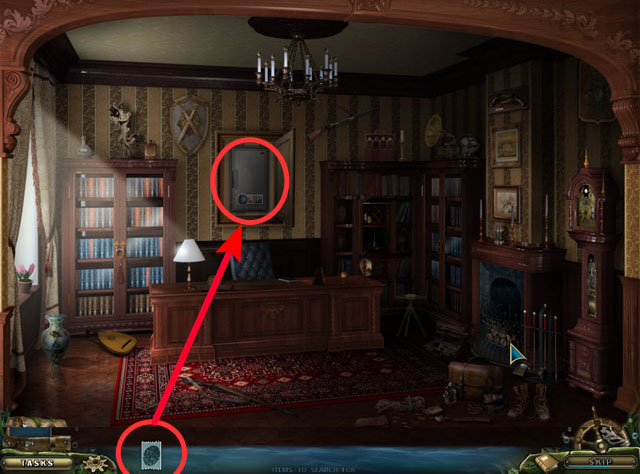
- Place the FINGERPRINT on the safe.
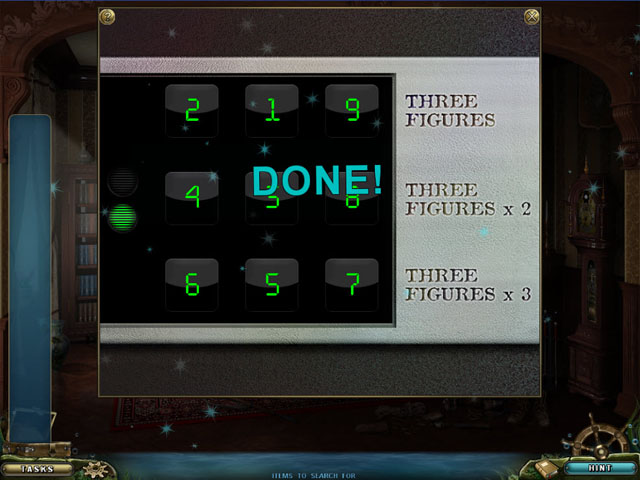
- Solve the puzzle by making three numbers in the three rows on the key pad.
- The bottom number is three times as much as the first number, and the second number is two times as much as the first number.
- There are two possible solutions, but the correct answer is: 219, 438 and 657 from the top row down.
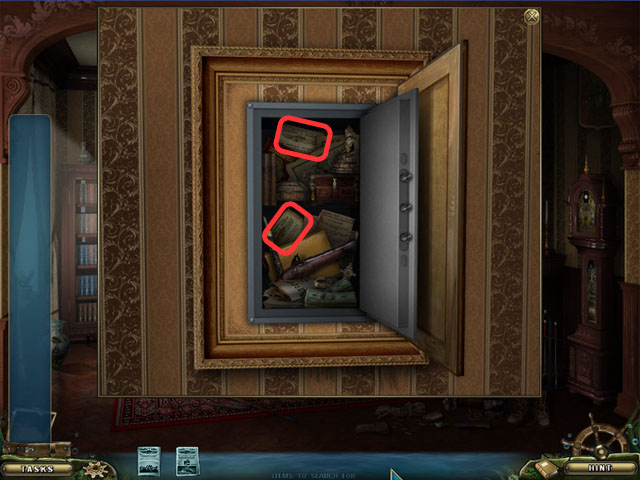
- Find the two newspapers.
Chapter 4
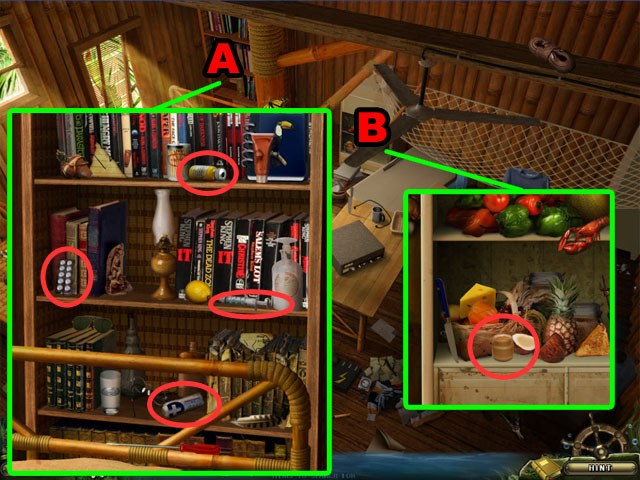
- Zoom in on the bookshelf (A) and collect the DRUGS.
- Zoom in on the shelf (B) collect the DRUG bottle.
- Click on the DRUGS and give them to the woman on the bed (C).
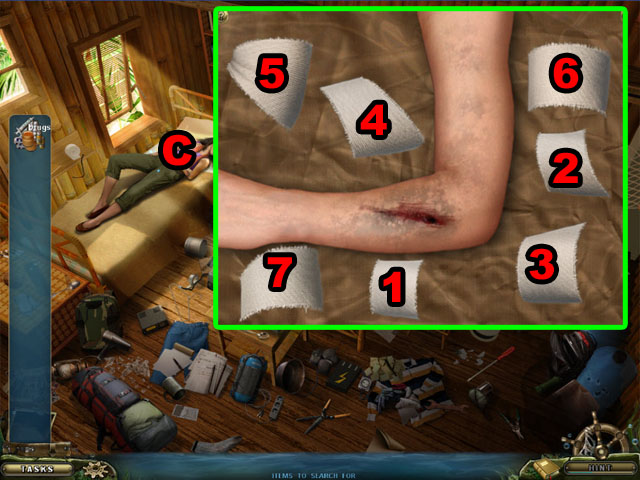
- Put the bandages on the woman's arm in the correct order, from the left to the right.
- Follow the contour of her arm and overlap the bandages.
- See the screenshot for the correct order.
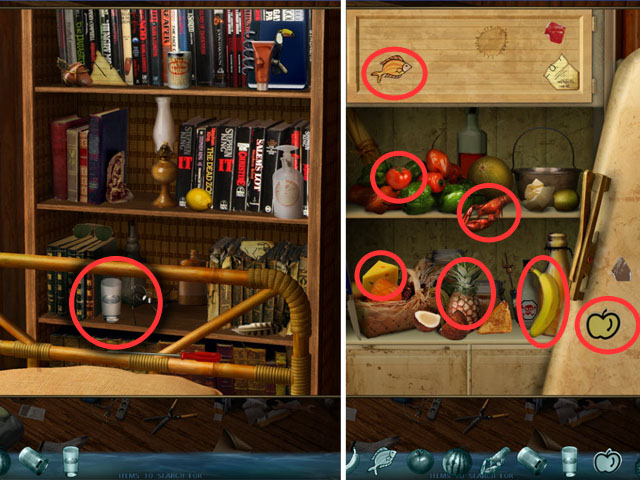
- Zoom in on the bookshelf (D).
- Collect the GLASS OF WATER.
- Zoom in on the shelf (E) and collect the FRUITS and SEAFOOD.
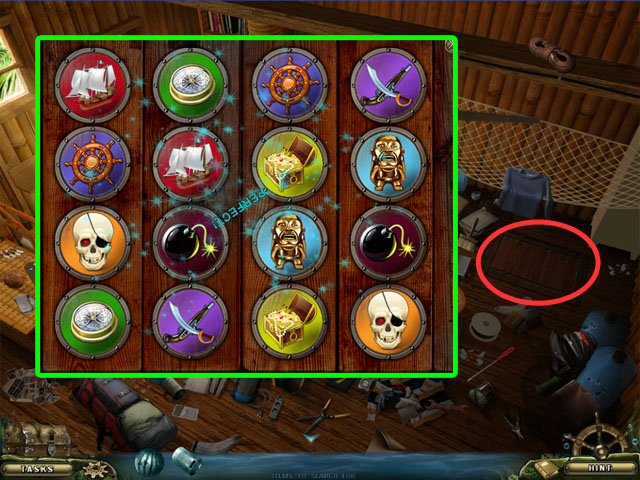
- Click on the basement door.
- Place a quick tile-matching memory game in this area.
- Click on tile and then another to flip them over, if both tiles are the same, they will stay up. If they after different they will flip back over.
- The solution to this game is randomized every time.
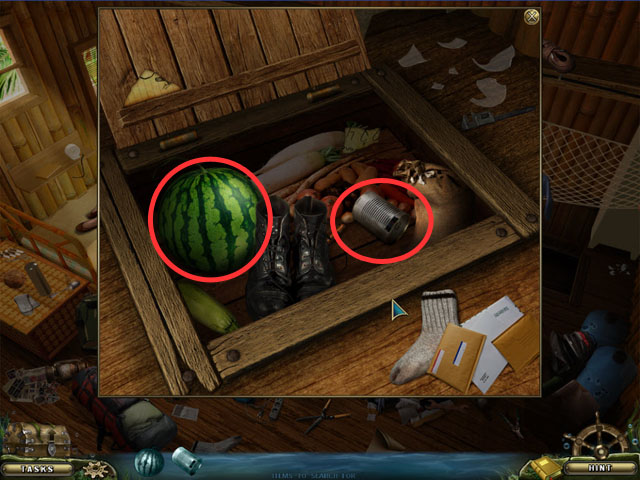
- Collect watermelon and can once completing the game.
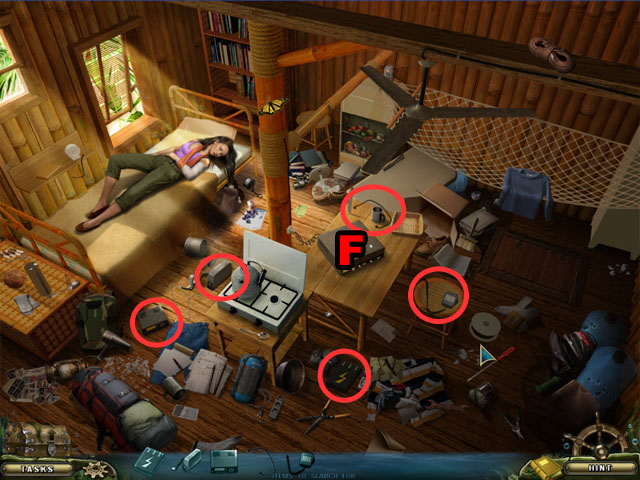
- Click on the radio (F) to start the radio parts hunt.
- Find all of the RADIO PARTS in the room highlighted in red.
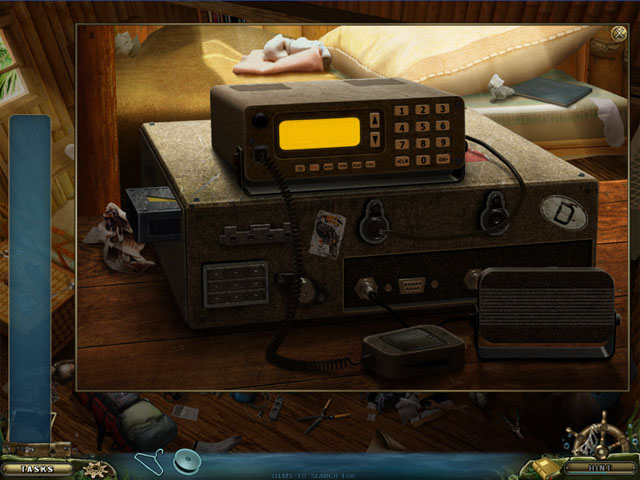
- Combine the RADIO PARTS onto the radio in any order.
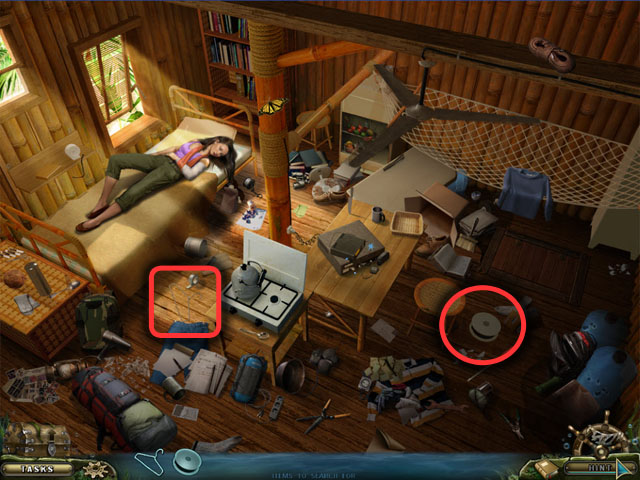
- Find the TAPE and the HANGER and use them on the radio.
- Click towards the bottom of the screen to go outside.
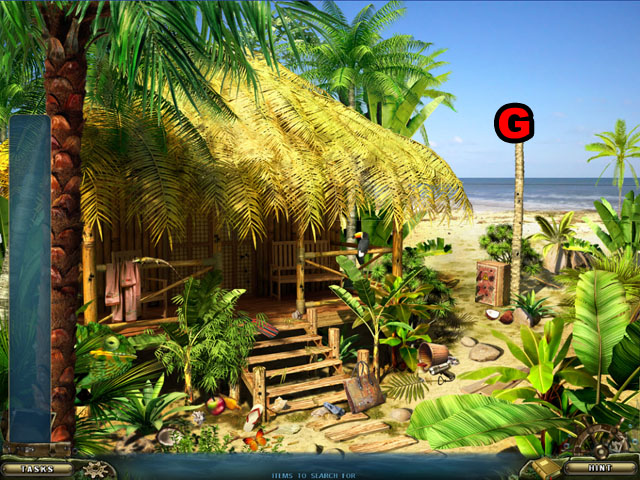
- Click on the windmill base (G) to get the next hunt.
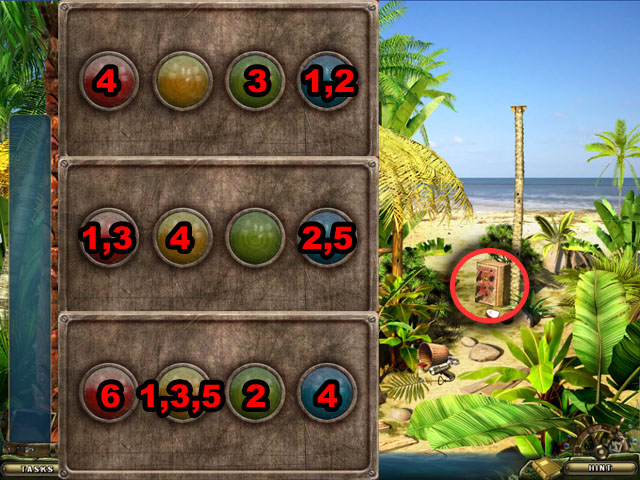
- Click on the battery box (H).
- Solve the puzzle by repeating the patterns that are played to your.
- A pattern of lights will play 3 times. Click the lights in the same order to move to the next pattern.
- The solution in the screenshot is just one of many, the order of these lights are randomized.
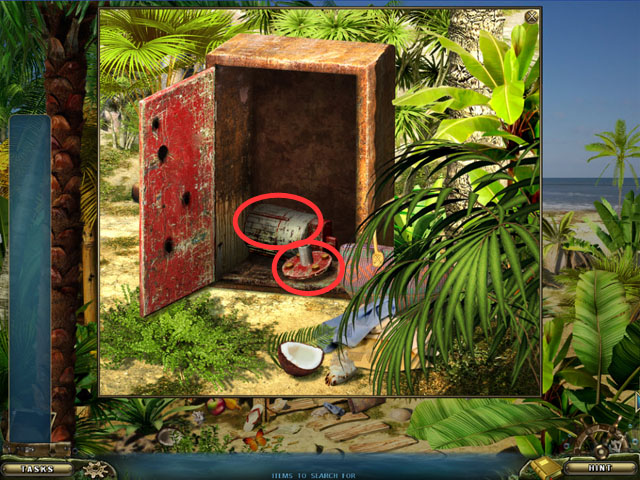
- Find two WINDMILL PARTS inside the battery box.
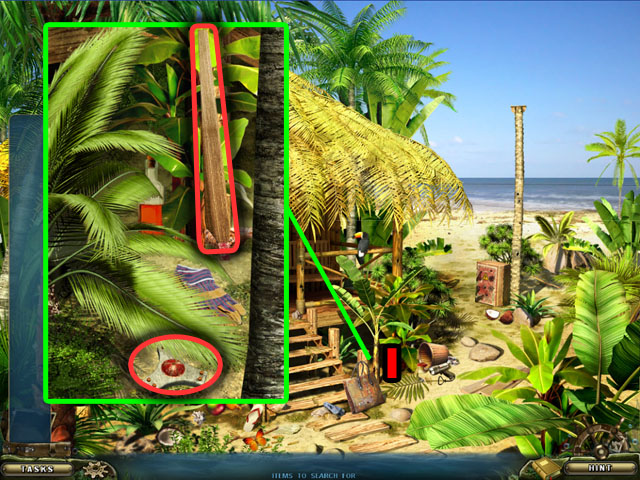
- Zoom in on the ground (I).
- Collect the WINDMILL PARTS.
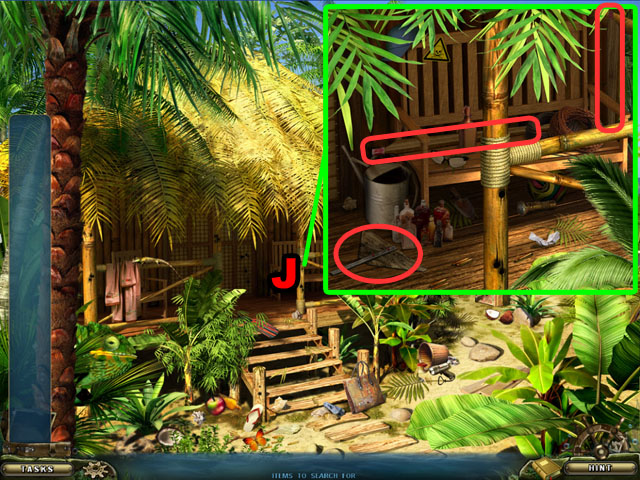
- Zoom in on the porch (J).
- Collect more WINDMILL PARTS.
- Click on the wind mill base again.
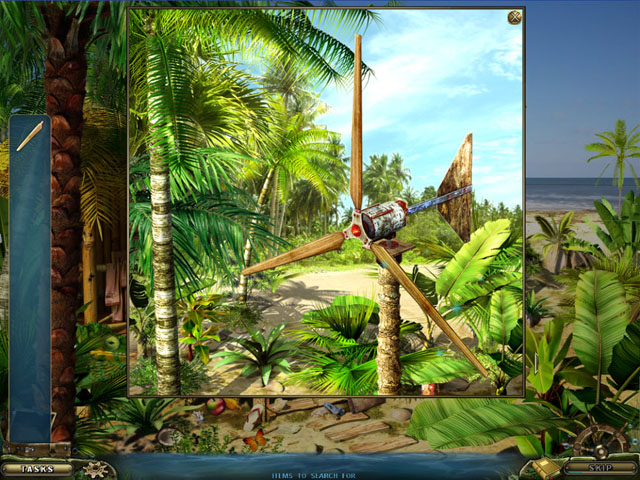
- Fix the windmill with the PARTS from your inventory.
- First place the BASE, then the MOTOR, then the COVER and the 3 BLADES.
- Then place the BACK FIN.
- Enter the house again.
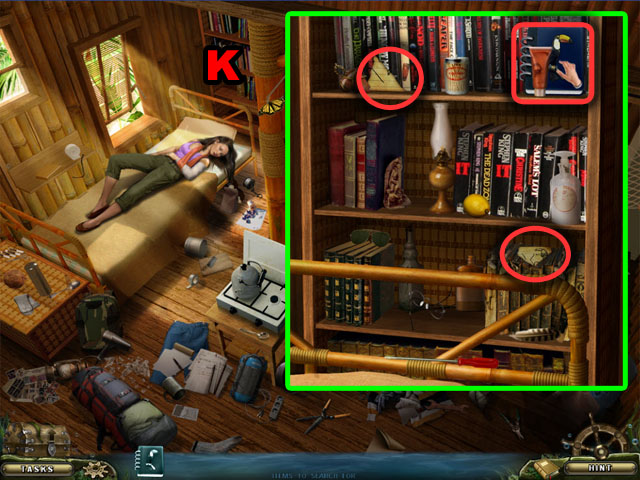
- Click on the bookshelf (K).
- Take the notebook, you will need to find some paper scraps.
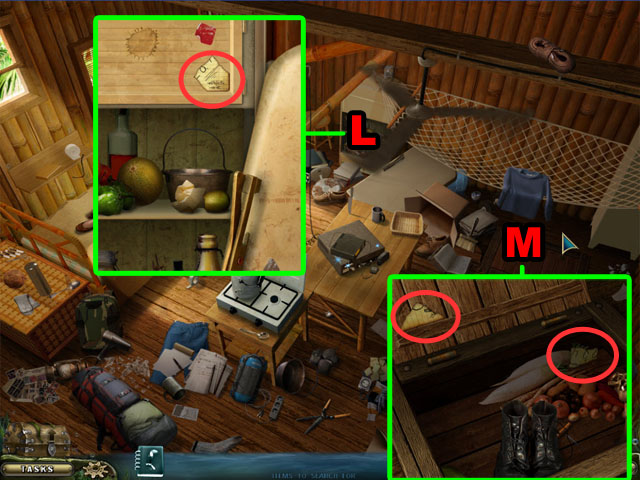
- Zoom in on the shelf (L) and collect the SCRAPS.
- Zoom in on the door of basement (M) and collect the rest of the SCRAPS.
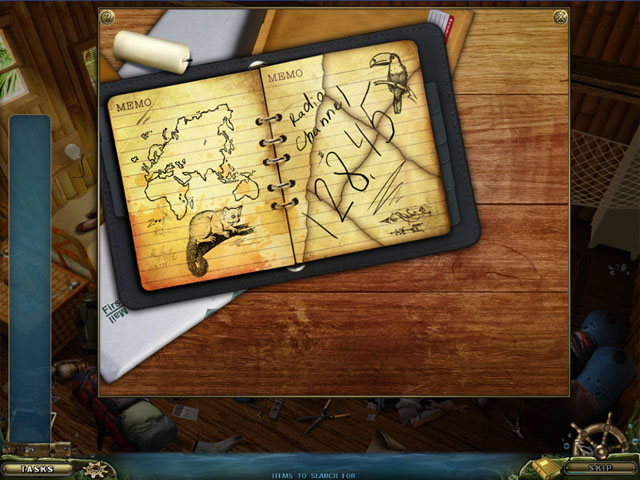
- Put together the scraps on the notebook on the table in front of the radio.
- Click and drop the pieces on the page and if they are in the correct location they will snap in place.
- See the screenshot for the correct solution.
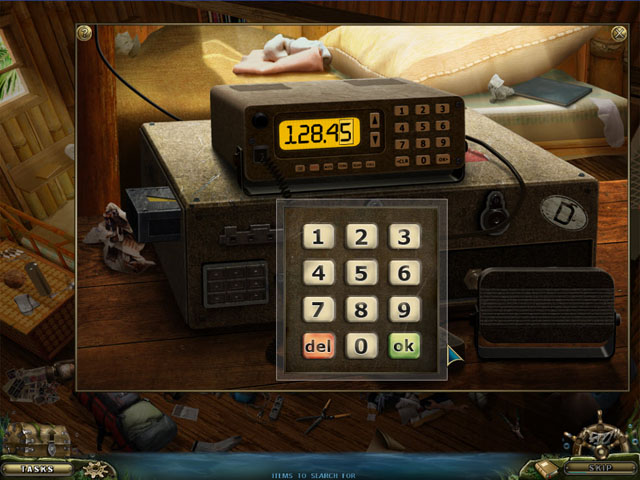
- Click on the radio and enter in the number from the note: 12845.
- You will need to click the number and then the “ok” button after each number.
- Once you have the number inputted, the scene will end.
Chapter 5
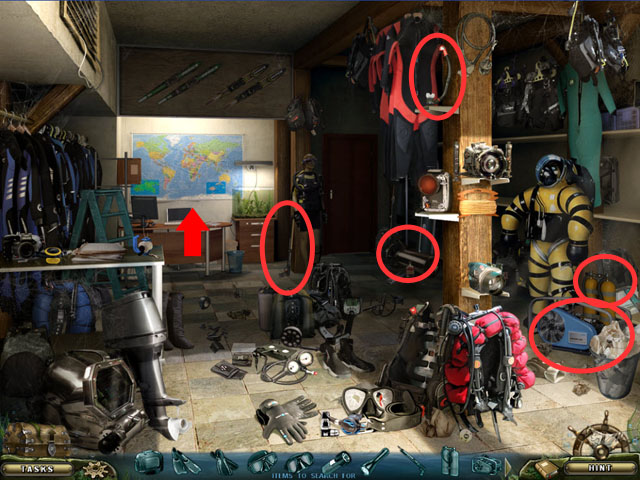
- Enter the building.
- Collect the scuba equipment.
- Enter the desk area.
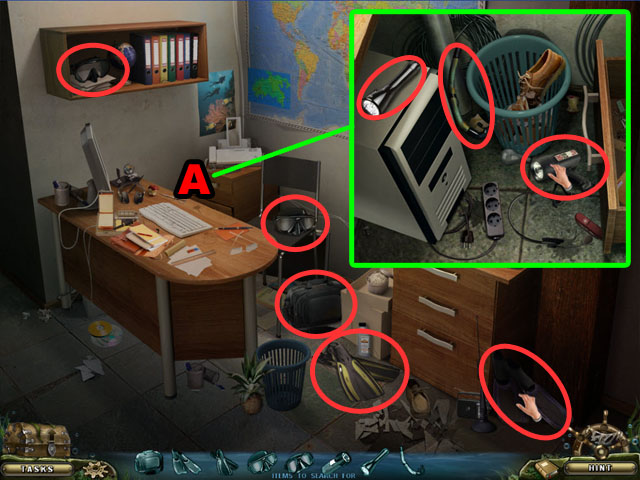
- Collect the scuba equipment circled in red.
- Zoom in on the drawer (A).
- Collect more scuba equipment.
- Return to the previous room and then go outside.
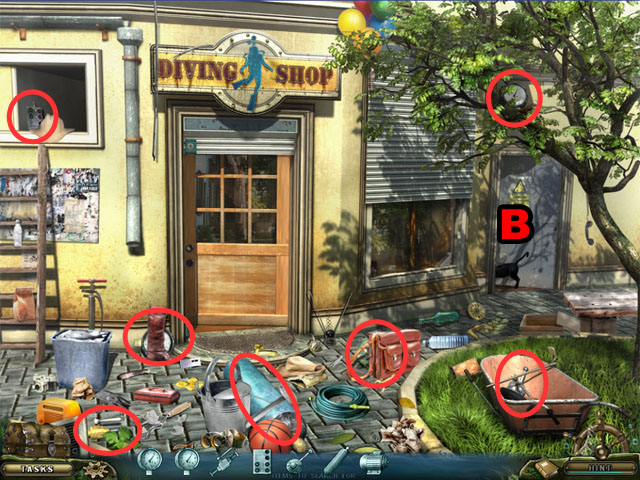
- Enter the door (B) on the left to get the next hunt, and then exit it.
- Collect the compressor parts.
- Enter the door again (B).
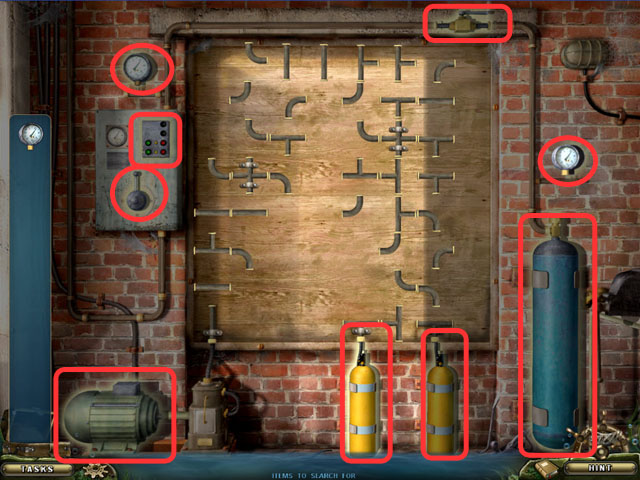
- Place the parts in the correct places.
- There is no specific order that you need to place them.
- See the screenshot for the locations.
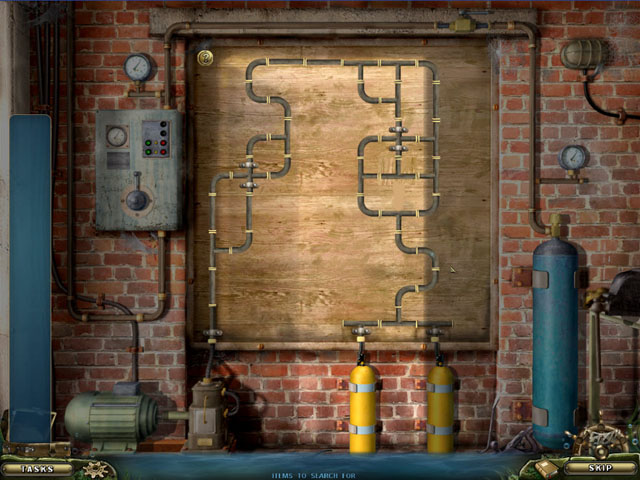
- Fix the compressor by rotating the pipes.
- All of the pipes must attach together with no dead ends or spaces.
- Click a pipe to rotate it once clockwise.
- Start from the end or the beginning and connect the pipes to the outside, then build your way to the other side. There is only one correct solution.
- See the screenshot for the completed pipe puzzle.
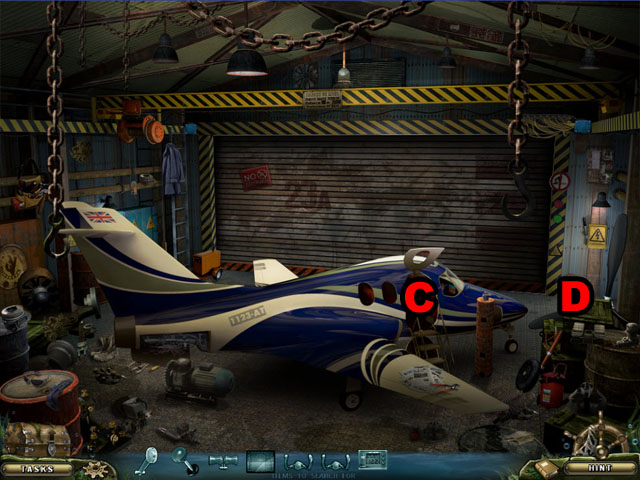
- Click on the entrance of the plane (C).
- Zoom in on the wooden box (D).
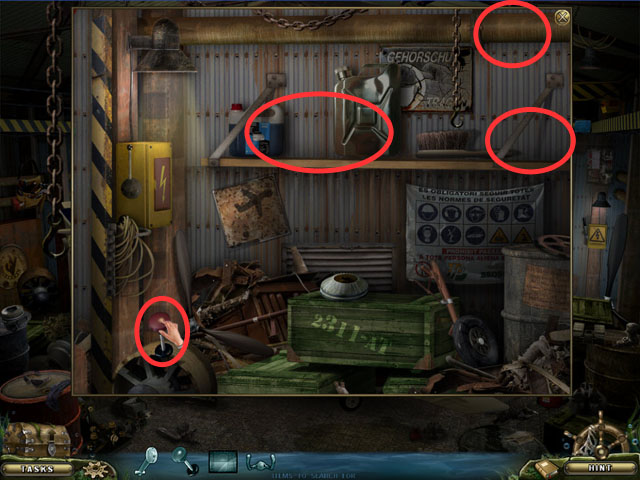
- Collect the airplane parts.
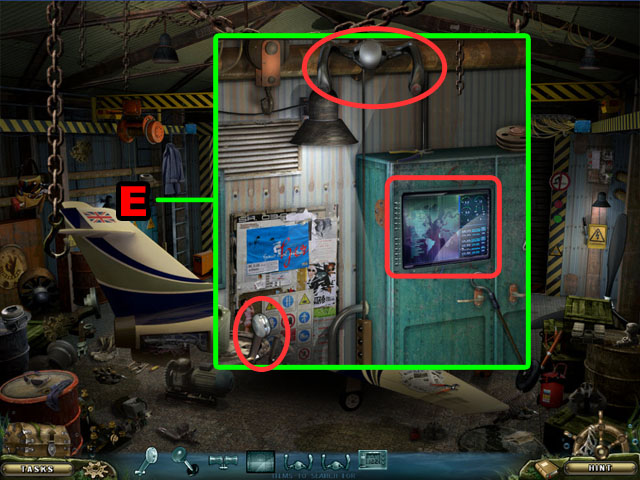
- Zoom in on the wall (E).
- Collect more airplane parts.
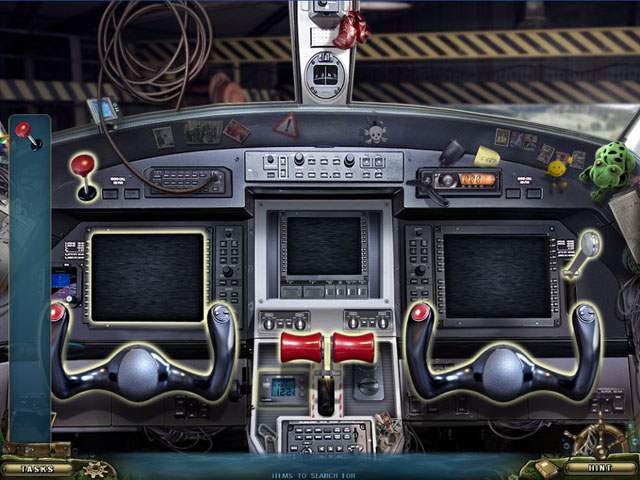
- Place all the parts in the correct locations.
- There is no specific order that they must be placed.
- Check the screenshot for the final placement.
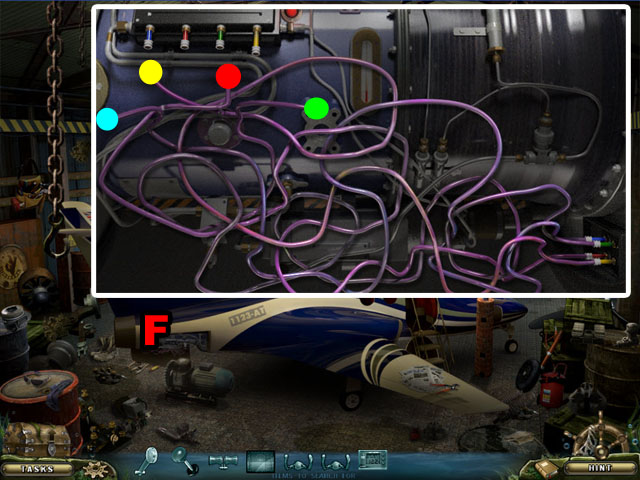
- Click on the wires (F) coming from the tail of the plane.
- Click on the ends of the wires and connect them to the correct color jacks.
- To find out which is the correct color, follow each wire from the beginning all the way to the end, though the maze of tangled wires.
- Watch out for the slight changes in color. Each wire cycles through many shades of purple.
- See the screenshot for the correct solution.
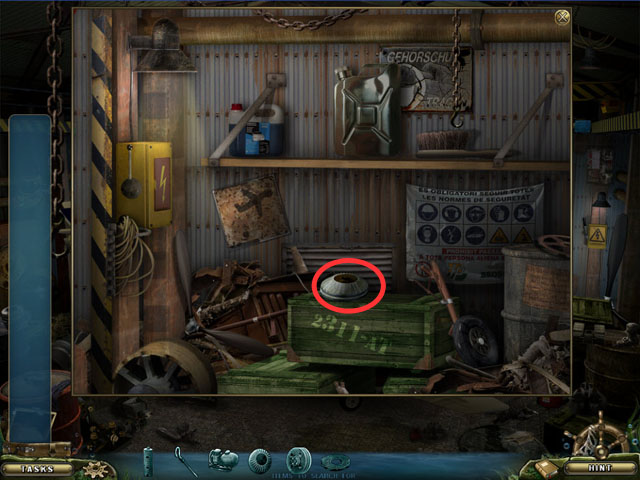
- Click on the hanger door.
- Then zoom in on the box to the right again.
- Collect the airplane part.
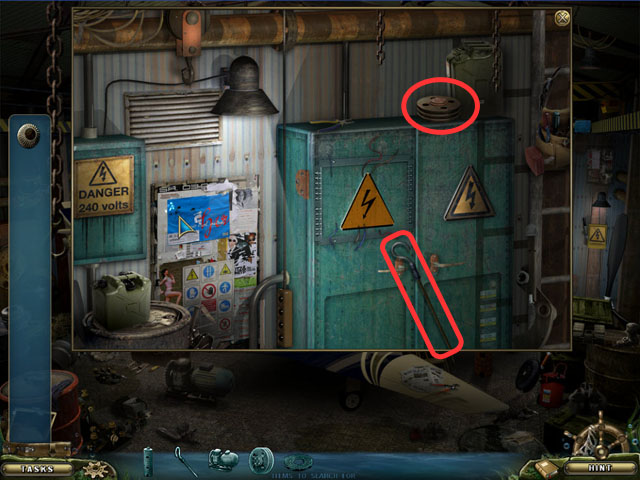
- Zoom in on the wall to the left.
- Collect more airplane parts.
- Return to the previous room.
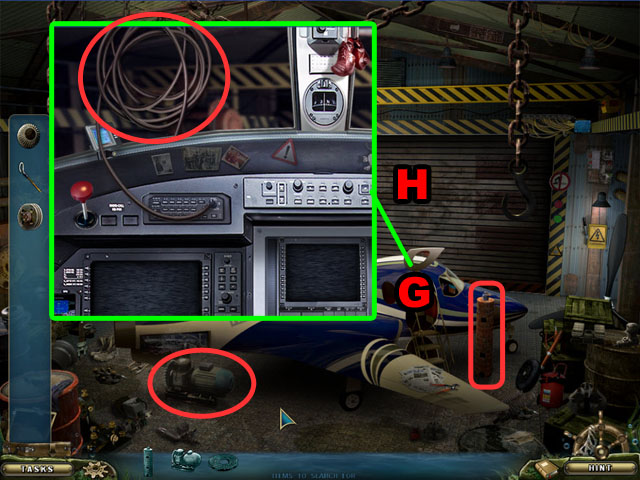
- Collect two more parts.
- Click on the door (G) and collect the WIRE.
- Click and drag the AIRPLANE PARTS on the hanger door (H).
- Click on the road.
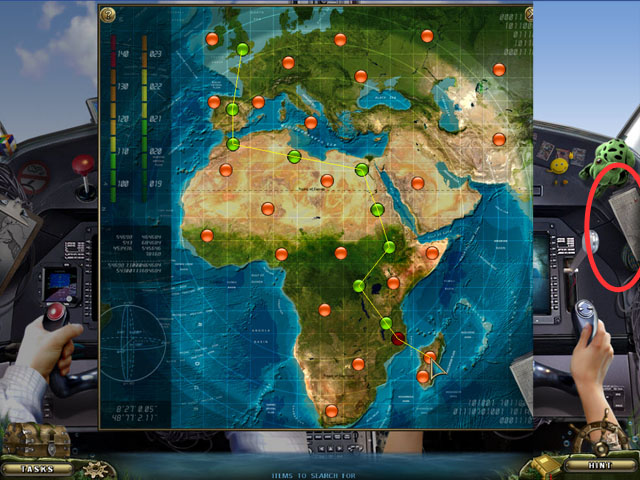
- Find the map highlighted in red and click on it.
- Connect the dots of the plane's map by following the same path that is shown to you in the paper map.
- You will start up in the left corner of Europe. Click on the green path in the screenshot to solve the puzzle.
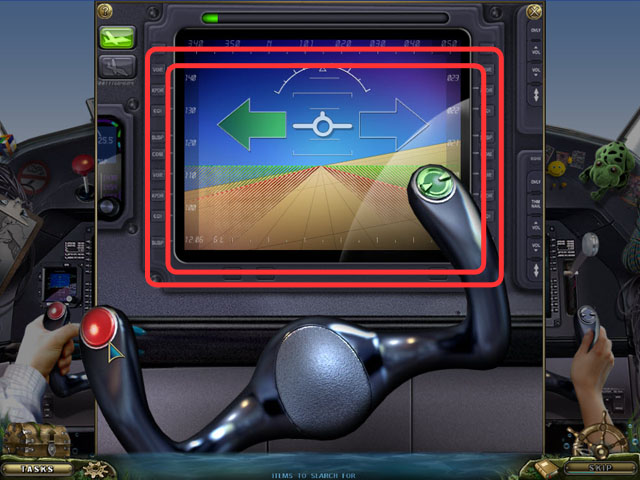
- Use your mouse to drive the plane to the left and the right.
- When the arrow shows up pointing on one direction, take your mouse in the other direction to level the plane out.
- Alternatively, you can just watch the horizon line in the background and more the mouse left and right to try and keep it level.
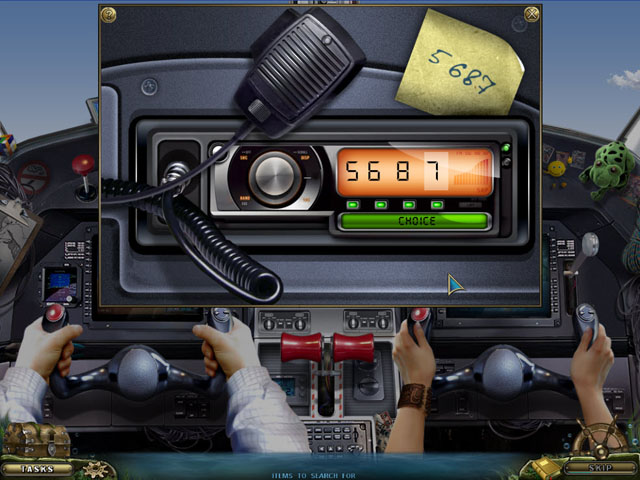
- Set the radio to the numbers 5687.
- The numbers on the radio will be constantly changing.
- Click the green button at the bottom to stop the number. If you can stop it on the correct number in the sequence, that number will be locked and you can move on to the next number.
- Once you have successfully stopped all the number correctly the chapter will end.
Chapter 6
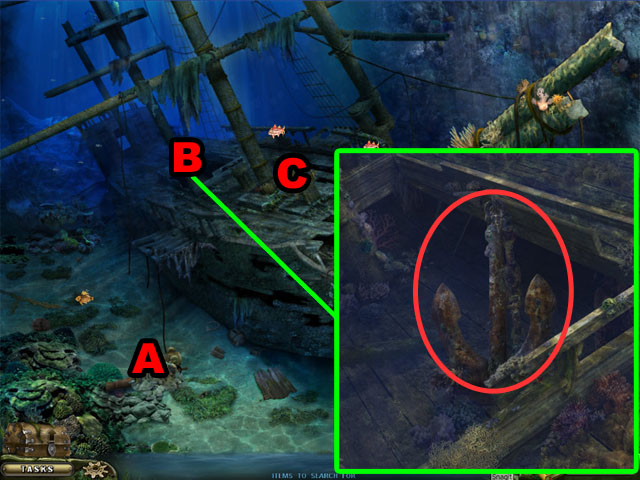
- Click on the cannon (A) sunken in the ground to the left to get the first hunt.
- Zoom in on the hole in the back (B) and get the ANCHOR.
- Click on the handle (C).
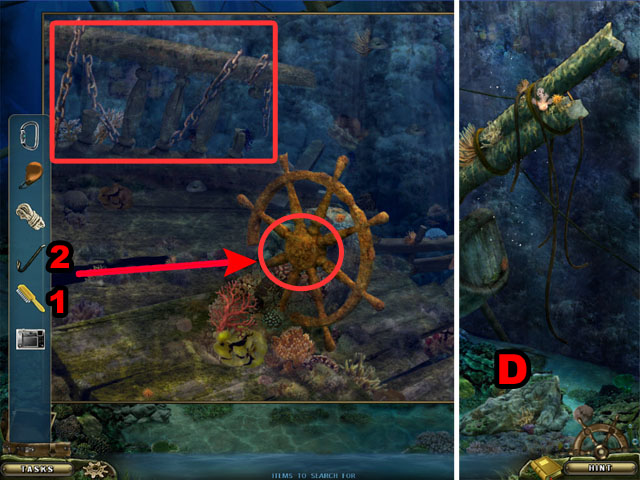
- Clean the steering wheel with the BRUSH (1).
- Take the COAT OF ARMS with the CROWBAR (2).
- Find the CHAIN in the top banister.
- Exit to the main scene and then zoom in on the bell (D).
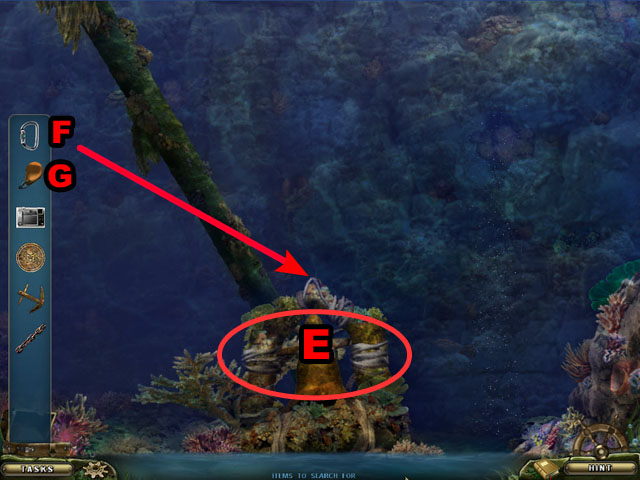
- Tie the bell with ROPE (E).
- Use the CARABINER on the bell (F).
- Place the SURFACE MARKER on the bell after that (G) and click it again to take it.
- Return to the previous scene.
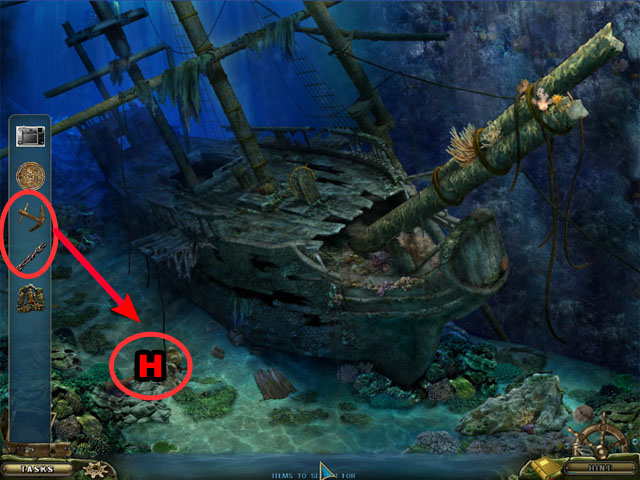
- Place the CHAIN and then ANCHOR on the cannon (H).
- Click on the cannon.
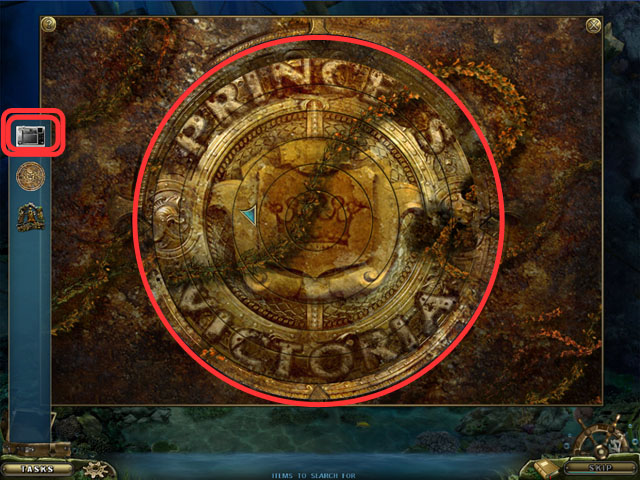
- Rotate rings to complete the picture.
- There is a small crown in the middle of the rings and two words across the top and bottom. Use these landmarks to line up the rings correctly.
- After completely the puzzle use the CAMERA to take a picture of the mark on the cannon.
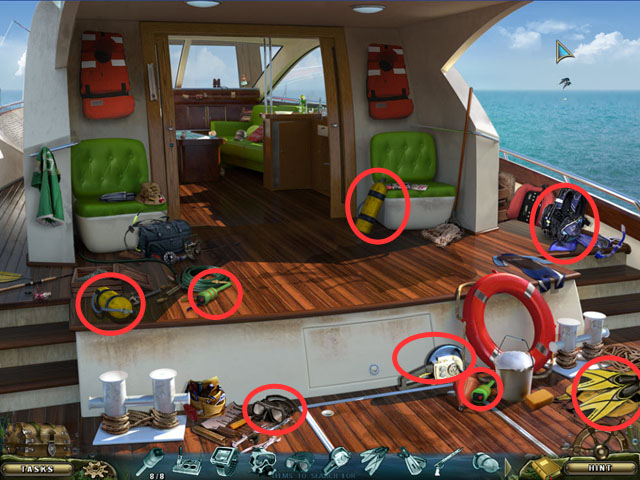
- Gather the diving equipment.
- Enter the cabin.
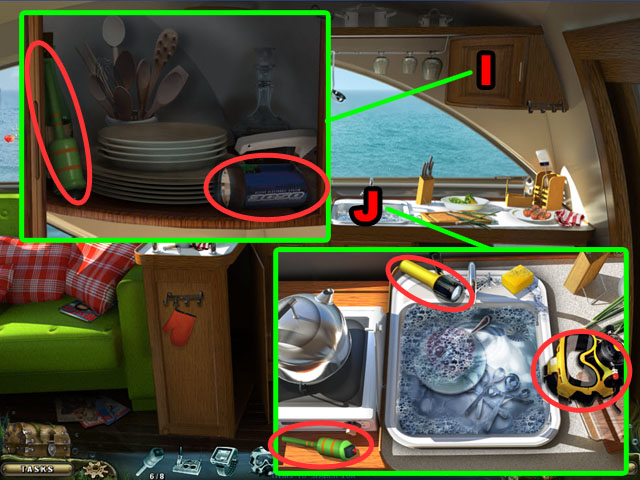
- Zoom in on the shelf (I) and collect the diving equipment.
- Zoom in on the sink (J) and collect more diving equipment.
- Enter the control room to the left.
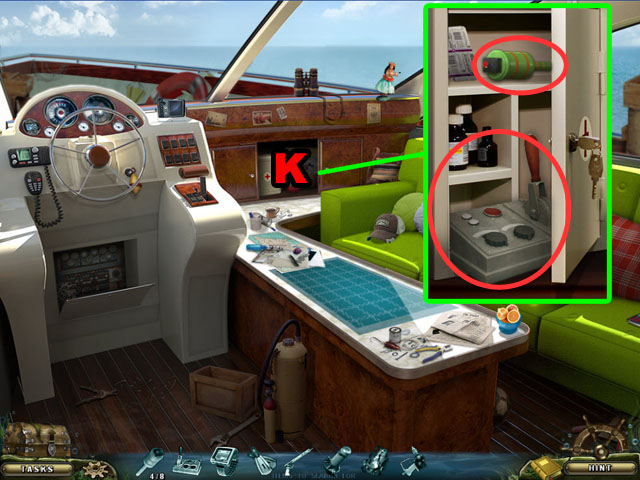
- Zoom in on the shelf (K).
- Collect the EXPLOSIVE CHARGE and the DETONATOR.
- Exit the cabin and move to the deck on the other side.
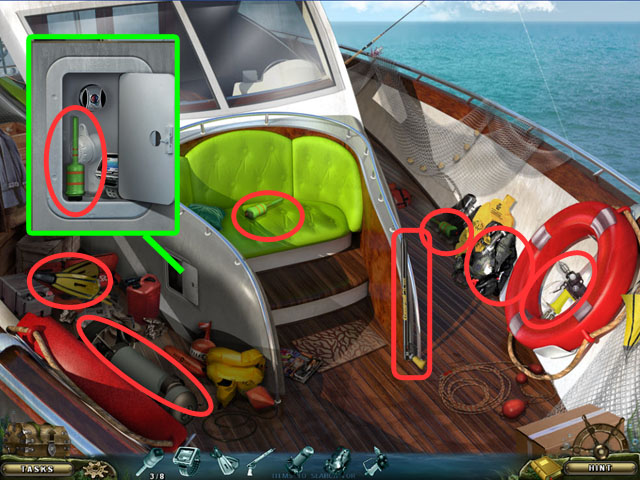
- Collect the various diving equipment.
- Click on the panel on the side of the seat and collect the EXPLOSIVE CHARGE.
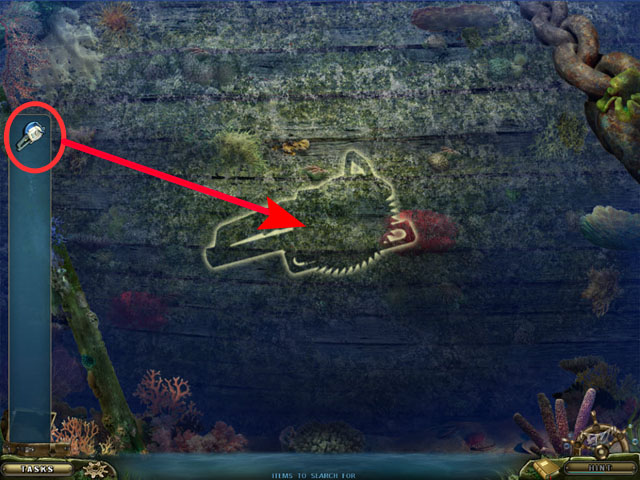
- Place the SAW in the middle of screen to cut open the wall.
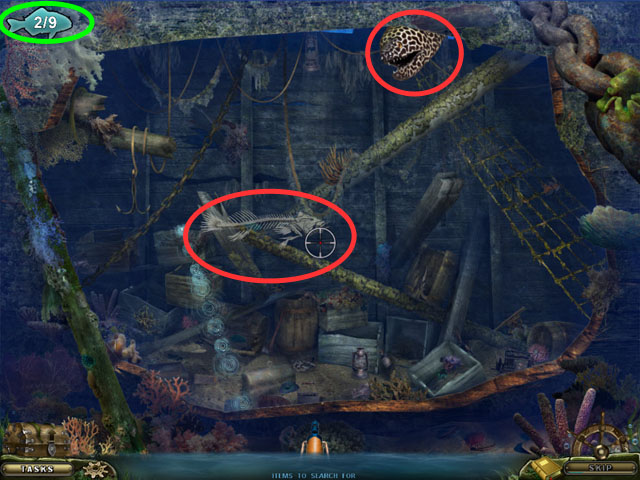
- Shoot nine fish with the cursor as the swim across the screen or pop out from the edge.
- It takes a while to reload, so plan you shoot well. Also the harpoon moves slowly, so you have to shoot towards the front of the fish that are swimming across the screen.
- There is a counter in the top left corner that tells you how many you have left.
- Get 9 fish to finish this mini-game.
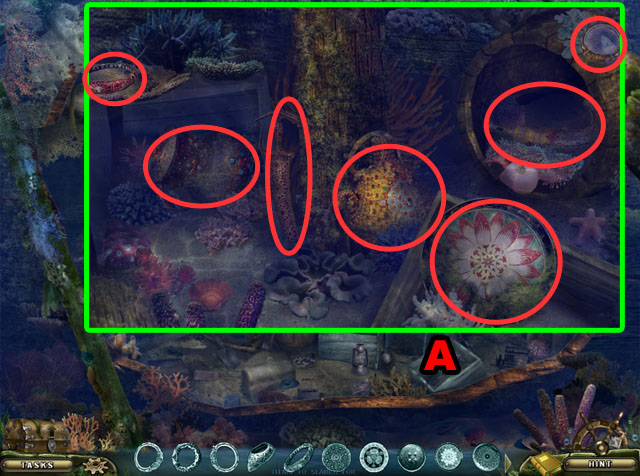
- Zoom in on the box (A) and collect the treasures.
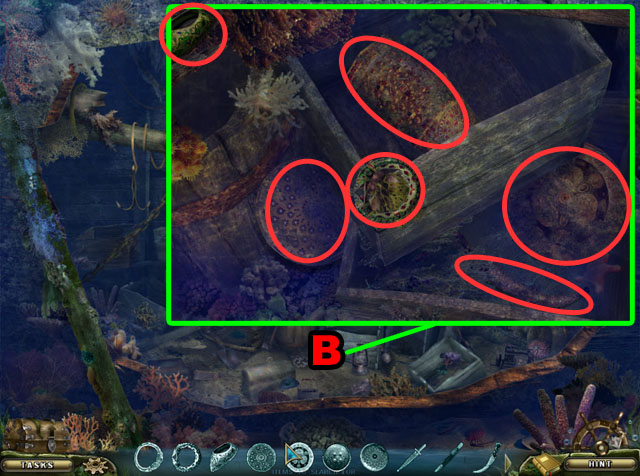
- Zoom in on the second box (B) and collect the treasures.
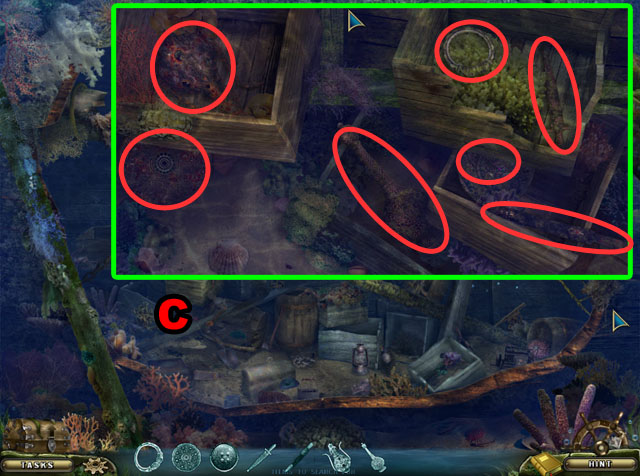
- Zoom in on the third box (C) and collect the treasures.
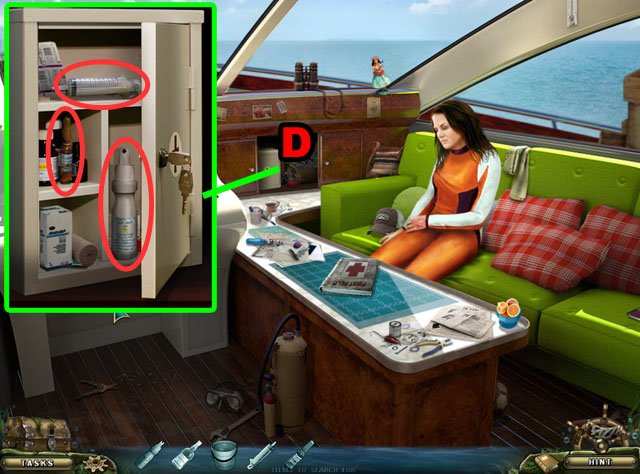
- Find all of the first aid equipment to help your friend.
- Zoom in on the shelf (D) and collect the SYRINGE, and OINTMENTS.
- Go to the right to the kitchen.
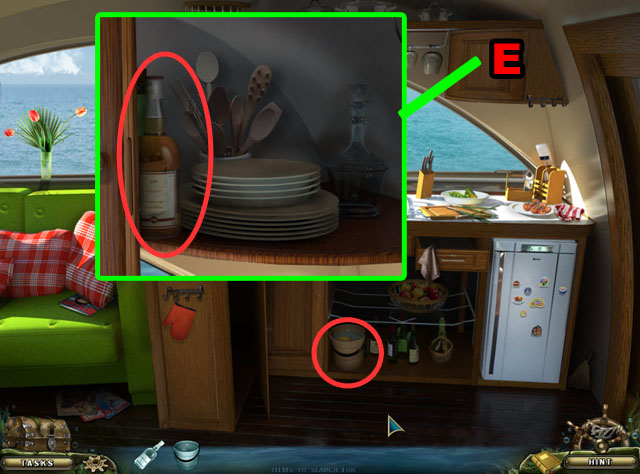
- Zoom in on the cupboard and collect the ALCOHOL (E).
- Take the bucket below the sink.
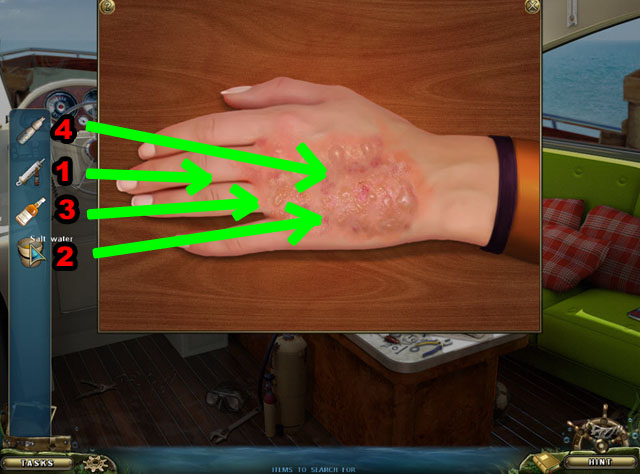
- Use the first aid equipment on your friend.
- You must use them in the correct order.
- First use the SYRINGE, then the SALT WATER, then the ALCOHOL, then the OINTMENT on her hand.
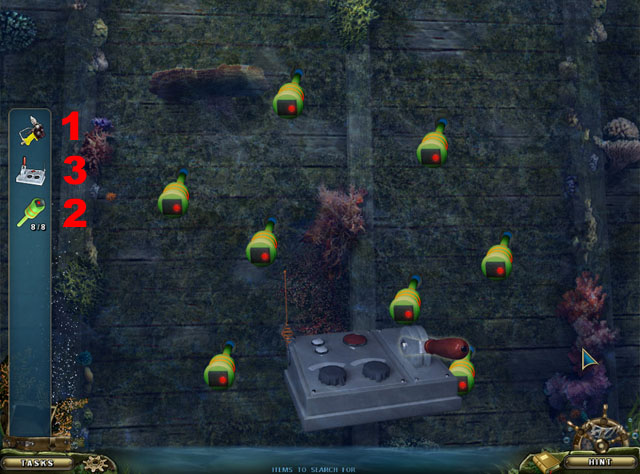
- Use the DRILL to make some holes in the wall of the boat.
- Place the EXPLOSIVES inside the holes that you drilled.
- Use the DETONATOR to detonate the explosives.
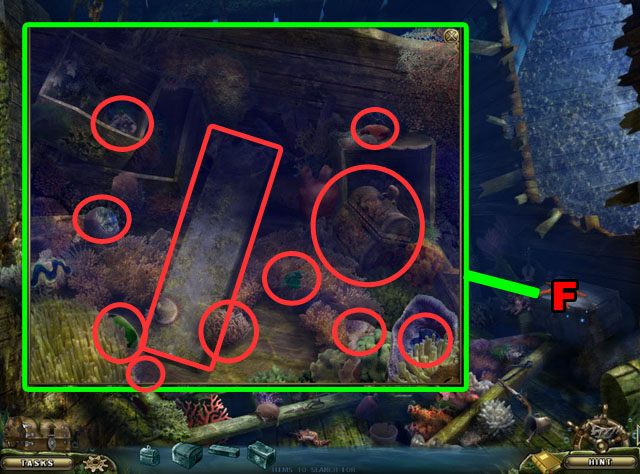
- Click on the chest (F) to open it. You will receive more objects to find.
- Zoom in on the chest and find the treasures circled in red.
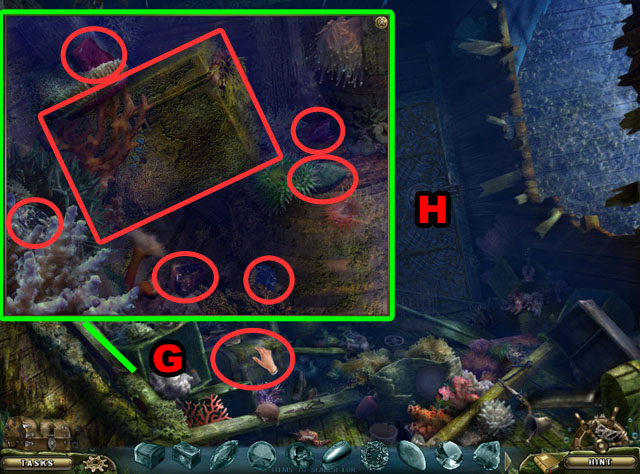
- Click on the CHEST circled in red to collect it.
- Zoom in on the chest (G) and find the treasures circled in red.
- Click on the door in the back of the scene (H).
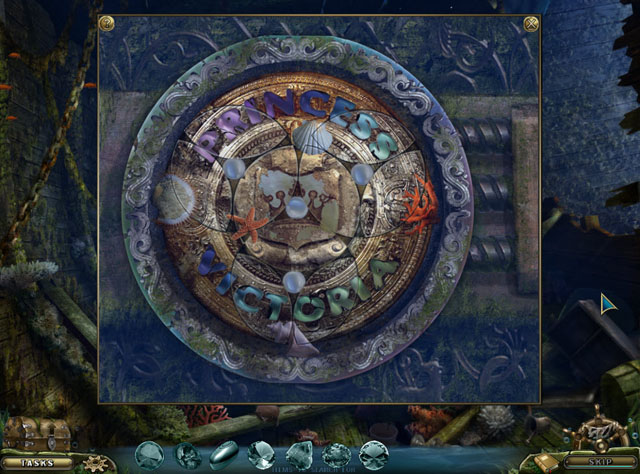
- Rotate the circles to complete the icon.
- There are three different circles on the outside and one in the middle. Each circle has three different pieces that can be moved.
- Transfer the parts to the other circles by using the middle circle.
- First start by getting the word “PRI” at the left top and “ESS” on the right.
- Then complete the letters “CTORI” on the ring on the bottom.
- Then match the rest of the outer ring pieces and rotate them into the correct place.
- Lastly the rotate the inner pieces so that the crown is pointing up.
- See the screenshot for the completed puzzle.
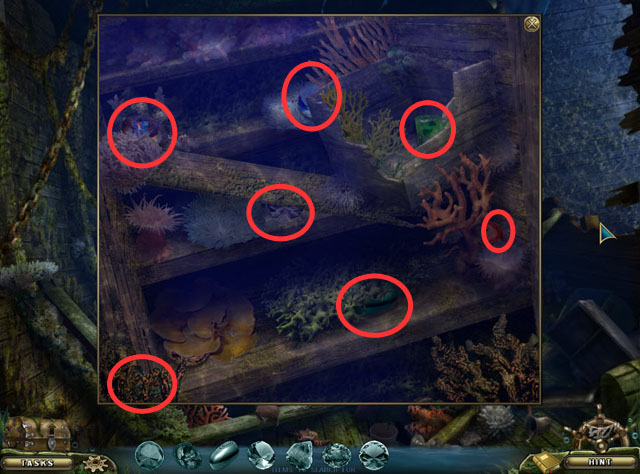
- Enter the door and find the last 7 treasures.
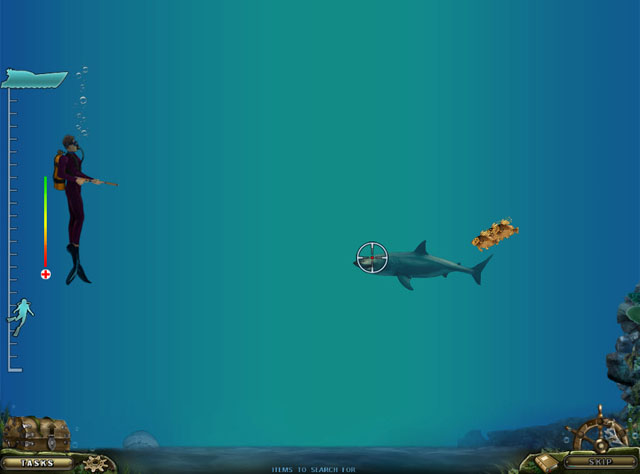
- Escape to the surface by surviving the shark attacks.
- Click the cursor on the sharks to shoot them before they attack you.
- You have a gauge on the left that shows you how far you need to go to get to the boat.
- You also have a health bar to the right of that, which will go do every time you are touched by a shark.
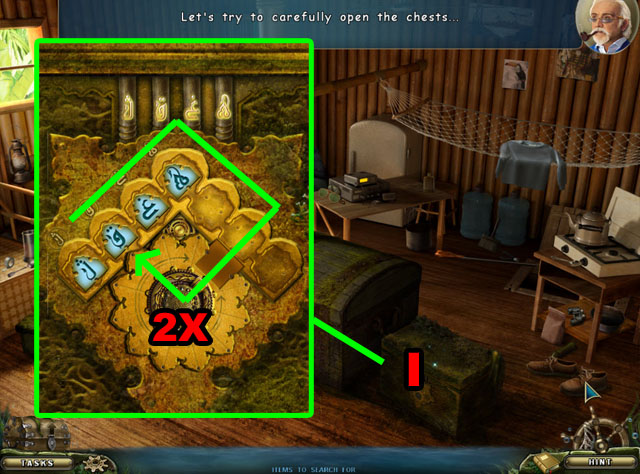
- Click on the chest (I) to open the next puzzle.
- To solve this puzzle you need to rotate all of the pieces 180 degrees and get them back to the same places.
- You can click on a tile and click on an empty slot to move the tile there.
- There is a disk in the middle that rotates and can transfer from the right to the left.
- Move the pieces in a clockwise direction around the board using the disk to transfer them two times to rotate them 180 degrees.
- Each time the piece is in the correct position, rotated correctly, a light will light up at the top of the puzzle.
- See the screenshot for the correct solution.
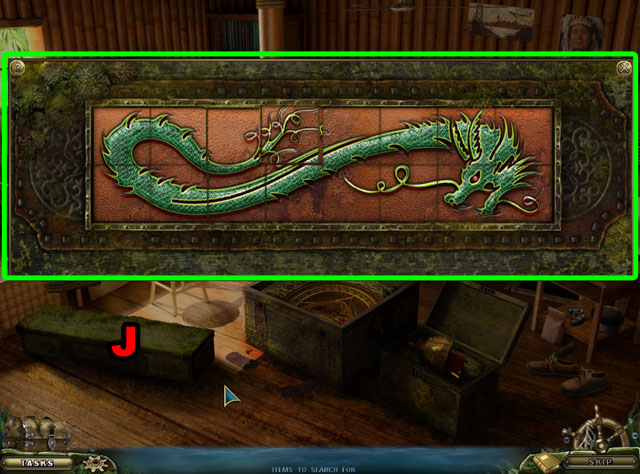
- Inspect and open the chest in the middle.
- Click on the chest to the left (J).
- Rearrange the pieces of the dragon to finish this puzzle.
- Click on a piece and then any piece beside it to switch their places.
- See the screenshot for the final image.
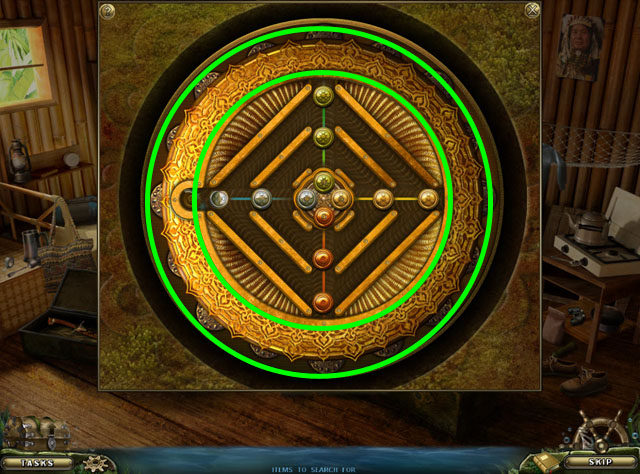
- Inspect and open the small chest in the above the last one.
- The object of this puzzle is to get the colored balls lined up to match the ones in the middle of the ring.
- Click a ball near a space to move the ball into that space.
- There is a ring on the outside, circled in green, that can be used to transport the balls on the edge around.
- First place the silver ball in the top ring.
- Then rearrange the colored balls so that they line up with those in the center.
- Turn the outside ring until the silver ball is on the left side and then click it to put it in place.
- See the screenshot for the correct solution.
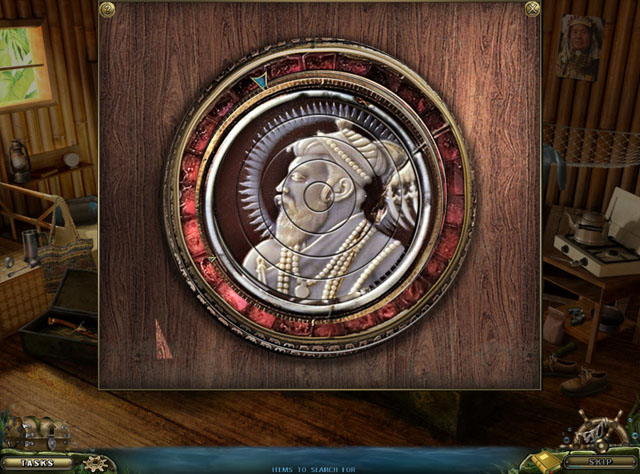
- Rotate rings to complete the picture.
- Use the man’s face to line up the middle rings and use the large crack to line up the outside rigs.
- See the screenshot for the solution.
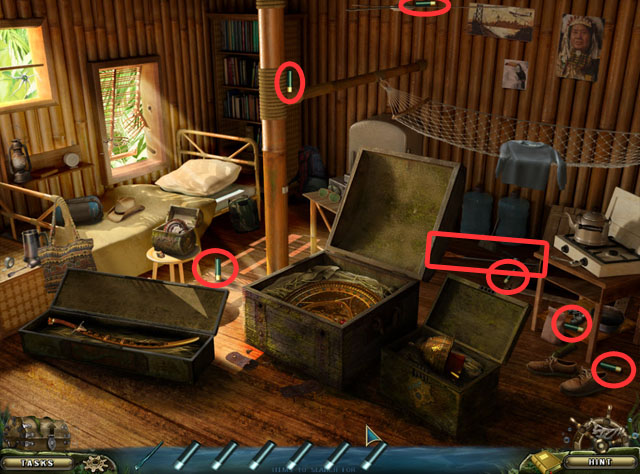
- Collect the BULLETS and the GUN.
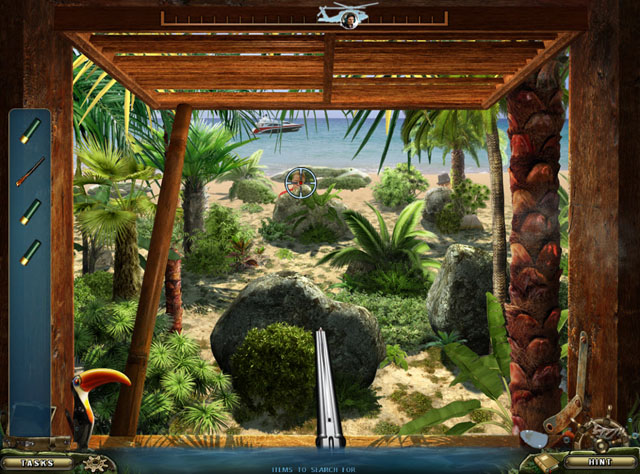
- Shoot the gun at the men that pop out from behind the rocks.
- You only have so many bullets.
- Once the helicopter at the top of the screen is all the way to the right, you have finishing the mini-game.
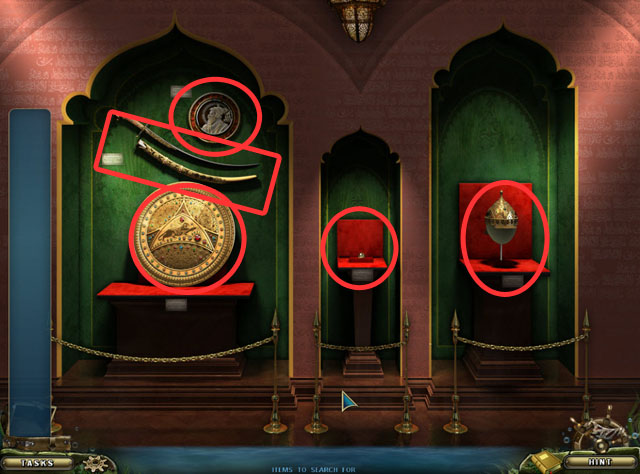
- Inspect all of the objects to finish the game.
- Congratulations, you have completed Mystery of the Missing Brigantine!
Created at: 2011-06-29

