Walkthrough Menu
- General Tips
- Chapter 1: The House
- Chapter 2: The Island
- Chapter 3: The Portals
- Chapter 4: Underwater World
- Chapter 5: The Mystic Diary
General Tips
- This is an Interactive Hidden Object Game.
- Click on the Options Button to adjust the Music Volume, Effects, Environment, Custom Cursor, and Full Screen option.
- You can choose to do a tutorial after the game intro.
- When your cursor changes to a magnifying glass that means the area requires closer inspection.
- Areas that sparkle mean that there are Hidden Object scenes there.
- Inventory items can be found by completing Hidden Object scenes, solving puzzles, or random discovery.
- Random clicking will cause the screen to cloud over temporarily.
- Click on an inventory item to pick it up and then click on the object on which you wish to use it.
- If your inventory bar gets full, you can use the arrows on each side to scroll.
- Your progress will be tracked in the Ghost Diary on the bottom left of the screen. Inside, you can find clues, objectives, and notes to help you on your way.
- Drag an inventory item to the hint area and then click on it to get a clue if you are unsure what to do with the item.
- Click on Goals in the lower right of the screen to see what you need to do.
- Hints replenish at a reasonable rate.
- Hotspots are marked in green in the screenshots.
- You need to click on some areas to advance or trigger a goal.
- Most puzzles can be skipped after a time, but there are some that will require completion in order to continue.
- Click on Menu to the exit game.
Chapter 1: The House
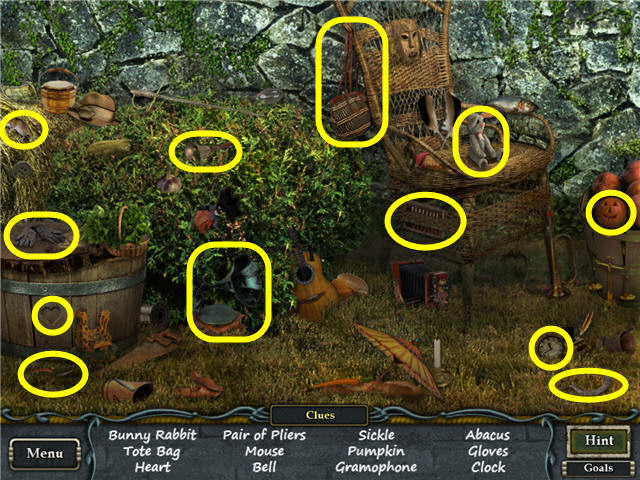
- Click on the sparkling area on the left and find all the items on the list.
- A PAIR OF PLIERS will be added to your inventory.
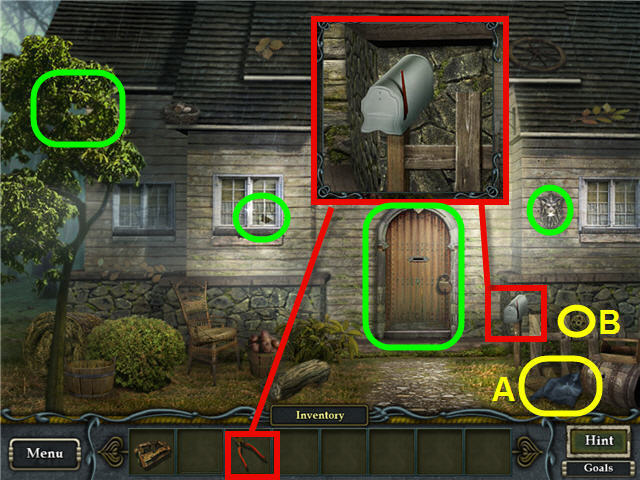
- Click on the blue cloth (A) and pick up the FIREWOOD.
- Pick up the GEAR 1 of 3 (B) on the fence, on the right.
- Click on, and check out, the door, the ornamental head to the left of the right windows, the broken window on the left of the door, and the top of the tree.
- Click on the mailbox and use the PAIR OF PLIERS on it three times to fix it.
- Click on the repaired mailbox to open it.
- Take the GHOST DIARY from the mailbox.
- Click on the apparition of Victor to get an entry in the Ghost Diary.
- Click on the left side of screen to get an arrow; click again when the arrow appears to reach the next area.
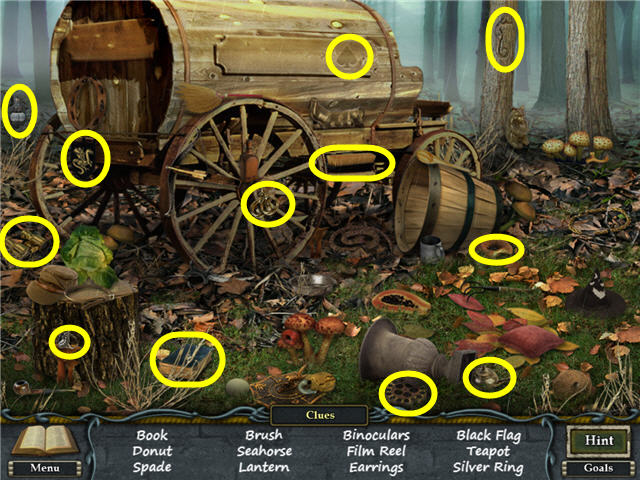
- Click on the sparkling area by the bench and then find all the items on the list.
- A LANTERN will be added to your inventory.
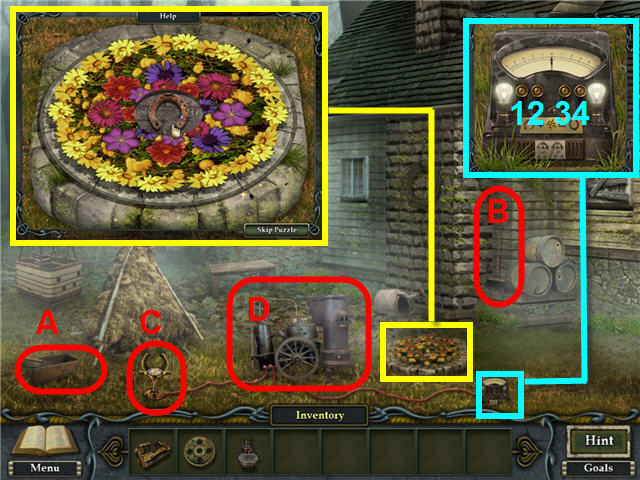
- Take the KNOB from the tool bin (A).
- Click on the haystack.
- Take the BROOM (B) and sweep it across the area until all the leaves are gone.
- Rotate the rings of flowers until they complete the picture. Backing out does not reset the puzzle. See screenshot for solution.
- Take the HORSESHOE from the center of the completed puzzle.
- Use the HORSESHOE on the mechanism (C) attached to the furnace.
- Use the FIREWOOD on the furnace (D).
- Click on the controls connected to the furnace; push the levers down, from left to right: 3, 4, 2, 1.
- Take the MAGNET (horseshoe) from the mechanism on the left (C).
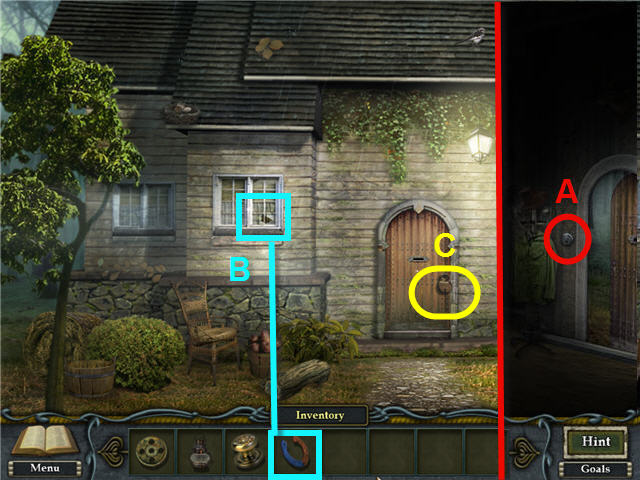
- Head right to the front of the house and use the MAGNET on the broken window (B) to get the DOOR KEY.
- Use the DOORKEY on the door lock (C).
- Flick the switch on the wall (A) when you enter the house.
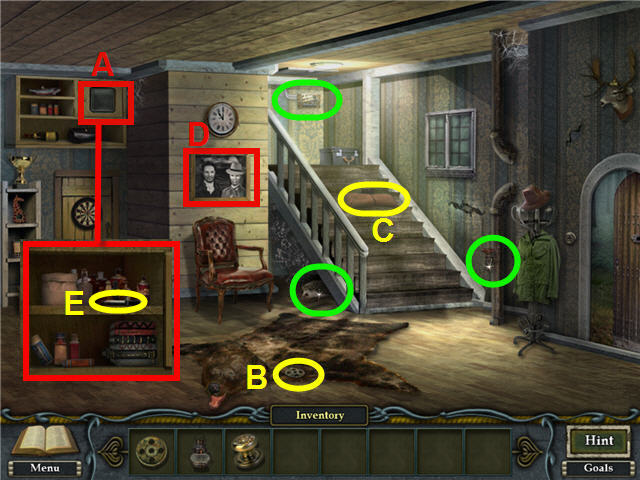
- Use the DOORKNOB on the cabinet (A) and then take the KNIFE (E) from the shelf inside.
- Take the GEAR 3 of 3 (B) next to the bear rug.
- Use the KNIFE on the picture on the wall (D) and then take the PLAN PIECE.
- Take the SWEATER (C) from the stairs.
- Click on the opossum under the stairs, the gas valve on the right of the stairs, and the gear boxes on the top of the stairs.
- Click on the door in the back of the room to enter the back room.
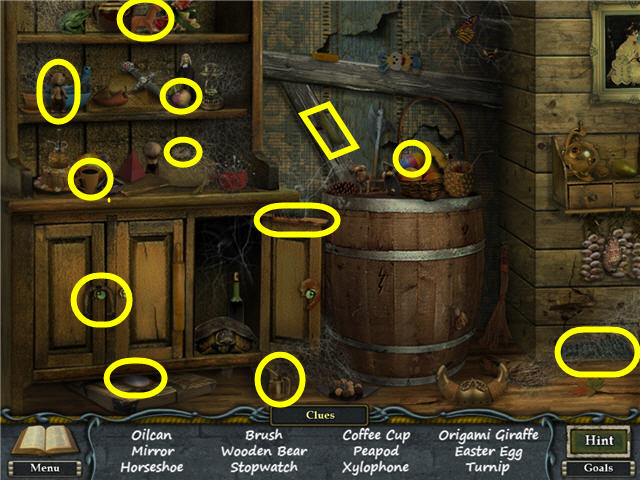
- Click on the sparkling hidden object area and then find the items listed.
- An OILCAN will be added to your inventory.
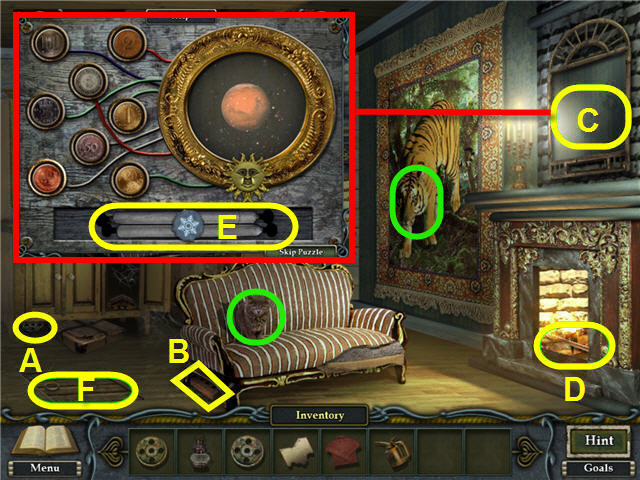
- Pick up GEAR 2 of 3 (A) from under the cupboard.
- Pick up the BRICK (B) from under the couch.
- Use the BRICK on the mirror (C) until a puzzle is revealed.
- Place the coins in the correct spots. When the coins are correctly placed, the picture of the planet will be clear. See screenshot for solution.
- Take the COLD SPELL SCROLL (E) from the bottom of the completed puzzle.
- Use the COLD SPELL SCROLL on the fireplace and draw the symbol. You will see an outline of the symbol flash on the drawing space, giving you an exact location.
- Take the CROWBAR (D) from the fireplace after completing the drawing.
- Use the CROWBAR on the hatch in the floor (F).
- Click on the bottom of the screen to go back to the main room.
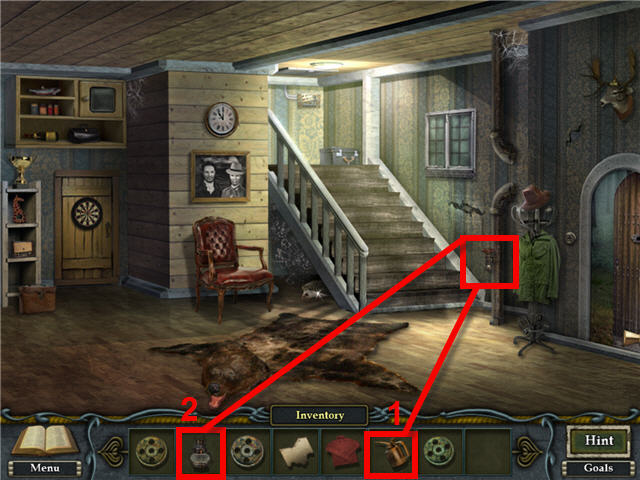
- Use the OILCAN on the gas valve at the bottom of the stairs.
- Use the LANTERN on the gas valve.
- A LIT LANTERN will be added to your inventory.
- Go back through the door with the dartboard and then go down the hatch.
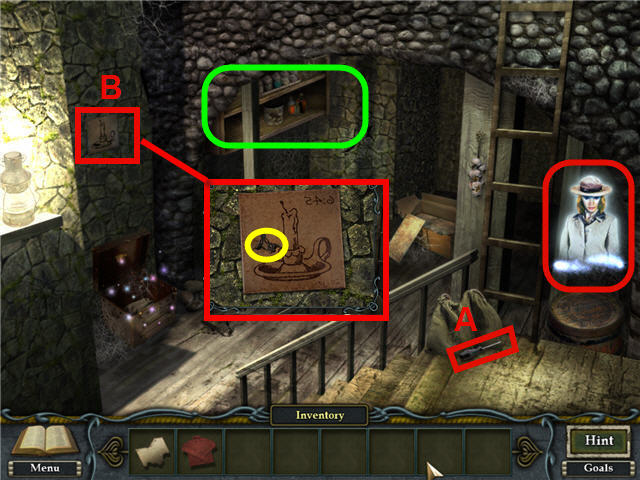
- Use the LIT LANTERN on the darkness and then click on the apparition of Anna to get a Ghost Diary update.
- Pick up the SCREWDRIVER (A) by the base of the ladder.
- Click on the photo of the candle (B) and take the CLOCK HANDS. You will get another update in the Ghost Diary.
- Click on the shelf and then check out the frog in the jar.
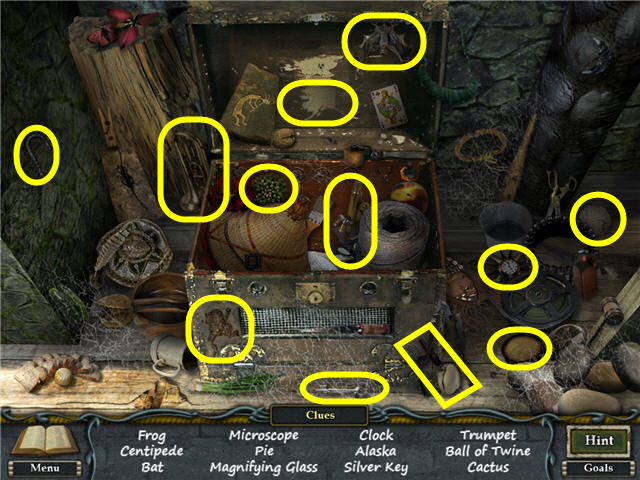
- Click on the sparkling area and then find all the items listed.
- A SILVER KEY will be added to your inventory.
- Head up the ladder.
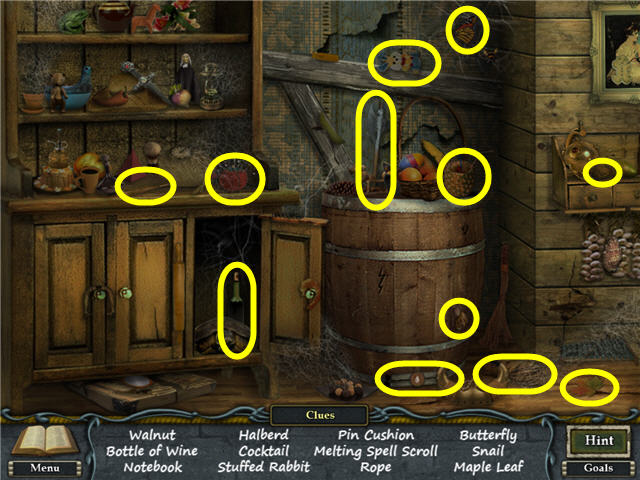
- Click on the sparkling area in the cupboard and then find all the items listed.
- A MELTING SPELL SCROLL will be added to your inventory.
- Back out of the room via the bottom of the screen.
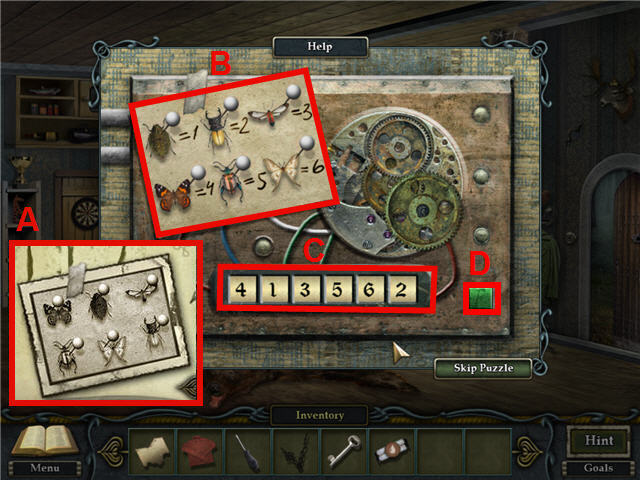
- Place GEAR 1 of 3, GEAR 2 of 3, and GEAR 3 of 3 on the gear box on the top of the stairs. They will automatically snap into the correct slots.
- Use the codes from the Ghost Diary (A) to determine the order of the numbers (B) to place in the door lock (C). The correct code is 413562.
- Press the green button (D) after you’ve entered the numbers.
- Go up through the newly opened attic hatch.
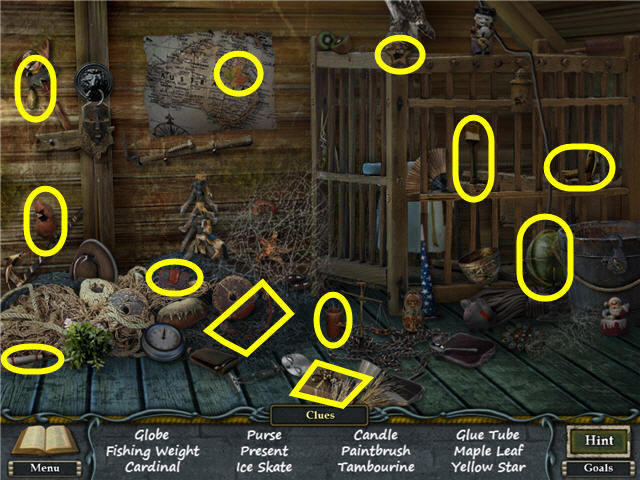
- Cover the beehive on the right rafters with the SWEATER and click on the sparkling area.
- Find all the items listed and a GLUE TUBE will be added to your inventory.
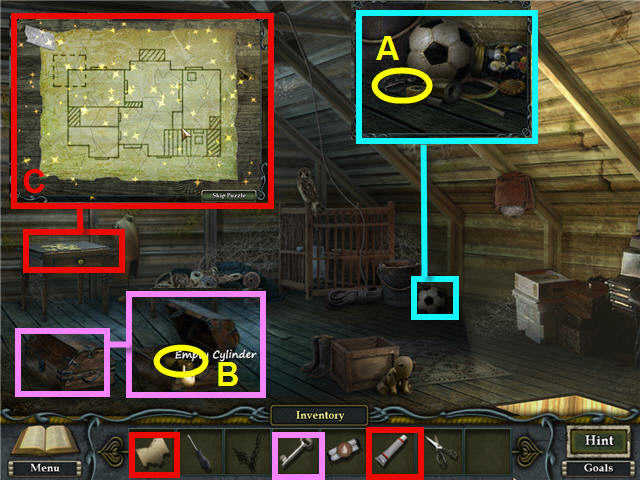
- Click on the soccer ball and then take the SCISSORS (A) from the close-up.
- Use the SILVER KEY on the locked chest and then get the EMPTY CYLINDER (B) from the opened chest.
- Use the GLUE TUBE on the table in the upper left.
- Place the PLAN PIECE from inventory on the papers.
- Assemble the pieces to form a map (C); right-click to turn the pieces.
- The pieces will snap into place when correctly placed. See screenshot for solution.
- You will get a Ghost Diary update upon completion of the map.
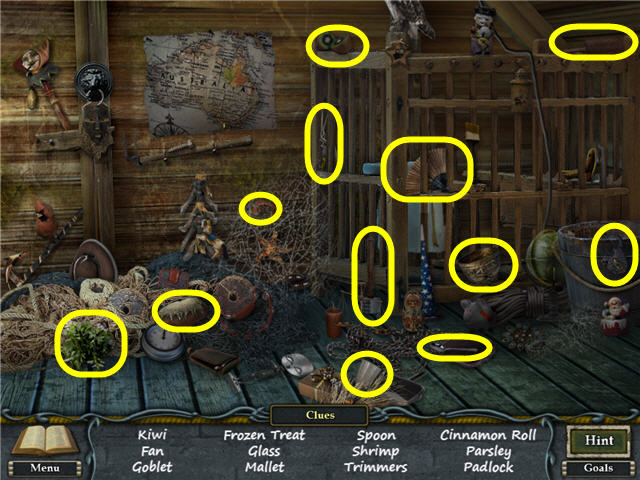
- Click on the sparkling area and then find all the items.
- A MALLET will be added to your inventory.
- Go down the hatch.
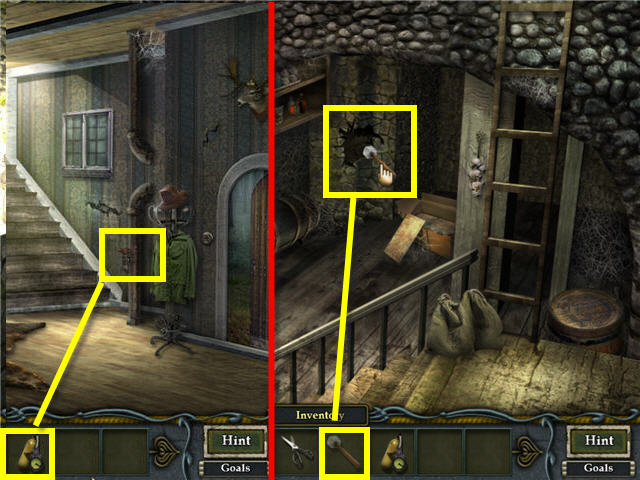
- Use the EMPTY CYLINDER on the gas valve to get a GAS CYLINDER.
- Head through the door with the dartboard and then go down the hatch to the basement.
- Use the MALLET on the back wall multiple times to break through to the secret room and.
- Enter the secret room.
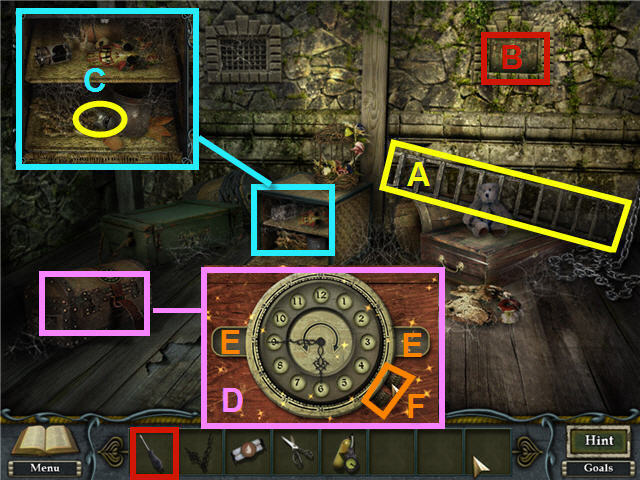
- Take the LADDER (A) from the back of the room.
- Use the SCREWDRIVER on each of the four screws on the panel (B) in the upper right.
- Take the RIGHT EYE from the bottom right of the grate after unscrewing the panel.
- Click on the wicker cart and then take the SALT (C).
- Click on the trunk on the left and complete the clock puzzle.
- Arrange the numbers in sequential order clockwise. Use the two slots on either side (E) to hold numbers you wish to move; click on the arrows in the center to rotate.
- When the numbers are in order, and you place the 12 (noon) on the top, you will need to insert the CLOCK HANDS into the center.
- Set the CLOCKHANDS to match the clue in the Ghost Diary using the knobs (F) on the bottom right.
- The correct time is 6:45. See screenshot (D) for solution.
- Take the BALLOON from the opened trunk.
- Go to the main room and click on the apparition to get a Ghost Diary update.
- Head outside the house.
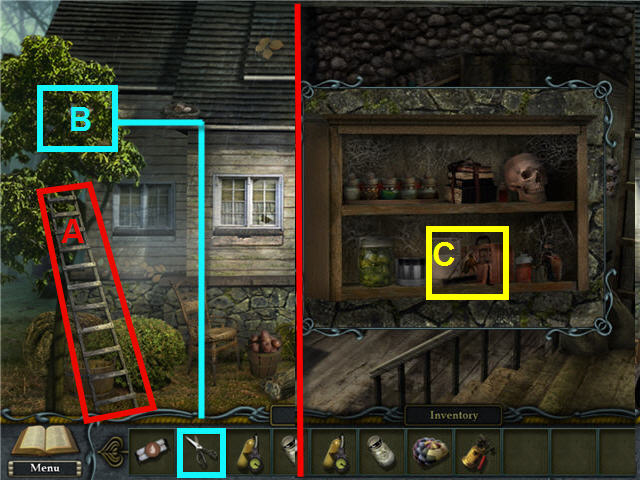
- Use the LADDER on the tree (A).
- Use the SCISSORS on the tree branches (B) to get a BRANCH.
- Head into the house and then go down to the basement.
- Use the BRANCH on the frog in the jar (C); note the jar of milk that is now empty.
- Head outside to the side yard.
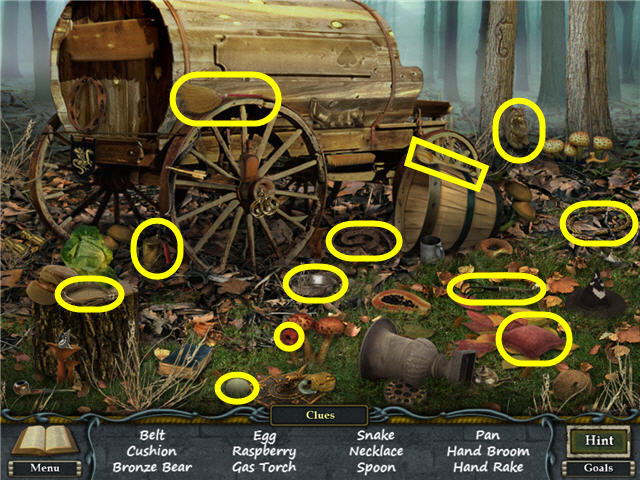
- Click on the sparkling area by the bench and then find the items listed.
- A GAS TORCH will be added to your inventory.
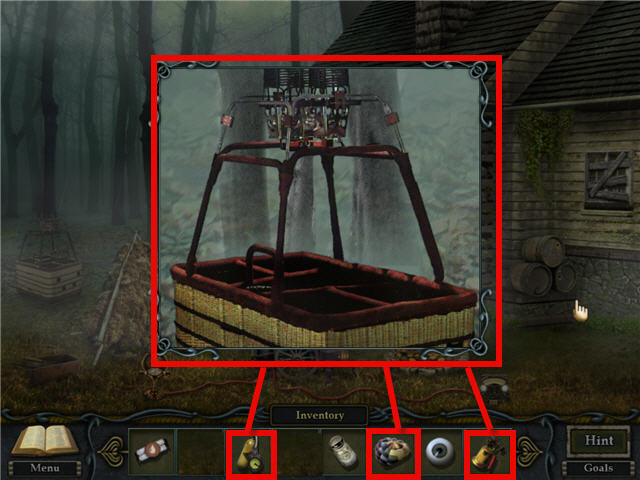
- Place the GAS TORCH, BALLOON, and GAS CYLINDER on the basket and then watch the cutscene.
Chapter 2: The Island
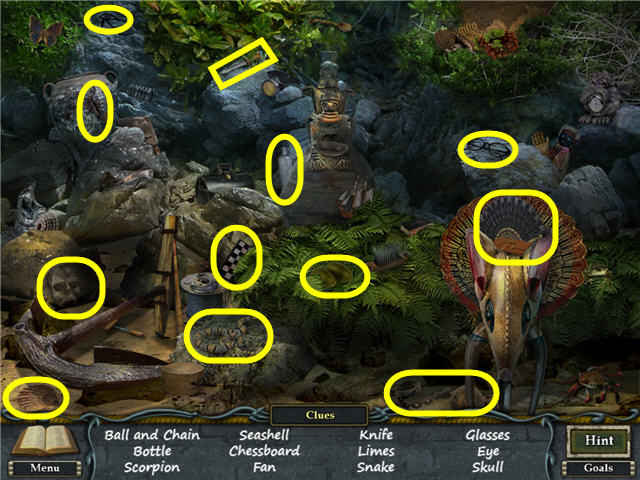
- Click on the apparition of Albert to get an update in the Ghost Diary.
- Click on the sparkling area and then find the items listed.
- A BOTTLE will be added to your inventory.
- Head to the right to get to the campsite.
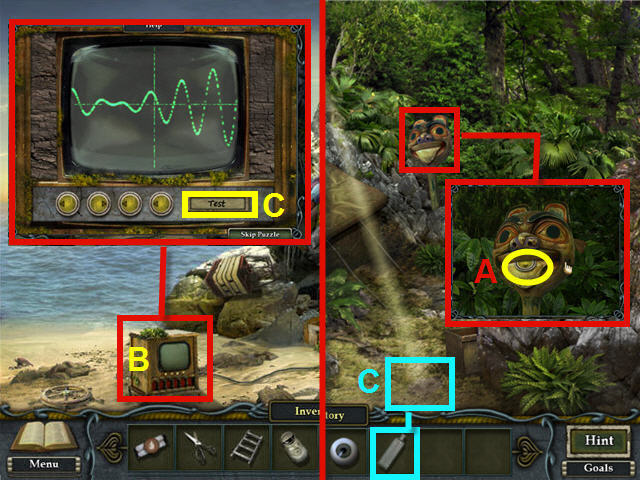
- Click on the Tiki head and then take the KNOB CONTROL (A) from its mouth.
- Place the BOTTLE on the area to which the light is pointing (C).
- Look into the hole to which the light is beamed and then try and take the eye.
- Go back to the crash site and then use the KNOB CONTROL on the TV (B).
- Set the test pattern on the TV screen so that it matches the test pattern in the Ghost Diary.
- The knobs, from left to right, should be set to point: left, right, left, left.
- Click on the Test Button (C) when the knobs are set. See screenshot for solution.
- Take the WATER AMULET from the dolphin’s mouth.
- Head over to the right to the campsite and then click on the sparking area.
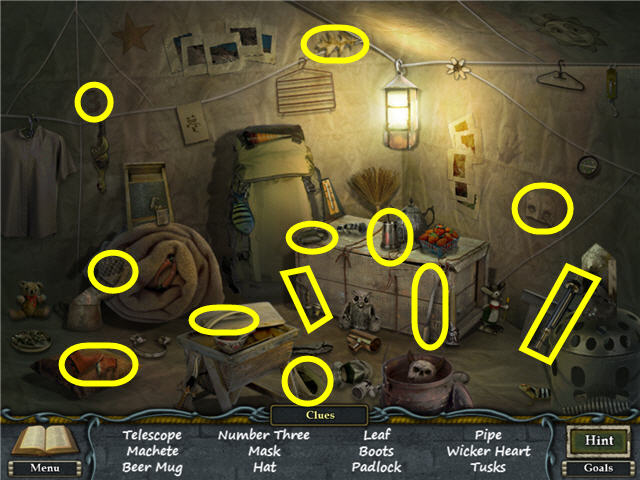
- Find all the objects listed.
- A MACHETE will be added to your inventory.
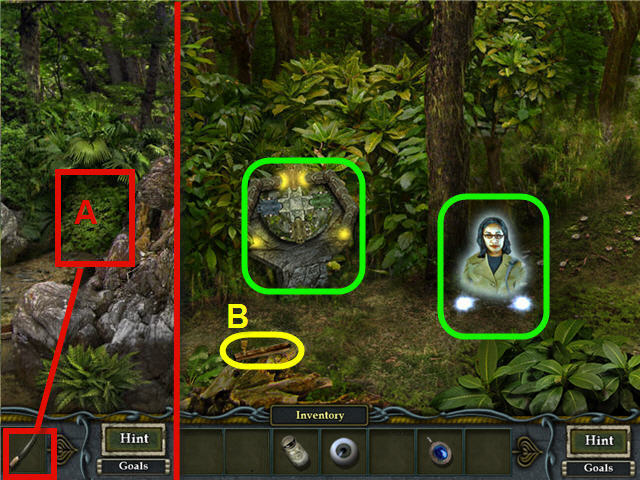
- Use the MACHETE on the bushes (A) to the right of the tent.
- Enter through the now opened area to the jungle at the right and then click on the apparition of Sophie to get a Ghost Diary update.
- Pick up the PIPE (B) on the woodpile.
- Click on the stone statue.
- Head over to the waterfall area, via the arrow on the right, and then click on the sparkling area.
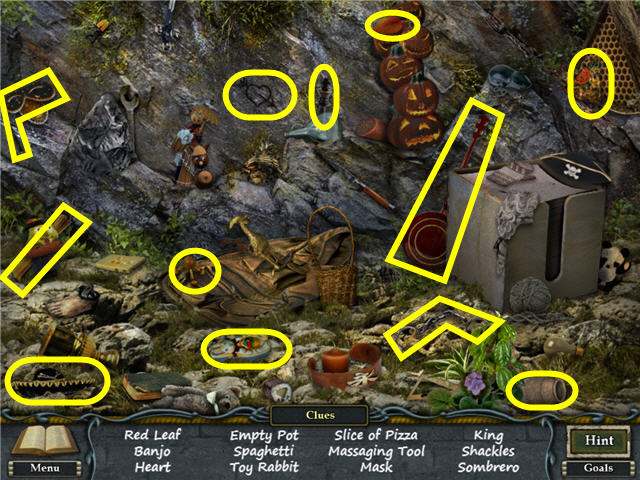
- Find all the items on the list.
- An EMPTY POT will be added to your inventory.
- Head over to the cave area, via the right of the screen, and then click on the sparkling area.
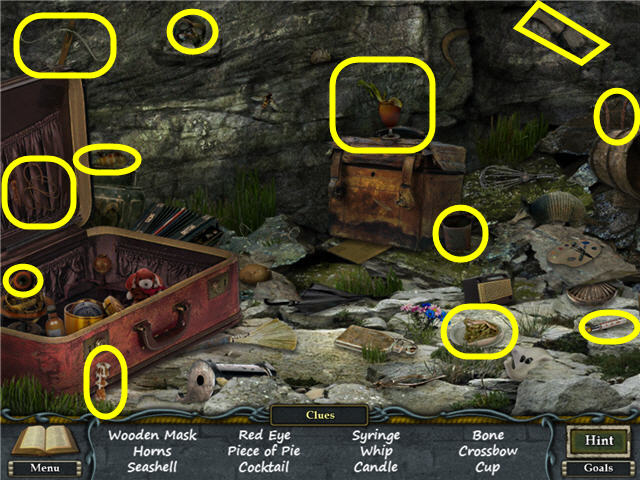
- Find all the items on the list.
- A RED EYE will be added to your inventory.
- Head into the cave and then click on the apparition of Orhan to get an update in the Ghost Diary.
- Click on the sparkling area.
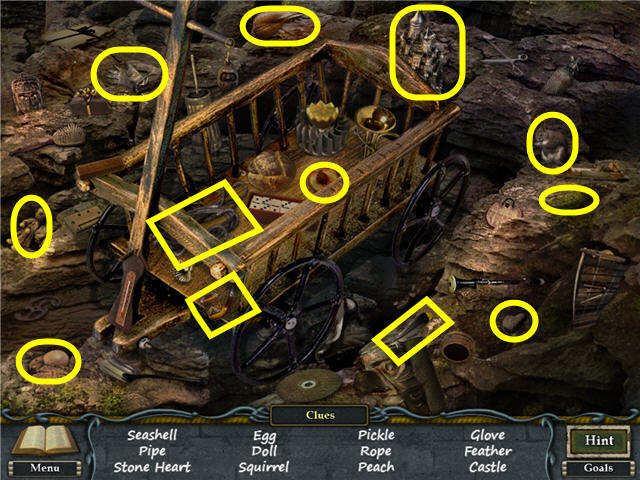
- Find all the items on the list.
- A STONE HEART will be added to your inventory.
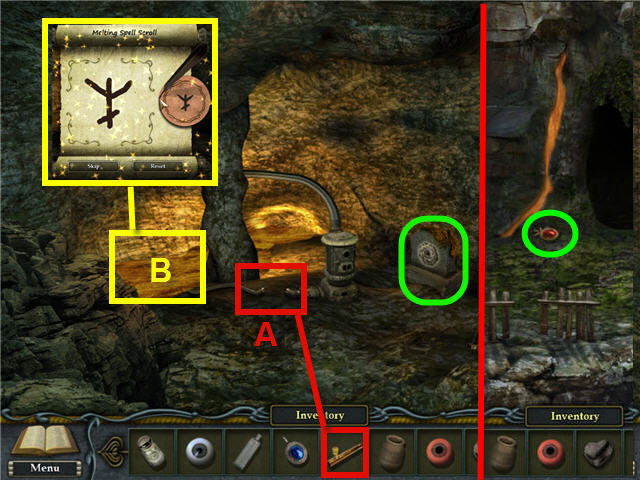
- Place the PIPE on the broken pipe (A) leading to the stove.
- Use the MELTING SPELL SCROLL on the lava (B).
- Copy the symbol from the right onto the scroll. The outline will flash on the drawing surface, showing the exact location. See screenshot for solution.
- Click on the stone marker to the right of the furnace.
- Exit the cave and then click on the fire amulet on the ground, but you’ll need something cold to pick it up!
- Head back to the campsite and click on the sparkling area.
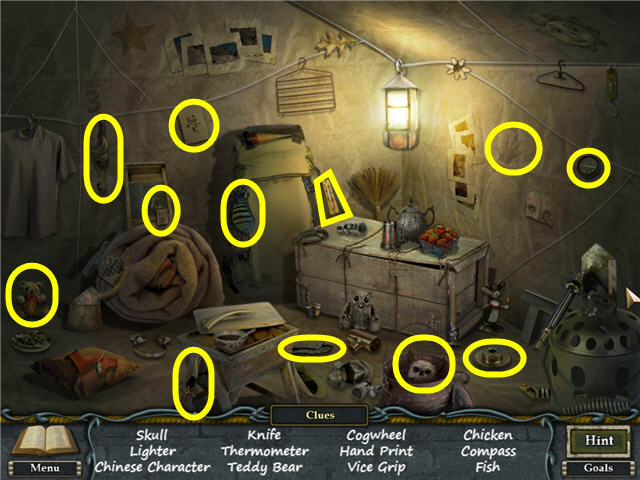
- Find all the items on the list.
- A COGWHEEL will be added to your inventory.
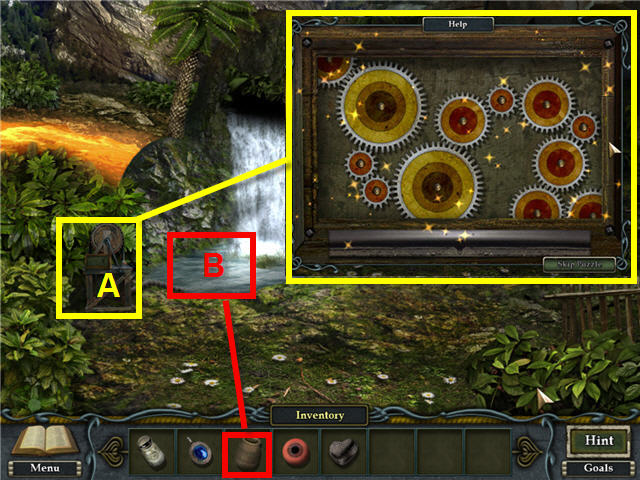
- Go right two times to the waterfall area and then click on the gear mechanism (A).
- Add the COGWHEEL to the gears; assemble them on the pegs so they all turn. See screenshot for solution.
- Use the EMPTY POT on the water by the waterfall (B) to get a FILLED POT.
- Head to the area at the right, by the cave, and pour the FILLED POT on the FIRE AMULET by the entrance.
- Pick up the cooled off FIRE AMULET.
- Head back to the waterfall and then click on the sparkling area.
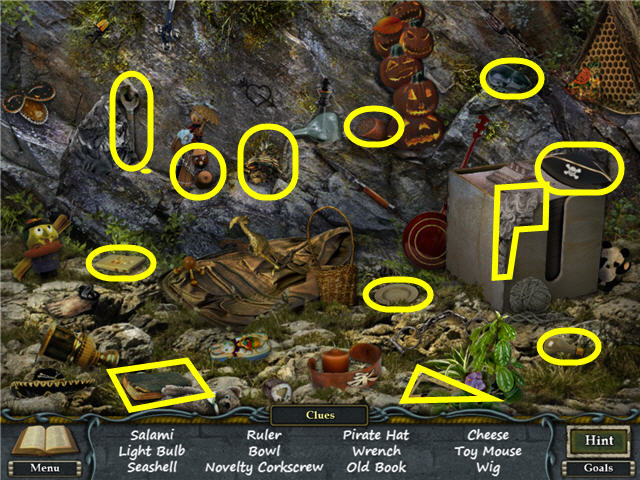
- Find all the items on the list.
- A BOWL will be added to your inventory.
- Head to the stone statue via the bottom of the screen and then place the STONE HEART and RED EYE on the statue to trigger a sparkling area by the cave.
- You will not be able to complete the stone statue yet.
- Head to the cave and then click on the sparkling area.
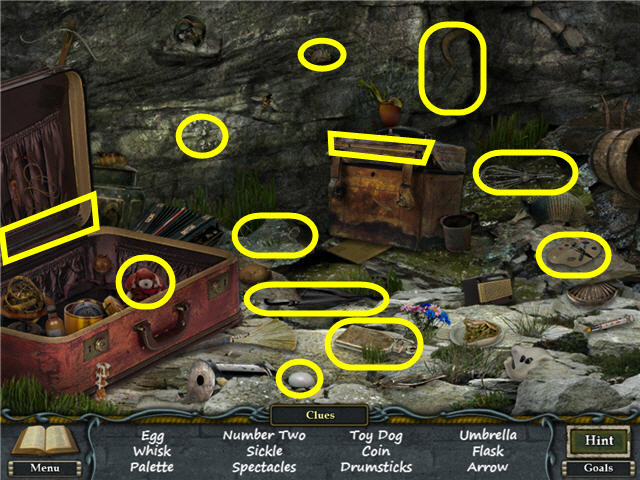
- Find all the items on the list.
- An EGG will be added to your inventory.
- Enter the cave and then click on the sparkling area by the wagon.
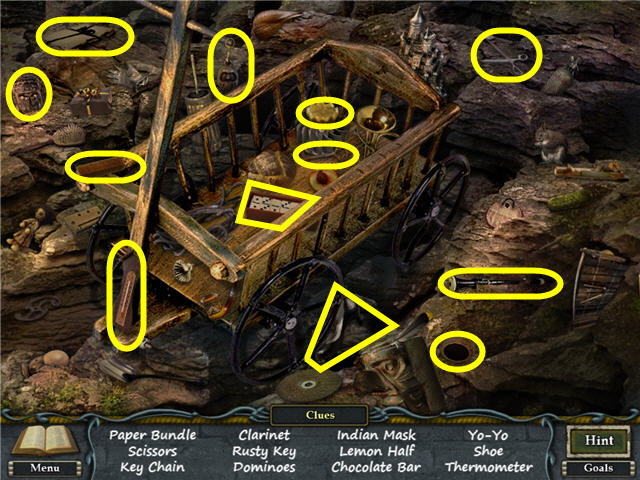
- Find all the items on the list.
- A RUSTY KEY will be added to your inventory.
- Exit out of the area and then head to the campsite.
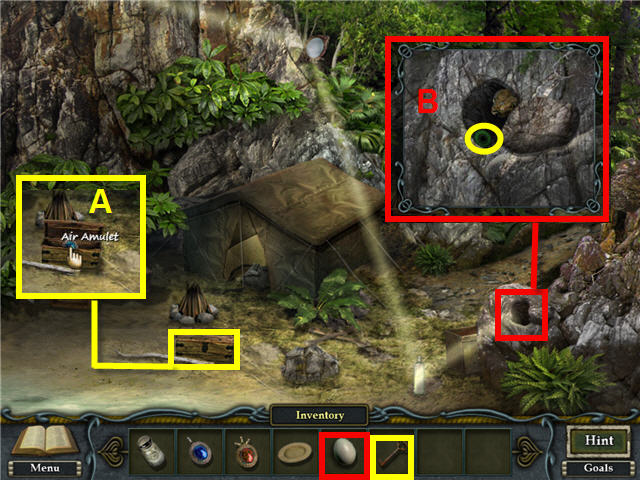
- Use the RUSTY KEY on the locked chest and then take the AIR AMULET (A).
- Use the EGG on the snake in the hole to which the beam of light is pointing.
- Take the GREEN EYE from the hole (B).
- Head to the right, into the jungle, and then click on the stone statue.
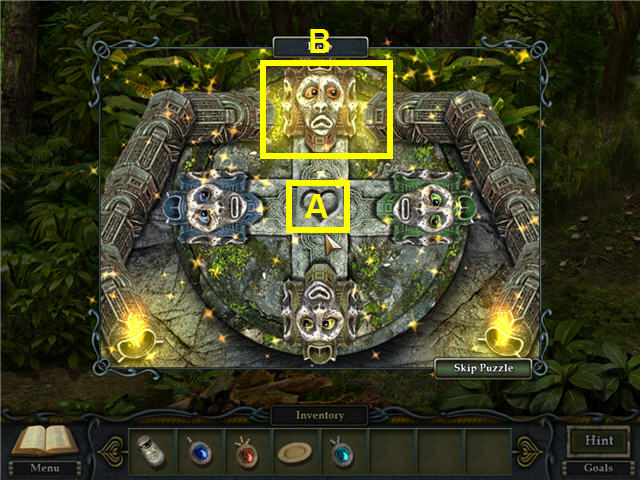
- Use the GREEN EYE on the empty eye socket in the green face on the statue.
- Place the RED EYE and the STONE HEART on the statue also.
- You need to use the clue from page 8 of the Ghost Diary to complete the puzzle.
- Click on the heart in the center (A) to rotate the faces.
- You can only change the facial expressions when the face is on the top (B).
- Click on the eyes and mouths, while in the top position, to change them.
- All eyes should be changed to face clockwise; the red face should be a sad face, and the face opposite the red one should be happy. See screenshot for solution.
- The EARTH AMULET will be added to your inventory.
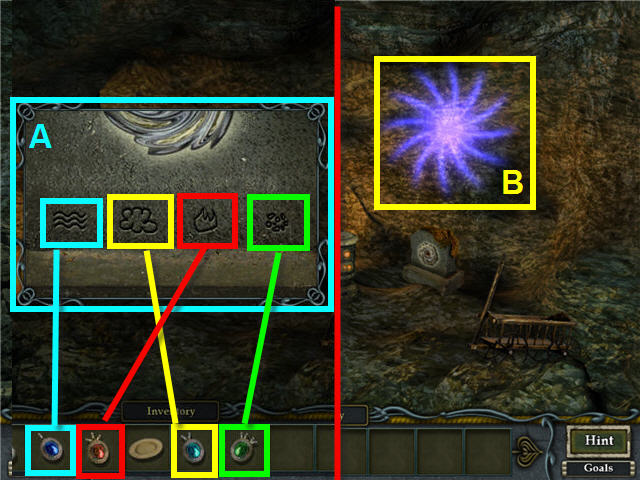
- Head to the right twice and go into the cave.
- Place the AIR AMULET, WATER AMULET, FIRE AMULET, and EARTH AMULET on their corresponding spots (A) on the stone marker. See screenshot for solution.
- Go through the opened portal (B).
Chapter 3: The Portals
- Head into the house and then go down into the basement.
- Click on the sparkling area.
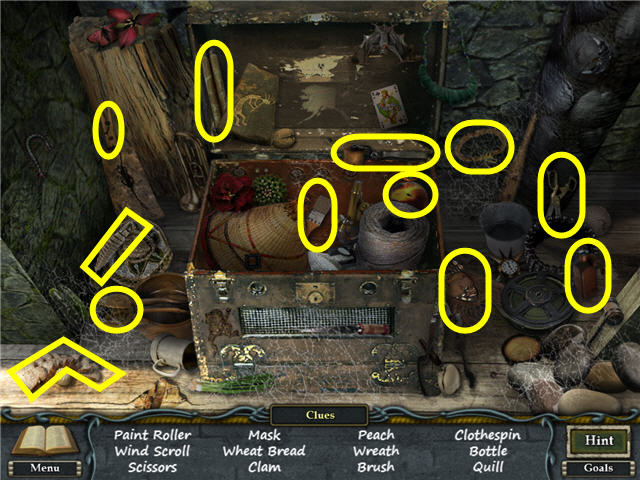
- Find the items listed.
- A WIND SPELL SCROLL will be added to your inventory.
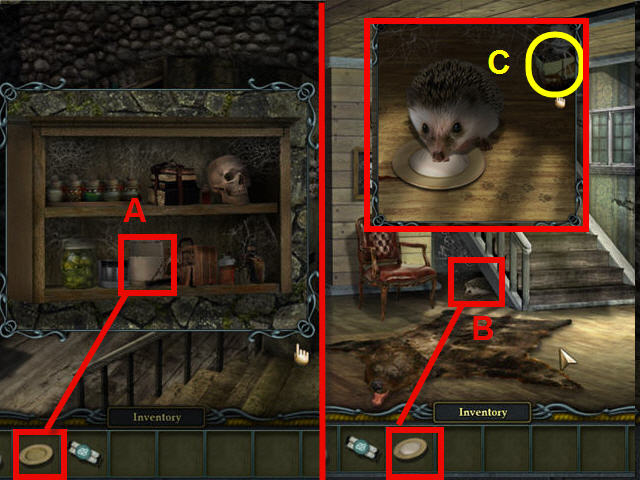
- Use the BOWL on the jar of milk by the frog (A) in the cabinet to get a BOWL OF MILK.
- Give the BOWL OF MILK to the opossum under the stairs (B), in the main room of the house, and then take the FEAR POTION (C).
- Head back through the portal in the front of the house to the island.
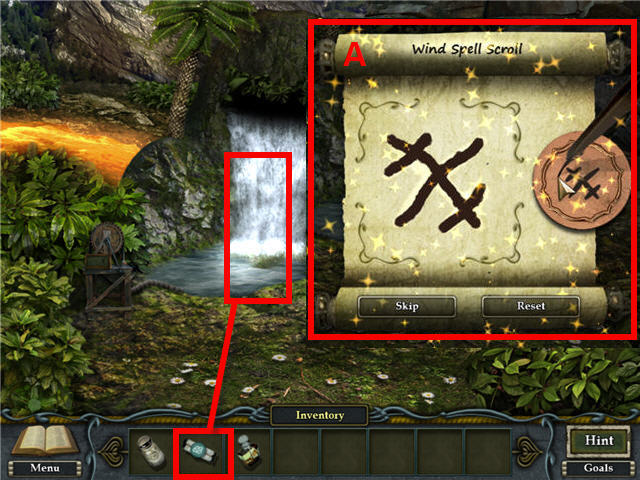
- Go to the waterfall and then use the WIND SPELL SCROLL on the waterfall.
- Copy the symbol from the right onto the scroll. The outline will flash on the drawing surface showing the exact location. See screenshot for solution (A).
- Head back to the beach and then click on the sparkling area.
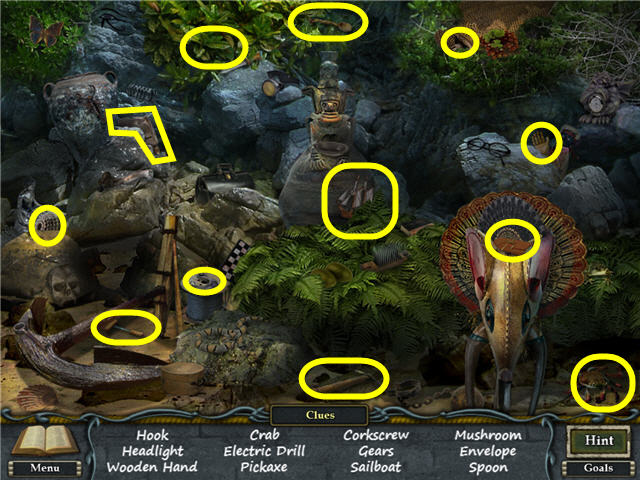
- Find the items listed.
- A PICKAXE will be added to your inventory.
- Use the PICKAXE on the frozen waterfall until you can get through.
- Click on the apparition of Albert and you will get a new Ghost Diary update.
- Click on the sparkling area.
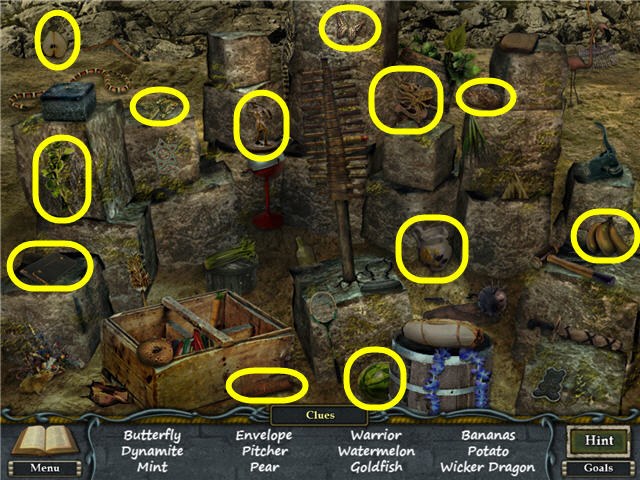
- Find the items listed.
- DAMP MINT will be added to your inventory.
- Go up the screen to the pier.
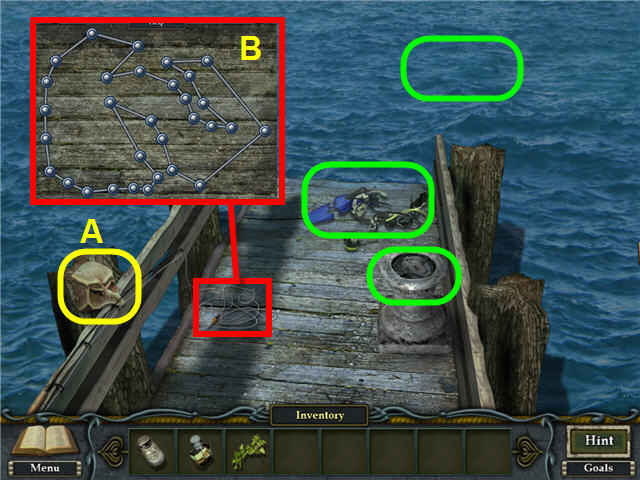
- Take the SCARY MASK (A) from the post on the left.
- Click on the fishing line on the pier and untangle it.
- Turn all the lines silver by not allowing any of them to cross.
- Pull the metal studs to the outside until they are all untangled. See screenshot (B) for one possible solution.
- Click on the broken diving equipment, the water off the front of the pier, and the stone container.
- Click on the bobber in the water attached to the pole and get a GOLDFISH.
- Head back through the waterfall and then go right, to the cave.
- Click on the furnace to get a close-up.
- Use the DAMP MINT on the heated surface to get some DRIED MINT.
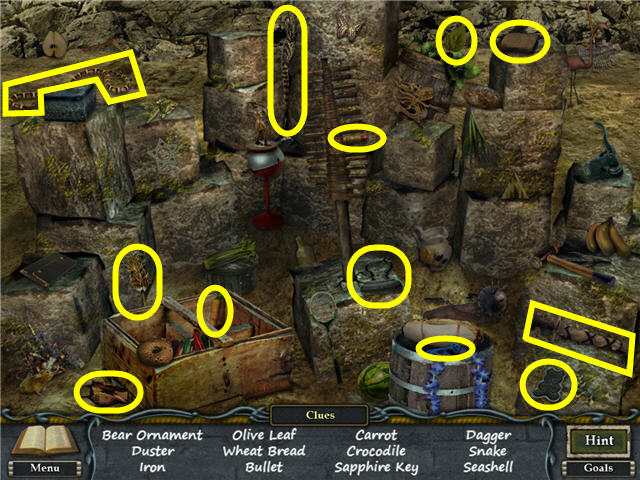
- Go through the frozen waterfall and then click on the sparkling area.
- Find all the items.
- A SAPPHIRE KEY will be added to your inventory.
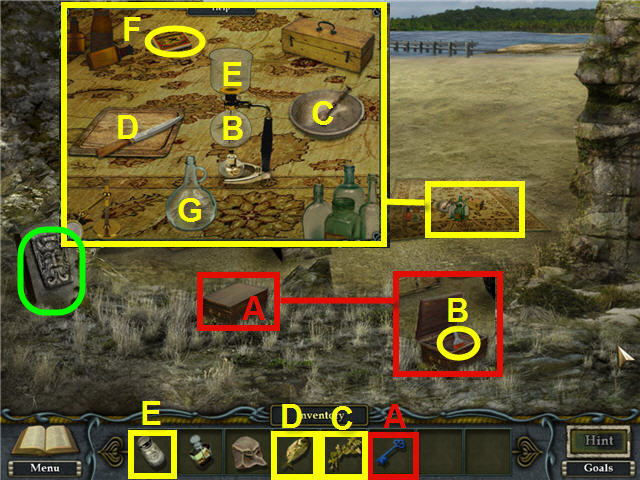
- Use the SAPPHIRE KEY to open the locked chest (A) and get the CATALYST.
- Click on the stone marker to the left.
- Click on the blanket to get the work station for the potion.
- Use the CATALYST on the burner (B).
- Place the DRIED MINT on the mortar and pestle (C).
- Place the GOLDFISH on the cutting board (D).
- Place the salt into the container with the catalyst (E).
- Click on the mortar and pestle to get the POUNDED MINT; add it to the catalyst (E).
- Click on the cutting board to get the CHOPPED FISH; add it to the catalyst (E).
- Take the MATCH BOX (F) and use it on the burner (B).
- Take the BULB (G) and use it on the finished potion.
- Go to the pier and use the BREATH POTION on the water.
- Go into the water and then click on the apparition of Anna for an update to your Ghost Diary.
Chapter 4: Underwater World
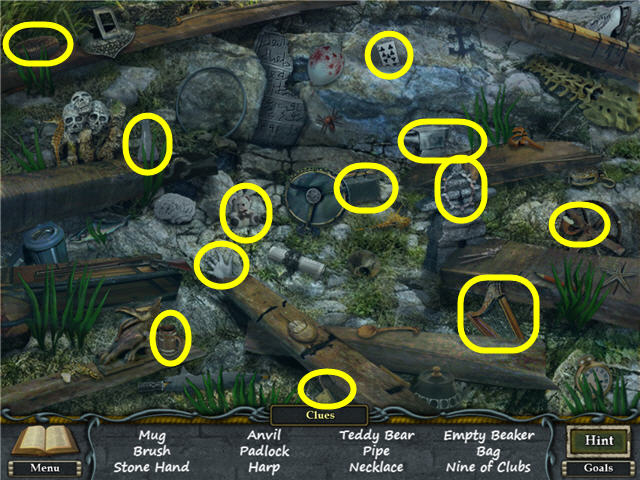
- Click on the sparkling area to the left and find the items listed.
- A STONE HAND will be added to your inventory.
- Click on the up arrow to exit the water and then go back to the lab area.
- Use the STONE HAND on the stone marker on the left.
- Take the MIRROR from the side of the stone marker.
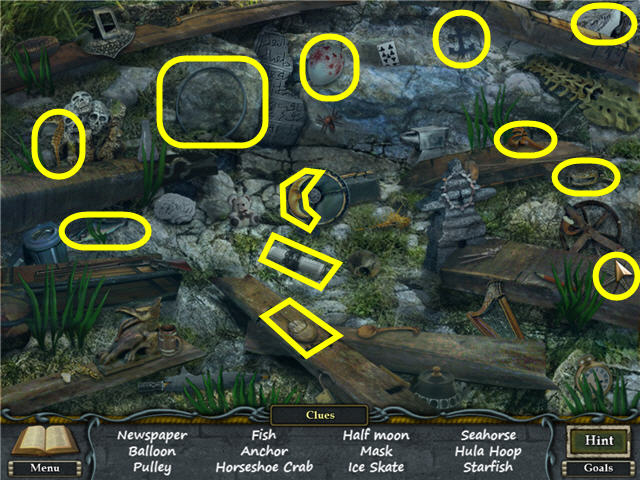
- Go back into the water off the pier and click on the sparkling area to the left.
- Find the items on the list.
- A HALF MOON will be added to your inventory.
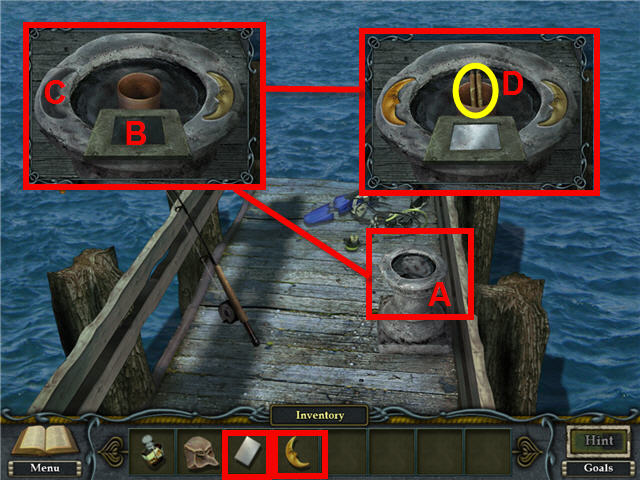
- Head up out of the water to the pier and click on the stone container (A).
- Place the MIRROR in the square (B).
- Place the HALF MOON in the slot (C).
- Take the ANTI-MAGIC SPELL SCROLL (D) from the middle receptacle.
- Enter the water and then use the FEAR POTION on the shark.
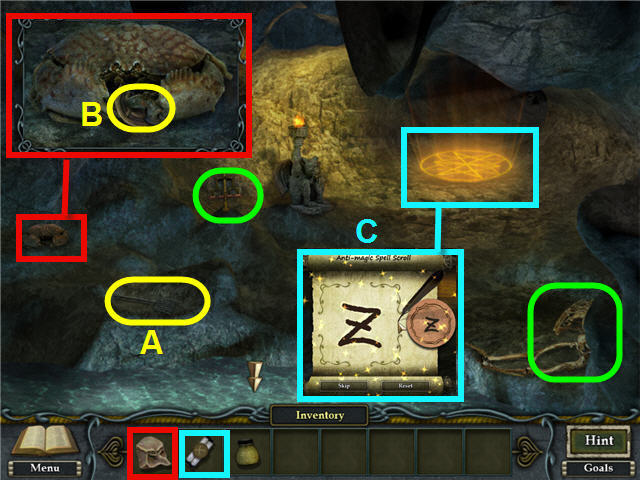
- Head into the tunnel and then pick up the FLYSWATTER (A) from the rocks.
- Click on the crab to the left and then use the SCARY MASK on it.
- The LEFT HALD SYMBOL (B) will be added to your inventory.
- Use the ANTI-MAGIC SPELL SCROLL on the magic symbol.
- Copy the symbol from the right on the scroll. The outline will flash on the drawing surface showing the exact location. See screenshot for solution (C).
- Click on the skeleton and the scale.
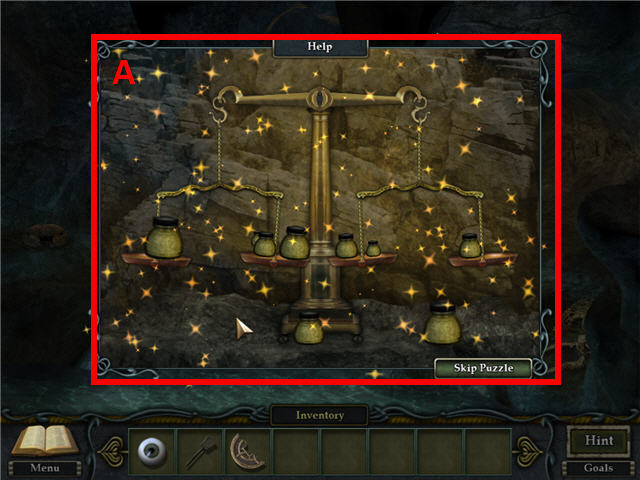
- The object of the scale puzzle is to balance all four scales equally using the weights provided.
- You do not need to use all the weights. See screenshot (A) for solution.
- Head into the cavern that the magic symbol was blocking.
- Click on the apparition of Orhan and get a Ghost Diary update.
- Click on the sparkling area.
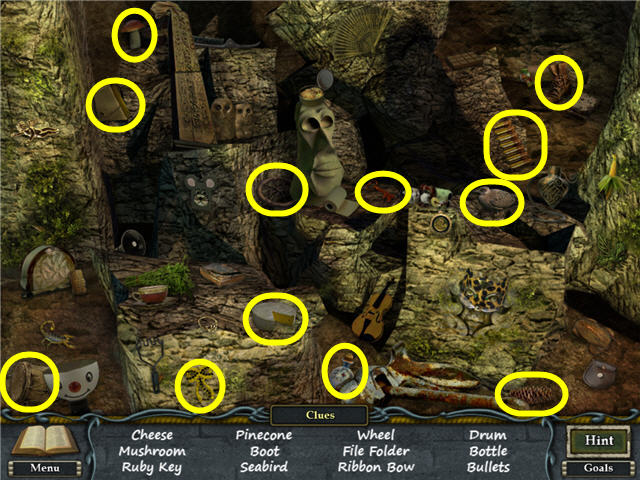
- Find the items on the list.
- A RUBY KEY will be added to your inventory.
- Head through the tunnel towards the magic wolf and click on the sparkling area.
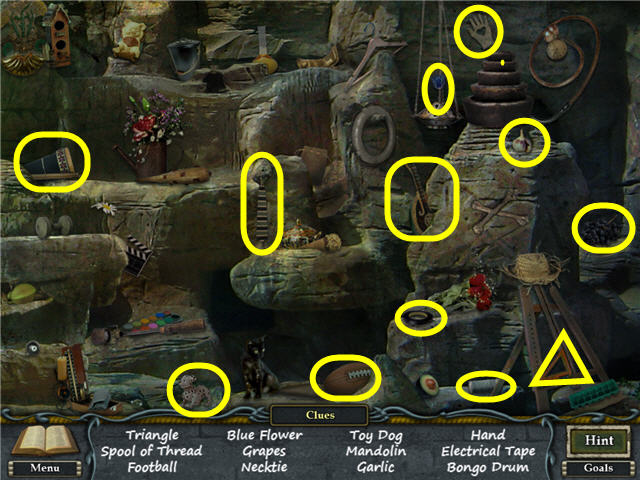
- Find the items on the list.
- A BLUE FLOWER will be added to your inventory.
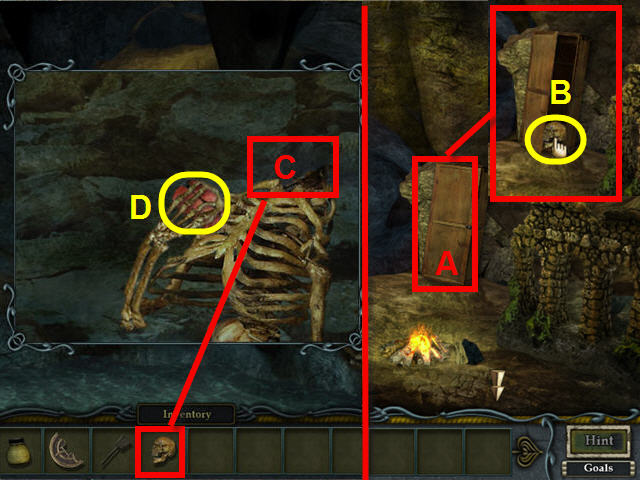
- Head back to Orhan and then use the RUBY KEY on the locked casket (A).
- Take the SKULL (B) from the opened casket.
- Go back to the tunnel entrance, via the bottom of the screen, and then use the SKULL on the skeleton (C).
- Take the MEAT (D) that the skeleton releases.
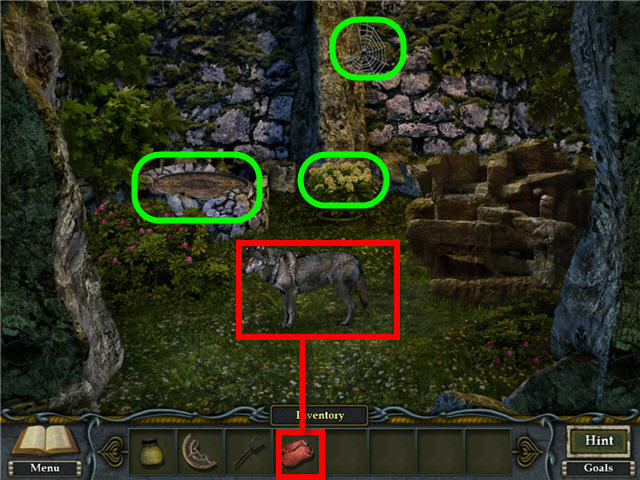
- Go forward two times and then give the MEAT to the wolf.
- Click on the well, the flowers, and the spiderweb.
- Go back to Orhan and then click on the sparkling area.
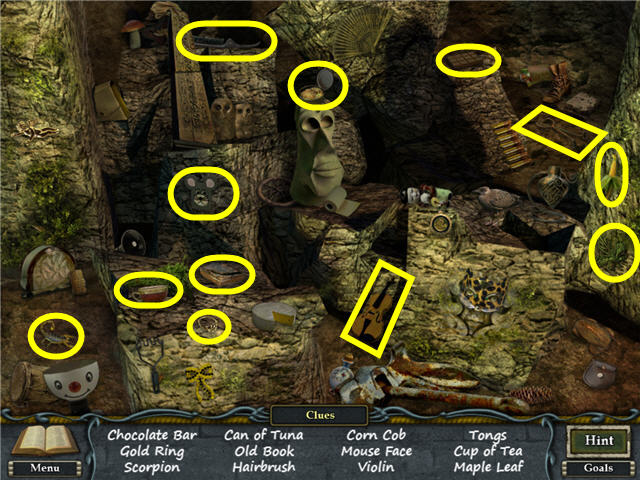
- Find the items on the list.
- The TONGS will be added to your inventory.
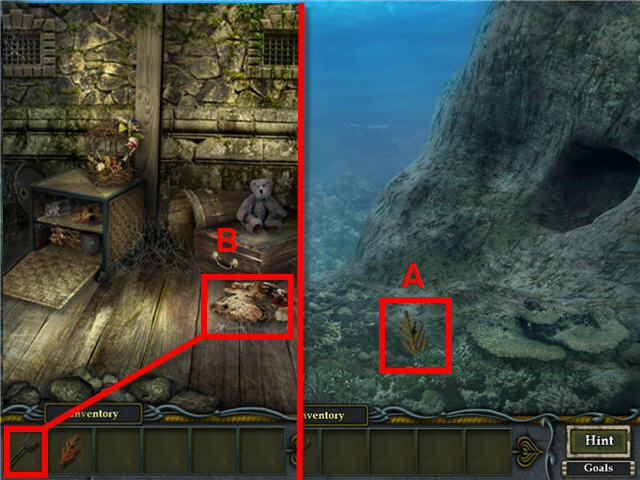
- Back out two times and then use the TONGS on the RED BARNACLE (A).
- Leave the water area and then go through the portal area in the cave, to the right of the frozen waterfall.
- Go into the secret room in the basement and then use the FLYSWATTER on the flies on the rotten meat (B) to get a FLY.
- Head back through the portal and then go to Orhan in the underwater cave.
- Give Orhan the RED BARNACLE, the SULFUR, and the BLUE FLOWER.
- The LIGHT-SPELL SCROLL will be added to your inventory.
- Head up to the wolf area and then click on the sparkling area.
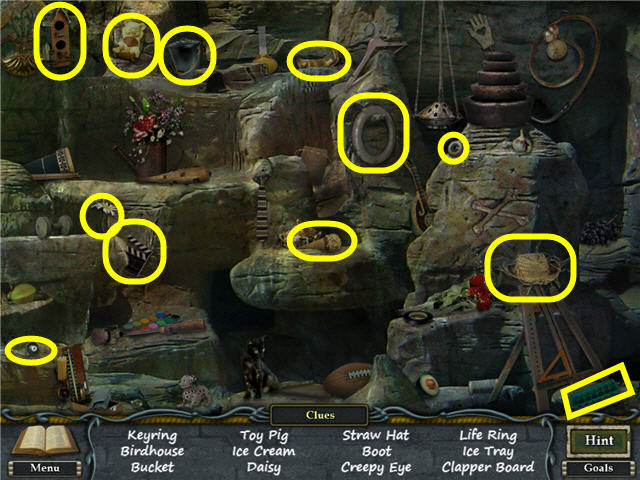
- Find the items on the list.
- A LEFT EYE will be added to your inventory.
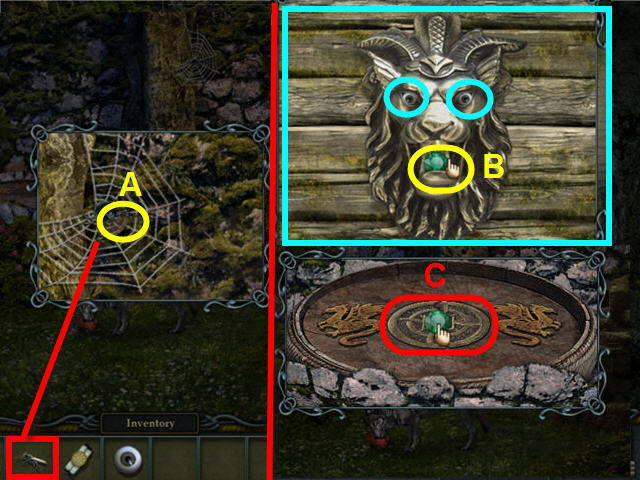
- Use the FLY on the spider in the web to get the RIGHT HALF OF SYMBOL (A).
- Go back to the house, via the portal in the cave, and then use the LEFT EYE and RIGHT EYE on the metal sculpture on the right side of the front door.
- Take the EMERALD (B) from the sculpture’s mouth.
- Head back to the wolf area and then use the LEFT HALF OF SYMBOL, RIGHT HALF OF SYMBOL, and the EMERALD on the well cover (C).
Chapter 5: The Mystic Diary
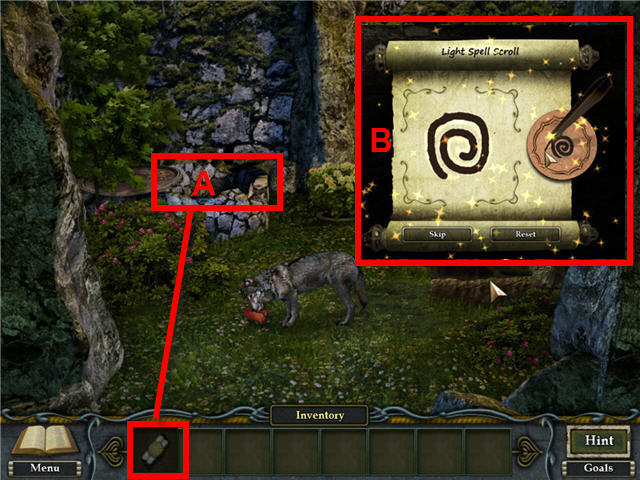
- Use the LIGHT-SPELL SCROLL on the well (A).
- Copy the symbol from the right on the scroll. The outline will flash on the drawing surface showing the exact location. See screenshot for solution (B).
- Click on the apparition in the bottom of the well to get a Ghost Diary update.
- Head up out of the well to the wolf area and then click on the sparkling area.
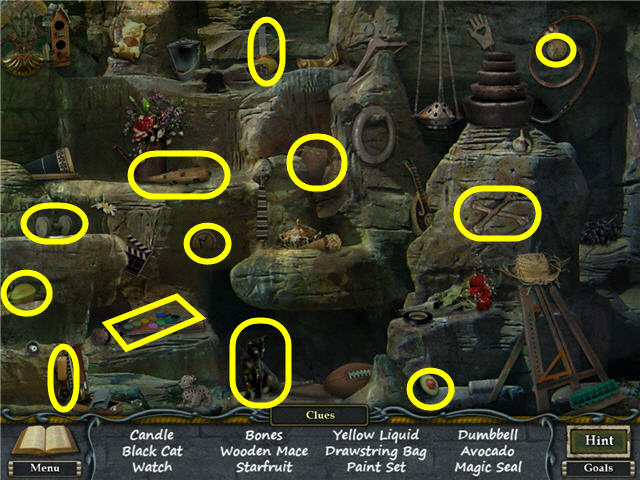
- Find the items on the list.
- A MAGIC SEAL will be added to your inventory.
- Back out of the area via the bottom of the scene and then click on the sparkling area.
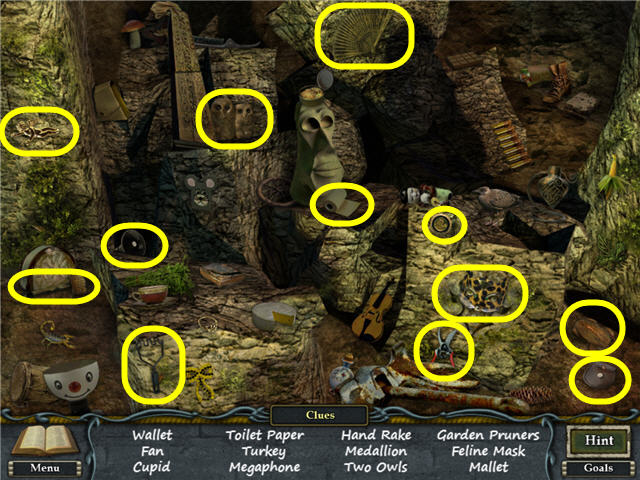
- Find the items on the list.
- GARDEN PRUNERS will be added to your inventory.
- Back out of the area two times and then click on the sparkling area.
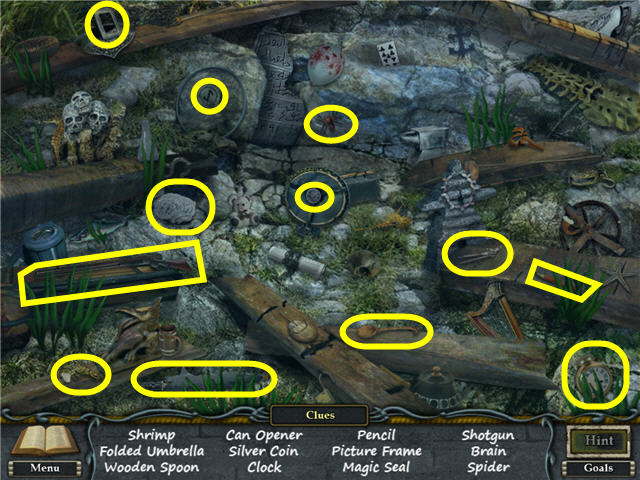
- Find the items on the list.
- A MAGIC SEAL will be added to your inventory.
- Head up out of the water and then back one screen to the lab area.
- Click on the sparkling area.
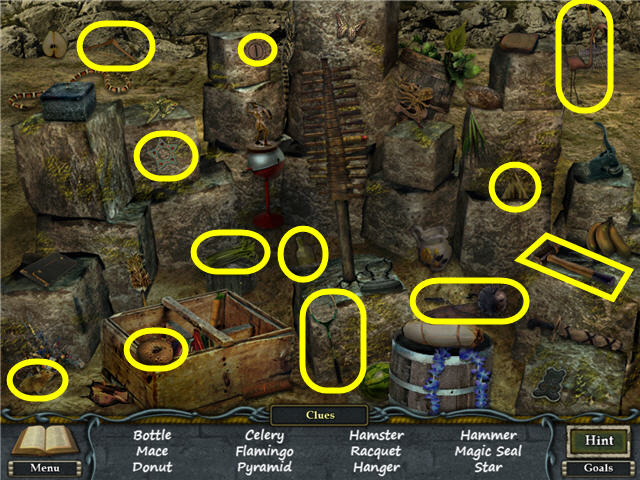
- Find the items on the list.
- A MAGIC SEAL will be added to your inventory..
- Head out of the area, via the bottom of the screen, and then click on the sparkling area.
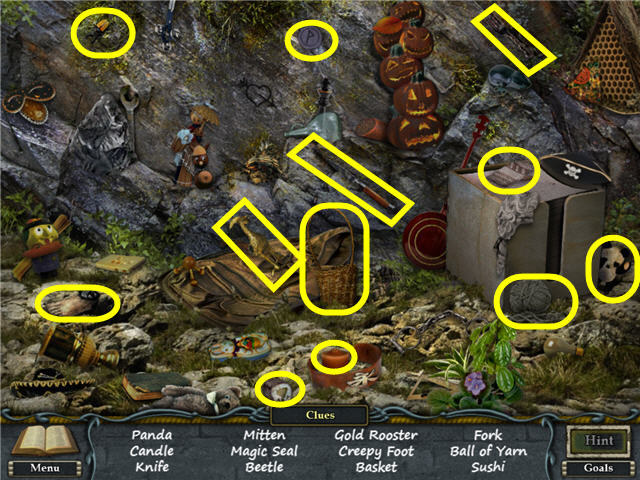
- Find the items on the list.
- A MAGIC SEAL will be added to your inventory.
- Head to the area on the right and then click on the sparkling area.
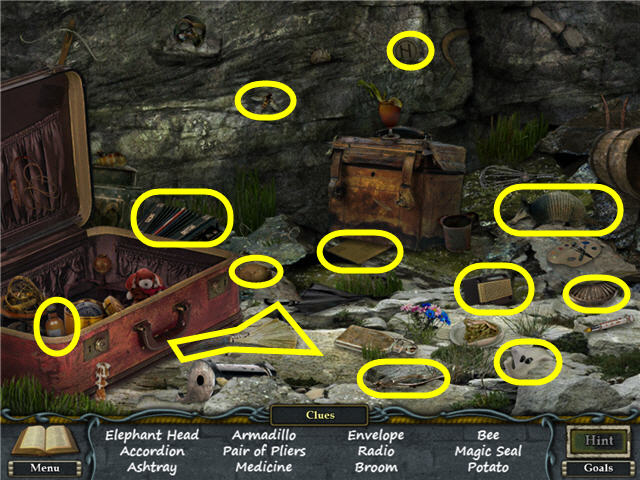
- Find the items on the list.
- A MAGIC SEAL will be added to your inventory.
- Head into the cave and then click on the sparkling area.
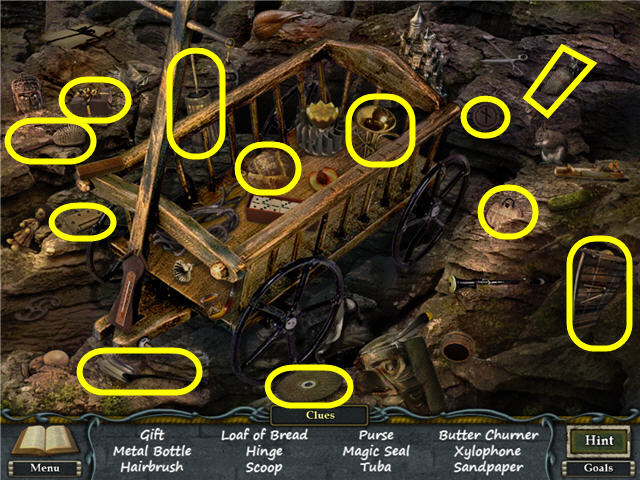
- Find the items on the list.
- A MAGIC SEAL will be added to your inventory.
- Back out of the area until you get to the campsite and then click on the sparkling area.
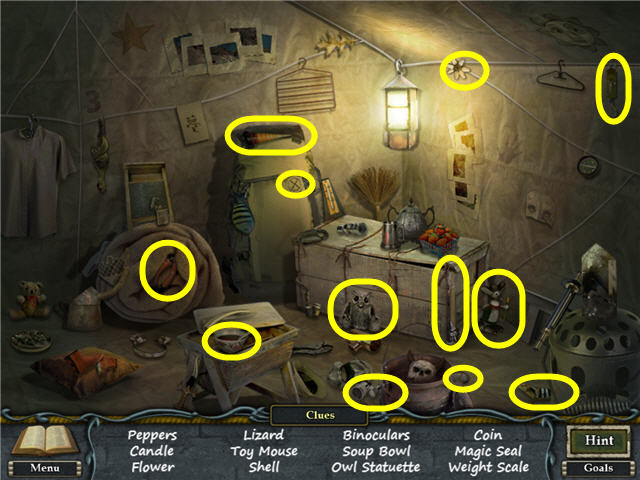
- Find the items on the list.
- A MAGIC SEAL will be added to your inventory.
- Head to the left beach area and then click on the sparkling area.
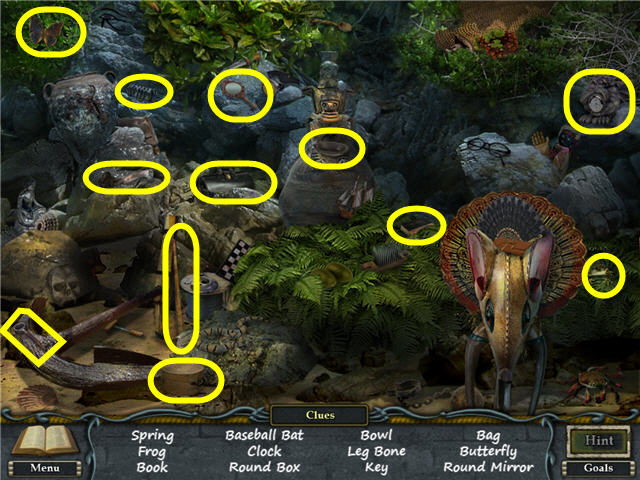
- Find the items on the list.
- A MIRROR will be added to your inventory.
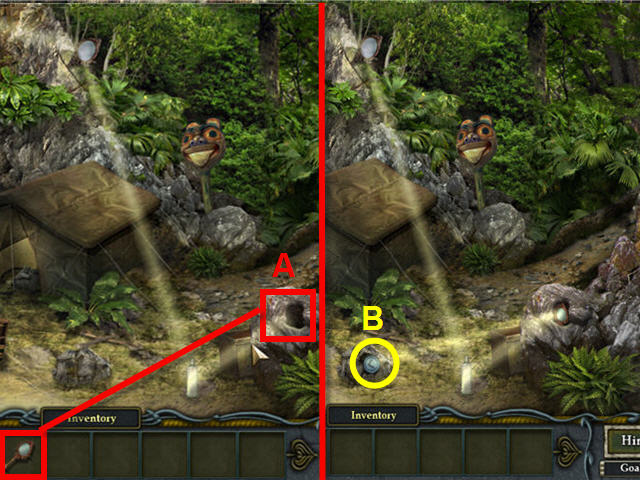
- Head to the campsite and then place the MIRROR in the hole on the right (A).
- Take the MAGIC SEAL from the pile of rocks (B) on which the beam is shining.
- Head to the cave and then go through the portal to the house.
- Click on the sparkling area next to the portal.
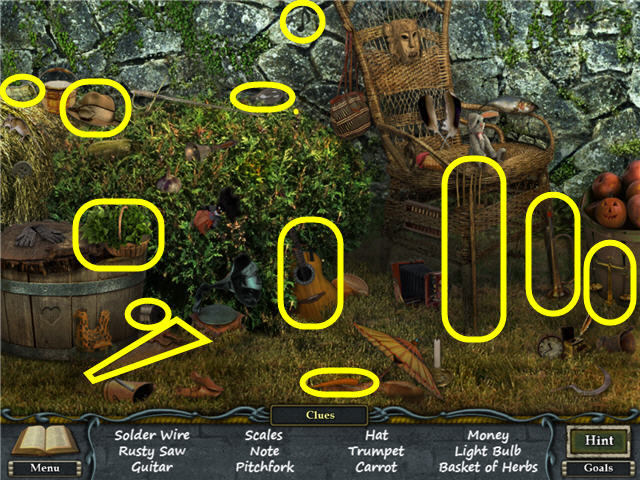
- Find the items on the list.
- A PITCHFORK will be added to your inventory.
- Head to the side of the house and then click on the sparkling area.
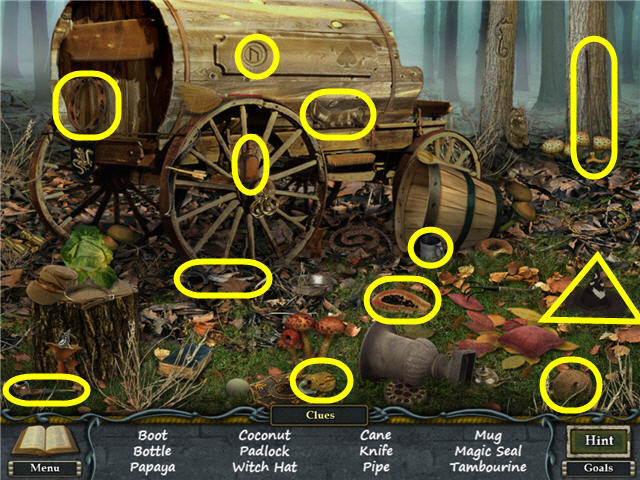
- Find the items on the list.
- A MAGIC SEAL will be added to your inventory.
- Use the PITCHFORK on the haystack and then take the MAGIC SEAL.
- Enter the house and then go through the door with the dartboard on it.
- Click on the sparkling area.
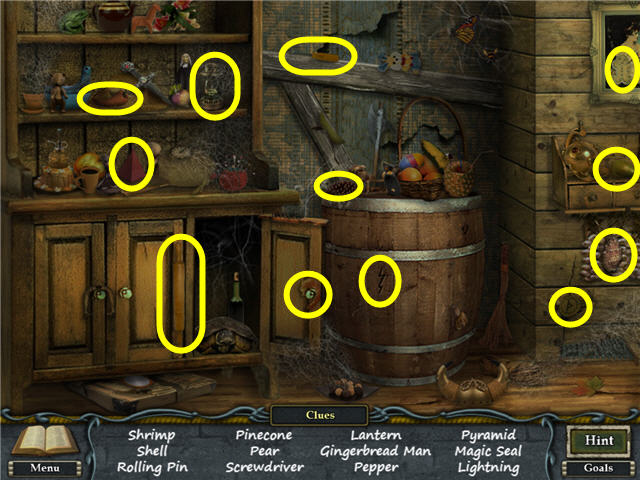
- Find the items on the list.
- A MAGIC SEAL will be added to your inventory.
- Head down the hatch and then click on the sparkling area.
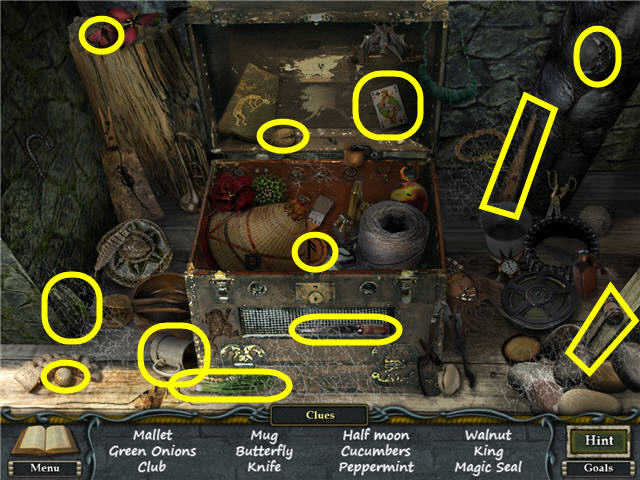
- Find the items on the list.
- A MAGIC SEAL will be added to your inventory.
- Head upstairs to the attic and then click on the sparkling area.
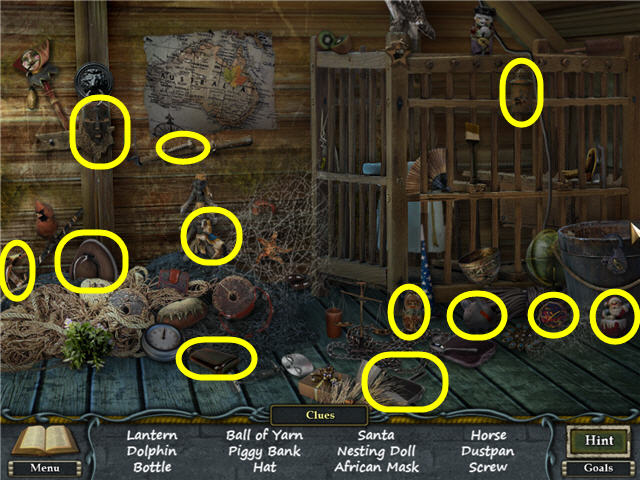
- Find the items on the list.
- A BALL OF YARN will be added to your inventory.
- Go downstairs and then through the door with the dart board.
- Give the BALL OF YARN to the cat and take the MAGIC SEAL.
- Go through the portal in front of the house and then head to the garden with the wolf.
- Use the PRUNING SHEARS on the flowers to the right of the well and then take the MAGIC SEAL.
- Go down into the well and then place the MAGIC SEALS on the wall.
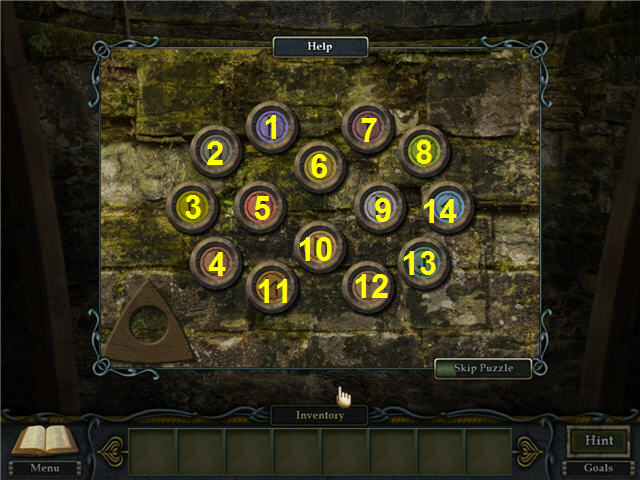
- You need to correctly repeat the pattern that the pointer makes five times.
- The solution for this puzzle may be randomized.
- You need to click the pointer when ready and then memorize the pattern.
- On your turn you do not need to use the pointer, just click on the correct magic seals.
- Using the numbering on the screenshot (A), the solution to the five patterns was as follows:
- The solution to the first pattern was 5, 13, 1.
- The solution to the second pattern was 14, 9, 12, 1.
- The solution to the third pattern was 7, 5, 13, 4, 10.
- The solution to the fourth pattern was 8, 1, 6, 7, 5, 11.
- The solution to the fifth pattern was 9, 13, 2, 12, 10, 1, 7.
- Congratulations! You’ve completed Mystic Diary: Haunted Island!
Created at: 2010-08-14

