Walkthrough Menu
- General Tips
- Chapter 1 - Jimmy
- Chapter 2 - The Pool
- Chapter 3 - The Lifeboat
- Chapter 4 - Thomas
- Chapter 5 - Way Out
- Chapter 6 - Dennise
- Chapter 7 - S.O.S.
General Tips
- This is an Interactive Hidden Object Game.
- Click on Options in the main screen to choose Fullscreen, sound options, Cursor and subtitles.
- Items that you can interact with or areas you can look at closer will sparkle.
- The exits in the scenes will have a running man icon.
- Random clicking in the hidden object scenes will result in loss of the cursor for a few seconds.
- Click on the diary in the upper right of the screen to access the map and see your achievements.
- Check on the map areas to see where you have outstanding tasks. They are marked with a red pushpin.
- There are 13 lost belongings you can locate throughout the game for an achievement award. These are marked in green on the screenshots.
- You can see the items needed for collection anytime by clicking on the diary and looking at the opened suitcase on the right.
- Click on the chapter name on the upper left at any time to find your objective.
- Click on the house icon in the upper right to return to the main menu.
- Inventory items are marked in red on the hidden object screenshots.
- There is an option to skip the puzzles.
Chapter 1 – Jimmy
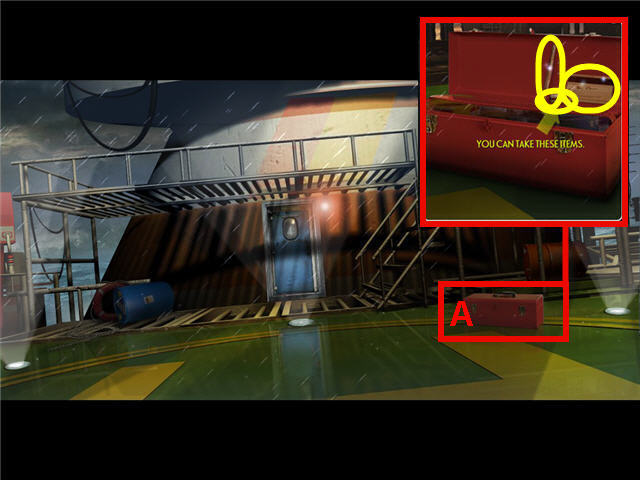
- Click on the red toolbox (A) on the right and click again to open it.
- Take the CONTROL LIGHT, CARD and TWEEZER from the toolbox.
- Click on the blue door and enter the next room.
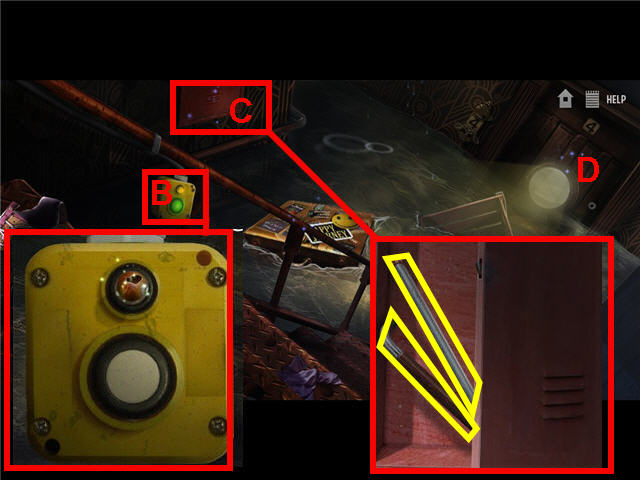
- Click on the yellow box (B) on the railing.
- Use the CONTROL LIGHT from inventory on the broken bulb.
- Push the green button to turn on the lights.
- Click on the locker (C) and use the CARD on the left edge to open it.
- Take the PIPE and DOOR HANDLE from inside the locker.
- Click on the suitcase in the water and note that you need a key to open it.
- Click on the submerged door (D) and use the DOOR HANDLE on it.
- Click on the door and pass through to the next room.
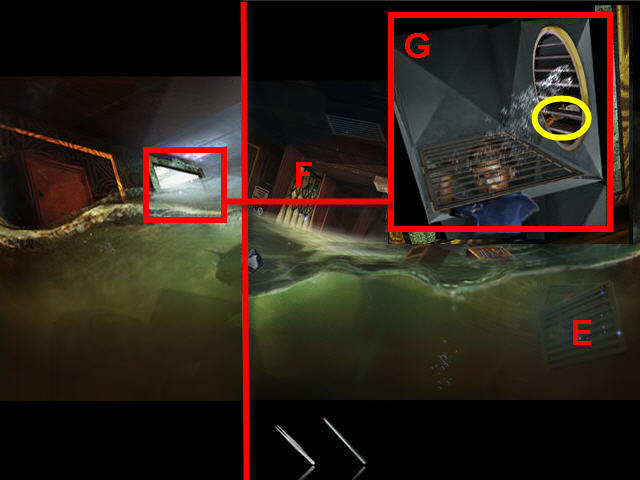
- Click on vent (E) to the right and note you need a tool to open.
- Click on the iron gate (F) in the far left of the room.
- Use the PIPE on the iron gate and enter through.
- Click on the open vent (G) on the left of the room.
- Use the TWEEZERS to get the SUITCASE KEYS from the grate.
- Exit the scene via the bottom of the screen two times.
- Use the SUITCASE KEYS on the suitcase floating in the water to trigger a hidden object scene.
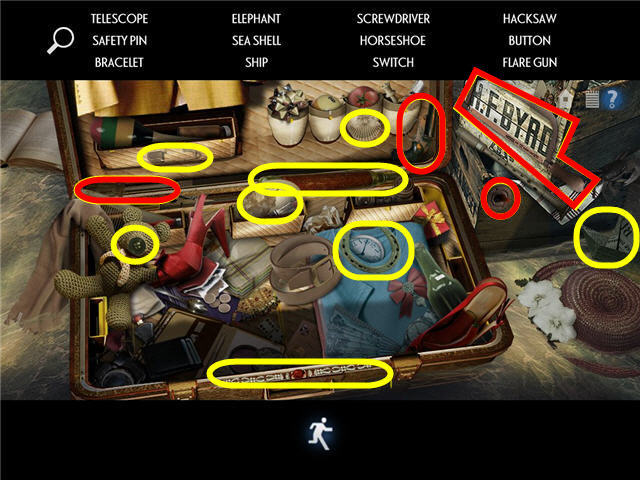
- Find all the items listed and get a SCREWDRIVER, HACKSAW, SWITCH and FLARE GUN.
- Head straight through the doorway one time.
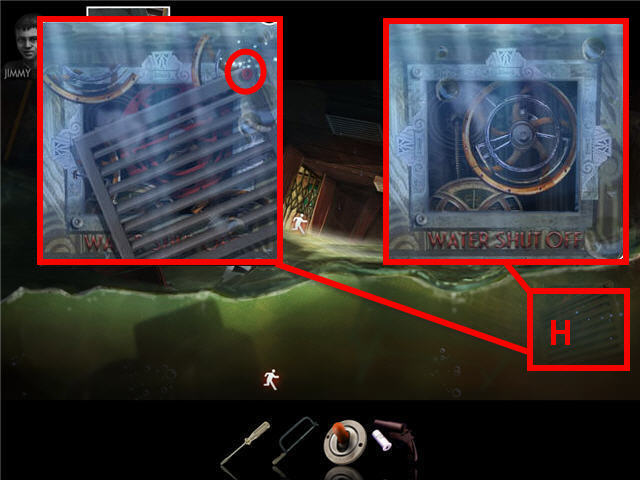
- Click on the grate (H) on the right.
- Use the SCREWDRIVER on the red screw on the upper right.
- Assemble the wheel and automatically turn the water off when complete.
- Head through the iron gates in the left rear.
- Click on the open vent on the left two times to find Jimmy.
Chapter 2 – The Pool
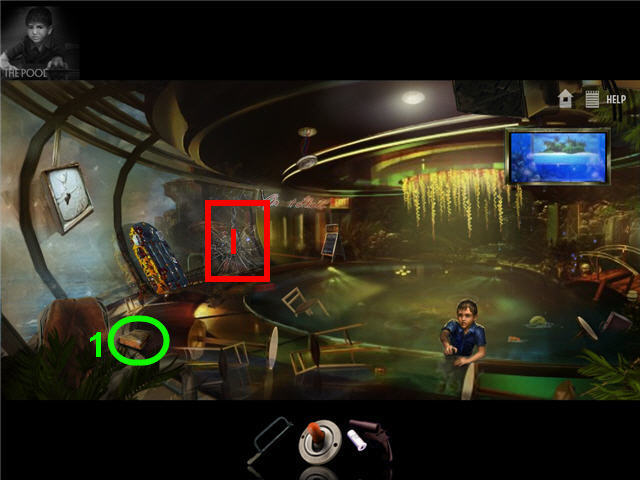
- Pick up the BOOK (1) to add to the lost belongings collection.
- Click on the broken glass window (I) on the left and note you need something to break the glass.
- Click on the arched bridge on the right to trigger a hidden object scene.
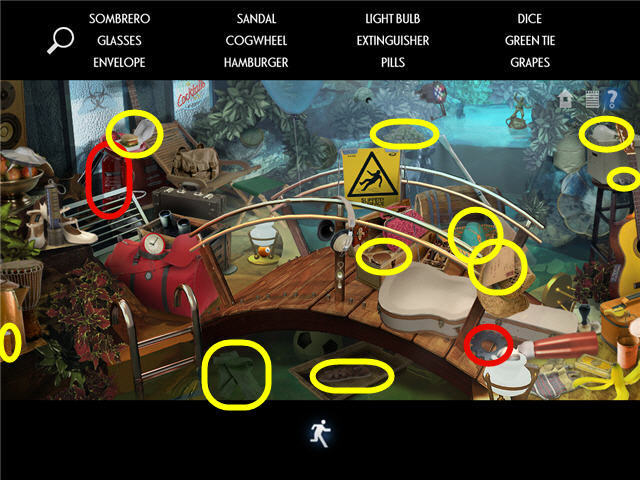
- Find all the items listed and get an EXTINGUISHER and a COG WHEEL.
- Head through the doorway to the right of the broken glass window.
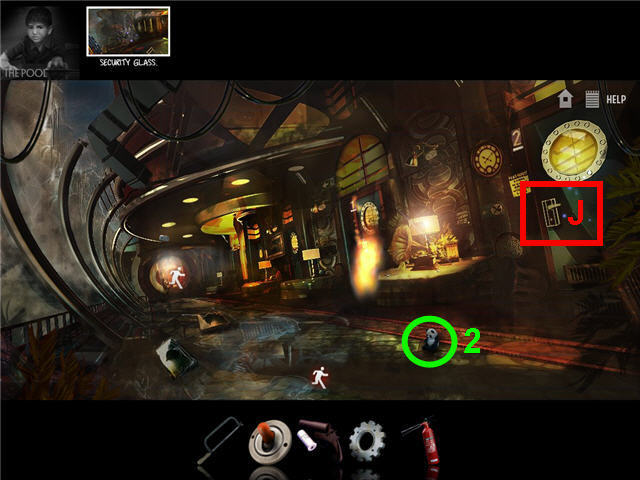
- Pick up the STUFFED PANDA (2) to add to your lost belongings collection.
- Click on the door lock (J) for cabin 2 on the right and note you need a key card.
- Use the EXTINGUISHER multiple times on the fire by the cabin 1 door till the fire is out.
- Click on the door to cabin 1 and then click on the transom window above and note that you need something to climb up.
- Head down the hall to the left.
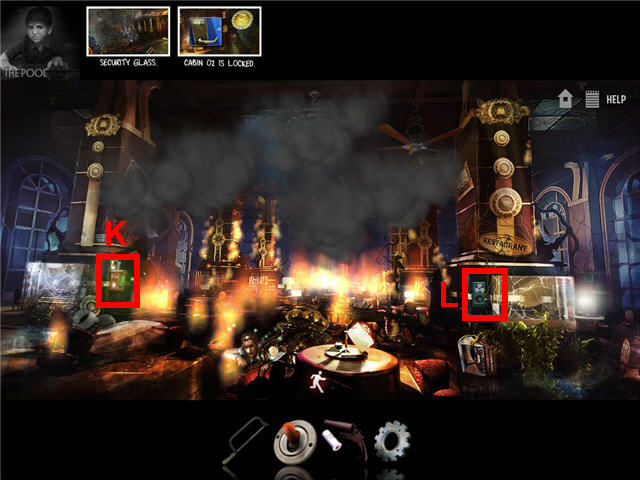
- Click on the steward trapped on the ground.
- Click on the fire box (K) on the left to turn on the sprinkler system and then click on the man again.
- Click on the fan (L) on the right and then speak to the man. Click on him repeatedly till the task appears on the top bar.
- Back out of the scene to the hall.
- Click to go forward and trigger a hidden object scene.
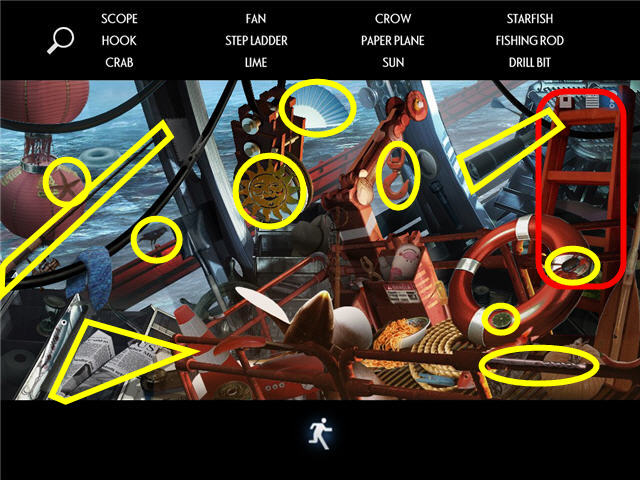
- Find all the items listed and get a STEP LADDER.
- Place the STEP LADDER in front of cabin 1 door and click on the transom window above.
- Use the HACKSAW multiple times to cut through all the trim.
- Enter through the opening above the door.
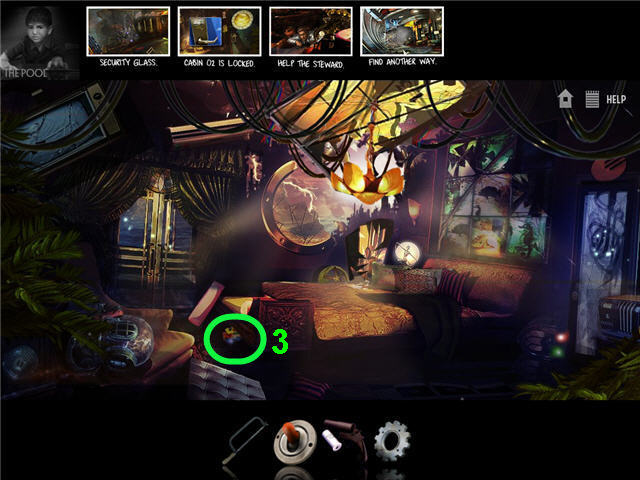
- Pick up the WOODEN TOY CAR (3) to add to your lost belonging collection.
- Click on the glass balcony doors and note they are locked.
- Click twice on the door to the right to enter the bathroom.
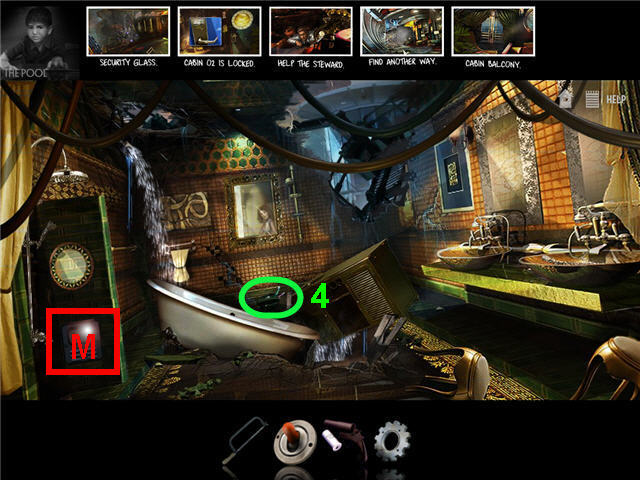
- Pick up the TOILETRY BAG (4) to add to your lost belonging collection.
- Click on the tub a few times till everything falls through the hole.
- Click on the hole to trigger a hotspot on the door.
- Click on the panel (M) on the door to the left.
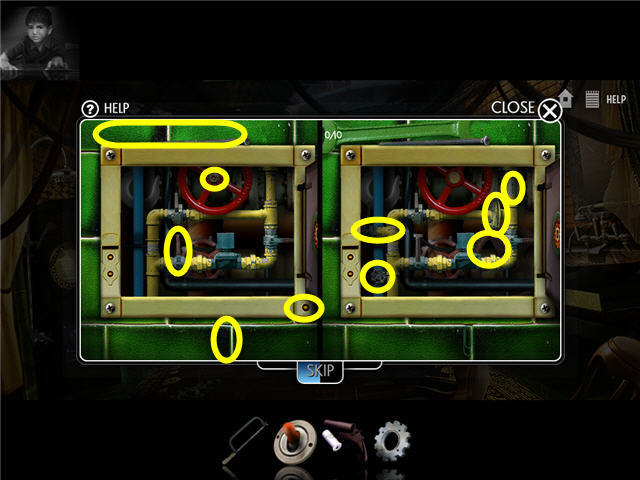
- Find ten differences between the two pictures.
- Click on the hole in the center of the room and note that the girders are sharp.
- Use the HACKSAW on the girders.
- Click on the hole to go down to the next floor.
- Click on the blue garbage can on the right by the desk to trigger a hidden object scene.
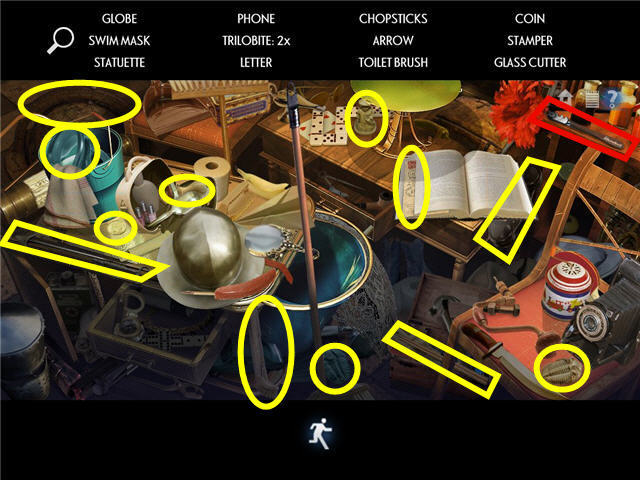
- Find all the items listed and get a GLASS CUTTER.
- Click on the glass door straight ahead and note it is locked.
- Click on the charger on the wall on the left.
- Head through the door on the right to the casino.
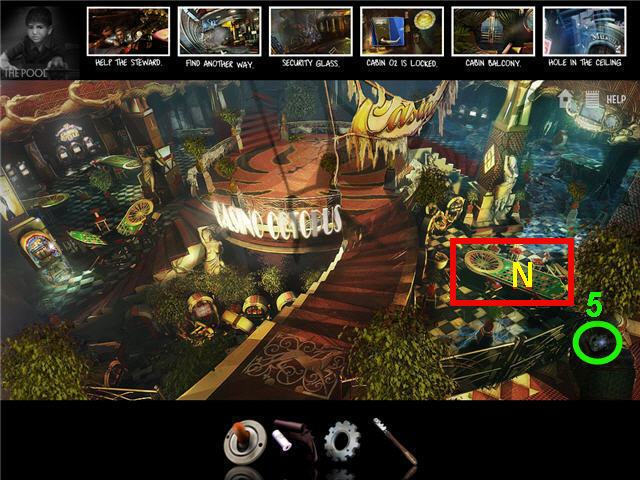
- Pick up the CAMERA (5) on the right to add to your lost belonging collection.
- Click on the slot machine on the left and note that you need 3 items to fix it, you only have 2 so far.
- Click on the roulette table (N) on the right to trigger a hidden object scene.
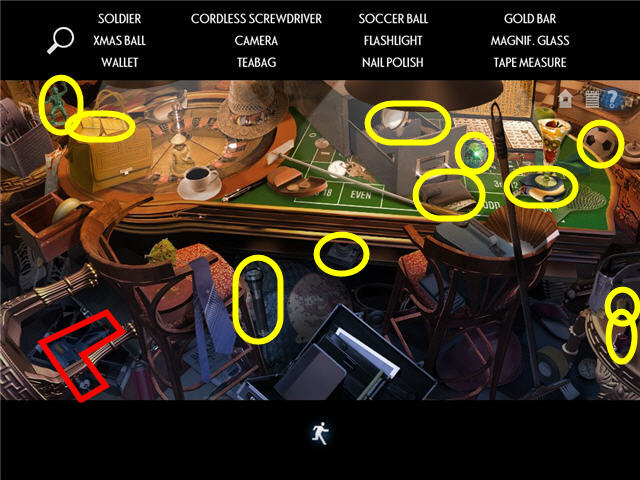
- Find all the items listed and get a CORDLESS SCREWDRIVER.
- Back out of the room one time.
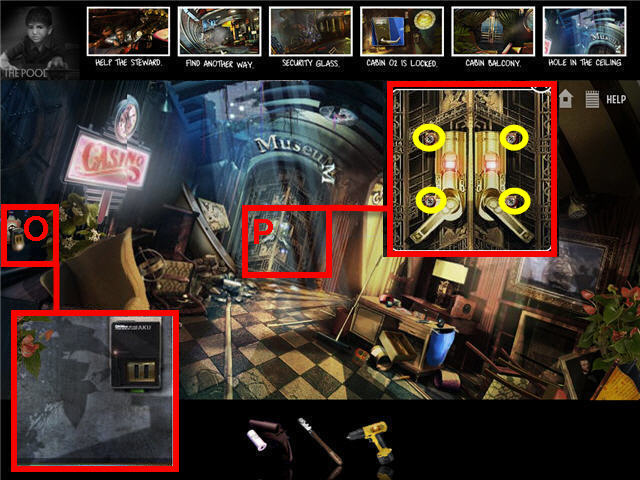
- Click on the charger (O) on the wall to the left.
- Place the CORDLESS SCREWDRIVER on the charger.
- Take the CHARGED SCREWDRIVER when the battery indicator on the screwdriver handle turns green.
- Click on the museum doors (P) to get a close-up.
- Use the CHARGED SCREWDRIVER on each of the 4 screws.
- Click on the opened doors to enter the museum.
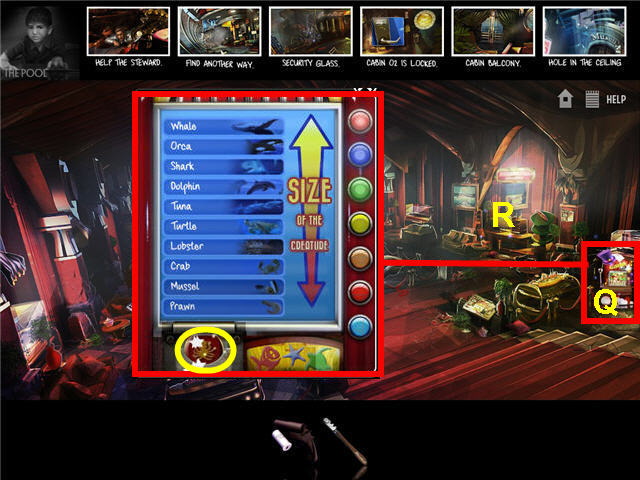
- Click on the gaming machine (Q) on the far right.
- The goal is to arrange the animals according to size.
- When you have them in the correct spot the edges will turn blue.
- The correct order is; Whale, Orca, Shark, Dolphin, Tuna, Turtle, Lobster, Crab, Mussel and Prawn. See screenshot for solution.
- Take the CHIP from the prize slot in the machine.
- Click on the desk area (R) on the right to trigger a hidden object scene.
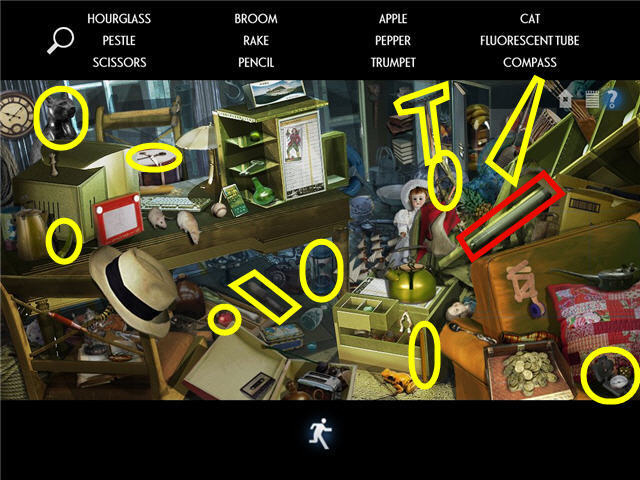
- Find all the items listed and get a FLUORESCENT TUBE.
- Exit the area one time and go right into the casino.
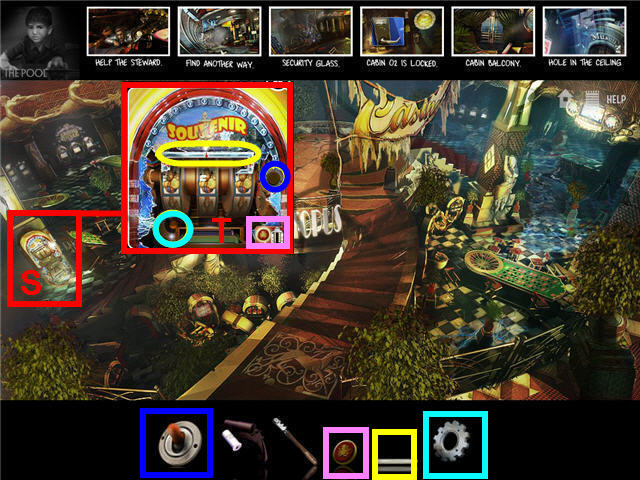
- Click on the slot machine (S) on the left.
- Place the COG WHEEL, SWITCH and FLUORESCENT TUBE on the slot machine in their proper location. See screenshot for locations.
- Place the CHIP in the coin slot and take the GOLDEN ANCHOR from the prize slot (T).
- Exit the casino and use the GOLDEN ANCHOR on the hole in the ceiling.
- Click on the rope hanging down and exit to the upper floor.
- Back out of the area 3 times till you reach the pool room with Jimmy.
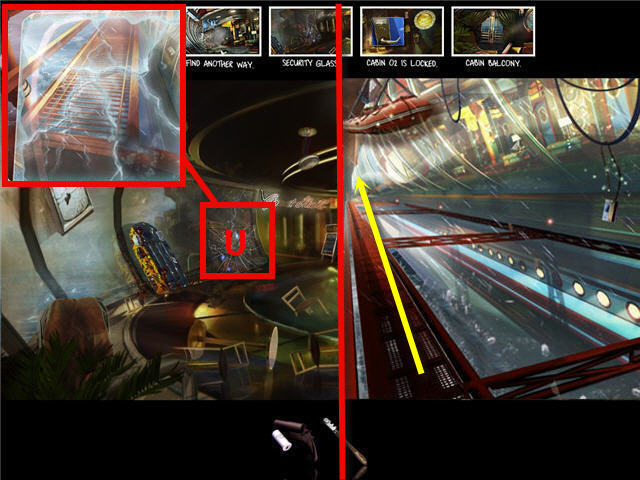
- Click on the broken glass window (U) on the left.
- Use the GLASS CUTTER on the broken glass till all the glass is gone.
- Exit through the broken window and note the lifeboat and keycard that you can’t reach yet.
- Click on the end of the walkway to walk out to the ladder.
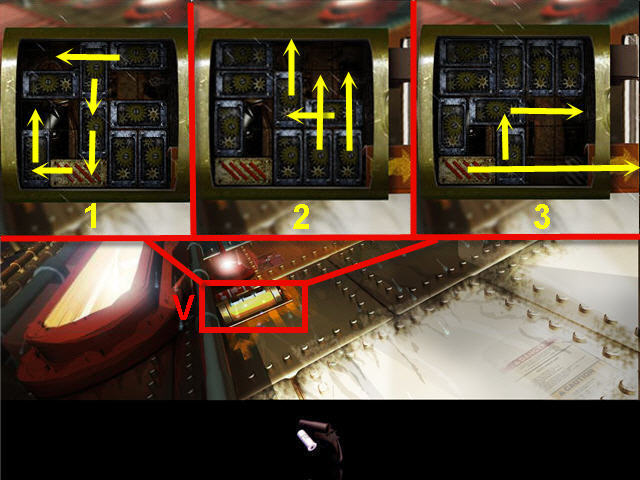
- Click on the controls (V) under the ladder.
- The object is to free the bottom bar so that you can slide it out by the arrow. See screenshot for solution.
- Click on the top of the ladder to get to the heliport.
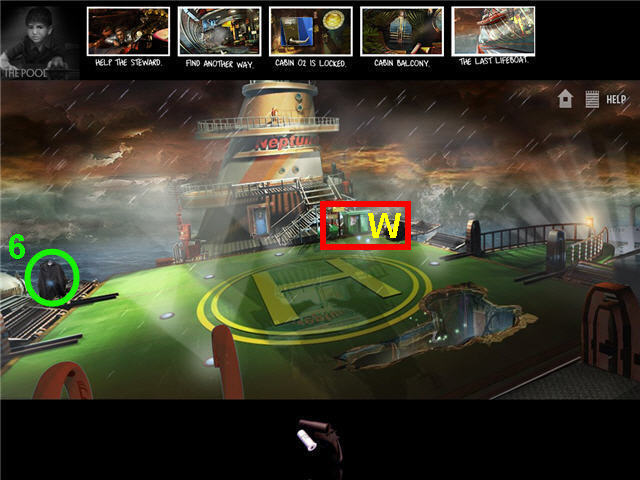
- Pick up the JACKET (6) on the railing to the left to add to your lost belonging collection.
- Click on the green storage unit (W) on the other side of the helipad to trigger a hidden object scene.
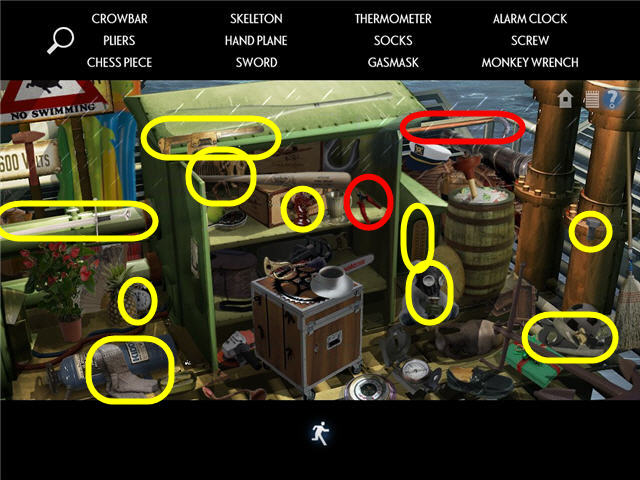
- Find all the items listed and get a CROWBAR and a WIRE CUTTING PLIER.
- Click on the right edge of the heliport by the flashing amber light to look at the crane, lifebuoy, lifeboat and caved in ceiling.
- Back out of the area 4 times to the pool and then go forward to the hallway.
- Enter Cabin 1 via the ladder.
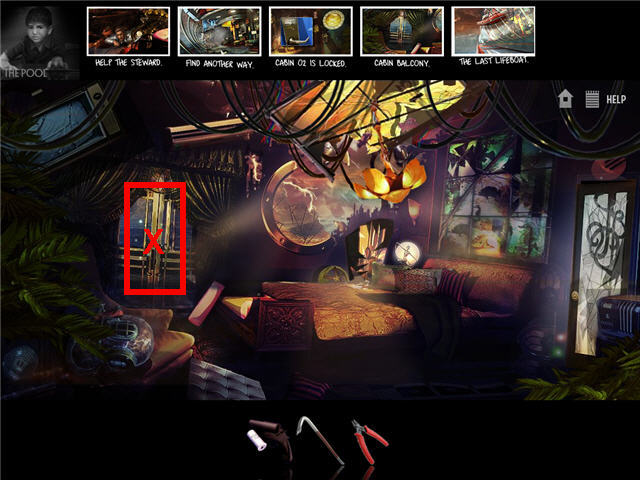
- Use the CROWBAR on the cabin balcony door (X).
- Click on the opened balcony door to trigger a hidden object scene.
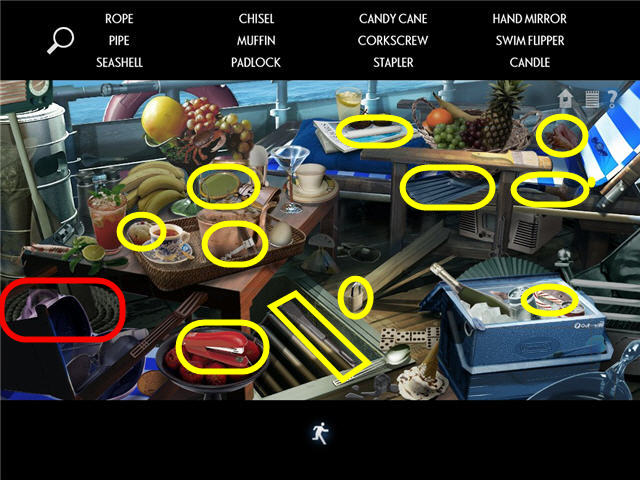
- Find all the items listed and get a ROPE.
- Head back up to the heliport.
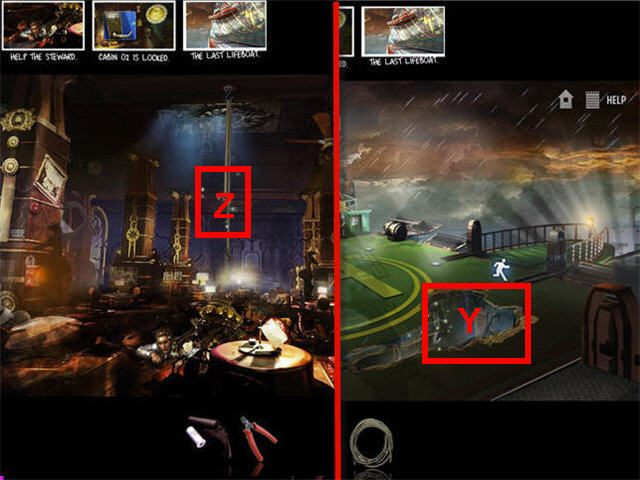
- Use the ROPE on the hole (Y).
- Click on the hole to climb down.
- Click on the hanging ROPE (Z) to free the steward.
- Automatically exit via the hole in the ceiling and back out of the areas till you reach the pool.
- Click on Jimmy on the pool to pull him out.
- Accept the phone call, watch the cutscene and accept the phone call again.
Chapter 3 – The Lifeboat
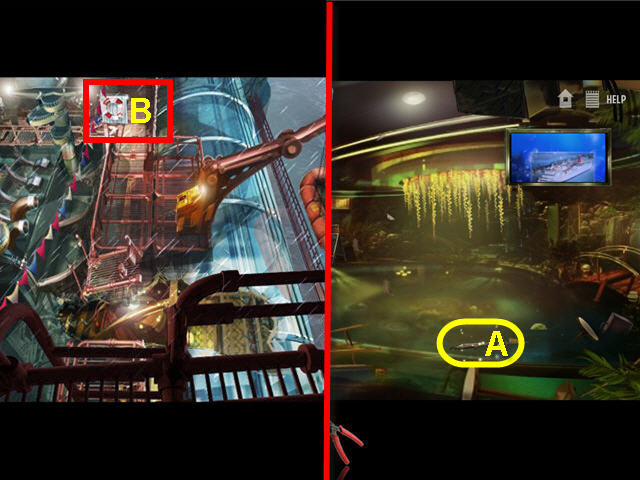
- Take the HARPOON (A) from the pool.
- Exit via the broken glass window to the walkway and head up to the heliport.
- Head to the right edge of the heliport.
- Use the HARPOON on the lifebuoy (B).
- Click on the lifebuoy to slide down.
- Click on the lifeboat to trigger a hidden object scene.
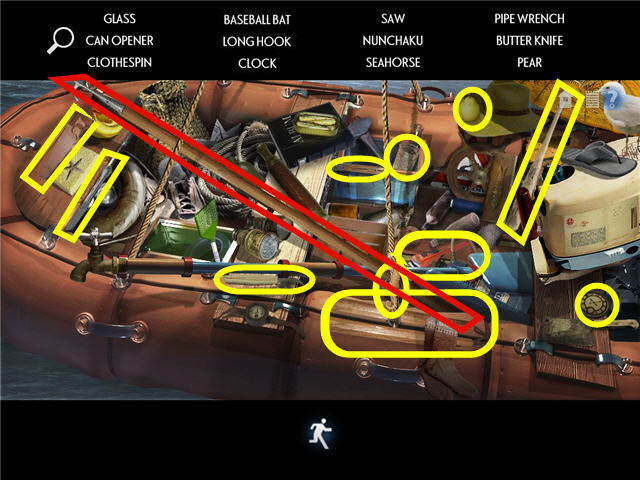
- Find all the items listed and get a LONG HOOK.
- Click on the crane panel and note that the lever is missing.
- Click on the control box and see that it is locked.
- Back out of the screen 4 times to get back to the walkway on the side of the ship.
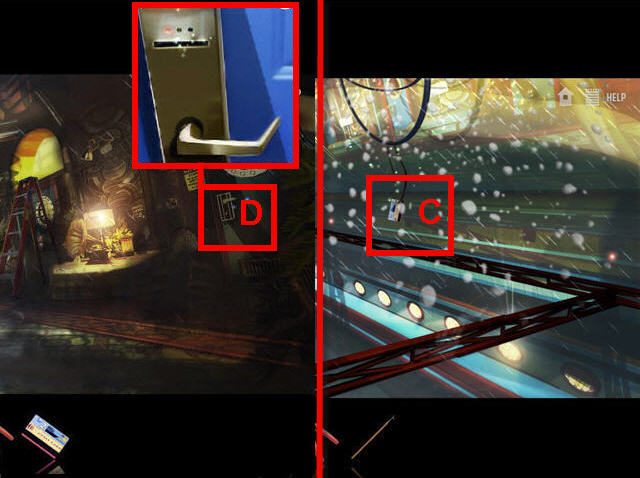
- Use the LONG HOOK on the KEY CARD (C) to get the KEY CARD.
- Head back inside to the pool area and go forward one time to the hall.
- Click on the lock (D) for the cabin 2.
- Use the KEY CARD on the slot to open the door.
- Enter Cabin 2.
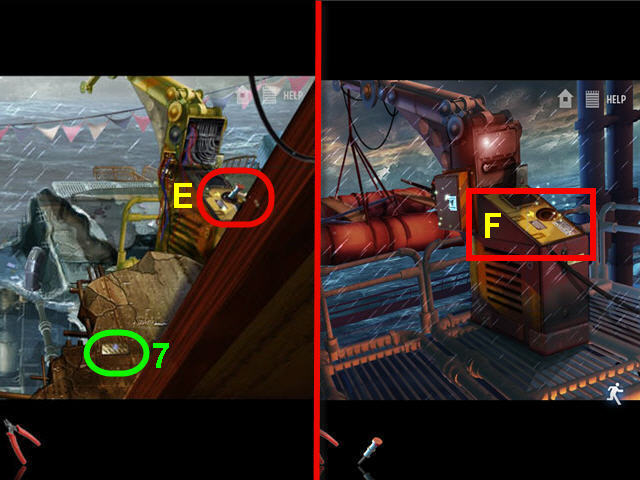
- Pick up the FOIL WRAPPED CAPSULES (7) and the CONTROL LEVER (E).
- Head back to the heliport and go to the right edge.
- Click on the lifebuoy to get to the lifeboat.
- Place the CONTROL LEVER on the crane panel (F).
- Click on the CONTROL LEVER to lower the lifeboat.
- Back out of the area 4 times to get back to the walkway.
- Click on the lifeboat and watch the cutscene.
Chapter 4 – Thomas
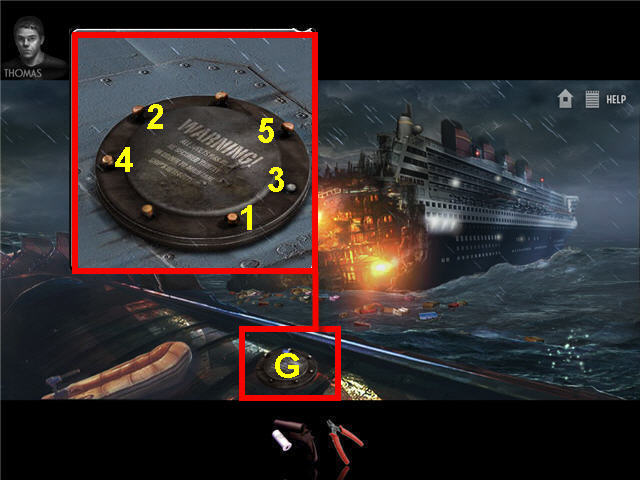
- Click on the lifebuoy floating in the water.
- Click on the hatch (G) to trigger a puzzle.
- The object is to click on the rivets to get them all in the up position at one time.
- Pushing one rivet will cause others to move as well. See screenshot for the correct order to push them.
- Head down the opened hatch.
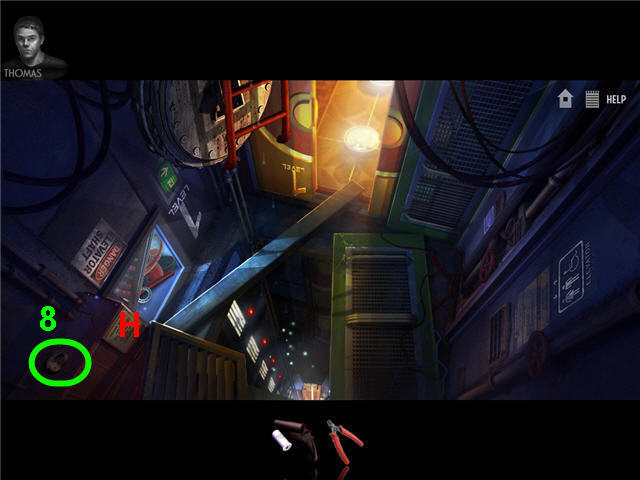
- Pick up the WATCH (8) to add to your lost belongings collection.
- Click on the lower level and note you need to find a way down.
- Click on the sign (H) on the left to trigger a hidden object scene.
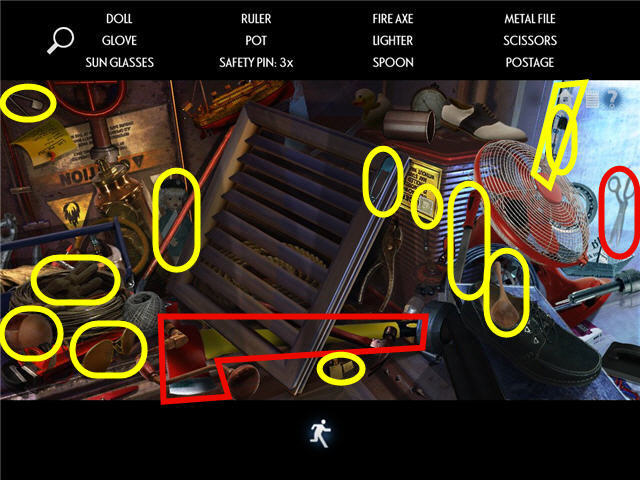
- Find all the items listed and get a FIRE AXE and SCISSORS.
- Head into the orange doorway to level 1 straight ahead.
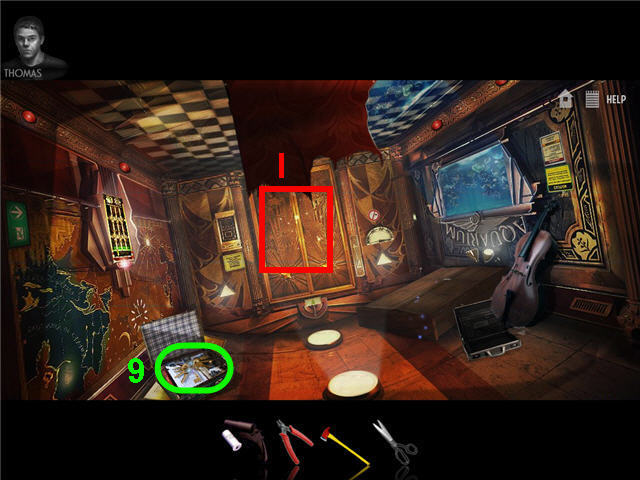
- Click on the suitcase to open it.
- Pick up the KEYS (9) from inside the opened suitcase to add to your lost belongings collection.
- Click on the fallen cabinet and note that it is locked and needs a key.
- Use the FIRE AXE on the door (I) 3 times or until opened.
- Enter the aquarium through the door (I).
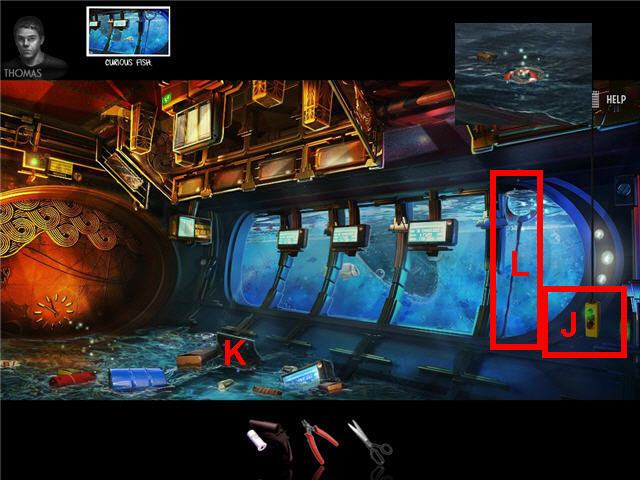
- Press the red button (J) on the right.
- Click on the drain (K) and note that the drain is not working.
- Click on the sparkling area to the left and note the water needs to be removed.
- Click on the rope (L) in the water on the right glass pane.
- Tap on the glass and note the fish are attracted to the tap.
- Make the fish go from the left of the tank to the right by tapping on the glass panes in front of it. Continue till he loosens the rope and it floats up.
- Back out of the area two times and then go up the ladder.
- Click on the lifebuoy in the water on the right to get a ROPE.
- Head down the hatch into the elevator shaft.
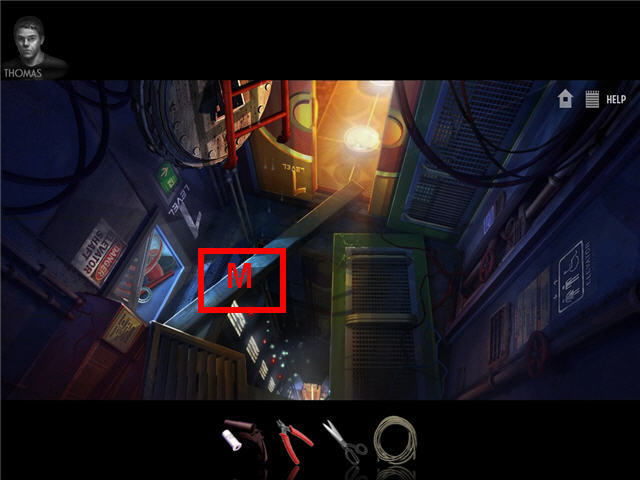
- Place the ROPE on the beam (M) leading to the doorway.
- Click on the shaft below to go down to level 2.
- Click on the lever on the right and note that it is too hot.
- Click on the level 2 door and note that it is stuck.
- Click down the shaft to go to level 3.
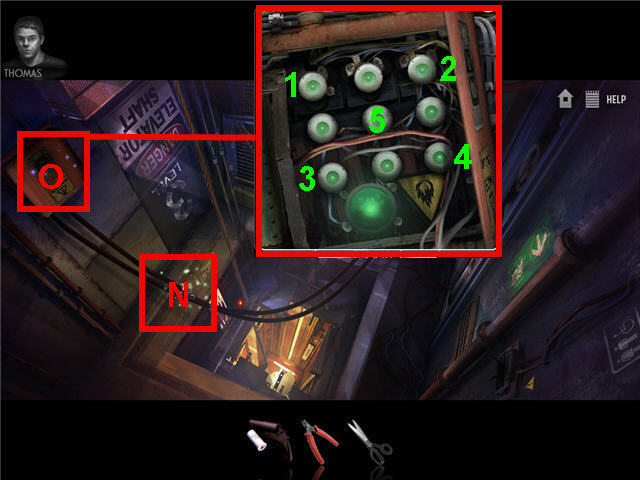
- Click on the sparking cable (N) and note you can’t go further till it’s moved.
- Click on the electrical box (O) on the left two times to open.
- The goal is to click on the lights to turn them all red.
- Clicking one light will turn others off or on.
- The solution is to click each of the 4 corners and then the middle one. See screenshot for solution.
- Use the WIRE CUTTING PLIERS on the cable (N).
- Head down to the next level.
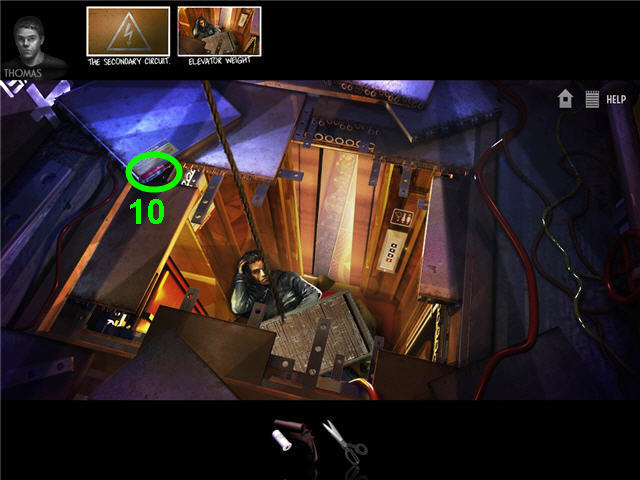
- Pick up the POCKET KNIFE (10) to add to your lost belonging collection.
- Click on the doorway by Tom to pass through.
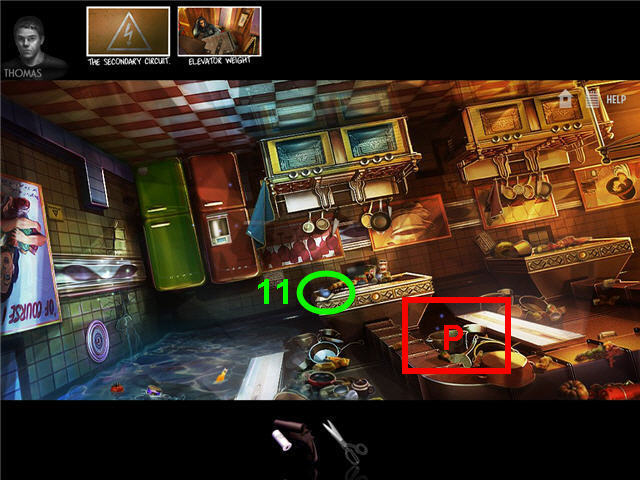
- Head left through the green door.
- Pick up the WALLET (11) to add to your lost belonging collection.
- Click on the wall to the left and note that it seems breakable.
- Click on the refrigerator and push the button on the ice maker.
- Click on the pots and pans (P) in the middle to trigger a hidden object scene.
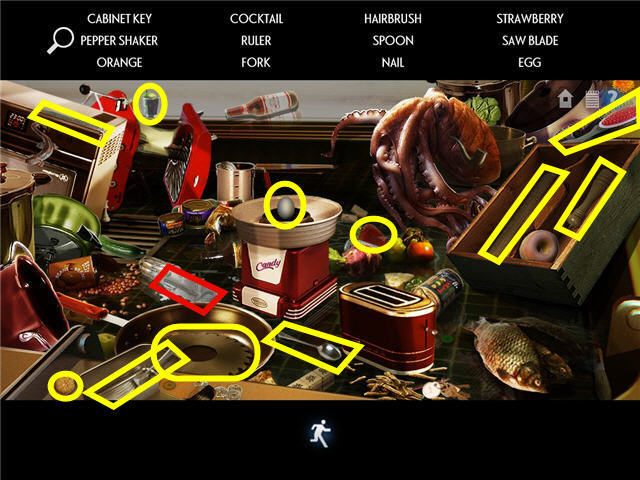
- Find all the items listed and get a CABINET KEY.
- Back out of the area two times.
- Head up the rope in the elevator 3 times and exit at the Level 1 door.
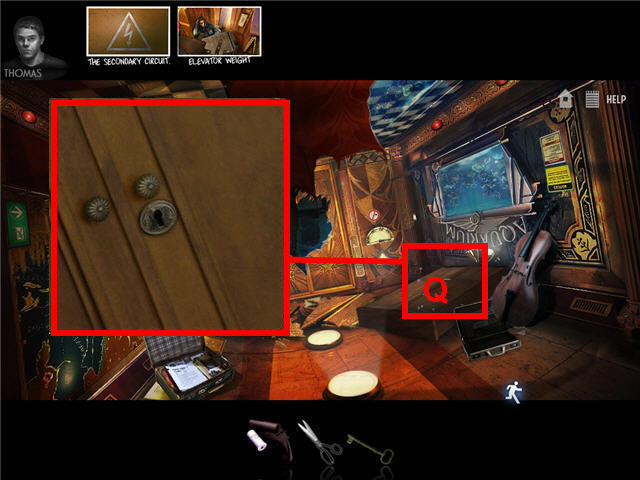
- Click on the fallen cabinet (Q) to get a close-up.
- Use the CABINET KEY on the lock, clicking on it one time to turn.
- Click on the opened cabinet to trigger a hidden object scene.
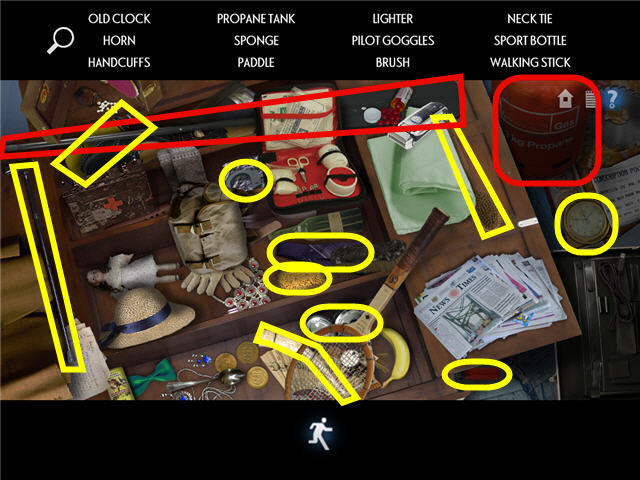
- Find the items listed and get a PROPANE TANK and a PADDLE.
- Back out of the area and head down the elevator shaft 3 times and exit Level 1.
- Head through the red door on the right.
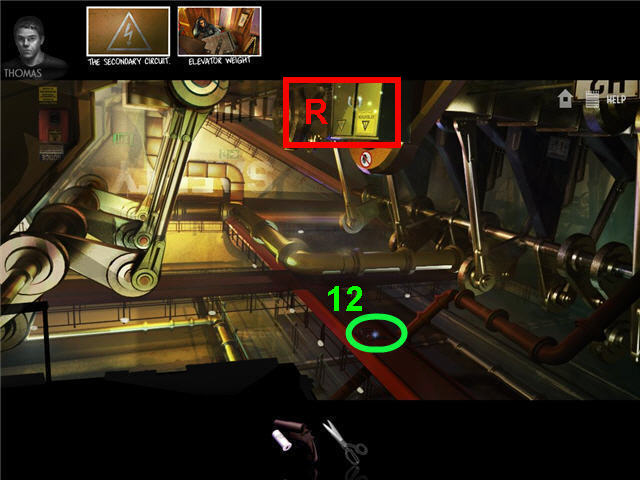
- Pick up the GLASSES (12) to add to your lost belonging collection.
- Click on the yellow generator box (R) on the right and note the cogwheels are missing.
- Back out of the room and head to the kitchen via the green door on the left.
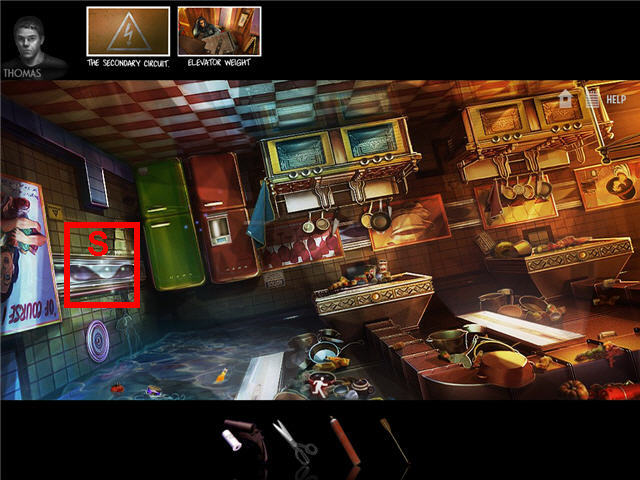
- Place the PROPANE TANK against the wall (S) on the left.
- Use the FLARE GUN on the PROPANE TANK.
- Enter through the new hole in the wall.
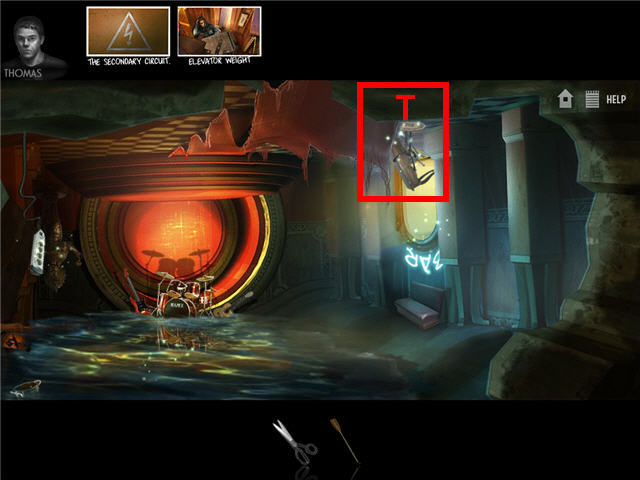
- Note the power strip hanging on the left and the shark in the water.
- Click on the entrance to the BAR on the right and note that you need something to reach it.
- Use the PADDLE on the furniture (T) above the entranceway.
- Exit the room via the bar entrance.
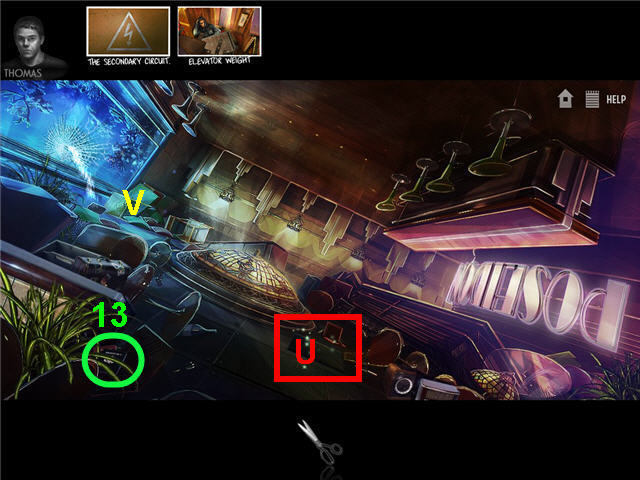
- Pick up the PASSPORT (13) to complete your lost belongings collection.
- Click on the panel (U) 3 times and note that you need a light bulb.
- Click on the debris (V) in the left corner of the room to trigger a hidden object scene.
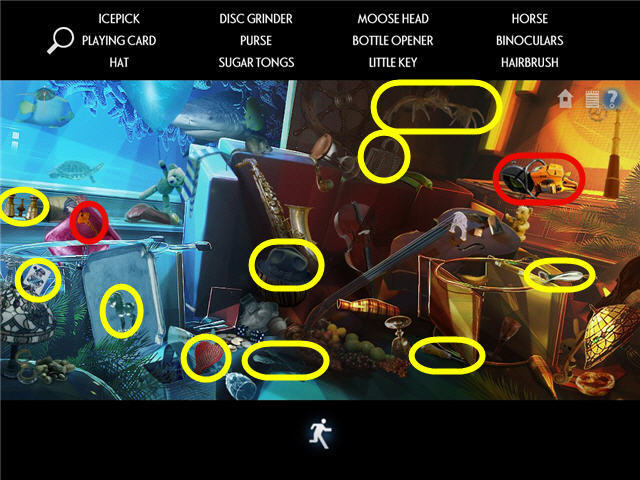
- Find all the items listed and get the DISC GRINDER and a LITTLE KEY.
- Back out of the area 4 times till you reach Thomas.
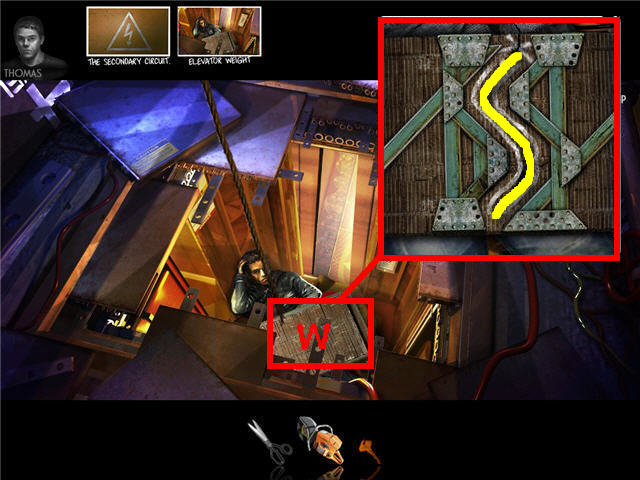
- Use the DISC GRINDER on the weight (W) on top of Thomas.
- The goal is to cut the weight from the top to bottom in between the white lines. See screenshot for solution.
- Speak to Thomas and he will give you a SERVICE KEY (wrench).
- Click on the area where Thomas is to trigger a hidden object scene.
Chapter 5 – Way Out
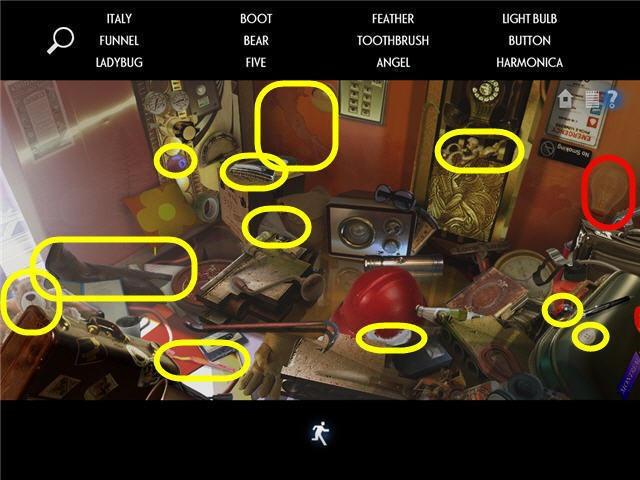
- Find all the items and get a LIGHT BULB.
- Head out of the shaft through the door next to Tom, go through the green door, through the wall and to the bar on the right.
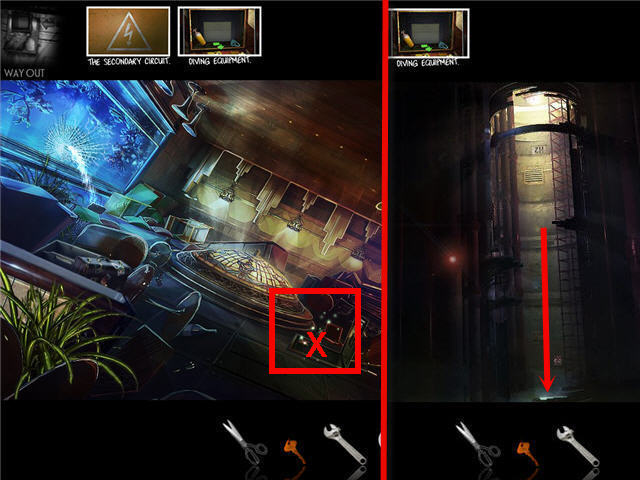
- Use the LIGHT BULB on the hatch (X).
- Head down the hatch two times to get to the stack room.
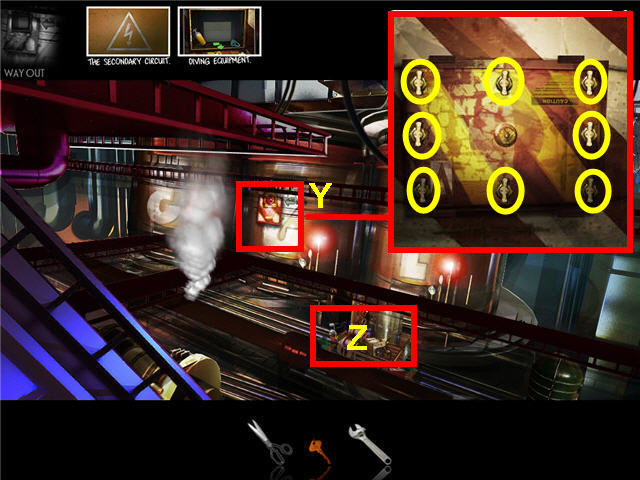
- Click on the red panel (Y) on the left wall to get a close-up.
- Use the SERVICE KEY (wrench) on the nuts to turn them all horizontal and open the panel.
- Click on the hole in the panel 2 times and note that you need the diving equipment.
- Click on the pile of debris (Z) in front of the right stack to trigger a hidden object scene.
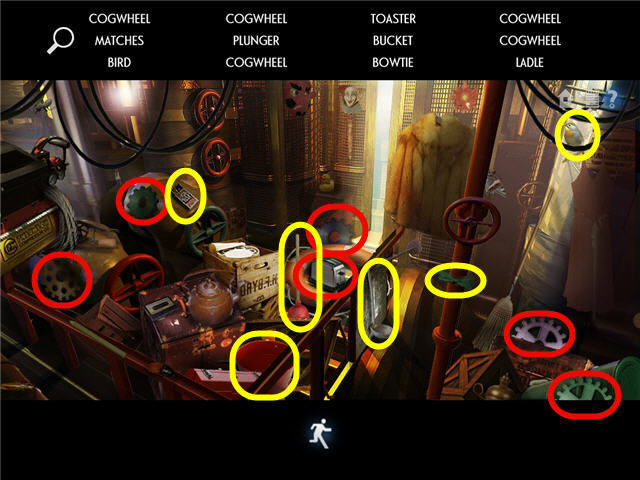
- Find the items listed and get 5 MISSING COG WHEELS and a TOASTER.
- Head back upstairs and exit out of the areas till you get to the corroder with the red and green door.
- Head into the red door on the right.
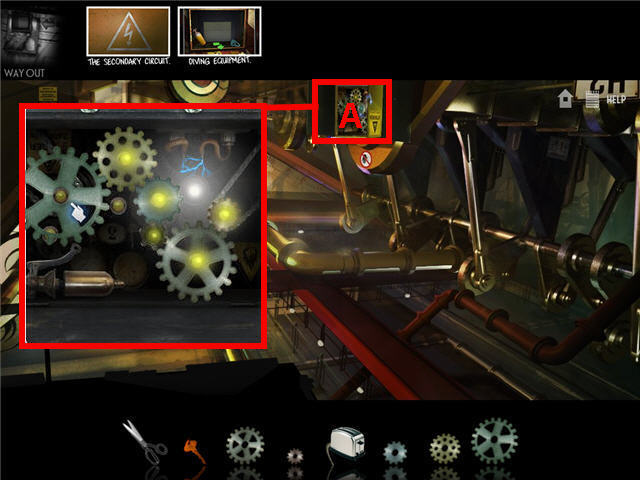
- Click on the generator panel (A) to the right.
- Place the 5 MISSING COG WHEELS on the pegs so that they are all turning. See screenshot for solution.
- Back out of the room and head into the green door on the left.
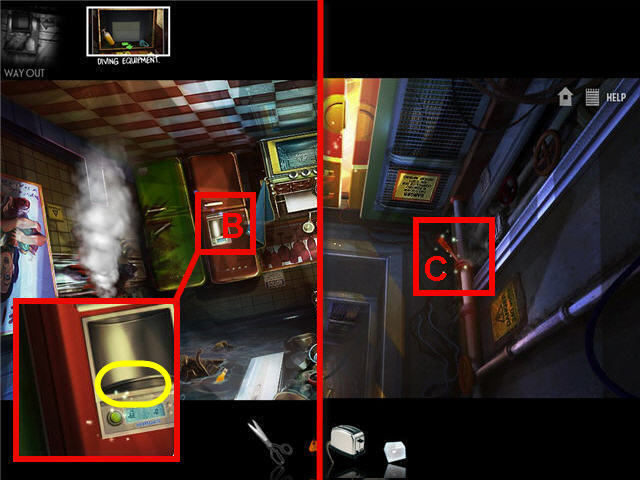
- Click on the refrigerator (B) to get a close-up.
- Press the green button on the ice maker and take the ICE CUBES.
- Back out of the area two times to get back to the elevator shaft.
- Using the rope, go up two times to Level 2.
- Use the ICE CUBES on the hot lever (C) on the right.
- Click on the cooled lever to open the door.
- Click on the opened Level 2 doorway to trigger a hidden object scene.
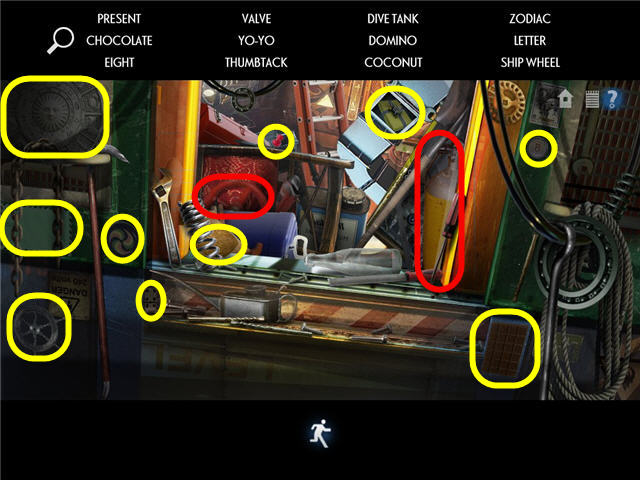
- Find all the items listed and get a VALVE and DIVE TANK.
- Head up the shaft and out through the level 1 door.
- Head straight to the aquarium.
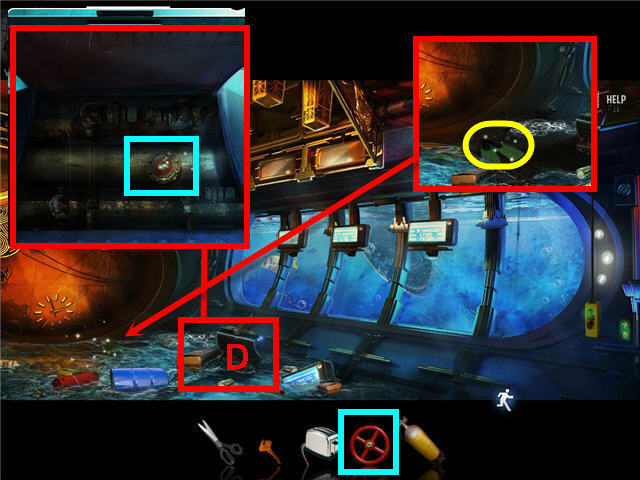
- Click on the panel (D) to get a close-up.
- Place the VALVE on the pipe to automatically drain the area.
- Take the FLIPPERS from the drained area.
- Exit the area two times to the elevator shaft and head down to the bottom Level.
- Enter the green door on the left and go through the hole in the wall. .
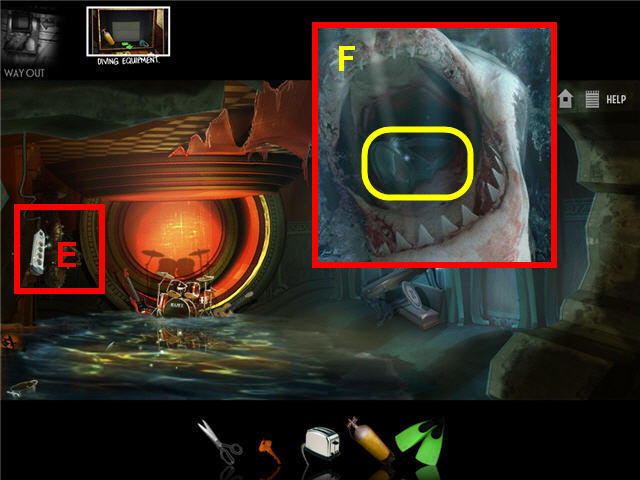
- Plug the TOASTER into the power strip (E).
- Click on the shark (F) and take the SWIM MASK.
- Head through the bar entrance and head down the hatch two times.
- Accept the phone call from Dennise.
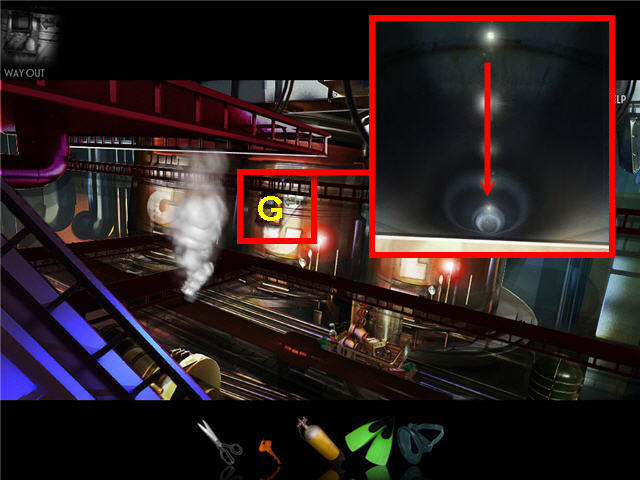
- Click on the hatch (G) on stack 2 to get a close-up.
- Click on the hole and watch the cutscene.
Chapter 6 – Dennise
- Swim straight and then go into the crack on the side of the ship on the lower part of the screen.
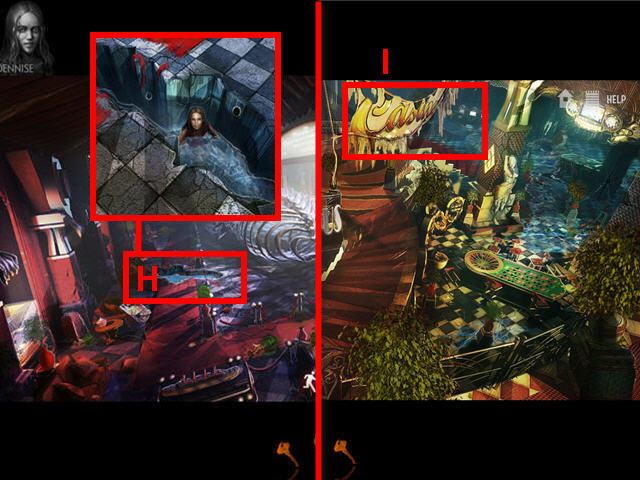
- Head into the museum and click on the water hole (H) to see Dennise.
- Back out of the area and go right into the casino.
- Use the SCISSORS on the banner (I) to get the BANNER.
- Head back into the museum and click on the water hole.
- Use the BANNER on Dennise.
Chapter 7 – S.O.S.
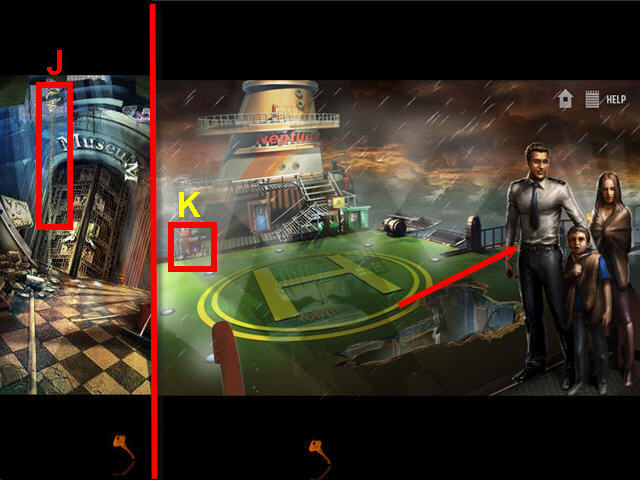
- Back out of the museum and go up the rope (J).
- Back out of the area three times to the pool area.
- Head out the broken glass window, along the walkway and up the ladder to the heliport.
- Click on the emergency call box (K) and note that it is not working.
- Exit to the right edge of the heliport.
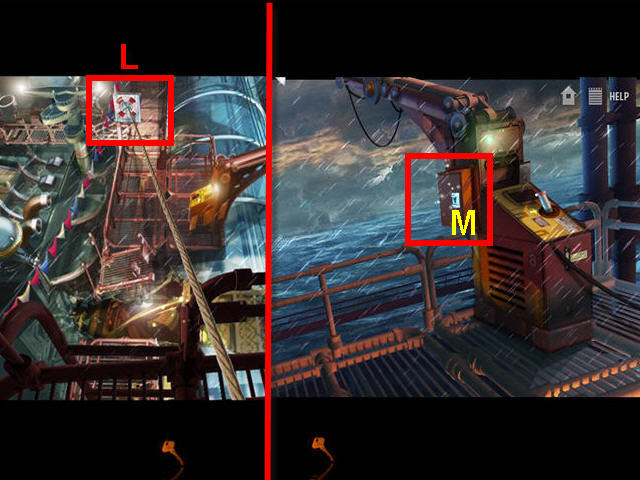
- Click on the lifebuoy (L) to get down to the lifeboat crane.
- Use the LITTLE KEY on the locked box (M) next to the controls.
- Take the WEATHER BALLOON from inside the opened box.
- Back out of the area two times to the helipad and click on the emergency call box.
- Use the WEATHER BALLOON on the call box.
- Accept the phone call and watch the cutscene.
- Congratulations! You have successfully completed Nightmare on the Pacific.
Created at: 2011-01-15

