Walkthrough Menu
- General Tips
- Chapter 1: Path to Town
- Chapter 2: Town Arrival
- Chapter 3: The Center of Town
- Chapter 4: The Blacksmith's House
- Chapter 5: Entering the Mine
- Chapter 6: Repairing the Train
- Chapter 7: The Barbershop
- Chapter 8: Rescue Suzy
General Tips
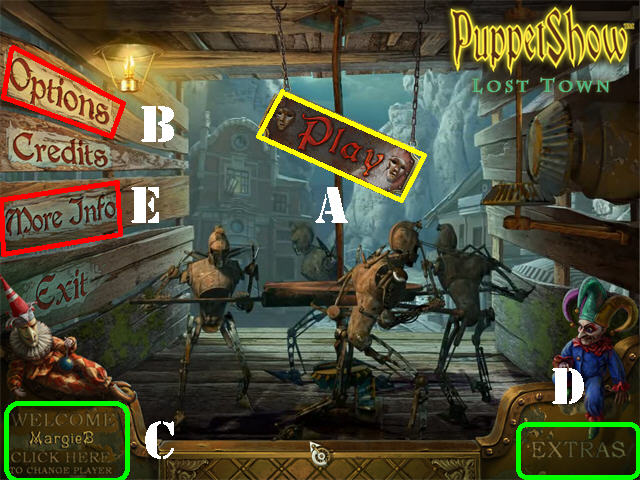
- This is the Official Walkthrough for PuppetShow: Lost Town!
- Click Play (A) to access the main chapters in the game.
- The Options (B) button allows you to adjust the screen, music, cursor, and sound.
- The 'Click here to change player' (C) can be used to manage your profiles in the game.
- The EXTRAS (D) button is only accessible once you buy the collector's edition for this game.
- Click on the 'More info' (E) button to access other titles from this developer and the Big Fish Games forums.
- Several sparkles in a cluster indicate a Hidden Object Scene. These scenes contain inventory items needed to complete your journey.
- Certain Hidden Object Scenes will require you to click on a part of the scene to uncover a hidden area. Items written in pink will be hidden from view.
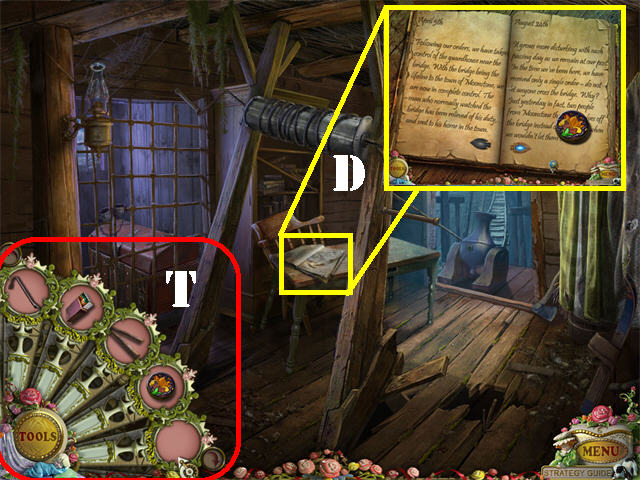
- When the cursor turns into a magnifying glass you can zoom into an area in the scene.
- When your cursor changes into a hand icon you can pick up inventory items or interact with objects.
- You can only use the hints for the Hidden Object Scenes. The Hint button will not appear in other scenes; it will be replaced by the Tools or Skip button.
- The diary (D) will appear in different areas during the game. Open the diary when available and read it to gain valuable insight.
- The Diary pages may also contain inventory items.
- You can skip a mini-game once the Skip button is full.
- Inventory items will go into the Tools tab (T) in the lower left corner. If it’s full, use the arrows on each end of the Tools section to scroll through your items.
- To use an item click on the Tools button to open it and select an inventory item. Drag the selected item to the appropriate area and click on it.
Chapter 1: Path to Town
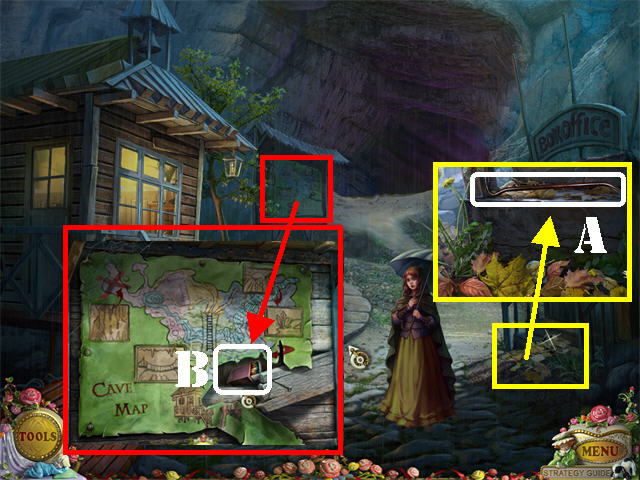
- Click on the lady.
- Examine the bottom of the box office; take the CROWBAR (A).
- Zoom into the bulletin board; click on the paper to tear part of it off.
- Place the CROWBAR on the board to remove the nails; take the MATCHES (B).
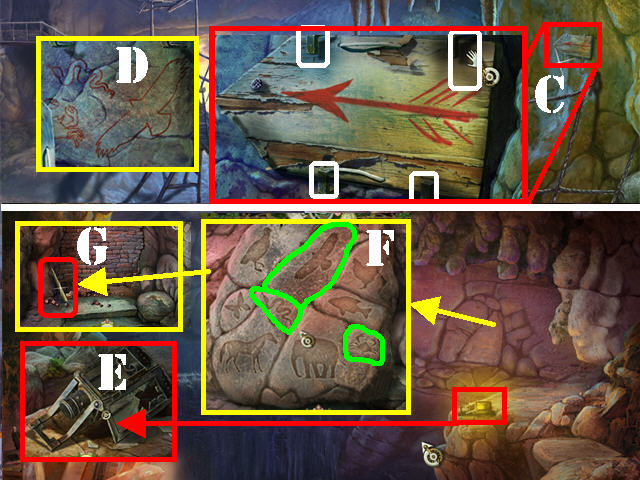
- Proceed forward.
- Zoom into the sign on the right (C); click on each of the 4 fastenings marked in white to remove them.
- Note the cave painting with the CRAB, BIRD, and SNAKE (D).
- Cross the bridge.
- Examine the lantern in the lower right; open the cover.
- Use the MATCHES to light the LANTERN (E) thus illuminating the cave.
- Zoom into the right side of the cave.
- Click on the CRAB, BIRD, and the SNAKE stones marked in green to reveal a wall (F).
- Take the PICKAXE HANDLE (G) on the ground.
- Click down twice.
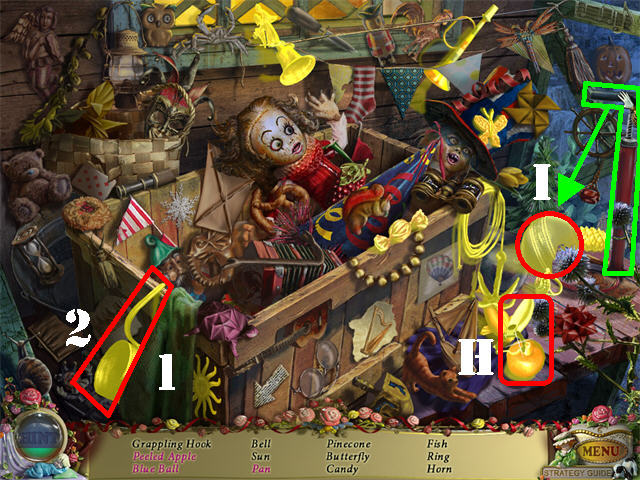
- Play the Hidden Object Scene on left.
- Click on the green towel (1); take the PAN (2).
- Click on the APPLE WITH PEELER; take the PEELED APPLE (H).
- Click on the pump marked in green; take the BLUE BALL (I).
- The GRAPPLING HOOK will be added to inventory.
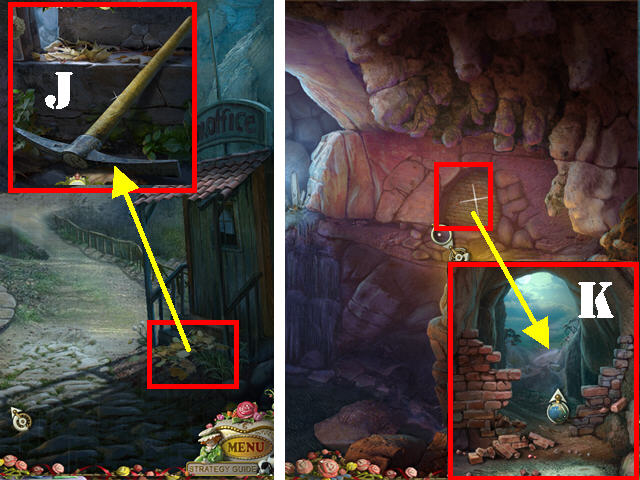
- Zoom into the bottom of the box office.
- Click on the leaves 3 times to remove them.
- Place the PICKAXE HANDLE on the PICKAXE HEAD; take the PICKAXE (J).
- Return to the cave.
- Zoom into the brick wall on the right; break the wall with the PICKAXE 3 times (K).
- Go through the hole.
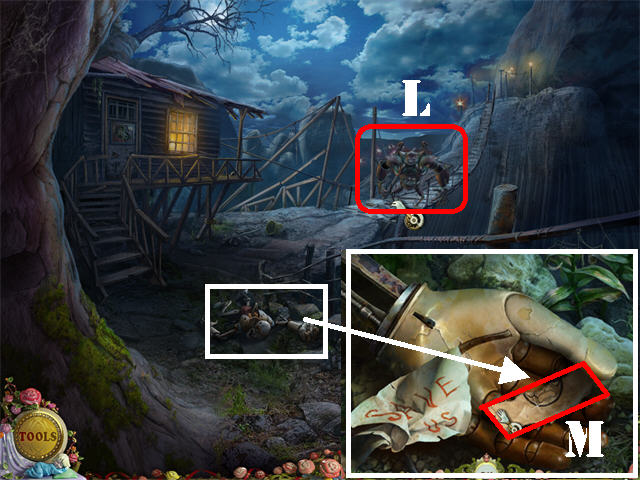
- Click on the monster on the bridge (L).
- Examine the puppet on the ground; click on the hand twice and take the PIECE OF PAPER (M).
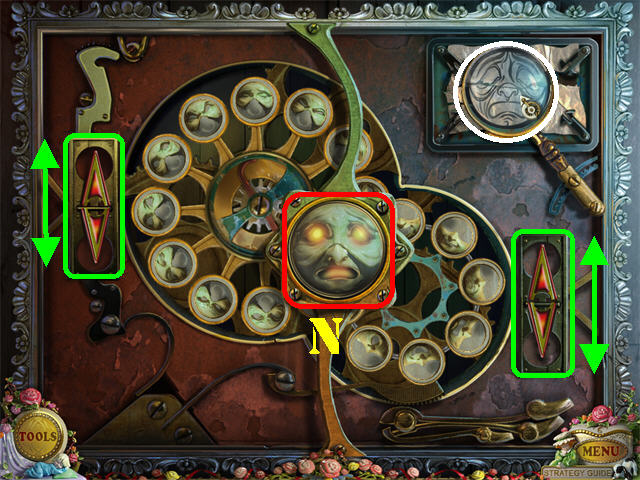
- Zoom into the door.
- Place the PIECE OF PAPER in the upper right corner to activate the puzzle.
- Use the arrows on the left and right to change the facial expressions to match the one on the paper.
- Please look at the screenshot for the solution (N).
- Enter the Jail Cell.
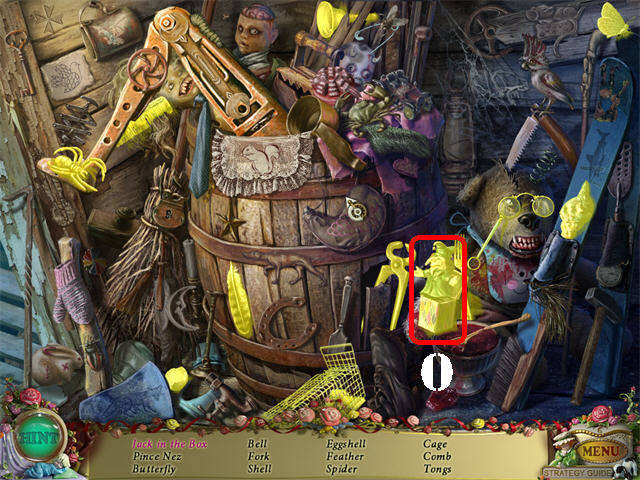
- Click on the curtain to activate a Hidden Object Scene.
- Click on the box in the lower right; take the JACK IN THE BOX (O).
- The CAGE will be added to inventory.
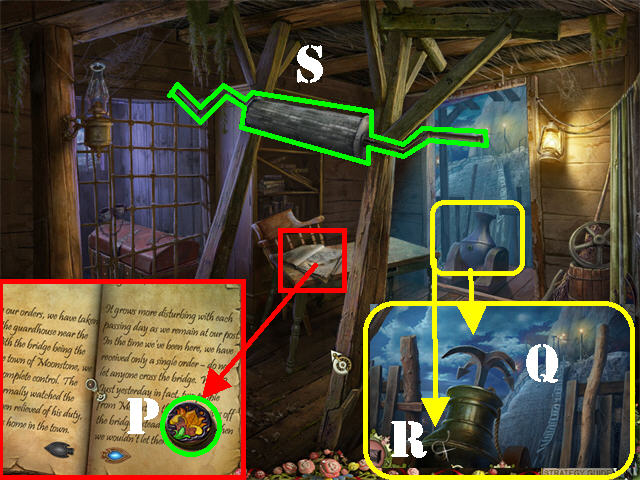
- Zoom into the diary on the table; take FLOWER DISC 1/3 (P) on the right page.
- Use the arrows to flip through the pages of the diary.
- Examine the cannon; place the GRAPPLING HOOK on the cannon (Q).
- Place the MATCHES on the cannon’s fuse (R).
- Click on the winch to raise the bridge (S).
- Go outside and head towards the bridge.
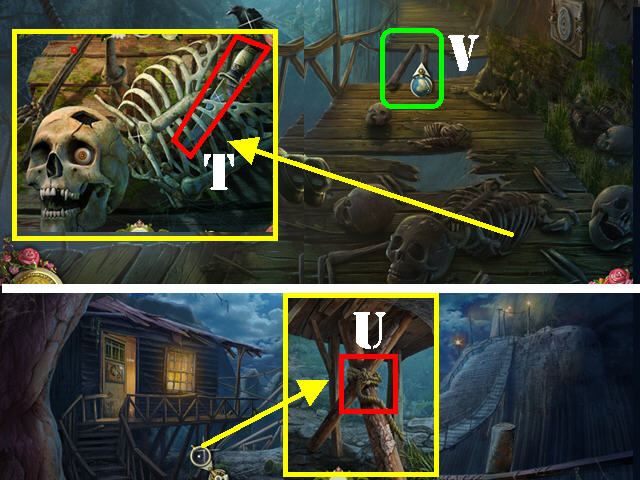
- Zoom into the skeleton on the ground; take the KNIFE (T).
- Click down once.
- Zoom into the bottom of the house.
- Cut the ROPE with the KNIFE 3 times; take the WOODEN BEAMS on the ground (U).
- Cross the bridge.
- Place the WOODEN BEAMS on the gap on the walkway (V).
Chapter 2: Town Arrival
- Cross the bridge and head forward.
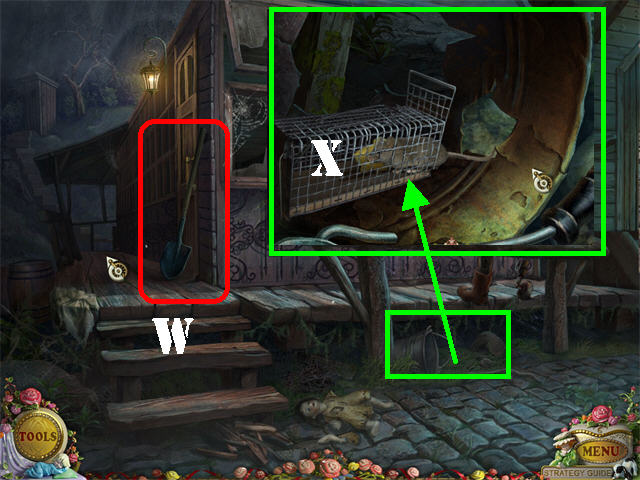
- Zoom into the house on the left; take the SHOVEL (W).
- Examine the bottom of the house.
- Place the CAGE below the house; the MOUSE (X) will be added to inventory.
- Click down twice and head right towards the cemetery.
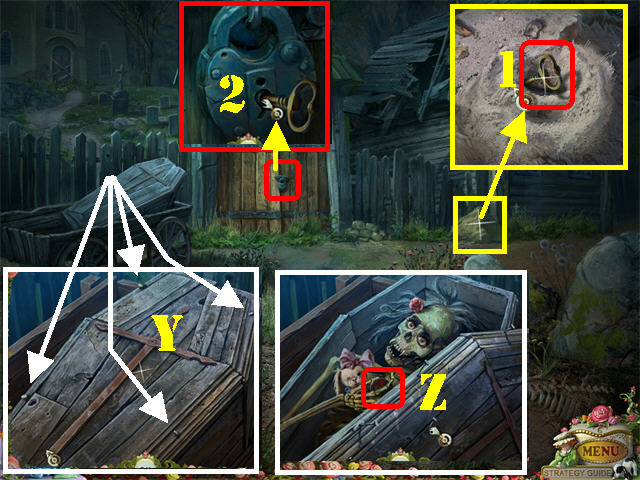
- Examine the coffin on the left; remove the 4 nails with the CROWBAR (Y) to open the casket.
- Take FLOWER DISC 2/3 (Z) from inside the casket.
- Examine the mound of sand by the house; place the SHOVEL in the sand twice.
- Take the CEMETERY KEY (1).
- Zoom into the fence; place the CEMETERY KEY (2) in the lock and turn the key once.
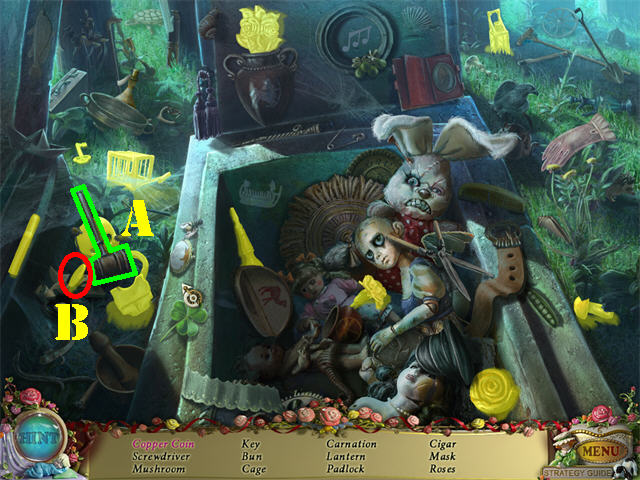
- Go through the gate to access the cemetery.
- Lift the cover off the grave on left to trigger a Hidden Object Scene.
- Click on the MALLET (A) on left; take the COPPER COIN (B) from the broken piggy bank.
- The COPPER COIN will be added to inventory.
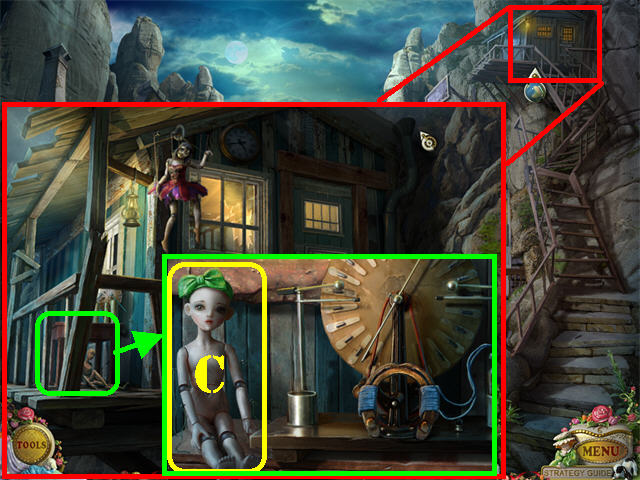
- Click down twice, head forward and go into the house in the upper right corner.
- Zoom into the small table on left; take the PUPPET (C).
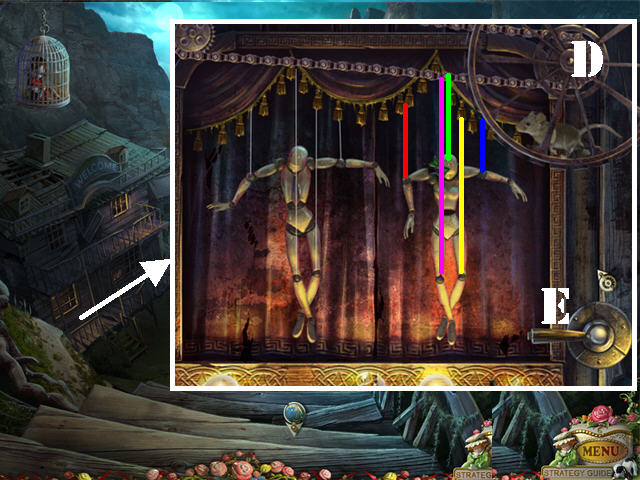
- Click down twice and zoom into the house in the lower left.
- Attach the PUPPET to the strings on the right.
- Place the MOUSE in the wheel in the upper right (D).
- Click on the lever (E) on the right to activate the puzzle. Watch the motion of the puppets.
- Click on any 2 strings of the right puppet to swap their positions.
- Arrange the strings correctly so that both puppets move in unison.
- After the strings have been rearranged, click on the lever (E) again to check your selections; watch the movements carefully and rearrange the strings as needed.
- The solution from left to right is: Red, Pink, Green, Yellow, and Blue.
- Enter the Saloon.
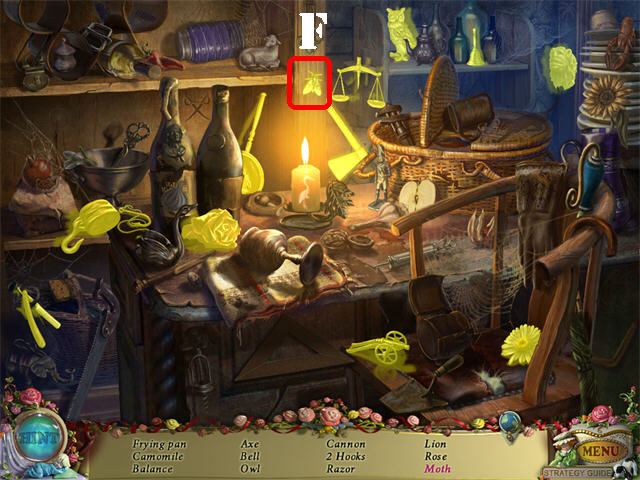
- Play the Hidden Object Scene on left.
- Remove the HAT; take the MOTH (F) once it stops flying around.
- The HOOK will be added to inventory.
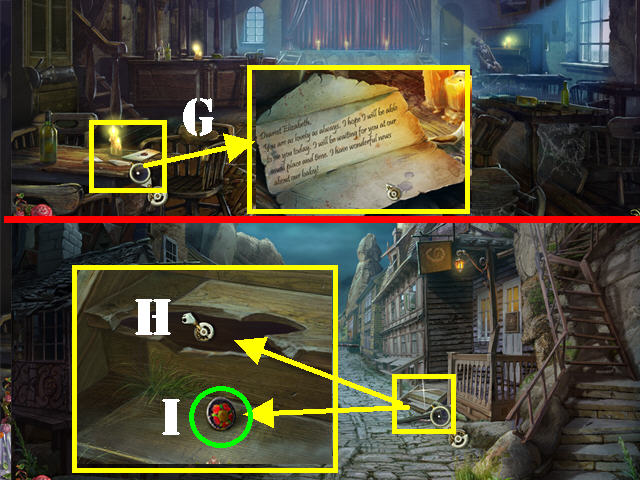
- Examine the table in the lower left.
- Open the letter (G).
- Click down and head forward.
- Zoom into the steps in the lower right.
- Place the HOOK in the crack (H) to retrieve FLOWER DISC 3/3 (I); take it.
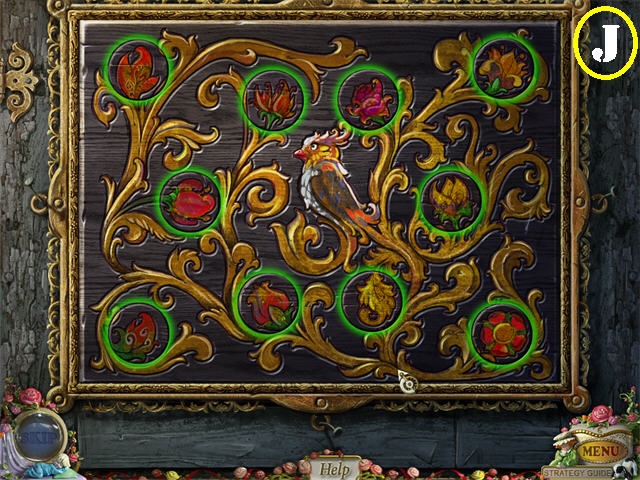
- Examine the door in the lower right.
- Place the 3 FLOWER DISCS on the board to activate the puzzle.
- Click on any 2 discs to swap their positions. Place the discs in the spots which match the edges of that disc.
- Please look at the screenshot for the solution (J).
- Enter the General Store.
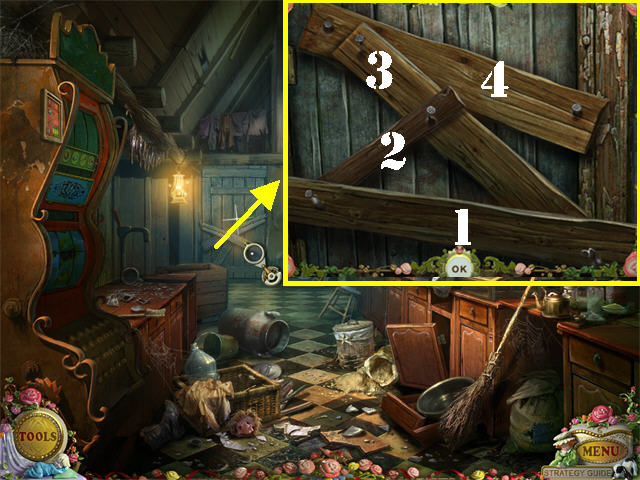
- Zoom into the back door.
- Remove the 4 boards (starting with the topmost board) with the CROWBAR to activate a Hidden Object Scene.
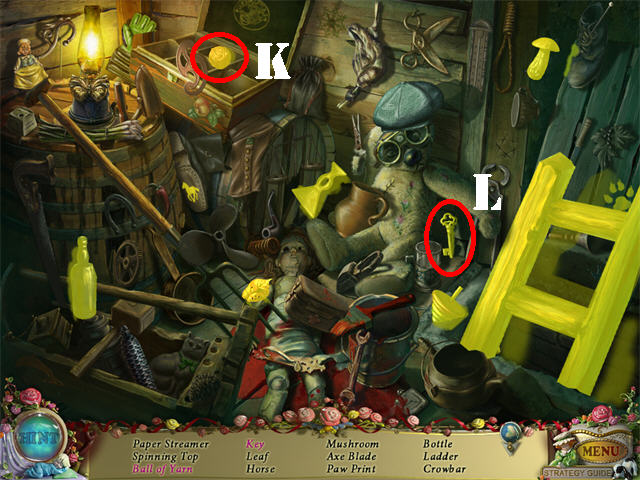
- Open the chest in the upper left; take the BALL OF YARN (K).
- Click on the teddy bear’s arm; take the KEY (L).
- The LADDER will be added to inventory.
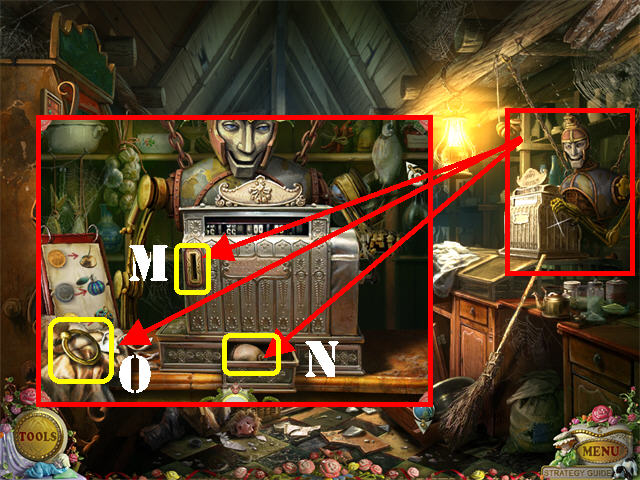
- Zoom into the cash register; place the COPPER COIN in the coin slot (M).
- Take the OIL CAN in the register (N).
- Grab the WELL RING next to the register (O).
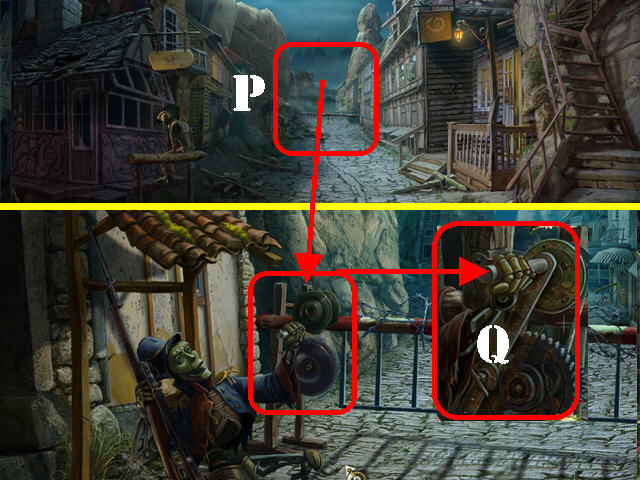
- Click down and focus on the back gate (P).
- Zoom into the puppet’s hand; place the OIL CAN on the gate’s mechanism to unlock the gate (Q).
- Go through the gate.
Chapter 3: The Center of Town
- Click on the puppet standing in the street with scissors for hands.
- Head to the right of the large building in the back.
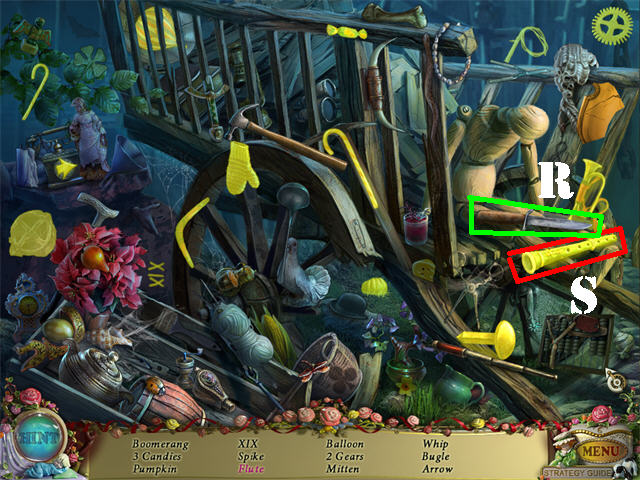
- Play the Hidden Object Scene on the left side of the gate.
- Click on the KNIFE (R); take the FLUTE (S) after the knife stops carving.
- The SPIKE will be added to inventory.
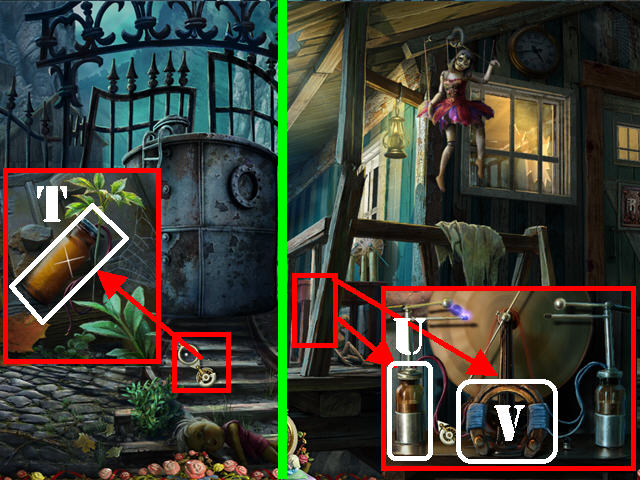
- Examine the railroad ties; take the BATTERY (T).
- Click down twice and go towards the house in the upper right side of the scene.
- Zoom into the small table on the left.
- Place the BATTERY on the left side of the device (U).
- Take the MAGNET on the device (V).
- Click down, go forward and head left by the large building in the back.
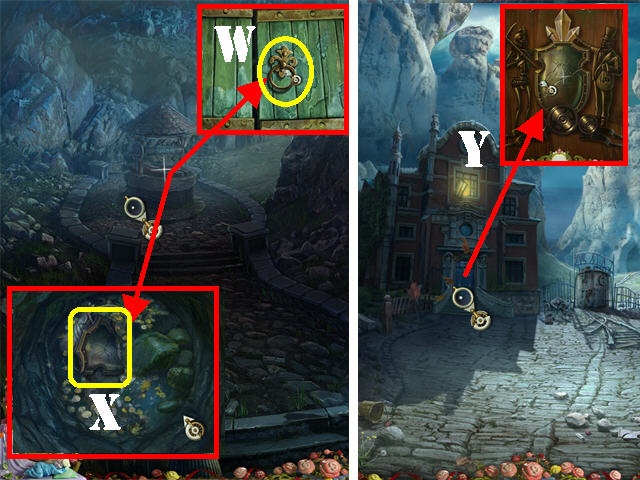
- Zoom into the Well; place the WELL RING on the cover (W).
- Open the cover.
- Place the MAGNET in the Well to retrieve the COAT OF ARMS PIECE (X).
- Click down.
- Examine the door of the large building in the back.
- Place the COAT OF ARMS PIECE on the door (Y).
- Enter the Estate.
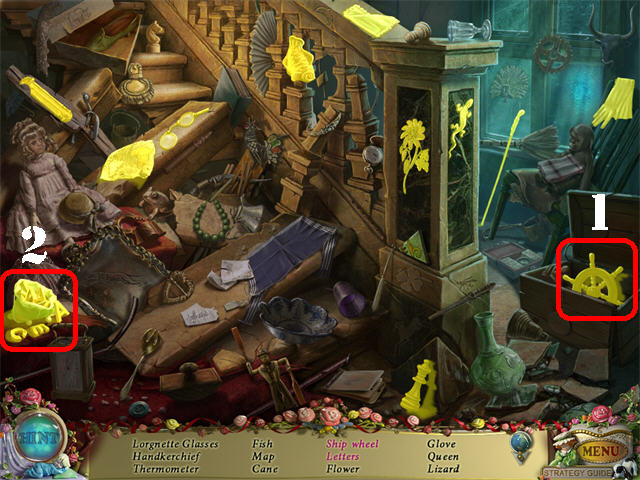
- Click on the steps and they will disintegrate, activating a Hidden Object Scene; play it.
- Open the chest on the right; take the SHIP WHEEL (1).
- Open the green pouch on left; take the LETTERS (2).
- The LETTERS will be added to inventory.
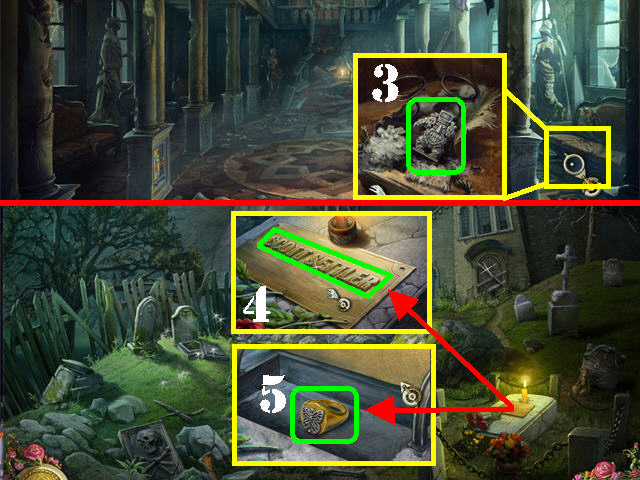
- Examine the chair on the right; click on the stitches twice to remove them.
- Take the METAL STATUE (3).
- Return to the cemetery.
- Zoom into the grave on the lower right.
- Place the LETTERS on top of the coffin for the name SCOTT SETTLER to appear (4).
- Open the cover and take the BUTTERFLY RING (5).
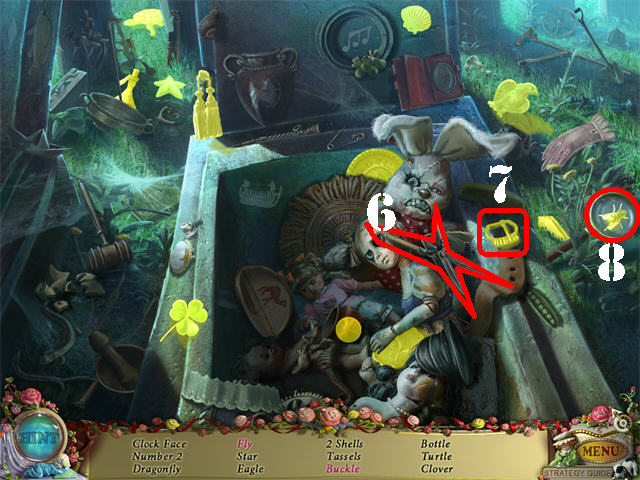
- Play the Hidden Object Scene in the cemetery.
- Click on the CLIPPERS (6); take the BUCKLE (7).
- Click on the MAGNIFYING GLASS; take the FLY (8).
- The WEED KILLER will be added to inventory.
- Click down twice.
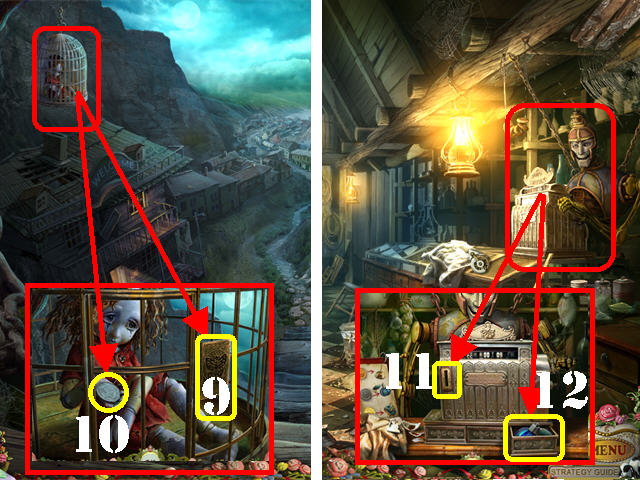
- Zoom into the birdcage in the upper left.
- Place the BUTTERFLY RING on the cage’s lock (9).
- Click on the RING once; take the SILVER COIN (10) inside the cage.
- Return to the General Store.
- Zoom into the cash register.
- Place the SILVER COIN in the coin slot (11); take the PESTICIDE in the drawer (12).
- Return to the Well area.
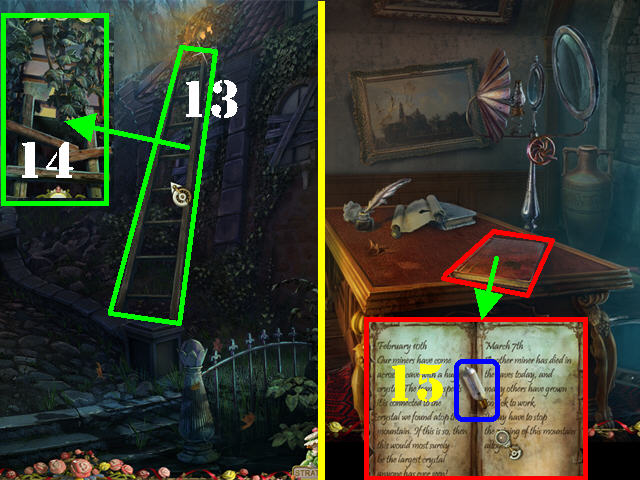
- Place the LADDER on the side of the building (13).
- Zoom into the window; kill the poison ivy with the WEED KILLER (14).
- Open the window and go inside.
- Click on Felicia.
- Open the diary on the desk; take the BULB (15).
- Click down 3 times and then click on the upper right side.
- Zoom into the door.
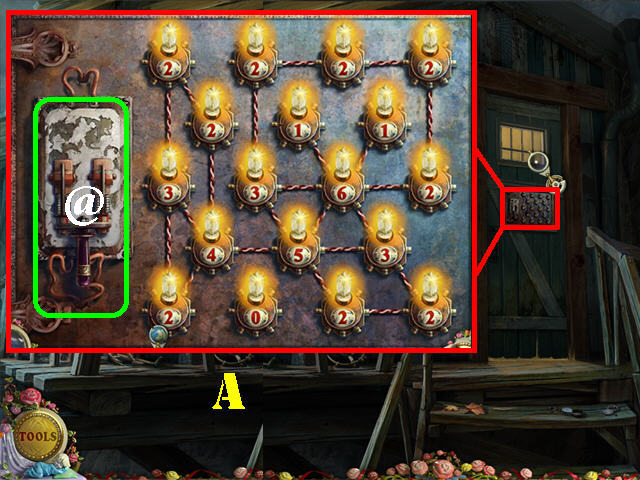
- Replace the burnt bulb with the BULB in inventory to activate the puzzle.
- Connect the bulbs so the number in the center is the same as the number of wires attached to it.
- Hover your mouse in the center of the 2 bulbs you want to connect and a faint line will appear; click on it to make the wire connection.
- Click on a wire to remove it if you want to make a different connection.
- Continue connecting wires until they are all in the right place. Click on the SWITCH (@) on the left to enter your selection; correct bulbs will light up.
- Please look at the screenshot for the solution (A).
Chapter 4: The Blacksmith's House
- Enter the Puppet-maker's Shop after you solve the puzzle.
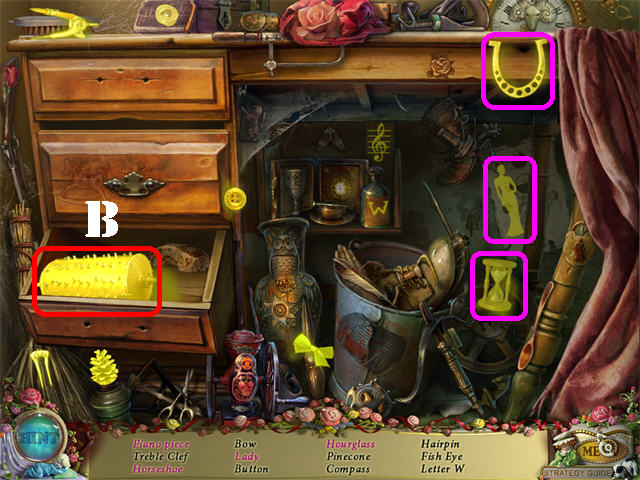
- Play the Hidden Object Scene.
- Open the bottom left drawer; take the PIANO PIECE (B).
- Remove the cloth on the right; take any items marked in pink.
- The PIANO PIECE will be added to inventory.
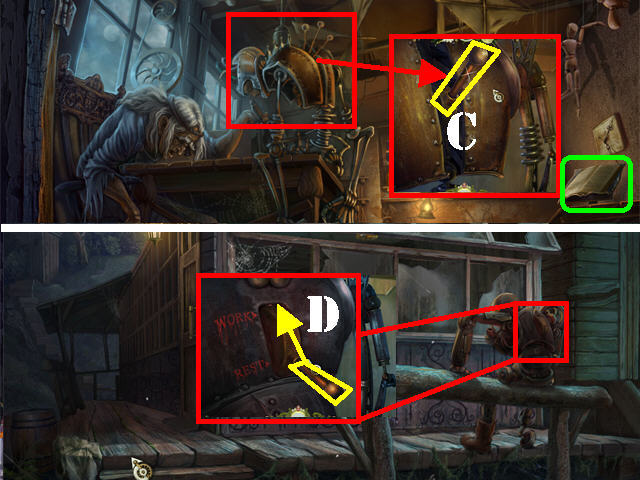
- Zoom into the puppet standing by the table; take the LEVER (C).
- Read the diary marked in green on the right.
- Click down twice and click on the house in the lower left.
- Examine the puppet; place the LEVER in the slot and click on it to activate the puppet (D).
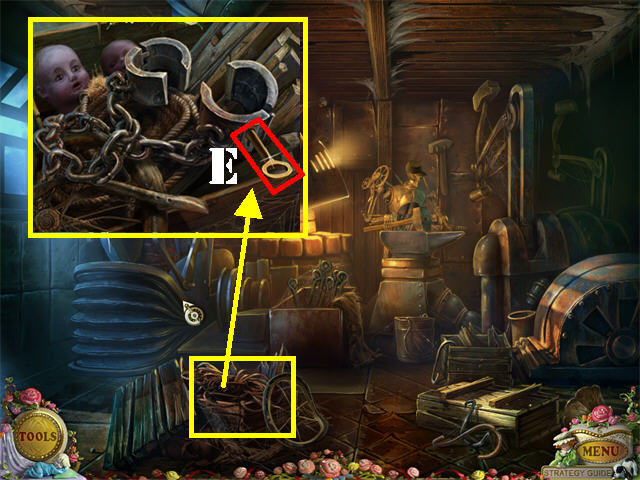
- Follow the puppet into the Blacksmith's House.
- Zoom into the pile of junk in the lower left; take the HANDCUFF KEY (E).
- Click down 3 times and go into the Saloon on the left.
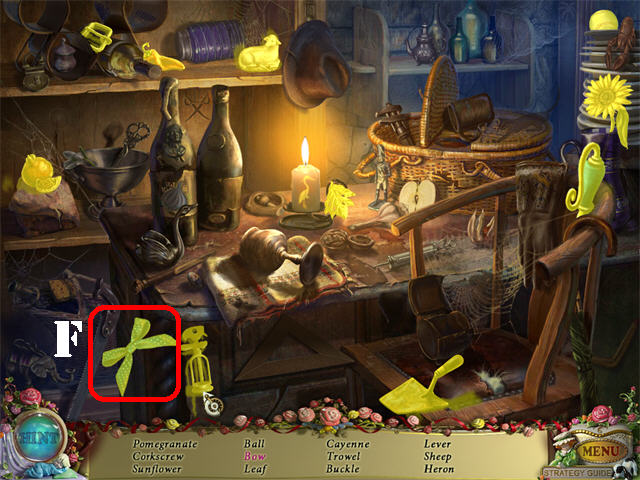
- Play the Hidden Object Scene on left.
- Click on the blue fabric piece in the lower left; take the BOW (F).
- The LEVER will be added to inventory.
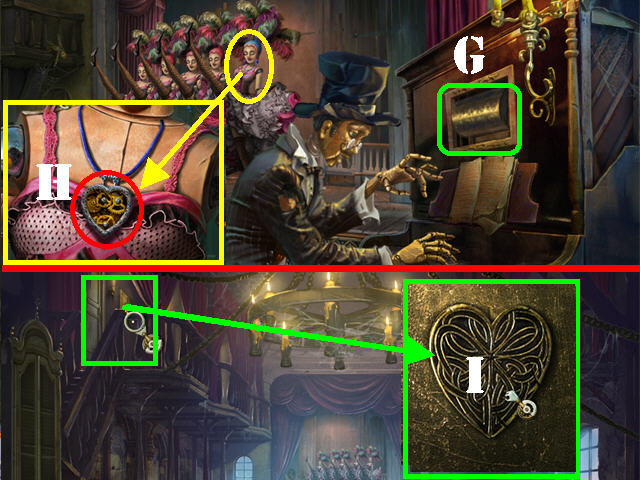
- Zoom into the piano player on the far right.
- Examine the top part of the piano and put the PIANO PIECE into the cavity (G).
- Examine the last dancer on stage; take the HEART (H).
- Click down.
- Click on the curtain in the upper left.
- Examine the door in the upper left; place the HEART in the slot to activate a puzzle (I).
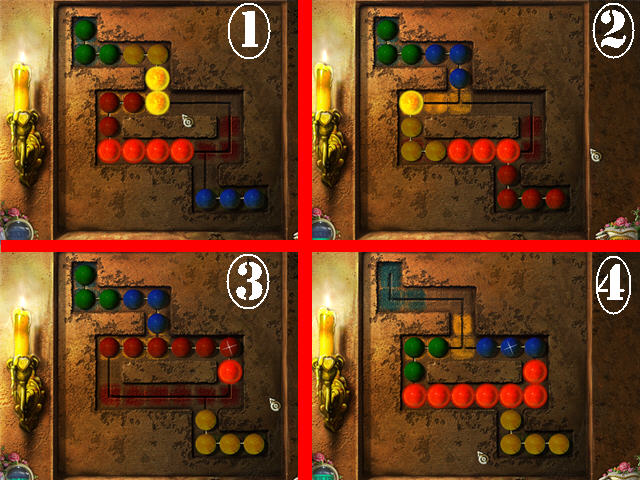
- Drag the balls around so they land on their matching color.
- Balls in the correct spots will light up; make sure all the balls are lit to solve the puzzle.
- The first screenshot shows you steps 1 through 4. Drag the balls into the positions shown.
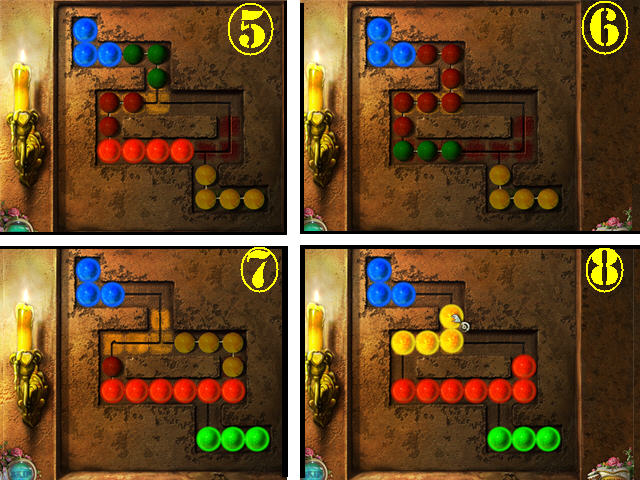
- The second screenshot shows you steps 5 through 8. Position 8 is the final solution.
- Go through the door after the puzzle has been solved.
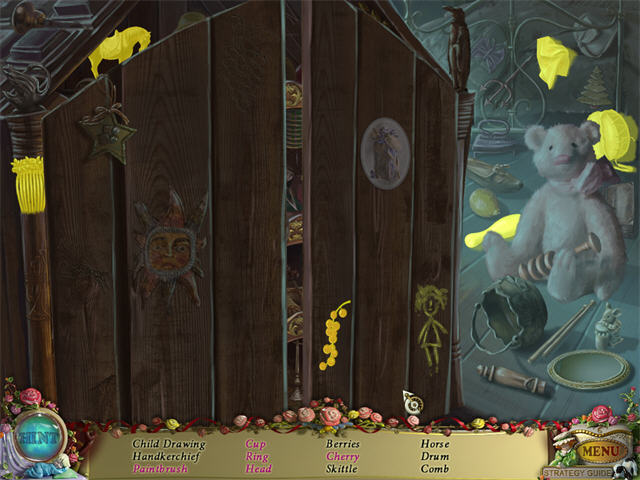
- Play the Hidden Object Scene in the bedroom.
- Take the items from the list.
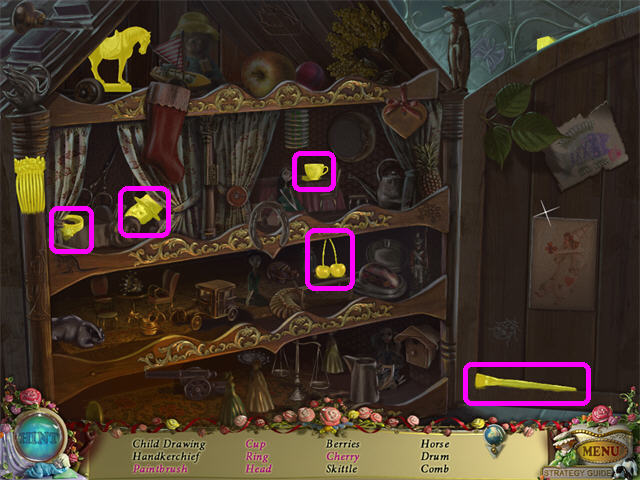
- Open the doors and grab all the items listed in pink.
- Open the curtain inside the doors; take the items listed in pink.
- The PUPPET HEAD will be added to inventory.
- Return to the General Store.
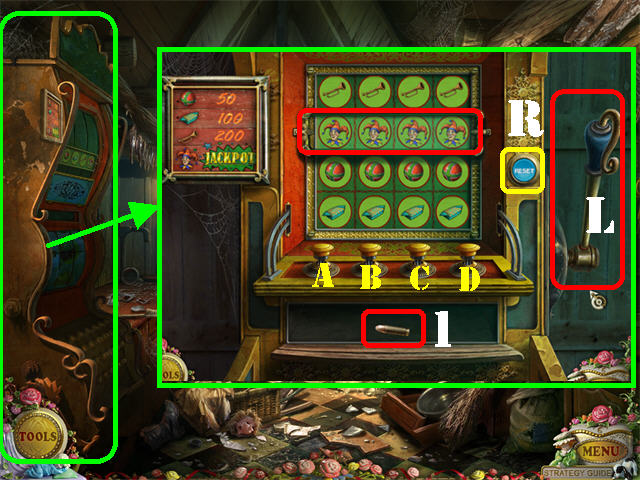
- Examine the slot machine on the left.
- Place the LEVER on the right side of the machine (L) to reveal some buttons.
- Your goal is to click on the buttons in the right order so you can obtain 4 jokers across the second line.
- Click on the RESET (R) button to start over.
- Click on the buttons in this order to solve the puzzle: A-D-C-C-A-A.
- Take the BULLET (1) at the bottom of the machine.
- Return to the Jail (click down 4 times from the store and enter on left).
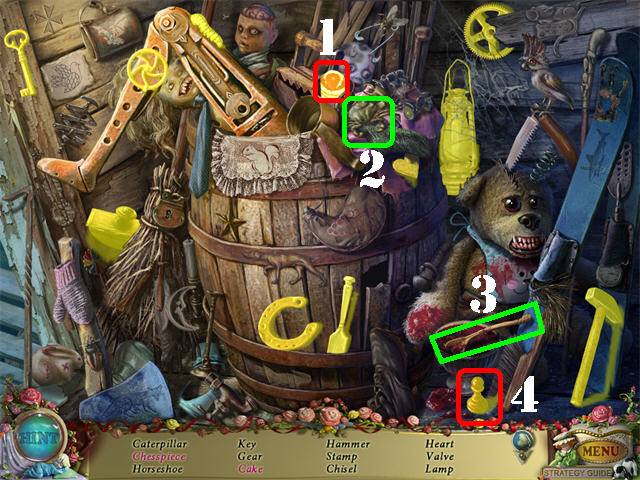
- Play the Hidden Object Scene.
- Click on the CRAB (2); take the CAKE (1).
- Click on the SPOON in the CAKE BATTER (3); take the CHESS PIECE (4).
- The CHISEL will be added to inventory.
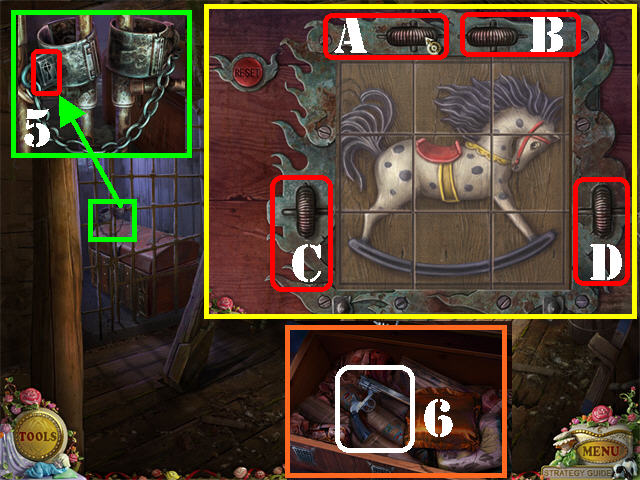
- Zoom into the cell; place the HANDCUFF KEY in the handcuff's keyhole (5).
- Zoom into the jail door and then the chest to activate the puzzle.
- Click on the rollers to adjust the rocking horse image.
- Once a row or column has been completed it will lock in place.
- To solve the puzzle click on the rollers in this order: A-B-B-C-C-C-D-C-D-C-A-A-C-A-A-A.
- Place the BULLET in the REVOLVER to add the REVOLVER to inventory (6).
Chapter 5: Entering the Mine
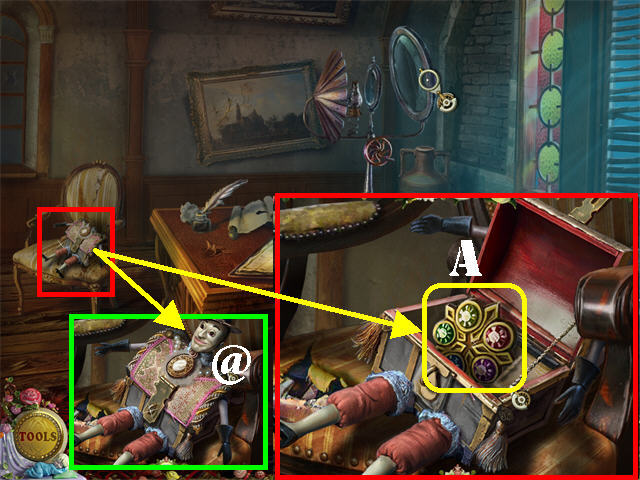
- Return to the Well area and go up the ladder on the side of the building.
- Zoom into the doll in the chair (@).
- Place the PUPPET HEAD on the body.
- Open the latch and take the PENDANT (A).
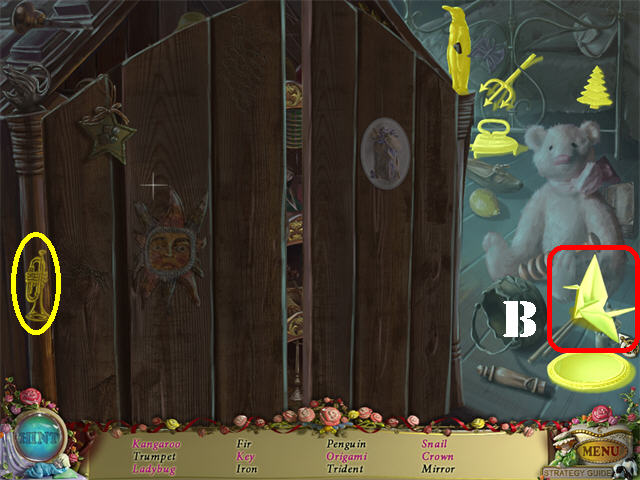
- Return to the Saloon and go into the upper left door.
- Play the Hidden Object Scene on the left.
- Click on the paper on the lower right side; take the ORIGAMI (B).
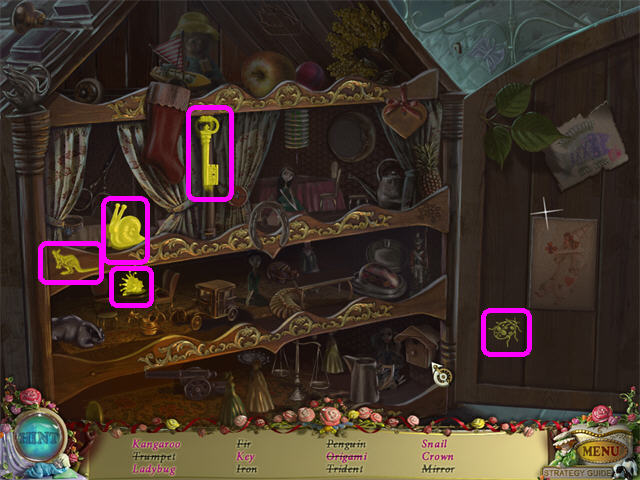
- Open the doors and the curtain if needed; take all items listed in pink.
- The MIRROR will be added to inventory.
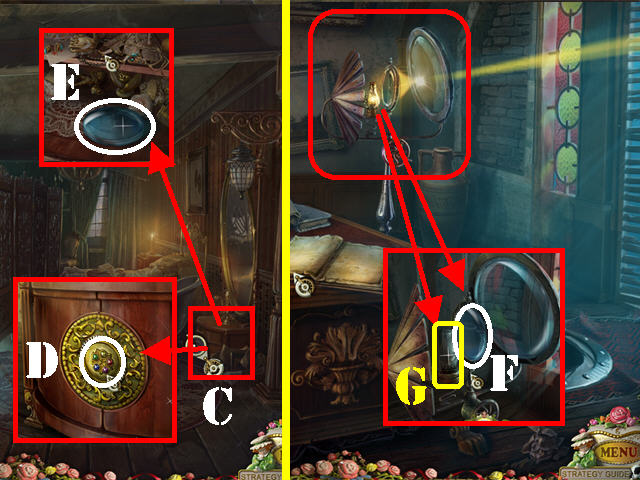
- Zoom into the dresser in the lower right (C).
- Spray the PESTICIDE on the bugs.
- Place the PENDANT in the center of the dresser to unlock the doors (D).
- Take the LENS (E).
- Return to the Well area and go up the ladder on the side of the building.
- Zoom into the light magnification device; place the LENS in the small frame (F).
- Place the MATCHES in the LANTERN (G) next to the lens and a light will shine through the lens.
- Click down twice.
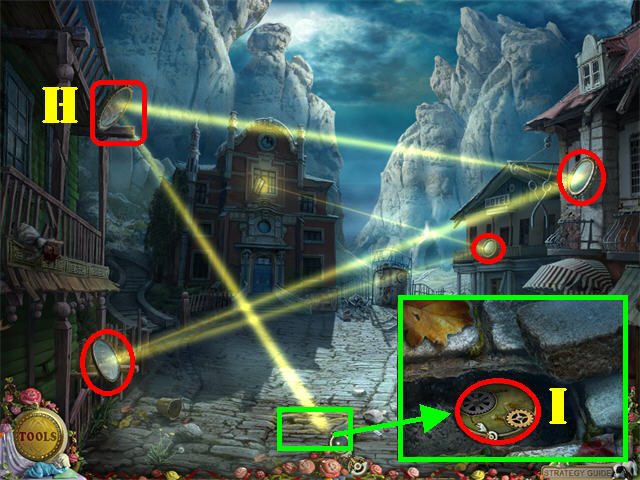
- Place the MIRROR in the frame in the upper left (H).
- Adjust the mirrors marked in red as shown in the screenshot.
- Zoom into the area the light beam is pointing to on the ground.
- Click on the loose stone to remove it; take the GEARS (I).
- Go towards the gate on the far right.
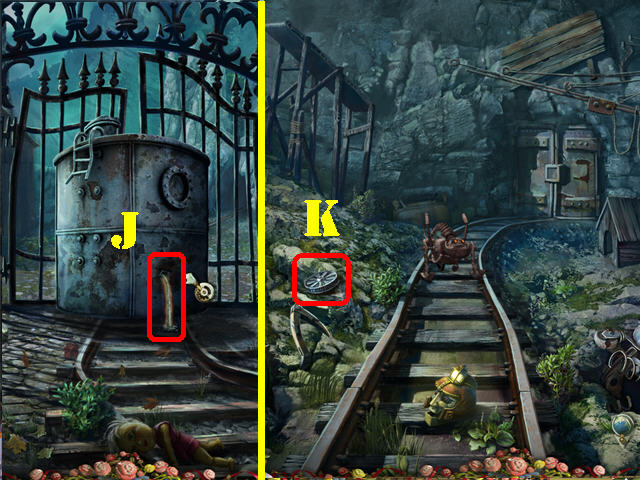
- Shoot the tank with the REVOLVER (J).
- Click on the tank to move it aside.
- Open the gate and go through it.
- Take the PUPPET WHEEL on the lower left (K).
- Return to the Puppet-maker's Shop.
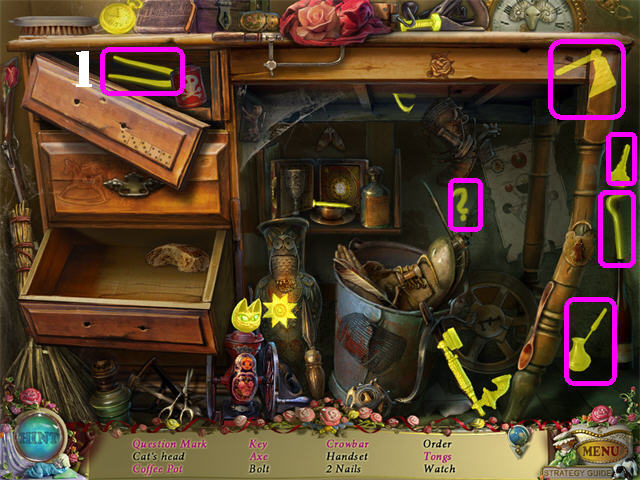
- Play the Hidden Object Scene.
- Remove the cloth on the right; take the items listed in pink.
- Open the top left drawer; take the TONGS (1).
- The CAT’S HEAD will be added to inventory.
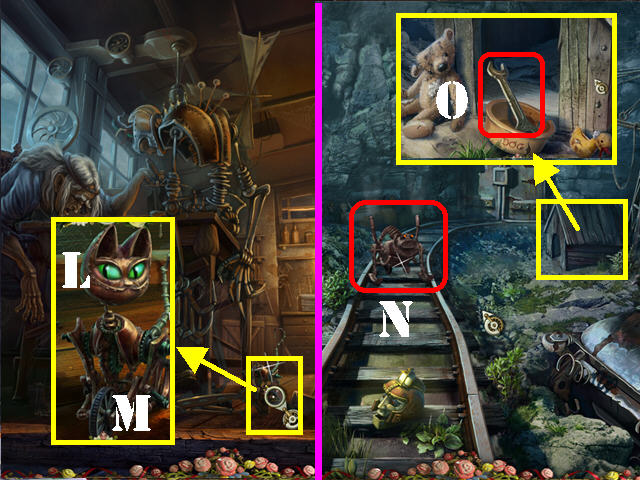
- Zoom into the mechanical cat on the floor.
- Place the CAT’S HEAD (L) and the PUPPET WHEEL (M) on the mechanical cat.
- The CAT PUPPET will be added to inventory.
- Click down twice, head forward, right towards the gate, and go through the gate.
- Give the CAT PUPPET to the mechanical guard dog (N).
- Zoom into the dog house; take the WRENCH (O).
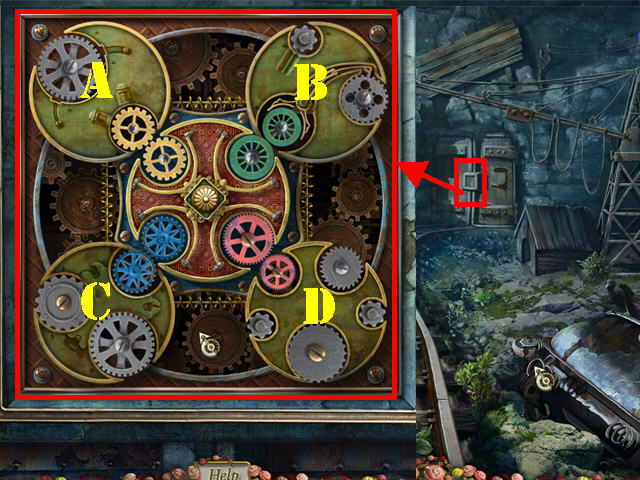
- Examine the back door.
- Place the GEARS on the door to activate a puzzle.
- Click on each set of gears to rotate them until all the small matching colored gears touch and spin.
- To solve the puzzle click on the gears in this order: A-C-C-C-A-D-D-B-D-B-B-C-B-B-C.
- Go through the door to access the Mine.
Chapter 6: Repairing the Train
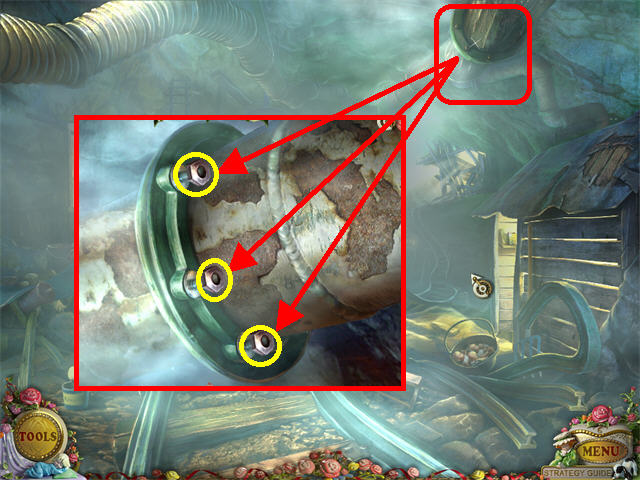
- Examine the steamy pipe in the upper right.
- Place the WRENCH on each of the 3 bolts to shut off the steam.
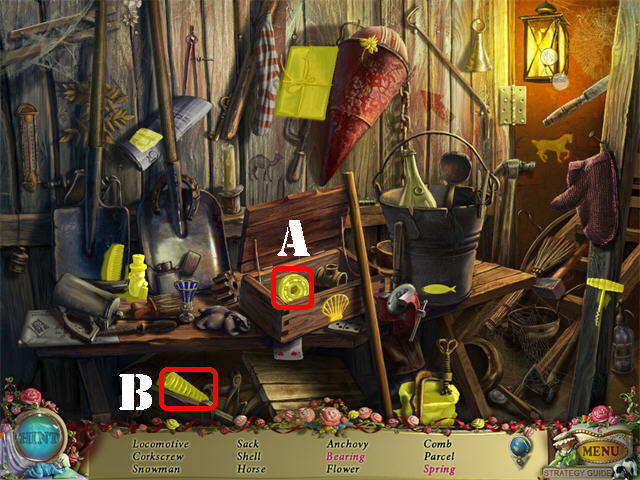
- Play the Hidden Object Scene on the left.
- Open the box; take the BEARING (A).
- Open the crate in the lower left; take the SPRING (B).
- The EMPTY SACK will be added to inventory.
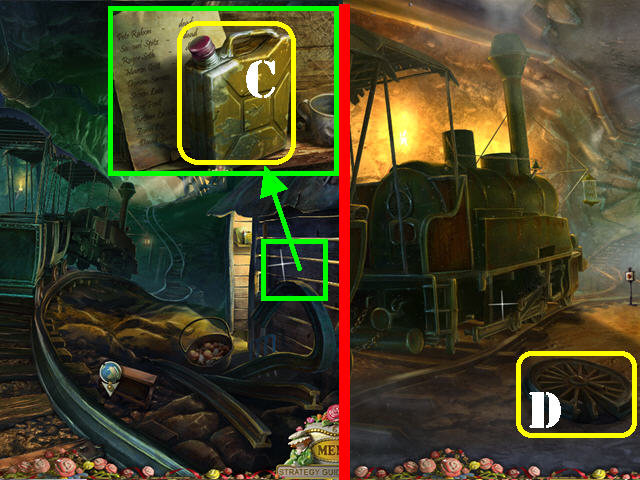
- Examine the area on the right; take the FUEL (C).
- Go forward.
- Take the BROKEN WHEEL (D) on the ground.
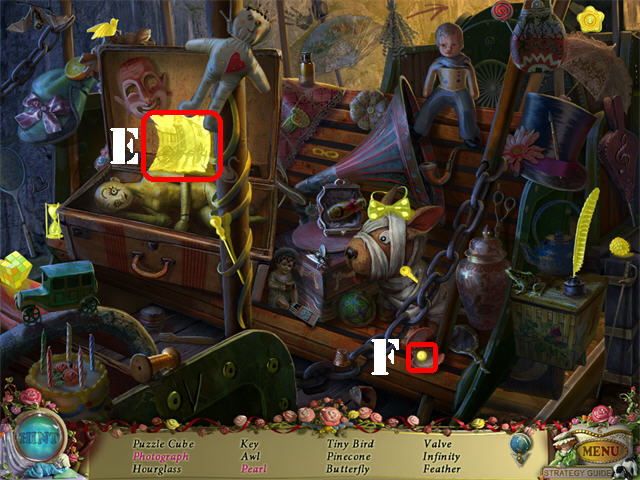
- Play the Hidden Object Scene on the left.
- Open the suitcase; take the PHOTOGRAPH (E).
- Open the clam in the lower right; take the PEARL (F).
- The VALVE will be added to inventory.
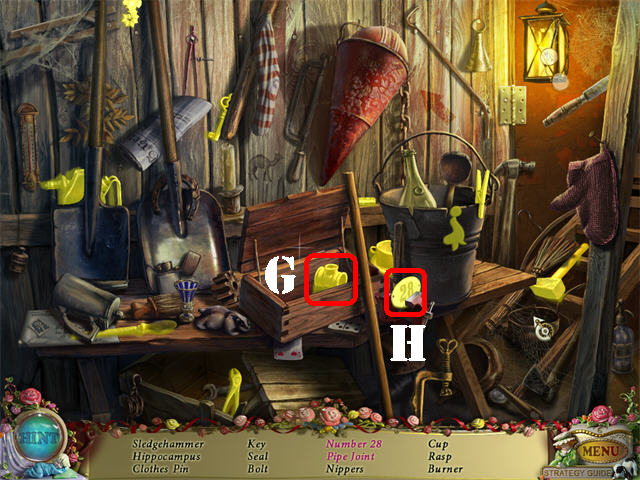
- Click down.
- Play the Hidden Object Scene on the left.
- Open the box; take the PIPE JOINT (G).
- Click on the vise grip; take the NUMBER 28 (H).
- The SLEDGEHAMMER will be added to inventory.
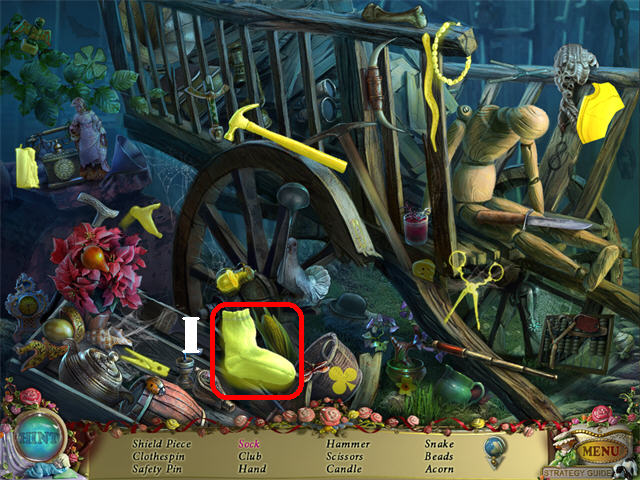
- Click down twice.
- Play the Hidden Object Scene on the left.
- Click on the YARN; take the SOCK (I).
- The HAMMER will be added to inventory.
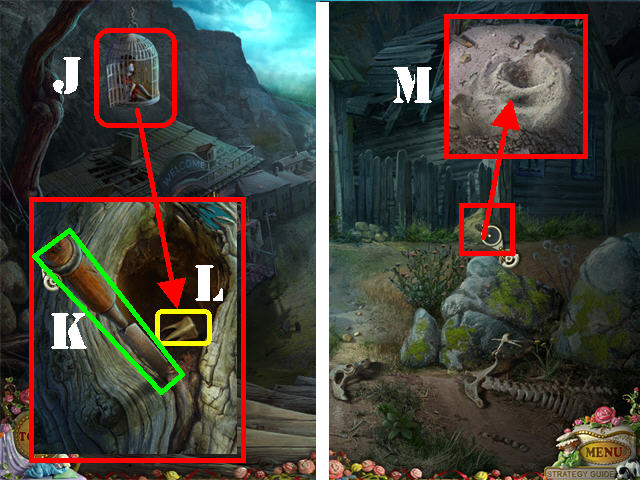
- Click down 3 times.
- Zoom into the tree hole in the upper left (J).
- Place the CHISEL in the tree hole (K).
- Put the HAMMER on the chisel twice; take the GOLDEN TOOTH (L).
- Head right towards the cemetery.
- Examine the pile of sand by the house (M).
- Place the EMPTY SACK in the sand to obtain the BAG WITH SAND.
- Return to the Blacksmith's house.
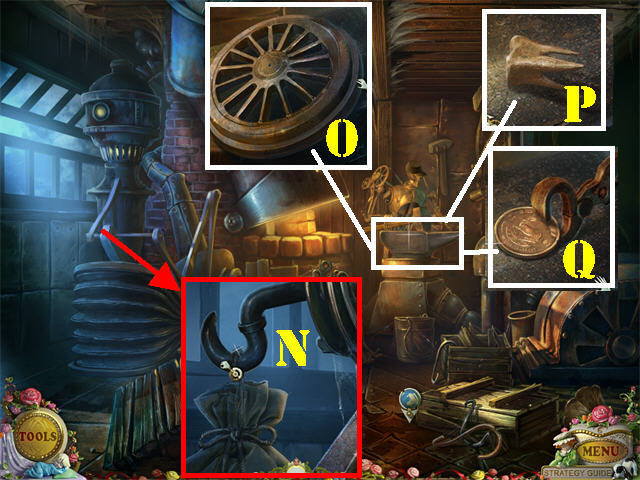
- Examine the contraption on the left; place the BAG WITH SAND on the hook (N) to activate the device.
- Zoom into the anvil; place the BROKEN WHEEL on it.
- The puppet will begin repairing the wheel.
- Zoom into the anvil after the puppet stops moving; take the TRAIN WHEEL (O).
- Place the GOLDEN TOOTH on the anvil (P).
- Zoom into the anvil once the puppet stops moving; take the GOLDEN COIN (Q).
- Return to the General Store.
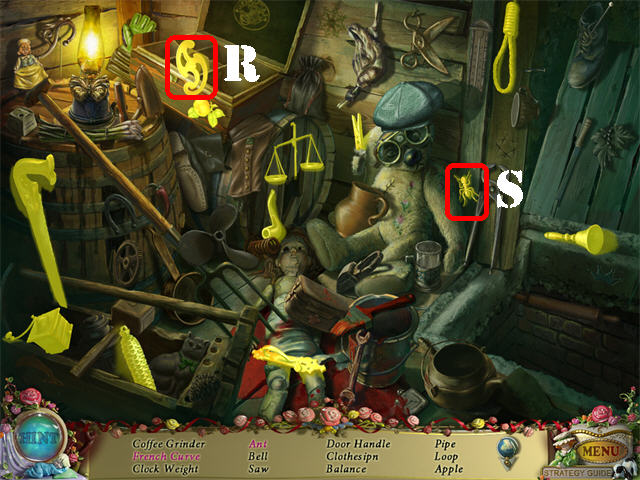
- Play the Hidden Object Scene in the back.
- Open the CHEST in the upper left; take the FRENCH CURVE (R).
- Lower the teddy bear’s arm; click on the ANT (S).
- The CLOCK WEIGHT will be added to inventory.
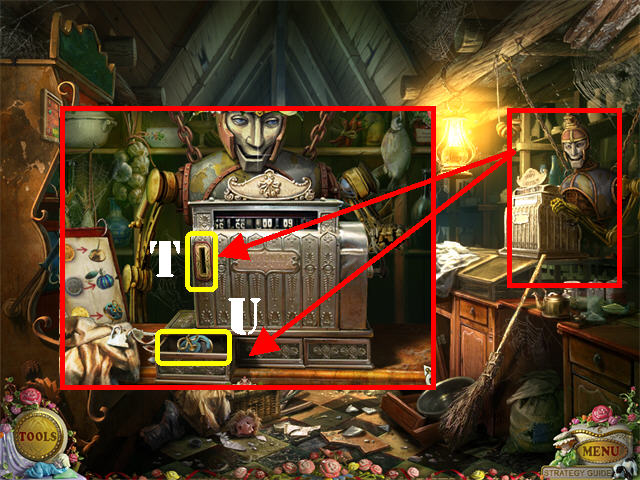
- Zoom into the cash register; place the GOLDEN COIN in the slot (T).
- Take the WINDING GEAR (U) from the drawer.
- Return to the Mine and head forward.
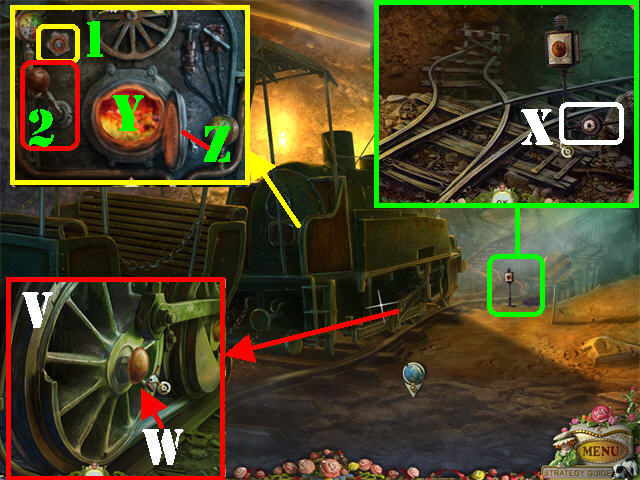
- Zoom into the bottom of the train; place the TRAIN WHEEL you fixed at the Blacksmith's on the axle (V).
- Place the SPIKE in the center of the wheel (W).
- Hit the SPIKE twice with the SLEDGEHAMMER.
- Zoom into the tracks in front of the train; place the OIL CAN on the LEVER (X).
- Click on the oiled LEVER to divert the tracks.
- Zoom into the train’s engine.
- Place the FUEL on the coals (Y).
- Light the COALS with the MATCHES.
- Close the cover (Z).
- Place the VALVE in the upper left and turn it (1).
- Click on the lever and the train will go deeper into the mine (2).
Chapter 7: The Barbershop
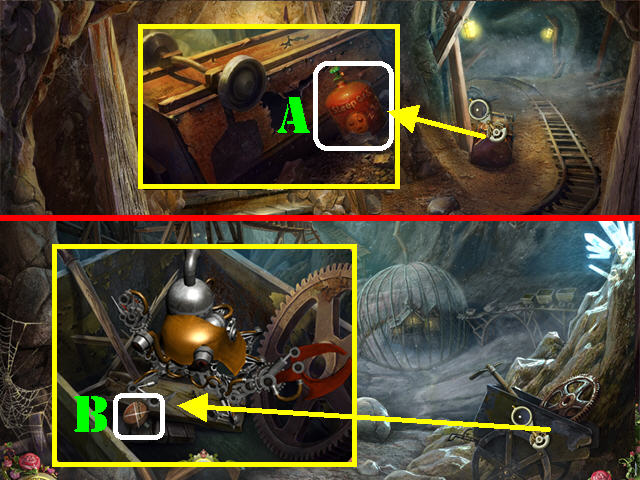
- Go through the hole in which the train passed through.
- Examine the upside down cart; take the SLEEP GAS (A).
- Go forward.
- Zoom into the cart in the lower right; take the BUTTON (B).
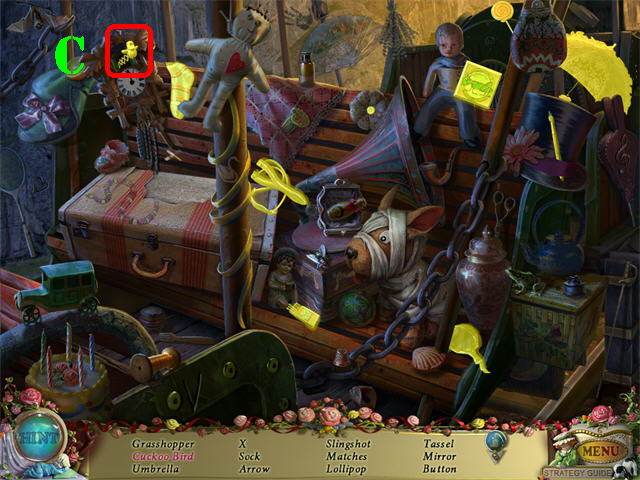
- Play the Hidden Object Scene.
- Click on the clock; take the CUCKOO BIRD (C).
- The GRASSHOPPER will be added to inventory.
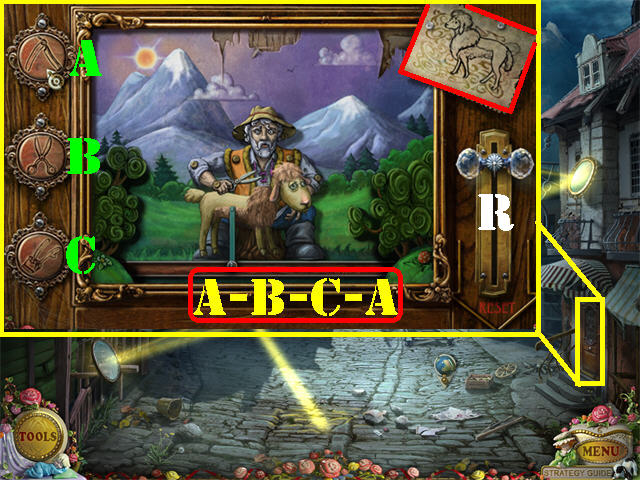
- Click down 5 times.
- Zoom into the door on the right.
- Place the BUTTON in the empty slot to activate the puzzle.
- Click on the buttons in the correct order so the farmer cuts the sheep’s hair the same as in the sample picture in the corner.
- If you cut the sheep’s hair incorrectly, click on the RESET (R) button on the right to bring out a new sheep.
- The solution is: A-B-C-A.
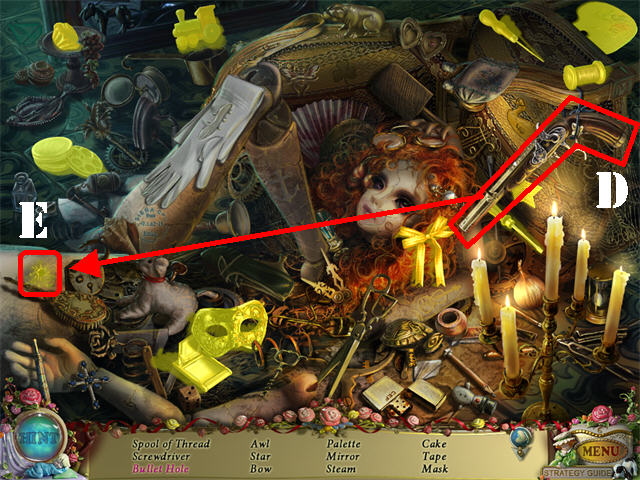
- Enter the Barbershop.
- Play the Hidden Object Scene.
- Click on the REVOLVER (D) and then on the BULLET HOLE (E).
- The SCREWDRIVER will be added to inventory.
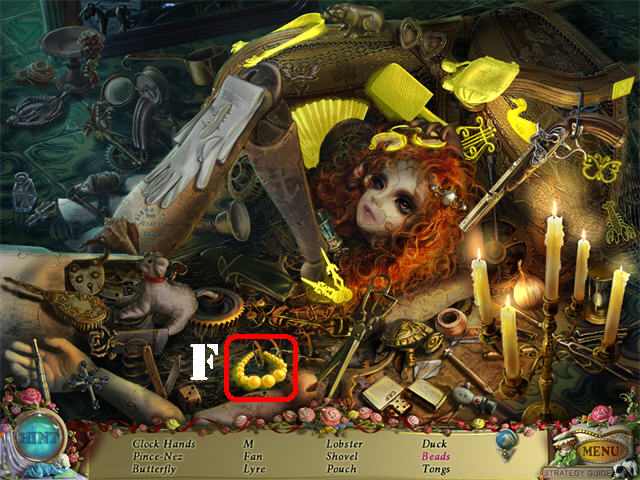
- Play the second Hidden Object Scene in the Barbershop.
- Click on the string with beads; take the BEADS (F).
- The CLOCK HANDS will be added to inventory.
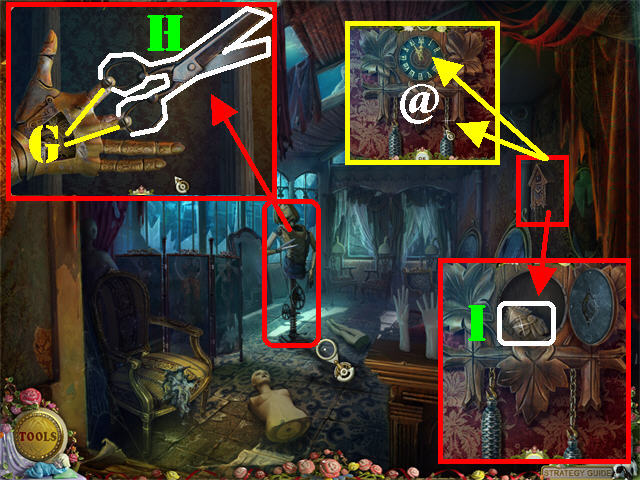
- Zoom into the barber puppet; remove the screws with the SCREWDRIVER (G). The SCISSORS (H) will be automatically added to inventory.
- Examine the cuckoo clock; place the CLOCK HANDS and the CLOCK WEIGHT on the clock (@).
- Take the IVORY STATUE inside the clock (I).
- Return to the Estate.
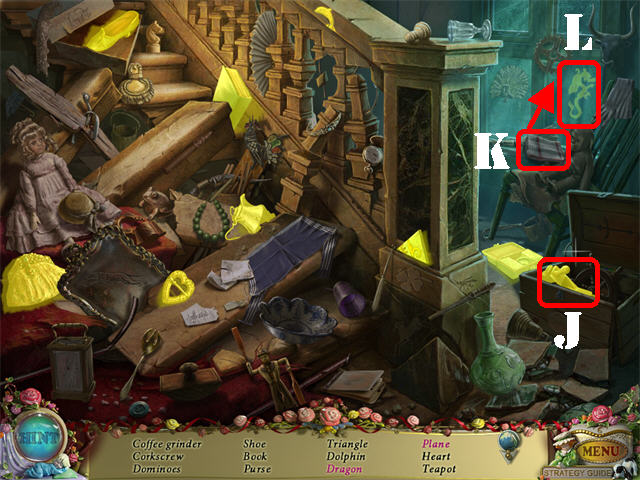
- Play the Hidden Object Scene.
- Open the trunk in the lower right; take the PLANE (J).
- Click on the DISH TOWEL (K) and it will clean the window; click on the DRAGON (L) which appears on the window.
- The TRIANGLE will be added to inventory.
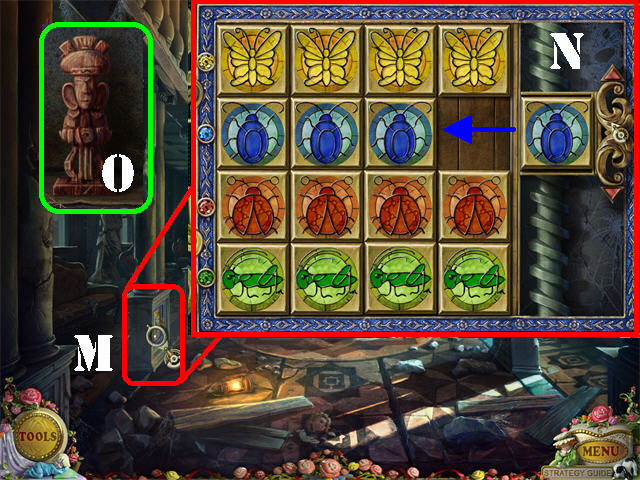
- Zoom into the lower left column (M).
- Place the GRASSHOPPER on the board to activate a puzzle.
- You must move all the pieces to their correct rows using the colored gems on the left as a clue.
- Click on a piece to slide it to an empty spot. You can also click on the end of a row or column to move all those pieces over.
- Use the ARROWS on the right to slide the outside piece up and down if needed.
- The starting configuration for this puzzle is random but the final solution is always the same.
- Please look at the screenshot for the solution (N).
- Take the WOODEN STATUE (O) after the puzzle has been solved.
Chapter 8: Rescue Suzy
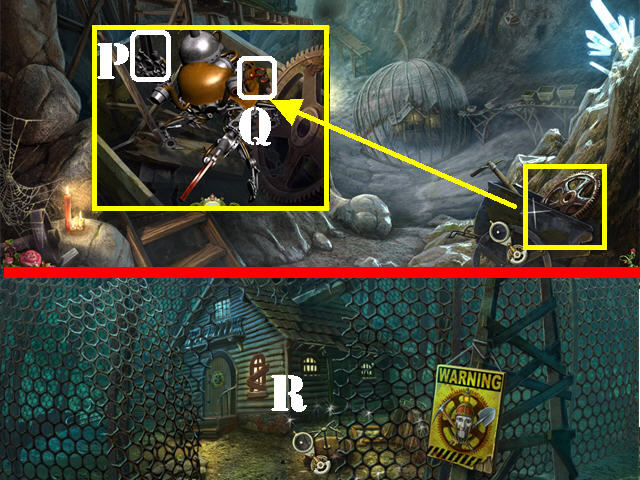
- Go into the Mine, through the hole on right, and right towards the tracks.
- Zoom into the cart in the lower right.
- Place the SCISSORS (P) and the WINDING GEAR (Q) on the mechanical crab.
- Follow the mechanical crab; it will go through the fence.
- Click on the fence to activate a Hidden Object Scene and to open a hole in the fence (R).
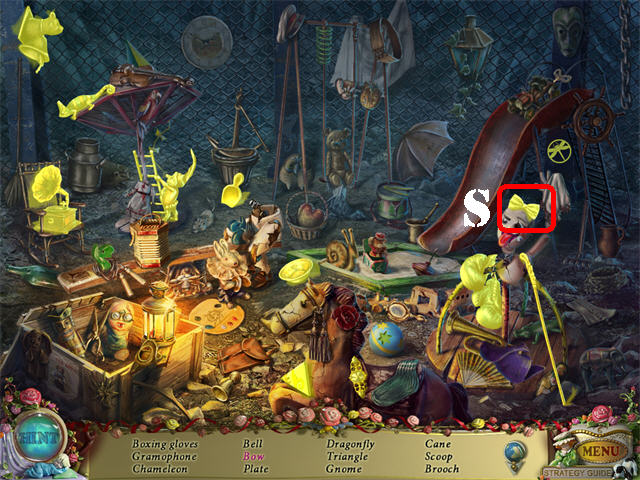
- Play the Hidden Object Scene.
- Remove the HAT; take the BOW (S).
- The TRIANGLE will be added to inventory.
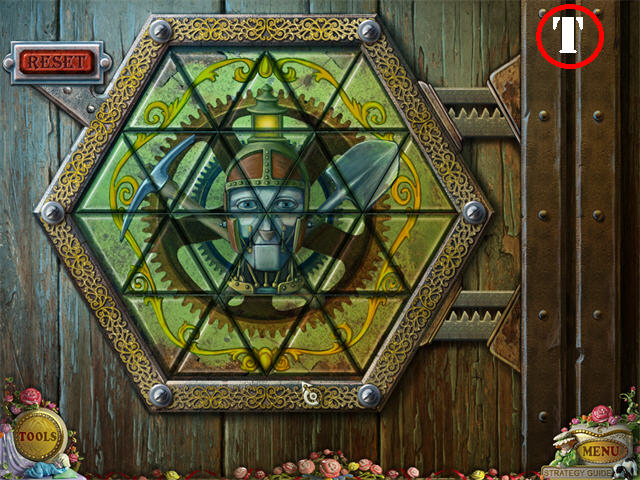
- Click on the door.
- Place the 2 TRIANGLES in the empty slots to activate a puzzle.
- Assemble the correct image.
- Click on the EDGE of 2 touching triangles to swap their positions.
- Click in the CENTER of a triangle to rotate it.
- Please look at the screenshot for the solution (T).
- Go into the house after the puzzle has been solved to activate a Hidden Object Scene outside.
- Exit the house.
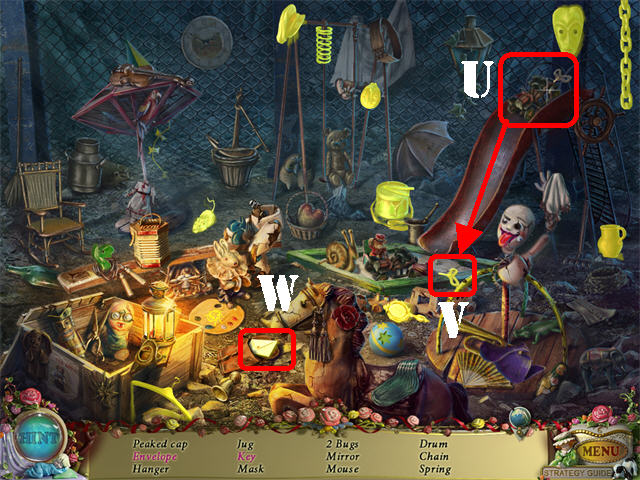
- Play the Hidden Object Scene.
- Click on the TRAIN (U) on top of the slide; take the KEY (V) on the ground.
- Open the BAG; take the ENVELOPE (W).
- The KEY will be added to inventory.
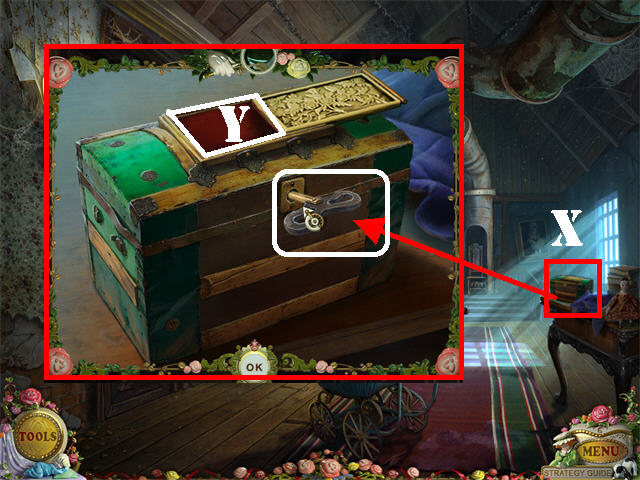
- Go back into the house.
- Zoom into the box on the right (X).
- Place the KEY in the lock.
- Click on top of the box to activate a puzzle (Y).
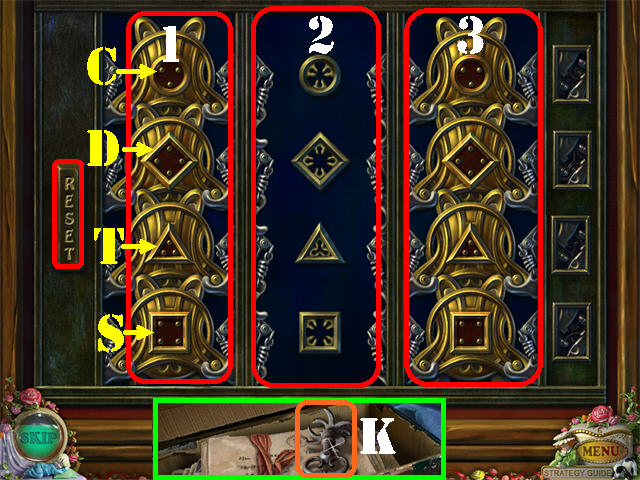
- Move the pieces from the left column all the way to the right column keeping the pieces in the same order.
- You can only move pieces one at a time, starting with the one at the bottom.
- A piece can only be placed on top of their matching symbol.
- S is for SQUARE, T is for Triangle, D is for DIAMOND, and C is for CIRCLE. The NUMBER 1 is for the first column, NUMBER 2 is for the middle column, and NUMBER 3 is for the last column.
- Please follow these steps to solve the puzzle.
- Move S to 3, Move T to 2, Move S to 2, Move D to 3, Move S to 3, Move T to 1, Move S to 1.
- Move D to 2, Move S to 3, Move T to 2, Move S to 2, Move C to 3, Move S to 3, Move T to 1.
- Move S to 1, Move D to 3, Move S to 2, Move T to 3, and Move S to 3 to complete the puzzle.
- Take the KEY (K) inside the box after the puzzle has been completed.
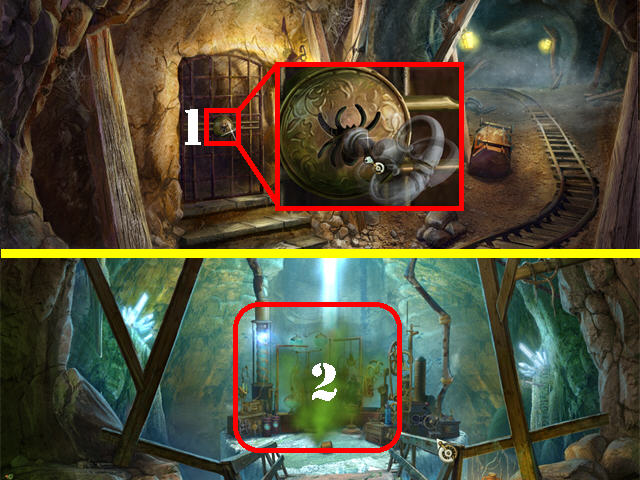
- Click down 3 times.
- Zoom into the left door.
- Place the KEY into the spider lock (1).
- Go into the Underground Lab.
- Place the SLEEP GAS anywhere in the scene (2).
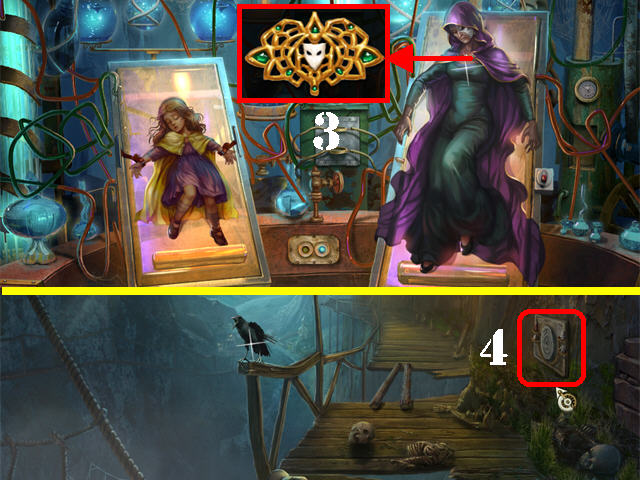
- Take a closer look at the scene.
- Click on Felicia’s torso to enter FELICIA’S BROOCH into inventory (3).
- Click down 9 times.
- Zoom into the puzzle on the right (4).
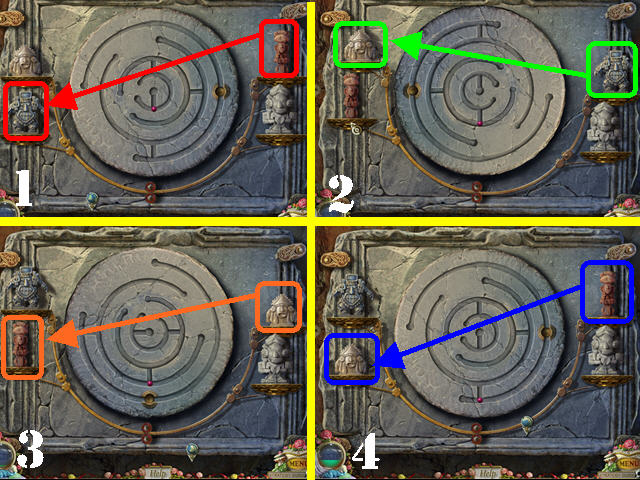
- Place the METAL STATUE, WOODEN STATUE, and the IVORY STATUE on the pedestals to activate the puzzle.
- Click on any 2 statues to swap their positions.
- Each time you move the statues the board will shift. Your goal is to place the ball in the golden hole.
- If you want the board to move to the right, place the heavier statues on the right. The same goes for the left, place the heavier statues on the left if you want the board to shift to the left.
- Swap the statues in the order shown in the screenshot to solve the puzzle.
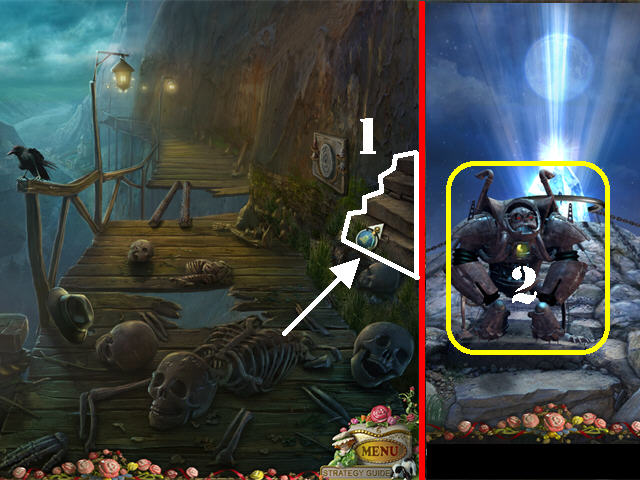
- Go up the steps that appear on the right (1).
- Click on the large puppet on the bridge (2).
- Give FELICIA’S BROOCH to the large puppet.
- Zoom into the large puppet to activate a puzzle.
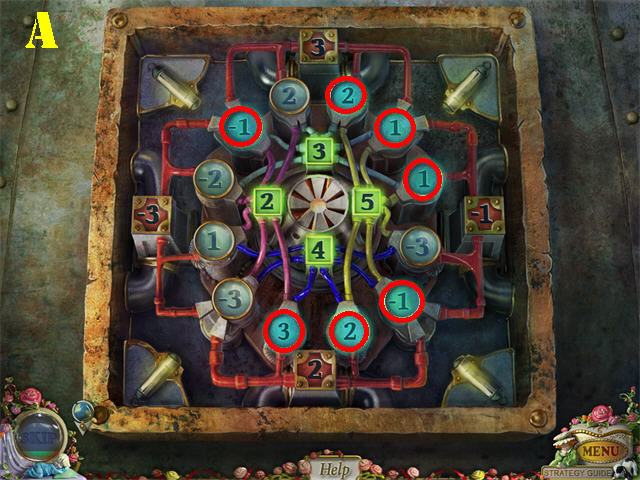
- Click on the correct set of blue numbers so they add up to the numbers in red.
- Please look at the screenshot for the solution (A).
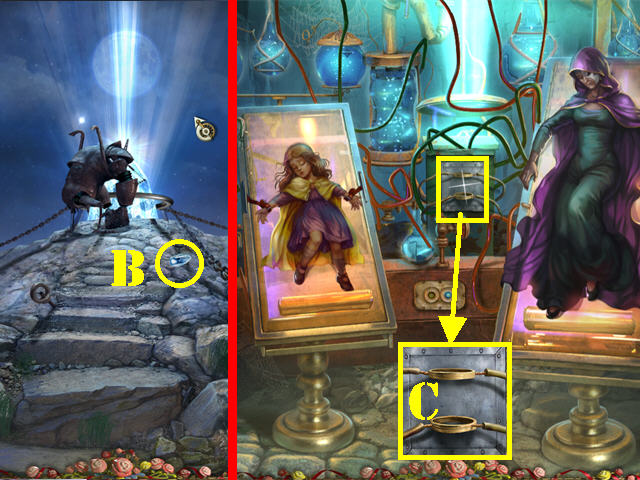
- The large puppet starts pounding at the crystals.
- Take the CRYSTAL which lands on the ground (B).
- Return to the Underground Lab in the Mine (where Felicia and Suzy are located).
- Zoom into the center of the contraption; place the CRYSTAL in the holder (C).
- Click on the panel to activate a puzzle.
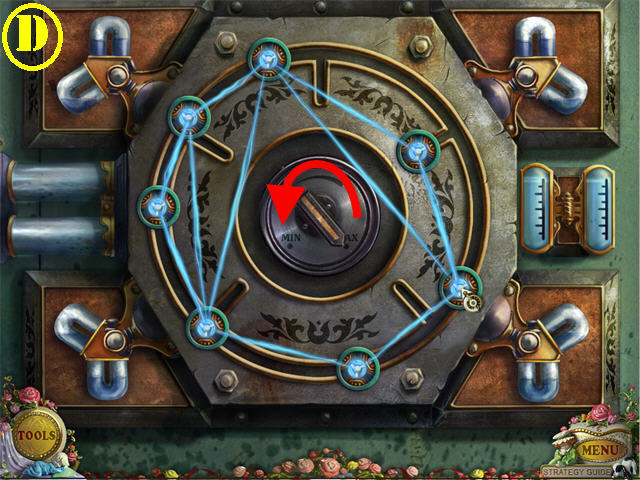
- Untangle the lines by dragging the circles into the correct spots.
- Use the slots on the board to move a circle out of the way if it is blocking the passage of another circle.
- Please look at the screenshot for the solution (D).
- Move the LEVER in the center counter-clockwise until it lands on the ‘MIN’ line.
- Congratulations! You have completed PuppetShow: Lost Town!
Created at: 2011-04-14

