Walkthrough Menu
- General Tips
- Chapter 1: The Hotel
- Chapter 2: The Hotel Owner’s House
- Chapter 3: The Graveyard
- Chapter 4: The Library
- Chapter 5: Joyville Museum
- Chapter 6: Theater Gate
- Chapter 7: Outside the Theater
- Chapter 8: Inside the Theater
- Chapter 9: Secret Backyard
- Chapter 10: Master’s House
- Chapter 11: Dungeon
- Chapter 12: Prison Cell
- Chapter 13: Grotto & Stairway
General Tips
- All scenes will have an area in which a single sparkle appears or several sparkles appear.
- A single sparkle indicates an interactive area in the game. This area may allow you to move to a different scene or exit out of a scene. It can also indicate an area that you need to investigate further.
- Several sparkles in a cluster indicate a Hidden Object scene. These scenes contain inventory items needed to complete your journey.
- Certain Hidden Object scenes will require that you click on a part of the scene to uncover a hidden area. They can be items like a piece of cloth that needs to be removed or a cabinet that needs to be opened. A hand icon will appear over such areas in the game.
- When the cursor turns into a magnifying glass it means you can zoom in to an area in the scene. You can sometimes find inventory items in these areas. In other instances a magnifying glass will allow you to read clues that will help you in the game or they can open up a mini-game.
- If a door is open you can travel to that location by clicking on the area in which your cursor turns into a globe icon.
- When your cursor changes into a hand icon you should click on that area to interact with it. The hand icon allows you to pick up inventory items or explore certain areas.
Hints
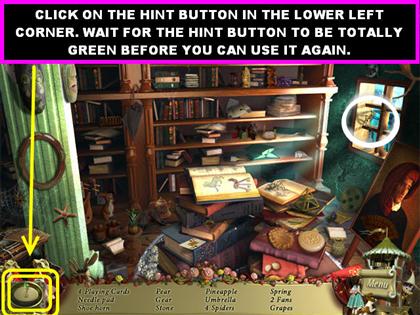
- If you can’t find an item in one of the Hidden Object scenes you can use a hint to locate an item.
- The hint button is located in the lower left corner of a Hidden Object scene.
- When you use a hint, a circle will appear around a random item from your list.
- You can only use the hints for the Hidden Object scenes. The hint button will not appear in other scenes, it will be replaced by the tools or skip button instead.
- You have unlimited hints in the game but you have to wait 60 seconds in between each use.
Inventory/ Tools
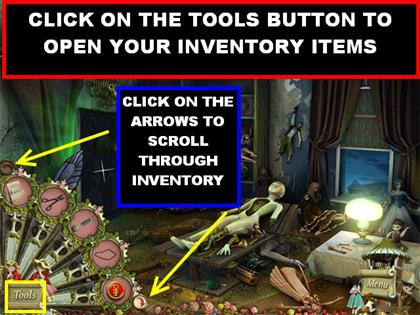
- You will find1 inventory item in each Hidden Object scene. You will not know which item goes into inventory until all the items have been cleared from the list.
- You can also find inventory items in the areas which have a magnifying glass icon.
- The inventory items will go into the tools tab in the lower left corner.
- Click on the tools button in the lower left to see all available items. If your inventory is full, use the arrows on each end of the Tools section to scroll through your items.
- To use an item begin by clicking on the tools button and selecting an inventory item. Drag the item you want to use to the appropriate area and click on it to make it stick.
Mini-games
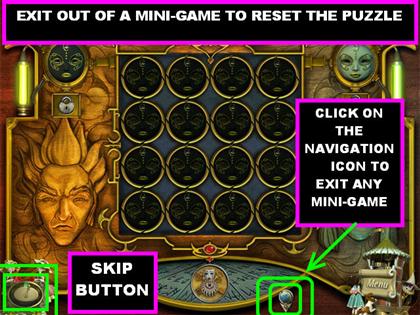
- You can skip a mini-game once the skip button is full. The skip button only appears in the mini-game sections and it is located in the lower left corner.
- The instructions for the mini-game only appear at the beginning. After that there is no way to access the instructions once the game has started.
- If you need to see the instructions for a mini-game again, exit out of it. Once you return to the game the instructions will appear. This action also resets the puzzle.
Chapter 1: The Hotel
Hotel Reception Area
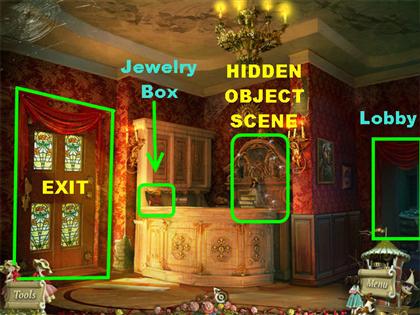
- You can choose to go through the game’s tutorial at the beginning of this level.
- There is a jewelry box on the counter but you cannot open it until you find a key. You can come back to the jewelry box later.
- Click on the sparkly area to open a Hidden Object scene. Look for all the items on the list.
Gear Set
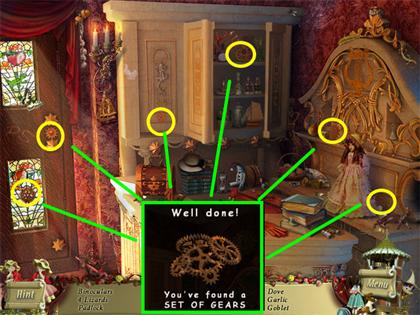
- Click on the cabinet to open it and search for items.
- The 6 gears are circled in yellow in the screenshot.
- Once you complete your search a Set of Gears will go into inventory.
- Click on the right door to enter the Lobby.
Jewelry Box Key – Hotel Lobby
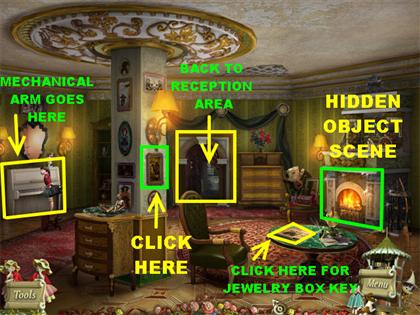
- When you first enter the lobby you will see a Spider Puppet on the round table. Click on the Spider Puppet and it will go away. You will see the Spider Puppet in several scenes from this point on.
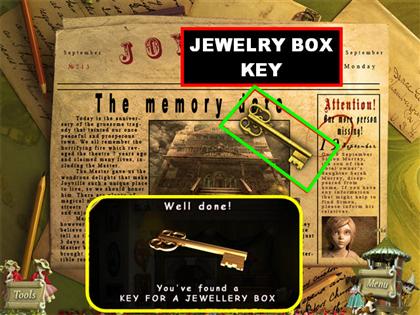
- Click on the newspaper on the round table for a closer view.
- Pick up the Jewelry Box Key on the paper.
- Close the window to return to the scene.
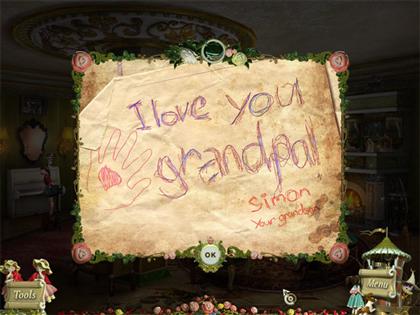
- Click on the picture on the column, below the lamp, and the picture will fall to the ground. Click on the hole in the wall for a closer view.
- The drawing says: “I love you grandpa! Simon, your grandson.”
Pick up the Puppet’s Arm – Fireplace
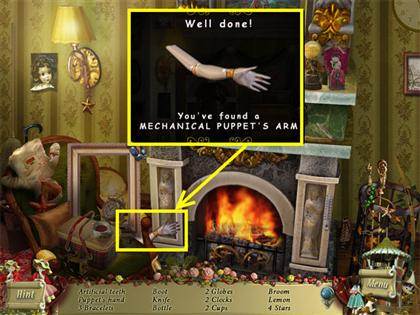
- Close the drawing, click on the fireplace for a closer view and find all the objects on the list.
- Pick up the Puppet’s Arm in the lower left side of the fireplace.
- You will be automatically returned to the Lobby as soon as you finish finding all the objects.
Use the Puppet’s Arm – Obtain Sheet Music
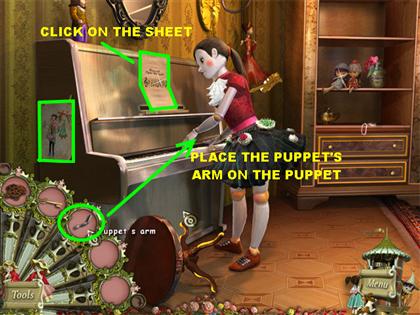
- Click on the piano on the left for a closer view.
- Open the tools in the lower left area.
- Grab the Puppet’s Arm and place it on the puppet next to the piano.
- The puppet will play the piano and a Sheet Music will appear above the piano.
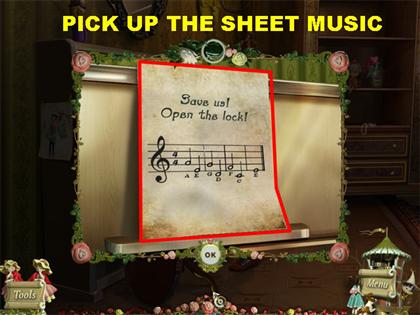
- Click on the Sheet Music for a closer view.
- Click on the Sheet Music to enter it into inventory.
- Go back to the Reception Area through the door in the back of the scene.
Open Jewelry Box – Obtain Set of Weights
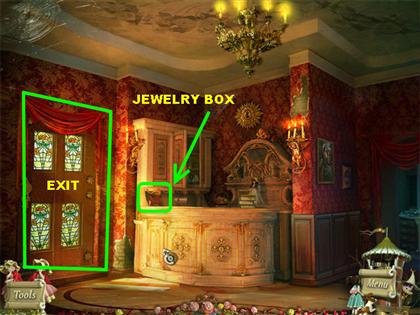
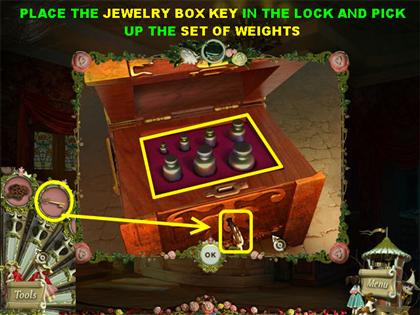
- Click on the jewelry box on the desk for a closer view.
- Grab the Jewelry Box Key from your tools and place it in the keyhole.
- Grab the Set of Weights inside the jewelry box.
- The front door will now be unlocked, go through the door to access the street.
The Street at Sunset
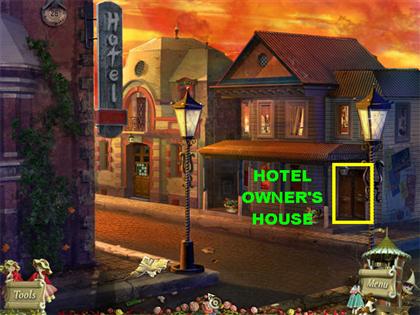
- When you reach outside you will notice that the sun is setting.
- Click on the door on the right to access the hotel owner’s house.
Chapter 2: The Hotel Owner’s House
Pick up Screwdriver – Downstairs, Hotel Owner’s House
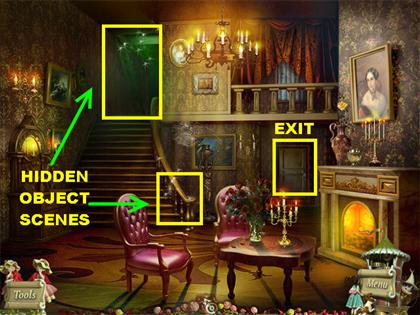
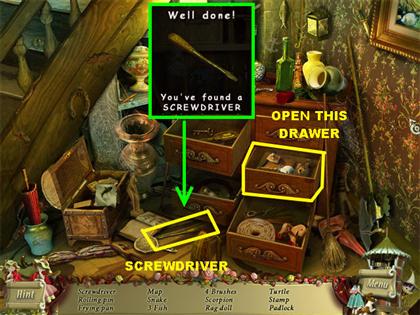
- There are 2 Hidden Object scenes in this section. The first one is at the bottom of the banister and the second one is upstairs.
- Click on the banister for a closer view and look for the objects on the list.
- There is a set of closed drawers on the right, click on the middle drawer to open it.
- Pick up the screwdriver on the floor, directly below the left drawer.
- Click on the sparkly area upstairs to search for items.
Obtain Oil Can - Upstairs, Hotel Owner’s House
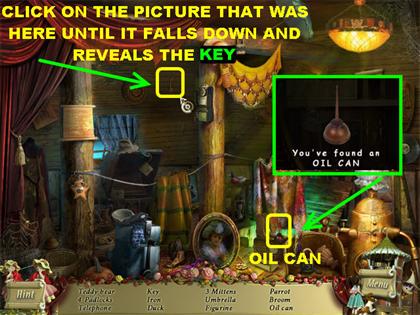
- Click on the picture on the upper left side of the wall and the picture will fall down.
- Grab the key that appears on the wall in place of the picture.
- Click on the Oil Can in the lower right side.
- The door on the right will open; go through the door to access the town.
The Street in the Evening
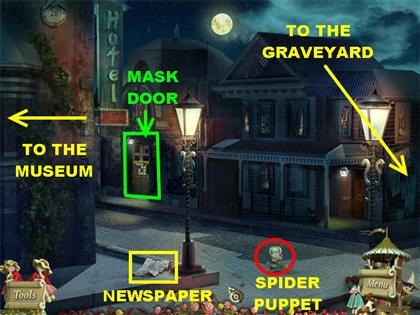
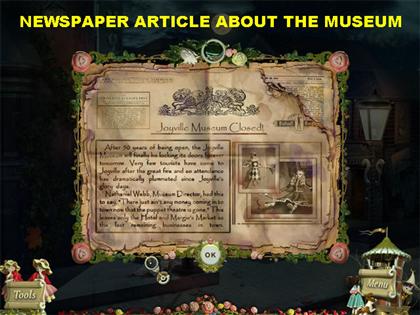
- When you go back outside you will see that it is dark at this moment and the Spider Puppet is outside on the street. He will run away on his own as soon as you enter the scene.
- There are several paths you can take in this section.
- If you click on the left it will take you the Museum.
- Click on the far right and you will be taken to the Graveyard Gate.
- If you click on the door on the left it will show you a closer view of the door. You will see that a mask is missing from the door; you do not have the mask at this time so you will have to return to this door later.
- Click on the newspaper on the ground and it will show you an article that states the Joyville Museum is closed. Close that window.
- The door on the right just takes you back to the hotel owner’s house.
- Let’s go to the far right to access the Graveyard Gate.
Chapter 3: The Graveyard
Use Oil Can – Graveyard Gate
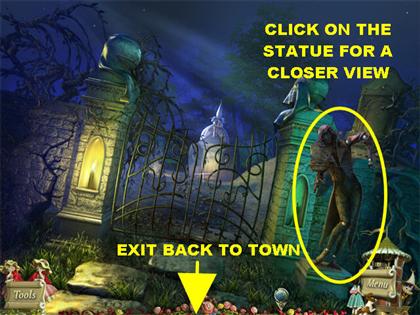
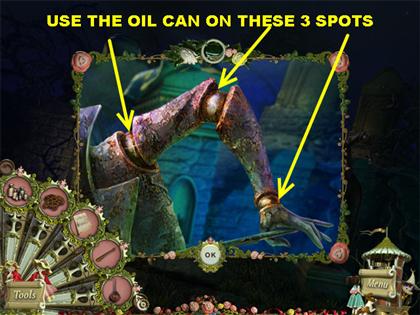
- Click on the statue on the right for a closer view.
- Grab the Oil Can from the tools section and place it on each of the 3 ball joints to oil them. Close that pop-up window.
- The statue will start playing the violin and the gates will slowly open.
Pick up Mask in Graveyard
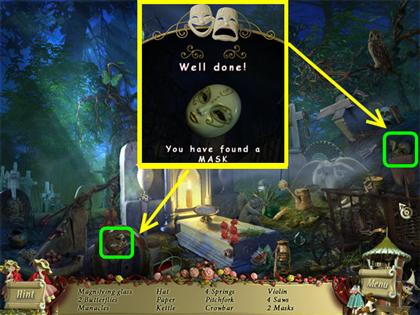
- Click inside the gate once the statue stops playing the violin and you will automatically enter a Hidden Object scene.
- Look for all the items on the list.
- Pick up the mask on the right edge of the scene. There is another mask in the lower left corner as well but the one on the right is the one you need.
- Exit the scene by placing your cursor at the bottom.
Open Mask/ Library Door
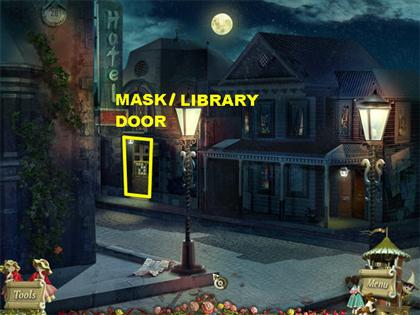
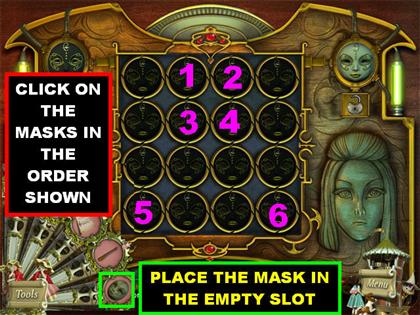
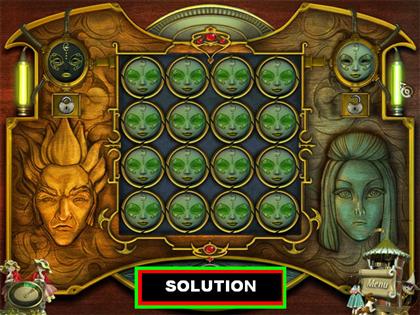
- You are back in town. Click on the left door for a closer view.
- Place the Mask from inventory in the empty slot.
- The goal in this puzzle is to click on the masks until you turn them all white.
- Each mask you touch affects another.
- Please look at the screenshot and click on the masks in the order shown to solve the puzzle.
- You can reset the puzzle to follow the solution on the screenshot by exiting out of the puzzle. Click at the bottom of the puzzle to exit and you will be back in town. Click on the door and the puzzle will be reset.
Chapter 4: The Library
Use Cloth to Discover the Time - Library
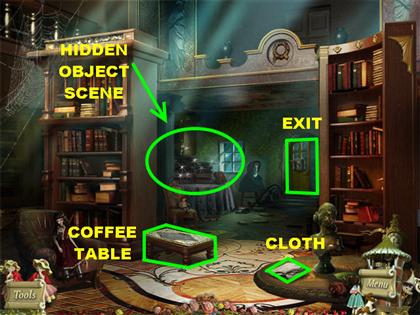
- Pick up the Cloth in the lower right.
- Click on the coffee table for a closer view.
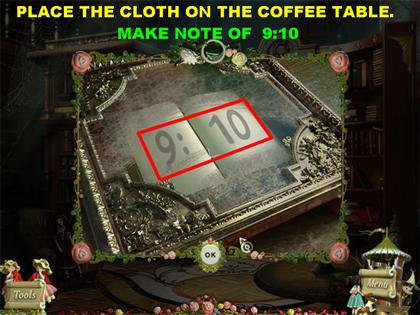
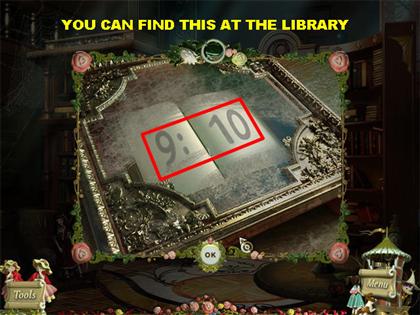
- Place the cloth on the coffee table 3 times until you can see “9:10” written on the table. You will need to remember this time for a future puzzle.
Pick up Heavy Stone
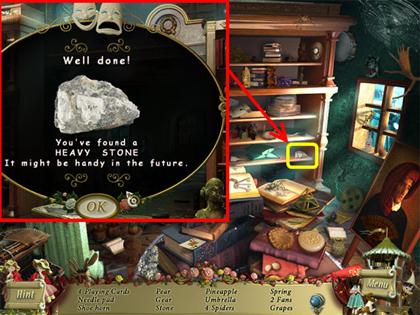
- Click on the sparkly area in the back of the Library for a closer view.
- Find all the objects on the list.
- The Heavy Stone is on the bottom right shelf.
- Once you’re done finding all the objects, exit through the door in the back of the Library.
Chapter 5: Joyville Museum
Accessing the Museum
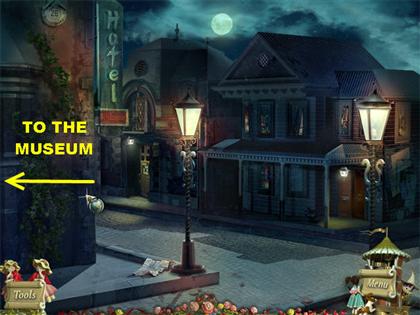
- Once you’re done in the Library you can go back to the street.
- Place your cursor on the lower left side of the wall to access the Museum.
Outside the Museum
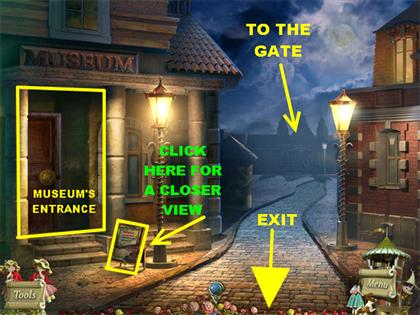
- You are now in front of the Museum.
- If you place your cursor in the back of the scene you will be taken to a gate. You cannot open the gate until you have the key, so no need to go there right now.
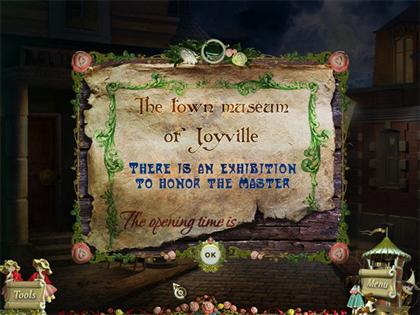
- Click on the sign in front of the Museum for a closer view.
- Notice the sign says there is an exhibition to honor the Master but the opening time at the bottom has been ripped off. The time was found back in the Library when you dusted off the coffee table.
Set the Time for the Museum – Use Heavy Stone
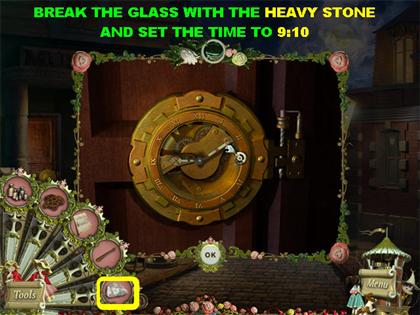
- Click on the door for a closer view.
- Grab the Heavy Stone from inventory and place it on the glass 3 times.
- Your goal is to set the time according to the note on the coffee table in the Library.
- Set the time to 9:10 to unlock the door. Go through the door.
Diamond Ring - Inside the Museum
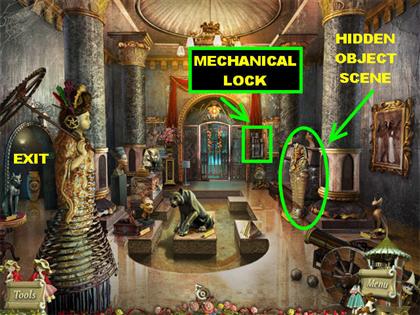
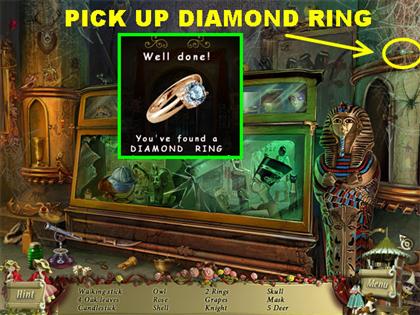
- Click on the sparkly spot on the right for a closer view and find the items on the list.
- Pick up the Diamond Ring in the upper right corner.
- Click on the mechanical lock on the right side of the grating for a closer view.
Mechanical Lock Puzzle
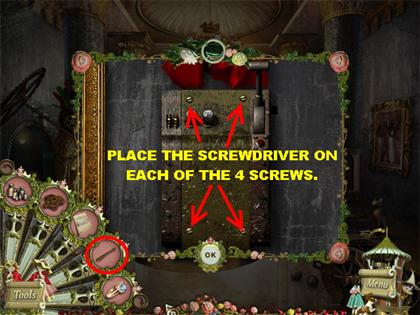
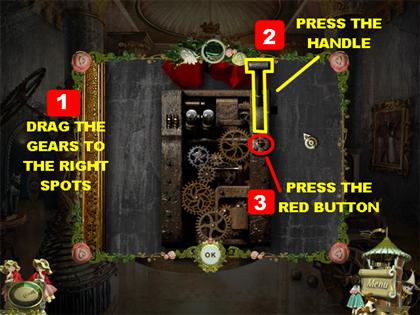
- Click on the Mechanical Lock to the right of the grating for a closer view.
- Place the screwdriver on each of the 4 screws of the panel to open it.
- Once the panel is open, open your tools, grab the gears and place them on the mechanism. The gears will appear on each side of the panel.
- Grab the gears and drag them to the correct spot on the mechanism.
- If a gear is in the right spot, it will stick into place.
- If the gear is not in the right spot it will go back where it came from.
- Once all the gears are in place, click on the red button first and on the handle second.
- Please look at the screenshot for the solution.
Chapter 6: Theater Gate
Obtain Theater Gate Key – Hall Room
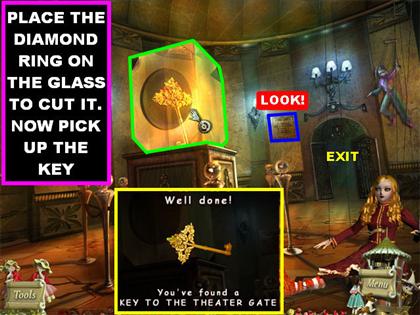
- Once everything has been done correctly, the grating will open, go through it.
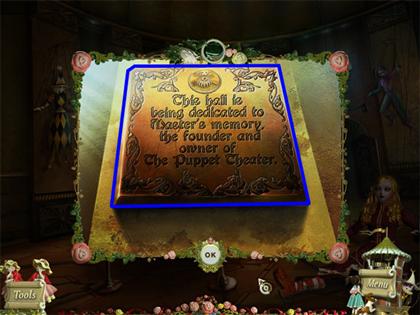
- Click on the plaque next to the door for a closer view.
- The plaque states that the Hall is dedicated to the Master’s memory.
- Grab the Diamond Ring from the tools section, place it the glass encircling the key and the ring will cut the glass.
- Grab the Theater Gate Key in the case.
- To go to the Theater Gate place your cursor in the following areas:GRATING DOOR ON LEFT BACK OF SCENE
Open the Theater Gate
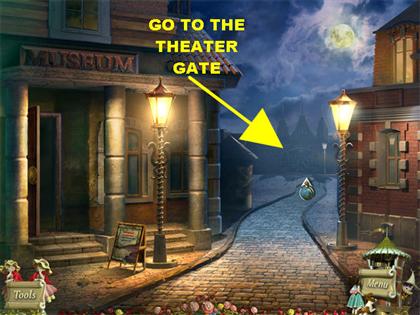
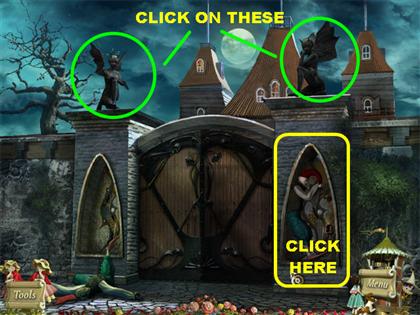
- The Spider Puppet appears in the scene again. This time he goes over the fence.
- You can interact with different parts of the scene here by clicking on the puppets. Some of them will move as you touch them.
- Click on the large puppet to the right of the door for a closer view.
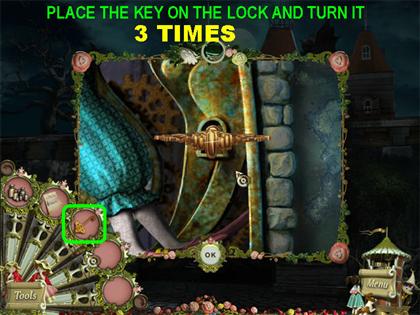
- Grab the Theater Gate Key from inventory and place it on the lock.
- Click on the key 3 times and the gate will open, go through it.
Chapter 7: Outside the Theater
Pick up Stick - Theater Fountain
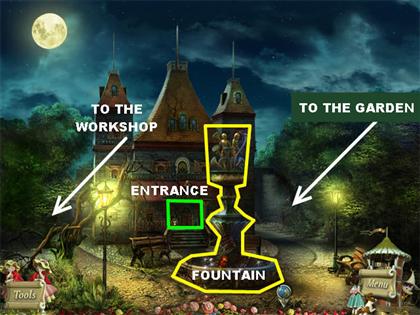
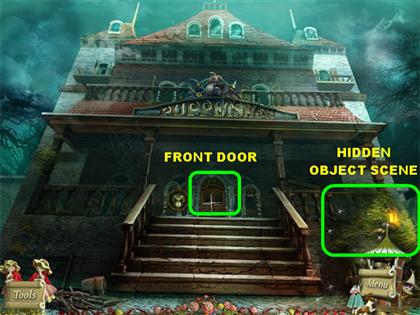
- You are now outside of the Theater. There are several places you can access in this area.
- If you click on the fountain you can search for a list of objects.
- Click on the front door for a closer view of the Theater’s Entrance.
- To the right you can access the back of the garden.
- To the left you can access the Theatre Workshop.
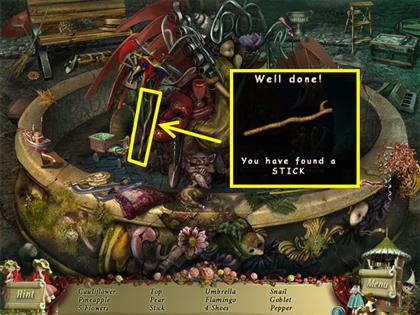
- Click on the Fountain and search for the items on the list.
- The stick is on the left side of the fountain.
Pick up Nails - Theater Entrance
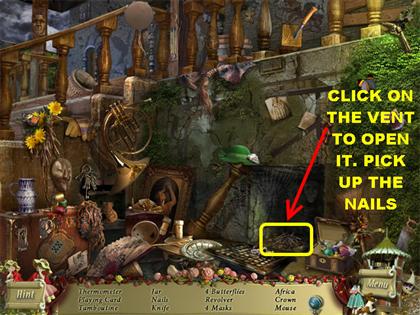
- Click on the front door for a closer view.
- Click on the bushes on the right and look for the items on the list.
- Click on the vent in the lower right to open it.
- Grab the Nails inside the vent.
- After all the items have been found, go to the Workshop.
- Place your cursor in the following manner to go to the Workshop:DOWN LEFT
Theater Workshop
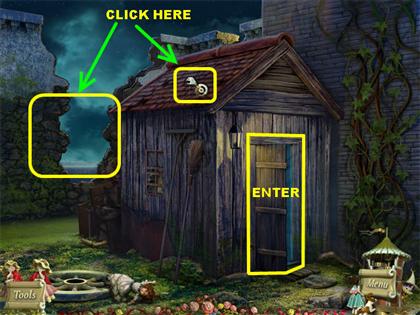
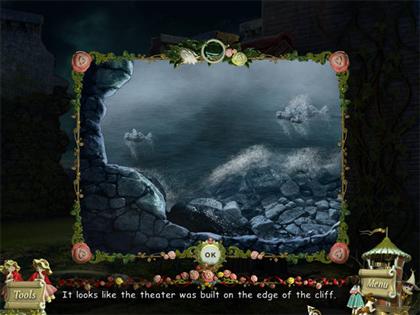
- Click on the left for a closer view of the cliff.
- Click on the roof and the hand icon will appear. Click on the roof again and parts of it will fall to the ground and a hole will appear on the ground. Do not worry about that area, there’s nothing you can do with it.
- Click on the door to go through it.
Pick up Hammer - Inside Workshop
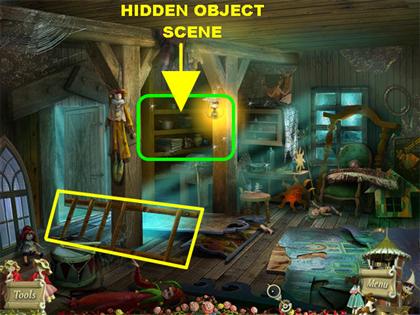
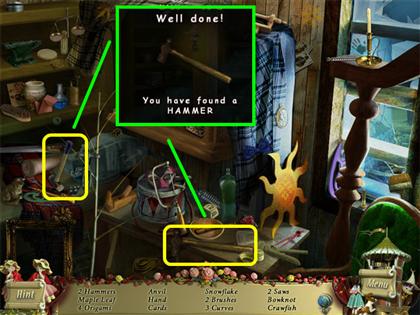
- There is a ladder on the floor that you must repair but you must find the hammer before you can to fix it.
- Click on the sparkly area on the left to search for the items on the list.
- Click on the blue cloth to reveal some hidden items.
- Pick up the 2 hammers in the scene.
- One of the hammers is in the lower center.
- The other hammer is on the lower left.
- Find the rest of the items on the list.
Repair Ladder
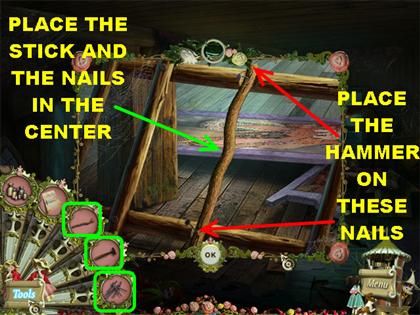
- Click on the ladder on the left for a closer view.
- Your goal is to repair the ladder.
- Open your tools section, grab the Stick and place it in the center of the ladder. If you try to place it on other areas it will not stick. You will see a sparkle appear in the area that you need to place the Stick.
- Place the Nails in the center of the ladder, on the sparkly spot. The Nails will go on each end of the Stick.
- Grab the Hammer and place it on the Nails on each end of the Stick.
- Click on the Ladder once it’s been repaired and it will go into inventory.
- Go the Garden by placing your cursor in the following areas:LEFT DOOR DOWN FAR RIGHT
Use Ladder & Find Bronze Statuette
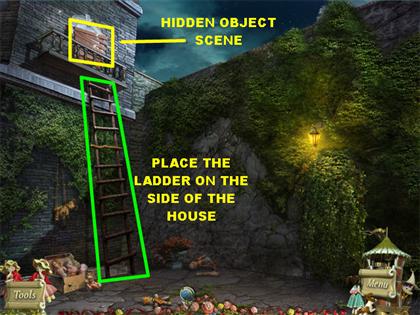
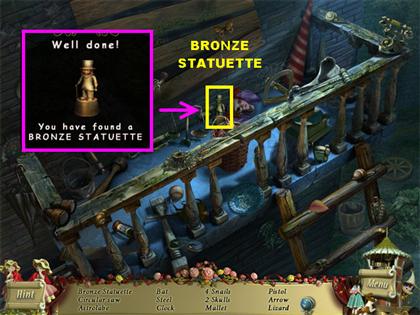
- Take the Ladder you just fixed and place it on the side of the house.
- Click on the boarded window and look for the items on the list.
- Pick up the Bronze Statuette in the center of the balcony.
- Go back to the Entrance by placing your cursor in the following manner:DOWN FRONT DOOR
MECHANICAL LOCK SCALES
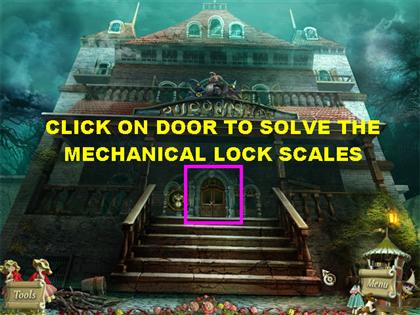
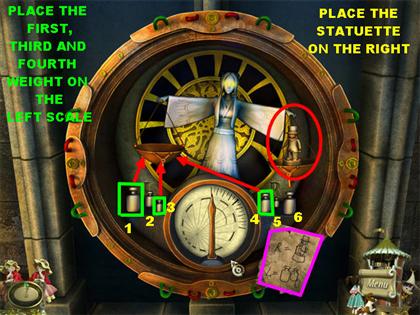
- Once you’re in front of the Theatre, click on the front door for a closer view. You will see a statue holding a scale.
- Your goal is to balance the scales using the Bronze Statuette and the Set of Weights.
- Notice the paper in the lower right, it shows a picture of the statuette with the letter “R” next to it. It also shows the Set of Weights with the letter “L” next to it.
- That paper lets you know that the weights go on the left scale and the statuette goes on the right scale.
- Grab the weights from inventory and place them below the letter “L”. The weights will automatically go below both scales.
- Grab the Bronze Statuette and place it on the right scale.
- Now you must balance the scale using the right weights.
- If you look at the diagram again it shows you a large, medium and small weight next to the letter “L”.
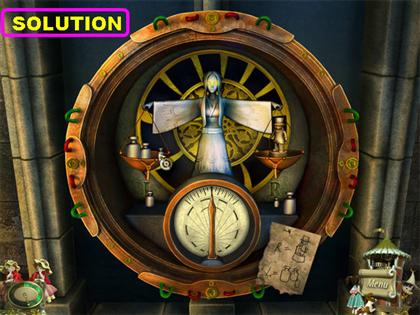
- From left to right, place the 1st, 3rd and 4th weight on the left scale.
- Once the scale is balanced the door to the Theater will open.
- Please look at the screenshot for the solution.
- Enter the Theater.
Chapter 8: Inside the Theater
Find Oil Lamp - Theater Hall
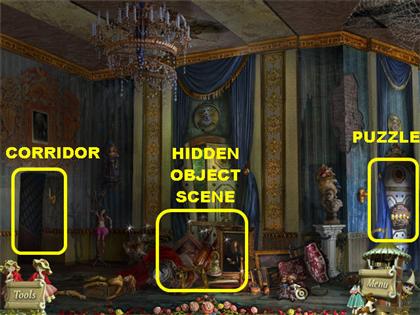
- The Spider Puppet appears again. This time he runs into the Corridor.
- There are many areas to explore in the Hall.
- The left door will lead you to the Corridor.
- The pile of stuff on the floor opens a Hidden Object scene.
- On the right side you have a puzzle. You will not be able to solve it now, you can return to it later.
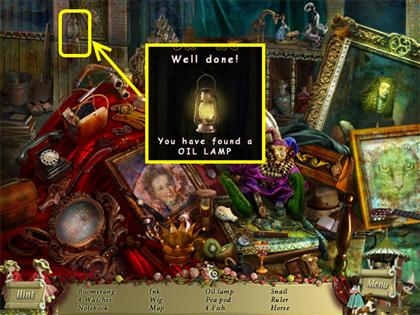
- Click on the pile of stuff on the floor to look for the items on the list.
- Click on the green cloth in the upper right to reveal some hidden items.
- Pick up the Oil Lamp on the top left side.
- Go through the door on the left after all the items from the list have been found.
Light the Corridor and Unlock the Door
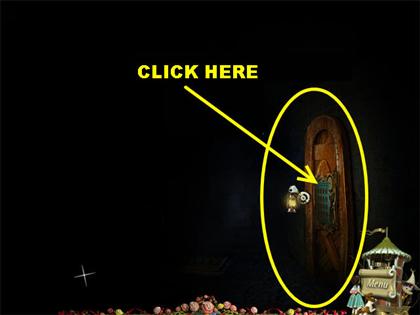
- When you first enter the Corridor it is very dark. The Oil Lamp is attached to your cursor, move it around the scene so you can see.
- Click on the panel on the right for a puzzle to appear.
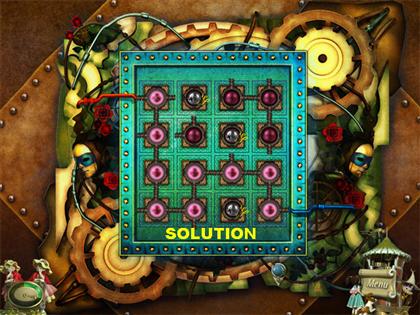
- Your goal in this puzzle is to connect a straight line from the red wire to the blue wire.
- Click on each connector and the wires will switch to a different position.
- When the wires are connected correctly the center of the connectors will light up.
- All the connectors do not have to be lit to complete this puzzle.
- Please look at the screenshot for the solution.
- Enter the Boiler Room on the right.
Boiler Room
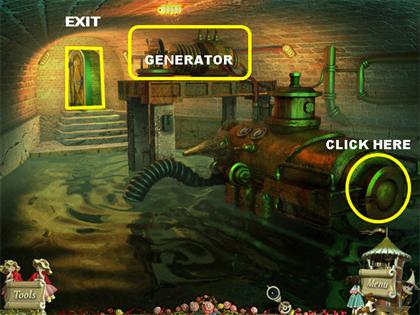
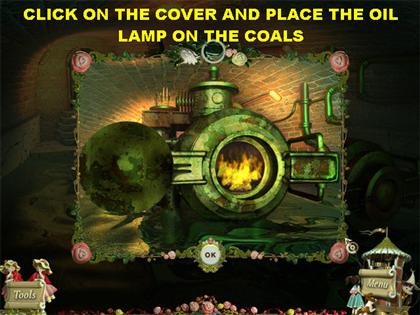
- Click on the end of the boiler for a closer view.
- Click on the close-up view and the cover will open.
- Place the Oil Lamp on the coals inside the boiler.
- The boiler will start working and it will dry up all the water on the ground.
- A sparkly spot will appear on the ground once the boiler starts working.
Find Electrode – Boiler Room
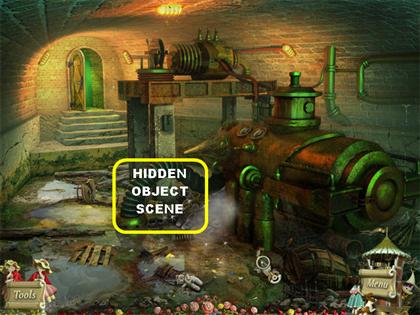
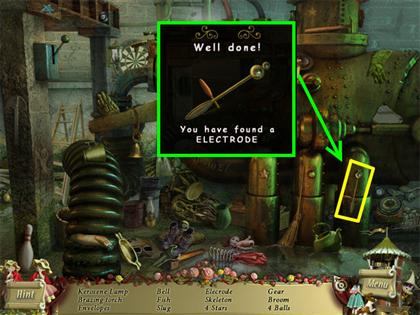
- Click on the sparkly spot on the ground to open a Hidden Object scene.
- Pick up the electrode on the lower right side of the boiler.
Use Electrode on the Generator – Boiler Room
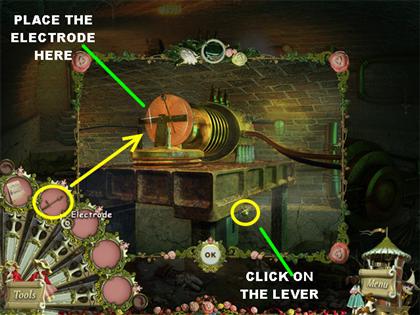
- Click on the generator on the left side of the boiler room for a closer view.
- Place the Electrode on the front of the generator.
- Click on the lever in the lower right side of the generator to start it.
- The lights will automatically turn on in the Corridor.
- Go through the door so you can go back to the Corridor.
Corridor
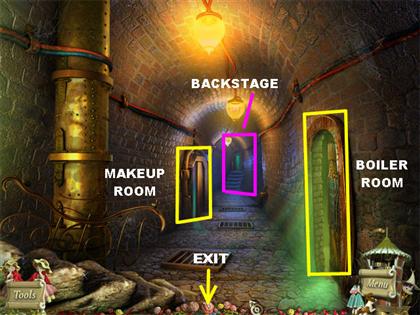
- You can access the Makeup Room through the door on the left.
- You can access the Backstage area through the door in the back of the Corridor.
- The Boiler Room is through the door on the right.
- To exit the Corridor, point your mouse downwards.
- For the purposes of this walkthrough we will go to the Makeup Room on the left first.
Pick up Lever - Makeup Room
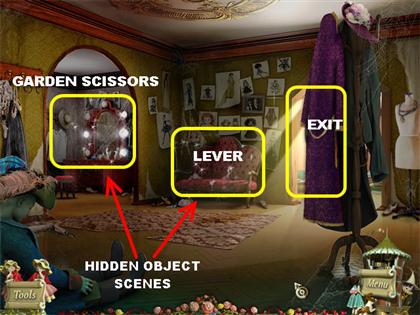
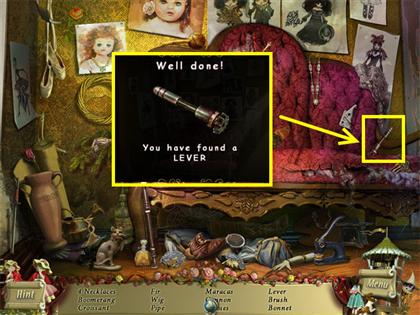
- There are 2 Hidden Object scenes in this room. One is on the red sofa and the other is on the dresser.
- Click on the red sofa for a closer view.
- Pick up the Lever on the right side of the sofa.
Pick up Garden Shears – Makeup Room
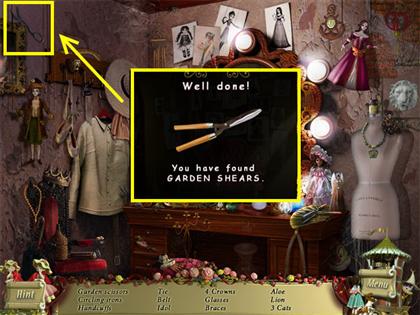
- Click on the dresser in the back of the Makeup Room for a closer view.
- Click on the green cloth on the mirror so you can expose the mirror.
- Pick up the Garden Shears in the upper left side of the scene. They are partially hidden behind the framed painting.
- Go through the door. Click in the back of the Corridor to access the Backstage area.
Use the Lever to Open Curtain – Backstage
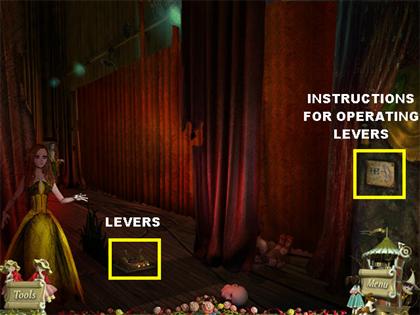
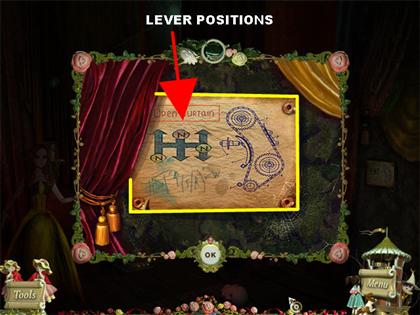
- Click on the drawing on the right for a closer view.
- The drawing shows you how the levers need to be positioned in order to open the curtains.
- Exit out of that window.
- Click on the levers on the ground for a closer view.
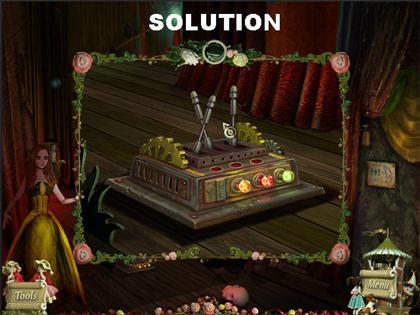
- Place the Lever from inventory in the empty slot.
- Using the diagram, click on the levers in the following manner:LEFT 2X MIDDLE 2X
- Once you’re done with the levers, they should be in the following positions from left to right:LEFT – ALL THE WAY FORWARD MIDDLE – ALL THE BACK RIGHT – IN THE MIDDLE POSITION
Pick up Blue Lever
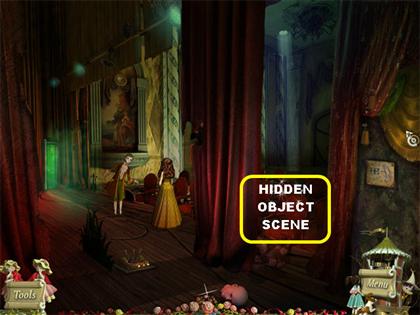
- The curtains are now open and 2 puppets are on stage.
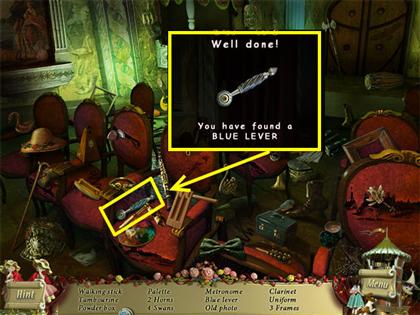
- Click on the sparkly area on the red chairs for a closer view.
- Click on the red chair in the front position, second to last, and it will disappear. Find the items on the list.
- Pick up the Blue Lever on the 4th chair from the left, in the front row.
- Click in the back of the scene to access the Back Room.
Pick up Chain - Back Room
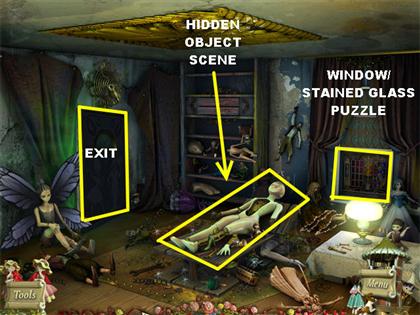
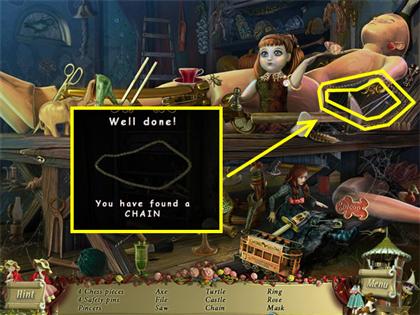
- Click on the Puppet on the stretcher for a closer view.
- Pick up the Chain in the top right side of the scene.
- Click on the small window on the right for a closer view and a puzzle will open up.
Stained Glass Puzzle
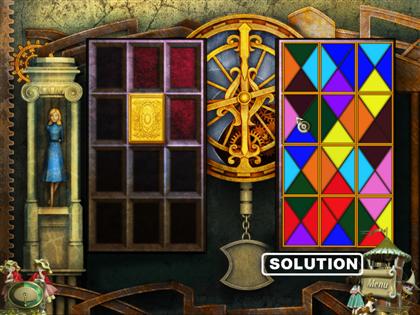
- Your goal in this puzzle is to move the pieces on the left onto the appropriate spots on the right.
- When a piece is in the right spot, it will stick and fill in the whole space.
- Adjacent pieces must have the same color.
- Please look at the screenshot for the solution.
Pick up Red Rune
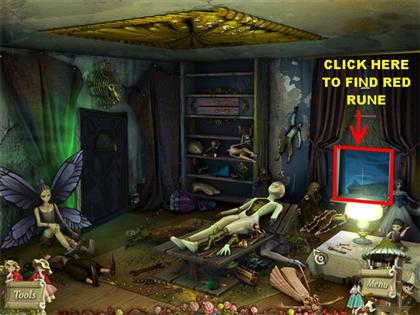
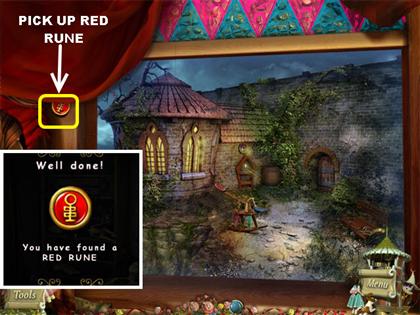
- Once the stained glass puzzle has been solved, the window will open.
- Click on the window for a closer view.
- You will see the Spider Puppet appear on the window and eventually will go through the door in the Secret Backyard.
- A Red Rune will appear in the upper left side of the curtain after the Spider Puppet has disappeared.
- Pick up the Red Rune to enter it into inventory.
- If you click on the scene it will tell you that the Theater has a Secret Backyard.
Fix the Puppet – Pick up the Puzzle Piece
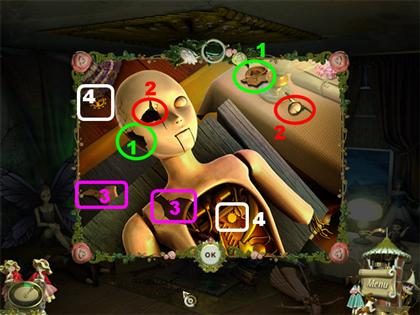
- Click on the puppet on the stretcher for a closer view.
- Your goal is to place the missing parts on the puppet.
- Grab the ear and place it on the side of his head.
- Grab the eye and place it in the eye socket.
- Pick up the chest piece and place it on the upper left side of his chest, next to his shoulder.
- Grab the gear and place it in his chest cavity.
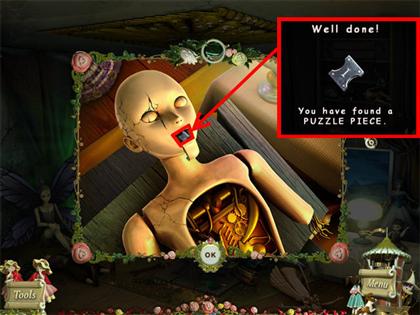
- Once all the pieces are in place, grab the Puzzle Piece in his mouth. This Puzzle Piece has the number “1” written on it.
- Let’s go back to the Hall, place your cursor in the following manner to reach the Hall:DOOR ON LEFT DOWN DOWN
Door Number Puzzle
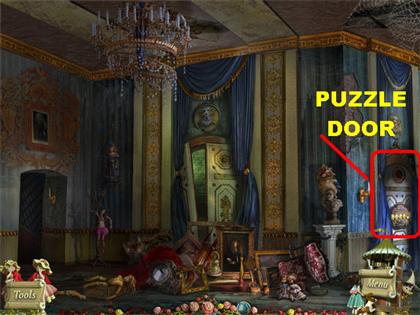
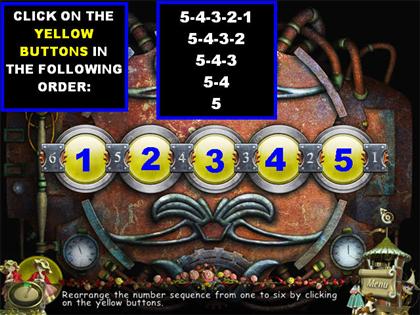
- Click on the hotspot on the right for a closer view.
- Place the Puzzle Part on the last slot.
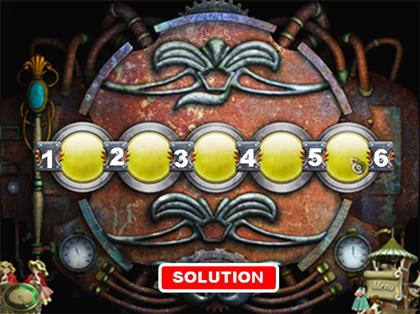
- Your goal is to arrange the numbers from 1 to 6, from left to right.
- Click on the yellow buttons to swap the numbers.
- Each yellow button will swap the order of the two numbers that are attached to it.
- I will number the yellow buttons from 1 to 5, from left to right. Click on the buttons in the following order:5-4-3-2-1 5-4-3-2 5-4-3 5-4 5
- At this point the numbers should read 1 to 6 from left to right.
Pick up the Piston – Balcony
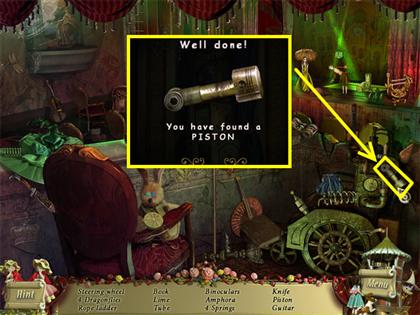
- The door to the Balcony opens once the puzzle has been solved, go through it and search for the items on the list.
- Pick up the Piston in the lower right.
- Exit the scene after all the items have been found by placing your cursor at the bottom of the scene 2 times.
Fix the Fountain’s Mechanism – Piston, Chain & Blue Lever Usage
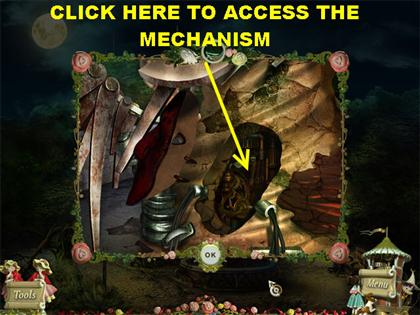
- Click on the Fountain for a closer view.
- Click on the red mask to expose the mechanism.
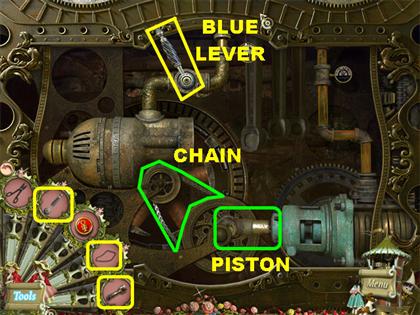
- Click on the mechanism for a closer view.
- Place the Chain on the two wheels in the lower center.
- Put the Blue Lever on the sparkly spot in the upper center.
- The Piston belongs on the lower right, in between the larger wheel and the blue metal piece.
- Click on the Blue lever to start the Fountain’s mechanism.
Pick up Key
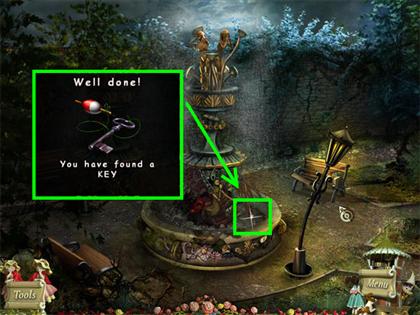
- You will be automatically taken to a closer view of the Fountain. Click on the floater on the right side of the water to pick up the key.
- Exit out of the Fountain by placing your cursor downwards.
- Go to the Garden by placing your cursor to the right of the Theater.
Chapter 9: Secret Backyard
Garden Shears & Key Usage – Unlock Secret Backyard
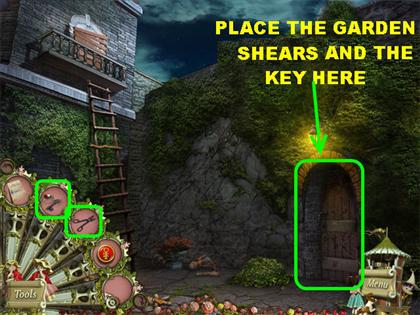
- Grab the Garden Shears from inventory and place them on the bushes on the right to expose a door.
- Place the key on the door to unlock it and gain access to the Secret Backyard.
Find Numbered Button - Backyard
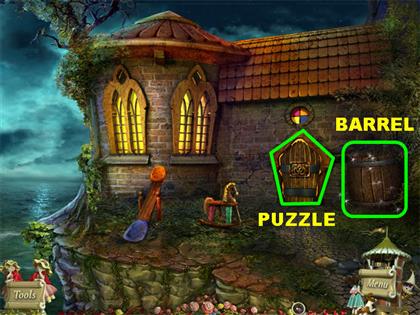
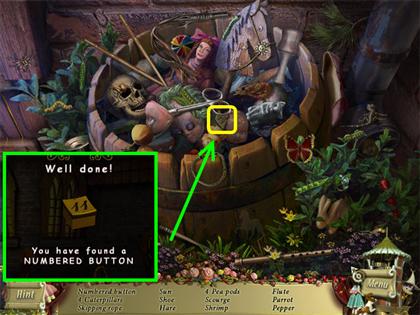
- Click on the barrel and look for the items on the list.
- Pick up the Numbered button (#11) in the center of the barrel.
Rune Door Puzzle
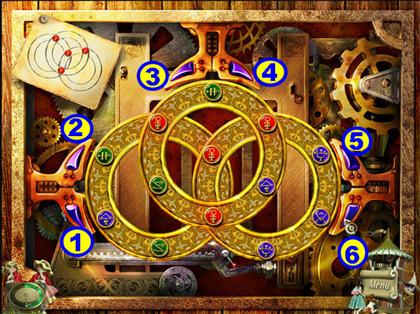
- Click on the door for a closer view.
- Place the Red Rune in the empty slot on the right.
- Your goal is to arrange the red runes in the same manner as the diagram in the upper left corner.
- Use the purple arrows to move the runes around. The rings will move in the direction of the arrows.
- The purple arrows control the ring they are attached to. The arrows on top control the top ring. The arrows on the right control the right ring. The arrows on the left control the left ring.
- I will number the arrows from 1 to 6 starting with the ones on the left. Press the arrows in the following manner to solve the puzzle:6 TWICE 2 ONCE 6 ONCE 4 TWICE 6 FIVE TIMES
Chapter 10: Master’s House
Pick up Fishing Lure - Master’s Hall
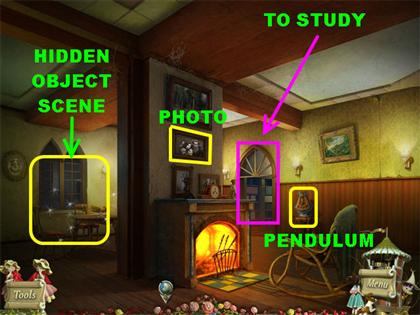
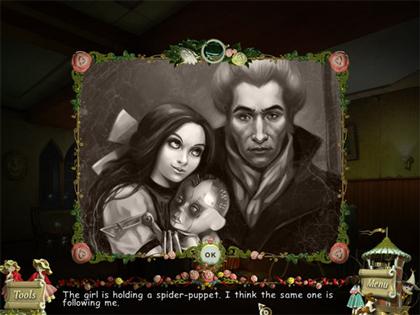
- You can click on the black and white picture above the fireplace for a closer look. You will see the Spider Puppet in the picture.
- There is a pendulum clock on the right but you cannot use it right now, you can come back to it later.
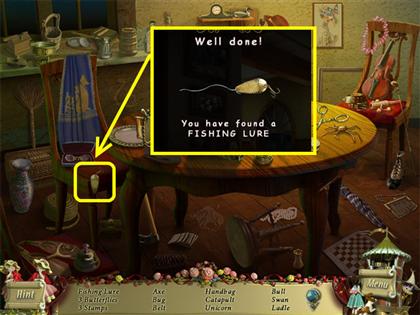
- Click on the sparkly spot on the left to search for items.
- Pick up the Fishing Lure on the left chair.
- Click on the door in the back of the scene to enter the Master’s Study.
Bookcase Close-up
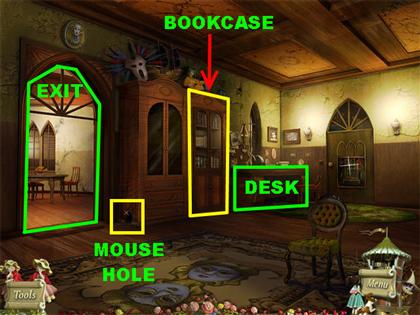
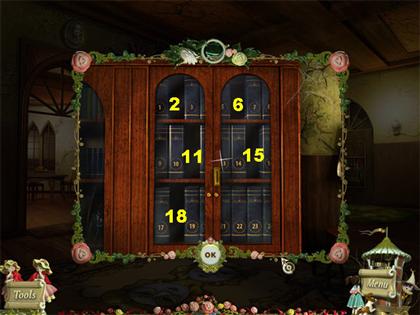
- There are many areas to explore in this section.
- Click on the bookcase for a closer view.
- There are several books missing from the collection. The missing numbers are 2, 6, 11, 15 and 18. You will need these numbers to solve a puzzle later in the game.
- If you click on the bookcase it tells you there is a strange slotted lock that doesn’t take a regular key.
- Close that window for now.
Use Fishing Lure to Obtain the Clock Key - Master’s Study
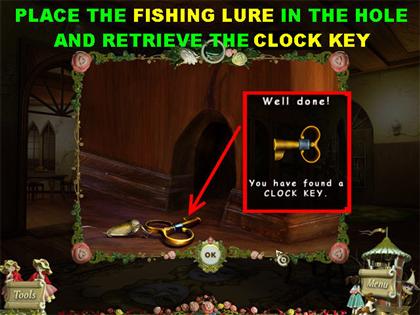
- Click on the mouse hole on the lower left corner of the bookcase for a closer view.
- Use the Fishing Lure on the hole to pull the Clock Key out. Pick it up once it’s out of the hole.
- Go back to the Hall by placing your cursor on the left door.
Use Clock Key – Pendulum Clock
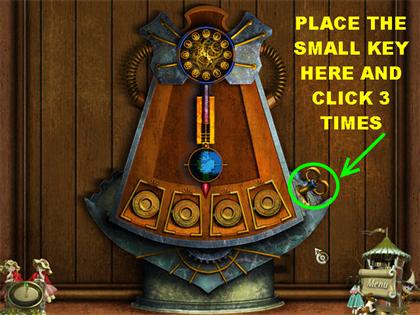
- Click on the pendulum clock on the right for a closer view.
- Place the Clock Key on the right side of the pendulum.
- Click on the Clock Key 3 times to activate the clock.
Pendulum Mini-game
- Your goal in this mini-game is to click on the highlighted token the moment the pendulum points to it.
- There are 4 tokens at the bottom of the pendulum. One token will light up at a time. Click on the token when the pendulum falls in between the 2 blue arrows.
- Each time you click on the gold token correctly a colored token will appear.
- You will win the game once the 4 tokens appear.
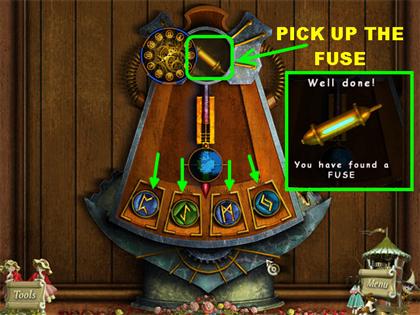
- Pick up the Fuse on top of the pendulum after the puzzle has been solved.
- Notice the symbols and the colors of the tokens at the bottom of the pendulum. This information will be useful in another puzzle.
- Go back to the Study.
Place the Fuse - Study
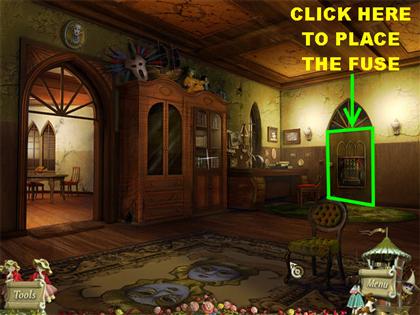
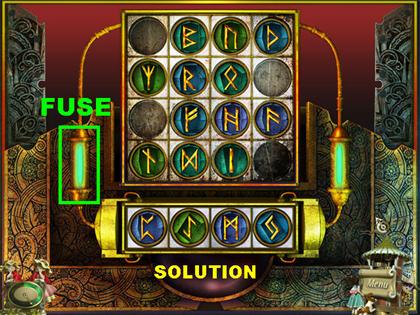
- Click on the door in the back of the scene for a closer view.
- Place the Fuse on the left side of the apparatus.
- Your goal is to place the runes in the right order at the bottom of the apparatus.
- The order of the tokens is shown on the pendulum in the Hall.
- Please look at the screenshot and place the runes in the order shown.
- Once the runes have been placed correctly, the door will open.
Pick up Rope Ladder - Daughter’s Room
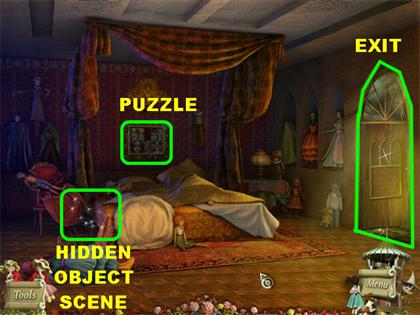
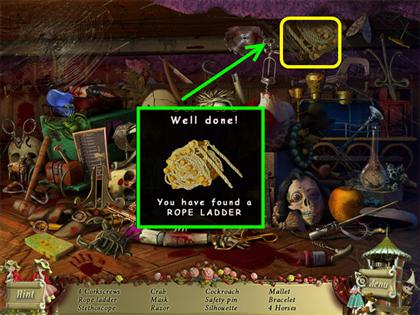
- Click on the sparkly spot next to the bed and look for the items on the list.
- The Rope Ladder is in the upper right side of the scene.
Mask Puzzle
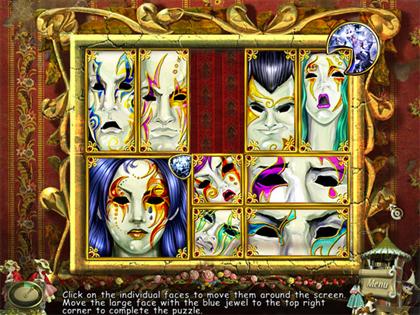
- Click on the picture on the back wall for a closer view.
- Your goal in this puzzle is to move the large square piece into the upper right corner.
- Click on a piece and it will slide into the empty space.
- Please follow the order of the screenshots to solve this puzzle.
Mask Puzzle - Step 1
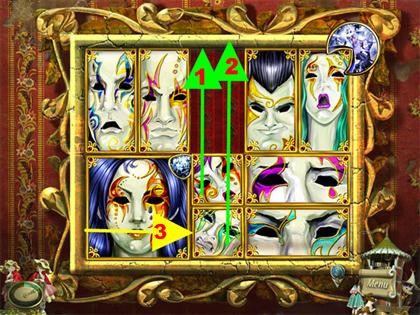
Mask Puzzle - Step 2
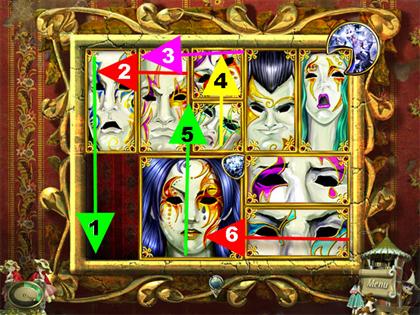
Mask Puzzle - Step 3
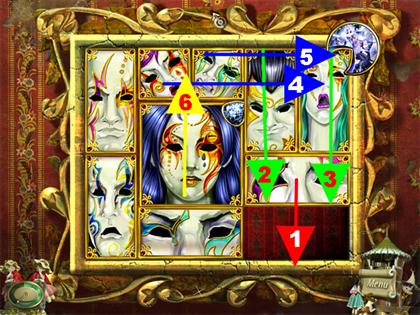
Mask Puzzle - Step 4
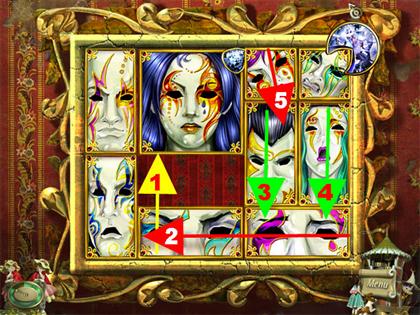
Mask Puzzle - Step 5
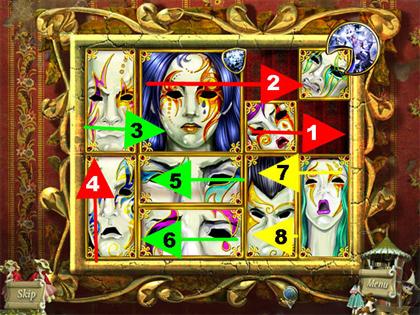
Mask Puzzle - Step 6
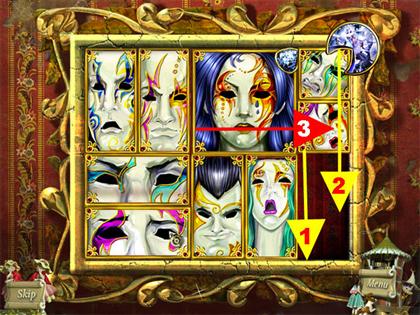
Pick up Handle & Glass Container – Daughter’s Bedroom
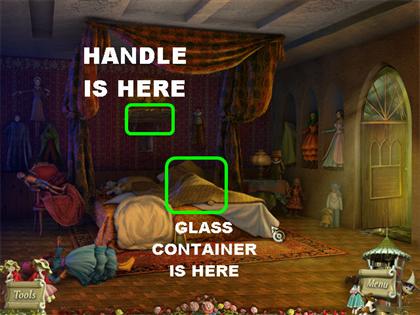
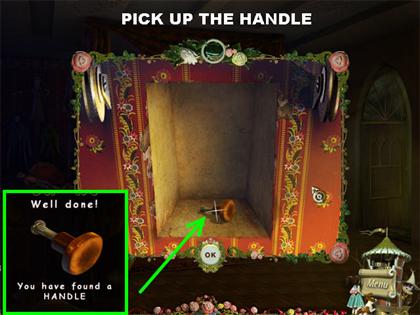
- Once the puzzle has been solved you will be automatically taken back to the bedroom scene. Click on the spot in which the picture was located for a closer view.
- Pick up the handle that appears in the wall.
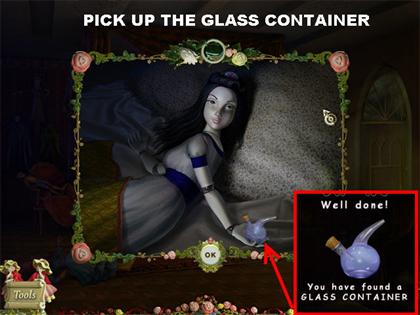
- Click on the bed covers for a closer view. Click on the covers again to pull them back.
- Grab the Glass Container in the puppet’s hand.
- Leave the Bedroom through the open door.
Pick up Punch Cards - Desk Close-up
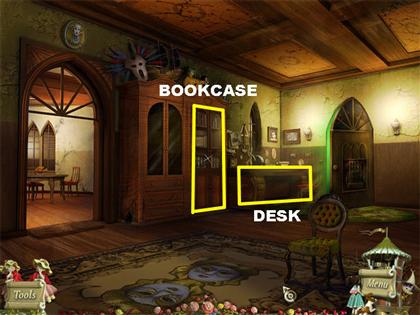
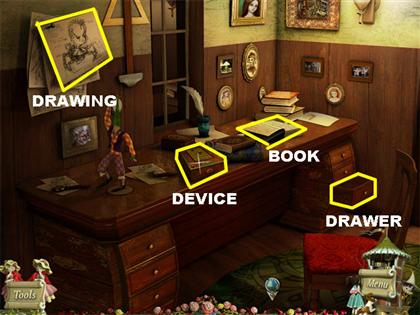
- Click on the desk for a closer view.
- The Spider Puppet is going through the book on the desk.
- Click on the book for a closer look.
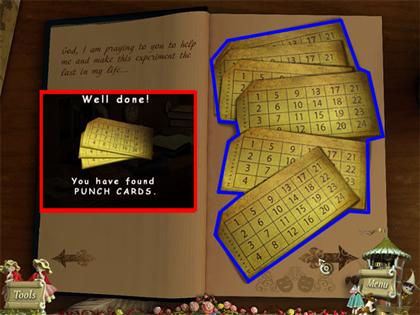
- Click on the pages to turn them. At the end of the pages you will find Punch Cards, pick them up.
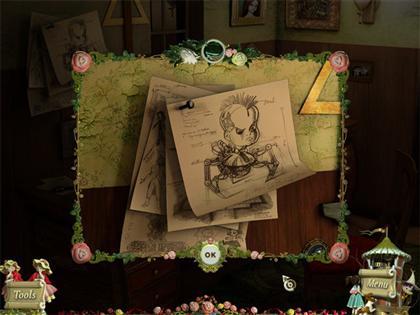
- Click on the picture in the upper left for a closer view. It is a drawing of the Spider Puppet we’ve been seeing in different areas.
Use Handle & Open Desk Drawer
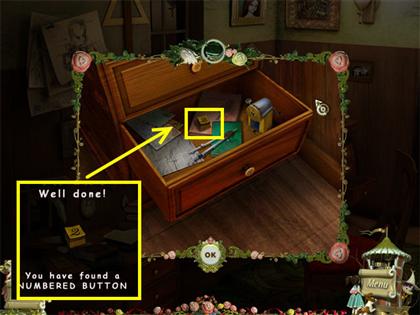
- Click on the right drawer for a closer view.
- Place the Handle on the drawer.
- Click on the Handle to open the drawer.
- Pick up the Numbered Button (#2) inside the drawer.
Punch Numbers onto the Punch Card
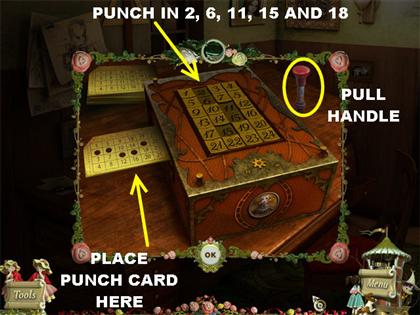
- Click on the device on the left side of the desk for a closer view.
- Place the 2 Numbered Buttons (number 2 and number 11) in the appropriate empty spaces on the device.
- Grab the Punch Cards and place them on the device. Click on it when you see the hand icon appear.
- The Punch Cards will automatically go behind the device.
- Grab a Punch Card and place it in the green slot. Click on it when you see the hand icon appear.
- Punch the following numbers into the device: 2, 6, 11, 15 and 18.
- Click on the red handle of the device and a Punch Card will come out on the side.
- Pick up the Punched Card and it will go into inventory.
- Exit out of that window by placing your cursor at the bottom.
Use Punch Cards on Bookcase
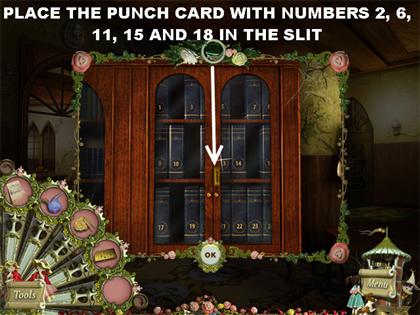
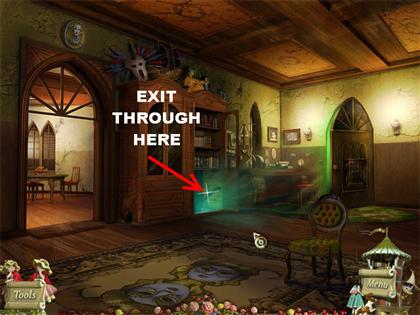
- Click on the bookcase for a closer view.
- Grab the Punched Card and place it in the slit on the lock.
- A secret entrance will open at the bottom of the bookcase, exit through there.
Chapter 11: Dungeon
Collect Valve Handle and Obtain Acid - Dungeon
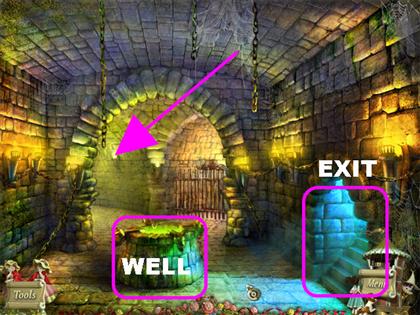
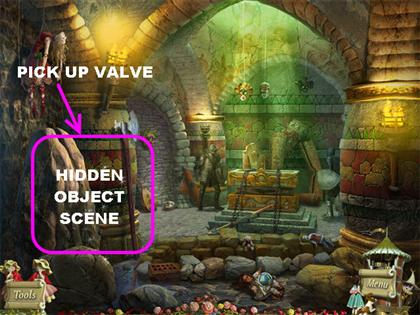
- Click on the far left to enter the next scene.
- Click on the sparkly spot on the left to look for the items on the list.
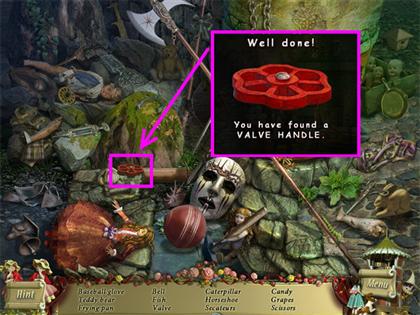
- Pick up the Valve Handle in the lower left.
- Exit out of that scene by pacing your cursor downwards.
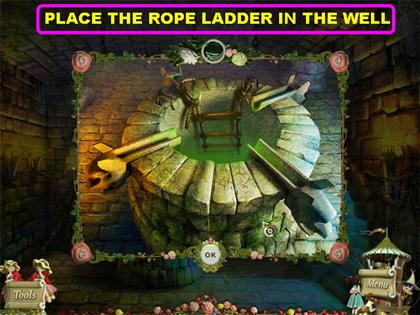
- Click on the well for a closer view.
- Grab the Rope Ladder and place it in the well.
- Click on the Rope Ladder to go inside the well.
Use Valve Handle and Collect Acid
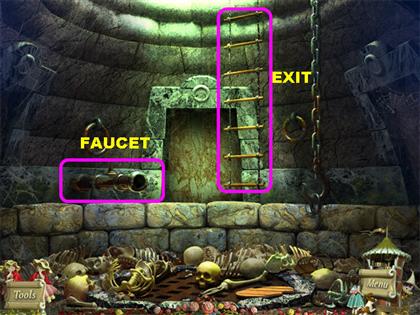
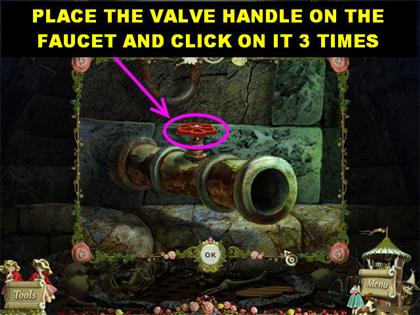
- Click on the faucet on the left for a closer view.
- Place the Valve Handle on the faucet.
- Click on the Valve Handle 3 times and acid will start dripping from the faucet.
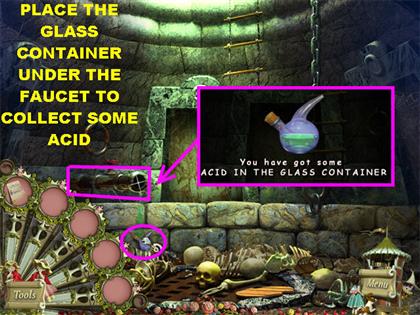
- Grab the Glass Container from inventory and place it under the faucet.
- The Glass Container will go back into inventory with acid in it.
- Click on the Rope Ladder to go back up.
- Click on the left side of the scene.

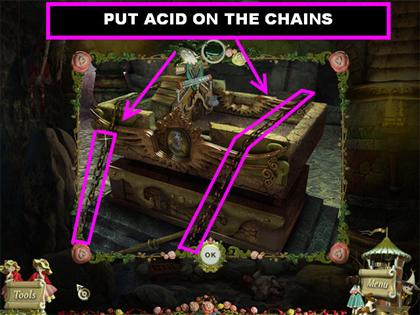
- Click on the lift for a closer view.
- Grab the Acid and place it on both chains.
- Click on top of the lift for a closer view and a puzzle will appear.
Black and White Ball Puzzle
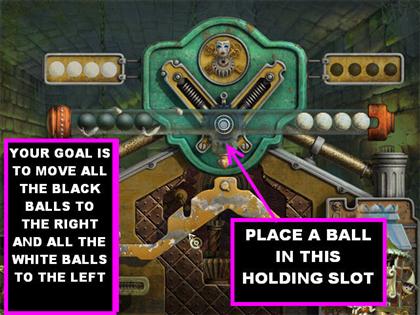
- Your goal is to move all the black balls to the right and all the white balls to the left.
- Use the holding space in the middle of the tube to hold the black balls only.
- Please follow these steps to complete the puzzle.
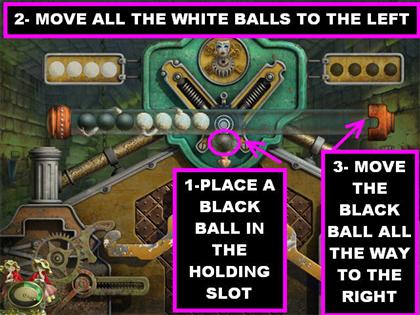
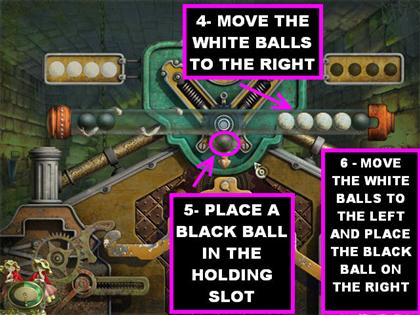
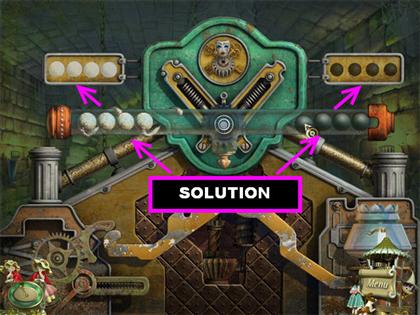
- First thing you must do is drag one black ball to the holding spot in the middle of the tube.
- Now move all the white balls to the left side of the tube.
- Move the one black ball in the holding spot all the way to the right.
- Move all the white balls all the way to the right.
- Place another black ball in the holding spot in the middle of the tube.
- Repeat the same process until all the black balls are on the right and the white balls are all on the left.
- The balls will fall into the contraption on the right and the lift will begin moving.
Chapter 12: Prison
Escape Prison Cell
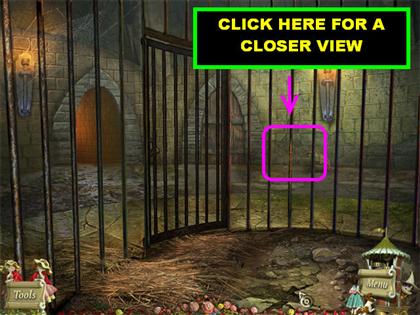
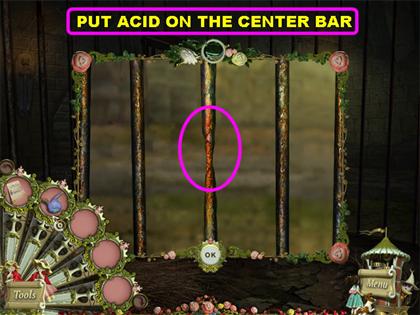
- You will be taken to Simon’s cell; he says he doesn’t want to become a puppet.
- The lady in the wheelchair takes Simon away. You have to find a way to escape the cell.
- Click on the sparkly bar on the right for a closer view.
- Grab the Acid and place it on the center bar.
- Click on the hole in the bars to exit.
Pick up Knife - Prison Corridor
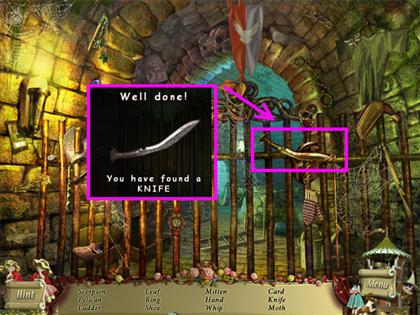
- Click on the sparkly spot on the left for a closer view.
- Pick up the knife on the right side of the bar.
Obtain the Key
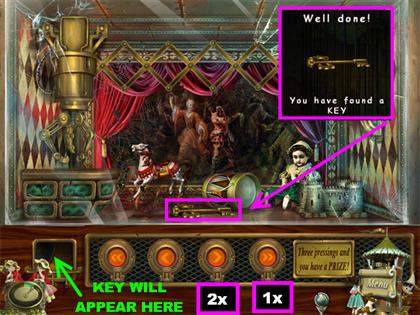
- Click on the machine on the left for a closer view.
- Your goal is to grab the key from the machine using only the buttons at the bottom of the machine.
- You can only click on a maximum of three buttons.
- Starting with the buttons on the left. Please press the buttons in the following order:4-3-3
- Pick up the Key in the lower left slot.
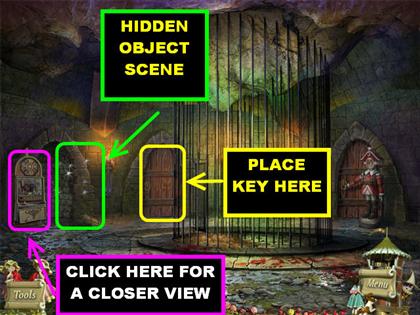
- Place the Key on the left door to open it.
Use Sheet Music & Free Simon
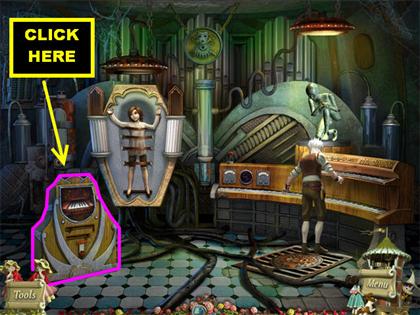
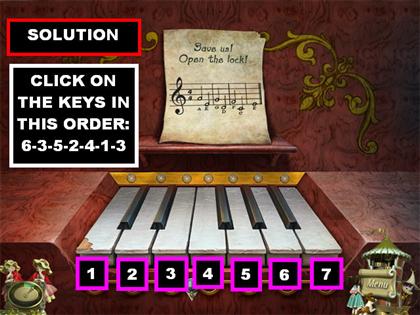
- Go through the door and you will find Simon strapped onto the wall with the Master to his right.
- Click on the Piano on the lower left for a closer view.
- Place the Sheet Music above the keyboard.
- Your goal is to play the melody from the sheet music.
- Each note and key has a specific alphabetical symbol to match.
- I will number the keys from 1to 7, from left to right. Hit the keys in the following order:6-3-5-2-4-1-3
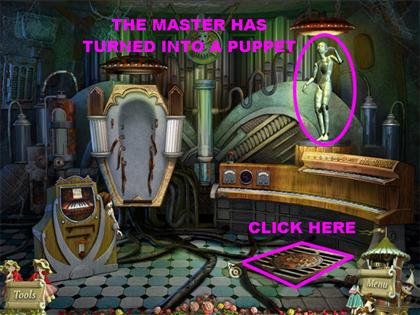
- Simon is freed from the contraption and escapes.
- The Master approaches the contraption and turns himself into a puppet. Eventually he crumbles into pieces.
- Click on the floor drain for a closer view.
Floor Drain Puzzle
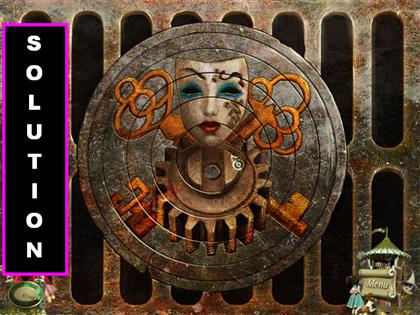
- Turn the circles until they form the image shown in the screenshot.
- The pieces will lock into place when turned correctly.
- A hole in the ground will open once the puzzle has been solved, click on it to access the next area.
Chapter 13: Grotto & Stairway
Pick up Blowtorch
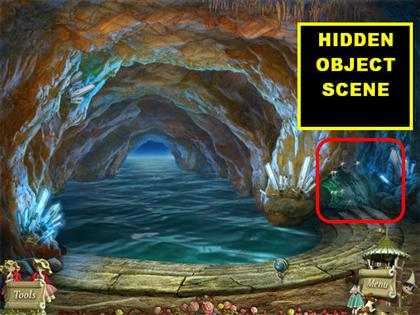
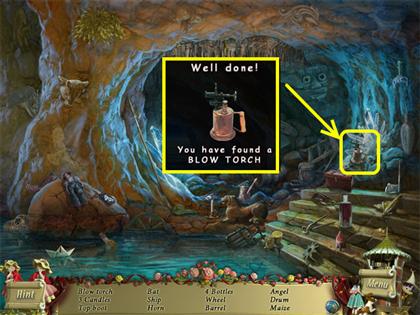
- Click on the sparkly spot on the right and look for the items on the list.
- Pick up the blowtorch on the right.
- Go back upstairs by placing your cursor at the bottom of the scene 2 times.
Open Right Door
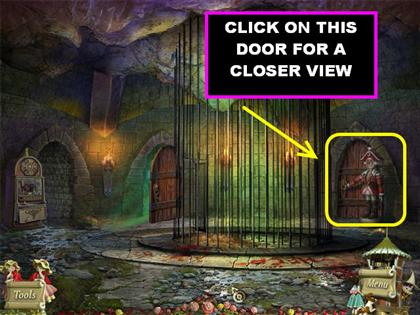
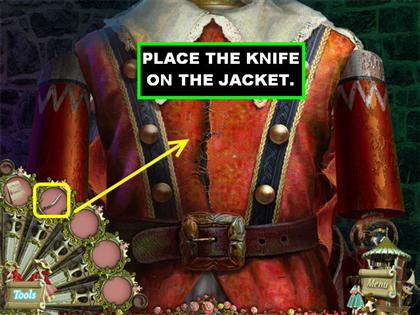
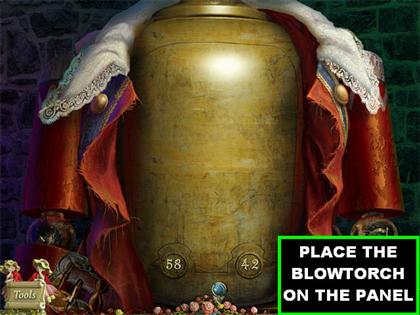
- Click on the right door for a closer view.
- Use the knife to cut the stitches on the jacket. Underneath you will find a panel that is sealed shut.
- Use the blowtorch to take out the panel.
Numbers Puzzle
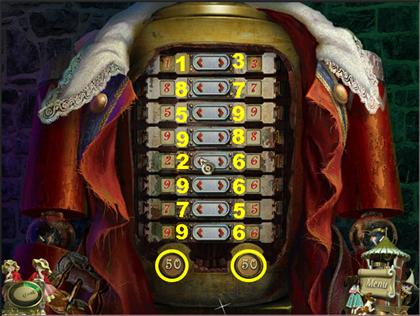
- Your goal in this puzzle is to have both bars add up to the same number.
- Click on the arrows and the numbers in that bar will swap places.
- Your current total shows up at the bottom of each column.
- Starting from the top, click on the center buttons in the following order to solve the puzzle:1-2-3-4-5
- The buttons should read:1-3 8-7 5-9 9-8 2-6 9-6 7-5 9-6
- This will give you a sum of 50 on each bar.
- Go through the door once it opens.
Pick up Crowbar - Stairway
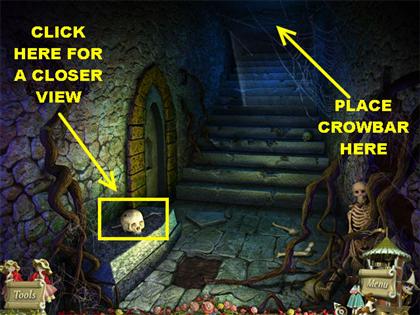
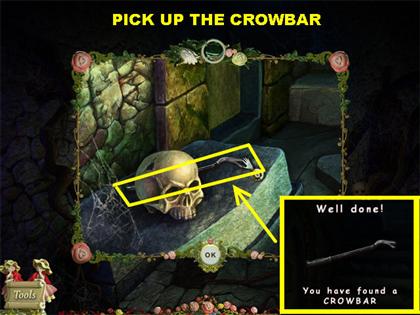
- Click on the skull on the lower left for a closer view.
- Pick up the Crowbar next to the skull.
- Place the crowbar on top of the steps so you can remove the block.
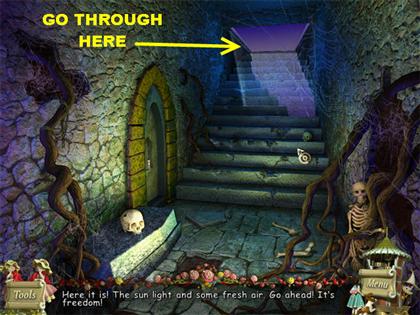
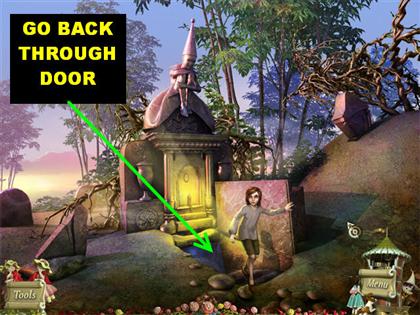
- Go up the stairway and Simon will tell you that you need to go back and look for Felicia.
- Simon leaves.

- Go back through the trap door and place your cursor in the following manner:DOWN LEFT DOOR DOWN
- The Master’s daughter is on a sub in the Grotto. The Spider Puppet hops in the sub with her. She says a few words and takes off in the sub.
Created at: 2009-10-01

