

Walkthrough Menu
- General Tips
- Victim 1
- Victim 2
- Victim 3
- Victim 4
- Victim 5
- Victim 6
- Victim 7
- Victim 8
- Victim 9
- Victim 10
General Tips
- You can change players by clicking on your username in the middle of the screen. Ten player slots are available at the same time in this game.
- You can adjust the music and sound FX volume, set screen modes, and adjust visual quality.
- You can see the credits and cast from the credits in the main menu.
- There are two types of playing styles for this game. The “Relaxed” mode lets you click as much as you want, while the “Paranoid” mode penalizes you for excessive clicking.
- After finishing every mini-game there will be a hint icon hidden somewhere in the level. The icon looks like a magnifying glass.
- You can skip any of the puzzles by waiting for the skip timer in the bottom right corner of the screen to charge.
- If you get stuck, go to any patient’s room and look for cards that still have sparkles. Sparkles signify unfinished scenes.
- Use the hint button in the bottom left corner to get a hint about where an item is or where to go next.
- Sometimes the hint button will say “Free Hint” and you can get a hint about where to go next by clicking it.
Victim 1
- After reading or skipping the intro, click on detective Ravenwood, highlighted in green in the middle of the screen.
- Click on the map highlighted in green in the bottom right corner.
- You will get a new objective to capture Dr. Fraud. It will be in the list at the bottom left corner of the screen.
- Click on Fraud’s office, on the map.
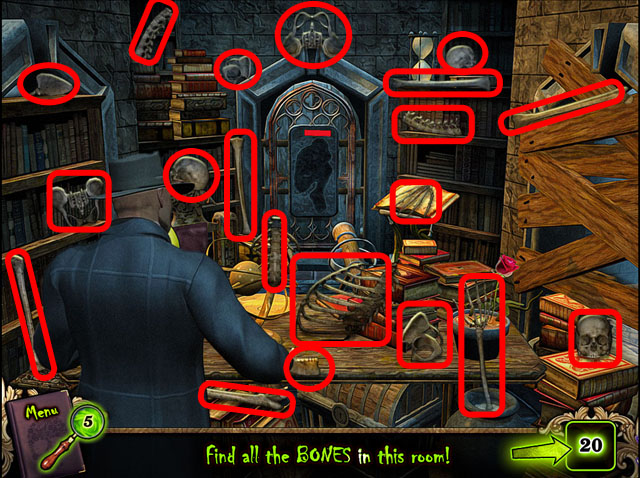
- Find the 20 bones in the room.
- If you get stuck looking for objects, click on the magnifying glass in the bottom left corner for a hint.
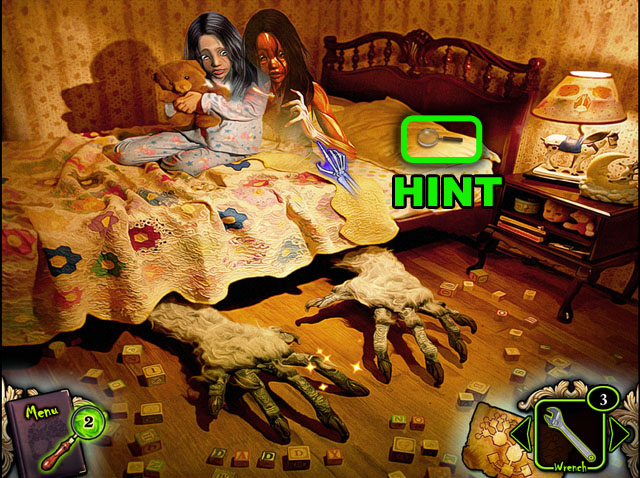
- After finding all 20 bones, click anywhere to continue. You will receive the SKELETON KEY.
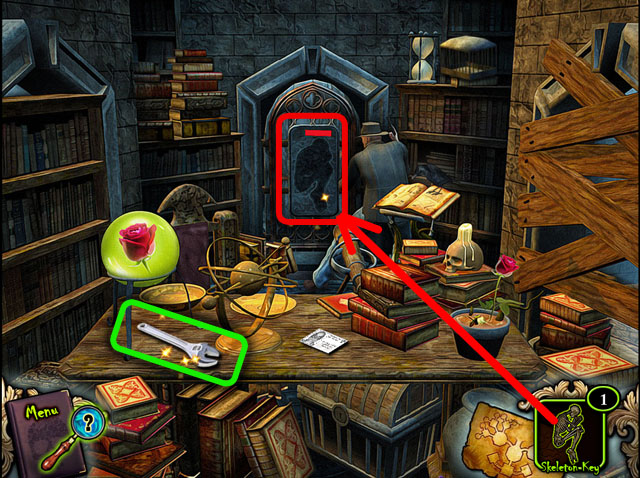
- Collect the WRENCH in the bottom left corner of the desk; the WRENCH will go into your inventory.
- Click on the door in the middle to zoom in. You can click with the SKELETON KEY as well.
- Take the SKELETON KEY from the inventory and drag it to the hole in the same shape.
- Wait for a few seconds, until the red bar turns totally green.
- Follow the girl and have few conversations with her.
- When you get inside the Asylum, collect the SYRINGE highlighted with sparkles in the middle of the screen.
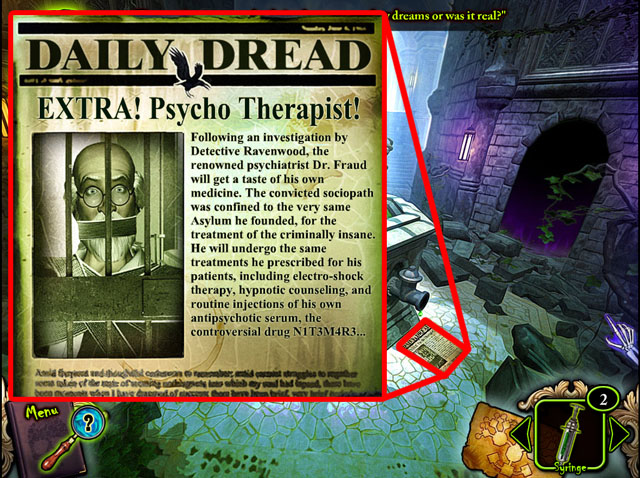
- Before you move to the next room, click on the piece of paper in the bottom of the right corner to zoom in.
- Click on the doorway on the left to continue.

- Click on the piece of paper on the wall to zoom in and read it.
- Click on the doorway to the left again to continue.
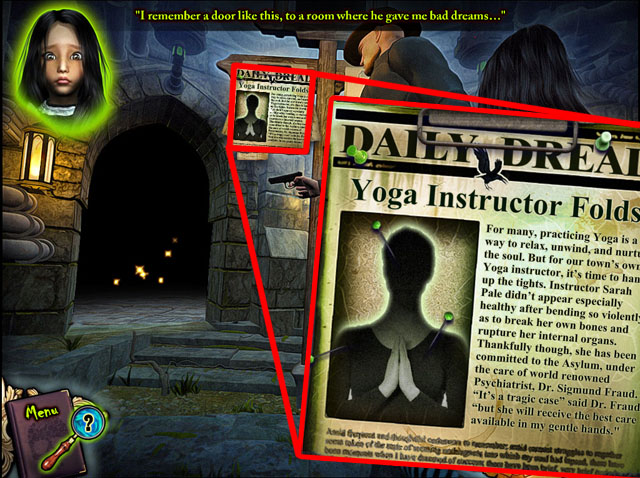
- Click on the piece of paper on the post to zoom in.
- Travel again to the left to go to the yoga instructor’s room and finish the first objective.
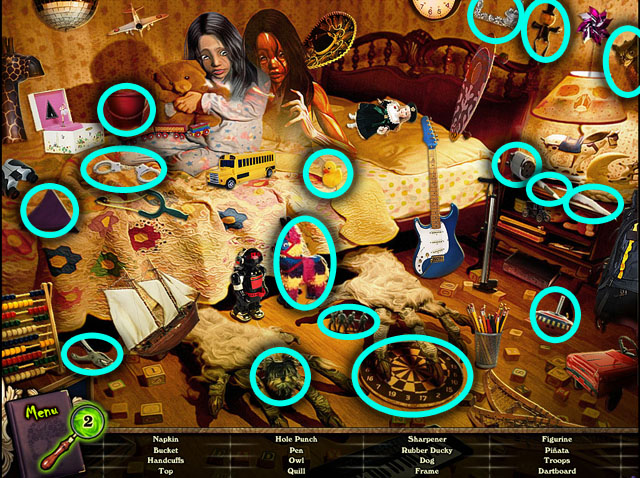
- Click on the card that says “Get Well!” to start the next hidden object scene.
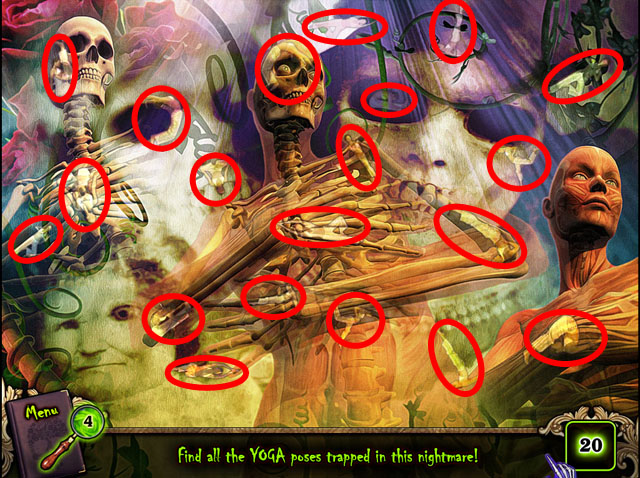
- Find the 20 YOGA poses in the scene.
- Click on the inventory item ANGEL WING after finding all 20 objects.
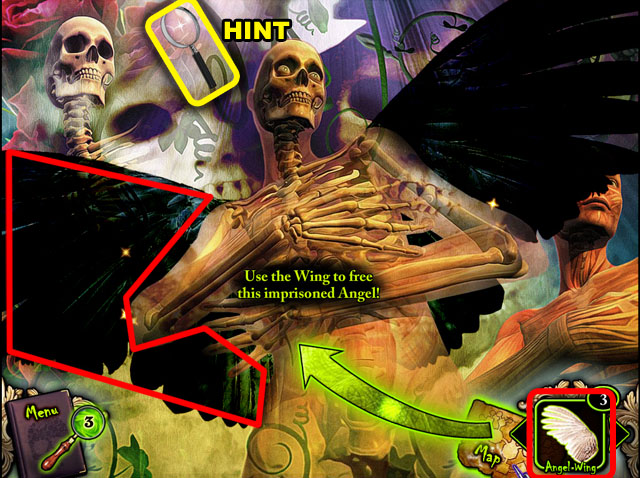
- Collect the magnifying glass, highlighted in yellow in the screenshot, to get another hint.
- Place the ANGEL WING from the inventory on the black wing, on the left side of the skeleton.
- Click at the bottom to exit.
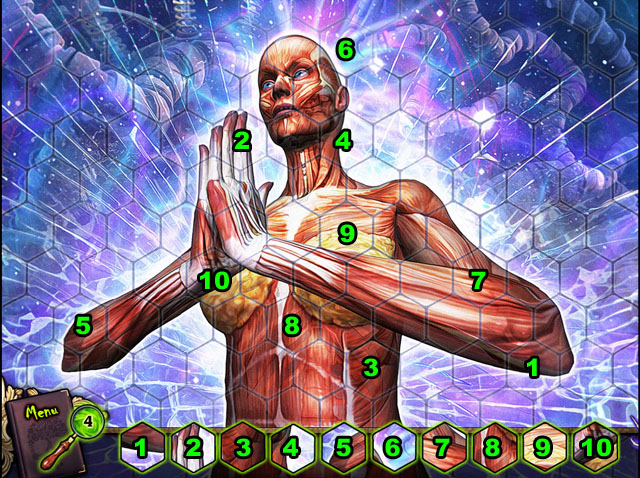
- Choose the card to the left to move to the next dream sequence.
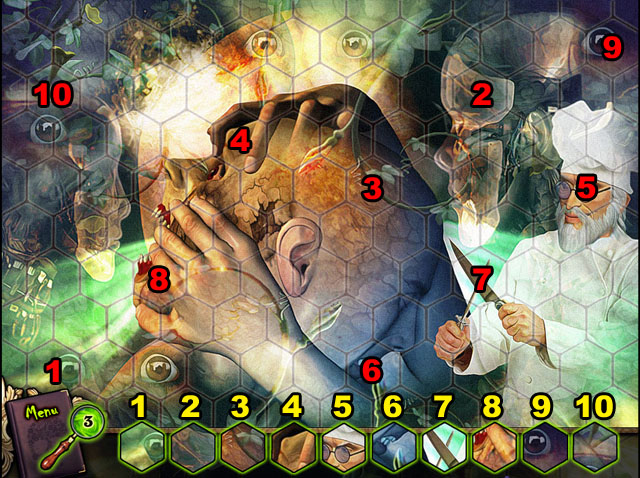
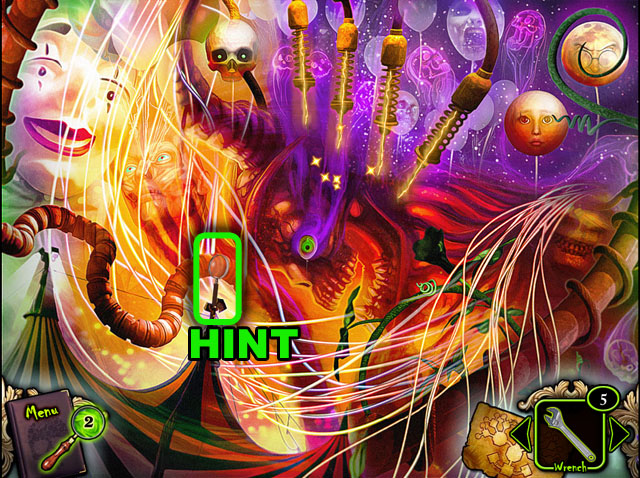
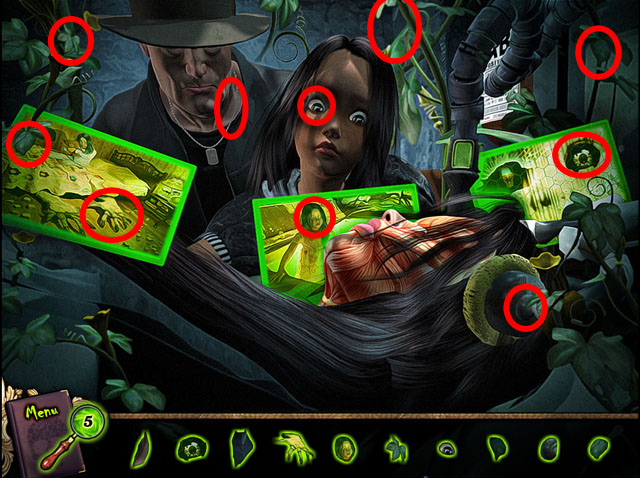
- Click hexagons in the picture that match the list below the picture.
- The picture will change every few seconds, at that time the hexagons at the bottom will also change.
- See the screenshot detailing which hexagon matches which part of the screen.
- The pieces can be found in any order.
- Add the LOCKPICK to your inventory after finding all the matching hexagons.
- Collect the magnifying glass on the left side of the screen.
- Click the down arrow until you return to Dr. Fraud’s office, the first scene you visited.
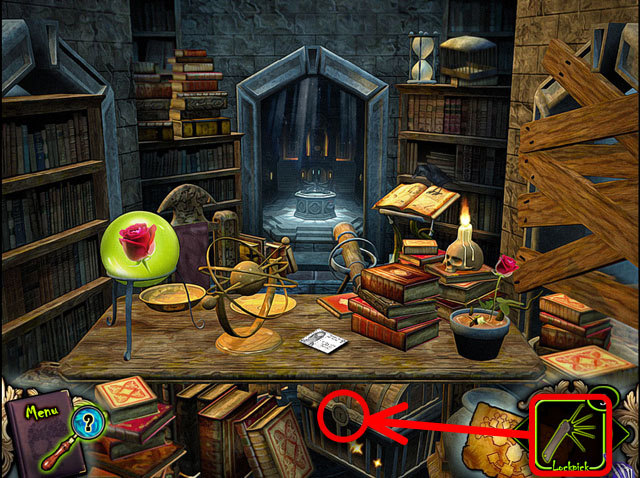
- Click and drag the LOCKPICK from your inventory to the lock on the treasure box in the bottom side of the screen to open it.
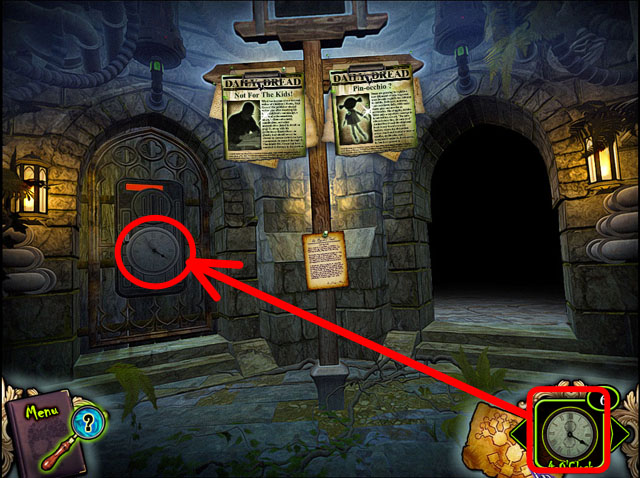
- Click on the sparkling CLOCK in the middle.
- Click down to return to the office.
- Open the map and go to the Atrium east.
- Enter the entrance on the right side.

- Read all three fliers on the post in the middle of the screen.
- Click and drag the CLOCK from the inventory to the clock on the matching clock on the right.
- Enter the room.
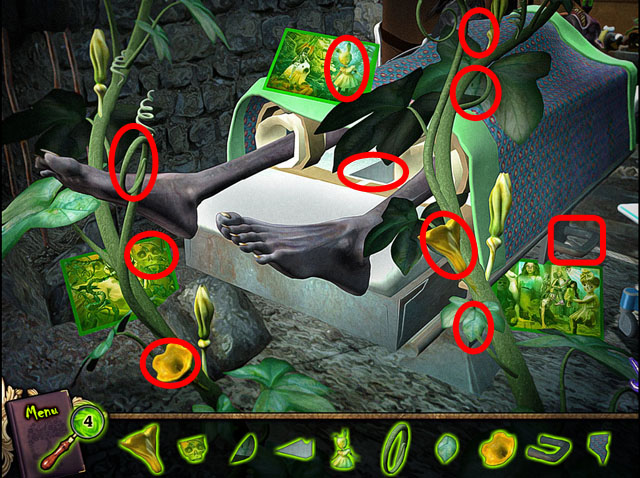
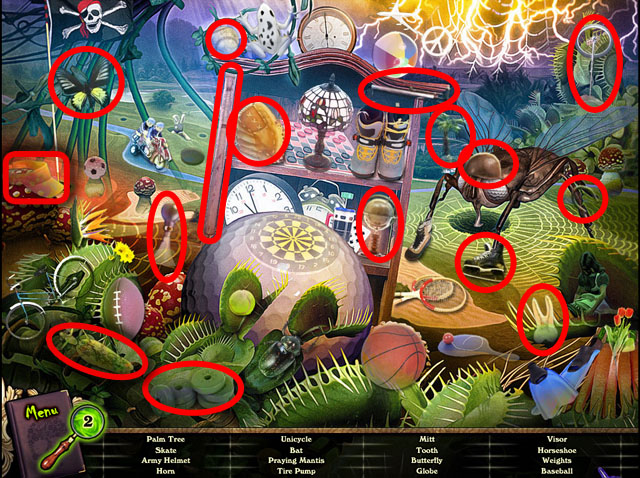
- Find parts in the scene that match the pieces at the bottom of the screen.
- Click on the top card to move to the next scene.
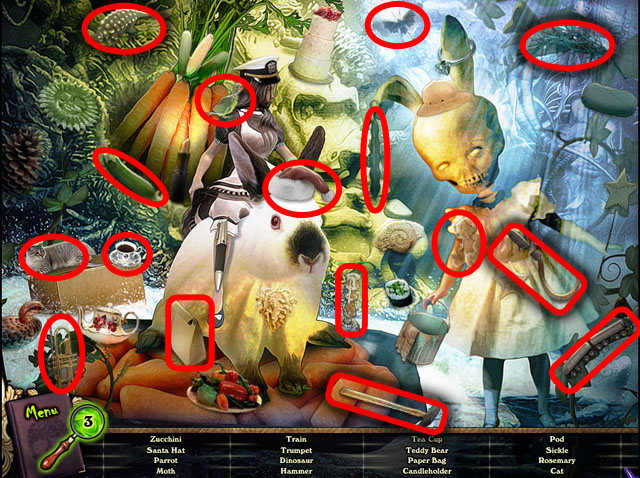
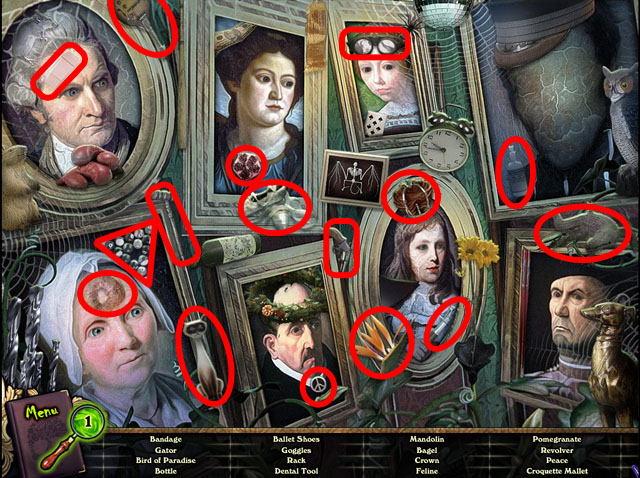
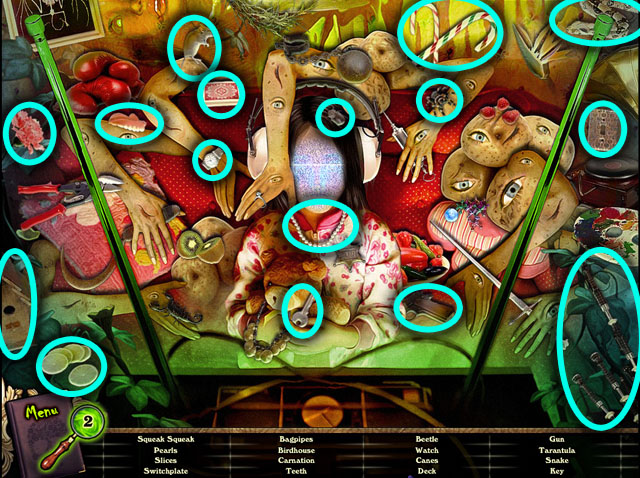
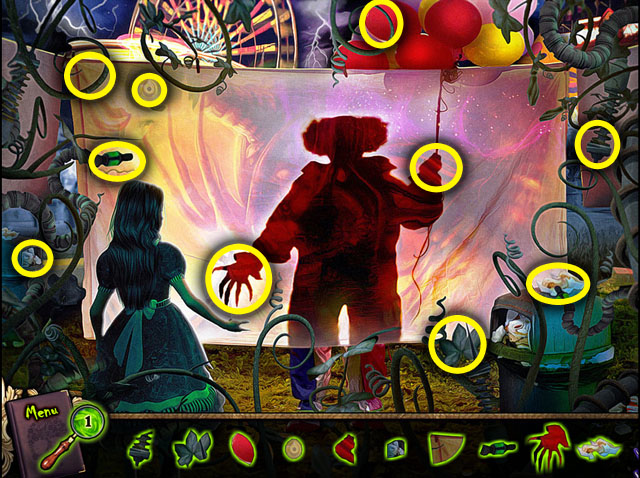
- Find the items in the list at the bottom of the screen.
- Collect the FACE after finding all the items.
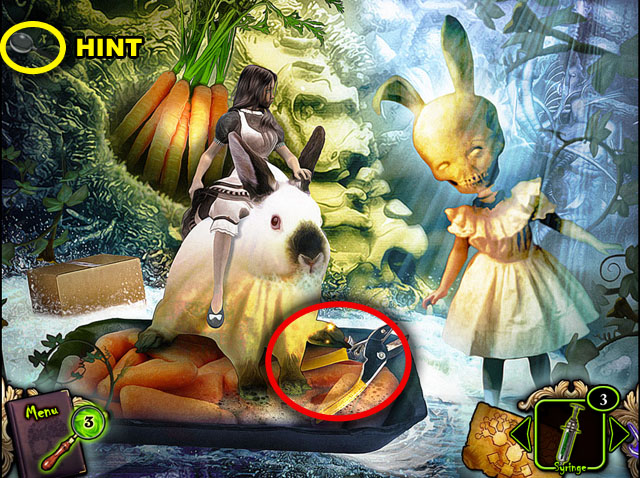
- Collect the magnifying glass circled in yellow in the screenshot.
- Click on the shears to learn that you will need to feed a carrot to the rabbit, to get the shears.
- Return to the previous room.
- Click on the card in the bottom left.

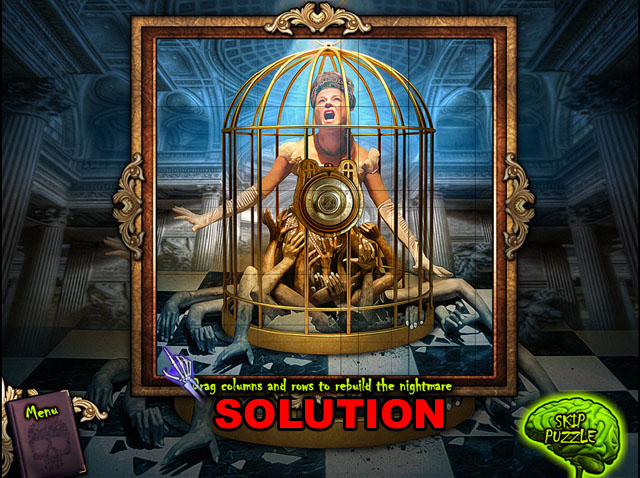
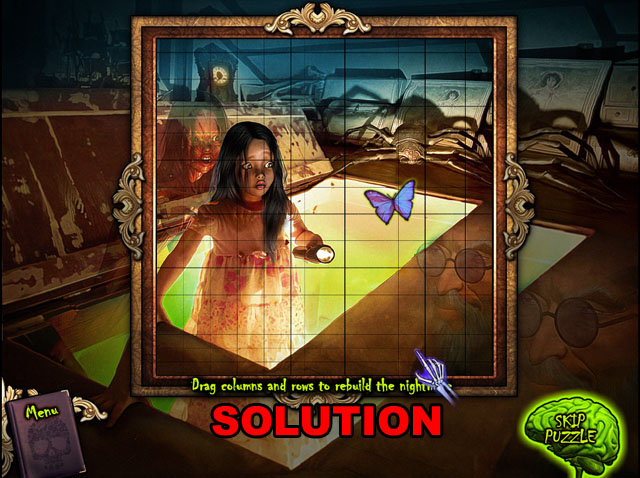
- Drag the columns and rows until the picture is completed.
- First work on just one column until it is complete. Click on a column and drag it to the left or the right to change its position.
- Once one row is correct, all the other rows will be correct.
- To finish the puzzle line up the rows by clicking and dragging up and down.
- The picture connects to the background. Use that to help you line up the edges.
- Refer to the screenshot for the final image.
- Collect the SYRINGE after finishing.

- Collect the magnifying glass highlighted in yellow in the screenshot.
- Click on the wing to find out what you need. You will need something to kill all the bees.
- Go back to the room and click on the last card in the bottom right corner.
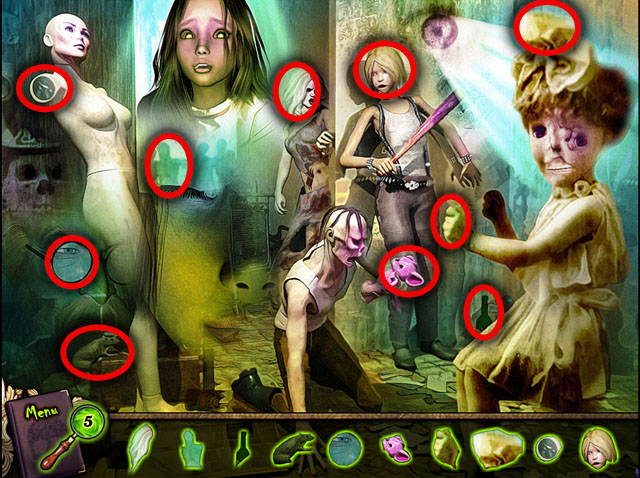
- Find the matching items in the list.
- Collect the HEART CHAKRA.
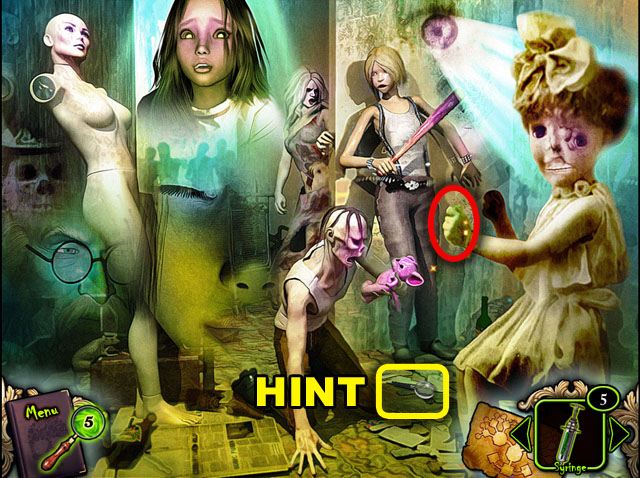
- Click on the doll’s hand, circled in red in the screenshot, to find out what you need next.
- Collect the magnifying glass highlighted in yellow in the screenshot.
- Return to the Atrium East again using the map.
- Collect the sparkling SYRINGE at the bottom of the screen.
- Return to the Atrium.
- Collect the red NEEDLE AND THREAD.
- Use the map to go to the Atrium West and continue to the first victim’s room.
- Click on the doll beside her.
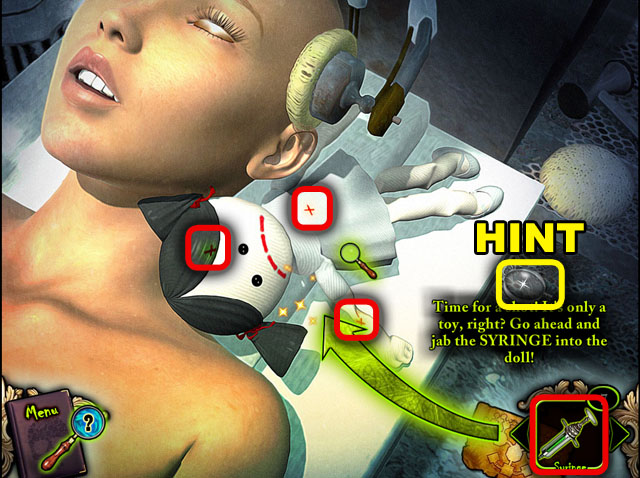
- Click and drag the three SYRINGES to the doll.
- Collect the VOODOO DOLL after using the three SYRINGES on it.
- Collect the magnifying glass highlighted in yellow in the screenshot.
- Return to the previous room.
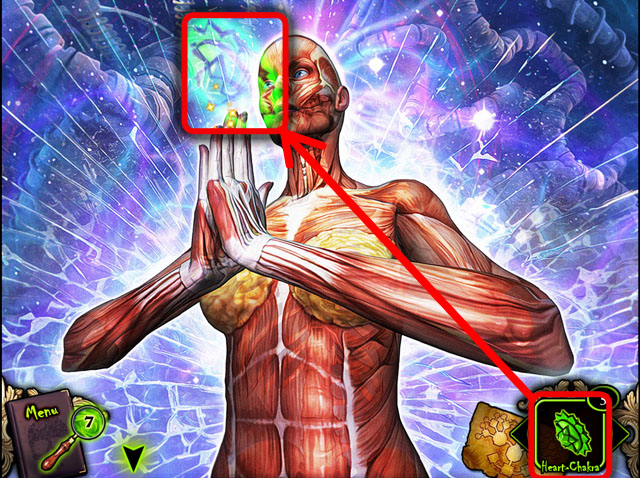
- Click on the card with the skinless body doing yoga.
- Place the HEART CHAKRA above the hands in the middle.
- Collect the POWER SWITCH.
- Move past the Atrium West and go to the second victim’s room. On the map this is marked with a “II.”
- Click on the card in the bottom right corner.
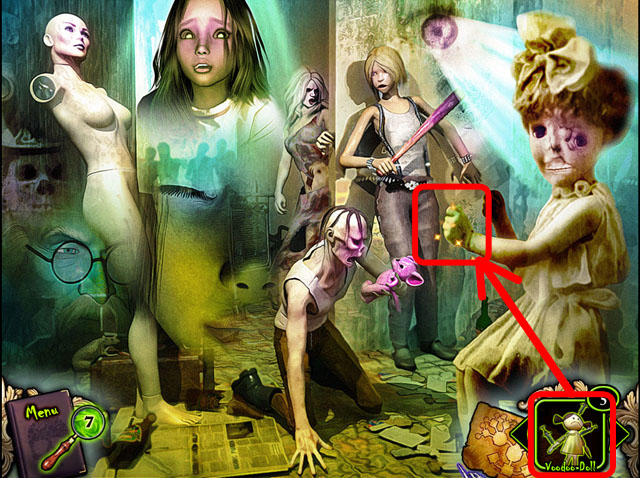
- Click and drag the VOODOO DOLL to the hand of the girl on the right.
- Collect ROSE’S DIARY.
- Go back to Dr. Fraud’s office.
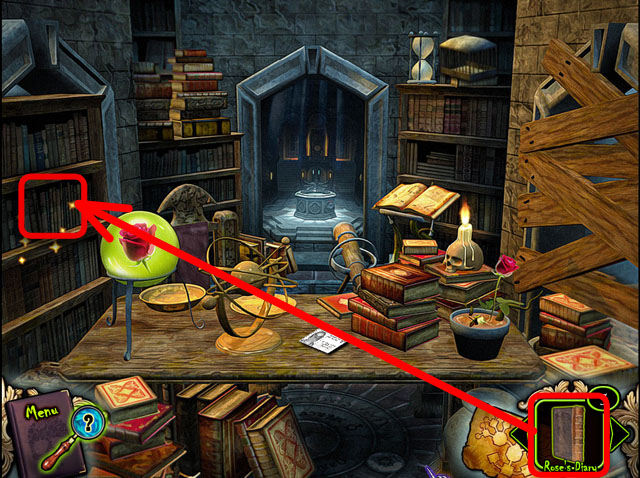
- Place ROSE’S DIARY into the bookshelf on the left side.
- Click on the bookshelf, highlighted in green, to move it aside, revealing a secret passage.
- Enter the room behind the bookshelf.
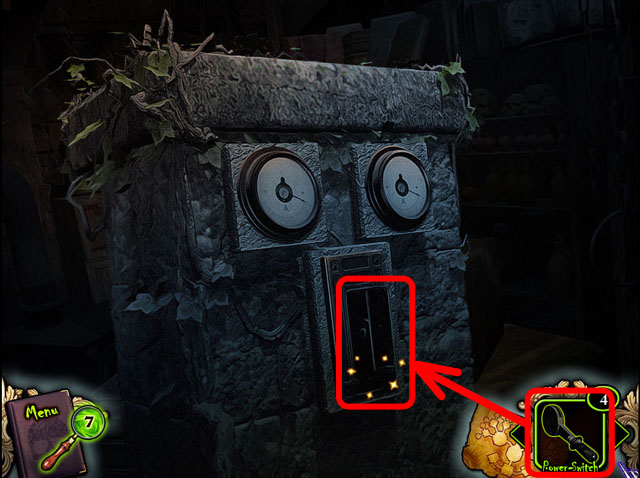
- Place the POWER SWITCH from the inventory on the switch.
- Turn on the switch by pulling the lever, and then click the contraption to enter the room.
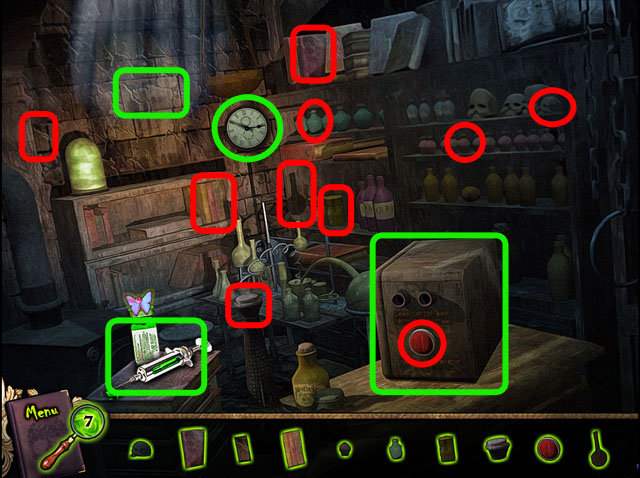
- Find the objects in the scene that match the items in the list at the bottom.
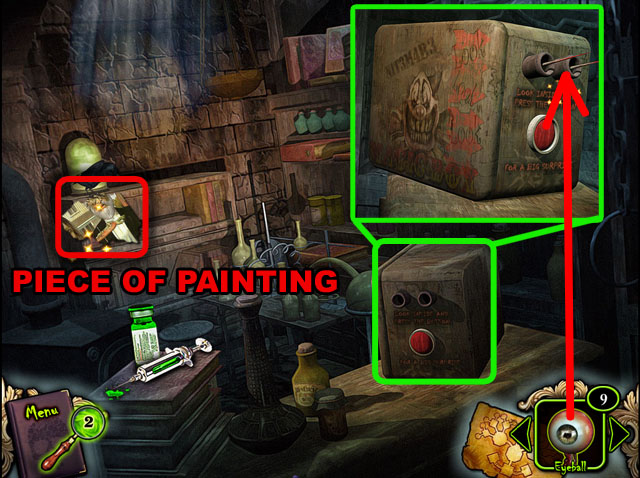
- Click on the box with the switch in the bottom right corner; click the button and then exit that scene.
- Click on the brick, highlighted in green in the screenshot, to find out what you need next: a painting.
- Click on the syringe in the bottom left corner. Click “Yes” to watch a cut scene; click “No” to skip it.
- Collect the CLOCK in the middle.
- Move through the Atrium West, to the next room.
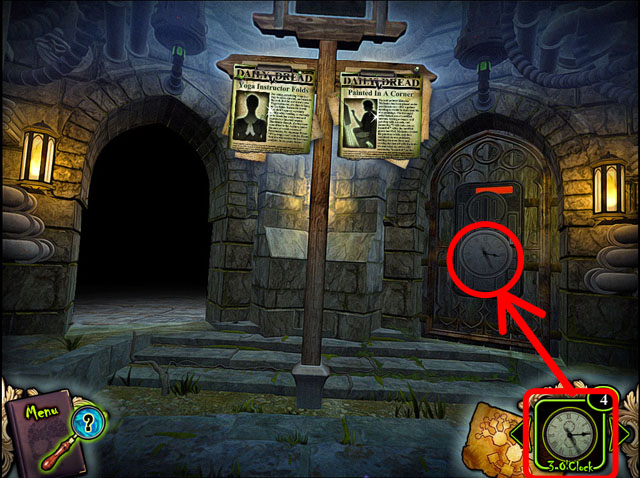
- Place the CLOCK from the inventory on the matching clock, on the door.
- Enter the room.
- Find the objects in the scene that match the items in the list at the bottom.
- After finding all the items, click on the sparkling card at the top.
- Find the hidden objects listed at the bottom.
- Collect the EYEBALL.
- Collect the magnifying glass, highlighted in yellow in the screenshot, to get another hint.
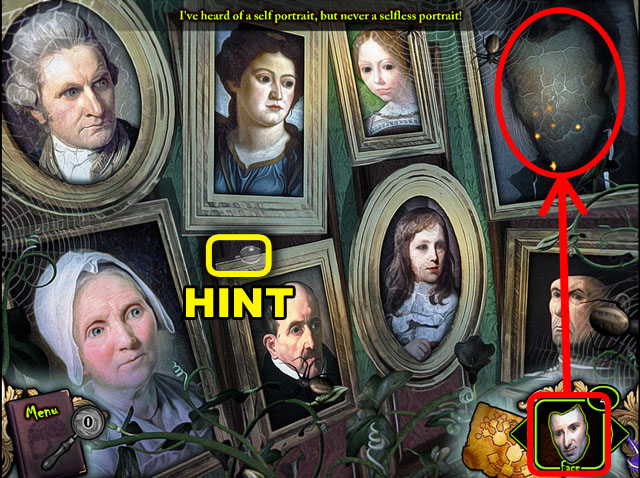
- Place the FACE from the inventory on the portrait in the upper right corner.
- Collect the MUSTARD GAS.
- Return to the last room by clicking the down arrow.
- Click on the sparkling card on the right side of the screen.

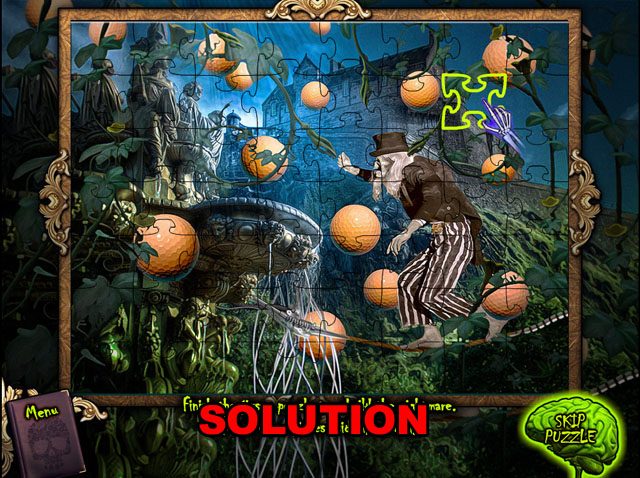
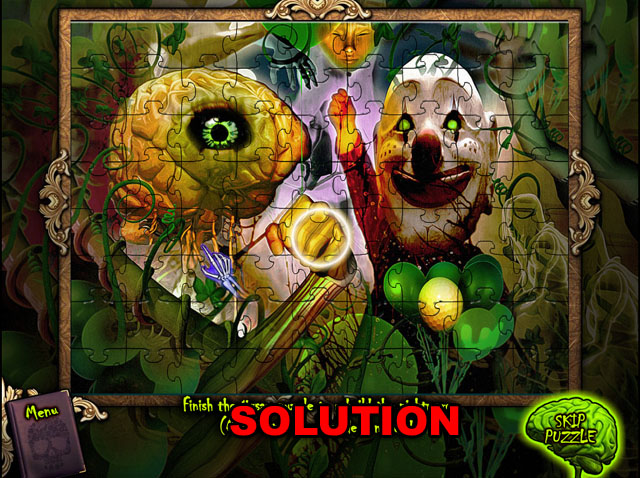
- Assemble all the pieces of the jigsaw puzzle.
- Click a piece to move it around; release it to place it.
- Pieces highlighted in green are not in the correct spot.
- You can connect pieces together without attaching them to the background.
- Refer to the screenshot for the final image.
- Collect the CRYPTIC SKULL.
- Collect the magnifying glass, highlighted in yellow, to get another hint.
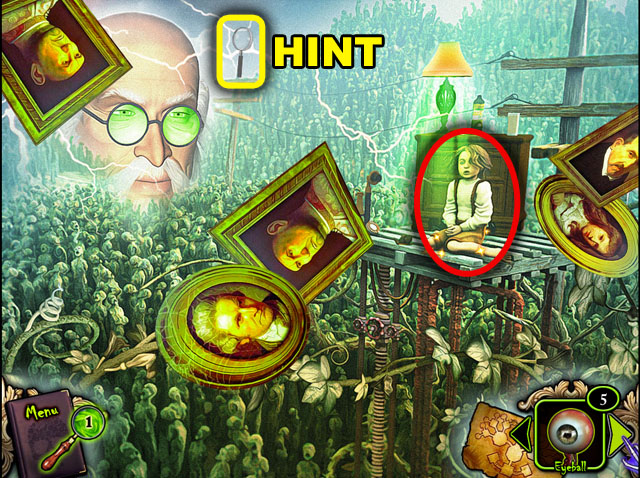
- Click on the boy in the right to find out what you need next.
- Return to the previous room with the back arrow.
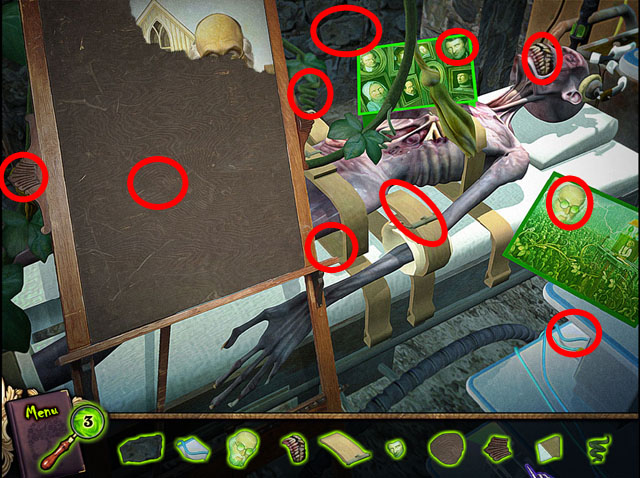
- Click on the sparkling easel on the left.
- Move to the second victim’s room and click on the card with skull in the bottom left corner.
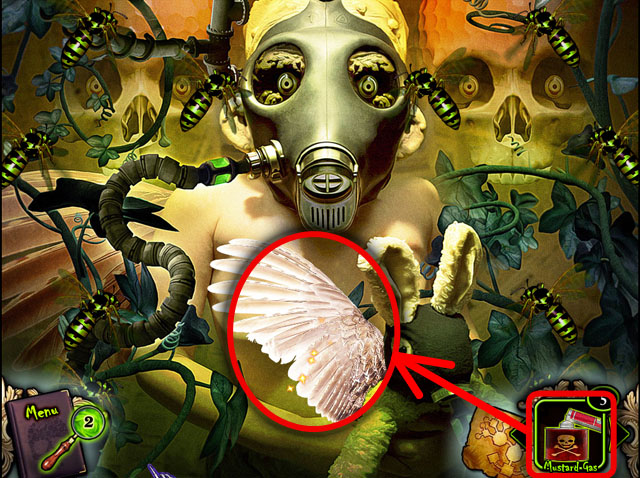
- Use the MUSTARD GAS from the inventory on the bees.
- Collect the ANGLE WING in the middle.
- Move to the first victim’s room and click on the sparkling card.
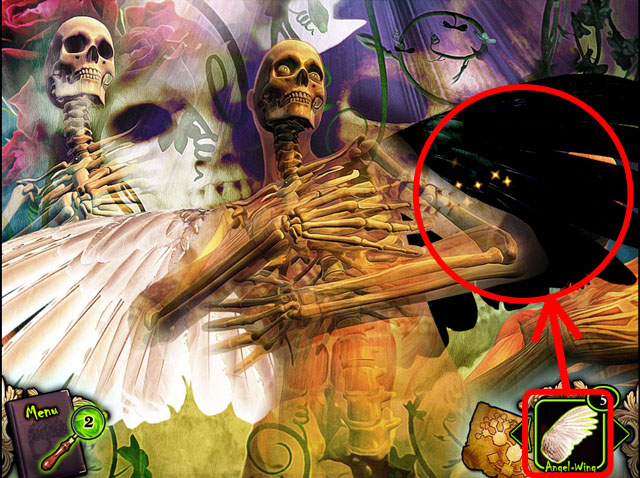
- Place the angel wing from the inventory on the black wing.
- Collect the BRICK, and you will complete the first victim’s room, releasing her.
- Go to Dr. Fraud’s office.
Victim 2
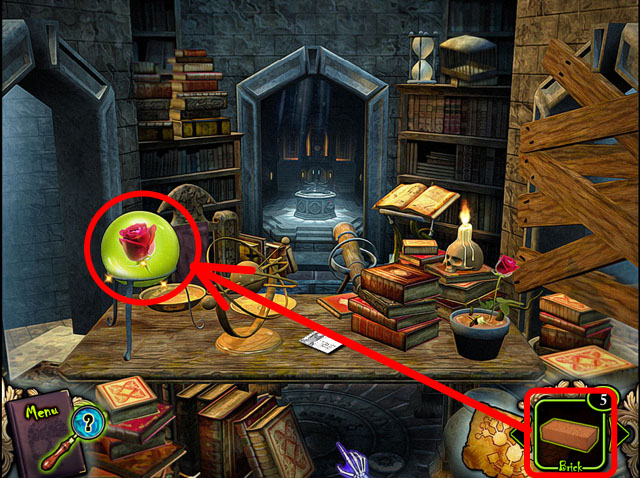
- Use the BRICK from the inventory to break the glass with the ROSE, in the bottom left corner.
- Collect the ROSE.
- Click the bottom to return to Fraud’s office; then the exit to the Atrium.
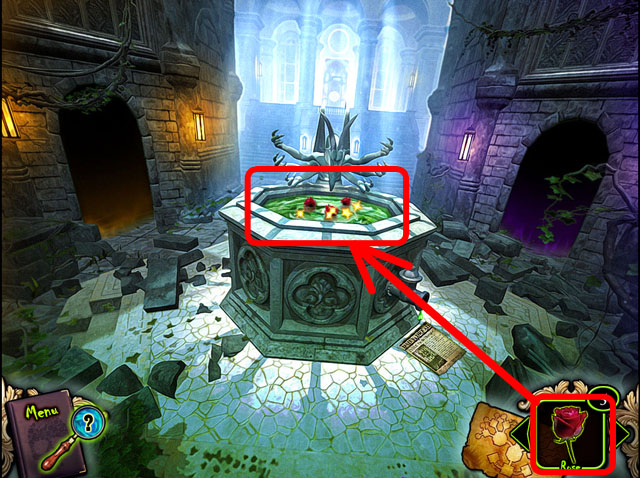
- Place the ROSE in the water.
- The 4 O’clock will appear in the sculpture’s hand.
- Collect the CLOCK with hands stuck at 4.
- Click the right opening to go to the Atrium East.
- You will find the DIAL below the claw in the bottom right corner. Collect the DIAL.
- Move to the next room.
- Place the CLOCK from your inventory on the clock, on the door on the left, which is stuck at the same time.
- Enter the room.

- Find the objects in the scene that match the items in the list at the bottom.
- Click on the card in the left.
- Find the objects that are listed at the bottom of the screen.
- Collect the PIECE OF PAINTING.
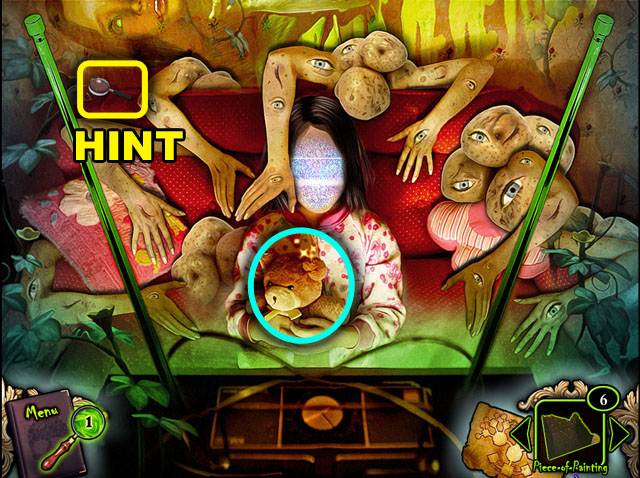
- Collect the magnifying glass, highlighted in yellow in the screenshot, to get another hint.
- Click the teddy bear in the middle to figure out what you need next.
- Go back to the patient’s room.
- Click on the card to the right.
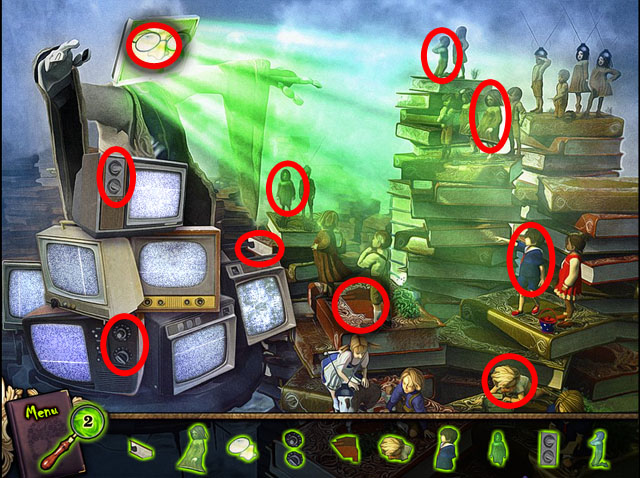
- Find the objects in the scene that match the items in the list at the bottom.
- After finding all objects, collect the PIECE OF PAINTING.
- Collect the magnifying glass in the upper right corner to get another hint.
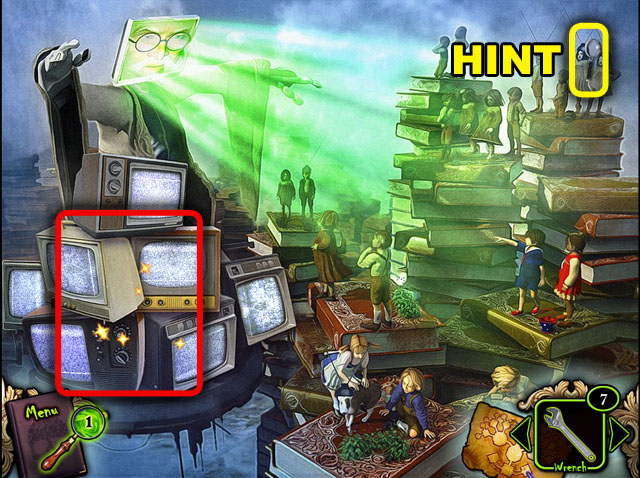
- Click on the TVs to figure out that you will need something to smash them.
- Return to Dr. Fraud’s office.
- Collect the sparkling PIECE OF PAINTING in the right side of the screen.
- Move to the Atrium West.
- Place the cryptic skull from your inventory on the left door.
- Enter the room.
- Collect another sparkling PIECE OF PAINTING under the claw in the middle.
- Read the two newspaper clippings; then move to the room to the west of Dr. Fraud’s office.
- There is another sparkling PIECE OF PAINTING. Collect it!
- Click on the box with the switch highlighted in green to zoom in.
- Place the EYE BALL from the inventory one of the picks coming out of the machine.
- Move to the third victim’s room.
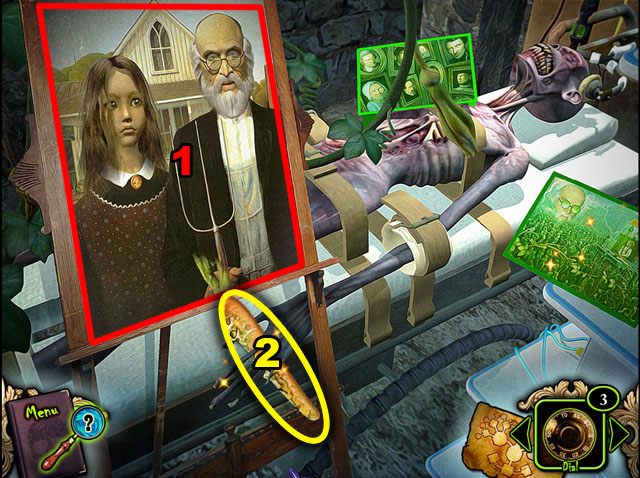
- Place all five PAINTING PIECES from the inventory on the painting. The order and placement don’t matter (1).
- After combining the pieces, collect the MOLDY CARROT (2).
- Move to the second victim’s room.
- Click on the card with the rabbit on the top.
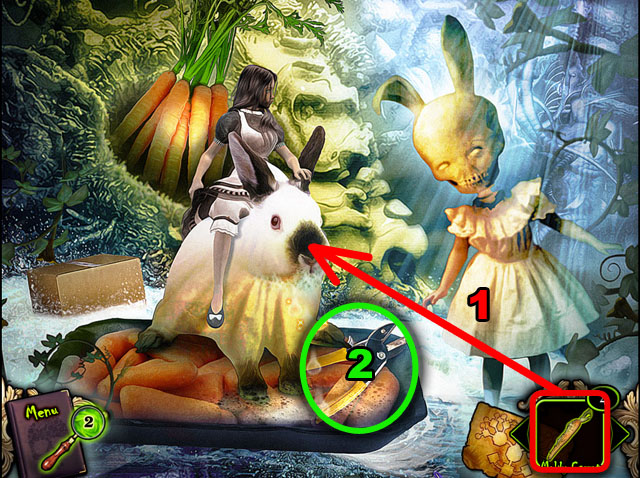
- Place the MOLDY CARROT from the inventory on the rabbit (1).
- Collect the PRUNING SHEARS beside the rabbit (2).
- This will finish the second victim’s quests, releasing him.
- Back to Dr. Fraud’s office.
Victim 3
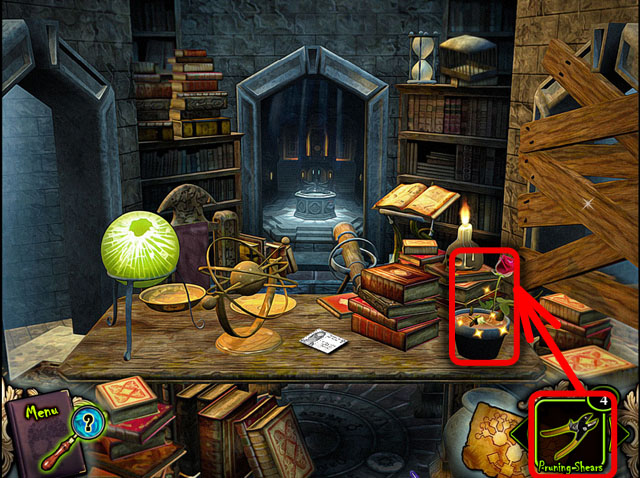
- Use the PRUNING SHEARS to cut the rose in the pot.
- Collect the ROSE and move to the Atrium.
- Place the ROSE into the water in the middle of the fountain.
- Collect another CLOCK, stuck at 5.
- Move to the Atrium West and enter the center opening.
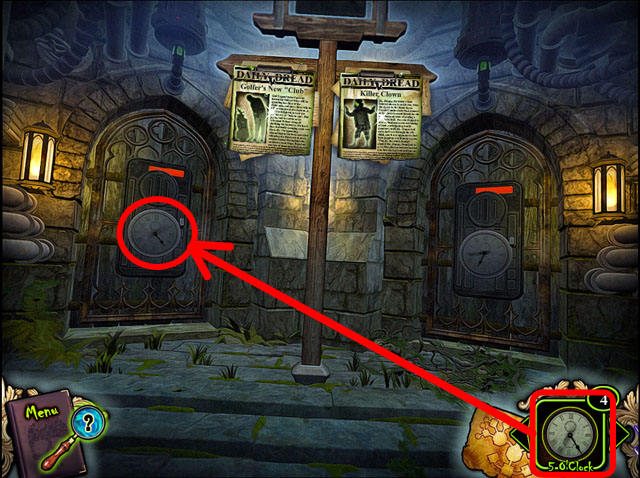
- Place the CLOCK stuck at 5 on the matching clock, on the left door.
- Enter the room.
- Find the objects in the scene that match the items in the list at the bottom.
- Click the top card to move to the next scene.
- Assemble all the pieces of the jigsaw puzzle.
- Click a piece to move it around; release it to place it.
- Pieces highlighted in green are not in the correct spot.
- You can connect pieces together without attaching them to the background.
- Refer to the screenshot for the final image.
- Collect the PLUG after finishing the jigsaw puzzle.
- Collect the magnifying glass, highlighted in yellow in the screenshot, in the bottom.
- Click on the skeleton’s hand to see what you need later.
- Return to the patient’s room and click on the right card.

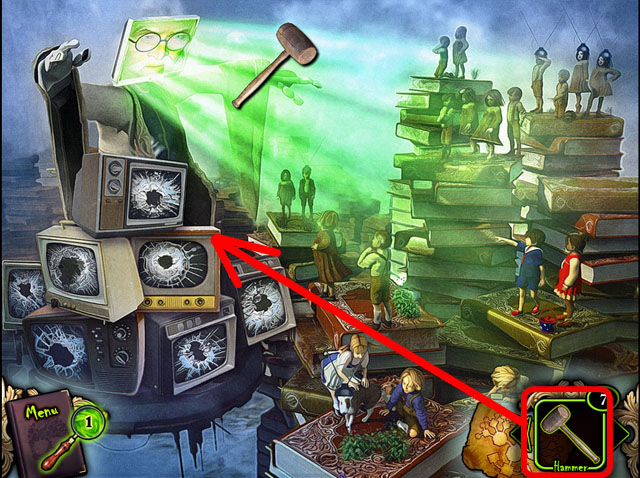
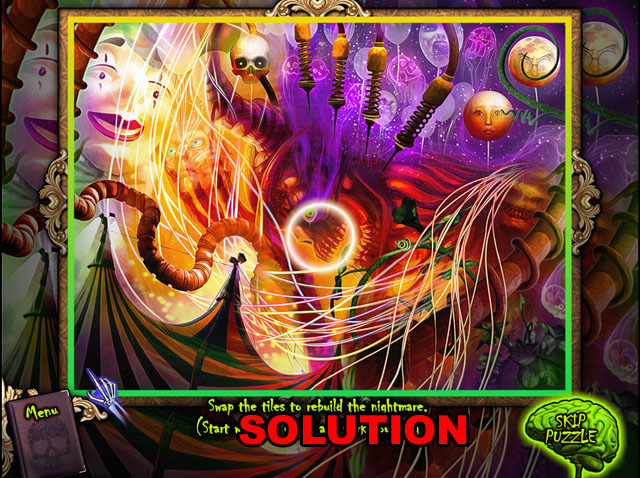
- Swap the tiles until they are all in the correct position to finish this puzzle.
- Click on one tile and then another to swap their places. Click the tile again to cancel.
- Start by using the colored bar that follows the edge to make the puzzle easier.
- Refer to the screenshot for the final image.
- After finishing the puzzle collect the HAMMER.
- Collect the magnifying glass highlighted in yellow in the screenshot.
- Click on the skeleton to figure out you will need a coin later to complete this scene.
- Return to the room and click on the left card.
- Find hidden objects that are listed at the bottom of the screen.
- Collect the CRYPTIC SKULL.
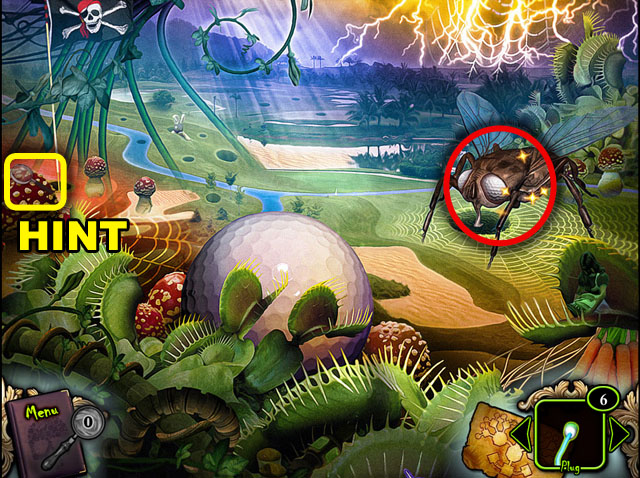
- Collect the magnifying glass, highlighted in yellow in the screenshot, to get another hint.
- Click on the fly on the right to figure out what you will need later.
- Return to the patient’s room.
- Move through the Atrium East, to the next room.
- Collect another sparkling PLUG on the ground.
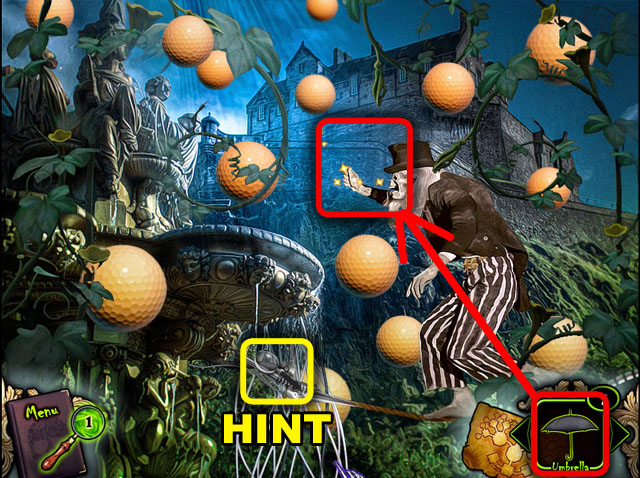
- Enter the fourth victim’s room and click on the right card.
- Use the HAMMER to smash up the TVs on the left.
- Collect the UMBRELLA.
- Move to the Atrium West and collect another sparkling plug on the ground.
- Return to the Atrium East.
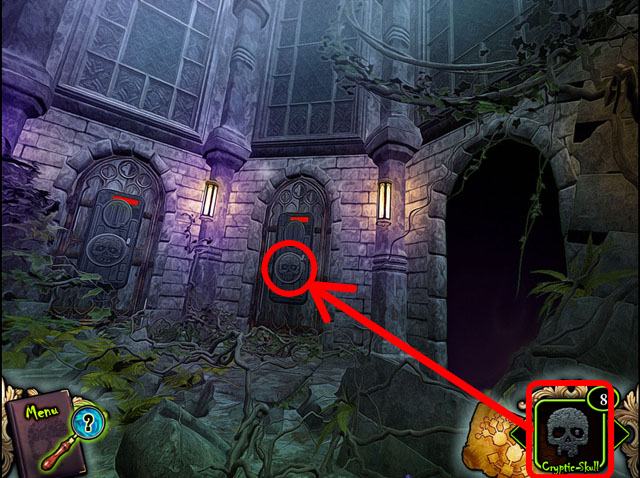
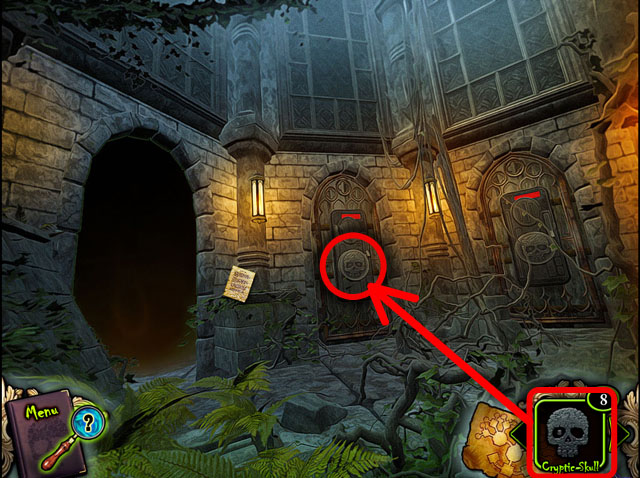
- Place the CRYPTIC SKULL on the right door.
- Read all the messages on the post in the middle to learn about the victims of this area.
- Move to the room of the fifth victim, the golf legend, using the map and clicking the “V” icon.
- Click on the middle postcard.
- Place the UMBRELLA in the skeleton’s hand.
- Collect another PLUG.
- Move to the fourth victim’s room, marked with “IV.”

- Place all of the PLUGS from the inventory on the monitor above the patient.
- Collect the EMPTY FRAME.
- Move to the third victim’s room and click on the right card.
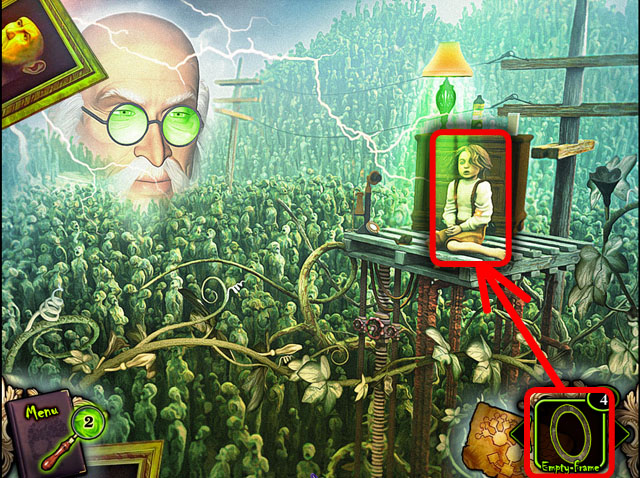
- Place the EMPTY FRAME on to the boy in the right.
- He will become a FRAMED PICTURE. Collect it after this happens.
- This will complete the third victim’s room, releasing him.
- Move to the room to the west of Dr. Fraud’s office.
Victim 4
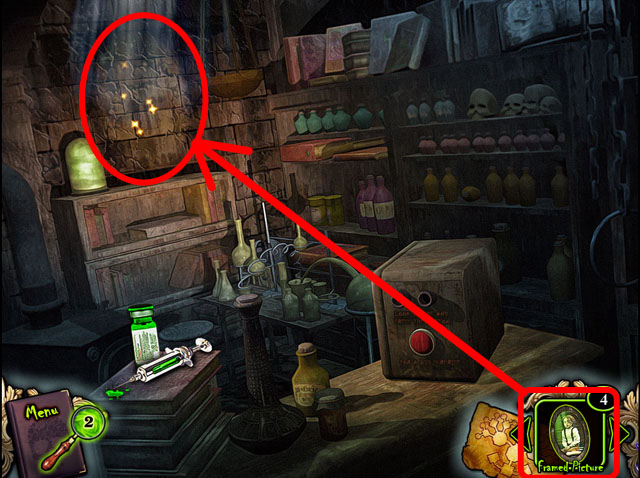
- Place the FRAMED PICTURE on the wall on the left.
- Collect the ROSE that appears on the FRAMED PICTURE.
- Move to the Atrium.
- Place the ROSE from the inventory on the water in the middle of the fountain.
- Collect the CLOCK that appears in the gargoyle’s hand. It will be stuck at 6.
- Move to the Atrium East and enter the middle room.
- Place the CLOCK stuck at 6 on the right door to open that door.
- Enter the room.
- Find the objects in the scene that match the items in the list at the bottom.
- Click on the top card.
- Drag the columns and rows of the picture until it is completed.
- First work on just one column until it is complete. Click on a column and drag it to the left or the right to change its position.
- Once one row is correct, all the remaining rows will be correct.
- To finish the puzzle line up the rows by clicking and dragging them up and down.
- The picture connects to the background. Use that to help you line up the edges.
- Refer to the screenshot for the final image.
- Once finished, collect the COIN.
- Collect the magnifying glass to get another hint.
- Click on the wires to get a hint about what you will need later.
- Return to the previous room and click on the bottom card.
- Click hexagons in the picture that match the list below the picture.
- The picture will change every few seconds, at that time the hexagons at the bottom will also change.
- See the screenshot for which hexagons match which parts of the screen.
- The pieces can be found in any order.
- Collect the CROWBAR.
- Collect the magnifying glass in the upper left corner to get another hint.
- Click on the man on the right to figure out what you need later.
- Move to Dr. Fraud’s office.
- Use the crowbar from the inventory on the sparkling boards on the right to open the pathway.
- Enter the room.
- Find hidden objects listed at the bottom.
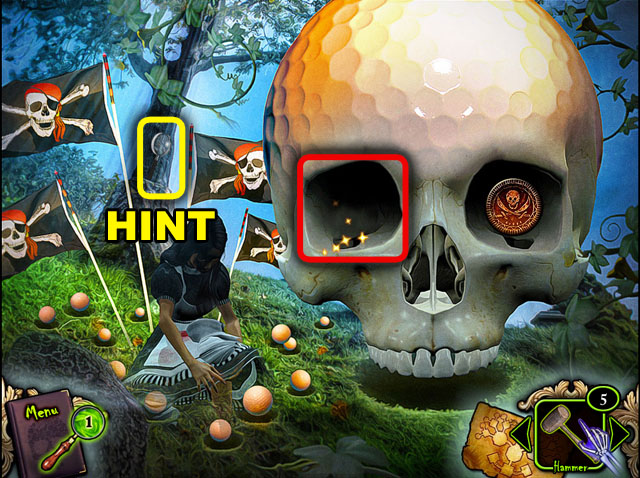
- Move to the fifth victim’s room and click on the right card with the skull.
- Place the COIN from the inventory in the eye on the large skull.
- Collect the REMOTE CONTROL.
- Move to the fourth victim’s room, and click on the card to the left.
- Use the REMOTE CONTROL on the girl to turn off the TV and collect the EYEBALL.
- After collecting the EYEBALL, this victim’s tasks will be completed and he will be free.
- Move to the room west of Dr. Fraud’s office.
Victim 5
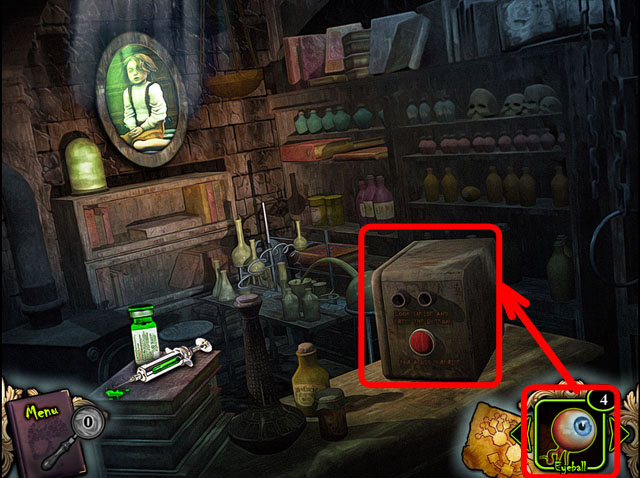
- Click on the magic box in the bottom right, and place the EYEBALL from the inventory on the other spike.
- Collect the ROSE and move to the Atrium.
- Place the ROSE on the water and collect another CLOCK. This one is stuck at 7.
- Move to the Atrium West and enter the middle room.
- Place the CLOCK from your inventory on to the right door which is also stuck at 7.
- Enter the room.

- Find the objects in the scene that match the items in the list at the bottom.
- Click on the card in the upper left.
- Assemble all the pieces of the jigsaw puzzle.
- Click a piece to move it around; release it to place it.
- Pieces highlighted in green are not in the correct spot.
- You can connect pieces together without attaching them to the background.
- Refer to the screenshot for the final image.
- After completing the puzzle, collect the CRYPTIC SKULL.

- Collect the magnifying glass highlighted in yellow to get another hint.
- Return to the previous room.
- Click on the card in the upper right.
- Find hidden objects listed at the bottom of the screen.
- Collect the WIRE CUTTERS.

- Collect the magnifying glass, highlighted in yellow in the screenshot, to get another hint.
- Return to the previous room and click on the bottom card.
- Swap the tiles into the correct positions to finish this puzzle.
- Click on one tile and then another to swap their places. Click the tile again to cancel.
- Start by using the colored bar that follows the edge to make the puzzle easier.
- Refer to the screenshot for the final image.
- Collect the magnifying glass, highlighted in yellow in the screenshot, to get another hint.
- Move to the Atrium West.
- Place the CRYPTIC SKULL from the inventory on to the right door to open it.
- Read the newspaper clipping on the post to learn more about the next victim.
- Move to the sixth victim’s room, marked “VI,” and click on the right card.
- Use the WIRE CUTTERS on the wires in the middle; collect the FROG.
- Move to the fifth victim’s room and click on the left card.
- Place the FROG in the middle to kill the fly and collect the KNIGHT’S GLOVE. This will complete this patient’s quests and free him.
- Move to the room to the east of Dr. Freud’s office.
Victim 6
- Use the KNIGHT’S GLOVE to get the ROSE in the skull’s mouth.
- Go to the Atrium, place the ROSE on the water and receive the next CLOCK, stuck at 8.
- Move to the Atrium East, and go to the middle room.
- Place the 8 o’clock on to the left door to open it; then enter the room.
- Find the objects in the scene that match the items in the list at the bottom.
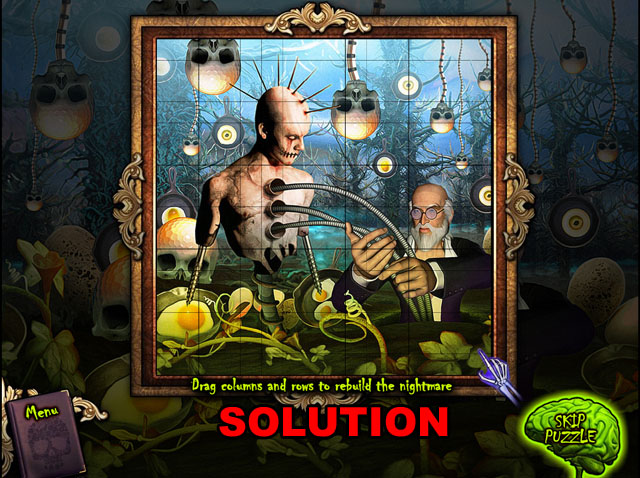
- Click on the top card.
- Drag columns and rows to complete the picture.
- Refer to the screenshot for the final image.
- Collect the CRYPTIC SKULL.
- Collect the magnifying glass, highlighted in yellow in the screenshot, to get another hint.
- Place the DIAL from the inventory on the missing piece of the lock.
- Back to the previous room.
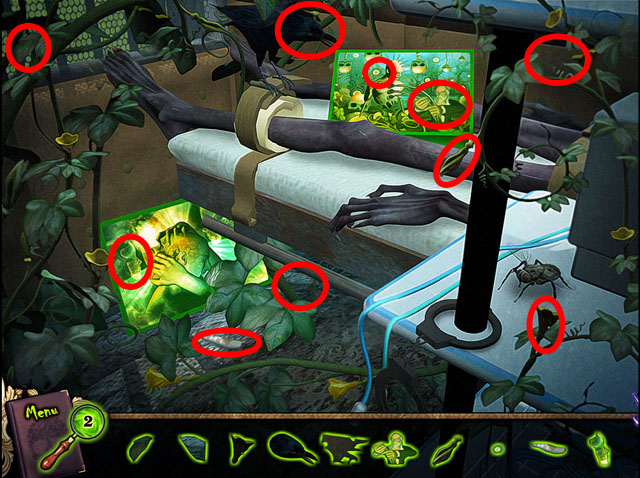
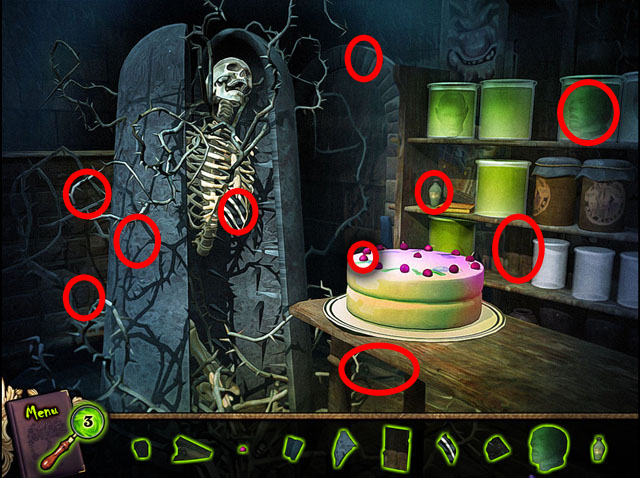
- Click on the left card in the bottom.
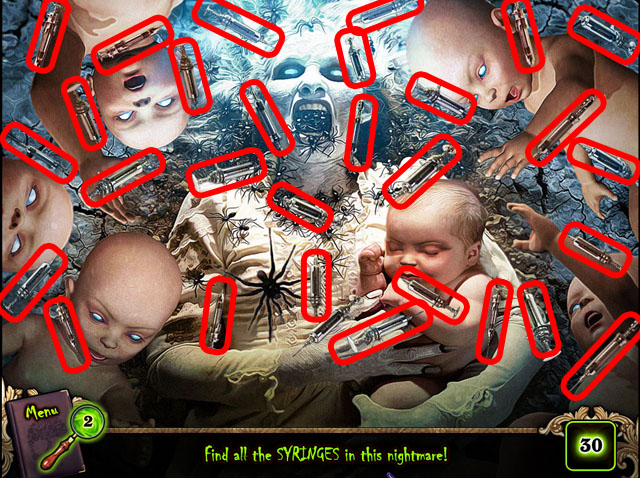
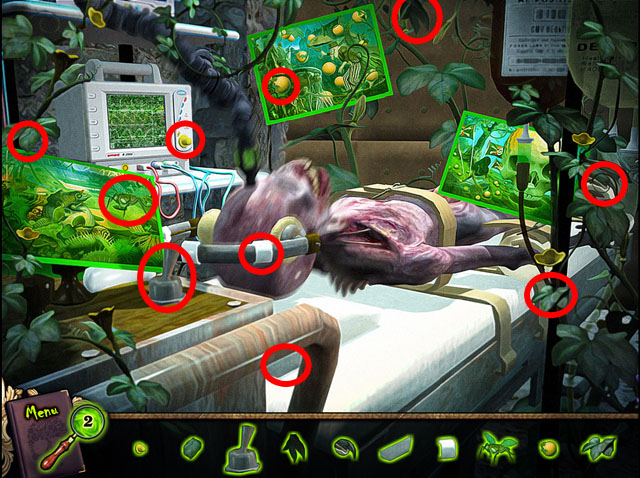
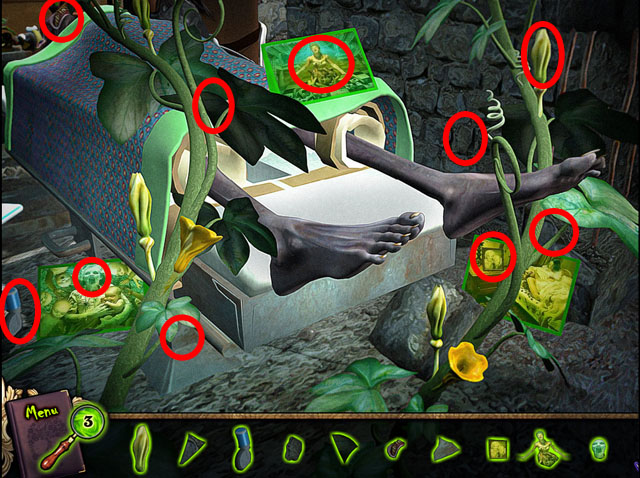
- Find 30 syringes, circled in red in the screenshot.
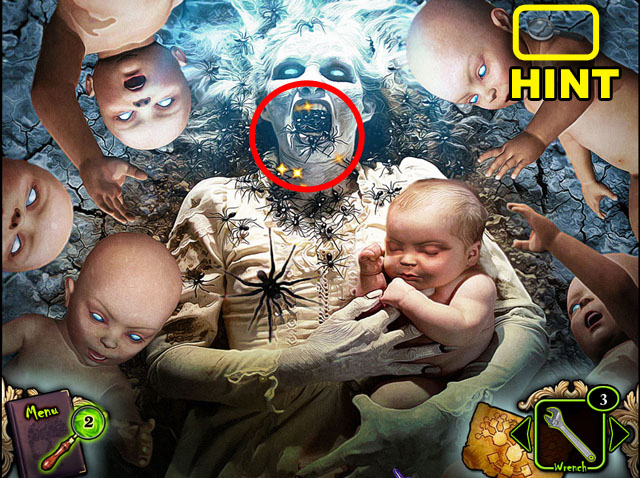
- Collect the magnifying glass, highlighted in yellow in the screenshot, to get another hint.
- Return to the previous room.
- Click on the right card in the bottom.
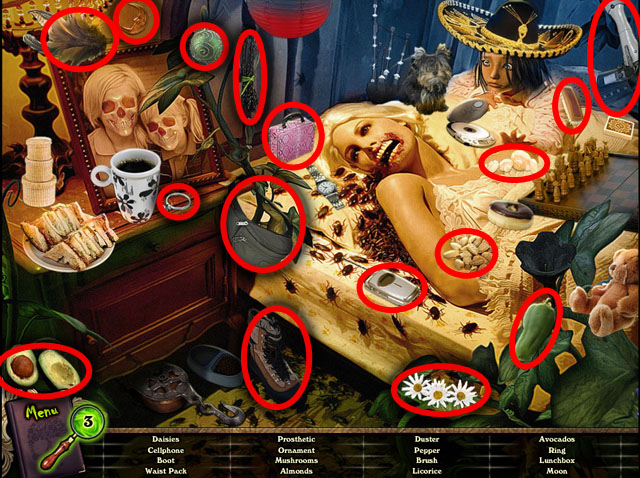
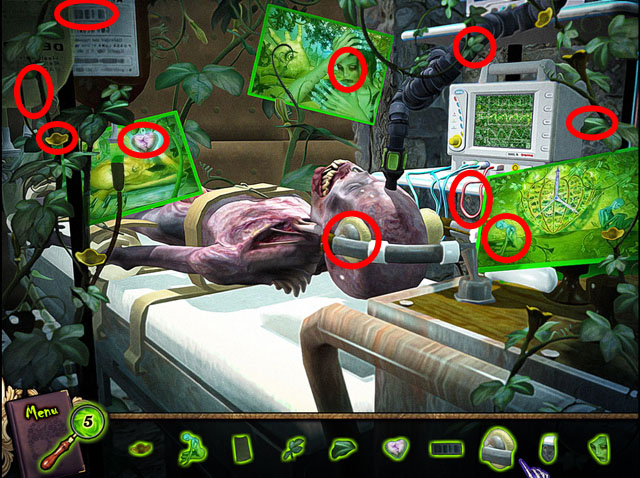
- Find hidden objects listed at the bottom of the screen.
- Collect the JAR OF TEARS.
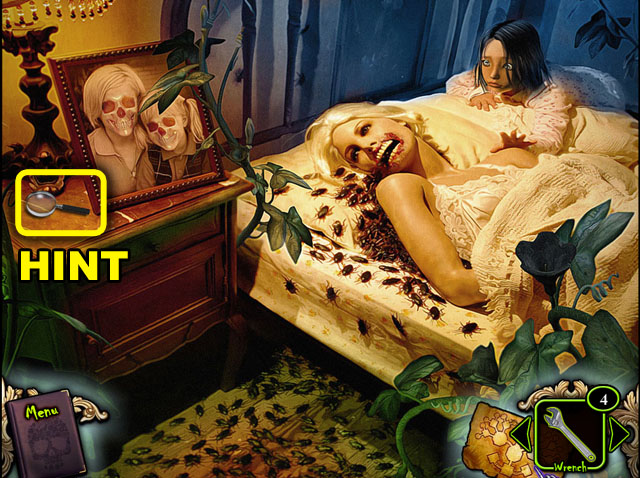
- Collect the magnifying glass, highlighted in yellow in the screenshot, to get another hint.
- Move to the seventh victim’s room, marked “VII,” on the map, and click on the bottom card.
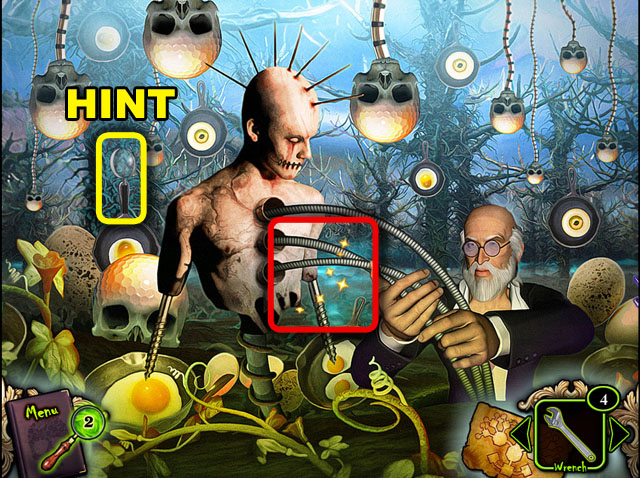
- Place the JAR OF TEARS on the needles in the middle.
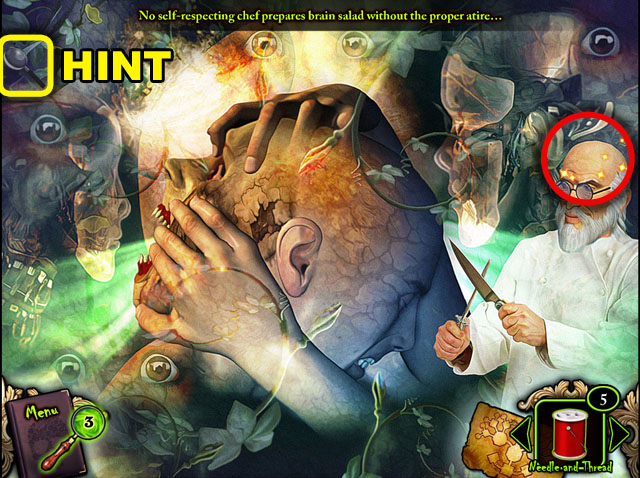
- Collect the CHEF’S HUT and move to the sixth victim’s room.
- Click on the left card and place the CHEF’S HAT on Dr. Fraud. This will complete this victim’s tasks and free him.
- Collect the KNIFE and return to the room to the east of Dr. Fraud’s office.
Victim 7
- Use the KNIFE on the sparkling cake; and collect the ROSE.
- Move to the Atrium, place the ROSE in the fountain and add the next CLOCK to your inventory. This clock is stuck at 9.
- Go to the Atrium West, and enter the right opening.
- Place the 9 O’CLOCK on the right door and enter the room.
- Find the objects in the scene that match the items in the list at the bottom.
- Click on the top card.
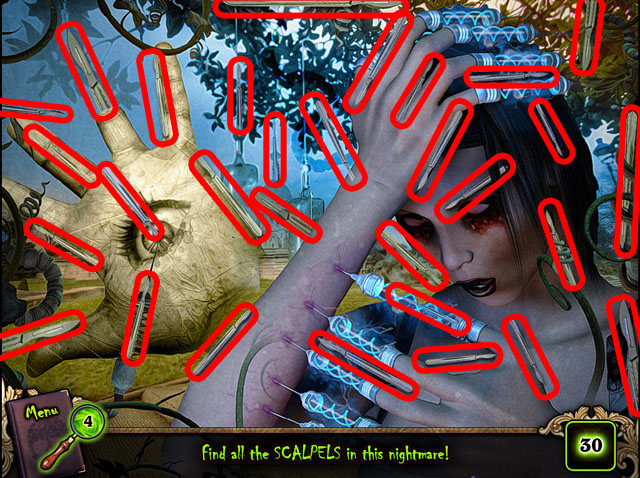
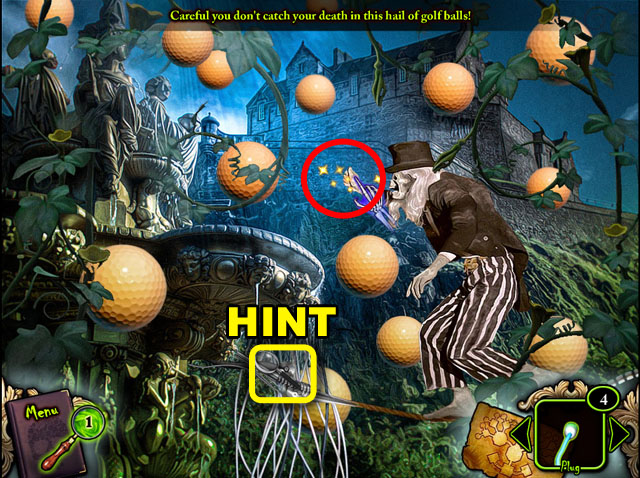
- Find 30 scalpels circled in red in the screenshot.
- Collect the magnifying glass, highlighted in yellow in the screenshot, to get another hint.
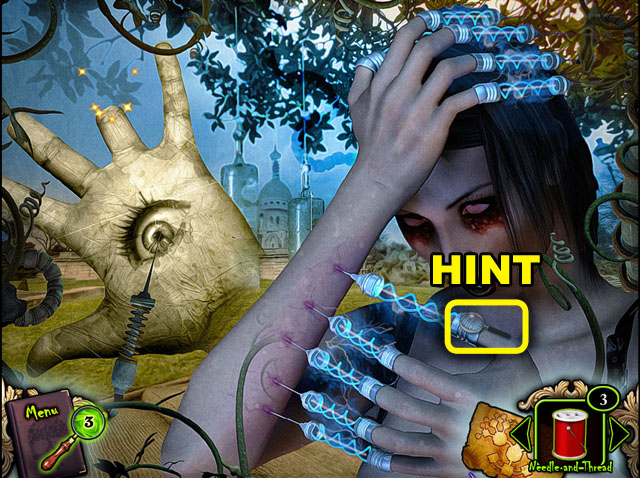
- Click the missing finger on the large hand to the left; then return to the previous room.
- Click on the left card.
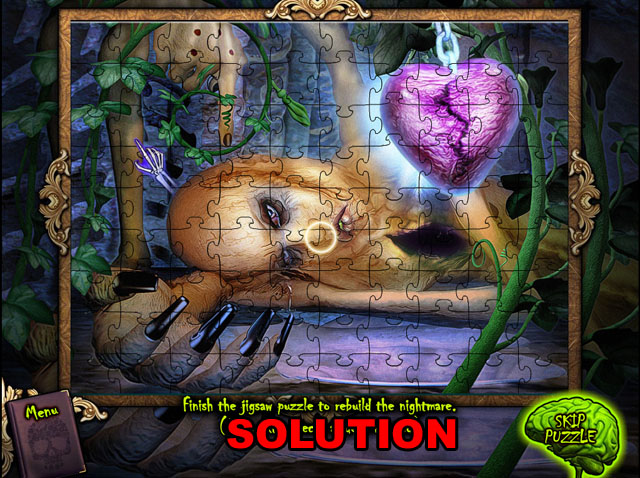
- Assemble all the pieces of the jigsaw puzzle.
- Click a piece to move it around; release it to place it.
- Pieces highlighted in green are not in the correct spot.
- You can connect pieces together without attaching them to the background.
- Refer to the screenshot for the final image.
- Collect the magnifying glass, highlighted in yellow in the screenshot, to get another hint.
- Back to the previous room.
- Click on the right card in the bottom.
- Swap the tiles into the correct positions to finish this puzzle.
- Click on one tile and then another to swap their places. Click the tile again to cancel.
- Start by using the colored bar that follows the edge to make the puzzle easier.
- Refer to the screenshot for the final image.
- Collect the PACIFIER.
- Collect the magnifying glass, highlighted in yellow in the screenshot, to get another hint.
- Move to the eighth victim’s room, labeled on the map “VIII.”
- Click on the card with babies on the left.
- Place the PACIFIER on to her mouth, in the middle, and collect the HEART BALLOON.
- Move to the seventh victim’s room and click on the left card.
- Place the HEART BALLOON on the hand in the middle and collect the ROSE.
- This will finish this patient’s tasks and free him.
Victim 8
- Move to the Atrium and place the ROSE from the inventory into the fountain to receive another CLOCK.
- This clock is stuck at 11.
- Move to the Atrium West, and enter the last room.
- Collect the BOLT CUTTER on the ground.
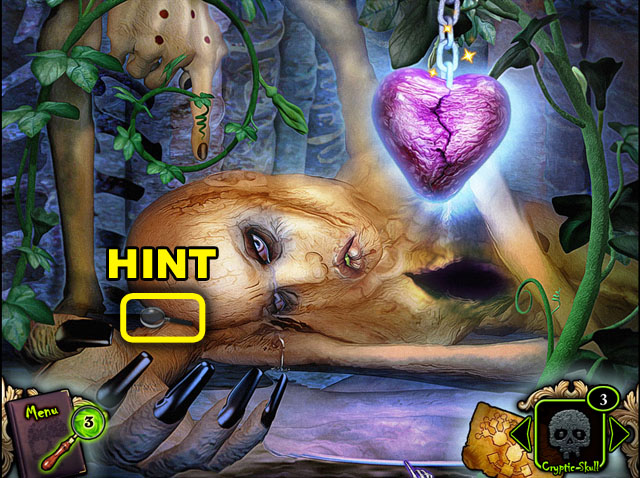
- Move to the ninth victim’s room; click on the left card with the picture of a heart.
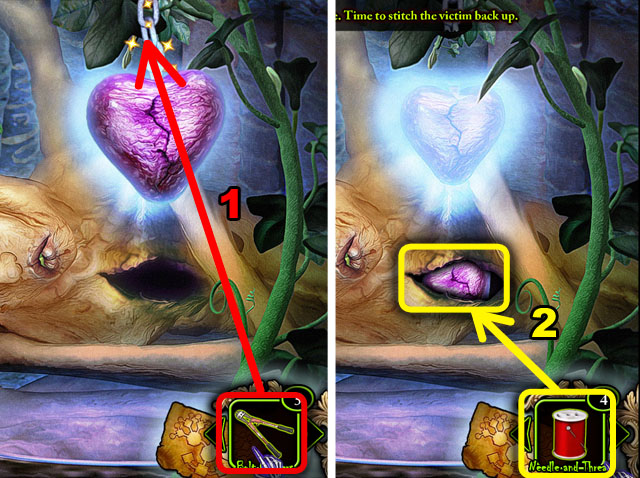
- Use the BOLT CUTTER to cut the chain (1).
- Use the THREAD AND NEEDLE to sew it into the body (2).
- Collect the COMBINATION.
- Move to the eighth victim’s room and click on the top card.
- Place the COMBINATION from the inventory on the lock to open it.
- Collect the ROSE. This finishes this victim’s tasks and frees her.
Victim 9
- Move to the Atrium and place the ROSE in the fountain to receive another CLOCK.
- This clock is stuck at 10.
- Move to the Atrium East and place the CRYPTIC SKULL onto the left door.
- Enter the room and place the CLOCK from your inventory on the left door. Both clocks are stuck on 10.
- Enter the room.
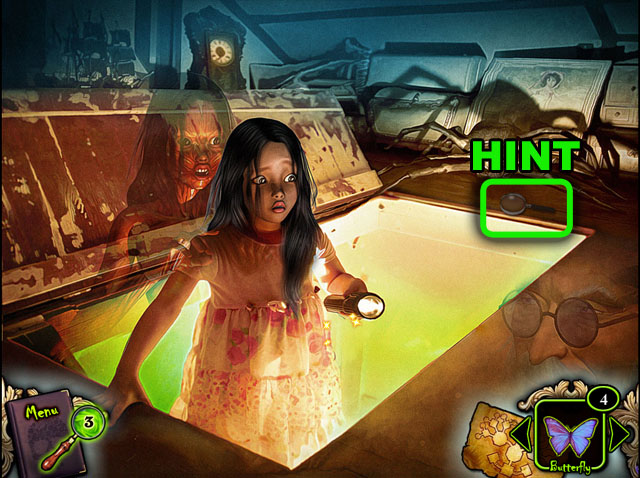
- After a few conversations, click on the sparkles in the middle of the scene.
- Find the objects in the next scene that match the items in the list at the bottom.
- Click on the left card.
- Find hidden objects listed at the bottom.
- Collect the RING FINGER.
- Collect the magnifying glass highlighted in green to get another hint.
- Return to the previous room and click on the middle card.
- Drag the picture’s columns and rows until it is completed.
- First work on just one column until it is complete. Click on a column and drag it to the left or the right to change its position.
- Once one row is correct, all of the rows will be correct.
- To finish the puzzle, line up the rows by clicking and dragging them up and down.
- The picture connects to the background. Use that to help you line up the edges.
- Refer to the screenshot for the final image.
- After finishing the puzzle collect the BUTTERFLY.
- Collect the magnifying glass highlighted in green to get another hint.
- Click on the flashlight to get a clue on solving this photo.
- Return to the previous room and click on the right card.
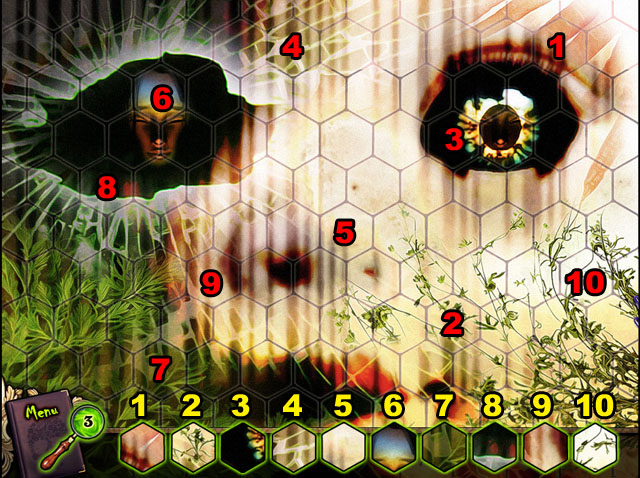
- Click hexagons in the picture that match the list below the picture.
- The picture will change every few seconds, and at that time the hexagons at the bottom will also change.
- See the screenshot detailing which hexagon matches which part of the screen.
- The pieces can be found in any order.
- Collect the RING.
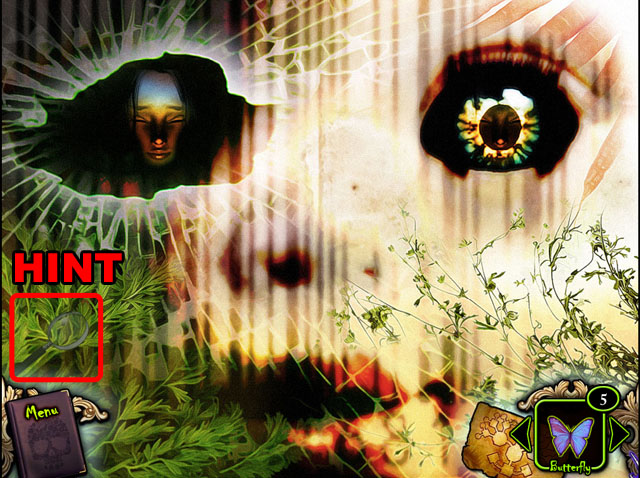
- Collect the magnifying glass highlighted in green to get another hint.
- Move to the ninth victim’s room and click on the middle card.
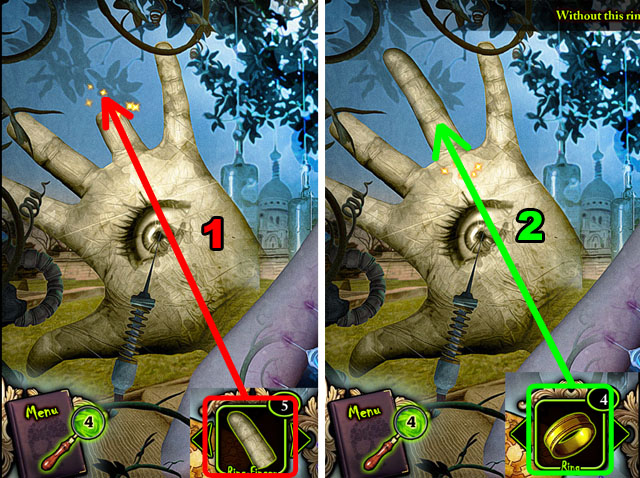
- Place the RING FINGER from the inventory on the missing finger.
- Place the RING from the inventory on the RING FINGER. This finishes all the victim’s tasks and frees her.
- Collect the ROSE and return to the Atrium.
Victim 10
- Place the ROSE in the fountain and receive another CLOCK. This clock is stuck a 12.
- Move to the Atrium East, and go through the left opening.
- Collect the RUG on the ground.
- Move to the tenth victim’s room, the clone of Rose, marked with an “X” on your map.
- Click on the left card and place the RUG under the bed.
- You will collect the BATTERIES but immediately have them taken away from you by Dr. Fraud.
- Return to the room to the west of Dr. Fraud’s office and collect the BATTERIES again.
- Click on the middle card; then put the BATTERIES from the inventory in the flashlight.
- Assemble all the pieces of the jigsaw puzzle.
- Click a piece to move it around; release it to place it.
- Pieces highlighted in green are not in the correct spot.
- You can connect pieces together without attaching them to the background.
- Refer to the screenshot for the final image.
- After the cut scene, try to collect the ROSE by the crow. It will fly away to another scene, telling you not to put the rose in the fountain.
- Follow the crow by clicking down in each scene; click the ROSE in each room.
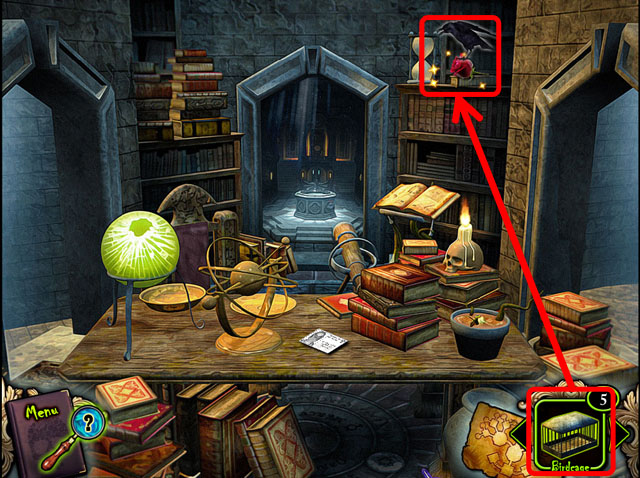
- The crow will hit the BIRDCAGE in Fraud’s office. Collect the BIRDCAGE.
- If the crow is not in this scene anymore, leave the scene and come back.
- Drag the BIRDCAGE to the crow on top of the bookshelf.
- Collect the ROSE on the desk.
- Move to the Atrium and place the ROSE in the fountain.
- The water will drain away and you will be able to go inside the water fountain.
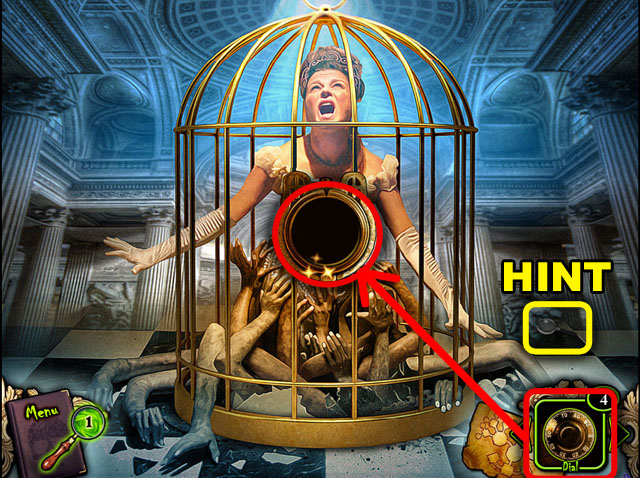
- Click the handle to zoom in.
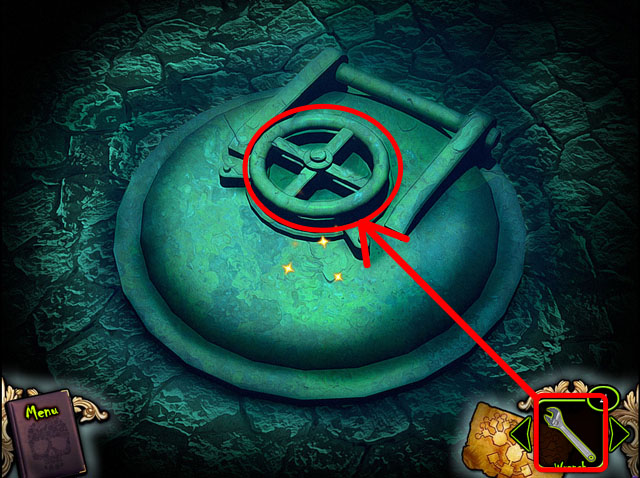
- Use the wrench from the inventory to open the hatch.
- Go inside the hatch.
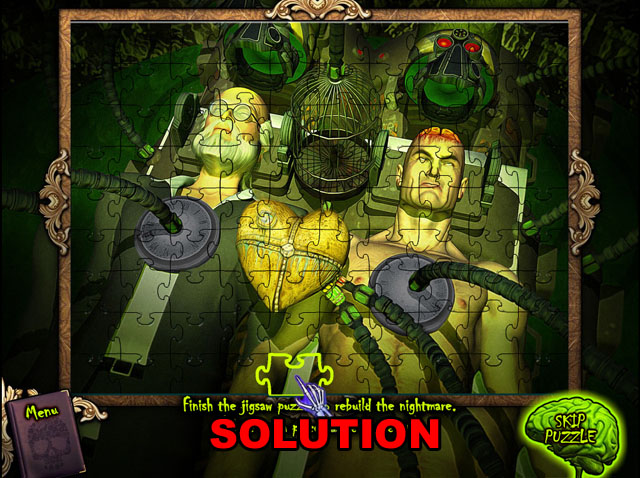
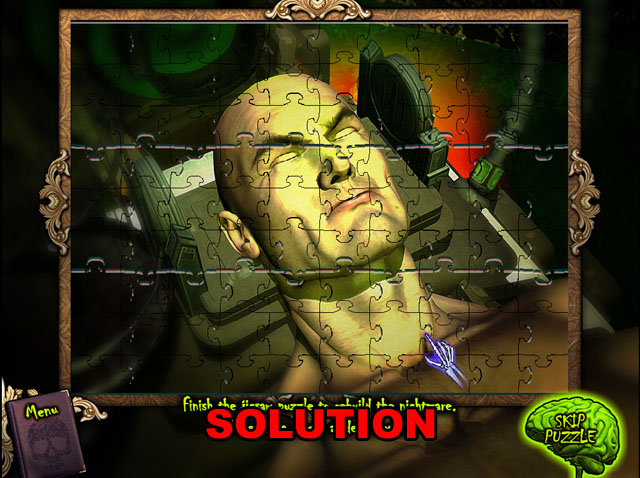
- Assemble all the pieces of the jigsaw puzzle.
- Click a piece to move it around; release it to place it.
- Pieces highlighted in green are not in the correct spot.
- You can connect pieces together without attaching them to the background.
- Refer to the screenshot for the final image.
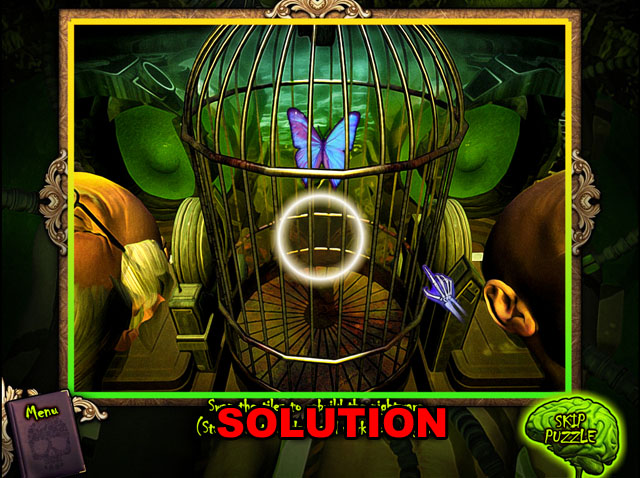
- Place the BUTTERFLY on the trap.
- Place the 12 O’CLOCK on the left man.
- Place the 11 O’CLOCK on the right man.
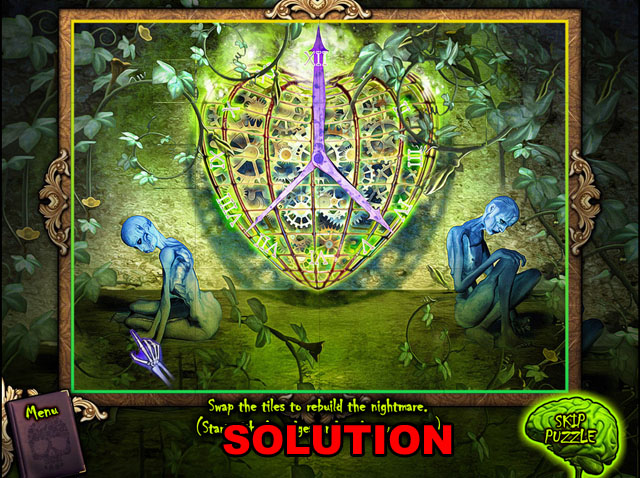
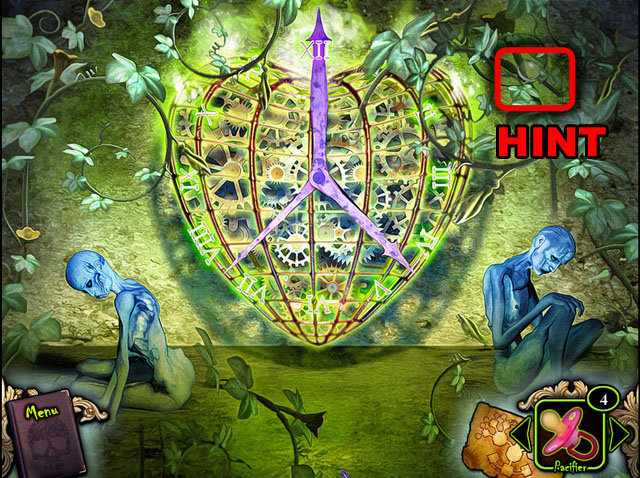
- Swap the tiles into the correct positions to finish this puzzle.
- Click on one tile and then another to swap their places. Click the tile again to cancel.
- Start by using the colored bar that follows the edge to make the puzzle easier.
- Refer to the screenshot for the final image.
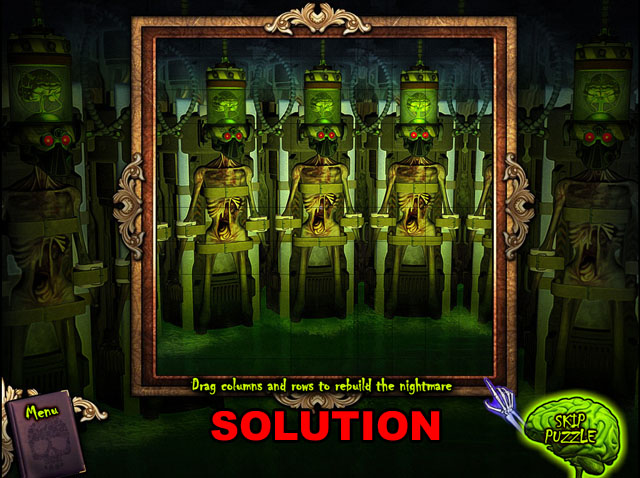
- Drag the columns and rows of the picture until it is completed.
- First work on just one column until it is complete. Click on a column and drag it left or right to change its position.
- Once one row is correct, all remaining rows will be correct.
- To finish the puzzle, line up the rows by clicking and dragging them up and down.
- The picture connects to the background. Use that to help you line up the edges.
- Refer to the screenshot for the final image.
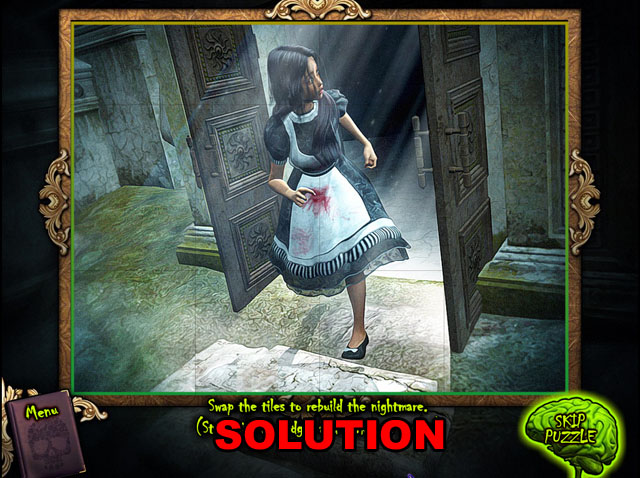
- Swap the tiles into the correct positions to finish this puzzle.
- Click on one tile and then another to swap their places. Click the tile again to cancel.
- Start by using the colored bar that follows the edge to make the puzzle easier.
- Refer to the screenshot for the final image.
- Watch the final cut scene of the game.
- Congratulations! You’ve completed Redrum: Time Lies!
Created at: 2010-08-07