Walkthrough Menu
- General Tips
- Chapter 1: Salamander Relic
- Chapter 2: Moon Relic
- Chapter 3: Snake Relic
- Chapter 4: Sun Relic
- Chapter 5: Lotus Relic
- Chapter 6: Bird Relic
- Chapter 7: Butterfly Relic
- Chapter 8: Shell Relic
- Chapter 9: Final Chapter
General Tips
- From the main menu you can change your player name, adjust options like sound volume full screen, and see the top fastest times completed.
- When you start the game you will be given a choice of Casual Mode and Challenge Mode.
- Casual Mode gives you more hints while Challenge Mode penalizes you for too many mistakes.
- Click the Task button in the upper right corner if your current task is not shown. In Casual Mode the task will be shown at all times.
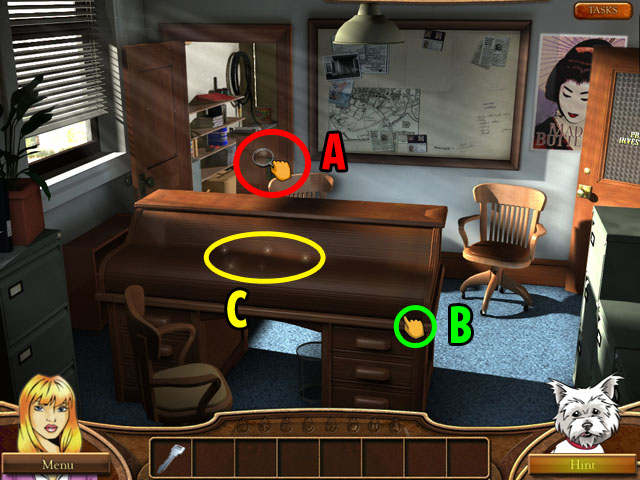
- There are two types of cursors in the game, the Magnifying Glass cursor (A) for when you can investigate something and the normal cursor (B).
- The cursor does not change when you are above items that you can collect.
- Sparkles show you something that can be investigated further (C).
- When you need to use multiple objects on a part of the scene, there will be a large magnifying glass over it and silhouettes of what you need to collect.
- When you get to the map scene, you can visit the different places in any order you want. This walkthrough has a specific order, but there are many possibilities.
- Click on the hint button to get a hint, once you have the dog. The dog will sleep for a while until the hint timer is refreshed.
Chapter 1: Salamander Relic
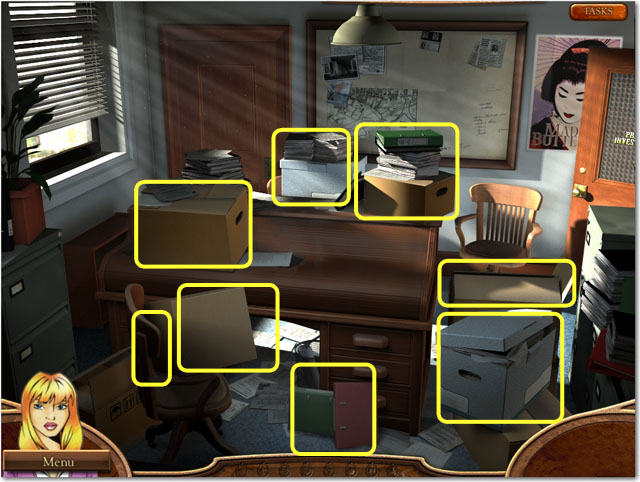
- Click eight boxes to clean them up.
- You will receive a DOORKNOB.
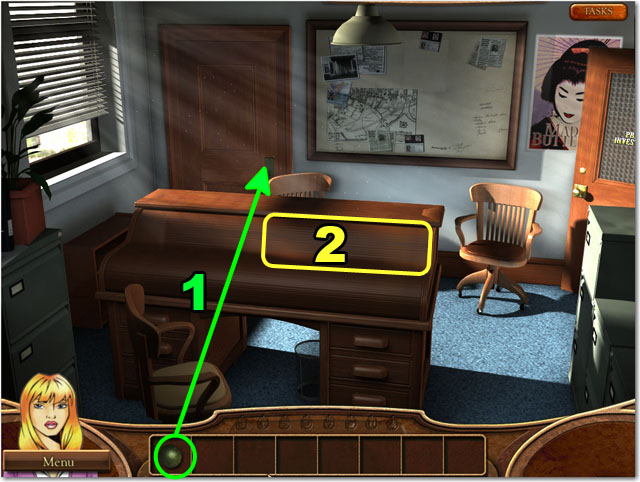
- Place the DOORKNOB on the door plate (1).
- Click on the door to open.
- You will receive a SMALL KEY.
- You will also find your dog. Use him for hints to Hidden Object Scenes and normal game play.
- Click on the desk (2).
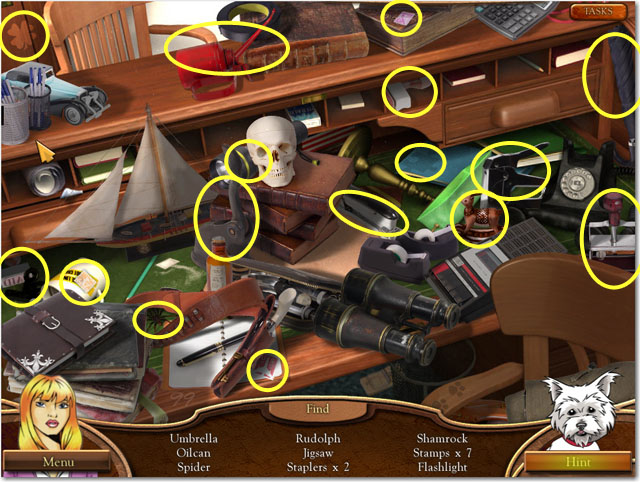
- Play the Hidden Object Scene.
- You will receive an OILCAN.
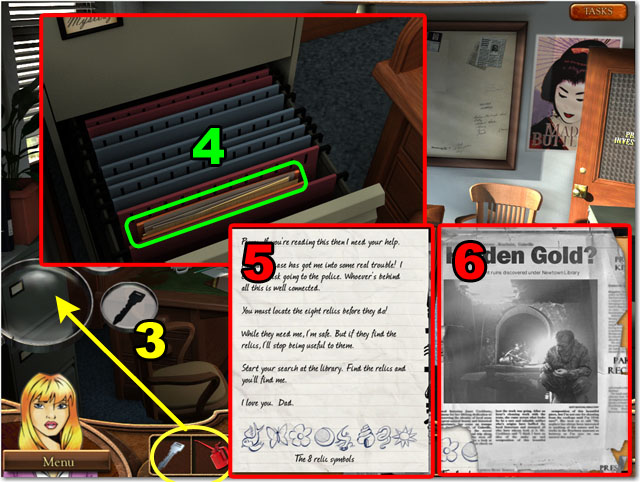
- Click on the file cabinet to the left. It will show you what objects you need to open it.
- Place the KEY and the OIL onto the magnifying glass, or place them over the silhouettes of the objects (3).
- Pick up the papers (4).
- Look the first paper (5).
- Look the second paper (6).
- Click the X button to exit this scene.
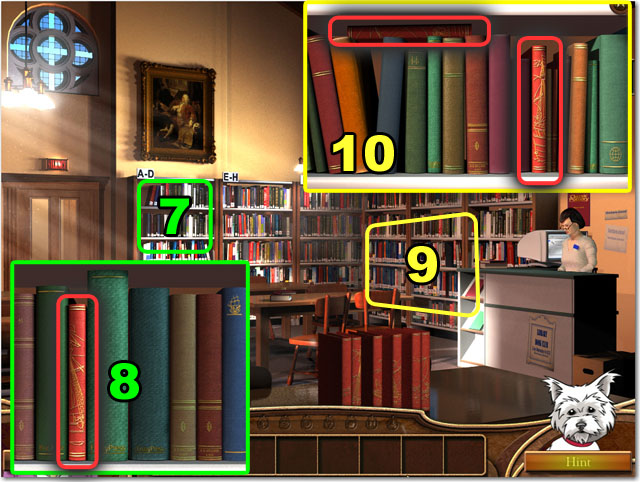
- Click on the bookshelf A-D (7).
- Find the RED BOOK (8).
- Click on the bookshelf Q-T (9).
- Find two more RED BOOKS (10).
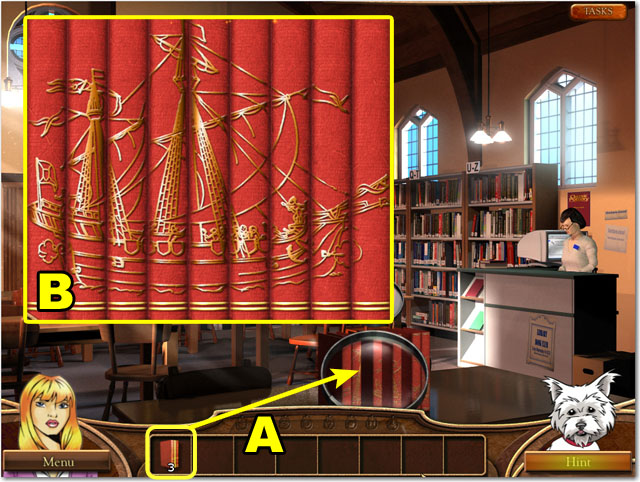
- Place the three BOOKS on the shelf in the front of the screen with the other red books (A).
- To finish this mini-game you must arrange of the books to form a picture of a ship.
- Click on the book and the click on another to change their places.
- Start with the front and rear of the ship on the left and right.
- See the screenshot for the solution (B).
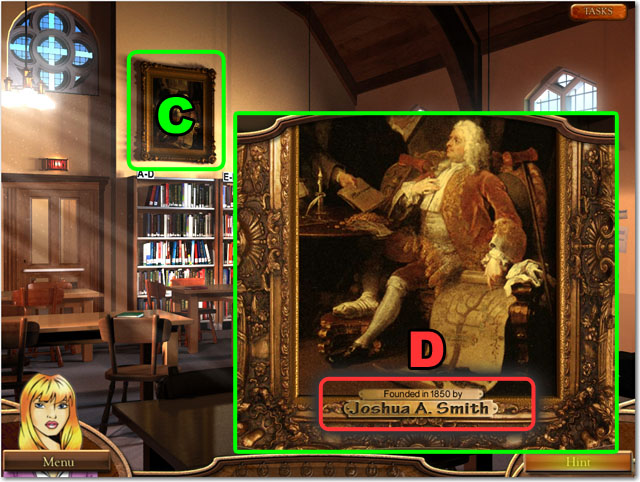
- Click on the painting (C).
- Check the name at the bottom. This is the founder of the library: Smith (D).
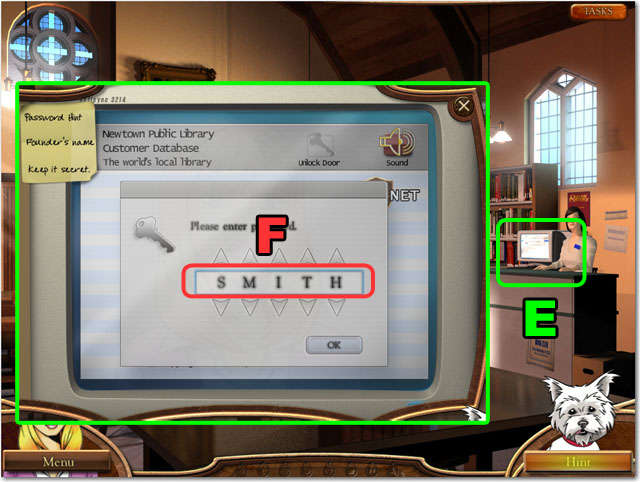
- Click on the computer on the counter to the left of the librarian (E).
- Type in 'SMITH' for the password by clicking the arrows up and down to find the right letters (F).
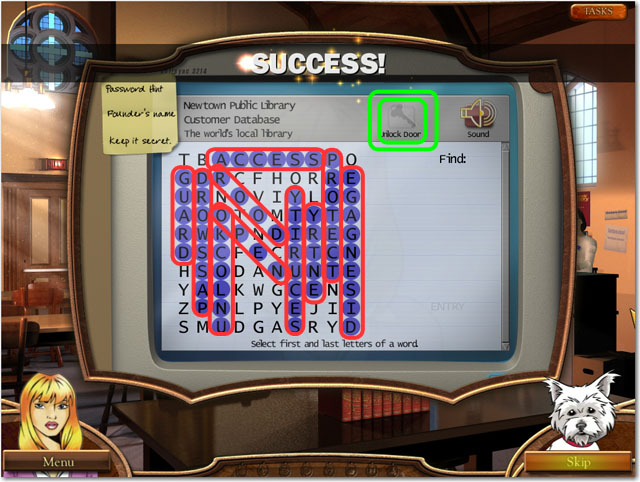
- Click on the unlock door button in the upper side.
- Find 10 words listed at the right.
- To find a word, click on the first letter and then the last letter. It works in reverse as well.
- Some of the words are diagonal, some are vertical, some are horizontal and a few are backwards.
- Click on the door that you just opened in the back.
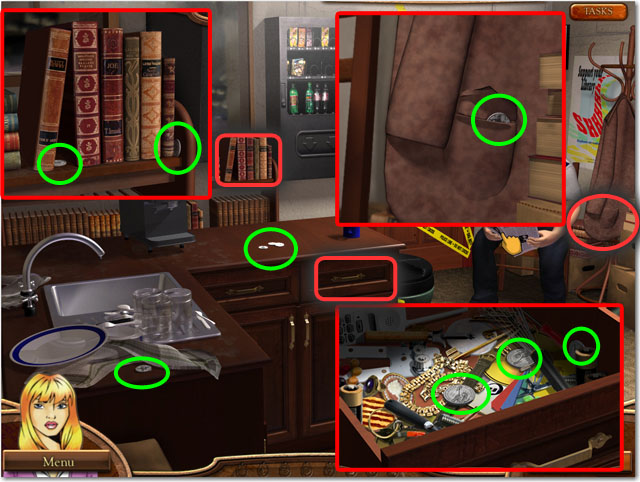
- Find 10 coins.
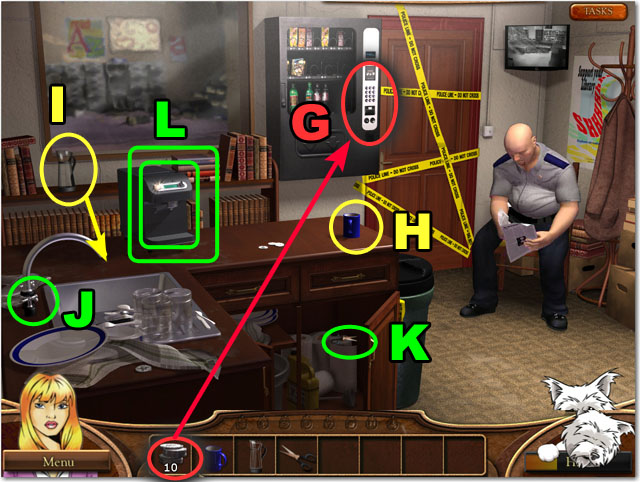
- Put the MONEY into the vending machine (G).
- You will receive some CHOCOLATE.
- Collect the EMPTY MUG (H).
- Collect the EMPTY JAR (I).
- Turn on the faucet (J) and fill the JAR with water.
- Collect the SCISSORS (K).
- Place the MUG, JAR and CHOCOLATE on the coffee machine (L).
- Give the HOT CHOCOLATE to the security guard.
- Cut the police tape on the door with SCISSORS while the security guard is sleeping.
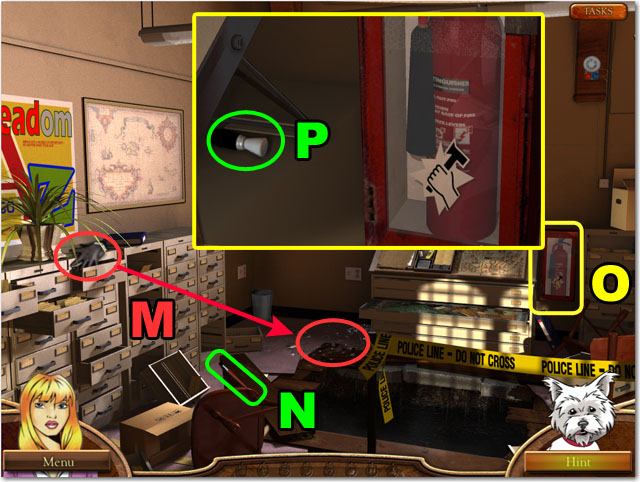
- Collect the GLOVE.
- Click the GLOVE and then use it on the glass in the back to collect some (M).
- Collect the DUSTING BRUSH (N).
- Zoom in on the fire extinguisher (O).
- Collect the CLEANING BRUSH (P).
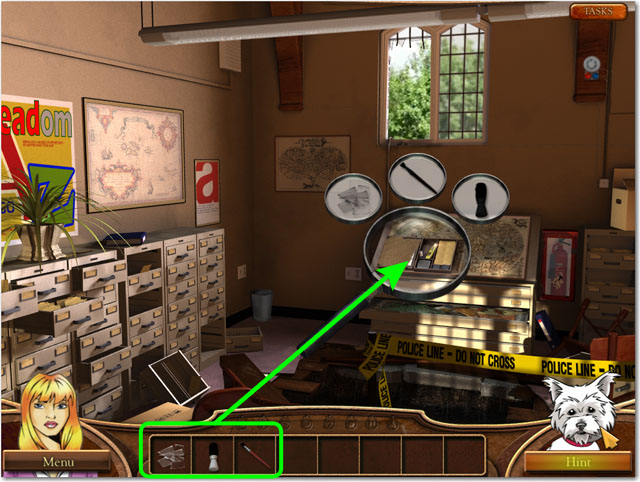
- Place all of the inventory items on the map.
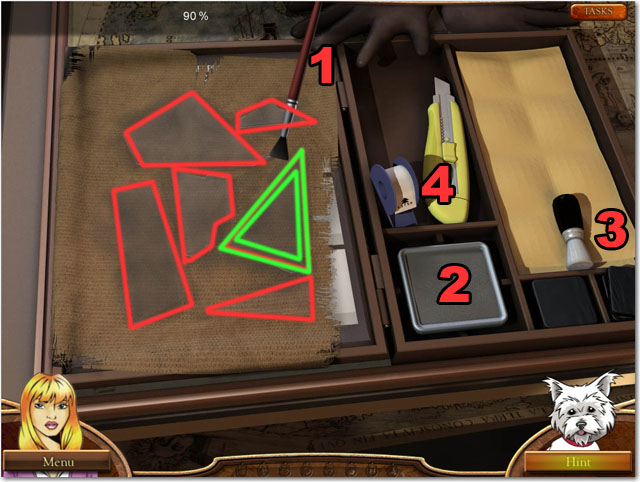
- Pick up the DUST BRUSH (1).
- Click on the powder (2).
- Put the powder with the BRUSH on to the six pieces of glass.
- Move your cursor back and forth over the glass until the BRUSH is removed.
- Clean the powder with the CLEANING BRUSH (3).
- Again move your cursor back and forth until the BRUSH is removed.
- Use the TAPE (4) on the FINGERPRINT and then collect it (4).
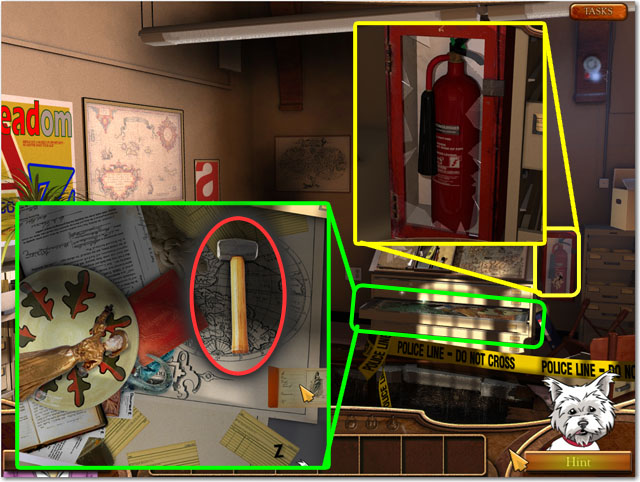
- Click on the drawer below the map.
- Drag objects out of the way to find the HAMMER in the upper right corner.
- The HAMMER is below all the other objects.
- Zoom in to the fire extinguisher highlighted in yellow.
- Use the HAMMER three times to break the glass.
- Collect the FIRE EXTINGUISHER.
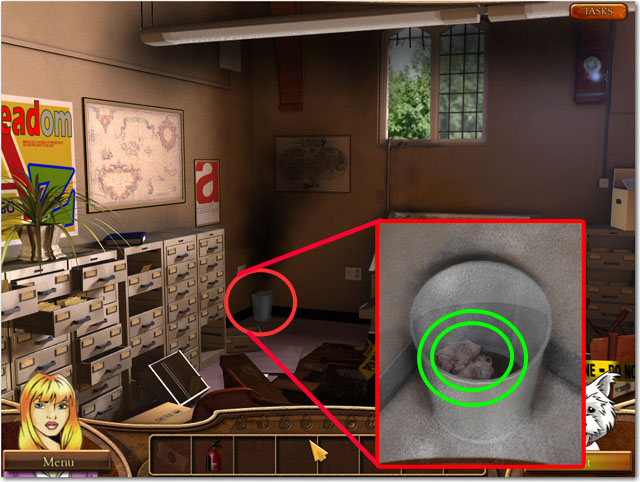
- Use the FIRE EXTINGUISHER to extinguish a fire in the bucket.
- Zoom in the bucket.
- Click on the paper highlighted in green.
- Take the FINGERPRINT KIT on top of the table with the map.
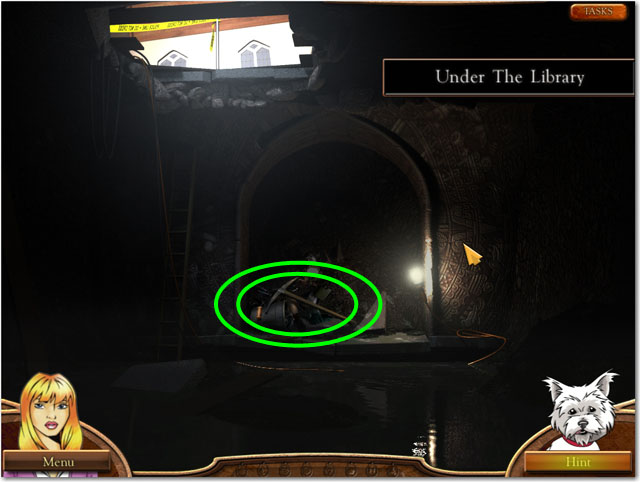
- Click on the middle of the screen, where the pick axe is.
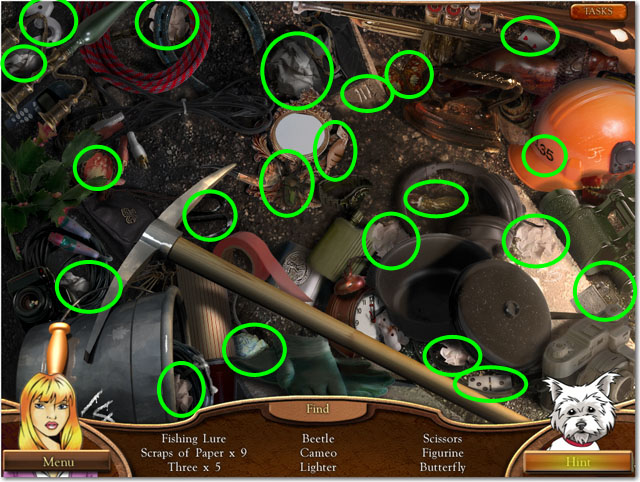
- Play the Hidden Object Scene.
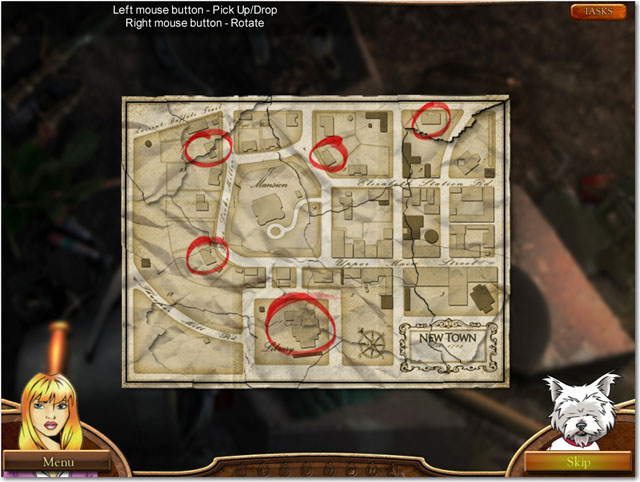
- Complete the jigsaw puzzle.
- Left mouse button works for picking up and dropping the pieces.
- Right mouse button works for rotation.
- When you place a piece next to a piece that fits, they will lock together.
- Once the pieces lock together you can move them around as one.
- Use the edges to get started and also use the map title in the bottom right corner.
- The map title looks like an old painting frame.
- Once finished you will receive the MAP in your inventory.
- In the office, place the MAP on the bulletin board in the back of the room.
- Click on the map to be able to travel between areas.
- Choose the '224 E Main St Local Historian'. It is the location closest to the library at the bottom.
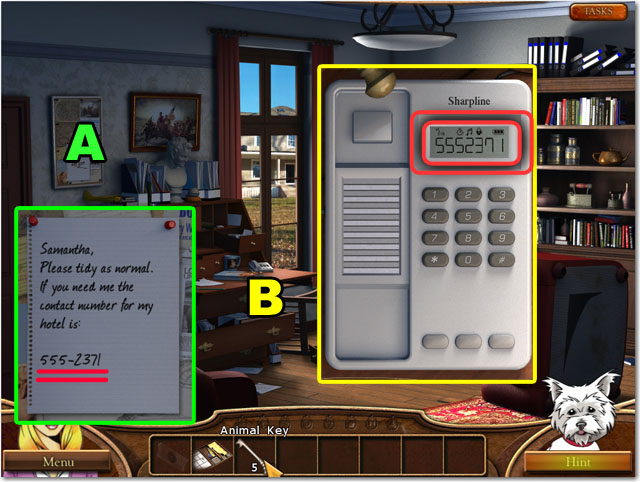
- Zoom in the clip board (A).
- Remember the phone number on the paper.
- Zoom in the phone on the desk (B).
- Pick up the handle and enter the phone number '5552371'.
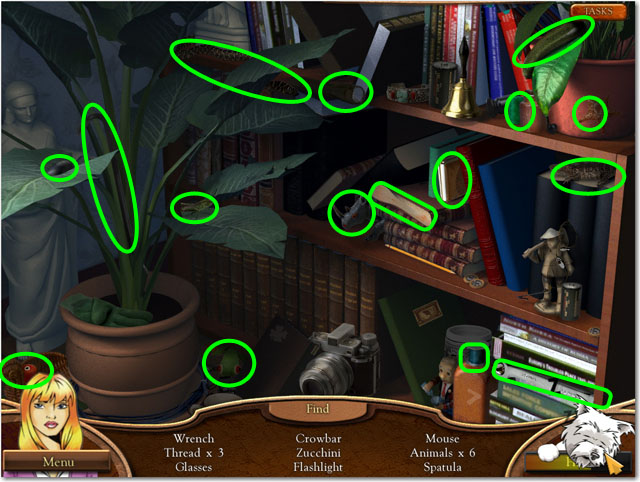
- Play the Hidden Object Scene.
- You will receive the CROWBAR.
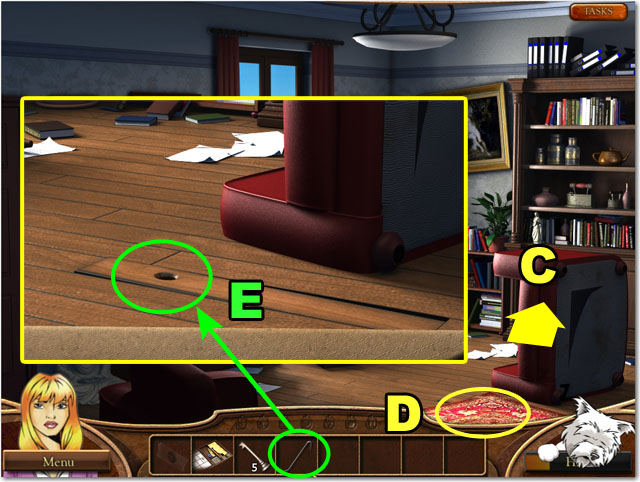
- Click on the chair to drag to the right side (C).
- Click on the rug (D).
- Use CROWBAR to open the floor piece (E).
- Click on the box inside the hole. You will need 5 keys to open it.
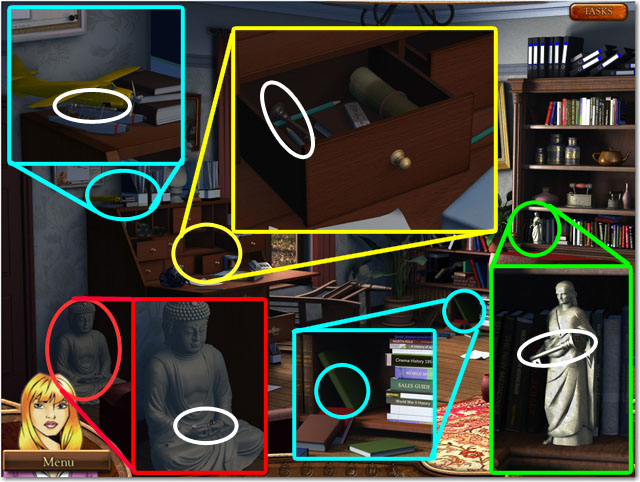
- Find five ANIMAL KEYS hidden around the room.
- One is in the Buddha’s lap, two are on the desk to the left, and two are on the shelves to the right.
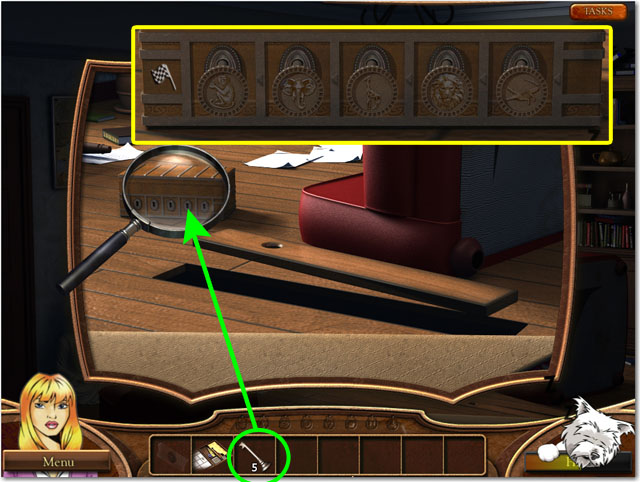
- Place the five ANIMAL KEYS on to the box to open it.
- Solve the puzzle on the box by rearranging the animals into the correct order.
- Click one animal key then another to switch their places.
- The order is hinted at by the text above the animals.
- Start with the first sentence and move your way through the logic puzzle, for example: if the lion finished before the crocodile and the giraffe finished before the lion, you can line them up giraffe, lion then crocodile.
- The correct order from the left is: monkey, elephant, giraffe, lion and crocodile.
- You will receive the Salamander Relic.
Chapter 2: Moon Relic
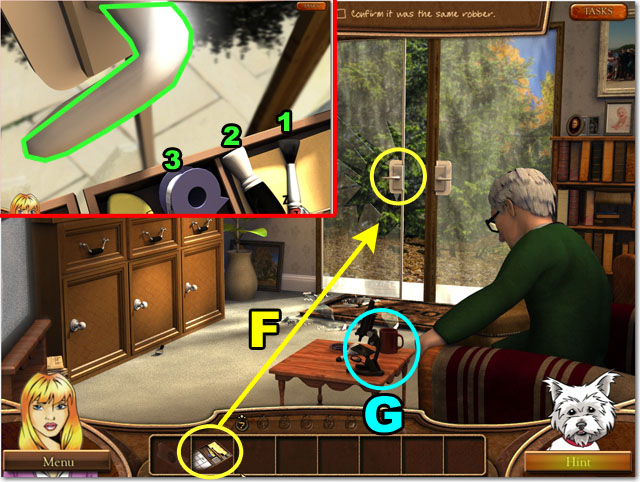
- You will return to the map screen. Choose 14a Blue Liks, the red circle to the left of the library.
- Use the FINGERPRINT KIT to collect the FINGERPRINT on the door handle (F).
- Put powder on the handle with the DUST BRUSH (1).
- Clean off the powder with the CLEANING BRUSH (2).
- Collect the FINGERPRINT with the tape (3).
- Place two FINGEPRINTS on to the microscope (G).
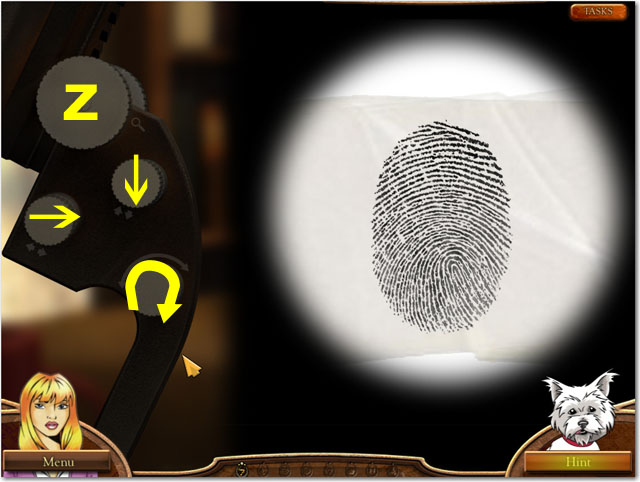
- Match the two FINGERPRINTS to complete this mini-game.
- You have four controls.
- The top control (Z) adjusts the focus of the second FINGERPRINT. Do this first.
- The next two controls move the FINGERPRINT to the left/right and up/down directions.
- The last control at the bottom rotates the FINGERPRINT.
- After making the print in focus, press left and down two times each.
- Then turn the FINGERPRINT with the bottom button until it is in place.
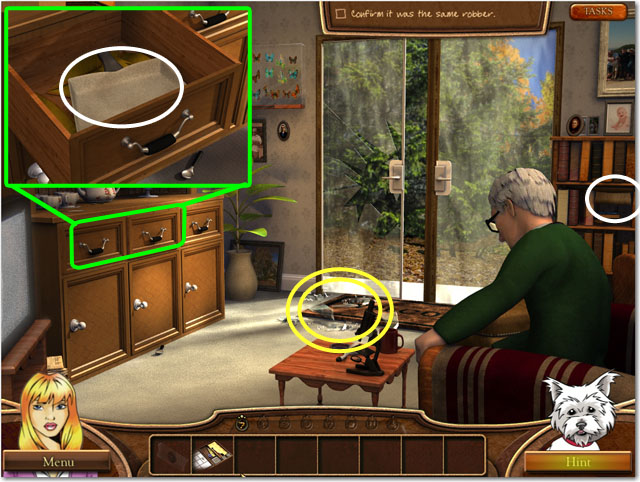
- Open the drawer in the bureau and collect the DUSTPAN.
- Collect the BROOM on the right side of the screen.
- Place the BROOM and the DUSTPAN on the broken glass.
- Click on the screen until the glass is all cleaned up.
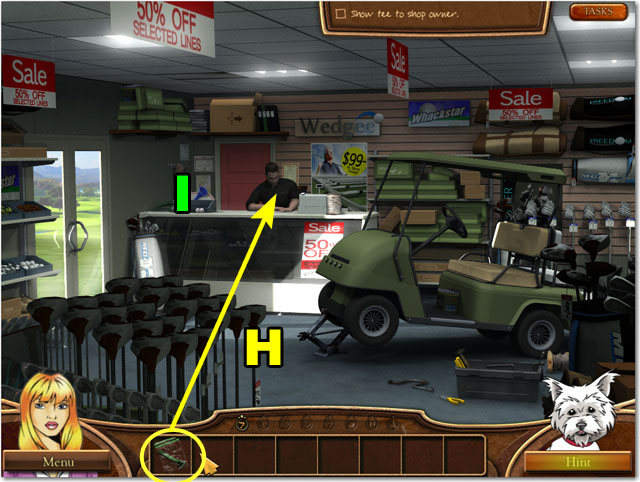
- You will be returned to the map. Select the 'Newtown Golf Course'.
- Show the GOLF TEE to the staff (H).
- Click on the counter (I).
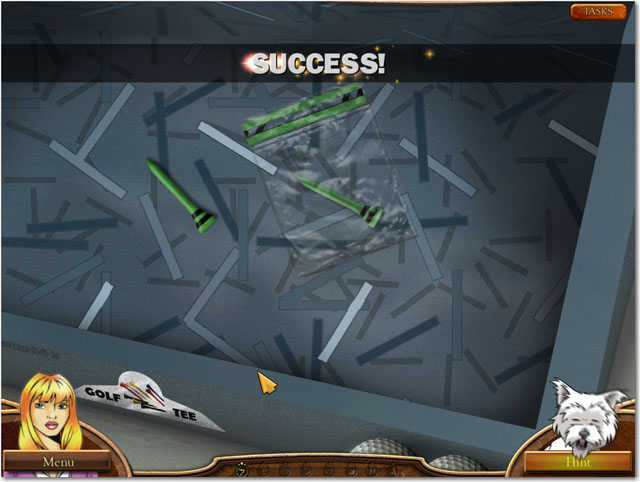
- Find matching pairs.
- Click on one tee and then another that looks like it.
- If the tees are a match the will disappear.
- Look closely at the colors and the patterns at the top of the tees to match them.
- After all of the tees have been found the green tee with two lines will be the only one left.
- It matches the tee in your inventory.
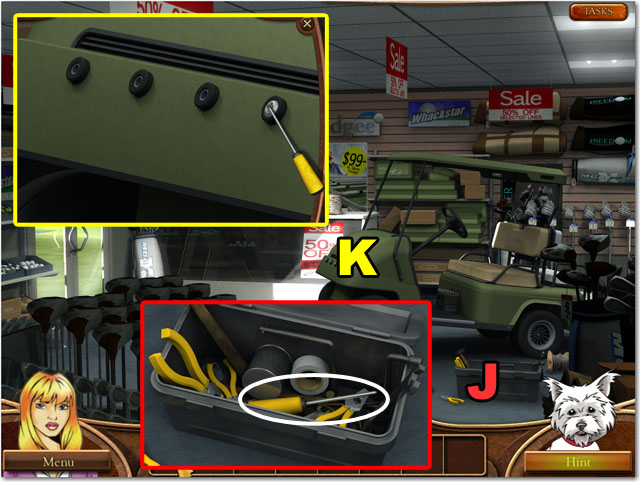
- Zoom in the tool box and find the SCREWDRIVER (J).
- Zoom in the golf cart and take of four screws (K).
- Click on the golf cart.
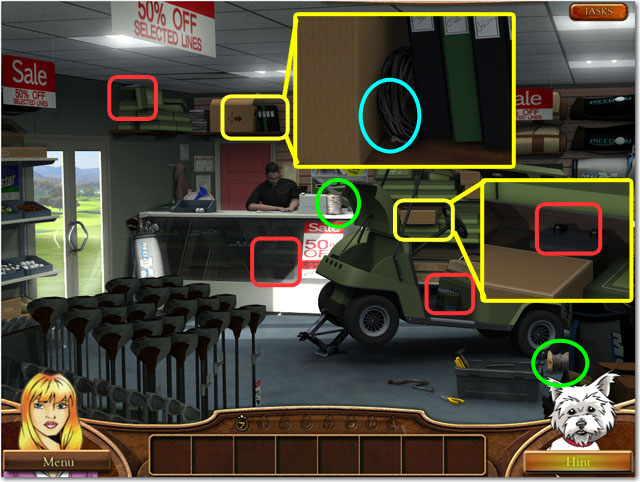
- Find two WIRE COILS highlighted in green.
- Find four BATTERIES highlighted in red.
- Find the spool of WIRE highlighted in light blue.
- Place all of your inventory items on to the golf cart.
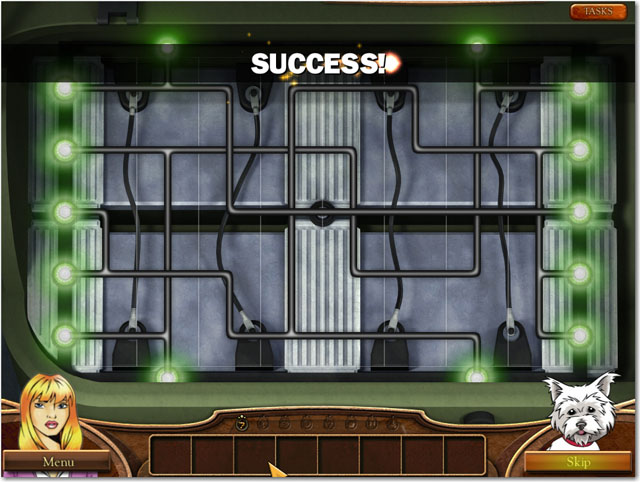
- Connect the wires by rearranging the rows of wire.
- Clicking on a row will highlight it with a dotted line.
- Click another row to switch their places.
- Start with the two lines that have connections at the top and the bottom and work out from there.
- See the screenshot for the correct solution.
- Click on the lock under the front tires to move next scene.
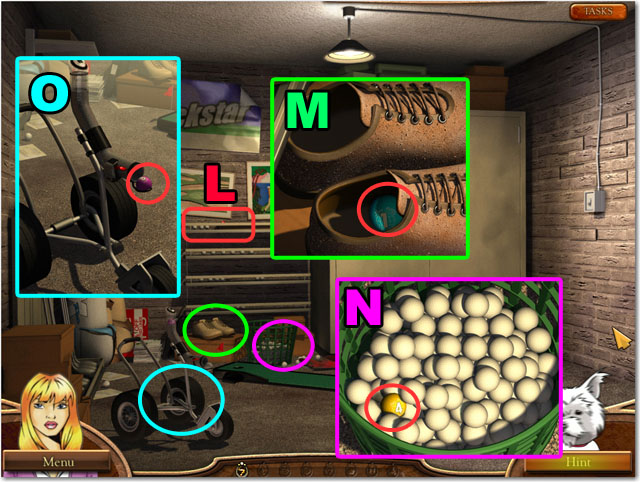
- Turn on the switch in the right side to activate the lights.
- Take off the big red blanket on the safe.
- Click the display (L). You will need to find the colored balls that fit this display.
- Zoom in on shoes and collect the CYAN BALL (M).
- Zoom in on basket highlighted in purple.
- Click the white balls in the bottom left corner to remove them and collect the YELLOW BALL (N).
- Zoom in on the bike highlighted in light blue.
- Push the red button until the PURPLE BALL appears and collect the it (O).
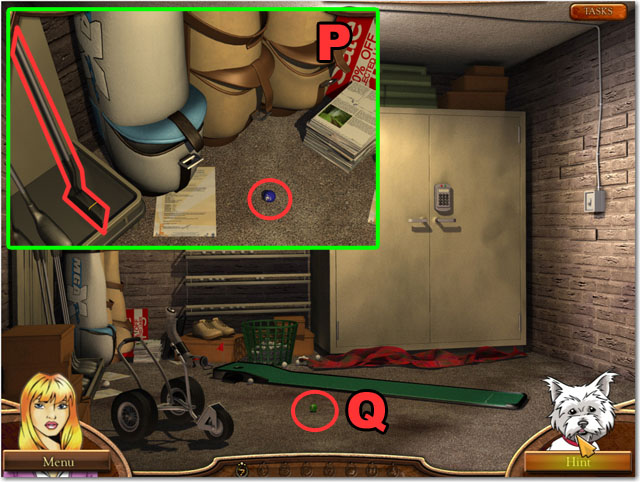
- Open all of pockets on the golf bags. Collect the BLUE BALL (P).
- Collect the PUTTER.
- Play the ball on the right side of the practice putting green with the PUTTER. Collect the green ball (Q) that rolls out.
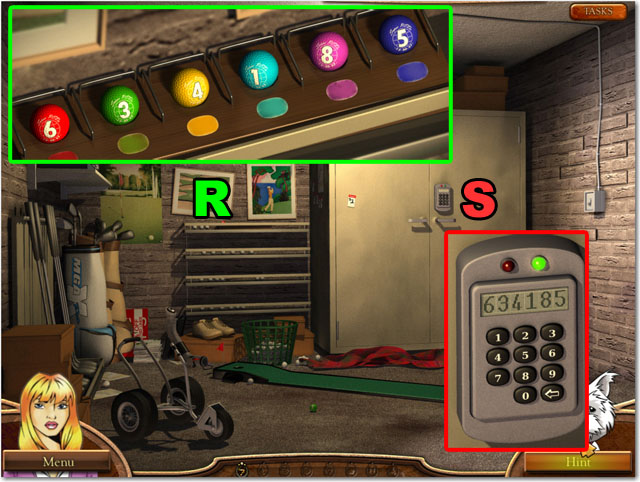
- Place all balls in your inventory on the display (R).
- Type in the password in the safe lock that matches the numbers on the balls: “634185”.
- Open the safe and collect the Moon Relic and the file.
Chapter 3: Snake Relic
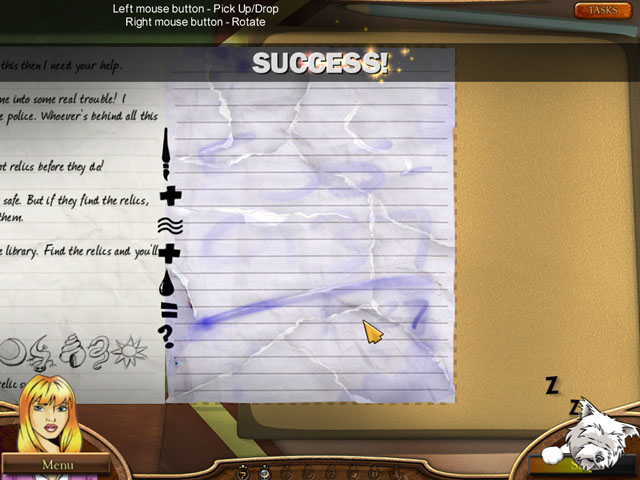
- Click on the book on top of the desk marked “JAKE MACEY”.
- Put the puzzle pieces together as show in the image.
- Click a piece to pick it up. Right click to rotate it and click it again to put it down.
- If you put the piece in the correct place, it will turn a darker shade of blue and you will be unable to move it again.
- Use the edges and the dark symbols on the very left of the page to help you match them to the correct locations.
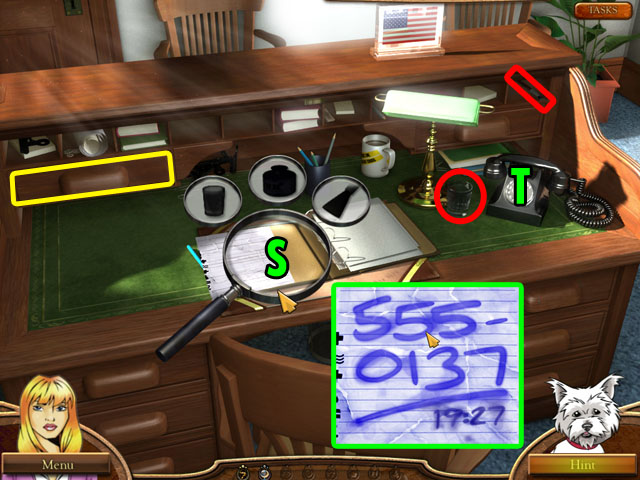
- Search around the desk for a CUP, INK BOTTLE and BRUSH.
- Collect the INK BOTTLE from the drawer highlighted in yellow and the other two objects highlighted in red.
- Click and drop them on the paper in the middle of the desk (S).
- Click and drag the paintbrush over the paper until you can see the numbers: 555-0137 and 19:27.
- Use the phone on the desk to call the first number (T).
- You will get a new location, click on the Newtown Antiques to go there.
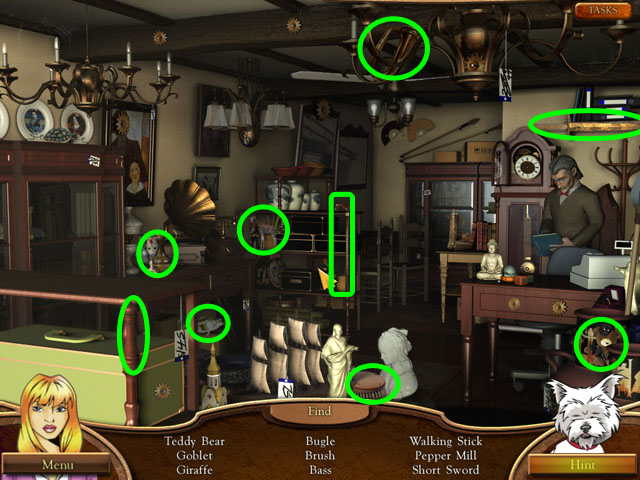
- Play the Hidden Object Scene.
- The hidden objects might be randomized.
- The owner will leave and you will be able to check out the clock that was behind him.
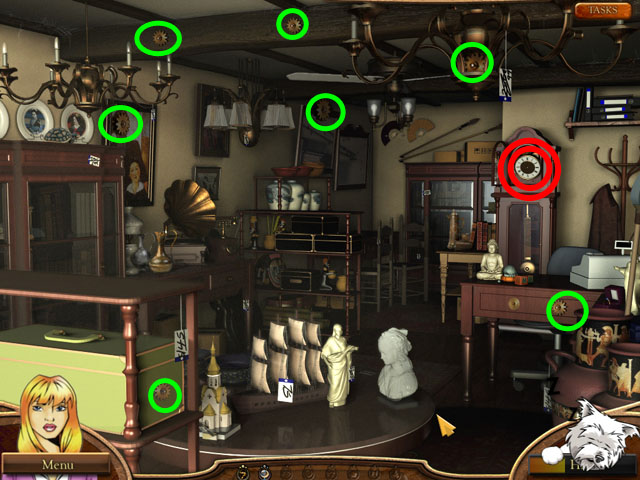
- Find 7 GEARS in the scene and use them on the clock.
- Click on the clock to view it closer.
- Place seven GEARS on the clock.
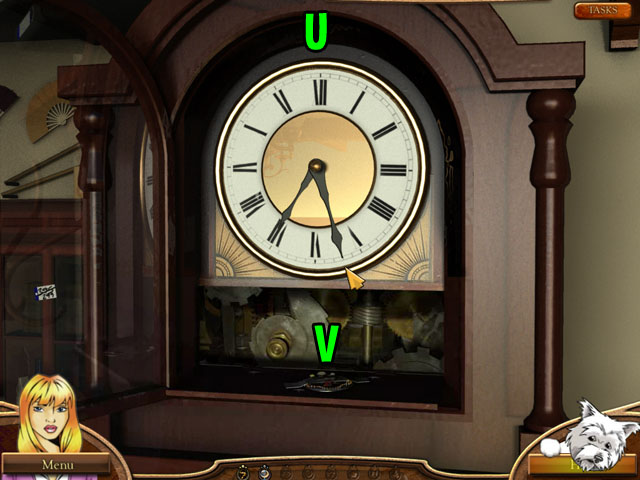
- Click on the clock to open the door and set the hands of the clock to 19:27 (U).
- On the inside of the compartment that opens up you will find the Snake Relic (V).
Chapter 4: Sun Relic
- Next you will be taken back to the map screen.
- Go to 808 Parsons Road at the top right corner of the map.
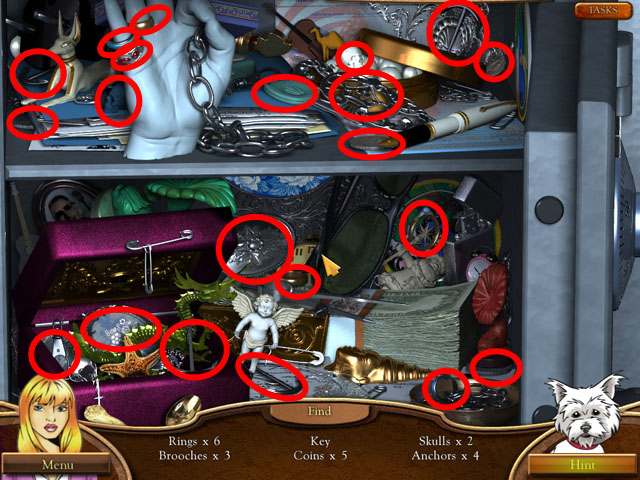
- Talk to the woman and then click on the safe in the middle of the back wall. You will be taken to a Hidden Object Scene.
- Play the Hidden Object Scene.
- After finding all of the objects, you will return to the previous room.
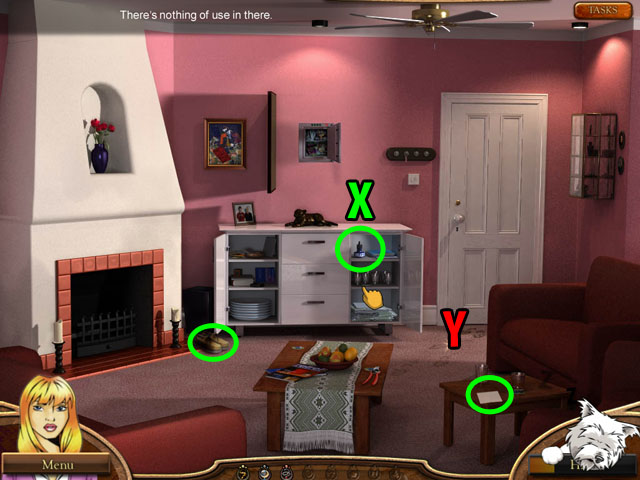
- Click on the muddy footprints at the bottom of the door to find that you need a pair of SHOES, PAPER, and GLUE.
- Open the white drawer to the right to find the INK (X).
- Find the SHOES to the right of the fireplace and the PAPER on the table to the right.
- Use all three objects on the muddy footprints (Y).
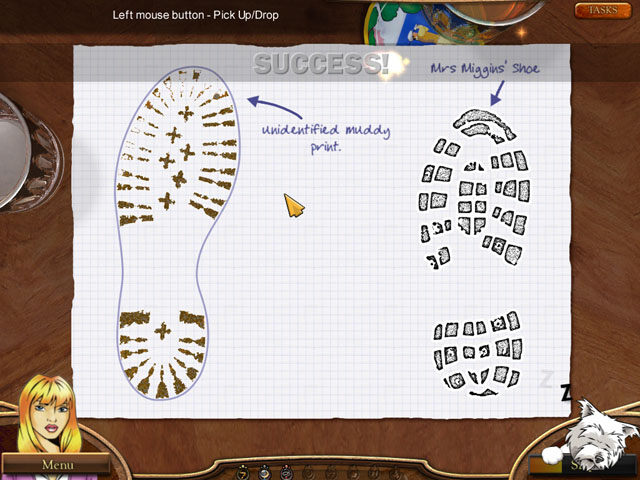
- Assemble the pieces of the muddy footprint into the area at the left of the screen.
- You can’t rotate the pieces, just click to pick one up and then click again to place.
- Use the shape of the edge and the boot to the right to help you put the print together.
- Once a piece is in the right place, you will not be able to move it.
- After finishing the shoe print correctly you will see that they are from two different shoes.
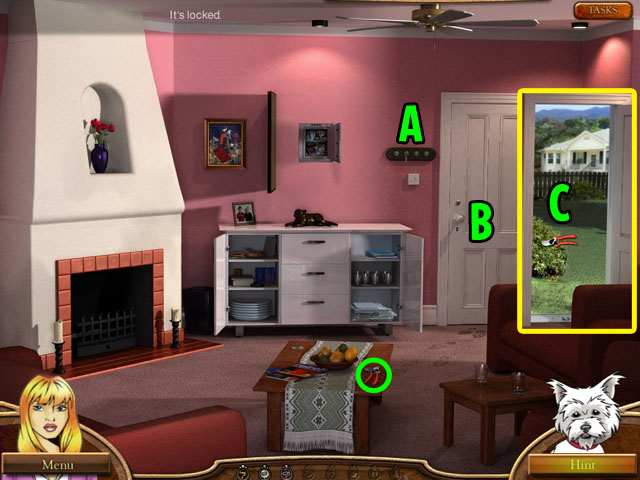
- Click on the key board to the left of the door (A). You will see one set of keys there.
- Collect the set of KEYS.
- Get the SHEARS on the table in the middle of the room.
- Use the KEYS on the door in the back (B).
- Use your SHEARS on the bush after the door opens (C).
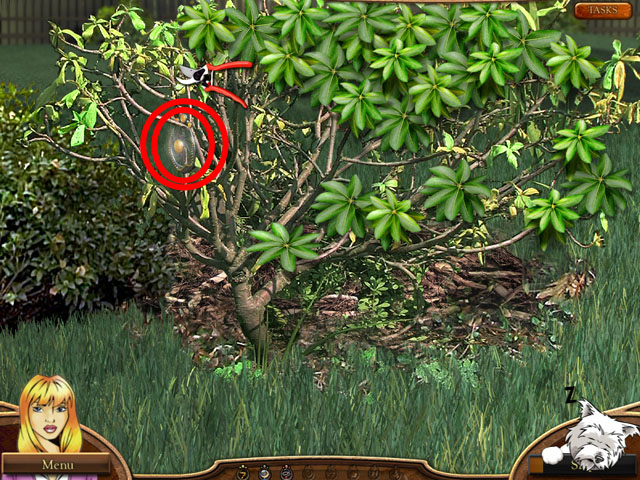
- Use your SHEARS on the leaves of the bush to remove them.
- Keep on removing leaves until you find the Sun Relic hidden beneath it.
- The location of the relic under the bush is randomized.
Chapter 5: Lotus Relic
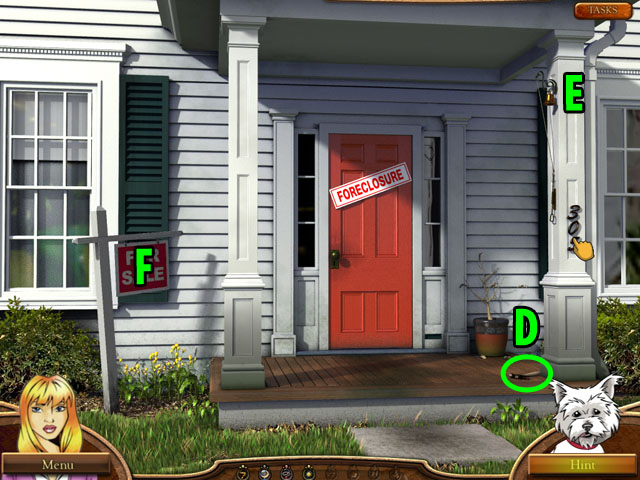
- Click the red circle at the top of the map to go to 305 Millers Run next.
- Get the HAMMER from the other side of the porch (D).
- Use the BELL WITH THE STRING above it a few times to knock it loose and collect it (E).
- Click the For Sale sign to push it over and then click on the area where it landed (F).
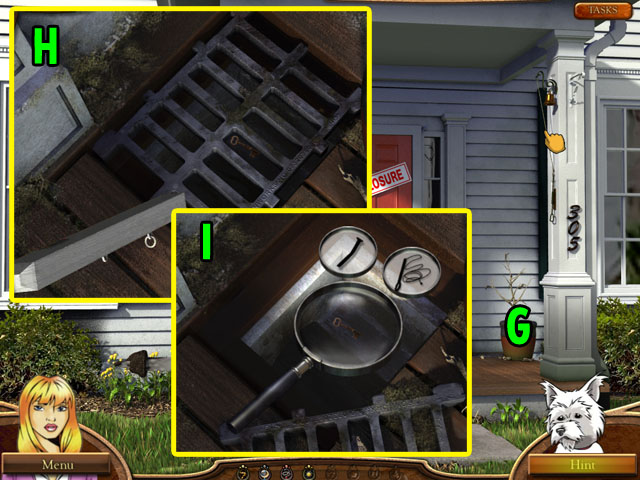
- Use the HAMMER on the nail to take it out of the post.
- Take the STAKE from the scene and go back to the porch.
- Click on the flower pot in the previous scene (G) to get a closer look.
- Move the flower pot out of the way and then use the POST on the heavy grate (H).
- Use the BELL CORD and the NAIL from your inventory on the KEY to start the next mini-game (I).
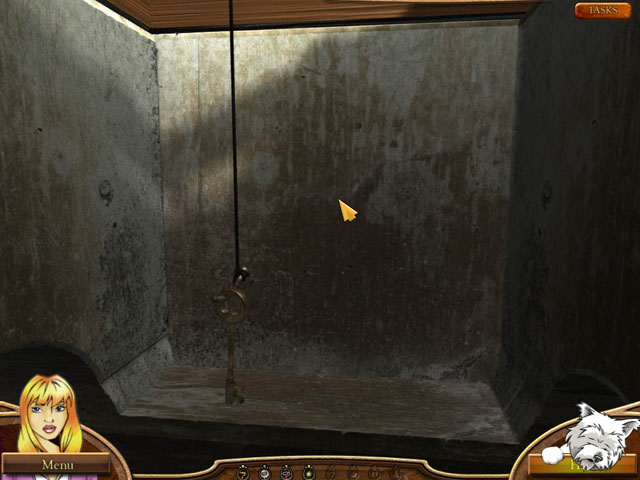
- Click the string to get the key at the bottom of the hole.
- You need to click the cord at the exact moment it is directly above the key.
- The string will not move left or right as it goes down to get the key.
- After collecting the KEY use it on the front door and enter the dark house.
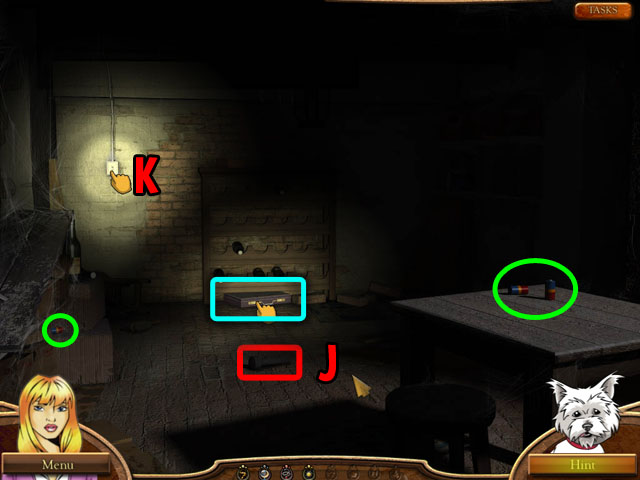
- Find the three BATTERIES in the scene, two on the table to the right and one on the boxes to the left.
- Use the BATTERIES on the FLASHLIGHT on the floor (J). You will then be able to see a small area.
- Find the light switch on the left side of the wall and click it (K).
- Next click the suitcase highlighted in light blue von the ground to start the next mini-game.
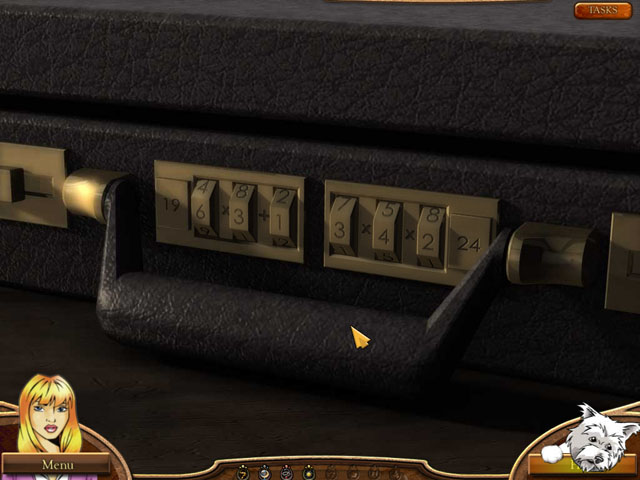
- You need to set the combination in this mini-game so that the numbers make two correct equations.
- On the left side you need to make the number 19. See the math signs in between the numbers to see how they are added or multiplied together to make 19.
- You can’t change the math signs, but you can change the numbers to solve the puzzle.
- The correct solution is 6 x 3 + 1 = 19 on the left side and 3 x 4 x 2 = 24 on the right side.
- After the suitcase is open you will find a note that says the next relic is behind the wall in this room.
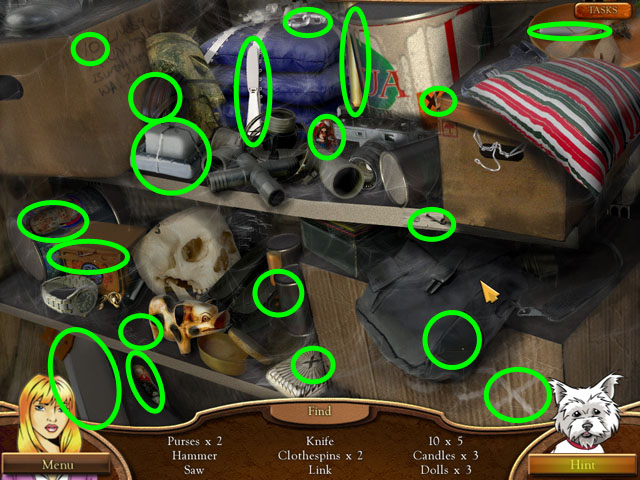
- Click on the boxes to the right side to enter another Hidden Object Scene.
- Finish the scene to receive the HAMMER.
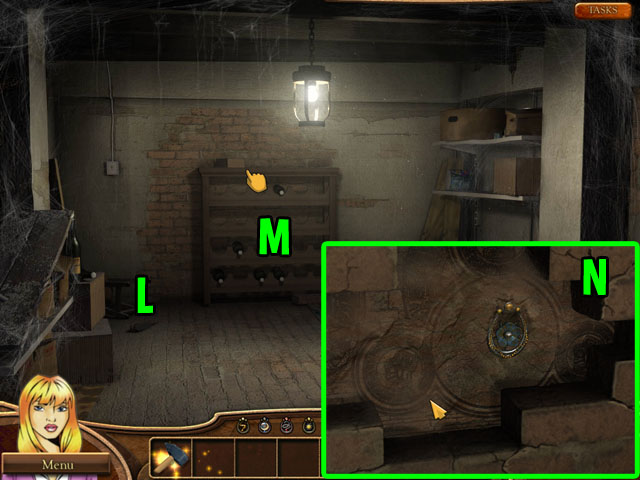
- Grab the BRUSH to the left of the wine rack (L).
- Click on the wine rack to pull it down (M).
- In the next scene use the HAMMER to destroy the bricks and then the BRUSH on the dusty wall until you can see the relic (N).
- The majority of the dust is on top of the relic, click and drag the BRUSH back and forth to remove it all.
- Collect the Lotus Relic.
Chapter 6: Bird Relic
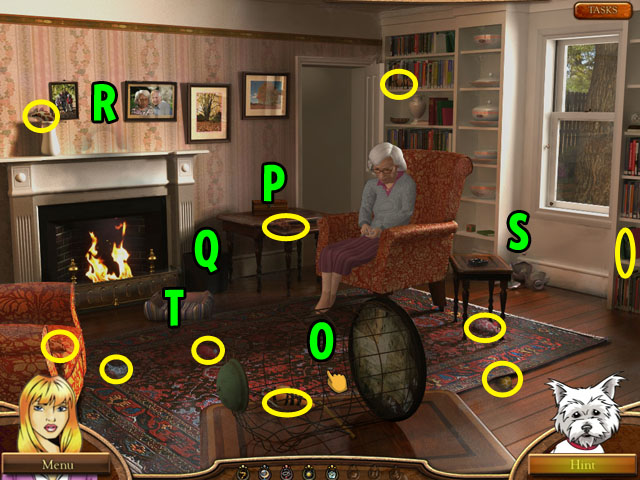
- When you return to the map screen a new house will be open.
- Click on the red circle to go to 10 Glebe St.
- Once in the house, click on the woman in the chair to talk to her, she will tell you want needs to be fixed in the room.
- First, click on the bird cage to put it right side up (O).
- Next click on the box to the left of the woman, and open it to find the SCREWDRIVER (P).
- Use the SCREWDRIVER to fix the bird cage.
- Click on the trash can to the right of the fire place and find the CLOCK on the inside (Q).
- Use the CLOCK on the shadowed area on the mantle to put it back there (R).
- Click the broken vase below the window (S) and move the pieces out of the way to find the WINDOW HOOK.
- Use the WINDOW HOOK on the window to keep it open.
- Find all 10 toy MICE and replace them back in the cats bed (T) to finish the scene.
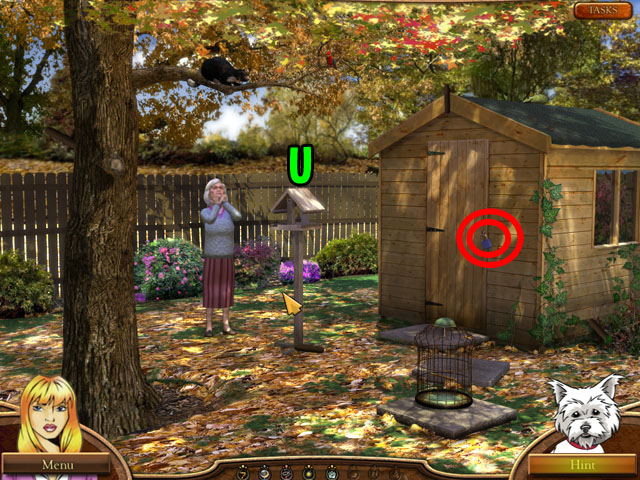
- You will be then taken to an outdoor scene, where you have to rescue the cat and the parrot in the tree.
- Click on the bird feeder (U) and collect the KEY hanging on the nail.
- Use the KEY on the lock to the door to the shed and click on the shed to go inside it.
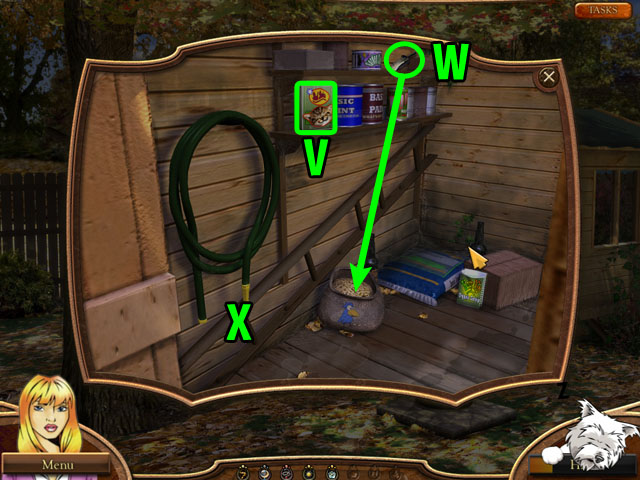
- Take the CATNIP bag from the top shelf (V).
- Take the SCOOP from the top shelf (W) and use it on the bird seed below.
- You cannot take the LADDER (X) yet because you need to find 4 RUNGS outside for it.
- Exit the shed and go back outside.
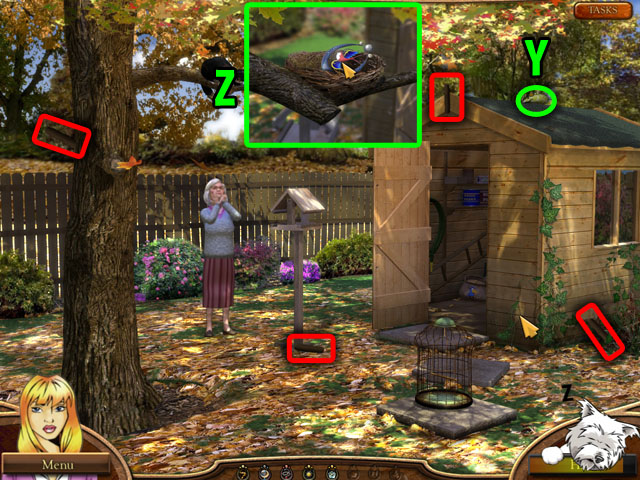
- Use the SCOOP of bird seed on the inside of the bird feeder and the bird will fly down to eat from it.
- Click on the BIRD to collect him and the put him in the cage below.
- Find the 3 LADDER RUNGS highlighted in red in this scene and then put them on the ladder in the shed.
- Collect the LADDER in the shed and use it on the tree.
- Use the CATNIP on the cat and then find the CAT TOY on top of the shed roof (Y) and give that to the cat as well.
- You will then be able to give the CAT to the woman.
- After getting the cat click on the bird’s nest on the branch to get the Bird Relic (Z).
Chapter 7: Butterfly Relic
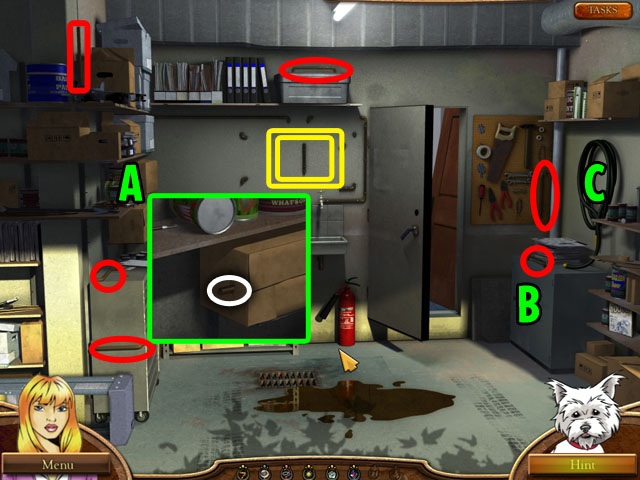
- You will return to your office automatically and it will have been burglarized.
- Go in the door to the back.
- You need to find a way to clean up the oil on the ground in this room.
- Click on the oil.
- Click on the shelf to the left (A) and collect the PIPE sticking out of the box.
- Open the drawers to the right (B) and collect the BRUSH and the PIPE inside.
- Take the HOSE off the wall above the drawers (C).
- Collect 6 more PIPES from around the room, highlighted in red.
- Use the PIPES in the area above the sink.
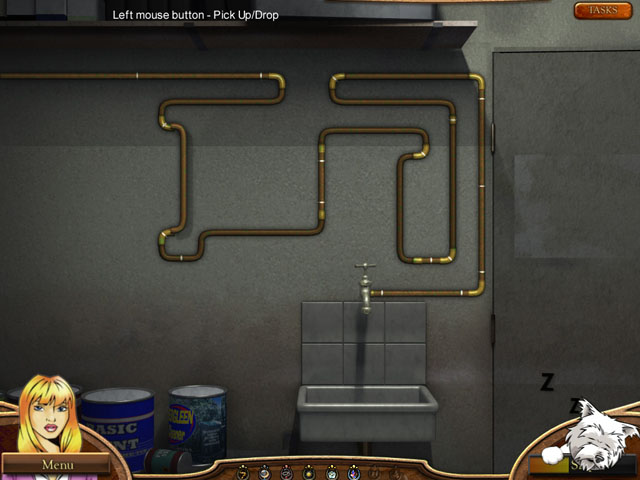
- Connect all of the pipes in this area to complete the mini game.
- You cannot rotate the pipes, but when you get one correct it will lock in place.
- Every pipe only fits in one space, so you can take one at a time and look for the correct position.
- See the screenshot for the final solution.
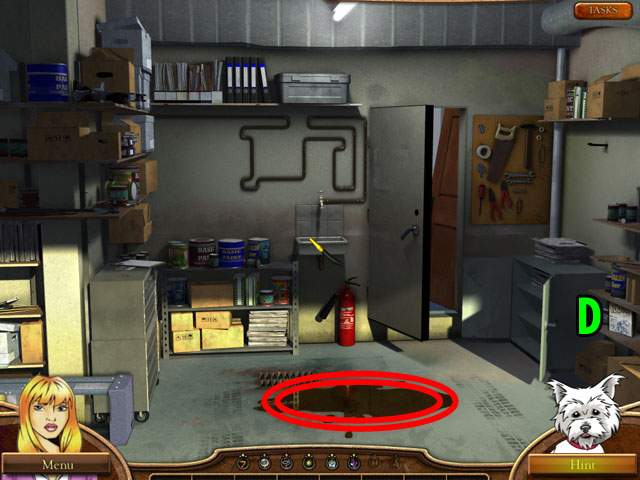
- Use the BRUSH and the HOSE on the faucet below the pipes, and you will receive the WET BRUSH.
- Collect the SOAP from the right side of the screen (D).
- Use the WET BRUSH and the SOAP on the floor below.
- Drag the WET BRUSH back and forth on the floor until you find the matchbook.
- Collect the matchbook and you will have your next hint.
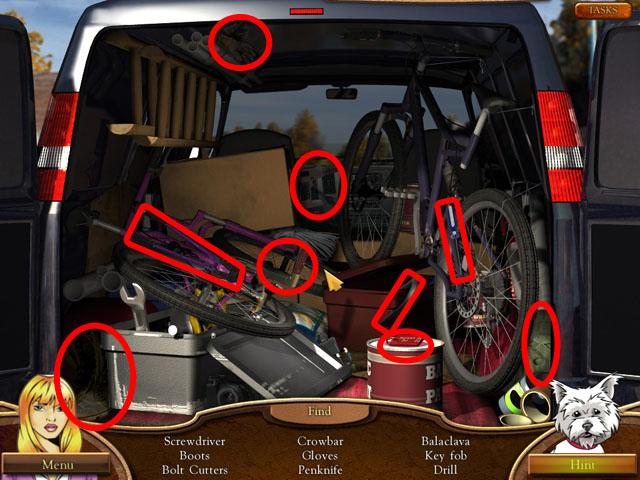
- You will move automatically to the Newton Hotel parking lot, and find a card that matches the tire tracks from your office.
- Click on the back door to enter the next Hidden Object Scene.
- Find all of the objects and receive a KEY FOB for room 237.
- You will automatically enter the hotel.
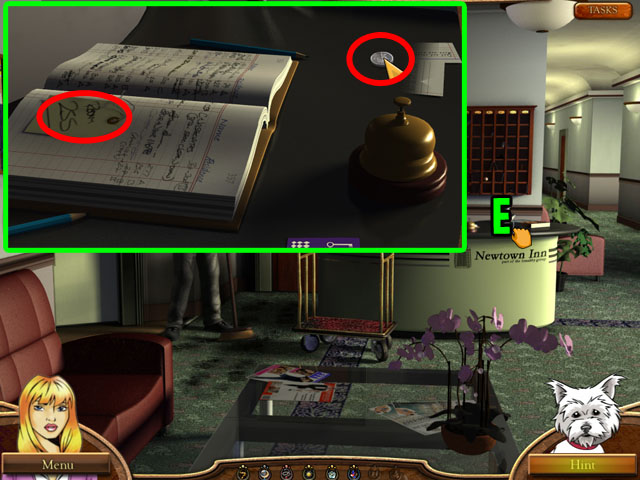
- First before checking out behind the manager’s desk, you need to get rid of the bellhop and the manager.
- Click on the guest book to the right on the desk and collect the TAG sitting on the book (E).
- Next move the index cards out of the way at the top of the screen and collect the COIN.
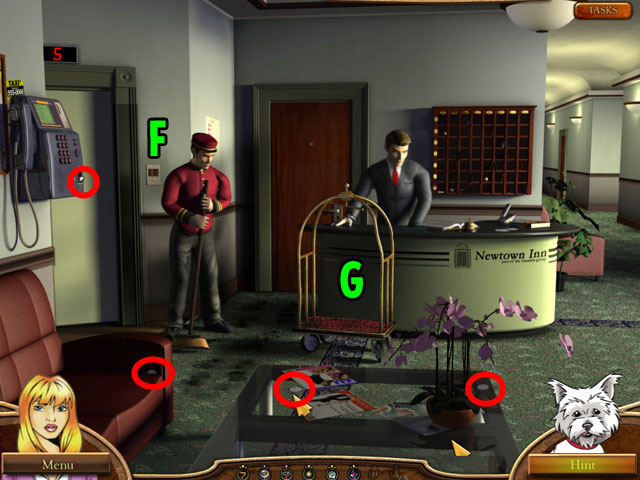
- Move the magazines on the table and find another COIN.
- Move the flowers on the desk and take another COIN.
- Click the elevator button (F) and wait for the elevator to come down.
- Once the door opens take the BAGS.
- Use the BAGS and the TAG on the cart in the middle of the scene (G).
- The bellhop will leave, taking the cart with him.
- Take the COIN on the couch.
- Click on the phone above the couch and take the COIN in the coin return slot at the bottom.
- Dial the number for the front desk in the brochure to the left of the phone: 555-5353.
- The manager will answer the phone and leave the room.
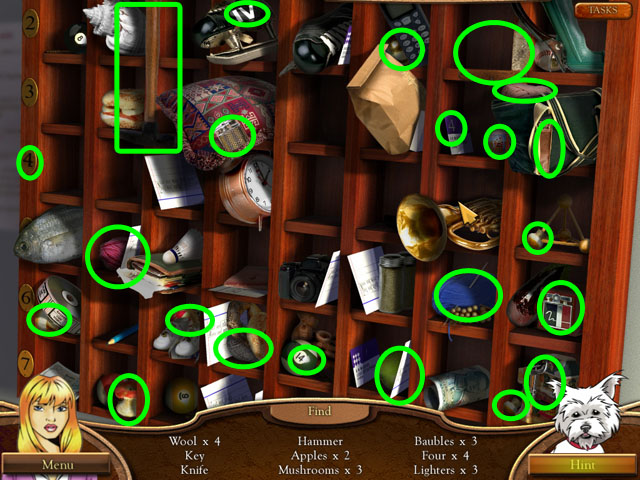
- Click on the cubbies behind the front desk (H).
- Finish the Hidden Object Scene and collect the KEY after finding all of the objects.
- Use the KEY and the KEY FOB on the door to room 237.
- Enter the room.
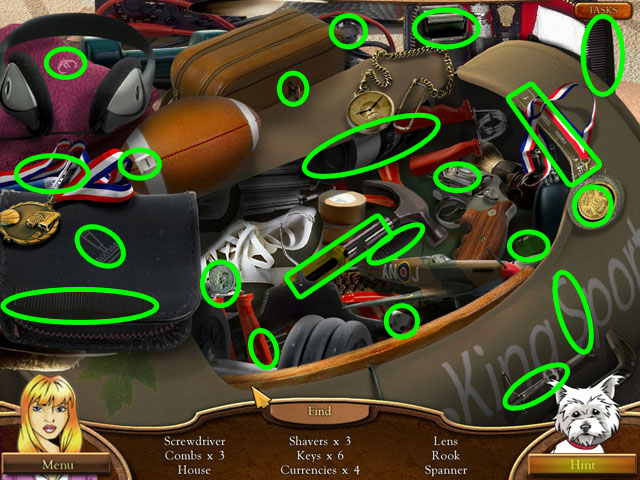
- Once you are inside the room, click on the bag on the floor to start another Hidden Object Scene.
- You will receive a SCREWDRIVER.
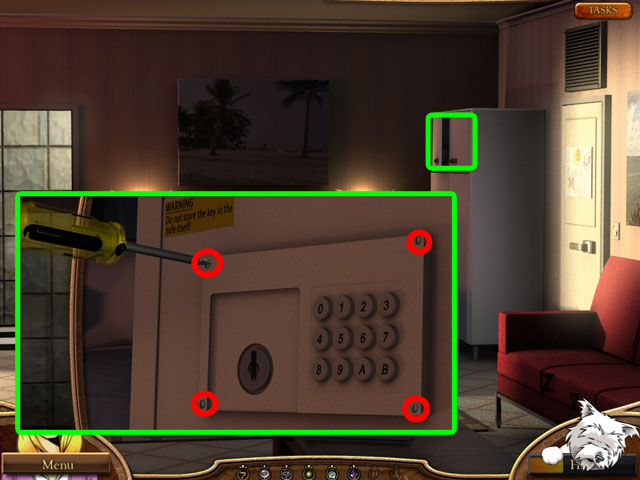
- Click on the smaller doors on top of the dresser and you will see a safe.
- Use the SCREWDRIVER on all of the screws to take the faceplate off the safe.
- Click on the wires to play a mini-game.
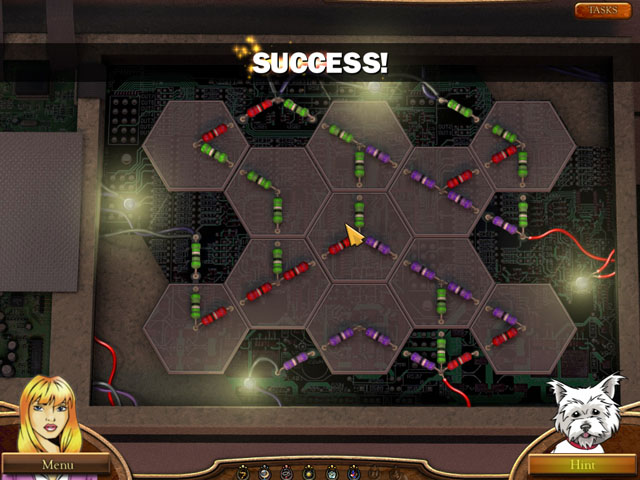
- Arrange the wires in a way that all of the hexagons connect correctly.
- The wires are one of three colors: red, green and purple. At the edges of each hexagon, the colors must match.
- No path can dead end on an edge, they have to connect to another wire if they touch the edge.
- Solve the puzzle by placing the outside pieces first, especially in the corners. Three of the four corner pieces can only fit on way.
- The hexagon with three different colors goes in the middle.
- See the screenshot for the correct solution.
- After opening the safe collect the Butterfly Relic and the Newton Bank ID card.
Chapter 8: Shell Relic
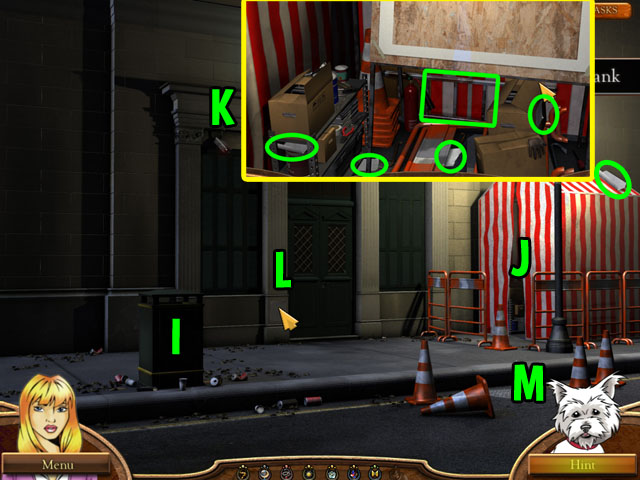
- After talking to the manager you decide to break into the bank and investigate him.
- You will be taken outside of the bank.
- Click on the garbage can to the left (I), and collect the GLOVE the PIECE OF PAPER and the PAPER BAG.
- Click on the red and white tent to the right (J) and collect the LADDER, GLOVE and 4 PIECES OF PAPER.
- Click on the security camera (K) and use the PAPER BAG on it to cover it up.
- Collect the PIECE OF PAPER to the left of it.
- Collect the PIECE OF PAPER to the left of the bank door (L).
- Click on the manhole below the tent (M), take the LANTERN and click the cones on the right to find another PIECE OF PAPER.
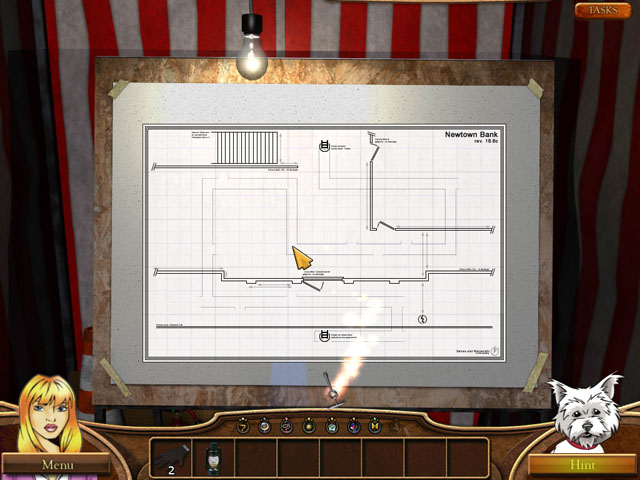
- Return to the tent and use all of the PIECES OF PAPER on the board to start the next mini-game.
- This mini-game is another jigsaw puzzle, but you do not have to rotate the pieces.
- First you should line up the edges of the map as best as you can - the corners can fit in only one spot each.
- Next start rearranging and tiles in the center and on the edges that have dark lines.
- Lastly move the pieces around that have no dark edges, aligning the lightly drawn tunnels.
- See the final screenshot for the correct map.
- Remember this map, because you will need it for the next mini-game.
- You will receive the MANHOLE WRENCH after completing the map.
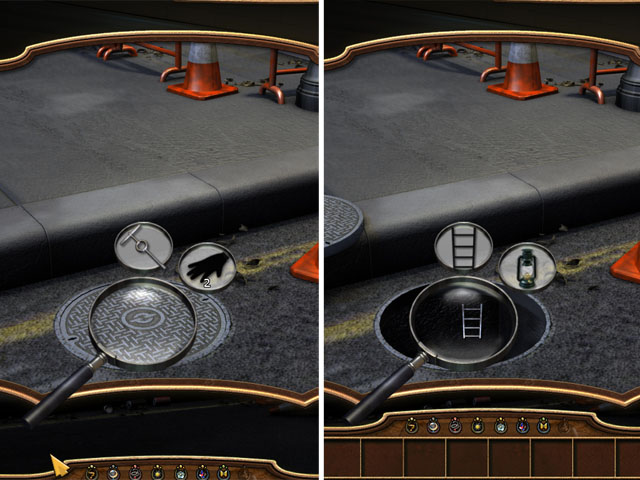
- Return to the manhole and use the MANHOLE LIFTER and the GLOVES on it.
- Next, use the LADDER and the LANTERN on the hole to enter the sewer.
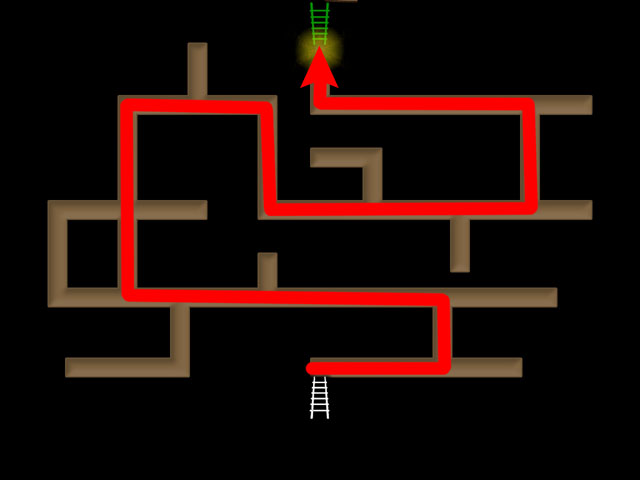
- Use the lantern light to find a path to the top of the screen.
- Click the arrows to travel in the direction pointed to.
- Try to remember the layout of the tunnels in the map you just put together.
- See the screenshot for the correct path.
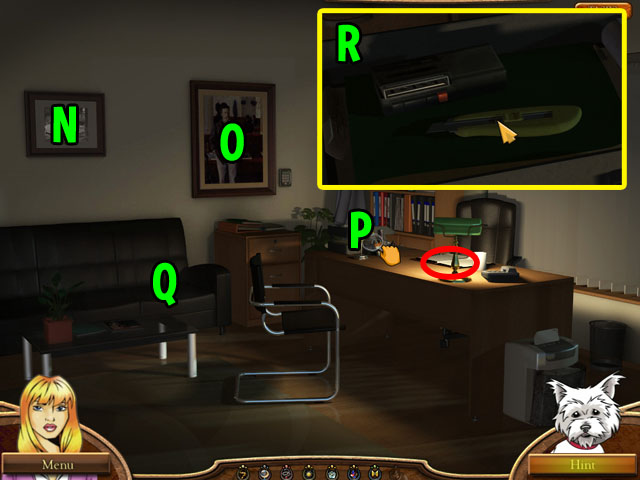
- First, click on the papers under the lamp to read how to open the safe.
- Click on the left picture hanging on the wall to find the date of the bank manager’s wedding: 1976 (N).
- Use that date on the key pad to the right of the larger painting (O).
- Next, click on the desk to find the TAPE RECORDER in his inbox (P).
- Then click on the couch and remove a cushion to find the CASSETTE of his voice (Q).
- Put the CASSETTE in the tape recorder (R).
- Use them both on the safe and take the KEY on the inside.
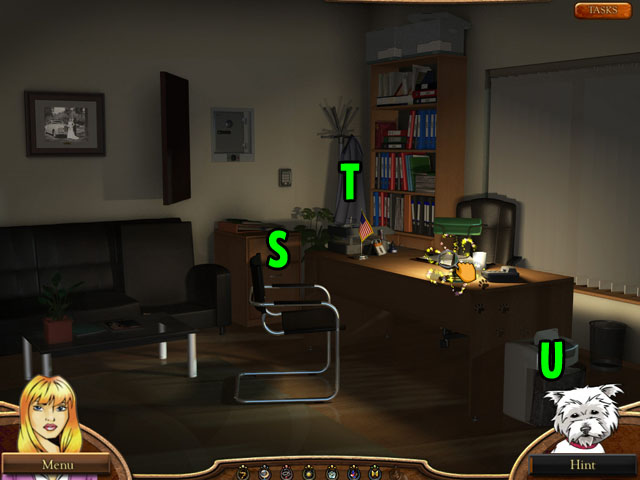
- Use the KEY to open the drawer below the safe (S) and take the TAPE.
- Click on the manager’s jacket in the back and take the TWEEZERS (T).
- Use the TAPE and TWEEZERS on the paper shredder to the right of his desk (U).
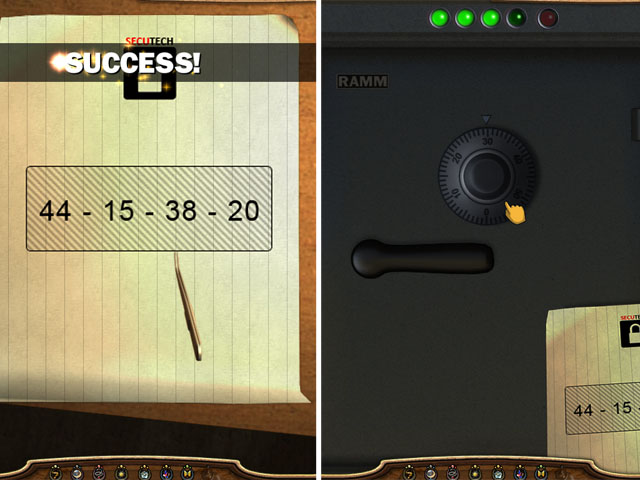
- Use the tweezers to move around the shredded paper pieces to complete the shredded passkey.
- The edges of the paper are smaller than all of the other pieces, so find them first.
- The color of the paper goes from brownish on the left to bluish on the right. Use these colors and the numbers to help you match up the pieces.
- By clicking on one and then another, you switch the pieces places.
- See the screenshot for the correct combination: 44-15-38-20.
- Use the COMBINATION from your inventory on the lock.
- Click on the dial and move it to the right slowly until you get to 44.
- If you go to the left first or go too fast you will have to start over.
- After going to the right, enter 15 to the left, 38 to the right, and lastly 20 to the left.
- The green light will light up for each one your get right.
- Inside the safe is the Shell Relic. Pick it up and then click on the map to finish this area.
Chapter 9: Final Chapter
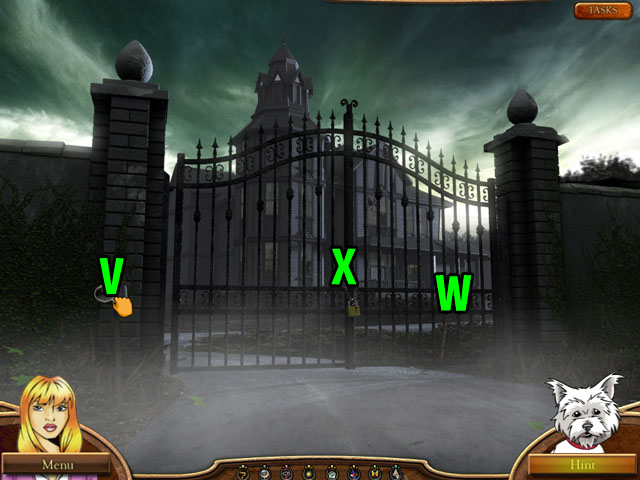
- After entering the front gate scene you will need to open the lock.
- Open the mailbox to the left and get the FIREWORKS (V).
- Click to the right of the lock, where there is something on the ground (W).
- Take the WETAL BAR and use it on the matchbook.
- Click on the matchbook to look at it and click on it again to open it.
- Take the MATCH.
- Use the FIREWORKS and the MATCH on the lock (X).
- Go through the gate.
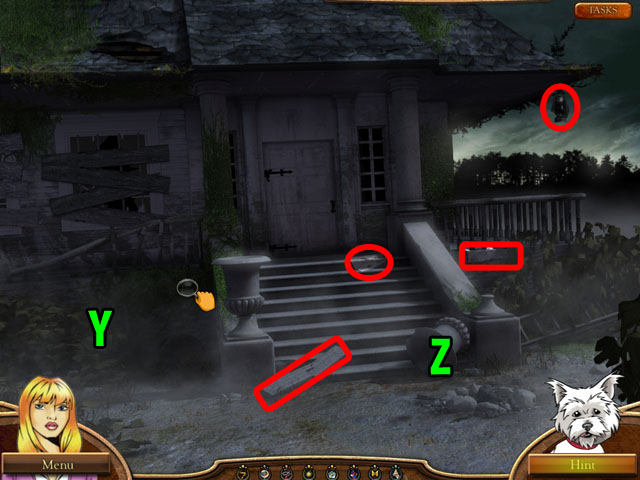
- When you first enter the area, collect the LAMP, BOARD, and the 2 PIECES OF PAPER circled in red.
- Click on the space to the left (Y) and get the 3 PIECES OF PAPER.
- Click on the broken pot and get the HAMMER (Z).
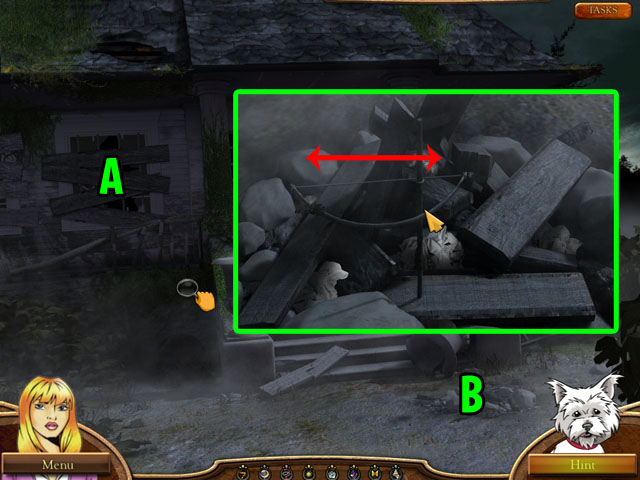
- Click on the boarded up window and use the HAMMER on the 4 BOARDS to get them (A).
- Take the PIECE OF PAPER left in the frame.
- Use the BOARDS and the PAPER on the fire pit at the bottom of the screen (B).
- You will then light the fire in a short mini game.
- Click the wooden bow multiple times as fast as you can to start the fire.
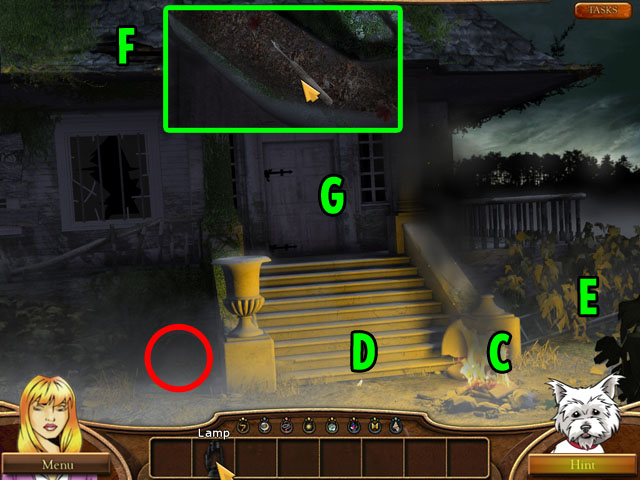
- Take the burning stick (C) and click on the hole to the left of the stairs again (D).
- Use the lamp and the stick on the hole in the back, and collect the SHEARS.
- Use the SHEARS on the ladder to the right (E).
- After cutting all of the plants away you can take the LADDER.
- Use the LADDER on the hole at the top of the roof (F).
- Clear away the dirt in the gutter to find a LOCKPICK.
- Use the LOCKPICK on the door (G).
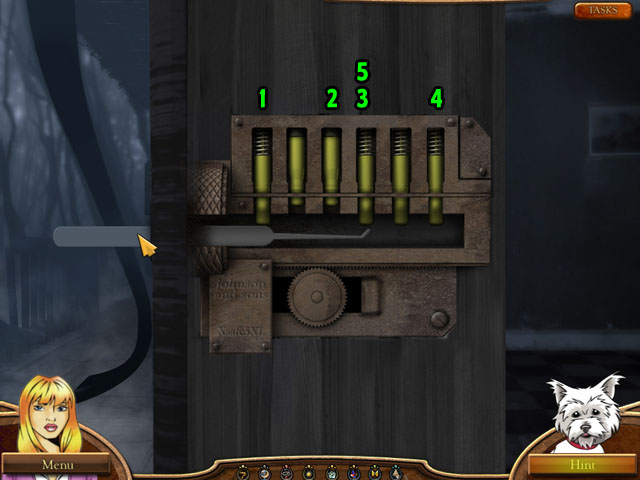
- This mini-game is finished when all of the lock tumblers are in the up position.
- Clicking any tumbler will make it go back up or down, and also will move some of the other tumblers.
- The first tumbler will make the third tumbler move as well.
- The third tumbler will make the forth move.
- The forth tumbler will make the first move.
- The last tumbler will make the forth move.
- The correct sequence from the very start is: 1st, 3rd, 4th, 6th, 4th.
- If you get stuck, remember that each tumbler moves one other tumbler so if you can get only two tumblers left, you should be able to find one that makes them both go down.
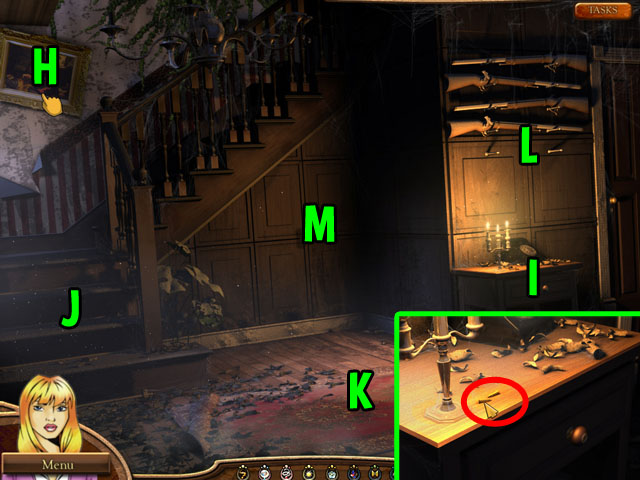
- Once inside the house, click on the painting on the stairs (H) and collect a KEY that falls out.
- Use the KEY on the drawer to the right, under the gun rack (I) and collect the SHOEHORN, SCREWDRIVER and PLATE.
- Collect the 2 SCREWS from the top of the dresser.
- Click on the bottom of the stairs again and use the SCREWDRIVER on the middle bar holding down the carpet (J). Take the HEAVY BAR and the 2 SCREWS.
- Click on the carpet to move it to the side (K).
- Use the SHOEHORN on the loose board under the carpet and collect the piece of WOOD.
- Use the STAIR ROD on the bottom of the gun rack (L) and take the DOORKNOB from the door that opens.
- Use the WOOD, DOORKNOB, SCREWS, and LIGHT SOCKET COVER on the secret door to find your father (M).
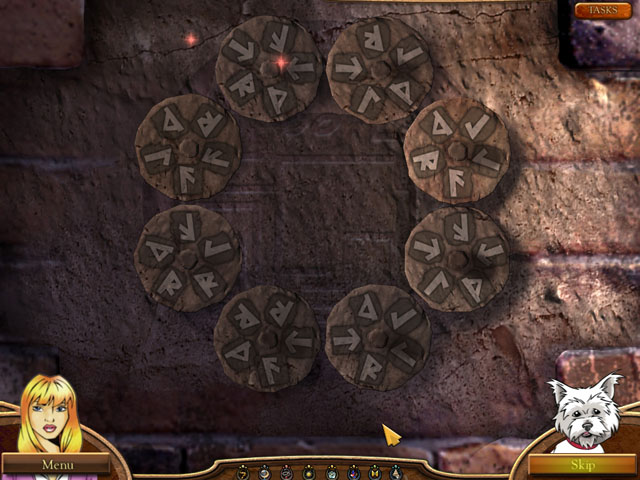
- After finding your father, click on the contraption in the fire place in the next room to start a mini-game.
- In this puzzle you have to match all of the symbols on the disks to the neighboring disks.
- The symbols on each disk will be rotated 180, not mirrored.
- If you start with the second disk to the left and then rotate it to a random position and then try to match the upper and lower disks and work out from there.
- In all but one combination you will not be able to match all the disks.
- See the screenshot for the completed puzzle.
- Go through the secret entrance to the next room.
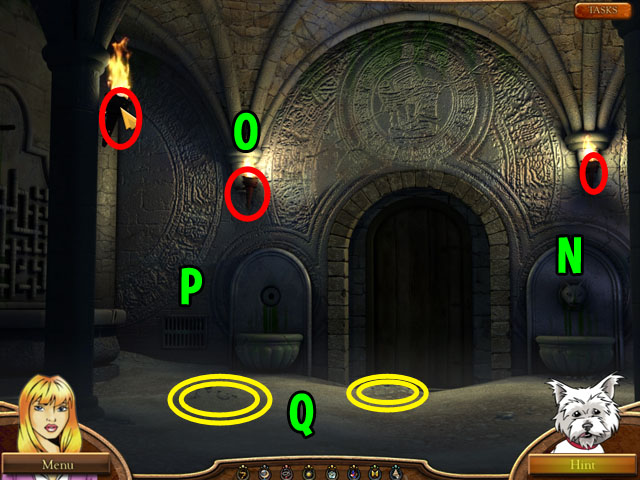
- This room will be dark and you won’t be able to see much. Click on the jaguar statue head to the right (N).
- Take the FLINT that is sitting on the basin.
- Use the FLINT on the torches in this room (O).
- Open the grate (P) and collect the RAKE shaped piece that falls out.
- Use the RAKE on the sand below the grate and in front of the door (Q).
- In the sand you will uncover 2 PIPES in each place.
- Use the 4 PIPES on the pipe maze to the left.
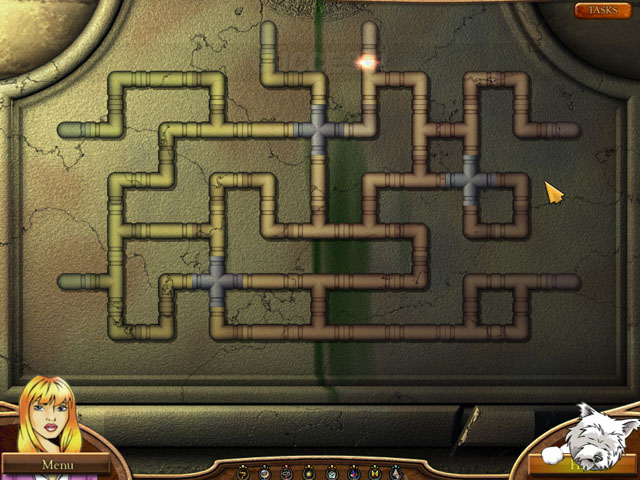
- Complete this mini-game by rearranging the pipes in a way that they are all connected to each other.
- Bronze pipes can rotation when clicked, while silver pipes stay in the same place.
- The ends of all the pipes also cannot be moved.
- Start from the outside ends and work your way towards the silver pipes.
- See the screenshot for the correct solution.
- After the water has drained collect the JAGUAR HEAD.
- Use the JAGUAR HEAD on the fountain to the left of the door and the door will open.
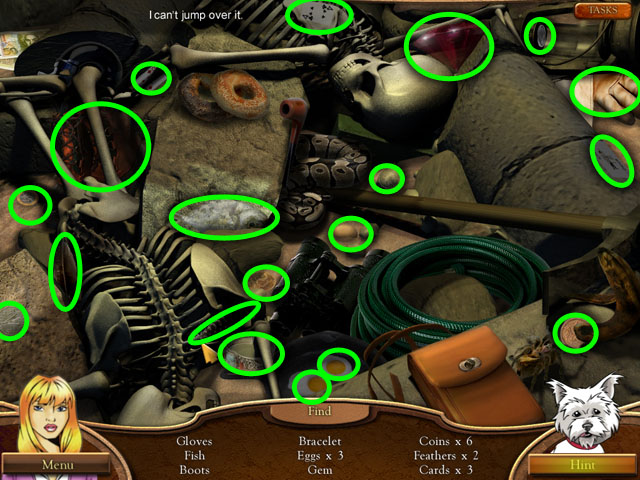
- Pass through the door and click on the skeletons to the right to start the next hidden object scene.
- After finishing the scene you will receive a GEM.
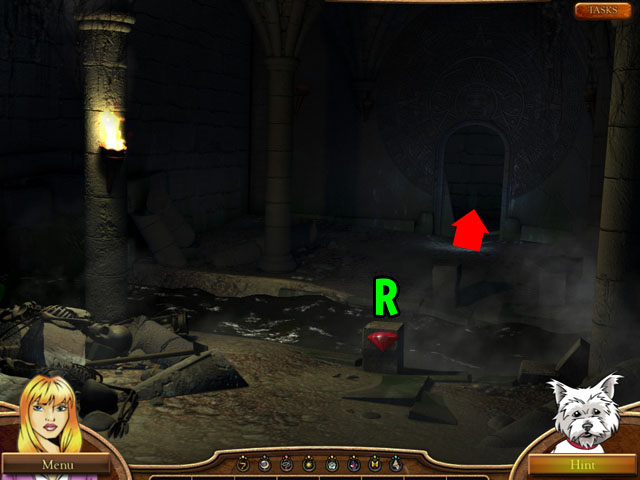
- Use the gem on the small stone relief to lower the water (R).
- Cross the bridge and go to the next room.
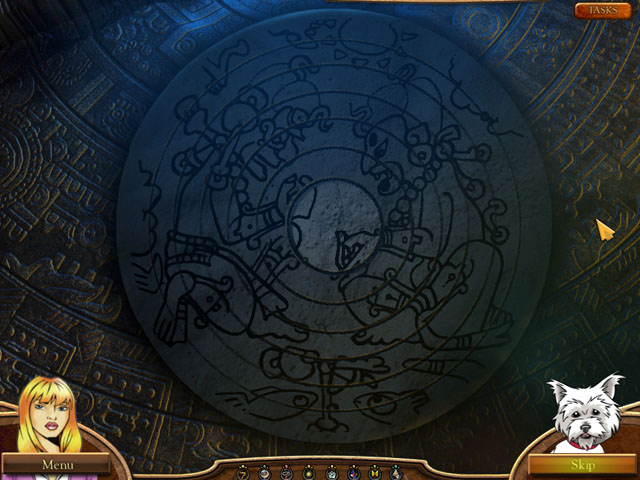
- Click on the light emitting dais to start the next mini-game.
- In this game you must rotate the disks until they all match up together.
- The first disk in the center cannot be moved and is a slight lighter color than the rest.
- The second disk is a little hard to line up. If you cannot get it right, line up all of the other disks to the second disk.
- You will see an image with two people sitting down.
- Rotate the disks on at a time then, to make the sitting couple perfectly horizontal.
- See the screenshot for the correct answer.
- After solving the first puzzle you will be able to travel to the second dais.
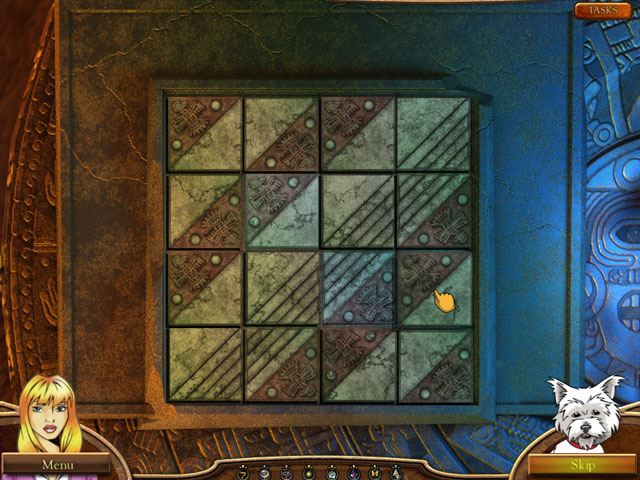
- Click on the second dais to start the next mini-game.
- You must line up the tiles in a way that the patterns from the first two tiles continue to the next.
- The first two tiles cannot be moved.
- Clicking on a tile will pick it up, while right clicking will flip it.
- The strip pattern goes from the top left corner: brown, white, brown, white, striped, brown, white, and then brown.
- Lastly you will go to a wall with a large face on it.
- Drag all of the RELICS to the face to finish the game.
- Congratulations! You have completed Relics of Fate: A Penny Macey Mystery.
Created at: 2011-02-21

