Walkthrough Menu
- General Tips
- Chapter 1 – Jailbreak
- Chapter 2 – Mystery Woman
- Chapter 3 – Investigation
- Chapter 4 – Doctor
- Chapter 5 - Church
- Chapter 6 – Crypt
- Epilogue
General Tips
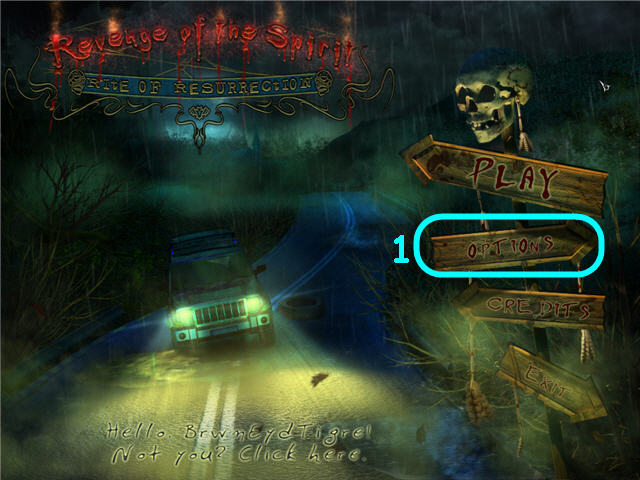
- Click on Options (1) to adjust the Music, Sound, Full Screen, Wide Screen and Software Cursor.
- You may set your difficulty level and choose between Casual or Expert Mode.
- A magnifying glass cursor indicates you can examine the area.
- A grabbing hand icon indicates you can take the item.
- A gear icon indicates you need to use an inventory item there.
- Examine the Journal in the lower left to access story updates and your current task.
- Throughout the guide, we will use the acronym ‘HOS’ for Hidden Object Scenes.
- There are no penalties for random clicking in HOS.
- Puzzles may be skipped.
- Click on the question mark above the journal to get instructions for the puzzles.
- Green items in the find list require an extra step in order to find; these steps will be marked in matching colors on the screenshots.
- You will need to activate HOS’s by your actions throughout the game. If you do not have one where I have them, please check to see what you may have missed.
Chapter 1 – Jailbreak
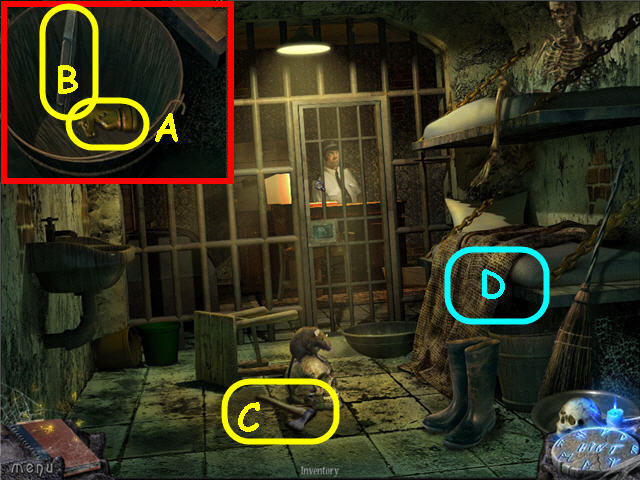
- Speak to the Officer.
- Examine the bucket; take the CHESS PIECE (A) and CHISEL (B).
- Take the AX (C).
- Move the blanket and examine the bunk (D) to access a HOS.
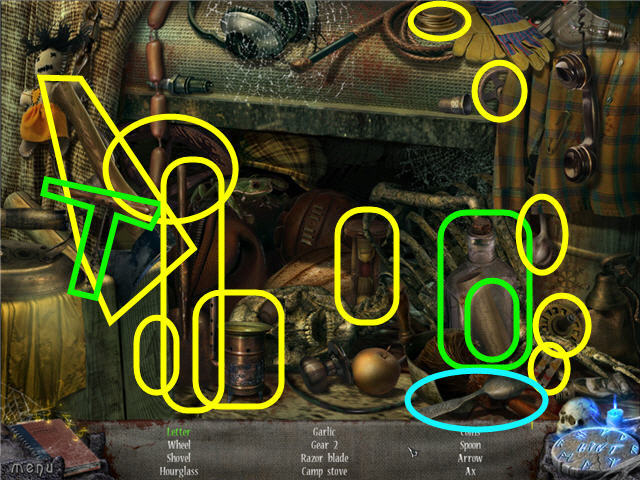
- Find the items listed.
- Use the corkscrew on the bottle to get the letter.
- You will earn a SPOON.
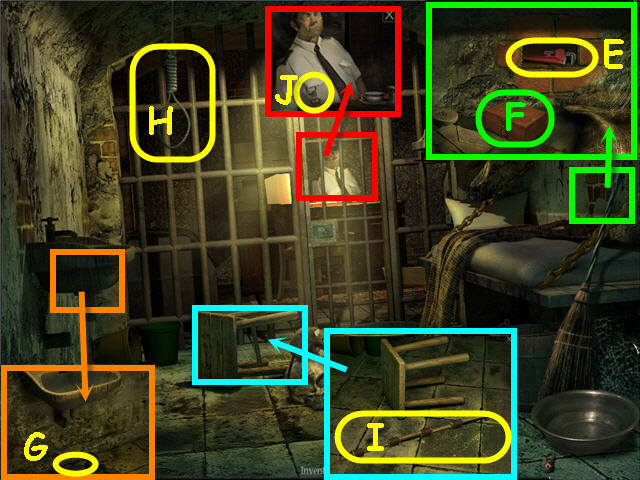
- Examine and place the chess piece in the wall; take the WRENCH (E).
- Use the SPOON on the brick (F) to get a SELF-MADE KNIFE.
- Examine the sink; use the WRENCH on the pipe; take the HOOK (G).
- Use the SELF-MADE KNIFE on the noose to get a ROPE (H).
- Examine and use the AX on the stool; assemble the 4 pieces.
- Place the HOOK and ROPE on the pieces; take the HOOKED STICK (I).
- Examine the Officer; use the HOOKED STICK to get the KEY (J).
- Examine and place the KEY in the cell lock.
- Use the CHISEL on the 3 corner brackets and click to trigger a puzzle.
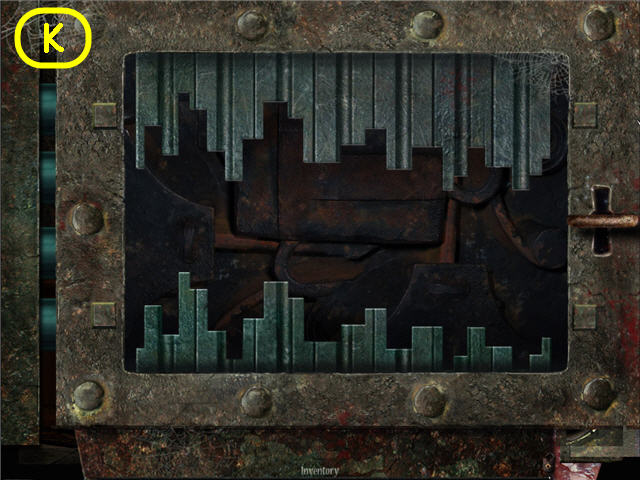
- Arrange the top teeth to match the bottom teeth.
- Turn the KEY when complete. See screenshot (K) for solution.
- Exit the cell.
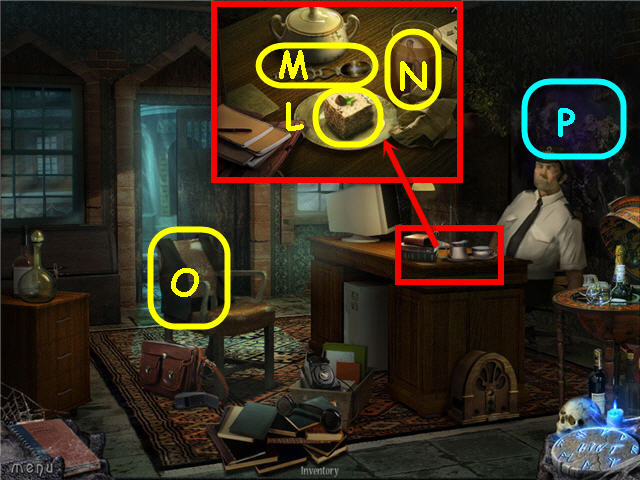
- Examine the desk; take the CAKE (L).
- Use the spoon (M) on the glass to get the MOSAIC PIECE (N).
- Take the VEST (O).
- Examine the map (P) to get a journal update.
- Exit the station.
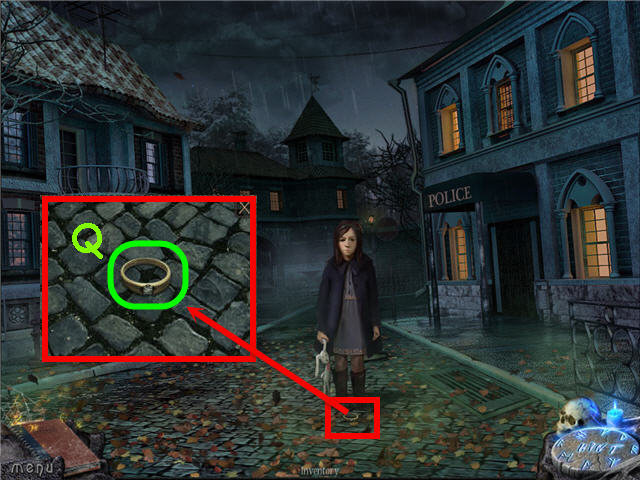
- Talk to the girl.
- Examine the ground; take the ring (Q) to get a journal update.
- Head right up the street around the police station and forward to the gate.
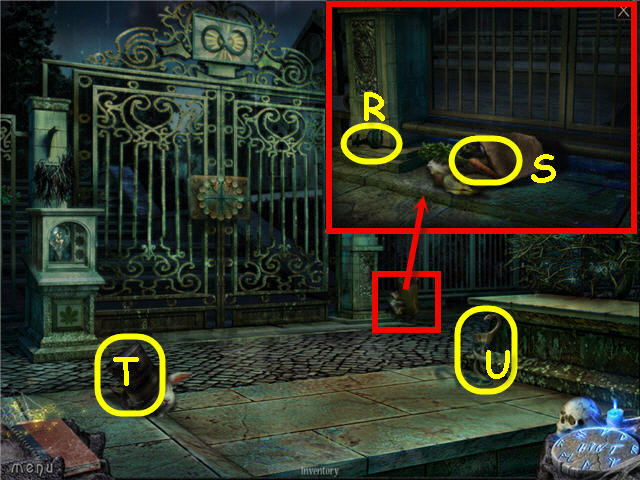
- Examine and knock over the bag; take the DOOR KNOB (R) and CARROT (S).
- Give the CARROT to the bunny; take the TOP HAT (T).
- Take the CADUCEUS (U).
- Examine the bushes to access a HOS.
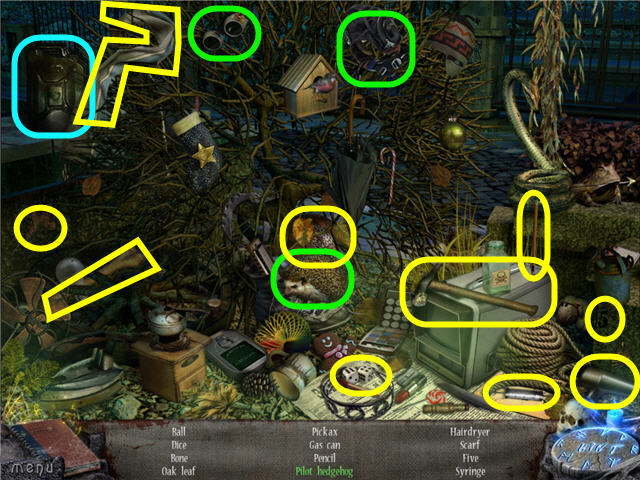
- Find the items listed.
- Place the helmet and goggles on the hedgehog to get a pilot hedgehog.
- You will earn an EMPTY GAS CAN.
- Back out and head right to the tavern stairs.
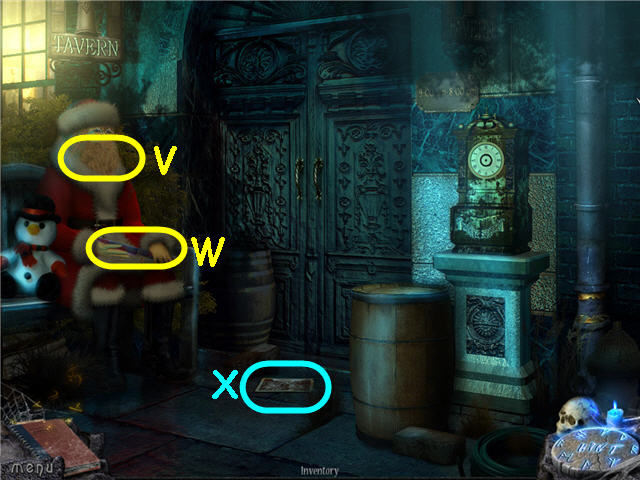
- Take the WHITE BEARD (V) and KNIFE (W).
- Examine the photo (X) to get a journal update.
- Back out twice and head straight.
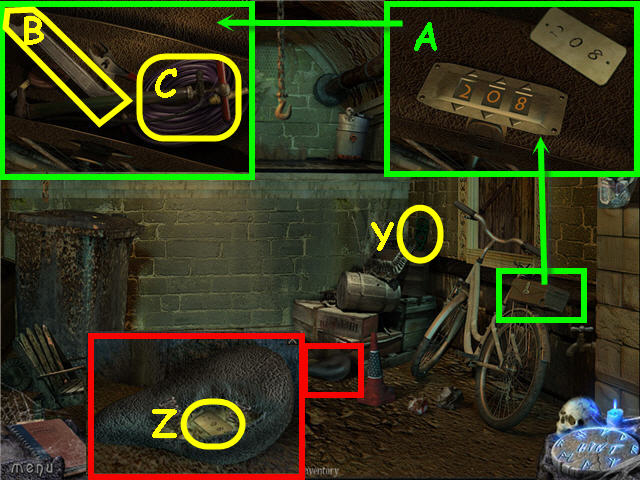
- Take the DOOR PLATE (Y).
- Examine and use the KNIFE on the bike seat; take the PASSWORD (Z).
- Examine and use the PASSWORD on the bike case; enter the code (A).
- Take the HOSE (B) and WRENCH (C).
- Back out.
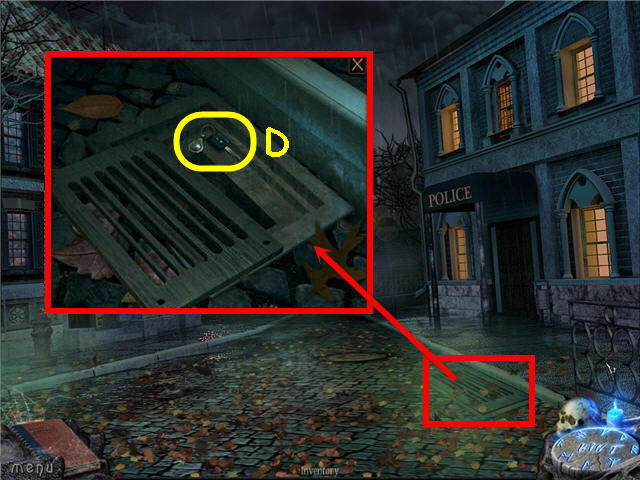
- Examine and use the WRENCH on the 4 bolts on the grate; remove the grate and take the CAR KEY (D).
- Head right around the police station.
- Examine the left wall; place the CADUCEUS in the center to trigger a puzzle.
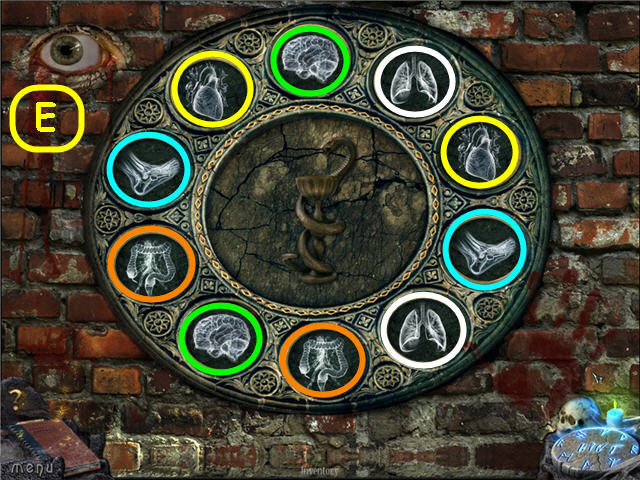
- Find the matching pairs.
- See screenshot (E) for solution.
- Head left into the newly-opened passage.
Chapter 2 – Mystery Woman
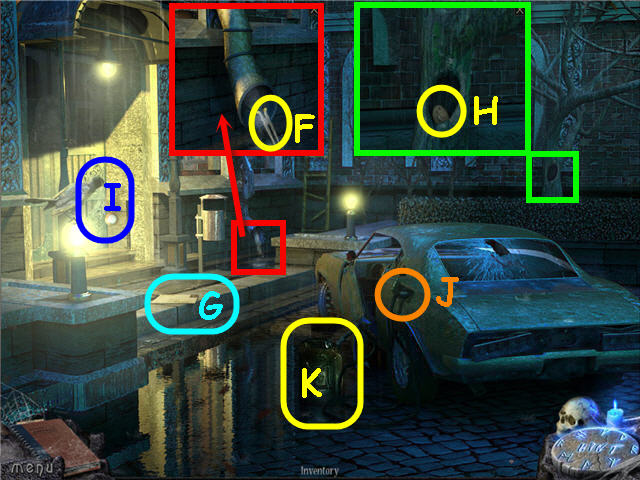
- Examine the downspout; take the WIRE CUTTER (F).
- Take the letter (G) to get a journal update.
- Examine the tree; take the 2nd MOSAIC PIECE (H).
- Give the CAKE to the crow; take the POCKET WATCH (I).
- Use the KNIFE on the gas tank door (J).
- Place the HOSE and EMPTY GAS CAN on the car gas tank; take the FULL GAS CAN (K).
- Use the CAR KEY on the trunk and examine to access a HOS.
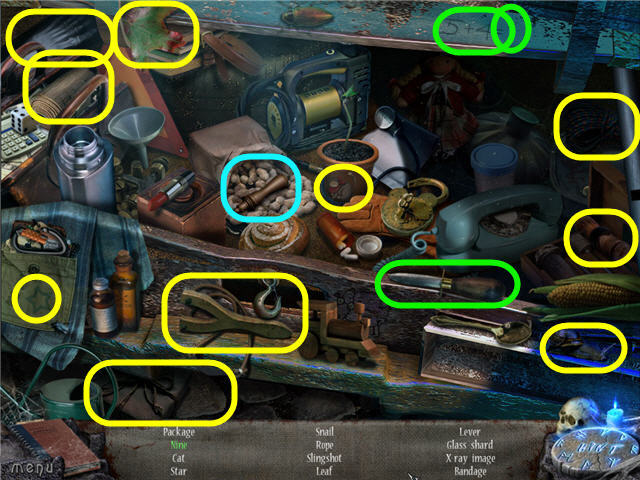
- Find the items listed.
- Use the knife on the equation to get a nine.
- You will earn a LEVER.
- Back out twice and right into the police station.
- Examine and use the WIRE CUTTER on the cabinet left of the door to access a HOS.
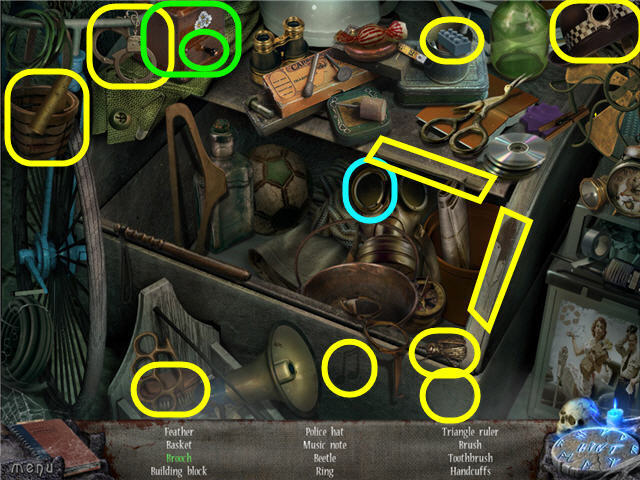
- Find the items listed.
- Open the drawer to get the brooch.
- You will earn a KNOCKER.
- Exit the station.
- Examine and place the KNOCKER on the library door on the left to trigger a puzzle.
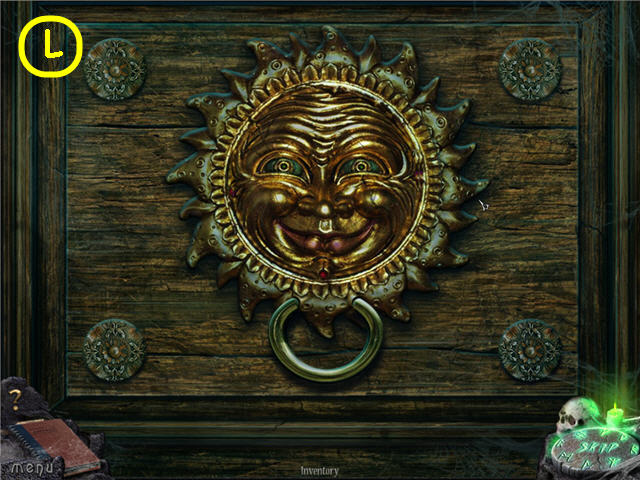
- Turn the rings to complete the picture.
- Tip: Set the outer ring first and the second from the center next since they turn others. See screenshot (L) for solution.
- Head into the library.
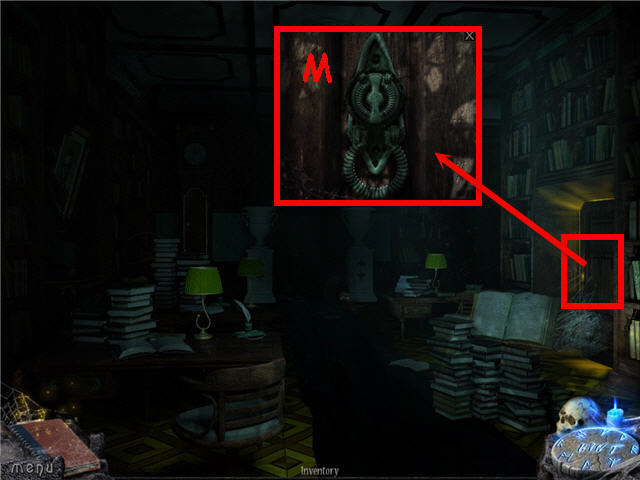
- Examine the door.
- Use the DOOR PLATE and DOOR KNOB on the door (M); turn to open.
- Head right.
- Examine the toolbox to access a puzzle.
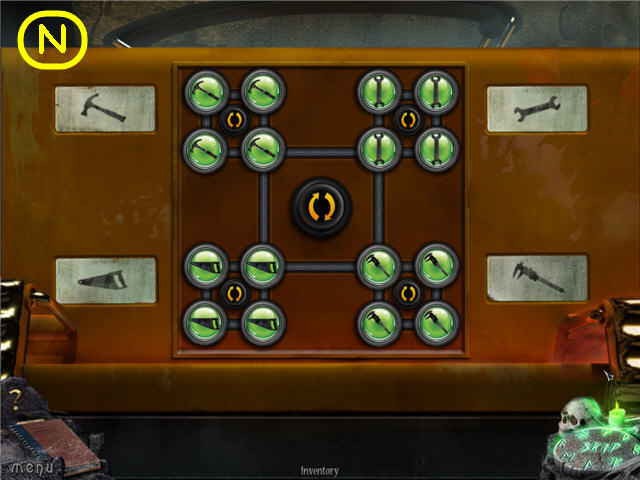
- Turn the yellow arrows to move all the matching tools to the 4 corners.
- The starting layout is random. See screenshot (N) for solution.
- Examine the open toolbox to access a HOS.
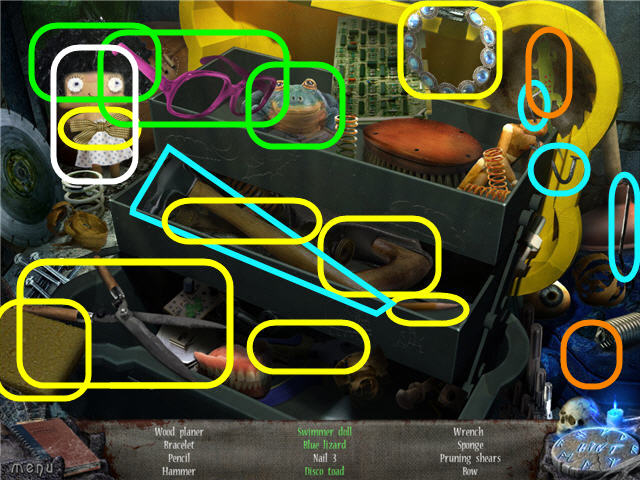
- Find the items listed.
- Place the glasses and hair on the toad to get a disco toad.
- Place the lizard in the blue ink to get a blue lizard.
- Remove the dolls dress to get a swimmer doll.
- You will earn a HAMMER and NAILS.
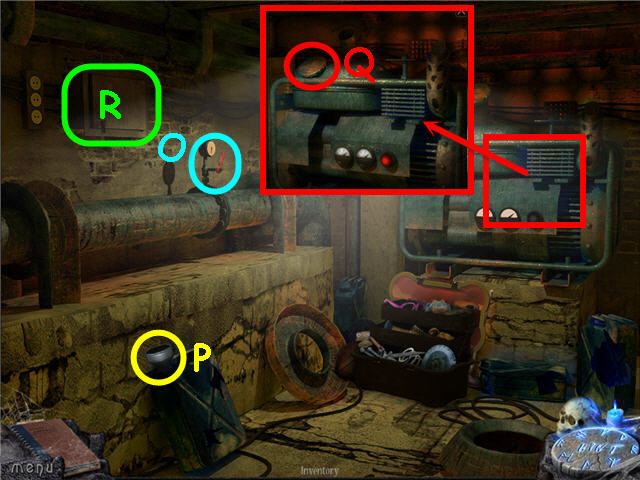
- Turn the lever (O).
- Take the FUNNEL (P).
- Examine the generator; open the tank cap (Q).
- Use the FUNNEL and FULL GAS CAN on the tank.
- Open the electrical panel (R); examine and pull the switch.
- Exit the room.
- Examine the door in the back to access a HOS.
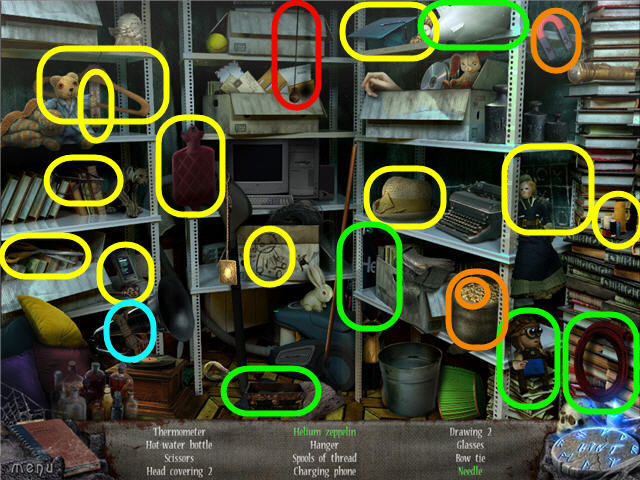
- Pull the switch marked in red to turn on the light.
- Find the items listed.
- Place the pilot, helium tank, zeppelin and hose on the basket to get a helium zeppelin.
- Use the magnet on the seed bag to get the needle.
- You will earn a BOW TIE.
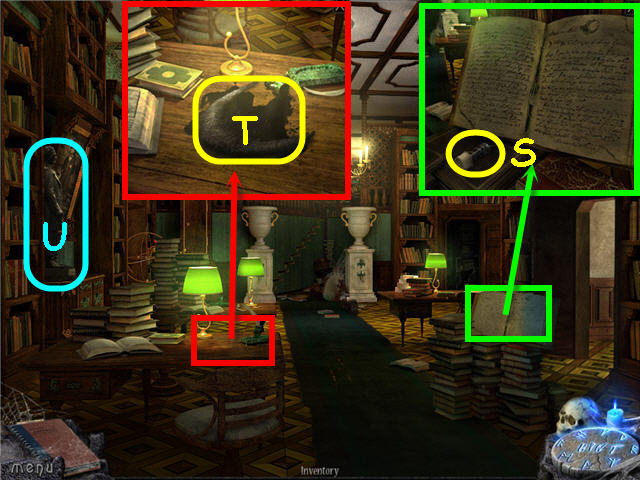
- Examine the open book; take the BUTTON (S).
- Examine the desk; knock over the inkwell.
- Place the WHITE BEARD in the ink; take the BLACK BEARD (T).
- Examine the statue (U).
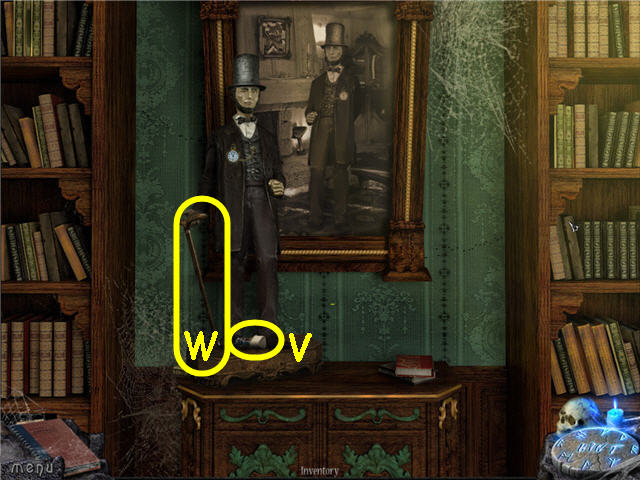
- Place the BLACK BEARD, VEST, POCKET WATCH, BOW TIE and TOP HAT on the statue.
- Take the 2nd BUTTON (V) and CANE (W).
- Back out and head straight.
- Place the LEVER and CANE in the two upper slots of the pillars to trigger a puzzle.
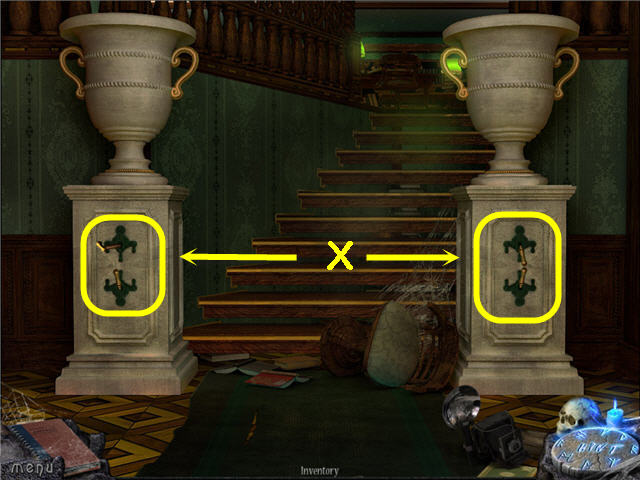
- Click the correct levers to complete the staircase.
- Solution: Click the top two levers down. See screenshot (X) for solution.
- Head upstairs.
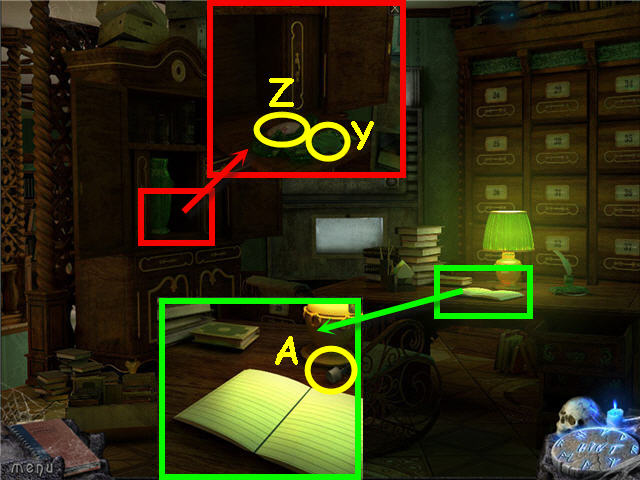
- Open the cabinet; move and examine the vase.
- Use the HAMMER on the vase; take the GREEN STAR (Y) and 3rd MOSAIC PIECE (Z).
- Examine the desk; take the 3rd BUTTON (A).
- Back out three times, head right around the corner and left.
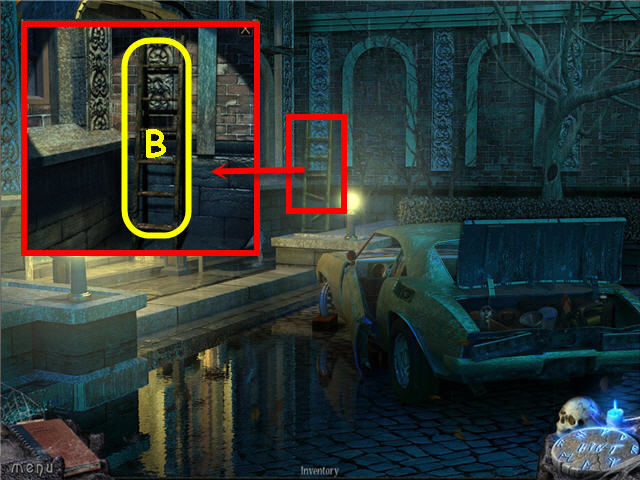
- Examine and use the NAILS and HAMMER on the broken ladder; take the LADDER (B).
- Back out twice and head straight.
- Place the LADDER against the ledge.
- Examine the ledge to access a HOS.
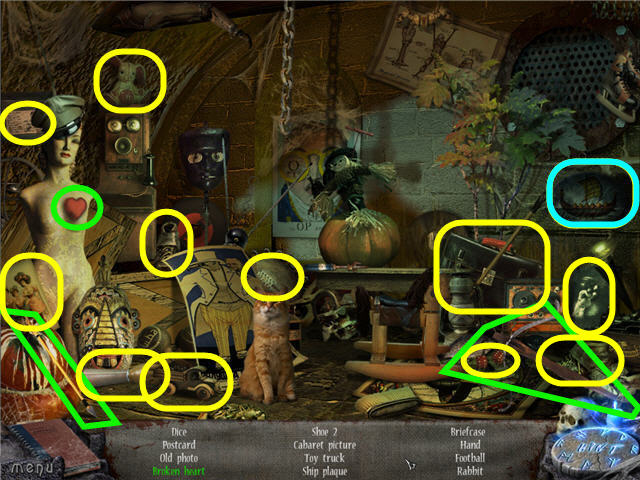
- Find the items listed.
- Place the arrow on the crossbow, click to shoot to get a broken heart.
- You will earn a SHIP.
- Back out and head right around the corner.
- Examine the fountain; place the SHIP in the slot to trigger a puzzle.
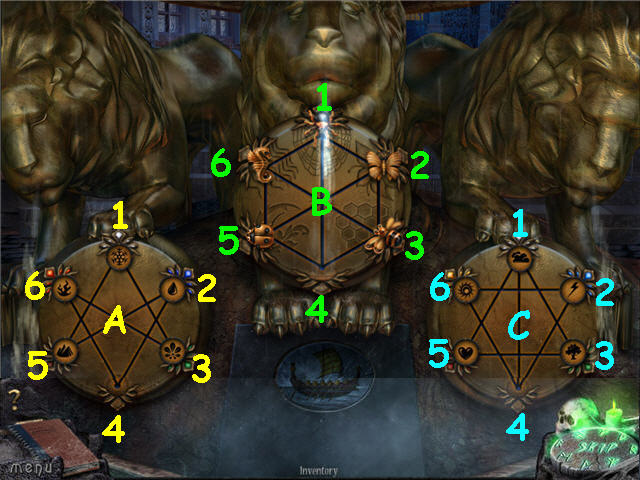
- Match the disks to their corresponding colors or pattern.
- Solution: Disk A; 6, 3, 1, 5, 2, 4, 6, 3, 1, 5, 2, 4, 6, 3, 1, 5, 2, 4.
- Disk B; 3, 6, 1, 4, 5, 2, 3, 4.
- Disk C; 1, 3, 5, 1, 4.
- See screenshot for solution.
- Take the HEADLINE CLIPPING and examine in inventory to get date.
- Back out; head left and straight twice.
- Examine the archive to trigger a puzzle.
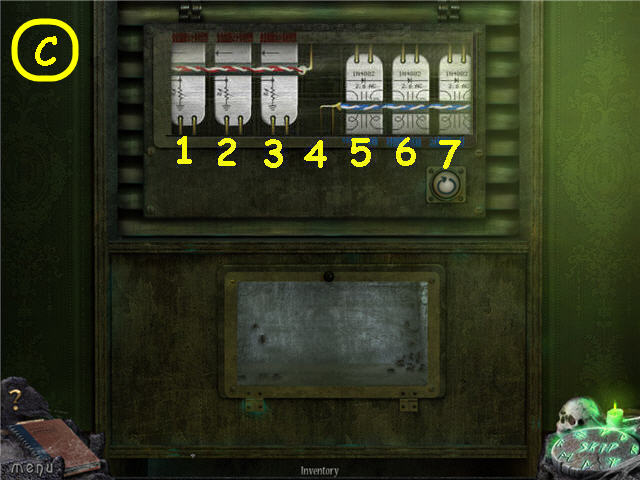
- Switch the red and blue panels.
- Solution: Click on the following spaces; 5, 3, 2, 4, 6, 7, 5, 3, 1, 2, 4, 6, 5, 3, 4.
- See screenshot (C) for solution.
- Place the 3 BUTTONS under the number panel.
- Note: You must have the HEADLINE CLIPPING in your inventory to continue to the next step.
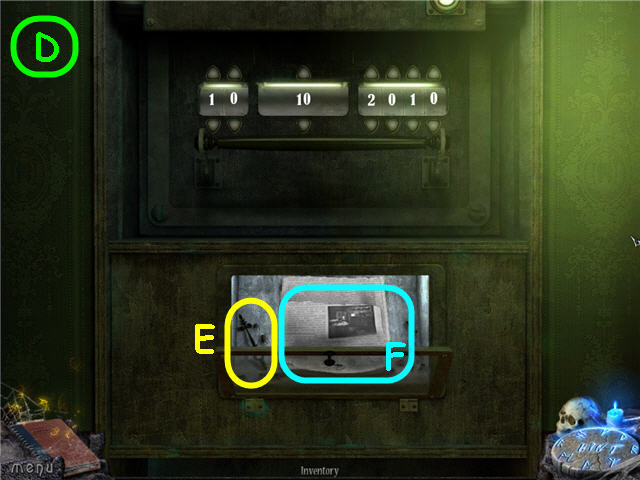
- Enter the date from the HEADLINE CLIPPING.
- Solution: 10-10-2010. See screenshot (D) for solution.
- Push the bar under the date.
- Take the WATCH HANDS (E).
- Examine the news clipping (F); place the HEADLINE CLIPPING on the top.
- Head to the fountain and right to the tavern porch.
Chapter 3 - Investigation
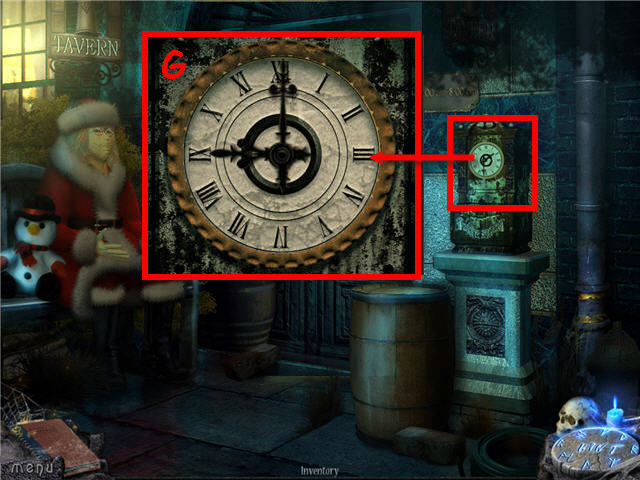
- Examine and place the WATCH HANDS on the clock.
- Note the tavern hours above the clock; set the clock hands to 9 o’clock (G).
- Enter the tavern.
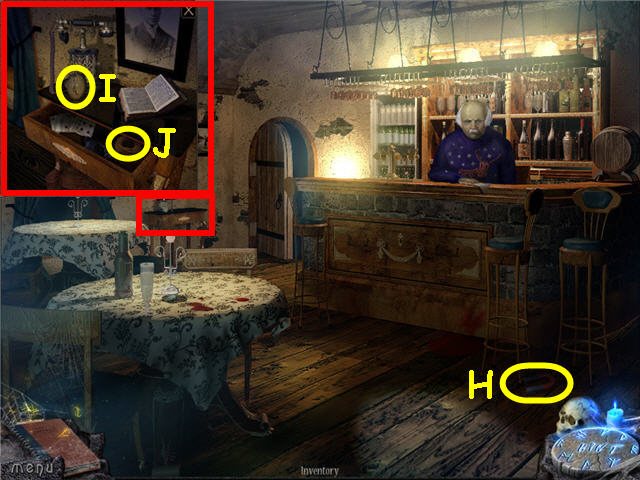
- Speak to the bartender.
- Take the MAGNET (H).
- Examine the console table; take the 4th MOSAIC PIECE (I).
- Open the drawer; take the ROPE (J).
- Head into the store room left of the bar.
- Examine the wheel on the left to access a HOS.
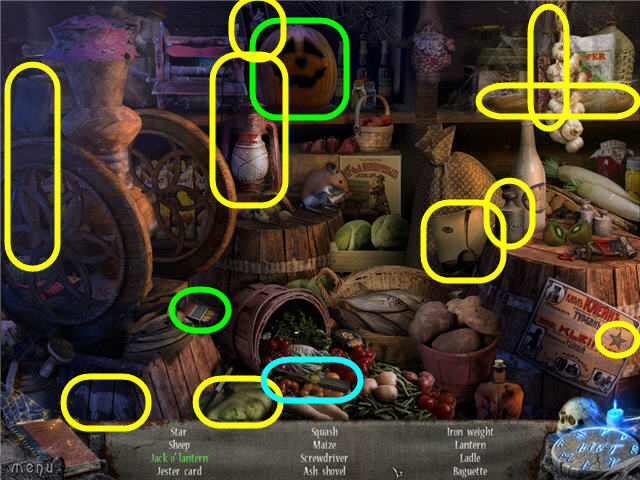
- Find the items listed.
- Take a match, strike it and use on the pumpkin to get a jack-o-lantern.
- You will earn a SCREWDRIVER.
- Examine the vent in the upper left of the room.
- Use the SCREWDRIVER on the screws on the panel to trigger a puzzle.
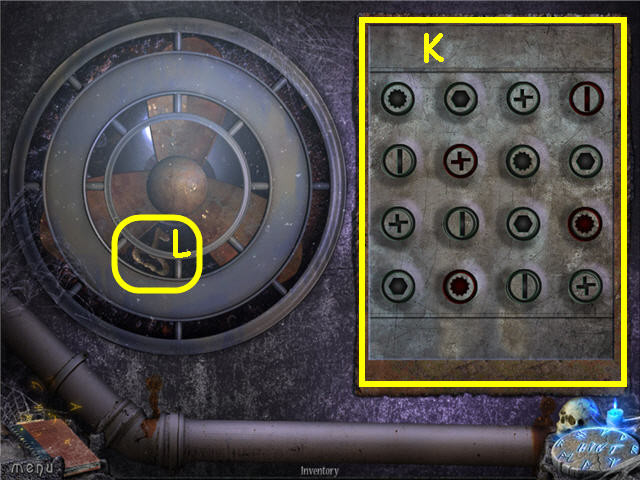
- Choose the symbols so that no two of the same in any row or column.
- Click on a circle and 4 choices will come up; the ones in red may not be moved.
- The starting layout is random. See screenshot (K) for my solution.
- Use the MAGNET to get the KEY (L).
- Back out.
- Examine and use the KEY on the cupboard in the front of the bar; turn to open.
- Examine the opened cupboard to access a HOS.
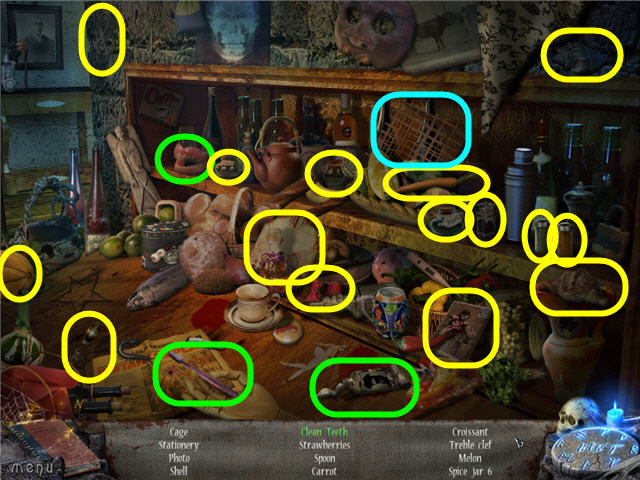
- Find the items listed.
- Use the toothbrush on the toothpaste; use the pasted toothbrush on the dentures to get clean teeth.
- You will earn a CAGE.
- Head into the store room.
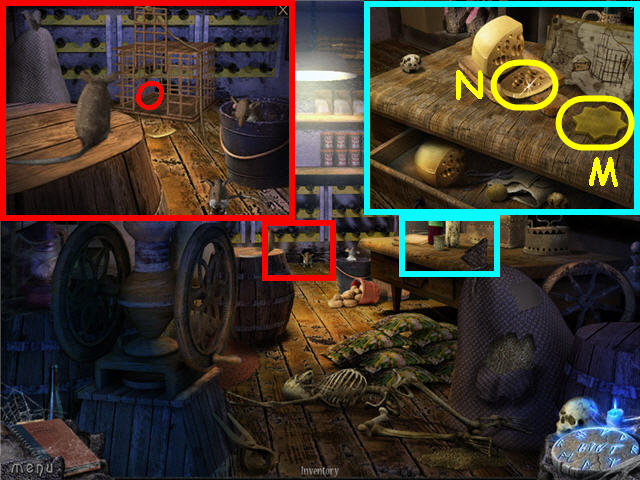
- Examine the table; take the YELLOW STAR (M).
- Open the drawer; drag the CHEESE to the cutting board.
- Use the KNIFE on the cheese; take the PIECE OF CHEESE (N).
- Examine the mouse hole.
- Place the CAGE, PIECE OF CHEESE and ROPE by the mouse hole (O) to trigger a puzzle.
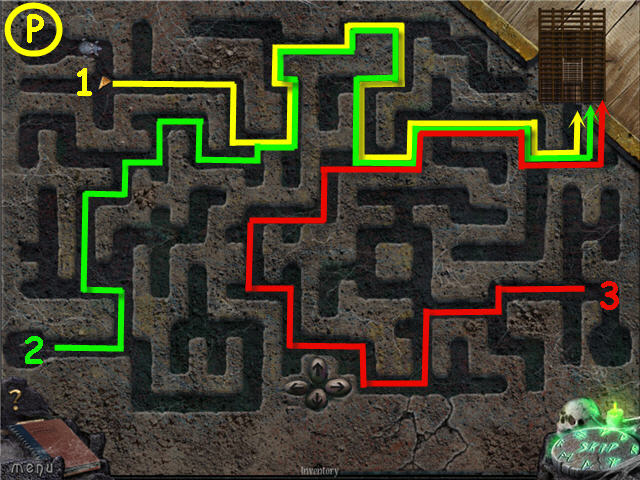
- Lead the mice to trap by moving the cheese to the cage.
- If you go too fast the mice will lose the scent and too slow the mouse will catch it and you will have to start over.
- See screenshot (P) for solution.
- Take the CAGE WITH MICE.
- Back out.
- Give the CAGE WITH MOUSE to the bartender; you will keep the CAGE WITH MICE.
- Back out twice, head left.
- Examine the hospital door; place the 4 MOSAIC on the sides to trigger a puzzle.
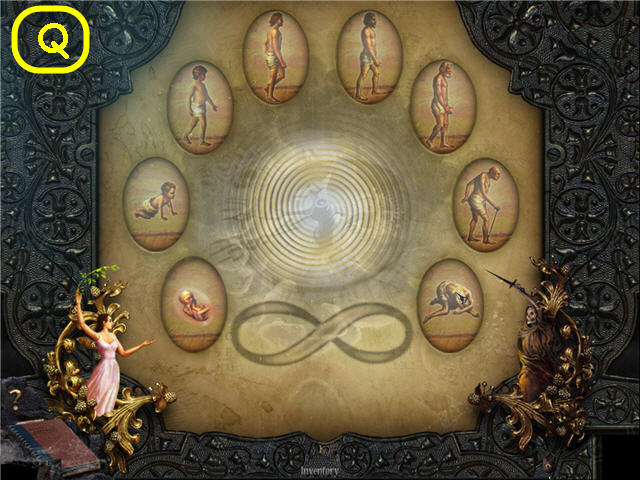
- Arrange the MOSAIC pieces in chronological order.
- See screenshot (Q) for solution.
- Enter the hospital.
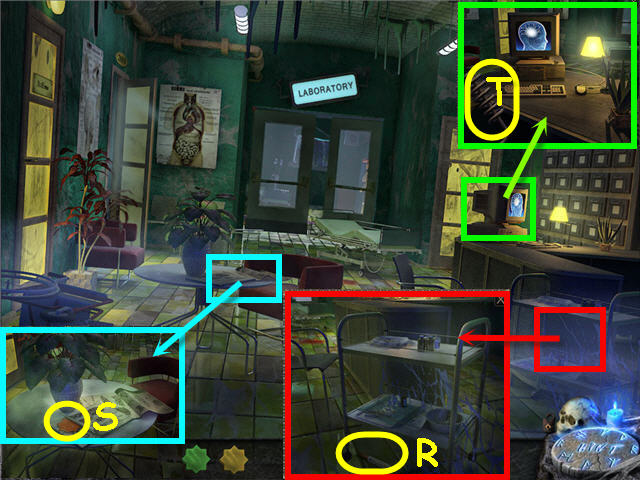
- Examine the cart; take the PINK HIGHLIGHTER (R).
- Examine the table; take the RED STAR (S).
- Examine the computer monitor; take the 1st DEVICE PART (SPIRAL TUBE) (T).
- Head left into room 205.
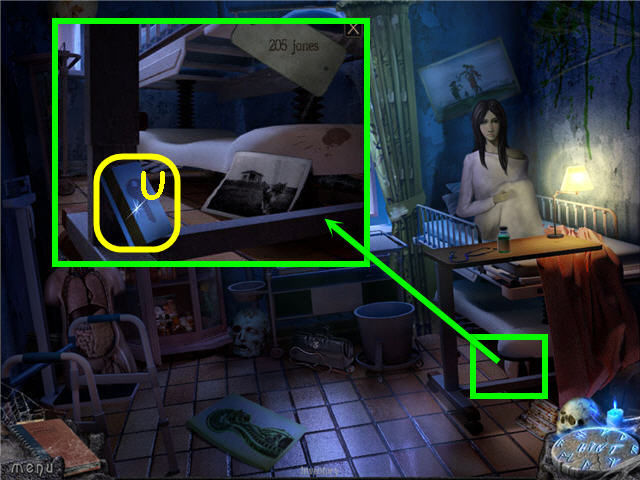
- Examine under the foot of the bed; take the ACCESS CARD (U).
- Speak to the patient.
- Examine the cabinet to access a HOS.
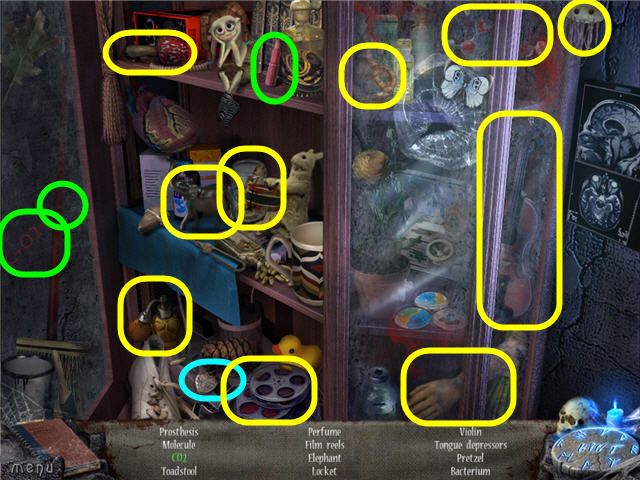
- Find the items listed.
- Use the marker on the equation to get the C02.
- You will earn an EMPTY LOCKET.
- Back out.
- Examine the drawers on the right; examine the key cabinet on the right of the drawers.
- Use the ACCESS CARD on the card reader to trigger a puzzle.
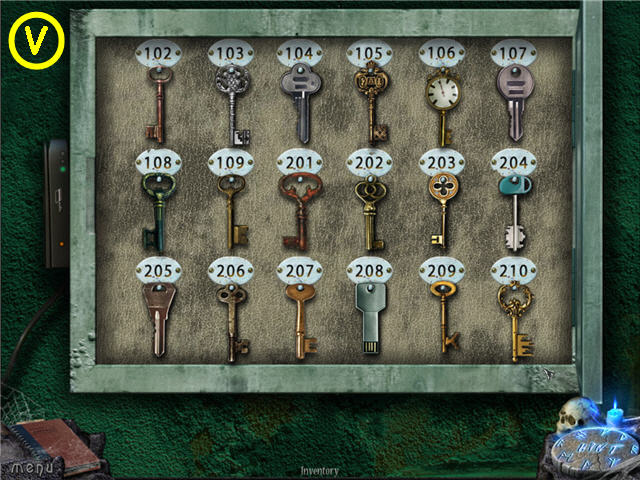
- Arrange the keys on the hook using the outlines as a guide.
- See screenshot (V) for solution.
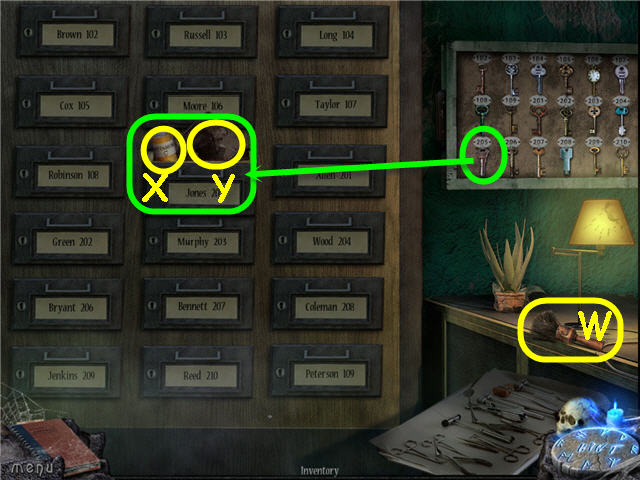
- Take the BRUSH (W).
- Use Key 205 on the Jones 205 box; take the VITAMIN C (X).
- Examine and click/hold/use the BRUSH on the photo to get the PHOTO (Y).
- Arrange the keys on the hook using the outlines as a guide.
- Head left into room 205.
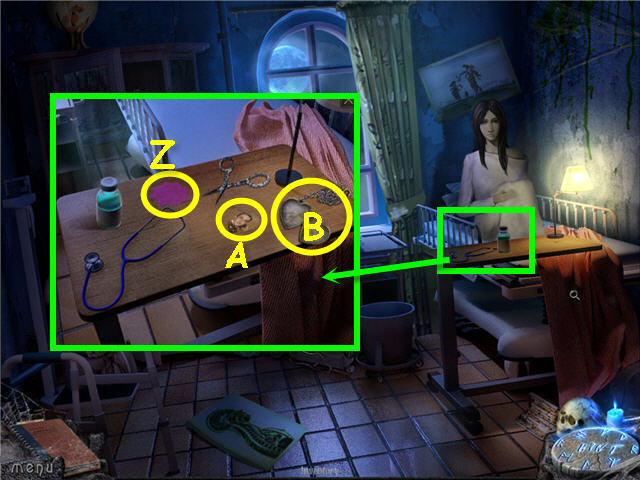
- Examine the tray.
- Use the PINK HIGHLIGHTER on the star; take the PINK STAR (Z).
- Place the PHOTO and EMPTY LOCKET on the tray.
- Use the scissors on the tray on the PHOTO (A); place the cut photo in the EMPTY LOCKET (B).
- Close the locket; take the LOCKET WITH PHOTO.
- Give the LOCKET WITH PHOTO to the patient; get a DOLL.
- Back out and head straight.
Chapter 4 – Doctor
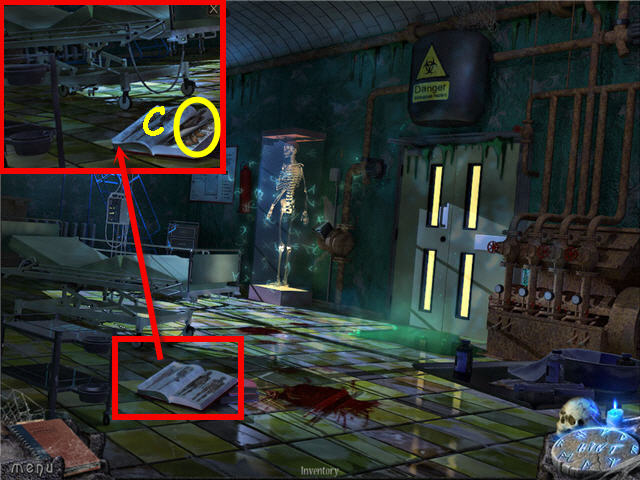
- Examine the book; take the LEAVES (C).
- Examine the skeleton to access a HOS.
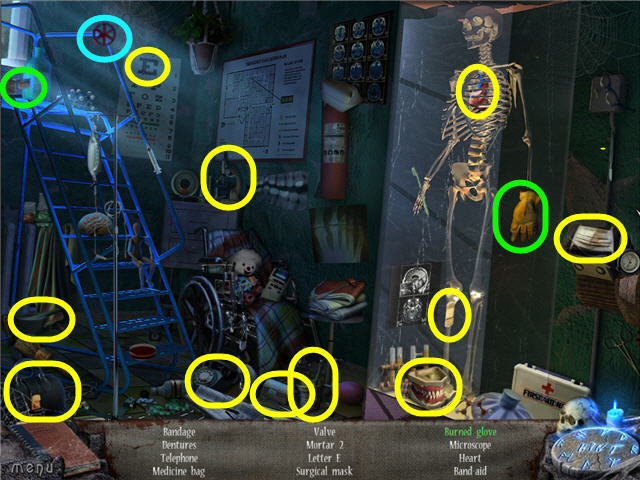
- Find the items listed.
- Use the lighter on the glove to get a burned glove.
- You will earn a VALVE.
- Examine and place the VALVE on the control panel right of the door.
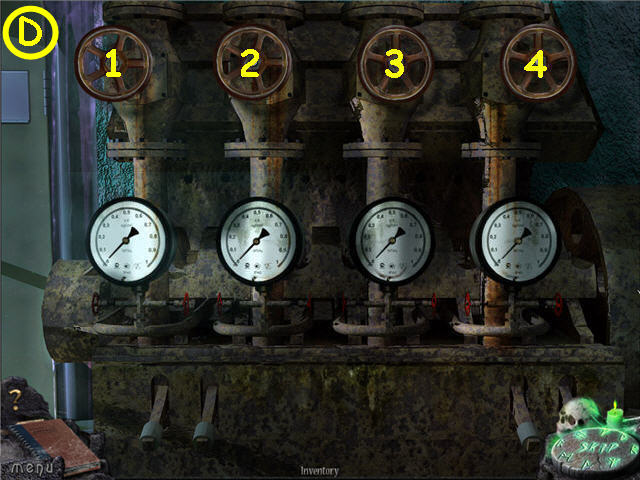
- Turn the valves to shut off all the pipes.
- Solution: Turn valve 2 and 4. See screenshot (D) for solution.
- Head through the newly opened doors.
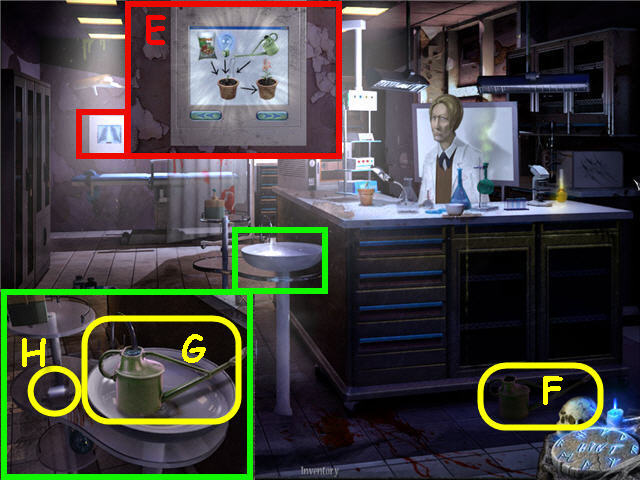
- Speak to the chemist.
- Give the CAGE WITH MICE to the chemist.
- Examine the lab counter, note the seedling and exit out.
- Examine the monitor and scroll through; note the plant growing process (E).
- Take the EMPTY WATERING CAN (F).
- Examine and place the EMPTY WATERING CAN in the sink; take the FULL WATERING CAN (G).
- Take the 2nd DEVICE PART (H).
- Head into the tavern.
- Examine the cabinet in the bar to access a HOS.
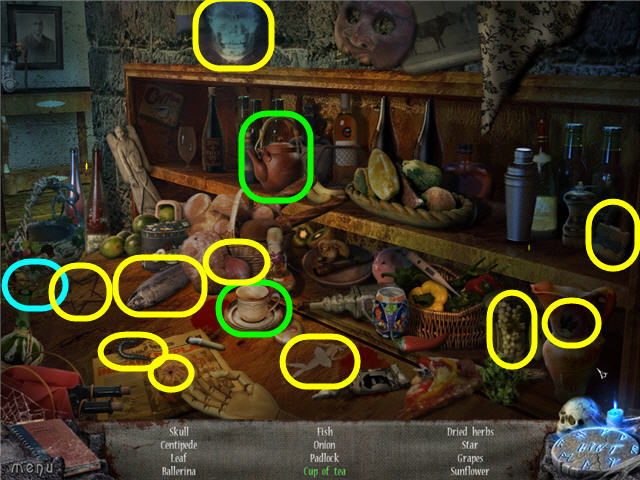
- Find the items listed.
- Use the teapot on the cup to get a cup of tea.
- You will earn DRIED HERBS.
- Enter the store room.
- Examine the wheel to access a HOS.
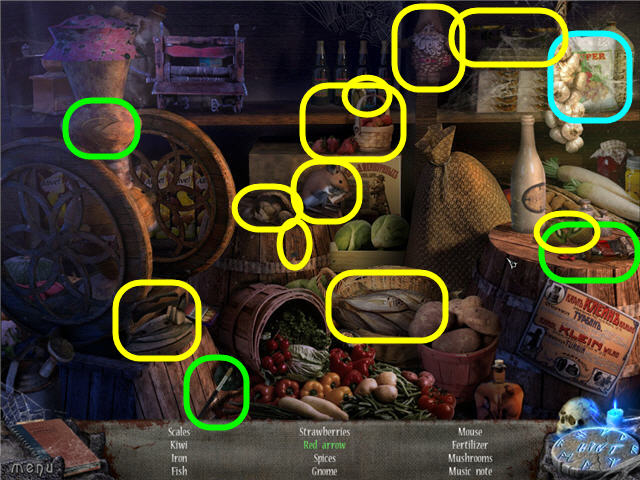
- Find the items listed.
- Dip the paintbrush in the red paint and paint the arrow to get a red arrow.
- You will earn FERTILIZER.
- Exit the tavern and head straight.
- Examine the bush to access a HOS.
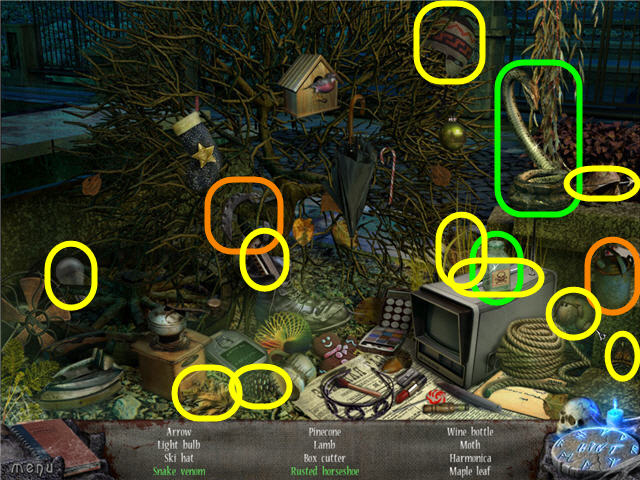
- Find the items listed.
- Use the bottle on the snake to get snake venom.
- Use the watering can on the horseshoe to get a rusted horseshoe.
- You will earn SNAKE VENOM.
- Head to the chemistry lab in the hospital.
- Examine the counter.
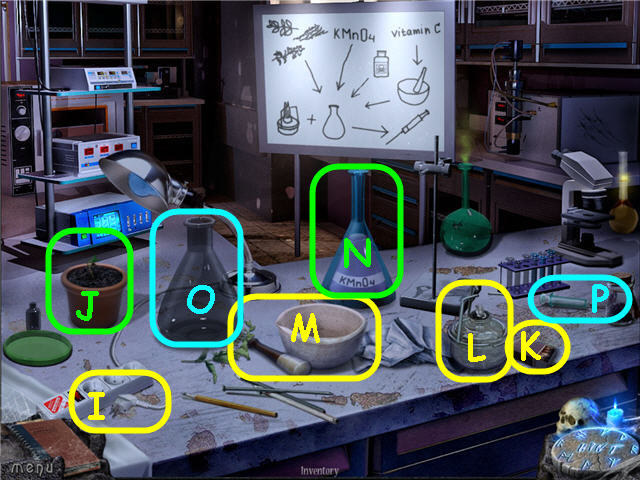
- Plug in the lamp (I).
- Use the FULL WATERING CAN and FERTILIZER on the seedling (J); take the FLOWER.
- Take a match (K), strike it and light the Bunsen burner (L).
- Place the VITAMIN C in the mortar (M); use the pestle to grind it.
- Place the LEAVES, DRIED HERBS and FLOWERS, KMn04 (N), SNAKE VENOM, and ground VITAMIN C in the gray beaker (O).
- Place the beaker in the Bunsen burner; use the syringe (P) on the beaker to get a SYRINGE WITH MEDICINE.
- Head into the police station.
- Use the SYRINGE WITH MEDICINE on the officer; get an OFFICE KEY.
- Examine the cabinet to access a HOS.
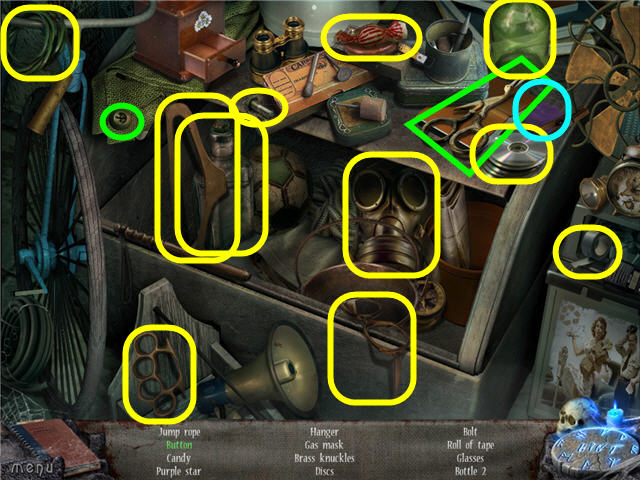
- Find the items listed.
- Use the scissors on the button to get the button.
- You will earn a PURPLE STAR.
- Head to the hospital lobby.
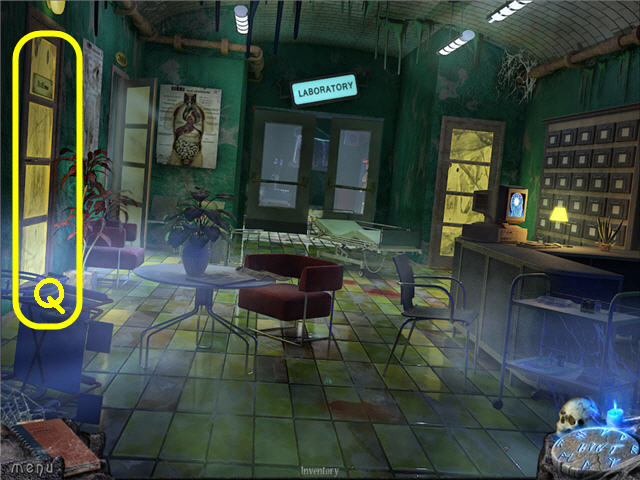
- Examine the doctor’s office door (Q); use the OFFICE KEY and turn the handle.
- Enter the office.
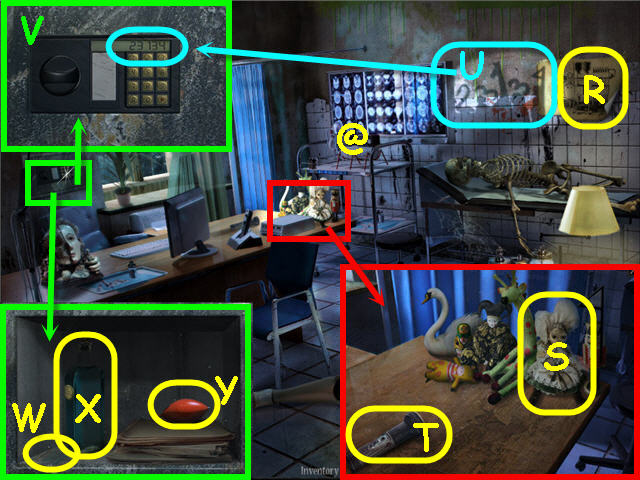
- Examine the schematic (R) on the wall.
- Open the curtain; examine and click on the device (@).
- Examine the toys; place the DOLL on the empty spot (S).
- Turn on the flashlight (T); note the code (U) on the wall.
- Examine the safe; enter the code from the wall and click the red arrow.
- Solution: 23134. See screenshot (V) for solution.
- Take the BLUE STAR (W), ADORA’S MEDICINE (X) and the 3rd DEVICE PART (Y).
- Back out and head straight.
- Examine the skeleton to access a HOS.
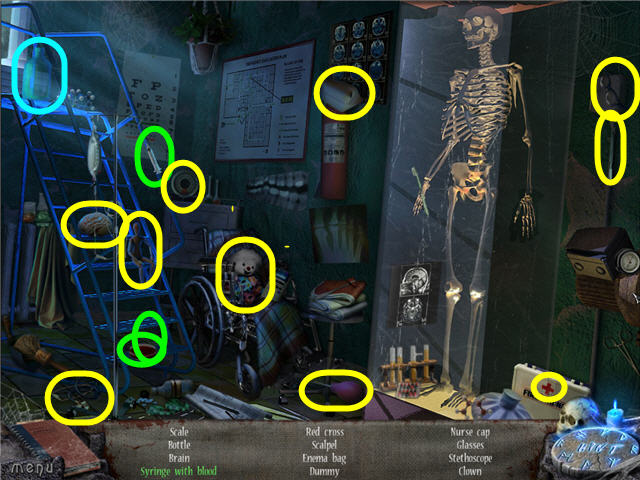
- Find the items listed.
- Use the syringe on the blood to get a syringe with blood.
- You will earn the 4th DEVICE PART.
- Back out and head left into room 205.
- Examine the cabinet to access a HOS.
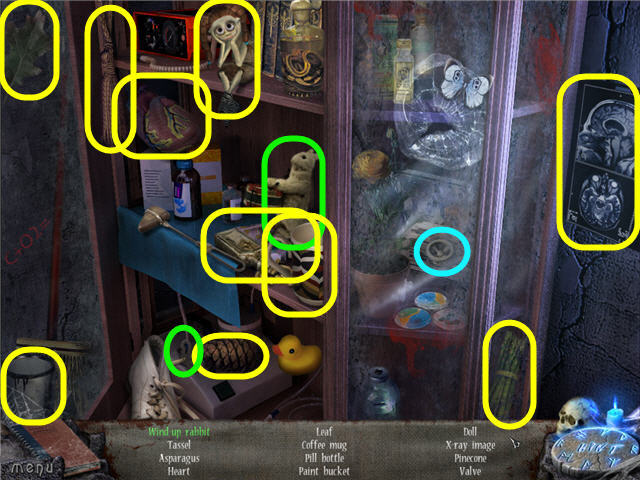
- Find the items listed.
- Use the key on the bunny to get a wind up rabbit.
- You will earn the 5th DEVICE PART.
- Back out and head left into the doctor’s office.
- Examine the device.
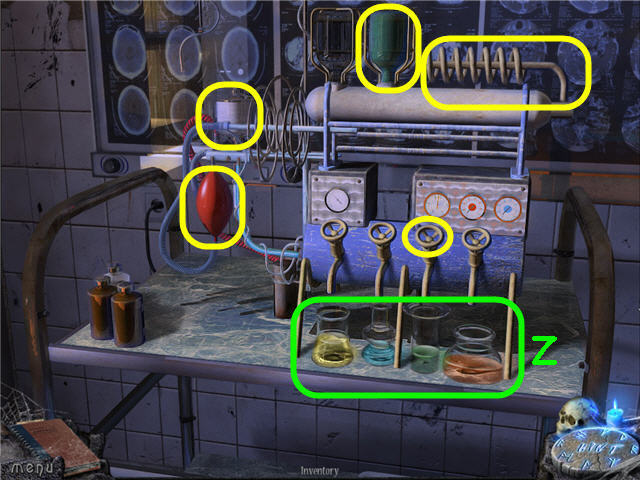
- Place the 5 DEVICE PARTS (including the SPIRAL TUBE) on the device; these are marked in yellow on the screenshot.
- Place ADORA’S MEDICINE on the valves; take the MEDICINAL CHEMICALS (Z).
- Head to the chemists lab.
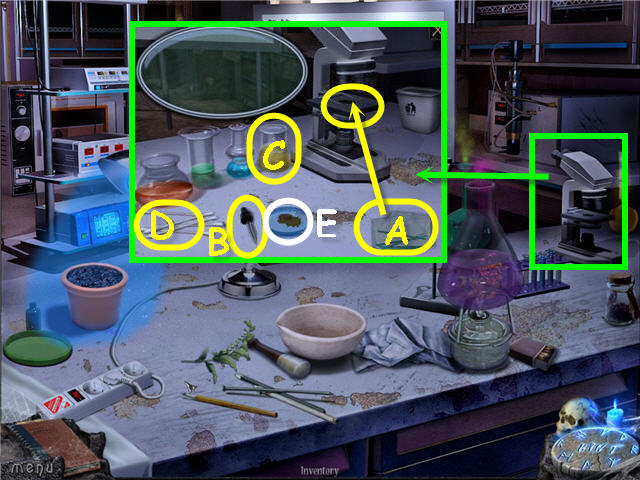
- Examine the lab counter.
- Examine and place the MEDICINAL CHEMICALS by the microscope.
- Place a slide (A) on the microscope.
- Use the dropper (B) on the yellow bottle (C); place on the microscope slide.
- Use a cotton swab (D) on the bacteria (E) and place on the microscope slide.
- Take the yellow beaker to get the POISONOUS SUBSTANCE.
Chapter 5 – Church
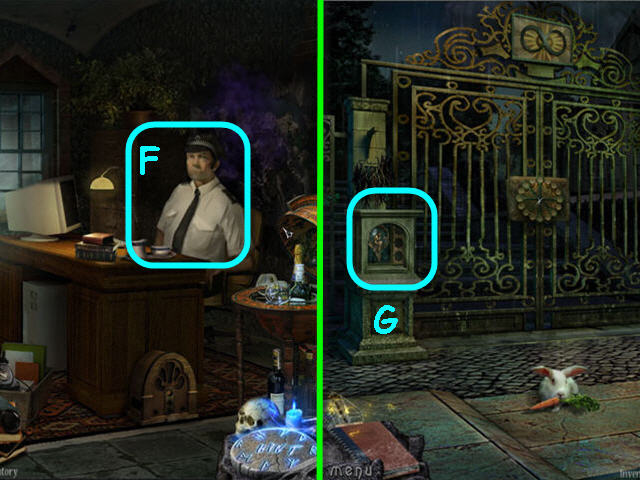
- Head into the Police station.
- Give the POISONOUS SUBSTANCE to the Officer (F); get the GATE KEYS.
- Head to the fountain and go straight.
- Examine the left pillar (G); place the BLUE STAR, PURPLE STAR, YELLOW STAR, RED STAR, GREEN STAR and PINK STAR in the corresponding colored slots to trigger a puzzle.
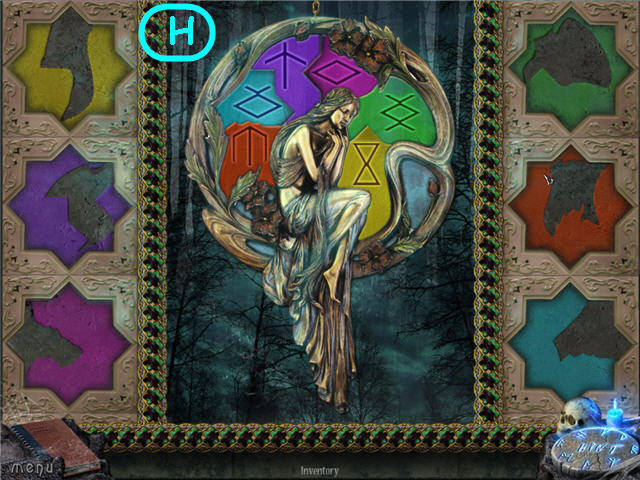
- Place the pieces of the star in the center to complete the border.
- See screenshot (H) for solution.
- Back out.
- Examine and place the GATE KEYS on the gates to trigger a puzzle.
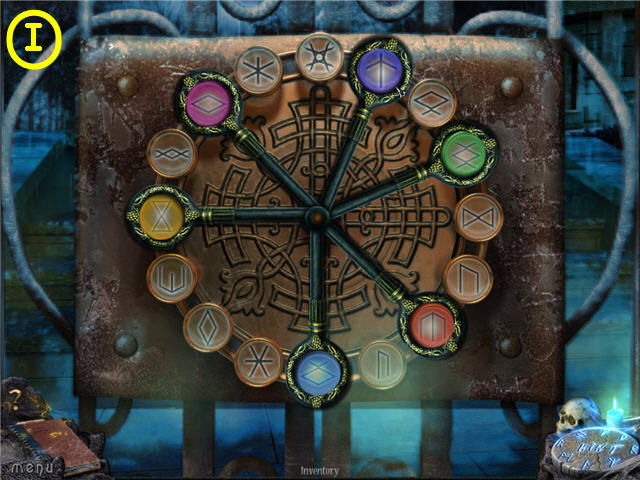
- Adjust the keys to match the color/symbols from the pillar.
- See screenshot (I) for solution.
- Head through the gates.
- Examine the back right fountain to access a HOS.
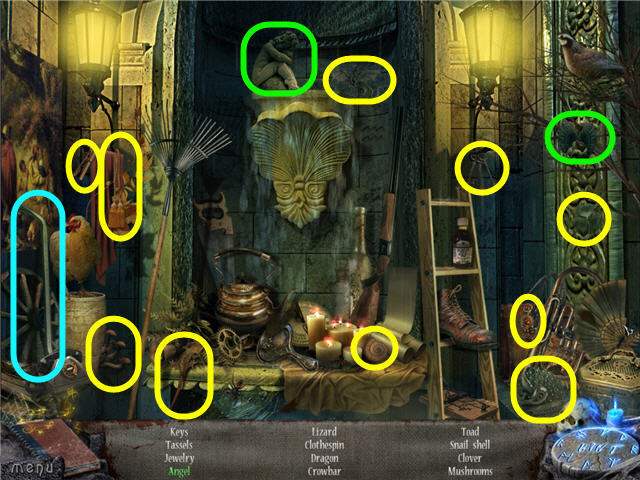
- Find the items listed.
- Place the wings on the cherub to get an angel.
- You will earn a CROWBAR.
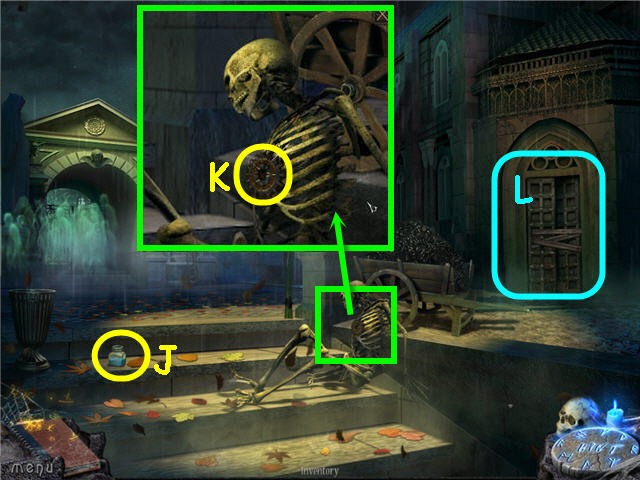
- Take the BLUE PAINT (J).
- Examine the skeleton; take the GEAR (K).
- Examine and use the CROWBAR on the door three times (L).
- Head right into the church.
- Speak to the monk.
- Examine the left to access a HOS.
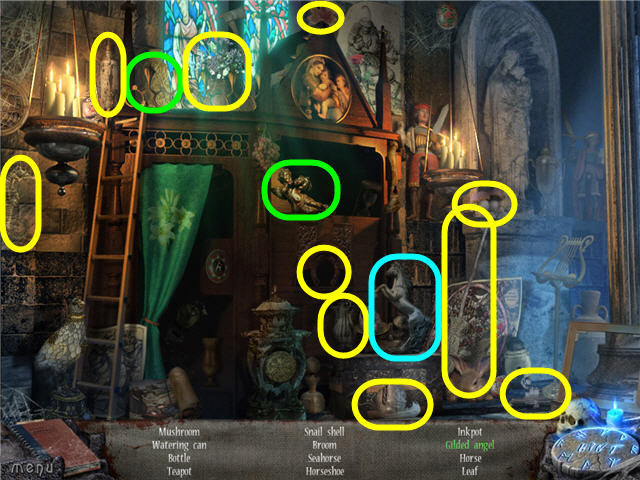
- Find the items listed.
- Place the gold leaf on the angel to get a gilded angel.
- You will earn a SILVER STATUE.
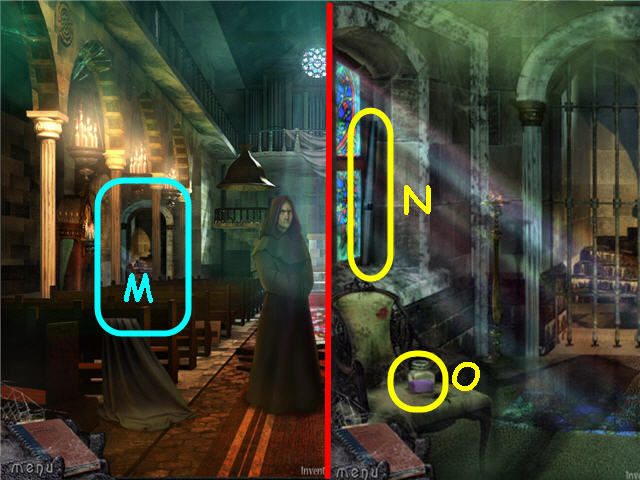
- Head through the left rear door (M).
- Take the ORGAN PIPE (N) and VIOLET PAINT (O).
- Back out.
- Head straight up to the balcony.
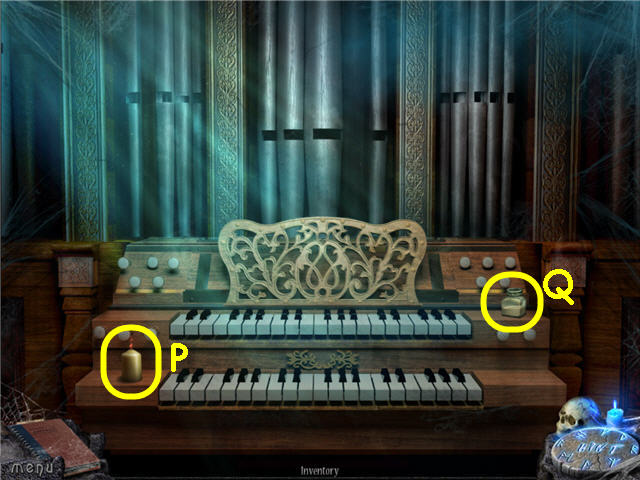
- Take the CANDLE (P) and WHITE PAINT (Q).
- Exit the church.
- Examine the fountain to access a HOS.
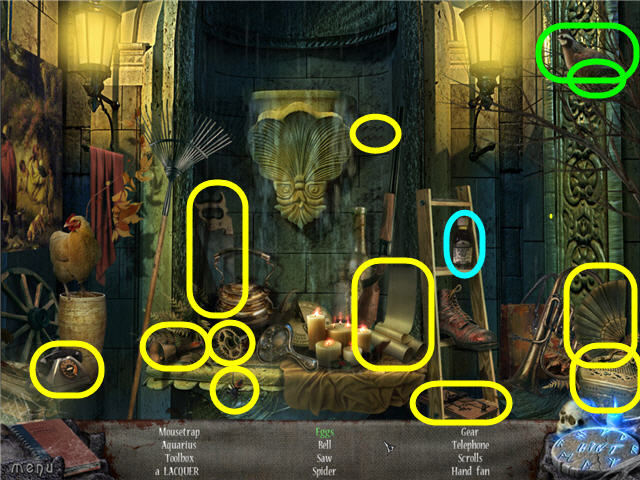
- Find the items listed.
- Move the bird to get the eggs.
- You will earn a BOTTLE OF LACQUER.
- Back out twice and head left.
- Examine the car trunk to access a HOS.
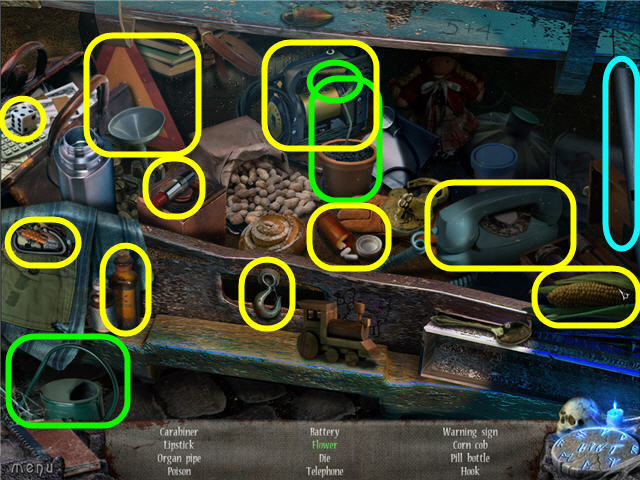
- Find the items listed.
- Use the watering can on the seedling to get a flower.
- You will earn the 2nd ORGAN PIPE.
- Back out twice and head straight.
- Examine the ledge to access a HOS.
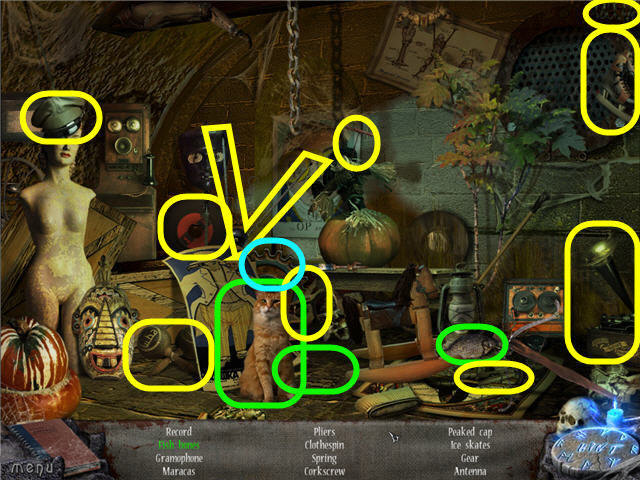
- Find the items listed.
- Give the fish to the cat to get fish bones.
- You will earn the 2nd GEAR.
- Head into left rear room of the church.
- Place the two GEARS on the mechanism to trigger a puzzle.
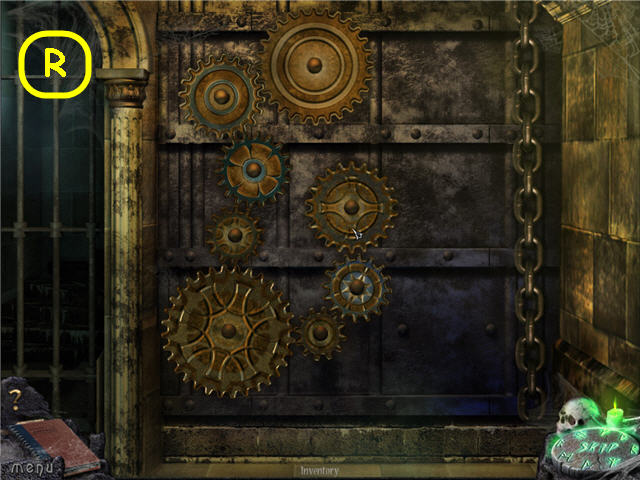
- Arrange the gears so that they are all turning.
- See screenshot (R) for solution.
- Head forward up the stairs one time.
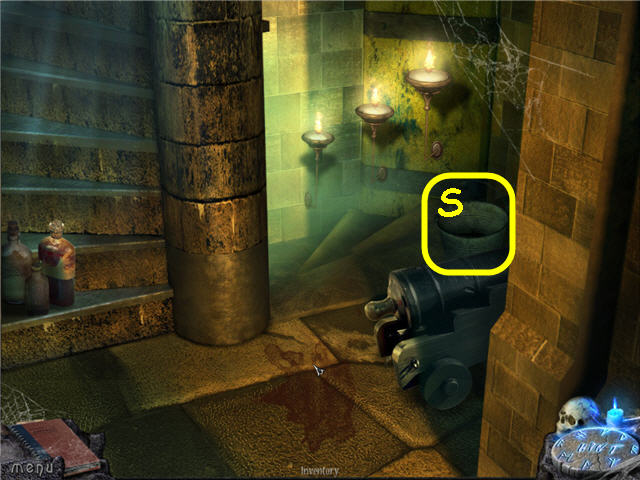
- Take the EMPTY BUCKET (S).
- Head upstairs.
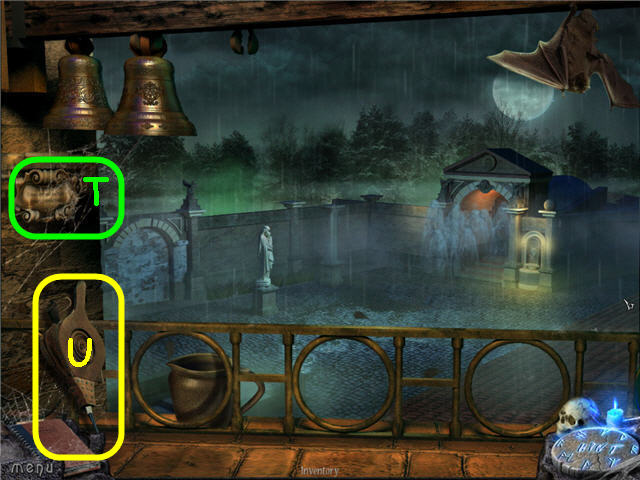
- Examine the plaque (T).
- Take the BELLOWS (U).
- Go downstairs once and back out three times.
Chapter 6 – Crypt
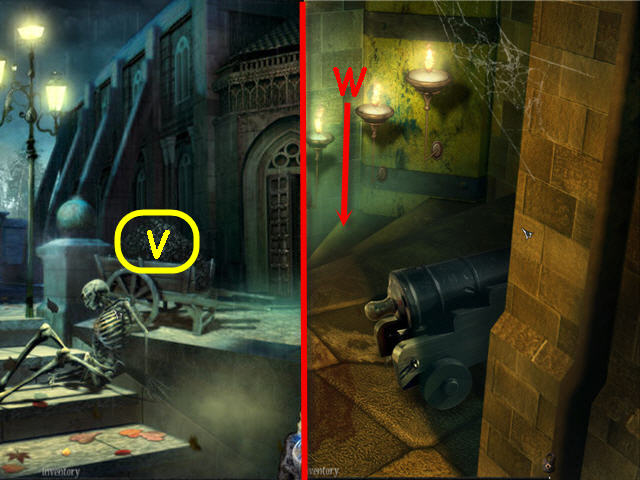
- Use the EMPTY BUCKET on the cart (V) to get a BUCKET OF COAL.
- Head back into the church stairwell and go downstairs (W).
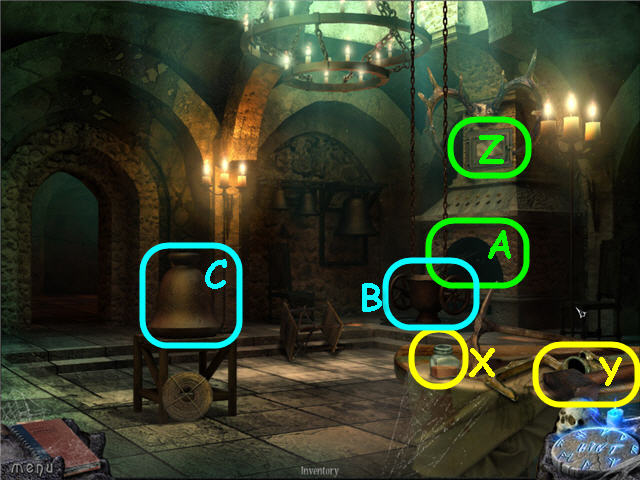
- Take the RED PAINT (X) and SLEDGHAMMER (Y).
- Open and place the SILVER STATUE in the oven (Z).
- Place the BUCKET OF COAL in the furnace (A).
- Use the CANDLE and BELLOWS on the coal.
- Move the pot (B) twice.
- Use the SLEDGEHAMMER on the mold (C); take the SILVER BELL.
- Back out and head upstairs.
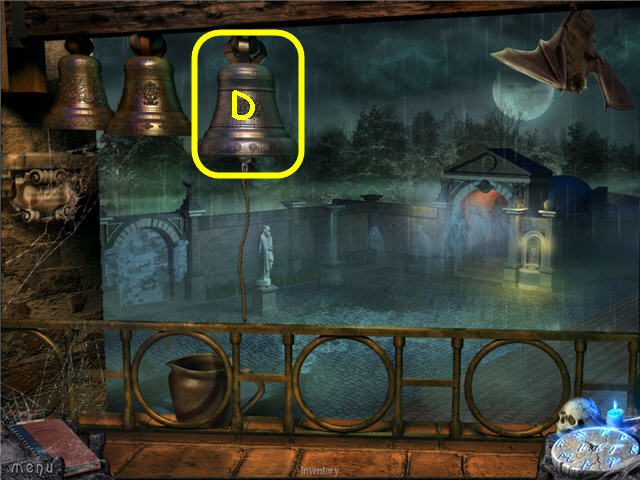
- Hang the SILVER BELL on the hook (D).
- Click the rope to ring the bell.
- Exit the church and head straight through the gates.
- Examine the wall to access a HOS.
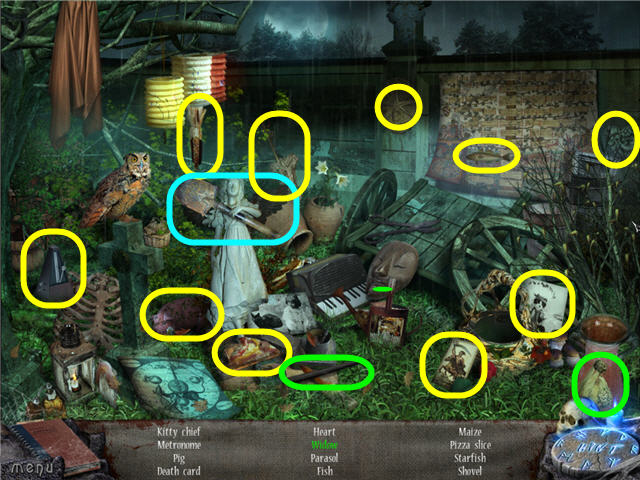
- Find the items listed.
- Use the charcoal on the bride to get a widow.
- You will earn a SPADE.
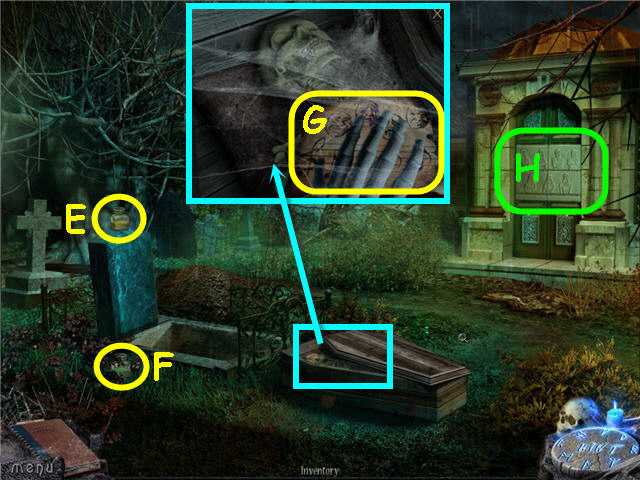
- Take the YELLOW PAINT (E) and GREEN PAINT (F).
- Use the SPADE on the grave.
- Open and examine the coffin; take the MUSIC PIECE (G).
- Examine the door (H).
- Head back into the church.
- Examine the stained glass on the right.
- Place the GREEN PAINT, YELLOW PAINT, RED PAINT, WHITE PAINT, VIOLET PAINT, BLUE PAINT and BOTTLE OF LACQUER on the table to trigger a puzzle.
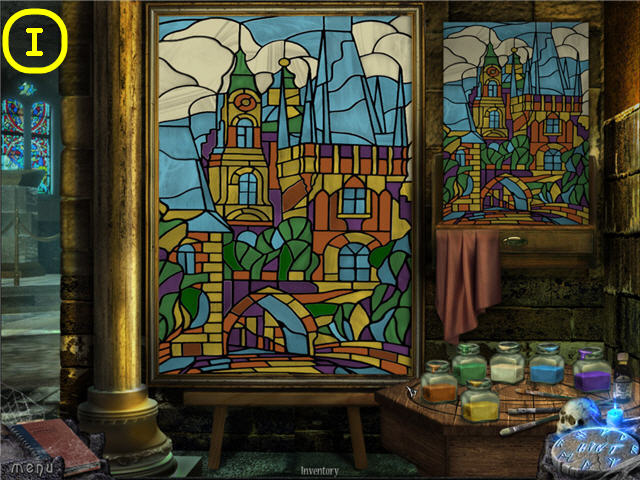
- Paint the gray pieces to match the stained glass on the right.
- You can change colors by dipping the brush in the color of your choice.
- See screenshot (I) for solution.
- Speak to the monk; get a 2nd MUSIC PIECE.
- Head straight up to the balcony.
- Place the 2 ORGAN PIPES on the pipes.
- Place the 2 MUSIC PIECES on the music stand to trigger a puzzle.
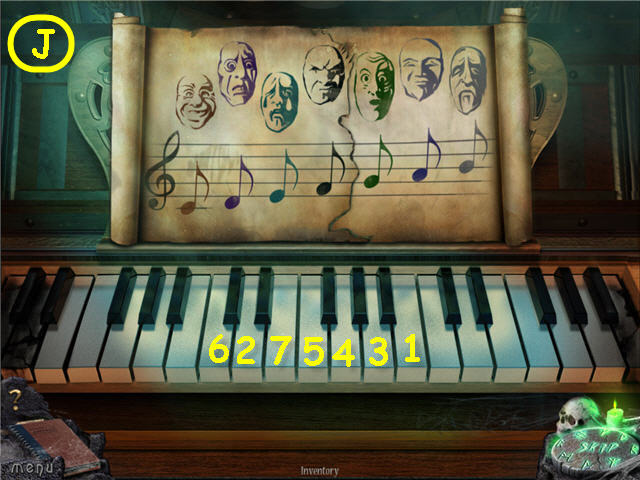
- Duplicate the 7 notes played.
- See screenshot (J) for solution.
- Back out twice; head straight and right into the crypt.
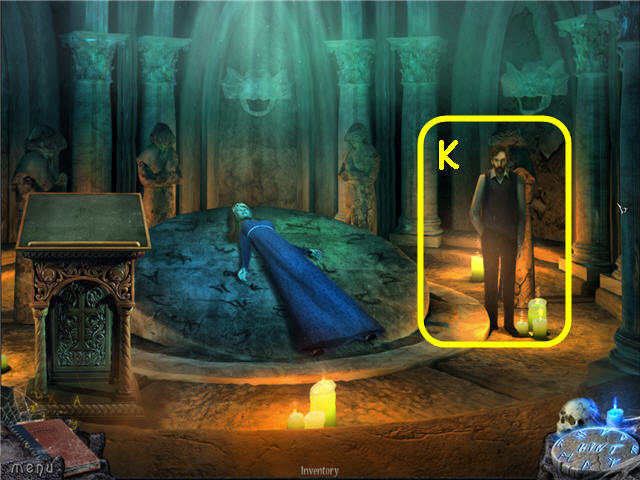
- Speak to the doctor (K).
- Go into the library.
- Examine the doorway under the bookcase to access a HOS.
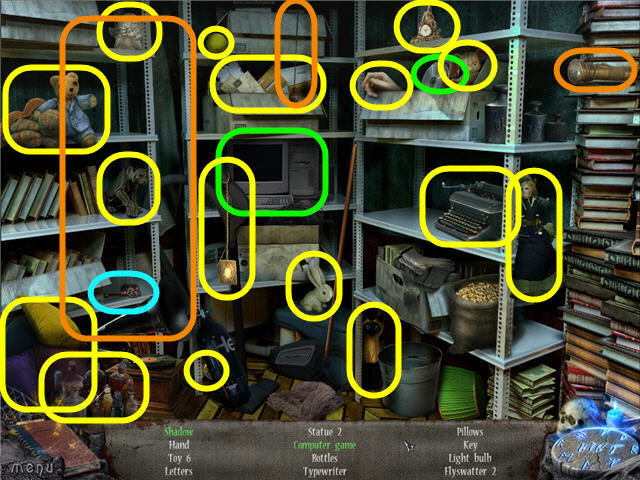
- Find the items listed.
- Click the monitor, place the disks in the computer, and click the monitor to get the computer game.
- Turn off the light; click on the flashlight to get the shadow.
- You will earn ARCHIVE KEY 26.
- Head straight upstairs twice.
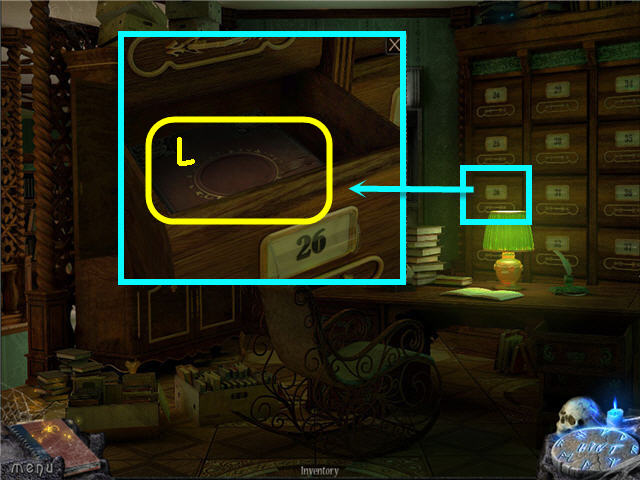
- Examine and use ARCHIVE KEY 26 on drawer number 26; take the ANCIENT BOOK (L).
- Head into the church.
- Examine the left pews to access a HOS.
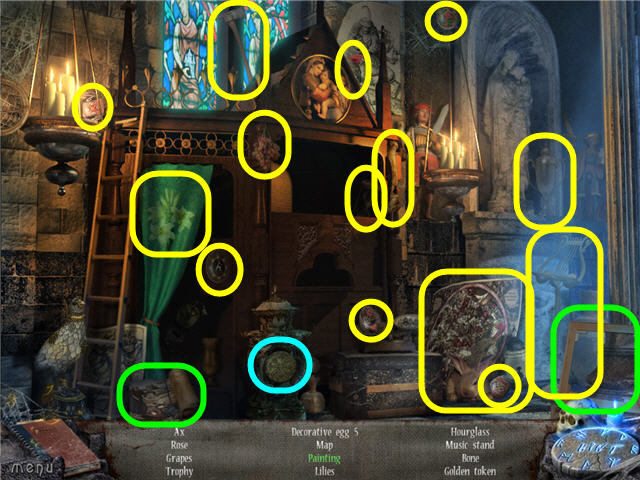
- Find the items listed.
- Place the canvas in the frame to get a painting.
- You will earn a MYSTERIOUS SIGN.
- Go into the crypt.
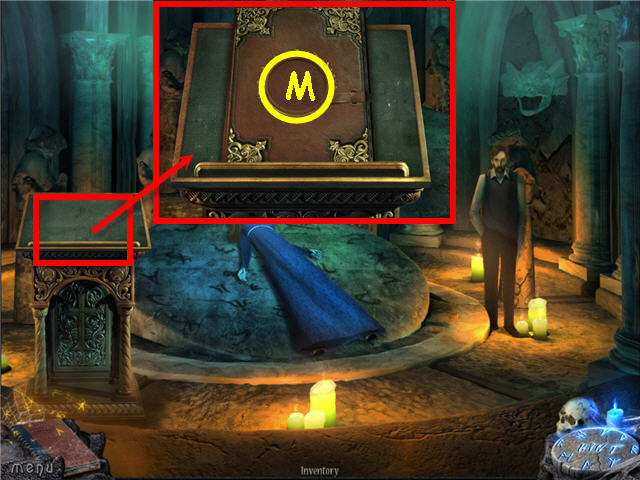
- Examine and place the ANCIENT BOOK on the stand.
- Place the MYSTERIOUS SIGN on the cover (M); click to open.
- Speak to the apparition to trigger a puzzle.
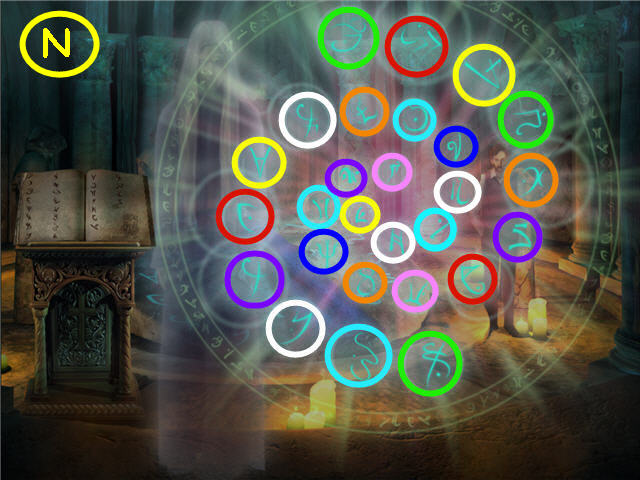
- Click on pairs of symbols that are related.
- See screenshot (N) for solution.
- Click on Adora.
Epilogue
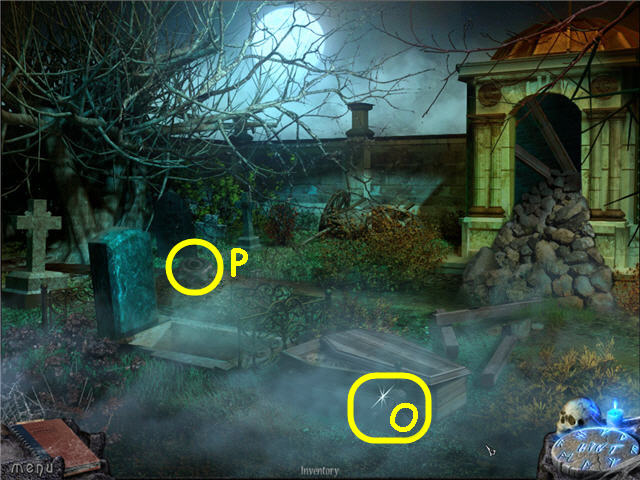
- Take the HANDLE (O) and GEAR (P).
- Head left.
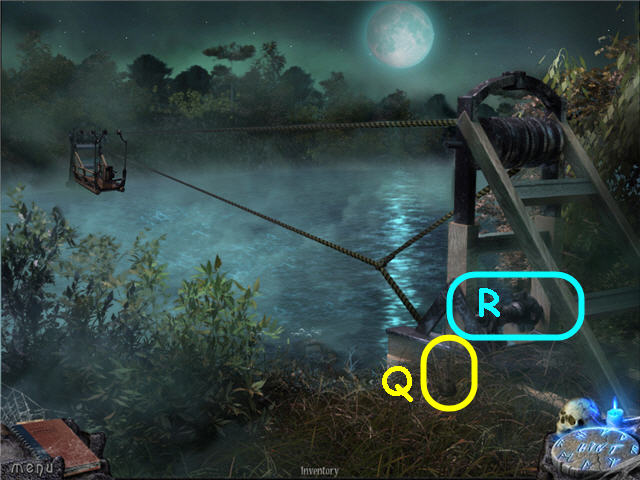
- Take the OILCAN (Q).
- Place the GEAR and HANDLE on the mechanism.
- Use the OILCAN on the gears (R); click the gears.
- Enter the cable car.
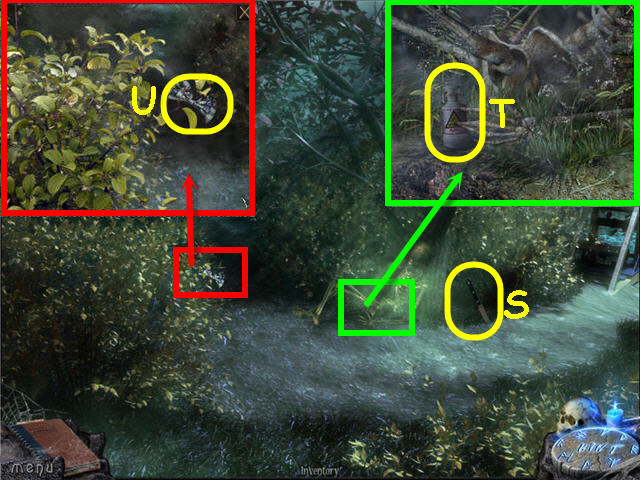
- Take the KNIFE (S).
- Examine the skeleton; take the ACID (T).
- Examine the bush; take the BOW (U).
- Head down the path and through the gate.
- Examine the well to access a HOS.
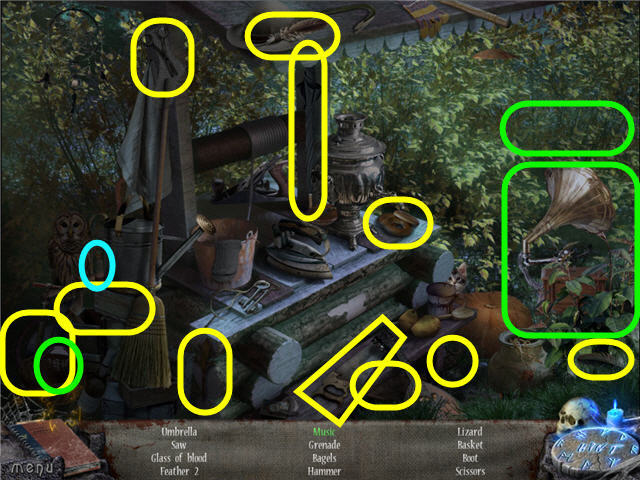
- Find the items listed.
- Place the record on the gramophone to get music.
- You will earn a VIAL OF BLOOD.
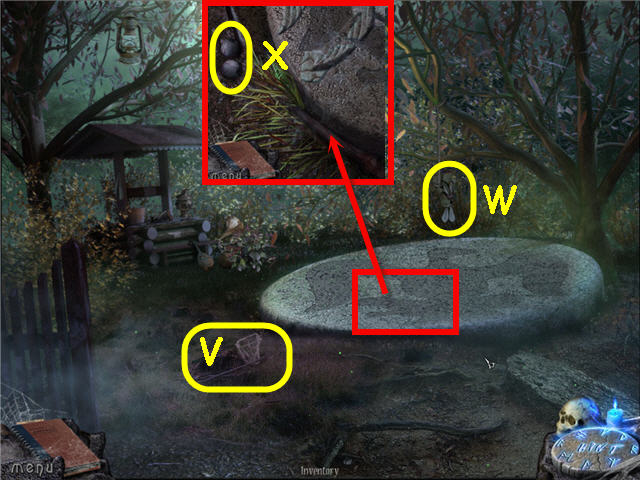
- Take the FISH NET (V).
- Use the KNIFE on the rope to get the RABBIT (W).
- Examine the stone mosaic; take the EYES (X).
- Back out to the house.
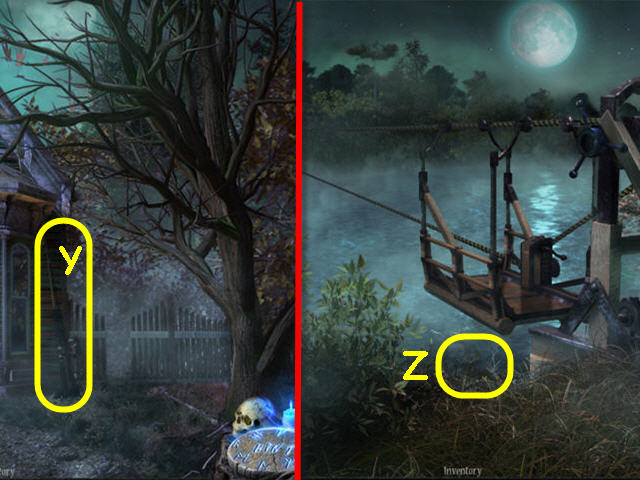
- Take the FISHING ROD (Y).
- Back out; head right and forward.
- Use the FISH NET to get the DOLL’S HEAD (Z).
- Take the cable car across; head straight.
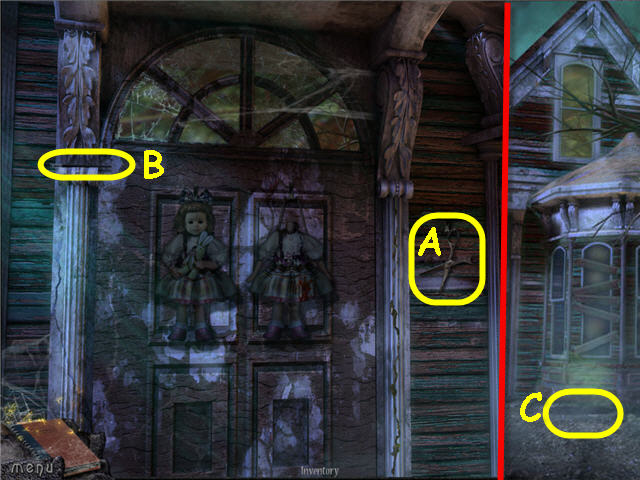
- Examine the doorway; take the SCISSORS (A) and BRUSH (B).
- Back out.
- Examine and use the BRUSH on the puddle (C) to get a BRUSH WITH PAINT.
- Examine the doorway and then examine the dolls.
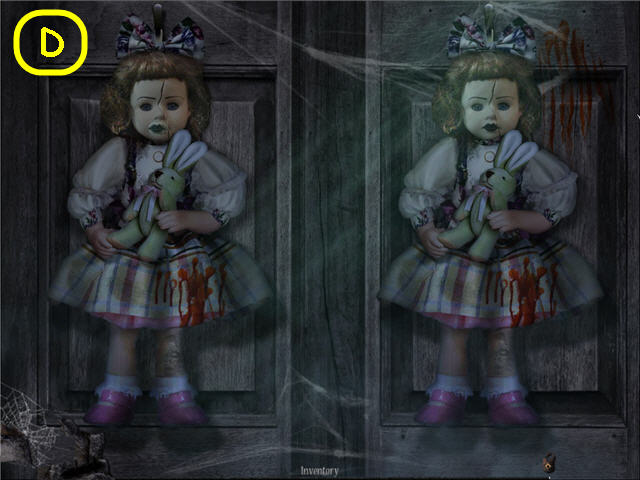
- Place the DOLL HEAD on the neck, RABBIT in the arms, and BOW on the head of the right doll.
- Use the SCISSORS on the right dolls hair.
- Place the EYES in the sockets, ACID on the leg and the VIAL OF BLOOD on the dress of the left doll.
- Use the BRUSH WITH PAINT on the left dolls lips.
- See screenshot (D) for solution.
- Head into the house.
- Examine the cabinet to access a HOS.
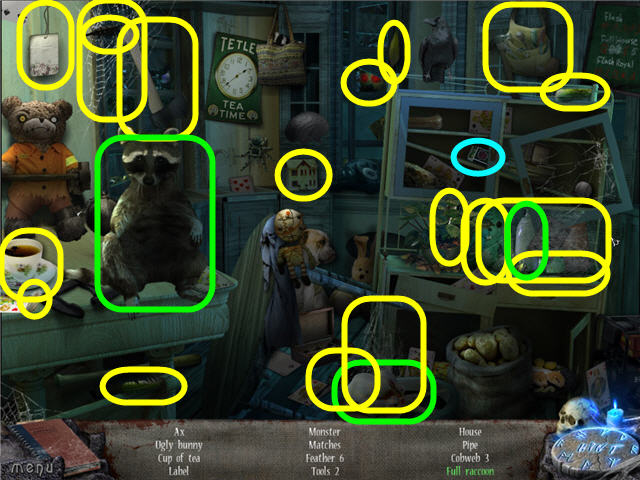
- Find the items listed.
- Give the milk bottle and chicken to the raccoon to get a full raccoon.
- You will earn MATCHES.
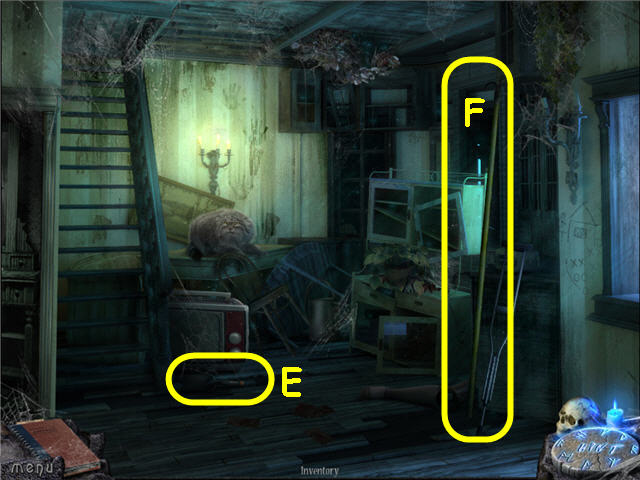
- Take the TROWEL (E) and GAFF (F).
- Back out and head through the gate.
- Examine the well to access a HOS.
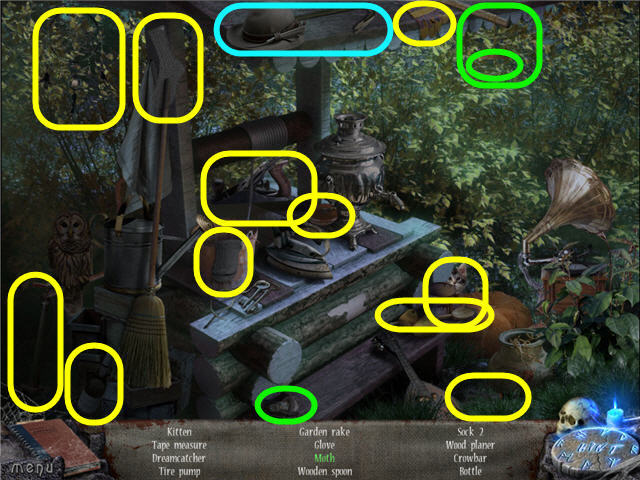
- Find the items listed.
- Place the light bulb in the lamp to get a moth.
- You will earn a CROWBAR.
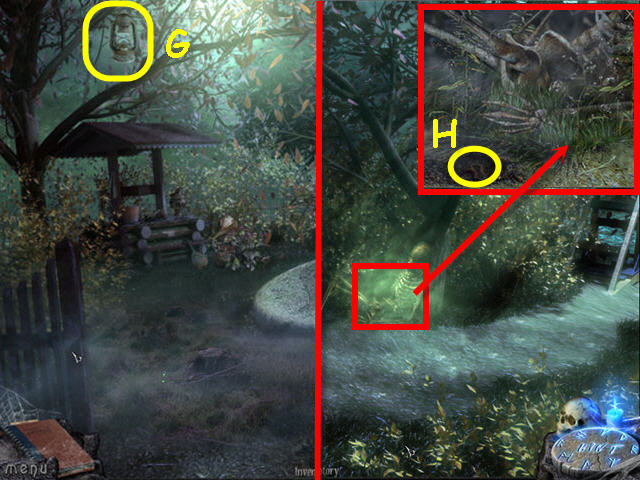
- Use the GAFF to get the LANTERN (G).
- Back out twice.
- Examine the skeleton.
- Use the TROWEL on the dirt; take the WORM (H).
- Head into the house.
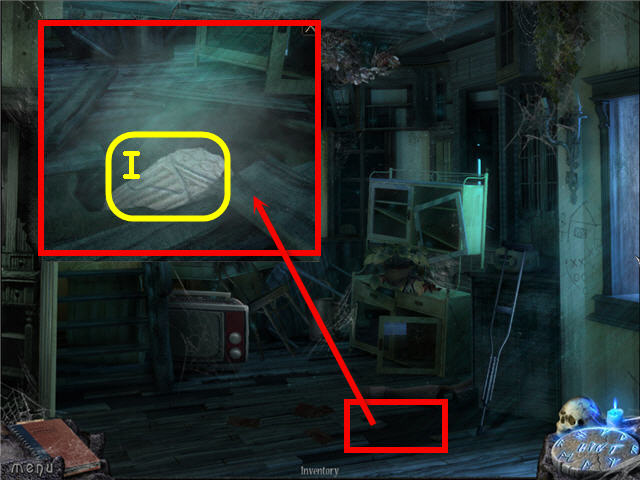
- Examine and use the CROWBAR on the floor; take the MOSAIC PIECE (I).
- Head left.
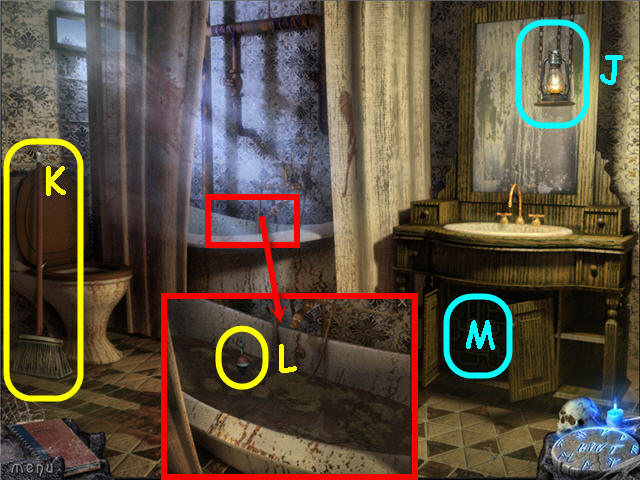
- Place the LANTERN on the hanger (J) and light with the MATCHES.
- Take the BROOM (K).
- Examine the tub; take the BOBBER (L).
- Examine the pipes (M) to trigger a puzzle.
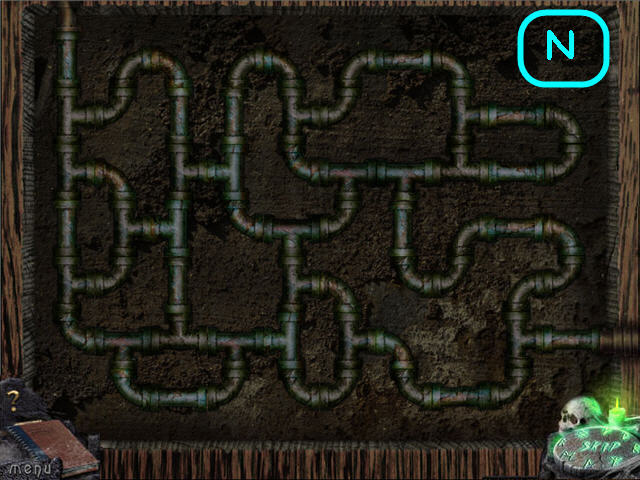
- Connect the pipes to complete the flow.
- See screenshot (N) for solution.
- Back out three times and head right.
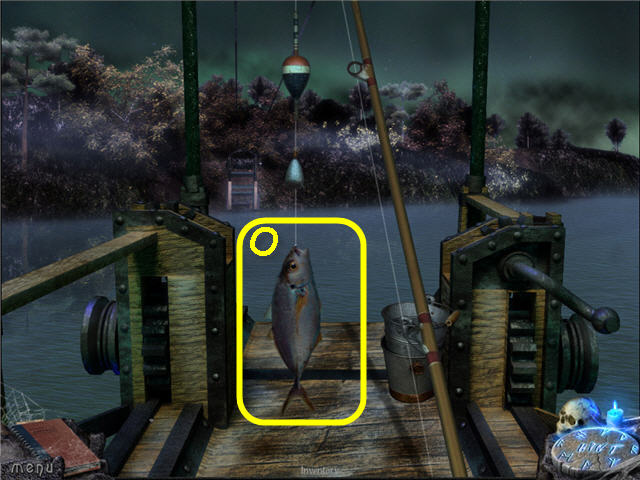
- Use the FISHING ROD on the water.
- Place the WORM and BOBBER on the line.
- Click the pole when the bobber gets tugged.
- Take the FISH (O).
- Back out and head straight into the house.
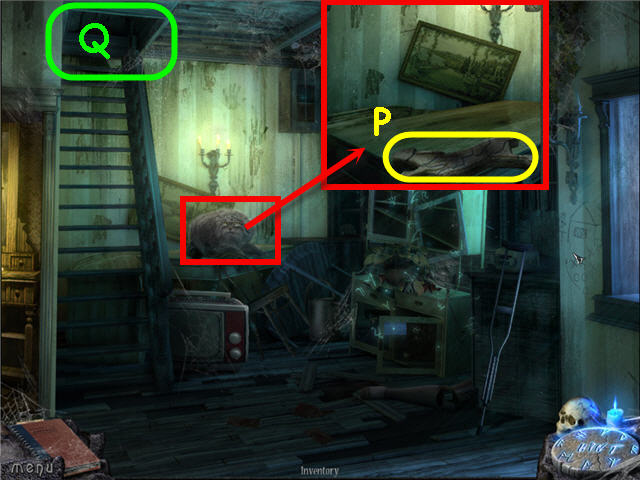
- Examine and give the fish to the cat; take the 2nd MOSAIC PIECE (P).
- Examine the attic door (Q).
- Use the BROOM on the cobwebs.
- Use the CROWBAR on the bar.
- Head up to the attic.
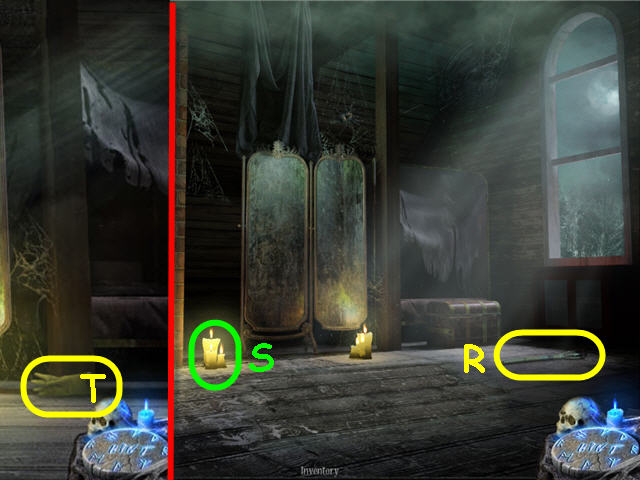
- Take the TORCH (R).
- Light the TORCH on the candles (S) to get a BURNING TORCH.
- Examine the mirror; take the GLOVE (T).
- Head to the bathroom.
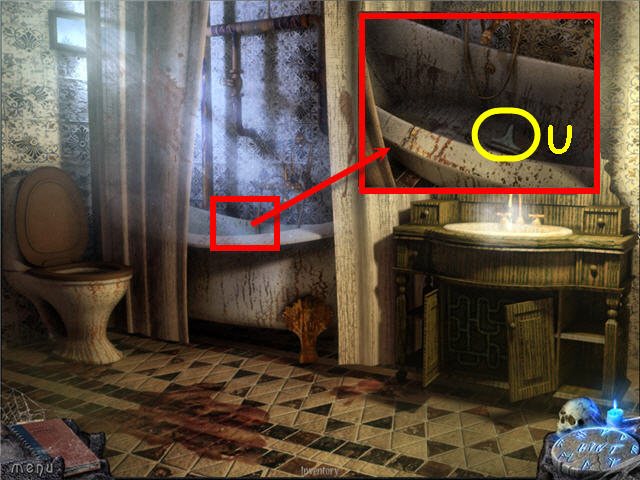
- Examine and use the GLOVE on the tub; take the 3rd MOSAIC PIECE (U).
- Back out.
- Examine the cabinets to access a HOS.
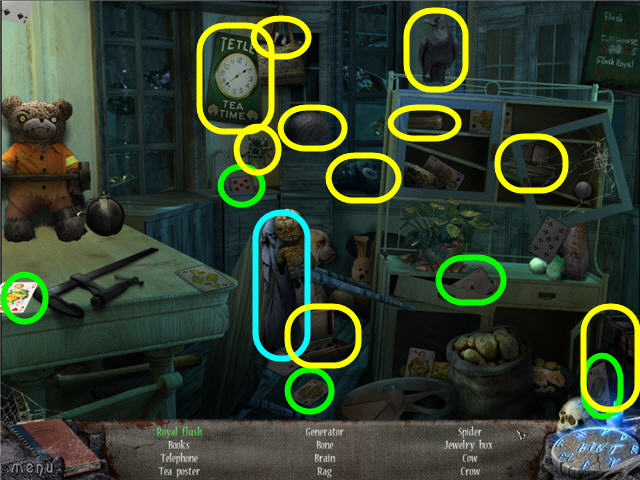
- Find the items listed.
- Gather the cards to get a royal flush.
- You will earn a RAG.
- Head left.
- Examine and use the RAG on the sink to get a WET RAG.
- Back out twice; head through the gate.
- Examine and place the 3 MOSAIC PIECES on the stone mosaic to trigger a puzzle.
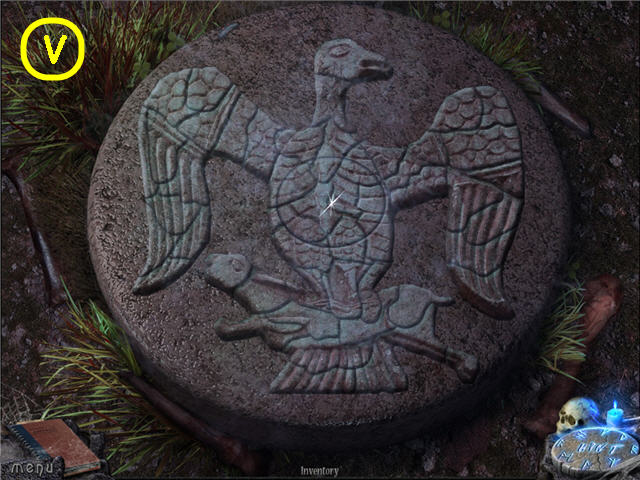
- Arrange the pieces to complete the mosaic.
- See screenshot (V) for solution.
- Remove the center; take the KEY.
- Go into the attic of the house.
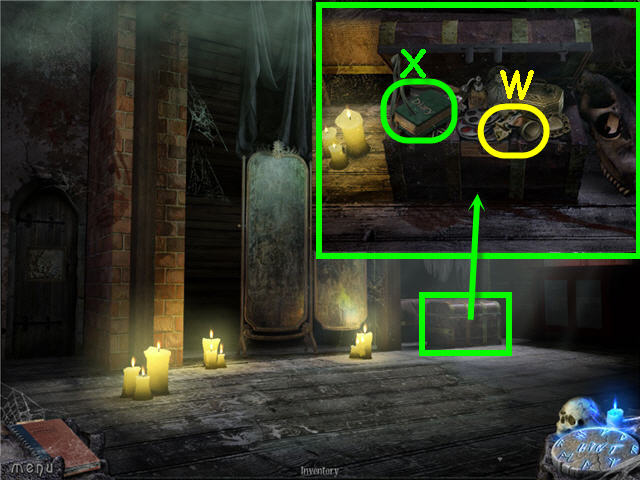
- Examine and use the KEY on the chest.
- Take the IMAGE PIECE (W) and click on the diary (X).
- Examine and place the IMAGE PIECE on the door to trigger a puzzle.
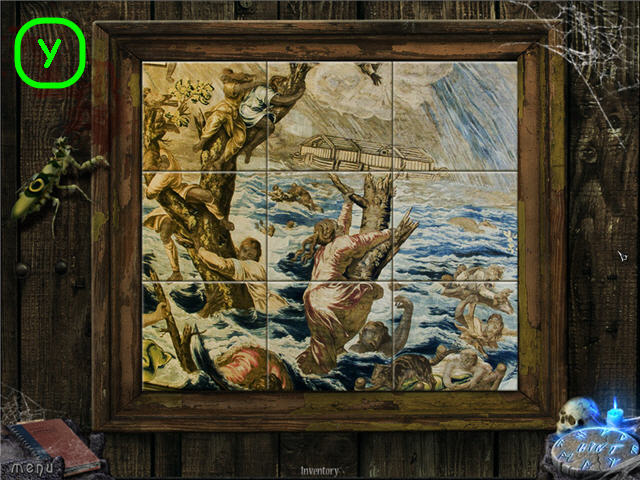
- Arrange the pieces to complete the image.
- See screenshot (Y) for solution.
- Examine the door to access a HOS.
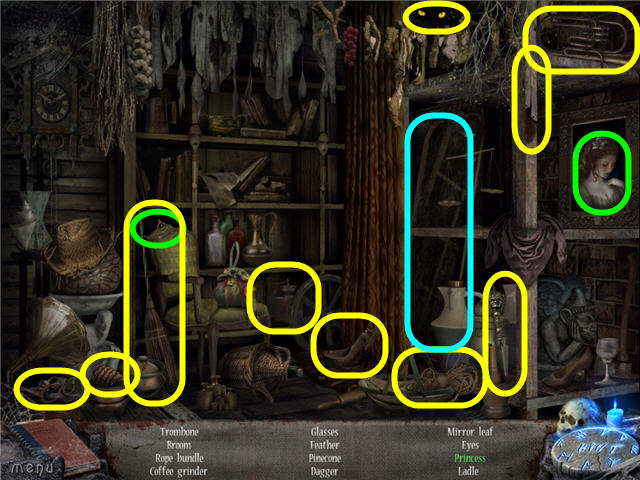
- Find the items listed.
- Place the crown on the picture to get a princess.
- You will earn a MIRROR’S LEAF.
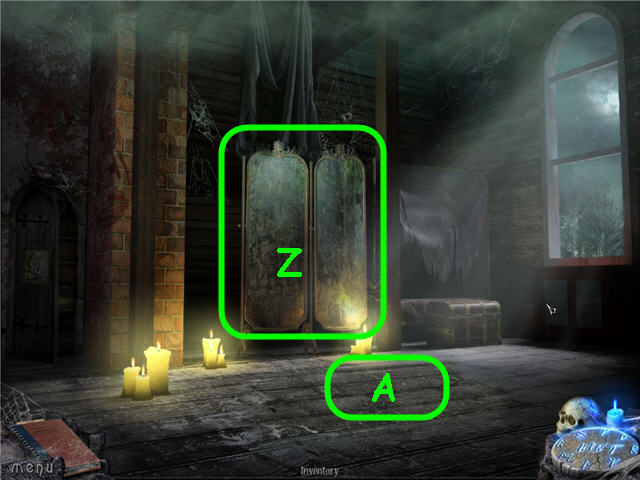
- Examine and place the MIRROR’S LEAF on the mirror (Z).
- Use the WET RAG on the mirror.
- Examine the floor boards (A).
- Examine the door to access a HOS.
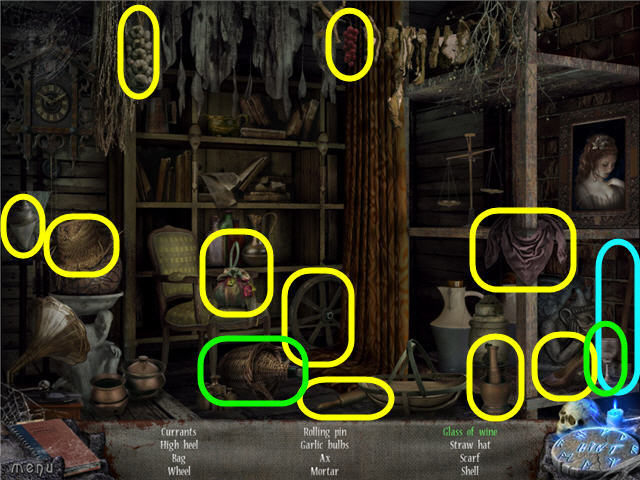
- Find the items listed.
- Use the glass of wine on the jug of wine; click on the cork to get a glass of wine.
- You will earn an AX.
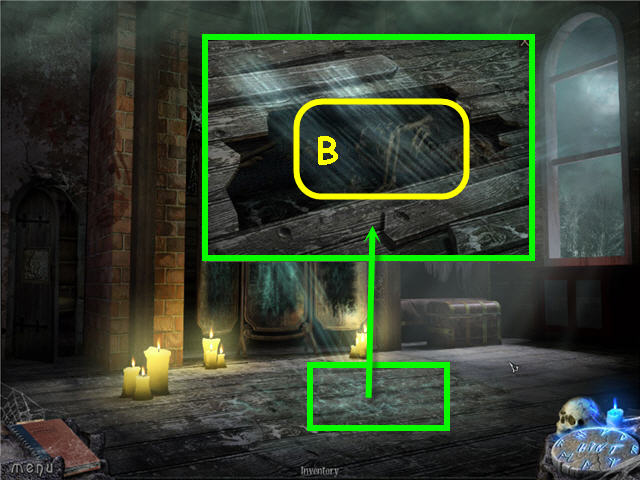
- Examine and use the AX on the floorboards a few times.
- Back out of the close-up and speak to the monk and get the CURSED BOOK.
- Examine the hole in the floor.
- Place the CURSED BOOK in the skeletons arms (B); use the BURNING TORCH on the skeleton.
- Congratulations! You have successfully completed Revenge of the Spirit: Rite of Resurrection.
Created at: 2011-12-07

