Walkthrough Menu
General Tips
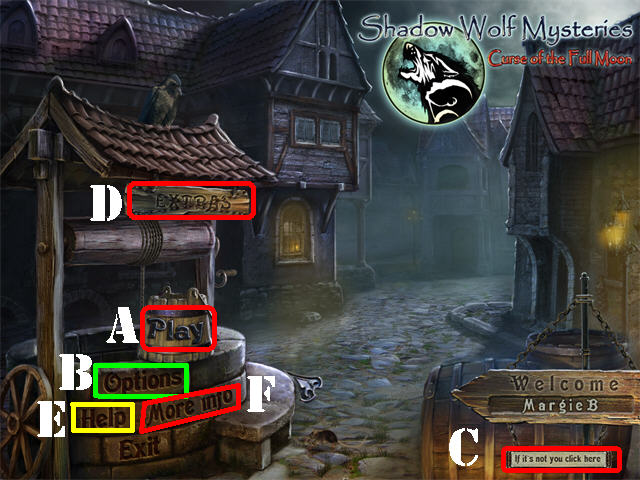
- This is the Official Guide for Shadow Wolf Mysteries: Curse of the Full Moon.
- Click 'Play' (A) to begin your adventure.
- The 'Options' (B) button allows you to adjust the screen, music, cursor, and sound.
- The 'If it’s not you click here' button (C) can be used to manage your profiles in the game.
- The 'Extras' (D) button will only be accessible when you play the Collector's Edition version of this game.
- Click on the 'Help' (E) button to view general tips for playing the game.
- Click on the 'More info' (F) button to view credits and a link to the forums for this game.
- Click on the Magnifying Glass Icon, when it appears, to take a closer look at a section or to read information regarding the game.
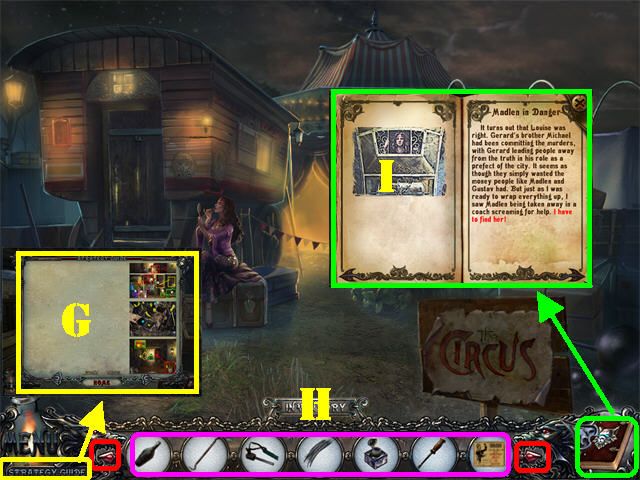
- A cluster of yellow sparkles indicates a Hidden Object Scene which will grant an inventory item upon completion.
- Items written in yellow in search scenes are hidden; you must open or click on something to make the hidden items appear.
- The 'STRATEGY GUIDE' (G) button will only be active in the Collector's Edition version of this game.
- Pass your mouse over the bottom of the scene to access your Inventory Tray (H).
- Inventory items will appear at the bottom of the scene. Use the red arrows in your inventory tray to scroll through all the items you’ve collected.
- The Journal (I) is in the lower right; read it to find clues and read part of the story.
- To use an inventory item, select it and drag it to the desired location; click it into the spot in which you want it used.
- You can skip a puzzle once the 'SKIP' button fills. The 'SKIP' button only appears in puzzle sections; it is located in the lower right corner.
- You have unlimited hints in the Hidden Object Scenes only but you must wait for them to recharge between uses.
Chapter 1
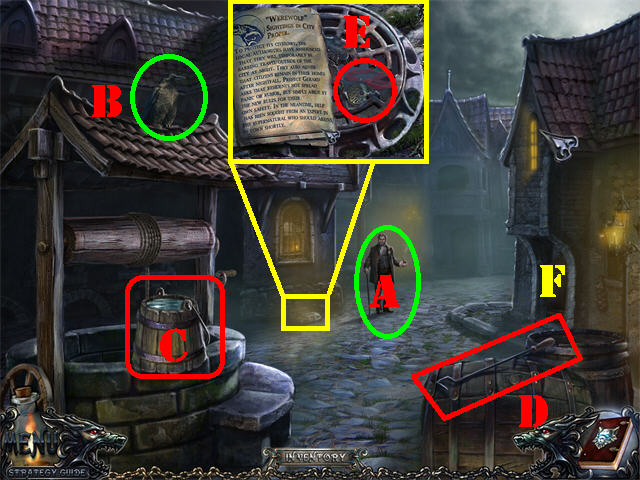
- Talk to Gerard (A).
- Click on the CROW (B).
- Click on the well; take the BUCKET OF WATER (C).
- Take the HOOK (D) in the lower right.
- Zoom into the grid; take the MEDALLION (E) using the HOOK.
- Go into the door on the right (F).
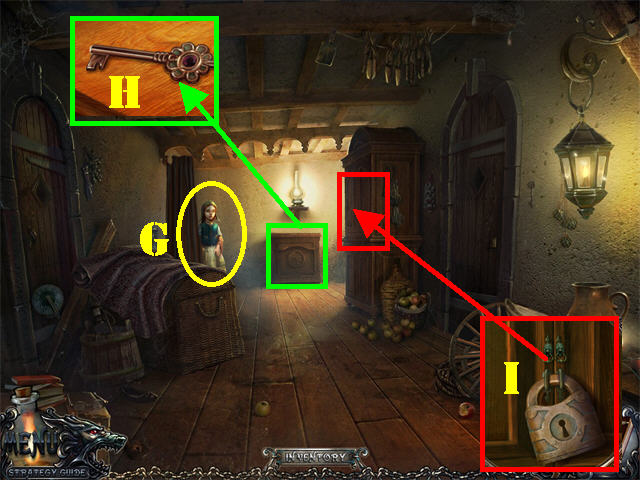
- Pull back the curtain in the back room; speak to the little girl (G).
- Zoom into the drawer behind the little girl; take the KEY (H).
- Examine the cupboard on the right; put the KEY in the lock and turn it to trigger a search scene (I).
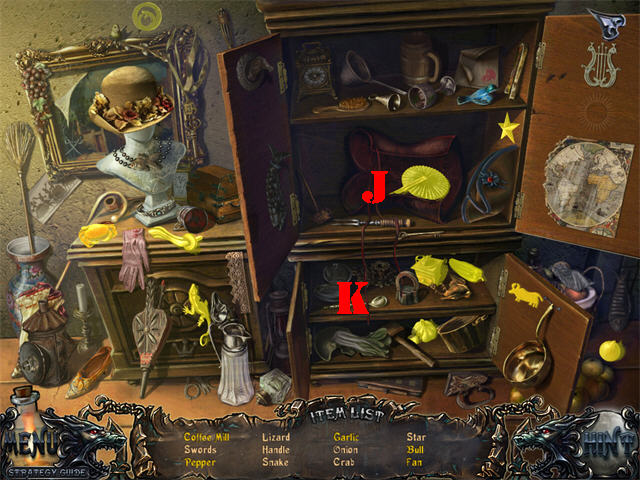
- Click twice on the corset in the center shelf; take the FAN (J).
- Open the bottom cabinets to view all the items (K).
- The HANDLE will be added to inventory.
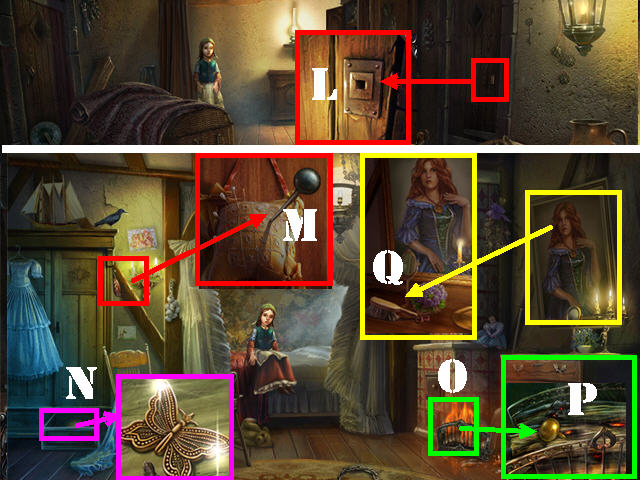
- Zoom into the right door; place the HANDLE on the lock and turn it (L).
- Go into the right door and talk to the little girl.
- Examine the hanging pincushion in upper left; take the BLUE PINHEAD (M).
- Zoom into the drawer in the lower left; take the GOLD BUTTERFLY (N).
- Put the BUCKET OF WATER into the fireplace (O).
- Zoom into the fireplace; take the GOLD PINHEAD (P).
- Examine the portrait in the upper right; take the BRUSH (Q).
- Exit the Bedroom.
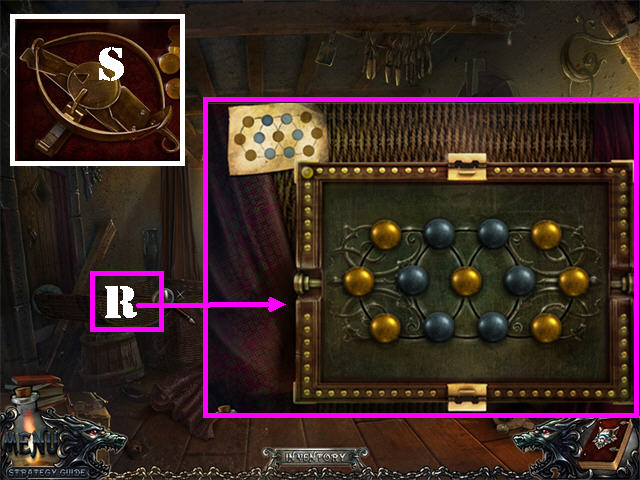
- Remove the sheet over the wicker chest, open it and look inside (R).
- Put the GOLD PINHEAD and the BLUE PINHEAD in the empty holes to activate a puzzle.
- Move the left, center, and right rings around until the image resembles the one in the sketch in the upper left.
- The solution to this puzzle is random.
- Take the TRAP (S) after the puzzle has been solved.
- Return to the little girl’s bedroom.
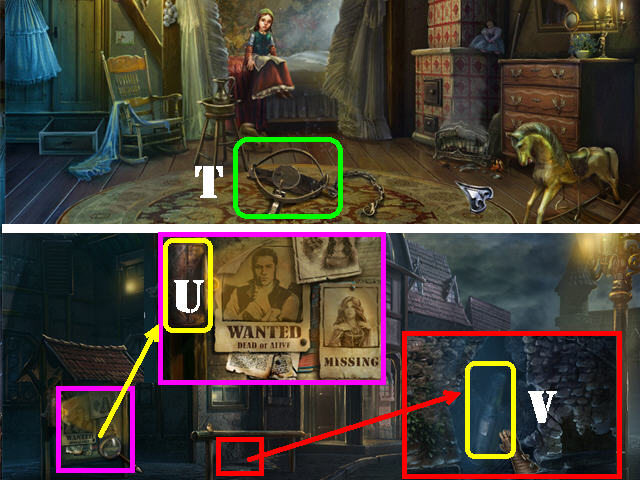
- Place the TRAP on the carpet (T).
- The little girl will give you the DULL KNIFE.
- Leave the house and talk to Gerard outside.
- Go forward.
- Zoom into the bulletin board on the left; take the LANTERN (U).
- Click on the posters to add a journal page.
- Examine the hole in the wall on the left; remove the cobwebs with the BRUSH and take the EMPTY BOTTLE (V).
- Go forward.
- Click on the wolf in the center of the road.
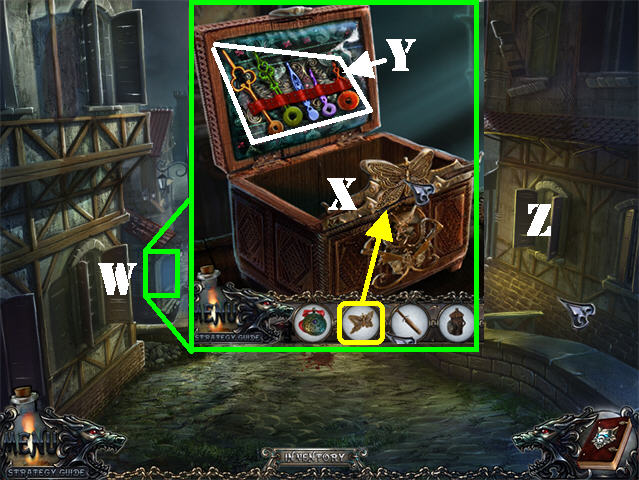
- Examine the left window display (W); place the GOLD BUTTERFLY (X) on the jewelry box and take the CLOCK HANDS (Y).
- Note the window on the right (Z).
- Head right.
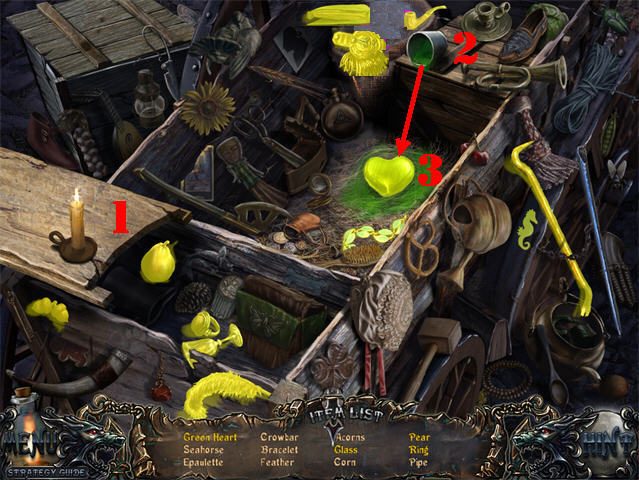
- Play the Hidden Object Scene.
- Slide the board on the lower left (1).
- Spill the GREEN PAINT onto the HEART (2) below and click on the GREEN HEART (3).
- The CROWBAR will be added to inventory.
- Click down and head forward.
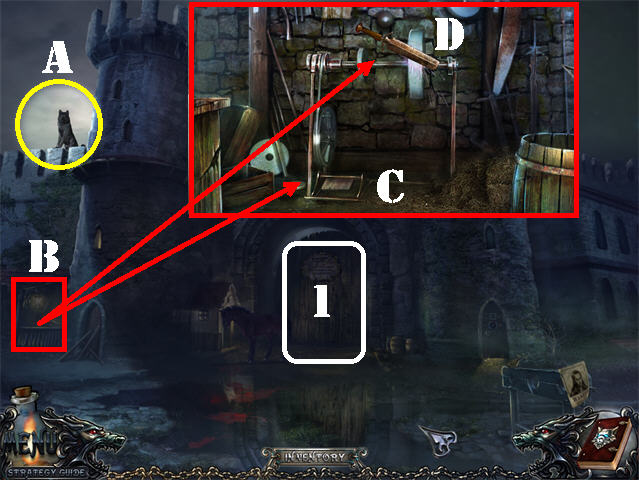
- Click on the wolf (A) in the upper left.
- Click on the door to add a page to your journal (1).
- Examine the lower left side area (B).
- Click on the PEDAL (C) 3 times.
- Place the DULL KNIFE on the STONE (D) to obtain the SHARP KNIFE.
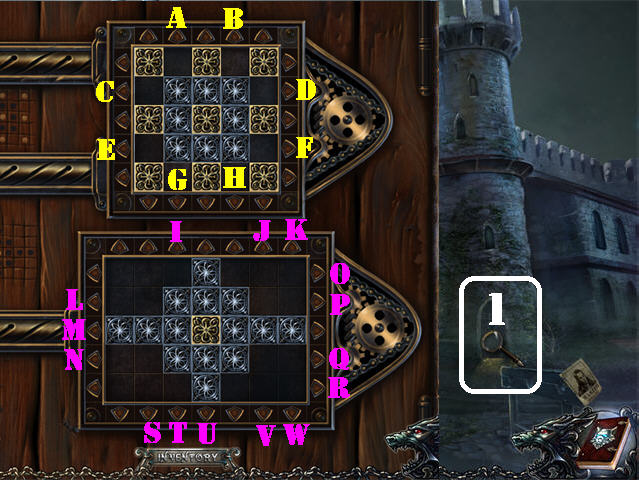
- Zoom into the lower right door (1).
- Arrange the tiles in the same order as the images on the left.
- The gold dots represent the gold tiles and the black dots the black tiles.
- To solve the top puzzle click C, D, B, B, G, E, E, H, D, C, F, B, B, H, F, A, F, G, E.
- To solve the bottom puzzle click on O, O, U, O, V, P, S, L, L, W, R, R, I, I, I, T, Q, Q, J, Q, Q, N, N, M, M, W, M, K, K.
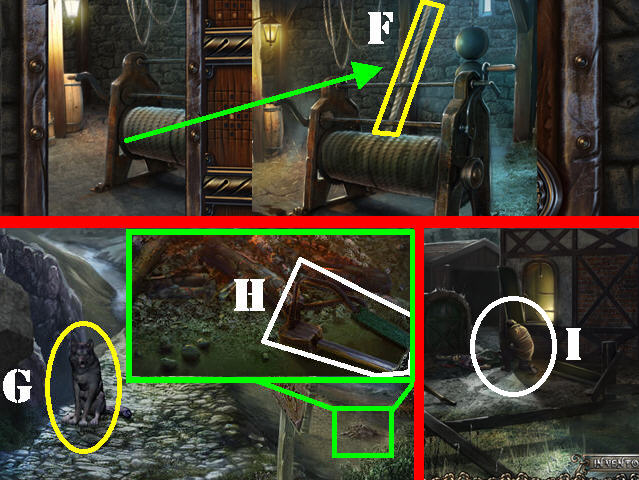
- Look inside the door.
- Cut the ROPE with the SHARP KNIFE (F) 4 times to open the gate.
- Go through the gate.
- Click on the WOLF (G).
- Zoom into the lower right corner; take the FLINT STONE (H).
- Head forward.
- Talk to Gerard (I).
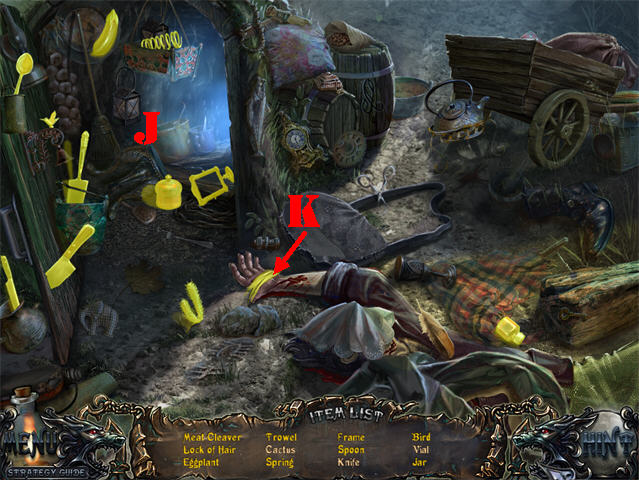
- Give the LANTERN to Gerard to trigger a search scene.
- Open the left door to view all items (J).
- Open the HAND; take the LOCK OF HAIR (K).
- The LOCK OF HAIR will be added to inventory.
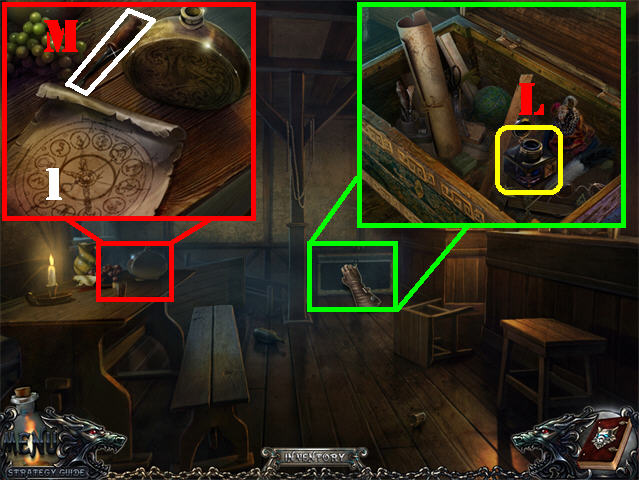
- Go into the Tavern.
- Open the chest, look inside and take the INKPOT (L).
- Zoom into the left table; note the clock sketch (1).
- Take the SCREWDRIVER (M).
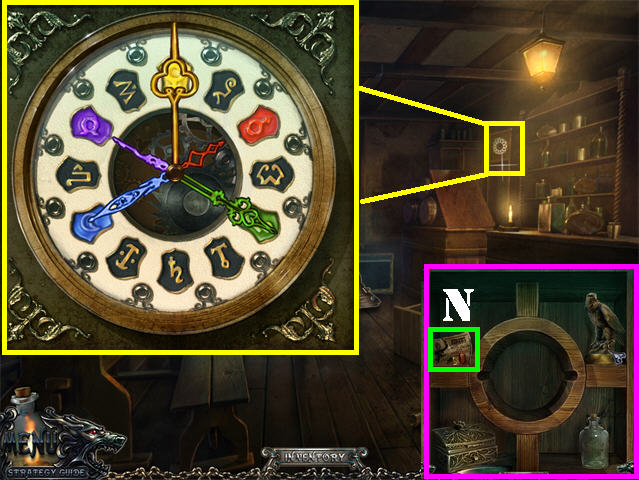
- Examine the clock on the right.
- Place the CLOCK HANDS on the clock to activate a puzzle.
- Rotate the colored hands until they land on their matching colors on the clock.
- Please look at the screenshot for the solution.
- Grab the CIRCUS TICKET (N) in the upper left.
Chapter 2
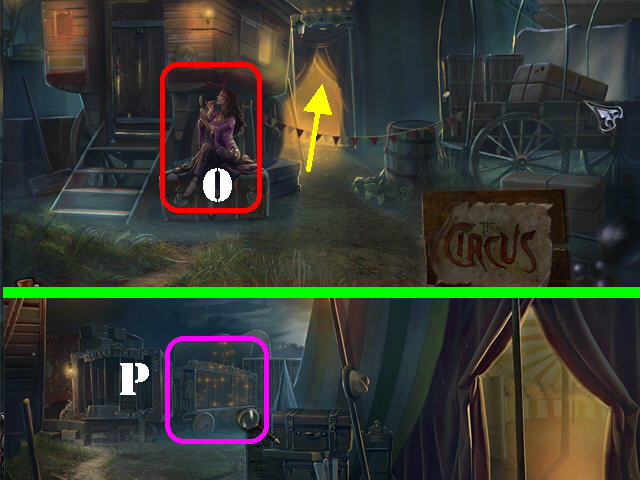
- Exit the Tavern and head forward on the road.
- Talk to Madlen the Fortuneteller (O); give her the CIRCUS TICKET.
- Go toward the tent.
- Play the search scene on the left (P).
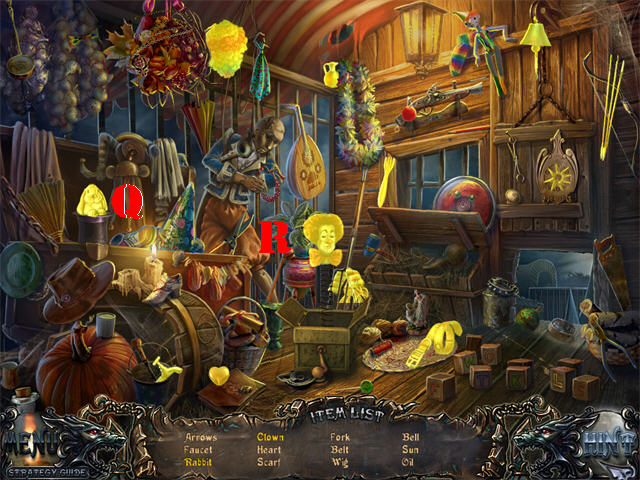
- Click on the magician’s hat; take the RABBIT (Q).
- Click on the Jack-in-the-box; take the CLOWN (R).
- The FAUCET will be added to inventory.
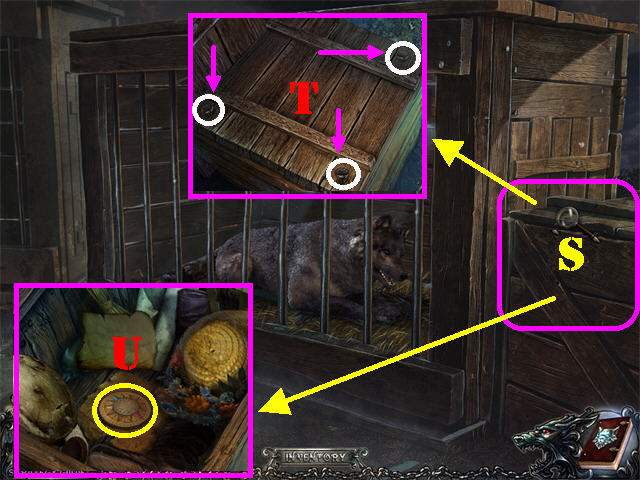
- Head left.
- Zoom into the crate (S).
- Remove the 3 nails with the CROWBAR (T).
- Open the crate; move the items aside and take the ORNATE DISK 1/2 (U).
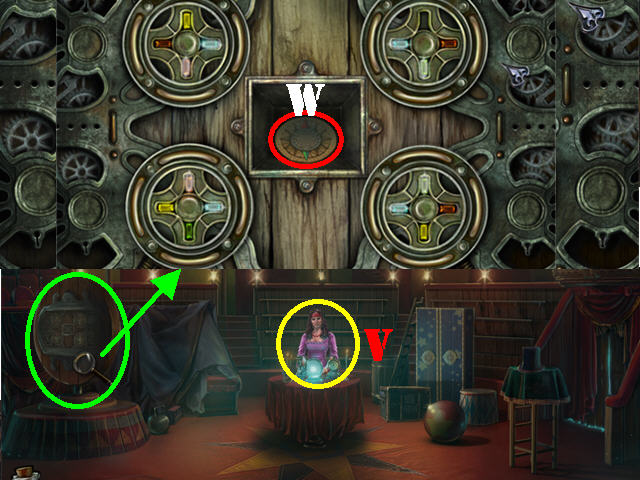
- Click down and enter the tent.
- Talk to Madlen, the Fortuneteller (V).
- Open the bull’s eye on the left and click on it again to activate a puzzle.
- Rotate the wheels until the gems facing each other match as shown in the screenshot.
- Take ORNATE DISK 2/2 (W).
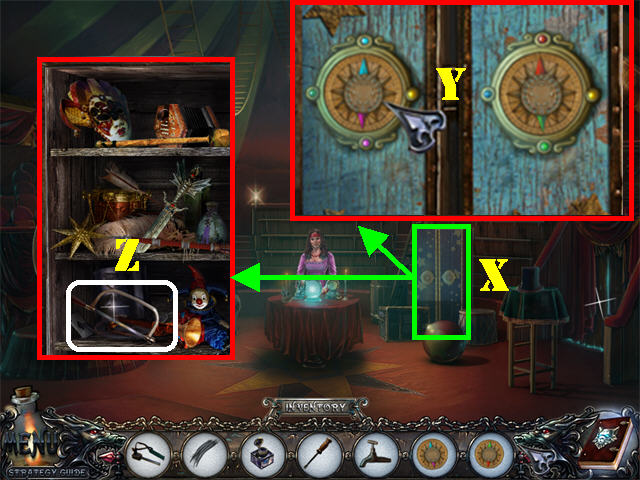
- Zoom into the right cabinet (X).
- Place the 2 ORNATE DISKS in the slots.
- Move the needles on the disk until they point to their matching colors as shown in the screenshot (Y).
- Take the SAW (Z) inside the cabinet.
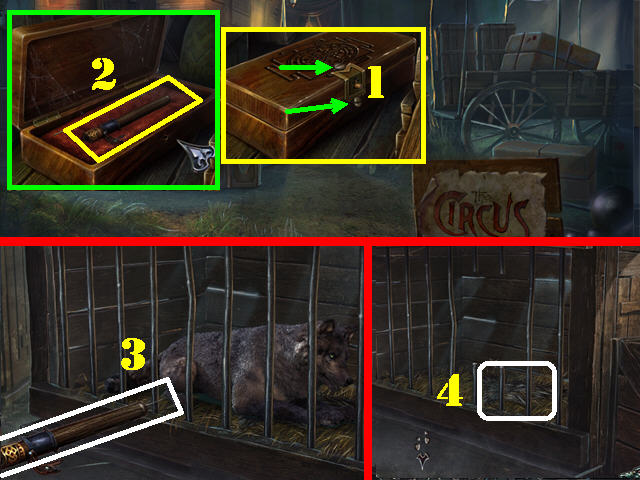
- Click down 2 times.
- Zoom into the cart on the right.
- Remove the 2 SCREWS on the box with the SCREWDRIVER (1).
- Open the box and take the TRANQUILIZER (2).
- Go forward and head left.
- Give the TRANQUILIZER to the WOLF (3).
- Cut the bars with the SAW for the wolf to escape.
- Zoom into the patch of hair inside the cage; grab the LOCK OF HAIR 2/2 (4) inside the cage.
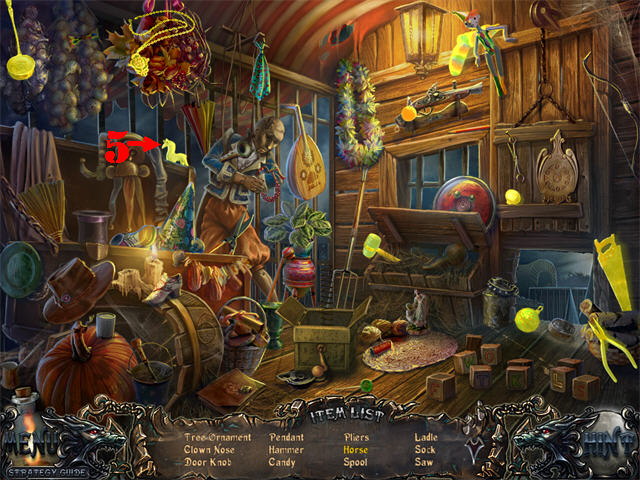
- Click down once.
- Play the Hidden Object Scene by the cages.
- Remove the cloth; take the HORSE (5).
- The DOORKNOB will be added to inventory.
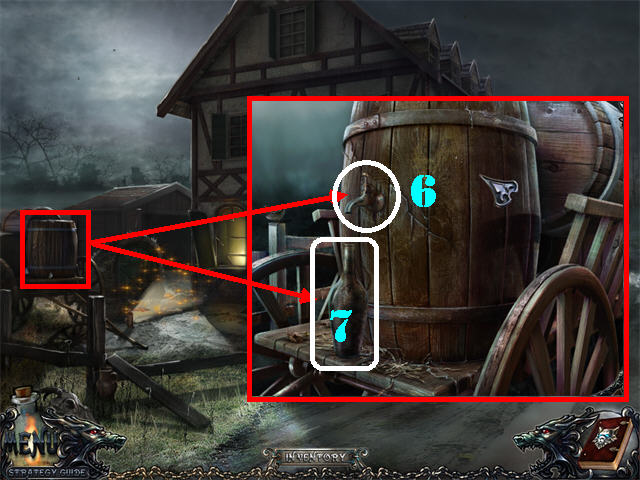
- Click down twice.
- Zoom into the barrel on the left.
- Place the FAUCET on the tap (6).
- Place the EMPTY BOTTLE below the faucet.
- Click on the faucet; take the WINE BOTTLE (7).
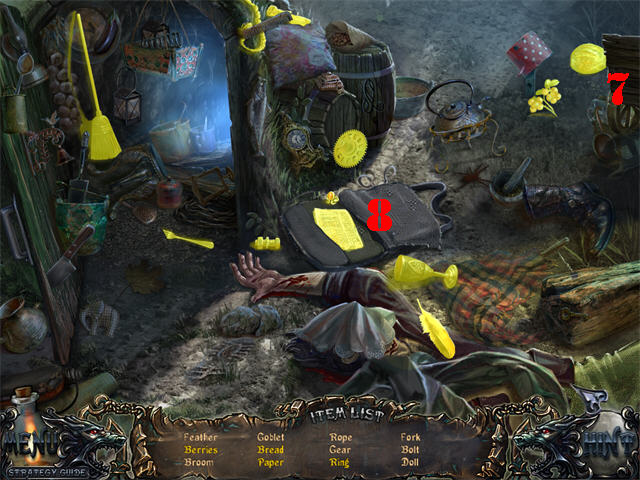
- Play the search scene.
- Move the cart on the right (8) and open the sack (9) to view all the items.
- The PAPER will be added to inventory.
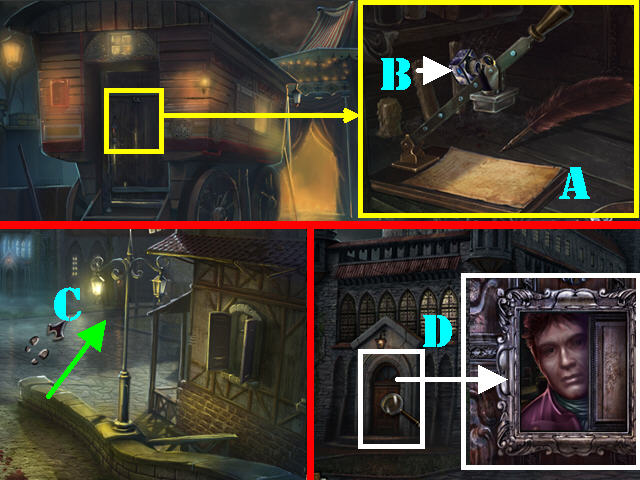
- Go forward.
- Enter the trailer on the left.
- Place the PAPER (A) and the INKPOT (B) on the ink press.
- Click on the ink press twice and take the PREFECTURE PASS.
- Return to the center of town and head right, between the buildings (C).
- Zoom into the left door; click on the doorknocker.
- Give the PREFECTURE PASS to the man in the peephole (D) and go inside.
Chapter 3
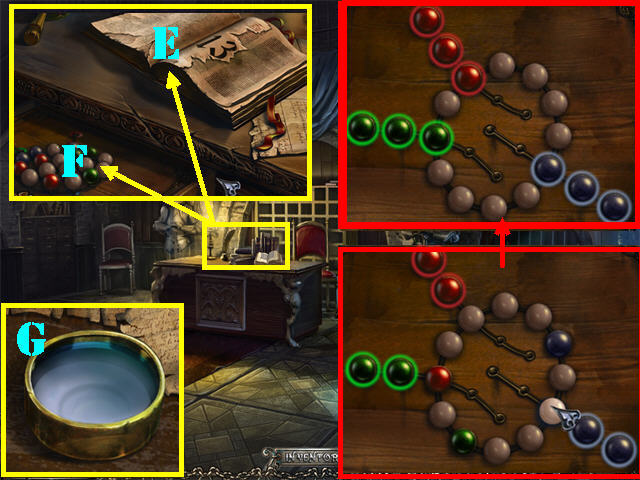
- Zoom into the desk; click on the pages twice for the number 13 to appear (E).
- Open the drawer and click on the beads to activate a puzzle (F).
- Place the colored balls over their matching slots.
- It is easier to move the colored balls into the last 2 slots (away from the center ring) of their matching colors. Then you can use the tracks on the inside ring to hold the balls you want to position into the last slots.
- Please look at the screenshot for the solution.
- Grab the LENS after the puzzle has been solved (G).
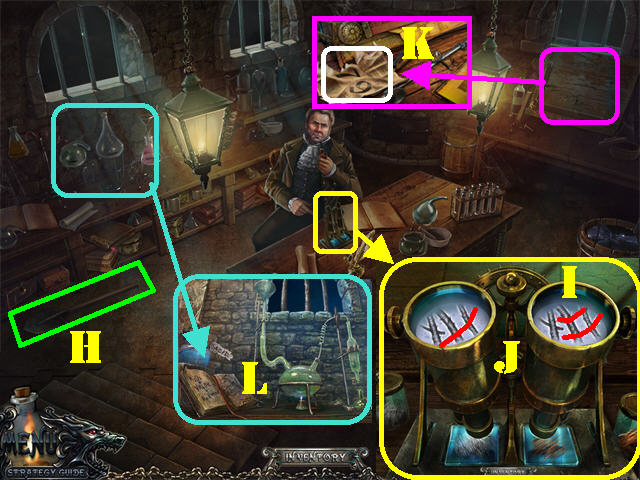
- Go through the right gate to access the Lab.
- Talk to Gerard.
- Take the SPADE (H) on the ground.
- Zoom into the microscope on the desk.
- Place the LENS on the right (I).
- Place the LOCKS OF HAIR into the left and right glass slides.
- Click on the 3 differences marked in red in the screenshot (J).
- Gerard says that you should visit the Tailor. He also grants you access to his equipment and removes the 2 sheets in the room.
- Zoom into the right table; click on the crumpled paper 3 times to add the CODE PIECE to inventory (K).
- Examine the flasks on the left table to add a journal page. You need to find the ingredients listed on the left page (L).
- Exit the Lab.
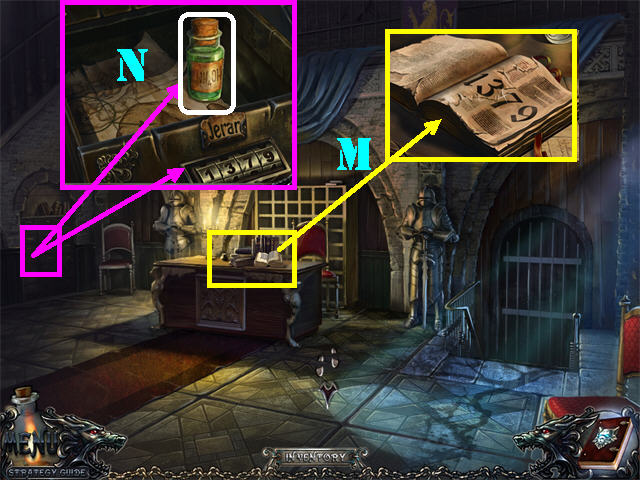
- Zoom into the desk (M).
- Place the CODE PIECE on the torn page to form the number 1379.
- Exit the desk and examine the cabinet on the left.
- Change the numbers to 1379 to unlock the drawer.
- Take the NH4OH bottle (N).
- The treasure map inside the drawer shows the location of the treasure chest.
- Exit the house.
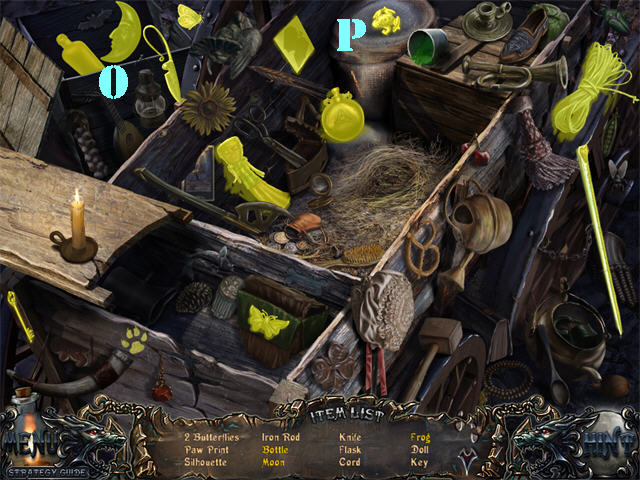
- Play the search scene on the right.
- Open the left crate to look for items (O).
- Click on the grains twice; take the FROG (P).
- The IRON ROD will be added to inventory.
- Click down and go forward twice.
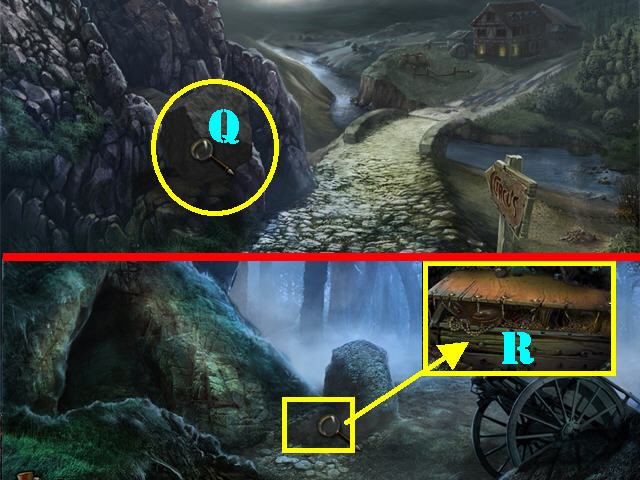
- Remove the boulder with the IRON ROD (Q).
- Head left.
- Zoom into the ground; use the SPADE twice on the dirt and take the CHEST (R).
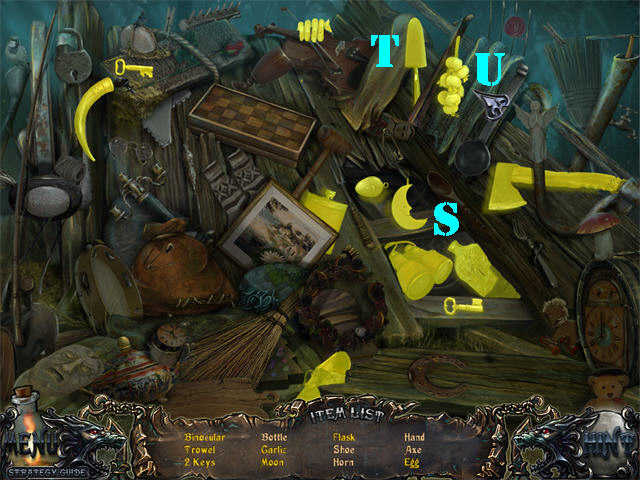
- Play the Hidden Object Scene on the right.
- Open the door on the right to look for all the items (S).
- Remove the fan in the upper right; take the TROWEL (T) and the GARLIC (U).
- The AXE will be added to inventory.
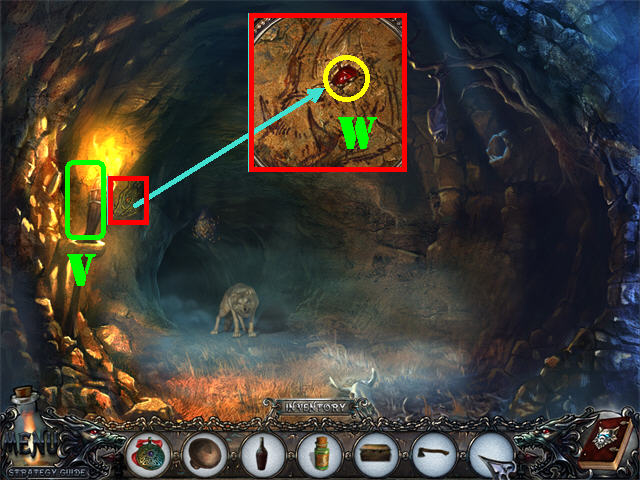
- Go into the cave on the left.
- Place the FLINT STONES on the torch on the left to light up the cave (V).
- Zoom into the side of the wall (close to the torch); take the JEWELED EYE (W).
- Exit the cave and head forward.
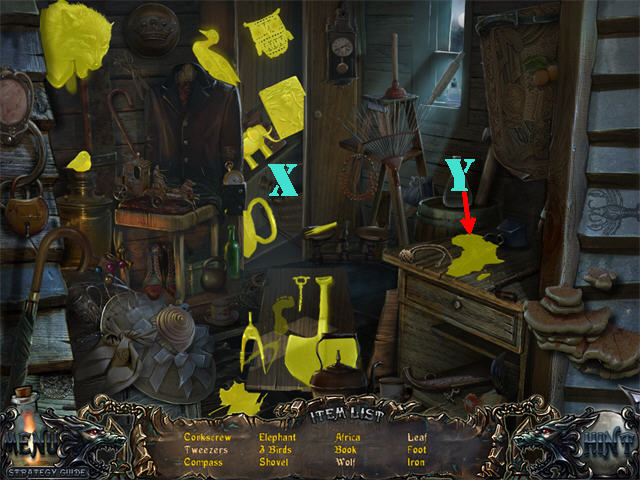
- Play the Hidden Object Scene.
- Open the left closet door to look for items (X).
- Spill the bottle of ink on the table; take the INK (Y).
- The TWEEZERS will be added to inventory.
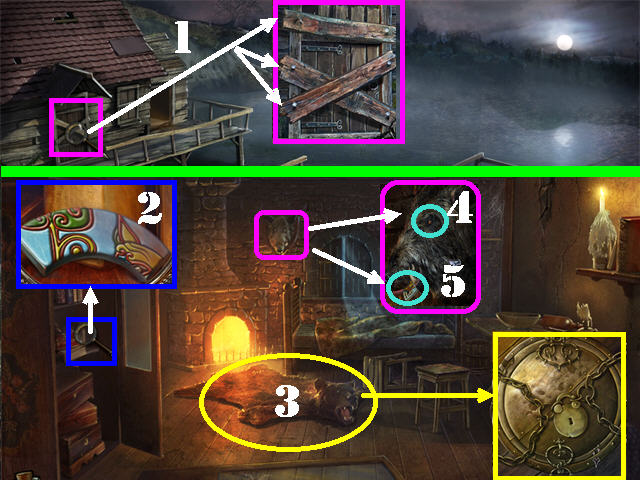
- Zoom into the door in the upper left.
- Remove the boards with the AXE (1).
- Go into the Hunter’s house.
- Remove the left cabinet door, examine it and take the PUZZLE PIECE 1/3 (2).
- Remove the bear rug and zoom into the lock on the floor (3). You’ll need an explosive to remove it.
- Examine the boar’s head on the back wall.
- Place the JEWELED EYE (4) on the boar; take PUZZLE PIECE 2/3 (5) from its mouth.
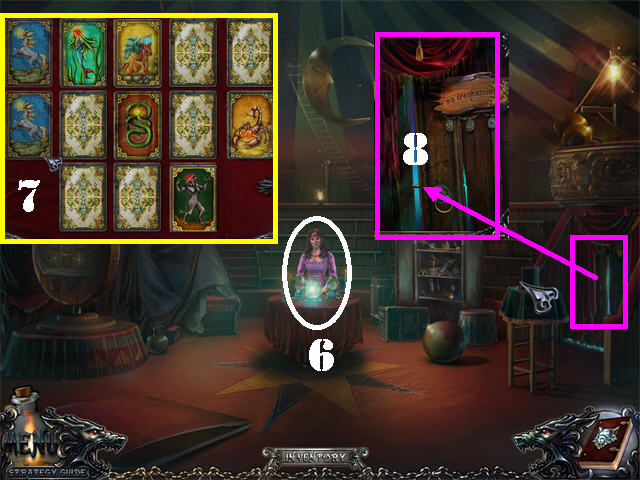
- Return to the tent where the fortuneteller was last seen.
- Give the CHEST to the fortuneteller to trigger a puzzle (6).
- Remove the identical pair of cards by turning over 2 cards at a time (7).
- Unmatched cards will switch positions.
- You will receive a CARD at the end of the puzzle.
- Zoom into the right door; unlock it with the CARD (8).
- Go through the door.
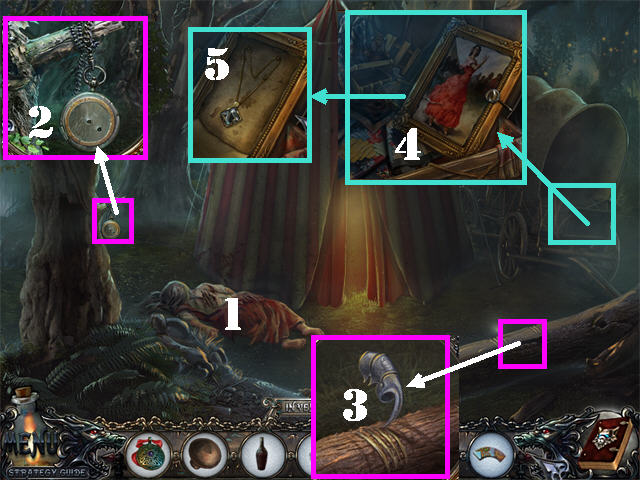
- Click on the dead body (1).
- Examine the left tree; take the POCKET WATCH (2).
- Zoom into the log in the lower right; take the METAL CLAW (3).
- Zoom into the wagon; cut the painting (4) with the METAL CLAW and take the NECKLACE (5).
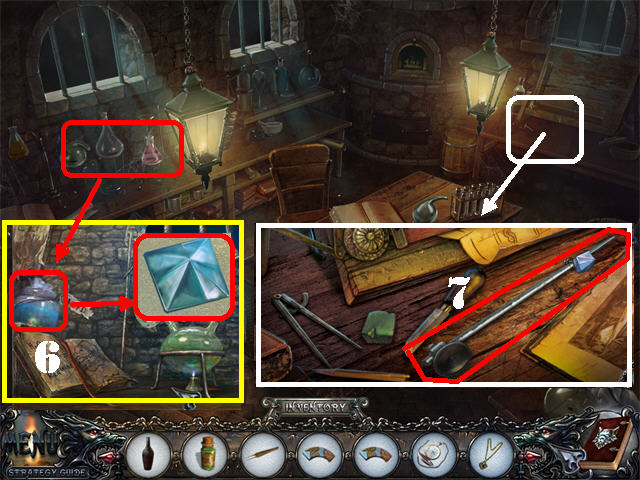
- Return to the Lab.
- Zoom into the flasks on the left.
- Place the NECKLACE into the ACID JAR on the left (6).
- Use the TWEEZERS to remove the DIAMOND in the acid jar.
- Zoom into the right table.
- Place the DIAMOND on the glazier’s tool on the table.
- Take the GLASSCUTTER (7).
Chapter 4
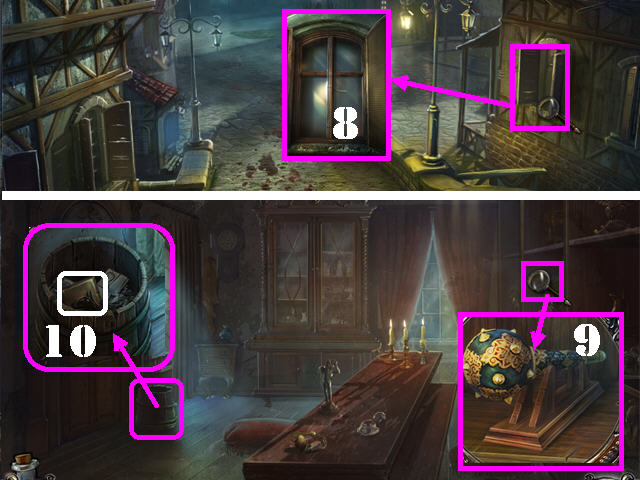
- Return to the center of Town.
- Zoom into the right window; cut the glass with the GLASSCUTTER (8).
- Click on the latch to open the window and go inside the tailor’s house.
- Examine the right bookshelf; take the MACE (9).
- Look in the barrel; take the PUZZLE PIECE 1/2 (10).
- Click on the right curtain to add a journal page.
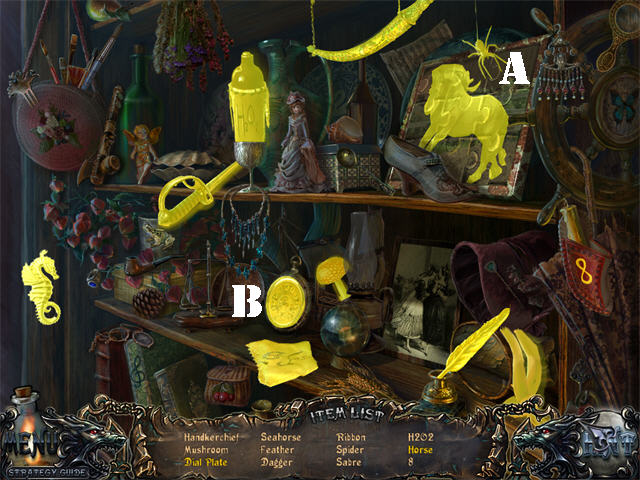
- Open the cupboard to trigger a search scene.
- Click on the PUZZLE PIECE in the upper right; take the HORSE (A).
- Open the LOCKET; click on the DIAL PLATE (B).
- The H2O2 will be added to inventory.
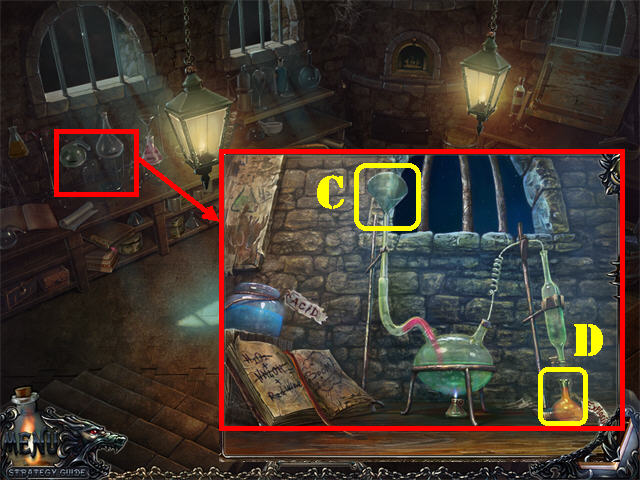
- Return to the Lab.
- Zoom into the flasks on the left.
- Place the H2O2, NH4OH, and the WINE BOTTLE into the funnel (C).
- Take the EXPLOSIVE (D) in the lower right after it has been filled.
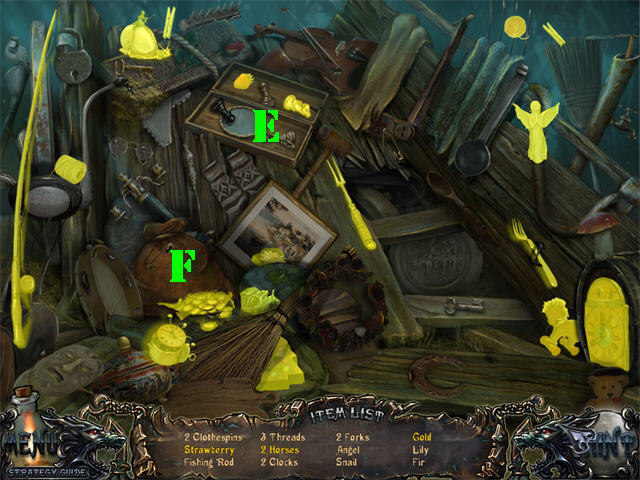
- Return to the area outside the cave.
- Play the search scene on the right.
- Open the chessboard (E) and click on the bag (F) to view all the items.
- The FISHING ROD will be added to inventory.
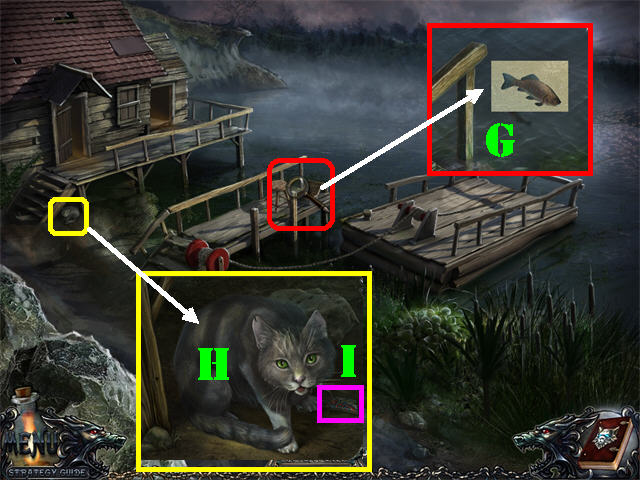
- Head forward to reach the outside of the Hunter’s house.
- Zoom into the dock.
- Place the FISHING ROD in the water to obtain the FISH (G).
- Examine the area below the left side of the house.
- Give the FISH to the cat (H); take the PUZZLE PIECE 3/3 (I).
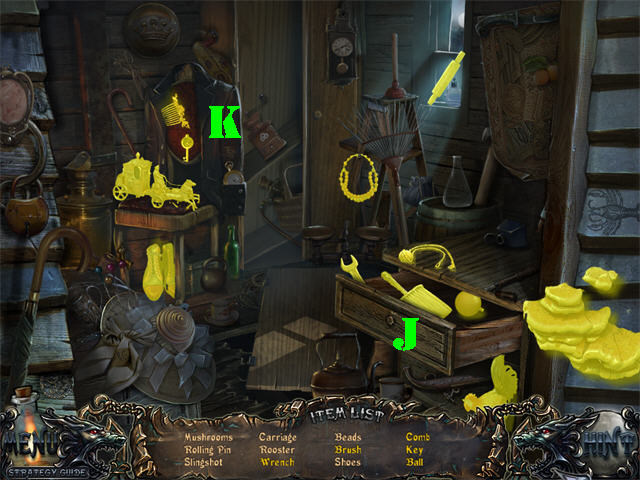
- Play the Hidden Object Scene.
- Open the drawer in the lower right (J) and the coat jacket on the left (K) and take all the available items.
- The SLINGSHOT will be added to inventory.
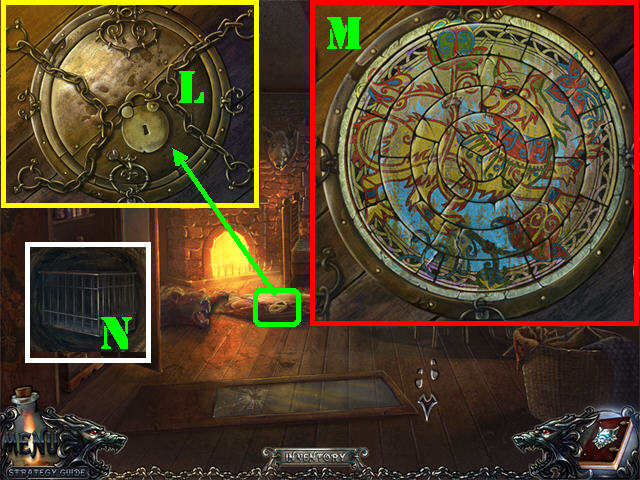
- Enter the hunter’s house.
- Zoom into the lock (L) on the ground (remove the bear rug first if you haven’t done so already).
- Put the EXPLOSIVE on the lock.
- Place the 3 PARTS OF PUZZLES on the board to activate a puzzle.
- Click on 2 parts of a ring to swap their positions until parts can no longer be swapped.
- Rotate that ring into the correct position.
- Follow the same steps above until all rings have been positioned correctly.
- Please look at the screenshot for the solution (M).
- Click on the CAGE (N) to add it to inventory.
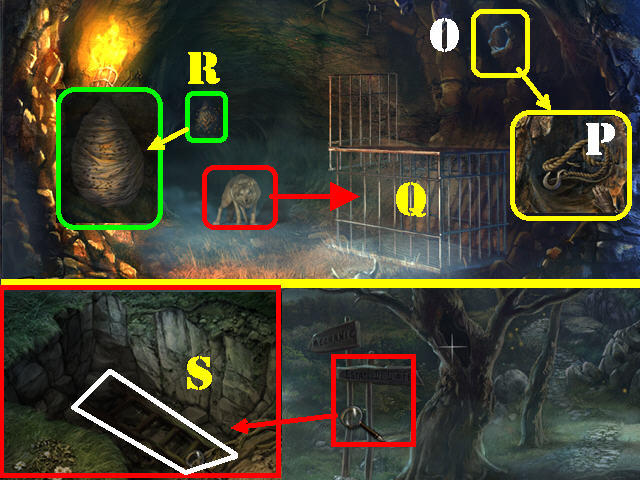
- Return to the inside of the Cave.
- Zoom into the hole (O) in the upper right; place the MACE on the stone 3 times.
- Grab the HOOK (P).
- Place the CAGE on the ground (Q).
- Zoom into the beehive (R); hit it with the SLINGSHOT to get the wolf into the cage.
- Go through the cave.
- Examine the signposts by the tree.
- Place the HOOK in the hole to retrieve the LADDER (S).
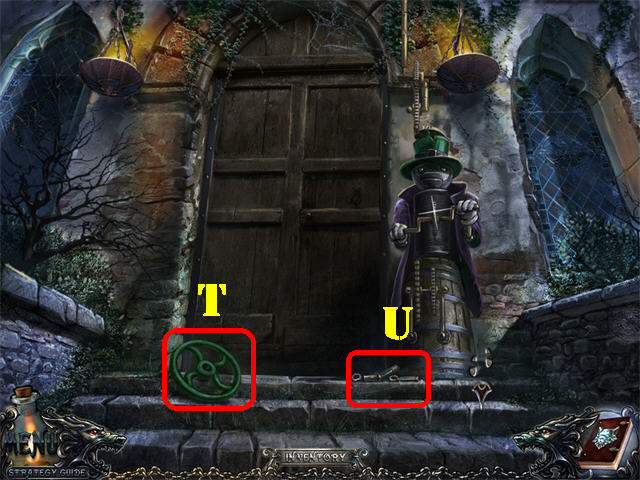
- Click down and go forward.
- Grab the METAL WHEEL (T) and the METAL PARTS (U) on the steps.
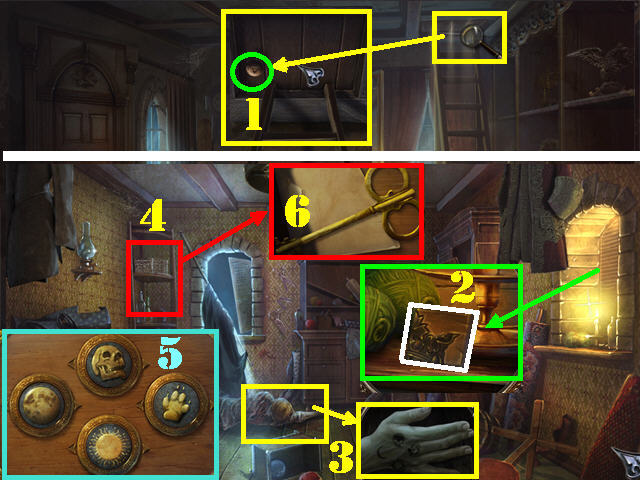
- Return to the tailor’s house.
- Place the LADDER on the right side of the ceiling.
- Zoom into the ceiling; place the DOORKNOB in the hole (1).
- Turn the DOORKNOB and go up.
- Examine the alcove on the right; take the PART OF PUZZLE 2/2 (2).
- Zoom into the dead tailor’s hand to view a strange tattoo and add a journal page (3).
- Zoom into the shelves on the left (4).
- Use the arrows on the side of each piece to change the images in the center until they look the same as the tattoo on the Tailor’s hand (5).
- Take the KEY (6) after the puzzle has been solved.
- Head down.
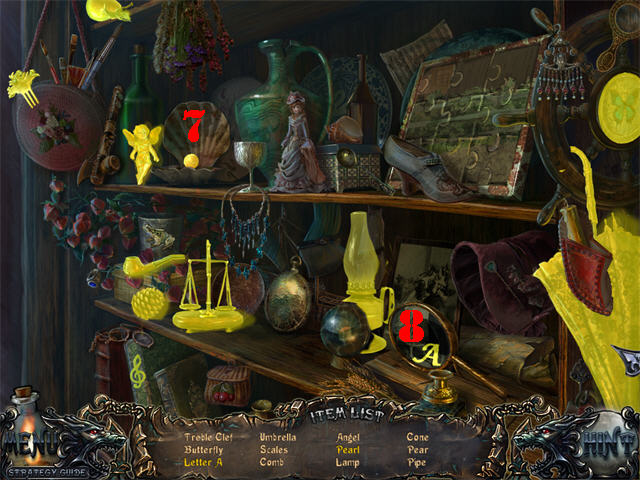
- Play the search scene.
- Open the CLAM; take the PEARL (7).
- Move the MAGNIFYING GLASS; click on the LETTER A (8).
- The LAMP will be added to inventory.
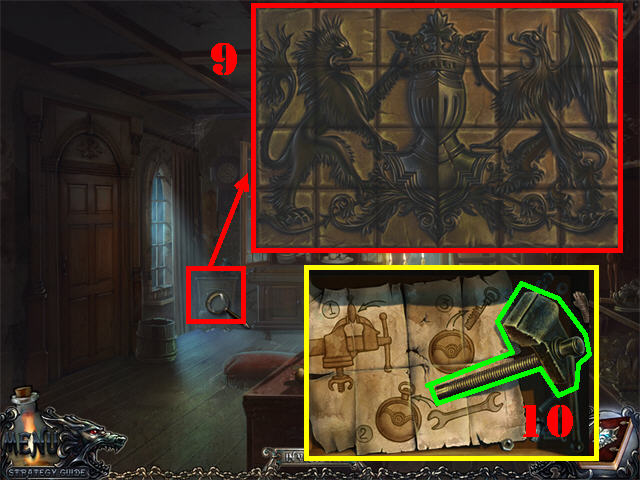
- Examine the cabinet in the lower left.
- Place the 2 PUZZLE PARTS on the board to activate a puzzle.
- Click on any 2 tiles to swap their positions until they form the image in the screenshot (9).
- Take the CLAMP PART (10) after the puzzle has been solved. Look at the instructions for the vise grip.
- Go to the tree on the other side of the cave.
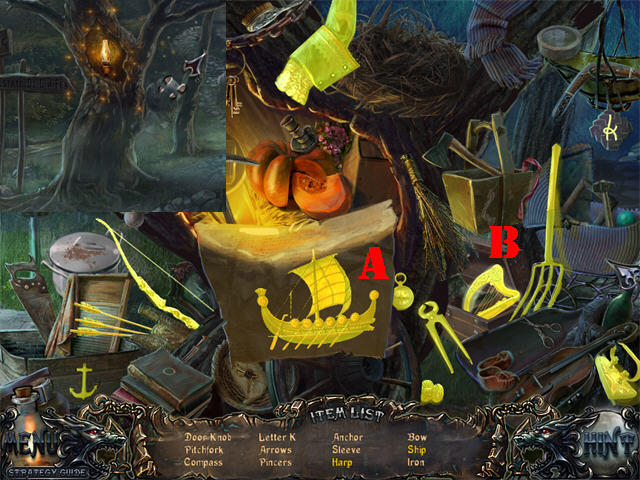
- Place the LAMP in the tree’s hole and click on the hole to activate a search scene.
- Open the SCROLL; click on the SHIP (A).
- Open the BOX; take the HARP (B).
- The PINCERS will be added to inventory.
Chapter 5
- Head left.
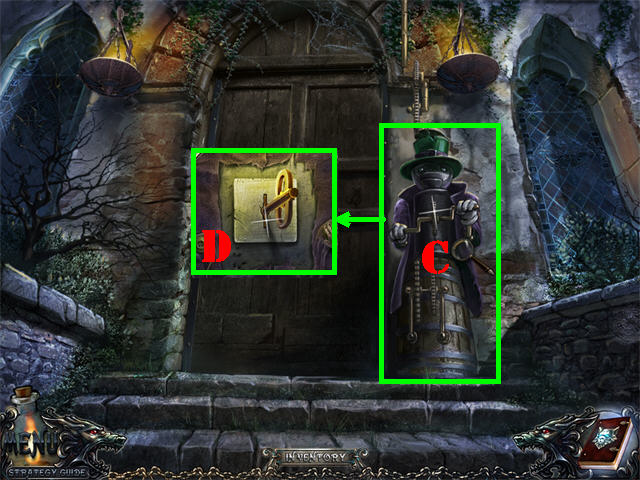
- Zoom into the metal mechanism above the steps (C).
- Place the KEY in the lock; turn the key twice to unlock the doors (D).
- Go through the door.
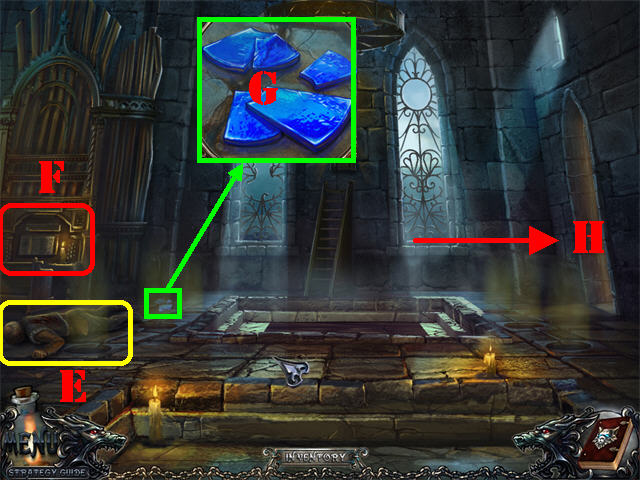
- Click on the dead man (E), and the organ (F) to add a journal page.
- Examine the left side of the ground; take the BLUE GLASS (G).
- Head right (H).
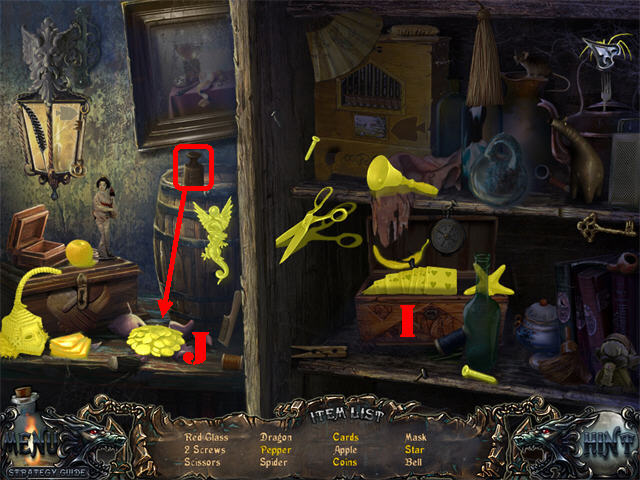
- Play the Hidden Object Scene.
- Open the box on the right; take all available items (I).
- Click on the weight above the barrel to break the piggy bank; take the COINS. (J).
- The RED GLASS will be added to inventory.
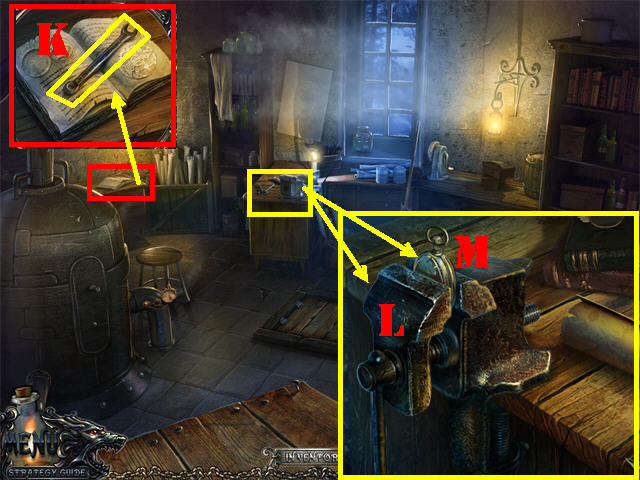
- Examine the book on the left; take the WRENCH (K).
- Zoom into the edge of the desk; place the CLAMP PART (L) on the vise.
- Place the CLOCK (M) on the vise.
- Put the WRENCH on the clock to obtain the LOCKPICK.
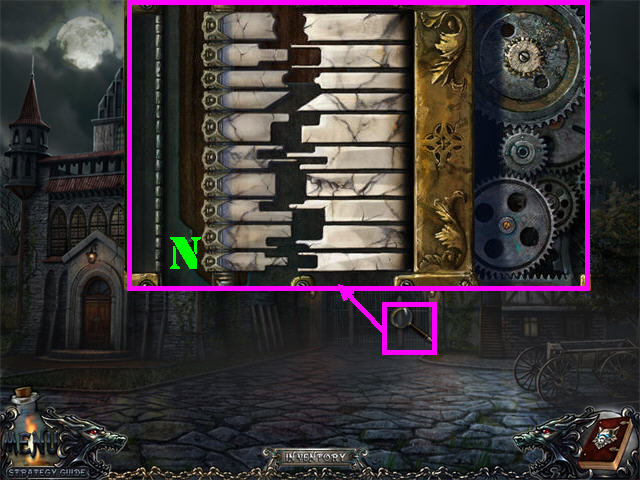
- Head back to the center of town and head right.
- Zoom into the back gate; place the LOCKPICK on the lock to activate a puzzle.
- Click on any of the two broken key pieces on the left to swap positions so the keys can interlock with each other when placed correctly (N).
- Go through the gate.
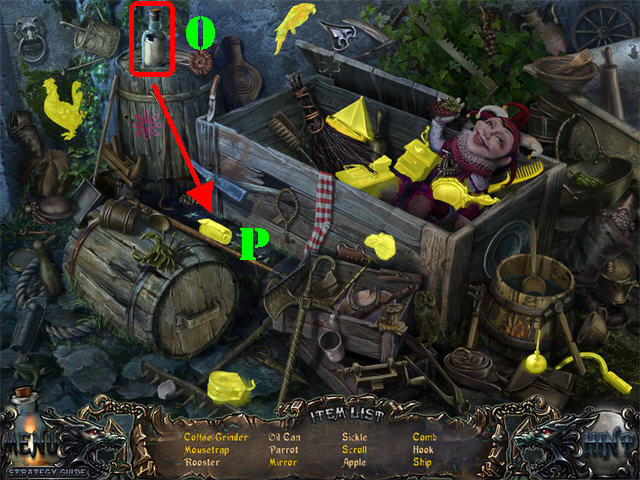
- Play the Hidden Object Scene.
- Open the top of the crate to look inside.
- Spill the bottle on the left (O); take the SCROLL (P).
- The OIL CAN will be added to inventory.
- Return to the mansion beyond the cave and go into the right door.
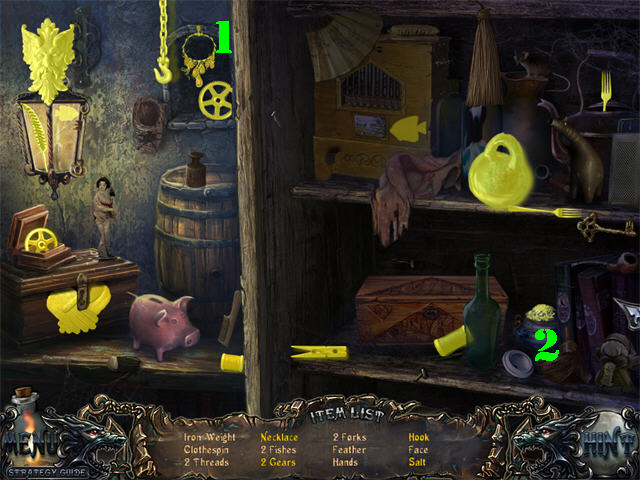
- Play the Hidden Object Scene.
- Remove the painting (1) to view all the items.
- Remove the lid; take the SALT (2).
- The IRON WEIGHT will be added to inventory.
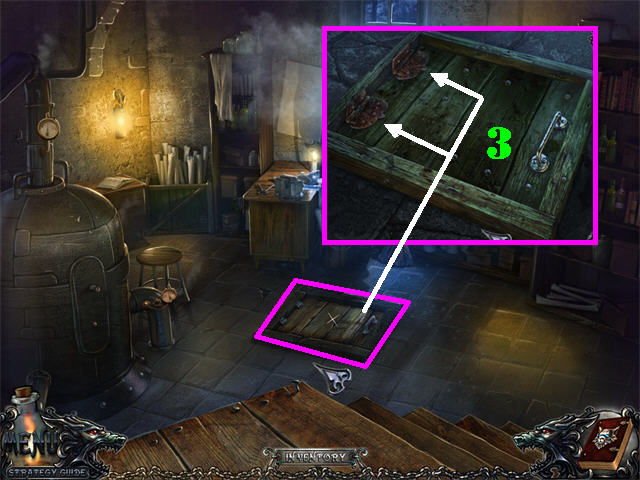
- Zoom into the trapdoor on the ground.
- Place the OIL CAN on the rusty hinges (3).
- Go through the trapdoor.
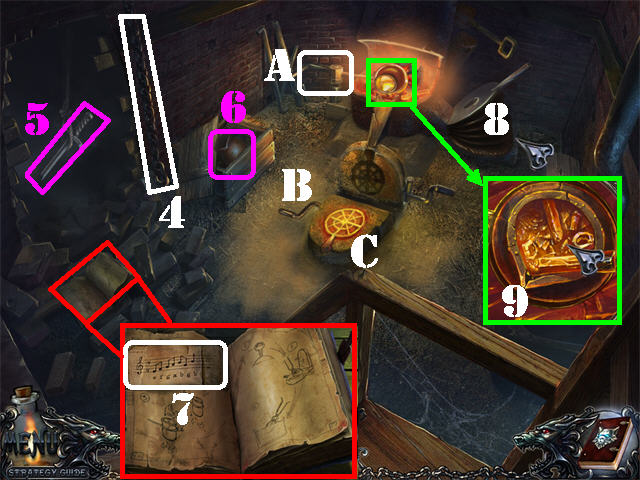
- Place the IRON WEIGHT on the chain (4).
- Click on the weight 3 times to break the wall.
- Take the BROKEN SWORD (5) in the wall.
- Take the CRUCIBLE in the crate (6).
- Zoom into the book in the lower left; take the SHEET MUSIC (7).
- Look at the instructions in the book.
- Click on the bellows on the right to flame the fire (8).
- Place the CRUCIBLE in the fire.
- Zoom into the crucible; place the METAL PARTS inside (9).
- Turn the HANDLE (A).
- Turn the other HANDLE (B).
- Take the HOT FRAME with the PINCERS (C).
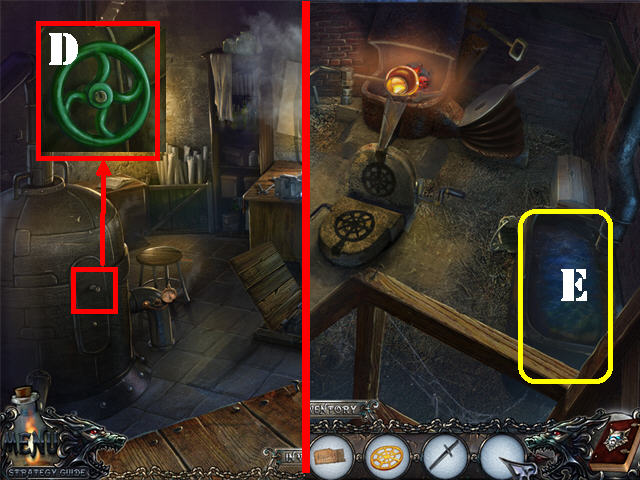
- Click down.
- Zoom into the water pump on the left.
- Place the METAL WHEEL on the tap and turn it once (D).
- Go back down the trapdoor.
- Dip the HOT FRAME in the water (E).
- Take the WINDOW FRAME.
- Click down twice.
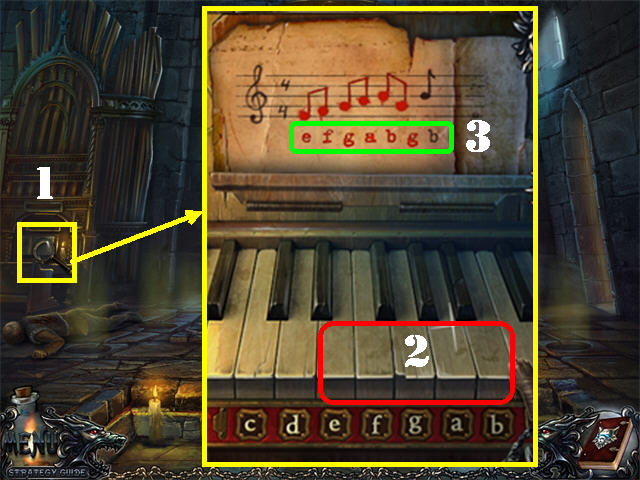
- Zoom into the organ on the left (1).
- Place the SHEET MUSIC on the organ to activate a puzzle.
- Press the keys (2) in the order shown (3).
- Click on the back panel for a new puzzle to appear.
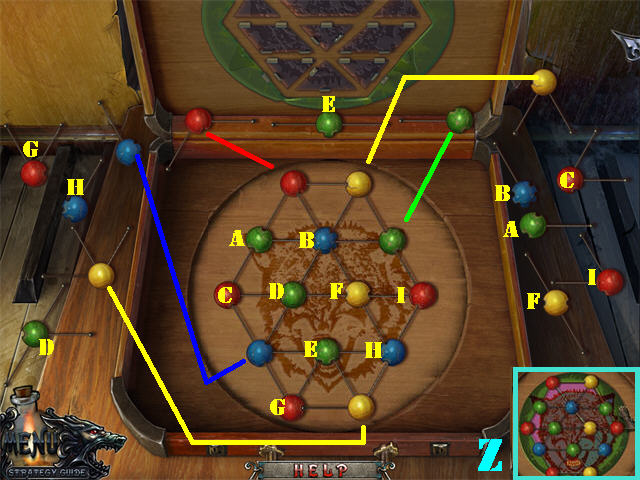
- Drag the pieces around and connect them to other pieces.
- Make sure the holes of the colored balls are facing the right direction in order to connect the pieces correctly.
- Please look at the screenshot for the solution.
- Grab the STAINED GLASS after the puzzle has ended (Z).
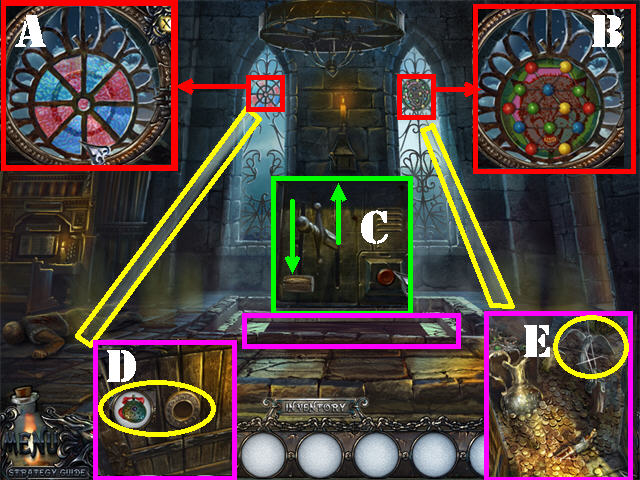
- Zoom into the left stained glass window; place the WINDOW FRAME (A).
- Put the RED GLASS AND BLUE GLASS into the frame.
- Close the pop-up window.
- Zoom into the right stained glass window; place the STAINED GLASS (B).
- Close the pop-up window.
- Note the spots on which each light from the window is shining; this is the solution for the next puzzle.
- Zoom into the area above the ladder.
- Place the BROKEN SWORD in the slot by the stained glass windows.
- Move the lever down and the sword up for the ground to open (C).
- Examine the hole in the ground; place the MEDALLION in the door (D).
- Take the GRAPPLING HOOK (E) inside the door.
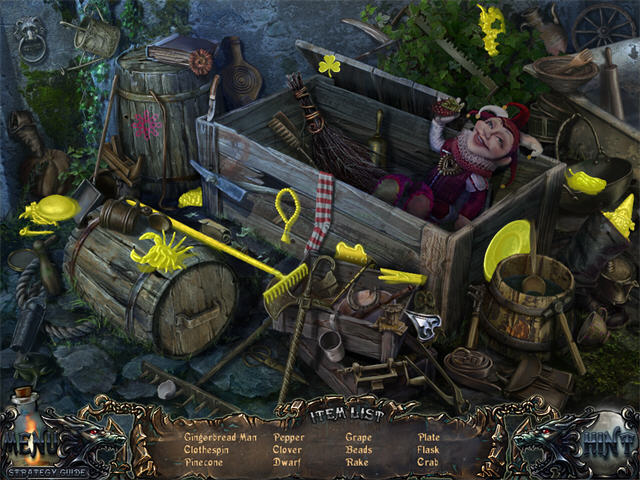
- Go to the center of town; head right and go through the gate.
- Play the Hidden Object Scene on the right.
- The RAKE will be added to inventory.
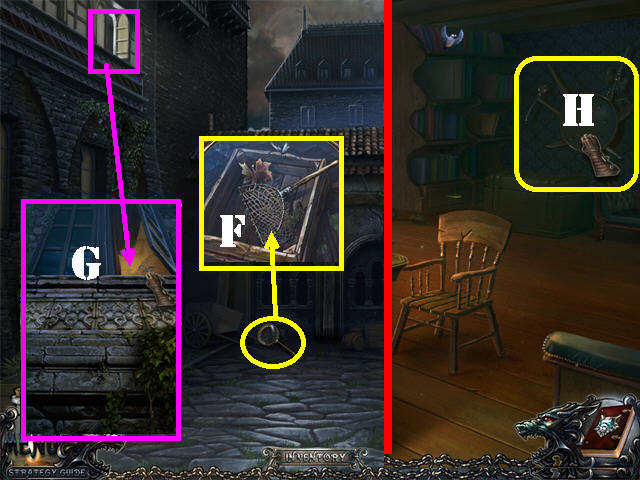
- Zoom into the lower left side; take the NET (F).
- Zoom into the top left window (G); place the GRAPPLING HOOK on the window and go in.
- Click on the shield (H) on the right to make it fall.
- Zoom into the area behind the shield for a puzzle to appear.
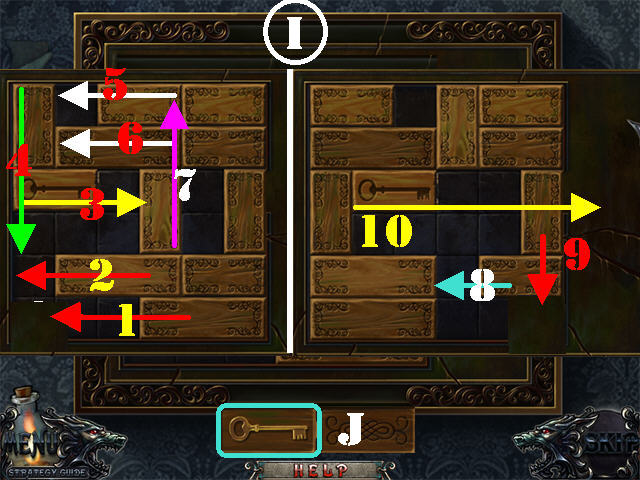
- Slide the key out of the box by dragging the wooden tiles out of the way.
- The tiles can only move in the direction they are facing (I).
- Take the KEY (J) after the puzzle has been solved.
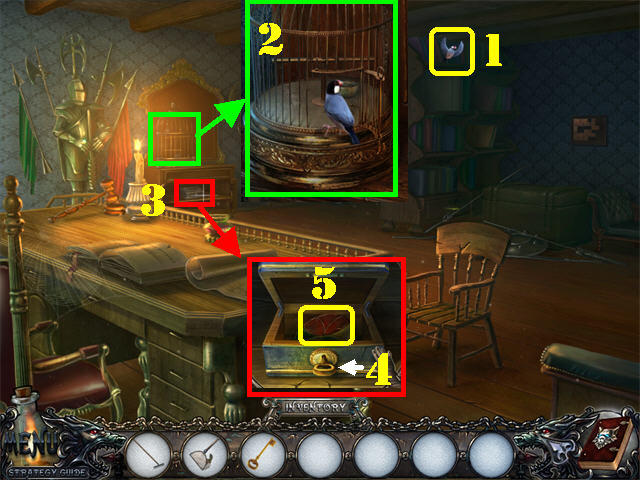
- Grab the BIRD with the NET (1).
- Zoom into the cage on the left; place the BIRD in the birdcage (2).
- Zoom into the box (3) below the birdcage; place the KEY (4) in the lock and turn it twice.
- Take the PUZZLE PIECE inside the box (5).
Chapter 6
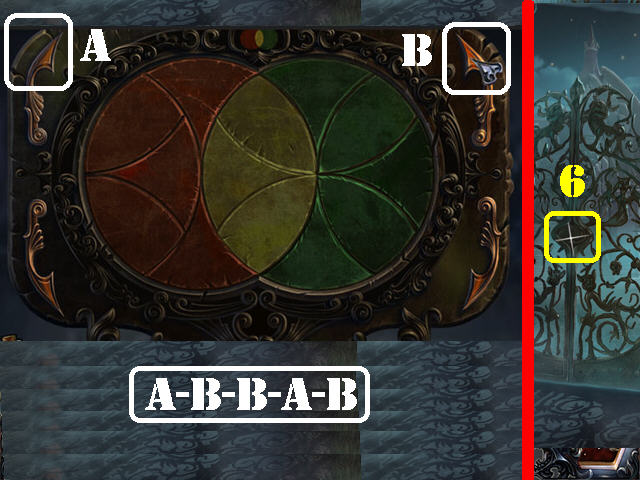
- Return to the other side of the Cave and head right.
- Zoom into the Castle gate (6); place the PUZZLE PIECE on the door to activate a puzzle.
- Rotate the rings using the arrows on each corner until they resemble the image in the upper center.
- To solve the puzzle click on the arrows in this order: A, B, B, A, B.
- Go through the gate.
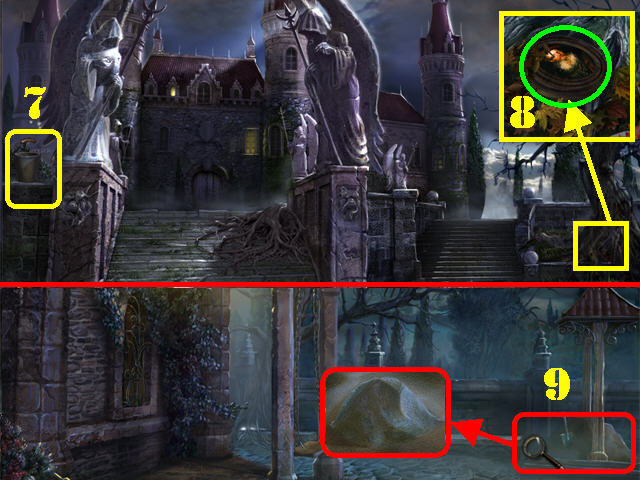
- Grab the BUCKET (7) in the upper left.
- Zoom into the base of the right tree.
- Remove the leaves with the RAKE 4 times; take PORTRAIT 1/3 (8).
- Go up the right steps.
- Zoom into the sand in the lower right.
- Place the BUCKET over the sand to create the BUCKET WITH SAND (9).
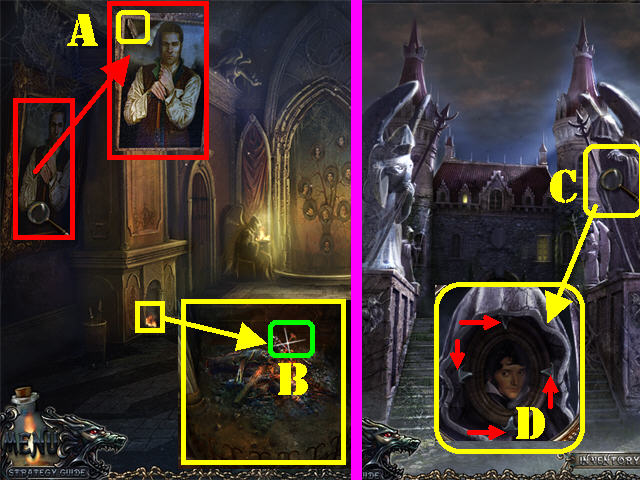
- Click down and go up the left steps.
- Zoom into the portrait in the upper left.
- Click on the upper left corner of the portrait and take the PLIERS (A).
- Zoom into the fireplace.
- Place the BUCKET WITH SAND into the fire and take the NAIL (B).
- Click down.
- Zoom into the large statue on the right (C).
- Remove the 4 metal pins with the PLIERS.
- Take PORTRAIT 2/3 (D).
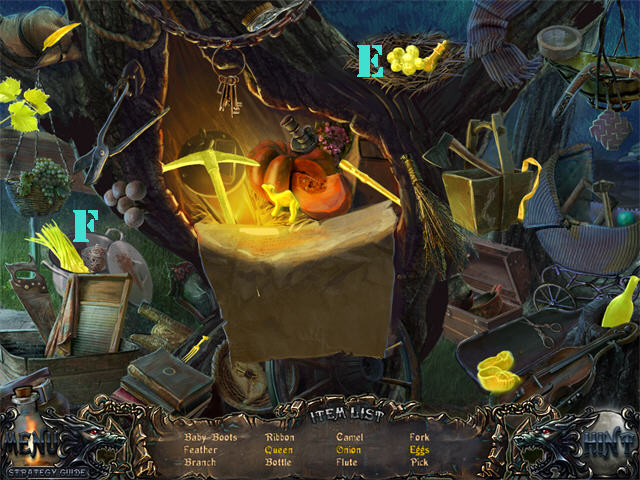
- Click down twice.
- Play the Hidden Object Scene by the tree.
- Click on the nest (E) and the lid (F); take all available items.
- The PICK will be added to inventory.
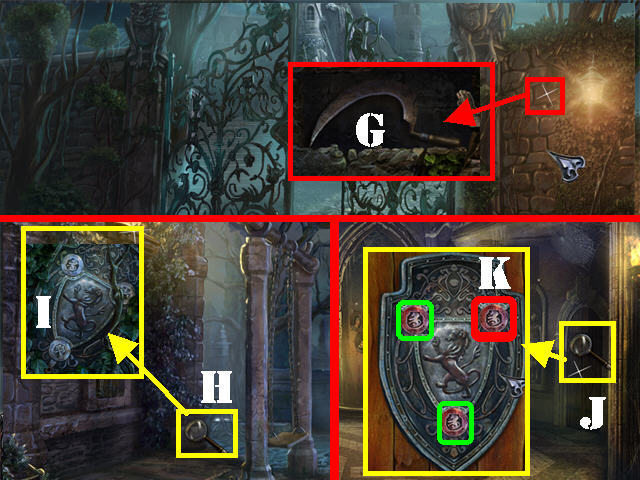
- Head right.
- Examine the upper right side of the wall.
- Place the PICK on the wall twice and take the SICKLE (G).
- Go through the gate and up the right steps.
- Examine the vines on the wall (H).
- Remove the vines with the SICKLE 3 times.
- Take the SHIELD (I).
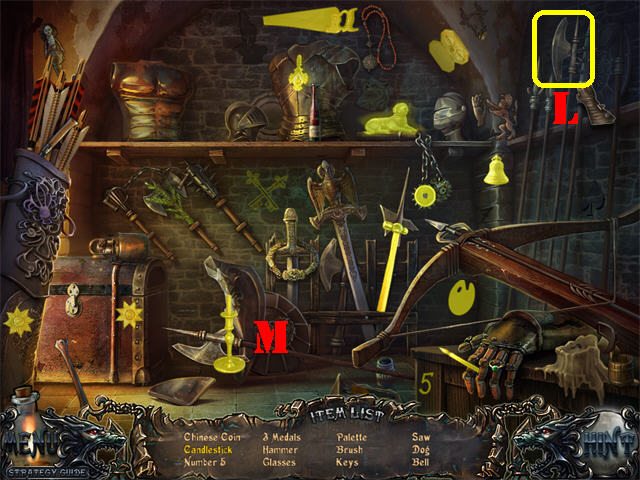
- Go inside the Castle.
- Zoom into the right door (J).
- Place the SHIELD on the right door and click on the upper right coin (K) to make all the coins the same.
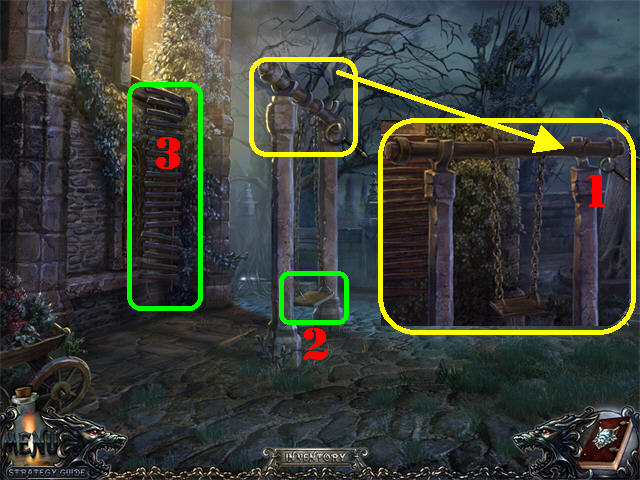
- Play the Hidden Object Scene.
- Click on the HALBERD (L) in the upper right; take the CANDLESTICK (M).
- The HAMMER will be added to inventory.
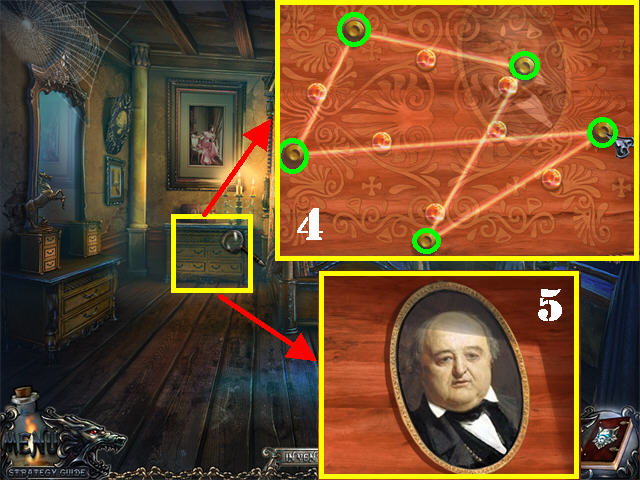
- Click down and go up the right steps.
- Zoom into the top part of the swing.
- Click on the upper right corner (1).
- Place the NAIL in the upper right.
- Place the HAMMER on the NAIL.
- Click on the swing until the rope ladder falls down (2).
- Go up the rope ladder (3).
- Zoom into the nightstand by the bed to trigger a puzzle.
- Pull on the yellow dots so that each string is over a blue dot (4).
- Take PORTRAIT 3/3 (5).
- Return to the inside of the Castle.
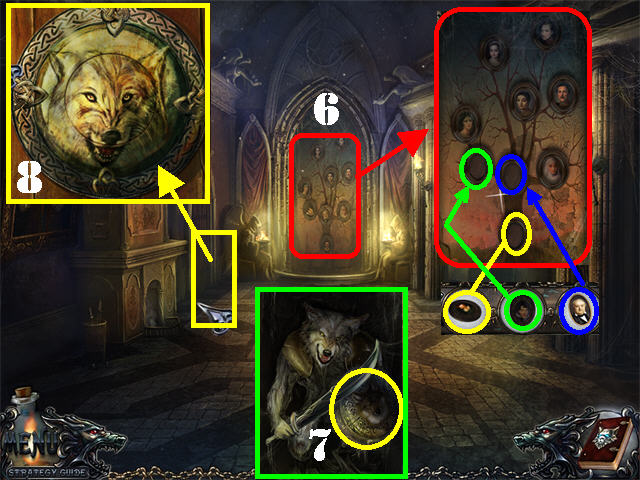
- Examine the family tree on the back wall (6).
- Place the 3 PORTAITS in the empty slots.
- Take the SHIELD (7).
- Zoom into the left door.
- Place the SHIELD into the slot on the door.
- Rotate the circles to form the image shown in the screenshot (8).
- Go through the door to access the Library.
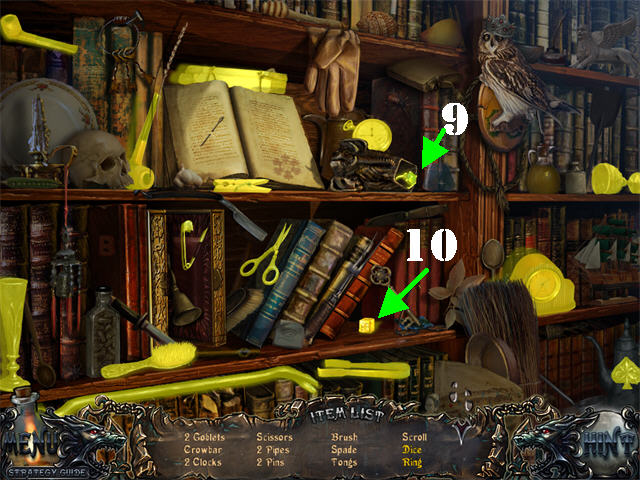
- Play the Hidden Object Scene.
- Click on the elephant bookend; take the RING (9).
- Remove the handkerchief; take the DICE (10).
- The STATUETTE will be added to inventory.
- Return to the Bedroom.
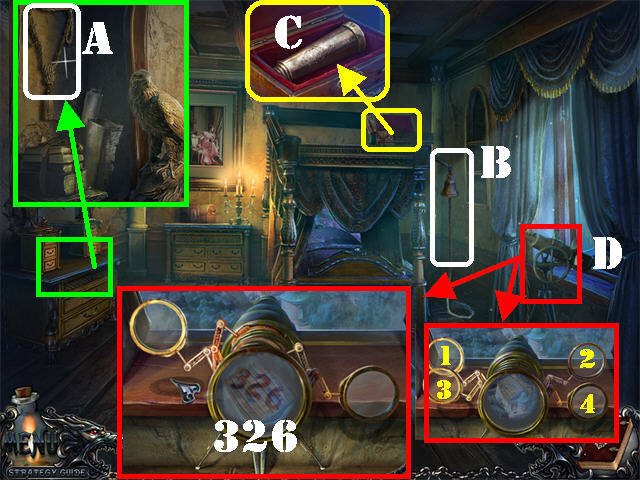
- Zoom into the dresser drawer.
- Place the STATUETTE on the jewelry box; take the CORD (A).
- Put the CORD on the bell (B).
- Pull on the bell.
- Zoom into the box above the bed and open it.
- Take the TELESCOPE (C).
- Put the TELESCOPE on the tripod (D).
- Zoom into the telescope.
- Click on the lenses in this order: 1, 4, 2, 3, for the number 326 to appear.
- Click on the center lens to reset the puzzle, if need be.
- Return to the inside of the Castle.
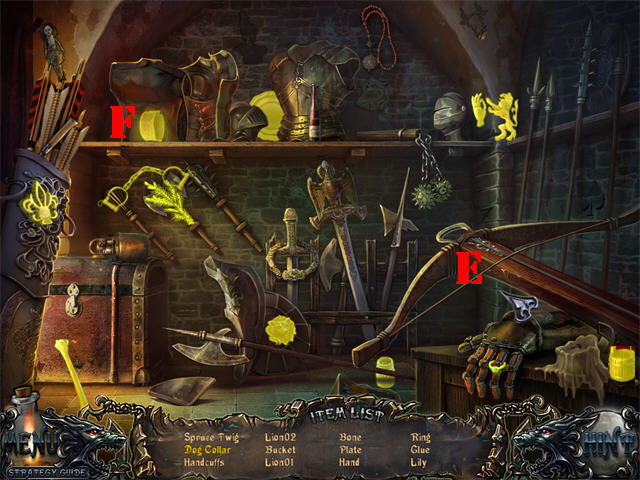
- Play the Hidden Object Scene.
- Pull the bow and arrow (E); take the DOG COLLAR (F).
- The GLUE will be added to inventory.
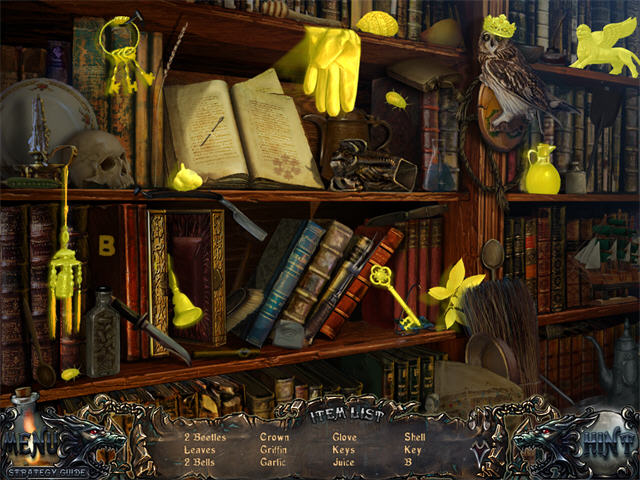
- Head through the left door.
- Click on the right bookcase to trigger a search scene on the bookcase next to it.
- The GLOVE will be added to inventory.
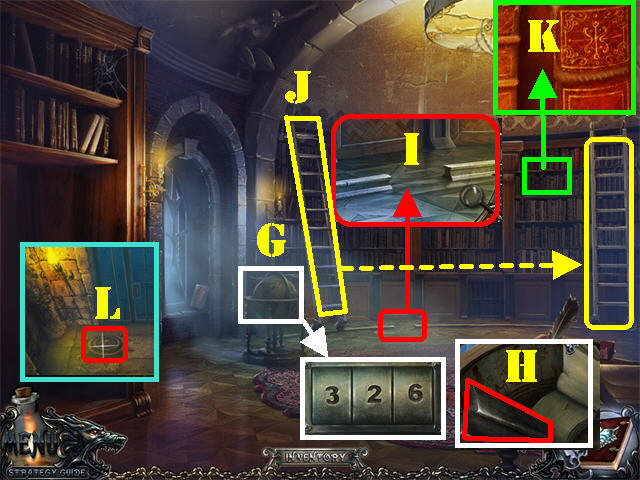
- Examine the globe next to the ladder (G).
- Enter the number 326 you found in the telescope lens.
- Take the RAIL (H).
- Zoom into the broken railing (I) and place the RAIL in the empty slot.
- Click on the ladder to move it to the right (J).
- Examine the right side of the bookcase; click on the book to open the left side of the bookcase (K).
- Zoom into the secret passage by the left bookcase; take the WHEEL (L).
Chapter 7
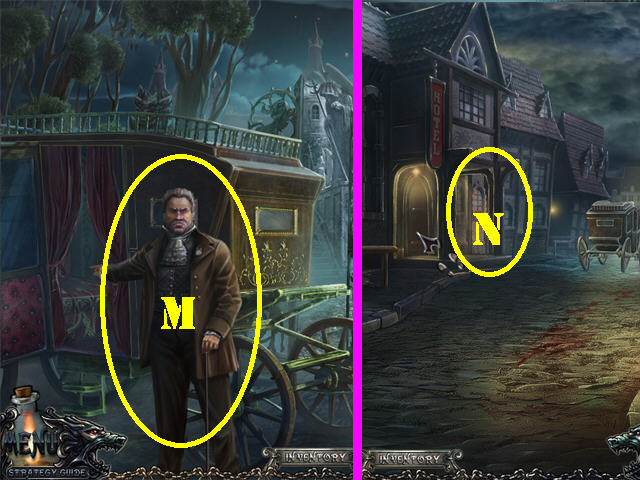
- Leave the Castle and you will encounter Gerard next to a stagecoach outside the gate.
- Click on Gerard. He will take you back to the Hotel (M).
- Enter the Hotel on the left (N).
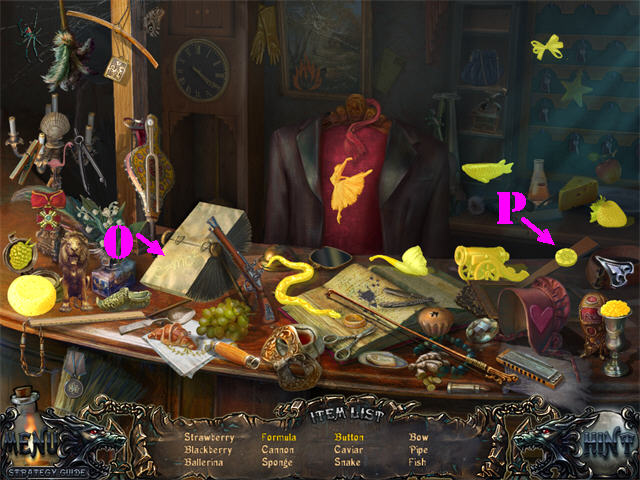
- Play the Hidden Object Scene.
- Click on the rolodex twice; click on the FORMULA (O).
- Touch the picture; take the BUTTON (P).
- The SPONGE will be added to inventory.
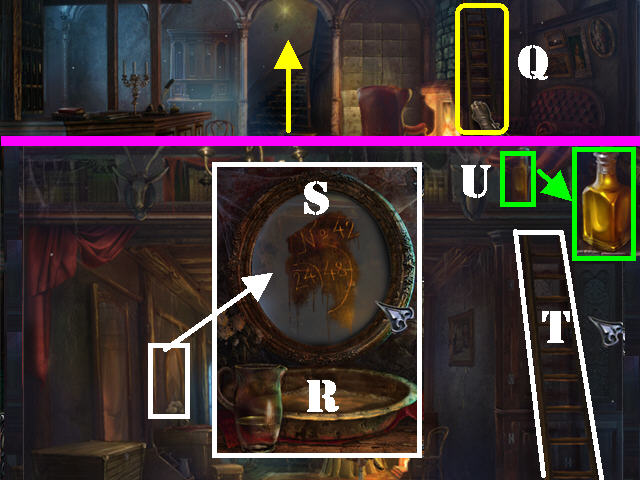
- Take the LADDER on the right (Q).
- Go up the steps and you will find the fortuneteller.
- Examine the dresser on the left; soak the SPONGE in the soapy water to create the SOAPY SPONGE (R).
- Place the SOAPY SPONGE on the mirror to view the numbers 42 and 24/48 (S).
- Put the LADDER on the right side of the room (T).
- Zoom into the top of the ladder; take the OIL (U).
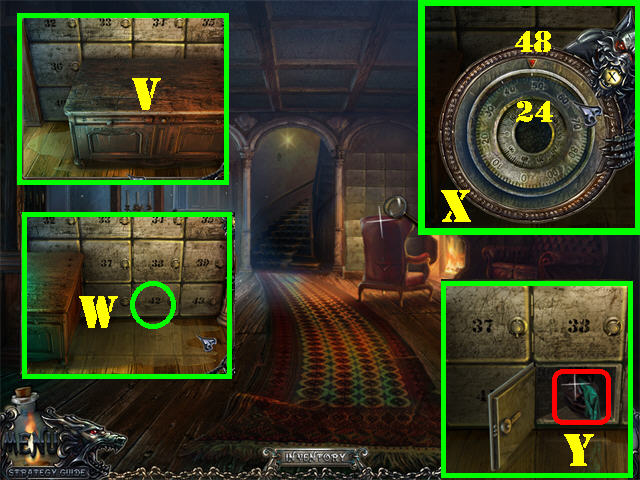
- Click down.
- Examine the wall by the chair; place the OIL on the floor.
- Click on the cabinet to move it (V).
- Zoom into locker 42 for a dial to appear (W).
- Use the numbers you found in the mirror to solve the puzzle. Each time one of the dials is set correctly, the dial will expand briefly.
- Place the small dial on 24 and the large dial on 48 (X).
- Take the CLOTHES BAG inside the locker (Y).
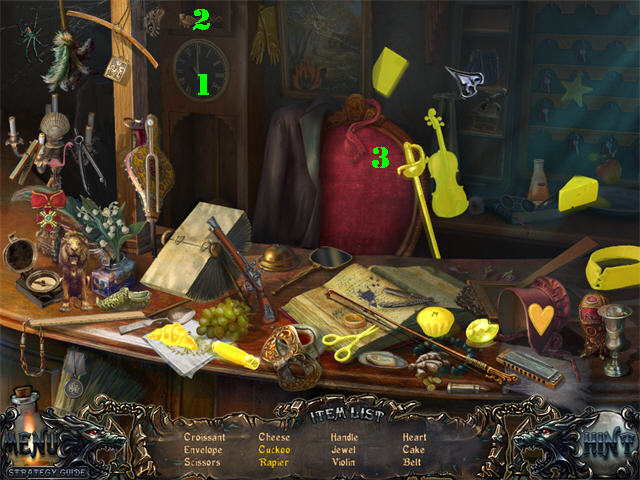
- Play the Hidden Object Scene.
- Touch the CLOCK (1); take the CUCKOO (2).
- Open the JACKET; take the RAPIER (3).
- The HANDLE will be added to inventory.
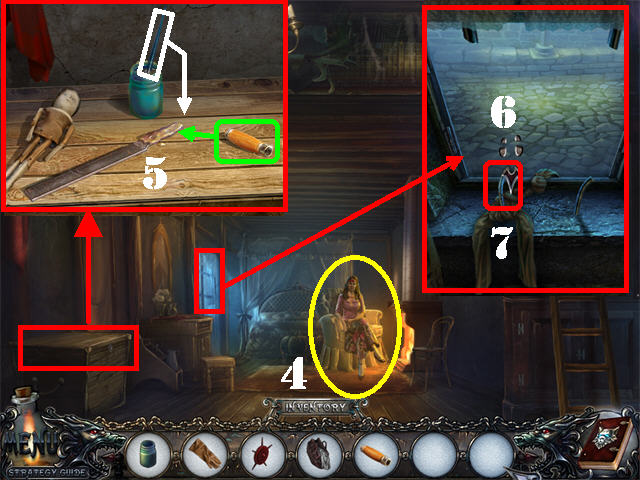
- Go up the steps
- Give the CLOTHES BAG to the fortuneteller and she will give you the PILLOWCASE ROPE (4).
- Zoom into the chest; place the HANDLE and the GLUE on top of the chest (5).
- Place the BRUSH in the GLUE bottle on the tip of the file.
- Drag the HANDLE over the glue and take the FILE.
- Examine the bars by the window; put the FILE on the bars (6).
- Put the PILLOWCASE ROPE on the bottom left bar (7).
- Go out the window.
Chapter 8
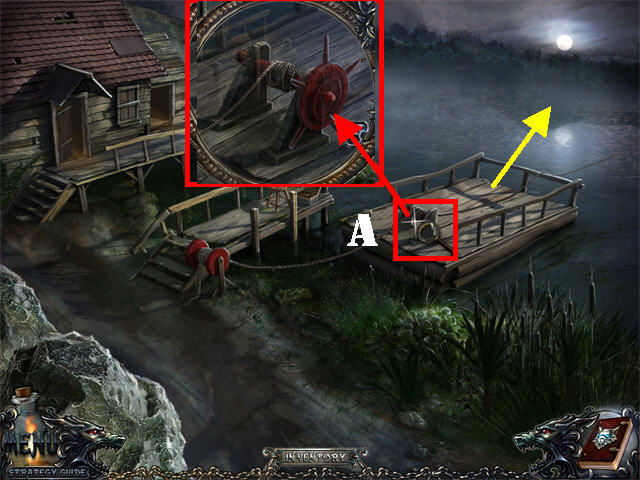
- Return to the outside of the hunter’s house.
- Zoom into the winch; place the WHEEL on it (A).
- Place your cursor over the water to reach the next area.
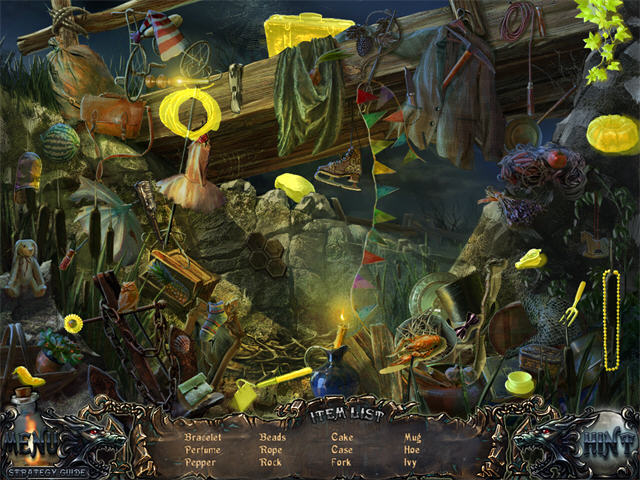
- Play the Hidden Object Scene to obtain the ROCK.
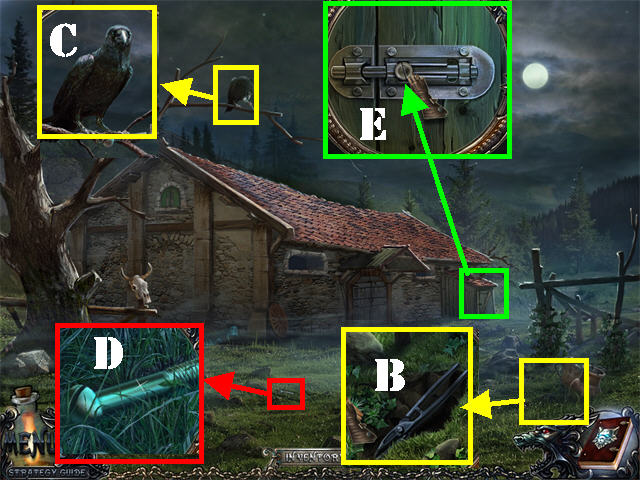
- Head left.
- Zoom into the lower right area; place the GLOVE on the poison ivy 3 times to remove it.
- Take the CLIPPERS (B).
- Zoom into the crow in the upper left (C).
- Throw the ROCK at the crow and it will drop the screw on the ground.
- Zoom into the left side of the grass and take the SCREW (D).
- Examine the side door (E); place the SCREW in the latch and click on the latch to trigger a search scene.
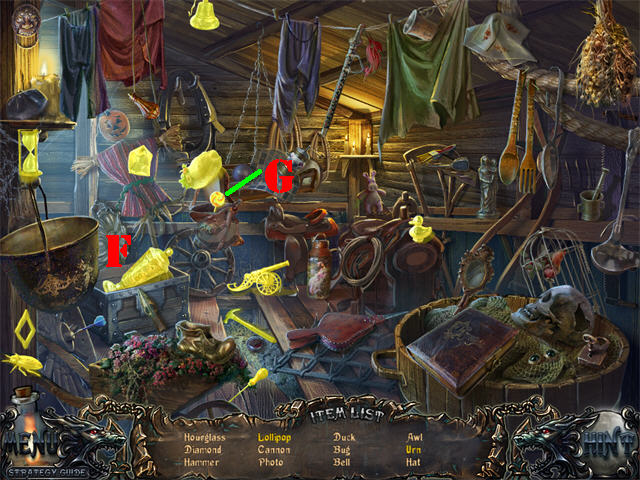
- Open the chest; take the URN (F).
- Open the bag; take the LOLLIPOP (G).
- The AWL will be added to inventory.
- Click down.
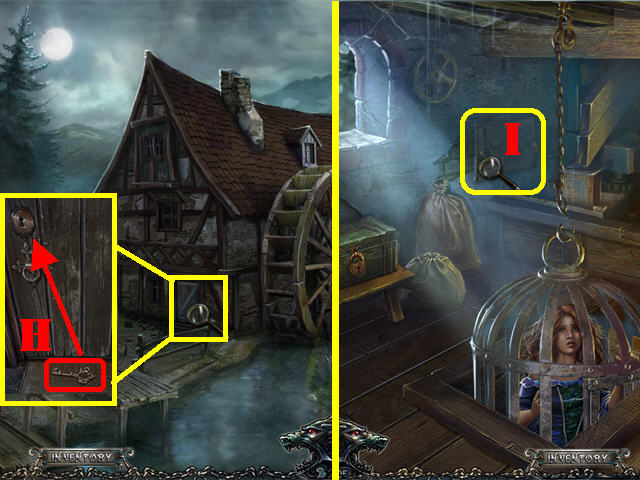
- Examine the front door; place the AWL in the lock.
- Pull the rug below the door; take the KEY (H).
- Place the KEY in the lock and go inside.
- Once inside, you will find Louise (the little girl’s mother) locked up in a cage.
- Examine the lock by the left side of the wall to activate a puzzle (I).
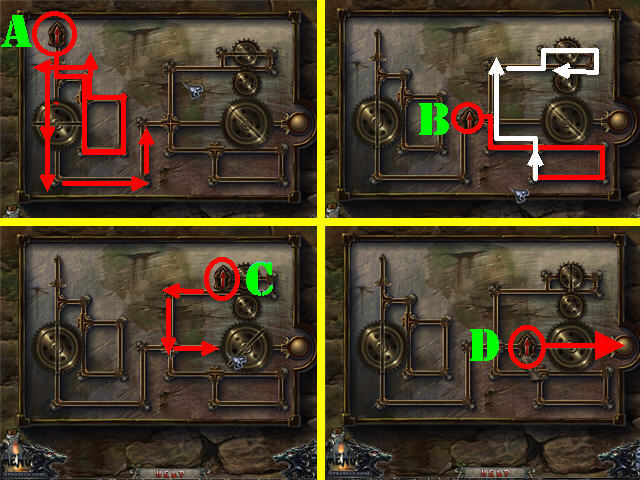
- Turn the arrow button as shown in the screenshot to solve the puzzle.
- The ARROW BUTTON will be added to inventory.
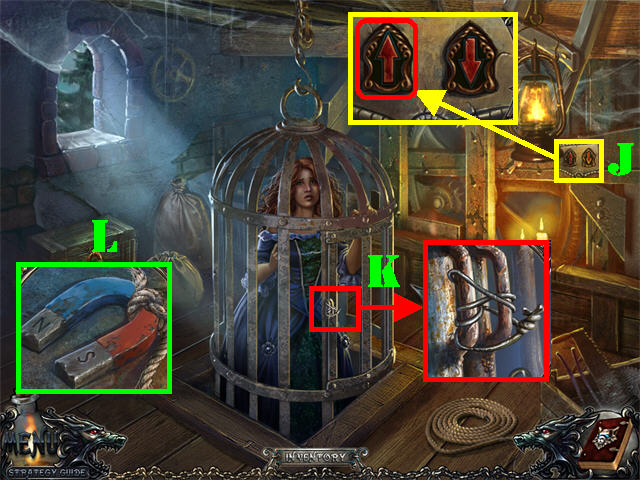
- Zoom into the plaque on the right side of the wall (J).
- Place the ARROW BUTTON on the plaque.
- Click on the left arrow to raise the cage.
- Examine the cage; cut the wire with the CLIPPERS twice (K) to free Louise.
- Zoom into the bottom of the cage; take the MAGNET (L).
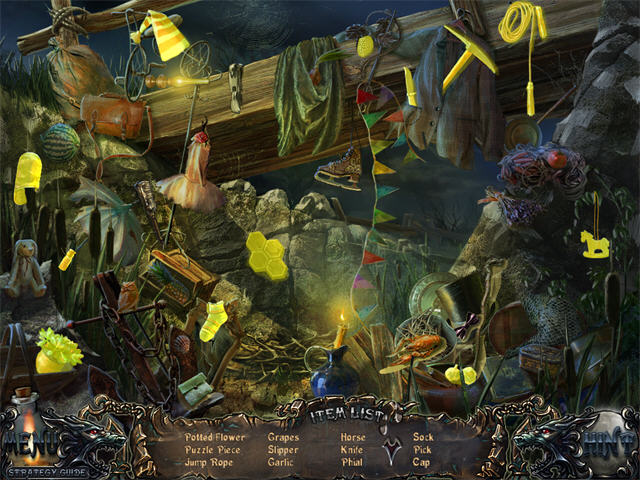
- Exit the house.
- Play the Hidden Object Scene to obtain PUZZLE PIECE 1/2.
- Head left.
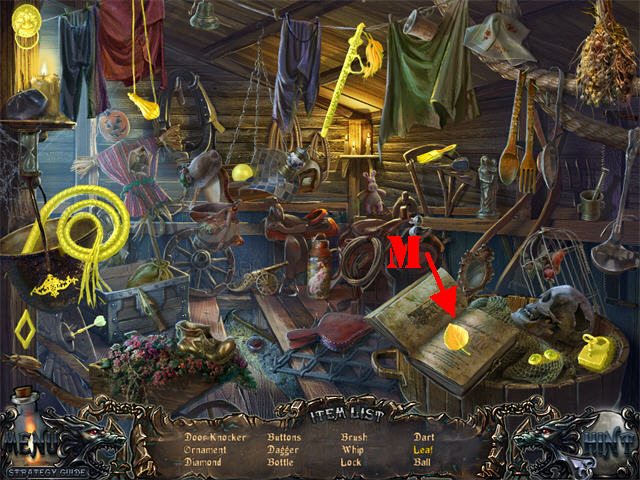
- Play the Hidden Object Scene.
- Open the book; take the LEAF (M).
- The WHIP will be added to inventory.
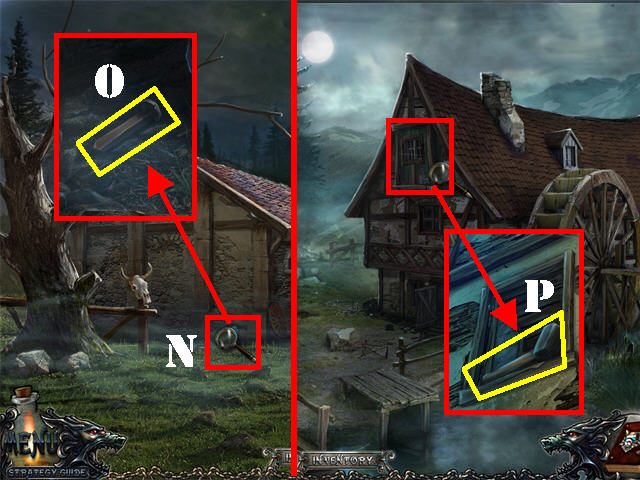
- Examine the hole on the ground (N); use the MAGNET to obtain the SPIKE (O).
- Click down.
- Zoom into the attic window; retrieve the MALLET with the WHIP (P).
- Go inside the Mill.
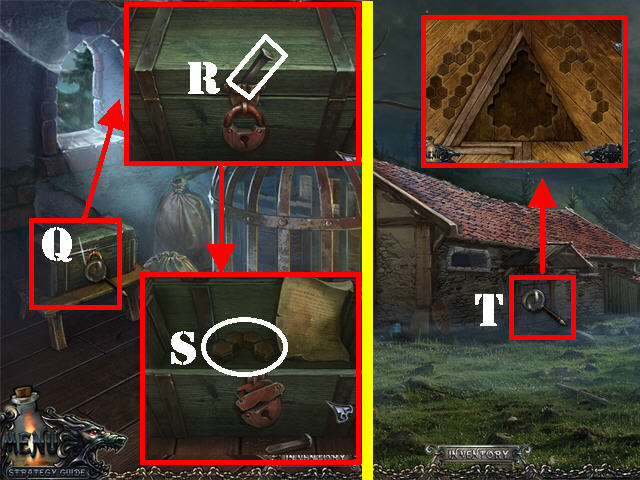
- Zoom into the chest (Q).
- Place the SPIKE on the lock (R).
- Place the MALLET on the spike.
- Take PUZZLE PIECE 2/2 (S) in the chest.
- Click down and head left.
- Zoom into the front door; place the WOODEN PUZZLES on the board to activate a puzzle (T).
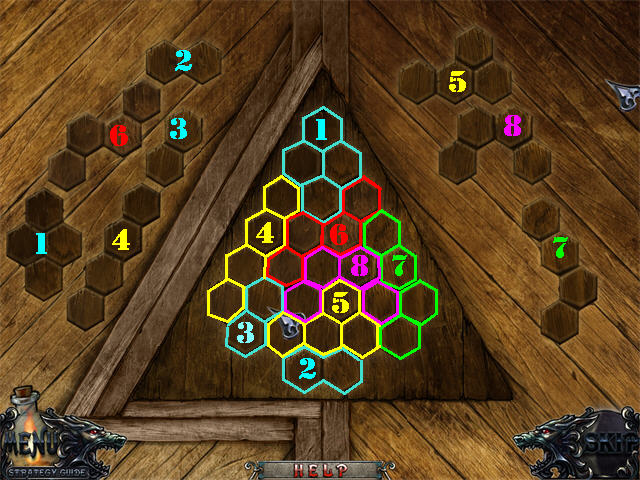
- Place the wooden pieces into the correct slots.
- Please refer to the screenshot for the solution.
- Congratulations! You have completed Shadow Wolf Mysteries: Curse of the Full Moon!
Created at: 2011-03-05

