Walkthrough Menu
General Tips
- When starting a new game you can choose to play in expert mode or not. Expert mode uses sparkles to denote places with which you can interact and recharges hints faster.
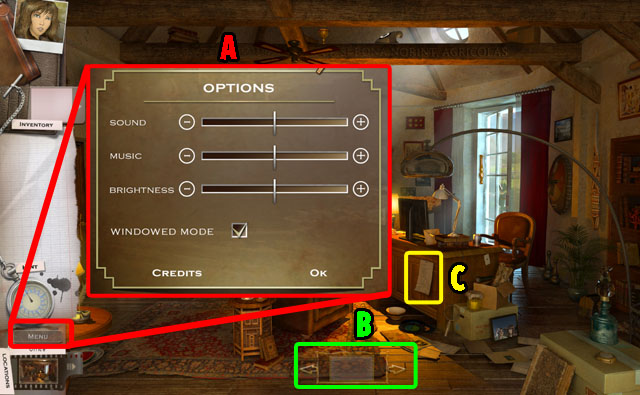
- From the main menu you can make a new profile, adjust options like sound, music, brightness and fullscreen mode, and see the game help (A).
- There are 5 different types of cursors in this game. The finger cursor is the standard cursor; the gears cursor tells you an action can be taken on an object; the magnifying glass tells you that you can zoom in; the arrow cursor tells you that you can move; and the word bubble cursor tells you that you can talk to a character.
- If you click too many times, you will lose control of the cursor for a short time.
- You can use the x button to get out of a Hot Spot and the arrow button to skip dialog.
- Some area views can be scrolled back and forth. If you see a white box at the bottom of the screen, click on it to move the viewing angle and see more things.
- Clicking on lists found in the game will bring up Hidden Object Scenes.
- Click on the arrow beside your inventory to show all the items you’ve collected.
- A list is always highlighted in light blue in this guide.
Chapter 1
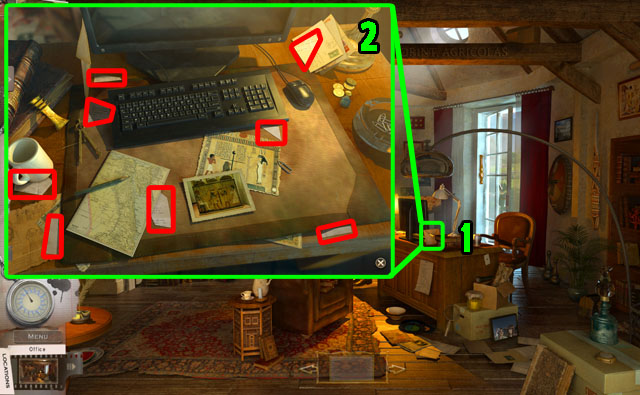
- Click on the letter highlighted in green on the desk to get a close up of that scene (1).
- Find pieces of the letter circled in red (2).
- You will automatically exit the scene.
- You may play the tutorial at this point if you want to learn more about how to play the game.
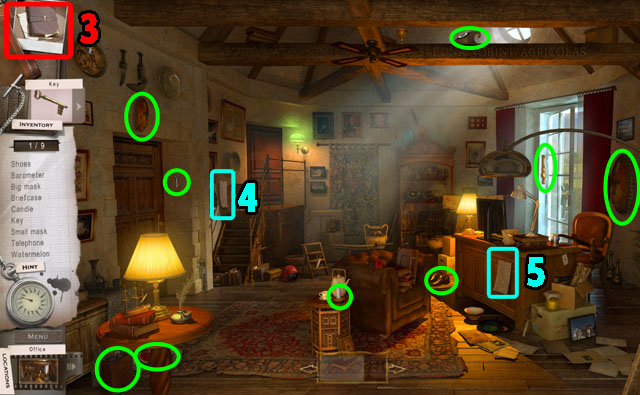
- When you click on the notebook in the upper left corner, you can read any letters or notes that you have collected (3).
- When you find a list, clicking on it displays items you must find in the current Hidden Object Scene.
- Click on the list on the wall on the left side of the screen (4).
- In order to find all of the hidden objects, sometimes you have to move the screen by clicking and moving the white box at the bottom.
- Find 9 objects in the list circled green.
- The hidden objects can be randomized in this game.
- After finding all of the objects, you will get a KEY.
- Click on the list on the desk (5).
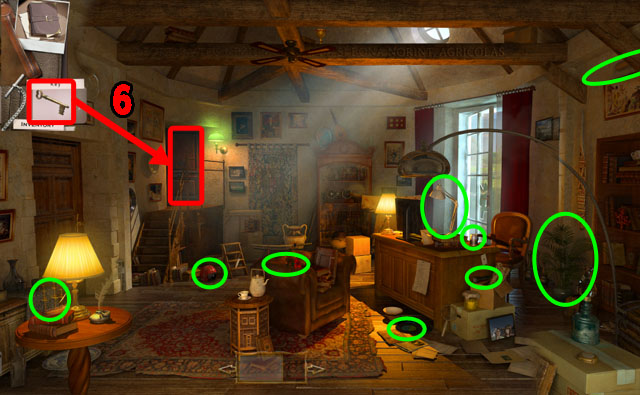
- Find 9 objects in the list circled in green. The list this time will be shown in silhouettes, not words.
- You will receive the FLASHLIGHT.
- Open the inventory, and drag the KEY to the door to open it (6).
- Enter the library.
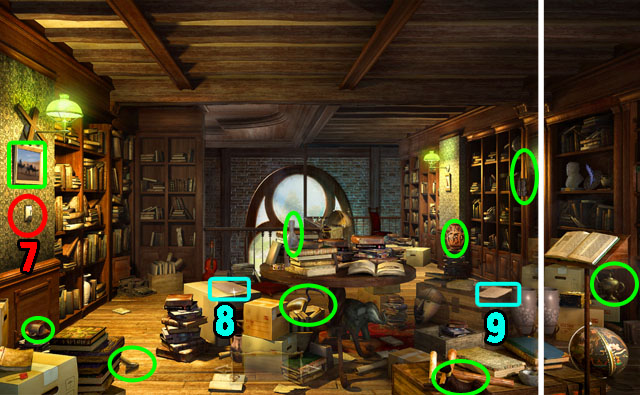
- Use the FLASHLIGHT to light up the spot in the left side of the room.
- Turn on the light (7).
- Click on the list (8).
- Find 9 objects in the list circled in green.
- Click on another list (9).
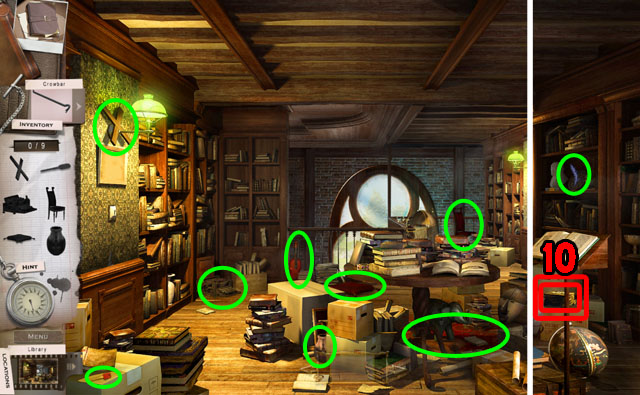
- Find 9 objects in the list circled in green.
- You will receive the KEY.
- Open the box on the right with the KEY (10).
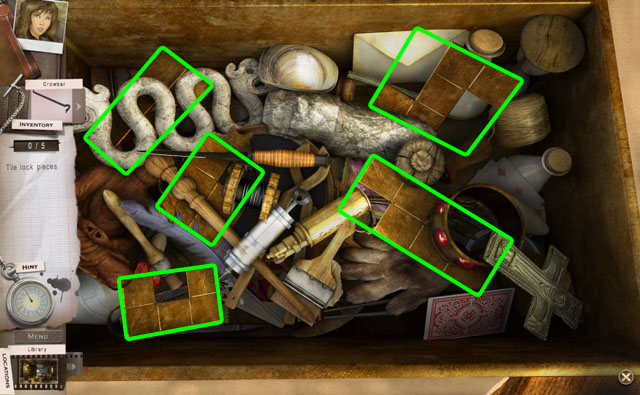
- Find 5 tile lock pieces highlighted in green.
- You will receive the TILE LOCK PIECES.
- Return to the office.
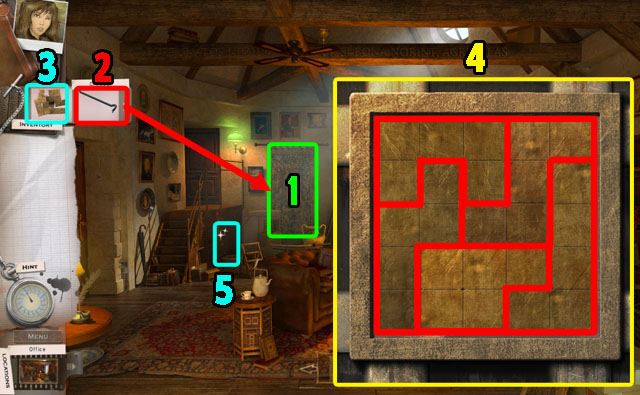
- Click on the rag on the wall (1).
- Remove the boards with the CROWBAR (2).
- Place the TILE LOCK PIECES on the safe (3).
- Place the tile lock pieces onto the grid. Connect all the pieces to make a perfect square without any overlapping.
- Refer to the image for the solution (4).
- This will open up a secret room, but you still need to do things in this room first before going in.
- Click on the door under the stairs (5).
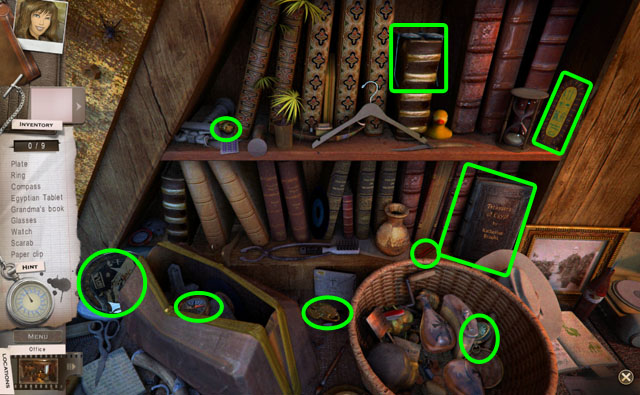
- Find 9 hidden objects in the list highlighted in green.
- You will receive the TABLET.
- The tablet goes to the special holder that Kate has. When you click on a tablet in the holder, you can see the history of the item.
- Enter the secret room through the hole in the wall.
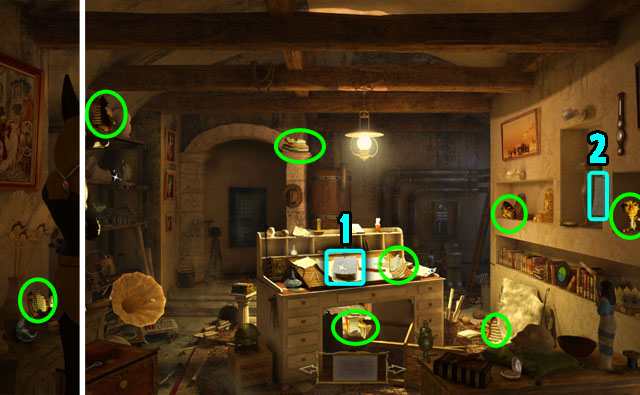
- Click on the list highlighted in light blue on the desk (1).
- Find the 8 pieces highlighted in green.
- You will receive the PHARAOH’S MASK.
- Click on the list highlighted in light blue in the right side of the screen (2).
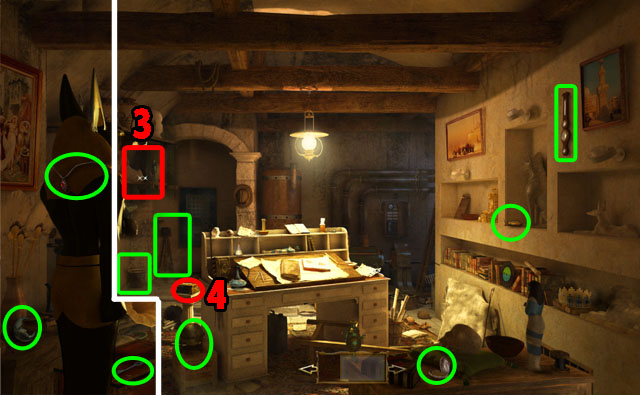
- Find the 9 objects highlighted in green.
- You will receive the MANOR’S KEY.
- Click on the shelf (3).
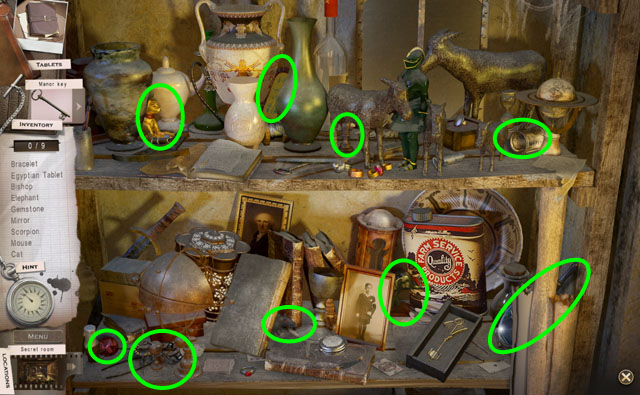
- Find the 9 objects highlighted in green.
- You will receive the TABLET.
- Open the box beside the desk with the Manor’s key (4 in the previous screenshot).
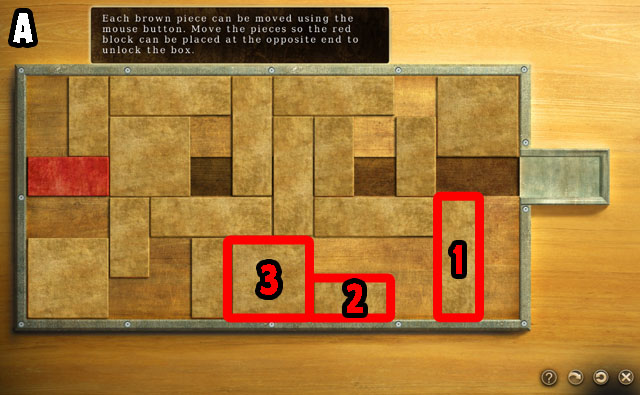
- Move blocks 1, 2, and 3 (A) in that order.
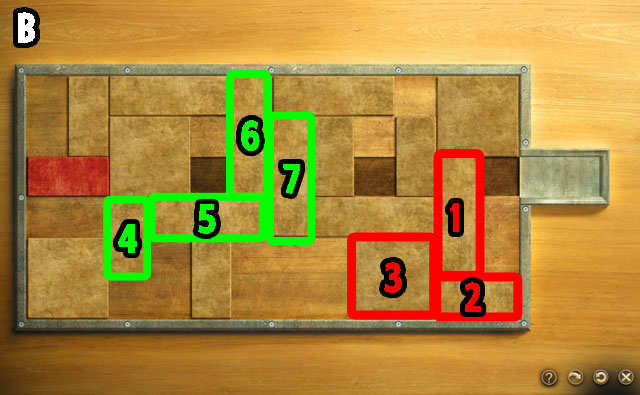
- The after positions of block 1, 2, and 3 are shown in the screenshot (B).
- Next, move the blocks marked 4, 5, 6, and 7, in that order.
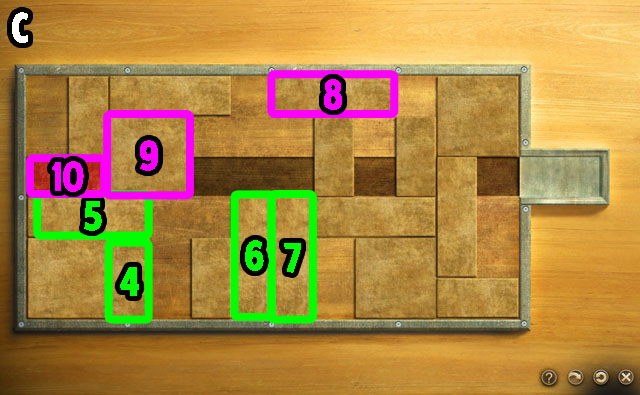
- The after positions of blocks 4, 5, 6, and 7 are shown in screenshot (C).
- Next move the blocks marked 8, 9, and 10, in that order.
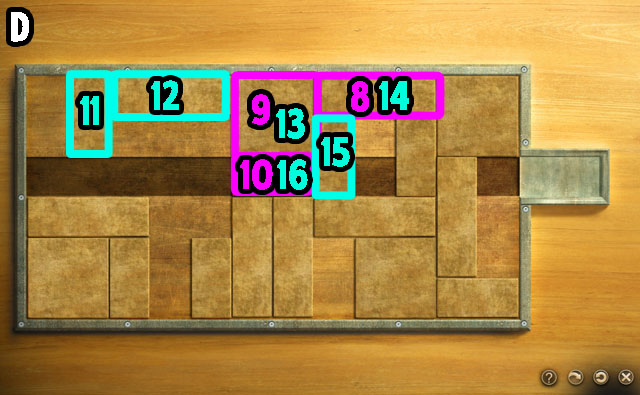
- The after positions of blocks 8, 9, and 10 are shown in screenshot (D).
- Next, move the blocks marked 11, 12, 13, 14, 15, and 16, in that order. Some of these blocks are the same blocks moved in the last step.
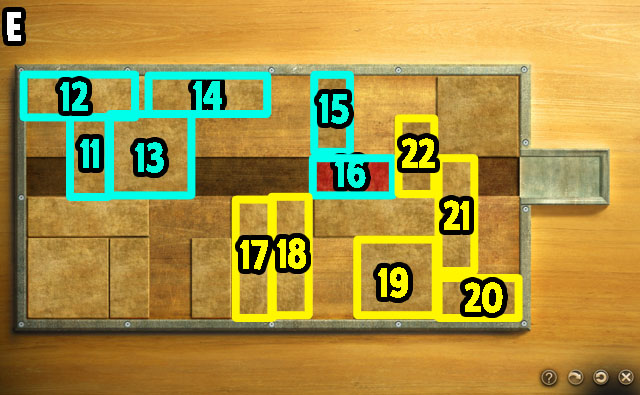
- The after positions of blocks 11, 12, 13, 14, 15, and 16 are shown in screenshot (E).
- Next, move the blocks marked 17, 18, 19, 20, 21, and 22 in that order.
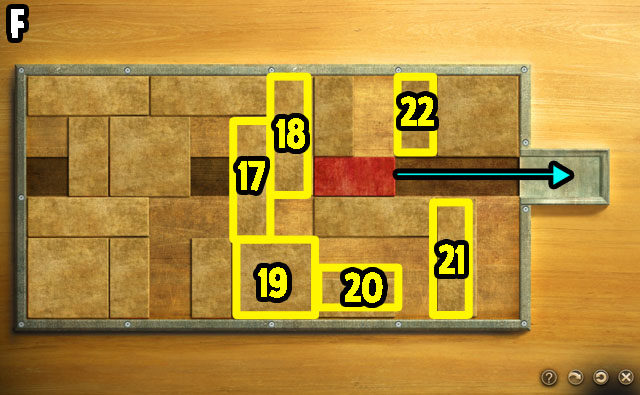
- The after positions of blocks 17, 18, 19, 20, 21, and 22 are shown in screenshot (F).
- Move the red block to the right edge space to solve the puzzle.
Chapter 2
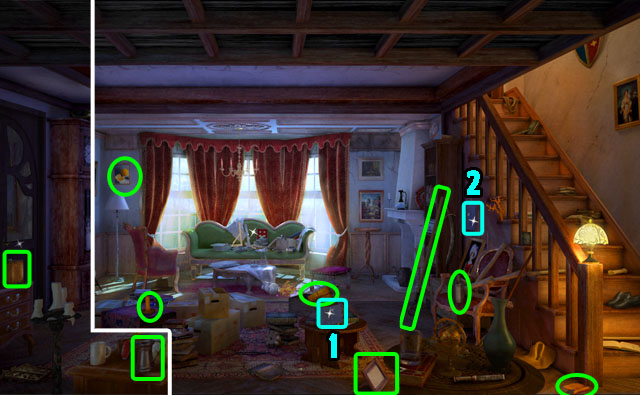
- Click on the list on the low table (1).
- Find the 9 objects highlighted in green.
- You will receive the POLE.
- Click on another list on the right side of the screen (2).
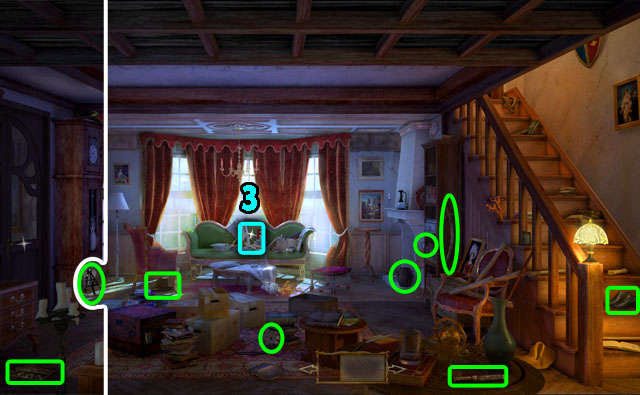
- Find 9 hidden objects from the list.
- You will receive a GEAR.
- Click on the sofa in the middle of the screen (3).
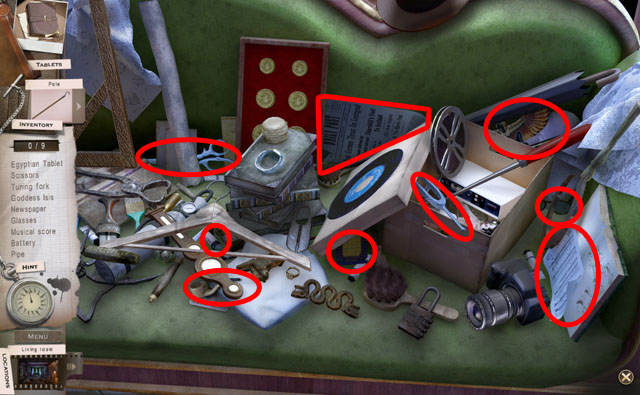
- Find 9 hidden objects from the list.
- You will receive the TABLET.
- Move to the bedroom from the stairs in the previous scene.
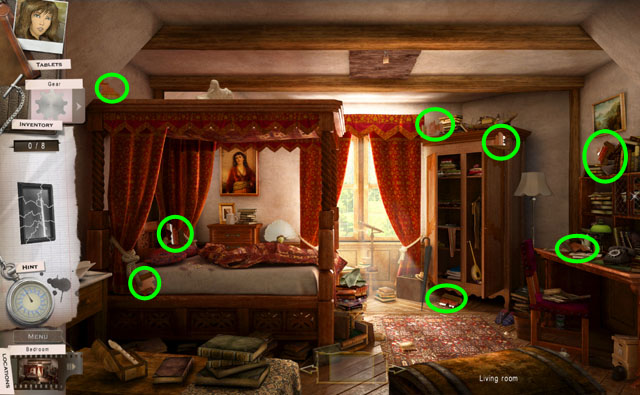
- Find the 8 pieces of mirror.
- You will receive the MIRROR.
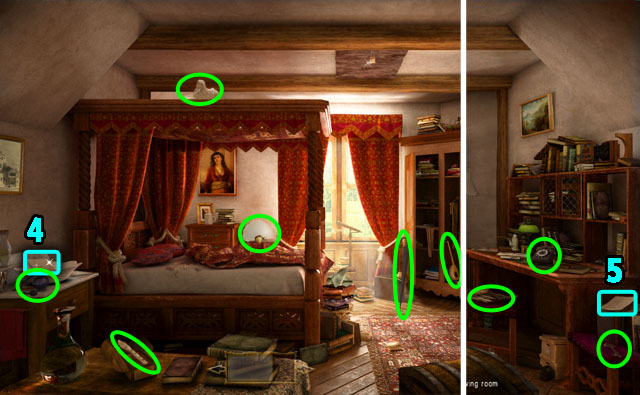
- Read the letter from Grandma on the desk on the right side.
- Click on the list on the side table on the left side (4).
- Find 9 hidden objects from the list.
- You will receive a KEY.
- Click on the list on the chair (5).
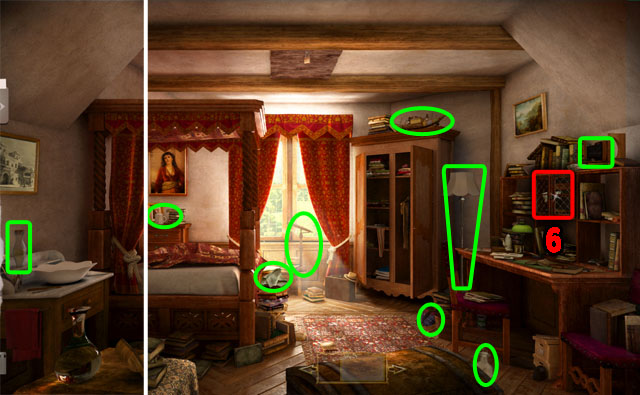
- Find 9 hidden objects from the list.
- You will receive the DUST RAG.
- Open the cupboard with the key from your inventory (6).
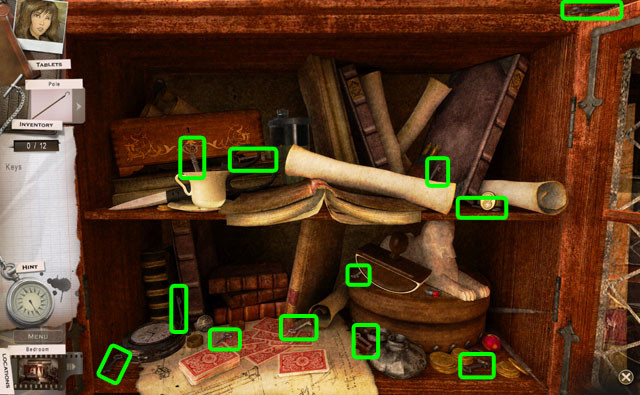
- Find 12 keys.
- You will receive another KEY.
- Return to the living room.
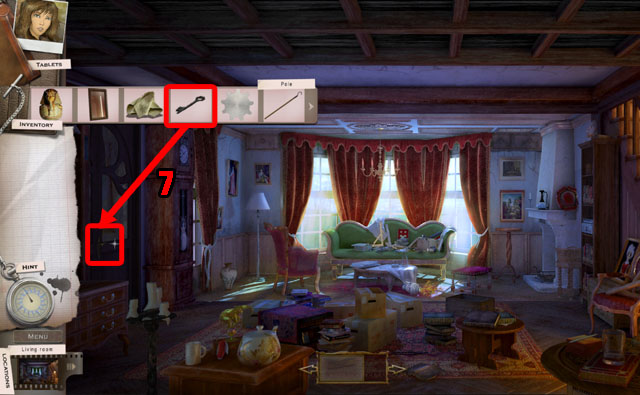
- Open the door with the key (7).
- Enter the library.
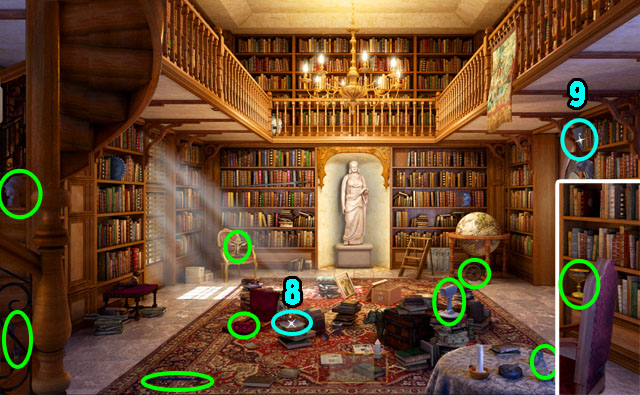
- Click on the list in the middle of the screen (8).
- Find 9 hidden objects from the list.
- You will receive the TRAP DOOR KEY.
- Click on the list in the right side of the book shelves (9).
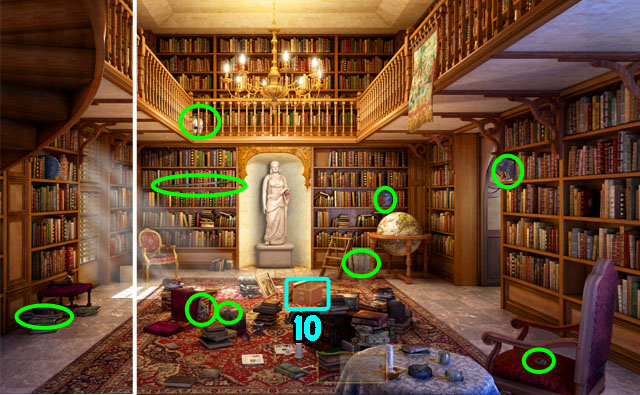
- Find 9 hidden objects from the list.
- You will receive the PLIERS.
- Click on the box in the middle of the screen (10).
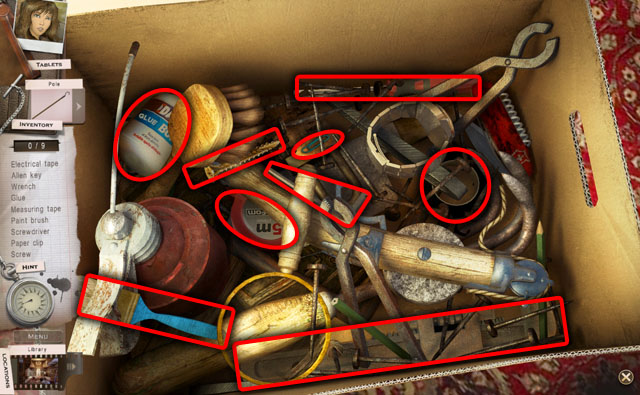
- Find 9 hidden objects from the list.
- You will receive the SCREWDRIVER.
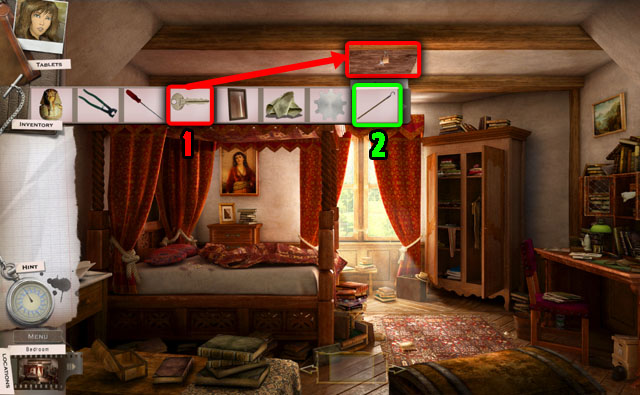
- Return to the living room, and go to the bedroom.
- Open the trapdoor in the ceiling with the TRAPDOOR KEY (1).
- Use the POLE to take out the stairs (2).
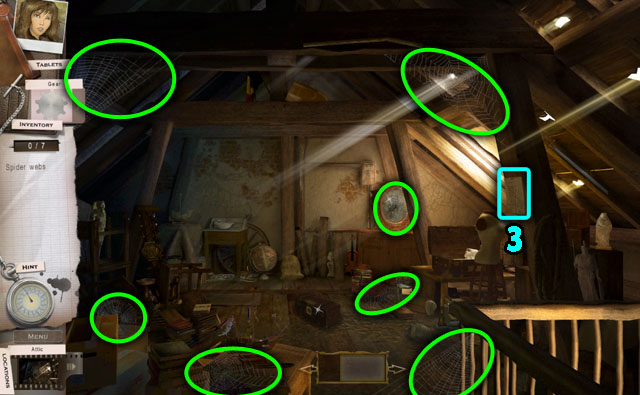
- Find 7 spider webs circled in green.
- Click on the list in the right side of the screen (3).
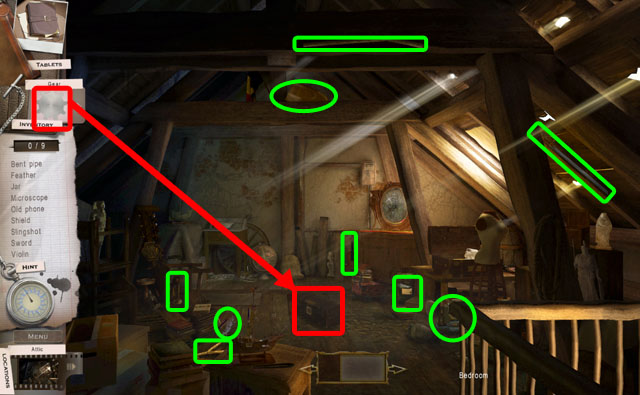
- Find 9 hidden objects from the list.
- You will receive the BENT PIPE.
- Open the inventory, and drag the GEAR to the chest in middle of the room to open it.
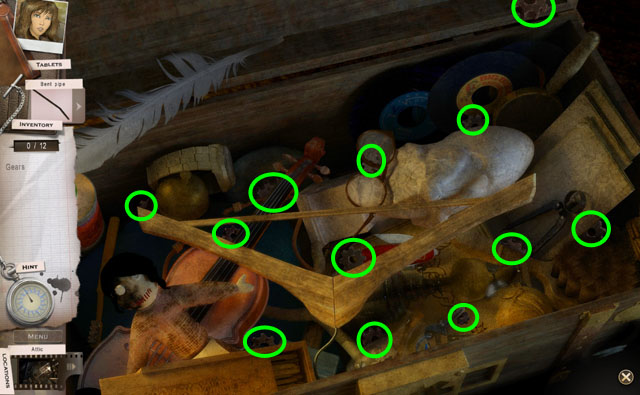
- Find 12 gears.
- You will receive the GEARS in your inventory.
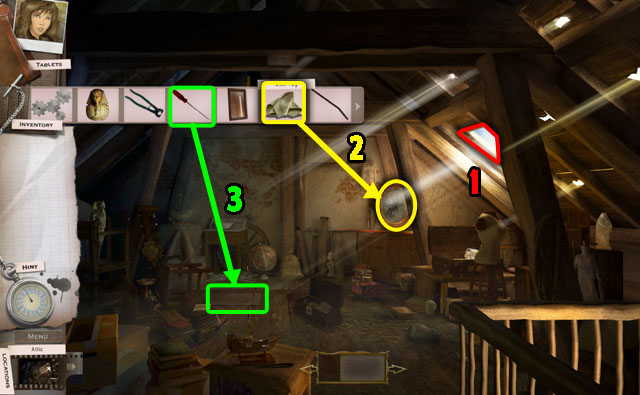
- Click on the paper on the ceiling to remove it (1).
- Remove the dust on the mirror with the DUST RAG (2).
- Take off the boards on the floor with the SCREWDRIVER (3).
- Return to the living room through the bedroom.
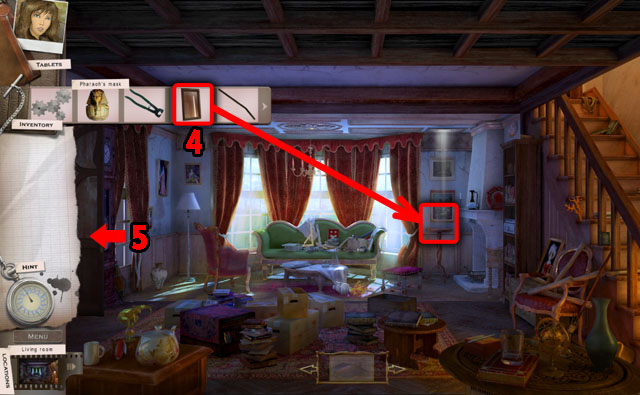
- Place the mirror from the inventory on the side table (4).
- Return to the library (5).
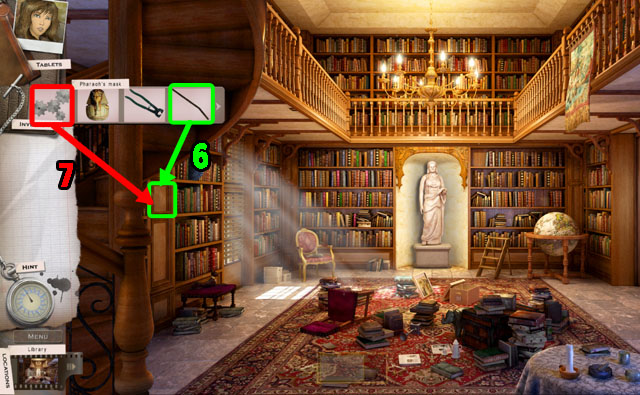
- Open the secret panel with the BENT BAR (6).
- Place the GEARS (7) in the panel.
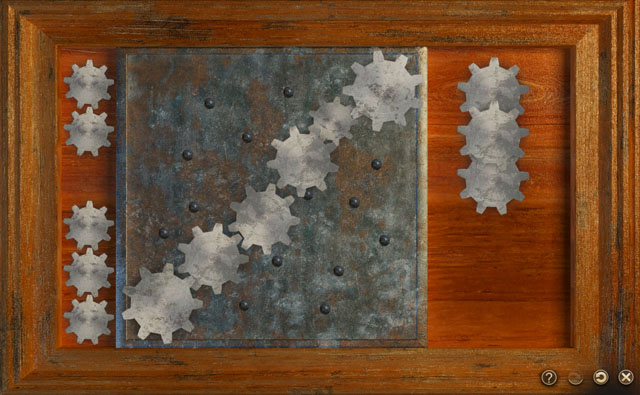
- Place the gears on the metal plate.
- Connect the gears from the left side to the right side. They must all be touching to move each other.
- You do not need to use all the gears.
- Refer to the screenshot for the sample solution.
- The statue will move, revealing the path to the basement.
- Move to the basement.
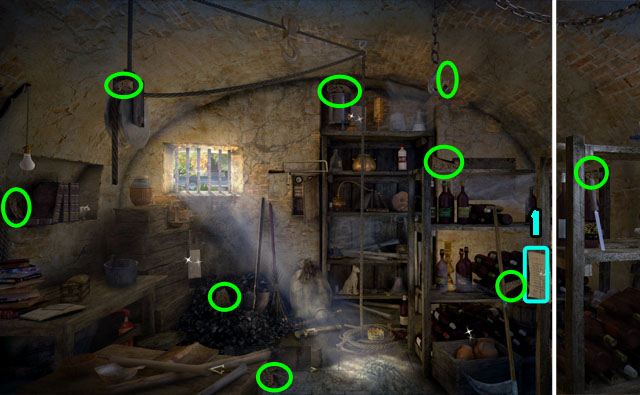
- Click on the list in the right side of the screen (1).
- Find the 9 pieces of the stone.
- You will receive the ANKH.
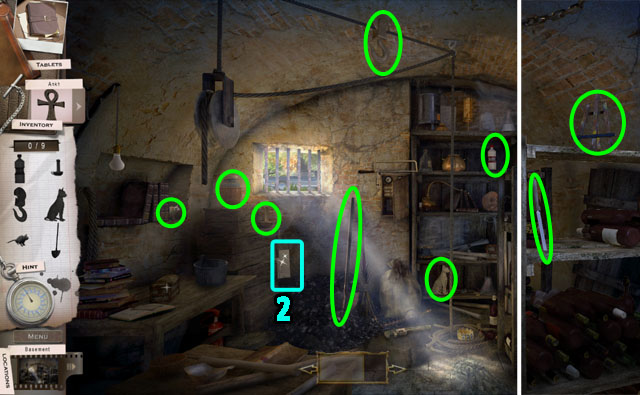
- Click on the list on the left side of the screen (2).
- Find the 9 objects highlighted in green.
- You will receive the FILE.
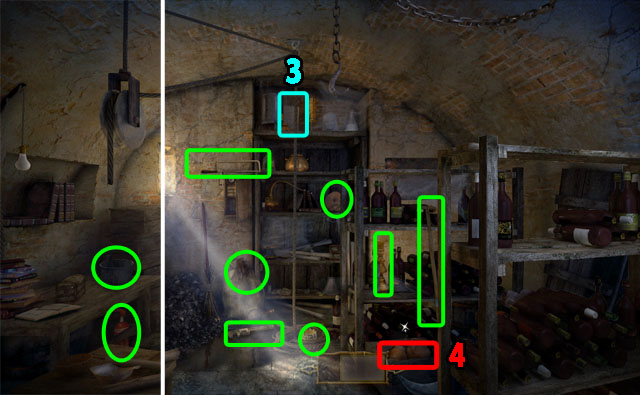
- Click on the list in the middle of the screen (3).
- Find 9 hidden objects from the list.
- You will receive the HACKSAW.
- Click on the wooden box on the right side (4).
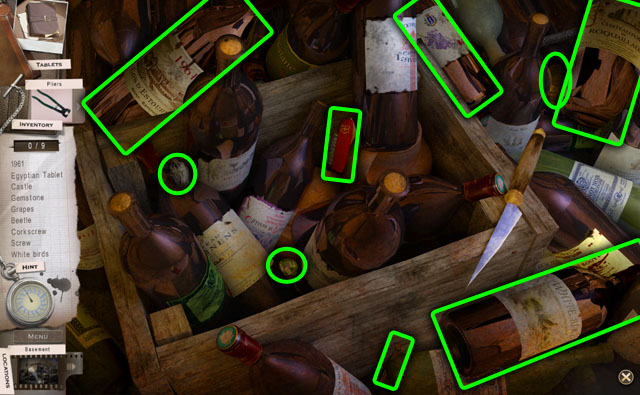
- Find 9 hidden objects from the list.
- You will receive the TABLET.
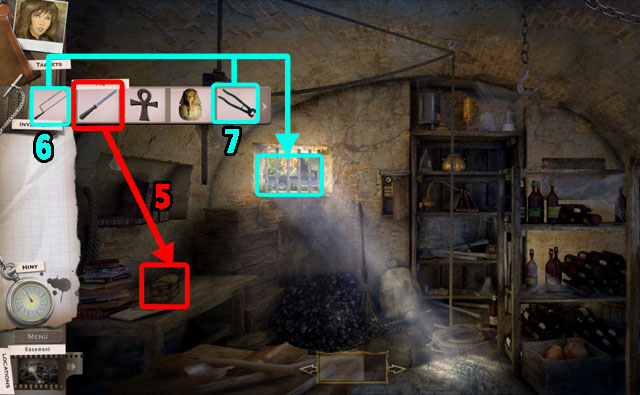
- Open the chest in the bottom left corner with the FILE (5).
- Click on the chest to read the letter.
- You will receive the MAP PIECES and CRUISE TICKET.
- Cut the bars in the window with the HACKSAW (6).
- Use the PLIERS to get through the window (7).
- Move outside through the window.
Chapter 3
- Enter the hotel in the middle of the screen.
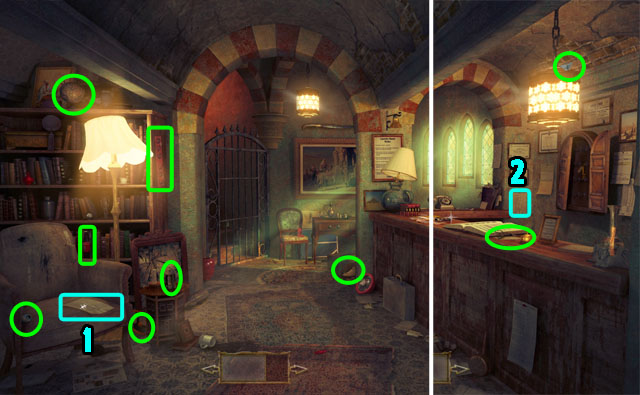
- Click on the list in the bottom left corner of the screen (1).
- Find 9 hidden objects from the list.
- You will receive the STEERING WHEEL.
- Click on the list in the right side of the screen (2).
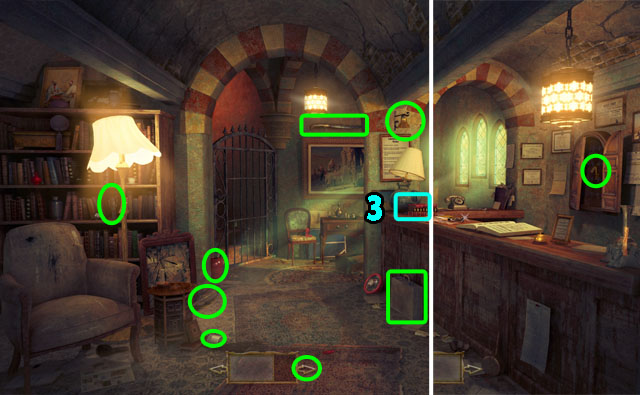
- Find 9 hidden objects from the list.
- You will receive the ROOM KEY.
- Click on the ashtray on the counter (3).
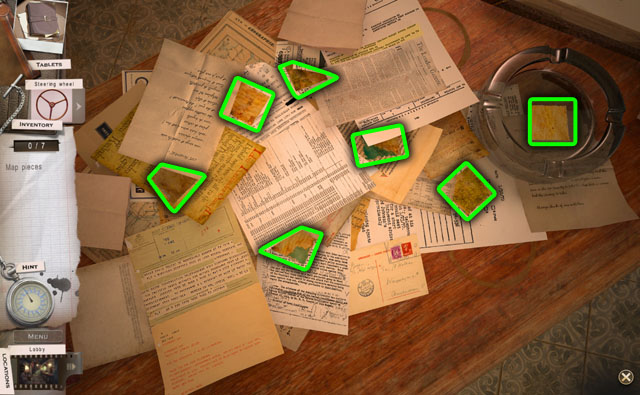
- Find 7 pieces of the map.
- You will receive the MAP PIECES.
- Open the gate in the middle of the scene with the ROOM KEY.
- Enter the room.
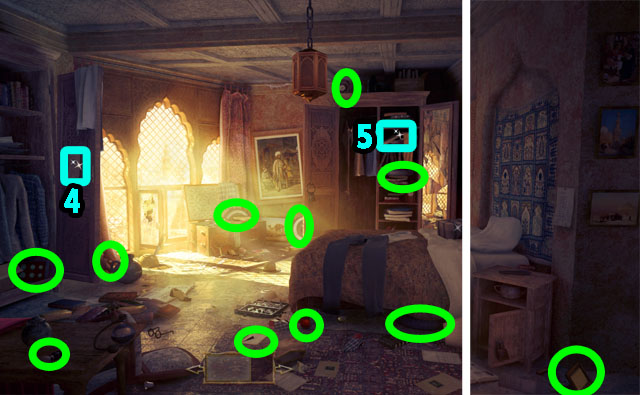
- Click on the list in the left side of the screen (4).
- Find 12 hidden objects from the list.
- You will receive the WHEELS.
- Click on the closet in the middle (5).
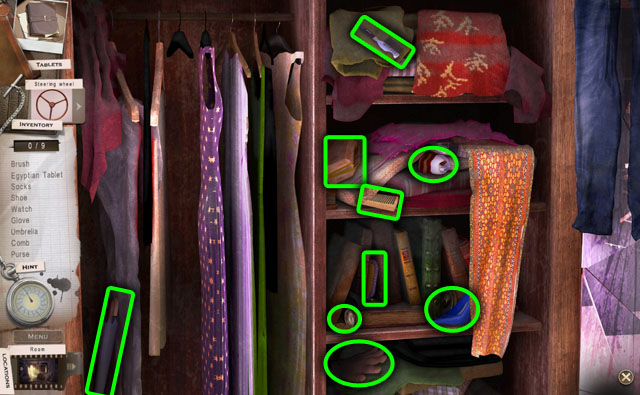
- Find 9 hidden objects from the list.
- You will receive a TABLET.
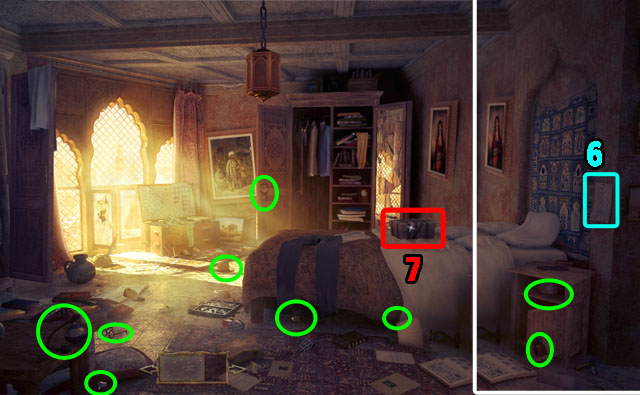
- Click on the list in the right side of the screen (6).
- Find 9 hidden objects from the list.
- You will receive a KNIFE.
- Cut the tape on the box on the bed with the KNIFE (7).
- Put the map pieces into the box.
- Click on the box to move to the next scene.
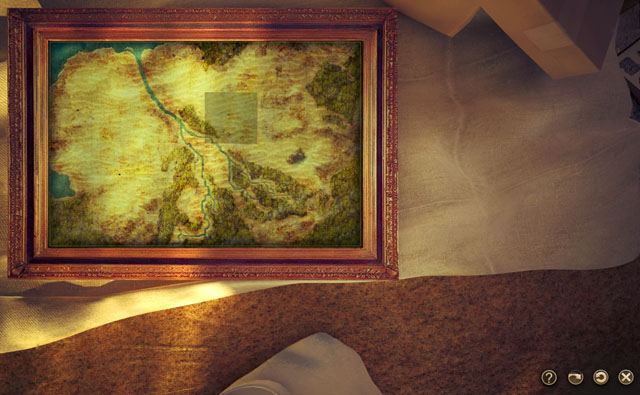
- Arrange the map pieces correctly to complete the map.
- To complete the map, drag the pieces into the frame and move them around.
- You do not need to rotate any pieces.
- Refer to the screenshot for the final image.
- Return to the dock through the lobby.
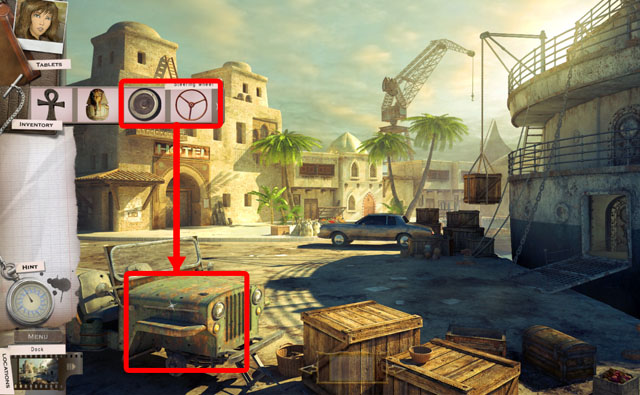
- Put the STEERING WHEEL and the WHEELS on the old truck in the bottom left corner.
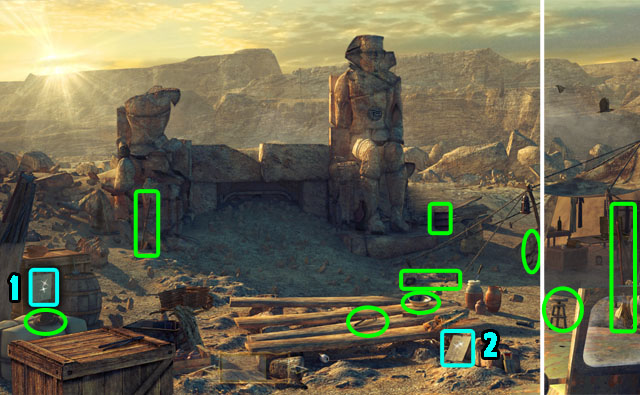
- Click on the list in the left side of the screen (1).
- Find 9 hidden objects from the list.
- You will receive the SHOVEL.
- Click on the list in the middle of the screen (2).
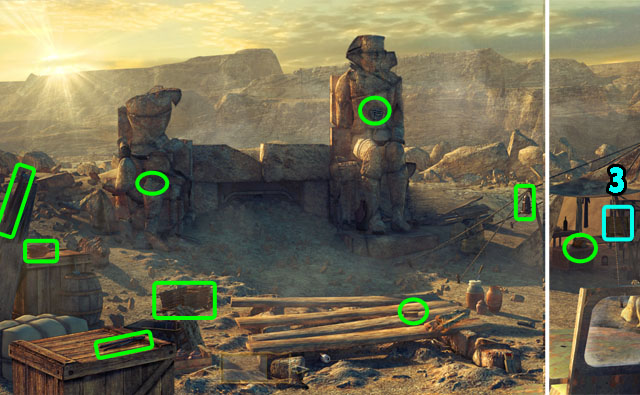
- Find 9 hidden objects from the list.
- The names in the list are randomized.
- You will receive the EYE OF HORUS.
- Click on the suitcase in the right side of the screen (3).
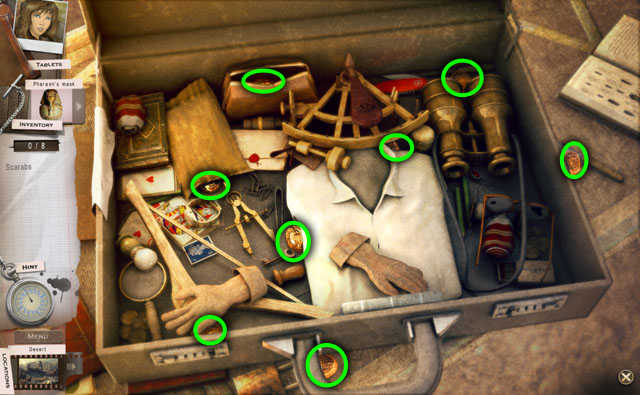
- Find 8 scarabs.
- You will receive the SCARABS.
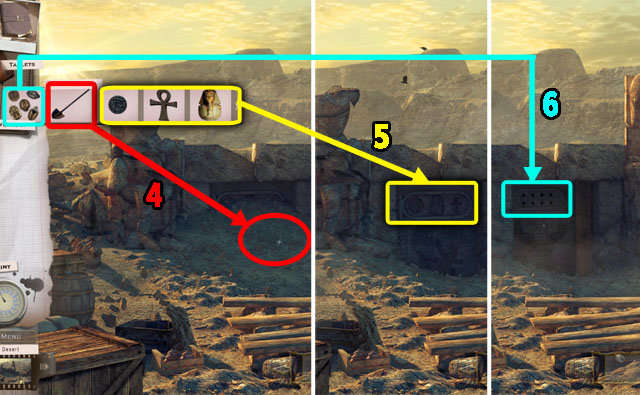
- Dig the ground with the SHOVEL (4) to remove dirt from in front of the stone arch.
- Put the EYE OF HORUS, ANKH, and the PHARAOH’S MASK into the stone hole (5).
- Place the SCARABS in the smaller holes that appear (6).
- Enter the antechamber.
Chapter 4
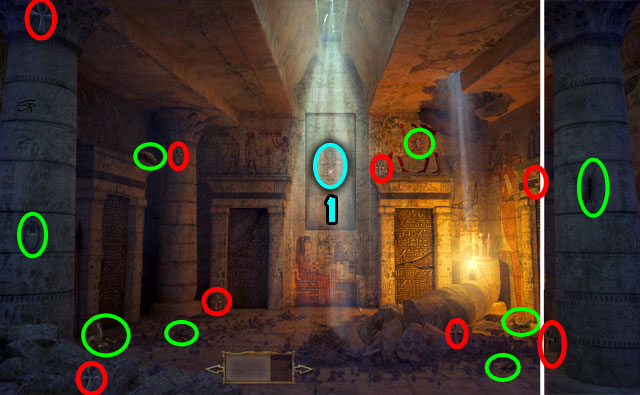
- Find 9 hidden objects highlighted in green in the list.
- Click on the outline of an ankh in the middle (1).
- Find 8 ankhs highlighted in red.
- You will receive the ANKH.
- Place the ANKH in the middle (1).
- Click on the grid to move to the next scene.
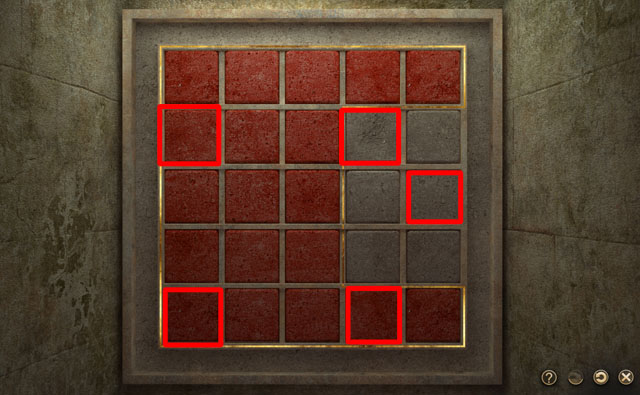
- Recreate the pattern shown in light red by selecting the correct stones in order to unlock the tomb doors.
- The light red stones will also have a gold border around them that tells you which stones need to be lit.
- Clicking on a stone will flip the color of the stone and all of the stones touching it, including diagonals; if a stone is red, it will get turned off to white again.
- Click on the circling arrow to restart the puzzle if you get stuck.
- Click 5 tiles highlighted in red in the screenshot in any order to complete the puzzle.
- Enter the Anubis Statue by clicking between 2 posts in the left side of the screen.
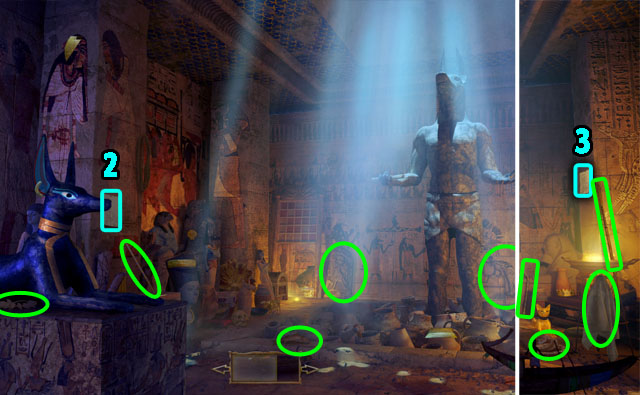
- Click on the list in the left side of the screen (2).
- Find 9 hidden objects highlighted in green in the list.
- You will receive a PIECE OF FRESCO.
- Click on the list in the right side of the screen (3).
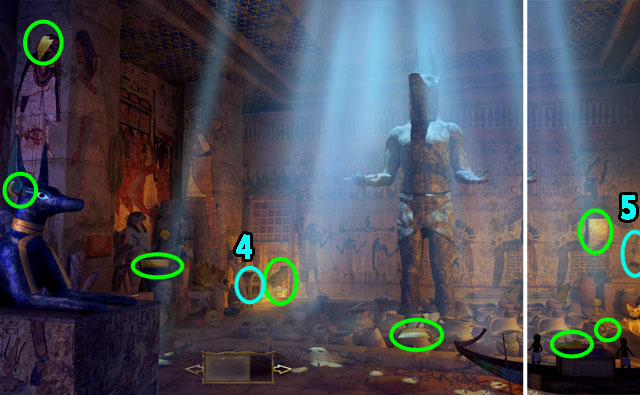
- Click on the list in the left side of the screen (4).
- Find 8 pieces of the urn.
- You will receive the URN.
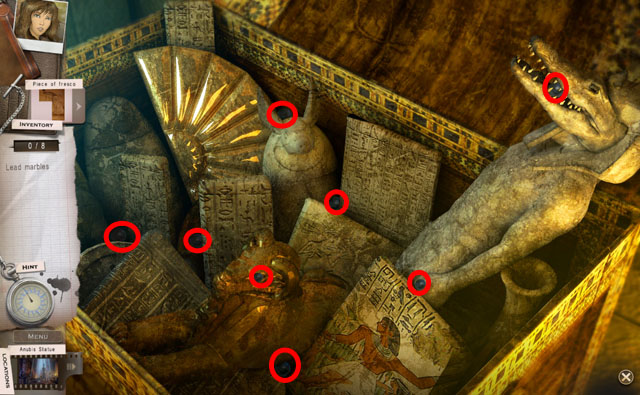
- Find 8 lead marbles.
- You will receive the LEAD MARBLES.
- Click on the white statue in the right side of the screen (5 in the previous screenshot).
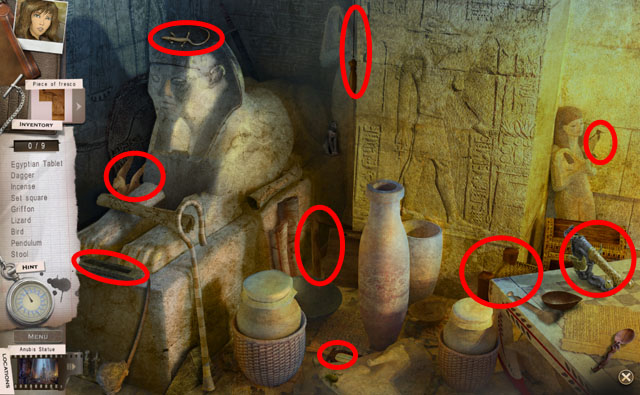
- Find 9 hidden objects from the list.
- You will get another TABLET.
- Return to the antechamber.
- Click on the grid in the middle to start the puzzle.
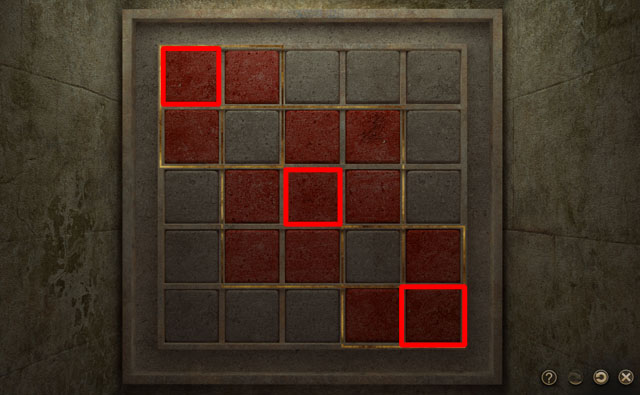
- Unlock the tomb doors by recreating the stone pattern shown in light red.
- The light red stones will also have a gold border around them that tells you which stones need to be lit.
- Clicking a stone will flip the color of the stone and all of the stones touching it, including diagonals.
- If a stone is red, it will get turned off to white again.
- Click on the circling arrow to restart the puzzle if you get stuck.
- Click the three tiles, highlighted in red in the screenshot, in any order to complete the puzzle.
- Enter the pantry from the left side of the gate.
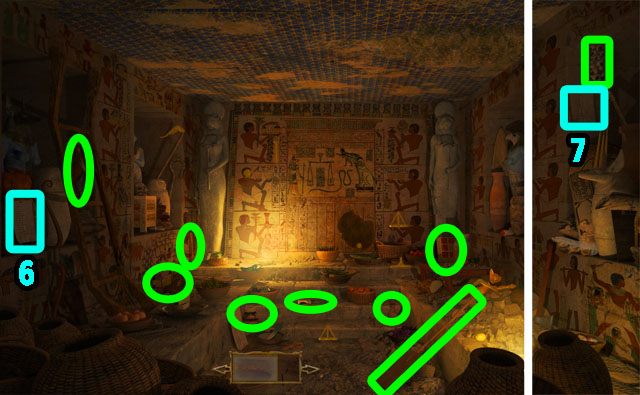
- Click on the list in the left side of the screen (6).
- Find 9 hidden objects from the list.
- You will receive a PATTERN PIECE.
- Click on the list in the right side of the screen (7).
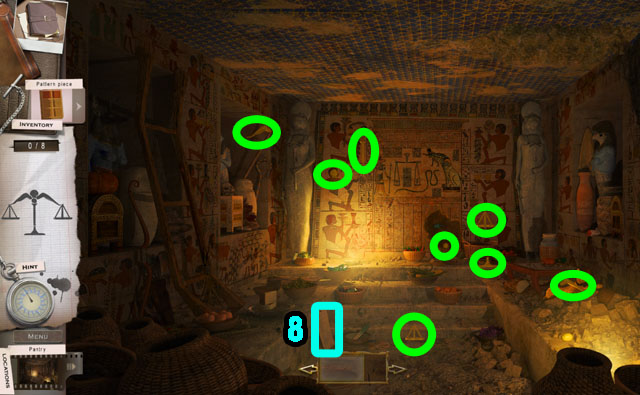
- Find 8 pieces of the scale.
- You will receive the SCALE.
- Click on the list at the bottom of the screen (8).
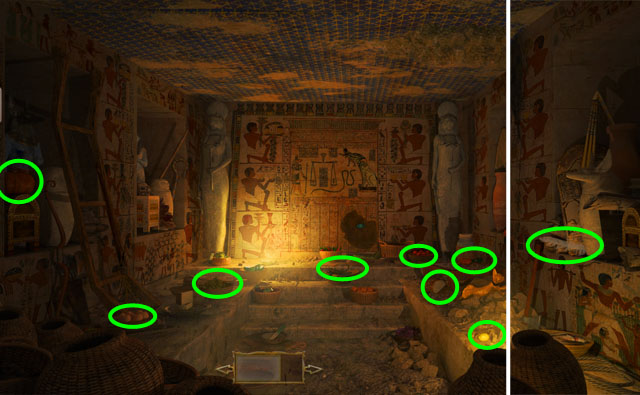
- Find 9 hidden objects from the list.
- You will receive a FEATHER.
- Return to the antechamber.
- Enter the fresco from the right side of gates.
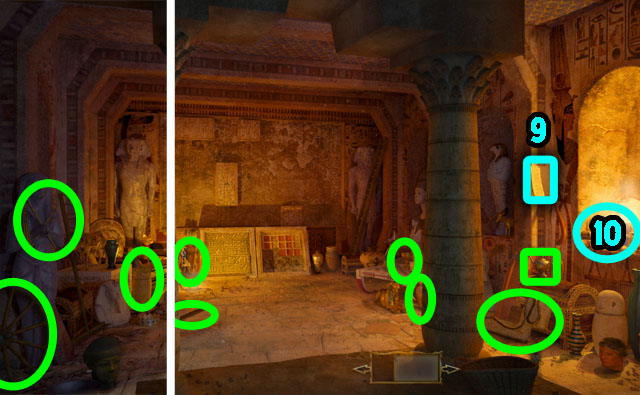
- Click on the list in the right side of the screen (9).
- Find 9 hidden objects from the list.
- You will receive another PIECE OF FRESCO.
- Click on the shelf in the right side of the screen to move to the next scene (10).
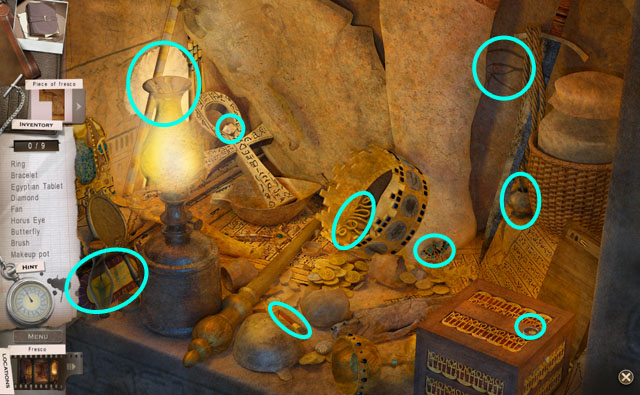
- Find 9 hidden objects from the list.
- You will receive another TABLET.
- Return to the antechamber.
- Move to the Anubis Statue.
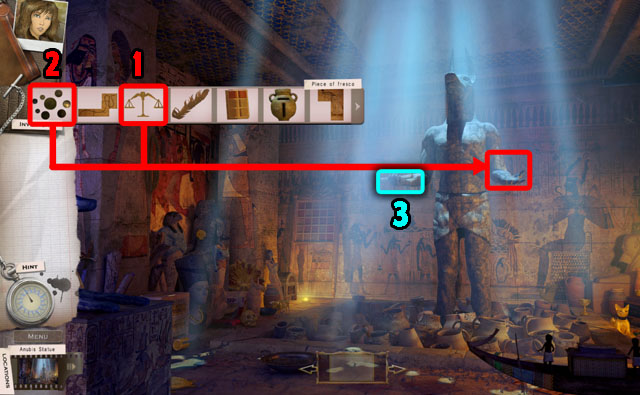
- Place the SCALE in the statue’s left hand (1).
- Place the LEAD MARBLES onto the SCALE (2).
- Click on the right hand to collect another PATTERN PIECE (3).
- Return to the antechamber.
- Enter the fresco.
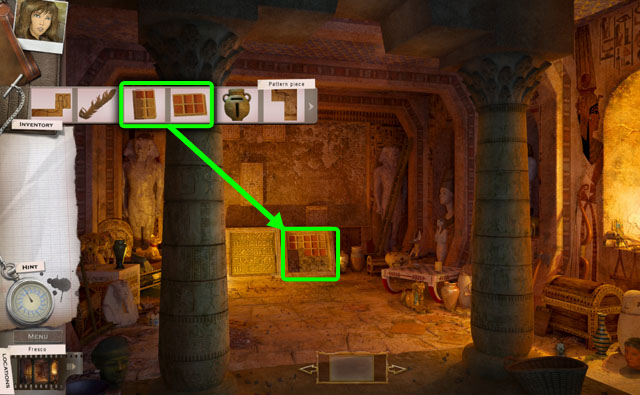
- Place 2 PATTERN PIECES from the inventory into the frame in the middle.
- Return to the antechamber.
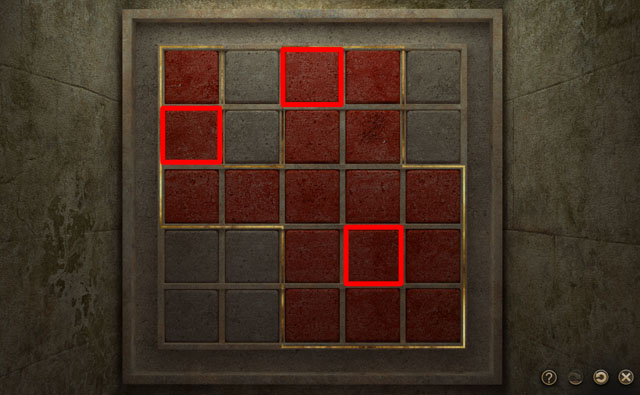
- Unlock the tomb doors by recreating the stone pattern shown in light red.
- The light red stones will also have a gold border around them that tells you which stones need to be lit.
- Clicking a stone will flip the color of the stone and all of the stones touching it, including diagonals.
- If a stone is red, it will get turned off to white again.
- Click on the circling arrow to restart the puzzle if you get stuck.
- Click the 3 tiles, highlighted in red in the screenshot, in any order to complete the puzzle.
- Enter the corridor in the left side of the screen.
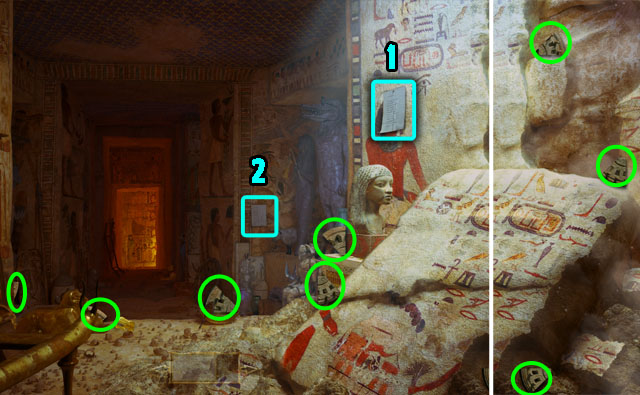
- Click on the list in the right side of the screen (1).
- Find 8 pieces of the wheel.
- You will receive the WHEEL.
- Click on the list in the middle of the screen (2).
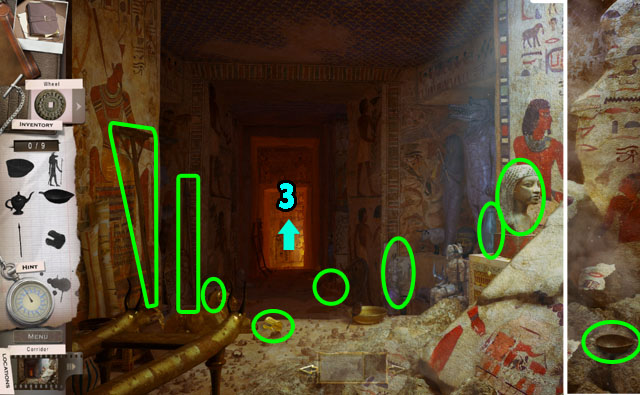
- Find 9 hidden objects from the list.
- You will receive another PIECE OF FRESCO.
- Enter the Abyss in the middle (3).
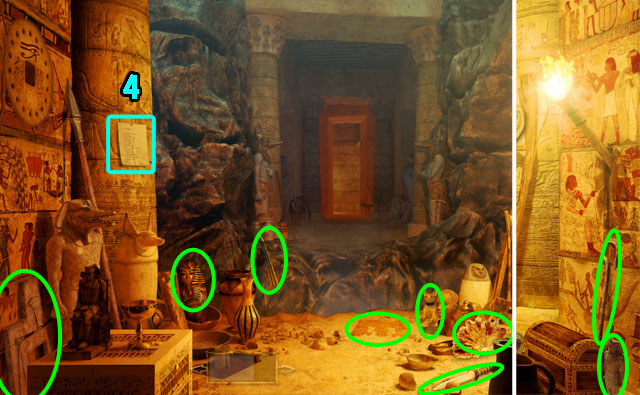
- Click on the list in the left side of the screen (4).
- Find 9 hidden objects from the list.
- You will receive the last PIECE OF FRESCO.
- Return to the fresco.
- Place one of the PIECES OF FRESCO in the missing spot in the middle.
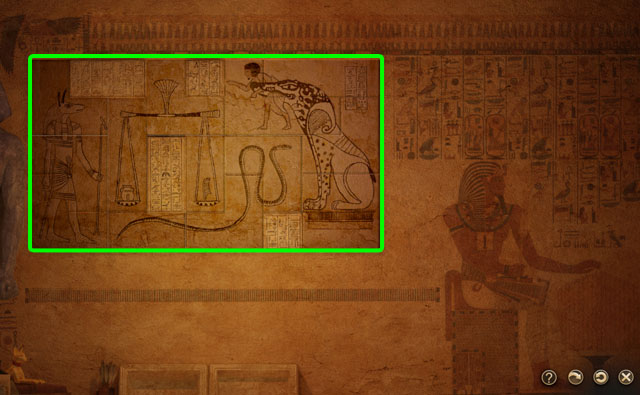
- Place the pieces on the fresco to lock them to the grid.
- Connect all the pieces to make a square shape without any overlapping.
- Finish the image following the solution in the screenshot.
- You do not need to rotate any pieces.
- Click on the frame under the fresco.
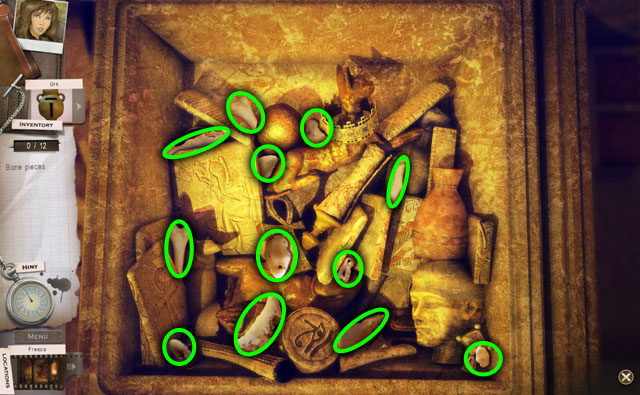
- Find the 12 pieces of bone.
- You will receive the HANDLE.
- Return to the Abyss.
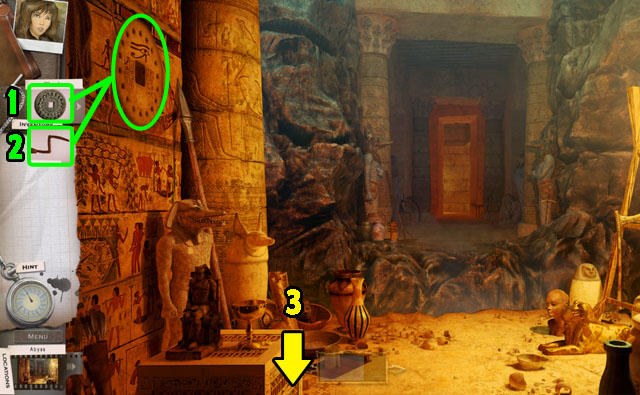
- Place the WHEEL on the left side of wall (1).
- Put the HANDLE on the wheel (2).
- Return to the corridor (3).
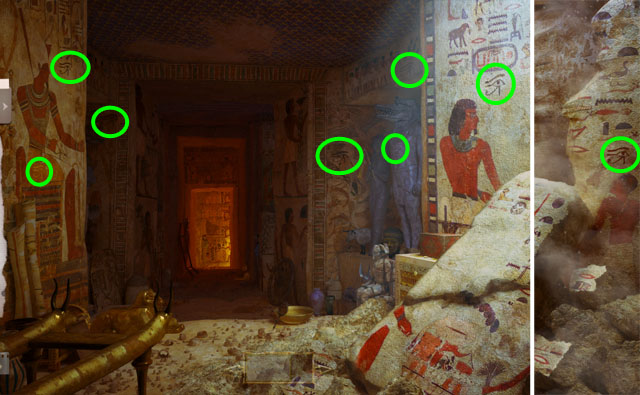
- Find 8 Horus eyes.
- Return to the Abyss again.
- Click on the handle in the right side of the screen.
- The bridge will appear.
- Enter the Judgment.
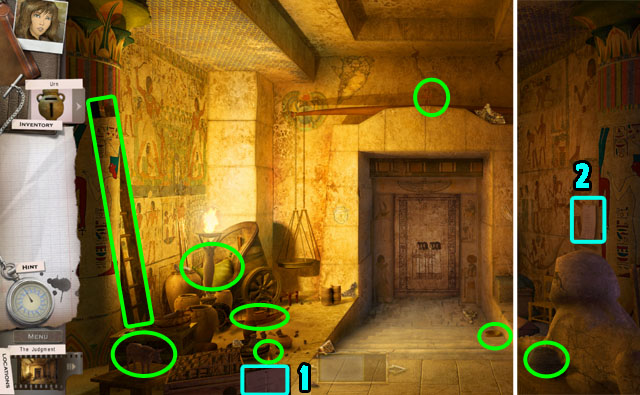
- Click on the list in the bottom left corner of the screen (1).
- Find 9 hidden objects from the list.
- The names in the list are randomized.
- You will receive a LADDER.
- Click on the list in the right side of the screen (2).
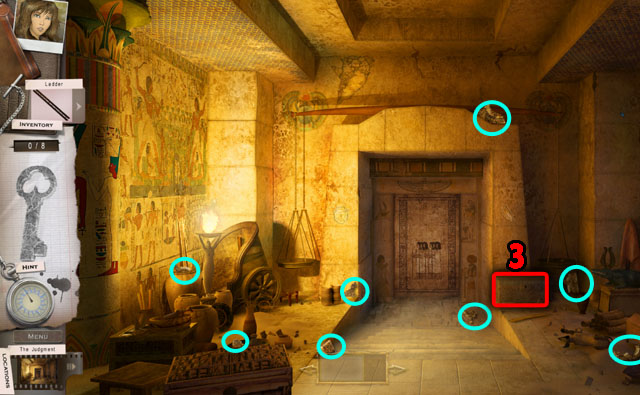
- Find 8 pieces of the key.
- You will receive the STONE KEY.
- Open the box with the STONE KEY (3).
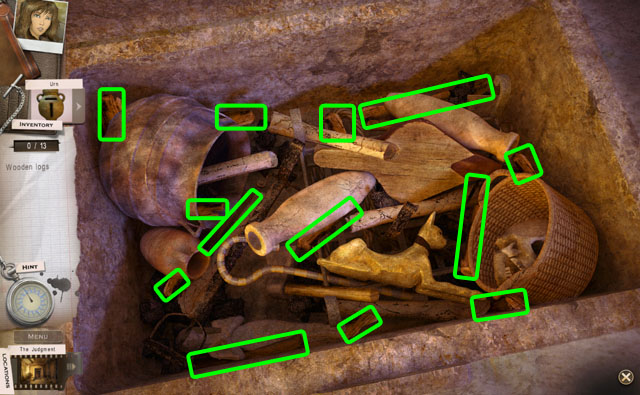
- Find 13 wooden logs.
- You will receive the WOODEN LOGS.
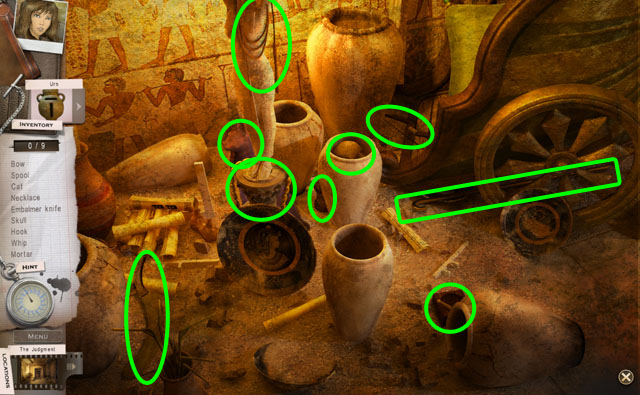
- Click on the vase in the bottom left corner of the screen.
- Find 9 hidden objects from the list.
- You will receive the CAT STATUE.
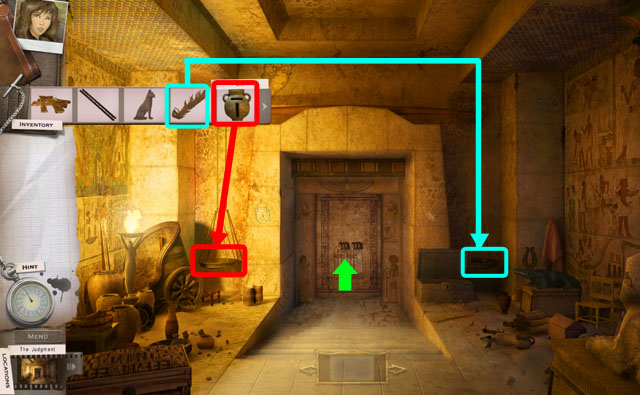
- Place the URN and the FEATHER on the scale.
- Enter the door of Babai from the entrance in the middle of the screen.
Chapter 5
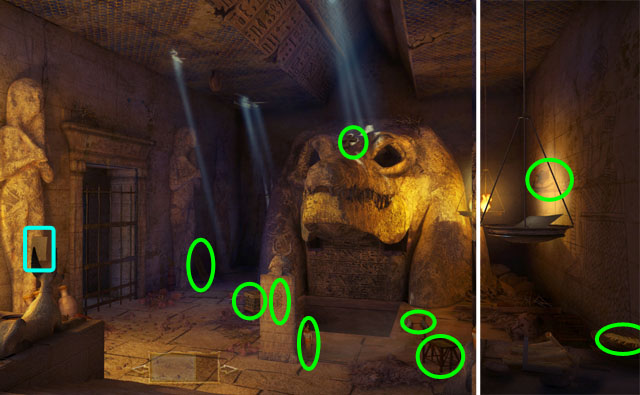
- Click on the list in the bottom left corner of the screen.
- Find 9 hidden objects from the list.
- You will receive some FLINT.
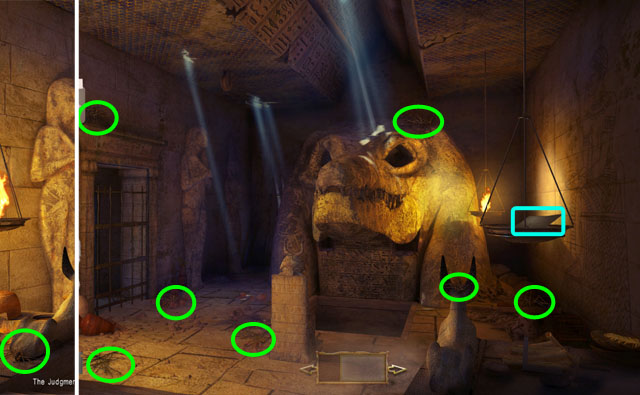
- Click on the list on the scale, on the right side of the screen.
- Find 8 twigs.
- You will receive the TWIGS.
- Place the LADDER on the statue of Babai’s eye.
- Enter the statue of Babai.
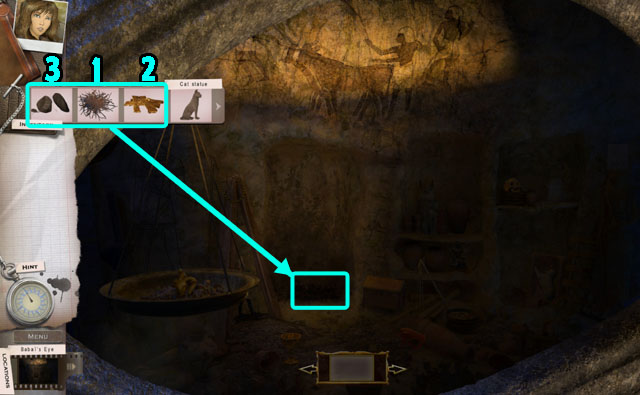
- Place the TWIGS in the fire place (1).
- Place the WOODEN LOGS (2) in the fire place as well.
- Light a fire with the FLINT (3) to light the room.
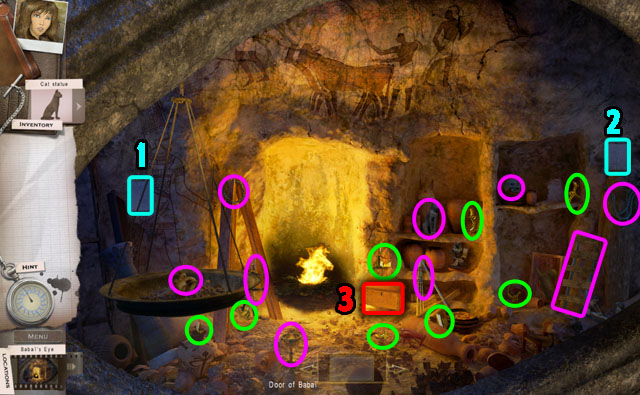
- Click on the list in the left side of the screen (1).
- Find 8 pieces of the key highlighted in green in the screenshot.
- You will receive the CHEST KEY.
- Click on the list in the right side of the screen (2).
- Find 9 hidden objects highlighted in purple in the list.
- You will receive the ROPE.
- Open the chest in the middle with the CHEST KEY (3).
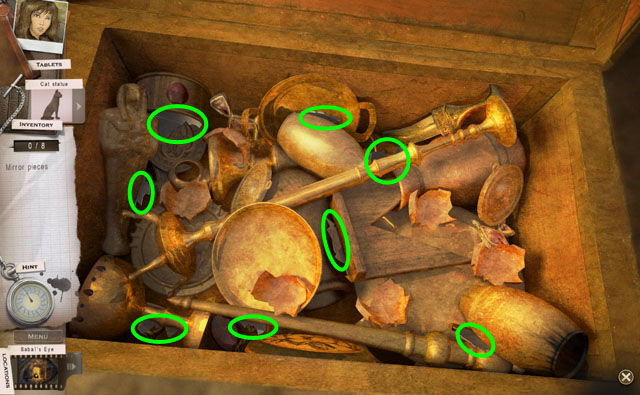
- Find the 8 pieces of mirror.
- You will receive the MIRROR.
- Return to the door of Babai.
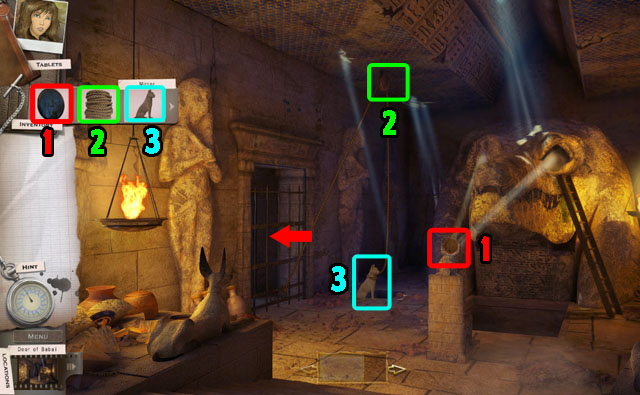
- Place the MIRROR on the turtle statue (1).
- Put the ROPE on the pulley (2).
- Tie the CAT STATUE with the rope (3).
- Click on the CAT STATUE to drop it into the hole.
- Enter the well now that the door is open.
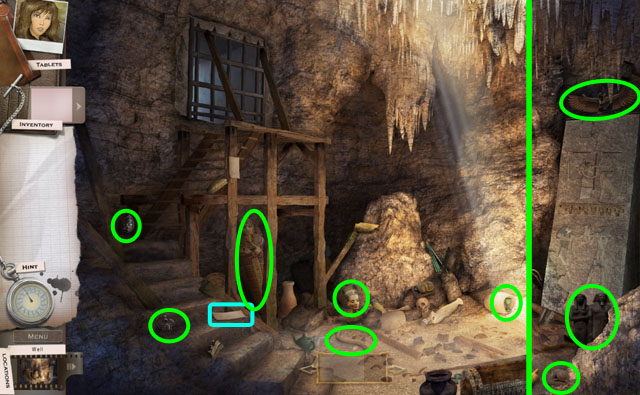
- Click on the list in the bottom right corner of the screen.
- Find 9 hidden objects from the list.
- You will receive a MAGNIFYING GLASS.
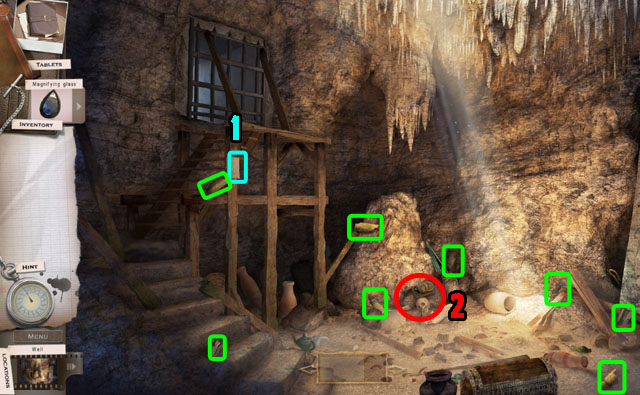
- Click on the list in the middle of the screen.
- Find 8 pieces of the torch.
- You will receive a TORCH.
- Click on the skull on the ground (2).
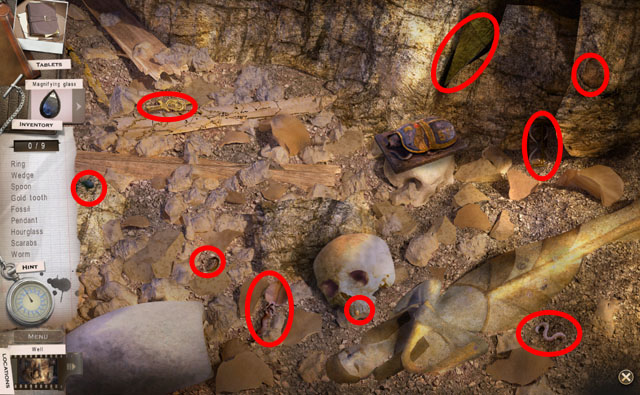
- Find 9 hidden objects from the list.
- You will receive the WEDGE.
- Move to the secret room in the far right side of the screen.
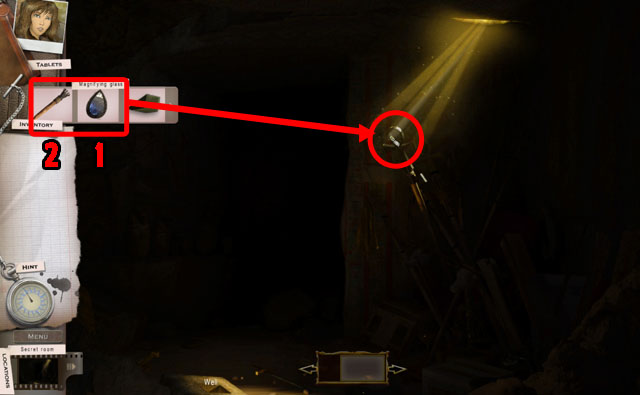
- Place the MAGNIFYING GLASS into the hole of the ankh getting hit by sunlight.
- Drag the TORCH to the MAGNIFYING GLASS to light up the room.
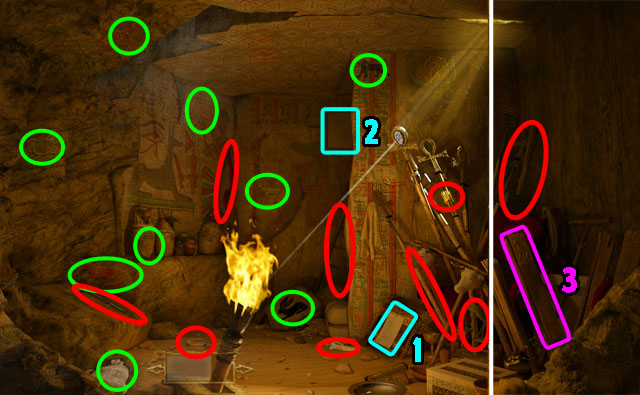
- Click on the list in the bottom side of the screen (1).
- Find 9 hidden objects highlighted in green in the list.
- You will receive the SACK OF GRAIN.
- Click on the list in the middle of the screen (2).
- Find 9 hidden objects highlighted in red in the list.
- You will receive the MACE.
- Click on the board highlighted in purple to move to the next scene (3).
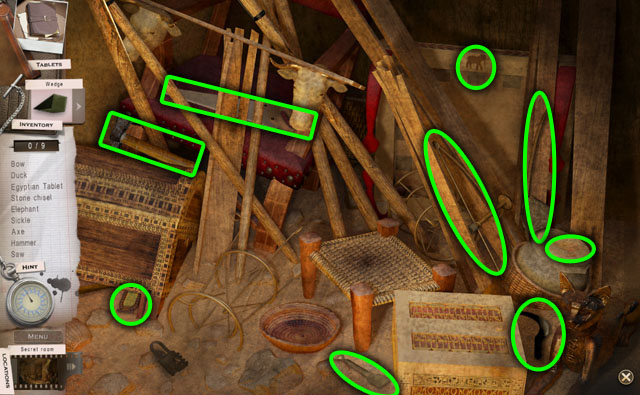
- Find 9 hidden objects highlighted in green in the list.
- You will receive another TABLET.
- Return to the well.
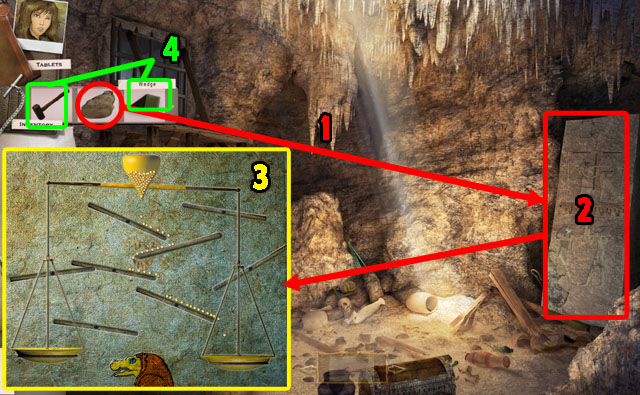
- Drag the SACK OF GRAIN onto the stone (1).
- Click the stone to start the puzzle (2).
- Change position of the platforms to make the grain fall into the tray on the right (3).
- Refer to the screenshot for a sample solution.
- Place the WEDGE under the gate. Break the gate with the MACE (4).
- Return to the door of Babai.
- The statue of Babai’s mouth will now be open.
- Enter the tomb.
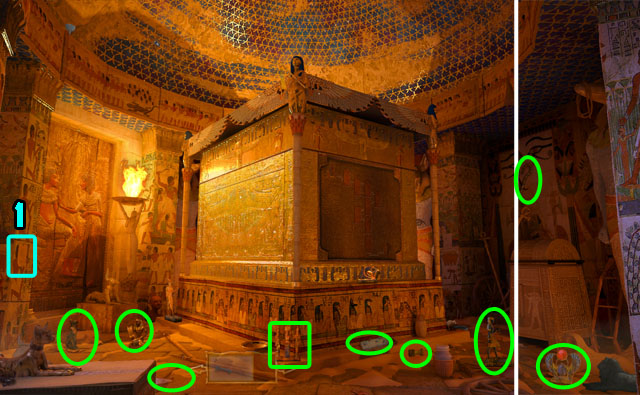
- Click on the list at the bottom of the screen.
- Find 9 hidden objects highlighted in green in the list.
- You will receive an OIL LAMP.
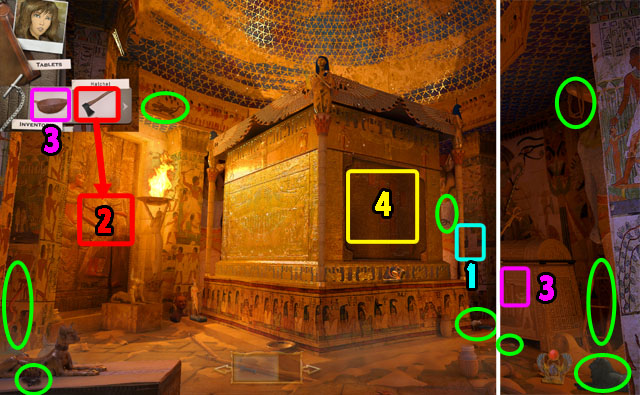
- Click on the list in the middle of the screen (1).
- Find 9 hidden objects highlighted in green in the list.
- You will receive the HATCHET.
- Break the door on the left with the hatchet.
- You will find a KEY (2).
- Use the OIL LAMP to put oil into the key hole on the right side of the screen (3).
- Use the KEY on the key hole to open the chest.
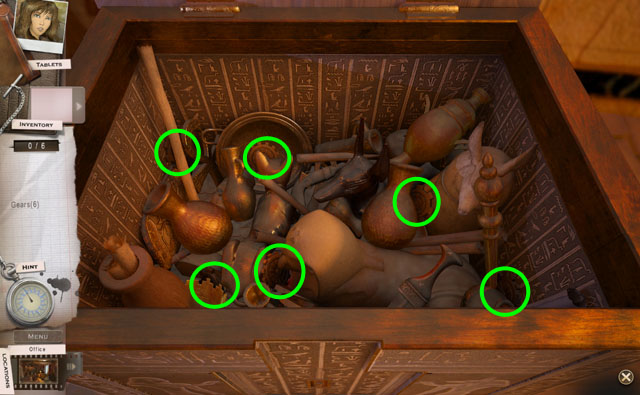
- Find the 6 hidden gears in the scene.
- You will receive the GEARS in your inventory.
- Exit the scene and click on the area in the middle of the sarcophagus to start the puzzle.
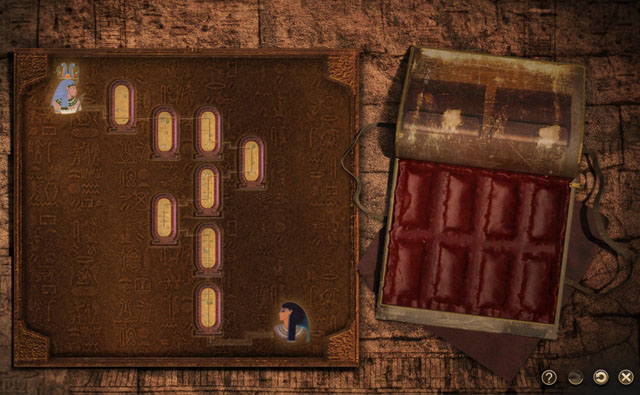
- Place the tablets from your case into the correct spots on the map (marked 4 in the previous screenshot).
- The line through the tablets should run uninterrupted from the top left corner to the bottom right.
- The line is small and hard to see but that is the only way to line up the tablets.
- See the screenshot for the correct solution.
- Once this is finished the panel will slide down and another panel will be visible.
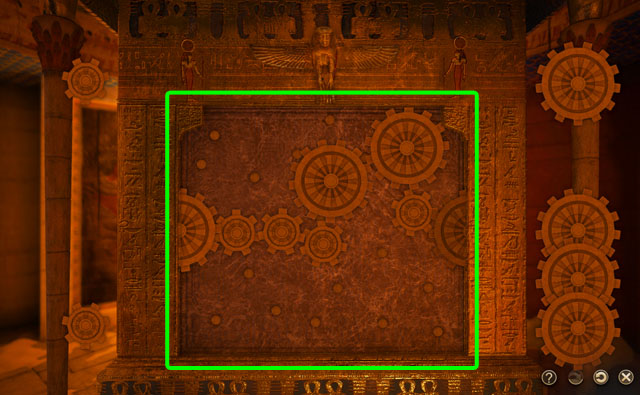
- Use the GEARS on the panel.
- Place the gears on the metal plate.
- Connect the gears from the left side to the right side. They must all be touching to move each other.
- You do not need to use all the gears.
- Refer to the screenshot for a sample solution.
- Congratulations! You’ve Completed The Secret Legacy: A Kate Brooks Adventure!
Created at: 2011-01-23

