You were recruited by a mysterious organization, Agency 33. However, on your first mission everything went wrong – you were attacked by a stranger, and the person with whom you have to get in touch was kidnapped right before your eyes.
Whether you use this document as a reference when things get difficult or as a road map to get you from beginning to end, we're pretty sure you'll find what you're looking for here.
We hope you find this information useful as you play your way through the game. Use the walkthrough menu below to quickly jump to whatever stage of the game you need help with.
Remember to visit the Big Fish Games Forums if you find you need more help. Have fun!
This Tips and tricks article was created by Nathaniel Apgar, and is protected under US Copyright laws. Any unauthorized use, including re-publication in whole or in part, without permission, is strictly prohibited.Walkthrough Menu
- Getting Started
- The Headquarters
- User Interface
- The World Map
- Questing
- Adventuring
- Hidden Object Scenes
- HOP Anomalies
- Anomaly Rifts and Relics
- Mobs
- Collections
- The Creation Room
- Inventory
- The Shop
- Player Profile
- Achievements
Getting Started
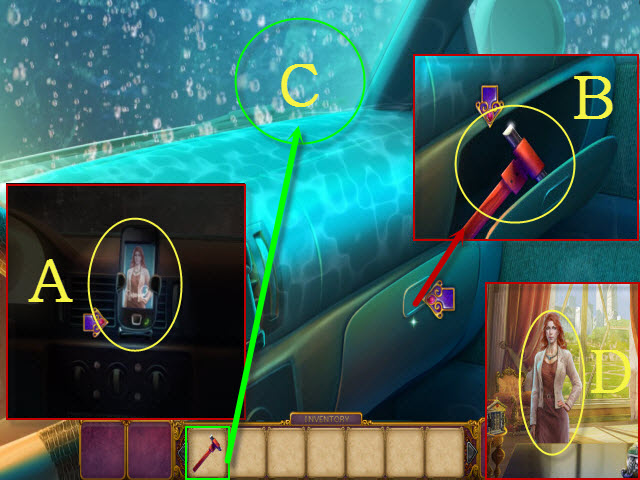
- Select the phone to answer it (A).
- Open the glove box and take the hammer (B).
- Use the hammer to smash the windshield (C).
- To begin playing, speak to Iris (D) and play through the tutorial.
The Headquarters
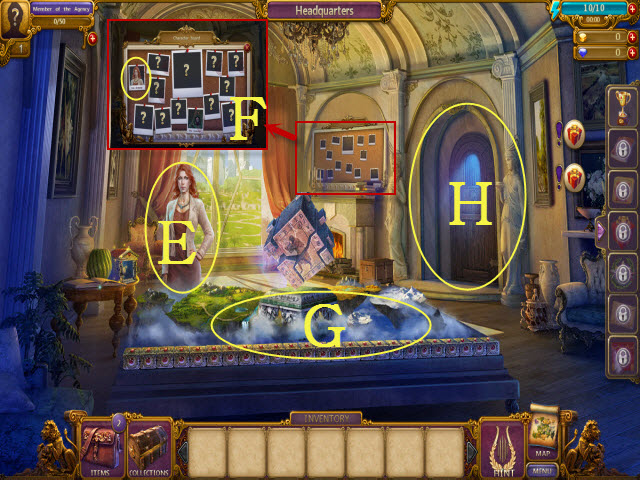
- After completing the tutorial, you will find yourself in the Headquarters.
- Iris will get you started on your quests (E).
- Select the Character Board to read profiles for each of the characters you find (F).
- After completing the introductory quests, access the World Map by selecting the table (G).
- The Creation Room can be found here (H); the Inventor will help craft many items used for various tasks.
User Interface
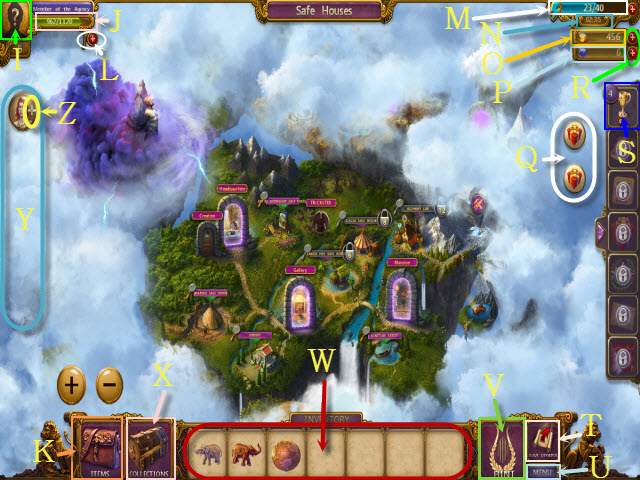
- Your Player Profile can be accessed here (I).
- This is your Experience Bar (J); gain levels to unlock new areas and items.
- View your Items here (K).
- Buy items from the Shop here (L).
- This is your Energy bar (M); energy is consumed by playing HOPs.
- This is the Energy counter (N); each time it counts down, some energy is restored.
- This is your total number of Coins; Coins can be used to purchase a variety of items and formulas (O).
- This is your total number of Orbs; Orbs are used to purchase items, buy crafted items, defeat Mobs, and more (P).
- Select these icons to view special item sales (Q).
- Select the plus signs to purchase more Coins, Orbs, or Booster Packs (R).
- View a summary of your Achievements here (S).
- Return to the Headquarters here (T).
- The Menu button (U) allows you to adjust Music, Sound Effects, Custom Icons, Environmental Details, swap between full screen and windowed mode, disable hints, or to exit the game.
- If you ever get completely stumped, the Hint button (V) will set you on the correct path.
- All usable adventure items can be viewed here (W).
- All current Collections can be seen here (X).
- All of the active quests are shown here (Y).
- The main quest is denoted by a plus symbol (Z).
The World Map
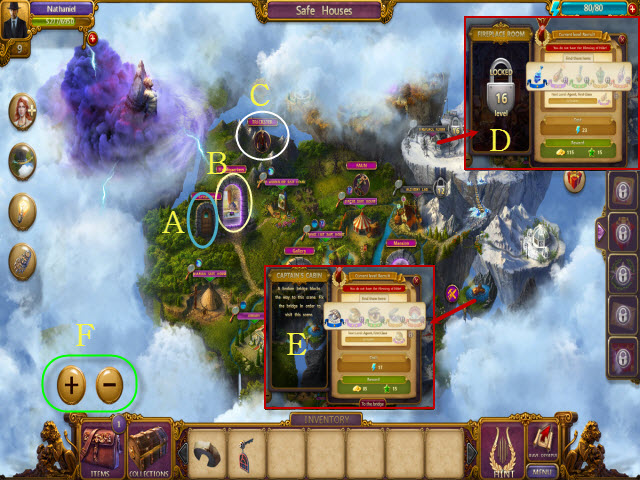
- This is the World Map; use it to travel quickly between areas.
- The Creation Room can be accessed here (A).
- Access the Headquarters here (B).
- As you gain levels and unlock new areas, you will also find Mobs (C) to banish.
- Some areas will not be readily available until reaching the appropriate level (D).
- As you progress in levels, more quests and areas will become available to explore; some of them will require additional items to unlock (E).
- Select the plus and minus buttons (F) to zoom in and out to navigate the World Map.
Questing
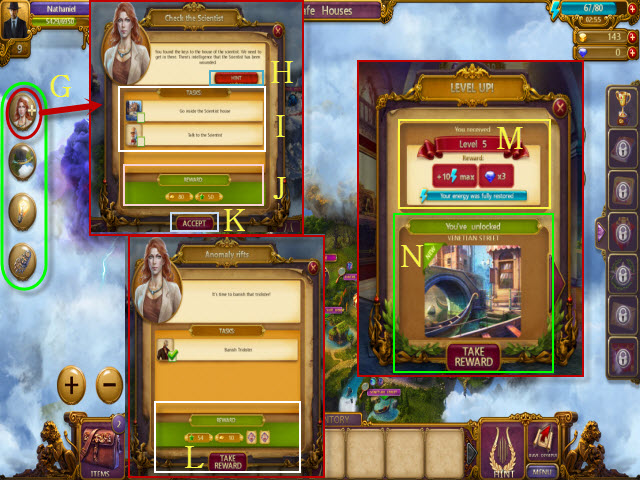
- The main goal of the game is to complete tasks, in order to find the required items to complete quests.
- Current quests are shown here (G); view them for additional information.
- If you are in need of help, select the Hint button (H) to teleport to the correct location.
- The Task List (I) shows the tasks required for quest completion.
- The rewards for quest completion are displayed here (J); gaining experience points through completing quests is how you gain levels.
- Accept a quest here (K).
- When you complete a quest, take your rewards here (L).
- Gaining levels will increase your total energy pool and reward you with Orbs (M).
- Gaining levels will also unlock new areas (N).
Adventuring
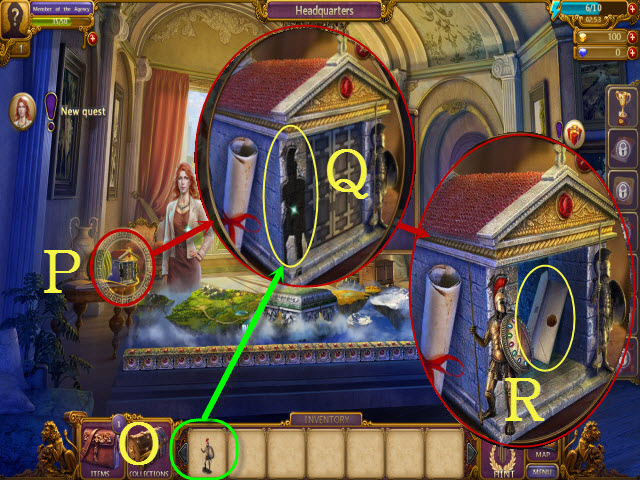
- Completing tasks will sometimes reward you with usable items.
- These items will be placed in your Inventory here (O).
- Some quests require using an item on a point of interest (P) for progression.
- Place the object in the correct area (Q) to complete task objectives, find additional items (R), and to unlock more quests and locations.
Hidden Object Scenes
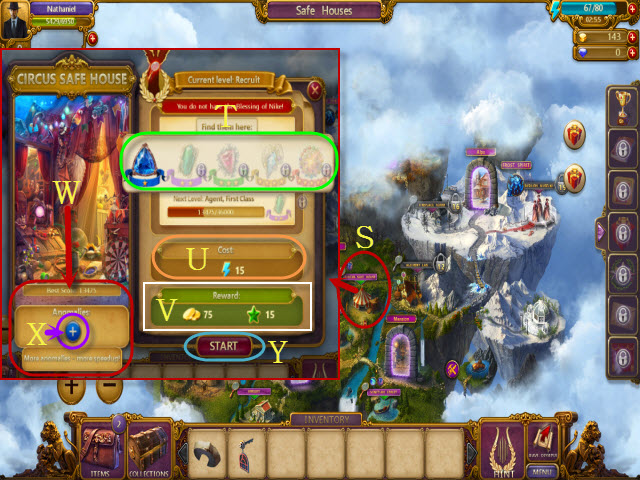
- One of the main ways of completing quest tasks is by finding the required item by completing a HOP.
- Select a HOP from the World Map to view its details (S).
- This is the current HOP rank (T); certain HOP ranks must be achieved to find certain items.
- Each HOP has an Energy requirement to play it (U).
- This is the Coin and Experience reward for completing the HOP (V).
- This is where HOP penalties, known as Anomalies, are displayed (W).
- You can purchase Anomalies with Orbs here (X) if you want an extra challenge and the extra rewards that come with them.
- Anomalies increase the energy cost of playing a HOP; however, you will gain bonus Coins, Experience Points, and extra rewards if you complete a HOP with an active Anomaly.
- Multiple Anomalies can be activated at once for even greater rewards.
- Select the Start button to play the HOP (Y).
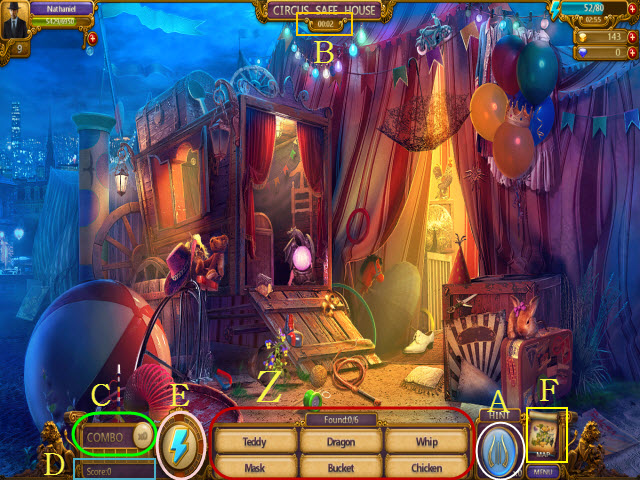
- This is your hidden item list (Z); find them all to complete the HOP.
- Select the Hint button (A) to show where an item is; the hint button takes some time to re-charge.
- If you are out of Hints, select the Hint Button to purchase more with Coins.
- This is your HOP timer (B); the faster the HOP is completed, the higher your total score will be.
- This is your combo multiplier (C); find items in rapid succession to gain bonus multipliers for a higher score.
- Your current score is displayed here (D).
- When you return to the World Map after completing the HOP, you will receive the bonus that is displayed here when the HOP is completed (E).
- You can select the World Map (F) to exit the HOP at any time, but all current HOP progress will be lost.
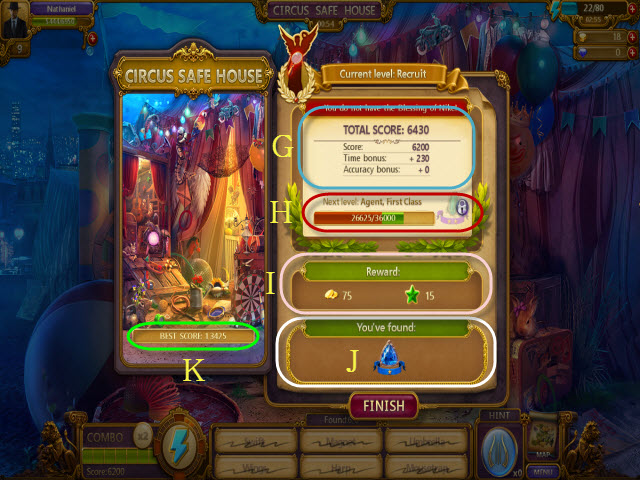
- When you complete a HOP, a window will pop up displaying your overall statistics (G).
- Gain a higher time bonus by completing the HOP faster.
- Gain more points towards the accuracy bonus by only selecting the correct items.
- This is your experience gained towards the next HOP rank (H); the amount of experience gained for completing a HOP is based upon your overall score.
- As new HOP ranks are unlocked, you will be able to find advanced items for crafting and questing.
- When a HOP levels up, the difficulty increases and more items must be found for completion.
- This is your Coin and Experience gained for completing the HOP (I).
- Your item rewards for completing the HOP are displayed here (J); you will not always find the required item to complete a task.
- Your highest score for the HOP is displayed here (K).
HOP Anomalies
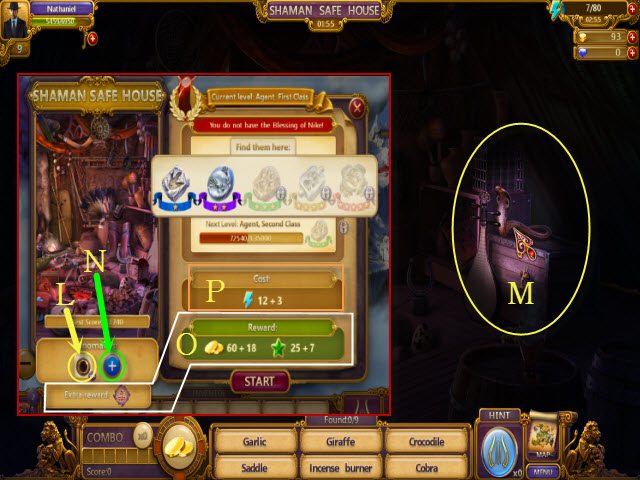
- Sometimes when you play a HOP, an Anomaly will appear; Anomalies act as a penalty that hinders your progress.
- There are a variety of penalties Anomalies can produce, such as Eclipse (L), which causes the screen to go dark (M).
- Some quest tasks require you to complete a HOP with an Anomaly in order to receive credit.
- In these cases, Anomalies may be purchased (N) with Orbs to aid task completion.
- Completing a HOP with Anomalies yields more experience, Coins, and extra rewards (O), but also costs more Energy (P) to initiate.
- As you gain HOP ranks, you may add simultaneous Anomalies for an extra challenge and even greater rewards.
- Alternatively, Anomalies may also be removed for an Orb cost.
Anomaly Rifts and Relics
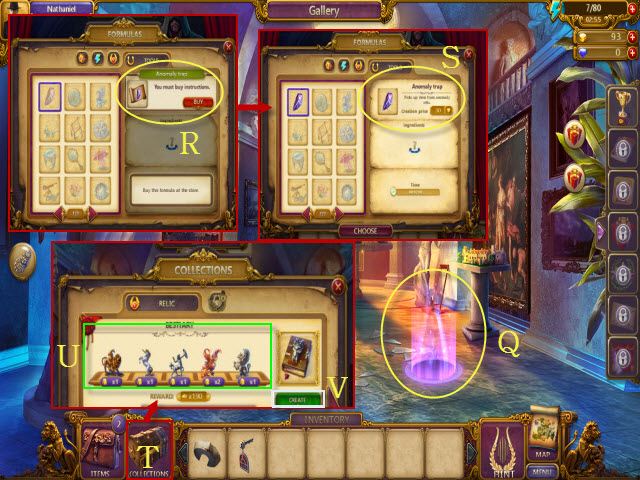
- Anomaly Rifts are another potential quest task.
- Anomaly Rifts first become available at the Gallery; after this point, you may find them all over Olympus.
- In order to complete them, you must first find and select the Anomaly (Q).
- You must purchase the Anomaly Trap recipe (R) from the Creation Room by choosing the formula and selecting it from the Tools Tab.
- Craft the Anomaly Trap for a Coin cost (S).
- Please see the Creation Room section for more detailed information on crafting items.
- Use the Anomaly Traps on the Anomaly Rifts to find Collections (T); traps are consumed each time you use one.
- After you've found a complete collection set (U), select the create button (V) and you'll be rewarded with a Relic and a Coin reward.
- Relics are used to banish Mobs for quests and additional rewards.
Mobs
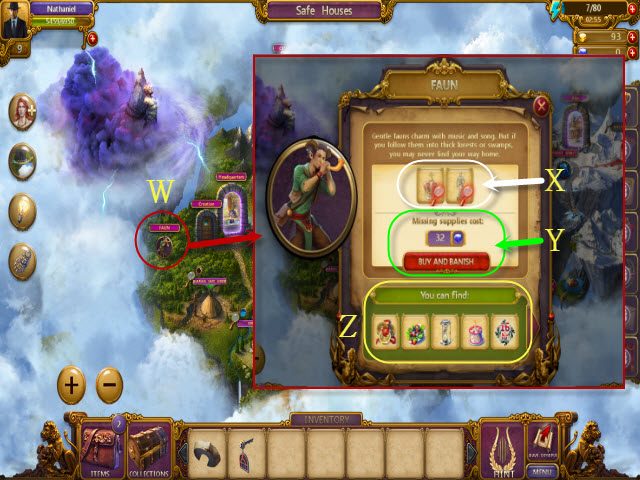
- Mobs are another possible quest task.
- You can find Mobs roaming around the World Map; to engage a Mob, select it (W).
- Mobs may be banished by using a Relic (X) or spending Orbs (Y), which can be obtained by completing Collections.
- Additional Mobs will appear on the World Map as you progress through the game; be on the lookout for new additions.
- Mobs can yield some rare rewards; view a list of them here (Z).
Collections
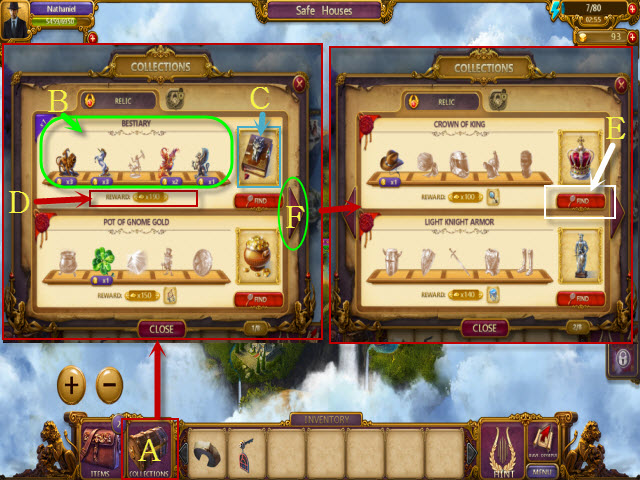
- View your Collections here (A).
- Collections are items that can be obtained from using Anomaly Traps on Anomaly Rifts.
- When a set (B) has been completed, you will receive a Relic (C), as well as a Coin or item reward (D).
- Select the Find button (E) to be directed towards the Anomaly Rift that can yield the items.
- Scroll through all of the pages with the arrow buttons (F) to view the various Collections and the Relics they can yield.
The Creation Room
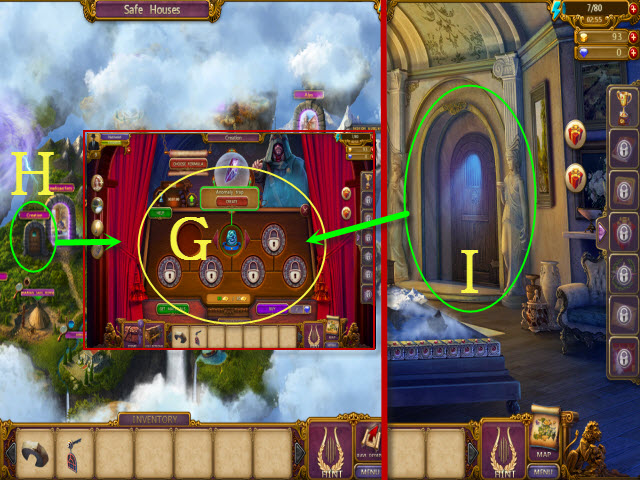
- This is the Creation Room (G); craft items here.
- You can access the Creation Room from the World Map (H) or from the Headquarters (I).
- Crafting items is an essential activity for creating certain Collections and quest items.
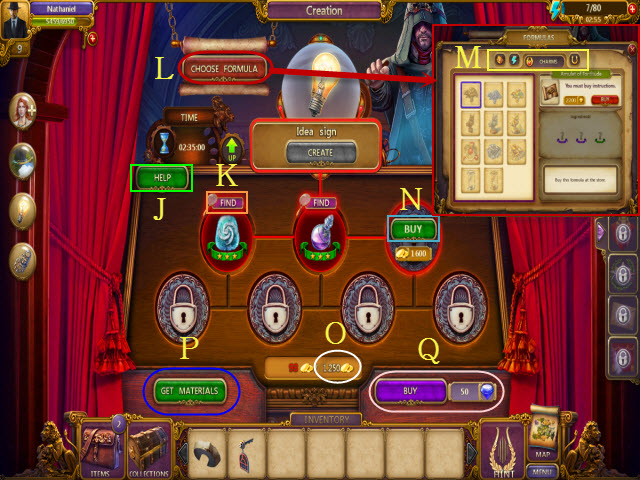
- Select the Help Button for additional information (J).
- Select the Find button (K) to be directed to the location of a needed component.
- Select Choose Formula (L) to view all of the possible formulas you can obtain; new formulas can be purchased with Coins.
- There are four different types (M) of items to craft: Inventory, Energy, Charms, and Tools; select the different tabs to view them.
- If you can't find it, buy a component you need with Coins (N).
- This is the Coin cost (O) to craft the item.
- For an Orb cost, the Get Materials (P) button will allow you to buy Chests with random crafting materials inside.
- The Buy (Q) button will allow you to purchase the completed item, for an Orb cost.
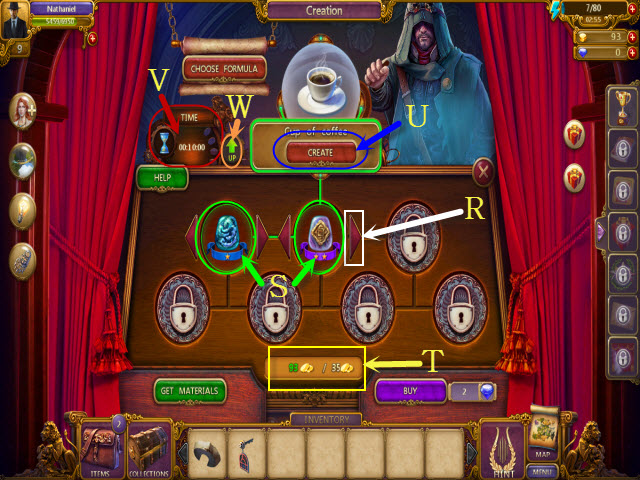
- Select the arrow keys (R) to scroll through all of the possible components you can use to craft a given item.
- Once you have chosen the correct formula and have the required materials (S) and Coins (T) to craft the item, select the Create (U) button to craft it.
- The timer indicates how long it will take to craft an item (V); however, it will tick down while you work on other tasks, so you're free to do other tasks while you wait for the item to complete.
- The Up button (W) will allow you to upgrade your crafting speeds permanently, for an Orb cost.
- More advanced formulas will become unlocked as you progress through the game.
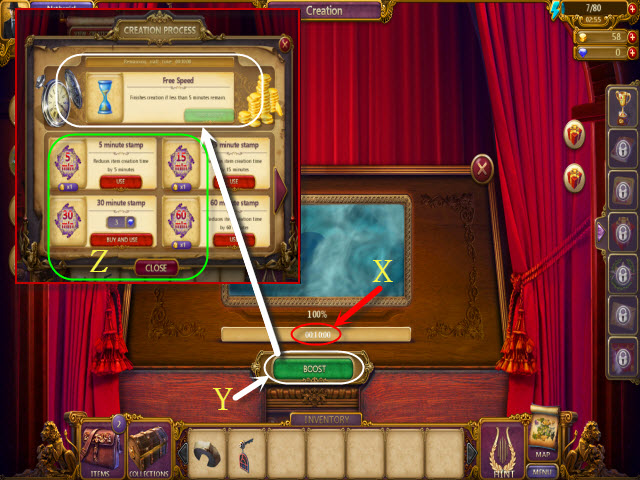
- Once the item creation process has begun, the Creation screen will appear.
- This timer (X) represents how much time remains until the item is created.
- The Boost button (Y) will give you a free boost of speed and open the Shop; the boost may only be used in the last five minutes of the crafting process, but it is a useful time saver.
- You may also purchase stamps from the Shop with Orbs (Z), or find them by completing HOPs with Anomalies; these stamps can reduce creation times or eliminate them completely.
Inventory
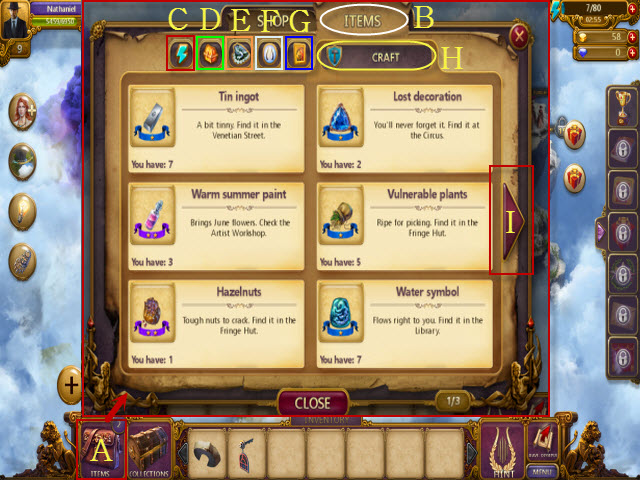
- Access the Inventory here (A).
- This is the Items Tab (B); all of your general items are found here.
- Access your Energy Replenishing items in the Energy Tab (C).
- View all of your Chests in the Chests Tab (D); open these to find rare and useful items.
- Your Charms are stored in the Charms Tab (E); these have a variety of short-term consumable effects to experiment with.
- This is the Tools Tab (F); this holds important items, such as Anomaly Traps, Orpheus Hints, and items used for unlocking new areas.
- The Relics Tab (G) displays all of your current Relics.
- The Crafting Tab (H) holds all of your available crafting materials.
- Use the arrows (I) to scroll through different Inventory pages.
The Shop
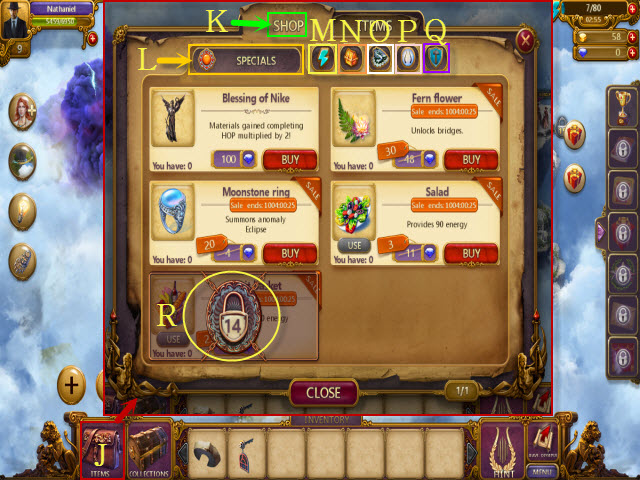
- Access the Shop here (J).
- This is the Shop Tab (K); Shop items may be purchased with Orbs or Coins.
- Buy items with unique effects in the Specials Tab (L); there are also limited time sales on these special items.
- Buy Energy Replenishing items in the Energy Tab (M).
- Buy Chests in the Chests Tab (N); these hold a variety of random crafting materials.
- Buy Charms in the Amulets Tab (O); these have useful short-term effects.
- Buy Tools in the Tools Tab (P); these can be used to unlock new areas, find Anomaly Rift items, and purchase Hints.
- Buy Craft timer-reducing items in the Craft Tab (Q).
- Some items will not be unlocked until reaching the appropriate level (R).
Player Profile
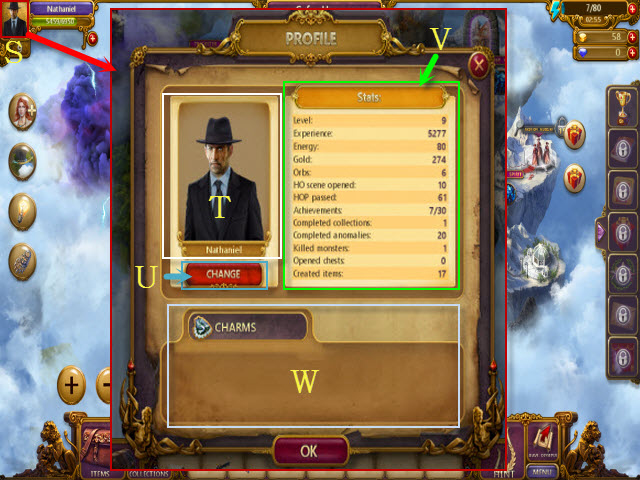
- View your player profile and statistics here (S).
- Beginning at level 5, you can choose a name and an avatar (T).
- There are a variety of interesting avatars to choose from (U); select the Change button to cycle through them.
- Check out your overall gameplay statistics here (V).
- This window displays your active Charms (W).
Achievements
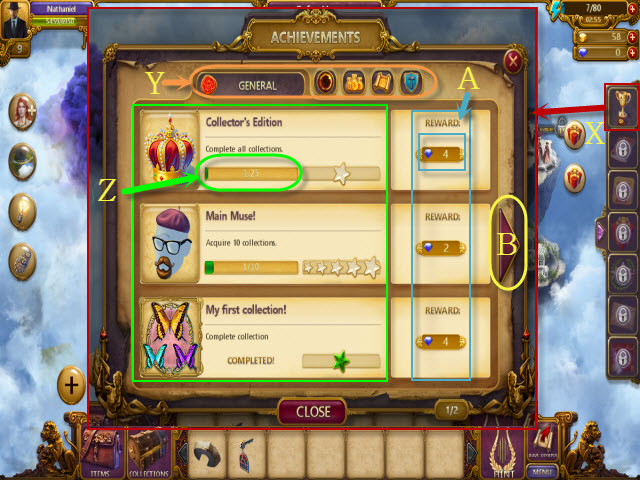
- View your Achievements here (X).
- There are five Achievement tabs to navigate: General, Anomaly, Economic, Exploration, and Creation (Y).
- Track your Achievement progress here (Z).
- Each time you complete an Achievement, you will be rewarded with Orbs; collect them here (A).
- Select the arrow (B) to cycle through the different Achievement pages in each tab.
Created at: 2014-05-28

