Walkthrough Menu
- General Tips
- Chapter 1: Entering the Theater
- Chapter 2: The Stage
- Chapter 3: In Front of the Balcony
- Chapter 4: Above the Stage
- Chapter 5: The Dressing Room
- Chapter 6: The Picnic
- Chapter 7: The Backyard
General Tips
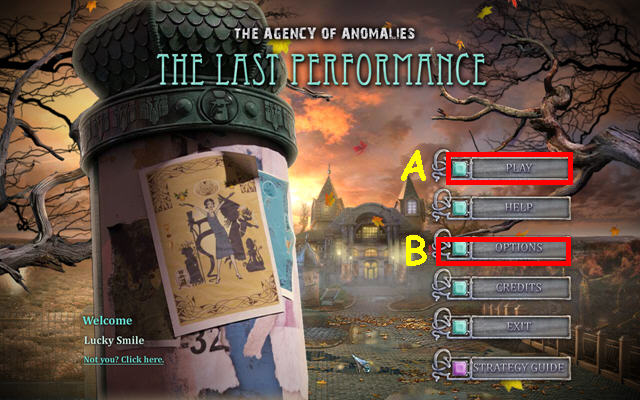
- This is the official guide for The Agency of Anomalies: The Last Performance Standard Edition.
- Press Play (A) to start the game.
- Select Options (B) to adjust volume and display mode.
- You can choose one from three difficulty levels: Casual, Advanced, and Hardcore.
- Hidden Object Scenes will be referred to as HOS during this guide.
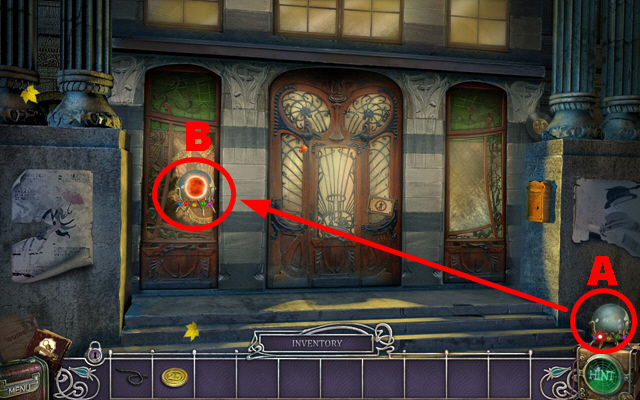
- There are five powers that you will obtain and use throughout the game. Powers will be stored in the crystal ball (A); the mouse cursor will turn into a shining crystal ball (B) when you can use any power in a specific scene.
- Astral Projection Power: the mini-game for this power requires you to fill a black hole by directing stars into it, using a varying number of gravity vortexes.
- Super-flexibility Power: move the mouse cursor in different directions to recreate a picture with the given outlines.
- Underwater Power: fill a sign by applying the spray bottle to it. Take into account that the sign has to be filled before the spray bottle gets empty.
- Electricity Power: connect one, two, or three large plus signs with the equal number of minus signs. Plus signs can only be connected with minus signs.
- Biotransformation Power: form a coherent group with a varying number of elements. There are no loose ends allowed in the end.
Chapter 1: Entering the Theater
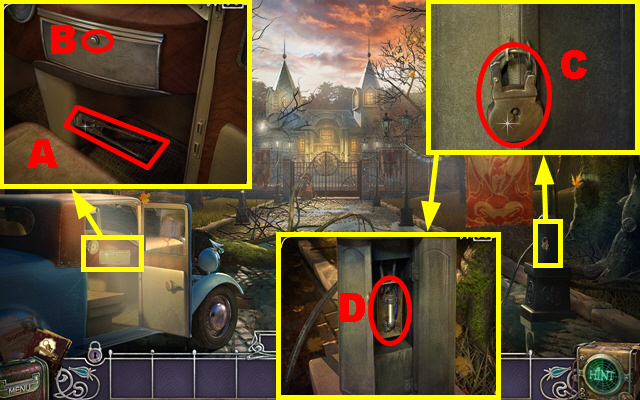
- Open the car door and zoom into it; take the BOLT CUTTER (A).
- Press the button (B) to open the glove compartment; take the HAMMER.
- Zoom into the padlock; use the BOLT CUTTER on the padlock (C).
- Use the HAMMER on the electricity source (D).
- Go forward.
- Play the HOS.
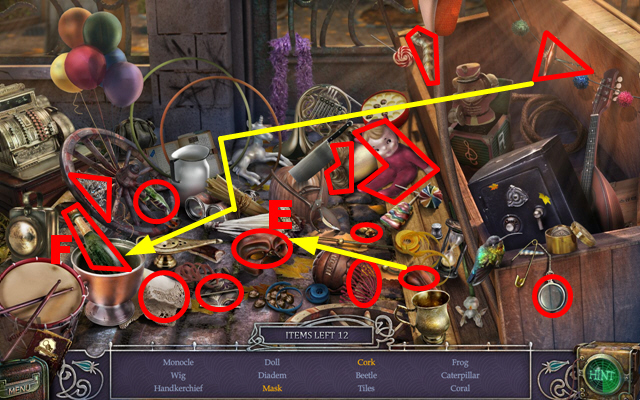
- Put the nose onto the mask and take the mask (E).
- Use the corkscrew on the bottle and take the cork (F).
- The TILES will go into inventory.
- Talk to Gerard.
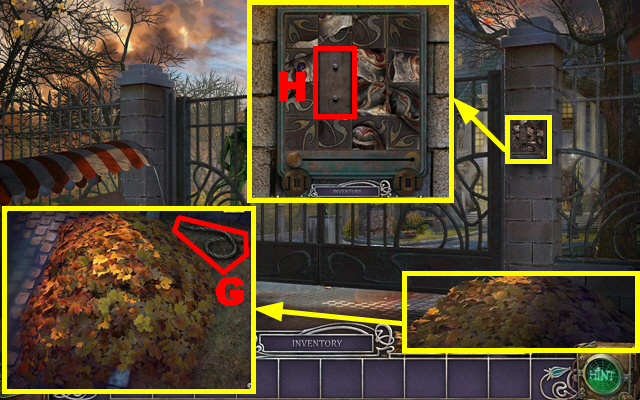
- Zoom into the pile of leaves and take the CORD (G).
- Zoom into the lock; put the TILES on it (H) to activate a mini-game.
- Play the mini-game.
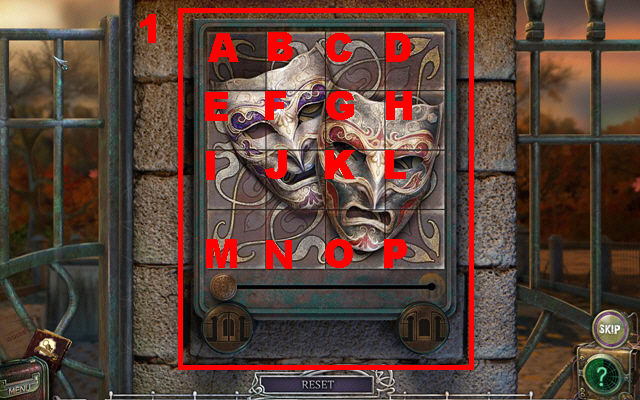
- Rotate the pieces to restore the picture.
- Rotating the four pieces on the edges does not affect any pieces next to them, so they should be turned when the remaining picture has already been restored.
- Pieces will light up when rotated to the proper position.
- Push tiles in the following order for the correct solution: F x 2, E, J x 2, I x 3, G x 2, K x 3, N x 3, O x 3, L x 2, P x 2, H x 3, C, D, and A x 3 (1).
- Back up, then move forward through the gates.
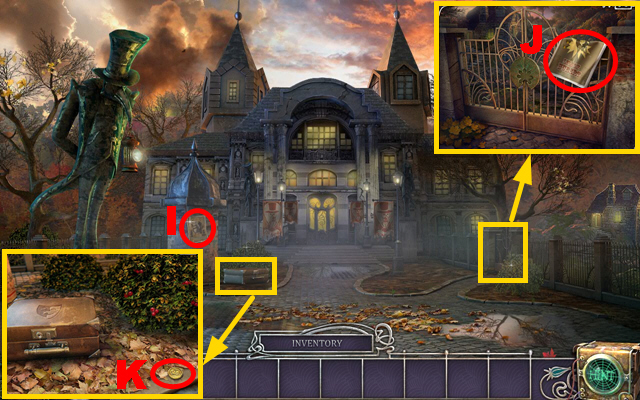
- Take the poster (I).
- Zoom into the gate; take the second poster (J) and the SCISSORS behind it.
- Zoom into the suitcase and take the 25 CENT PIECE (K).
- Go back to the car.
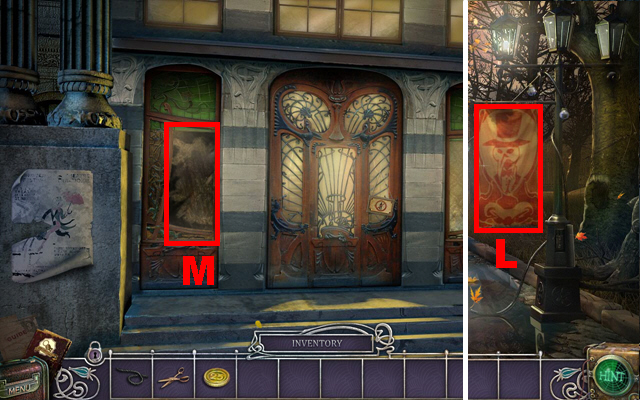
- Use the SCISSORS on the flag (L) to get the RAG.
- Go to the theater's front entrance.
- Use the RAG on the dirty mirror (M); you will gain the Astral Projection Power.
- Grab the amulet.
- Use the Astral Projection Power on the mirror.
- Play the mini-game.
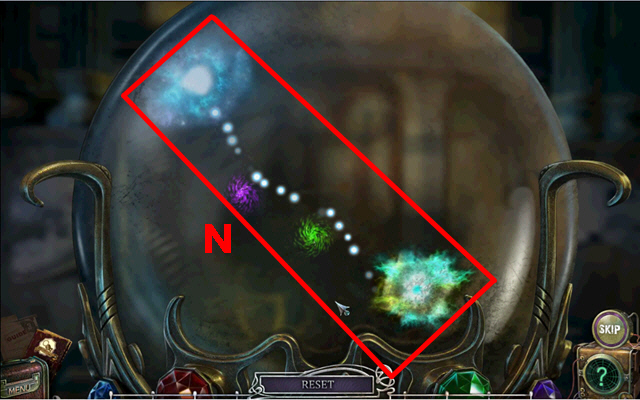
- Rearrange the gravity vortexes to fill the black hole.
- The screenshot displays the proper positions (N).
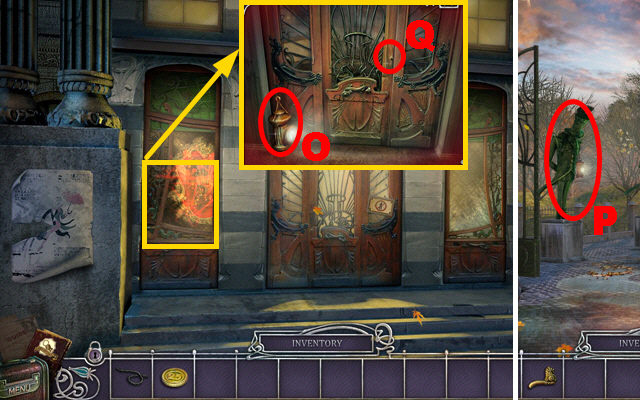
- Zoom into the door and take the LANTERN (O).
- Walk back twice.
- Put the LANTERN on the front statue (P) to get the HANDLE.
- Return to the theater entrance.
- Zoom into the left door and put the HANDLE on it (Q).
- Push the handle and go through the door.
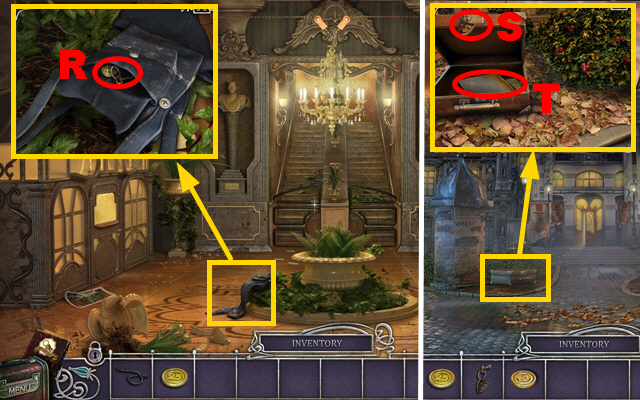
- Zoom into the bag and open it; take the CASE KEY and the 10 CENT PIECE (R).
- Walk down twice.
- Zoom into the suitcase and use the CASE KEY on the lock (S); remove the note; then take the note and the SCREWDRIVER (T).
- Go back into the theater and turn right.
- Play the HOS.
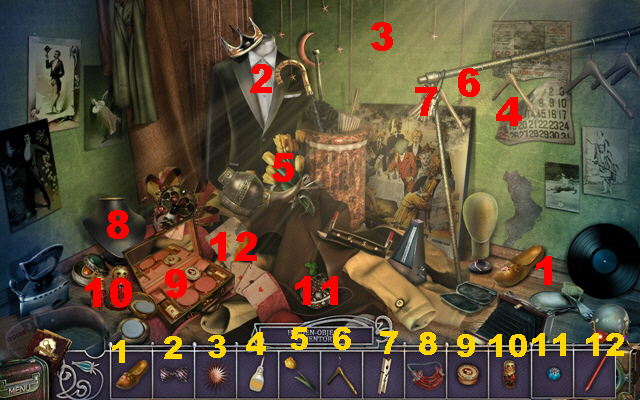
- Put all the items back into place (1-12).
- The BATTERY will be added to the inventory.
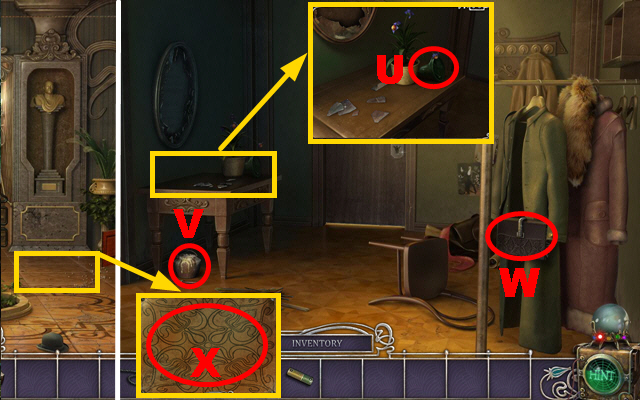
- Zoom into the desk and take the BELL (U).
- Take the GLUE (V).
- Use the SCREWDRIVER on the bag and take the DUSTER (W).
- Turn to the left.
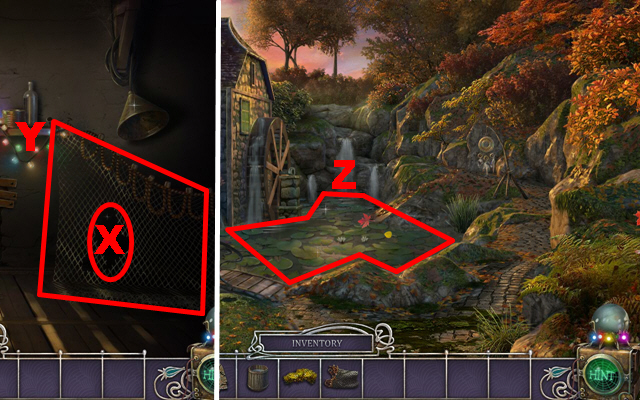
- Zoom into the floor and use the SCREWDRIVER on the screws (X) to activate a mini-game.
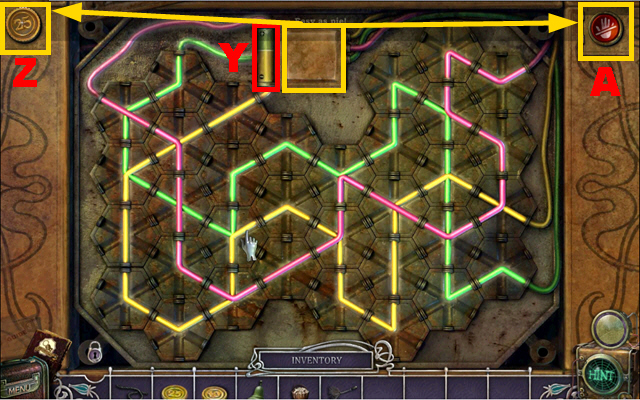
- Put the BATTERY on the wiring (Y).
- Swap wires to restore the wiring.
- Correctly placed wires will illuminate.
- The screenshot displays the correct solution.
- Take the 25 CENT PIECE (Z) and press the red button (A).
- Go left.
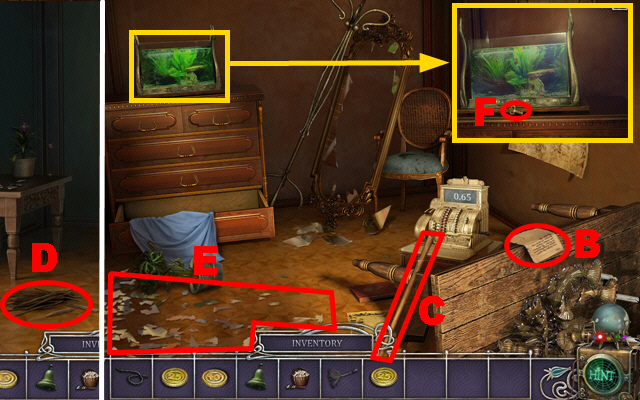
- Take the note (B) and the BROOM HANDLE (C).
- Walk down and go right.
- Use the CORD and the BROOM HANDLE on the broken broom (D); take the BROOM.
- Go left twice.
- Use the BROOM on the floor (E).
- Zoom into the tank and take the TINY KEY (F).
- Walk down twice.
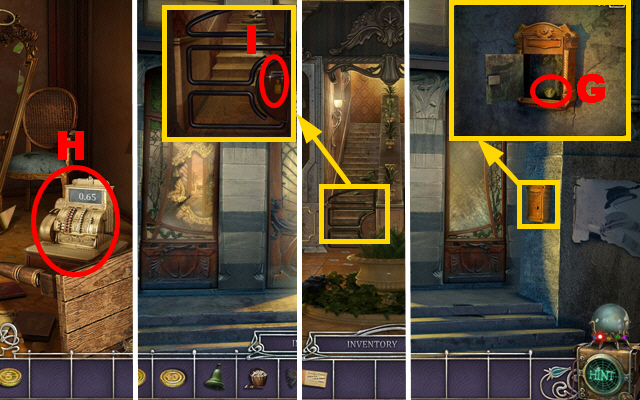
- Zoom into the donation box; use the TINY KEY in the lock and turn the key once to open it.
- Take the 5 CENT PIECE (G).
- Go through the door and go left.
- Put the 5 CENT PIECE, 10 CENT PIECE, the 25 CENT PIECE, and the second 25 CENT PIECE into the register (H) to get the TICKET.
- Walk down.
- Zoom into the gate; put the TICKET into the slot (I) and go upstairs.
- Play the HOS.
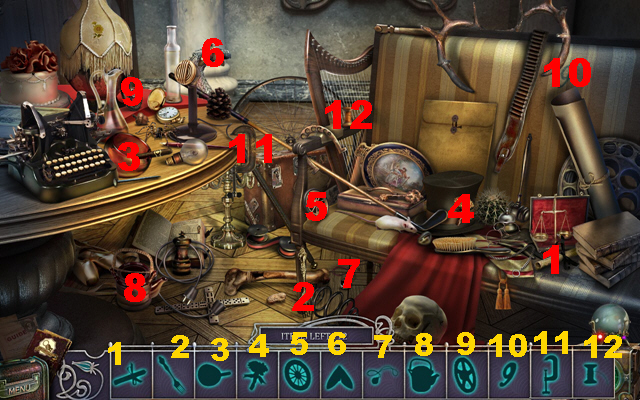
- Find all the silhouette items shown in the screenshot (1-12).
- The POWER CORD will go into the inventory.
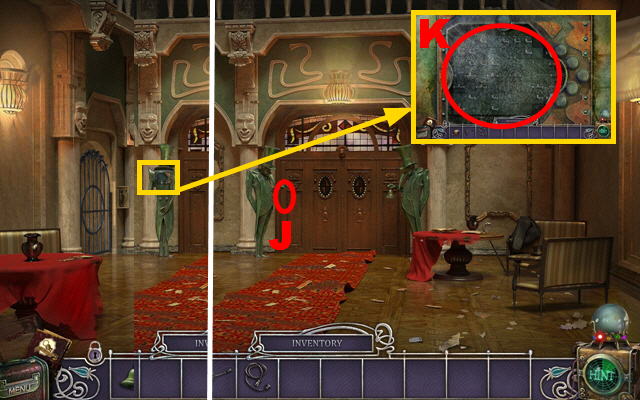
- Use the BELL on the left statue (J) and then zoom into it.
- Use the DUSTER on the panel (K).
- Play the mini-game.
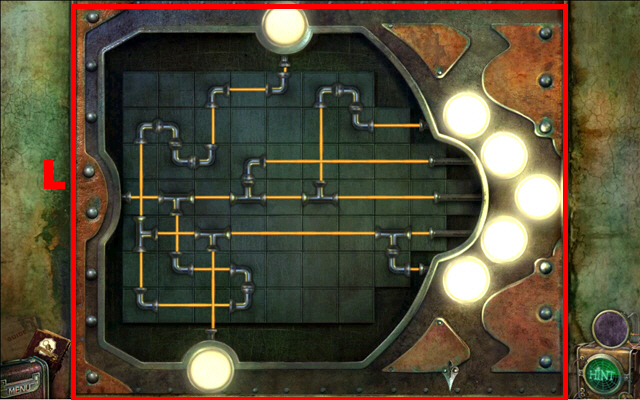
- Rotate the tubes to light up all seven bulbs at the same time.
- The screenshot displays the correct solution (L).
- Move forward.
Chapter 2: The Stage
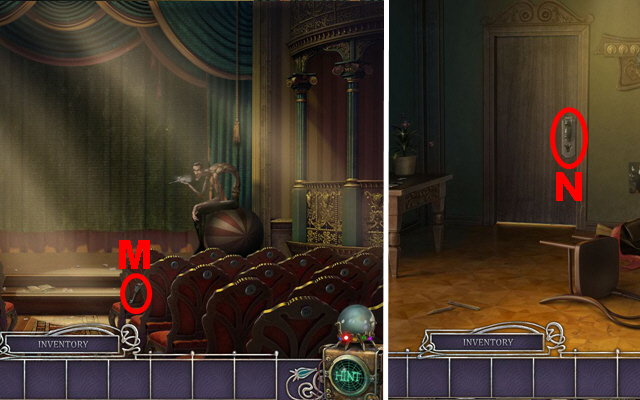
- Talk to Hubert.
- Take the TULIP-SHAPED KEY (M).
- Walk down twice and go right.
- Use the TULIP-SHAPED KEY on the door lock (N).
- Go forward.
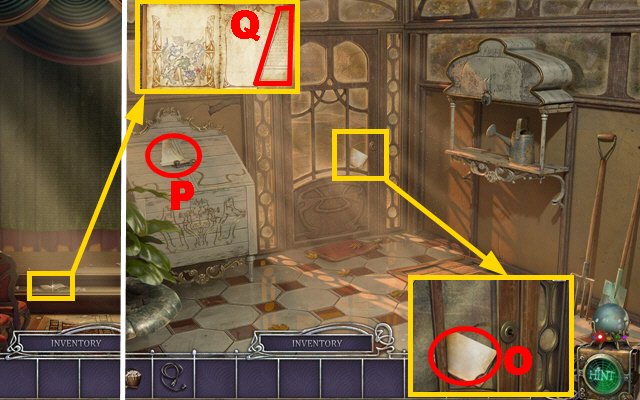
- Zoom into the door and take the note (O).
- Take the DIARY PAGE from the cupboard (P).
- Walk back twice and go forward twice.
- Zoom into the book; use the DIARY PAGE on it (Q).
- Play the mini-game.
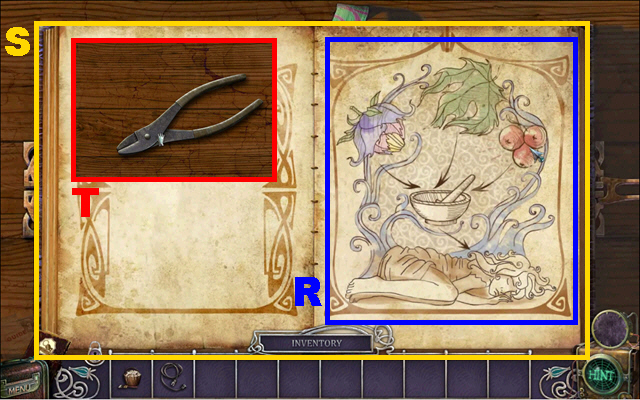
- Rearrange the picture by putting the pieces on the small spots.
- The outline is a good indication where to put specific pieces.
- The screenshot displays the correct solution (R).
- Take the RECIPE BOOK (S) and the PLIERS (T).
- Walk back twice, turn right, and go forward.
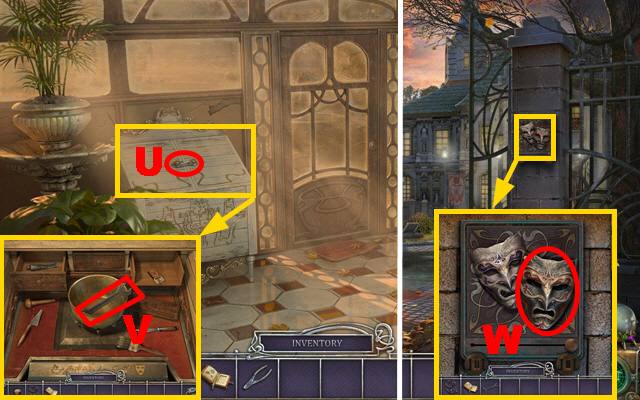
- Use the PLIERS on the cupboard (U); zoom into it and take the WRENCH (V).
- Go back five times.
- Zoom into the panel; use the WRENCH on the red mask (W) to get the MASK.
- Play the HOS.
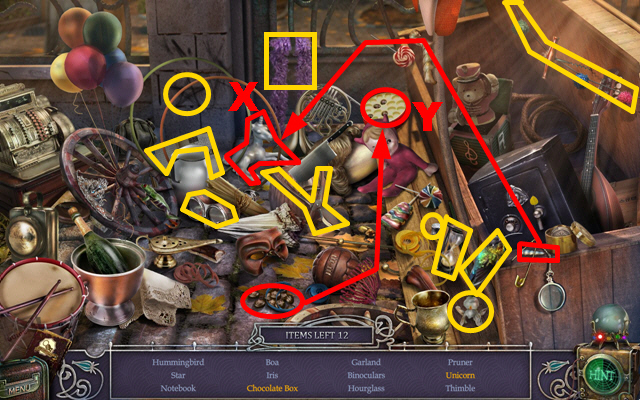
- Put the horn on the horse and take the unicorn (X).
- Put the chocolate into the box and take the chocolate box (Y).
- The PRUNER will go into inventory.
- Go forward.
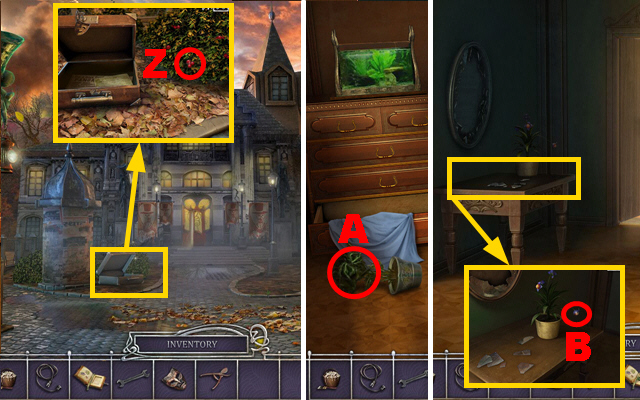
- Zoom into the suitcase; use the PRUNER on the bush (Z).
- Go forward twice and turn left.
- Use the PRUNER on the plant (A).
- Go back and turn right.
- Zoom into the desk; use the PRUNER on the flower (B).
- Go forward.
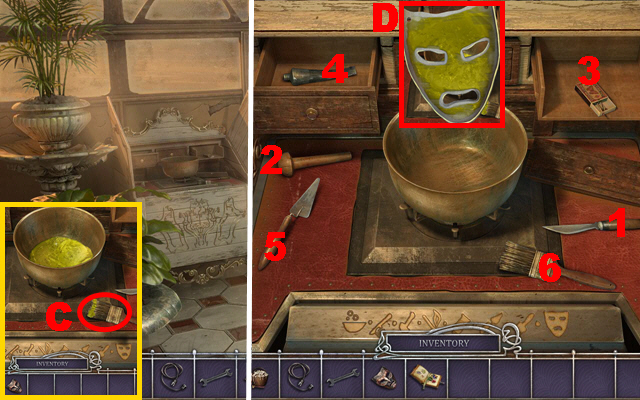
- Zoom into the cupboard.
- Put the RECIPE BOOK on the pot.
- Use the knife to cut the ingredients (1). Use the pestle on the ingredients (2). Use the matches to heat the pot (3). Use the tube on the ingredients (4). Use the spatula on the ingredients (5). Use the paintbrush on the mixture (6).
- Use the MASK on the paintbrush (C).
- Paint the MASK with the paintbrush.
- Take the HYPNOTIC MASK (D).
- Go back twice and then move forward twice.
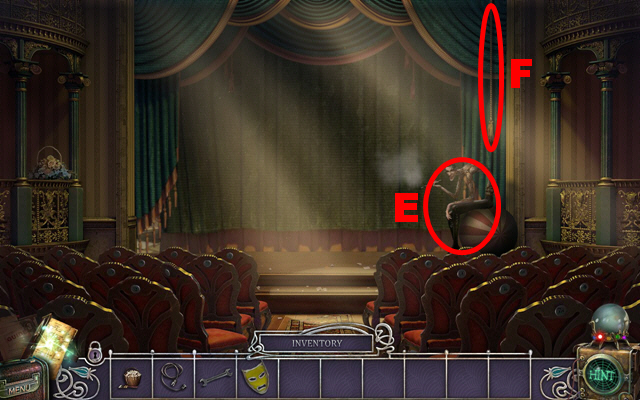
- Use the HYPNOTIC MASK on Hubert (E).
- You will receive the Super-flexibility Power; take the power.
- Use the Super-flexibility Power to reach the rope (F).
- Play the mini-game.
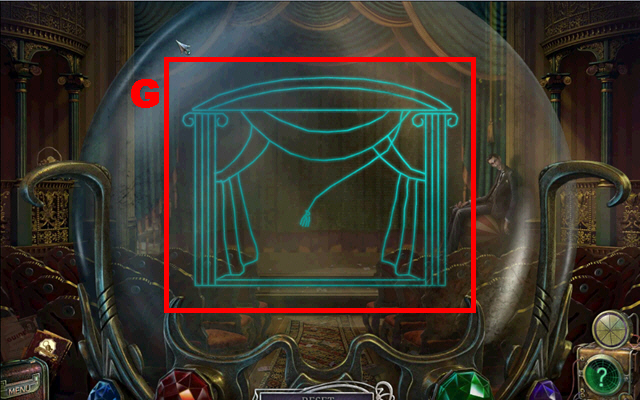
- Move the cursor in any direction to rearrange the outlines to create a picture.
- The screenshot displays the correct solution (G).
- Go forward and play the HOS.
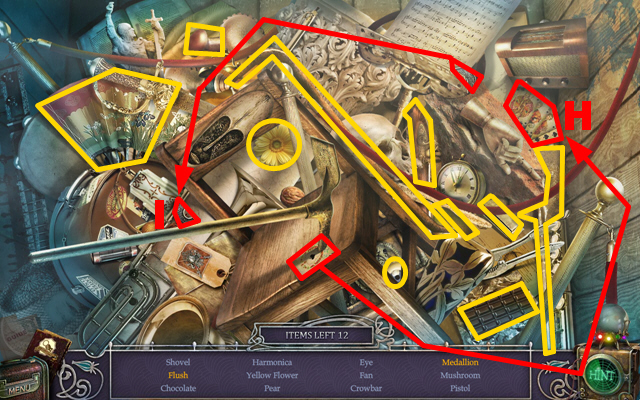
- Put the ace on the other playing cards and take the flush (H).
- Take one half of a medallion and add it to the other half; take the recreated medallion (I).
- The CROWBAR will go into inventory.
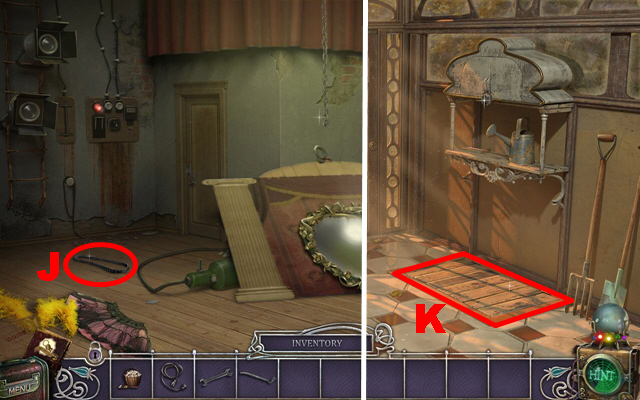
- Take the STRAP (J).
- Go back three times, turn right, and go forward.
- Use the CROWBAR on the trap door (K).
- Go downstairs.
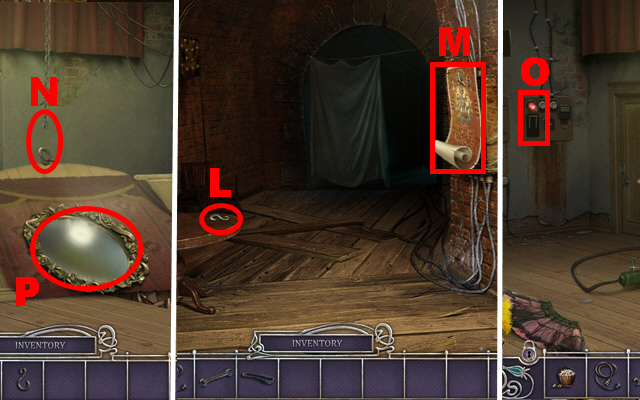
- Take the poster (M) and the CHAIN HOOK (L).
- Go back three times and then move forward three times.
- Use the CHAIN HOOK on the chain (N).
- Press the handle (O) and use your Astral Projection Power on the mirror (P).
- Play the mini-game.
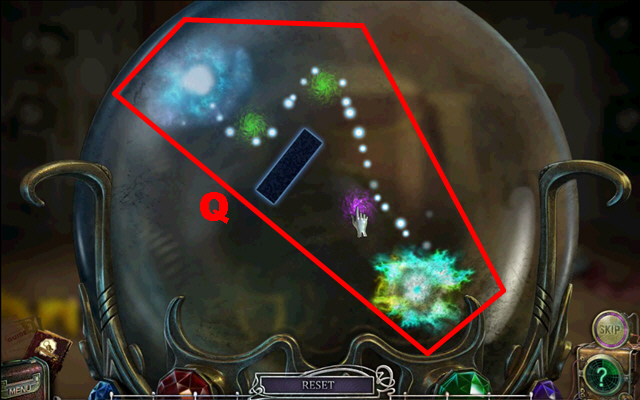
- Rearrange the gravity vortexes to fill the black hole.
- The screenshot displays the correct solution (Q).
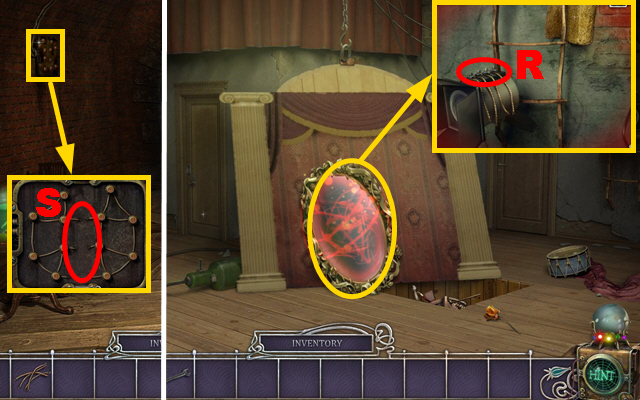
- Zoom into the mirror; use the WRENCH on the bolts (R) to get the WIRES.
- Go back three times, turn right, move forward, and go downstairs.
- Zoom into the panel and use the WIRES on it (S).
- Play the mini-game.
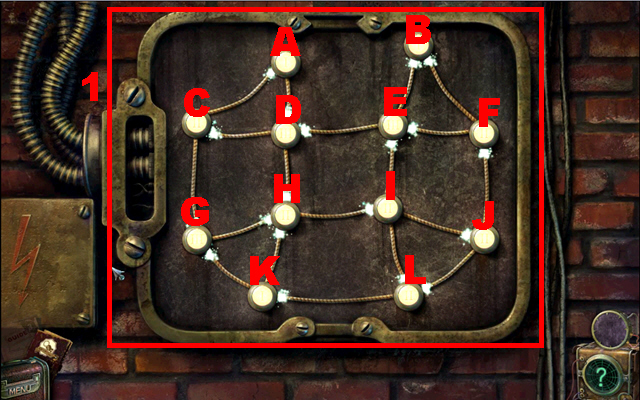
- The number on each button indicates how many sparkles should be next to the button.
- Pushing a button attracts all sparkles from neighboring buttons and pushes away all sparkles next to it.
- To solve this puzzle (1), push the buttons in this order: L, G, C, B, I, D, F, B, K, and G.
- Go forward.
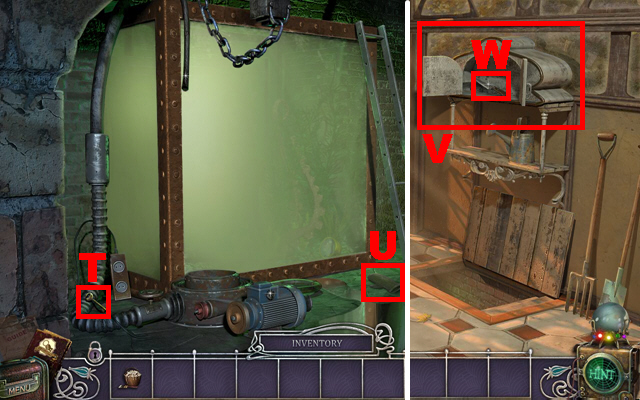
- Take the LOCKER KEY (T) and the HEAVY GLOVE (U).
- Go back twice.
- Use the LOCKER KEY on the locker (V) and take the KNIFE (W).
- Go back.
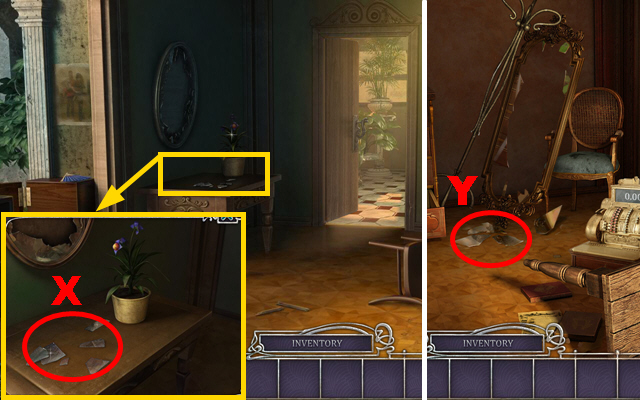
- Zoom into the desk; use the HEAVY GLOVE on the shards to get the MIRROR SHARDS (X).
- Go back and turn left.
- Use the HEAVY GLOVE on the glass and take the MIRROR SHARDS (Y).
- Go back and move forward.
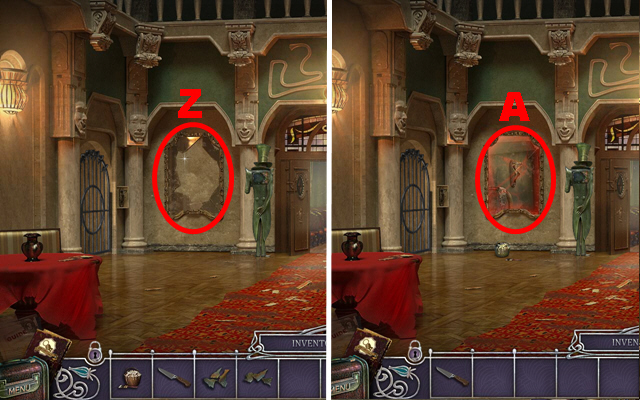
- Use the GLUE on the broken mirror and put the first MIRROR SHARD and the second MIRROR SHARD on it to fix it (Z).
- Use your Astral Projection Power on the mirror (A).
- Play the mini-game.
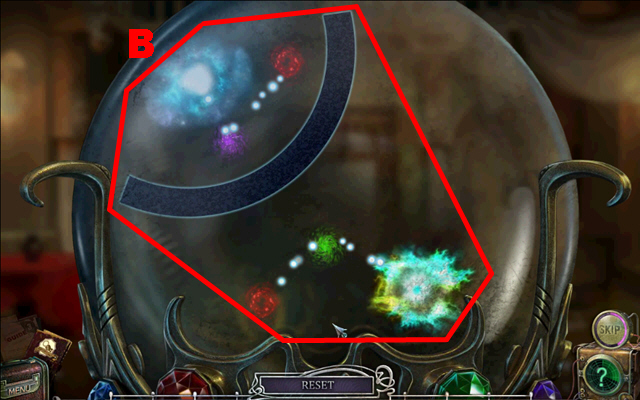
- Rearrange the gravity vortexes to fill the black hole.
- The screenshot displays the correct solution (B).
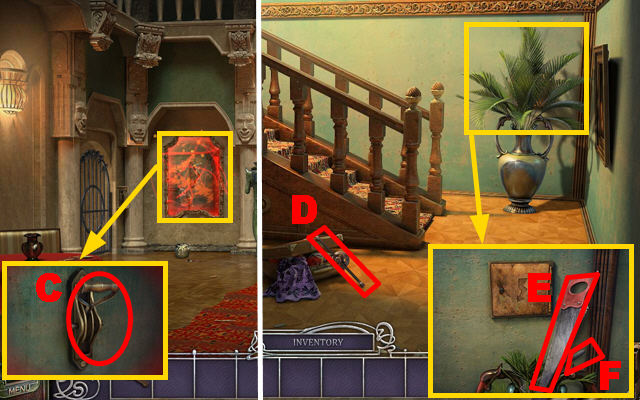
- Zoom into the mirror and pull the lever (C).
- Go left and take the HANDLE (D).
- Zoom into the palm and use the KNIFE on it; take the HACKSAW (E) and the NET (F).
- Go back and play the HOS.
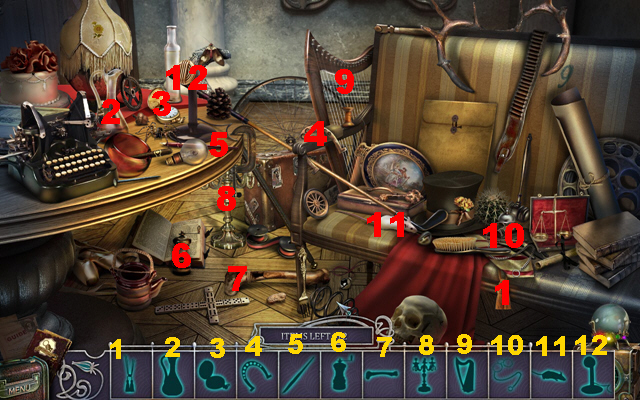
- Find all the silhouette items shown in the screenshot (1-12).
- The GLASS CUTTER will go into inventory.
- Turn left and move forward.
Chapter 3: In Front of the Balcony
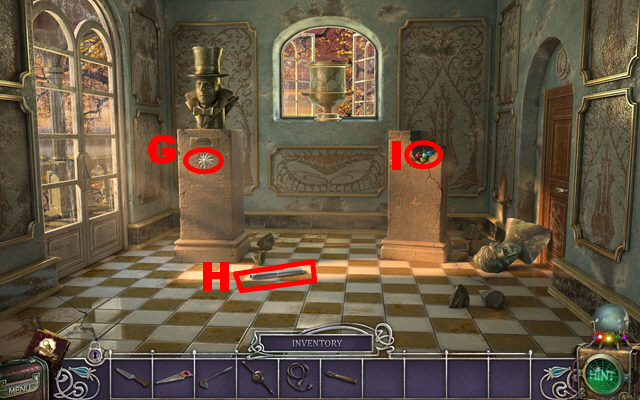
- Use the KNIFE on the star (G) and take the STAR.
- Take the PLANK (H) and the COLORED TILES (I).
- Go back twice and then move forward twice.
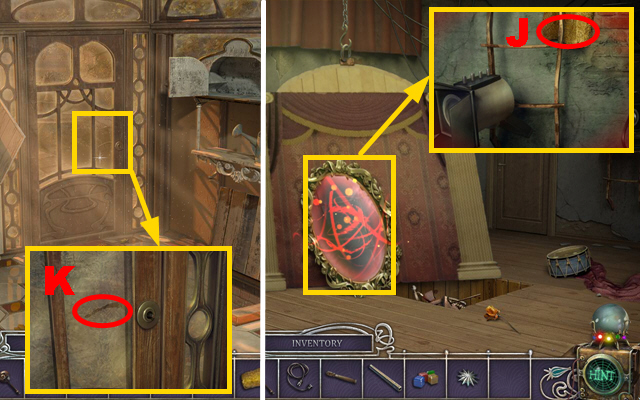
- Zoom into the mirror and use the KNIFE on the sponge (J); the SPONGE FILTER will go into inventory.
- Go back three times, turn right, and move forward.
- Zoom into the door and use the GLASS CUTTER on it (K).
- Move forward.
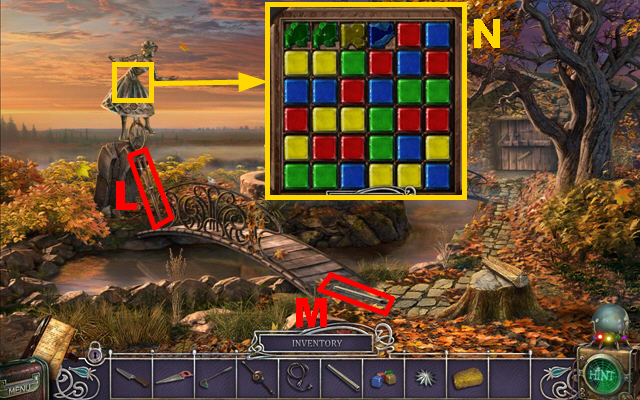
- Take the TELESCOPE LEG (L) and the PLANK (M).
- Zoom into the statue and use the COLORED TILES on it (N).
- Play the mini-game.
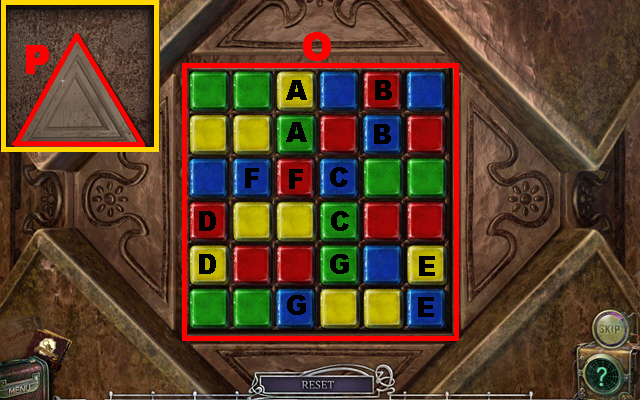
- Swap tiles to connect three tiles of the same color to make them disappear.
- Starting in the top rows makes it easier to solve the puzzle.
- You have to swap tiles (O) from A to G to clear the board.
- Take the TRIANGULAR STONE (P).
- Go back three times, move forward, turn left, and go upstairs.
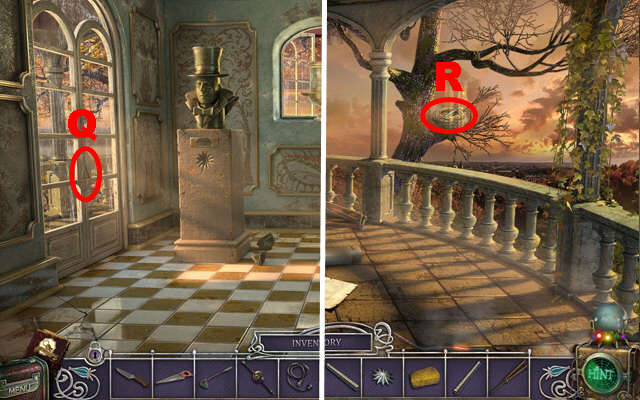
- Use the TRIANGULAR STONE on the door to the balcony (Q).
- Open the door and turn left.
- Use your Super-flexibility Power on the bird's nest (R).
- Play the mini-game.
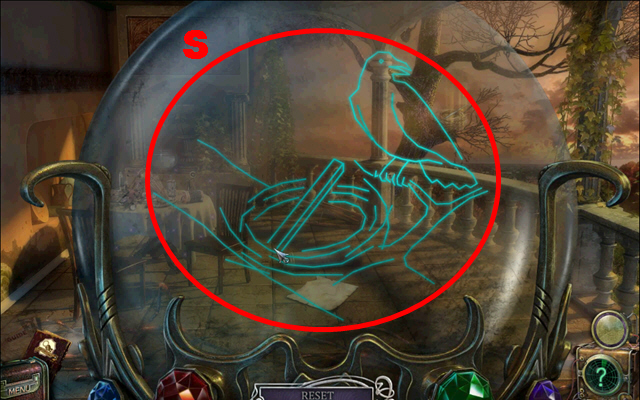
- Move the cursor in any direction to rearrange the outlines to create a picture.
- The screenshot displays the correct solution (S).
- The PLANK will go into inventory.
- Play the HOS.
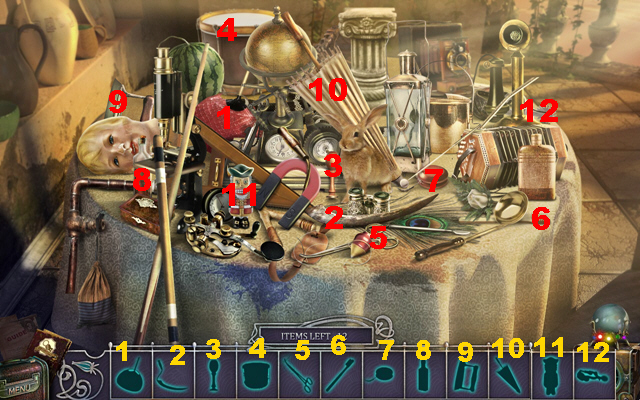
- Find all the silhouette items shown in the screenshot (1-12).
- The BUTTONS will go into inventory.
- Go back four times, turn right, and move forward three times.
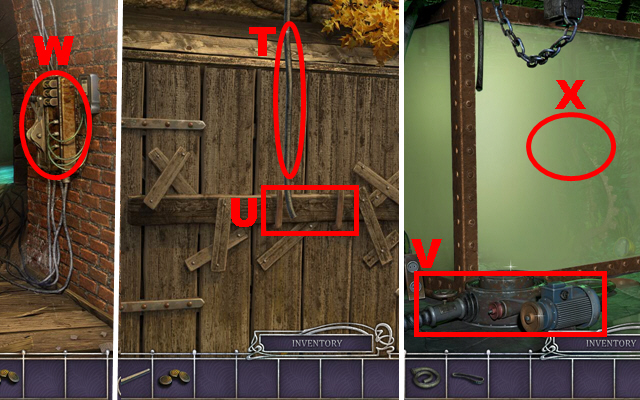
- Use the KNIFE on the hose (T); the HOSE PART goes into inventory.
- Use the HACKSAW on the planks to open the door (U).
- Go back twice, go downstairs, and move forward.
- Use the POWER CORD, the HOSE PART, the SPONGE FILTER, and the STRAP on the device (V).
- Go back once and pull the lever (W) to start the water filter.
- Move forward and talk to Salavat (X); the JAR will go into inventory.
- Go back twice and move forward.
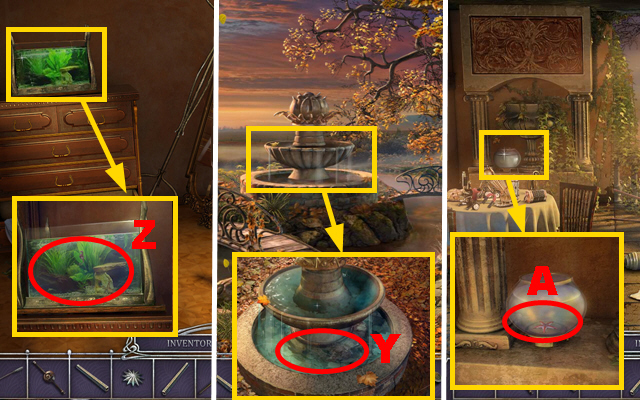
- Zoom into the fountain and use the NET on the fountain (Y).
- Go back three times and turn left.
- Zoom into the aquarium and use the NET on it (Z).
- Go back once, move forward, turn left, go upstairs, and turn left again.
- Zoom into the small aquarium and use the NET on it (A).
- Go back four times, turn right, move forward, go downstairs, and move forward.
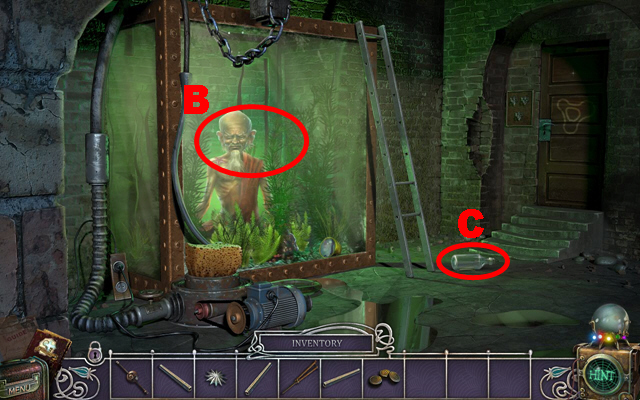
- Use the JAR WITH FISH on the tank (B).
- Take the power.
- You gain the Underwater Power.
- Take the SOLVENT (C).
- Go back twice and move forward twice.
- Play the HOS.
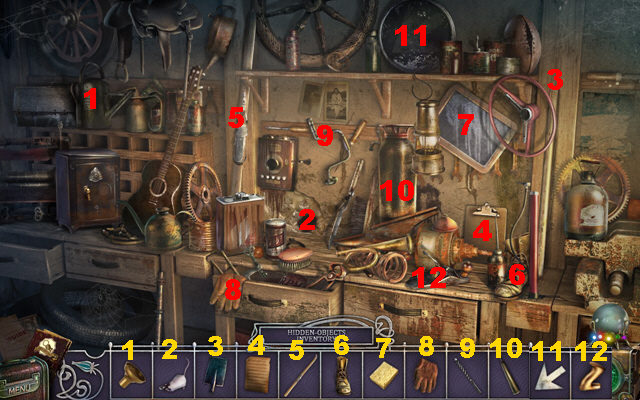
- Put all the items back into place (1-12).
- The WINCH HANDLE will go into inventory.
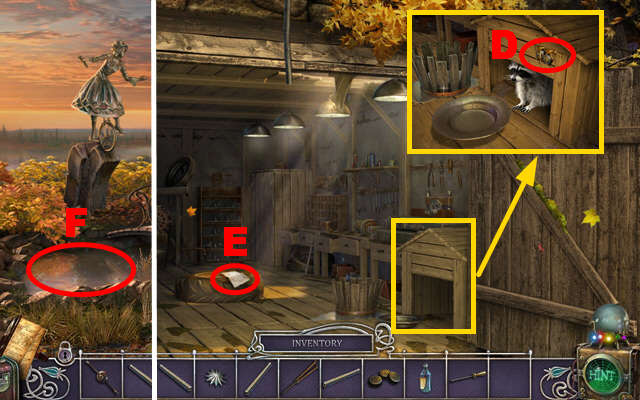
- Zoom into the tiny house; use the SOLVENT on the buttons (D) to get the BUTTONS.
- Take the note (E).
- Go back and use your Underwater Power on the pond (F).
- Play the mini-game.
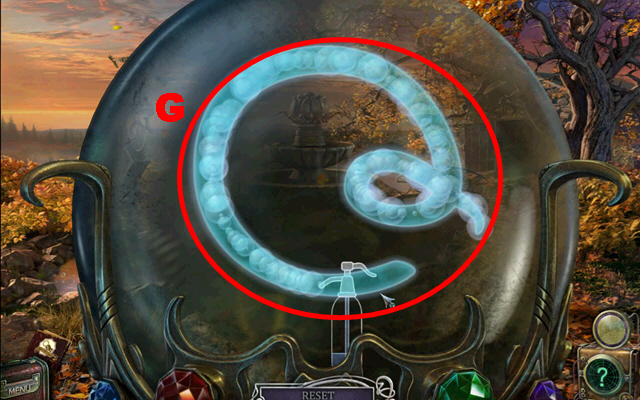
- Fill the whole sign with bubbles by applying the spray bottle to it.
- The screenshot displays the correct solution (G).
- Play the HOS.
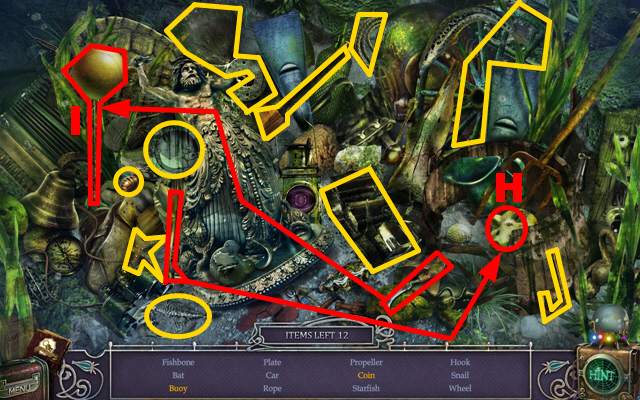
- Use the hammer to break the piggy bank (H) and take the coin.
- Use the knife to cut the rope; take the buoy (I).
- The ROPE will go into inventory.
- Go back three times, move forward, turn left, and go upstairs.
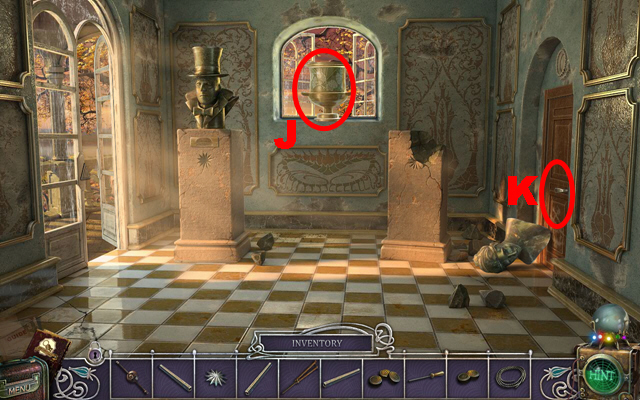
- Use the ROPE on the trophy (J).
- Push the TROPHY.
- Open the right door (K) and go through it.
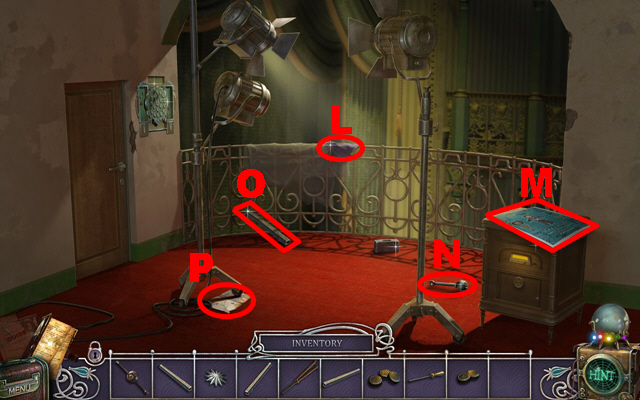
- Take the HANDKERCHIEF (L).
- Take the poster (M).
- Take the LEVER (N).
- Take the PLANK (O).
- Take the note (P).
- Go back four times, turn right, move forward, go downstairs, and move forward.
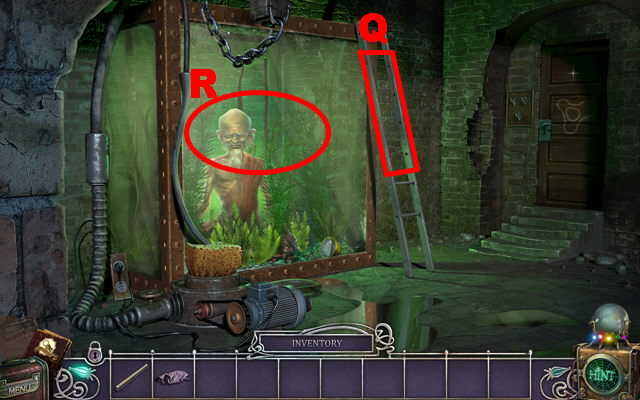
- Use all four PLANKS on the broken ladder (Q).
- Use your Underwater Power on the tank (R).
- Play the mini-game.
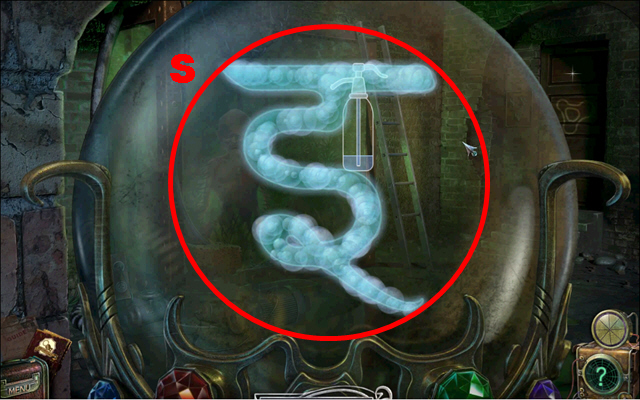
- Fill the whole sign with bubbles by applying the spray bottle to it.
- The screenshot displays the correct solution (S).
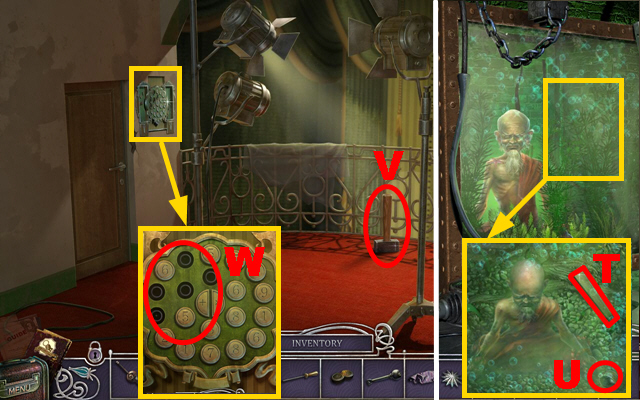
- Zoom into the tank; take the HAMMER HANDLE (T) and the CARVED LENS (U).
- Go back four times, move forward, turn left, go upstairs, and turn right.
- Use the HAMMER HANDLE on the slegde; take the SLEDGEHAMMER (V).
- Zoom into the panel; use both piles of BUTTONS on the panel (W) to activate a mini-game.
- Play the mini-game.
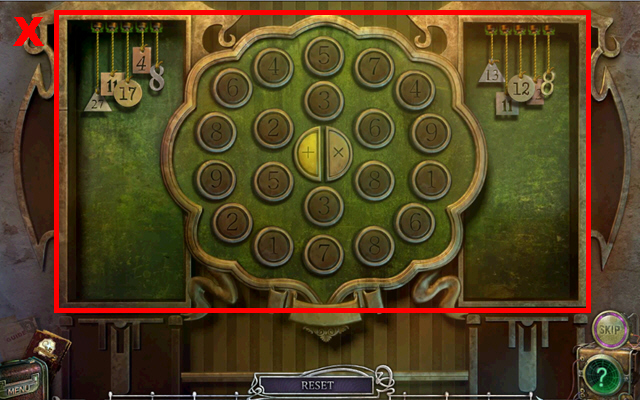
- Add or multiply numbers to get the sums shown on the left and right side.
- All numbers can only be used once to solve this puzzle.
- To solve this puzzle (X), use the numbers in the following order and combinations: 9x3, 7+6, 3x4, 2+2, 1x8, 9+8, 7+1, 8+4, 6+5, and 6+5.
- Go left.
Chapter 4: Above the Stage
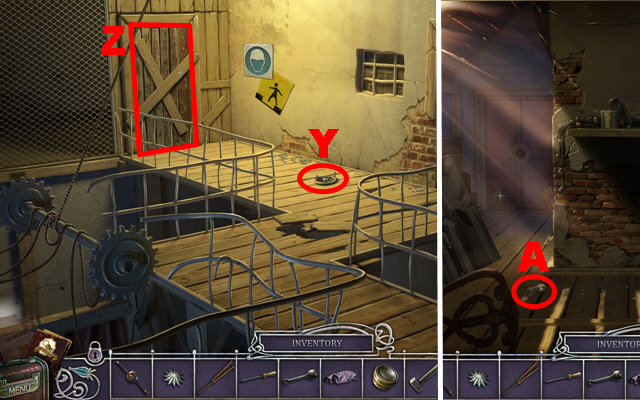
- Take the TELESCOPE HANDLE (Y).
- Use the SLEDGEHAMMER on the blocked door (Z).
- Go through the door.
- Take the KEY (A).
- Go back four times.
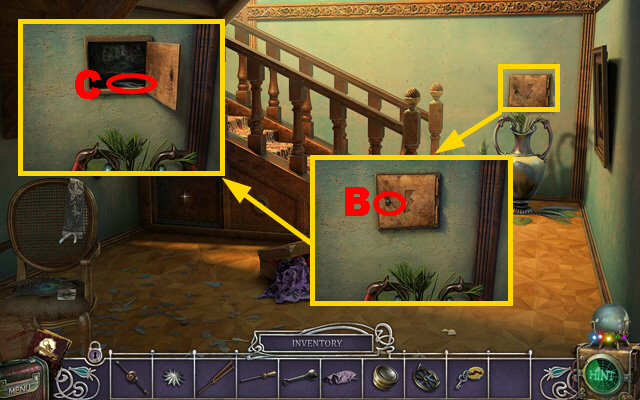
- Zoom into the box; use the KEY on the box (B) and take the TWEEZERS (C).
- Go upstairs and turn left.
- Play the HOS.
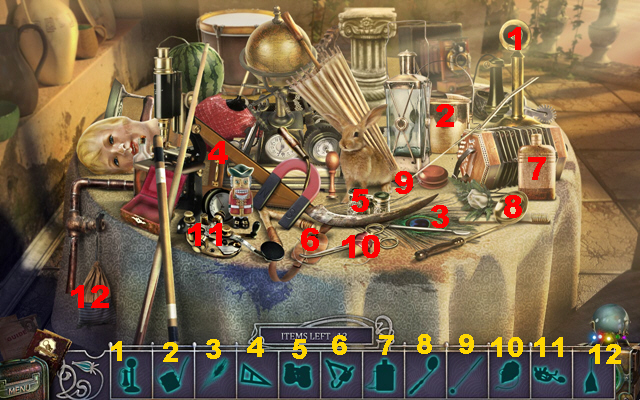
- Find all the silhouette items shown in the screenshot (1-12).
- The BIG GEAR will go into inventory.
- Go back four times, turn right, move forward, and go downstairs.
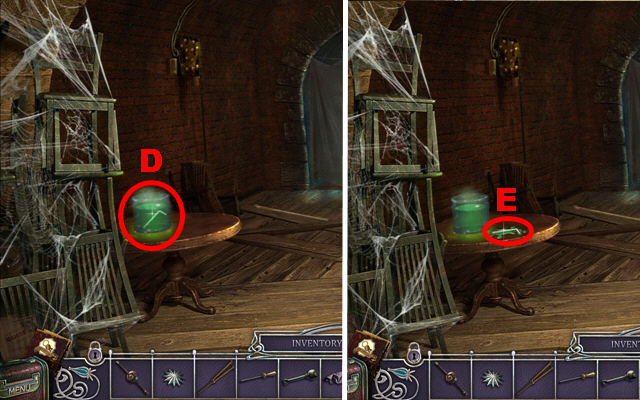
- Use the TWEEZERS on the jar (D).
- Use the HANDKERCHIEF on the hex wrench and then take the HEX WRENCH (E).
- Go back once and move forward.
- Play the HOS.
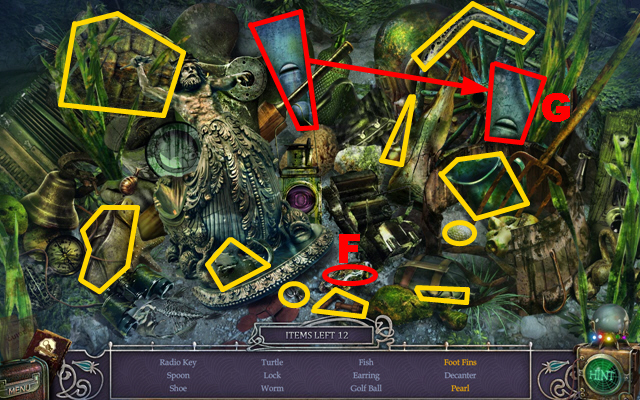
- Open the oyster and take the pearl (F).
- Put together two fins and take them (G).
- The RADIO KEY will go into inventory.
- Go back three times, move forward, turn left, go upstairs, and turn right.
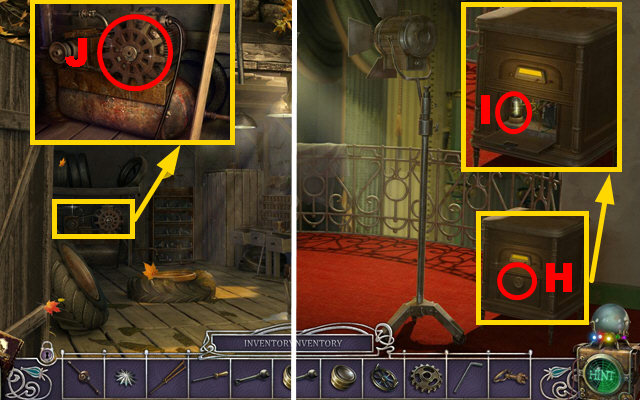
- Use the RADIO KEY on the radio (H).
- Take the BULB (I).
- Go back four times, turn right, and move forward three times.
- Zoom into the device; use the HEX WRENCH on it and take the GEAR (J).
- Go back four times, move forward, turn left, go upstairs, turn right, and go left twice.
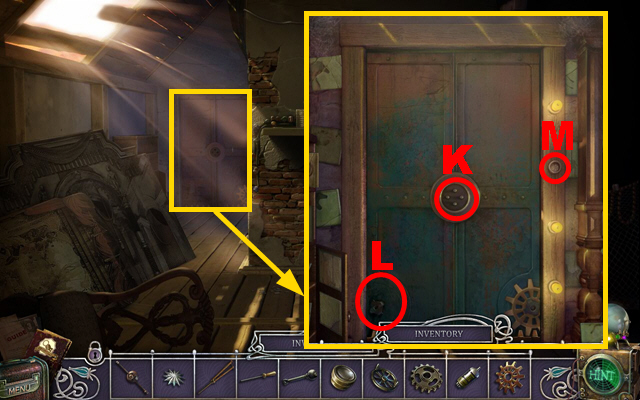
- Zoom into the door.
- Use the HANDLE (K), the GEAR (L), and the BULB (M) on it to activate a mini-game.
- Play the mini-game.
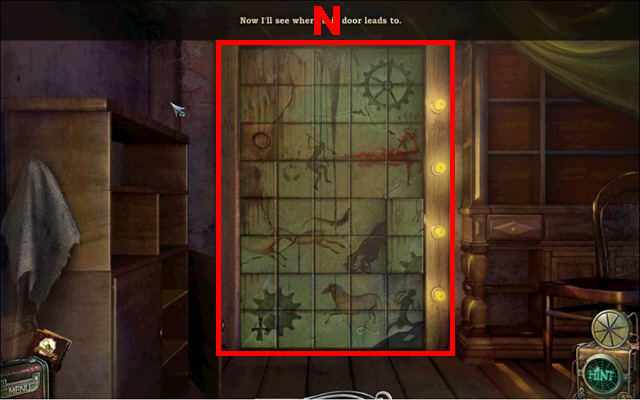
- Put the tiles on the door to recreate a picture.
- The outlines on the door can help you to place the tiles correctly.
- The screenshot displays the correct solution (N).
- Go through the newly-opened door.
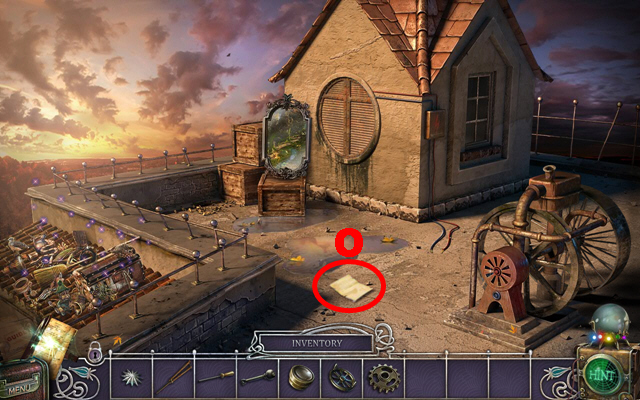
- Take the note (O).
- Play the HOS.
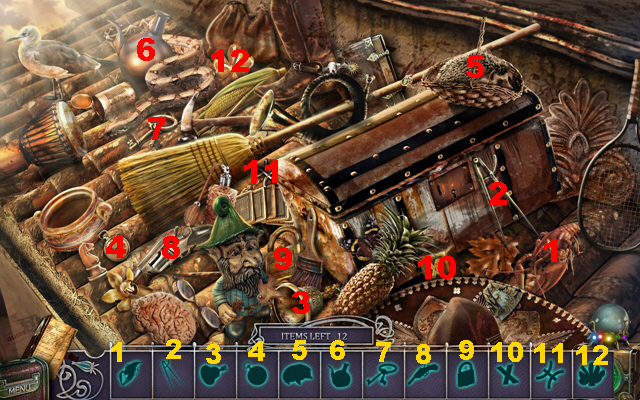
- Find all the silhouette items shown in the screenshot (1-12).
- The METAL CUTTER will go into inventory.
- Go back twice.
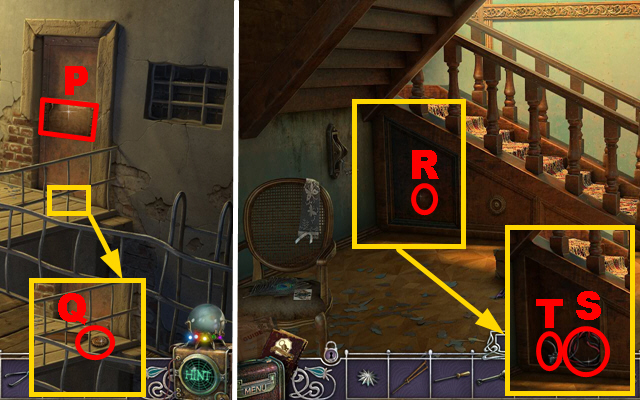
- Use the METAL CUTTER on the metal panel (P).
- Take the WOODEN CIRCLE (Q).
- Go back three times.
- Use the WOODEN CIRCLE on the wooden compartment (R).
- Take the GENERATOR WIRE (S) and the OIL (T).
- Go upstairs, turn right and go left.
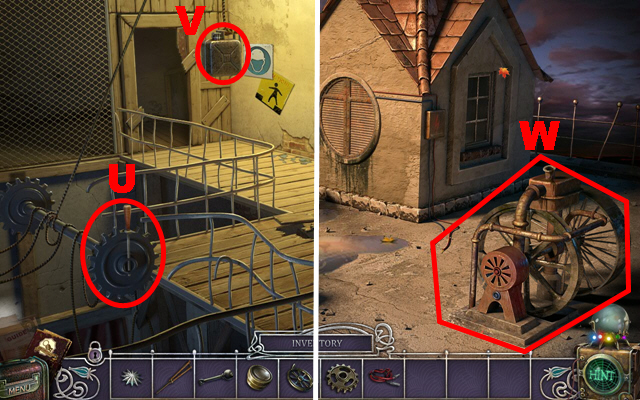
- Use the WINCH HANDLE and the OIL on the device (U).
- Push the handle.
- Take the GAS (V).
- Turn left and move forward.
- Use the GAS and the GENERATOR WIRE on the device (W).
- Move forward.
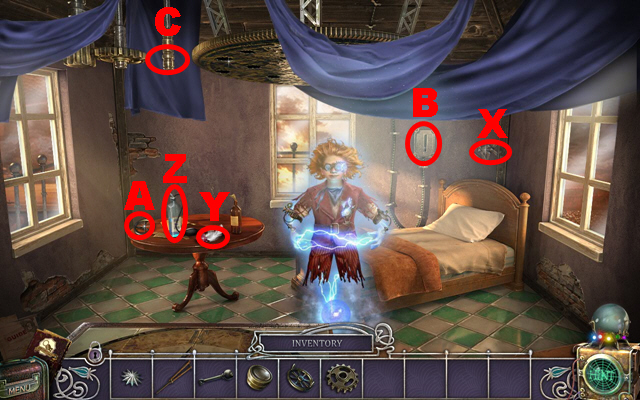
- Take the METAL STRIP (X), the HAT (Y), the CLEANER (Z), and the VALVE (A).
- Use the LEVER on the contraption (B).
- Put the BIG GEAR on the rod (C).
- Go back three times.
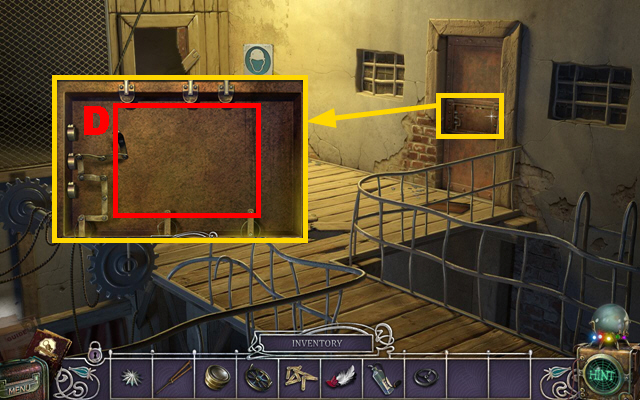
- Zoom into the panel; put the METAL STRIP on the device (D) to activate a mini-game.
- Play the mini-game.
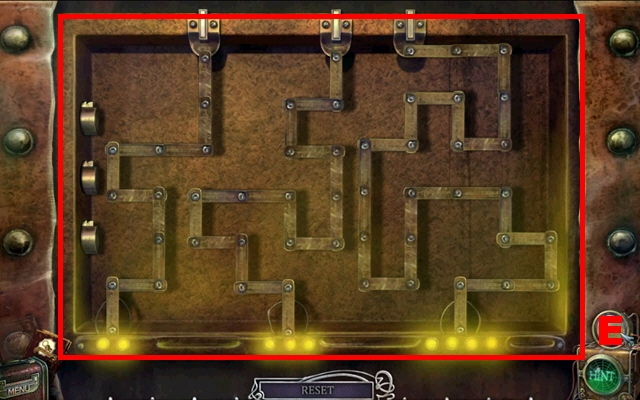
- You have to memorize the correct alignment of the metal stripes three times.
- The tiny light bulbs indicate how many wrong guesses you can make until you have to restart.
- The screenshot displays the correct solution (E).
- Move forward.
- Play the HOS.
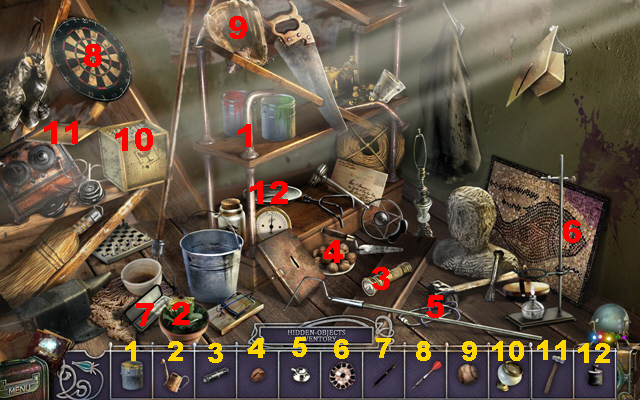
- Put every item back into its place (1 – 12).
- The PIN will go into inventory.
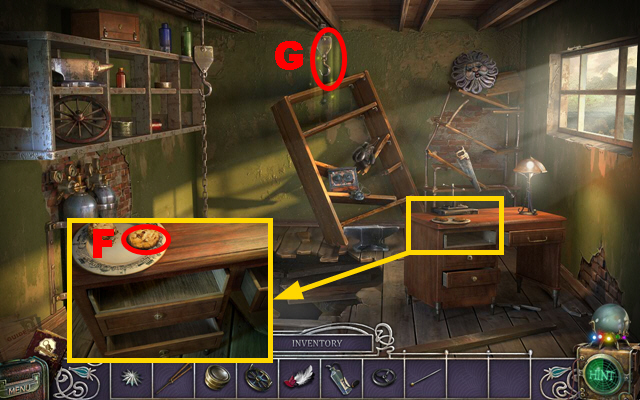
- Zoom into the desk and take the COOKIE (F).
- Use your Super-flexibility Power on the hook (G).
- Play the mini-game.
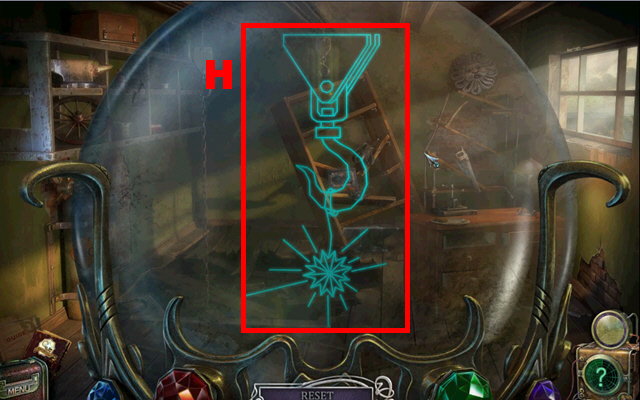
- Move the cursor in any direction to rearrange the outlines to create a picture.
- The screenshot displays the correct solution (H).
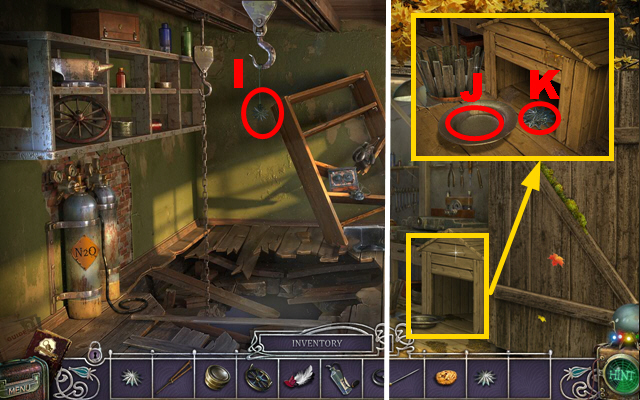
- Use the CLEANER on the star and take it (I).
- Go back six times, turn right, and move forward three times.
- Zoom into the tiny house; put the cookie into the bowl (J) and take the STAR (K).
- Go back three times.
- Play the HOS.
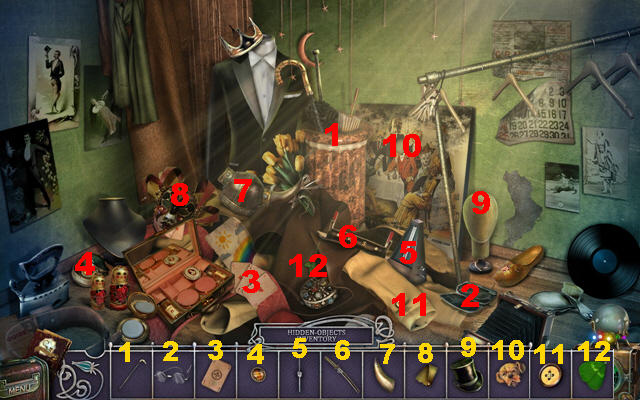
- Put all the items back into place (1-12).
- The SMALL HANDLE will go into inventory.
- Go back, move forward, turn left, go upstairs, turn right, turn left, and move forward.
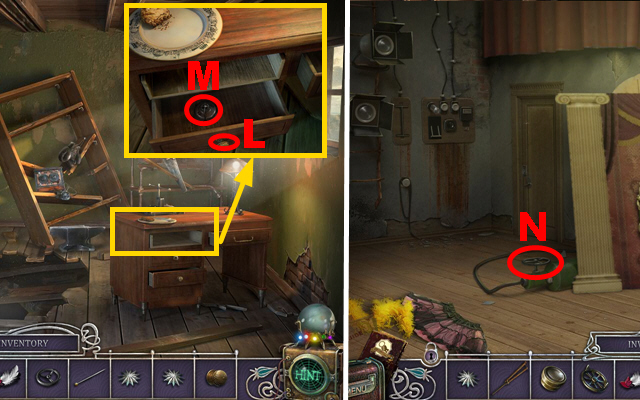
- Zoom into the desk; put the SMALL HANDLE on the drawer (L) and take the SOLID FUEL (M).
- Go back five times and move forward twice.
- Put the VALVE on the device (N).
- Turn the VALVE.
- Go back two times, turn left, go upstairs, turn right, and go left.
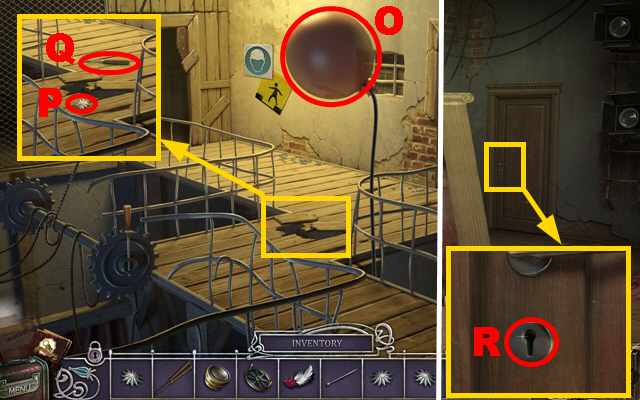
- Use the PIN to burst the balloon (O).
- Take the STAR (P) and the LOCKPICK (Q).
- Go back four times and then move forward twice.
- Zoom into the right door and use the LOCKPICK on it (R).
- Move forward.
Chapter 5: The Dressing Room
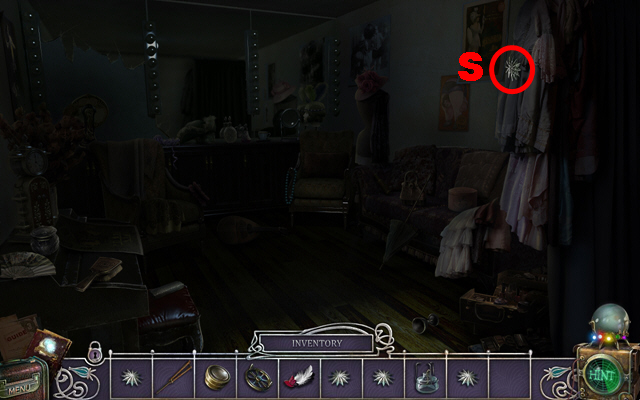
- Take the STAR (S).
- Walk back.
- Play the HOS.
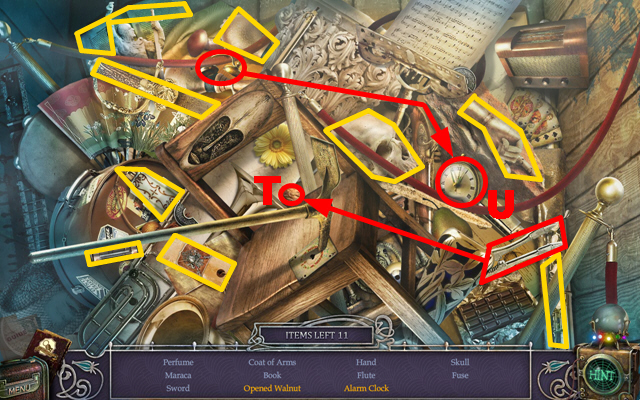
- Take the nutcracker, use it on the nut, and take the opened walnut (T).
- Take part of the alarm clock, put it on the other part of the clock, and take the alarm clock (U).
- The FUSE goes into inventory.
- Move back twice, turn left, go upstairs, turn right, go left twice, and move forward twice.
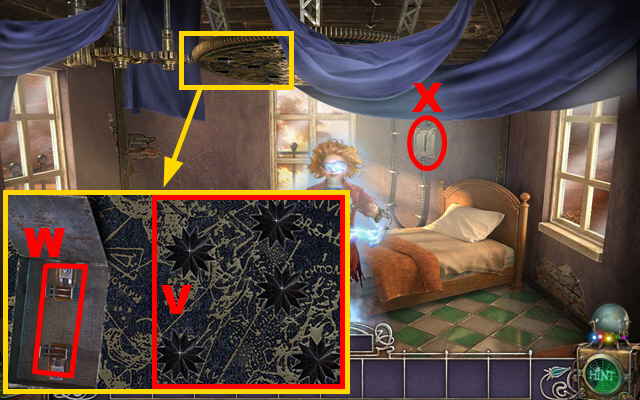
- Zoom into the ceiling.
- Put the first STAR, the second STAR, the third STAR, the fourth STAR, the fifth STAR (V), and the FUSE (W) on it.
- Pull the lever (X).
- Take the power; you will gain the Electricity Power.
- Go back.
- Play the HOS.
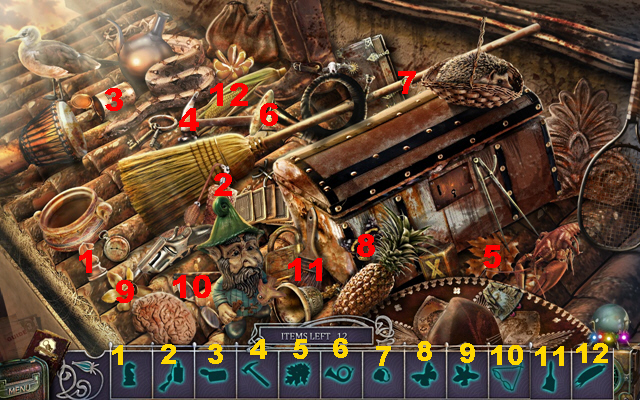
- Find all the silhouette items shown in the screenshot (1-12).
- The SKIRT will go into inventory.
- Go back and use your Electricity Power.
- Play the mini-game.
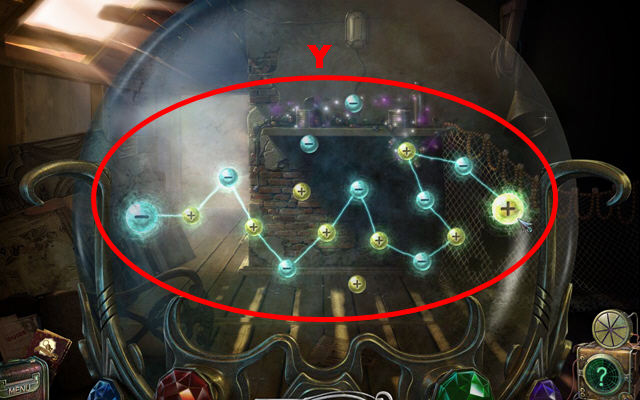
- You have to connect the big minus with the big plus. You always have to connect a minus and a plus, and they have to be in each other's sphere to do so.
- The screenshot displays the correct solution (Y).
- Move back five times and then move forward three times.
- Use your Electricity Power.
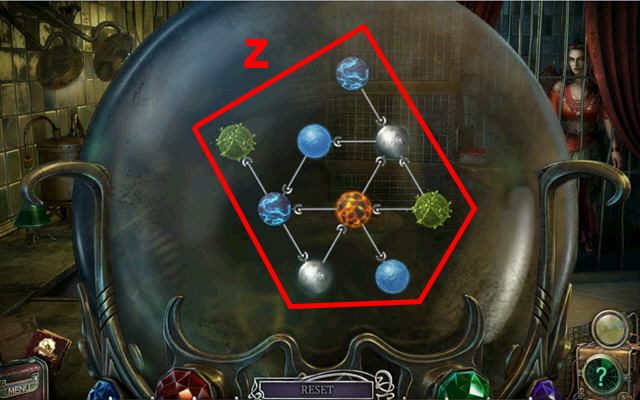
- Play the mini-game.
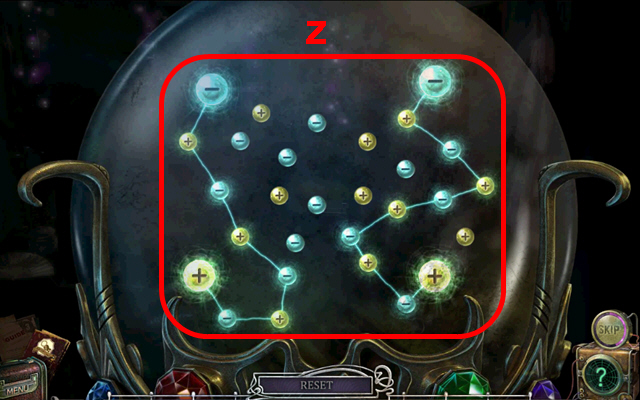
- Connect both large plus signs with both large minus signs. You always have to connect a minus and a plus, and they have to be in each other's sphere to do so.
- The screenshot displays the correct solution (Z).
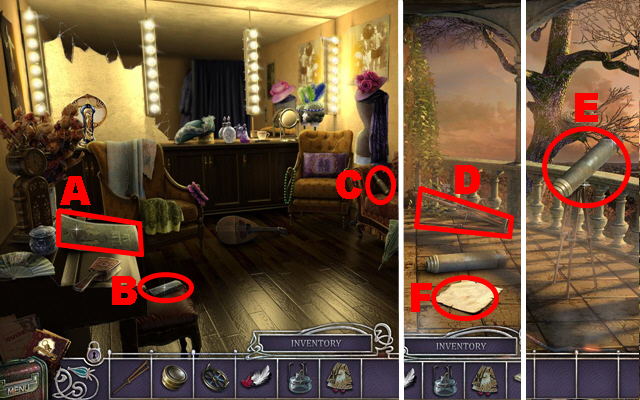
- Take the poster (A).
- Take the WHETSTONE (B) and the TELESCOPE EYE (C).
- Go back three times, turn left, go upstairs, and turn left.
- Use the TELESCOPE LEG on the broken telescope on the floor (D); use the TELESCOPE EYE, the TELESCOPE HANDLE, and the CARVED LENS on the standing telescope (E).
- Take the STAR MAP (F).
- Go back, turn right, go left twice, and move forward twice.
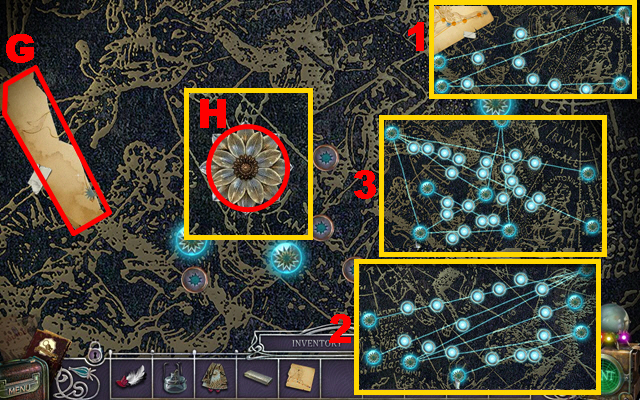
- Zoom into the ceiling and place the STAR MAP on it (G). Play the mini-game.
- Move the big stars in a way so that all small stars are illuminated.
- The screenshot displays the correct solutions (1-3).
- Take the LAKE STONE (H).
- Go back ten times.
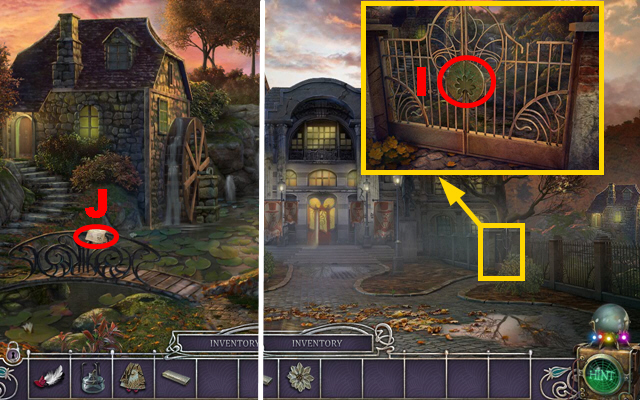
- Zoom into the gate; put the LAKE STONE on it to open it (I).
- Turn right.
- Take the note (J).
- Move forward.
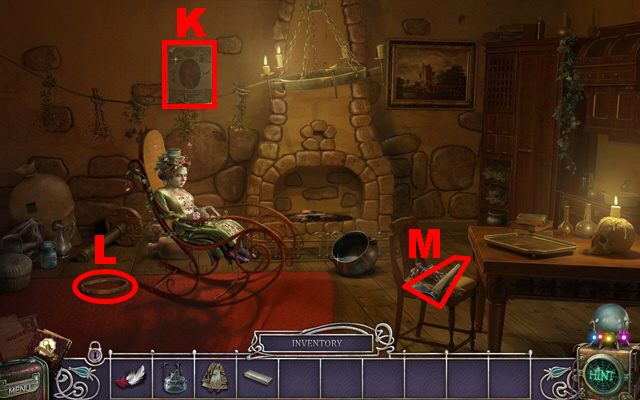
- Take the poster (K).
- Take the METAL BELT (L).
- Use the WHETSTONE on the axe; take the AXE (M).
- Move back twice, move forward twice, turn right, and move forward twice.
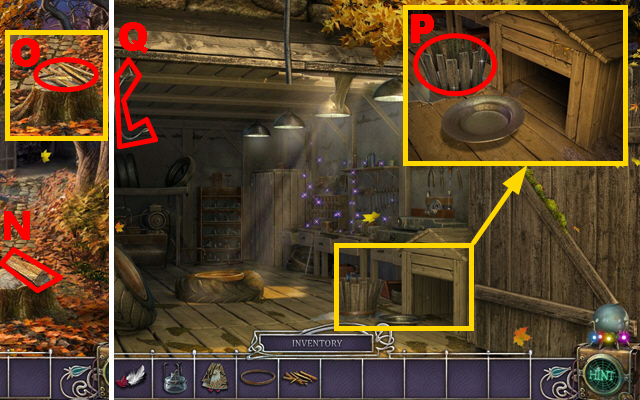
- Use the AXE on the log (N).
- Take the WOOD CHIPS (O).
- Move forward.
- Zoom into the tiny house; use the METAL BELT on the broken bucket and take the BUCKET (P).
- Take the CAULDRON HANDLE (Q).
- Play the HOS.
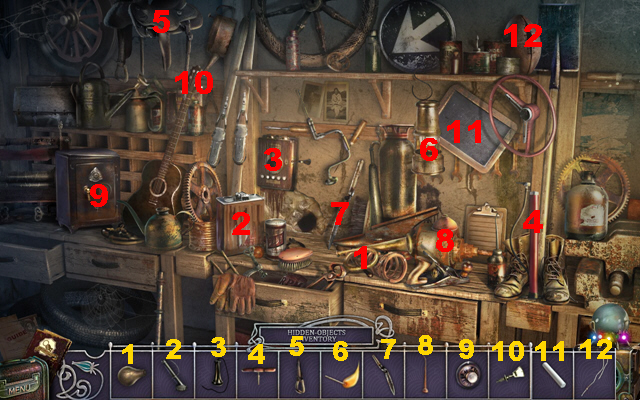
- Put all the items back into place (1-12).
- The TONGS will go into inventory.
- Go back six times, turn right, and move forward.
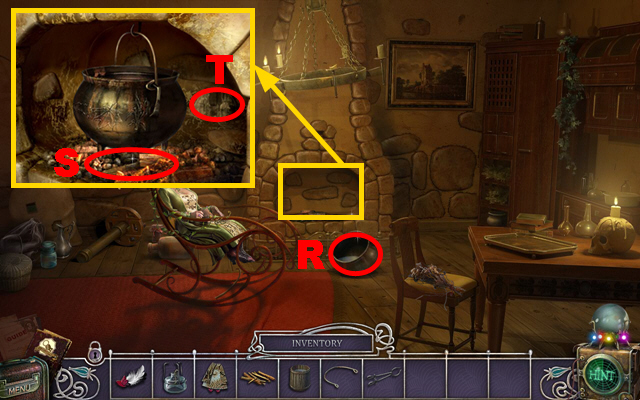
- Put the CAULDRON HANDLE on the cauldron (R).
- Zoom into the fireplace; add the WOOD CHIPS to it (S).
- Use the TONGS on the mould (T).
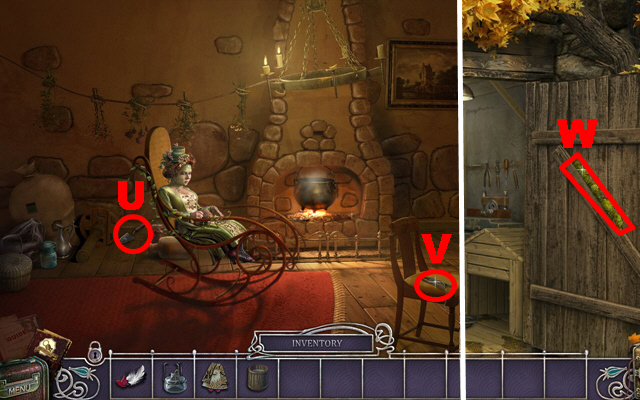
- Move the wooden pillar and take the TROWEL (U).
- Move the plant and take the FISHING LINE (V).
- Go back twice, move forward twice, turn right, and move forward three times.
- Use the TROWEL on the moss to get the MOSS (W).
- Go back four times, move forward, turn left, go upstairs, turn right, and go left twice.
- Use the FISHING LINE on the net (X) and take the BIG NET (Y).
- Go back eight times and turn right.
- Use the BIG NET on the pond (Z).
- Use your Underwater Power on the pond.
- Play the mini-game.
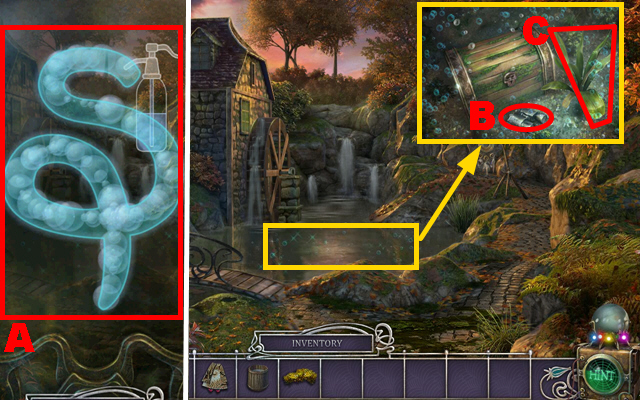
- Fill the whole sign with bubbles by applying the spray bottle to it.
- The screenshot displays the correct solution (A).
- Zoom into the pond.
- Take the BINOCULARS (B) and the SEAWEED (C).
- Go back once and move forward three times.
- Play the HOS.
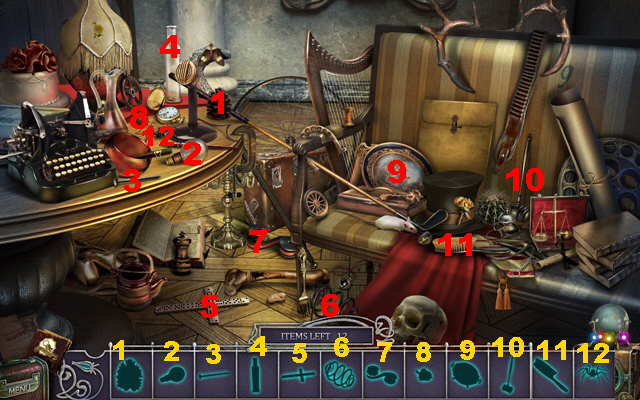
- Find all the silhouette items shown in the screenshot (1-12).
- The STRANGE OLD KEY will go into inventory.
- Go back three times and turn right.
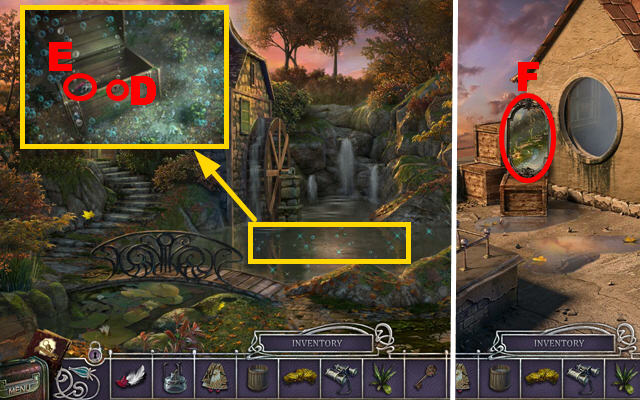
- Zoom into the lake; use the STRANGE OLD KEY on the chest’s lock (D) and take the HELMET (E).
- Go back, move forward three times, turn left, go upstairs, turn right, turn left twice, and move forward.
- Use the BINOCULARS on the mirror (F).
- Use your Astral Projection Power and play the mini-game.
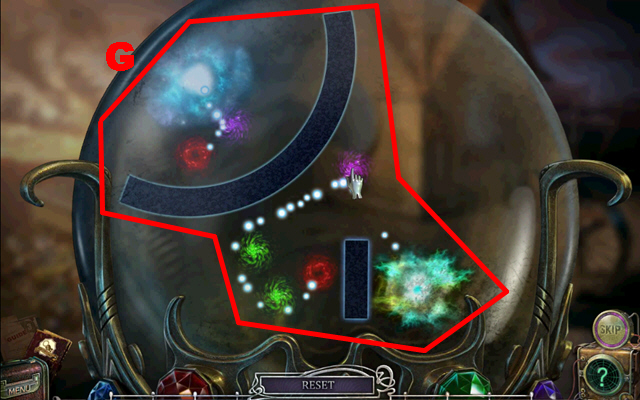
- Rearrange the gravity vortexes to fill the black hole.
- The screenshot displays the correct solution (G).
- Play the HOS.
Chapter 6: The Picnic
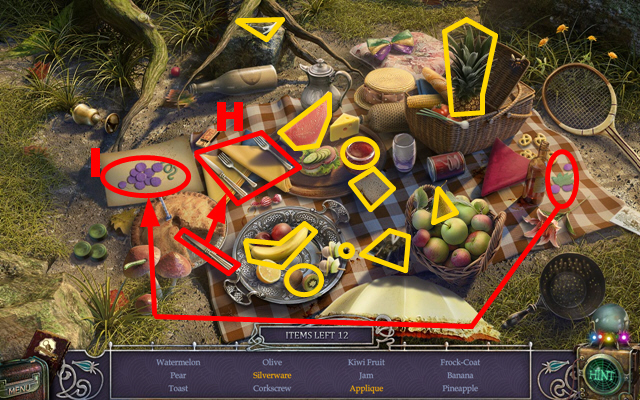
- Put the knife on the silverware and take the silverware (H).
- Take part of the grapes, put it on the paper, and take the applique (I).
- The DRESS will go into inventory.
- Use your Super-flexibility Power on the branch and play the mini-game.
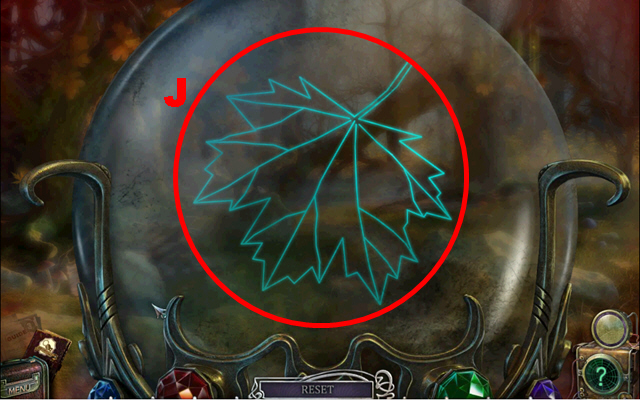
- Move the cursor in any direction to rearrange the outlines to create a picture.
- The screenshot displays the correct solution (J).
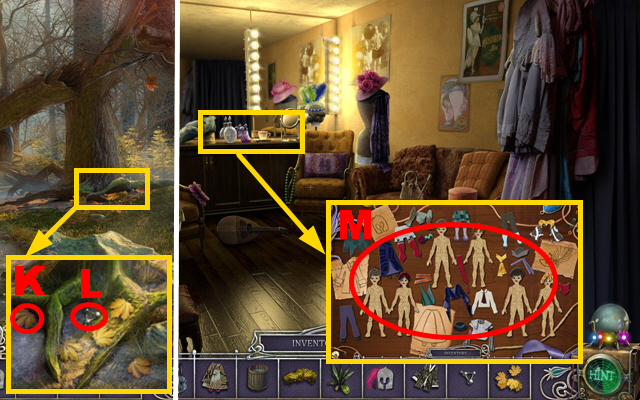
- Zoom into the bottom of the tree; take the LEAVES (K) and the KEY PART (L).
- Go back seven times and move forward three times.
- Zoom into the desk; add the SKIRT, the HAT, the HELMET, and the DRESS to it (M).
- Play the mini-game.
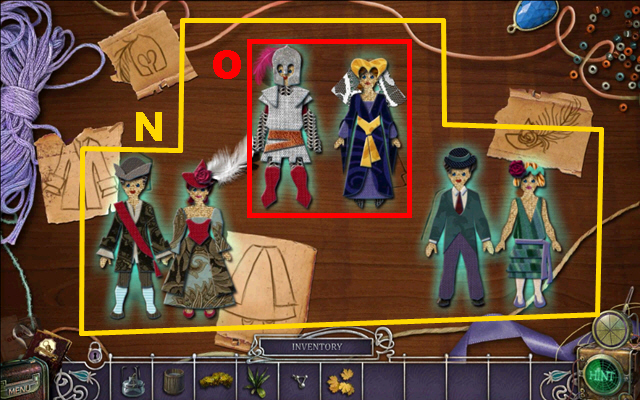
- Dress all six dolls according to their era and their garb.
- The screenshot displays the correctly dressed dolls (N).
- Take the DOLLS (O).
- Go back six times, turn right, and move forward.
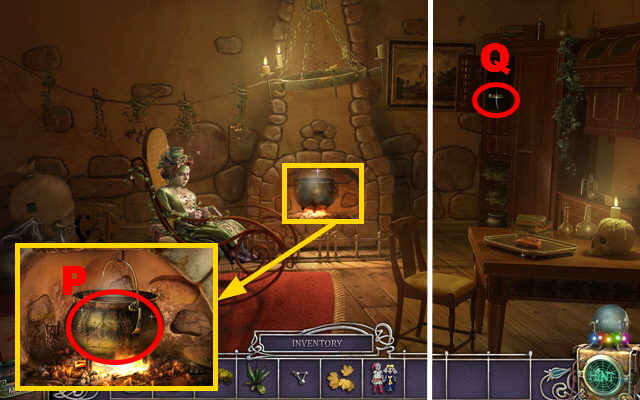
- Zoom into the cauldron; put the LEAVES, the SEAWEED, and the MOSS in it (P).
- Take the power; you will gain the Biotransformation Power.
- Open the cupboard.
- Take the CORKSCREW (Q).
- Go back twice and then move forward six times.
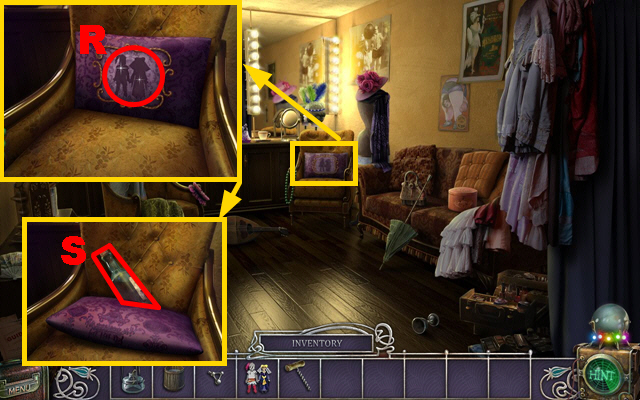
- Zoom into the armchair; add the DOLLS to the cushion (R).
- Use the CORKSCREW on the bottle; take the OPENED WINE (S).
- Go back six times, turn right, and move forward.
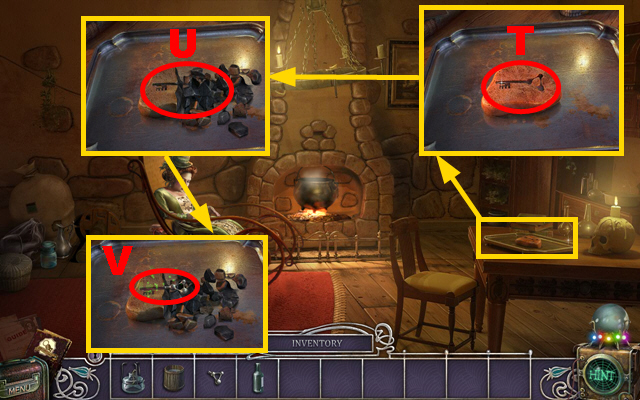
- Zoom into the desk; use the BUCKET on the mold (T).
- Use the KEY PART and the OPENED WINE on the mold (U).
- Use the Biotransformation Power on the mold (V).
- Play the mini-game.
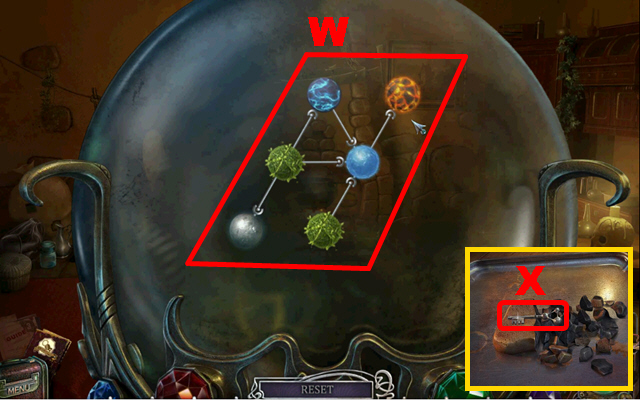
- You have to connect all elements so that they form a coherent group.
- The screenshot displays the correct solution (W).
- Take the LAB KEY (X).
- Go back twice, move forward twice, turn right, move forward, go downstairs, and move forward.
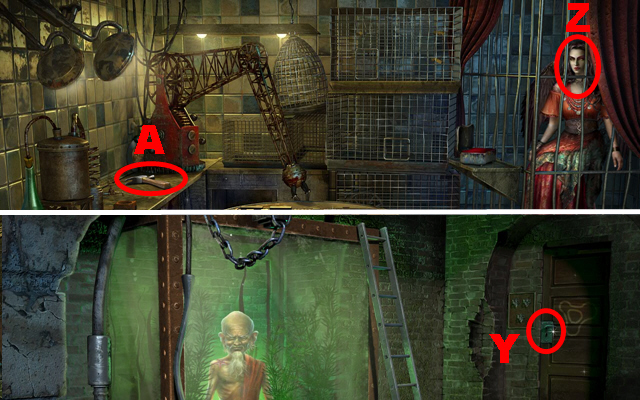
- Use the LAB KEY on the door (Y) and move forward.
- Talk to Eve (Z).
- Take the NAIL PULLER (A).
- Move back five times, move forward, turn left, go upstairs, turn right, and go left twice.
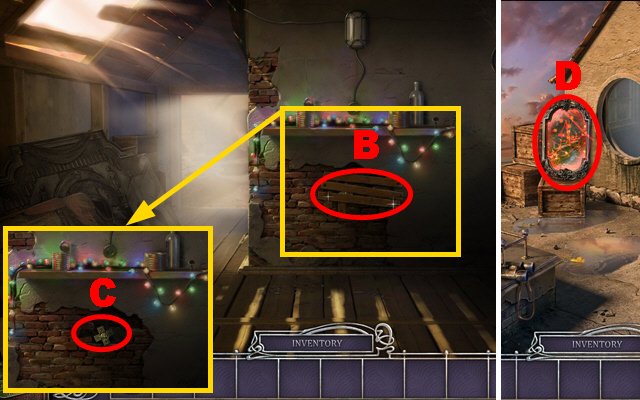
- Use the NAIL PULLER on the boarded wall (B).
- Take the JOYSTICK (C).
- Move forward and go through the mirror (D).
- Use the Biotransformation Power on the acorn and play the mini-game.
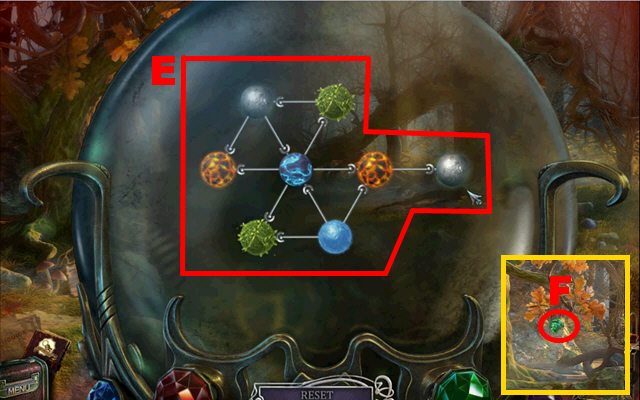
- You have to connect all elements so that they form a coherent group.
- The screenshot displays the correct solution (E).
- Take the ACORN (F).
- Play the HOS.
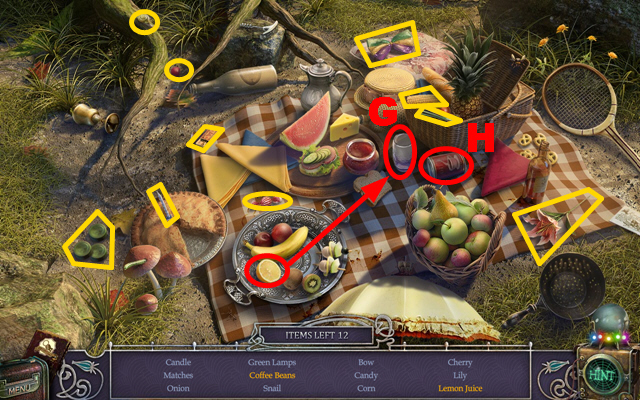
- Squeeze the lemon over the glass and take the lemon juice (G).
- Open the can and take the coffee beans (H).
- The GREEN LAMPS will go into inventory.
- Go back eight times, turn right, move forward, go downstairs, and move forward twice.
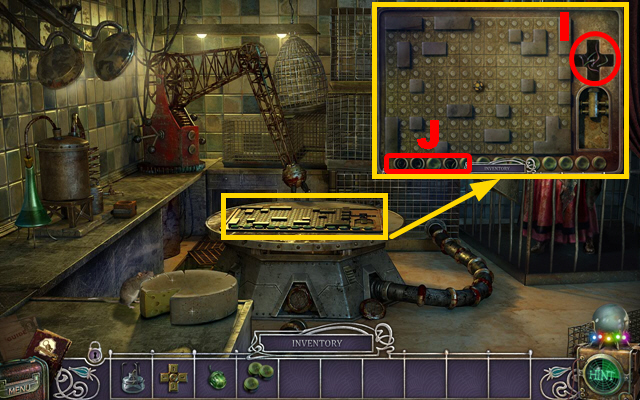
- Zoom into the large panel in the center of the room.
- Add the JOYSTICK (I) and the GREEN LAMPS (J) to it.
- Play the mini-game.
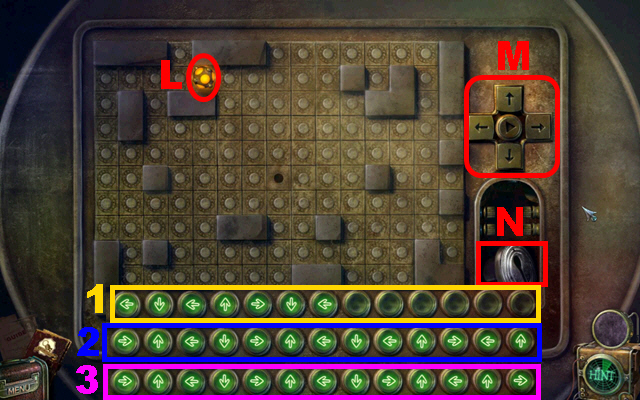
- Direct the ball (L) through the board using the arrows (M) on the joystick to collect all the green lights on the board.
- You can direct the ball up to thirteen times.
- Round 1 solution: left, down, left, up, right, down, and left (1).
- Round 2 solution: right, up, left, down, right, up, left, down, left, up, right, left, and up (2).
- Round 3 solution: right, up, left, down, right, up, left, down, right, up, left, up, and right (3).
- Take the LOCK PART (N).
- Go back four times, turn left, and move forward three times.
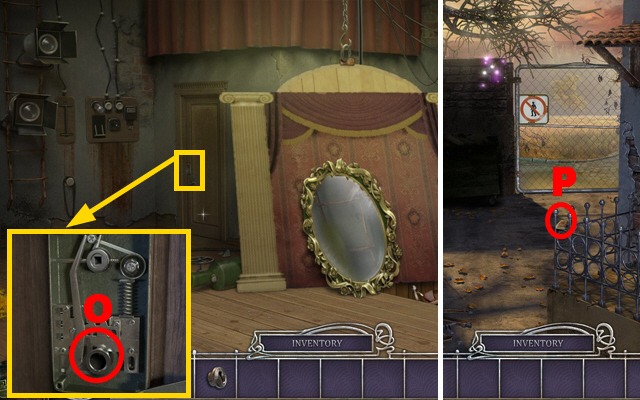
- Zoom into the lock and add the LOCK PART to it (O).
- Open the door and go through it.
- Take the MATCHES (P).
- Play the HOS.
Chapter 7: The Backyard
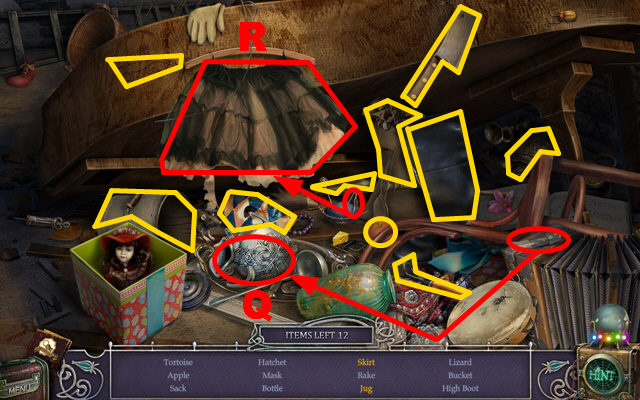
- Take the glue, use it on the jug, and take the jug (Q).
- Take the needle, use it on the skirt, and take the skirt (R).
- The HATCHET will go into inventory.
- Use your Electricity Power on the lamp.
- Play the mini-game.
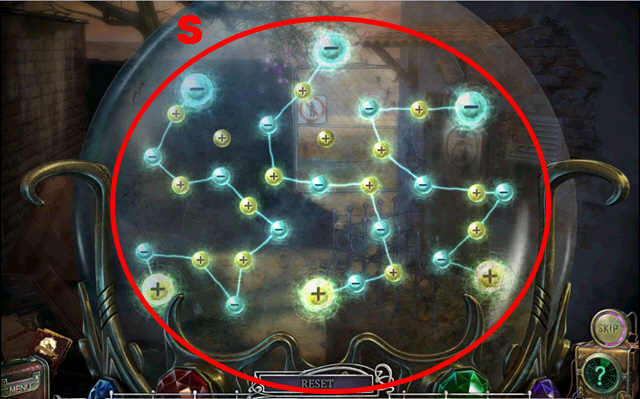
- Connect each large plus sign with one large minus sign.
- The screenshot displays the correct solution (S).
- Go back four times, turn right, move forward, go downstairs, and move forward twice.
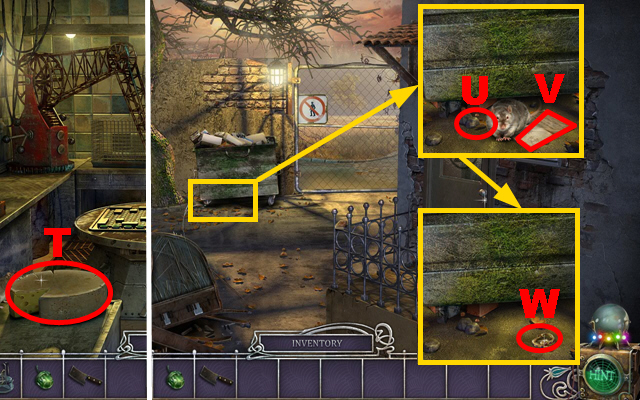
- Use the HATCHET on the cheese and take the CHEESE (T).
- Move back five times, move forward three times, and go through the left door.
- Zoom into the trash bin and use the CHEESE on the rat (U).
- Take the note (V) and the GOLD (W).
- Go back four times, turn right, move forward, go downstairs, and move forward twice.
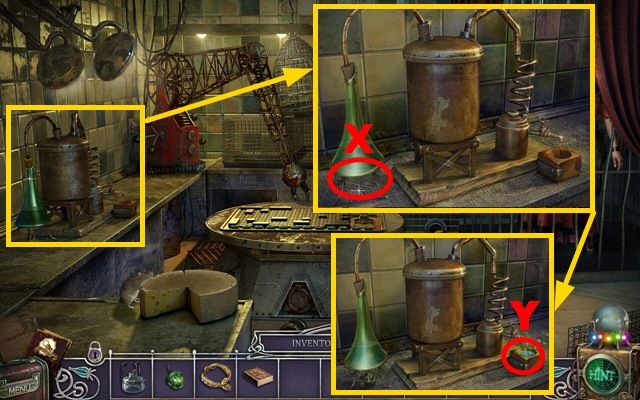
- Zoom into the device; use the SOLID FUEL and the MATCHES on it (X).
- Use your Biotransformation Power on the liquid (Y).
- Play the mini-game.
- You have to connect all elements so that they form a coherent group.
- The screenshot displays the correct solution (Z).
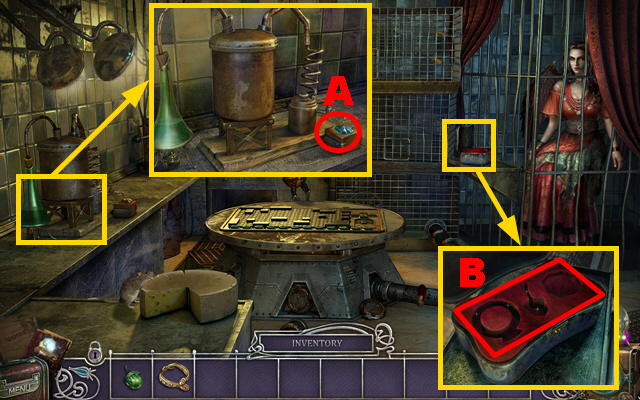
- Take the DIAMOND (A).
- Zoom into the jewellery box; add the ACORN, the GOLD, and the DIAMOND to it (B).
- The OFFICE KEY will go into inventory.
- Take the Astral Projection Power.
- Move back five times, move forward three times, and go through the left door.
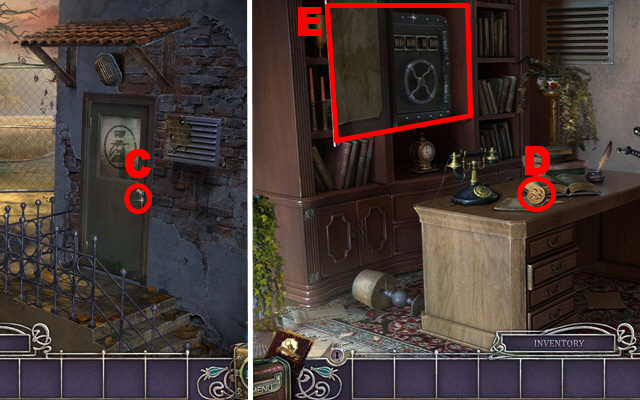
- Use the OFFICE KEY on the door (C) and go through it.
- Take the CIRCLE PART (D).
- Open the cabinet (E).
- Move back seven times and turn right.
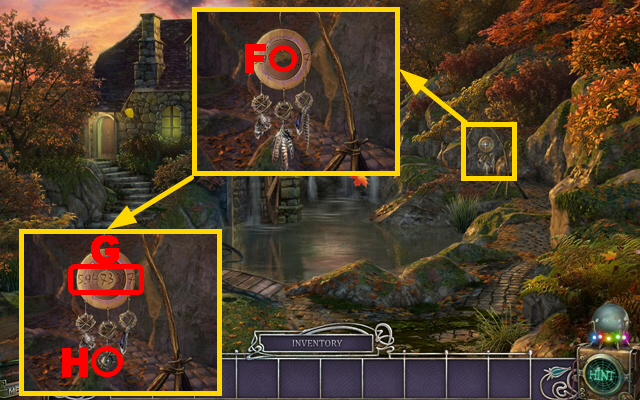
- Zoom into the dreamcatcher; use the CIRCLE PART on the dreamcatcher (F).
- Make note of the created code: 59473317 (G).
- Take the NUMBER DISC (H).
- Move back once, go forward five times, go through the left door, and go right.
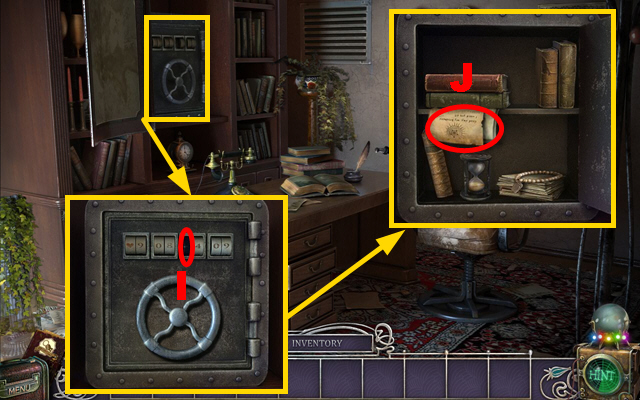
- Zoom into the safe; add the NUMBER DISC to it (I).
- The code for the safe is: heart-9-4-club-diamond-diamond-spade-club.
- Take the notes (J).
- Play the HOS.
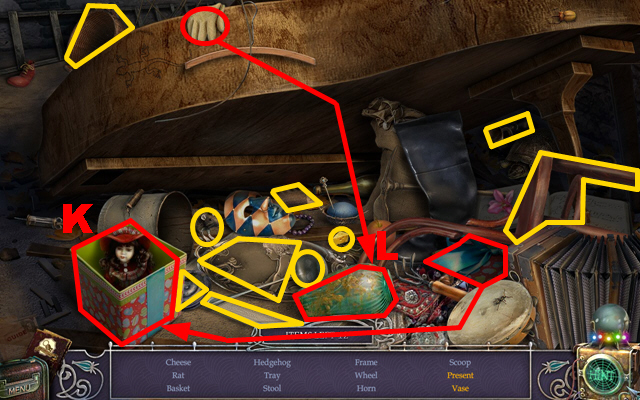
- Take the top of the present, put it on the box, and take the present (K).
- Take the glove, put it on the vase, and take the vase (L).
- The WHEEL will go into inventory.
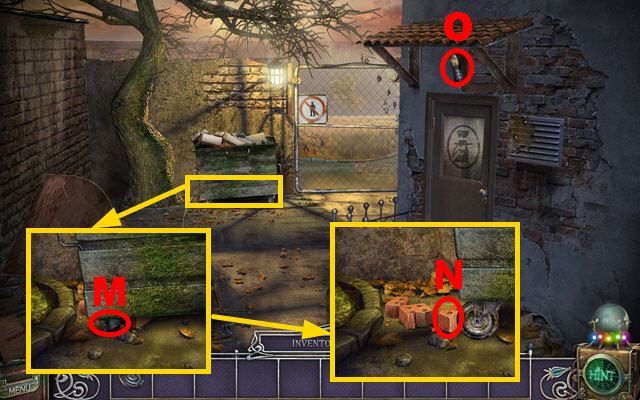
- Zoom into the trash bin; use the WHEEL on it (M) and take the BRICK (N).
- Take the BULB (O).
- Go back three times, turn left, go upstairs, turn right, and turn left twice.
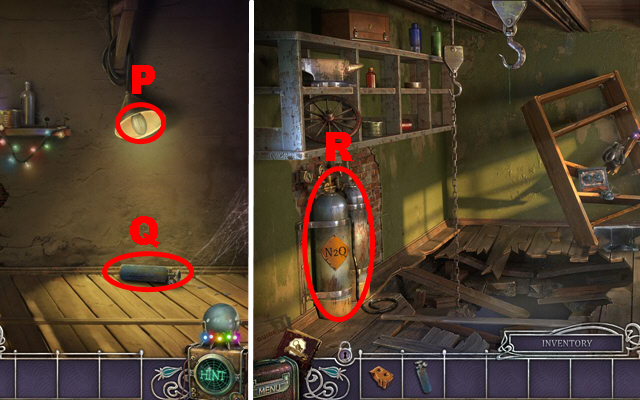
- Use the BULB on the lamp (P).
- Take the EMPTY GAS CONTAINER (Q).
- Go back and move through the right door.
- Use the EMPTY GAS CONTAINER on the sleeping gas container (R); the SLEEPING GAS goes into inventory.
- Play the HOS.
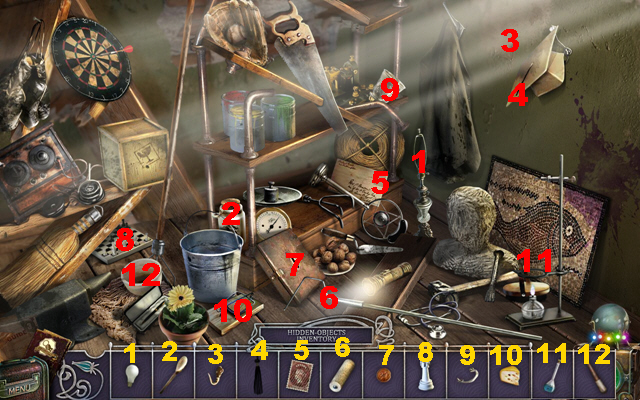
- Put all items back into place (1-12).
- The ACID will go into inventory.
- Go back five times, move forward twice, and go through the left door.
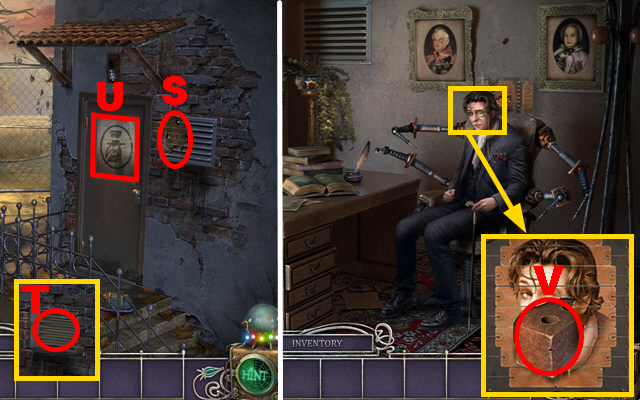
- Use the ACID on the panel (S); remove the panel.
- Use the SLEEPING GAS on the new opening (T).
- Use the BRICK on the window of the door (U).
- Open the door and enter the office.
- Zoom into Gerard, remove the brick (V), and play the mini-game.
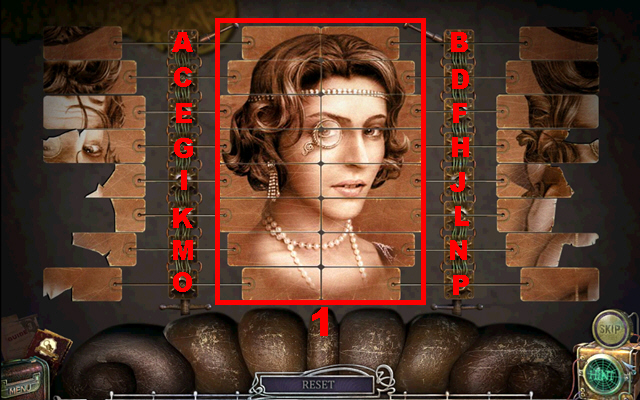
- Recreate the picture of Patrizia.
- Turning one specific part always rotates two or three other parts of the picture.
- To solve this puzzle (1), swap the pieces in this order: H, E, B, H, J, N, P, M, N, B, E, M, K, J, H, B, C, B, D, F, E, H, M, L, N, and P.
- Congratulations, you have completed The Agency of Anomalies: The Last Performance.
Created at: 2012-10-12

