Walkthrough Menu
- General Tips
- Chapter 1: The Camp
- Chapter 2: The Wayshrine
- Chapter 3: The Palace Terrace
- Chapter 4: Elana's House
- Chapter 5: The Ruins
- Chapter 6: The Passageway
- Chapter 7: The Reliquary
General Tips
- This is the official guide for Amaranthine Voyage: The Shadow of Torment.
- Hidden-object puzzles are referred to as HOPs. This guide will not show screenshots of the HOPs, however, it will mention when an HOP is available and the inventory item you'll collect from it.
- This guide will not mention each time you have to zoom into a location; the screenshots will show each zoom scene.
- Use the map to travel to a location.
Chapter 1: The Camp
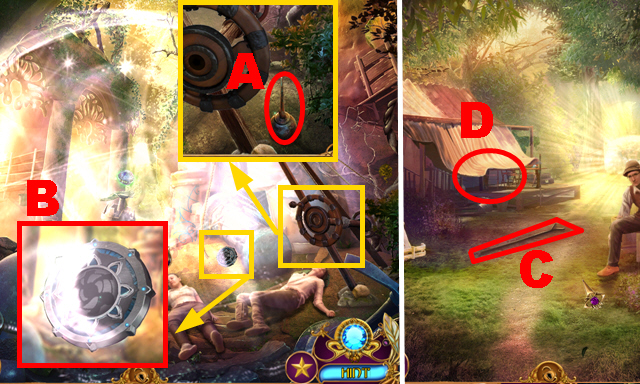
- Move forward.
- Take the OIL (A).
- Pull the disc twice (B) to acquire STRANGE DISC 1/3.
- Take the TENT POLE (C).
- Place the TENT POLE (D).
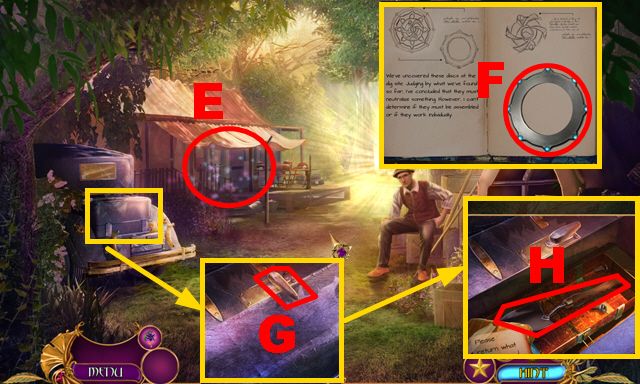
- Play the HOP (E) to receive WINFIELD'S JOURNAL.
- Open WINFIELD'S JOURNAL and turn two pages; take STRANGE DISC 2/3 (F).
- Use the OIL (G); open the box.
- Take the TROWEL (H).
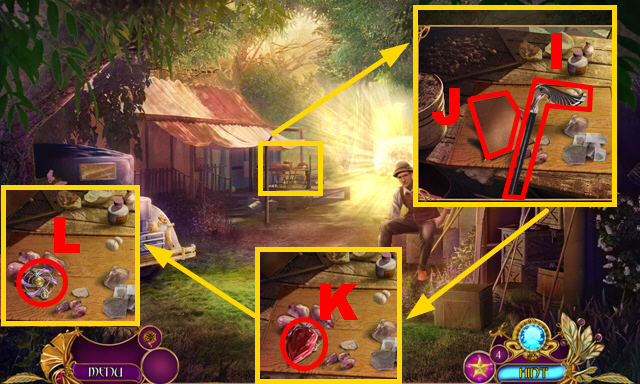
- Take the WALKING CANE (I), map (J), RED SHARD (K) and STRANGE DISC 3/3 (L).
- Move forward.
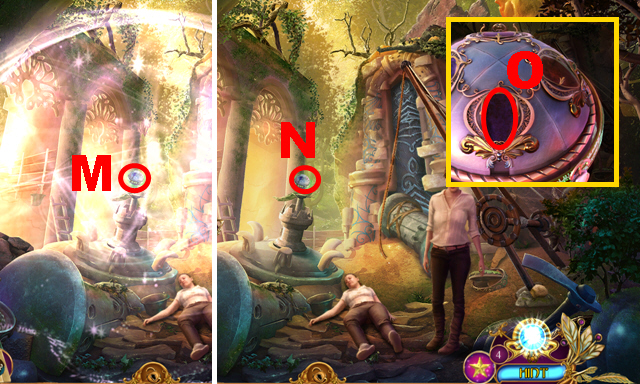
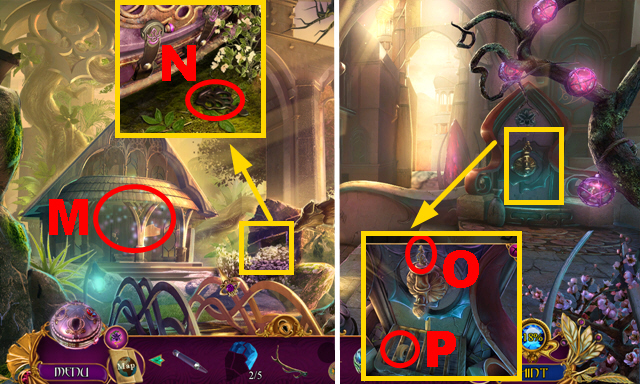
- Use 3 STRANGE DISCS (M).
- Take the strange orb (N).
- Place the RED SHARD on the orb (O).
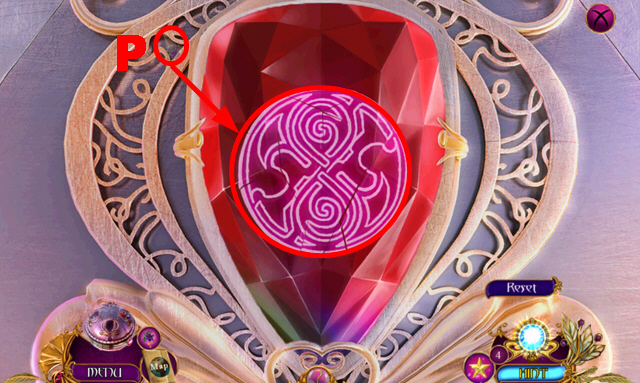
- Play the mini-game.
- Solution: (P).
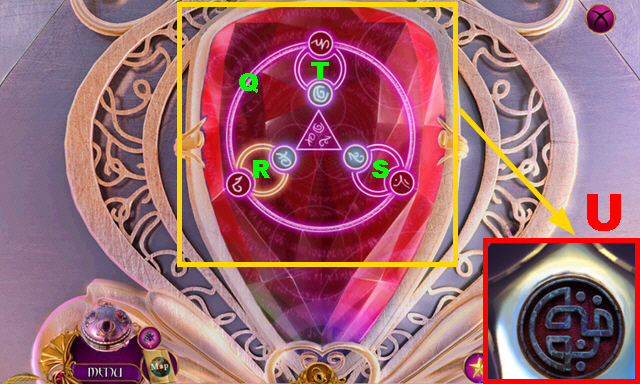
- Play the mini-game.
- Solution: Q-T-S-R-Q-S-Q-R.
- Take the VAULT SEAL (U).
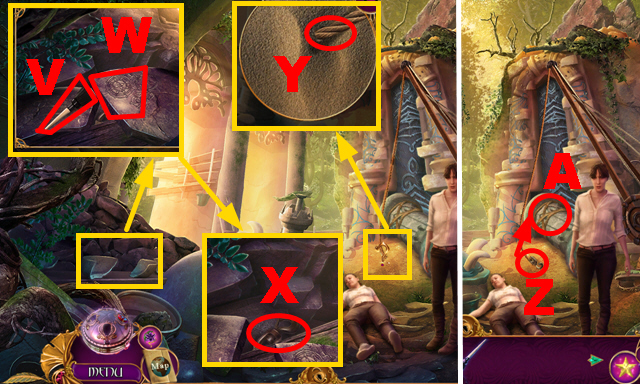
- Take the BRUSH (V); use the TROWEL (W).
- Take the CRANE HOOK (X).
- Place the CRANE HOOK (Y).
- Connect the CRANE HOOK (Z) to the column (A).
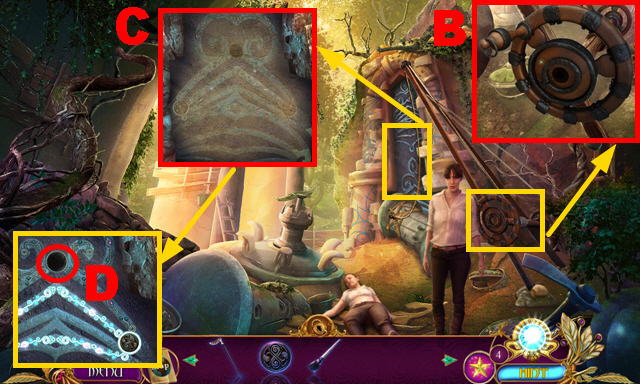
- Rotate the wheel (B).
- Use the BRUSH to remove the dust completely (C).
- Place the VAULT SEAL (D).
- Move forward.
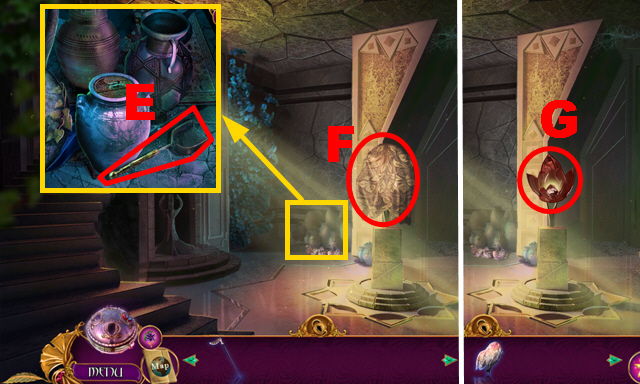
- Take the COAL SIFTER (E) and CLOTH (F).
- Activate the flower (G).
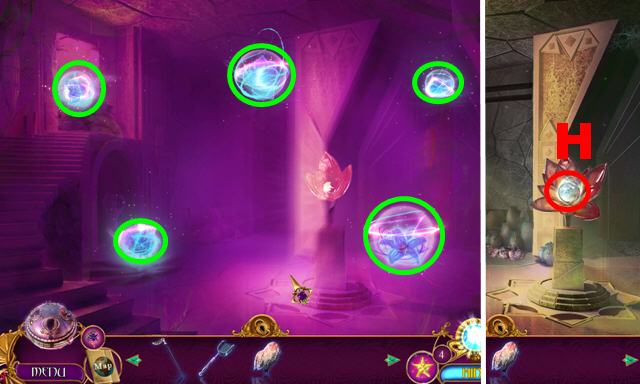
- Collect 5 flower essences (green).
- Take the WAYFARER'S PEARL (H).
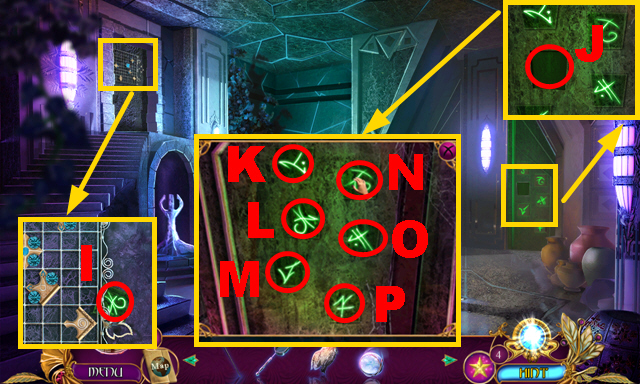
- Take the GLYPH PLATE (I).
- Place the GLYPH PLATE (J).
- Play the mini-game.
- Solution: N-K-L-P-N-O-K-M-L.
- Turn right.
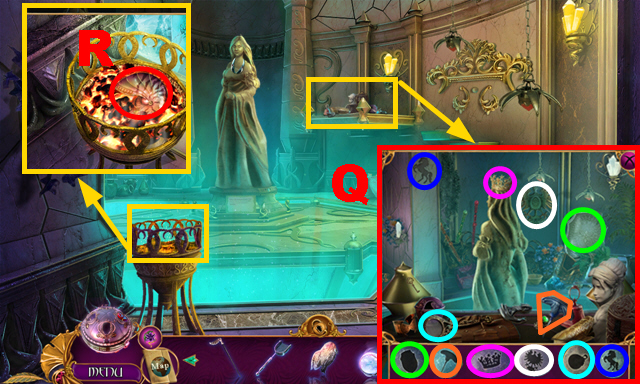
- Collect 6 objects (Q) to receive the GIMLET TOOL.
- Use the COAL SIFTER to acquire the MEMORY SHELL (R).
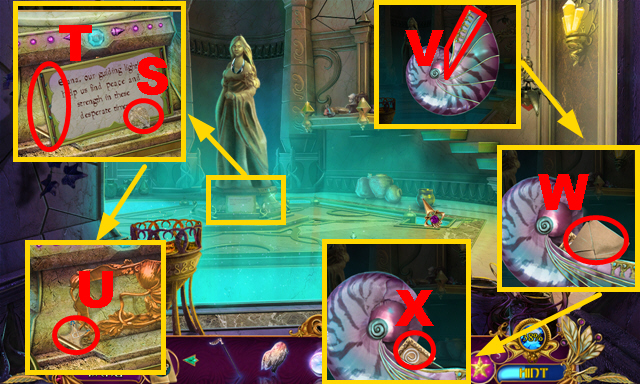
- Take the FRUIT HUSK (S).
- Use the GIMLET TOOL (T); take JEWELED PIECE 1/3 (U).
- Open the MEMORY SHELL (V); take the note (W) and JEWELED PIECE 2/3 (X).
- Walk down.
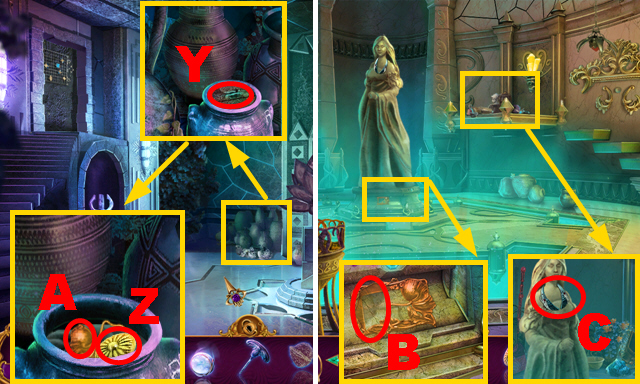
- Use the GIMLET TOOL (Y); take the ORNATE KNOB (Z) and COPPER LEAF (A).
- Turn right.
- Place the COPPER LEAF (B).
- Collect the NECKLACE with the WALKING CANE (C).
- Walk down.
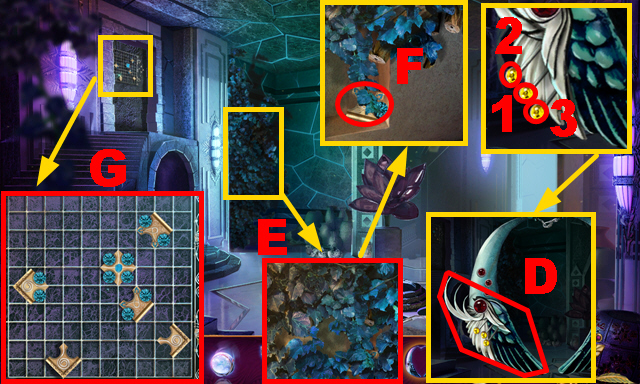
- Push the levers on the NECKLACE: 1-3.
- Take the DAGGER (D).
- Use the DAGGER (E); take JEWELED PIECE 3/3 (F).
- Place 3 JEWELED PIECES (G).
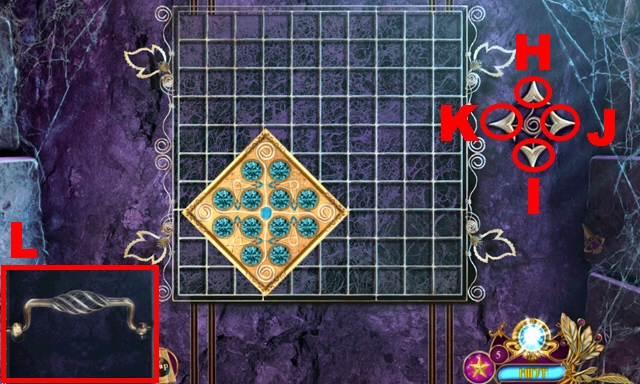
- Play the mini-game.
- Solution: I-J-Hx2-K-Ix5-J-K-Hx6-Ix2-Kx2-I-K-Hx2-Ix4.
- Pull the lever (L).
- Turn left.
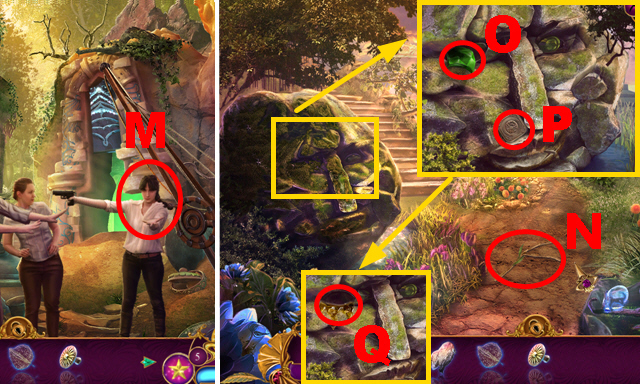
- Use the WAYFARER'S PEARL (M).
- Take the TWIG (N), SHARD FRAGMENT 1/5 (O), and SQUARE COIN (P).
- Place the TWIG (Q) to acquire the TWIG WITH NECTAR.
- Turn left.
Chapter 2: The Wayshrine
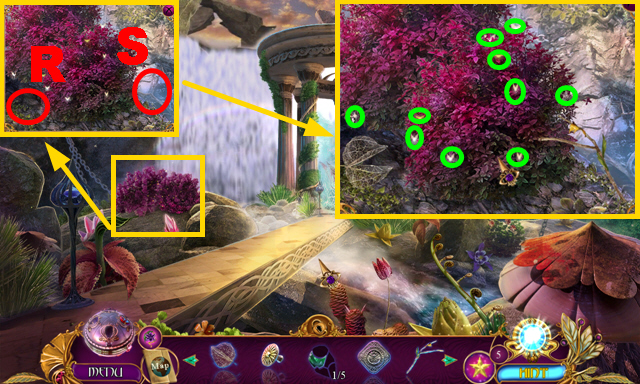
- Place the FRUIT HUSK (R) and TWIG WITH NECTAR (S).
- Lead all fireflies (green) into the husk with the twig to acquire the TRAPPED FIREFLIES.
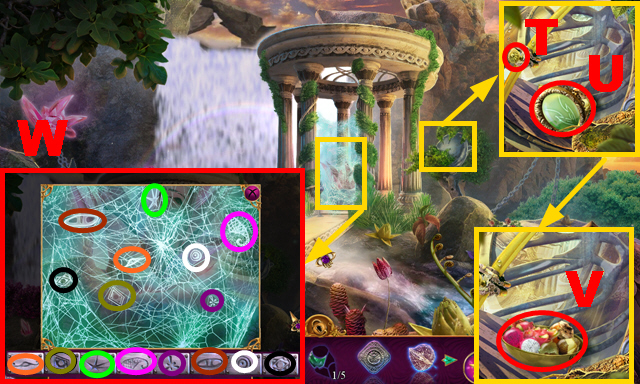
- Place the ORNATE KNOB (T); turn it.
- Take the LENS (U) and BOWL OF FRUITS (V).
- Collect 8 symbols (W) to acquire the STRONG SILK THREAD.
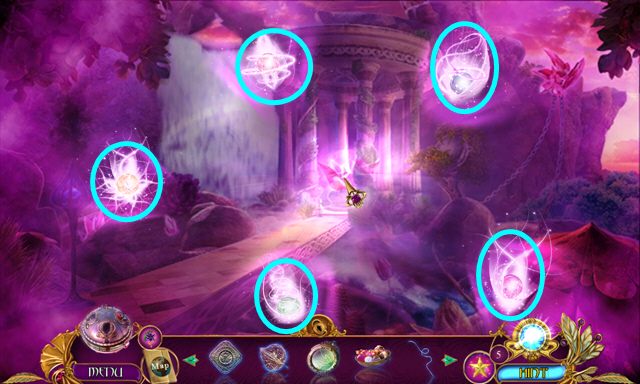
- Collect 5 flower essences (blue).
- Walk down.
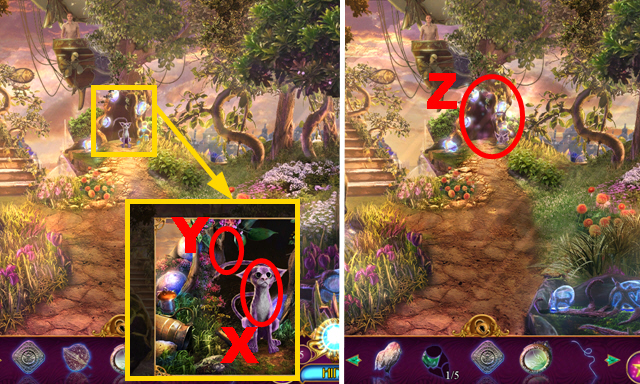
- Place the BOWL OF FRUITS (X) and TRAPPED FIREFLIES (Y).
- Play the HOP (Z) to receive the FLOWER EMBLEM.
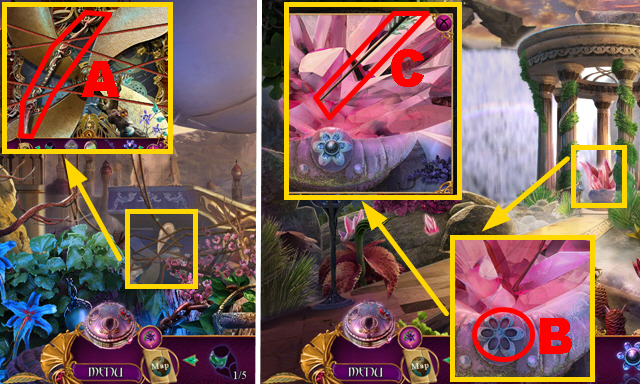
- Take the INCOMPLETE BOW (A).
- Walk down, turn left.
- Place the FLOWER EMBLEM (B); take the EXPLOSIVE ARROW (C).
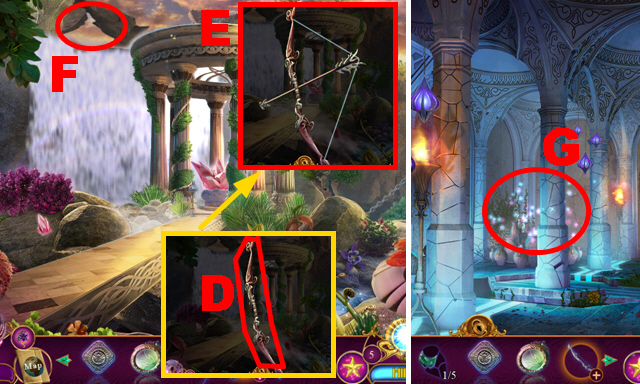
- Place the STRONG SILK THREAD and EXPLOSIVE ARROW on the INCOMPLETE BOW (D).
- Take the BOW WITH EXPLOSIVE ARROW (E).
- Shoot the BOW WITH EXPLOSIVE ARROW (F).
- Play the HOP (G) to receive the GLASS EYE.
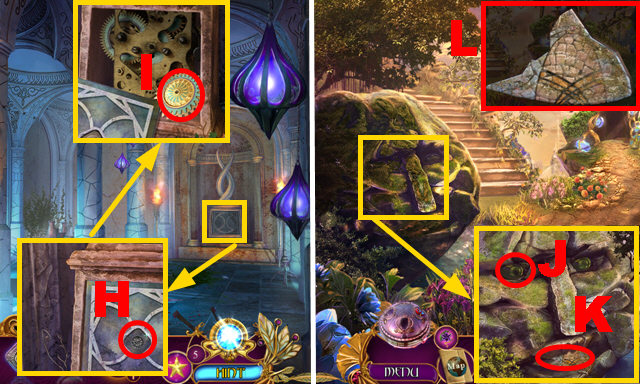
- Place the SQUARE COIN (H); take the COG (I).
- Go to the Grove.
- Place the GLASS EYE (J); take the DIRTY FRAGMENT (K).
- Clean the DIRTY FRAGMENT with the CLOTH (L) to receive the MOSAIC FRAGMENT.
- Go to the Undercroft.
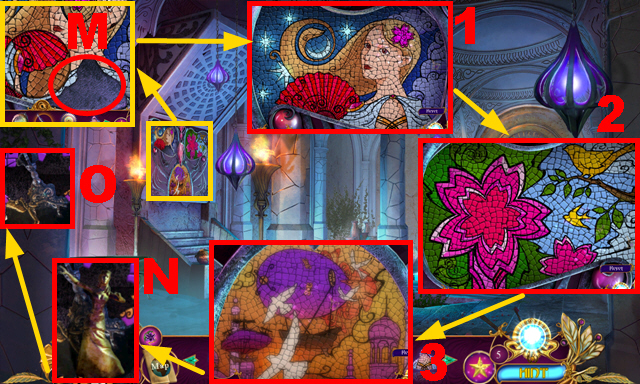
- Place the MOSAIC FRAGMENT (M).
- Play the mini-game.
- Rotate the discs to create the correct images: 1-3.
- Take the PRINCESS FIGURINE (N) and RITUAL BLADE (O).
- Go to the Treetop.
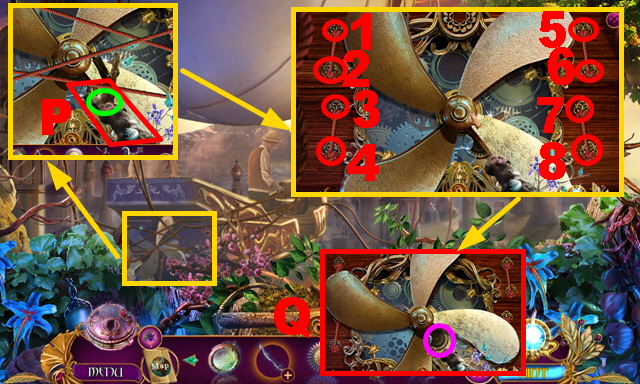
- Use the RITUAL BLADE (P); remove the branch (green).
- Play the mini-game.
- Solution: 2-6-3-7-2.
- Rotate the propeller (Q); place the COG (purple).
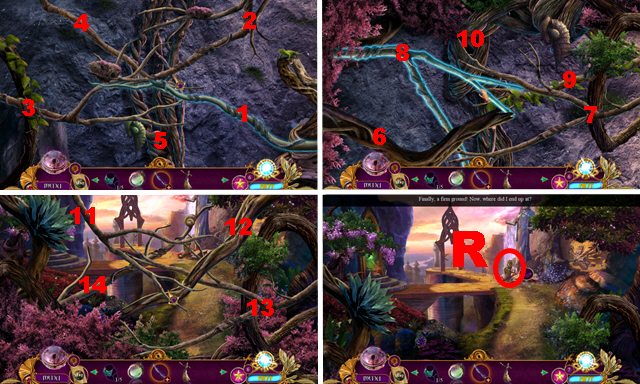
- Remove branches 1-14.
- Talk to the creature (R).
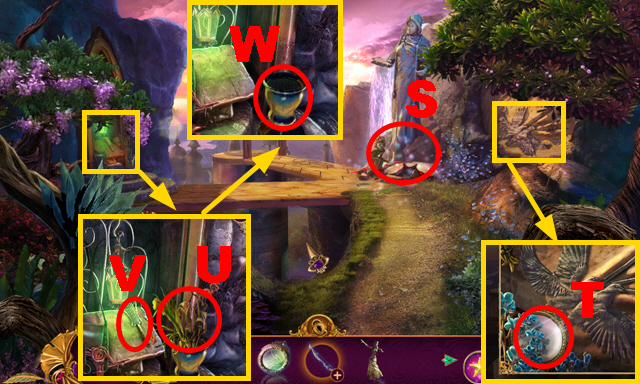
- Play the HOP (S) to receive the FILTER FRAME.
- Take the MIRROR (T).
- Remove the flowers (U); take the GARDEN FORK (V).
- Take the VASE (W).
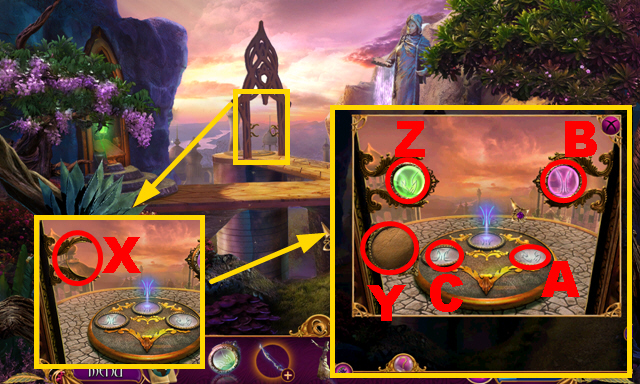
- Place the LENS and MIRROR (X).
- Play the mini-game.
- Solution: Use the mirror (Y) to guide sunlight through lens (Z) to spot (A) and through lens (B) to spot (C).
- Go downstairs.
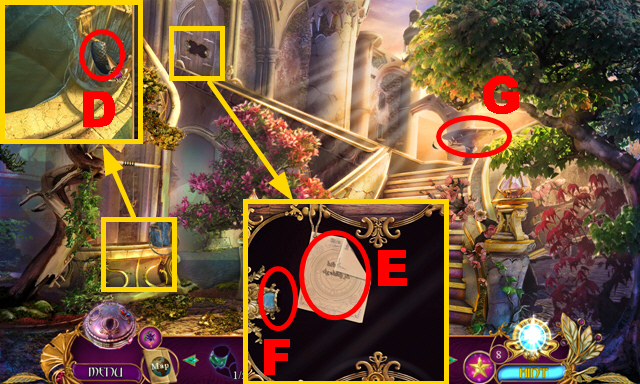
- Remove 3 boards; take the TAIL HOOK (D).
- Read and move the note (E); place the FILTER FRAME (F).
- Examine the pedestal (G).
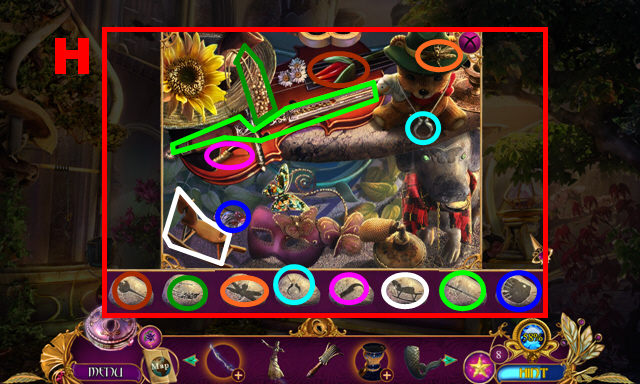
- Collect 8 items (H).
- You receive the PORCELAIN TULIP.
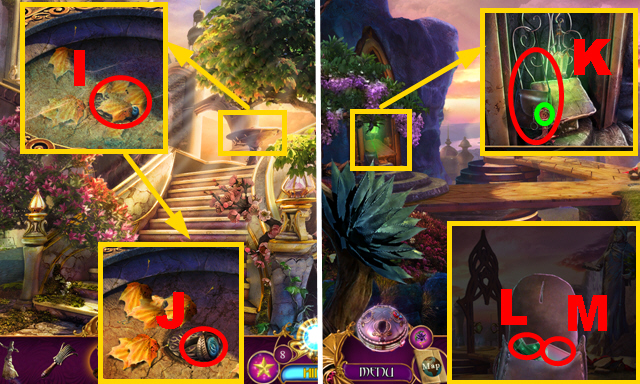
- Use the GARDEN FORK (I); take the SIGNET RING (J).
- Walk down.
- Use the SIGNET RING (green); take the LEATHER BAG (K).
- Open the LEATHER BAG; take SHARD FRAGMENT 2/5 (L) and the FILTER (M).
- Go downstairs.
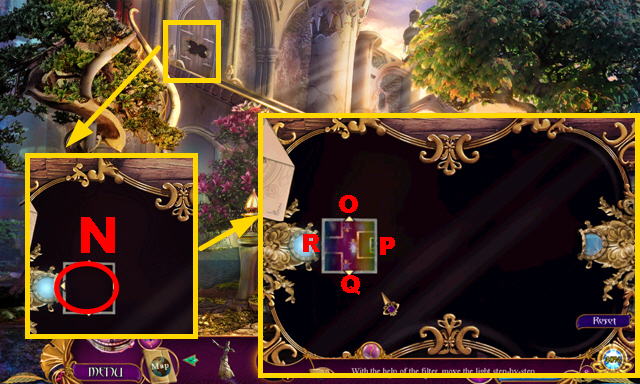
- Place the FILTER (N).
- Play the mini-game.
- Solution: Q-P-P-Q-P-O-O-P-Q-P.
- Enter the Palace Garden.
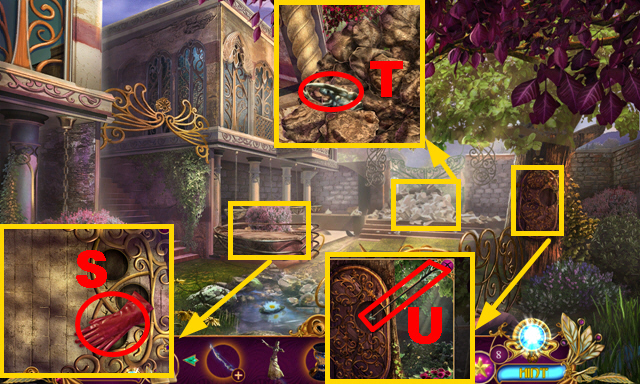
- Take the LEATHER GLOVES (S), MERMAID TORSO (T), and FAULTY ARROW (U).
- Turn left.
Chapter 3: The Palace Terrace
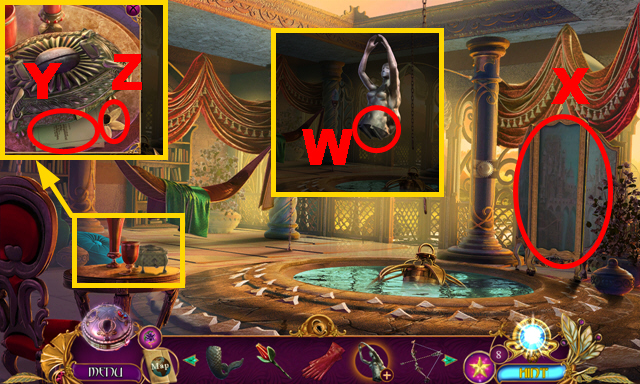
- Place the TAIL HOOK on the MERMAID TORSO (W) to receive the MERMAID HOOK.
- Move aside the room divider (X).
- Take the notes (Y) and STONE DAFFODIL (Z).
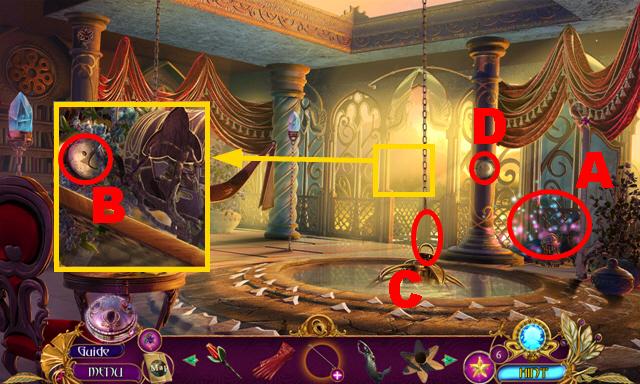
- Play the HOP (A) to receive the EYEPIECE.
- Take RUNE PEBBLE 1/3 (B).
- Place the MERMAID HOOK (C).
- Rotate the lever (D).
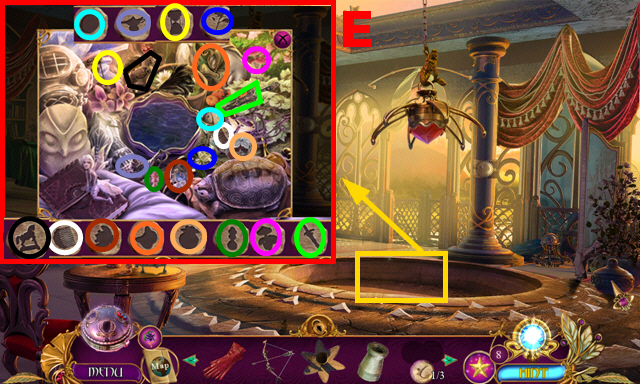
- Collect 12 items (E) to receive RUNE PEBBLE 2/3.
- Walk down three times.
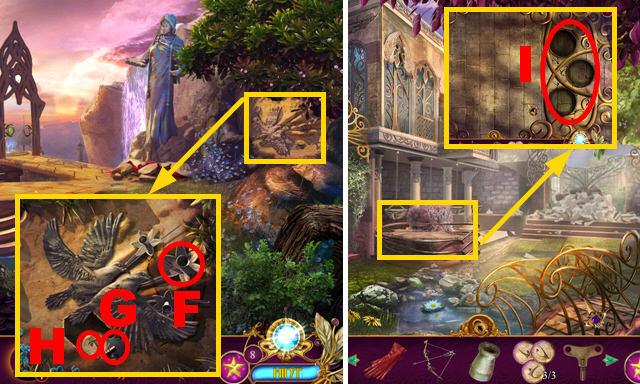
- Place the STONE DAFFODIL (F); take the WINDUP KEY (G) and RUNE PEBBLE 3/3 (H).
- Go to the Palace Garden.
- Place 3 RUNE PEBBLES (I).
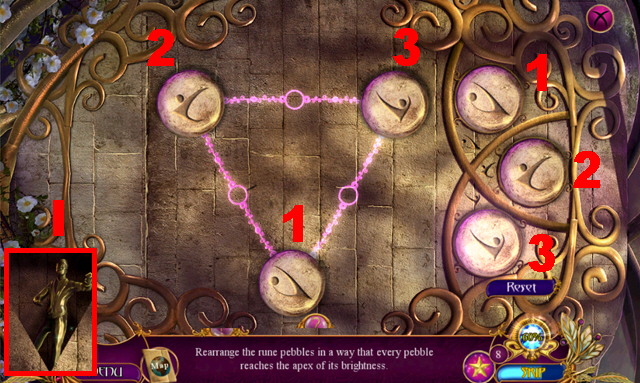
- Play the mini-game.
- Solution: 1-3.
- Open the compartment; take the PRINCE FIGURINE (I).
- Turn left.
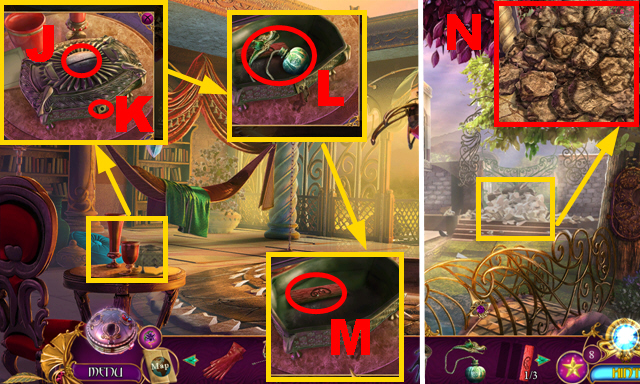
- Place the PRINCE FIGURINE and PRINCESS FIGURINE (J); use the WINDUP KEY (K).
- Take the LEVITATION SPRAY (L) and EMBLEM PIECE 1/3 (M).
- Walk down.
- Use the LEVITATION SPRAY (N).
- Move forward.
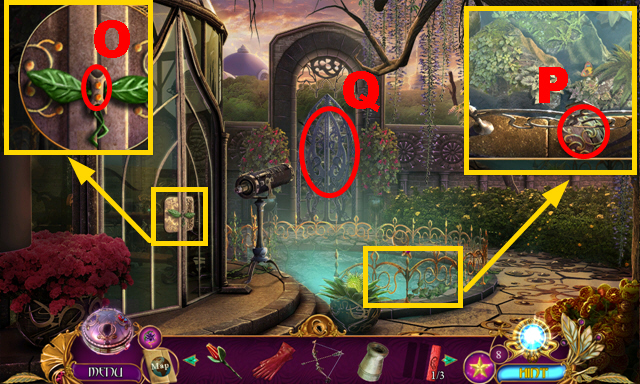
- Place the PORCELAIN TULIP (O).
- Take the PATTERNED PIECE (P).
- Examine the gate (Q).
- Walk down.
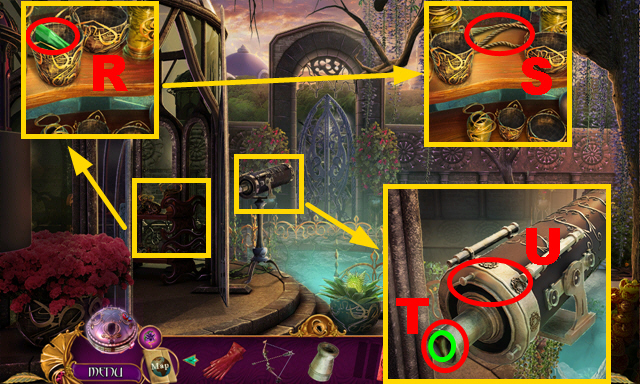
- Take SHARD FRAGMENT 3/5 (R).
- Move 2 bowls; take the ROPE (S).
- Take the PORCELAIN GECKO (green); place the EYEPIECE (T).
- Inspect the telescope (U).
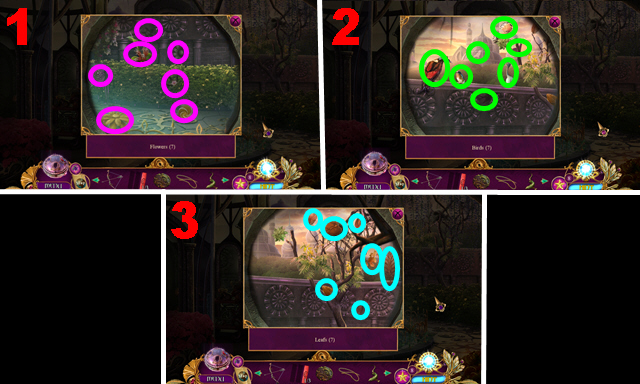
- Find framed objects: 1-3.
- Walk down twice.
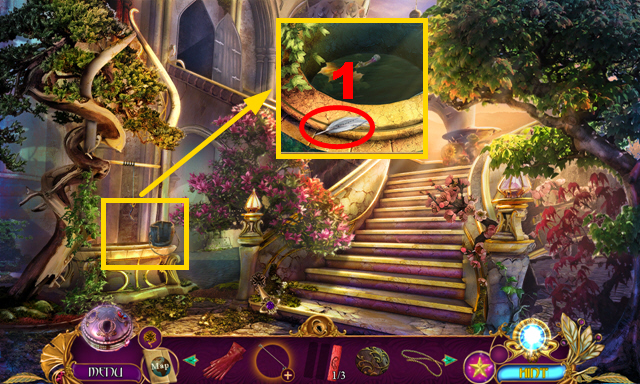
- Take the WHITE FEATHER (1).
- Move forward.
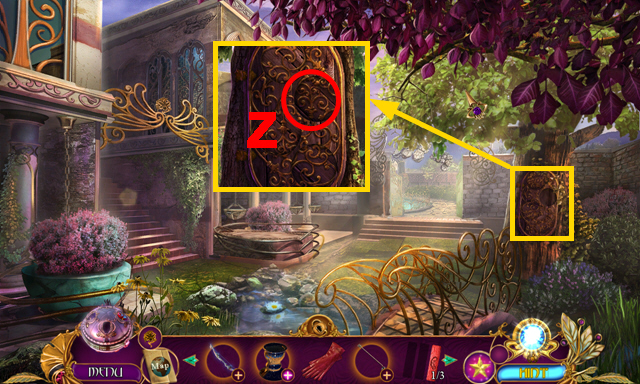
- Place the PATTERNED PIECE (Z).
- Play the mini-game.
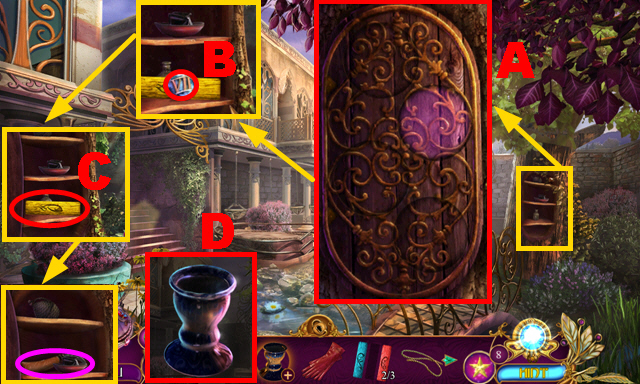
- Switch and rotate the discs to create the correct pattern (A).
- Take GOLDEN NUMBER 1/2 (B), EMBLEM PIECE 2/3 (C), and PRUNING KNIFE (purple).
- Place the ROPE on the VASE (D) to receive the VASE WITH ROPE.
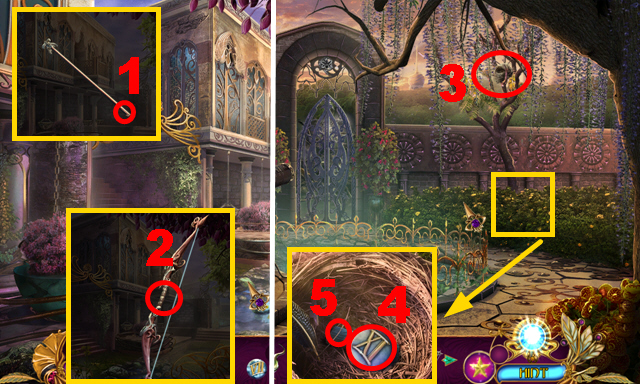
- Remove a piece from the FAULTY ARROW; apply the PRUNING KNIFE and WHITE FEATHER on the FAULTY ARROW (1) to receive the TWIG ARROW.
- Place the TWIG ARROW on the BOW (2) to receive the BOW WITH ARROW.
- Move forward.
- Shoot the BOW WITH ARROW (3).
- Take GOLDEN NUMBER 2/2 (4) and EMBLEM PIECE 3/3 (5).
- Walk down twice.
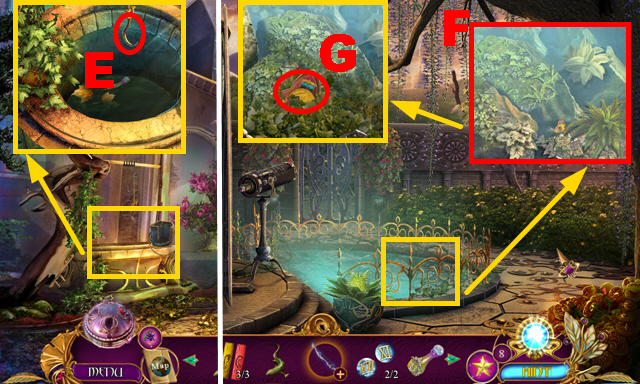
- Place the VASE WITH ROPE (E) to receive the GROWTH POTION.
- Go to the Palace Courtyard.
- Use the GROWTH POTION (F); take the EMBLEM (G).
- Walk down, turn left.
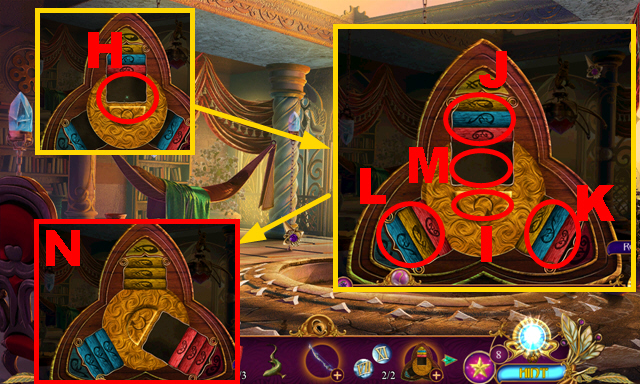
- Place 3 EMBLEM PIECES on the EMBLEM (H).
- Play the mini-game.
- Solution: Jx2-I-K-Ix2-M-I-K-Ix2-M-Ix2-L-Ix2-M-Ix2-J-I-M-I-L-I-M-Ix2-M-Ix2-K-I-M-Ix2-M.
- Take the CHEST EMBLEM (N).
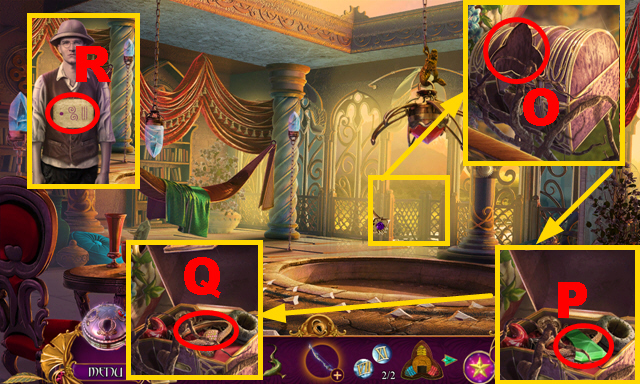
- Place the CHEST EMBLEM (O); take SHARD FRAGMENT 4/5 (P) and the DIAMOND BRACELET (Q).
- Take the PATH INSTRUCTIONS (R).
- Walk down, move forward.
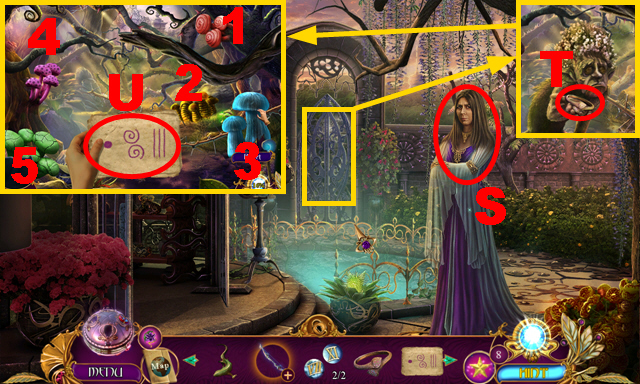
- Talk to the woman (S).
- Give the DIAMOND BRACELET to the creature (T).
- Use the PATH INSTRUCTIONS (U).
- Play the mini-game.
- Solution: 4-1-3-1-4-5-3-4-2-5-3-1.
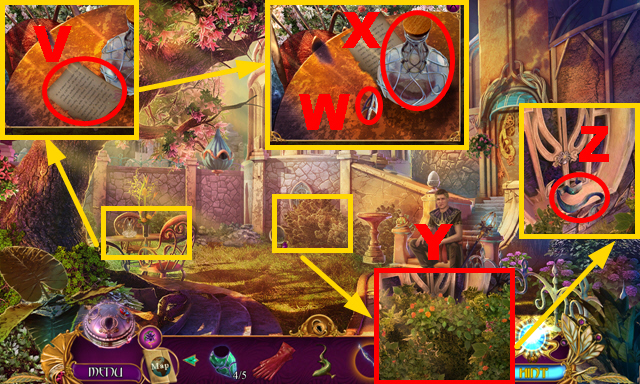
- Take the note (V), MINIATURE ARROWHEAD (W), and BOTTLE (X).
- Use the LEATHER GLOVES (Y); take the CURTAIN TIE (Z).
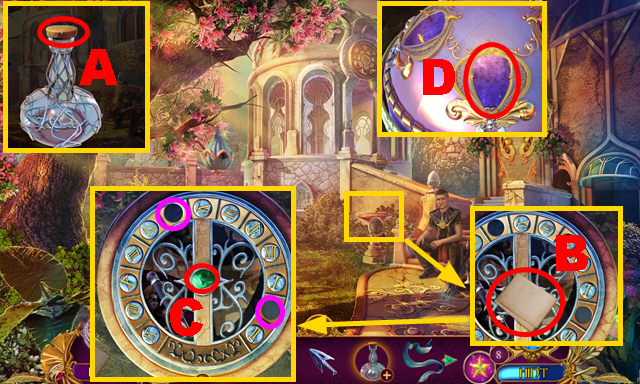
- Open the BOTTLE (A).
- Take the note (B) and SHARD FRAGMENT 5/5 (C).
- Place 2 GOLDEN NUMBERS (purple).
- Put 5 SHARD FRAGMENTS into the orb (D).
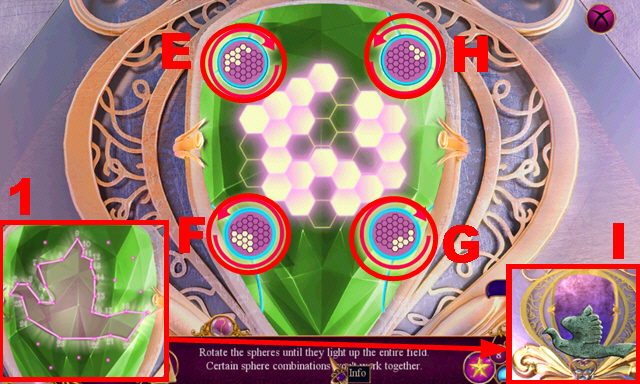
- Play the mini-game.
- Solution: E-F-F-F-G-G-H.
- Connect dots 1-25 to create the correct shape (1).
- Take the TURTLEDOVE SHAPE (I).
Chapter 4: Elana's House
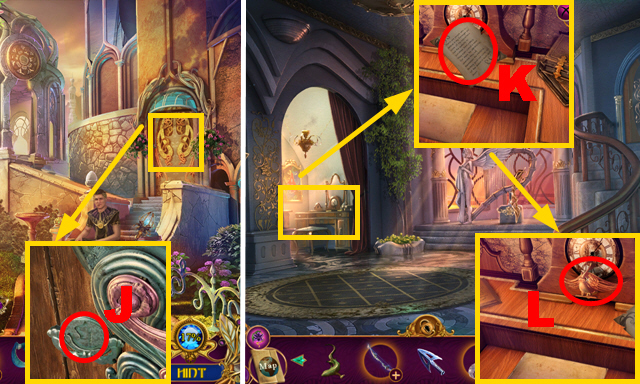
- Place the TURTLEDOVE SHAPE (J); open the door.
- Turn right.
- Take the note (K) and CUCKOO (L).
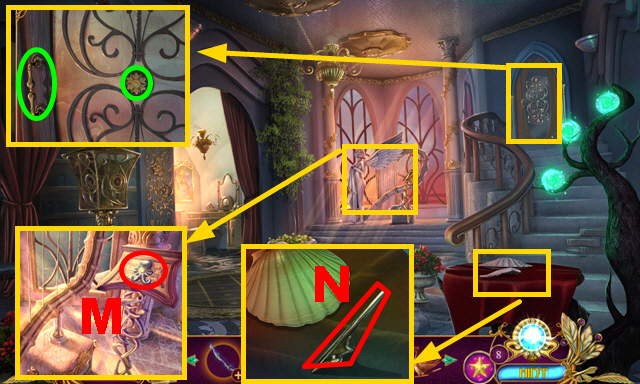
- Take the SQUID HEAD (M) and CERAMIC WING (N).
- Try to open the door (green).
- Walk down.
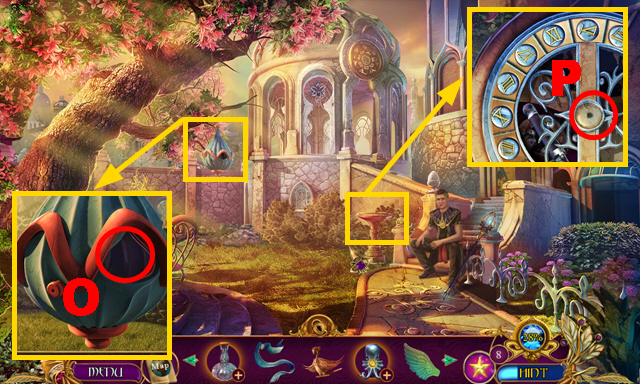
- Place the CUCKOO (O).
- Place the CERAMIC WING (P).
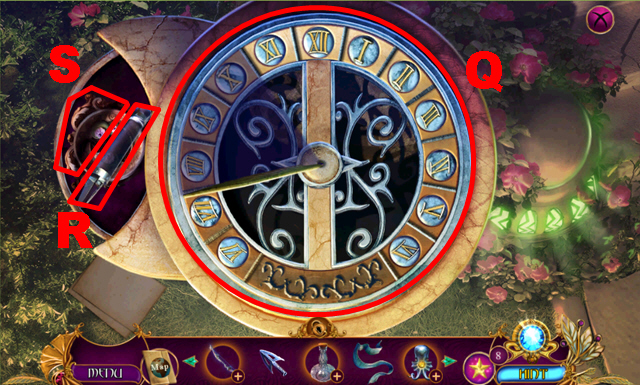
- Play the mini-game.
- Solution: (Q).
- Take the EMPTY CRYSTAL (R) and INCOMPLETE DECORATIVE LOCK (S).
- Turn right.
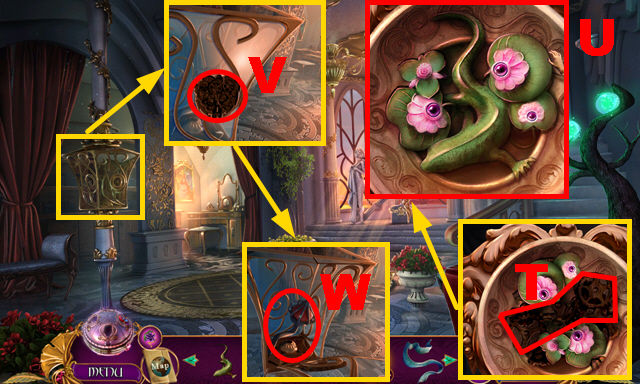
- Place the PORCELAIN GECKO on the INCOMPLETE DECORATIVE LOCK (T).
- Rotate gecko and lilies into the correct position (U) to receive the DECORATIVE LOCK.
- Place the DECORATIVE LOCK (V); take the TURN HANDLE (W).
- Walk down.
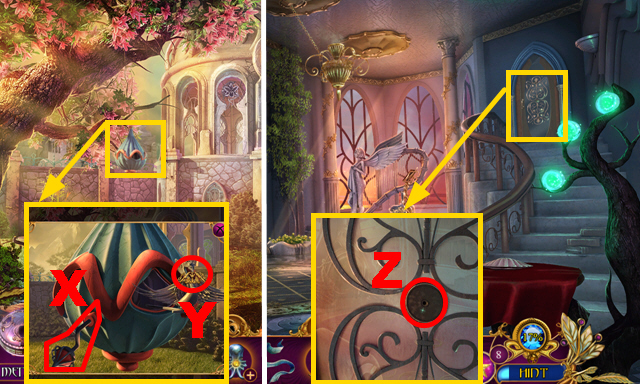
- Place the TURN HANDLE (X); turn it.
- Take the SAFETY LOCK (Y).
- Turn right.
- Use the SAFETY LOCK (Z).
- Turn right.
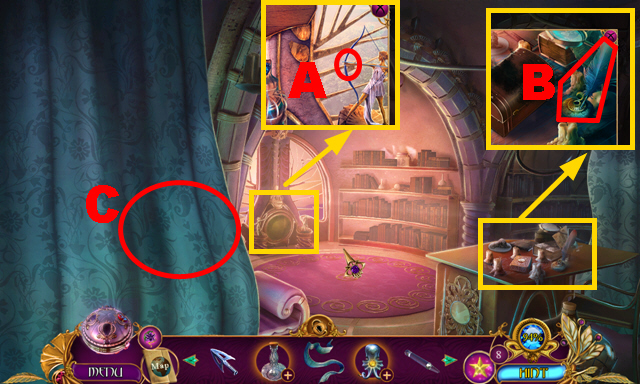
- Place the MINIATURE ARROWHEAD (A).
- Take the INK AND QUILL (B).
- Use the CURTAIN TIE (C).
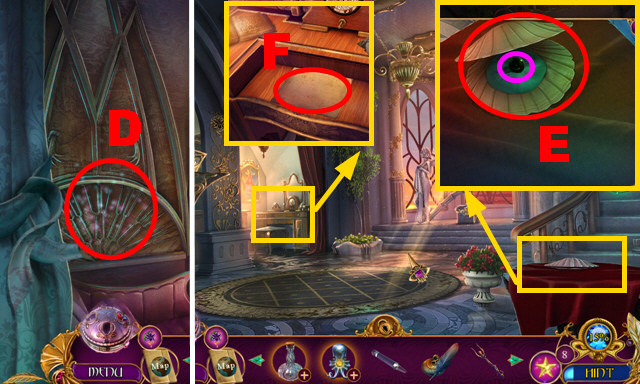
- Play the HOP (D) to receive the BIDENT.
- Walk down.
- Use the BIDENT (E); take the BLACK PEARL (purple).
- Use the INK AND QUILL (F) to paint the note completely; you acquire the HARP NOTES.
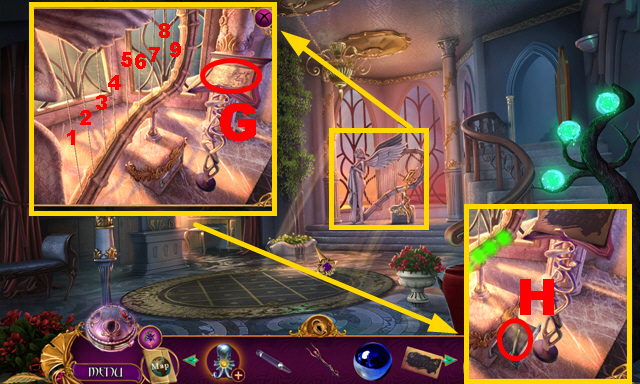
- Place the HARP NOTES (G).
- Play the mini-game.
- Solution: 2-7-4-6-8-5-3-1-9.
- Take FLINT AND STEEL 1/2 (H).
- Turn right.
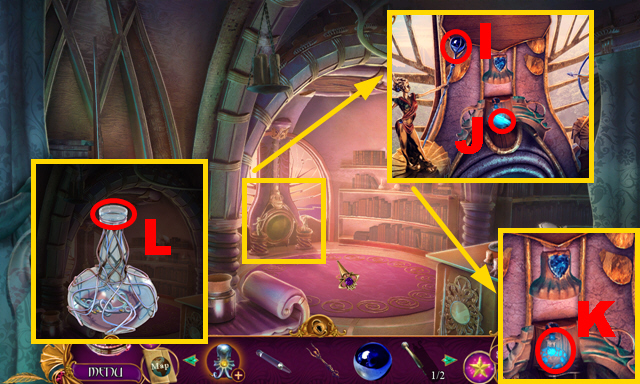
- Place the BLACK PEARL (I); take SHARD FRAGMENT 1/5 (J) and VIAL (K).
- Pour the VIAL into the BOTTLE (L); turn over the bottle to acquire the SQUID TENTACLES.
- Walk down twice.
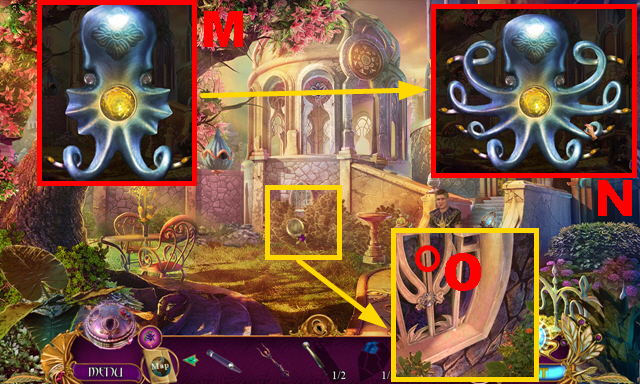
- Place the SQUID TENTACLES on the SQUID HEAD (M).
- Assemble the squid correctly (N); take the SQUID KEY.
- Place the SQUID KEY (O).
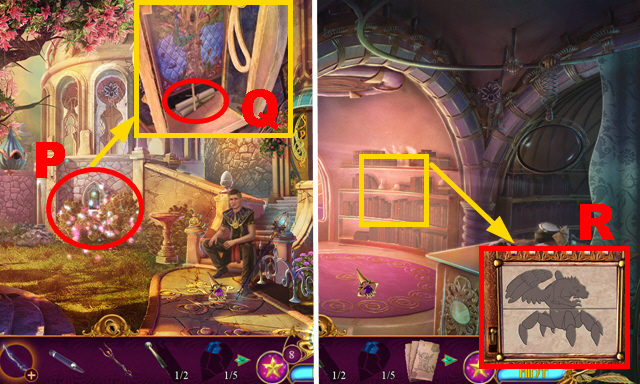
- Play the HOP (P) to unlock the window.
- Take the ANIMAL SKETCHES (Q).
- Turn right twice.
- Place the ANIMAL SKETCHES (R).
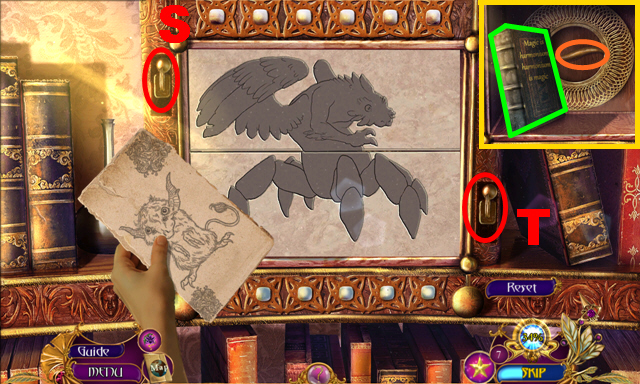
- Play the mini-game.
- Solution: S-S-S-T-T-T-S-S-T-T-T-T-S-S-T-T-T-T.
- Read the book (green).
- Turn the handle (orange).
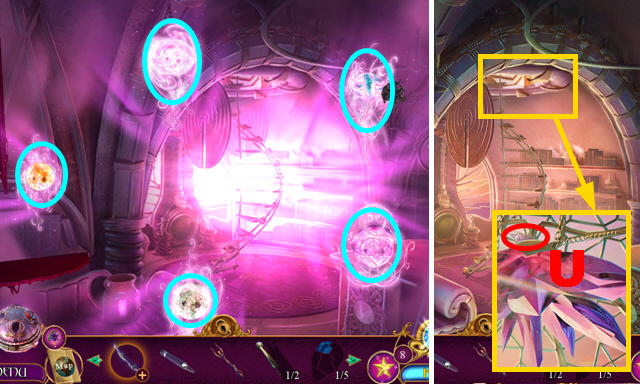
- Collect 5 flower essences (blue).
- Take FLINT AND STEEL 2/2 (U).
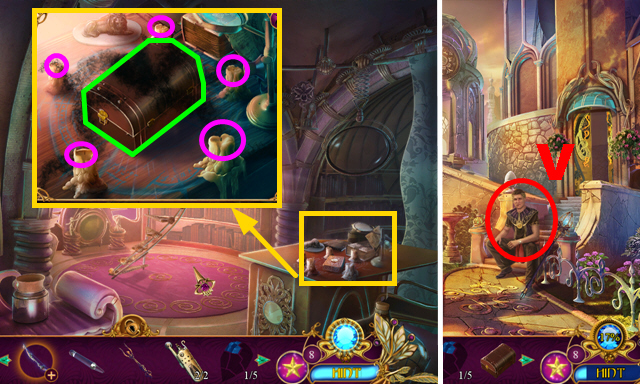
- Use the FLINT AND STEEL (purple); take the BOX (green).
- Walk down twice.
- Give the BOX to the man (V).
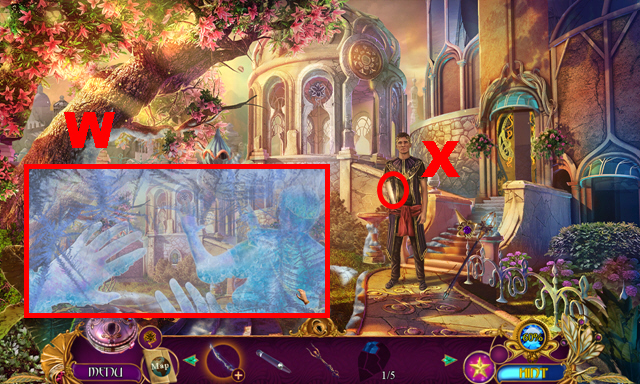
- Break the ice four times (W).
- Take the CODE FOR BELLS (X).
- Move forward.
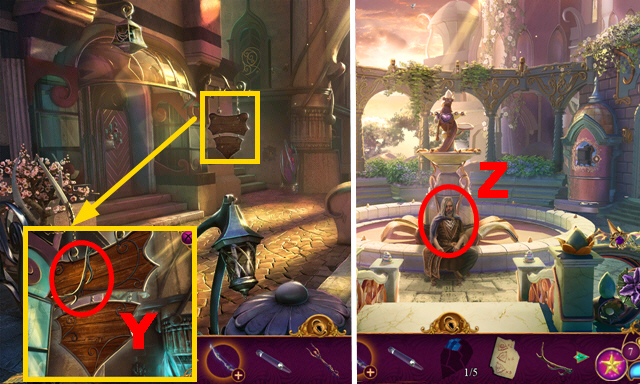
- Collect the LEFT ANTLER with the BIDENT (Y).
- Move forward.
- Talk to the man (Z).
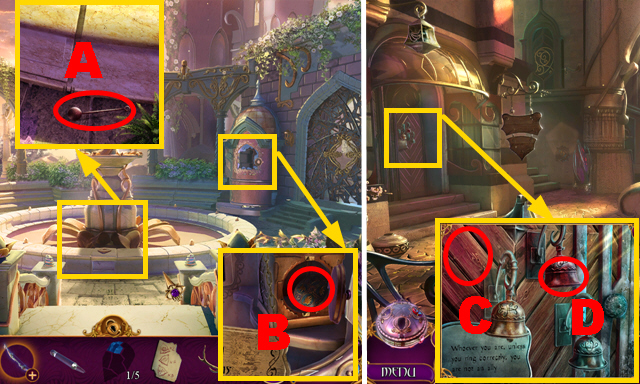
- Take the BELL CLAPPER (A) and ELEMENTAL DISC 1/3 (B).
- Walk down.
- Place the CODE FOR BELLS (C) and BELL CLAPPER (D).
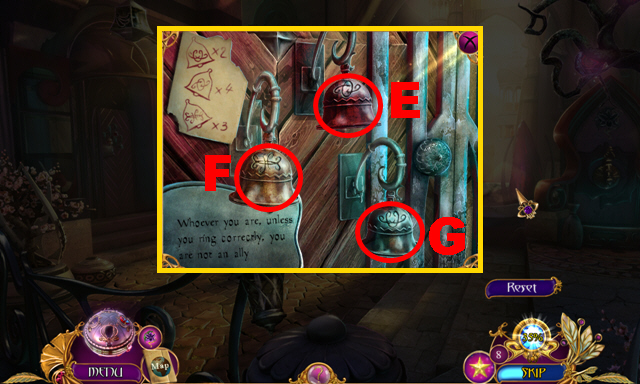
- Play the mini-game.
- Solution: G-G-E-E-E-E-F-F-F.
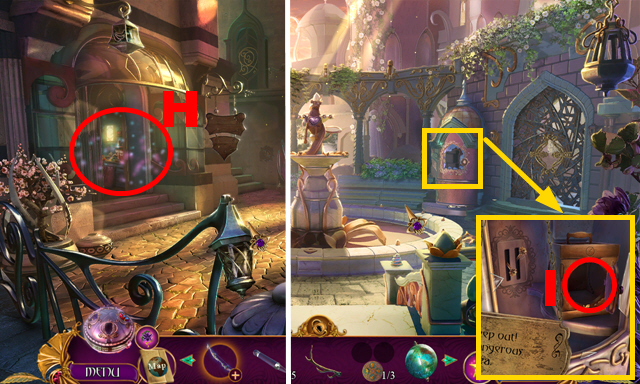
- Play the HOP (H) to receive the POWER SOURCE.
- Move forward.
- Place the POWER SOURCE (I).
- Turn right.
Chapter 5: The Ruins
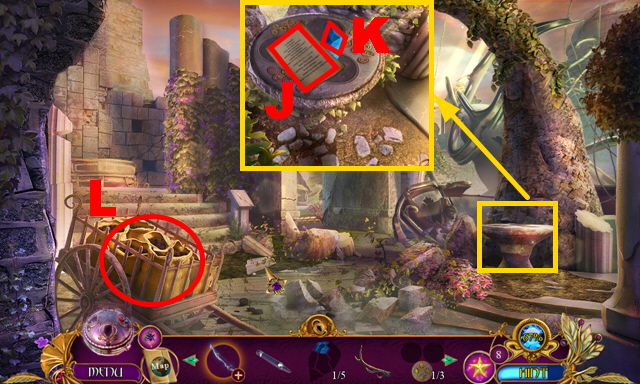
- Take the note (J) and SHARD FRAGMENT 2/5 (K).
- Examine the cart (L).
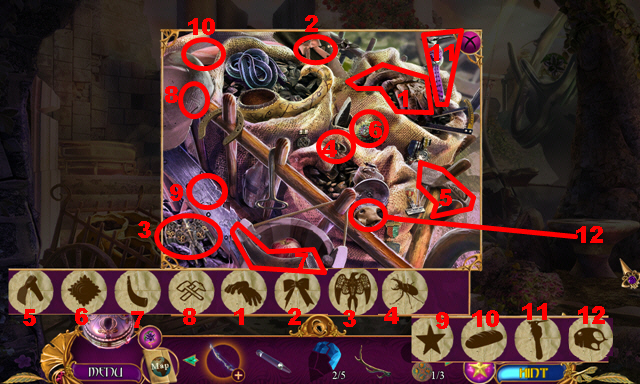
- Collect items 1-12 to receive the BOOK INSIGNIA.
- Move forward.
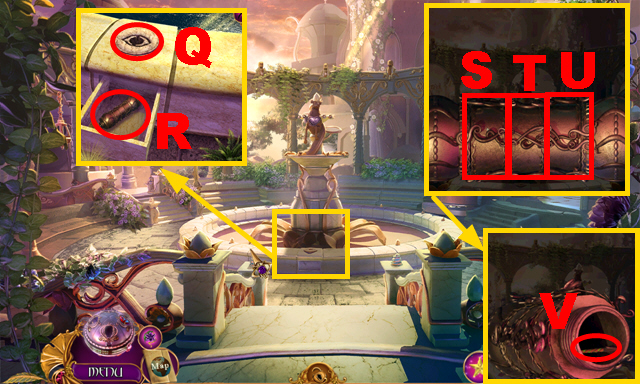
- Play the HOP (M) to receive the SAPPHIRE ROSE.
- Take the FAUCET HANDLE (N).
- Walk down three times.
- Place the FAUCET HANDLE (O); take the EYE TURNKEY (P).
- Move forward.
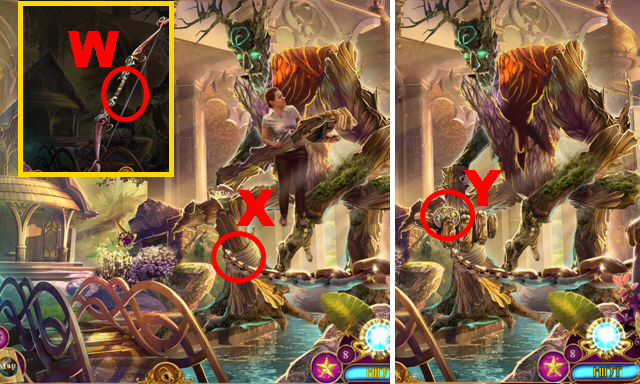
- Place the EYE TURNKEY (Q); take the LONG BOX (R).
- Examine the LONG BOX.
- Play the mini-game.
- Solution: Sx4, Tx9, Ux4.
- Take the RUNE ARROW (V).
- Turn right, move forward.
- Place the RUNE ARROW on the BOW (W) to acquire the BOW WITH RUNE ARROW.
- Shoot the BOW WITH RUNE ARROW (X).
- Take ELEMENTAL DISC 2/3 (Y).
- Walk down twice.
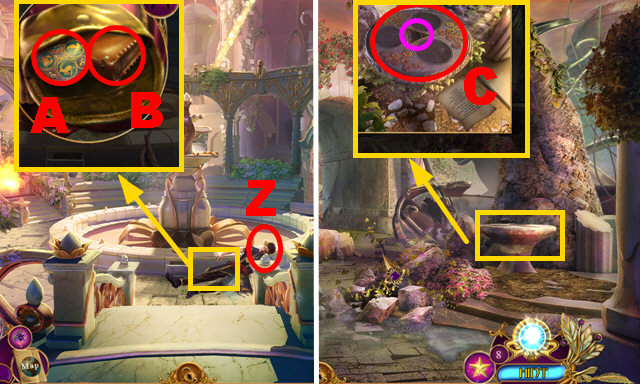
- Talk to the man (Z).
- Open the bag; take ELEMENTAL DISC 3/3 (A) and the SPELL BOOK (B).
- Turn right.
- Place 3 ELEMENTAL DISCS (C) and the EMPTY CRYSTAL (purple).
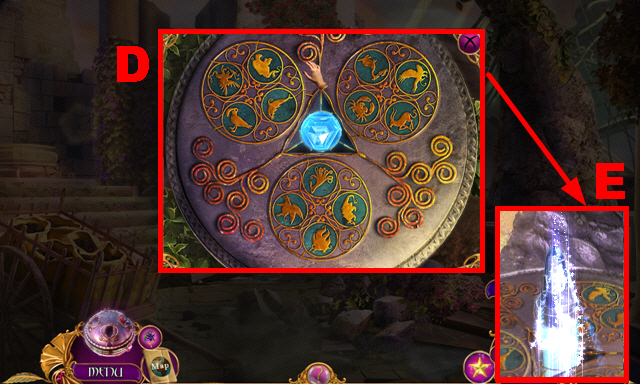
- Play the mini-game.
- Solution: (D).
- Take the WATER CRYSTAL (E).
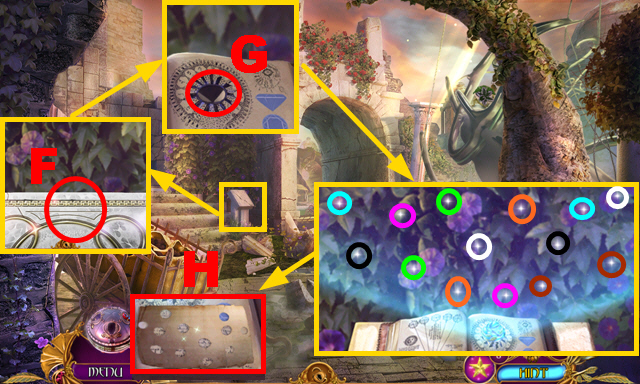
- Place the SPELL BOOK (F) and SAPPHIRE ROSE (G).
- Play the mini-game.
- Collect 7 pairs framed in the same color.
- Take the PUNCH PAPER (H).
- Walk down.
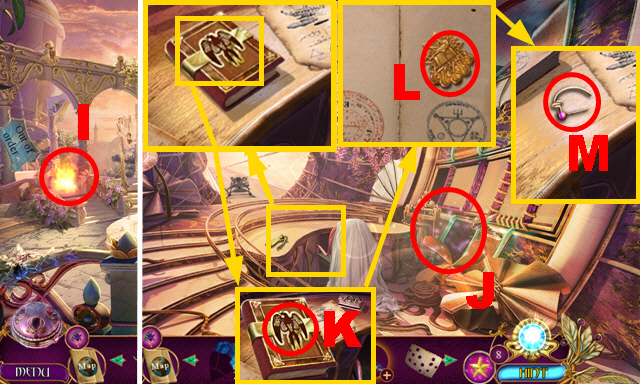
- Use the WATER CRYSTAL (I).
- Turn left.
- Play the HOP (J) to receive the GILDED ROD.
- Remove 2 notes and select the book; place the BOOK INSIGNIA (K) and turn a page.
- Take the MEMBERSHIP BADGE (L).
- Take the CHEST PIN (M).
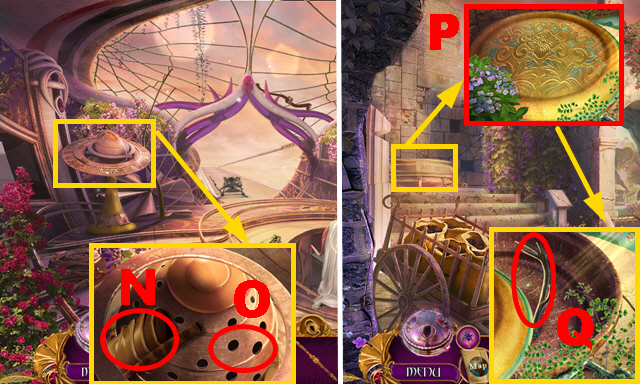
- Take WATERWHEEL PADDLE 1/2 (N); place the PUNCH PAPER (O).
- Walk down, turn right.
- Use the GILDED ROD (P); take the RIGHT ANTLER (Q).
- Walk down.
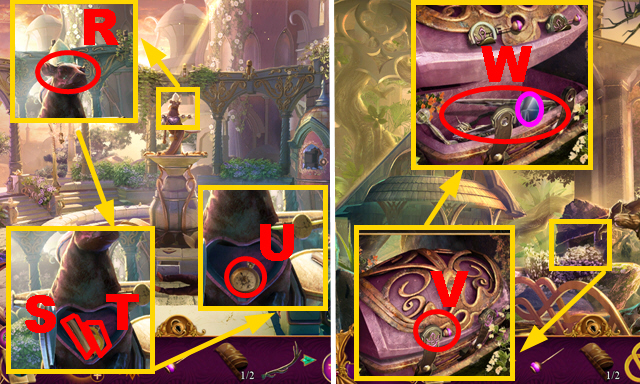
- Place the LEFT ANTLER and RIGHT ANTLER (R); take the note (S), BADGE OF KNOWLEDGE (T), and COMPASS (U).
- Turn right, move forward.
- Use the CHEST PIN (V); take SHARD FRAGMENT 3/5 (purple) and the DIVIDER (W).
- Walk down twice, turn left.
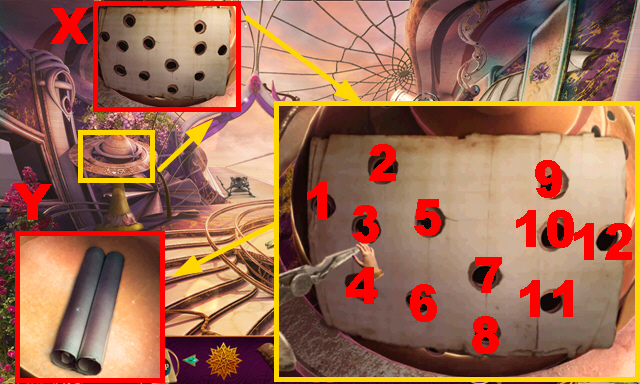
- Use the DIVIDER (X).
- Play the mini-game.
- Solution: 1-12.
- Take the BLUEPRINT (Y).
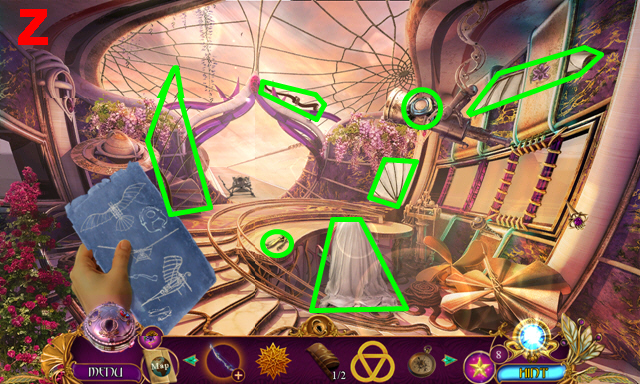
- Play the mini-game (Z).
- Collect 7 parts (green).
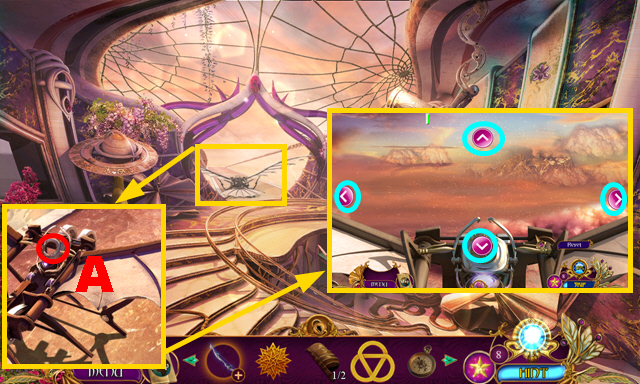
- Place the COMPASS (A).
- Play the mini-game.
- Use the arrows (blue) to avoid floating islands.
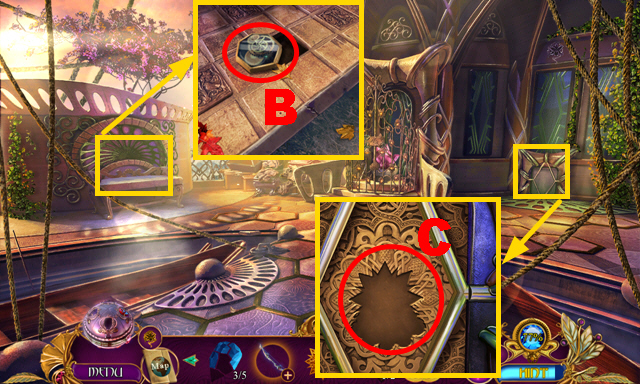
- Remove leaves twice; take the COGWHEEL MECHANISM (B).
- Place the MEMBERSHIP BADGE (C).
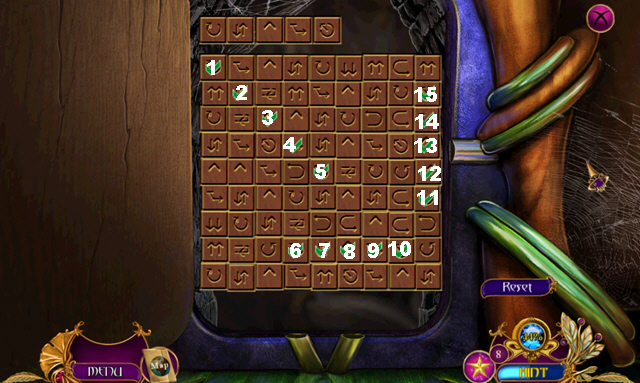
- Play the mini-game.
- Solution: 1-15.
- Move forward.
Chapter 6: The Passageway
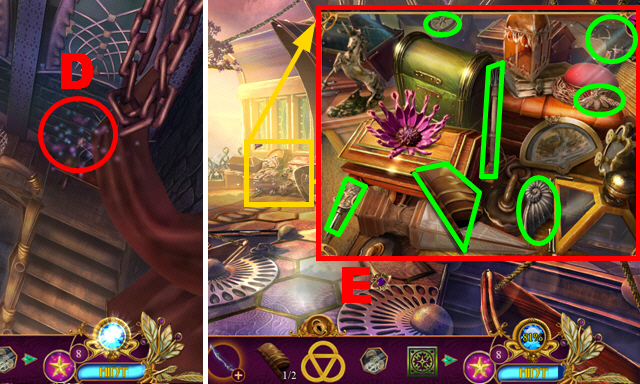
- Play the HOP (D) to receive the CERAMIC TILE.
- Walk down.
- Collect 7 items (green) to receive WATERWHEEL PADDLE 2/2 (E).
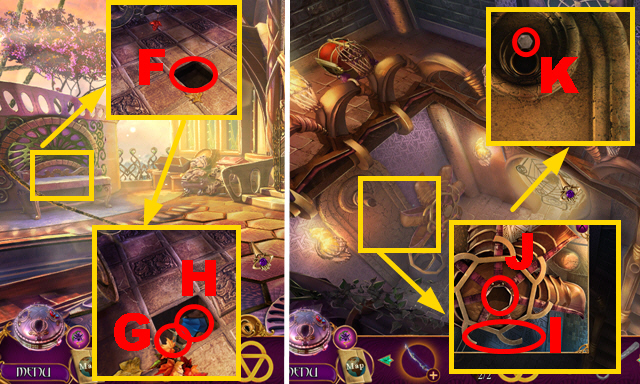
- Place the CERAMIC TILE (F); take the HEXAGON TURNER (G) and SHARD FRAGMENT 4/5 (H).
- Move forward.
- Place 2 WATERWHEEL PADDLES (I) and the COGWHEEL MECHANISM (J).
- Use the HEXAGON TURNER (K).
- Move forward.
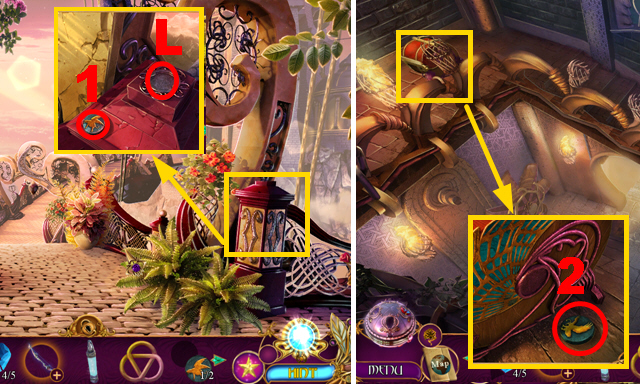
- Remove the rock (L); take ELEMENTAL DISC 1/2 (1).
- Walk down.
- Take ELEMENTAL DISC 2/2 (2).
- Walk down.
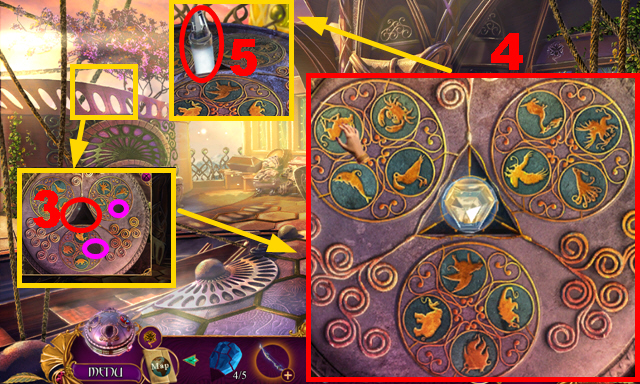
- Place 2 ELEMENTAL DISCS (purple) and the WATER CRYSTAL (3).
- Play the mini-game.
- Solution: (4).
- Take the AIR CRYSTAL (5).
- Move forward twice.
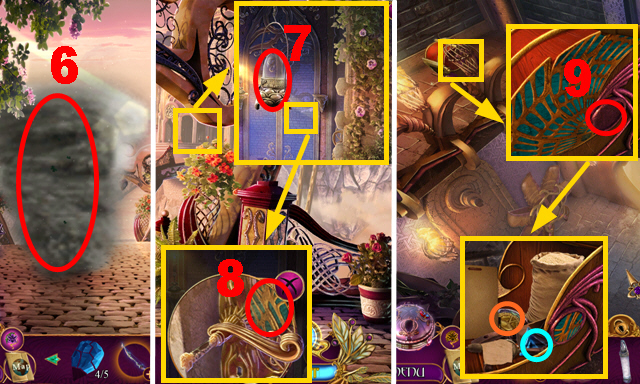
- Use the AIR CRYSTAL (6).
- Take the OIL LAMP (7) and TOOLBOX BUTTON (8).
- Walk down.
- Place the TOOLBOX BUTTON (9); take SHARD FRAGMENT 5/5 (blue) and the GUARD MEDAL PARTS (orange).
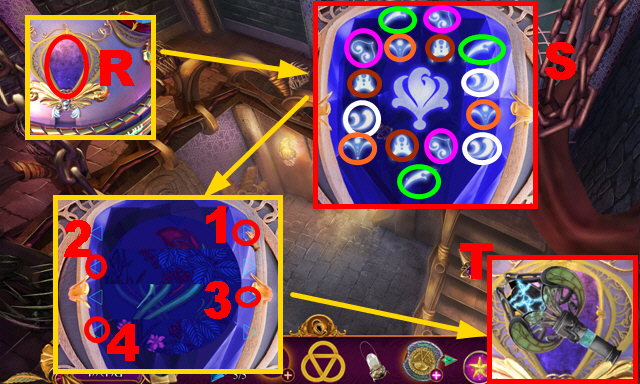
- Put 5 SHARD FRAGMENTS into the orb (R).
- Play the mini-game.
- Collect 5 groups of symbols framed in the same color (S).
- Play the mini-game.
- Solution: 1-4.
- Take the STUNNER (T).
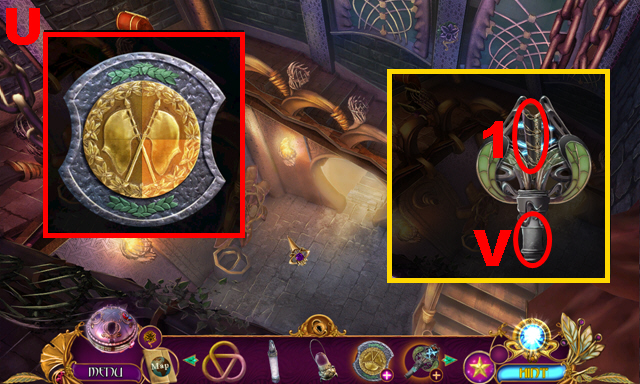
- Arrange the GUARD MEDAL PARTS correctly (U) to receive the GUARD MEDAL.
- Push the STUNNER (V); take the SUMMONING CYLINDER (1) to receive the STUNNER.
- Move forward.
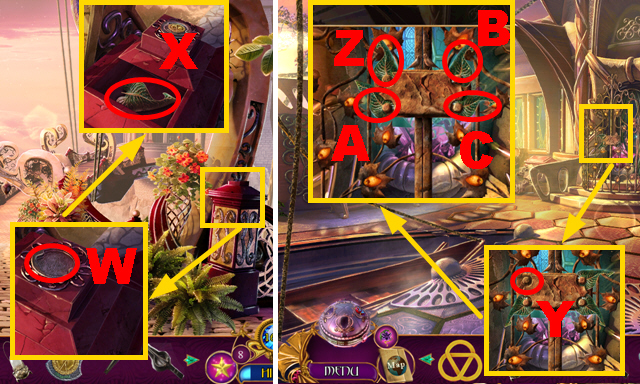
- Place the GUARD MEDAL (W); take the IRON LEAF (X).
- Walk down twice.
- Place the IRON LEAF (Y).
- Play the mini-game.
- Solution: B-A-Z-C-B.
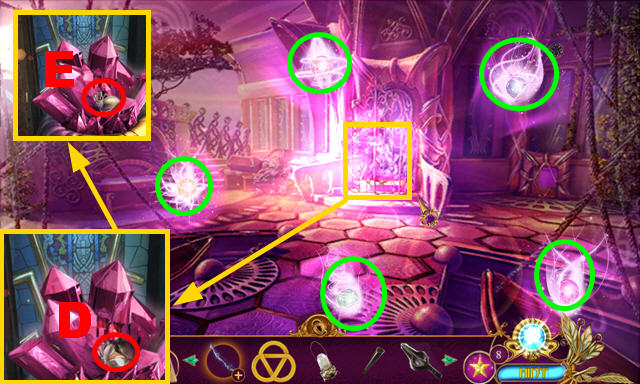
- Collect 5 flower essences (green).
- Take the TETRAHEDRON (D) and MECHANICAL HANDLE SPIDER (E).
- Move forward twice.
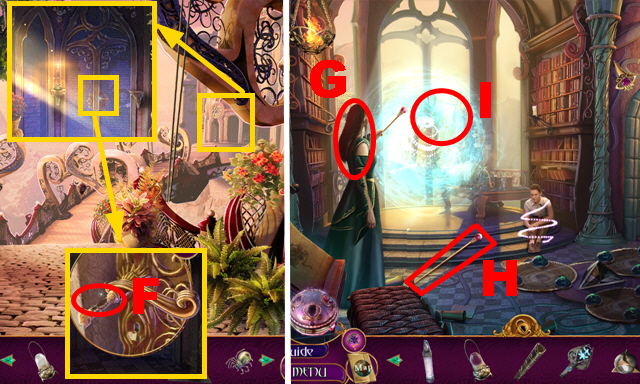
- Place the MECHANICAL HANDLE SPIDER (F).
- Move forward.
- Use the STUNNER (G).
- Take AMELIA'S STAFF (H).
- Use AMELIA'S STAFF (I).
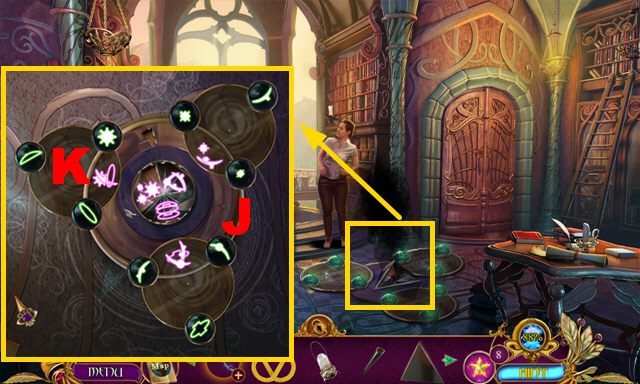
- Play the mini-game.
- Solution: J-K-J.
- You receive the CRACKED ESSENCE CATCHER.
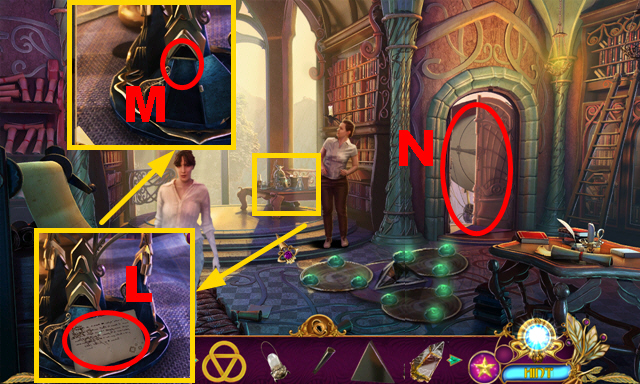
- Take the note (L).
- Open the compartment; place the TETRAHEDRON and SUMMONING CYLINDER (M).
- Open the door (N).
- Move forward.
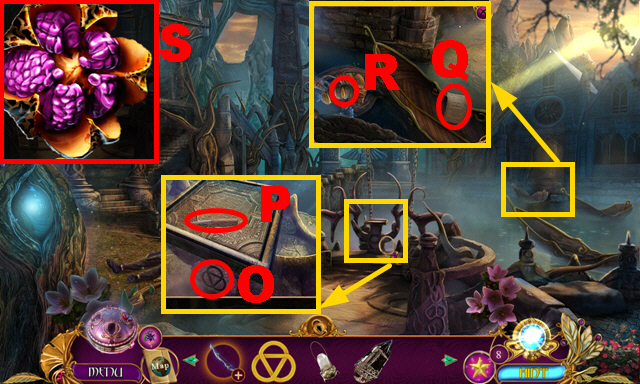
- Place the BADGE OF KNOWLEDGE (O); take the DIBBER (P).
- Take the note (Q) and POD (R).
- Open the POD; take the TWIST TREE SEED (S).
- Move forward twice.
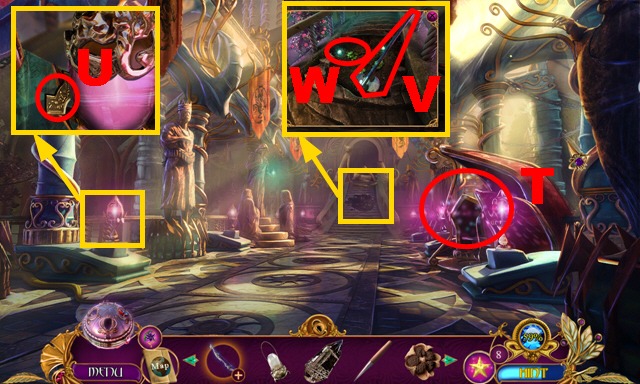
- Play the HOP (T) to receive the CATTAIL.
- Take PEDESTAL PART 1/2 (U) and the ORNATE AXE (V).
- Use the DIBBER and TWIST TREE SEED (W).
- Walk down.
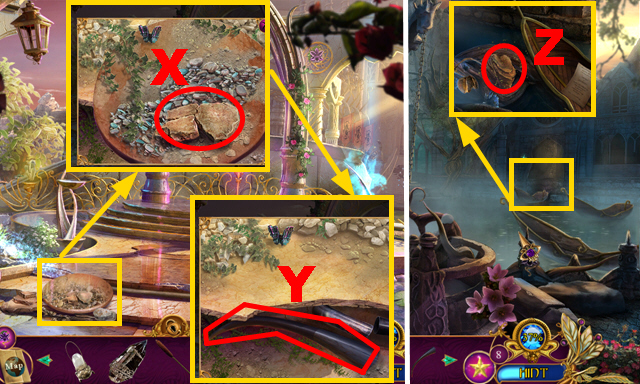
- Use the ORNATE AXE (X); take the HORN (Y).
- Walk down.
- Use the CATTAIL (Z) to acquire the HONEY-COVERED CATTAIL.
- Move forward twice.
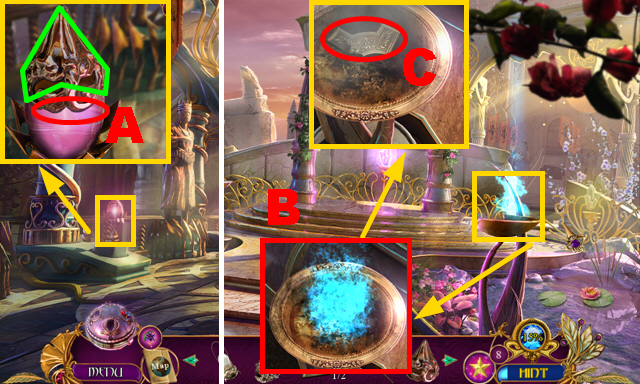
- Use the HORN (A); take the SILVER LID (green).
- Walk down.
- Place the SILVER LID (B); take PEDESTAL PART 2/2 (C).
- Walk down.
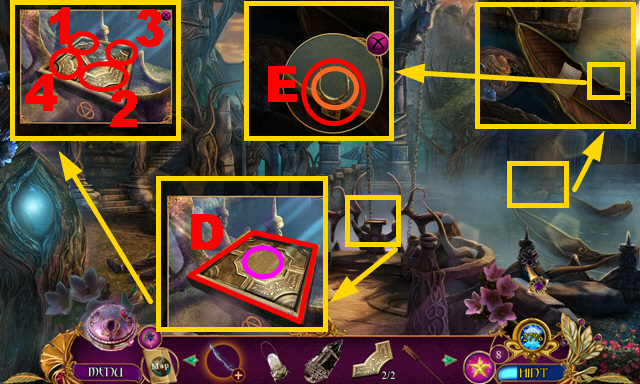
- Place 2 PEDESTAL PARTS (D) and the CRACKED ESSENCE CATCHER (purple).
- Activate parts: 1-4.
- Use the OIL LAMP (E); take the OARLOCK (orange).
- Move forward.
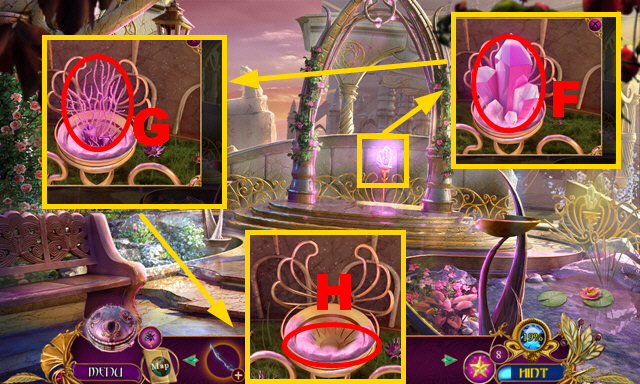
- Use the OARLOCK (F); take the HARMOCORAL (G).
- Use the HONEY-COVERED CATTAIL to collect the dust (H); you acquire the HARMODUST-COVERED CATTAIL.
- Move forward.
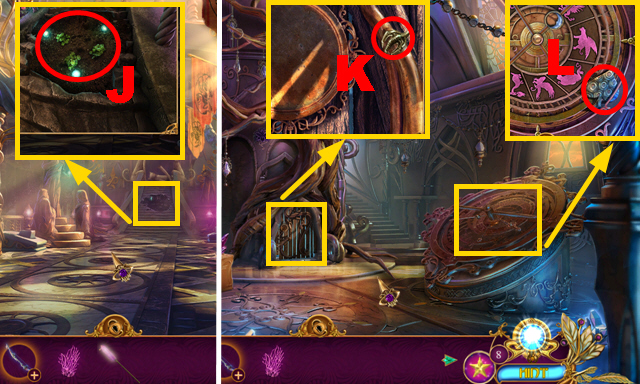
- Use the HARMODUST-COVERED CATTAIL (J).
- Move forward.
- Take the GOLDEN CLAW (K) and SPADE SIGNET (L).
- Walk down twice.
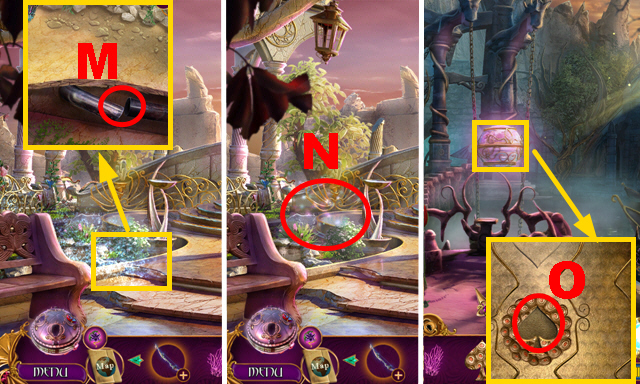
- Use the GOLDEN CLAW (M).
- Play the HOP (N) to receive the PLAIN ARROW.
- Walk down.
- Place the SPADE SIGNET (O).
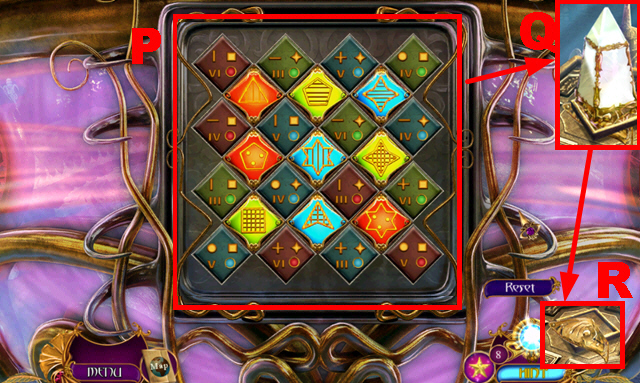
- Play the mini-game.
- Solution: (P).
- Take the WHITE ESSENCE CATCHER (Q) and BUTTERFLY ORNAMENT 1/2 (R).
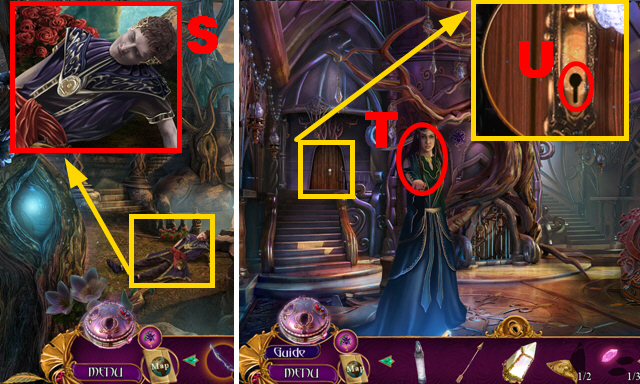
- Use the HARMOCORAL (S); you receive JEWEL EYE 1/3.
- Go to the Spiraling Hallway.
- Give the PLAIN ARROW to the woman (T); you receive the RELIQUARY KEY.
- Use the RELIQUARY KEY (U).
- Turn left.
Chapter 7: The Reliquary
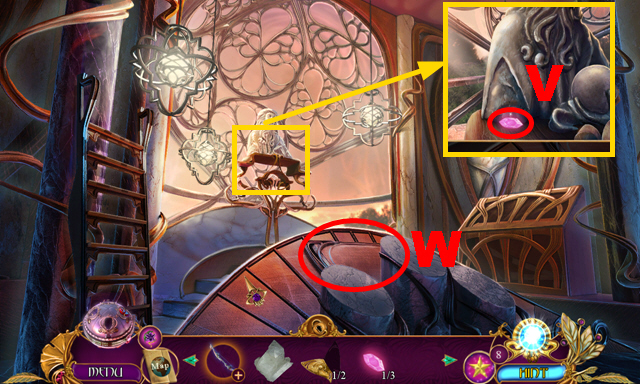
- Take JEWEL EYE 2/3 (V).
- Examine the area (W).
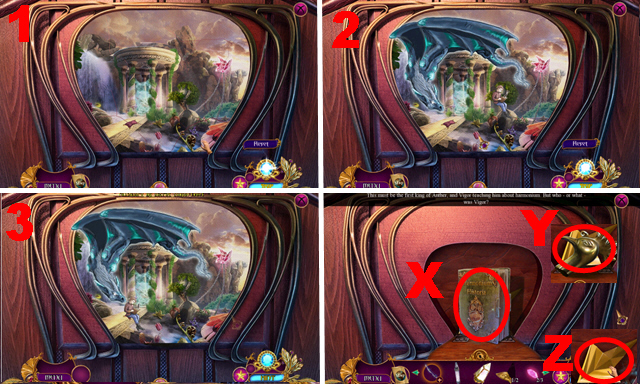
- Play the mini-game.
- Solution: 1-3.
- Take the book (X), PHOENIX HEAD (Y), and SHARD FRAGMENT 1/5 (Z).
- Walk down, turn right.
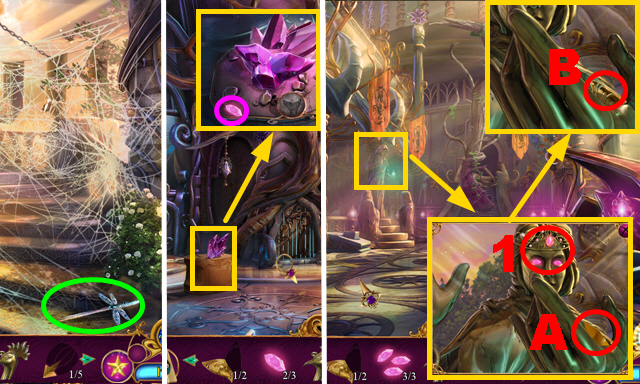
- Take the DRAGONFLY DAGGER (green).
- Walk down.
- Take JEWEL EYE 3/3 (purple).
- Walk down.
- Place 3 JEWEL EYES (1).
- Take SHARD FRAGMENT 2/5 (A) and BUTTERFLY ORNAMENT 2/2 (B).
- Move forward.
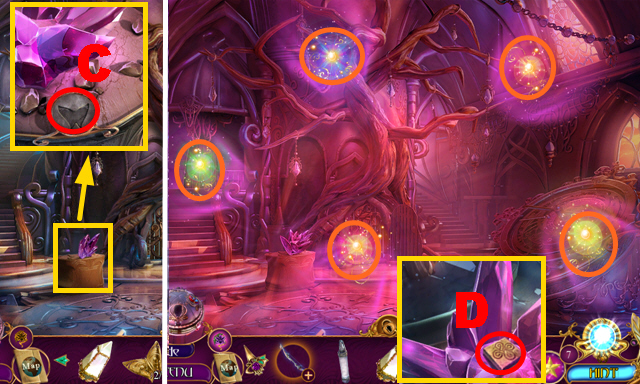
- Place 2 BUTTERFLY ORNAMENTS (C).
- Collect 5 flower essences (orange).
- Take the SQUARE LOCK (D).
- Turn left.
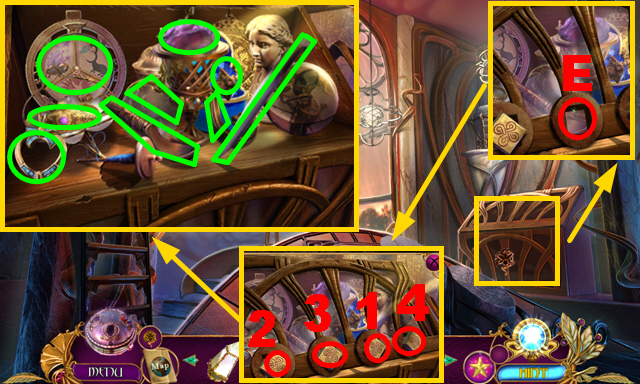
- Place the SQUARE LOCK (E).
- Turn squares 1-4; open the box.
- Collect 9 items (green) to acquire the ALIDADE.
- Walk down.
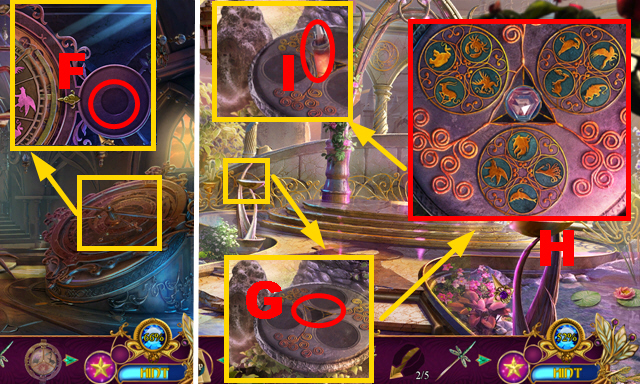
- Place the ALIDADE (F).
- Walk down twice.
- Use the DRAGONFLY DAGGER and AIR CRYSTAL (G).
- Play the mini-game.
- Solution: (H).
- Take the FIRE CRYSTAL (I).
- Go to the Outer Path.
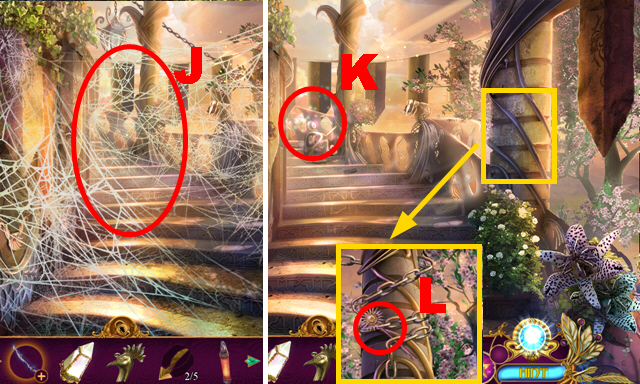
- Use the FIRE CRYSTAL (J).
- Take the SUN (L).
- Play the HOP (K) to receive SHARD FRAGMENT 3/5.
- Move forward.
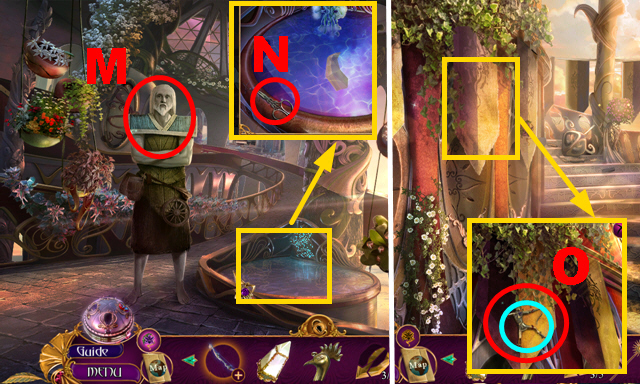
- Talk to the guardian (M).
- Take the SCISSORS (N).
- Walk down.
- Use the SCISSORS (O); take the ANTHERIAN KNIGHT (blue).
- Move forward.
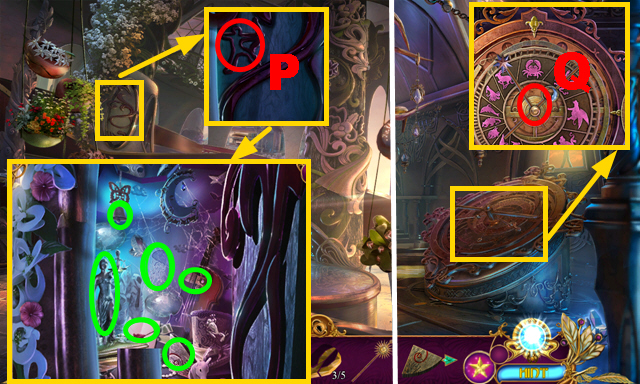
- Place the ANTHERIAN KNIGHT (P).
- Collect 6 items (green) to receive the WOODEN PART.
- Walk down twice.
- Place the SUN (Q).
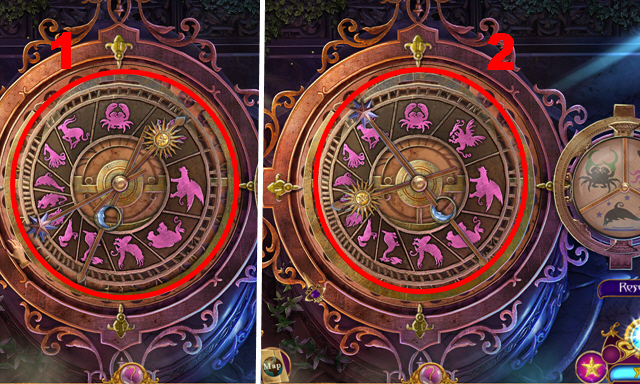
- Play the mini-game.
- Solution: 1-2.
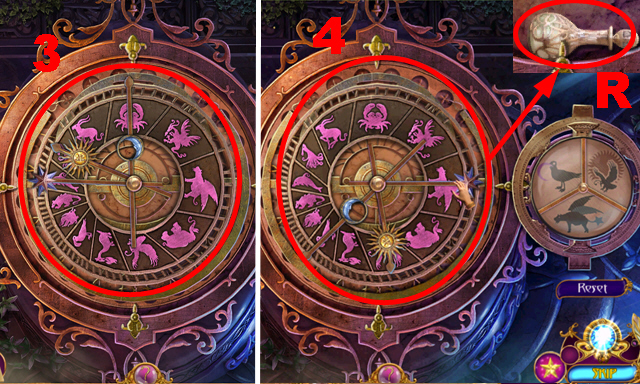
- Continue the mini-game.
- Solution: 3-4.
- Take the FRUIT ACID (R).
- Turn right, move forward.
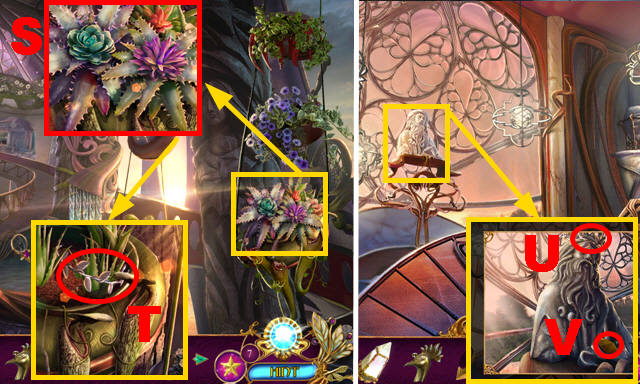
- Use the FRUIT ACID (S); take the SILVER WREATH (T).
- Go to the Reliquary.
- Place the SILVER WREATH (U); take SHARD FRAGMENT 4/5 (V).
- Walk down.
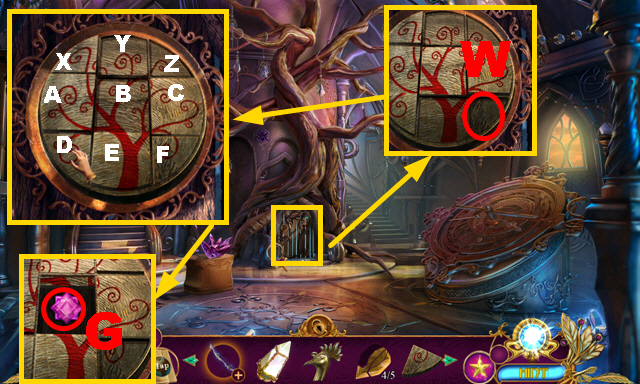
- Place the WOODEN PART (W).
- Play the mini-game.
- Solution.
- Take the FREEZING CRYSTAL (G).
- Turn right, move forward.
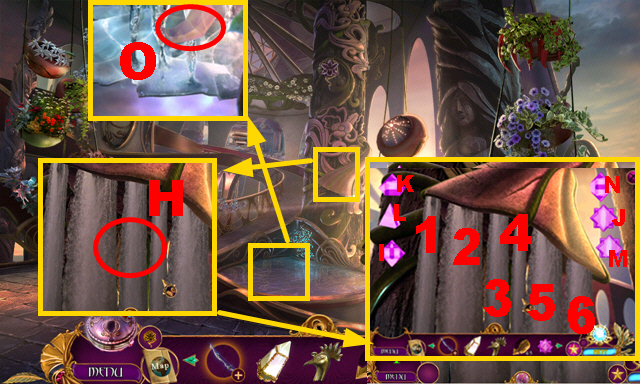
- Place the FREEZING CRYSTAL (H).
- Play the mini-game.
- Solution: I-1-J-2-K-3-L-4-M-5-N-6.
- Take SHARD FRAGMENT 5/5 (O).
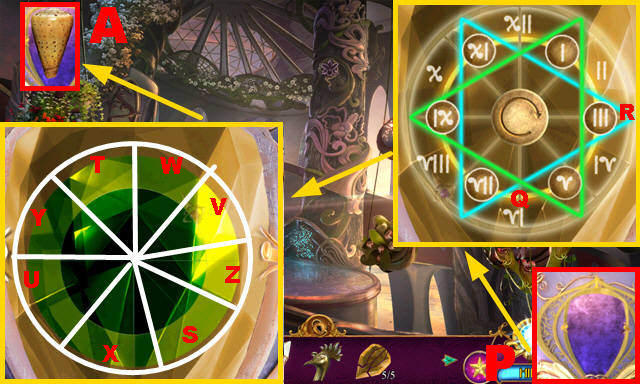
- Place 5 SHARD FRAGMENTS on the orb (P).
- Play the mini-game.
- Solution: Qx5, R.
- Play the mini-game.
- Solution: S-Z.
- Take the CONUS SHELL (A).
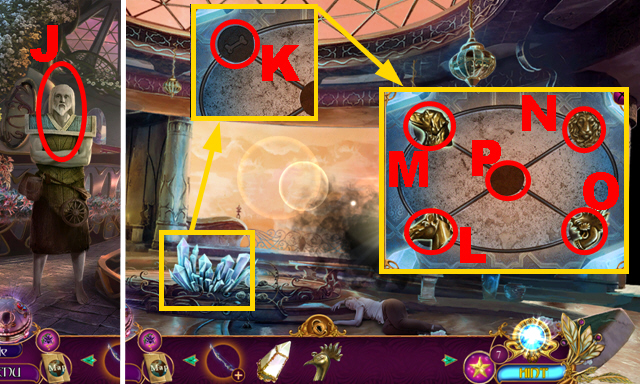
- Use the CONUS SHELL (J).
- Move forward.
- Place the PHOENIX HEAD (K).
- Play the mini-game.
- Solution: O-N-M-P-L-O-N-P.
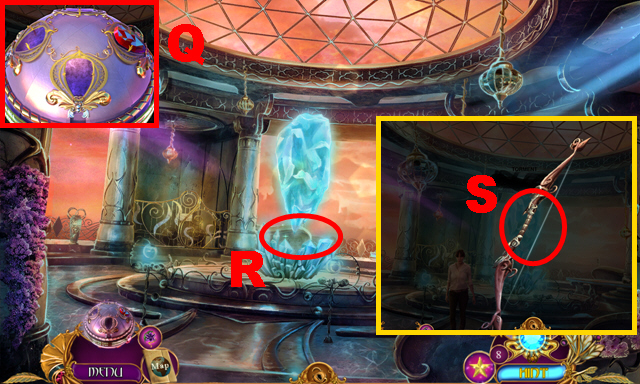
- Place the WHITE ESSENCE CATCHER on the orb (Q) to receive the ORB WITH HARMONIUM.
- Use the ORB WITH HARMONIUM (R) to receive the CHARMED ARROW.
- Place the CHARMED ARROW on the BOW (S) to acquire the BOW WITH CHARMED ARROW.
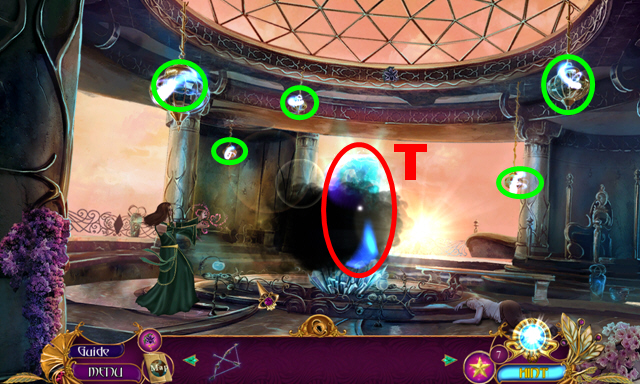
- Touch 5 lamps (green).
- Shoot the BOW WITH CHARMED ARROW (T).
- Congratulations, you have completed Amaranthine Voyage: The Shadow of Torment.
Created at: 2014-08-29

