

Walkthrough Menu
- General Tips
- Chapter 1: The Sunhook Spire
- Chapter 2: The Underspire
- Chapter 3: The Enchantress
- Chapter 4: Close Quarters
- Chapter 5: The Spire Battle
General Tips
- This is the official guide for Awakening: The Sunhook Spire.
- This guide will not mention each time you have to zoom into a location; the screenshots will identify each location.
- Hidden-object puzzles are referred to as HOPs in this guide. Items listed in yellow are hidden, or they require additional actions to locate. Interactive items in HOPs are color-coded.
- Mini-games and HOPs are sometimes randomized; your solution may vary.
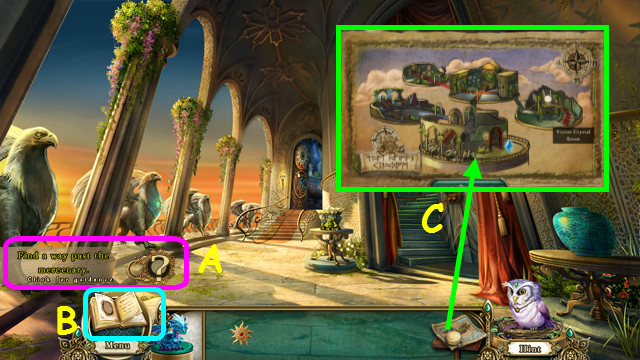
- Select the question mark for a nudge if you are stuck (A).
- Refer to your Journal for clues and objectives (B).
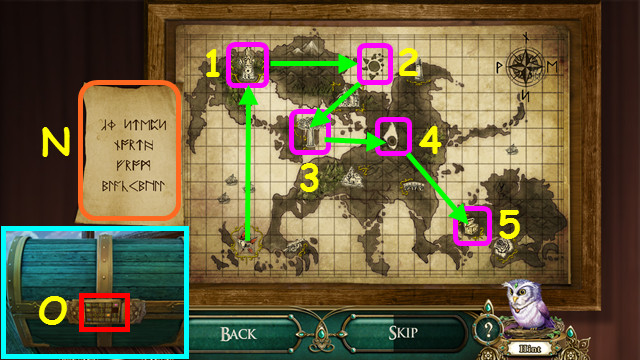
- Use your map to travel between locations (C).
Chapter 1: The Sunhook Spire
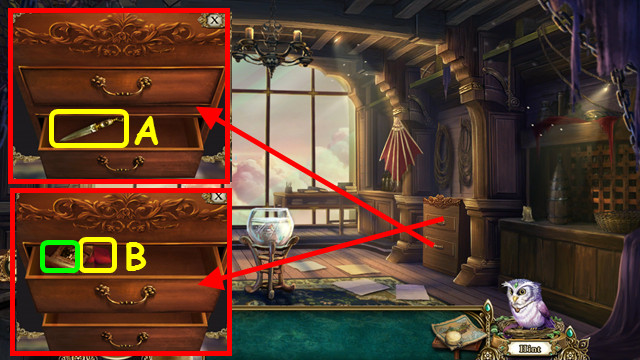
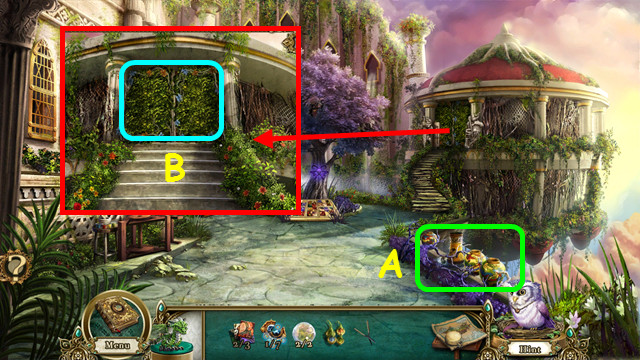
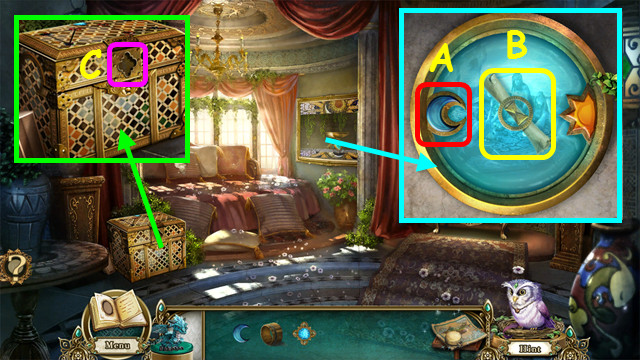
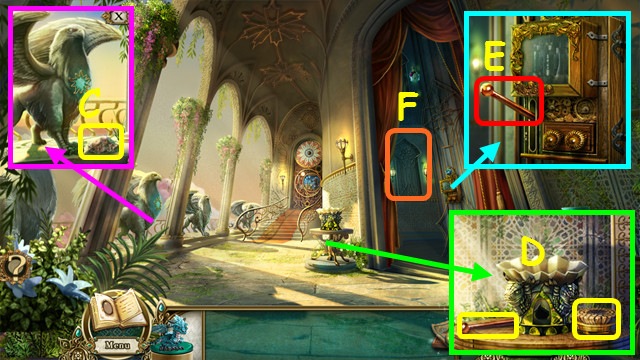
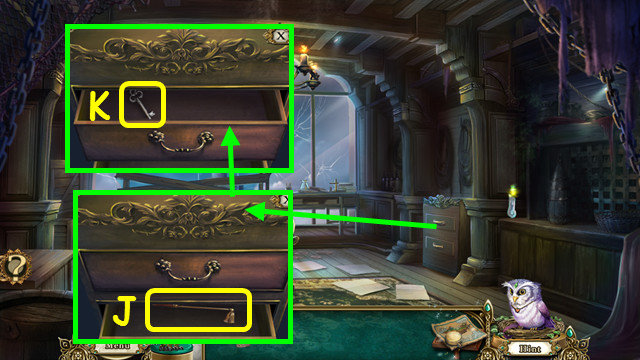
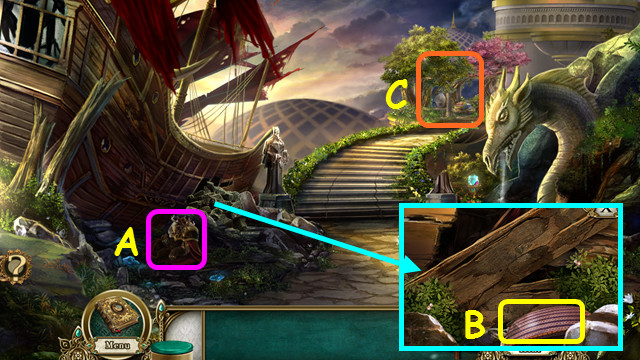
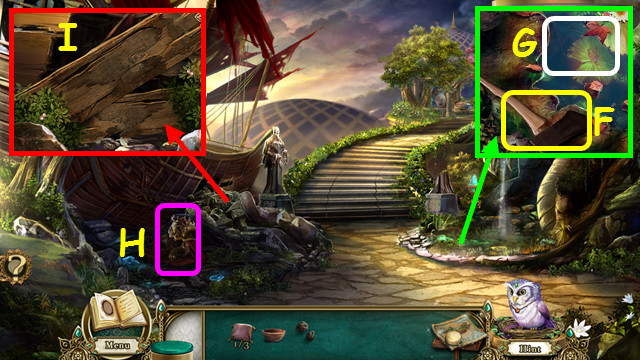
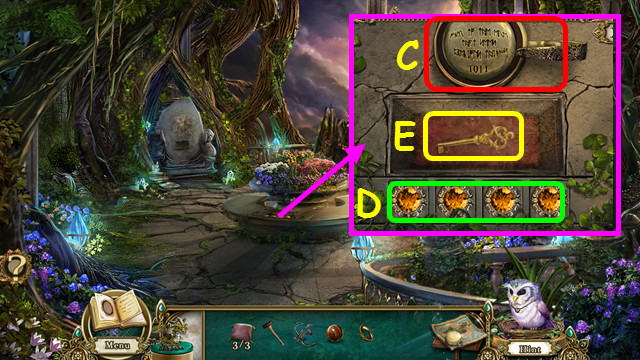
- Open the bottom drawer. Take the BLADE (A).
- Open the top drawer; take the note and CLOTH (B).
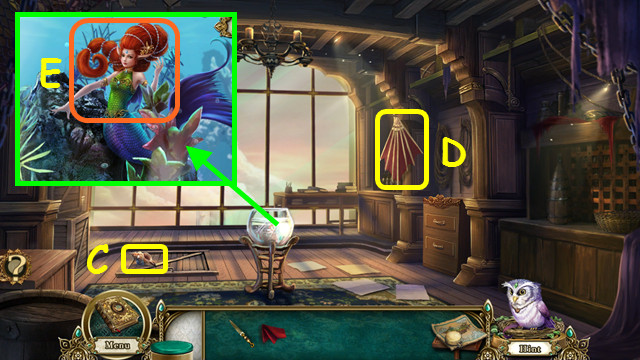
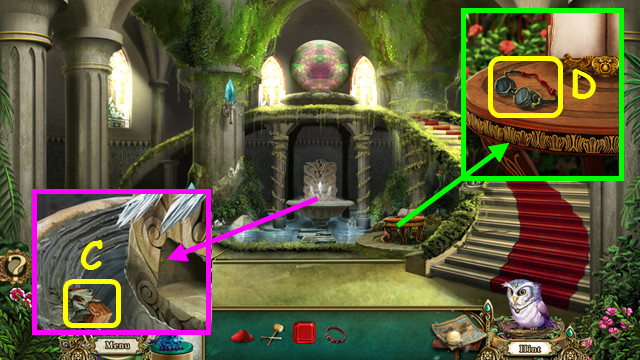
- Take the CONCH SHELL (C) and GLIDER (D).
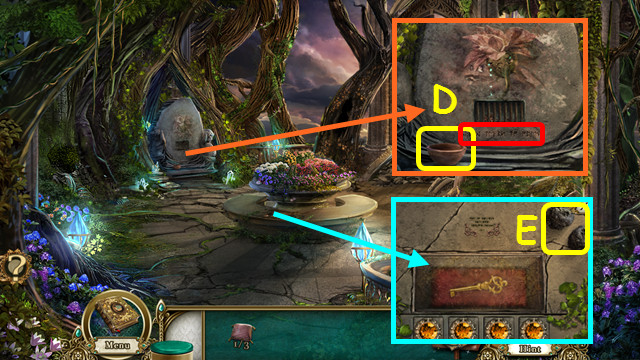
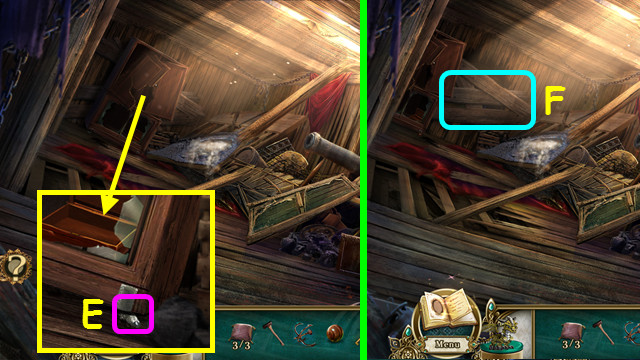
- Give Shelsea the CONCH SHELL to receive the PIN (E).
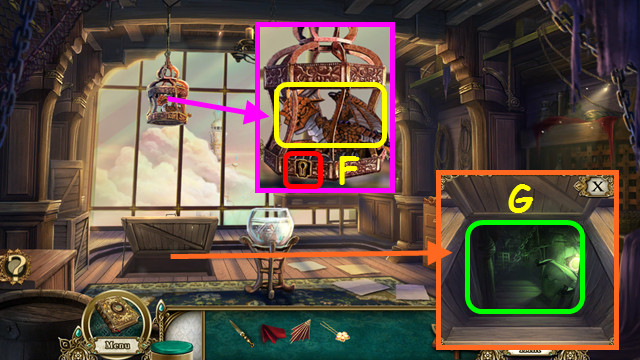
- Use the PIN in the lock. Take the DRAGON (F).
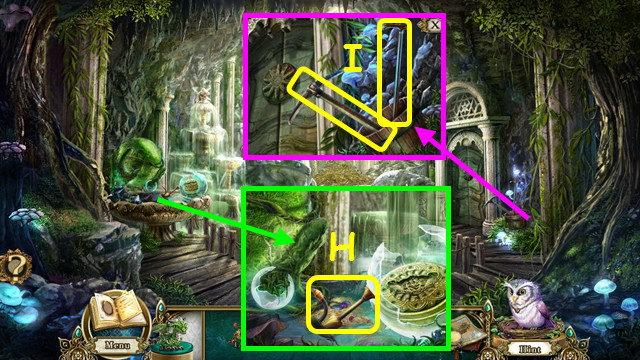
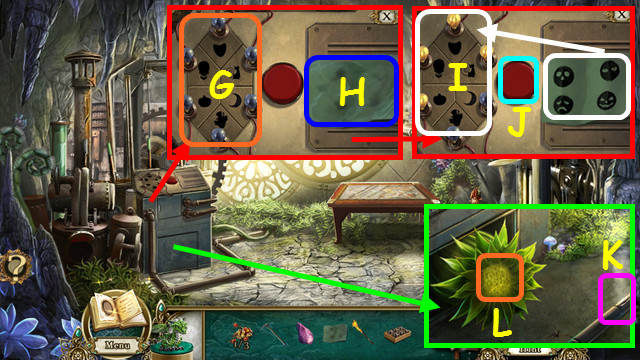
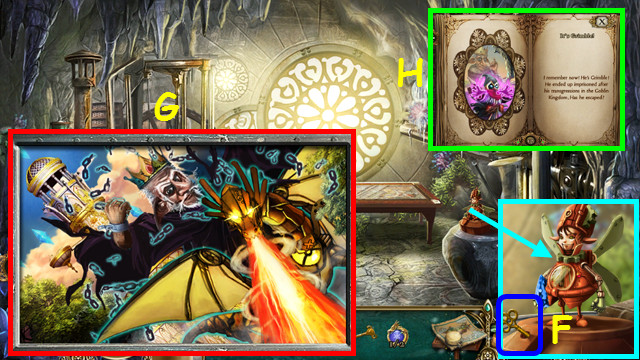
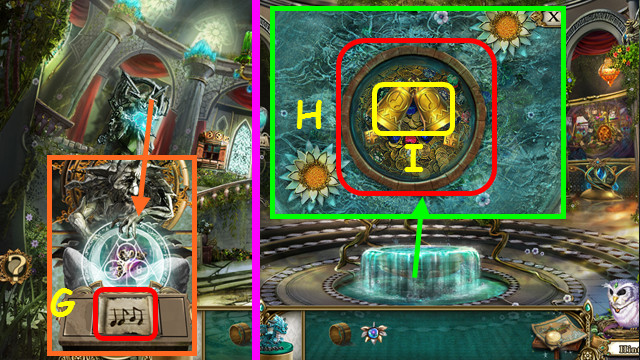
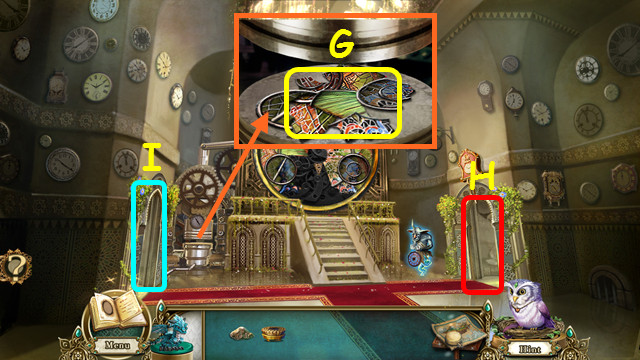
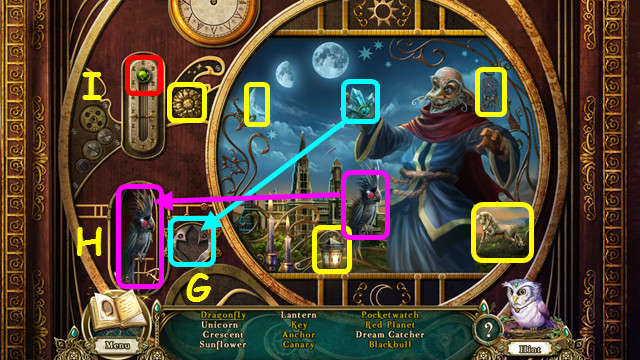
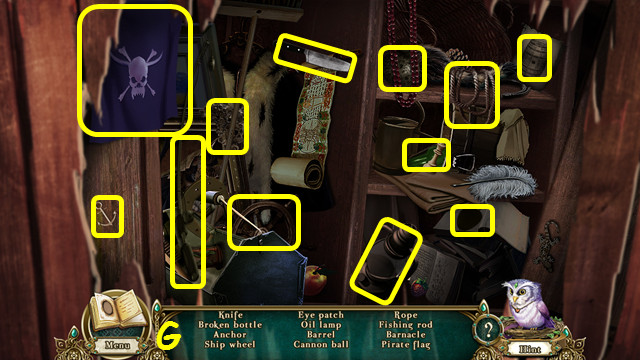
- Open the trap door. Go down the stairs for a HOP (G).
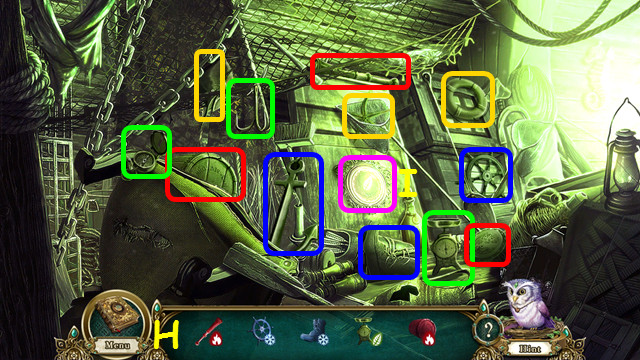
- Locate the objects (H) when the light is the same color.
- Press the mirror (I) to change the lighting color.
- You will earn the KEG OF GUNPOWDER.
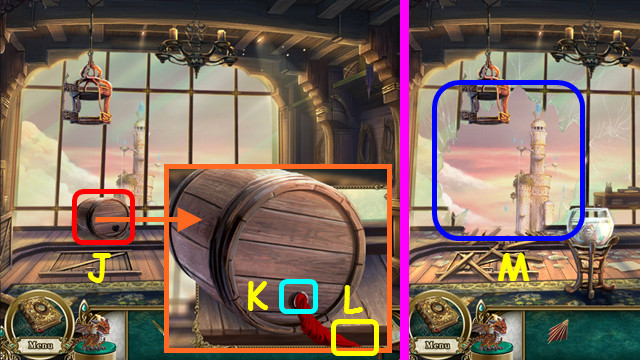
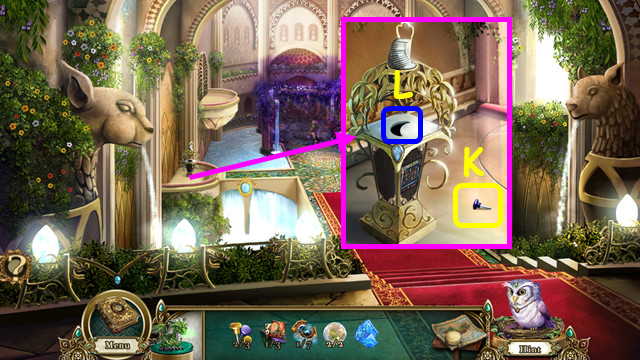
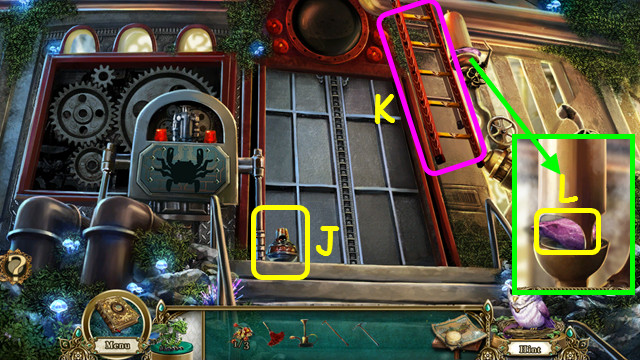
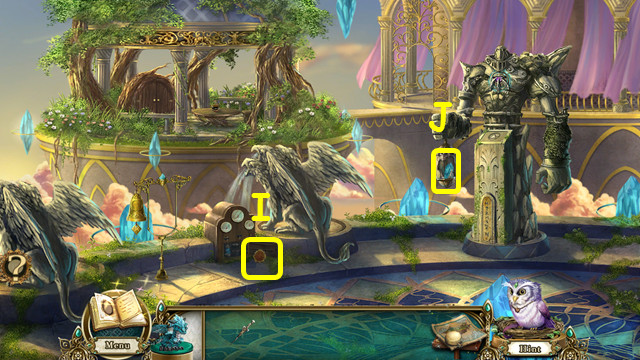
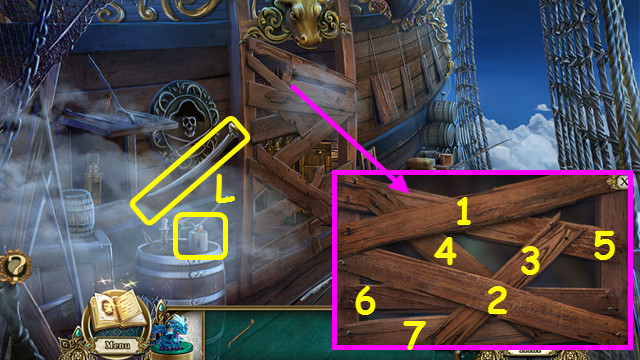
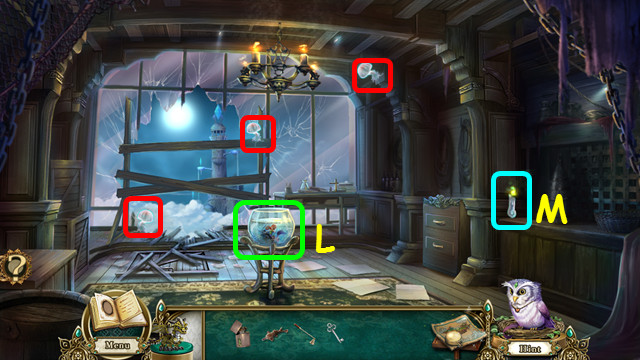
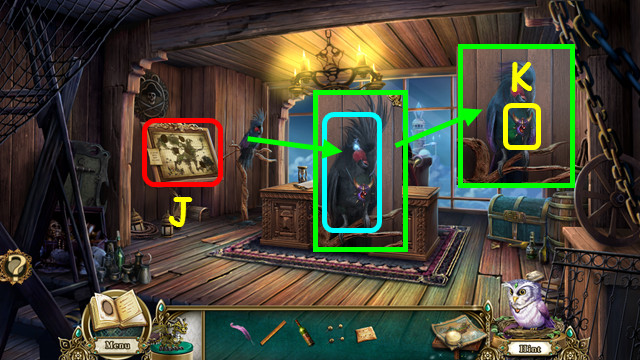
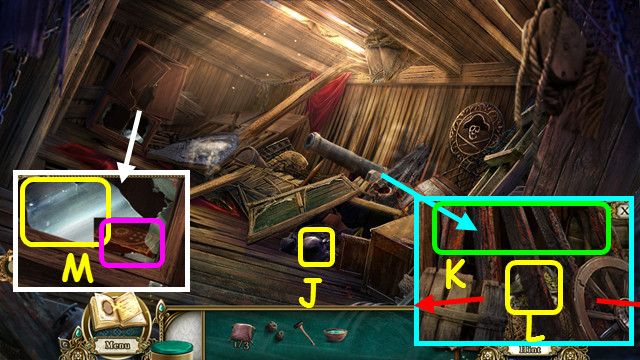
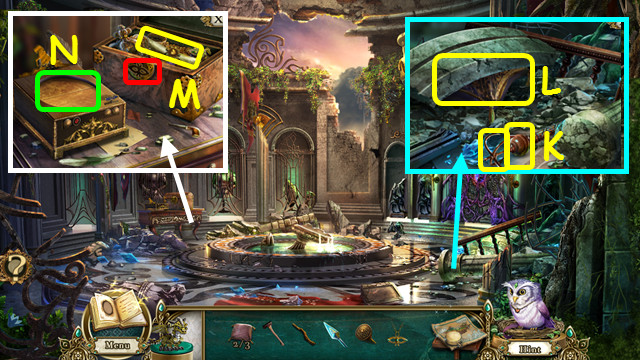
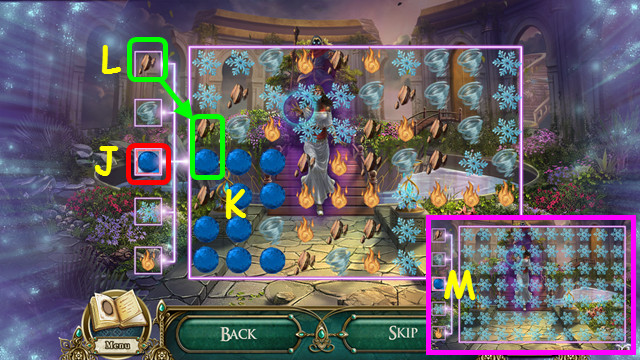
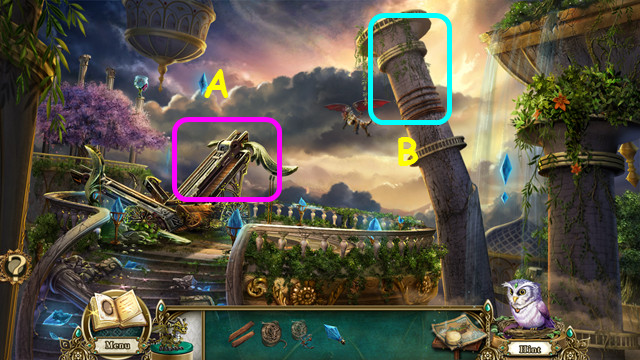
- Place the KEG OF GUNPOWDER by the window (J).
- Use the BLADE to remove the plug, and then place the CLOTH inside (K).
- Use the DRAGON on the cloth end (L).
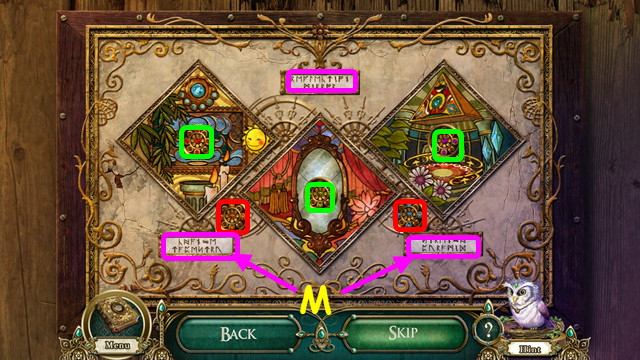
- Use the GLIDER on the broken window (M).
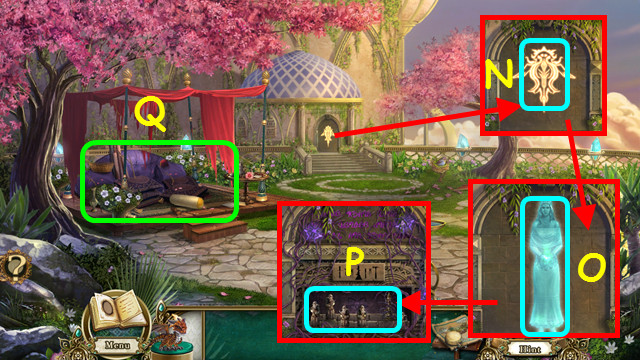
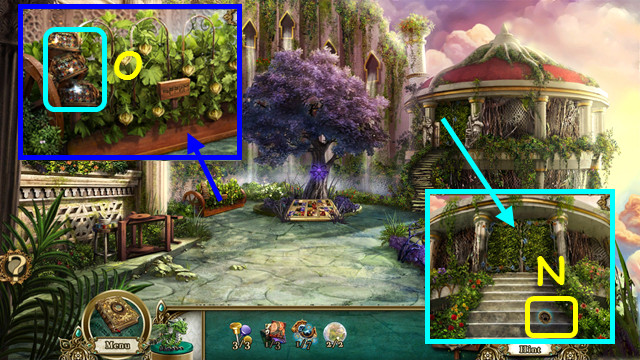
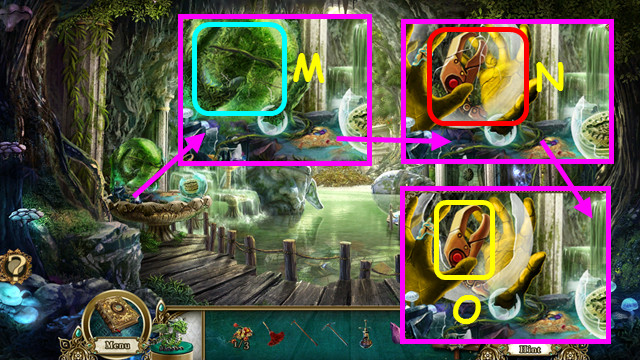
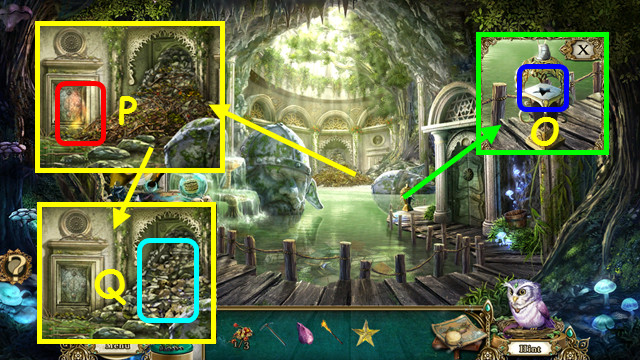
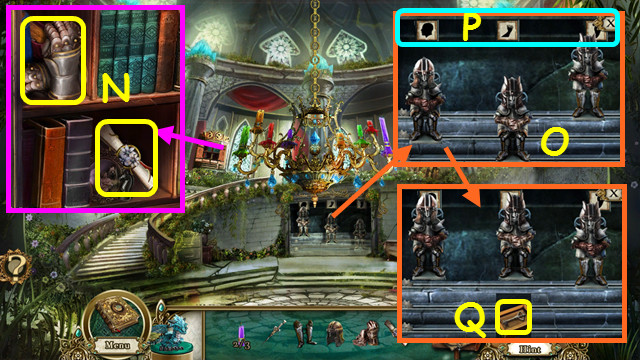
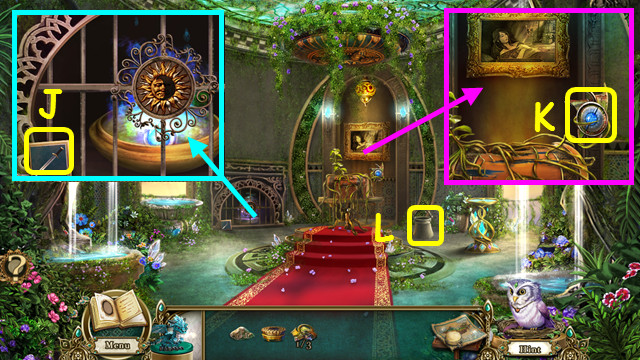
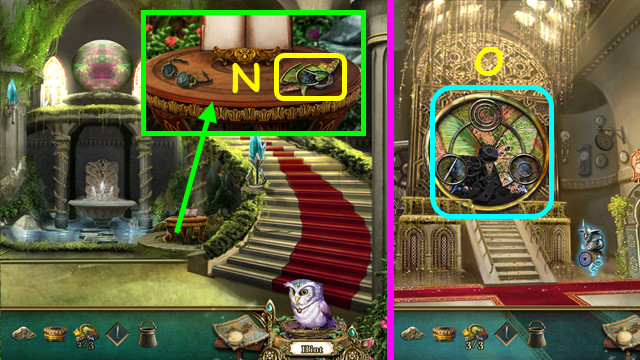
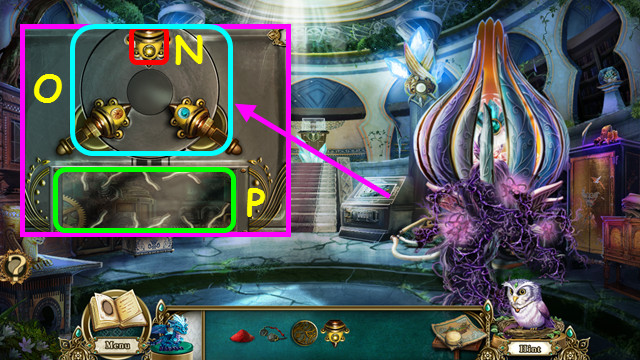
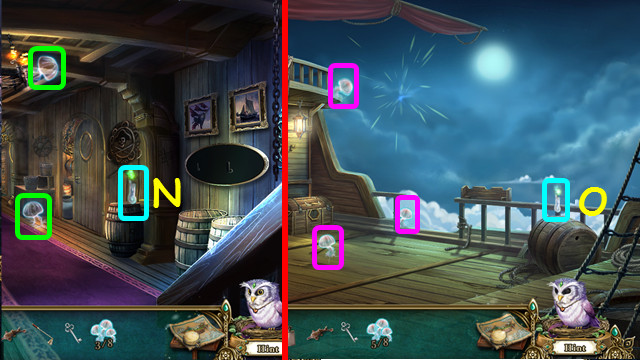
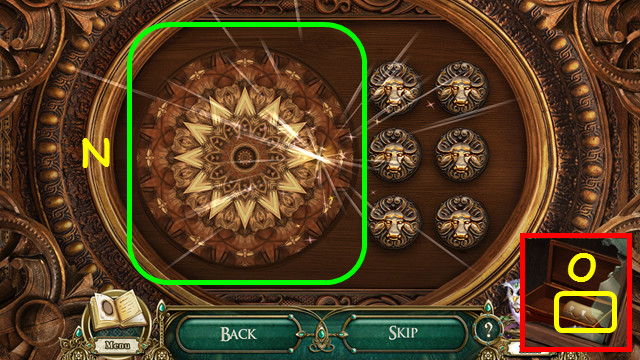
- Look at the door, touch the symbol (N), and talk to the Enchantress (O).
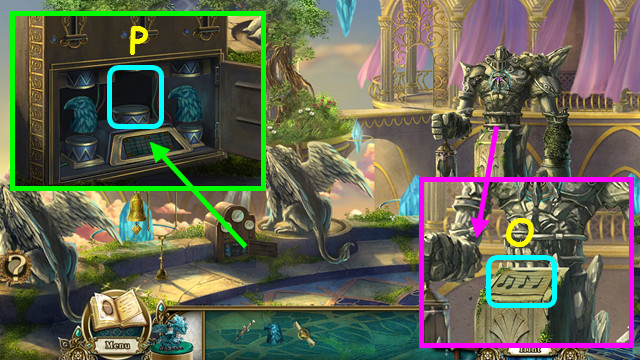
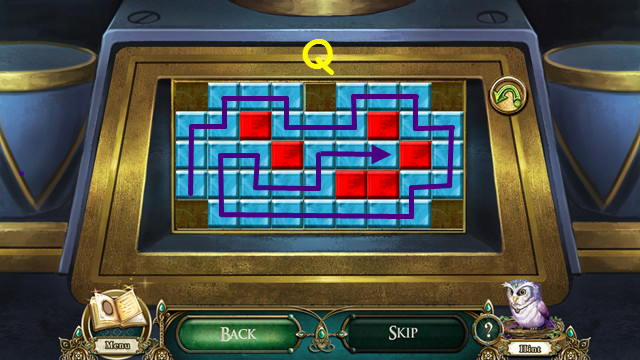
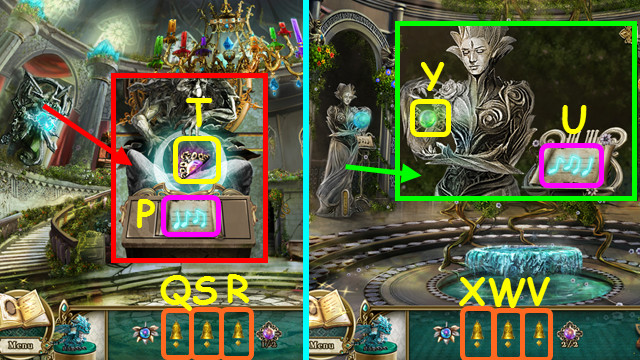
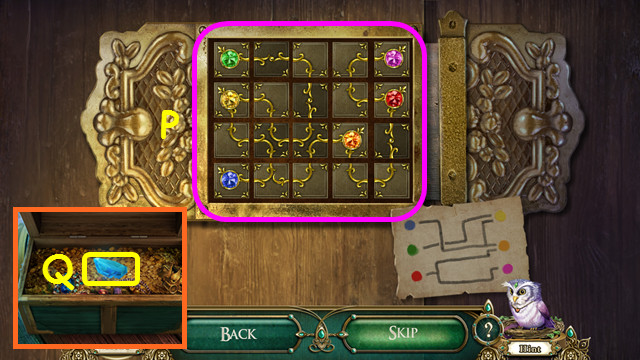
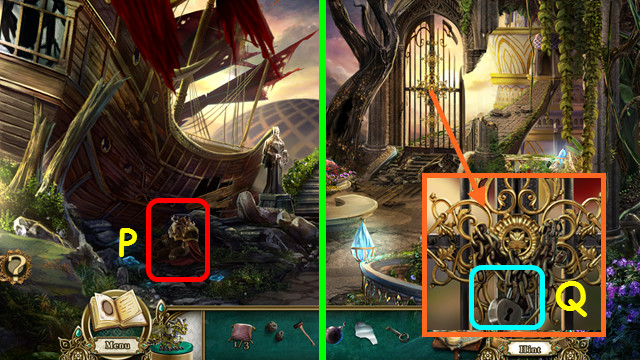
- Note the mini-game (P).
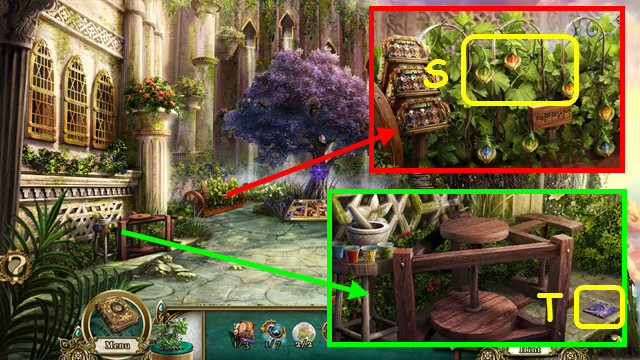
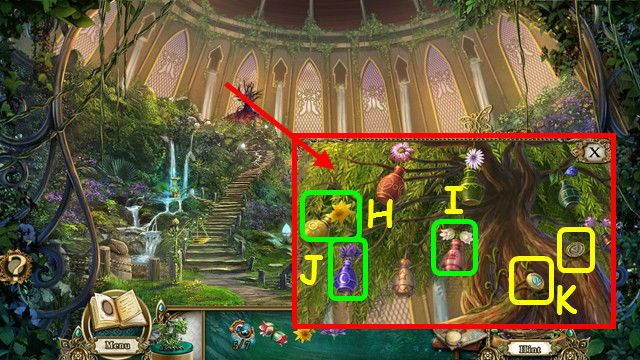
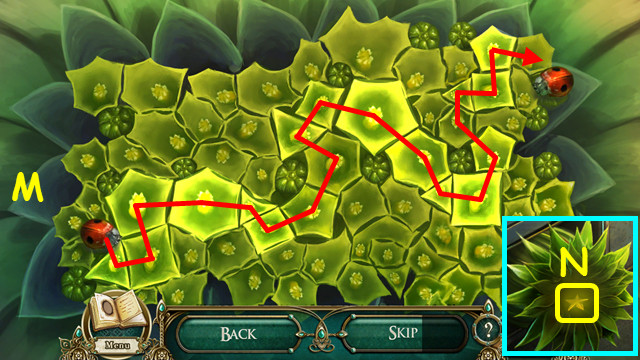
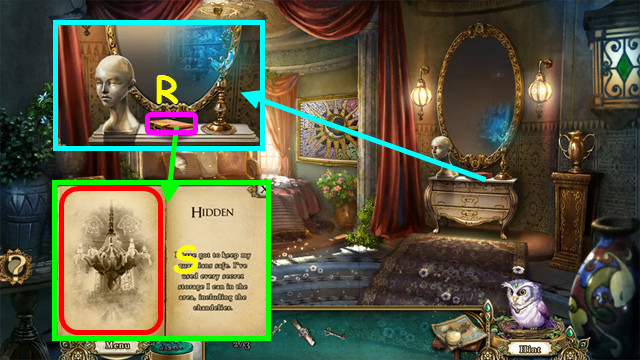
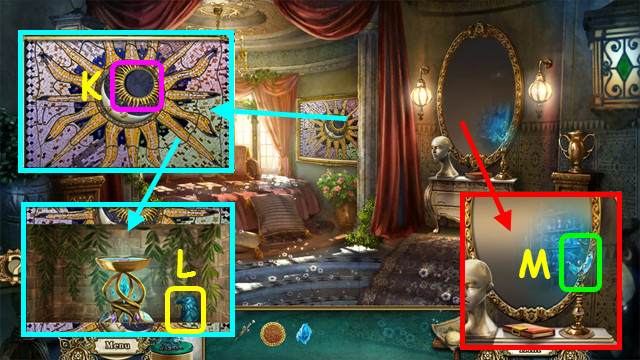
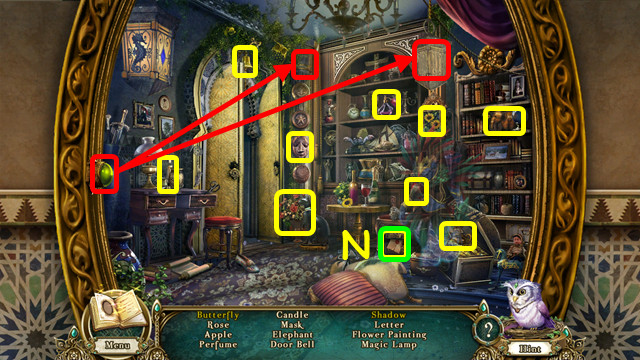
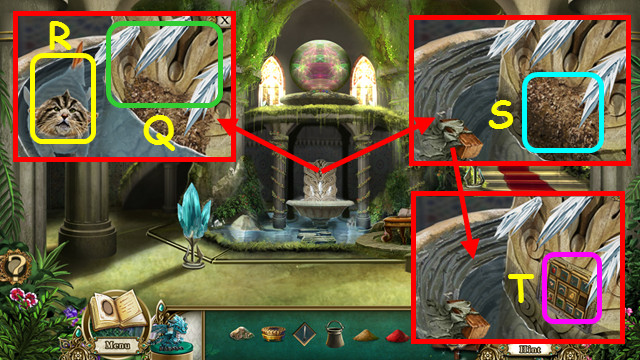
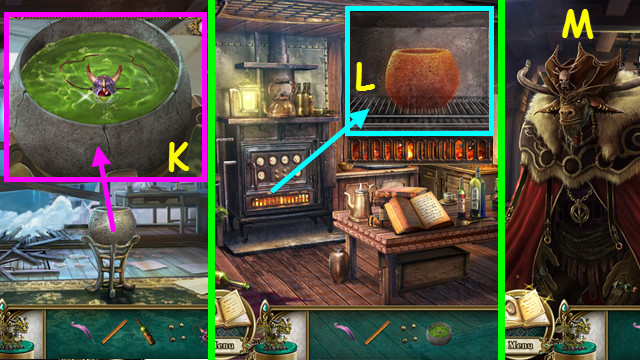
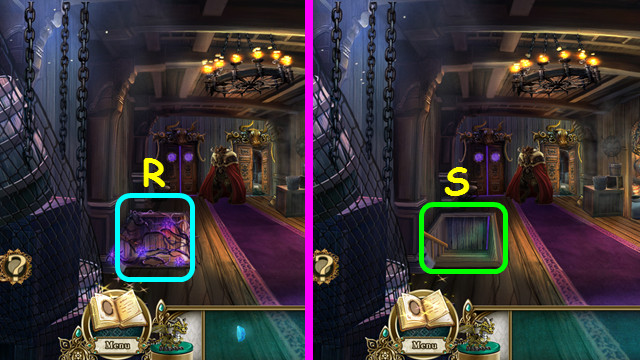
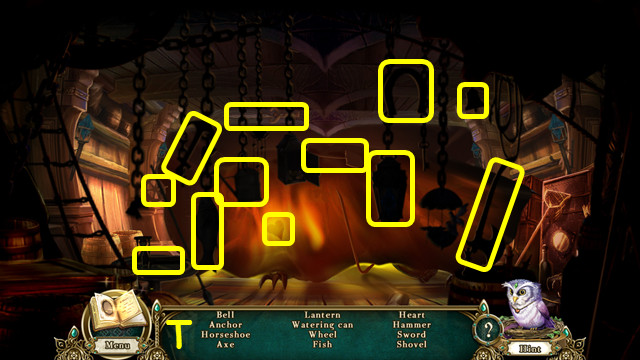
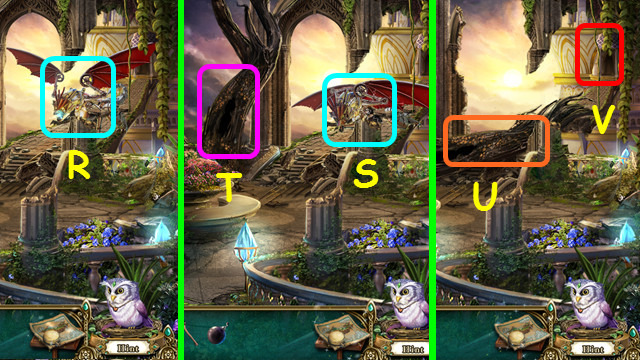
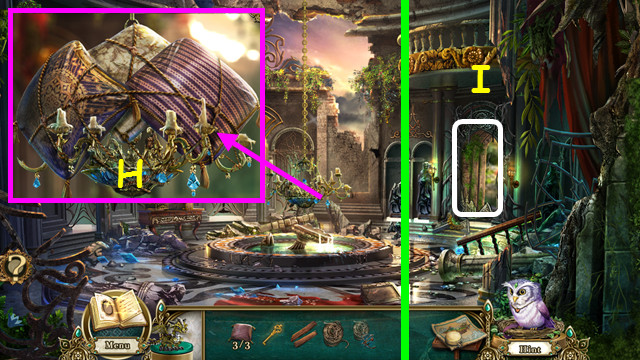
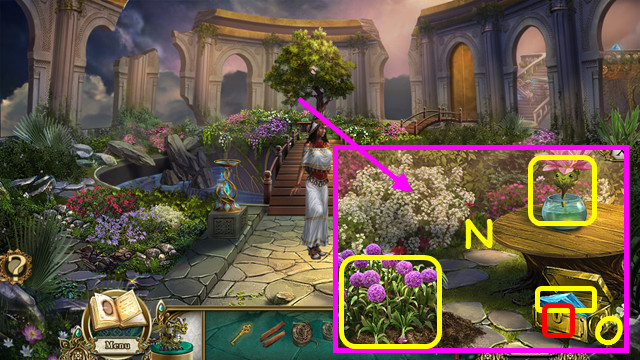
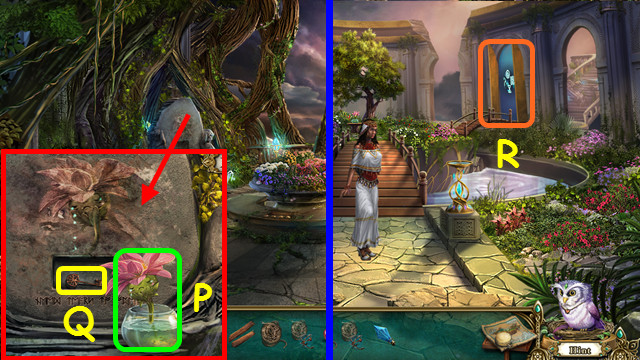
- Look at the Outdoor Haven for a HOP (Q).
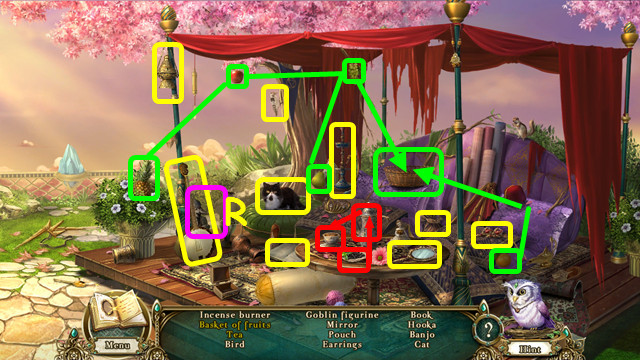
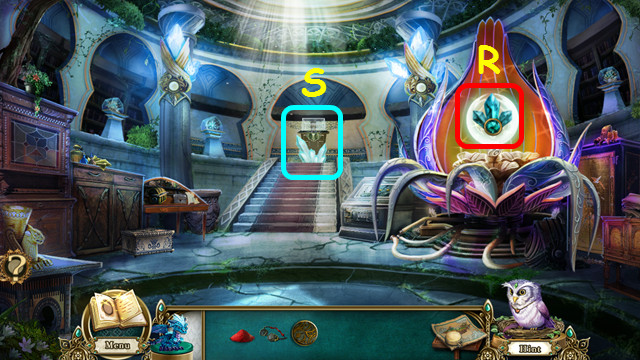
- Play the HOP to earn the FIGURINE (R).
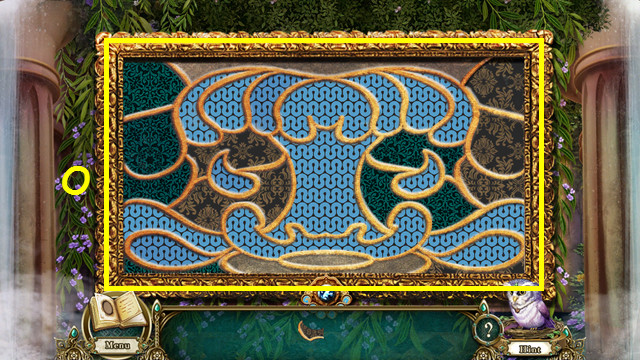
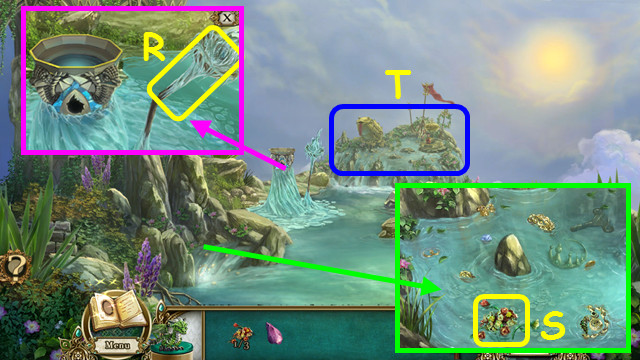
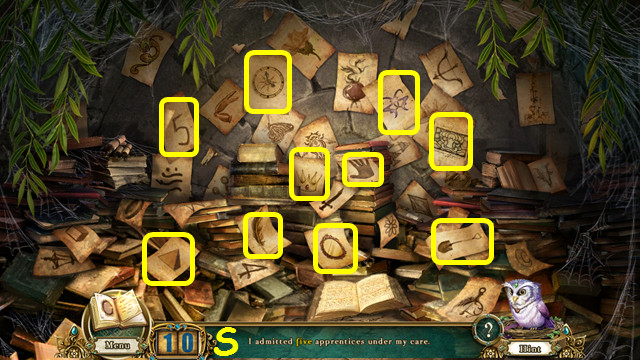
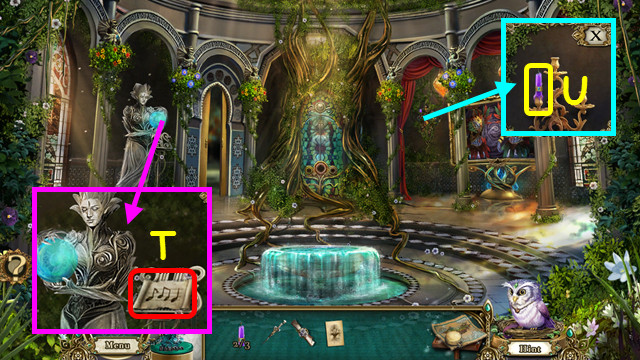
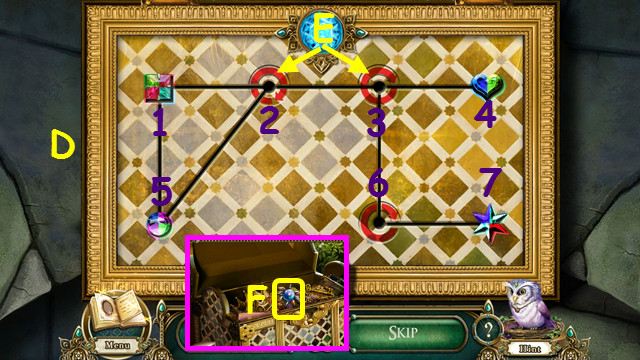
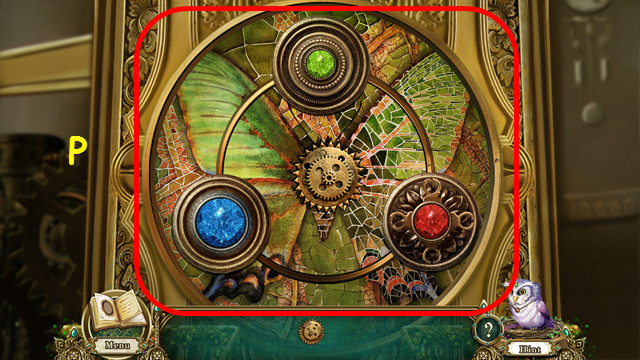
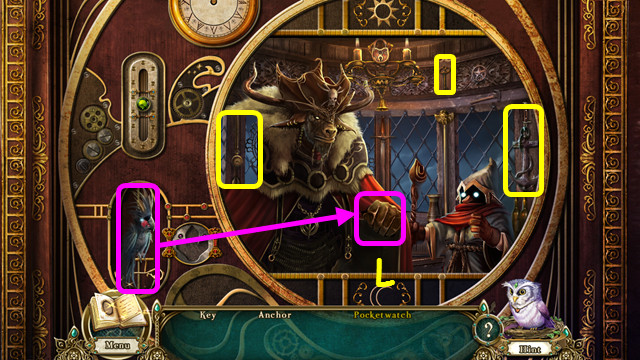
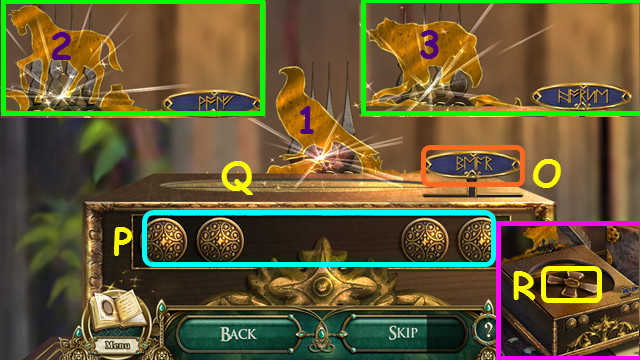
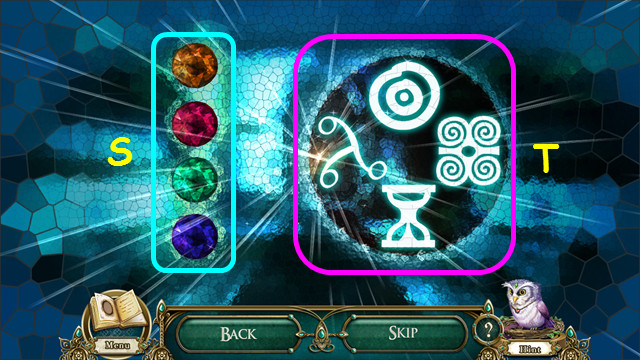
- Look at the mini-game on the wall.
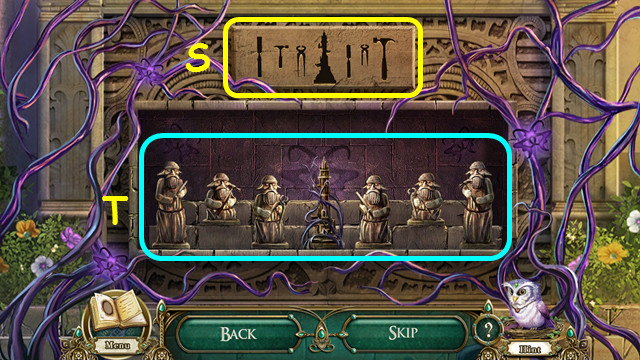
- Place the FIGURINE with the others, and then arrange the figurines (S) to match the carving (T).
- Select 2 figurines to swap positions.
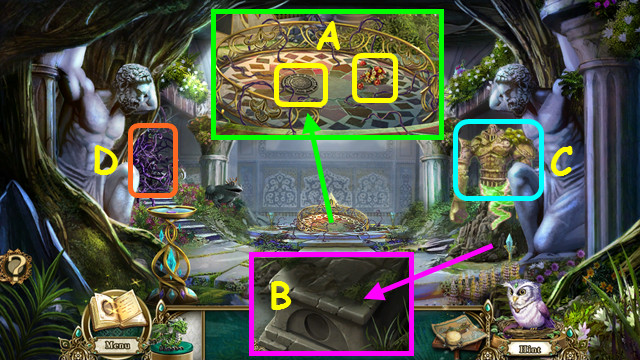
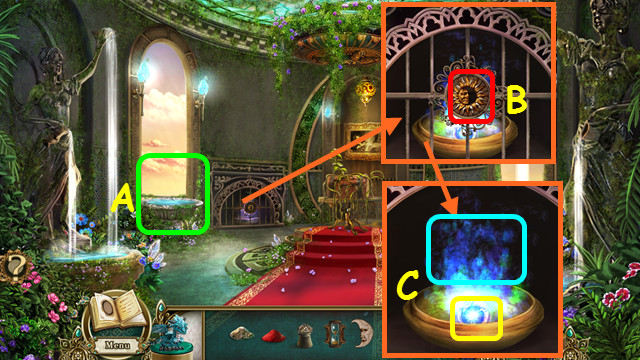
- Walk forward twice.
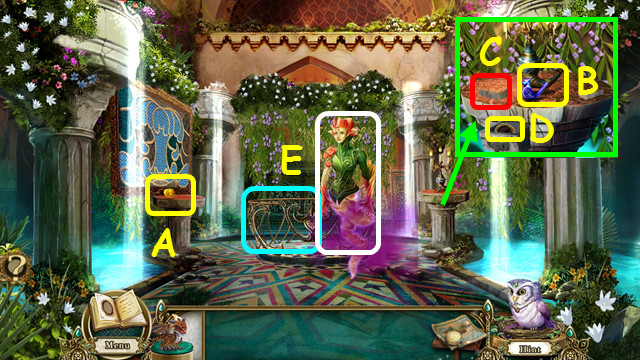
- Take the SUN GEM (A).
- Take the BIRD WHISTLE (B).
- Press the left button (C). Take the SLOT PIECE (D).
- Touch the lift, and talk to the Djinn of Change (E).
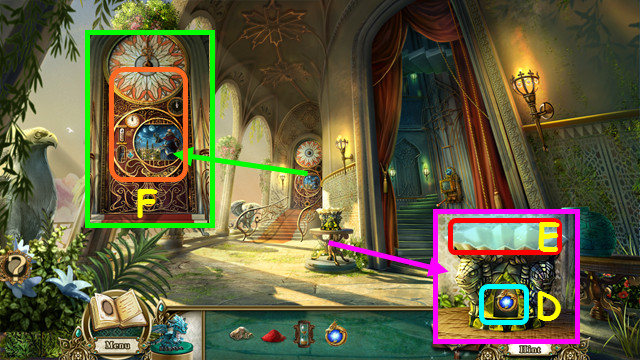
- Walk down.
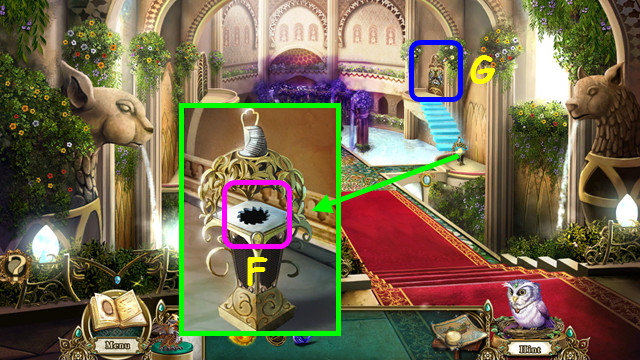
- Insert the SUN GEM into the device (F).
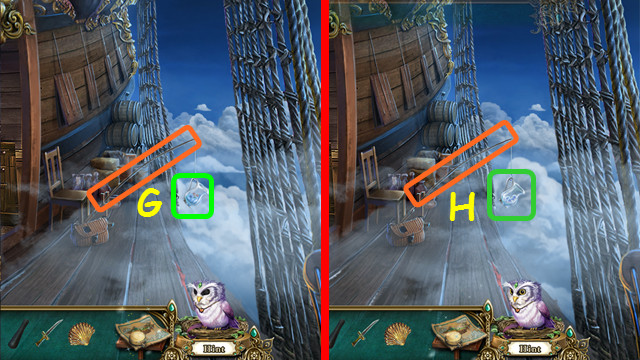
- Look at the right door (G).
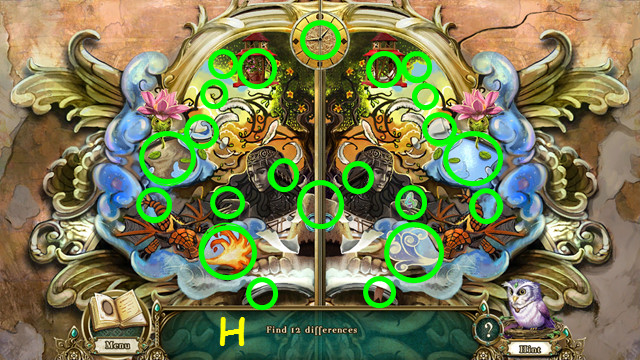
- Locate the 12 differences (H).
- Walk right.
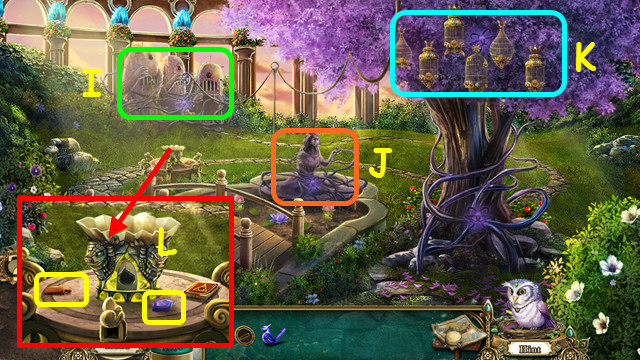
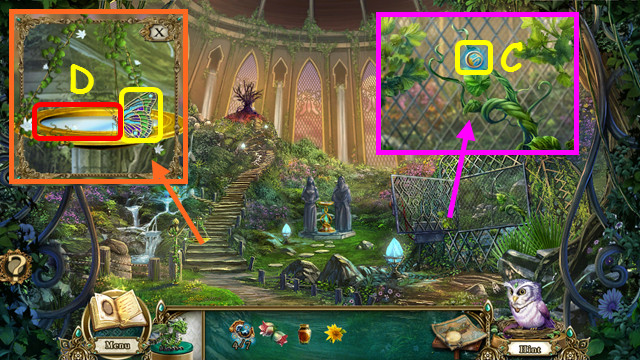
- Note the Pinwheel Machine (I), Pond (J), and Cages (K).
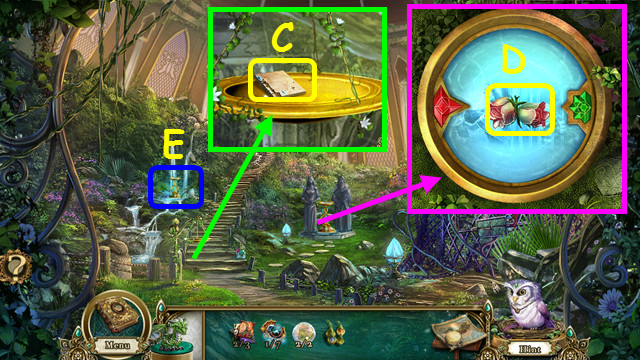
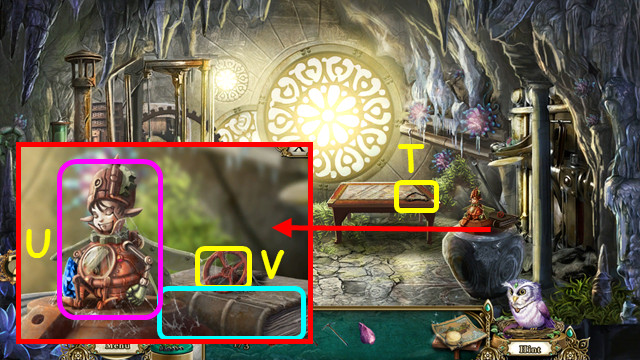
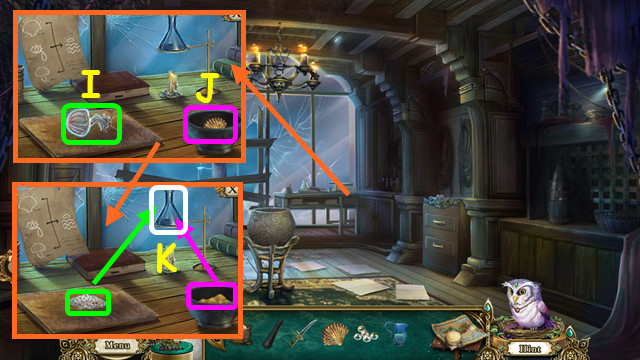
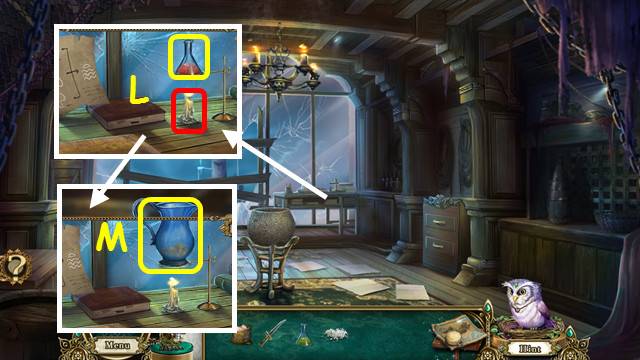
- Look at the Book; take the WOODEN WEDGE and the 1st MEMORY PRISM (L).
- Exit the close-up, walk down, and forward.
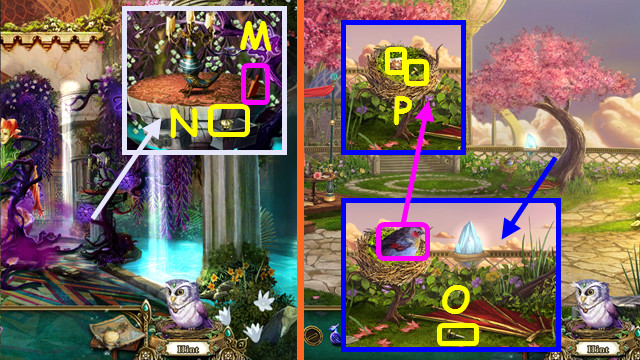
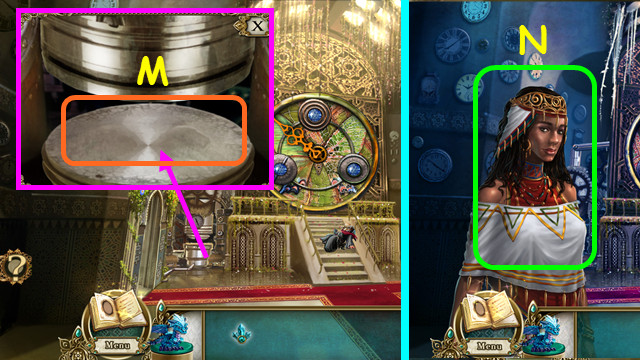
- Use the WOODEN WEDGE on the button (M); take the MAGIC INK (N).
- Walk down twice.
- Move the glider; take the 1/3 SCREW (O).
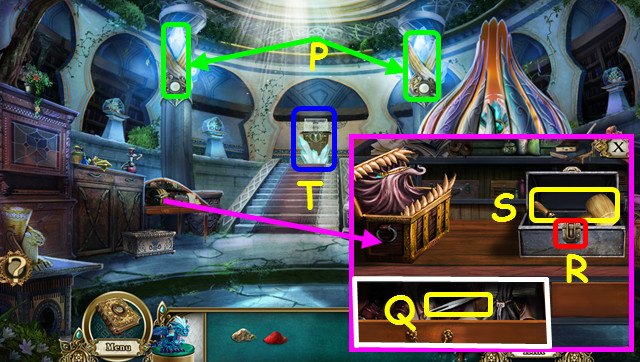
- Use the BIRD WHISTLE on the bird; take the 1/3 TILE and the 2/3 SCREW (P).
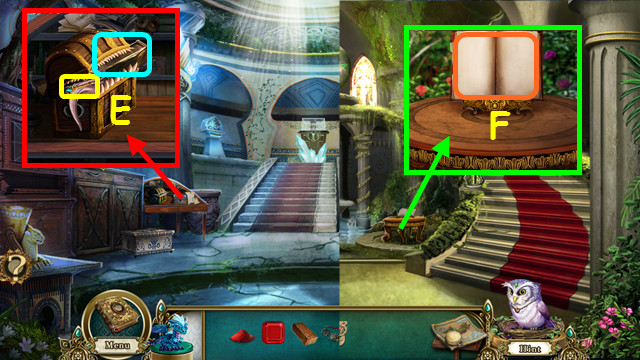
- Walk forward, go right, and look at the Book.
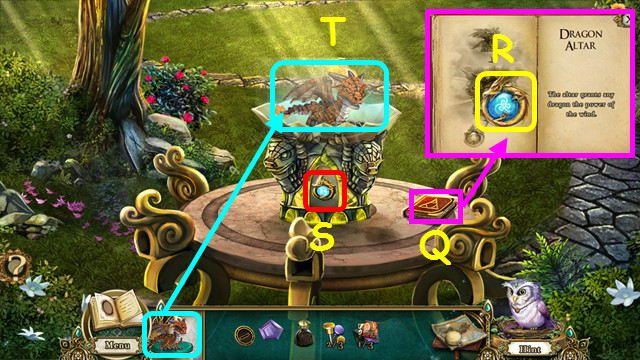
- Use the MAGIC INK on the pages of the blank book (Q).
- Turn the pages to find the DRAGON EMBLEM (R).
- Place the DRAGON EMBLEM in the altar (S).
- Place the DRAGON in the altar to make the WIND POCKET DRAGON (T).
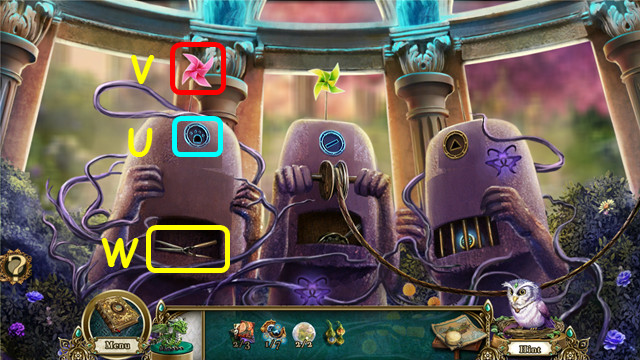
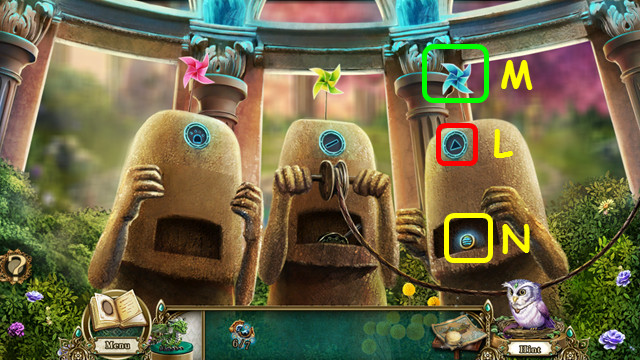
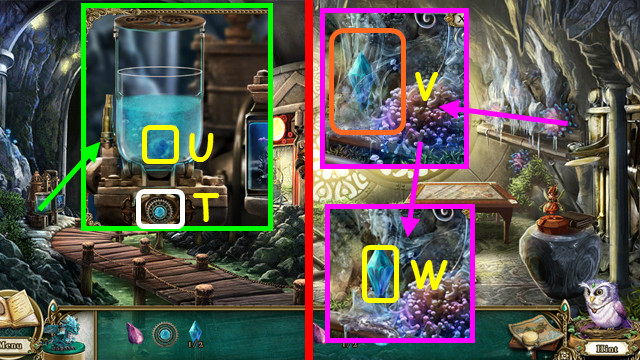
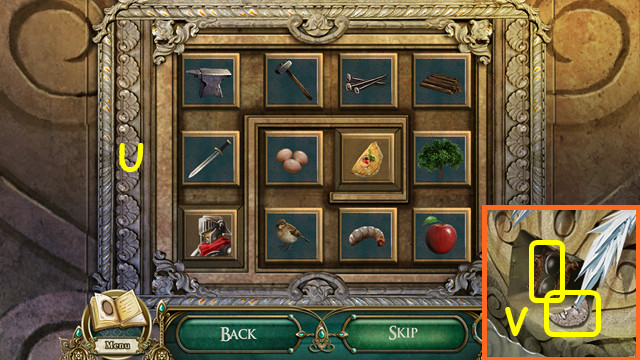
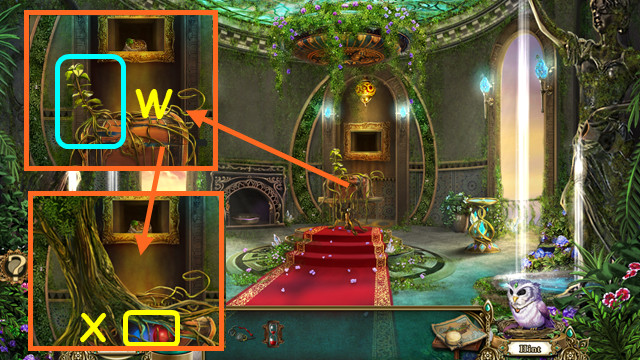
- Exit the close-up and look at the pinwheel machine.
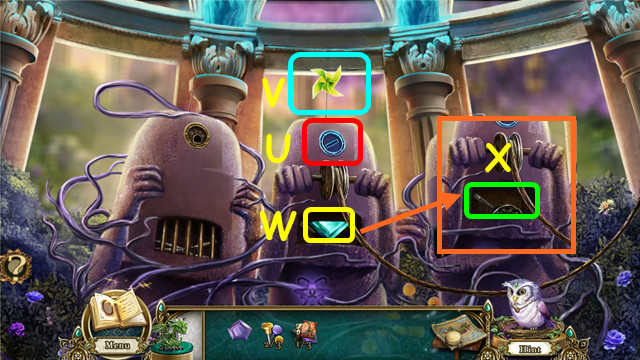
- Place the SLOT PIECE in the center structure (U).
- Use the WIND POCKET DRAGON on the pinwheel (V).
- Take the 2nd MEMORY PRISM (W) and pull the lever (X).
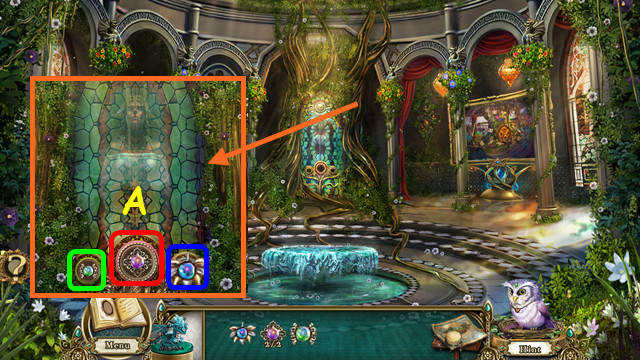
- Exit the close-up; select the cages for a mini-game.
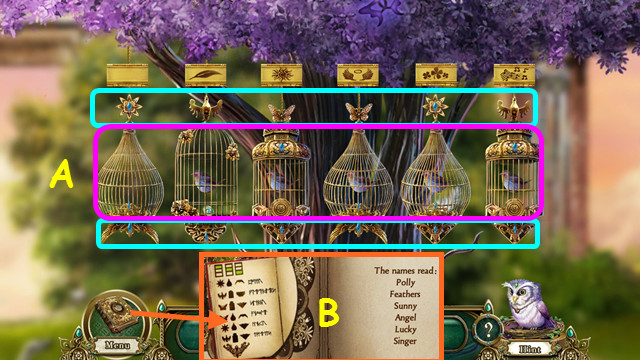
- Change the upper decorations, cage, and lower decorations (A) to match the journal (B).
- Select an element to change the configuration.
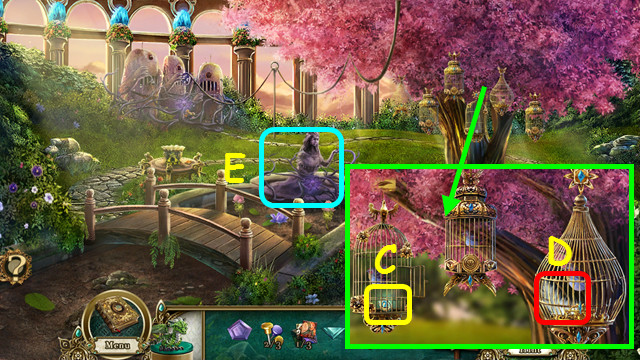
- Take the 1/7 CORE PIECE (C).
- Use the WIND POCKET DRAGON to get the FEATHER (D).
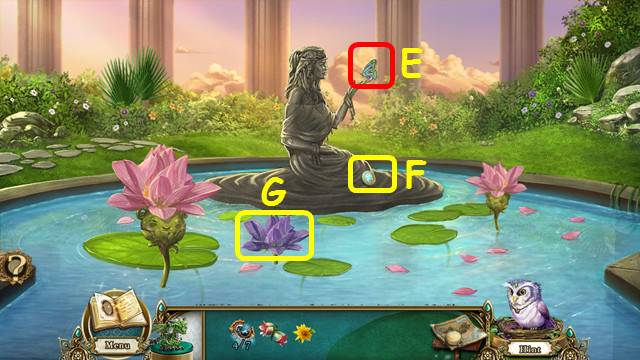
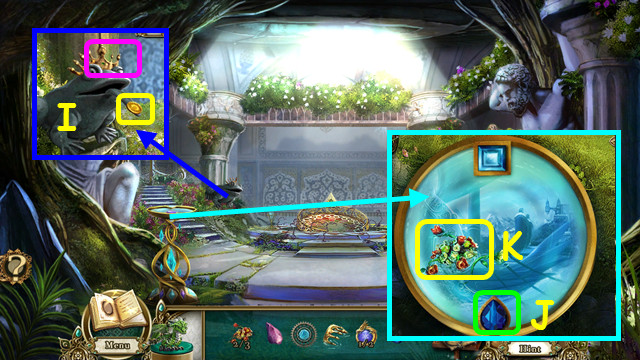
- Look at the Pond (E).
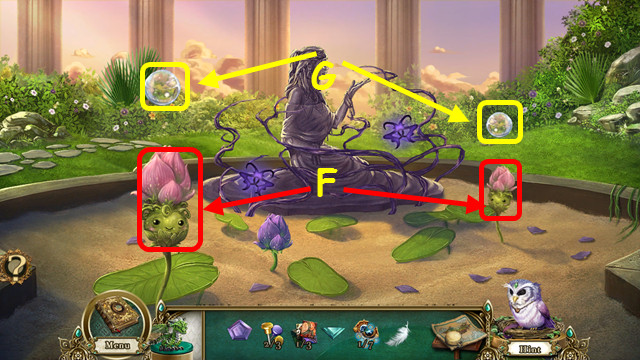
- Use the FEATHER on the 2 water lilies (F).
- Take the 2 WATER SPHERES (G).
- Leave the pond and walk down twice.
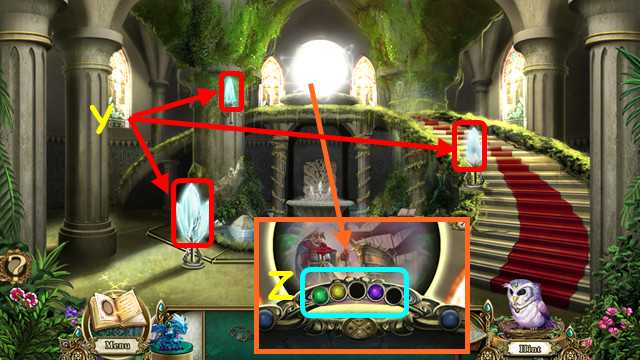
- Place the 1st MEMORY PRISM in the lower opening (H). Place the 2nd MEMORY PRISM in the upper opening (I).
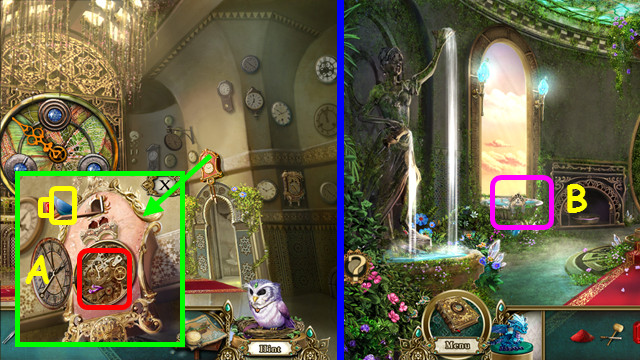
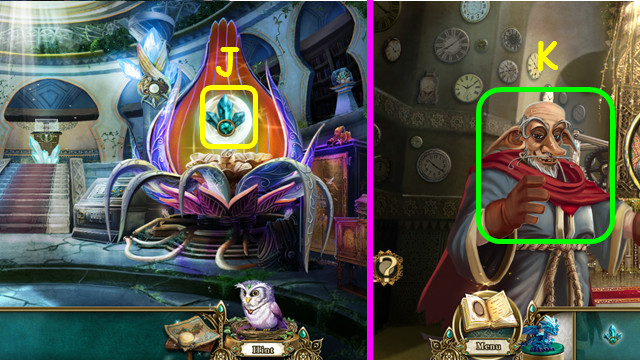
- After the cut-scene, take the MOON GEM (J).
- Walk forward.
- Take the 3/3 SCREW (K).
- Insert the MOON GEM into the device (L).

- Use the buttons to move the gears to the correct positions (M).
- Move the gears to see the outlines underneath each gear.
- Walk left.
- Take the SLOT PIECE (N).
- Use the 3 SCREWS on the regulators for a mini-game (O).

- Look at the clues (P), and turn the wheels to match (Q).
- Some clues will be broken (R); deduce the correct symbol/color.
- There are 3 patterns to complete (1-3).
- Take the BERRIES (S).
- Look at the Potter's Wheel; take the 2/3 TILE (T).
- Go to the Pinwheel Machine.
- Place the SLOT PIECE into the left structure (U).
- Use the WIND POCKET DRAGON on the pinwheel (V).
- Take the SHEARS (W).
- Go to the Hanging Gardens.
- Note the vase display (A).
- Use the SHEARS on the doors (B).
- Walk forward.
- Take the 3/3 TILE (C).
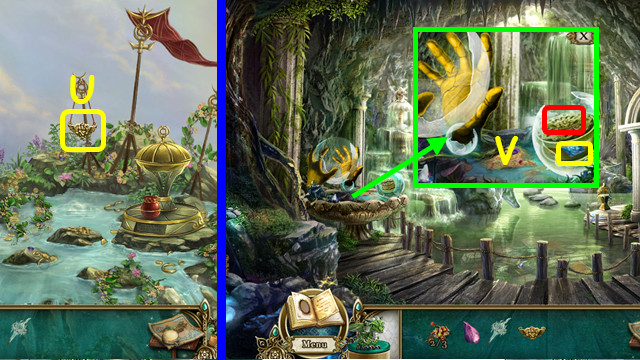
- Touch the water for a cut-scene, then take the MIDDAY BELLS (D).
- Look at the Garden Pond for a HOP (E).
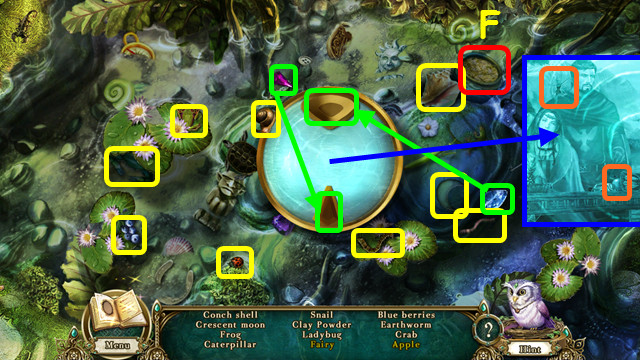
- Play the HOP to receive the CLAY POWDER (F).
- Walk down.
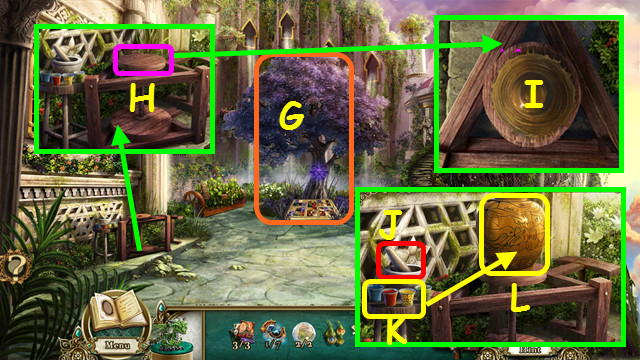
- Note the Tree (G).
- Look at the wheel (H); place the CLAY POWDER and a WATER SPHERE on the circle.
- Move the wheel back and forth until you return to the full view. (I).
- Place the BERRIES in the mortar (J). Take the DYE (K).
- Use the DYE on the vase (L).
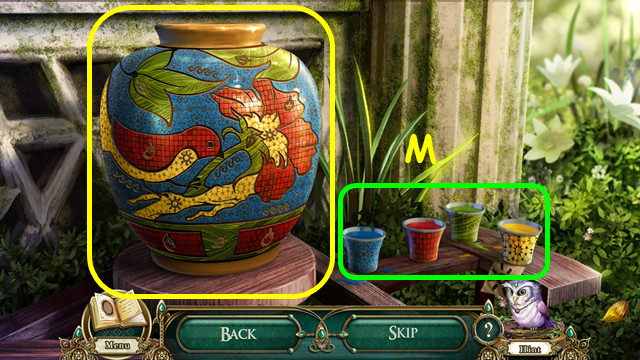
- Color the sections of the vase, using the symbols as a guide (M).
- Use the blue dye on see the wave symbols, and use the red dye on the fire symbols.
- Use the green dye on the leaf symbols, and the yellow dye on the sun symbols.
- Take the VASE and look at the Vases on the right.
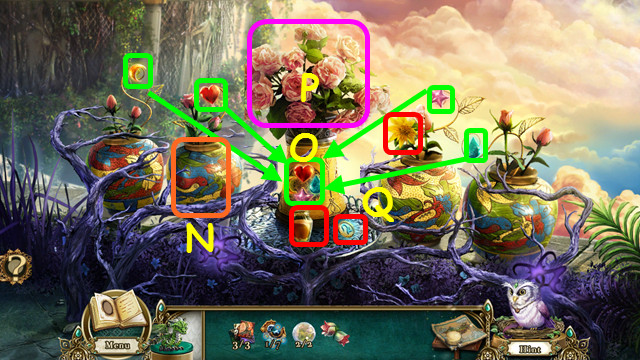
- Place the VASE in the space (N).
- Place the vase fragments on the center vase (O).
- Use the WATER SPHERE on the wilted flowers (P).
- Take the NECTAR, DAWNLIGHT FLOWER, and 2/7 CORE PIECE (Q).
- Look at the tree.
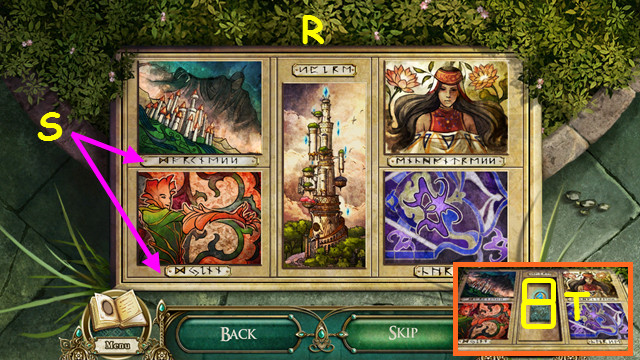
- Place the 3 TILES on the board.
- Swap the tiles to sort the pictures (R).
- Use the caption bars as a guide (S).
- Take the METAL PLATE and 3/7 CORE PIECE (T).
- Walk forward.
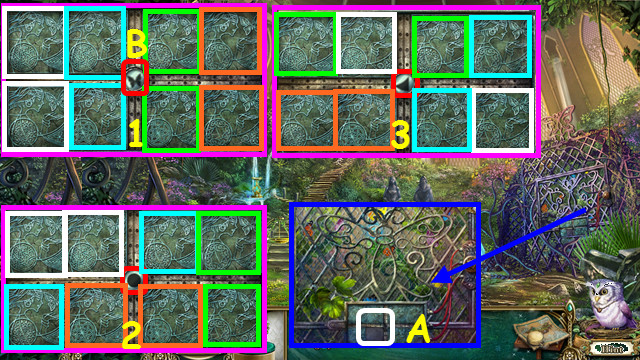
- Place the METAL PLATE in the opening (A).
- Look at the symbol in the center (B),then find the pairs of matching symbols.
- There are 3 sets to match (1-3).
- Take the 4/7 CORE PIECE (C).
- Pour the NECTAR into the bowl. Take the BUTTERFLY (D).
- Walk down twice, go right, and look at the Pond.
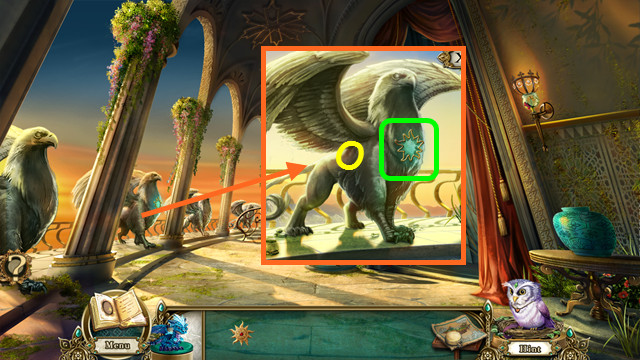
- Place the BUTTERFLY in the statue's hand (E).
- Take the 5/7 CORE PIECE (F) and NIGHT LILY (G).
- Return to the Butterfly Sanctuary.
- Place the DAWNLIGHT FLOWER in the yellow jar (H), the MIDDAY BELLS in the pink jar (I), and the NIGHT LILY in the blue jar (J).
- Take the 6/7 CORE PIECE and SLOT PIECE (K).
- Return to the Pinwheel Machine.
- Place the SLOT PIECE in the top of right structure (L).
- Use the WIND POCKET DRAGON on the pinwheel (M).
- Take the 7/7 CORE PIECE (N).
- Walk down, go forward, and look at the Artifact of Change on the left.
- Place the 7 CORE PIECES on the tapestry.
- Drag the pieces into the frame to complete the tapestry (O).
Chapter 2: The Underspire
- Take the STONE DISC and 1/3 BOUQUET (A).
- Place the STONE DISC in the circle (B).
- Talk to the Djinn to earn the STUDS (C).
- Look at the left door.
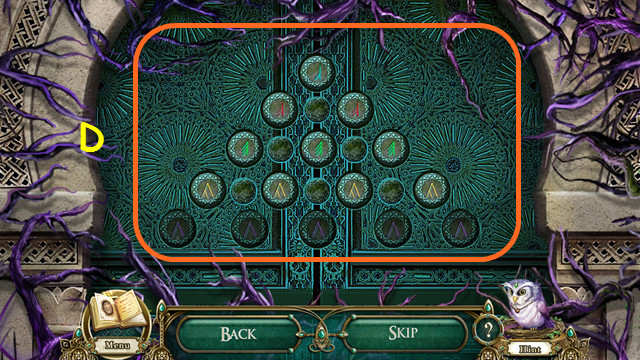
- Place the STUDS on the door.
- Use the buttons to move the runes to the correct locations (D).
- The number of each color determines the level of the runes.
- Walk to the left.

- Take the FEATHER DUSTER (E).
- Note the Mechanical Wall (F).
- Walk forward (G).
- Take the SPRAY HEAD (H).
- Take the WOODEN CANE and the PICKAXE (I).
- Walk down and look at the Mechanical Wall.
- Use the SPRAY HEAD on the bottle to get the MOSS KILLER (J).
- Pull down the ladder with the WOODEN CANE (K).
- Take the SHARP ROCK (L).
- Exit the close-up; walk forward.
- Use the MOSS KILLER on the moss (M).
- Use the SHARP ROCK on the sphere (N).
- Take the GOLDEN CLAW (O).
- Walk down.
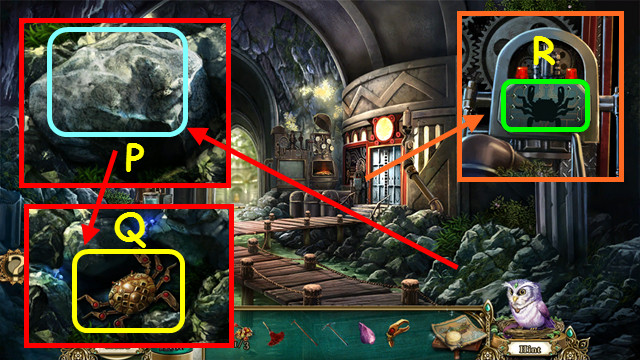
- Use the PICKAXE on the rocks (P).
- Move the broken rocks away, place the GOLDEN CLAW on the crab to get the GOLDEN CRAB (Q).
- Look at the Mechanical Wall; place the GOLDEN CRAB in the indentation for a mini-game (R).
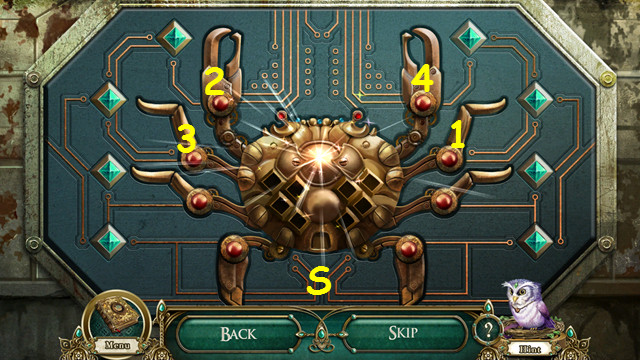
- Press the red buttons to turn on all the green lights (S).
- Press the buttons in numerical order (1-4).
- Walk right.
- Take the BELT (T).
- Use the FEATHER DUSTER on the fairy (U).
- Take the VALVE WHEEL and read the book (V).
- Walk down.
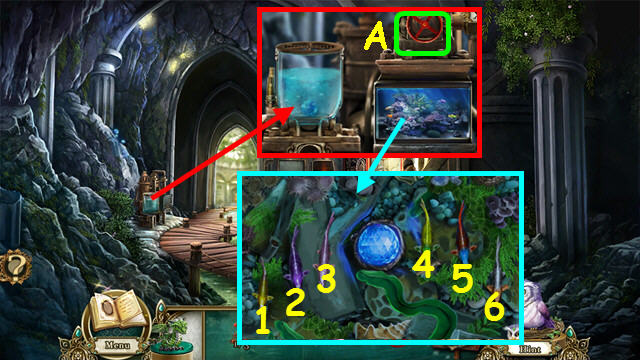
- Place the VALVE WHEEL on the right and turn the wheel (A).
- Select the fish in order (1-6) to earn the MACHINE CODE SEQUENCE.
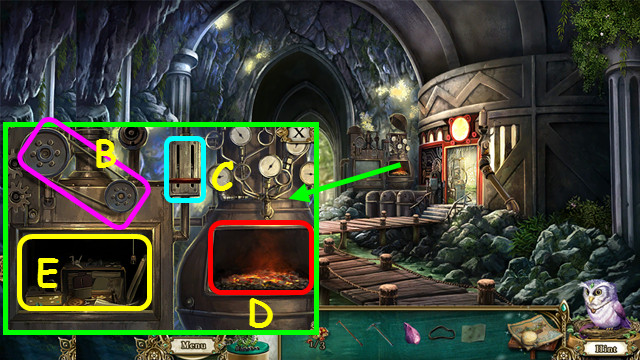
- Place the BELT on the gears (B).
- Pull down the lever (C).
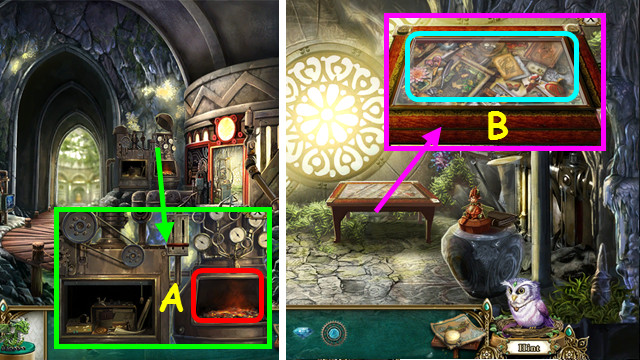
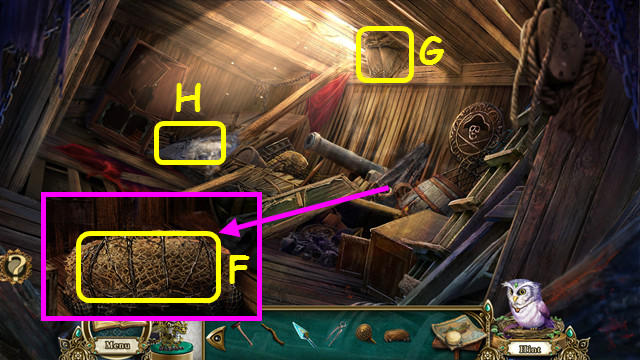
- Use the WOODEN CANE on the coals to get the FLAMING CANE (D).
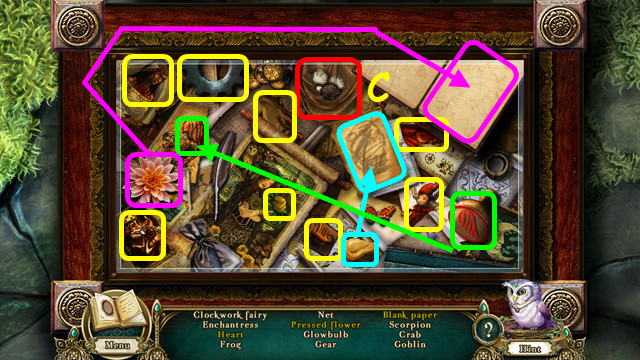
- Look in the compartment for a HOP (E).
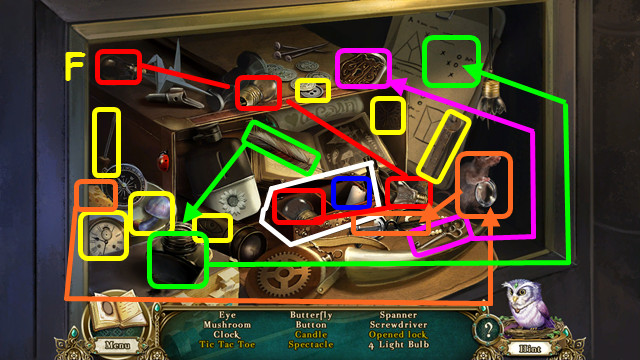
- Play the HOP to receive the LIGHT BULBS (F).
- Walk right.
- Place the LIGHT BULBS on the console (G).
- Place the MACHINE CODE SEQUENCE on the console; use the WIND POCKET DRAGON to dry the paper (H).
- Select the symbols that represent cat, skull, mask, and pumpkin (I).
- Press the red button (J).
- Use the WIND POCKET DRAGON on the steam (K).
- Look at the bulb web (L).
- Create a path of polyogonals from the left to the right; start with the lowest number of sides to the highest, and then repeat the pattern (M).
- Select a figure to light it up in the path, select the figure again to remove it from your chain.
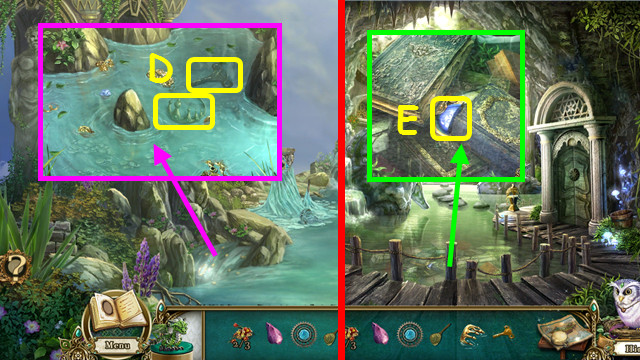
- Take the STAR GEM (N).
- Walk down and go forward.
- Place the STAR GEM in the indentation (O).
- Look across the water. Use the FLAMING CANE on the dry branches, then use the WIND POCKET DRAGON on the flames (P).
- Use the PICKAXE 3 times on the rocks (Q).
- Walk forward.
- Bend and then take the FROZEN TORCH (R).
- Take the 2/3 BOUQUET (S).
- Look at the Cliff Marks (T).
- Take the BUTTON (U).
- Exit the Cliff Marks and walk down.
- Place the BUTTON on the broken box; take the DIAMOND (V).
- Walk down.
- Place the FROZEN TORCH on the coals to get the MACHINE PART (A).
- Walk to the right.
- Use the DIAMOND on the glass (B).
- Look inside the table.
- Play the HOP to receive the FISHING NET (C).
- Walk down and go forward twice.
- Use the FISHING NET to take the HALF-CROWN and the WINDER (D).
- Walk down.
- Use the FISHING NET to take the 1/2 DRAGON EMBLEM (E).
- Walk down and go right.
- Use the WINDER on the fairy (F).
- Restore the moving picture; select 2 tiles to swap positions (G).
- Talk to the fairy. Close the book to earn the MEMORY PRISM (H).
- Walk down twice.
- Place the HALF-CROWN on the frog; take the COIN (I).
- Place the MEMORY PRISM in the lower opening (J).
- After the cut-scene, take the 3/3 BOUQUET (K).
- Go left, walk forward twice, and look at the Cliff Marks.
- Use the 3 BOUQUETS on the Dragon Altar; take the WALL MOTIF (L).
- Use the COIN on the frog, then look at the box (M).
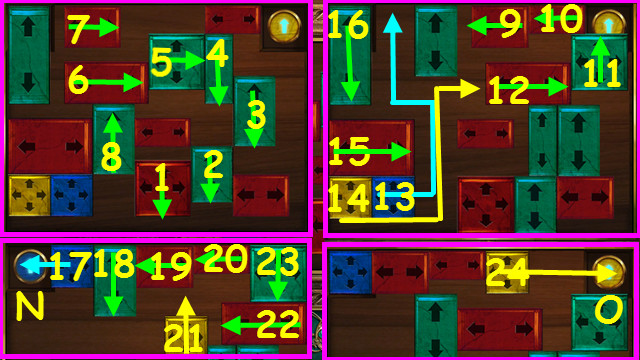
- Slide the tiles so you can move the blue tile to the upper left corner (N), and yellow tile to the upper right corner (O).
- Slide the tiles in the direction indicated in numerical order (1-24).
- Take the 2/2 DRAGON EMBLEM from the frog's mouth.

- Place the DRAGON EMBLEM in the opening (P).
- Place the WIND POCKET DRAGON on the altar to get the ICE DRAGON (Q).
- Walk down.
- Place the WALL MOTIF on the marking (R).
- Look at the wall.
- Locate the items based on the highlighted word to receive the 1/2 LIGHT CRYSTAL (S).
- Walk down.
- Place the MACHINE PART in the base (T).
- Use the ICE DRAGON to cool the liquid, and then take the STALWART CORE (U).
- Walk to the right.
- Use the ICE DRAGON on the sticky jelly (V).
- Use the SHARP ROCK to break the ice, then take the 2/2 LIGHT CRYSTAL (W).
- Walk down twice and look at the lift.

- Replace the 2 LIGHT CRYSTALS (X).
- Place the STALWART CORE in the pyramid (Y).
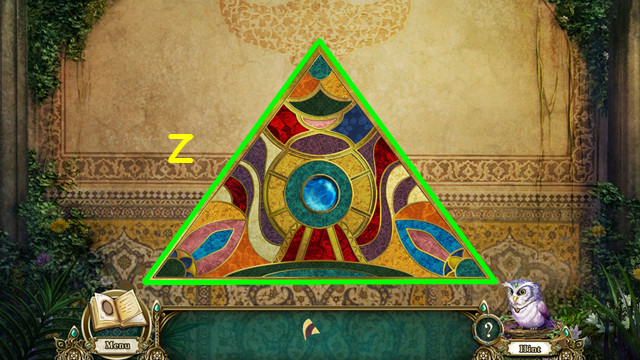
- Place the pieces in the triangle to complete the mosaic (Z).
- Pieces will snap into place when correct.
Chapter 3: The Enchantress
- Look at the Enchantress (A).
- Take the 1/3 CANDLE (B).
- Look at the curtains (C).
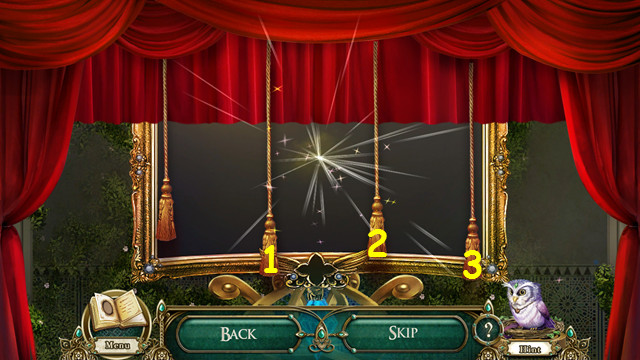
- Pull the cords to open all the curtains; one cord may open or close more than one curtain.
- Pull the cords in numerical order (1-3).
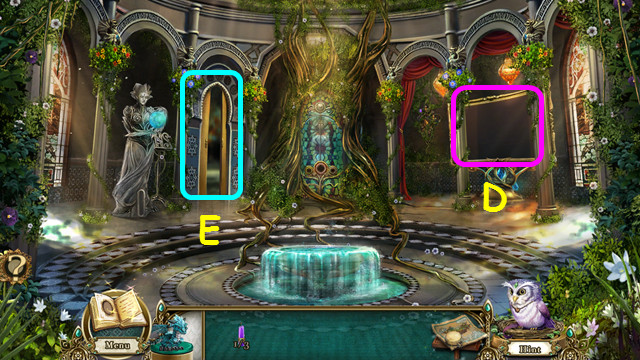
- Look in the mirror and speak to the twin Djinn (D).
- Walk left (E).
- Take the DAGGER (F).
- Flip the switch to lower the chandelier (G).
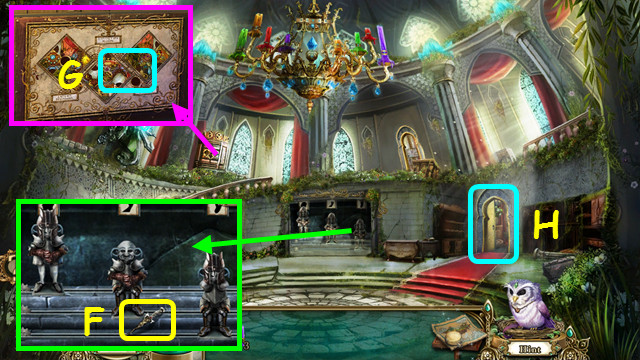
- Walk right (H).
- Take the GREAVES (I).
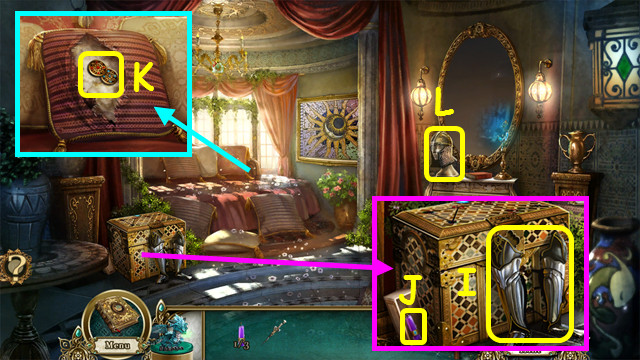
- Open the box. Take the 2/3 CANDLE (J).
- Use the DAGGER on the pillow; take the DISPLAY BUTTONS (K).
- Take the KNIGHT'S HELM (L).
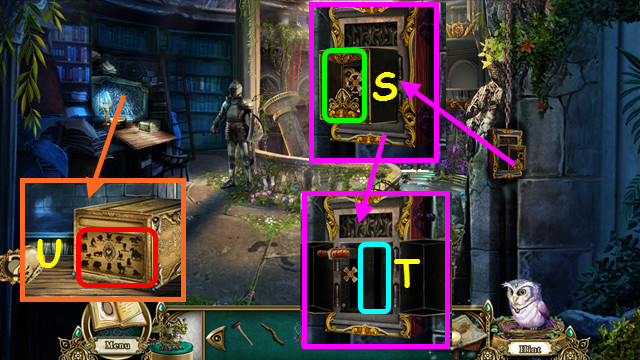
- Walk down. Look at the display cabinet.
- Use the DISPLAY BUTTONS on the cabinet.
- Use the buttons to move the tiles and restore the 3 scenes.
- Use the titles as clues (M).
- The 3 center buttons (green) rotate the tiles in the frame; the 2 lower buttons swap a tile between frames (red).
- Take the GAUNTLETS and NATURE'S HYMN (N).
- Place the GREAVES on the left figure, the HELM on the center figure, and the GAUNTLETS on the right figure (O).
- Move the figures under the sign of the item they just received (P).
- Open the box; take the JOURNAL KEY (Q).
- Walk to the right.
- Use the JOURNAL KEY on the journal (R).
- Take the CHANDELIER SCROLL (S).
- Walk down twice.
- Place the NATURE'S HYMN on the stand (T).
- Use the DAGGER on the plants and take the 3/3 CANDLE (U).
- Walk to the left.
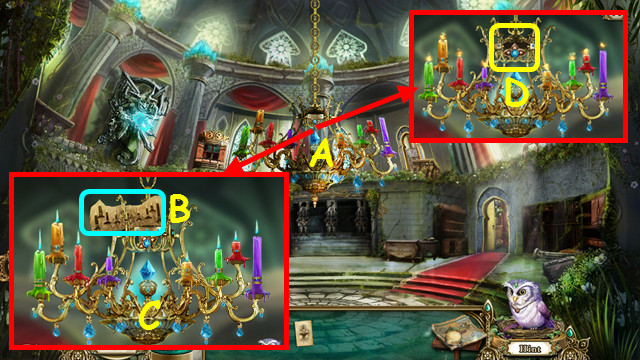
- Place the 3 CANDLES with the others (A).
- Use the CHANDELIER SCROLL on the chandelier (B).
- Swap the candles to match the diagram (C).
- Use the melted wax as a clue.
- Take the ILLUSORY TALISMAN (D).
- Walk down.
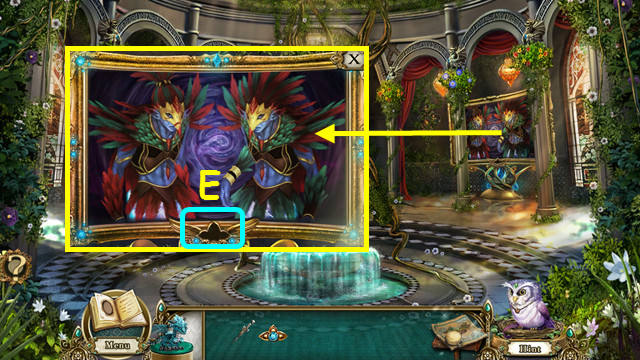
- Place the ILLUSORY TALISMAN in the mirror frame (E).
- This will trigger a HOP.
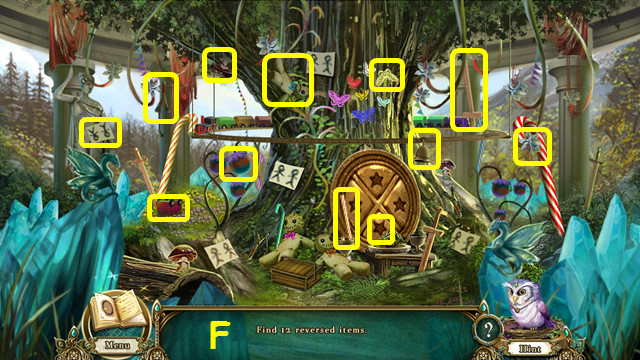
- Locate items that are backwards or upside down to receive the GLASS ROSE (F).
- Walk to the left.
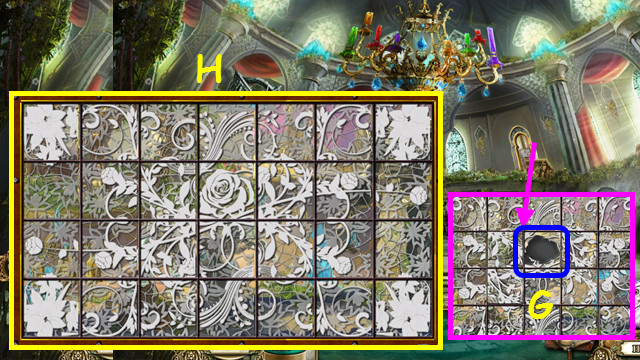
- Place the GLASS ROSE in the center of the door (G).
- Rotate the tiles to complete the pattern (H).
- Walk through the upper door.
- Take the MURAL TILE (I).
- Take the LAMP CRYSTAL (J).
- Walk down and go right.
- Place the MURAL TILE in the center of the mural (K).
- Take the GRIFFON HEAD (L).
- Place the LAMP CRYSTAL in the lamp (M).
- Play the HOP to receive the SONG OF MOUNTAINS (N).
- Walk down and go out through the upper door.
- Place the SONG OF MOUNTAINS on the symbol (O).
- Place the GRIFFON HEAD on the pedestal (P).
- Start on any square and make a path that covers all the tiles (Q).
- You will travel until reaching an obstacle.
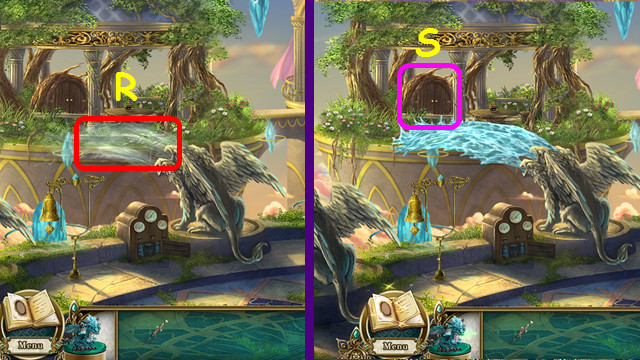
- Use the ICE DRAGON on the water stream (R).
- Cross the ice bridge (S).
- Take the MEMORY PRISM (T).
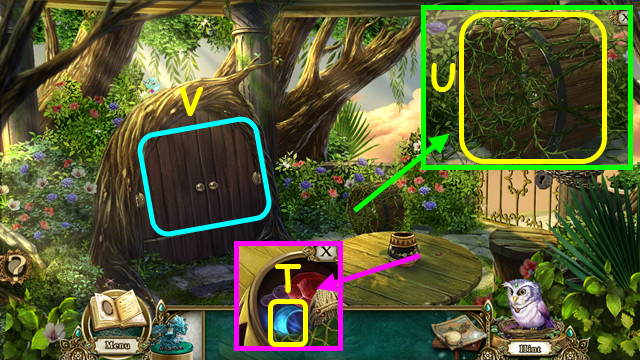
- Use the DAGGER 3 times on the thorns, then take the BOTTOMLESS BARREL (U).
- Open the cupboard and look inside (V).
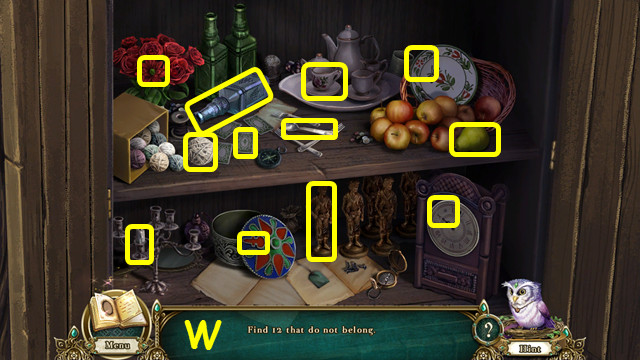
- Locate the 12 items that do not belong to receive the CHEST KEY (W).
- Walk down twice and go right.
- Place the MEMORY PRISM on the left (A).
- After the cut-scene, take the MELODY OF TIME (B).
- Place the CHEST KEY in the lock (C).
- Move the crystals to the correct base (D).
- Use the red circles to rotate the crystal to the correct orientation as seen on the bases (E).
- Select and release a piece, then move the mouse to the position you want. Select again to release the piece.
- Solution: (1-6), (5-1), (4-5), (6-2), (7-4), (2-3), (3-6), (6-7), (1-6), (4-1), (6-3), (3-2), 2-3), and (3-4).
- Take the blue COLORGLASS KEY (F).
- Walk down.
- Place the MELODY OF TIME on the symbol (G).
- Walk down.
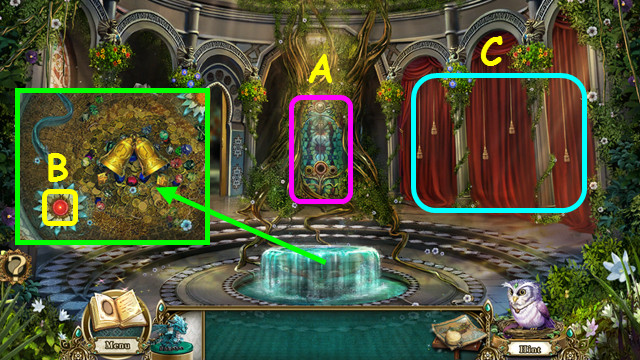
- Place the BOTTOMLESS BARREL in the center of the fountain. Use the ICE DRAGON on the outer water (H).
- Take the BELLS (I).
- Return to the Outdoor Towers.
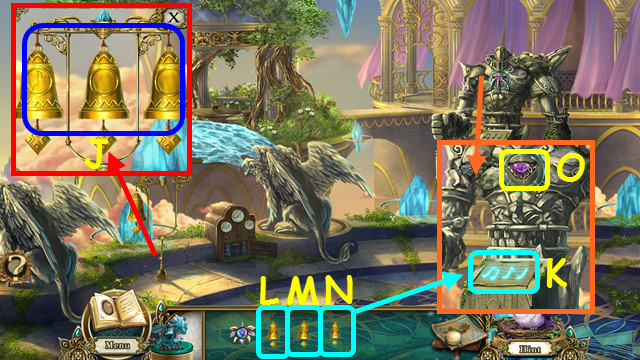
- Hang the BELLS on the frame; take the 3 BELLS (J).
- Use the 3 BELLS on the statue in the order shown by the melody (K).
- Use the 2nd BELL (M), the 3rd BELL (N), and the 1st BELL (L), and then take the 1/2 red COLORGLASS KEY (O).
- Walk down.
- Use the 3 BELLS on the statue in the order shown by the melody (P).
- Use the 1st BELL (Q), the 3rd BELL (R), and the 2nd BELL (S), then take the 2/2 red COLORGLASS KEY (T).
- Walk down.
- Use the 3 BELLS on the statue in the order shown by the melody (U).
- Use the 3rd BELL (V), the 2nd BELL (W), and the 1st BELL (X), then take the green COLORGLASS KEY (Y).
- Place the green COLORGLASS KEY on the left circle, the red COLORGLASS KEY in the center circle, and the blue COLORGLASS KEY in the right circle (A).
- After the cut-scene, you will earn the KEY TO THE OUTER TOWERS.
- Return to the Enchantress' Haven.
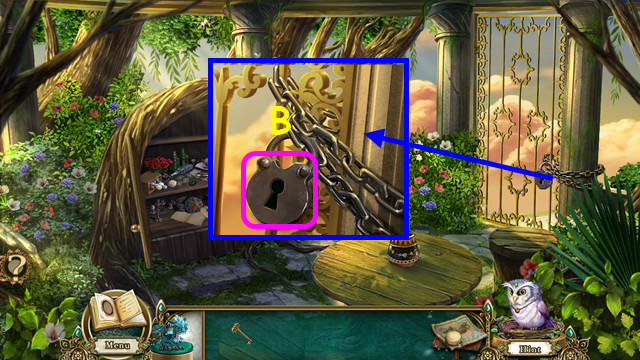
- Use the KEY TO THE OUTER TOWERS on the lock (B).
- Walk forward to the Breezy Passage.
- Take the SANDSTONE (C).
- Take the LEVER HANDLE and the POLISH BRUSH (D).
- Attach the LEVER HANDLE to the control, then pull it (E).
- Walk up the inner stairs (F).
- Take the 1/3 CLOCK PIECE (G).
- Note the path to the Vision Crystal Room (H).
- Walk left to the Dome Overlook (I).
- Take the STONE SLAB (J).
- Take the 2/3 CLOCK PIECE (K).
- Take the BUCKET (L).
- Walk down and to the right.
- Take the 3/3 CLOCK PIECE (N).
- Walk down.
- Use the 3 CLOCK PIECES on the Artifact of Time (O).
- Restore the mosaic by placing the pieces in the frame (P).
- The Djinn of Time will give you the SAND OF SLOW and the SAND OF HASTE.
- Walk to the right.
- Use the ICE DRAGON on the falling water (Q).
- Use the BUCKET to take the CAT FISH (R).
- Use the POLISH BRUSH on the dirt (S).
- Place the STONE SLAB on the grid (T).
- Swap the tiles so each adjacent tile relates to its neighbor (U).
- Select 2 tiles to swap positions.
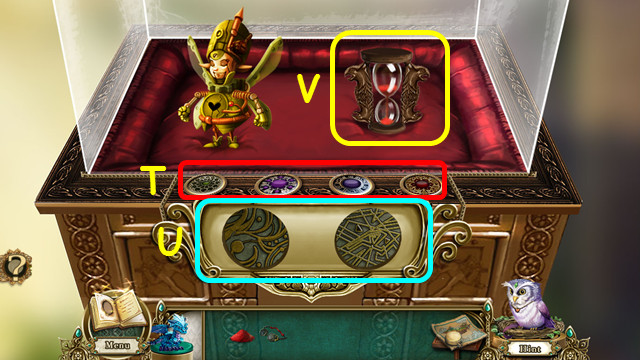
- Place the SAND OF SLOW in the hourglass; take the HOURGLASS OF SLOW and the SILVER HANDLE (V).
- Walk down and go to the left.
- Place the CAT FISH in the basin (A).
- Place the SILVER HANDLE in the grate (B).
- Use the ICE DRAGON on the flames, then take the ENERGY CREST (C).
- Walk down twice.
- Place the ENERGY CREST in the opening on the altar (D).
- Place the ICE DRAGON in the altar to make the ENERGY DRAGON (E).
- Use the HOURGLASS OF SLOW on the Timepiece Door (F).

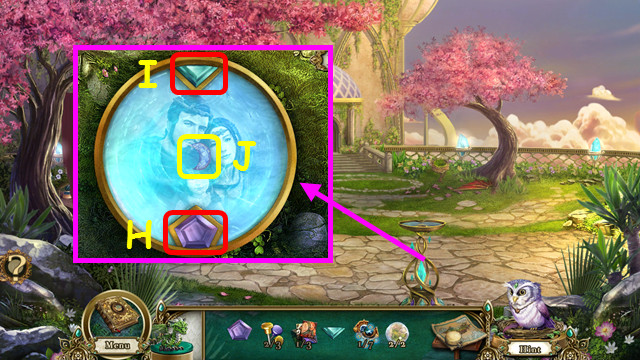
- Place the crystal in the opening and find the items in white (G).
- Move the bird to the stand (H) and select the green button (I).
- Place the crystal in the Enchantress' hands (J).
- Find the items in white, then press the green button (K).
- Place the bird on Captain Ironhoof (L). Locate the items in white.
- Walk forward on the left to the Dark Room.
- Use the ENERGY DRAGON on the 2 crystals (P).
- Open the drawer. Take the TWEEZERS (Q).
- Use the SANDSTONE on the rusty latch (R).
- Open the chest; take the CHISEL AND HAMMER (S).
- Note the Hourglass Display (T).
- Walk down and go up the stairs on the right.
- Use the TWEEZERS on the gears; take the PRISM and BIRD (A).
- Walk left.
- Give the BIRD to the catfish to receive the COLLAR (B).
- Walk down and right.
- Use the CHISEL AND HAMMER to take the BRICK (C).
- Use the COLLAR to repair the GOGGLES (D).
- Return to the Dark Room.
- Use the BRICK on the giggle box. Take the PENCIL (E).
- Return to the Vision Crystal Room.
- Use the PENCIL on the book (F).
- Play the HOP to receive the MAGICAL CUTOUTS (G).
- Walk down and go left.

- Place the MAGICAL CUTOUTS in the frame (H).
- This will trigger a mini-game.

- Place the cutouts (I) into the scene to restore the items.
- There are 4 scenes to correct (1-4).
- Remove the peeling canvas, open the bag, and take the COPPER PIECE and the MEMORY PRISM (J).
- Place the MEMORY PRISM in the lower opening (K), and the PRISM in the upper opening (L).
- After the cut-scene, take the ENERGY FUSE (M).
- Return to the Dark Room.
- Place the ENERGY FUSE in the opening (N).
- Use the ENERGY DRAGON on the fuses (O).
- Select the energy links for a mini-game (P).
- Rotate the beam to connect the upper beams with the lower beams (Q).
- Select a beam and use the mouse to move it to the position you want.
- Note the Gem of Power (R).
- Look at the Hourglass Display (S).
- Place the COPPER PIECE in the opening.
- Use the buttons (T) to rotate the copper pieces to form patterns (U).
- Place the SAND OF HASTE in the hourglass; take the HOURGLASS OF HASTE (V).
- Return to the Dome Overlook.
- Look at the painting; use the HOURGLASS OF HASTE on the tree (W).
- Take the COLORED ORBS (X).
- Walk down and right.
- Use the ENERGY DRAGON on the 3 crystals (Y).
- Look at the vision crystal; use the COLORED ORBS on the panel for a mini-game (Z).
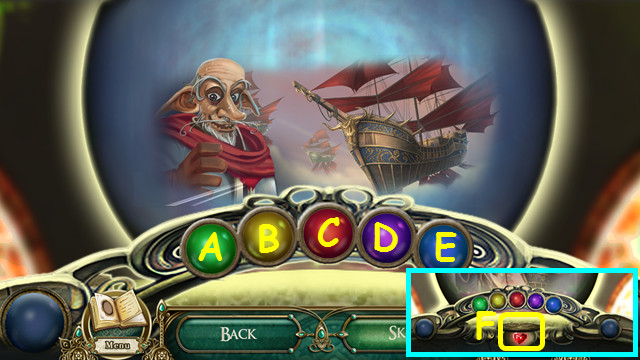
- Press the colored buttons to bring the picture into focus.
- Our solution was Ax2, Bx4, Cx3, Dx1, and Ex1.
- Take the CLOCKWORK HEART (F).
- Return to the Dark Room; look at the Hourglass Display.
- Place the CLOCKWORK HEART in the clockwork fairy (G).
- Use the ENERGY DRAGON on the fairy (H).
- Place the GOGGLES on the fairy, then take the CLOCKWORK FAIRY (I).
- Use the CLOCKWORK FAIRY to take the GEM OF POWER (J).
- Walk down and go forward on the right.
- Grimbel will try to stop you (K).
- Find 2 discs (green) that contain the 4 symbols in blue (L).
- There are 7 sets to find.
- Place the GEM OF POWER in the piston (M).
- Talk to the Enchantress to receive the GRIFFON'S PENDANT (N).
- Walk down.
- Place the GRIFFON'S PENDANT on his chest (O).
- The statue will come to life.
Chapter 4: Close Quarters
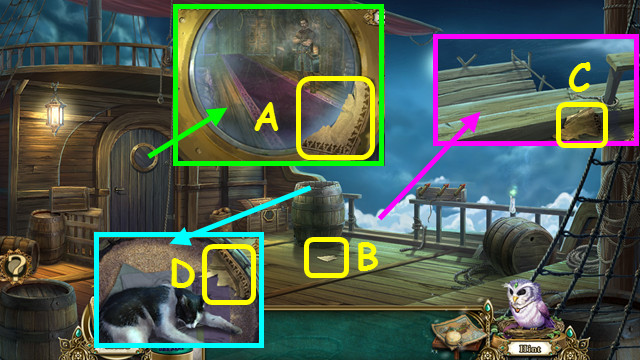
- Take the 1/4 BLUEPRINT PIECE (A).
- Take the 2/4 BLUEPRINT PIECE (B).
- Look down the side of the ship. Take the 3/4 BLUEPRINT PIECE (C).
- Take the 4/4 BLUEPRINT PIECE (D).
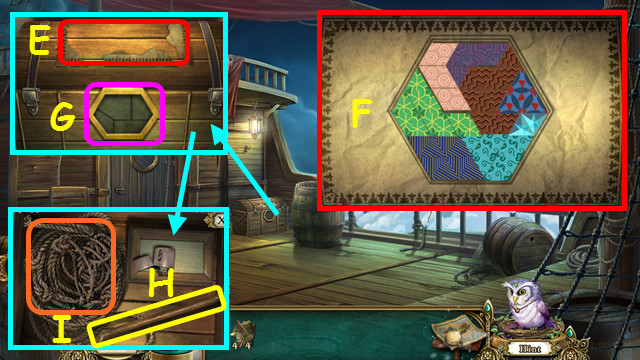
- Place the 4 BLUEPRINT PIECES on top of the chest (E).
- Place the colored pieces in the frame to form a hexagon (F).
- Select a piece to rotate it in place, then drag the piece into the frame.
- You will earn the GOBLIN RELIC; place it in the chest lock (G).
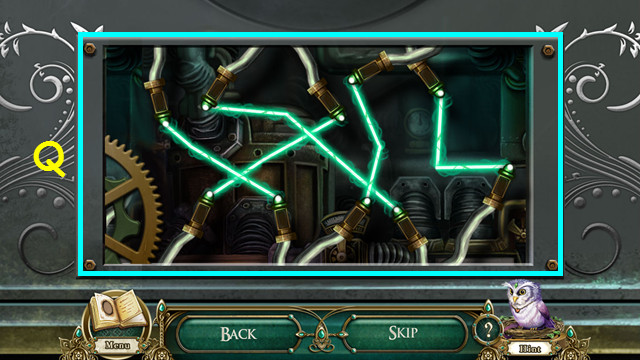
- Take the CROWBAR (H). Look at the rope ladder for a mini-game (I).
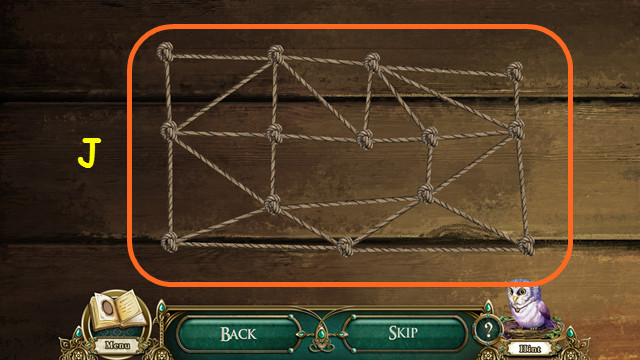
- Drag the knots so no lines cross (J).
- You will earn the ROPE LADDER.
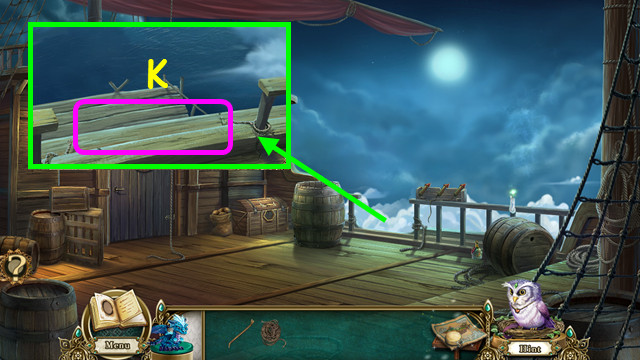
- Look down the side of the ship and hang the ROPE LADDER (K).
- Go down to the Side of the Ship.
- Take the CUTLASS and LIGHTER FUEL (L).
- Look at the boarded-up hole. Use the CROWBAR on the boards in numerical order (1-7).
- Look in the opening.
- Play the HOP to receive the ANCHOR (M).
- The ENERGY DRAGON is now the STONE DRAGON.
- Walk down.
- Use the LIGHTER FUEL on it, then take the LIGHTER (N).
- Use the STONE DRAGON on the sail (O).
- Climb up the sail.
- Use the LIGHTER on the lamp, then turn the winch twice (P).
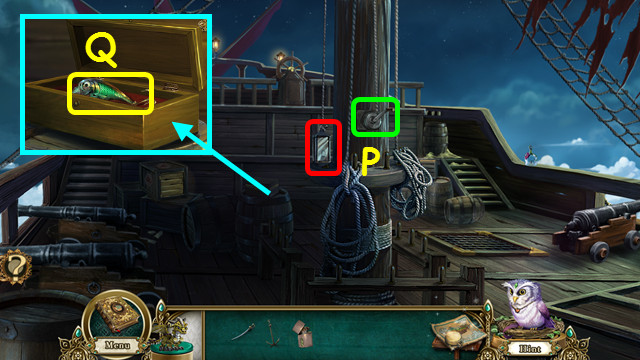
- Open the wooden box; take the FISHING LURE (Q).
- Return to the side of the ship.
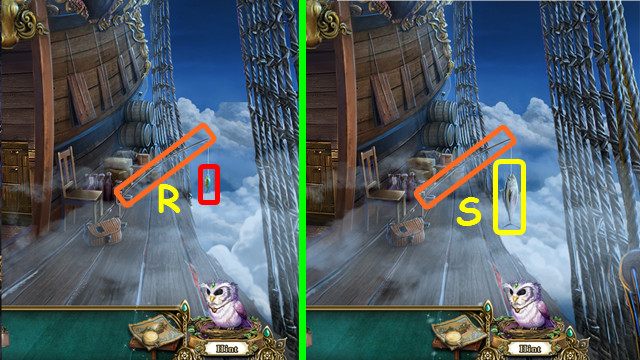
- Place the FISHING LURE on the fishing rod; select the rod to lower the line (R).
- Select the line again to bring up a FRESH FISH (S).
- Walk down.
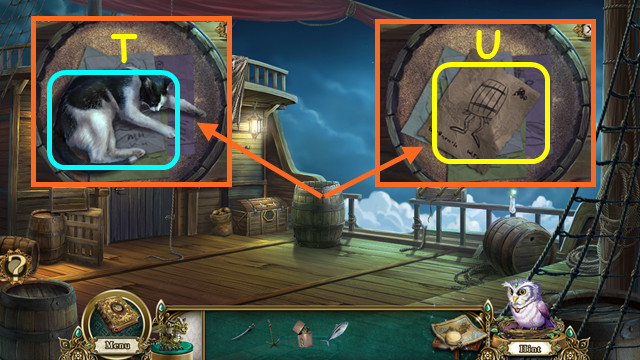
- Give the FRESH FISH to the cat (T).
- Look at the humorous drawings; take the BARREL (U).
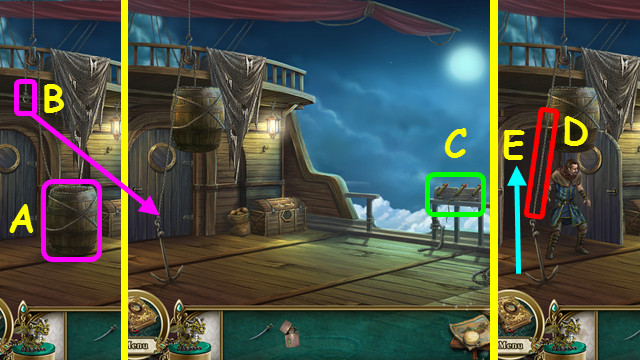
- Use the BARREL on the rope (A); use the ANCHOR on the short end of the rope (B).
- Use the LIGHTER on the fireworks (C).
- Use the CUTLASS to cut the rope (D).
- Enter the Ship Hallway (E).
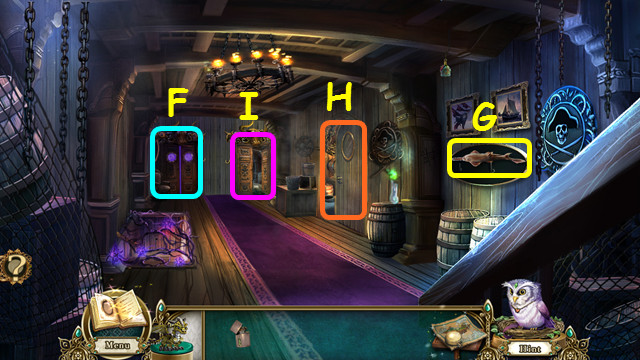
- Look at the door to the Captain's Cabin (F).
- Take the SAWFISH (G).
- Note the door to the Galley (H).
- Go to the Brig (I).
- Open the bottom drawer and take the CANDLE SNUFFER (J).
- Open the top drawer and take the GALLEY CABINET KEY (K).
- Talk to Shelsea (L).
- Use the CANDLE SNUFFER on the spirit candle (M).
- Take the 1/8, 2/8, and 3/8 GHOST MUSHROOMS (red).
- Walk down.
- Use the CANDLE SNUFFER on the spirit candle (N).
- Take the 4/8 and 5/8 GHOST MUSHROOMS (green).
- Walk down.
- Use the CANDLE SNUFFER on the spirit candle (O).
- Take the 6/8, 7/8, and 8/8 GHOST MUSHROOMS (pink).
- Enter the Ship hallway, then go right to the Galley.
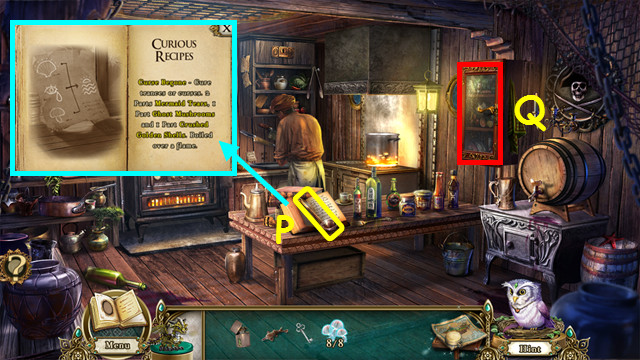
- Take the LADLE and read the cookbook (P).
- Use the GALLEY CABINET KEY on the cabinet and look inside (Q).
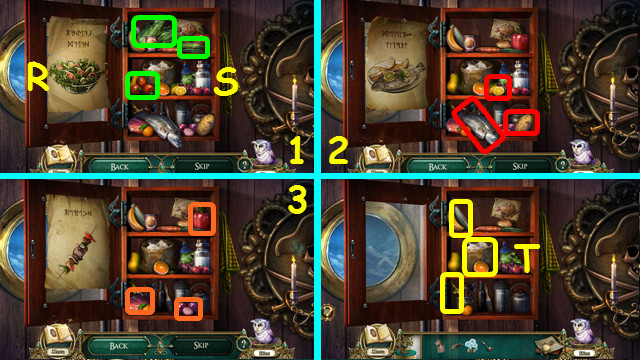
- Look at the picture on the left (R) and locate the ingredients on the right (S).
- There are 3 sets of ingredients to find (1-3).
- Take the PESTLE, FLOUR, and COOKING KNIFE (T).
- Walk down twice and go to the Upper Deck.
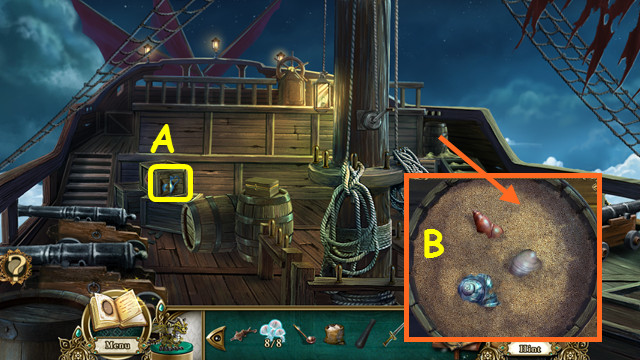
- Use the SAWFISH on the wooden cargo; take the PITCHER (A).
- Use the LADLE to uncover shells; select the shells for a mini-game (B).
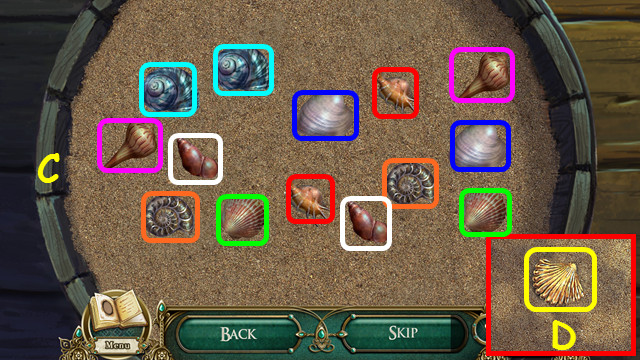
- Select the mounds to see the shells beneath; find all the matching pairs (C).
- Take the GOLDEN SHELL (D).
- Return to the Ship's Brig.
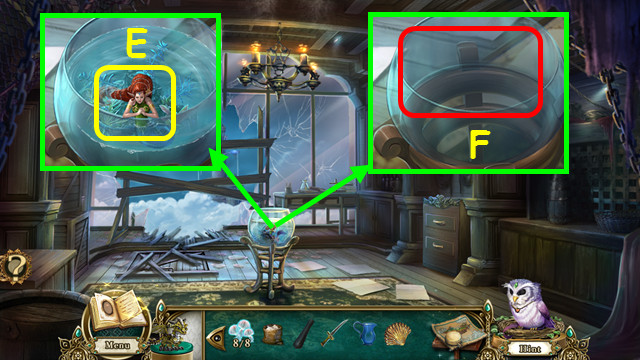
- Use the PITCHER to take SHELSEA (E).
- Use the STONE DRAGON on the bowl to make it a stone bowl (F).
- Return to the Side of the Ship.
- Place SHELSEA on the fishing pole; select the rod to lower her down (G).
- Select the rod again; take the SEA WATER and MERMAID'S TEARS (H).
- Return to the Ship's Brig.
- Place the 8 GHOST MUSHROOMS on the cutting board, then use the COOKING KNIFE to chop them up (I).
- Place the GOLDEN SHELL in the mortar and add the PESTLE (J).
- Move the chopped mushrooms and shellpowder to the flask; add the MERMAID'S TEARS (K).
- Use the LIGHTER on the candle, then take the flask of CURSE BEGONE (L).
- Place the SEA WATER over the burner, then take the SEA SALT (M).
- Travel to the Upper Decks.

- Look at the grate; pour the CURSE BEGONE into the stew (N).
- Walk down and enter the Ship Hallway.
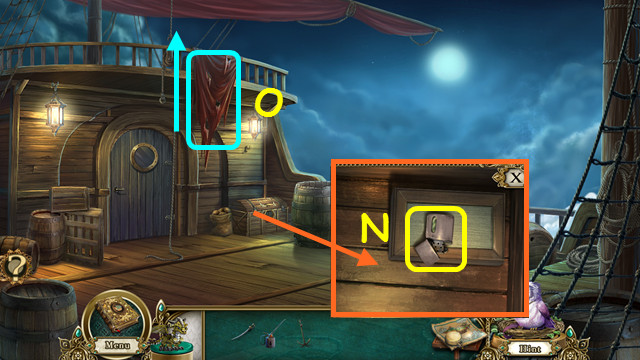
- Look at the door to the Captain's Cabin to see if the potion worked, then enter (O).
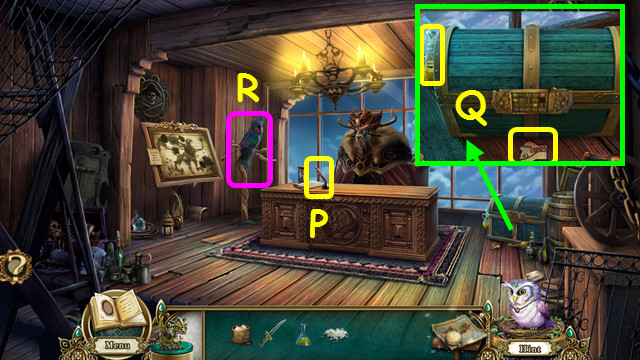
- Take the QUILL (P).
- Take the OIL and the BOTTLE LABEL (Q).
- Note the Evil Parrot (R).
- Walk down and enter the Galley.
- Take the RULER and the SUGAR (S).
- Note the oven (T).
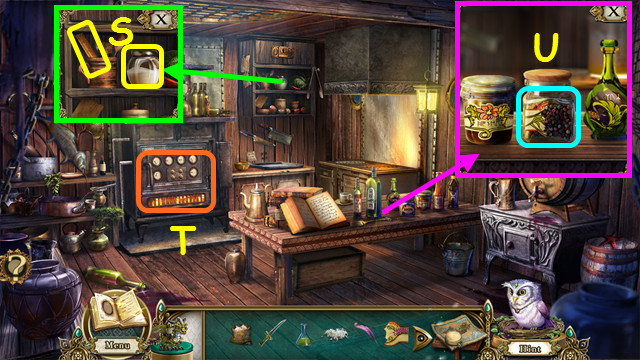
- Place the BOTTLE LABEL on the center bottle (U).
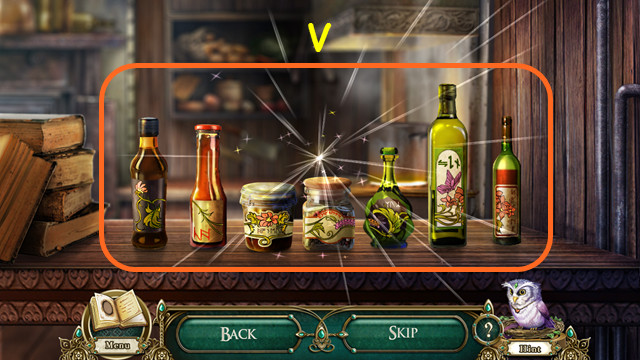
- Arrange the bottles according to the pictures on the labels (V).
- Select two bottles to swap positions.
- You will earn the CATOBLEPAS ACID.
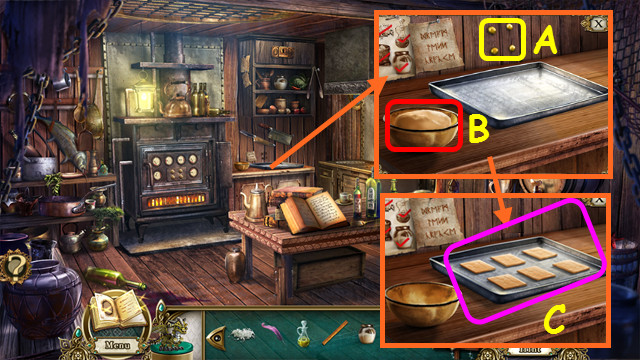
- Look at the cooking counter and take the PINS (A).
- Place the FLOUR, SEA SALT, OIL, SUGAR, and CURSE BEGONE in the bowl (B).
- Take the dough from the bowl, place it on the tray, then use the COOKING KNIFE to cut the dough (C).
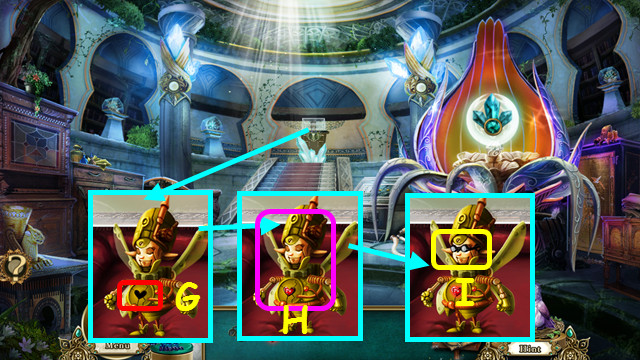
- Take the TRAY and zoom into the oven for a mini-game.
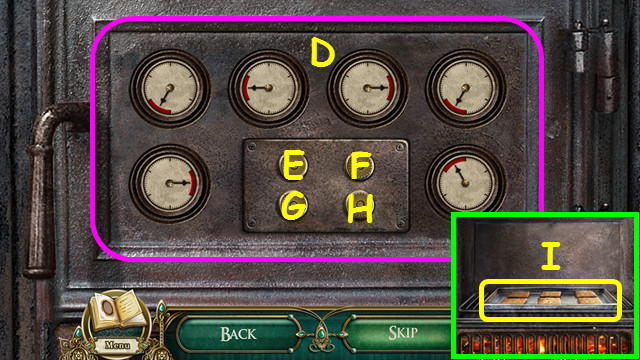
- Use the buttons in the center to move the needles so all are in the red (D).
- Press the buttons: Ex5, Fx5, Gx5, and Hx5.
- Place the TRAY in the oven, then take the CURSE BEGONE CRACKERS (I).
- Return to the Captain's Cabin.
- Note the Strategy Board (J).
- Give the Evil Parrot the CURSE BEGONE CRACKERS and take GRIMBLE'S TRINKET (K).
- Go to the Ship's Brig.
- Place GRIMBLE'S TRINKET and the CATOBLEPAS ACID inside the stone bowl, then take the TRINKET IN BOWL (K).
- Travel to the Galley.
- Place the TRINKET IN BOWL in the oven (L).
- Walk down; talk to the Captain to receive IRONHOOF'S GUIDE TO RICHES (M).
- Enter the Captain's Cabin. Look at the Strategy Board.
- Place IRONHOOF'S GUIDE TO RICHES, QUILL, RULER, and PINS on the board for a mini-game.
- Read the clues on the left (N), and select the item on the map.
- There are 5 clues and 5 items (1-5).
- You will earn the CHEST TILE.
- Look at the Captain's Stash; use the CHEST TILE on the lock for a mini-game (O).
- Rotate the tiles so all the gems are connected (P).
- Take the LIGHT CRYSTAL (Q).
- Walk down.
- Use the LIGHT CRYSTAL on the Cursed Door (R).
- Look at the Cargo Hold (S).
- Play the HOP to end the chapter (T).
- Note: you will not receive an inventory item.
Chapter 5: The Spire Battle
- Talk to the Captain (A).
- Move the rubble; take the 1/3 LARGE LIGHT PILLOW (B).
- Walk forward to the Rotunda Balcony (C).
- Take the BOWL OF WATER and read the Oath (D).
- Look at the garden bench; take the FLINT (E).
- Walk down.
- Use the FLINT on the dull axe to get the AXE (F).
- Use the BOWL OF WATER on the water to get the BOWL OF WATER (G).
- Give the Captain the BOWL OF WATER (H).
- Use the AXE on the wood, then go to the Ship's Interior (I).
- Take the BOMB (J).
- Move the debris; use the BOWL OF WATER on the frame (K).
- Move the frame; take the STONE DRAGON (L).
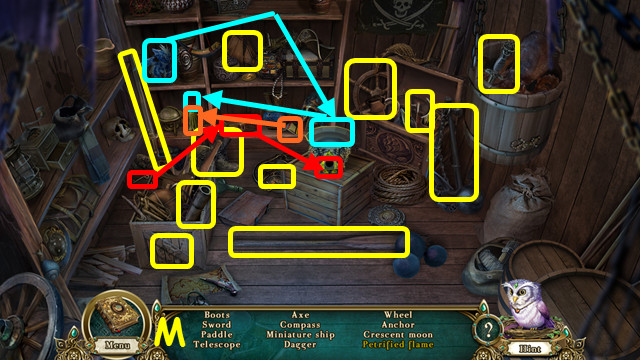
- Take the MIRROR and look at the medicine box for a mini-game (M).
- Use the buttons to restore the pattern (N).
- Each button changes a different ring.
- Take the BANDAGES (O).
- Walk down.
- Use the BANDAGES on the Captain to receive the GATE KEY (P).
- Walk forward.
- Look at the gate; use the GATE KEY on the lock (Q).
- Use the MIRROR on the Clockwork Dragon (R).
- Use the BOMB and the FLINT on the Clockwork Dragon (S).
- Use the AXE on the dead tree to receive the SLENDER TWIG (T).
- Use the STONE DRAGON on the fallen tree (U).
- Walk forward (V).
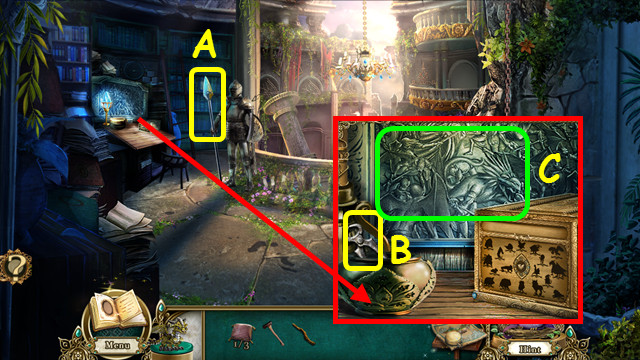
- Take the SPEAR (A).
- Look at the desk; take the WIRE CUTTER (B).
- Select the soldier carving (C).
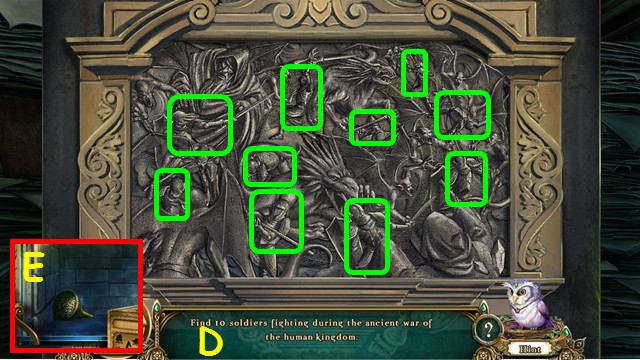
- Play the HOP (D).
- Take the GOLDEN KNOB (E).
- Return to the Ship Interior.
- Use the WIRE CUTTER on the straps, then take the LARGE FISHING NET (F).
- Use the SPEAR to take a SACK (G).
- Use the SACK on the MATTRESS to get the 2/3 LARGE LIGHT PILLOWS (H).
- Walk down.

- Look at the statue; use the WIRE CUTTER to take the PENDANT (I).
- Return to the Rotunda Loft.
- Look at the broken stairs and attach the LARGE FISHING NET (J).
- Go forward to the Rotunda Foyer.
- Use the AXE on the shaft twice to get the HOOK and WOODEN SPHERE (K).
- Use the SPEAR to move the large chunk; take the 3/3 LARGE LIGHT PILLOWS (L).
- Use the PENDANT on the right box; take the MENAGERIE SCROLL (M).
- Use the GOLDEN KNOB on the left box (N).
- Read the clue on the blue sign (O), then use the dials (P) to form the answer (Q).
- Solve the 3 riddle (1-3).
- Take the CHANDELIER CONTROLS PIECE (R).
- Walk down.
- Look at the chandelier control box; use the CHANDELIER CONTROLS PIECE to open the cover (S).
- Use the SLENDER TWIG as a lever and pull down (T).
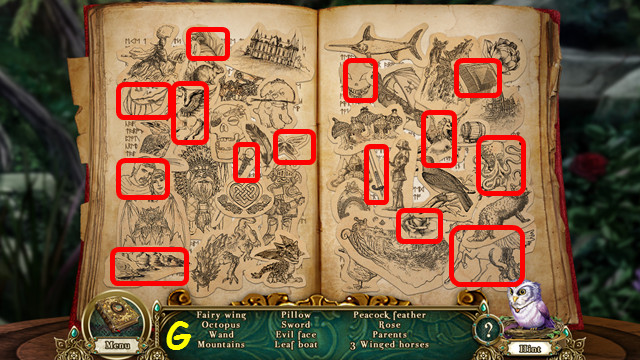
- Look at the hobby desk; use the MENAGERIE SCROLL on the box for a mini-game (U).
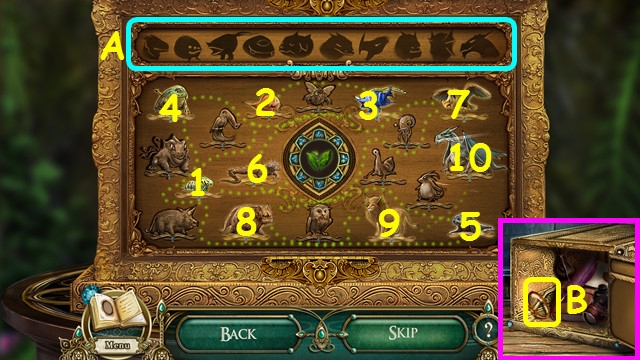
- Use the clues at the top (A) to select the animals in order (1-10).
- Take the LENS (B).
- Go to the Rotunda Balcony.
- Use the LENS on the small print (C).
- Press the 4 gems and take the GOLDEN KEY (D).
- Return to the Ship Interior.
- Look at the medicine cabinet; use the WOODEN SPHERE to replace the wheel (E).
- Use the AXE to take the STURDY PIECES OF WOOD (F).
- Look in the wall opening.
- Play the HOP to receive the ROPE (G).
- Part of the rope will combine with the HOOK to make the GRAPPLING HOOK.
- Travel to the Rotunda Foyer.
- Place the 3 LARGE LIGHT PILLOWS followed by the ROPE onto the chandelier, and then use the STONE DRAGON on them (H).
- Go to the Antechamber for a mini-game (I).
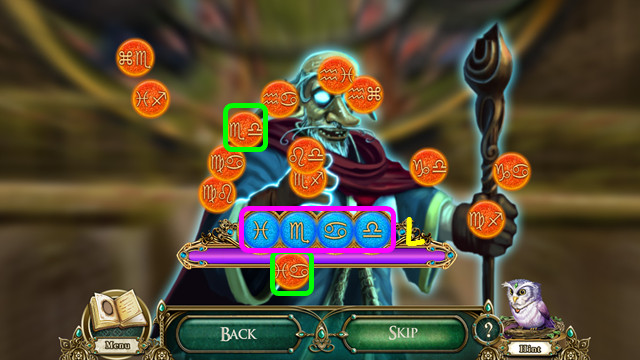
- Press the blue button (J).
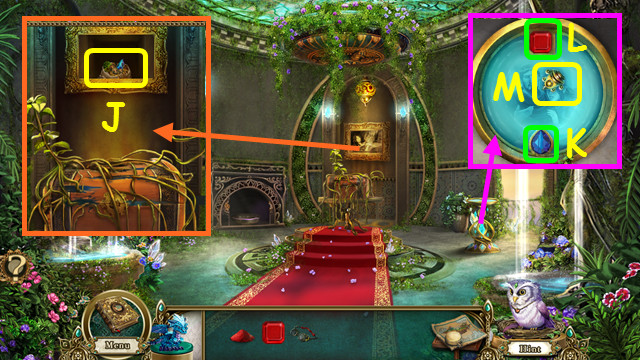
- Select a symbol that is touching the blue dots (K) to change them (L).
- Repeat this process until all the symbols are the same (M), then press the blue button to finish.
- Take the ONIONS and the LAUGHING LILY (N).
- Use the GOLDEN KEY on the box and take the ARROWHEAD (O).
- Return to the Rotunda Balcony.
- Place the LAUGHING LILY on the step (P).
- Use the ONIONS on the lily, then take the KEY TO THE SPIRE DEFENSE TOWER (Q).
- Return to the Antechamber.
- Use the KEY TO THE SPIRE DEFENSE TOWER on the door, and then look at the barrier (R).
- Use the Jeweled buttons (S) to restore the symbol (T).
- Go forward to the Defenses Tower.
- Place the ARROWHEAD, STURDY PIECES OF WOOD, and the ROPE on the ballista (A).
- Use the GRAPPLING HOOK on the top of the pillar (B).
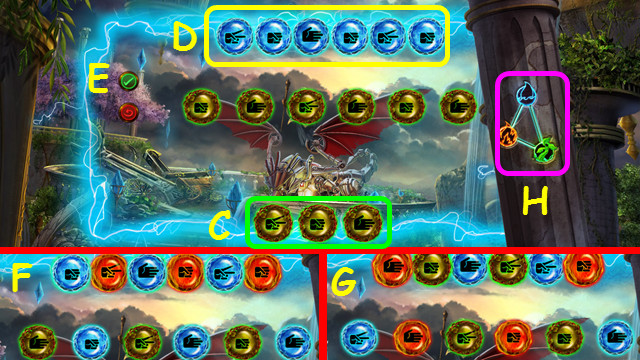
- Select the rock, paper, or scissors symbols (C) below that will beat the ones listed at the top (D) then press the green button (E).
- Rock beats scissors, scissors beats paper, and paper beats rock.
- The 2nd (F) and 3rd levels (G) of the game will also include elements; refer to the carving on the pillar (H).
- Water beats fire, fire beats plants, and plants beat water.
- Talk to the Clockwork Dragon, then walk down.
- Take the CROWN (I).
- Take the BROOCH (J).
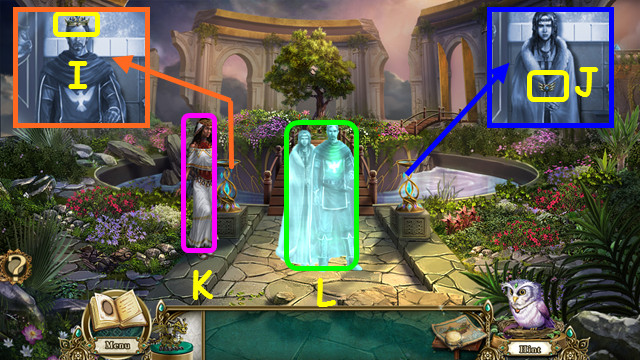
- Talk to the Enchantress (K).
- Talk to your parents (L).
- Congratulations! You have completed Awakening: The Sunhook Spire!
Created at: 2013-09-15