

Walkthrough Menu
- General Tips
- Chapter 1: Shipwreck
- Chapter 2: Temple
- Chapter 3: Old Capital
- Chapter 4: Whale
- Chapter 5: Volcano Outpost
- Chapter 6: Portal
General Tips
- This is the official guide for Botanica: Earthbound.
- This guide will not mention each time you have to zoom into a location; the screenshots will show each zoom scene.
- We will use the acronym HOP for Hidden-object puzzles. Interactive items will be color-coded and some will be numbered; please follow the numbers in sequence.
- The HOP lists may be random; our lists may vary from yours.
- Most Puzzles are random. Where possible, there will be step-by-step solutions.
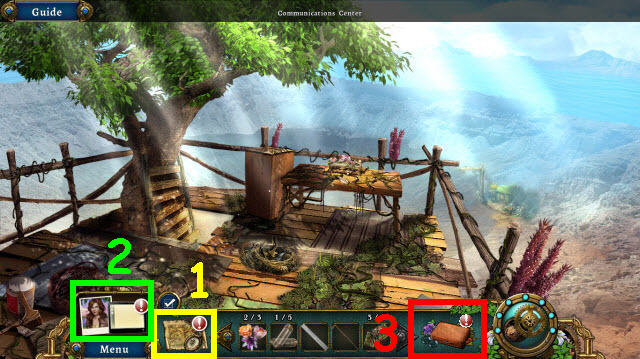
- Use the map (1) to check locations and objective areas.
- Select the journal (2) for clues and story updates.
- The kits will get an exclamation point by them when complete. You may then select them and solve the puzzle (3).
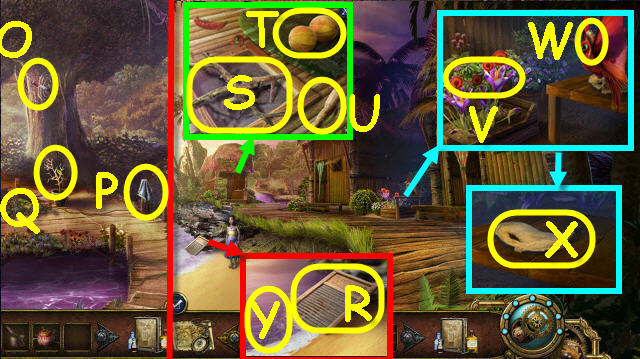
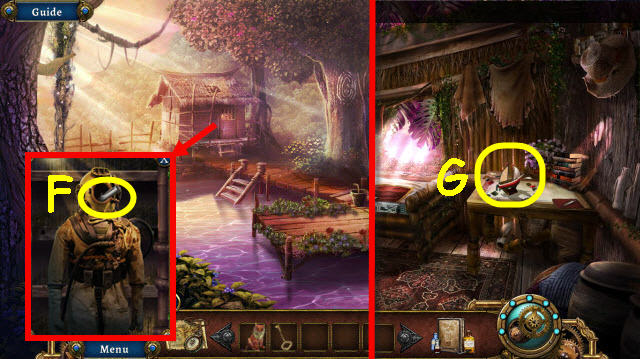
Chapter 1: Shipwreck

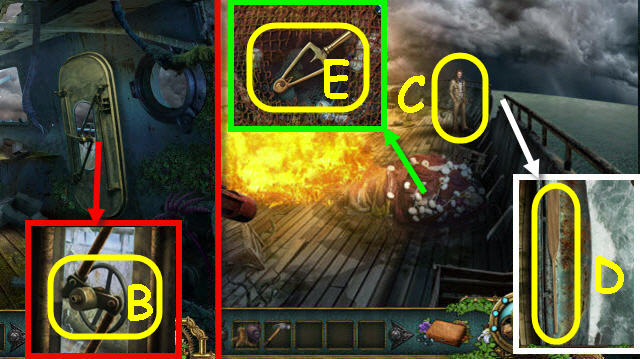
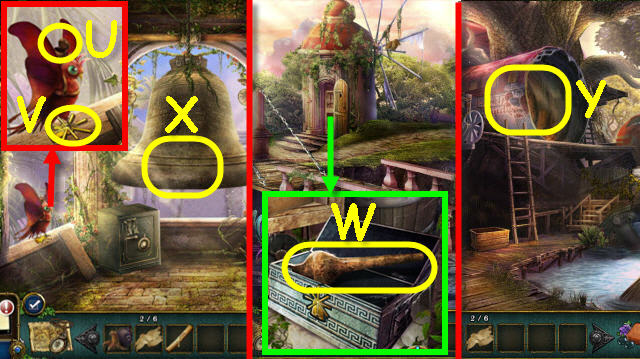
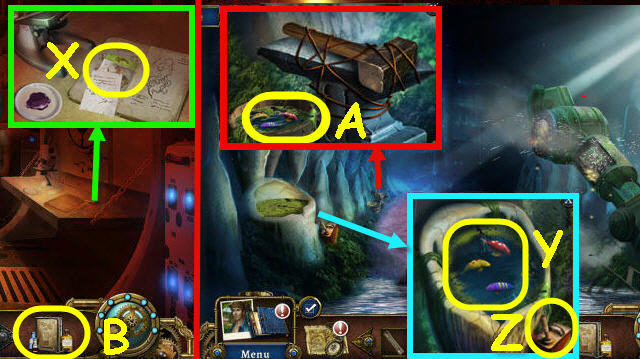
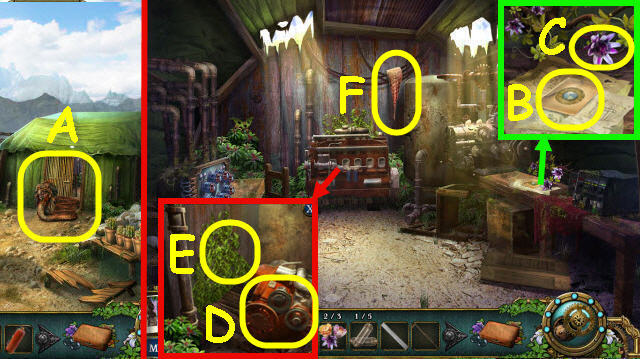
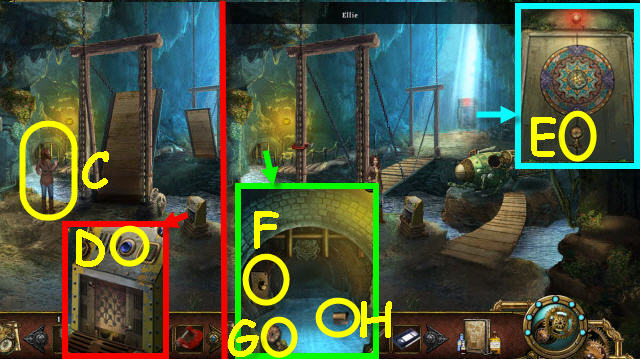
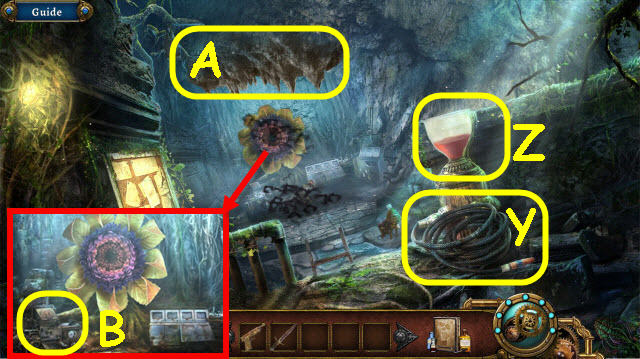
- Take the Journal (A) which will be added to your toolbar.
- Open the pocket; take the SCREWDRIVER (B).
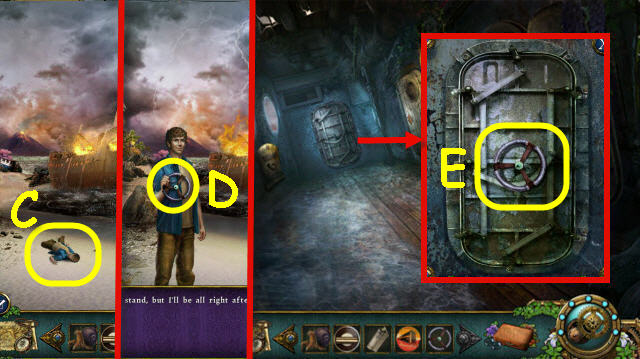
- Speak to Ian (C).
- Go forward.
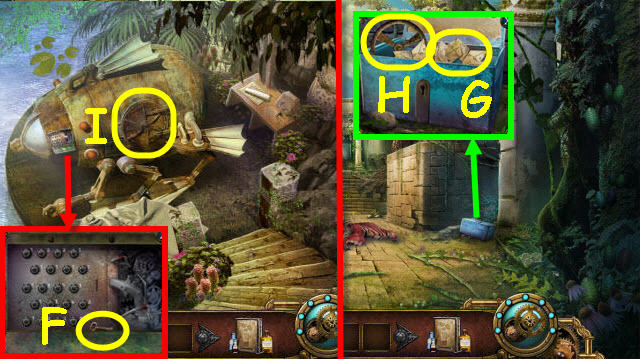
- Use the SCREWDRIVER on the clam; take the KEY (D).
- Back out.
- Take the STONE (E).
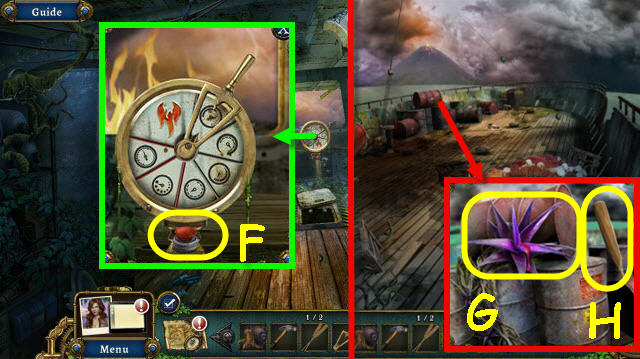
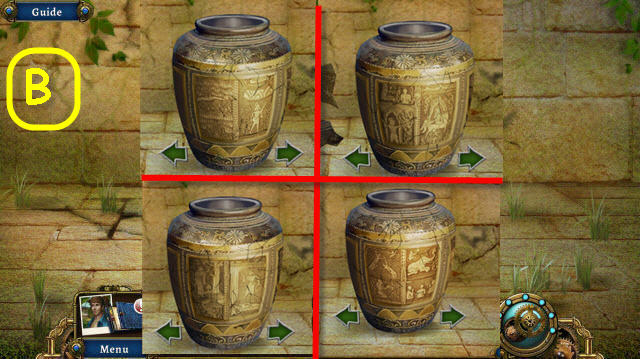
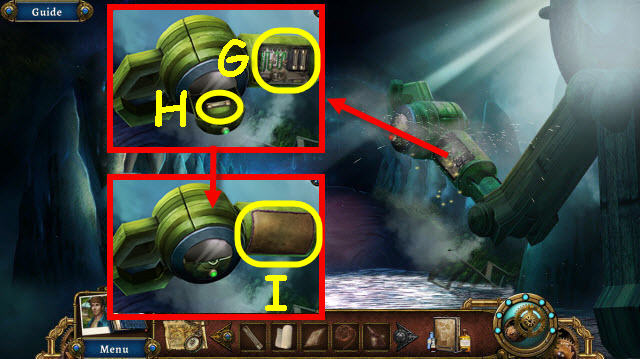
- Use the KEY on the lock to trigger a puzzle (F).
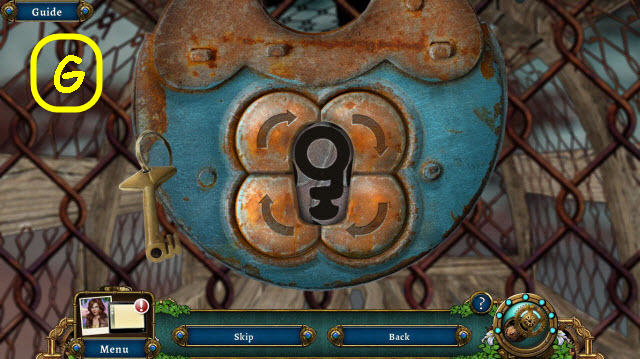
- Select the arrows to complete the keyhole.
- See screenshot for solution (G).
- Take the CLAWCRAB.
- Go forward.
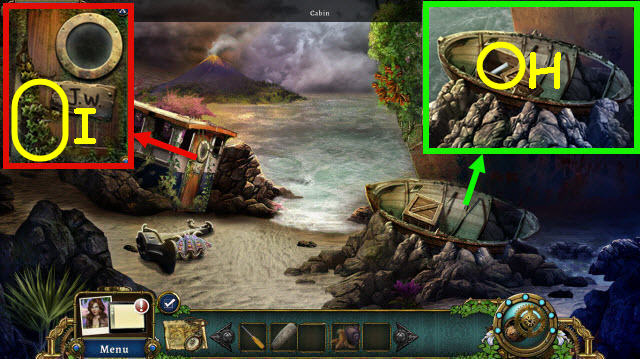
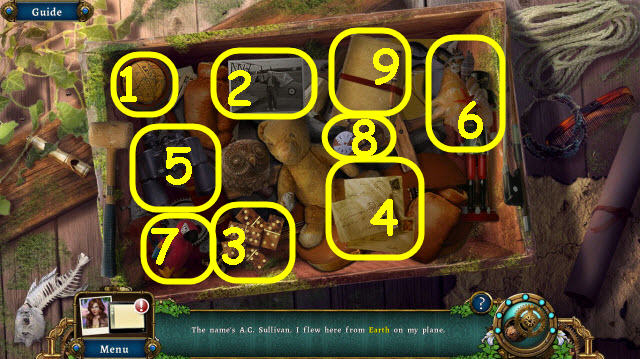
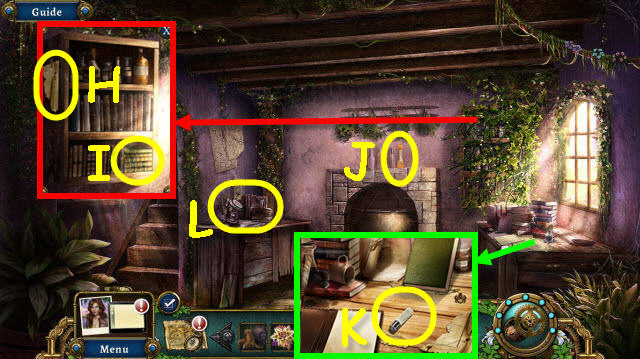
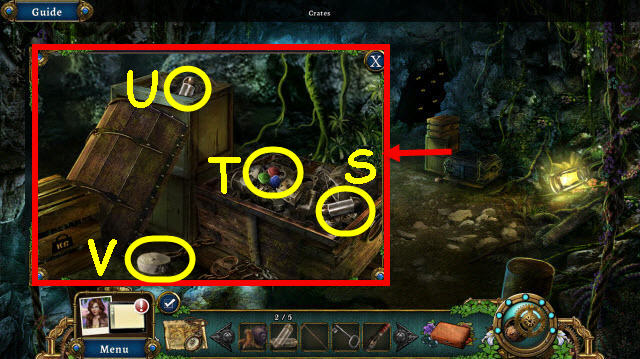
- Open the crate; take the CANDLE (H).
- Use the CLAWCRAB on the vines (I).
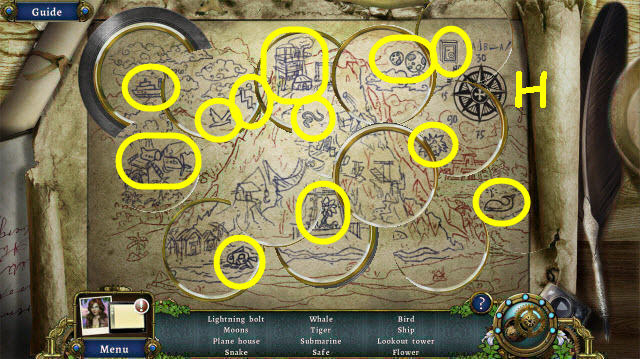
- Turn the door handle to trigger a HOP.
- Play the HOP.
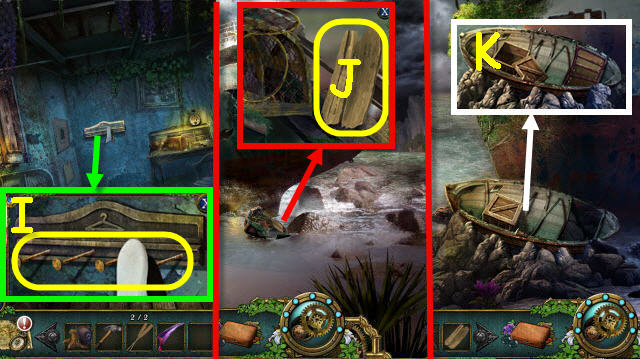
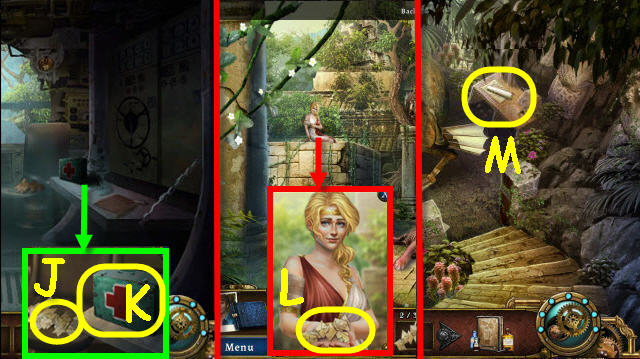
- You receive a WALKING STICK (J).
- You receive a BOTANIST'S KIT which is added to your toolbar.
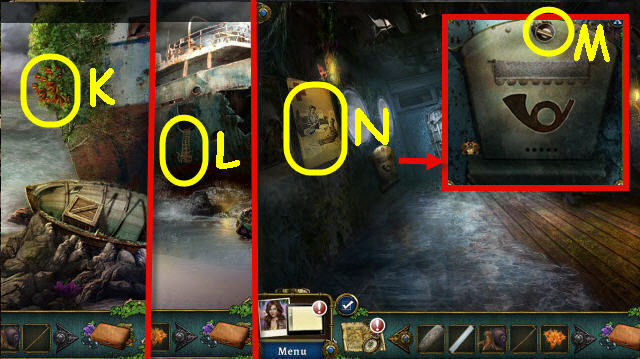
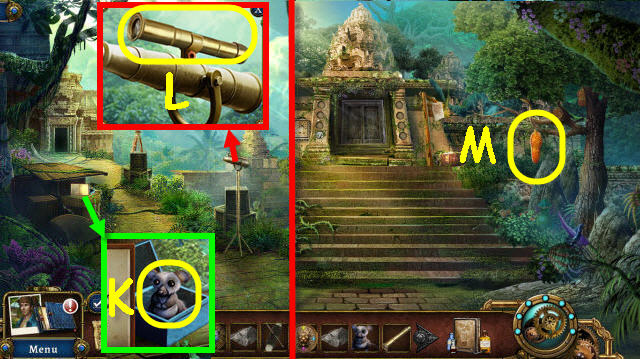
- Use the WALKING STICK to get TRUMPET FLOWERS (K).
- Back out.
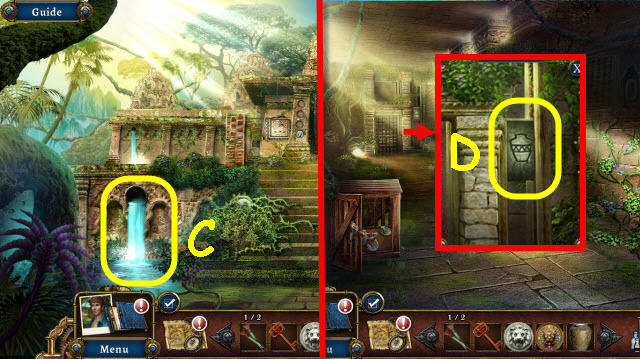
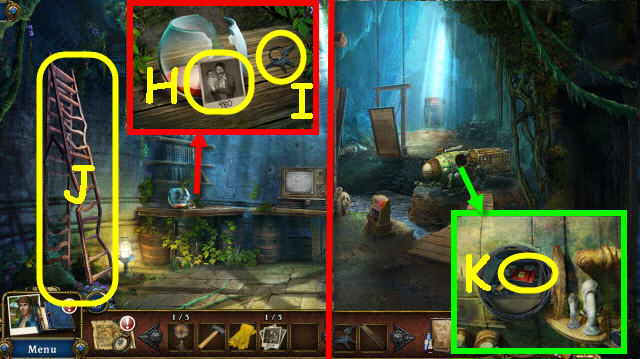
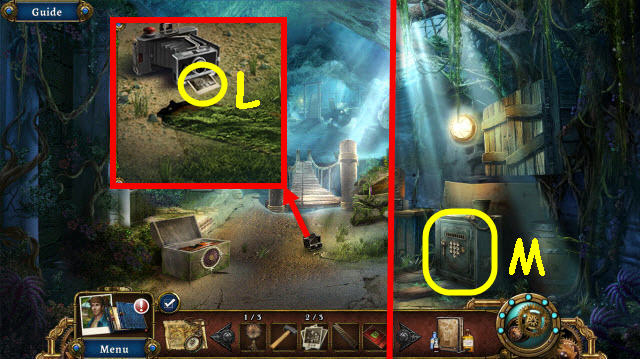
- Use the WALKING STICK on the ladder (L).
- Go up the ladder.
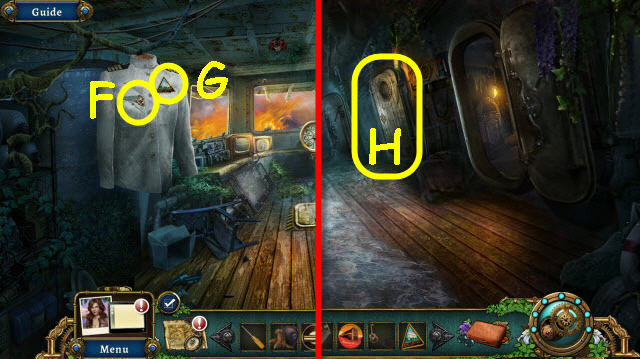
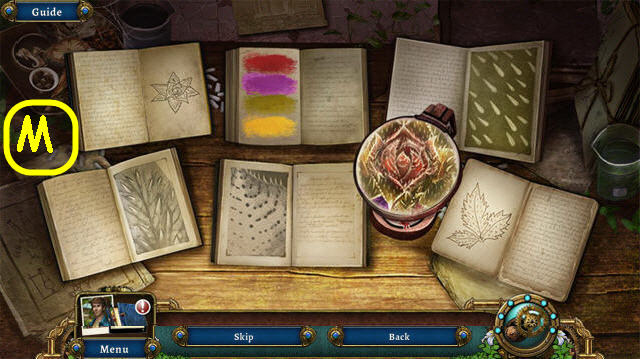
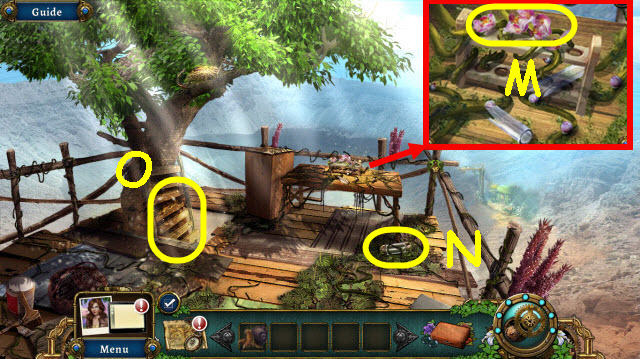
- Take the WOODEN KNOB (M).
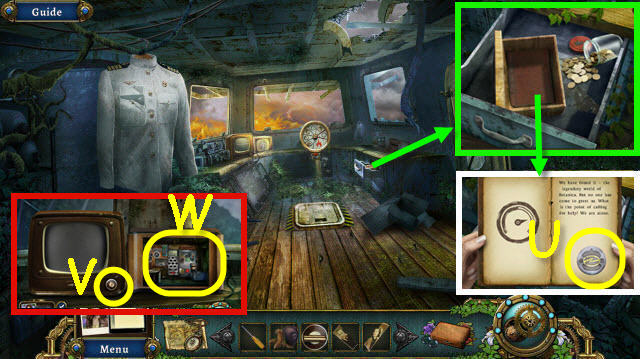
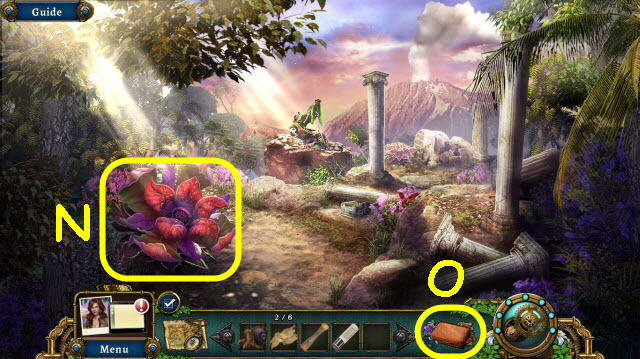
- Select the poster twice to get a recipe (N) added to your Botanist's kit.
- Go right.
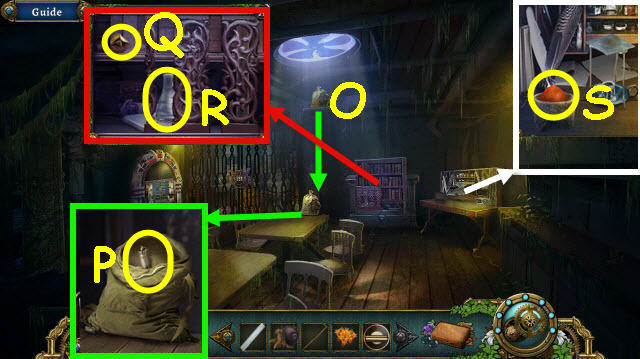
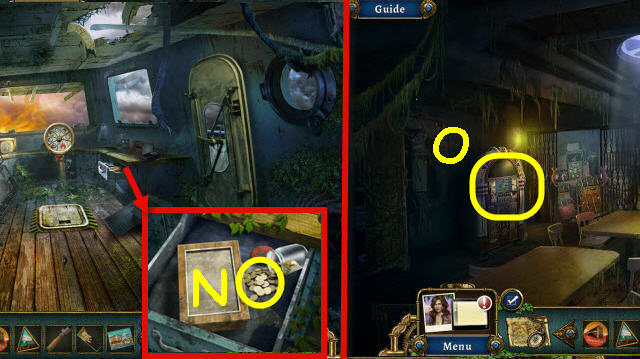
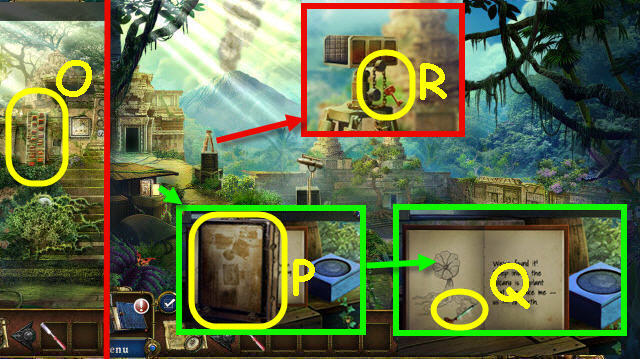
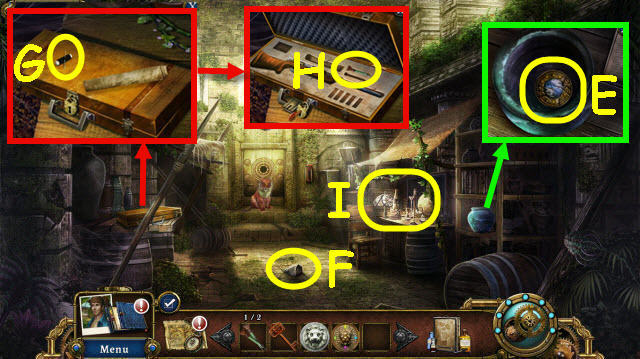
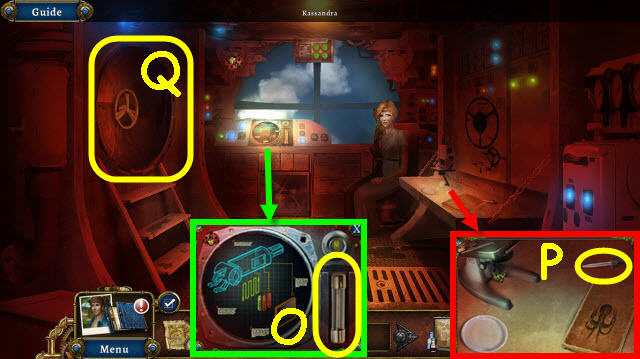
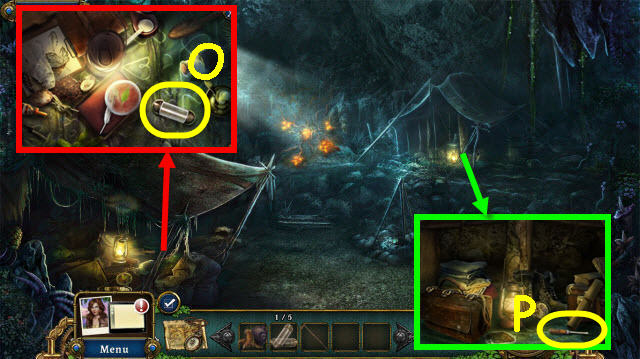
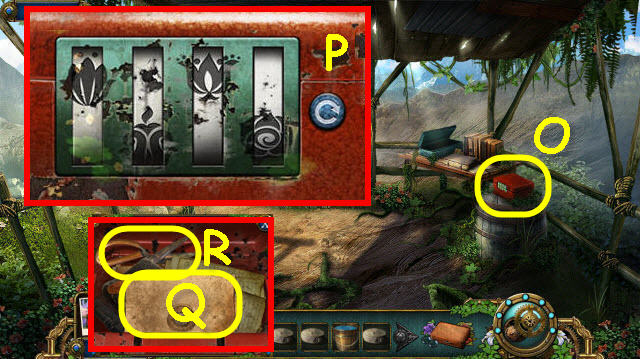
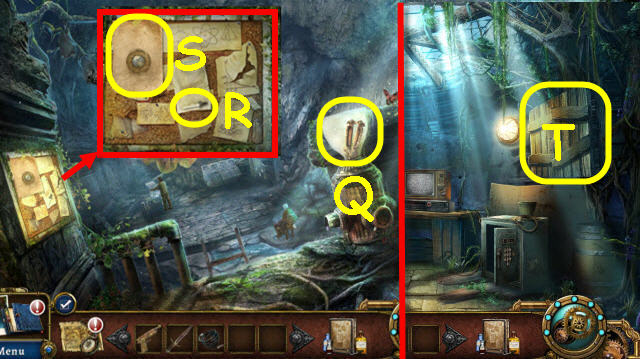
- Use the WALKING STICK on the bag (O).
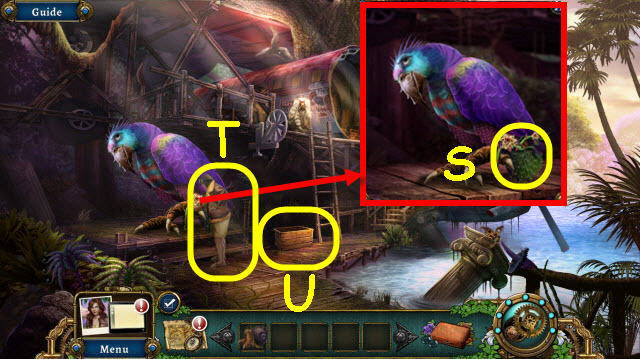
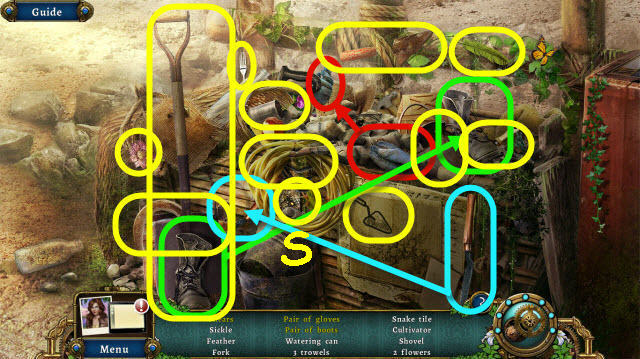
- Use the CLAWCRAB on the bag; take the LIGHTER (P).
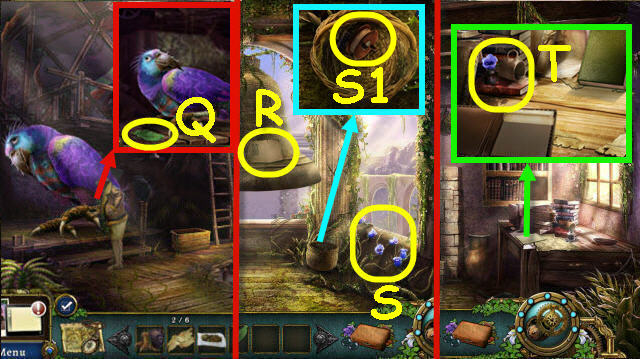
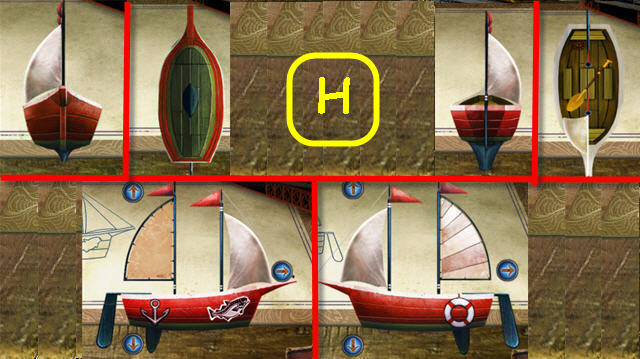
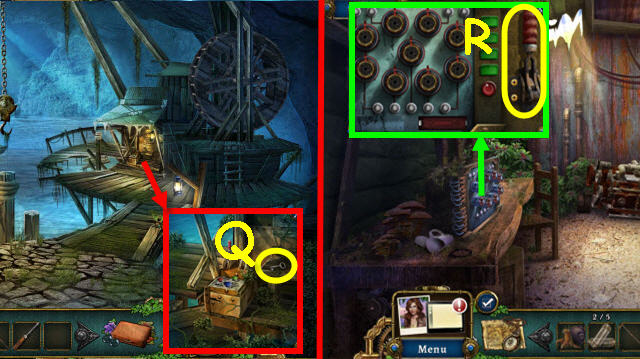
- Move the panels; take the CIRCLE PATCH (Q) and EMPTY FLASK (R).
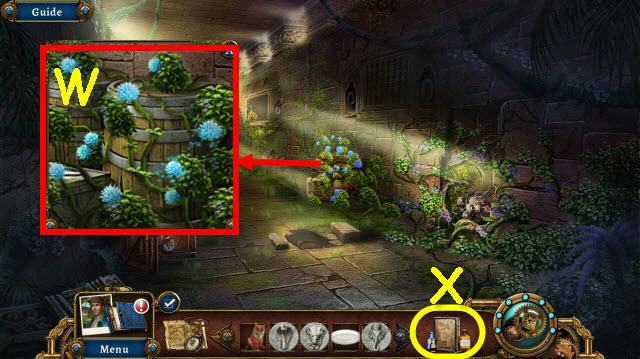
- Use the TRUMPET FLOWERS and the STONE on the mortar; select the mortar. Take the ground trumpet flowers (S) which will be added to your Botanist's kit.
- Go to Back of Ship.
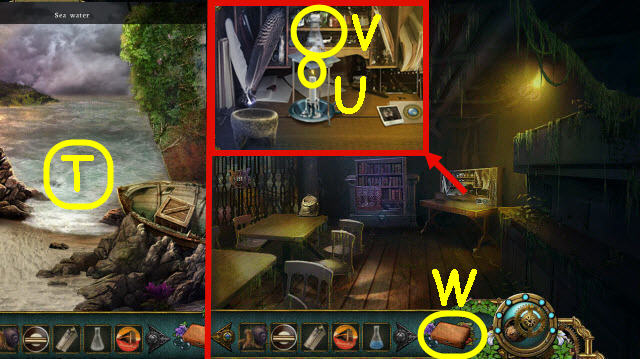
- Use the EMPTY FLASK on the water; receive SALT WATER (T).
- Go to Wardroom.
- Place the CANDLE in the holder; use the LIGHTER on the wick (U).
- Place the SALT WATER on the burner; take the salt (V).
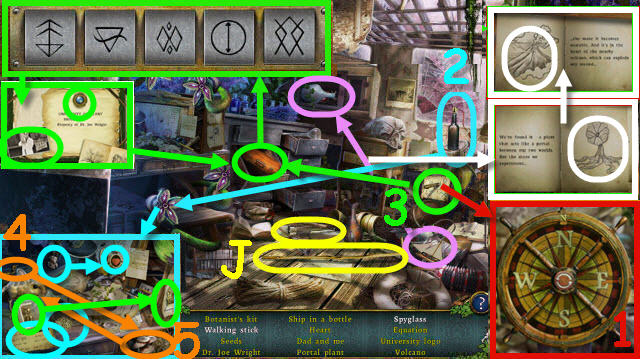
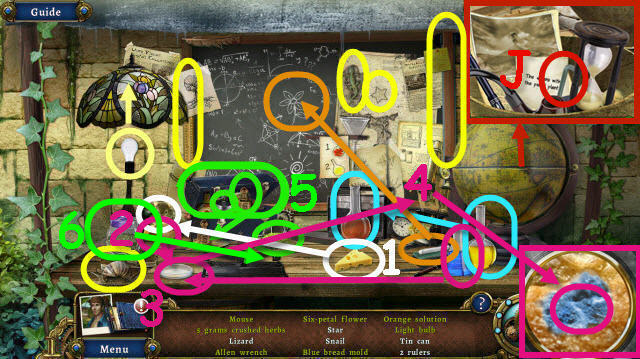
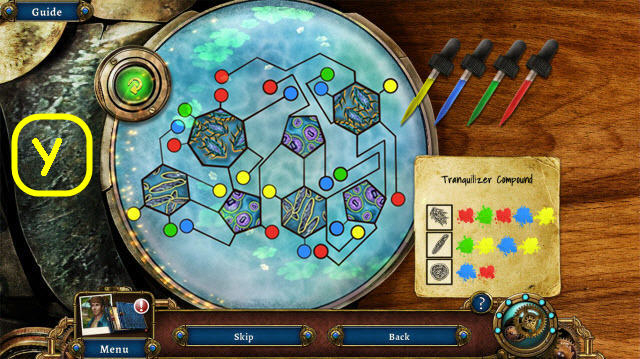
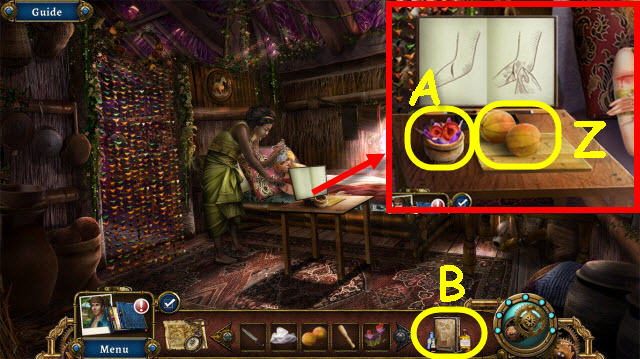
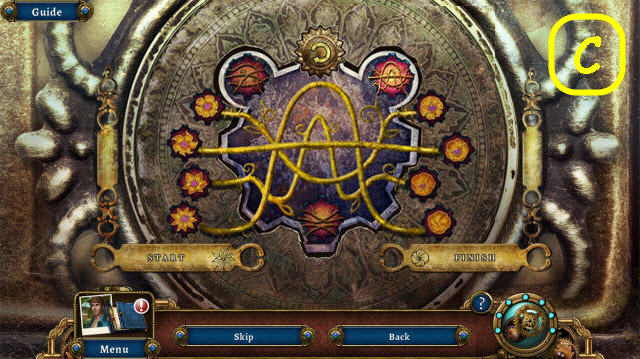
- Examine the Botanist's Kit to trigger a puzzle (W).
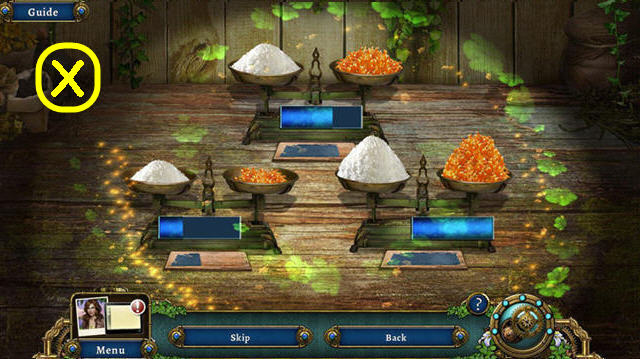
- Place the ingredients per the clues.
- See screenshot for solution (X).
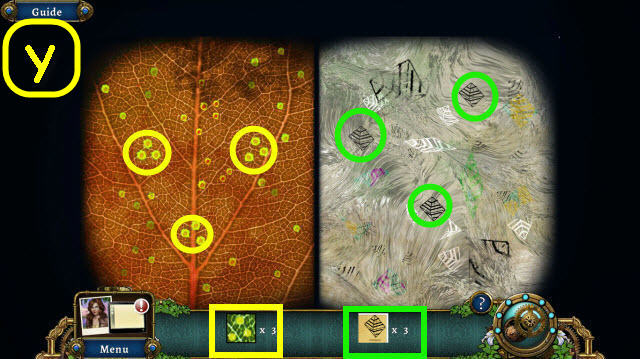
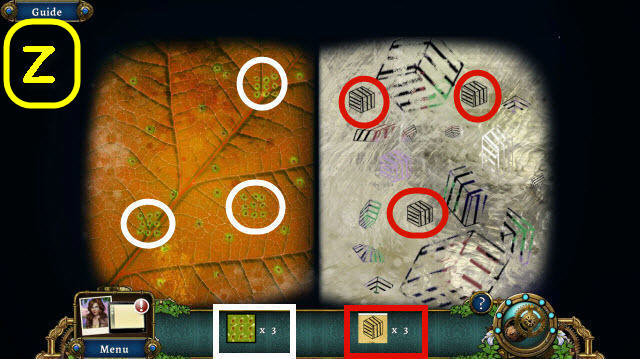
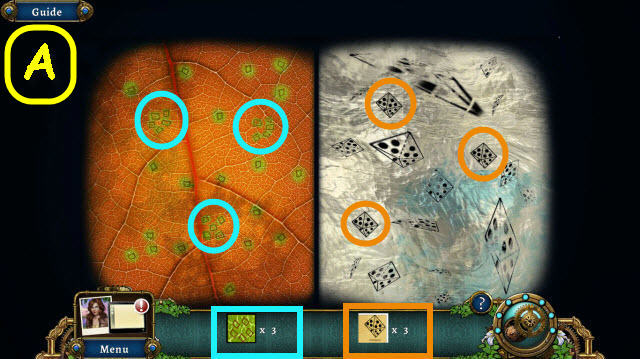
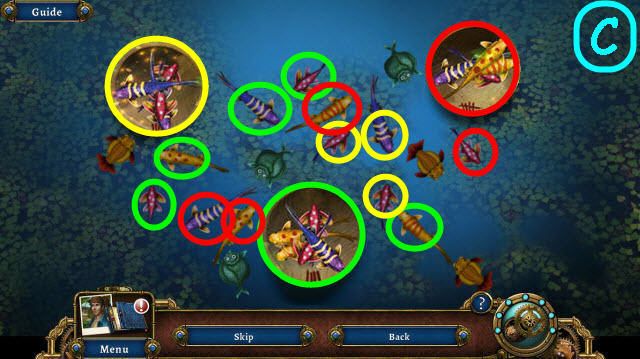
- Find the patterns.
- Part 1 solution (Y).
- Part 2 solution (Z).
- Part 3 solution (A).
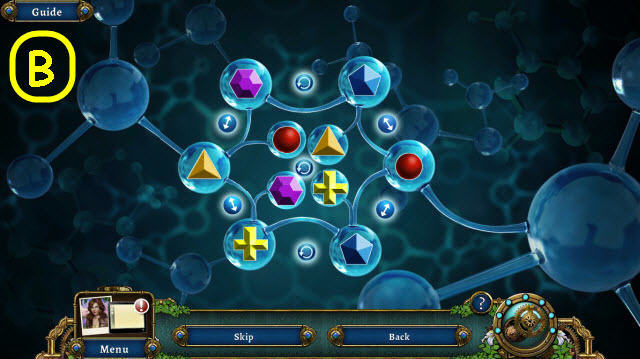
- Place the symbol on their matching platforms.
- See screenshot for solution (B).
- You receive SMELLING SALTS.
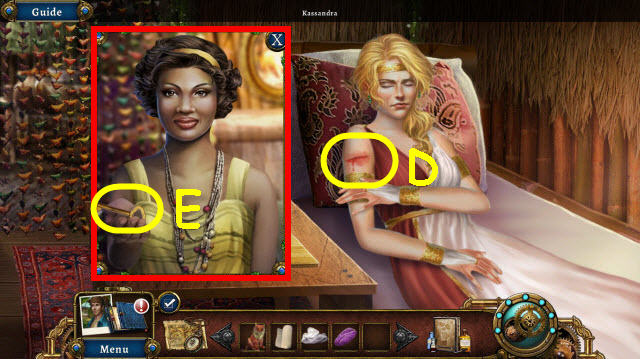
- Back out twice.
- Use the SMELLING SALTS on Ian (C).
- Take the WHEEL (D).
- Enter the ship.
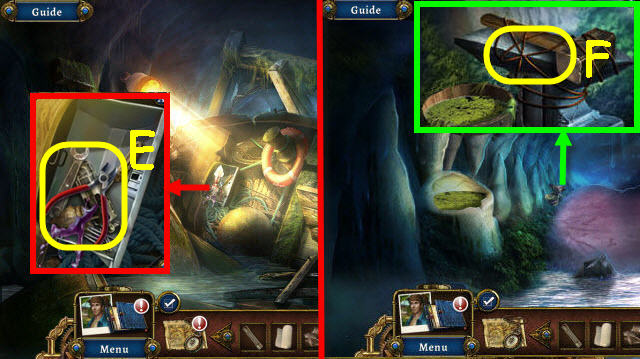
- Place the WHEEL on the door; turn the wheel (E).
- Go forward.
- Open the pocket; take the CABIN KEY (F).
- Take the TRIANGLE PATCH (G).
- Back out.
- Use the CABIN KEY on the lock; enter the Captain's Cabin (H).
- Use the LIGHTER on the lanterns (1-3).
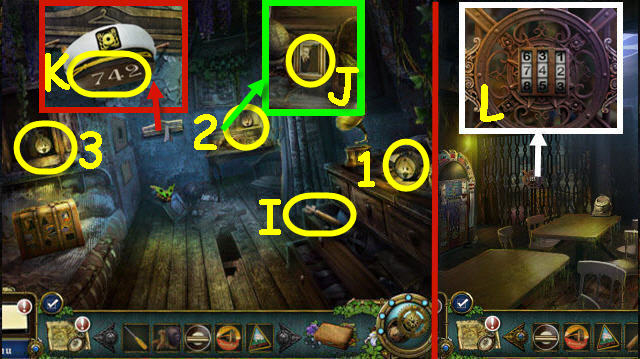
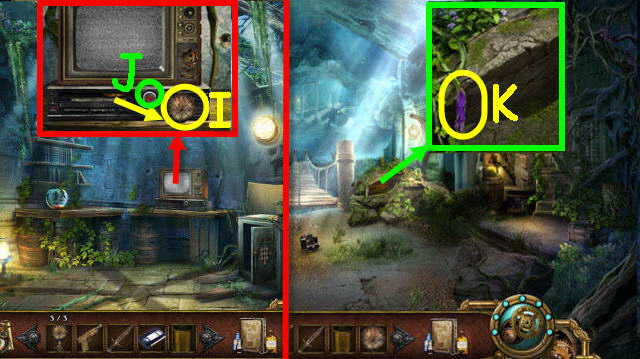
- Take the CAN OPENER (I).
- Examine and take the PHOTOGRAPH (J).
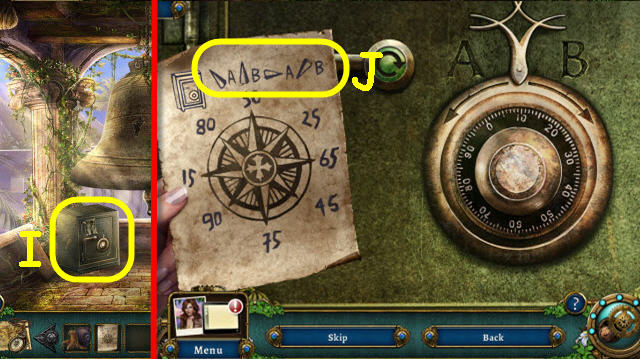
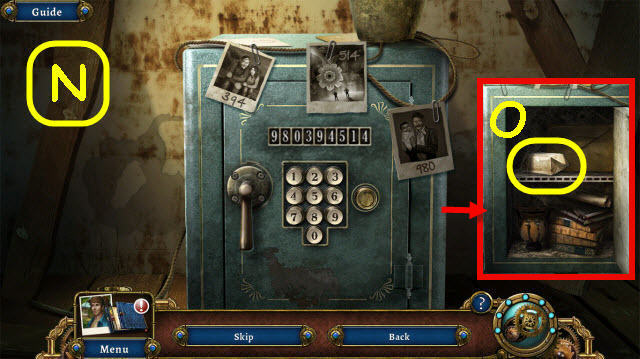
- Lift the cap to get a code (K).
- Go to Wardroom.
- Use the code from the cap on the lock: 742 (L).
- You will trigger a HOP.
- Play the HOP.
- You receive a SQUARE PATCH (M).
- Go to Comm room.
- Use the CAN OPENER on the jar; take a COIN (N).
- Go to Wardroom.
- Use the COIN on the jukebox to trigger a puzzle (O).
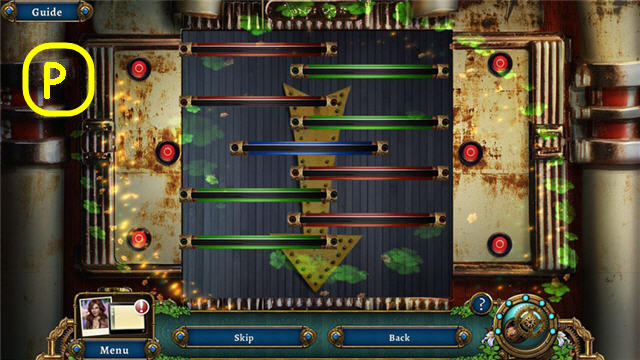
- Move the bars so only the blue is in the center.
- See screenshot for random solution (P).
- You receive a RECORD.
- Go to Captain's cabin.
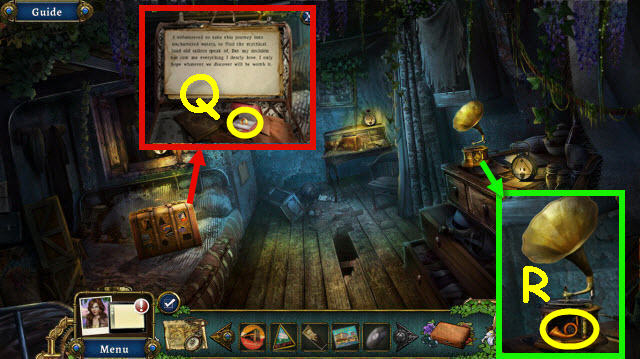
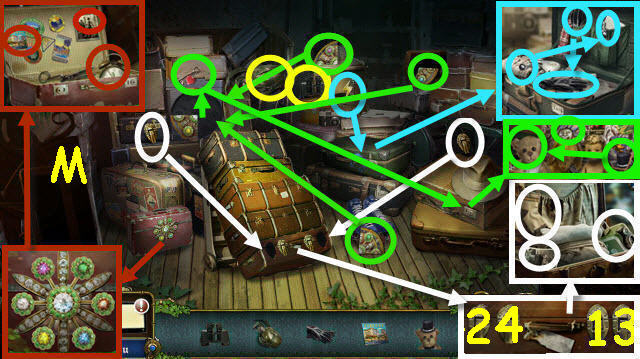
- Place the SQUARE PATCH, TRIANGLE PATCH and CIRCLE PATCH on the suitcase. Open the box; take the WEDDING RING 1/2 (Q).
- Place the RECORD on the phonograph; take the HORN ORNAMENT (R).
- Back out.
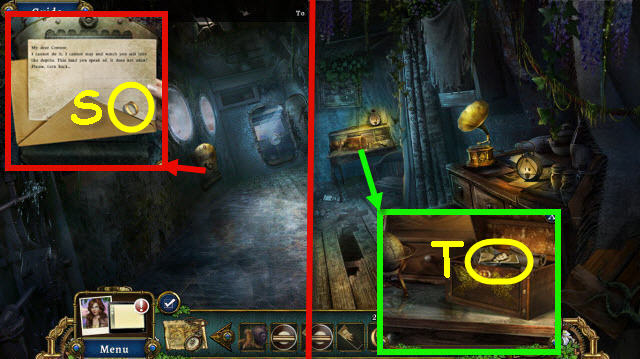
- Place the HORN ORNAMENT on the letter box; open the letter and take the WEDDING RING 2/2 (S).
- Go to Captain's cabin.
- Place the 2 WEDDING RINGS on the chest; take the 2nd PHOTOGRAPH (T).
- Go to Comm room.
- Place the 2 PHOTOGRAPHS on the box; open the book and take the MICROPHONE (U).
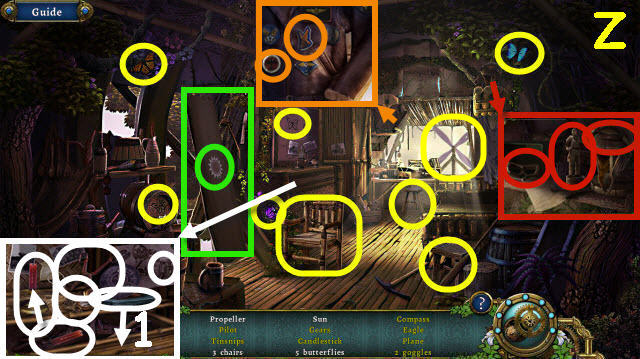
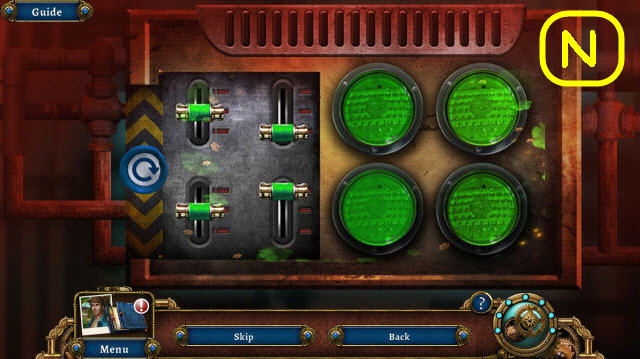
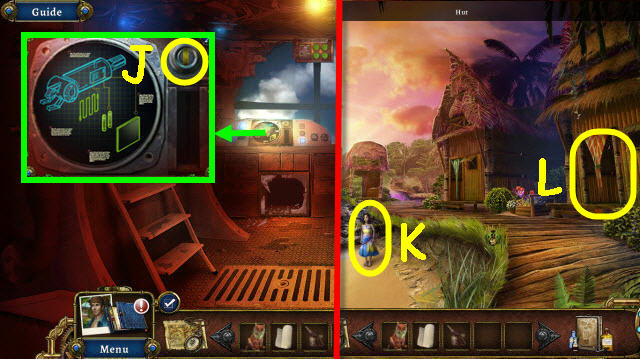
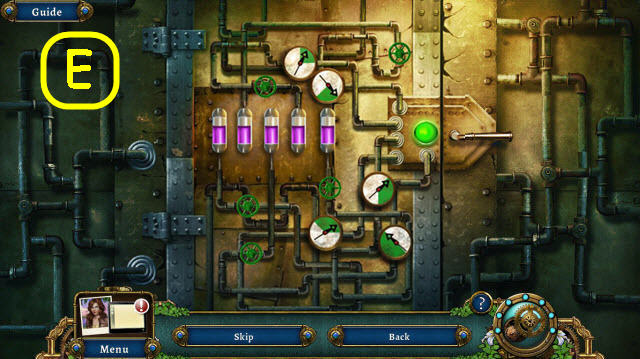
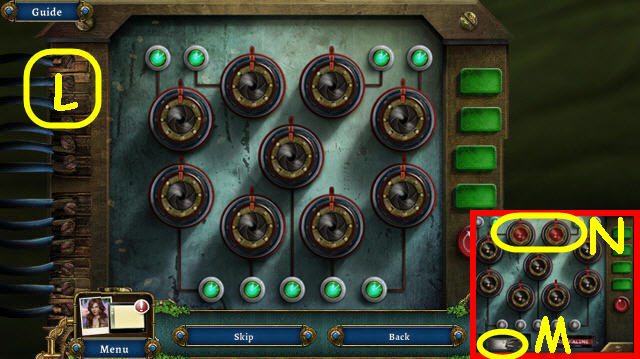
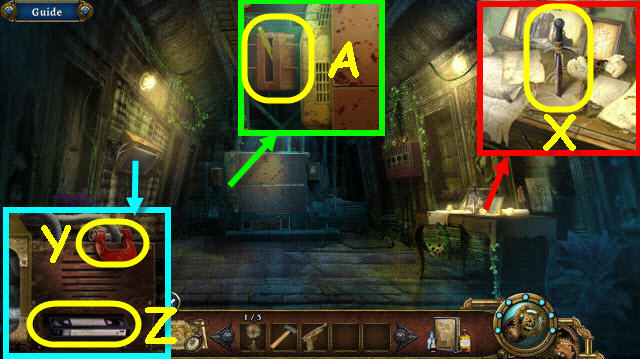
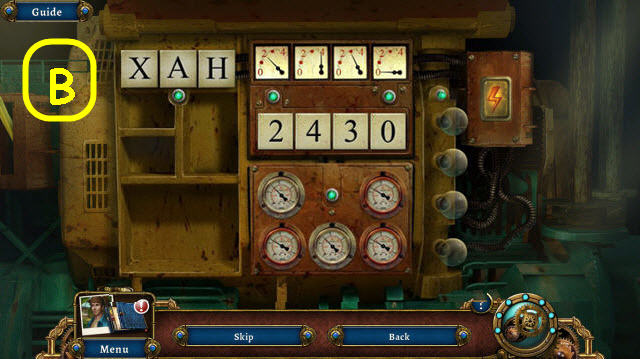
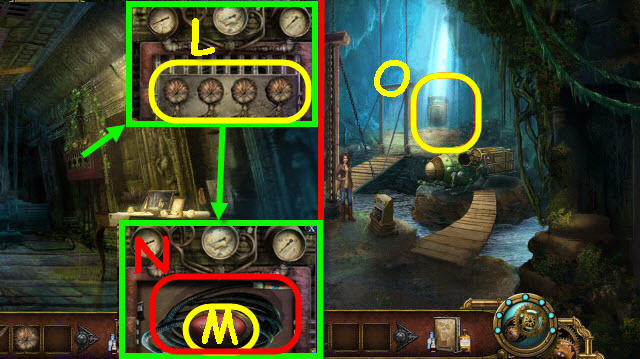
- Place the WOODEN KNOB on the monitor (V) and the MICROPHONE on the radio. Select the radio to trigger a puzzle (W).
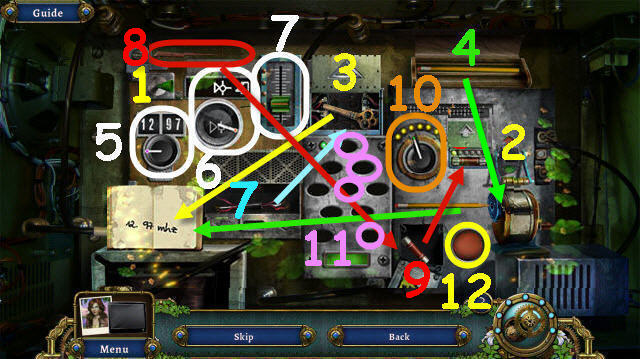
- Set the controls to their proper settings.
- See screenshot for order (1-12).
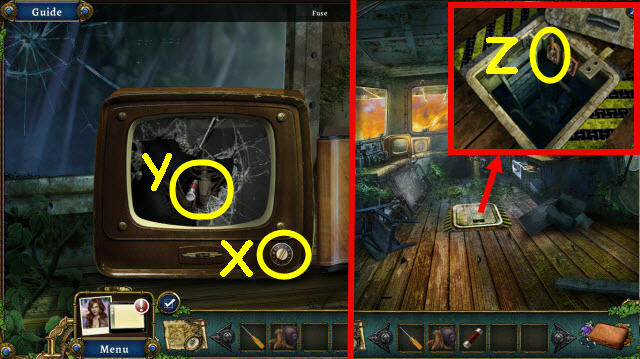
- Select the monitor knob (X) and the screen.
- Take the FUSE (Y).
- Use the SCREWDRIVER on the hatch; place the FUSE in the socket and pull the lever (Z).
- Select the bottom of the hatch to access a HOP.
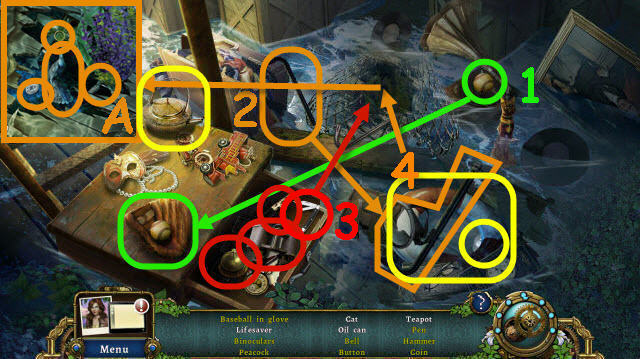
- Play the HOP.
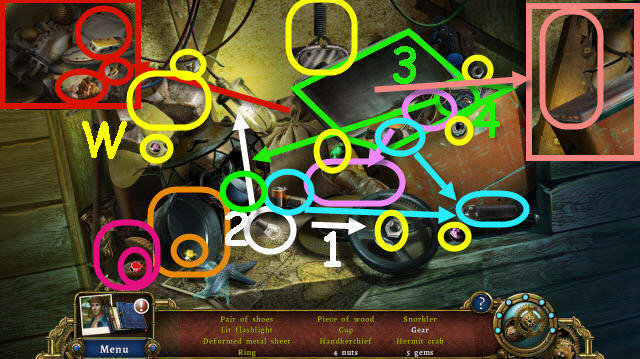
- You receive a HAMMER (A).
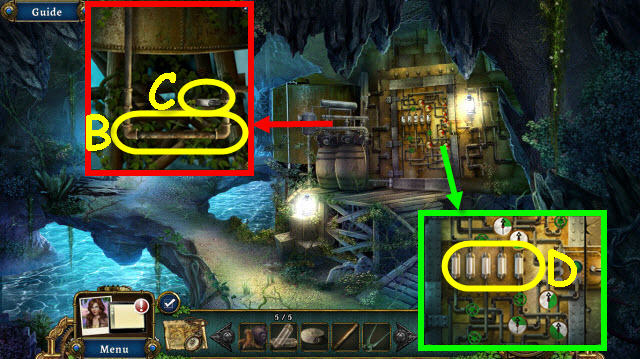
- Use the HAMMER on the glass; turn the wheel (B).
- Go right.
- Select Gustav (C).
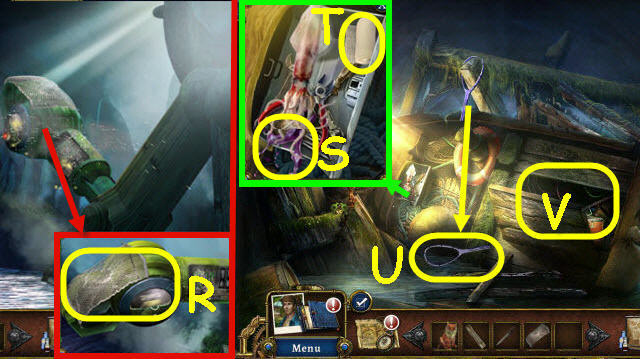
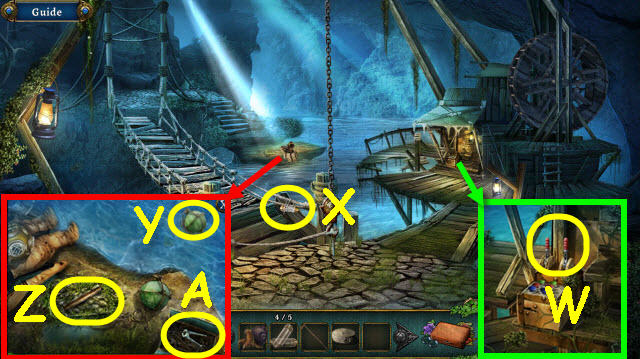
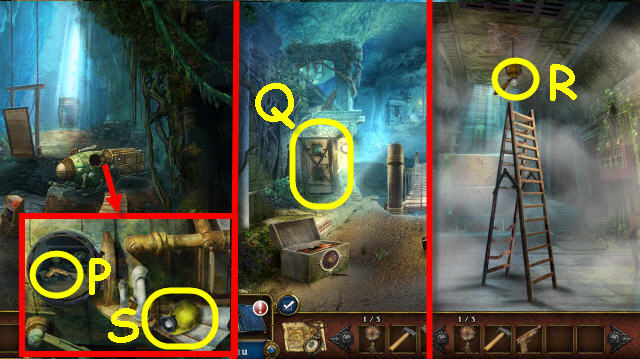
- Look over the edge; take the PADDLE 1/2 (D).
- Use CLAWCRAB on the net 3x; take the LEVER (E).
- Back out.
- Place the LEVER on the mechanism turn to the correct symbol; select the button (F).
- Go right.
- Use CLAWCRAB to get WATERPROOF RESIN (G).
- Take PADDLE 2/2 (H).
- Go to Captain's cabin.
- Use the HAMMER to get the NAILS (I).
- Back out twice.
- Use the HAMMER on the boat; take the WOODEN PLANKS (J).
- Go forward.
- Use the WOODEN PLANKS, NAIL, HAMMER, WATERPROOF RESIN and 2 PADDLES on the boat (K).
Chapter 2: Temple
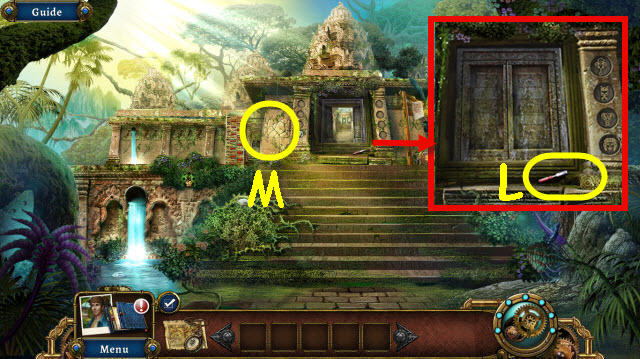
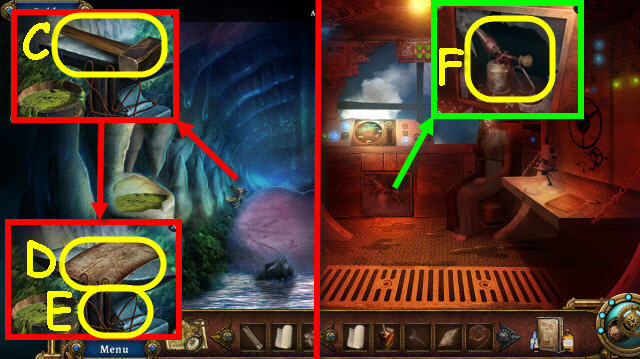
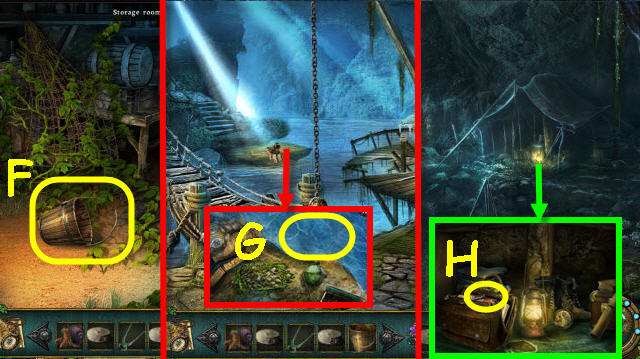
- Select the door twice; take the CHISEL (L).
- Use CHISEL on cracks 4x to trigger a puzzle (M).
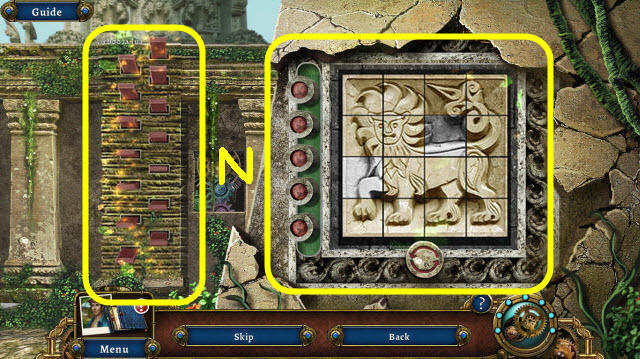
- Use the buttons and arrows to pull out all the bricks and complete the image.
- See screenshot for solution (N).
- Go up to the ledge (O).
- Take the Chemist's KIT which will be added to your toolbar (P).
- Turn the pages; take the EMPTY DARTS 1/2 (Q).
- Take the KEY (R).
- Go forward.

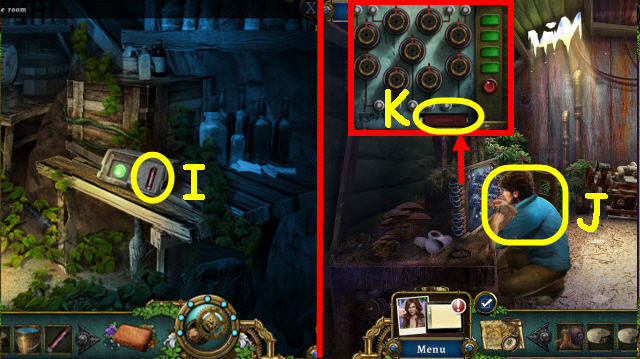
- Take the JAR SHARDS 1/3 (S).
- Take the JAR SHARDS 2/3 (T).
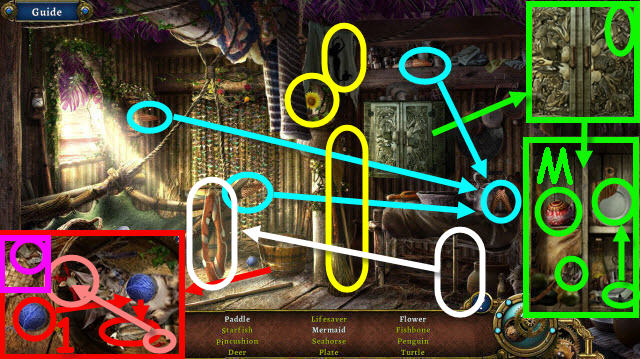
- Examine the vines to trigger a puzzle (U).
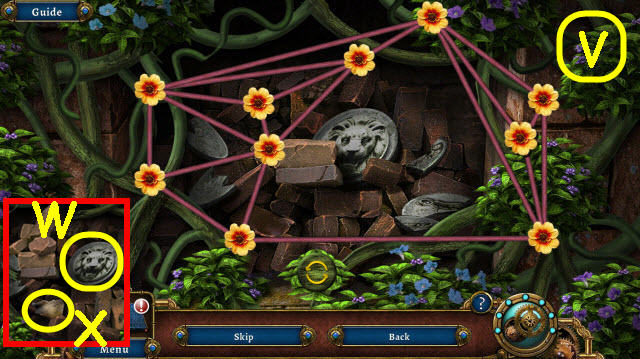
- Untangle the ropes.
- See screenshot for solution (V).
- Move the bricks; take the TOKEN (W) and JAR SHARDS 3/3 (X).
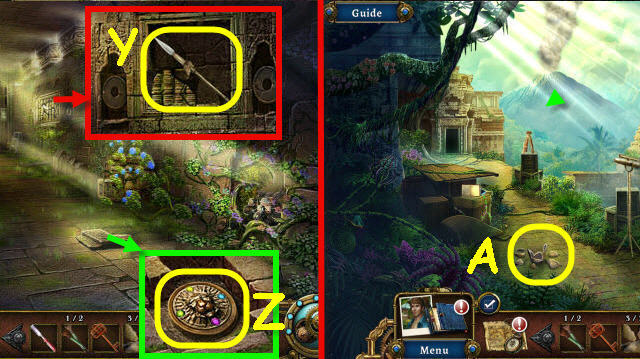
- Use the CHISEL on the wall 4x; take the SPEAR (Y).
- Use the SPEAR on the stones; take the CENTERPIECE (Z).
- Back out.
- Place the 3 JAR SHARDS on the jar to trigger a puzzle (A).
- Assemble the jug.
- See screenshot for solution (B).
- You receive an EMPTY JUG.
- Back out.
- Use the EMPTY JUG on the waterfall; receive a FILLED JUG (C).
- Go to Temple hall.
- Place the FILLED JUG on the pulley (D).
- Go forward.
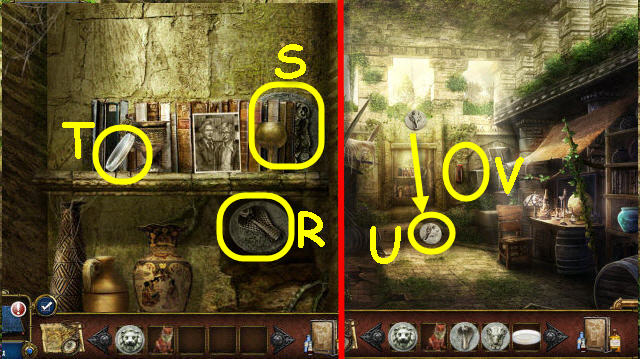
- Take the UNIVERSITY LOGO (E).
- Take the ROCK (F).
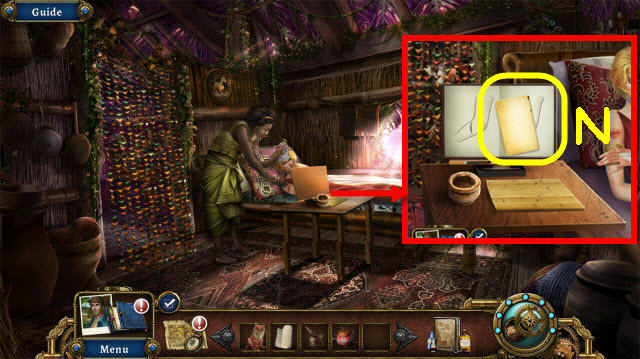
- Take the recipe and NEEDLE AND THREAD (G).
- Use the KEY on the lock; take the EMPTY DART 2/2 (H) which will go into your Chemist's kit.
- Examine the desk to access a HOP (I).
- Play the HOP.
- You receive an ALLEN WRENCH (J).
- Back out twice.
- Place the UNIVERSITY LOGO on the box; use the NEEDLE AND THREAD on the toy. Take the PLUSH TOY (K).
- Use the ALLEN WRENCH on the screw; receive a SCOPE (L).
- Back out.
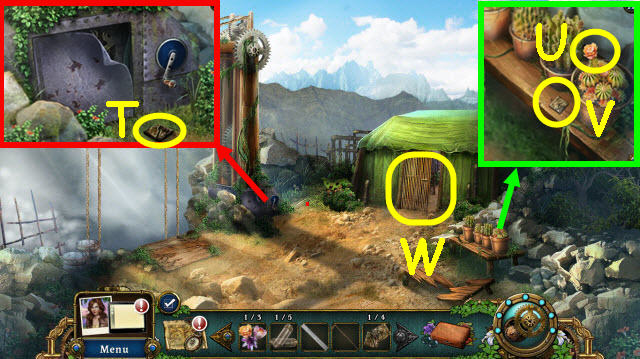
- Use the ROCK to get the THORNFRUIT (M).
- Go to Abandoned camp.
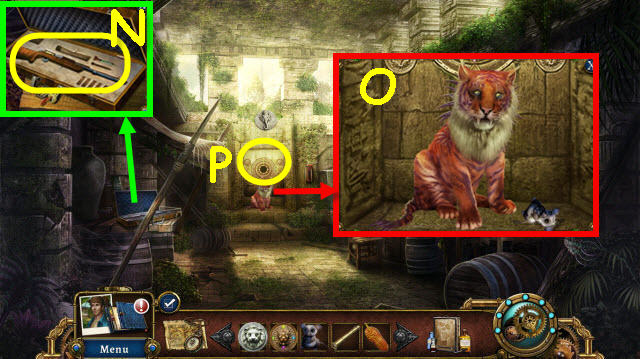
- Place the SCOPE on the rifle (N); get a rifle in the Chemist's kit.
- Give the PLUSH TOY and THORNFRUIT to the tiger; get a SPIKE TIGER (O).
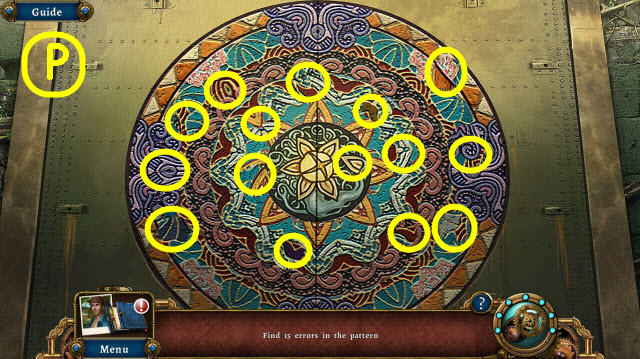
- Place the CENTERPIECE on the door to trigger a puzzle (P).
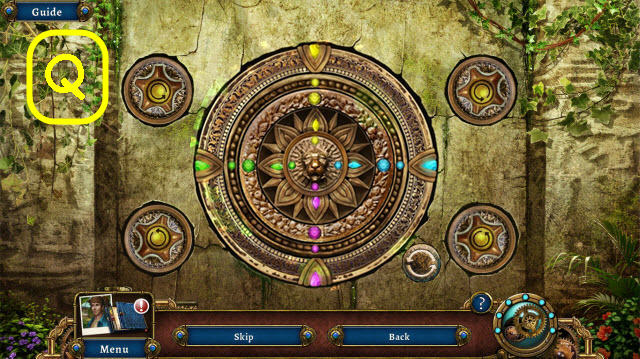
- Rotate the rings to complete the image.
- See screenshot for solution (Q).
- Use the SPIKED TIGER on the vines; take the 2nd TOKEN (R), 3rd TOKEN (S), PETRI DISH (T) and photo.
- Use the SPIKED TIGER on the token; take the 4th TOKEN (U).
- Pull the lever (V).
- Back out.
- Use the PETRI DISH on the flowers (W). It will be added to your Chemist's kit.
- Open the Chemist's kit to trigger a puzzle (X).
- Create the right combination of colors.
- See screenshot for solution (Y).
- You receive a TRANQUILIZER RIFLE.
- Back out.
- Place the TRANQUILIZER RIFLE on the tripod (Z).
- Back out.
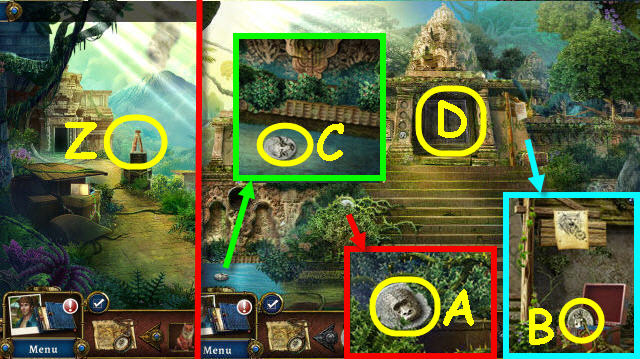
- Use the SPIKED TIGER on the vines; take the 5th TOKEN (A).
- Use the SPIKED TIGER on the vines; take the 6th TOKEN (B) and the poster.
- Take the 7th TOKEN (C).
- Examine the doorway (D).
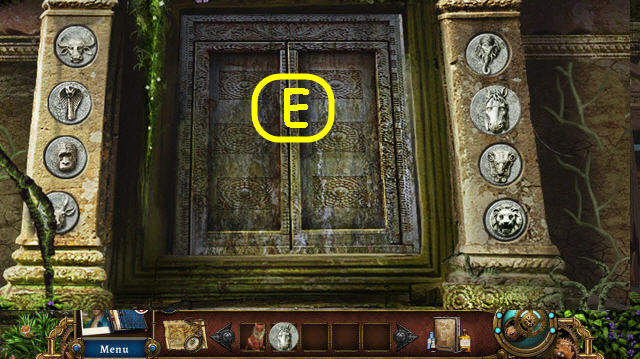
- Place the 7 TOKENS in their matching slots.
- See screenshot for solution (E).
- Go forward; go forward again after cutscene.
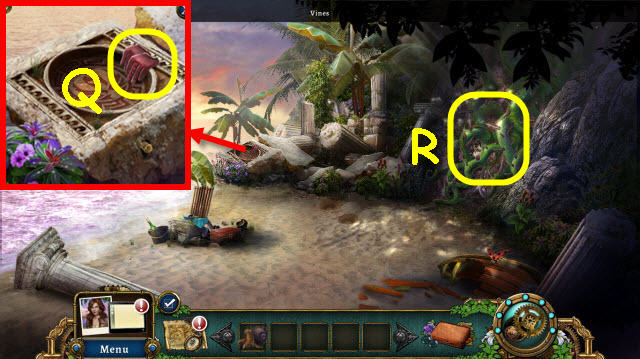
- Remove the cover; zoom in and take the METAL KEY (F).
- Back out.
- Use the METAL KEY on the box; take the SCHEMATIC PIECES 1/3 (G) and VALVE (H).
- Go forward.
- Place the VALVE on the door; turn it (I).
- Enter the submarine.
- Take the SCHEMATIC PIECES 2/3 (J) and FIRST AID KIT (K).
- Go to Temple courtyard.
- Use FIRST AID KIT on Kassandra; take the SCHEMATIC PIECES 3/3 (L).
- Go forward.
- Take the note; place the 3 SCHEMATIC PIECES on the schematic to trigger a puzzle (M).
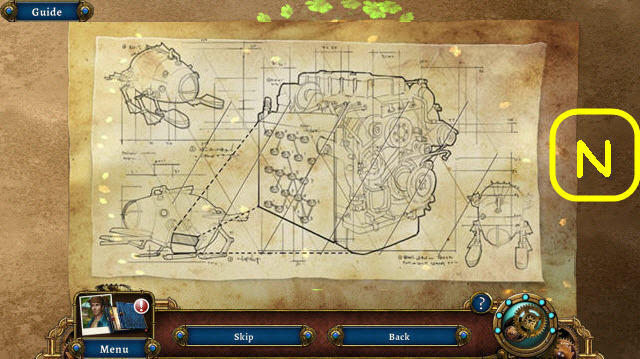
- Complete the schematic.
- See screenshot for solution (N).
- You receive a SUBMARINE SCHEMATIC.

- Place the SUBMARINE SCHEMATIC on the panel to trigger a puzzle (O).
- Connect the nodes with the correct number of wires.
- See screenshot for solution (P).
Chapter 3: Old Capital
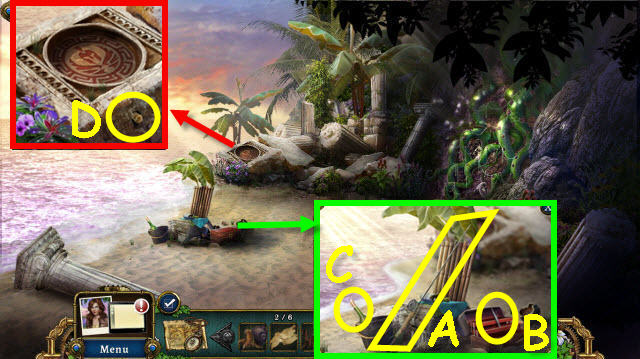
- Take the GLOVES (Q).
- Use CLAWCRAB and GLOVES on the vines (R).
- Go forward and left over the bridge.
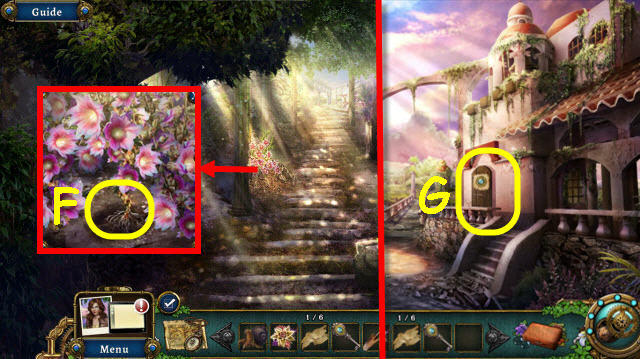
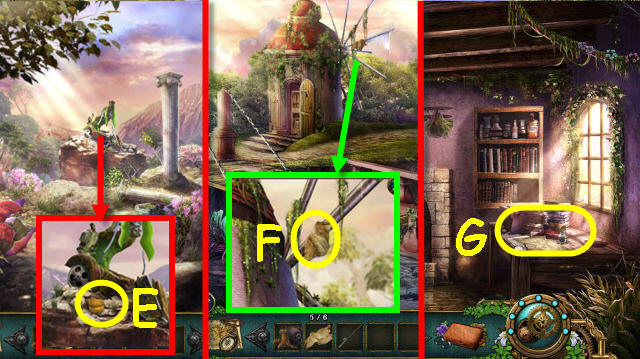
- Take the FLOWERTHORN SAMPLE (S).
- Speak to Sullivan (T).
- Examine the crate to access a HOP (U).
- Play the HOP.
- You receive SULLIVAN'S JOURNAL (9).
- Give SULLIVAN'S JOURNAL to Sullivan.
- Back out; go forward.
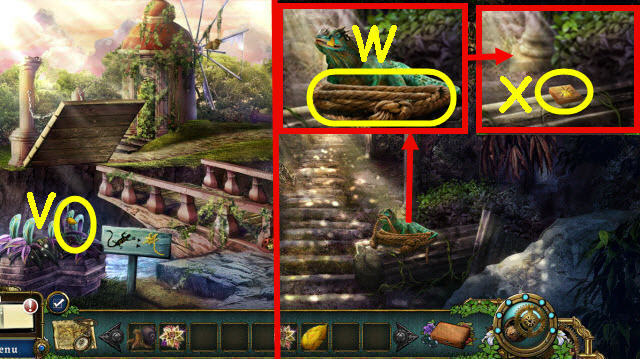
- Use CRABCLAW on the flower; get PETALS (V).
- Go to Mediterranean vista.
- Give the PETALS to the lizard; take the ROPE (W) and WOODEN TILE (X).
- Go to Plane house 1F.
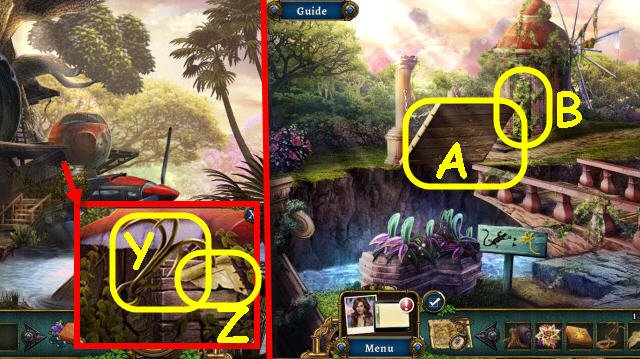
- Place the ROPE on the hook; receive a HOOK (Y).
- Take the MAP PIECES 1/6 (Z).
- Go to Forest drawbridge.
- Use the HOOK on the drawbridge (A).
- Use CLAWCRAB and the WOODEN TILE on the door to trigger a puzzle (B).
- Turn over all the tiles.
- See screenshot for solution (1-6).
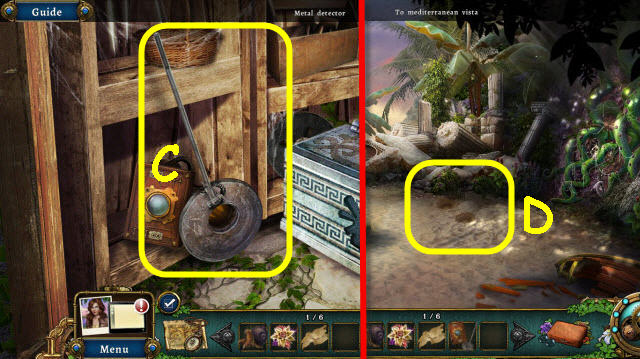
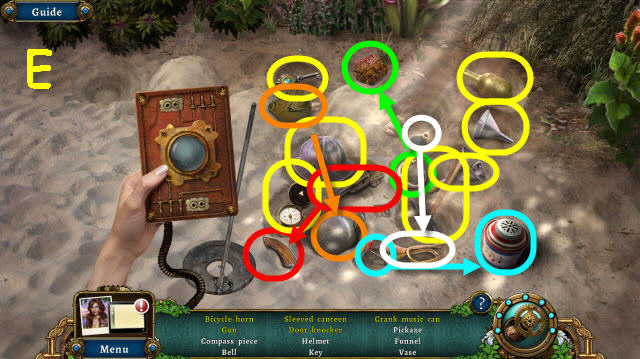
- Take the METAL DETECTOR (C).
- Go to Mountain shore.
- Use the METAL DETECTOR on the sand to trigger a HOP (D).
- Play the HOP.
- You receive a KEY and TROWEL (E).
- Go up the vines.
- Use the TROWEL on the dirt; use CLAWCRAB to get a marshmallow root (F) added to your Botanist's kit.
- Go forward.
- Use the KEY on the lock; enter Joe's outpost (G).
- Use CLAWCRAB on the vines; take MAP PIECES 2/6 (H) and BOTANY BOOKS (I).
- Take the PEPPER SHAKER (J).
- Take the VIAL (K).
- Place the FLOWERTHORN SAMPLE and the BOTANY BOOKS on the table to trigger a puzzle (L).
- Find the correct pages to match the flower.
- See screenshot for solution (M).
- Take the recipe which will be added to your Botanist's kit.
- Go to Forest drawbridge. Go up the right to Forest edge.
- Use PEPPER SHAKER and VIAL on the flower (N); nectar is added to your Botanist kit.
- Select the Botanist kit to access a puzzle (O).

- Adjust the vial levels per the clue.
- See screenshot for solution (P).
- You receive FLOWERTHORN MEDICINE.
- Go to Plane house 1F.
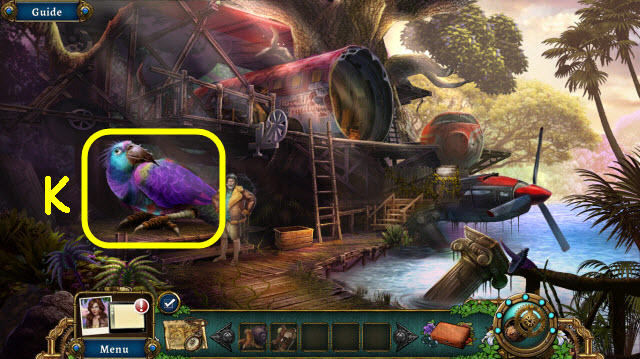
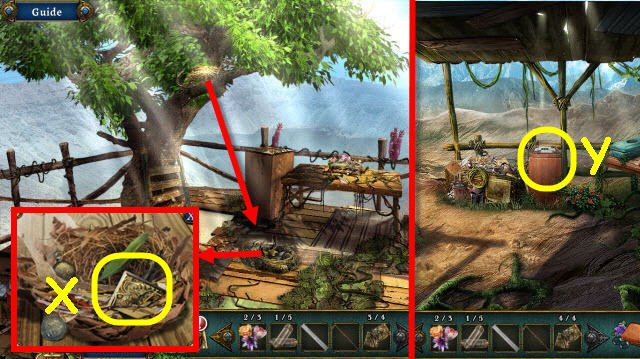
- Use the FLOWERTHORN MEDICINE on the bird; take the FEATHER (Q).
- Go to Joe's outpost and up the stairs to the Bell tower.
- Read the note (R).
- Use CLAWCRAB on the flower; receive BELLFLOWER INK (S).
- Take the FISHING REEL (S1).
- Back out.
- Place the BELLFLOWER INK on the inkwell; dip the FEATHER in it (T).
- Receive a LETTER FOR IAN.
- Go to Bell tower.
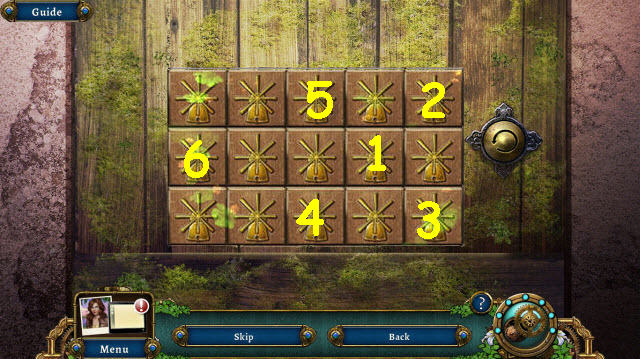
- Place the LETTER FOR IAN in the carrier (U).
- Take the WINDMILL EMBLEM (V).
- Go to Forest drawbridge.
- Place the WINDMILL EMBLEM on the chest; take the BELL CLAPPER (W).
- Return to Bell tower.
- Hang the BELL CLAPPER on the bell; ring it (X).
- Go to Plane house 1F.
- Examine the top of the ladder to trigger a HOP (Y).
- Play the HOP.
- You receive TINSNIPS (Z).
- Go to Mountain shore.
- Place the FISHING REEL on the rod; take the FISHING POLE (A).
- Use the TINSNIPS on the tackle box; take the TWEEZERS (B).
- Take the MAP PIECES 3/6 (C).
- Use the TWEEZERS to get MAP PIECES 4/6 (D).
- Go to Forest edge.
- Use the FISHING POLE to get the pouch; open and take the MAP PIECES 5/6 (E).
- Back out.
- Use the FISHING POLE to get the MAP PIECES 6/6 (F).
- Go to Joe's outpost.
- Place the 6 MAP PIECES on the desk to trigger a HOP (G).
- Play the HOP.
- You receive a SAFE CODE (H).
- Go upstairs.
- Place the SAFE CODE on the safe to trigger a puzzle (I).
- Turn the dial per the safe code.
- Solution: Left 80, right 30, left 65, right 90 (J).
- Take the SADDLE and read the journal.
- Go to Plane house 1F.
- Place the SADDLE on the bird (K).
Chapter 4: The Whale
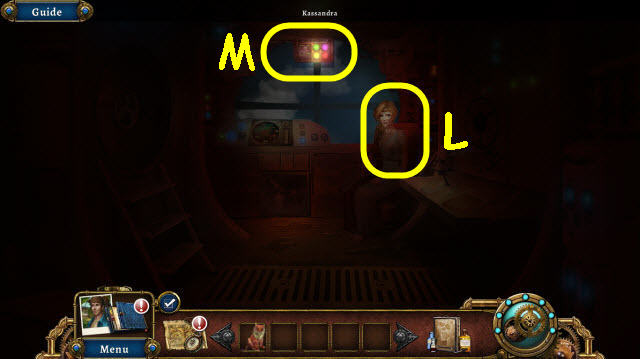
- Speak to Kassandra (L).
- Examine the panel to trigger a puzzle (M).
- Turn all the lights green.
- See screenshot for solution (N).
- Take the FUSE (O).
- Take the DROPPER (P).
- Open the portal; go left (Q).
- Take the ROPE NET (R).
- Go forward.
- Select the quid; then use the DROPPER on the squid to acquire INK SAMPLE (S).
- Take the BANDAGES (T).
- Use the SPIKED TIGER on the net frame; place the ROPE NET on it to receive a FISHING NET (U).
- Select the compartment to access a HOP (V).
- Play the HOP.
- You receive a DEFORMED METAL SHEET (W).
- Back out twice.
- Place the INK SAMPLE in the dish; read the recipe and take the FISH FLAKES (X).
- Go left.
- Use the FISH FLAKES and FISHING NET on the tooth to get PATTERNED FISH 1/2 (Y).
- Take the GAS CAN (Z).
- Use the FISH FLAKES and FISHING NET on the barrel to get PATTERNED FISH 2/2 (A).
- Select the Chemist's Kit to access a puzzle (B).
- Place the fish with the equal number strips or dots in their matching numbered bowls.
- See screenshot for solution (C).
- You receive PATTERNED FISH CHUNKS.
- Go forward.
- Give the PATTERNED FISH CHUNKS to the squid; take the WIRE CUTTER (E).
- Back out.
- Select the wires to trigger a puzzle (F).

- Pass through each wire one time.
- See screenshot for order (1-14).
- Take the MALLET (C).
- Place the DEFORMED METAL SHEET on the anvil and use the MALLET on it 3x; take the METAL SHEET (D).
- Use the WIRE CUTTERS on the wire; receive COPPER WIRE (E).
- Back out.
- Use the MALLET on the glass. Use the GAS CAN on the torch; receive a BLOWTORCH (F).
- Go left.
- Place the COPPER WIRE in the panel (G).
- Open the compartment; take the 2nd FUSE (H) and place the 2 FUSES in the panel (G).
- Place the METAL SHEET on the panel; use the BLOWTORCH on it (I).
- Back out.
- Flip the switch (J).
- Speak to the girl (K).
- Examine the hut to trigger a HOP (L).
- Play the HOP.
- You receive a PINCUSHION (M).
- Go forward into Lois's hut.
- Select the beaded alcove to access a HOP.

- Play the HOP.
- You receive a MEDICINE JOURNAL (7).
- Place the MEDICINE JOURNAL on the stand; take the recipe (N) which is added to your Chemist's kit.
- Exit the hut and go forward to the Diving outpost.
- Use the SPIKED TIGER to get the HUNTING KNIFE (O).
- Take the WASHCLOTH (P).
- Use the HUNTING KNIFE on the plant; receive DRY STICKS (Q).
- Back out.
- Use the WASHCLOTH on the washboard; get a CLEAN CLOTH (R).
- Place the DRY STICKS in the pit; use the BLOWTORCH on it (S).
- Take the HONEYNUTS (T) and PESTLE (U).
- Use the HUNTING KNIFE on the flowers; receive SAFFRON DANDELIONS (V).
- Take the note (W).
- Use the PINCUSHION on the hole; receive a WATERSKIN (X).
- Use the WATERSKIN on the water to get salt water in your Chemist's Kit (Y).
- Enter Lois's hut.
- Place the HONEYNUTS on the table; use the HUNTING KNIFE on them (Z).
- Place the SAFFRON DANDELIONS in the mortar; use the PESTLE on them (A).
- Both ingredients will be added to your Chemists Kit; select it to trigger a puzzle (B).

- Turn all circles orange.
- See screenshot for solution (C).
- You receive HEALING GEL.
- Use the CLEAN CLOTH, HEALING GEL and BANDAGES on the wound (D).
- Take the KEY (E).
- Go to Diving outpost.
- Use the KEY on the lock; take the INSTRUCTIONS (F).
- Go to Lois's hut.
- Place the INSTRUCTIONS on the sailboat to trigger a puzzle (G).
- Complete the sailboat.
- See screenshot for solution (H).
- You receive a TOY SAILBOAT.
- Back out.

- Give the TOY SAILBOAT to the girl; take the FACE PLATE (I).
- Go to Diving post.
- Place the FACE PLATE on the suit; receive a DIVING SUIT (J).
- Use the DIVING SUIT on the water (K).
- Check your map (L).
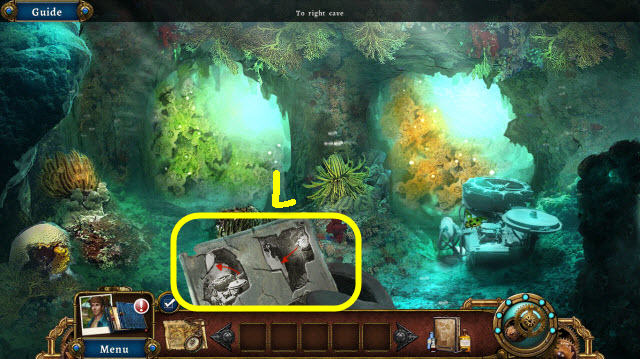
- Go through the right cave, left cave and then right cave.
Chapter 5: Volcano Outpost
- Use CLAWCRAB to get the EDIBLE FLOWERS 1/3 (M).
- Take the CYLINDER 1/5 (N).
- Go down the ladder (O).
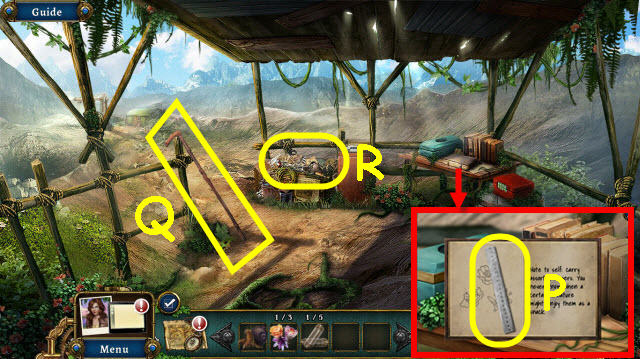
- Open the book; flip the pages and take the METAL RULER (P).
- Take the WALKING STICK (Q).
- Examine the bin to access a HOP (R).
- Play the HOP.
- You receive a SNAKE TILE 1/4 (S).
- Go up the path.
- Take the SNAKE TILE 2/4 (T).
- Use CLAWCRAB to get EDIBLE FLOWERS 2/3 (U).
- Take the SNAKE TILE 3/4 (V).
- Try and enter the hut (W).
- Back out twice.
- Use the WALKING STICK on the nest; take the SNAKE TILE 4/4 (X).
- Go down the ladder.
- Place the 4 SNAKE TILES on the pedestal to trigger a puzzle (Y).
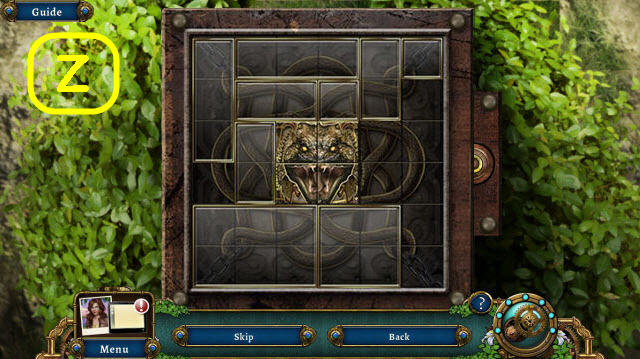
- Move the corner pieces to the center to complete the image.
- See screenshot for solution (Z).
- Take the FIRE EXTINGUISHER.
- Go up the path.
- Use the FIRE EXTINGUISHER on the creature (A).
- Go forward.
- Take the recipe (B) which will be added to your Botanist's kit.
- Use CLAWCRAB to get the EDIBLE FLOWERS 3/3 (C).
- Use the WALKING STICK on the machine (D).
- Use the METAL RULER on the moss 3x (E) to get moss in the Botanist's kit.
- Take the snake skin (F) for your Botanist kit.
- Go to Lookout post 2F.

- Give the 3 EDIBLE FLOWERS to the Horned Lorikeet; use the WALKING STICK to get the tiny citrus bunch (G) in your Botanist's kit.
- Select the Botanist kit to trigger a puzzle (H).
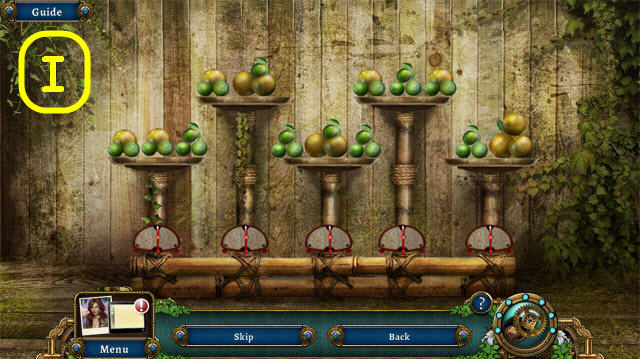
- Swap the fruit to balance the scales.
- See screenshot for solution (I).
- You receive a RUST REMOVER.
- Go to Inside comm center.
- Use the RUST REMOVER on the engine; take the AQUEUX LOGO (J).
- Back out twice.
- Place the AQUEUX LOGO on the toolbox; open the lid and take the WRENCH SET (K).
- Return to Inside comm center.
- Use the WRENCH SET on all three nuts; take the GEARS 1-3/3 (L).
- Back out.
- Remove the cover and place the 3 GEARS on the mechanism; turn the handle (M).
- Go down the lift (N) and then down to Campsite.
- Move the blanket; take the CYLINDER 2/5 (O).
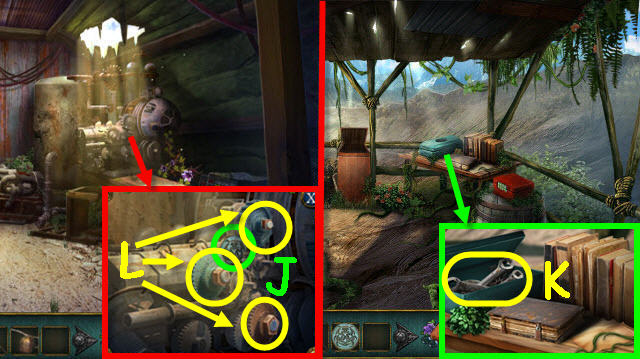
- Take the SCREWDRIVER (P).
- Back out; go forward twice.
- Take the KEY (Q).
- Go to Inside comm center.
- Use the SCREWDRIVER on both screws; take the LEVER (R).
- Go to Cavern.
- Use the KEY on the padlock; open the lid and take the CYLINDER 3/5 (S) and CONTROL PANEL BUTTONS (T).
- Knock off the crate; take the CYLINDER 4/5 (U).
- Take the DIAL (V).
- Go to Cliff.
- Place the CONTROL PANEL BUTTONS and LEVER on the mechanism; pull the right lever (W).
- Take the CYLINDER 5/5 (X).
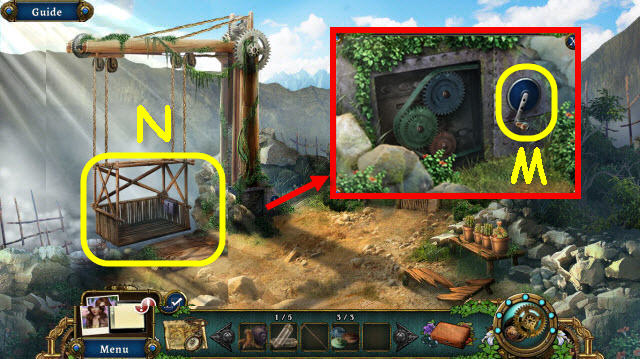
- Use the WALKING STICK on the buoy (Y).
- Use CLAWCRAB on the moss; take the PIPE (Z) and PLIERS (A).
- Back out.
- Place the PIPE on the pipes (B); take the 2nd DIAL (C).
- Select the broken cylinders and place the 5 CYLINDERS on them (D); turn any valve to trigger a puzzle.
- Turn the valves to fill the vials and set the dials to green.
- See screenshot for solution (E).
- Take the BUCKET (F).
- Go to Cliff.
- Use the BUCKET on the water; receive a FILLED BUCKET (G).
- Go to Campsite.
- Use PLIERS on bag and open it; take the DEAD BATTERY (H).
- Go to Supply Cave and zoom into Storage room.
- Place the DEAD BATTERY on the charger; take the CHARGED BATTERY (I).
- Go to Inside comm center.
- Speak to Ian (J).
- Place the CHARGED BATTERY in the slot to trigger a puzzle (K).
- Rotate the dials so they all point up.
- See screenshot for random solution (L).
- Take the 3rd DIAL (M).
- Select the two red cameras (N).
- Go to Lookout post 1F.
- Place the 3 DIALS on the box to trigger a puzzle (O).
- Rotate the dials to complete the images.
- See screenshot for solution (P).
- Take the recipe (Q) which will go to your Botanist's kit and the SHEARS (R).
- Go to Supply cave and examine Storage room.

- Use the CLAWCRAB and SHEARS on the net to get wick (S) added to Botanist's kit.
- Take the BRUSH AND DUSTPAN (T).
- Go to Campsite.
- Use the FILLED BUCKET and CLAWCRAB on the lava fruit to get lava fruit (U) added to Botanist's kit.
- Use the BRUSH AND DUSTPAN on the ashes (V) to get ashes added to Botanist's kit.
- Select the Botanist's kit to access a puzzle (W).

- Place the proper ingredients in the containers.
- See screenshot for solution (X).
- You receive PLANT BOMBS.
- Back out.
- Place the PLANT BOMBS on the rock wall (Y).
- You will trigger a puzzle.
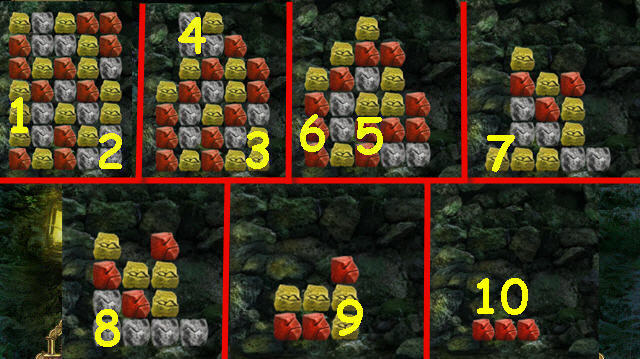
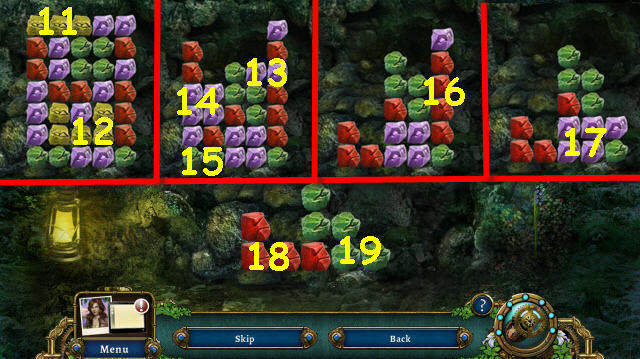
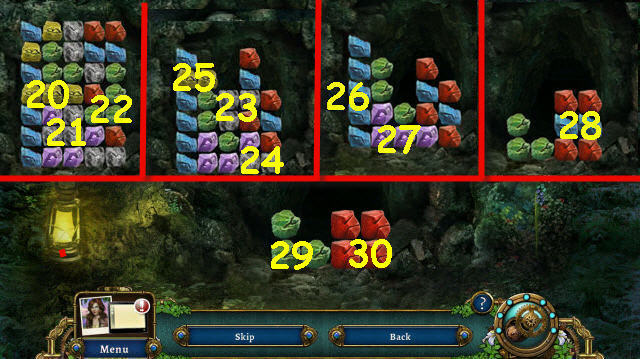
- Clear the rocks by selecting groups of 2 or more.
- See screenshot for first set order (1-10).
- Second set order (11-19).
- Third set order (20-30).
Chapter 6: Portal
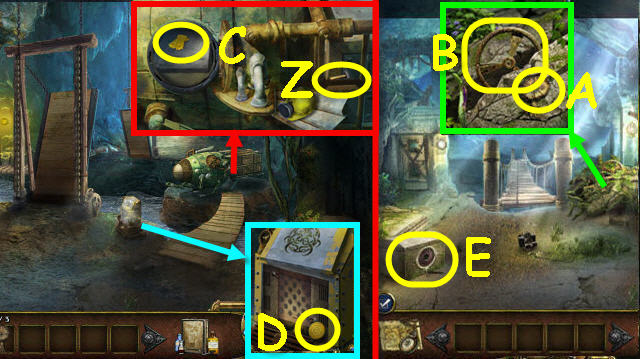
- Go forward.
- Speak to Ellie.
- Take the MALLET (Z).
- Back out to Path to bridge.
- Take the STONE FIGURINE 1/3 (A).
- Use the MALLET on the stone twice; take the WHEEL (B).
- Go forward.
- Place WHEEL on door and turn it; take the YELLOW SAFETY GLOVES (C).
- Use the YELLOW SAFETY GLOVES on the panel; take the STONE MEDALLION (D).
- Back out.
- Place the STONE MEDALLION on the chest to trigger a HOP (E).
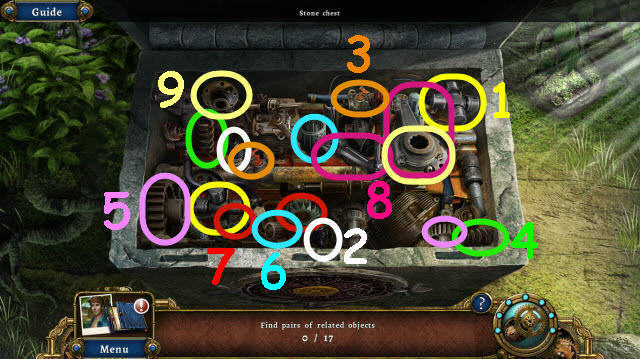
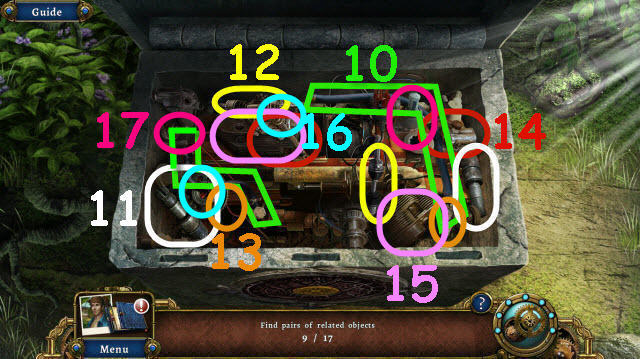
- Find the matching pairs (1-9).
- Additional pairs (10-17).
- You receive WIRE CONNECTORS.
- Go forward.
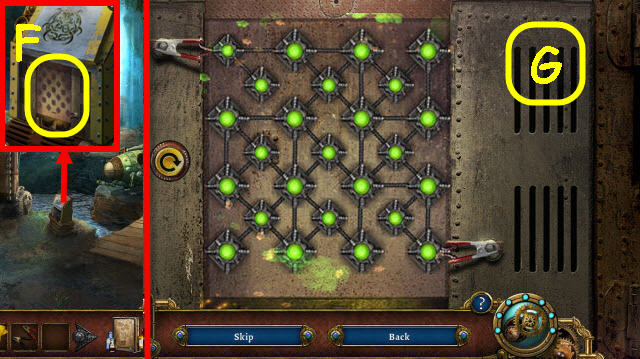
- Place the WIRE CONNECTORS on the panel to trigger a puzzle (F).
- Connect the nodes.
- See screenshot for solution (G).
- Take the PHOTO 1/3 and METAL BAR.
- Go left into Joe's Lab.
- Take the PHOTO 2/3 (H).
- Use the YELLOW SAFETY GLOVES to remove 4 glass shards; take the KEYS (I).
- Use the MALLET on bent ladder rungs 3x; take the LADDER (J).
- Back out.
- Use KEYS on the compartment; take the INSTANT FILM (K).
- Go to Path to bridge.
- Place the INSTANT FILM in the camera and press the button; take the PHOTO 3/3 (L).
- Go to Joe's lab.
- Place the 3 PHOTOS on the safe to trigger a puzzle (M).
- Punch in the correct code on the safe.
- See screenshot for solution (N).
- Unwrap the box; take the BULLETS (O).
- Back out.
- Place the BULLETS in the gun; take the GUN (P).
- Go to Path to bridge.
- Use the GUN on the padlock; enter the generator room (Q).
- Place the LADDER under the fan; take the BULB (R).
- Go to Drawbridge.
- Place the BULB in the hat; take the HARD HAT (S).
- Back out.

- Use the HARD HAT on the nook; use the MALLET on the two rocks. Take the PUMICE (T) and FAN BLADE 1/2 (U).
- Use PUMICE on the moss 3x; take the FAN BLADE 2/2 (V).
- Go to Generator room.
- Place the 2 FAN BLADES on the fan; pull the chain (W).
- Take the DAGGER (X) and read the note.
- Use the DAGGER to get the CLAMP (Y).
- Push the arrow; take the UNWATCHED TAPE (Z).
- Place the METAL BAR in the slot; pull the bar to trigger a puzzle (A).
- Put the items where they belong and set the dials and buttons to turn all the lights green.
- See screenshot for solution (B).
- Go to Drawbridge.
- Give the CLAMP to Ellie (C).
- Press the button (D).
- Take the STONE FIGURINE 2/3 (E).
- Use the MALLET on the rocks twice; use the GUN on lever (F).
- Take the STONE FIGURINE (G) and EMPTY CAN (H).
- Go left.
- Open the tape drive and use the DAGGER on the piece; take the STATUE PIECE (I).
- Place the UNWATCHED TAPE in the drive; push it in and press the arrow (J).
- Back out twice.
- Use the DAGGER and EMPTY CAN on the vine to get an oil sample (K) in your Chemist's kit.
- Go to Generator room.
- Place the 3 STONE FIGURINES and STATUE PIECE in the slots; push one (L).
- Push the button (M); take the HOSE (N).
- Go to drawbridge.
- Examine the portal door to trigger a puzzle (O).
- Find the differences.
- See screenshot for solution (P).
- Go forward.
- Take the HANDLE (Q).
- Take the DROPPER (R) and recipe (S) which is added to your Chemist's kit.
- Go to Joe's lab.
- Use the HANDLE on the cabinet and open it to trigger a puzzle (T).
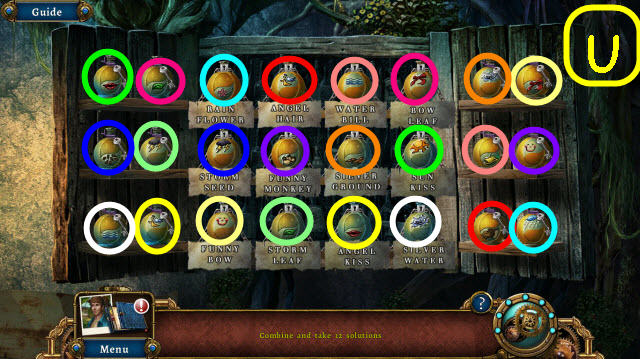
- Combine the correct solutions.
- See screenshot for solution (U).
- Take the 12 solution samples when complete to be added to your Chemist's kit.
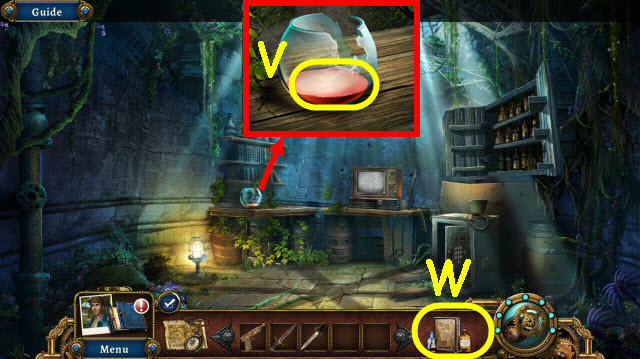
- Use the DROPPER on the bowl to get bat bait drops (V) added to your Chemist's kit.
- Examine the Chemist's kit to trigger a puzzle (W).
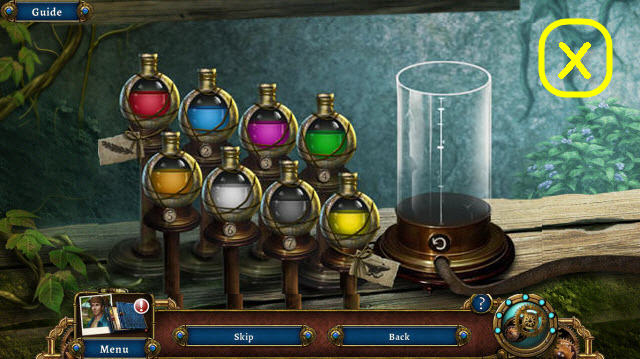
- Drag and drop the bottles according to weight.
- See screenshot for solution (X).
- You receive BAT BAIT.
- Go to Portal room.
- Place the HOSE on the hydrant (Y) and the BAT BAIT in the container (Z); select the container.
- Use the Gun on the rocks (A).
- Examine the control panel to trigger a puzzle (B).
- Arrange the flowers from open to closed.
- See screenshot for solution (C).
- Back out of close-up.

- Use the DAGGER on the ropes (D).
- Speak to both Ellie and Joe (E).
- Go through portal (F).
- Congratulations! You have successfully completed Botanica: Earthbound.
Created at: 2014-01-12