Walkthrough Menu
- General Tips
- Chapter I: Lost
- Chapter II: Pinta
- Chapter III: Corsica
- Chapter IV: France
- Chapter V: Market
- Chapter VI: Santa Maria
- Chapter VII: Spain
- Chapter VIII: Back to the Island
- Chapter IX: Felipa
General Tips
- “Columbus: Ghost of the Mystery Stone” is an Interactive Hidden Object Adventure Game.
- Click on the Options button to adjust the Music, Sound, Custom Cursor, or Screen options.
- An auto-solve button appears, after a short time, during puzzles.
- You have a choice between Casual and Advanced Modes. In Casual Mode there is a tutorial available, the rate at which the help and skip buttons recharge is quicker, and the areas in which you need to do something sparkle.
- You will lose control of your cursor for a few seconds if you excessively click randomly.
- On replay, the hidden object items will differ, but the fragmented objects will remain the same.
- Your hidden object items may differ from those in this guide.
- Click “Menu” on the bottom right of the task bar to exit the game.
Chapter I: Lost
- Pick up the diary in the sand.
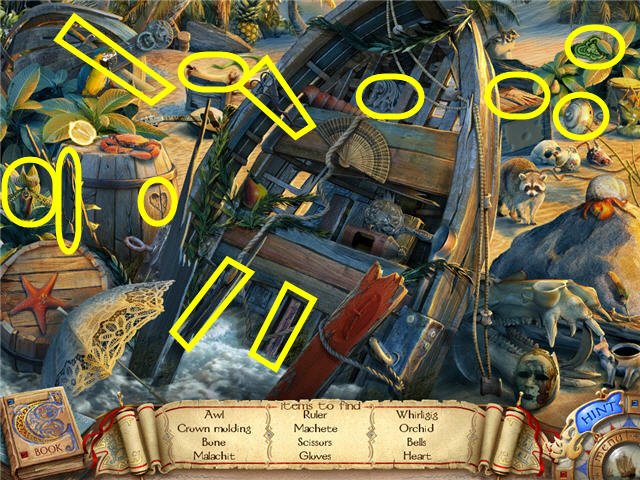
- Click on the boat on the left.
- Find all the items listed and you will get a MACHETE added to your inventory.
- Head over to the area on the upper right.
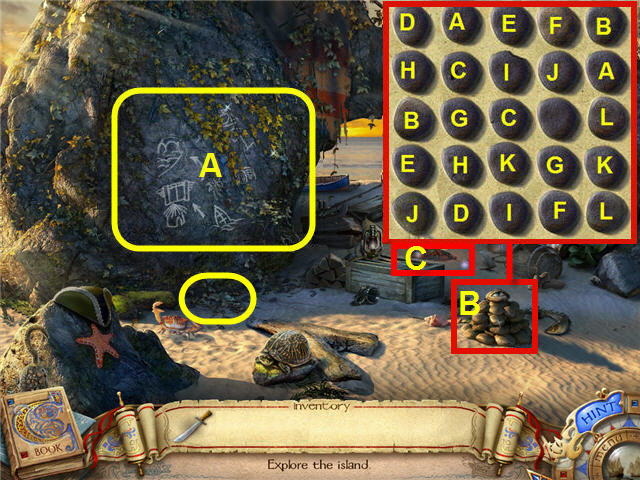
- Remove the vines covering the map (A) on the stone on the left.
- Pick up the VINES from the pile on the sand.
- Click on the stones (B).
- Click on matching pairs of stones until all stones are removed. See the screenshot for the solution.
- Take the STONE EYE.
- Click on the fire pit (C) and place the VINES on the embers.
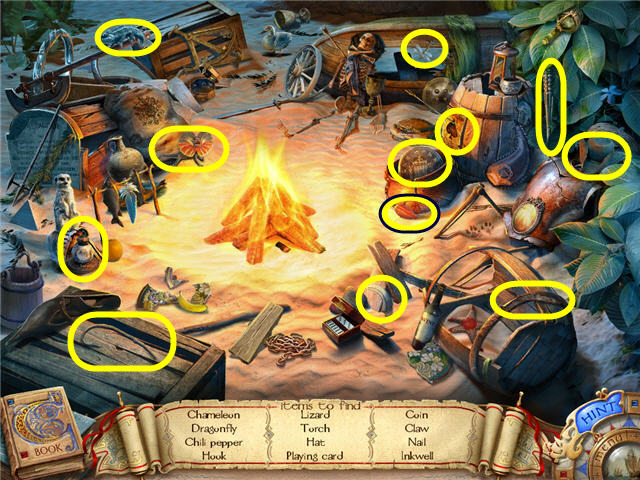
- Find all the items listed and you will get a TORCH added to your inventory.
- Light the TORCH on the fire to get a LIT TORCH.
- Enter the main area via the bottom of the screen.
- Click on the passage to the upper left.
- Use the LIT TORCH on the wasp’s nest and enter the hut.
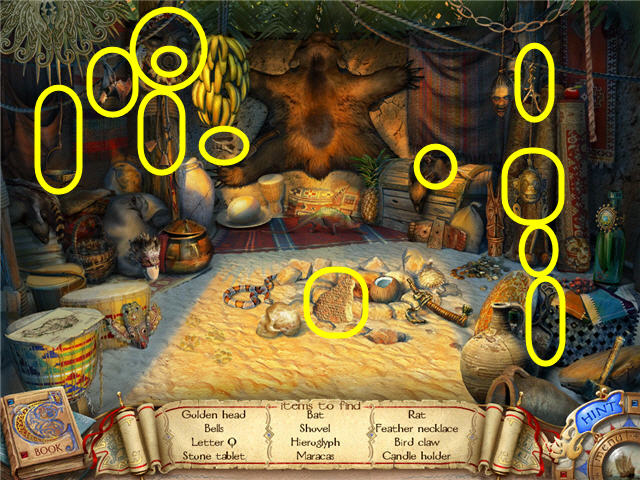
- Find all the items listed and you will get a SHOVEL added to your inventory.
- Click on the bearskin (A) and take the RUBY from underneath.
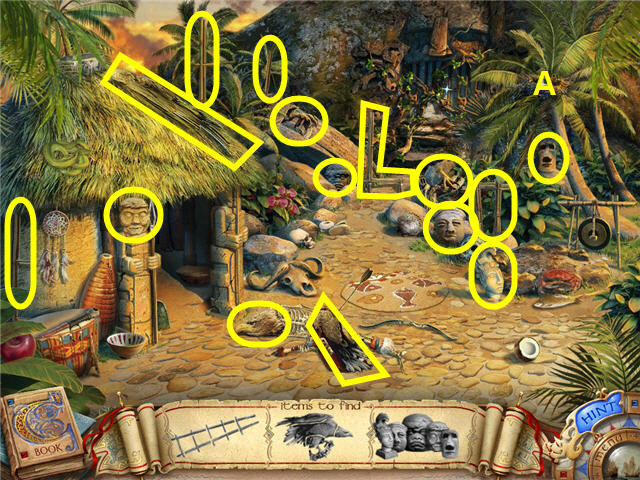
- Find all the pieces pictured and you will get a LADDER added to your inventory.
- Use the LADDER on the bird’s nest (A).
- Click on the bird’s nest.
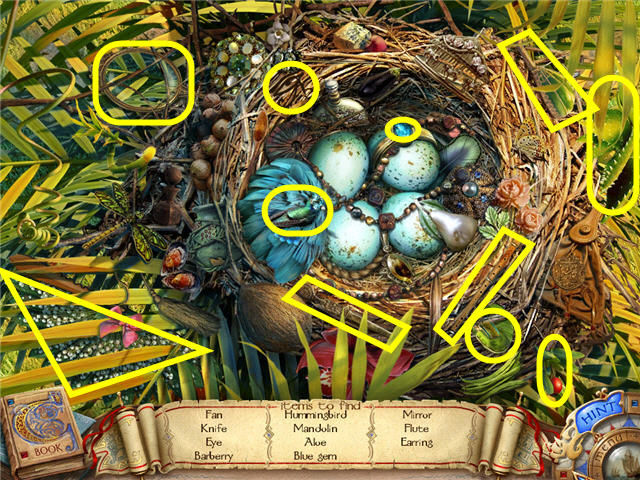
- Find all the items listed and you will get a BLUE GEM added to your inventory.
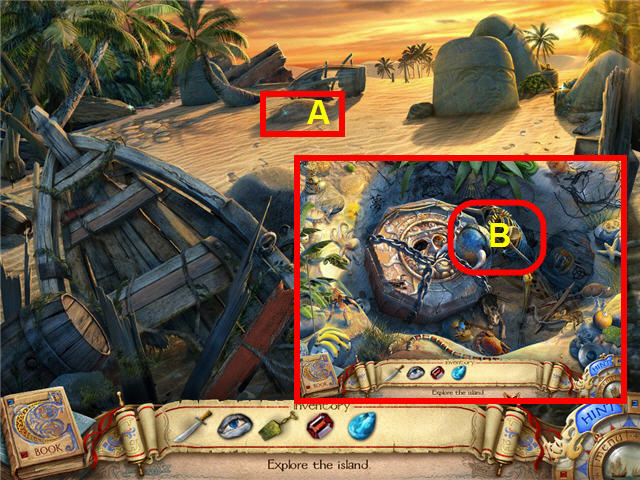
- Exit out of the area to get back to the main area.
- Use the SHOVEL on the mound of sand (A) two times and click on the hole.
- Click on the skeleton (B).
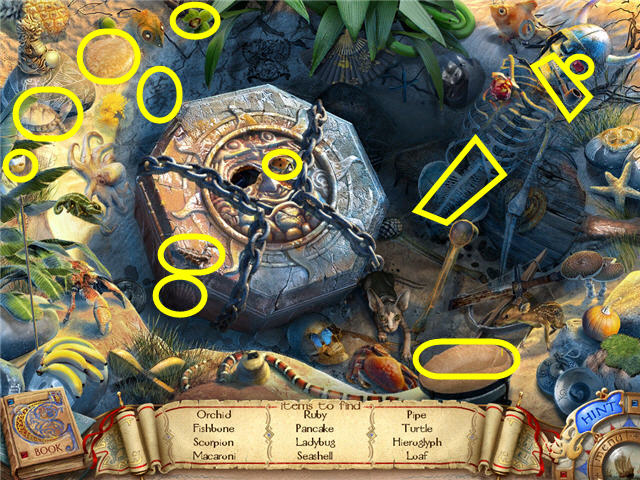
- Find all the items listed and you will get a RUBY added to your inventory.
- Place the STONE EYE in the eye socket (A) on the stone chest.
- Click on the stone chest.
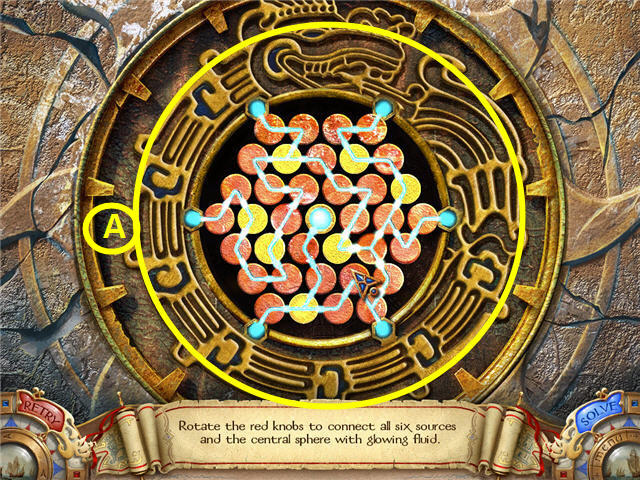
- Rotate the red knobs to connect all 6 outer spheres to the inner sphere. See the screenshot (A) for the solution.
- Take the BLUE GEM from the opened stone chest.
- Head to the passage on the upper left and continue up the path past the hut.
- Use the MACHETE on the vines until they are all cleared.
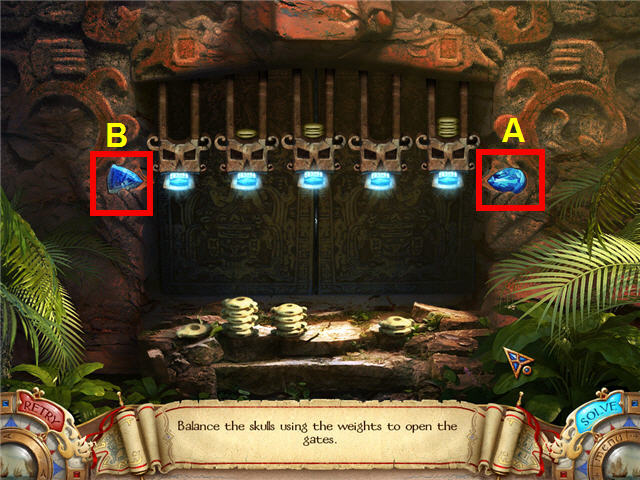
- Place the teardrop shaped BLUE GEM (A) on the empty slot on the right.
- Place the triangular shaped BLUE GEM (B) on the empty slot on the left.
- Place the correct weights provided on the steps on the skulls to balance them all in line with the BLUE GEMS. See the screenshot for the solution.
- Head forward into the next room.
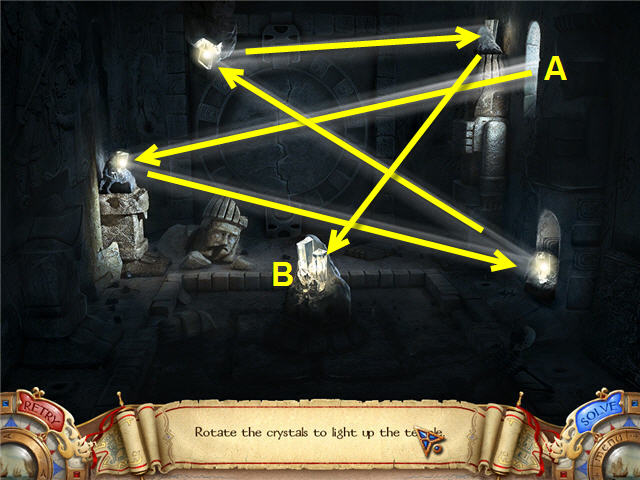
- Rotate the crystals to reflect the light from the window (A) to the crystals in the center of the room (B) to light up the temple. See the screenshot for the solution.
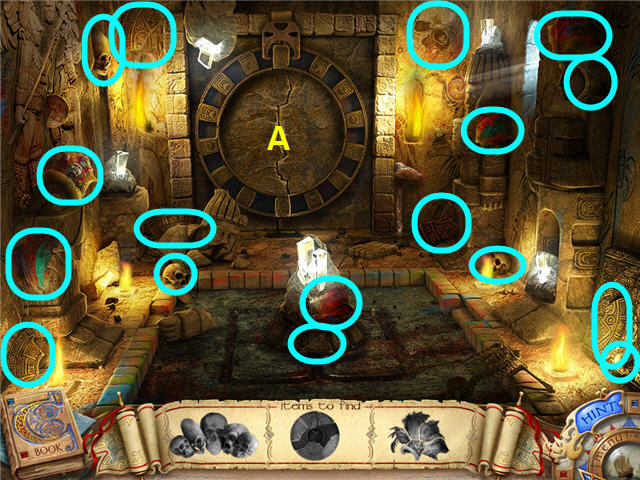
- Find all the pieces pictured and you will get a BROKEN DISK (CALENDAR PARTS) and a SKULL added to your inventory.
- Place the CALENDAR PARTS on the round slot (A).
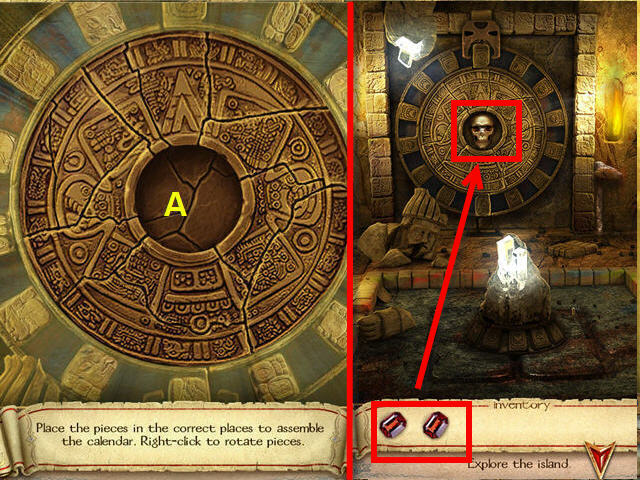
- Assemble the pieces of the CALENDAR PARTS to complete the calendar.
- You can right-click on them to rotate as needed.
- They will lock into place when in the correct location. See the screenshot for the solution.
- Place the SKULL in the center (A).
- Place the two RUBIES in the eye sockets of the skull.
- Go forward through the opening.
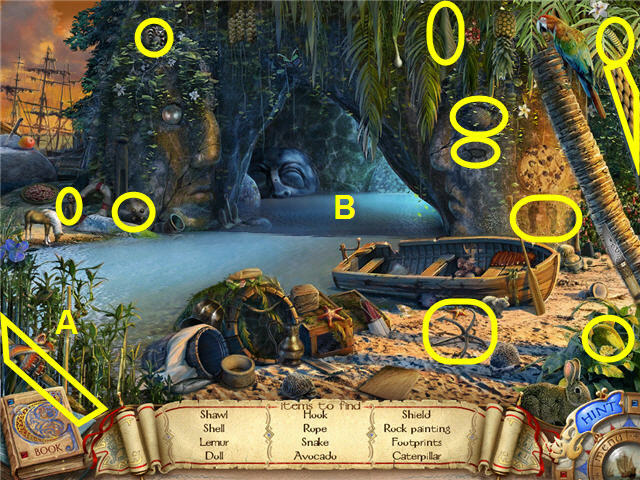
- Find all the items listed and you will get a SHARP SHELL added to your inventory.
- Use the SHARP SHELL on the REED (A).
- Use the REED on the water in the cave (B) and swim into the cave.
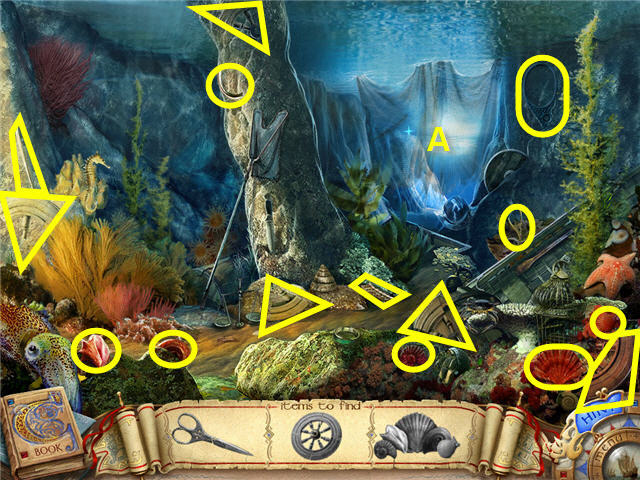
- Find all the pieces pictured and you will get SCISSORS added to your inventory.
- Use the SCISSORS on the net (A).
- Click where the net was to get to the next cave and speak to Felipa.
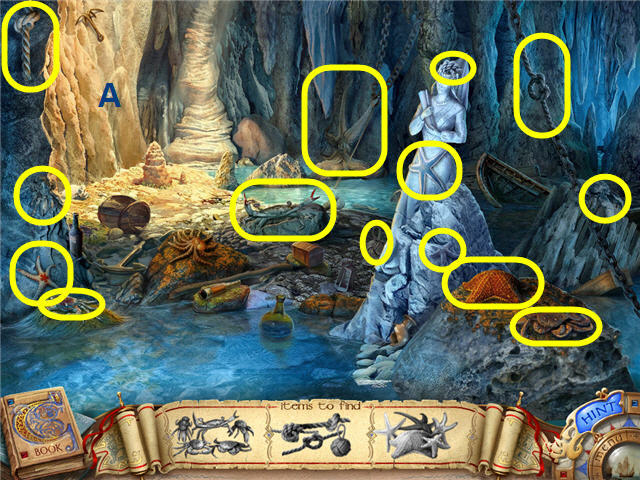
- Find all the pieces pictured and you will get a ROPE added to your inventory.
- Use the ROPE on the wall (A).
Chapter II: Pinta
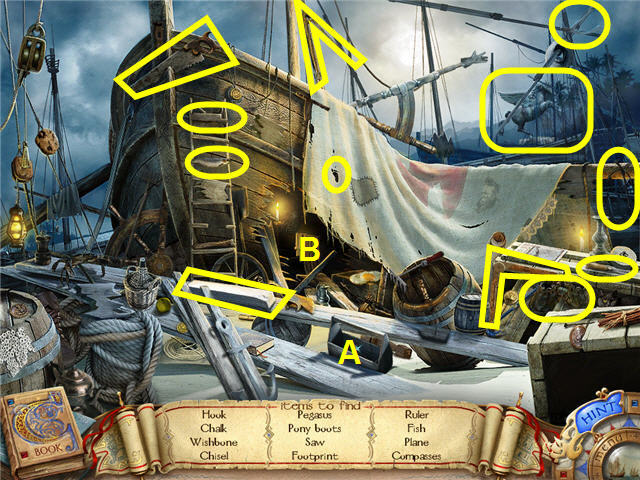
- Find all the items listed and you will get a CHISEL added to your inventory.
- Place the CHISEL on the toolbox (A).
- Click on the hole in the hull of the ship (B).
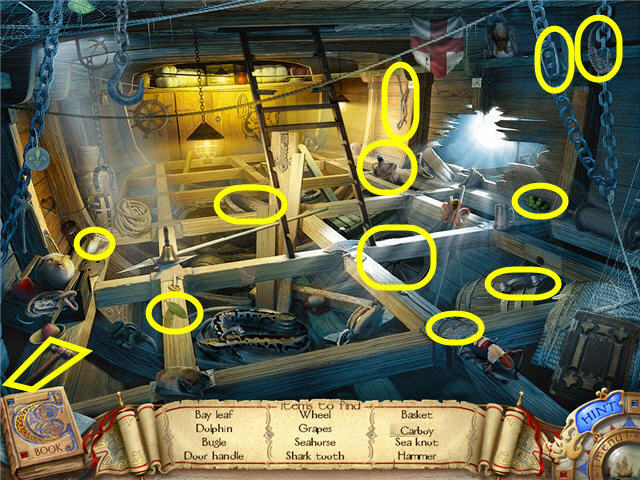
- Find all the items listed and you will get a HAMMER added to your inventory.
- Exit out the hole in the hull and add the HAMMER to the toolbox.
- Take the TOOLBOX.
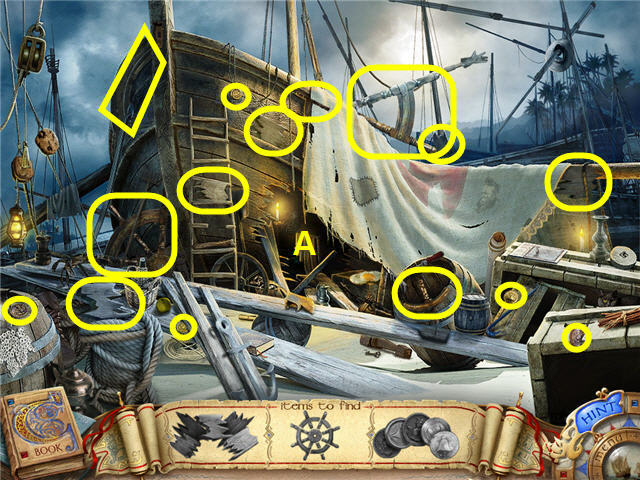
- Find all the pieces pictured and you will have WOOD (PATCHES) added to your inventory.
- Use the PATCHES on the hole in the hull (A).
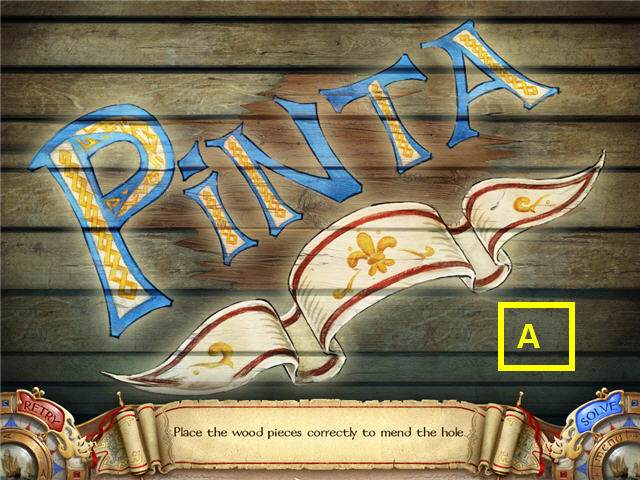
- Arrange the PATCHES inside the hole until it’s fully repaired. See the screenshot for the solution.
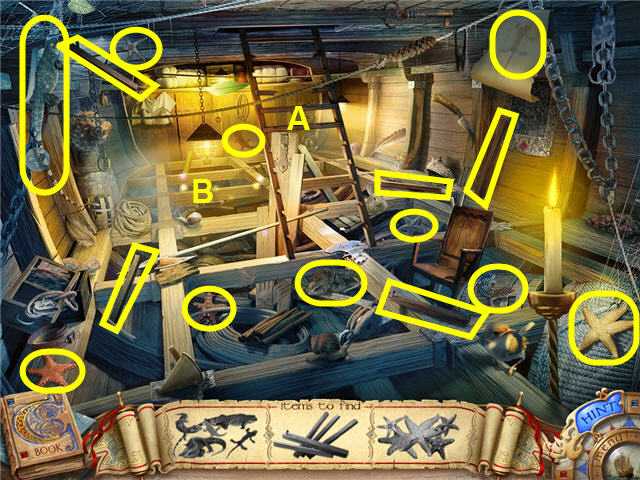
- Find all the pieces pictured and you will have BOARDS (PLANKS) added to your inventory.
- Use the PLANKS on the broken ladder (A).
- Use the TOOLS on the broken ladder.
- Click on the area behind the ladder (B).
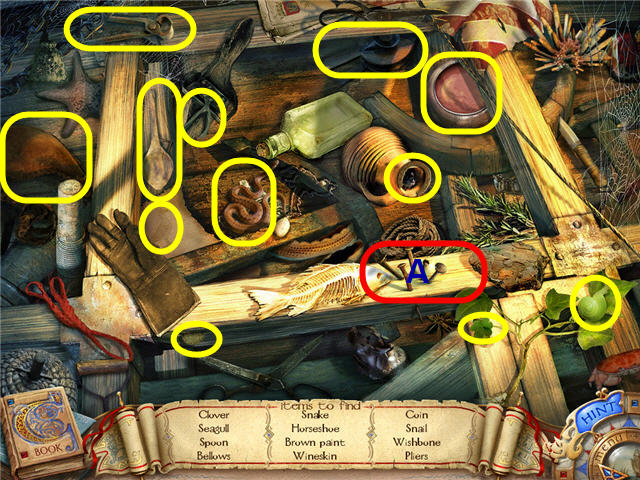
- Find all the items listed and you will get PLIERS added to your inventory.
- Use the PLIERS to take the NAILS (A).
- Use the NAILS on the broken ladder.
- Head up the ladder and then up the stairs to the upper deck.
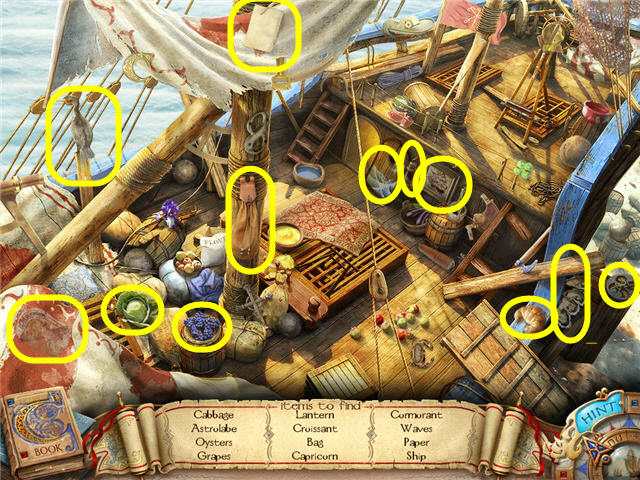
- Find all the items listed and you will get a PICTURE OF A SHIP (PINTA’s PICTURE) added to your inventory.
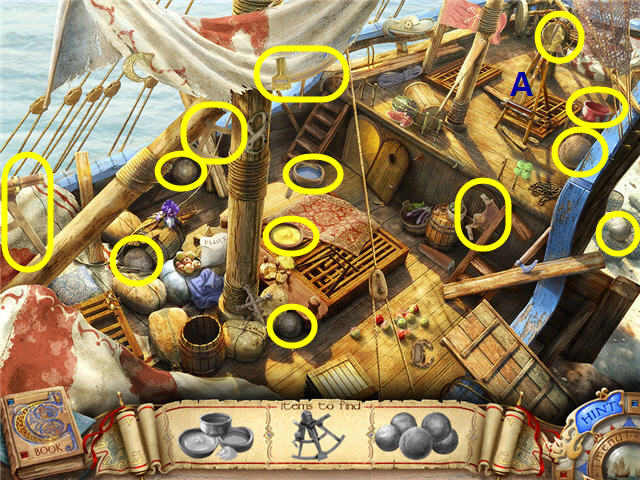
- Find all the pieces pictured and you will get PAINTS added to your inventory.
- Place the PINTA’S PICTURE on the easel (A).
- Use the PAINTS on the easel.
- Go downstairs and head into the room on the left of the stairs.
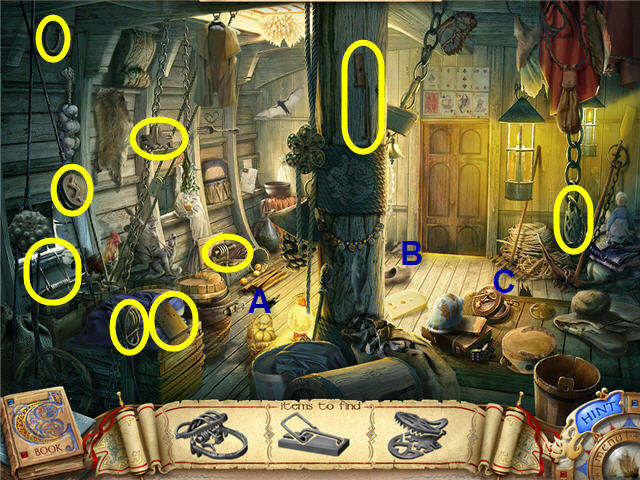
- Find all the pieces pictured and you will get RAT TRAPS added to your inventory.
- Place the 1st TRAP (A), the 2nd TRAP (B), and the 3rd TRAP (C).
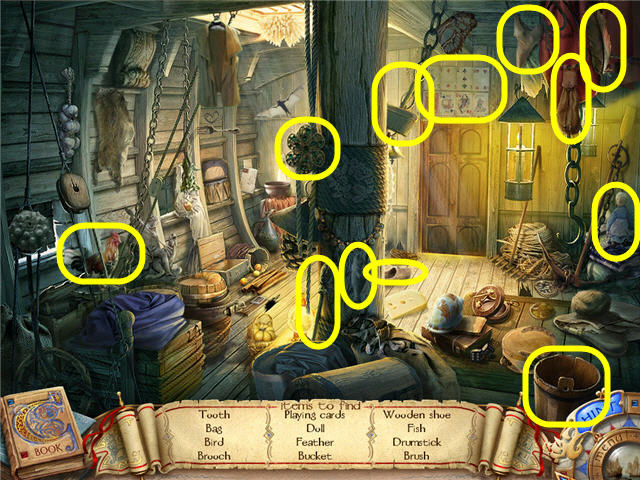
- Find all the items listed and you will get a BRUSH and a BUCKET added to your inventory.
- Go back to the upper deck and use the BUCKET AND BRUSH on the easel.
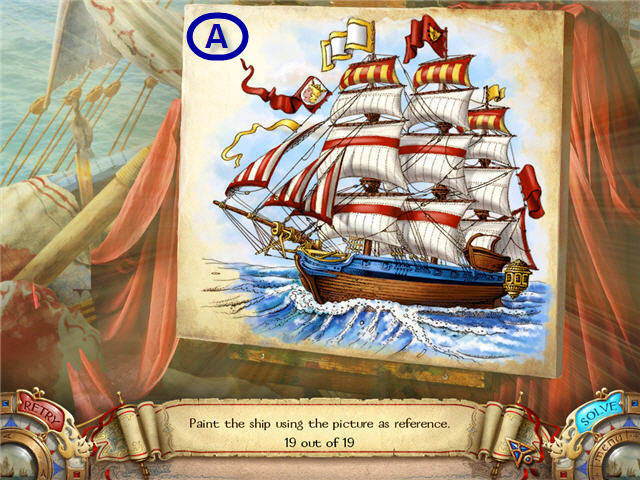
- Paint the ship to match the colors on the picture. See the screenshot (A) for the solution.
Chapter III: Corsica
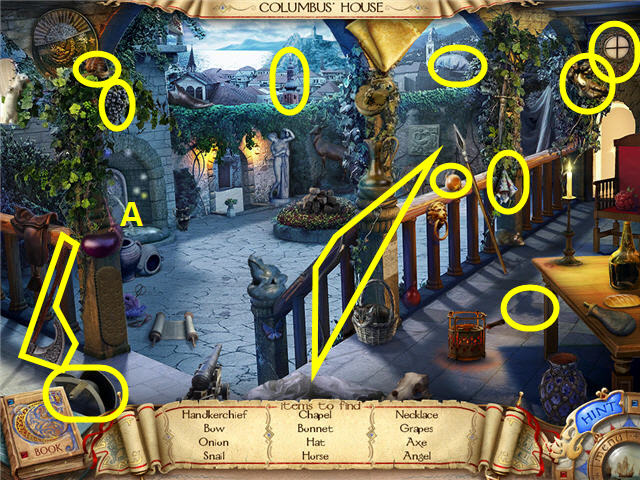
- Find all the items listed and you will get an AXE added to your inventory.
- Click on the fountain (A).
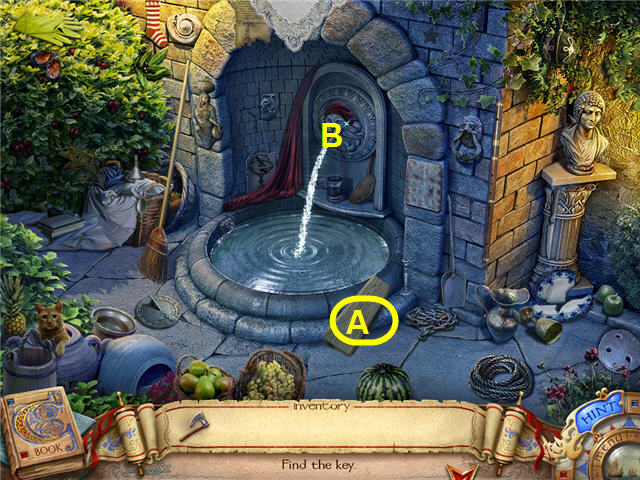
- Use the AXE on the plank (A).
- Pick up the SPLINTER.
- Use the SPLINTER on the mouth (B) of the fountain to stop the water.
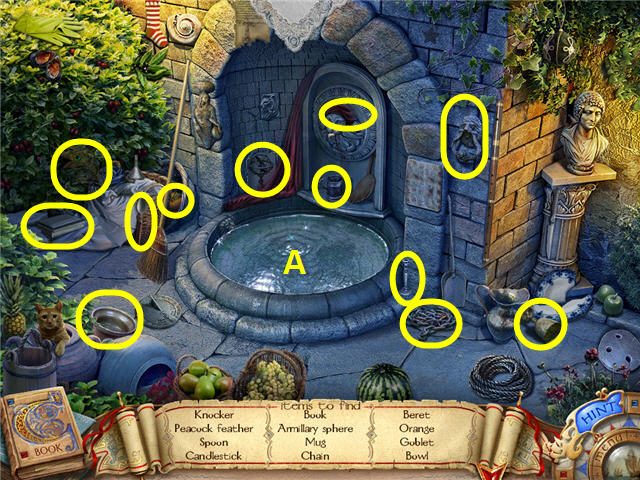
- Find all the items listed and you will get a BOWL added to your inventory.
- Use the BOWL on the water in the fountain (A).
- Take the CABINET KEY from the bottom of the drained fountain.
- Head through the door to the right on the porch.
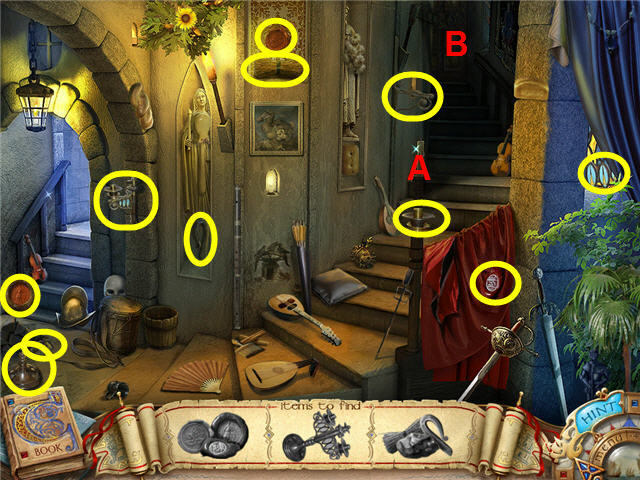
- Find all the pieces pictured and you will get a FLINT, FIRESTEEL, and HAY added to your inventory.
- Use the FLINT, FIRESTEEL, and HAY on the unlit candle (A).
- Use the CABINET KEY on the door on the top of the stairs (B) and enter the room.
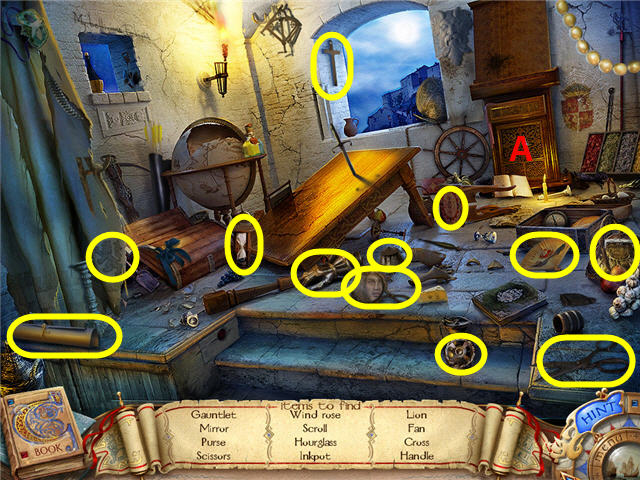
- Find all the items listed and you will get a HANDLE added to your inventory.
- Use the HANDLE on the cabinet (A).
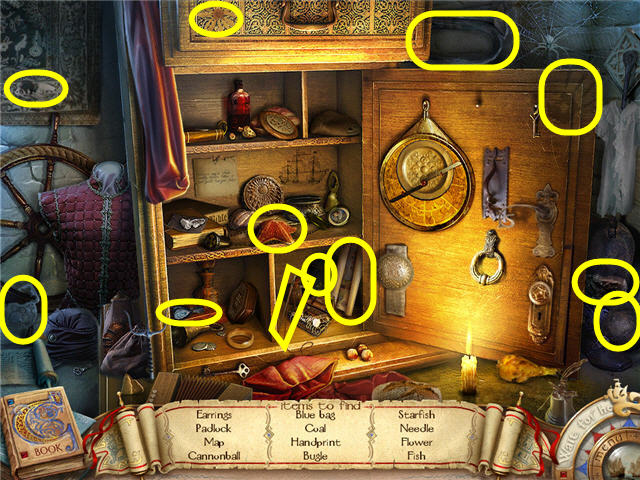
- Find all the items listed and you will get a MAP added to your inventory.
- Place the MAP on the map holder above the cabinet.
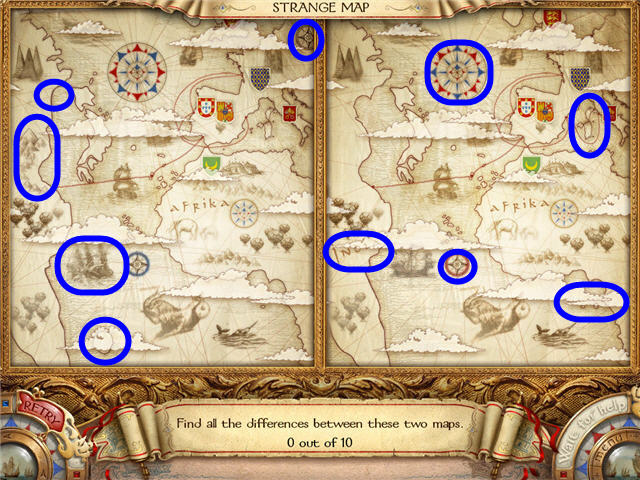
- Find the 10 differences between the two maps.
Chapter IV: France
- Speak to the astrologist and head downstairs two times.
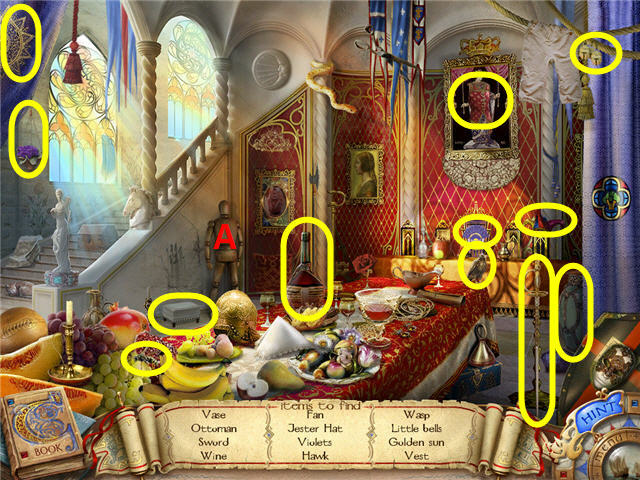
- Find all the items listed and a VEST (CLOTH) will be added to your inventory.
- Place the CLOTH on the mannequin (A).
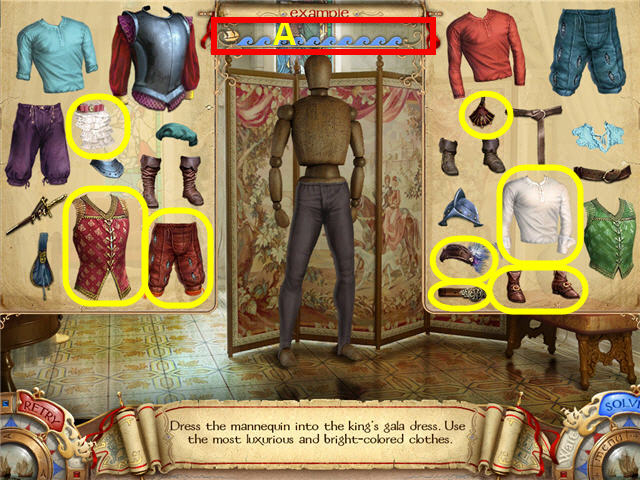
- Click on and drag the fanciest, brightly colored clothes to the mannequin.
- The little boat (A) above the mannequin will move to the right if your choices are correct. See the screenshot for the solution.
- You will get a LENS when finished.
- Head up the stairs and take the spiral staircase on the left.
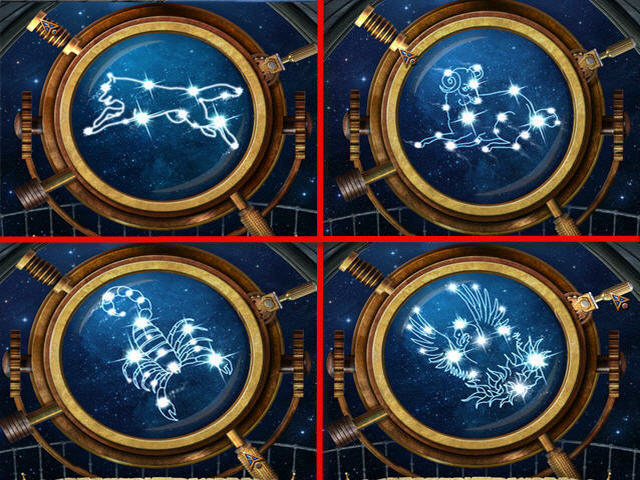
- Place the LENS on the telescope.
- Use the handles to line up the pieces of the constellations so that all the lights light up. See the screenshot for the solution.
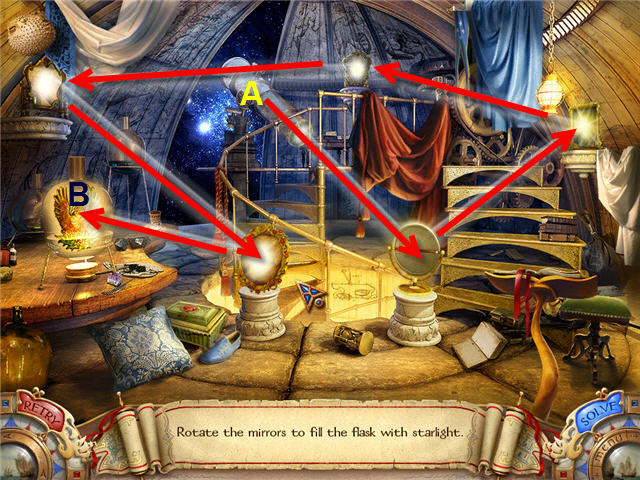
- Rotate the mirrors to light up the flask on the table.
- The beam starts at (A) and ends at (B). See the screenshot for the solution.
- Head down the spiral staircase and up the marble staircase to the library.
- Click on the bookshelf to the right.
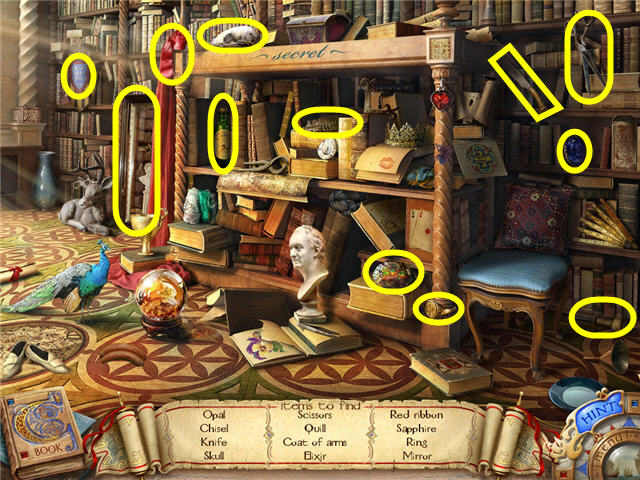
- Find all the items listed and you will get an ELIXIR added to your inventory.
- Go downstairs and then up the spiral staircase.
- Place the ELIXIR in the flask and take the BURNING PHOENIX.
- Go down the spiral staircase and up the marble staircase to the library.
- Click on the case under the stained glass window.
- Place the BURNING PHOENIX in the slot on the front of the safe under the stained glass window.
- Click on the disks.
- Back away from the safe and click on the book shelves on the right of the room.
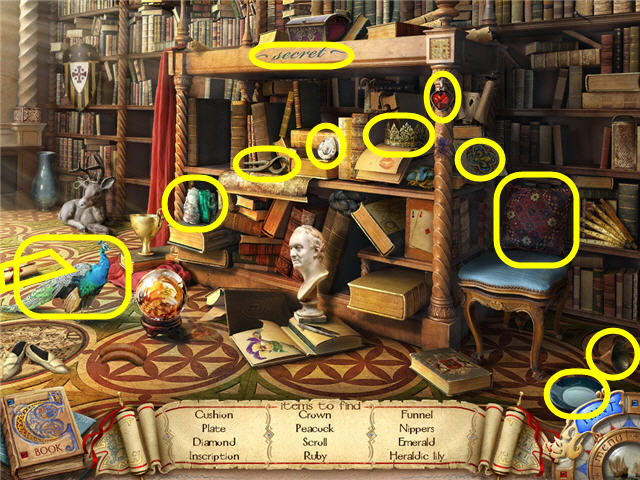
- Find all the items listed and you will get a HERALDIC LILY added to your inventory.
- Go downstairs and then up the spiral staircase to the star house.
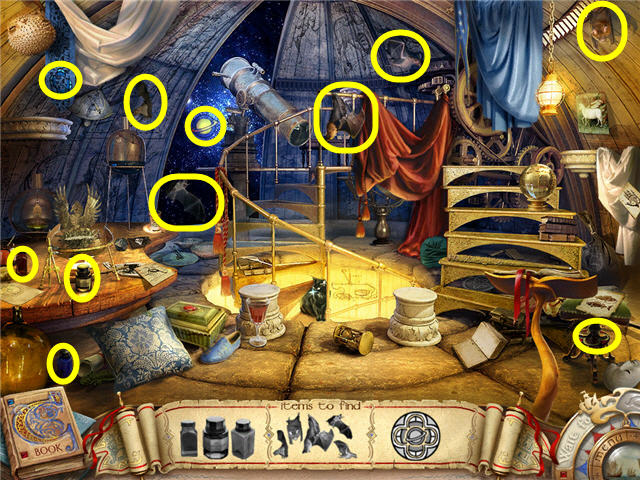
- Find all the pieces pictured and you will get a SATURN added to your inventory.
- Head downstairs two times to the throne room.
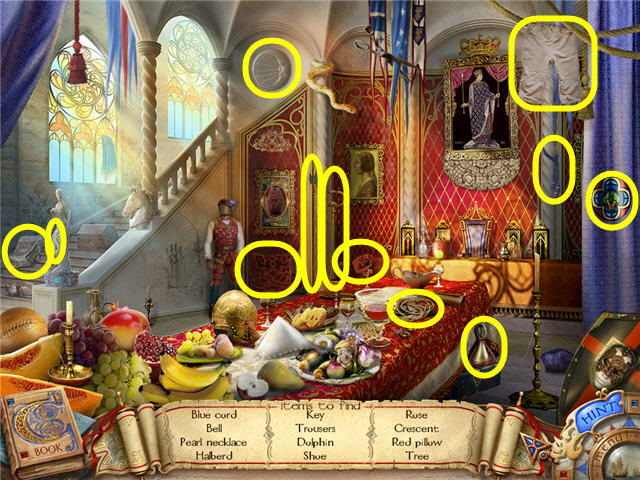
- Find all the items listed and you will get a TREE added to your inventory.
- Head upstairs two times to the library.
- Place the HERALDIC LILY, SATURN, and TREE on the combination lock in the slot that matches their image.
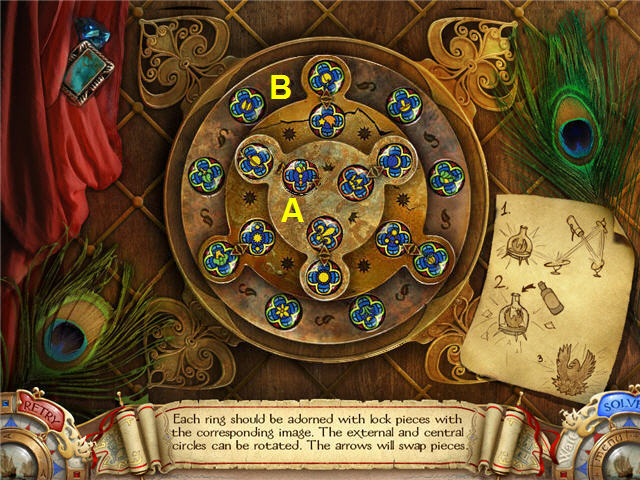
- Place all the royal images in the center ring, the planetary images in the middle and the plant related images on the outer ring in order to open the lock.
- It is easiest to complete the outer ring first.
- You can rotate the inner ring (A) and the outer ring (B) to help move around the pieces.
- Use the up/down arrows to move them from one row to another. See the screenshot for the solution.
- Click on the open book.
Chapter V: Market
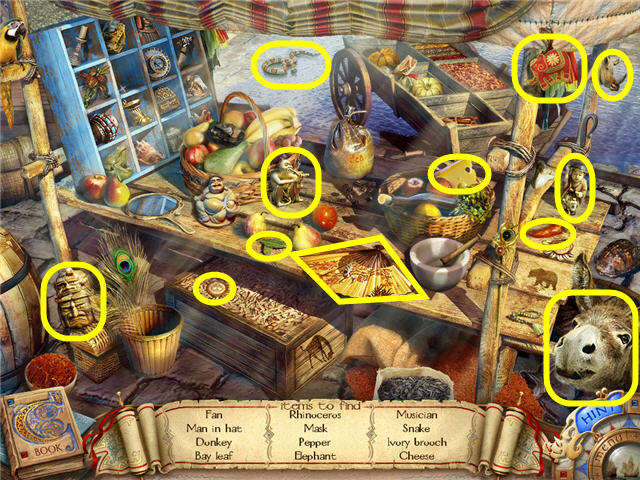
- Speak to Alonso and then click on the market stall to the left.
- Find all the items listed and you will get CHEESE added to your inventory.
- Give the CHEESE to the rat on the barrel on the right.
- Take the KEY from where the rat was.
- Use the ARMORY KEY on the door up the stone steps on the right.
- Head up the stone stairs to the right and enter the armory.
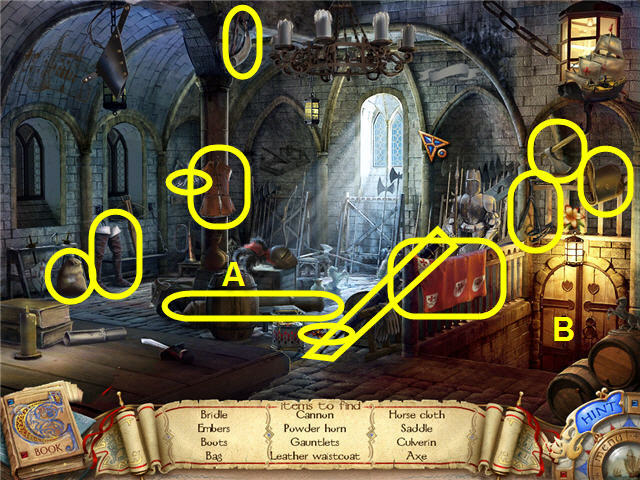
- Find all the items listed and you will get an AXE added to your inventory.
- Use the AXE on the barrel (A).
- Take the DOOR HANDLE from the split in the barrel.
- Click on the armory cabinet door (B) two times to get a close-up.
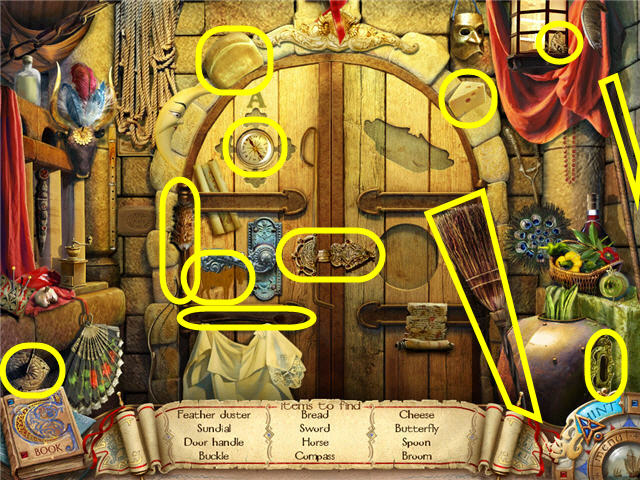
- Find all the items listed and you will get a DOOR HANDLE added to your inventory.
- Leave the armory and go to the market area.
- Click on the market stall to the left.
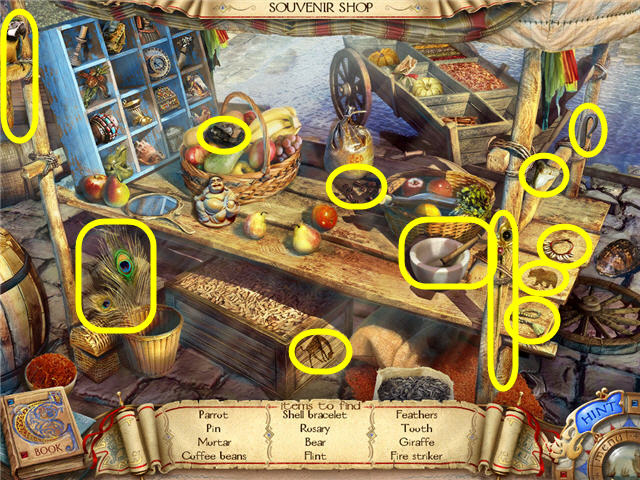
- Find all the items listed and you will get a FLINT AND FIRESTEEL added to your inventory.
- Head back into the armory and use the FLINT AND FIRESTEEL on the candle next to the books on your left.
- Click on the table with the lit candle.
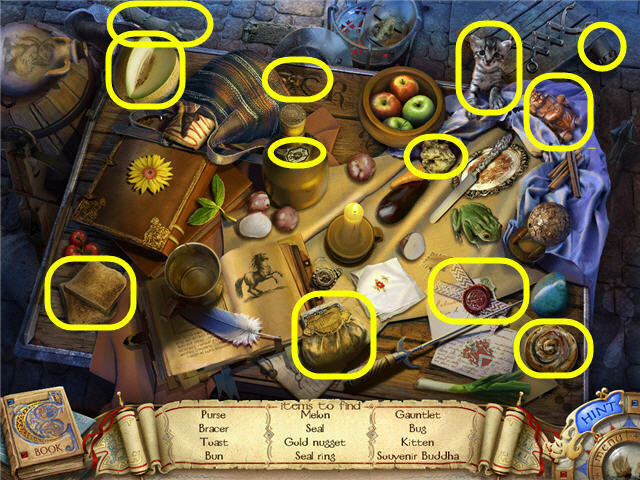
- Find all the items listed and a SOUVENIR will be added to your inventory.
- Go outside via the bottom of the screen and click on the market stall to the left.
- Place the SOUVENIR on the empty cubbyhole on the blue display case.
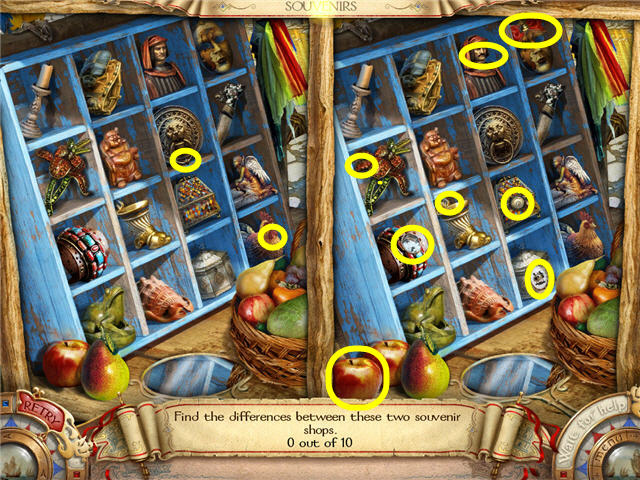
- Find the 10 differences between the two display cases.
- You will get a DOOR HANDLE in inventory.
- Head back up the stairs into the armory.
- Click on the armory cabinet.
- Place the 3 DOOR HANDLES on the door to the armory cabinet in the slots matching the 3 door handles shapes.
- Head into the cabinet.
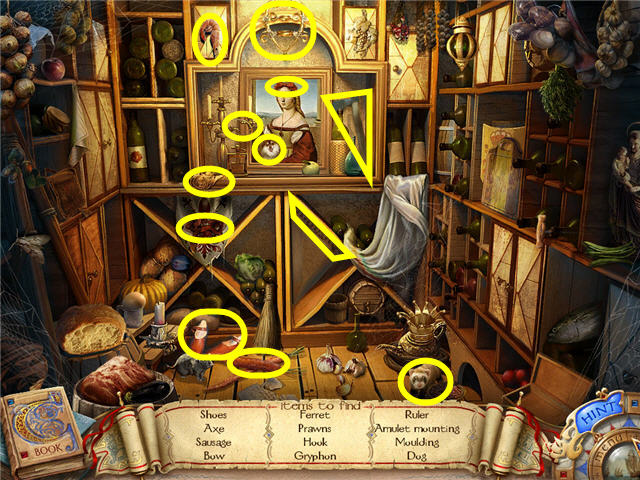
- Find all the items listed and you will get an AMULET MOUNTING added to your inventory.
Chapter VI: Santa Maria
- Click on the wind rose pattern on the deck.
- Head to the bow of the ship on the left.
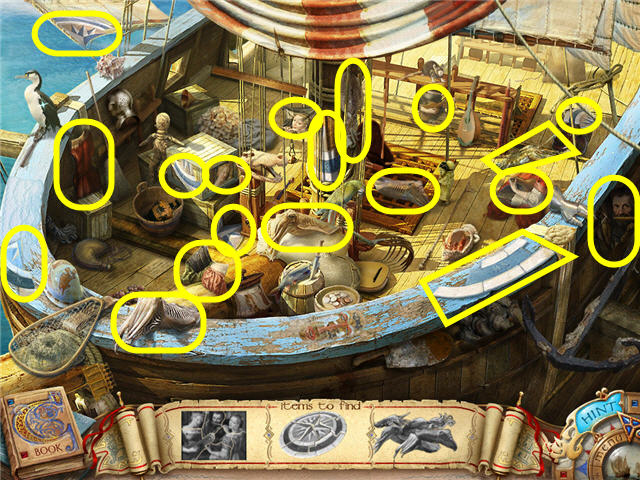
- Find all the pieces pictured and you will get PARTS OF THE WIND ROSE added to your inventory.
- Head back to the main deck area and go towards the stern and into the door on the right.
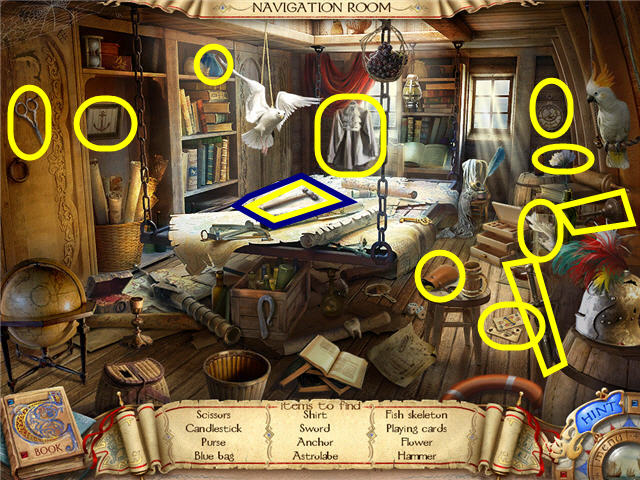
- Find all the items listed and you will get a HAMMER added to your inventory.
- Head back to the main deck area and go towards the stern into the door on the left.
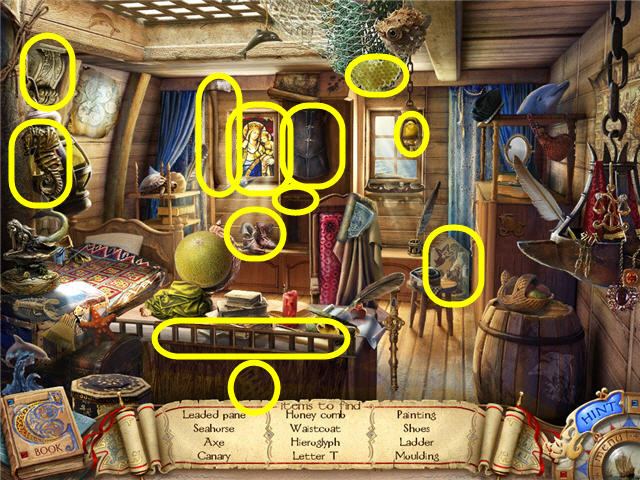
- Find all the items listed and you will get an AXE added to your inventory.
- Head back to the main deck area and place the PARTS OF THE WIND ROSE, the HAMMER, and the AXE into the faded wind rose.
- Go left towards the bow of the ship.
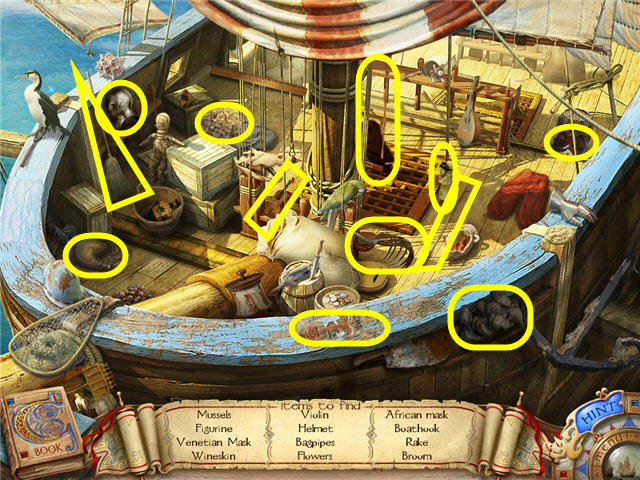
- Find all the items listed and you will get a BROOM added to your inventory.
- Use the BROOM on the bird (A) and take the CHISEL.
- Head back to the main deck.
- Place the CHISEL on the faded wind rose on the main deck area.
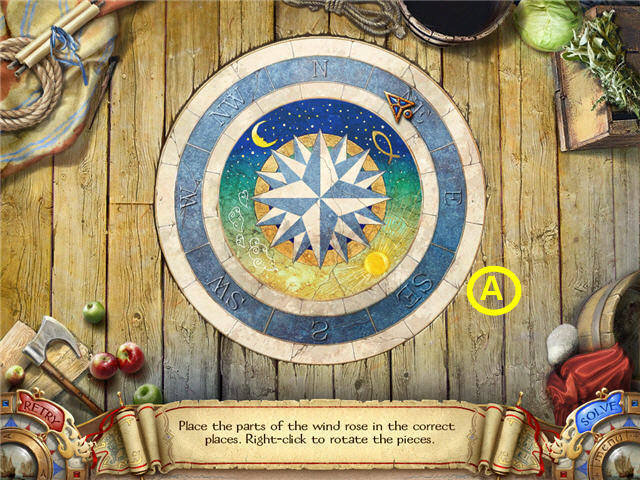
- Arrange the parts in the circle to complete the wind rose.
- You can right-click to rotate the pieces. The pieces will lock into place when correct.
- Head right toward the stern and enter the door on the right.
- Click on the table.
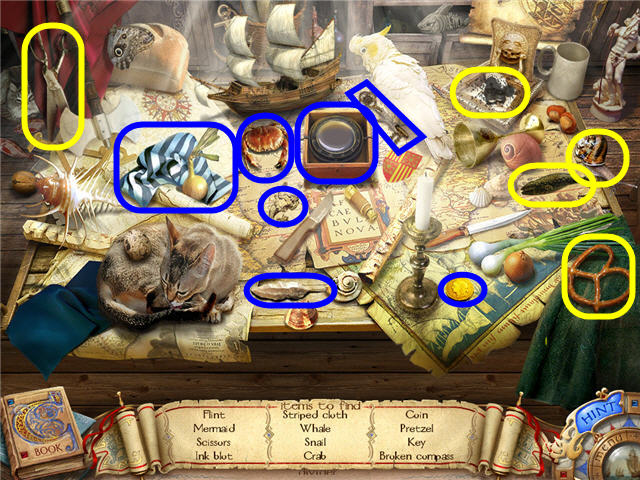
- Find all the items listed and you will get a BROKEN COMPASS added to your inventory.
- Exit the room and go into the door on the left.
- Click on the bed.
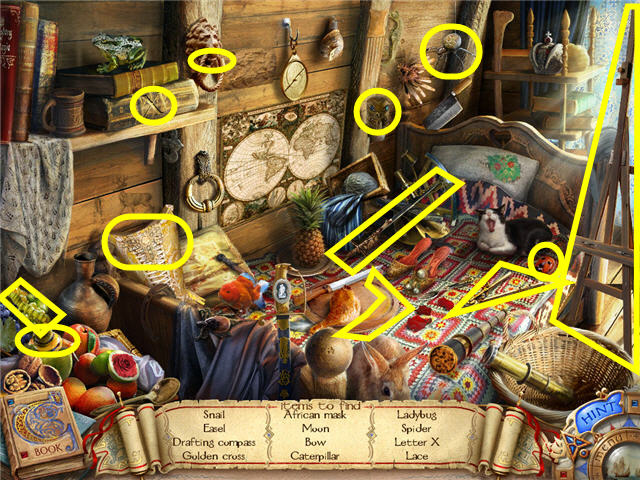
- Find all the items listed and a DIVIDER will be added to your inventory.
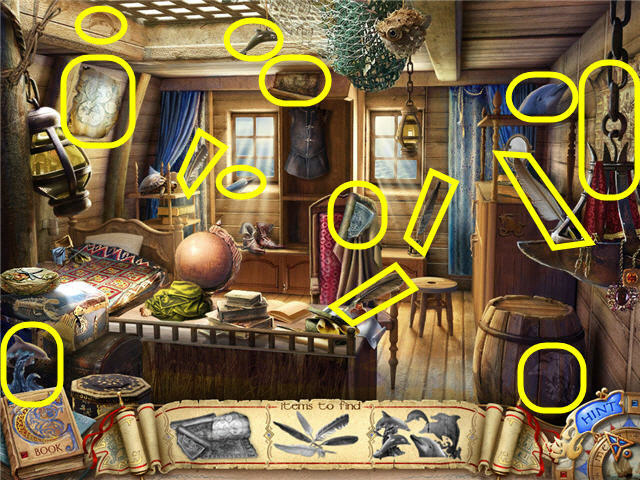
- Find all the pieces pictured and you will get a MAP added to your inventory.
- Head out of the room to the main deck and use the BROKEN COMPASS on the wind rose.
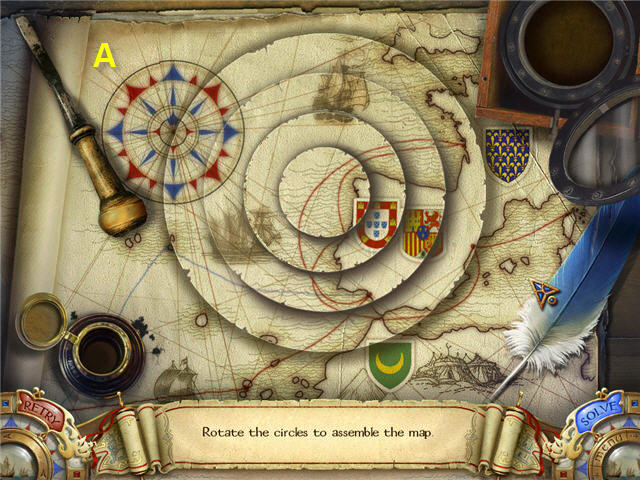
- Rotate the rings to complete the picture. See the screenshot (A) for the solution.
- You will get a FIXED COMPASS when complete.
- Head towards the right to the stern and go into the map room on the right.
- Place the MAP on the table and add the COMPASS and the DIVIDER.
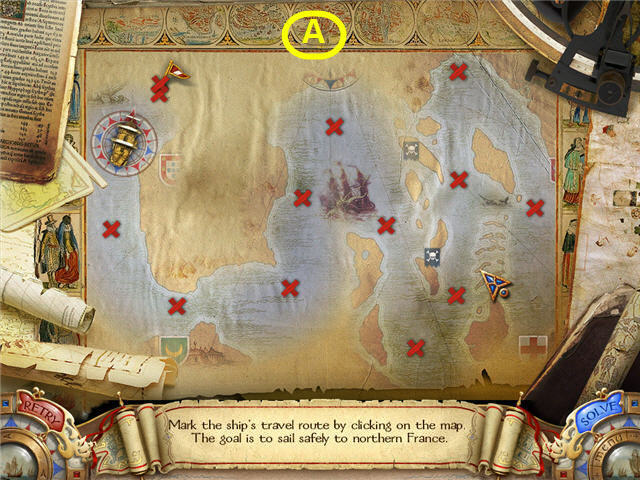
- Mark the map to get the ship safely to northern France.
- The map will cloud over after you start placing X’s, so you will have to place the X’s by memory.
- Click on Start on the top of the map to set the ship in motion.
- It is easiest to do a few at a time, set sail, and then add more.
- Click on reset to get rid of the X’s you have placed if you wish to start over.
- See the screenshot (A) for the solution.
Chapter VII: Spain
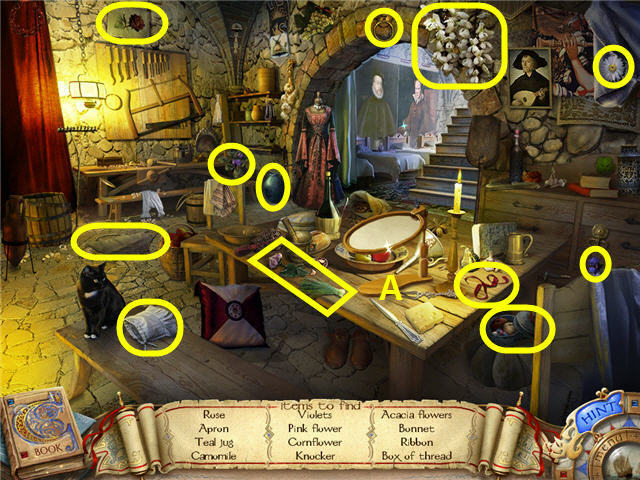
- Speak with the guard and head to the doorway to the left of the courtyard.
- Find all the items listed and SPOOLS OF THREAD will be added to your inventory.
- Place the SPOOLS OF THREAD on the table by the tambour (A).
- Go forward up the stairs.
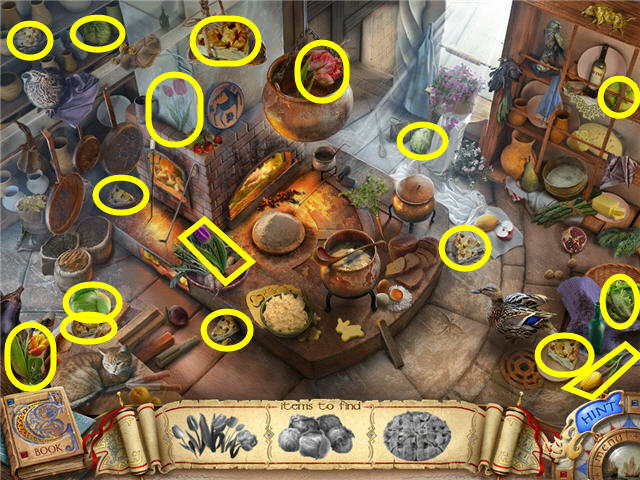
- Find all the pieces pictured and you will get TULIPS added to your inventory.
- Exit out of the room and add the TULIPS to the tambour.
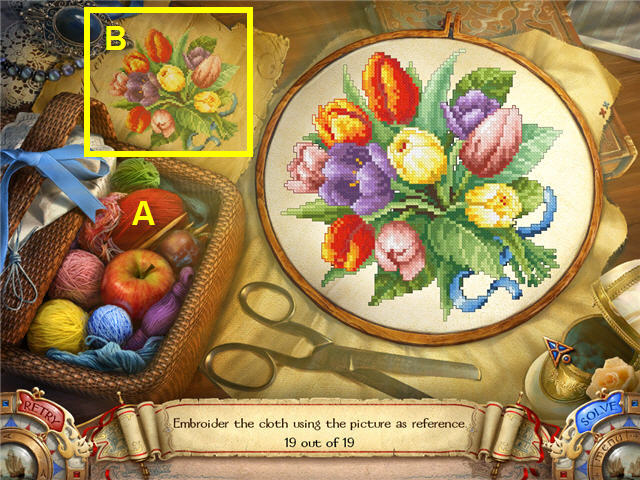
- Embroider the cloth by clicking on the different colored yarns (A) and clicking on the correct area on the cloth to duplicate the picture on the left (B).
- You will get an EMBROIDERY piece added to your inventory.
- Exit via the bottom of the screen and give the EMBROIDERY to the guard.
- Head up the red carpeted stairs on the left to see Queen Isabella.
- Click on the bush to the left.
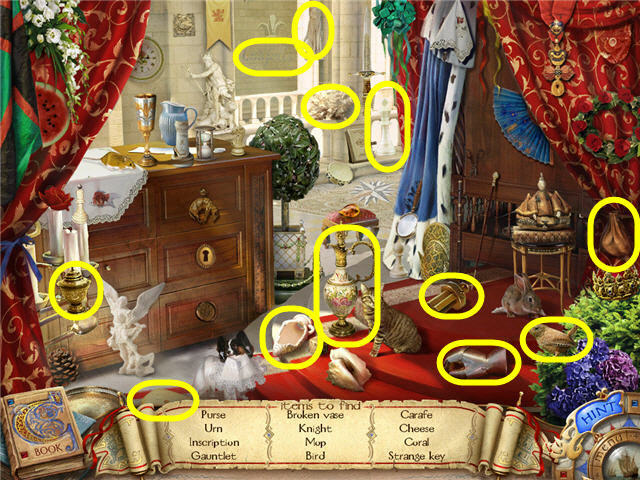
- Find all the items listed and you will get a STRANGE KEY added to your inventory.
- Head out of the palace and head to the patio straight through the arched doorway.
- Click on the tub on the left.
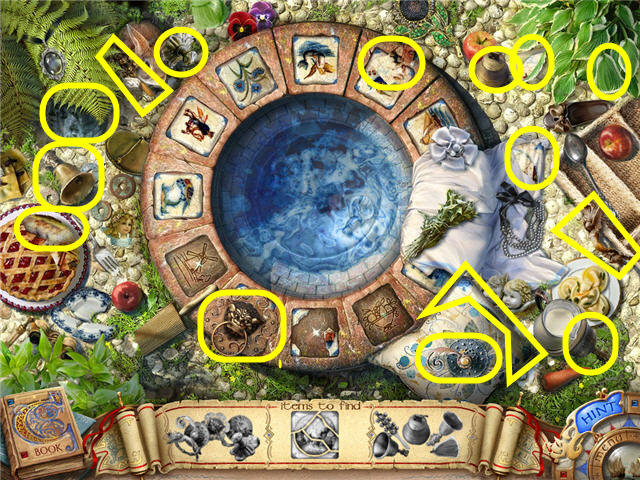
- Find all the pieces pictured and you will get a BROKEN TILE added to your inventory.
- Place the BROKEN TILE on the bottom slot (A).
- Exit out of the tub but remain in the patio area.
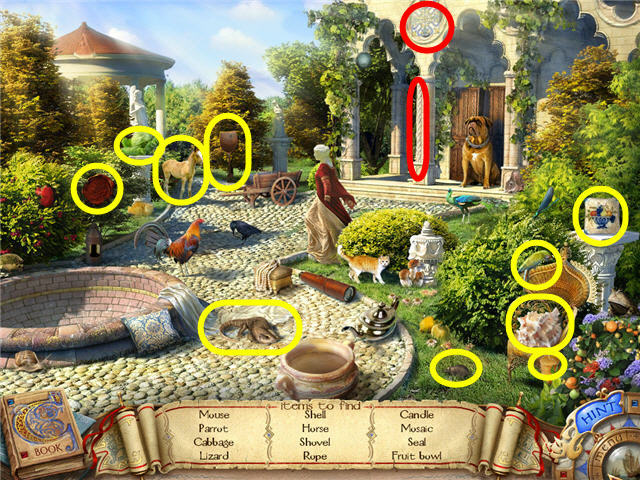
- Find all the items listed and you will get a FRUIT TILE added to your inventory.
- Head back to the courtyard and go down the stairway to the left.
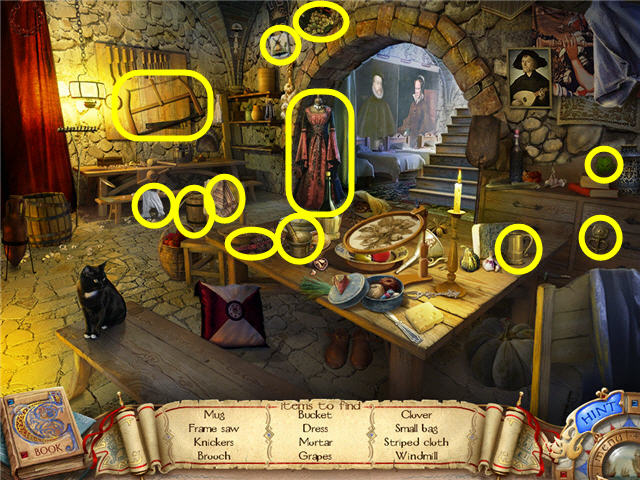
- Find all the items listed and you will get a MILL TILE added to your inventory.
- Head up the stairs.
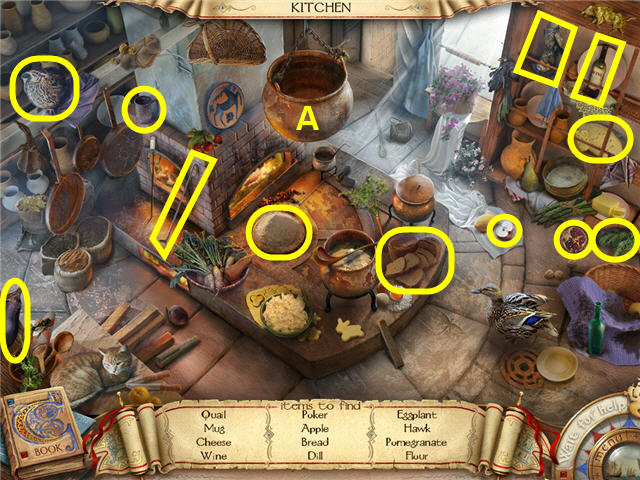
- Find all the items listed and you will get FLOUR added to your inventory.
- Place the FLOUR in the kettle (A) to get a close-up.
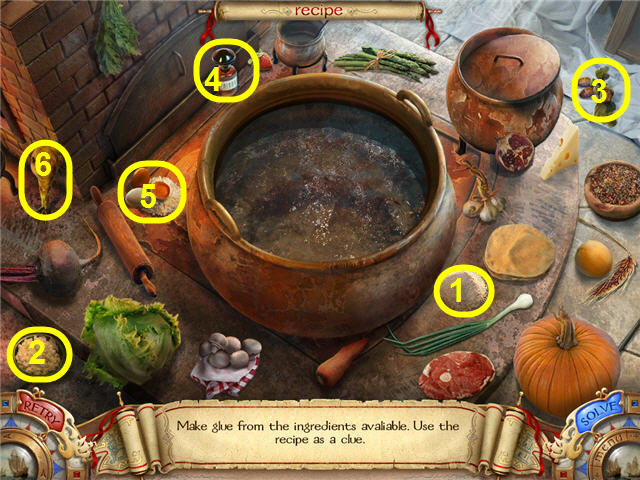
- Click on the top scroll to get the recipe.
- Place the FLOUR, COTTAGE CHEESE, ACORNS, POISON, EGGS, and CHICKEN LEG in the kettle and get GLUE.
- Leave the palace and go back to the patio and click on the tub.
- Place the GLUE on the BROKEN TILE.
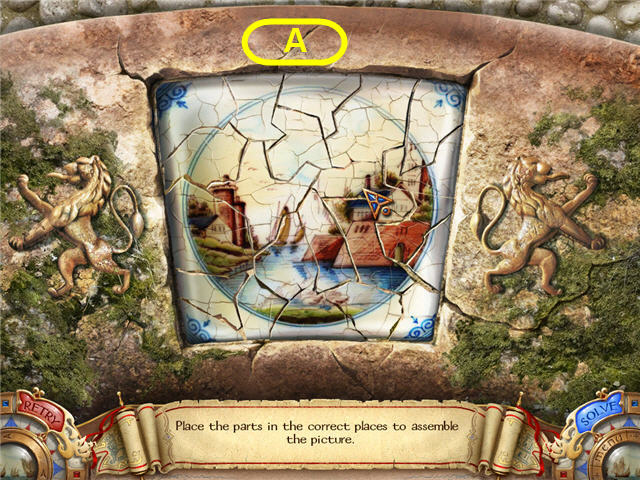
- Place the pieces in their correct places to complete the tile.
- You can right click to rotate. See the screenshot (A) for the solution.
- Place the MILL TILE on the slot with the mill.
- Place the FRUIT TILE on the slot with the fruit bowl.
- Place the STRANGE KEY in the keyhole on the bottom of the tub.
- Go down the drain.
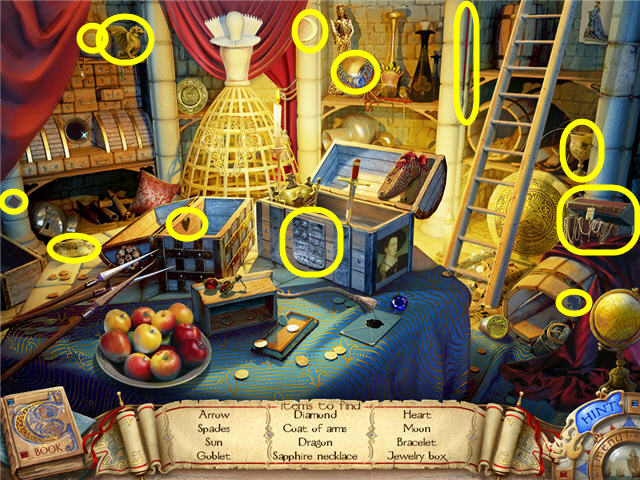
- Find all the items listed and you will get JEWELS added to your inventory.
- Head back to the palace and up to the audience room and give the JEWELS to the Queen.
- Click on the area behind the throne.
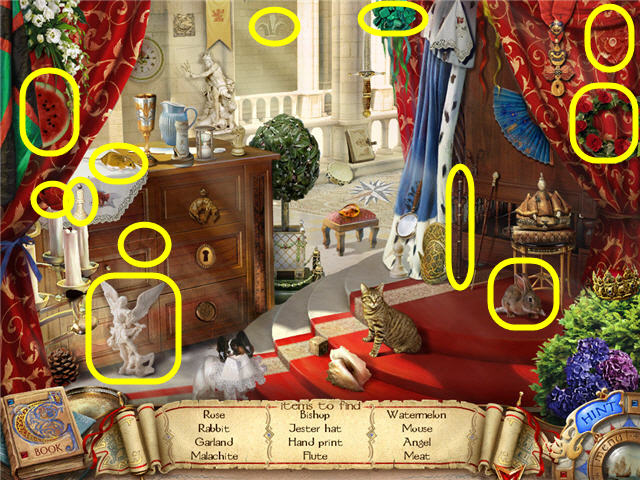
- Find all the items listed and you will get MEAT added to your inventory.
- Leave the palace and head over to the patio.
- Give the MEAT to the watchdog by the pillars on the right.
- Enter the boudoir where the watchdog was.
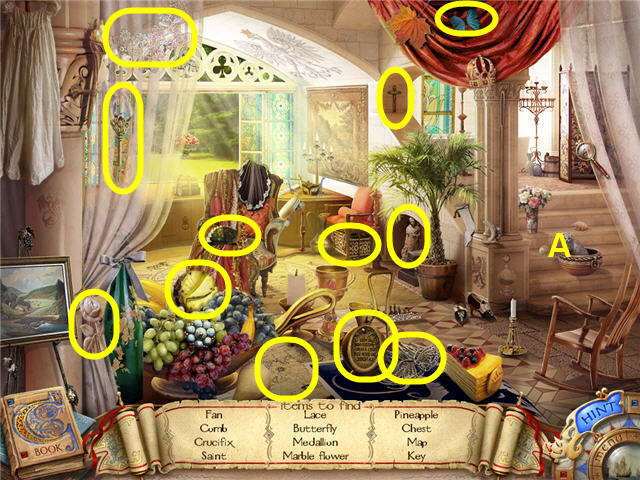
- Find all the items listed and you will get a KEY added to your inventory.
- Click on the stair area to the right side of the room (A).
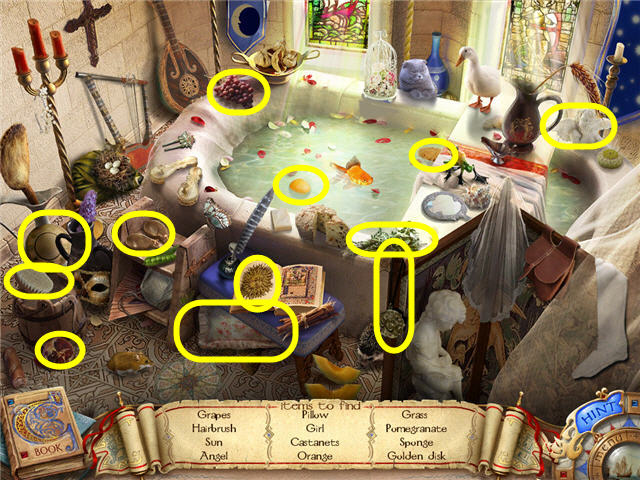
- Find all the items listed and you will get a GOLDEN DISK added to your inventory.
- Head into the palace and click on the area behind the throne.
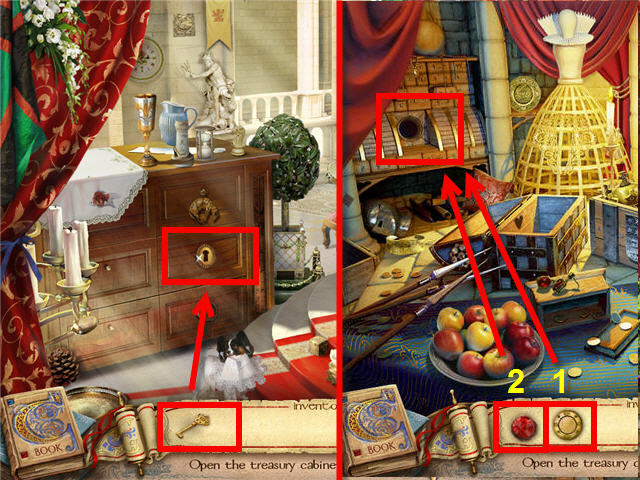
- Use the KEY on the drawer and get the RED GEM.
- Head back to the patio and down the drain.
- Place the GOLDEN DISK (1) in the big round slot in the treasury cabinet on the left.
- Place the RED GEM (2) in the slot in the treasury cabinet.
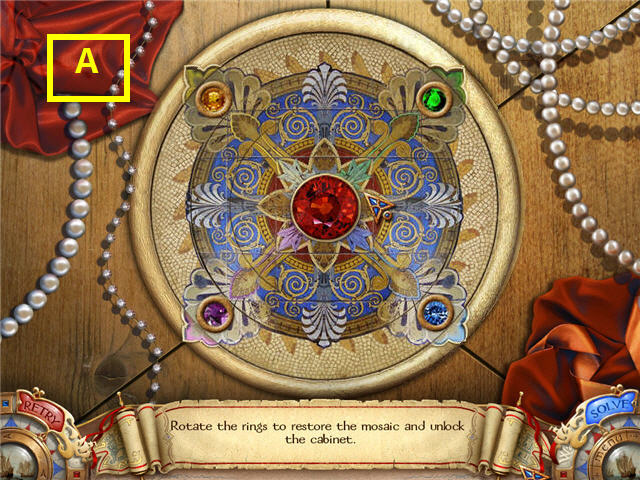
- Rotate the rings to complete the pattern and unlock the lock. See screenshot (A) for solution.
- Click on the drawer area where you placed the disk to get a close-up.
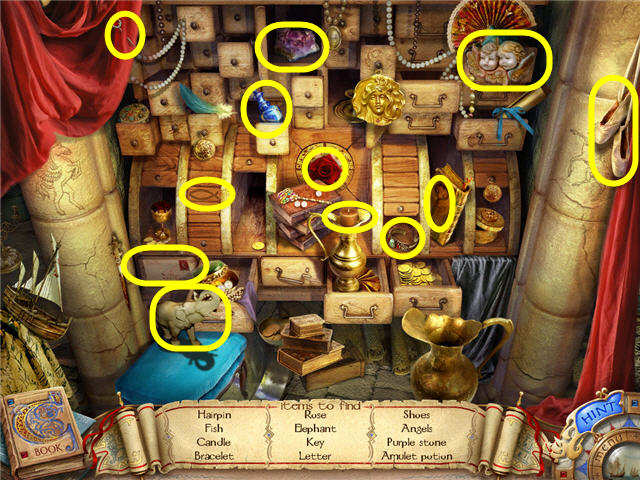
- Find all the items listed and an AMULET POTION will be added to your inventory.
Chapter VIII: Back to the Island
- Head to the stern on the right and enter the room on the left.
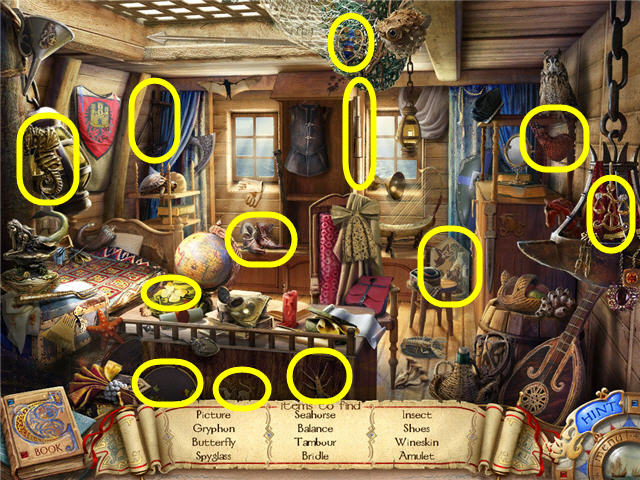
- Find all the items listed and you will get an AMULET added to your inventory.
- Head into the dinghy and note the missing gear and spool.
- Go back into the ship and head left into the bow area.
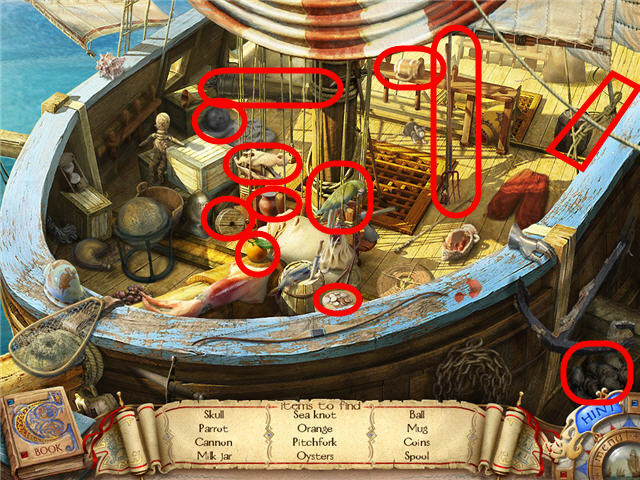
- Find all the items listed and you will get a SPOOL added to your inventory.
- Head down the hatch on the main deck next to the wind rose.
- Click on the pump.
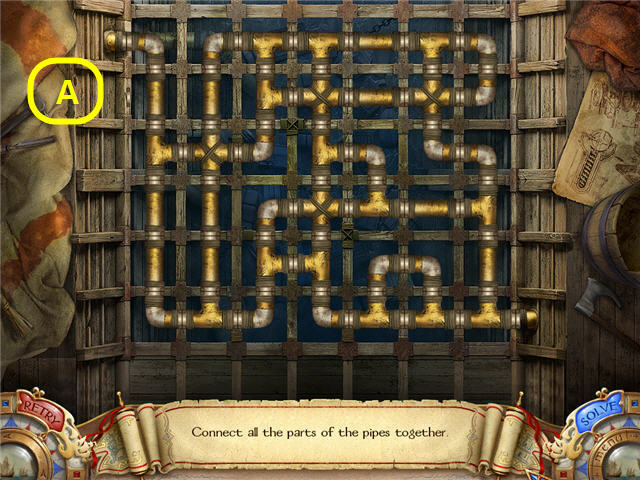
- Click and turn the pipes so that they connect from the upper left to the lower right.
- Make sure there are no unconnected ends. See screenshot (A) for solution.
- Click on the ladder going down.
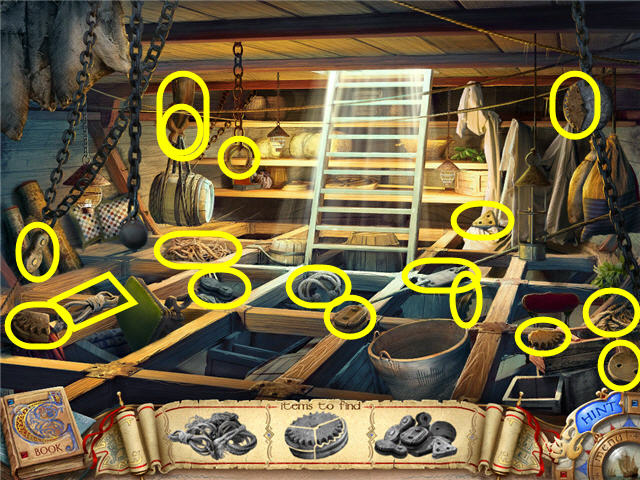
- Find all the pieces pictured and you will get a GEAR added to your inventory.
- Head to the upper deck.
- Go into the dinghy.
- Place the WOOD GEAR and the SPOOL on their matching slots.
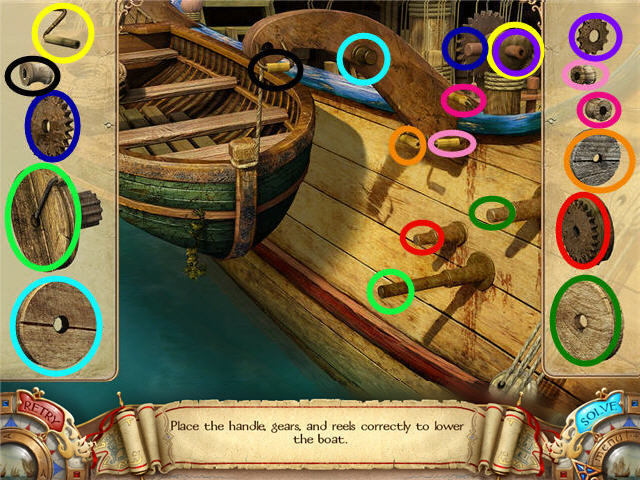
- Place the gears, reels, and handle in their proper spots.
- They will lock into place when correct. See the screenshot for the solution.
- Click on the dinghy to set sail.
- Click on the large rock blocking the cave entrance.
- Go back into the dinghy.
- Head down the hatch next to the wind rose.
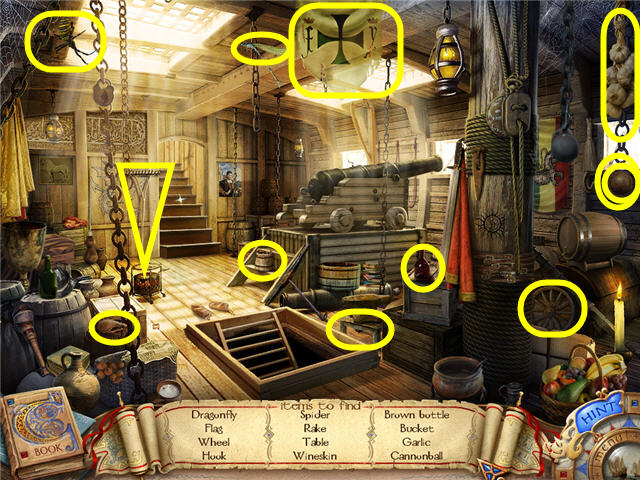
- Find all the items listed and you will get a CANNONBALL added to your inventory.
- Place the CANNONBALL by the cannon (A).
- Exit via the stairs and head into the door to the left, towards the stern.
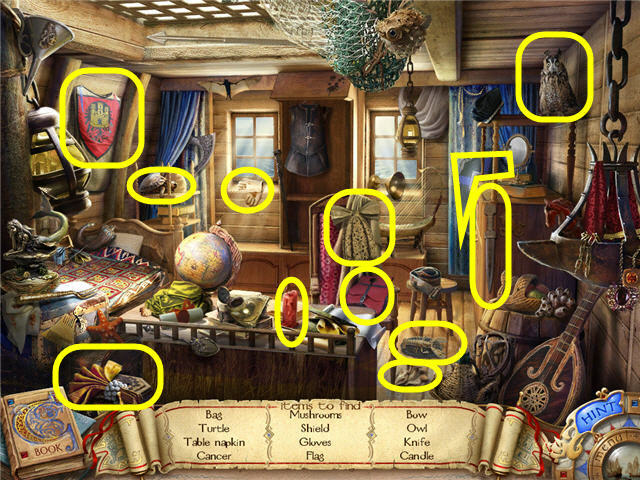
- Find all the items listed and you will get a CANDLE added to your inventory.
- Exit the room and head into the door on the right towards the stern.
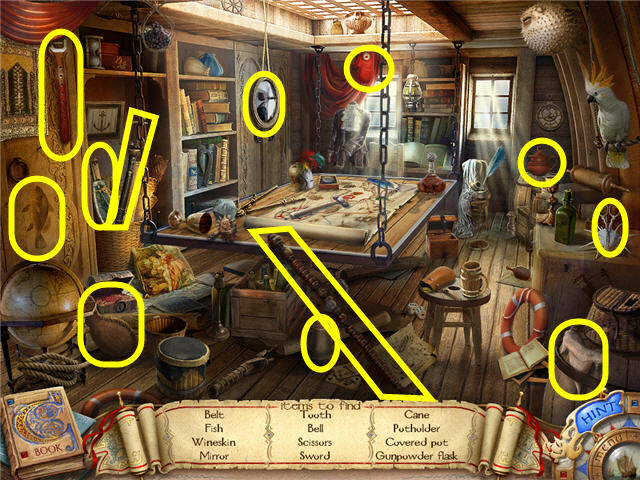
- Find all the items listed and you will get GUNPOWDER added to your inventory.
- Head down the hatch next to the wind rose.
- Place the GUNPOWDER and the CANDLE on the cannon.
- Exit the room to the upper deck.
- Click on the dinghy to lower it into the water and then click on it again to go to the island.
- Click on the cave entrance.
- Place the AMULET on the stone statue.
Chapter IX: Felipa
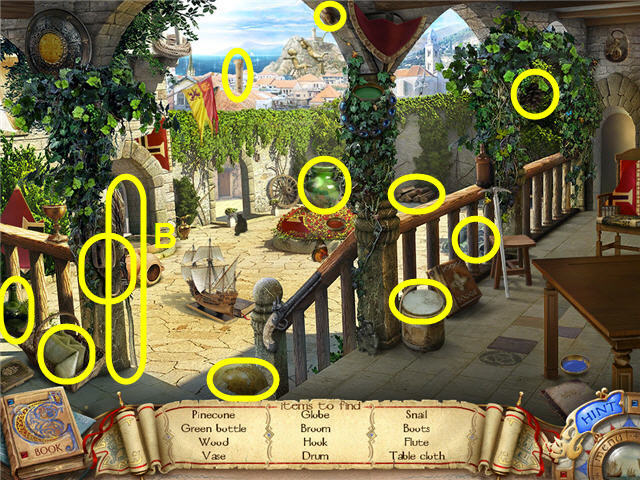
- Find all the items listed and you will get a VASE AND TABLE CLOTH added to your inventory.
- Place the VASE AND TABLECLOTH on the table (A).
- Head out to the fountain (B).
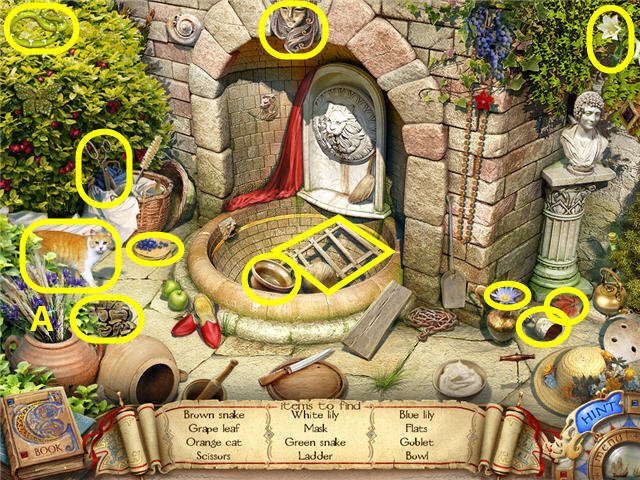
- Find all the items listed and you will get SCISSORS added to your inventory.
- Use the SCISSORS on the flowers (A) on the lower left to get FLOWERS in inventory.
- Place the FLOWERS on the vase on the table and take the BRUSHES.
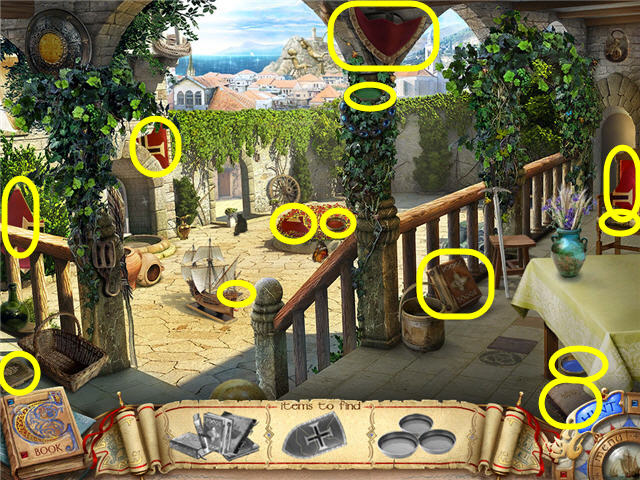
- Find all the pieces pictured and you will get PAINTS added to your inventory.
- Head into the house via the door on the right.
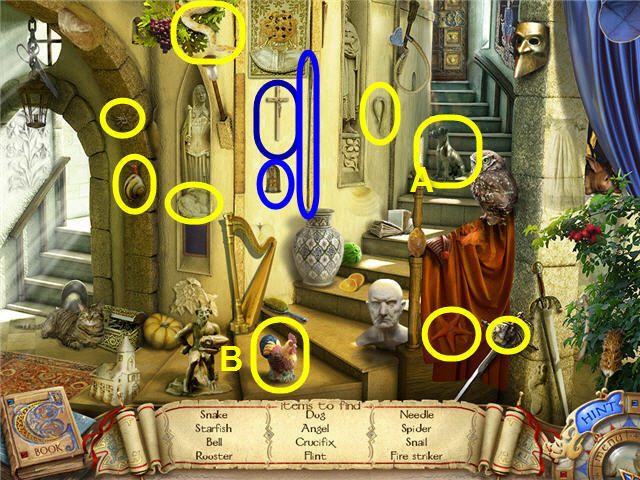
- Find all the items listed and you will get a FLINT and FIRESTEEL added to your inventory.
- Use the FLINT AND FIRESTEEL on the candle (A) on the newel post.
- Place the PAINTS on the stairs (B).
- Place the BRUSHES on the stairs.
- Exit the house and head to the fountain area.
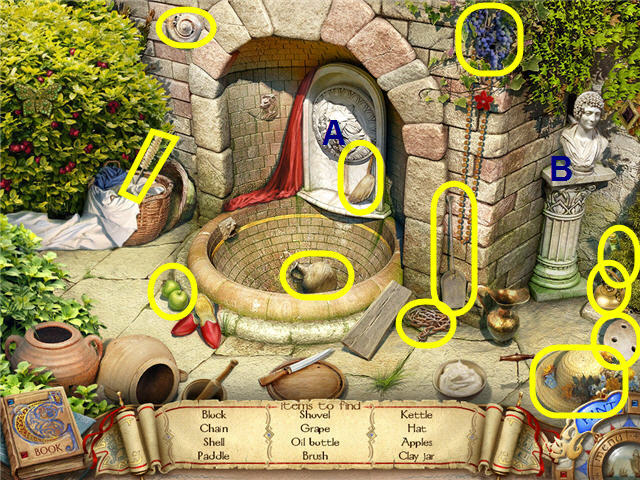
- Find all the items listed and you will get a BRUSH added to your inventory.
- Use the BRUSH on the plugged fountain (A).
- Take the KEY on the pedestal (B) to the right.
- Head into the house and use the KEY on the door at the top of the stairs.
- Click on the table in the room.
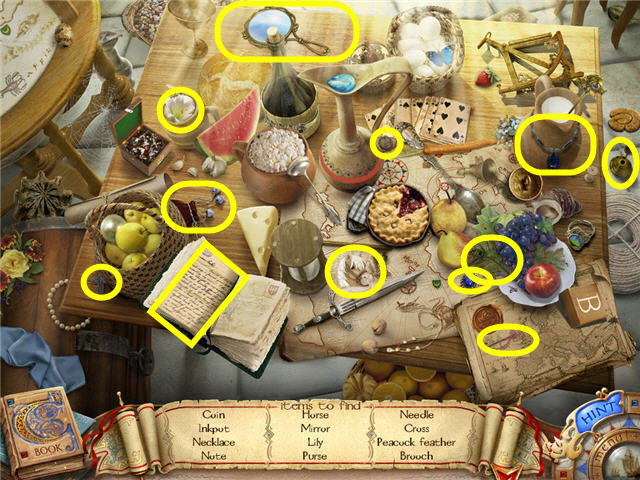
- Find all the items listed and you will get a BROOCH added to your inventory.
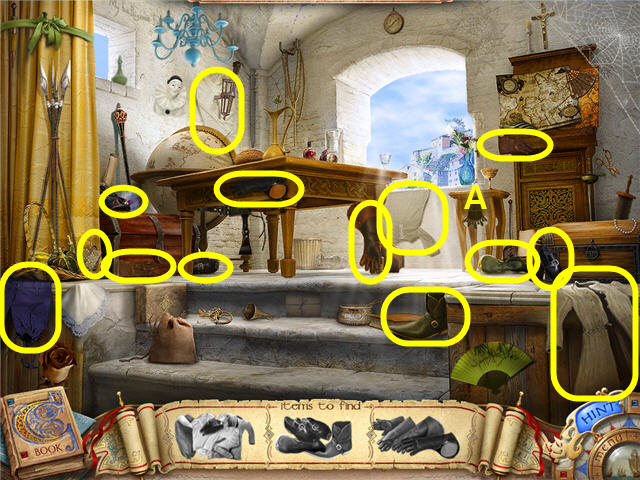
- Find all the pieces pictured listed and you will get CLOTHES added to your inventory.
- Place the BROOCH and the CLOTHES on the table (A).
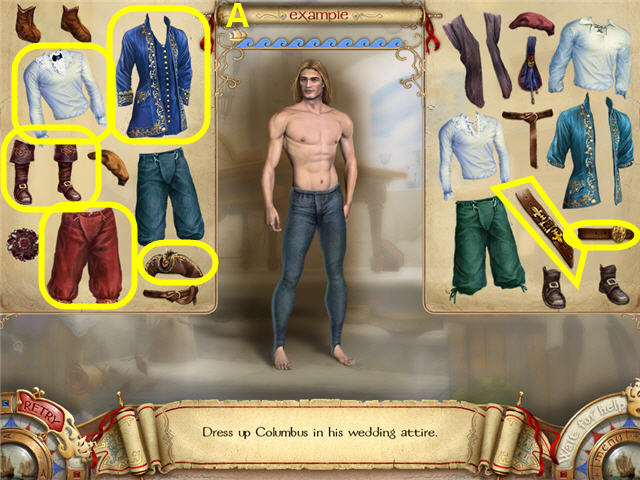
- Dress Columbus in his wedding attire.
- Click on the scroll that says example on the top of the screen for a hint.
- If you have picked a correct article of clothing, the boat (A) on the top will move farther to the right. See the screenshot for the solution.
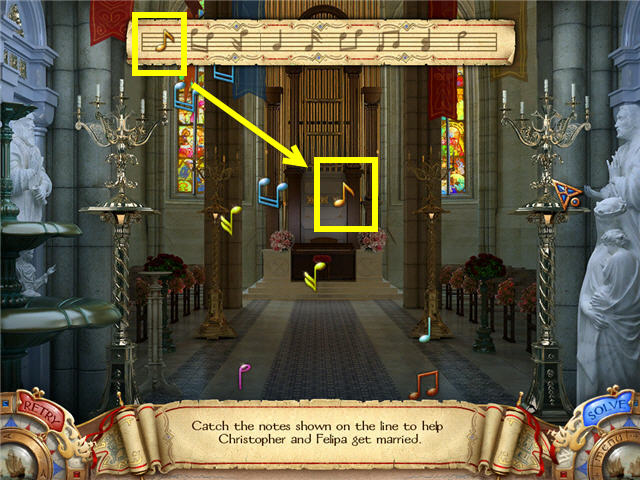
- Catch the note that is highlighted on the top bar.
- When you get a correct one, the next note will highlight.
- You will need to do this a few times.
- Congratulations! You've completed Columbus: Ghost of the Mystery Stone!
Created at: 2010-09-28

