

Walkthrough Menu
- General Tips
- Chapter 1: Escape
- Chapter 2: The Cabin
- Chapter 3: Town
- Chapter 4: The Church
- Chapter 5: The Bank
- Chapter 6: The Police Station
General Tips
- Hidden Object Scenes will be referred to as 'HOS' in this walkthrough.
- HOS and mini-games are often randomized - your solution may vary.
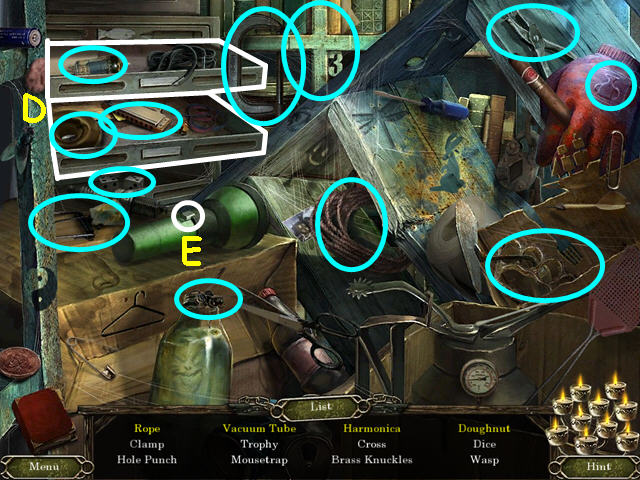
- The items written in yellow in the HOS require objects to be moved or opened to be found; these items are marked in white in the screenshots.
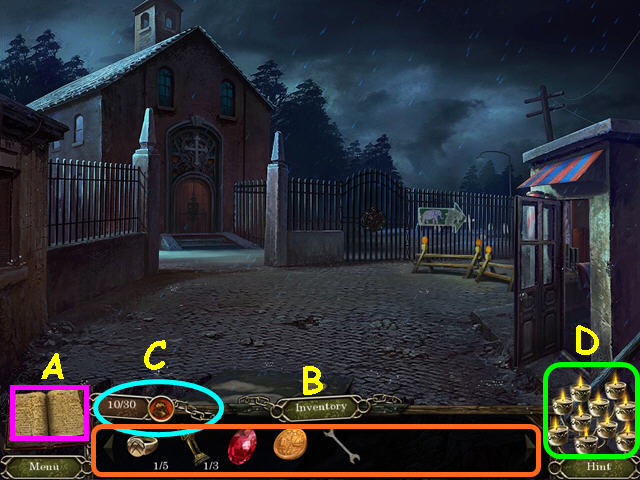
- Inside the journal you will find your task list and clues like combinations (A).
- Your inventory is in the bottom panel - click on an item to select it for use (B).
- Throughout the game, 30 GOLD POUCHES can be found (C).
- GOLD POUCHES will allow you access to extras in the Bonus menu.
- Hints are unlimited, but you must wait for all the candles to re-light (D).
Chapter 1: Escape
- You will have the option of some interactive help.
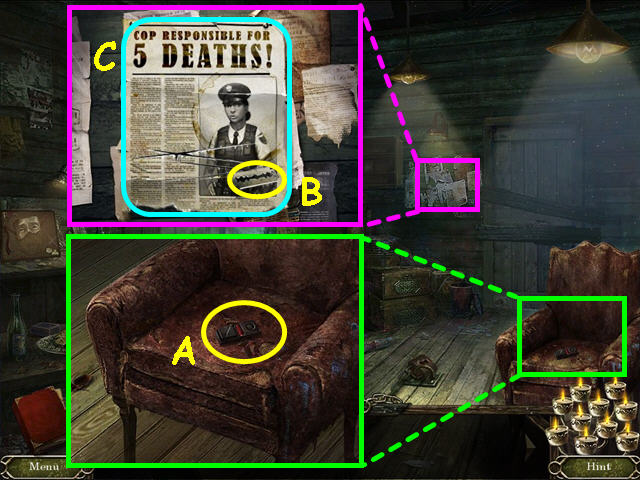
- Look at the chair and take the cell phone (A).
- After listening to the phone call, look at the bulletin board and take the RAZOR BLADE (B).
- Read the newspaper clipping about the 5 deaths (C).
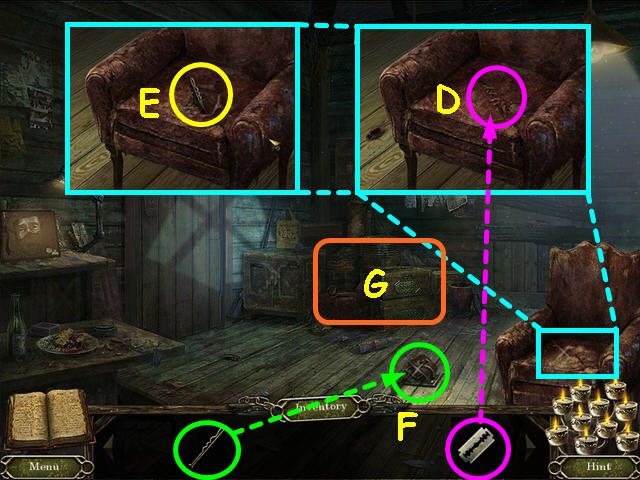
- Look at the chair and use the RAZOR BLADE to cut open the cushion (D).
- Take the BOBBY PIN (E).
- Use the BOBBY PIN on the floor shackle (F).
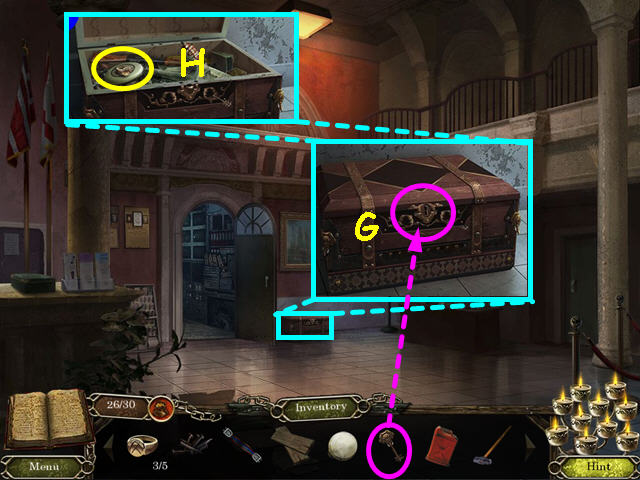
- Select the rubbish pile for a HOS (G).
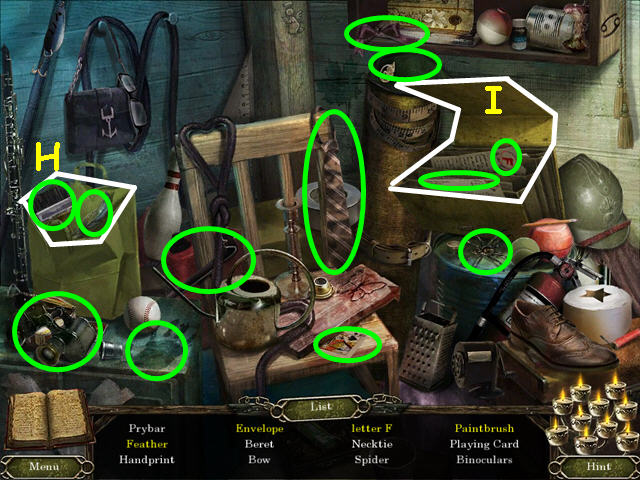
- The items marked in white need to be moved or opened to find some objects.
- Look inside the brown grocery bag (H).
- Open the portable file (I).
- You will earn the PRY BAR.
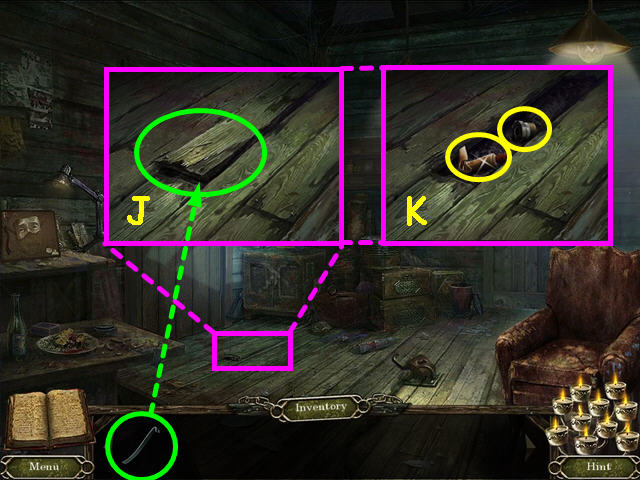
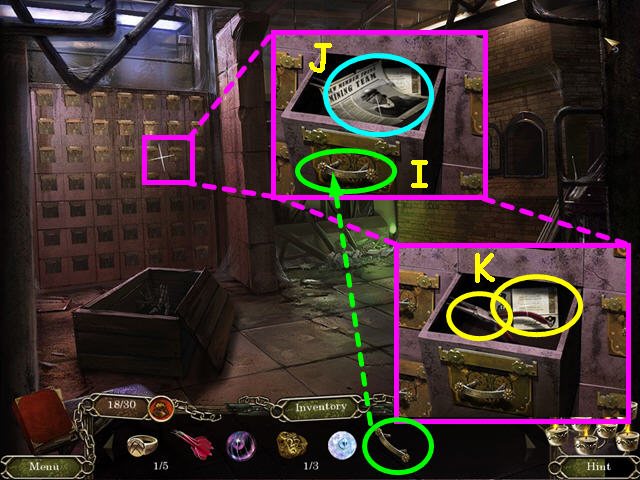
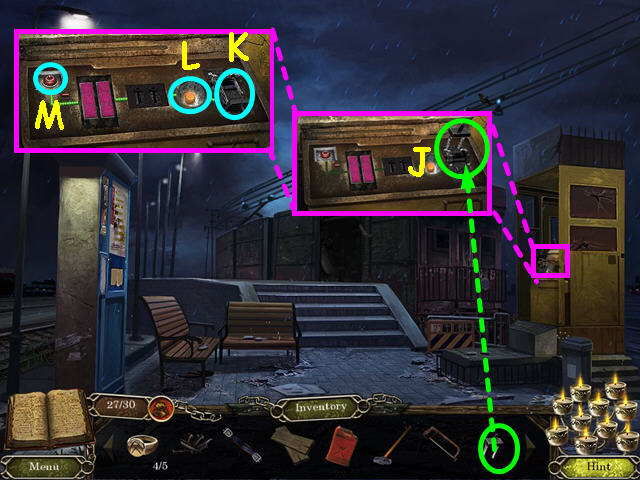
- Look at the loose floorboard and use the PRY BAR to remove the board (J).
- Take the GLUE and the FUSE (K).
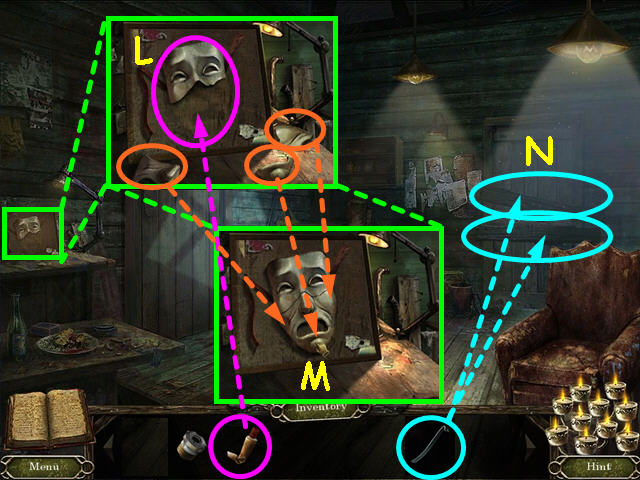
- Look at the close-up of the mask and use the GLUE on the mask piece on the board (L).
- Drag the 3 loose mask pieces to the board to repair the mask (M).
- Take the SORROWFUL MASK.
- Use the PRY BAR on each of the 2 boards barring the bathroom door (N).
- After the cop tells you to wash up, enter the bathroom door.
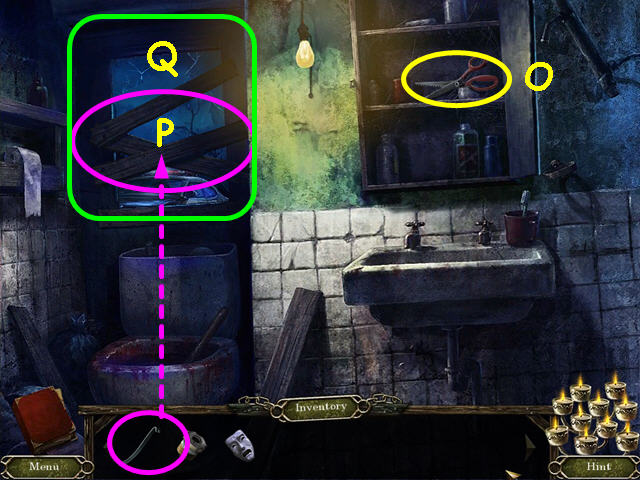
- Take the FABRIC SCISSORS from the medicine chest (O).
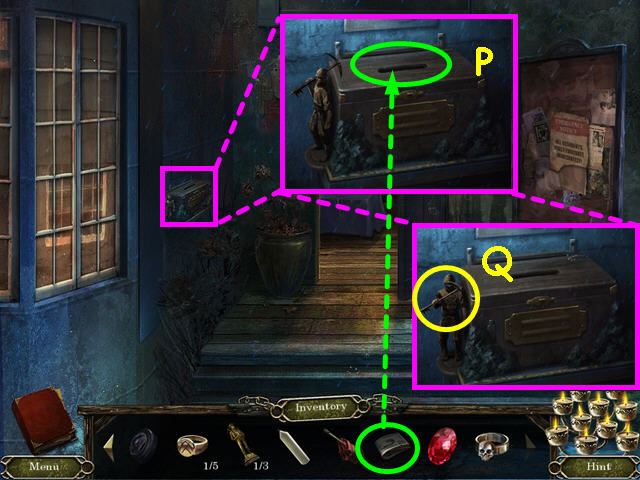
- Use the PRY BAR 3 times on the boards covering the window (P).
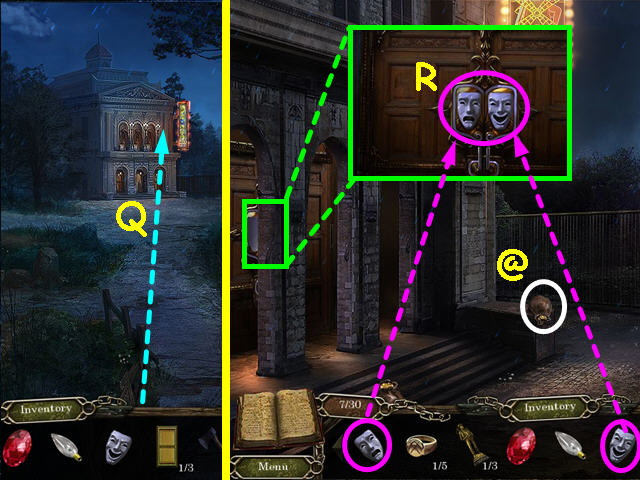
- Climb out the window (Q).
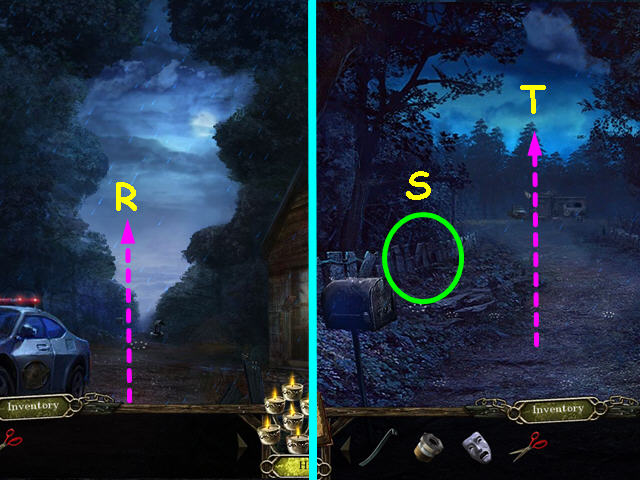
- After the apparition departs, walk forward (R).
- Select the fence on the left to hide (S).
- After the police car passes, you will be returned to the road.
- Walk forward (T).
- Once you are in front of the gas station, walk to the left.
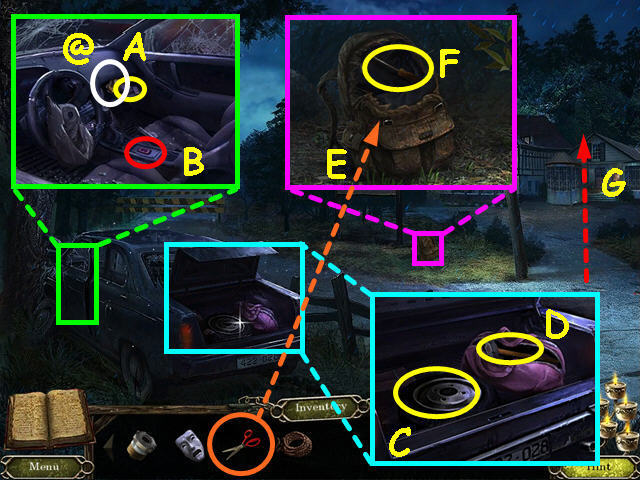
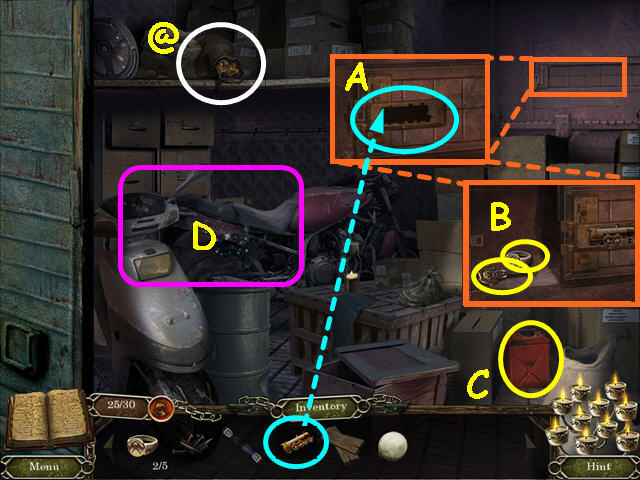
- Look inside the driver’s door; open the glove box and take the 1 of 30 GOLD POUCH (@), and the LIGHTER (A).
- Press the button in the center console to open the trunk (B).
- Look inside the trunk and take the TIRE (C).
- Open the bag and take the SLEDGE HAMMER (D).
- Look at the backpack and use the FABRIC SCISSORS to cut it open (E).
- Take the SCREWDRIVER (F).
- Walk forward to the museum (G).
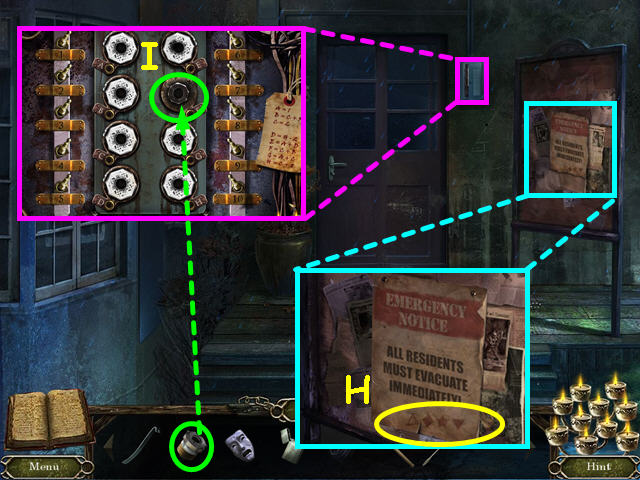
- Look at the close-up of the bulletin board and tear the code off the notice (H).
- Look at the fuse box and use the FUSE in the empty spot to trigger a mini-game (I).
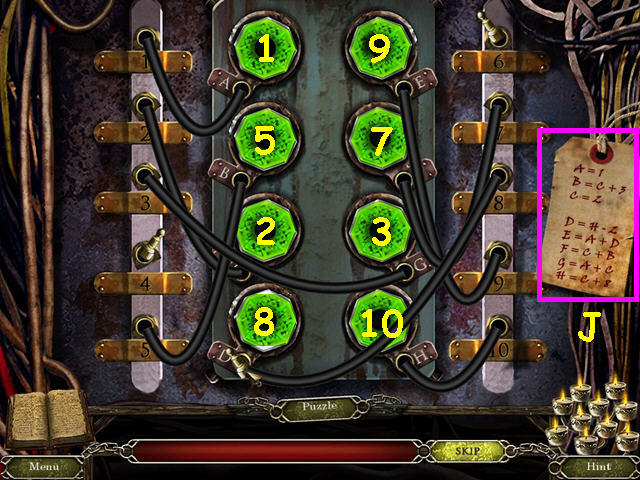
- Connect all the wires according to the legend (J).
- Each fuse will turn green when properly connected.
- Click on a wire, then click on the empty hole by the fuse to connect.
- The solution is: A=1, B=5. C=2, D=8, E=9, F=7, G=3, and H=10.
- Enter the museum.
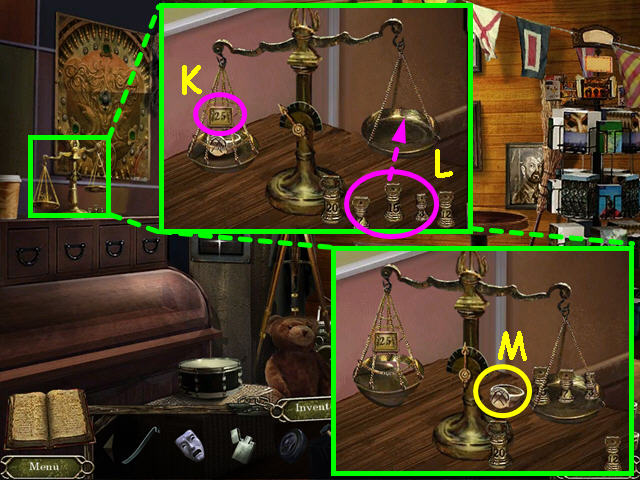
- Look at the scale and note the number over the ring is 25 (K).
- Place the 3 weights (15, 7, and 3) that add up to 25 into the right tray (L).
- Take the 1 of 5 MINER’S RING (M).
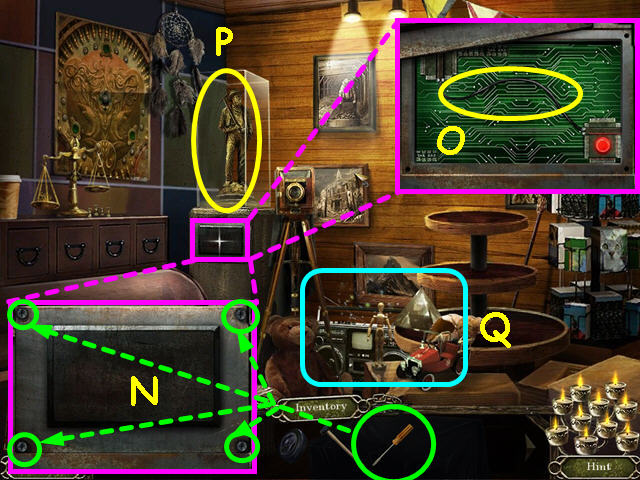
- Look at the metal plate and use the SCREWDRIVER on the 4 screws (N).
- Take the PIECE OF WIRE (O).
- Take the 1 of 3 MINER STATUETTE once the glass case drops (P).
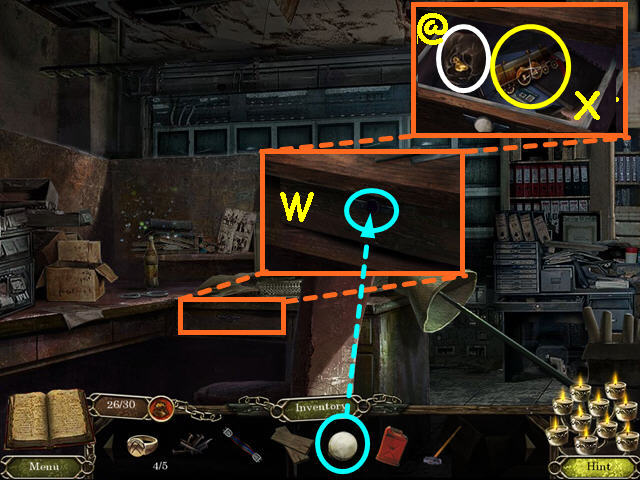
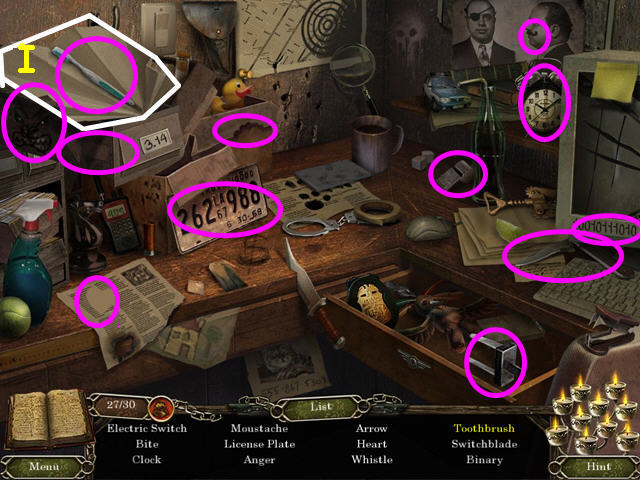
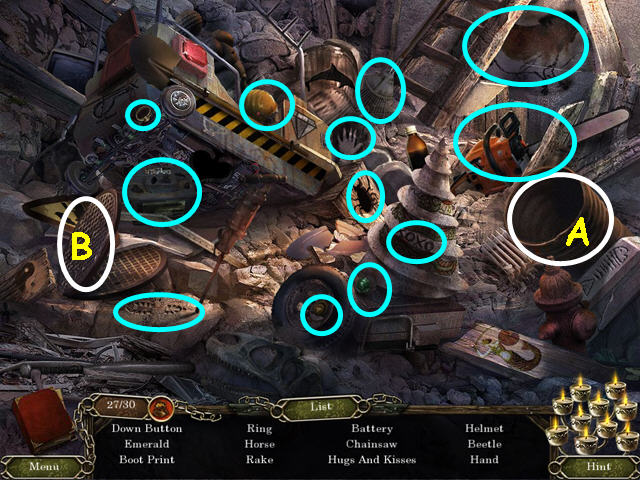
- Select the area by the boom box for a HOS (Q).
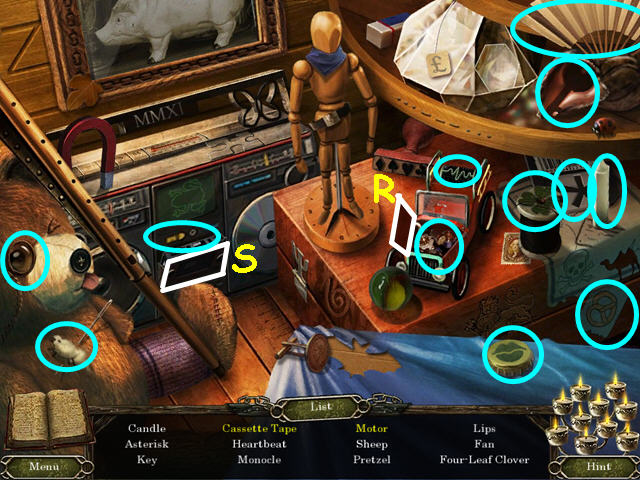
- The items marked in white need to be moved or opened to find some objects.
- Open the hood of the toy car (R).
- Open the cassette player door (S).
- You will earn the CANDLE.
- Walk down to exit the museum.
- After talking to Vincenzo, walk down, then go right to return to the gas station.
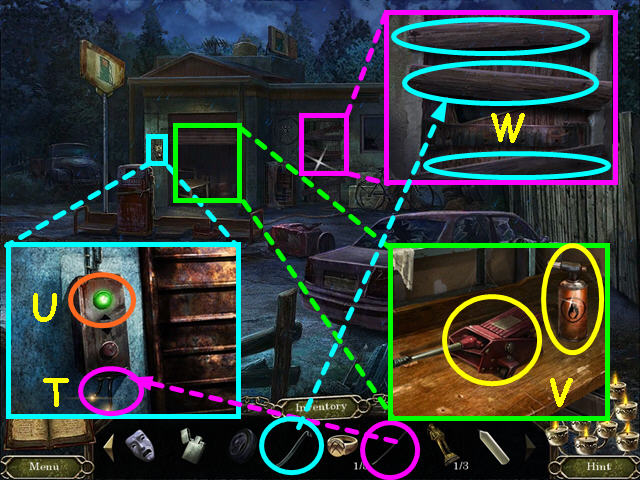
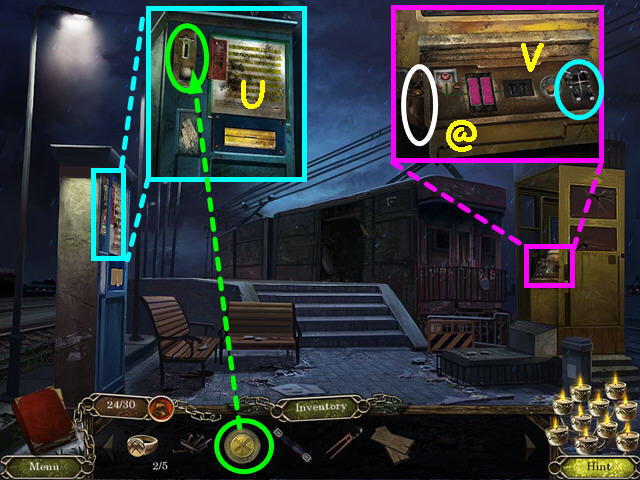
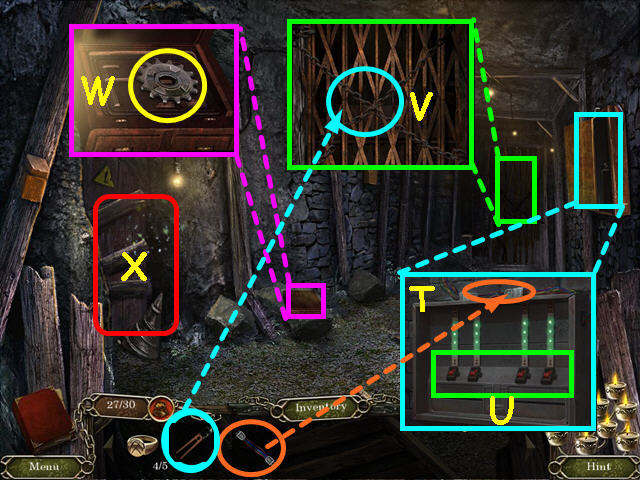
- Look at the close-up of the garage door control and use the PIECE of WIRE to repair the control (T).
- Press the green button to open the garage door (U).
- Look inside the garage and take the CAR JACK and the BLOW TORCH (V).
- Look at the door and use the PRY BAR on each of the 3 boards (W).
- Enter the building.
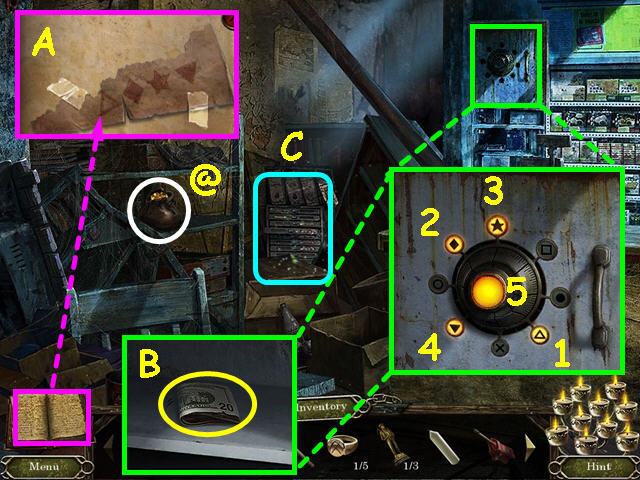
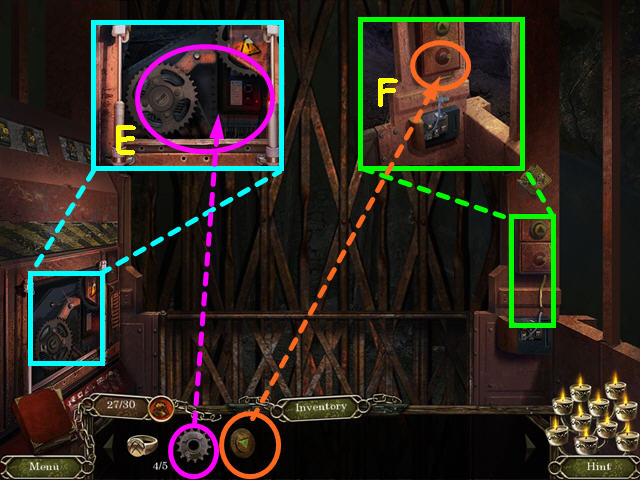
- Look in your journal for the code torn off the notice at the museum (A).
- Look at the close-up of the safe and press the symbols in the order of the code, then press the center of the dial when lit (1-5).
- Take the CASH from the open safe (B).
- Take the 2 of 30 GOLD POUCH from the shelf (@).
- Look at the debris in the center for a HOS (C).
- The items marked in white need to be moved or opened to find some objects.
- Open 2 drawers on the cabinet (D).
- Turn on the flashlight (E).
- You will earn the ROPE.
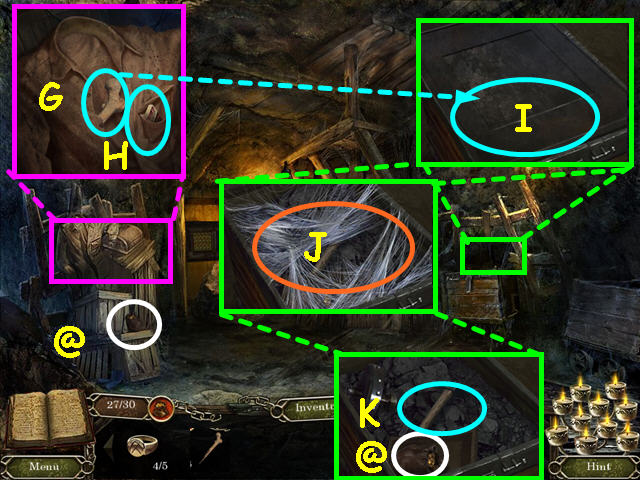
- Walk down 3 times to the locked shed.
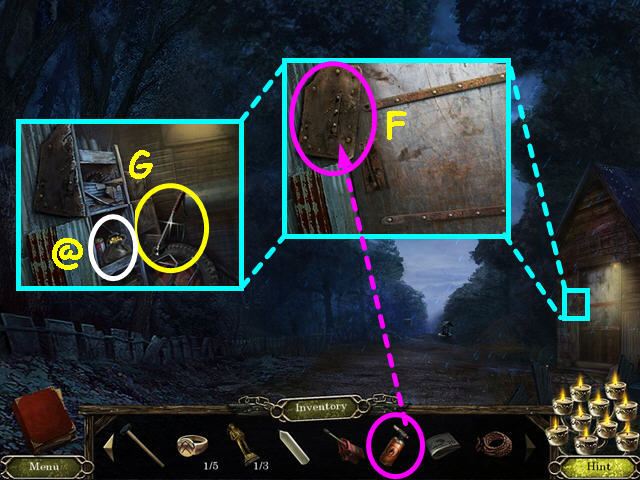
- Look at the shed door and use the BLOW TORCH on the metal plate (F).
- Take the 3 of 30 GOLD POUCH from the shelf (@).
- Take the CRANK HANDLE (G).
- Walk forward to the well area.
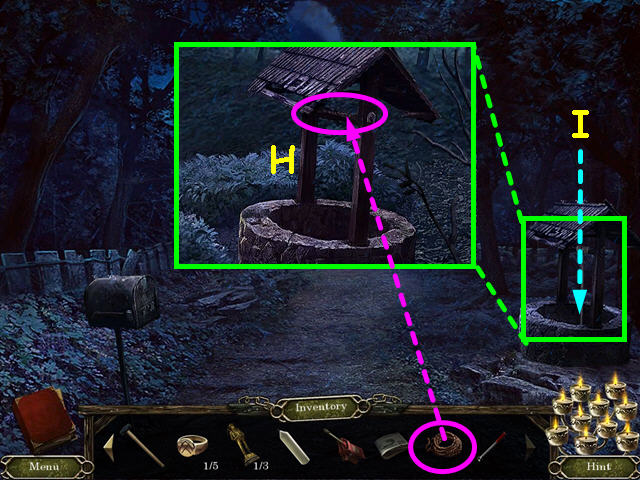
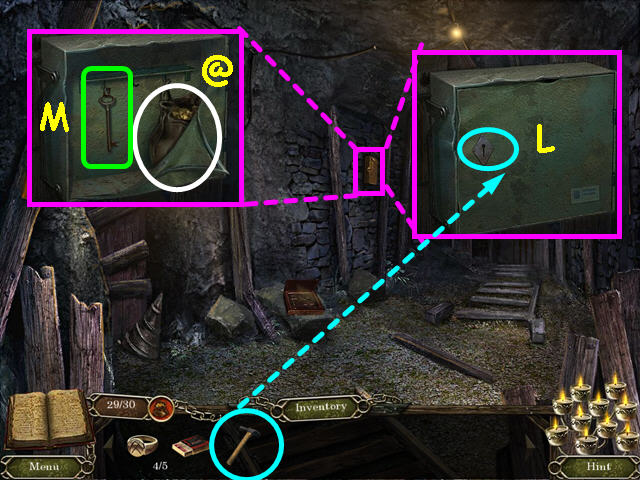
- Look at the close-up of the well and use the ROPE on the bar (H).
- Climb down into the well (I).

- Look at the close-up of the wall and use the SLEDGE HAMMER on the bricks (J).
- Take the RED GEMSTONE from inside the hole (K).
- Take the 4 of 30 GOLD POUCH (@).
- Look at the red area of the strap and use the CRANK HANDLE in the hole (L).
- Click on the handle twice to raise the rock, then take the OIL that falls from the skeleton’s hand (M).
- Climb up the rope to exit the well.
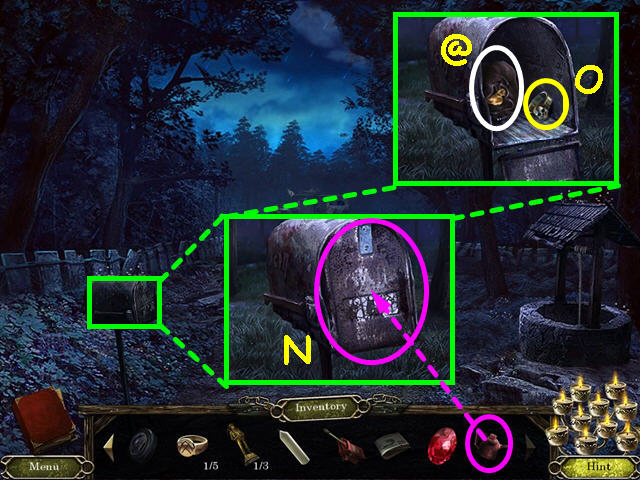
- Look at the mailbox and use the OIL on the door (N).
- Take the 5 of 30 GOLD POUCH (@).
- Take the SKULL RING (O).
- Walk forward, left, and forward to return to the porch of the museum.
- Look at the donation box and place the CASH into the slot (P).
- Take the MINER’S KEY (Q).
- Walk down twice, then enter the gas station building.
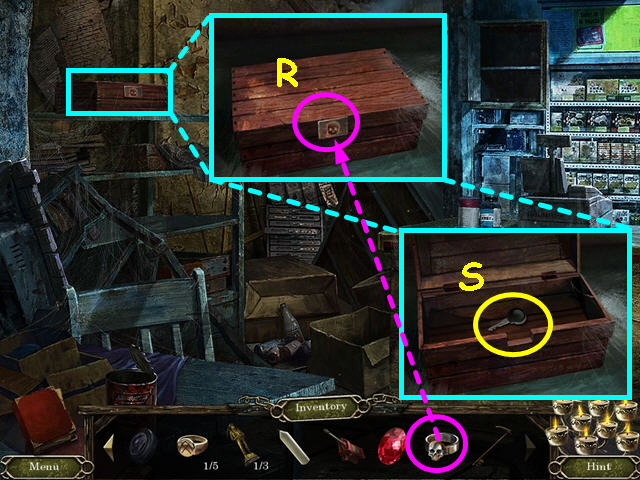
- Look at the close-up of the wood box and use the SKULL RING on the lock (R).
- Take the CAR KEY (S).
- Walk down to exit the room.
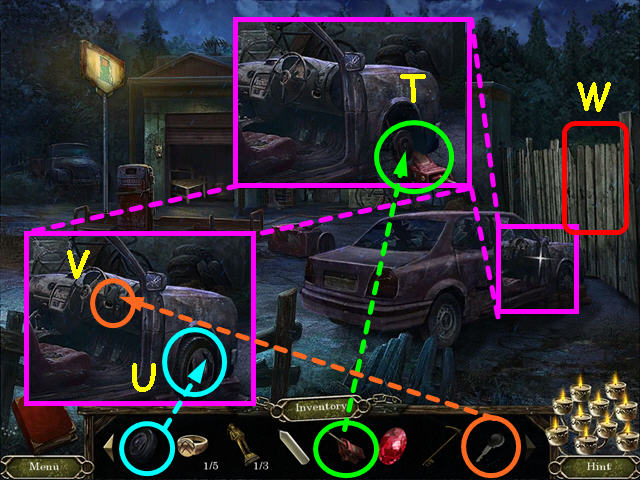
- Look at the close-up of the car and use the CAR JACK on the front of the car (T).
- Click on the car jack to raise the car.
- Place the TIRE on the wheel (U).
- Use the CAR KEY on the ignition (V).
- Walk right through the hole in the fence (W).
Chapter 2: The Cabin
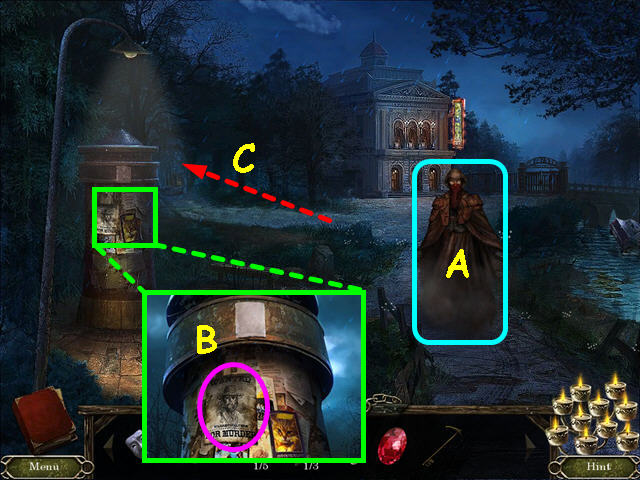
- Click on the apparition and it will leave (A).
- Read the wanted notice on the pole (B).
- Take the path to the left of the building (C).
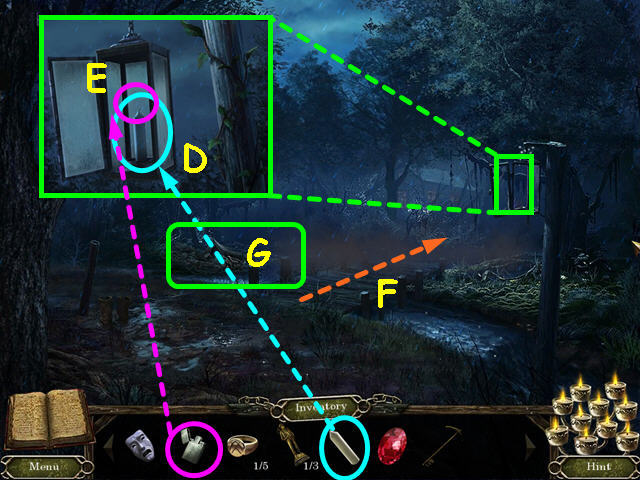
- Look at the close-up of the lantern and place the CANDLE inside (D).
- Use the LIGHTER to light the candle (E).
- Note the path across the bridge (F).
- Select the campsite for a HOS (G).
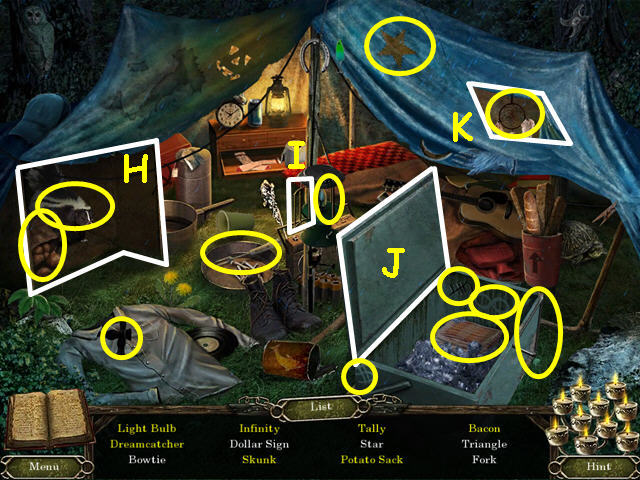
- The items marked in white need to be moved or opened to find some objects.
- Open the flaps on the cardboard box (H).
- Open the cage on the lantern (I).
- Open the chest (J).
- Tear open the tent (K).
- You will earn the LIGHT BULB.
- Walk forward across the bridge, then continue forward past the cabin.
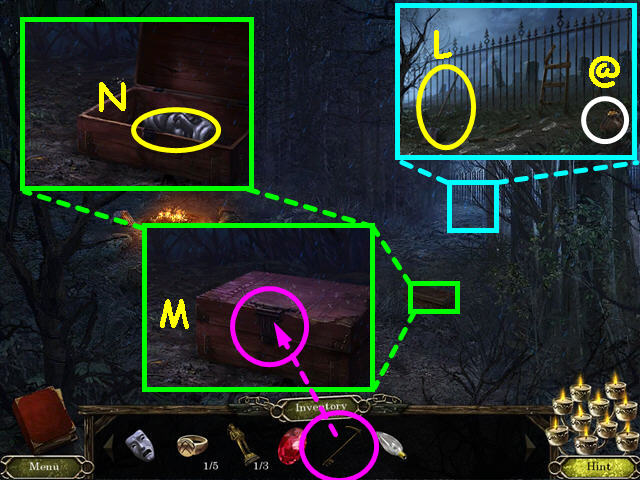
- Look at the fence area and take the SHOVEL (L).
- Take the 6 of 30 GOLD POUCH (@).
- Look at the chest and use the MINER’S KEY on the lock (M).
- Take the JOYFUL MASK (N).
- Walk down to the cabin.
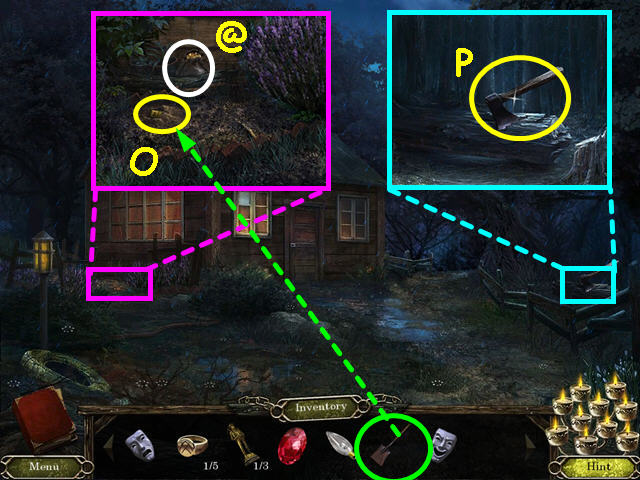
- Look at the close-up of the garden and use the SHOVEL twice to dig up the 1 of 3 PURSE TILE (O).
- Take the 7 of 30 GOLD POUCH (@).
- Look at the log on the right and take the AXE (P).
- Walk down twice.
- Walk forward to the theater (Q).
- Take the 8 of 30 GOLD POUCH (@).
- Look at the theater door and place the SORROWFUL MASK in the left spot and the JOYFUL MASK into the right spot (R).
- Walk left to enter the theater.

- Take the SCENERY FLAT (S).
- Look at the stage light and install the LIGHT BULB, then click to close the door (T).
- Note the code above the stage (U).
- Use the AXE to cut the rope and raise the curtain (V).
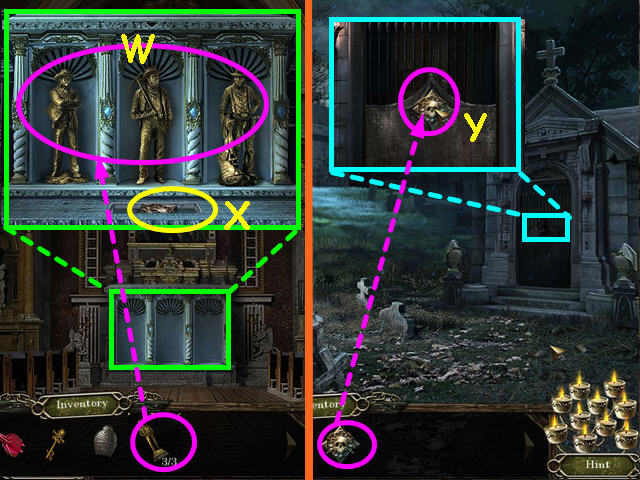
- Walk forward to the stage (W).
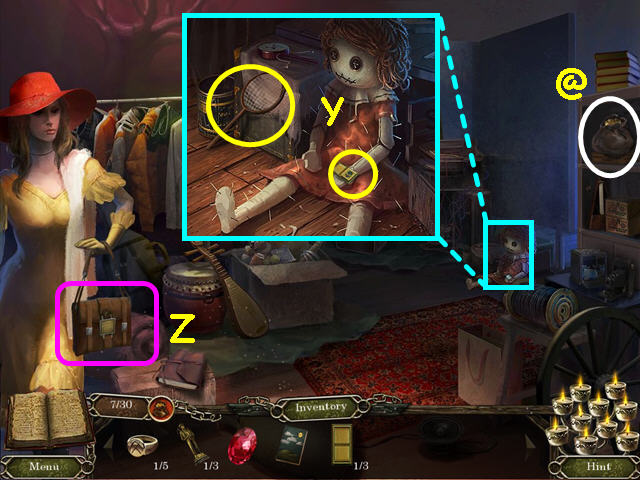
- Look at the close-up of the doll then take the BUG NET and the 2 of 3 PURSE TILE (Y).
- Take the 9 of 30 GOLD POUCH (@).
- Note the purse (Z).
- Walk down 3 times, then go left to the bridge area.

- Use the BUG NET on the lamp to catch MOTHS (A).
- Walk down and look at the edge of the lake.
- Give the MOTHS to the frog (A).
- Take the NUMBERED PLAQUE (C).
- Walk forward to the theater and go inside.
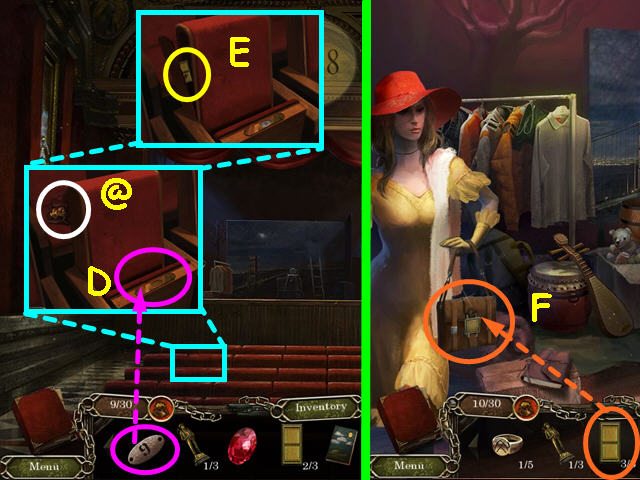
- Look at the theater seat on the left and take the 10 of 30 GOLD POUCH (@).
- Place the NUMBERED PLAQUE on the edge of the seat (D).
- Take the 3 of 3 PURSE TILE from the hidden compartment (E).
- Walk forward to the stage, look at the purse and use the 3 of 3 PURSE TILES on the board to trigger a mini-game (F).
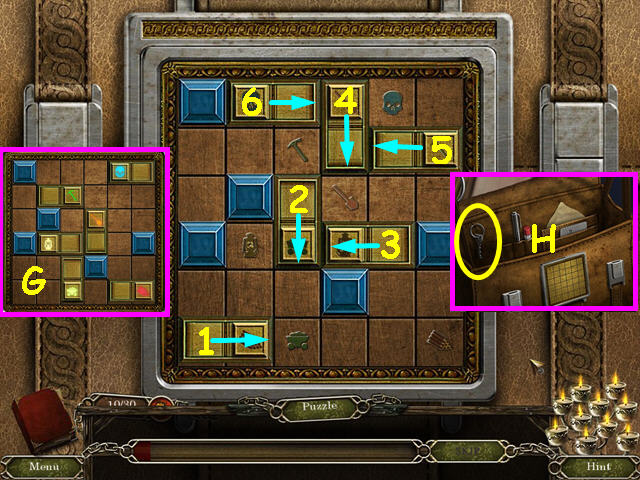
- Move each tile in the direction indicated until the symbol on the tile lights (G).
- Drag each tile in numerical order (1-6).
- Look inside the purse and take the CABIN KEY (H).
- Walk down 3 times, go left then right to return to the cabin area.
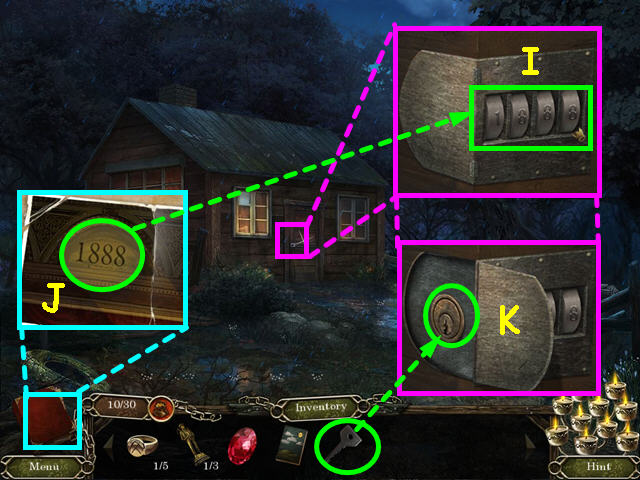
- Look at the lock on the cabin door and enter the code 1888 (I).
- Refer to your journal for the code if necessary (J).
- Use the CABIN KEY on the key hole, then enter the cabin (K).
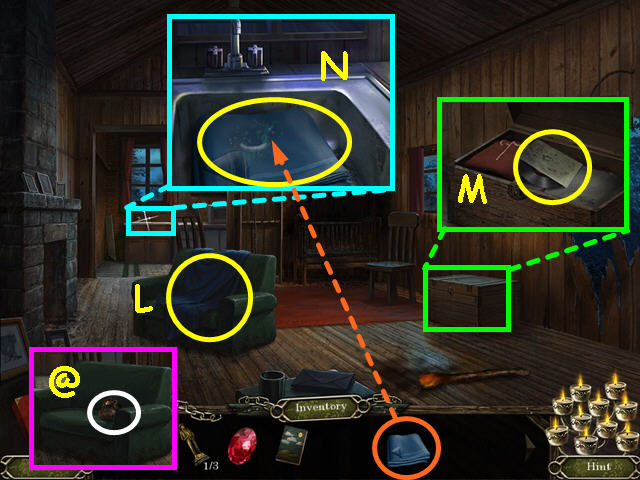
- After you regain consciousness, take the BLANKET from the couch (L).
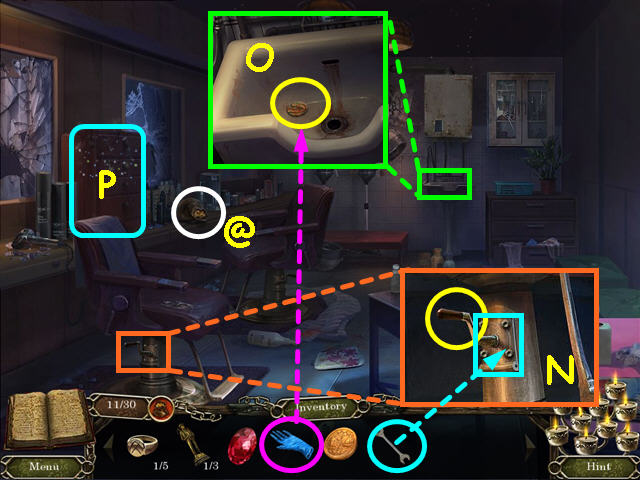
- Take the 11 of 30 GOLD POUCH that was under the blanket (@).
- Look at the wood chest, open the lid and take the OPERA RECORD (M).
- Look at the sink and place the BLANKET in the basin (N).
- Once the water stops, take the WET BLANKET.
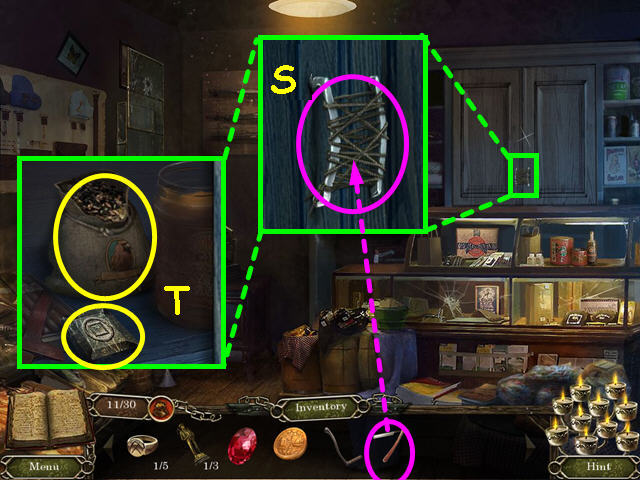
- Exit the cabin, walk forward.
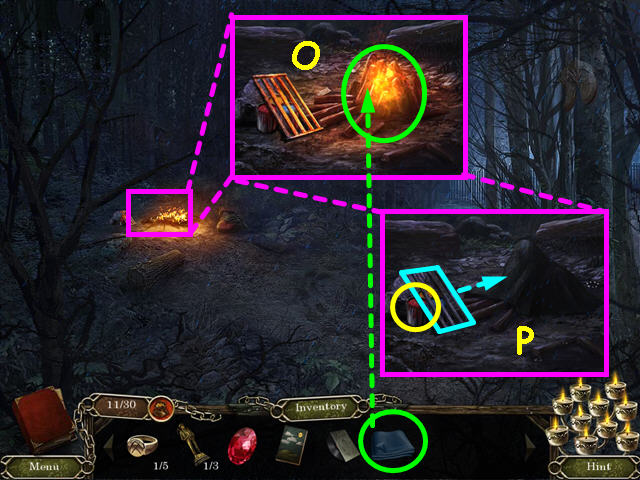
- Look at the campfire and place the WET BLANKET on the fire (O).
- Move the metal grate and take the CANS of PAINT (P).
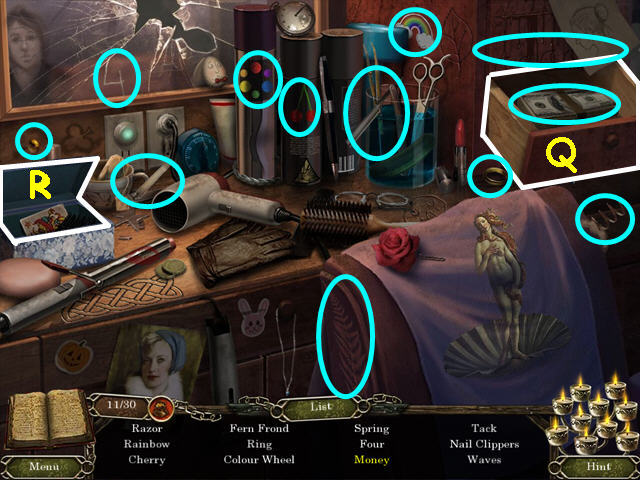
- Walk down twice, then select the campsite for a HOS.
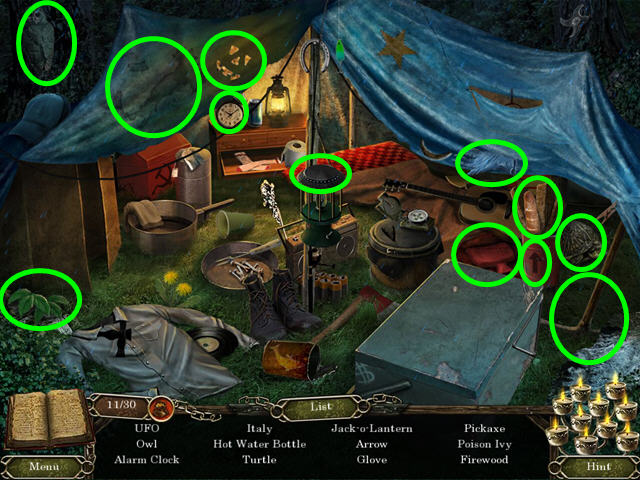
- You will earn the GLOVE.
- Walk down once, then go forward to the gate by the theater.
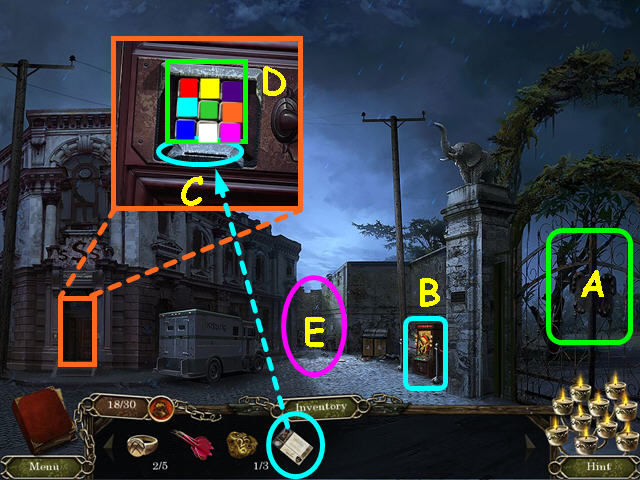
- Use the CANS of PAINT on the gate for a mini-game.
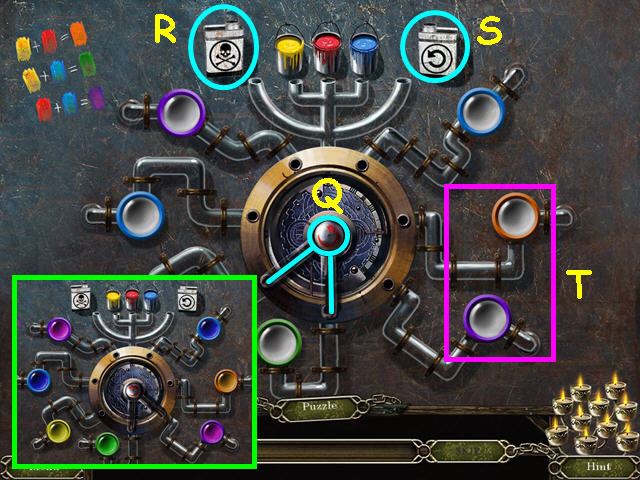
- Mix the paints so that the colors in each circle match the outer rim.
- The center button spins the tubes to point at the colored circles (Q).
- The skull and crossbones will empty the two circles of paint that the tubes are pointing to (R).
- The rewind symbol will undo the most recent move, provided you are still pointing in the same direction (S).
- Click on the center button so the tubes are pointing to the purple and orange circles on the right (T).
- Add red paint, then click the center button once. Add yellow paint and click the center button. Click the skull and crossbones, the add blue paint.
- Click the center button, then add red paint. Click the center button, then the skull and crossbones. Add blue paint, then press the center button.
- Press the skull and crossbones, then add yellow paint. Click the center button, then add blue paint.
- Walk forward through the gate.
Chapter 3: Town
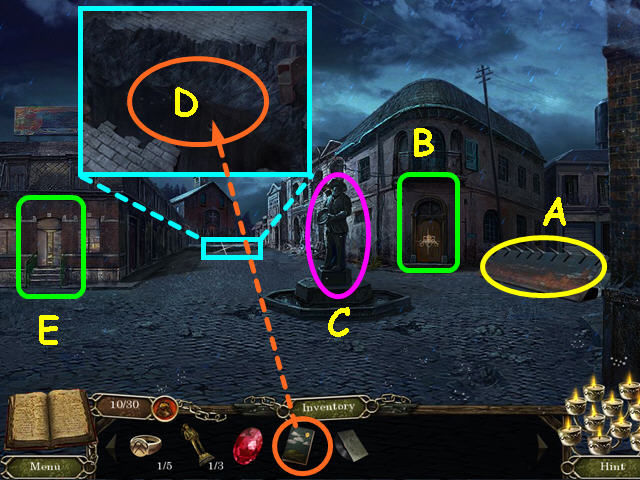
- Note the barricade (A).
- Note the library on the right (B).
- Note the statue of the town founder (C).
- Look at the crevice and place the SCENERY FLAT across the hole (C).
- Enter the general store on the left (D).

- Look at the gramophone and place the OPERA RECORD on the turntable (E).
- Take the LIBRA EMBLEM once the case opens (F).
- Select the counter display for a HOS (G).
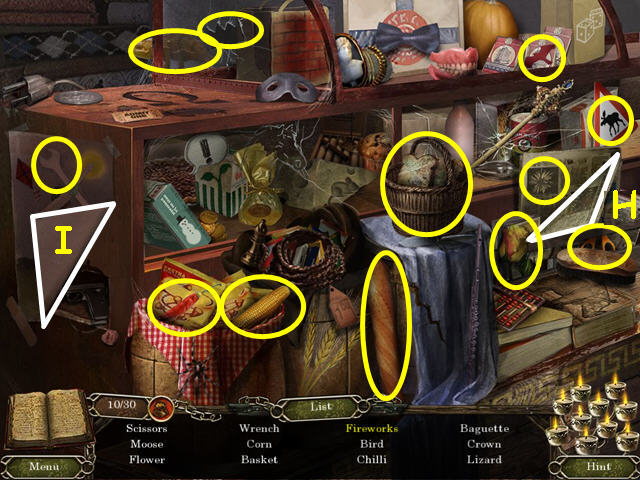
- The items marked in white need to be moved or opened to find some objects.
- Open the newspaper (H).
- Pull back the drawing (I).
- You will earn the WRENCH.
- Exit the store, then walk forward.
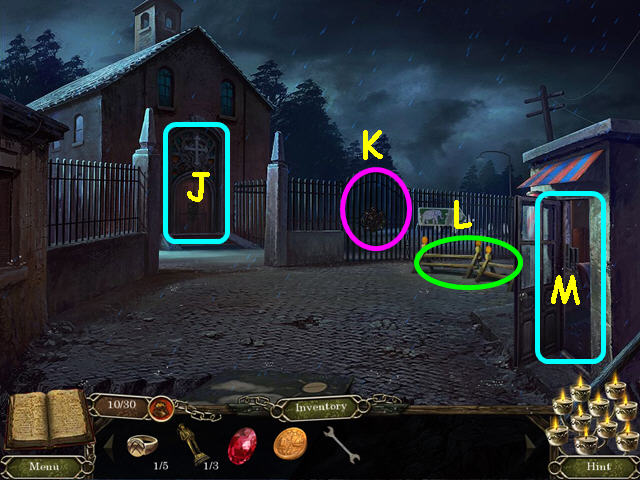
- Note the church (J).
- Note the cemetery entrance (K).
- Note the barricades (L).
- Enter the barber shop (M).
- Look at the base of the barber chair and use the WRENCH 4 times to remove the CRANK (N).
- Look in the sink and use the GLOVE to drain the water and find 1 of 2 ENGRAVED DISC (O).
- Take the 12 of 30 GOLD POUCH (@).
- Look at the counter for a HOS (P).
- Open the drawer (Q).
- Open the jewelry box (R).
- You will earn the STRAIGHT RAZOR.
- Exit the barber shop, walk down and re-enter the general store.
- Look at the cupboard and use the STRAIGHT RAZOR to cut the twine on the handles (S).
- Click to open the door and take the BIRD SEED and 1 of 2 RUNE (T).
- Exit the general store.
- Look at the statue and take the 13 of 30 GOLD POUCH (@).
- Give the BIRD SEED to the bird and you will receive the 2 of 2 ENGRAVED DISC (U).
- Look at the library door and use the 2 ENGRAVED DISCS and the LIBRA EMBLEM on the lock to trigger a mini-game (V).
- Use the buttons to move the discs to the correct location.
- Each button controls 3 discs.
- Press the following buttons for our solution: A-B-A-B-C-C-A-A.
- Enter the library.
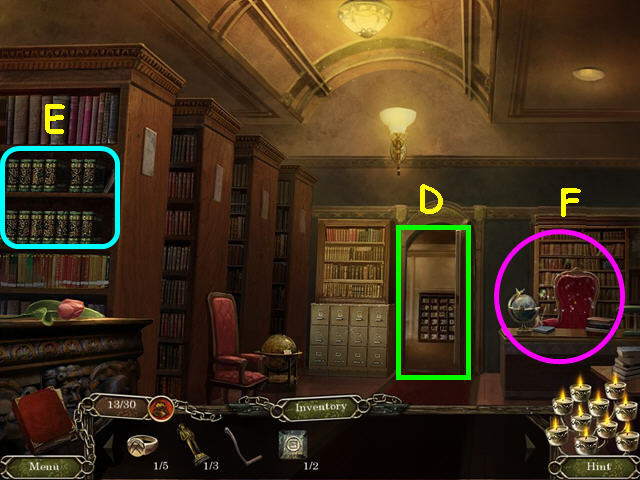
- Note the open doorway (D).
- Note the bookcase (E).
- Select the chair on the right for a HOS (F).
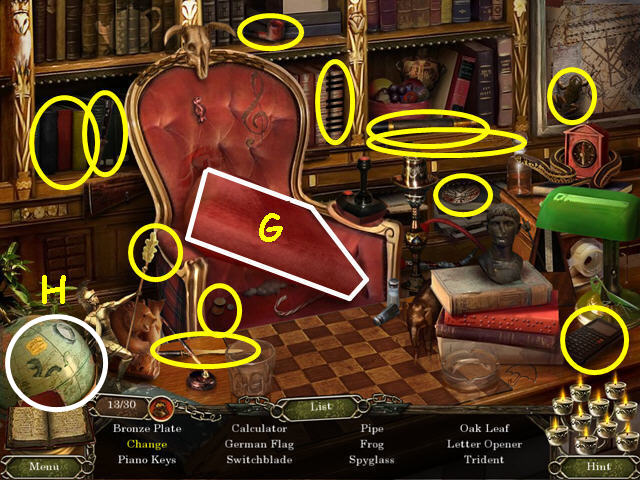
- The items marked in white need to be moved or opened to find some objects.
- Lift the seat cushion (G).
- Turn the globe (H).
- You will earn the BRONZE PLATE.
- Walk forward.
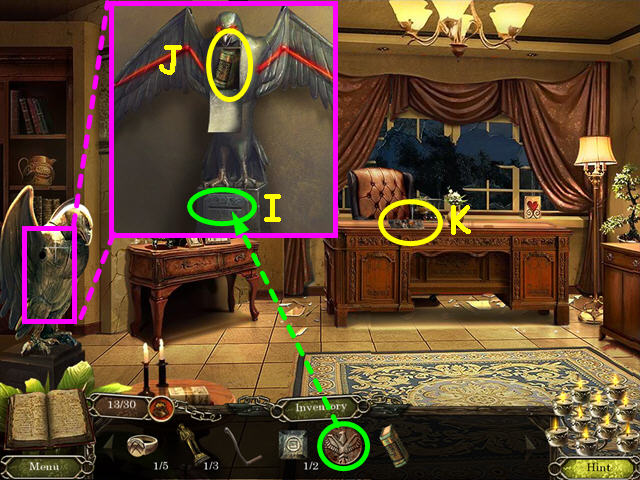
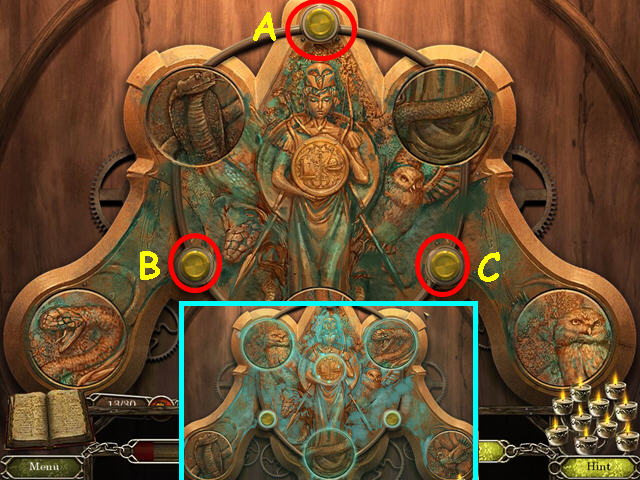
- Look at the eagle and use the BRONZE PLATE in the base (I).
- Take the BOOK (J).
- Take the photograph (K).
- Exit the room, look at the bookcase and use the BOOK to trigger a mini-game.
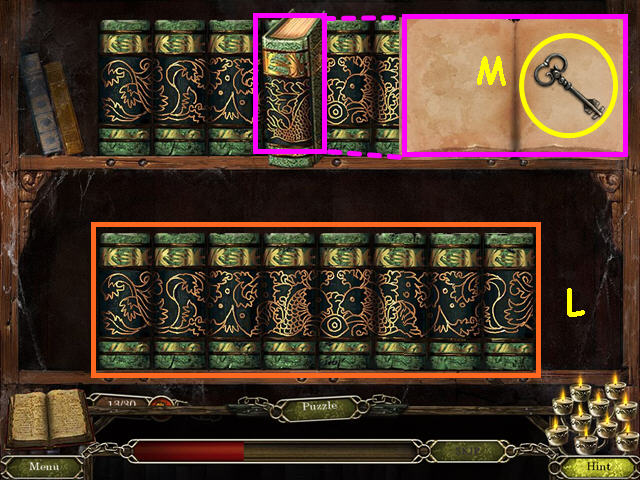
- Rearrange the books on the bottom shelf to look like the books on the top shelf (L).
- Click on 2 books to swap positions.
- Look at the book that tilted out and take the CABINET KEY (M).
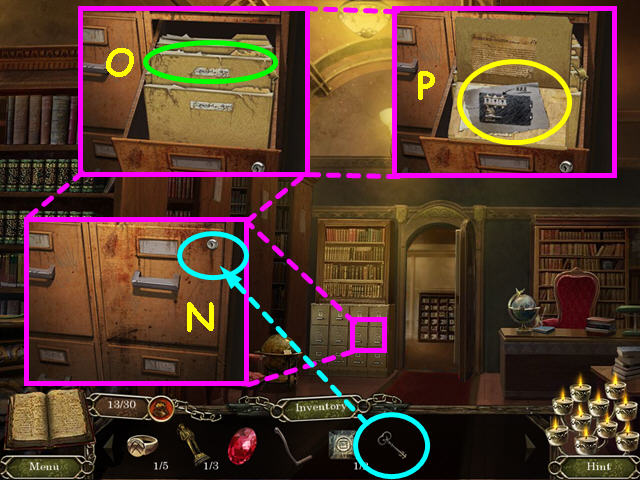
- Look at the filing cabinet and use the CABINET KEY on the lock (N).
- Move your cursor along the files until the second one pops up, the click on it (O).
- Take the safe combination (P).
- Note - you must look in your journal for the correct combination.
- Walk forward to the office.
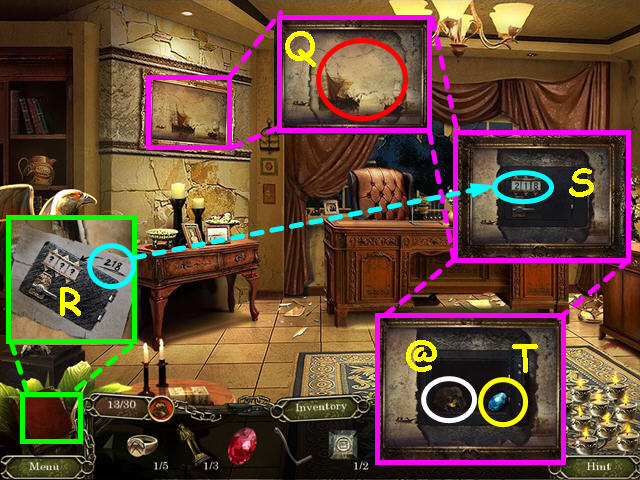
- Look at the painting and click on it to tear out the center (Q).
- Refer to your journal for the safe code (R).
- Enter the code into the safe – 218 (S).
- Take the 14 of 30 GOLD POUCH (@).
- Take the BLUE GEMSTONE (T).
- Walk down twice to exit the library, then walk forward.
Chapter 4: The Church
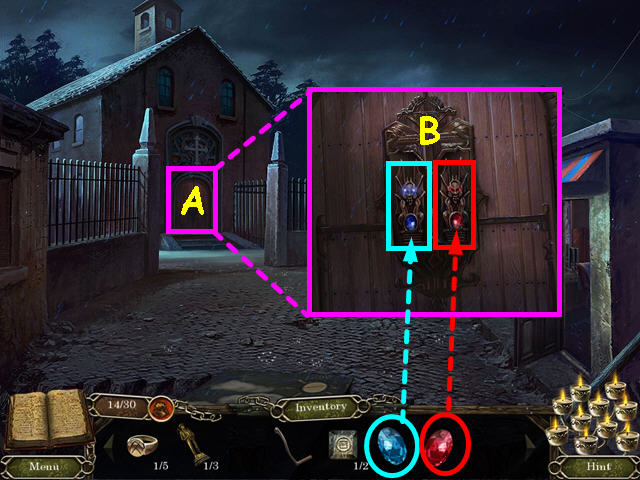
- After speaking with Diane, look at the church door (A).
- Place the RED GEMSTONE in the right door handle and the BLUE GEMSTONE into the left door handle (B).
- Enter the church.
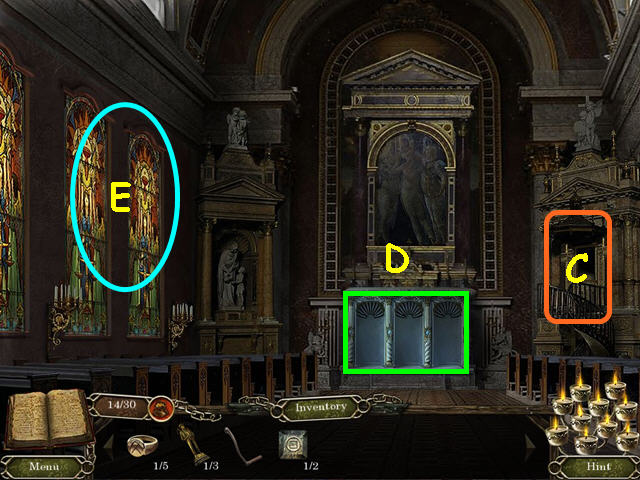
- Note the door to the bell tower (C).
- Note the empty alcoves (D).
- Select the stained glass (E).
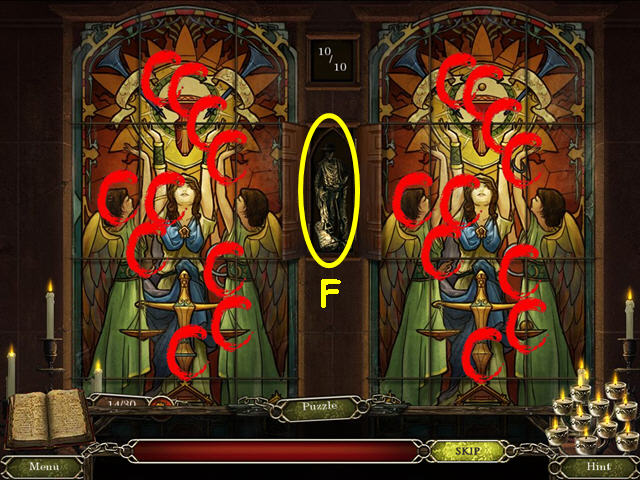
- Click on the 10 differences between the 2 windows.
- Take the 2 of 3 MINER STATUETTE from the center compartment (F).
- Enter the bell tower.
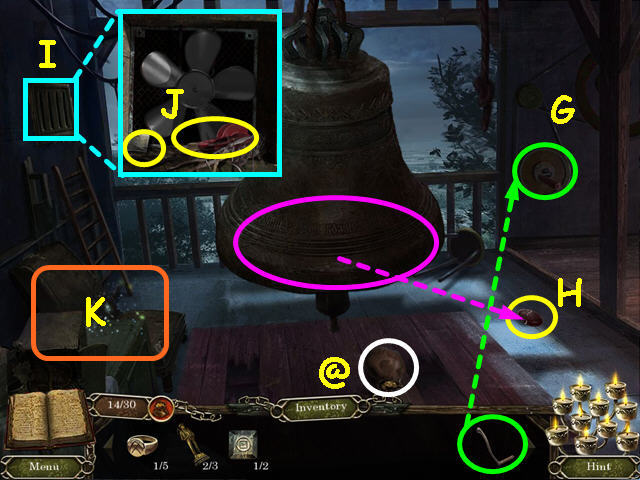
- Place the CRANK in the control, then click on the handle to raise the bell (G).
- Click on the bell to make it ring, then take the GATE DISC (H).
- Take the 15 of 30 GOLD POUCH (@).
- Click on the vent to remove the grate, then look inside (I).
- Move the straw and take the 2 of 2 RUNE and the DARTS (J).
- Select the area by the chair for a HOS (K).
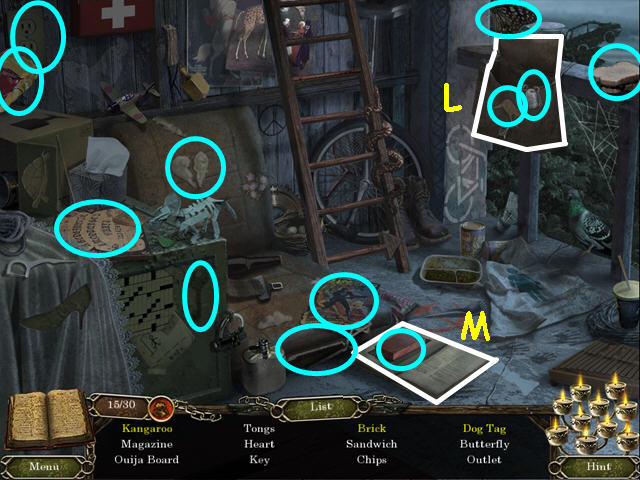
- The items marked in white need to be moved or opened to find some objects.
- Open the messenger bag (L).
- Open the book (M).
- You will earn the TONGS.
- Walk down twice to exit the church.
- Look at the cemetery gate and use the GATE DISC on the lock for a mini-game.
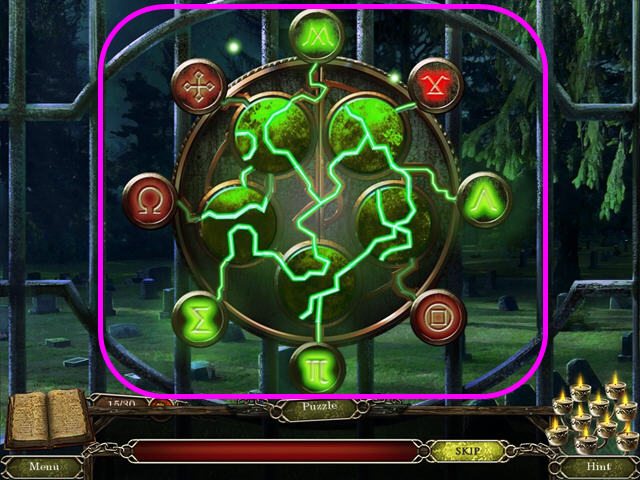
- Rotate the discs in the center so that power reaches all the outer symbols.
- Click on each disc to rotate.
- Enter the cemetery.
- Note the mausoleum (N).
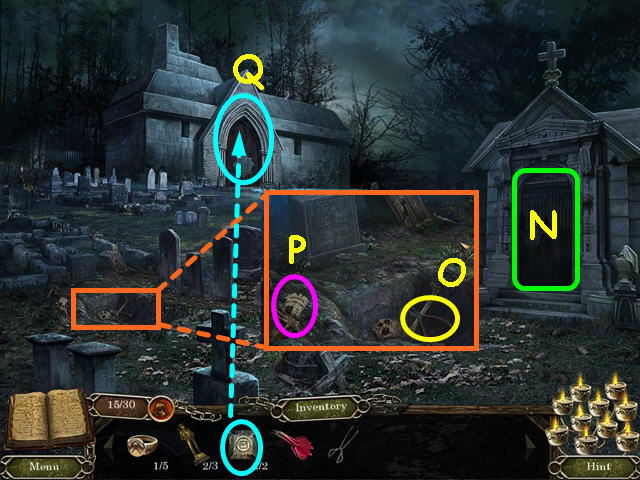
- Look at the open grave and take the WIRE CUTTERS (O).
- Read the newspaper article (P).
- Look at the crematorium’s door and use the 2 RUNES on the lock for a mini-game (Q).
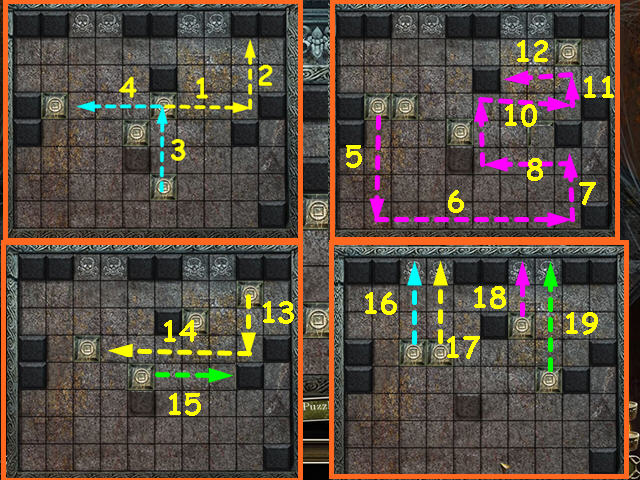
- Slide the 4 runes into the 4 spaces with the skulls (R).
- Click on a rune, then click on one of the directional arrows to move.
- Move the runes in numerical order (1-19).
- Enter the crematorium.
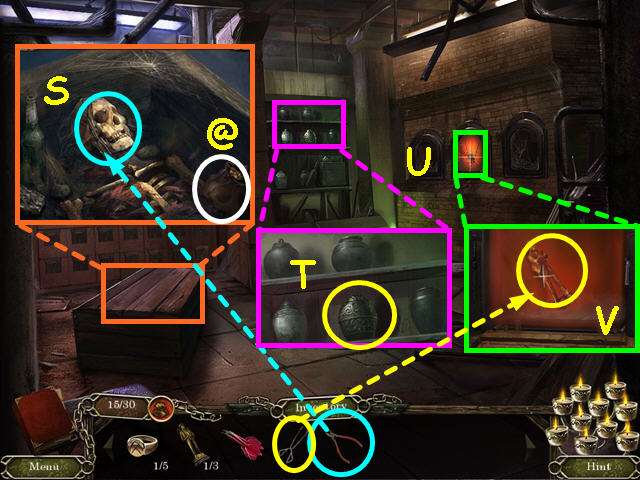
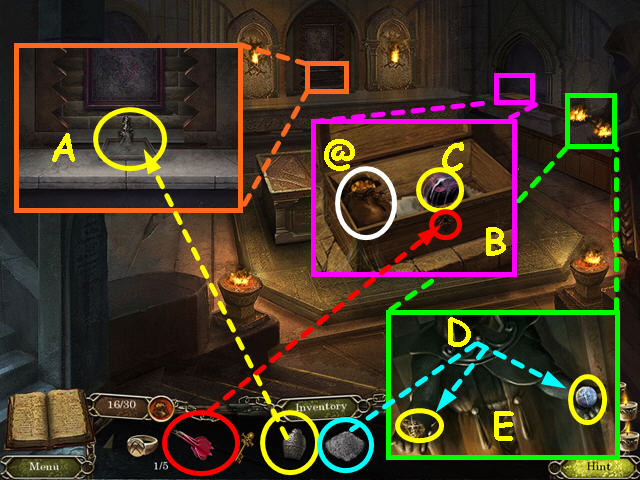
- Click on the lid of the crate and look inside.
- Take the 16 of 30 GOLD POUCH (@).
- Use the WIRE CUTTERS on the skull 3 times, then take the DEATH KEY (S).
- Look at the shelves and take the METAL URN (T).
- Look at the furnace and open the door (U).
- Use the TONGS to collect the 3 of 3 MINER STATUETTE (V).
- Walk down twice then enter the church.
- Look at the alcoves and place the 3 MINER STATUETTES inside (W).
- Take the WALTERS EMBLEM (X).
- Exit the church and enter the cemetery.
- Look at the mausoleum door and use the WALTERS EMBLEM on the indentation (Y).
- Enter the mausoleum.
- Look at the shrine in the back and place the METAL URN in the circle (A).
- Take the ASHES after the urn is smashed.
- Look at the wooden box and use the DEATH KEY on the lock (B).
- Take the 17 of 30 GOLD POUCH (@).
- Take the ONYX EYE (C).
- Look at the statue and use the ASHES on his flaming hands (D).
- Take the 1 of 3 GOLD NUGGET and the CRYSTAL EYE (E).
- Walk to the left.
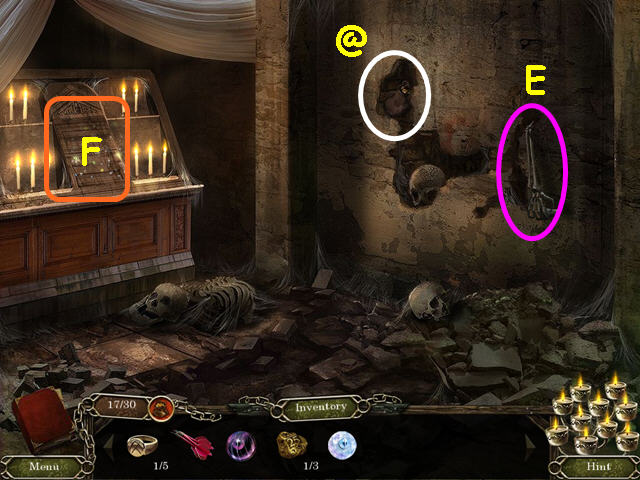
- Note the skeleton arm in the wall (E).
- Take the 18 of 30 GOLD POUCH (@).
- Select the shrine for a HOS (F).
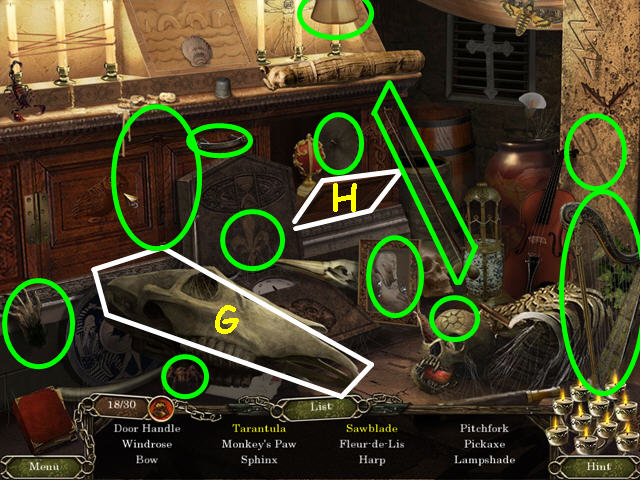
- The items marked in white need to be moved or opened to find some objects.
- Tip the animal skull (G).
- Open the panel (H).
- You will receive the ASH-BIN HANDLE.
- Walk down twice, then enter the crematorium.
- Look at the drawers and use the ASH-BIN HANDLE to open the drawer(I).
- Read the newspaper article (J).
- Take the PLIERS and the SPECIAL ACCESS CARD (K).
- Exit the crematorium, then enter the mausoleum and walk to the left.
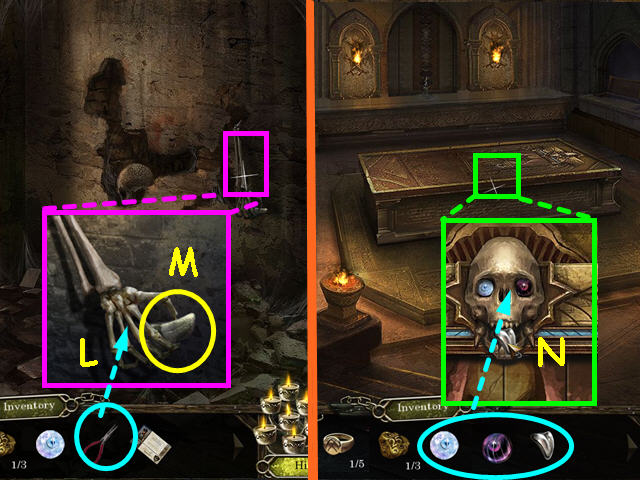
- Look at the skeleton arm in the wall and use the PLIERS on the hand (L).
- Take the SILVER TONGUE (M).
- Walk to the right and look at the sarcophagus.
- Use the SILVER TONGUE, the CRYSTAL EYE and the ONYX EYE on the skeleton head for a mini-game (N).
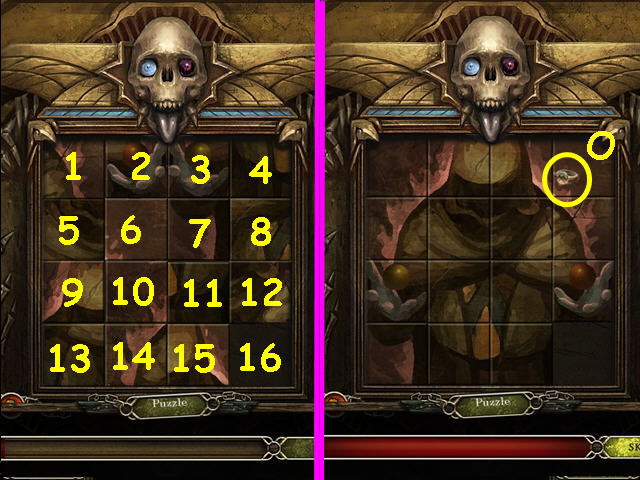
- Slide the tiles to restore the painting.
- Click on a tile that is adjacent to the empty square to move.
- Numbering the locations 1-16, click on the following squares: 12-11-15-14-13-9-10-6-2-1-5-6-2-3-7-11-12-16.
- Take the 2 of 5 MINER’S RING (O).
- Walk down twice to exit the cemetery.
Chapter 5: The Bank
- Walk to the right, past the cemetery.
- Note the gate (A).
- Note the machine (B).
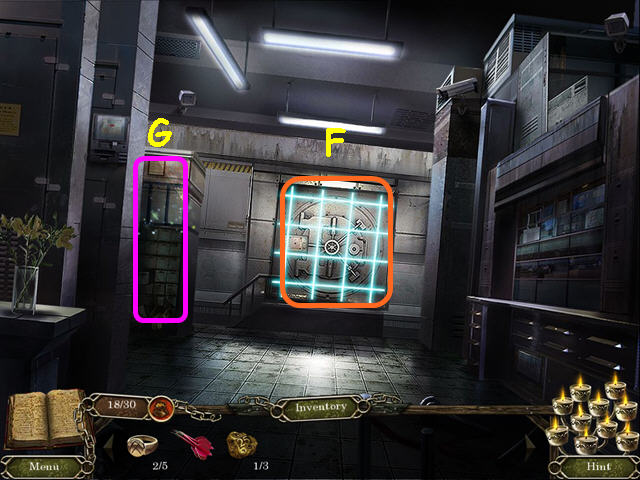
- Look at the lock on the bank door and use the SPECIAL ACCESS CARD on the slot (C).
- The keypad will want to play a Simon-like game (D).
- Watch the sequence, the press the buttons to duplicate the sequence.
- The first sequence will be 2 colors, and will continue adding a color until your get to 5 colors.
- Our sequence was: yellow-pink-green-purple-red.
- Note the alley (E).
- Enter the bank.
- Note the safe (F).
- Select the deposit boxes for a HOS (G).
- Open the drawer (H).
- Open the cigar box (I).
- You will earn the TRAIN TICKET.
- Exit the bank.
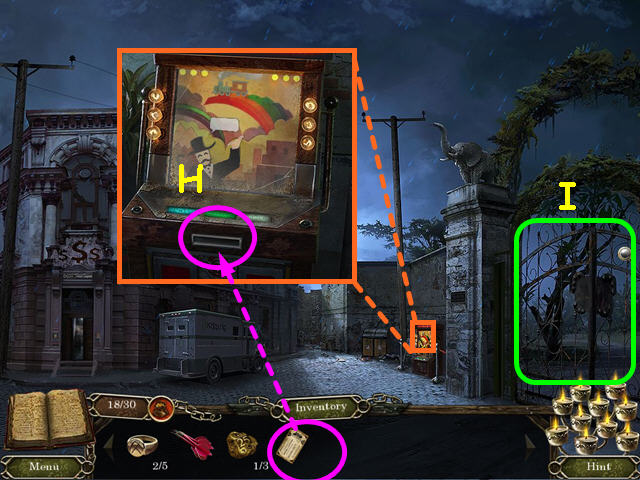
- Look at the ticket machine and use the ticket on the slot (H).
- Walk right through the gate (I).
- After speaking with Evelyn, look at the ticket counter and take the ARCHEOLOGY BRUSH (J).
- Note the small stage (K).
- Walk forward to the museum (L).
- Note the hamster cage on the right (M).
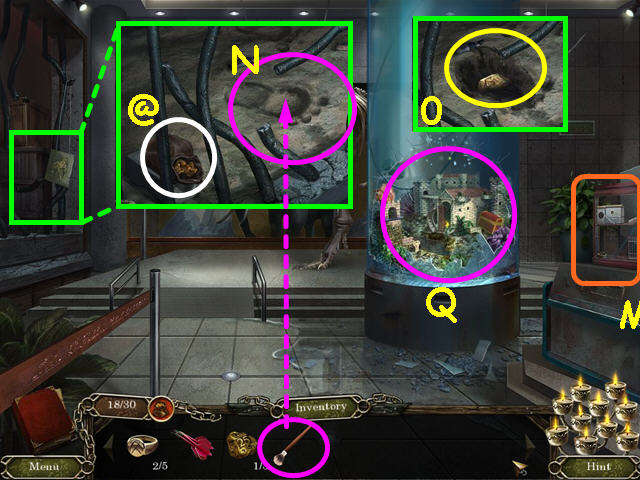
- Look at the cage on the left and use the ARCHEOLOGY BRUSH on the footprint (N).
- Take the 19 of 30 GOLD POUCH (@).
- Take the 2 of 3 GOLD NUGGET (O).
- Select the aquarium for a HOS (P).
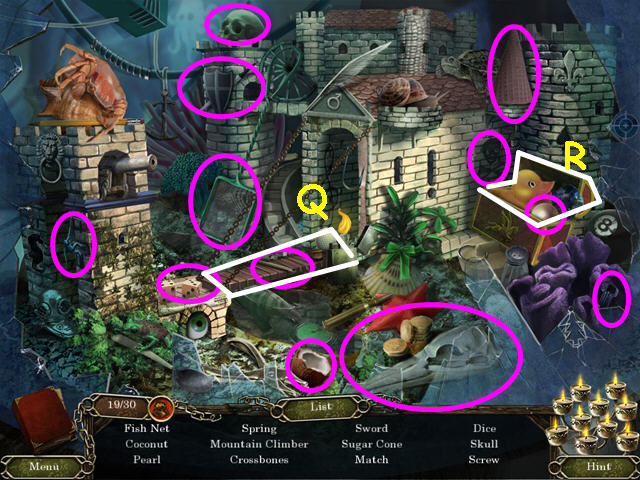
- The items marked in white need to be moved or opened to find some objects.
- Lower the drawbridge (Q).
- Open the chest (R).
- You will earn the FISH NET.
- Exit the museum.
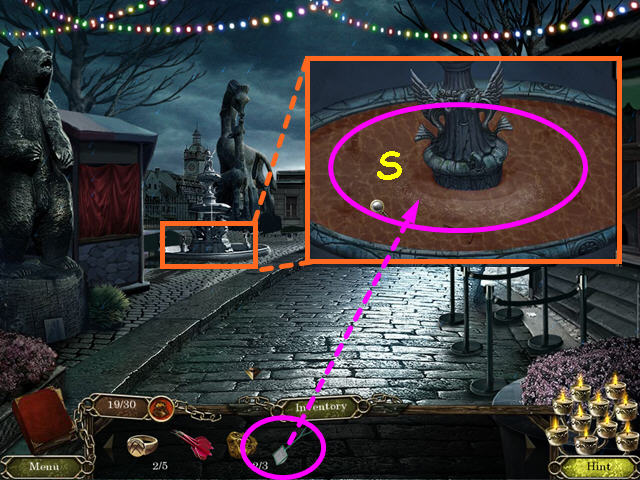
- Look at the fountain and use the FISH NET (S).
- You will earn the HEX KEY.
- Walk down, then enter the alley.
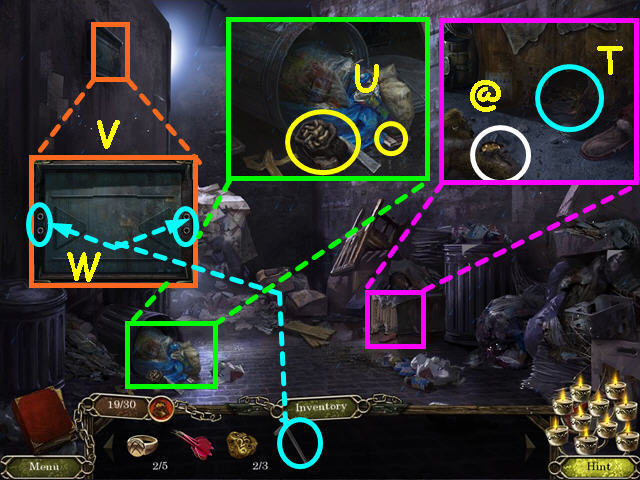
- Look at the cardboard box and note the mouse (T).
- Take the 20 of 30 GOLD POUCH (@).
- Exit the close-up and look at the trash on the left.
- Take the BAG of PEANUTS and the MATCHES (U).
- Exit the close-up and look at the security panel (V).
- Use the HEX KEY on the 4 bolts to open the panel (W).
- Click on the lid to remove it and move all the switches to the down position.
- Exit the alley and enter the bank.
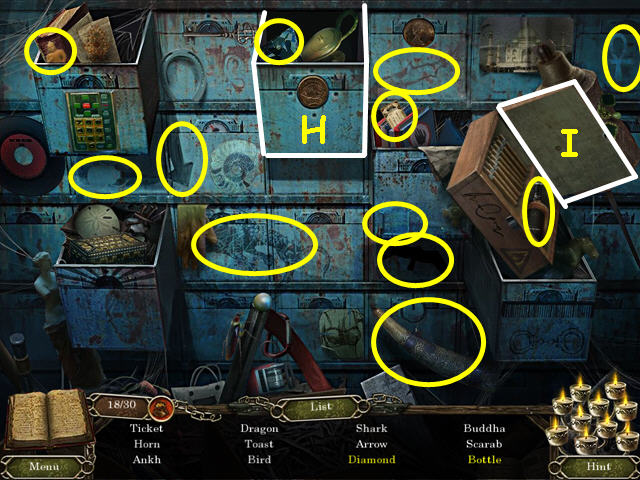
- Select the deposit boxes for a HOS.
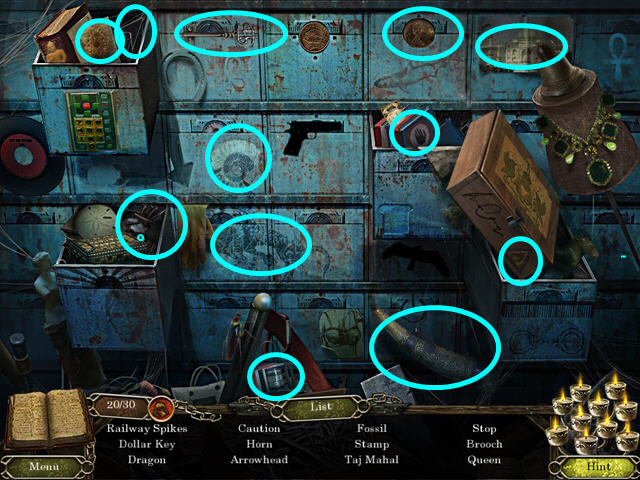
- Locate all the items on the list.
- You will earn the RAILWAY SPIKES.
- Exit the bank and walk to the right.
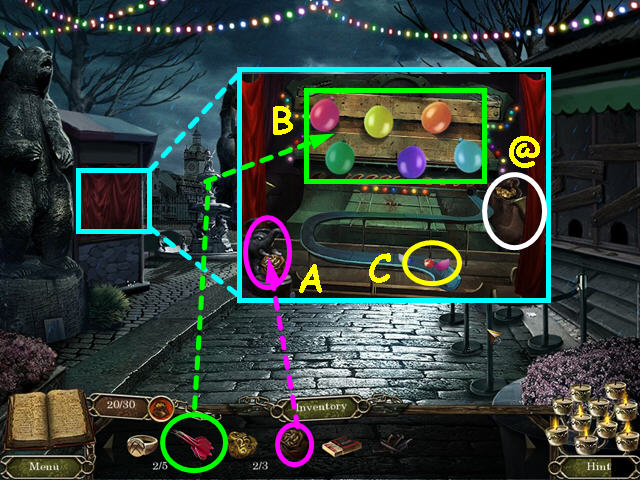
- Look at the mini-stage and give the BAG of PEANUTS to the elephant (A).
- Use the DARTS to pop all 6 balloons (B).
- Take the CHEESE (C).
- Take the 21 of 30 GOLD POUCH (@).
- Walk down, then enter the alley.
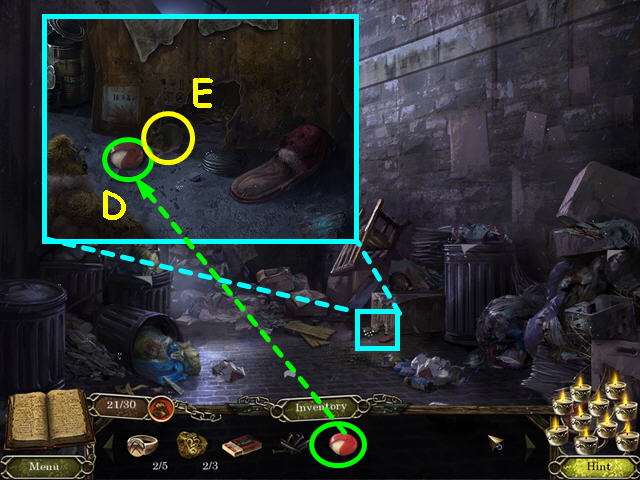
- Look at the box and give the CHEESE to the mouse (D).
- Take the MOUSE and exit the alley (E).
- Walk to the right then enter the museum.

- Look at the hamster cage and click on the door (F).
- Place the MOUSE inside the cage (G).
- Take the METAL BALL when it falls to the door (H).
- Walk down twice and enter the bank.
- Look at the safe and use the METAL BALL on the board for a mini-game.
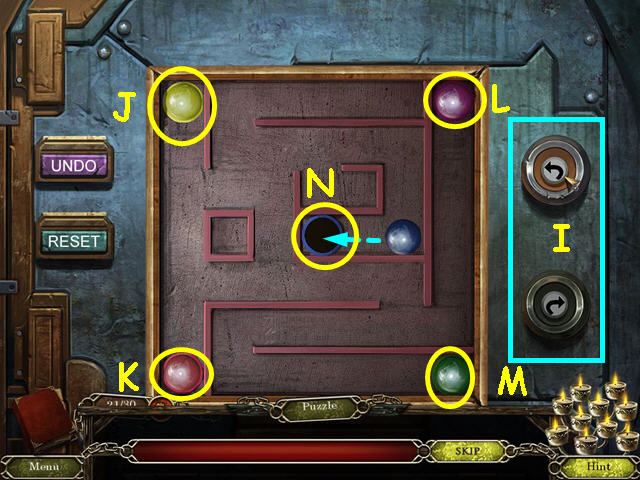
- Use the buttons to rotate the tray so that the colored balls go in their matching holes.
- The top button rotates to the left and the lower button rotates to the right (I).
- Make the following moves: L-L-R-L-L. The yellow ball should be in place (J).
- Move: R-R-L-R. The pink ball should be in place (K).
- Move: R-L-R-L-R-R. The purple ball should be in place (L).
- Move: R-R-R-L-R-L-L-R-R to put the green ball in place (M).
- Move: R-L-L-L to put the blue ball in its place (N).
- Enter the vault.
- Take the photograph (O).
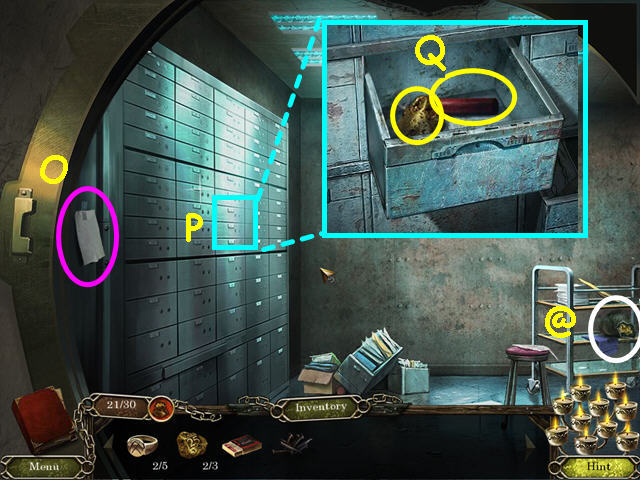
- Take the 22 of 30 GOLD POUCH (@).
- Look at the wall of drawers and open the drawer (P).
- Take the 3 of 3 GOLD NUGGET and the DYNAMITE (Q).
- Walk down twice to exit the vault.
- After talking with Diane, walk down twice more.
Chapter 6: The Police Station
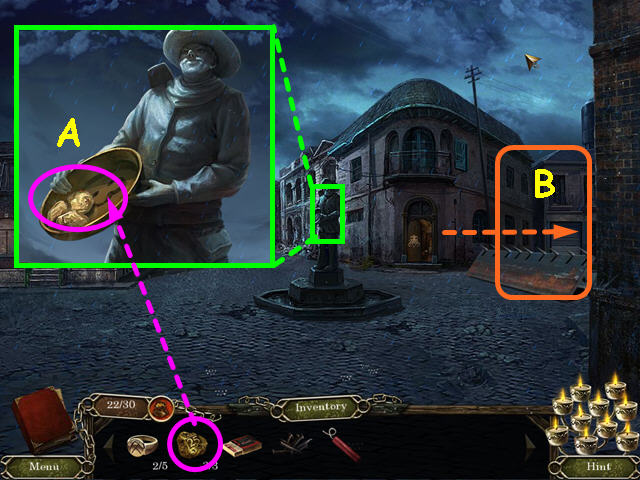
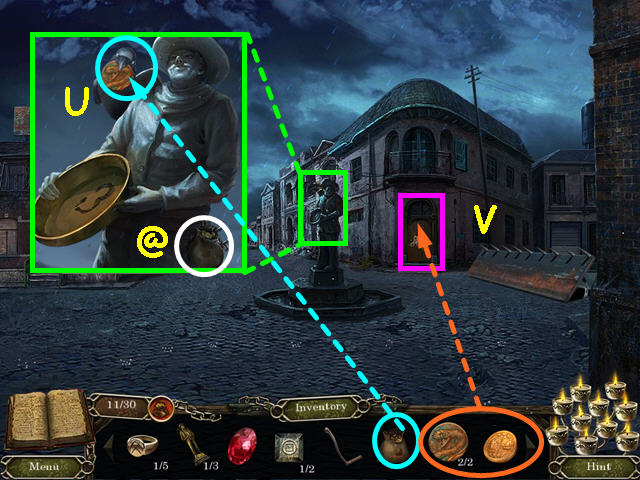
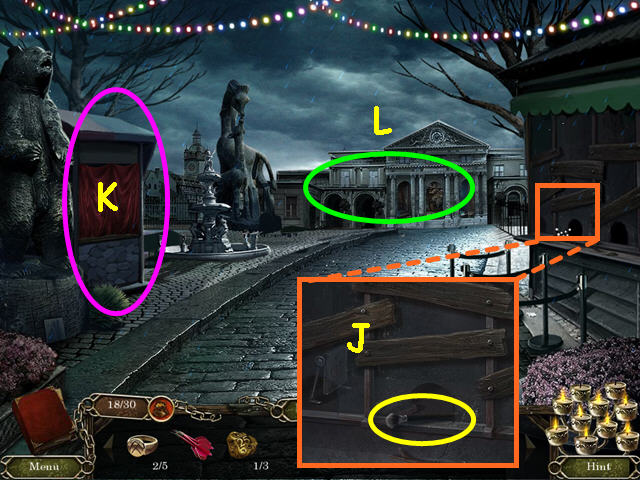
- Look at the statue and place the 3 GOLD NUGGETS into the pan (A).
- Once the barricade falls, walk to the right (B).
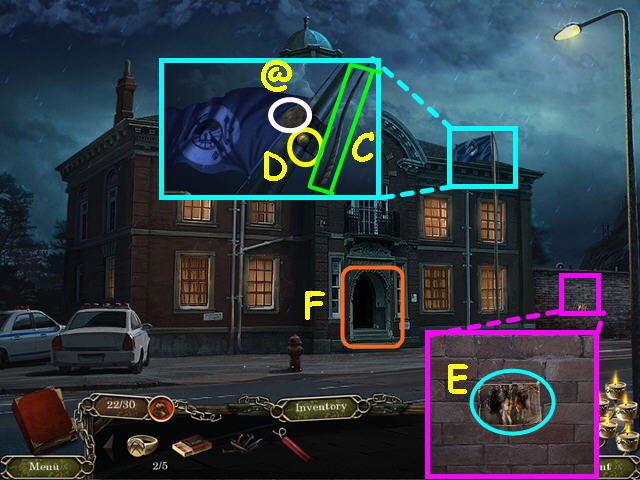
- Look at the flag, the pull the rope to lower the flag (C).
- Take the 23 of 30 GOLD POUCH (@).
- Take the TOKEN (D).
- Look at the brick wall and take the photo (E).
- Enter the police station (F).
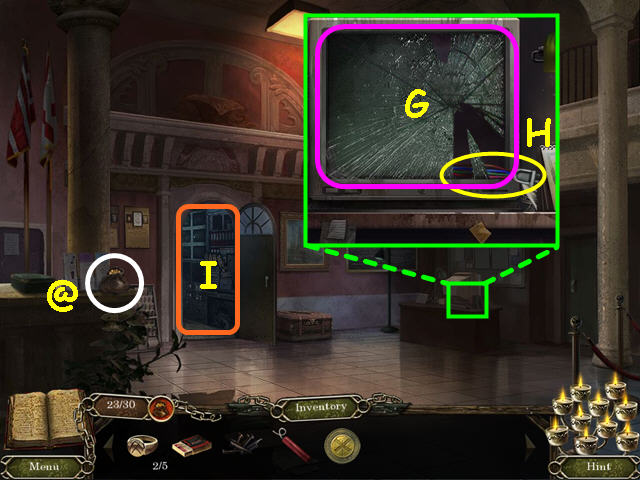
- Take the 24 of 30 GOLD POUCH (@).
- Look at the desk and click on the monitor screen (G).
- Take the CABLE (H).
- Walk forward to the back room (I).
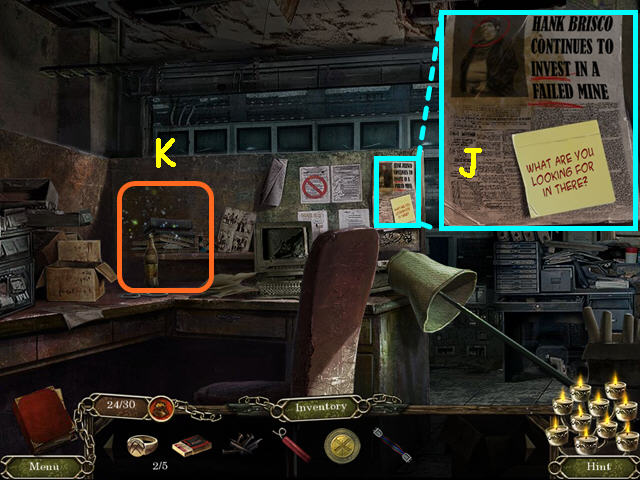
- Look at the newspaper clipping (J).
- Select the desk for a HOS (K).
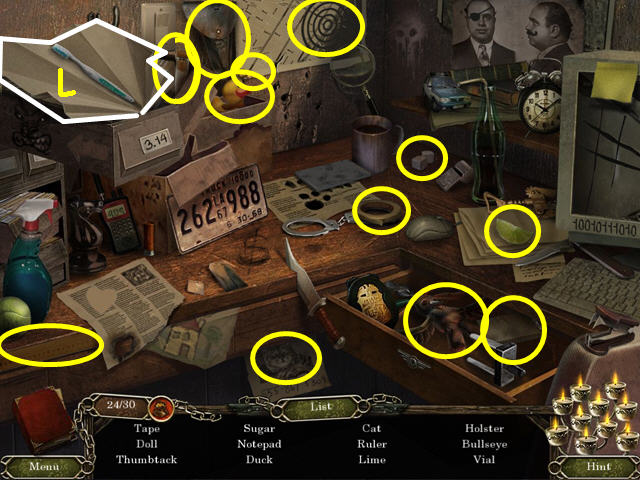
- The items marked in white need to be moved or opened to find some objects.
- Unfold the paper airplane (L).
- You will earn the TAPE.
- Walk down twice to exit the building.
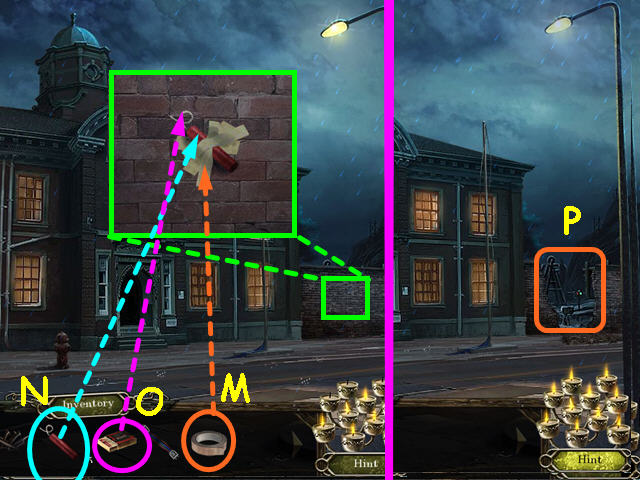
- Look at the brick wall and use the TAPE on it (M).
- Place the DYNAMITE on the tape (N).
- Use the MATCHES on the dynamite (O).
- Walk through the hole in the wall (P).
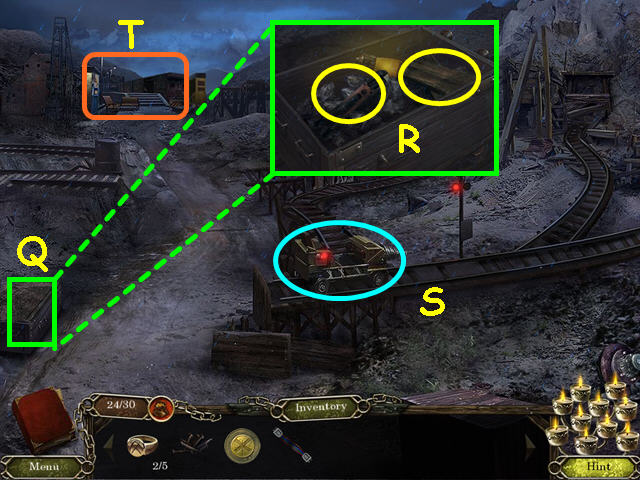
- Look at the bin and remove the cover (Q).
- Take the BOLT CUTTERS and the PLANKS (R).
- Note the cart (S).
- Walk forward to station (T).
- Look at the dispenser and insert the TOKEN (U).
- You will earn the KNOB.
- Look in the control booth and click on the controls to learn you need a switch (V).
- Take the 25 of 30 GOLD POUCH (@).
- Walk down twice and enter the police station.
- Walk forward to the back room.
- Look at the drawer and use the KNOB on the hole, then click to open (W).
- Take the 26 of 30 GOLD POUCH (@).
- Take the TRAIN PIN (X).
- Walk down twice, then enter the hole in the wall and go forward.
- Click on the door to the train car, then enter.
- Take the 27 of 30 GOLD POUCH (@).
- Look at the compartment and use the TRAIN PIN on the indentation (A).
- Open the compartment and take the ELEPHANT KEY and the 3 of 5 MINER’S RING (B).
- Take the GASOLINE (C).
- Look at the motorcycle for a HOS (D).
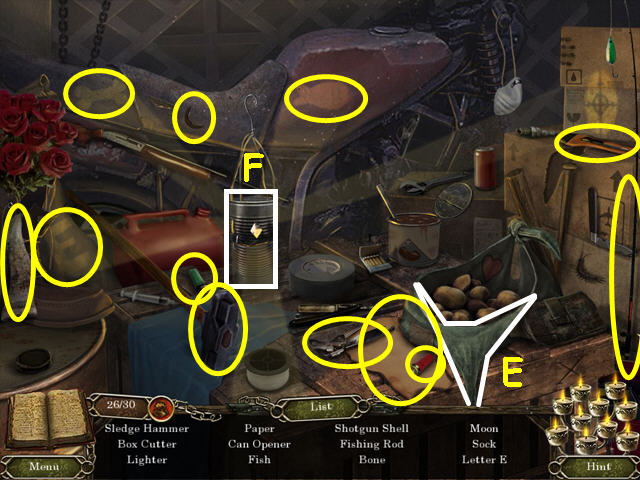
- The items marked in white need to be moved or opened to find some objects.
- Open the flap in the knapsack (E).
- Close the lantern (F).
- You will earn the SLEDGE HAMMER.
- Walk down 3 times, then enter the police station.
- Look at the chest and use the ELEPHANT KEY on the lock (G).
- Take the 4 of 5 MINER’S RING (H).
- Walk forward to the back room and select the desk area for a HOS.
- The items marked in white need to be moved or opened to find some objects.
- Unfold the paper airplane (I).
- You will earn the ELECTRIC SWITCH.
- Walk down twice, then enter the hole in the wall and go forward.
- Look in the control booth and place the ELECTRIC SWITCH on the panel (J).
- Flip the switch (K), press the orange button (L), then press the red button (M).
- Walk down to the mine area.
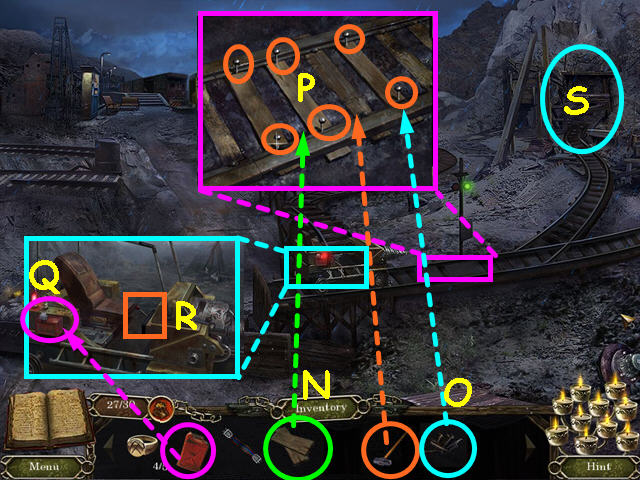
- Look at the track and lay down the PLANKS (N).
- Use the RAILWAY SPIKES on the planks (O).
- Use the SLEDGE HAMMER on each of the 6 spikes (P).
- Look at the cart and use the GASOLINE on the fuel tank (Q).
- Click on the power lever in front of the seat (R).
- Enter the mine (S).
- Look at the power box on the right and use the CABLE at the top (T).
- Press the 4 switches to turn on the lights (U).
- Look at the chained gate and use the BOLT-CUTTERS twice on the chains, then click to open (V).
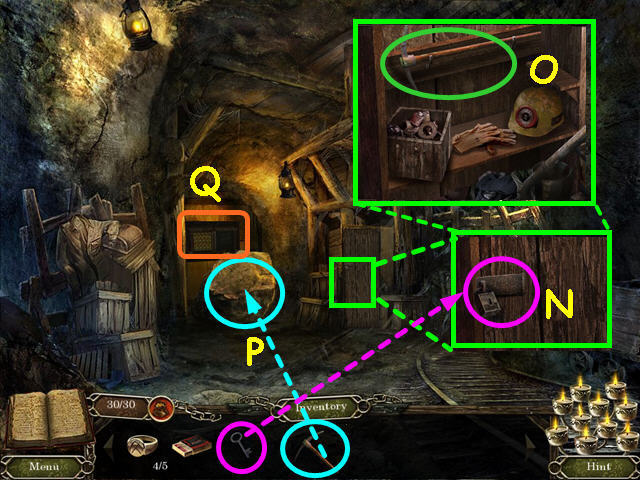
- Look at the box, open the lid and take the GEAR (W).
- Select the area by the boarded door for a HOS (X).
- The items marked in white need to be moved or opened to find some objects.
- Tip the barrel (A).
- Lift the manhole cover (B).
- You will earn the ELEVATOR BUTTON (C).
- Walk forward to the elevator (D).
- Look at the gear control on the left and insert the GEAR (E).
- Look at the controls on the right and add the ELEVATOR BUTTON (F).
- Press the down button.
- Exit the car.
- Take the 28 of 30 GOLD POUCH (@).
- Look at the shirt and take the FEMUR (G).
- Look in the pocket to find the MATCHES (H).
- Look at the cart and use the FEMUR to pry off the lid (I).
- Remove the cobwebs (J).
- Take the HAMMER (K).
- Tale the 29 of 30 GOLD POUCH (@).
- Walk down, then press the up button in the elevator.
- Walk down to exit the elevator.
- Look at the locked box on the left wall and use the HAMMER on the door 4 times to open the case (L).
- Take the 30 of 30 GOLD POUCH (@).
- Take the TOOL KEY (M).
- Return to the elevator and go down, then exit the car.
- Look at the wooden locker and use the TOOL KEY on the lock (N).
- Take the PICKAXE (O).
- Use the PICKAXE on the rock 3 times (P).
- Look at the door for a mini-game (Q).
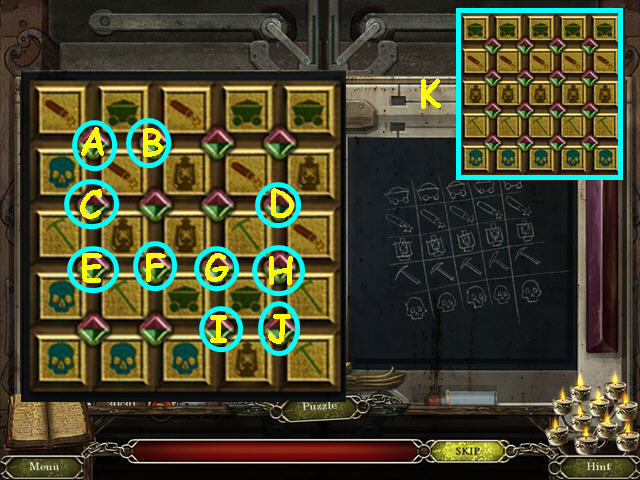
- Rotate the tiles on the left to match the drawing on the right.
- Each button will turn 4 pieces.
- Press the following buttons: B, G, Fx2, Ex3, Cx2, Ax2, Hx1, Dx1, Hx3, Dx3, Fx2, Gx1, Jx1, Gx2, Jx2, and Ix3.
- The final solution is shown here (K).
- Walk forward to the next area.
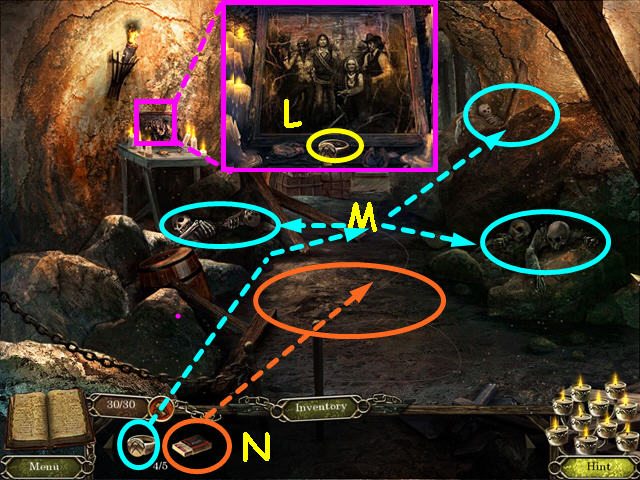
- Look at the photo and take the 5 of 5 MINER’S RING (L).
- Once the apparition tells you, look at each skeleton and place a MINER’S RING on each skeleton (M).
- When the apparition tells you, use the matches at his feet (N).
- Congratulations! You have completed Cursed Memories: Secret of Agony Creek!
Created at: 2011-10-15