Walkthrough Menu
- General Tips
- Chapter 1: Fountain Square
- Chapter 2: Statue Park and Cemetery
- Chapter 3: Photo Studio and House
- Chapter 4: Farm House
- Chapter 5: Doctor's House
- Chapter 6: Mine and Train Station
General Tips
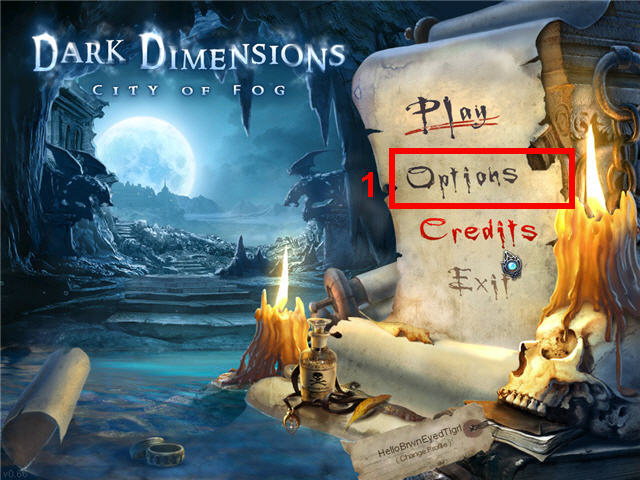
- Click on Options (1) for Sound, Music, and Screen Settings.
- Move your cursor around each scene to find interactive areas by watching the cursor change.
- The cursor will change to a magnifying glass when you can look closer at something.
- The cursor will change to a hand when you can pick up something.
- Hidden Object Scenes will be marked with sparkles.
- Interactive areas are marked with a glint.
- Click on the book in the lower left to access your journal.
- Click on Tools in the bottom center to access the inventory.
- When in a Hidden Object Scene you will unlock a Clues bar with the list of items to find next to the Tools Bar.
- The items listed in yellow require an extra step to find; these items will be marked in the same color on the screenshots.
- Items that stick on your cursor in Hidden Object Scenes need to be used on another item in that scene. You can click these items anywhere on the screen to drop it and it will then go in your Tools bar.
- The game is not fully linear and certain actions in one area trigger Hidden Object Scenes in another.
- If there is a Hidden Object Scene available in the guide that you do not have, please explore other areas and come back or check the guide for what you may have missed.
- Puzzles can be skipped after a short wait.
- The directions for the puzzles can be accessed by clicking on the help button on the bottom right of the screen.
- There is a brief fog on the Hidden Object Scenes if you randomly click really fast.
Chapter 1: Fountain Square
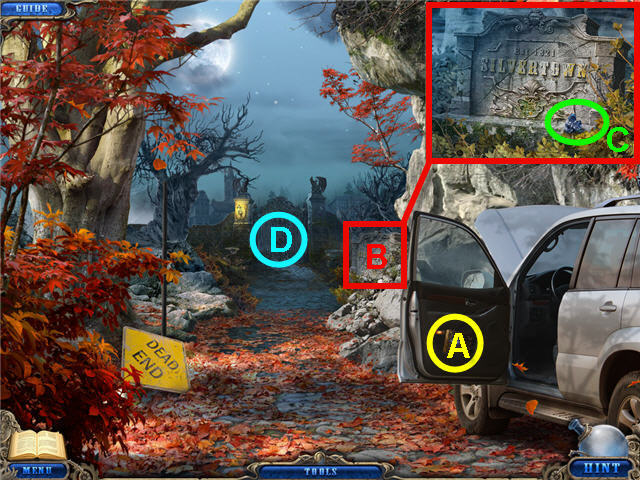
- Click on the book (A) in the car door and then on the page to get a journal update.
- Click on the marker (B) and take the GEM (C).
- Click on the gate (D) and then click on the area to the left to access a Hidden Object Scene.
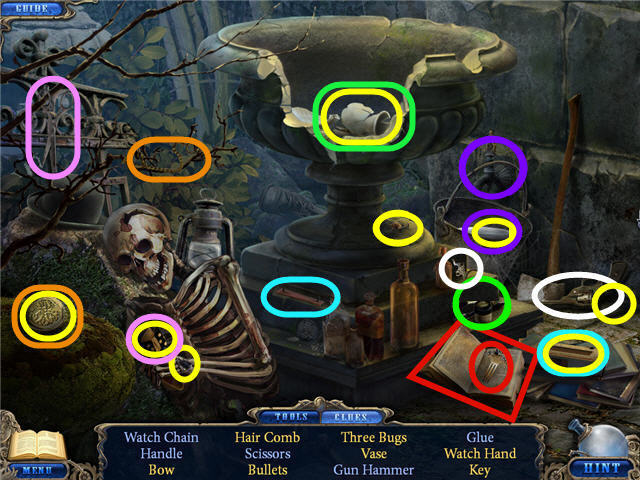
- Click on the book to open it and take the hair comb.
- Click on the spigot to fill the bucket and get a bug.
- Use the glue on the broken pottery to get the vase.
- Use the watch chain on the watch to open it and take the watch hand.
- Use the handle on the chest to open it and take the key.
- Use the scissors on the bow to get a bow.
- Use the gun hammer on the gun and take the bullets.
- Find the items listed and get a KEY.
- Click on the gate to trigger a puzzle.
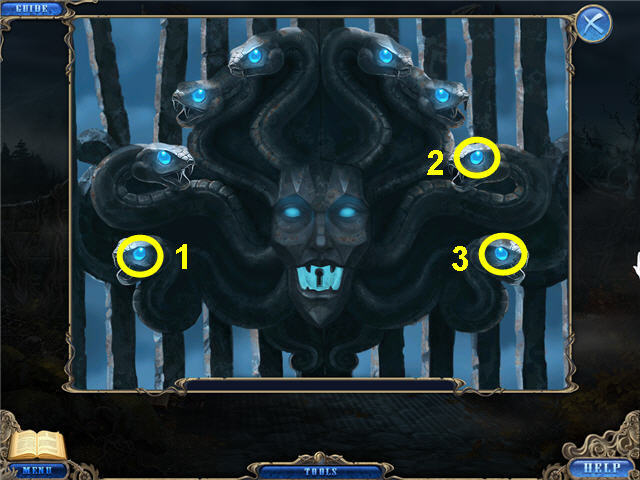
- The object is to click on the red snake eyes and turn them all blue.
- Clicking on one eye will turn on and off other eyes.
- Solution; from left, click on 1, 7 and 8.
- Place the KEY in the center mouth lock when complete and click to turn it.
- Enter through the open gates.
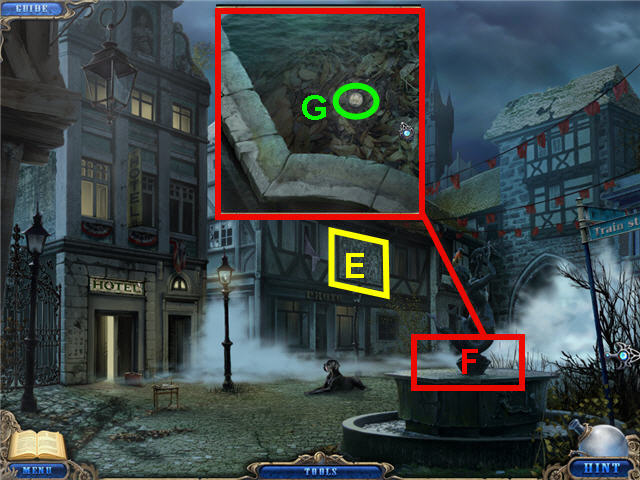
- Click on the dog.
- Click on the side of the building to get a map (E) added to your journal.
- Try and head through the tunnel on the right.
- Click on the fountain (F) and click on the leaves to move them and take the 25 CENTS (G).
- Click on the fog to the right of the hotel.
- Enter the hotel on the left.
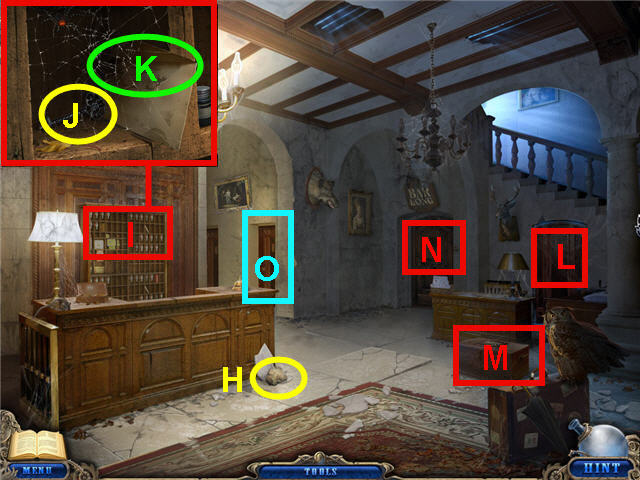
- Take the STONE (H).
- Click on the mail slots (I) behind the counter and take the SPIRAL KEY (J) and read the letter (K) to get a journal update.
- Click on the door under the stairs (L).
- Click on the table (M) and note you are missing a puzzle piece.
- Click on the door under the bar sign (N) and note you are missing pieces.
- Enter the bedroom in the hall (O) to the right of the counter.
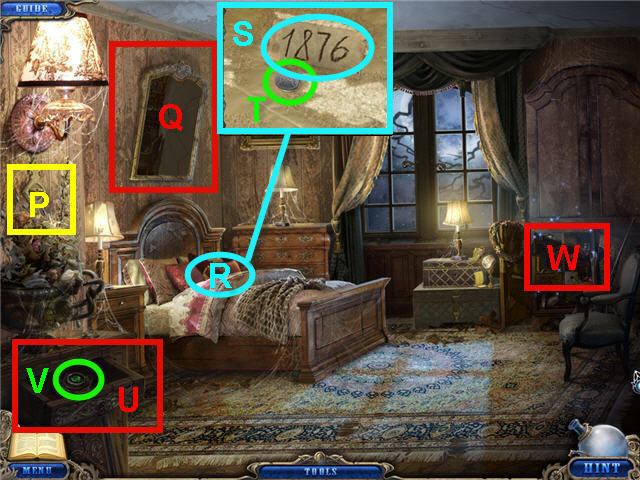
- Flip the switch on the left wall (P) to turn on the lights and meet Lillian.
- Click on the mirror (Q) above the bed and use the STONE on it.
- Look close at the note (R) that fell on the bed and take the code (S) which updates your journal and the second 25 CENTS (T).
- Click on the window.
- Click on the drawer (U) in the lower left and take the PUZZLE PIECE (V).
- Look close at the cabinet (W) on the right of the window to access a Hidden Object Scene.
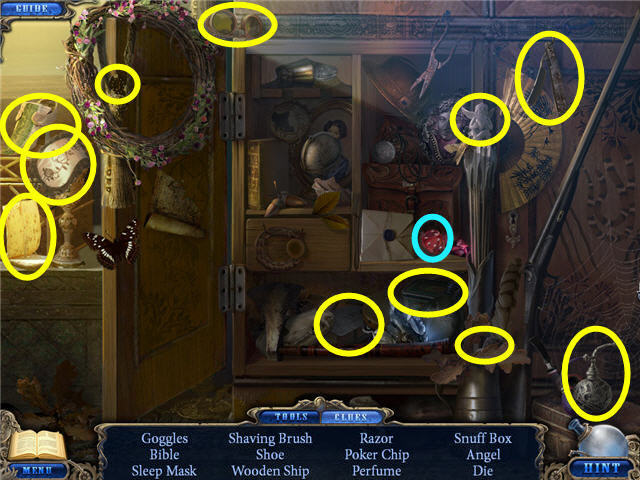
- Find the items listed and get a DIE.
- Exit the room and click on the puzzle table.
- Place the PUZZLE PIECE on the puzzle.
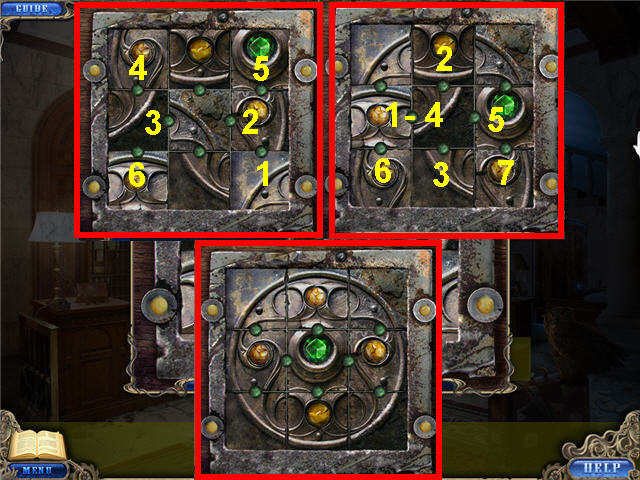
- The object is to click the green dots that connect two squares in order to switch those squares and complete the picture.
- You can only switch pieces left and right if they are in the middle row.
- This puzzle solution is random, if your original layout looks like mine; click on the green dots in the order on the screenshot.
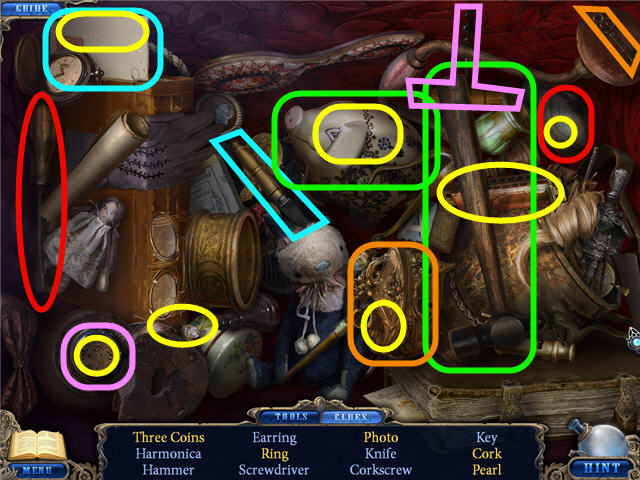
- Use the screwdriver on the oyster to get the pearl.
- Use the knife on the letter and take the photo.
- Use the hammer on the piggybank and take the three coins.
- Use the key on the jewelry box and take the ring.
- Use the corkscrew on the bottle to get the cork.
- Find the items listed and get the third 25 CENTS.
- Exit via the bottom of the screen and note the fog lifted from the arched passageway.
- Head right to the train station.
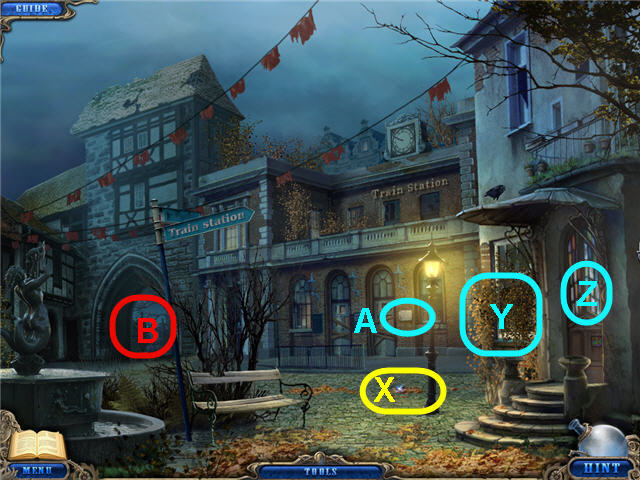
- Look close at the ground by the lamp and pick up the CIRCLE KEY (X).
- Click on the bushes covering the windows (Y) and note they need to be cut.
- Click on the door to the right (Z) to note a missing tile.
- Read the sign on the wall (A) outside the train station.
- Head through the archway (B) on the left.
- Click on the tree trunk to access a Hidden Object Scene.
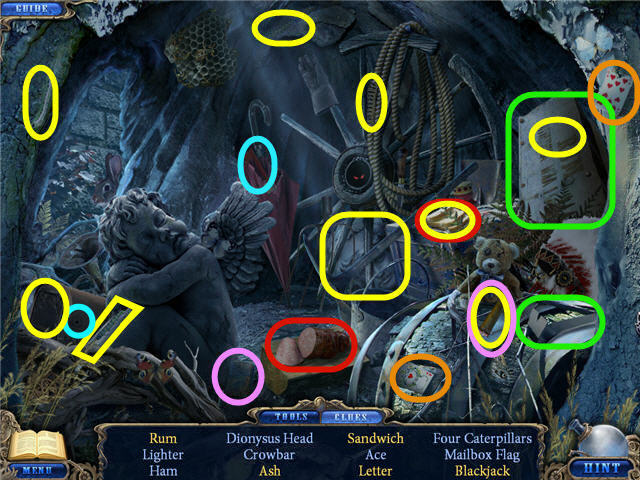
- Place the ham on the bread to get a sandwich.
- Place the mailbox flag on the hole in the side of the mailbox and take the letter.
- Use the crowbar on the crate and take the rum.
- Use the card on the card to get blackjack.
- Use the lighter on the cigar and take the ash.
- Find the items listed and get the DIONYSUS HEAD.
Chapter 2: Statue Park and Cemetery
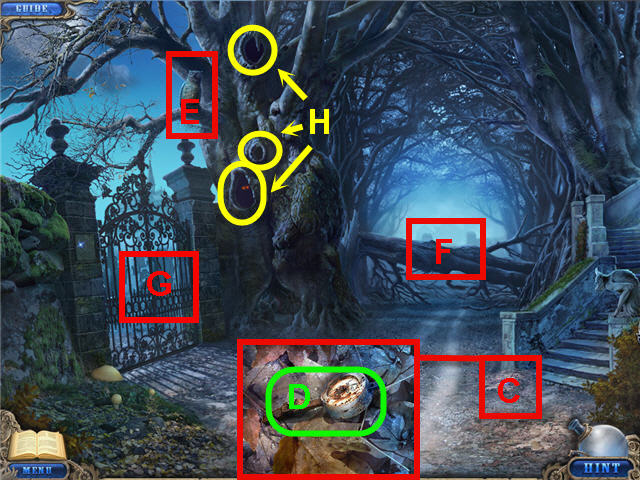
- Look close at the ground by the foot of the stairs (C) and take the LEVER (D).
- Click on the owl (E), the fallen tree (F), the gate (G) and the 3 holes the tree (H).
- Look close at the plaque on the left of the gates.
- Head right to the statue park.
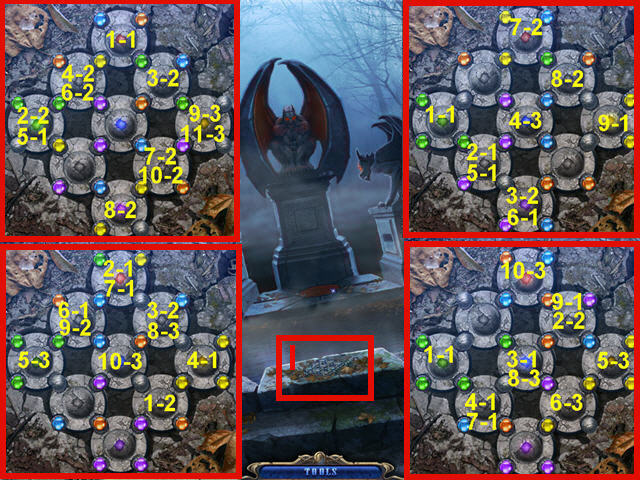
- Click on the area between the two front pillars to access a puzzle (I).
- The object is to place all the same colored gems around its matching colored center by clicking on the center of the circle you wish to rotate.
- The puzzle is random. See screenshot for the first part of the solution if your beginning layout is the same as in the first screen.
- The first number is the order in which to press and the second number is how many times to press the center.
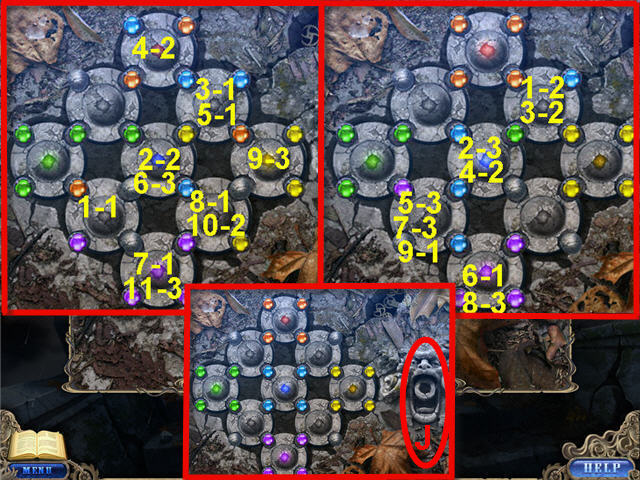
- Part 2 of the solution. The first number is the order in which to press and the second number is how many times to press the center.
- Place the LEVER in the mouth (J) when puzzle is complete and click on it.
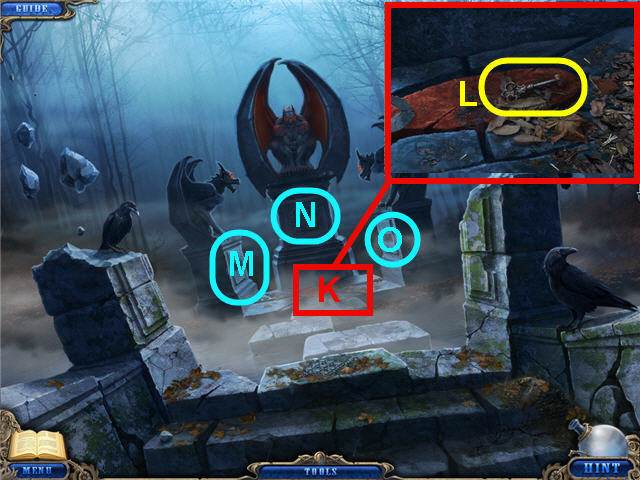
- Click on the area in front of the middle statue (K) and take the CROSS KEY (L).
- Click on the base of the pedestal on the left (M) and note a piece is missing.
- Click on the base of the middle statue (N) and note the missing angels.
- Click on the pedestal on the right (O) and place the DIE in the empty slot on the right.
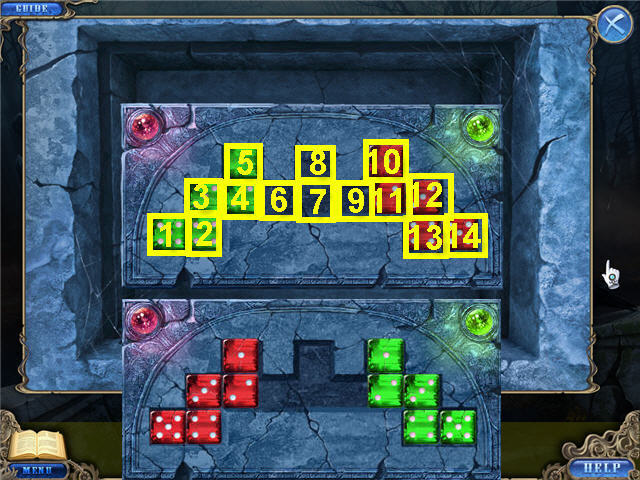
- The goal is to move the green die to the right and the red die to the left.
- They need to be in the same numerical order that they are in when you first start.
- See screenshot for the key to the position number for the solution.
- G=Green Die; R=Red Die; the first number is the number on the die; the second number is the square to move it to.
- Solution: G2-8, R2-4, R1-6, G2-10, R3-8, R4-7, R5-9, G2-14, R5-10, R4-13,
- R3-12, R5-8, R3-7, R4-10, R3-13, R1-12, R2-11, G1-9, R5-5, G1-8,
- R2-4, R4-6, G1-10, R4-8, R1-6, R3-7, G1-13, R3-10, R1-12, R2-11,
- G3-9, G4-7, G5-6, R5-1, G5-5, G4-2, R4-3, G5-8, R4-5, G4-7, R4-2,
- G4-5, G3-3, R2-4, R3-6, G5-10, R1-8, G1-7, G2-9, G5-14, G2-13, G1-10,
- R1-12, R3-8, R2-11, G4-9, R3-5, G3-8, R3-3, G3-5, G4-8, R2-4, R1-6,
- G1-12, G4-10, R1-8, R2-11, G3-9, R1-5, G3-8, R2-4, G3-6, G1-8, G2-7,
- G4-13, G2-10, G3-12, G2-6, G1-10, G2-11.
- Take the PHOTO PLATE from the opened compartment.
- Back out of the area two times, head left and into the hotel.
- Click on the chest in the center to access a Hidden Object Scene.
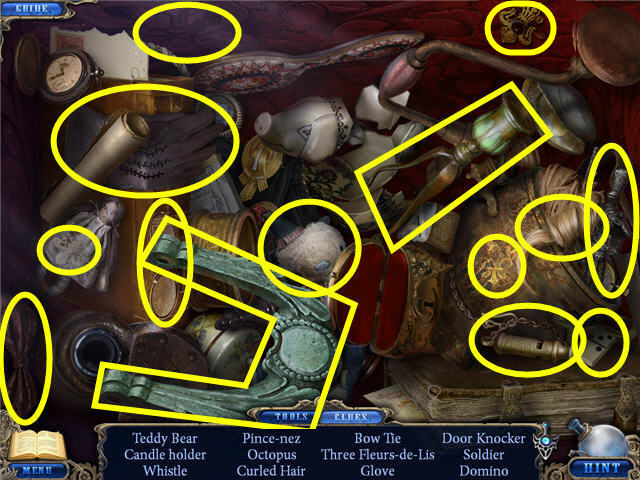
- Find the items listed.
- A DOOR KNOCKER will be added to inventory.
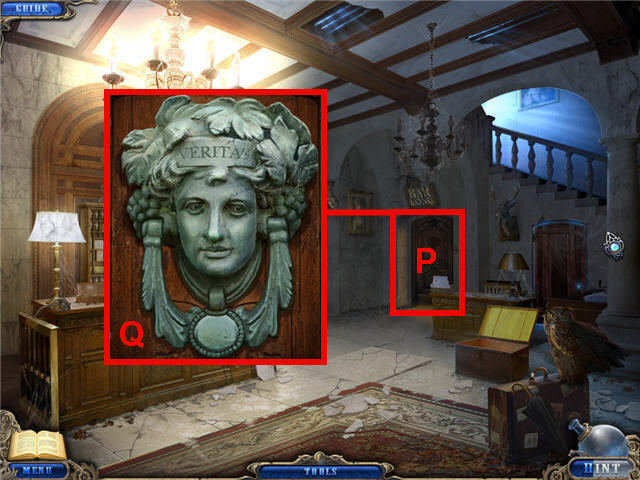
- Look close at the door to the Bar (P).
- Place the DIONYSUS HEAD and the DOOR KNOCKER on the door (Q).
- Click the DOOR KNOCKER to open the door.
- Enter into the Bar.
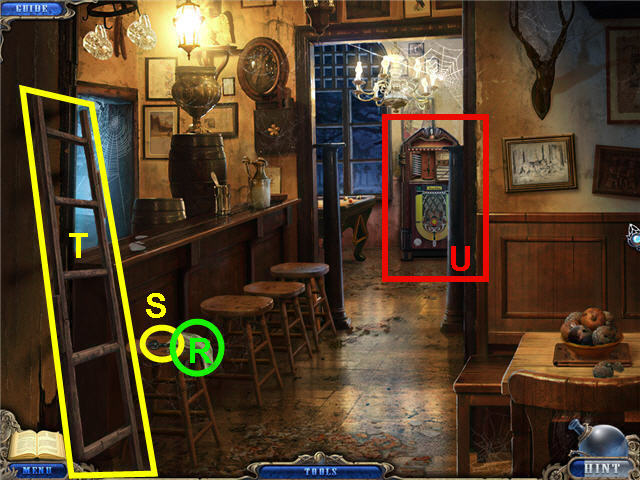
- Move the rag (R) on the barstool and take the ZIGZAG KEY (S).
- Take the LADDER (T).
- Look close at the jukebox (U).
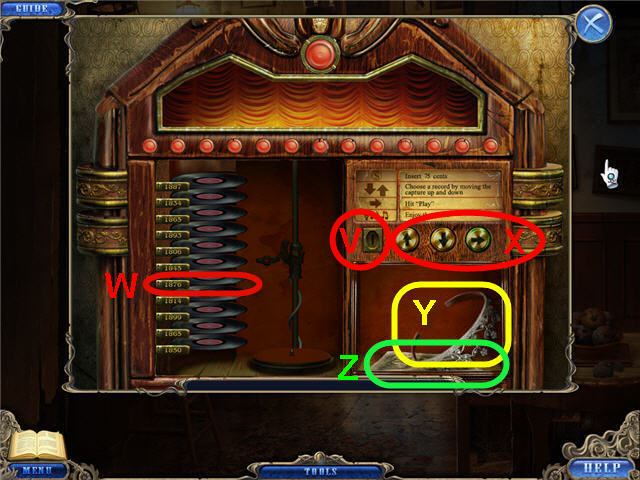
- Place the three 25 CENTS into the coin slot (V) of the jukebox one at a time.
- Using the date from behind the bedroom mirror in your journal, you need to choose the record 1876 (W).
- The up and down arrows (X) move more than one space; one solution is; down, up, up, down, up, down.
- Click on the arrow pointing right to play.
- Take the TIARA (Y) from the compartment to the right.
- Look close at the three paintings (Z) that were under the TIARA to get a journal update.
- Back out of the area two times to the fountain and then head straight through the arched passageway.
- Click on the base of the tree to access a Hidden Object Scene.
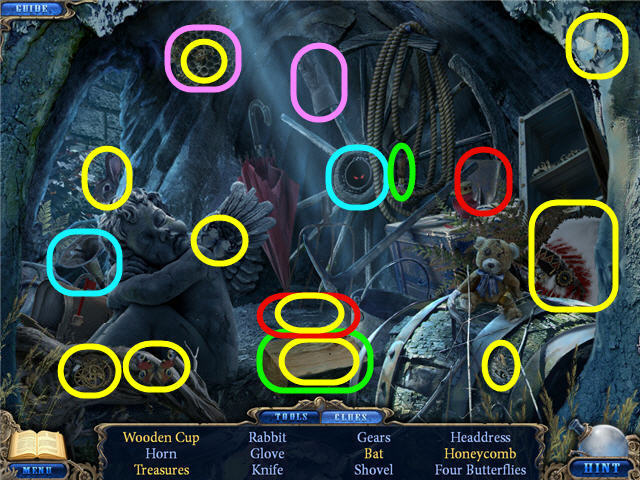
- Use the glove on the honeycomb to get a honeycomb.
- Use the horn on the bat hideout to get a bat.
- Use the knife on the wooden log multiple times and get a wooden cup.
- Use the shovel on the X, click to open the chest and take the treasure.
- Find the items listed and get a STRAIGHT-CUT GEAR, BEVEL GEAR, SPIRAL BEVEL GEAR and HELICAL GEAR.
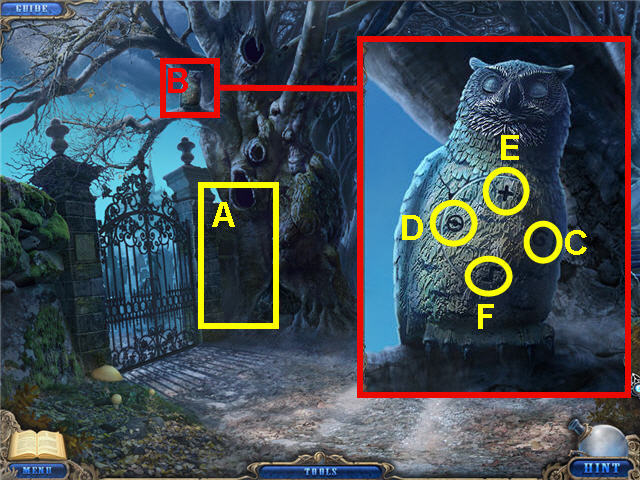
- Place the LADDER (A) below the owl on the tree.
- Look close at the owl (B) and note the 4 keyholes.
- Use the SPIRAL KEY (C), CIRCLE KEY (D), CROSS KEY (E) and the ZIGZAG KEY (F) on their matching shaped keyholes.
- Click on each key to turn them and open the compartment.
- Place the STRAIGHT-CUT GEAR, BEVEL GEAR, SPIRAL BEVEL GEAR and HELICAL GEAR on the opened compartment.
- Take the LADDER.
- Head into the cemetery on the left.
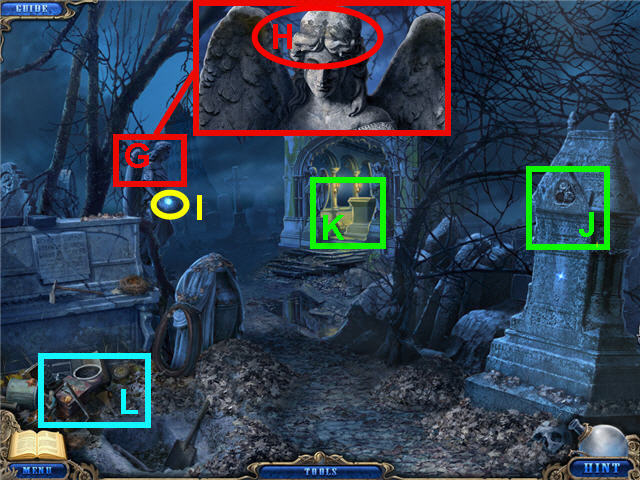
- Look close at the angel statue (G) and place the TIARA on her head (H).
- Take the SHINING STAR (I) from her hands after the cutscene.
- Look at the headstone to the right (J) and note it is missing a rose emblem.
- Click on the lit mausoleum (K) and note you need pieces to complete the puzzle.
- Click on the area in front of the stone piano (L) to access a Hidden Object Scene.
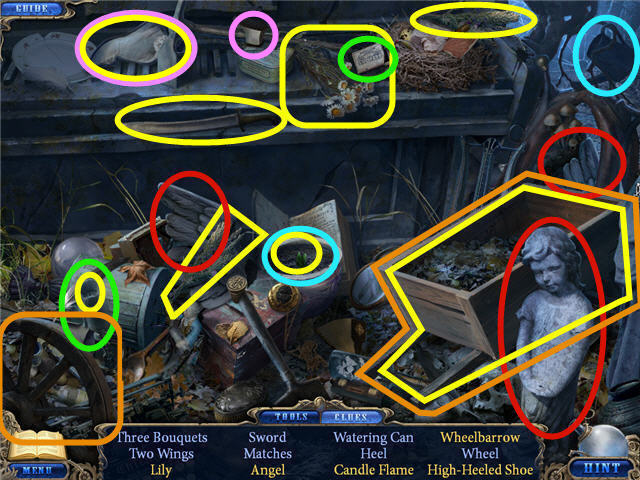
- Place the two wings on the statue to get an angel.
- Use the matches on the candle to get a candle flame.
- Use the watering can on the seedling to get a lily.
- Place the wheel on the cart to get a wheelbarrow.
- Place the heel on the shoe to get a high-heeled shoe.
- Find the items listed and get a KNIFE.
- Back out two times and head right to the train station.
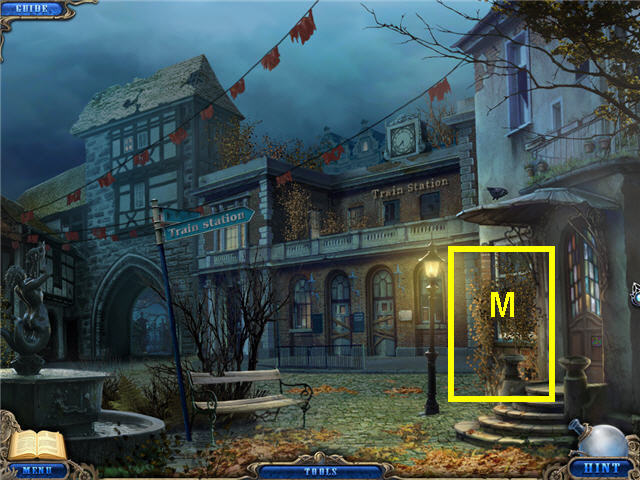
- Use the knife on the vines covering the window (M).
- Click on the exposed window to access a Hidden Object Scene.
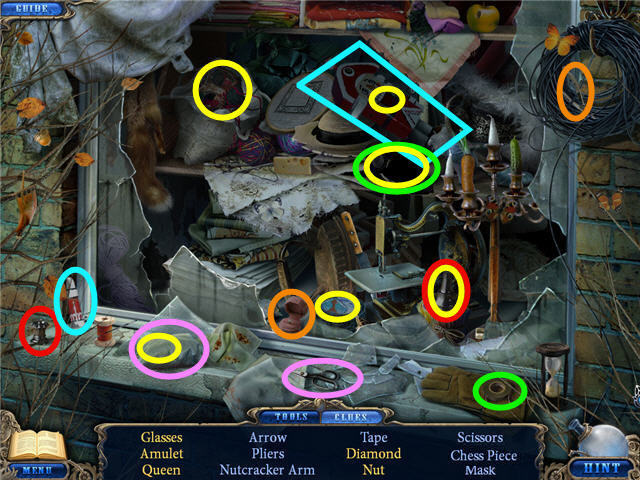
- Use the tape on the broken glasses to get glasses.
- Use the chess piece on the base of the chess piece base to get a queen.
- Use the pliers on the ring to get a diamond.
- Use the scissors on the sachet to get an amulet.
- Use the nutcracker arm on the nutcracker to get a nut.
- Find the items listed and get an ARROW.
- Head through the arched passageway and go right to the statue park.
- Click on the far left statue base to access a puzzle.
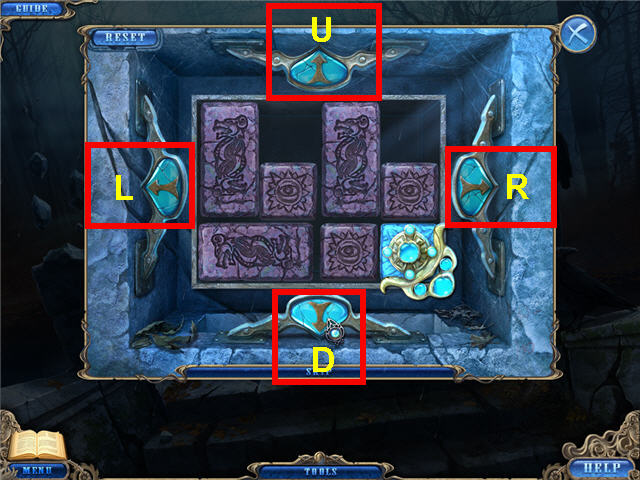
- Place the ARROW on the left slot.
- The goal is to move the blue tile to the bottom right by using the arrows.
- Any unblocked tile will slide in the direction of the arrow you click.
- Using the following arrow codes for the solution; U=Up, D=Down, L=Left, R=Right; click on the following arrows:
- U, L, D, R, U, R, D, L, U, R, D, R, U.
- L, D, R, U, L, D, R, D, R, U, L, D.
- Take the HIGH-POWERED FAN from the opened compartment.
- Back out of the area two times and head left to the fountain square.
Chapter 3: Photo Studio and House
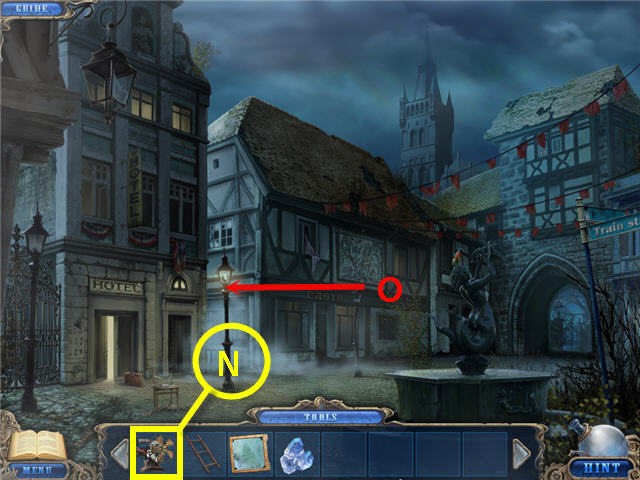
- Place the HIGH-POWERED FAN in front of the alleyway (N) right of the hotel.
- Head down the alleyway (O) to the photo studio.
- Click on the newsstand to access a Hidden Object Scene.
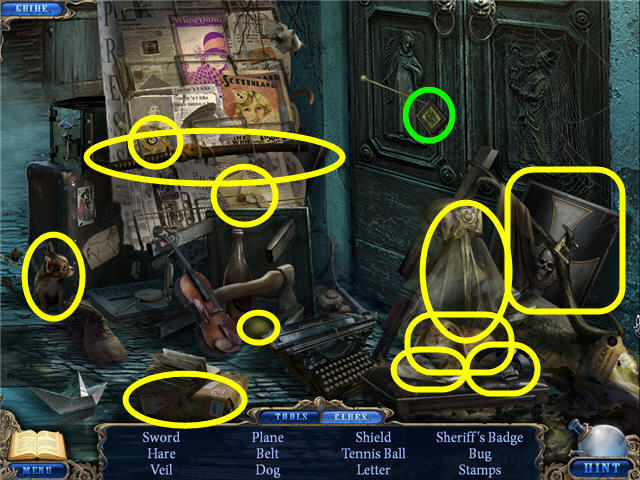
- Find all the items listed.
- The GNOME TILE will be added to inventory.
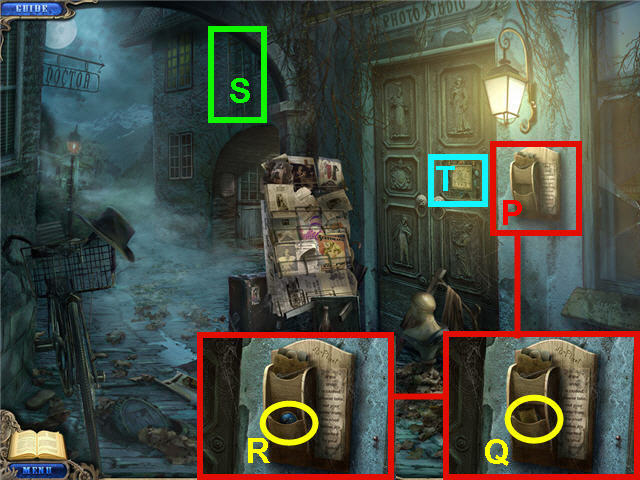
- Click on the pick-up shelf (P) on the right of the door.
- Take the photo (Q) from the bottom slot to get a journal update.
- Take the BUTTON (R) from the shelf that was behind the photo.
- Click on the sign outside the doctor's office.
- Look close on the fire escape ladder (S) above the doctor's office door.
- Click on the panel (T) on the right photo studio door to trigger a puzzle.
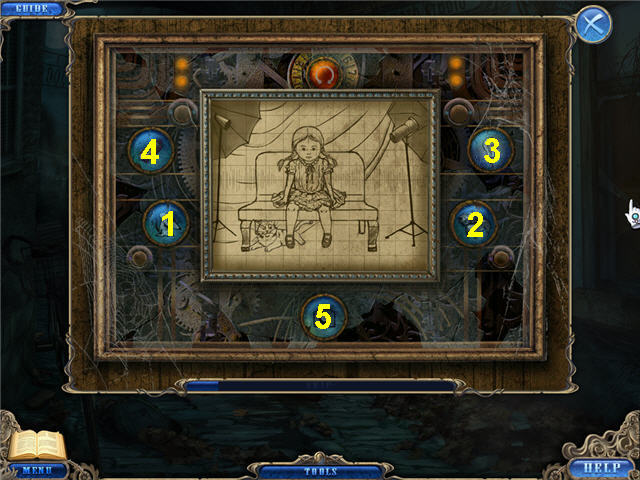
- Place the BUTTON on the missing slot on the right.
- The goal is to push the buttons in the order of the activities that took place in order to achieve the photo that you took out of the pick-up slot next to the door. The photo can be seen in your journal.
- The solution is; mouse, dog, lights, candy, and camera. See screenshot for solution.
- Enter the photo studio.
- Click on the trunk on the lower left to access a Hidden Object Scene.
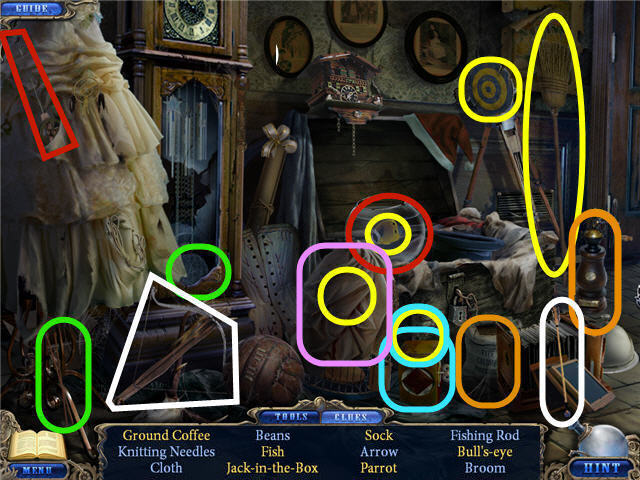
- Use the fishing rod on the fishbowl to get a fish.
- Use the coffee beans on the grinder to get grained coffee.
- Click on the Jack-in-the-box and take the Jack-in-the-box.
- Use the knitting needles on the ball of yarn to get a sock.
- Use the arrow on the crossbow and get a bull's eye shot.
- Click on the cage cover and take the parrot.
- Find the items listed and get a BROOM.
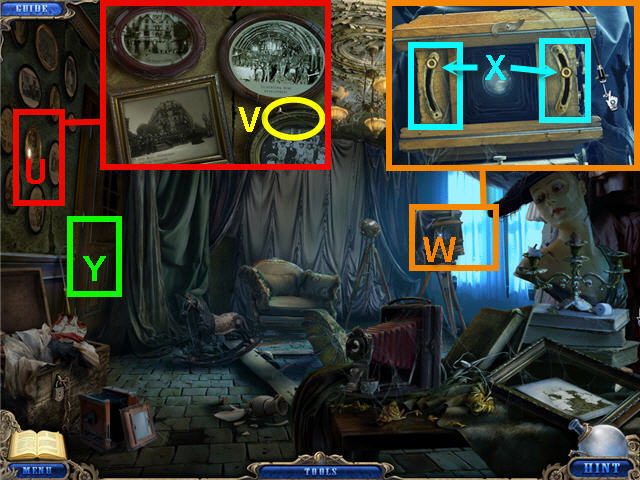
- Click on the photos (U) on the left wall and take the PHOTO KNOB (V).
- Look close at the camera (W) and place the PHOTO KNOB on the right.
- Adjust the left and right knobs to focus in on the subject. See screenshot for proper placement (X).
- When correct it will tell you that you need to insert a negative.
- Place the PHOTO PLATE on the camera and get NEGATIVE #1.
- Head into the photo developing room (Y) on the left.
- Click on the red light and note it is missing a chain.
- Back out of the area two times and head straight down the alleyway to the bridge.
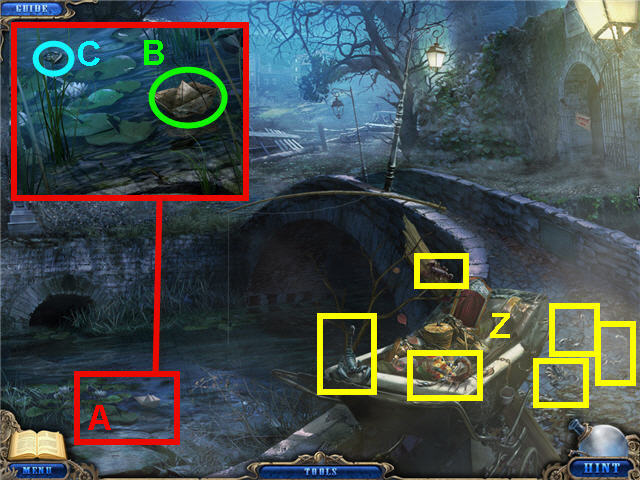
- Use the BROOM on the 6 scorpions (Z) and when you are complete sparkles appear in the baby carriage.
- Click on the water lilies (A) and take the paper boat to get an entry in your journal (B).
- Take the ANGEL (C).
- Click on the fishing pole and note the reel is missing.
- Read the plaque on the bridge.
- Click on the baby carriage to access a Hidden Object Scene.
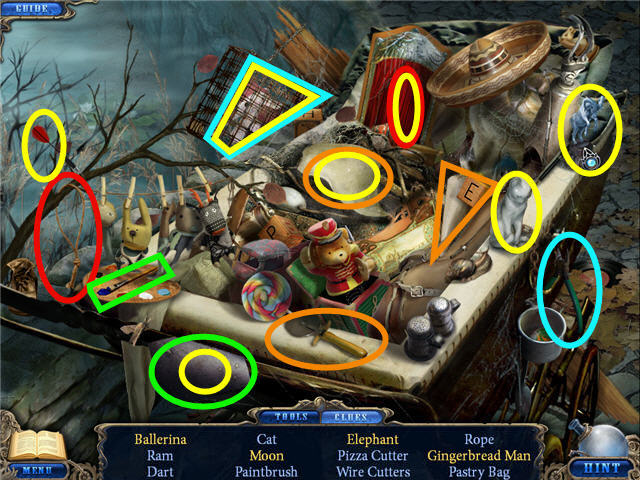
- Use the rope on the curtain and take the ballerina.
- Use the paintbrush on the paper to get a moon.
- Use the pliers on the cage and take the elephant.
- Use the pizza cutter on the dough and then use the pastry bag on the cut out dough to get a gingerbread man.
- Find the items listed and get a RAM.
- Cross the bridge to the house.
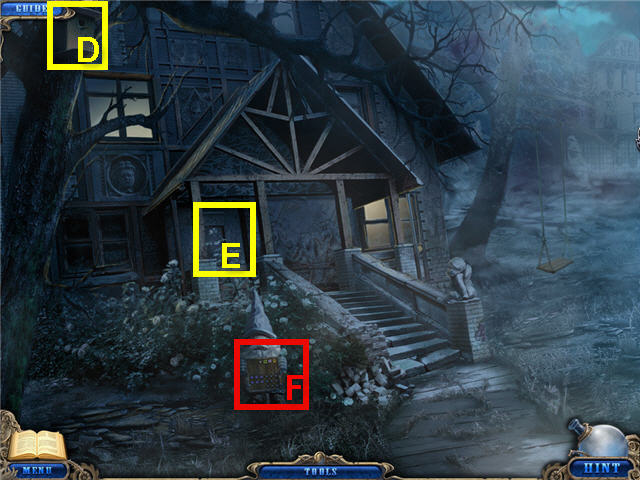
- Look close at the birdhouse (D) and note you need grain.
- Look close at the front door (E) and look close again at the keyhole to note that the key is stuck.
- Look close at the garden gnome (F) and trigger a puzzle.
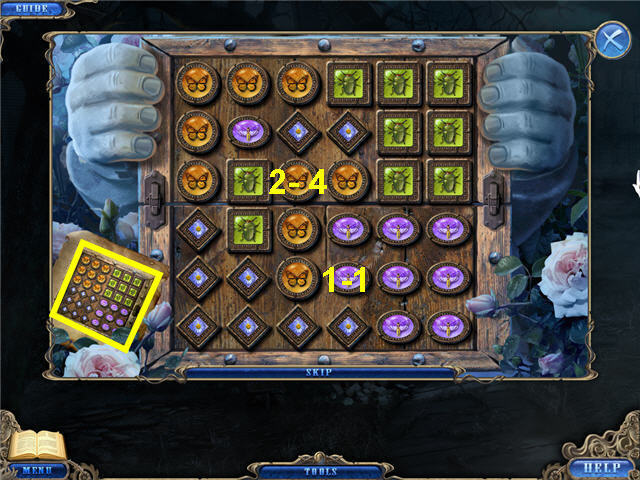
- Place the GNOME TILE on the missing spot.
- The goal is to arrange the tiles on the board to match the tile board on the bottom left.
- Clicking on a tile will rotate all the tiles around it.
- See screenshot for solution; the first number is the order in which to rotate and the second number is how many times to rotate.
- Take the 2nd GEM.
- Back out of the area two times and click on the newsstand to access a Hidden Object Scene.
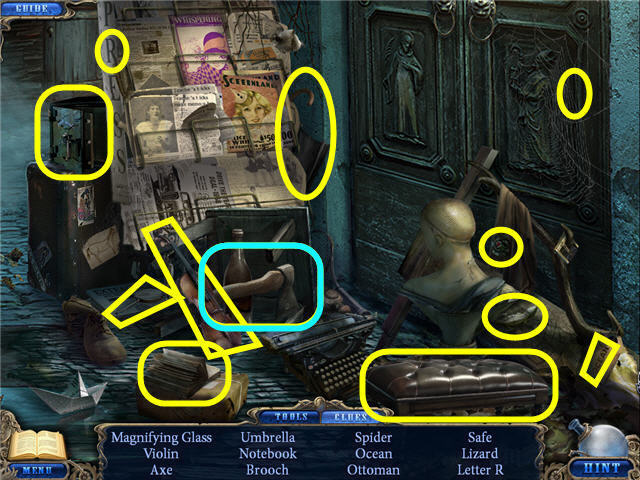
- Find the items listed and get an AXE.
- Back out of the area and head through the arched passageway.
- Use the AXE on the tree that is blocking the road 4 times.
- Head straight to the farm after the path is clear.
- Click on the old tractor on the right to access a Hidden Object Scene.
Chapter 4: Farm House
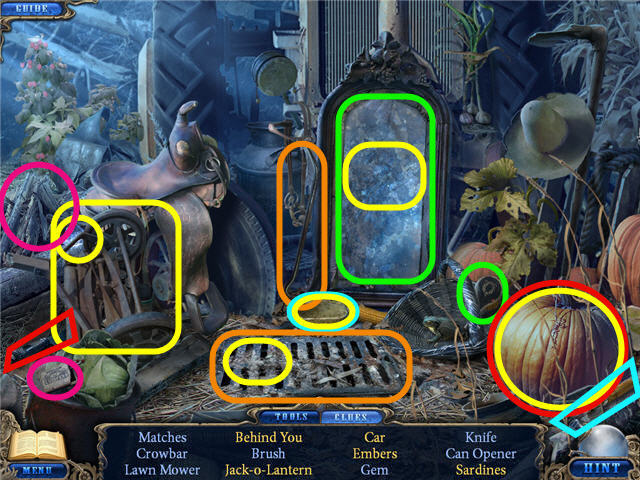
- Use the matches on the pile of twigs to get the embers.
- Use the can opener on the can to get sardines.
- Use the brush on the mirror and get behind you!
- Use the crowbar on the grate and take the car.
- Use the knife on the pumpkin to get a jack-o-lantern.
- Find the items listed and get a 3rd GEM.
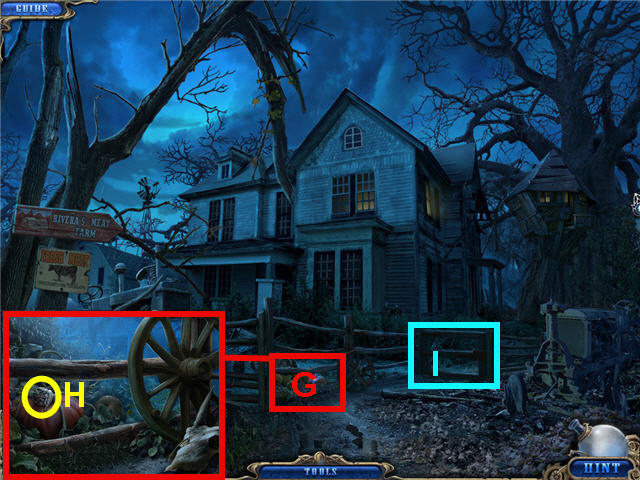
- Look close at the pumpkin patch (G) and take the 2nd ANGEL (H).
- Click on the gate (I) to trigger a puzzle.
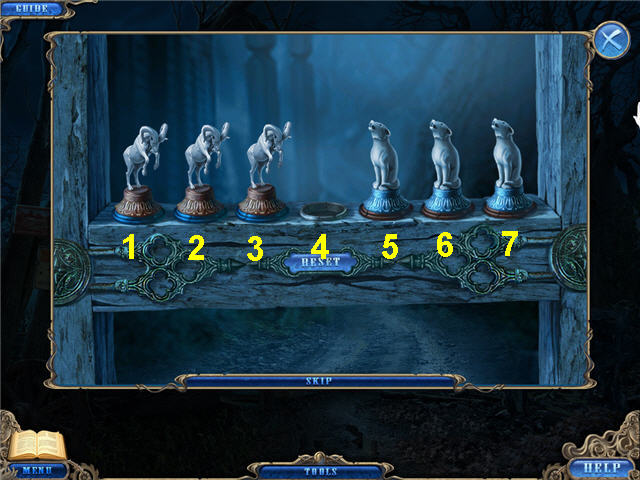
- Place the RAM on the empty slot on the left.
- The goal is to move the goats to the blue slots on the left and the rams to the red spots on the right.
- To solve the puzzle click on the spaces marked in the screenshot in this order; 5, 3, 2, 4, 6, 7, 5, 3, 1, 2, 4, 6, 5, 3, 4.
- Enter into the gate towards the farmhouse.
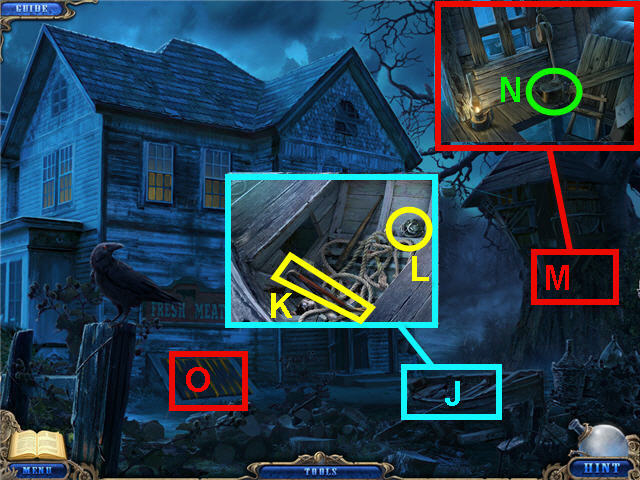
- Click on the rowboat (J) and take the CROWBAR (K) and the ROSE (L).
- Place the LADDER on the tree trunk (M).
- Look close at the tree house.
- Take the KEROSENE (N).
- Look at the pulley and note we need a weight.
- Look at the symbol written on the paper.
- Exit the tree house.
- Look close at the cellar door (O) and note we need something thin.
- Back out of the area two times and head left into the cemetery.
- Click on the ground in front of the piano statue to access a Hidden Object Scene.
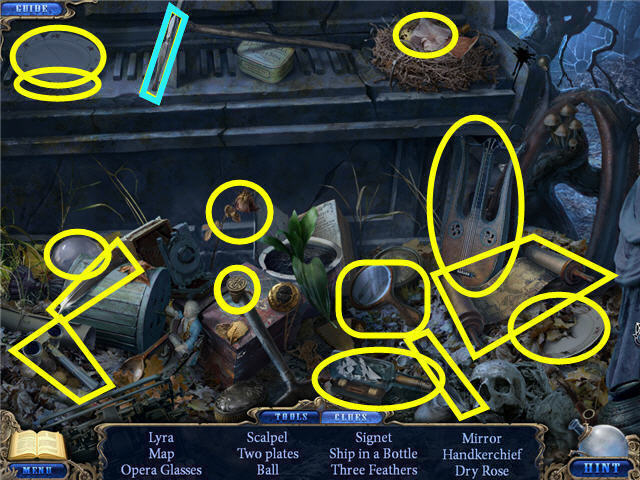
- Find the items listed.
- You will obtain the SCALPEL in your inventory.
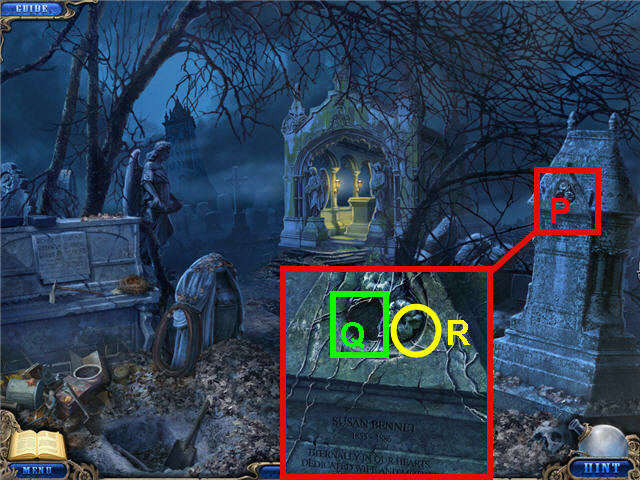
- Look close at the grave stone (P) on the right.
- Place the ROSE on the empty slot (Q) and take the 4th GEM (R).
- Back out of the area one time and head straight to the farm house yard.
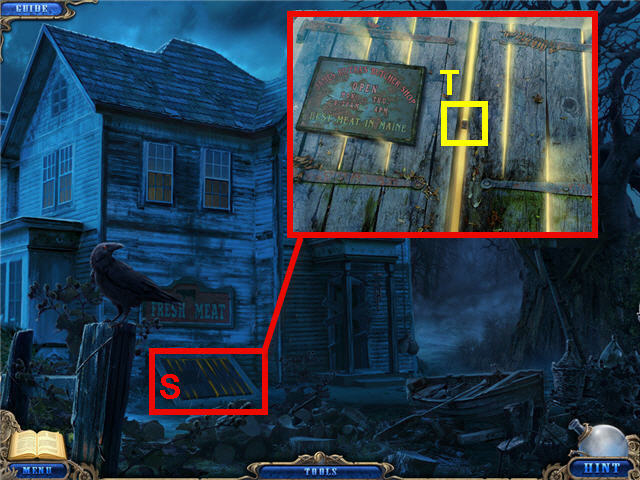
- Look close at the cellar door (S) and use the SCALPEL on the center latch (T).
- Enter the cellar and click on the butcher table on the right to access a Hidden Object Scene.
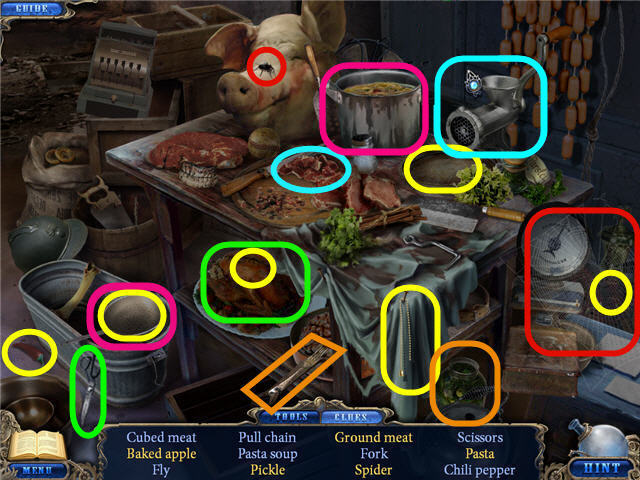
- Place the cubed meat in the meat grinder and take the ground meat.
- Use the fly on the spider web and take the spider.
- Use the fork on the pickle jar and get a pickle.
- Use the scissors on the turkey to get a baked apple.
- Use the pot of pasta soup on the strainer to get pasta.
- Find the items listed and get a PULL CHAIN.
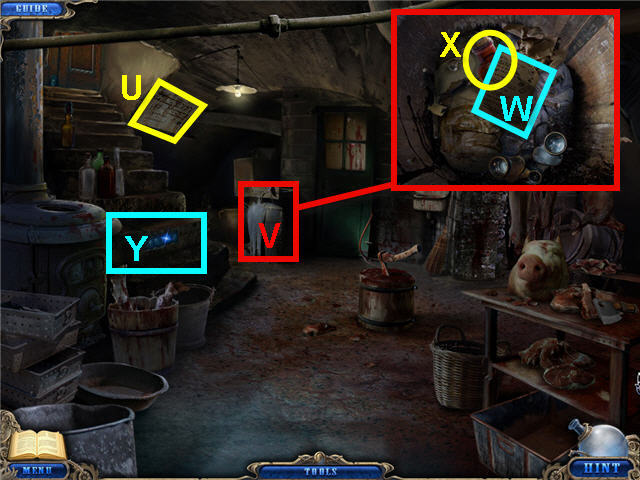
- Look close at the floor plan (U) to the right of the stairs.
- Look close at the barrel (V) in the corner.
- Take the directions for photo developing (W) which will update your journal and the DEVELOPER (X).
- Look close at the glowing symbols (Y) on the stair riser and note we need a code.
- Look close at the lock on the door at the top of the stairs and note we need something to dissolve the lock.
- Back out of the area four times and head down the alleyway to the right of the hotel.
- Enter into the photo shop and click on the trunk in the lower left to access a Hidden Object Scene.
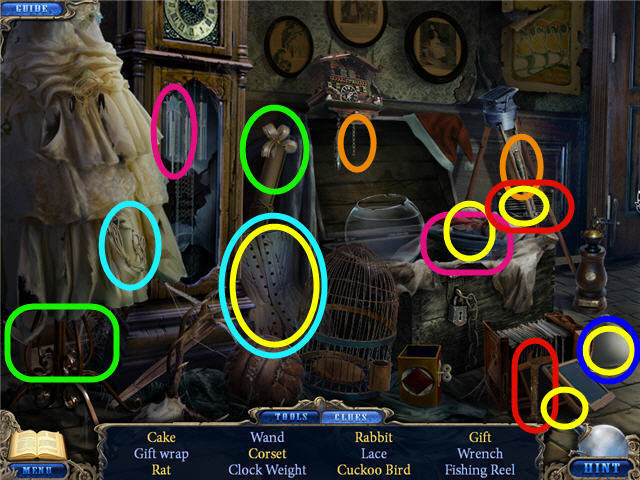
- Use the gift wrap on the open box to get a gift.
- Use the wand on the top hat to get a rabbit.
- Click on the serving plate lid and take the cake.
- Use the lace on the corset to get a corset.
- Use the wrench on the grate and take the rat.
- Use the clock weight on the cuckoo clock to get a cuckoo bird.
- Find the items listed and get a SPINNING REEL.
- Enter the photo developing lab through the door on the left.
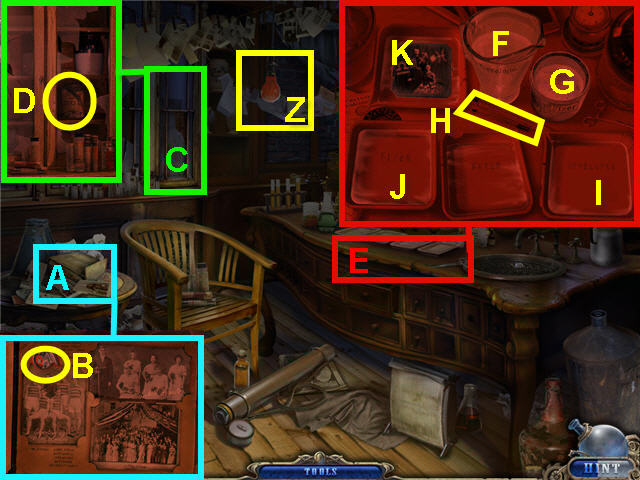
- Use the PULL CHAIN on the red light (Z).
- Look close at the table on the left (A) and click to turn the page and take the 3rd ANGEL (B).
- Look close at the glass cabinet (C) and take the FIXER (D).
- Look close at the developing trays (E).
- Place the DEVELOPER in the developer container (F).
- Place the FIXER in the fixer jar (G).
- Use the pipette (H) on the DEVELOPER container (F) and place it in the developer tray (I).
- Use the pipette (H) on the FIXER jar (G) and use it on the fixer tray (J).
- Develop the photos in the following steps:
- Place NEGATIVE #1 in the developer tray.
- Take the photo and place it in the water to the left.
- Take the photo and place it in the fixer tray.
- Take the photo and place it in the final water tray.
- Take the photo (K) to add the symbols in your journal.
- Back out of the area two times and go forward one time.
- Click on the baby carriage to access a Hidden Object Scene.
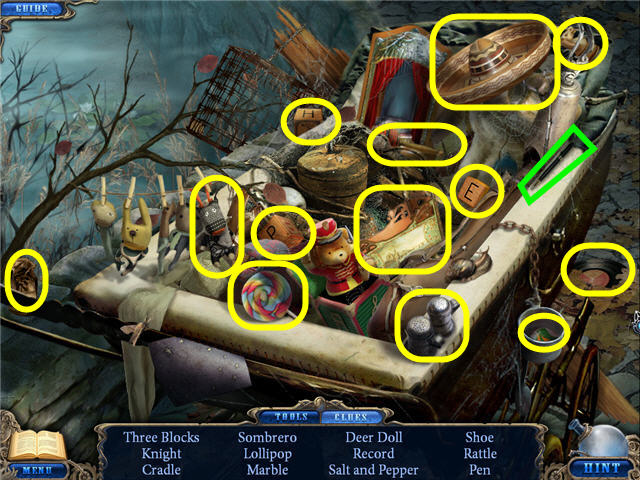
- Find the items listed.
- A PEN will be added to inventory.
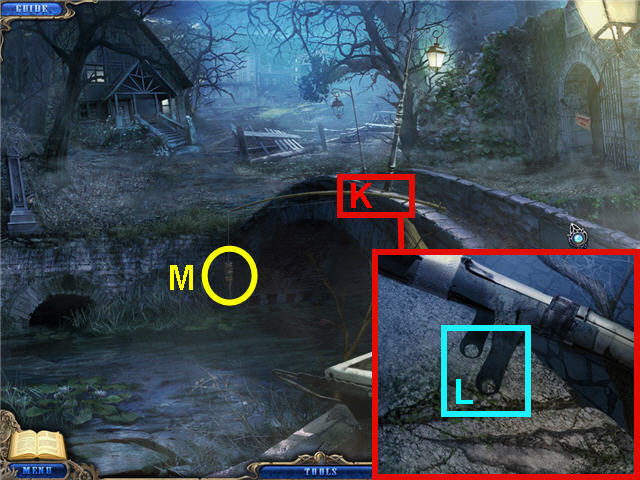
- Look close at the fishing pole (K).
- Place the SPINNING REEL on the pole (L).
- Click on the handle of the SPINNING REEL to reel in the line.
- Take the COUNTERWEIGHT (M) from the end of the line.
- Back out of the area two times and then head straight three times through the arched passageway until you are in the yard of the farmhouse.
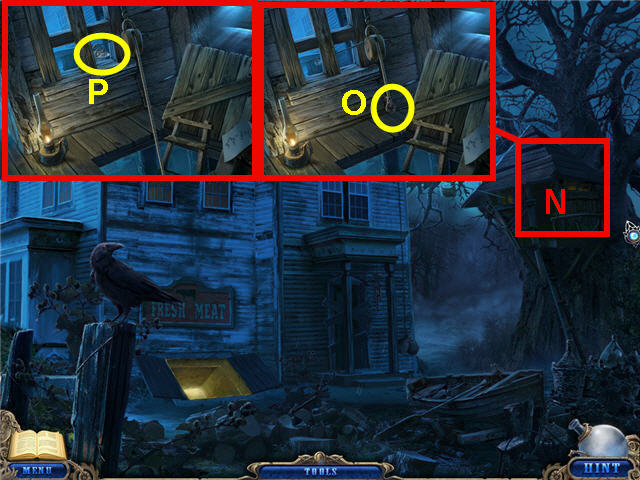
- Look close at the tree house (N).
- Place the COUNTERWEIGHT on the end of the rope (O).
- Take the 4th ANGEL (P).
- Exit the tree house and enter into the cellar.
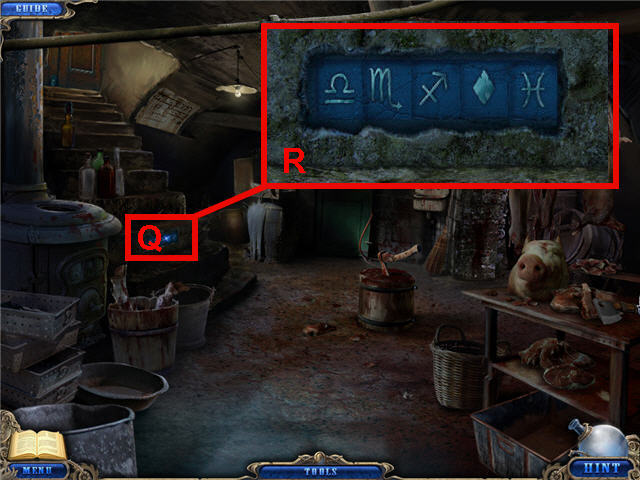
- Look close at the glowing symbols (Q) on the stair riser.
- Your clue is the code from the photo you developed which is in your journal.
- Click on the symbols to change them until they match the code in the photo. See screenshot (R) for solution.
- Take the 5th and final GEM.
- Back out of the area three times and head left into the cemetery.
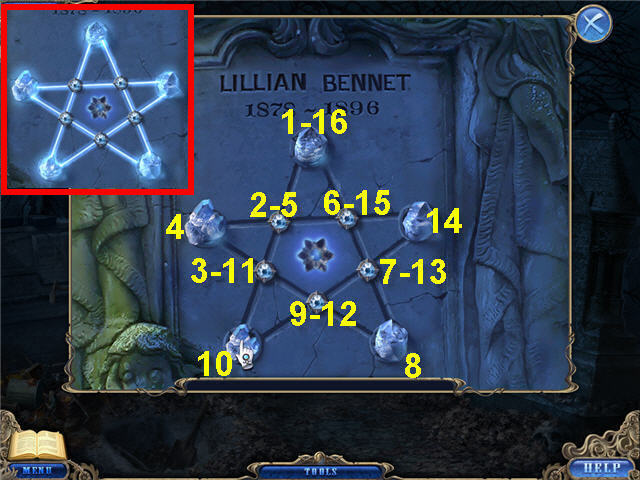
- Look close at the mausoleum.
- Place the SHINING STAR in the center.
- Place the 5 GEMS in the 5 slots on the points of the star.
- The goal is to light up all the points and paths using each path only once.
- For the solution, click on the gems in the order listed in the screenshot.
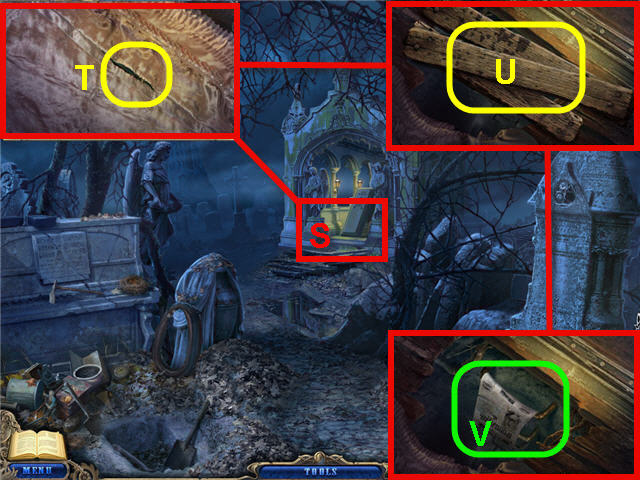
- Look close at the opened coffin in the mausoleum (S).
- Click on the stitching (T) to expose some boards.
- Use the CROWBAR on the boards (U) until they are gone.
- Take the NEWSPAPER (V).
- Click on the ladder going down note the body was removed from underground.
- Back out of the area two times and head down the alleyway next to the hotel three times until you reach the house.
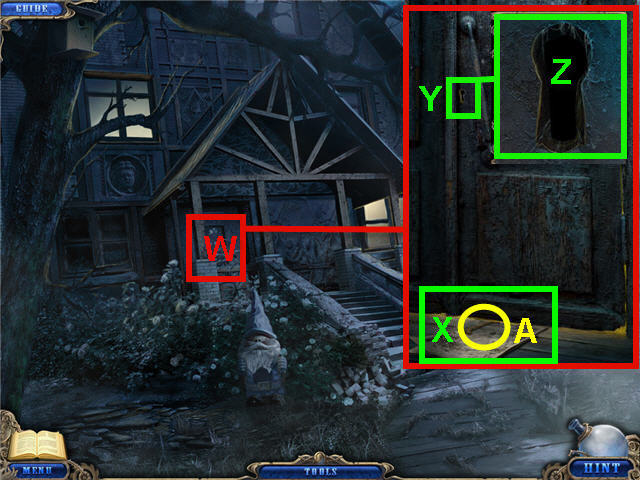
- Look close at the front door (W) of the house.
- Place the NEWSPAPER under the door (X).
- Look close at keyhole (Y).
- Use the PEN on the keyhole (Z).
- Pull out the NEWSPAPER and take the DOOR KEY (A).
- Look close at the keyhole and use the KEY on the hole.
- Enter the house and click on the area left of the staircase to access a Hidden Object Scene.
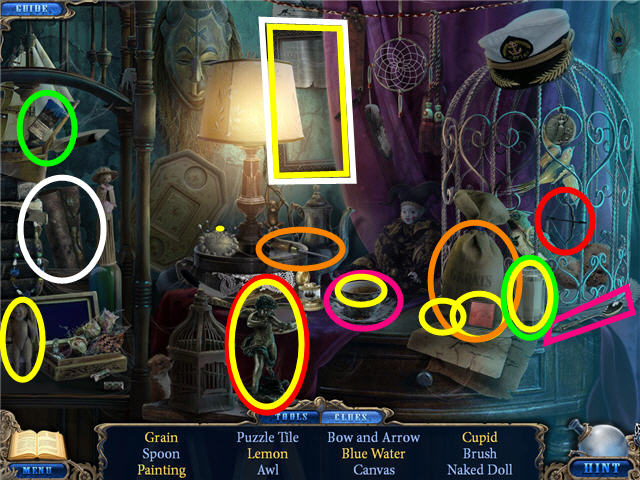
- Use the awl on the grain bag and take the grain.
- Use the brush on the glass to get blue water.
- Use the bow and arrow on the statue to get a cupid.
- Use the canvas on the frame and get a painting.
- Use the spoon on the teacup to get a lemon.
- Find the items listed and get a PUZZLE TILE.
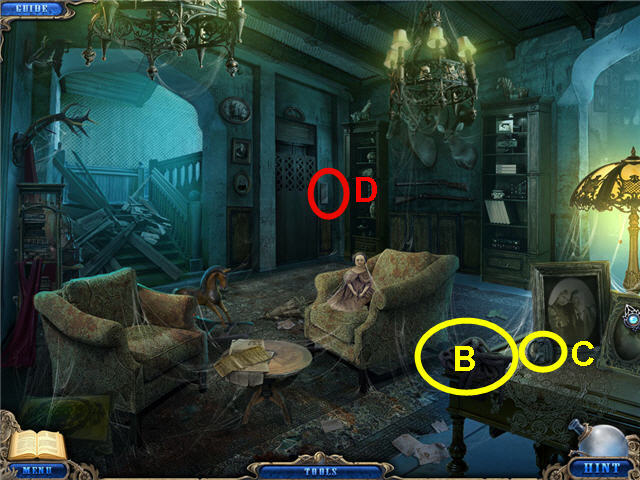
- Take the ROPE (B) and the 5th ANGEL (C) from the table on the right.
- Look close at the panel (D) at the right of the elevator and note the button is missing.
- Back out of the area four times and head to the train station on the right.
- Click on the window to the left of the right stairs to access a Hidden Object Scene.
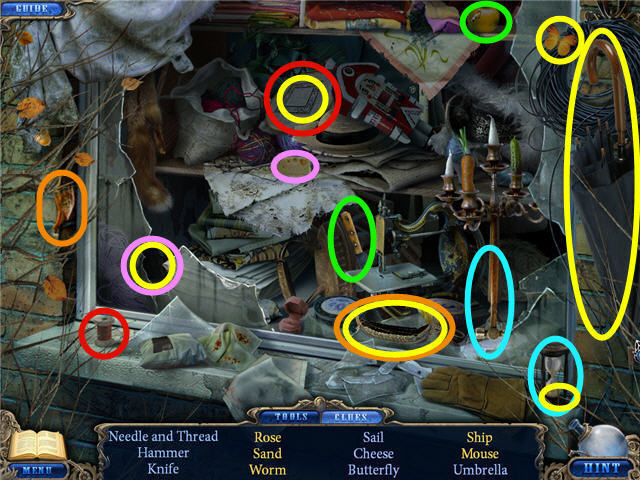
- Use the needle and cotton on the embroidery hoop and get a rose.
- Use the hammer on the hourglass to get sand.
- Use the knife on the apple and get a worm.
- Use the cheese on the mouse hole and take the mouse.
- Place the sail on the boat and get a ship.
- Find the items listed and get an UMBRELLA.
- Head to the left and then through the alleyway next to the hotel.
Chapter 5: Doctor's House
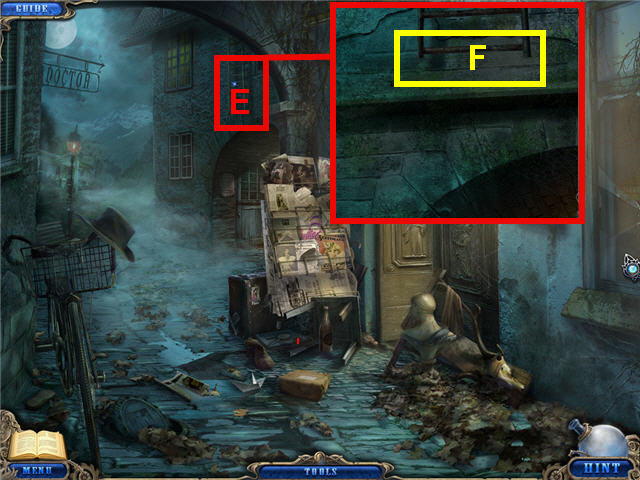
- Look close at the fire escape (E).
- Use the UMBRELLA on the bottom rung of the ladder (F).
- Head up the fire escape ladder to the rooftop.
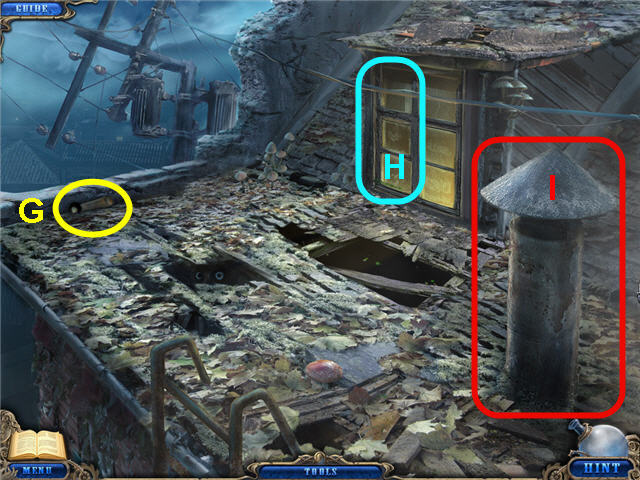
- Take the ELEVATOR HANDLE (G).
- Click on the window (H) to open it.
- Use the ROPE on the chimney (I).
- Click on the open window and enter into the doctor's office.
- Click on the table to access a Hidden Object Scene.
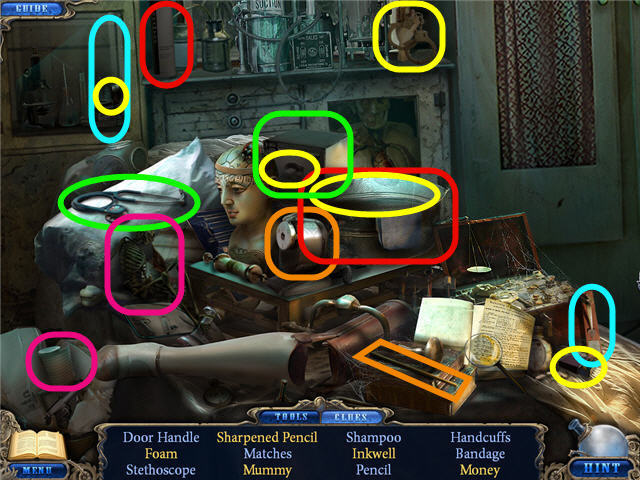
- Use the door handle on the cabinet door and get an inkwell.
- Use the pencil on the pencil sharpener and click the pencil sharpener to get a sharpened pencil.
- Use the shampoo on the tub and get foam.
- Use the bandage on the skeleton and get a mummy.
- Use the stethoscope on the safe to get money.
- Find the items and get MATCHES.
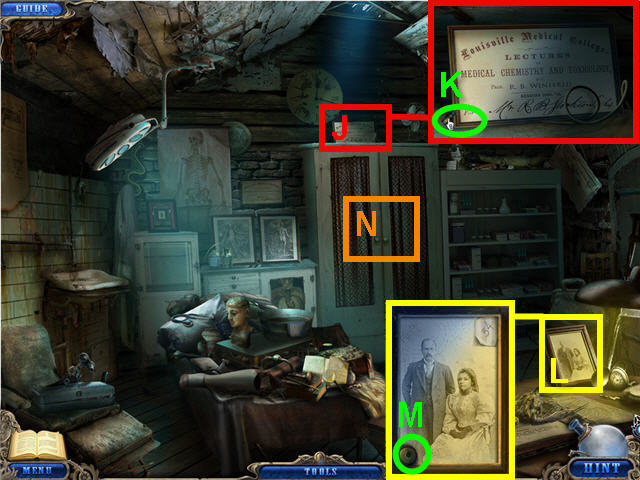
- Look close at the top of the cabinet (J) and take the ACID (K).
- Look close at the picture on the right table (L) and take the ELEVATOR BUTTON (M).
- Click on the cabinet (N) and note it needs more light to see inside.
- Back out of the area two times and go forward three times into the house.
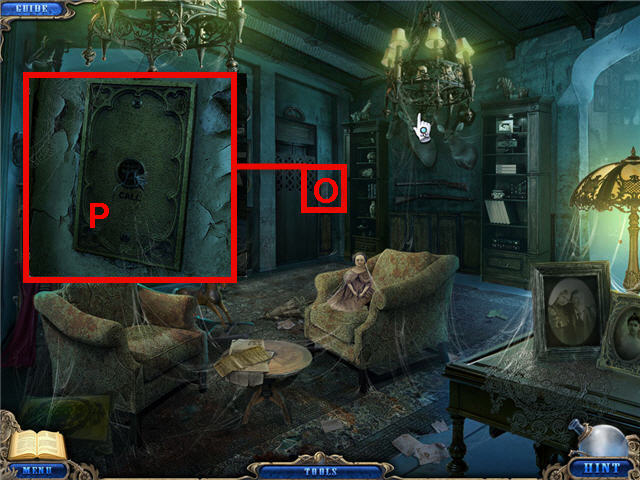
- Look close at the panel (O) to the right of the elevator.
- Place the ELEVATOR BUTTON on the panel (P) and push the button.
- Enter the elevator.
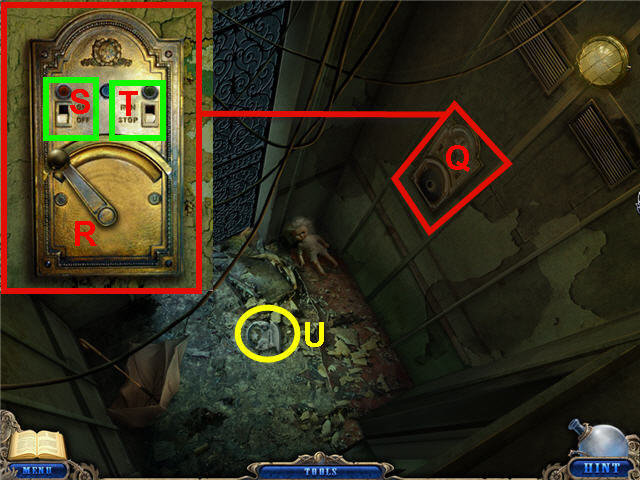
- Look close at the panel (Q) to the inside of the elevator.
- Place the ELEVATOR HANDLE on the bottom of the panel (R).
- Push the button on the left (S) to the ON position.
- Push the button on the right (T) to the RUN position.
- Click the ELEVATOR HANDLE to the right.
- Take the 6th ANGEL (U) from the floor of the elevator.
- Exit through the opened elevator door.
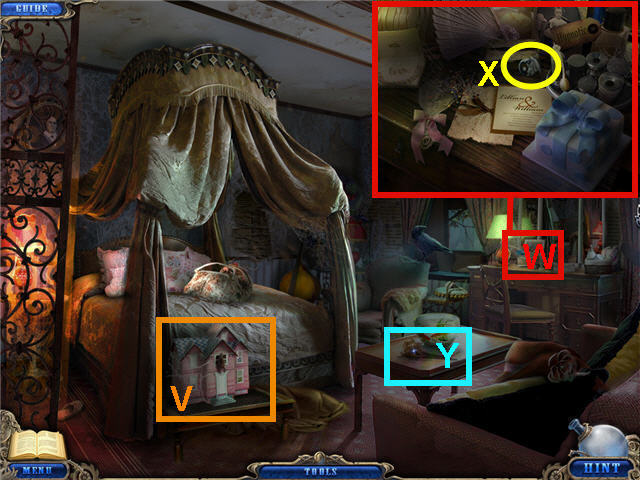
- Look close at the dollhouse (V) and note we need a tool.
- Look close at the dressing table (W) and take the 7th ANGEL (X).
- Read the note (Y) next to the bowl on the table and get a journal update.
- Back out of the room and into the elevator.
- Look close at the elevator panel and click the handle so it goes to the left.
- Back out five times to the fountain and head forward through the arched passageway two times.
- Click on the old tractor to the right of the farm gate to access a Hidden Object Scene.
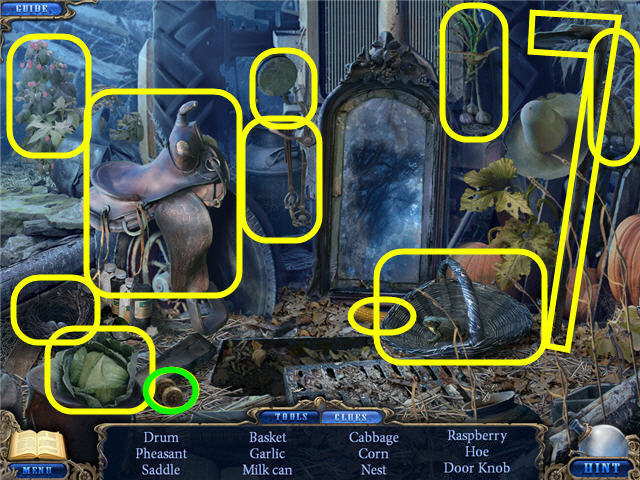
- Find the items listed and get a DOOR HANDLE.
- Head forward to the farmhouse and enter the cellar.
- Click on the table on the right to access a Hidden Object Scene.
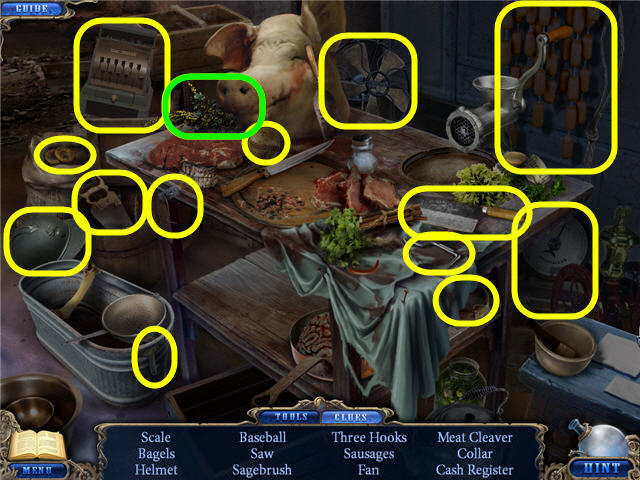
- Find the items listed.
- The SAGEBRUSH will be added to inventory.
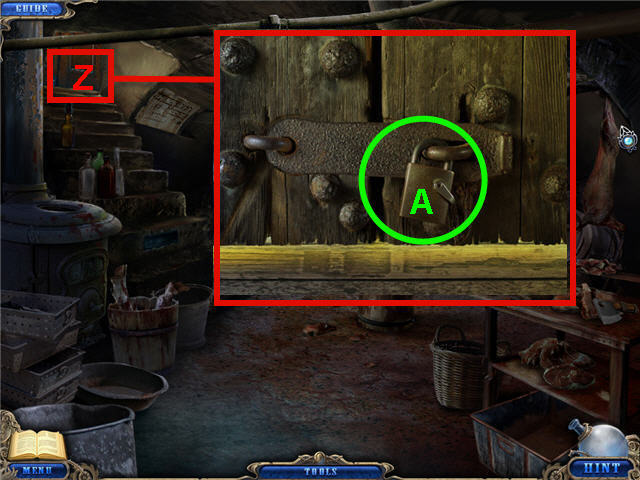
- Look close at the door (Z) on the top of the stairs.
- Use the ACID on the lock (A).
- Enter through the opened door on the top of the stairs.
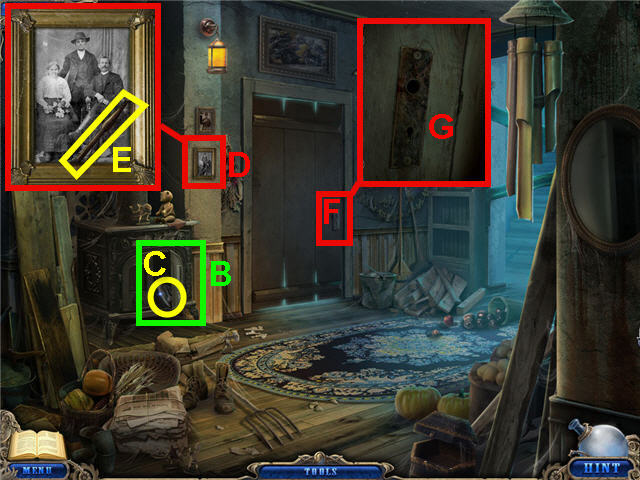
- Click on the right furnace door (B) and take the 8th ANGEL (C).
- Look close at the photo (D) to the left of the door and take the DOLL HOUSE KEY (E).
- Look close at the escutcheon plate (F) on the door.
- Place the DOOR HANDLE on the plate (G).
- Enter through the opened door to the bedroom.
- Click on the bookshelf to the left of the bed to access a Hidden Object Scene.
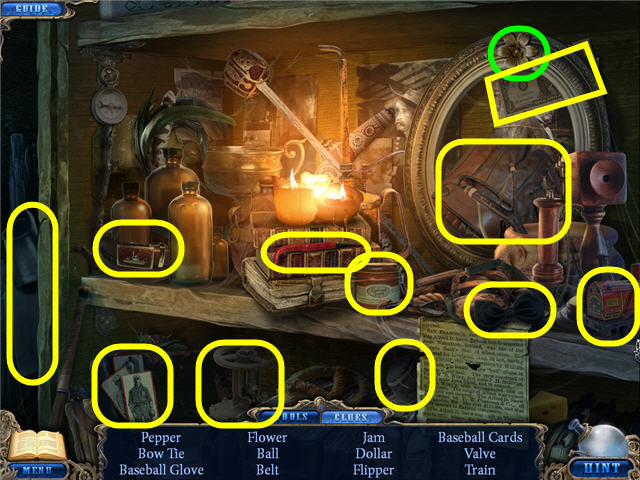
- Find the items listed.
- A FLOWER will be added to inventory.
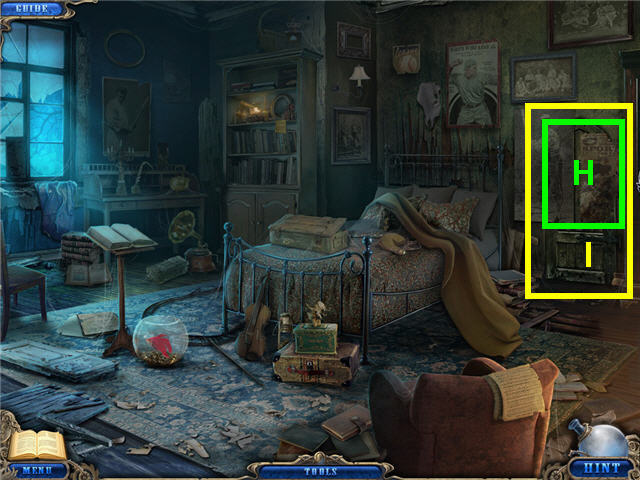
- Click on the poster (H) on the right of the bed to expose a door.
- Look close at the door (I) and note the puzzle is missing a tile.
- Back out of the area six times.
- Head down the alleyway to the right of the hotel and forward into the house.
- Click on the area to the left of the staircase to access a Hidden Object Scene.
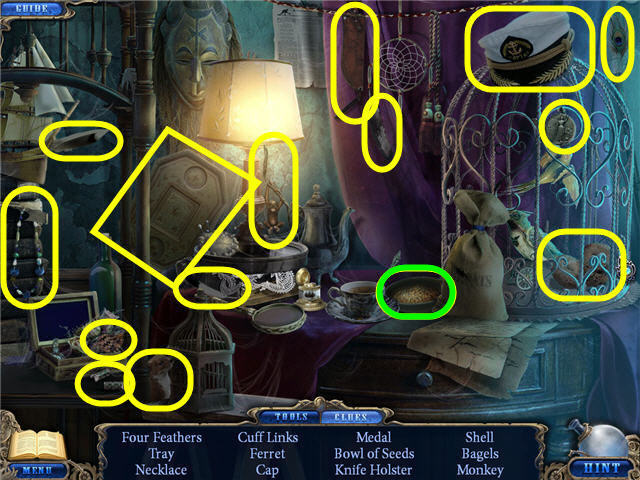
- Find the items listed and get a FEEDER.
- Enter the elevator.
- Look close at the elevator panel and click the handle to the right.
- Exit the elevator.
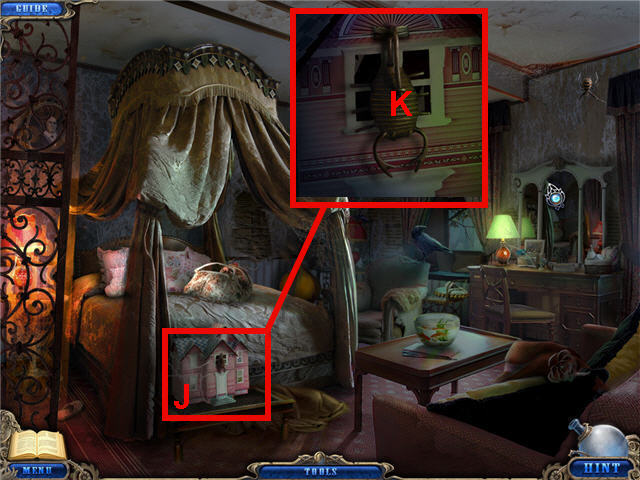
- Look close at the dollhouse (J).
- Use the DOLL HOUSE KEY on the lock (K).
- Click on the open doll house to access a Hidden Object Scene.
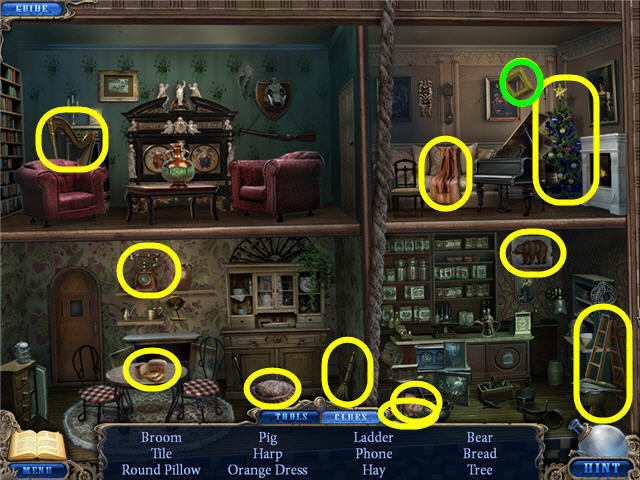
- Find the items listed and get a YELLOW TILE.
- Back out of the room, click on the elevator panel and click the handle.
- Back out of the area two times to the front of the house.
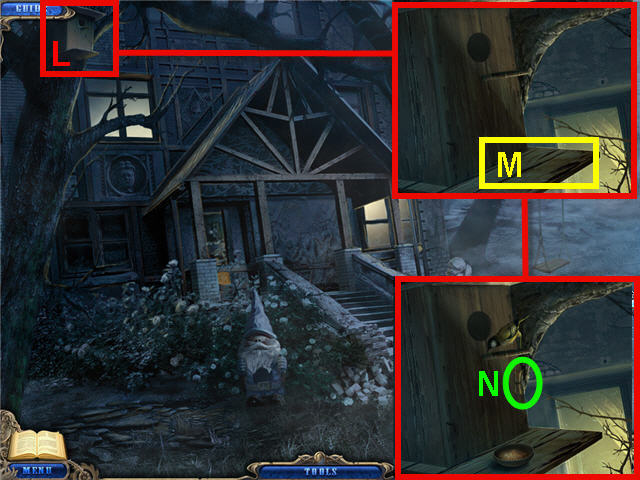
- Look close at the birdhouse (L).
- Place the FEEDER on the shelf (M) of the birdhouse.
- Take the DIARY KEY (N) hanging from the bird.
- Back out of the area 3 times to the fountain square and forward through the arched passageway three times and into the cellar.
- Head up the stairs and into the bedroom.
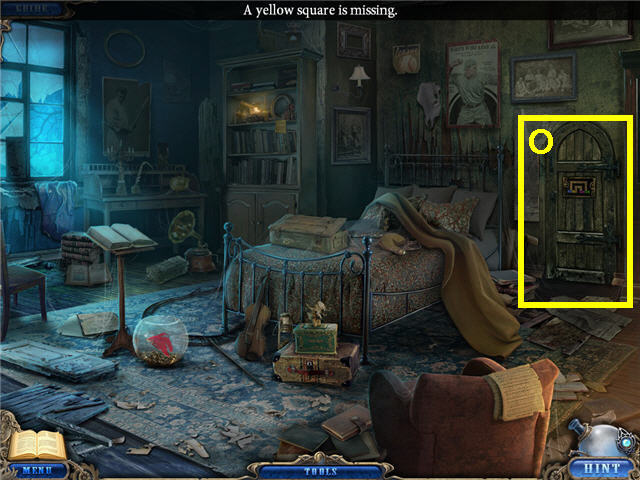
- Look close at the door (O) at the right of the bed.
- Place the YELLOW TILE on the second from the right blank space.
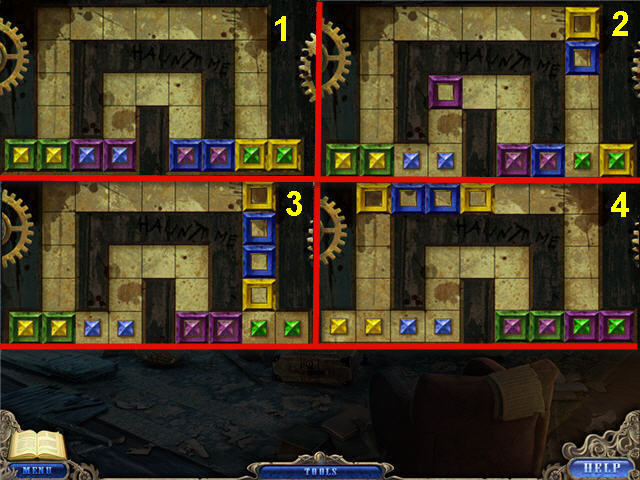
- The goal is to move the colored tile to their matching colored centers.
- You cannot jump or pass through any other tiles.
- In order to move a tile, click-hold the tile and drag in the direction you wish to go until you see a series of smaller squares and then let go.
- Pile up tiles to act as bumpers to get them lined up to go up the bends on the bottom.
- See first screenshot for part 1 of the solution.
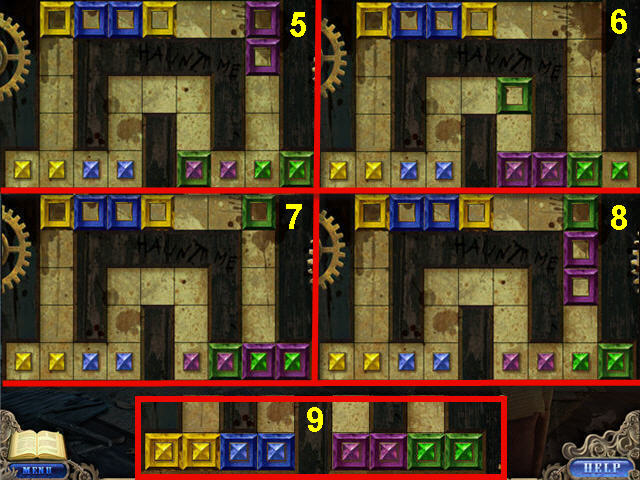
- See second screenshot for part 2 of the solution.
- Enter into the newly-opened door.
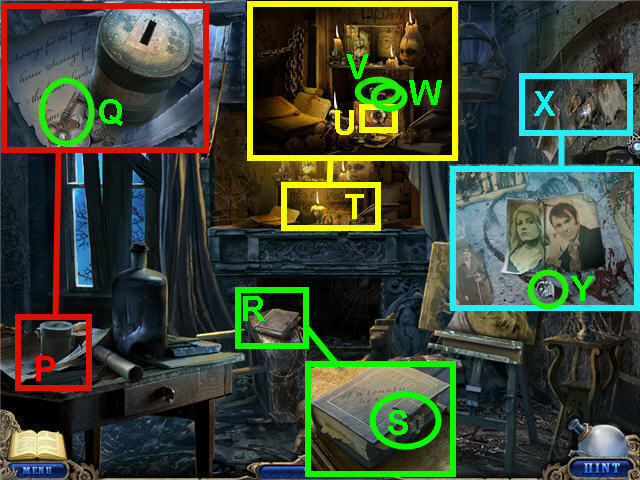
- Look close at the table (P) on the left and take the KEY (Q).
- Look close at the diary (R) and use the DIARY KEY on the lock (S); take the letter and the 9th ANGEL.
- Look close at the shrine (T) and place the FLOWER in the indentation (U) in the front of the box.
- Take LILLIAN'S CURL (V) and the HANDLE (W) from the box.
- Look close at the photos on the right wall (X) and take the 10th ANGEL (Y).
- Back out of the room and click on the bookshelf to the left of the bed to access a Hidden Object Scene.
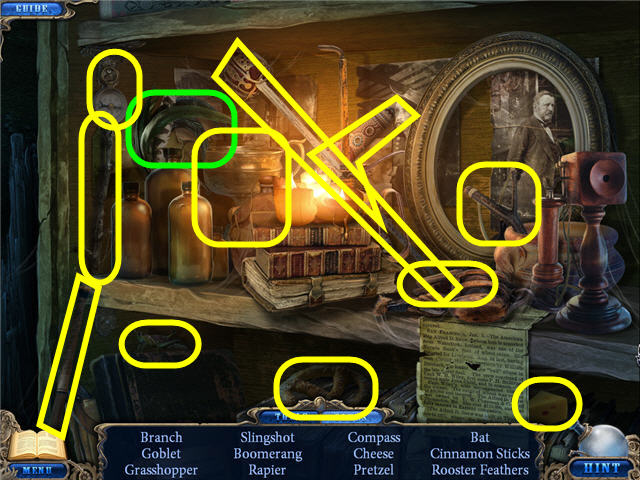
- Find the items listed and get FEATHERS.
- Back out of the area six times and head to the train station on the right.
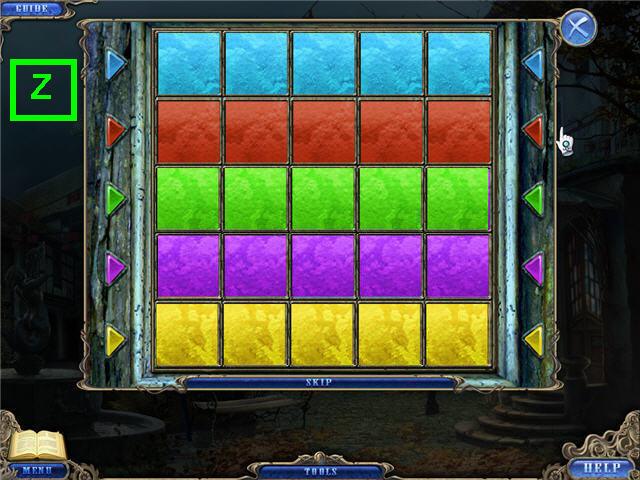
- Look close at the door on the right building to access a puzzle.
- Place the PUZZLE TILE on the empty slot.
- The goal of the puzzle is to move the rows vertically and horizontally to align the colored tiles with the same colored arrows on the sides.
- This puzzle is random with each game. See screenshot for solution (Z).
- Place the KEY in the keyhole when completed and click to turn.
- Enter into the opened door and click on the back of the room to access a Hidden Object Scene.
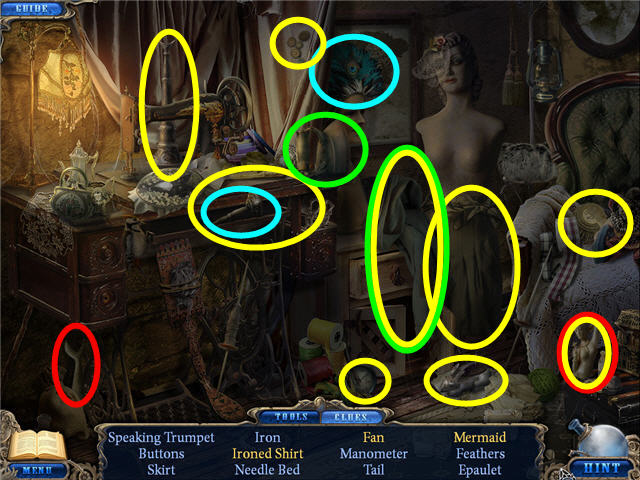
- Place the tail on the torso to get a mermaid.
- Place the feathers on the handle and get a fan.
- Place the iron on the shirt to get an ironed shirt.
- Find the items listed and get a MANOMETER.
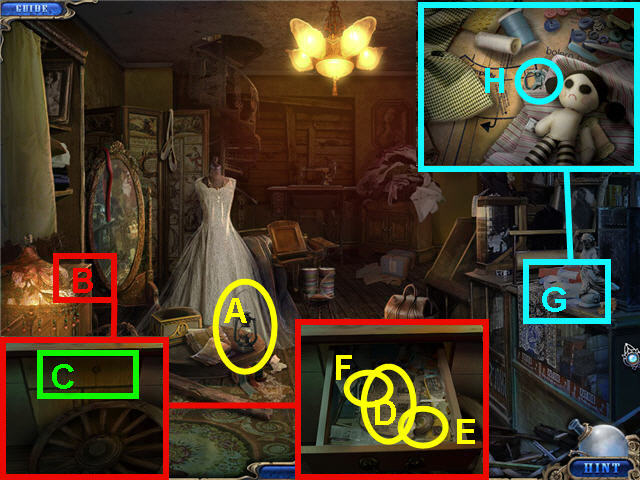
- Take the KEROSENE LAMP (A).
- Look close at the drawers (B) on the left and place the HANDLE on the top drawer (C).
- Take the Angels vs. Demons rules (D) to get a journal update.
- Take the 11th ANGEL (E) and the TELESCOPE LENS (F) from the drawer.
- Look close at the right counter (G) and take the 12th ANGEL (H).
- Back out one time and go forward through the arched passageway and right to the statue park.
- Click on the base of the large statue in the center to access a puzzle.
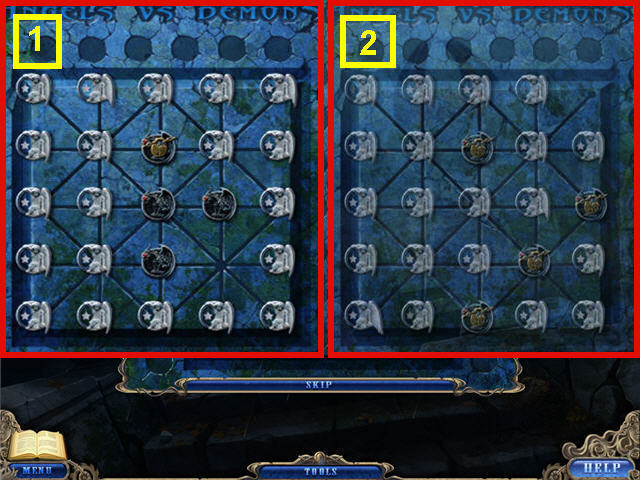
- Place the 12 ANGELS in the empty slots. You will automatically start the game while placing the last ANGEL.
- The last angel will be stuck on your cursor ready for placement on the board.
- You can access the journal and read the rules to the game anytime during play.
- First you need to carefully place the angels on the board.
- When placing an ANGEL next to a demon, check that you have no space adjacent to the ANGEL that allows the demon to jump you. See section (1) of the screenshot for my placement.
- After the ANGELS are placed, you can move them one space along a path only.
- The goal is to trap all 4 of the demons by surrounding them with no option of a move or jump. See section (2) of the screenshot for a winning board.
- If the demon jumps 6 ANGELS you lose and the game will start over.
- Head down the ladder in the base of the statue.
Chapter 6: Mine and Train Station
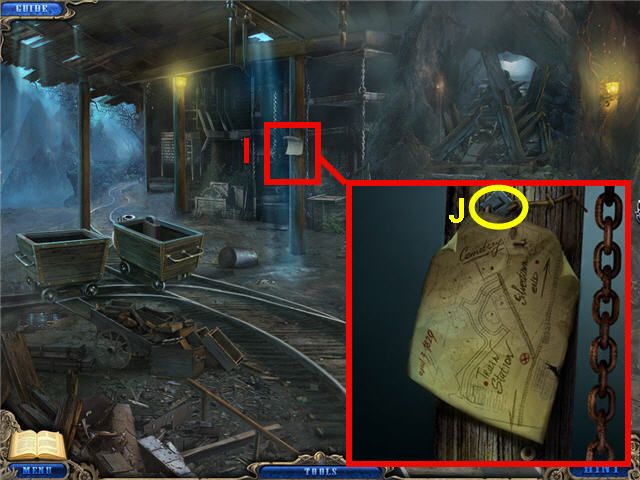
- Look close at the note (I) on the pillar and take the BLOCK (J).
- Back out of the area three times and head left to the fountain square.
- Head down the alleyway to the right of the hotel and up the fire escape ladder and in the window.
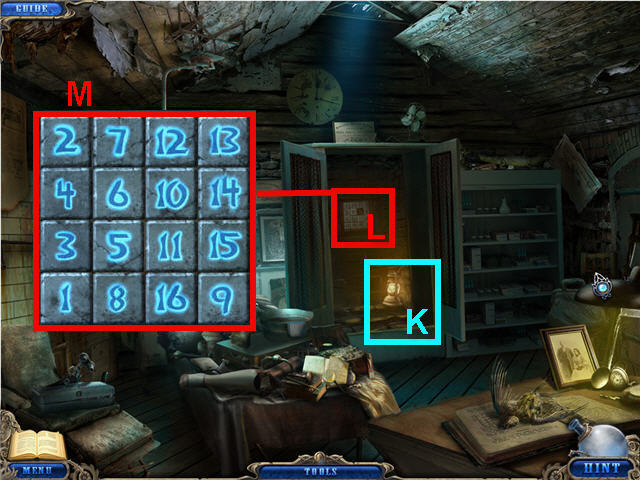
- Place the KEROSENE LAMP in the dark cabinet (K).
- Look close at the grid (L) on the back of the closet.
- Place the BLOCK on the empty square.
- The goal is to have each horizontal row add up to 34.
- Click on any two tiles to switch them. See screenshot (M) for one solution.
- Enter through the opening to the lair.
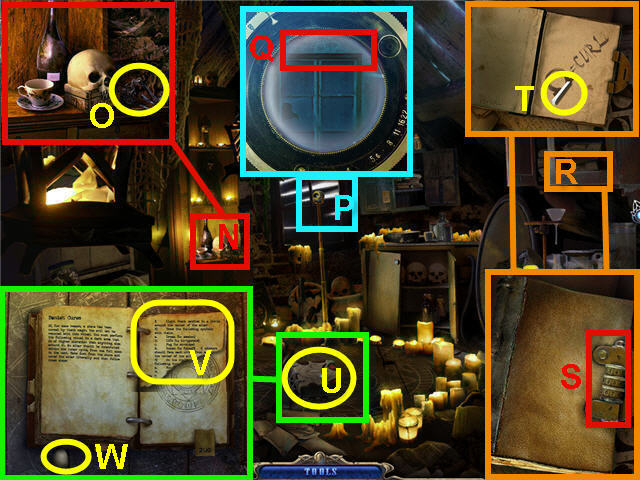
- Look close at the candle lit shelf with skull (N).
- Take the GRAPPLING (O) and note the skull needs a key.
- Look through the telescope (P) and place the TELESCOPE LENS on the scope.
- Adjust the scope and note the code 457 (Q).
- Look close at the note on the cabinet door (R).
- Look close at the cabinet in the upper right and use the code from the telescope (457) on the lock (S) to open the book.
- Take the 3 files for a journal update and take the CHALK (T).
- Look close at the book (U) on the floor that the doctor left.
- Flip through the pages taking the half page SHEET (V) and the EGG (W).
- Take the BOOK after you back out of the close-up.
- Back out of the room and click on the table to access a Hidden Object Scene.
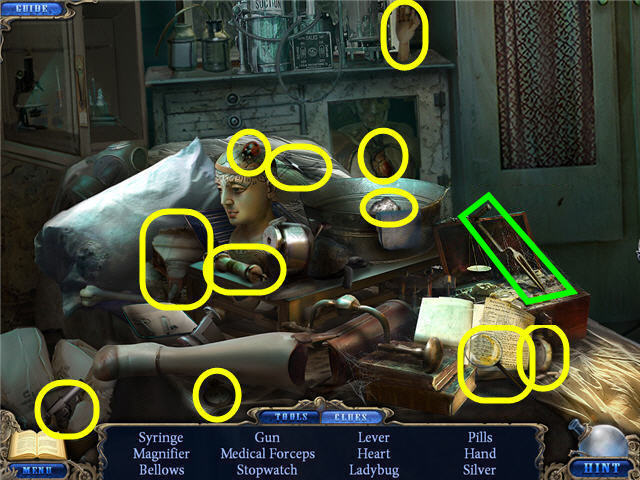
- Find the items listed and get a TRAIN CAR LEVER.
- Back out of the area three times to the fountain square and through the arched passageway.
- Head to the statue park on the right, go down into the mines and left up the track.
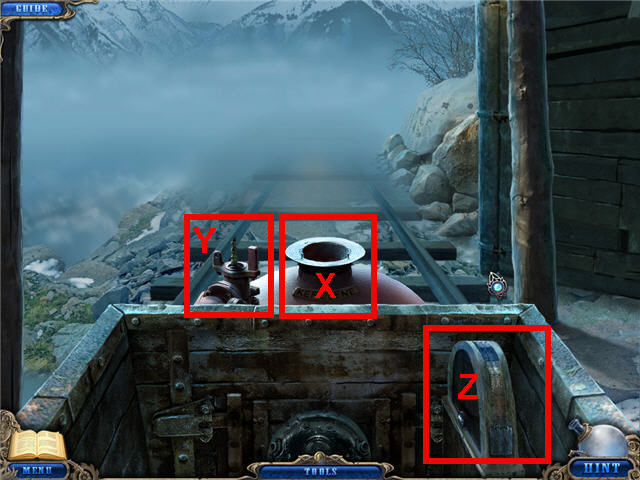
- Place the KEROSENE in the tank (X).
- Place the MANOMETER on the stem (Y) on the left.
- Place the TRAIN CAR LEVER on the mechanism (Z) on the right.
- Click on the TRAIN CAR LEVER to start the train car.
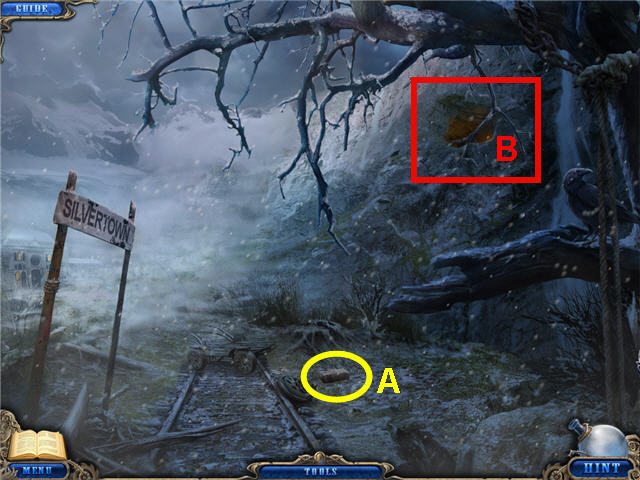
- Take the BRICK (A).
- Look at the cave (B) on the upper right.
- Click on the Silvertown sign to head to the train station.
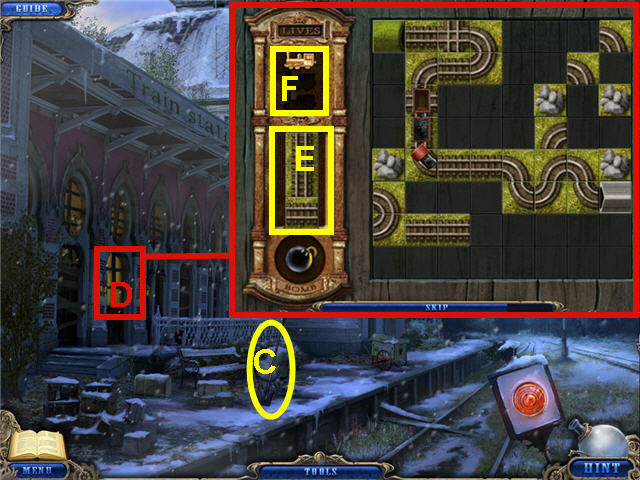
- Take the SPADE (C).
- Click on the door to the train station (D) to access a puzzle.
- The object of the puzzle is to complete the train track on the right by using the tracks as they pop up on the left (E).
- Once you have clicked on a track you must place it somewhere on the right in order to get another one.
- If you don't want a track, just click on it and drop it out of the way on the right so you can get more choices of tracks.
- You have a few lives (F) and the tracks will stay in place so you can continue your track building until the lives are up. See screenshot for one solution.
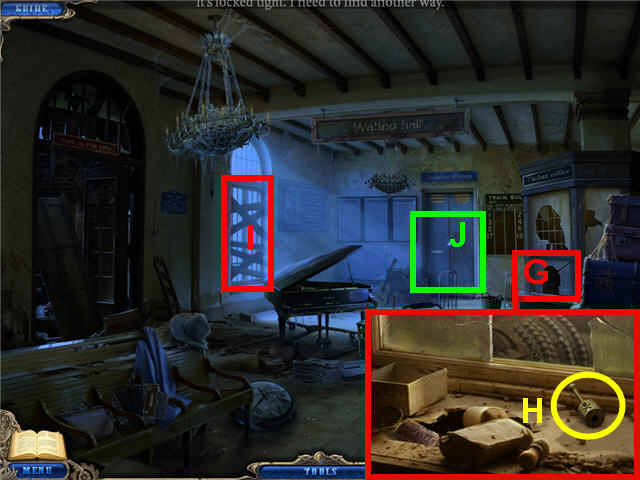
- Look close at the ticket office (G) and take the KEY (H).
- Click on the exit to the left and the boarded up window (I).
- Click on the luggage storage door (J) to open it and click again to access a Hidden Object Scene.
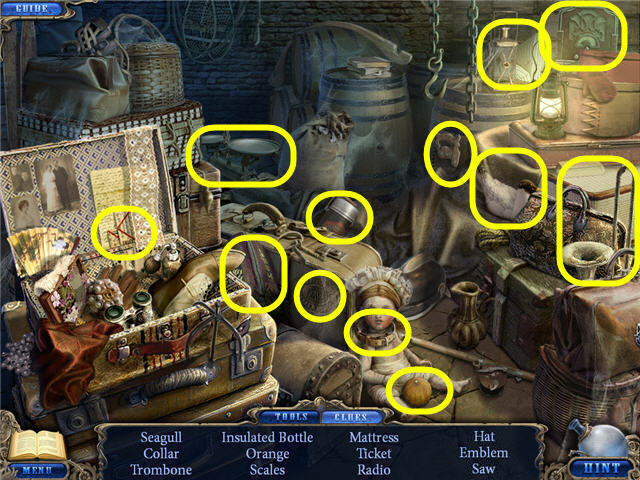
- Find the items listed and get a SAW.
- Use the SAW on the boarded up window to the left.
- Use the BRICK on the window.
- Exit out the window to note your new shortcut and head back into the window left of the door.
- Back out the area two times to the Silvertown Sign.
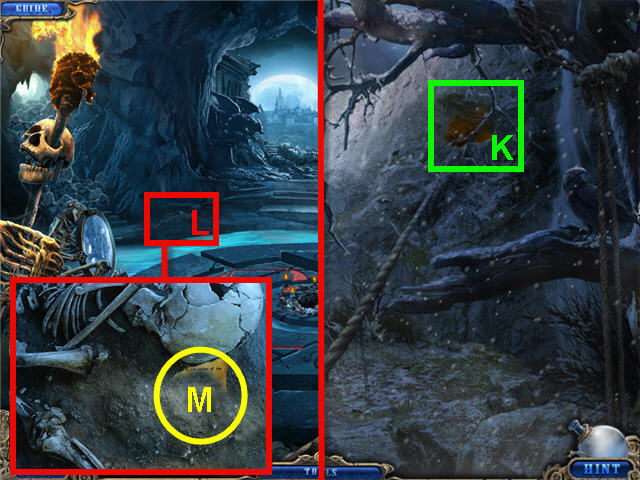
- Use the GRAPPLING on the cave entrance (K) and click on the entrance to climb up.
- Look close at the skeleton (L) on the left and use the SPADE to expose the note (M).
- Place the SHEET on the half note and click on the completed page to get a journal update.
- Take the CLOVER on the ground that was under the page.
- Look close at the ritual ring and also read the journal page update on the curse banishing ritual to note what is needed.
- Exit the cave and head forward to the train station. Go through the station and out the window to the station courtyard.
- Head left, go down the alleyway right of the hotel one time, up the fire escape, into the window and into the lair.
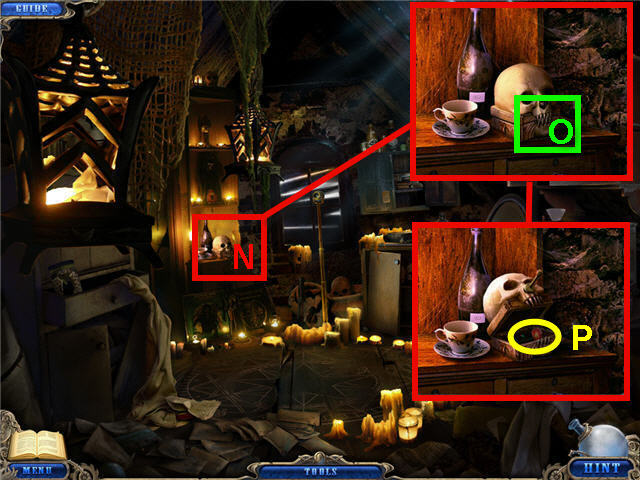
- Look close at the skull (N) on the candle lit shelf.
- Use the KEY on the skull (O) and take the POPPY (P).
- Back out four times to the fountain square and head right and into the window of the train station.
- Click on the luggage storage room to access a Hidden Object Scene.
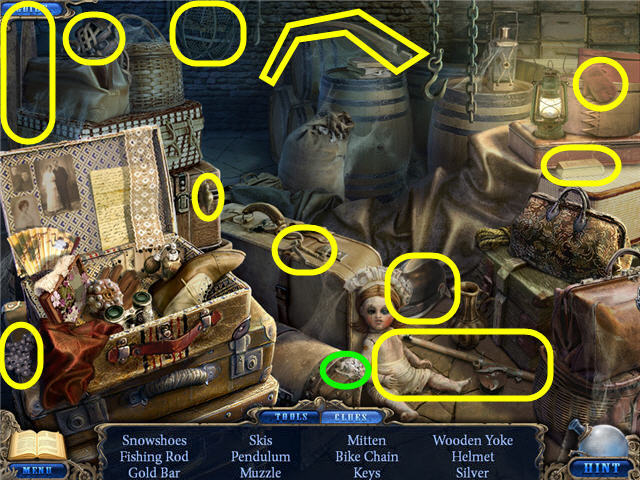
- Find the items listed and get SILVER.
- Back out of the area two times and head up to the cave.
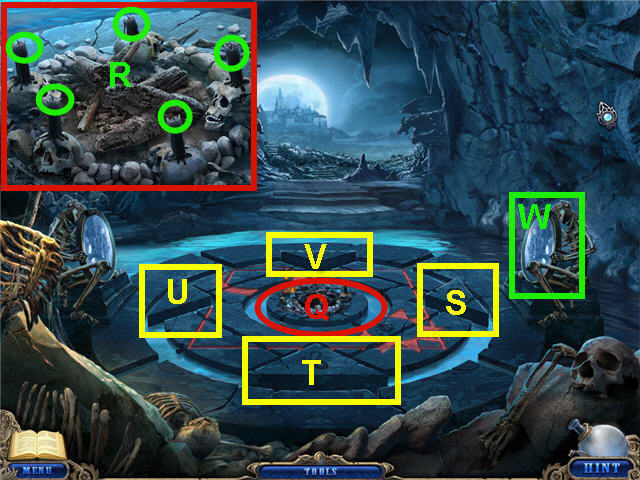
- Look close at the center (Q) and use the MATCHES to light the wicks (R) of the candles.
- Look close at each pedestal (S, T, U, and V) with a symbol on it and use the CHALK on each.
- Place LILLIAN'S CURL on the right pedestal (S).
- Place the CLOVER on the closest bottom pedestal (T).
- Place the POPPY on the left pedestal (U).
- Place the SILVER on the farthest top pedestal (V).
- Place the SAGEBRUSH in the center (Q).
- Use the MATCHES on the SAGEBRUSH.
- Place the BOOK on the flame when it turns blue.
- Place the FEATHERS on the flame.
- Place the EGG on the FLAME.
- Click on the right mirror (W).
- Congratulations! You have successfully completed Dark Dimension: City of Fog.
Created at: 2011-06-17

