

Walkthrough Menu
- General Tips
- Chapter 1
- Chapter 2
- Chapter 3
- Chapter 4
- Chapter 5
- Chapter 6
- Chapter 7
- Chapter 8
- Chapter 9
- Chapter 10
General Tips
- This is the official guide for Dark Parables: Goldilocks and the Fallen Star.
- This guide will not mention each time you have to zoom into a location; the screenshots will show each zoom scene.
- Hidden-object puzzles are referred to as HOPs. This guide will not show HOP solutions. It will identify the location of the HOP and the inventory item acquired.
- This guide will show solutions for non-random puzzles. Please read the in-game instructions for each puzzle.
- In this game, you will sometimes have to select the new scene to trigger dialog, cut-scenes, or tasks prior to interacting with the scene.
Chapter 1
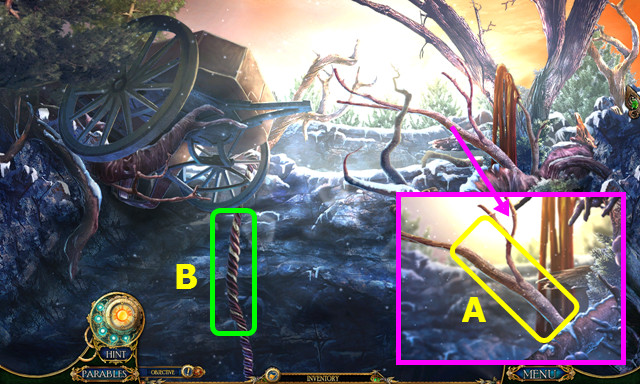
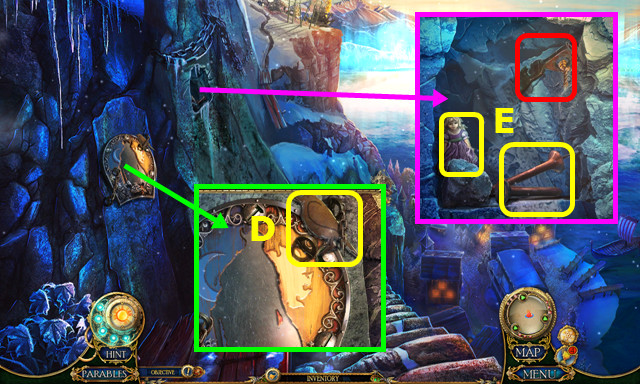
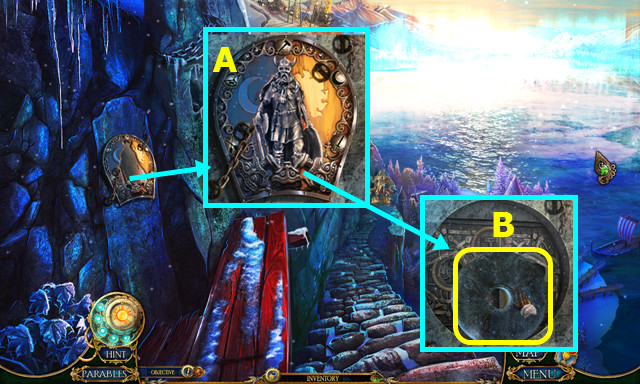
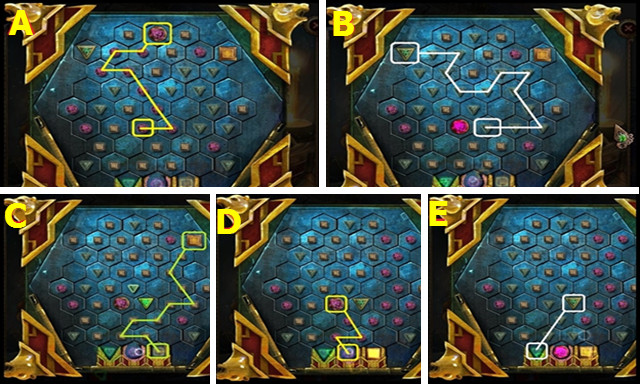
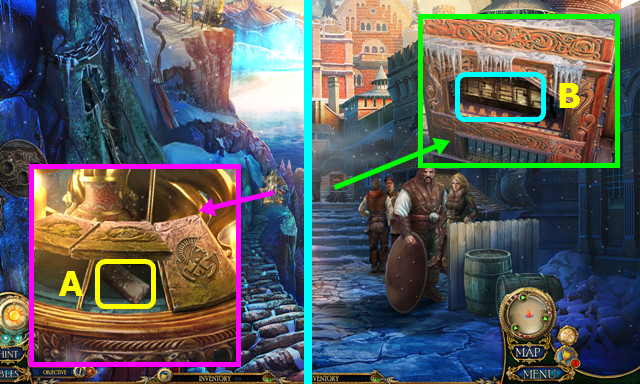
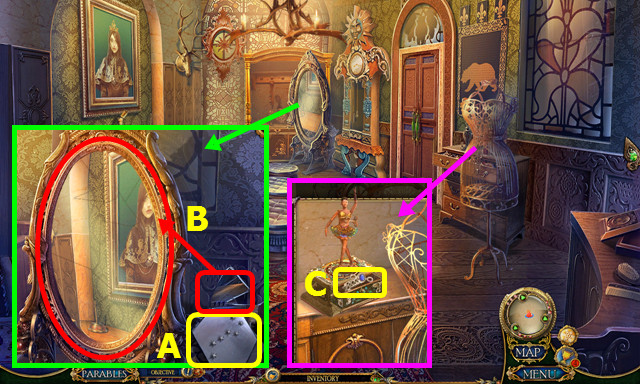
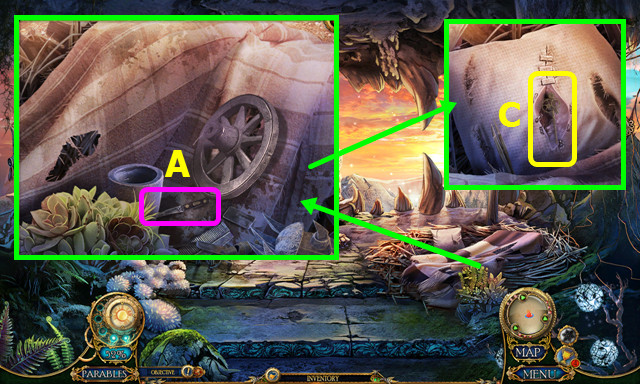
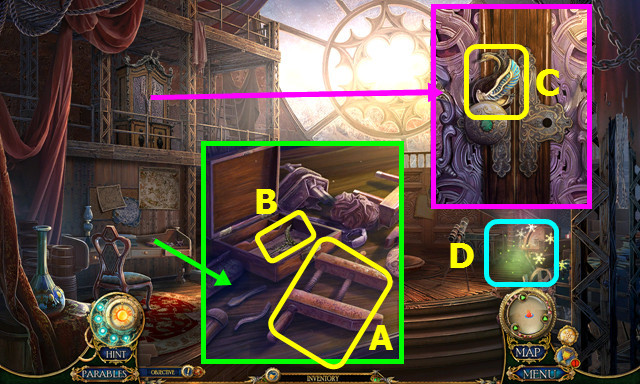
- Take the HOOKED BRANCH (A).
- Use the HOOKED BRANCH (B).
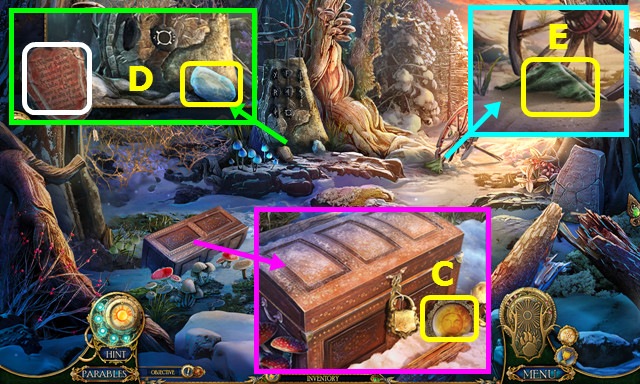
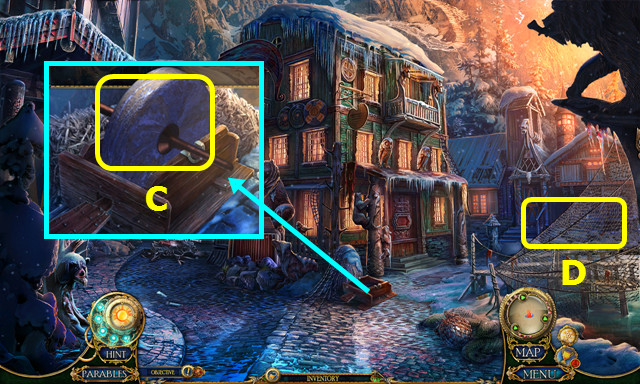
- Right the chest; take the GOLDEN SUN (C).
- Read the plaque; take the FROZEN STATUE (D).
- Take the CLOTH (E).
- Open the CLOTH; take the COPPER PIECES and CLOTH (inventory).
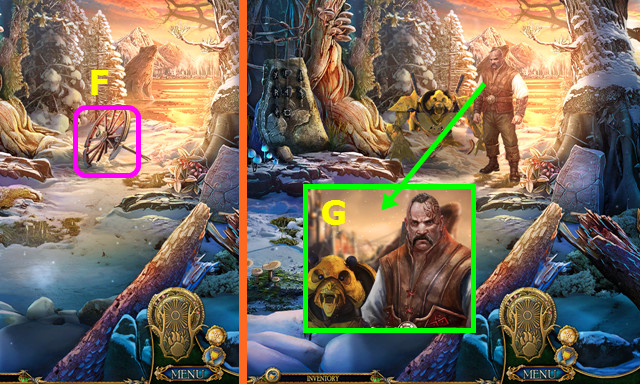
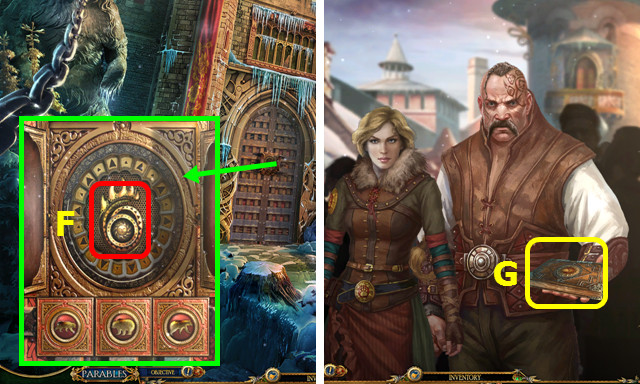
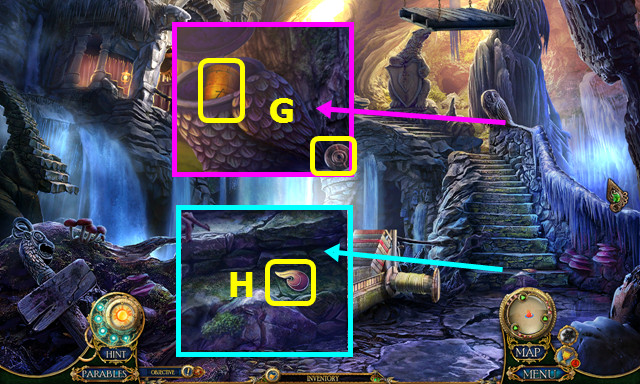
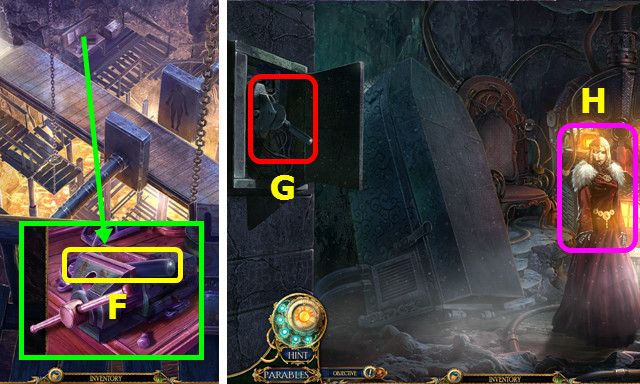
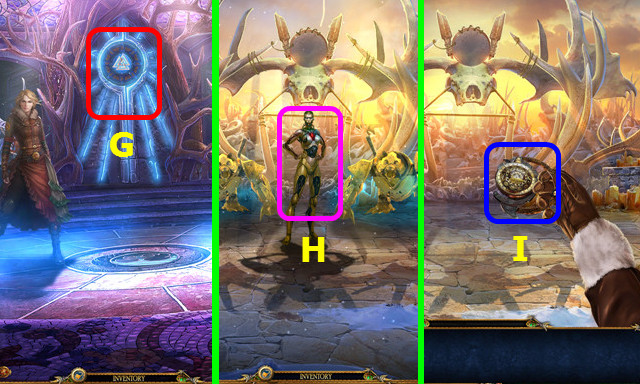
- Touch the wheel (F).
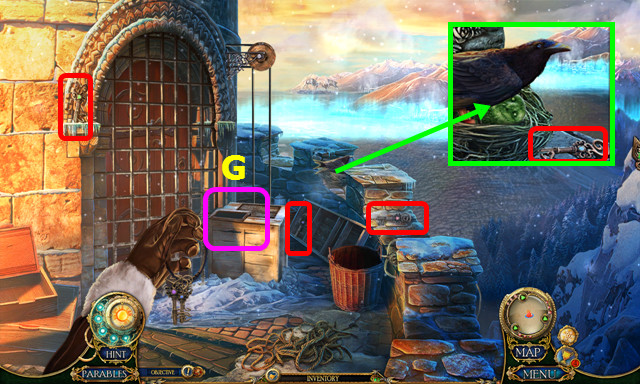
- Talk to the Sentry; show the ARTIFACT (G).
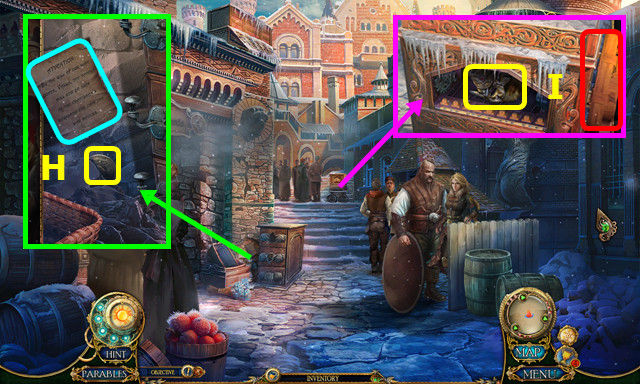
- Walk right.
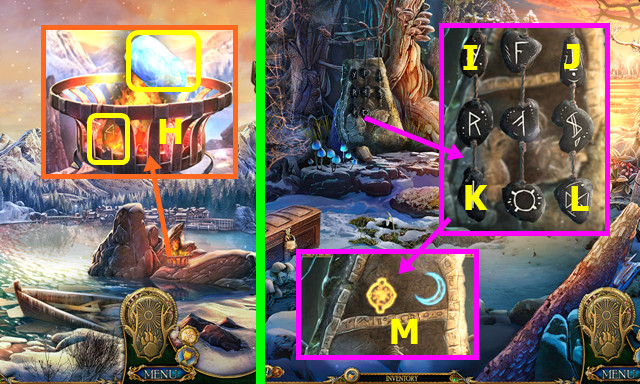
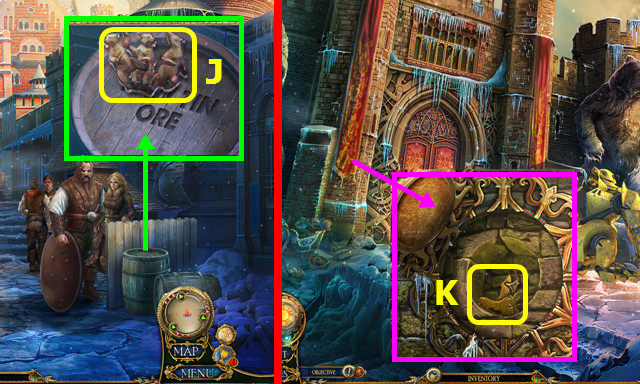
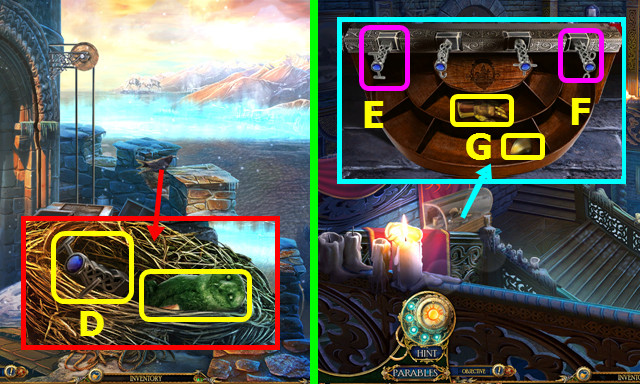
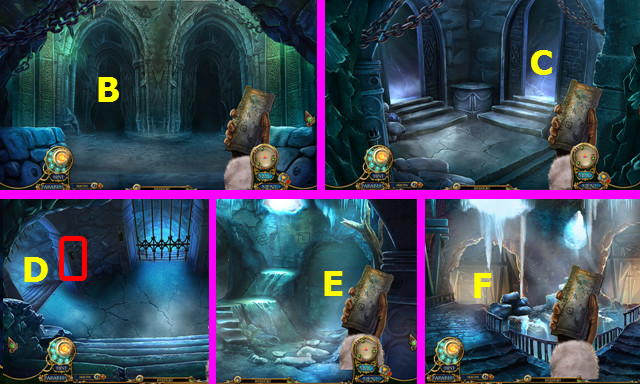
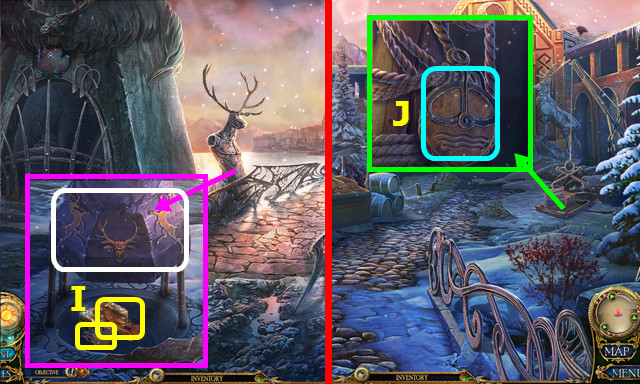
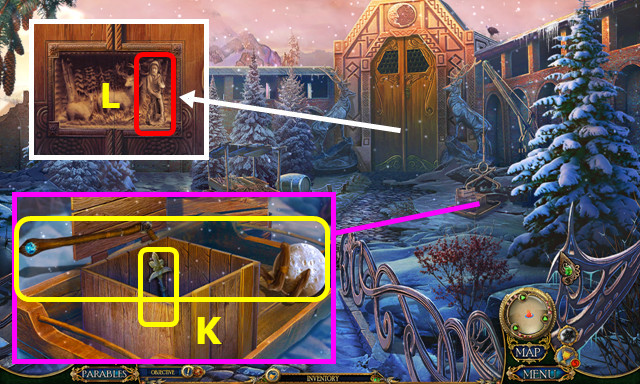
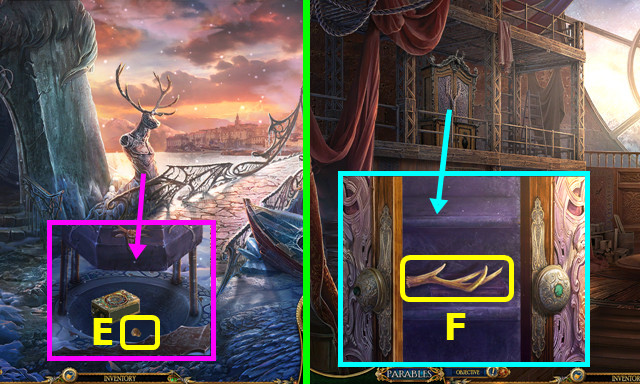
- Use the FROZEN STATUE and earn the METAL RAVEN; use the CLOTH to take the RUNE STONE (H).
- Walk down.
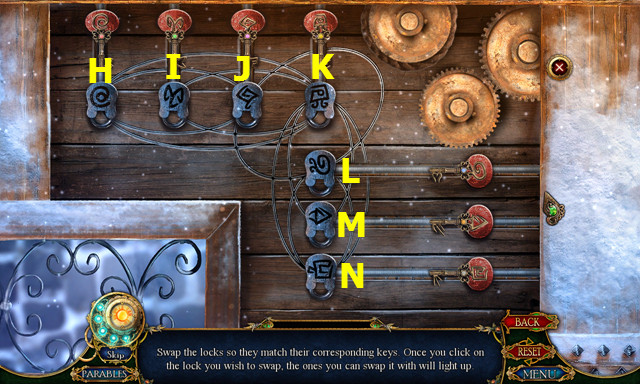
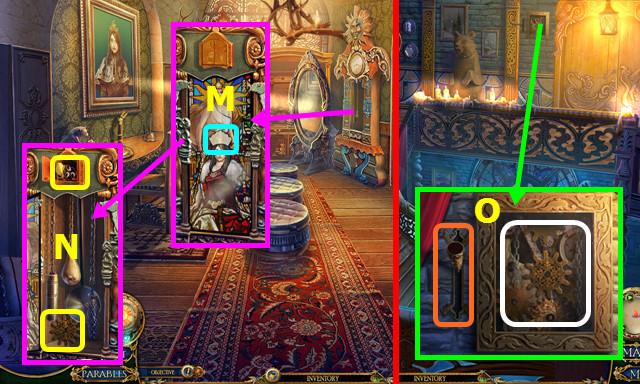
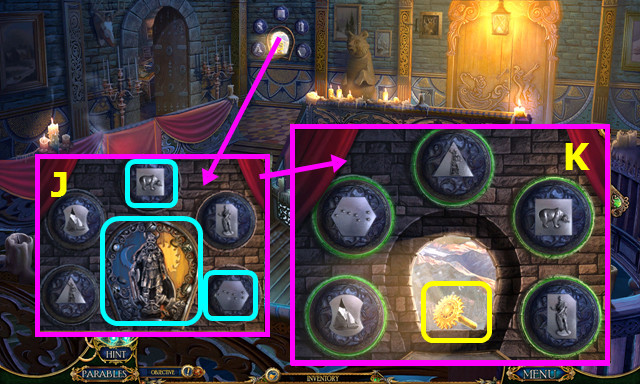
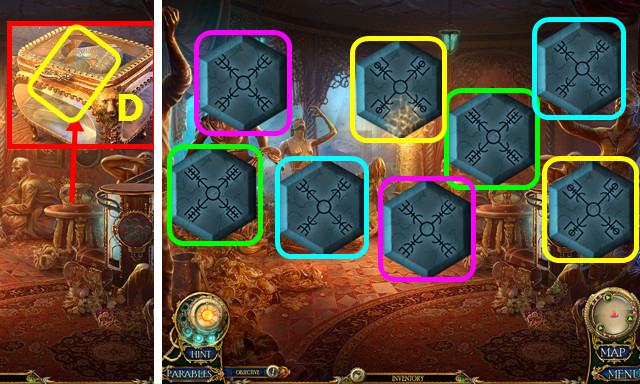
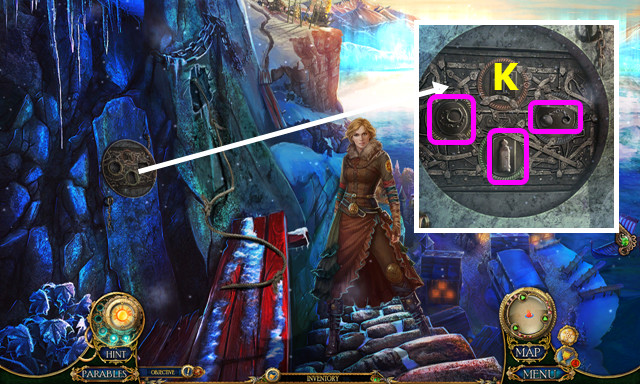
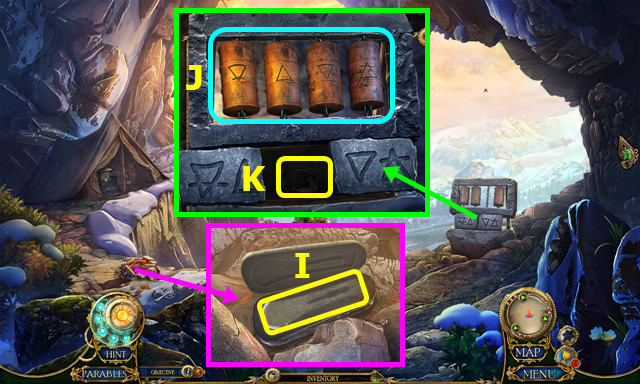
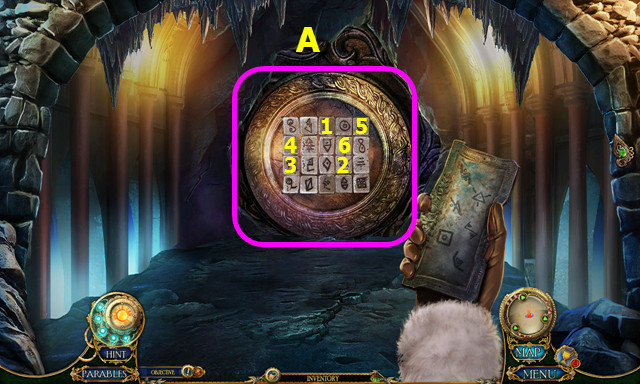
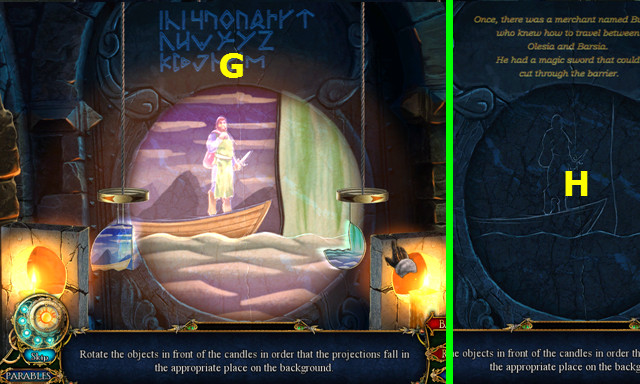
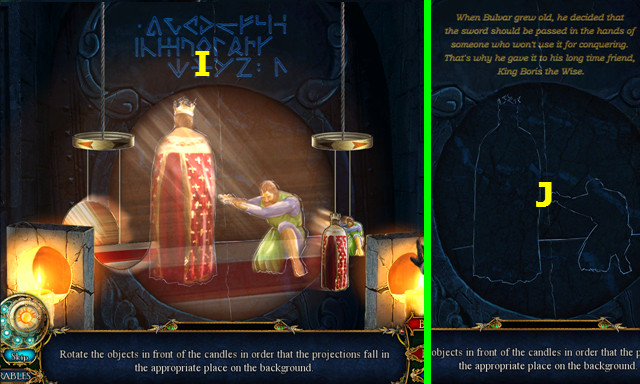
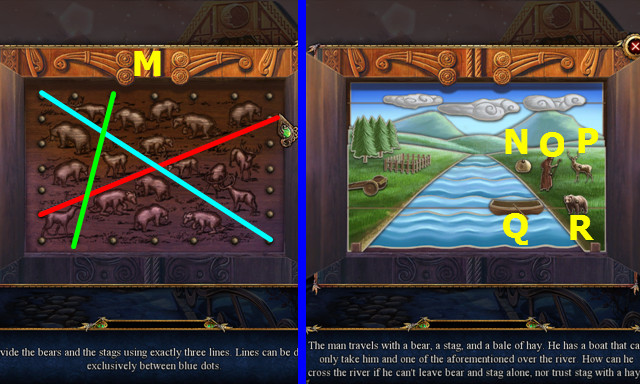
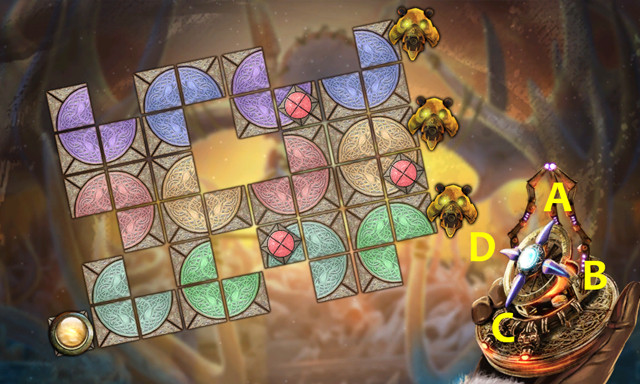
- Place the RUNE STONE; select I-J-K-L.
- Select the two glowing symbols, and then select the combined symbol (M).
- Walk left.
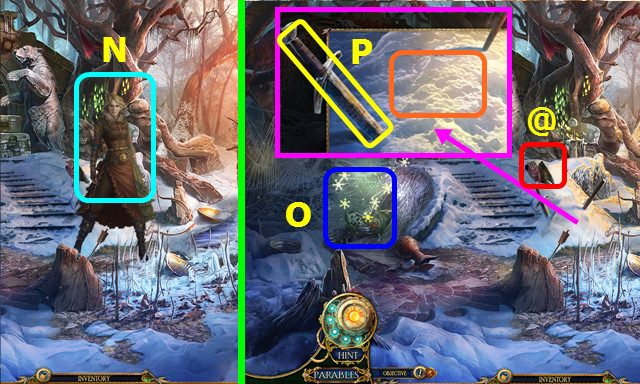
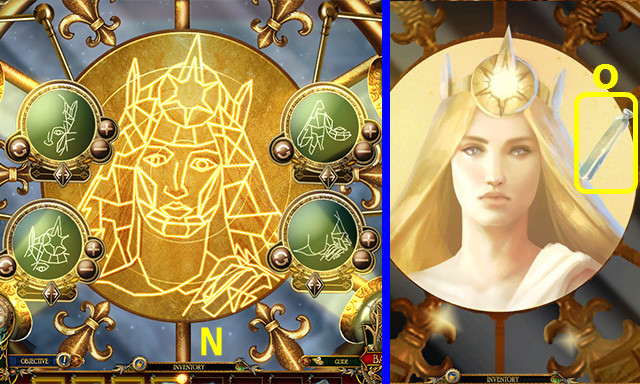
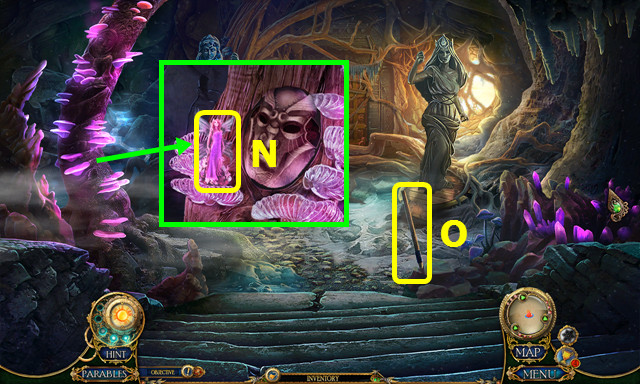
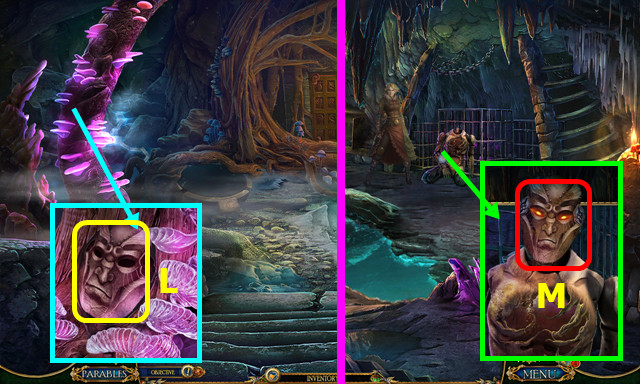
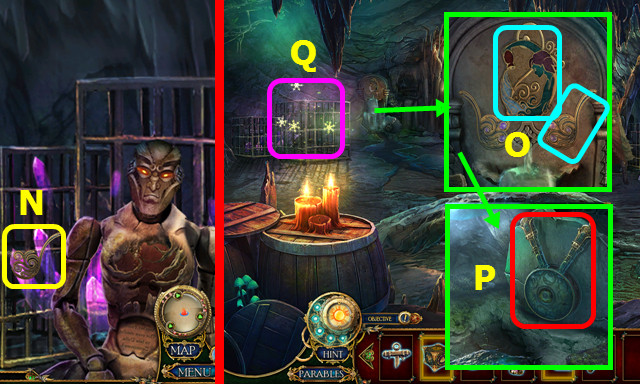
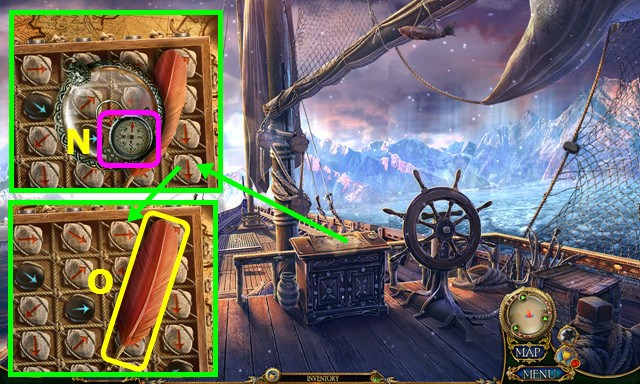
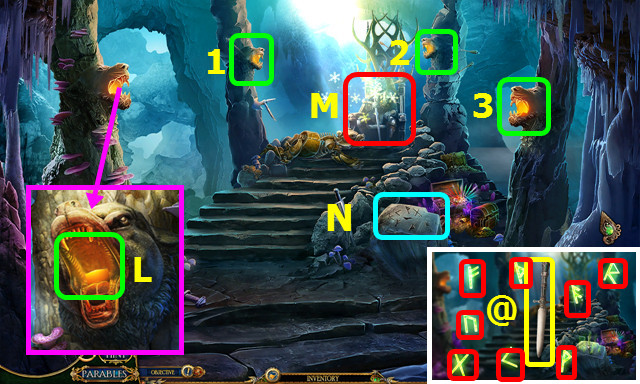
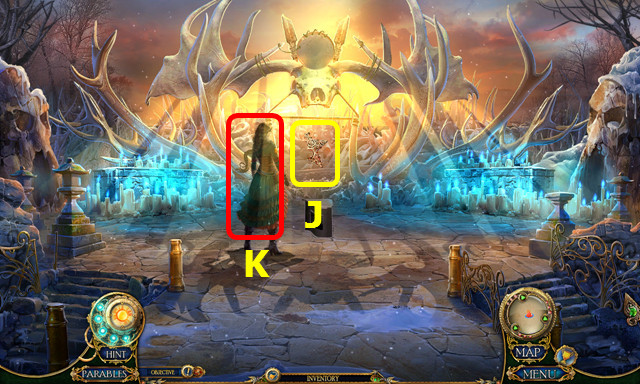
- Talk to Princess Leda (N).
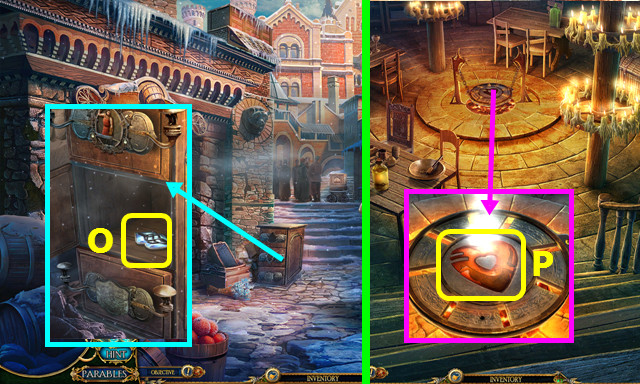
- Play the HOP; earn the HUNTING HORN (O).
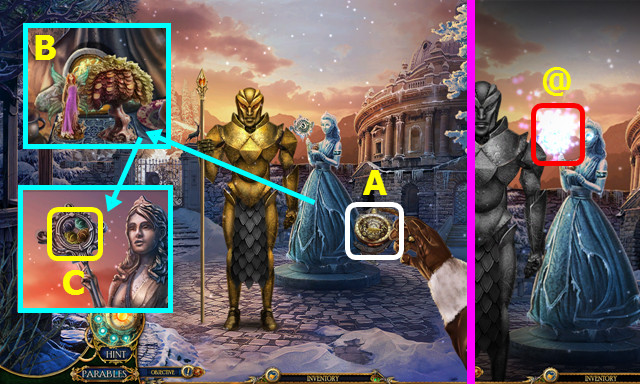
- Touch the bird (@).
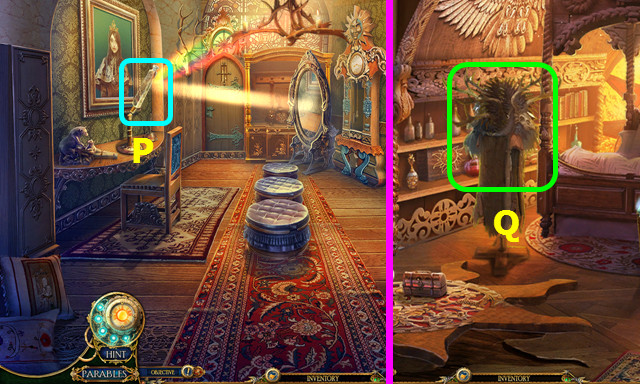
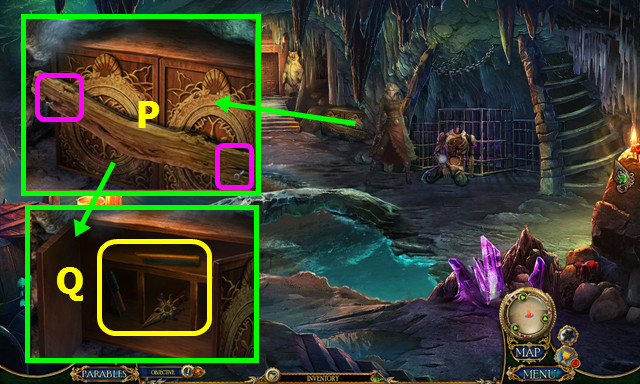
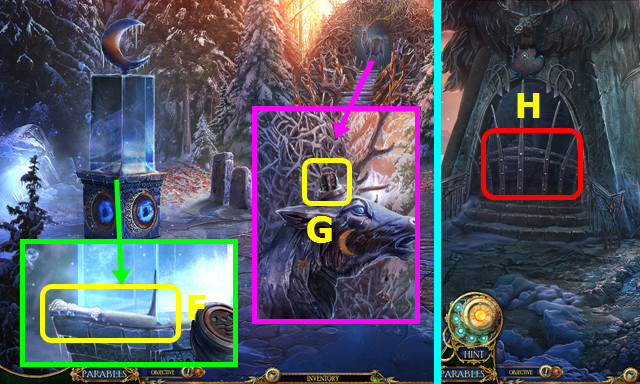
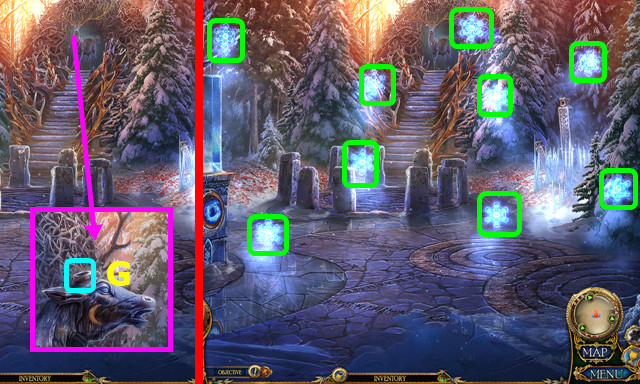
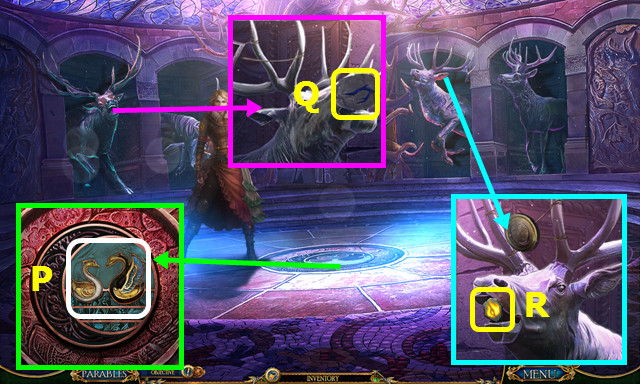
- Take the RUSTY SWORD; move the snow 2x (P).
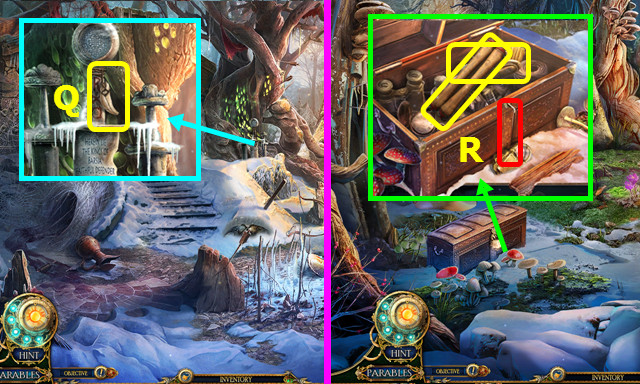
- Take the BEAR TOOTH (Q).
- Walk down.
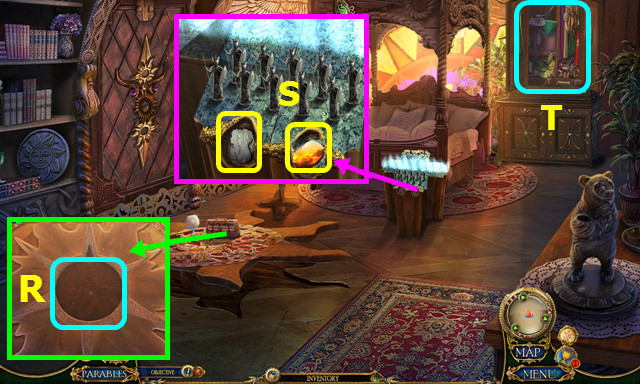
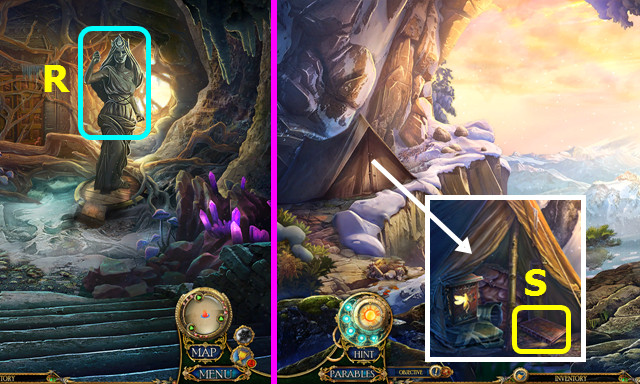
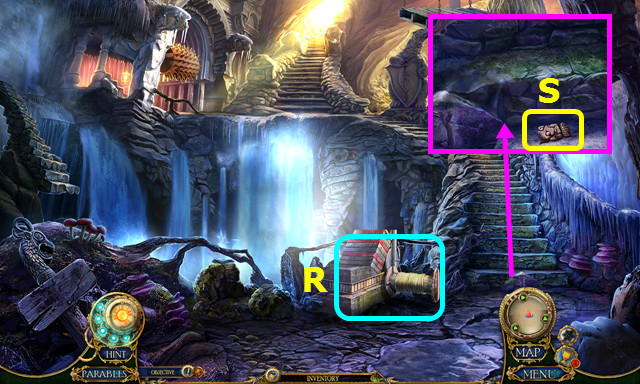
- Use the RUSTY SWORD; take the MAP and BRUSH (R).
- Walk right.

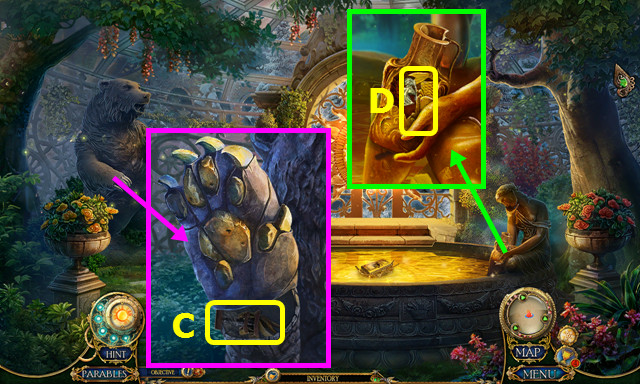
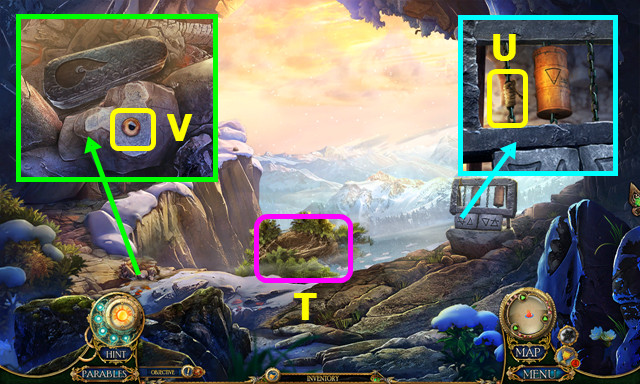
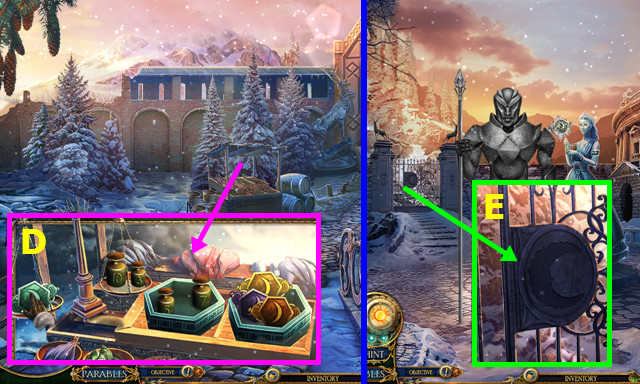
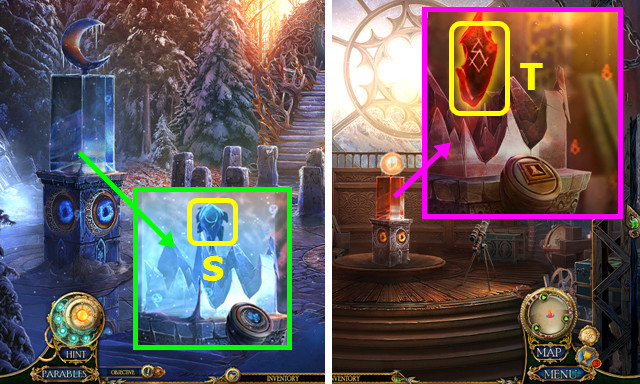
- Use the RUSTY SWORD 2x; take the GOLDEN PHOENIX and SILVER MOON (S).
- Walk down and left.
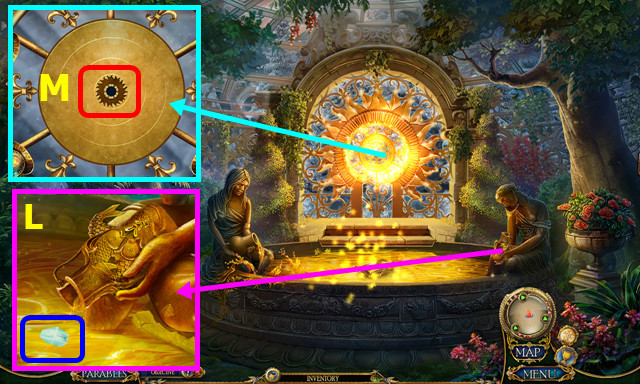
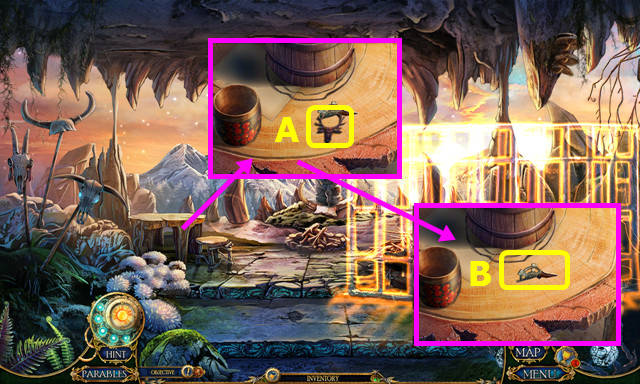
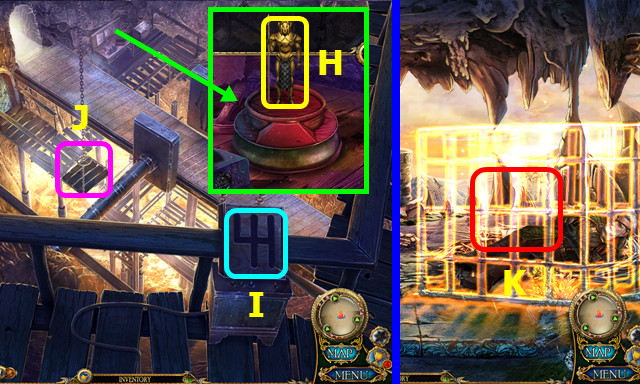
- Place and press the SILVER MOON and GOLDEN SUN; take the HUNTING HORN PIECE (T).
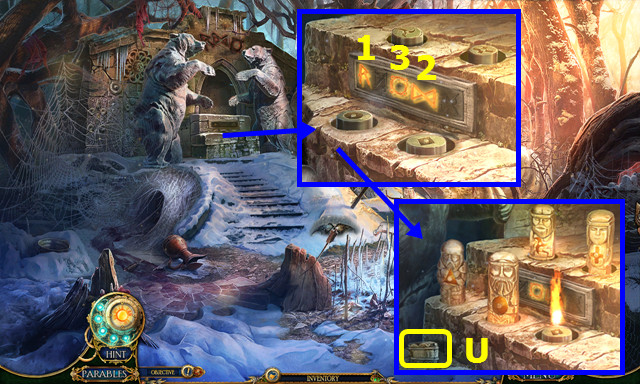
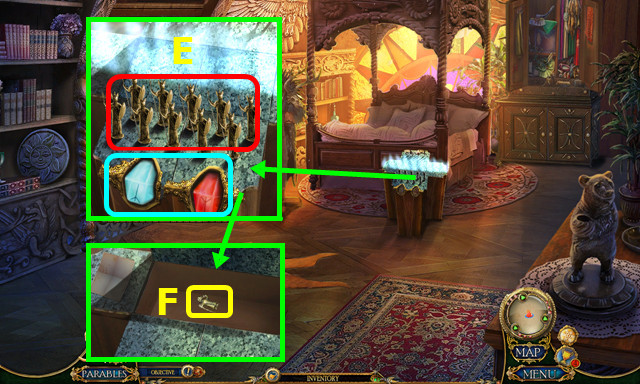
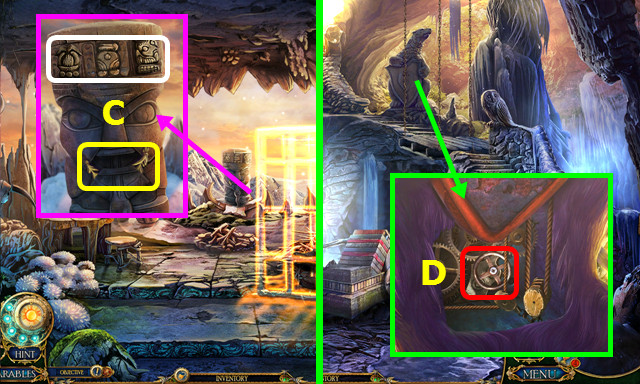
- Use the BRUSH; press 1-3.
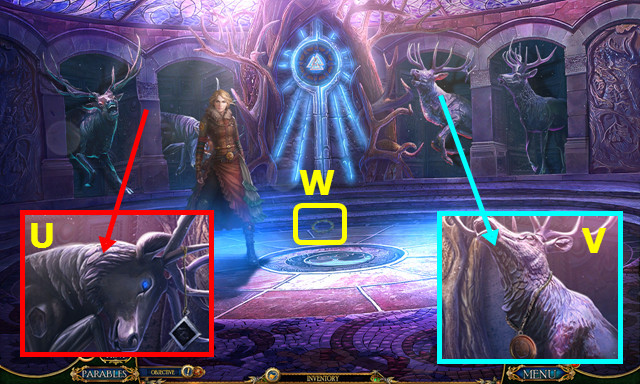
- Place the 5 statues; take the HUNTING HORN PART (U).
- Combine the HUNTING HORN, HUNTING HORN PART, and HUNTING HORN PIECE to complete the HUNTING HORN (inventory).
- Walk down and right.
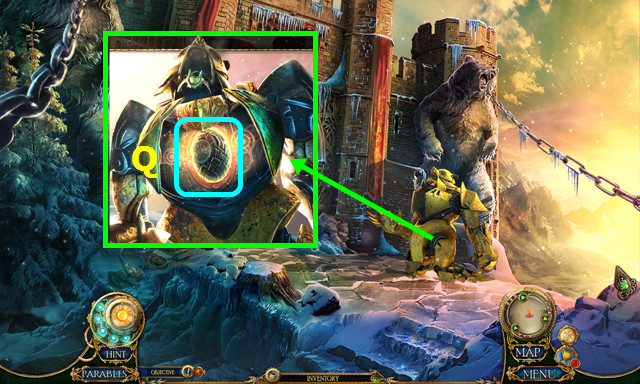
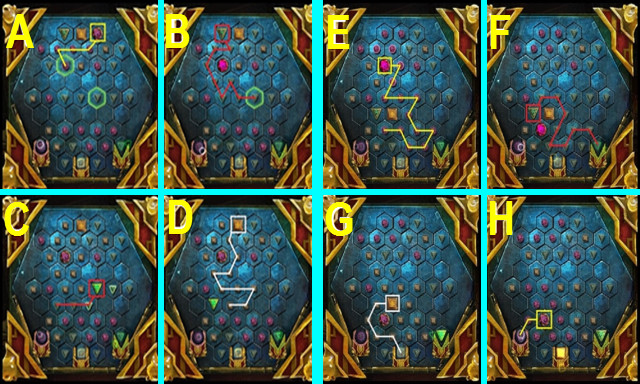
- Use the HUNTING HORN; talk to the Sentry (A).
- Walk left.
- Open the gate (@).
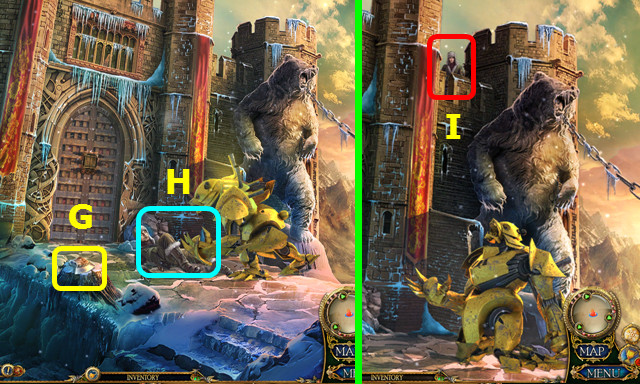
- Take the 1st SOLDIER FIGURINE HALF (B).
- Play the HOP; earn the AXE HANDLE (C).
- Walk left.
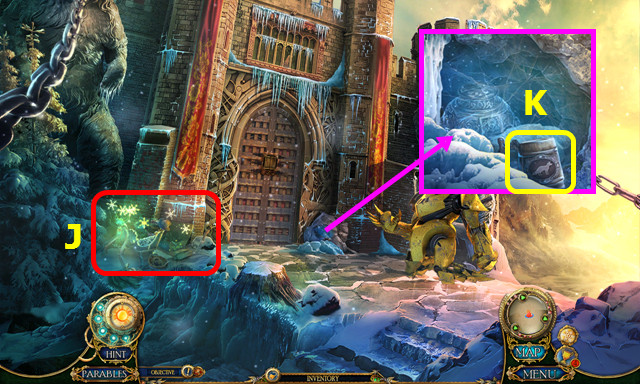
- Take the METAL MOCKINGBIRD (D).
- Take GOLDILOCKS and the SMALL AXLE; remove the rock wedge (E).
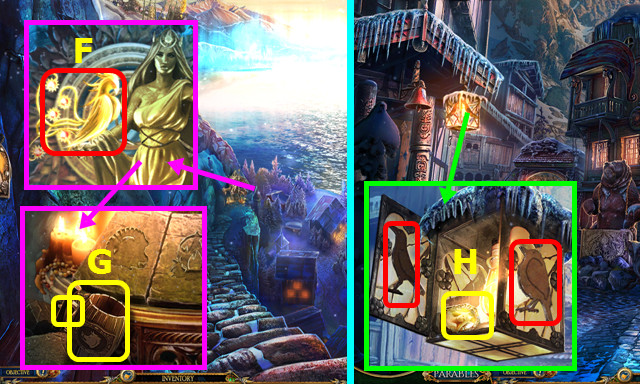
- Place and press the GOLDEN PHOENIX (F).
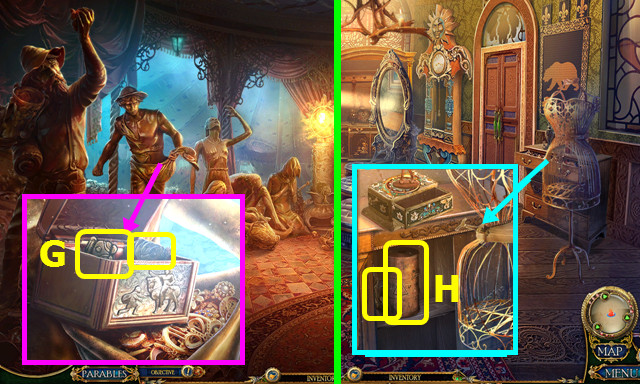
- Take the BOAR TANKARD and GODDESS' LOCKET (G).
- Walk down.
- Place the METAL RAVEN and METAL MOCKINGBIRD; take the GODDESS' PENDANT (H).
- Add the GODDESS' PENDANT to the GODDESS' LOCKET (inventory).
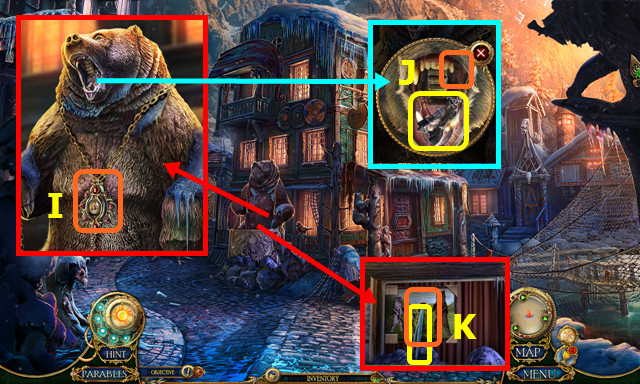
- Place the GODDESS LOCKET (I).
- Take the 2nd SOLDIER FIGURINE HALF and place the BEAR TOOTH (J).
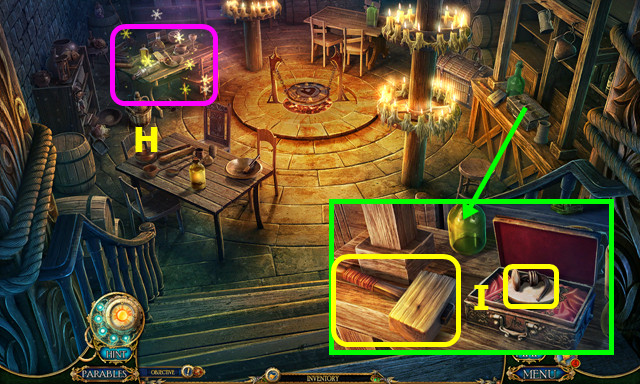
- Take the TWEEZERS and place GOLDILOCKS (K).
- Open the curtain.
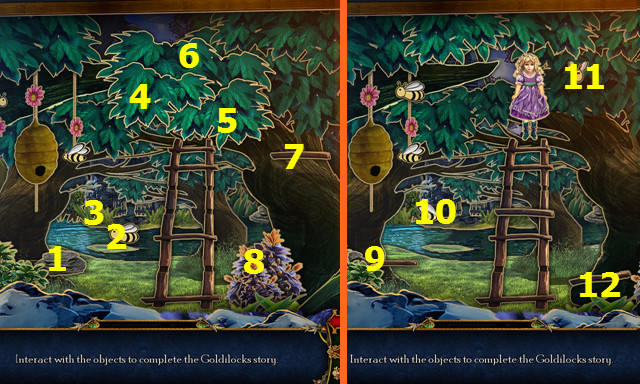
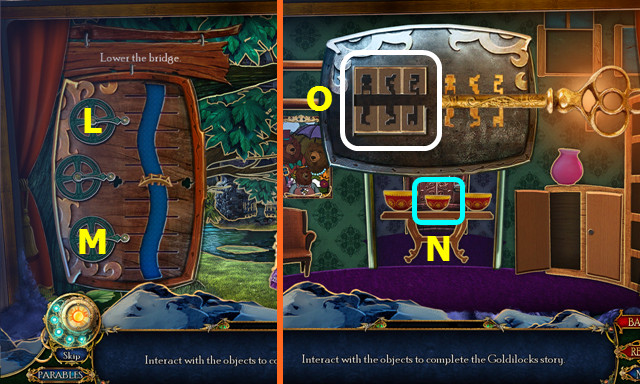
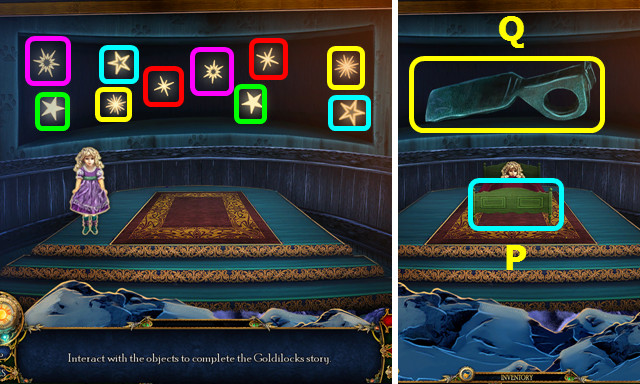
- Select the items in numerical order (1-12).
- Select Lx3-Mx2.
- Play the bears HOPs.
- Remove the lid, move the bowls, and select the smallest (N).
- Change the lock to match the key (O).
- Select pairs (color-coded).
- Select 3x (P).
- Take the ROCK WEDGE (Q).
- Walk left.
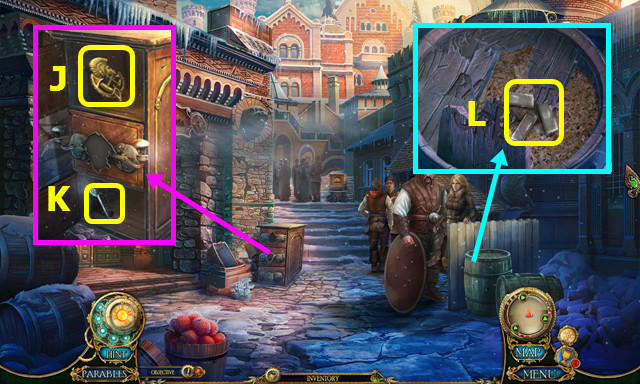
- Place the 2 SOLDIER FIGURINE HALVES; earn the ORNATE SHIELD (A).
- Take the WHETSTONE (B).
- Combine the WHETSTONE and SMALL AXLE to make the WHETSTONE ON AXLE (inventory).
- Walk down.
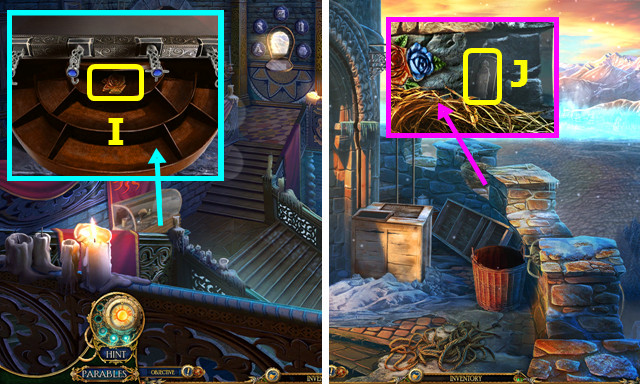
- Place the WHETSTONE ON AXLE; use the RUSTY SWORD to make the SHARP SWORD (C).
- Use the SHARP SWORD to take the ROPE (D).
- Walk left.
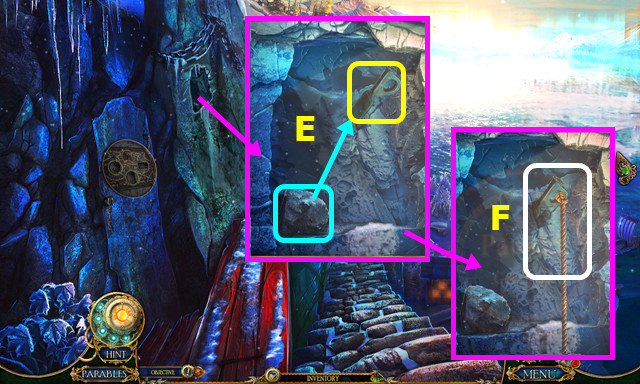
- Place the ROCK WEDGE and use the rock (E).
- Place the ROPE (F).
- Go forward.
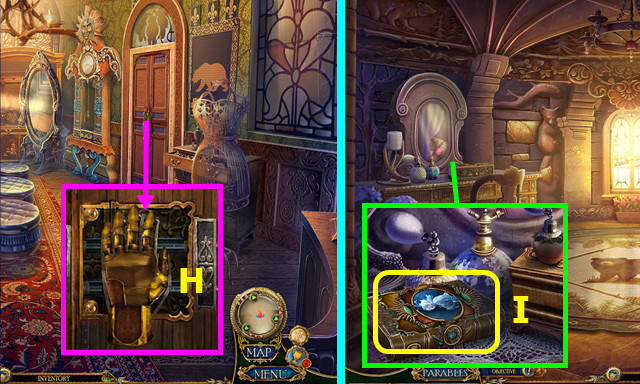
- Use the AXE HANDLE to take JACK'S AXE (G).
- Use JACK'S AXE (H).
- Talk to Jack (I).
Chapter 2
- Play the HOP; earn the THE MARK OF THE GODDESS (J).
- Take the FOX TANKARD (K).
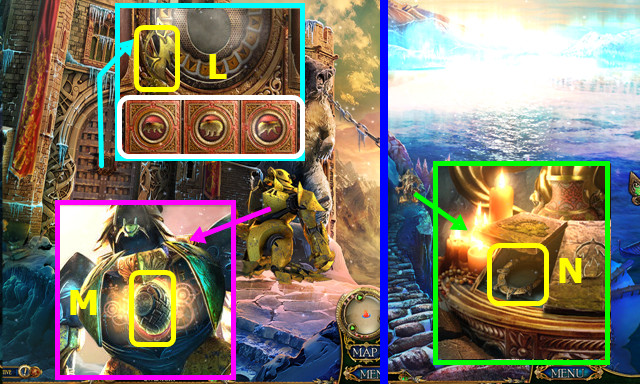
- Change the 3 emblems; take the 1st GODDESS' MARK PIECE (L).
- Open the chest, press the button, and take the HEART CONTAINER (M).
- Walk down.
- Place the MARK OF THE GODDESS; take the ARTIFACT PART (N).
- Combine the ARTIFACT and ARTIFACT PART; press the center (inventory).
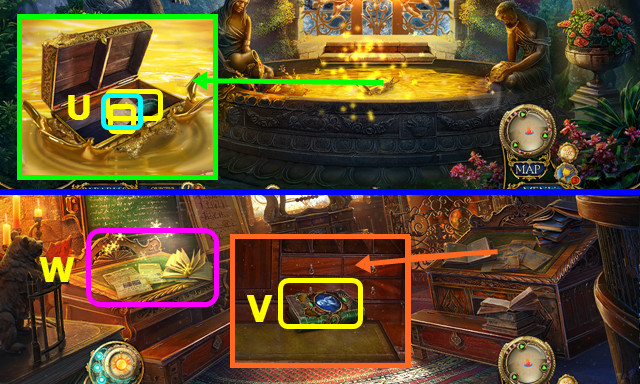
- Move the pieces along the paths A-B-C-D-E.
- Take the BEAR CLAW from the ARTIFACT opening.
- Go forward.
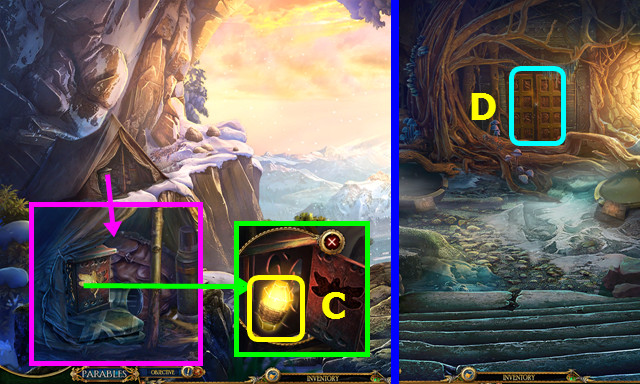
- Place the BEAR CLAW; open the door (F).
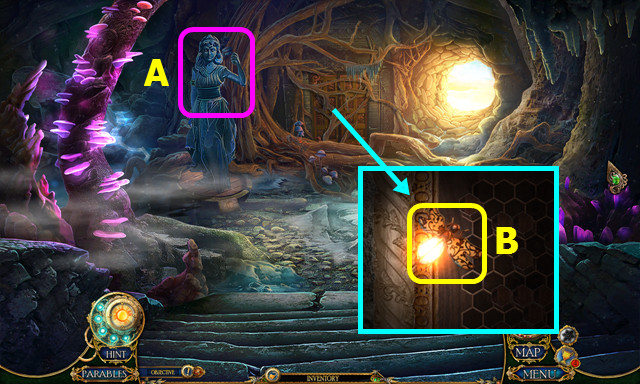
- Talk to Princess Leda and the Sentry; read the book (G).
- Use the TWEEZERS to take the OLD COIN; read the note (H).
- Turn the wheel; take THE MASK OF THE GODDESS (I).
- Take the THREE BRASS BEARS (J).
- Walk down.
- Move the banner and place THE MASK OF THE GODDESS; take the 2nd GODDESS' MARK PIECE (K).
- Walk down.
- Place the 2 GODDESS' MARK PIECES; take the MUSIC CYLINDER (A).
- Unwrap the MUSIC CYLINDER (inventory).
- Walk forward 2x.
- Place the MUSIC CYLINDER (B).

- Set the path shown; select (C).
- Set the path shown; select (D).
- Set the path shown; select (E).
- Take the HARE TANKARD (F).

- Place the HARE TANKARD, FOX TANKARD, and BOAR TANKARD; arrange as shown (G).
- Walk left.
- Select 1-2-3.
- Play the HOP; earn the CRAFTSMAN'S EMBLEM (H).
- Place the OLD COIN; take the MALLET and SMALL KNOB (I).
- Walk down.
- Place the CRAFTSMAN'S EMBLEM; take THE MARK OF THE GODDESS (J).
- Use the SMALL KNOB; take the STASH KEY (K).
- Use the MALLET 2x; move the sawdust and take the TIN ORE (L).
- Walk down.
- Touch the ice 4x and use the STASH KEY; take the WOODCARVER'S SIGIL (M).
- Walk down.
- Place THE MARK OF THE GODDESS; take the GOLDEN PISTON (N).
- Walk forward 2x.
- Place the WOODCARVER'S SIGIL; take the ENERGY CORE (O).
- Walk left.
- Place the COPPER PIECES and TIN ORE; remove and take the BRASS HEART (P).
- Combine the HEART CONTAINER, BRASS HEART, ENERGY CORE, and GOLDEN PISTON to make the BEAR'S HEART (inventory).
- Walk down 2x.
- Place and press the BEAR'S HEART (Q).
- Walk forward.
Chapter 3
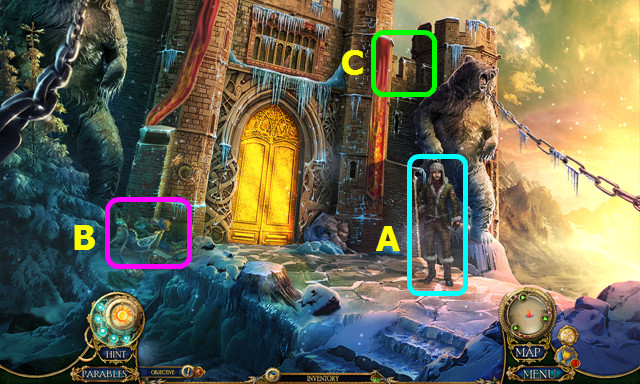
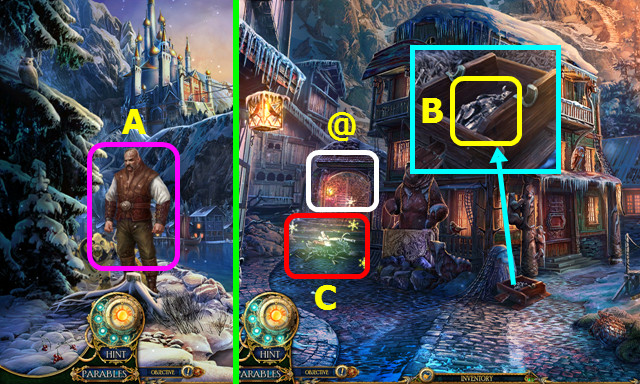
- Talk to Jack (A).
- Play the HOP; earn the HARPOON (B).
- Use the HARPOON (C).
- Go forward.
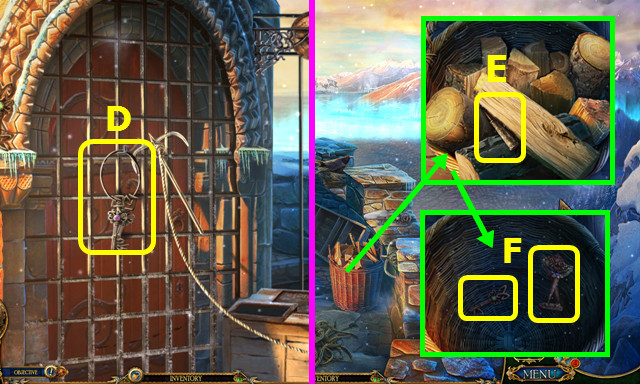
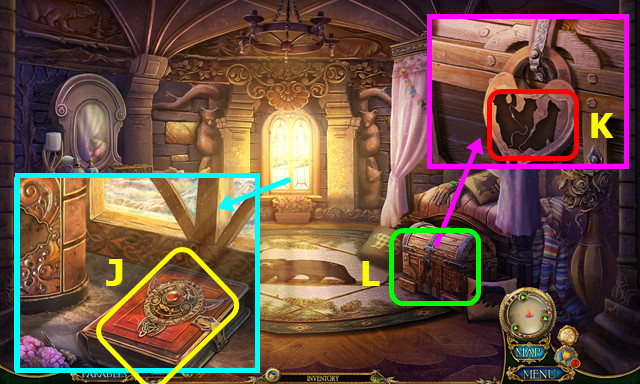
- Take the key ring (D).
- Take the LEVER and move the wood 4x (E).
- Take the key and BALLERINA BODY (F).
- Select the 4 keys (red); you earn the TOWER KEYS.
- Select (G).
- Use the TOWER KEYS.
- Solution: NL-LJ-JH-NK-KI-MK-KN-NL-LJ-MK-KN-NL.
- Walk left.
- Take the BALLERINA HEAD (O).
- Combine the BALLERINA BODY and BALLERINA HEAD to make the BALLERINA FIGURINE (inventory).
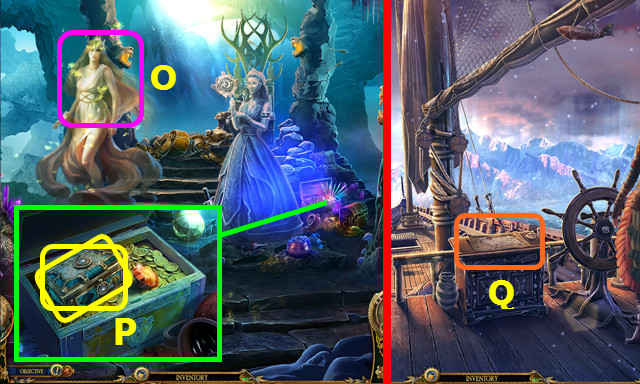
- Take the MERMAID AND THE PURPLE TIDE (P).
- Take the BIRD SEEDS (Q).
- Remove the banner (R).
- Place and pull the LEVER (S).
- Walk right.
- Take the HEXAGONAL SHIELD ORNAMENT (A).
- Use the pieces to restore the mirror (B).
- Take the PRISON INSIGNIA and place the BALLERINA FIGURINE; take the STAR-SOCKETED LEVER (C).
- Walk down 2x.
- Use the BIRD SEEDS; take the SQUARE-SOCKETED LEVER and JADE OWL (D).
- Walk left.
- Place the SQUARE-SOCKETED LEVER (E) and the STAR-SOCKETED LEVER (F).
- Take the GOLDEN GLOVE and BEAR CLAW AMULET (G).
- Walk right.
Chapter 4
- Place the GOLDEN GLOVE (H).
- Walk right.
- Talk to Goldilocks.
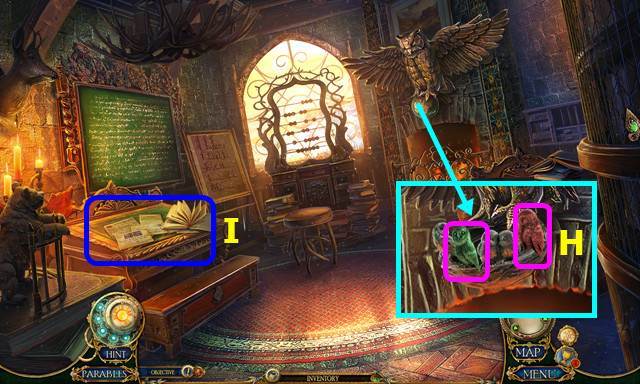
- Take the RISE OF THE SNOW QUEEN (I).
- Read the book; take the SMALL COG (J).
- Place the THREE BRASS BEARS (K).
- Play the HOP; earn the MINIATURE CROWN (L).
- Walk down.
- Place the MINIATURE CROWN (M).
- Pull the chains; take the PART OF ABACUS and ORNATE COG (N).
- Walk down.
- Place the SMALL COG and ORNATE COG; pull the lever (O).
- Walk left.

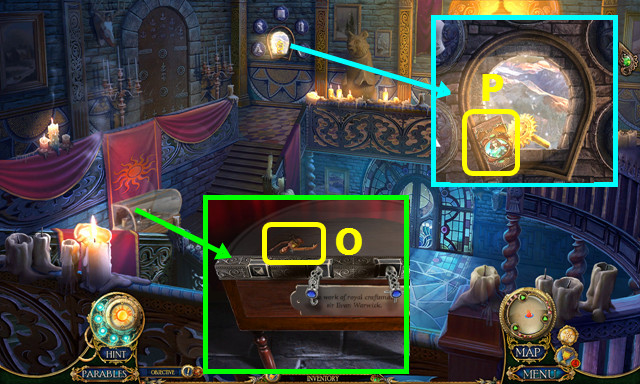
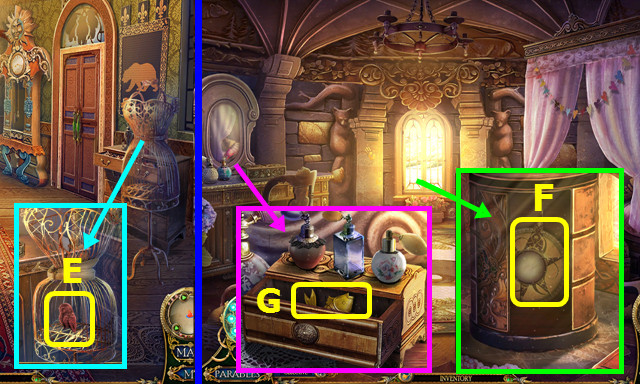
- Take the HEART SHAPED LOCKET (P).
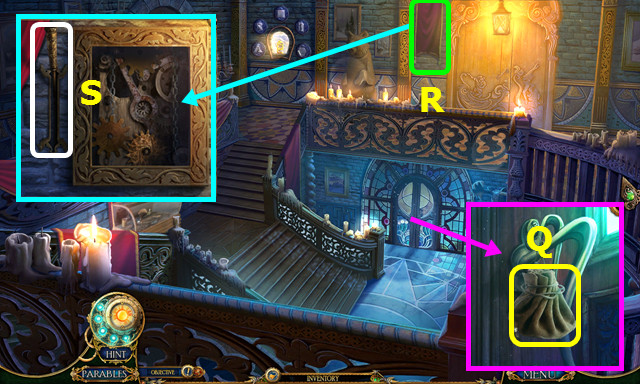
- Take the DRAWER LID and ICE PICK; remove the other items (Q).
- Select (R).

- Place the PART OF ABACUS.
- Solution (S).
- Take the PERFUME BOTTLE and GARDEN KEY (T).
- Walk down.

- Use the GARDEN KEY (A).
- Walk forward.
- Touch (B).
- Place the BEAR CLAW AMULET; take the TOURNIQUET (C).
- Take the PEASANT RELIEF (D).
- Walk down and right.
- Use the TOURNIQUET; take the RUBY OWL (E).
- Walk right.
- Place and press the DRAWER LID; take the GOLDEN STAR (F).
- Place the PERFUME BOTTLE; take the GOLDEN FISH (G).
- Walk down 2x; go left.
- Place the JADE OWL and RUBY OWL (H).
- Play the HOP; earn the SQUARE SHIELD ORNAMENT (I).
- Walk down.
- Place the SQUARE SHIELD ORNAMENT, the ORNATE SHIELD, and the HEXAGONAL SHIELD AMULET (J).
- Swap the amulets as shown; take the SUN SHRINE LOCK PIECE (K).
- Go forward.
- Place the GOLDEN FISH; take the BLESSED STONE (L).
- Use the SUN SHRINE LOCK PIECE (M).
- Solution (N).
- Talk to the Sun Goddess; take the GLASS PRISM (O).
- Walk down and right.
Chapter 5
- Place and select the GLASS PRISM (P).
- Go forward.
- Select (Q).
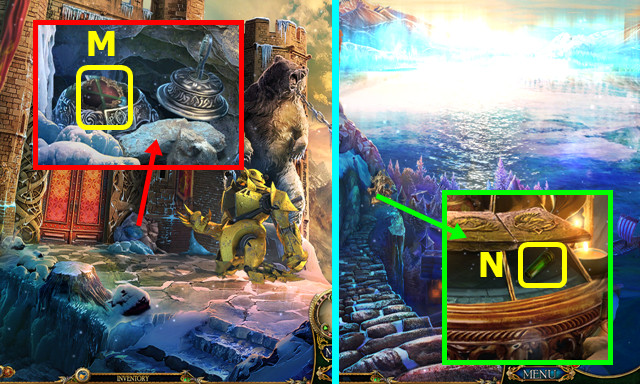
- Place the GOLDEN STAR (R).
- Take the FIRE GEM and LOCKET CAMEO (S).
- Combine the HEART SHAPED LOCKET and LOCKET CAMEO to make the SISTERS' LOCKET (inventory).
- Open the doors and play the HOP; earn the TREE OF LIFE (T).
- Walk down 2x; go forward.
- Place the SISTERS' LOCKET and read the note; take the ANCHOR PIECE and NOTARY'S SEAL (U).
- Walk down and left.
- Place the NOTARY'S SEAL; take THE FINAL CINDERELLA (V).
- Play the HOP; earn the ARTIFACT PART (W).
- Combine the ARTIFACT and ARTIFACT PART; press the center (inventory).
- Move the token on the paths A-H.
- Take the TREASURY KEY from the ARTIFACT.
- Walk down, right, and forward.

- Place the RISE OF THE SNOW QUEEN, MERMAID AND THE PURPLE TIDE, and THE FINAL CINDERELLA; place the books in order (P).
- Use the TREASURY KEY (Q).
- Walk left.
- Take the SHACKLES INSIGNIA (A).
- Place the TREE OF LIFE (B).
- Use the FIRE GEM (C).
- Use the ICE PICK 3x; read the book and take the CURSED STONE (D).
- Talk to Goldilocks.
- Select the pairs (color-coded).
- Walk down.
Chapter 6
- Place the BLESSED STONE and the CURSED STONE; select the figurines (E).
- Read the note and take the KNIGHT (F).
- Walk left.
- Place the PEASANT RELIEF and the KNIGHT; take the BEAR TOTEM PART and ROOSTER CARVING (G).
- Walk down 2x.
- Place the ROOSTER CARVING; take the 1st BRASS CYLINDER and FORTRESS RELIEF (H).
- Walk down.
- Place the FORTRESS RELIEF; take the ROSEBUD (I).
- Walk down.
- Place the ROSEBUD; take the TORTURE CHAMBER INSIGNIA (J).
- Walk down 2x.
- Place the SHACKLES INSIGNIA, TORTURE CHAMBER INSIGNIA, and PRISON INSIGNIA (K).
- Walk left.

- Take the CHISEL HANDLE (L).
- Select 2x to take the MIRROR (M).
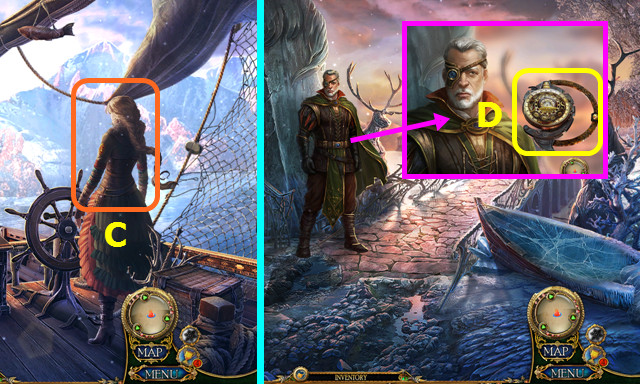
- Talk to Princess Leda.
- Go forward.
- Take the FAIRY FIGURINE (N).
- Take the IMPROVISED CROWBAR (O).
- Walk down.
- Use the IMPROVISED CROWBAR 2x (P).
- Open the cabinet; take the SUN SPEARHEAD (Q).
- Combine the SUN SPEARHEAD and IMPROVISED CROWBAR to make the SUN SPEAR (inventory).
- Walk forward.
- Place the SUN SPEAR (R).
- Walk right.
- Open the flap; take the CRAFTSMAN DIARY (S).
- Combine the CRAFTSMAN'S DIARY and MIRROR; take the BLUE CORE (inventory).
- Move the branches 3x and play the HOP; earn the MOON GODDESS' STAFF (T).
- Take the TWINE (U).
- Take the OWL'S EYE; move the ashes 3x (V).
- Walk down.
- Place the MOON GODDESS' STAFF (A).
- Take the FIREFLY (B).
- Walk right.
- Place the FIREFLY; take the ILLUMINATING STONE (C).
- Walk down.
- Select (D).
- Use the ILLUMINATING STONE.
- Select 1-6; select the key (E).
- Select 1-13; select the key (F).
- Walk forward.
- Place the OWL'S EYE; take the 2nd BRASS CYLINDER and CRAFTSMAN'S DIARY COMPONENT (G).
- Combine the CRAFTSMAN'S DIARY and CRAFTSMAN'S DIARY COMPONENT to find the PURPLE CORE (inventory).
- Take the FIRE ORNAMENT (H).
- Walk down and right.
- Place the FIRE ORNAMENT; take the CHISEL BLADE (I).
- Combine the CHISEL HANDLE, CHISEL BLADE, and TWINE to make the CHISEL (inventory).
- Place the 2 BRASS CYLINDERS; change the symbols as shown (J).
- Take the AQUARIUS ORNAMENT (K).
- Walk down.
- Use the CHISEL to take the AUTOMATON HEAD (L).
- Add the BLUE CORE and PURPLE CORE to the AUTOMATON HEAD (inventory).
- Walk down.
- Place the AUTOMATON HEAD (M).
- Talk to the Automaton; take the WAVE ORNAMENT (N).
- Place the AQUARIUS ORNAMENT and WAVE ORNAMENT (O).
- Select (P).
- Play the HOP; earn the ELEGANT CRANK (Q).
- Walk forward 2x.
- Use the ELEGANT CRANK (R).
- Use the CHISEL; take the BIRD TOTEM PART (S).
- Go forward.
- Move the bucket; take the STAG HEAD (A).
- Use the CHISEL to take the CRAFTSMAN'S DIARY COMPONENT (B).
- Combine the CRAFTSMAN'S DIARY and CRAFTSMAN'S DIARY COMPONENT to find the PLANT TOTEM PART (inventory).
- Place the BEAR TOTEM PART, BIRD TOTEM PART, and PLANT TOTEM PART; take the LAUREL WREATH (C).
- Walk down.
- Place the LAUREL WREATH; turn the valve (D).
- Walk left.

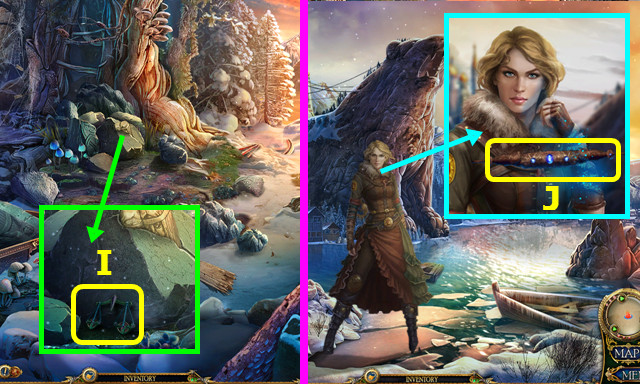
- Take the ARTIFACT PART (E).
- Combine the ARTIFACT and ARTIFACT PART; press the center (inventory).
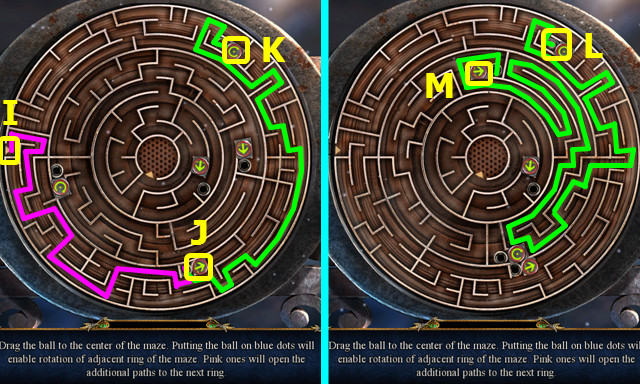
- Move the token on the paths F-L.
- Take the LABYRINTH KEY from the ARTIFACT.
- Use the LABYRINTH KEY (A).
- Select 1-6.
- Go forward.
- Go left (B), go right (C).
- Pull the lever; go left (D).
- Go right (E), go left (F).
- Remove the glass; take the AUTOMATON FIGURINE (H).
- Select (I).
- Play the HOP; earn the STONES OF DARKNESS (J).
- Walk down 2x and forward.
- Select (K).
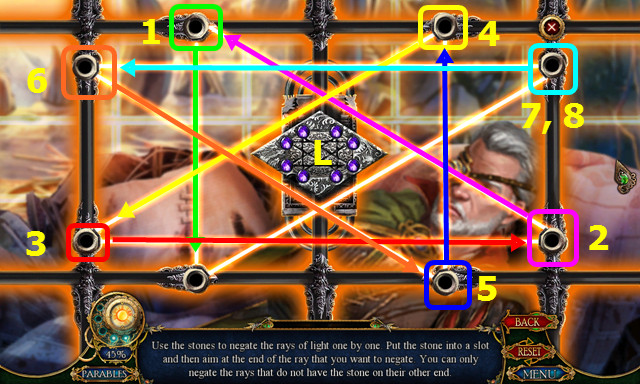
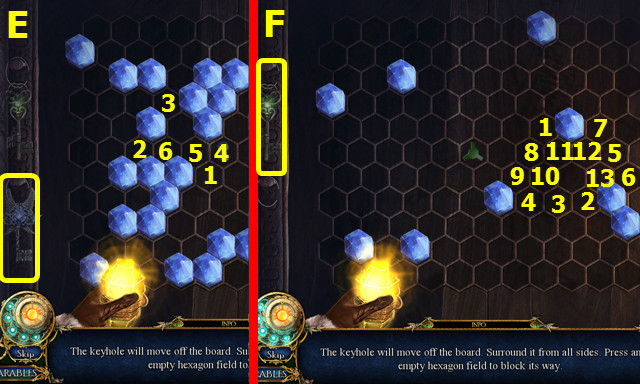
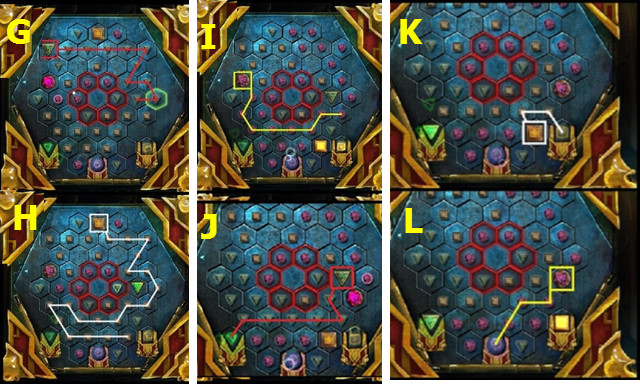
- Place the STONES OF DARKNESS in the center (L).
- Place a stone from the center in a node and select the node in the indicated direction (1-7).
- Place the final stone in (8).
- Talk to the Craftsman and Princess Leda.
Chapter 7
- Move the items; select the knife (A).
- Open the seam; take the RUSTED KEY (C).
- Walk down, left, and forward.

- Use the RUSTED KEY (D).
- Go forward.
- Place the AUTOMATON FIGURINE; take the TOMMY BAR (E).
- Walk down.
- Place and turn the TOMMY BAR; take the CONTROL ROOM MECHANISM (F).
- Go forward.
- Place and pull the CONTROL ROOM MECHANISM (G).
- Talk to the Queen (H).
Chapter 8
- Take the SCALES EMBLEM (I).
- Walk right.
- Talk to Goldilocks; take BULVAR'S NOTES (J).
- Look at BULVAR'S NOTES; take the SHIP EMBLEM and BULVAR'S NOTES PIECE (inventory).
- Walk forward.
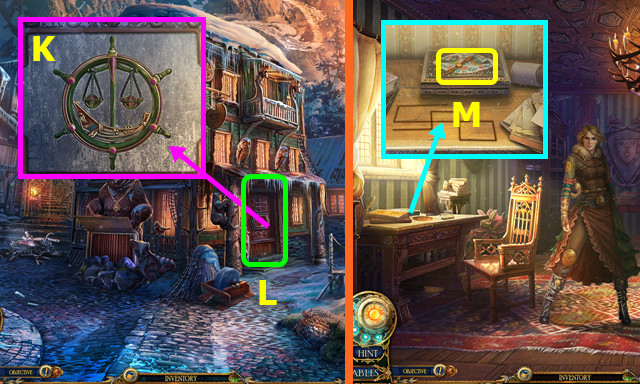
- Place the SHIP EMBLEM and SCALES EMBLEM (K).
- Enter Bulvar's House (L).
- Take the COMPASS NEEDLE (M).
- Walk down and right.
- Place the COMPASS NEEDLE (N).
- Take the FEATHER (O).
- Return to Bulvar's House.

- Use the FEATHER (P).
- Open the scroll; add the BULVAR'S NOTES PIECE to make BULVAR'S NOTES (Q).
- Give BULVAR'S NOTES (R).
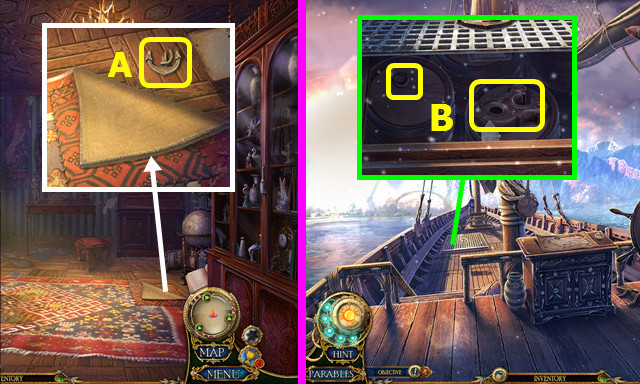
- Move the rug; take the ANCHOR (A).
- Walk down and right.
- Place the ANCHOR and ANCHOR PIECE; take the METAL RING and LAMP OIL (B).
- Go to Bulvar's House.
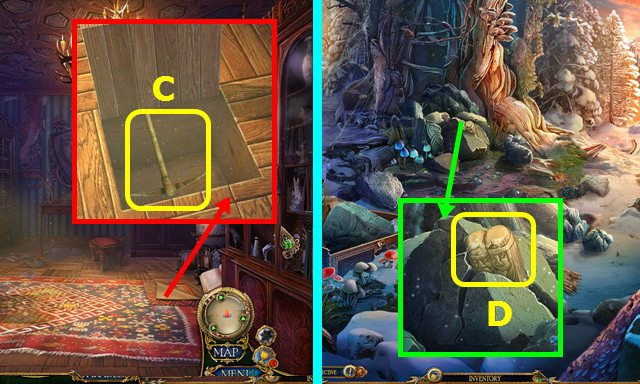
- Move the rug and use the METAL RING; take the PICKAXE (C).
- Walk down 3x.
- Use the PICKAXE 3x; take the KING AND QUEEN STATUE (D).
- Walk left.
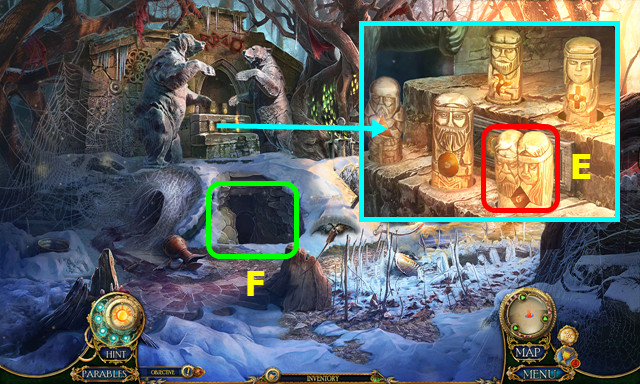
- Place the KING AND QUEEN STATUE (E).
- Select (F).
- Restore the image (G).
- Select (H).

- Restore the image (I).
- Select (J).
- Restore the image (K).
- Select (X).
- Use the LAMP OIL (L).
- Select 1-3.
- Play the HOP; earn the ANCIENT DAGGER (M).
- Place the ANCIENT DAGGER (N).
- Select all the runes; take the EMPOWERED DAGGER (@).
- Talk to the Goddess (O).
- Take the RELIQUARY and MAP SCROLLS (P).
- Go to the Ship.
- Select (Q).
- Place the MAP SCROLLS.
- Arrange the black runes (A).
- Select (B).
Chapter 9
- Use the EMPOWERED DAGGER (C).
- Talk to the Craftsman; take the CRAFTSMAN'S DEVICE (D).
- Use the PICKAXE 3x and play the HOP; earn the ORNATE LOCK PIECE (E).
- Take the MYSTICAL TREE (F).
- Walk forward.
- Take the METAL STAG (G).
- Take the WOODEN STAG (H).
- Walk down.
- Place the WOODEN STAG, STAG HEAD, and METAL STAG; take the PULLEY and SHEPHERD FIGURINE (I).
- Walk forward.
- Place the PULLEY (J).
- Place the ORNATE LOCK PIECE; take the SANCTUARY SEAL and FULL MOON STAFF (K).
- Place the SHEPHERD FIGURINE (L).
- Solution (M).
- Select P-O-Q-P-Q-N-Q-N-P-Q-P-R-Q-R-Q-P-Q-P-O.
- Go forward.
Chapter 10
- Select 3x (A).
- Take the LIGHTHOUSE INSIGNIA; place the FAIRY FIGURINE and MYSTICAL TREE (B).
- Take the MOON RELIC TOKENS (C).
- Select (@).
- Walk down.
- Place the MOON RELIC TOKENS; move the token and weights as shown (D).
- You earn the MOON TOKEN.
- Combine the RELIQUARY and MOON TOKEN; take the MOON SHRINE KEY (inventory).
- Go forward.
- Use the MOON SHRINE KEY (E).
- Walk left.
- Take the RASP (F).
- Take the WATCHTOWER INSIGNIA (G).
- Walk down 3x.
- Select (H).
- Place the LIGHTHOUSE INSIGNIA and WATCHTOWER INSIGNIA.
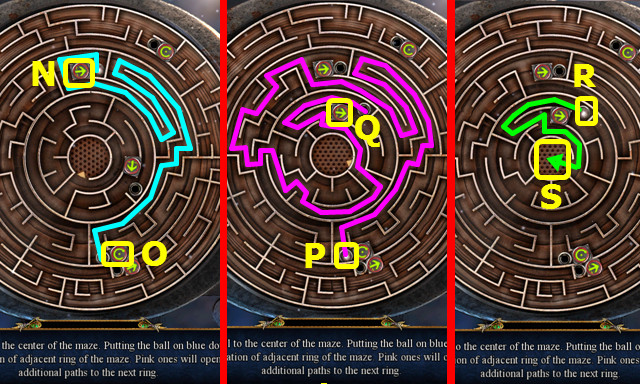
- Drag the ball (I) to (J); press the button.
- Drag the ball to (K); press the button.
- Drag the ball (L) to (M); press the button.
- Drag the ball (N) to (O); press the button.
- Drag the ball (P) to (Q); press the button.
- Drag the ball (R) to (S).
- Walk left.
- Take the CLAMP (A).
- Use the RASP 3x; open the box and take the CRESCENT MOON STAFF (B).
- Take the BLACK SWAN (C).
- Play the HOP; earn the HEART ARROW (D).
- Walk down.
- Use the CLAMP 2x; take the KNOB (E).
- Walk left.
- Use the KNOB; take the ANTLERS (F).
- Walk down; go forward 2x, and then go left.
- Place the ANTLERS (G).
- Select the 9 snowflakes (green).

- Select (@).
- Take the CRESCENT MOON STAFF PIECE (H).
- Add the CRESCENT MOON STAFF PIECE to the CRESCENT MOON STAFF (inventory).
- Play the HOP; earn the MOON ARROW (I).
- Walk down.

- Place the MOON ARROW, SANCTUARY SEAL, and HEART ARROW (J).
- Walk forward.
- Take the HALF-MOON STAFF (K).
- Walk down and left.
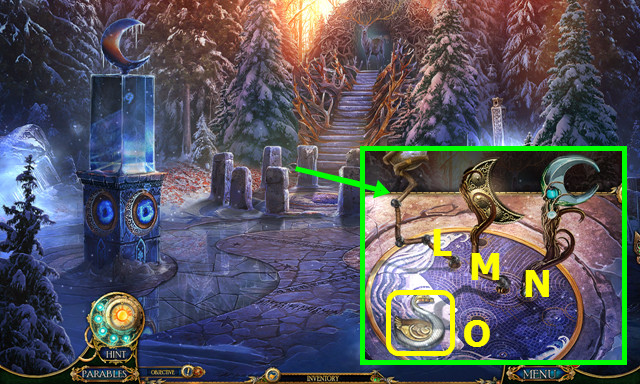
- Place the FULL MOON STAFF (L), HALF-MOON STAFF (M), and CRESCENT MOON STAFF (N).
- Take the WHITE SWAN (O).
- Walk down and right.
- Place the BLACK SWAN and WHITE SWAN (P).
- Take the VOLCANO RUNE (Q).
- Take the LAKE RUNE (R).
- Walk down and left.
- Use the LAKE RUNE; take the TRANQUILITY STONE (S).
- Walk down 3x; go left.
- Use the VOLCANO RUNE; take the RAGE STONE (T).
- Walk down, go forward 2x, and go right.
- Place the RAGE STONE (U).
- Place the TRANQUILITY STONE (V).
- Take the ARTIFACT PART (W).
- Combine the ARTIFACT and ARTIFACT PART; press the center (inventory).
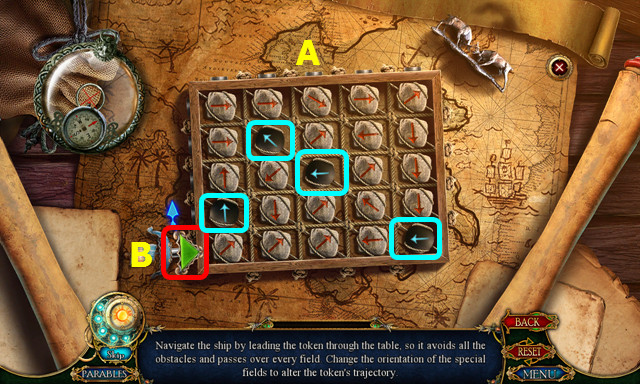
- Move the tokens on the indicated paths (A-F).
- Move across the field using the arrows on the trinket: 1xB-3xA-3xB-1xC-1xB-2xC-4xA-2xB-1xA-1xB-3xC.
- Use the ARTIFACT (G).
- Walk forward.
- Talk to the Queen; use the CRAFTSMAN'S DEVICE (H).
- Final fight not complete.
- Select (I).
- Use the ARTIFACT; take the FALLEN STAR (J).
- Give the FALLEN STAR (K).
- Congratulations! You have completed Dark Parables: Goldilocks and the Fallen Star!
Created at: 2015-12-18