Walkthrough Menu
- General Tips
- Prologue
- Chapter 1
- Chapter 2
- Chapter 3
- Chapter 4
- Chapter 5
- Chapter 6
- Chapter 7
- Chapter 8
- Chapter 9
- Chapter 10
- Hard Mode
- Cursed Morphing Objects
General Tips
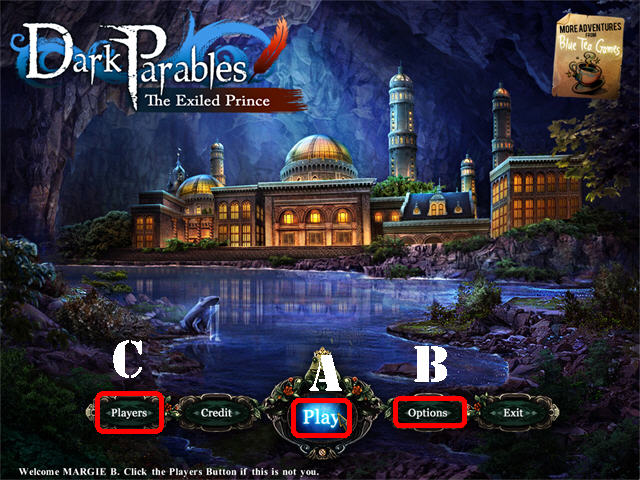
- Click on “Play” (A) to begin your adventure. You can also use this button to play Hard Mode after you complete the regular adventure.
- In Hard Mode the Hint and Skip Buttons will be totally unavailable.
- The “Players” (C) Button can help you manage your profiles in the game.
- Use the “Options” (B) Button to adjust ambiance, sound and screen size.
- Clicking randomly in Hidden Object Scenes will disable your cursor temporarily.
- Clicking downwards in a scene can help you navigate back to previous locations or exit Hidden Object Scenes.
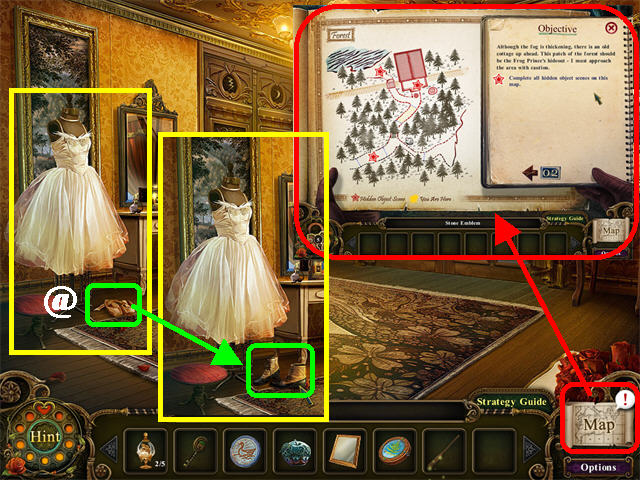
- The Cursed Morphing Objects are items that morph from one form to another. Find 20 in total throughout the game.
- The Cursed Objects have been marked with the (@) symbol throughout the guide.
- Collecting them will not affect the outcome of the game; they are only used for instantly recharging your hints.
- You may have to pass through a location several times before the Cursed Morphing Objects are activated.
- A sign will appear each time you click on a morphing object letting you know your total.
- Use the Map (M) in the lower right corner to view objectives for the game and to see the locations of Hidden Object Scenes that need to be played.
- Inventory Items will be placed at the bottom of the scene.
- Click on the arrows on each end of the Inventory Tray to scroll through all available items.
- Place your mouse over an Inventory Item to read its name in the small window attached to the Inventory Tray.
- Using a Hint during a Hidden Object Scene will show you a random item from the list.
- Using a Hint in a puzzle can help you view a partial solution for that puzzle.
- Grab an Inventory Item and place it on the Hint button. An image of the location in which that item belongs will appear on your screen.
- The puzzles are not timed and can be skipped by clicking on the Skip button at the bottom of the page. Skipping a puzzle will lock up the Hint functionality for 5 minutes.
- Puzzles cannot be skipped in Hard Mode.
- The instructions can be found at the bottom of each puzzle.
- You can exit a puzzle by clicking on the “Go Back” button in the lower right.
Prologue
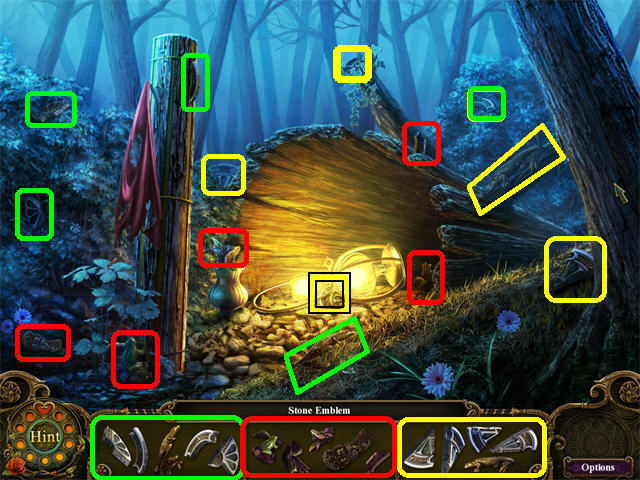
- Click on the sparkly log on right to trigger a Hidden Object Scene.
- The STONE EMBLEM will be added to inventory.
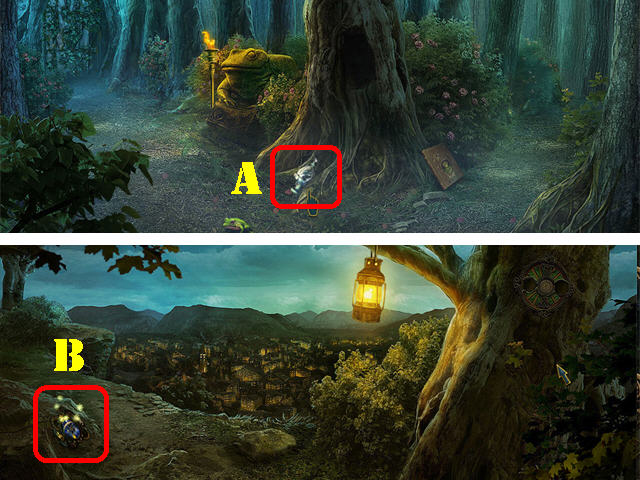
- Go forward.
- Take the DECORATED JAR COLLECTION 1/5 (A).
- Head right.
- Click on the sparkly area in the lower left to trigger a puzzle (B).
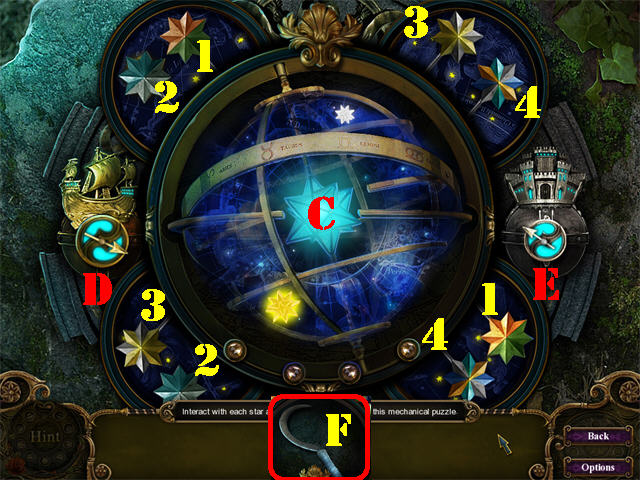
- Solve the mechanical puzzle by interacting with the objects.
- Click on the large STAR (C) in the center to move the small stars.
- Turn both arrows (D and E) until they light up; the rest of the stars will light up.
- Click on two stars whose color scheme matches and the matching pieces will lower and remain in the locked position.
- Please look at the screenshot for the matching pairs.
- Take the SHARP SICKLE (F) after the puzzle has been solved.
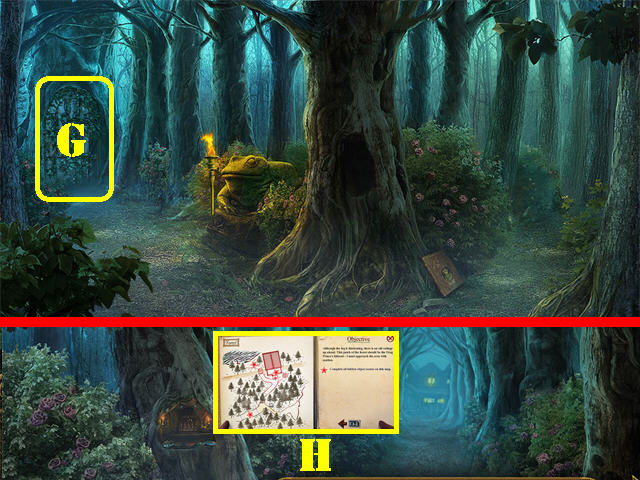
- Click down.
- Use the SHARP SICKLE on the vines covering the left gate (G).
- Zoom into the gate.
- Place the STONE EMBLEM in the center of the gate.
- Go through the gate; you now have access to the hidden road in the Forest.
- Open the Map in the lower right; look for the Hidden Object Scenes marked with a red star (H).
Chapter 1
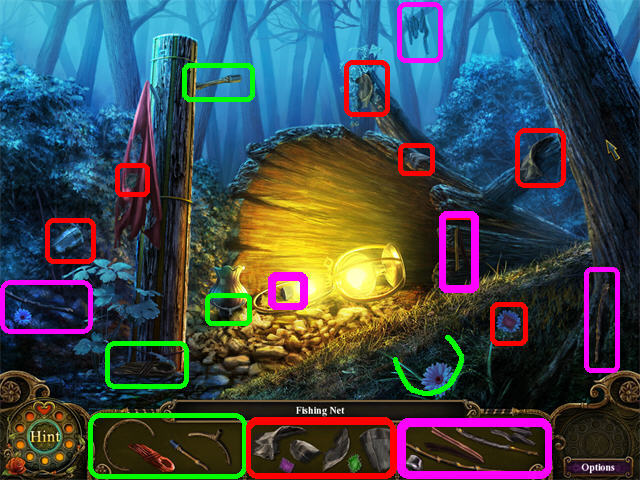
- Click down twice until you reach a sparkly log.
- Click on the sparkly log on right to trigger a Hidden Object Scene.
- The FISHING NET will be added to inventory.
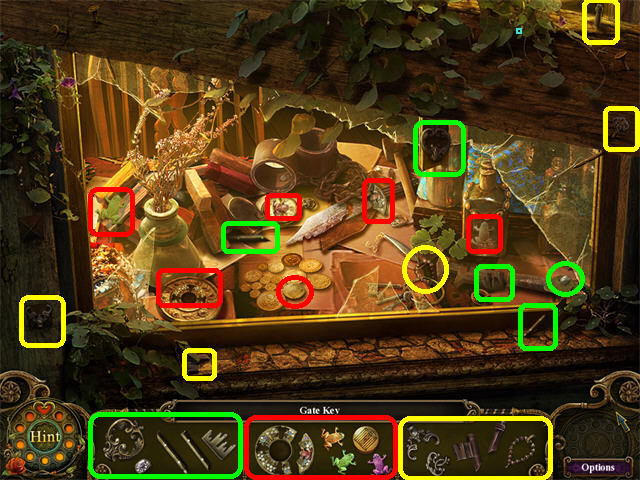
- Go forward, head left and forward twice to reach the Cottage.
- Play the Hidden Object Scene to obtain the GATE KEY.
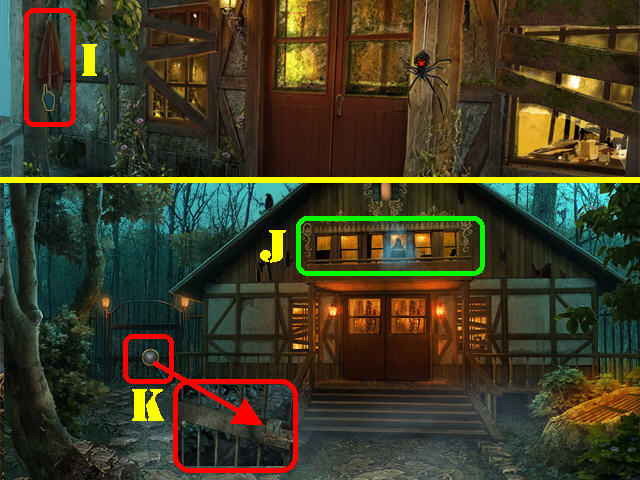
- Take the DAMP CLOTH (I) in the upper left.
- Click down.
- Examine the top windows (J); a strange silhouette appears.
- Zoom into the left gate (K).
- Open the gate with the GATE KEY.
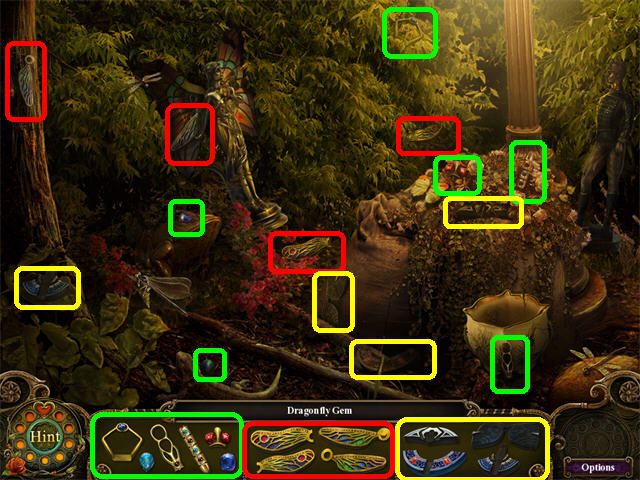
- Go through the gate.
- Play the Hidden Object Scene to obtain the DRAGONFLY GEM.
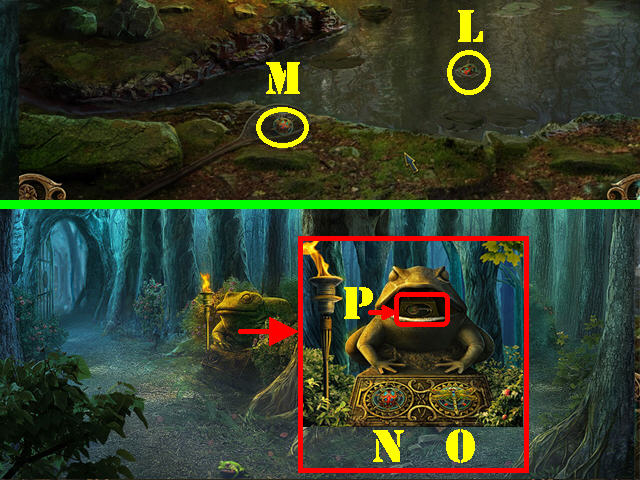
- Place the FISHING NET on the gem (L) in the water to drag it to dry land.
- Grab the LADYBUG GEM (M) on the left side of the ground.
- Click down 3 times.
- Zoom into the frog on the left.
- Clean the frog with the DAMP CLOTH.
- Place the LADYBUG GEM (N) and the DRAGON FLY GEM (O) in the empty slots.
- Take the COTTAGE KEY (P) from the frog’s mouth.
- Return to the front porch of the cottage for a brief cut scene and enter the Cave Area.
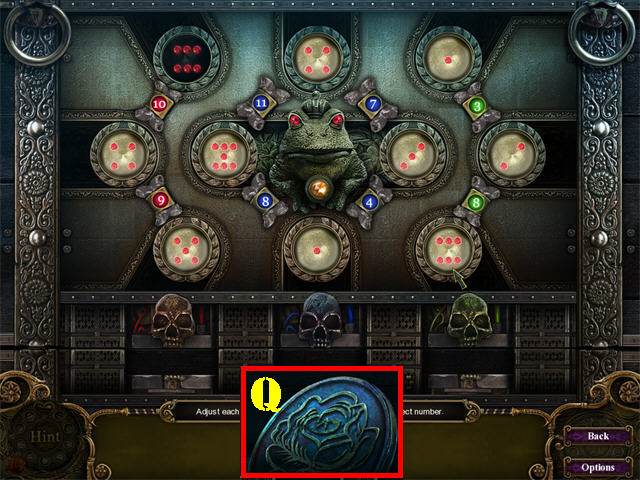
- Click on the sparkly chest in the cave to trigger a puzzle.
- Click on each die so that joined pairs add up the numbers attached to them.
- When die have been placed correctly the numbers attached to them will light up blue, green, or red.
- Please look at the screenshot for the solution.
- Take the ROSE EMBLEM (Q) after the puzzle has been solved.
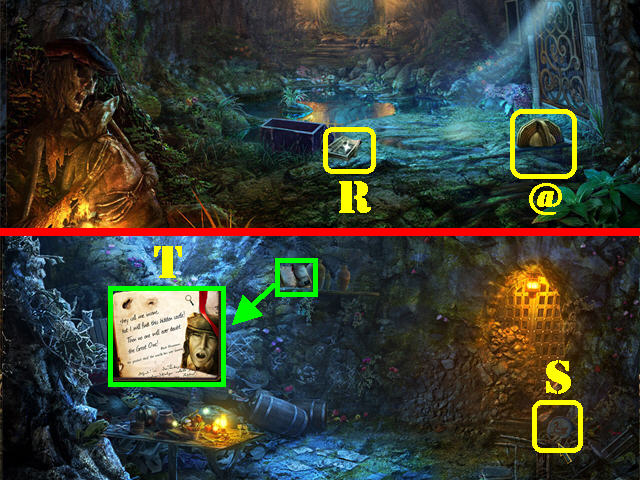
- Read the paper on the ground (R).
- Click on the CURSED OBJECT (@) on the right side of the ground.
- Go forward.
- Take the LAKESIDE DISC (S) in the lower right.
- Read the note on the shelf (T).
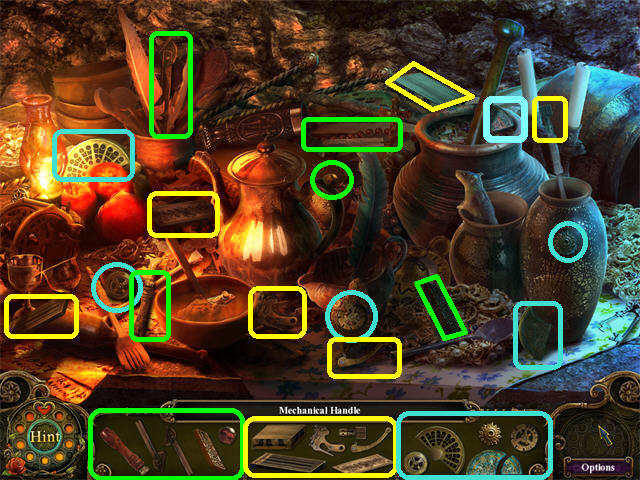
- Play the Hidden Object Scene to obtain the MECHANICAL HANDLE.
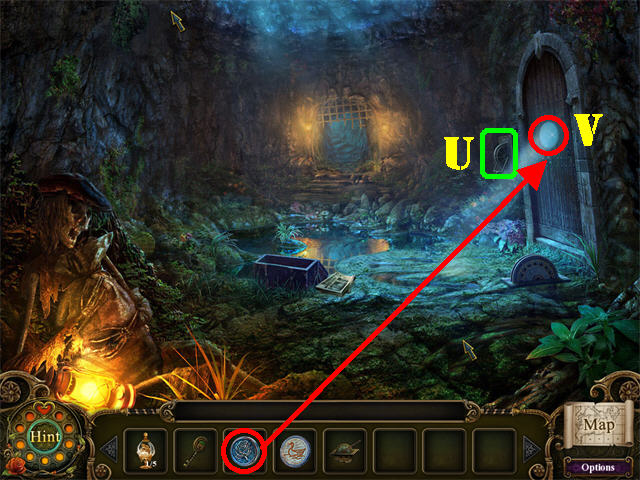
- Click down.
- Place the MECHANICAL HANDLE on the mechanism by the door (U).
- Click on the handle to release the gate.
- Place the ROSE EMBLEM in the round slot (V).
- Go through the door to end the chapter.
Chapter 2
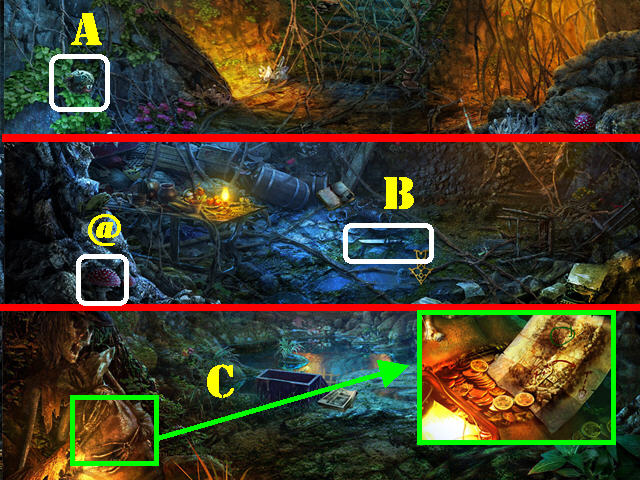
- Grab the SILVER APPLE (A) on the left.
- Click down and go forward.
- Click on the CURSED OBJECT (@) in the lower left which changes from mushrooms to crystals.
- Take the SMALL KNIFE (B) on the ground.
- Click down.
- Examine the sack the skeleton is holding (C).
- Cut the sack with the SMALL KNIFE; click on the map to enter EVIDENCE into inventory. Finding this evidence unlocked a secret Hidden Object Scene.
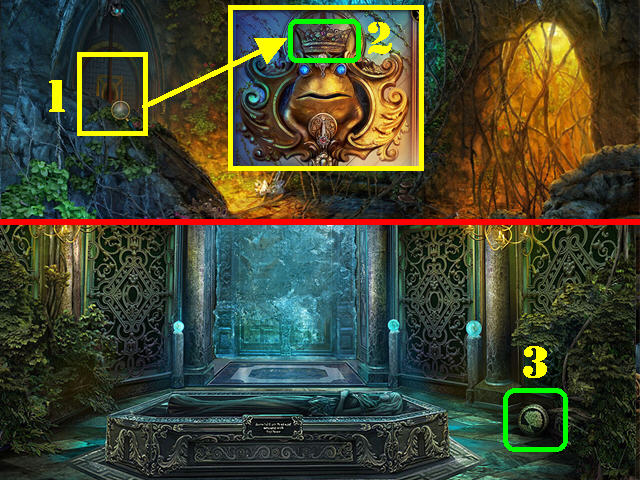
- Go into the right door.
- SPOILER ALERT FOR HARD MODE!!
- Zoom into the left door (1); place the FROG PRINCE GOLDEN CROWN on the crown above the frog’s head (2).
- Go into the left door.
- Take the SECRET TREE DISC in the lower right (3).
- END OF SPOILER ALERT!!!
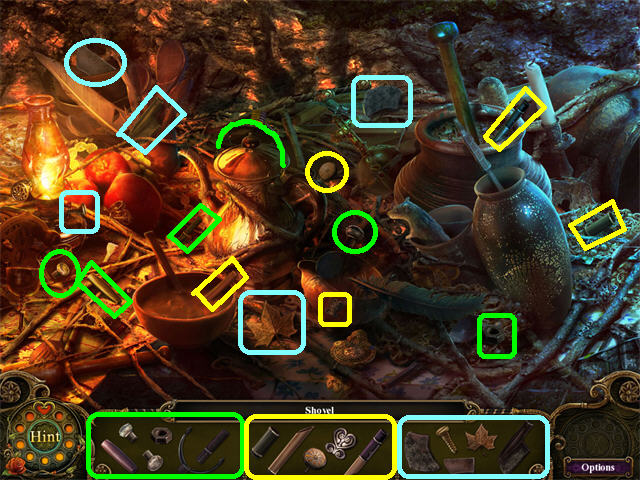
- Click down twice and go forward if you’re in Hard Mode and in Regular Mode just go forward.
- Play the Hidden Object Scene to obtain the SHOVEL.
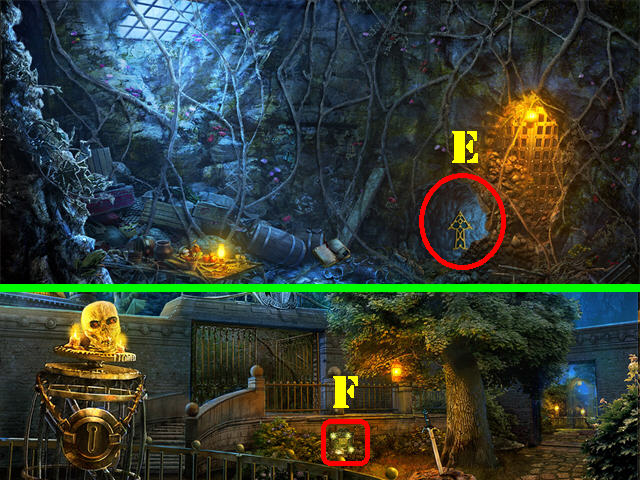
- Place the SHOVEL on the mound of dirt by the gated door (E).
- Go through the small hole to reach the garden.
- Click on the sparkly area in the garden to trigger a puzzle (F).
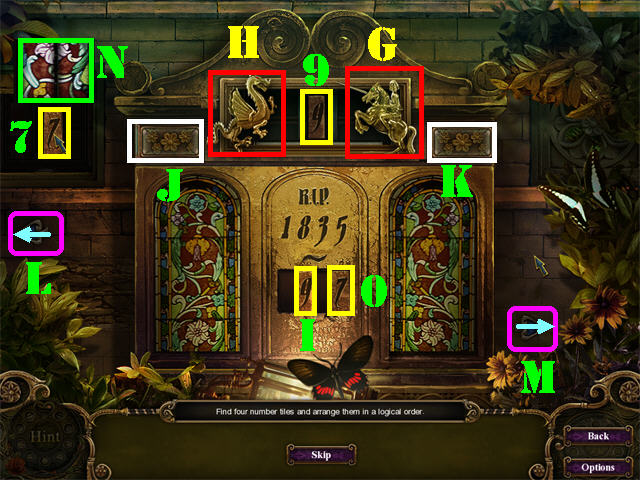
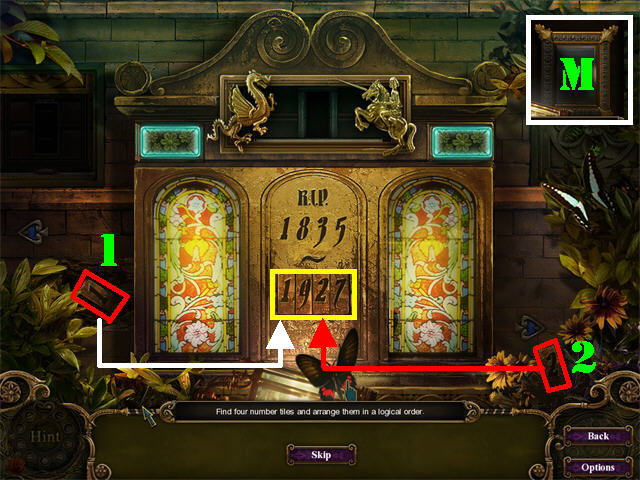
- You must find four numbers hidden in the gravestone and place them in the correct order below the date shown.
- Click on the Dragon (G) and as it moves forward click on the soldier on the horse (H) to open the panel behind them; take the NUMBER 9 (9).
- Place the number 9 in the second slot (I).
- Click on the panels next to the soldier and the dragon to open up the panel on the left (J and K) which reveals an image in the upper left.
- Use the arrows (L and M) at the bottom to change the image. The left arrow changes the left side of the image and the right arrow changes the right side of the image.
- Please look at the screenshot for the solution (N).
- Take the NUMBER 7 (7) and place it in the last slot (O).
- Grab the NUMBER 2 in the lower right and place it in the third slot.
- Click on the lower left side of the wall 3 times to see the NUMBER 1.
- Grab the NUMBER 1 and place it in the first slot.
- The correct date is “1927”.
- Take the SQUARE MIRROR (M) after the puzzle has been solved.
- Go forward.
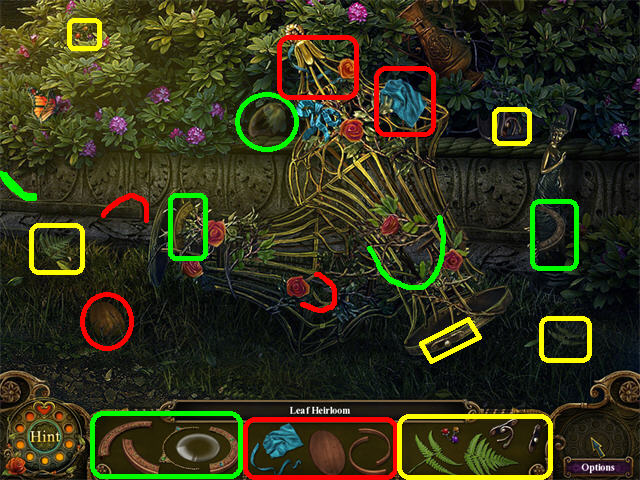
- Play the Hidden Object Scene to obtain the LEIF HEIRLOOM.
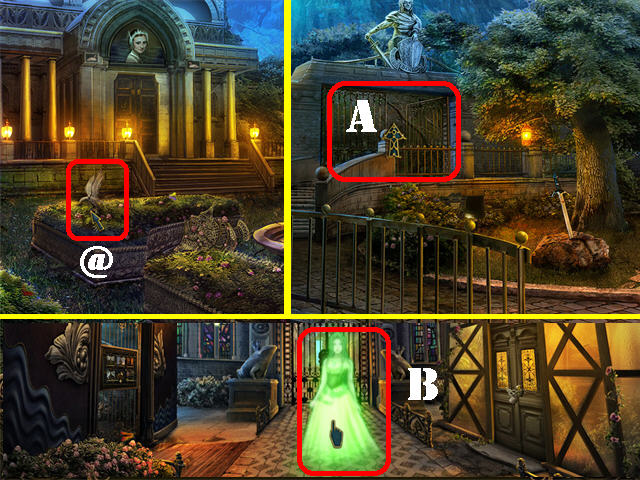
- Click on the CURSED OBJECT (@) on left which changes from a bird to a lantern.
- Click down and go into left gate (A).
- Click on the green ghost (B).
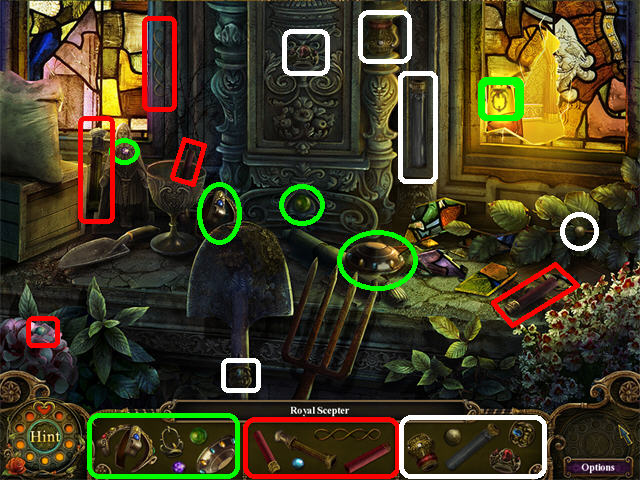
- Play the Hidden Object Scene on left to obtain the ROYAL SCEPTER.
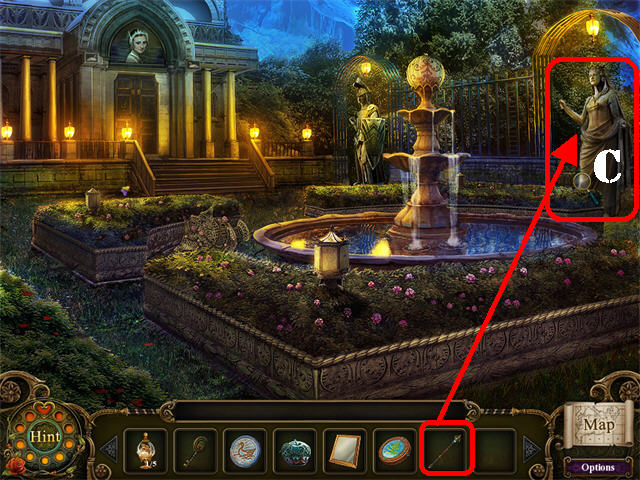
- Click down and head forward.
- Give the ROYAL SCEPTER to the statue of the queen on the right (C) so it will step aside.
- Go through the gate to trigger some new Hidden Object Scenes and to reach Snow White’s Cottage.
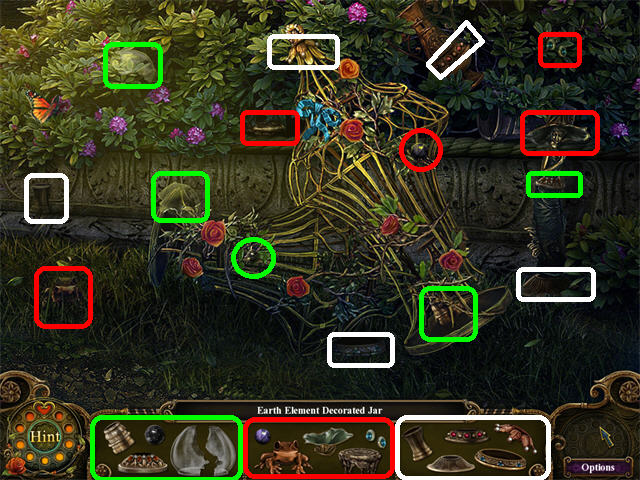
- Click down.
- Play the Hidden Object Scene to obtain the EARTH ELEMENT DECORATED JAR.
- This will add the DECORATED JAR COLLECTION 2/5 to inventory.
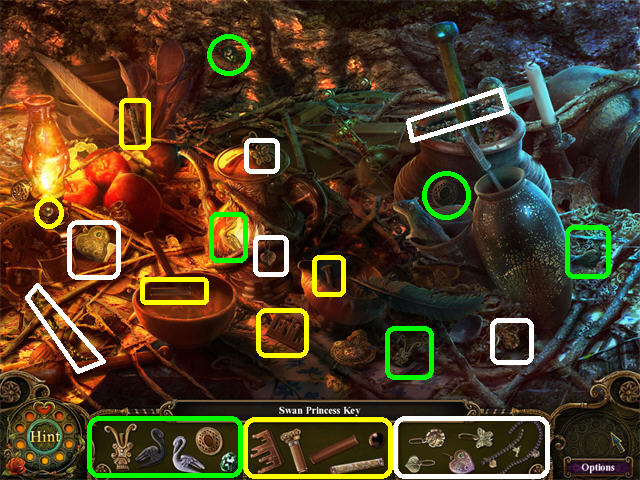
- Return to the cave.
- Play the Hidden Object Scene to obtain the SWAN PRINCESS KEY.
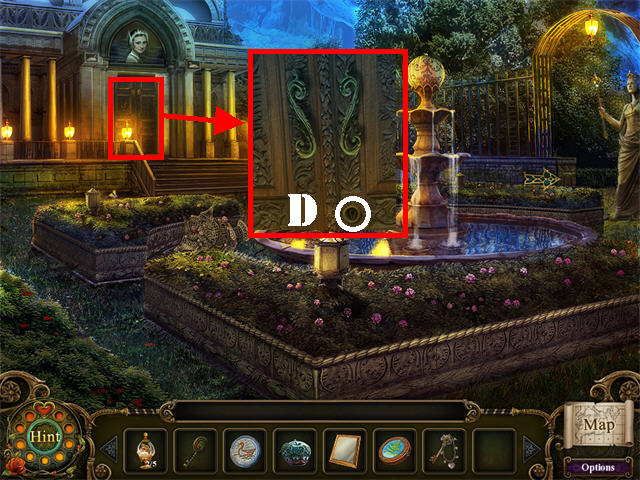
- Go outside and through the right entrance.
- Zoom into the Swan Lake Princess’ door on left.
- Put the SWAN LAKE PRINCESS KEY in the lock (D).
- Go inside.
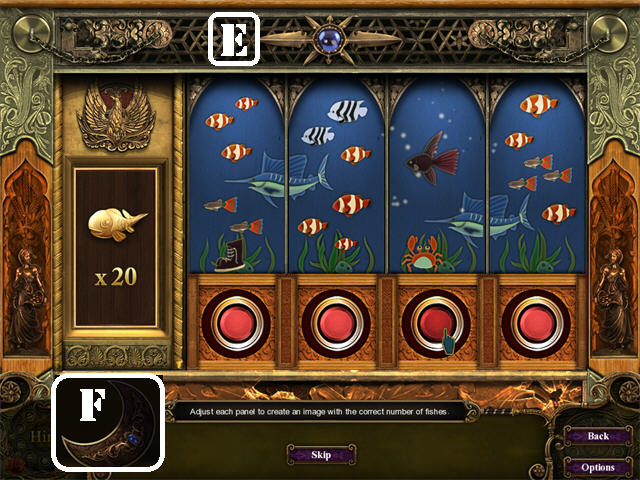
- Click on the sparkly area on left to trigger a puzzle.
- Click on the red buttons to change the image in each of the 4 panels.
- Choose the 4 correct panels that add up to 20 fishes in the scene to unlock the safe.
- Each fish that falls on half of the screen must be counted as a half a fish.
- Please look at the screenshot for the solution (E).
- Take the MOON GEM (F) after the puzzle has been solved.
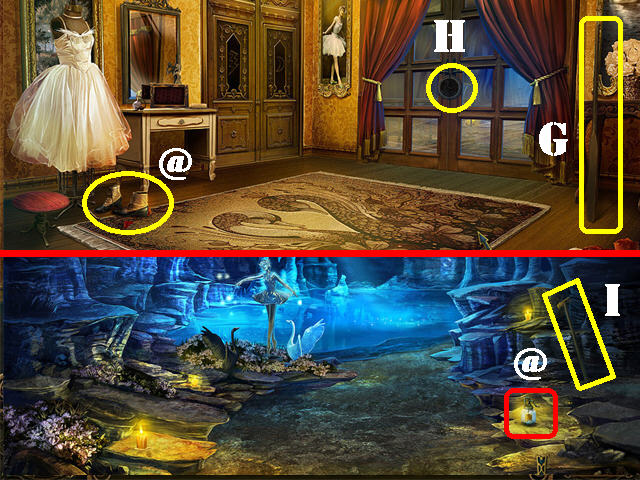
- Click on the CURSED OBJECT (@) on the left side of the ground. The ballerina slippers morph into boots.
- Take the WOODEN OAR (G) on the right.
- Place the LAKESIDE DISC in the round slot on the double doors (H).
- Click on the CURSED OBJECT (@) on the right side of the ground in which the candle morphs into a lantern.
- Grab the SLEDGEHAMMER (I) on the right.
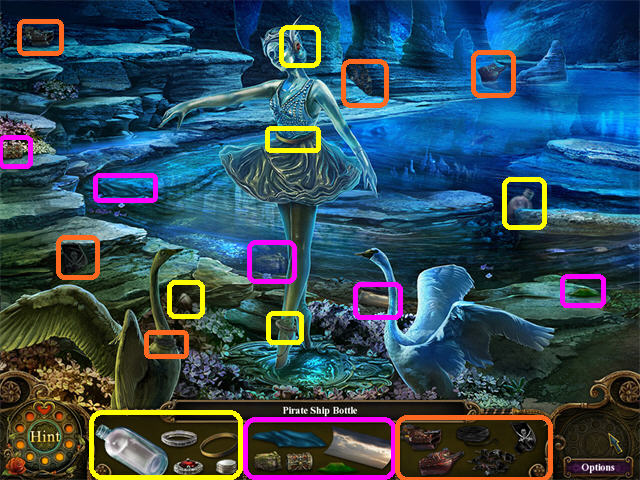
- Play the Hidden Object Scene to obtain the PIRATE SHIP BOTTLE.
- This will add the SHIP IN BOTTLE COLLECTION 1/5 to inventory.
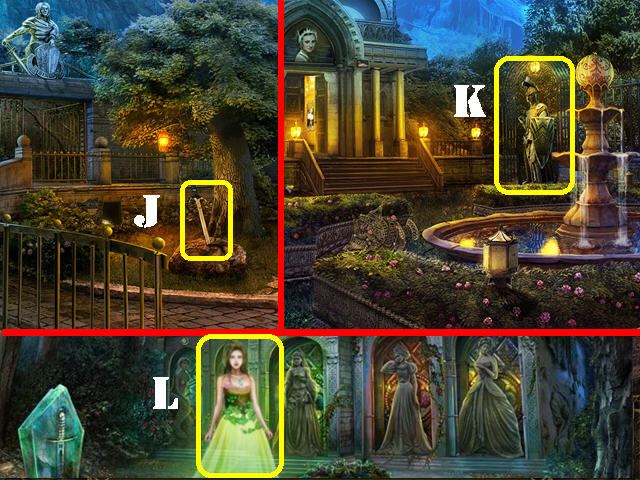
- Click down three times.
- Use the SLEDGEHAMMER on the large stone to obtain the ROYAL SWORD (J).
- Go forward.
- Give the ROYAL SWORD to the knight on the left that is blocking the pathway (K).
- Go through the door to encounter Princess Ivy; the first love of “The Frog Prince”.
- Princess Ivy hands you the GREENHOUSE KEY.
Chapter 3
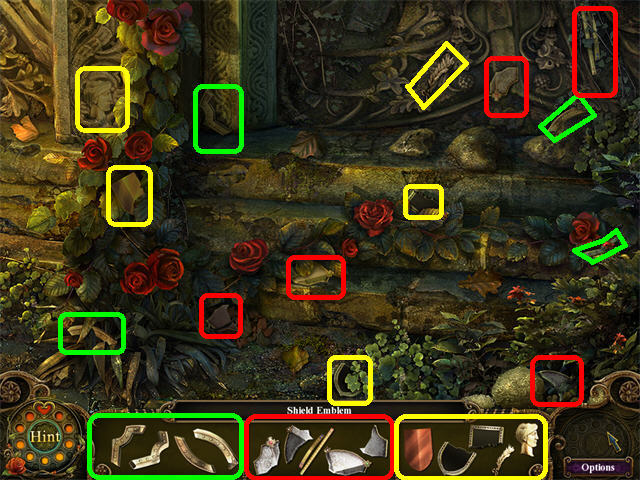
- Play the Hidden Object Scene by Cinderella to obtain the SHIELD EMBLEM.
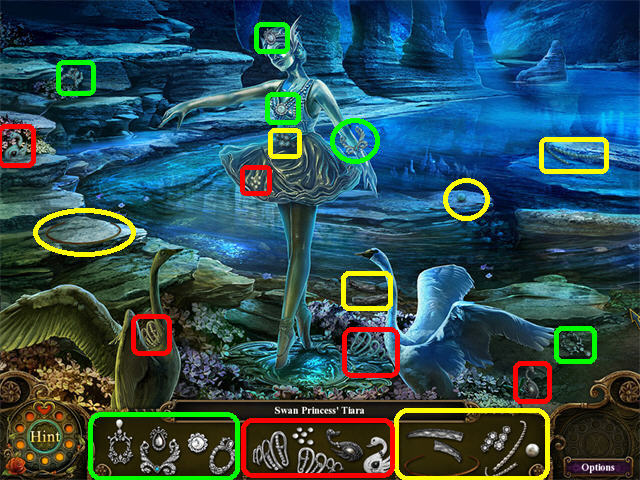
- Return to the lake/cave in the Swan Princess’ house.
- Play the Hidden Object Scene to obtain the SWAN PRINCESS’ TIARA.
- This will add the PRINCESS TIARA COLLECTION 1/5 to inventory.
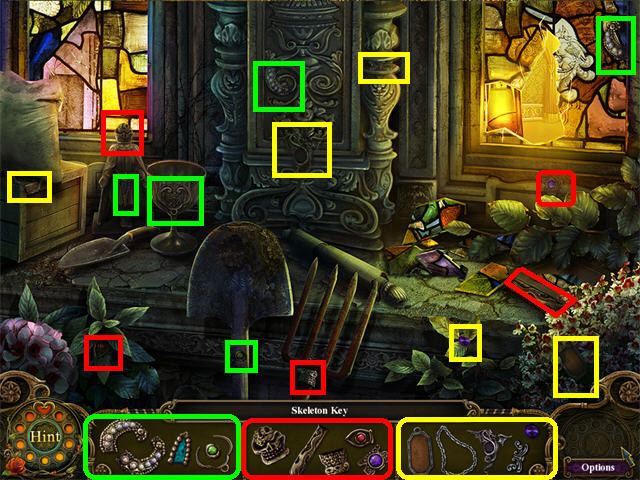
- Exit the house, click down, and head into the left gate.
- Play the Hidden Object Scene to obtain the SKELETON KEY.
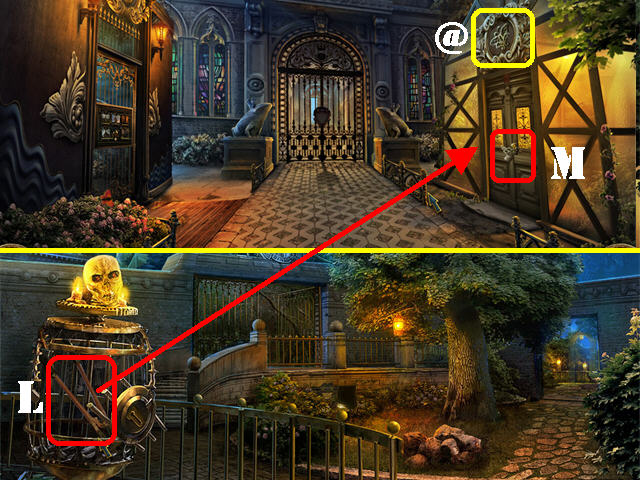
- Click on the CURSED OBJECT (@) above the changing door sign.
- Go outside.
- Place the SKELETON KEY on the cage on left.
- Take the BOLT CUTTER inside the cage (L).
- Go through the gate.
- Break the chains on the right door with the BOLT CUTTER (M).
- Place the GREENHOUSE KEY on The door.
- Enter the Greenhouse.
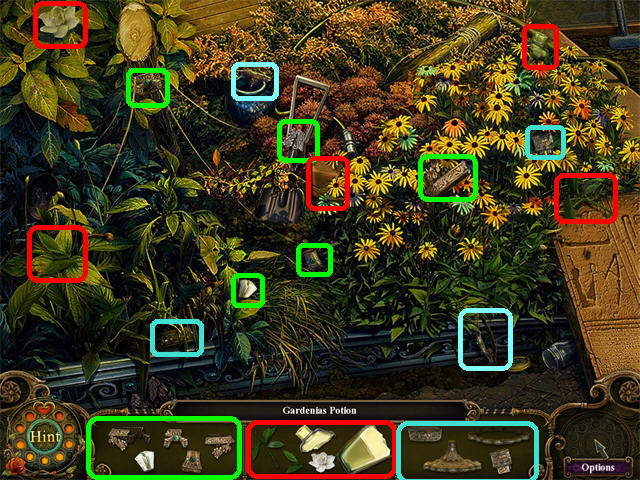
- Play the Hidden Object Scene to obtain the GARDENIA POTION.
- This will add the PLANT POTION COLLECTION 1/6 to inventory.
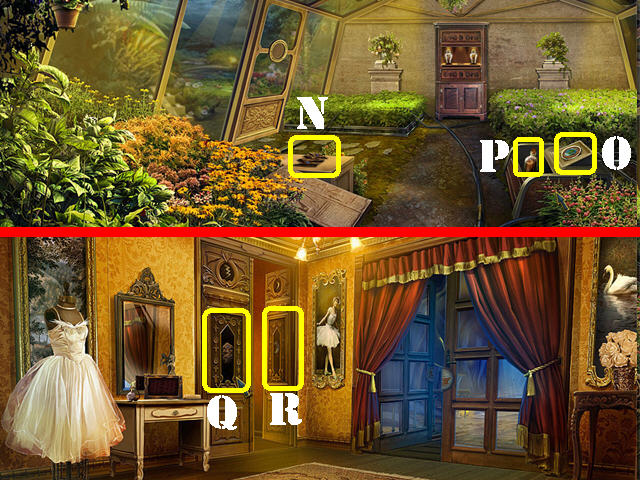
- Grab the LIGHTNING GEM (N) on the left.
- Place the LEAF HEIRLOOM in the round slot on the cabinet in the right (O).
- Take the SHIP IN BOTTLE COLLECTION 2/5 (P) in the cabinet.
- Return to the Swan Lake Princess’ House.
- Place the LIGHTNING GEM (Q) and the MOON GEM (R) in their appropriate slots on the door.
- Go inside.
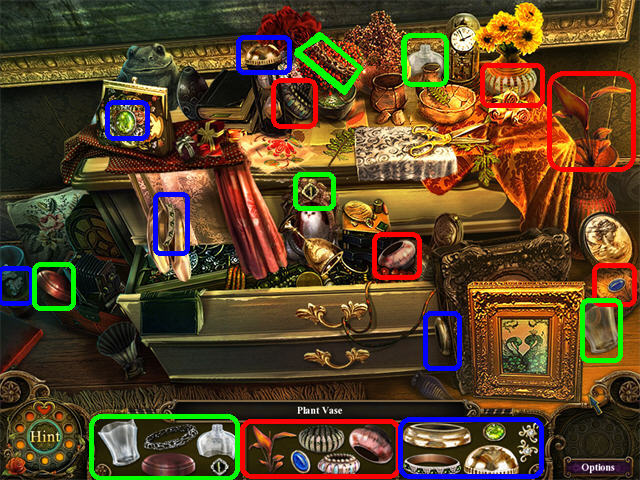
- Play the Hidden Object Scene on left to obtain the PLANT VASE.
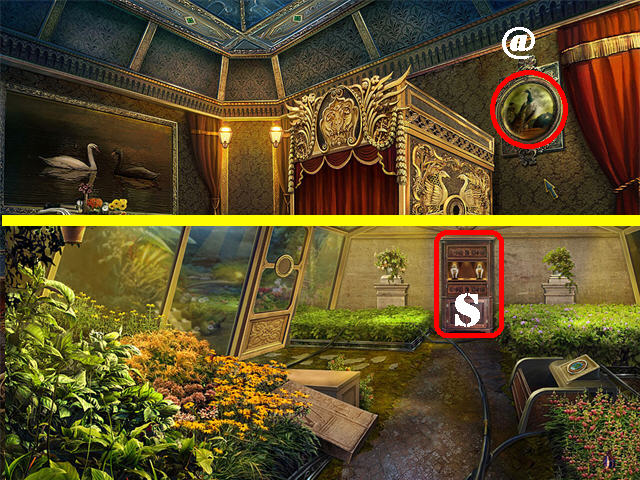
- Click on the CURSED OBJECT (@) in the upper right in which a picture changes images.
- Return to the Greenhouse.
- Put the PLANT VASE on the shelf against the back wall (S).
- Go into the Kitchen.
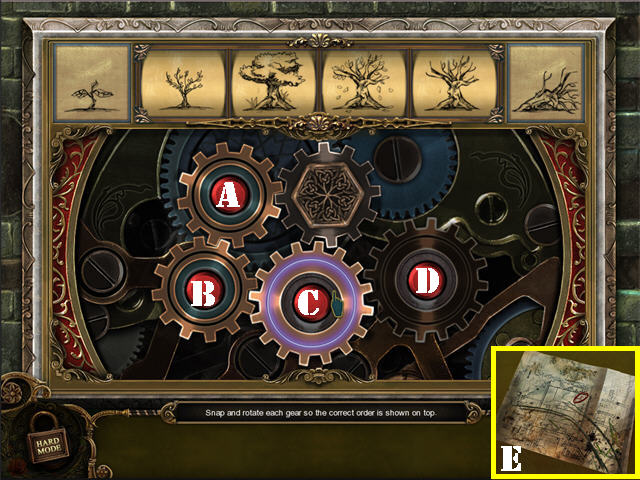
- Click on the sparkly area on right to trigger a puzzle.
- Click on each gear until the correct image forms on top.
- Clicking on the red button stops that gear from moving.
- Click on the gear itself to make that gear and any gear attached to it rotate.
- Follow the instructions below to solve the puzzle.
- Click on the Red button C and rotate GEAR B once.
- Press Red button B and rotate GEAR C once and GEAR A once.
- Press Red button C and rotate GEAR A twice.
- Release the Red Button C and rotate GEAR C once.
- Press Red button D and rotate GEAR C 3 times.
- Click on the BLUEPRINT EVIDENCE (E) after the puzzle has been solved.
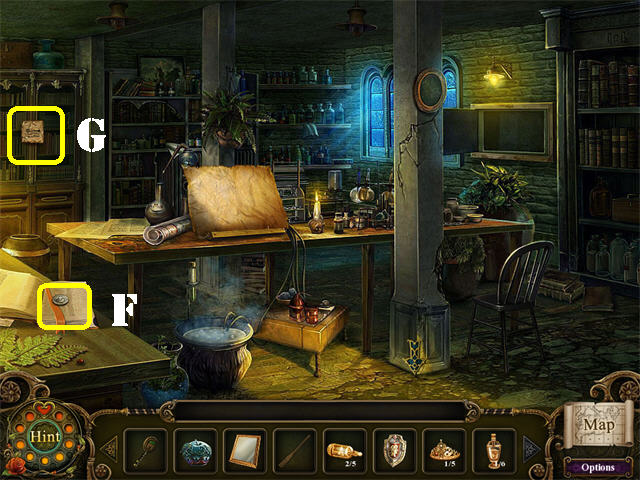
- Open the book in the lower left; take the SILVER COIN (F).
- Read the NOTE (G) in the upper left.
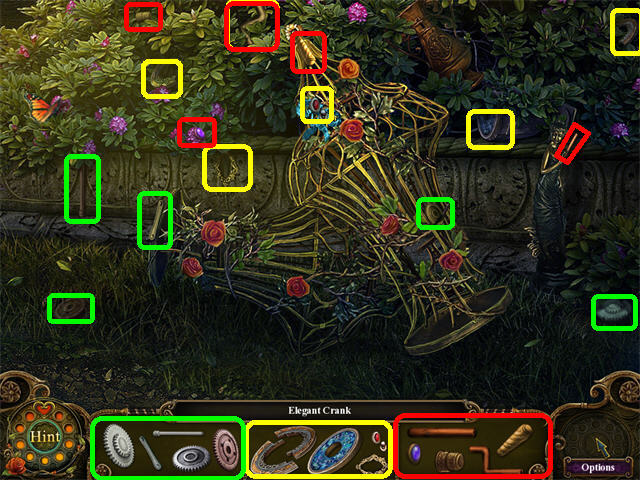
- Return to the fountain outside of the Swan Lake Princess’ House.
- Play the Hidden Object Scene to obtain the ELEGANT CRANK.
Chapter 4
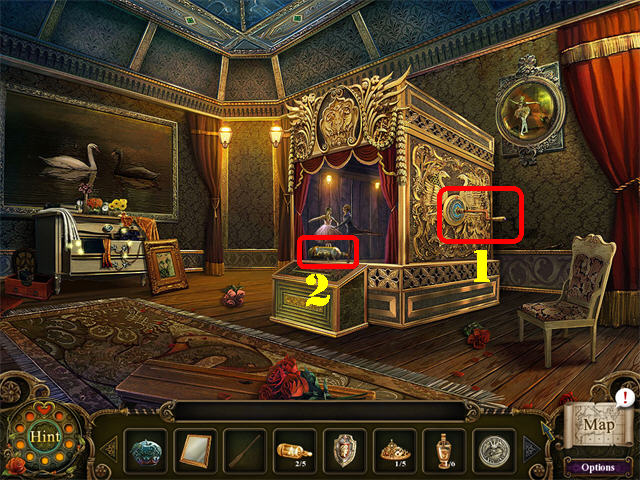
- Return to the Swan Lake Princess’ Bedroom.
- Place the ELEGANT CRANK on the side of the marionette theater (1).
- Take the SHIP IN BOTTLE COLLECTION 3/5 on the stage (2).
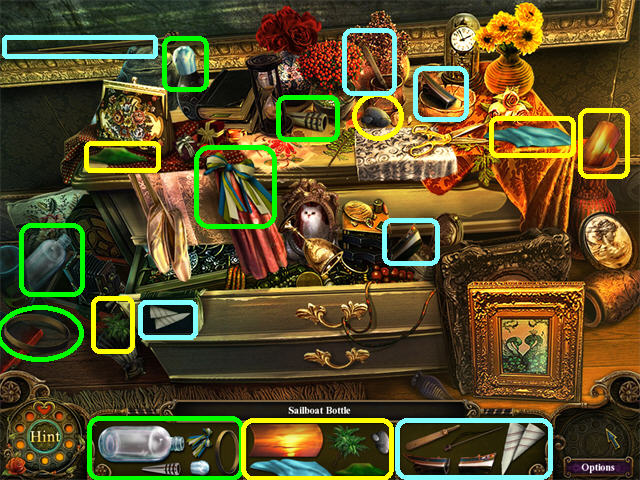
- Play the Hidden Object Scene to obtain SAILBOAT BOTTLE.
- This will add the SHIP IN BOTTLE COLLECTION 4/5 to inventory.
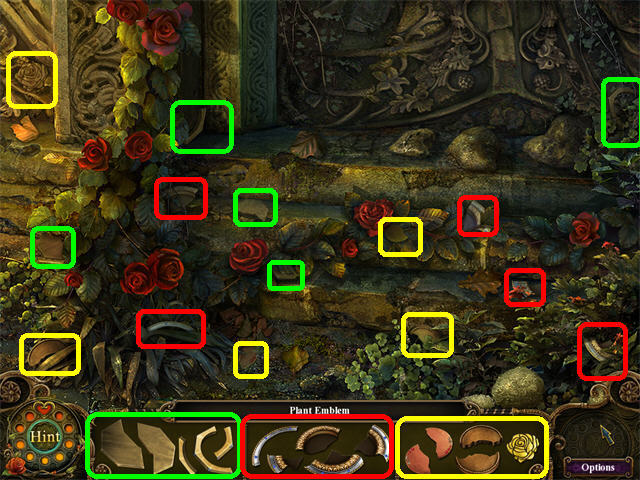
- Click down twice and go into the left gate outside of the Swan Princess’ House to reach the Princess’ Shrine.
- Play the Hidden Object Scene to obtain the PLANT EMBLEM.
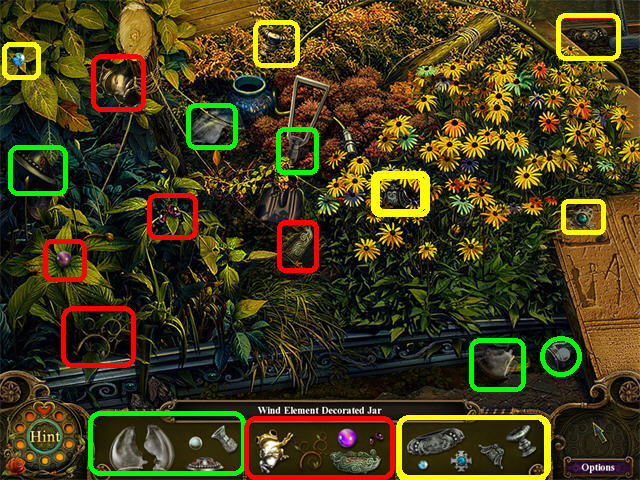
- Return to the Greenhouse.
- Play the Hidden Object Scene to obtain the WIND ELEMENT DECORATED JAR.
- This will add the DECORATED JAR COLLECTION 3/5 into inventory.
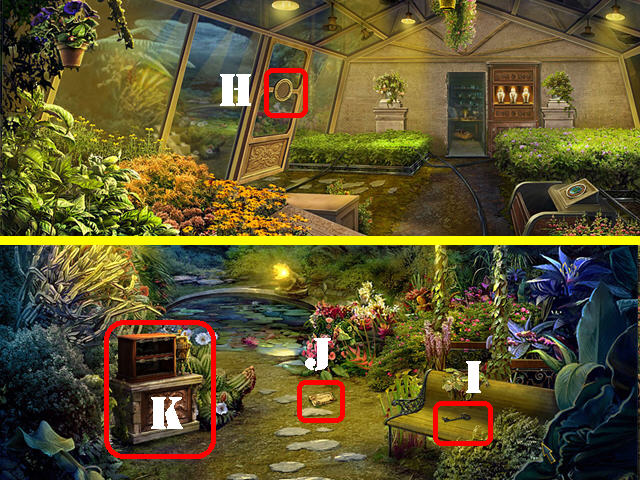
- Place the PLANT EMBLEM in the round slot on the left door (H).
- Go through the door.
- Take the RUSTY CAVE KEY (I) on the bench.
- Read the NOTE (J) on the ground.
- Remember the location of the plant potion collection on left (K).
- Click down twice.
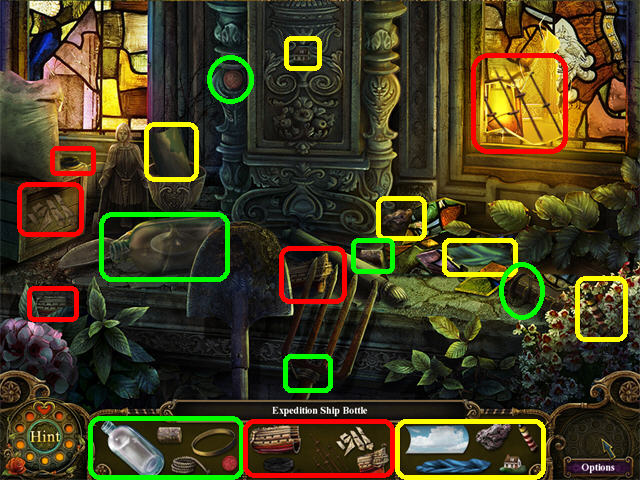
- Play the Hidden Object Scene by the stained glass window to obtain the EXPEDITION SHIP BOTTLE.
- This will add the SHIP IN BOTTLE COLLECTION 5/5 to inventory.
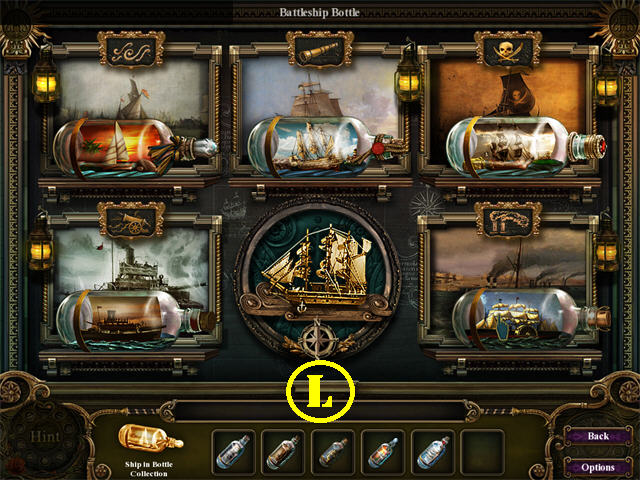
- Examine the left door to activate a puzzle if you have the 5 “SHIP IN BOTTLE COLLECTION”.
- Place your mouse over a bottle to read its description in the upper center. Place the bottles in the right spots by using the small images above each picture as a clue.
- For example, the Pirate Ship goes in the painting with the crossbones above.
- Click on any 2 bottles to swap their positions.
- The lantern will light up when a bottle has been placed correctly.
- Please look at the screenshot for the solution (L).
- Go through the door after the puzzle has been solved.
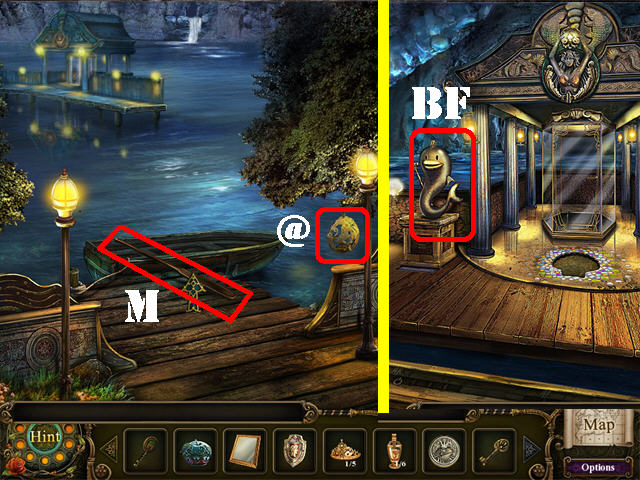
- Click on the CURSED OBJECT (@) changing sign on the right lamppost.
- Place the WOODEN OAR in the boat (M).
- Click on the boat to reach the pier for the Little Mermaid area.
- Click on the Big Fish (BF) and the message appears: “Crown the Big Fish and the Path will be shown.”
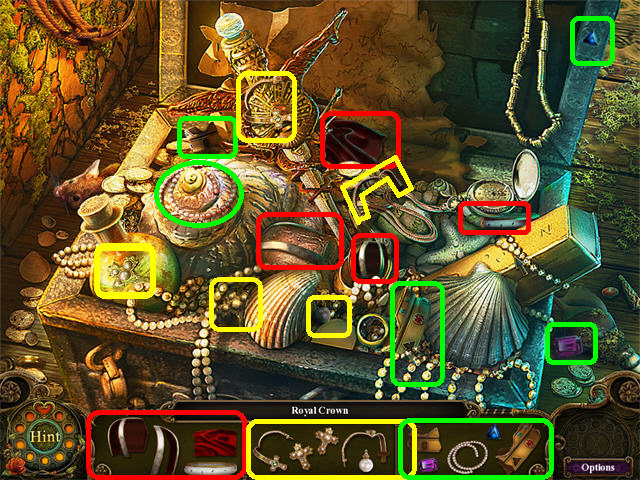
- Play the Hidden Object Scene by the chest to obtain the ROYAL CROWN.
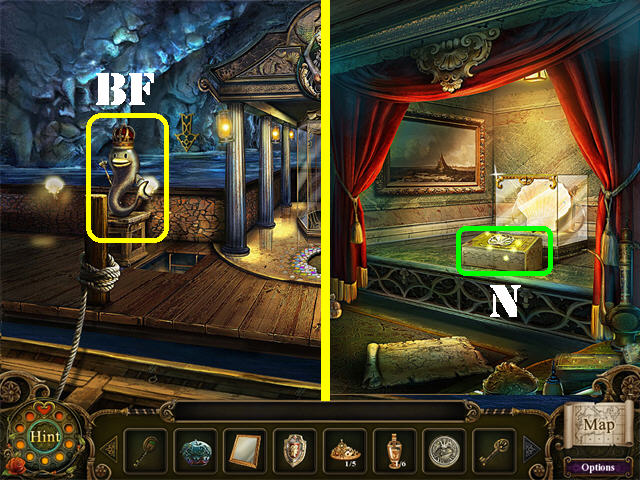
- Place the ROYAL CROWN on the BIG FISH on left (BF) so it can move aside.
- Go into the hole in the floor.
- Click on the sparkly case on right to activate a puzzle (N).
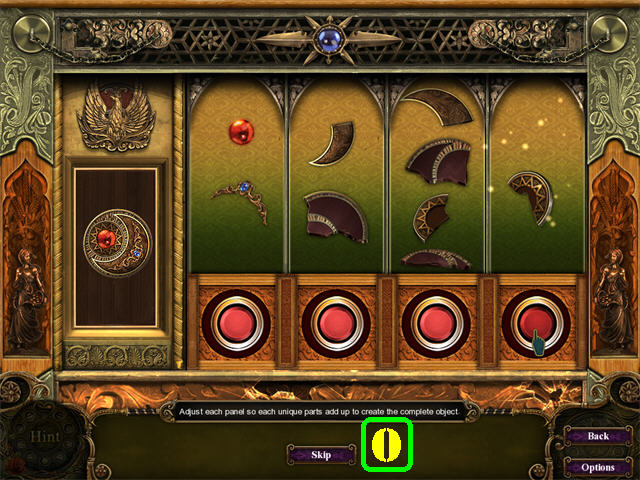
- Clicking on the red buttons changes the images on each of the 4 panels.
- Choose the correct set of panels so the sums of all parts add up to create the image on left.
- Please look at the screenshot for the solution (O).
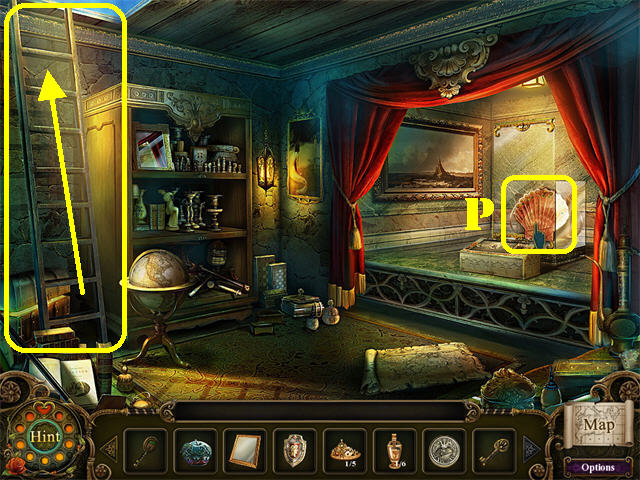
- Take the LARGE SEASHELL (P) in the case after the puzzle has been solved.
- Go up the ladder on left to return to the Pier.
Chapter 5
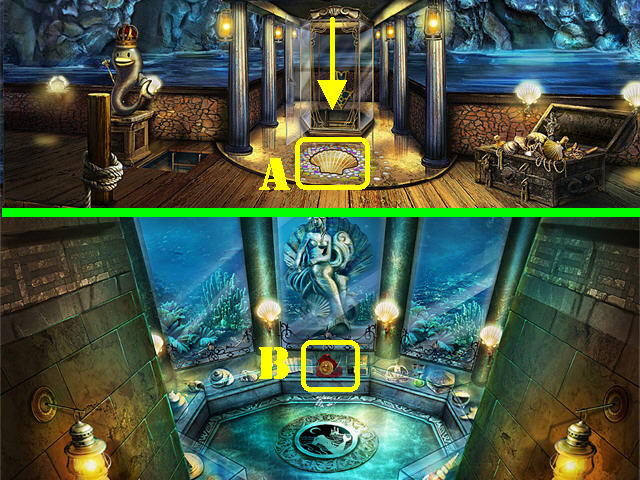
- Place the LARGE SEASHELL on the engraved section on the floor (A).
- Go down the glass chamber.
- Take the GOLD COIN (B) in the back case.
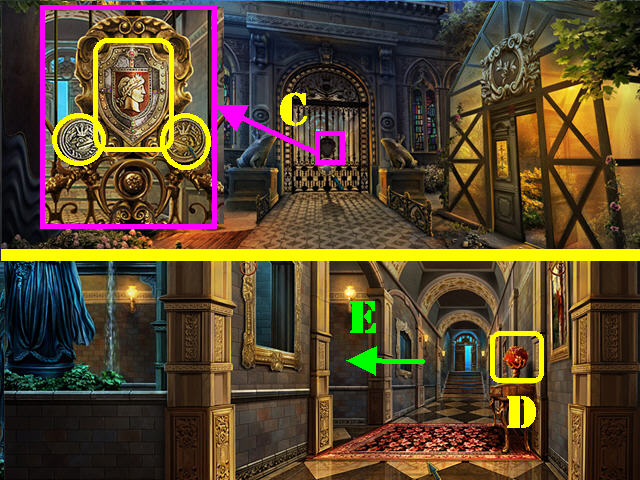
- Return to the Palace.
- Zoom into the back gate.
- Place the SHIELD, GOLD COIN, and SILVER COIN into their respective slots (C) to unlock the gate.
- Go through the gate.
- Take the CHEMICAL INK (D) on the small table.
- Head left (E).
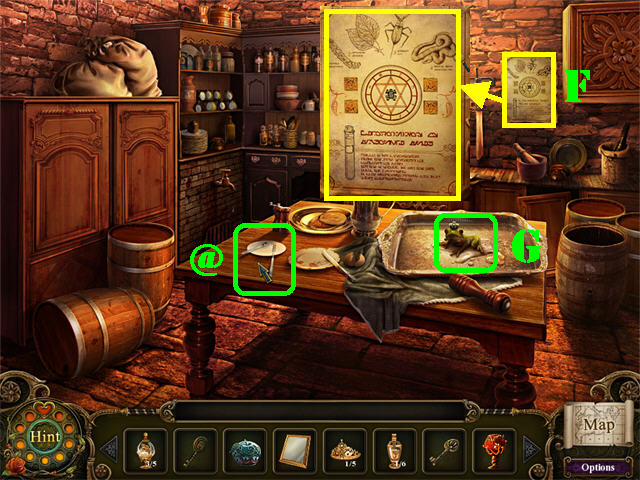
- Click on the PLATE CURSED OBJECT (@) on the table.
- Make note of the little frog on the tray (F).
- Examine the paper on the back wall to view instructions on creating the frog potion (G).
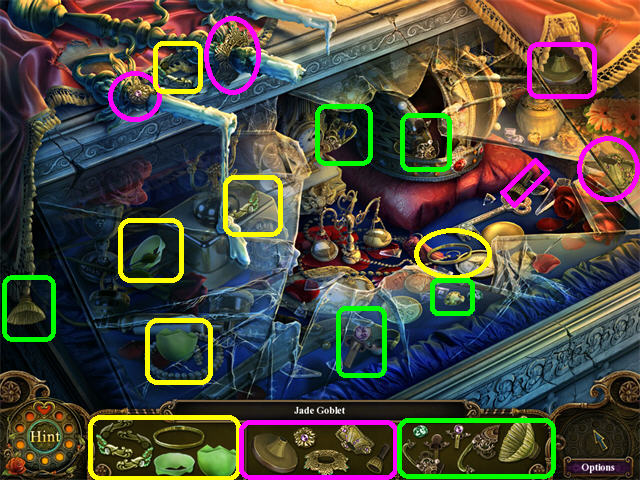
- Click down and go forward.
- Play the Hidden Object Scene in the upper right to obtain the JADE GOBLET.
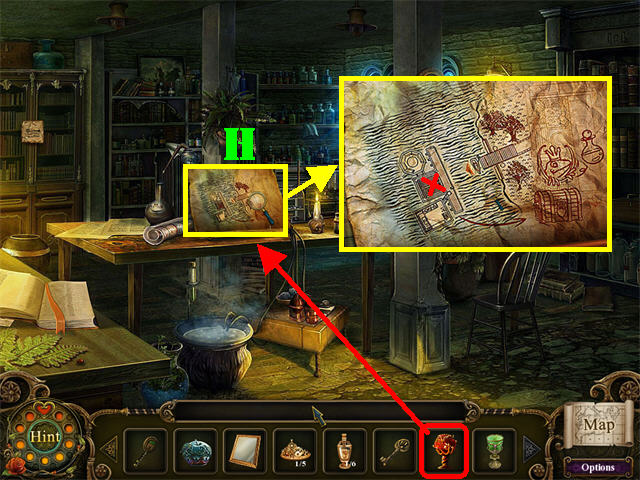
- Return to the potion room in the back of the Greenhouse.
- Place the CHEMICAL INK on the large page on the desk (H).
- Zoom into the page to enter the EVIDENCE into the map.
- Take the boat back to the pier.
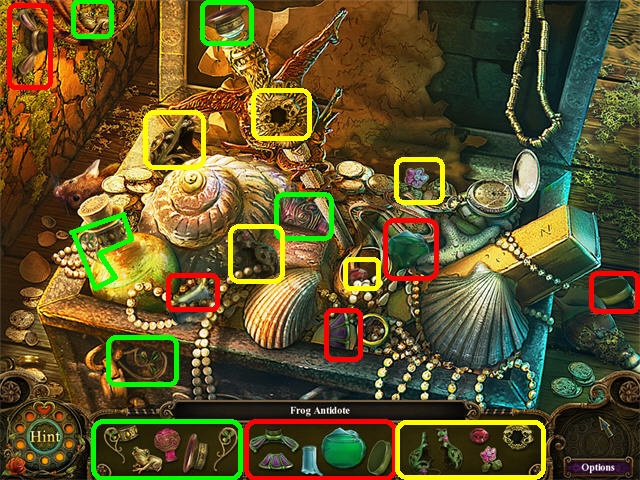
- Play the Hidden Object Scene to obtain the FROG ANTIDOTE.
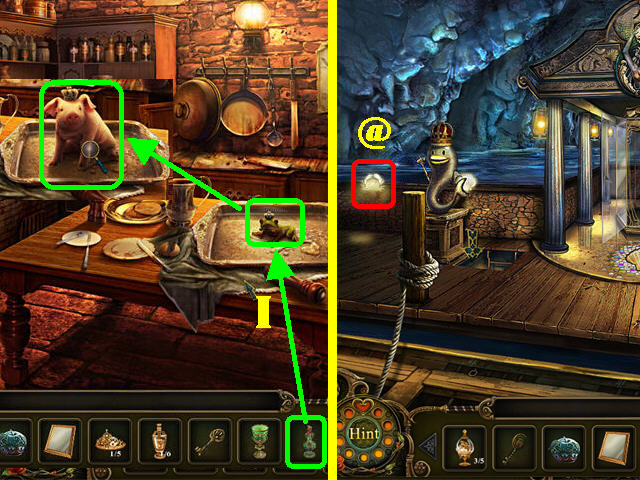
- Click on the SHELL CURSED OBJECT (@) on left.
- Return to the Kitchen in the Palace.
- Give the FROG ANTIDOTE to the frog in the tray (I).
- The frog turns into a pig.
- Return to the pier.
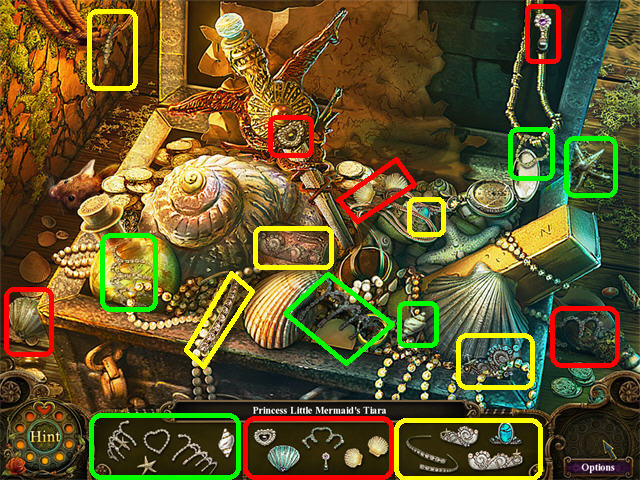
- Play the Hidden Object Scene to obtain the PRINCESS LITTLE MERMAID’S TIARA.
- This will add the PRINCESS TIARA COLLECTION 2/5 to inventory.
- Return to the Swan Princess’ Bedroom.
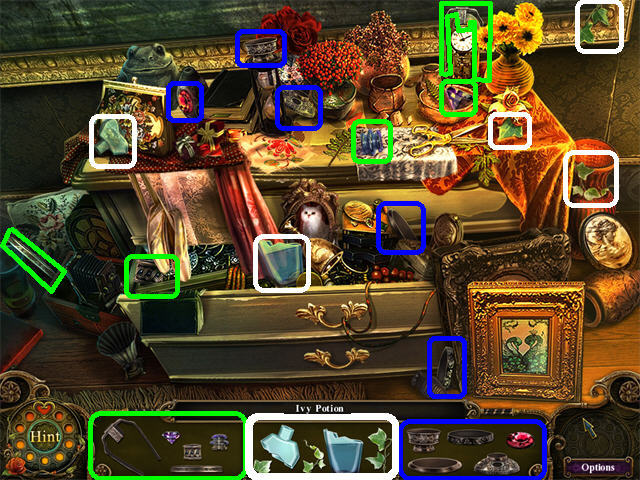
- Play the Hidden Object Scene to obtain the IVY POTION.
- This will add the PLANT POTION COLLECTION 2/6 to inventory.
- Return to the Cave.
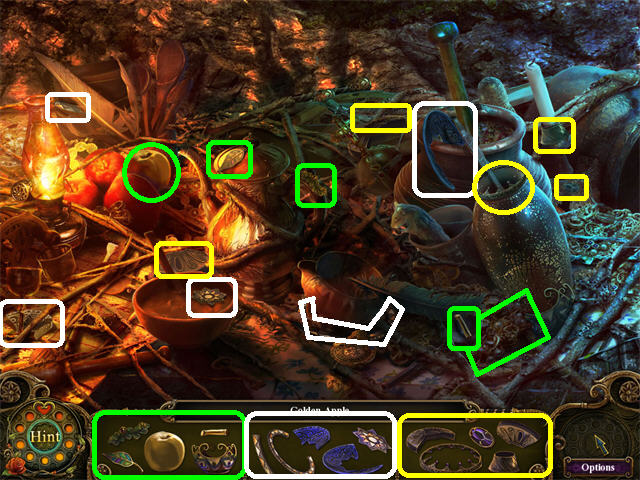
- Play the Hidden Object Scene to obtain the GOLDEN APPLE.
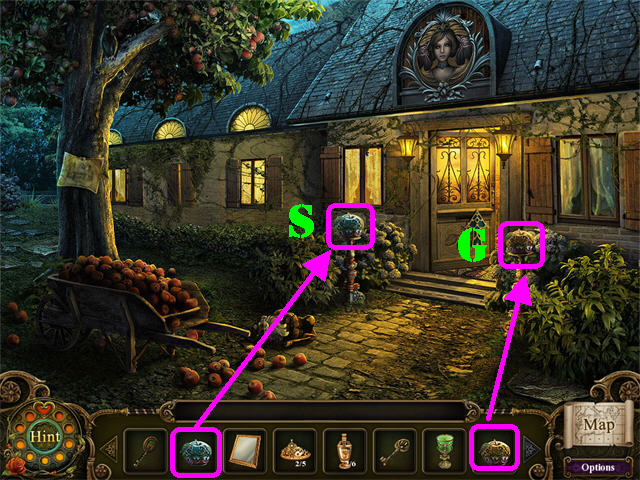
- Go forward twice and through right gate to reach Snow White’s Cottage.
- Put the SILVER APPLE you found in the cave on the left pedestal (S).
- Put the GOLDEN APPLE you found in the cave’s Hidden Object Scene on the right pedestal (G).
- Enter the Cottage.
Chapter 6
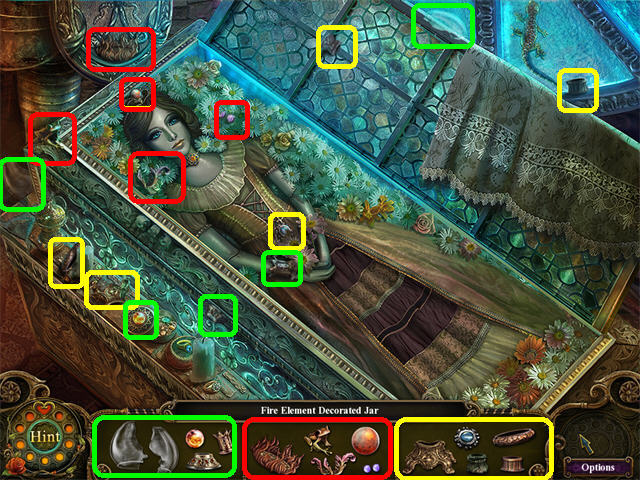
- Play the Hidden Object Scene at Snow White’s Cottage to obtain the FIRE ELEMENT DECORATED JAR.
- This adds the DECORATED JAR COLLECTION 4/5 to inventory.
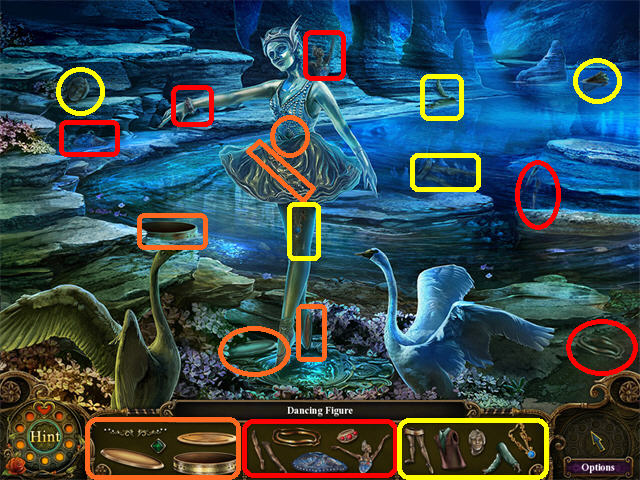
- Return to the lake in the Swan Lake Princess’ House.
- Play the Hidden Object Scene to obtain the DANCING FIGURE.
- Return to Snow White’s Cottage.
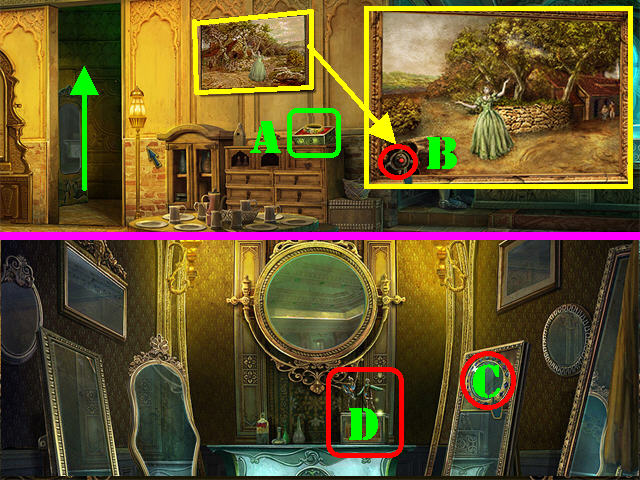
- Take the MYSTERIOUS BRACELET (A).
- Examine the hanging picture and press the red button (B) to reveal a secret passage behind the wall.
- Go through the wall.
- Take the ROUND MIRROR (C) on the right.
- Place the DANCING FIGURE on the music box on the table to trigger a puzzle (D).
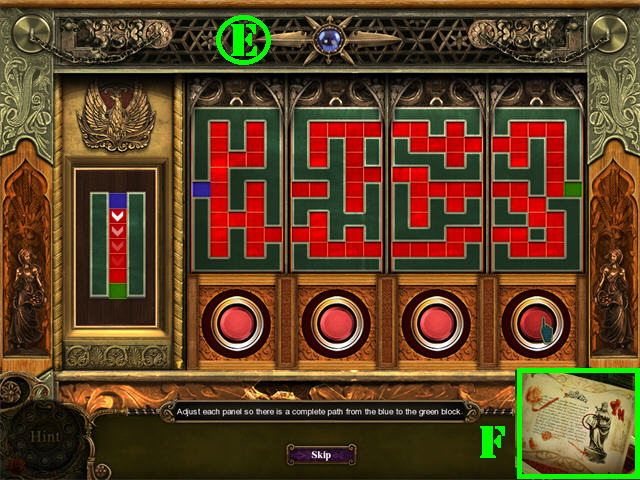
- In this puzzle you need adjust each panel so a complete path forms between the blue and green block.
- Click on the red buttons to change the image of each of the 4 panels.
- To solve the puzzle the road has to zigzag around to connect through the top and the bottom of the path.
- Please look at the screenshot for the solution (E).
- Click on the EVIDENCE (F) which shows the location of a stone book that unlocks a secret passage to the Library.
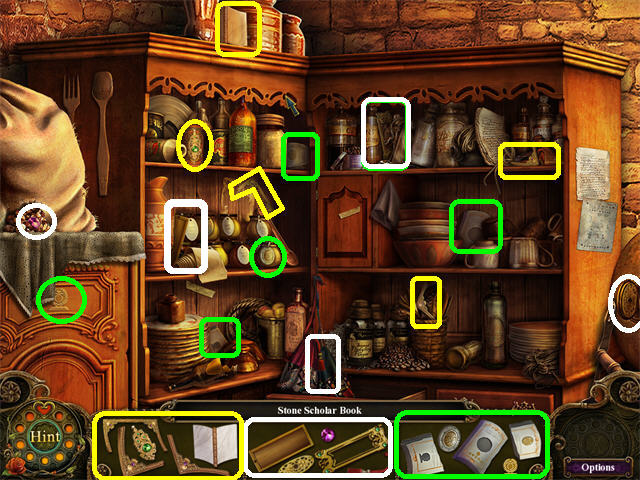
- Return to the Kitchen in the Palace.
- Play the Hidden Object Scene to obtain the STONE SCHOLAR BOOK.
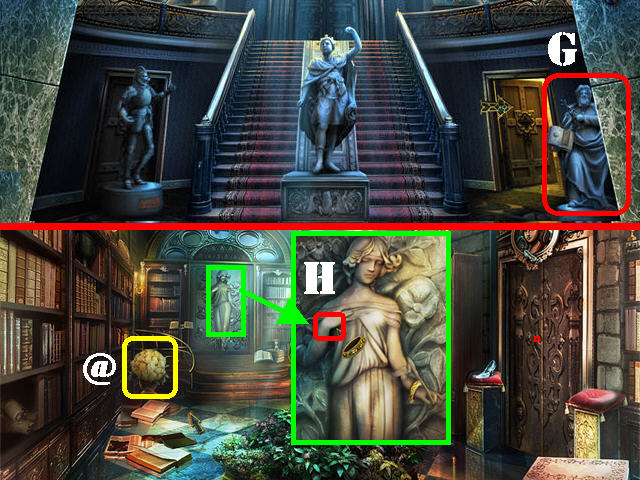
- Click down and head forward.
- Give the STONE SCHOLAR BOOK to the statue on the right to unlock the door behind it (G).
- Go through the right door to access the Library.
- Click on the GLOBE CURSED OBJECT (@) on left.
- Zoom into the statue on the back wall.
- Place the MYSTERIOUS BRACELET you found in Snow White’s Cottage on the statue’s wrist (H).
- Go through the door.
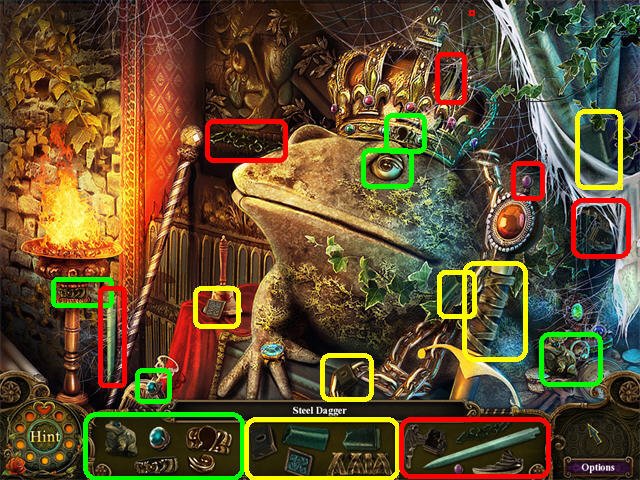
- Play the Hidden Object Scene to obtain the STEEL DAGGER.
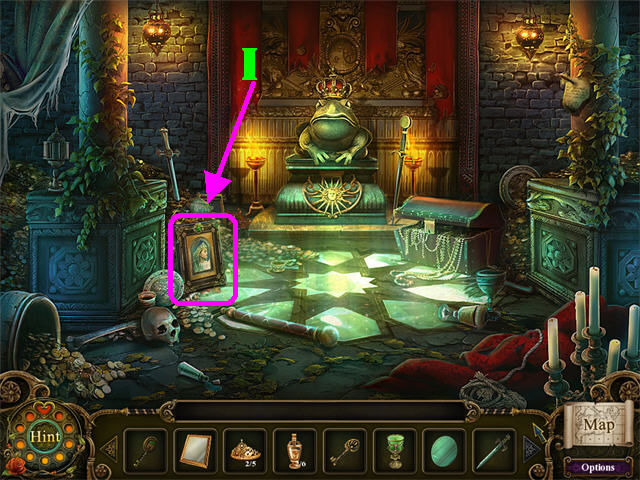
- Grab the PRINCESS PORTRAIT (I) on the left side of the ground.
- Click down twice.
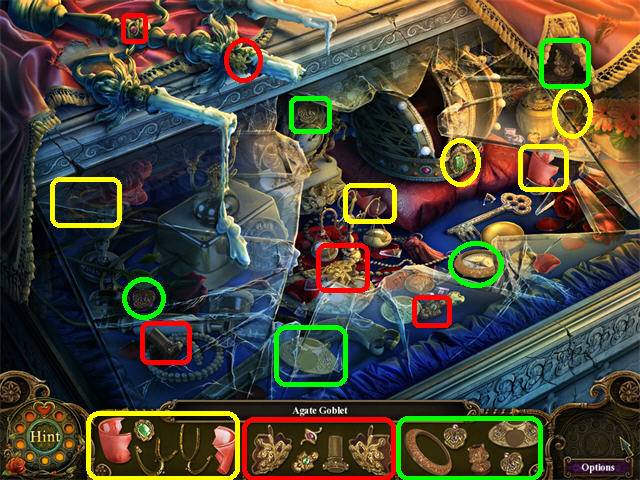
- Play the Hidden Object Scene by the statues to obtain the AGATE GOBLET.
- Return to Snow White’s Cottage.
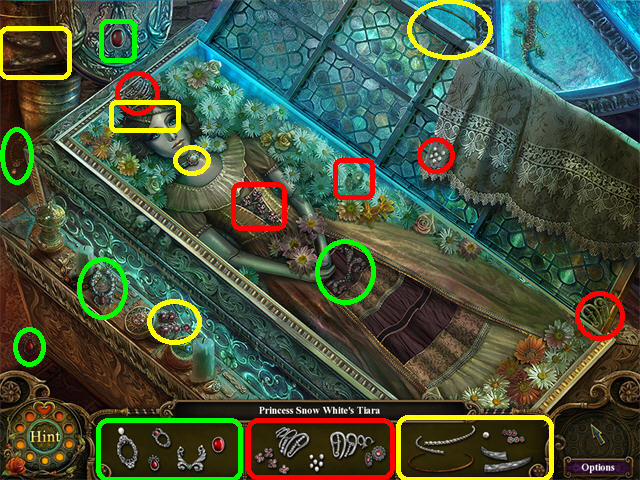
- Play the Hidden Object Scene to obtain PRINCESS SNOW WHITE’S TIARA.
- This will add the PRINCESS TIARA COLLECTION 3/5 to inventory.
Chapter 7
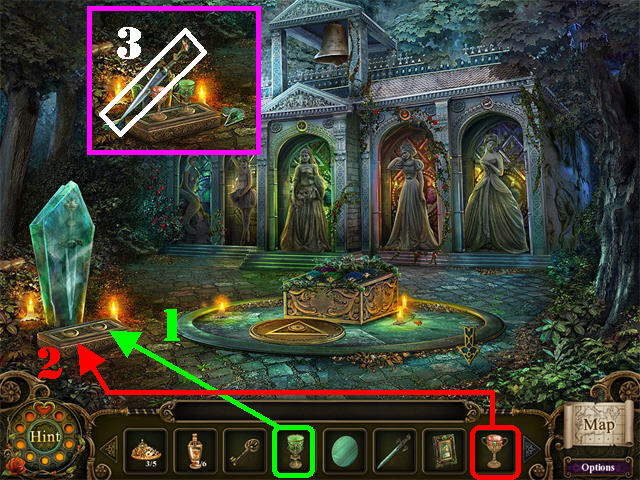
- Go into the left gate by the fountain outside of the Swan lake Princess’ house.
- Place the JADE GOBLET on the right side of the panel next to the frozen sword (1).
- Place the AGATE GOBLET on the left side of the panel next to the frozen sword (2).
- Placing the goblets shatters the ice around the sword and triggers a Hidden Object Scene.
- Take the PRINCE DISPLAY SWORD (3).
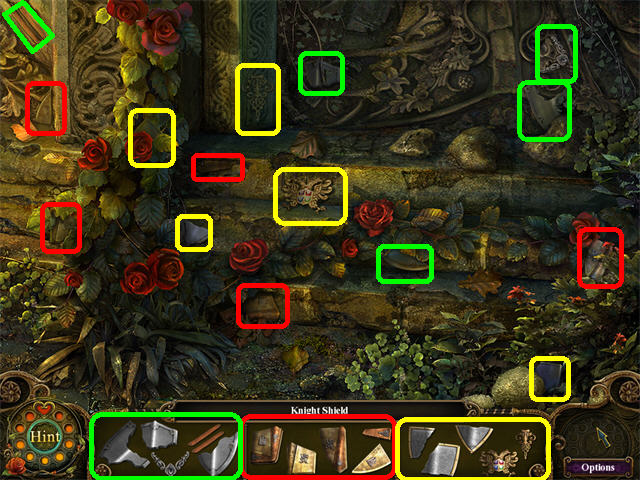
- Play the Hidden Object Scene to obtain the KNIGHT SHIELD.
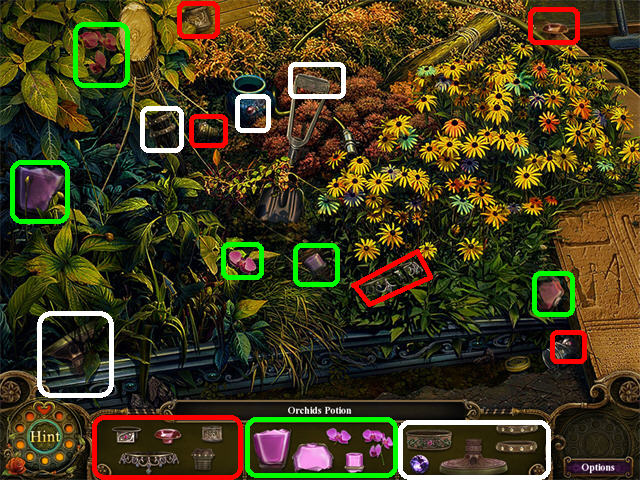
- Return to the Greenhouse.
- Play the Hidden Object Scene to obtain the ORCHIDS POTION.
- This will add the PLANT POTION COLLECTION 3/6 to inventory.
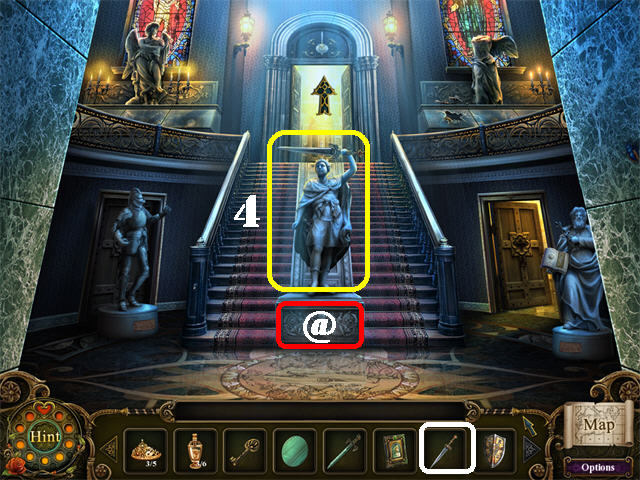
- Return to the statue hall.
- Click on the CURSED OBJECT (@) at the base of the statue in the middle.
- Give the PRINCE DISPLAY SWORD to the statue in the center to gain access to the top door (4).
- Go through the top door.
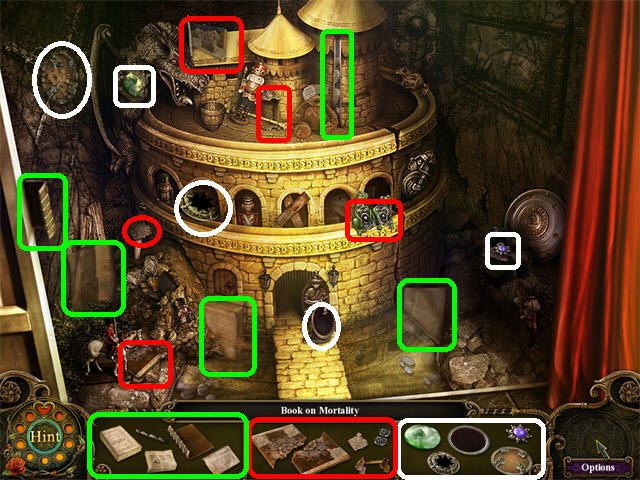
- Play the Hidden Object Scene to obtain the BOOK ON MORTALITY.
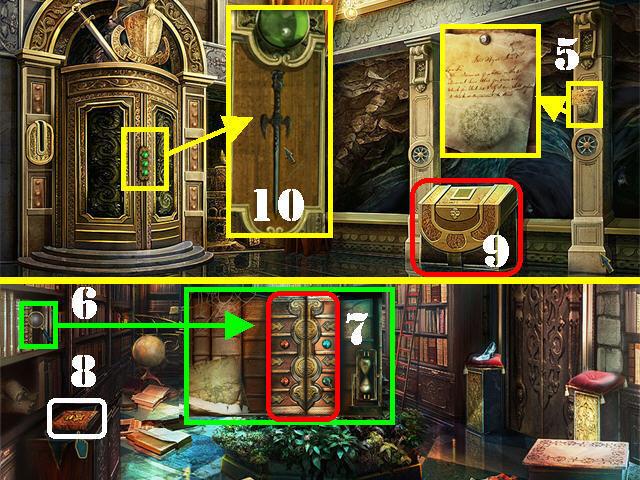
- Read the NOTE on the right side of the wall (5).
- Return to the Library downstairs.
- Examine the bookcase on left (6).
- Place the BOOK ON MORTALITY in the empty slot for a small stand to appear (7).
- Grab the PRINCE DIARY on the small stand (8).
- Click down and go through the top door.
- Put the PRINCE DIARY into the stand by the wall to make the door rumble (9).
- Examine the door; place the STEEL DAGGER into the slot to unlock the door (10).
- Go through the door to trigger new tasks.
- Note that the 2 statues in the scene are missing items.
- Exit the room covered with vines.
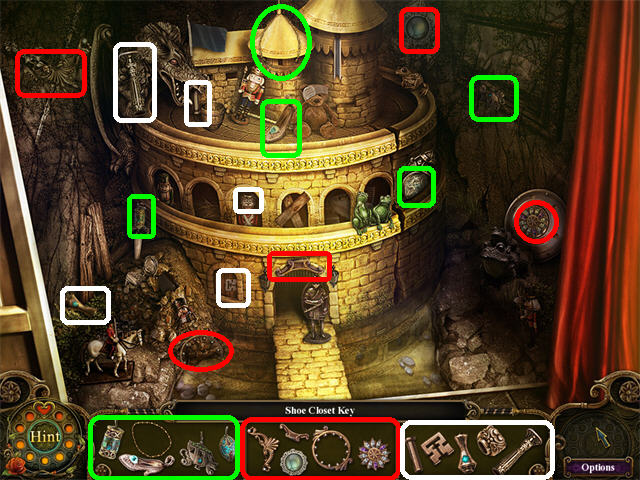
- Play the Hidden Object Scene to obtain the SHOE CLOSET KEY.
- Return to the Library and go into the back room.
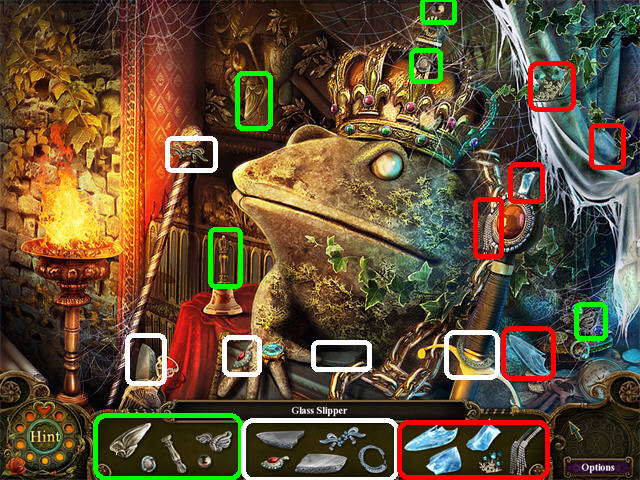
- Play the Hidden Object Scene to obtain the GLASS SLIPPER.
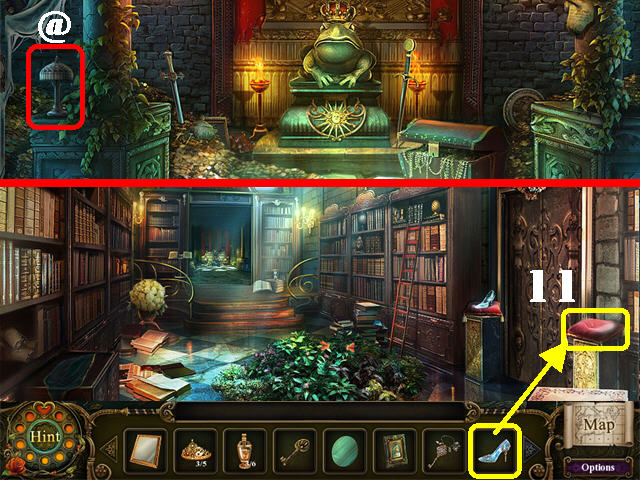
- Click on the CURSED OBJECT (@) that changes from a lamp to a lantern on the left.
- Click down.
- Place the GLASS SLIPPER on the empty red pillow next to the door (11).
- Enter Cinderella’s Room.
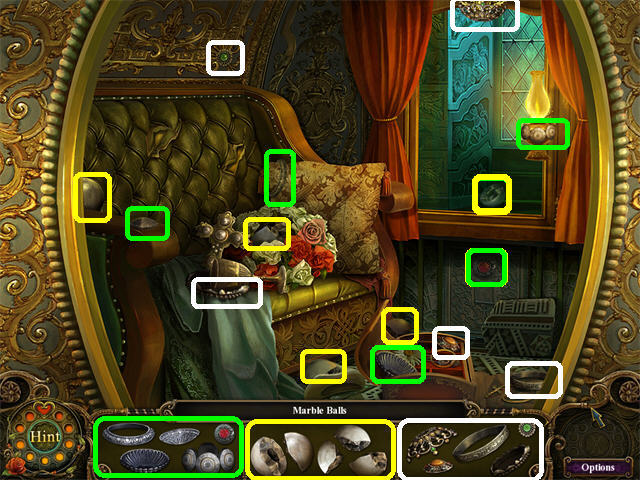
- Play the Hidden Object Scene by the caboose to obtain the MARBLE BALLS.
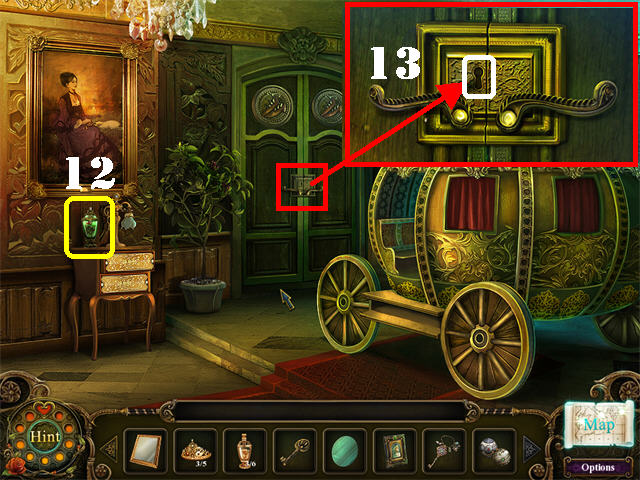
- Take the PLANT POTION COLLECTION 4/6 on the stand (12).
- Zoom into the door; place the SHOE CLOSET KEY into the keyhole to unlock the door (13).
- Go into the door to access the Shoe Closet.
Chapter 8
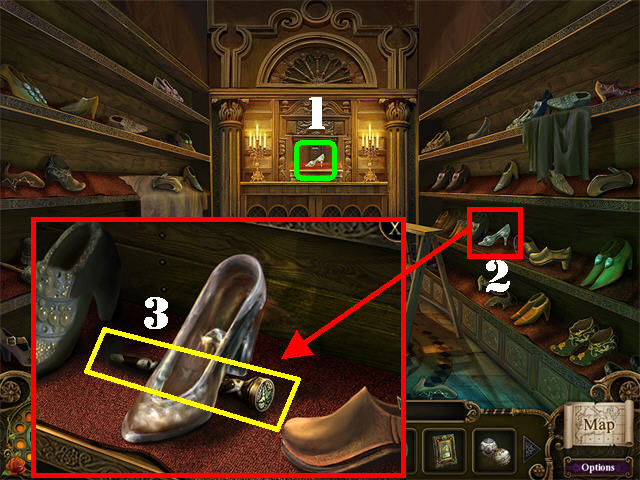
- Click on the GLASS SLIPPER in the back of the room and a message appears asking where the other one is (1).
- Examine the matching GLASS SLIPPER on the right side of the closet (2).
- Take the GOLDEN SWITCH HANDLE (3) below the shoe.
- Click down.
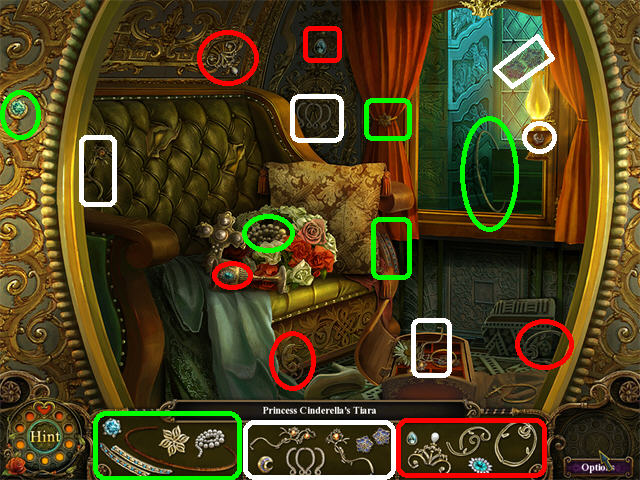
- Play the Hidden Object Scene by the caboose to obtain the PRINCESS CINDERELLA TIARA.
- This adds the PRINCESS TIARA COLLECTION 4/5 to inventory.
- Click down twice and go into the top door.
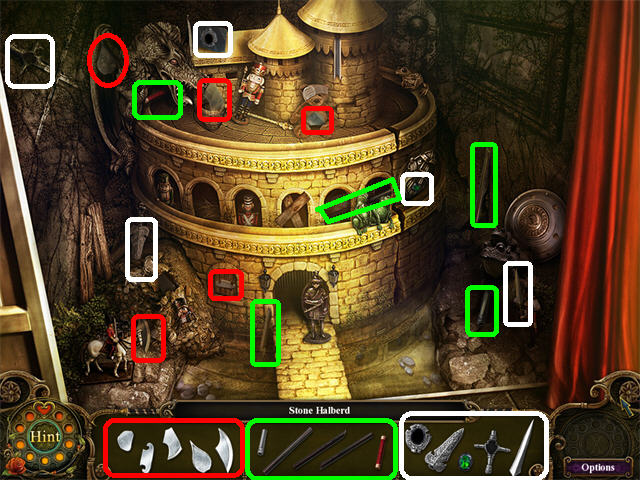
- Play the Hidden Object Scene to obtain the STONE HALBERD.
- Click down.
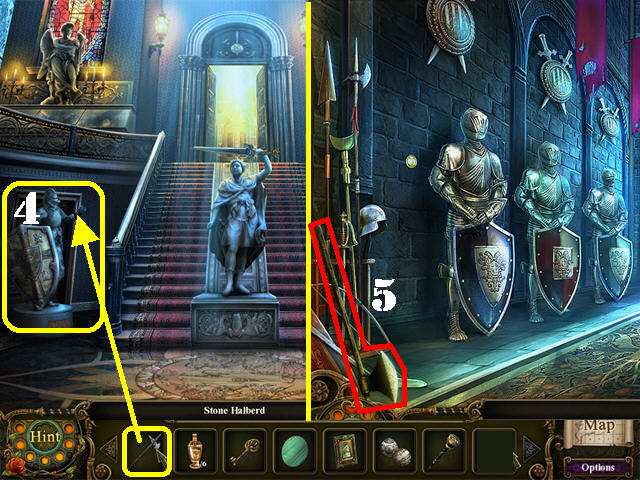
- Give the KNIGHT SHIELD and the STONE HALBERD to the statue in the lower left (4).
- Go into the left door to access the Armory Room.
- Grab the STURDY AXE (5) on left.
- Return to Cinderella’s Shoe Closet.
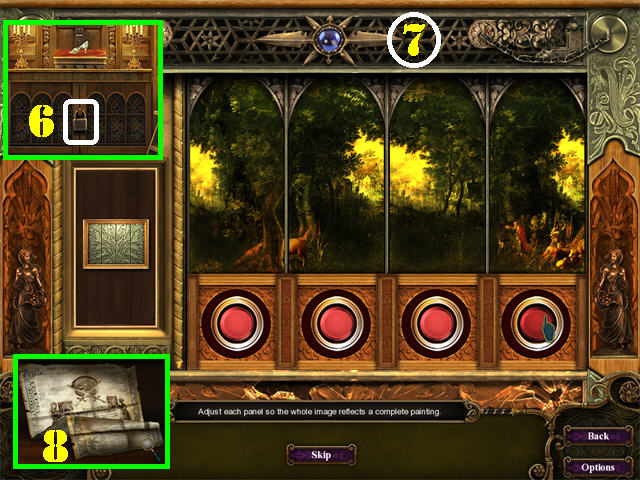
- Break the lock (6) on the back wall with the STURDY AXE to trigger a puzzle.
- Click on the red buttons to change the image in each of the 4 panels.
- Choose the 4 correct panels that add up to the complete painting.
- Please look at the screenshot for the solution (7).
- Click on the EVIDENCE (8) which shows a secret staircase accessible by 2 portrait frames.
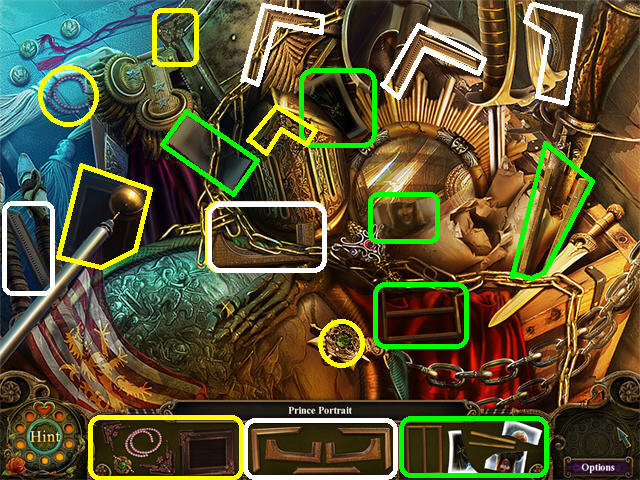
- Return to the Armory Room.
- Play the Hidden Object Scene to obtain the PRINCE PORTRAIT.
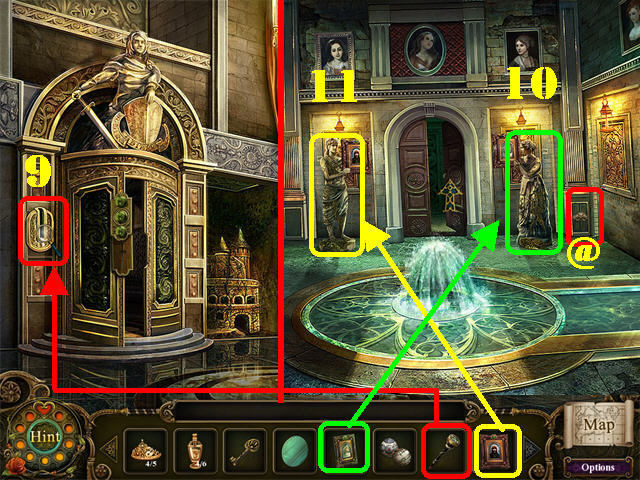
- Click down and go into the top door.
- Place the GOLDEN SWITCH HANDLE found in the shoe closet in the switch slot next to the door (9).
- Placing the handle removes the vines from the next room.
- Go through the door.
- Give the PRINCESS PORTRAIT (found in the back room of the Library) to the female statue (10).
- Give the PRINCE PORTRAIT to the male statue (11).
- Click on the CURSED OBJECT (@) next to the female statue.
- Go through the back door.
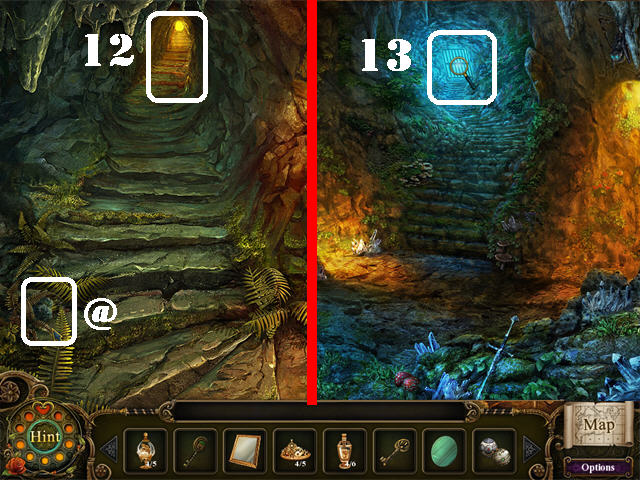
- Click on the FLOWER CURSED OBJECT (@) in the lower left.
- Once in the cave, go into the hole in the upper left (12).
- Put the RUSTY CAVE KEY found on the bench outside the Greenhouse (13) on the gated door.
- Go through the hole to access the Forest.
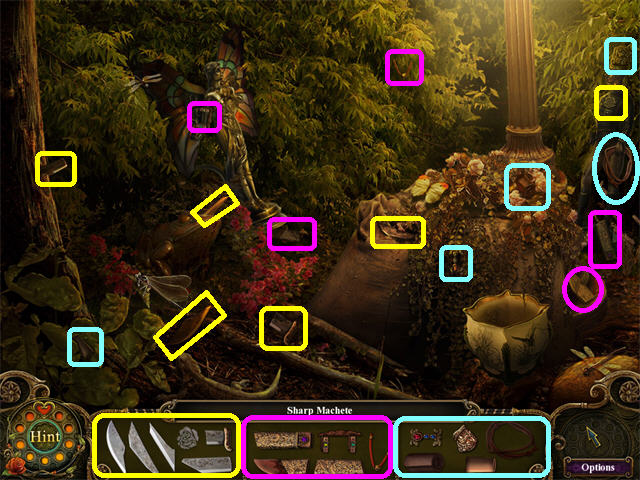
- You are outside the cottage, head left.
- Play the Hidden Object Scene to obtain the SHARP MACHETE.
- Click down 4 times.
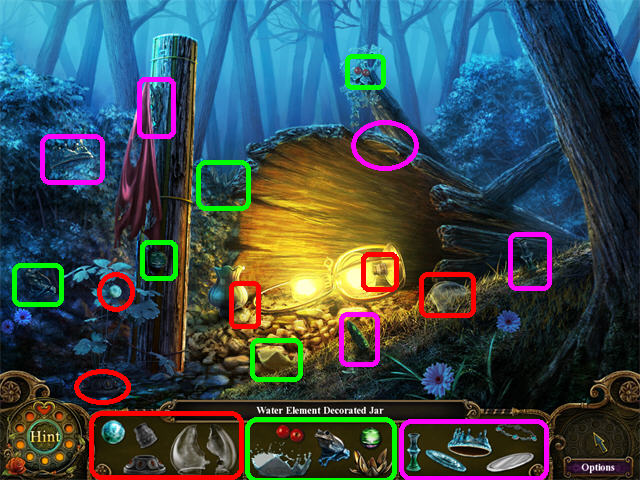
- Play the Hidden Object Scene by the fallen log to obtain the WATER ELEMENT DECORATED JAR.
- This will add DECORATED JAR COLLECTION 5/5 to inventory.
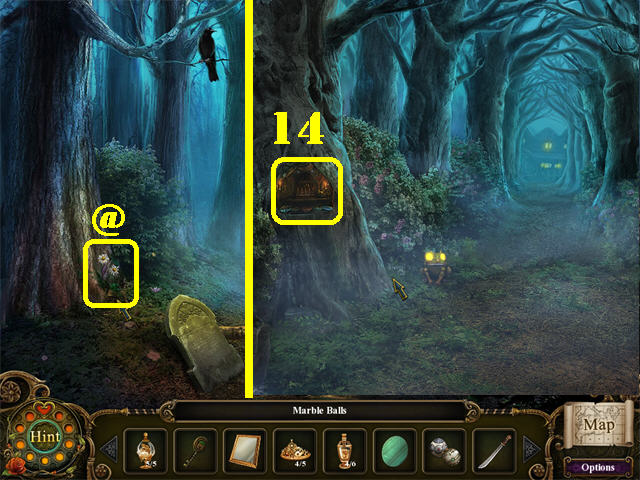
- Click on the CURSED OBJECT (@) which morphs from a leaf to a flower.
- Go forward and head left.
- Examine the tree to trigger a puzzle (14).
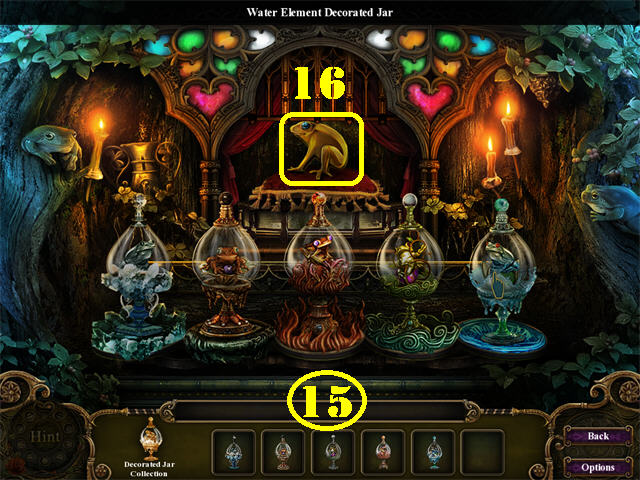
- The puzzle will only activate if you have the 5 decorated jars.
- Place your mouse over a jar to read its description in the upper center. Place the jars in the right spots by using the images at the base as a clue.
- For example, the Fire Element jar belongs in the stand with the flames at the bottom.
- Click on any 2 jars to swap their positions.
- The lantern will light up when a bottle has been placed correctly.
- Please look at the screenshot for the solution (15).
- The METAL FROG PLATING (16) will be added to inventory after the puzzle has been solved.
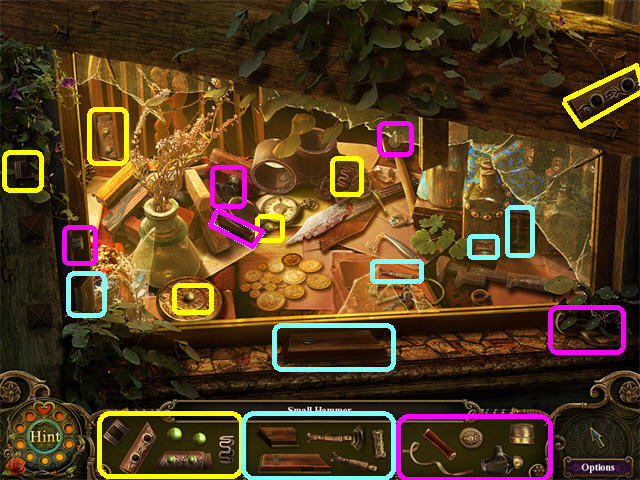
- Go forward twice to reach the Cottage.
- Play the Hidden Object Scene to obtain the SMALL HAMMER.
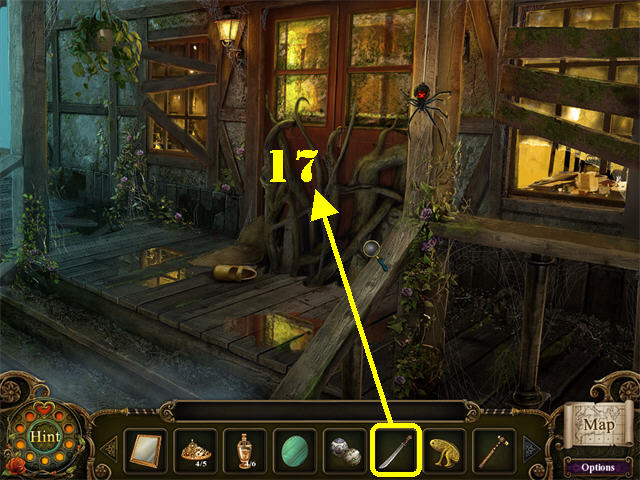
- Remove the vines covering the front door with the SHARP MACHETE (17).
- Unlock the door with the COTTAGE KEY.
- Go inside the Cottage to end Chapter 8.
Chapter 9
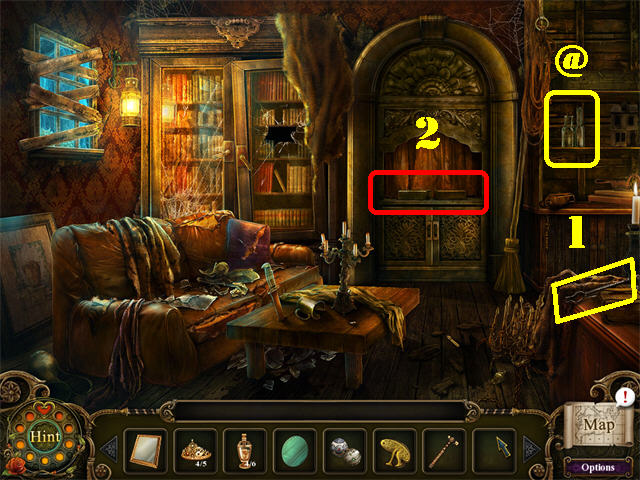
- Click on the CLOCK CURSED OBJECT (@) in the upper right.
- Take the TONGS (1) on right.
- When you click on the podium the inscriptions ask for “The Trickster Frog” and the “The Conjuring Frog” (2).
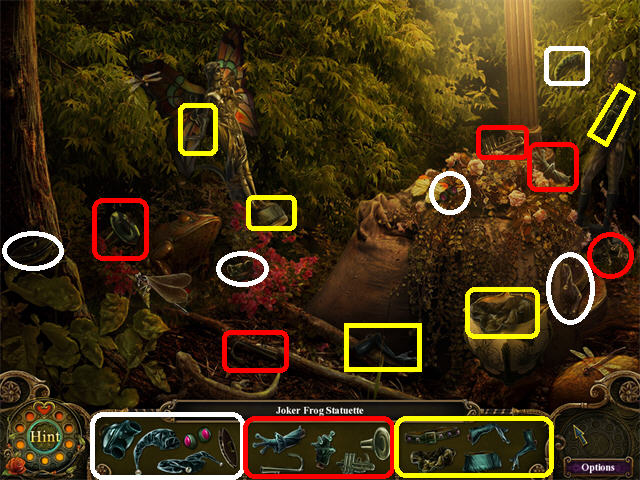
- Click down twice and head left.
- Play the Hidden Object Scene to obtain the JOKER FROG STATUETTE.
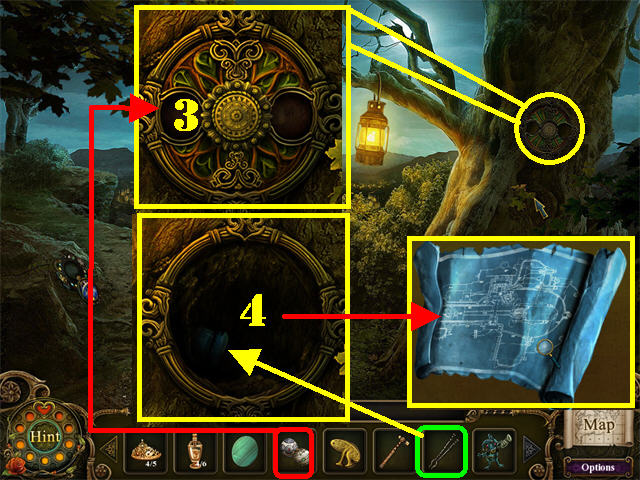
- Click down 3 times and head right.
- Zoom into the tree hole.
- Place the MARBLE BALLS into the empty slots (3).
- Use the TONGS in the tree hole to retrieve the EVIDENCE which shows a secret staircase behind the bookshelf in the Cottage (4).
- Return to the inside of the Cottage.
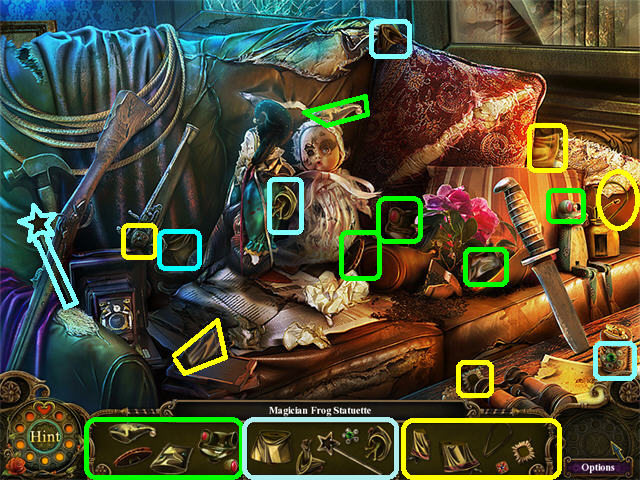
- Play the Hidden Object Scene to obtain the MAGICIAN FROG STATUETTE.
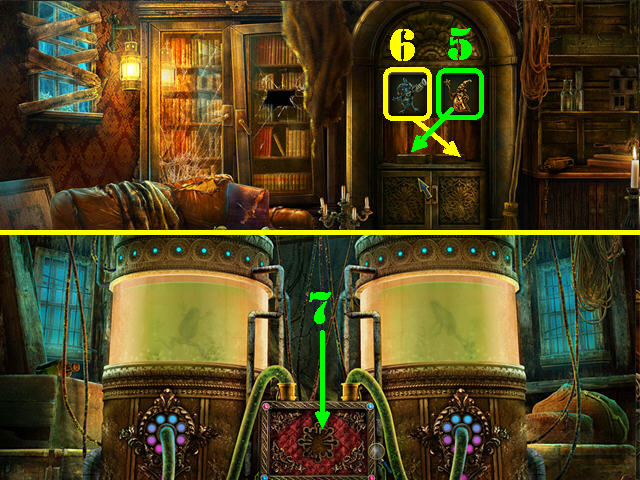
- Place the MAGICIAN FROG STATUETTE on the left side of the podium (5).
- Put the JOKER FROG STATUETTE on the right side of the podium (6) to reveal the secret passage.
- Go through the secret passage in the Cottage to encounter the locked panel; you need to find a something in the shape of jewelry (7).
- Click down to return to the Living Room in the Cottage.
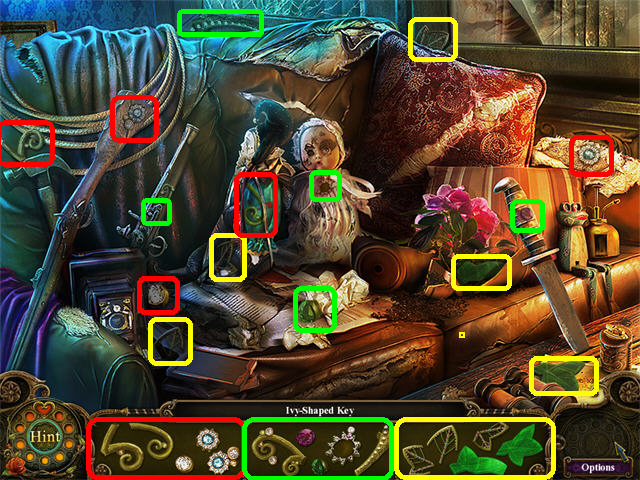
- Play the Hidden Object Scene to obtain the IVY-SHAPED KEY.
- Click down.
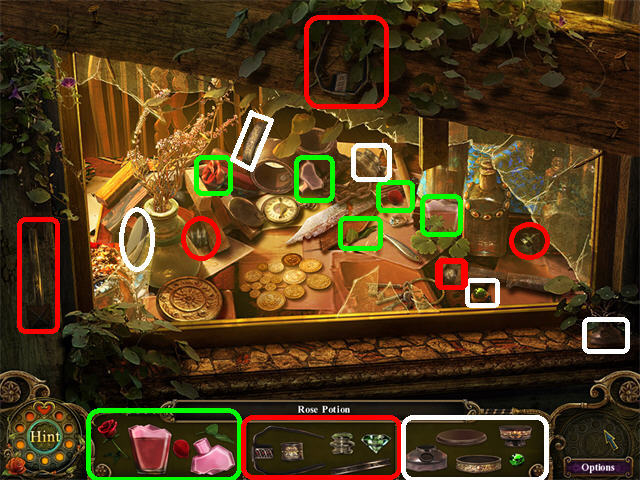
- Play the Hidden Object Scene to obtain the ROSE POTION.
- This adds the PLANT POTION COLLECTION 5/6 to inventory.
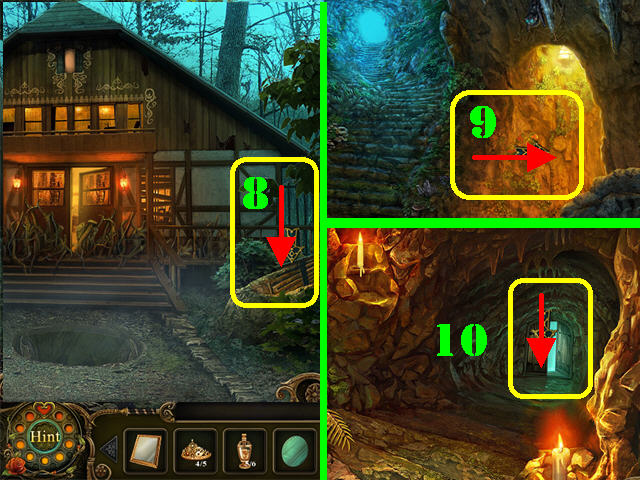
- Click down and go into the hatch on the right to access the Cave (8).
- Head right (9) and then go into the lower right door to access the Ivy Room (10).
- Click down twice to access the Statue Room.
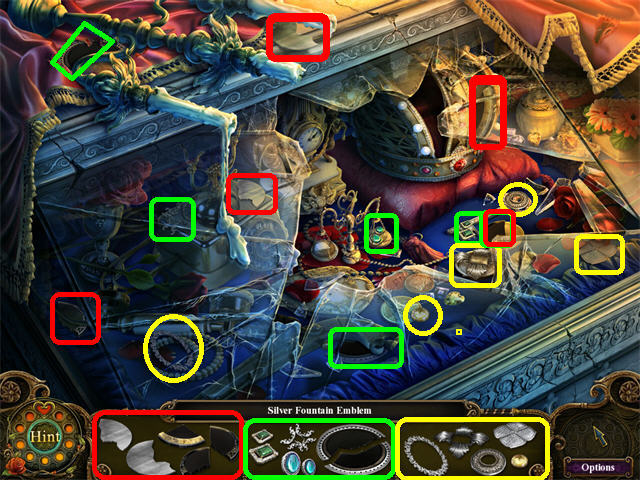
- Play the Hidden Object Scene to obtain the SILVER FOUNTAIN EMBLEM ().
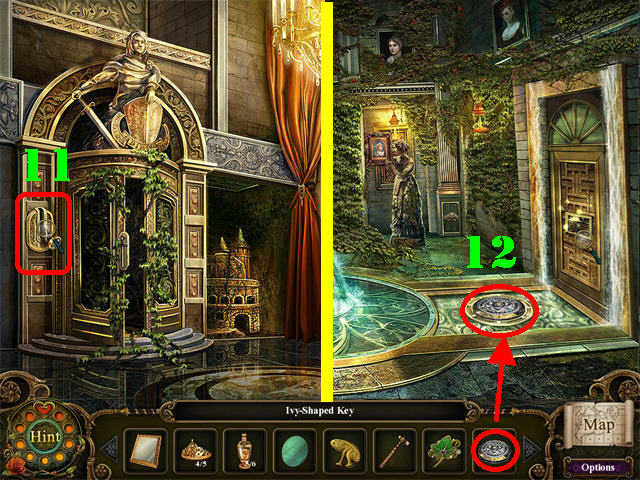
- Go into the top door.
- Click on the GOLDEN SWITCH HANDLE by the door to turn the next room back into the Ivy Room. If the other room is already covered in Ivy , there’s no need to click on the handle (11).
- Go into the door.
- Place the SILVER FOUNATIN EMBLEM (12) in the slot on the floor to trigger a puzzle.
- Click on the sparkly door to activate the puzzle.
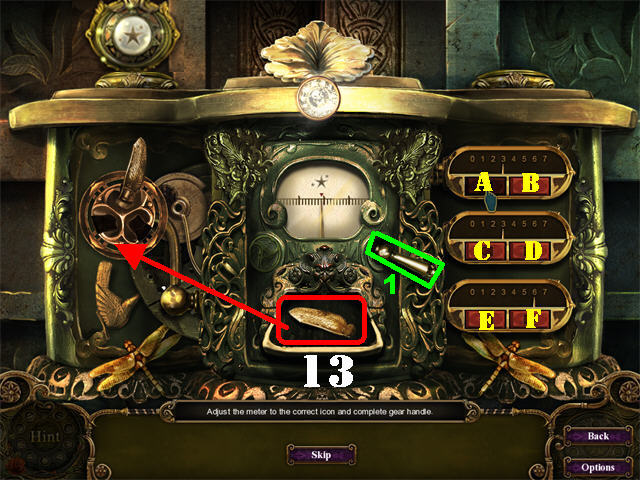
- Click on the HANDLE (1) on right to activate the puzzle.
- You must use the arrows on the right to set the needle in the correct position. It needs to land below the matching image of the star in the upper left or right.
- The first set of arrows moves the needle 1 space to the left or right.
- The second set of arrows moves the needle 5 spaces to the left or right.
- Move arrows B and D until both needles land on the number 4.
- Move F once.
- Move B three times.
- Take the GEAR HANDLE PIECE in the slot and place it on the left (13).
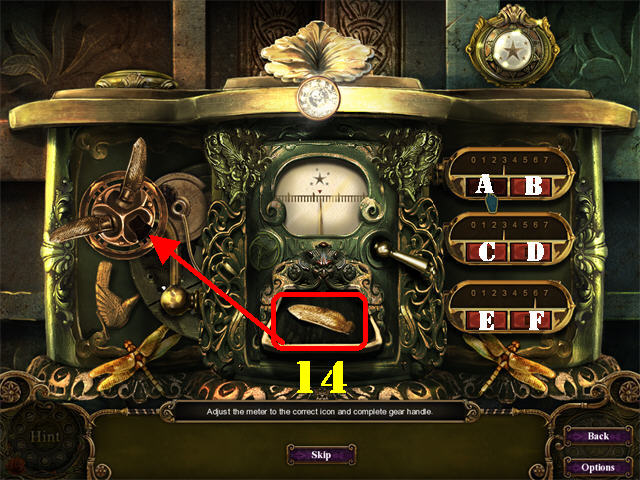
- A new star symbol will appear in the upper right corner.
- Move A until it lands on 4.
- Move F 5 times.
- Move C once.
- Move A 2 times.
- Take the GEAR HANDLE PIECE in the slot and place it on the left (14).
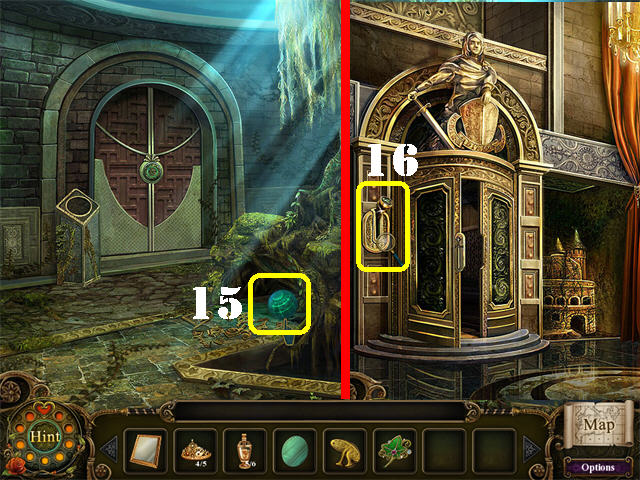
- Go into the door after the puzzle has been solved.
- Use the SMALL HAMMER to break the rigid panel below the tree.
- Take the GLASS ORB (15).
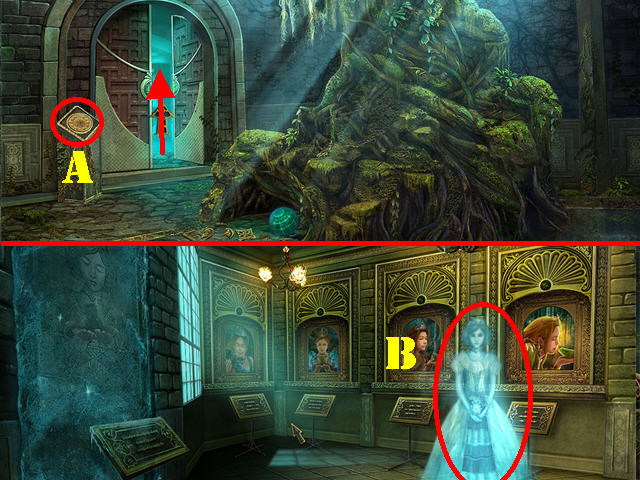
- SPOILER ALERT FOR HARD MODE!!!
- Put the SECRET TREE DISC into the slot (A) on the pedestal by the door; go into the door.
- Click on the ghost (B).
- Click on each of the portraits in the room for a closer look.
- Exit the room.
- END OF SPOILER ALERT FOR HARD MODE!!
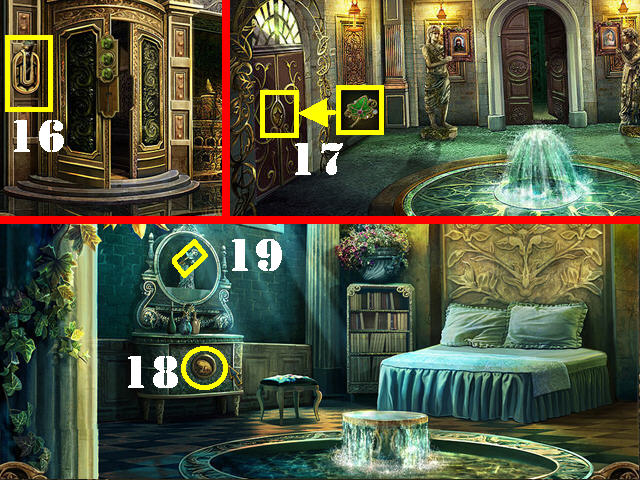
- Click down twice if you’re playing regular mode.
- Click on the GOLDEN SWITCH HANDLE (16) by the door to remove the ivy covering the next room.
- Go into the door.
- Open the left door with the IVY-SHAPED KEY (17).
- Go into the door to access the Princess Ivy’s Bedroom.
- Place the METAL FROG PLATING on the slot below the dresser (18).
- Take the ARMORY KEY (19) that appears in the mirror.
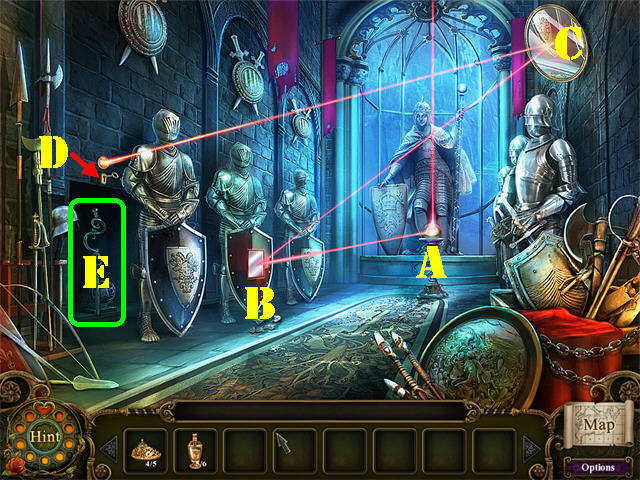
- Return to the Armory Room.
- Place the GLASS ORB on the stand; directly below the red laser beam (A).
- Place the SQUARE MIRROR into the shield the beam is pointing to (B).
- Put the ROUND MIRROR into the round frame the laser beam is pointing to (C).
- Place the ARMORY KEY into the keyhole below the round button the beam is pointing to (D).
- Take the ANCIENT WAND (E) that appears behind the wall.
Chapter 10
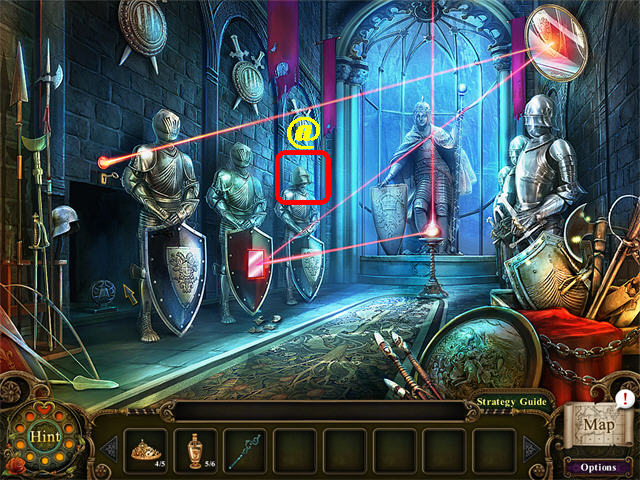
- Exit the Armor Room after you complete the laser puzzle and return to that room immediately in order to activate a Hidden Object Scene.
- Click on the HELMET CURSED OBJECT (@) on the left wall.
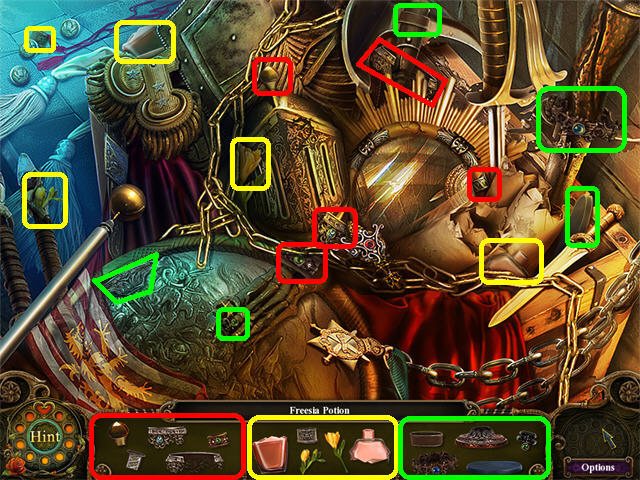
- Play the Hidden Object Scene to obtain the FREESIA POTION.
- This adds the PLANT POTION COLLECTION 6/6 to inventory.
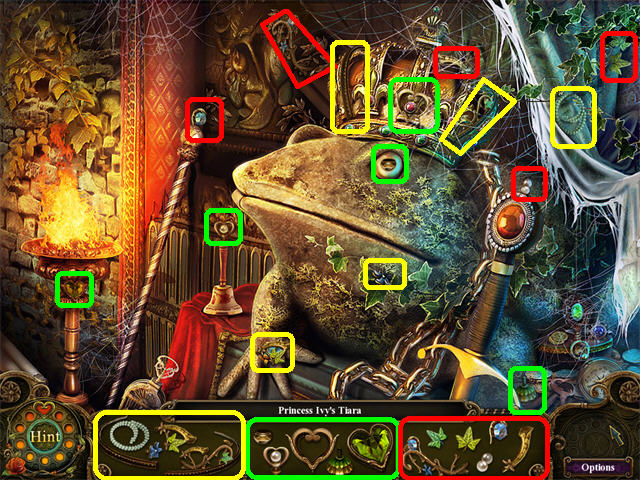
- Go forward.
- Play the Hidden Object Scene to obtain PRINCESS IVY’S TIARA.
- This adds PRINCESS TIARA COLLECTION 5/5 to inventory.
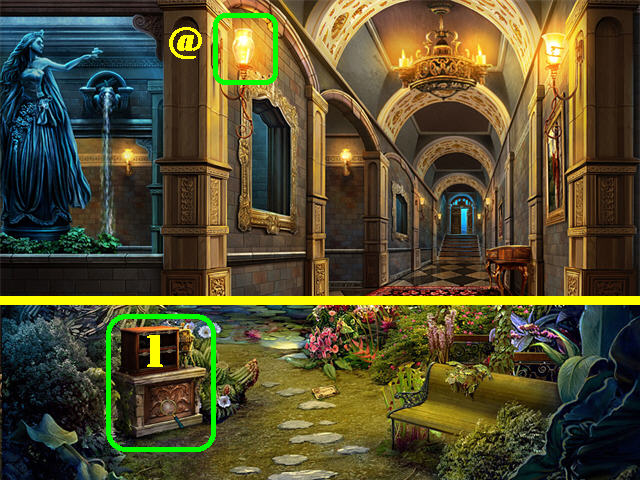
- Click down 3 times to return to the Palace Hallway.
- Click on the LAMP CURSED OBJECT (@) in the upper left.
- Go into the Greenhouse and then go into the left door.
- Click on the stand to trigger a puzzle (1).
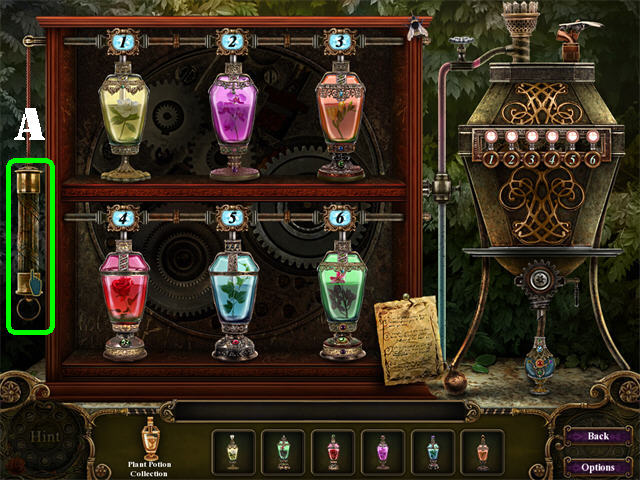
- The puzzle will only activate if you have all 6 of the PANT POTIONS.
- Place your mouse over a jar to read its description in the upper center.
- Click on any 2 jars to swap their positions. Click on the handle on left to enter your selections; if they are correct, the numbers will light up.
- Please look at the screenshot for the solution. Click on the handle on left to enter the solution (A).
- The UNCURSED POTION will be added to inventory after the puzzle has been solved.
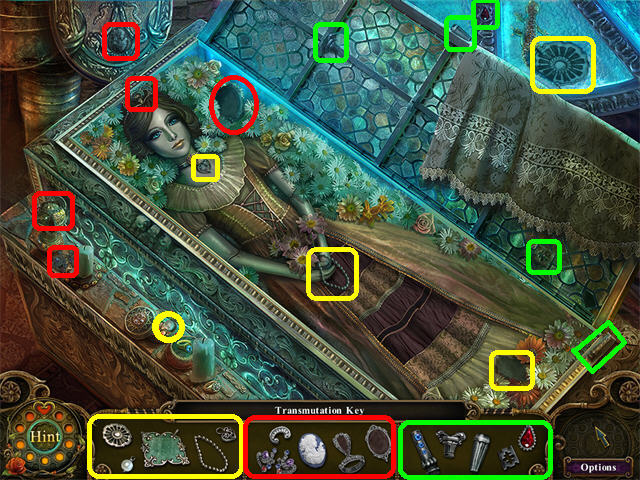
- Return to Snow White’s Cottage.
- Play the Hidden Object Scene to obtain the TRANSMUTATION KEY.
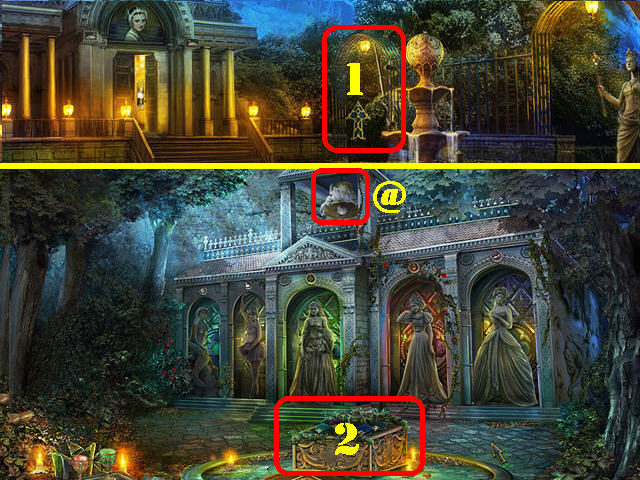
- Go outside of the Swan Lake Princess’ House; go into the left gate (1).
- Click on the BELL CURSED OBJECT (@) in the upper center.
- Examine the stand in the center to activate the Tiara Puzzle (2).
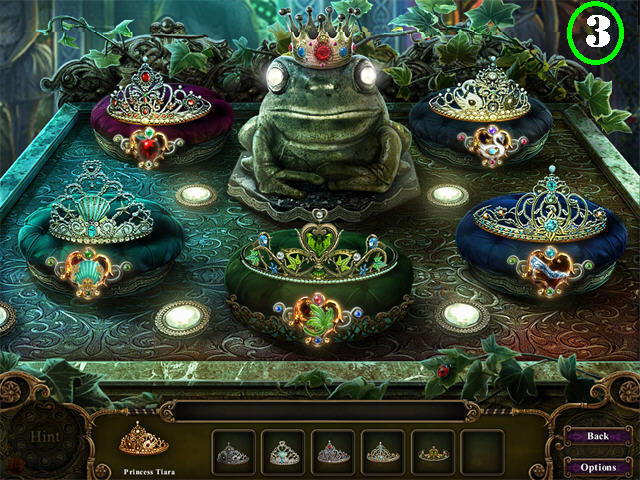
- The Puzzle will only activate if you have all 5 of the tiaras.
- Place your mouse over a tiara to read its description in the upper center. Place the tiaras in the right spots by using the images at the base as a clue.
- For example, the Snow White Tiara belongs on the pillow with the apple at the bottom.
- Click on any 2 tiaras to swap their positions.
- The buttons will light up when a tiara has been placed correctly.
- Please look at the screenshot for the solution (3).
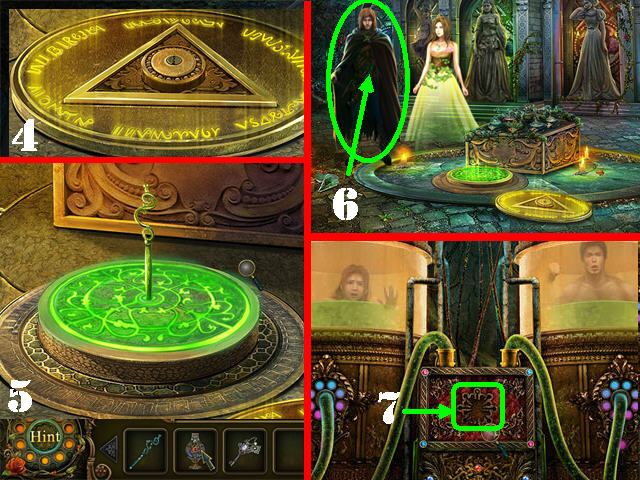
- Once the tiaras have been placed correctly a device will appear.
- Place the TRANSMUTATION KEY in the center of the device (4).
- Put the ANCIENT WAND in the center of the device (5).
- Place the UNCURSED POTION on the wand.
- Click on the device for James and Princess Ivy to appear.
- The IMMORTAL WAND will be added to inventory after the cutscene ends.
- Put the IMMORTAL WAND on the Prince (6).
- The PRINCE LOCKET will be added to inventory.
- Return to the inside of the Cottage and go into the secret passage. To get to the Cottage you can go through the cave or the Ivy Room.
- Place the PRINCE LOCKET into the slot in between the 2 tanks to activate a puzzle (7).
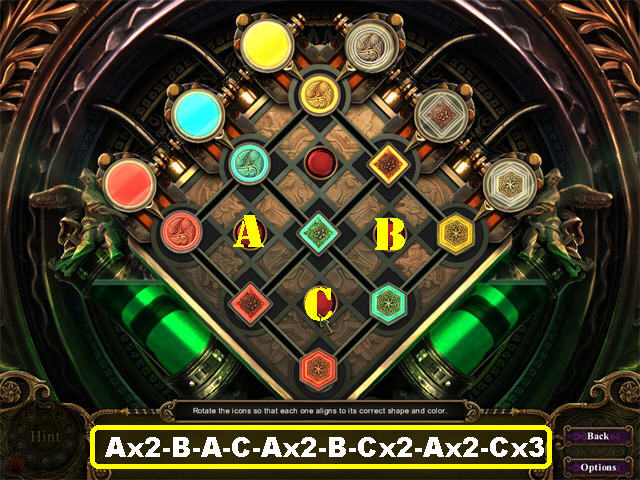
- Use the 4 red buttons to change the symbols around.
- Your goal is to place each symbol in the spot which intersects with the matching color and shape.
- To solve the puzzle click on the red buttons in this order: A X 2, B, A,C,A X 2, B, C X 2, A X 2, C X 3.
- Congratulations! You have completed Dark Parables: The Exiled Prince!
Hard Mode
- The HARD MODE has been unlocked and the GOLDEN CROWN has been added to your inventory.
- To access Hard Mode, click on the Play Button in the Main Menu.
- The puzzles during Hard Mode are the same as in the Regular Mode but in Hard Mode Hints are disabled and you cannot skip any puzzles.
- The steps for special sections in Hard Mode have been added into the guide with the words “SPOILER ALERT!!” in that section.
Cursed Morphing Objects
- The Cursed Morphing Objects have been marked in the screenshots in the guide with the (@) symbol.
- Armory Room: Morphing helmet on the knight on left side of the wall.
- Cave with Skeleton: Round device on right side of the ground.
- Cave Room 2: Mushrooms that morph into crystals in the lower left.
- Cave (outside the Ivy Room doors): Morphing blue flowers in the lower left corner.
- Cinderella’s Library: Globe that morphs into a round bouquet of flowers.
- Cinderella’s Treasure Room: Morphing Lamp/Lantern on left.
- Cottage Living Room: Morphing Clock/Bottles.
- Fountain Scene (Outside the Swan Princess’ House): Morphing Light/ Bird.
- Forest (Scene with fallen log): Morphing Flowers/ Leaves.
- Greenhouse (outside door in hallway): Morphing sign above doorway.
- Ivy Room: Morphing part of wall on the lower right side of the female statue.
- Little Mermaid’s dock scene: Morphing Seashell/Crab on left.
- Palace Hallway: Lamp in upper left.
- Palace Kitchen: Morphing Plate on left side of the table.
- Palace Statue Hall: Morphing stone frog at the base of the large statue in the center.
- Princess Shrine Area: Morphing Bell.
- Rowboat Scene: Morphing sign on right lamppost.
- Swan Princess’ Bedroom: Morphing picture in upper right.
- Swan Princess’ Lake/Cave: Morphing candle in the lower right.
- Swan Princess’ Main Hall: Ballerina shoes that morph into boots.
Created at: 2011-03-25

