

Walkthrough Menu
- General Tips
- Chapter 1
- Chapter 2
- Chapter 3
- Chapter 4
- Chapter 5
- Chapter 6
- Chapter 7
- Chapter 8
- Parables
General Tips
- This is the official guide for Dark Parables: The Thief and the Tinderbox.
- This guide will not tell you when you have to zoom into a location; the screenshots will show each zoom scene.
- Hidden-object puzzles are referred to as HOPs. This guide will not show screenshots of the HOPs, however, it will mention when an HOP is available and the inventory item you'll collect from it.
- Use the Map to fast travel to a location.
Chapter 1
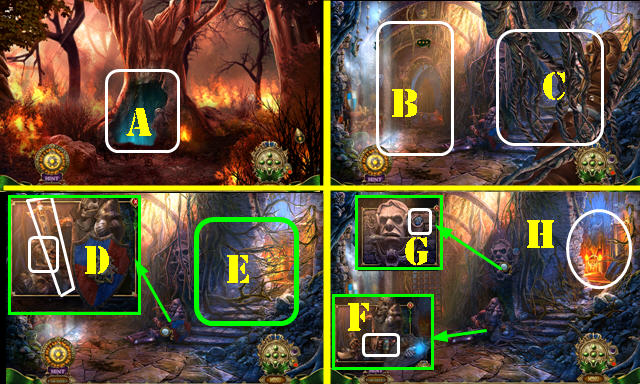
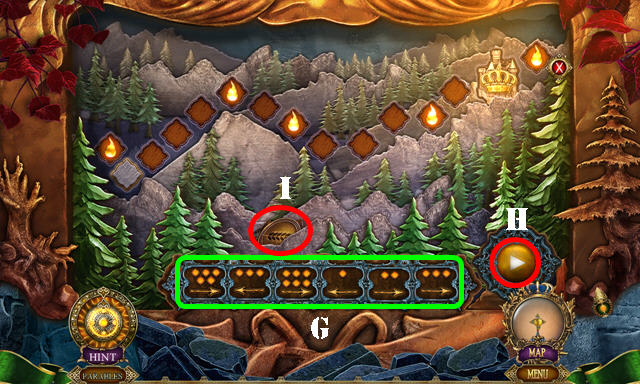
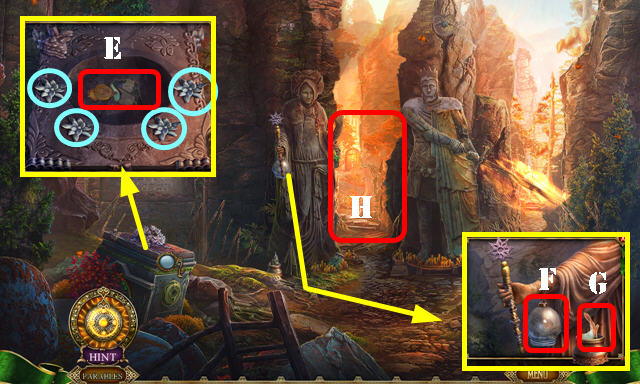
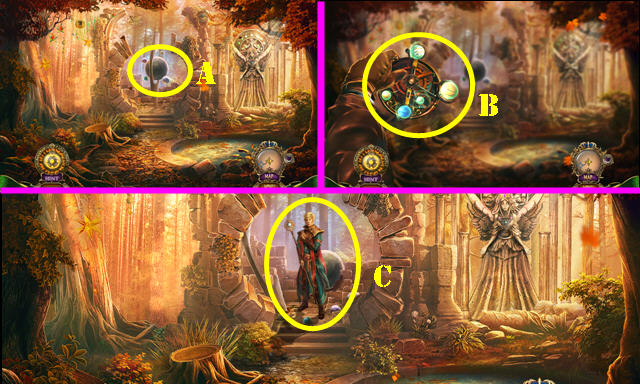
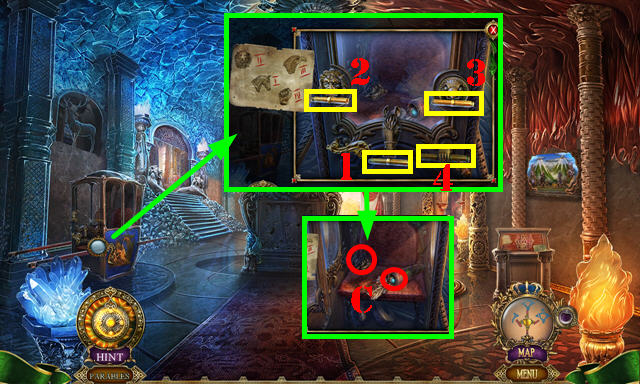
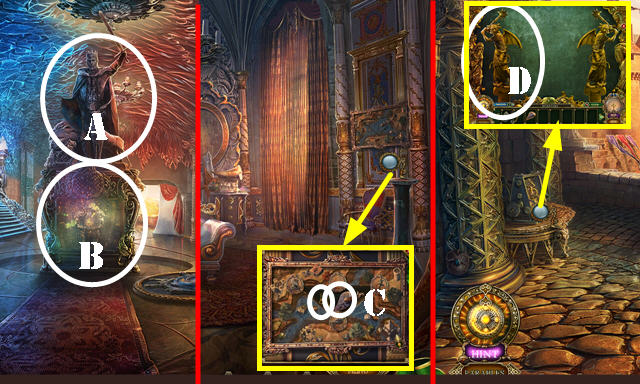
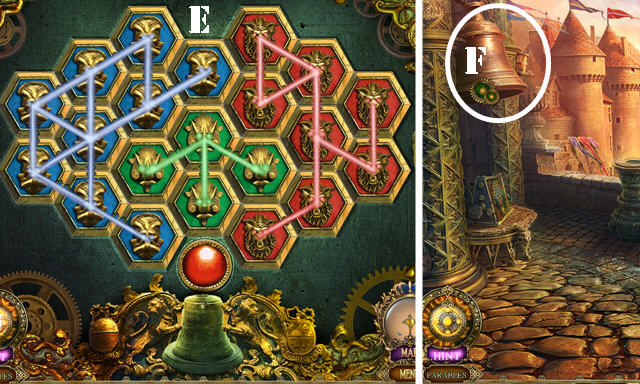
- Go through the tree trunk (A); select the scene twice (B) and the vines twice (C).
- Look at the note; take the GUARDIAN'S SWORD (D).
- Use the GUARDIAN'S SWORD 3x (E).
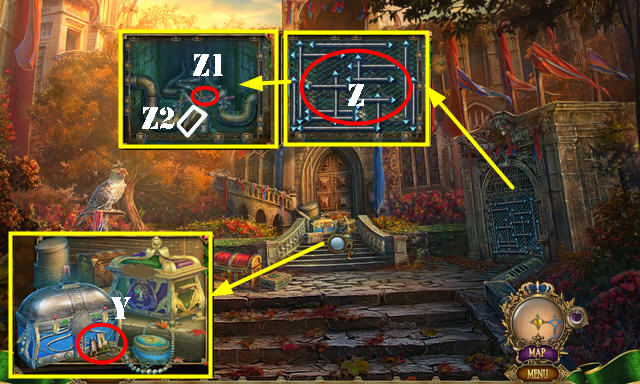
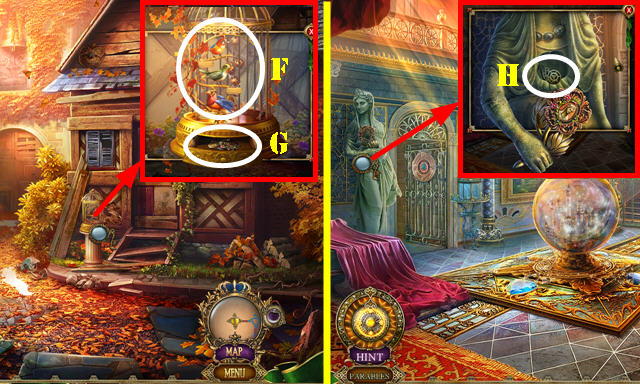
- Take the UTILITY BELT (F) and BLUE EYE (G).
- Open all the pockets of the UTILITY BELT; take the LONG PIN and GUARDIAN FIGURINE.
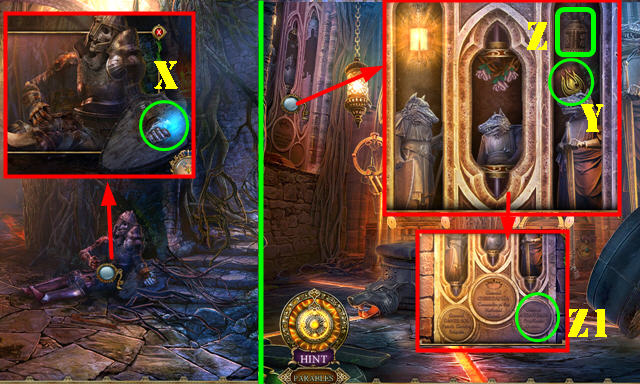
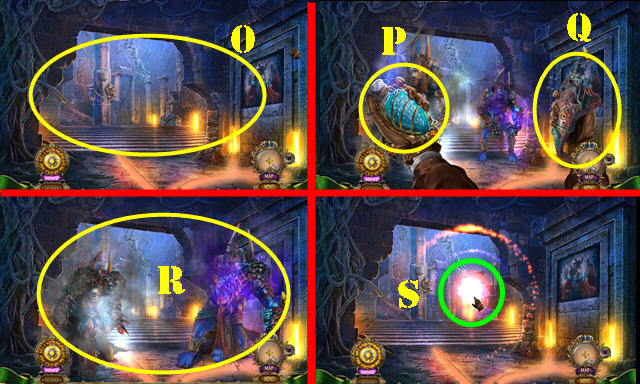
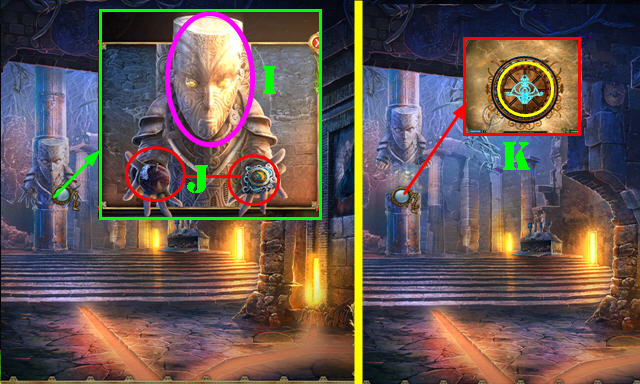
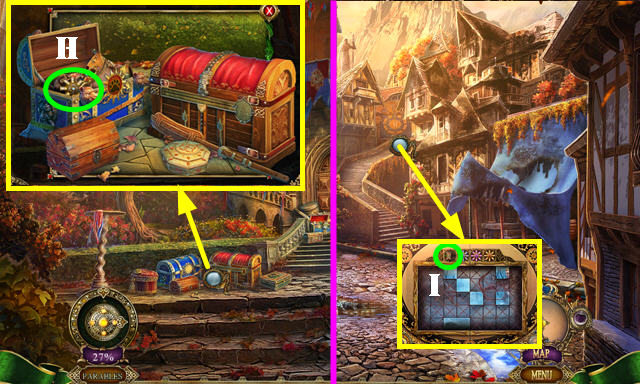
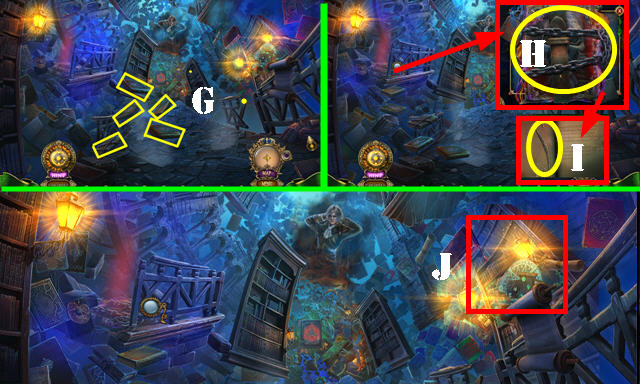
- Go to Keepers Hall (H).
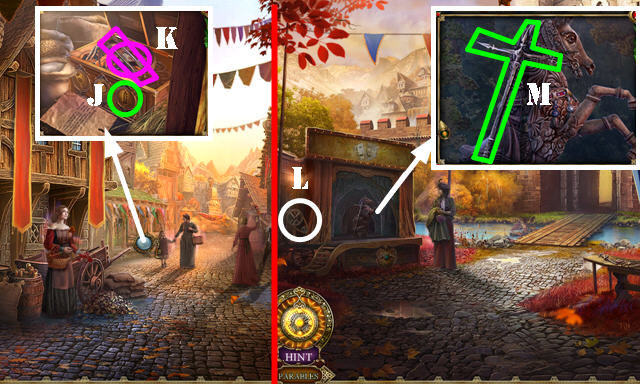
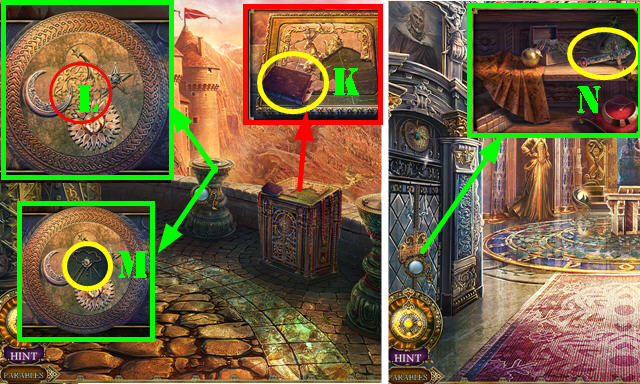
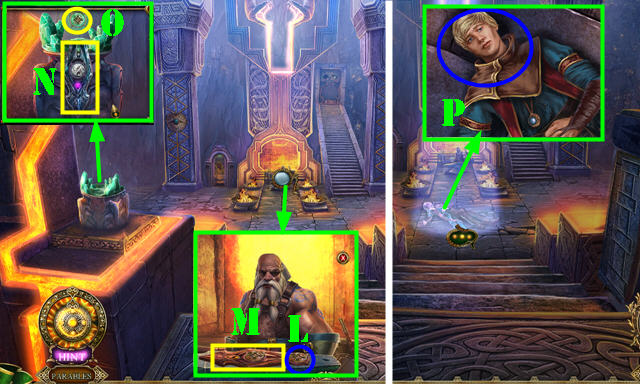
- Take the LOCKER KNOB (I); select the light (J) and stone (K).
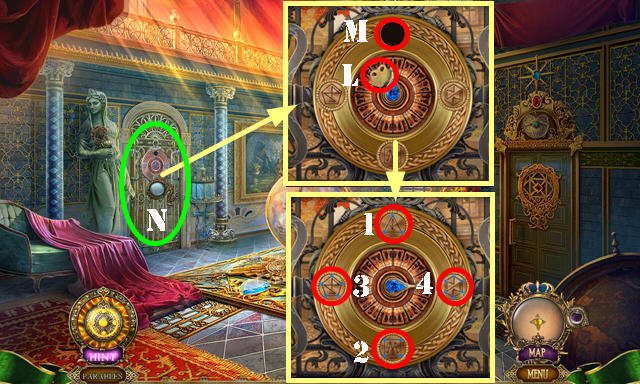
- Place the GUARDIAN FIGURINE; take the FISH WEIGHT (L). Select the flowers (M) and Stone (N).
- Use the LONG PIN; receive the LIGHT TILE (O).
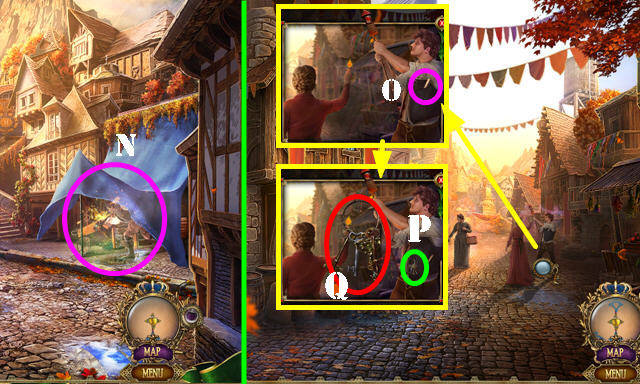
- Walk down.
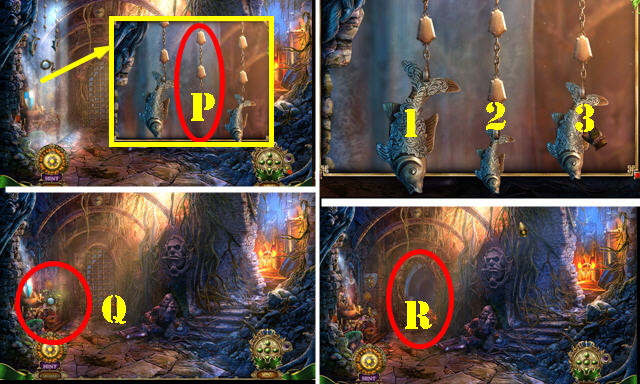
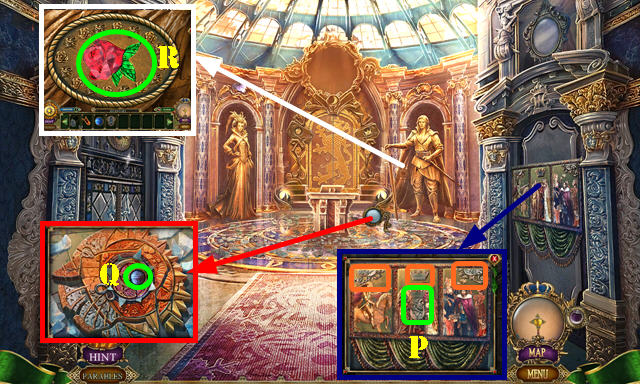
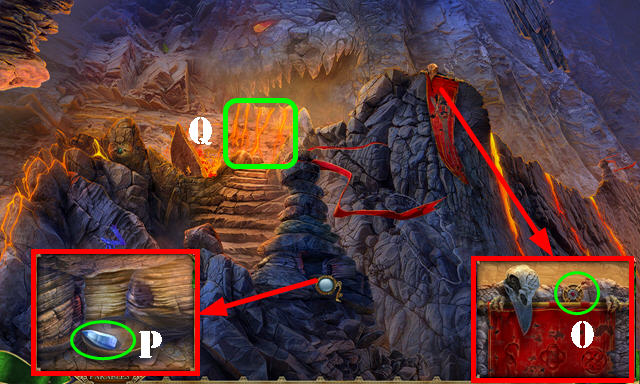
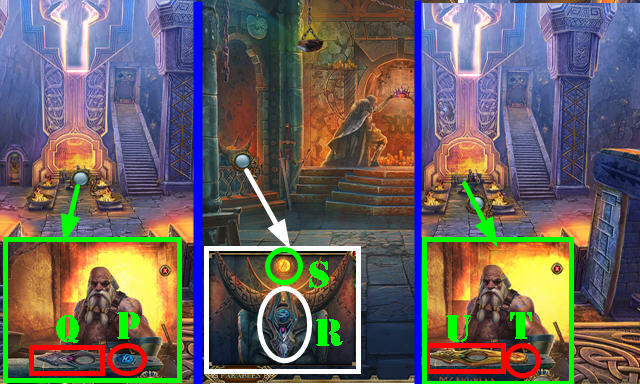
- Place the FISH WEIGHT (P); select 1-3.
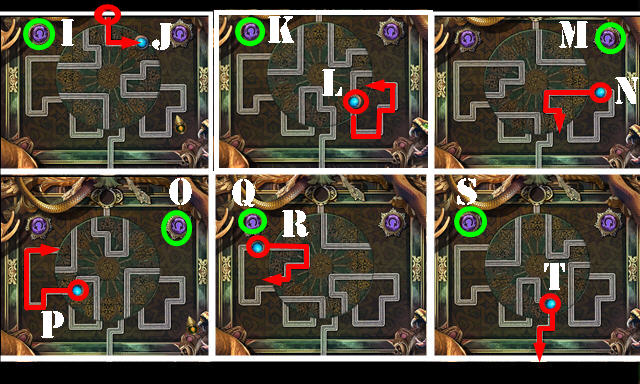
- Play the HOP (Q).
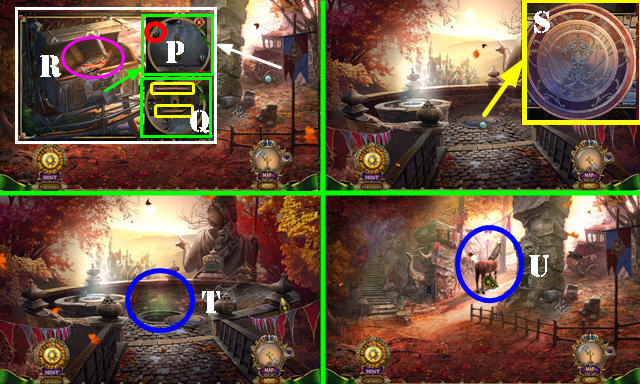
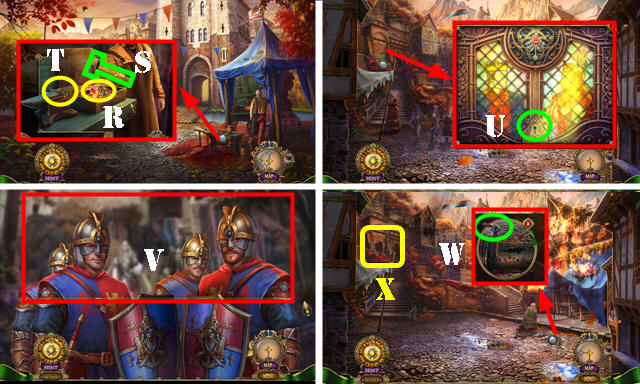
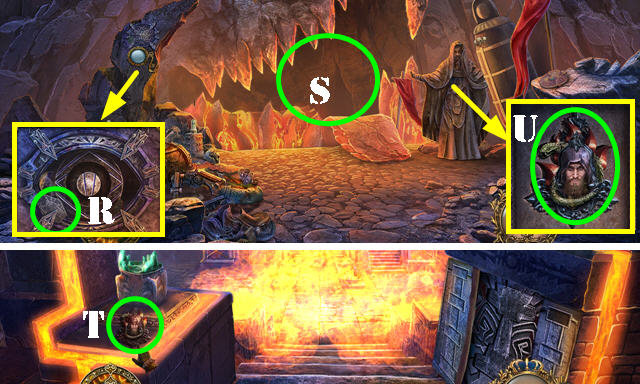
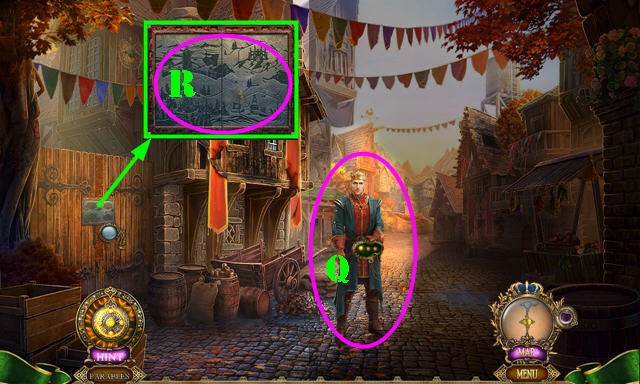
- Go to the Arched Hallway (R).
- Take the SILVER GOBLET (S).
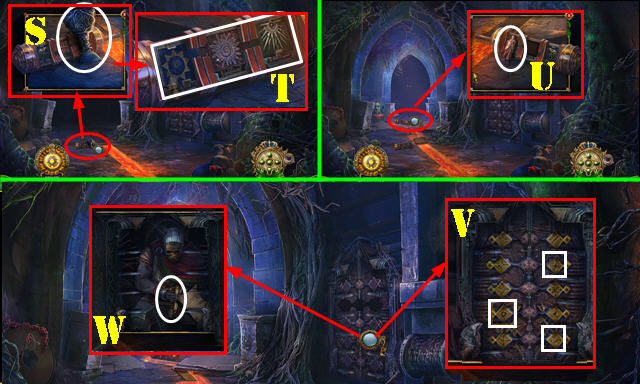
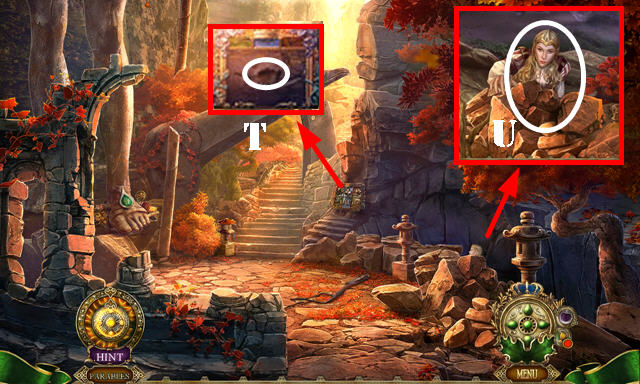
- Place the LIGHT TILE; arrange as shown (T).
- Take the GENERAL FIGURINE (U).
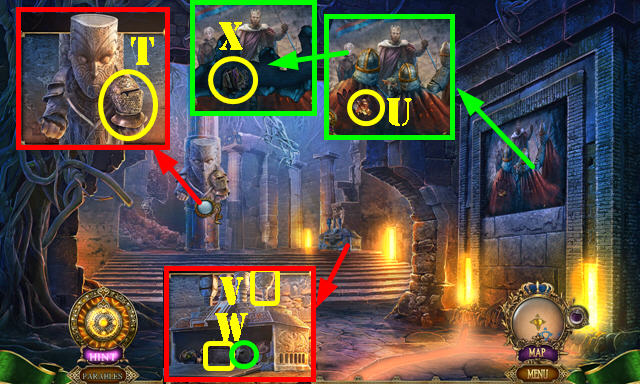
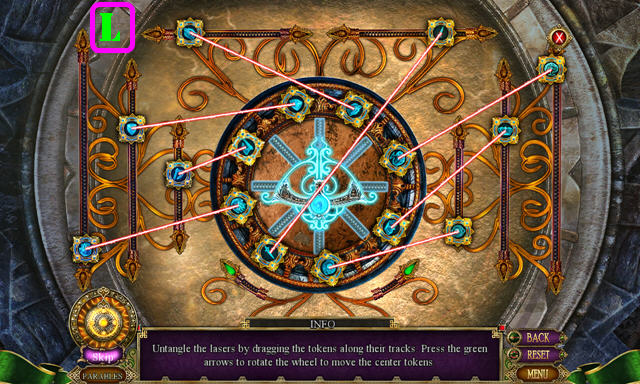
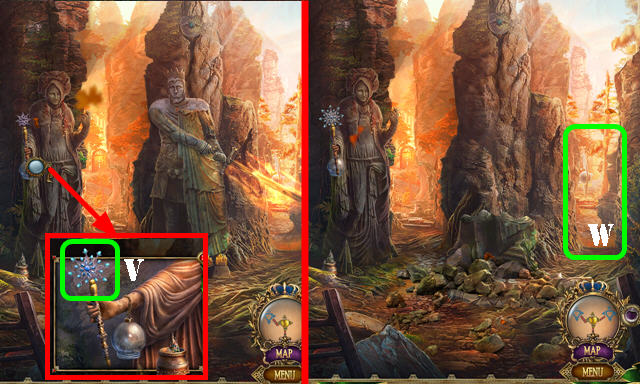
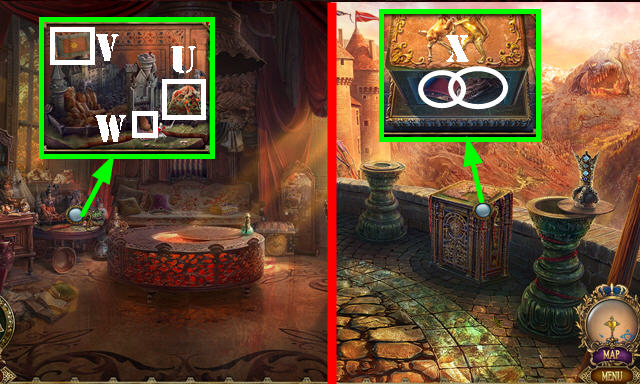
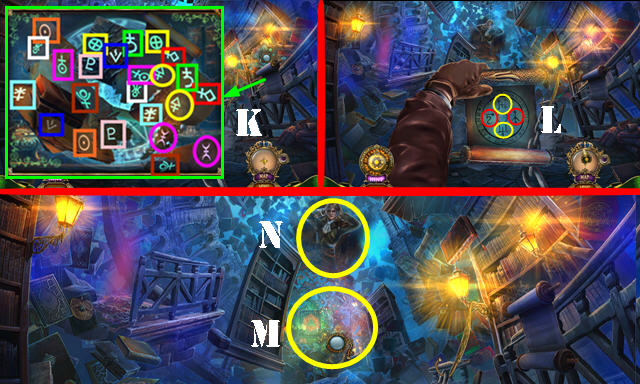
- Place the LOCKER KNOB and select the three tiles (V).
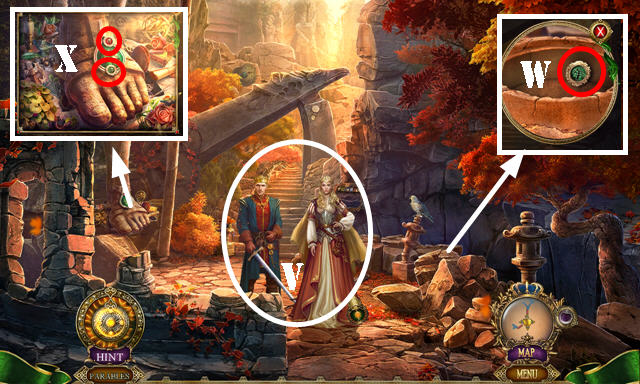
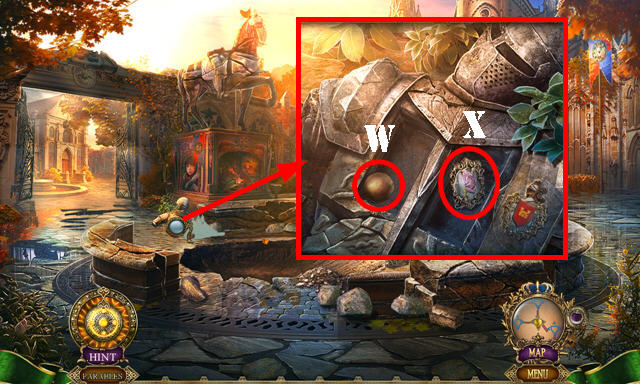
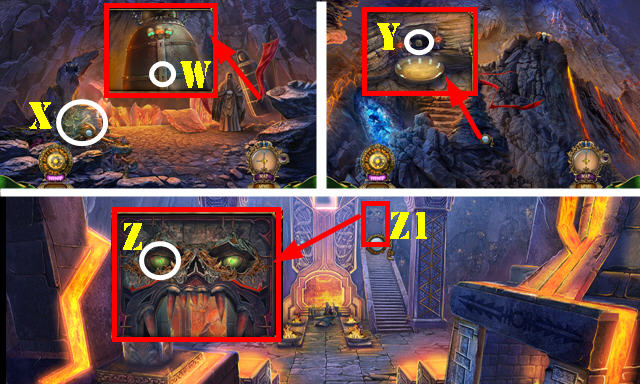
- Look at the note and select the skeleton. Take the Map and NAIL PULLER (W).
- Walk down.
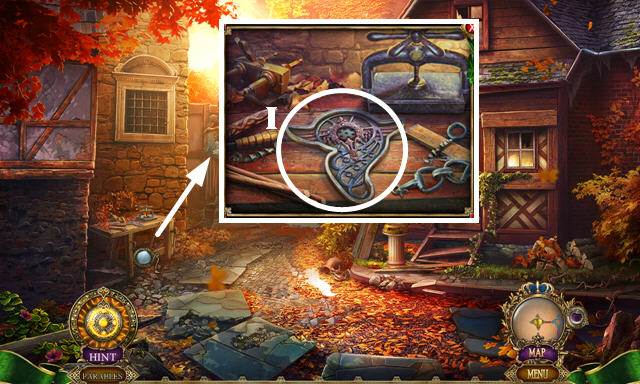
- Use the NAIL PULLER; take the PERFUME BOTTLE and APPLE GEM (X).
- Return to Keepers Hall.
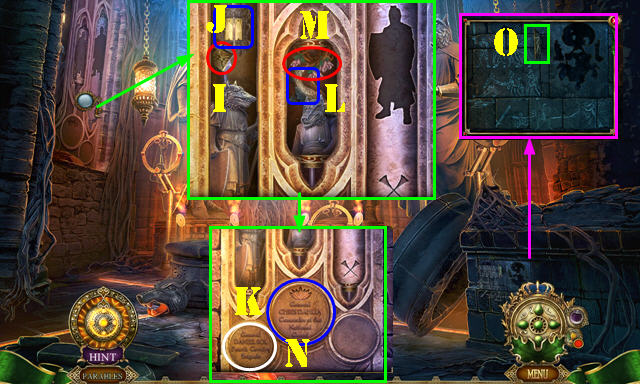
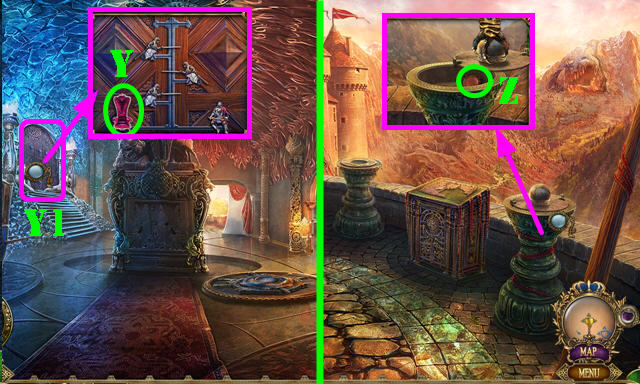
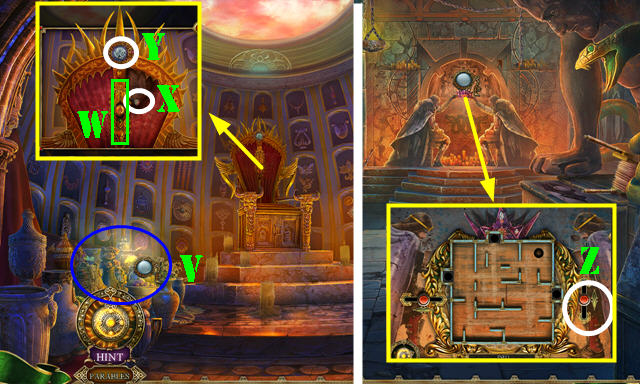
- Place the GENERAL FIGURINE; take the FIRE TILE and GREEN EYE (Y). Ring the bell (Z); select the plaque (Z1).
- Return to the Arched Hallway.
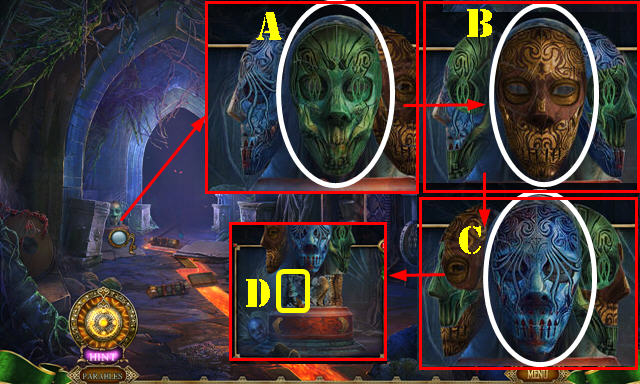
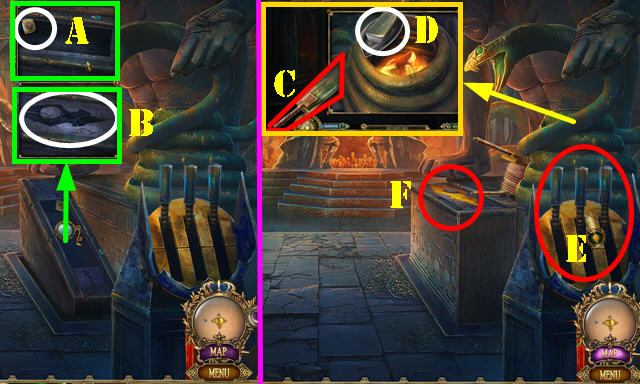
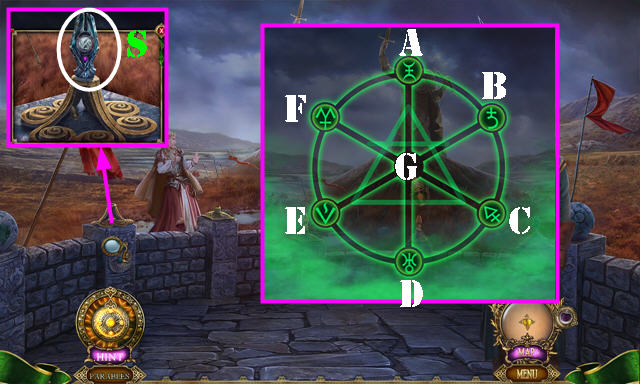
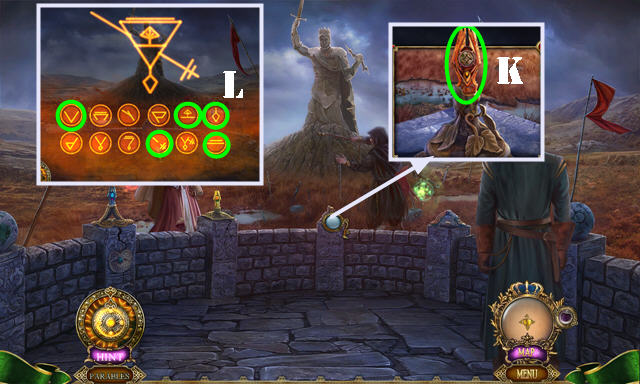
- Place the GREEN EYE and the BLUE EYE for a puzzle. Solution (A-B-C).
- Take the JAW SPREADER (D).
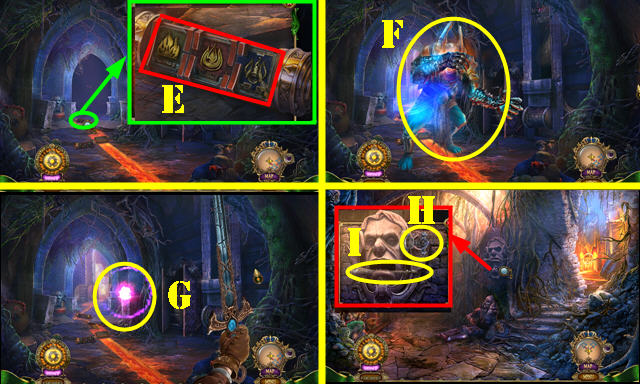
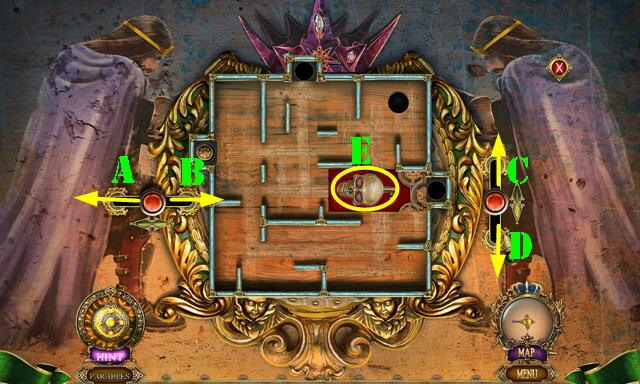
- Place the FIRE TILE; select all flames (E).
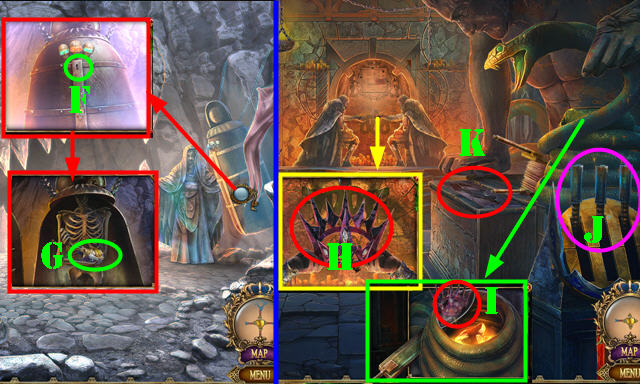
- Use the GUARDIAN'S SWORD (F).
- Select the light (G); receive the ESSENCE SWORD.
- Walk down.
- Use the JAW SPREADER (H); take the LEVER (I).
- Go to the Arched Hallway.
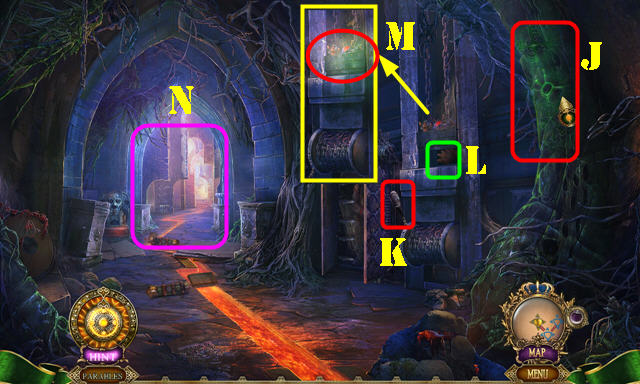
- Note the symbols (J).
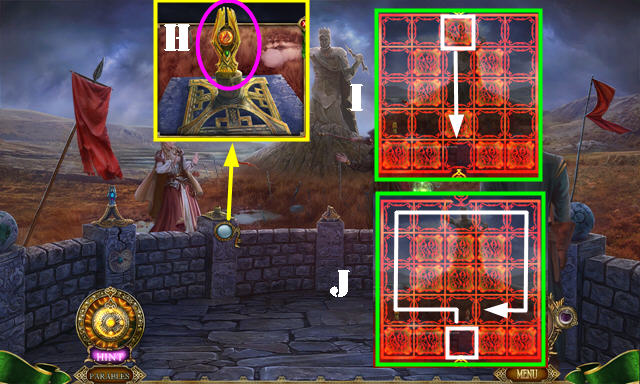
- Place the LEVER and pull it (K); take the STONE FLOWER (L).
- Play the HOP (M) to receive the OCARINA.
- Go to the Hall of Murals (N).
- Select the scene (O).
- Place the PERFUME BOTTLE (P) and OCARINA (Q). Select Q-P-Q-P.
- Use the ESSENCE SWORD (R).
- Select the light (S) to receive the CHARGED SWORD.
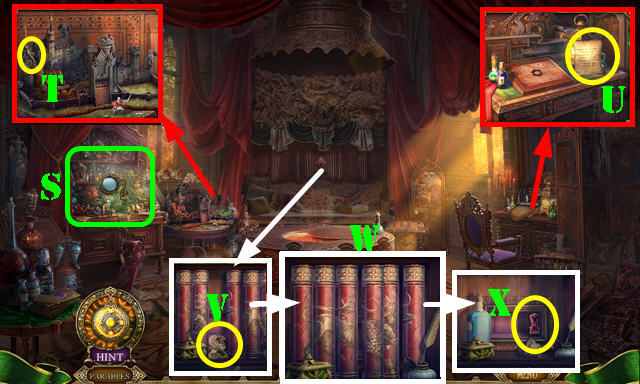
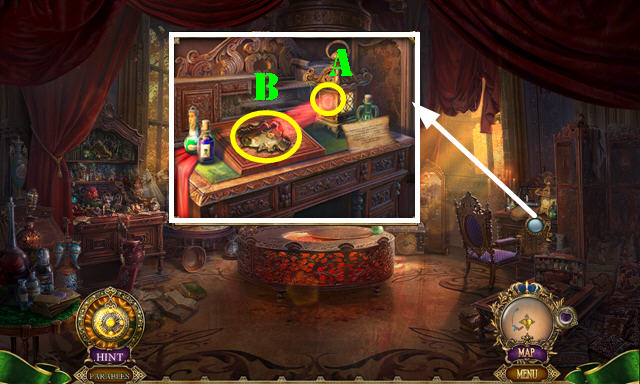
- Take the ANCIENT HELMET (T) and RESIN (U).
- Place the SILVER GOBLET (V); take the SHIELD TILE and STONE OWL (W).
- Select the ANCIENT HELMET; receive the VISOR.
- Place the STONE FLOWER; take the FIGURINE LEGS and EMPTY PLAQUE (X).
- Walk down.
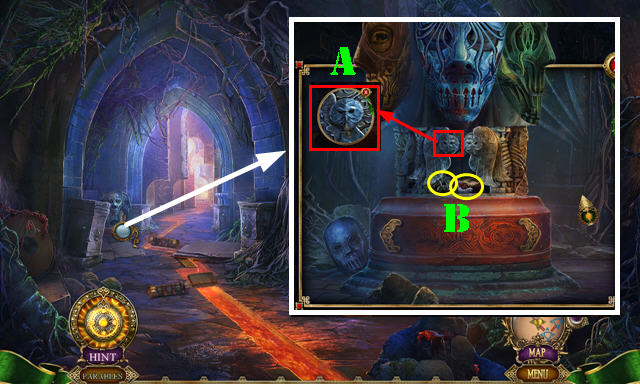
- Place the STONE OWL (A); take the BROKEN GEM and TREE INLAY (B).
- Use the APPLE GEM on the BROKEN GEM; receive the APPLE GEM.
- Return to Keepers Hall.
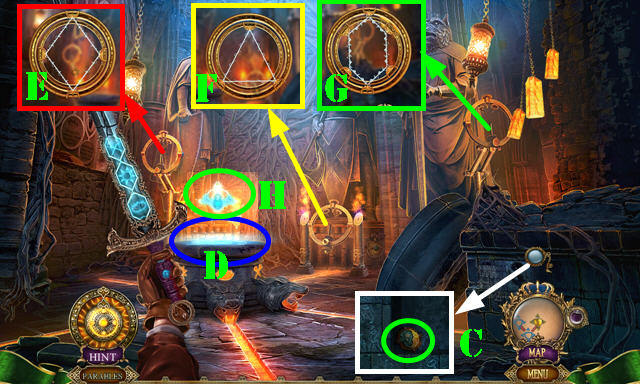
- Place the TREE INLAY; take the MOON AMULET (C).
- Use the CHARGED SWORD (D). Select: Ex2-Fx2-Gx2.
- Take the GLOWING KEY (H).
- Place the MOON AMULET on the EMPTY PLAQUE; receive the MOON PLAQUE.
- Return to the Hall of Murals.
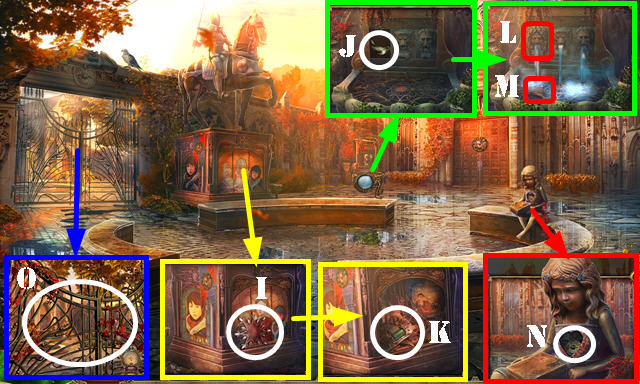
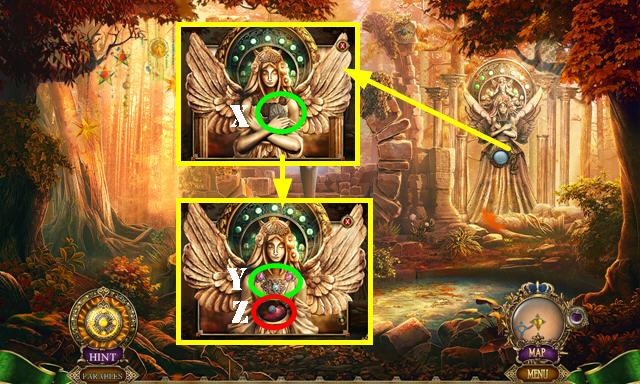
- Talk to the statue (I). Place the APPLE GEM and MOON PLAQUE (J).
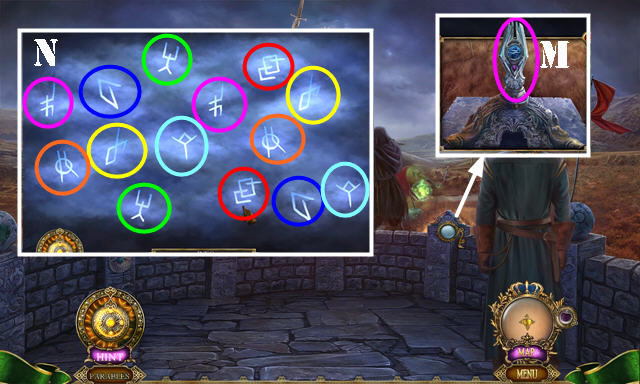
- Use the GLOWING KEY for a puzzle (K).
- Solution (L).
- Take the TINDERBOX; (it gets automatically used).
- Go forward; Select the photo twice. Go forward.
Chapter 2
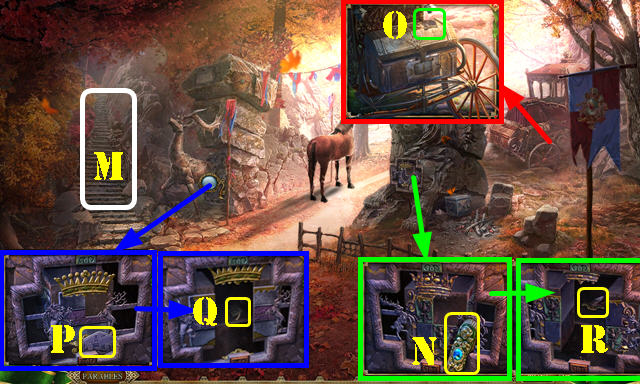
- Try to go to the Overlook (M).
- Take the BRUSH (N), SHIELD TILE (O), and GATE PLATES 1/4 (P).
- Place the SHIELD TILE; take the FLOWER INLAY (Q).
- Place the SHIELD TILE; take the STONE NOSE and SOLDIER FIGURINE (R).
- Go to the Overlook (M).
- Use the VISOR to receive the FIGURINE TOP (S).
- Place the RESIN and FIGURINE TOP on the FIGURINE LEGS; receive the WITCH FIGURINE.
- Place the SOLDIER FIGURINE and WITCH FIGURINE for a puzzle (T).
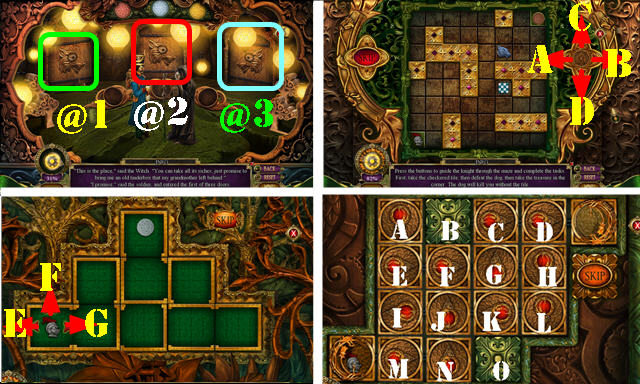
- Select the door (@1). Solution: Cx2-Bx5-C-A-Cx3-Bx3-C.
- Select the door (@2). Solution: Gx3-F-E-F.
- Select the door (@3). Solution: (N-O)-(C-D)-(D-H)-(H-G)-(K-G)-(K-L)-(L-H)-(H-D)-(D-C)-(C-B).
- Select the witch and the soldier; receive the COIN.
- Walk down.
- Use the COIN (P); select the two latches (Q). Look at the note; take the LEATHER ROPE and FLOWER INLAY (R).
- Go to the Overlook.
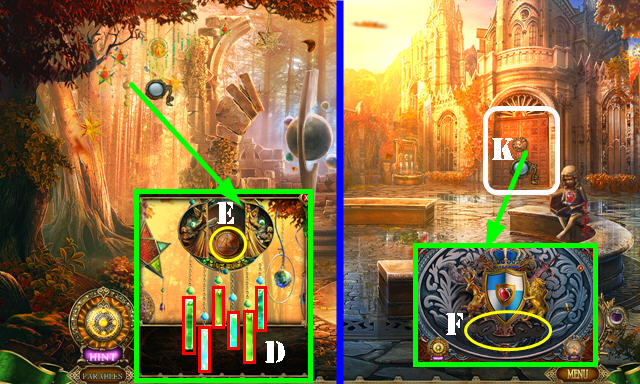
- Place the two FLOWER INLAYS; select the disc 3x (S).
- Play the HOP to receive the SADDLE (T).
- Walk down.
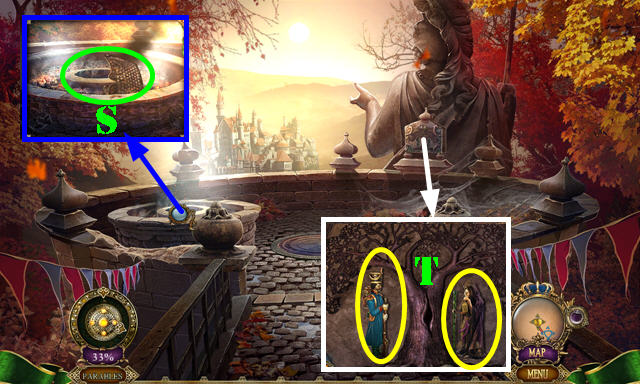
- Place the SADDLE; go to the City Gates (U).

- Select the two boats (V-W); use the LEATHER ROPE (X); take the TOY SHIP (Y).
- Take the LANTERN TOP (Z).
- Go to the Street (Z1).
- Take the BROKEN AMULET and NAIL PULLER (A).
- Take the STONE TOOTH and look at the note (B).
- Use the NAIL PULLER 3x on the TOY SHIP; select the ship and take the SNAKE FIGURINE.
- Go to the City Square (C).
- Place the STONE NOSE and STONE TOOTH (D); take the KING FIGURINE (E).
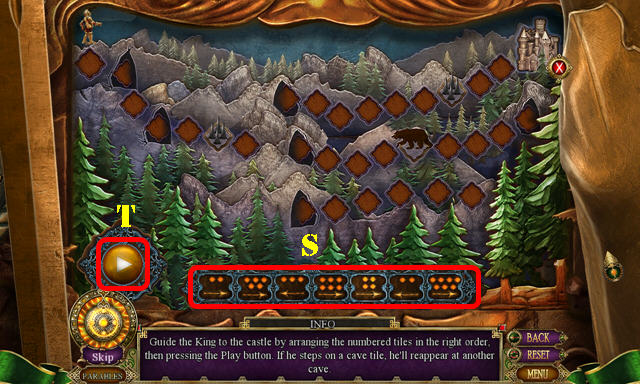
- Place the SNAKE FIGURINE and KING FIGURINE for a puzzle (F).
- Arrange the tiles as shown (G); press play (H).
- Take the GRAIN TOKEN (I).
- Walk down.
- Place the GRAIN TOKEN (J); take the TONGS and BELT (K).
- Walk down.
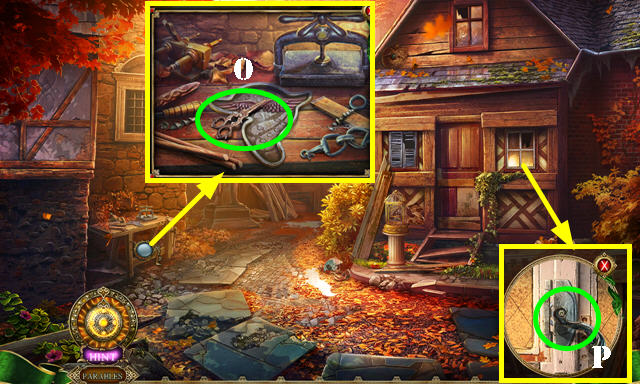
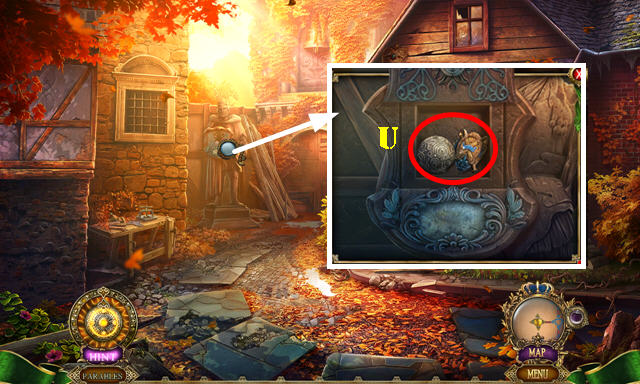
- Use the BELT (L); take the BANNER POLE (M).
- Go to City Square.
- Use the BANNER POLE; play the HOP to receive the CUTTER (N).
- Walk down.
- Look at the note and touch the vest (O). Use the CUTTER and select the keys (P). Select the keys 3x; receive the BENT KEY (Q).
- Walk down.
- Put down the BENT KEY and use the TONGS (R). Select the hammer (S); take the CHAPEL KEY (T).
- Go to City Square.
- Use the CHAPEL KEY (U); go through the door.
- Select the soldiers (V).
- Take the VALVE HANDLE (W).
- Go to the Wedding (X).
- Take the CASTLE TOKEN (Y).
- Select the arrows 3x and remove the grid (Z); place the VALVE HANDLE and select it (Z1). Take the BRICK (Z2).
- Walk down.
- Use the BRICK (A).
- Walk down.
- Talk to the lady; take the EAGLE KEY (B).
- Go to the Wedding.
- Use the EAGLE KEY; take the WHITE SWAN (C).
- Place the WHITE SWAN on the BROKEN AMULET; receive the SWAN AMULET.
- Place the SWAN AMULET; look at the note and take the CRYSTAL BOTTLE (D).
- Return to the Street.
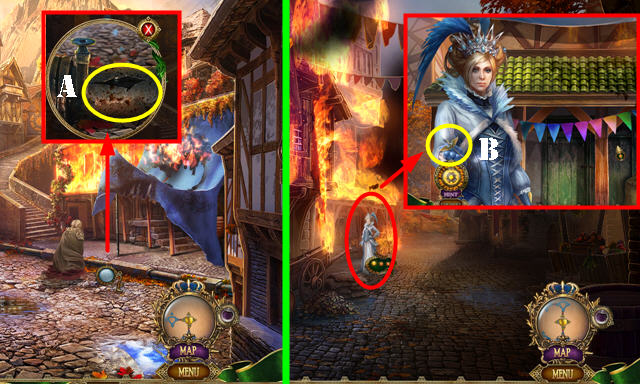
- Use the CRYSTAL BOTTLE (E).
- Select the symbols (F).
- Go forward.
- Take the BARSIA EMBLEM (G).
- Go to the Wedding.
- Place the BARSIA EMBLEM. Look at the note; take the GOLD STAR and FIREWORKS BALL (H).
- Walk down.
- Place the GOLD STAR for a puzzle (I).
- Solution (J).
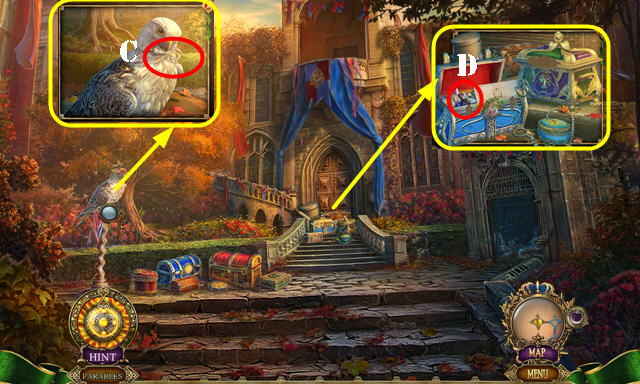
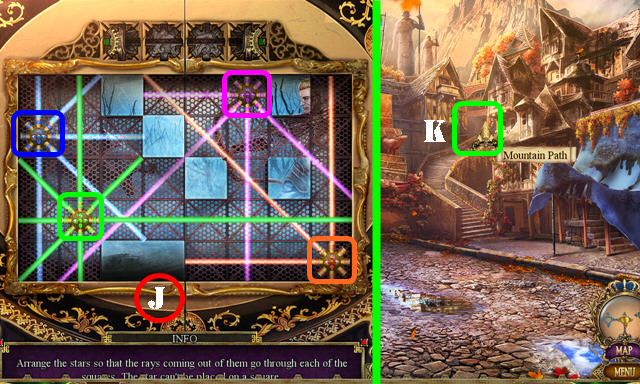
- Go to the Mountain Path (K).
- Take the NIGHTINGALE (L). Place the LANTERN TOP (M); take the EDELWEISS BUD (N).
- Take the STAG JAW (O).
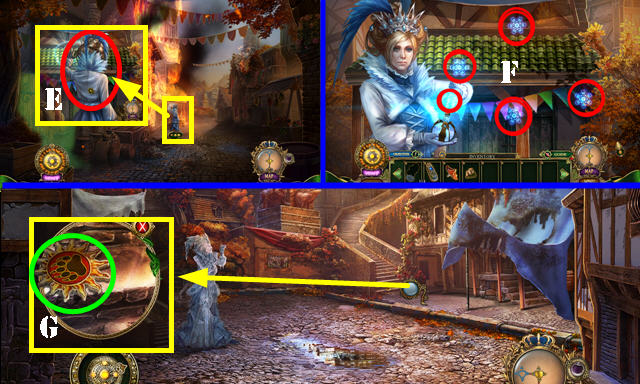
- Talk to Gerda (P).
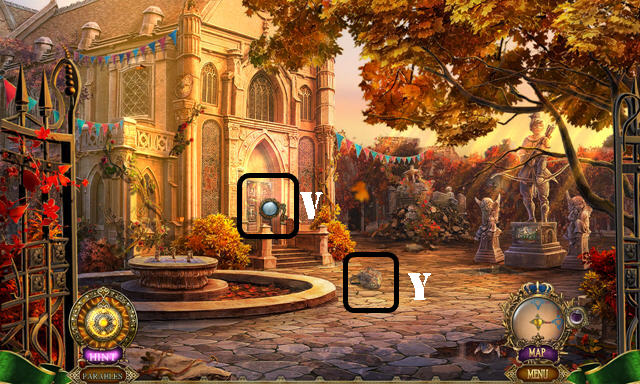
- Go to the Queen's Pass (Q).
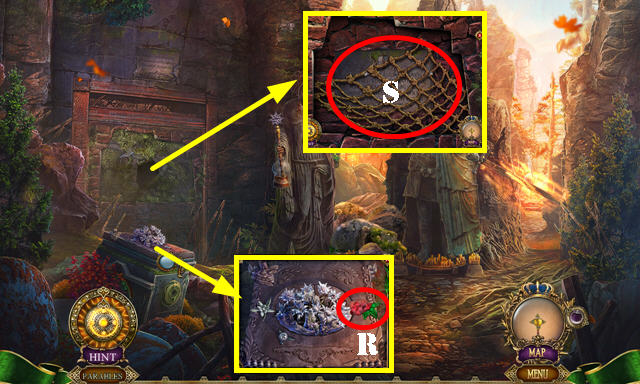
- Take the ROSE (R).
- Use the BRUSH and select the soldiers 3x; take the STRONG NET (S).
- Take the RED JEWEL and MONARCH PORTRAIT from the STRONG NET. Select the net 4x; receive the ROPE.
- Walk down.
- Place the CASTLE TOKEN and MONARCH PORTRAIT; take the SPOUT BASE and RED RIDING SISTERS' EMBLEM (T).
- Use the ROPE (U).
Chapter 3
- Talk to the couple (V).
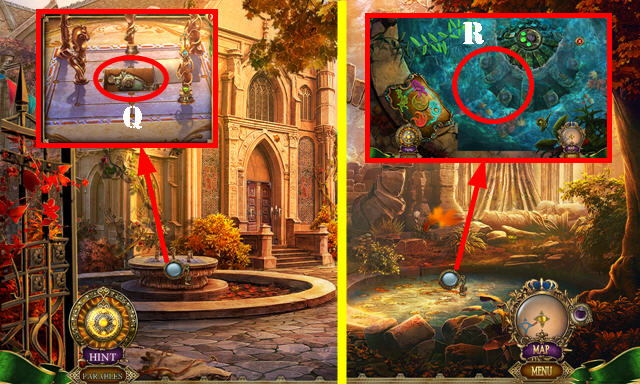
- Take the GREEN JEWEL (W).
- Place the RED JEWEL and GREEN JEWEL (X); play the HOP to get the FLORAL DECORATION.
- Walk down.
- Place the STAG JAW and select it (A); take the SPOUT FACE (B).
- Go to the Wedding.
- Place the RED RIDING SISTERS' EMBLEM; look at the note; take the EMPTY CROSSBOW and EDELWEISS BLOSSOM (C).
- Place the FLORAL DECORATION; look at the note; take the MINERAL OIL and STRONG VINE (D).
- Return to the Queen's Pass.
- Place the EDELWEISS BUD and EDELWEISS BLOSSOM; open all the flowers as shown (light blue) and take the STAINED GLASS FIGURE (E).
- Use the MINERAL OIL and select the ball 2x (F); take the STAINED GLASS PIECE (G).
- Use the STRONG VINE and FIREWORKS BALL on the EMPTY CROSSBOW; receive the LOADED CROSSBOW.
- Use the LOADED CROSSBOW; go to the Palace Courtyard (H).
Chapter 4
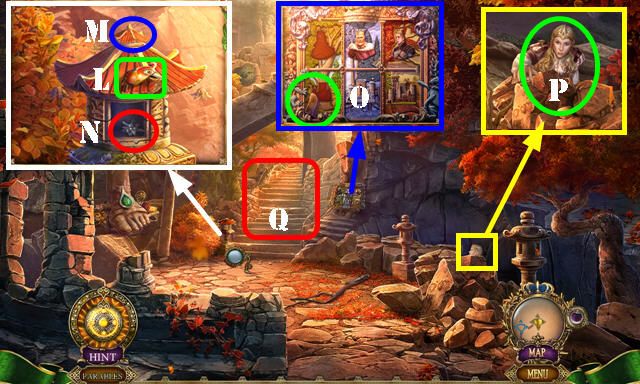
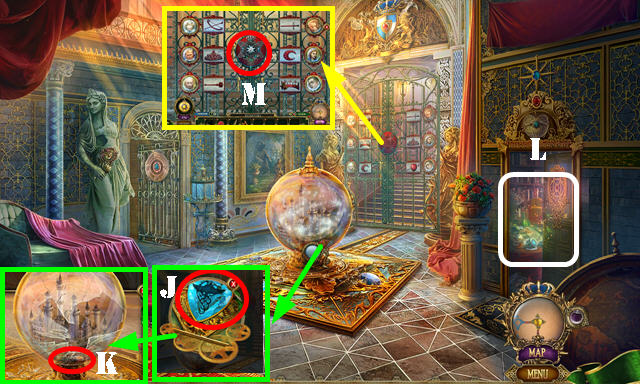
- Take the SCEPTER STAR FRAME (I) and SPARROW (J).
- Place the STAINED GLASS FIGURE and STAINED GLASS PIECE; take the MUSIC BOX CYLINDER (K).
- Place the SPOUT FACE on the SPOUT BASE; receive the FOUNTAIN SPOUT.
- Place the FOUNTAIN SPOUT (L); take the COMB BOX (M).
- Open the COMB BOX; take the MUSICAL COMB.
- Take the ARCHER ORDER (N).
- Open the gates (O).
- Place the MUSICAL COMB and MUSIC BOX CYLINDER (P); select the cylinder; take the HEART HALF and SCEPTER STAR (Q).
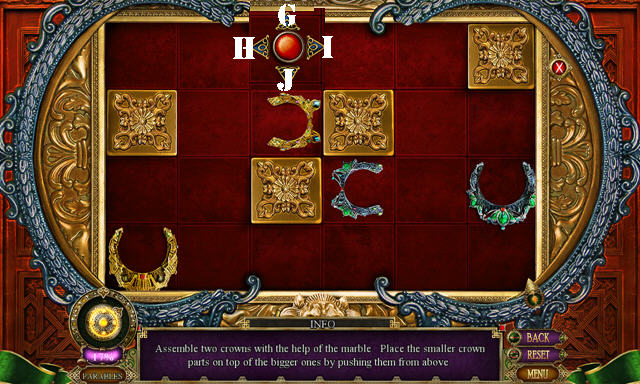
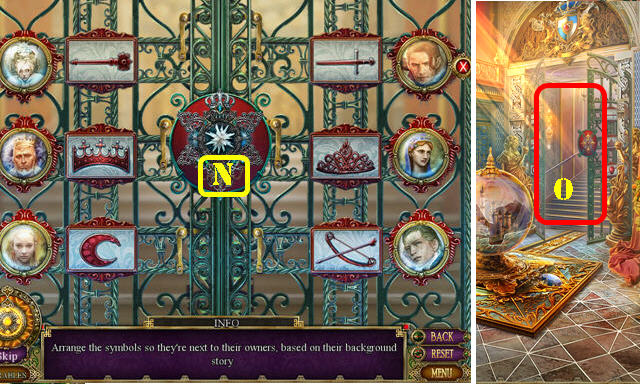
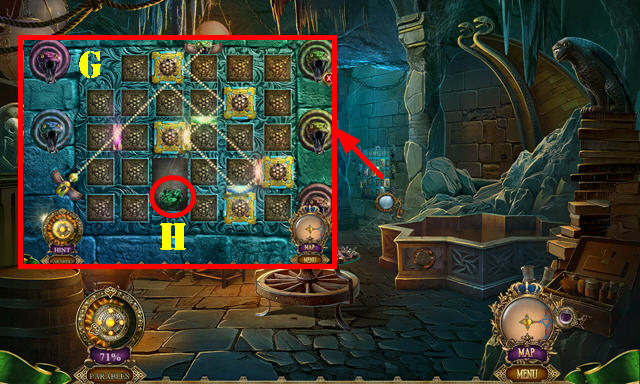
- Place the ARCHER ORDER for a puzzle (R).
- Solution (S). Press both buttons (T).
- Take the FLORAL RAIMENT (U).
- Walk down twice.
- Place the SCEPTER STAR FRAME and SCEPTER STAR (V).
- Go to the Mountain Shrine (W).
- Take the GATE PLATES 2/4 (X).
- Place the FLORAL RAIMENT (Y); take the HEART HALF (Z).
- Go to the Palace Courtyard.

- Place the two HEART HALVES (A); take the CHAPEL SYMBOL (B).
- Go to the Chapel.
- Place the CHAPEL SYMBOL (C); play the HOP to receive the KING'S ARCHIVE.
- Select the center slot in the KING'S ARCHIVE; select the note and take the CHIME.
- Return to the Mountain Shrine.
- Place the CHIME and select each one (D). Take the DISC and ARCHIVE KEY (E).
- Use the ARCHIVE KEY on the right slot of the KING'S ARCHIVE; select the note and take the CREST BANNER.
- Return to the Palace Courtyard.
- Place the CREST BANNER for a puzzle (F).
- H-Jx2-H-J-Ix4-Gx3-Hx3-J-I-G-Ix2-Jx3-G-H-J.
- Hx2-Gx3-Ix3-J-I-Jx2-Hx4-Gx2-I-G-H-Jx3.
- Go to the Palace Lobby (K).
- Take the WINDOW KEY (L). Place the DISC (M). Select 1-4.
- Go to the Workshops (N).
- Take the SCISSORS (O).
- Use the WINDOW KEY (P); play the HOP to get the GAME PIECE.
- Return to the Chapel.
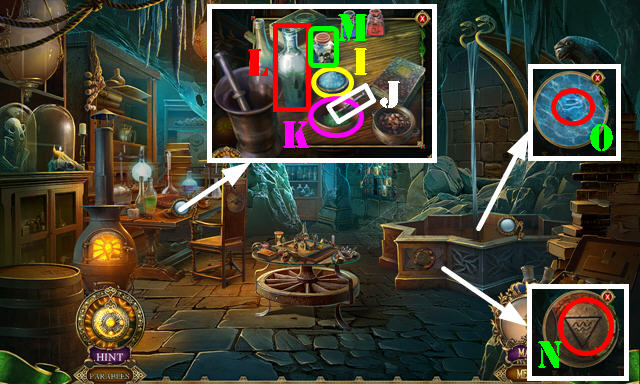
- Place the GAME PIECE and select the board. Look at the note; take the SCRYING CATALYST (Q).
- Return to the Mountain Shrine.
- Use the SCRYING CATALYST for a puzzle (R).
- Solution: C-D-E-B-A-C-D-E-A-C-D-B-C-D.
- Take the ARCHIVE KEY.
- Return to the Workshops.
- Use the ARCHIVE KEY on the left slot of the KING'S ARCHIVE; look at the note and take the ROBIN.
- Place the SPARROW, NIGHTINGALE, and ROBIN (F); take the CAMEO and TOKEN FRAGMENT (G).
- Walk down.
- Place the CAMEO; take the TOKEN FRAGMENT (H).
- Go to the Workshops.
- Place the two TOKEN FRAGMENTS; take the WIND TOKEN (I).
- Walk down.
- Place the WIND TOKEN (J); take the RED BEETLE (K).
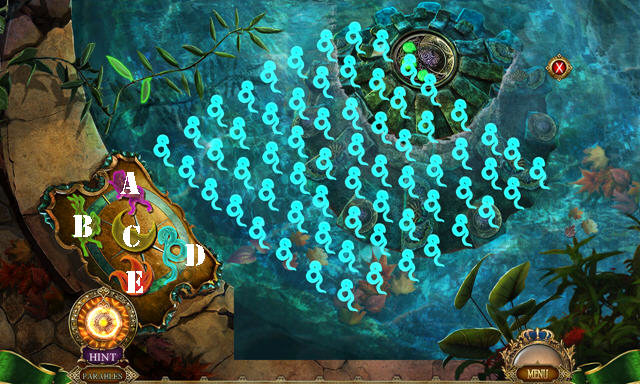
- Play the HOP (L) to get the KINGDOM INSIGNIA.
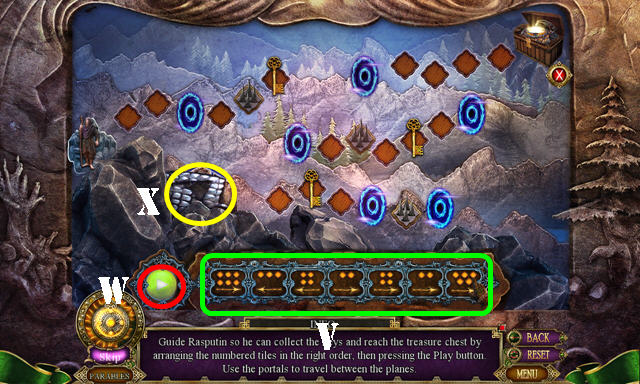
- Place the KINGDOM INSIGNIA for a puzzle (M).
- Solution (N).
- Go to the Foyer (O).
Chapter 5
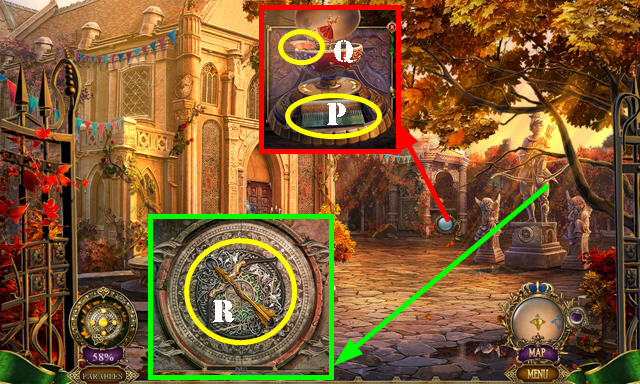
- Use the SCISSORS 3x (orange) and select the painting; take the KING'S MEDALLION (P).
- Open the mechanism; take NEPTUNE (Q).
- Place the ROSE for a puzzle (R).
- Solution (S); select the button (T).
- Take the HONOR MEDAL.
- Return to the Workshops.
- Place the KING'S MEDALLION; take PLUTO and the BRAVERY MEDAL (U).
- Return to the Chapel.
- Play the HOP (V) to get the ASTROLABE.
- Return to the Palace Courtyard.
- Place the BRAVERY MEDAL; take MARS (W).
- Place the HONOR MEDAL; take the WOLFSBANE (X).
- Return to the Chapel.
- Take the BOTANIST BOX (Y).
- Return to the Mountain Shrine.
- Place the WOLFSBANE on the BOTANIST BOX; select the box 4x and look at the note. Take the BLUE BEETLE, PEN, and SATURN.
- Place PLUTO, NEPTUNE, MARS, and SATURN on the ASTROLABE.
- Place the ASTROLABE (A) and select it (B).
- Talk to Hansel (C).
- Return to the Foyer.
- Talk to Hansel (D).
- Go to the Hall of the Kings (E).
- Talk to Hansel (F).
Chapter 6

- Take the GATE PLATES 3/4 (G).
- Read the note; use the PEN; take the COG (H).
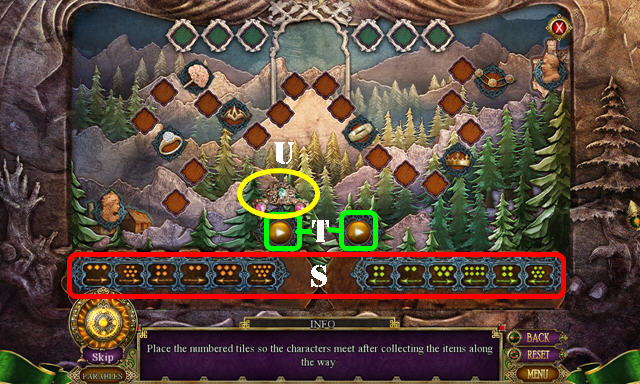
- Select the board twice for a puzzle (I).
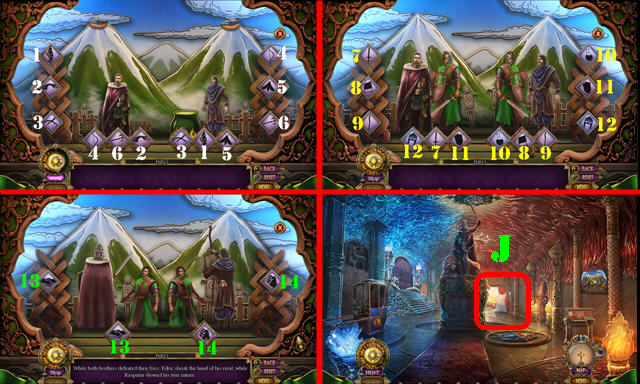
- Solution one (1-6).
- Solution two (7-12).
- Solution three (13-14). Take the SHOOTING STAR and CARVED EAR.
- Go to the Royal Balcony (J).
- Take the BOOK (K).
- Place the COG and SHOOTING STAR; select the center disc 3x (L); take the LOCKPICKS (M).
- Walk down twice.
- Use the LOCKPICKS; take the SWORD HILT (N).
- Go forward.

- Talk to the king (O).
- Place the SWORD HILT; select each hilt (orange) and take the SERPENT CIRCLE (P).
- Place the SERPENT CIRCLE (Q) and select each serpent (blue); go to Rasputin's Room (R).
- Open the door; play the HOP (S) to get the DRAGON'S CLAW.
- Take the LIZARD (T).
- Look at the note (U).
- Place the CARVED EAR; take the GRIFFIN (V).
- Place the BOOK and swap as shown (W). Take the THRONE (X).
- Walk down.
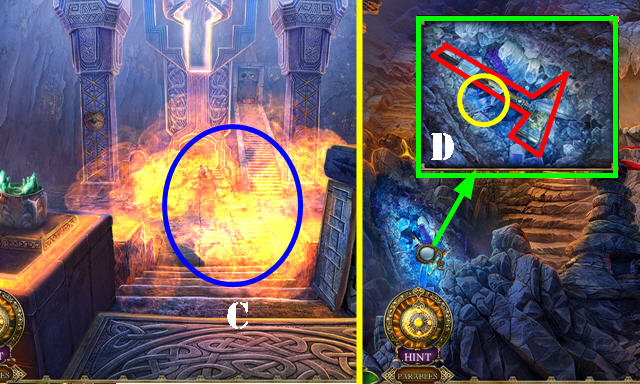
- Place the THRONE and select 4x (Y); enter the Royal Bedchamber (Y1).
- Return to the Royal Balcony.
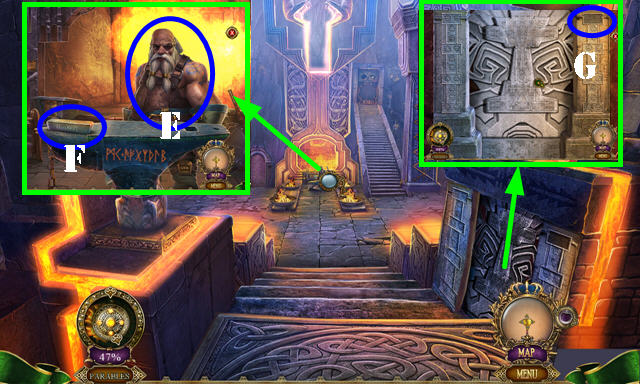
- Use the DRAGON'S CLAW; take the LANTERN LENS (Z).
- Go to Rasputin's Room.
- Place the LANTERN LENS (A); take the BEETLE SHELL and PALANQUIN COMBINATION (B).
- Walk down.
- Place the PALANQUIN COMBINATION; select 1-4.
- Take the BEAR'S HEAD and BLUE MARBLE (C).
- Go to the Royal Bedchamber.

- Place the RED BEETLE, BLUE BEETLE, and BEETLE SHELL; spin 3x (D); take RASPUTIN'S FLAG (E).
- Place the BEAR'S HEAD (F); take the GUARDIAN DOG (G).
- Place the BLUE MARBLE for a puzzle (H).
- Solution: I-J-Kx3-L-M-N-O-P-Q-R-S-T.
- Look at the note; take the SHIELD PIECE and TABLET FRAGMENT.
- Return to Rasputin's Room.
- Place the GUARDIAN DOG (U) and RASPUTIN'S FLAG (V); take the TABLET FRAGMENT (W).
- Return to the Royal Balcony.
- Place the 2 TABLET FRAGMENTS; select them 3x; take the DRAGON'S HEAD and SHIELD PIECE (X).
- Walk down.
- Place the SHIELD PIECE on the SHIELD PIECE; receive the HEIRLOOM SHIELD.
- Place the HEIRLOOM SHIELD (A); play the HOP (B) to get the KING'S HAMMER.
- Go to the Royal Bedchamber.
- Place the GRIFFIN, LIZARD, and DRAGON'S HEAD; take the SKULL and GARGOYLE (C).
- Return to the Royal Balcony.
- Place the GARGOYLE for a puzzle (D).
- Solution (E).
- Use the KING'S HAMMER (F).
- Select the five books (G).
- Take the CHAIN (H); open the book and take the SNAKE HOOK (I).
- Use the CHAIN on the SNAKE HOOK; receive the CHAIN HOOK.
- Use the CHAIN HOOK (J).
- Pair the symbols (K). Take the DISPELLING CIRCLE.
- Place the DISPELLING CIRCLE on the scene; select the four symbols (L).
- Play the HOP (M) to get the CONCENTRATION CIRCLET.
- Use the CONCENTRATION CIRCLET (N); receive RASPUTIN'S BOOK.
Chapter 7
- Take the BLANK AMULET (O) and CRYSTAL (P).
- Go to the Lava Portal (Q).
- Take the GATE PLATES 4/4 (R).
- Go to The Forge (S).
- Take the RASPUTIN EMBLEM (T).
- Walk down.
- Place the RASPUTIN EMBLEM for a puzzle (U).
- Solution (V). Press the button (W).
- Take the SERPENT SCALES and EYE PART (X).

- Place the EYE PART; take the ALCHEMY KIT and SKULL (Y).
- Walk down.
- Place the SERPENT SCALES on the ALCHEMY KIT and select it; take the BOWL PIECE.
- Place the BOWL PIECE; take the BELLOWS and GOLD COINS (Y1).
- Place the 2 SKULLS; swap the skulls as shown (Z); receive the IMPROVISED TORCH.
- Go to The Forge.

- Use the IMPROVISED TORCH; take the TORCH (A).
- Walk down.
- Use the TORCH (B); play the HOP to get the LAVA.
- Place the LAVA on RASPUTIN'S BOOK; take the WATER SORCERY.
- Return to The Forge.
- Use the WATER SORCERY (C).
- Walk down.
- Take the KING'S HAMMER and CRYSTAL (D).
- Return to The Forge.
- Use the KING'S HAMMER (E); take the SILVER BAR (F).
- Place the CRYSTAL on the ALCHEMY KIT and select it; take the DOOR PLATE.
- Place the DOOR PLATE for a puzzle (G).
- Solution (H).
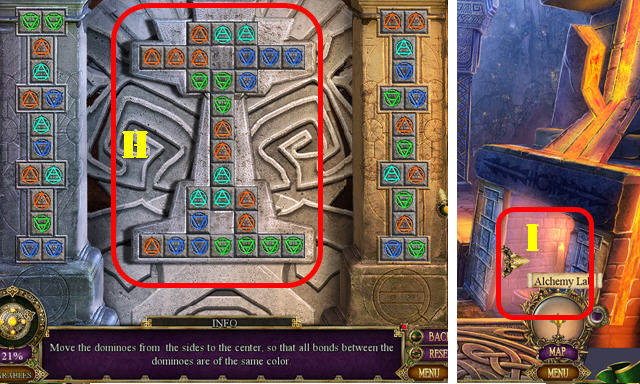
- Go to the Alchemy Lab (I).
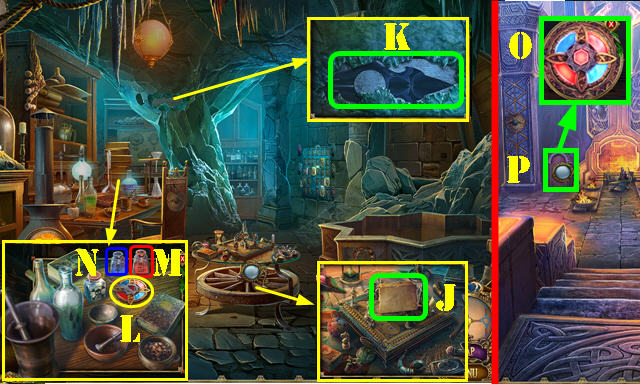
- Look at the note (J).
- Select the area twice; take the MOLD (K).
- Place the BLANK AMULET (L); select M-N-M-N; take the COLORED AMULET (L).
- Walk down.
- Place the COLORED AMULET (O); enter the Artifact Room (P).
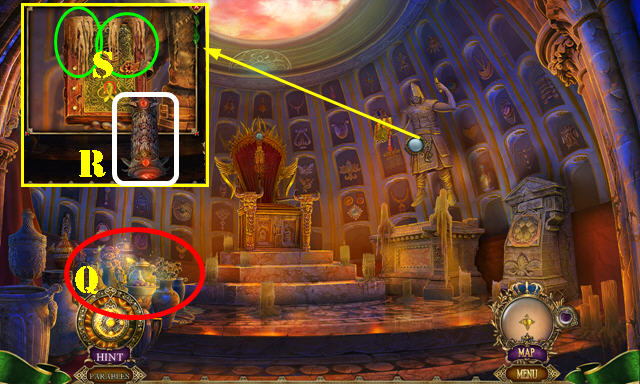
- Play the HOP (Q) to receive the KINGDOM FIGURINE.
- Take the SEALED OFFERING (R); select the wax 2x (S) and the book 2x.
- Return to the Alchemy Lab.
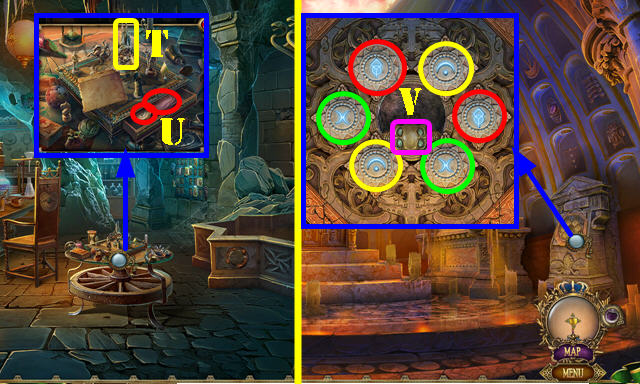
- Place the KINGDOM FIGURINE (T); take the ALCHEMY TILE and COPPER PLATE (U).
- Return to the Artifact Room.
- Place the ALCHEMY TILE; select matching pairs (color-coded). Press the center tile; take the DOUBLE SKULL KEY (V).
- Go to the Lava Portal.
- Use the DOUBLE SKULL KEY (W).
- Play the HOP (X); receive the DEMONIC EYE.
- Walk down.
- Place the SEALED OFFERING and select it; take the REFLECTIVE SQUARE (Y).
- Go to The Forge.
- Place the DEMONIC EYE (Z); go to the Smeltery (Z1).
- Take the REFLECTIVE SQUARE (A). Place the MOLD (B).
- Place the BELLOWS and select it (C); place the SILVER BAR (D).
- Select the levers (E).
- Take the SILVER SEAL (F).
- Place the GOLD COINS (D); select the levers (E); take the GOLD SEAL (F).
- Place the COPPER PLATE (D); select the levers (E); take the COPPER SEAL (F).
- Return to the Alchemy Lab.
- Place the two REFLECTIVE SQUARES for a puzzle. Solution (G).
- Take the MALACHITE (H).
- Place the CRYSTAL (I); select the pestle (J).
- Place the MALACHITE (K); select the pestle (J).
- Select the crystal powder (I), bottle (L), and bowl (K). Take the CORROSIVE LIQUID (M).
- Use the CORROSIVE LIQUID and press the stone (N). Take the WATER STONE (O).
- Walk down.
- Put down the WATER STONE (P) and SILVER SEAL (Q); take the WATER SEAL.
- Go to the Smeltery.
- Place the WATER SEAL (R); take the FIRE STONE (S) and receive the WATER SEAL.
- Walk down.
- Put down the FIRE STONE (T) and GOLD SEAL (U); take the FIRE SEAL.
- Go to the Artifact Room.
- Play the HOP (V) to get the SHACKLE.
- Place the FIRE SEAL (W); take the KNOB (X) and AIR STONE (Y); receive the FIRE SEAL.
- Go to the Smeltery.
- Place the KNOB for a puzzle (Z).
- Solution: D-A-C-A-D-B-C-A-D-A-C-B-C-B-D-A-D-A.
- Take the SKULL KEY (E).
- Go to the Lava Portal.
- Use the SKULL KEY (F); take the SHACKLE (G).
- Return to the Smeltery.
- Place the two SHACKLES; take the AZURITE CROWN (H).
- Place the AZURITE CROWN (I); pull the levers (J); take the AZURITE SEAL (K).
- Walk down.
- Put down the AIR STONE (L) and AZURITE SEAL (M); take the AIR SEAL.
- Place the AIR SEAL (N); take the EARTH STONE (O); receive the AIR SEAL.
- Put down the EARTH STONE (L) and COPPER SEAL (M); take the EARTH SEAL.
- Talk to Hansel (P).
Chapter 8
- Talk to the king (Q).
- Place the GATE PLATES 4/4 (R).
- Place the AIR SEAL (S) for a puzzle.
- Solution: D-E-F-G-B-C-D-E-G-A-B-C-G.
- Place the FIRE SEAL (H) for a puzzle.
- Solution (I-J).
- Place the EARTH SEAL (K) for a puzzle.
- Solution (L).
- Place the WATER SEAL (M) for a puzzle.
- Solution (N).
- Congratulations, you've completed Dark Parables: The Thief and the Tinderbox.
Parables
- Parables (A).
- Parables (B).
- Parables (C).
Created at: 2016-10-21