Walkthrough Menu
- General Tips
- Chapter 1: The Church
- Chapter 2: The Graveyard
- Chapter 3: The Old House
- Chapter 4: The White Witch
- Chapter 5: The Forest
- Chapter 6: The Cave
- Chapter 7: The Jail
- Chapter 8: The Spell Book
General Tips
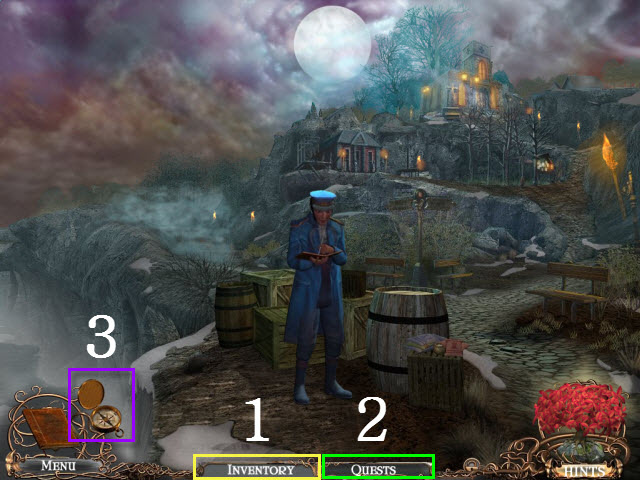
- This is the Official Guide for Dark Sisterhood: The Initiation.
- We will use the acronym HOP for Hidden-object puzzles. Interactive items will be color-coded and some will be numbered; please follow the numbers in sequence.
- This guide will not mention each time you have to zoom into a location; the screenshots will show each zoom scene.
- The HOP lists may be random; our lists may vary from yours.
- There are two difficulty levels: Regular and Advanced.
- The Inventory items are stored here (1).
- You may view your current Quests here (2).
- Use the compass to travel to a location (3).
Chapter 1: The Church
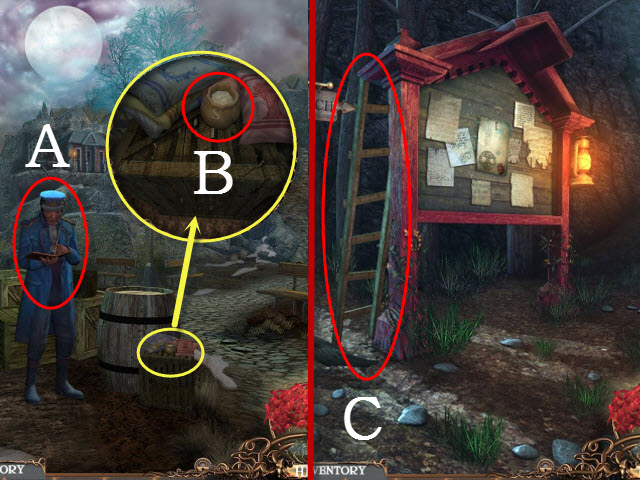
- Talk to the man (A).
- Examine the crate; take the BAG OF SALT (B).
- Walk forward to the Crossroads.
- Pick up the LADDER (C).
- Walk left to the Courthouse; walk down and right to the Church Plaza.
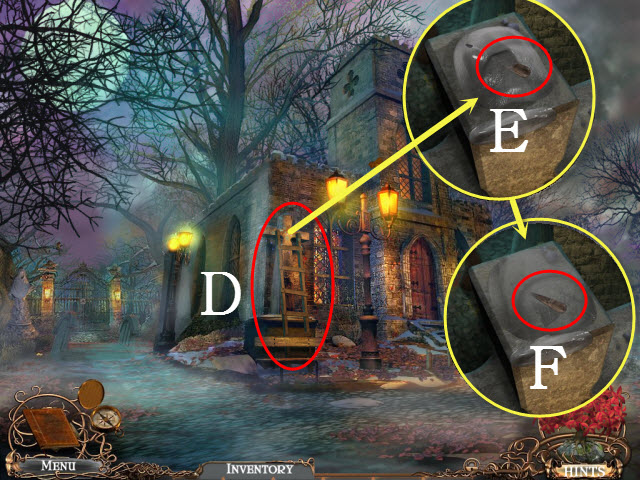
- Place the LADDER with the cross; examine the cross (D).
- Use the BAG OF SALT on the ice (E).
- Take the SCREWDRIVER (F).
- Return to the Courthouse.
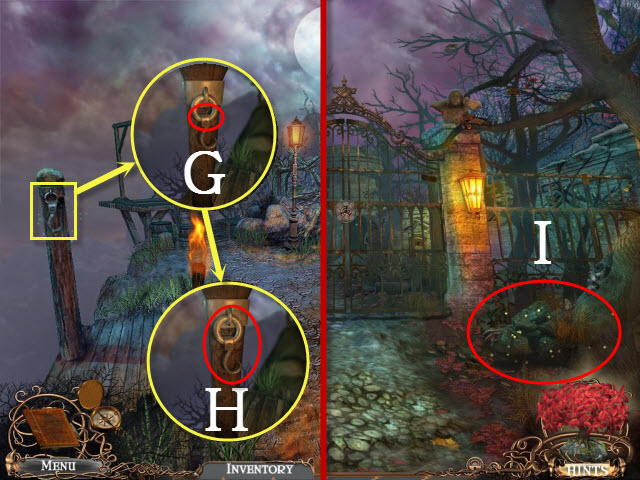
- Examine the hook; use the SCREWDRIVER on the screw (G).
- Take the HOOK (H).
- Return to the Church Plaza and walk forward to the Cemetery Gate.
- Examine the grass to activate a HOP (I).
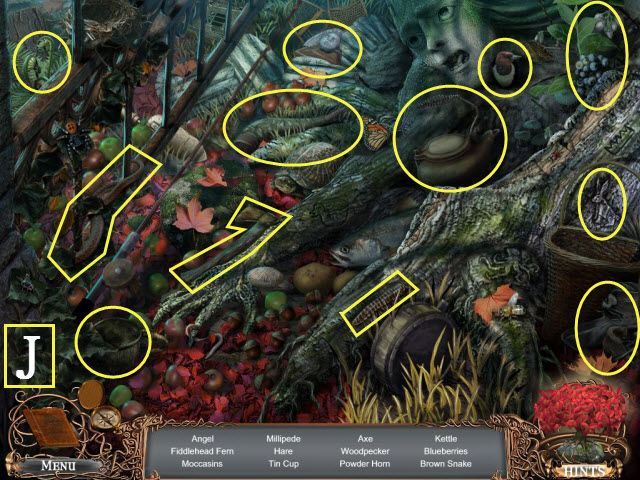
- Play the HOP (J).
- You receive the ANGEL.
- Walk down; examine the Church Entrance.
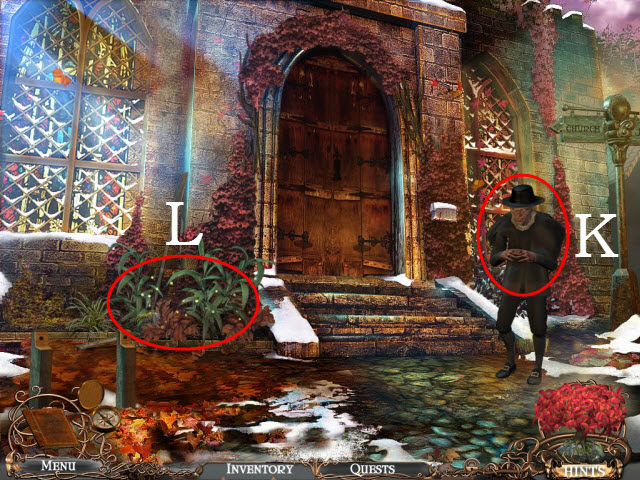
- Talk to the Reverend (K).
- Examine the plants to activate a HOP (L).
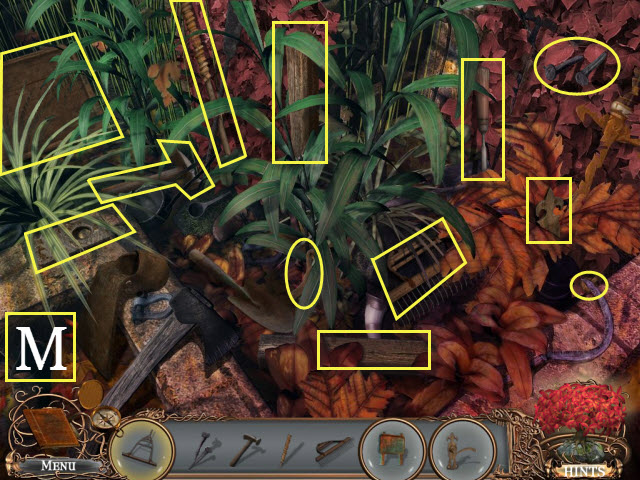
- Play the HOP (M).
- You receive the RAKE, the DOOR LATCH, and the CHURCH SIGN.
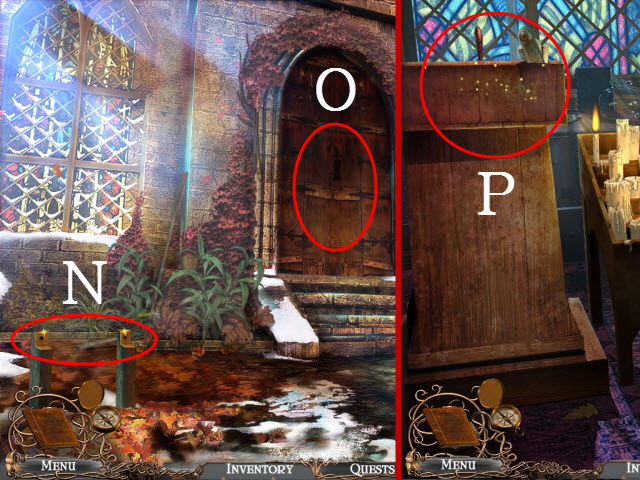
- Place the CHURCH SIGN on the poles (N).
- Place the DOOR LATCH on the door (O).
- Walk forward to the Main Hall and enter the Right Side.
- Examine the podium to activate a HOP (P).
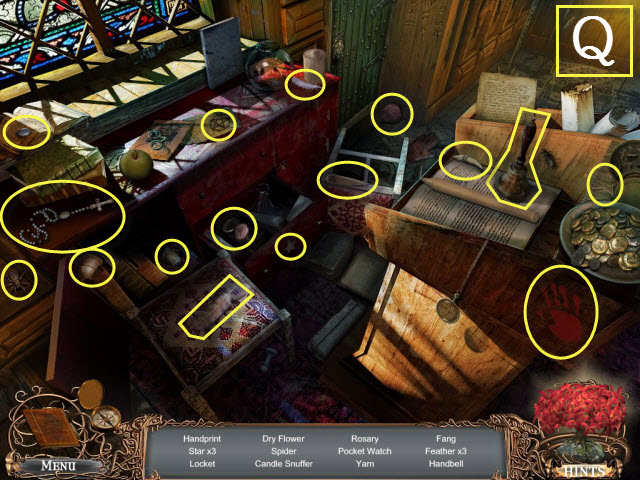
- Play the HOP (Q).
- You receive the ROSARY.
- Walk down and enter the Left Side; examine the candles to activate a HOP.
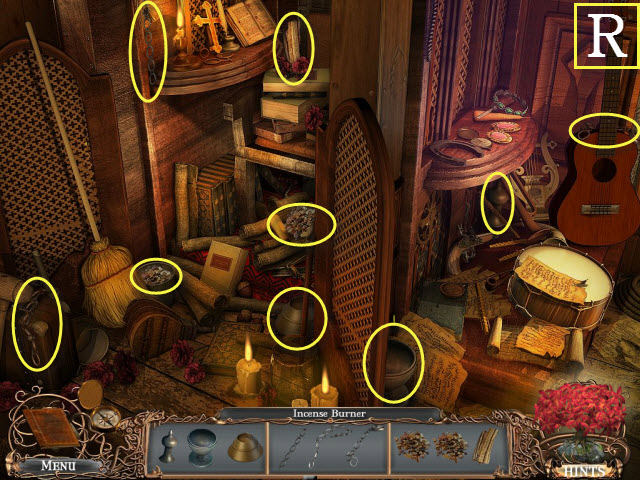
- Play the HOP (R).
- You receive the INCENSE BURNER.
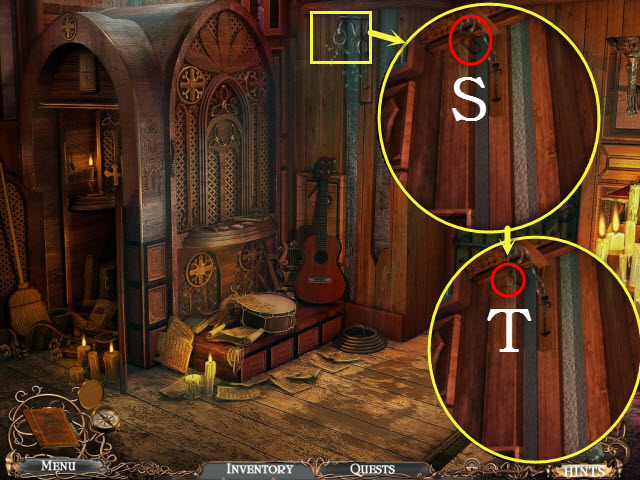
- Examine the link; place the HOOK on it (S).
- Place the INCENSE BURNER on the hook (T).
- Walk down twice.
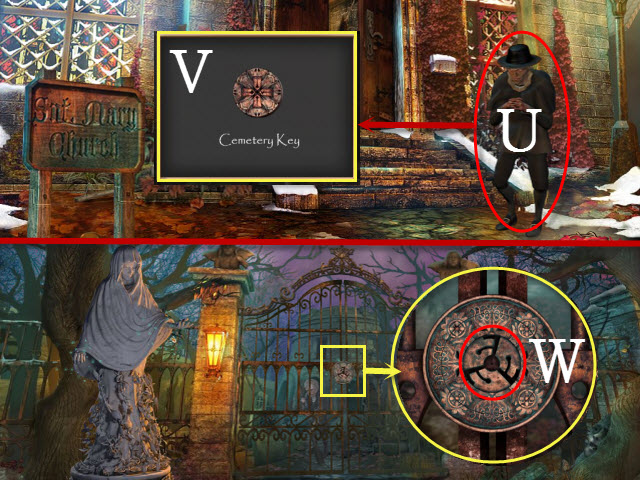
- Give the ROSARY to the Reverend (U).
- Take the CEMETERY KEY (V).
- Return to the Cemetery Gate.
- Select the gate; place the CEMETERY KEY in the keyhole (W).
- Enter the Graveyard.
Chapter 2: The Graveyard
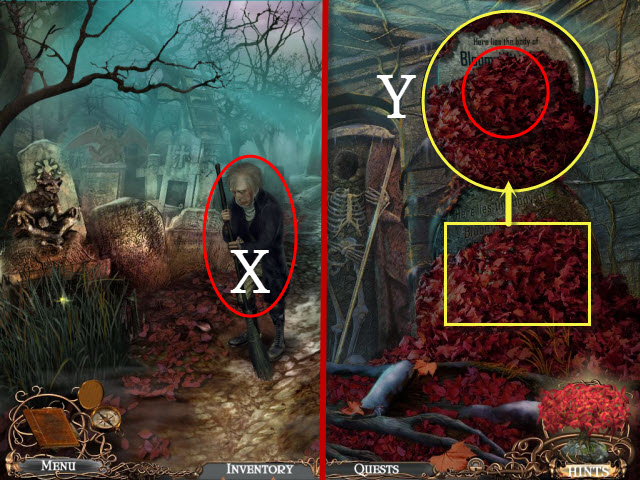
- Talk to the Sexton (X).
- Walk right.
- Examine the leaves; use the RAKE on them (Y).
- Walk down and then forward twice to the Mausoleum.
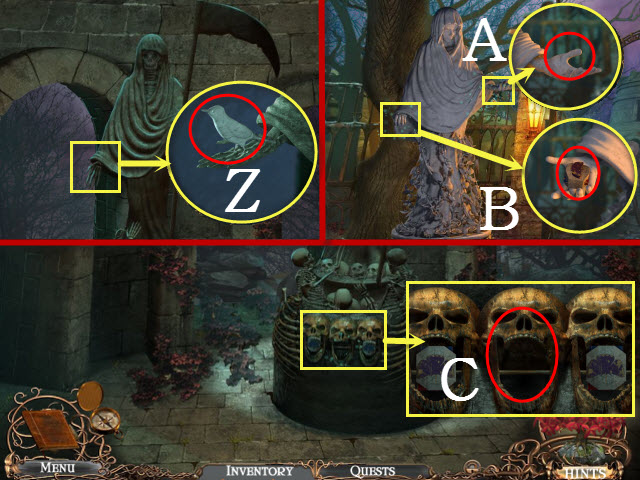
- Examine the hand; take the BIRD (Z).
- Return to the Cemetery Gate.
- Examine the right hand; place the BIRD in it (A).
- Examine the left hand; take the CUBE (B).
- Return to the Mausoleum.
- Examine the skulls; place the CUBE in the space to activate a mini-game (C).
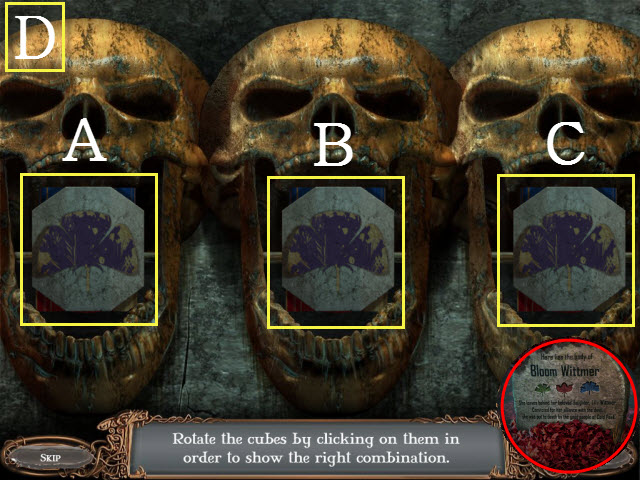
- To solve the mini-game, rotate the cubes so that they match the clue from the gravestone.
- Please see the screenshot for the solution: Ax2, Bx1, and Cx3 (D).
- Enter the Chamber and examine the candles to activate a HOP.
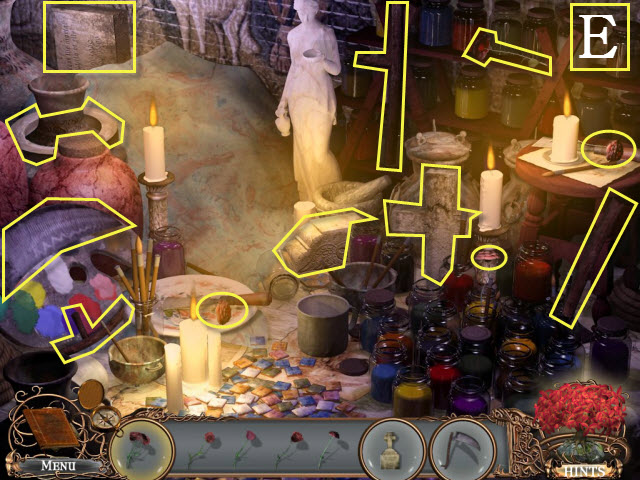
- Play the HOP (E).
- You receive the SCYTHE, the ROSES, and the HEADSTONE.
- Walk forward to the Crypt.
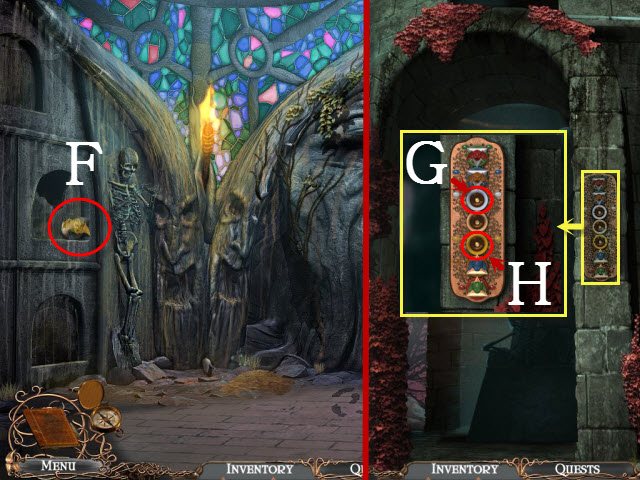
- Take the DEMON (F).
- Return to the Mausoleum and walk back once.
- Examine the device; place the DEMON (G) and the ANGEL (H) in the slots to activate a puzzle.
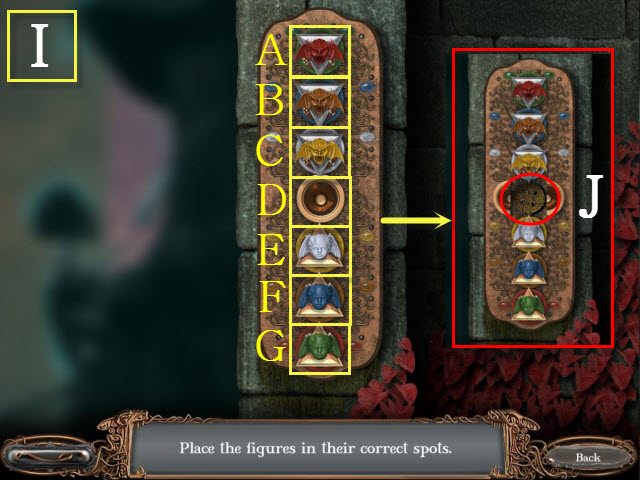
- Rearrange the faces so that their colors match the colors on the borders. The pieces may only be moved to an empty space.
- To solve the puzzle, select the pieces: C, D, E, C, D, E, A, D, G, A, D, G, B, D, F, B, D, and F (I).
- Take the TOMB CREST (J).
- Walk down.
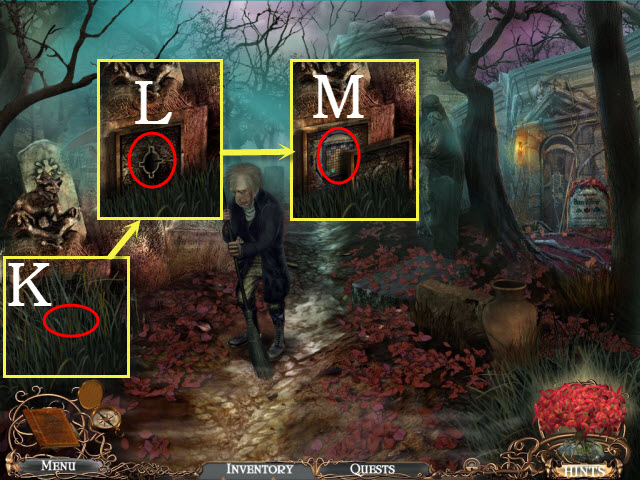
- Use the SCYTHE on the weeds (K).
- Place the TOMB CREST in the slot (L).
- Examine the board to activate a puzzle (M).
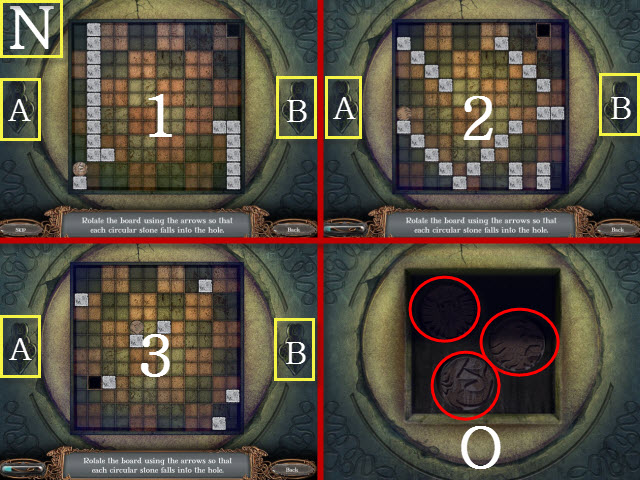
- To solve the puzzle, select the left and right arrows to rotate the board in order to guide the ball into the hole.
- Please follow steps 1-3 to solve (N).
- Phase one: B, B, B, A, and A (1).
- Phase two: B, B, B, A, and A (2).
- Phase three: A, B, B, B, B, and B (3).
- Take the SHARK CREST, the EAGLE CREST, and the LION CREST (O).
- Return to the Chamber.
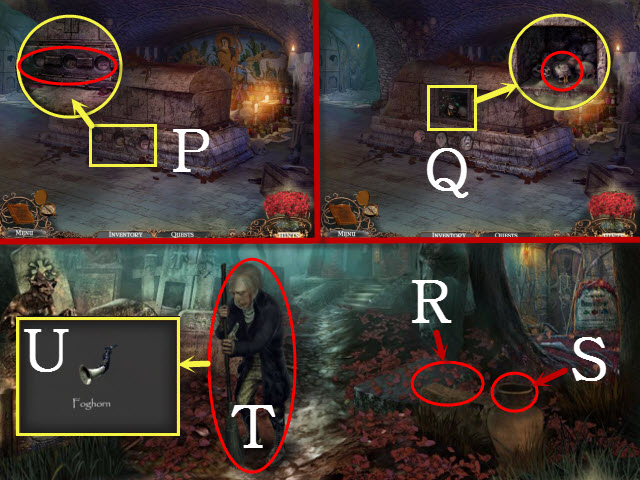
- Examine the sarcophagus; place the LION CREST, the EAGLE CREST, and the SHARK CREST in the slots (P).
- Examine the compartment; take the GHOST AMULET (Q).
- Return to the Graveyard.
- Place the HEADSTONE on the stone base (R).
- Place the ROSES in the vase (S).
- Give the GHOST AMULET to the Groundskeeper (T); take the FOGHORN (U).
- Return to the Crossroads; walk down and then left to the Misty Forest.
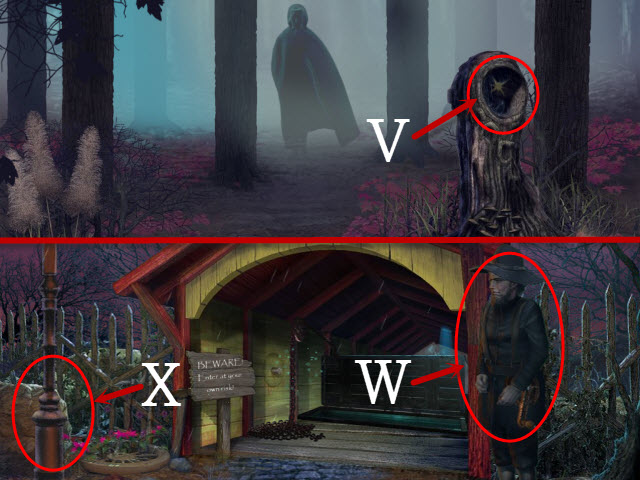
- Place the FOGHORN in the holder (V).
- Walk forward twice to the Forest Entrance.
- Talk to the man (W).
- Examine the lamp post to activate a HOP (X).
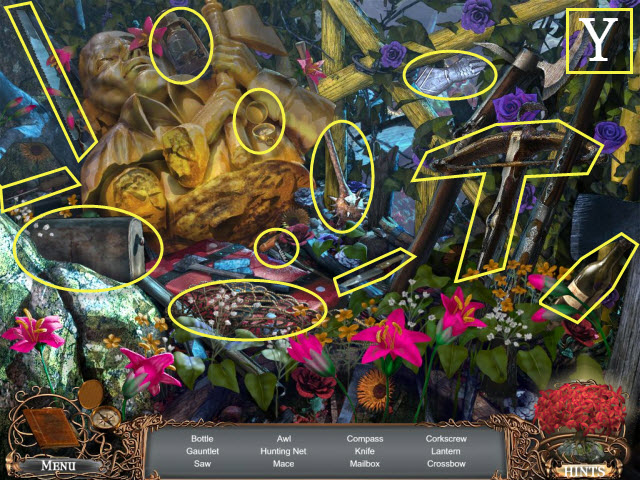
- Play the HOP (Y).
- You receive the MAILBOX.
- Walk down to the Town Outskirts.
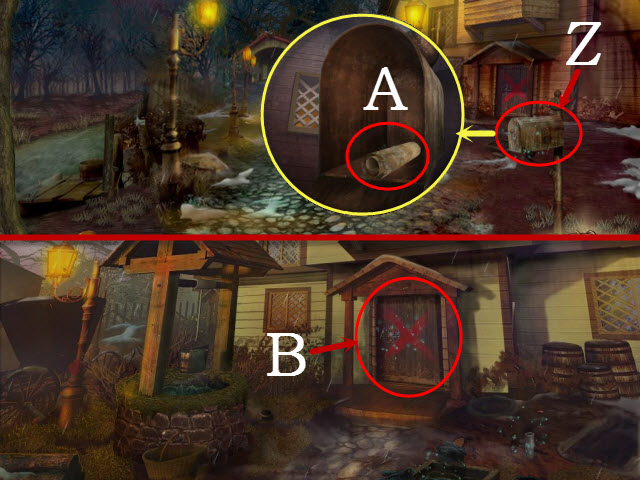
- Place the MAILBOX on the post (Z).
- Examine the mailbox; open it and select the paper (A).
- Walk right to the House Entrance.
- Examine the door to activate a mini-game (B).
Chapter 3: The Old House
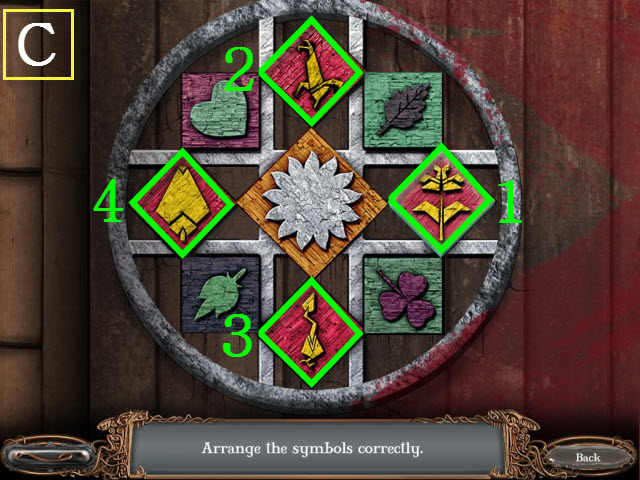
- To complete the mini-game, swap the symbols so that they match the note from the mailbox.
- Please see the screenshot for the solution; select the symbols in the order shown (C).
- Enter the Foyer; examine the desk to activate a HOP.
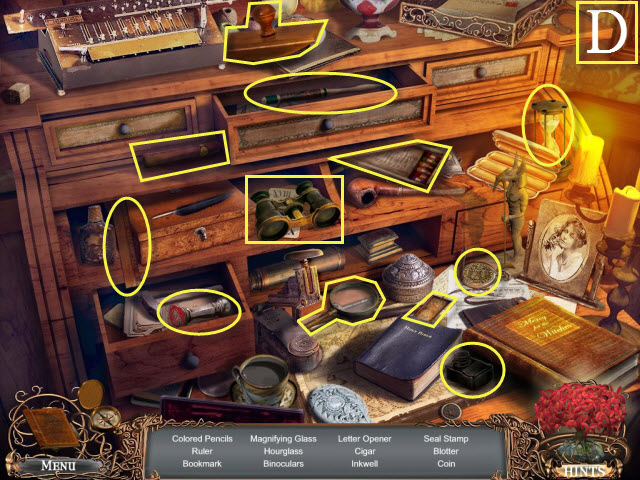
- Play the HOP (D).
- You receive the COLORED PENCILS.
- Walk forward to the Living Room; examine the fireplace to activate a HOP.
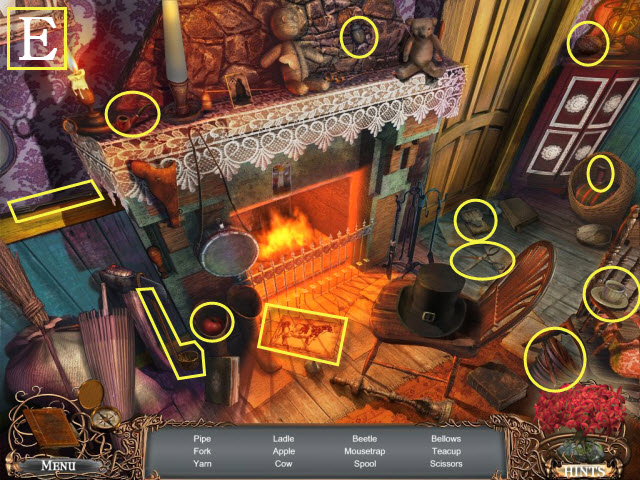
- Play the HOP (E).
- You receive the SCISSORS.
- Walk down and then upstairs to the Hallway.
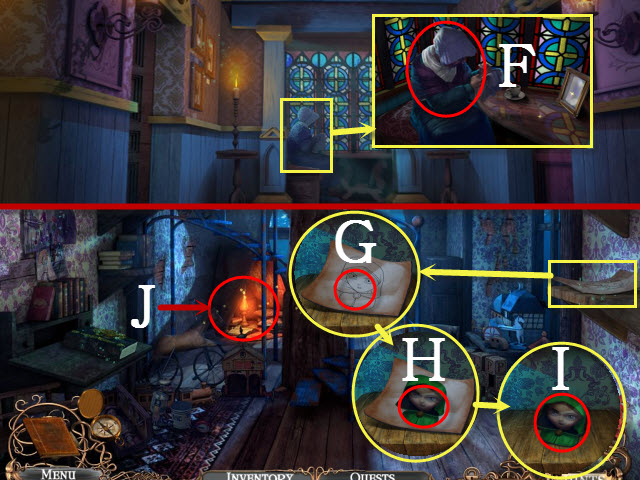
- Examine the old lady and talk to her (F).
- Walk left to the Bedroom.
- Examine the shelf; use the COLORED PENCILS on the drawing (G).
- Use the SCISSORS on the drawing (H).
- Take the PAPER WITCH (I).
- Examine the lamp to activate a HOP (J).
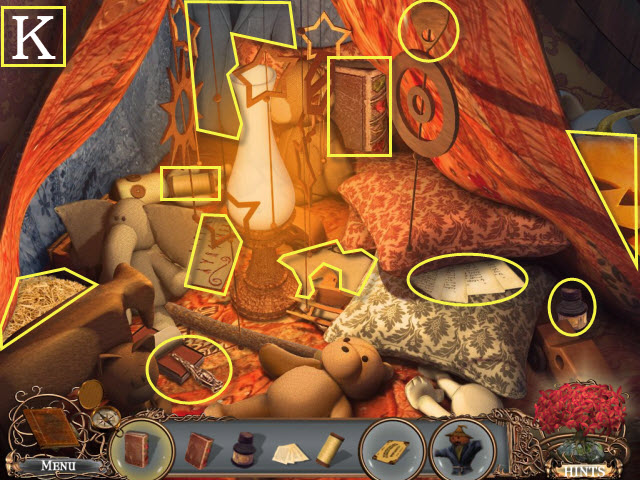
- Play the HOP (K).
- You receive the BOOK, the SPIRIT BOARD, and the SCARECROW.
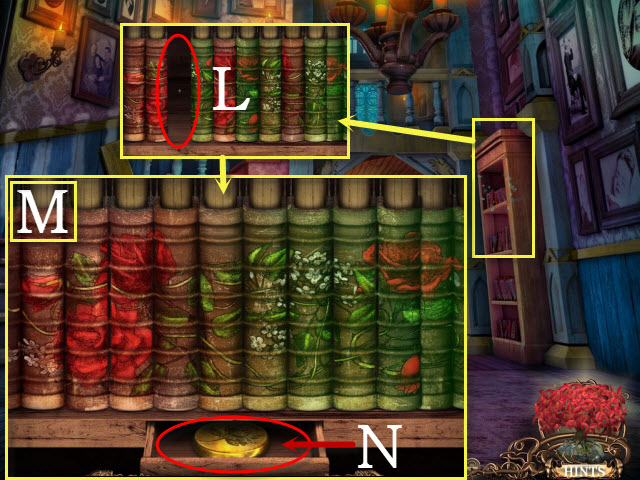
- Return to the Foyer; examine the bookcase; place the BOOK in the slot to activate a puzzle (L).
- To solve the puzzle, rearrange the books to form a complete image.
- Please see the screenshot for the solution (M).
- Take the ROSE COIN (N).
- Walk down.
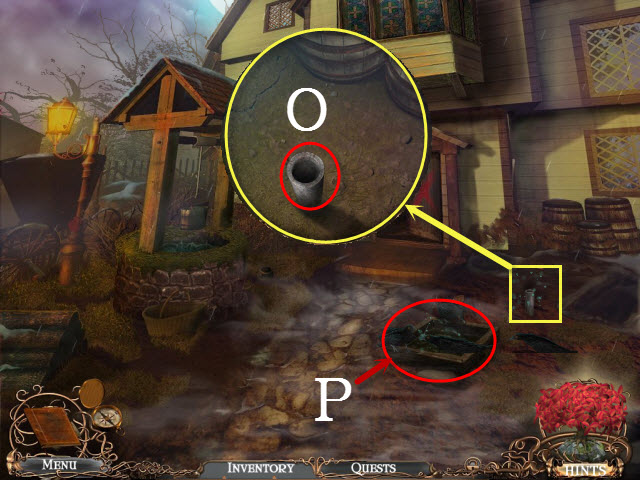
- Examine the pole; place the SCARECROW on it (O).
- Examine the pipes to activate a puzzle (P).
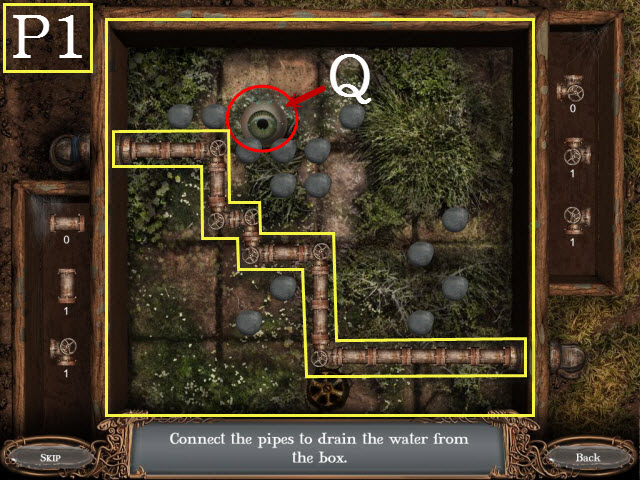
- To solve the puzzle, arrange the pipes so that they form a path from left to right. The numbers indicate the available quantity of each pipe.
- This puzzle is random; please see the screenshot for one possible solution (P1).
- Take the GLASS EYE (Q).
- Return to the Bedroom.
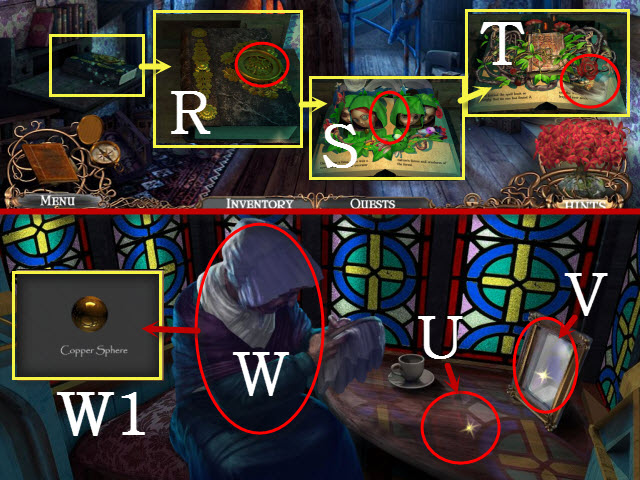
- Examine the book; place the ROSE COIN in the engraving (R).
- Place the PAPER WITCH on the book (S).
- Turn the page twice and take the PICTURE OF LILY (T).
- Walk down; examine the old lady.
- Place the SPIRIT BOARD on the table (U).
- Place the PICTURE OF LILY in the frame (V).
- Give the old lady the GLASS EYE (W); take the COPPER SPHERE (W1).
- Return to the Crypt.
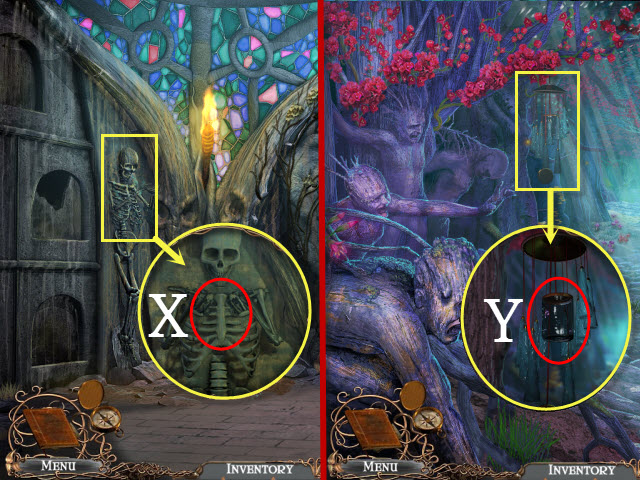
- Examine the skeleton; place the COPPER SPHERE in its hands (X).
- Walk forward to the Lair Tunnel.
- Examine the chime; take the GLASS JAR (Y).
- Walk forward three times to the Altar.
Chapter 4: The White Witch
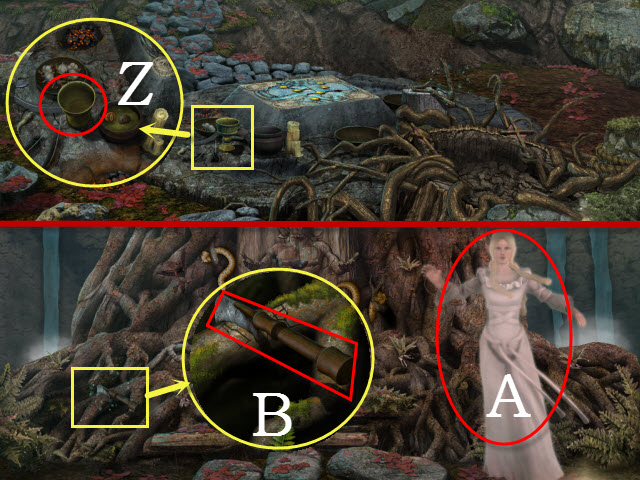
- Examine the ground; take the CHALICE (Z).
- Walk forward to the Tree Entrance.
- Talk to the White Witch (A).
- Examine the roots; take the HOOK BLADE KNIFE (B).
- Walk down three times to the Fountain.
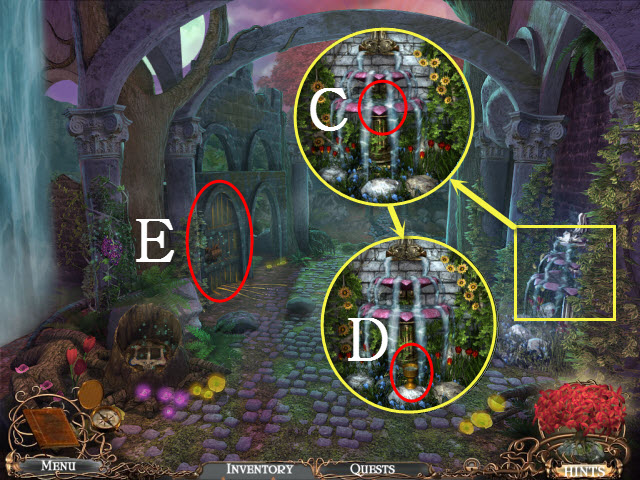
- Examine the fountain; use the CHALICE with the water (C).
- Take the CHALICE OF WATER (D).
- Examine the door to activate a puzzle (E).
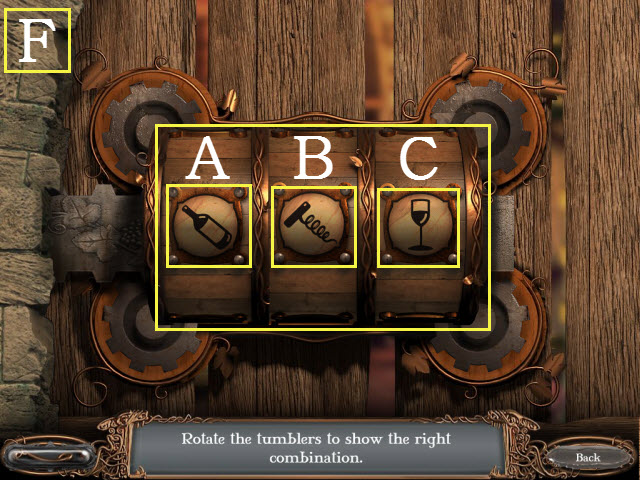
- To solve the puzzle, flip the symbols until the order matches the clue from the tree branch.
- Please see the screenshot for the solution: Ax2, Bx1, and Cx3 (F).
- Enter the Wine Cellar; examine the wine bottles to activate a HOP.
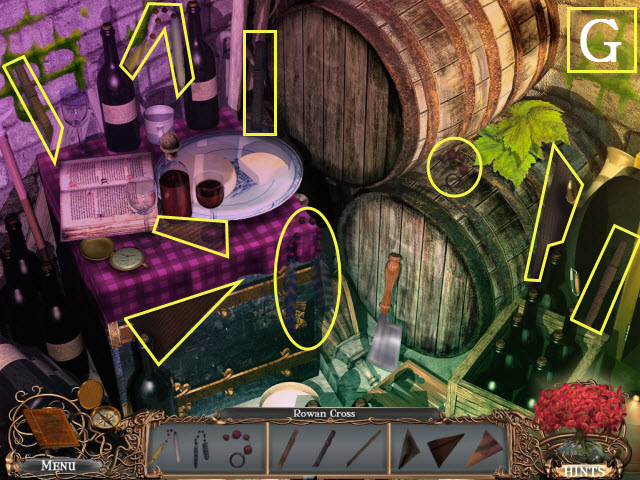
- Play the HOP (G).
- You receive the ROWAN CROSS.
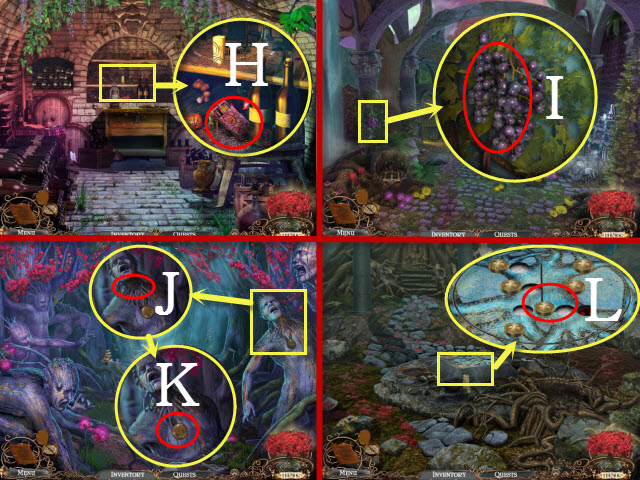
- Examine the shelf; take the MATCHES (H).
- Walk down.
- Examine the grapes; use the HOOK BLADE KNIFE on them and take the GRAPES (I).
- Walk down.
- Examine the tree man; use the MATCHES on the roots (J).
- Take the MEDAL (K).
- Return to the Altar; examine the altar and place the MEDAL on it to activate a puzzle (L).
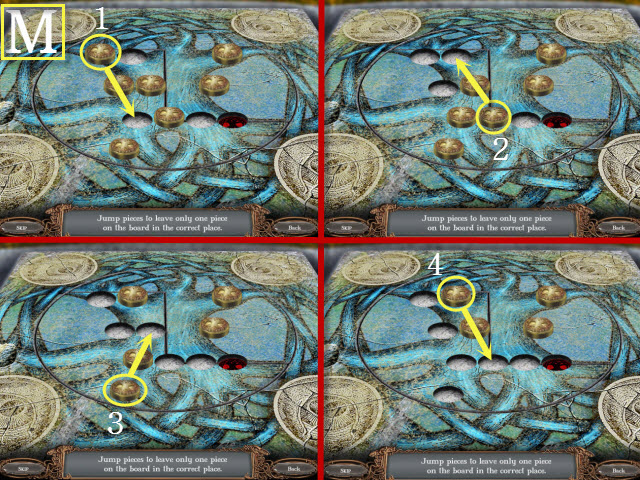
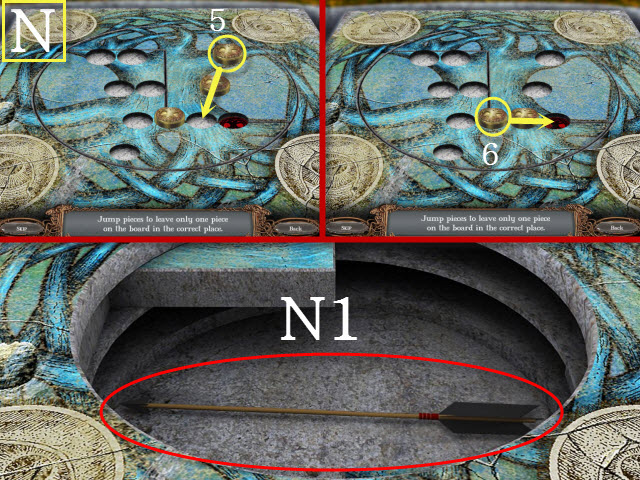
- To solve the puzzle, play the game of Chinese checkers; Pieces may only jump over each other to eliminate another piece and the last move must finish on the empty space.
- Follow steps 1-6 to solve (M, N).
- Take the ARROW (N1).
- Walk down to the Lair Glen.
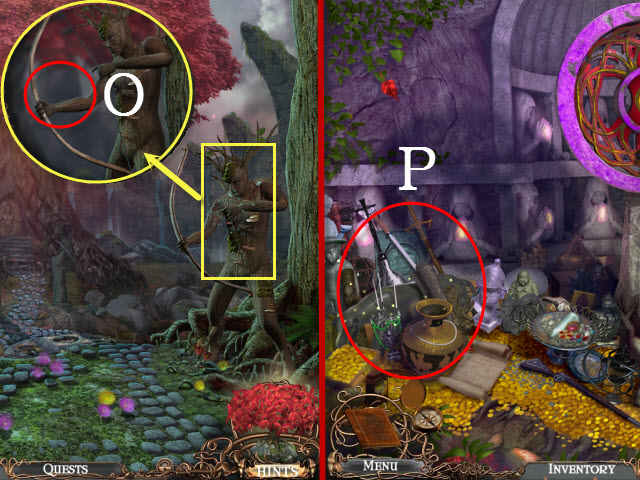
- Examine the archer; place the ARROW with the bow (O).
- Walk left to the Treasury.
- Examine the treasure to activate a HOP (P).
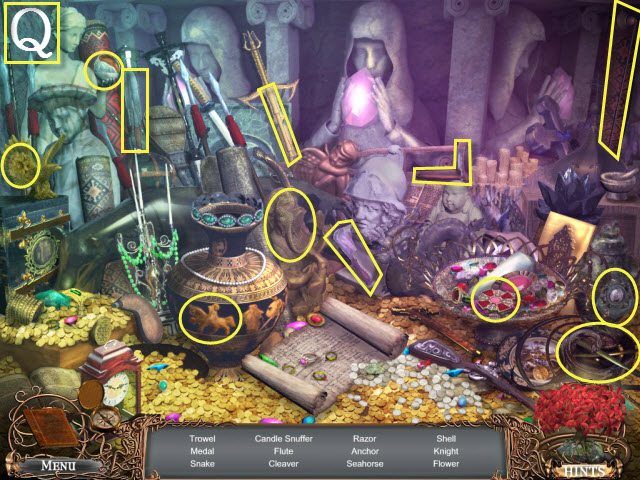
- Play the HOP (Q).
- You receive the TROWEL.
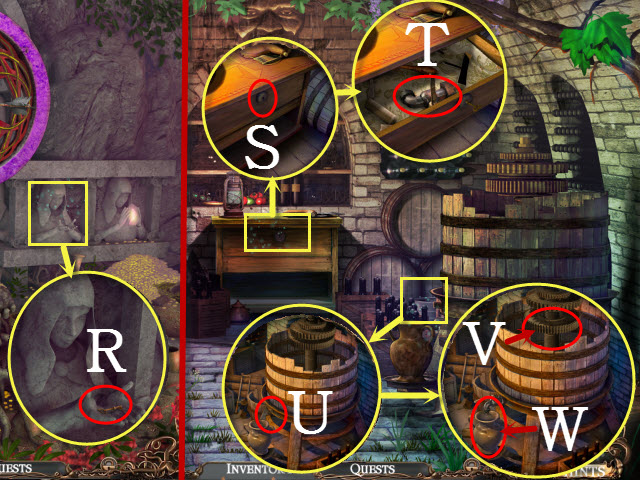
- Examine the statue; take the SMALL KEY (R).
- Return to the Wine Cellar.
- Examine the desk; use the SMALL KEY on the lock (S).
- Take the TAP (T).
- Examine the barrel; place the TAP the fixture (U).
- Place the GRAPES in the barrel (V); take the WINE JAR (W).
- Return to the Tree Entrance.
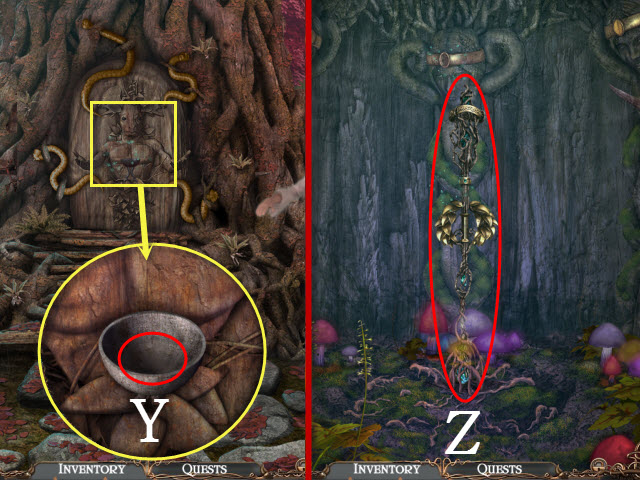
- Examine the door; use the WINE JAR on the bowl (Y).
- Enter the Great Tree.
- Examine the scepter to activate a mini-game (Z).
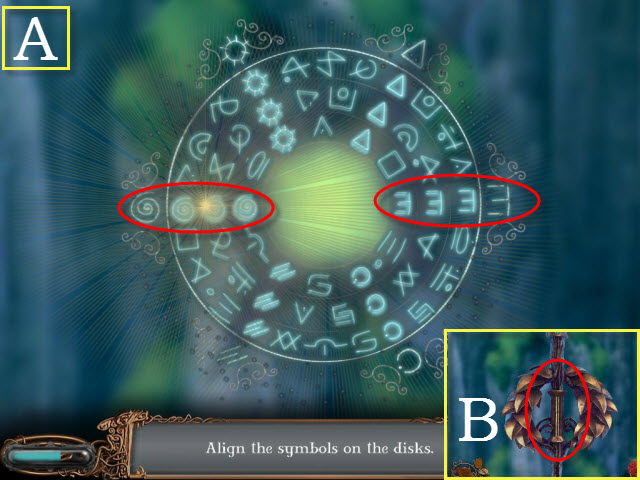
- To solve the mini-game, rotate each disk so the symbols are aligned with the symbols on the outer rim.
- Please see the screenshot for the solution (A).
- Take the MAGIC SCEPTER (B).
- Return to the Crypt.
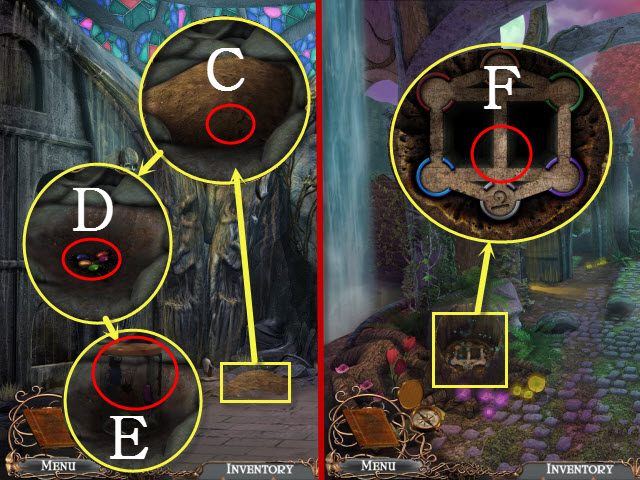
- Examine the soil; use the TROWEL on it (C).
- Use the GLASS JAR on the bugs (D).
- Take the JAR OF BEETLES (E).
- Return to the Fountain.
- Examine the tree stump; place the BEETLES on the game to activate a puzzle (F).
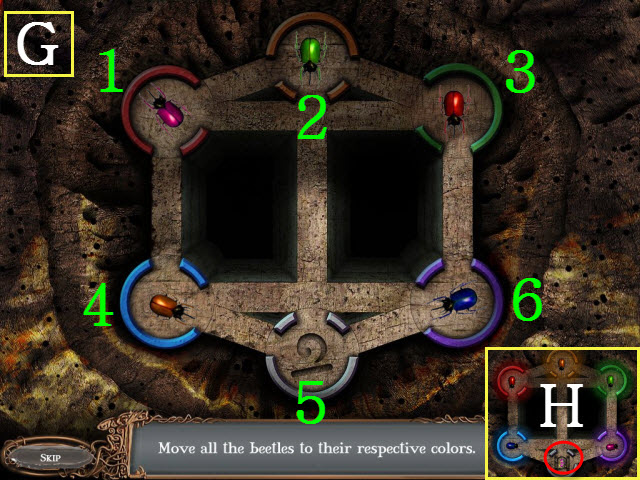
- To solve the puzzle, move the beetles to the spaces with corresponding colors.
- Please see the screenshot for the solution: 4, 1, 3, 2, 5, 4, 6, and 5 (G).
- Take the MAGIC SEED (H).
- Return to the Treasury.
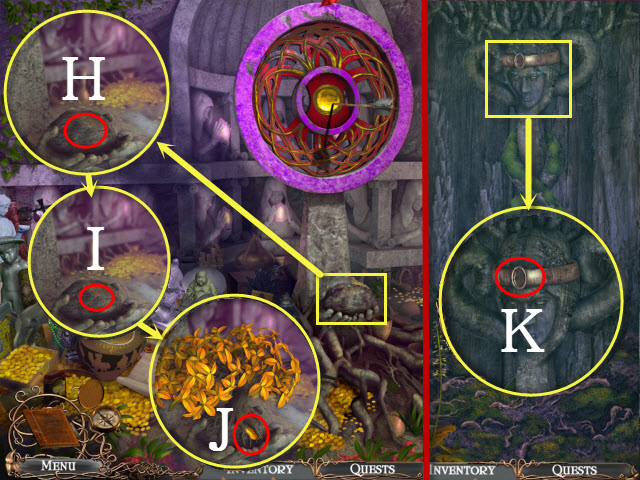
- Examine the stone; place the MAGIC SEED in it (H).
- Use the CHALICE OF WATER on the stone (I).
- Take the GOLDEN LEAF (J).
- Return to the Great Tree.
- Examine the crown; place the GOLDEN LEAF in the engraving (K).
- Return to the Altar.
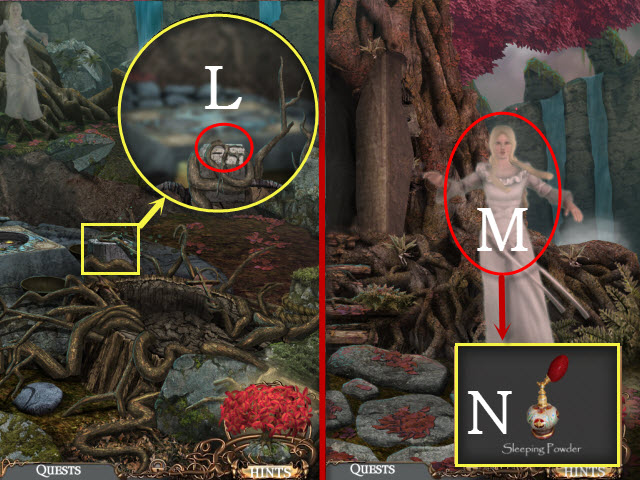
- Examine the base; place the ROWAN CROSS on it (L).
- Walk forward.
- Give the MAGIC SCEPTER to the White Witch (M).
- Take the SLEEPING POWDER (N).
- Return to the Forest Entrance.
Chapter 5: The Forest
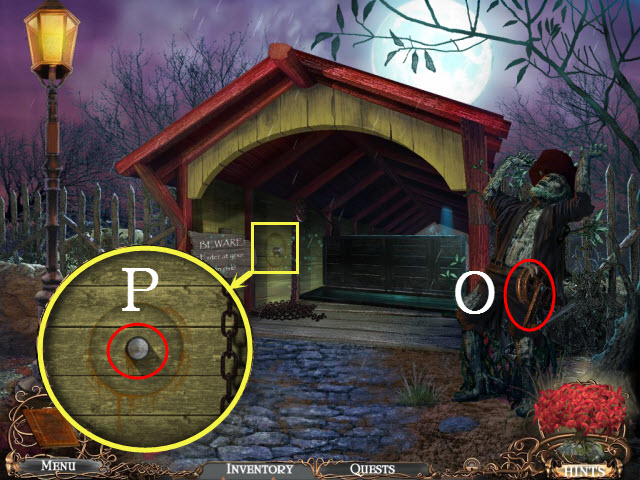
- Take the BRIDGE CRANK (O).
- Examine the knob; place the BRIDGE CRANK on it (P).
- Walk forward to the Black Woods.
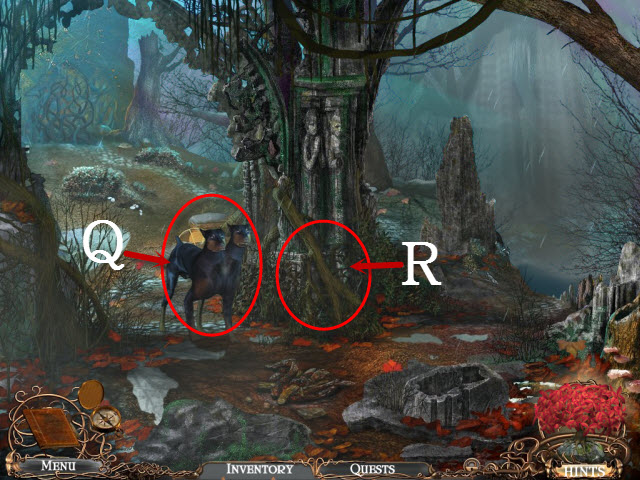
- Give the SLEEPING POWDER to the beast (Q).
- Examine the tree base to activate a HOP (R).
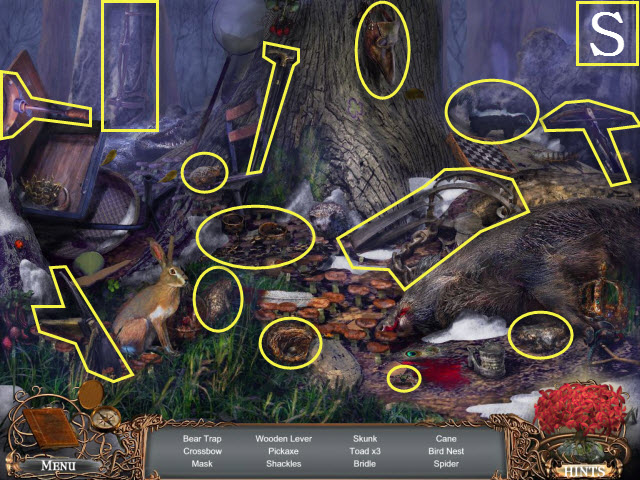
- Play the HOP (S).
- You receive the WOODEN LEVER.
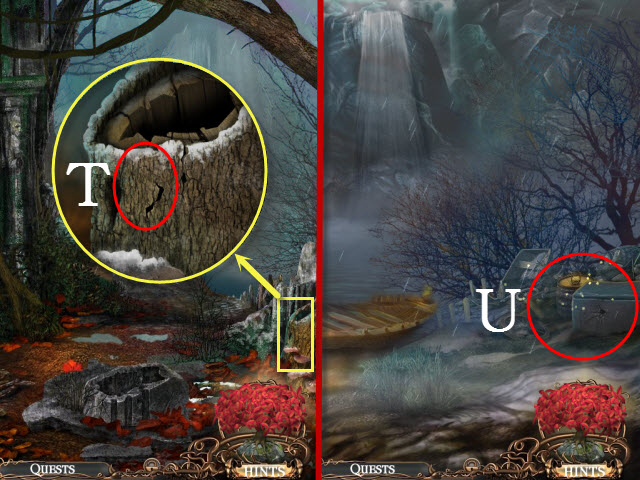
- Examine the stump; take the CANOE PATCH (T).
- Walk right.
- Examine the debris to activate a HOP (U).
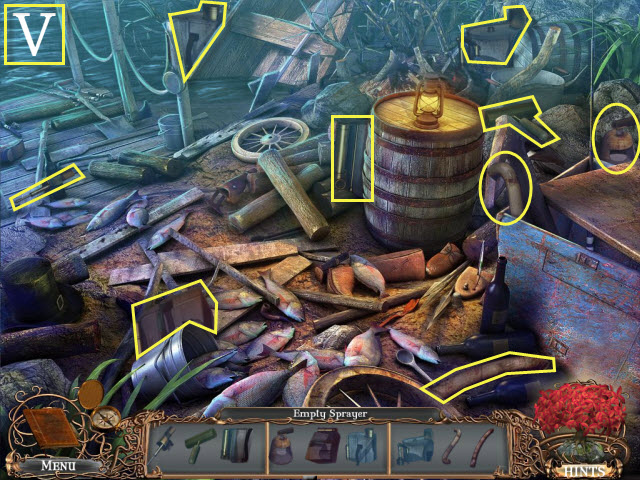
- Play the HOP (V).
- You receive the EMPTY SPRAYER.
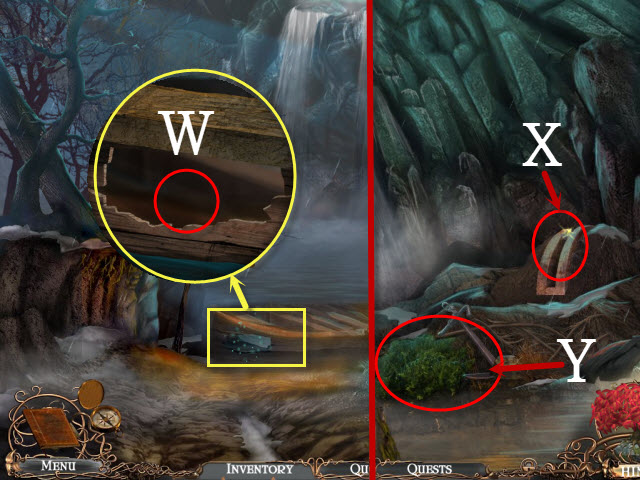
- Examine the canoe; place the CANOE PATCH over the hole (W).
- Walk forward to the Waterfalls.
- Place the WOODEN LEVER in the slot (X).
- Examine the shore to activate a HOP (Y).
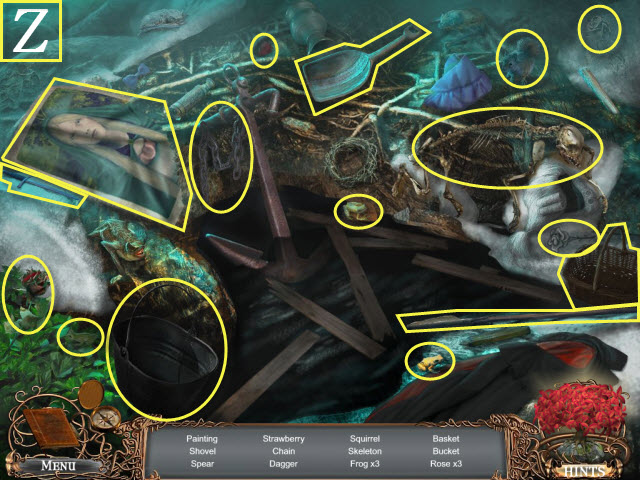
- Play the HOP (Z).
- You receive the PAINTING.
- Walk forward to the Cave.
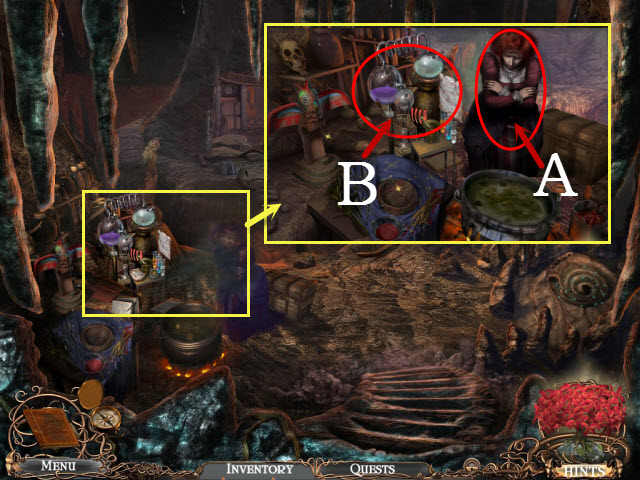
- Examine the camp; talk to Fatine (A).
- Examine the flasks to activate a puzzle (B).
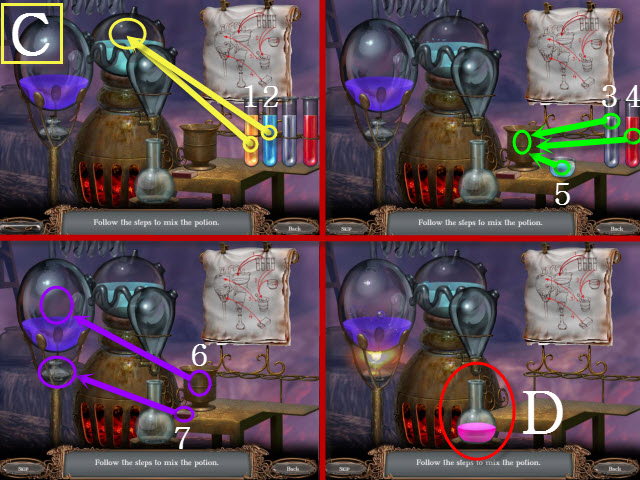
- To solve the puzzle, follow the steps 1-7 (C) to complete the recipe.
- Take the SPECIAL POTION (D).
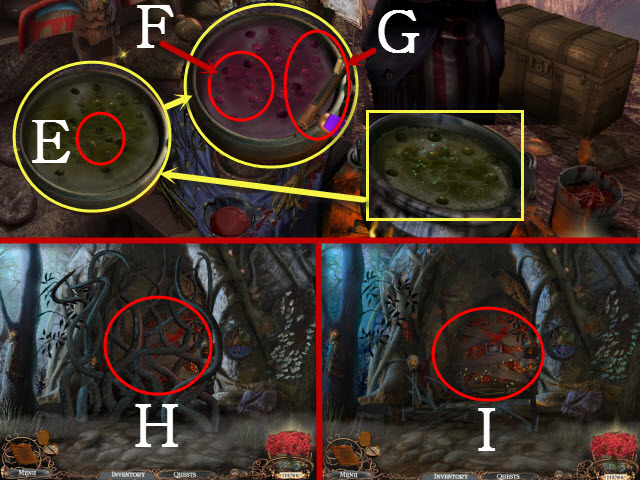
- Examine the cauldron; place the SPECIAL POTION in it (E).
- Use the EMPTY SPRAYER with the cauldron (F).
- Take the FILLED SPRAYER (G).
- Return to the Black Woods; walk left to the Cabin Entrance.
- Use the FILLED SPRAYER on the branches (H).
- Examine the doorway to activate a HOP (I).
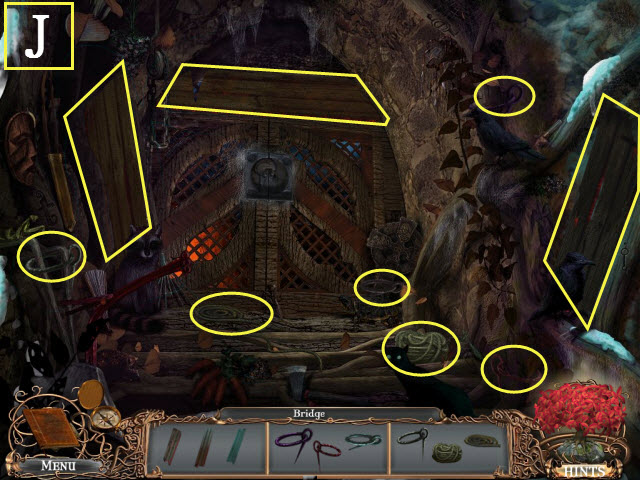
- Play the HOP (J).
- You receive the BRIDGE.
- Return to the Cave and walk forward to the Gap.
Chapter 6: The Cave
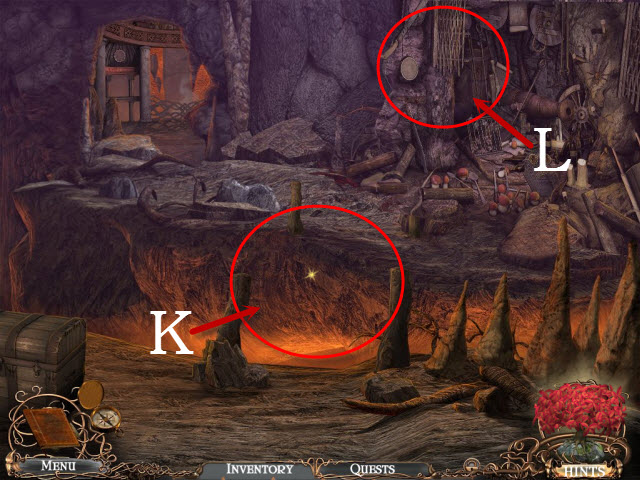
- Place the BRIDGE over the chasm (K).
- Examine the wall to activate a HOP (L).
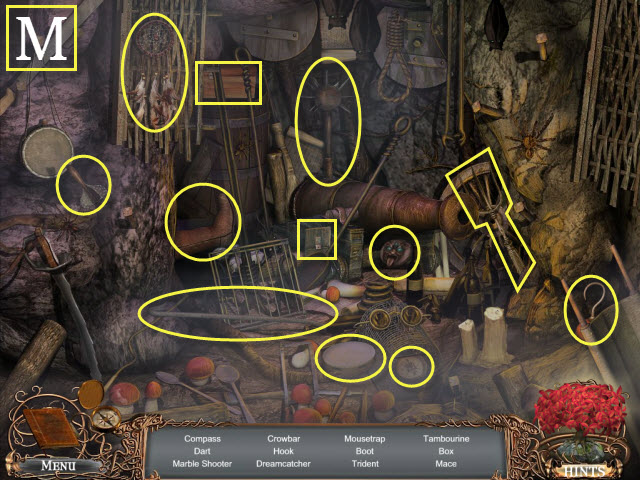
- Play the HOP (M).
- You receive the MARBLE SHOOTER.
- Walk down.
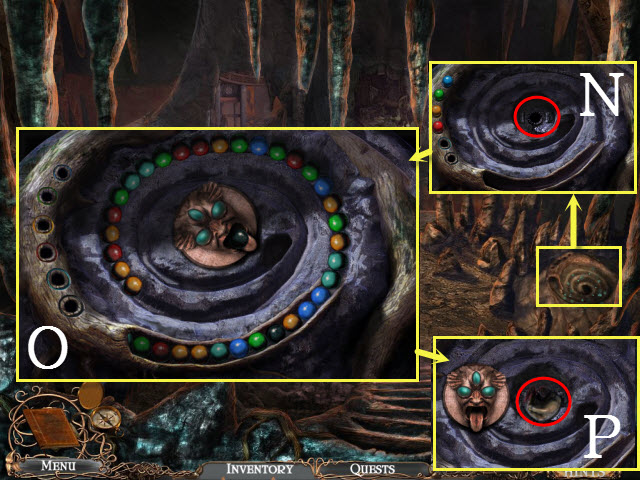
- Examine the mechanism; place the MARBLE SHOOTER on it to activate a mini-game (N).
- To complete the mini-game, shoot the marbles into groups of three of the same color until you win (O).
- Take the CABIN KEY (P).
- Return to the Cabin Entrance.
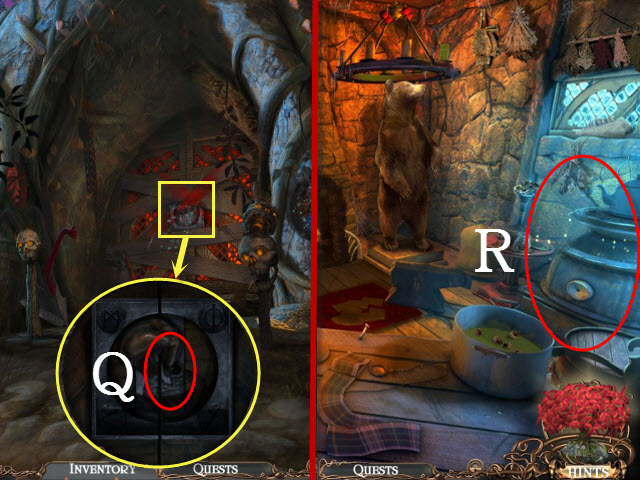
- Examine the door; place the CABIN KEY in the lock (Q).
- Enter the Cabin.
- Examine the stove to activate a HOP (R).
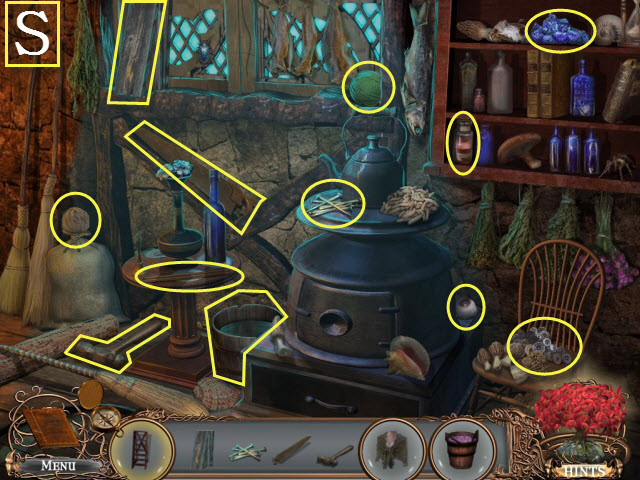
- Play the HOP (S).
- You receive the MAGIC LIQUID BUCKET, the SHAWL, and the STEPLADDER.
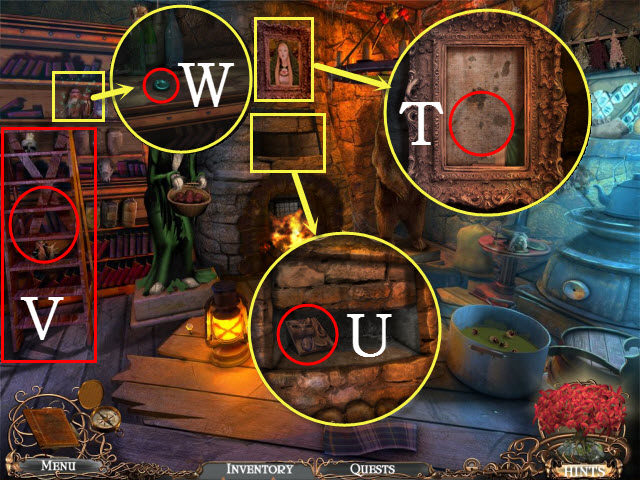
- Examine the frame; place the PAINTING in it (T).
- Examine the compartment; take the CAT CREST (U).
- Place the STEPLADDER with the shelves (V).
- Examine the shelves; take the WANING CRESCENT (W).
- Return to the Gap and walk forward to the Puzzle Room.
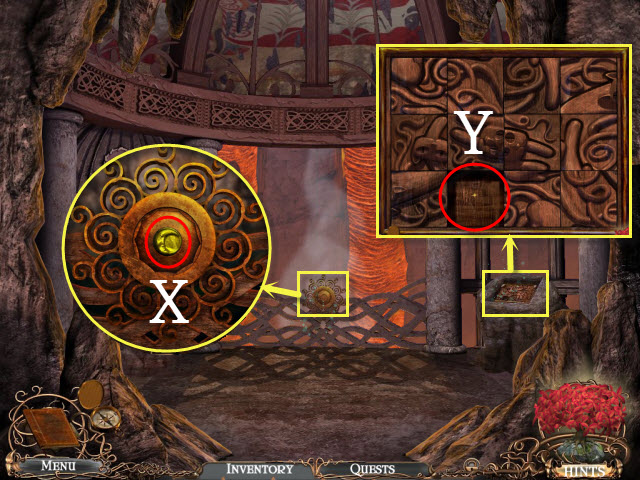
- Examine the engraving; take the WAXING CRESCENT (X).
- Examine the stone altar; place the CAT CREST in the empty space to activate a puzzle (Y).
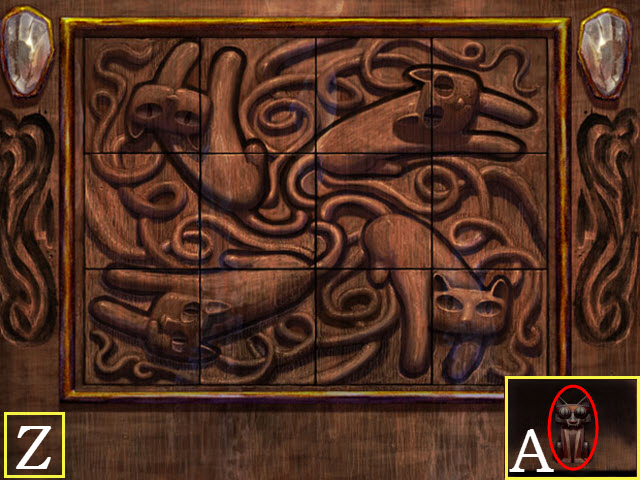
- To solve the puzzle, arrange the pieces to create a whole image.
- Please see the screenshot for the solution (Z).
- Take the CAT STATUE (A).
- Return to the Cabin Entrance.
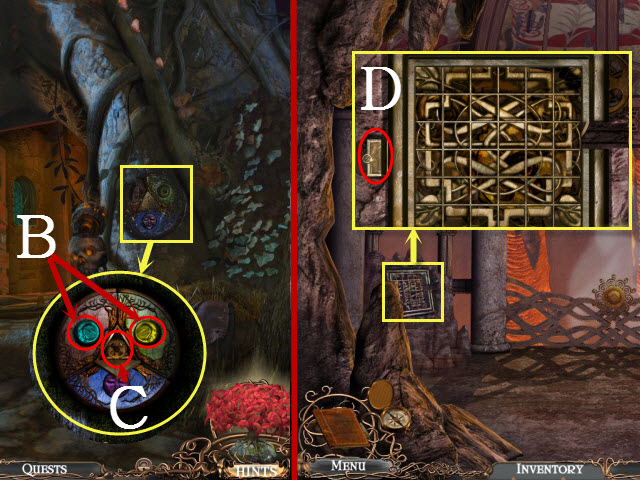
- Examine the plaque; place the WAXING CRESCENT and the WANING CRESCENT in the slots (B).
- Take the PUZZLE KEY (C).
- Return to the Puzzle Room.
- Examine the puzzle; use the PUZZLE KEY on the slot to activate a puzzle (D).
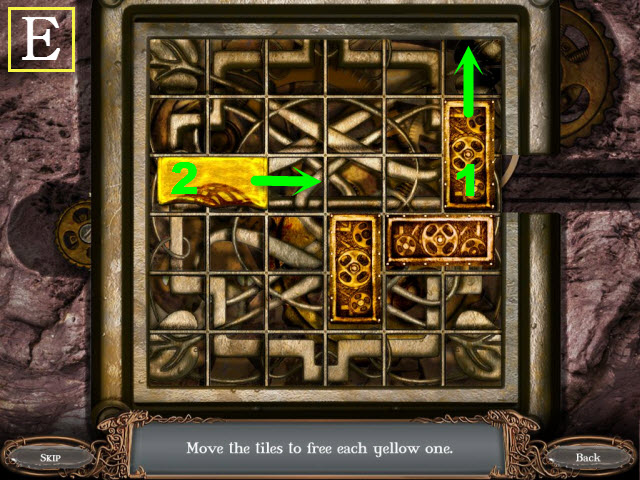
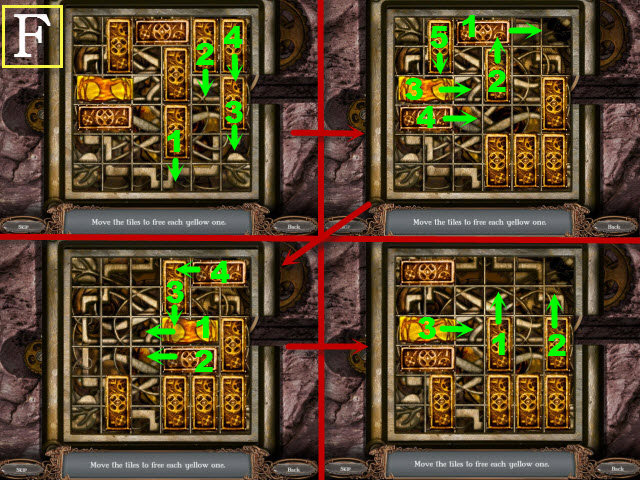
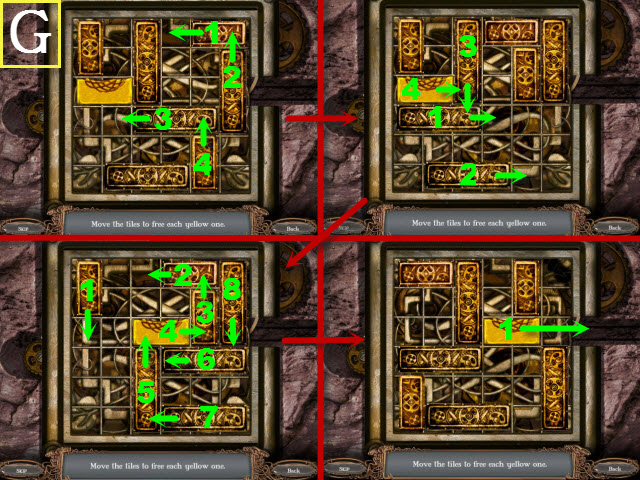
- To solve the puzzle, slide the rectangles so that the golden rectangle can be dragged through the opening on the side.
- For each phase, drag each rectangle as far as it can go in the indicated direction (E-G).
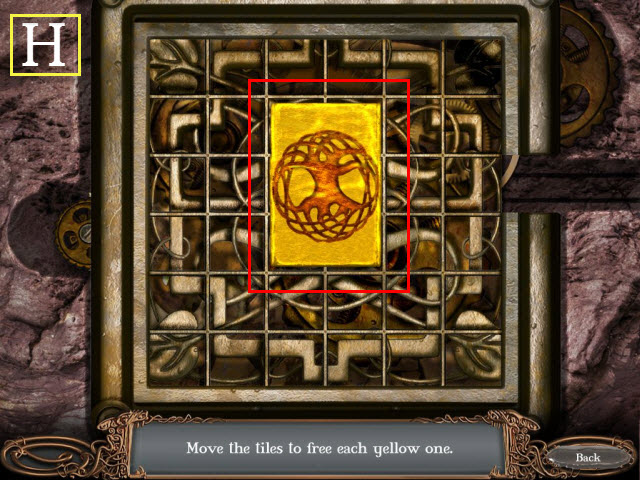
- Take the GOLDEN RECTANGLE (H).
- Return to the Cabin.
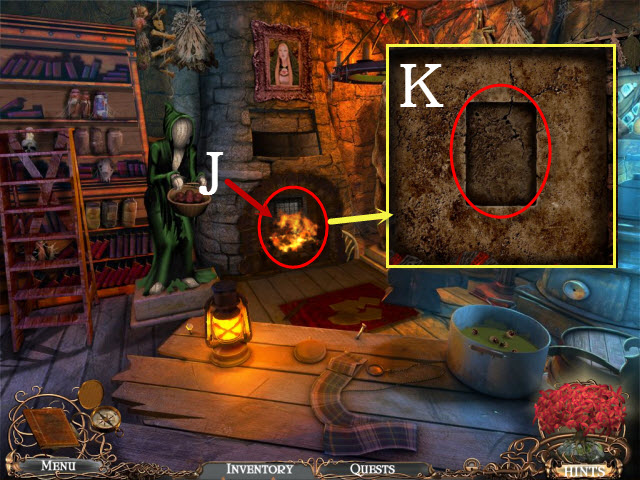
- Use the MAGIC LIQUID BUCKET on the fire (J).
- Examine the fireplace; place the GOLDEN RECTANGLE in the engraving to activate a puzzle (K).
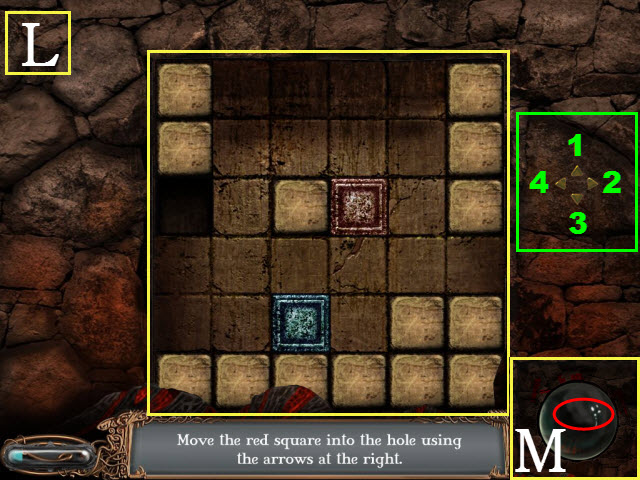
- To solve the puzzle, use the arrows to move the blue square; use the blue square to push the red square into the hole.
- Please see the screenshot for the solution: 4, 1, 1, 1, 2, 2, 3, 2, 3, 4, 4, 4, 3, 4, and 1 (L).
- Take the CRYSTAL BALL (M).
- Return to the Cave.
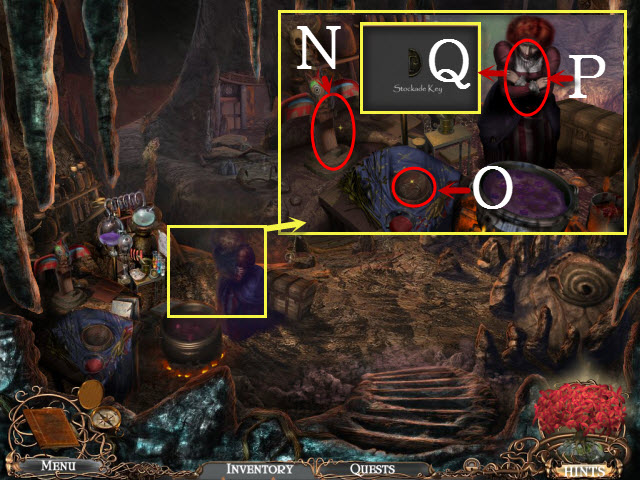
- Examine the camp; place the CAT STATUE with the totem (N).
- Place the CRYSTAL BALL on the pedestal (O).
- Give Fatine the SHAWL (P).
- Take the STOCKADE KEY (Q).
- Return to the Church Plaza and walk right to the Jail Plaza.
Chapter 7: The Jail
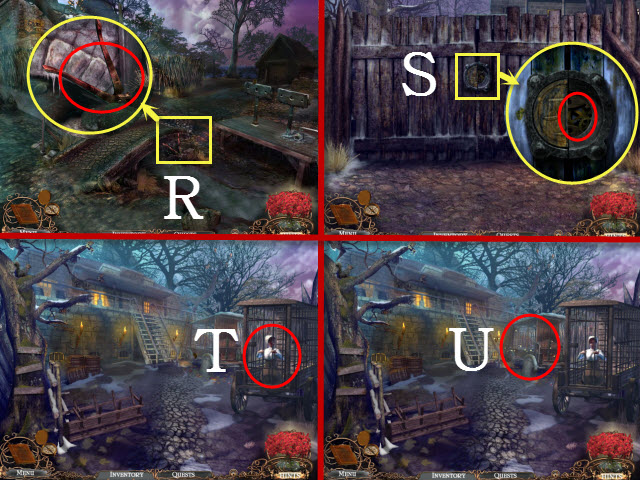
- Examine the bridge; take the BOLT CUTTERS (R).
- Walk forward.
- Examine the lock; place the STOCKADE KEY in the slot (S).
- Walk forward to the Jail Entrance.
- Talk to Daisy (T).
- Examine the cart to activate a HOP (U).
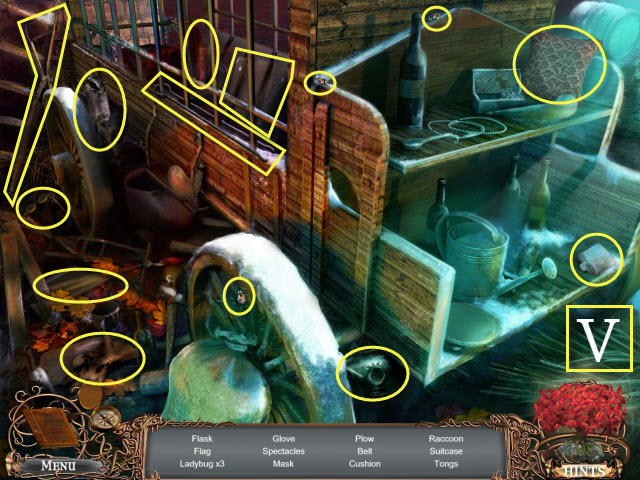
- Play the HOP (V).
- You receive the TONGS.
- Walk forward to the Stockade Entrance; examine the window to activate a HOP.
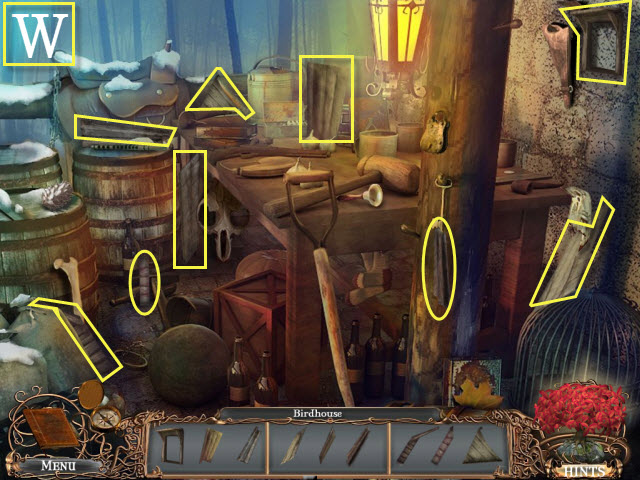
- Play the HOP (W).
- You receive the BIRDHOUSE.
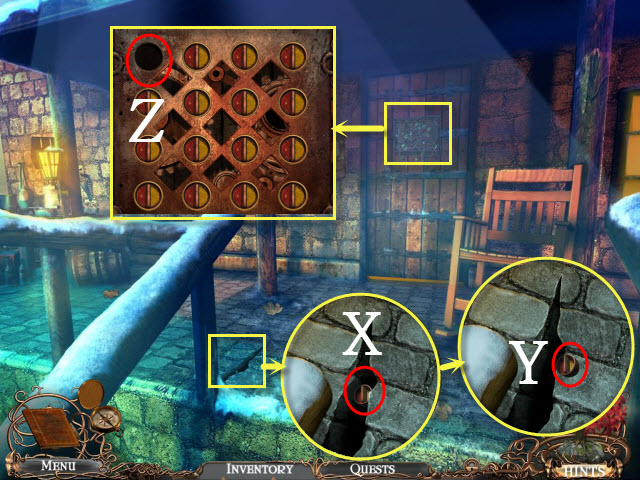
- Examine the crack; use the TONGS on the object (X).
- Take the KNOB (Y).
- Examine the door; place the KNOB in the slot to activate a puzzle (Z).
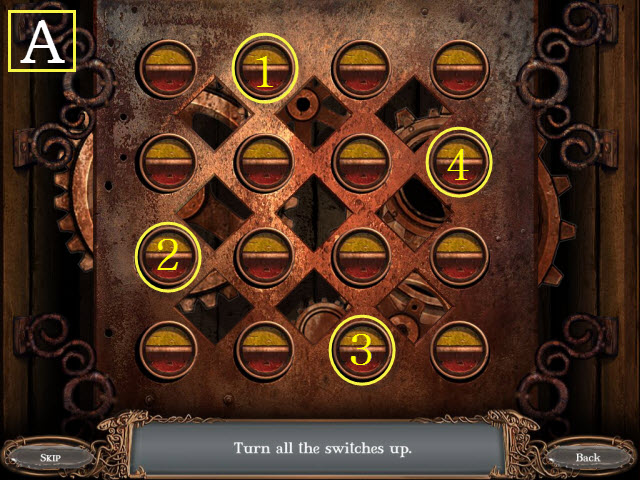
- To solve the puzzle, flip the switches until they are all in the up position. Pressing one switch will trigger adjacent switches.
- Please see the screenshot for the solution; select the switches in the order shown (A).
- Enter the Stockade.
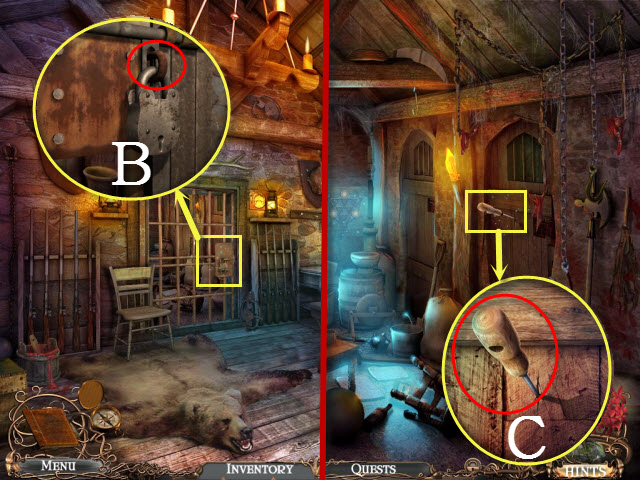
- Examine the door; use the BOLT CUTTERS on the padlock (B).
- Enter the Guard Room.
- Examine the door; take the ICE PICK (C).
- Return to the Jail Plaza.
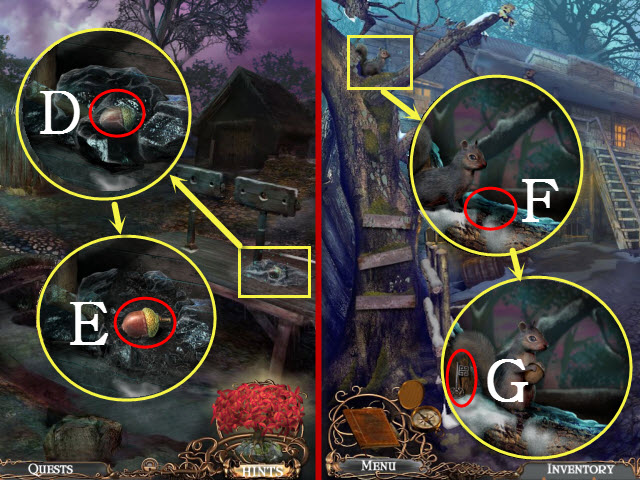
- Examine the ice; use the ICE PICK on it (D).
- Take the ACORN (E).
- Return to the Jail Entrance.
- Examine the tree branch; place the ACORN with the squirrel (F).
- Take the DRAWER KEY (G).
- Return to the Stockade.
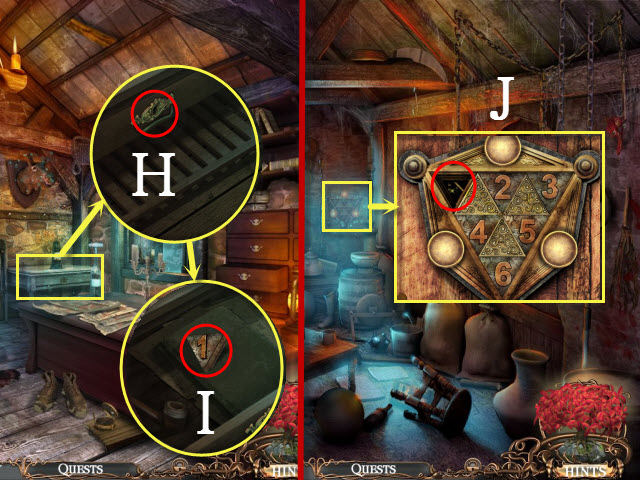
- Examine the drawer; place the DRAWER KEY in the lock (H).
- Take the METAL TRIANGLE (I).
- Walk forward.
- Examine the device; place the METAL TRIANGLE in the slot to activate a puzzle (J).
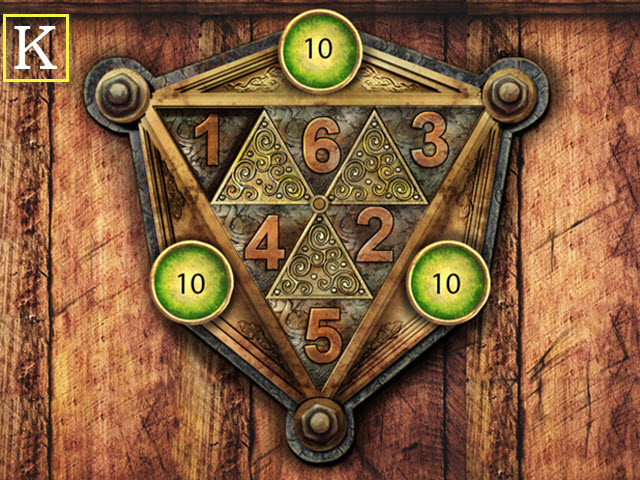
- To solve the puzzle, arrange the tiles so that each side is equal to the number ten.
- Please see the screenshot for the solution (K).
- Enter the Cell; examine the books to activate a HOP.
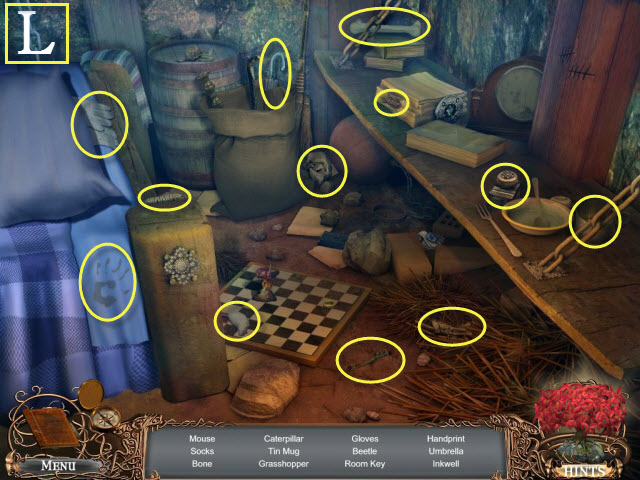
- Play the HOP (L).
- You receive the INKWELL.
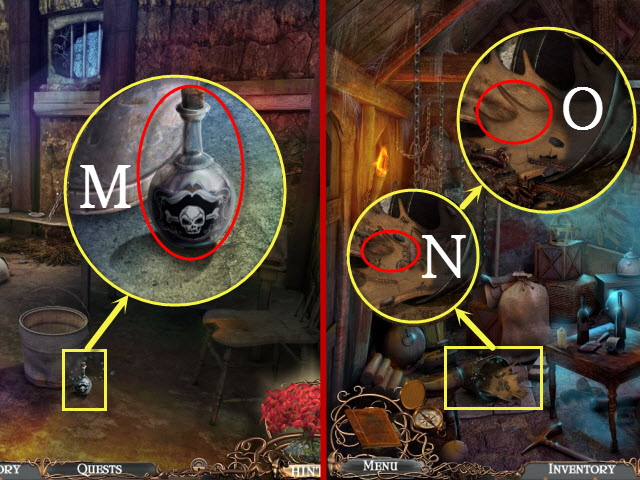
- Examine the flask; take the POISON FLASK (M).
- Walk down.
- Examine the bucket; use the POISON FLASK on the scorpions (N).
- Take the ANTLERS (O).
- Walk down.
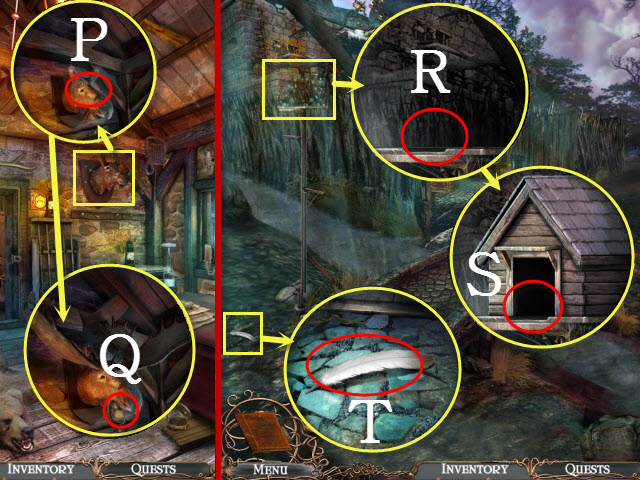
- Examine the moose; place the ANTLERS on it (P).
- Take the BIRD FOOD (Q).
- Return to the Jail Plaza.
- Examine the perch; place the BIRDHOUSE on it (R).
- Place the BIRD FOOD with the birdhouse (S).
- Examine the ground; pick up the FEATHER (T).
- Return to the Stockade.
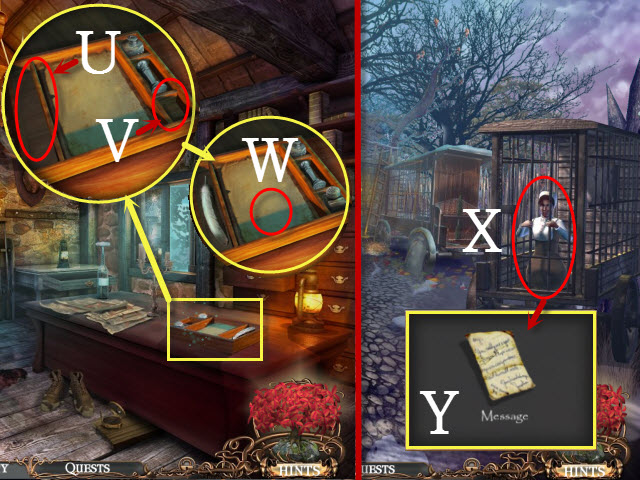
- Examine the table; place the FEATHER (U) and the INKWELL with the kit (V).
- Take the WRITING KIT (W).
- Walk down twice.
- Give the WRITING KIT to Daisy (X).
- Take the MESSAGE (Y).
- Walk down twice.
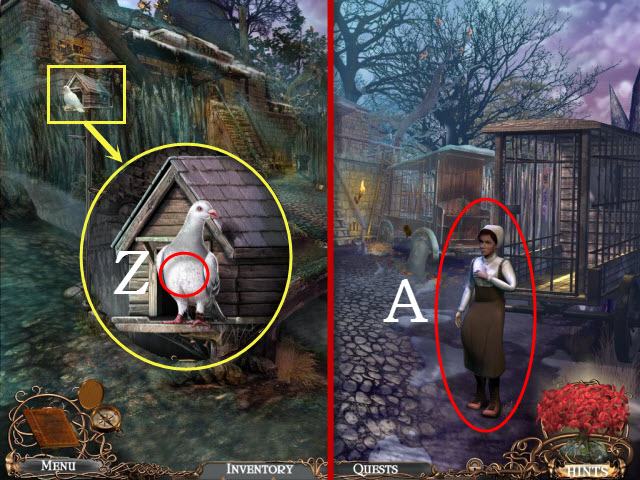
- Examine the birdhouse; place the MESSAGE with the bird (Z).
- Return to the Jail Plaza.
- Talk to Daisy (A).
- Return to the Church Main Hall and walk to the Left Side.
Chapter 8: The Spell Book
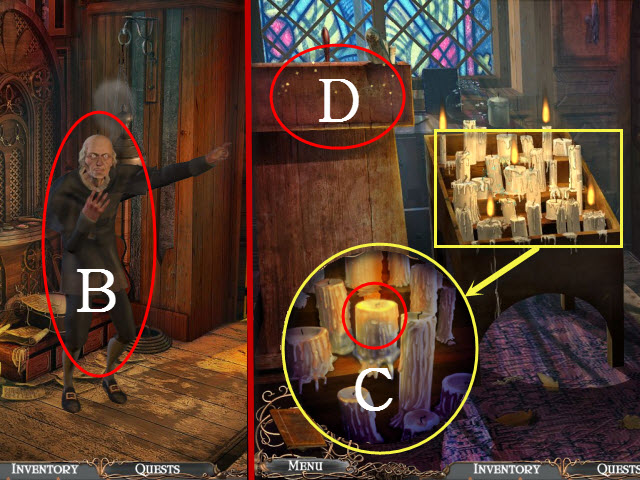
- Talk to the Reverend (B).
- Walk down; walk to the Right Side.
- Examine the candles; take the LIT CANDLE (C).
- Examine the pew to activate a HOP (D).
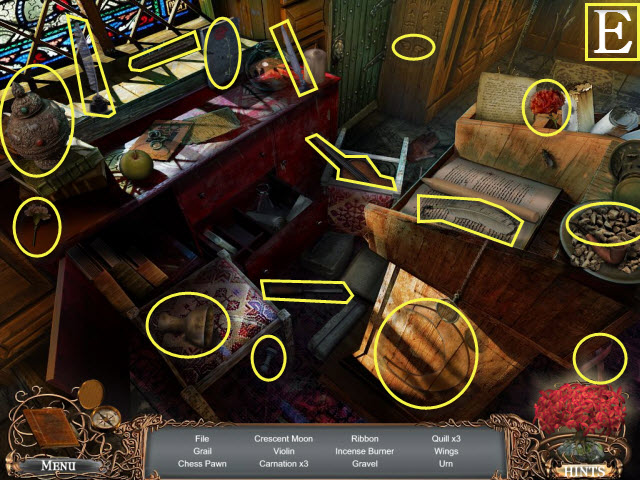
- Play the HOP (E).
- You receive the CHESS PAWN.
- Return to the Left Side and walk forward to the Office.
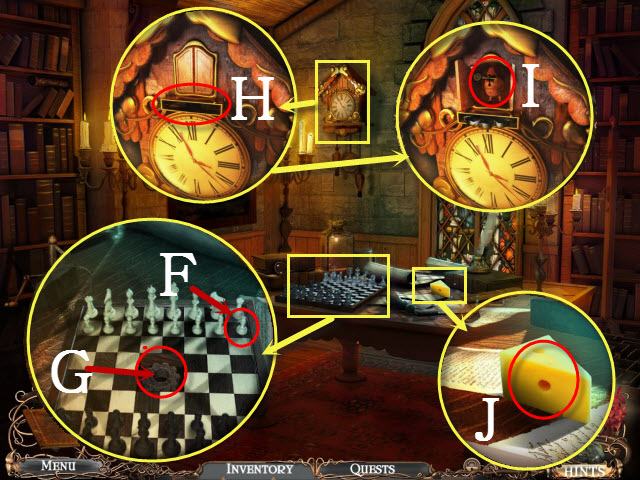
- Examine the chess board; place the CHESS PAWN on it (F).
- Take the GEAR (G).
- Examine the clock; place the GEAR in the slot (H).
- Take the BELFRY KEY (I).
- Examine the table; take the CHEESE (J).
- Return to the Right Side.
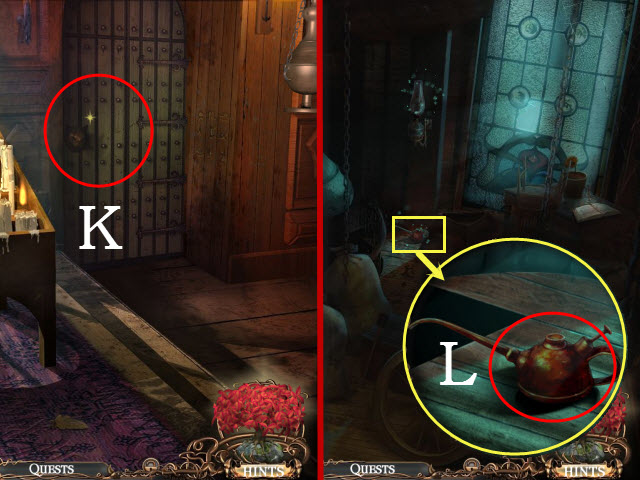
- Use the BELFRY KEY on the door (K).
- Walk forward to the Belfry.
- Examine the can; take the EMPTY OIL CAN (L).
- Return to the Office.
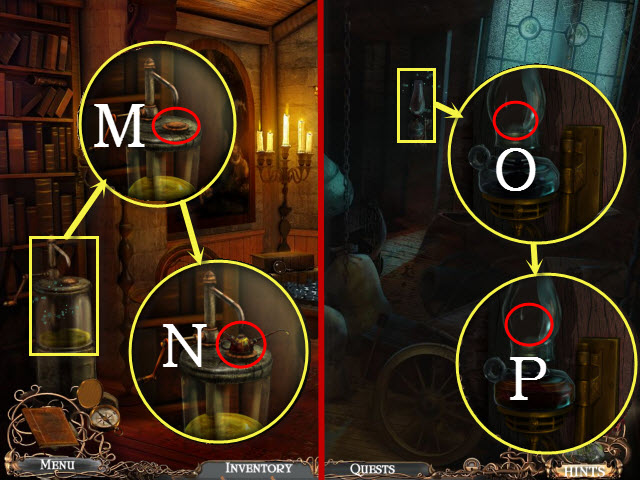
- Examine the dispenser; place the EMPTY OIL CAN with it (M).
- Take the FULL OIL CAN (N).
- Return to the Belfry.
- Examine the lamp; use the FULL OIL CAN on it (O).
- Place the LIT CANDLE in the lamp (P).
- Examine the table to activate a HOP.
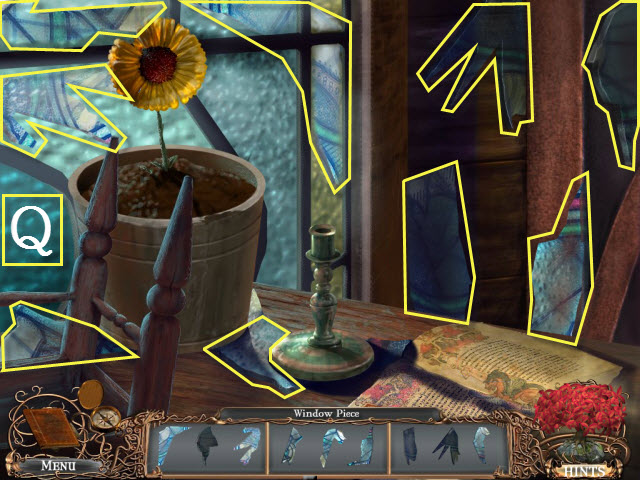
- Play the HOP (Q).
- You receive the WINDOW PIECE.
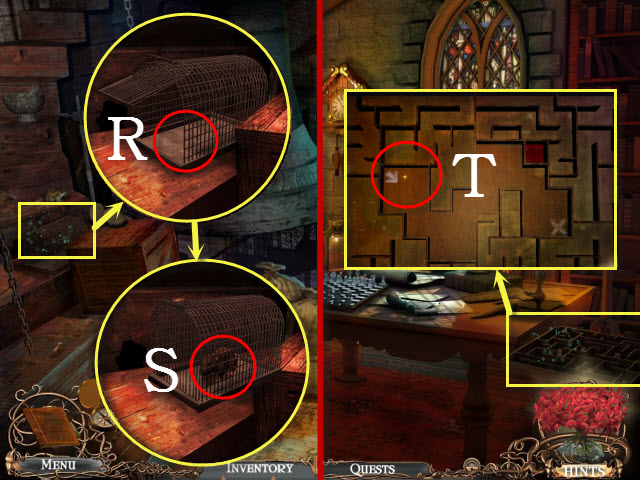
- Examine the mousetrap; place the CHEESE in it (R).
- Take the CAGED MOUSE (S).
- Return to the Office.
- Examine the maze; place the CAGED MOUSE in it to activate a mini-game (T).
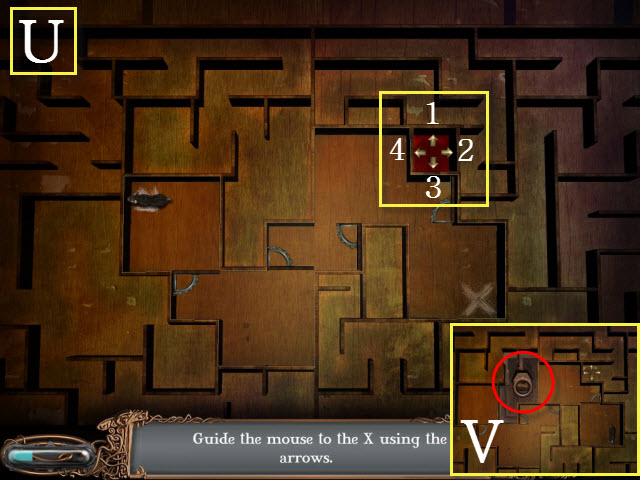
- To complete the mini-game, use the arrows to guide the mouse through the maze.
- Please see the screenshot for the solution: 2, 3, 2, 2, 1, 2, 1, 2, 2, 3, 2, and 1 (U).
- Take the HATCH HANDLE (V).
- Return to the Graveyard; examine the gravestone to activate a HOP.
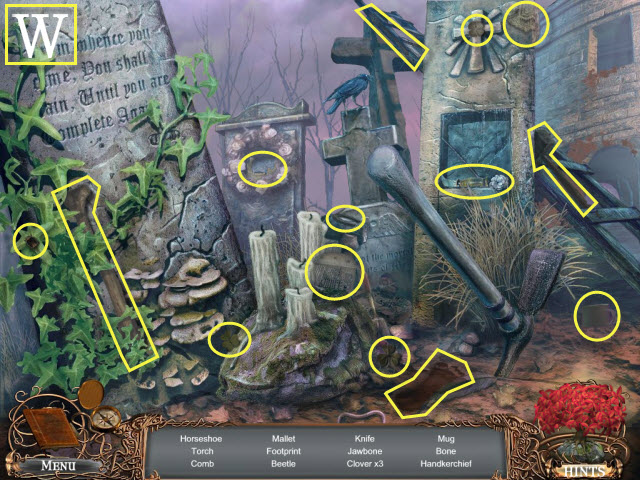
- Play the HOP (W).
- You receive the KNIFE.
- Return to the Church Main Hall.
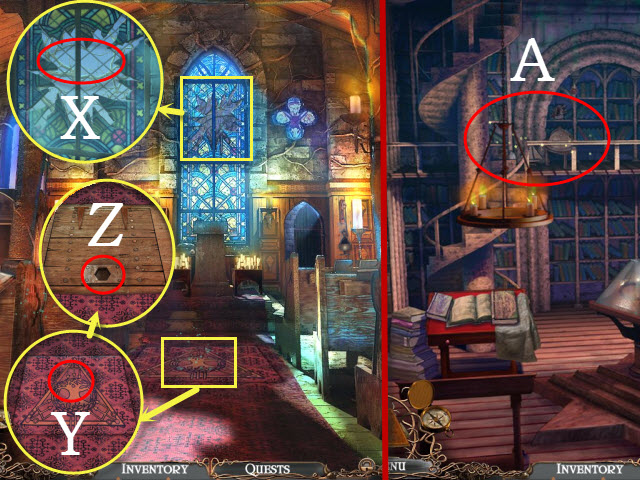
- Examine the window; place the WINDOW PIECE on the crack (X).
- Examine the carpet; use the KNIFE on it (Y).
- Place the HATCH HANDLE in the slot (Z).
- Go down to the Library; examine the balcony to activate a HOP (A).
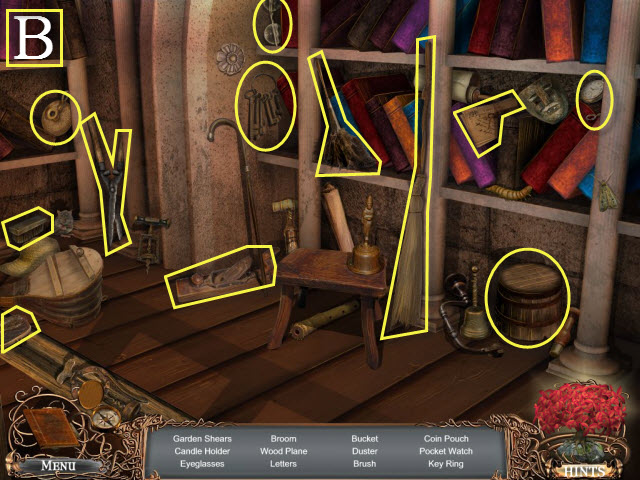
- Play the HOP (B).
- You receive the GARDEN SHEARS.
- Examine the shelves to activate a HOP.
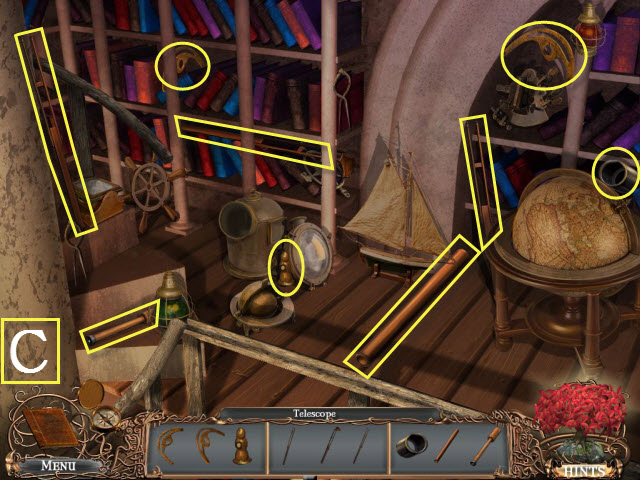
- Play the HOP (C).
- You receive the TELESCOPE.
- Return to the Church Entrance.
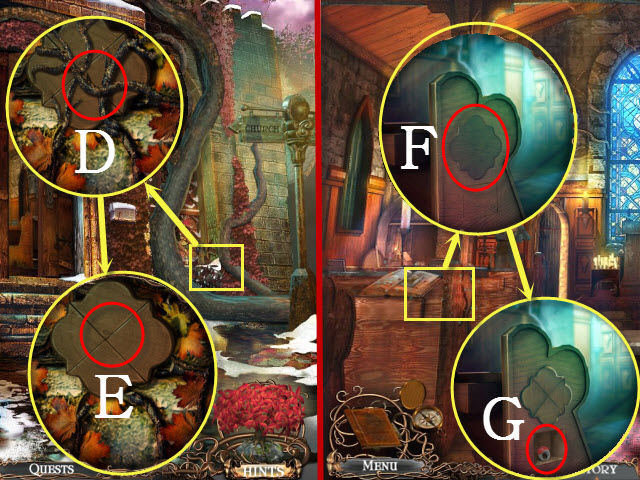
- Examine the vines; use the GARDEN SHEARS on them (D).
- Take the WOODEN ORNAMENT (E).
- Walk forward.
- Examine the bench; place the WOODEN ORNAMENT in the engraving (F).
- Take the REVEREND'S RING (G).
- Return to the Belfry.
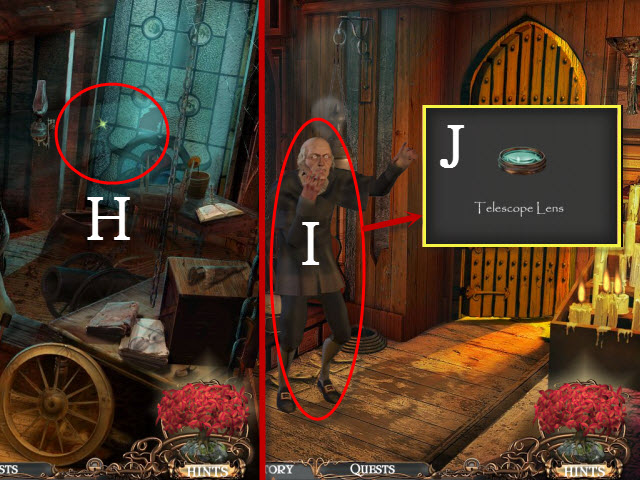
- Place the TELESCOPE with the window (H).
- Return to the Left Side.
- Give the Reverend the REVEREND'S RING (I).
- Take the TELESCOPE LENS (J).
- Return to the Belfry.
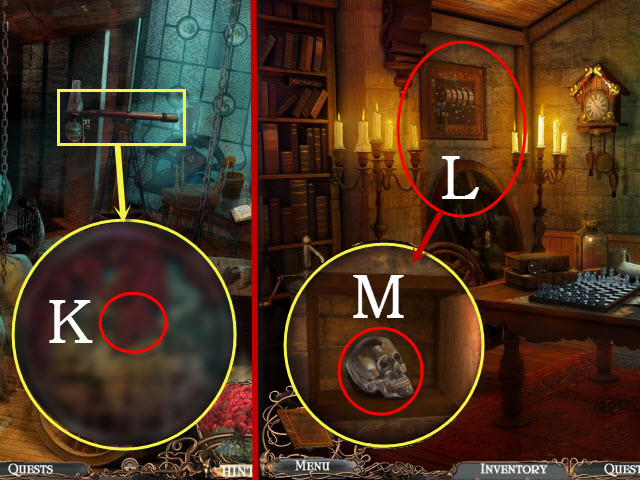
- Examine the telescope; place the TELESCOPE LENS on it (K).
- Return to the Office.
- Move the painting; examine the safe (L).
- Take the CRYSTAL SKULL (M).
- Return to the Graveyard and walk right.
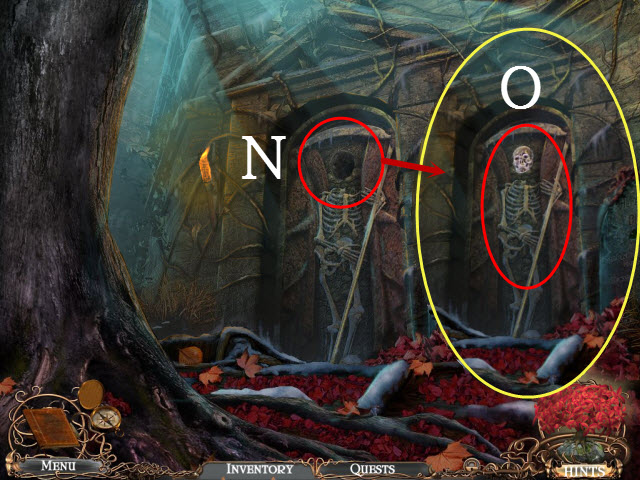
- Place the CRYSTAL SKULL in the crevice (N).
- Examine the skeleton to activate a mini-game (O).
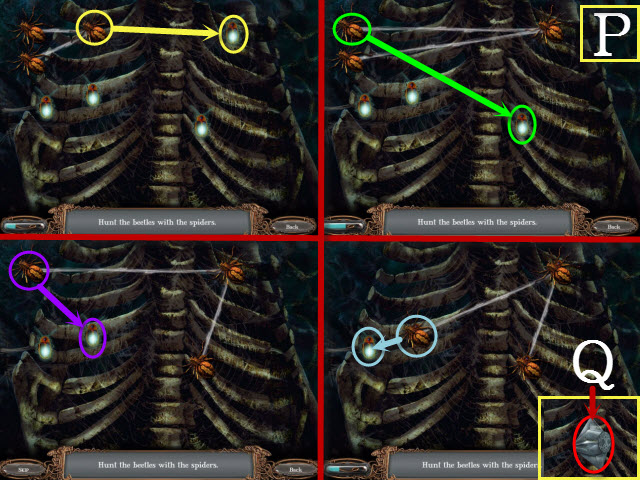
- To complete the mini-game, drag the spiders over the bugs.
- Please see the screenshot for the solution (P).
- Take the SPELL BOOK KEY (Q).
- Return to the Library.
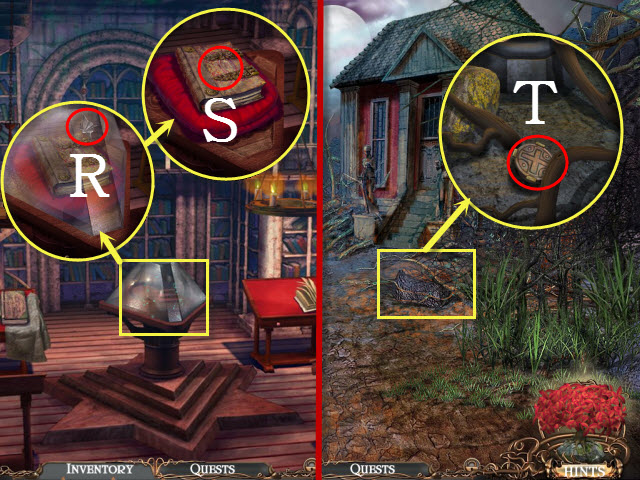
- Examine the case; place the SPELL BOOK KEY in the lock (R).
- Take the SACRED SPELL BOOK (S).
- Return to the Courthouse.
- Examine the branches; take the POSITIVE SEAL (T).
- Walk forward.
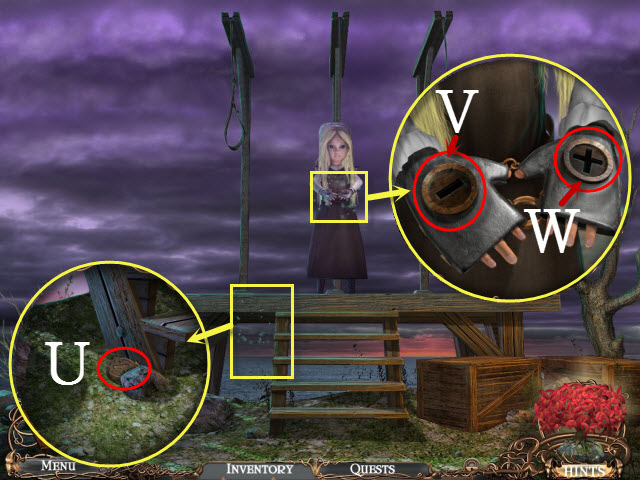
- Examine the steps; take the NEGATIVE SEAL (U).
- Examine the girl; place the NEGATIVE SEAL (V) and the POSITIVE SEAL (W) in the slots.
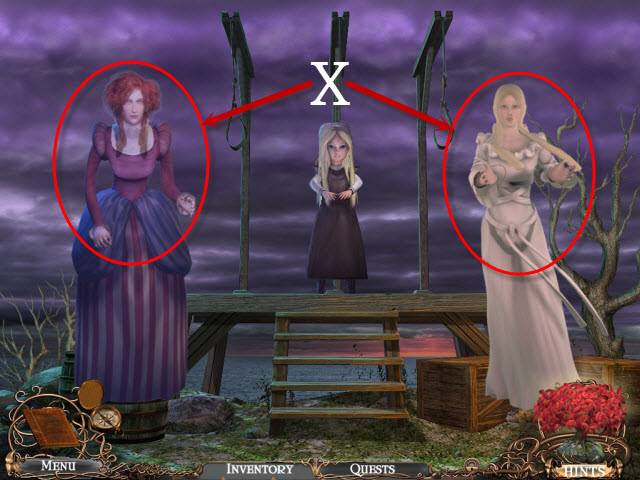
- Give the SACRED SPELL BOOK to Fatine or the White Witch (X).
- Congratulations! You have completed Dark Sisterhood: The Initiation!
Created at: 2013-09-30

