Walkthrough Menu
- General Tips
- Chapter 1: The Clearing
- Chapter 2: The Fair
- Chapter 3: The Square
- Chapter 4: The Room with the Mirror
- Chapter 5: The Perfume Shop
- Chapter 6: The Dungeon
- Chapter 7: The Secret Room
General Tips
- This is the official guide for Dark Strokes: The Legend of the Snow Kingdom.
- This guide will not mention each time you have to zoom into a location; the screenshots will show each zoom scene.
- We will use the acronym HOP for Hidden-object puzzles. Interactive items will be color-coded.
- Use the map to travel to a location.
Chapter 1: The Clearing
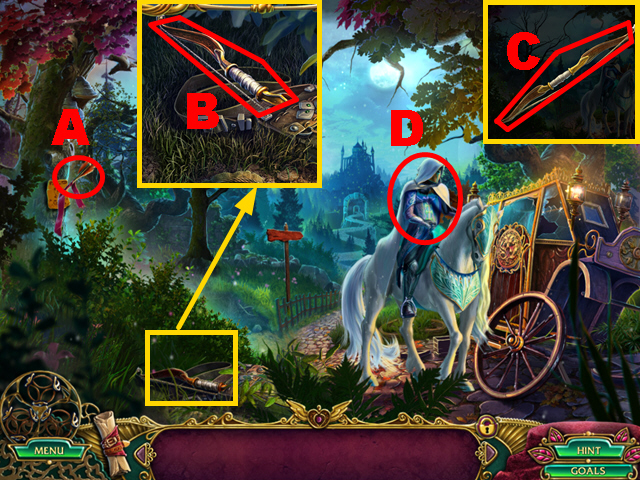
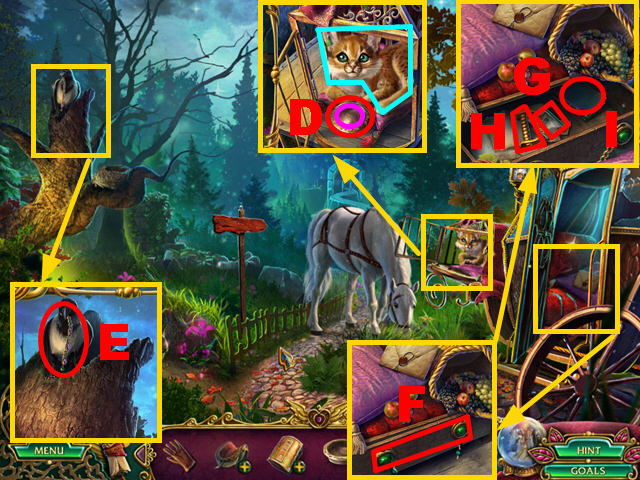
- Take the ARROW (A).
- Remove 2 twigs; take the BOW (B).
- Place the ARROW on the BOW (C) to acquire the BOW AND ARROW.
- Use the BOW AND ARROW (D).
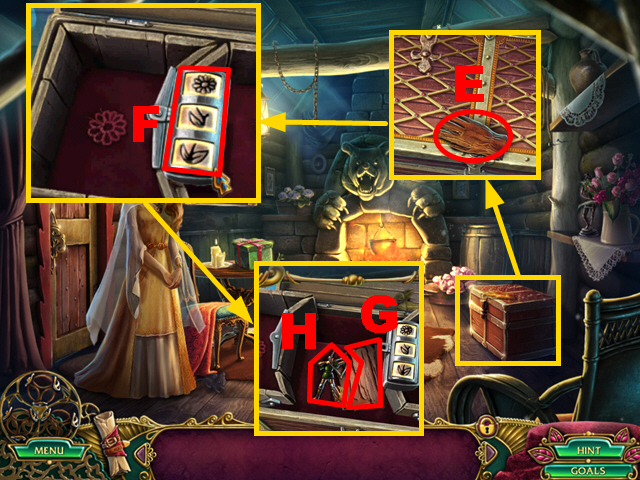
- Take the GLOVE (E); open the chest.
- Remove 5 items; enter the correct code (F).
- Take the PIECE OF PAPER (G) and HUNTER FIGURINE (H).
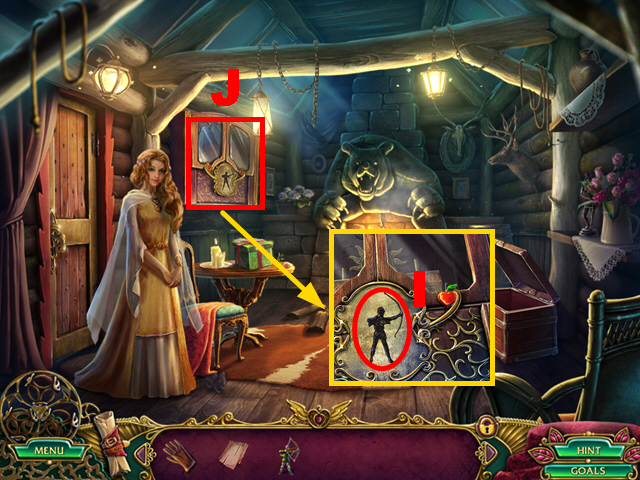
- Place the HUNTER FIGURINE (I).
- Examine the cupboard (J).
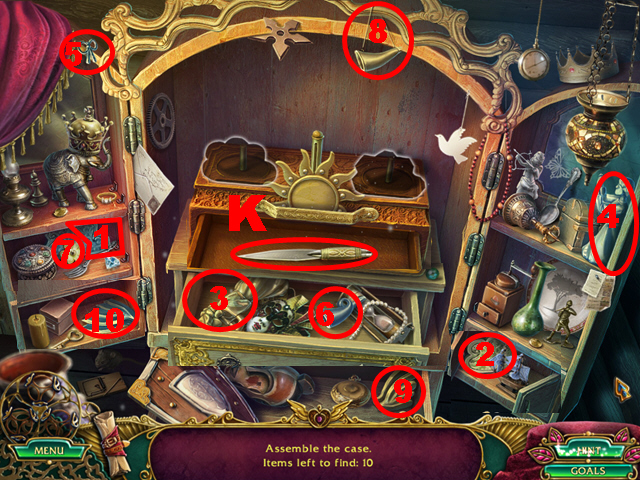
- Play the HOP.
- Solution: 1-10.
- Take the KNIFE (K).
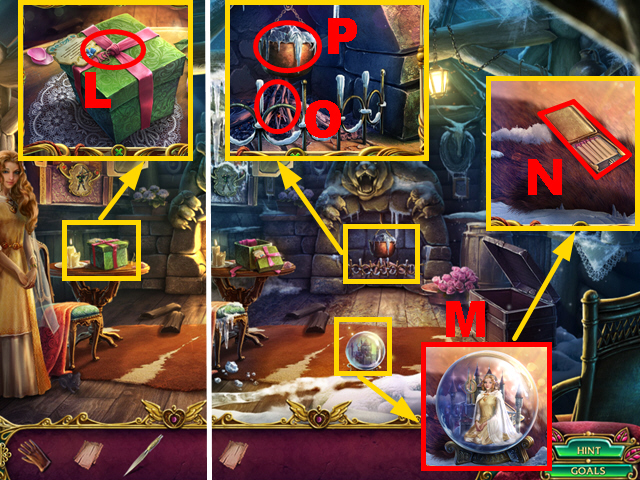
- Use the KNIFE (L).
- Take the snow globe (M) and MATCHES (N).
- Use the PIECE OF PAPER and MATCHES (O); collect the HOT WATER with the GLOVE (P).
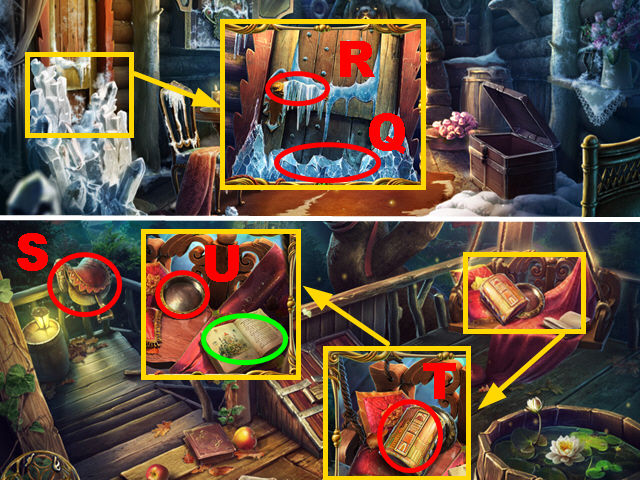
- Use the HOT WATER (Q); pull the handle (R).
- Turn left.
- Take the SADDLE (S), CASE (T), and BOWL (U); read the book (green).
- Turn left.
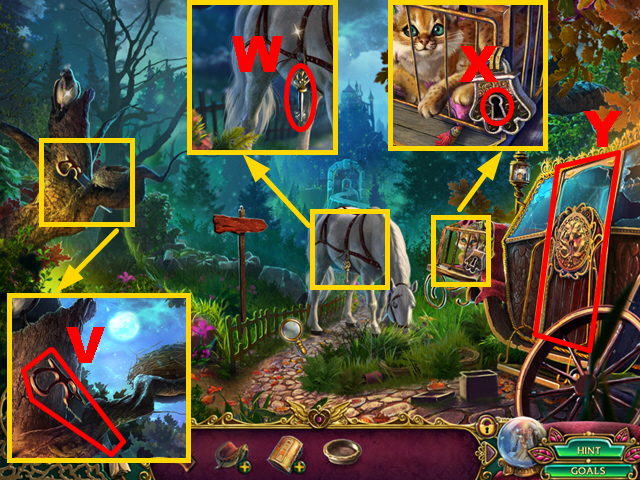
- Take the SAW (V) and CAGE KEY (W).
- Use the CAGE KEY (X); turn the key twice.
- Open the door (Y).
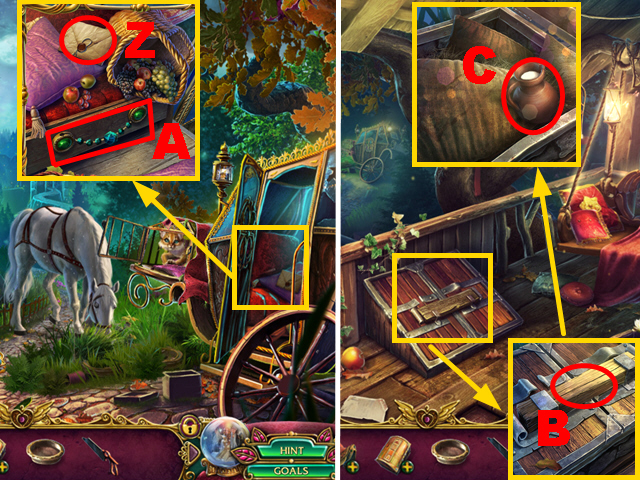
- Read the letter (Z); try to open the drawer (A).
- Walk down.
- Use the SAW (B); take the CREAM (C).
- Turn left.
- Place the BOWL (D); use the CREAM (purple).
- Take the LYNX (blue).
- Use the LYNX (E) to acquire the CHAIN.
- Place the CHAIN (F).
- Take the STORY SLIDES (G) and STIRRUP (H).
- Read the book (I).
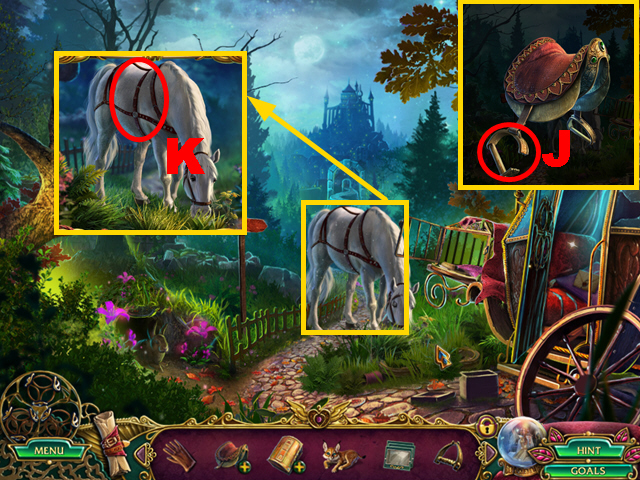
- Place the STIRRUP on the SADDLE (J).
- Place the SADDLE (K).
- Move forward.
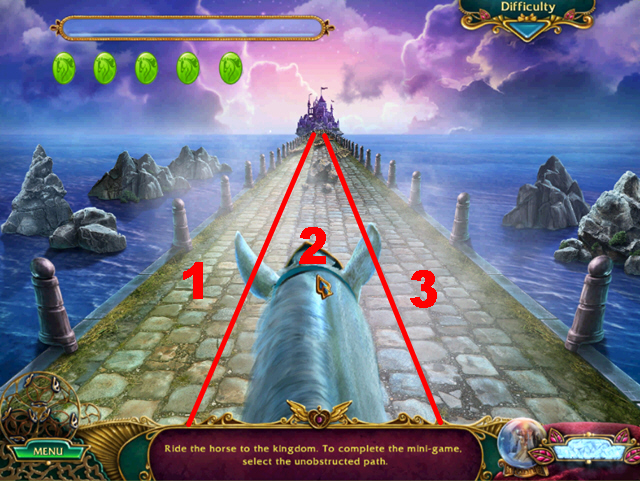
- Play the mini-game.
- The solution for hard and casual mode are the same; the horse will move quicker in hard mode.
- To solve this puzzle, switch between paths 1-3 to avoid obstacles.
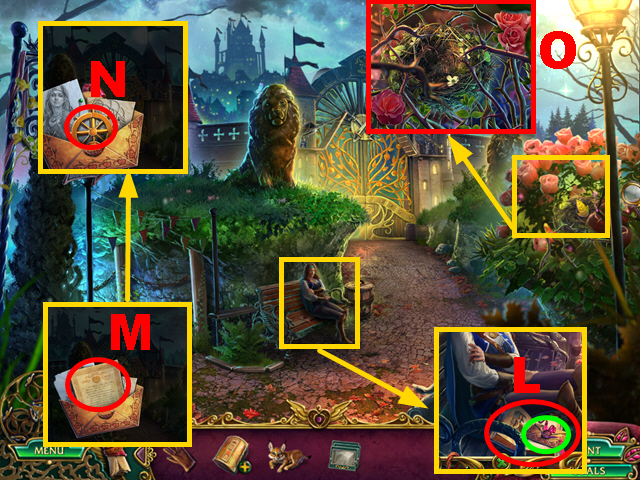
- Take the LETTER (green); read the book (L).
- Open the LETTER; take the note (M) and SHIP'S WHEEL (N).
- Remove the twigs with the GLOVE (O) to acquire GOLDEN LEAF 1/3.
- Turn left.
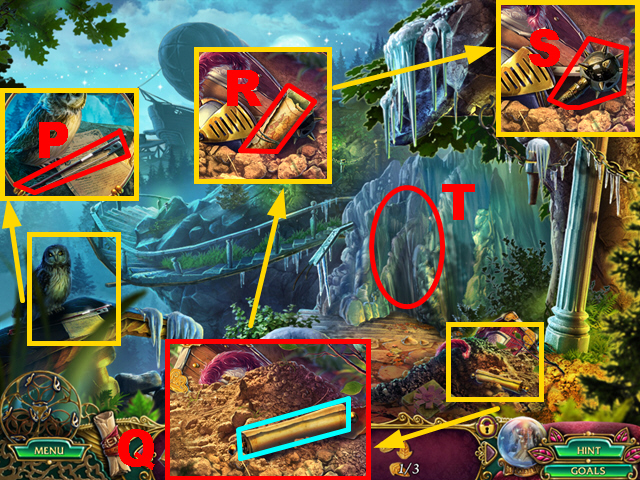
- Talk to the man.
- Take the VIOLIN BOW (P).
- Read the scroll (blue); use the LYNX (Q).
- Take the map (R) and MACE (S).
- Use the MACE three times (T).
- Move forward.
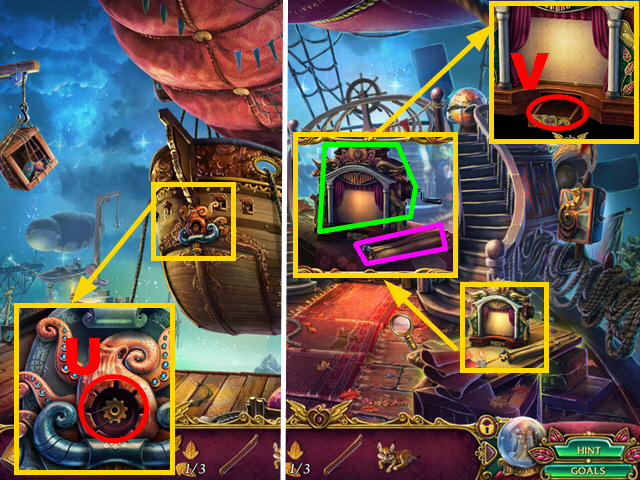
- Place the SHIP'S WHEEL (U).
- Move forward.
- Read the scroll (purple); take the device (green).
- Place the STORY SLIDES (V); you receive the LEVER.
- Walk down.
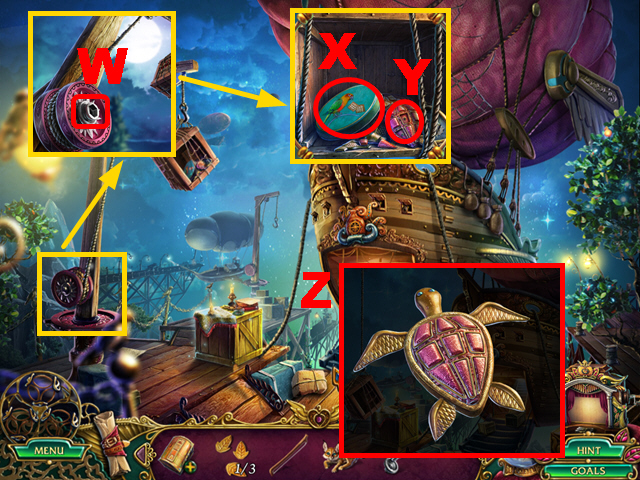
- Place the LEVER (W); take the BROKEN TURTLE (X) and CRACKERS (Y).
- Assemble the BROKEN TURTLE correctly (Z) to acquire the TURTLE.
- Move forward.
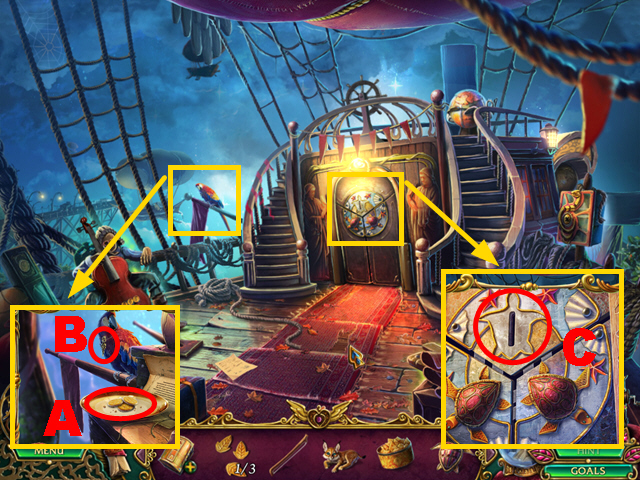
- Place the CRACKERS (A); take the COMPASS ARROW (B).
- Place the TURTLE (C).
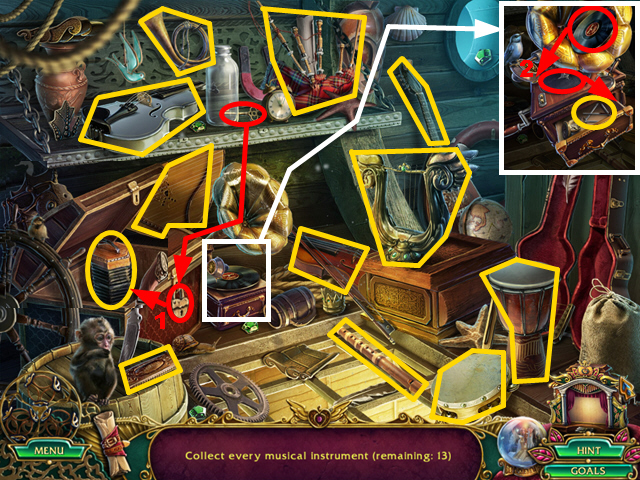
- Play the HOP.
- Solution: 1-2.
- You receive the LIRA.
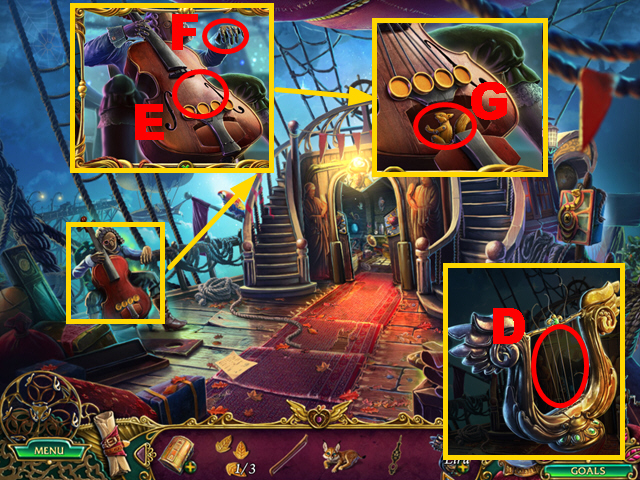
- Take 4 CELLOS STRINGS from the LIRA (D).
- Place 4 CELLO STRINGS (E) and VIOLIN BOW (F).
- Take the SQUIRREL FIGURINE (G).
- Walk down.
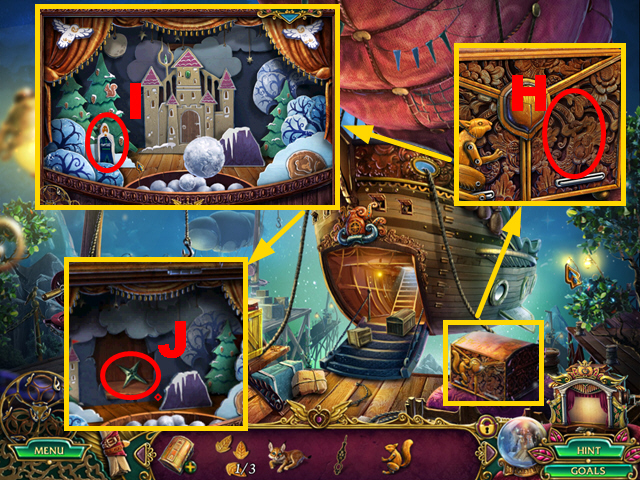
- Place the SQUIRREL FIGURINE (H).
- Play the mini-game.
- To solve this puzzle, hit the wizard (I) with snowballs five times.
- Take the COMPASS STAR (J).
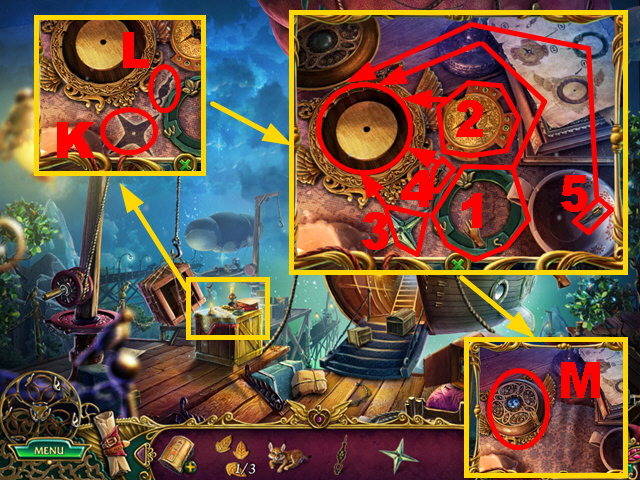
- Place the COMPASS STAR (K) and COMPASS ARROW (L).
- Assemble the compass correctly: 1-5.
- Close the compass; take the COMPASS (M).
- Move forward.
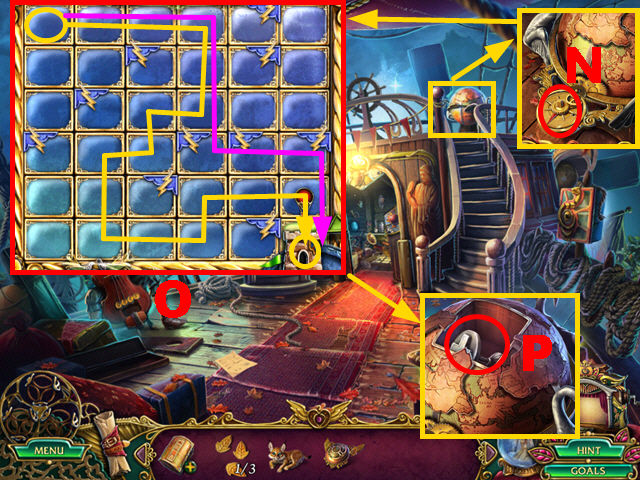
- Place the COMPASS (N).
- Play the mini-game (O).
- Hard solution: Yellow line.
- Casual solution: Purple line.
- Take the FIRST-AID KIT KEY (P).
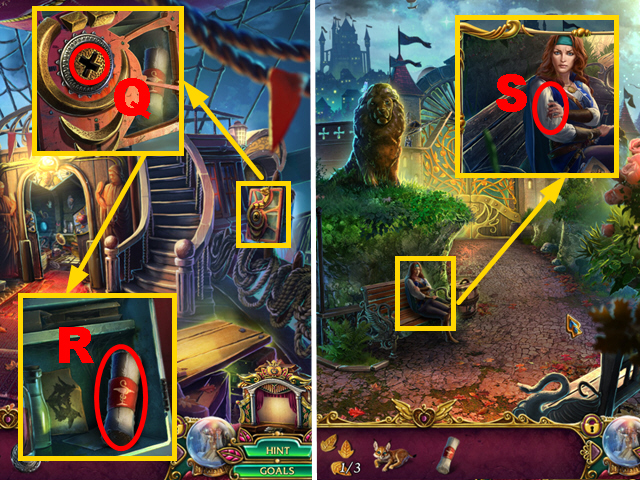
- Use the FIRST-AID KIT KEY (Q); take the BANDAGE (R).
- Walk down three times.
- Use the BANDAGE (S); you receive the GATE KEY.
Chapter 2: The Fair
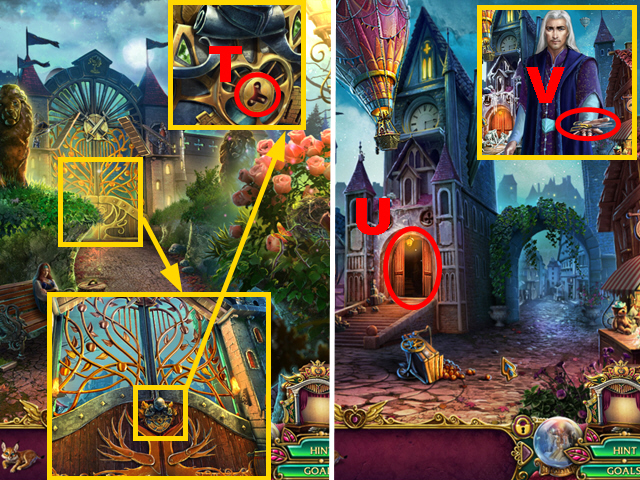
- Use the GATE KEY (T); turn it.
- Move forward.
- Examine the door (U); try to open it.
- Take the SCISSORS (V).
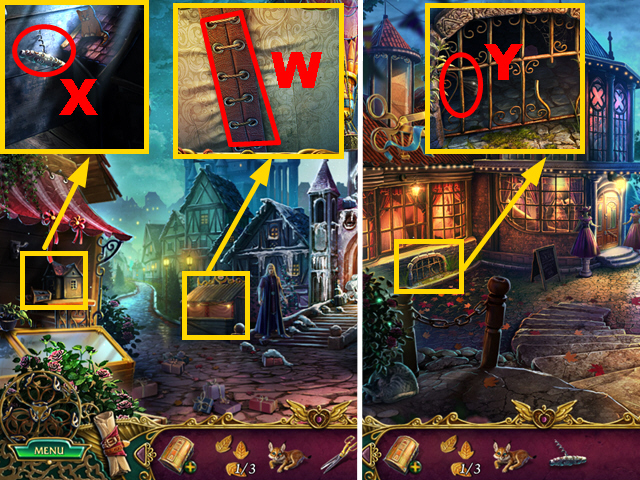
- Use the SCISSORS (W).
- Take the CORKSCREW (X).
- Turn right.
- Collect the FEATHER DUSTER with the LYNX (Y).
- Walk down, turn left.
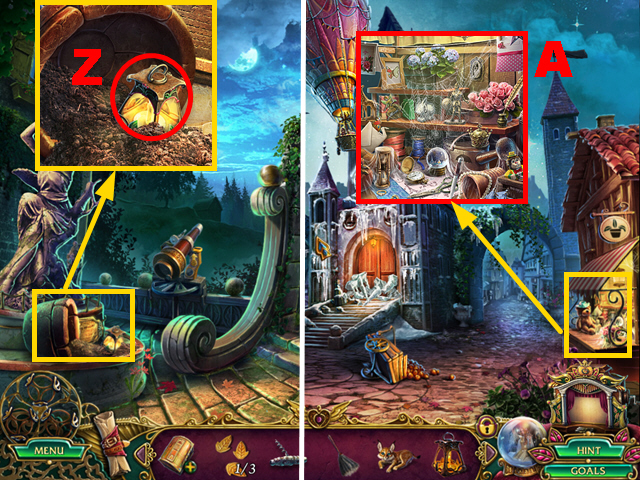
- Take the LANTERN (Z).
- Walk down.
- Use the FEATHER DUSTER (A).
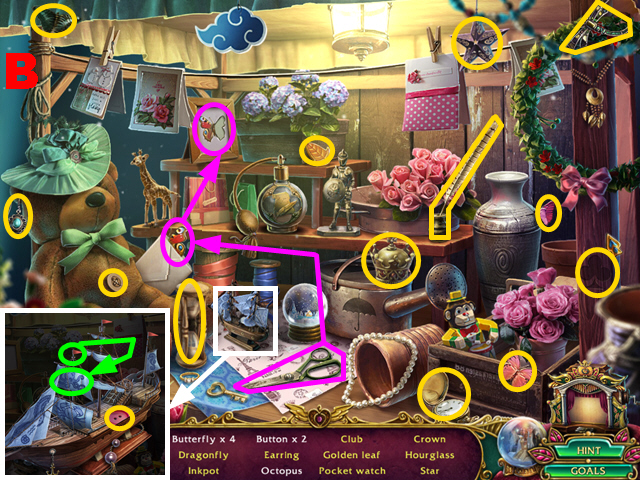
- Play the HOP.
- You receive GOLDEN LEAF 2/3 (B).
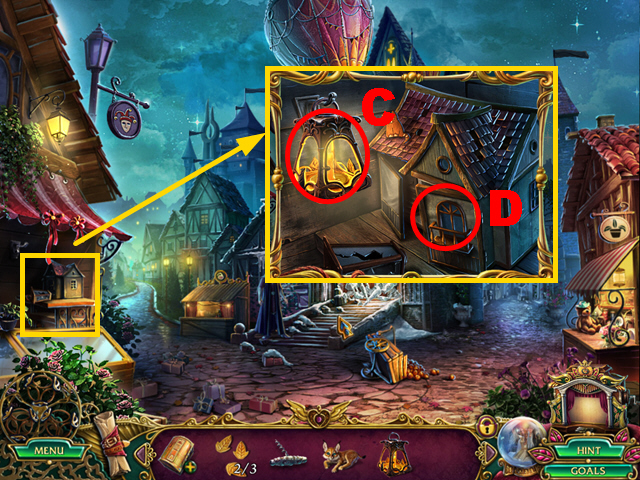
- Place the LANTERN (C).
- Examine the house (D).
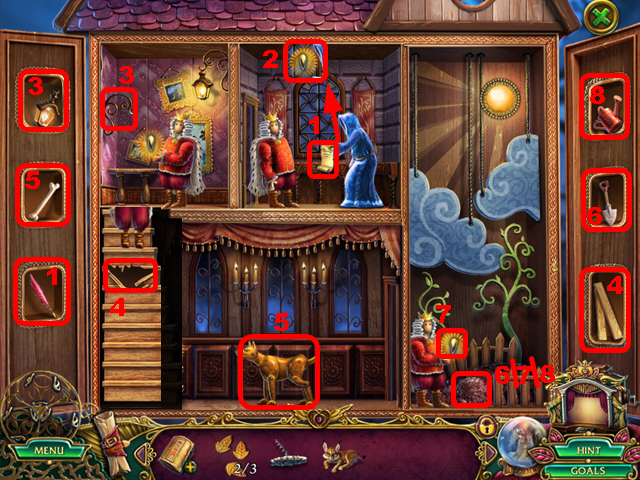
- Play the mini-game.
- Solution: 1-8.
- You receive the GOLDEN LEAF 3/3.
- Turn left.
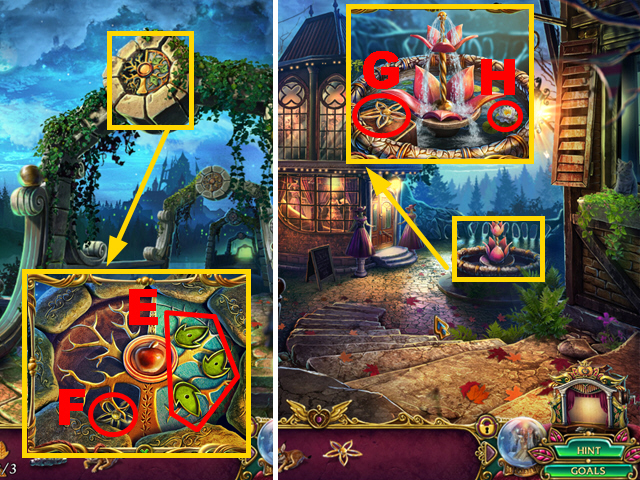
- Place 3 GOLDEN LEAVES (E); take the VALVE HANDLE (F).
- Walk down, turn right.
- Place the VALVE HANDLE (G); turn it.
- Take the WATER LILY (H).
- Walk down.
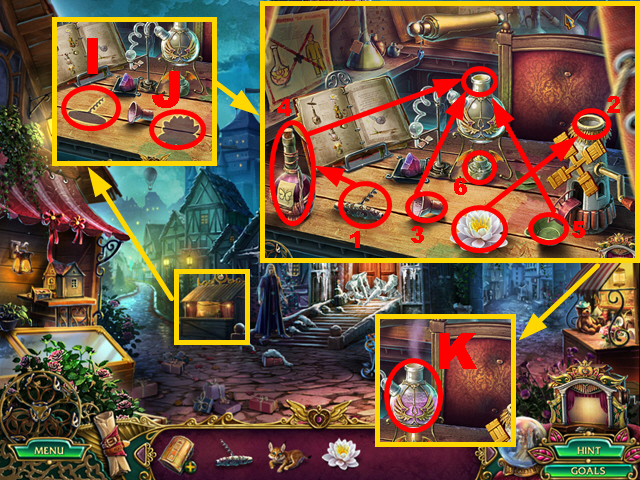
- Place the CORKSCREW (I) and WATER LILY (J).
- Mix the potion: 1-6.
- Take the LEVITATION POTION (K).
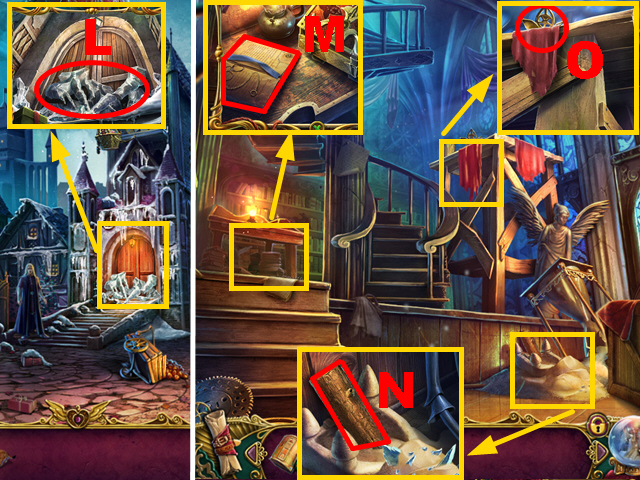
- Use the LEVITATION POTION (L).
- Move forward.
- Read the book (M).
- Take the LOG (N).
- Use the LYNX to acquire BUTTERFLY 1 (O).
- Go upstairs.
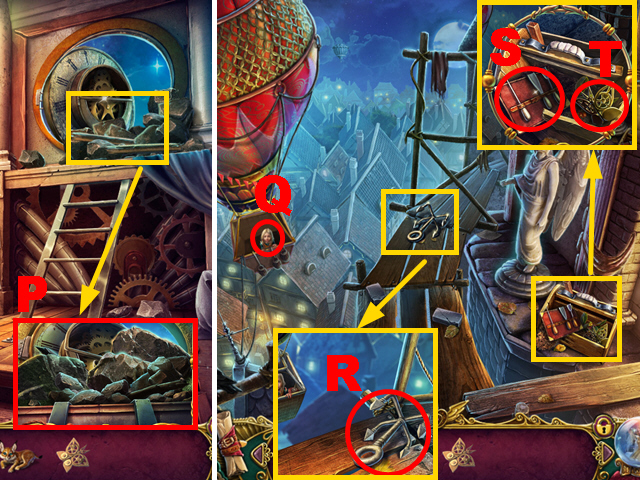
- Use the LEVITATION POTION (P).
- Move forward.
- Talk to the girl (Q).
- Take the HOOK (R), TOOL SET (S), and BUTTERFLY 2 (T).
- Walk down three times, turn left.
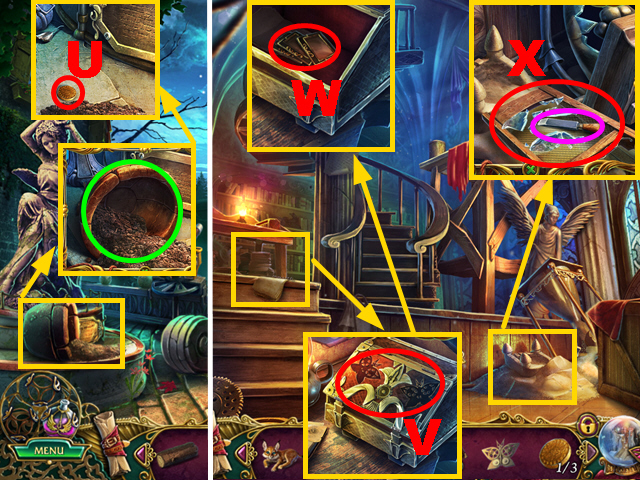
- Use the LEVITATION POTION (green); take COIN 1/3 (U).
- Walk down, move forward.
- Place BUTTERFLY 1 and BUTTERFLY 2 (V); take the STORY SLIDES (W).
- You receive the SIEVE.
- Use the SIEVE (X); take the CHISEL (purple).
- Go upstairs.
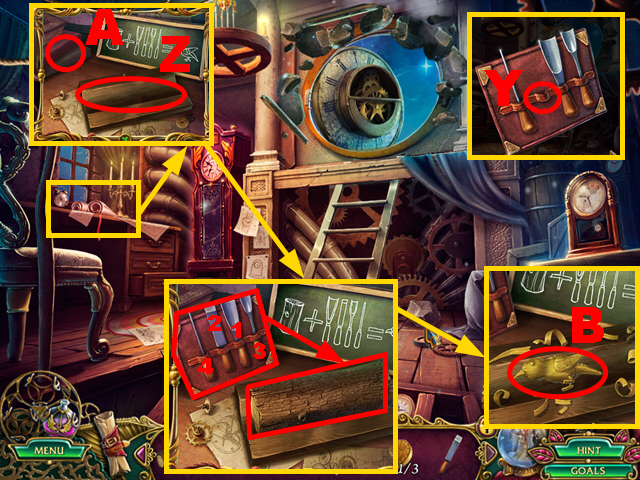
- Place the CHISEL on the TOOL SET (Y) to acquire the TOOLS.
- Place the LOG (Z) and TOOLS (A).
- Play the mini-game.
- Use the tools: 1-4.
- Take the CUCKOO (B).
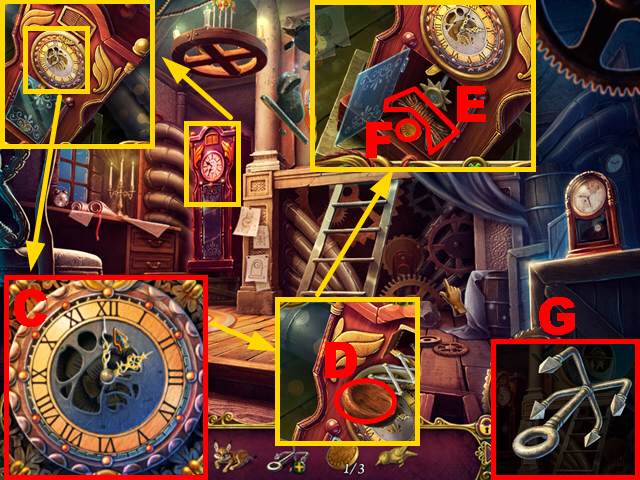
- Enter the correct time (C).
- Place the CUCKOO (D); take the ROPE (E) and COIN 2/3 (F).
- Connect the ROPE to the HOOK (G) to acquire the GRAPPLING HOOK.
- Move forward.
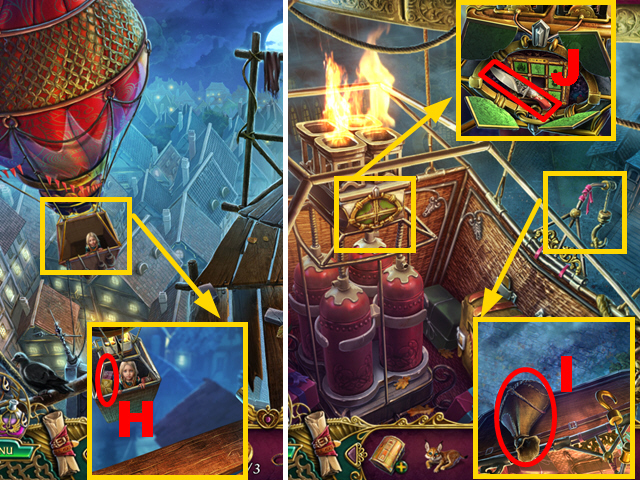
- Throw the GRAPPLING HOOK (H).
- Take the SACK OF SAND (I).
- Open the compartment; take the KNIFE (J).
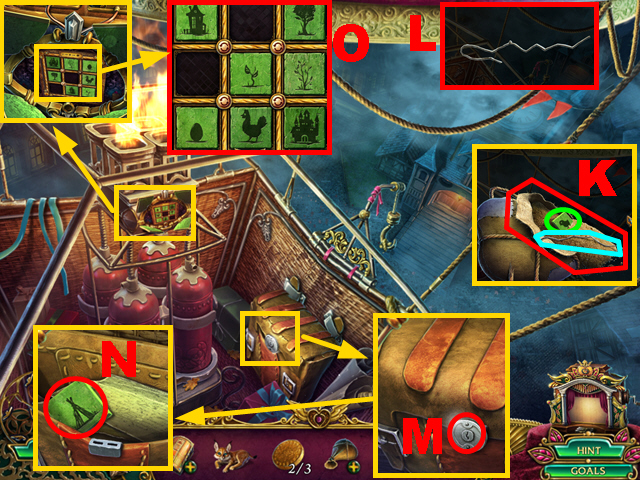
- Open the SACK OF SAND with the KNIFE (K); take the PUZZLE PIECE 1 (green) and WIRE (blue).
- Bend the WIRE twice; take the LOCK PICK (L).
- Place the LOCK PICK (M); open the bag.
- Take PUZZLE PIECE 2 (N).
- Place PUZZLE PIECE 1 and PUZZLE PIECE 2 (O).
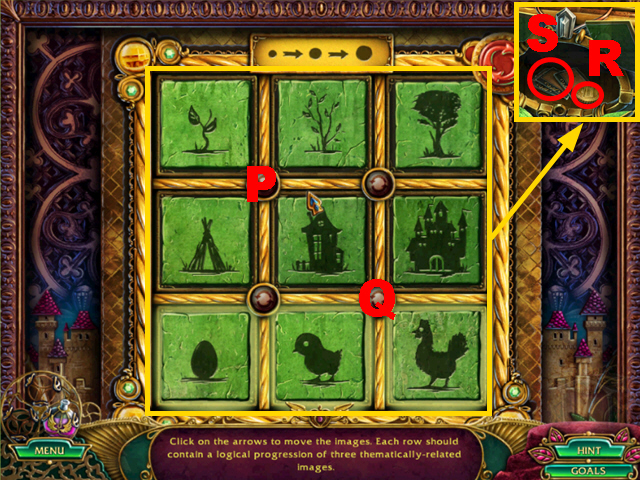
- Play the mini-game.
- Solution: P, Q, P.
- Take COIN 3/3 (R) and the STORY SLIDES (S); you acquire the ROPE.
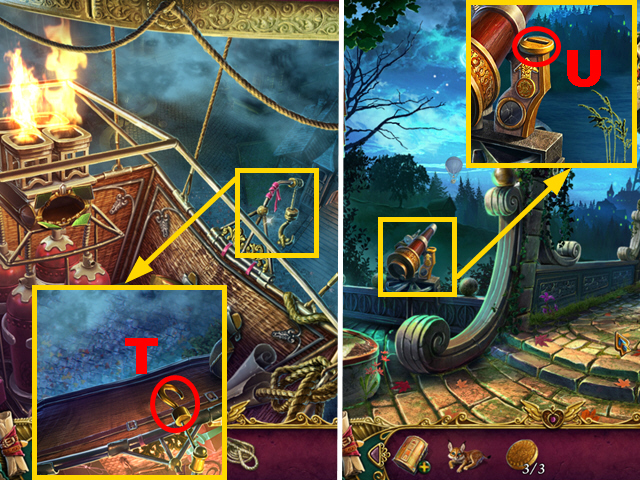
- Use the ROPE (T).
- Climb down.
- Turn left.
- Place 3 COINS (U).
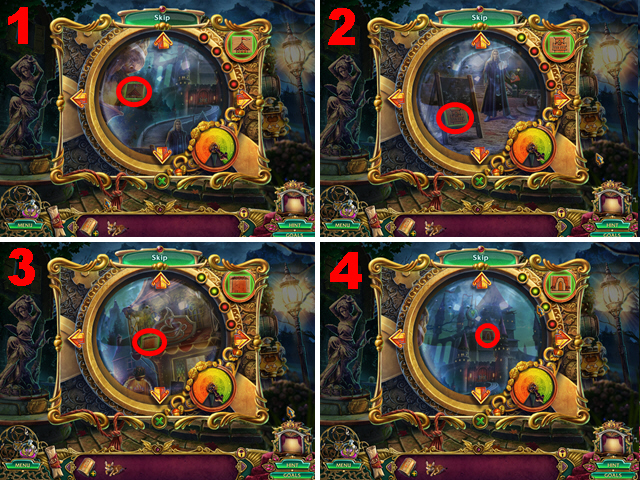
- Play the mini-game.
- Solution: 1-4.
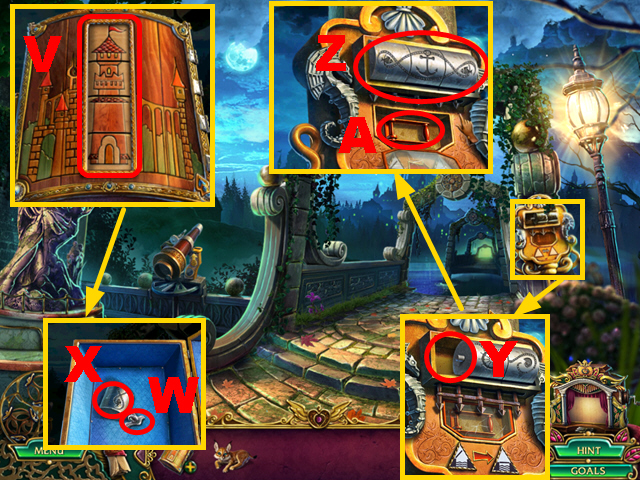
- Create the correct tower image on the CASE (V).
- Take the PIGEON (W) and BRIDGE CONTROL PART (X).
- Place the BRIDGE CONTROL PART (Y).
- Assemble the parts correctly (Z).
- Turn the lever (A).
- Move forward.
Chapter 3: The Square
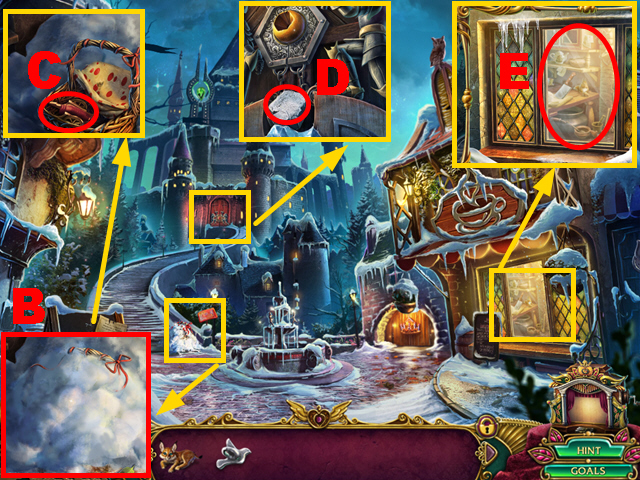
- Use the LYNX (B).
- Remove the cloth; take SMALL CANNON 1/2 (C).
- Take the STONE (D).
- Use the STONE three times (E).
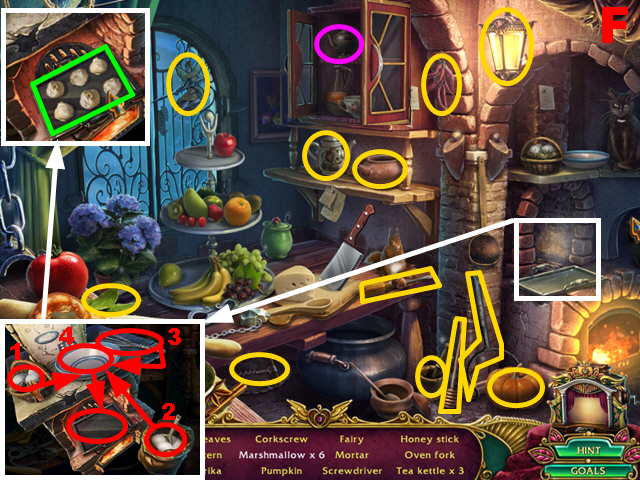
- Play the HOP.
- You receive the SCREWDRIVER and FAIRY 1 (F).
- Walk down.
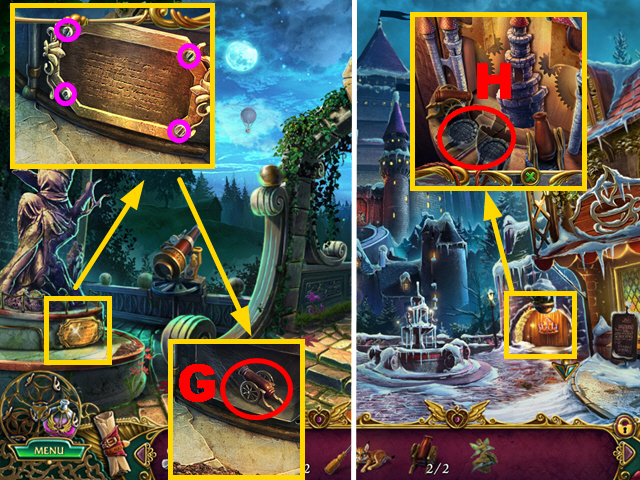
- Use the SCREWDRIVER (purple); take SMALL CANNON 2/2 (G).
- Move forward.
- Place 2 SMALL CANNONS (H).
- Move forward.
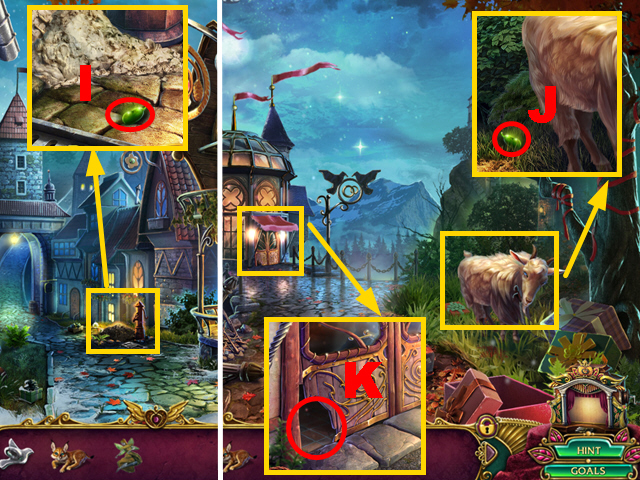
- Take BEAN 1/4 (I).
- Turn left.
- Take BEAN 2/4 (J).
- Use the LYNX (K).
- Move forward.
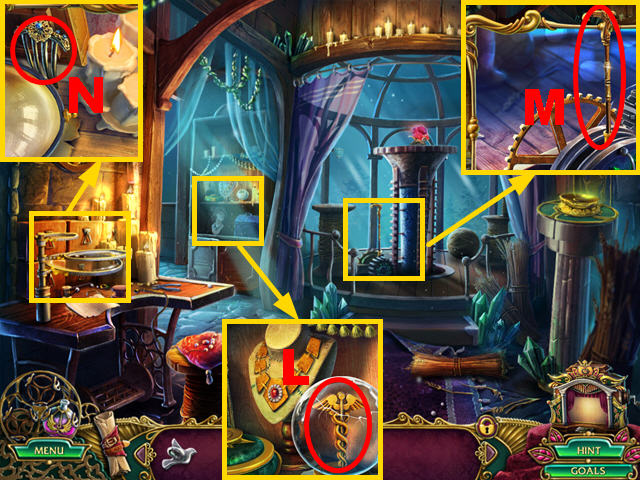
- Take the CADUCEUS (L).
- Move the lever (M) to acquire the BROKEN LEVER.
- Take the COMB (N).
- Walk down.
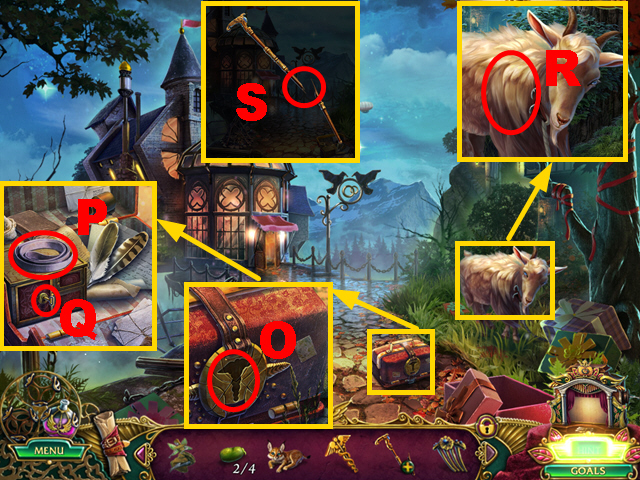
- Place the CADUCEUS (O); open the bag.
- Take the BINDER (P); try to take the key (Q).
- Use the COMB (R) to acquire the WOOL.
- Repair the BROKEN LEVER with the BINDER (S) to acquire the LEVER.
- Move forward.
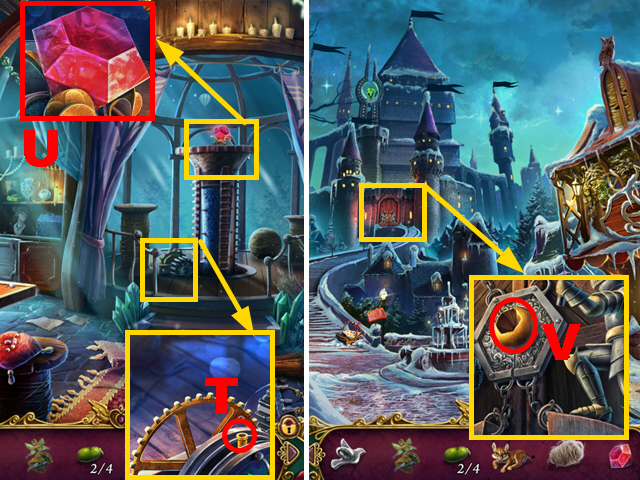
- Place the LEVER (T); pull it.
- Take the DIAMOND (U).
- Walk down three times.
- Place the DIAMOND (V).
- Turn left.
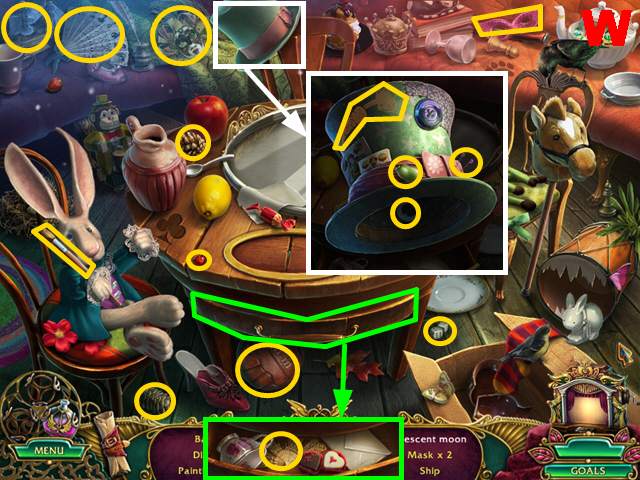
- Play the HOP.
- You receive the BROKEN FAN and BEAN 3/4 (W).
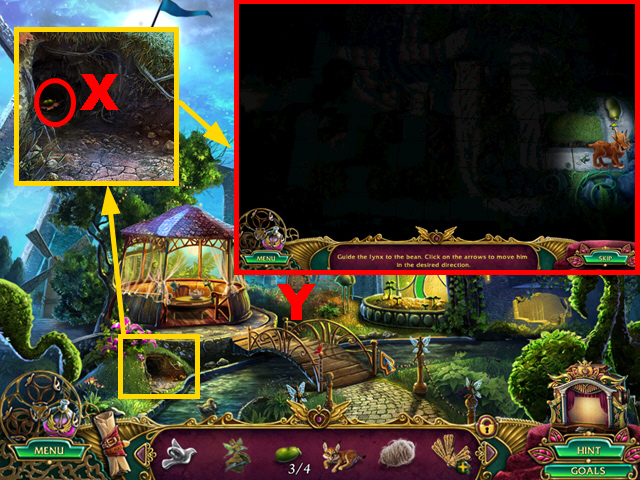
- Place the LYNX (X).
- Play the mini-game.
- Solution (Y): Right, down, right, up x2, left, down, right, down x2, right, up.
- This solution for both hard and casual difficulty.
- You receive BEAN 4/4.
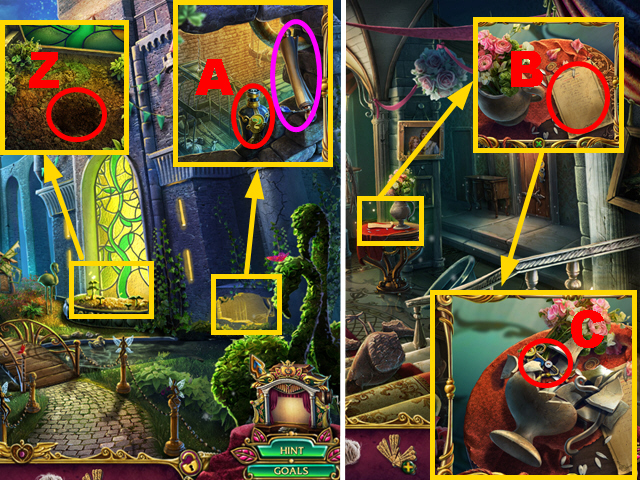
- Take the GROWTH POTION (Z); read the scroll (purple).
- Use 4 BEANS and the GROWTH POTION (A).
- Climb up.
- Read the note (B).
- Turn over the vase and remove two shards; take the TAILOR SHOP KEY (C).
- Walk down four times, turn right.
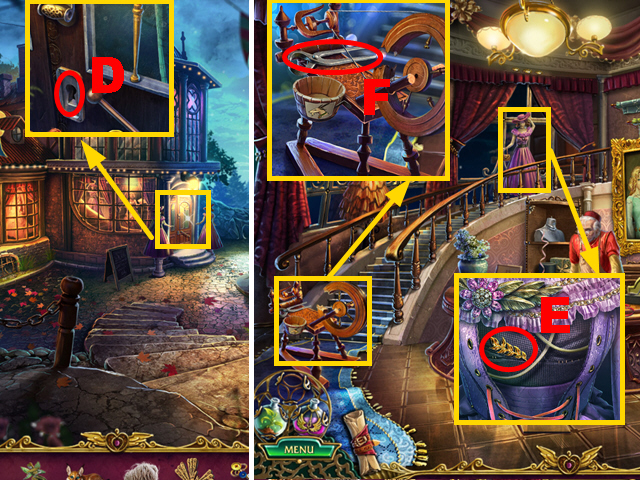
- Use the TAILOR SHOP KEY (D); turn it.
- Move forward.
- Remove the ribbon; take the GOLDEN TWIG (E).
- Take the PLIERS (F).
- Go to the Fair.
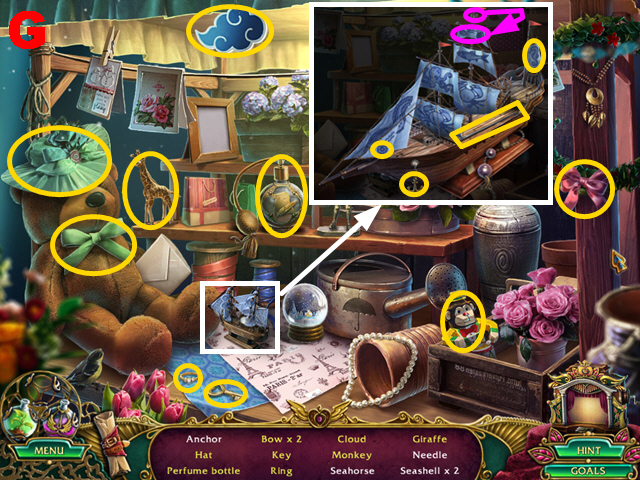
- Play the HOP.
- You receive the NEEDLE and BOTTLE (G).
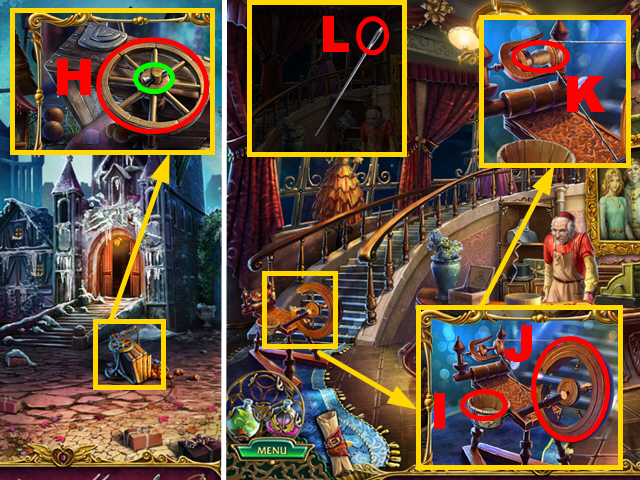
- Use the PLIERS (green); take the WHEEL (H).
- Go to the Ticket Office.
- Place the WOOL (I); replace the broken wheel with the WHEEL (J).
- Take the THREAD (K).
- Place the THREAD on the NEEDLE (L) to acquire the NEEDLE AND THREAD.
- Move forward.
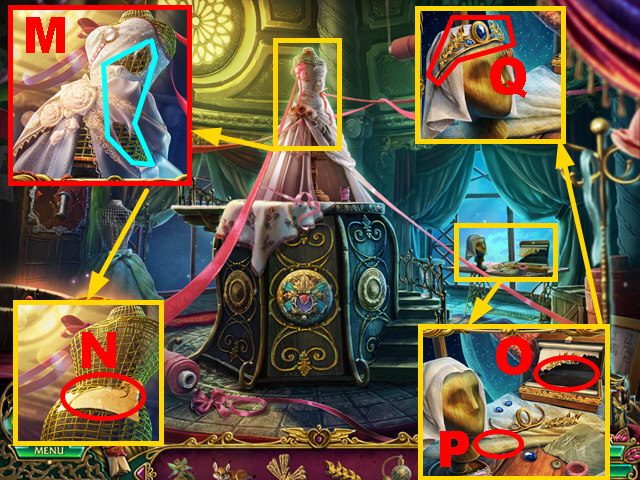
- Use the NEEDLE AND THREAD (blue); take the CORONATION GOWN (M).
- Take the SCHEMATIC FRAGMENT (N).
- Place the SCHEMATIC FRAGMENT (O) and GOLDEN TWIG (P).
- Assemble the tiara correctly (Q); take the TIARA.
- Walk down.
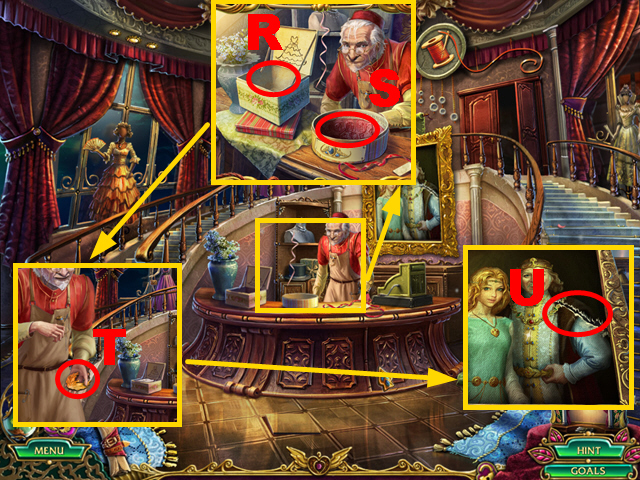
- Place the CORONATION GOWN (R) and TIARA (S).
- Take the PHOENIX (T).
- Tear apart the canvas (U).
- Move forward.
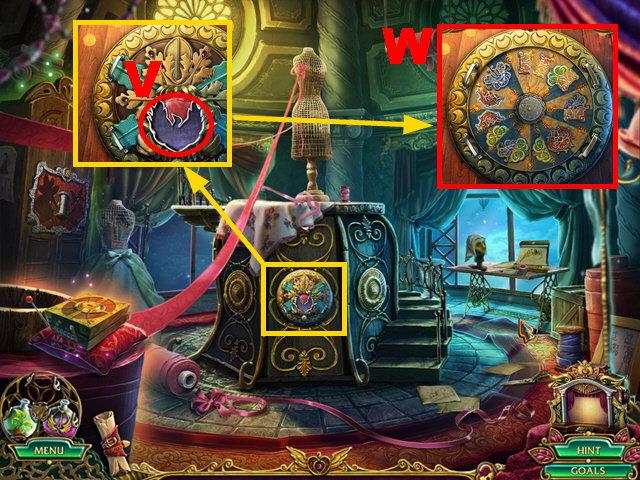
- Place the PHOENIX (V).
- Examine the device (W).
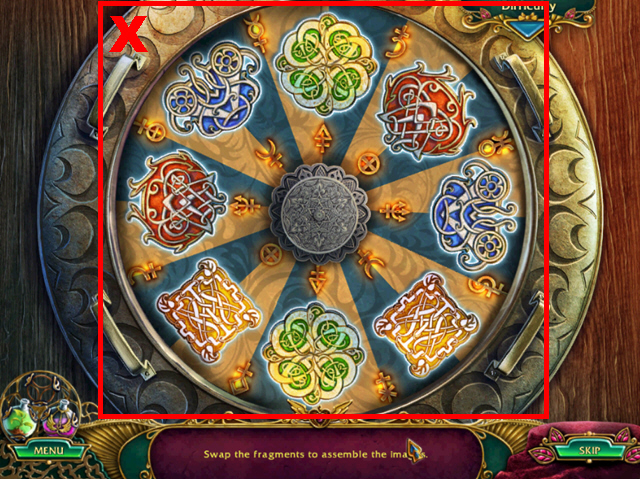
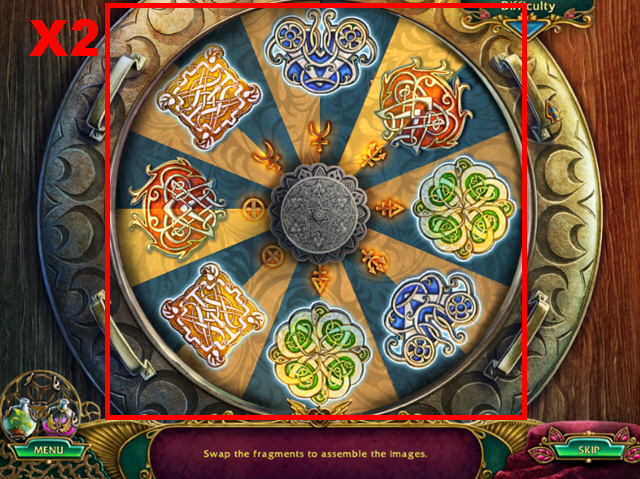
- Play the mini-game.
- Hard solution: (X).
- Casual solution (X2).
- Move forward.
Chapter 4: The Room with the Mirror
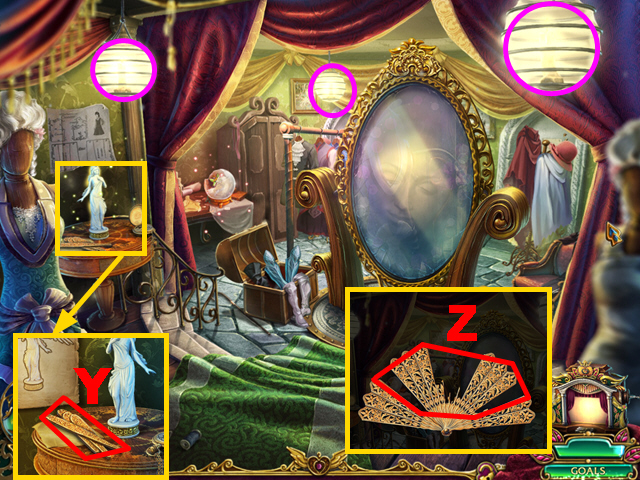
- Switch on the lamps (purple).
- Take the WOODEN FEATHERS (Y).
- Open the BROKEN FAN; place the WOODEN FEATHERS (Z) to acquire the FAN.
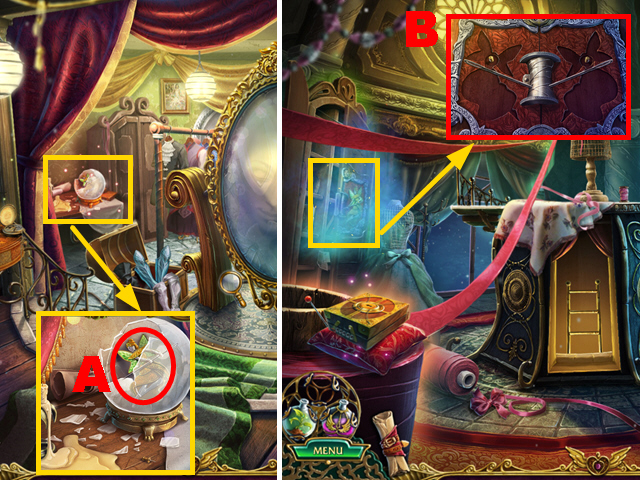
- Take the FAIRY 2 (A).
- Walk down.
- Place the FAIRY 1 and FAIRY 2 (B).
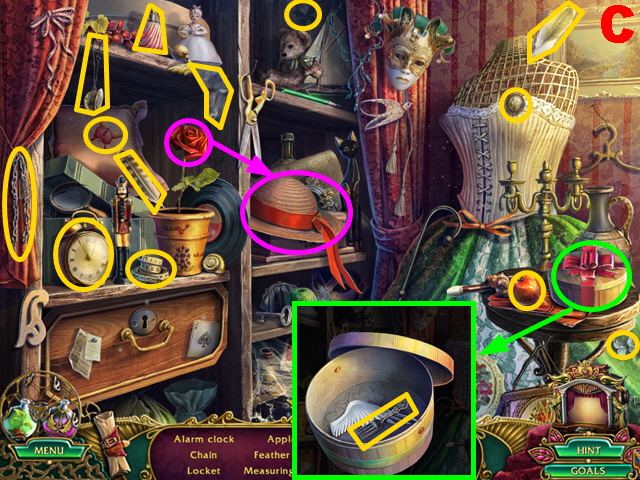
- Play the HOP.
- You receive the FORK (C).
- Move forward.
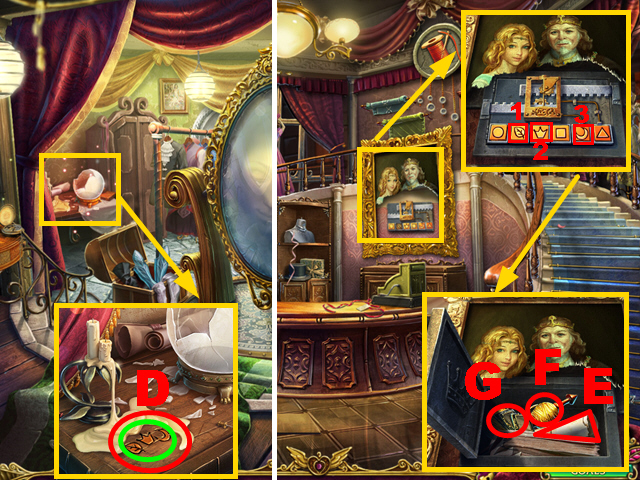
- Use the FORK (D); make note of the symbols (green).
- Walk down twice.
- Activate symbols: 1-3.
- Read the scroll (E); take the MAGIC SPINDLE (F) and STORY SLIDES (G).
- You receive the SMALL KEY.
- Move forward.
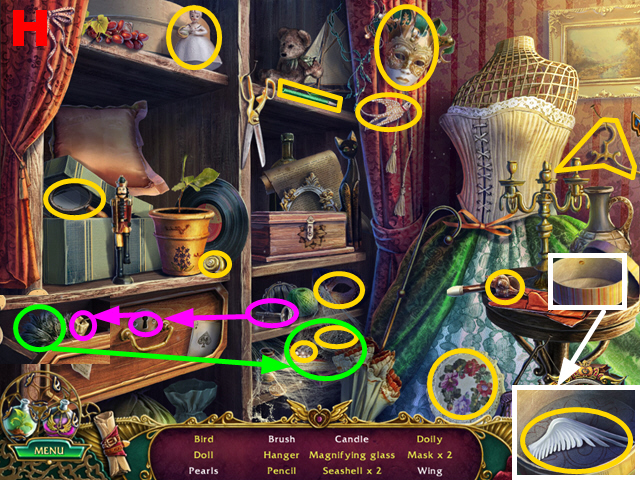
- Play the HOP.
- You receive the BRUSH and WING 1/2 (H).
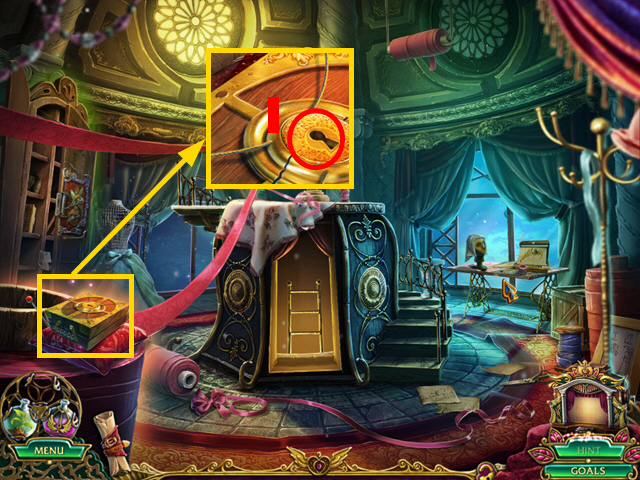
- Use the SMALL KEY (I).
- Turn it twice.
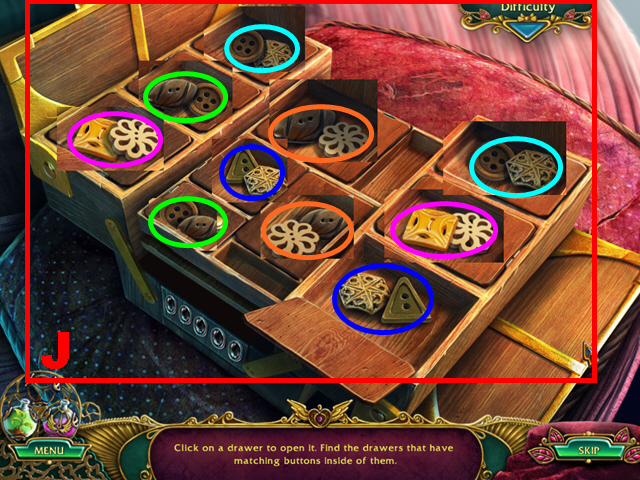
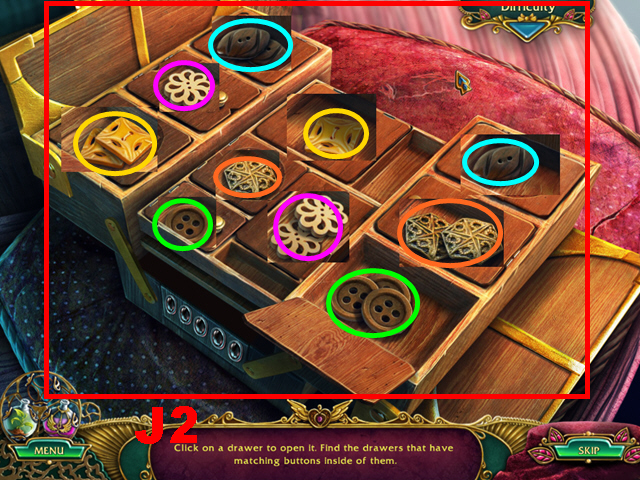
- Play the mini-game.
- Hard solution: (J).
- Casual solution: (J2).
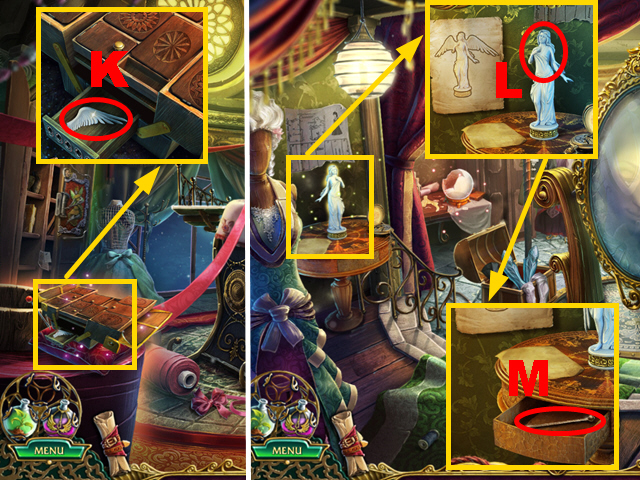
- Take WING 2/2 (K).
- Move forward.
- Place 2 WINGS (L); pull the wings.
- Take the CROCHET HOOK (M).
- Walk down twice.
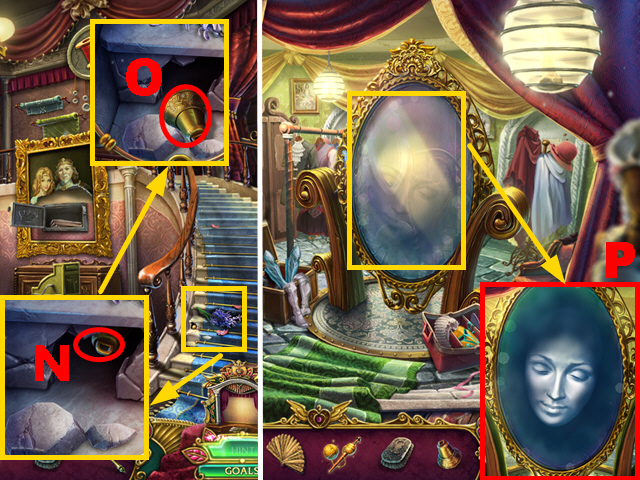
- Use the CROCHET HOOK (N); take the BELL (O).
- Move forward twice.
- Use the BELL (P).
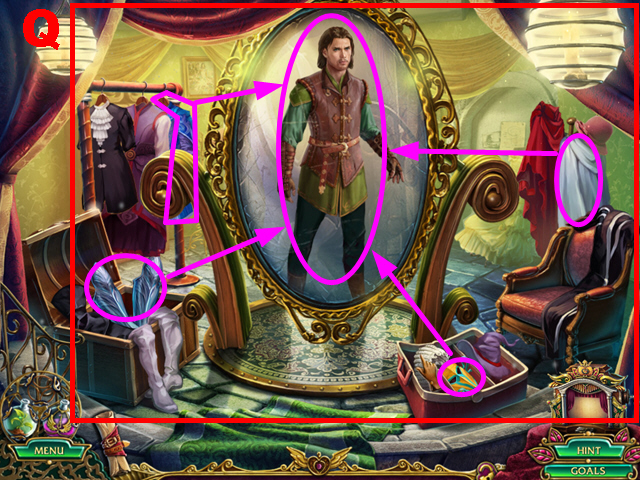
- Dress yourself correctly (Q).
- Go to the Passage, move forward.
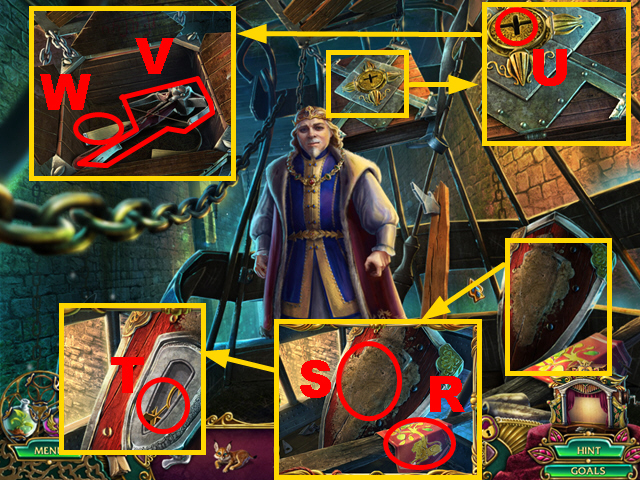
- Take the BANNER (R); clean the shield with the BRUSH (S).
- Take the CRATE KEY (T).
- Place the CRATE KEY (U); turn it.
- Take the CROSSBOW (V) and BELT (W).
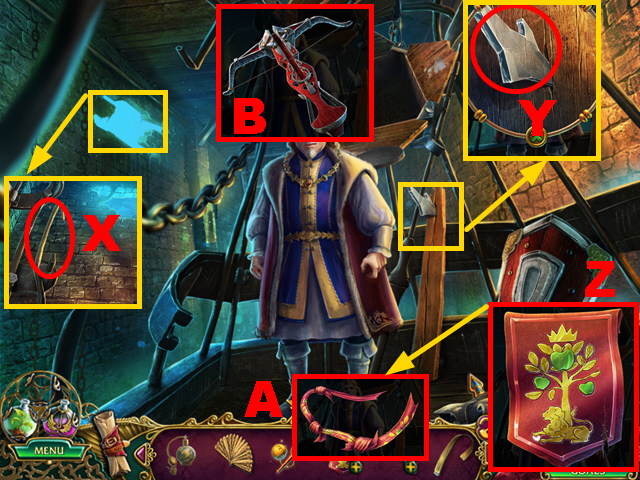
- Move the rod twice (X); take the ROD.
- Place the BELT (Y); take the GLASS SHARD.
- Use the GLASS SHARD (Z); tie the ripped banner.
- Take the ROPE (A).
- Place the ROD and ROPE on the CROSSBOW (B) to acquire the CROSSBOW WITH AN ARROW.
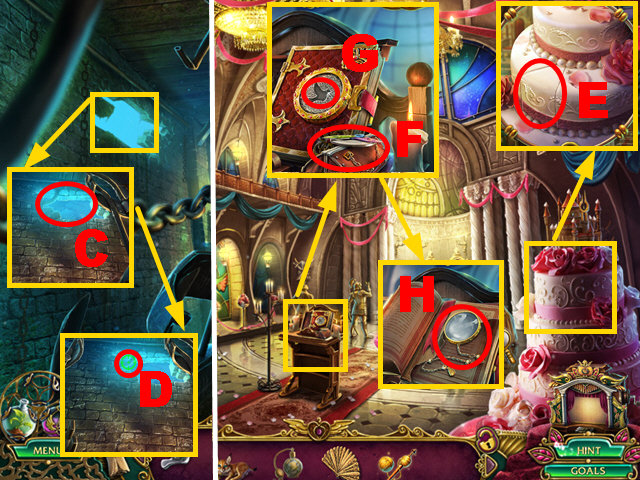
- Use the CROSSBOW WITH AN ARROW (C); shoot it (D).
- Turn left, move forward, turn left.
- Take the PIECE OF CAKE (E) and PURSE (F).
- Place the PIGEON (G); take the MONOCLE (H).
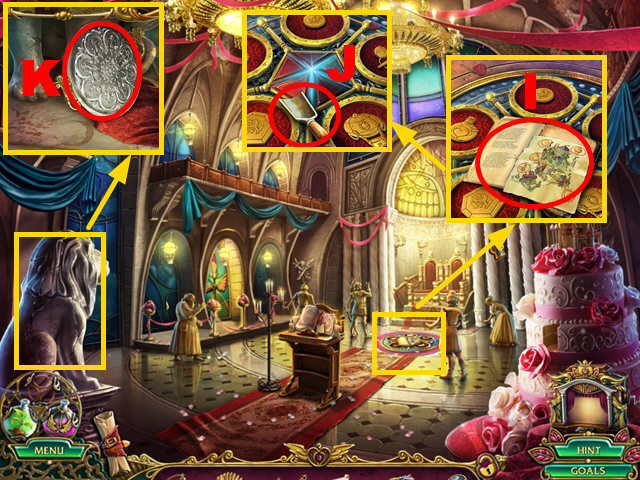
- Read the book (I); take the SCOOP (J).
- Take the TRAY (K).
- Go to the Street.
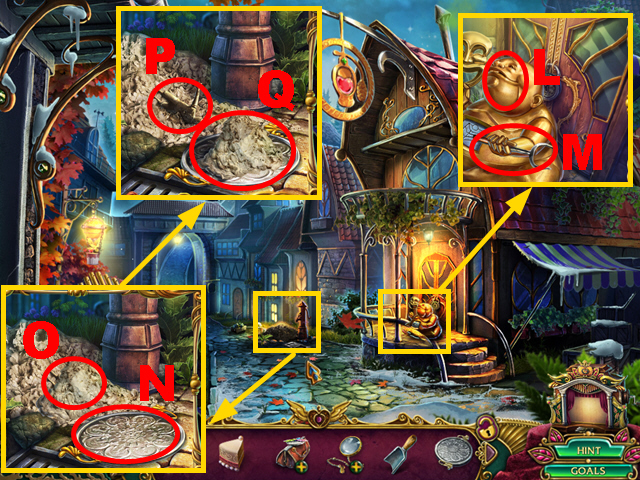
- Use the PIECE OF CAKE (L); take the OVEN FORK (M).
- Place the TRAY (N); use the SCOOP three times (O).
- Take the CHILD FIGURINE (P) and CLAY (Q).
- Walk down.
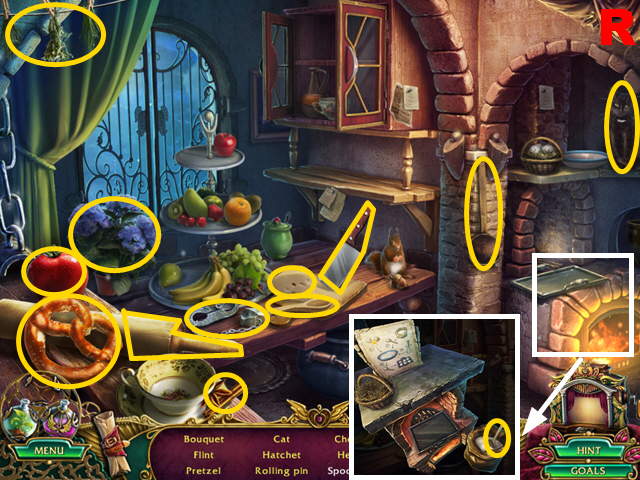
- Play the HOP.
- You receive the FLINT and CINNAMON (R).
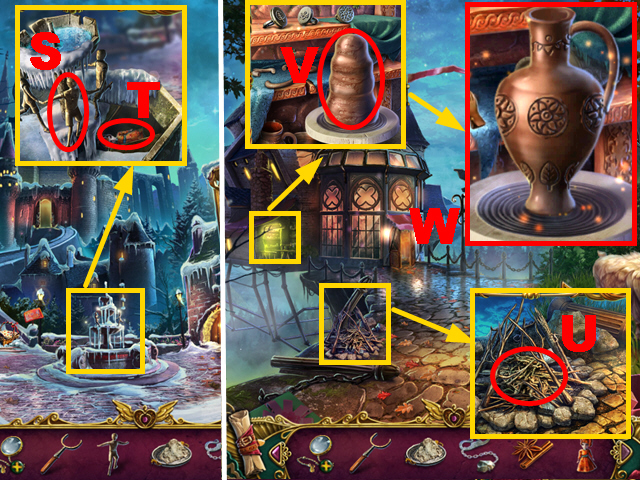
- Place the CHILD FIGURINE (S); take the PRINCESS FIGURINE 2 (T).
- Turn right, turn left.
- Use the FLINT and FAN (U).
- Place the CLAY (V).
- Rotate the vase and mold it; apply the correct patterns and decoration (W).
- You receive the CLAY VASE.
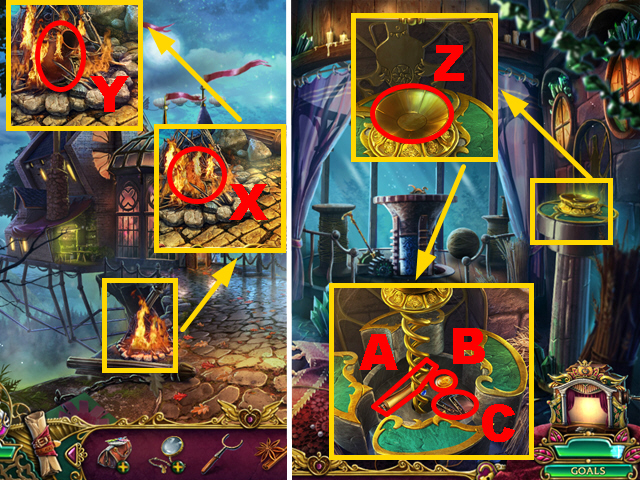
- Place the CLAY VASE (X); collect the VASE with the OVEN FORK (Y).
- Move forward.
- Place the VASE (Z).
- Read the scroll (A); take the GOLDEN COIN (B) and STORY SLIDES (C).
- You receive the CAKE.
- Walk down twice.
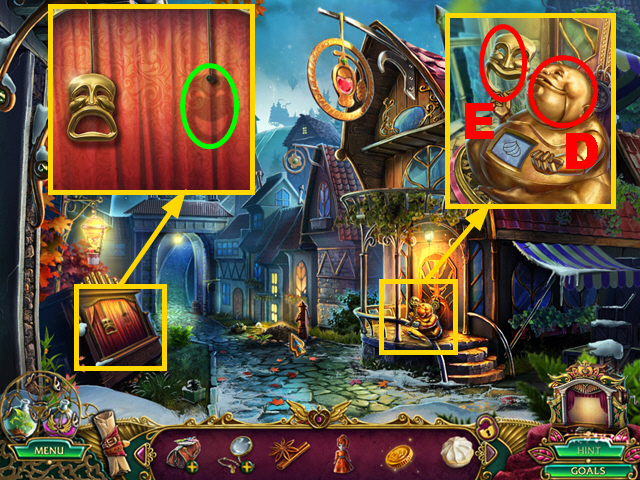
- Use the CAKE (D); take the THEATER MASK (E).
- Place the THEATER MASK (green).
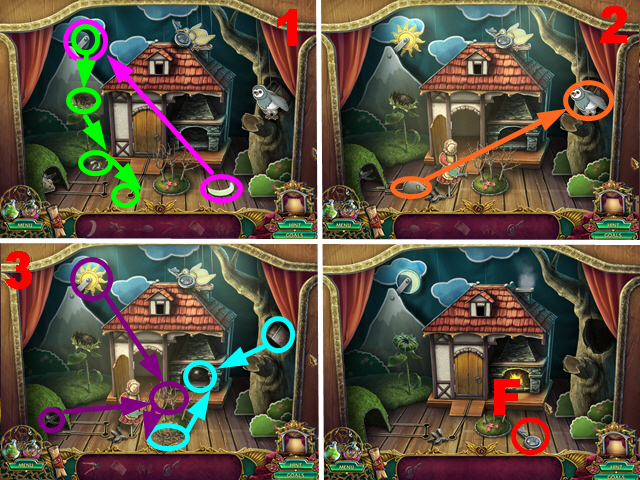
- Play the HOP.
- Solution: 1-3.
- Take the PERFUME SHOP KEY (F).
Chapter 5: The Perfume Shop
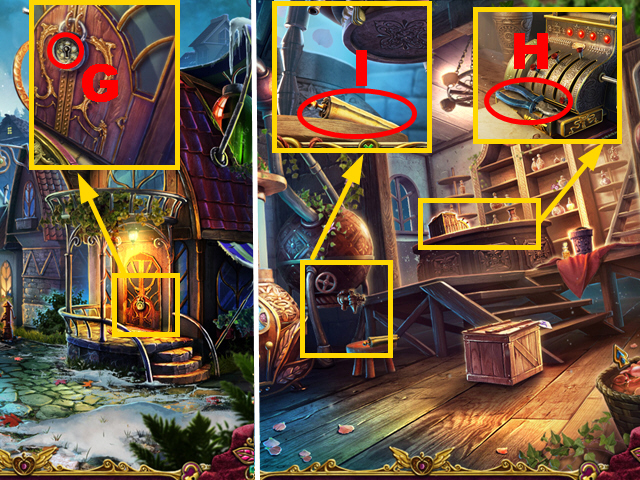
- Place the PERFUME SHOP KEY (G); turn it twice.
- Turn right.
- Take the PLIERS (H) and scroll (I).
- Go to the Cliff Edge.
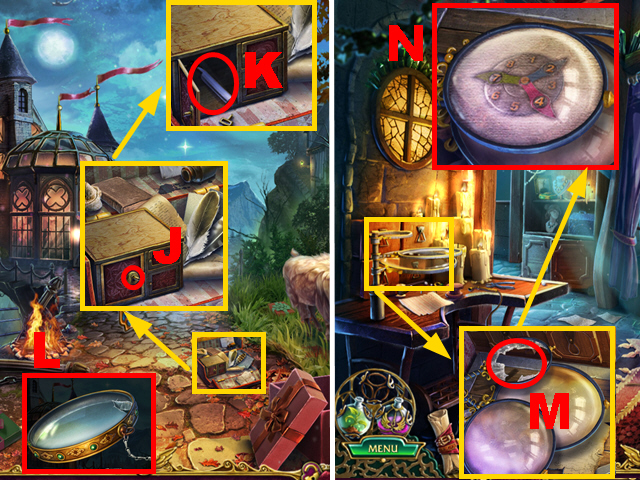
- Use the PLIERS (J); take the SHARP RAZOR (K).
- Cut the MONOCLE with the SHARP RAZOR (L) to acquire the LENS.
- Move forward.
- Place the LENS (M).
- Move the three lenses once; make note of the code (N).
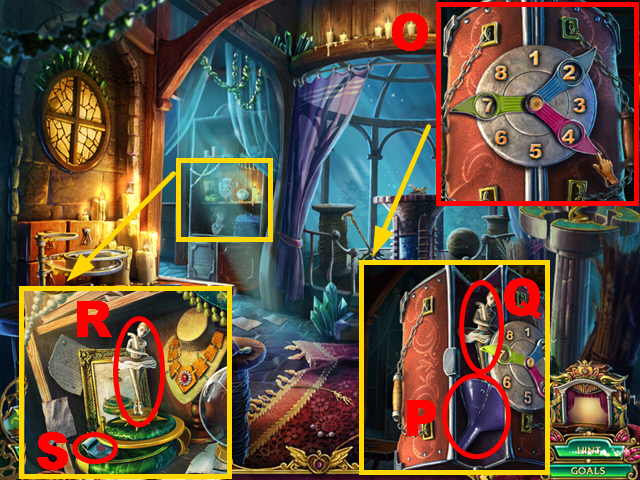
- Enter the correct code on the PURSE (O); open it.
- Take the FUNNEL (P) and BALLERINA (Q).
- Place the BALLERINA (R); take the ROSE SEEDS (S).
- Go to the Perfume Shop.
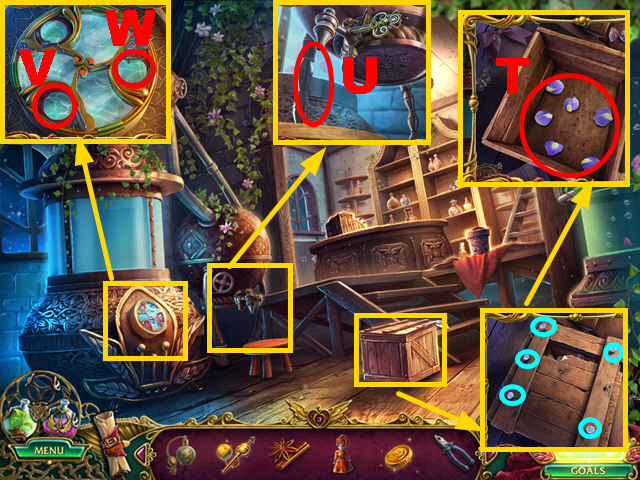
- Use the PLIERS (blue); remove 9 items.
- Take 6 IRIS PETALS (T).
- Place the BOTTLE and FUNNEL (U).
- Open the device; place the CINNAMON (V) and 6 IRIS PETALS (W).
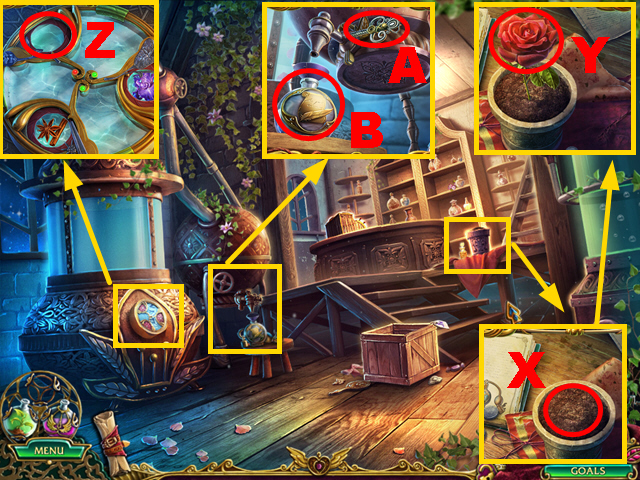
- Use the ROSE SEEDS and GROWTH POTION (X); collect the ROSE PETALS with the SHARP RAZOR (Y).
- Place the ROSE PETALS (Z).
- Turn the lever (A); take the REVEALING POTION (B).
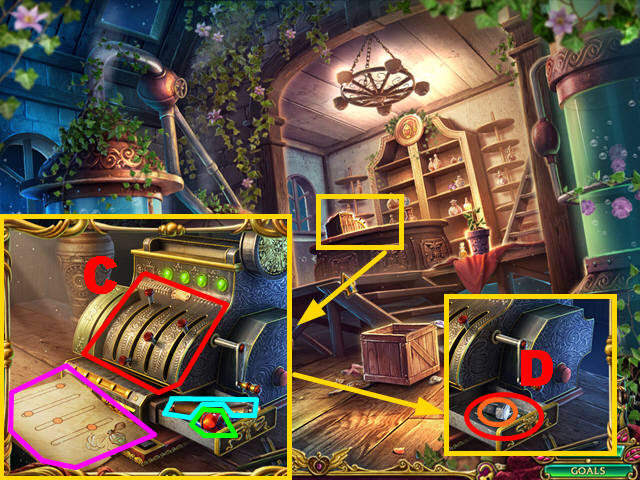
- Use the REVEALING POTION (purple); align the switches correctly (C).
- Read the scroll (blue); take the LOVE POTION (green), NUT (orange), and STORY SLIDES (D).
- You receive the HAND RAKE.
- Go to the Garden.
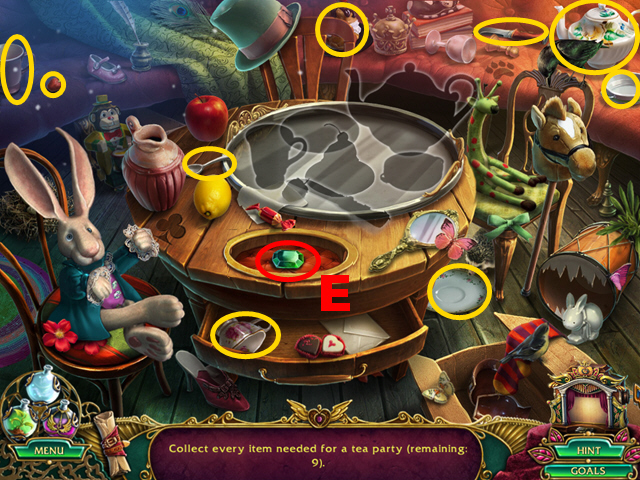
- Play the HOP.
- Take the EMERALD (E).
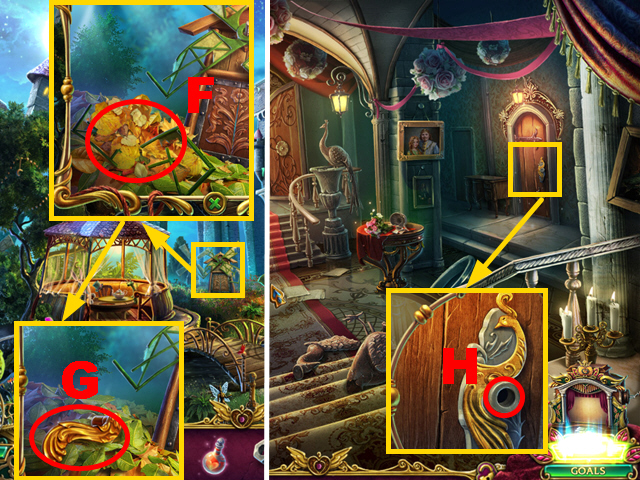
- Use the HAND RAKE (F); take the HANDLE (G).
- Move forward.
- Place the HANDLE (H); pull the handle.
- Turn right.
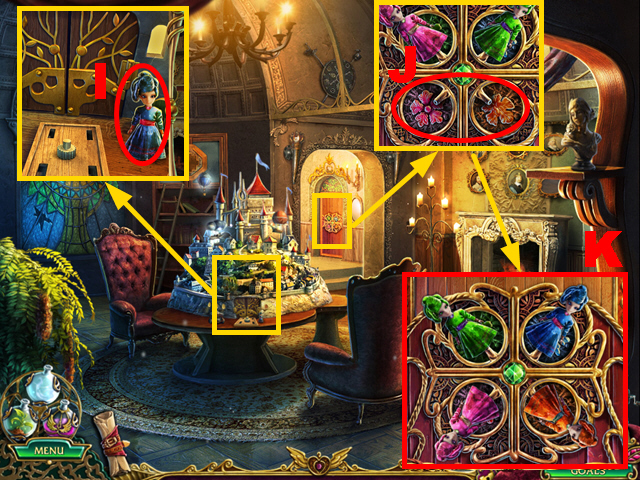
- Take the PRINCESS FIGURINE 1 (I).
- Place 2 PRINCESS FIGURINES (J).
- Align the figurines correctly (K).
- Move forward.
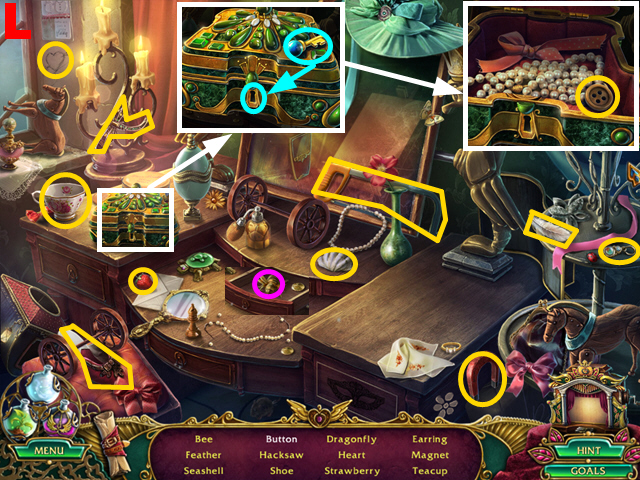
- Play the HOP.
- You receive the MAGNET and HACKSAW (L).
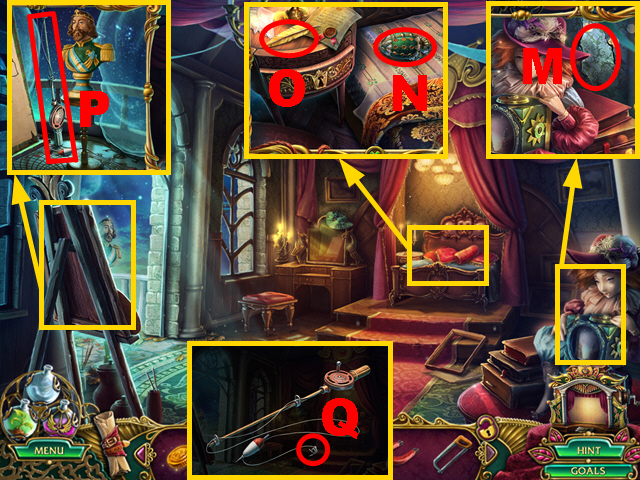
- Rip open the pillow (M).
- Remove 4 pillows; take the EGG-SHAPED CASE (N) and GOLD PEN (O).
- Take the FISHING ROD (P).
- Place the MAGNET on the FISHING ROD (Q) to acquire the FISHING ROD WITH MAGNET.
- Walk down.
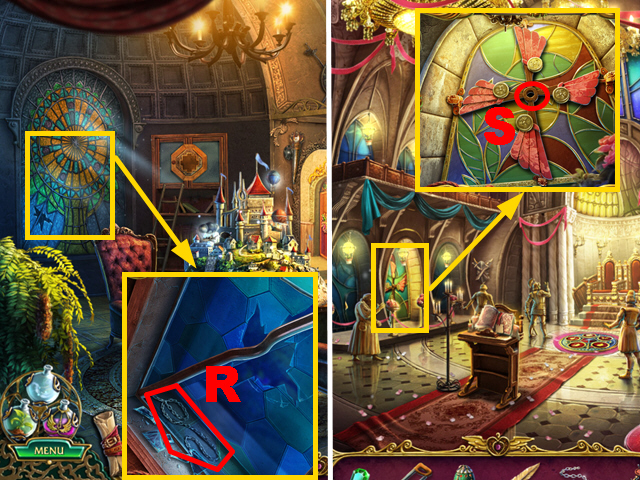
- Collect the CHAIN with the FISHING ROD WITH MAGNET (R).
- Walk down, turn left.
- Collect the MILL BLADES with the HACKSAW (S).
- Walk down twice.
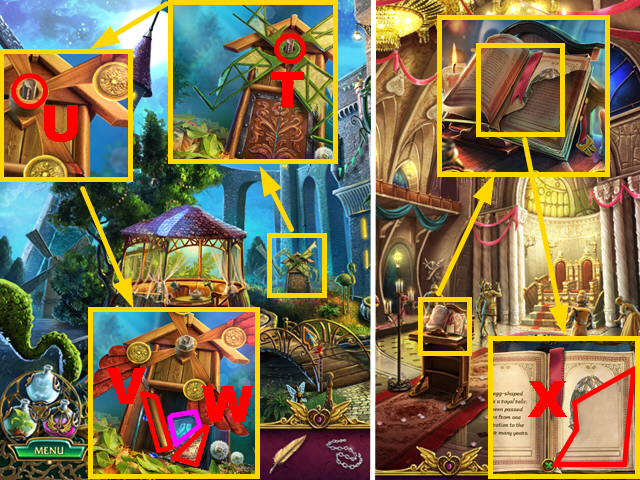
- Place the MILL BLADES (T) and NUT (U).
- Read the scroll (V); take the TORN PAGE (W) and MAGIC STONE (purple).
- Move forward, turn left.
- Place the TORN PAGE (X).
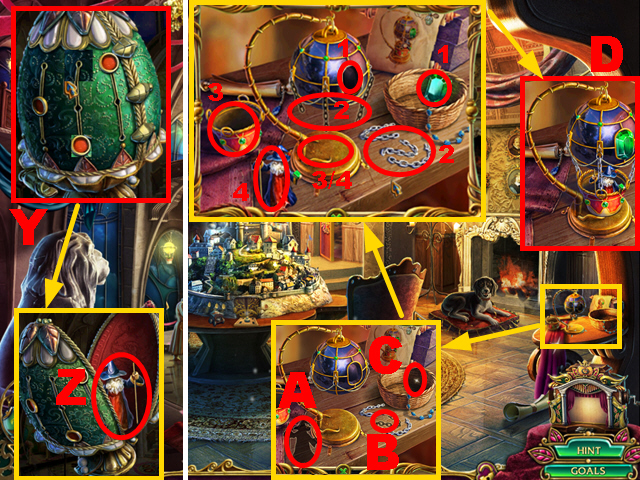
- Arrange the switches on the EGG-SHAPED CASE correctly (Y); take the WARLOCK FIGURINE (Z).
- Walk down, turn right.
- Place the WARLOCK FIGURINE (A), CHAIN (B), and EMERALD (C).
- Solution: 1-4.
- Take the BALLOON (D).
- Walk down, turn left.
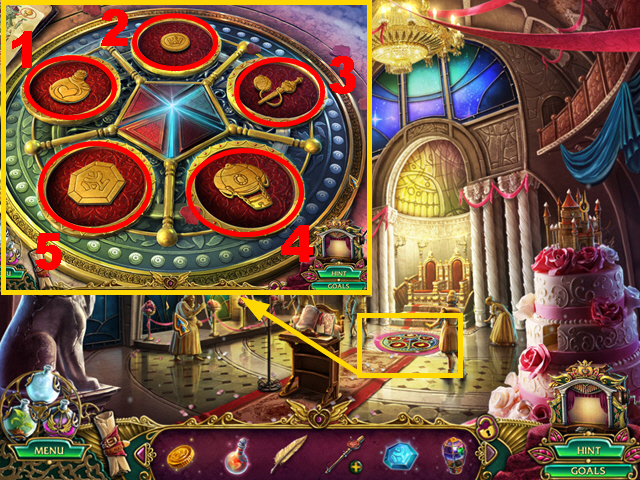
- Place the LOVE PERFUME (1), GOLDEN COIN (2), MAGIC SPINDLE (3), BALLOON (4), and MAGIC STONE (5).
- Move forward.
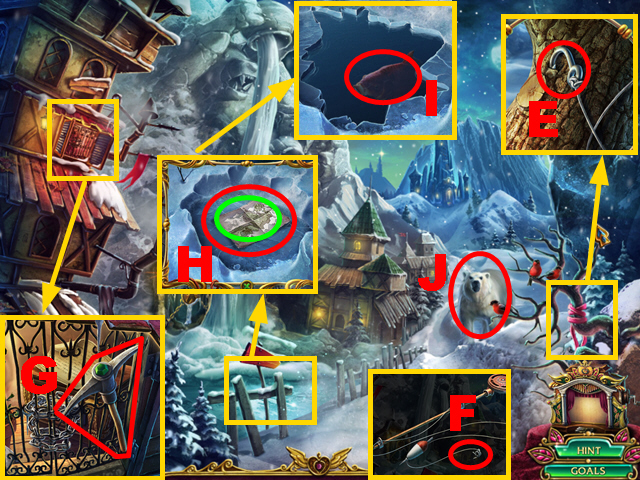
- Take the HOOK (E).
- Place the HOOK on the FISHING ROD (F) to acquire the FISHING ROD WITH HOOK.
- Take the PICKAXE (G).
- Take the MAP (green); use the PICKAXE (H).
- Collect the FISH with the FISHING ROD WITH HOOK (I).
- Give the FISH to the bear (J).
- Move forward.
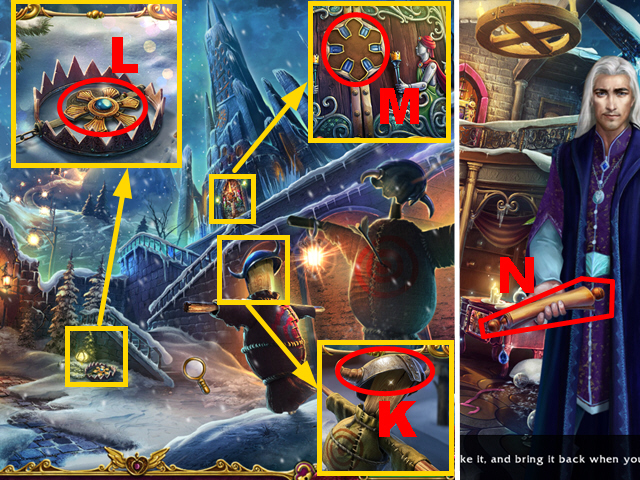
- Remove the helmet (K).
- Use the LEVITATION POTION; take the SUN FIGURINE (L).
- Place the SUN FIGURINE (M).
- Turn right.
- Take the CONTRACT (N).
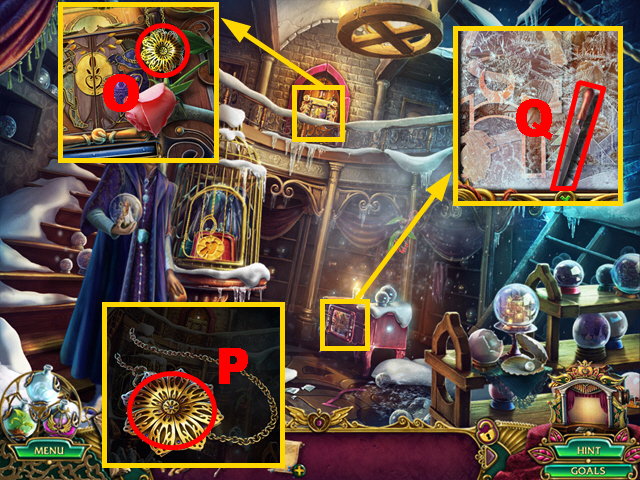
- Take the WARLOCK'S LOCKET (O).
- Open the WARLOCK'S LOCKET (P).
- Take the FILE (Q).
- Walk down twice.
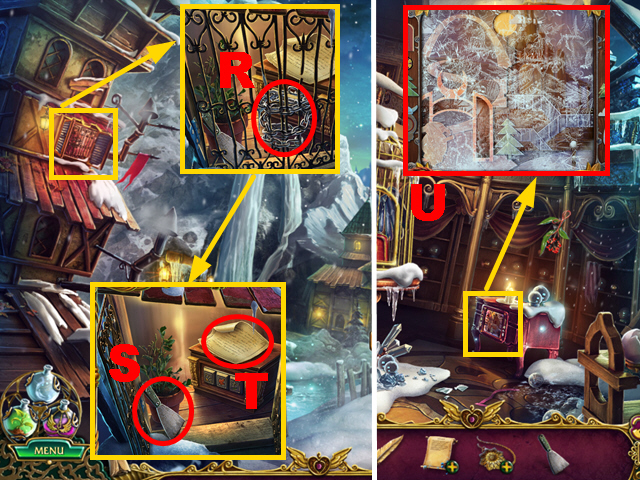
- Use the FILE (R).
- Take the SPATULA (S); read the note (T).
- Move forward, turn right.
- Use the SPATULA three times (U).
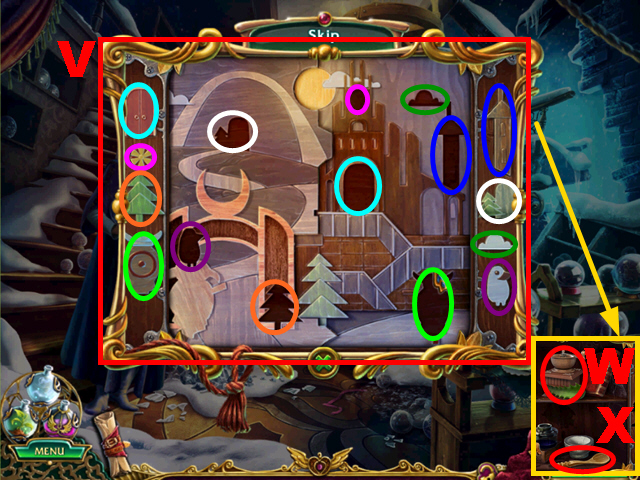
- Play the mini-game.
- Place the figurines correctly (V).
- Take the COFFEE GRINDER (W) and TEASPOON (X).
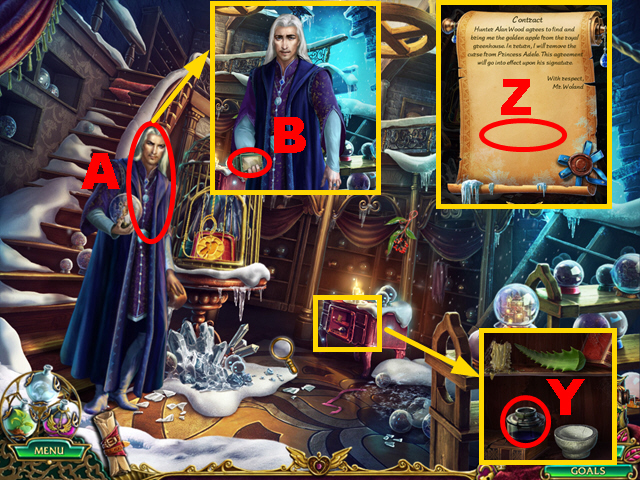
- Place the GOLD PEN (Y) to acquire the PEN WITH INK.
- Sign the CONTRACT with the PEN WITH INK (Z) to acquire the SIGNED CONTRACT.
- Give the SIGNED CONTRACT to the man (A).
- Take the STORY SLIDES (B); you receive the DRAWER KEY.
- Go to the Princess's Bedroom.
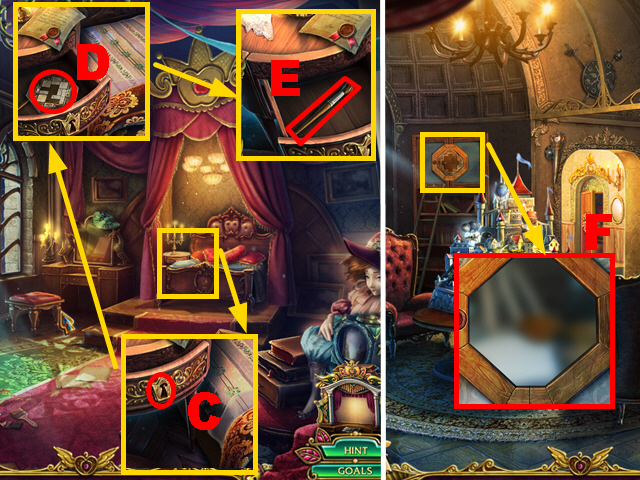
- Place the DRAWER KEY (C); turn it.
- Take the PUZZLE FRAGMENTS (D) and PAINTBRUSH (E).
- Walk down.
- Place the PUZZLE FRAGMENTS (F).
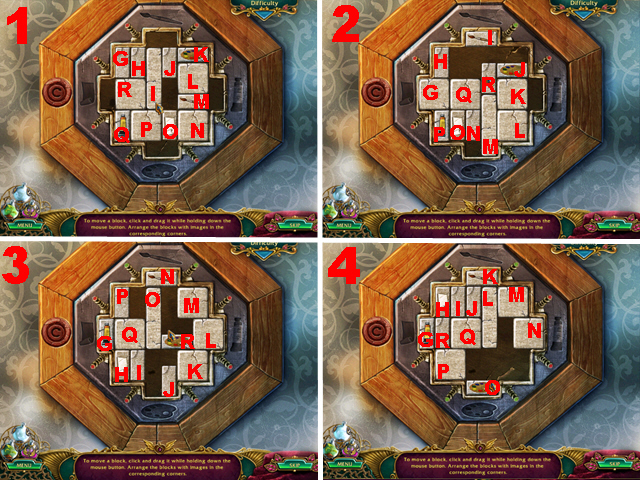
- Play the mini-game.
- Hard solution (1): O-down, I-up, R-left, M-left x3, L-down, K-down, J-down x3, I-right, M-up, H-right, H-up, M-up, P-up x2, O-left, O-up, O-left, J-down, J-left, I-down x4, H-right, H-down x2, M-up, M-right, M-up.
- Hard solution (2): Q-up x2, N-down, G-right x2, P-up x2, P-left, O-left, O-up x2, N-up, N-left x2, G-down x2, Q-down x2, R-up, Q-up x2, G-up x2, N-right, O-down x2, G-left, M-left, L-left, K-left, M-up, K-right x2, R-down x2, J-left, L-right, R-down x2, J-down, Q-right x3, M-up x2, R-down, J-down.
- Hard solution (3): O-down x3, R-up, R-left, R-up, J-up x3, J-right, R-down, M-left x3, J-up x2, J-left, L-left, L-up x2, K-up x2, K-right, R-right, R-down x3, O-up, K-left, K-down, M-down, J-down, L-up, K-up, K-right, J-down, J-right, O-down, J-left, K-left, K-down, L-down, M-up, R-right, J-down x3, K-left, K-up, K-right x2, L-left, O-up, L-right, J-up x5, O-right, Q-right, H-up x2, I-left, Q-down x2, M-down x2, J-left x2, O-up x2, Q-right, I-right, J-right, P-right, H-up x2, I-left, I-up x2, Q-left x2, R-left x2, R-down.
- Hard solution (4): N-left, N-down x2, M-down x2, M-right, L-down x2, J-right x3, L-up x2, P-right x2, R-down x2, R-right, H-down x4, I-left, Q-up x2, G-right x3, H-up x2, H-left, I-down x2, Q-left, G-left, R-left, G-down x2, L-left, J-left x2, M-left, M-up x2, N-up x2, N-right, P-right, P-up x2, G-right x4, L-down x2, L-left, J-left, P-down x2, P-left, N-left x3, G-up x2, G-right.
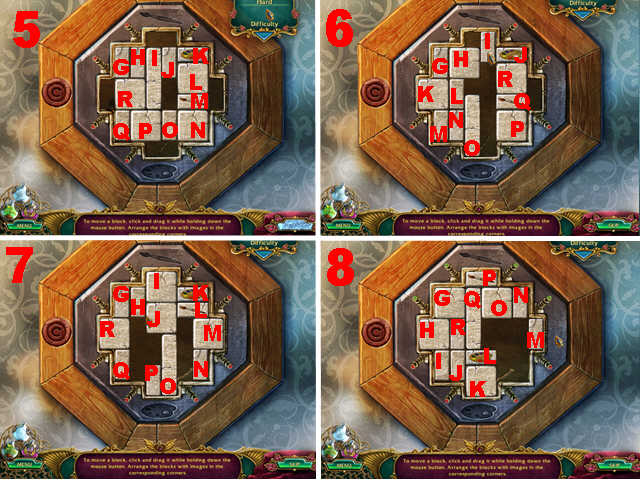
- Casual solution (5): R-left, I-up, P-up, O-down, O-left, J-down x5, I-right, I-down x2, P-up, H-right, H-up, H-right, P-up x2, O-up x3, O-left, J-left, J-up, J-left, I-down x2, I-left.
- Casual solution (6): I-down x6, H-right, H-up, R-left x2, J-down x2, L-up x2, J-right, R-right, L-down, L-right, N-up x4, Q-right, I-up x2, N-down x4, L-left, L-up, R-left, J-left, J-up x2, Q-left, Q-up x2, P-up x2, P-right, I-down, I-right x2, O-right, N-right, N-down.
- Casual solution (7): H-down x4, J-left, O-up, O-right, J-right, P-right, H-right, H-down, J-down x2, I-down x2, G-right, G-down x4, I-up, I-left x2, L-left x2, L-up x2, K-left x2, J-up x2, G-up x2, H-up, H-left, O-up x2, P-up, P-right, J-down x4, K-down x4, O-left x2, M-left x2, M-up x2, N-up x4, P-up x2, P-right x2.
- Casual solution (8): L-right, L-up x2, K-up, K-right x2, Q-down x3, L-left, O-left, N-left, K-up x2, Q-right, J-right, J-down, R-down, R-right, I-right, H-right, K-down x2, N-right, O-right, H-left, I-up x2, L-right x2, R-up x3, J-up, J-left x2, Q-left, L-left x2, K-up x2, Q-right, J-down x2, J-right, J-down, L-left, L-down x2, R-down x2, R-left, O-left, N-left, K-down x2, Q-up, N-right, N-down x2, O-right x2, Q-up x2, J-right, J-up, L-down, Q-left, J-up x4, L-right, L-down.
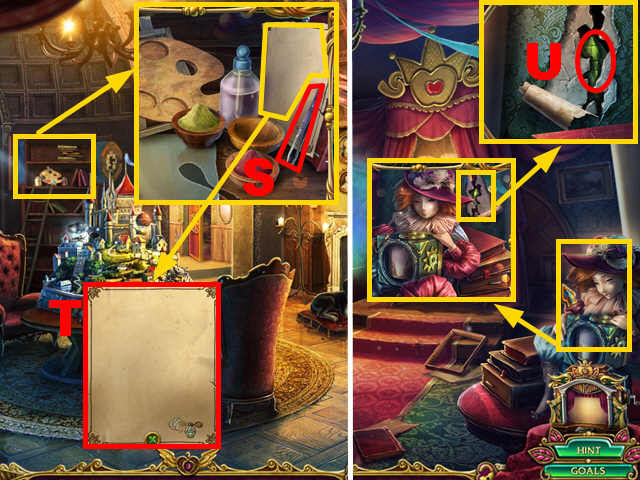
- Take the TWEEZERS (S); use the REVEALING POTION (T).
- Move forward.
- Collect the GREEN STONE with the TWEEZERS (U).
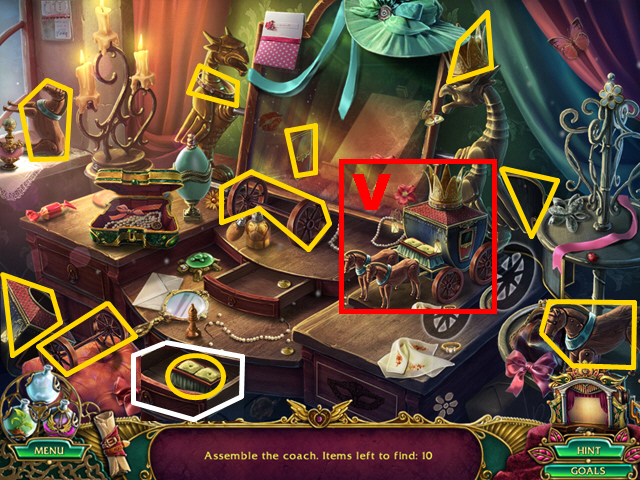
- Play the HOP.
- Take the COACH (V).
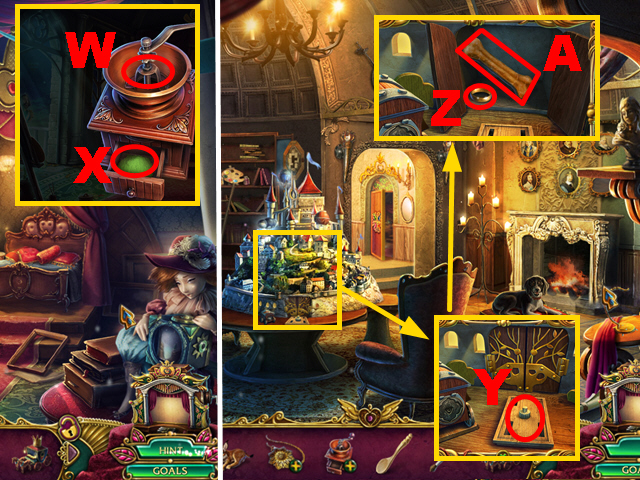
- Put the GREEN STONE into the COFFEE GRINDER (W); take the GREEN POWDER (X).
- Walk down.
- Place the COACH (Y); take WEDDING RING 1/2 (Z) and the BONE (A).
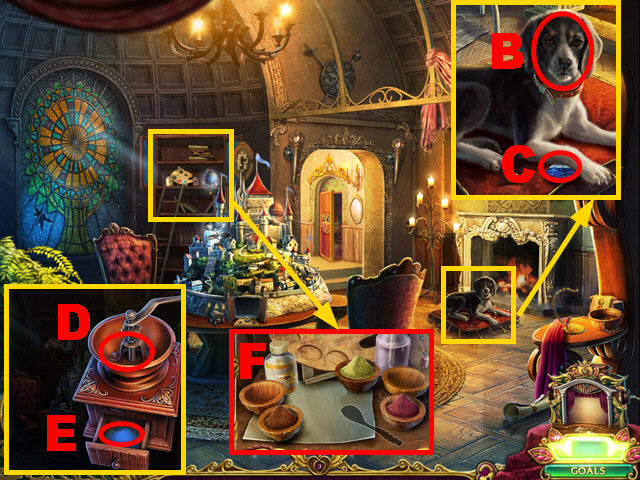
- Give the BONE to the dog (B); take the BLUE STONE (C).
- Place the BLUE STONE in the COFFEE GRINDER (D); take the BLUE POWDER (E).
- Place the TEASPOON, BLUE POWDER, and GREEN POWDER (F).
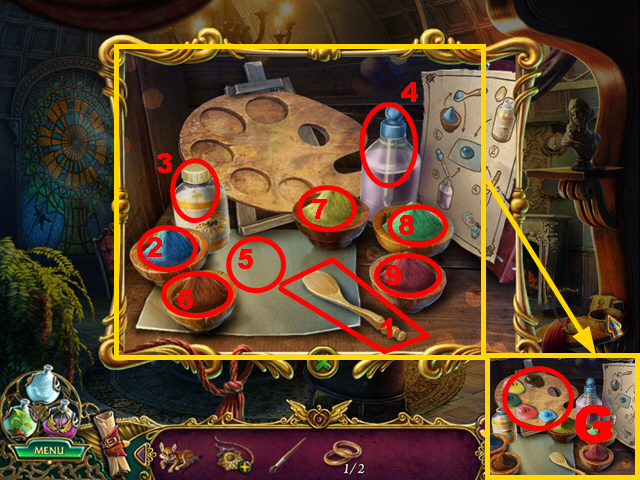
- Solution: 1, 2, 3, 3, 4, 1, 5, 1, 6, 3, 4, 1, 5, 1, 7, 3, 4, 1, 5, 1, 8, 3, 4, 1, 5, 1, 9, 3, 4, 1, 5.
- Take the PALETTE WITH PAINTS (G).
- Move forward.
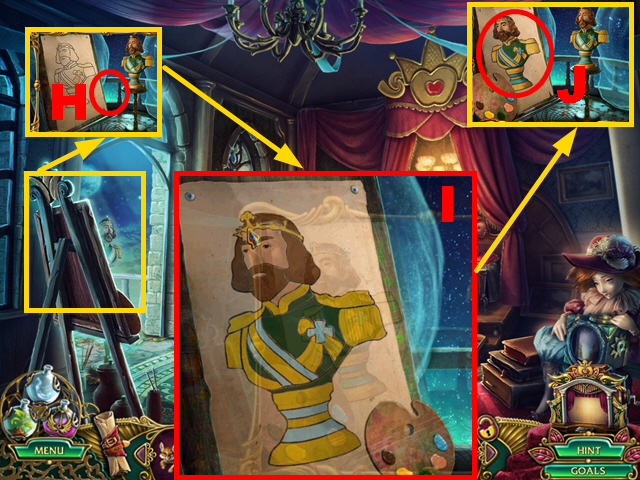
- Place the PALETTE WITH PAINTS and PAINTBRUSH (H).
- Play the mini-game.
- Solution: (I).
- Take the KING'S PORTRAIT (J).
- Walk down.
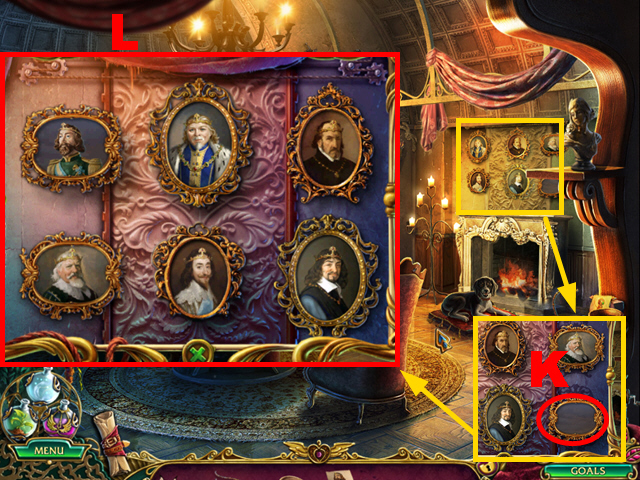
- Place the KING'S PORTRAIT (K).
- Arrange the portraits correctly (L).
- Turn right.
Chapter 6: The Dungeon
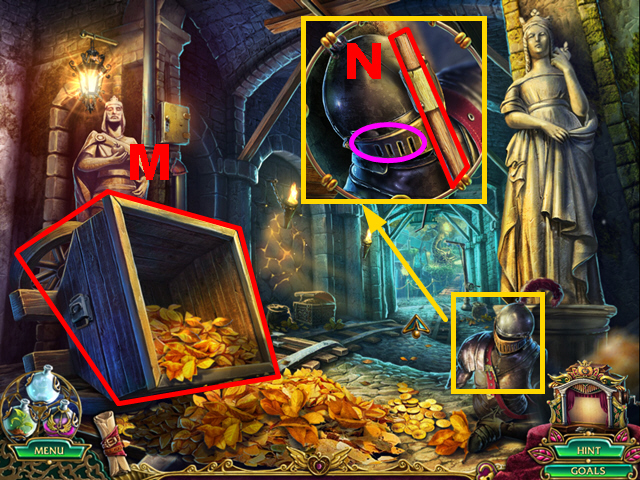
- Use the LEVITATION POTION (M).
- Take the SHOVEL HANDLE (N); open the helmet visor (purple).
- Move forward.
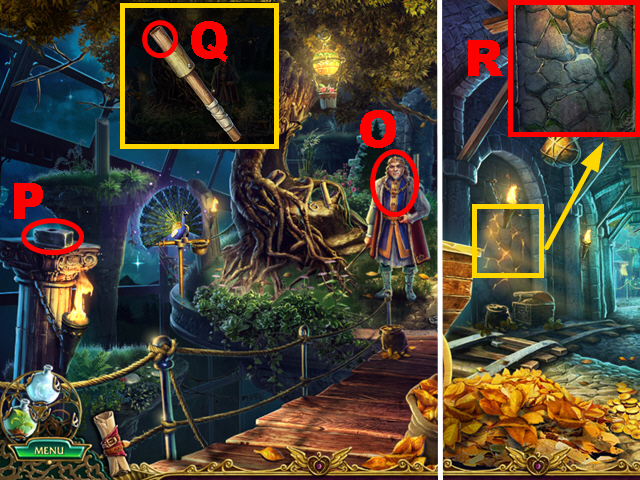
- Talk to the king (O).
- Take the HAMMER HEAD (P).
- Place the HAMMER HEAD on the SHOVEL HANDLE (Q) to acquire the SLEDGEHAMMER.
- Walk down.
- Use the SLEDGEHAMMER three times (R).
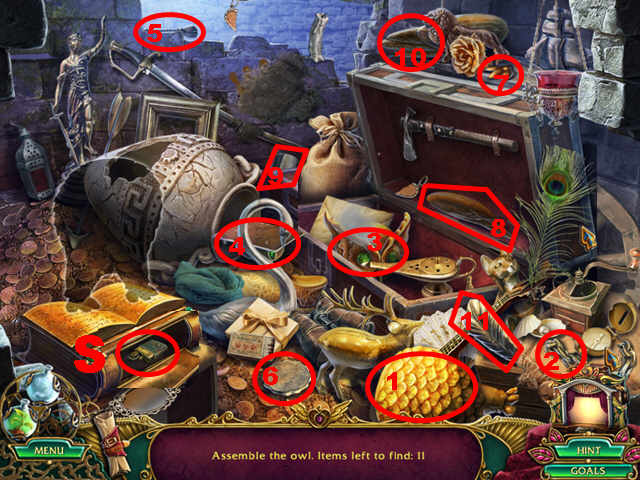
- Play the HOP.
- Solution: 1-11.
- Take the LIGHTER (S).
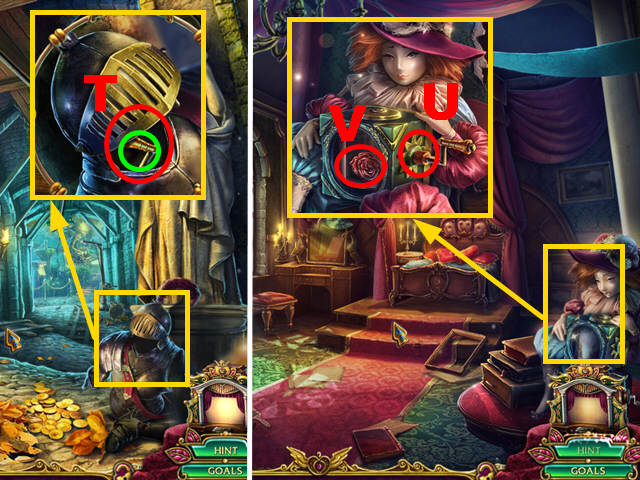
- Use the LIGHTER (T); take the MUSIC BOX HANDLE (green).
- Walk down, turn left.
- Place the MUSIC BOX HANDLE (U); take the ROSE (V).
- Walk down.
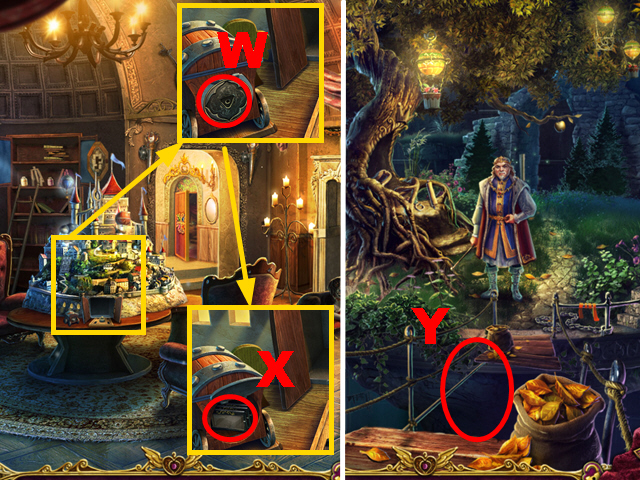
- Place the ROSE (W); take the STORY SLIDES (X).
- You receive the PLANKS.
- Turn right, move forward.
- Use the PLANKS (Y).
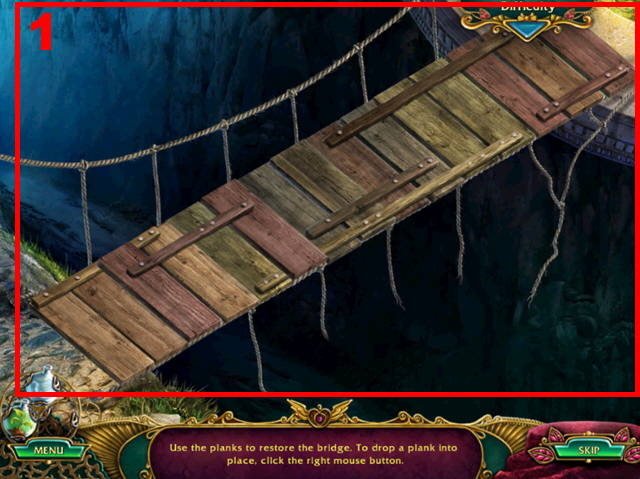
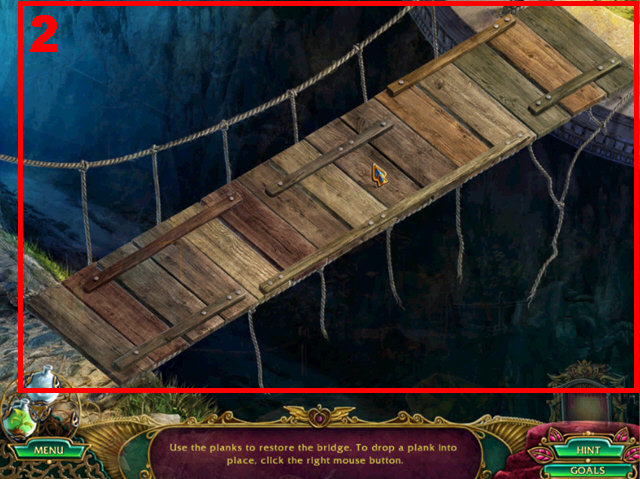
- Play the mini-game.
- Hard solution: (1).
- Casual solution: (2).
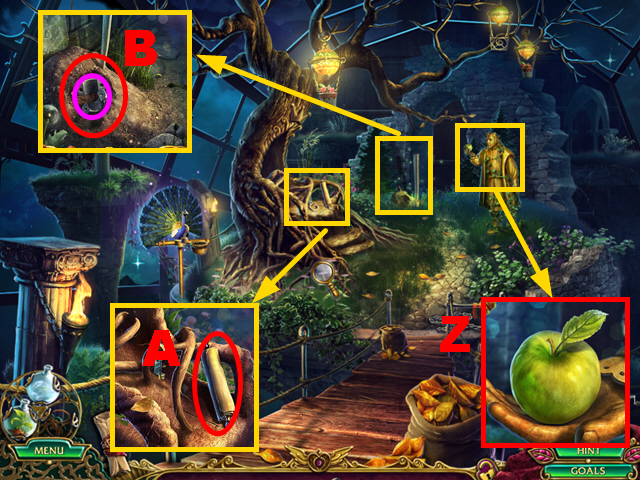
- Take the MAGIC APPLE (Z).
- Read the scroll (A).
- Use the LYNX (B); take the PIPE CLAMP (purple).
- Walk down, try to walk down.
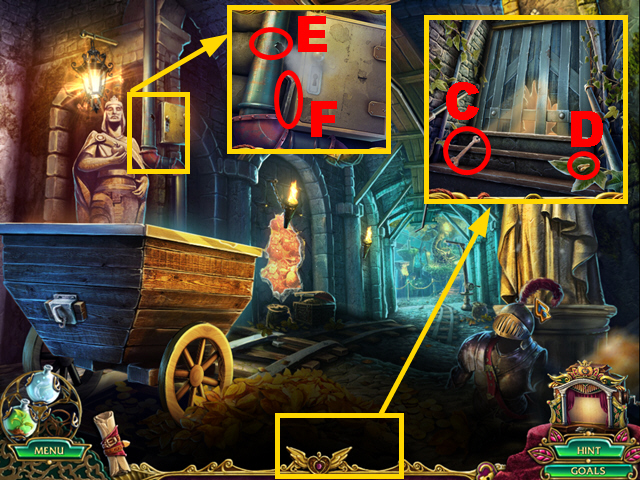
- Take the PIPE WRENCH (C) and GRAPE SEED (D).
- Use the PIPE CLAMP and PIPE WRENCH (E); take the RAILROAD SPIKE (F).
- Move forward.
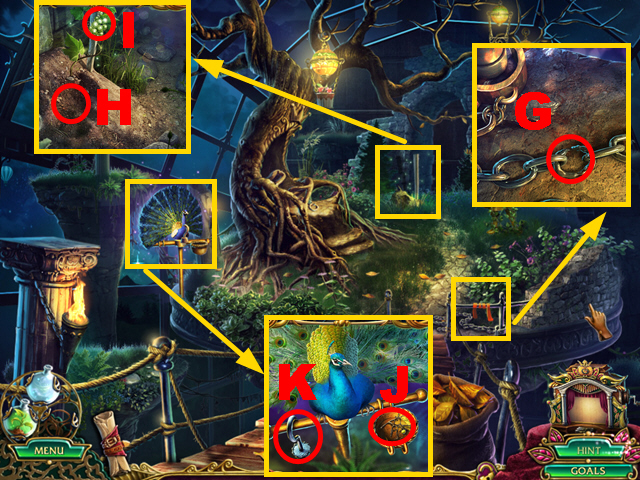
- Use the RAILROAD SPIKE and SLEDGEHAMMER (G) to acquire the CHAIN.
- Use the GRAPE SEED and GROWTH POTION (H); take the GRAPES (I).
- Place the GRAPES (J); take the PIRATE'S HOOK (K).
- Walk down.
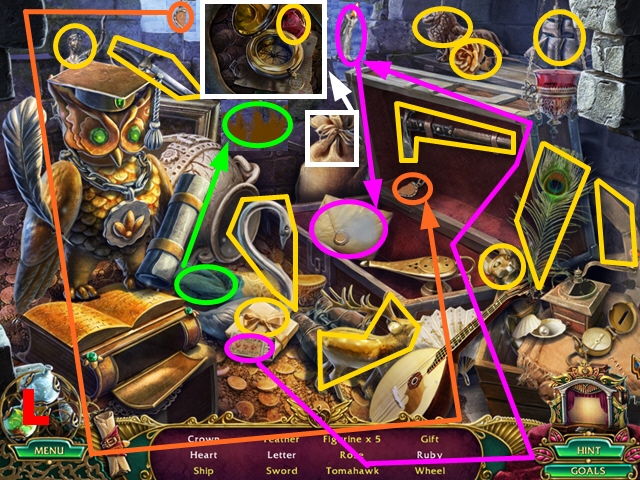
- Play the HOP.
- You receive the TOMAHAWK (L).
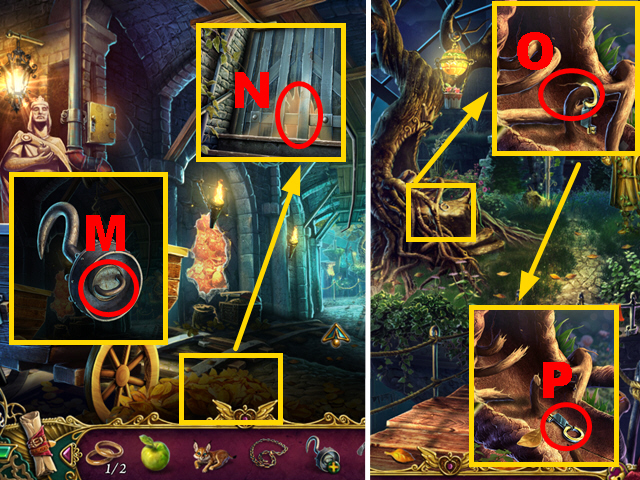
- Connect the CHAIN to the PIRATE'S HOOK (M) to acquire the CHAIN WITH HOOK.
- Place the CHAIN WITH HOOK (N).
- Move forward.
- Use the TOMAHAWK (O); take the CABINET KEY (P).
- Walk down.
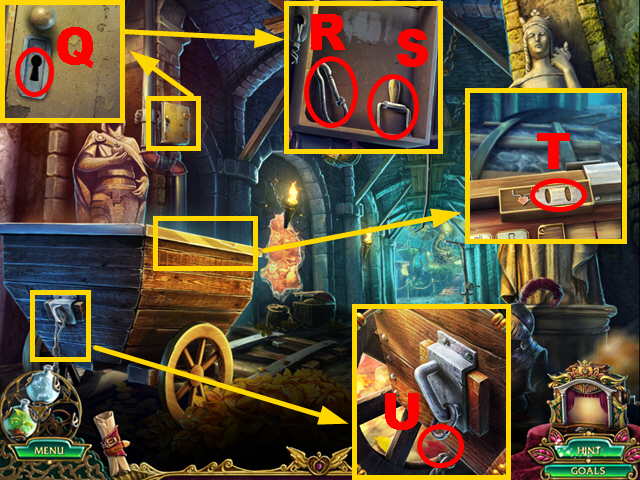
- Place the CABINET KEY (Q); turn it twice.
- Take the CARBINE (R) and SWITCH (S).
- Place the SWITCH (T).
- Place the CARBINE (U).
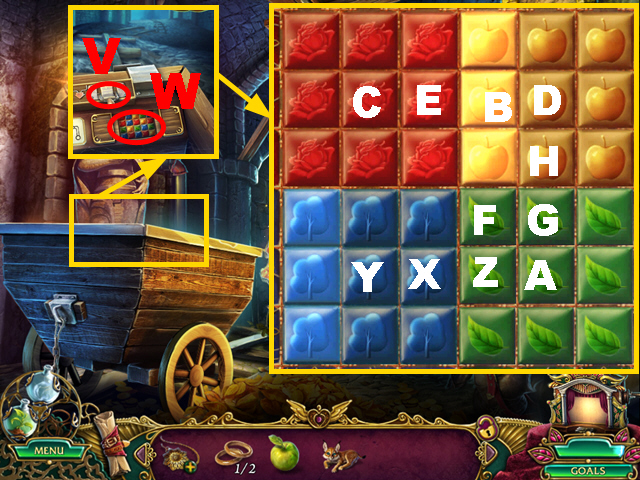
- Turn the switch (V); examine the compartment (W).
- Play the mini-game.
- Solution: Xx3, Y, Zx2, Yx2, Xx2, Zx2, Ax2, Bx4, Cx3, Dx4, Ex4, Xx2, Fx3, Dx4, B, Dx2, B, Gx4, A, Zx2, Ax2, Z, Dx2, Gx3, Dx4, Ax2, Hx2, G, Hx4.
- Go to the Storage.
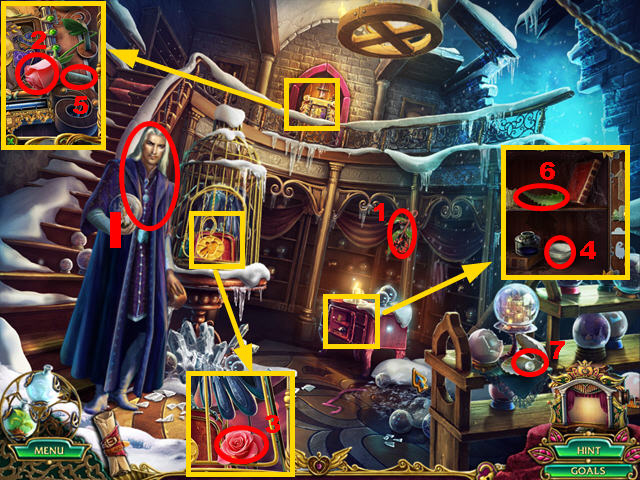
- Give the MAGIC APPLE to the man (I).
- Find the correct ingredients: 1-7.
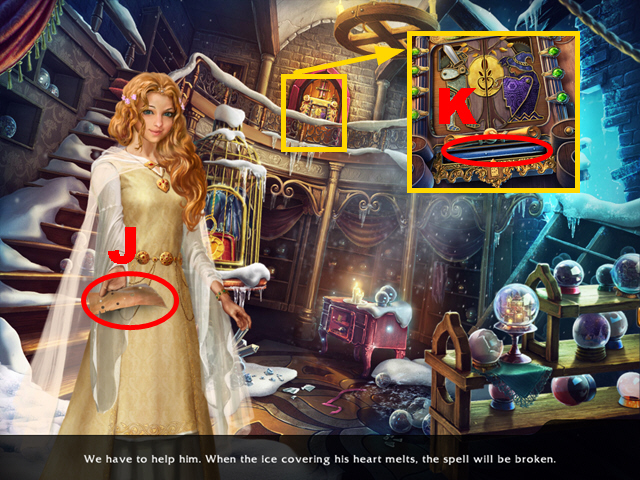
- Take the PUNCH CARD (J).
- Place the PUNCH CARD (K).
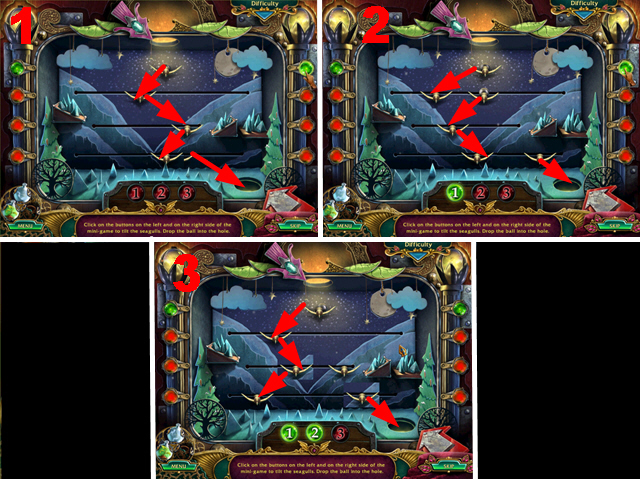
- Play the mini-game.
- Solution: 1-3.
- The difficulty grades only differ in the figurines movement speed.
- Move forward.
Chapter 7: The Secret Room
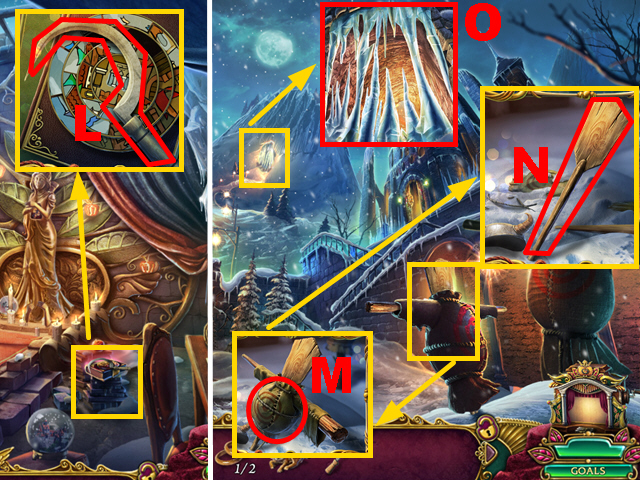
- Take the SICKLE (L).
- Walk down twice.
- Use the SICKLE three times (M); take the OAR (N).
- Use the OAR three times (O).
- Move forward.
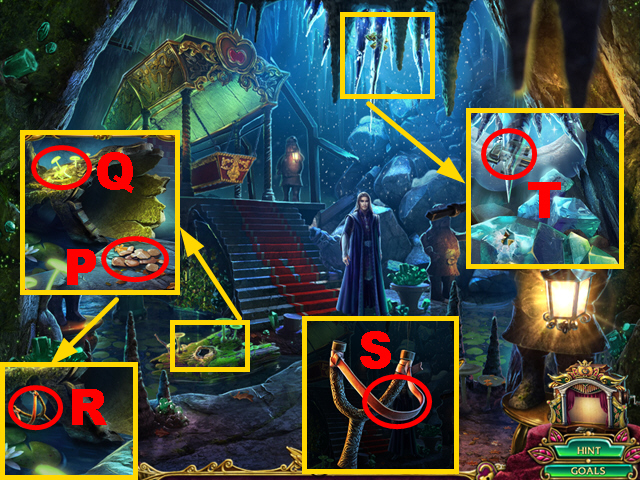
- Take the PEBBLES (P); use the GROWTH POTION (Q).
- Use the LYNX to collect the SLINGSHOT (R).
- Put the PEBBLES into the SLINGSHOT (S) to acquire the LOADED SLINGSHOT.
- Shoot the LOADED SLINGSHOT (T) to acquire the LOCK FRAGMENT.
- Walk down twice.
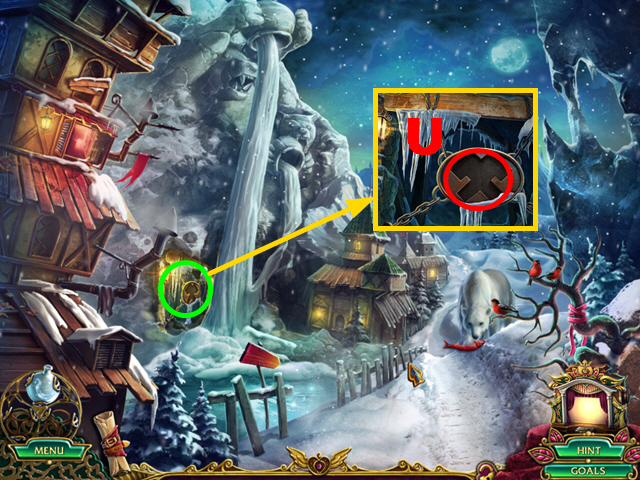
- Place the LOCK FRAGMENT (U).
- Examine the cave (green).
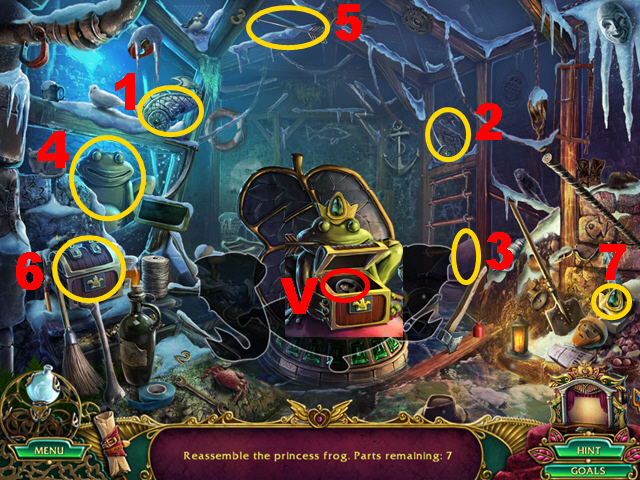
- Play the HOP.
- Solution: 1-7.
- Take the PORTRAIT OF AURORA (V).
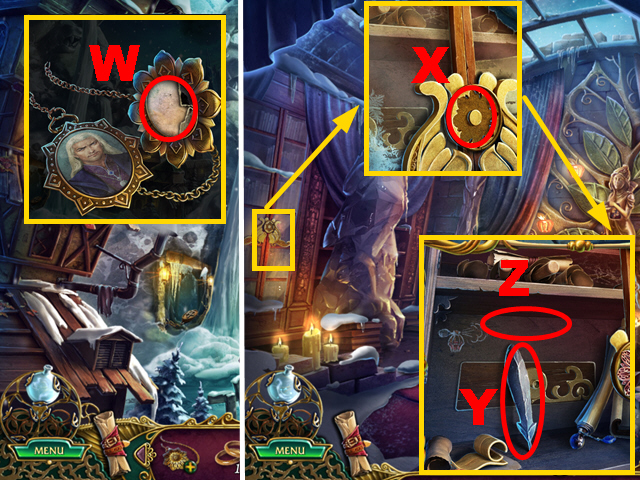
- Put the PORTRAIT OF AURORA into the WARLOCK'S LOCKET (W) to acquire the PENDANT.
- Go to the Secret Room.
- Place the PENDANT (X).
- Take FEATHER 1/2 (Y); use the REVEALING POTION (Z).
- Walk down three times.
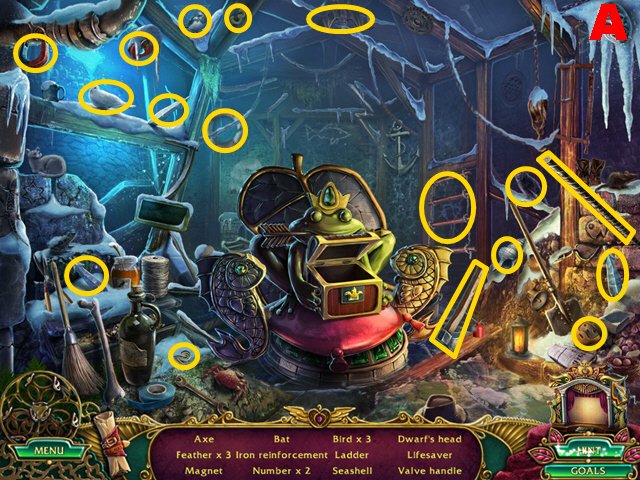
- Play the HOP.
- You receive the DWARF'S HEAD and FEATHER 2/2 (A).
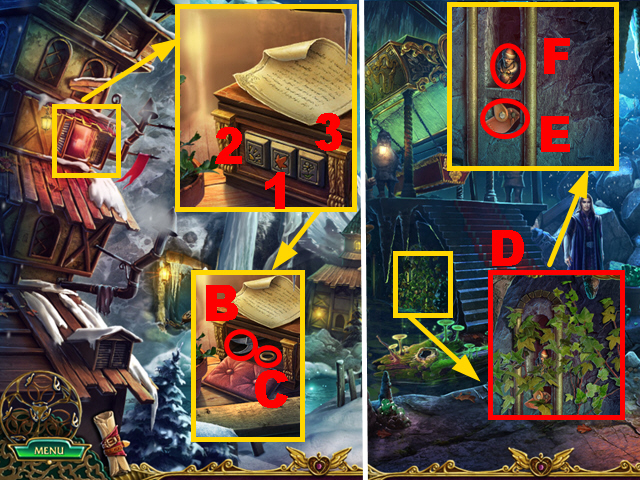
- Activate symbols 1-3.
- Take the PRUNING SHEARS (B) and WEDDING RING 2/2 (C).
- Move forward twice.
- Use the PRUNING SHEARS (D); take the BIRD FIGURINE (E) and DWARF FIGURE 1/4 (F).
- Walk down, turn right.
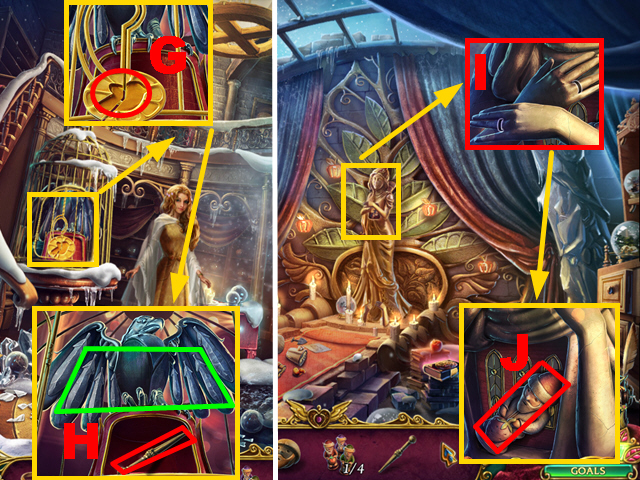
- Place the BIRD FIGURINE (G); place 2 FEATHERS (green).
- Take the ICE PICK (H).
- Move forward.
- Place 2 WEDDING RINGS (I); take DWARF FIGURE 2/4 (J).
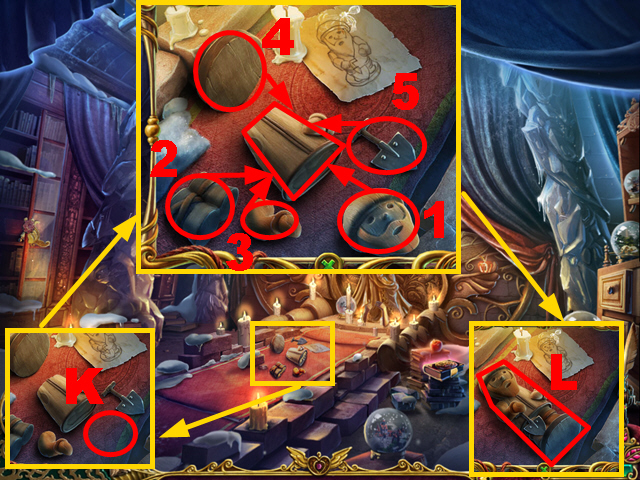
- Place the DWARF'S HEAD (K).
- Assemble the dwarf: 1-5.
- Take DWARF FIGURE 3/4 (L).
- Walk down twice, turn left.
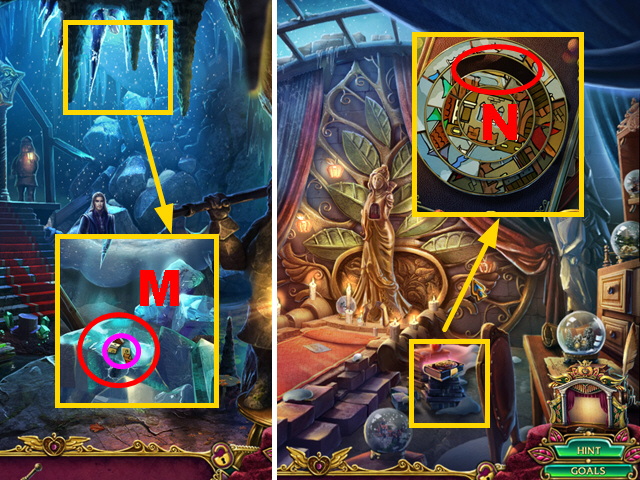
- Use the ICE PICK three times (M); take the BOOK COVER PARTS (purple).
- Go to the Secret Room.
- Place the BOOK COVER PARTS (N).
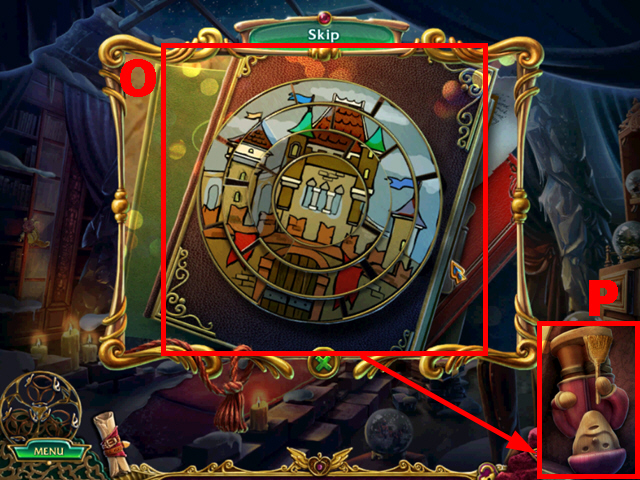
- Play the mini-game.
- Solution: (O).
- Take DWARF FIGURE 4/4 (P).
- Walk down twice, move forward.
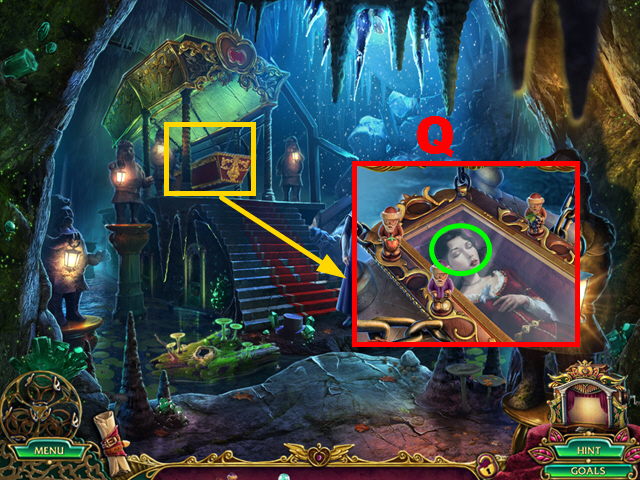
- The man will talk to you; you receive the LIFE ELIXIR.
- Place 4 DWARF FIGURES (Q).
- Use the LIFE ELIXIR (green).
- Congratulations, you have completed Dark Strokes: The Legend of the Snow Kingdom.
Created at: 2014-05-09

