

Walkthrough Menu
- General Tips
- Chapter 1: Ravensoul Mansion
- Chapter 2: Wilhelm
- Chapter 3: The Chapel
- Chapter 4: Finding Frederica
- Chapter 5: The Curse
General Tips
- This is the official guide for Dark Tales: Edgar Allan Poe's Metzengerstein.
- This guide will not show when you have to zoom into a location; the screenshots will show each zoom scene.
- Hidden-object puzzles are referred to as HOPs. This guide will not show screenshots of the HOPs, however, it will mention when an HOP is available and the inventory item you'll collect from it.
- Use the Map to fast travel to a location.
Chapter 1: Ravensoul Mansion
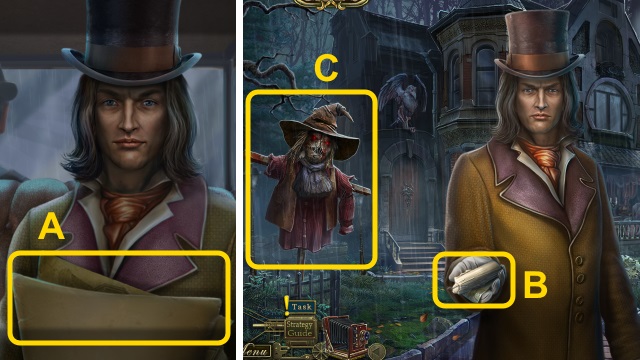
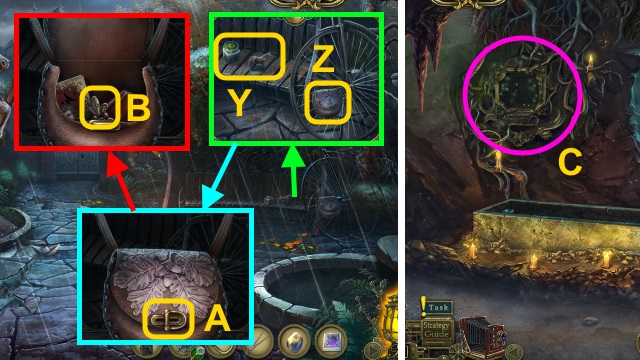
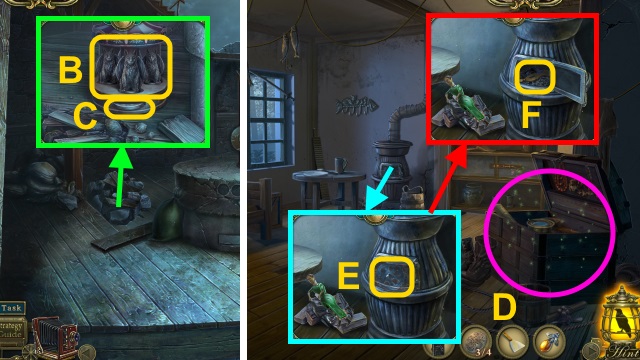
- Read the papers (A).
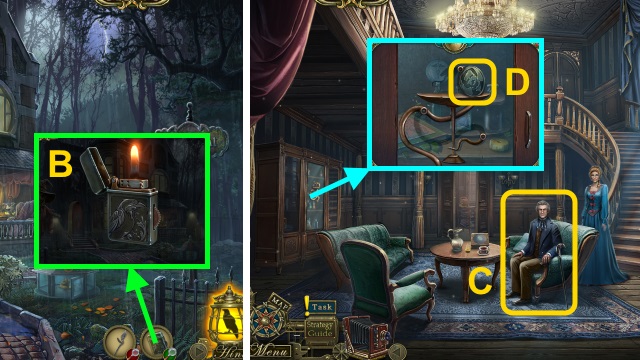
- Take the CANDLE (B).
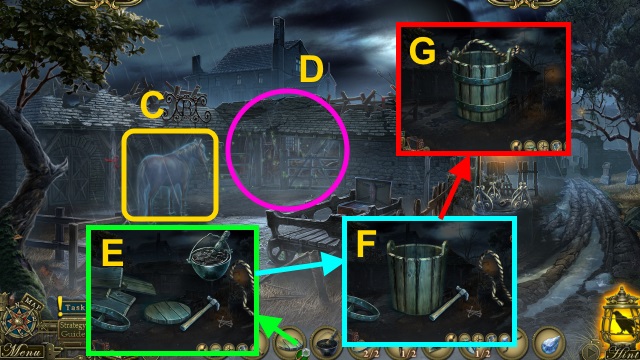
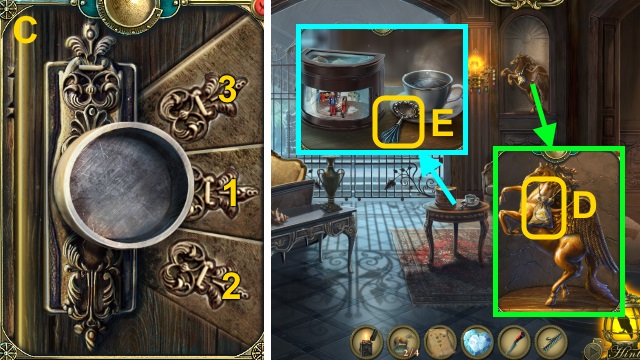
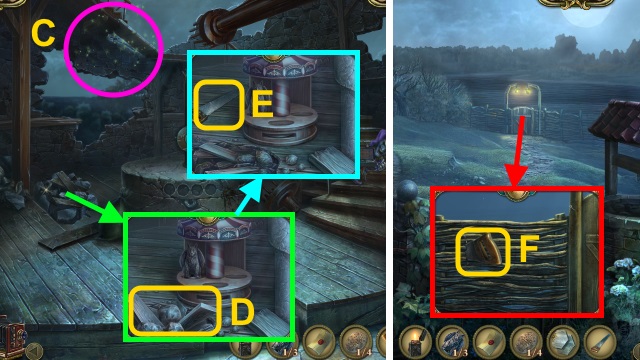
- Examine the scarecrow (C).
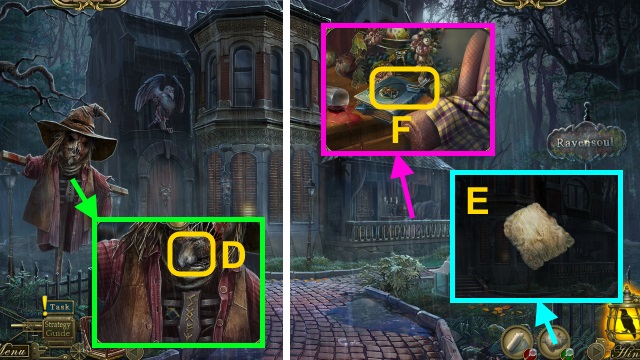
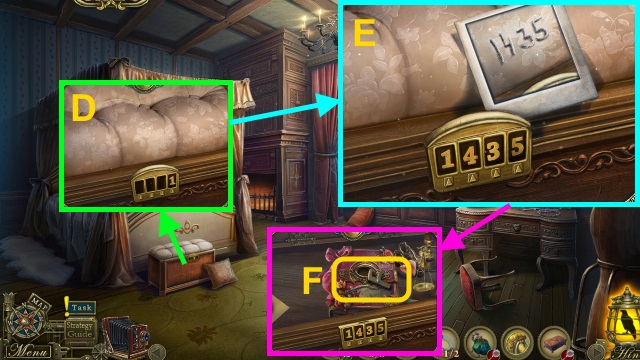
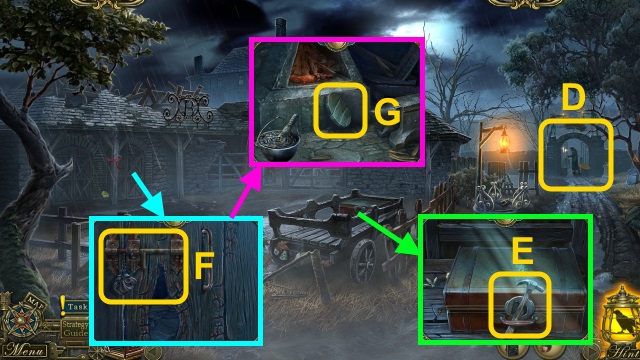
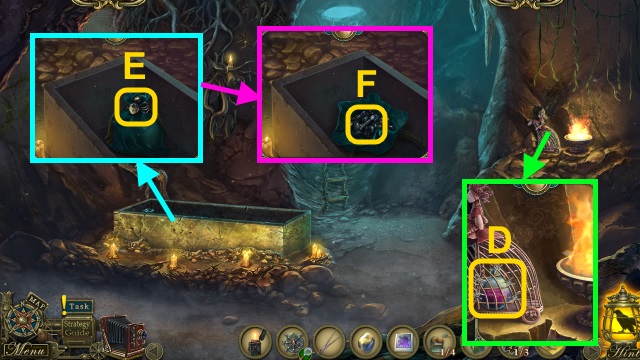
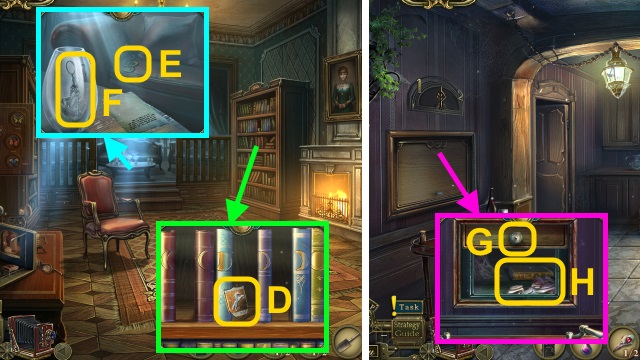
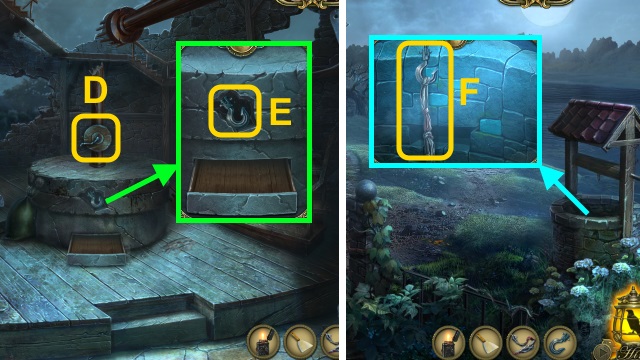
- Take the LIGHTER PACK (D).
- Examine the LIGHTER PACK 3x; take the LIGHTER PACK (E).
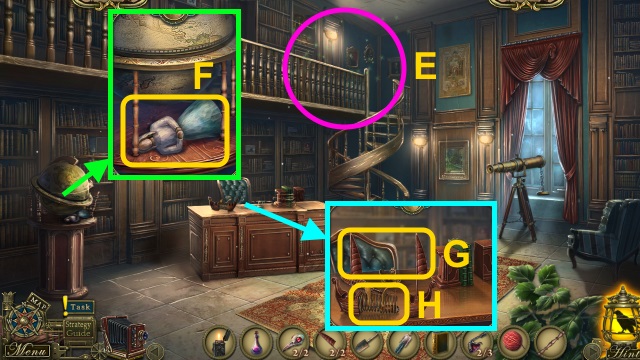
- Take the LIGHTER CAP and Map (F).
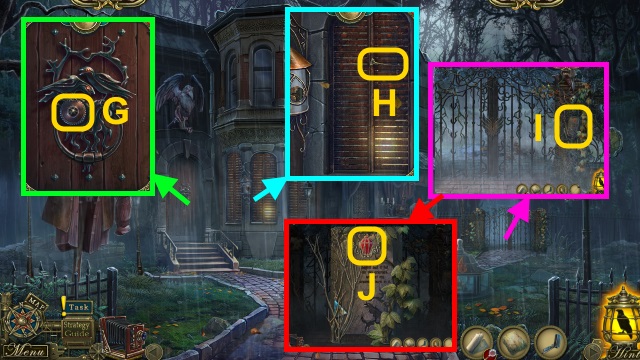
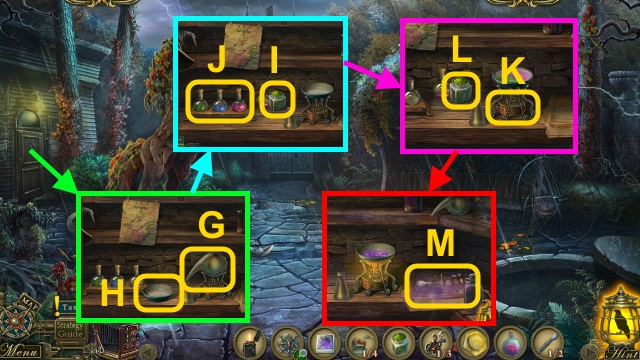
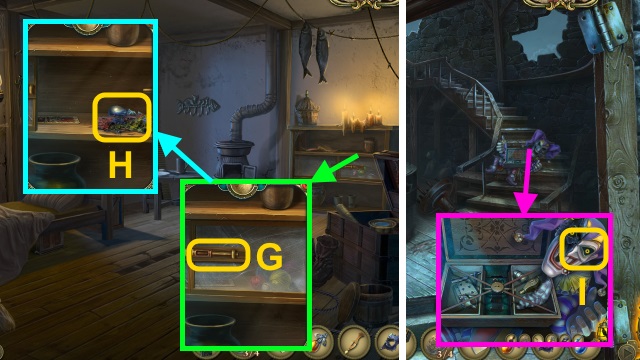
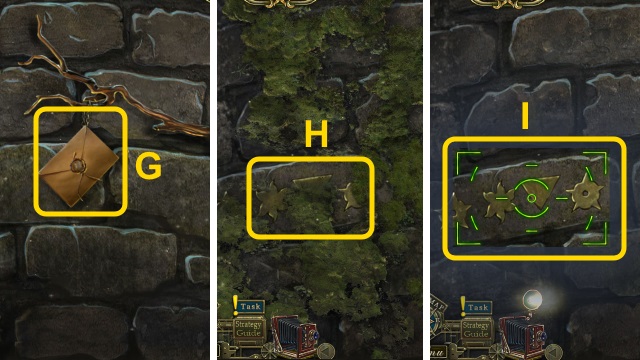
- Take the LIGHTER GEAR (G).
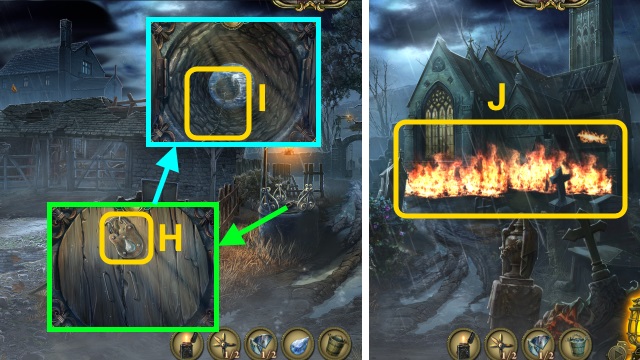
- Take the PLUNGER (H).
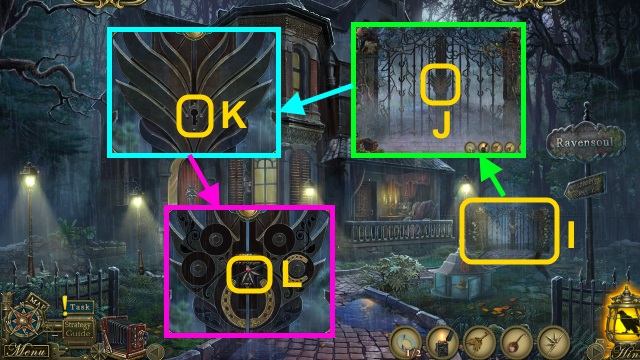
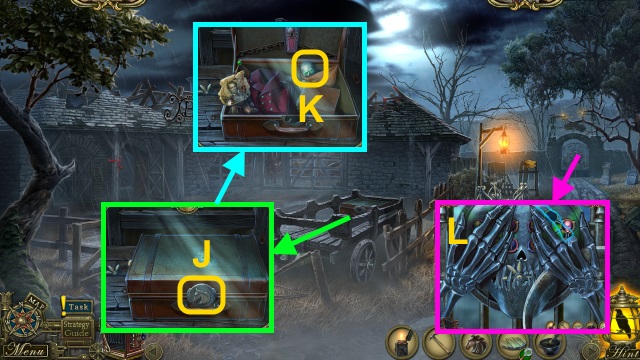
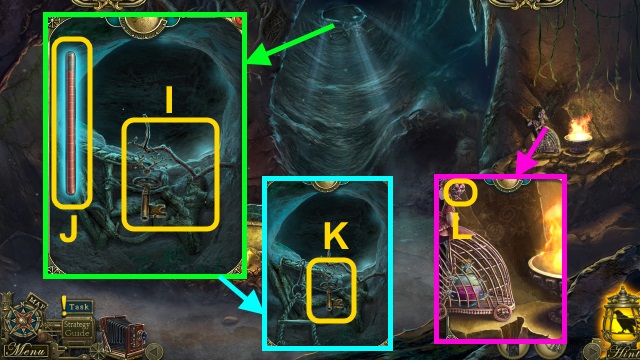
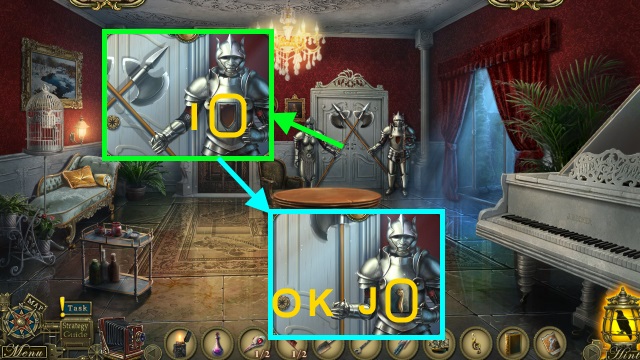
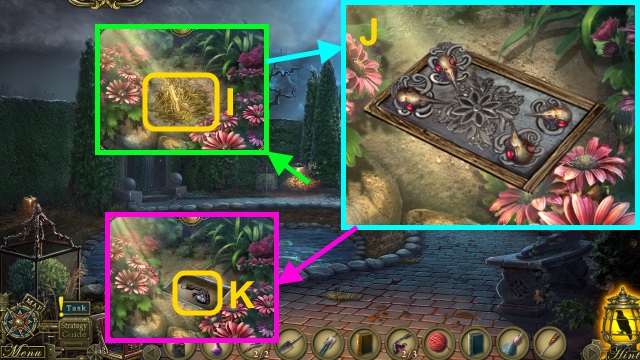
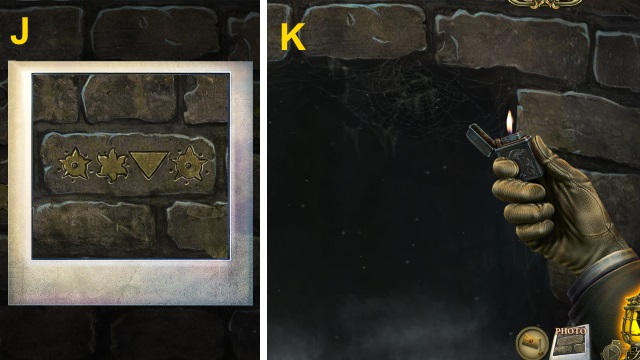
- Examine the sign (I); take the LIGHT KEY (J).
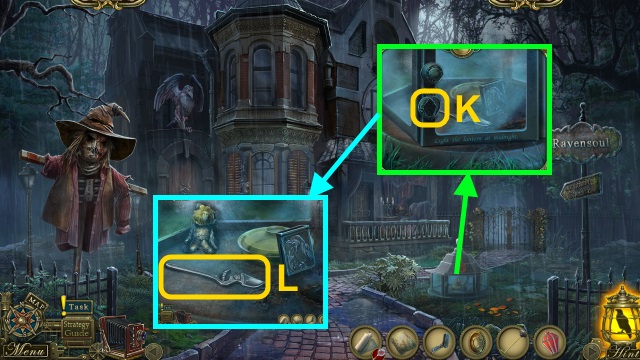
- Place the LIGHT KEY (K); open the door.
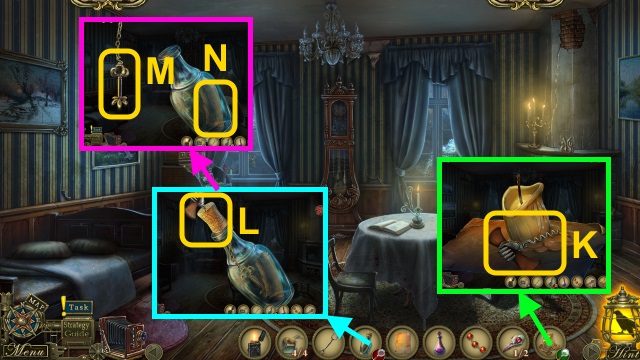
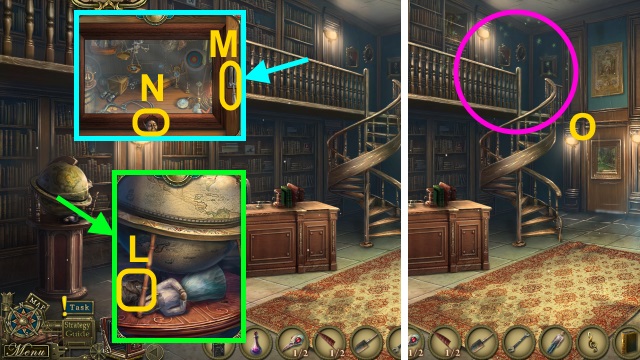
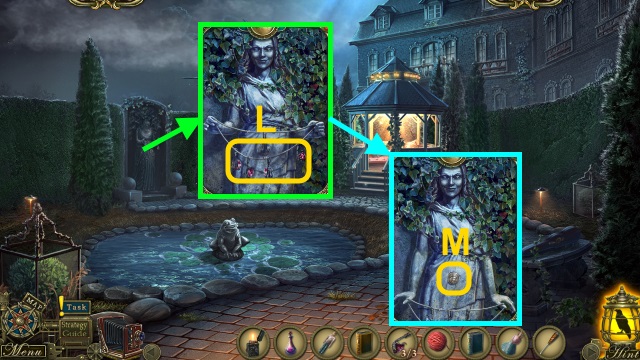
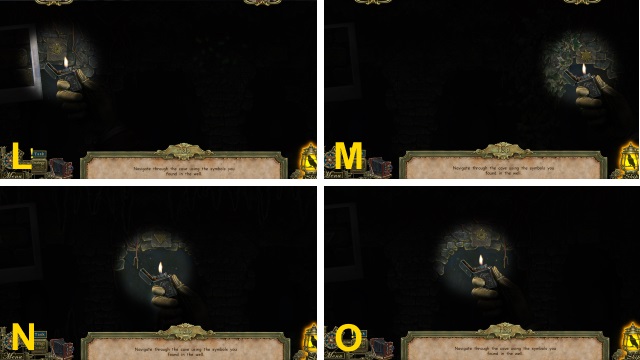
- Take the SCISSORS PIECE (L).
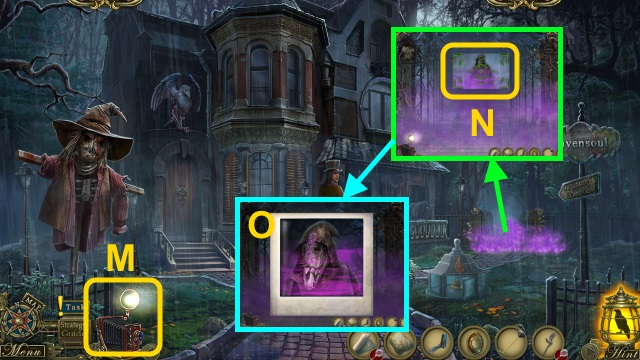
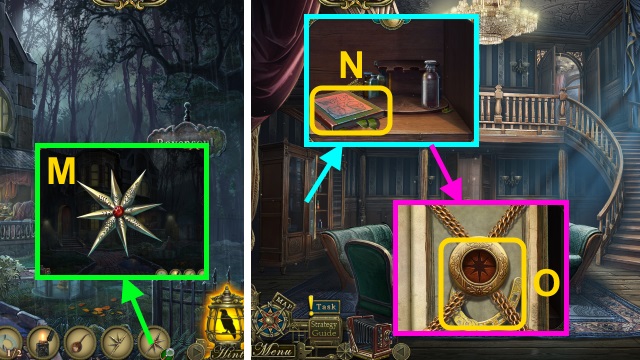
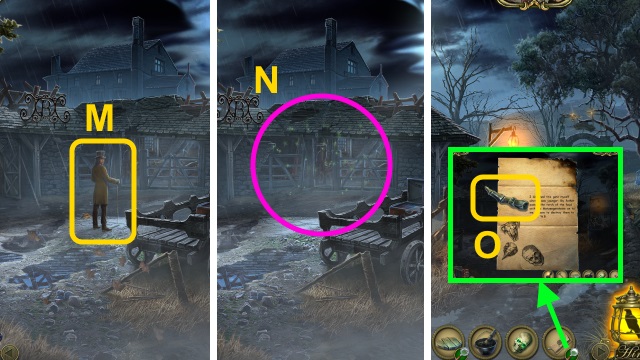
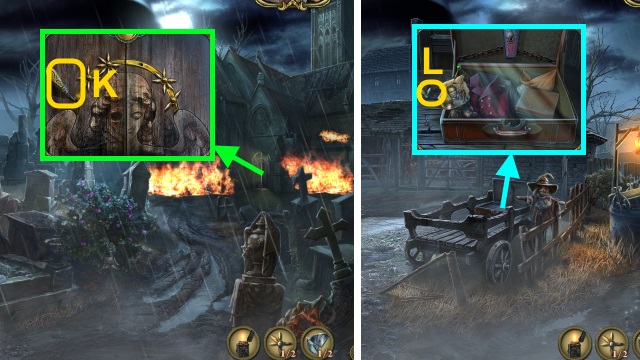
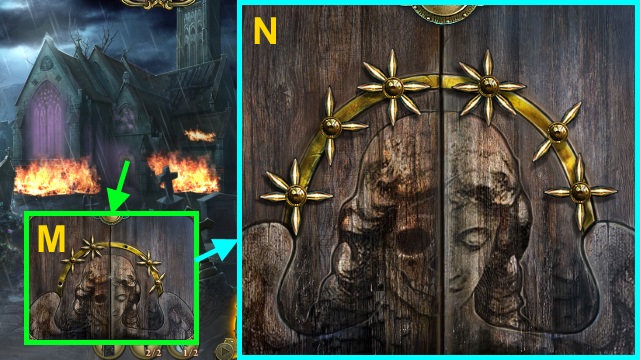
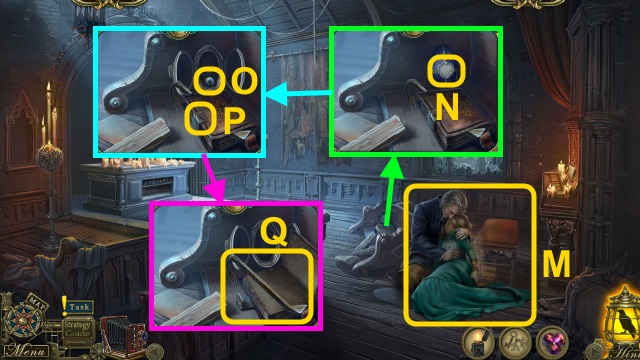
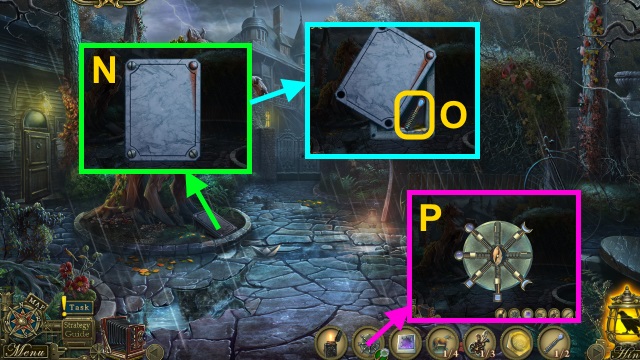
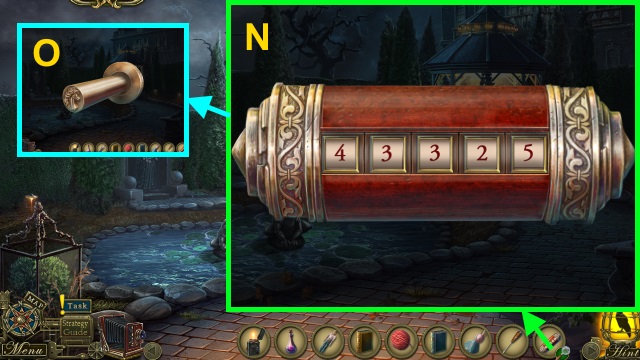
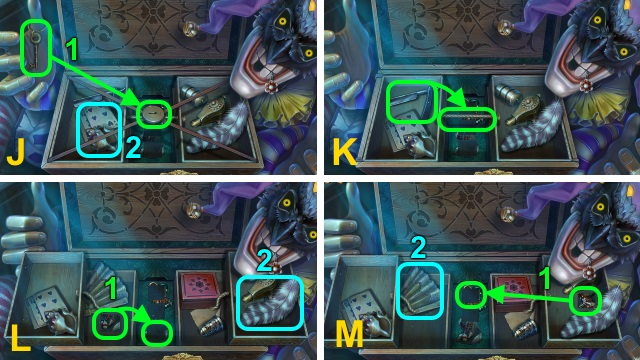
- Use the CAMERA (M) to take a photo (N).
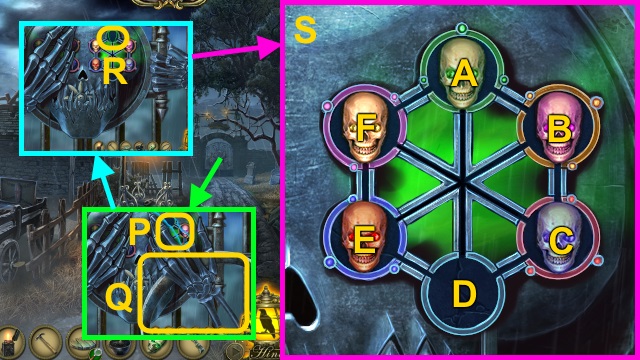
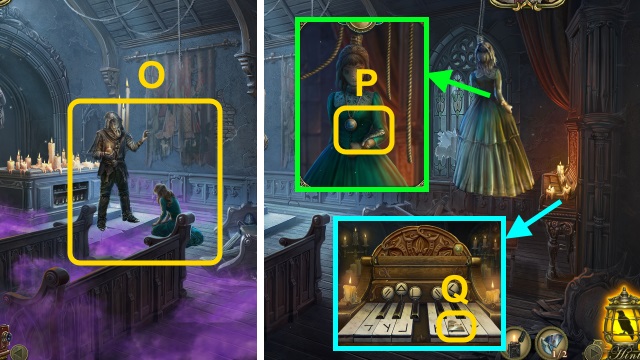
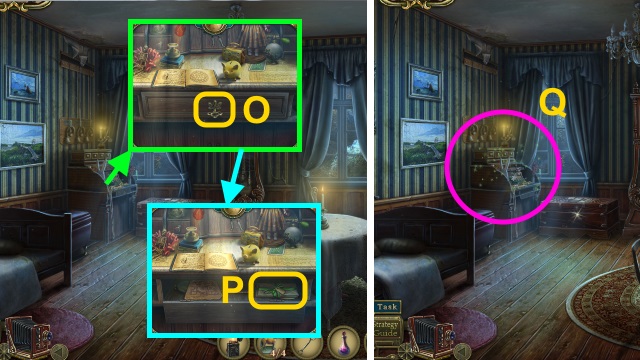
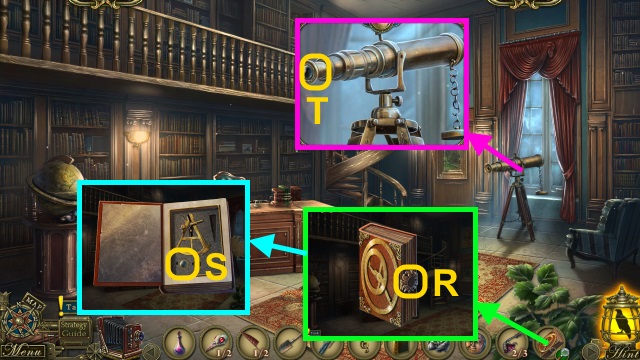
- Take the PHOTO (O).
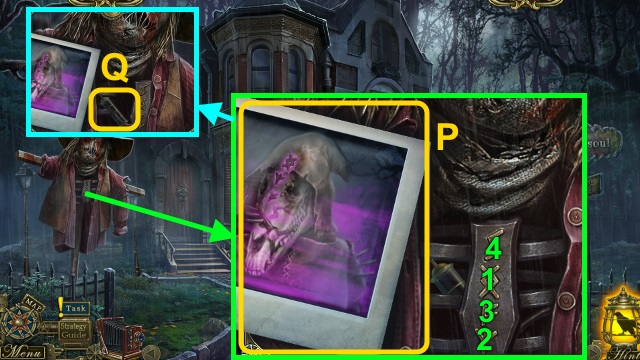
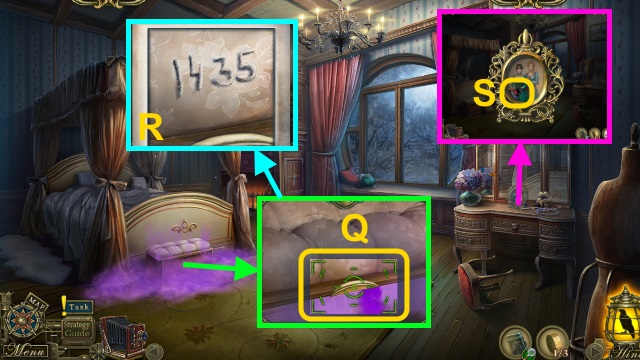
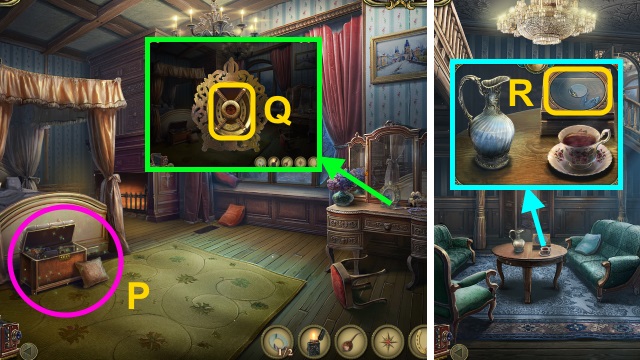
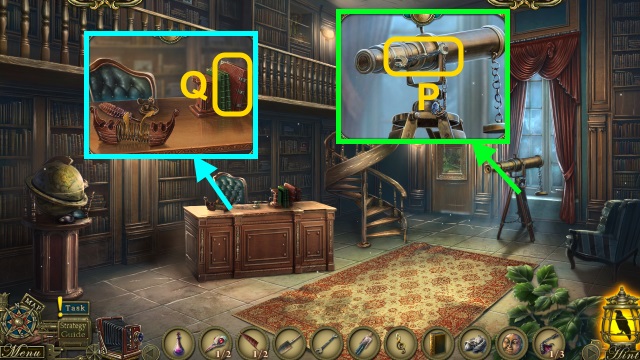
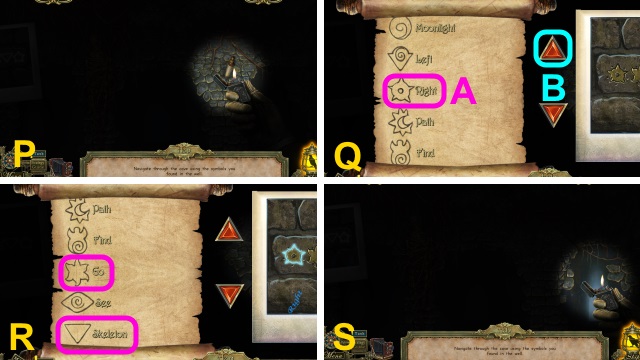
- Place the PHOTO (P); select the symbols in order (1-4).
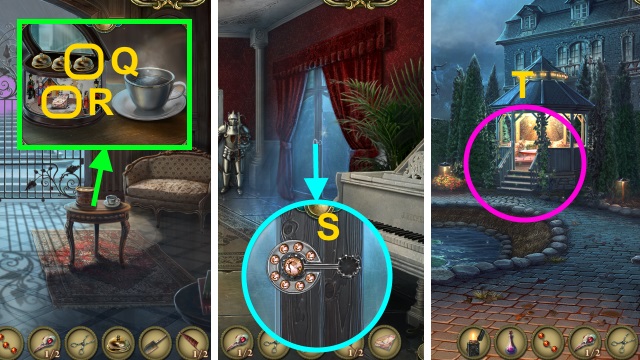
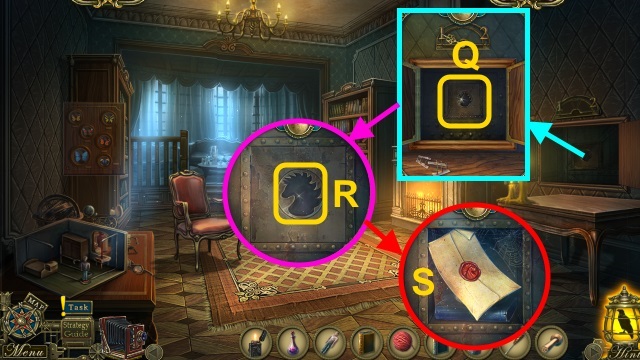
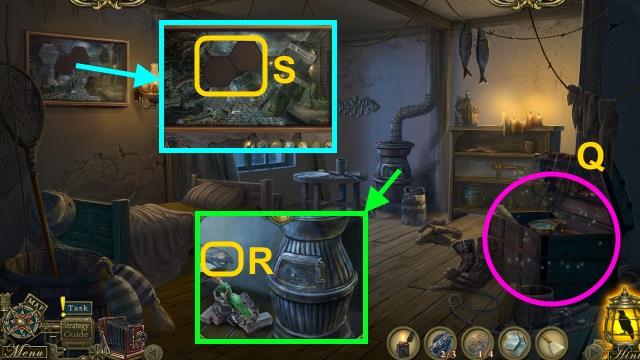
- Take the SYRINGE (Q).
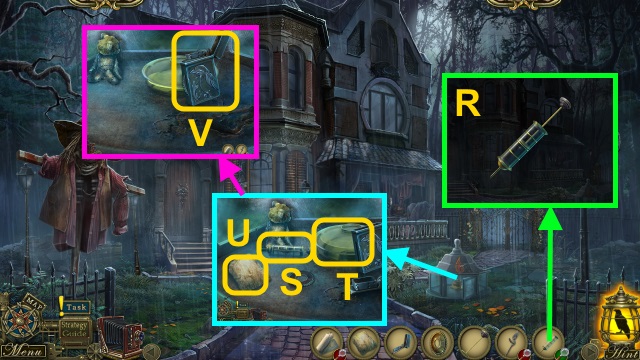
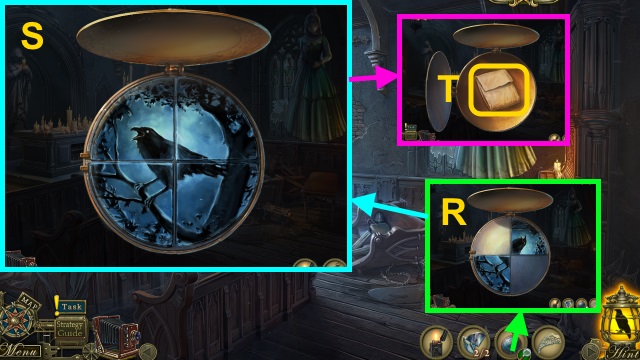
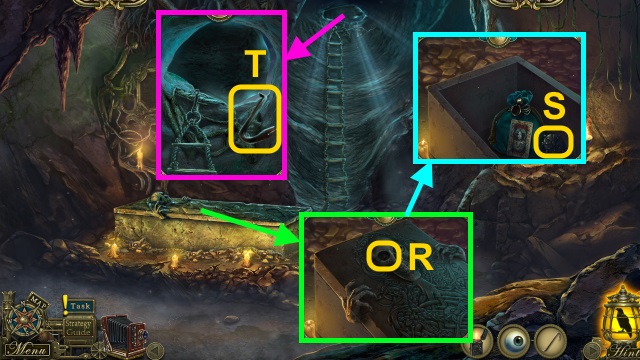
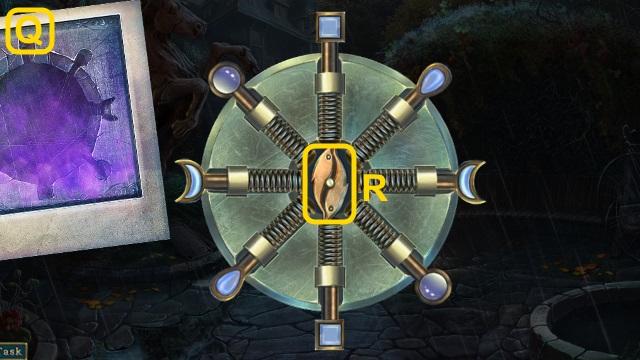
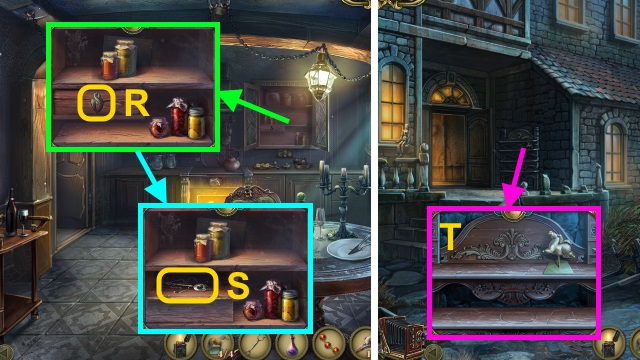
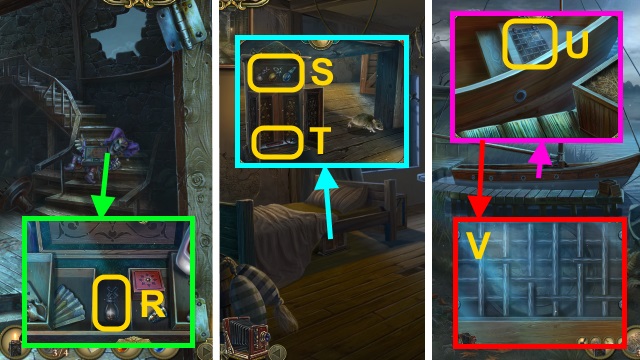
- Combine the SYRINGE and PLUNGER (R); take the SYRINGE.
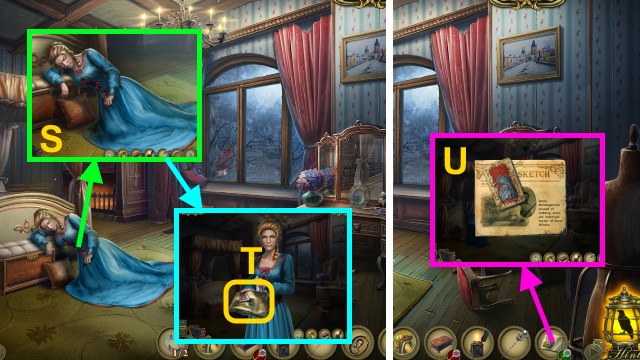
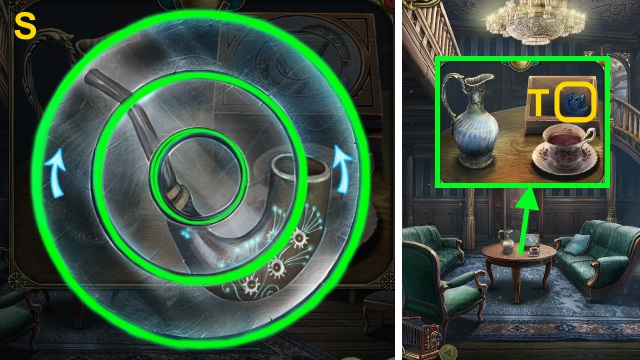
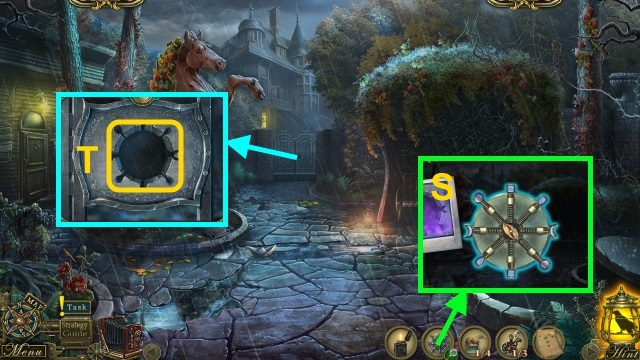
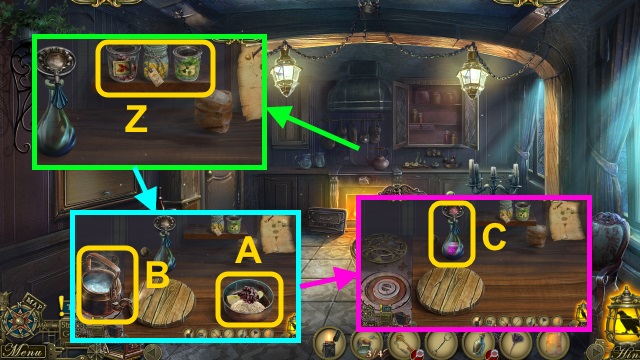
- Place the LIGHTER PACK, LIGHTER CAP, LIGHTER GEAR, and SYRINGE; use the syringe (S) on the fluid (T) and then on the pack (U).
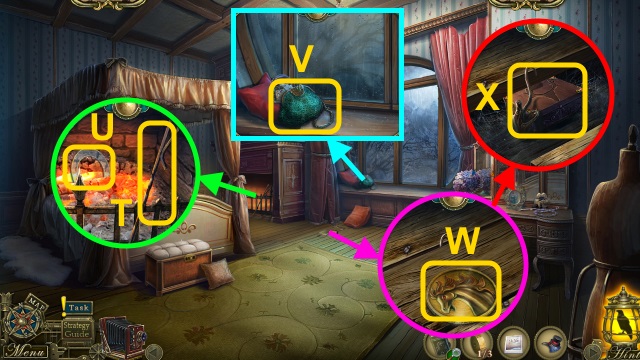
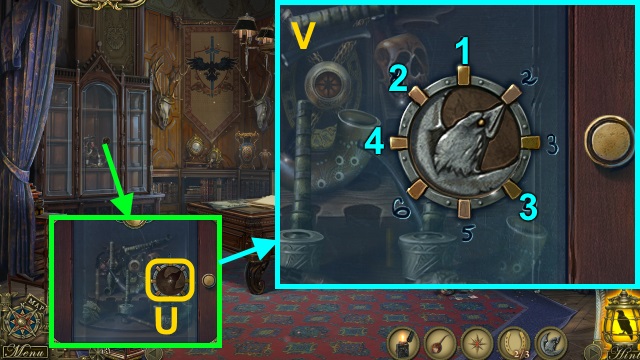
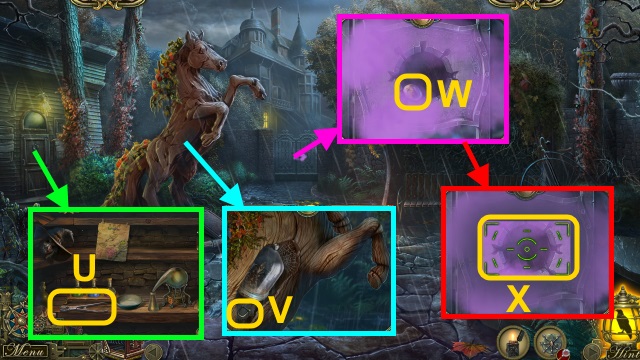
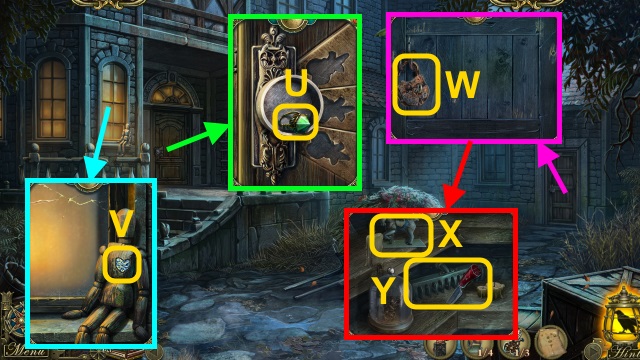
- Place the pack, gear, and cap (V); take the LIGHTER.

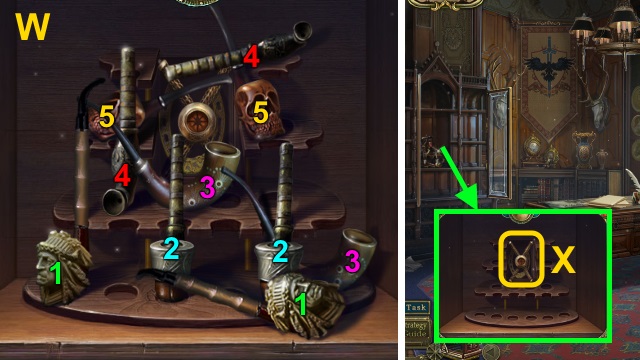
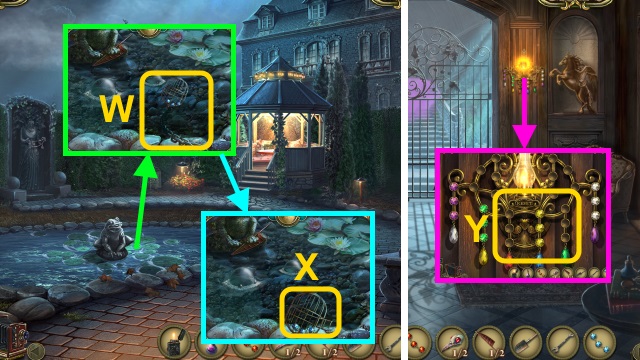
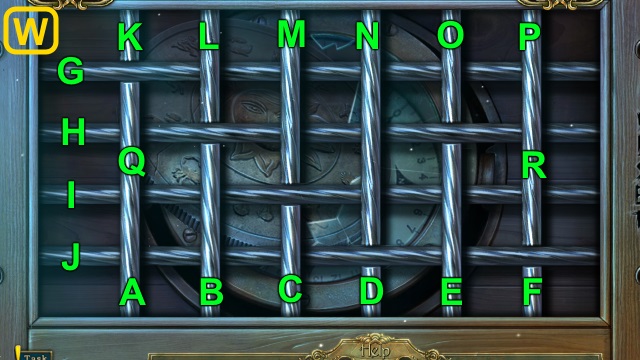
- Open the LIGHTER; examine the gear 2x (W). Take the LIT LIGHTER.
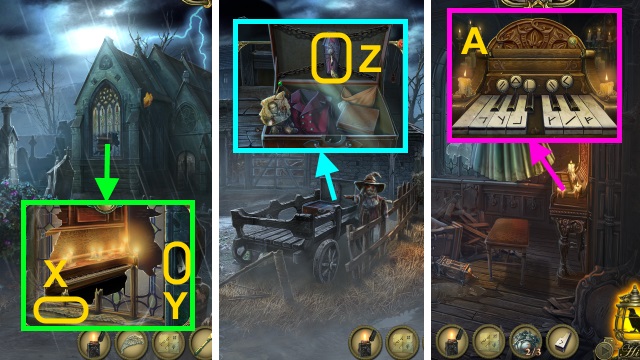
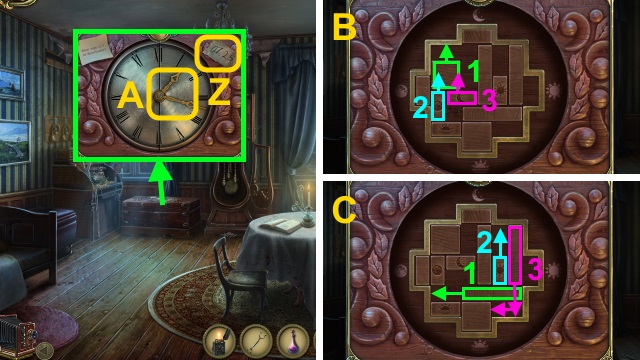
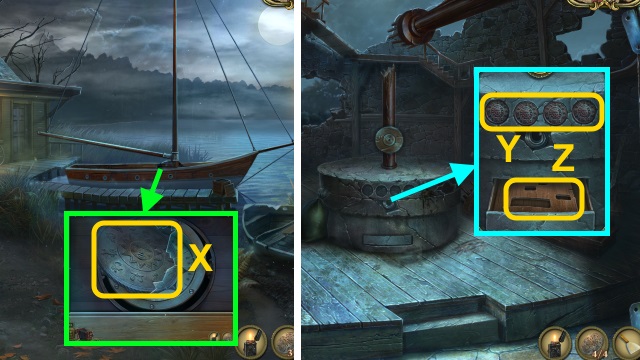
- Combine the CANDLE and LIT LIGHTER; take the LIT CANDLE (X).
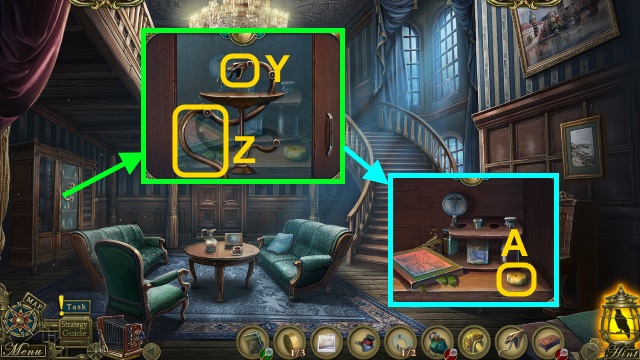
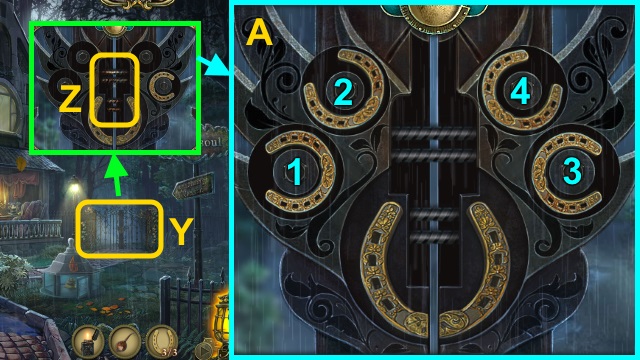
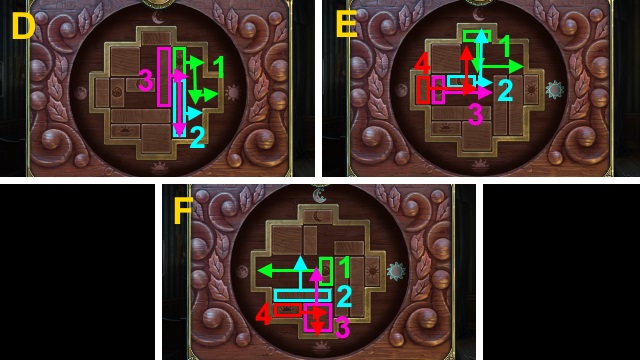
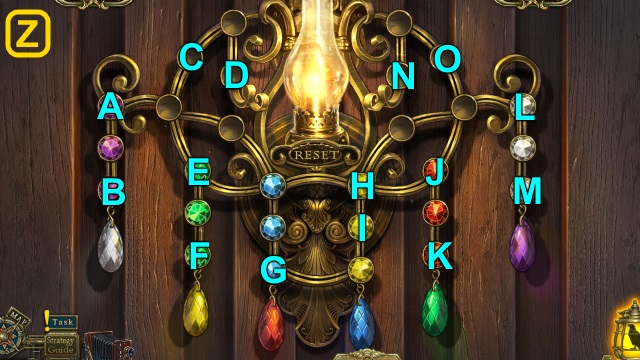
- Use the LIT CANDLE for a mini-game (Y).
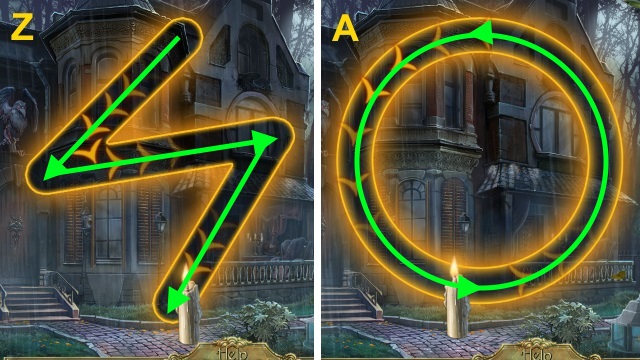
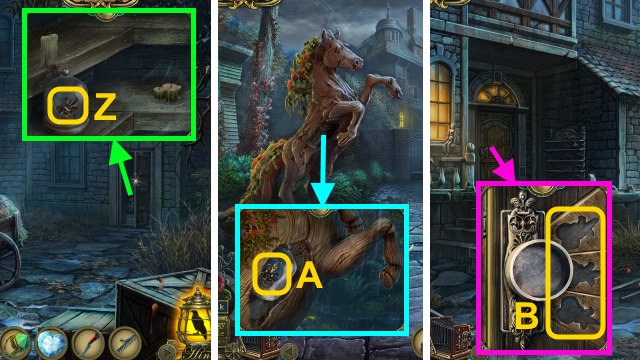
- Solution (Z-A).
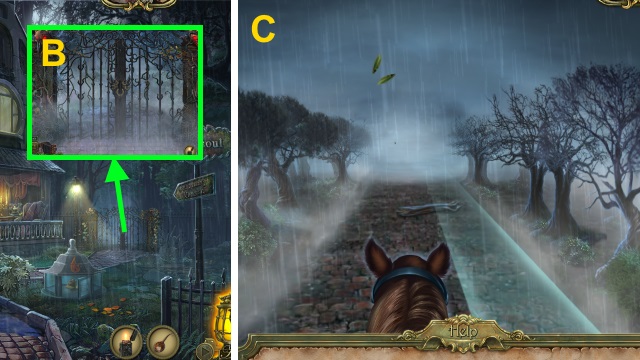
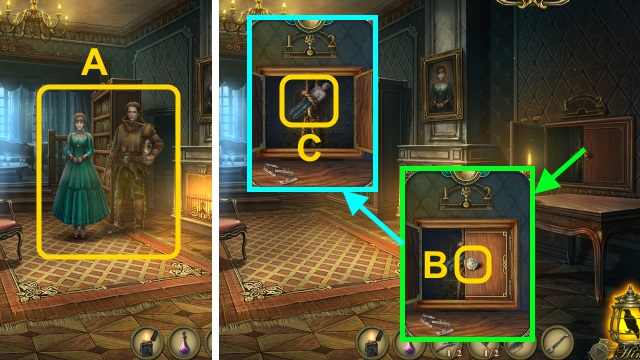
- Open the LIGHTER; examine the gear. Take the LIT LIGHTER (B).
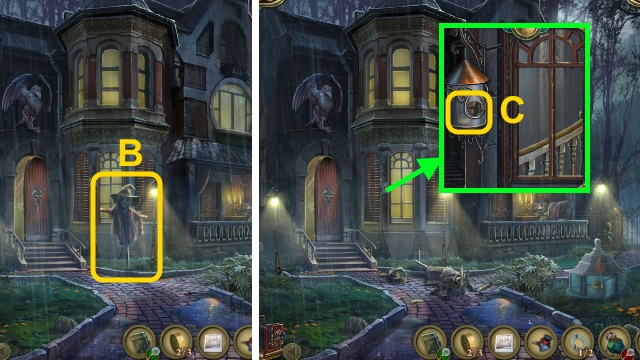
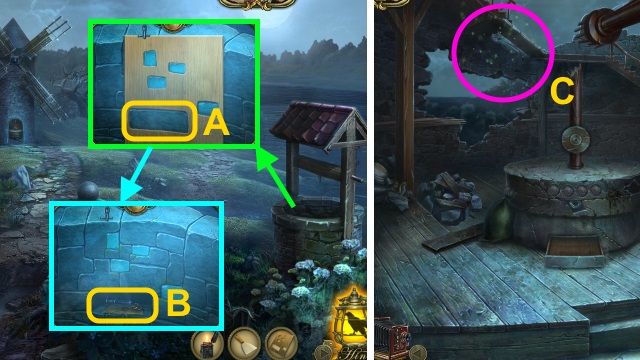
- Walk left.
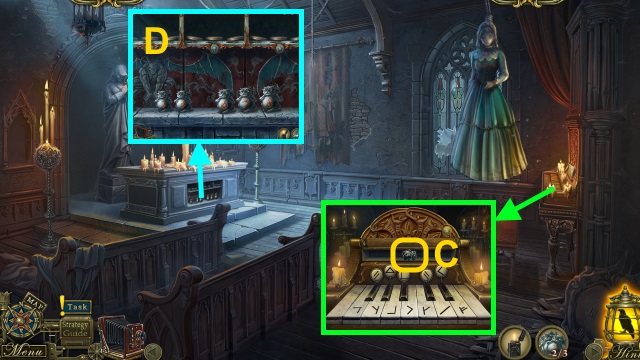
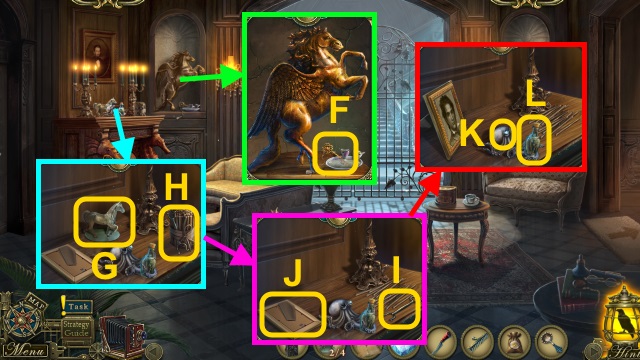
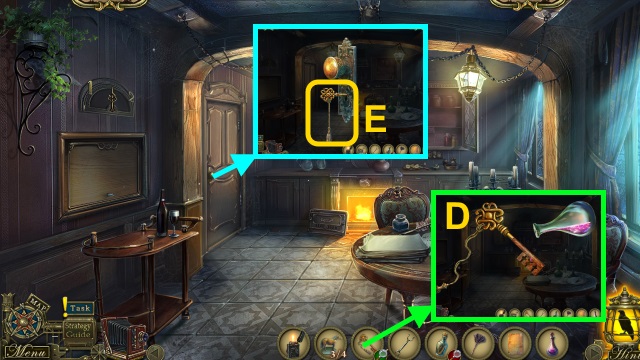
- Talk to Karl (C).
- Take the BOOK KEY (D).
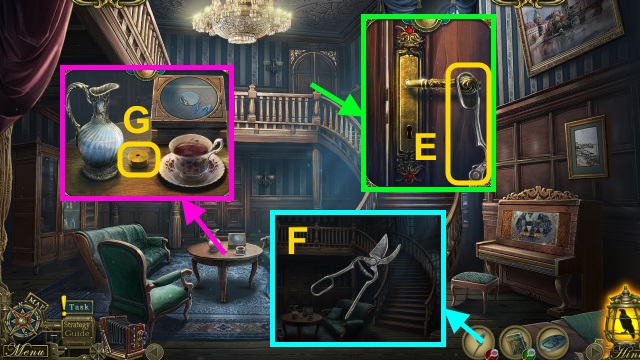
- Examine the door; take the SCISSORS PIECE (E).
- Combine the 2 SCISSORS PIECES (F); take the SCISSORS.
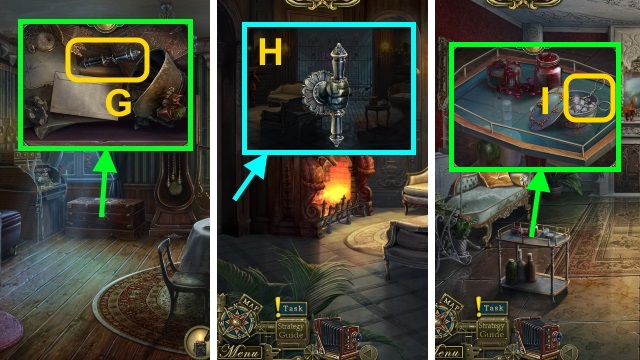
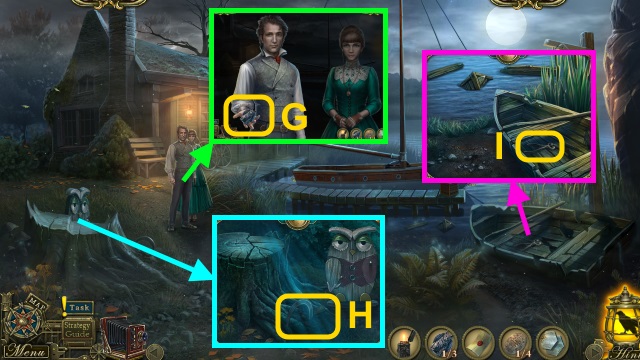
- Take the LOCK CYLINDER (1/3) (G).
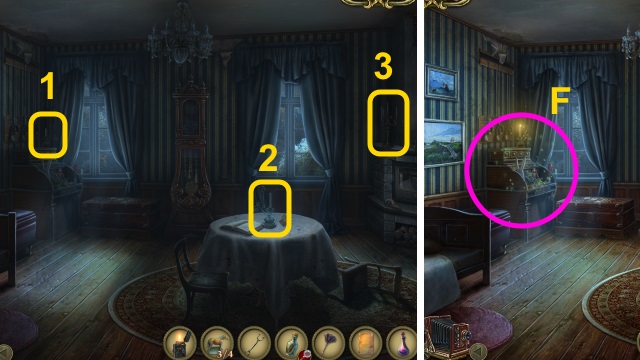
- Walk down.

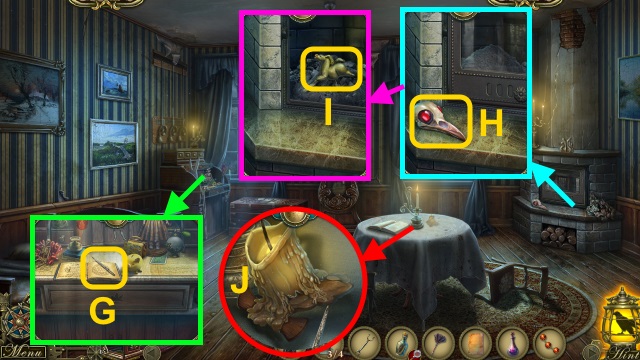
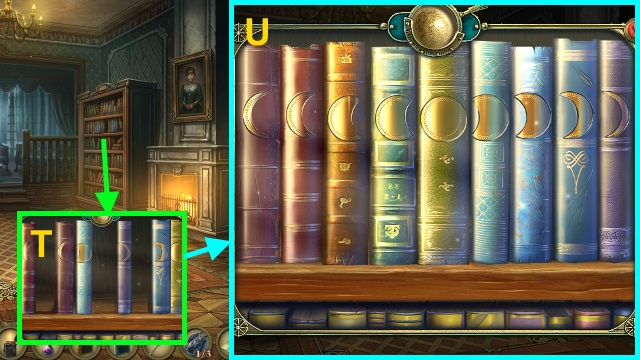
- Place the BOOK KEY (H); read the book.
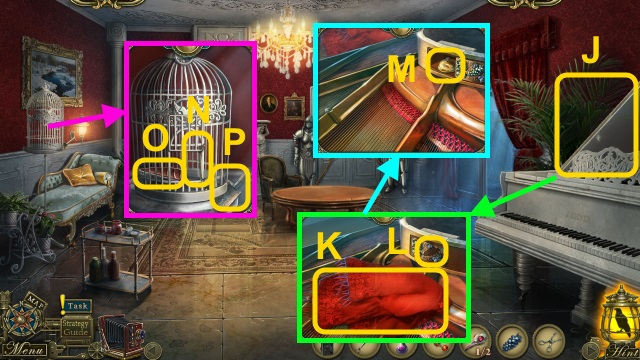
- Take the GLASS PIECE (1/2) (I).
- Use the SCISSORS; take the GLASS PIECE (2/2) (J).
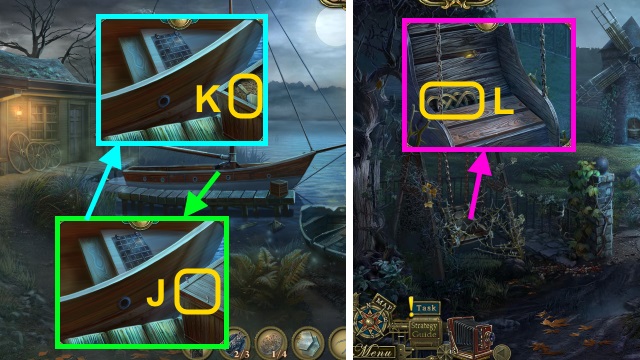
- Walk left.
- Place the GLASS PIECE (2/2) for a mini-game (K).
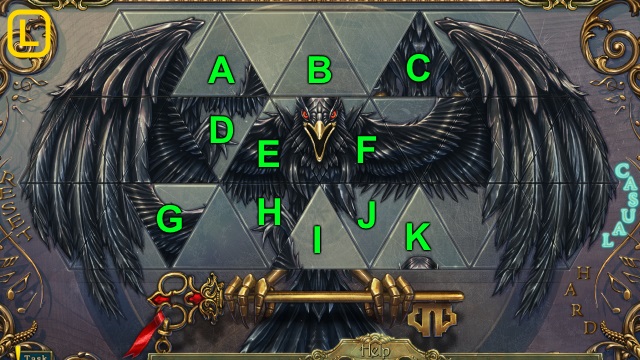
- Casual solution (L): (A-B)-(B-C)-(I-E)-(E-A)-(K-F).
- (F-B)-(D-H)-(H-J)-(D-H)-(K-F)-(I-E)-(K-I)-(G-D).

- Hard solution (M): (Q-S)-(S-U)-(U-W)-(W-Y)-(Y-P).
- (O-W)-(W-U)-(U-S)-(S-I)-(I-G)-(I-S)-(S-U)-(U-M).
- (M-O)-(U-W)-(W-Y)-(W-U)-(U-S)-(S-Q)-(I-B)-( F-D).
- (D-B)-(B-I)-(L-C)-(L-T)-(E-L)-(L-V)-(D-F)-(A-C)-(C-L).
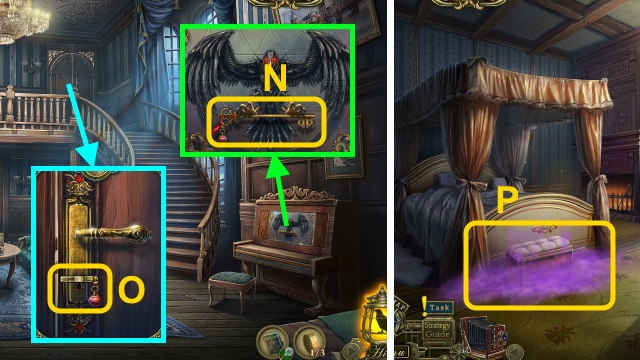
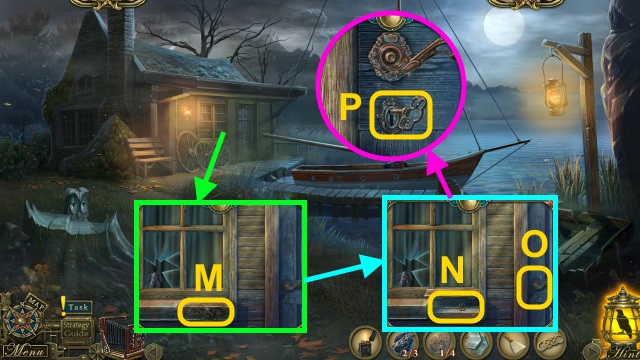
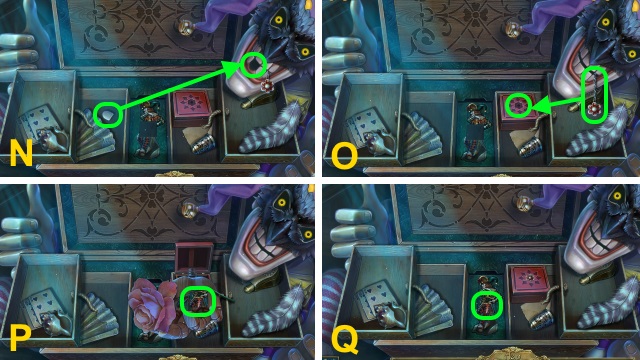
- Take FREDERICA'S KEY (N).
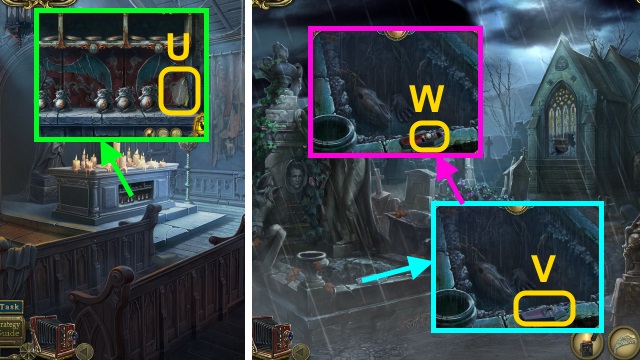
- Use FREDERICA'S KEY (O); open the door.
- Walk forward.
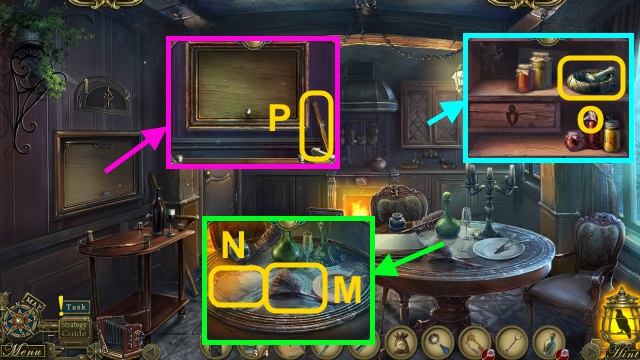
- Examine the chest (P).
- Use the Camera (Q).
- Take the CODE (R).
- Take the BIRD (S).
- Take the POKER (T).
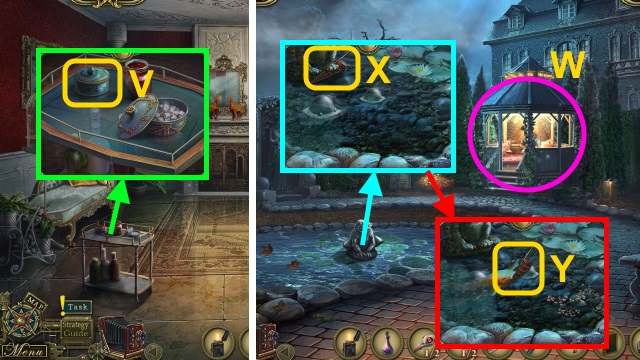
- Use the POKER; receive the DISK (1/2) (U).
- Take the HANDBAG (V).
- Take the BERLIFITZING COIN (W); use the POKER.
- Take the SNAKE HEAD and CHEST (X).
- Walk down.
- Place SNAKE HEAD (Y); examine the part (Z).
- Open the cupboard; take the LOCK CYLINDER (2/3) (A).
- Walk down.
- Examine the scarecrow (B).
- Place the BIRD; take the LOCK CYLINDER (3/3) (C).
- Walk left, then forward.
- Place the CODE and LOCK CYLINDER (3/3) (D).
- Enter the code (E).
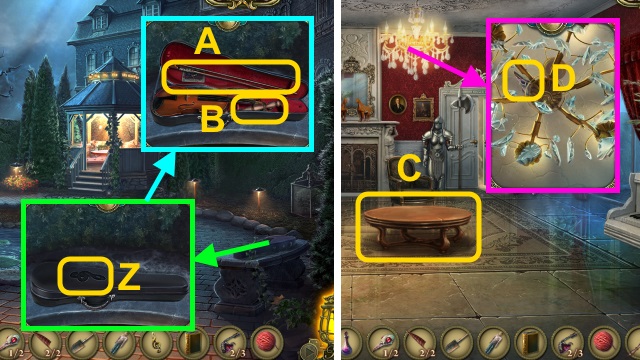
- Open the chest; take the LETTER F and SCISSORS (F).
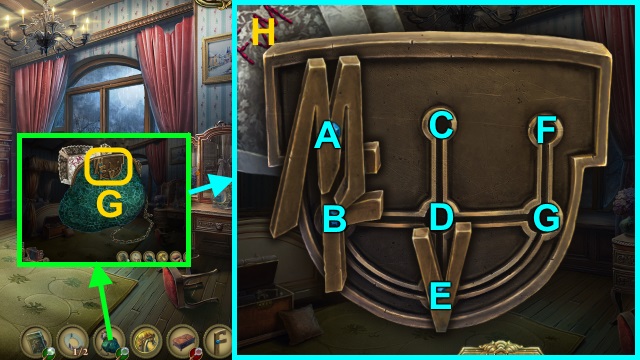
- Combine the HANDBAG and LETTER F; examine the lock for a mini-game (G).
- Solution (H): (E-D-C)-(B-E)-(A-B-D-G-F)-(E-B-A).

- Open the handbag; examine the handkerchief (I).
- Take the PIN (J).
- Examine the doll (K).
- Use the SCISSORS; take the GLASS EYE (L).
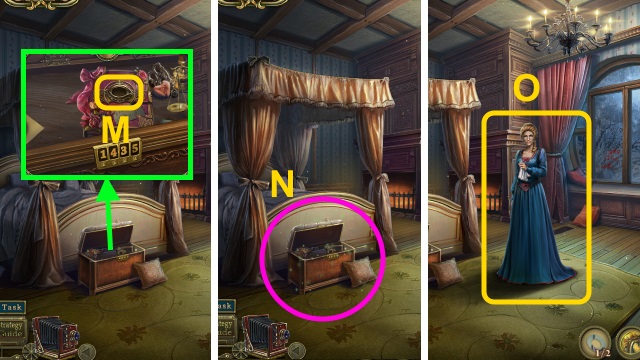
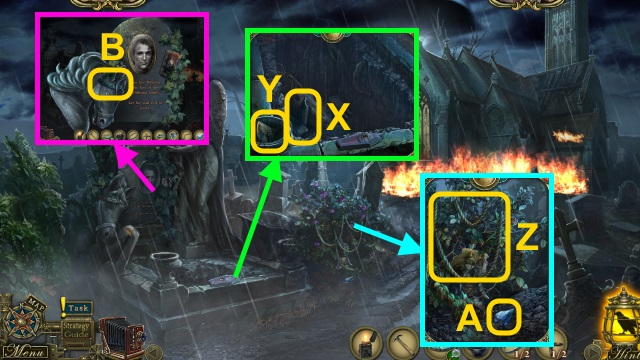
- Place the GLASS EYE (M); read the diary.
- Play the HOP; receive the PHOTO (N).
- Talk to Mary (O).
Chapter 2: Wilhelm
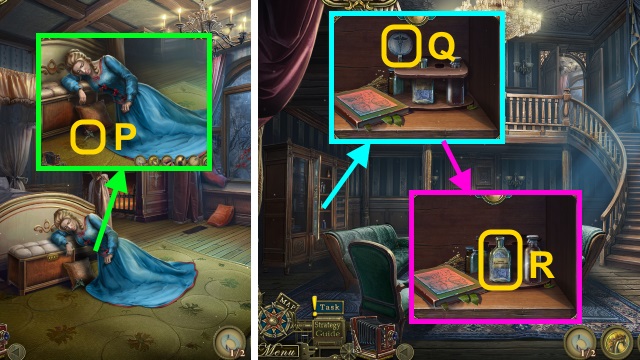
- Take the CADUCEUS (P).
- Walk down.
- Place the CADUCEUS (Q); move the lock.
- Take the SMELLING SALTS (R).
- Walk forward.
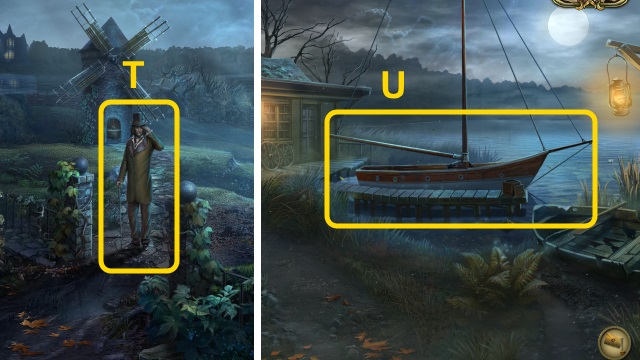
- Use the SMELLING SALTS (S).
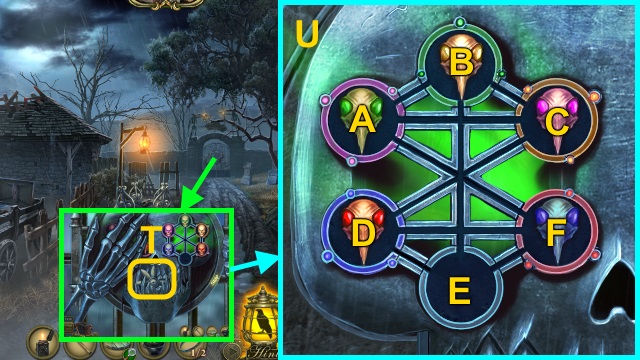
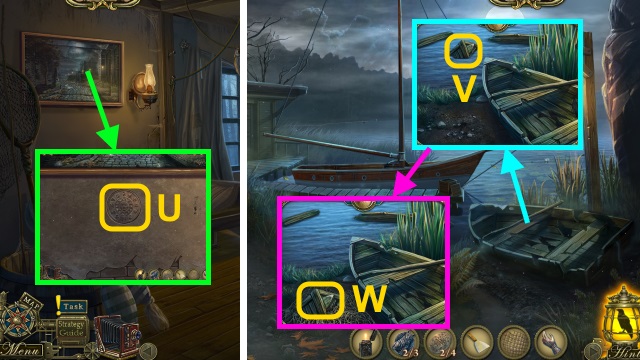
- Give the PHOTO; take the FOLDED NEWSPAPER (T).
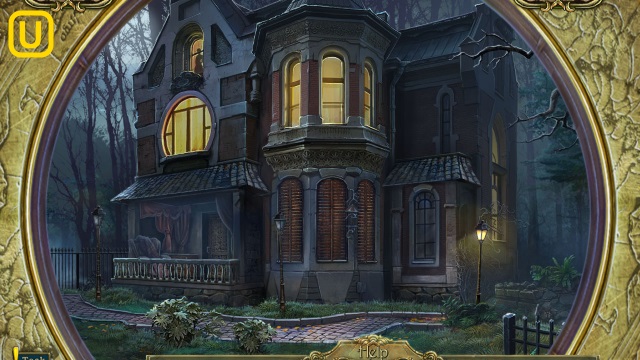
- Examine the FOLDED NEWSPAPER (U); take the NEWSPAPER.
- Walk down.
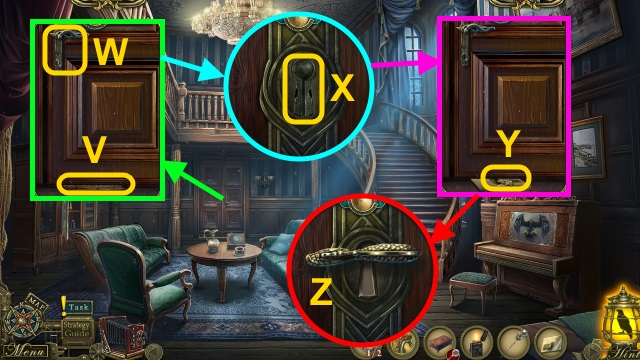
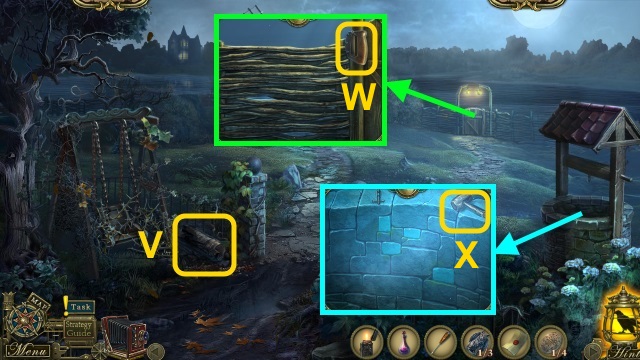
- Examine the door; place the NEWSPAPER (V).
- Examine the keyhole (W); use the PIN (X).
- Take the KEY (Y).
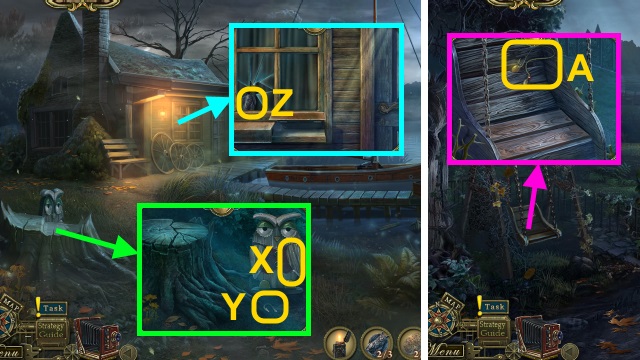
- Use the KEY (Z).
- Walk forward.
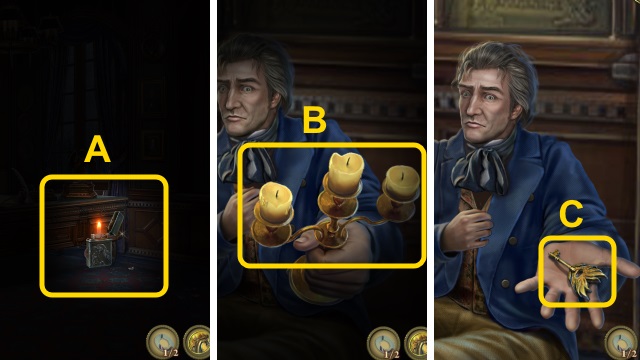
- Use the LIT LIGHTER to view the scene (A).
- Use the LIT LIGHTER (B).
- Give the BERLIFITZING COIN; take the GATE KEY (C).
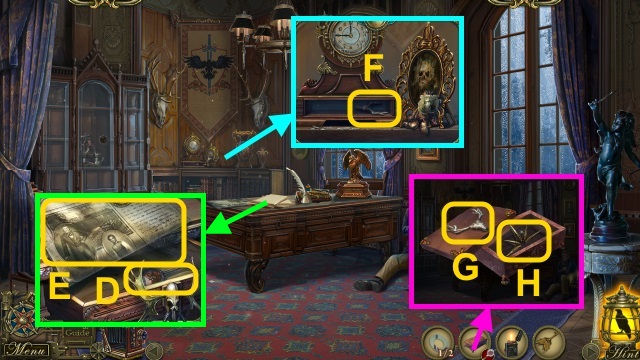
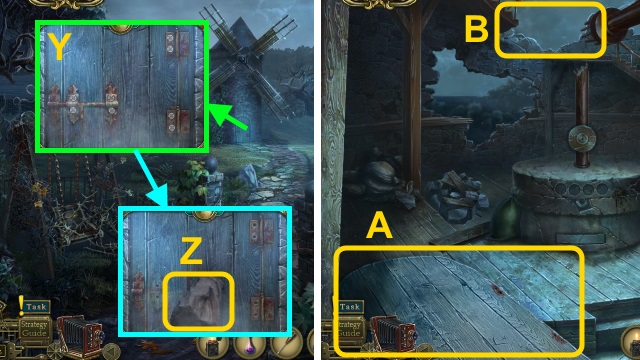
- Take the OIL (D); read the newspaper (E).
- Remove the cover; take the DEER SKULL (F).
- Combine the CHEST and DEER SKULL (G); open the chest. Take the KEY PART (H).
- Walk down twice.
- Examine the gate (I).
- Examine the lock (J); use the GATE KEY (K).
- Take the KEY PART (L).
- Combine the 2 KEY PARTS (M); take the SPECIAL KEY.
- Walk left.
- Open the book (N).
- Use the SPECIAL KEY; take the HORSESHOE (1/3) (O).
- Go to Frederica's Room.
- Play the HOP; receive the DISK (2/2) (P).
- Turn the frame. Use the SPECIAL KEY; take the HORSESHOE (2/3) (Q).
- Walk down.
- Place the DISK (2/2); examine the box for a mini-game (R).
- Solution (S).
- Open the lid; take the RAVEN (T).
- Go to the Baron's Office.
- Place the RAVEN (U).
- Enter the code (V); open the door for a mini-game.
- Solution (W).
- Place the SPECIAL KEY; take the HORSESHOE (3/3) (X).
- Walk down twice.
- Examine the gate (Y).
- Use the OIL (Z); place the HORSESHOE (3/3) for a mini-game.
- Solution (A).
- Examine the gate (B).
- Walk forward for a mini-game.
- Dodge the debris (C).
- Examine the gate (D).
- Take the HAMMER (E).
- Use the OIL; examine the latch (F). Take the HORSE SYMBOL.
- Open the door; take the BUCKET BOTTOM (G).
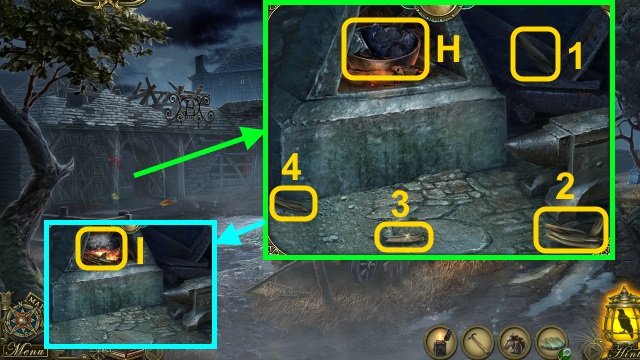
- Place the bowl (H); collect the wood (1-4).
- Use the LIT LIGHTER; take the LIQUID TAR (I).
- Place the HORSE SYMBOL (J); open the case.
- Take the SKULL (K).
- Examine the gate (L).
- Talk to Dupin (M).
- Play the HOP; receive the LETTER (N).
- Read the LETTER; take the FINGER (O).
- Place the FINGER (P); take the BUCKET RIM (Q).
- Place the SKULL for a mini-game (R).
- Solution (S): C-F-E-D-A-B-C-F-A-D.
- Take the METAL FLOWER (1/2) for a mini-game (T).
- Solution (U): D-C-B-E-D-F-A-B-E-F-A-B-E.
- Solution (V): B-A-F-D-E-C-D.
- Walk right.
- Examine the church (W).
- Take the PLANKS (X) and LOCKET PART (1/2) (Y).
- Take the ROPE (Z) and DROPLET GEM (A).
- Take the BUCKET RIM (2/2) (B).
- Walk down.
- Examine the horse (C).
- Play the HOP; receive the NAILS (D).
- Combine the BUCKET BOTTOM, LIQUID TAR, HAMMER, BUCKET RIM (2/2), PLANKS, NAILS, and ROPE (E).
- Place the planks; use the tar (F). Place the rims; use the nails and hammer.
- Place the rope; tie it. Take the BUCKET (G).
- Place the DROPLET GEM (H); remove the cover.
- Use the BUCKET (I); receive the WATER BUCKET.
- Walk right.
- Use the WATER BUCKET (J).
- Take the AWL (K).
- Walk down.
- Use the AWL; receive the METAL FLOWER (2/2) (L).
- Walk right.
- Place the METAL FLOWER (2/2) for a mini-game (M).
- Solution (N).
- Walk forward.
Chapter 3: The Chapel
- Examine the scene (O).
- Turn the doll; take the LOCKET and WING (P).
- Take the LOCKET PART (2/2) (Q).
- Open the LOCKET; place the LOCKET PART (2/2) (R).
- Arrange the parts (S); open the pendant.
- Take the TUNE (T).
- Use the LIT LIGHTER (U); take the COFFIN KEY.
- Walk down.
- Use the COFFIN KEY (V); open the coffin.
- Take the GARGOYLE (1/3) (W).
- Place the WING (X); take the PIANO KEY (Y).
- Walk down.
- Use the COFFIN KEY; open the coffin (Z). Take the GARGOYLE (2/3).
- Walk right, then forward.
- Place the PIANO KEY and TUNE for a mini-game (A).
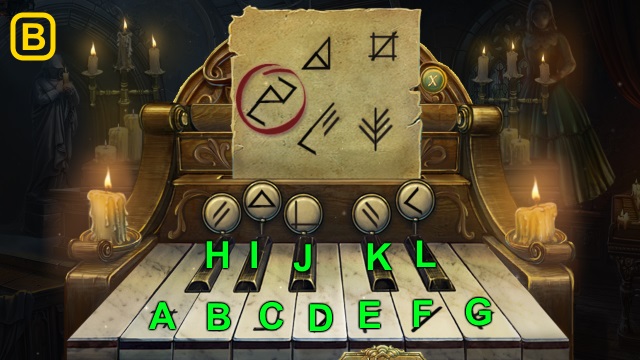
- Solution (B): (I-D-L)-(I-C-F)-(A-J-F)-(H-F-L)-(H-E-K).
- Take the GARGOYLE (3/3) (C).
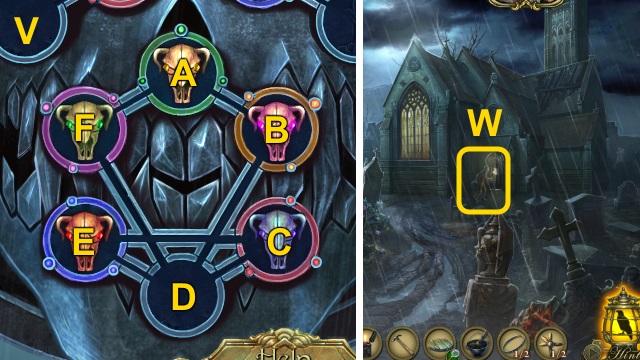
- Place the GARGOYLE (3/3) for a mini-game (D).
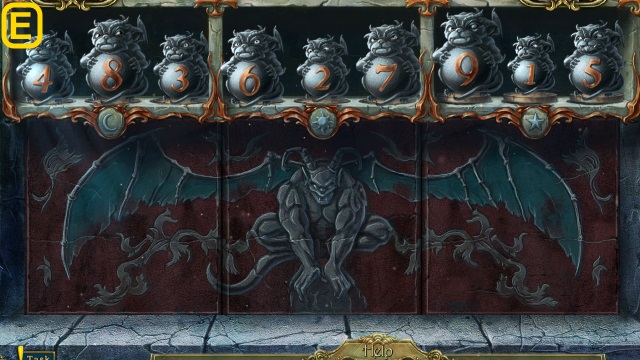
- Solution (E).
- Walk left.
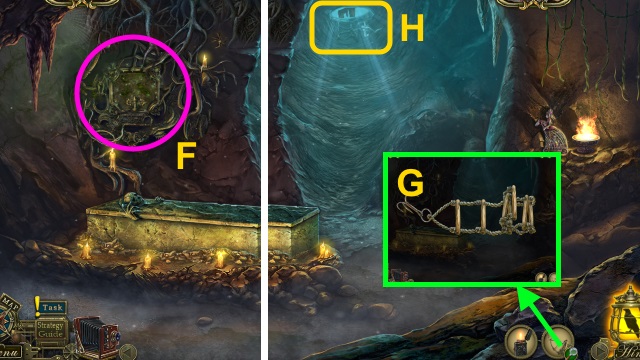
- Play the HOP; receive the LADDER (F).
- Open the LADDER; take the ROPE LADDER (G).
- Examine the opening (H).
- Use the ROPE LADDER for a mini-game (I).
- Solution: stop the meter when it's full (J).
- Take the ELK KEY (K).
- Take the FLOWER (L).
- Walk down.
- Examine Karl (M).
- Place the FLOWER (N); take the SKELETON EYE (O).
- Use the ELK KEY (P); take the CROWBAR (Q).
- Walk left.
- Place the SKELETON EYE (R).
- Take the INCOMPLETE AMULET (S).
- Use the CROWBAR (T); move the stone 3x.
- Go up.
- Take the PLIERS (U).
- Move the wood; take the BAG HANDLE (V).
- Take the SPIDER STONE (W).
- Use the Camera; take the PHOTO (X).
- Take the HORSE FIGURE (1/4) and REAGENT (Y).
- Examine the bag (Z); place the BAG HANDLE (A).
- Open the bag; take the ORNAMENT FRAGMENT (1/3) (B).
- Walk down.
- Play the HOP; receive the HEXAGONAL COIN (C).
- Use the PLIERS; open the cage (D). Take the FLASK.
- Examine the bag; place the SPIDER STONE (E).
- Open the bag; take the AMULET PART (1/2) (F).
- Go up.
- Move the flask (G); place the bowl (H).
- Use the REAGENT (I) and FLASK; pour the flasks (J).
- Use the burner (K) and reagent (L).
- Take the SOLVENT RECIPE (M).
- Use the HEXAGONAL COIN (N).
- Take the AMULET PART (2/2) (O).
- Combine the INCOMPLETE AMULET, PHOTO, and AMULET PART (2/2) for a mini-game (P).
- Solution (Q).
- Turn the handle (R).
- Take the AMULET (S).
- Place the AMULET (T).
- Walk forward.
- Turn the handle 2x; take the RING (U).
- Take the HEART (V).
- Examine the lock 3x (W); open the door.
- Use the LIT LIGHTER; take the HORSE FIGURE (X), KNIFE, and RAKE TEETH (Y).
- Use the RING; take the ORNAMENT FRAGMENT (2/3) (Z).
- Walk down.
- Use the RING; take the ORNAMENT FRAGMENT (3/3) (A).
- Walk forward.
- Place the ORNAMENT FRAGMENT (3/3) (B).
- Select the fragments in order (C).
- Walk left.
- Take the SEEDS (D).
- Take the SIEVE (E).
- Take the RUSTY KEY (F).
- Take the HORSE FIGURE (3/4) (G); examine the string (H).
- Take the CAGE POST (I); move the frame (J).
- Place the HEART (K); take the MESSAGE IN A BOTTLE (L).
- Walk right.
- Take the DUSTER (M) and PAPER SHEET (N).
- Open the cupboard; take the MORTAR (O).
- Take the RAKE HANDLE (P).
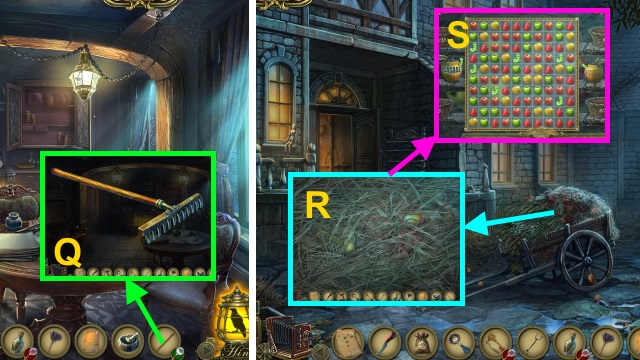
- Combine the RAKE HANDLE and RAKE TEETH (Q); take the RAKE.
- Walk down twice.
- Use the RAKE for a mini-game (R).
- Solution is random (S); receive the APPLES.
- Walk left, then right.

- Place the SOLVENT RECIPE, KNIFE, MORTAR, SEEDS, SIEVE, and APPLES (T).
- Place the apples; use the knife (U). Place the seeds (V).
- Place the powder and apples (W).
- Place the pot (X); place the funnel and sieve (Y).
- Arrange the herbs (Z).
- Place the red herbs (A); pour the water (B) into the bowl.
- Pour the mixture; take the SOLVENT (C).
- Combine the RUSTY KEY and SOLVENT (D); take the SERVANT'S KEY.
- Examine the keyhole; use the SERVANT'S KEY (E).
- Walk left.
Chapter 4: Finding Frederica
- Use the LIT LIGHTER 3x (1-3).
- Play the HOP; receive the RED GEMS (F).
- Take the NAIL FILE (G).
- Take the CROW SKULL (1/2) (H); open the door.
- Use the DUSTER; take the HORSE FIGURE (4/4) (I).
- Use the NAIL FILE; take the BURNT CANDLE (J).
- Combine the BURNT CANDLE, PAPER SHEET, and LIT LIGHTER; take the CORKSCREW (K).
- Combine the MESSAGE IN A BOTTLE and CORKSCREW (L); take the DESK KEY (M) and note (N).
- Use the DESK KEY (O); open the drawer.
- Examine the letters 3x (P).
- Play the HOP; receive the CUPBOARD KEY (Q).
- Walk down.
- Place the CUPBOARD KEY (R); open the drawer.
- Take the MAGNIFIER (S).
- Walk down twice.
- Place the HORSE FIGURE (4/4) (T).
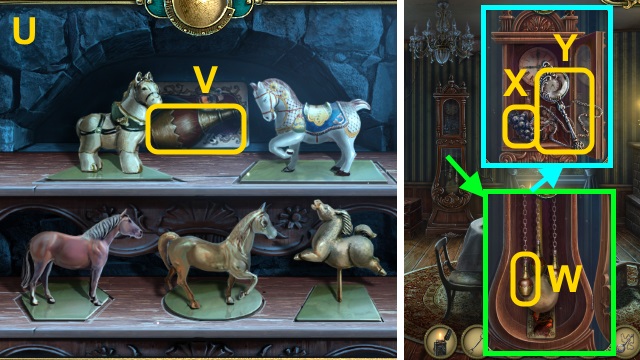
- Arrange the figures (U); take the WEIGHT (V).
- Walk forward, right, then left.
- Scroll down; open the clock. Place the WEIGHT (W).
- Examine the clock; scroll up. Take the GRAPES (X).
- Use the MAGNIFIER; take the TIME CLUE (Y).
- Place the TIME CLUE (Z); turn the hands for a mini-game (A).
- Solution (B-F).
- Take the GRIP (G).
- Walk down twice.
- Place the GRIP; turn the handle (H).
- Walk left.
- Take the TONGS (I).
- Open the piano (J).
- Move the shawl (K); place the GRAPES (L).
- Take the BELL (M).
- Use the CAGE POST (N); take the SAIL (1/2) (O) and SCOOP (P).
- Walk down.
- Open the cover; place the BELL (Q). Take the CRYSTAL (R).
- Walk left.
- Place the CRYSTAL (S). Turn the lock; examine the crystal.
- Walk right.
- Play the HOP; receive the GAFF TIP (T).

- Take the WRENCH (U).
- Walk down.
- Place the GAFF TIP; take the GAFF (V).
- Walk right.
- Examine the chain; use the GAFF (W).
- Open the cage; take the BLUE GEMS (X).
- Walk down twice.
- Place the RED GEMS and BLUE GEMS for a mini-game (Y).
- Solution (Z): (H-N)-(G-I)-(L-D)-(A-M)-(C-B)-(J-D)-(E-K)-(O-F)-(I-H)-(C-G).
- Walk forward.
- Talk to Frederica (A).
- Examine the handle; take the HANDLE (B).
- Open the door; take the BOY STATUE (C).
- Take the COAT OF ARMS (D).
- Take the TREBLE CLEF (E); use the TONGS (F). Receive the SHIP.
- Walk down, then right.
- Place the HANDLE (G); open the door.
- Move the dishes; take the YELLOW BOOK (H).
- Walk down, then left.
- Place the COAT OF ARMS (I).
- Place the handle (J) on the door (K).
- Walk forward.
- Take the RAG (L).
- Pull the lever (M). Take the SUN FACE; place the SHIP (N).
- Play the HOP; receive the CROW CLAW (1/3) (O).
- Use the WRENCH (P); receive the CROW CLAW (2/3).
- Take the BOOK (Q).
- Combine the BOOK and SUN FACE (R).
- Open the book; take the LENS (S).
- Place the LENS; examine it for a mini-game (T).
- Solution (U).
- Walk down.
- Use the RAG; take the FISH FOOD (V).
- Walk right.
- Play the HOP; receive the SILK THREAD (W).
- Examine the sail; use the FISH FOOD (X).
- Take the SAIL (2/2) (Y).
- Place the TREBLE CLEF (Z); open the case.
- Take the BOW (A) and GLOBE LEG (B).
- Walk down.
- Move the table twice (C).
- Use the BOW (D); receive the CROW SKULL (2/2).
- Walk forward.
- Play the HOP; receive the GREEN BOOK (E).
- Place the GLOBE LEG; take the DOLL (F).
- Place the SAIL (2/2) (G); take the SCREWDRIVER (H).
- Walk down, then right.
- Move the hay; use the SCOOP (I).
- Place the CROW SKULL (2/2); turn the skulls (J).
- Take the CROW CLAW (3/3) (K).
- Place the CROW CLAW (3/3) (L).
- Take the CRYPTEX (M).
- Examine the CRYPTEX; enter the code (N).
- Take the STAMP KEY (O).
- Walk down twice, then forward.

- Place the BOY STATUE, DOLL, and SILK THREAD; take the GLOBE KEY (P).
- Go to the Library.
- Place the GLOBE KEY (@); take the WINGED CAT (#).
- Examine the safe (Q).
- Use the STAMP KEY (R).
- Examine the safe; take the LETTER TO WILHELM, STONE DISK (1/4), and BLUE BOOK (S).
- Place the YELLOW BOOK, GREEN BOOK, and BLUE BOOK for a mini-game (T).
- Solution (U).
- Walk forward.
Chapter 5: The Curse
- Take the LOG (V).
- Take the SAW HANDLE (W).
- Take the HAMMER (X).
- Use the SOLVENT 4x; use the SCREWDRIVER 3x (Y).
- Examine the door 2x; use the LOG (Z).
- Walk forward.
- Place the door (A) on the walkway (B).
- Play the HOP; receive the PICTURE TILES (C).
- Move the debris and blade (D).
- Use the HAMMER and SAW HANDLE; take the SAW (E).
- Walk down.
- Use the SAW (F).
- Go forward.
- Talk to Wilhelm; give the LETTER TO WILHELM (G). Take the WINGED CAT (2/3).
- Take the SICKLE (H).
- Take the PLIERS (I).
- Use the PLIERS (J).
- Open the crate; take the SCRAPER (K).
- Walk down.
- Use the SICKLE; take the SYMBOL (L).
- Walk right.
- Use the SCRAPER; place the SYMBOL (M).
- Examine the symbol; take the OLD KEY (N).
- Examine the door (O). Use the OLD KEY (P); open the door.
- Walk forward.
- Play the HOP; receive the FISHING NET (Q).
- Take the GLOVE (R).
- Place the PICTURE TILES for a mini-game (S).
- Solution (T).
- Move the painting; take the STONE DISK (2/4) (U).
- Walk down.
- Use the FISHING NET (V); take the OWL WING (W).
- Place the OWL WING (X); take the HOOK (Y).
- Use the GLOVE; take the WINGED CAT (3/3) (Z).
- Walk down.
- Use the HOOK; receive the BEE MEDALLION (A).
- Walk forward.
- Place the WINGED CAT (3/3) (B); take the STONE DISK (3/4) (C).
- Walk down, right, then forward.
- Play the HOP; receive the VALVE (D).
- Place the VALVE (E); open the door.
- Take the LATCH and MASK HALF (F).
- Use the LATCH (G).
- Examine the yarn; take the FISH MEDALLION (H).
- Walk down twice, then forward.
- Place the MASK HALF for a mini-game (I).
- Solution (J-Q).
- Take the MILL MEDALLION (R).
- Walk down, right, then forward.
- Place the BEE MEDALLION, FISH MEDALLION, and MILL MEDALLION (S); take the SHAPED KEY (T).
- Walk down.
- Examine the grate (U).
- Use the SHAPED KEY (V); examine the glass for a mini-game.
- Solution (W): Ax3-C-Ex2-F-I-B-A-B-D-F.
- D-J-Kx3-Lx2-Px3-Nx2-G-Q-R-H.
- Take the STONE DISK (4/4) (X).
- Walk down, then forward.
- Place the STONE DISK (4/4) (Y); take the STENCIL (Z).
- Walk down.
- Use the STENCIL; examine the stone (A).
- Examine the letter; take the LEVER ARM (B).
- Walk forward.
- Play the HOP; receive the ROPE (C).
- Use the LEVER ARM (D).
- Take the METAL HOOK (E).
- Walk down.
- Place the METAL HOOK and ROPE; examine them (F).
- Scroll right.
- Take the letter and FAMILY STONE (G).
- Scroll right.
- Use the SCRAPER (H).
- Use the Camera (I).
- Take the PHOTO (J).
- Scroll right.
- Use the LIT LIGHTER and PHOTO (K).
- Walk forward for a mini-game.
- Solution (L-S).
- Solution (Q): A-Bx3.
- Talk to Dupin (T).
- Walk right.
- Examine the boat (U).
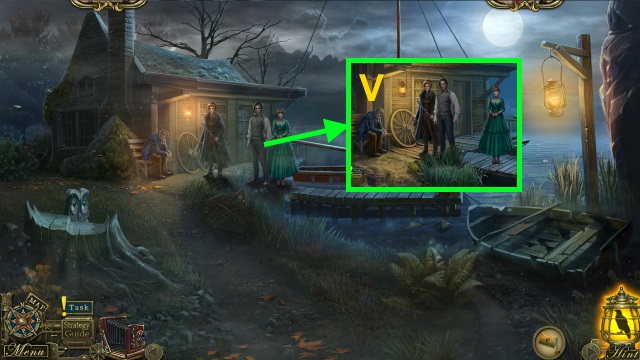
- Talk to Mary; give the FAMILY STONE (V).
- Select 'Yes' or 'No.'
- Congratulations! You have completed Dark Tales: Edgar Allan Poe's Metzengerstein.
Created at: 2016-08-19