

Walkthrough Menu
General Tips
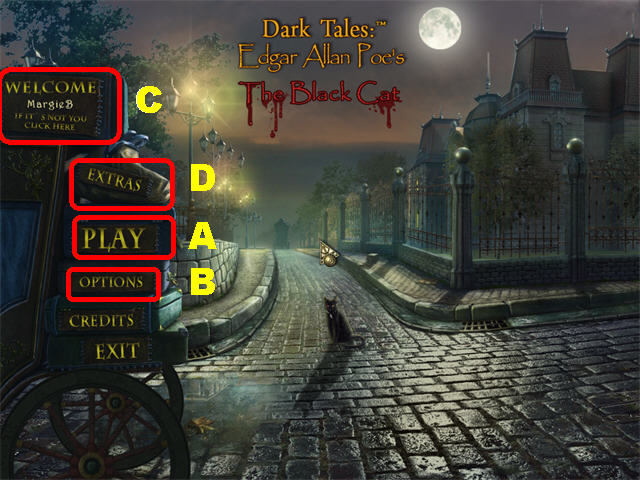
- This is the Official Guide for Dark Tales: Edgar Allan Poe’s The Black Cat, a chilling Hidden Object Puzzle Adventure!
- Click on PLAY (A) to access the main chapters in the game. The OPTIONS (B) Button allows you to adjust the screen, music, cursor, and sound.
- The WELCOME Button (C) can be used to manage your profiles in the game.
- The EXTRAS (D) Button has a link for the collector’s edition version of this game.
- A single sparkle indicates an interactive area in the game. A cluster of sparkles indicates a Hidden Object Scene which will grant an inventory item upon completion.
- Certain Hidden Object Scenes will require you to uncover hidden areas within the scene.
- Click on the Eye Icon, when it appears, to take a closer look at a section, or to read valuable information regarding the game.
- The Hand Icon allows you to pick up inventory items or explore certain areas.
- You will find an inventory item in each Hidden Object Scene, investigation site, or after you solve a puzzle.
- Inventory Items can be used more than once and will remain in your inventory until they are no longer of use.
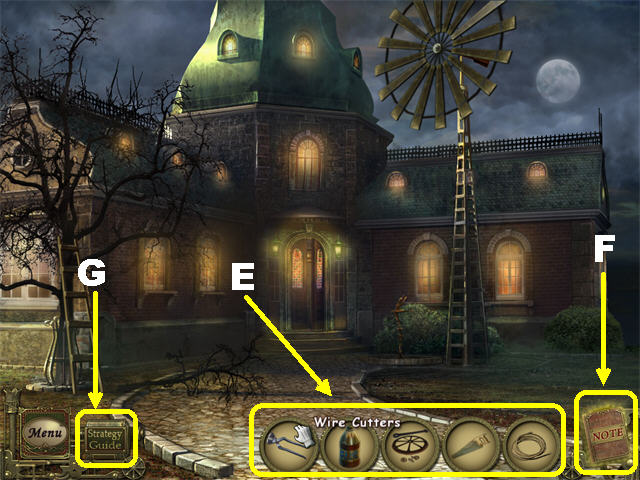
- Inventory items will appear at the bottom of the scene (E). Use the arrows in your inventory tray to scroll through all the items you’ve collected.
- Open your Journal (F), in the lower right, to find clues and read part of the story.
- The Strategy Guide (G) button can only be activated if you upgrade to the collector’s edition.
- To use an inventory item, select the one you want to use, drag it to the desired location, and click it into the spot in which you want it used.
- You can skip a mini-game once the Skip Button fills. The Skip Button only appears in mini-game sections; it is located in the lower right corner.
- You have unlimited hints in the game but you must wait for them to recharge between uses.
Chapter 1
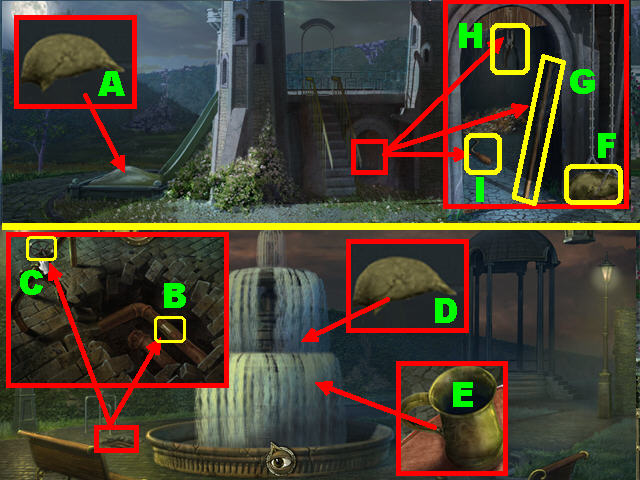
- Click on the BLACK CAT (A).
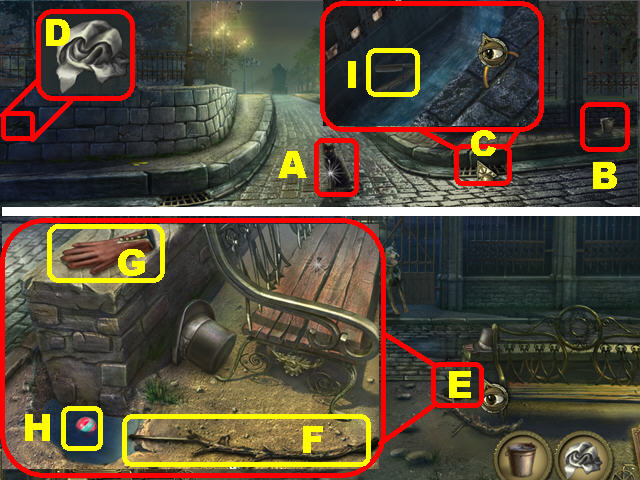
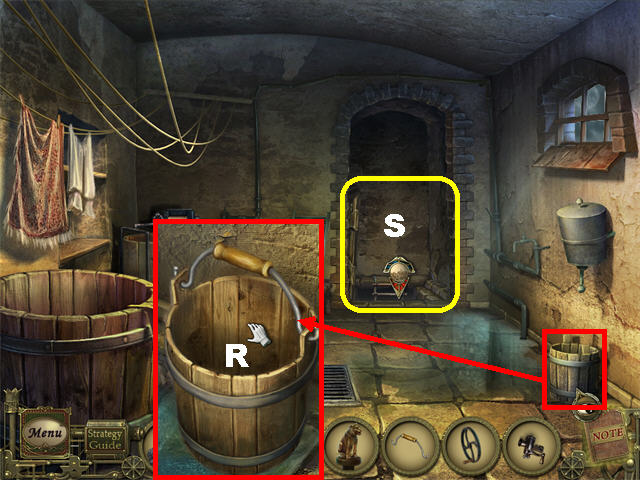
- Take the BUCKET (B) in the lower right.
- Zoom into the grid (C) in the lower right; click it to open it.
- Place the BUCKET in the water to create the FILLED BUCKET.
- Collect the RAG (D) in the lower left.
- Go forward.
- Zoom into the hotspot next to the right bench (E); take the BRANCH (F).
- In the same hotspot, click on the hat to remove it; take the GLOVE (G).
- Place the FILLED BUCKET in the hole; grab the BALL (H) that floats to the surface.
- Click down.
- Zoom into the grid in the lower right (C).
- Collect the RAZOR (I) with the GLOVE.
- Go forward.
- Zoom into the left bench.
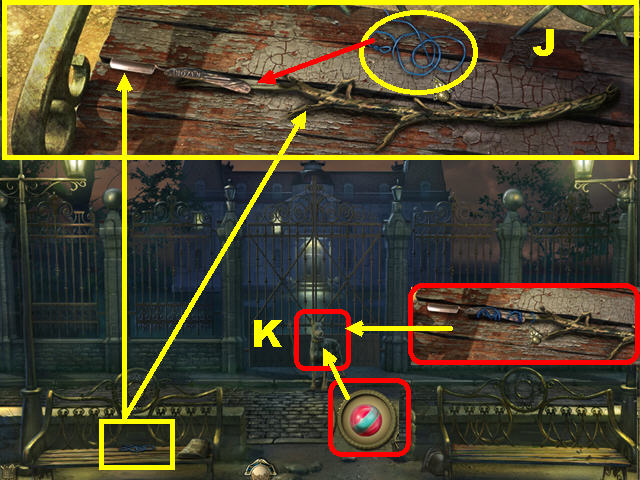
- Place the RAZOR and the BRANCH on the bench.
- Click on the RAZOR to open it.
- Drag the opened RAZOR to the end of the branch, as shown in the screenshot (J).
- Drag the STRING from the bench to the handle of the razor to obtain the RAZOR TOOL.
- Give the BALL to the dog (K).
- Cut the dog’s leash using the RAZOR TOOL.
- Go through the gate.
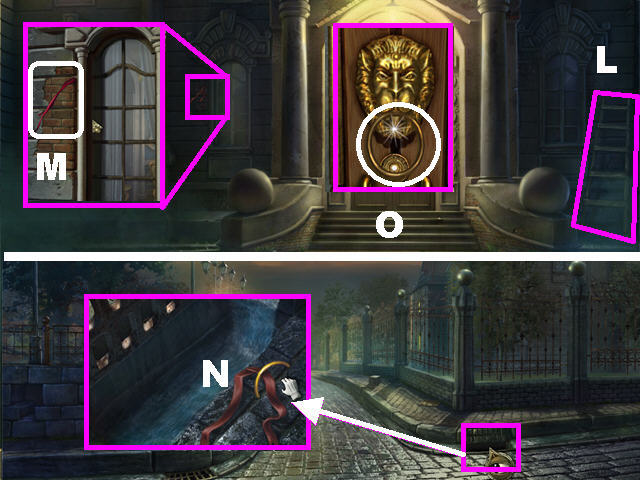
- Take the LADDER (L) on the right side of the house.
- Zoom into the left window, closest to the door.
- Click on the window and Madame Davies will appear.
- Take the RIBBON (M) on the left side of the wall.
- Exit the pop-up window and click down twice.
- Zoom into the hotspot in the lower right.
- Use the RIBBON to take the RING (N).
- Return to the front of the Estate.
- Zoom into the front door.
- Place the RING (O) on the doorknocker.
- Click on the ring to unlock the door.
- Go through the door.
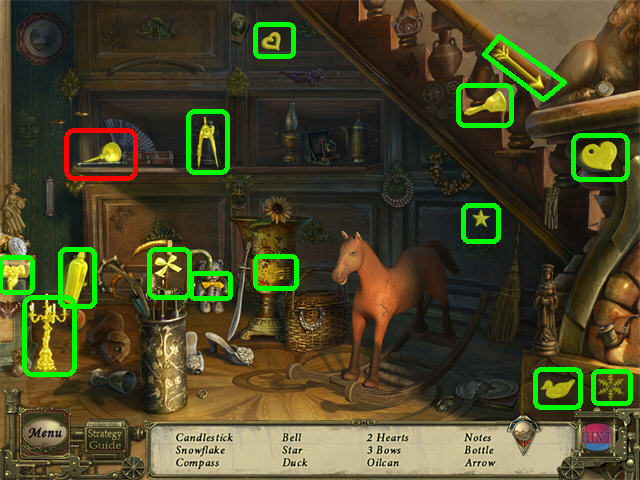
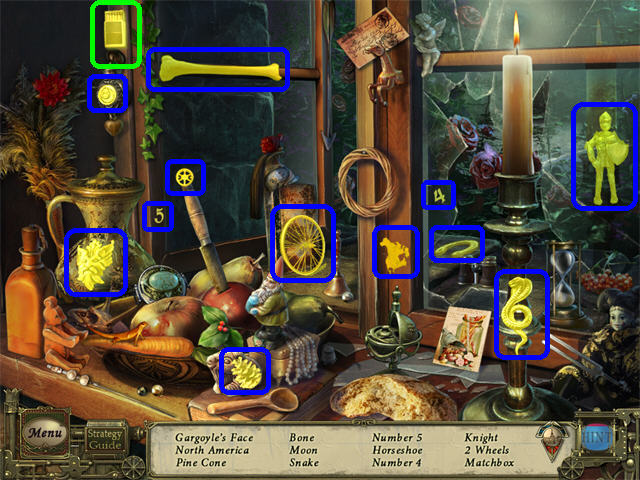
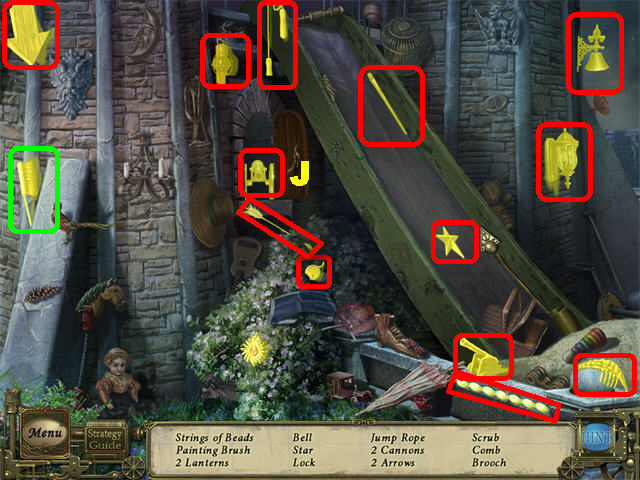
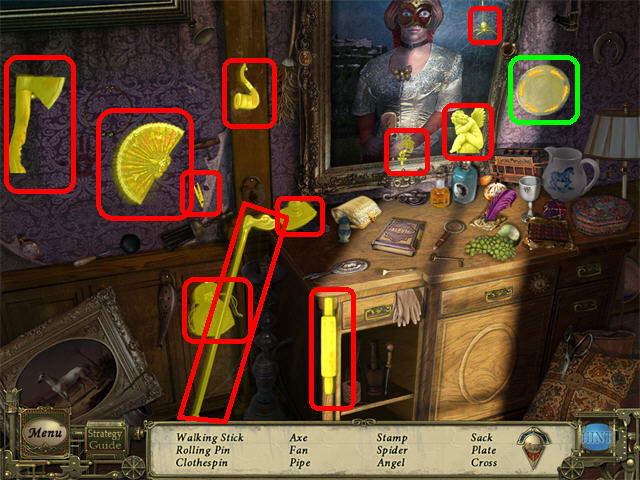
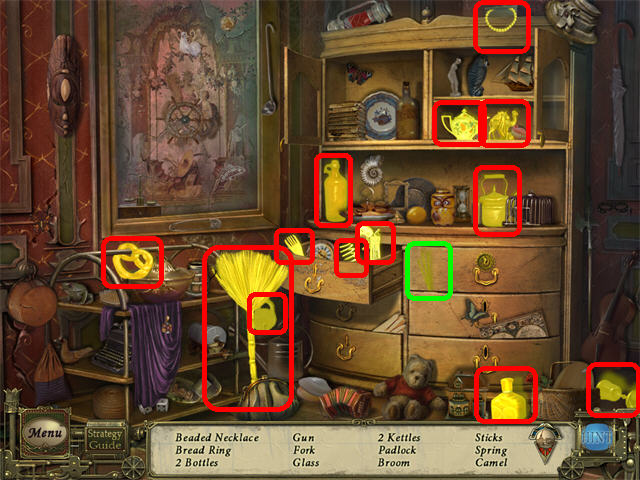
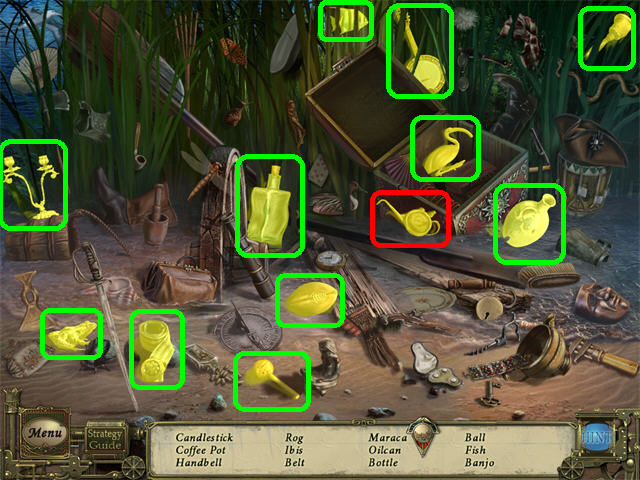
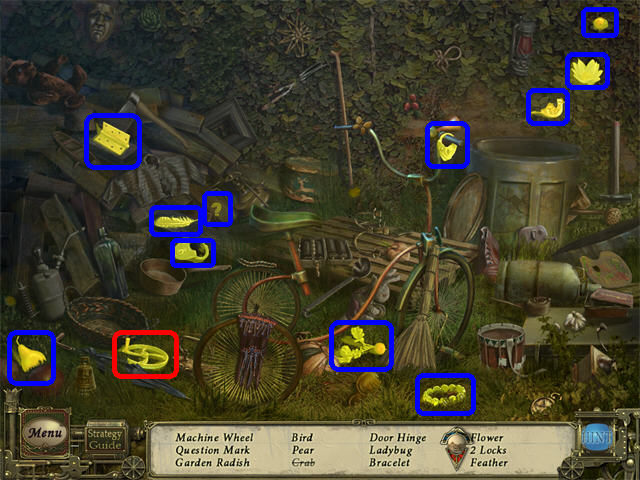
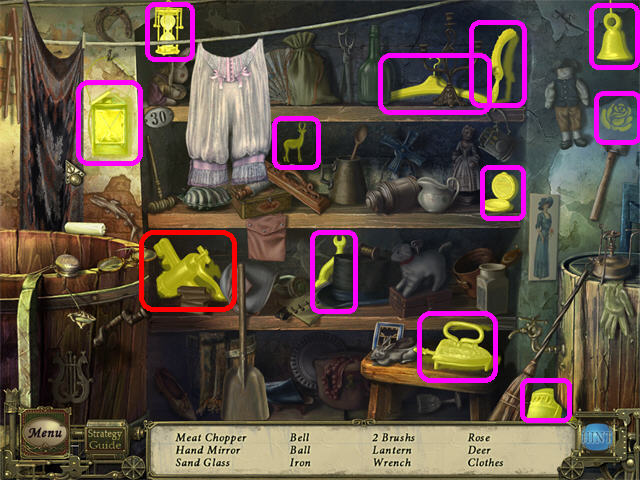
- Play the Hidden Object Scene.
- Open the two middle drawers.
- Look for the items on your list.
- The OILCAN will be added to inventory.
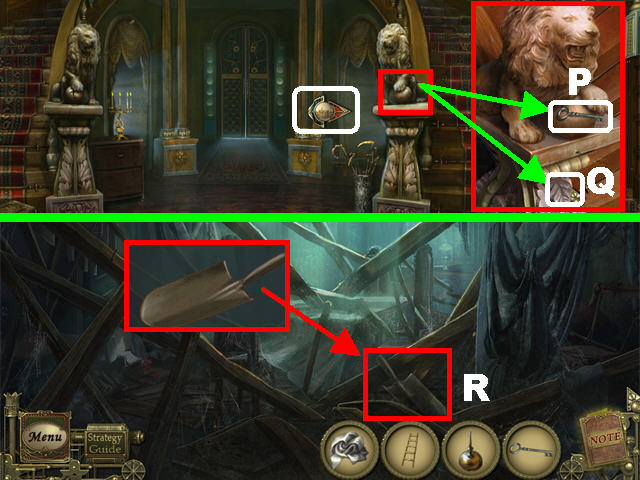
- Zoom into the right lion.
- Click on the lever (Q) at the base of the statue and then take the GARDEN KEY (P).
- Go into the entryway in the lower right and then take the SPADE HEAD (R).
- Exit that scene.
- Go in to the entryway in the lower left.
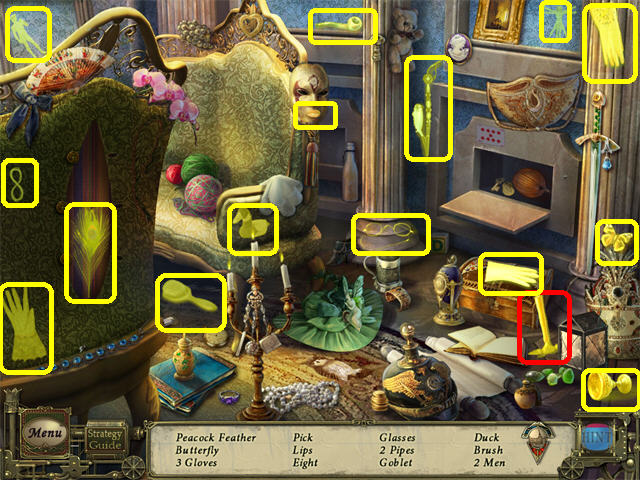
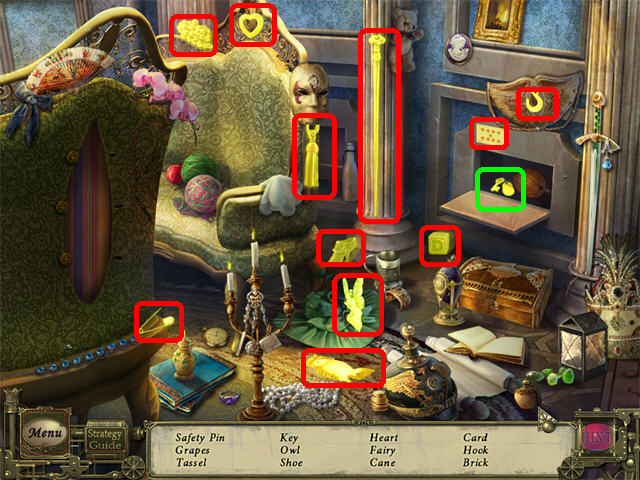
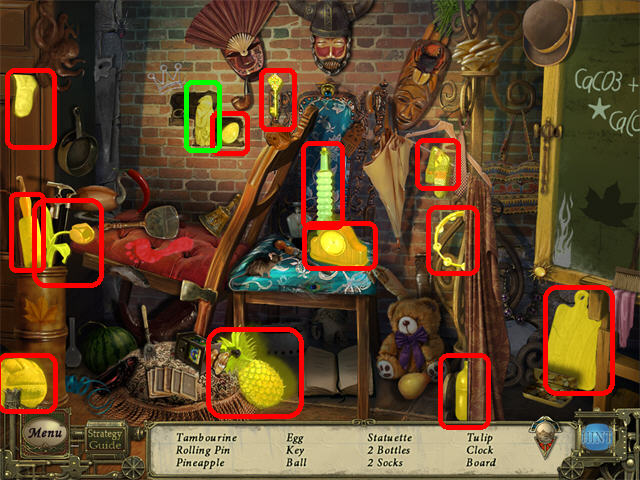
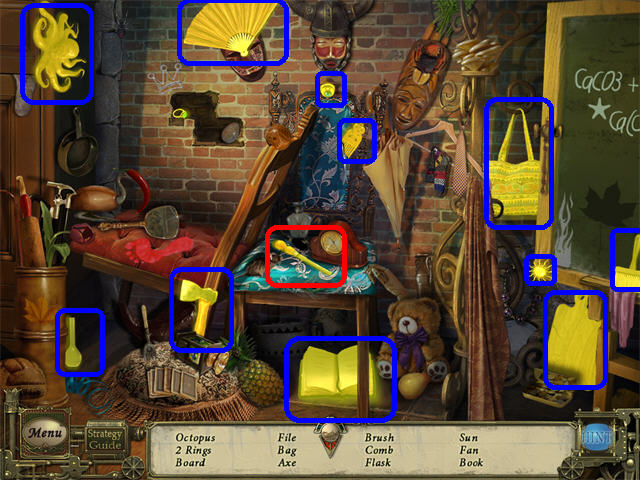
- Play the Hidden Object Scene by the chair.
- Click on the three buttons in the back of the chair (take the peacock feather if it’s on your list).
- Open the compartment on the right.
- Take any items on your list.
- The HAND PICK will be added to your inventory.

- Zoom into the mirror.
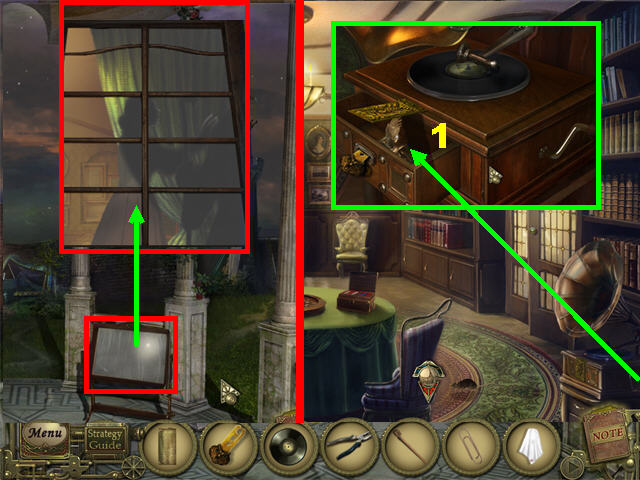
- Wipe the mirror with the RAG until it shatters (S).
- Take the WINDOW HANDLE (T) that falls on the table.
- Go outside.
- Zoom into the steps.
- Use the HAND PICK on the steps and take the CLOCK KEY (U).
- Go inside the Estate.
- Go into the lower left entryway.
- Play the Hidden Object Scene by the chair to obtain the CAGE KEY.
- Zoom into the right door.
- Place the OILCAN on the rusty hinges.
- Go through the door to access the Entertainment Room.
- Play the Hidden Object Scene on the left to obtain the DRAWER HANDLE.
- Return to the Lobby.
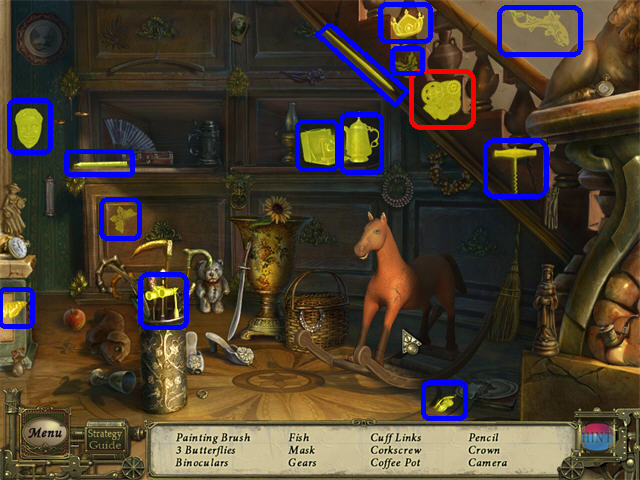
- Play the Hidden Object Scene on the right to obtain the GEARS.
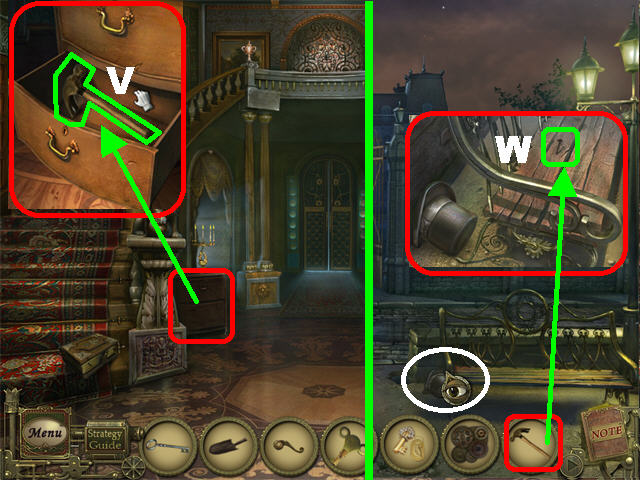
- Zoom into the dresser on the left.
- Place the DRAWER HANDLE on the bottom drawer.
- Open the drawer and take the HAMMER (V).
- Go outside the gate.
- Zoom into the hotspot by the right bench.
- Remove the NAIL from the bench with the HAMMER (W).
- Return to the Entertainment Room.
- Play the Hidden Object Scene on the left to obtain the MATCHBOX.
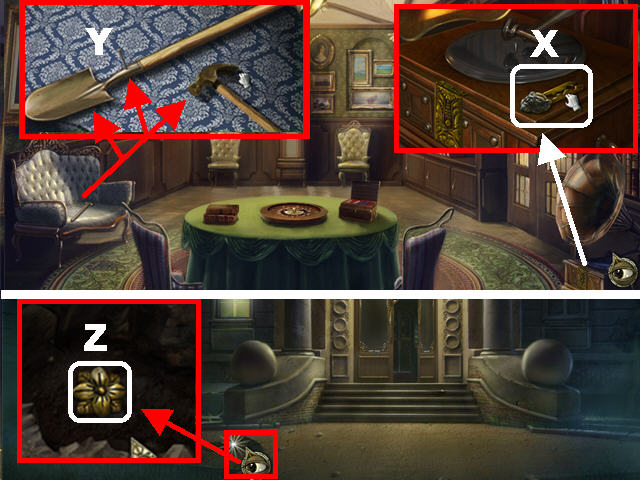
- Zoom into the gramophone; pick up the LION KEY (X).
- Zoom into the couch on the left.
- Place the HAMMER, NAIL, and the SPADE HEAD on the couch.
- Place the SPADE HEAD and NAIL on the stick, as shown in the screenshot.
- Place the HAMMER on the NAIL to complete the SPADE (Y).
- Go outside.
- Take a closer look at the hole in the ground.
- Use the SPADE on the dirt two times and take the FLOWER (Z).
- Return to the Entertainment Room.
- Zoom into the right door.
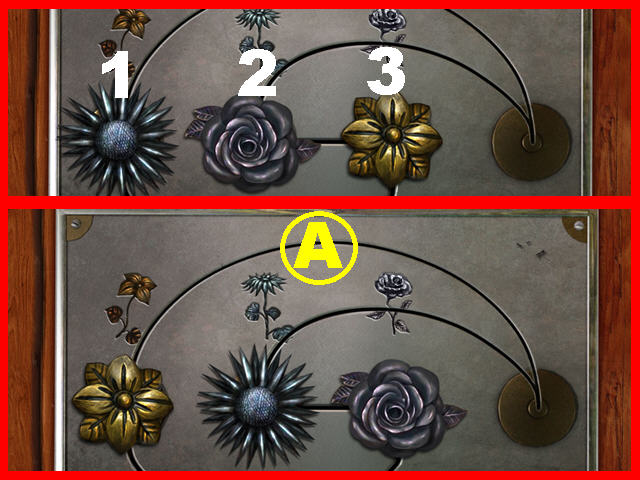
- Place the FLOWER on the door to trigger a puzzle.
- Slide the flowers on the board until each one is below its matching flower.
- Using the screenshot numbers (A), click on the flowers in the following order to solve the puzzle: 1, 3, 2, 1.
- Go through the door after the puzzle has been solved.
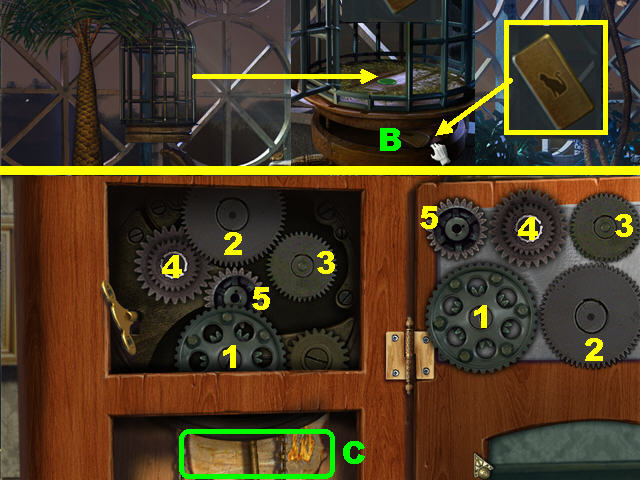
- Zoom into the birdcage; open it with the CAGE KEY.
- Click on the bottom of the cage three times to open the compartment below the cage.
- Take the TILE (B).
- Click down.
- Zoom into the grandfather clock.
- Place the CLOCK KEY in the keyhole.
- Arrange the GEARS on the board, as in the screenshot.
- Click on the CLOCK KEY to start the mechanism.
- Take the MYSTERIOUS PAPER (C) below the gears.
- Click down and then zoom into the left door.
- Place the TILE on the lock to trigger a puzzle.
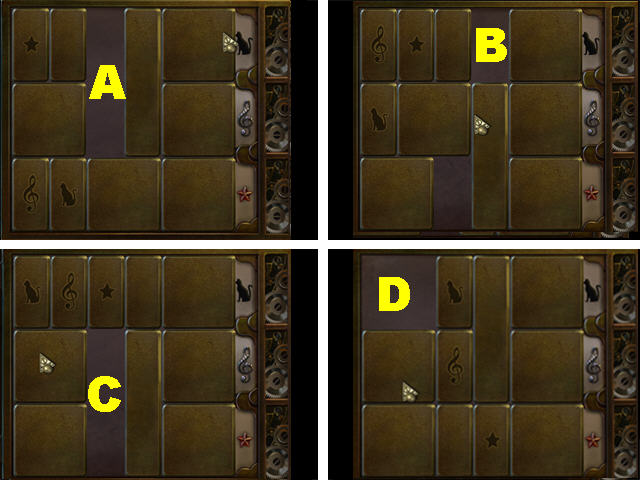
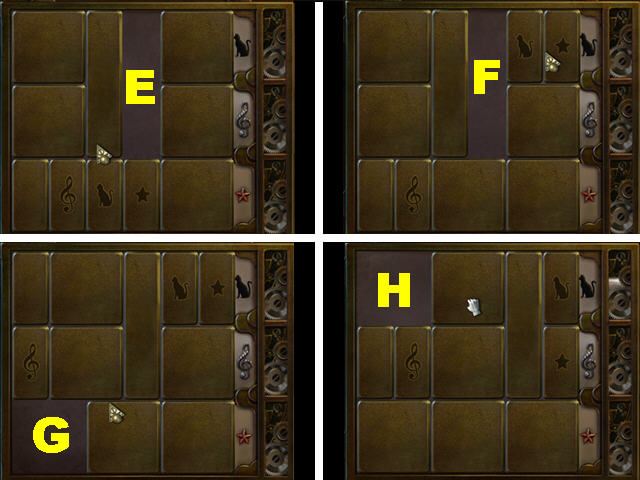
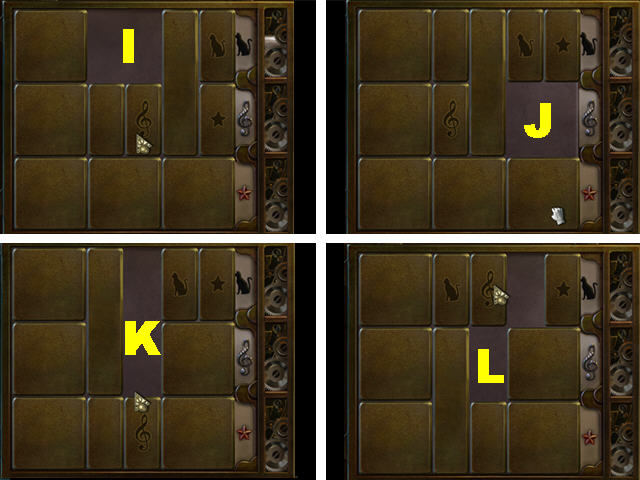
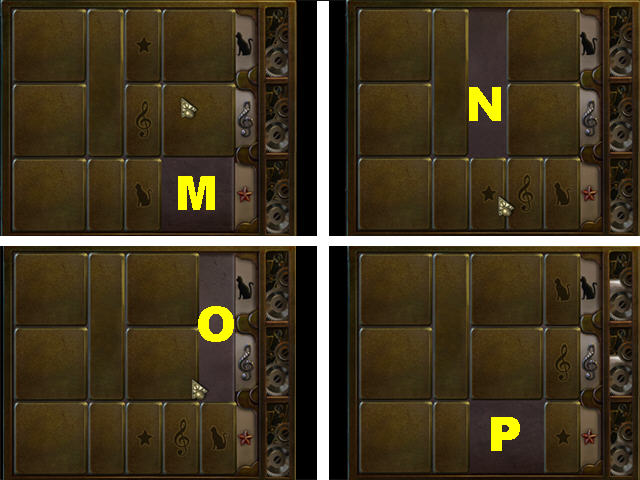
- Slide the tiles around the board until they are next to their matching symbols on the right.
- You can reset the puzzle by clicking the right lever.
- You can only move tiles to empty spaces.
- Please look at the screenshots for step-by-step solutions.
- Slide the tiles around the board until they are next to their matching symbols on the right (D).
- You can only move a tile to an empty space.
- Check out of video solution.
- Go through the door after the puzzle has been solved.
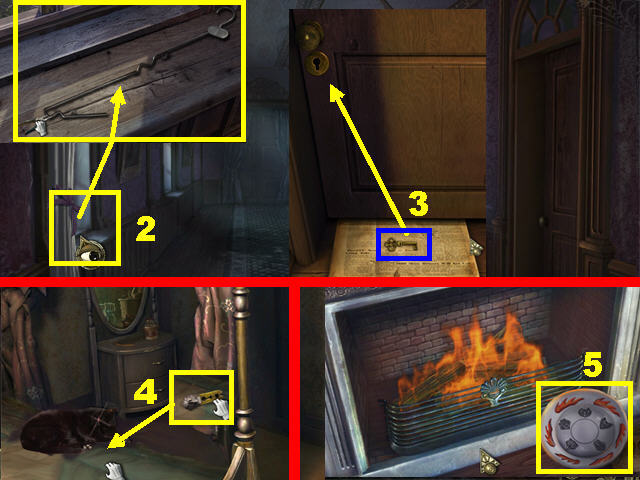
- Zoom into the right chair; take the BOLT CUTTERS (E).
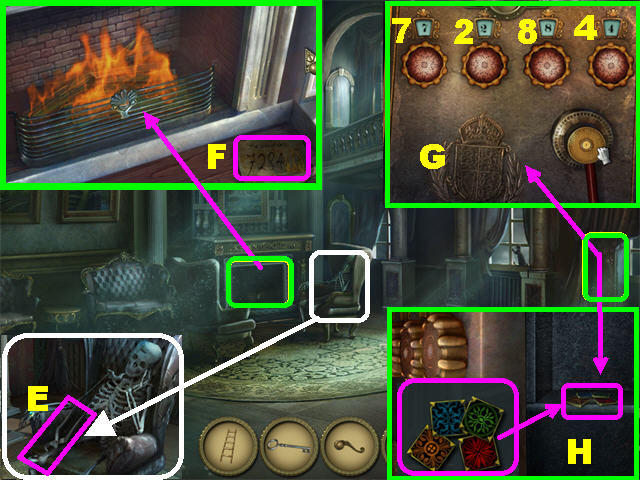
- Zoom into the fireplace; light it up with the MATCHBOX.
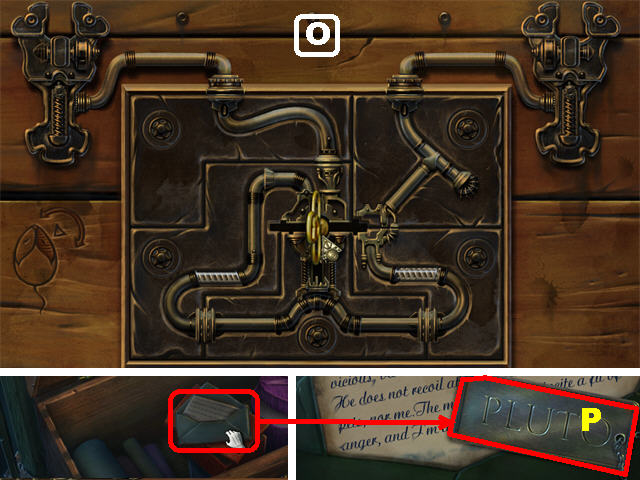
- Place the MYSTERIOUS PAPER in the fireplace to reveal the code for the safe “7284” (F).
- Exit the pop-up window and then zoom into the safe in the lower right.
- Turn the dials from left to right to 7, 2, 8, and 4 (G).
- Click on the handle to open the safe.
- Take the COLORED TILES (H) from inside the safe.

- Return to the Atrium.
- Zoom into the board on the table; place the COLORED TILES on the table to trigger a puzzle.
- Slide the tiles around until the positions of the colors mirror those in the diagram on the right side of the screen.
- Click on a tile to move the surrounding tiles in a clockwise fashion.
- Take the WINDOW HANDLE (I) after the puzzle has been solved.
- Return to the Fireplace Room.
- Zoom into the window in the lower right.
- Place the WINDOW HANDLES on the window.
- Click on the WINDOW HANDLES and then the window to open it.
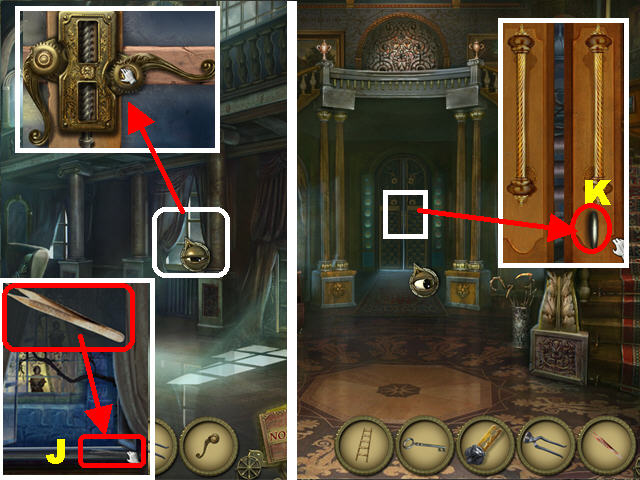
- Take the TWEEZERS from the window sill (J).
- Return to the Lobby and zoom into the back door.
- Remove the blockage from the keyhole with the TWEEZERS (K).
- Unlock the door with the GARDEN KEY. Go through the door.
Chapter 2
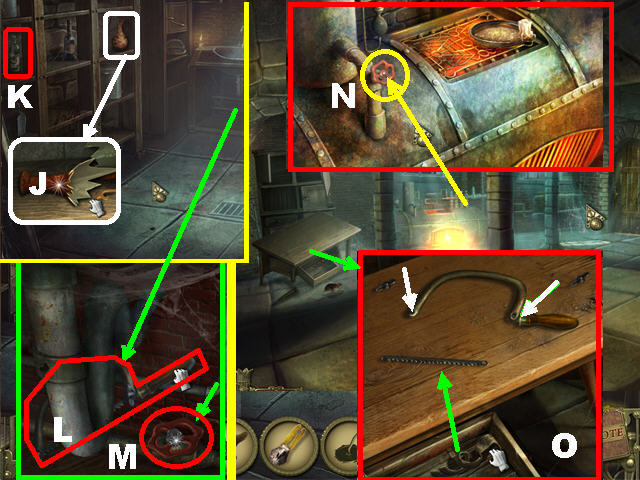
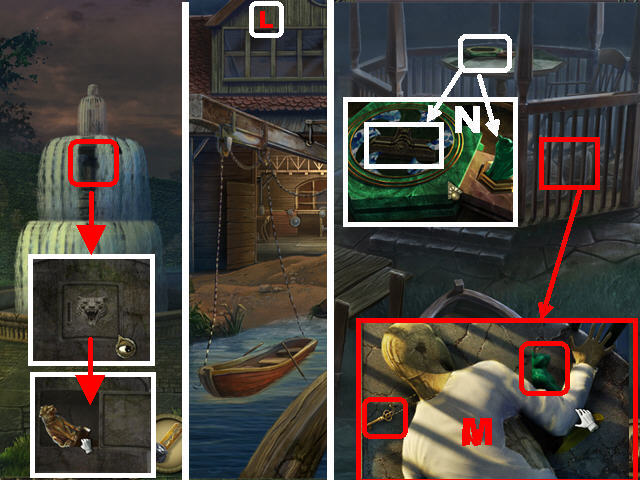
- Take the SPARE BOILER PARTS (L) in the lower right side of the ground.
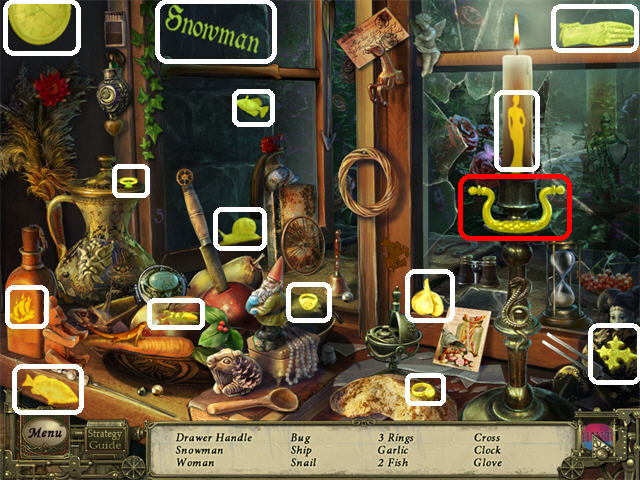
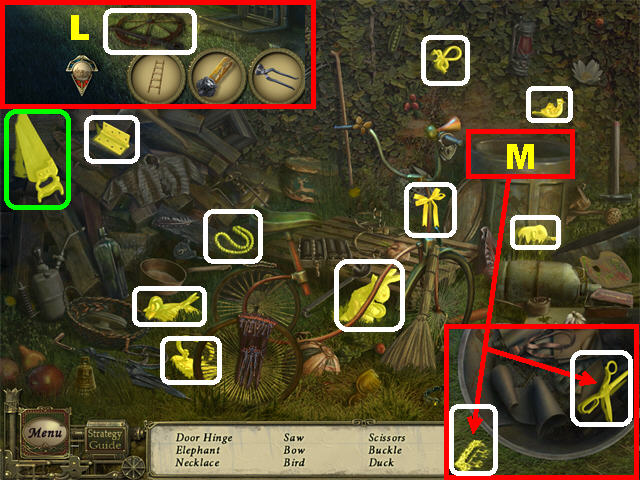
- Play the Hidden Object Scene.
- Open the lid on the right and zoom into it; take any items on your list (M).
- The SAW will be added to inventory.
- Click down and then go left.
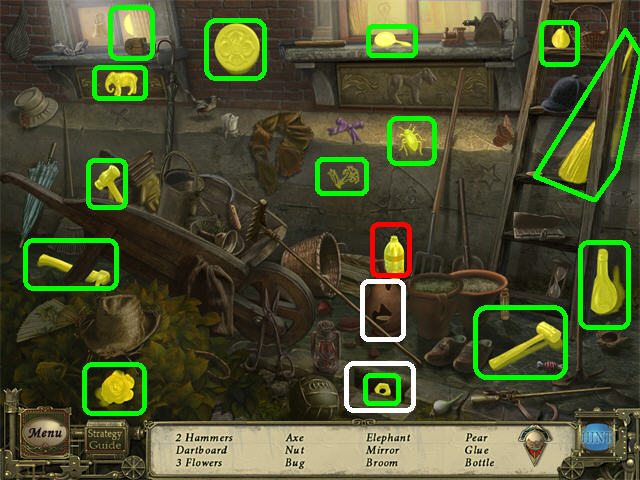
- Play the Hidden Object Scene.
- Click on the vase and the brick, marked in white; take any items on your list.
- The GLUE will be added to inventory.
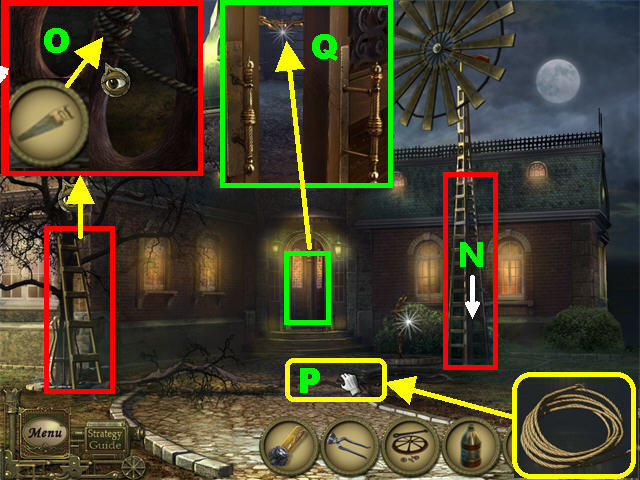
- Click on the rope on the windmill to remove it (N).
- Place the LADDER on the left tree.
- Zoom into the top of the tree.
- Cut the branch with the SAW (O).
- Take the ROPE (P) from the ground.
- Zoom into the door; cut the chains with the BOLT CUTTERS (Q).
- Go through the door on the left.
- Go through the right door to reach the Pool Room.
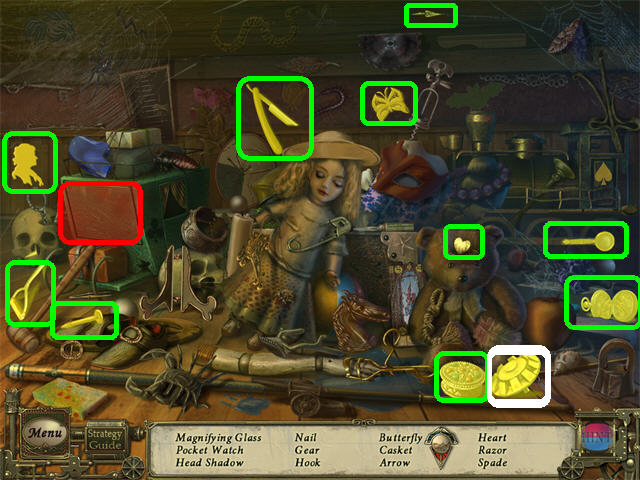
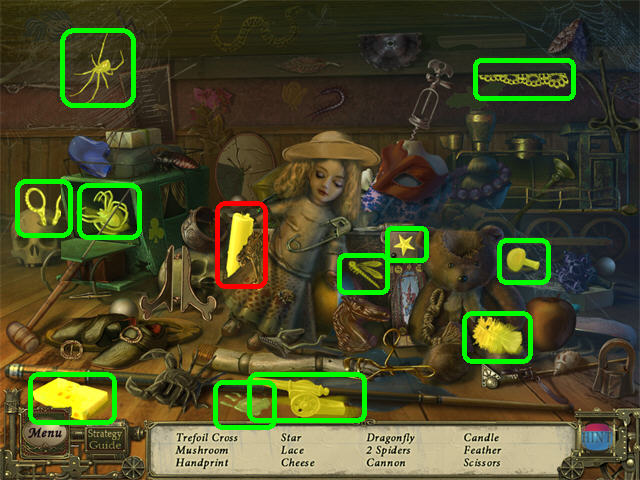
- Play the Hidden Object Scene.
- Click on the bear’s head.
- Open the cover on the left, marked in red; take any items on your list.
- The GEAR will be added to inventory.

- Zoom into the pool table; take the BROKEN BILLIARD CUE (R) and the NEWSPAPER (S).
- Click down.
- Place the ROPE on the ornament above the cupboard (T).
- Click on the excess ROPE (U) on the ground to send some of it outside.
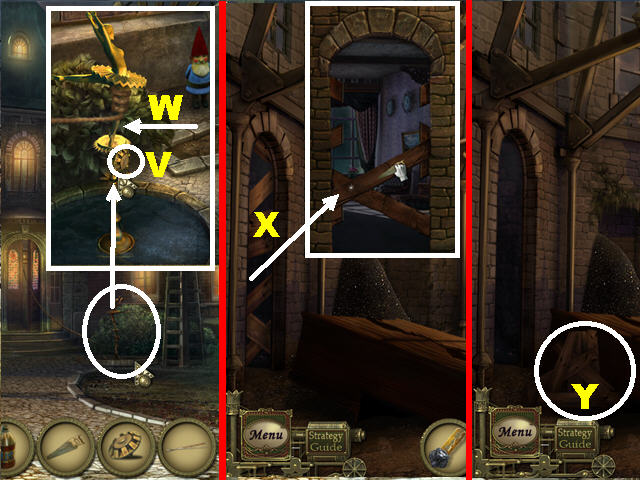
- Go outside and then zoom into the fountain on the right.
- Place the GEAR at the base of the ballerina (V).
- Drag the ROPE on the left to the ballerina’s leg (W), she will start spinning and pulling the rope.
- Go back; the cupboard will be on the ground.
- Zoom into the wooden boards on the left (X).
- Remove the boards with the SAW by cutting them several times.
- Take the FIREWOOD (Y) from the ground.
- Go through the door.
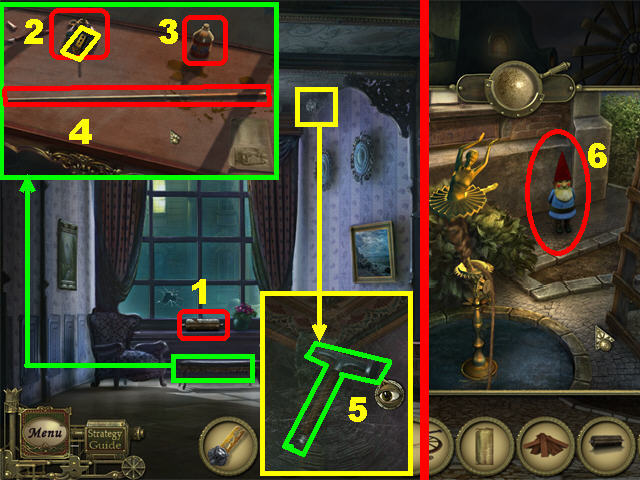
- Take the ROLLER ORGAN PART (1) on the window sill after Sarah disappears.
- Zoom into the coffee table by the window.
- Take the OWL KEY (2).
- Place the GLUE (3) and BROKEN BILLIARD CUE (4) on the table.
- Place the long pole on the short pole; fix them together with the glue.
- The BILLIARD CUE will be added to inventory.
- Zoom into the cobweb in the ceiling.
- Remove the cobweb with the BILLIARD CUE to obtain the ICE PICK and view a dwarf sketch (5).
- Return to the fountain outside.
- Break the Garden Dwarf with the ICE PICK to obtain the CODE SCRAP (6).
- Return to the Pool Room.
- Play the Hidden Object Scene.
- Open the panel on the left; take any items in your inventory.
- The CANDLE will be added to inventory.
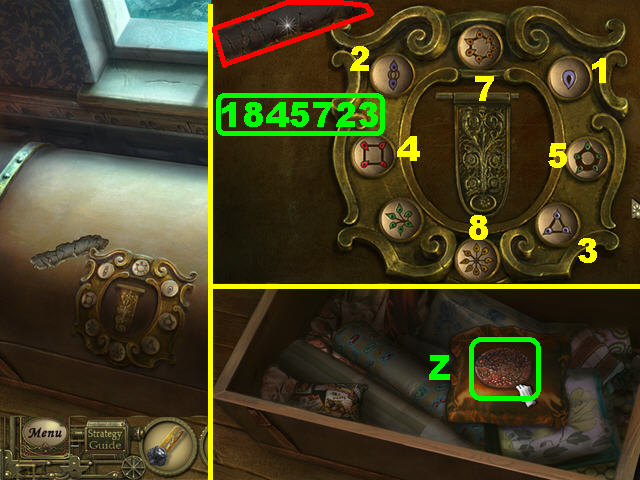
- Zoom into the chest in the lower right.
- Place the CODE SCRAP on the chest.
- Click on the chest to trigger a puzzle.
- Use the code on the scrap (1845723) to solve the puzzle. Each number represents the number of drops each button has.
- Click on the items in the order shown in the screenshot to solve the puzzle.
- Take the LOCK PIECE (Z) from the chest, after it is unlocked.
- Click down and then go through the left door.
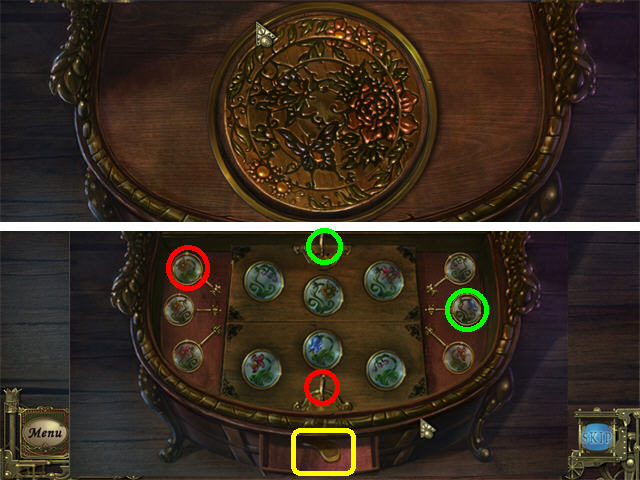
- Zoom into the table on the right.
- Place the LOCK PIECE on the table to trigger a mini-game.
- Rotate the pieces to mirror the image in the screenshot. Correct pieces will lock in place.
- The top will open after the pieces are in place, revealing a second puzzle.
- Place the keys into their respective holes, as in the screenshot, and then click each key to unlock a secret compartment below.
- Take the PAWL from the secret compartment.
- Click down.
- Light the CANDLE on the candles in the chandelier.
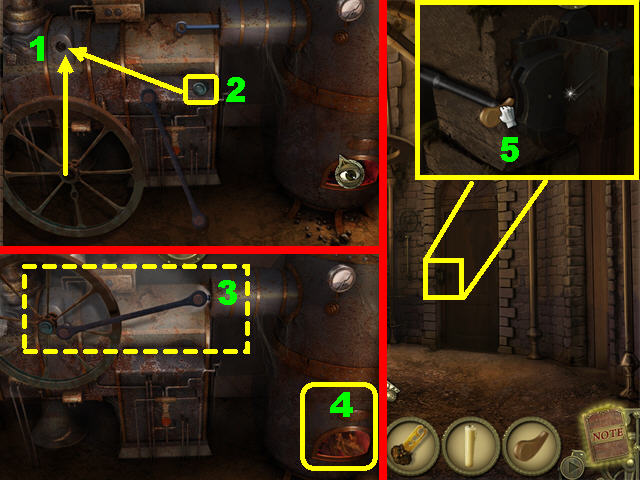
- Zoom into the boiler.
- Place the SPARE BOILER PARTS on the boiler.
- Move the WHEEL (1) to the slot in the upper left.
- Drag the BOLT (2) in the center of the boiler to the center of the wheel.
- Place the BAR (3) as shown in the screenshot.
- Add the FIREWOOD and the LIT CANDLE in the lower right (4).
- Once the mechanism starts; zoom out of the pop-up window.
- Zoom into the door to the right of the boiler.
- Place the PAWL in the lock.
- Go through the door to access the Gazebo (5).
Chapter 3
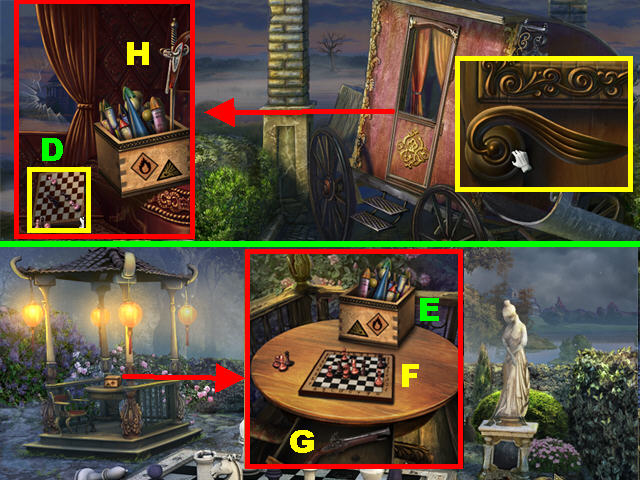
- Zoom into the small table; pick up the CUP (6).
- Click down to back away from the table and then head right.
- Pick up the RECORD (7) in the lower right.
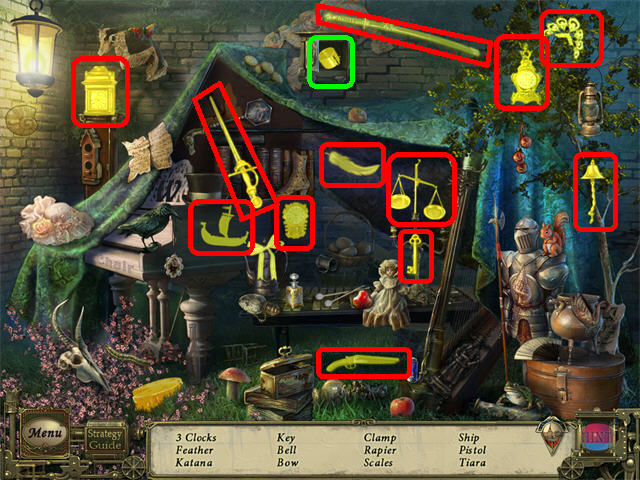
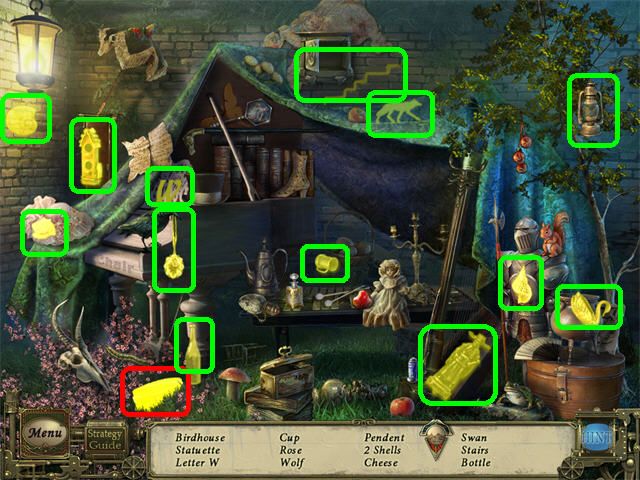
- Play the Hidden Object Scene.
- Open the cabinet in the upper center; pick up items on your list.
- The CLAMP will be added to inventory.
- Head right.
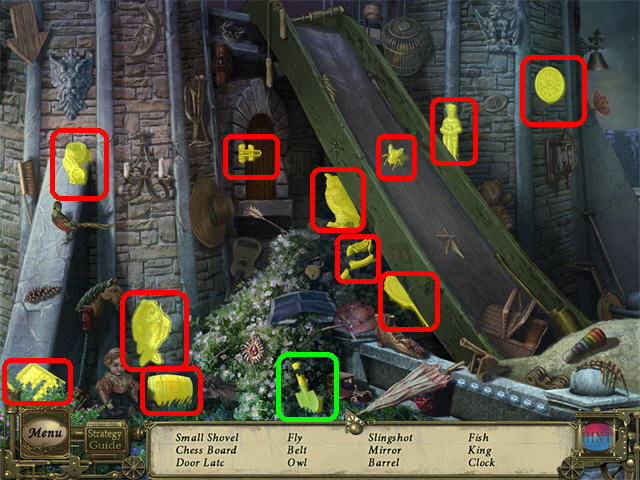
- Play the Hidden Object Scene.
- The SMALL SHOVEL will be added to inventory.
- Return to the fountain area outside the Boiler Room.
- Play the Hidden Object Scene.
- The SACK will be added to inventory.
- Return to the Playground.
- Place the SACK on the SAND to create the SACK OF SAND (A).
- Return to the fountain by the gazebo.
- Zoom into the patch of dirt next to the fountain.
- Use the SMALL SHOVEL twice on the patch of dirt.
- Place the CLAMP on the broken pipe (B).
- Turn the valve to fill the fountain with water (C).
- Place the SACK WITH SAND in the water to create the WET SAND SACK (D).
- Once the water starts flowing, place the CUP on the water to obtain the CUP WITH WATER (E).
- Return to the Playground.
- Zoom into the right door.
- Place the WET HEAVY SACK WITH SAND on the swing to open the door (F).
- Take the STICK (G), PLIERS, (H) and BARREL ORGAN HANDLE (I).
- Play the Hidden Object Scene to obtain the SCRUB BRUSH.
- Open the small door (J); pick up the items on your list.
- The SCRUB BRUSH will be added to inventory.
- Return to the fountain by the Gazebo Area.
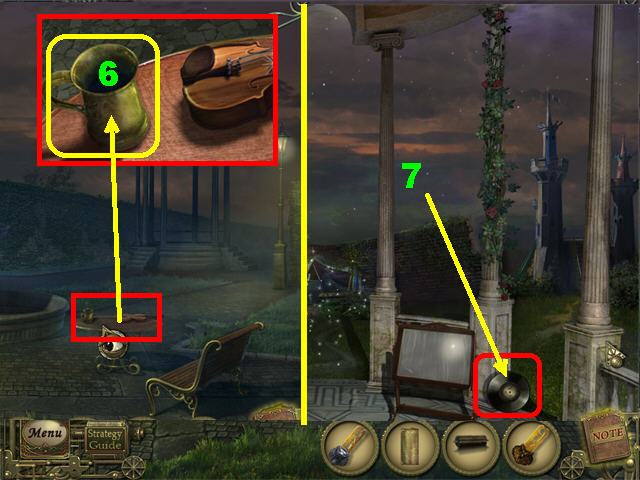
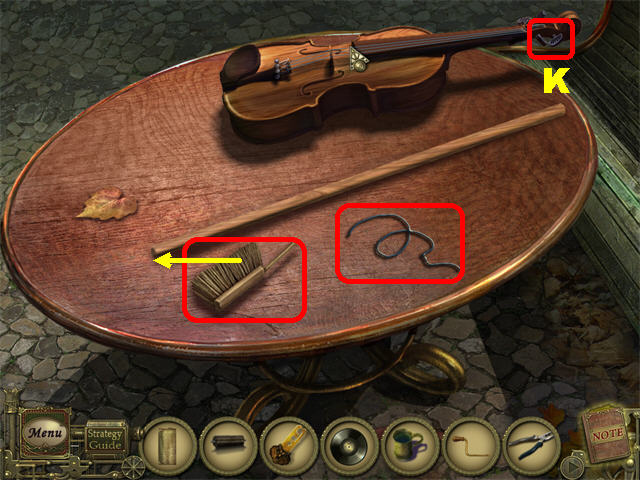
- Zoom into the small table; place the STICK and the SCRUB BRUSH on the table.
- Turn the violin’s peg (K) to release a string.
- Click on the loose string and it will land on the table.
- Place the SCRUB BRUSH at the end of the stick.
- Drag the STRING to the end of the SCRUB BRUSH, attaching it to the stick and creating the LONG BRUSH.
- Go to the Gazebo.
- Zoom into the roller organ; place the ROLLER ORGAN HANDLE on the side of the roller organ.
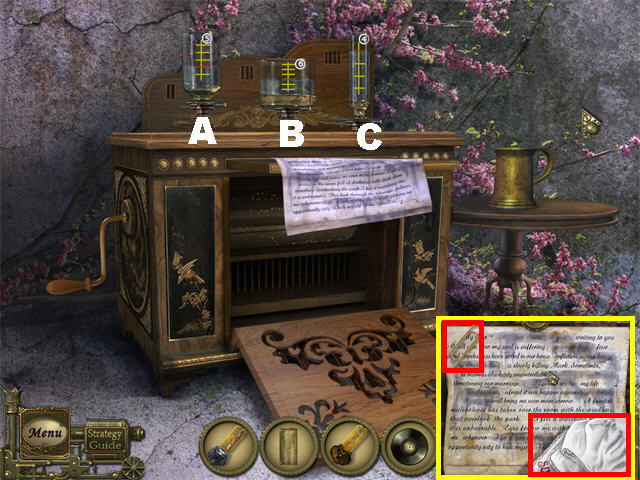
- Place the CUP WITH WATER on the small table to activate a puzzle.
- Fill each cylinder to the red line using the cup of water.
- Remove water from the cylinders by placing them back into the cup.
- Fill cylinder A with CUP OF WATER and pour it into cylinder C.
- Place the remainder of cylinder A into cylinder B.
- Empty cylinder C.
- Repeat those steps twice to completely fill cylinder B.
- Fill cylinder A with CUP OF WATER.
- Pour cylinder A into cylinder C.
- Empty cylinder C test.
- Place the rest of cylinder A into cylinder C.
- Fill cylinder A and pour it into cylinder C to complete the puzzle.
- Place the ROLLER ORGAN PART into the compartment below after the puzzle has been solved.
- Turn the handle; pick up the PAPER CLIP and HANDKERCHIEF on the letter.
- Exit the pop-up window.
- Clean the mirror with the HANDKERCHIEF three times to view someone in the upstairs window.
- Return to the Entertainment Room.
- Place the RECORD on the gramophone and then turn the handle.
- Place the OWL KEY in the slot and then pick up the OWL STATUETTE (1).
- Go into the upper left door inside the Estate Lobby.
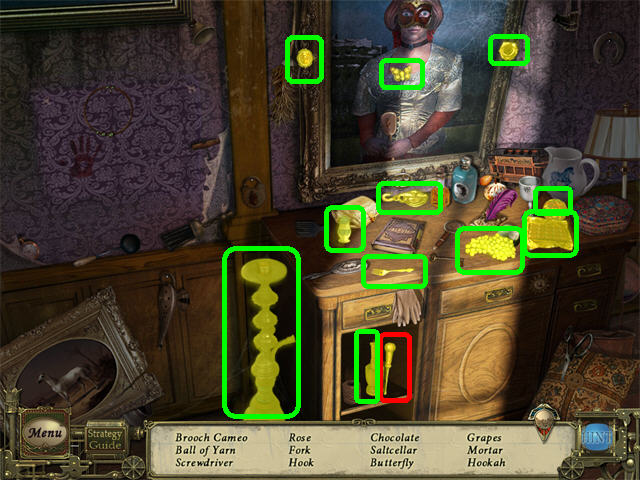
- Play the Hidden Object Scene.
- Remove the left painting by clicking on it (take the fan if it’s on your list).
- The PLATE will be added into inventory.
- Move the curtains and then zoom into the window sill.
- Place the PLIERS on the loose end of the hanger three times to straighten it; the CLOTHES HANGER (2) will be added to inventory.
- Take a closer look at the right door.
- Put the NEWSPAPER below the door and push it in.
- Place the PAPER CLIP in the keyhole to push the key onto the newspaper.
- Pull the newspaper out and then pick up the KEY.
- Place the KEY in the keyhole.
- Turn the KEY and enter the bedroom (3).
- Click on the cat and then pick up the EAGLE KEY below it (4).
- Return to the Fireplace Room.
- Zoom into the fireplace; place the PLATE in the fire to view the code on it (5).
- Go to the second floor hallway.
- Play the Hidden Object Scene to obtain the SCREWDRIVER.
- Zoom into the back door.
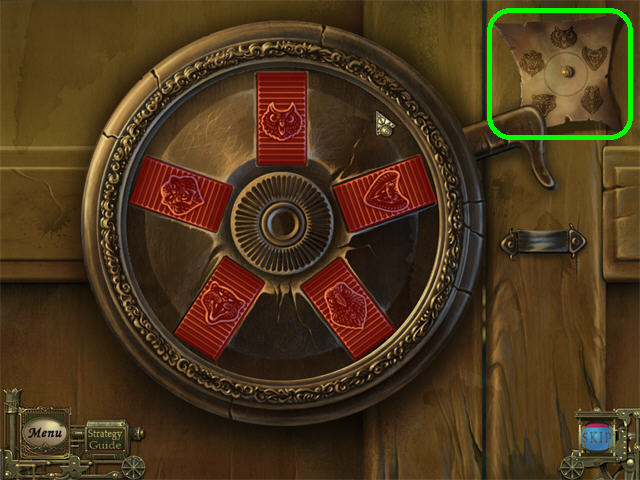
- Reproduce the images shown on the plate code in the upper right.
- Click on the images to change them.
- The solution is, clock-wise from the top: owl, snake, eagle, tiger, lion.
- Go into the door to access the Library.
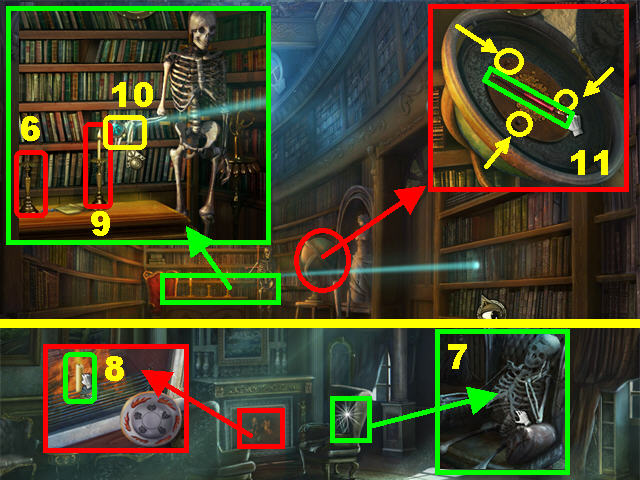
- Zoom into the back desk; pick up the left CANDLE (6).
- Return to the Fireplace Room.
- Zoom into the chair; take the SKELETON (7).
- Light the CANDLE in the fireplace (8).
- Return to the Library.
- Zoom into the back desk; light the candle in the candleholder with the LIT CANDLE (9).
- Place the SKELETON on the coat rack.
- Click on its hand to shine a light on the right bookcase (10).
- Zoom into the globe.
- Open the globe with the SCREWDRIVER; take the PEN (11).
- Remove the rest of the screws (11) on the panel with the SCREWDRIVER to reveal the snake keyhole (you will not acquire this key until much later in the game).
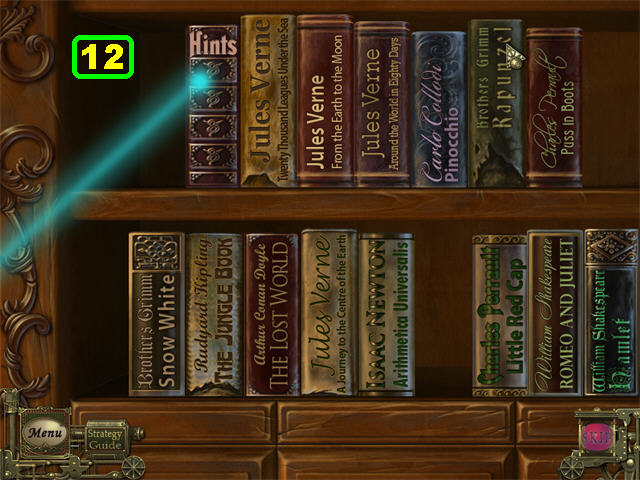
- Take a closer look at the right bookcase and then click on the book marked “HINTS.”
- Arrange the books following the book’s instructions. Pay attention to the red words (12).
- A correct solution is shown in the screenshot.
- Pull the lever with the CLOTHES HANGER to unlock the door; go into the Office.
Chapter 4
- Play the Hidden Object Scene.
- Open the cabinets and drawers; find the items on your list.
- The INCENSE STICKS will be added to inventory.
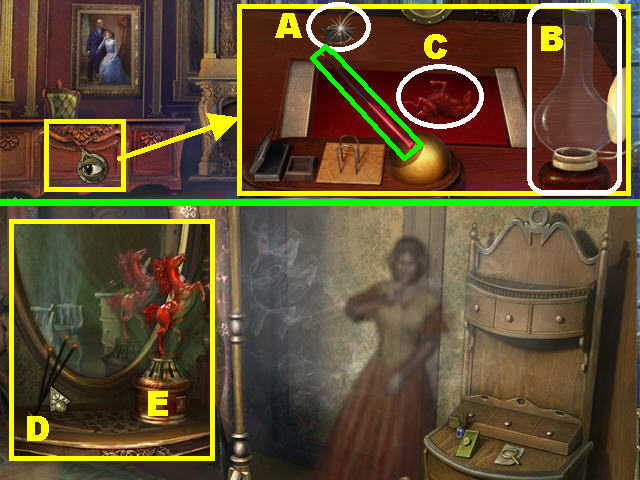
- Zoom into the desk; take the BENT GEAR (A) and the LAMP (B).
- Place the PEN in the penholder.
- Pick up the HORSE that appears on the desk (C).
- Go into the bedroom by the hallway and zoom into the dresser.
- Place the INCENSE STICKS (D) on the incense holder.
- Light the INCENSE STICKS with the LIT CANDLE.
- Place the HORSE on the stand and a ghost will appear (E).
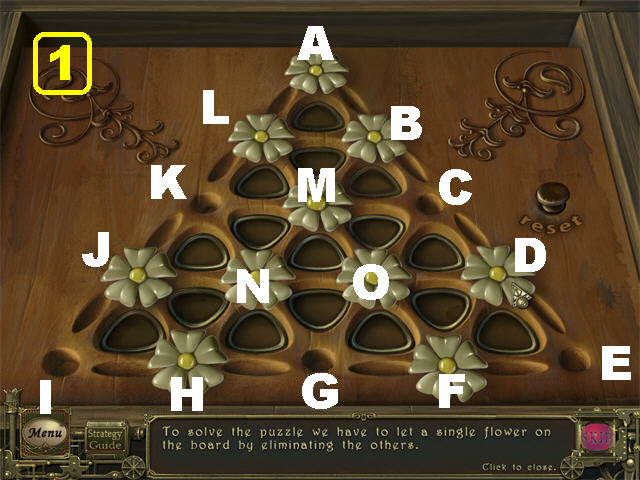
- Click on the box by the bedside table; click it again to trigger a puzzle.
- Eliminate all flowers but one to solve the puzzle.
- Flowers can only jump into empty pegs (F).
- Flowers can only jump into empty pegs (1).
- Move the Flower from Spot A to Spot C.
- Move the Flower from Spot C to Spot E.
- Move the Flower from Spot E to Spot G.
- Move the Flower from Spot G to Spot I.
- Move the Flower from Spot I to Spot K.
- Move the Flower from Spot K to Spot A.
- Move the Flower from Spot N to Spot B.
- Move the Flower from Spot A to Spot C.
- Move the Flower from Spot C to Spot G.
- The TELESCOPE LENS will be added to inventory.
- Go into the Office.
- Zoom into the fireplace.
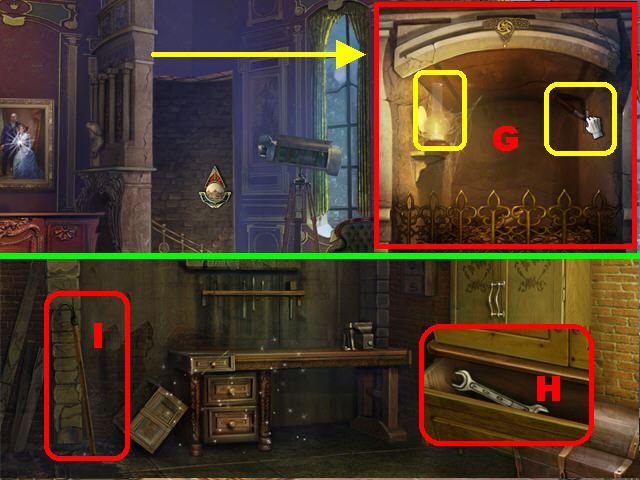
- Put the LAMP in the fireplace and then click on the lever to unlock a secret passage (G).
- Go into the hidden area.
- Click on the far right door twice and go into the door.
- Open the bottom drawer of the wardrobe; pick up the WRENCH (H).
- Take the POLE HOOK on the left (I).
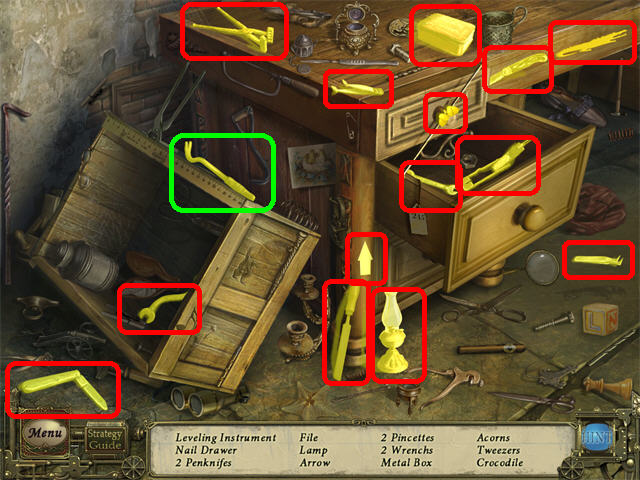
- Play the Hidden Object Scene.
- Open the middle drawer; look for items on your list.
- The CROWBAR will be added to inventory.
- Exit this scene.
- Zoom into the right door; remove the hinges with the CROWBAR.
- Go into the room.
- Zoom into the vase on the left shelf; break it with the WRENCH and take the VASE SHARD (J).
- Pick up the VINEGAR BOTTLE on the left (K).
- Take a closer look below the sink; take the FRETSAW (L).
- Remove the nut from the VALVE with the WRENCH; pick up the VALVE (M).
- Exit this scene; zoom into the oven.
- Place the VALVE on the vent.
- Twist the VALVE to eliminate the steam from the room (N).
- Zoom into the left table; place the FRETSAW on it.
- Remove the screws marked with white arrows in the screenshot.
- Grab the cloth from below the table and then attach it to the blade to create the SAW BLADE (O).
- Zoom into the leftmost door; cut the crossbar using the SAW BLADE twice.
- Go into the door.
- Play the Hidden Object Scene.
- Pull the sheet on the right; look for any items on your list.
- The WAX STATUETTE will be added to inventory.
- Exit this scene.
- Zoom into the oven.
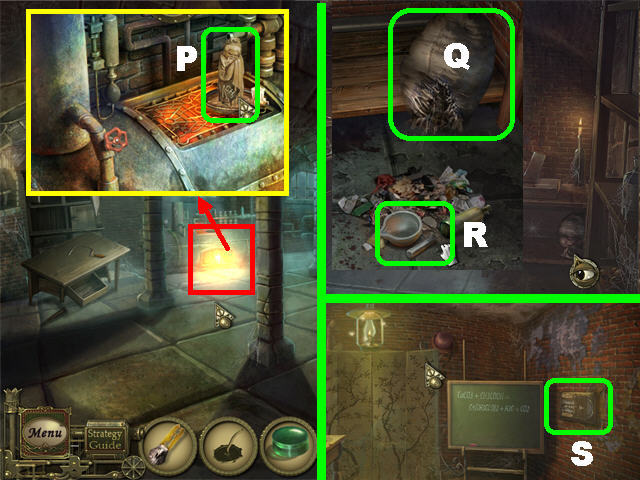
- Place the WAX STATUETTE on top of the oven; pick up the CHEMISTRY PLATE (P).
- Go into the right door.
- Zoom into the right table; place the POLE HOOK on the bag to move it closer.
- Open the bag with the VASE SHARD (Q).
- Take the MORTAR AND PESTLE (R).
- Return to the lab; zoom into the device on the right wall (S).
- Place the CHEMISTRY PLATE into the empty slot.
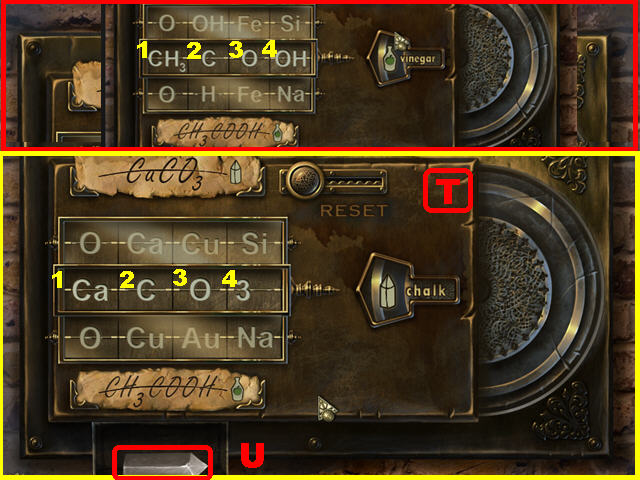
- Click on the plates in the correct order until you obtain the formula at the bottom of the puzzle.
- For the VINEGAR BOTTLE combination (CH3, C, O, OH) click the center buttons in this order: 3, 4, 2, 1 (T).
- For the chalk combination (Ca, C, O, 3) click on the center buttons in this order: 2, 3 (T).
- Take the CHALK (U).
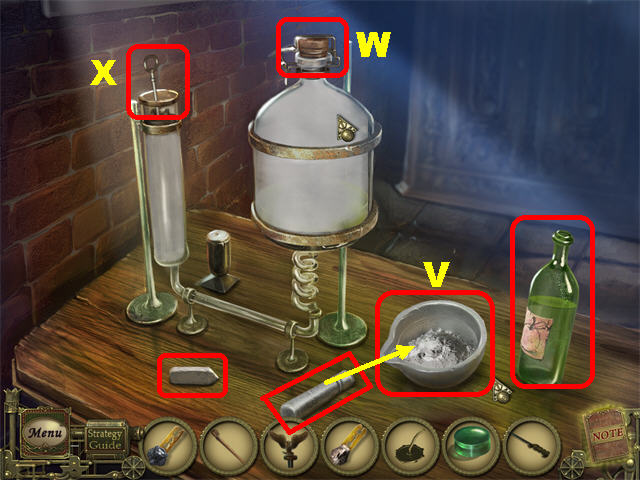
- Zoom into the table.
- Place the VINEGAR BOTTLE, CHALK, and MORTAR AND PESTLE on the table.
- Place the CHALK into the mortar and then pulverize it with the PESTLE (V).
- Open the lid (W); place the PULVERIZED CHALK and the VINEGAR BOTTLE into the bottle.
- Close the lid; pick up the KEY (X) from the test tube.
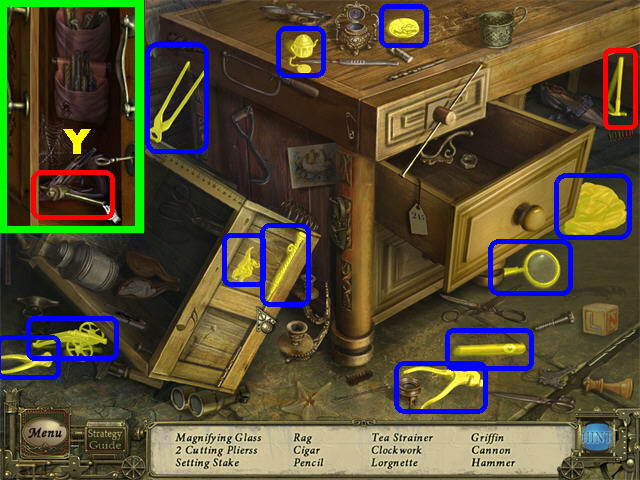
- Go into the Chest Room.
- Zoom into the wardrobe; open it with the KEY and take the VISE HANDLE (Y).
- Play the Hidden Object Scene to obtain the HAMMER.
- Zoom into the vise on the right.
- Place the VISE HANDLE and the BENT GEAR on the vise; turn the handle to secure the gear (Z).
- Straighten out the gear using the HAMMER; take the GEAR.
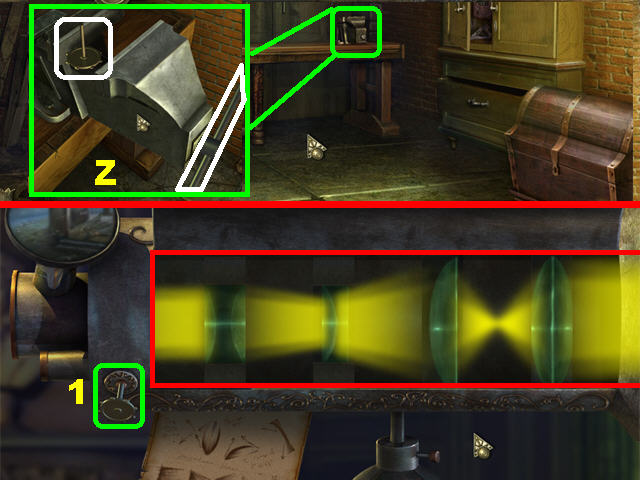
- Go to the Office.
- Place the TELESCOPE LENS and the GEAR (1) on the telescope.
- Place the LENSES in the correct order by swapping the pieces. Once the lenses are set correctly, you will see a vision of someone at the arbor.
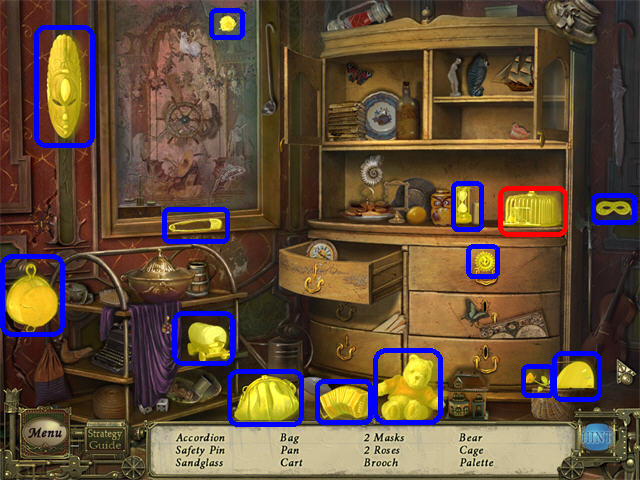
- Play the Hidden Object Scene by the window to obtain the CAGE WITH MOUSE.
- Return to the Gazebo.
- Play the Hidden Object Scene to obtain the CHEESE.
- Zoom into the left gate; cut the three bars with the SAW BLADE (2).
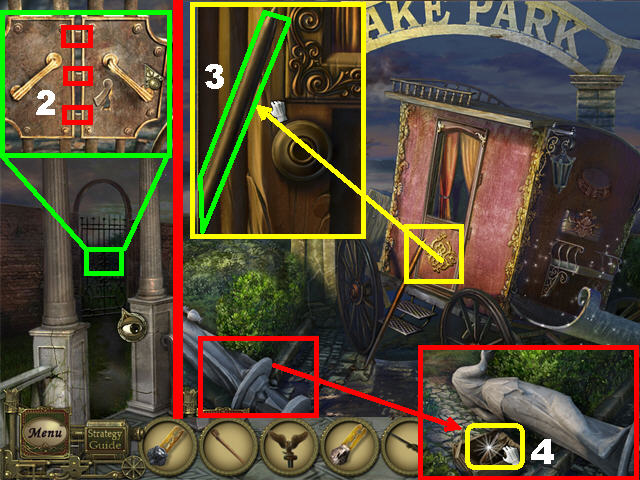
- Go through the gate to access the Lake Park Area.
- Zoom into the stagecoach door; take the STEEL BAR (3).
- Zoom into the statue on the ground; move it using the STEEL BAR and take the NAIL PULLER (4).
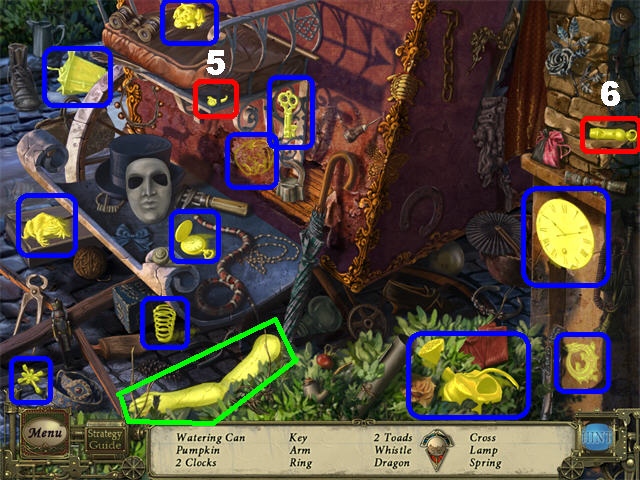
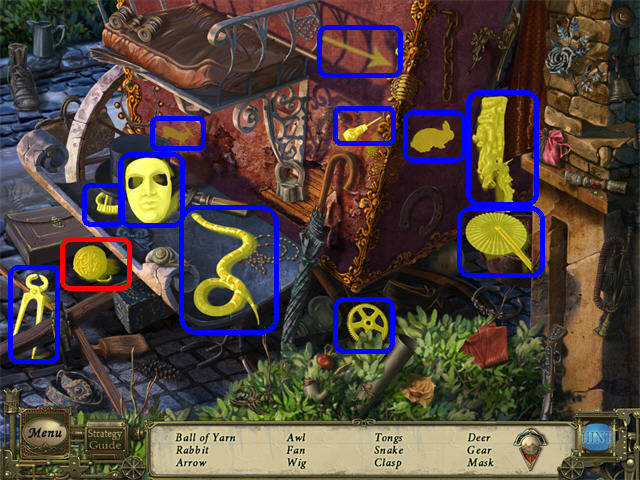
- Play the Hidden Object Scene.
- Click on the edge of the cushion; take any items on your list (5).
- Remove the brick on right (take the whistle if it’s on your list) (6).
- The STATUE ARM will be added to inventory.
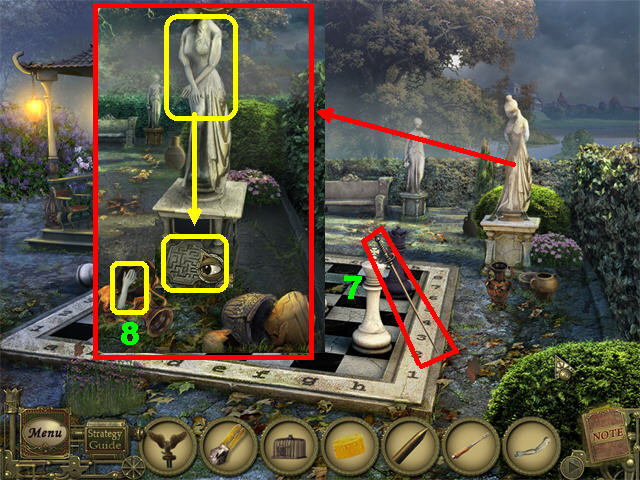
- Head right to reach the Chess Area.
- Take the RAPIER next to the chessboard (7).
- Zoom into the right statue.
- Take the STATUE ARM on the ground (8).
- Place the STATUE ARM and the STATUE ARM on the statue to unlock the secret compartment on the base.
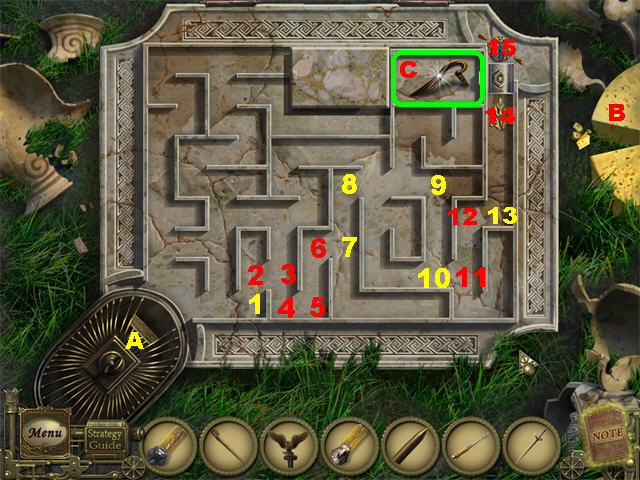
- Take a closer look at the maze on the base.
- Place the CAGE WITH MOUSE in the lower left end of the maze (A).
- Place the CHEESE on the upper right side of the maze (B).
- Place the cheese pieces on the maze so the mouse can see them, otherwise the mouse will not move forward.
- Keep placing the cheese pieces around the maze until you reach the upper right side.
- Take the HANDLE (C) after the maze has been completed.
- Return to the Stagecoach Area.
- Play the Hidden Object Scene to obtain the BALL OF YARN.
- Zoom into the stagecoach door.
- Place the HANDLE on the door and then turn it to go inside.
- Grab the CHESSBOARD (D).
- Return to the Chess Area. Zoom into the veranda.
- Remove the nails from the box with the NAIL PULLER; take the FIREWORKS (E).
- Place the CHESSBOARD on the table; chess pieces will appear on the table (F).
- Place the CHESS PIECES on the CHESSBOARD to unlock the drawer below; take the PISTOL (G).
- Go to the Stagecoach Area.
- Place the FIREWORKS on the seat.
- Place the RAPIER in the fireworks box.
- Put the PISTOL on the RAPIER (H).
- Place the BALL OF YARN on the PISTOL to pull the trigger from a distance.
- Re-enter the coach and then go through the hole in the other side.
Chapter 5
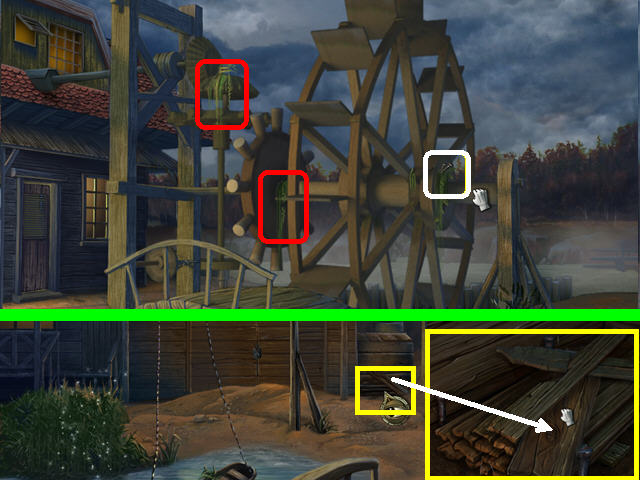
- Head towards the watermill on the right.
- Take the NAILS marked in white.
- Click on the areas marked in red to eliminate all rubbish from the pinions, activating the watermill.
- Cross the bridge.
- Zoom into the area marked in yellow; take the BOARD.
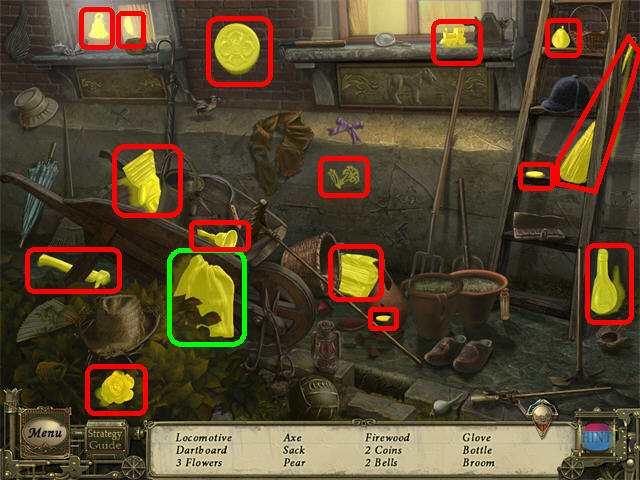
- Play the Hidden Object Scene.
- Open the treasure chest; look for items on your list.
- The OILCAN will be added to inventory.
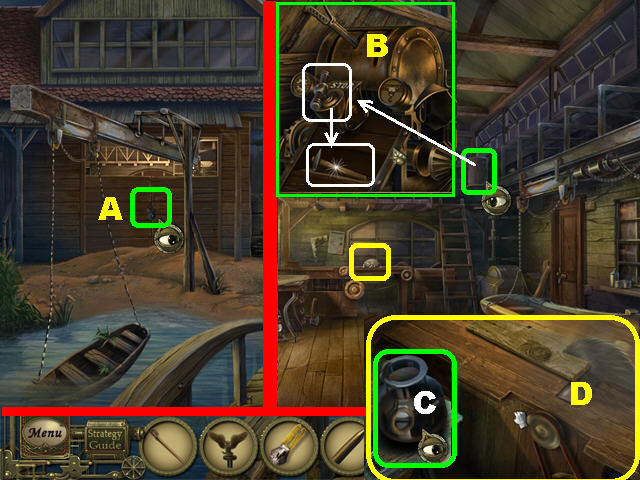
- Zoom into the lock on the back door; place the STEEL BAR on the rusted lock.
- Enter the boathouse (A).
- Zoom into the windlass drum above the steps; turn the valve and take the HAMMER that appears below (B).
- Take a closer look at the back table; fill the OILCAN by placing it in the oil jar (C).
- The FULL OILCAN will be added to inventory.
- Break the oil jar with the HAMMER and take the BOAT HOOK (C).
- Zoom into the lever on the windlass drum.
- Click on the LEVER to start the buzz saw.
- Place the BOARD on the buzz saw to cut it; take the BOARD (D).
- Click down.
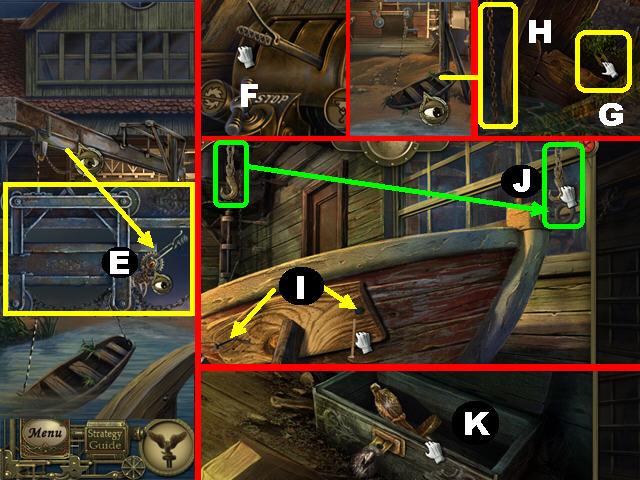
- Zoom into the lever above the boat.
- Place the FULL OILCAN on the lever (E) and then click the lever to lift the boat out of the water.
- Go inside; zoom into the windlass drum.
- Move the lever to the last slot so the outside boat can move onto the ground (F).
- Go outside.
- Zoom into the boat on the ground; take the TIGER KEY (G).
- Pull the CHAIN so it detaches itself from the boat (H).
- Go into the boathouse. Zoom into the boat.
- Place the BOARD on the side of the boat.
- Place the NAILS (I) on the board.
- Place the HAMMER on both nails.
- Place the BOAT HOOK in the slot.
- Drag the HOOK onto the BOAT HOOK to lift the boat and place it in the water outside (J).
- Go inside.
- Zoom into the small box in the lower right; place the EAGLE KEY in the slot and take the EAGLE STATUETTE (K).
- Go outside.
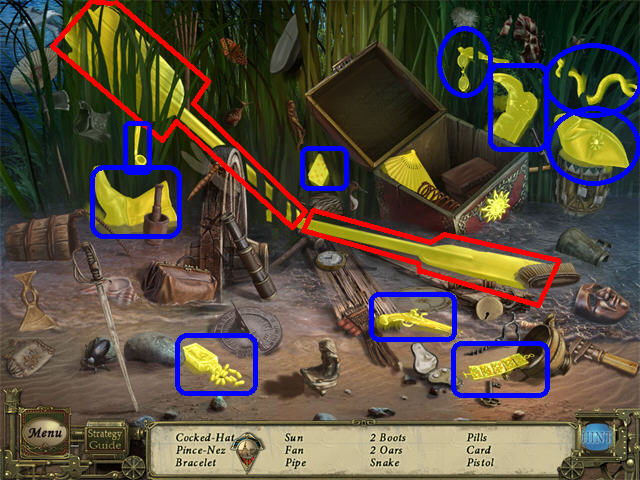
- Play the Hidden Object Scene to obtain the PAIR OF OARS.
- Return to the fountain area near the gazebo.
- Zoom into the top of the fountain; place the LONG BRUSH on the moss.
- Put the TIGER KEY in the slot; take the TIGER STATUETTE.
- Return to the dock; place the PAIR OF OARS in the boat to reach the Island (L).
- Zoom into the dummy on the ground; take the CAT STATUETTE and the KEY (M).
- Zoom into the table.
- Place the CAT STATUETTE in the empty slot; take the LOCK PART (N).
- Zoom into the chest; place the LOCK PART on the device.
- Assemble the lock mechanism by dragging the pieces into the correct spots.
- Right-click on a piece to rotate it; left-click it to release it.
- Correctly placed pieces will lock.
- Place the KEY in the center; click on it to unlock the chest (O).
- Click on the letter.
- Take the NAME TAG inside the chest (P).
Chapter 6
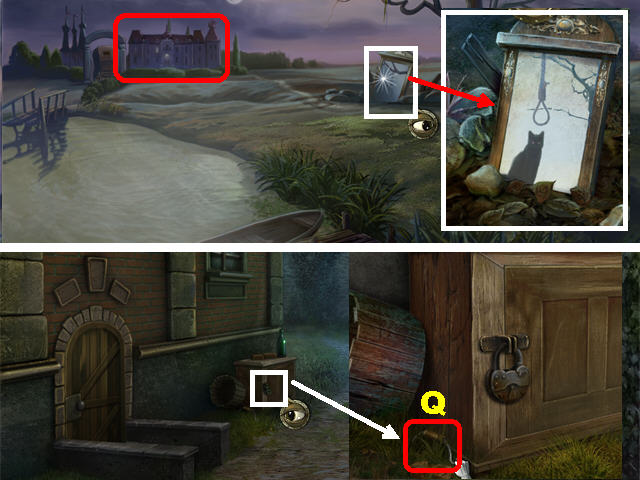
- Head towards the black cat on the far bank of the river.
- Zoom into the mirror on the right; place the NAME TAG on the mirror after the cutscene.
- Head towards the estate.
- Zoom into the box; take the BUCKET HANDLE (Q).
- Play the Hidden Object Scene to obtain the TURNWHEEL.
- Click on the door; go through it and the next door on the left.
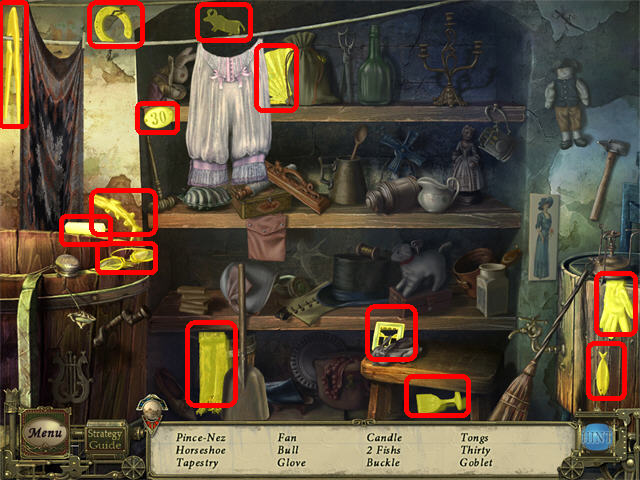
- Play the Hidden Object Scene.
- Move aside both items hanging on the clothesline; pick up any items on your list.
- The MEAT GRINDER will be added to inventory.
- Zoom into the bucket in the lower right; place the BUCKET HANDLE on it.
- Grab the BUCKET (R).
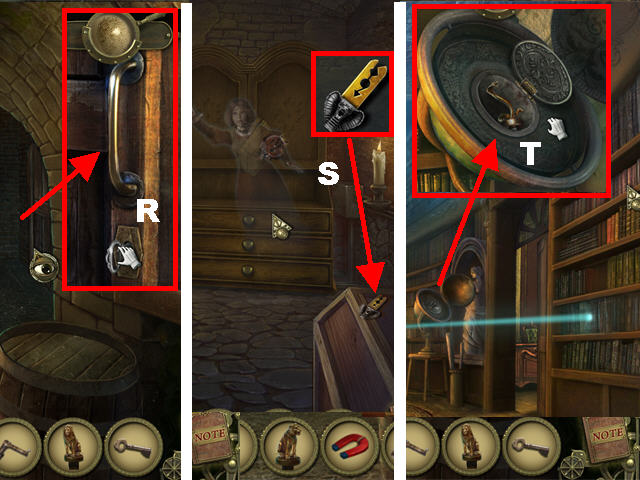
- Open the trapdoor by the entryway; go downstairs to the lab (S).
- Play the Hidden Object Scene to obtain the FILE.
- Return to the cellar via the rope ladder.
- Play the Hidden Object Scene by the washing machine to obtain the DIRTY TAPESTRY.
- Click down twice.
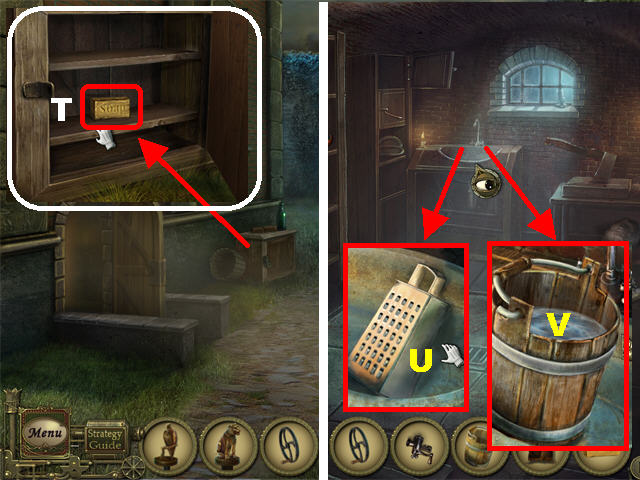
- Zoom into the box; open the lock with the FILE and take the SOAP (T).
- Return to the lab.
- Click down and then go to the room on the right.
- Zoom into the sink; take the GRATER (U).
- Place the BUCKET in the sink; turn the faucet to fill the bucket.
- Grab the BUCKET WITH WATER (V).
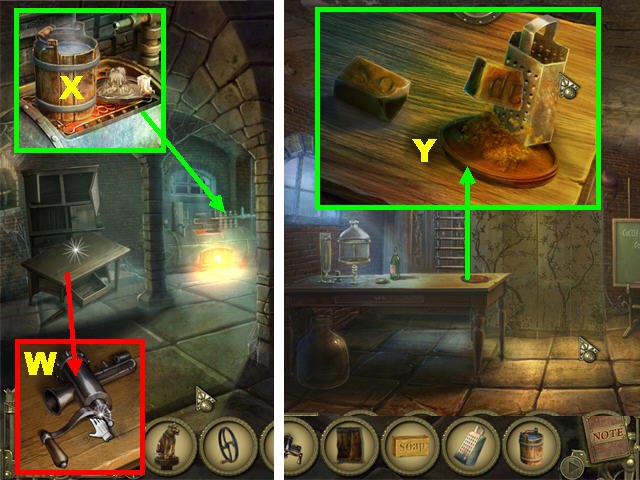
- Exit this scene and zoom into the left table; place the MEAT GRINDER on the table.
- Twist the handle twice to add the MEAT GRINDER LEVER to inventory (W).
- Zoom onto the oven; place the BUCKET WITH WATER on the oven and take the BUCKET WITH WARM WATER (X).
- Go into the lab; zoom into the table.
- Place the GRATER on the table.
- Place the SOAP on the table.
- Move the SOAP onto the GRATER and pick up the SOAP SHAVINGS (Y).
- Go up the rope ladder.
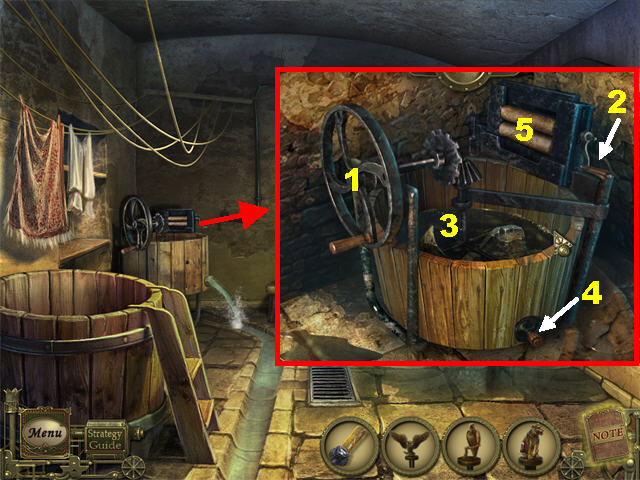
- Zoom into the old-fashioned washing machine; place the WASHING MACHINE TURNWHEEL in the slot (1).
- Place the MEAT GRINDER LEVER by the rollers (2).
- Place the BUCKET WITH WARM WATER and the SOAP SHAVINGS into the machine (3).
- Place the DIRTY TAPESTRY into the water.
- Turn the washing machine wheel to activate the machine (1).
- Click on the plug (4) to drain the water.
- Take the WET TAPESTRY and place it in the rollers to dry it (5).
- Take the TAPESTRY PIECE.
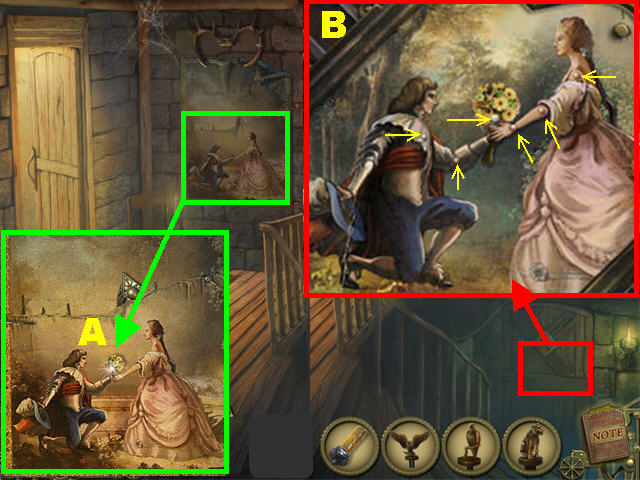
- Click down and then zoom into the wall close to the chair.
- Place the TAPESTRY PIECE on the wall and take the BOUQUET OF FLOWERS from the tapestry (A).
- Zoom into the door at the bottom of the steps.
- Place the BOUQUET OF FLOWERS in the man’s left hand.
- Position the hands of the man and the woman as in the tapestry by clicking the small buttons attached to each character (B).
- Go through the door after the puzzle has been solved.
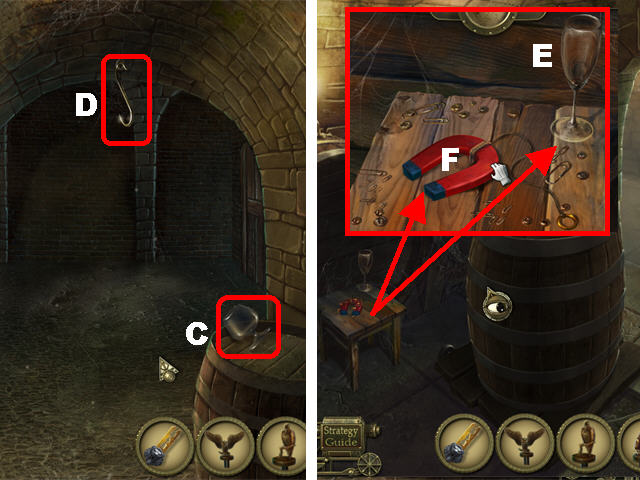
- Grab the WINEGLASS on the right (C).
- Grab the HOOK in the upper center (D).
- Go through the left entryway.
- Zoom into the small table; pick up another WINEGLASS (E).
- Click on the MAGNET twice to remove the debris; take the MAGNET (F).
- Go through the entryway.
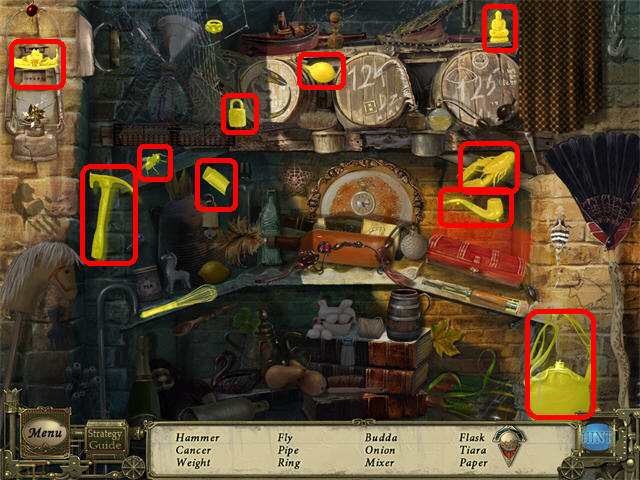
- Play the Hidden Object Scene.
- Move the curtain; take any items on your list.
- The WEIGHT will be added to inventory.
- Pick up another WINEGLASS on the table (G).
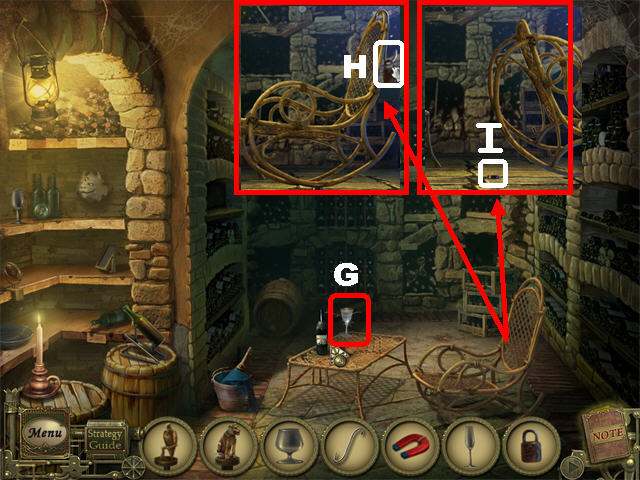
- Take a closer look at the rocking chair.
- Place the HOOK on the upper right side of the chair (H).
- Hang the WEIGHT on the hook (H).
- Take the WHEEL (I) on the ground after the chair is moved.
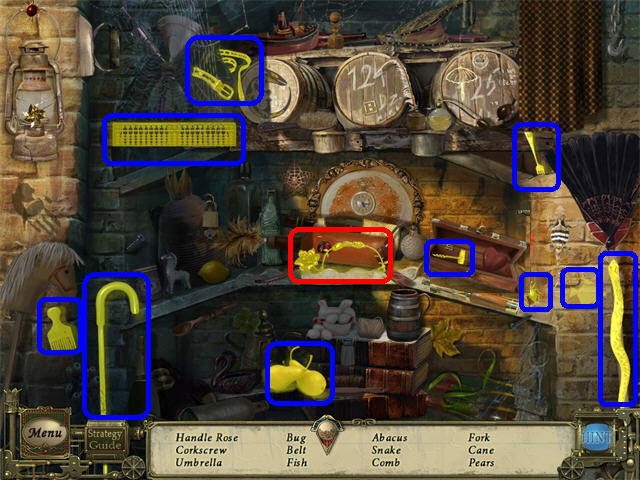
- Play the Hidden Object Scene to obtain the ROSE HANDLE.
- Open the small chest; take any items on your list.
- Click down.

- Place the WHEEL on the barrel cart (J).
- Click on the barrel to move it out of the way; zoom into that area on the floor.
- Take the HANDLE on the floor (K).
- Place the ROSE HANDLE on the slab (L).
- Click on the slab and grab the chain for a box to appear (M).
- Place the LION KEY in the slot (N) and take the LION STATUETTE (O).
- Go through the entryway.
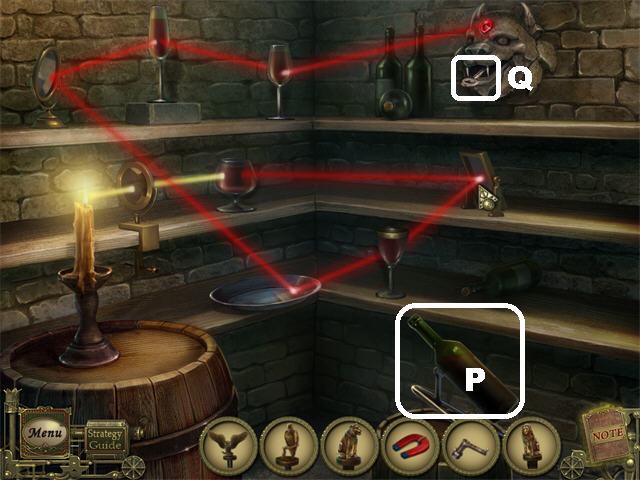
- Zoom into the left shelf; place the WINEGLASSES on the shelf to trigger a puzzle.
- Using the bottle in the lower right (P), pour wine into each of the WINEGLASSES.
- Position the mirrors so the light from the candle shines through all the glasses and hits the lion head.
- Take the KEY (Q) from the lion’s mouth after the puzzle has been solved.
- Click down twice.
- Zoom into the right door.
- Place the KEY into the lock; turn it and then go through the door (R).
- Pick up the SNAKE KEY in the lower right (S).
- Click downwards until you reach the Estate. You will have to take the boat twice.
- Go to the Library on the second floor.
- Zoom into the globe; place the SNAKE KEY into the slot and take the SNAKE STATUETTE (T).
- Return to the cellar. Go through the stagecoach door, take the boat and return to the same cellar location in which you picked up the SNAKE KEY.
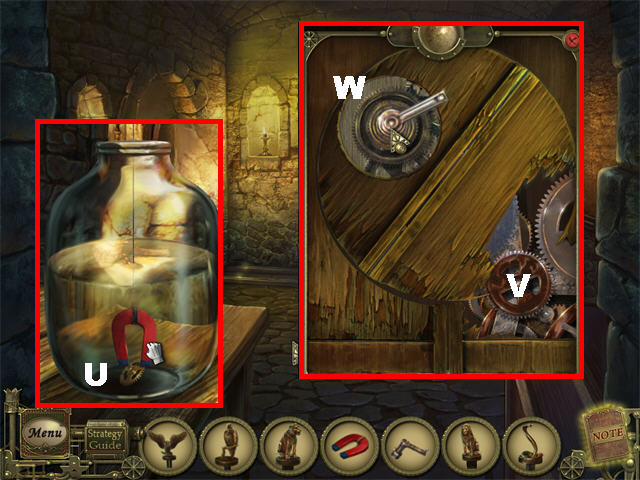
- Zoom into the large glass jar.
- Place the MAGNET on top of the jar and then drag it to the GEAR to pick it up (U).
- Zoom into the cabinet on the right.
- Place the GEAR in the lower right side of the mechanism (V).
- Place the HANDLE in the upper side of the mechanism to activate it (W).
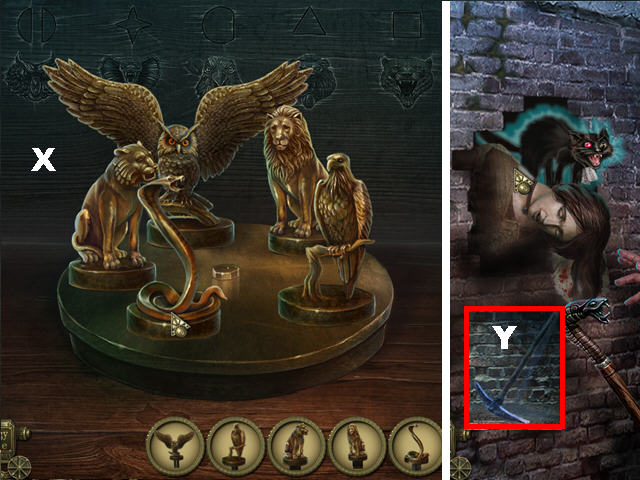
- Zoom into the cabinet; place the SNAKE STATUETTE, EAGLE STATUETTE, LION STATUETTE, TIGER STATUETTE, and OWL STATUETTE into the correct slots.
- Use the symbols on the wall, and the ones on the base, to figure out the proper placement (X).
- Correctly placed pieces will lock.
- Go through the secret compartment after the puzzle has been solved.
- Take the PICK (Y).
- Break the left side of the wall following the cutscene; a cat and dead woman will come out of the wall!
- You now have access to the Bonus Adventure! Click on the EXTRAS button in the main menu and then click on PLAY to begin.
- Congratulations! You’ve completed Dark Tales: Edgar Allan Poe’s Black Cat!
Created at: 2010-10-08