Walkthrough Menu
- General Tips
- Chapter 1: The House
- Chapter 2: The Upstairs
- Chapter 3: The Town
- Chapter 4: The Cemetery
- Chapter 5: The Treehouse
- Chapter 6: The Dungeons
General Tips
- This is the official guide for Dark Tales: Edgar Allen Poe's The Fall of the House of Usher.
- This guide will not mention each time you have to zoom into a location; the screenshots will identify each location.
- Hidden-object puzzles are referred to as HOPs in this guide. Items listed in red are hidden or they require additional actions. Interactive items in HOPs are color-coded.
- Mini-games and HOPs are sometimes randomized; your solution may vary.
Chapter 1: The House
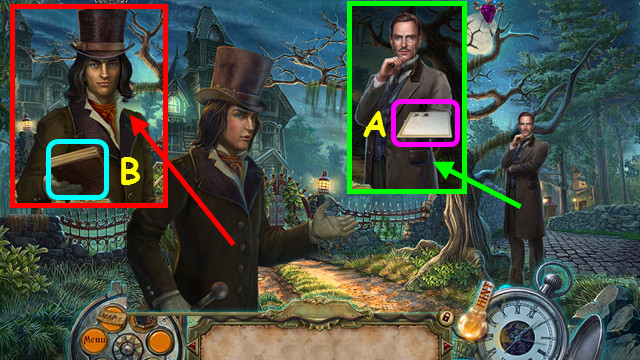
- You have the option of a tutorial.
- Talk to Dr. Morris; take the file (A).
- Talk to Dupin; take the DIARY (B).
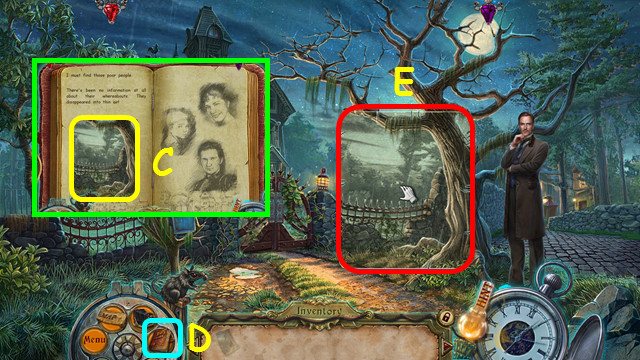
- Open the DIARY and take the PHOTOGRAPH (C).
- The DIARY now sits in the menu bar (D).
- Place the PHOTOGRAPH on the scene (E).
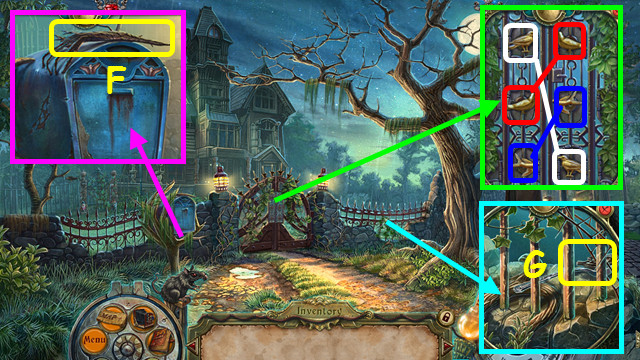
- Take the BRANCH (F).
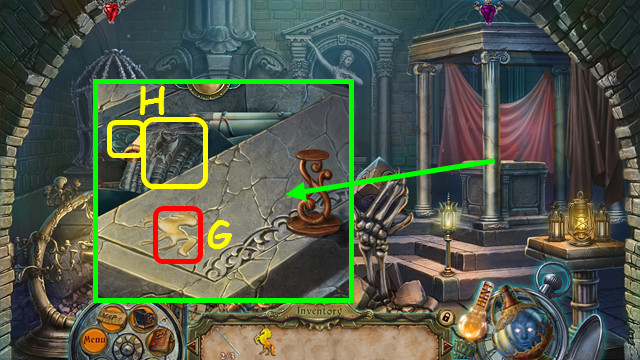
- Use the BRANCH to take the RAVEN FIGURINE (G).
- Place the RAVEN FIGURINE on the gate; select matching pairs (color-coded).
- Walk forward.
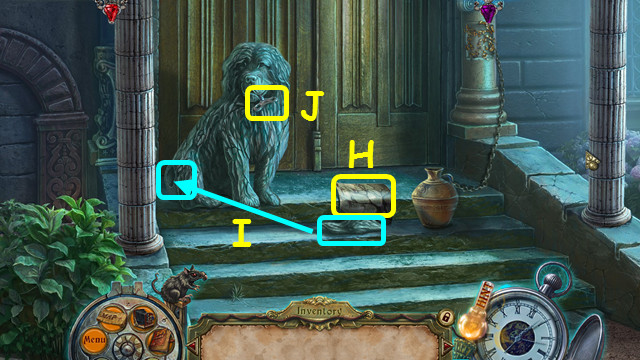
- Take the PHOTOGRAPH (H).
- Place the TAIL on the dog (I).
- Take the WINDING KEY (J).
- Walk forward.
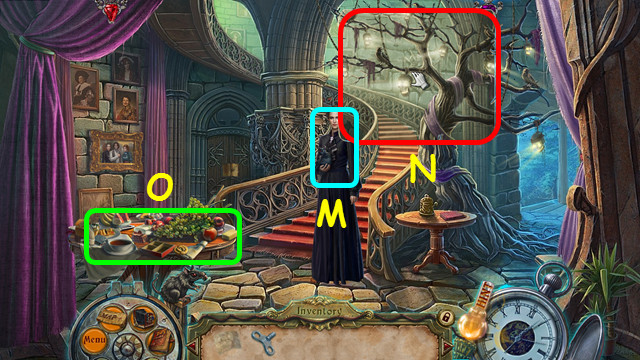
- Talk to Estelle (M).
- Use the PHOTOGRAPH on the tree (N).
- Select the table (O).
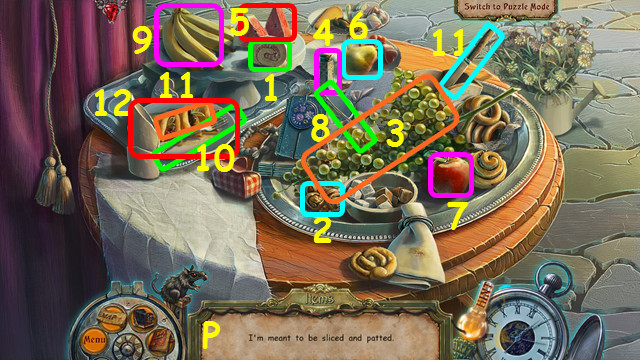
- Play the HOP to earn the KNIFE (P).
- Walk to the right.
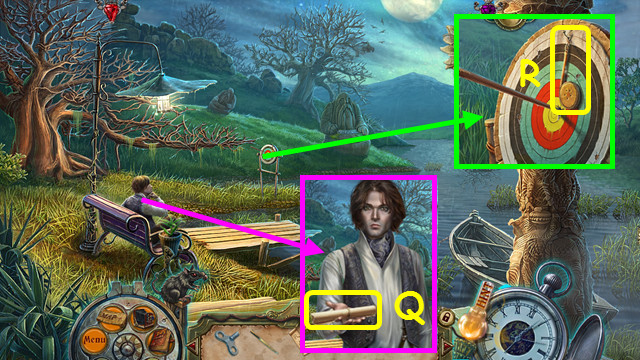
- Talk to Roderick; take the SCROLL (Q).
- Take the NOISEMAKER (R).
- Walk down.
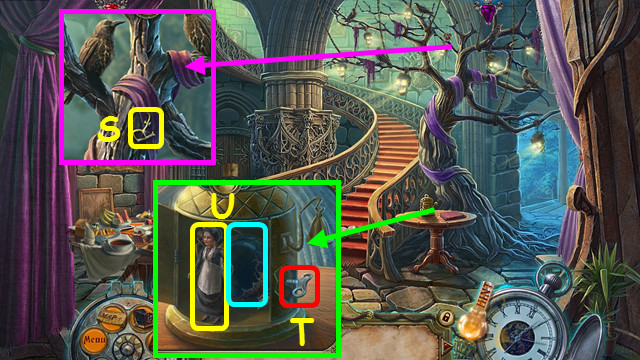
- Take the FEATURE SYMBOL (S).
- Use the WINDING KEY on the case (T).
- Take the MAID FIGURINE and select the bottle (U).
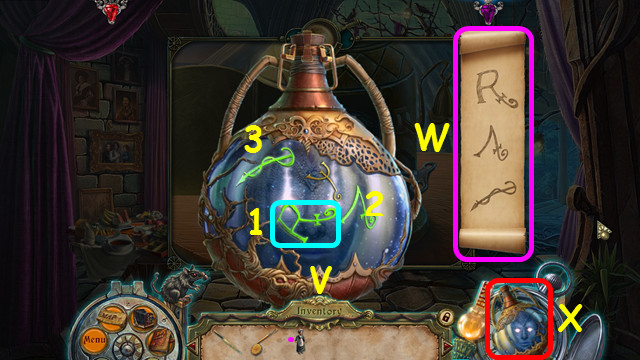
- Place the FEATURE SYMBOL on the bottle (V).
- Place the SCROLL on the bottle (W).
- Press the symbols in order (1-3).
- The REBORN ONE will be on your menu bar (X).
- Walk down.
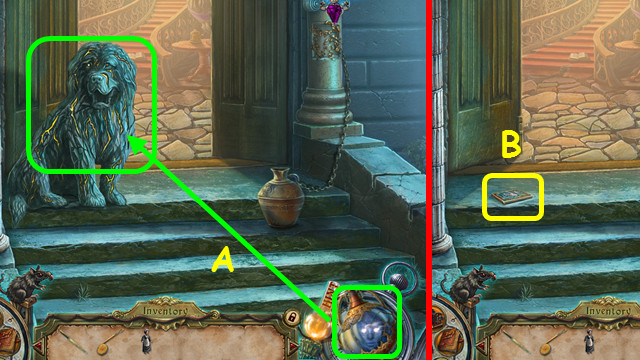
- Use the REBORN ONE on the dog (A).
- Take the PUZZLE PIECE (B).
- Walk forward.
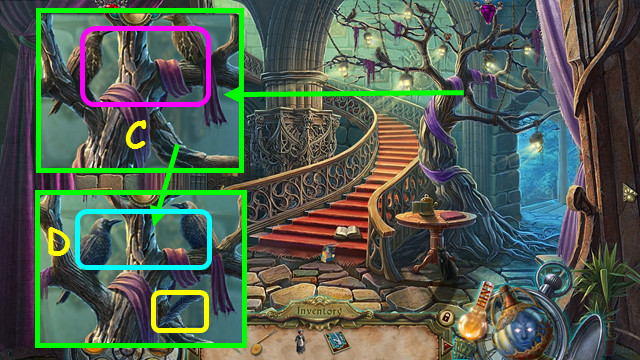
- Use the REBORN ONE on the tree (C).
- Use the NOISEMAKER on the ravens; take the 1/3 FEATHER (D).
- Walk to the right.
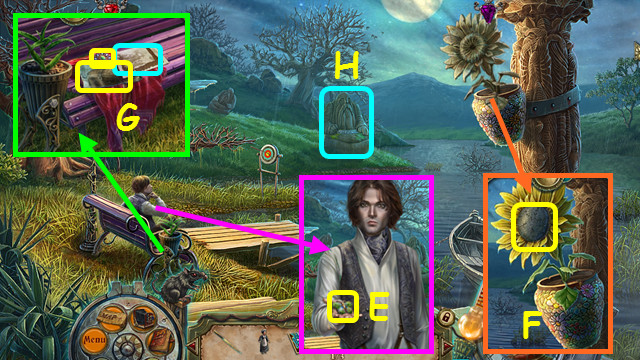
- Talk to Roderick; take the KEY TO MADELEINE'S DIARY (E).
- Use the REBORN ONE on the flower; use the KNIFE to take the SUNFLOWER SEEDS (F).
- Read the note; take the PHOTOGRAPH and the BROOCH (G).
- Select the statue mini-game (H).
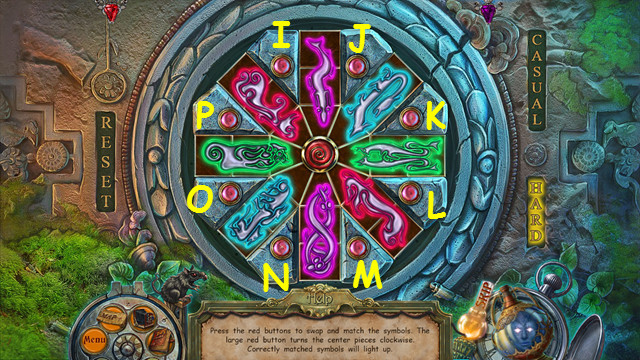
- Place the PUZZLE PIECE into the device.
- Use the red buttons to rotate the pieces to the correct place.
- Press Jx2, Lx2, Nx2, and Px2 for the casual solution.
- Press Px1, Ox1, Nx1, Mx1, Lx1, Kx1, Lx1, Kx3, Lx1, Kx1, Lx1, Kx2, Px3, Ox1,Nx1, Ox3, Nx1, Mx1, Nx3, Mx1, and Nx3 for the hard solution.
- Take the KEY TO ESTELLE'S ROOM.
- Walk down and go up the stairs.
Chapter 2: The Upstairs
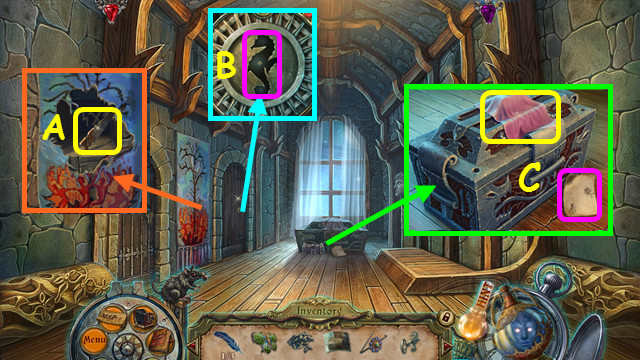
- Use the KNIFE on the tapestry; take the SAW (A).
- Use the KEY TO ESTELLE'S ROOM on the lock (B).
- Read the note and take the HANDKERCHIEF (C).
- Enter Estelle's Room.
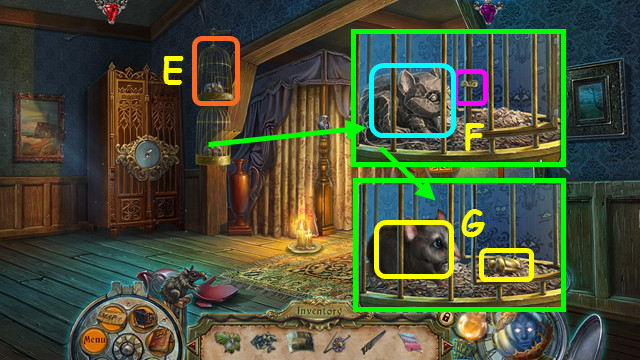
- Pull down the cage (E).
- Open the cage and use the REBORN ONE on the mouse (F).
- Give the SUNFLOWER SEEDS to the mouse; take the MOUSE and the 1/2 GOLDEN BUG SYMBOL (G).
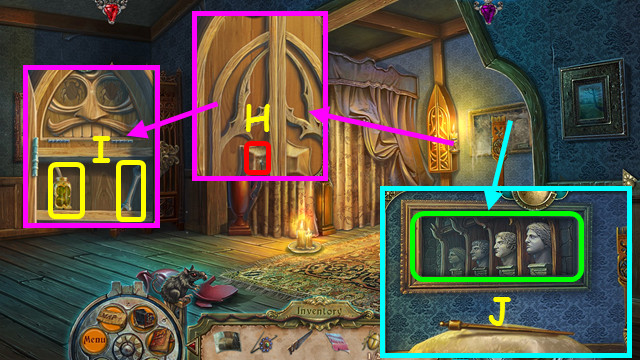
- Use the BROOCH on the keyhole (H).
- Take the GLUE and the WRENCH (I).
- Use the HANDKERCHIEF on the frame (J).
- Walk down.
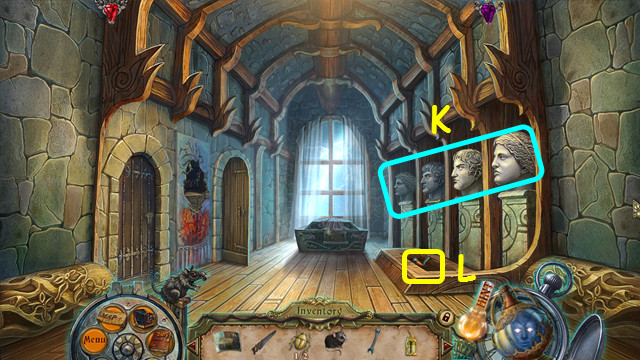
- Change the heads to match the clue (K).
- Take the WINCH HANDLE (L).
- Enter the Estelle's Room.
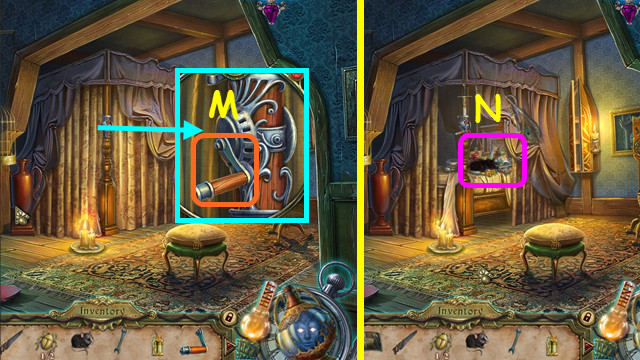
- Use the WINCH HANDLE on the pole; turn the handle (M).
- Select the bed (N).
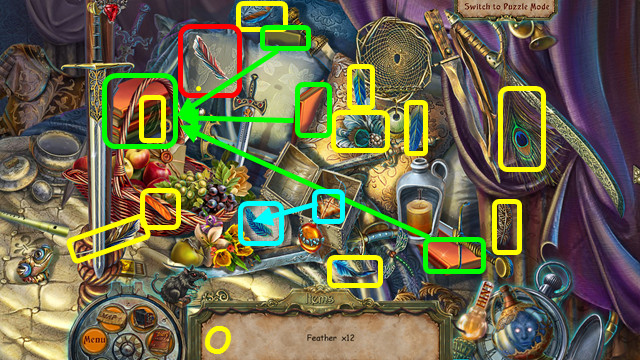
- Play the HOP to earn the 2/3 FEATHER (O).
- Walk down twice, and go right.
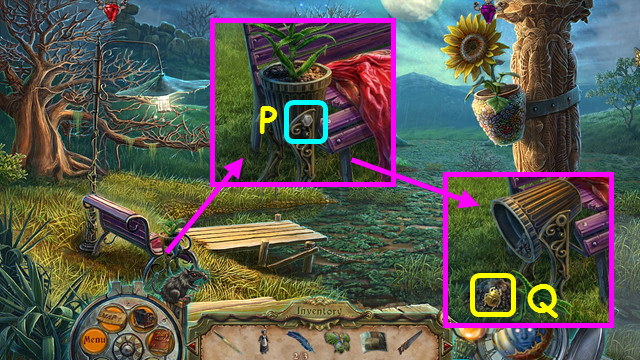
- Use the WRENCH on the bolt (P).
- Take the 2/2 GOLDEN BUG SYMBOL (Q).
- Return to Estelle's Room.
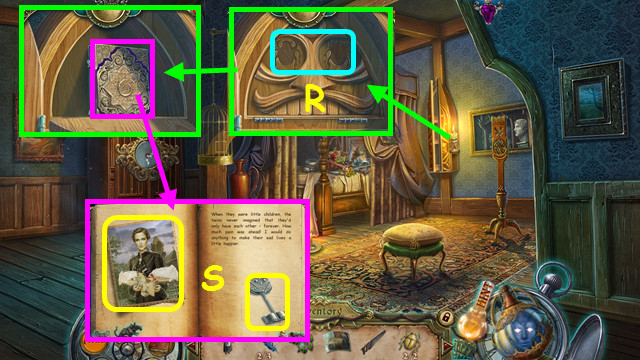
- Place the 2 GOLDEN BUG SYMBOLS on the door (R).
- Open the book, look at the photo, and take the BOOK KEY (S).
- Walk down twice.
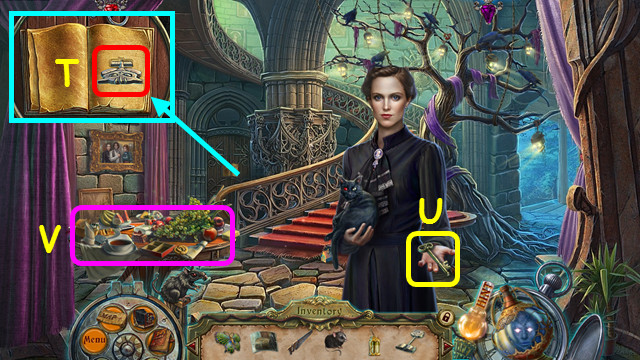
- Turn the page in the book and use the BOOK KEY in the lock (T).
- Take the KEY TO MADELINE'S ROOM (U).
- Select the table (V).
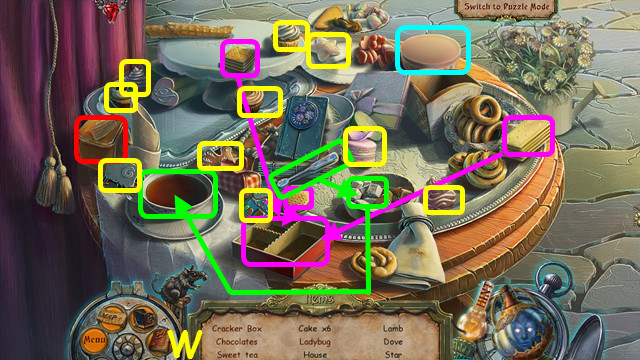
- Play the HOP to earn the COOKIE (W).
- Walk up the stairs.
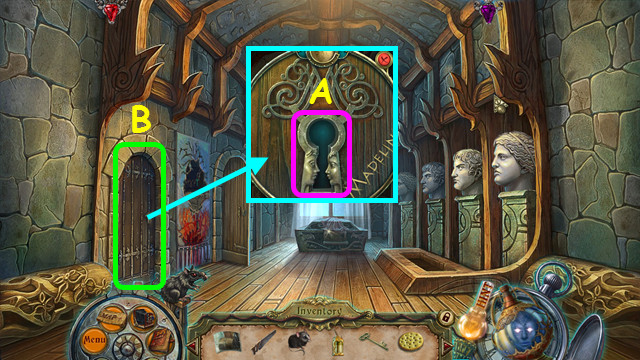
- Use the KEY TO MADELINE'S ROOM on the lock (A).
- Enter Madeline's Room (B).
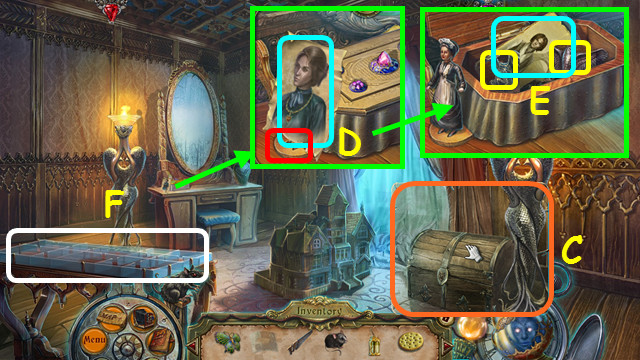
- Place the PHOTOGRAPH on the scene (C).
- Look at the drawing; place the MAID FIGURINE on the tab (D).
- Read the diary; take the DRAGON and the DOVE-SHAPED HANDLE (E).
- Select the maze (F).
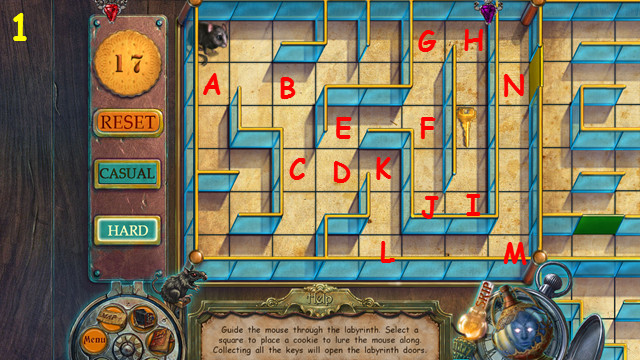
- Place the MOUSE and the COOKIE in the maze.
- For the 1st level, select the squares A, B, C, D, E, F, G, H, I, J, F, E, D, K, L, M, and N.
- This solution works for both difficulties.
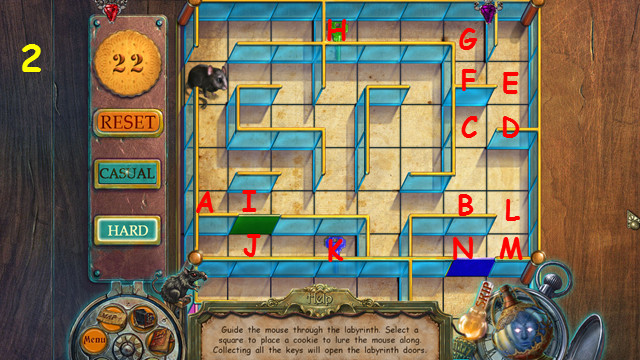
- For the 2nd level, select the squares A, B, C, D, E, F, G, H, G, F, E, D, C, B, I, J, K, J, I, L, M, and N.
- This solution works for both difficulties.
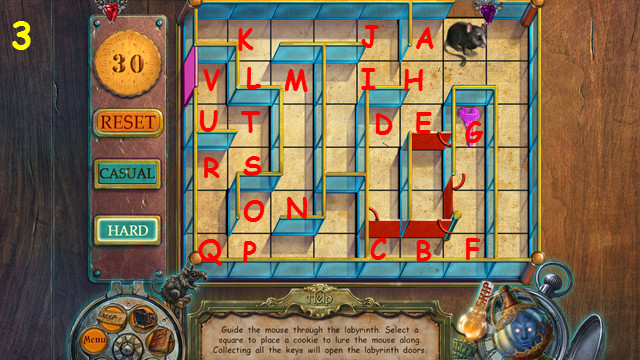
- For the 3rd level, select the squares A, B, C, D, E, B, E, D, C, F, G, F, C, D, E, H, I, J, K, L, M, N, O, P, Q, R, S, T, U, and V.
- This solution works for both difficulties.
- You earn the TRAINED MOUSE.
- Walk down twice.
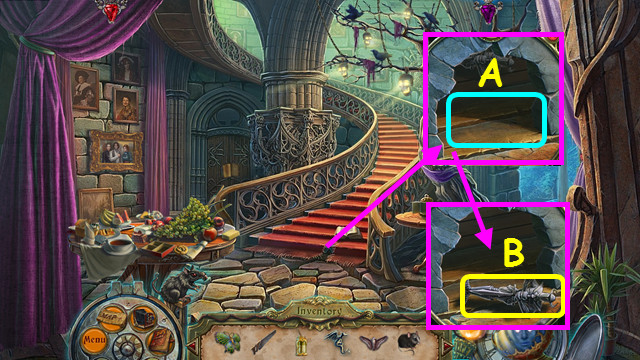
- Place the TRAINED MOUSE in the hole (A).
- Take the KNIGHT (B).
- Go up the stairs.
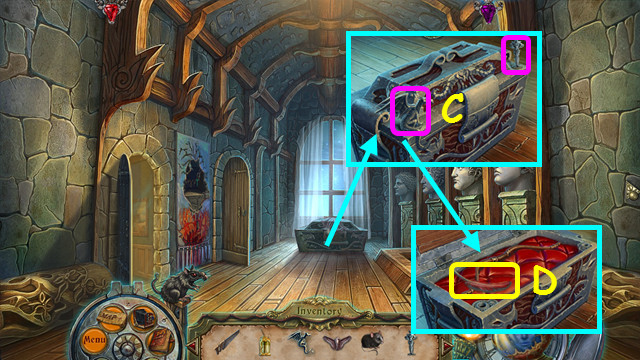
- Place the DRAGON and the KNIGHT on the chest (C).
- Take the 3/3 FEATHER (D).
- Walk down and right.
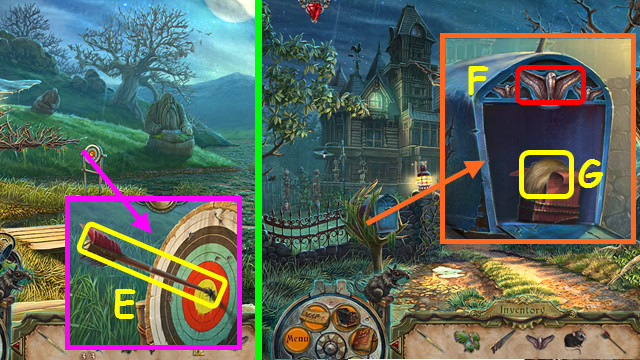
- Use the GLUE on the arrow, followed by the 3 FEATHERS; take the ARROW (E).
- Walk down 3 times.
- Place the DOVE-SHAPED HANDLE on the box (F).
- Pull the package forward, use the KNIFE on the strings, and take the STRAW (G).
- Go to Estelle's Room.
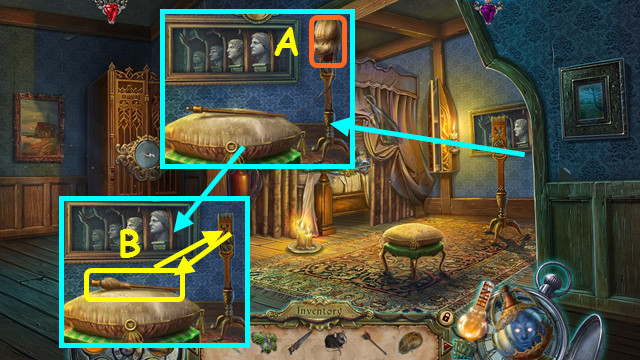
- Place the STRAW on the spindle (A).
- Pick up the pole and use it on the spindle; take the BOWSTRING (B).
- Walk down.
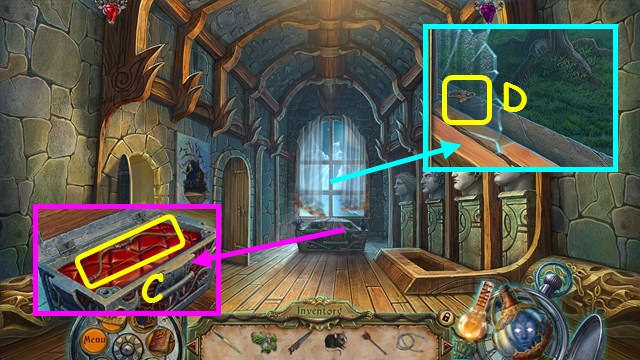
- Use the BOWSTRING to make the BOW (C).
- Use the TRAINED MOUSE to take the 1/2 FRAGMENT OF A BAS-RELIEF (D).
- Walk down.
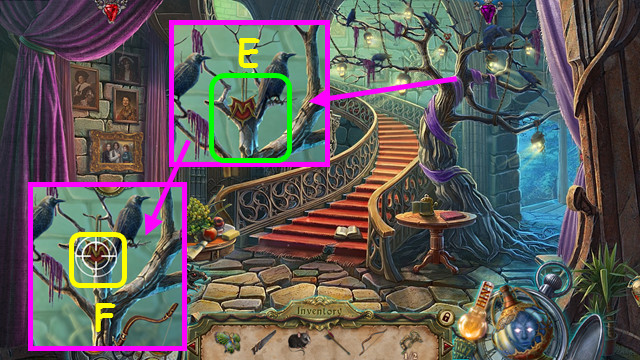
- Place the BOW and the ARROW on the tree (E).
- Aim at and select MADELEINE'S MEDALLION (F).
- Go to Madeline's Room.
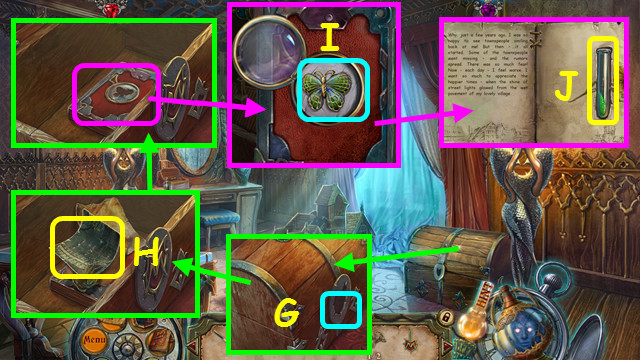
- Use MADELEINE'S MEDALLION in the chest lock (G).
- Take the PHOTOGRAPH (H).
- Move the other items, select the book, open the glass and place the KEY TO MADELEINE'S DIARY in the indentation (I).
- Close the cover and open the book; take the PURIFIER (J).
- Walk down 4 times.
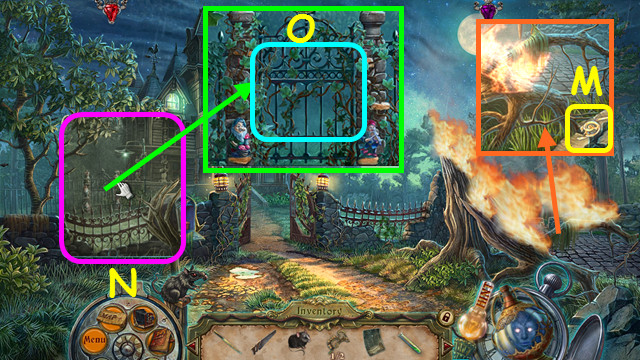
- Take the 2/2 FRAGMENT OF A BAS-RELIEF (M).
- Place the PHOTOGRAPH on the scene (N).
- Use the KNIFE 4 times to cut away the vines (O).
- Walk forward.
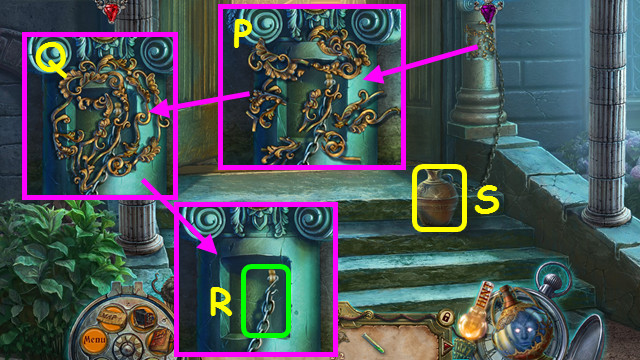
- Place the 2 FRAGMENTS OF A BAS-RELIEF on the post (P).
- Rotate the pieces to restore the bas-relief (Q).
- Remove the chain (R).
- Take the JAR (S).
- Walk forward and right.
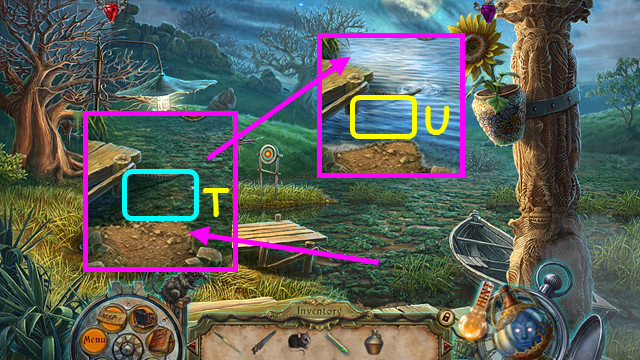
- Use the PURIFIER on the water (T).
- Use the JAR on the water to get the JUG OF WATER (U).
- Walk down twice.
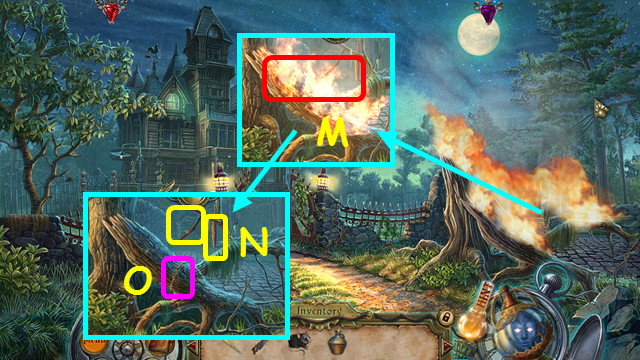
- Use the JUG OF WATER on the flames (M).
- Take the CHARCOAL and the CLOCK WEIGHT (N).
- Use the SAW on the log, and then move the piece (O).
- Walk to the right.
Chapter 3: The Town
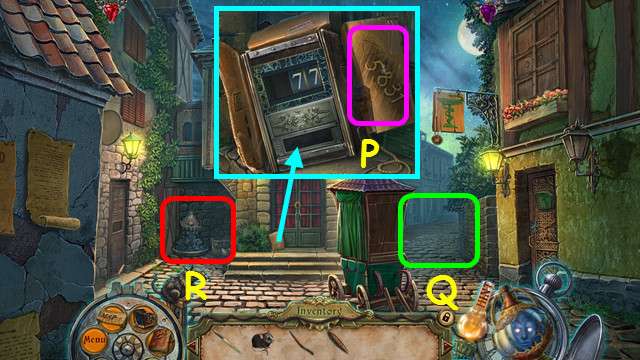
- Open the box and use the CHARCOAL on the flap (P).
- Note the street (Q).
- Select the fountain (R).
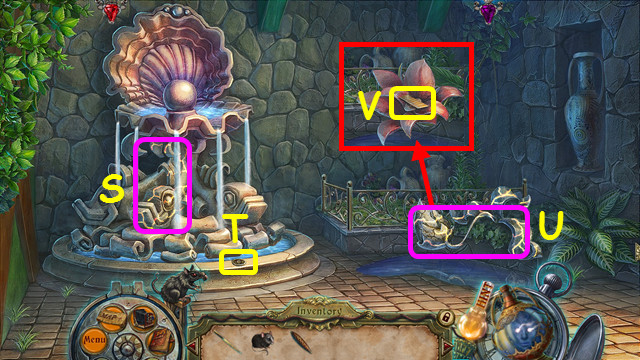
- Use the REBORN ONE on the fish (S).
- Take the 1/3 STONE COIN (T).
- Use the REBORN ONE on the flower (U).
- Take the TOY PLANE WING (V).
- Walk forward on the street.
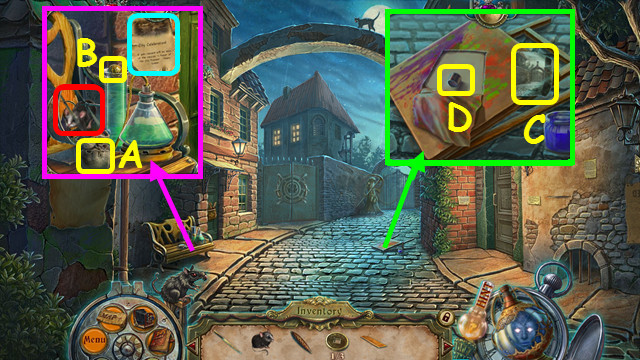
- Take the POUCH WITH SAND (A).
- Place the TRAINED MOUSE on the wheel; take the 1/2 FRAME FRAGMENT, and read the poster (B).
- Take the PHOTOGRAPH (C).
- Use the KNIFE on the panel and take the 1/2 BUTTON (D).
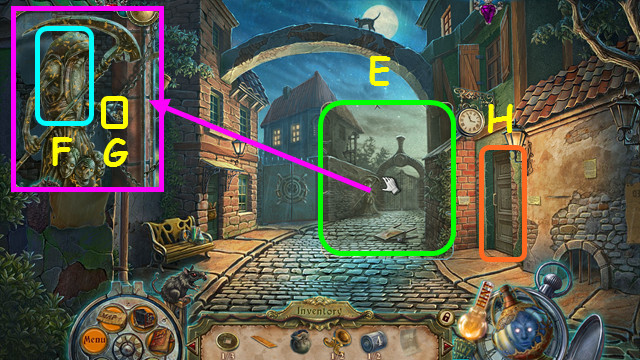
- Place the PHOTOGRAPH on the scene (E).
- Use the REBORN ONE on the statue (F).
- Take the 2/2 FRAME FRAGMENT (G).
- Enter the Clockmaker's Shop on the right (H).
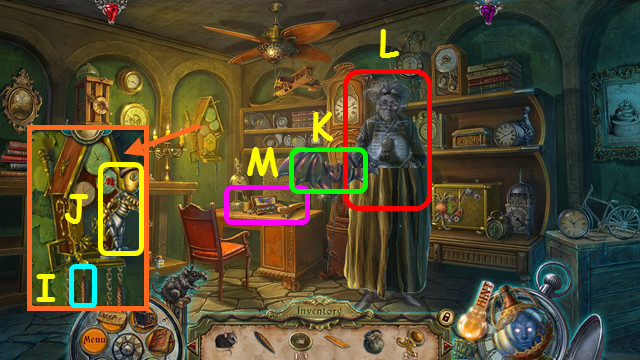
- Place the CLOCK WEIGHT on the hook (I).
- Take the MIME FIGURINE (J).
- Use the KNIFE on the balloon (K).
- Remove the cloak and talk to the ghost (L).
- Note the toy plane mini-game on the desk (M).
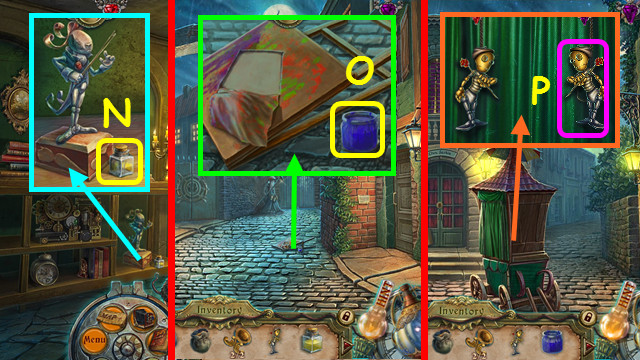
- Take the TURPENTINE (N).
- Walk down.
- Use the TURPENTINE on the jar; take the PAINT (O).
- Walk down.
- Place the MIME FIGURINE on the hook (P).
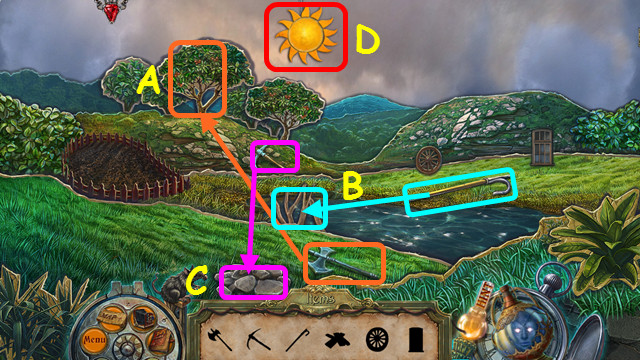
- Use the items in the following locations: AXE (A), SPEAR (B), and PICK (C).
- Select the sun (D).
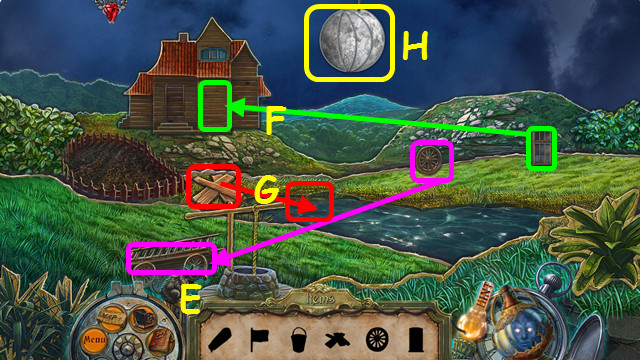
- Use the items in the following locations: WHEEL (E), WINDOW (F), and LUMBER (G).
- Select the moon (H).
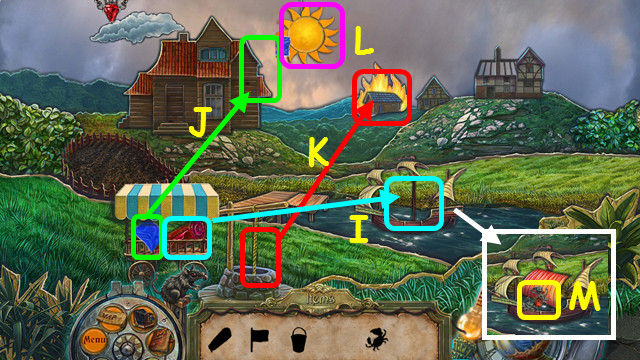
- Use the items in the following locations: CLOTH (I), FLAG (J), and BUCKET (K).
- Select the sun (L).
- Take the MECHANICAL CRAB (M).
- Return to the Clockmaker's Shop.
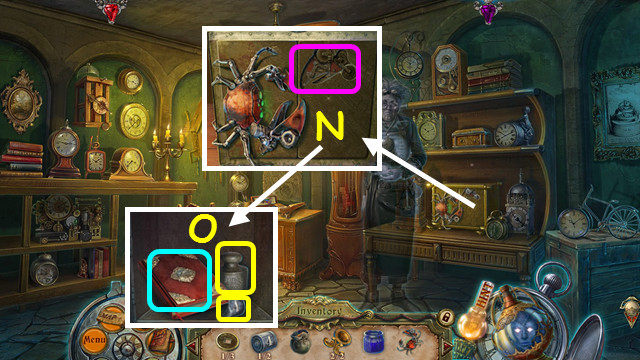
- Place the MECHANICAL CRAB on the box (N).
- Read the book, take the 2/2 BUTTON, and take the WEIGHT (O).
- Walk down 3 times and enter the house.
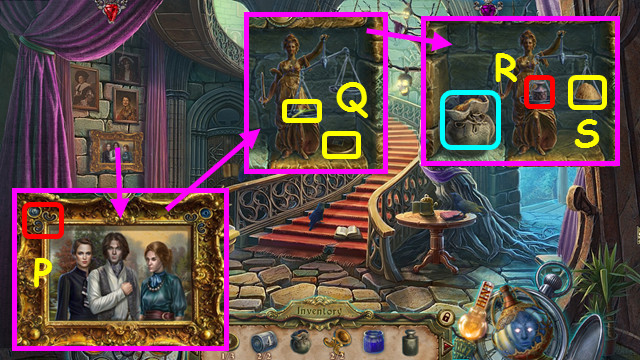
- Place the 2 FRAME FRAGMENTS on the frame (P).
- Take the 1/3 SYMBOL and the 2/3 STONE COIN (Q).
- Place the POUCH WITH SAND on the left and the WEIGHT on the scale (R).
- Select the pouch 3 times, and then take the MEASURED SAND (S).
- Walk down and right.
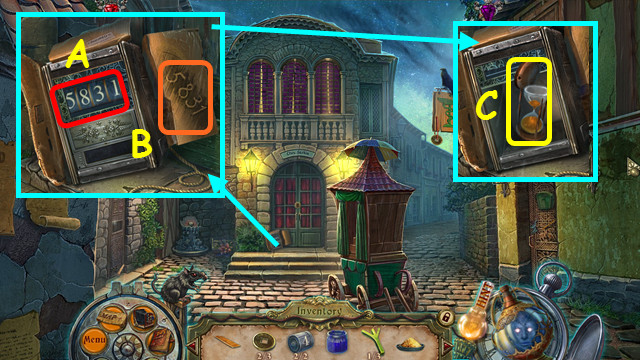
- Place the 2 BUTTONS in the device (A).
- Turn the buttons to match the code (B).
- Open the hourglass and fill it with the MEASURED SAND; close and take the HOURGLASS (C).
- Return to the Clockmaker's Shop.
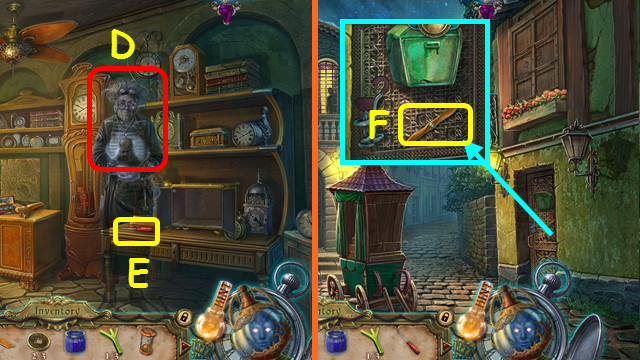
- Give the HOURGLASS to the ghost (D).
- Take the SCREWDRIVER (E).
- Walk down twice.
- Use the SCREWDRIVER to take the PROPELLER (F).
- Return to the Clockmaker's Shop and select the toy plane mini-game.
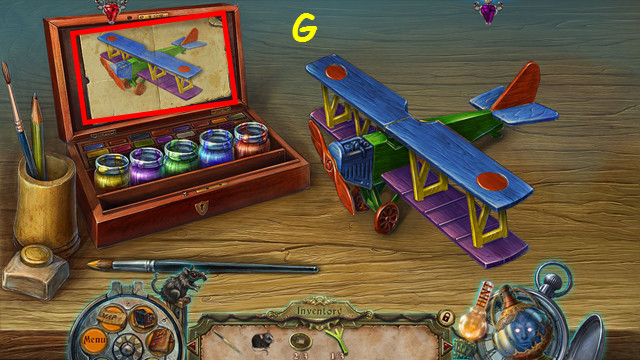
- Place the PAINT, the TOY PLANE WING, and the PROPELLER on the table.
- Assemble the plane and use the brush to paint it to match the picture (G).
- Take the TOY PLANE.
- Note that a toy ship mini-game is now in place.
- Exit the close-up and walk down twice.
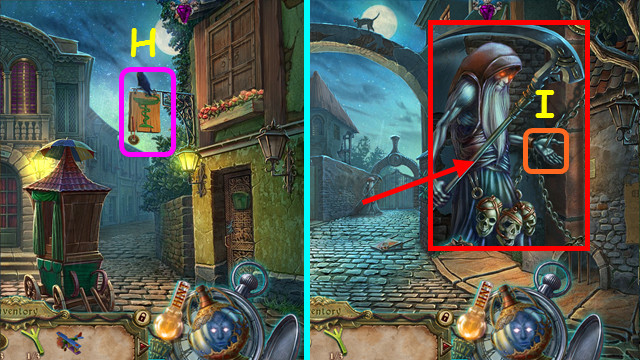
- Use the TOY PLANE on the sign to earn the 3/3 STONE COIN (H).
- Walk forward.
- Give the three STONE COINS to the gatekeeper (I).
- Walk forward to the Cemetery.
Chapter 4: The Cemetery
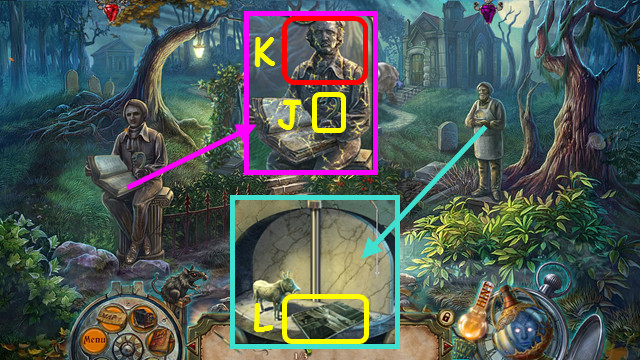
- Take the SNAKE FRAGMENT (J).
- Use the REBORN ONE on the statue (K).
- Take the PHOTOGRAPH (L).
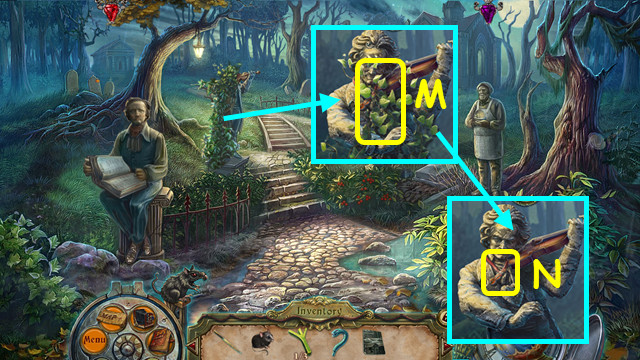
- Use the KNIFE to take the LONG IVY BRANCH (M).
- Take the VIOLIN MEDALLION (N).
- Go to the Clockmaker's Shop.
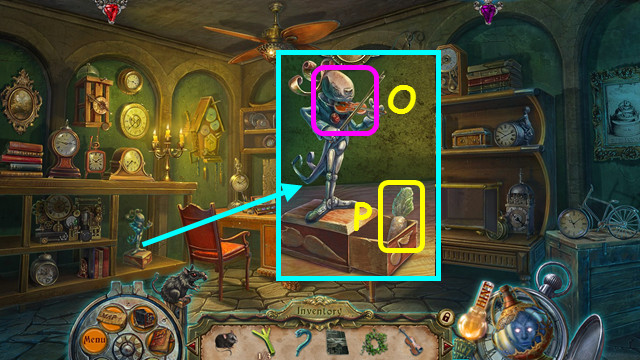
- Place the VIOLIN MEDALLION on the bunny (O).
- Take the STONE CARROT (P).
- Walk down twice and select the Puppet stand.
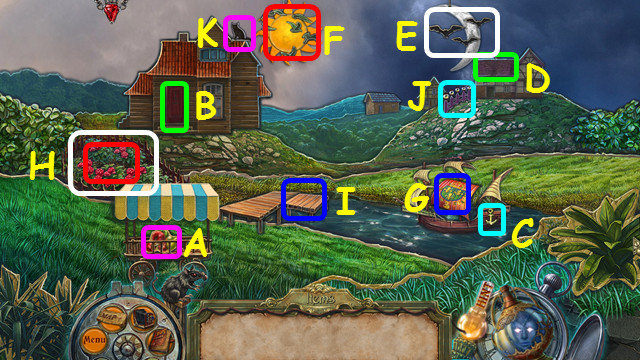
- Place the items in the following locations: FRUIT (A), DOOR (B), ANCHOR (C), ROOF (D), BATS (E), BIRDS (F), COAT OF ARMS (G), FLOWERBED and the FLOWERS (H), DOCK (I), FENCE (J), and CAT (K).
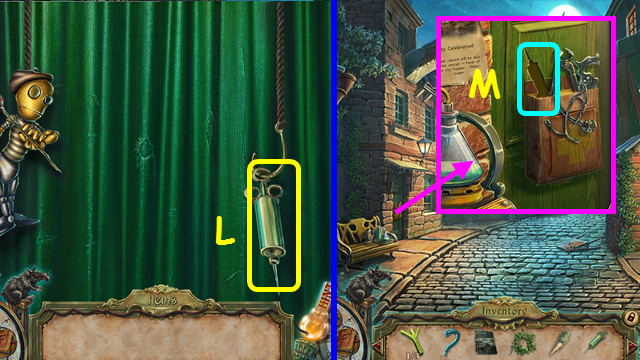
- Take the SYRINGE (L).
- Walk forward.
- Place the SYRINGE on the door (M), and then walk left.
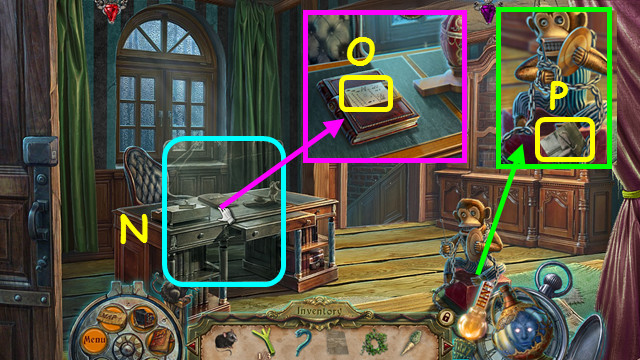
- Use the PHOTO on the scene (N).
- Take the PERFORATED CARD (O).
- Take the PHOTOGRAPH (P).
- Walk forward.
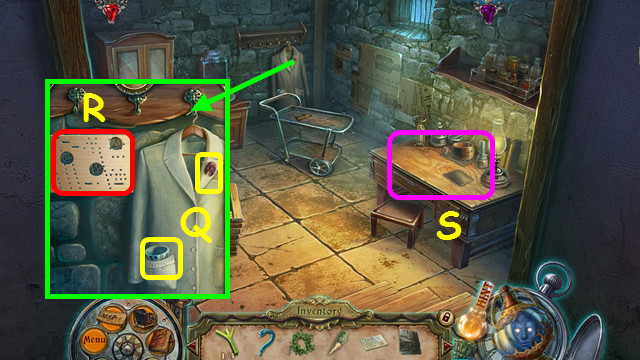
- Take the RED MASK and the BOWL (Q).
- Use the PERFORATED CARD on the tablet (R).
- Note the lab table (S).
- Walk down twice, and then go forward.
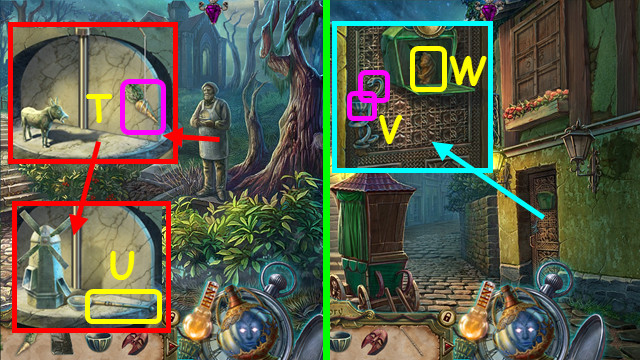
- Hang the STONE CARROT on the string (T).
- Take the 1st TOY SHIP'S MAST (U).
- Walk down twice.
- Place the SNAKE FRAGMENT and the BOWL on the handle (V).
- Take the SMALL BEAR (W).
- Walk forward and left.
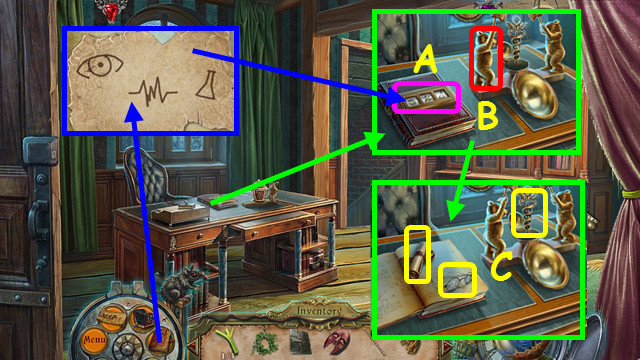
- Turn the dials to match the code (A).
- Place the SMALL BEAR next to the egg (B).
- Take the SCROLL, the GLASSES, and the CADUCEUS (C).
- Walk down twice.
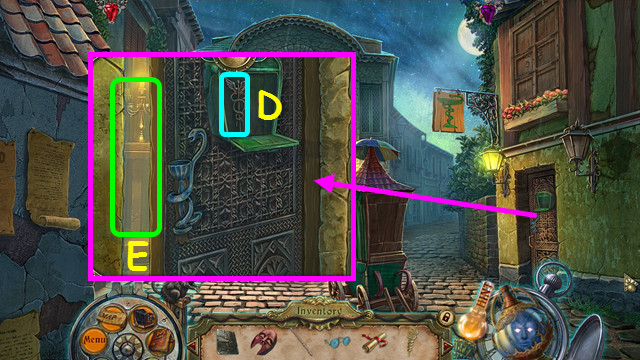
- Place the CADUCEUS on the door (D).
- Enter the Pharmacy (E).
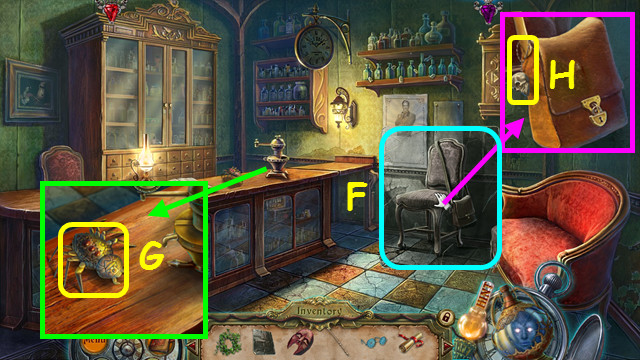
- Use the PHOTO on the scene (F).
- Take the MECHANICAL SPIDER (G).
- Take the SKULL PENDANT (H).
- Return to the Basement.
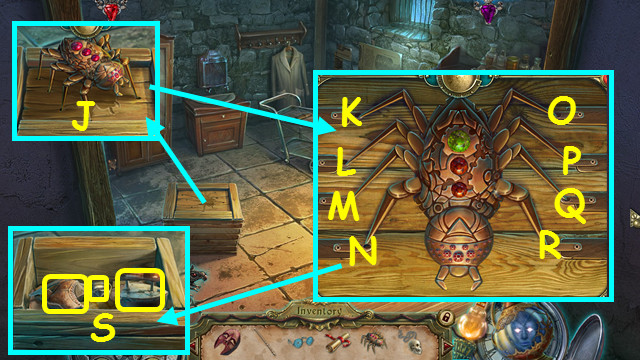
- Place the MECHANICAL SPIDER on the crate, and then select the spider (J).
- Watch and repeat the sequence the legs make; there are 3 random sequences to complete.
- Our sequences were (L, P, R), (P, R, L, N), and (P, R, M, L, K, N).
- Remove the top layer of items; take the PHARMACIST'S RING, the SKATE, and the IRON (S).
- Return to the Pharmacy.
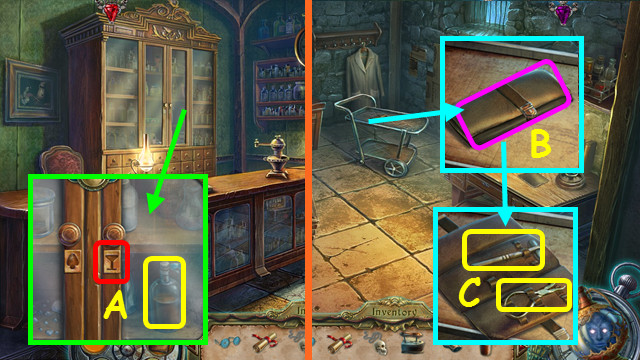
- Use the PHARMACIST'S RING on the right door; take the CASTOR OIL (A).
- Return to the Basement.
- Use the CASTOR OIL on the wallet (B).
- Take the REFLEX HAMMER and the MEDICAL NIPPERS (C).
- Walk down.
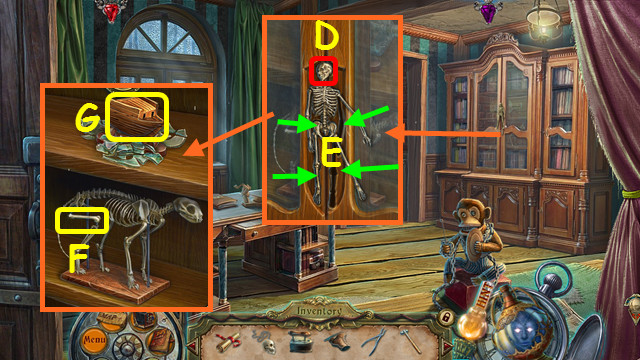
- Place the SKULL PENDANT on the door (D).
- Move the arms and legs into the indentations (E).
- Use the MEDICAL NIPPERS to take the BONE (F).
- Use the REFLEX HAMMER on the bottle; take the TOY SHIP'S HULL (G).
- Walk down and forward.
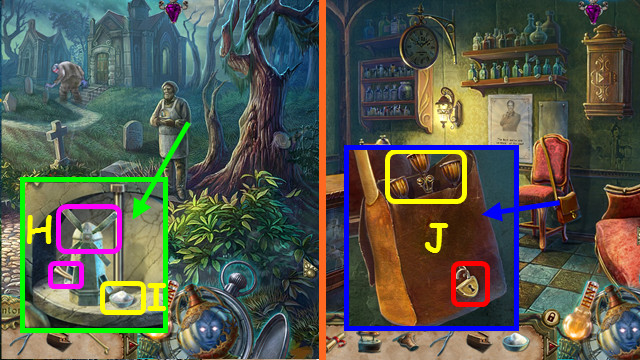
- Place the BONE in the mill and turn the blades (H).
- Take the BONE FLOUR (I).
- Return to the Pharmacy.
- Use the NIPPERS on the lock; take the CANDELABRA (J).
- Walk down.
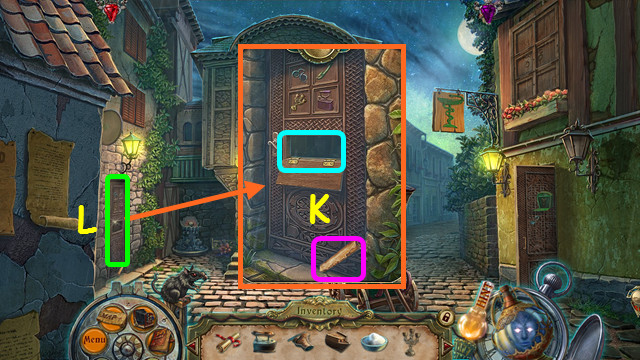
- Read the note and open the panel; place the GLASSES, the IRON, the SKATE, and the CANDELABRA in the opening (K).
- Walk left into the Tailor's (L).
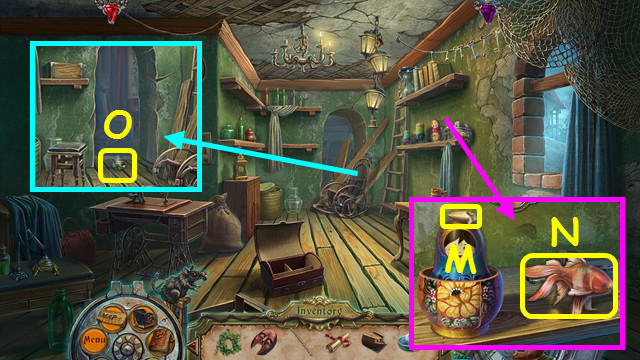
- Open the doll and take the BURNED-OUT CANDLE (M).
- Use the REBORN ONE on the fish; take the GOURAMI FISH (N).
- Move the debris from the door and take the RING WITH A SYMBOL (O).
- Walk forward.
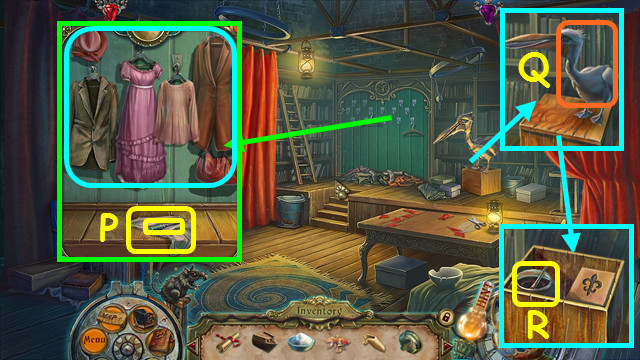
- Hang up the clothes; take the CHISEL and the WHITE CLOTH (P).
- Use the REBORN ONE on the pelican; give him the GOURAMI FISH (Q).
- Open the box and take the JAR OF TAR (R).
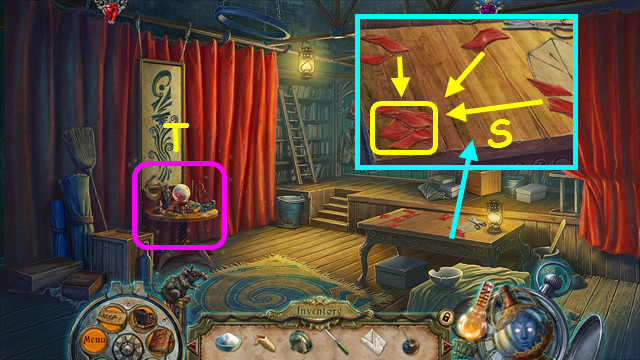
- Collect all the pieces; take the RAGS (S).
- Select the table (T).
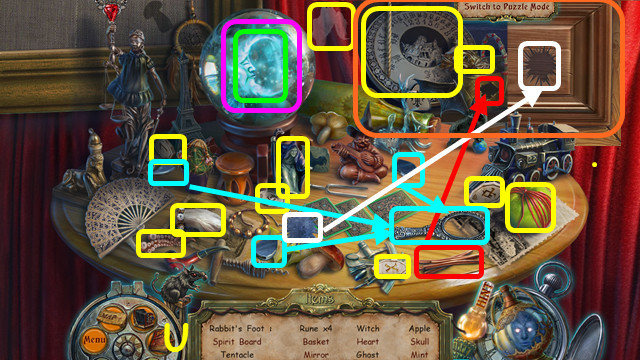
- Play the HOP to earn the BASKET (U).
- Walk down.
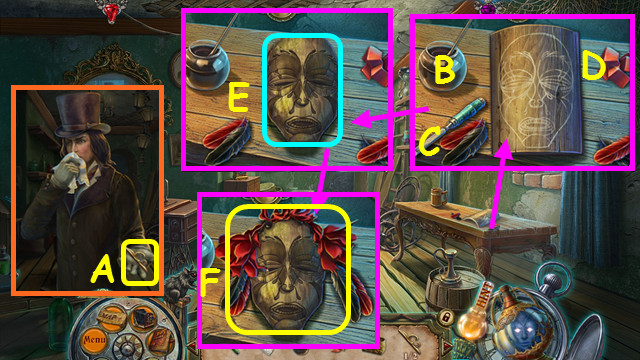
- Take the 1/2 LILY (A).
- Place the JAR OF TAR (B), the CHISEL (C), and the RAGS on the table (D).
- Use the chisel on the wood (E).
- Use the tar on the wood, followed by the rags and the feathers; take the MASK and the PHOTOGRAPH underneath (F).
- Walk down.
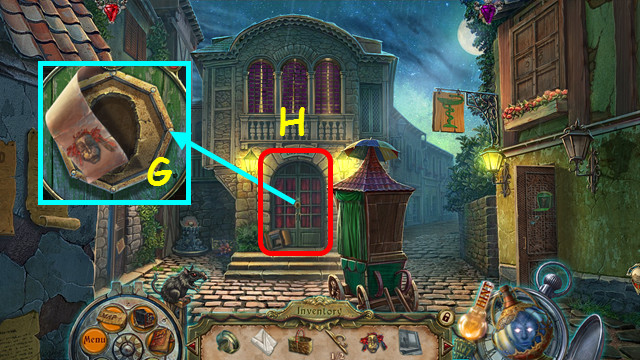
- Place the MASK on the lock (G).
- Enter the Museum (H).
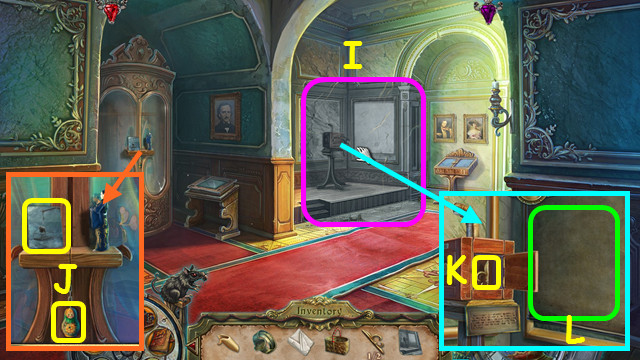
- Use the PHOTOGRAPH on the scene (I).
- Take the PHOTOGRAPH and the MATRYOSHKA DOLL (J).
- Open the camera and take the 2/2 LILY (K).
- Hang the WHITE CLOTH on the wall (L).
- Return to the Pharmacy.
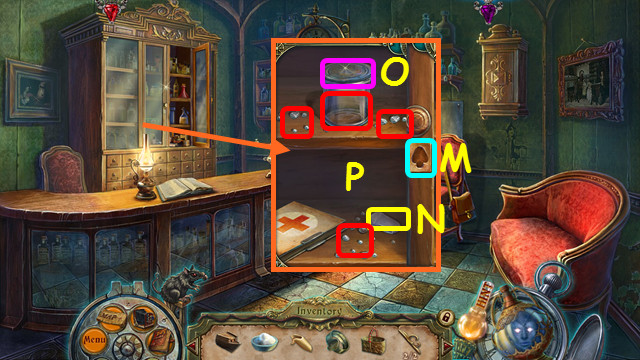
- Use the RING WITH A SYMBOL on the left door (M).
- Take the CHALK (N).
- Remove the jar lid (O).
- Collect the 3 sets of grains (red), take the JAR OF SALT (P).
- Walk down and left.
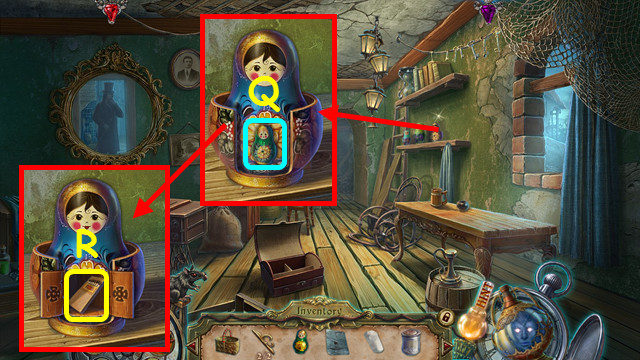
- Open the bottom of the doll; place the MATRYOSHKA DOLL inside (Q).
- Take the MATCHES (R).
- Walk forward.
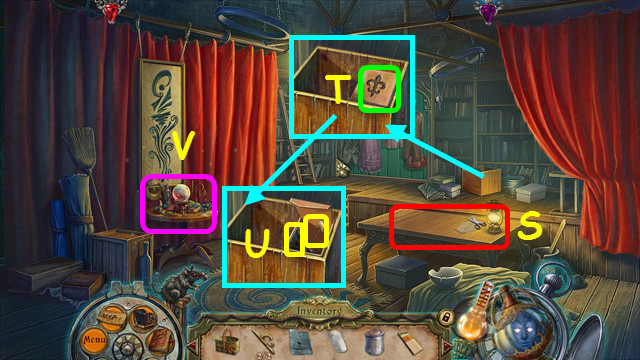
- Note the sewing table (S).
- Place the 2 LILY pieces on the box and open it (T).
- Take the SLIDES WITH IMAGES and the 2nd TOY SHIP MAST (U).
- Select the table (V).
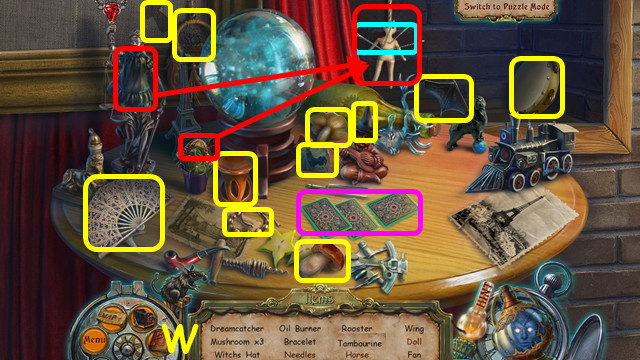
- Play the HOP to earn the NEEDLE (W).
- Walk down twice and enter the Museum.
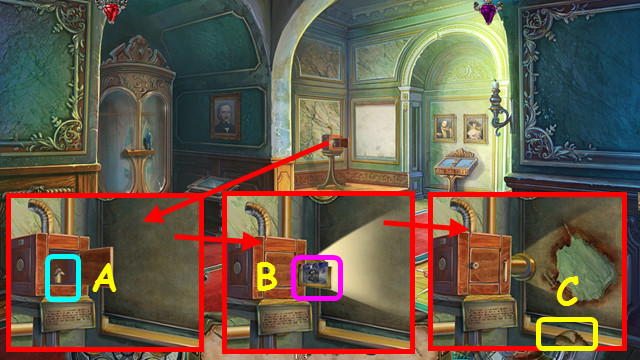
- Use the BURNED OUT CANDLE and the MATCHES in the projector (A).
- Place the SLIDES WITH IMAGES in the frame and push it inside (B).
- Take the TOY SHIP'S SAIL (C).
- Travel to the Clockmaker's and select the mini-game on the table.
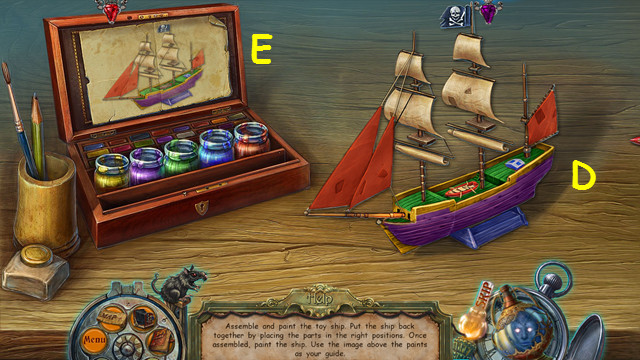
- Place the 1st TOY SHIP'S MAST, the TOY SHIP'S HULL, the 2nd TOY SHIP'S MAST, and the TOY SHIP'S SAIL on the table.
- Restore the ship (D) using the parts and paints to match the picture (E).
- Take the TOY SHIP.
- Walk down and forward.
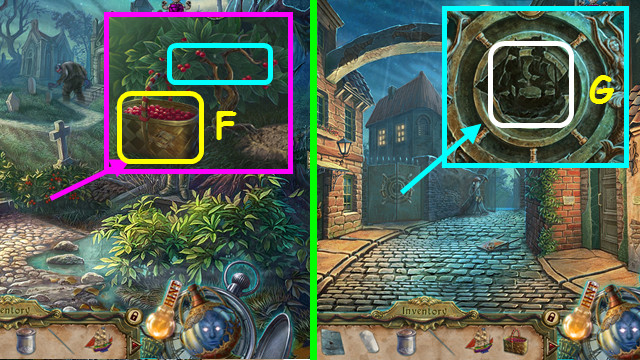
- Place the BASKET under the bush; select the berries, and then take the basket to get the SPICE BERRIES (F).
- Walk down.
- Place the TOY SHIP in the gate lock (G).
- Walk through the gate.
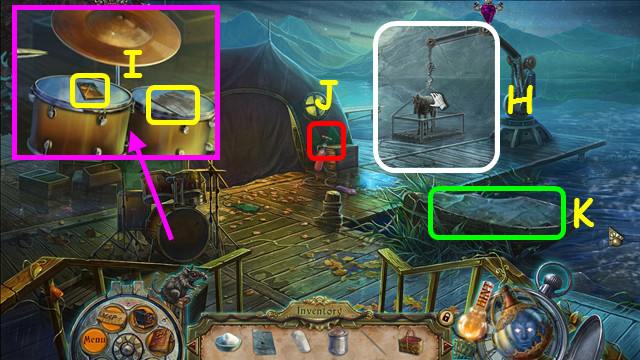
- Use the PHOTOGRAPH on the scene (H).
- Take the PUZZLE PIECE and the PHOTOGRAPH (I).
- Turn on the air pump (J).
- Select the boat (K).
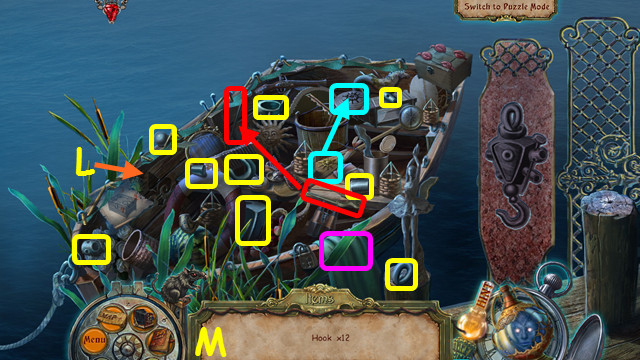
- Use the KNIFE to remove the tarp (L).
- Play the HOP to earn the HOOK (M).
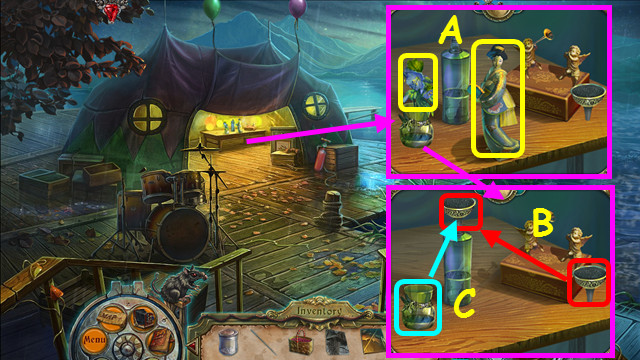
- Take the GREEK VALERIAN and the GEISHA STATUETTE (A).
- Place the funnel on the bottle (B).
- Pour the glass into the bottle to earn the GLASS (C).
- Walk down and left.
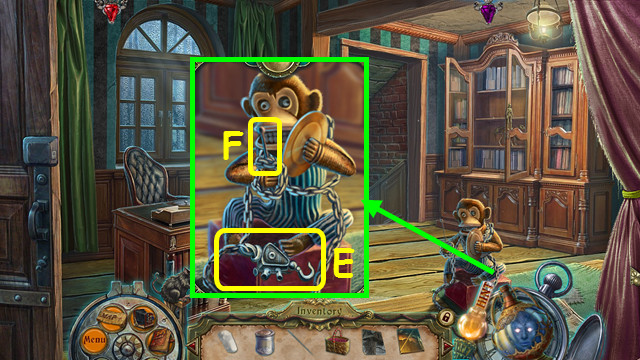
- Use the HOOK on the chain; take the HOOK WITH CHAIN (E).
- Take the DRUMSTICK (F).
- Walk down and go left through the gate.
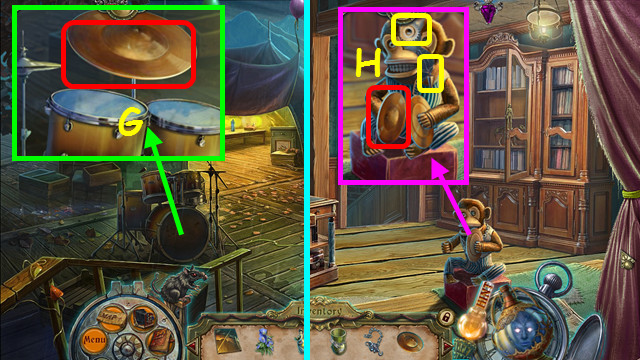
- Use the DRUMSTICK to take the CYMBAL (G).
- Walk down and left.
- Use the CYMBAL on the monkey; take the GEAR and the PENDULUM (H).
- Return to the Pier.
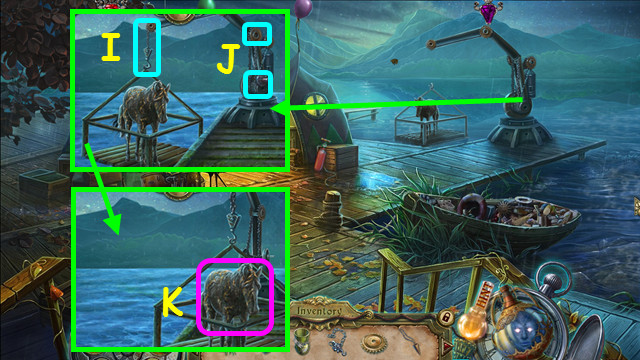
- Place the HOOK WITH CHAIN on the winch arm (I).
- Use the GEAR on the winch; select the winch (J).
- Use the REBORN ONE on the pony (K).
- Return to the Pharmacy.
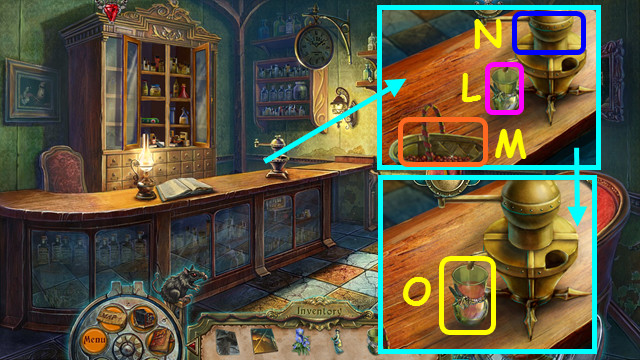
- Place the GLASS under the spigot (L).
- Place the SPICE BERRIES on the table; select the berries 3 times (M).
- Select the device to squeeze the berries (N).
- Take the SPICE BERRY JUICE (O).
- Walk down and enter the museum.
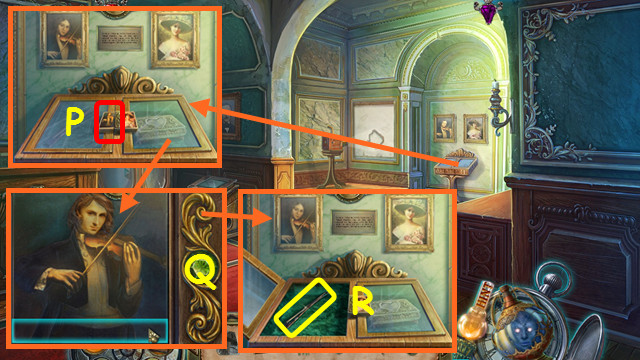
- Select the left latch (P).
- Use the PUZZLE PIECE on the portrait; drag the strips horizontally and vertically to restore the portrait (Q).
- Take the FIDDLESTICK (R).
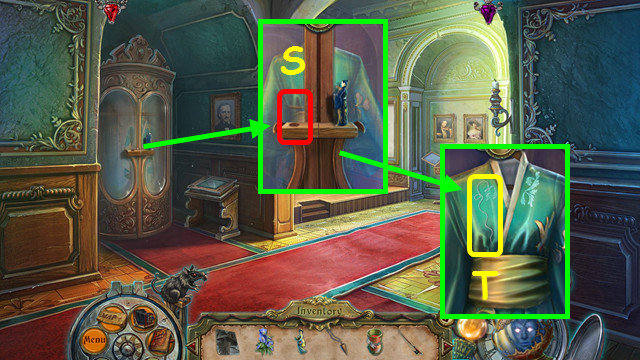
- Place the GEISHA STATUETTE on the handle (S).
- Take the SILVER THREAD (T).
- Travel to the Cemetery.
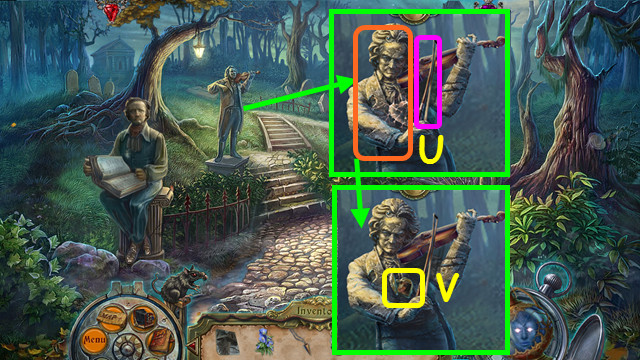
- Use the FIDDLESTICK, and then the REBORN ONE on the statue (U).
- Open the medallion; take the PUZZLE PIECE and the HEART-SHAPED MEDALLION (V).
- Return to the Museum.
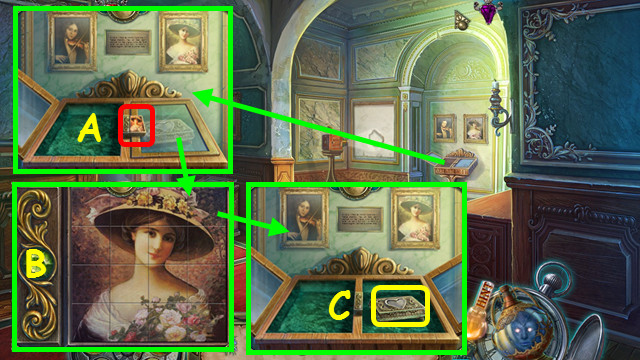
- Select the right handle (A).
- Use the PUZZLE PIECE on the painting; swap the pieces to restore the painting (B).
- Place the HEART-SHAPED MEDALLION on the box and take the COMB (C).
- Return to the pier.
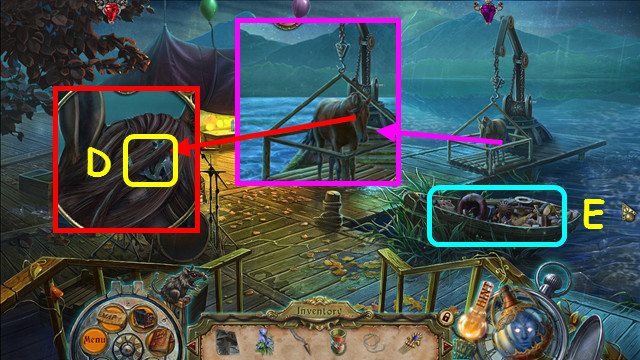
- Use the COMB to take the BLACK CAT (D).
- Select the boat (E).
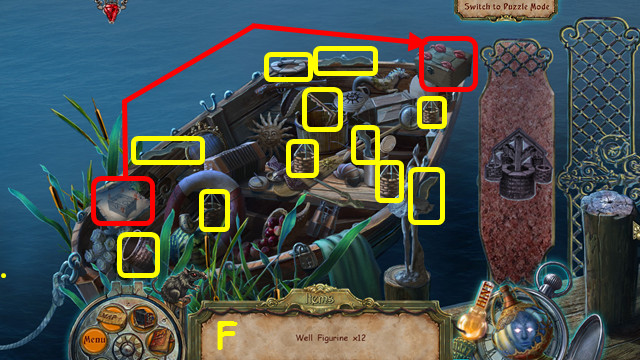
- Play the HOP to earn the WELL FIGURINE (F).
- Return to the Museum.
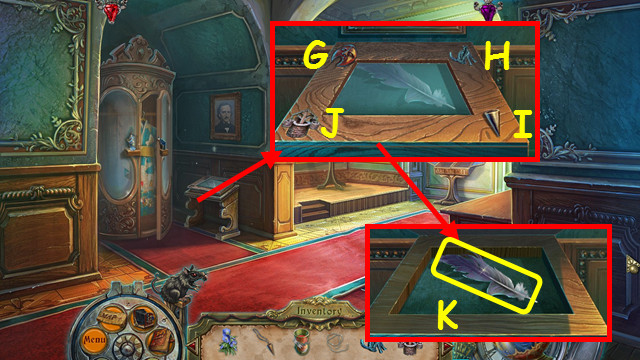
- Place the RED MASK (G), the BLACK CAT (H), the PENDULUM (I), and the WELL FIGURINE (J) on the frame.
- Take POE'S FEATHER (K).
- Travel to the Cemetery.
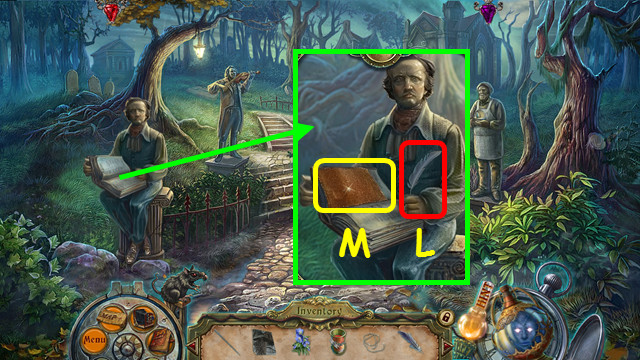
- Place the POE'S FEATHER on the statue (L).
- Take the LEATHER (M).
- Walk down twice, go left, and go forward.
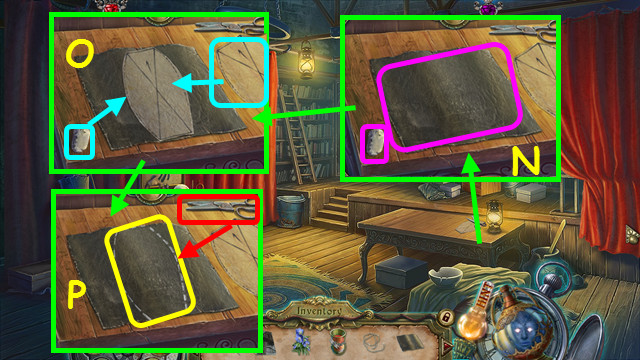
- Place the CHALK and the LEATHER on the table (N).
- Place the pattern on the leather, and then use the chalk on the pattern (O).
- Use the scissors on the leather; take the CUTOUT POUCH (P).
- Walk down and select the sewing machine.
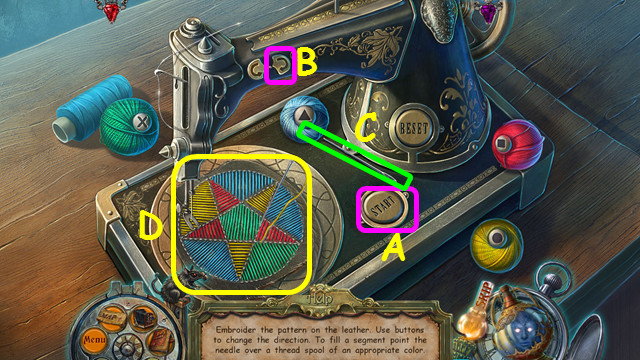
- Place the NEEDLE, the SILVER THREAD, and the CUTOUT POUCH on the machine.
- Solution: A, Bx2, A, Bx2, A, Bx2, A, Bx2, A, Bx3, A, Bx4, A, Bx4, A, Bx4, A, Bx4, and A.
- Use the needle (C) on the spools and then the cloth to embroider the colors (D).
- Take the LEATHER POUCH.
- Return to the Basement and select the table on the right.
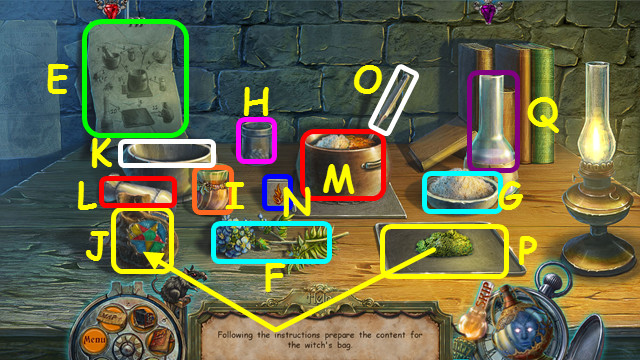
- Place the SCROLL (E), GREEK VALERIAN (F), BONE FLOUR (G), JAR OF SALT (H), SPICE BERRY JUICE (I), and LEATHER POUCH (J) on the table.
- Read the SCROLL.
- Place the Greek valerian, and then the spice berry juice in the mortar (K); use the pestle (L) in the mortar.
- Pour the mortar and the bone flour into the pot (M).
- Turn on the flame (N), and stir the pot (O).
- Use the jar of salt on the pot.
- Pour the pot into the pan (P).
- Use the bottle (Q) on the pan.
- Place the mixture from the pan into the pouch; take the WITCH'S POUCH.
- Return to the Graveyard.
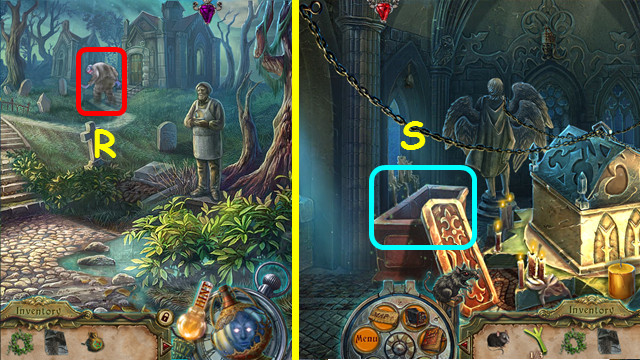
- Use the WITCH'S POUCH on the ghost (R).
- Walk forward; select the open casket (S).
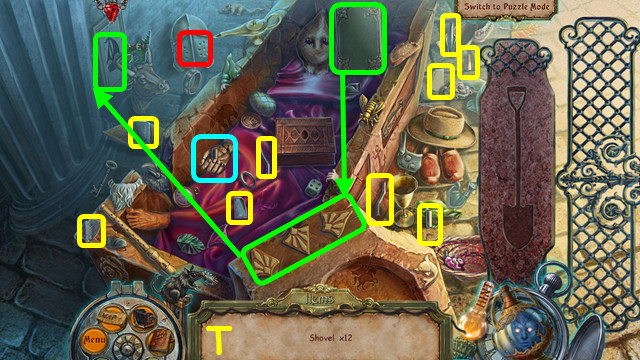
- Play the HOP to earn the SHOVEL (T).
- Walk down.
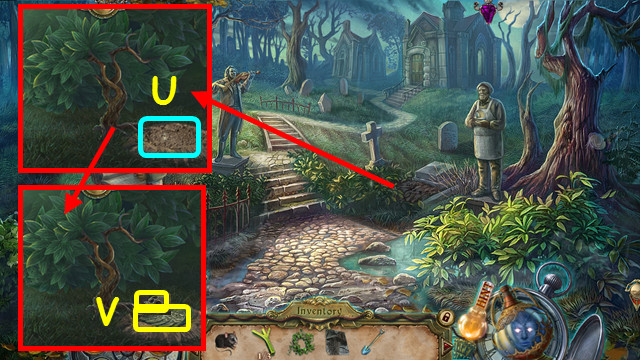
- Use the SHOVEL on the dirt (U).
- Take the SERAPH'S WING and the SKULL (V).
- Walk forward.
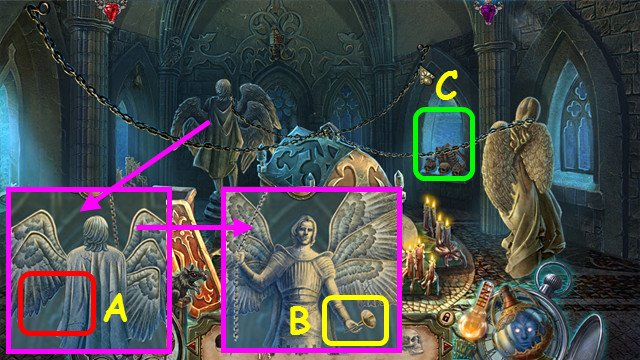
- Place the SERAPH'S WING on the statue (A).
- Take the HORN (B).
- Select the window (C).
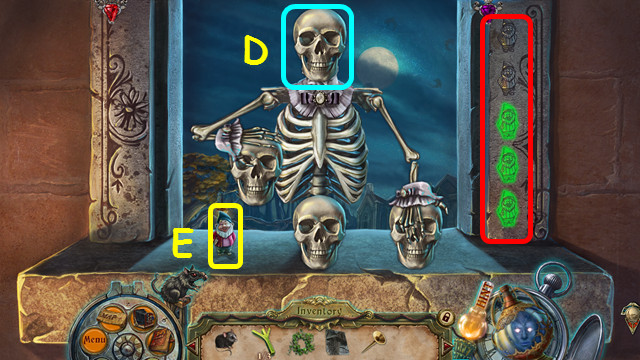
- Place the SKULL on the skeleton (D).
- Find the gnome once the movement stops.
- Win 3 times, and then take the 1/4 GARDEN GNOME (E).
- Return to the Pier.
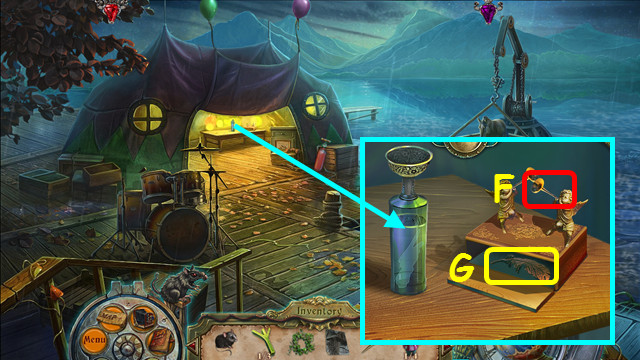
- Place the HORN on the angel (F).
- Take the ANGEL'S FEATHER (G).
- Return to the Crypt.
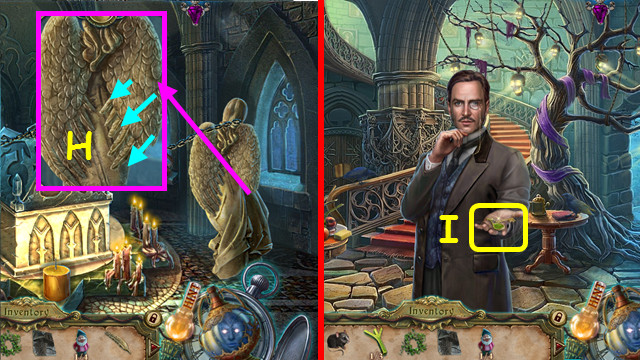
- Place the ANGEL'S FEATHER on the statue and pull the feathers out to the correct length (H).
- Take the KEY (I).
- Travel to the Basement.
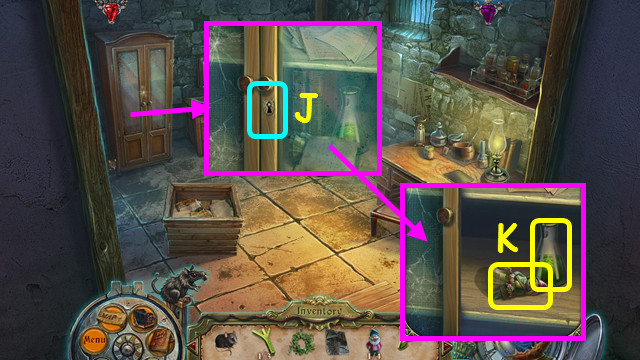
- Use the KEY in the lock (J).
- Move the cloth; take the 2/4 GARDEN GNOME and the POTION (K).
- Return to the Crypt and select the open casket.
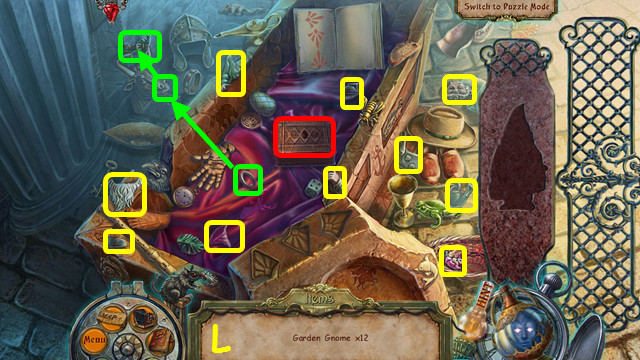
- Play the HOP to earn the 3/4 GARDEN GNOME (L).
- Walk down 4 times and enter the House.
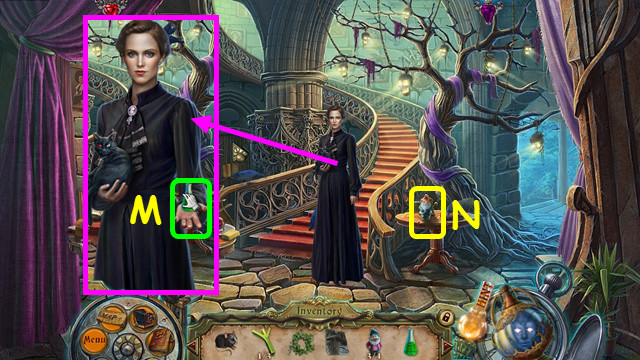
- Talk to Estelle and give her the POTION (M).
- Take the 4/4 GARDEN GNOME (N).
- Walk down.
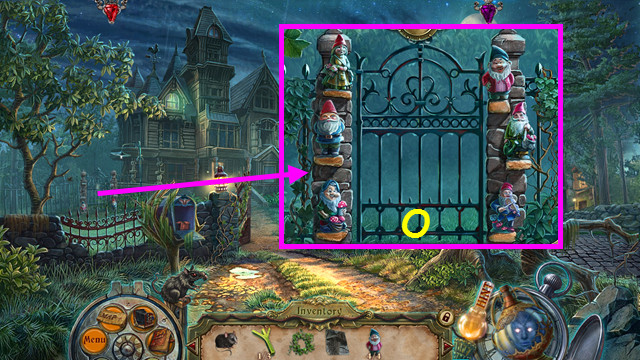
- Place the 4 GARDEN GNOMES on the gate (O).
- Enter the gate.
Chapter 5: The Treehouse
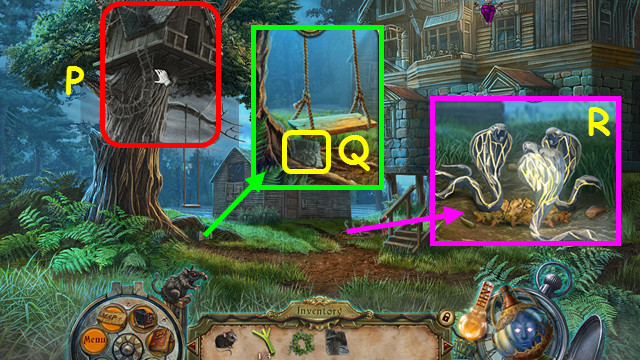
- Use the PHOTOGRAPH on the scene (P).
- Take the PHOTOGRAPH (Q).
- Use the REBORN ONE on the snakes (R).
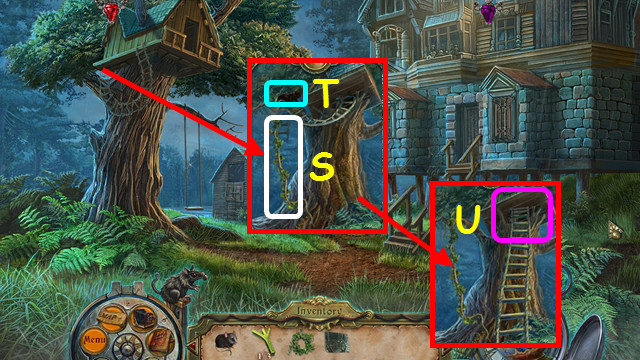
- Use the LONG IVY BRANCH on the ladder (S).
- Use the TRAINED MOUSE on the cat (T).
- Go up the ladder (U).
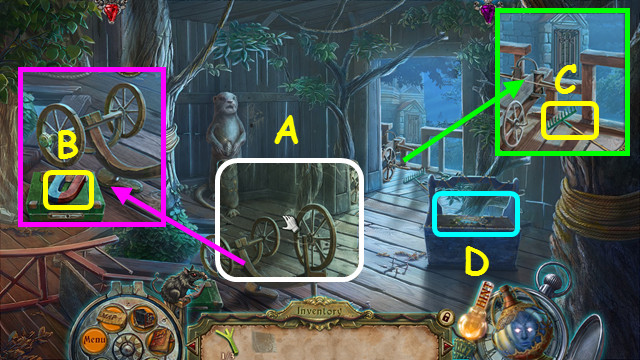
- Place the PHOTOGRAPH on the scene (A).
- Take the MAGNET (B).
- Take the TOY RAKE (C).
- Note the mini-game (D).
- Walk down.
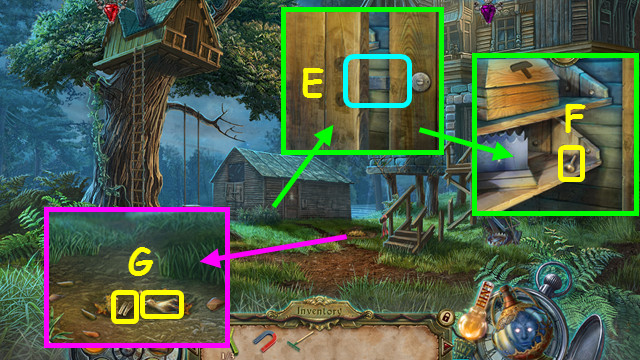
- Use the MAGNET on the latch (E).
- Take the LATCH KNOB (F).
- Use the TOY RAKE on the leaves; take the BEAVER TEETH and the DOG FIGURINE (G).
- Go to the Treehouse.
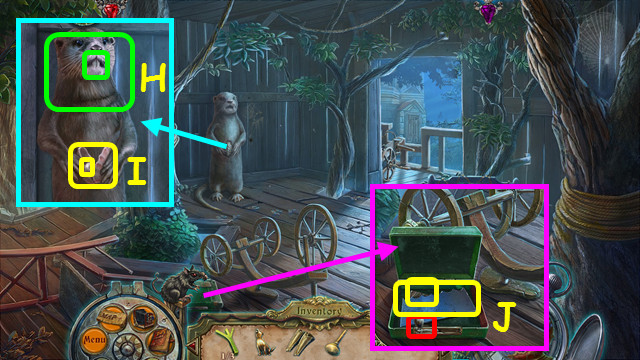
- Place the BEAVER TEETH on the beaver; use the REBORN ONE on the beaver (H).
- Take the PEARL and the CRACKED SHELL (I).
- Use the LATCH KNOB on the box; take the METAL WAVE and the PHOTOGRAPH (J).
- Select the mini-game.
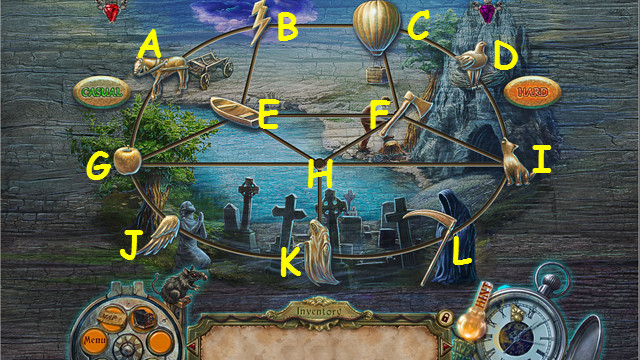
- Place the DOG FIGURINE on the grid.
- Move the pieces to the correct location.
- Solution: I, D, C, B, A, G, J, K, H, I, D, C, B, A, G, J, K, H, F, C, B, A, G, J, K, H, F, I, L, K, H, F, C, B, A, G, J, K, H, I, L, K, J, G, E, H, I, F, E, and H.
- This solution works for both difficulties.
- Select the open chest.
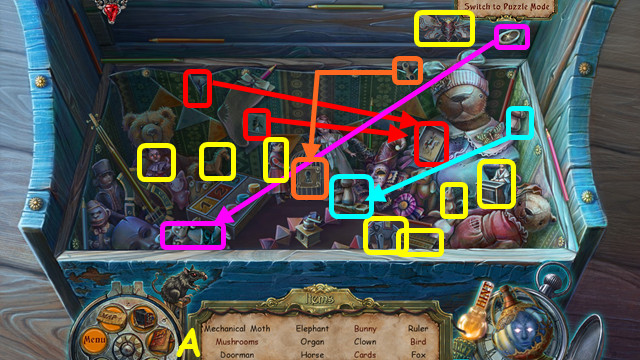
- Play the HOP to earn the RULER (A).
- Walk down.
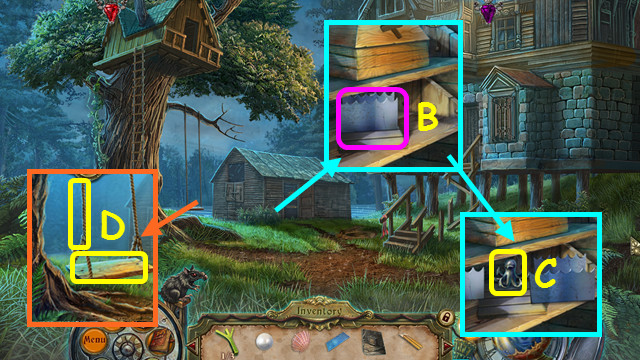
- Place the METAL WAVE on the stand (B).
- Take the METAL OCTOPUS (C).
- Use the CRACKED SHELL on the swing; take the PLANK and the ROPE (D).
- Go up to the Treehouse.
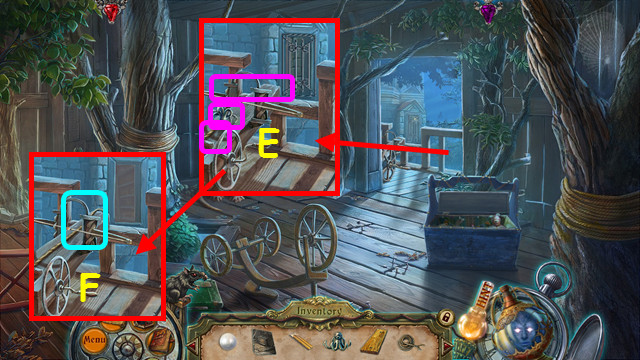
- Place the ROPE and the METAL OCTOPUS on the crossbow (E).
- Pull the bowstring back to fire at the window.
- Pull the rope back up and fire again (F).
- Walk down.
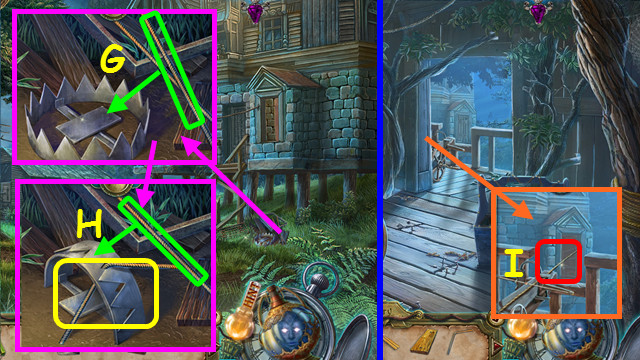
- Use the 1st pole on the trap (G).
- Use the 2nd pole to open the trap; take the BENT STEEL BAR (H).
- Return to the Treehouse.
- Use the BENT STEEL BAR on the rope (I).
- Go right.
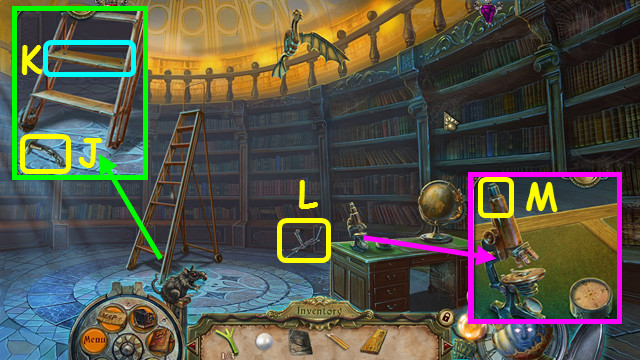
- Take the CHAINED HAMMER (J).
- Place the PLANK on the ladder (K).
- Take the UMBRELLA RIBS (L).
- Take the EYEPIECE (M).
- Walk down twice.
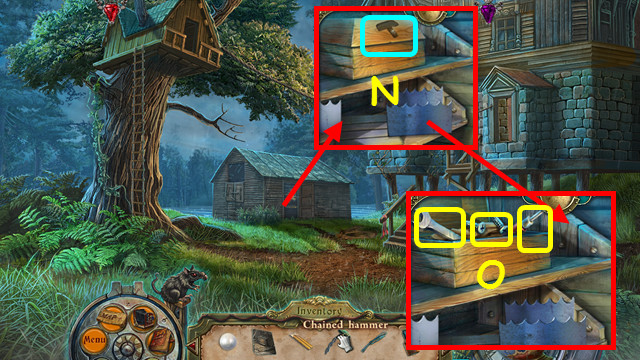
- Place the CHAINED HAMMER on the box (N).
- Take the SCREWS, the WRENCH, and the PHILLIPS SCREWDRIVER (O).
- Enter the Treehouse.
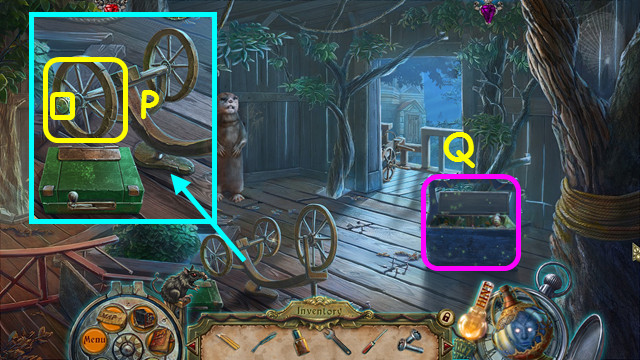
- Use the WRENCH to take the BOLT and the TRICYCLE WHEEL (P).
- Select the crate (Q).
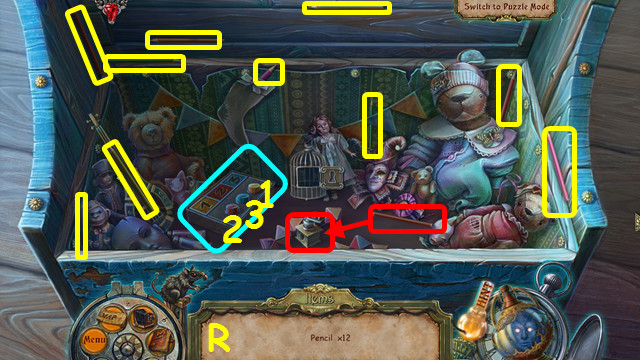
- Play the HOP to earn the PENCIL (R).
- Walk right.
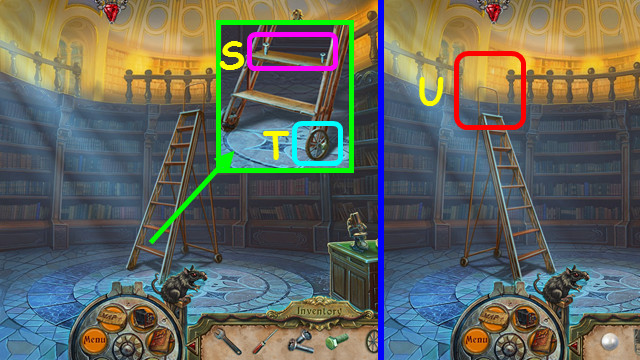
- Place the SCREWS on the step, and then use the PHILLIPS SCREWDRIVER on each screw (S).
- Place the TRICYCLE WHEEL and the BOLT on the foot; use the WRENCH on the bolt (T).
- Push the ladder twice and go forward (U).
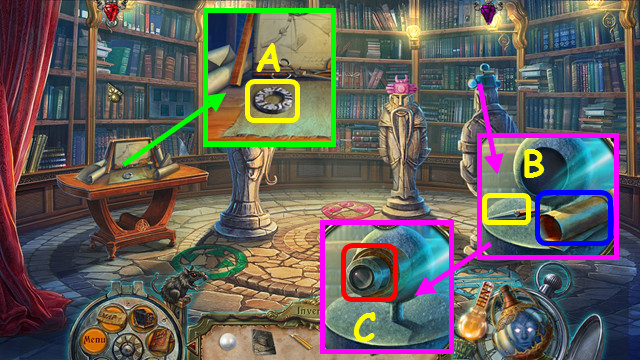
- Take the 1/3 ROUND LOCK (A).
- Read the list and take the COMPASS NEEDLE (B).
- Place the EYEPIECE in the hole (C).
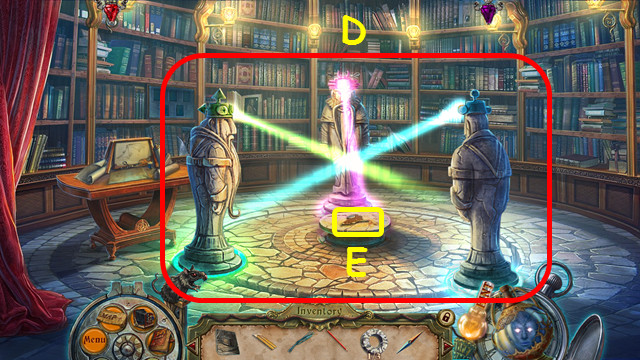
- Move the three statues onto the colored circles (D).
- Take the MAP FRAGMENT (E).
- Walk down.
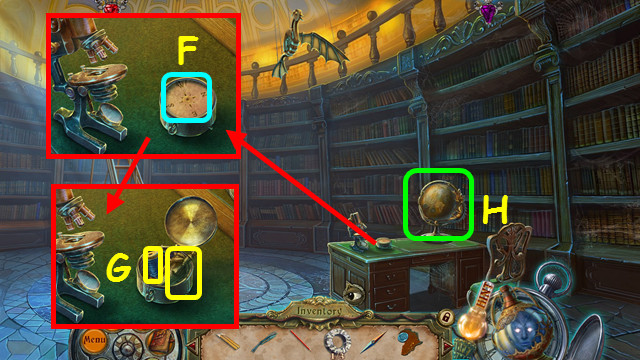
- Place the COMPASS NEEDLE on the compass (F).
- Take the THREAD and the STRAW PUPPET (G).
- Select the globe (H).
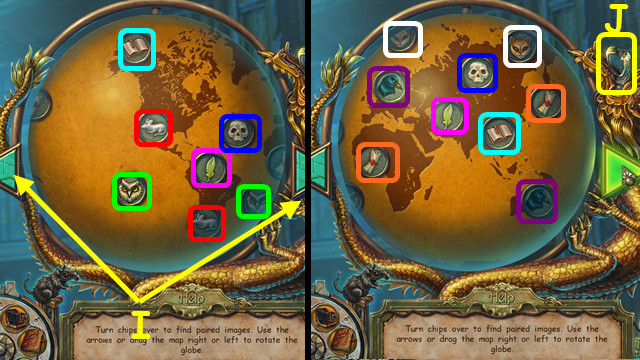
- Place the MAP FRAGMENT on the globe.
- Turn over the chips to find matching pairs (color-coded).
- Use the arrows to turn the globe (I).
- Take the SILVER STAMP (J).
- Go forward.
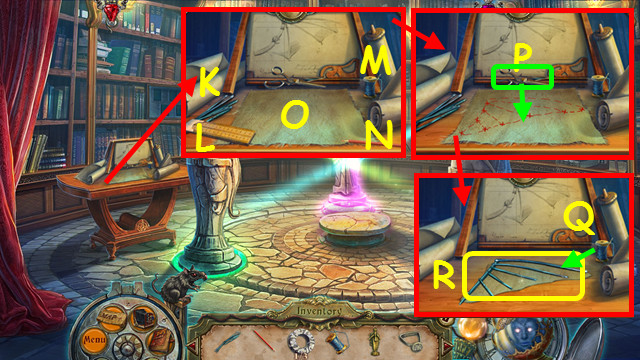
- Place the UMBRELLA RIBS (K), the RULER (L), the THREAD (M), and the PENCIL (N) on the table.
- Place the ruler on the cloth, and then use the pencil on the cloth (O).
- Use the scissors (P) on the cloth.
- Place the umbrella ribs on the cloth, and then use the thread on the ribs (Q).
- Take the WING (R).
- Walk down.
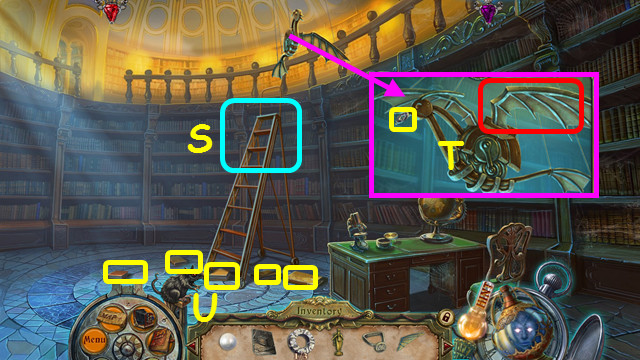
- Move the ladder to the right (S).
- Place the WING on the bird; take the 2/3 ROUND LOCK (T).
- Take the 5 BOOKS (U).
- Move the ladder and go forward.
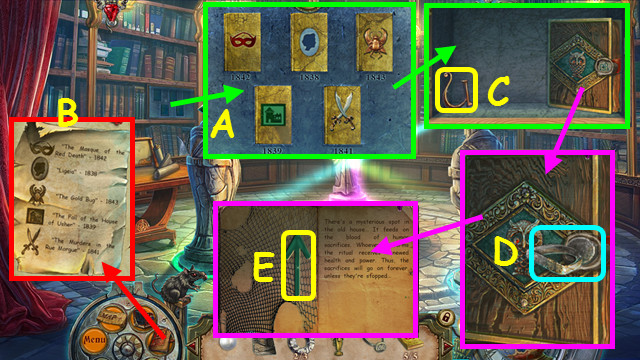
- Place the 5 BOOKS on the panel; drag the books to the correct year (A).
- Refer to your journal (B).
- Take the COAT OF ARMS (C).
- Use the SILVER STAMP on the seal (D).
- Take the 2/3 SYMBOL (E).
- Walk down 3 times.
- Walk down, enter the house, go up the stairs, and enter Madeline's Room.
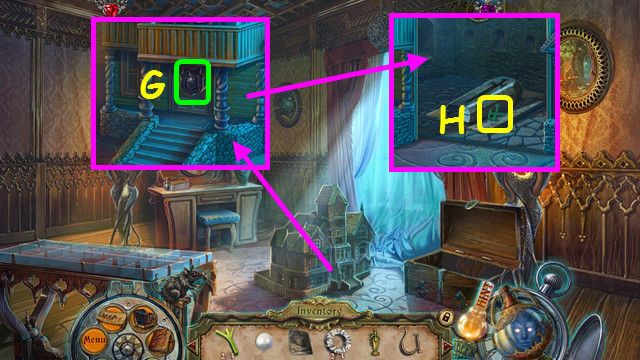
- Place the COAT OF ARMS on the door (G).
- Take the 3/3 SYMBOL (H).
- Walk down.
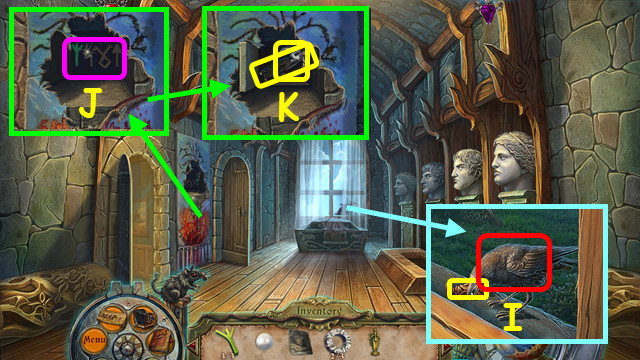
- Give the PEARL to the crow and take the WOODEN PUPPET (I).
- Place the 3 SYMBOLS on the panel (J).
- Take the RODERICK FIGURINE and the 3/3 ROUND LOCK (K).
- Enter Estelle's Room.
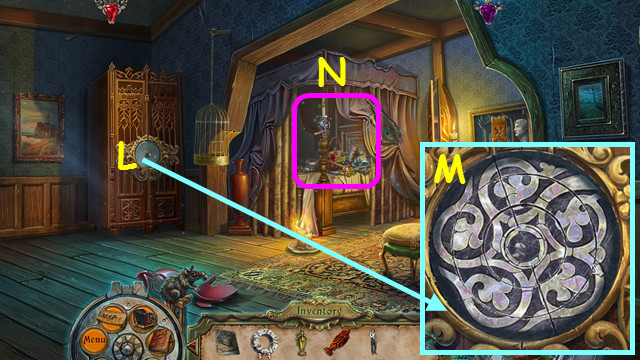
- Place the 3 ROUND LOCKS on the door (L).
- Turn the pieces to complete the pattern (M).
- Select the bed (N).
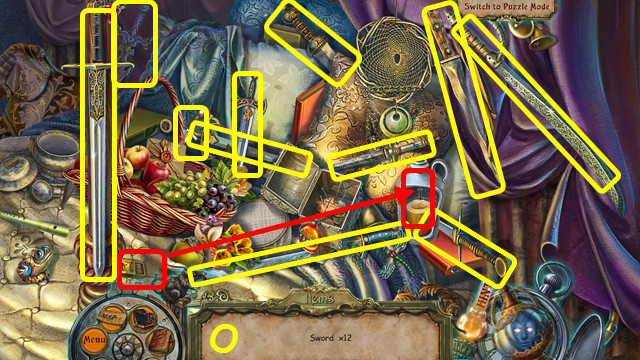
- Play the HOP to earn the PUPPET SWORD (O).
- Walk down and enter Madeline's Room.
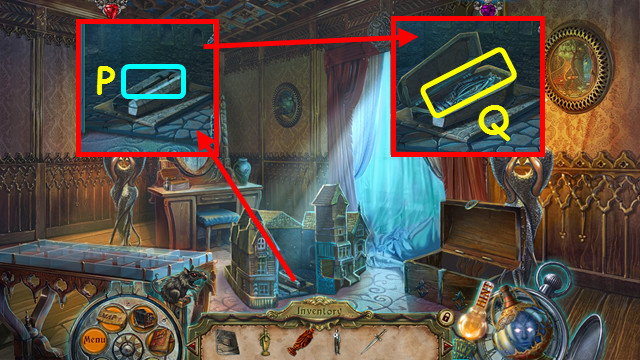
- Place the PUPPET SWORD on the coffin (P).
- Take the STONE PUPPET (Q).
- Go to Estelle's Room.
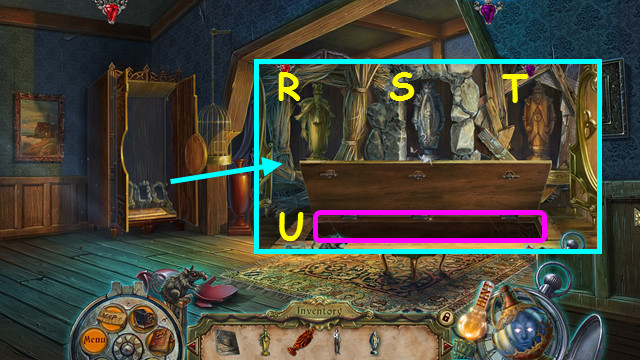
- Place the STRAW PUPPET (R), the STONE PUPPET (S), and the WOODEN PUPPET (T) into the frames.
- Enter the trapdoor (U).
Chapter 6: The Dungeons
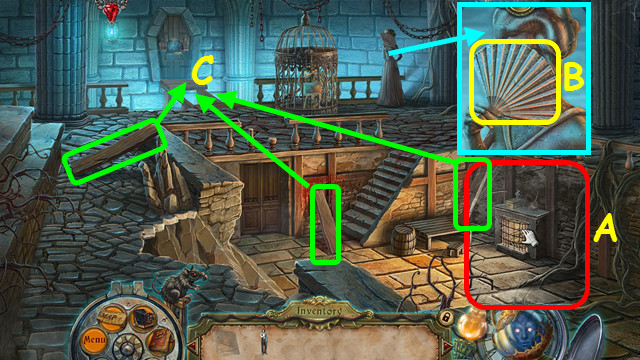
- Place the PHOTOGRAPH in the scene (A).
- Take the HAND FAN (B).
- Place the 3 planks on the bridge (C).
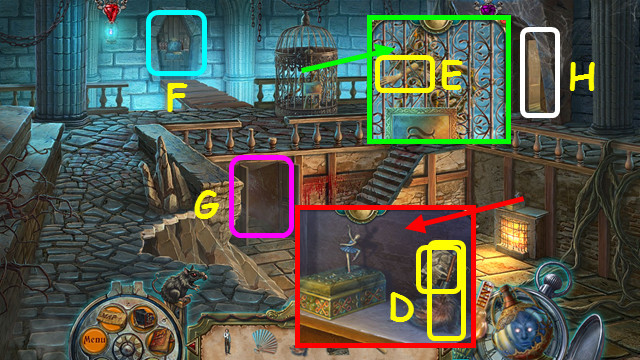
- Take the BRUSH and the PHOTOGRAPH (D).
- Take the MANNEQUIN HAND (E).
- Note the mini-game (F).
- Note the Dungeon door (G).
- Walk right to the Kitchen (H).
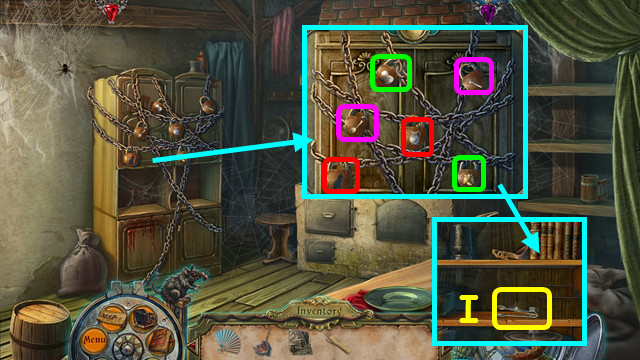
- Select pairs of locks (color-coded).
- Use the BRUSH on the cobwebs; take the SUGAR TONGS (I).
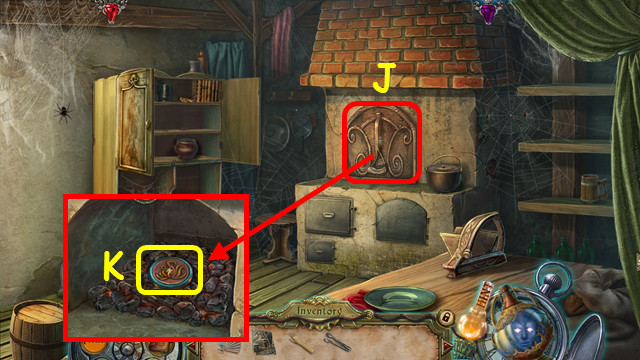
- Remove the cover (J).
- Take the FIRE RUNE (K).
- Walk down and enter the Dungeon.
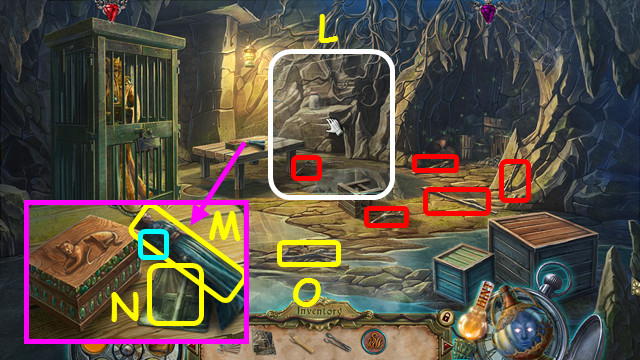
- Place the PHOTOGRAPH in the scene (L).
- Place the MANNEQUIN HAND on the figure; take the MADELEINE FIGURINE (M).
- Take the PHOTOGRAPH (N).
- Select the 5 sticks (red); take the BRUSHWOOD (O).
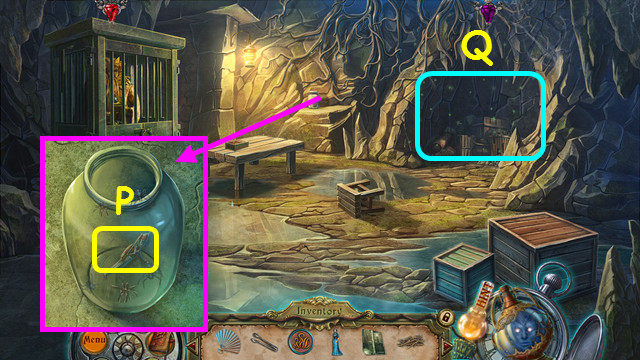
- Use the SUGAR TONGS to take the TIN SOLDIER (P).
- Select the cave (Q).
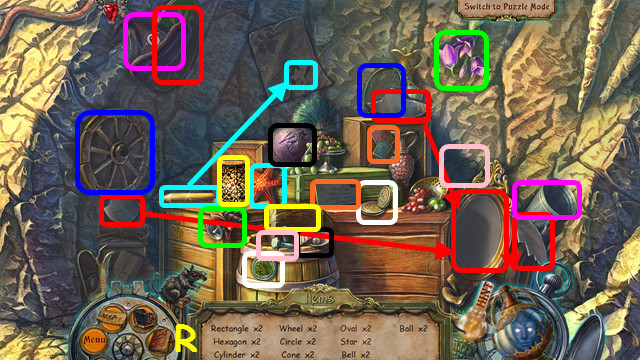
- Play the HOP to earn the EARTH RUNE (R).
- Select the pairs (color-coded).
- Walk down.
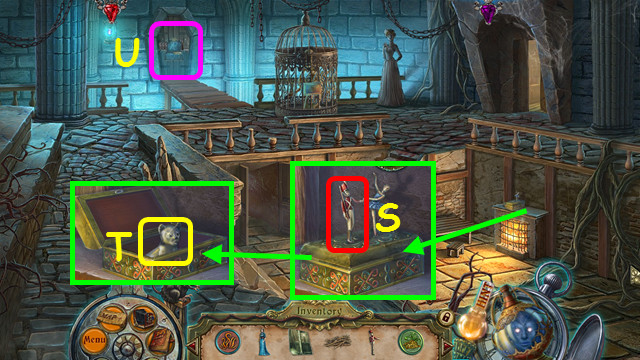
- Place the TIN SOLDIER on the box (S).
- Take the LION CUB FIGURINE (T).
- Select the mini-game (U).
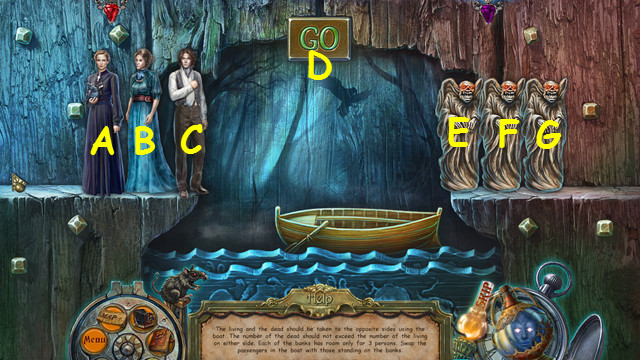
- Place the RODERICK FIGURE and the MADELEINE FIGURINE on the shelf.
- Select the figures or button E, D, C, E, B, D, C, F, D, F, A, D, A, G, B, D, and G.
- Walk forward into the Chamber.
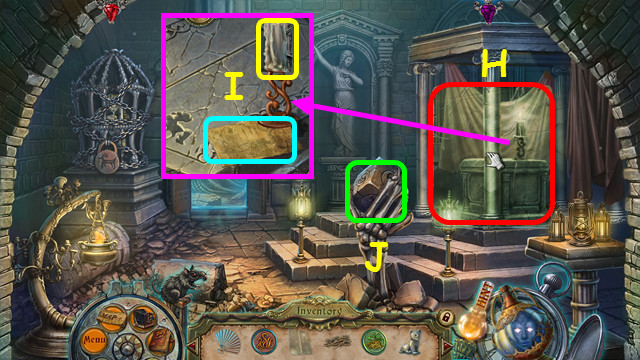
- Place the PHOTOGRAPH in the scene (H).
- Note the cube mini-game (I).
- Read the note and take the CANDLE (J).
- Walk forward.
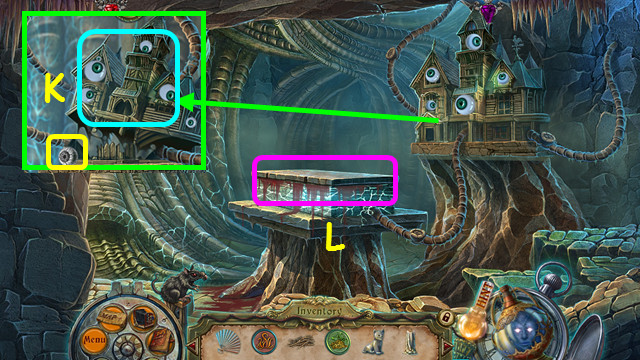
- Talk to the house and take the GLASS EYE (K).
- Note the coffin lid (L).
- Walk down twice.
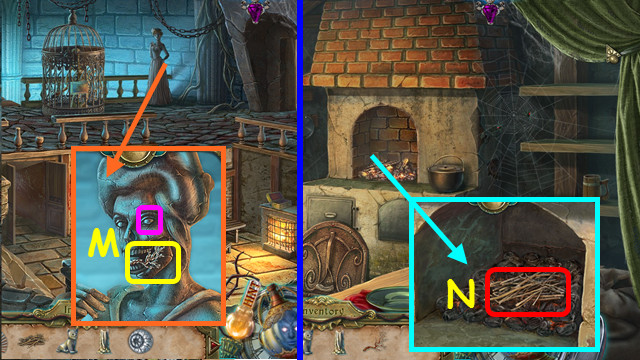
- Place the GLASS EYE in the statue; take the TREE SYMBOL (M).
- Walk right.
- Place the BRUSHWOOD on the embers; use the HAND FAN on the brushwood (N).
- Walk down and enter the dungeon.
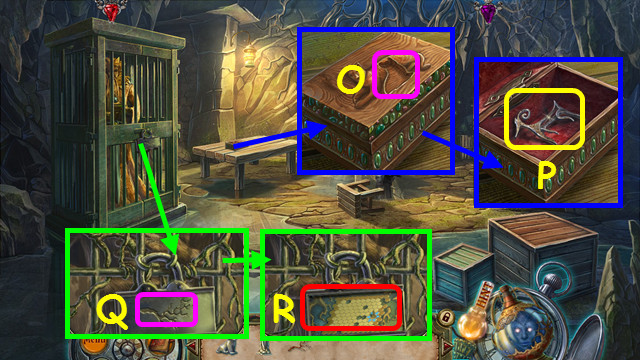
- Place the LION CUB SYMBOL on the box (O).
- Take the ANIMAL SYMBOL (P).
- Place the TREE SYMBOL in the lock (Q).
- Select the mini-game (R).
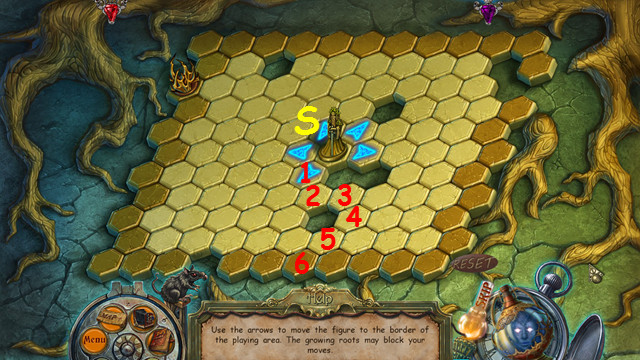
- Move the figure (S) to an outer gold space.
- Select the spaces in order (1-6).
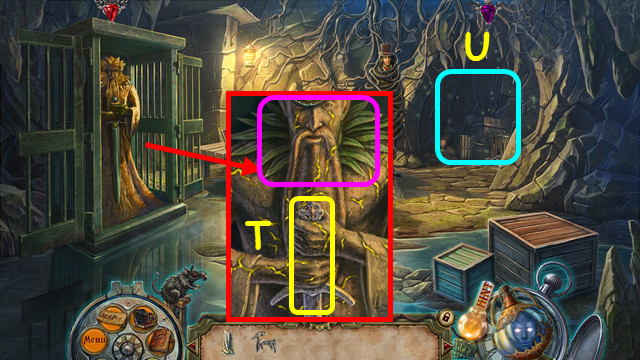
- Use the REBORN ONE on the statue; take the 1/3 SWORD POWER (T).
- Select the cave (U).
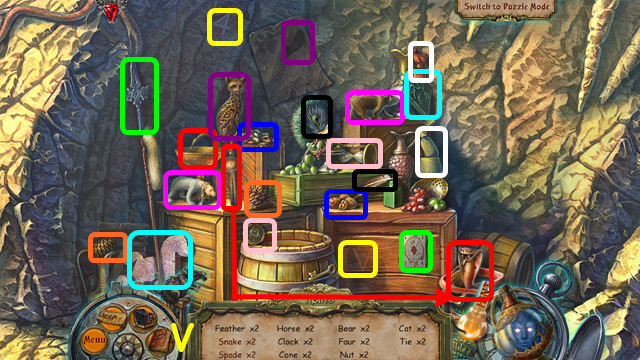
- Play the HOP to earn the HORSE-SHAPED MOLD (V).
- Select the pairs (color-coded).
- Walk down and cross the bridge to the Chamber.
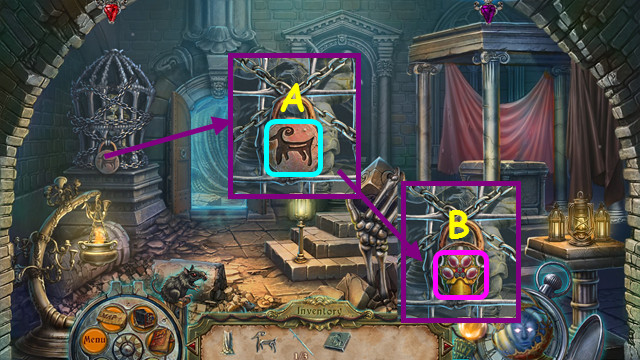
- Place the ANIMAL SYMBOL in the lock (A).
- Select the mini-game (B).
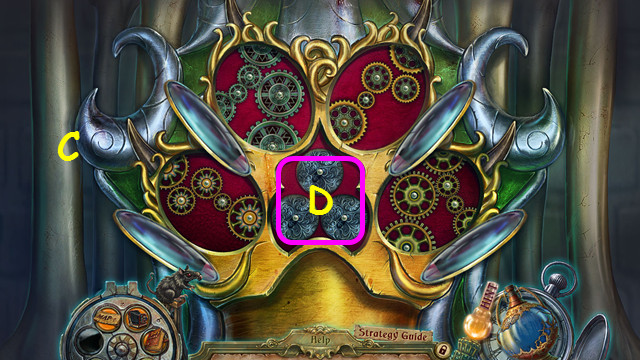
- Move the gears to the correct locations (C).
- Place gears in the center to move to another section (D).
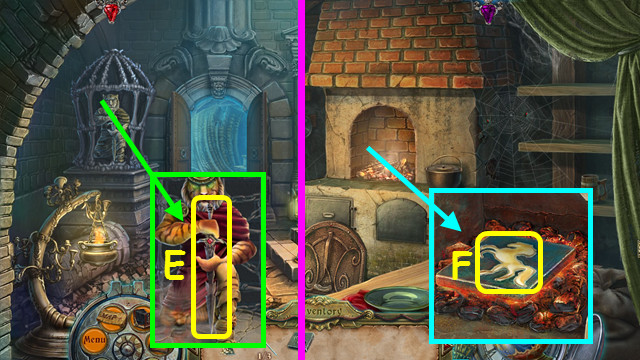
- Use the REBORN ONE on the statue; take the 2/3 SWORD POWER (E).
- Walk down and right.
- Place the HORSE-SHAPED MOLD on the embers, followed by the CANDLE; take the HORSE FIGURINE (F).
- Walk down and enter the Chamber.
- Place the HORSE FIGURINE on the lid (G).
- Take the PHOTOGRAPH and the RAIN RUNE (H).
- Walk forward.
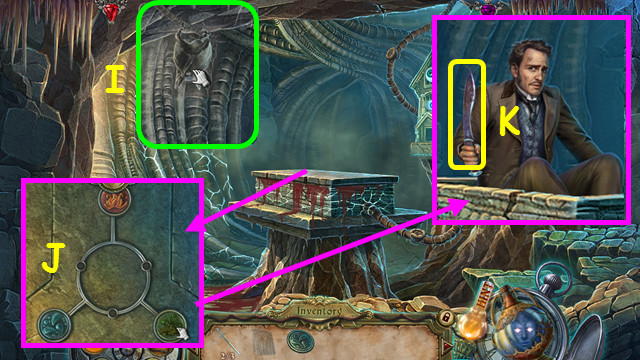
- Place the PHOTOGRAPH on the scene (I).
- Place the EARTH RUNE, the FIRE RUNE, and the RAIN RUNE on the lid and move them to the correct locations (J).
- Take the MACHETE (K).
- Go to the dungeon.
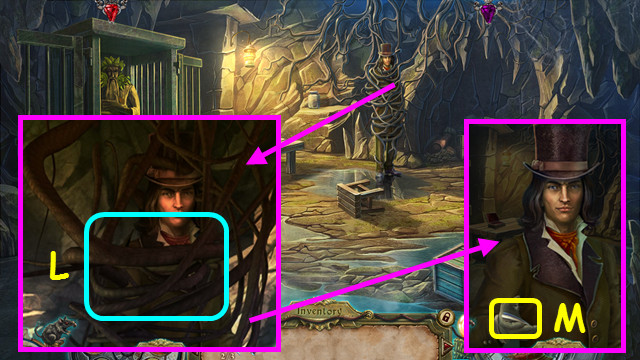
- Use the MACHETE on the vines (L).
- Take the CLAW (M).
- Return to the Chamber, and select the cube mini-game.
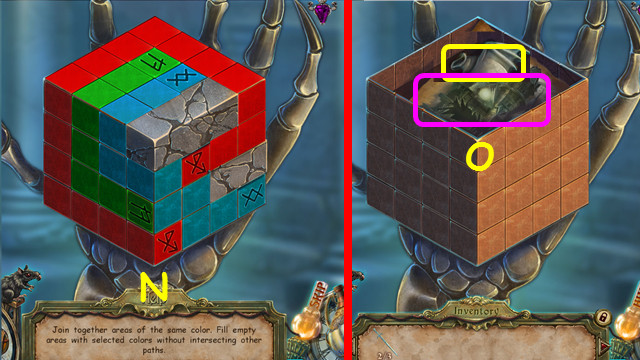
- Place the CLAW on the hand.
- Connect the colored squares (N).
- Read the note and take the BAT (O).
- Walk forward.
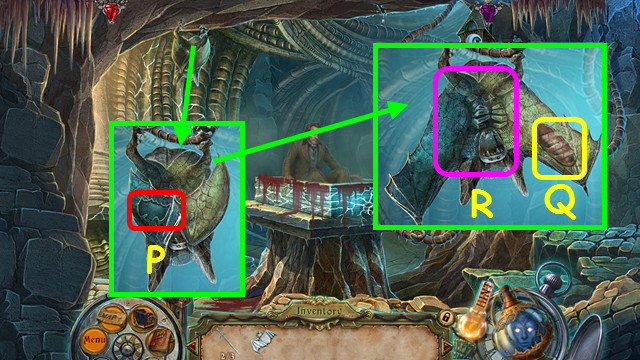
- Place the BAT on the bat (P).
- Take the STONE BREAD LOAF (Q).
- Use the REBORN ONE on the bat (R).
- Walk down twice and enter the Kitchen.
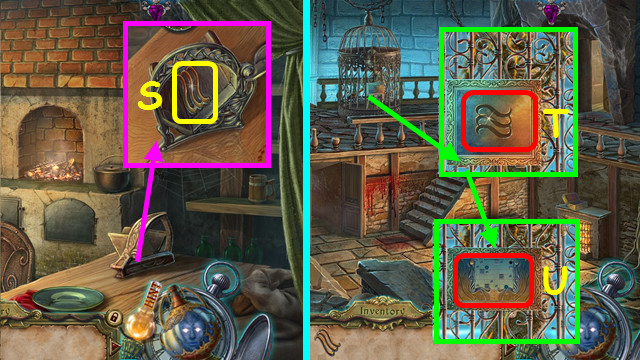
- Use the STONE BREAD LOAF on the chopper; take the WATER SYMBOL (S).
- Walk down.
- Place the WATER SYMBOL on the lock (T).
- Select the mini-game (U).
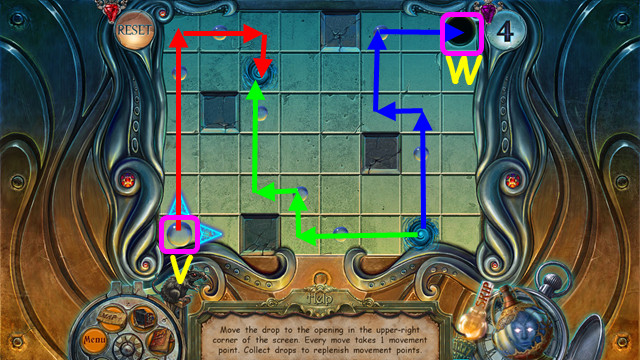
- Move the drop (V) to the opening (W).
- Follow the path of the red arrows, the green arrows, and then the blue arrows.
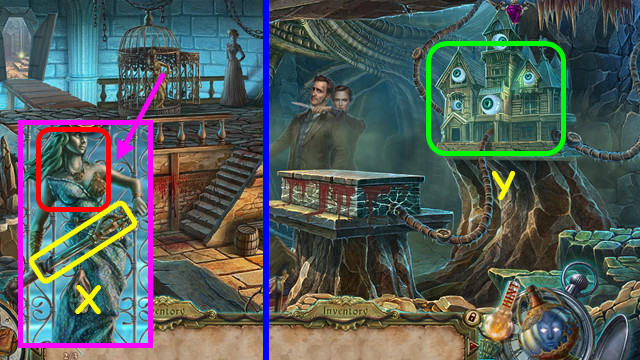
- Use the REBORN ONE on the statue; take the 3/3 SWORD POWER (X).
- Enter the Chamber and walk forward.
- Use the SWORD POWER on the house (Y).
- Congratulations! You have completed Dark Tales: Edgar Allen Poe's The Fall of the House of Usher!
Created at: 2014-04-18

