

Walkthrough Menu
- General Tips
- Chapter 1: The Old House
- Chapter 2: The Gunsmith
- Chapter 3: The Sheriff's Office
- Chapter 4: The Graveyard
- Chapter 5: The Docks
- Chapter 6: Under Water
- Chapter 7: The Lighthouse
General Tips
- This is the official guide for Dark Tales: Edgar Allan Poe's the Raven.
- This guide will not mention when you have to zoom into a location; screenshots will show each zoom scene.
- The screenshots will show where to play Hidden-Object Puzzles (HOP).
- This guide will give step-by-step solutions for all puzzles that are not random. Read the instructions in the game for each puzzle.
- Inventory items marked with a magnifying glass need to be combined with other items or otherwise altered.
- Dialogs often have multiple options. This guide will only mention specific options if it changes the course of the game.
Chapter 1: The Old House
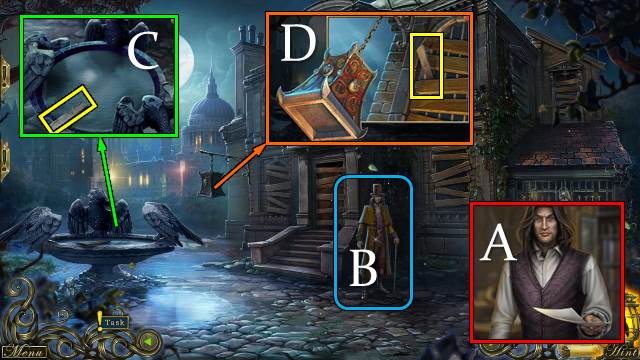
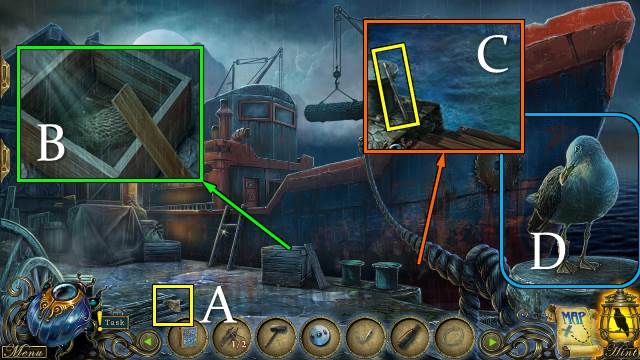
- Take the note (A).
- Talk to Dupin (B); select a dialog option.
- Talk to Dupin again.
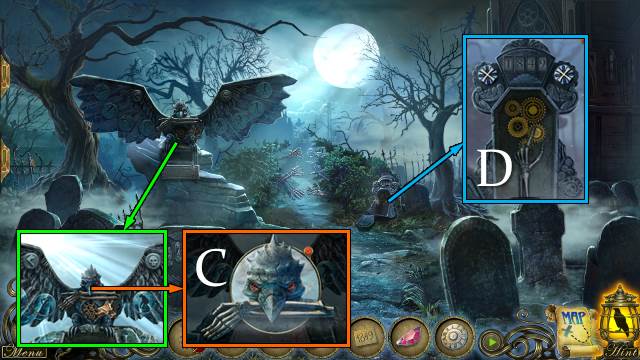
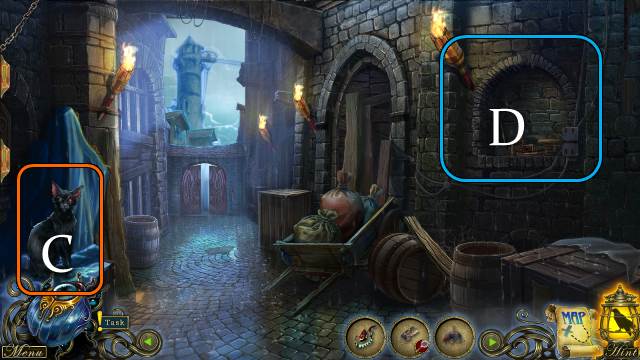
- Take BOARD 1/3 (C).
- Take BOARD 2/3 and the CAGE (D).
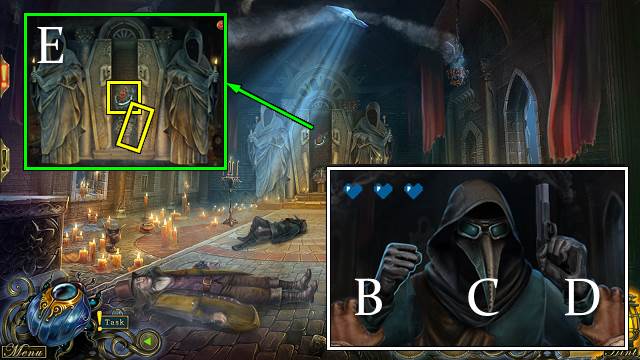
- Take the WIRE (E).
- Bend the WIRE into a HOOK.
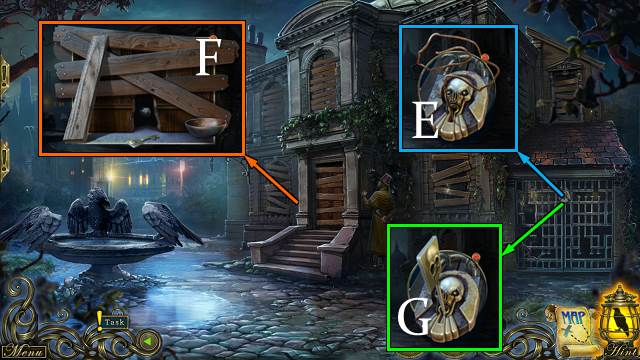
- Take BOARD 3/3 and the BOWL; move the mat and take the BARN KEY. Take BELL 1/5 with the HOOK (F).
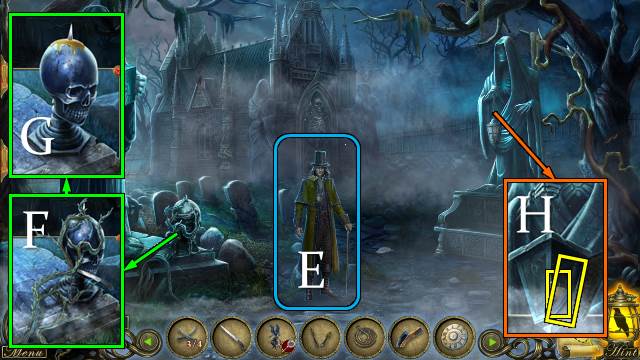
- Open the lock with the BARN KEY (G).
- Zoom into the barn.
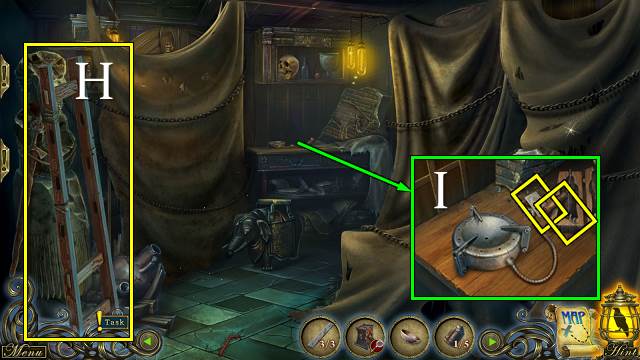
- Take the BROKEN LADDER (H).
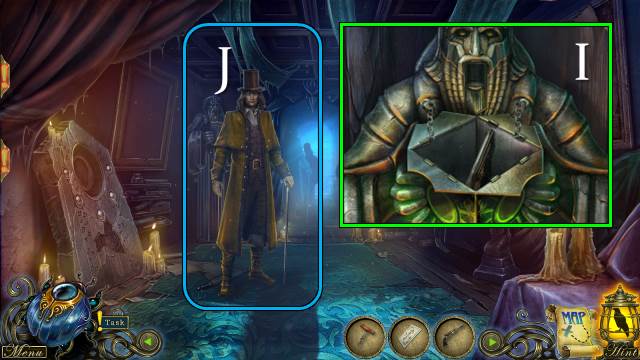
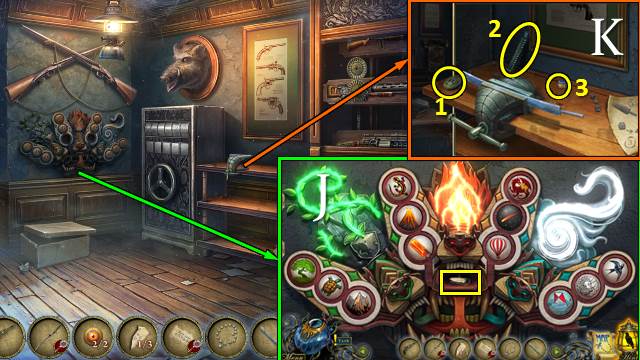
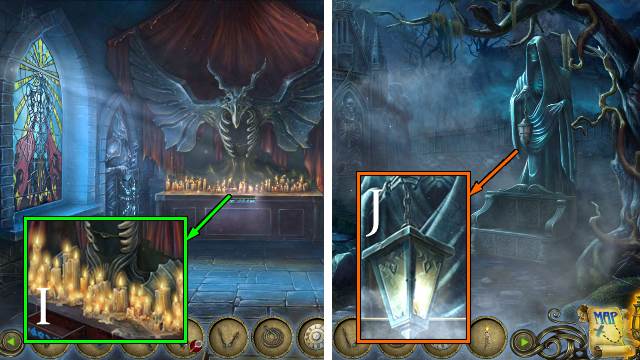
- Take the CORKSCREW and CARD. Push the button and place the BOWL (I).
- Place the BOARDS on the BROKEN LADDER and take the LADDER.
- Walk down.
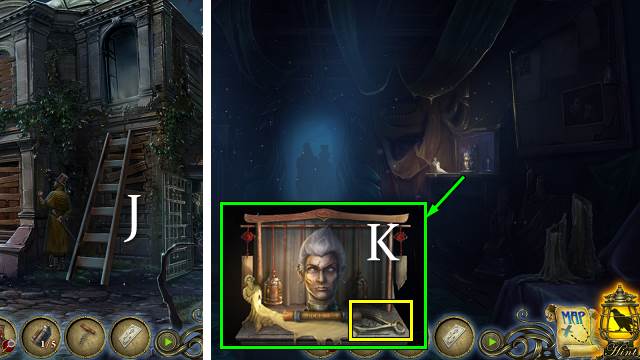
- Place the LADDER (J).
- Go forward.
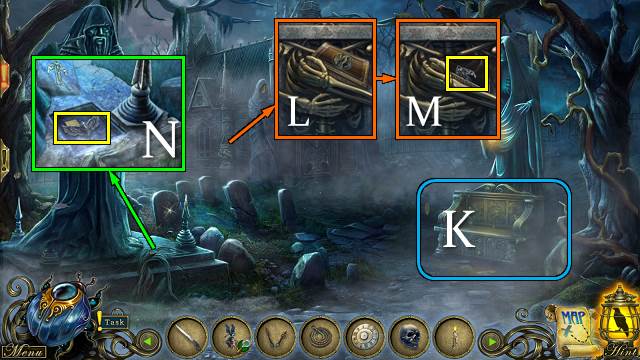
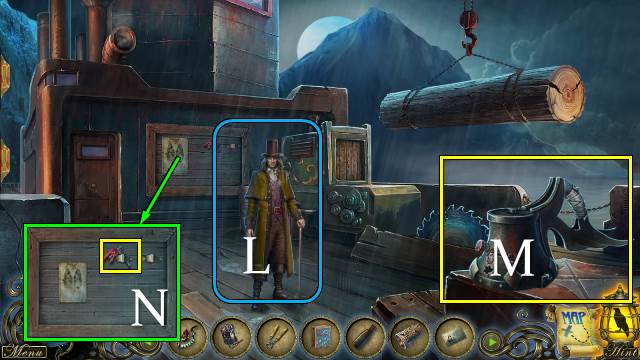
- Take the NIPPERS and interact with the head (K).
- Go to the barn.
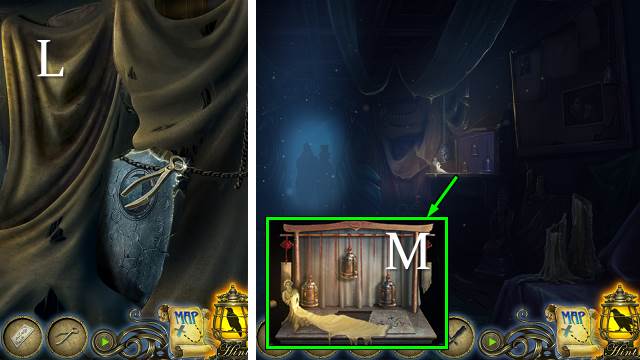
- Use the NIPPERS on the chains and remove the drapes for a HOP (L). Receive a KNIFE.
- Go to the Second Floor.
- Use the KNIFE three times to get some WAX (M).
- Go to the barn.
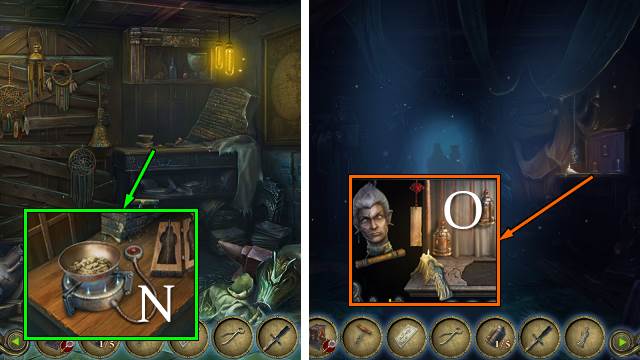
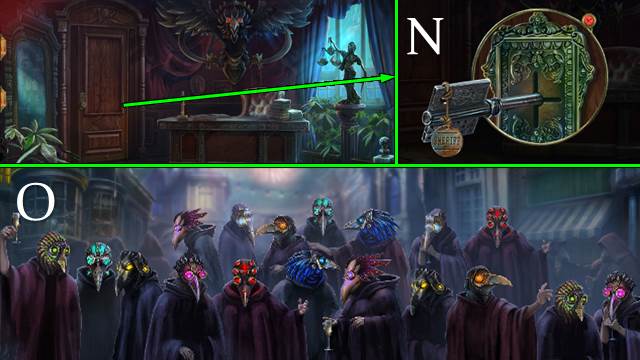
- Place the WAX, pour it into the mold, close the mold and take the CANDLE (N).
- Go to the Second Floor.
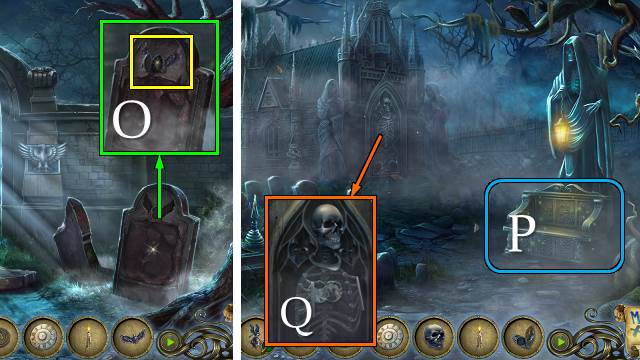
- Light the CANDLE; receive a LIT CANDLE (O).
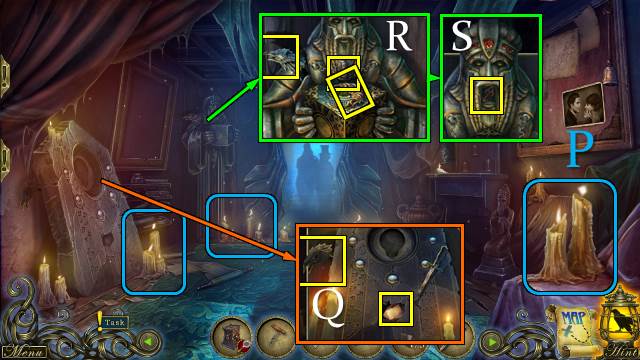
- Light all candles with the LIT CANDLE (P).
- Use the KNIFE twice and take the GEM and RAVEN HEAD 1/2 (Q).
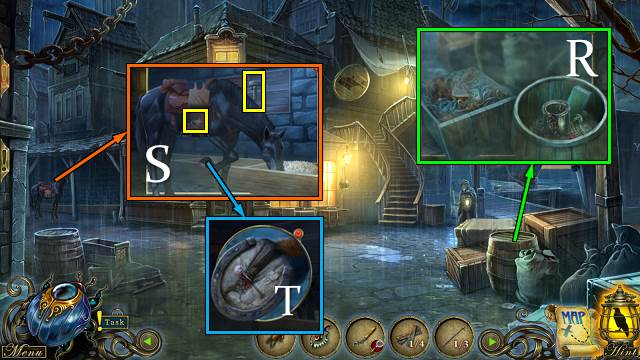
- Take the MOON and RAVEN HEAD 2/2; use the NIPPERS and take BELL 2/5 (R). Place the GEM and take the CAGE KEY (S).
- Use the CAGE KEY on the CAGE, open the cage and take the SUMERIAN HEAD.
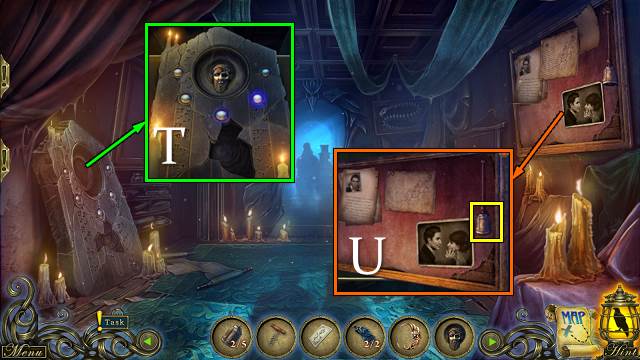
- Place the SUMERIAN HEAD and push the buttons in the shown (random) order. Take BELL 3/5 (T).
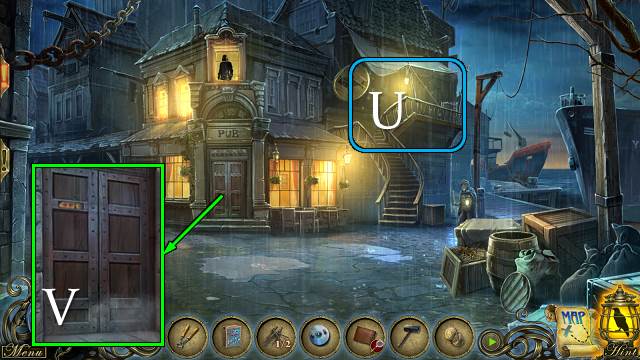
- Take BELL 4/5, read the notes and look at the picture (U).
- Walk down.
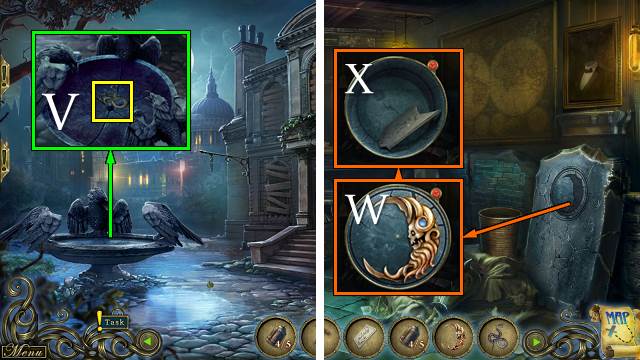
- Place the RAVEN HEADS; take the SNAKE KEY (V).
- Place the MOON (W); open the compartment and take the TABLET PIECE (X).
- Go to the Second Floor.
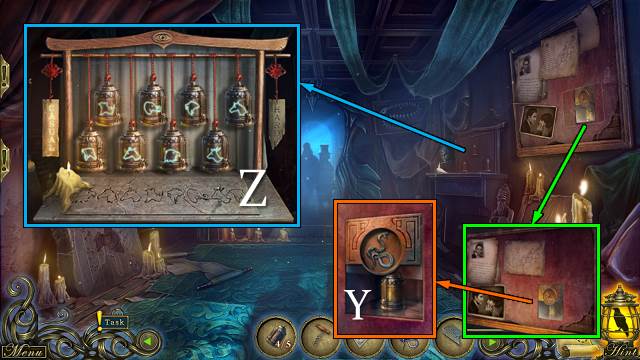
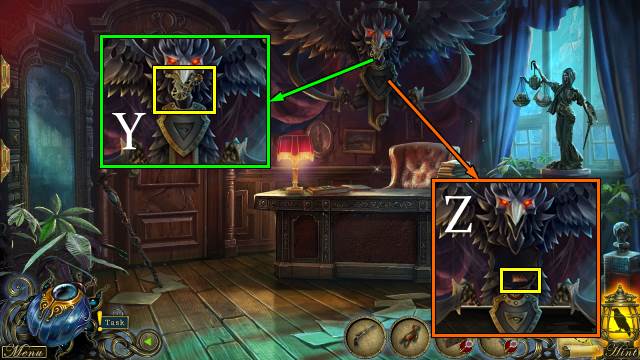
- Place the SNAKE KEY; take BELL 5/5 (Y).
- Place the TABLET PIECE and BELLS for a mini-game (Z). The solution is random.
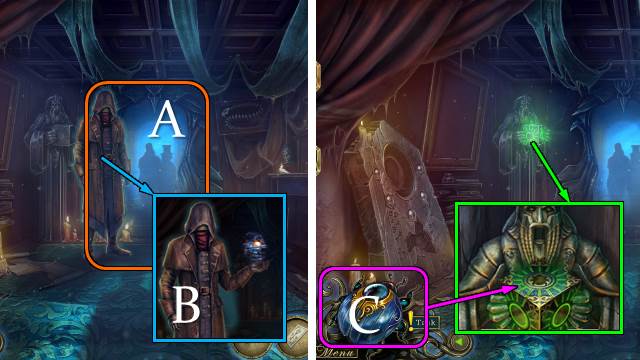
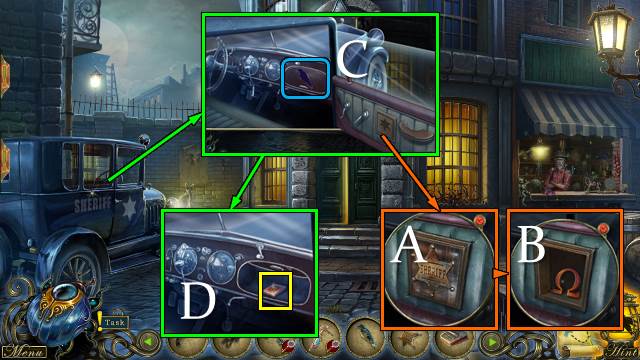
- Touch the mirror (A).
- Talk to the client; take the Scarab (B).
- Select the Scarab for a mini-game (C).
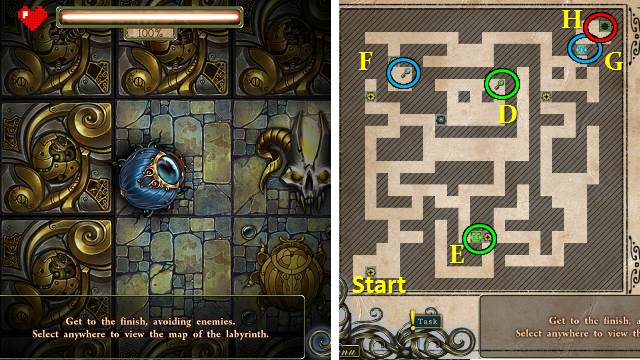
- Find the green key (D); open the green lock (E). Find the blue key (F); open the blue lock (G). Find the exit (H).
- Take the GUN (I).
- Talk to Dupin (J) and if you're ready, tell him you are. If you still want to look around, Dupin will be waiting outside The Old House.
Chapter 2: The Gunsmith
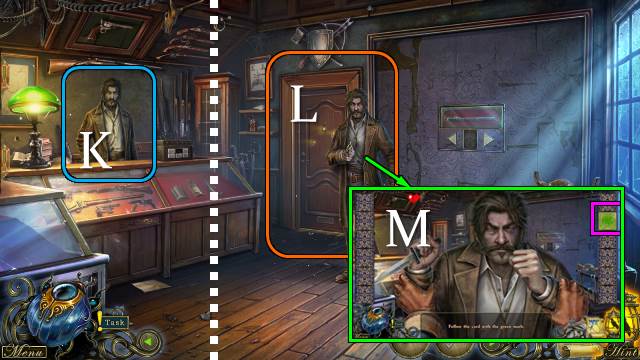
- Talk to the gunsmith (K).
- Zoom into the door (L).
- Fight the gunsmith (M).
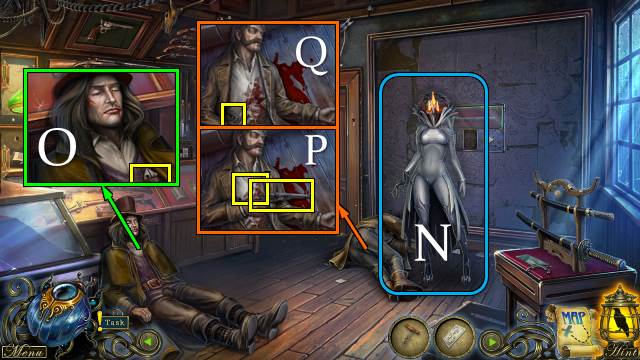
- Talk to the White Crow (N).
- Move Dupin's coat and take his HANDKERCHIEF (O).
- Take the GUN SHELL and REVOLVER (P). Move the hand and take the AMMO CLIP and notes (Q).
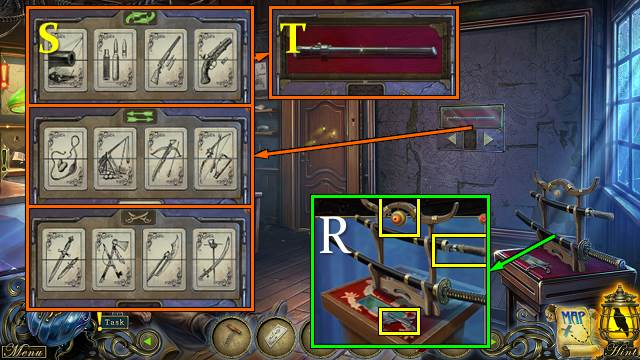
- Take the GUN KEY, SCISSORS PART and EYE 1/2 (R).
- Place the CARD for a mini-game (S).
- Take the OPTIC SIGHT (T).
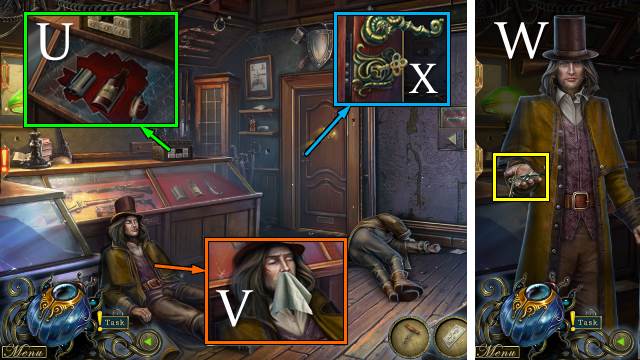
- Use the REVOLVER; take the SMELLING SALTS and CYLINDER (U).
- Open the SMELLING SALTS with the CORKSCREW and put some on the HANDKERCHIEF. Receive the SOAKED HANDKERCHIEF.
- Use the SOAKED HANDKERCHIEF (V).
- Take the KEYS (W).
- Take the OFFICE KEY and STAR-SHAPED KEY from the KEYS.
- Open the door with the OFFICE KEY (X).
- Go forward.
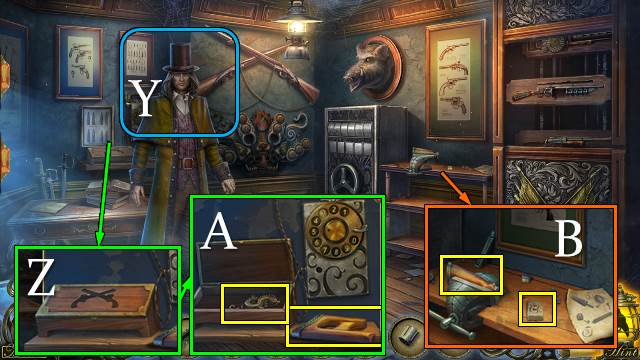
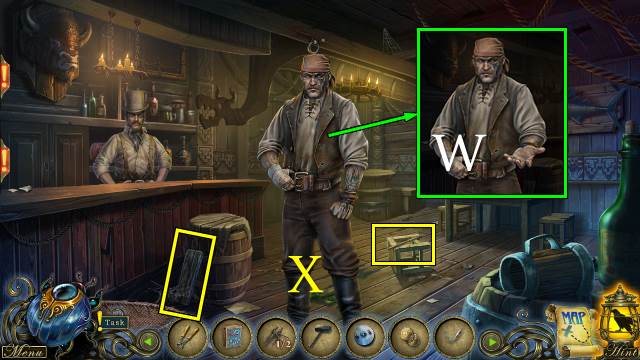
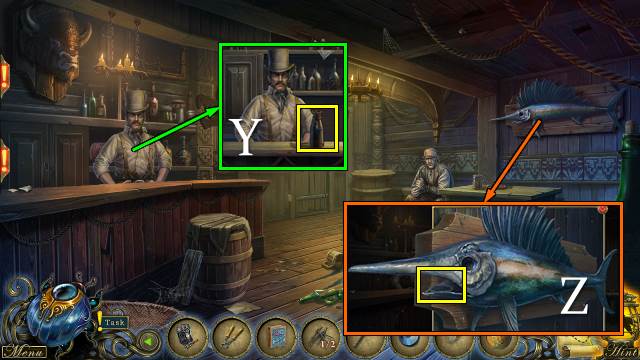
- Talk to Dupin (Y).
- Place the GUN KEY and open the box (Z); take the ERGONOMIC STOCK and HANDLE (A).
- Take the BUTTON and STOCK (B).
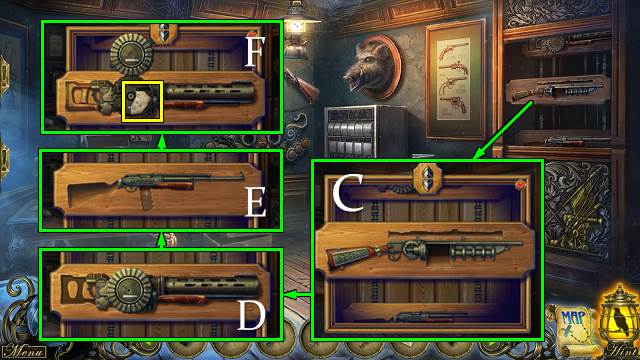
- Place the CYLINDER and OPTIC SIGHT (C). Scroll up and place the ERGONOMIC STOCK (D). Scroll up and place the STOCK and AMMO CLIP (E). Take CODE PIECE 1/3 (F).
- Open the GUN SHELL with the STAR-SHAPED KEY; take the CODE BASE.
- Walk down.
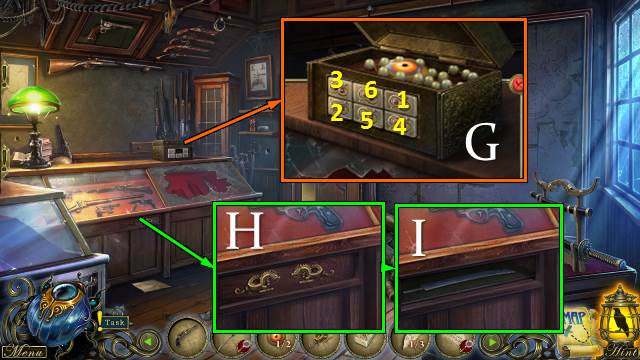
- Place the BUTTON for a mini-game (G).
- Take the BEADS and EYE 2/2.
- Place the HANDLE (H); take the SWORD BLADE (I).
- Go forward.
- Place the EYES for a mini-game (J).
- Take CODE PIECE 2/3.
- Place the SWORD BLADE; place the guard (1), grip (2) and pommel (3). Take the SWORD (K).
- Walk down.

- Place the SWORD; take CODE PIECE 3/3 (L).
- Place the CODE PIECES on the CODE BASE; take the CODE.
- Walk forward.
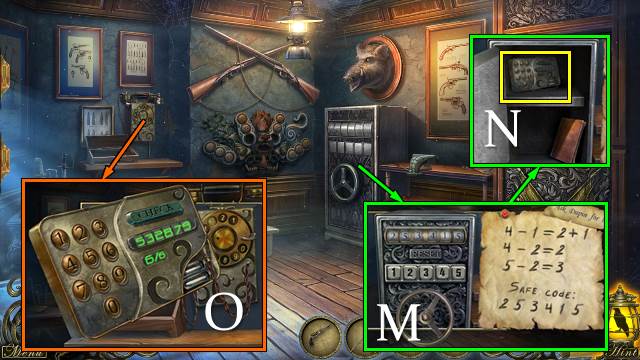
- Place the CODE for a mini-game (M).
- Enter 2-5-3-4-1-5.
- Take the NUMBER FINDER and read the book (N).
- Place the NUMBER FINDER for a mini-game (O).
- Enter 5-3-2-8-7-9 and push 'check'.
- Talk to Dupin; tell him you're ready.
Chapter 3: The Sheriff's Office

- Take the TIE and FIREFLY BOTTLE (P).
- Take the BIRD SKULL (Q).
- Talk to Old Bob. Receive a JUNK BOX (R).
- Place the FIREFLY BOTTLE, TIE, BEADS and BIRD SKULL in the JUNK BOX. Take the FULL JUNK BOX.
- Give the FULL JUNK BOX to Old Bob; take the HANGED-MAN FIGURINE.
- Take the ROPE and DOLL from the HANGED-MAN FIGURINE.
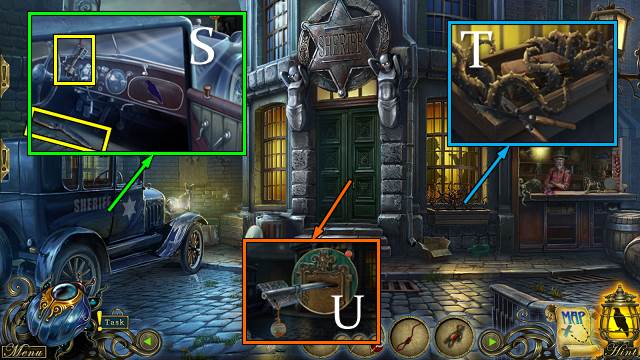
- Use the ROPE; take the OFFICE KEY and SCISSORS PART (S).
- Combine the two SCISSORS PARTS; take the SCISSORS.
- Use the SCISSORS; take the METAL BOX (T).
- Open the door with the OFFICE KEY (U).
- Go forward.
- Interact with the White Crow.
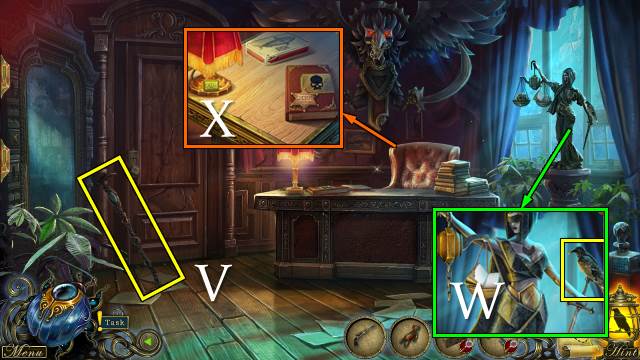
- Take the WALKING STICK (V).
- Take the RAVEN (W).
- Take the SHERIFF'S BADGE; open and take the CANNED FISH (X).
- Take the CYCLIST FIGURE (Y).
- Open the METAL BOX with the CYCLIST FIGURE; take the SHIELD KEY.
- Place the SHIELD KEY; take the EYE (Z).
- Walk down.
- Place the SHERIFF'S BADGE (A), open the compartment and take PUZZLE PART 1/2 (B). Place the RAVEN (C) and take the EYE (D).

- Play the HOP (E); receive the METAL SKULL.
- Offer the CANNED FISH (F); take the EAGLE (G).
- Go forward.
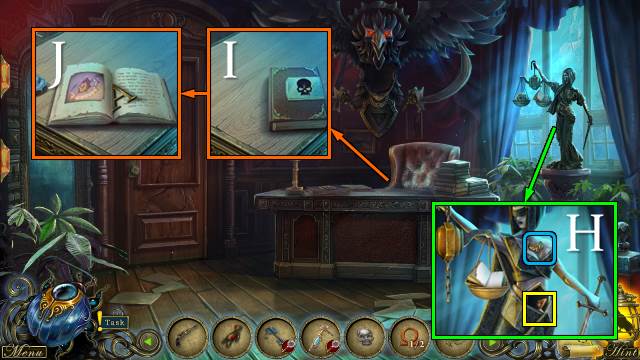
- Place the EAGLE; take the EYE (H).
- Open the book with the METAL SKULL (I); take PUZZLE PART 2/2 and read the book (J).
- Walk down.
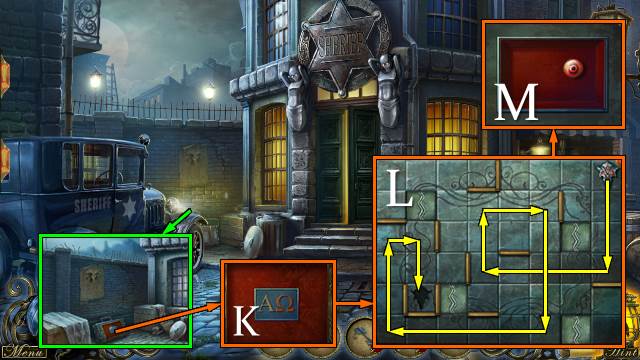
- Place the PUZZLE PARTS (K) for a mini-game (L).
- Take the EYE (M).
- Go forward.
- Place the four EYES on the WALKING STICK; take the SHERIFF'S KEY PART.
- Place the SHERIFF'S KEY PART on the INCOMPLETE OFFICE KEY; receive the SHERIFF'S KEY.
- Open the door with the SHERIFF'S KEY (N).
- Play the mini-game (O).
Chapter 4: The Graveyard
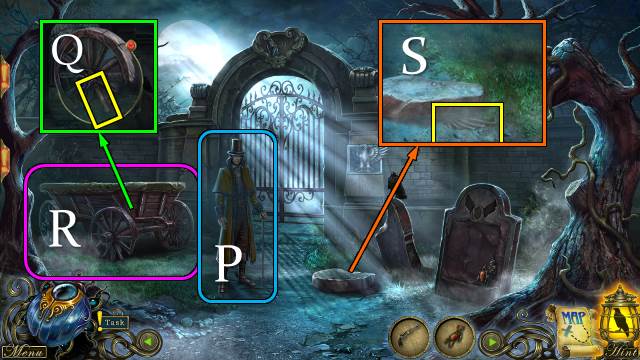
- Talk to Dupin (P).
- Take the SPOCKET (Q).
- Play the HOP (R); receive an OILCAN.
- Use the SPOCKET; take the WING (S).
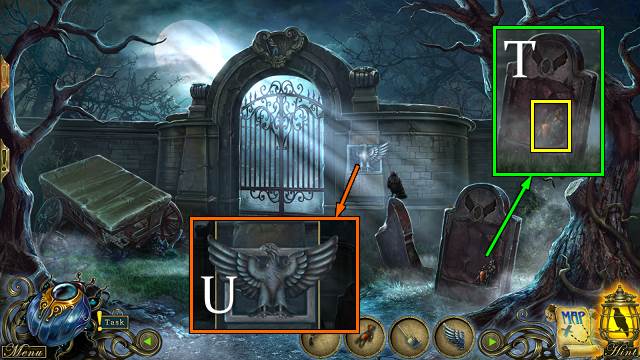
- Take FIGURE 1/6 (T).
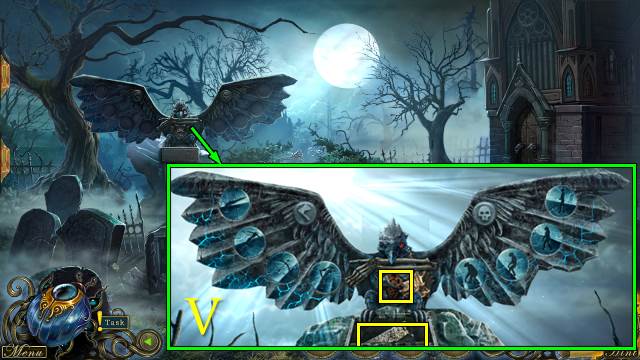
- Place the WING and move the raven (U).
- Go forward.
- Move the plate and take METAL RIB 1/4. Use the OILCAN for a mini-game (V).
- Take the SCROLL TUBE.
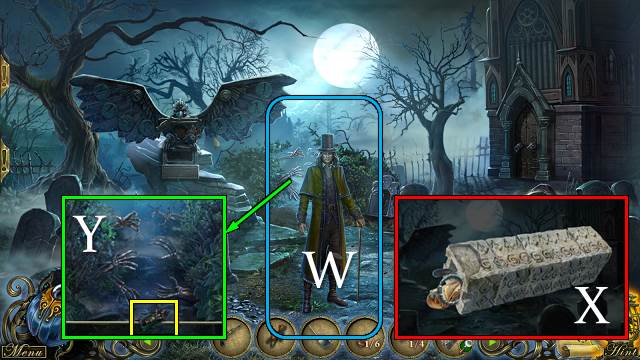
- Talk to Dupin (W).
- Turn the discs on the SCROLL TUBE; take the DOOR KEY, KNIFE and PAPER (X).
- Take FIGURE 2/6 (Y).
- Move the plate and take FIGURE 3/6 (Z).
- Take METAL RIB 2/4 (A). Place and pull the DOOR KEY (B).
- Go right.
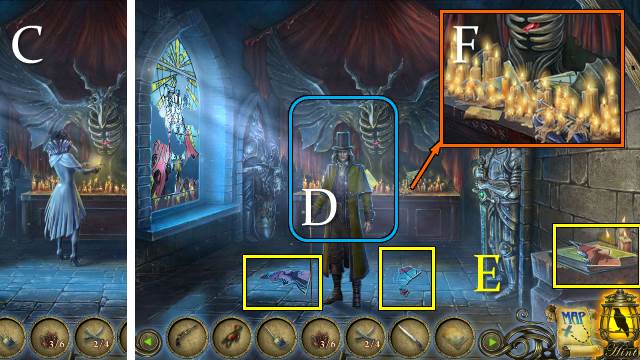
- Interact with the White Crow (C).
- Talk to Dupin (D).
- Take WINDOW PIECE 1-3/6 (E).
- Take WINDOW PIECE 4-5/6 and the TORN PAGE; use the KNIFE, remove the wax and take FIGURE 4/6 (F).
- Take WINDOW PIECE 6/6 and the STONE (G).
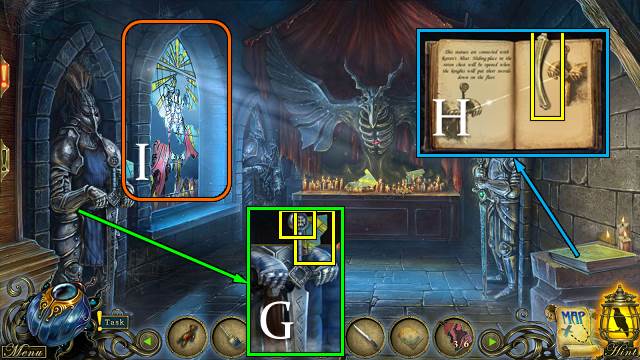
- Open the book and place the TORN PAGE. Take the map, turn the pages and take METAL RIB 3/4 (H).
- Place the WINDOW PIECES for a mini-game (I).
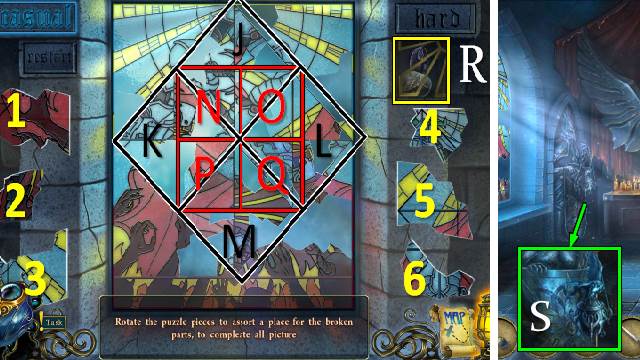
- Casual solution: L-M-Q-(place 1 and 2)-J-(place 4)-O-(place 3)-K-P-N-(place 5 and 6).
- Hard solution: M-(place 2)-O-L-Mx3-L-Q-K-P-M-K-Lx2-O-Lx2-(place 1)-N-(place 5 and 6)-J-(place 4)-Lx3-Jx3-O-L-J-(place 3).
- Take the STONE and FIGURE 5/6 (R).
- Take the RAVEN CENSER with the KNIFE (S).
- Take the CLOCK HANDS from the RAVEN CENSER.
- Walk down twice.
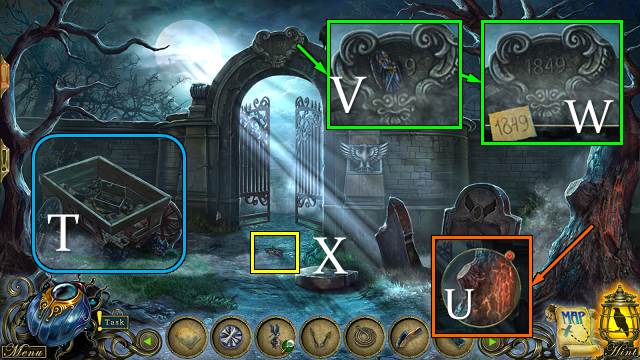
- Use the KNIFE, take the ROPE, remove the tarp and Play the HOP (T); receive a BRUSH.
- Take some WOOD (U).
- Use the STONE (V); place the PAPER and WOOD and take the FOUNDATION YEAR (W).
- Take FIGURE 6/6 (X).
- Go forward.
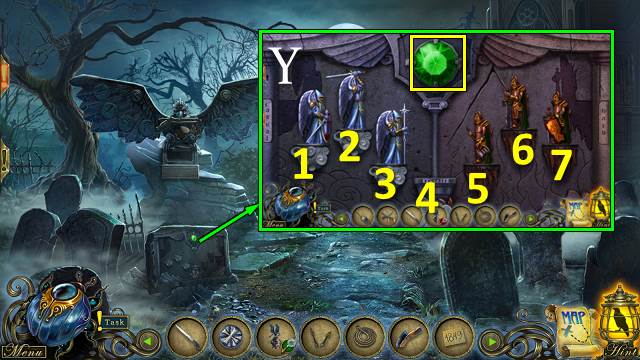
- Place the FIGURES for a mini-game (Y).
- Solution: 3-5-6-4-2-1-3-5-7-6-4-2-3-5-4.
- Take the CRYSTAL.
- Go right.
- Place the CRYSTAL (Z).
- Use the BRUSH (A).
- Take the EYE and OLD DIAL (B).
- Walk down.
- Place the EYE; receive the BONY HAND (C).
- Remove the hand. Place the STONE, BONY HAND and FOUNDATION YEAR. Enter 1849 (D).
- Go forward.
- Talk to Dupin (E).
- Use the KNIFE three times (F). Use the OILCAN; take the METAL SKULL (G).
- Open the lantern; take the UNLIT CANDLE and METAL RIB 4/4 (H).
- Walk down and right.
- Light the UNLIT CANDLE (I); receive a CANDLE.
- Walk down and forward.
- Use the BRUSH; place the CANDLE (J).
- Play the HOP (K); receive an OLD SIGN.
- Place the OLD SIGN (L); open the chest and take the ARROW SIGN (M).
- Place the ARROW SIGN; take the OLD GRAVE PLAQUE and read the note (N).
- Walk down twice.
- Place and open the OLD GRAVE PLAQUE; take the PUZZLE PIECES (O).
- Walk forward twice.
- Play the HOP (P); receive an AMULET.
- Place the METAL RIBS and METAL SKULL; open the ribcage, zoom in and place the PUZZLE PIECES and AMULET for a mini-game (Q).
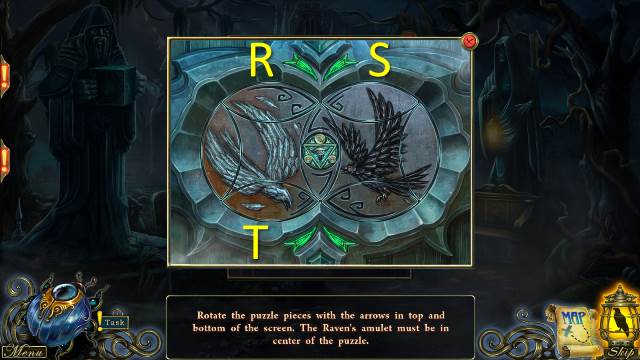
- Solution: S-T-S-Rx3.
- Go forward.
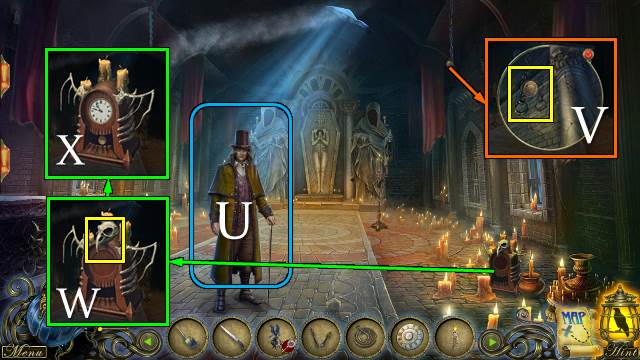
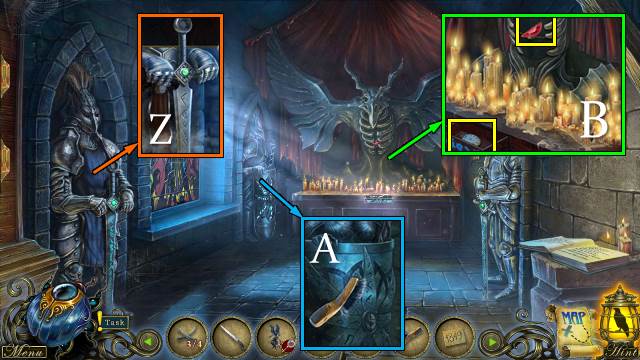
- Talk to Dupin (U).
- Use the ROPE; take the PENDULUM (V).
- Take the METAL SKULL (W); place the OLD DIAL, PENDULUM and CLOCK HANDS. Move the wing (X).
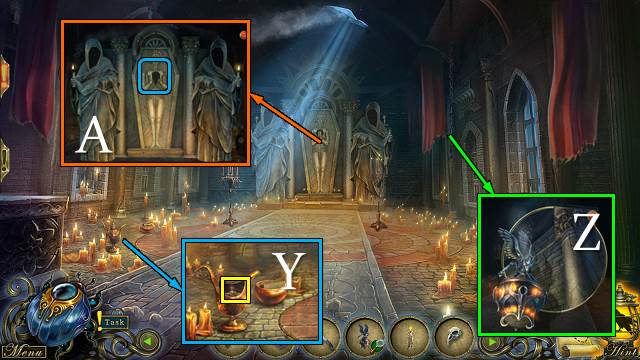
- Pour out the oil; take the INCENSE (Y).
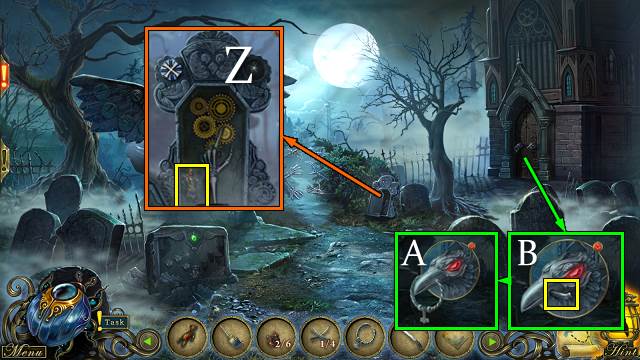
- Open the RAVEN CENSER and place the INCENSE. Use the CANDLE and close the censer.
- Place and move the RAVEN CENSER (Z).
- Place the METAL SKULL (A).
- Fight the raven.
- Solution: B-C-D-C-C.
- Take the SHUMERIAN HEART and SNAKE CATCHING EQUIPMENT (E).
- Walk down.
- Use the SNAKE CATCHING EQUIPMENT (F).
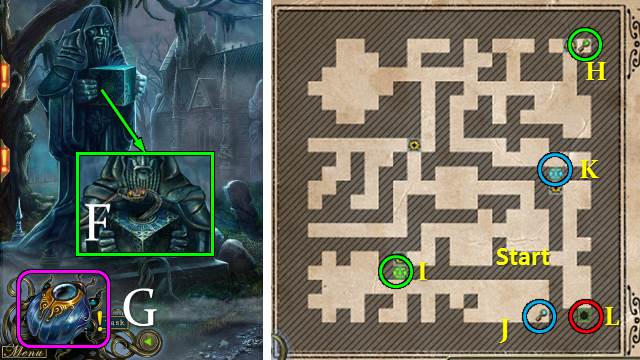
- Select the Scarab for a mini-game (G).
- Find the green key (H); open the green lock (I). Find the blue key (J); open the blue lock (K). Go to the exit (L).
- Take the TAVERN KEY CARD and OLD NOTES (M).
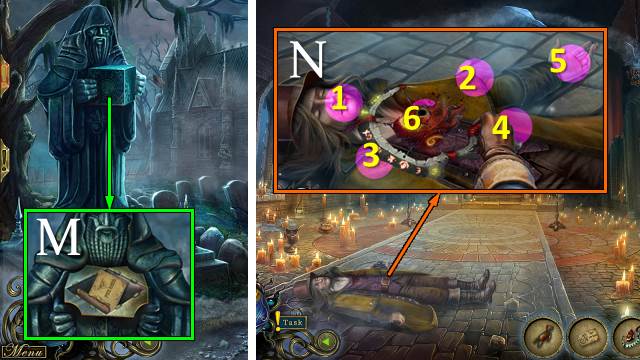
- Place the OLD NOTES on the SHUMERIAN HEART and use the KNIFE.
- Go forward.
- Place the SHUMERIAN HEART for a mini-game (N).
- Talk to Dupin; if you're ready, tell him okay.
Chapter 5: The Docks
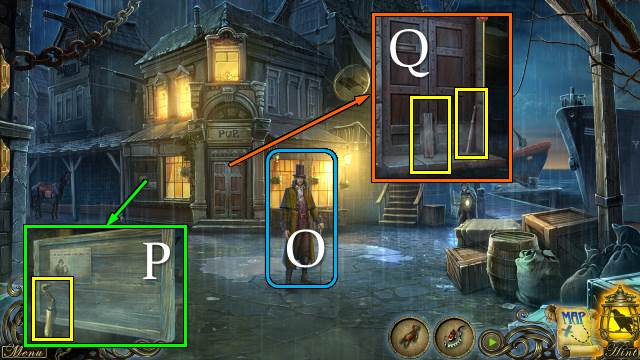
- Talk to Dupin (O).
- Try to walk forward.
- Take the NIPPERS and read the note. You receive a BOLT (P).
- Take FISHING ROD PART 1/3 and BOARD 1/4 (Q).
- Remove the lid and take the TAR, BOARD 2/4, PART OF NIPPERS and OAT (R).
- Combine the PART OF NIPPERS and BOLT with the NIPPERS.
- Use the NIPPERS; open the crate and take the FISH FOOD (R).
- Place the OAT. Open the saddle bag and take the REEL and WALLET, and take the HAMMER (S). Take NAILS 1/2 with the NIPPERS (T).
- Open the WALLET, take the COINS and break the zipper.
- Play the HOP (U); receive a FLOAT.
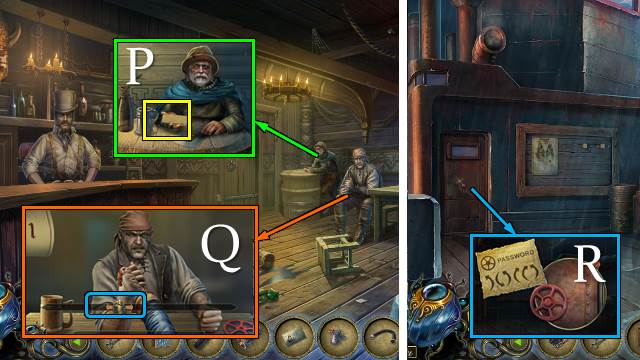
- Open the zipper in the WALLET with the FLOAT; take the PASSWORD.
- Offer the PASSWORD (V).
- Go forward.
- Talk to the man; give him one of the COINS (W).
- Take BOARD 3/4 and FISHING ROD PART 2/3 (X).
- Talk to the barman. Give him the COINS. Take the WATER (Y).
- Take the FISHING LINE (Z).
- Walk down and go right.
- Take the TORN PHOTO (A).
- Take BOARD 4/4, move the net and take the FISHING ROD PART (B).
- Take FISHING ROD PART 3/3 (C).
- Place the FISHING ROD PARTS, REEL, FLOAT and FISHING LINE on the FISHING ROD PART; take the FISHING ROD.
- Touch the gull (D).
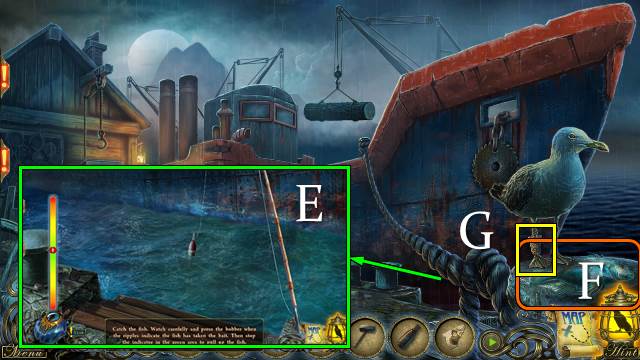
- Place the FISH FOOD and FISHING ROD for a mini-game (E).
- Receive a FRESH FISH.
- Place the FRESH FISH (F).
- Take the GOLD BRACELET (G).
- Walk down.
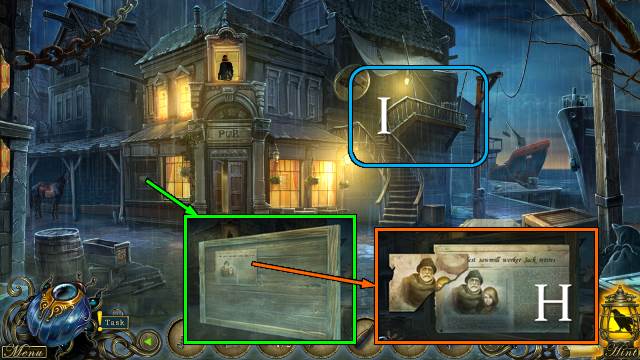
- Place the TORN PHOTO; take the NEWSPAPER (H).
- Play the HOP (I); receive NAILS 2/2.
- Go right.
- Place the BOARDS and move them onto the ladder. Place the NAILS and use the HAMMER on each of them (J).
- Go forward.
- Interact with the White Crow (K).
- Talk to Dupin (L).
- Take the BLOWTORCH BOTTOM (M).
- Take the BURNER and read the note (N).
- Walk down.

- Move the rod and turn it; take the PIPE. Take the FUEL TANK (O).
- Disassemble the BLOWTORCH BOTTOM and place the BURNER and FUEL TANK. Light and take the BLOWTORCH.
- Walk down and forward.
- Talk to Jack twice. Show him the NEWSPAPER, then the DOLL. Take the WHEEL CODE (P).
- Talk to the man and give him the GOLD BRACELET for a mini-game (Q).
- Receive the CAPTAIN'S DOOR WHEEL.
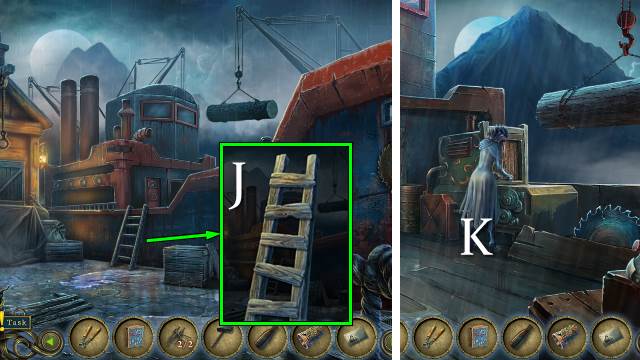
- Go to the Sawmill Deck.
- Place the CAPTAIN'S DOOR WHEEL and WHEEL CODE. Enter the code (R).
- Go forward.
Chapter 6: Under Water
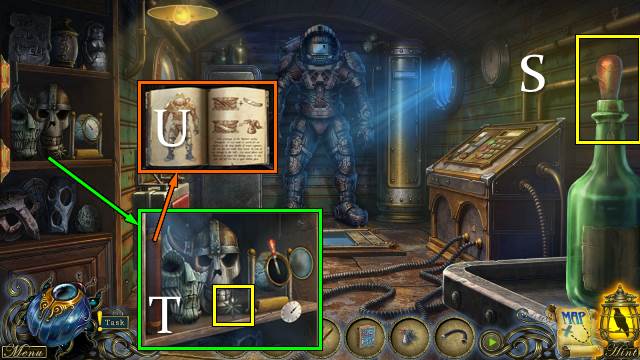
- Take the CHISEL (S).
- Take the WIND ROSE; open the barometer and use the CHISEL to receive a BAROMETER (T). Open the book and take the INSTRUCTION PAGE (U).
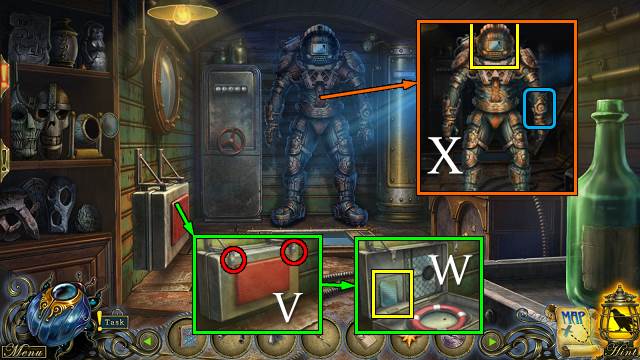
- Use the CHISEL on both screws (V); open the compartment and take the HELMET GLASS (W).
- Take the BROKEN HELMET. Place the BAROMETER (X).
- Take the LAMP (Y).
- Remove the broken glass from the BROKEN HELMET and place the HELMET GLASS and LAMP; take the DIVING SUIT HELMET.
- Place the DIVING SUIT HELMET and PIPE (Z).
- Walk down twice.
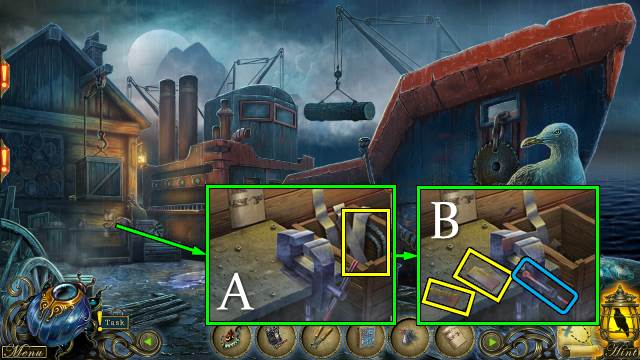
- Place the INSTRUCTION PAGE. Take the MACHINE CHAIN (A). Put a plate in the vice and use the BLOWTORCH. Take the two PLATES and open the vice to receive the third PLATE (B).
- Go forward twice.

- Place the PLATES and use the BLOWTORCH and TAR (C).
- Place the WIND ROSE and open the hatch (D).
- Go down the hatch.
- Scroll right.
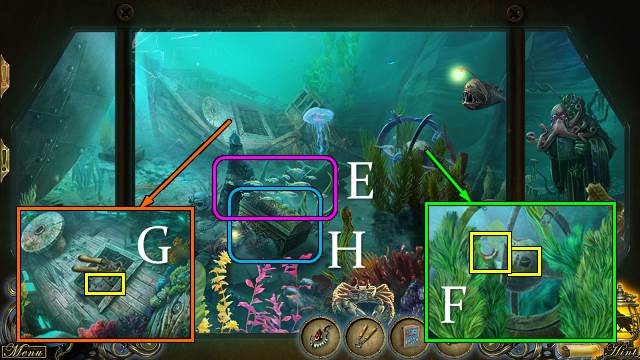
- Use the FISH FOOD (E).
- Remove the weeds; break the globe and take the BOAT EMBLEM and LIFEBUOY (F).
- Use the NIPPERS. Read the note and take the MACHINE LEVER (G).
- Play the HOP (H). Place the STONE BOAT and play the second HOP. Receive a BULL HORN.
- Scroll left.
- Remove the cloak and take the MORSE CODE (I).
- Walk down.
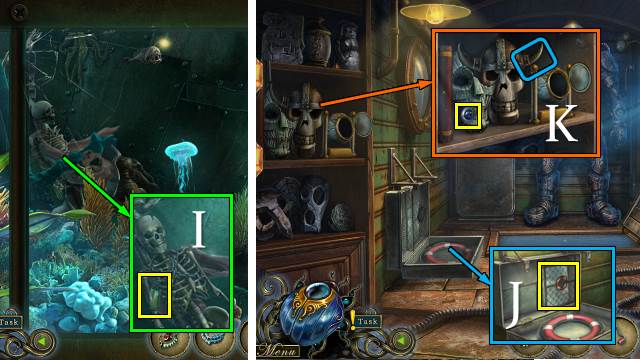
- Place the LIFEBUOY; take the MIRROR (J).
- Place and turn the BULL HORN; take the FISH EYE (K).
- Go forward.
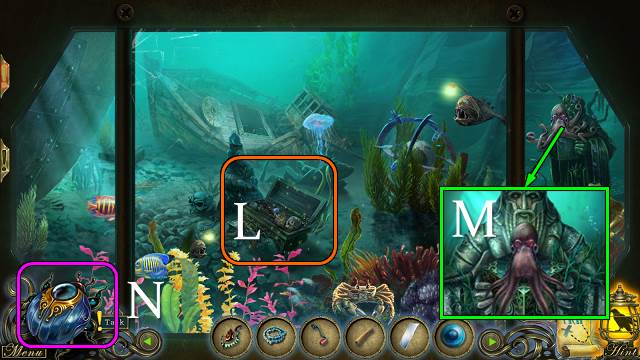
- Play the HOP (L); receive a MASK ARTIFACT.
- Scroll right.
- Use the MIRROR (M).
- Select the Scarab for a mini-game (N).
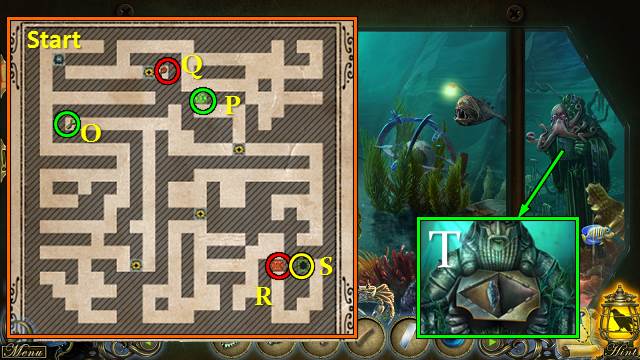
- Take the green key (O); use the green key (P). Take the red key (Q); use the red key (R). Go to the exit (S).
- Take the RAVEN LEVER and note (T).
- Walk down twice.

- Talk to Dupin (U).
- Remove the cover and broken chain. Place the MACHINE CHAIN and MACHINE LEVER. Turn the lever (V).
- Take the MORSE CODE DECODER and BATTERY (W).
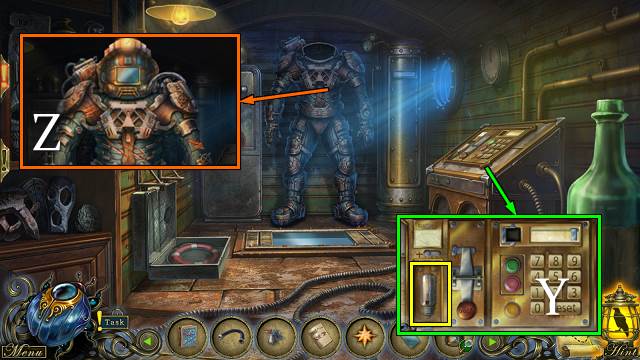
- Go forward.
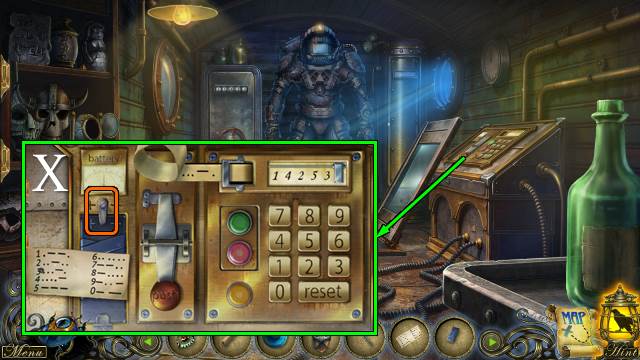
- Place the BATTERY, move the latch and place the MORSE CODE DECODER and MORSE CODE for a mini-game (X).
- Enter 1-4-2-5-3.
- Receive the SAFE CODE.
- Move the latch and take BATTERY 1/3.
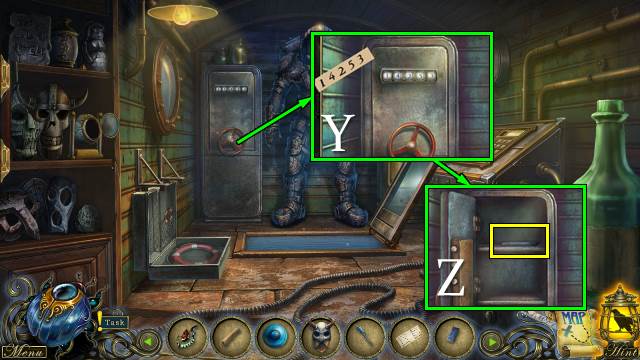
- Place the SAFE CODE and enter the code (Y). Turn the wheel and take BATTERY 2/3 (Z).
- Go to the Tavern.

- Place the FISH EYE (A); take the BAR KEY (B).
- Talk to the barman; give him the MASK ARTIFACT (C).
- Place the BAR KEY (C) and open the doors. Read the notes, open the chest and take BATTERY 3/3 (D).
- Open the door (E).
- Go forward.
Chapter 7: The Lighthouse

- Cut the net with the sickle (F).
- Play the HOP (G); receive the BROKEN MOUSE.
- Take the WINDER (H).
- Take MOUSE WHEEL 1/2 (I). Place and pull the RAVEN LEVER (J).
- Go forward.
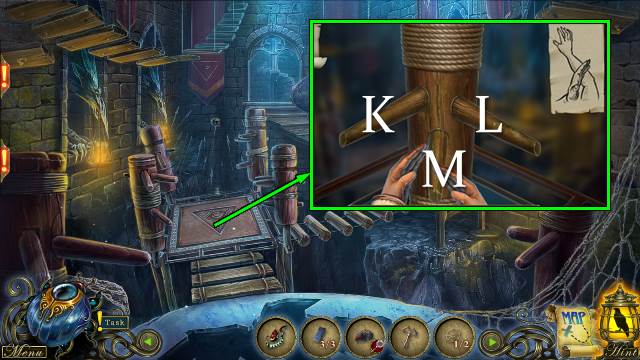
- Play the mini-game.
- Solution: K-K-K-L-L-L; K-K-K-L-L-L-M-M-M; L-M-K-K-L-M.
- You receive TRAM LEVER 1/2.
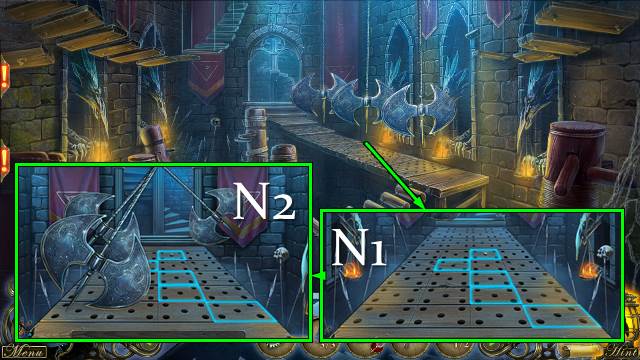
- Play the mini-game (N1-2).
- Receive TRAM LEVER 2/2.
- Go forward.
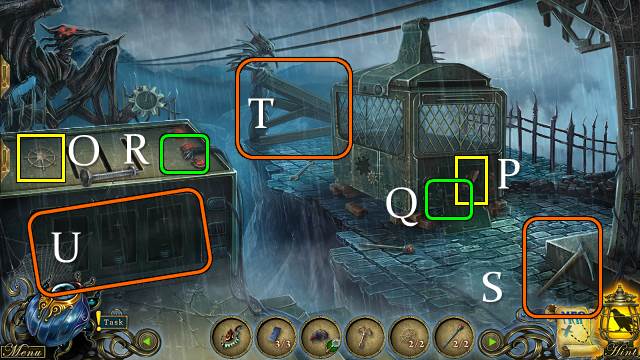
- Take MOUSE WHEEL 2/2 (O).
- Open the hatch and take the SIGNAL GUN (P).
- Put the button (Q) on the cable (R) and move the cable.
- Use the pickaxe (S) on the boards (T).
- Use the pickaxe; place the BATTERY (U).
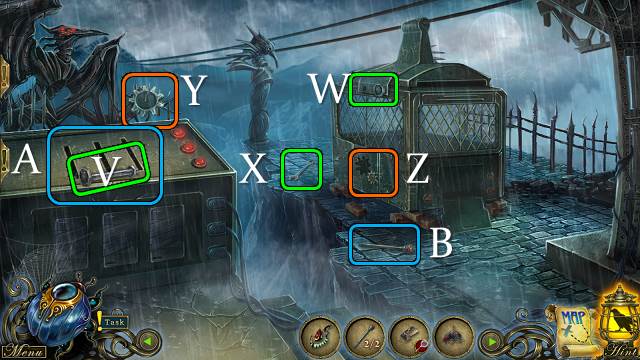
- Place the bolt (V) on the cart (W) and tighten it with the wrench (X).
- Place the cog (Y) on the cart (Z).
- Place the TRAM LEVERS (A) and the third lever (B).
- Move the levers.
- Walk down twice.
- Place the MOUSE WHEELS on the mouse and use the WINDER; take the MECHANICAL MOUSE.
- Release the MECHANICAL MOUSE (C).
- Play the HOP (D); receive the FLARES.

- Select the Scarab (E) for a mini-game.
- Take the green key (F); open the green lock (G). Take the blue key (H); open the blue lock (I). Take the red key (J); open the red lock (K). Go to the exit (L).
- Take the CUBE and note (M).
- Take the SIGNAL GUN out of its holster, open it and place the FLARES.
- Go forward twice.
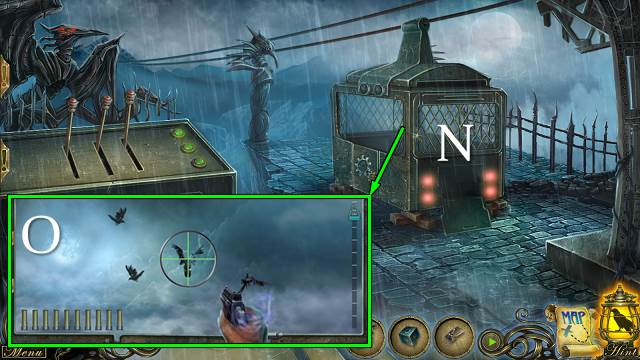
- Enter the cart (N).
- Use the SIGNAL GUN for a mini-game (O).
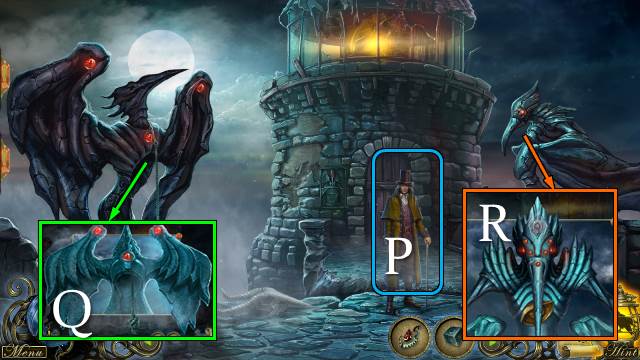
- Talk to Dupin (P).
- Take the ROPE WITH HOOK and MYSTIC EYE (Q).
- Place the MYSTIC EYE; push the eyes in the shown (random) order. Receive the RAVEN'S EYE (R).
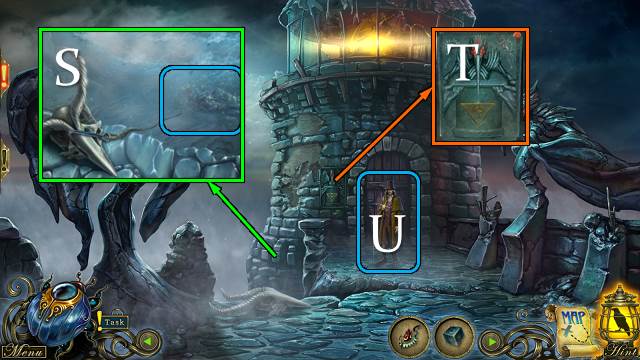
- Place the ROPE WITH HOOK. Play the HOP (S); receive the RAVEN'S TRIANGLE.
- Place the RAVEN'S TRIANGLE and RAVEN'S EYE (T).
- Talk to Dupin (U).
- Play the HOP (S); receive the SCROLL WITH SPELLS.
- Open the door.
- Go forward.
- Interact with the scene twice.
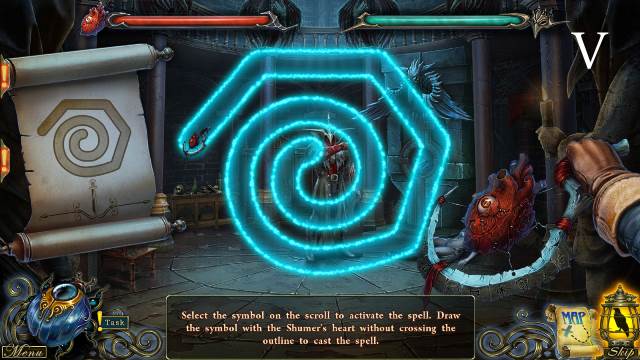
- Place and open the SCROLL WITH SPELLS and place the SUMERIAN HEART for a mini-game (V).
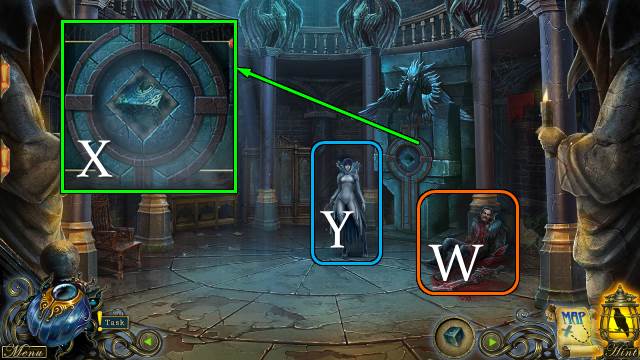
- Talk to the man (W).
- Place the CUBE (X).
- Talk to the White Raven (Y).
- Select an ending.
- Congratulations, you have completed Dark Tales: Edgar Allan Poe's The Raven.
Created at: 2017-01-27