Walkthrough Menu
- General Tips
- Chapter 1: The University at Lucca
- Chapter 2: The University Grounds
- Chapter 3: Casentino
- Chapter 4: Monastery
- Chapter 5: The University Grounds (Revisited)
- Chapter 6: Chapel
General Tips
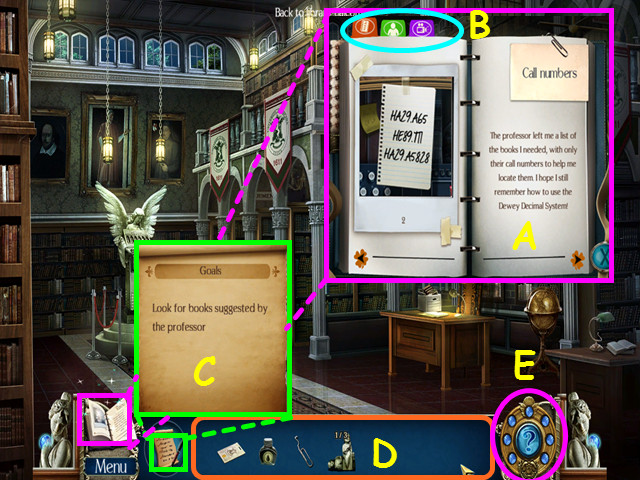
- Hidden Object Scenes will be referred to as HOS in this walkthrough.
- HOS and mini-games are often randomized - your solution may vary.
- Inside the journal you will find the clues and information you have found (A).
- Click on the tabs to view dossiers on the characters and previous cut-scenes (B).
- Select the goals button for your current tasks (C).
- Your inventory is in the bottom panel - click on an item to select it for use (D).
- Hints are unlimited, but you must wait for the hint meter to recharge (E).
Chapter 1: The University at Lucca
- You will have the option of some interactive help.
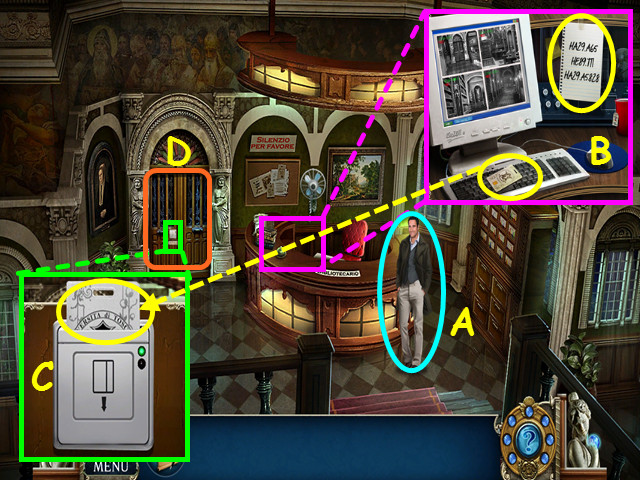
- Talk to Professor Romano (A).
- Look at the reception desk; take the KEY CARD and the LIST (B).
- The LIST will go into your journal.
- Look at the lock on the door then use the KEY CARD on the slot (C).
- Take the KEY CARD back then walk forward through the doors to the library balcony (D).
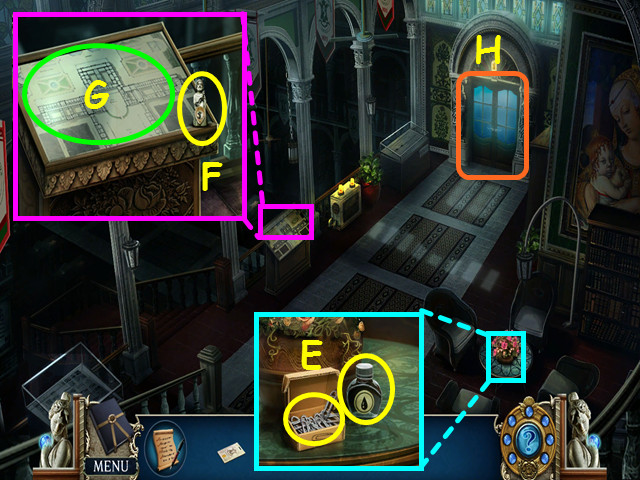
- Look at the table; take the PAPER CLIP and the INK BOTTLE (E).
- Look at the display and take the 1/3 HUMAN FIGURINES (F).
- Click on the map to learn the location of the literature and medical sections (G).
- Look at the door; click several times until the ghost is gone and the door opens (H).
- Walk forward to the literature section.
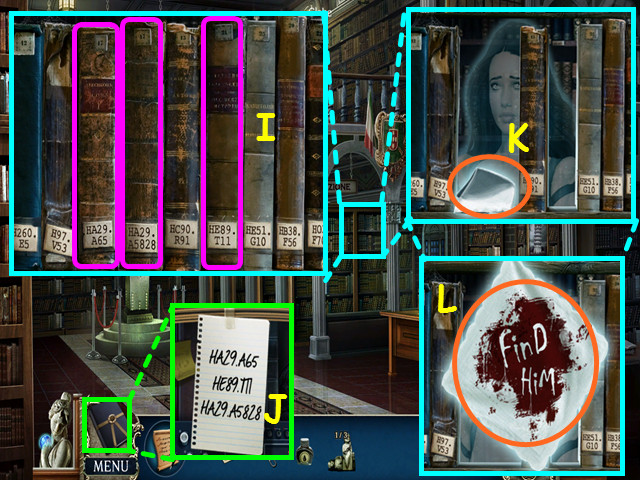
- Look at the bookshelf and click on the 3 books from the list (I).
- Refer to your journal for the list (J).
- Click on the handkerchief (K).
- Click on the bloody handkerchief (L).
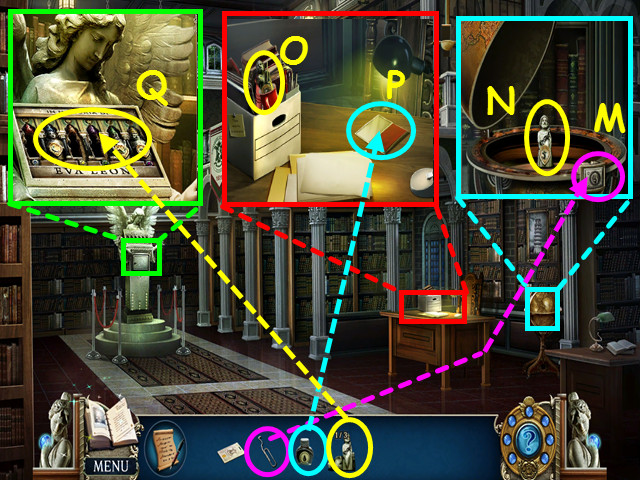
- Look at the globe and use the PAPER CLIP on the lock (M).
- Take the 2/3 HUMAN FIGURINES (N).
- Look at the desk and take the 3/3 HUMAN FIGURINES (O).
- Use the INK BOTTLE on the ink pad (P).
- Look at the angel and use the 3 HUMAN FIGURINES on the display for a mini-game (Q).
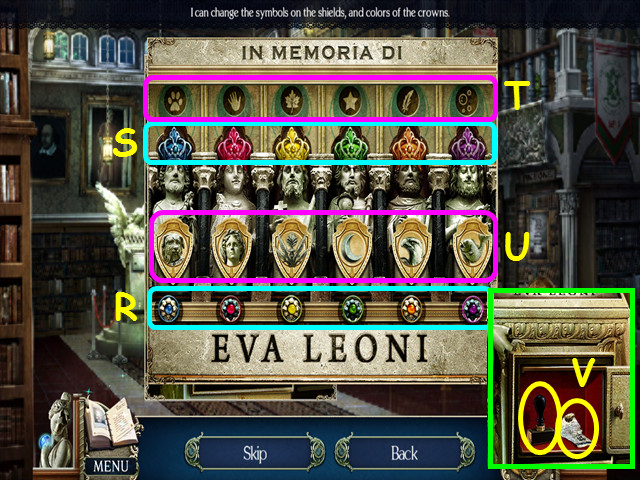
- The gems at the bottom (R) determine the color of the crowns (S); click on the crowns to change the color.
- The symbols at the top (T) determine the content of the shields (U); click on the shields to change the picture.
- For example, the paw print belongs to the dog and the star is over the moon.
- Take the WOODEN STAMP and the 1/3 TORN NEWSPAPER (V).
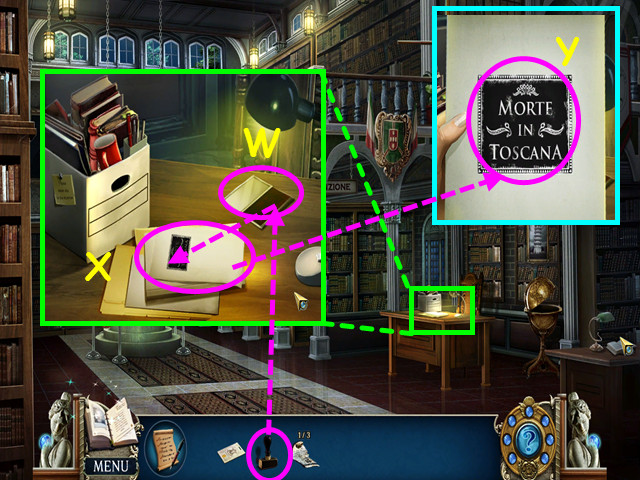
- Look at the desk and use the WOODEN STAMP on the ink pad (W).
- Next use it on the paper (X).
- Take the paper and click on the impression (Y).
- Talk to Professor Romano to learn it may be a book title.
- Walk down twice to return to the library reception.
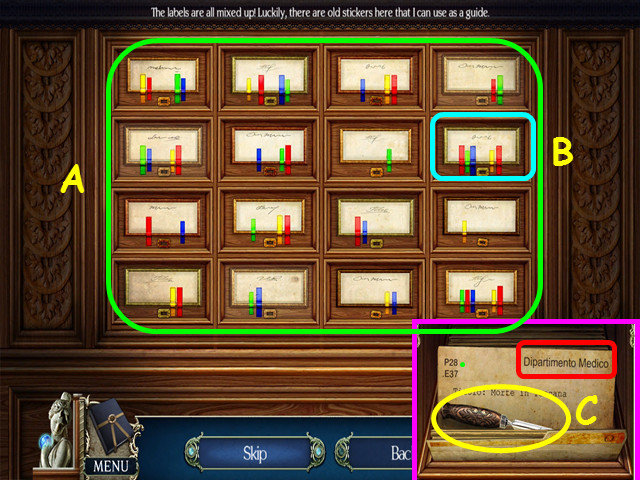
- Look at the card catalog on the right for a mini-game.
- Match the stripes on the labels to the drawers (A).
- Click on 2 labels to swap position.
- Look in the drawer that opens on the right and open the file (B).
- Take the LETTER OPENER and note the book is located in the medical section (C).
- Walk forward to the balcony.
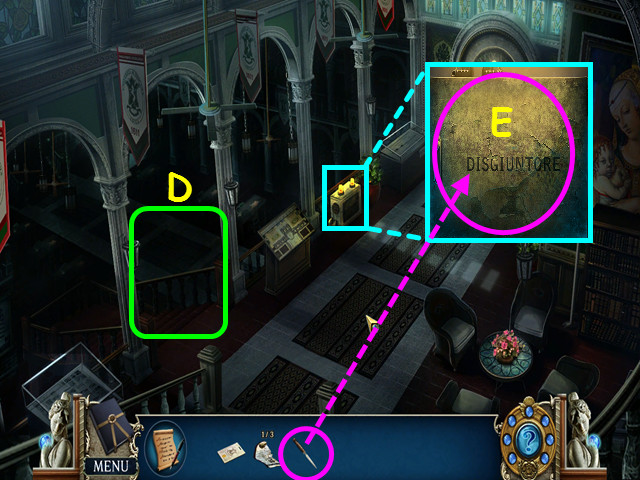
- Note the stairs to the main library (D).
- Look at the circuit breaker and use the LETTER OPENER on the cover for a mini-game (E).
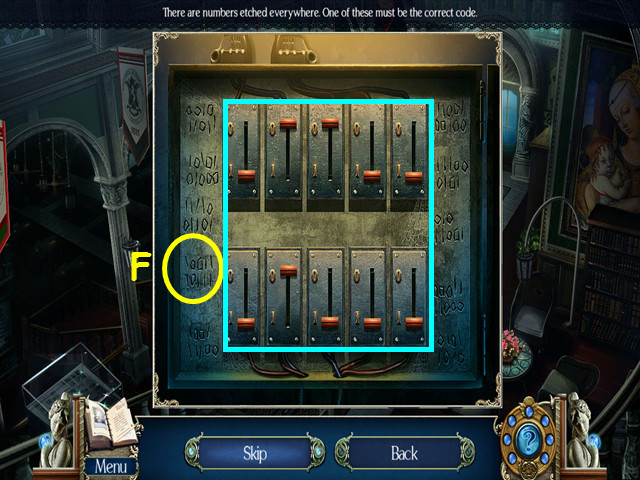
- Move the breakers to match one of the codes etched into the metal (F).
- Drag each breaker to the '1' or '0' position.
- Enter the main library.
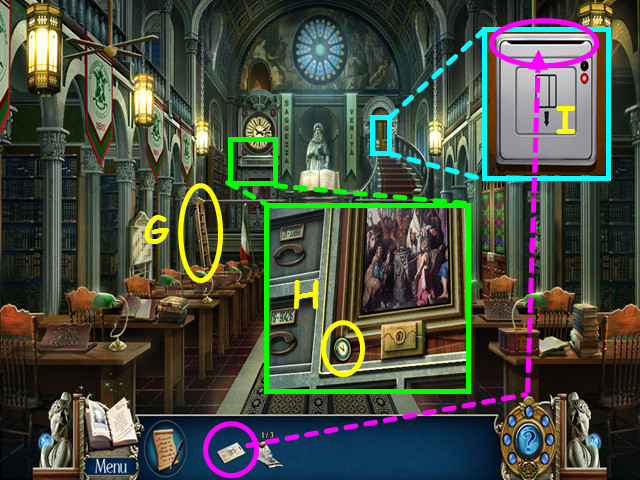
- Take the LADDER (G).
- Look at the painting and take the 1/3 NUMBERED KNOB (H).
- Look at the lock on the door then use the KEY CARD on the slot (I).
- Walk forward to the medical section.
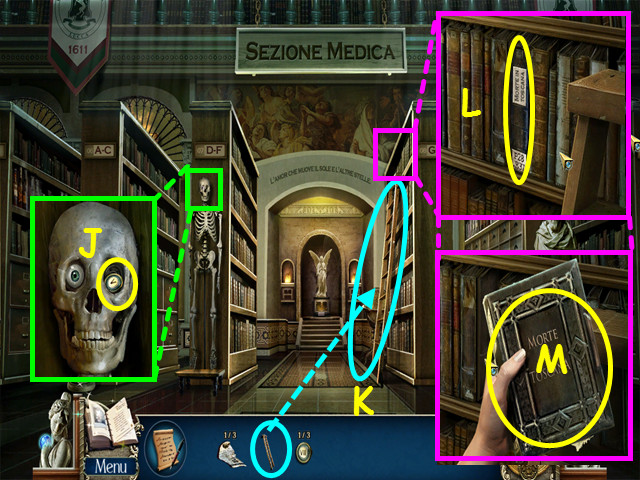
- Look at the skeleton and take the 2/3 NUMBERED KNOB (J).
- Place the LADDER on shelf L-P (K).
- Look at Shelf L-P and take the book (L).
- Open the book for a HOS (M).
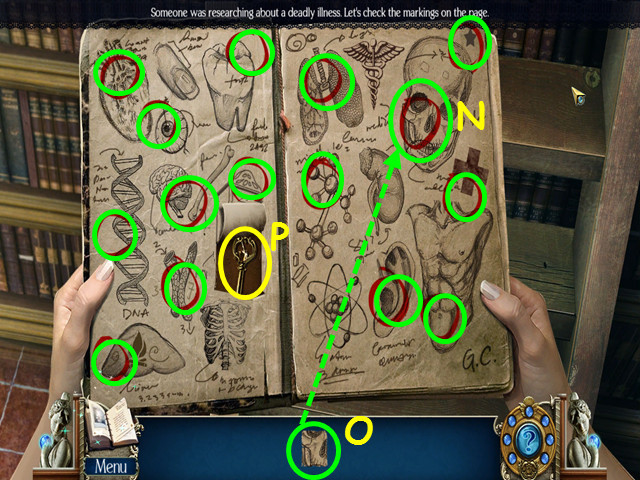
- Locate the spot (N) on the pages depicted by the scraps of paper (O).
- Take the SMALL IRON KEY (P).
- Walk down to the main library.
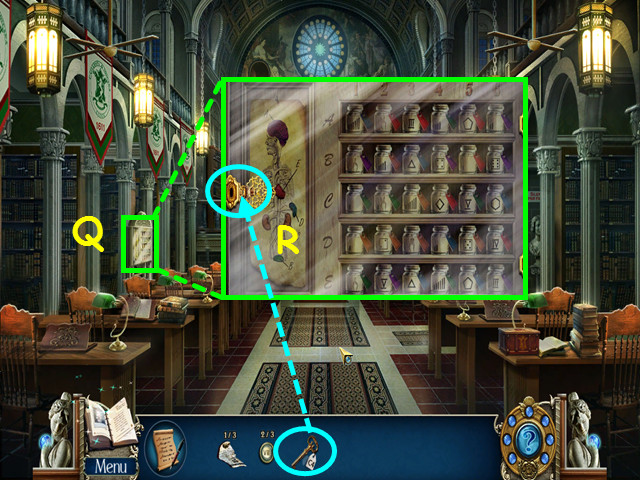
- Look at the cabinet on the left (Q).
- Use the SMALL IRON KEY in the lock for a mini-game (R).
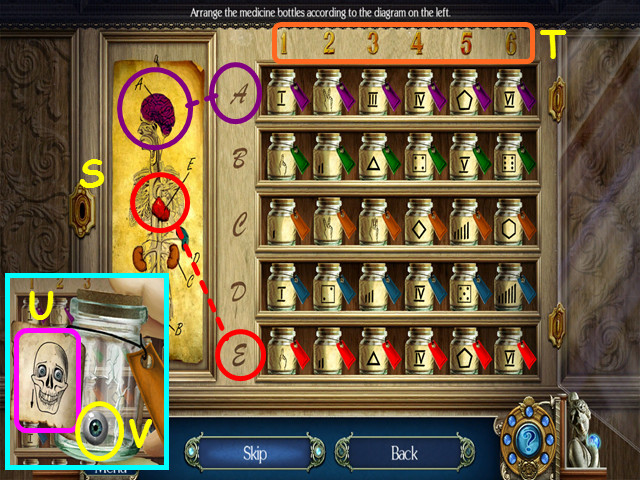
- Move the jars to the shelves indicated by the colors in the diagram (S).
- Place the jars in numerical order (T).
- Click on 2 jars to swap positions.
- Peel the label on the jar (U).
- Take the GLASS EYE (V).
- Return to the Medical section.
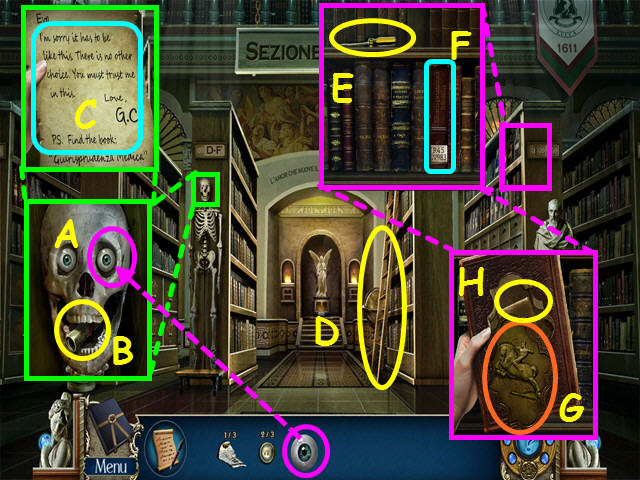
- Look at the skeleton and place the GLASS EYE in the socket (A).
- Take the scroll from the skeleton's mouth (B); click on it to read about another book to find (C).
- Take the LADDER (D).
- Look at the Q-U shelf and take the SCREWDRIVER (E).
- Click on the book (F).
- Drag the brass plate down (G).
- Take the note; click on it several times to unfold, then read about the gardens (H).
- Walk down to the main library.
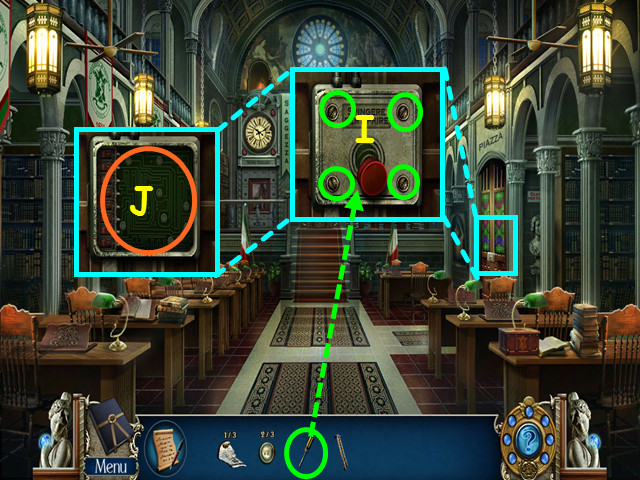
- Look at the garden doors and use the SCREWDRIVER on the 4 screws (I).
- Click on the circuitry for a mini-game (J).
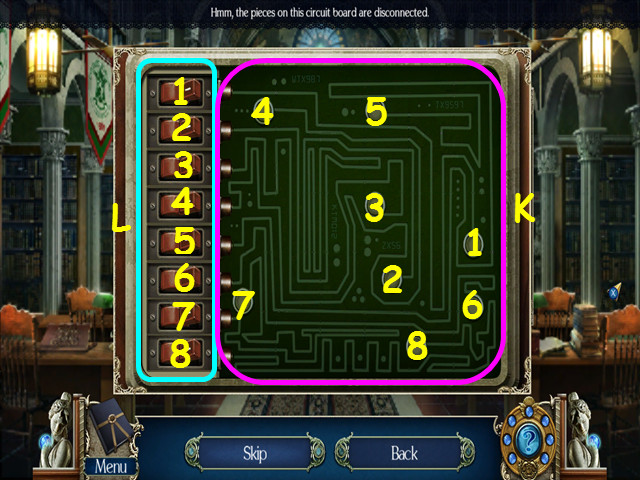
- For the first part of this mini-game, click on the green squares to rotate them and repair the circuit board so all lines are connected (K).
- For the second part, flip a switch on the left (L), then follow the line from the switch to the button at the end and press the button.
- Do this for all 8 switches (1-8).
- Walk to the right.
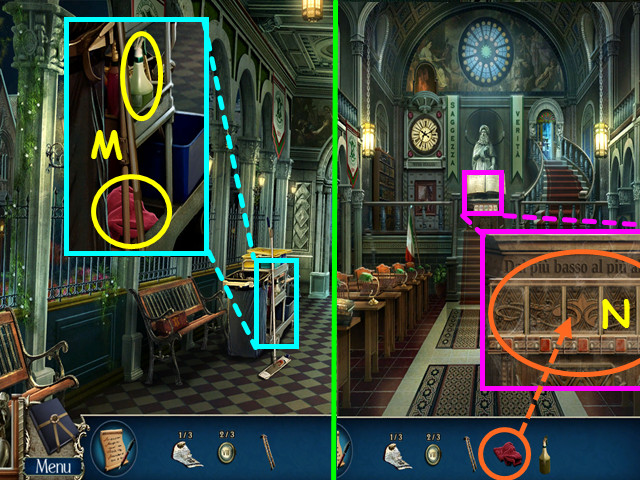
- Look at the cleaning trolley; take the CLEANING RAG and the GLASS CLEANING SOLUTION (M).
- Walk down to return to the main library.
- Look at the book stand and use the CLEANING RAG to remove the dust for a mini-game (N).
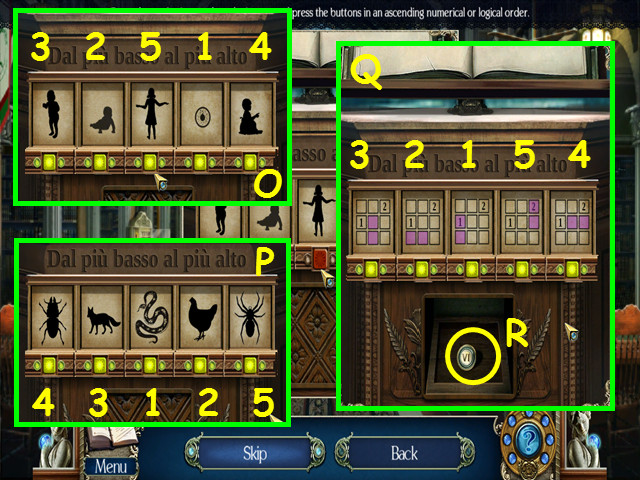
- Look at the figures and press the buttons in ascending order.
- The first set starts with an embryo and ends with a young girl (O).
- The second set is based on the number of legs (P).
- The third set is based on the position of the 2 light squares as they rotate in the grid (Q).
- Take the 3/3 NUMBERED KNOB (R).
- Walk right, then go forward to the plaza.
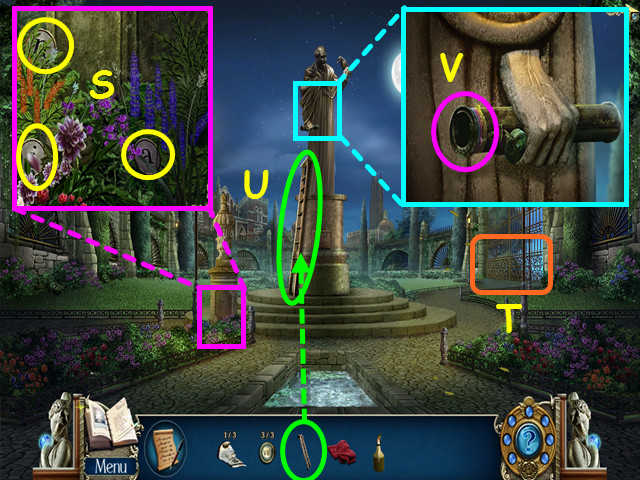
- Look at the base of the sculpture and take 3 of the 7 STONE LETTERS (S).
- Note the locked gate on the right (T).
- Place the LADDER on the statue (U).
- Zoom into the statue and look into the spyglass for a mini-game (V).
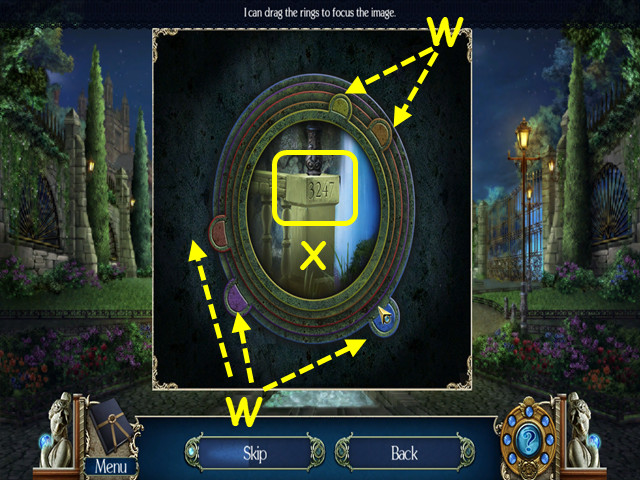
- Move the colored tabs to bring the object into focus (W).
- Note the number etched onto the bridge (X).
- Look at the gate for a mini-game.
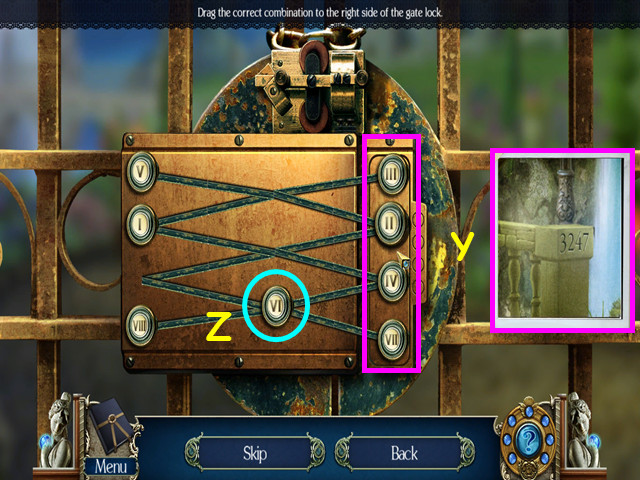
- Place the 3 NUMBERED KNOBS into the empty spaces to trigger the mini-game.
- Drag the knobs to reflect the number from the bridge that is noted in your journal (Y).
- Note that knobs can sit in the junctions (Z).
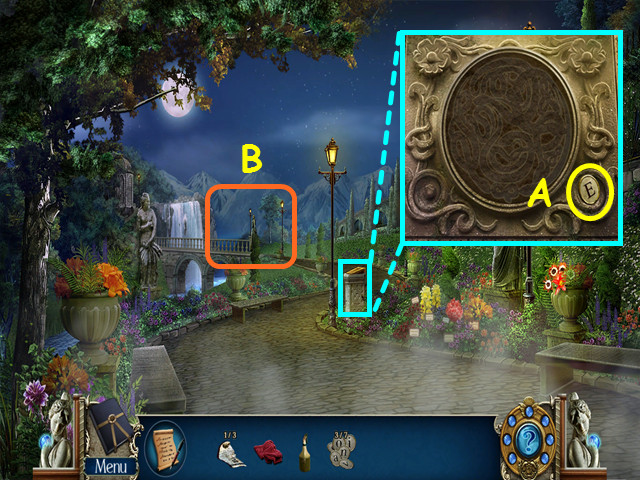
- Look at the plaque and take the 4/7 STONE LETTERS (A).
- Walk towards the bridge (B).
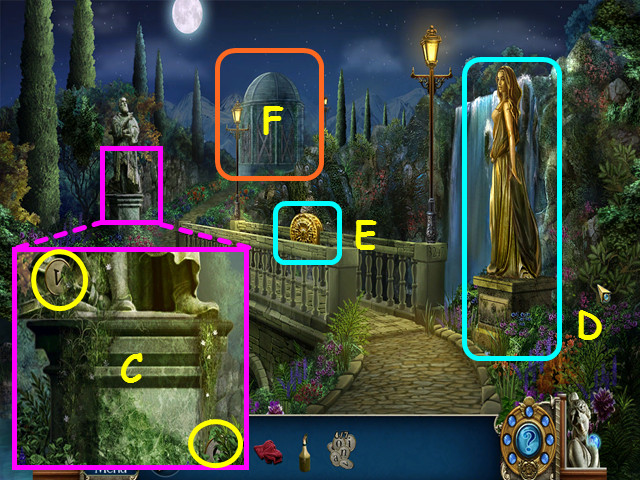
- Look at the statue and take the 5/7 and 6/7 STONE LETTERS (C).
- Note the statue of Eva (D).
- Note the ornament on the bridge (E).
- Walk towards the domed building (F).
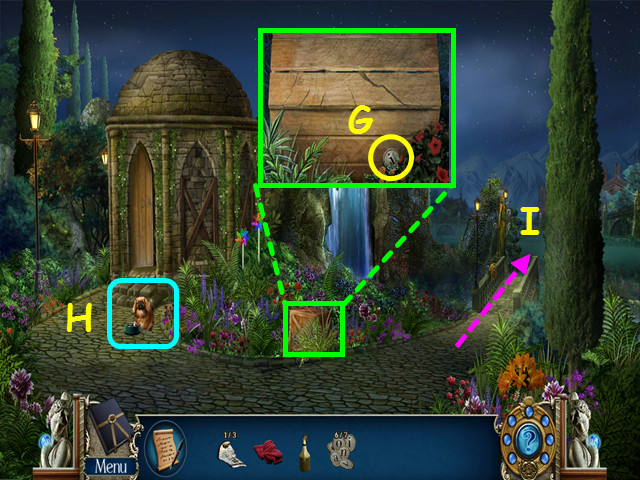
- Look at the crate and take the 7/7 STONE LETTERS (G).
- Note the dog guarding the domed building (H).
- Return to the bridge area (I).
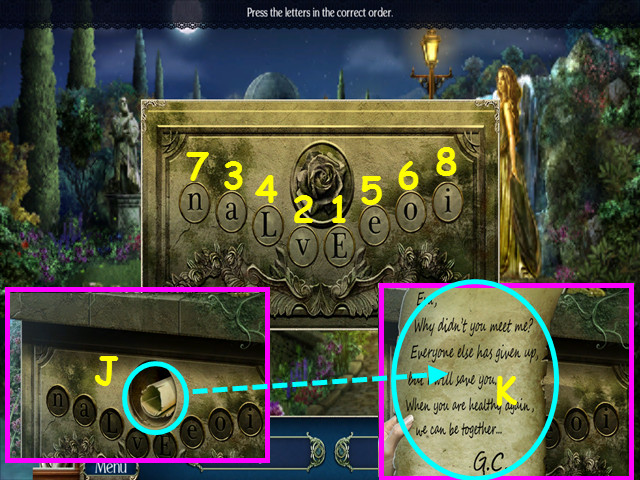
- Look at the statue of Eva and place the 7 STONE LETTERS on the plaque for a mini-game.
- Press the letters to spell E-v-a-L-e-o-n-i (1-8).
- Take the scroll (J); then click on the note to read it (K).
- After the ghost departs, look at the ornament on the bridge.
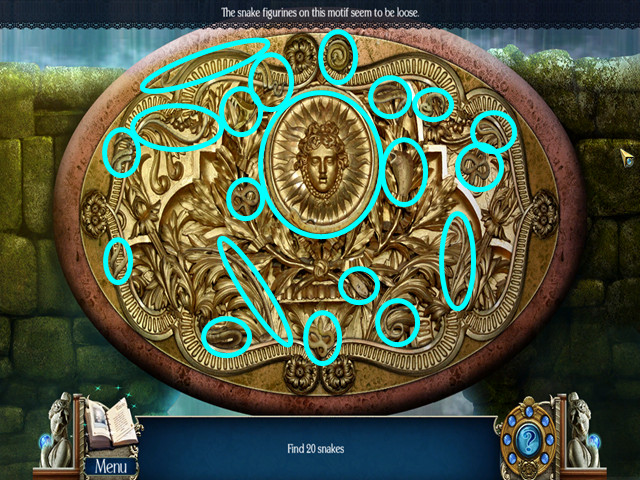
- Locate the 20 snakes.
- You will earn the SNAKE FIGURINE.
- Walk down.
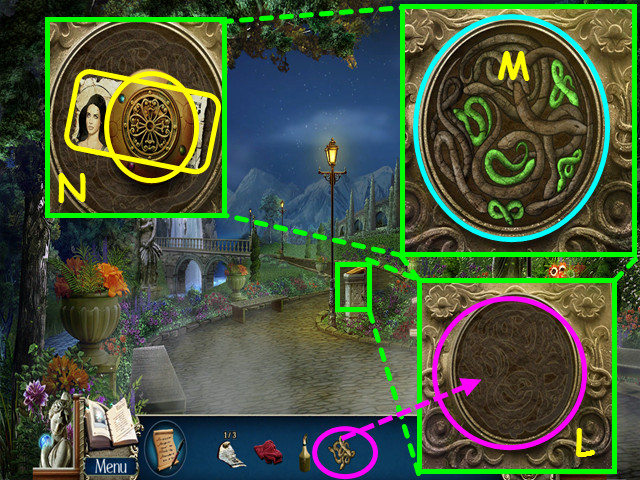
- Look at the plaque and place the SNAKE FIGURINE in the center (L).
- Click on any 5 snakes that are not next to each other (M).
- Take the COPPER DISK and the 2/3 TORN NEWSPAPER (N).
- Return to the medical section of the library.
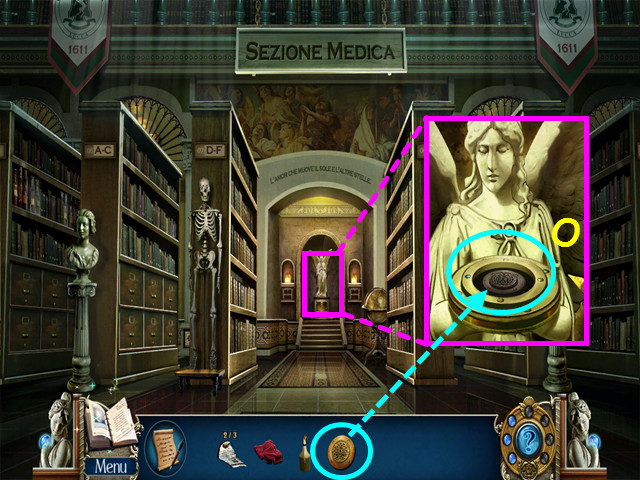
- Look at the angel and place the COPPER DISK into the center of the object she is holding (O).
- This will activate a mini-game.
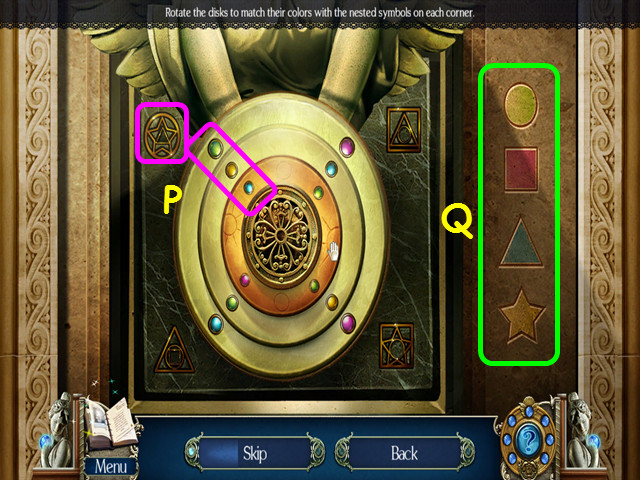
- Rotate the 3 dials so the colors in each corner correspond with the symbol in each corner (P).
- The circle is green, the star is yellow and the triangle is blue.
- Use the color legend on the right (Q).
- The statue will move to reveal a secret chamber.
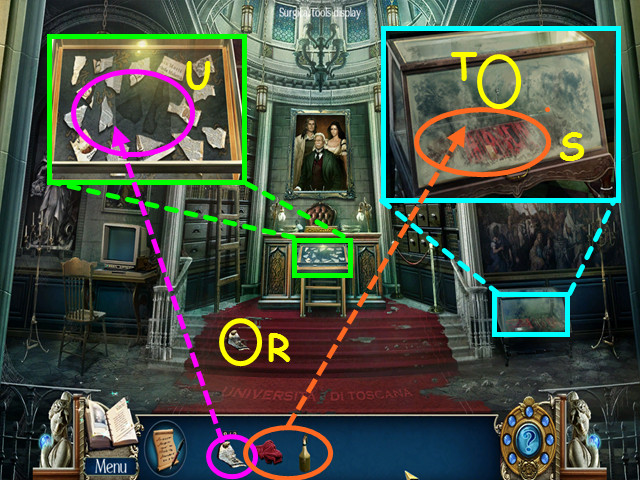
- Take the 3/3 TORN NEWSPAPER (R).
- Look at the display case and use the GLASS CLEANING SOLUTION, then the CLEANING RAG on the glass (S).
- Open the case and take the SILVER KEY (T).
- Look at the center case and use the 3 TORN NEWSPAPERS on it for a mini-game (U).
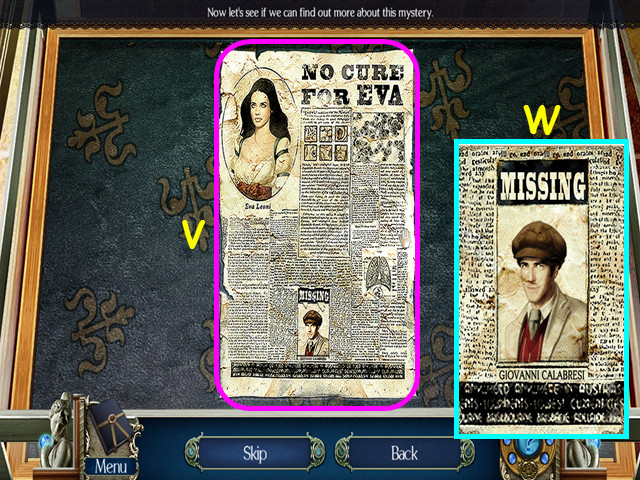
- Restore the torn newspaper by fitting the pieces into the rectangle (V).
- Click on a piece to rotate it to the correct orientation, then drag the piece into position.
- Look at the 'Missing' announcement (W).
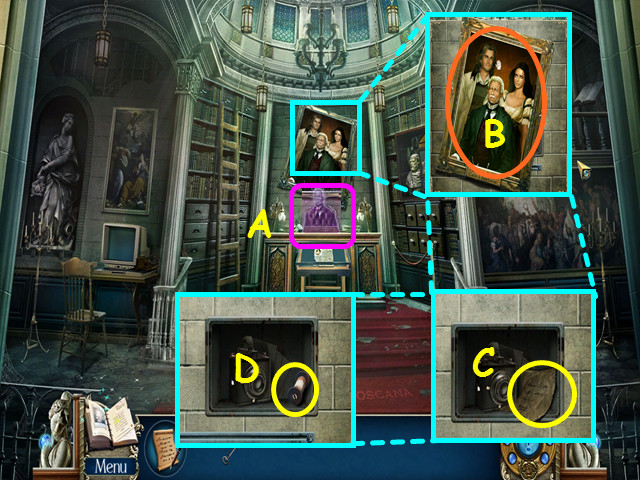
- Look at the ghost behind the desk (A).
- Zoom in on the family portrait, click on the portrait to reveal a compartment (B).
- Take the note (C).
- Take the UNDEVELOPED FILM (D).
- Walk down twice.
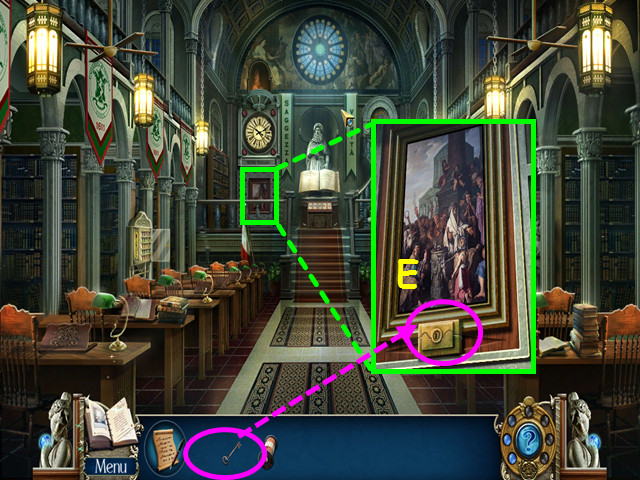
- Look at the painting and use the SILVER KEY on the lock (E).
- This will trigger a HOS.
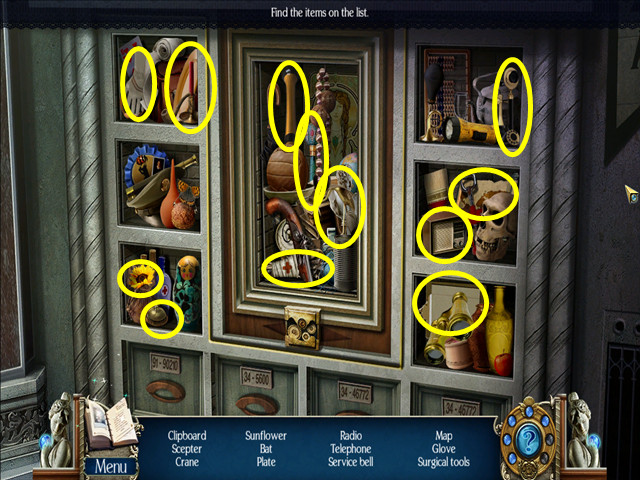
- Locate all the items on the list.
- You will earn the SURGICAL TOOLS.
- Return to the secret chamber.
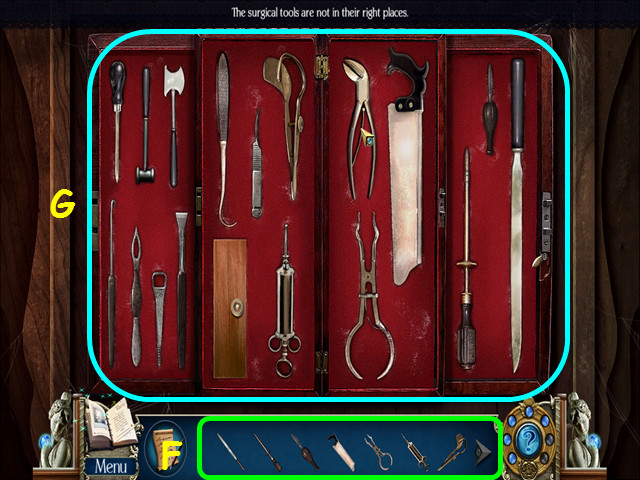
- Look at the display case on the right; use the SURGICAL TOOLS on the case for a mini-game.
- Place the tools from the bottom (F) into the matching spots in the top area (G).
- You will earn the SCISSORS.
- Walk down twice, then go to the right.
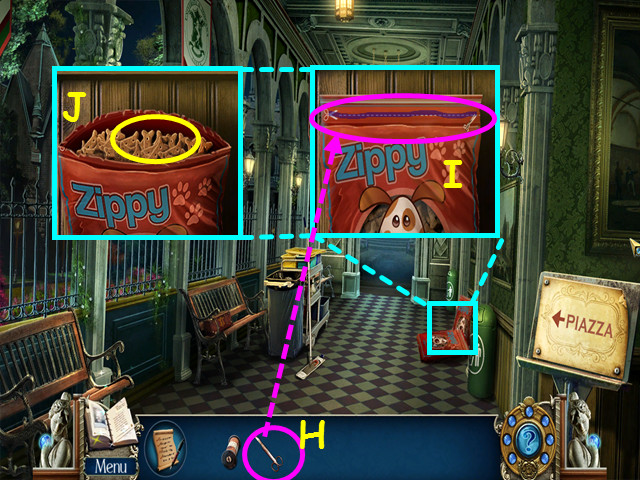
- Look at the dog biscuits and use the SCISSORS on them (H).
- Drag the point of the scissors over the dotted line (I).
- Take the DOG BISCUITS (J).
- Return to the domed building area.
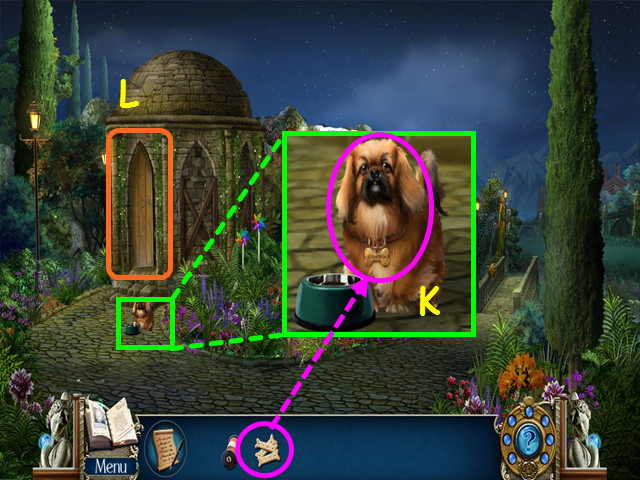
- Look at the dog and give him the DOG BISCUITS (K).
- Enter the domed building (L).
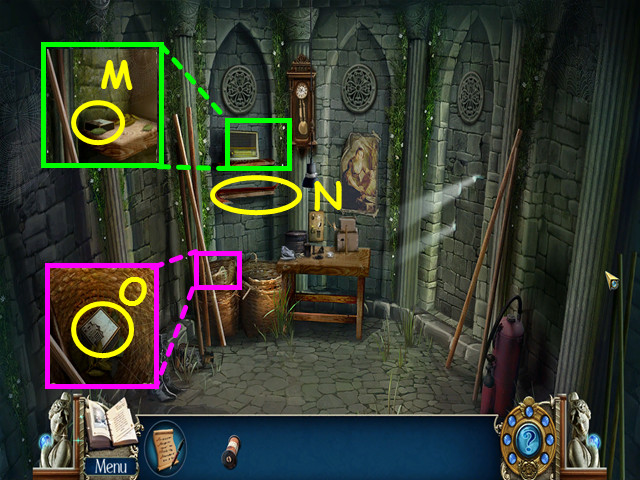
- Look on the radio shelf and take the 1/3 WOODEN CUBES (M).
- Take the CROWBAR (N).
- Look in the basket and take the 2/3 WOODEN CUBES (O).
- Exit the building.
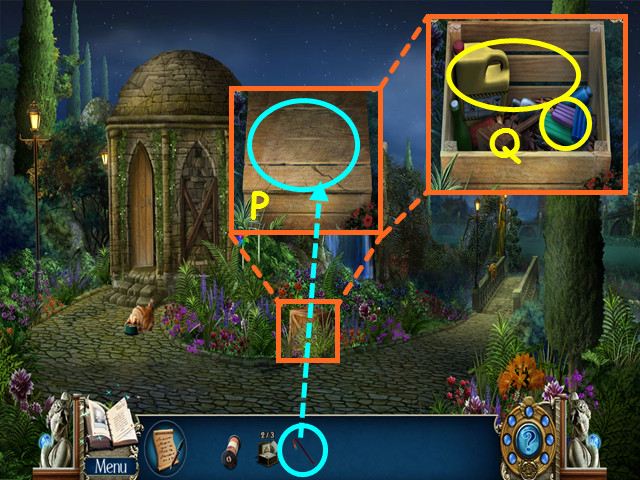
- Look at the crate and use the CROWBAR to open it (P).
- Take the MODELING CLAY and the FILM DEVELOPING CHEMICALS (Q).
- Enter the domed building.
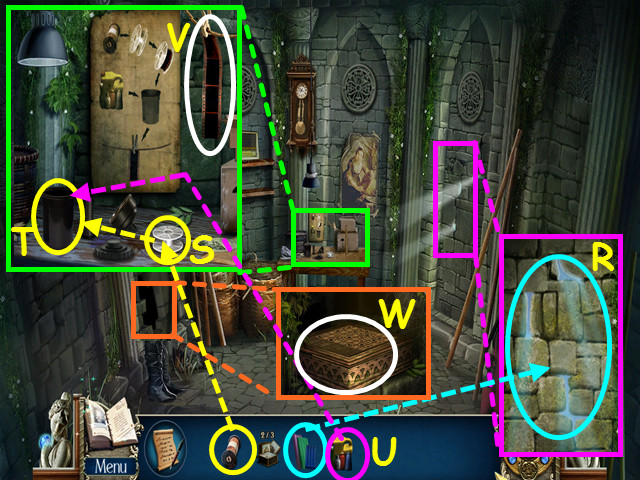
- Look at the gaps in the wall and use the MODELING CLAY 3 times to fill the holes (R).
- Look at the table and place the UNDEVELOPED FILM on the reel (S).
- Place the reel into the container (T).
- Place the FILM DEVELOPING CHEMICALS into the container (U).
- The WET FILM will go into your inventory; place it on the line to dry (V).
- Click on the dried film for a cut scene.
- Look in the hole in the wall and look at the box for a mini-game (W).
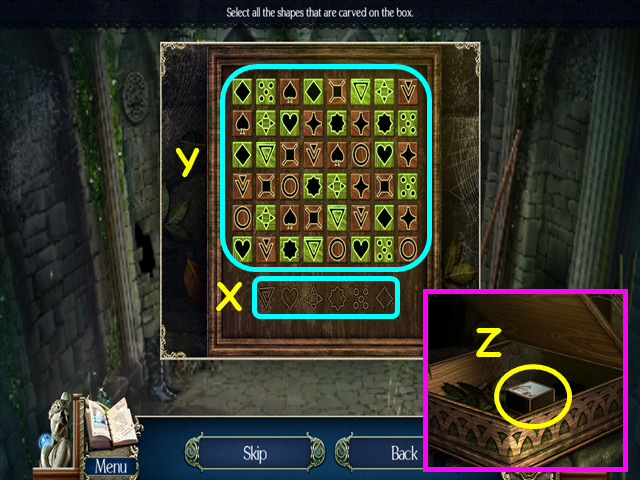
- Look at the symbols in the bottom section (X).
- Press all instances of the bottom symbols in the top section (Y).
- Take the 3/3 WOODEN CUBES (Z).
- Return to the secret chamber.
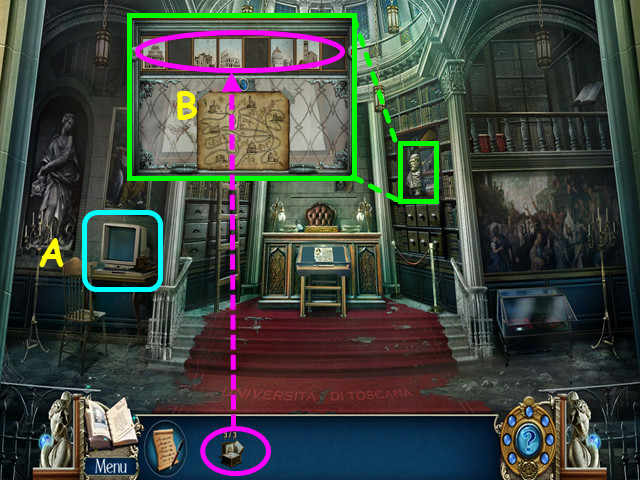
- Note the microfiche scanner on the left (A).
- Look at the collection display and use the 3 WOODEN CUBES on the top to trigger a mini-game (B).
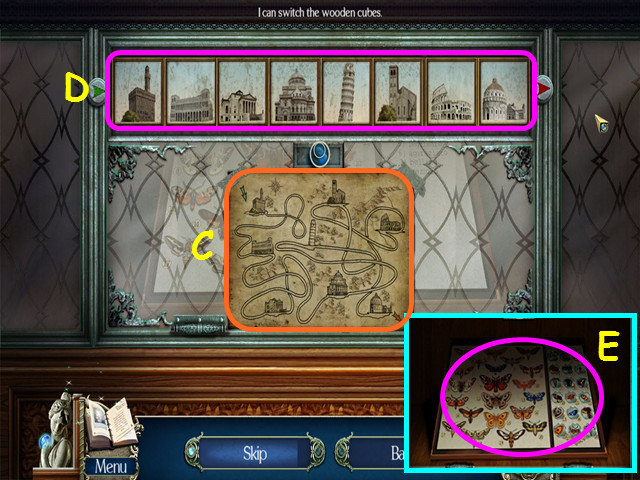
- Starting in the upper left of the map, note the buildings and the order they appear on the road (C).
- Click on the cubes to match the buildings in order as on the map (D).
- Select the moth collection for a mini-game (E).
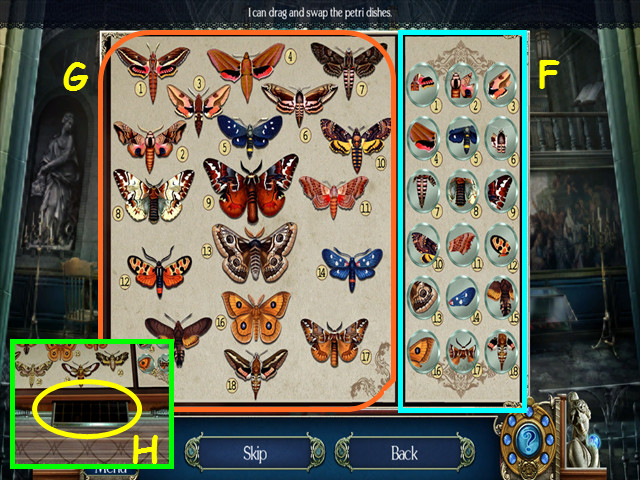
- Switch the petri dishes on the right (F) so the cross-section shown matches the numbered moth on the left (G).
- Click on 2 petri dishes to swap positions.
- Take the MICROFILM (H).
- Look at the microfiche scanner on the left.
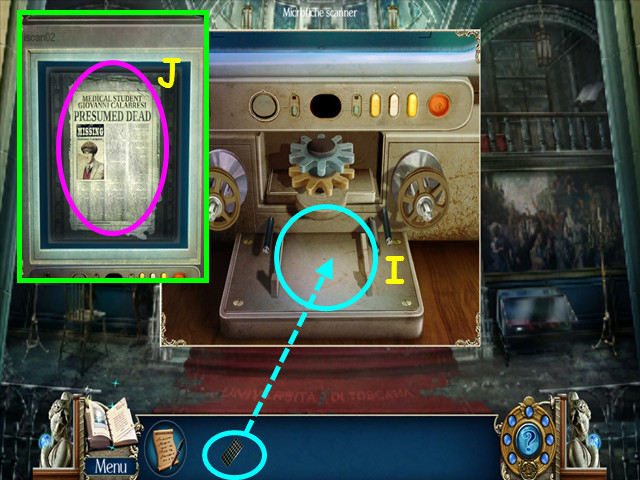
- Place the MICROFILM into the scanner (I).
- Click on the image (J).
Chapter 2: The University Grounds
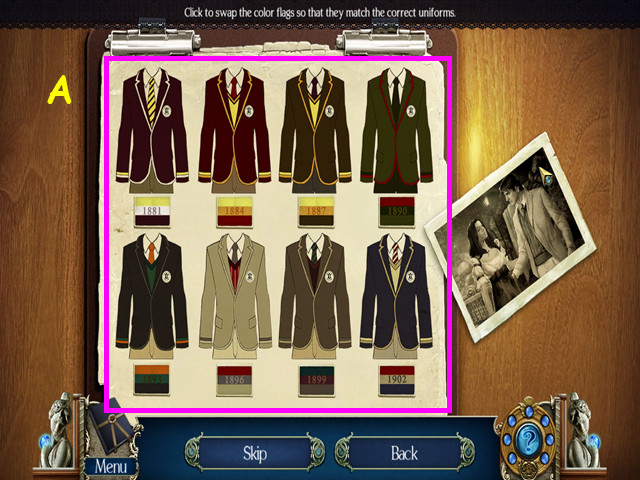
- Talk to Professor Romano for a mini-game.
- Put the flags in order by date (A).
- Click on 2 flags to swap position.
- Walk forward to the hall.
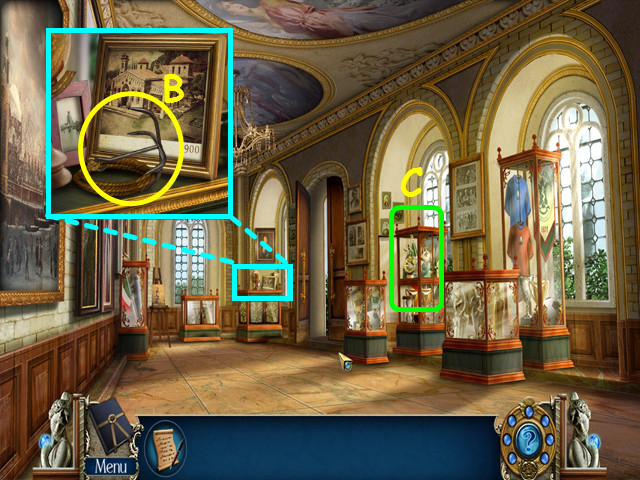
- Look at the display case and take the GRAPPLING HOOK (B).
- Look at the trophy display for a HOS (C).
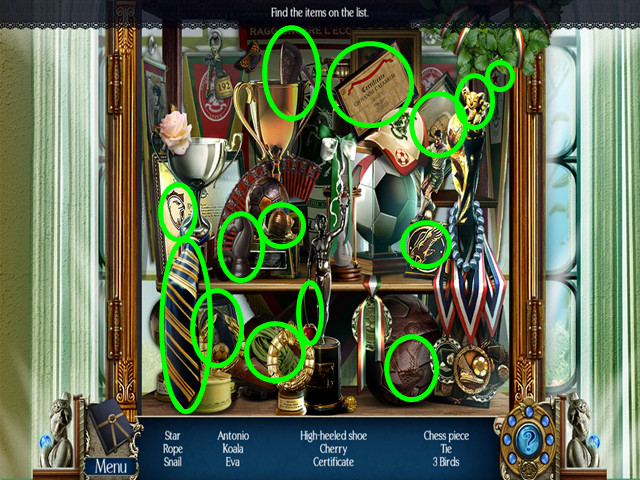
- Locate all the items on the list.
- You will earn GIOVANNI'S CERTIFICATE.
- Walk down to the record's office.
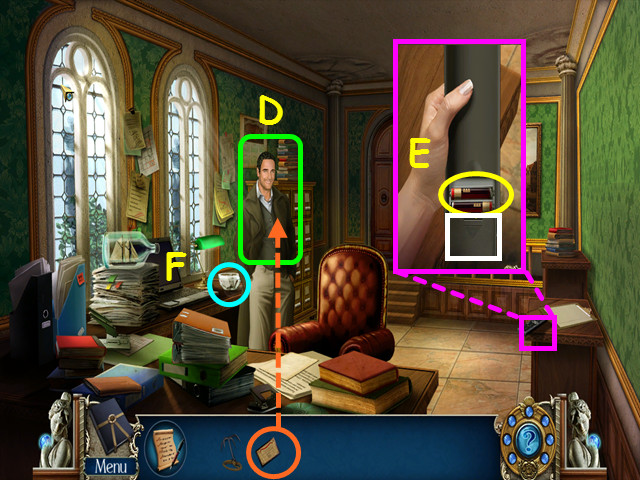
- Give GIOVANNI'S CERTIFICATE to Professor Romano (D).
- Look at the remote control, drag the cover down and take the BATTERIES (E).
- Look at the glass bowl for a mini-game (F).
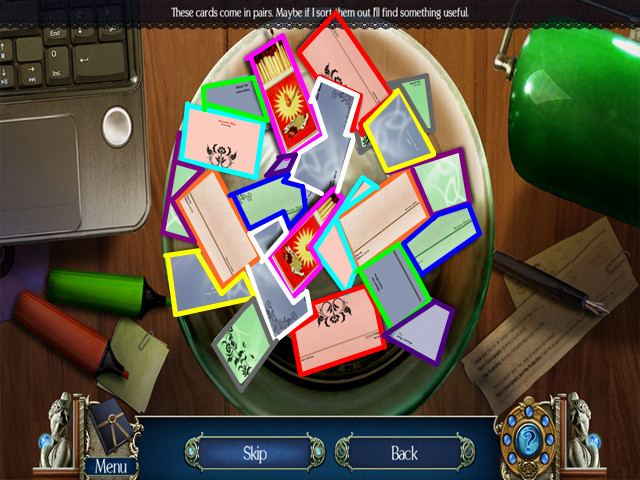
- Click on matching pairs to remove them from the bowl.
- You will earn the MATCHES.
- Walk forward twice to the university grounds.
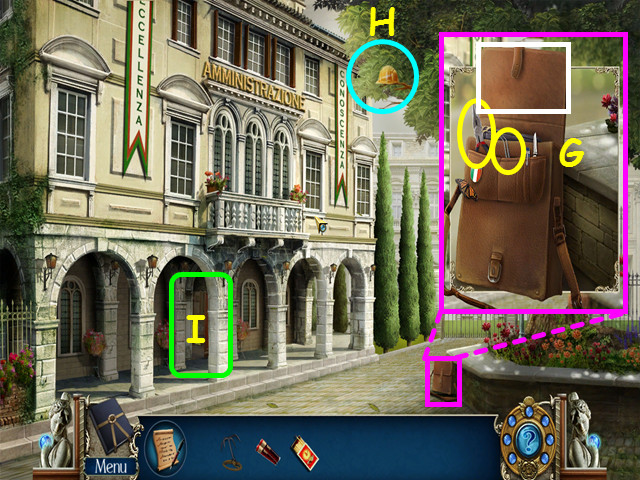
- Look at the student bag and open the flap; take the TWEEZERS and the WIRE CUTTERS (G).
- Note the helmet in the tree (H).
- Return to the Hall (I).
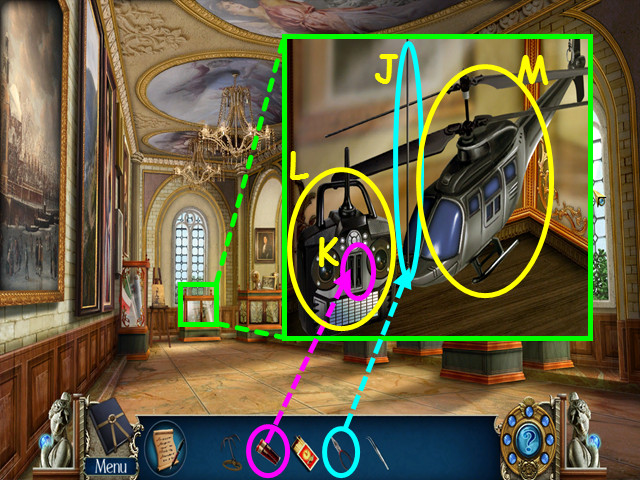
- Look at the student's work display and use the WIRE CUTTERS on the wire (J).
- Place the BATTERIES into the controller (K).
- Take the controller (L) and the helicopter (M) to get the REMOTE-CONTROLLED HELICOPTER.
- Return to the records office.
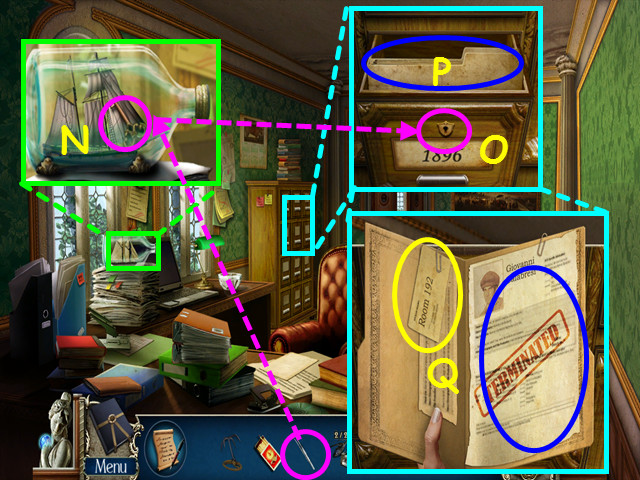
- Look at the ship in the bottle and use the TWEEZERS to get the CABINET KEY (N).
- Look at the cabinet and use the CABINET KEY on the lock (O).
- Click on the files (P).
- Take the DORM ADDRESS and read the termination letter (Q).
- Return to the University grounds.
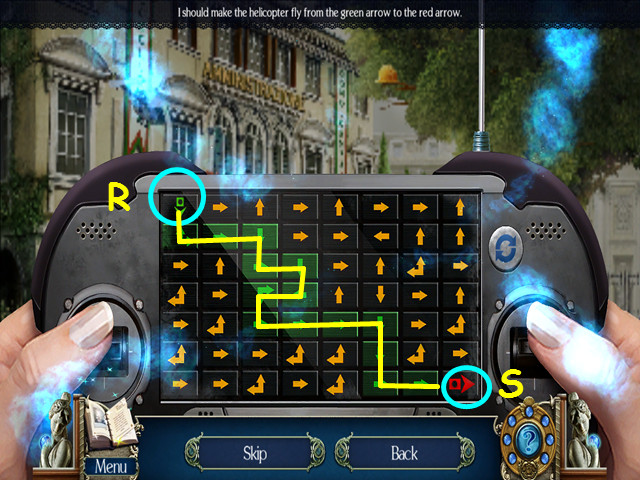
- Use the REMOTE-CONTROLLED HELICOPTER on the helmet for a mini-game.
- Make a path from start (R) to finish (S) by clicking on the arrows.
- Take the HELMET once it falls to the ground.
- Walk to the right.
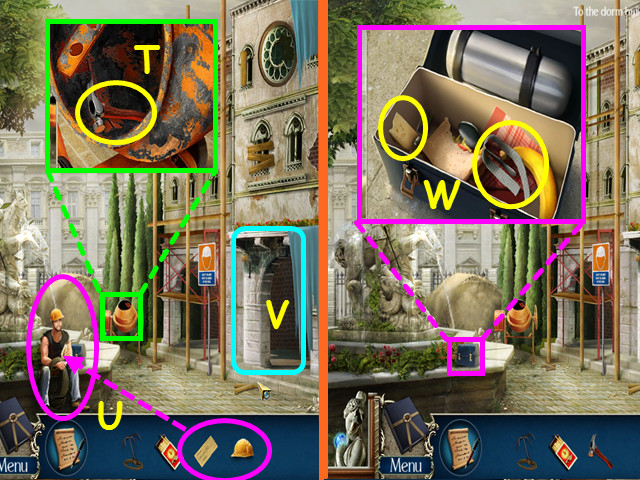
- Look in the cement mixer and take the HAMMER (T).
- Give the HELMET and the DORM ADDRESS to the construction worker (U).
- Enter the dorm lobby then exit immediately (V).
- Look at the lunch box; take the CHEESE and the WICK (W).
- Return to the dorm lobby.
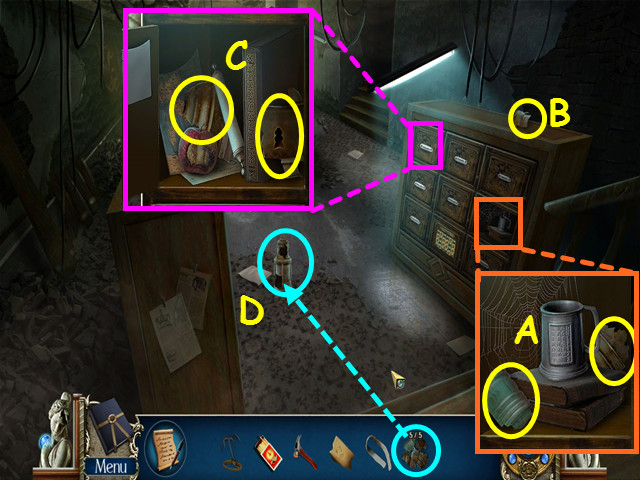
- Look in the open locker and take the 1/5 and 2/5 BROKEN GLASS (A).
- Take the 3/5 BROKEN GLASS (B).
- Look at the locker and open the door; take the 4/5 and 5/5 BROKEN GLASS (C).
- Use the 5 BROKEN GLASS on the lantern for a mini-game (D).
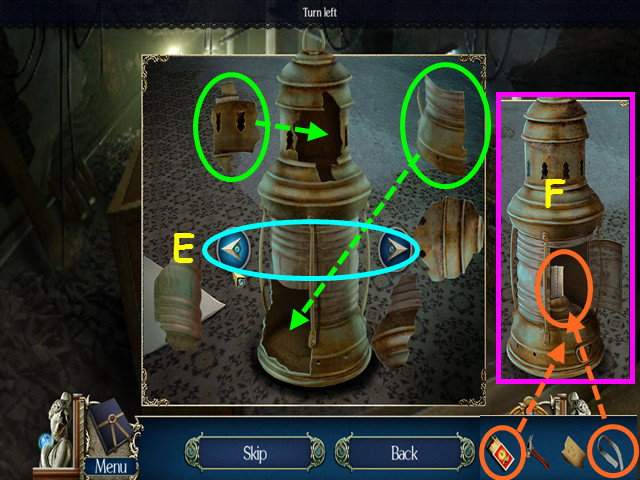
- Use the arrows to rotate the lantern (E).
- Click on a piece to rotate it to the correct orientation, then drag the piece into position.
- Place the WICK inside the lantern and use the MATCHES to light the wick (F).
- Take the LANTERN.
- Use the LANTERN on the stairs.
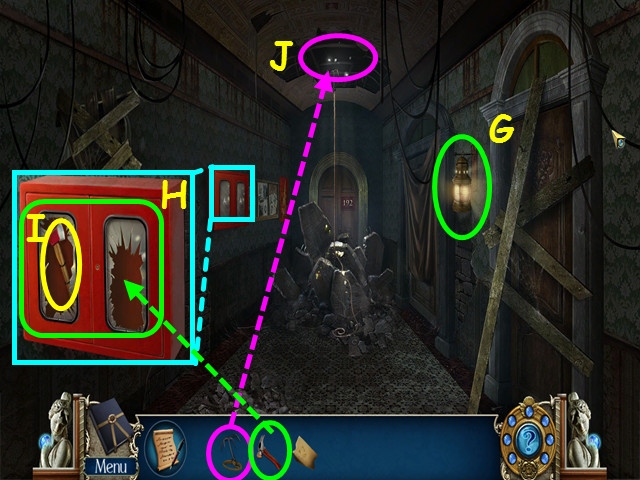
- Hang the lantern on the hook (G).
- Look at the emergency case and use the HAMMER on the glass panels (H).
- Take the FIRE AXE (I).
- Use the GRAPPLING HOOK on the ceiling rails (J).
- Move forward.
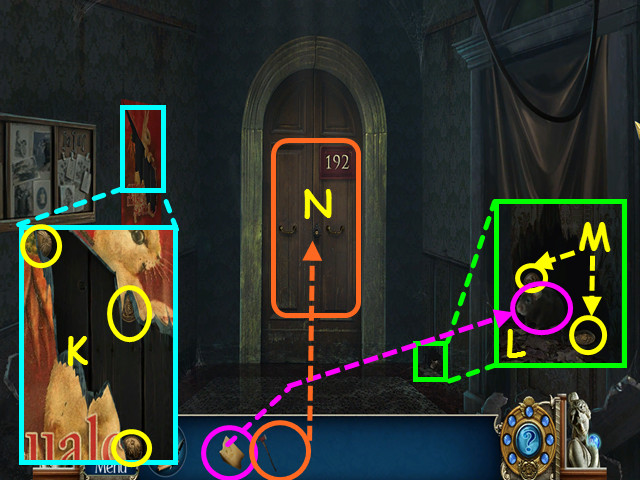
- Look at the poster and take the 1/5, 2/5, and 3/5 BRASS COINS (K).
- Look at the mouse hole and give the CHEESE to the mouse (L).
- Take the 4/5 and 5/5 BRASS COINS (M).
- Look at the door and use the FIRE AXE several times to create an opening (N).
- Walk down twice to the locker area then look at the bottom center locker for a mini-game.
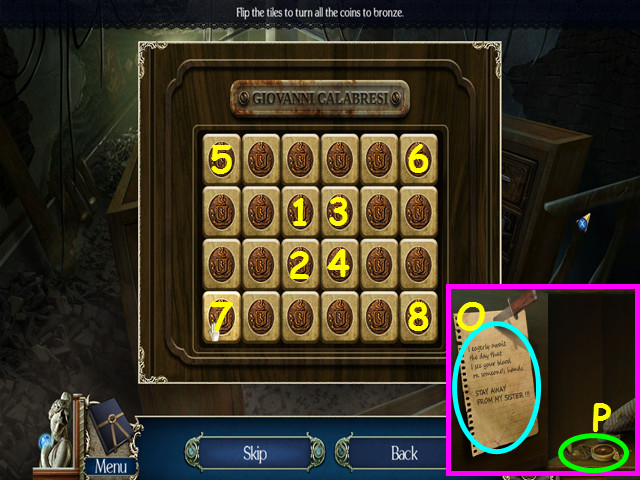
- Use the 5 BRASS COINS on the grid to activate the mini-game.
- Click on the coins to flip them all over to bronze.
- Each coin you flip will affect other coins.
- Click on the coins in numeric order (1-8).
- Read the note (O).
- Select the locket for a mini-game (P).
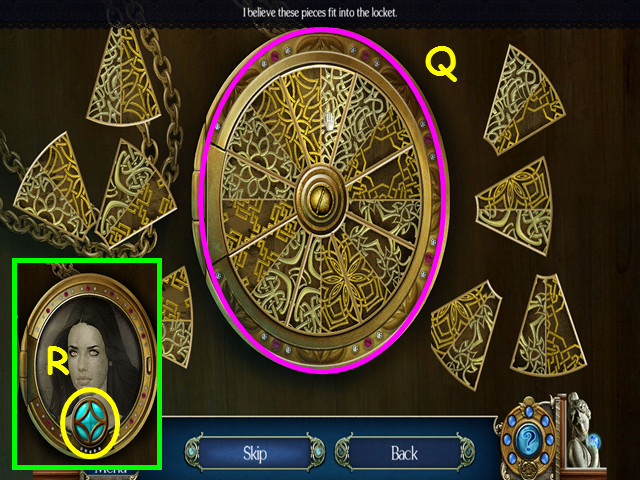
- Restore the front of the locket (Q).
- Click on a piece to rotate it to the correct orientation, then drag the piece into position.
- Pieces correctly placed will lock into position.
- Take the GEM (R).
- Return upstairs and enter room 192.
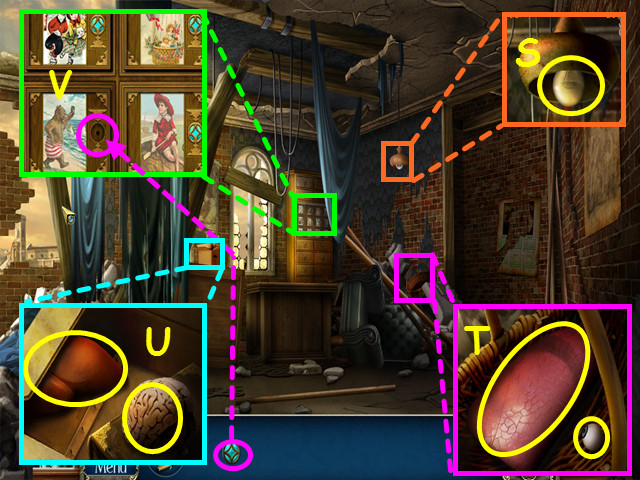
- Look at the lamp and take the LIGHT BULB (S).
- Look at the basket and take the 1/8 and 2/8 PLASTIC ORGANS (T).
- Look at the box and take the 3/8 and 4/8 PLASTIC ORGANS (U).
- Look at the cabinet and place the GEM in the empty circle for a mini-game (V).
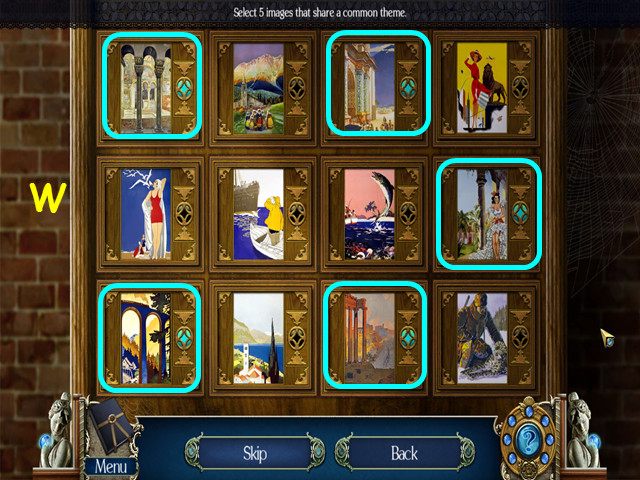
- This mini-game has 2 levels.
- Select 5 pictures with a common theme.
- Click on the pictures with columns (W).
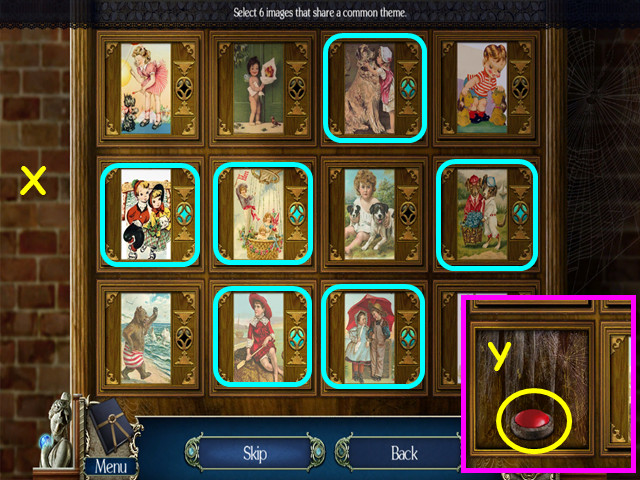
- For the second level, select 6 pictures with a common theme.
- Select the 6 pictures with hats (X).
- Press the red button (Y).
- Climb up the ladder to the secret attic.
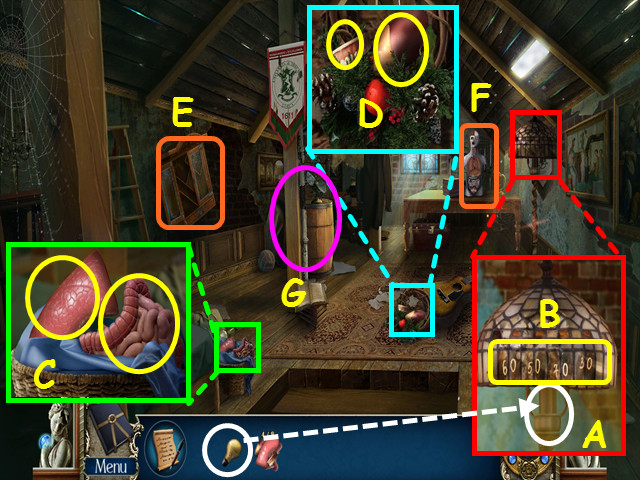
- Look at the lamp and place the LIGHT BULB in the socket (A).
- Note the code on the lampshade (B).
- Look at the basket and take the 5/8 and 6/8 PLASTIC ORGANS (C).
- Look at the wreath and take the 7/8 and 8/8 PLASTIC ORGANS (D).
- Note the cabinet on the left wall (E).
- Note the human anatomy model (F).
- Select the corner for a HOS (G).
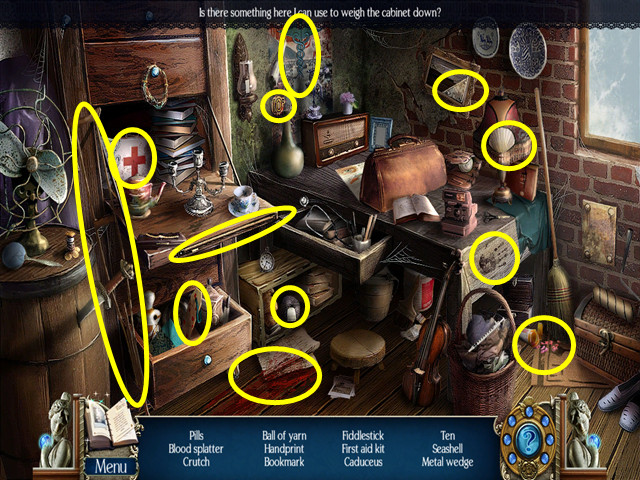
- Locate all the items on the list.
- You will earn the HEAVY BLOCKS.
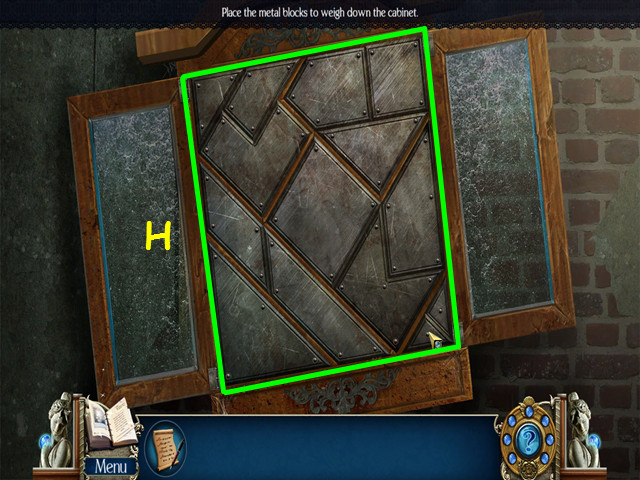
- Look at the cabinet on the left and use the heavy blocks to trigger a mini-game.
- Place the blocks into the grid so that all fit (H).
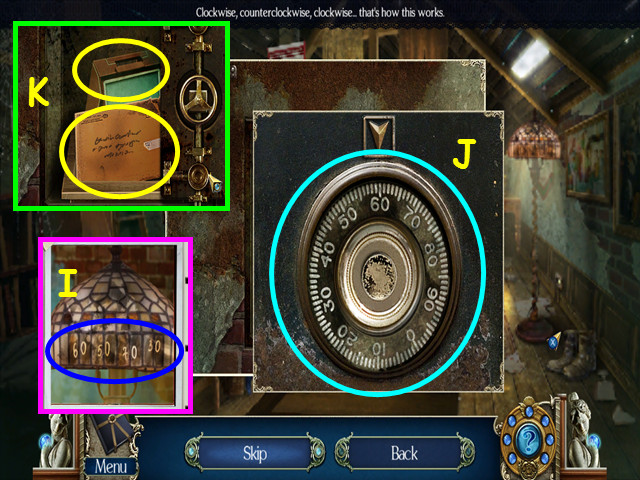
- Zoom into the safe dial and enter the code from the lampshade (I).
- Drag the dial clockwise to 60, counterclockwise to 50, clockwise to 70, and counterclockwise to 30 (J).
- Look at the envelope to get DOCTOR FERRO'S ADDRESS; also take the PORTABLE MICROFICHE VIEWER (K).
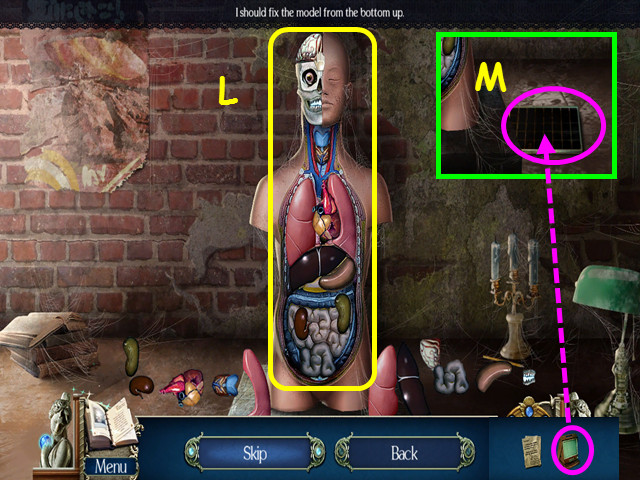
- Use the 8 PLASTIC ORGANS on the anatomy model.
- Starting from the bottom, place the organs into the model (L).
- Click on a piece to rotate it to the correct orientation, then drag the piece into position.
- Correctly placed pieces will lock into place.
- Use the PORTABLE MICROFICHE VIEWER on the microfilm (M).
Chapter 3: Casentino
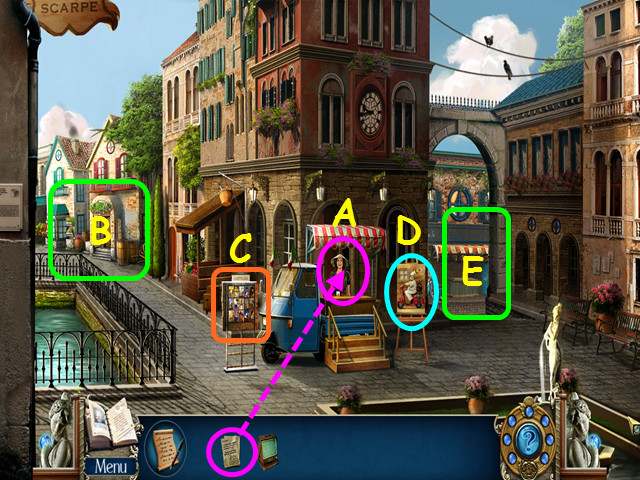
- Give DOCTOR FERRO'S ADDRESS to the tour guide (A).
- Note the path to the wine shop (B).
- Note the postcard stand (C).
- Look at the poster to learn about the contest (D).
- Walk to the scooter rental (E).
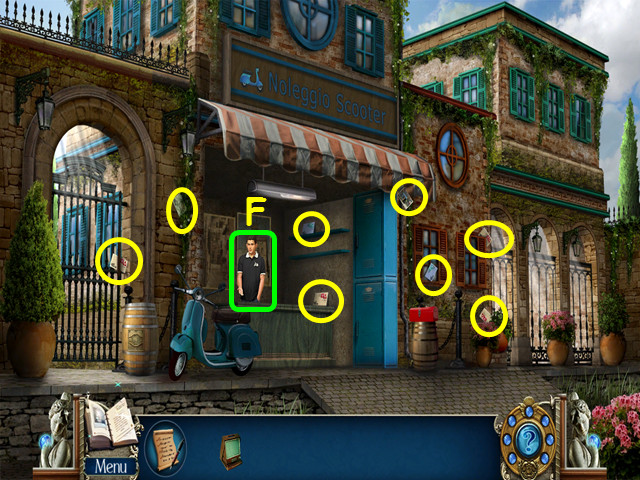
- Collect the 8 POSTCARDS (circled in yellow).
- Talk to the scooter rental owner (F).
- Walk down to the town center and give the 8 POSTCARDS to the tour guide for a mini-game.
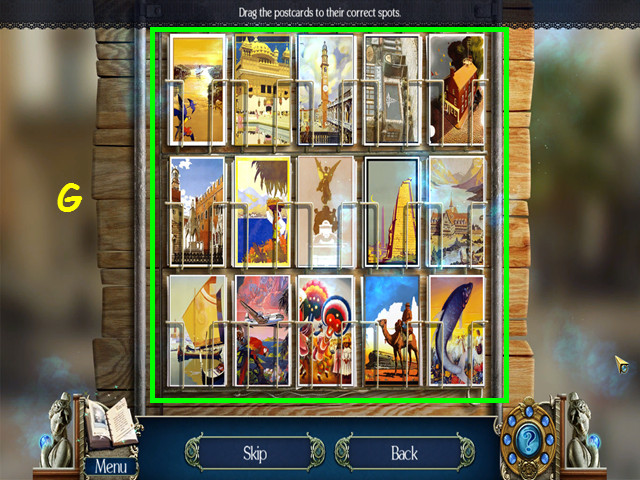
- Underneath each postcard is a small picture that represents the postcard that belongs in the slot.
- Drag postcards to the correct location; they will lock into place when correct (G).
- The tour guide will tell you about an old map at the wine shop.
- Walk forward on the left to the wine shop.
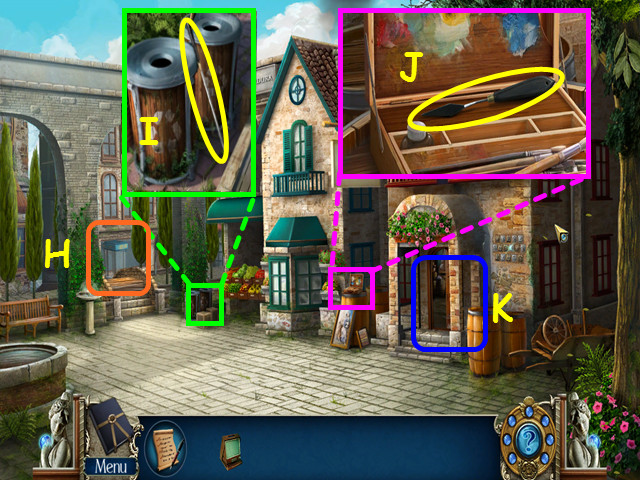
- Note the path to the toy shop (H).
- Look at the trash bins and take the LITTER PICKER (I).
- Look at the painting supplies and take the PALETTE KNIFE (J).
- Enter the wine shop (K).
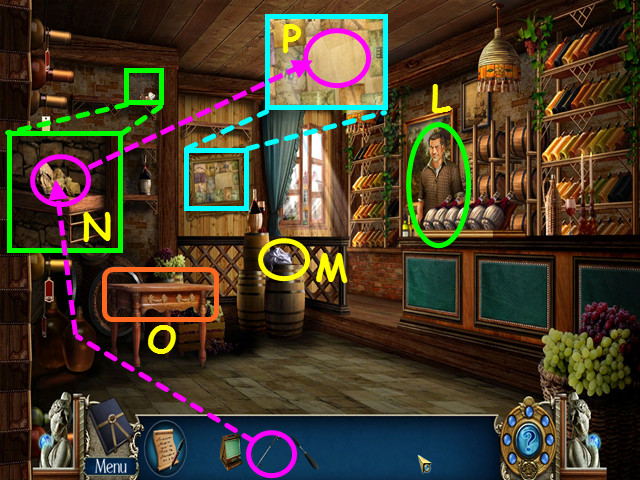
- Talk to the wine store owner (L).
- Take the RAG (M).
- Look at the shelf and use the LITTER PICKER to get the MAP PIECE (N).
- Note the wine rack (O).
- Look at the map and use the MAP PIECE on it for a mini-game (P).
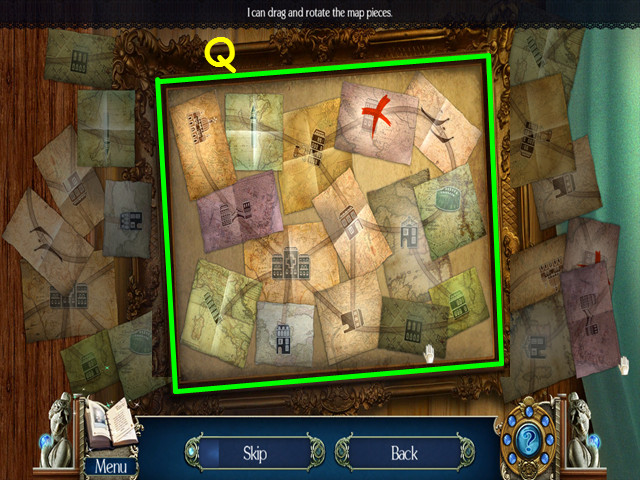
- Restore the map by placing the map pieces in the correct position (Q).
- Click on a piece to rotate it to the correct orientation, then drag the piece into position.
- Exit the wine shop and walk forward to the toy shop area.
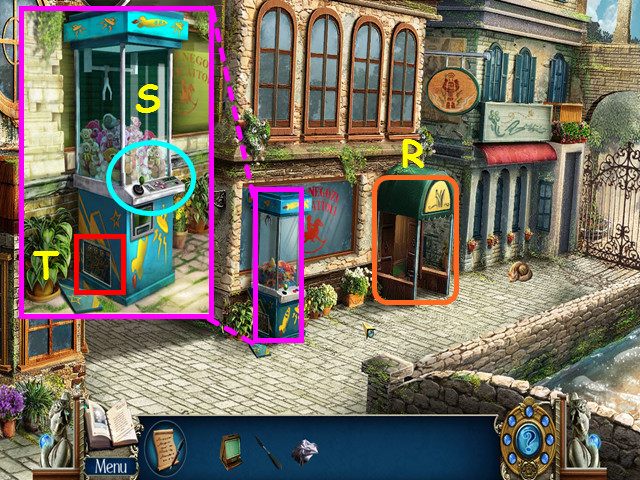
- Note the entrance to the toy shop (R).
- Look at the UFO Catcher game and try the controls (S).
- Look at the power panel for a mini-game (T).
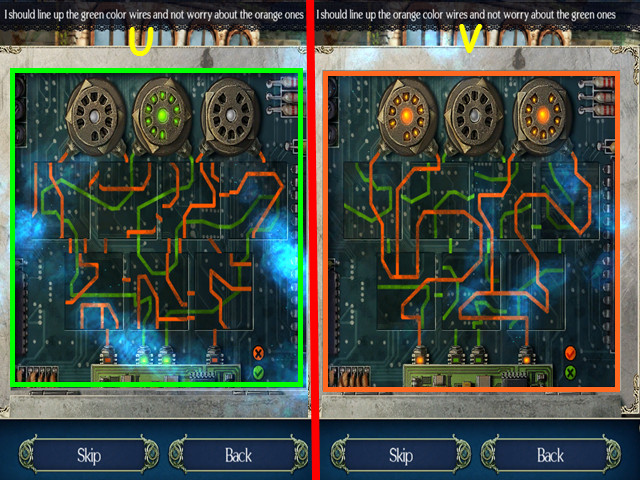
- For the first part of this mini-game, line up all the green wires (U).
- For the second part, line up all the orange wires (V).
- Click on 2 squares to swap positions; click on a square to rotate it in place.
- Enter the toy shop.
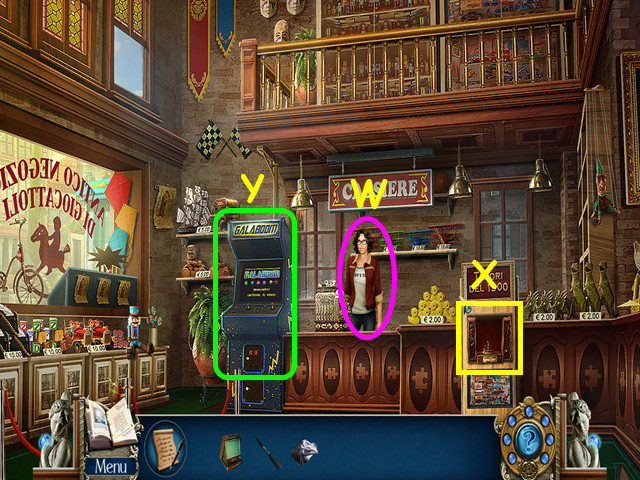
- Talk to the toy shop keeper (W).
- Look at the mechanical pigeon (X).
- Look at the arcade machine for a mini-game (Y).
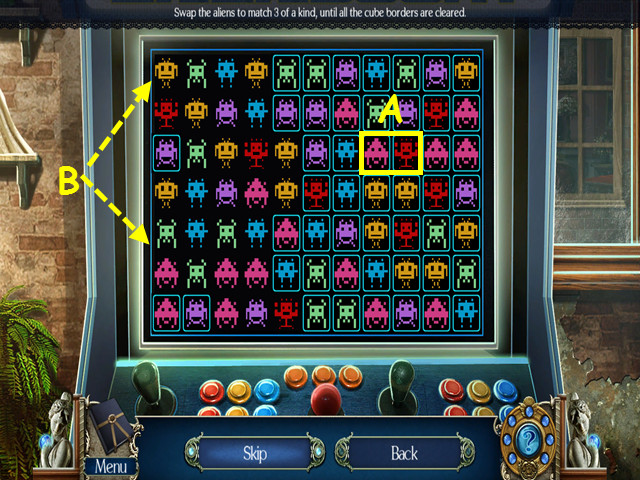
- Click on 2 adjacent aliens to swap positions and make a chain of 3 or more identical aliens (A).
- Continues this process the border around each of the aliens are gone (B).
- You will earn a PLASTIC EGG.
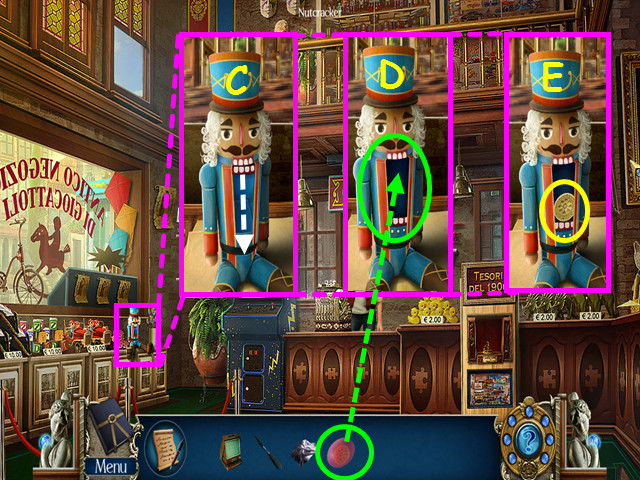
- Look at the nutcracker and drag his mouth open (C).
- Place the PLASTIC EGG inside the open mouth (D).
- Take the TOKEN (E).
- Exit the shop and look at the UFO game controls.
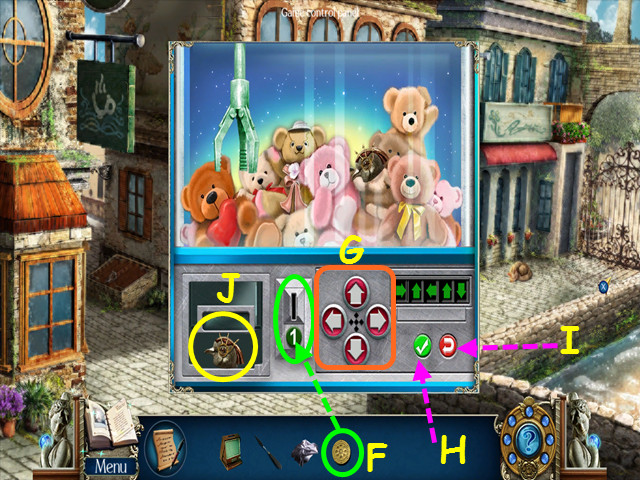
- Place the TOKEN in the slot for a mini-game (F).
- Press the arrow buttons to input 5 directions for the mechanical arm to get the bird head (G).
- Press the green check to see if you are correct (H).
- Tip: press 1 arrow then the green button until you find the correct first arrow. Then press the correct first arrow, another arrow and the green button until you have 2 correct.
- Press the red u-arrow to reset the game (I).
- Take the 1/3 MECHANICAL PIGEON PARTS (J).
- Return to the scooter rental area.
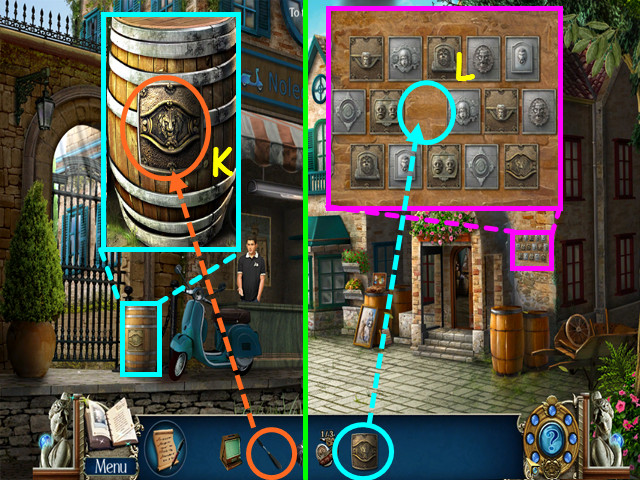
- Look at the barrel and use the PALETTE KNIFE to remove the EMBLEM (K).
- Return to the front of the wine shop.
- Look at the wall and place the EMBLEM in the empty spot for a mini-game (L).
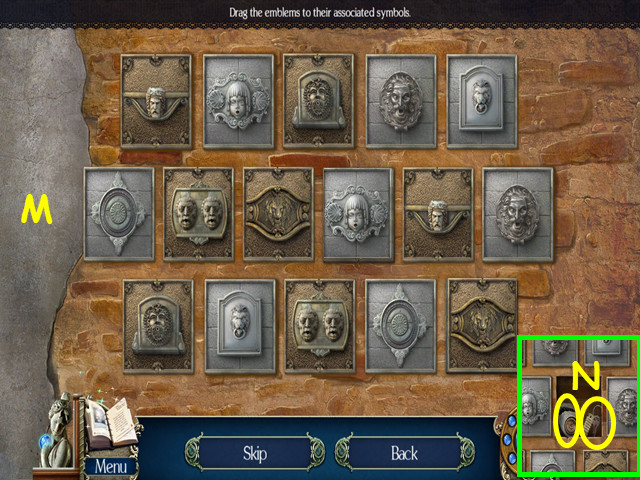
- Move the emblems to the correct position (M).
- Under each emblem is a symbol that relates to each emblem like a shell or door ring.
- Take the LOCKER KEY and the 2/3 MECHANICAL PIGEON PARTS (N).
- Return to the scooter rental area.
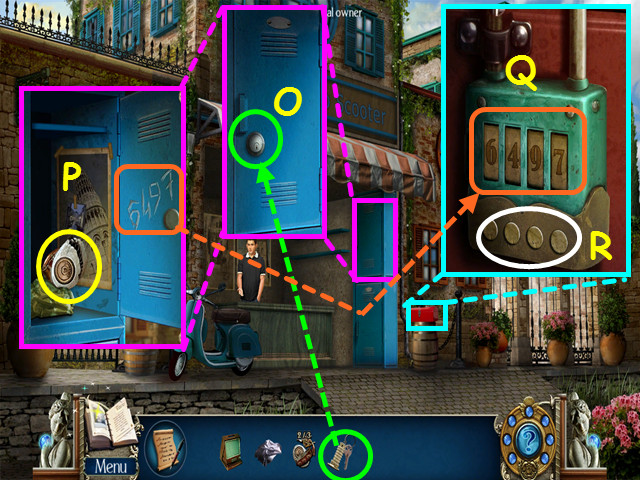
- Look at the locker and use the LOCKER KEY on the lock (O).
- Take the 3/3 MECHANICAL PIGEON PARTS and note the numbers scratched into the door (P).
- Look at the tool box and use the numbers from the locker door on the lock (Q).
- Push the buttons to change the numbers (R).
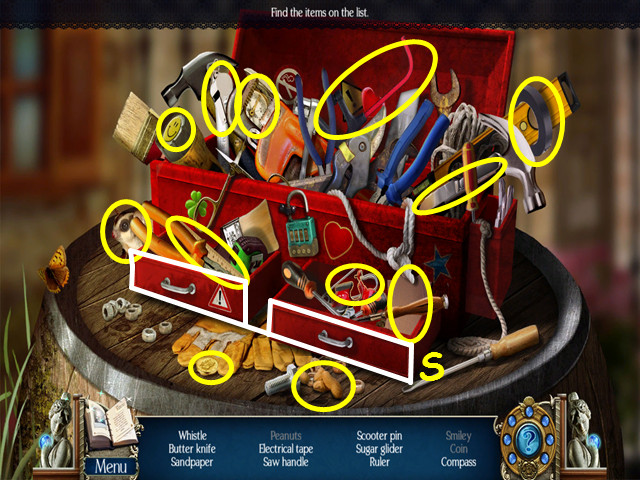
- Locate all the items on the list.
- Open the 2 drawers for more items (S).
- You will earn the SAW HANDLE.
- Return to the toy shop.
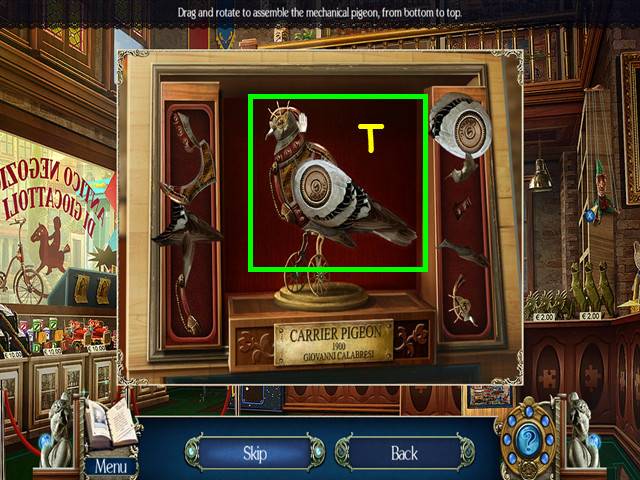
- Look at the mechanical pigeon and use the 3 MECHANICAL PIGEON PARTS on the display for a mini-game.
- Reassemble the pigeon from the bottom up (T).
- Click on a piece to rotate it to the correct orientation, then drag the piece into position.
- After the pigeon flies away, exit the toy shop.
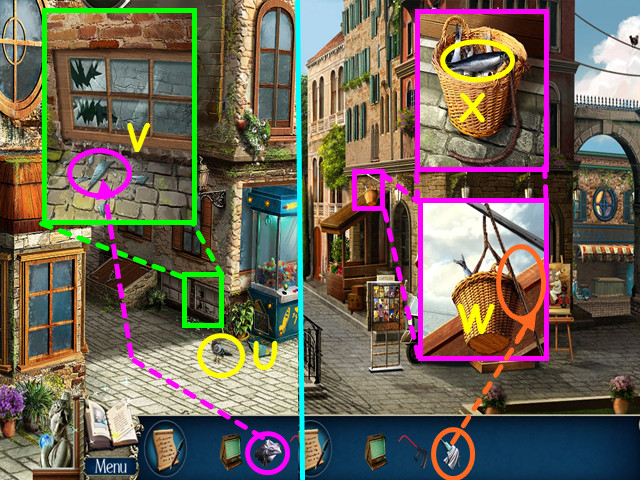
- Try to grab the pigeon, but it will fly into the basement window (U).
- Look at the broken window and use the RAG to take a GLASS SHARD (V).
- Return to the town center with the tour guide.
- Look at the basket and use the GLASS SHARD to cut it down (W).
- Take a FISH (X).
- Return to the front of the toy shop.
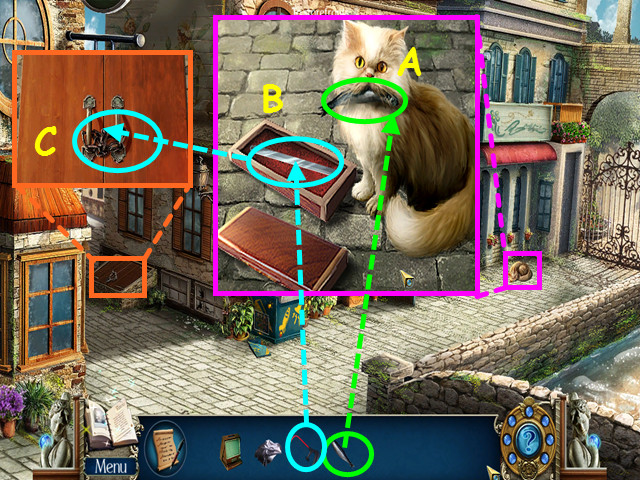
- Look at the cat and give him the FISH (A).
- Click on the box to open it then use the SAW HANDLE on the blade to get the HANDSAW (B).
- Look at the cellar doors and use the HANDSAW on the chain (C).
- Open the door and enter.
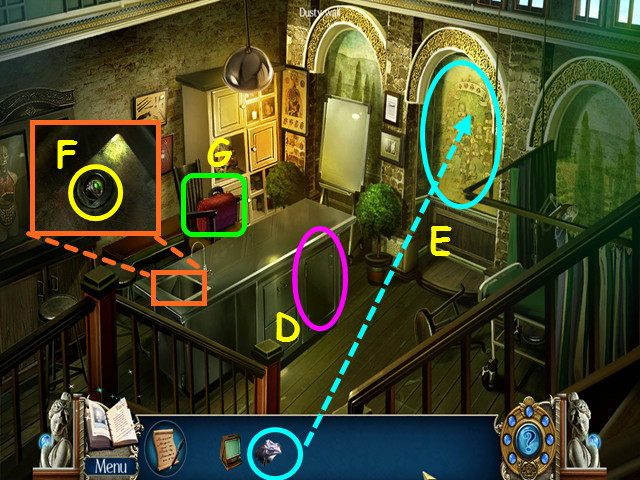
- Note the locked cabinet (D).
- Use the RAG to clean the alcove (E).
- Look in the sink and take the 1/3 RINGS (F).
- Select the doctor's bag for a HOS (G).
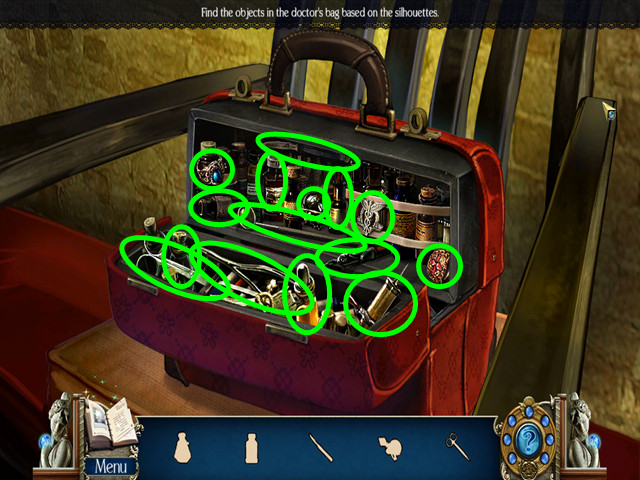
- Locate all the items on the list.
- You will earn the 2/3 and 3/3 RINGS.
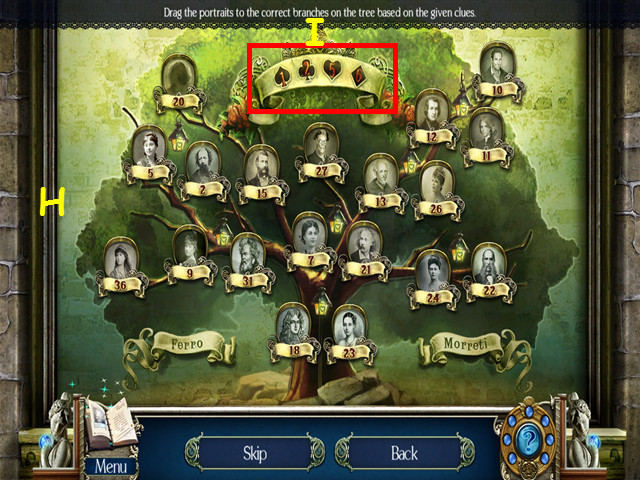
- Move the portraits to the correct branch of the family tree (H).
- Under each portrait is a set of suit symbols; using the legend at the top (I), find the total and move the same numbered portrait to that position.
- Portraits will 'light' when in the correct position.
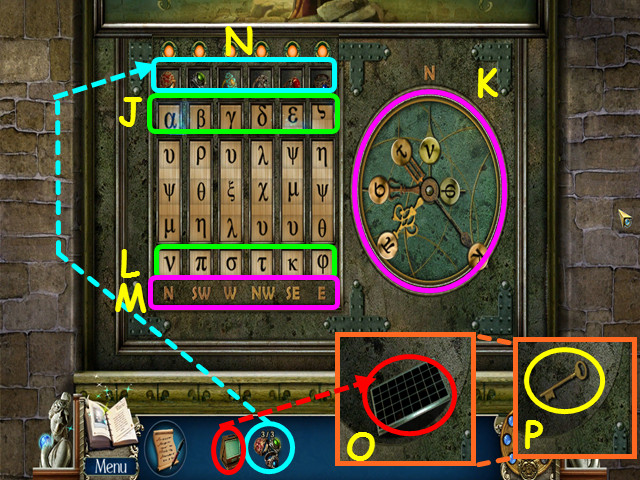
- Move the strips so the first 6 letters of the Greek alphabet are in the upper squares (J).
- Move the clock hand (K) with the symbol from the bottom squares (L) to the direction indicated below the squares (M).
- Repeat this process for all 6 symbols.
- Place the 3 RINGS into the slots at the top (N).
- Use the PORTABLE MICROFICHE VIEWER (O) on the microfiche, then take the CABINET KEY (P).
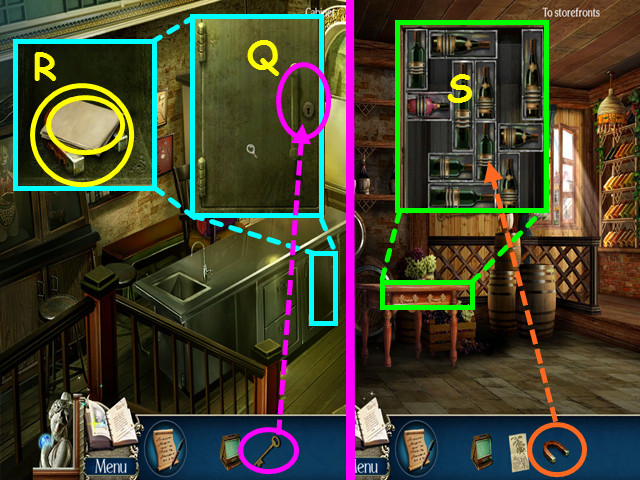
- Look at the cabinet and use the CABINET KEY on the lock (Q).
- Take GIOVANNI'S FORMULA and the MAGNET (R).
- Return to the inside of the wine shop.
- Look at the wine rack and use the MAGNET on it for a mini-game (S).
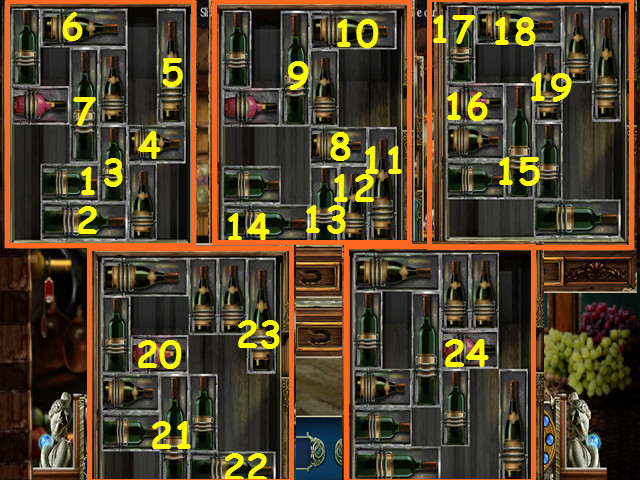
- Move the wine bottles around so you can slide the red bottle out on the right.
- Move the wine bottles in numerical order (1-24).
- You will earn the WINE.
- Return to the tour guide area.
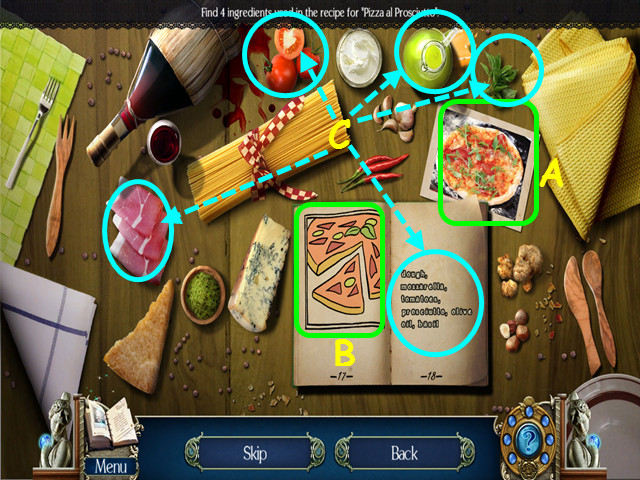
- Give the WINE to the tour guide for a mini-game.
- Look at the photograph (A), then find the recipe in the book (B).
- Click on the 4 available ingredients from the pizza recipe (C).
- There are 3 recipes to complete.
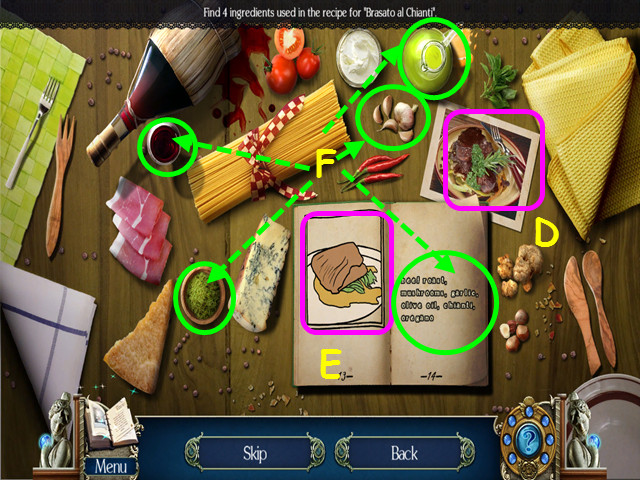
- Look at the photograph (D), then find the recipe in the book (E).
- Click on the available 4 ingredients from the brasato recipe (F).
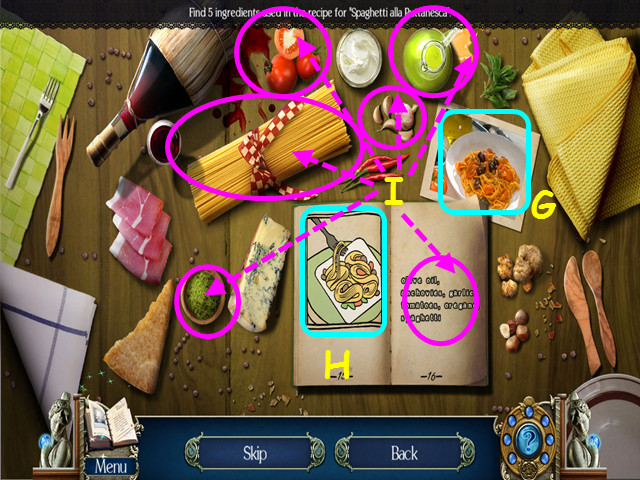
- Look at the photograph (G), then find the recipe in the book (H).
- Click on the available 5 ingredients from the spaghetti recipe (I).
- You will earn the SCOOTER VOUCHER.
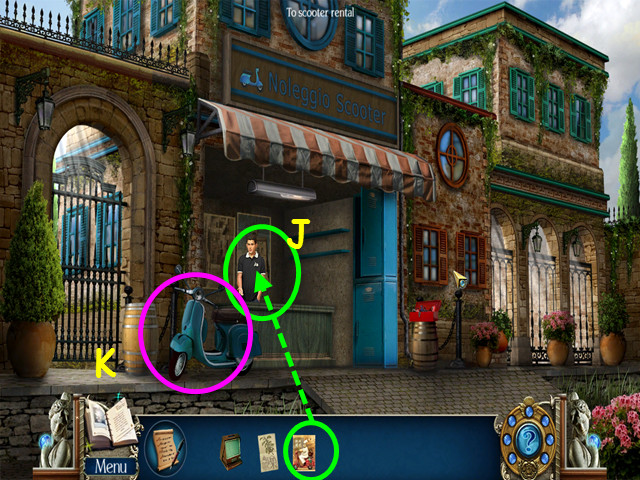
- Give the SCOOTER VOUCHER to the scooter rental owner (J).
- Click on the scooter (K).
Chapter 4: Monastery
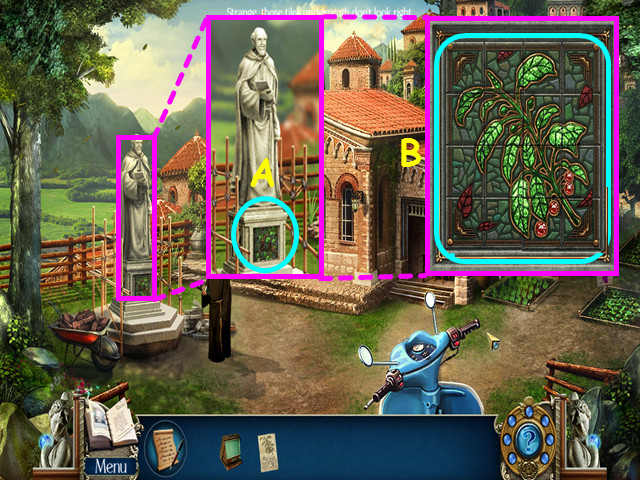
- After talking to the monk, look at the statue and click on the base (A).
- Restore the mosaic by moving the tile; click on 2 tiles to swap positions (B).
- Enter the doorway to the courtyard.
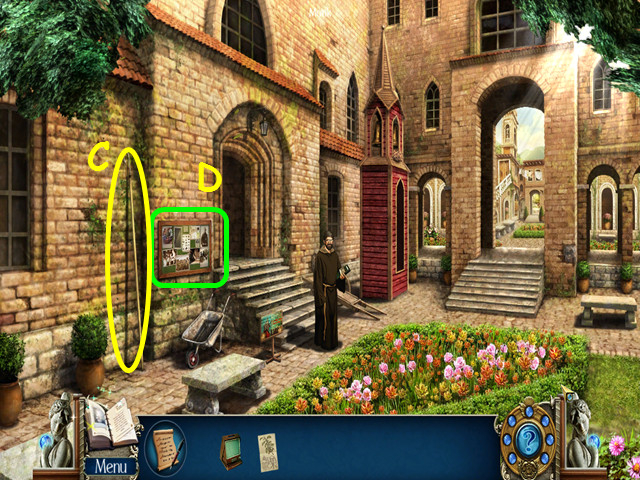
- Take the LONG STICK (C).
- Look at the bulletin board for a HOS (D).
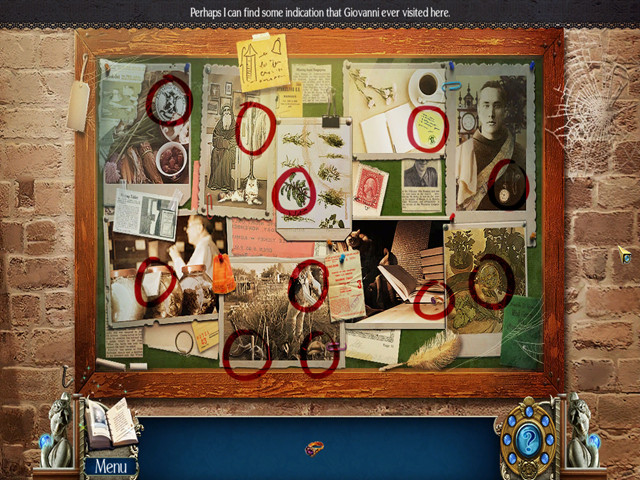
- Locate all the items on the list.
- You will learn Giovanni was at the monastery at one time.
- Walk forward to the outside tower.
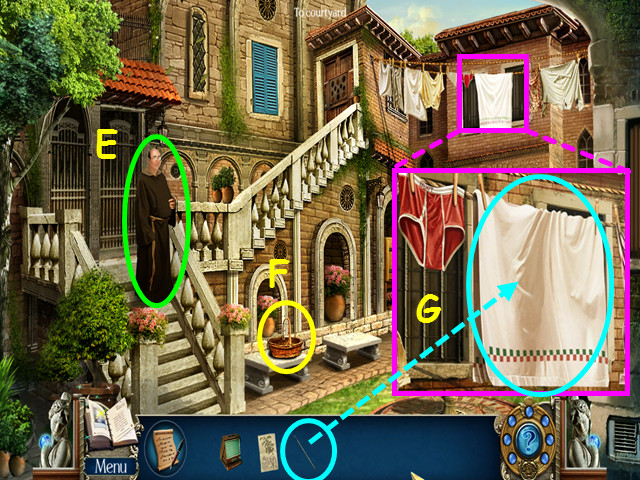
- Talk to the monk to learn no visitors are allowed upstairs (E).
- Take the BASKET (F).
- Look at the clothesline and use the LONG STICK to take the BLANKET (G).
- Walk down to return to the courtyard.
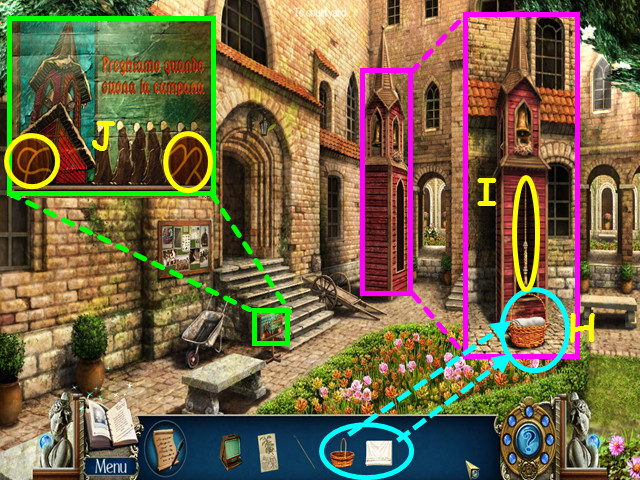
- Look at the prayer bell and place the BASKET, then the BLANKET on the ground (H).
- Ring the bell (I).
- Look at the prayer schedule; take the 1/8 and 2/8 WOODEN TILES (J).
- Return to the front of the monastery.
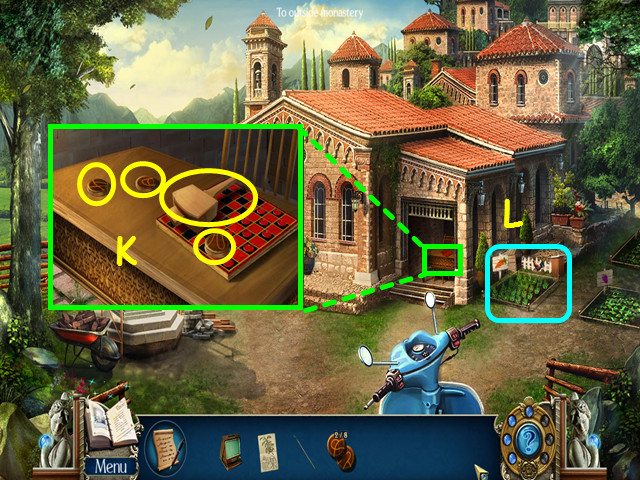
- Look at the table; take the 3/8, 4/8, 5/8 WOODEN TILES and the MALLET (K).
- Note the carrot patch (L).
- Enter the monastery then walk left to the herb garden.
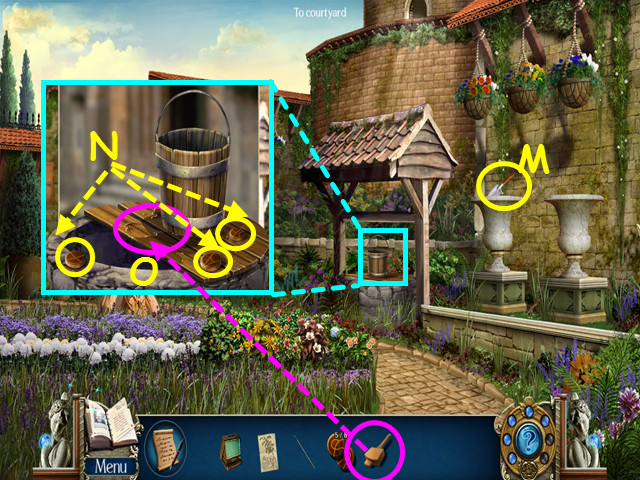
- Take the TROWEL (M).
- Look at the well; take the 6/8, 7/8 and 8/8 WOODEN TILES (N).
- Use the MALLET on the boards to get the BUCKET of WATER (O).
- Exit the garden, then walk forward.
- Look at the oak door at the top of the stairs for a mini-game.
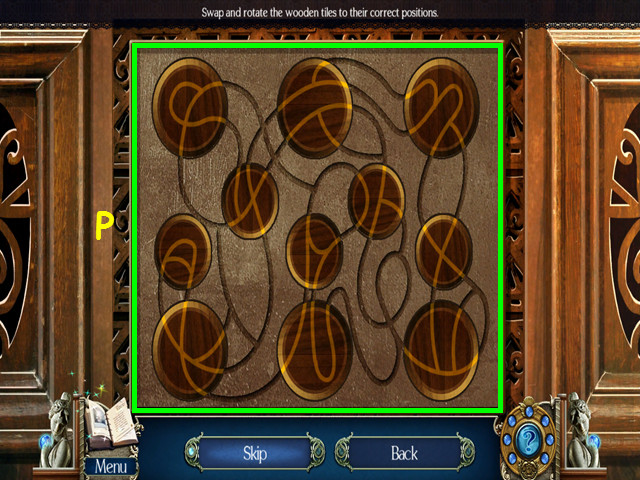
- Place the 8 WOODEN TILES onto the board.
- Click on a piece to rotate it to the correct orientation; click on 2 pieces to swap positions.
- Move the tiles so all the lines are connected (P).
- Enter the tower stairs.
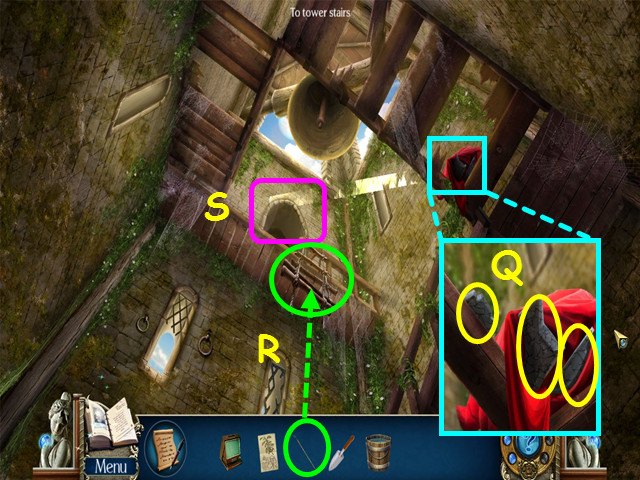
- Look at the cloth; take the 1/6, 2/6, and 3/6 MOSAIC PARTS (Q).
- Use the LONG STICK to pull down the ladder (R).
- Enter the Abbot's room (S).
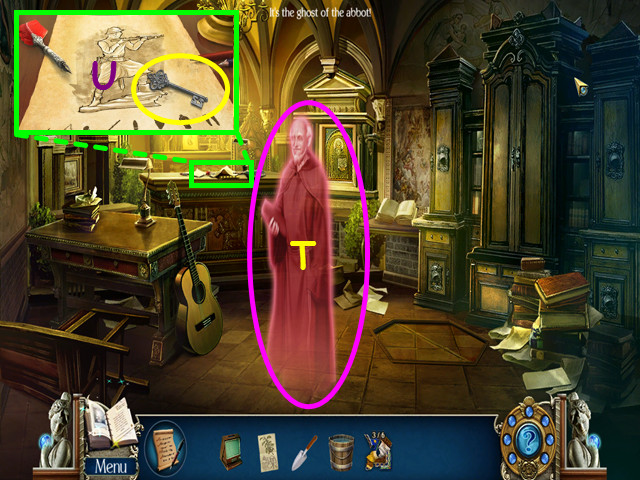
- Click on the ghost (T).
- Look at the table and take the SUPPLY KEY (U).
- Exit the tower completely.
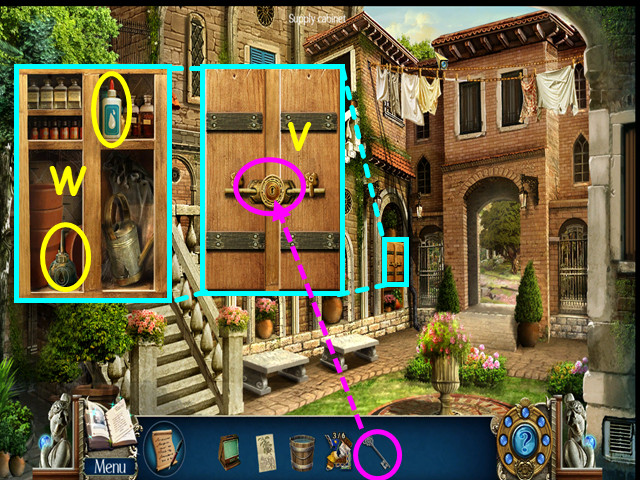
- Look at the supply cabinet: use the SUPPLY KEY on the lock (V).
- Take the GLUE and the OIL (W).
- Walk to the herb garden.
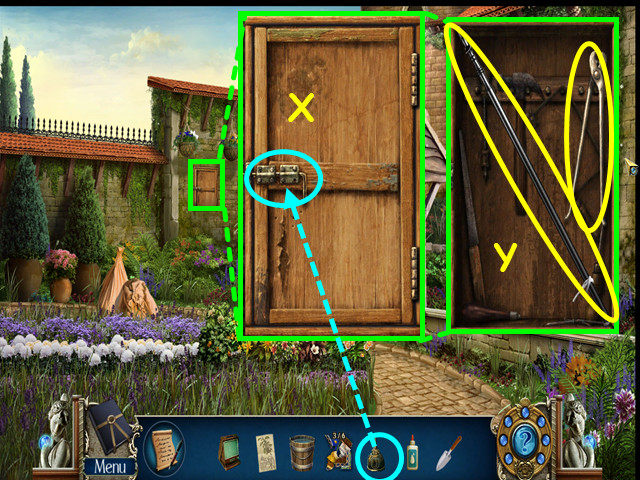
- Look at the tool cabinet and use the OIL on the latch (X).
- Take the WOODEN POLE and the NAIL PULLER (Y).
- Exit the herb garden and walk forward twice to the shady grove.
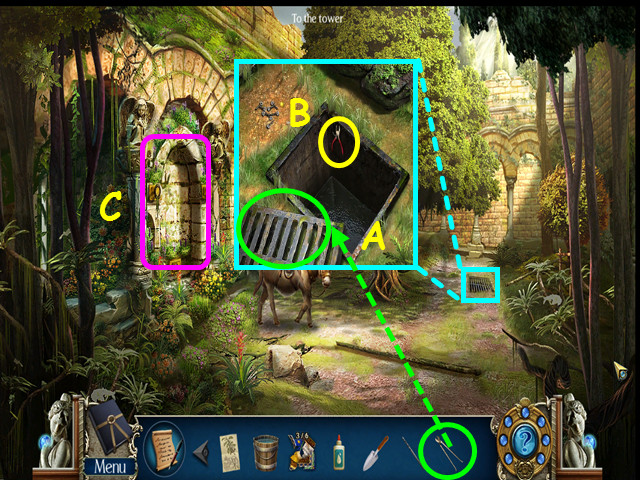
- Look at the drain and use the NAIL PULLER to remove the grate (A).
- Take the WIRE CUTTERS (B).
- Note the message on the wall and the fire ants (C).
- Exit the shady grove and enter the tower stairs.
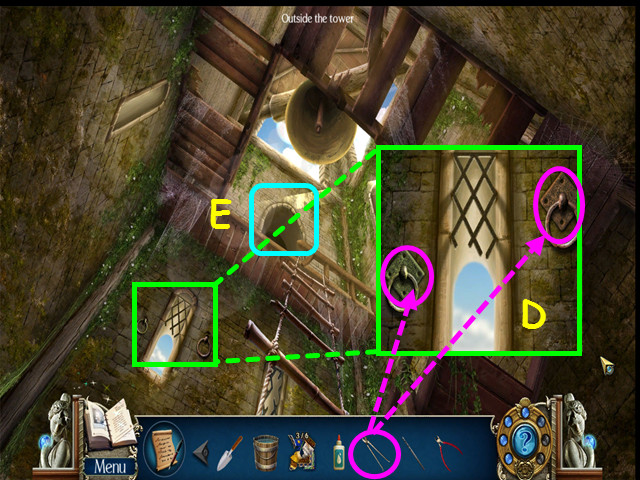
- Look at the window and use the NAIL PULLER to remove the 2 METAL RINGS (D).
- Enter the Abbot's room (E).
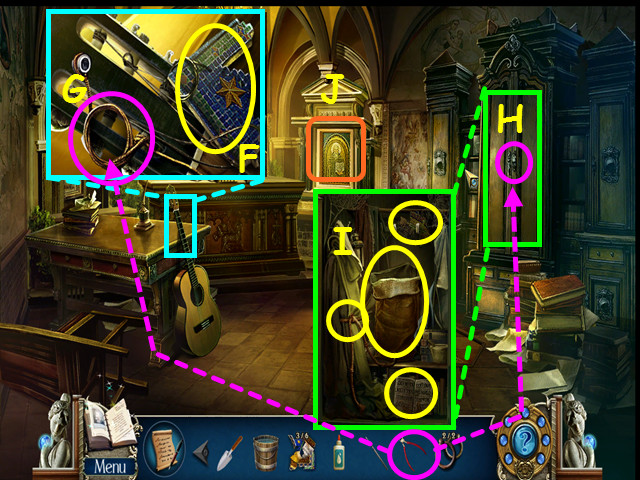
- Look at the guitar and take the 4/6 MOSAIC PARTS (F).
- Use the wire cutters on the string and it will combine with the wooden pole to make the POLE with STRING (G).
- Look at the wardrobe and use the WIRE CUTTERS to remove the wire (H).
- Click to open both doors and take the SACK, ROPE BELT, 5/6 and 6/6 MOSAIC PARTS (I).
- Look at the wall mosaic for a mini-game (J).
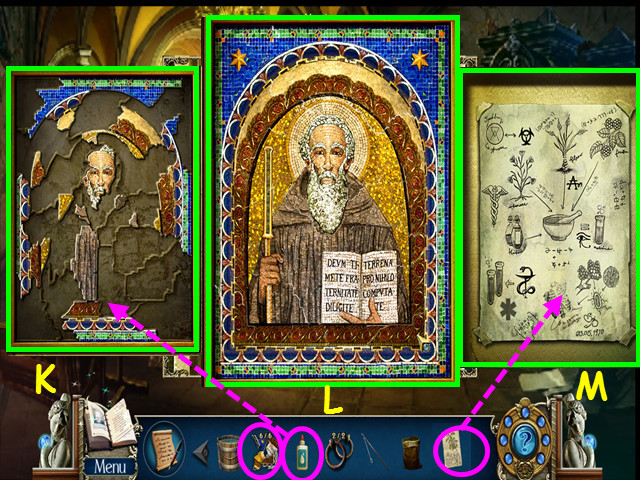
- Use the GLUE on the mosaic, then add the 6 MOSAIC PARTS (K).
- Restore the mosaic by placing the pieces in the empty spots (L).
- Compare GIOVANNI'S FORMULA with the abbot's formula for a mini-game (M).
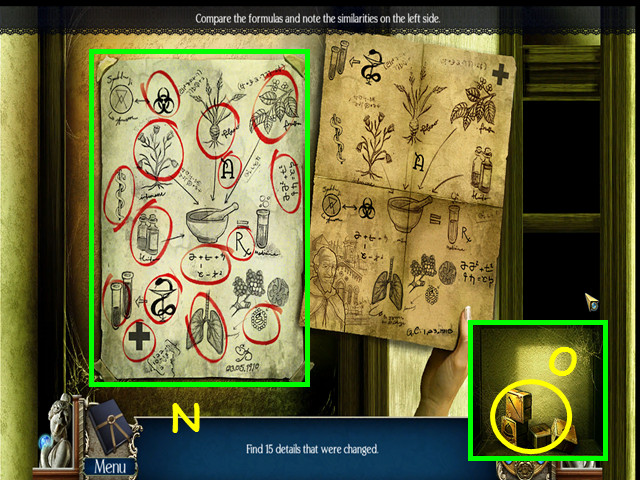
- Compare the 2 formulas and click on the 15 differences (N).
- You will earn the FORGED FORMULA.
- Take the GOLDEN CUBES (O).
- Look at the table for a mini-game.
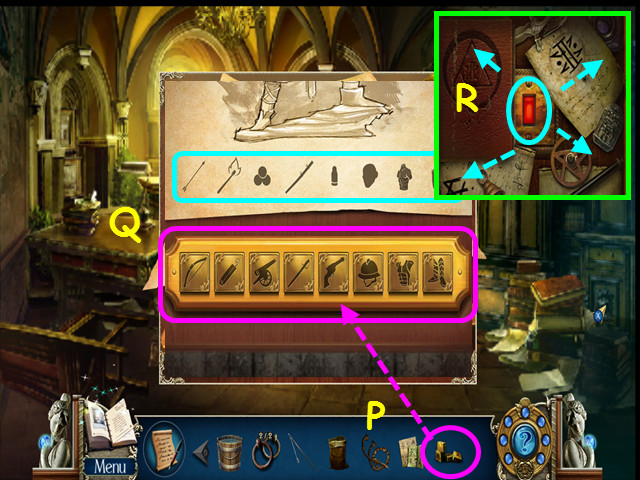
- Place the GOLDEN CUBES into the squares for a mini-game (P).
- Click on the cubes to change them to an icon that relates to the icon above each cube (Q).
- Drag the documents to the sides, then press the red switch (R).
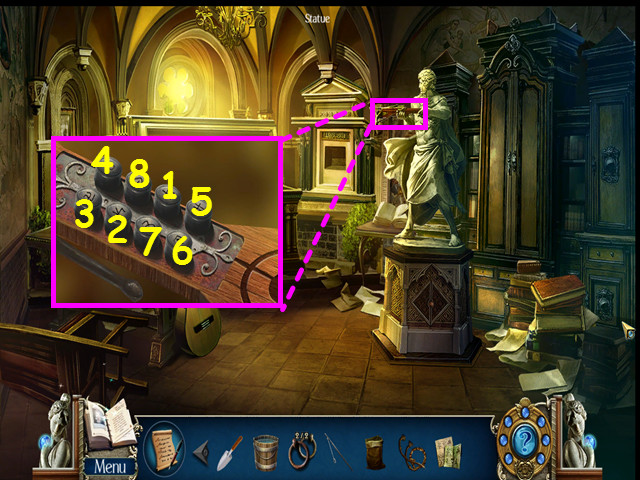
- Look at the statue; press the buttons in numeric order (1-8).
- After the arrow flies out the window, exit and return to the front of the monastery.
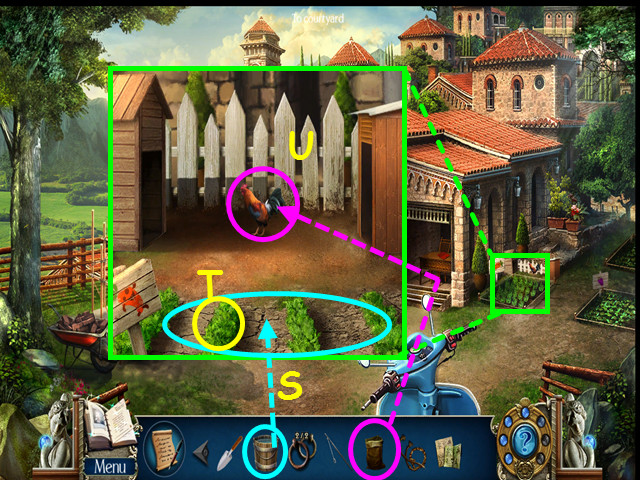
- Look at the carrot patch and use the BUCKET of WATER on the carrots (S).
- Take a CARROT (T).
- Use the SACK on the rooster to get the ROOSTER in a SACK (U).
- Enter the monastery, then go forward twice to the shady grove.
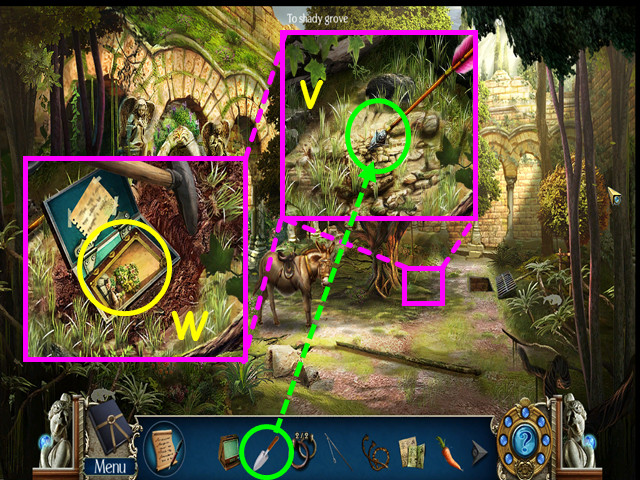
- Look where the arrow landed and use the TROWEL to dig a hole (V).
- Open the box and look at the herb guide to learn about an ant repellant (W).
- Return to the herb garden.
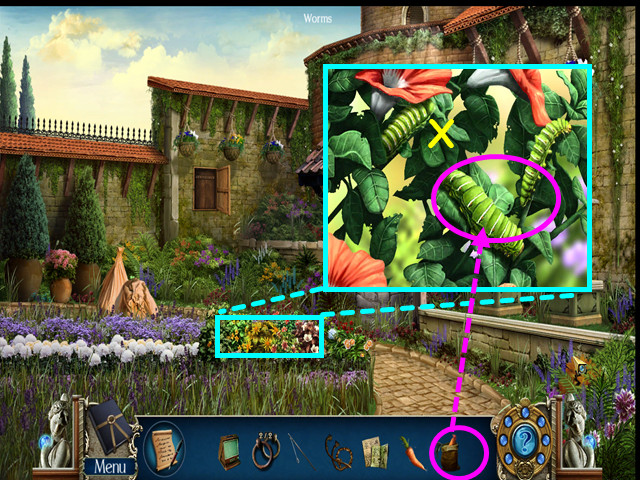
- Look at the herb patch and use the ROOSTER in a SACK to get rid of the worms (X).
- Select the herb patch again for a HOS.
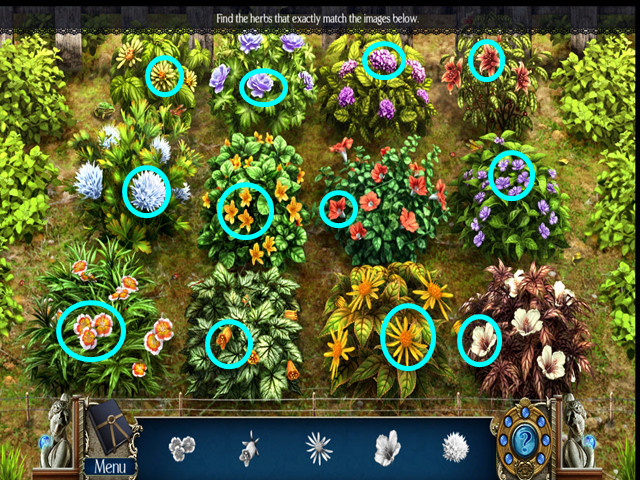
- Locate all the blossoms on the list.
- You will earn the NATURAL ANT KILLER.
- Return to the shady grove.
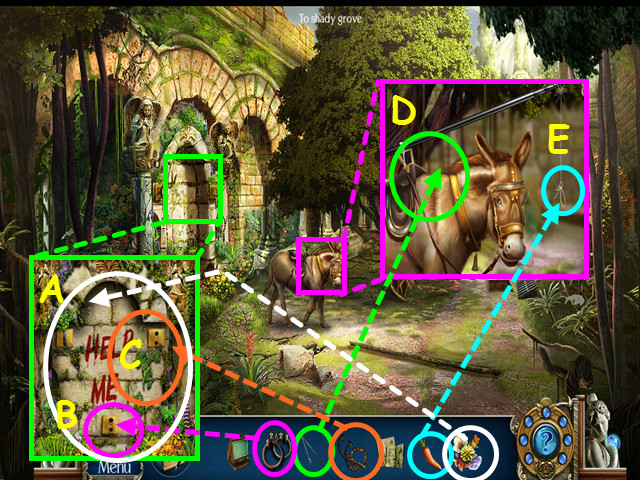
- Look at the wall and use the NATURAL ANT KILLER on it (A).
- Use the 2 METAL RINGS on the brackets (B), then attach the ROPE BELT (C).
- Look at the donkey and use the POLE with STRING on him (D).
- Attach the CARROT to the string (E).
- Look at the crypt behind the wall for a HOS.
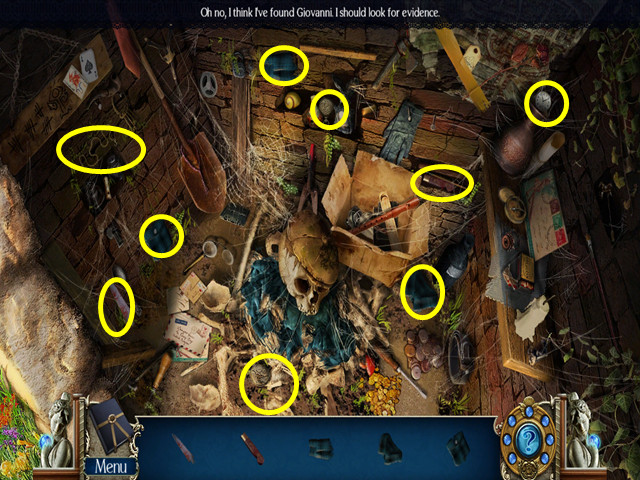
- Locate all the items on the list.
- You will earn the microfiche and the EVIDENCE.
Chapter 5: The University Grounds (Revisited)
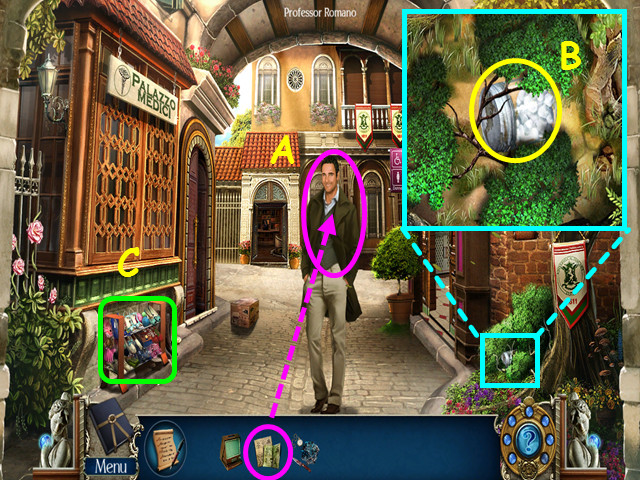
- Give the FORGED FORMULA to Professor Romano (A).
- Look in the bushes and take the COTTON (B).
- Select the shoe rack for a HOS (C).
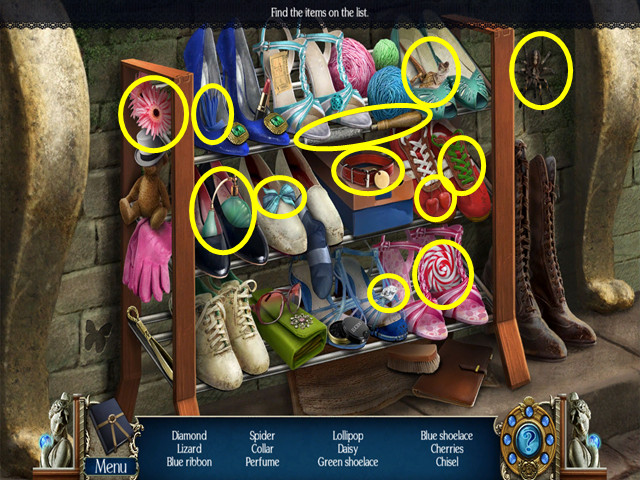
- Locate all the items on the list.
- You will earn the CHISEL.
- Enter the medical department on the left, then walk forward to the laboratory.
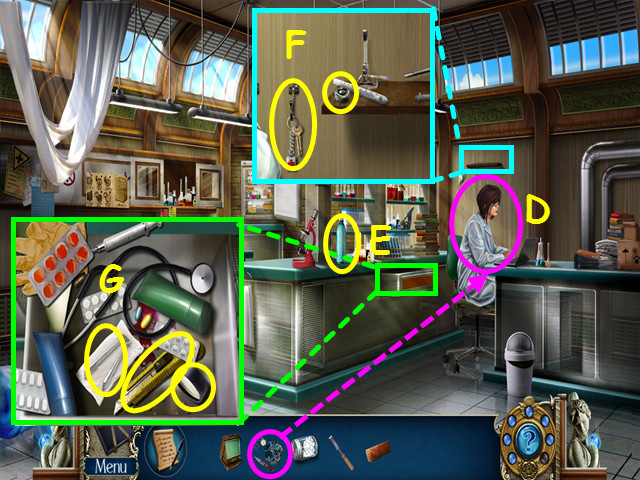
- Talk to the lab assistant; give her the EVIDENCE (D).
- Take the EMPTY BOTTLE (E).
- Look at the shelf; take the KEYS and the 1/3 MICROSCOPE PARTS (F).
- Look in the drawer and move the items to the side; take the TONGS, CUTTER, and 2/3 MICROSCOPE PARTS (G).
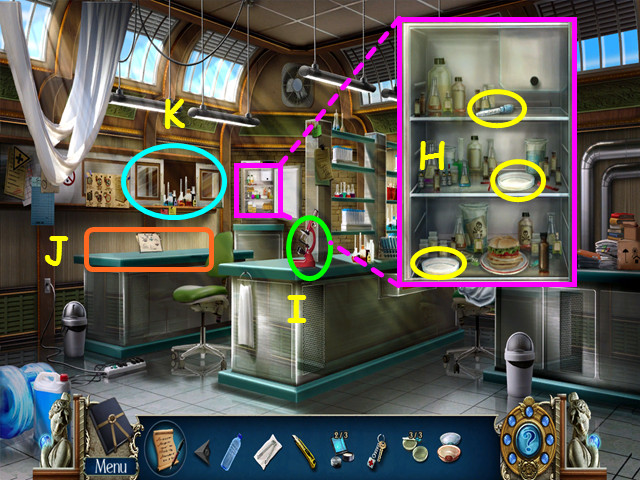
- Look in the fridge and take the 3 DIRTY LAB EQUIPMENT parts (H).
- Note the microscope (I).
- Note the counter (J).
- Select the cabinet for a HOS (K).
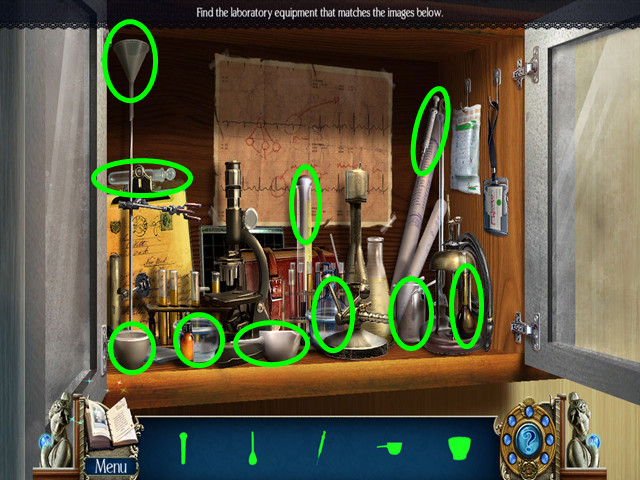
- Locate all the items on the list.
- You will earn the BOWLS.
- Exit the lab.
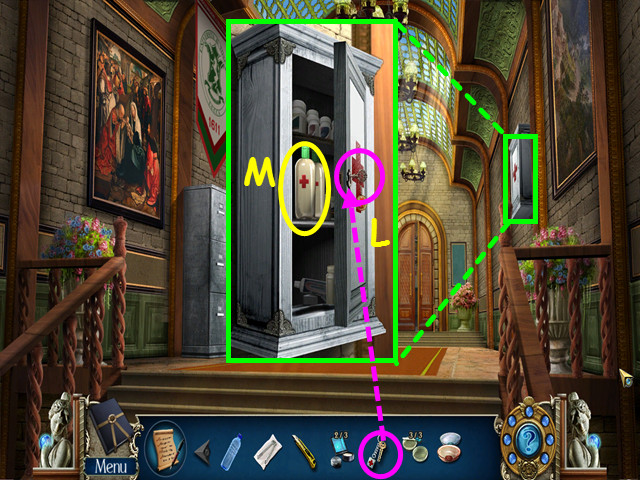
- Look at the medical cabinet and use the KEYS on the lock (L).
- Take the ALCOHOL (M).
- Walk down to exit the hall.
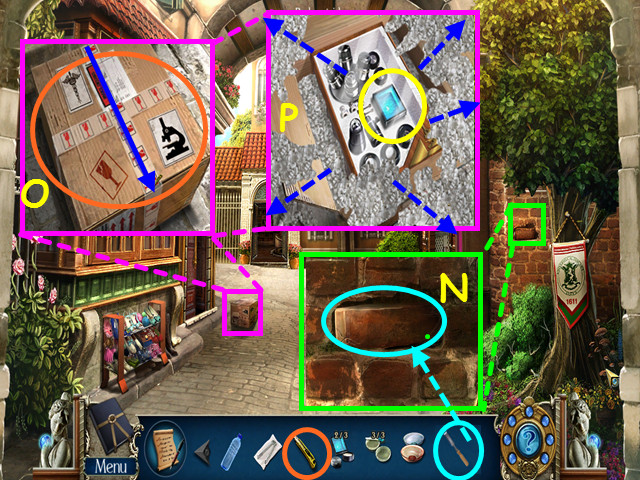
- Look at the brick wall and use the CHISEL to take the BRICK (N).
- Look at the cardboard box and use the CUTTER on it; drag the cutter down the tape (O).
- You will see a blue line where you drag the cutter.
- Drag the packing material to the sides and take the 3/3 MICROSCOPE PARTS (P).
- Walk right to enter the girl's restroom.
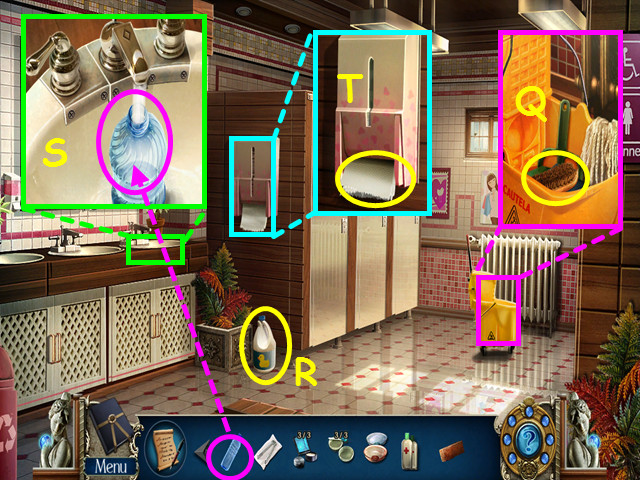
- Look at the mop bucket and take the BRUSH (Q).
- Take the BLEACH (R).
- Look in the sink; place the EMPTY BOTTLE in the sink then take the BOTTLE of WATER (S).
- Look at the dispenser and take 3 TISSUE (T).
- Return to the lab and look at the counter.
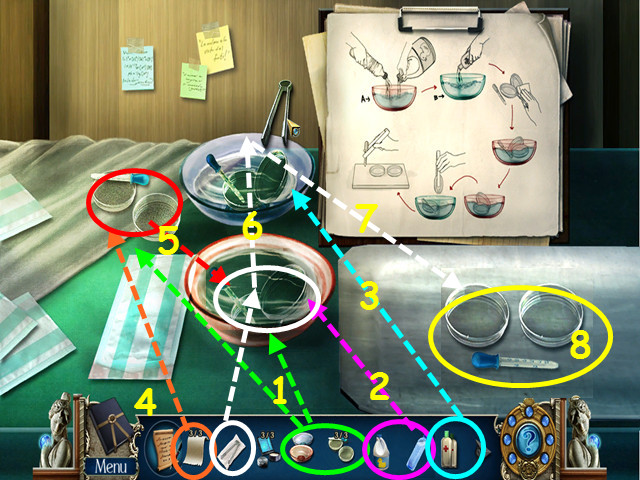
- Place the BOWLS and the 3 DIRTY LAB EQUIPMENT parts on the counter (1).
- Pour the BOTTLE of WATER and the BLEACH into the pink bowl (2).
- Pour the ALCOHOL into the blue bowl (3).
- Use the 3 TISSUES on the dirty lab equipment (4).
- Pick up the UNSTERILIZED LAB EQUIPMENT and place it into the pink bowl (5).
- Use the TONGS to move the lab equipment from the pink bowl to the blue bowl (6).
- Use the TONGS to lab equipment from the blue bowl to the tray (7).
- Take the TRAY with CLEAN EQUIPMENT (8).
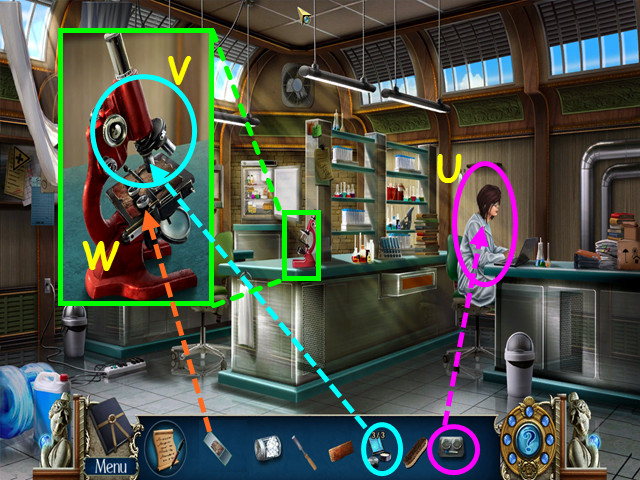
- Give the TRAY with CLEAN EQUIPMENT to the lab assistant (U).
- She will give you the CLOTH SPECIMEN.
- Look at the microscope and use the 3 MICROSCOPE PARTS on the device (V).
- Place the CLOTH SPECIMEN in the microscope for a mini-game (W).
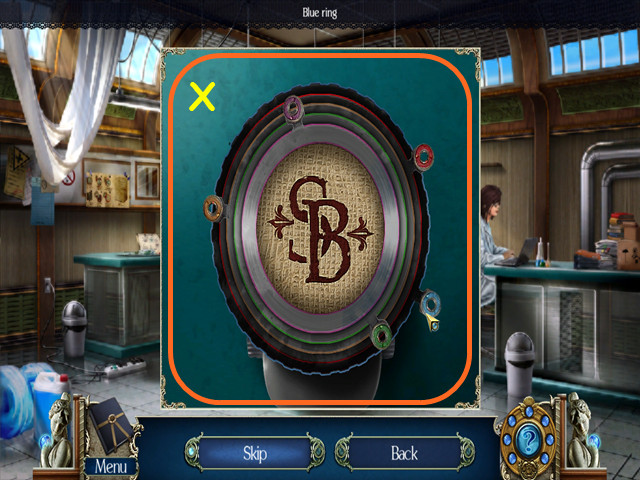
- Move the colored tabs to bring the monogram into focus (X).
- The lab technician will confirm it is the same monogram as on the knife and will also give you a POCKET WATCH.
- Exit the lab.
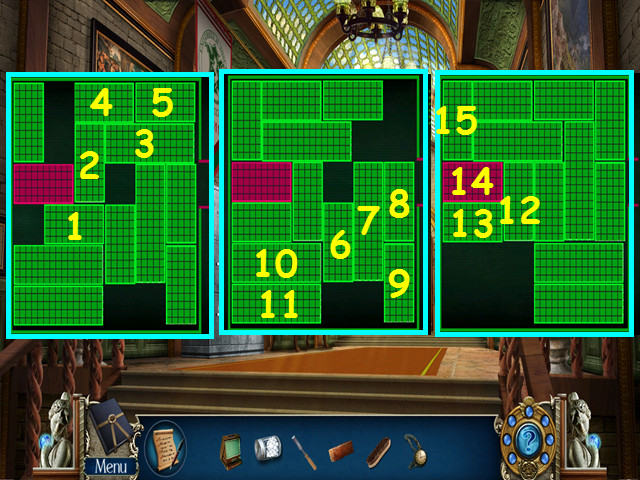
- Look at the records cabinet on the left and click on the screen in the center for a mini-game.
- Move the red bar to the exit on the right.
- Move the bars in numerical order (1-15).
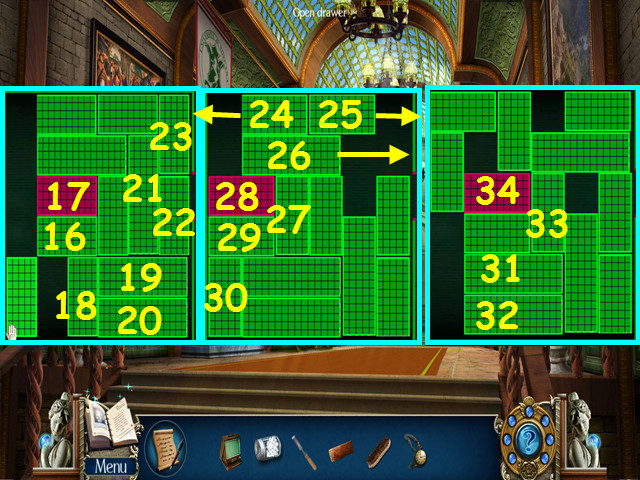
- Continue moving the bars to release the red bar.
- Move the bars in numerical order (16-34).
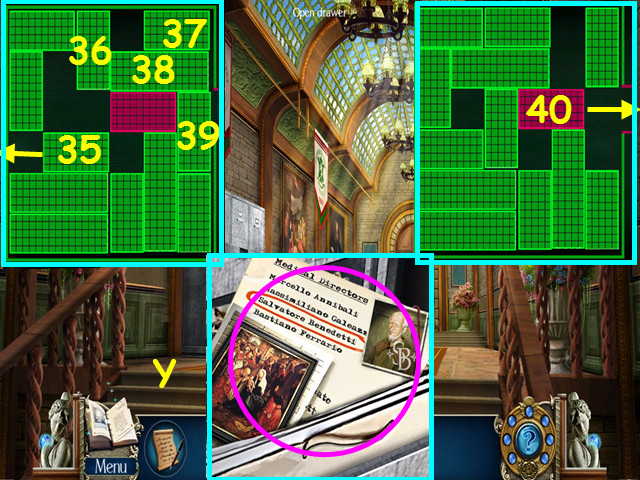
- Continue moving the bars to release the red bar.
- Move the bars in numerical order (35-40).
- Look in the open drawer, click on the files and read about the Abbot (Y).
- Return to the girl's restroom.
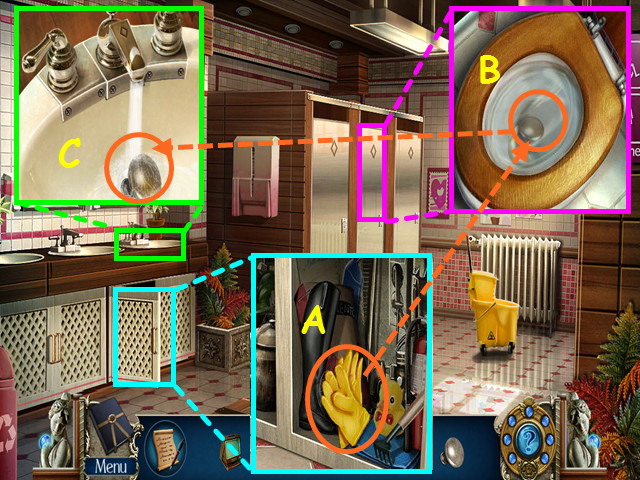
- Open the cabinet, look inside and take the RUBBER GLOVES (A).
- Look in the center stall and use the RUBBER GLOVES to retrieve the DIRTY KNOB (B).
- Look at the sink, place the DIRTY KNOB in the bowl, then take the CLEAN KNOB (C).
- Return to the medical building hall.
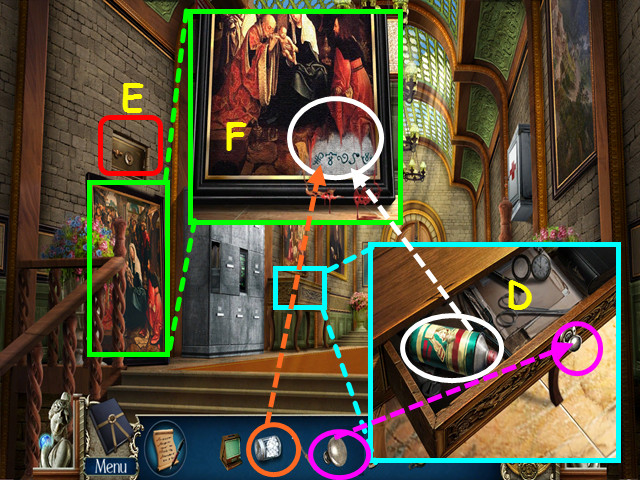
- Look at the desk and use the CLEAN KNOB on the drawer; take the THINNER (D).
- Look at the painting; remove it from the wall to find the safe (E).
- Look at the painting again; use the THINNER, followed by the COTTON to reveal a code (F).
- Zoom into the safe for a mini-game.
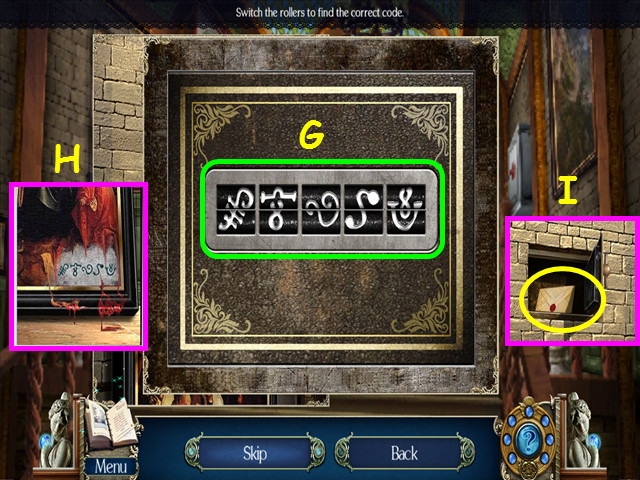
- Change the rollers (G) to reflect the code found on the painting (H).
- Take the letter from the safe (I).
- Click on the envelope to open it, then click on the letter to read it.
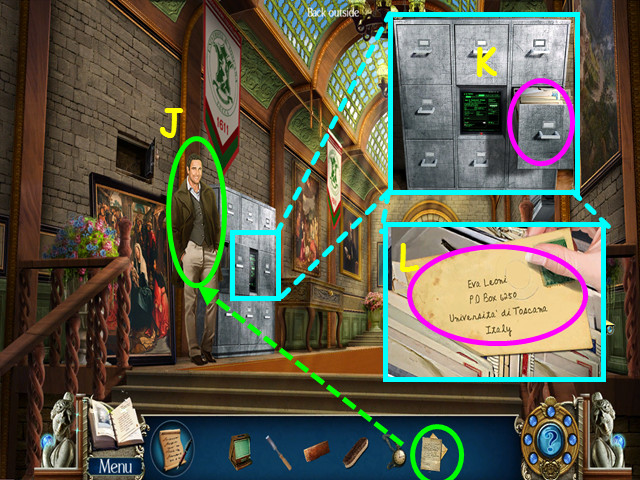
- Give the CONFESSION LETTER to Professor Romano (J).
- Look at the records cabinet and select the open drawer (K).
- Click on the files to search, then click on Eva's letter to find EVA'S ADDRESS (L).
- Walk down, then go forward to the girls dorm.
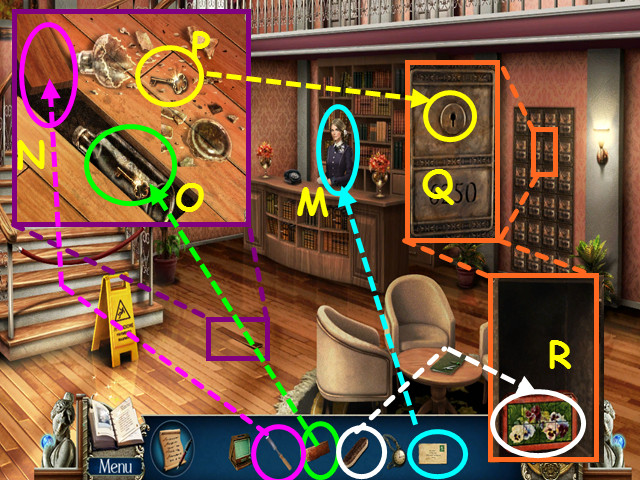
- Give EVA'S ADDRESS to the student representative (M).
- Look at the floorboard and use the CHISEL to pry up the board (N).
- Use the BRICK to break the bottle (O) then take the POST BOX KEY (P).
- Look at the post boxes and use the POST BOX KEY on the lock (Q).
- Use the BRUSH to clean the dirt off the box, then select the box for a mini-game (R).
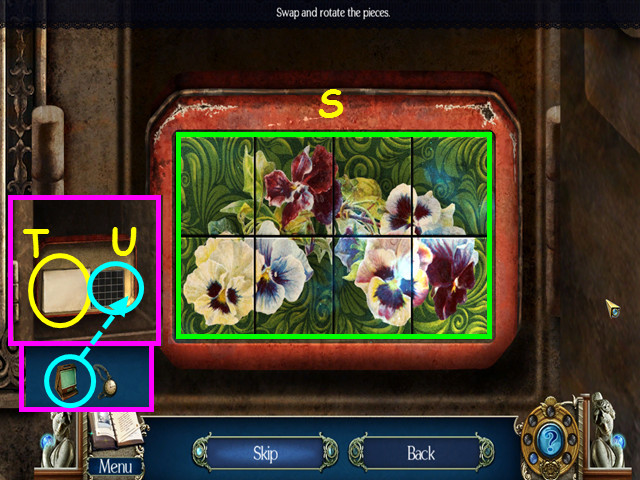
- Restore the mosaic on the box (S); click on 2 tiles to swap positions, click on a single tile to rotate in place.
- Read the letter (T).
- Use the PORTABLE MICROFICHE VIEWER on the microfiche (U).
Chapter 6: Chapel
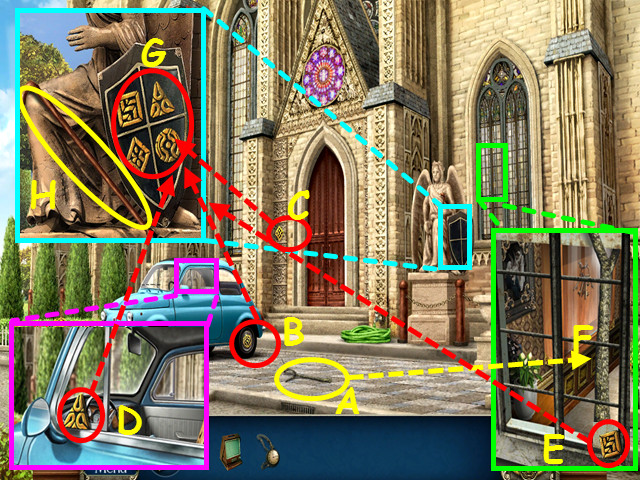
- Take the BRANCH (A), ROUND BADGE (B), and the DIAMOND BADGE (C).
- Look at the car and take the TRIANGLE BADGE (D).
- Look at the window and take the SQUARE BADGE (E).
- Use the BRANCH on the window (F).
- Look at the statue and place the 4 BADGES in to the same shape spots on the shield (G).
- Take the STAFF (H).
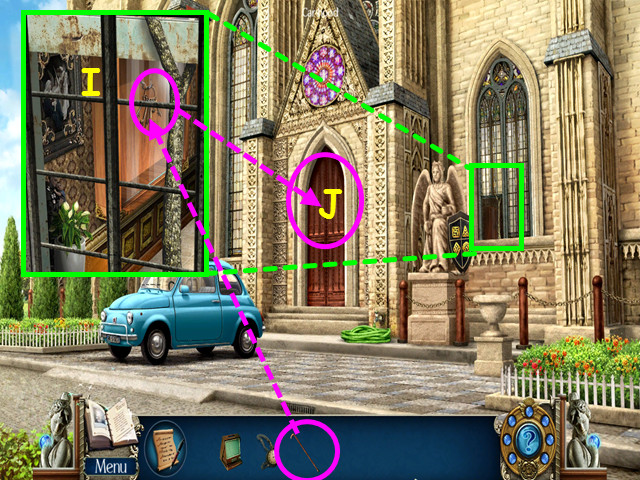
- Look in the window and use the STAFF to open the glass door and get the KEYS (I).
- Use the KEYS on the cathedral door for a mini-game (J).
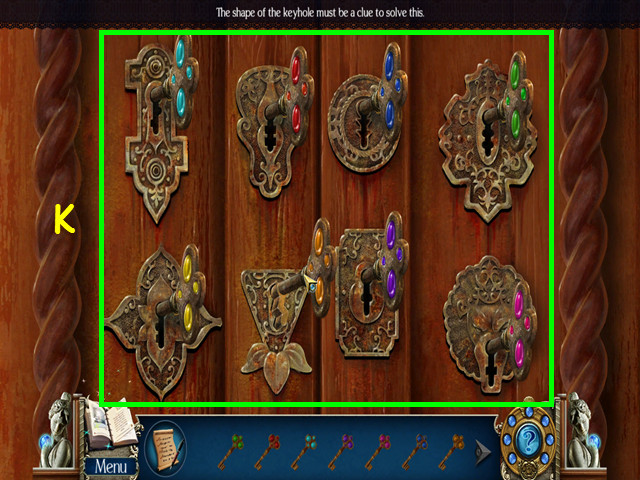
- Place the keys into the locks based on the shape of the keyhole (K).
- Enter the cathedral.
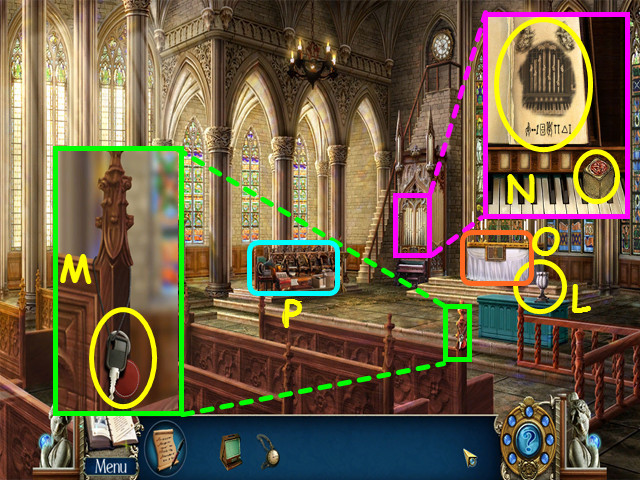
- Take the VASE (L).
- Look at the bench and take the CAR KEY (M).
- Look at the pipe organ; take the code sheet and the 1 /2 CUBE (N).
- Note the altar (O).
- Select the chorale area for a HOS (P).
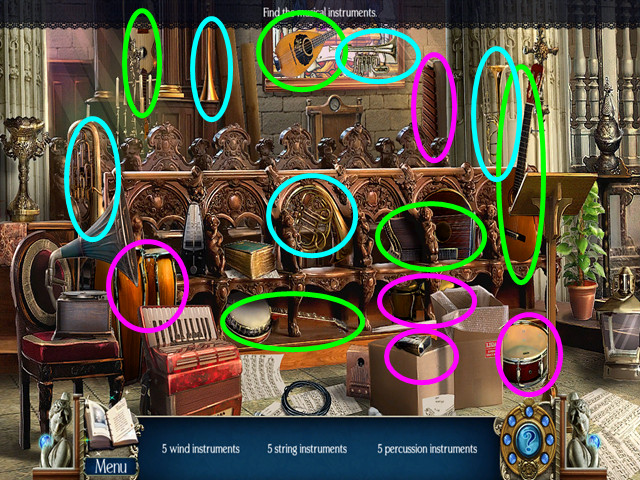
- Locate all the instruments on the list.
- You will earn the TRUMPET.
- Exit the cathedral.
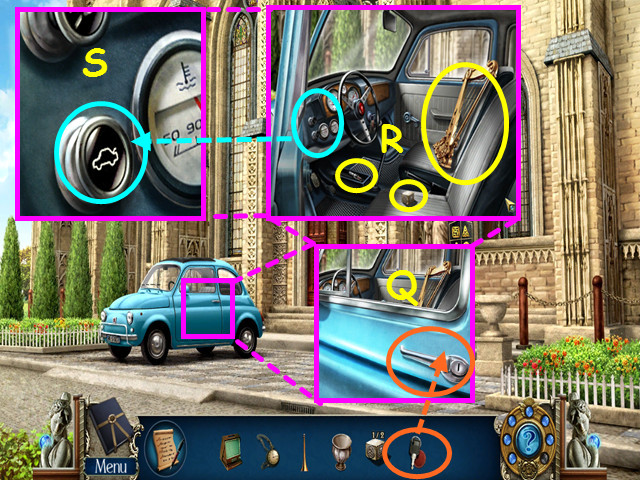
- Look at the car door and use the CAR KEY on the lock (Q).
- Take the SPARK PLUG, 2/2 CUBE and the HARP (R).
- Look at the dash and press the hood button (S).
- Enter the cathedral and look at the altar.
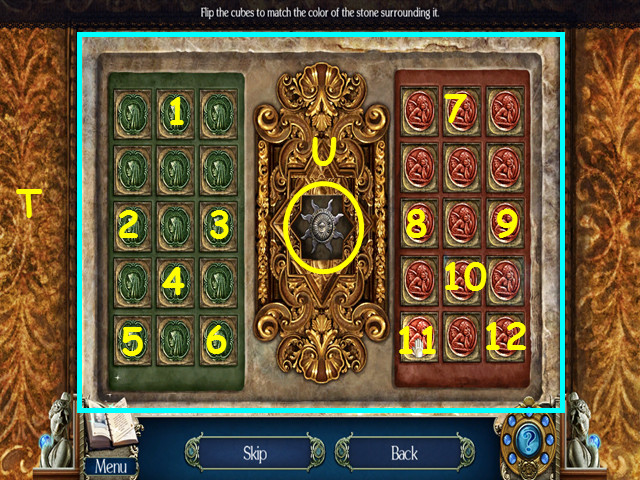
- Place the 2 CUBES into the squares to trigger the mini-game.
- Flip the cubes to match the surrounding stone (T).
- Clicking on a cube will affect other cubes.
- Click on the cubes in numerical order (1-12).
- Take the SUN DISK from the center (U).
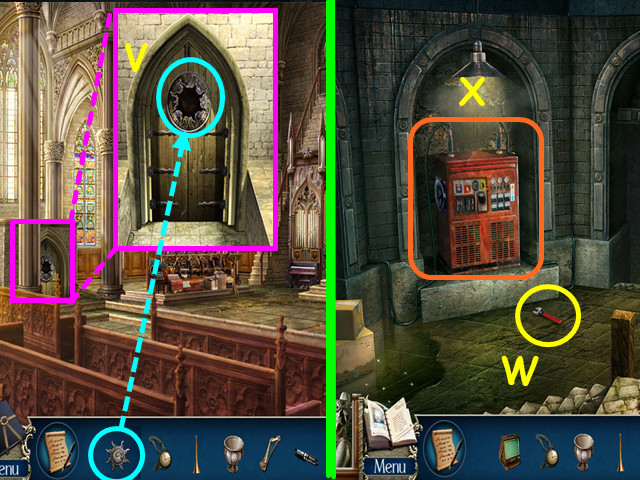
- Look at the door to the tunnels on the left.
- Place the SUN DISK in the door and enter the tunnels (V).
- Take the SPANNER (W).
- Note the generator (X).
- Exit the cathedral.
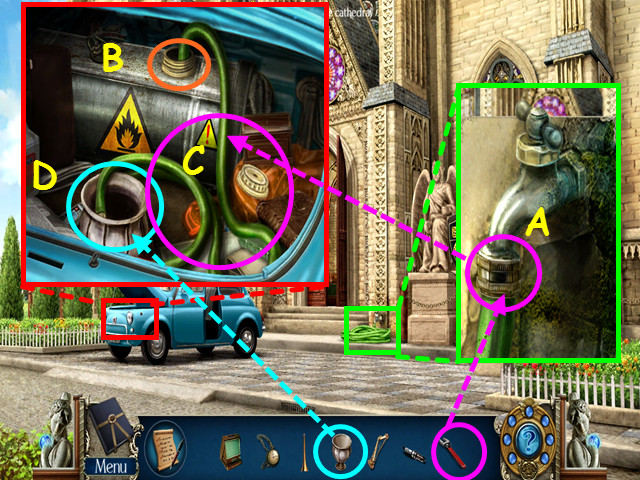
- Look at the spigot and use the SPANNER to take the HOSE (A).
- Look under the hood of the car and remove the fuel cap (B).
- Place the HOSE in the fuel tank (C).
- Use the VASE on the hose (D).
- Take the VASE with FUEL.
- Return to the tunnels and look at the generator.
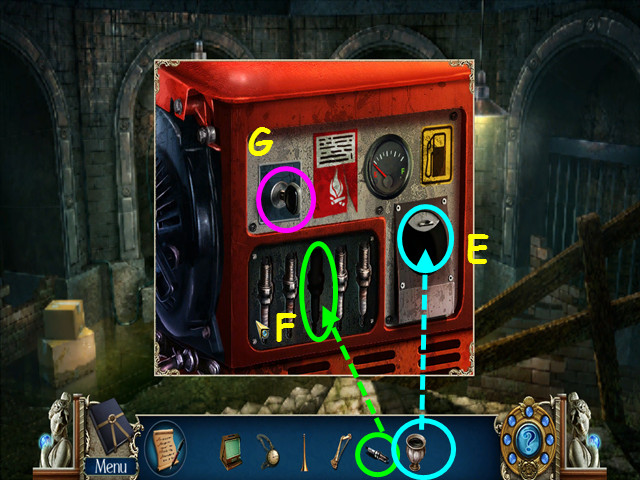
- Use the VASE with FUEL on the fuel hole (E).
- Place the SPARK PLUG in the empty slot (F).
- Turn the key (G).
- Walk forward into the catacombs.
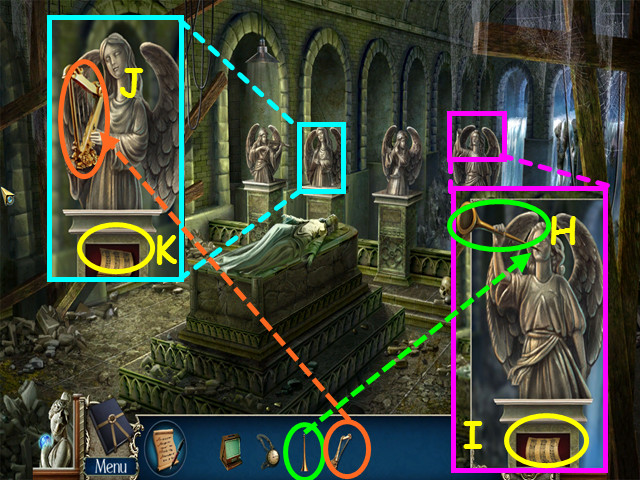
- Look at the right angel and place the TRUMPET in her arms (H).
- Take the 1 /2 MUSIC SHEET (I).
- Look at the second from the left angel and place the HARP in her hands (J).
- Take the 2/2 MUSIC SHEET (K).
- Walk down twice to return to the cathedral.
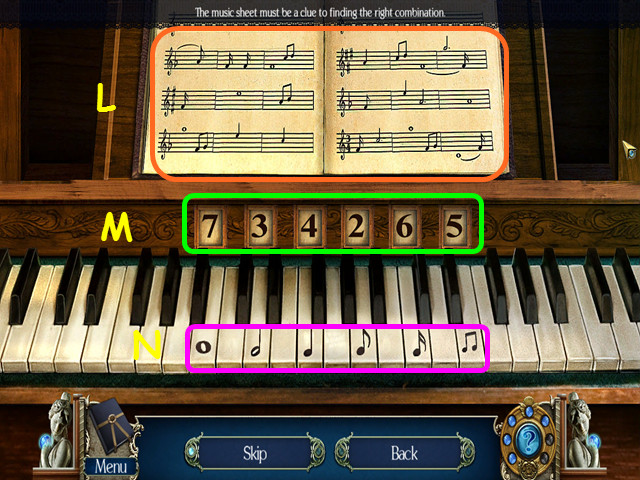
- Look at the pipe organ and place the 2 MUSIC SHEETS on the music book for a mini-game.
- Look at the music book (L), count how many of each note, then enter that number on the piano (M).
- Press the key under each number to change that number (N).
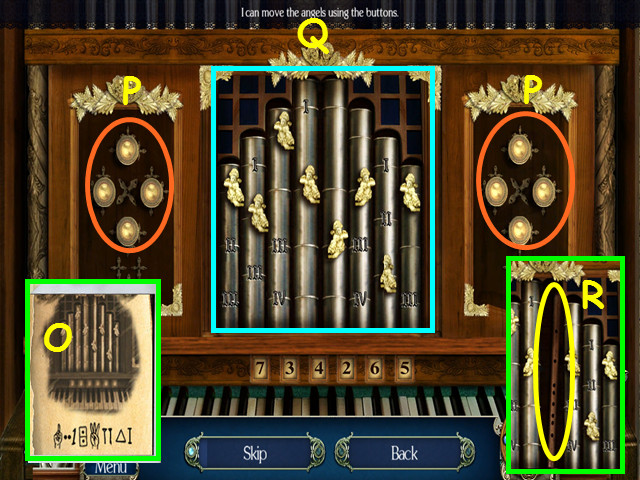
- Look at the code in your journal; the symbols at the bottom are 1-2-1-2-3-2-3-1 (O).
- Click on the left and right buttons (P) to raise or lower the angels to these numbers (Q).
- Take the FLUTE hidden inside one of the pipes (R).
- Return to the catacombs.
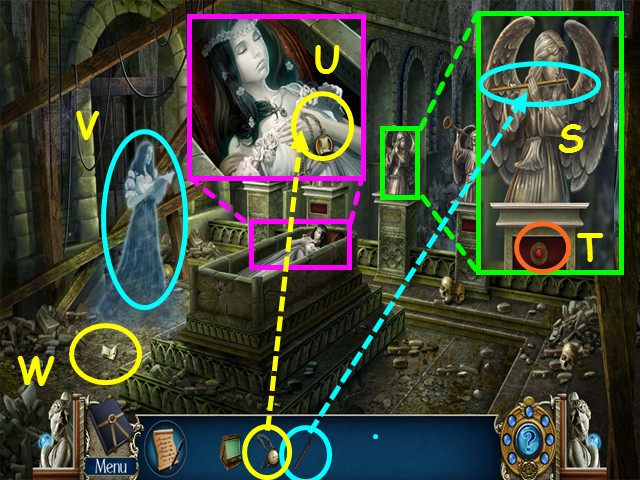
- Look at the second angel from the right and place the FLUTE in her hands (S).
- Press the hidden switch (T).
- Look at Eva and place the POCKET WATCH in her hands (U).
- Click on Eva's spirit (V), then read the note (W) she drops about meeting Giovanni at 7:15.
- Return to the cathedral.
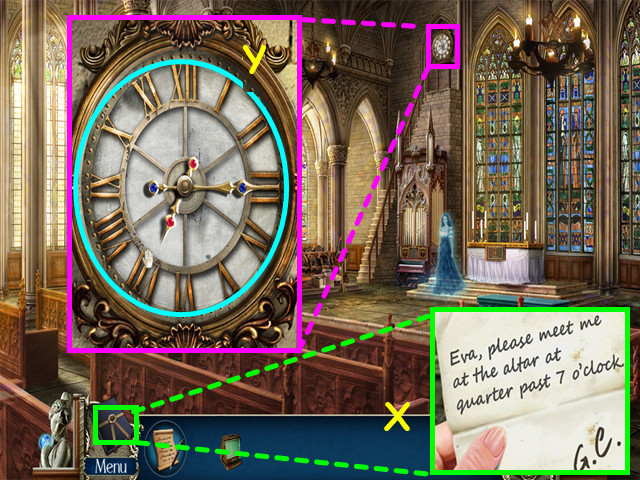
- Refer to your journal for the note found in the catacombs ( X).
- Look at the clock and set the time to 7:15 (Y).
- Congratulations! You have completed Death Under Tuscan Skies: A Dana Knightstone Novel Collector's Edition!
Created at: 2011-12-03

