

Walkthrough Menu
- General Tips
- Chapter 1: The Forest
- Chapter 2: The Tree House
- Chapter 3: The Spell Book
- Chapter 4: Finding the Runes
- Chapter 5: Breaking the Curse
General Tips
- This is the official guide for Dreampath: Curse of the Swamps.
- This guide does not mention each time you have to zoom into a location; the screenshots show each zoom scene.
- Hidden-object puzzles are referred to as HOPs. This guide does not show screenshots of the HOPs, however, it is mentioned when a HOP is available and the inventory item collected.
- Use the Map to travel to a location.
Chapter 1: The Forest
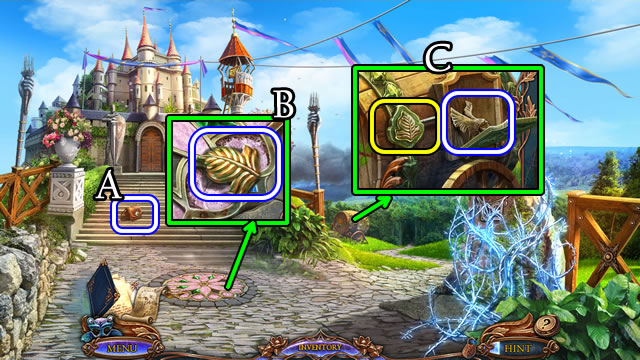
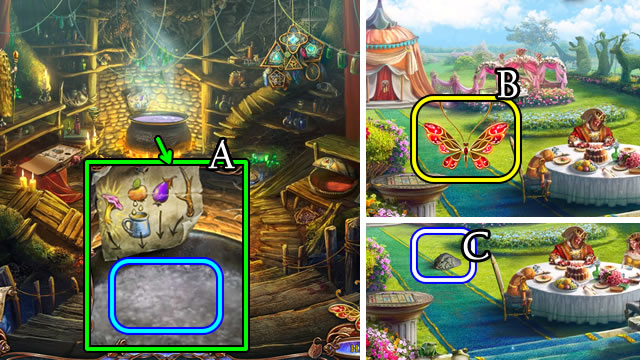
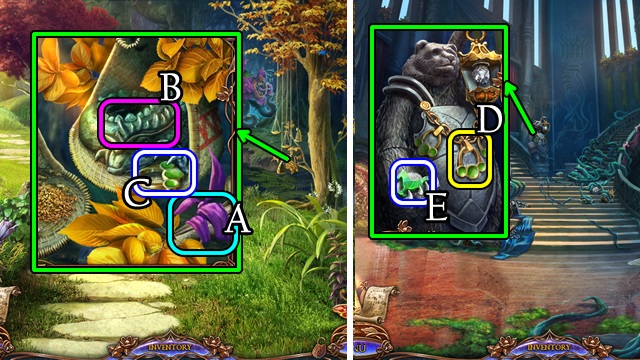
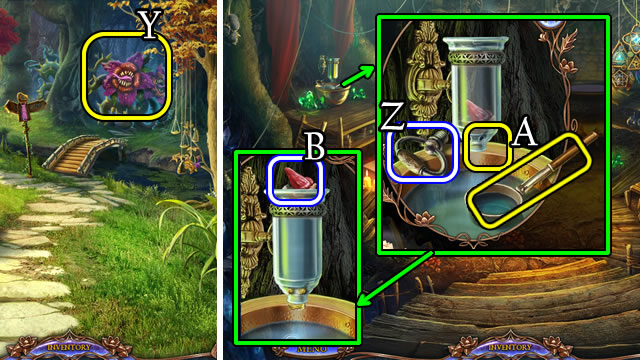
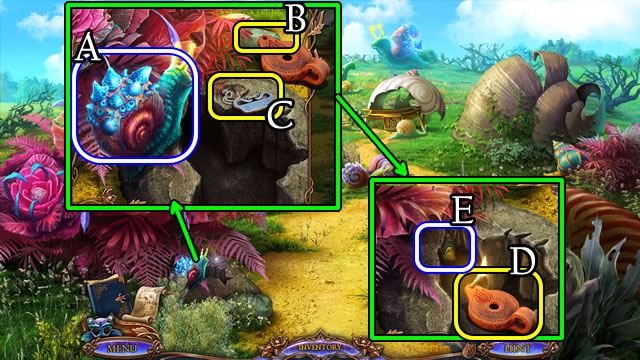
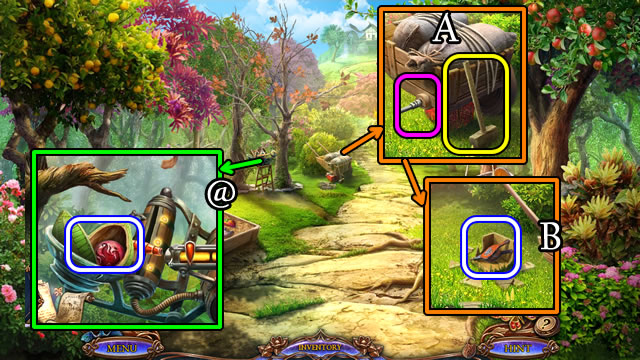
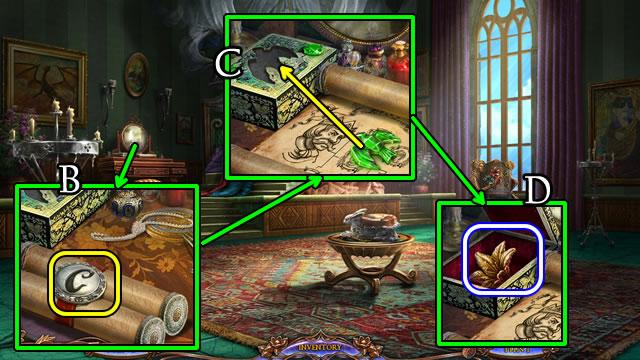
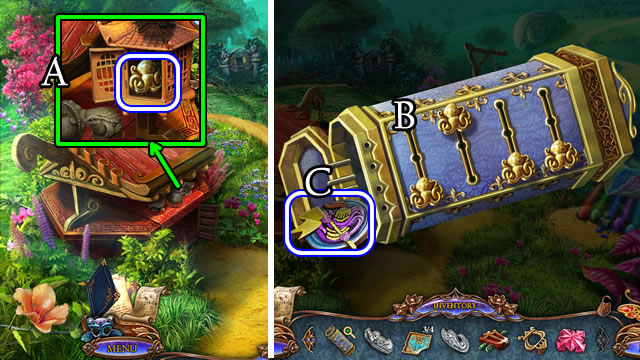
- Take the SATCHEL (A).
- Take the GOLDEN LEAF (B).
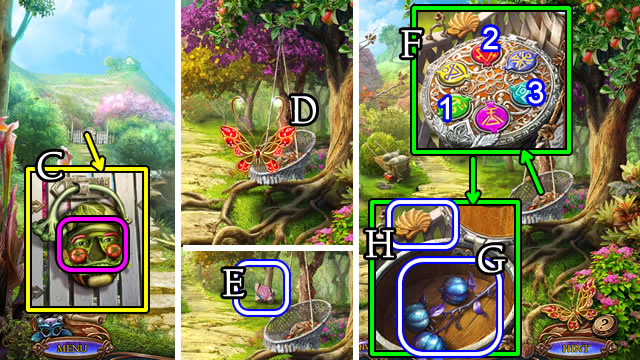
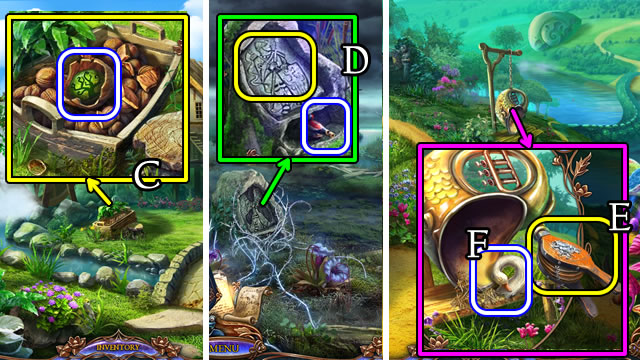
- Place the GOLDEN LEAF. Take the EAGLE EMBLEM (C).
- Combine the SATCHEL and EAGLE EMBLEM. Take the JEWELS. Open the flap, take BOOK (1/3) (Inventory).
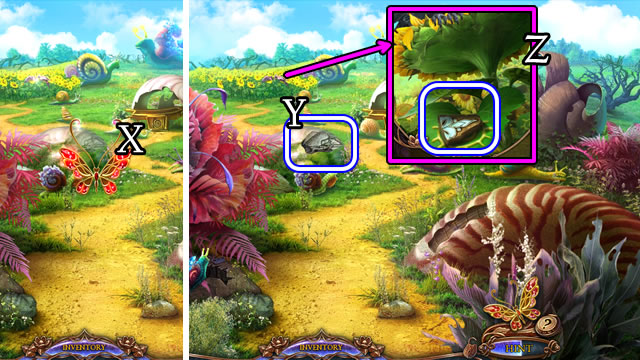
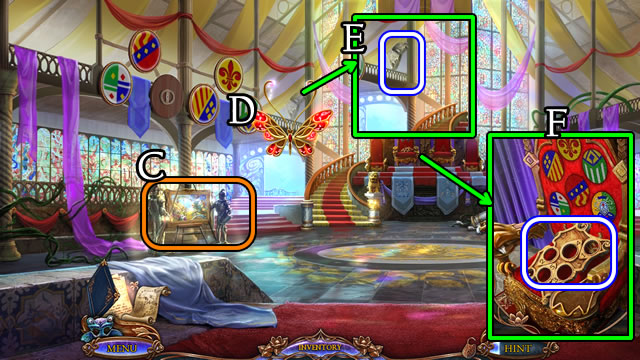
- Combine the BUTTERFLY FRAME and JEWELS to create a Butterfly (Inventory).
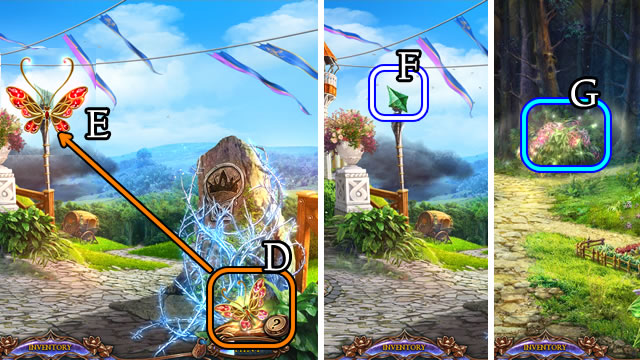
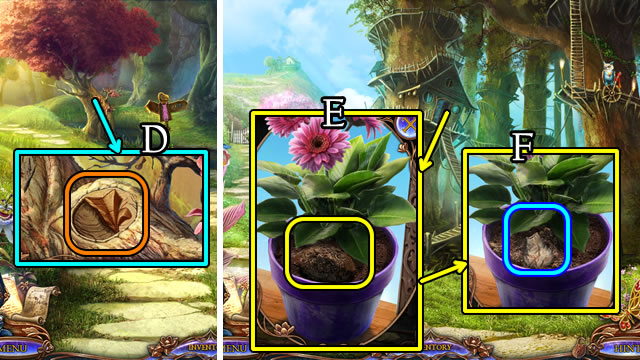
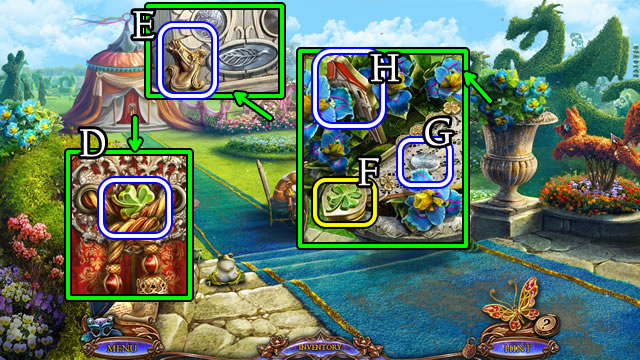
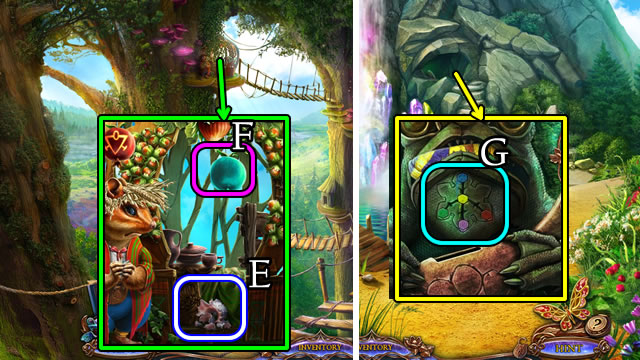
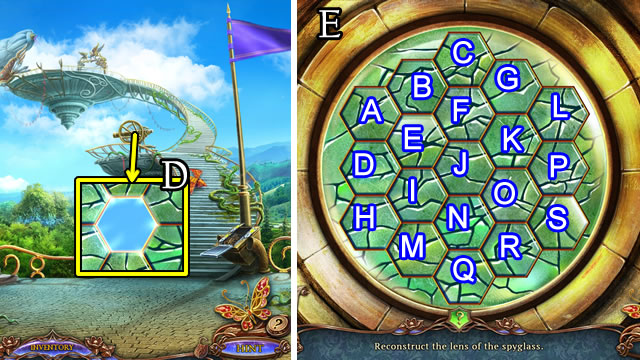
- Place the Butterfly (D) on the post (E).
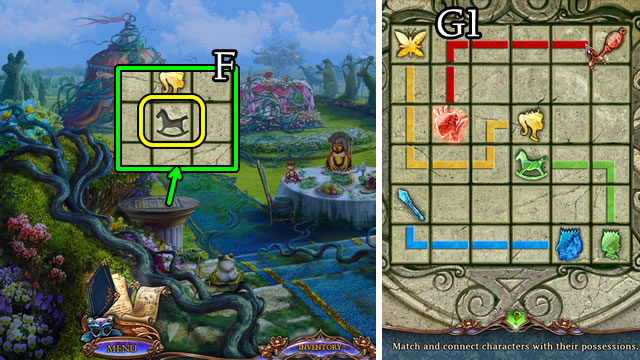
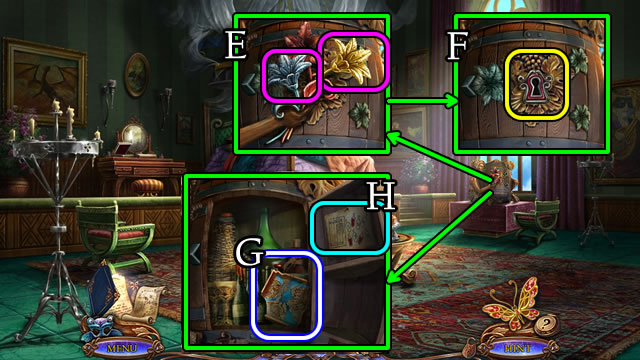
- Take the MALACHITE (1/2) (F).
- Walk forward.
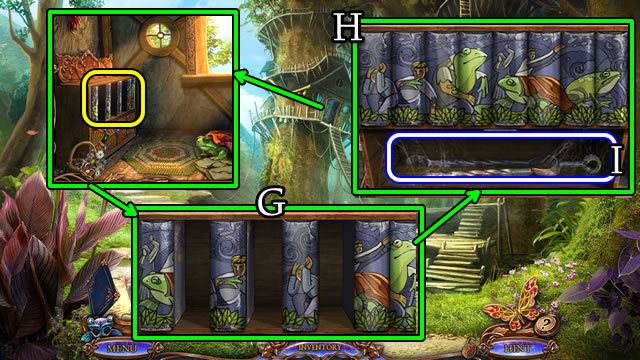
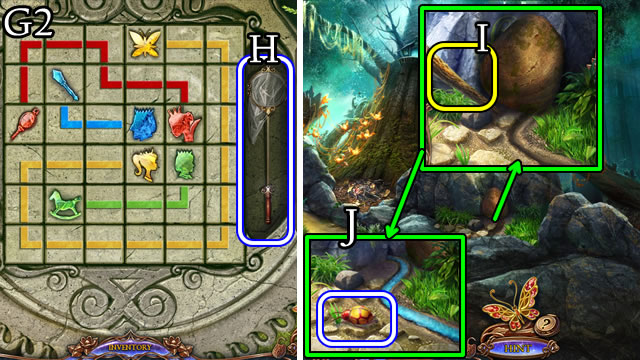
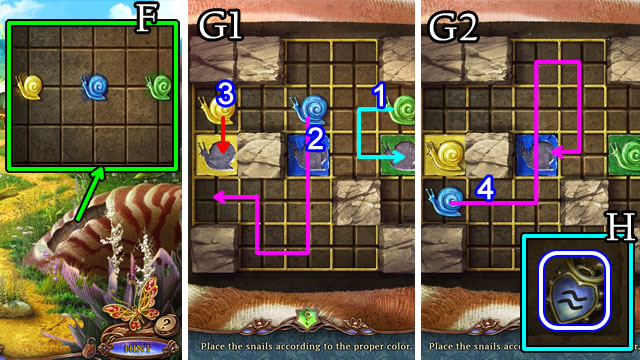
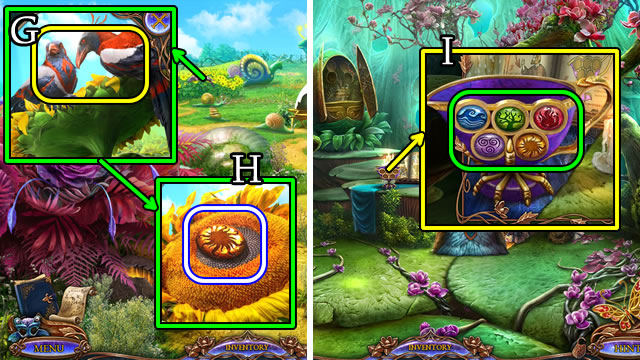
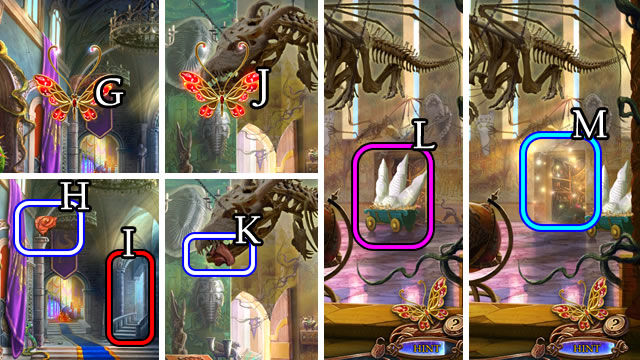
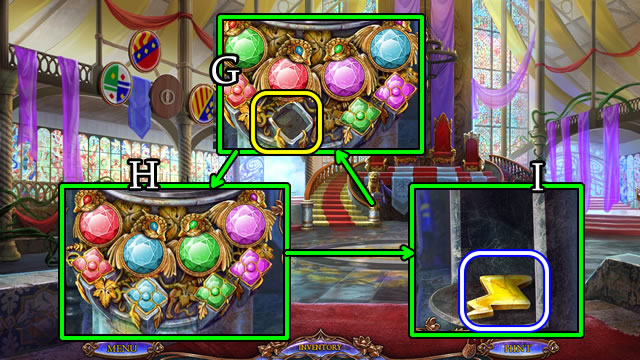
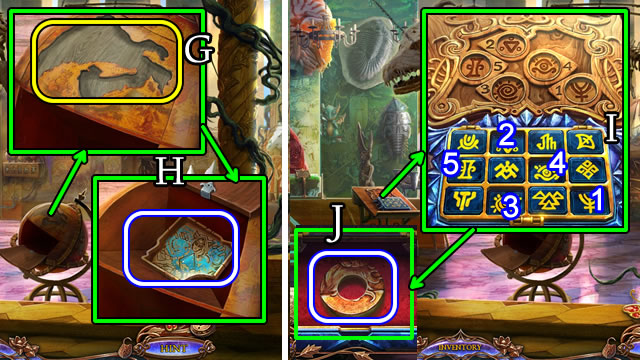
- Play the HOP (G); receive BOOK (2/3).
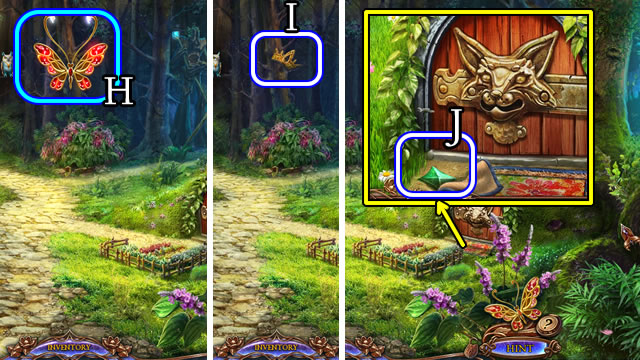
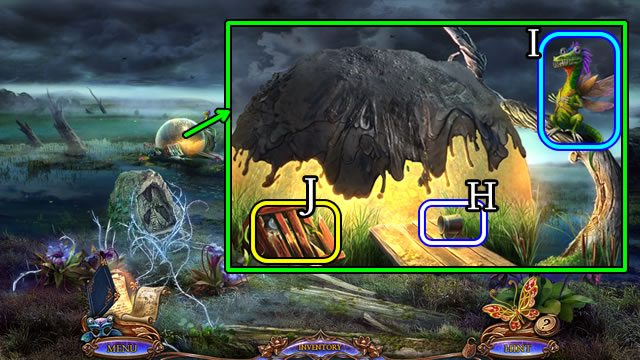
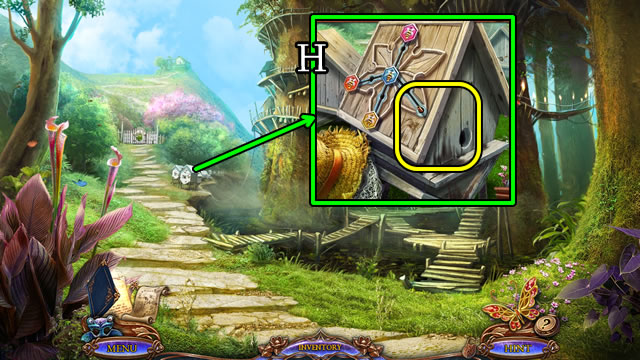
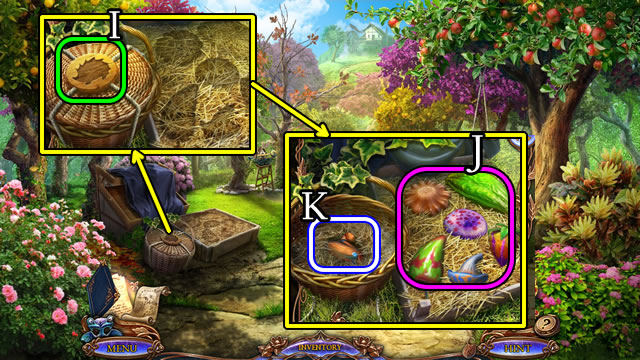
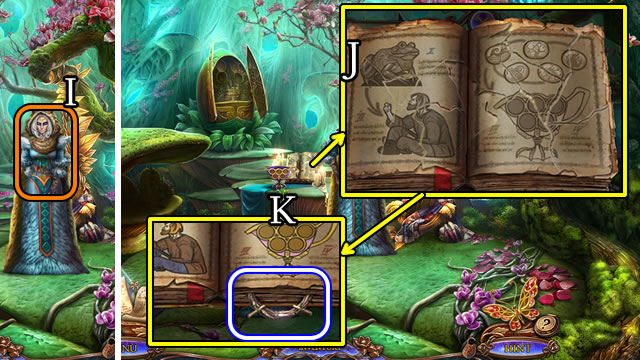
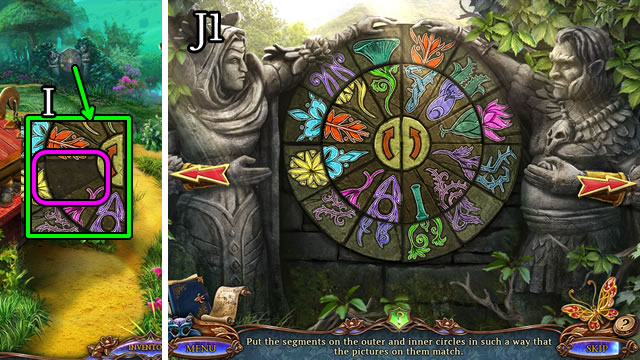
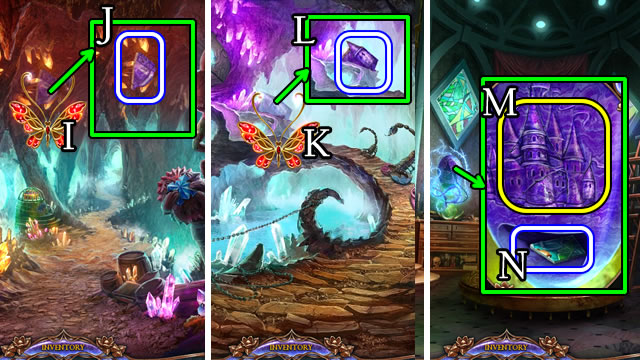
- Place the Butterfly (H); take the CROWN (I).
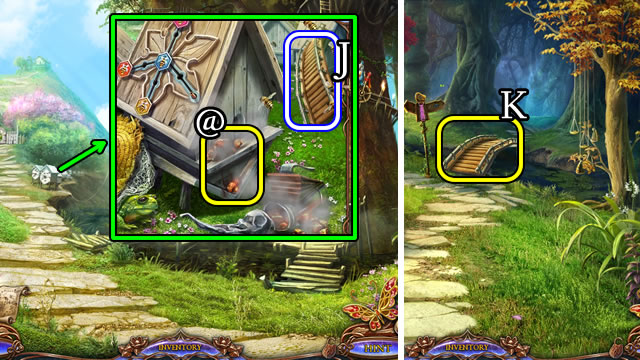
- Lift the mat; take MALACHITE (2/2) (J).
- Walk down.
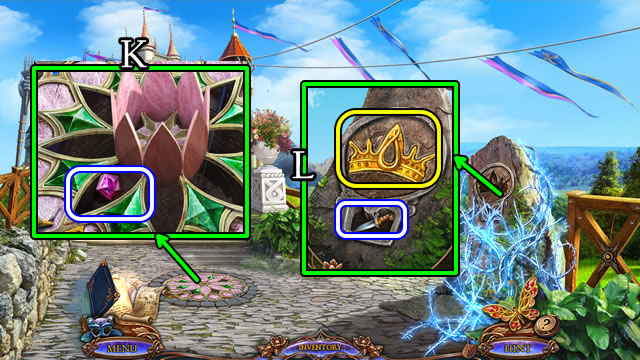
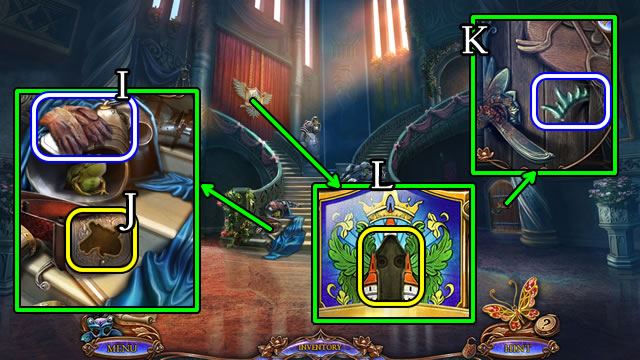
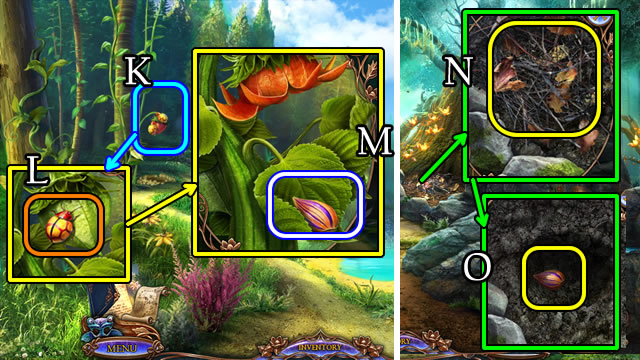
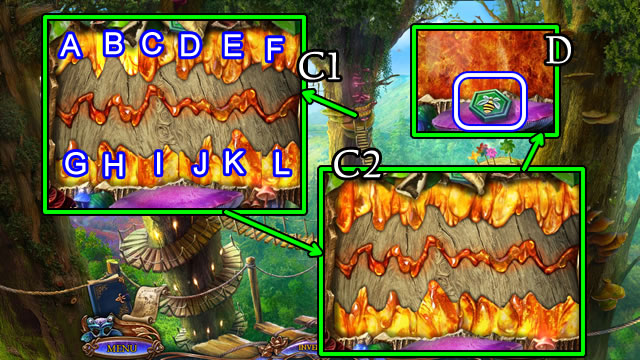
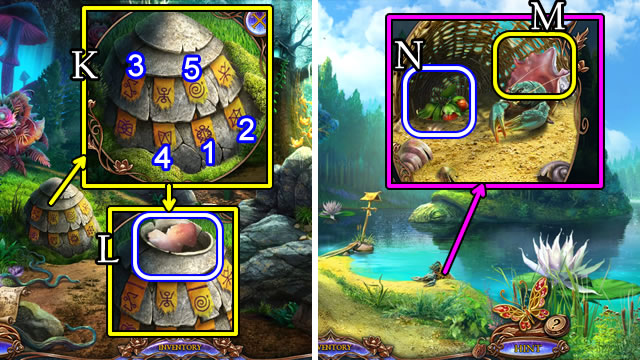
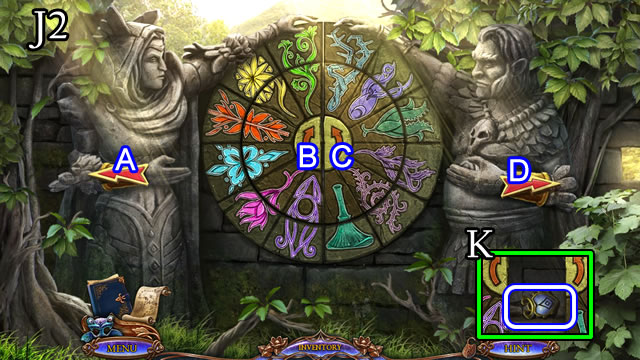
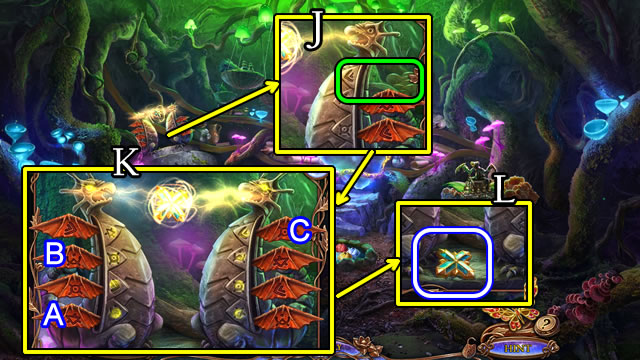
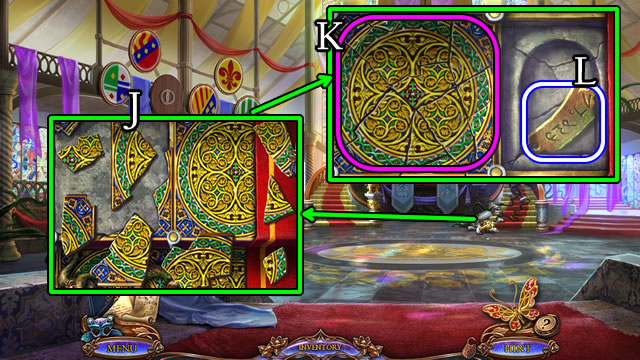
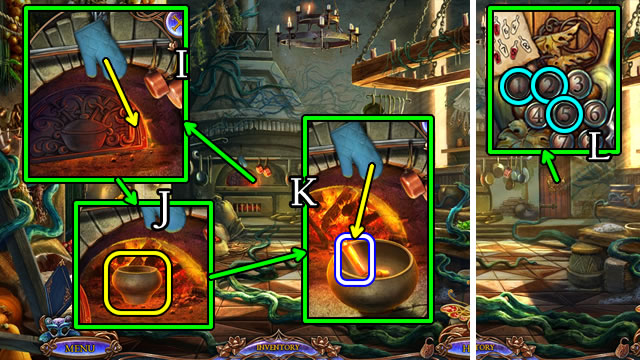
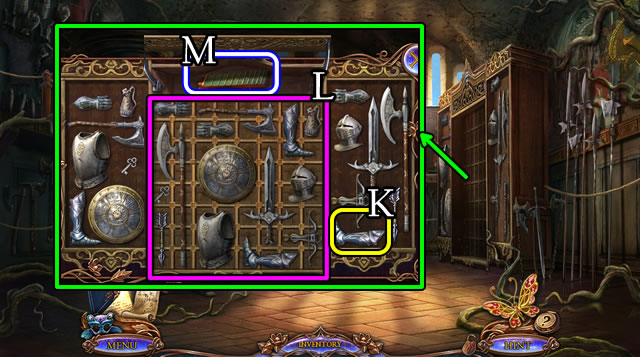
- Place the MALACHITE stones (2/2). Take the FIRE RUBY (K).
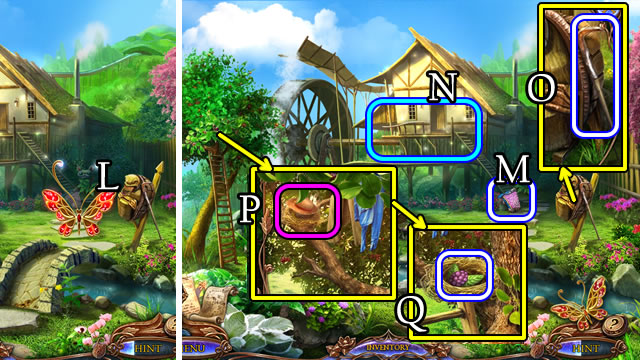
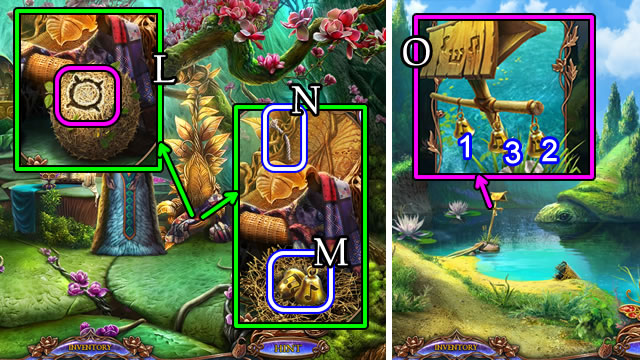
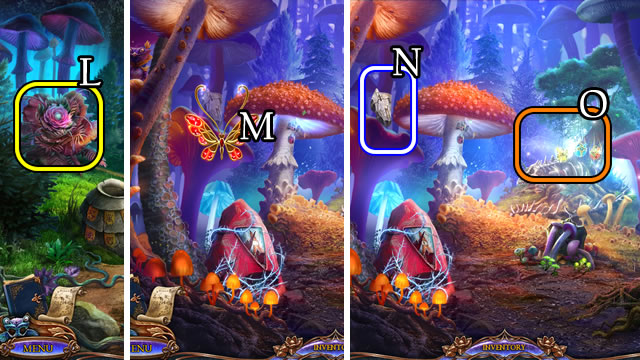
- Place the CROWN. Take the KNIFE (L).
- Walk forward.
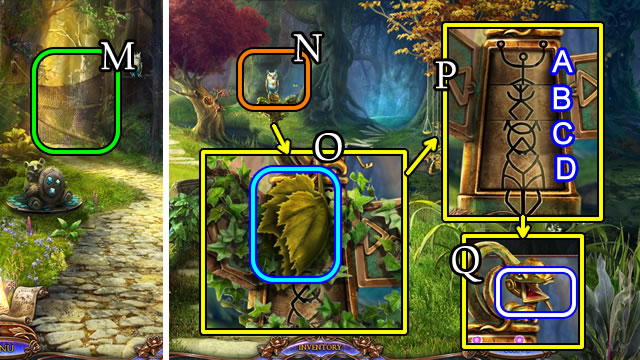
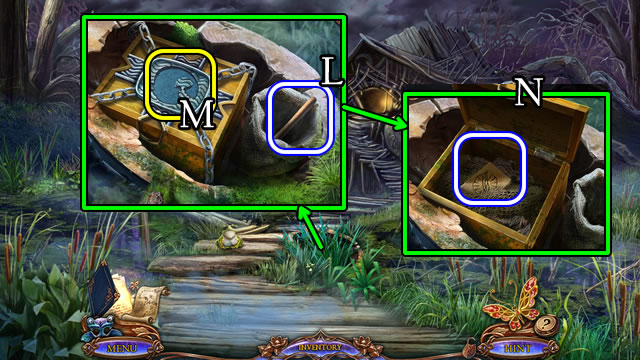
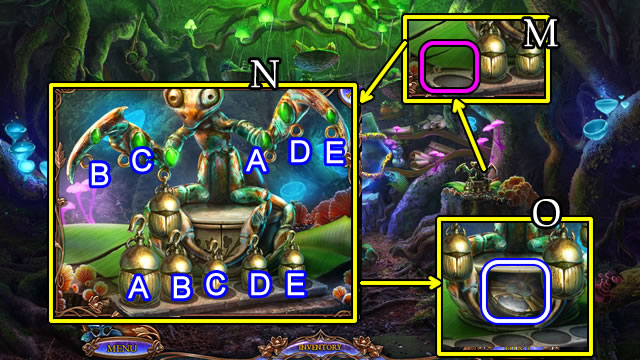
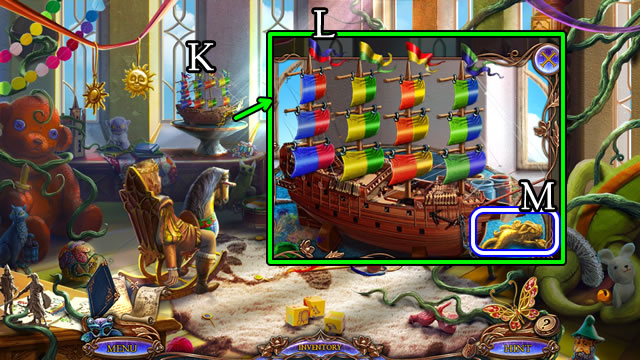
- Use the KNIFE (M).
- Walk left.
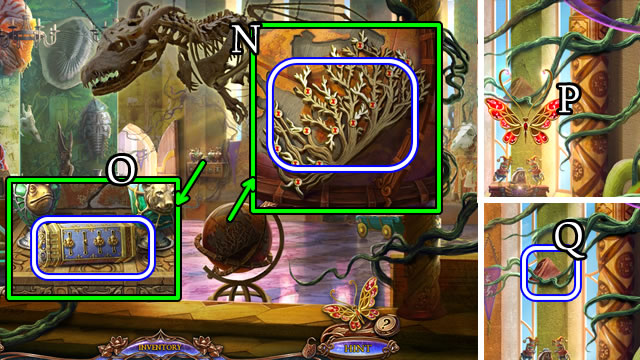
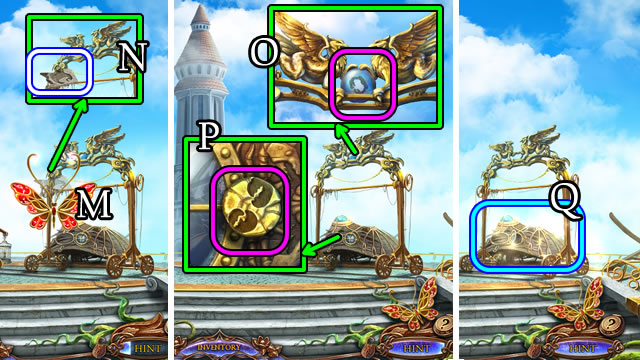
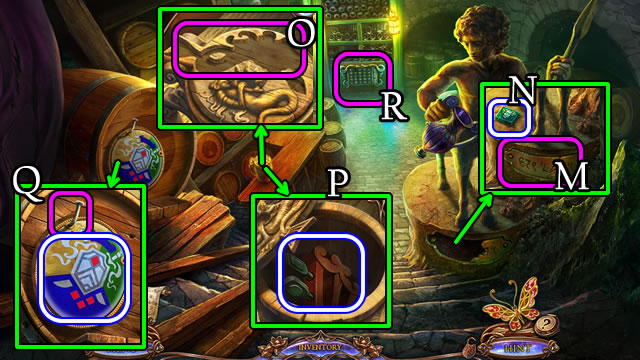
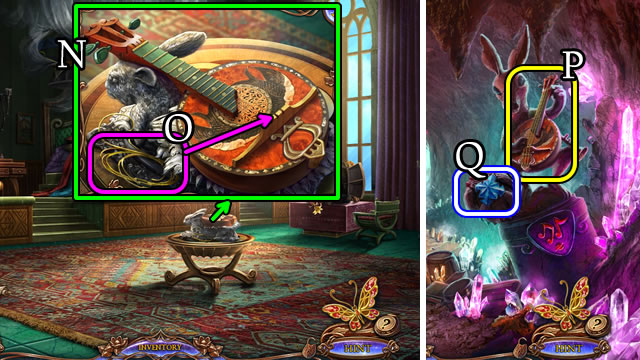
- Touch the owl (N).
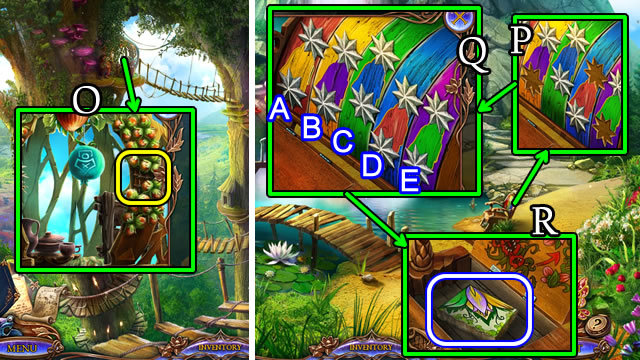
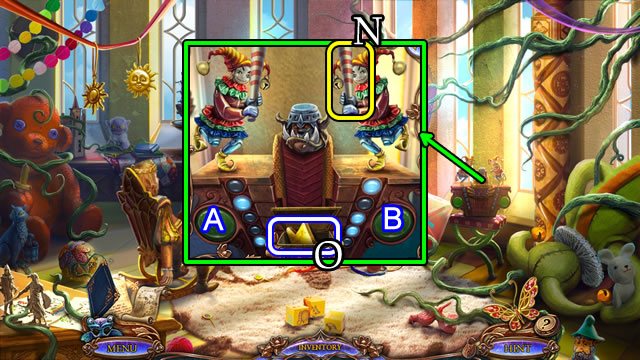
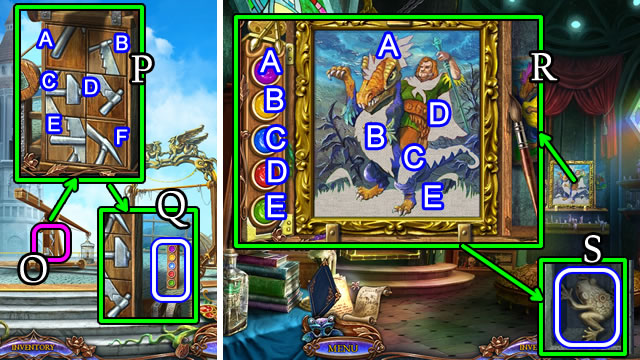
- Take the leaf note (O). Touch the vines.
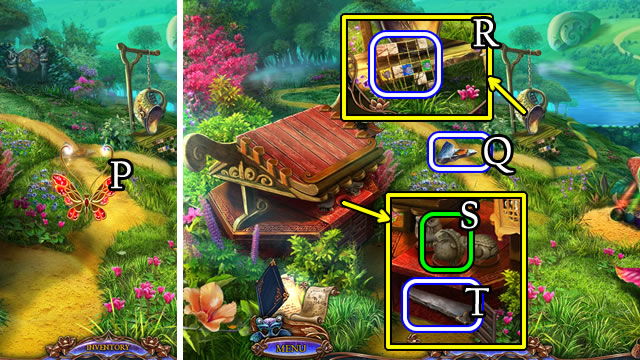
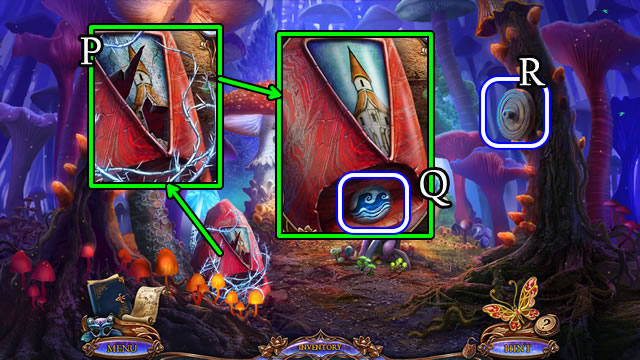
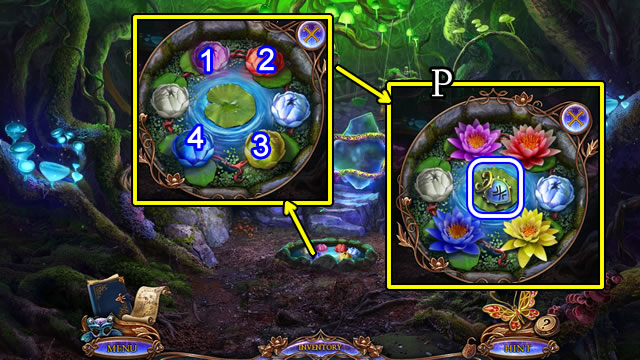
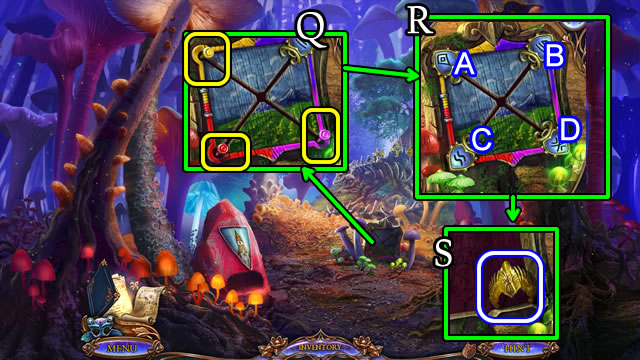
- Solution (P). Ax3-B-Cx2-Dx3.
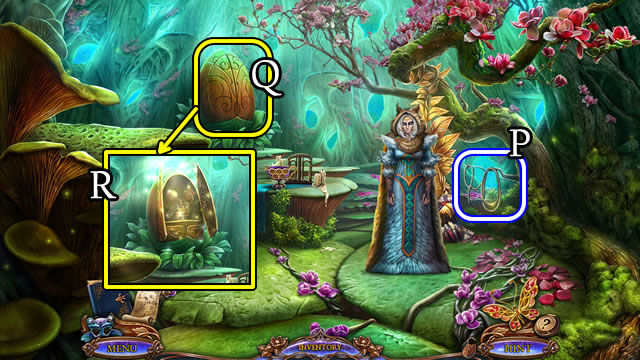
- Take the TRIANGLE GEM (Q).
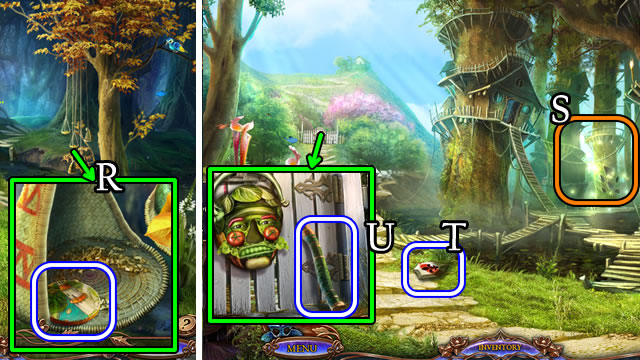
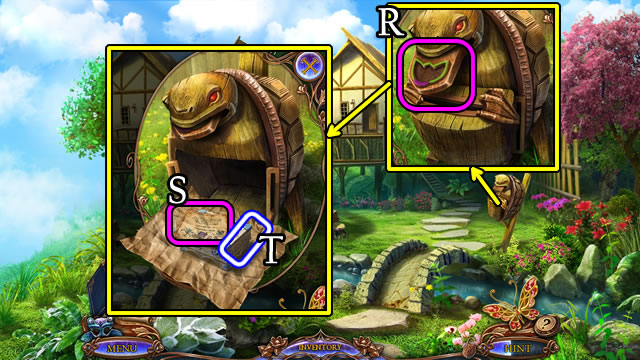
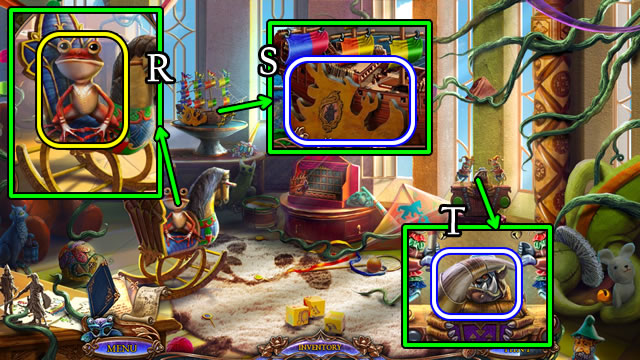
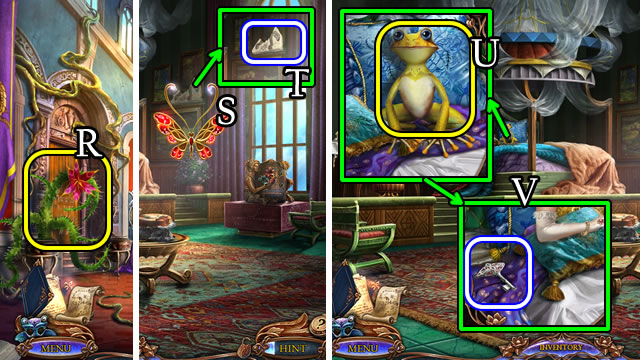
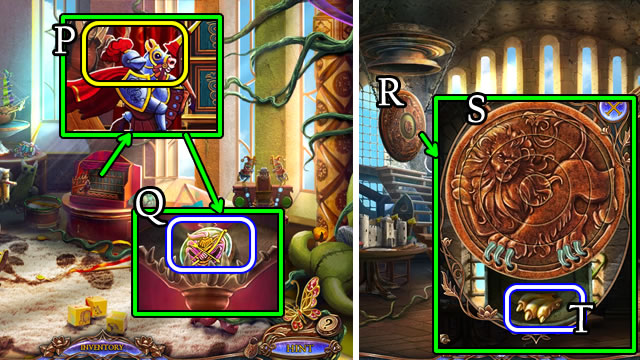
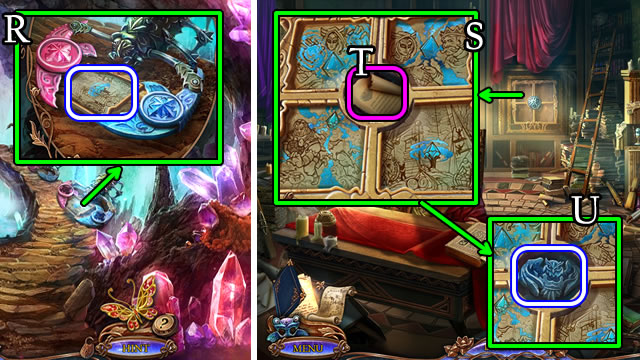
- Take the MAP TOKEN (R).
- Walk left.
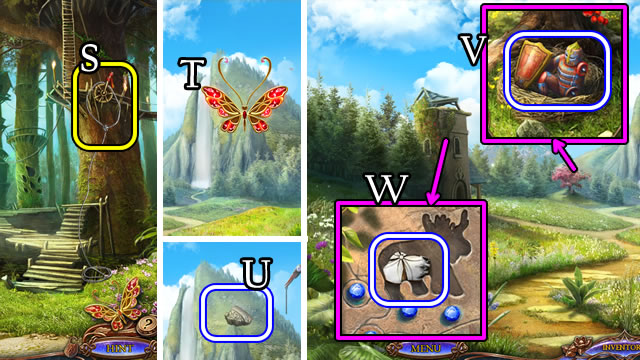
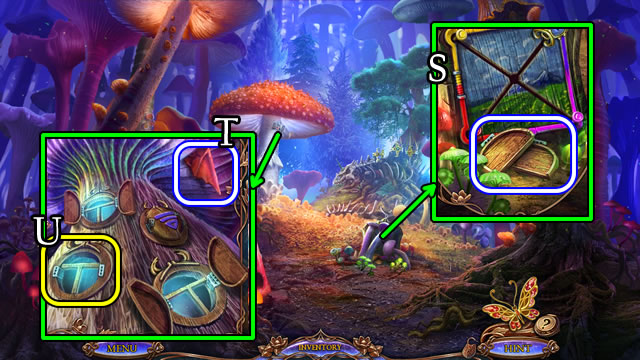
- Play the HOP (S) for an OPAL.
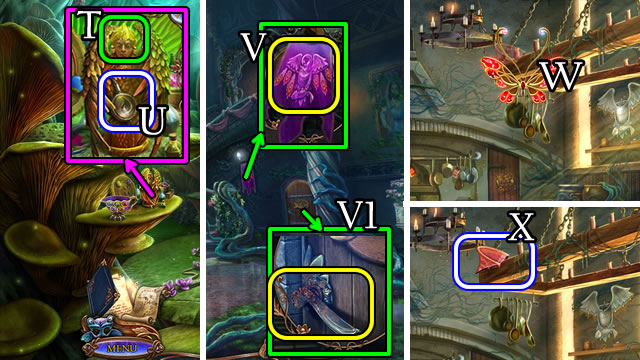
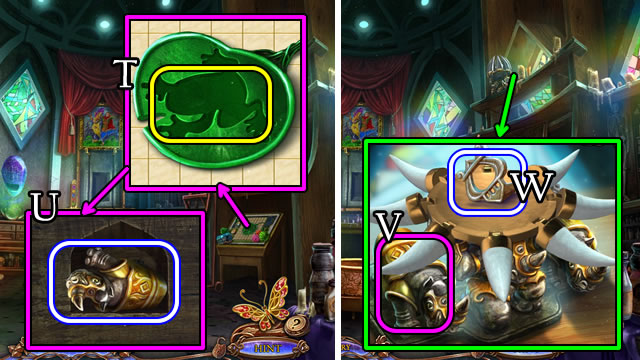
- Take the STONE SHIELD (T).
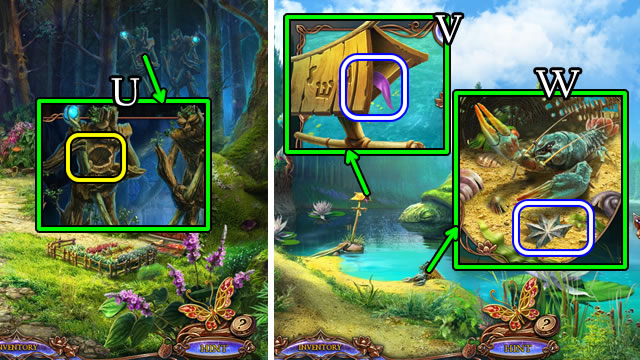
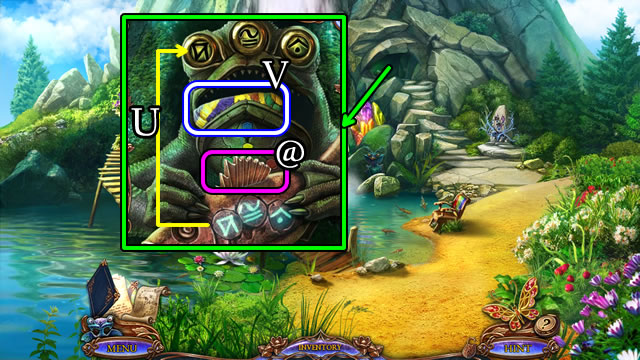
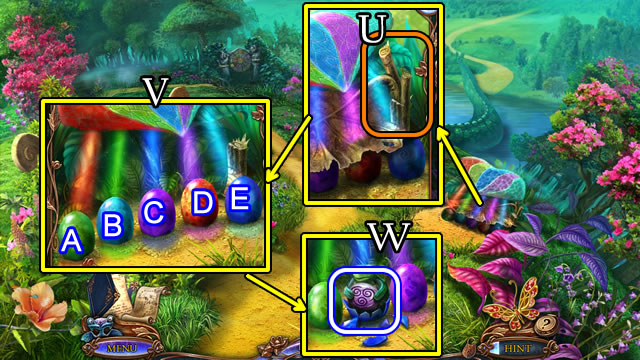
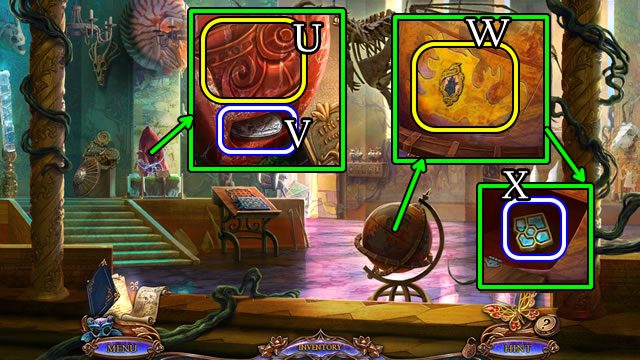
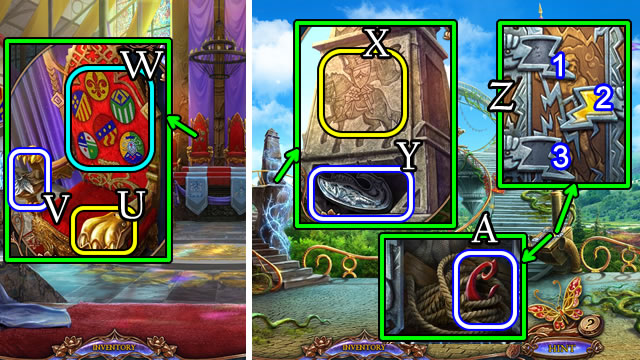
- Take the AXE HANDLE (U).
- Walk down.
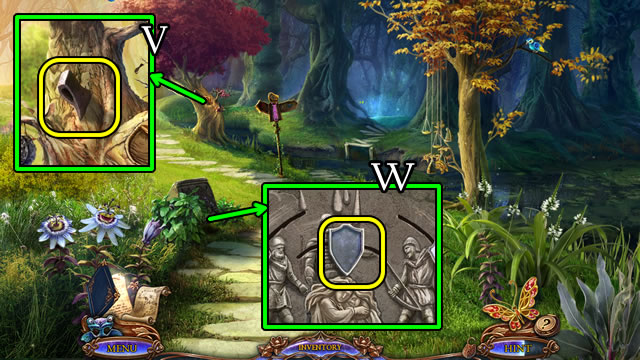
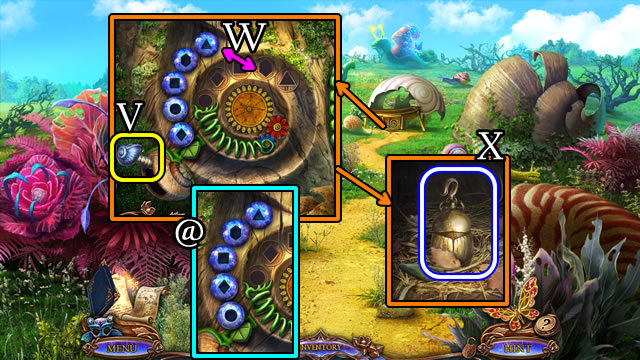
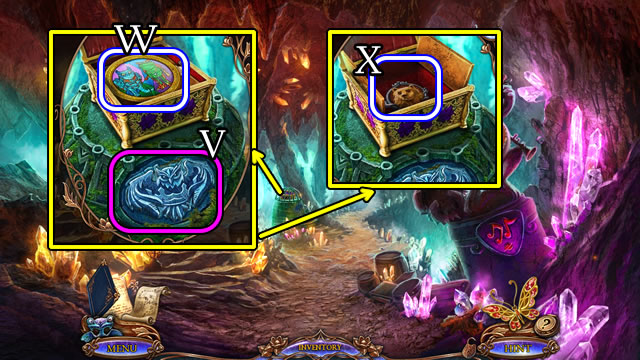
- Place the AXE HANDLE (V). Take the RUSTY AXE.
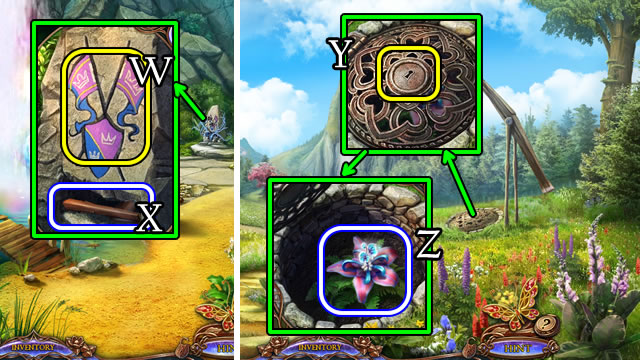
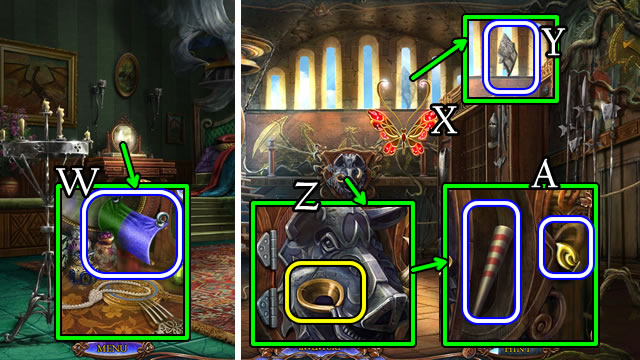
- Move the leaves. Place the STONE SHIELD (W).
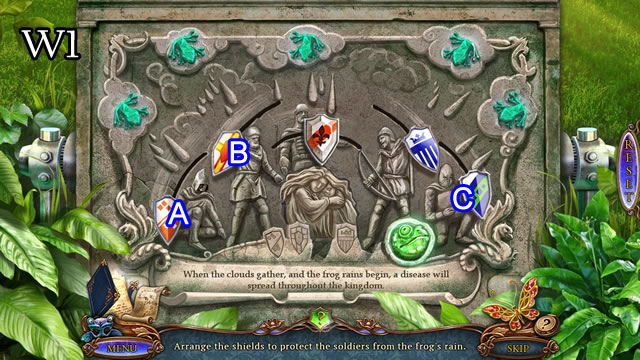
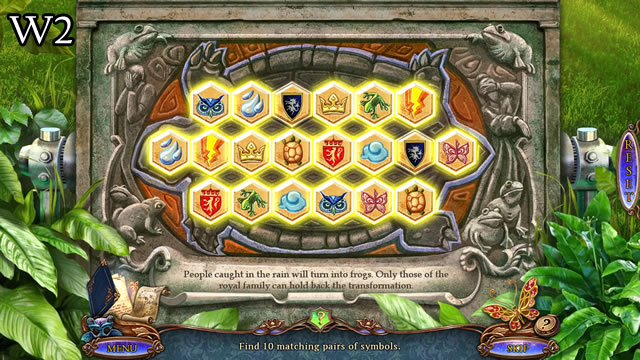
- Solution (W1). Ax2-B-C.
- Solution (W2).
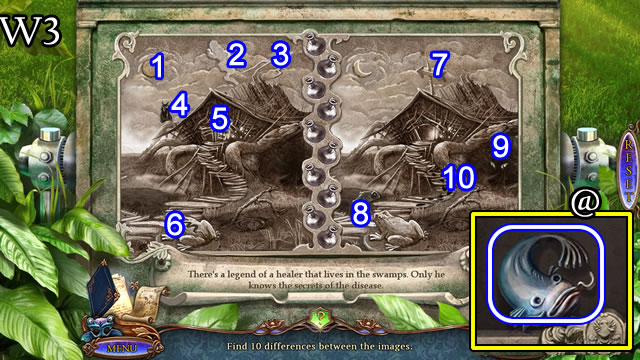
- Solution (W3) 1-10.
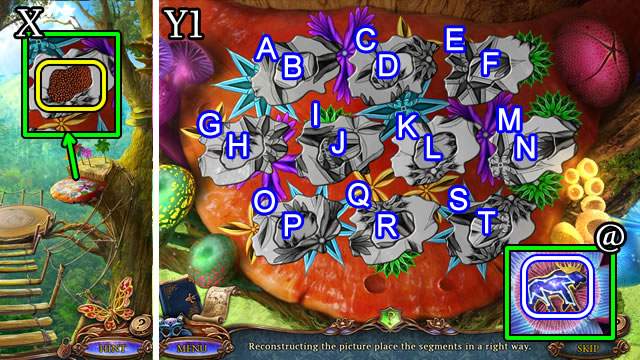
- Take the CATFISH EMBLEM (@).
- Walk down.
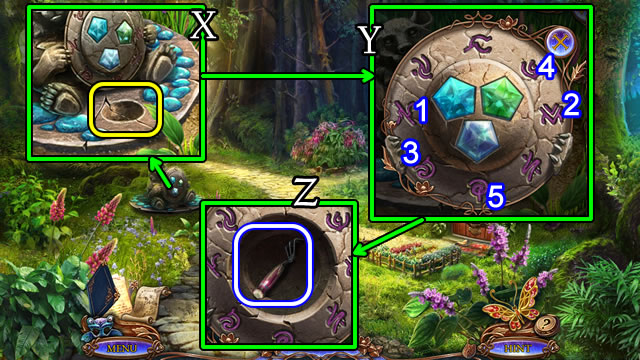
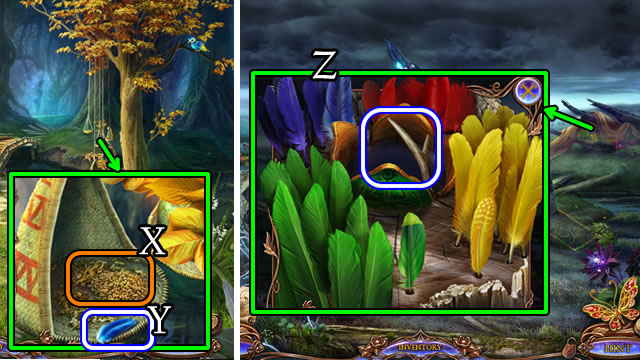
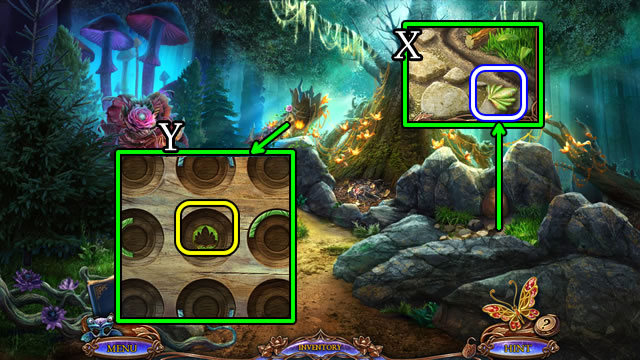
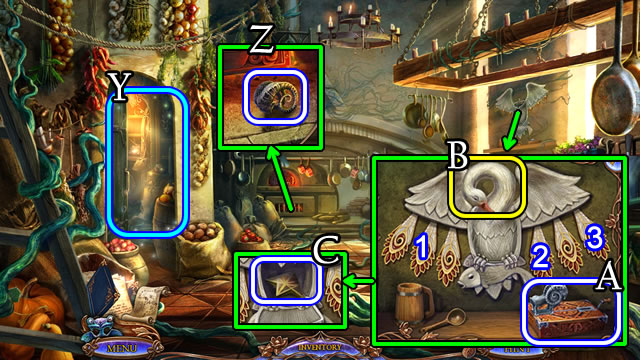
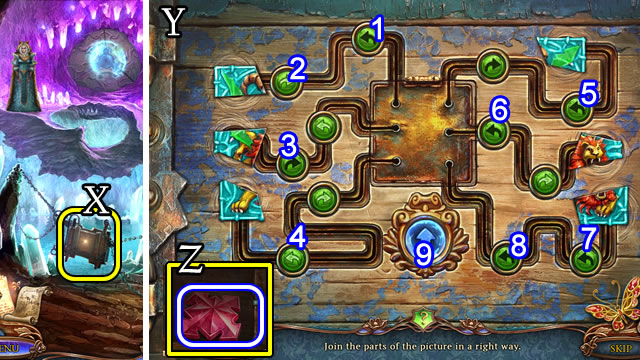
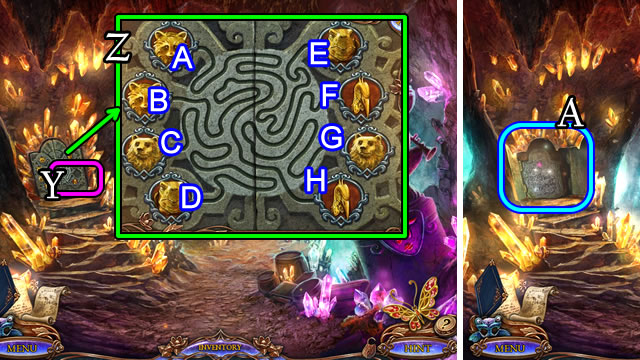
- Place the OPAL (X).
- Solution (Y). 1-5.
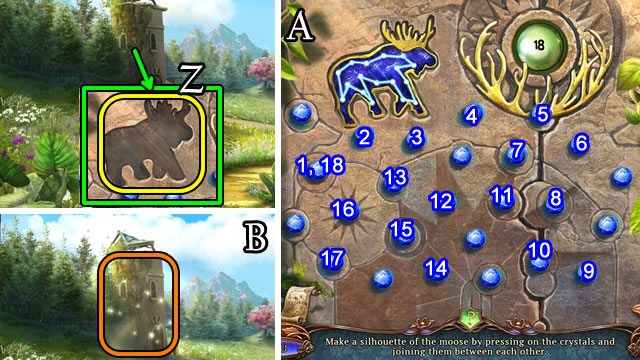
- Take the GARDENING FORK (Z).
- Walk down.
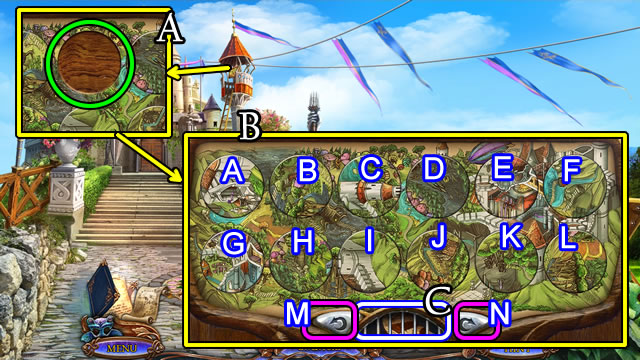
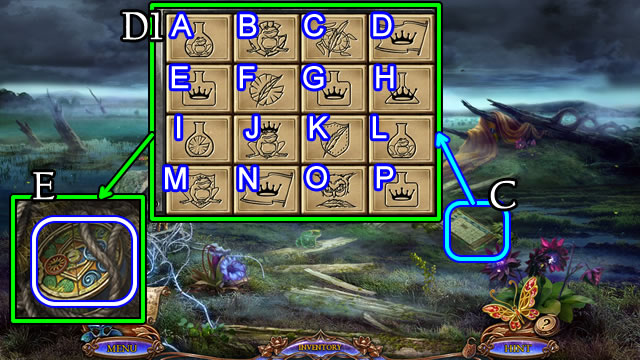
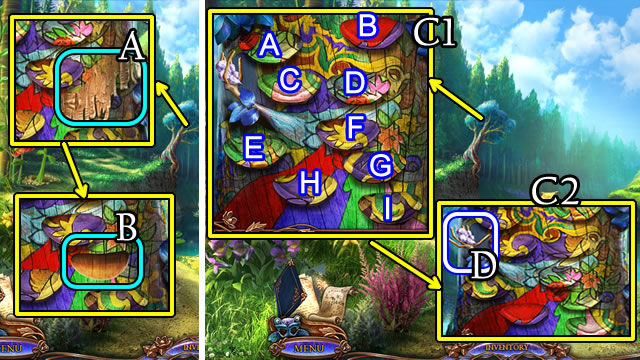
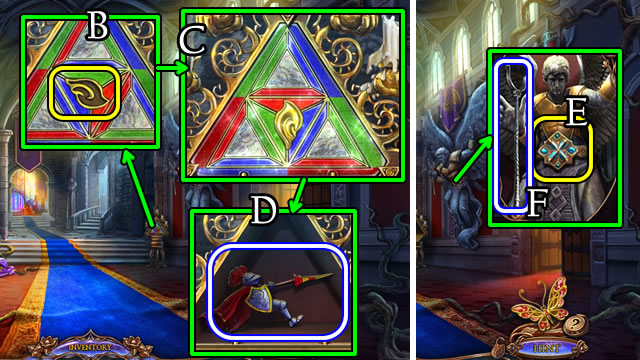
- Place the MAP TOKEN (A).
- Solution (B). SWAPPING: (C-D)-(A-K)-(E-F)-(I-L)-(E-G)-(A-G)-(J-G)-(I-H)-(B-I)-(B-C). ROTATION: (A-M)-(B-Mx2)-(D-M)-(F-Mx2)-(G-M)-(H-M)-(I-N)-(J-Mx2)-(K-N)-(L-N).
- Take the PIECE OF BARK (C).
- Walk forward, then left.
- Place the PIECE OF BARK (D). Take BOOK (3/3).
- Walk left.
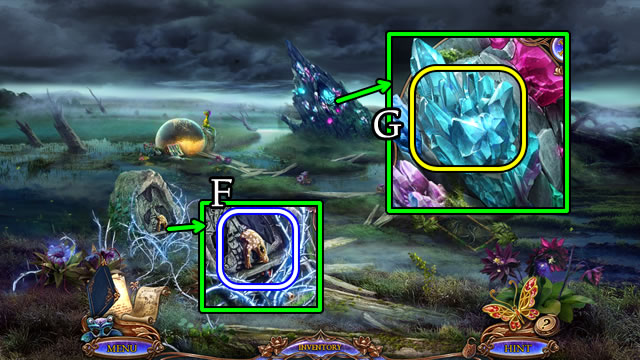
- Use the GARDENING FORK (E).
- Touch then take the AMBER SHARDS (F).
- Place the BOOKS (3/3) (G).
- Solution (H).
- Take the TONGS (I).
- Use the TONGS (@).
- Take the BRIDGE (J).
- Walk down.
- Place the BRIDGE (K).
- Walk right.
- Uncover, open the bag and take the HAMMER (L).
- Remove the cloth. Place the CATFISH EMBLEM (M).
- Open, take the SMALL TILE (N).
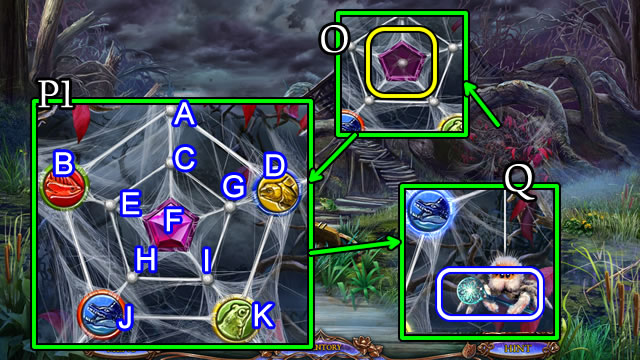
- Place the FIRE RUBY (O).
- Solution (P1). (D-A)-(K-D)-(J-K)-(B-J)-(A-B)-(D-A)-(K-D)-(J-K)-(B-J)-(A-B)-(F-C)-(K-I)-(J-K)-(I-H)-(H-J)-(C-F).
- Take the WINTER KEY (Q).
- Walk right.
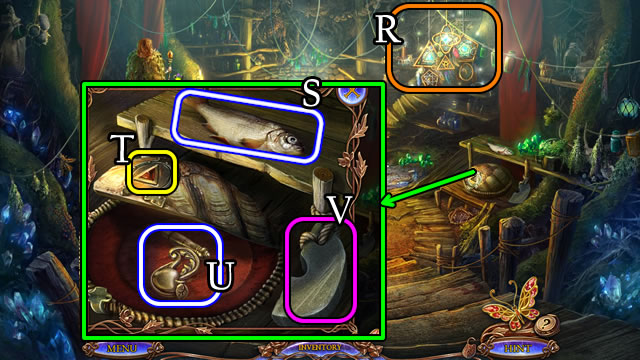
- Play the HOP (R) for a YELLOW FEATHER.
- Take the FISH (S). Place the TRIANGLE GEM (T).
- Take the VALVE (U).
- Place the RUSTY AXE for a SHARPENED AXE (V).
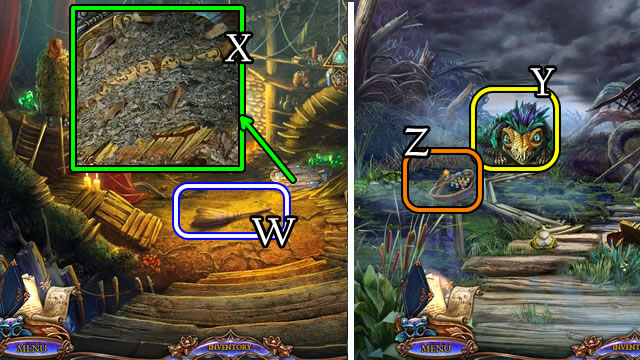
- Grab the BROOM (W).
- Use the BROOM (X). Note the number/pattern clue.
- Walk down.
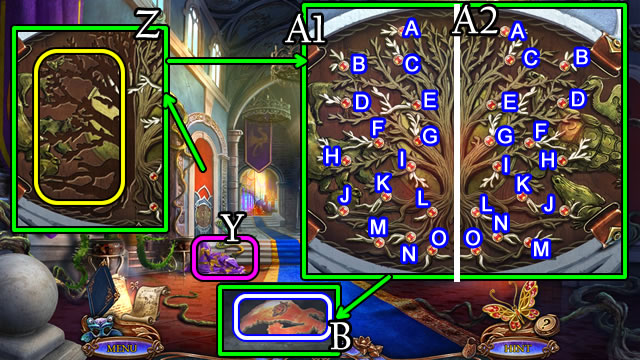
- Give the FISH (Y).
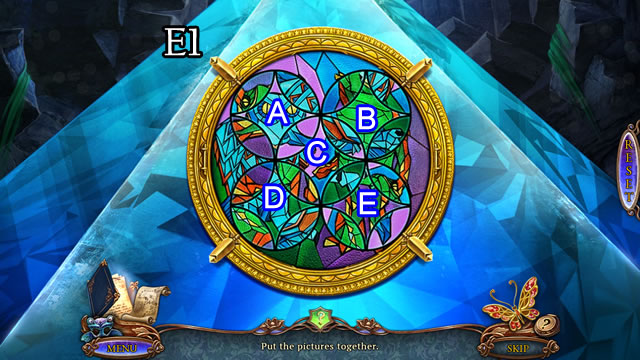
- Select for a puzzle (Z).
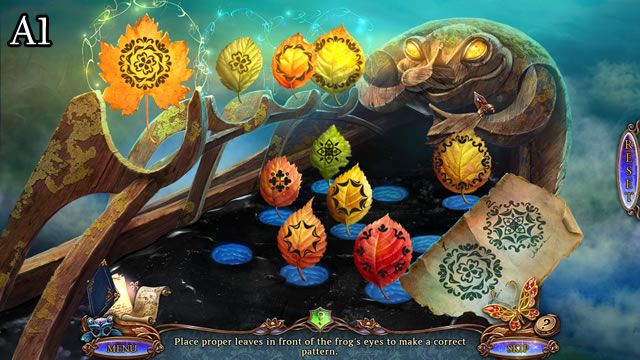
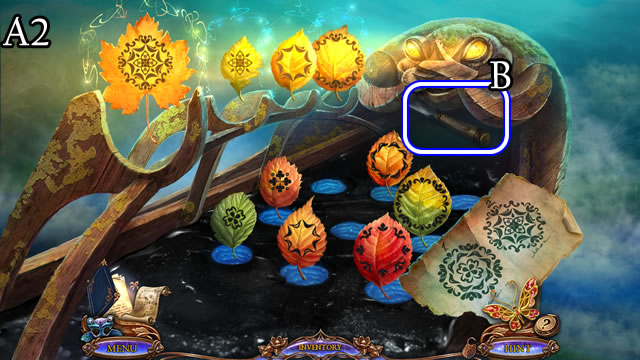
- Solution (A1-A2).
- Take the CHISEL (B).
- Walk forward.
- Place the SMALL TILE (C).
- Solution (D1). A-B-Hx3-Dx3-Lx3-Kx3-I-Mx3-N-Ox2-Px2.
- Take the SEASONAL TIN (E).
- Take the SNAKE HEAD (F).
- Use the CHISEL and HAMMER for a GLOWING CRYSTAL (G).
- Take the MUG (H).
- Touch (I).
- Use the SHARPENED AXE. Take the LENSES (J).
- Walk down.
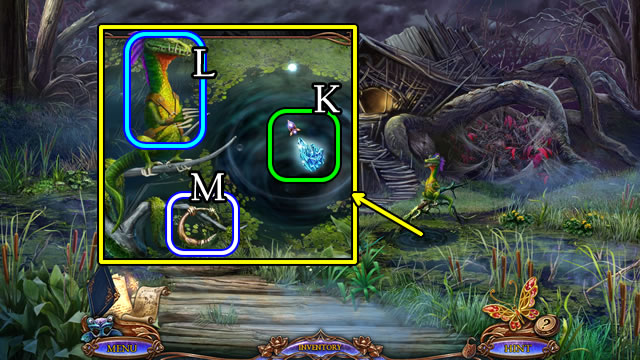
- Place the GLOWING CRYSTAL (K).
- Touch the creature for a SPIRAL DISC (L).
- Take the KNOCKER (M).
- Walk forward.
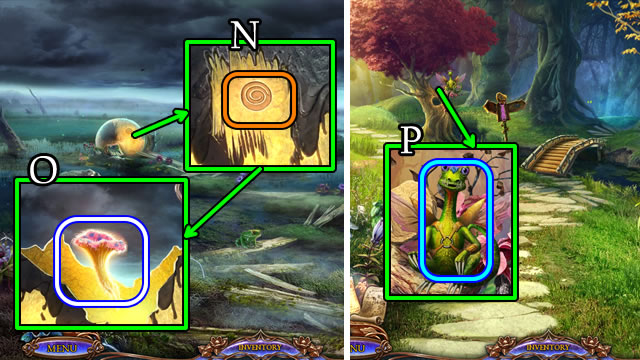
- Place the SPIRAL DISC (N).
- Take the MUSHROOM (O).
- Walk down 2x.
- Touch the creature (P); receive a FIG.
- Walk down.

- Place then select the KNOCKER (Q).
- Touch the animal. Take the BROKEN GLASSES (R).
- Select the BROKEN GLASSES (Inventory). Remove the cracked lenses, select 1-4 and place the LENSES for GLASSES.
- Give the GLASSES. Take the JEWELRY BOX (S).
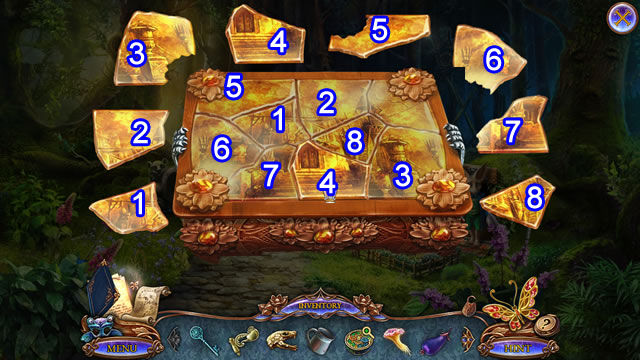
- Combine the JEWELRY BOX and AMBER SHARDS (1-8). Take the RED FEATHER (Inventory).
- Walk down.
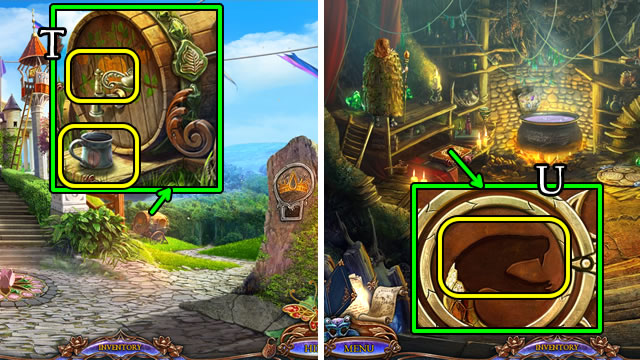
- Place the VALVE and MUG. Touch the valve. Take MUG WITH JUICE (T).
- Return to the Healer's Hut.
- Place the SNAKE HEAD (U).

- Solution (V1-V2).
- Take the SUMMER KEY (W).
- Combine the SEASONAL TIN, WINTER KEY and SUMMER KEY for GRAIN (Inventory).
- Walk down 2x.
- Place the GRAIN (X).
- Take the BLUE FEATHER (Y).
- Walk right, then forward.
- Uncover and place the BLUE, RED and YELLOW FEATHERS. Swap the feathers to match the colors. Take the ANTLER (Z).
- Walk down and right.
- Place the MUSHROOM, FIG, ANTLER and MUG WITH JUICE (A). Receive ELIXIR.
- Walk down 4x. Enter the Castle Hall.
- Walk left.
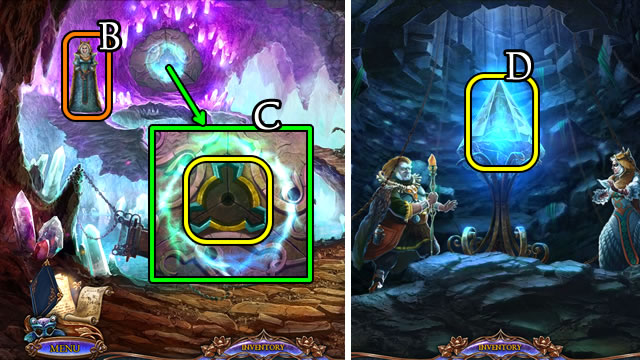
- Place the Butterfly (B).
- Take the STONE FRAGMENT (1/3) (C).
- Take the CLOVER (D).
- Take the HORSE EMBLEM (E).
- Uncover, then place the CLOVER (F).
- Take the SILVER COIN (1/3) (G).
- Take the TOWER FRAGMENT (H).
- Walk down.
- Take the GARDENING GLOVES (I).
- Place the HORSE EMBLEM (J). Open and take a SILVER COIN (2/3).
- Take the SPIKES (K).
- Place the TOWER FRAGMENT (L).
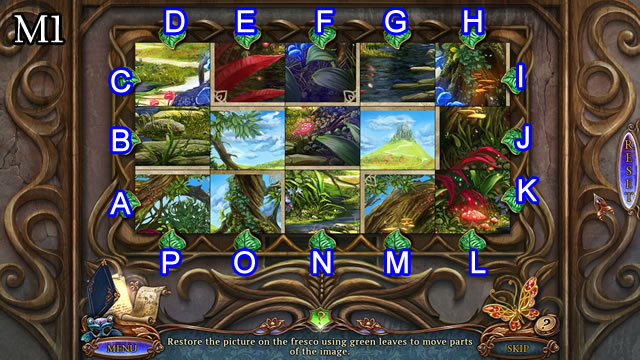
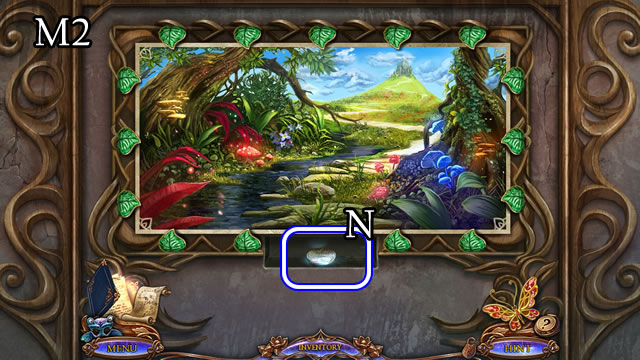
- Solution (M1-M2). Kx3-Px2-B-Ex2-K-E-B-A-N-J-A-M-Kx2-N-B-M-J-L-Ax2-H-Kx2-C-L-I-B-H-J.
- Take the SILVER COIN (3/3) (N).
- Walk left.
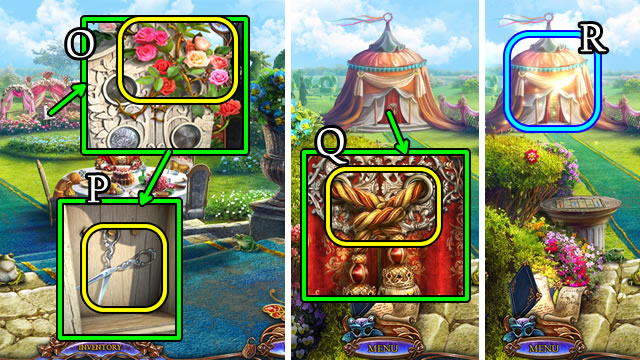
- Use the GARDENING GLOVES (O).
- Place the SILVER COINS (3/3). Open. Take the SCISSORS (P).
- Use the SCISSORS (Q) to play a HOP (R). Receive a GOBLET.
- Combine the GOBLET and ELIXIR for a DILUTED ELIXIR (Inventory).
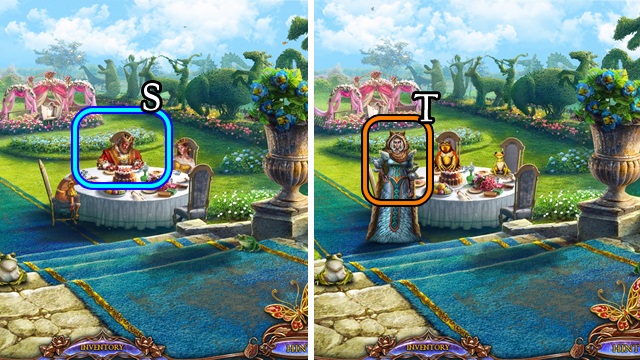
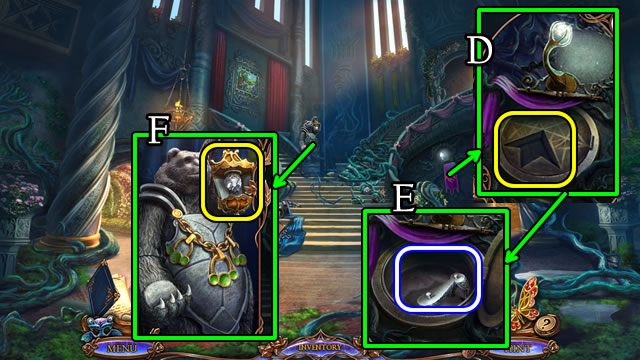
- Give the DILUTED ELIXIR (S).
- Select (T) to receive a FOREST TALISMAN.
- Walk down 2x and forward.
Chapter 2: The Tree House
- Place the FOREST TALISMAN (U).
- Walk right.
- Take the RIBBON (V).
- Take the STAR ORNAMENT (1/3) (W).
- Walk forward.
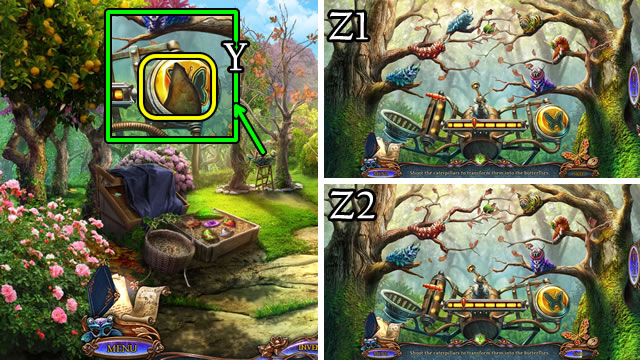
- Take the WOODEN LEAF (X).
- Place the WOODEN LEAF (Y).
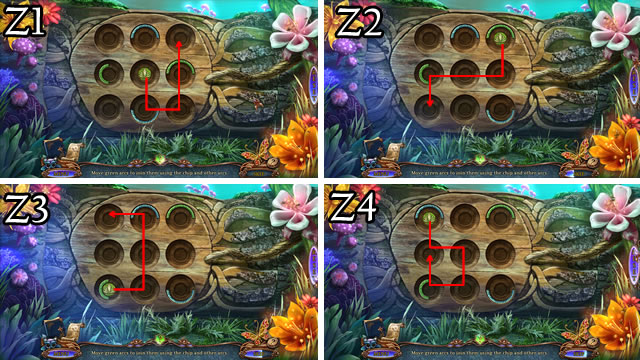
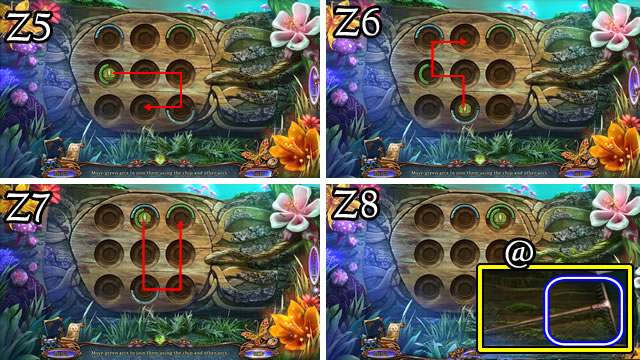
- Solution (Z1-Z4).
- Solution (Z5-Z8).
- Take the RAKE (@).
- Walk down 2x and left.
- Use the RIBBON (A).
- Place the SPIKES (B).
- Take the GOLD BRACELET (C).
- Return to the Castle Hall.
- Place the GOLD BRACELET (D).
- Take the TOY HORSE (E).
- Walk left.
- Place the TOY HORSE (F).
- Solution (G1).
- Solution (G2).
- Take the NET (H).
- Return to the Singing Forest.
- Select and place the stick (I).
- Use the NET for a BEETLE (J).
- Walk down.
- Select (K).
- Place the BEETLE (L).
- Touch the pod to take the MAGIC SEED (M).
- Walk forward.
- Use the RAKE (N).
- Place the MAGIC SEED (O).
- Walk forward.
- Take the LASSO (P).
- Select (Q) to play a HOP (R) and receive a WATERING CAN.
- Return to the Village.
- Touch the owl. Use the LASSO (S).
- Walk forward, then left.
- Place the Butterfly (T). Take STONE FRAGMENT (2/3) (U).
- Uncover and take the BROKEN KNIGHT (V).
- Take the MUSHROOM PIECE (W).
- Walk down.
- Place the MUSHROOM PIECE (X).
- Solution (Y1). (A-K)-(A-Q)-(A-I)-(A-C)-(A-E)-(A-S)-(A-M)-(G-O)-(B-D)-(B-R)-(B-H)-(B-J)-(B-T)-(B-P)-(B-N)-(B-L)-(B-F).
- Take the MOOSE EMBLEM (@).
- Walk left.
- Place the MOOSE EMBLEM (Z).
- Solution (A).
- Play a HOP (B) to receive STAR ORNAMENT 2/3.
- Walk down.
- Solution (C1). (A-C)-(B-D)-(C-E)-(D-C)-(F-D)-(G-J)-(J-H)-(K-I)-(J-L)-(K-L)-(J-K).
- Solution (C2).
- Take a BEE TOKEN (D).
- Take the BROKEN SHELL (E).
- Touch (F).
- Walk left and forward.
- Note the color scheme (G).
- Walk down 3x.
- Place the BEE TOKEN (H).
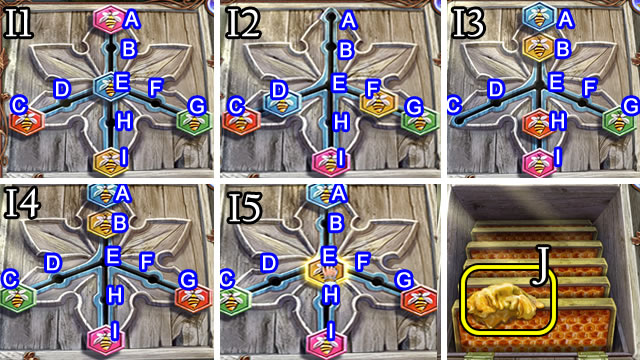
- Solution (I1). (E-D)-(I-F)-(A-I).
- Solution (I2). (D-A)-(F-B)-(C-H).
- Solution (I3). (G-C)-(H-G).
- Solution (I4). (B-E).
- Solution (I5). Completed puzzle.
- Take the WAX (J).
- Combine the BROKEN SHELL pieces, then note the symbols (Inventory).
- Return to the Singing Forest.
- Solution (K). 1-5.
- Take the SHELL PART (L).
- Combine the BROKEN SHELL and SHELL PART for a SEASHELL (Inventory).
- Walk down.
- Place the SEASHELL (M). Take the NUTS (N).
- Return to the Upper Platforms.
- Place the NUTS (O) to receive a STAR ORNAMENT (3/3).
- Walk left and forward.
- Place the STAR ORNAMENTS (3/3) (P).
- Solution (Q). (A-B)-(A-E)-(A-C)-(A-D).
- Open and take the LILY TILE (R).
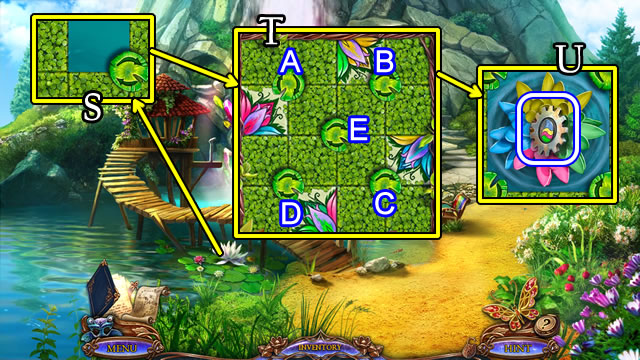
- Place the LILY TILE (S).
- Solution (T). Ax3-E-Cx3-Ex2-Bx3-E-Dx3.
- Take the GEAR (U).
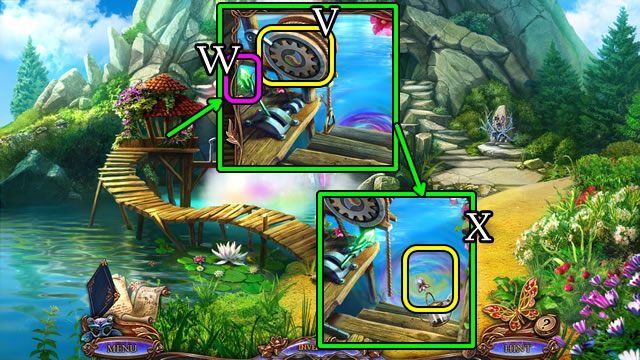
- Place the GEAR (V). Pull the lever (W).
- Place the WATERING CAN for RAINBOW WATER (X).
- Walk down 4x.
Chapter 3: The Spell Book
- Use the RAINBOW WATER (Y).
- Walk right and enter the Healer's Hut.
- Take the HATCH HANDLE (Z).
- Place the WAX. Select and place the water scoop (A).
- Take the ORCHARD KEY (B).
- Return to the Village.
- Place and select the ORCHARD KEY (C).
- Walk left.
- Place the Butterfly (D). Take the FLAG FRAGMENT (1/2) (E).
- Uncover and play the puzzle (F).
- Solution. 1-3.
- Take the YAWNING BERRIES (G).
- Take the HEDGEHOG EMBLEM (H).
- Place the HEDGEHOG EMBLEM (I).
- Uncover, then place the pieces (J).
- Take the KNIGHT'S LEG (K).
- Walk forward.
- Place the Butterfly (L).
- Take FLAG FRAGMENT (2/2) (M).
- Play the HOP (N) for a TURTLE FIGURINE.
- Take the CANE (O).
- Uncover and use the CANE (P).
- Uncover and take the BERRY TILE (Q).
- Place the BERRY TILE (R).
- Select and open the package. Take the note (S).
- Take the DREAM CHEST (T).
- Open the DREAM CHEST (Inventory) and take the FIN.
- Return to the Waterfall.
- Place the FIN (@).
- Set the eye symbols (U).
- Take the RAINBOW MUSHROOM CAP (V).
- Place the FLAG FRAGMENTS (2/2) (W).
- Take the KNIGHT'S ARM (X).
- Combine the BROKEN KNIGHT, KNIGHT'S LEG and ARM to take the WELL KEY (Inventory).
- Walk down.
- Uncover and use the WELL KEY (Y).
- Take the SLEEPING FLOWERS (Z).
- Return to the Forest Lake.
- Remove the bark (A).
- Place the RAINBOW MUSHROOM CAP (B).
- Solution (C1-C2). (B-H)-(D-F)-(C-I)-(A-G)-(E-B)-(C-D)-(E-D).
- Take the CRYSTAL TEARS (D).
- Combine the DREAM CHEST, CRYSTAL TEARS, YAWNING BERRIES and SLEEPING FLOWERS for a SOPORIFIC CHEST (Inventory).
- Return to the Healer's Hut.

- Place the SOPORIFIC CHEST (E).
- Place and select the HATCH HANDLE (F).
- Enter the Secret Lair.
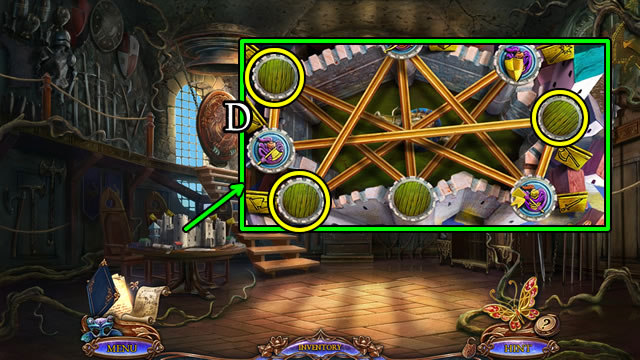
- Play the HOP to receive a SPELLBOOK (G).
- Take the NUTCRACKER (H).
- Return to the Tree House.
- Give the SPELLBOOK (I).
- Restore the book (J).
- Take the RING OF TWIGS (K).
- Uncover and place the RING OF TWIGS (L).
- Take the BELLS (M).
- Take the WICK (N).
- Walk down 2x.
- Place the BELLS. Select 1-3 (O).
- Walk right.
Chapter 4: Finding the Runes
- Place the Butterfly (P).
- Take the TOWER FRAGMENT (1/2) (Q).
- Take the GAME FRAME (R).
- Place the TURTLE FIGURINE (S). Take the SAW (T).
- Use the SAW (U).
- Solution (V). (A-B)-(A-D)-(C-D)-(C-E).
- Take the AIR RUNE (W).
- Walk right.
- Place the Butterfly (X).
- Take STONE FRAGMENT (3/3) (Y).
- Take the RUNESTONE (Z).
- Take the DEVOURING SNAIL (A).
- Place the WICK (B). Use the flint (C).
- Place the lit lamp (D). Take the BUTTON PART (E).
- Place the GAME FRAME (F).
- Solution (G1-G2). 1-2-3-4.
- Take the BEETLE (1/3) (H).
- Walk down.
- Place the RUNESTONE (I).
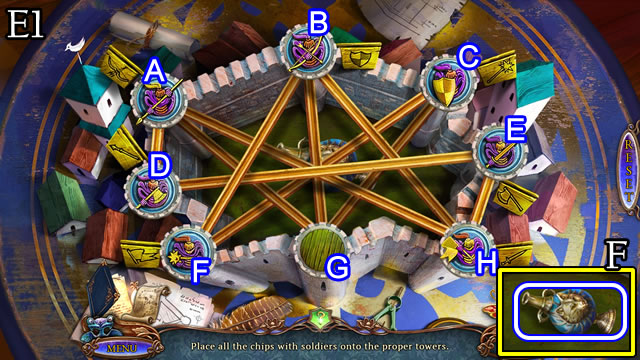
- Solution (J1).
- Solution (J2-). Cx2-A-Bx5-D-Bx2-D-Bx2-D-B-A-B-A-Cx5-D-Cx3-D-Bx6-D-C-A-Bx2-A-Bx2-D-Bx5-D-A-Bx2-A-Cx3-D-Bx5-A-C-A-C-A-Cx3-A-Bx4-A-C-A-Bx7-D-Bx2-A-C-A-Cx3-D-Bx5-A-Bx5-D-Bx3.
- Take the BEETLE (2/3) (K).
- Return to the Singing Forest.
- Use the DEVOURING SNAIL (L).
- Walk left.
- Place the Butterfly (M).
- Take the TOWER FRAGMENT (2/2) (N).
- Play the HOP for a LEVER (O).
- Place the TOWER FRAGMENTS (2/2) (P).
- Take the WATER RUNE (Q).
- Take the WOODEN WHEEL (R).
- Uncover and take the SHUTTERS (S).
- Take the WING (T).
- Place, then close all of the SHUTTERS for a clue (U).
- Return to the Snail Village.
- Place and select the LEVER (V).
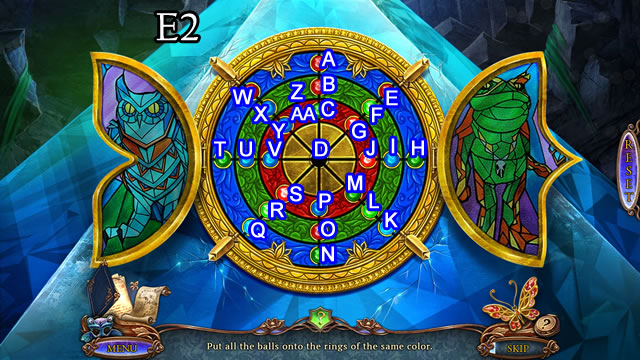
- Swap to match the ball shapes to the inner wheel (W).
- Solution (@). Pull the lever.
- Take the WEIGHT (X).
- Return to the Orchard.
- Place the BUTTON PART for a puzzle (Y).
- Solution (Z1-Z2).

- Solution (Z3-Z6).
- Take the FIRE RUNE (@).
- Place the WOODEN WHEEL and secure with the hammer (A).
- Select the cart. Open and take the BELLOWS (B).
- Walk forward.
- Use the NUTCRACKER. Take the EARTH RUNE (C).
- Return to the Black Swamp.
- Place the STONE FRAGMENTS (3/3). Take the WHISTLE (D).
- Return to Turtle Island.
- Use the BELLOWS (E). Take the BIRD'S HEAD (F).
- Walk right.
- Use the WHISTLE (G).
- Take the SUN RUNE (H).
- Return to the Tree House.
- Place the AIR, FIRE, WATER, EARTH and SUN RUNES (I). Receive MAGIC POLLEN.

- Touch the cup (I1).
- Note the colors and numbers (I2).
- Return to the Secret Lair.
Chapter 5: Breaking the Curse
- Place the WING (J).
- Solution (K). A-B-Cx2.
- Take the MAGIC BUCKLE (L).
- Place the WEIGHT (M).
- Solution (N).
- Take the ENCHANTED DISC (O).
- Select 1-4.
- Take the BEETLE (3/3) (P).
- Return to the Mushroom Circle.
- Place the BEETLES (3/3) (Q).
- Solution (R). (A-D)-(A-C).
- Take the GOLDEN WREATH (S).
- Return to the Tree House.
- Place the GOLDEN WREATH (T).
- Take the OILER (U).
- Return to the Castle Hall.
- Note the banner (V).
- Use the OILER (V1). Touch the handle.
- Walk right.
- Place the Butterfly (W).
- Take the BATTLE HORN FRAGMENT (1/4) (X).
- Open the door for a HOP (Y). Receive the SHEEP TORSO.
- Take the SHEEP HEAD (Z).
- Take the SHEEP BOX (A).
- Place the BIRD'S HEAD (B).
- Select 1-3.
- Take the BRONZE ORNAMENT (C).
- Walk down.
- Uncover and place the BRONZE ORNAMENT (D).
- Take the SHEEP LEGS (E).
- Combine the SHEEP BOX, SHEEP'S LEGS, TORSO and HEAD. Touch the handle. Take the GLOWING STONE (Inventory).
- Replace the stone with the GLOWING STONE (F).
- Walk right.
- Place the Butterfly (G).
- Take BATTLE HORN FRAGMENT (2/4) (H).
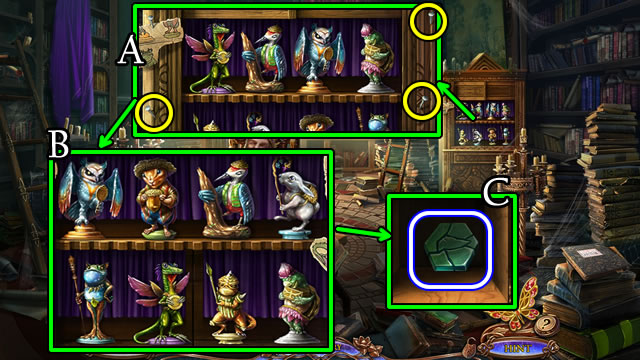
- Enter the Museum (I).
- Place the Butterfly (J).
- Take BATTLE HORN FRAGMENT (3/4) (K).
- Touch the cart (L); play the HOP to receive a ROYAL CHIP (1/3) (M).
- Take the TREE OF LIFE HALF (N).
- Take the GOLDEN TUBE (O).
- Walk left.
- Place the Butterfly (P).
- Take BATTLE HORN FRAGMENT (4/4) (Q).
- Give the MAGIC POLLEN (R). Receive a SLINGSHOT.
- Take the YELLOW CONTINENT (S).
- Take the TUSK (T).
- Walk down.
- Place the BATTLE HORN FRAGMENTS (4/4) (U). Take the DEER TILE (V).
- Place the YELLOW CONTINENT (W).
- Take the PRECIOUS SAPPHIRE (X).
- Walk down.
- Remove the drape (Y).
- Place the TREE OF LIFE HALF (Z).
- Solution (A1). Ax2-Bx2-C-Ex2-Fx2-Gx2-Hx2-I-Jx2-K-Mx2-Nx2-O.
- Solution (A2). A-Cx2-Dx2-Ex2-G-H-I-Jx2-Kx2-Lx2-Mx2-N.
- Take the RED CONTINENT (B).
- Walk forward.
- Play the HOP to receive PLIERS (C).
- Place the Butterfly (D).
- Take the RIDER FRAGMENT (1/4) (E).
- Take the WOODEN STENCIL (F).
- Place the PRECIOUS SAPPHIRE (G).
- Solution (H).
- Take the LIGHTNING BOLT (1/2) (I).
- Assemble the pieces (J).
- Solution (K).
- Take the BROKEN NAMEPLATE (L).
- Walk right, then left.
- Place the Butterfly (M).
- Take RIDER FRAGMENT (2/4) (N).
- Place the SLINGSHOT for a puzzle (O).
- Solutions vary. Receive a CRAB HANDLE.
- Place and select the CRAB HANDLE (P) to play a HOP (Q). Receive a SPHERE OF REDUCTION.
- Walk down 3x.
- Use the SPHERE OF REDUCTION (R).
- Open and walk left.
- Place the Butterfly (S).
- Take the RIDER FRAGMENT (3/4) (T).
- Use the MAGIC POLLEN (U).
- Take the KEG KEY (V).
- Take the SAIL (W).
- Walk down, then right.
- Place the Butterfly (X).
- Take RIDER FRAGMENT (4/4) (Y).
- Place the TUSK (Z).
- Take the JESTER'S CUDGEL and METALLIC FLAME (A).
- Walk down.
- Place the METALLIC FLAME (B).
- Solution (C).
- Take the SPEAR KNIGHT (D).
- Place the MAGIC BUCKLE (E). Take the POT HOOK (F).
- Enter the Museum.
- Place the RED CONTINENT (G).
- Take the OLD ENGRAVING (1/4) (H).
- Place the WOODEN STENCIL (I).
- Solution. 1-5.
- Take the COPPER DISC (J).
- Walk left.
- Place the SAIL (K).
- Solution (L).
- Take the MERMAID FIGURINE (M).
- Place the JESTER'S CUDGEL (N).
- Solution. B-A-Bx2-A.
- Take the LIGHTNING BOLT (2/2) (O).
- Place the SPEAR KNIGHT (P).
- Solution is random.
- Take the ROYAL CHIP (2/3) (Q).
- Walk down 2x, then right.
- Place the COPPER DISC (R).
- Solution (S).
- Take the GOLDEN PAW (T).
- Walk down, then forward.
- Place the GOLDEN PAW (U). Take the SILVER LILY (V). Note the pattern (W).
- Walk right.
- Place the RIDER FRAGMENTS (4/4) (X). Take the FISH TILE (Y).
- Place the LIGHTNING BOLTS (2/2) (Z).
- Select 1-3.
- Take the INITIAL (A).
- Walk down 2x, then left.
- Place the INITIAL (B).
- Select the scroll.
- Select and place the bird (C).
- Take the GOLDEN LILY (D).
- Place the GOLDEN and SILVER LILIES (E).
- Place and select the KEG KEY (F).
- Take the OLD ENGRAVING (2/4) (G). Take the note (H).
- Walk down 2x, then right.
- Use the mitt (I).
- Use the POT HOOK (J).
- Use the mitt to take the LANTERN HANDLE (K).
- Select 1-2-5 (L).
- Walk forward.
- Place the BROKEN NAMEPLATE (M). Take the MONSTER TILE (N).
- Place the MERMAID FIGURINE (O).
- Open and take the MANDOLIN HEAD (P).
- Use the PLIERS on the nail. Take the ROUND EMBLEM (Q).
- Place the MONSTER TILE (R).
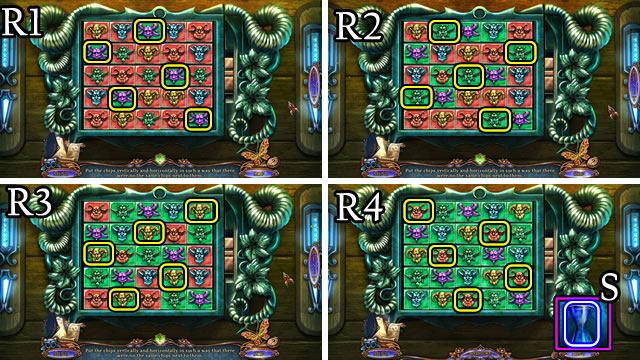
- Solution (R1-R4).
- Take the POWER CELL (S).
- Return to the Throne Hall.
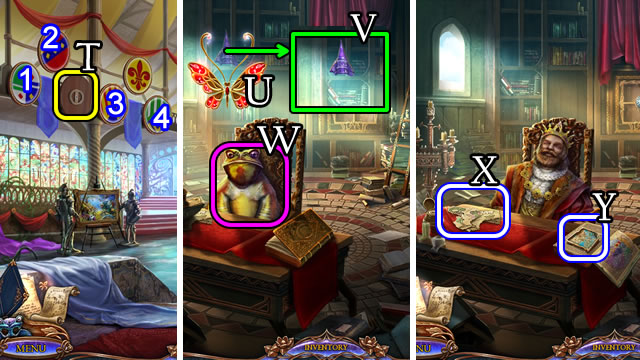
- Place the ROUND EMBLEM (T).
- Select 1-4.
- Walk forward.
- Place the Butterfly (U). Take CASTLE FRAGMENT (1/3) (V).
- Place the MAGIC POLLEN (W).
- Take the SCRAPS OF PARCHMENT (X).
- Open the book. Take the OLD ENGRAVING (3/4) (Y).
- Place the SCRAPS OF PARCHMENT (A).
- Solution (B).
- Take the LENS FRAGMENT (C).
- Return to the Observation Deck.
- Place the LENS FRAGMENT (D).
- Solution (E). (A-K)-(B-C)-(D-G)-(E-L)-(P-F)-(H-Q)-(I-R)-(M-N)-(L-S)-(P-J)-(K-O)-(N-R)-(C-S)-(G-O)-(R-Q)-(P-O)-(Q-P).
- Note the airship and symbols.
- Walk left.

- Remove the cover. Place the POWER CELL (F).
- Solution (G).
- Select the airship.
- Take the BUILDER'S SIGN PART (H).
- Walk left.
- Place the Butterfly (I). Take CASTLE FRAGMENT (2/3) (J).
- Walk forward.
- Place the Butterfly (K). Take CASTLE FRAGMENT (3/3) (L).
- Walk down 2x.
- Place the CASTLE FRAGMENTS (3/3) (M). Take the CHEST FRAGMENT (N).
- Walk down.
- Place the BUILDER'S SIGN PART (O).
- Solution (P). (A-B)-(B-F)-(C-E)-(D-E)-(E-F).
- Take the BOX OF PAINTS (Q).
- Walk forward.
- Place the BOX OF PAINTS.
- Solution (R).
- Take the TOAD FIGURINE (S).
- Place the TOAD FIGURINE (T).
- Solutions vary.
- Take the RHINOCEROS FIGURINE (U).
- Place the RHINOCEROS FIGURINE (V). Take the MANDOLIN BRIDGE (W).
- Walk left and forward.
- Place the CHEST FRAGMENT (X).
- Solution (Y) 1-9.
- Take the CRIMSON JEWEL (Z).
- Return to Turtle Island.
- Use the LANTERN HANDLE and take the OCTOPUS LATCH (A).
- Combine the GOLDEN TUBE and OCTOPUS LATCH (Inventory). Open (B) and take the ROYAL CHIP 3/3 (C).
- Return to the Sentry tower.
- Place the ROYAL CHIPS (3/3) (D).
- Solution (E1). B-H-E-D-A-G-C-F-B-G.
- Take the WOLF PITCHER (F).
- Return to the Museum.

- Place the WOLF PITCHER (G).
- Solution (H).
- Take the DAGGER (I).
- Return to the Observation Deck.
- Use the DAGGER. Take the BOOT (J).
- Return to the Sentry tower.
- Place the BOOT (K).
- Solution (L).
- Take the MANDOLIN NECK (M).
- Walk down, then left.
- Place the MANDOLIN BRIDGE, NECK and HEAD (N). Select and place the strings (O). Take the MANDOLIN.
- Return to the Underground.
- Place the MANDOLIN (P). Take the BLUE JEWEL (Q).
- Walk forward.
- Place the CRIMSON and BLUE JEWELS. Take OLD ENGRAVING (4/4 (R).
- Return to the Secret room.
- Place the OLD ENGRAVINGS (4/4 (S). Take the note (T).
- Take the ROYAL SEAL (U).
- Return to the Underground.
- Uncover and place the ROYAL SEAL (V). Open. Take the AMULET OF CALM (W).
- Open the box. Take the BEAR TILE (X).
- Place the BEAR TILE (Y).
- Solution (Z). (E-B)-(D-G)-(G-H).
- Play the HOP for a FROG TILE (A).
- Combine the ENCHANTED DISC, DEER, FROG and FISH TILES for an UNCHARGED KEY (Inventory).
- Walk forward.
- Give the UNCHARGED KEY (B); receive a CHARGED KEY.
- Place the CHARGED KEY (C).
- Walk forward.
- Place the AMULET OF CALM (D).
- Solution (E1). Ex2-A-Cx2-A-C-E-B-Cx3-B-A-Dx3-C-D-C-Ax3-Cx3-A-C-Ex2-Cx3-Dx2-B-Cx2-Bx3-C-Ex3-Cx2-Dx3-Cx3-D-Ex3-C-Ex2-Cx3-Ex2.
- Solution (E2). G-AAx7-B-A-Z-B-Z-E-Z-F-Z-H-Zx4-I-Z-M-AAx2-R-Z-T-Zx2-U-Z-Y-AAx5-O-Z-S-AA-U-Z-W-Z-X-Zx5-N-Zx5-O-AAx2-P-Zx2-O-Zx5-G-D.
- Congratulations. You have completed playing Dreampath: Curse of the Swamps.
Created at: 2016-07-03