
Walkthrough Menu
- General Tips
- Chapter 1: Oregon
- Chapter 2: Agora
- Chapter 3: The Tower
- Chapter 4: Tempus
- Chapter 5: The Barbaric Village
- Chapter 6: The Dragon Cave
- Chapter 7: Labrion
General Tips
- This is the official guide for Edge of Reality: Ring of Destiny.
- This guide will not mention when you have to zoom into a location; screenshots will show each zoom scene.
- The screenshots will show where to play a Hidden-Object Puzzle (HOP) and what inventory item will be received.
- Some inventory items require further actions.
- This guide will give step-by-step solutions for all puzzles which are not random. Read the instructions in the game for each puzzle.
Chapter 1: Oregon
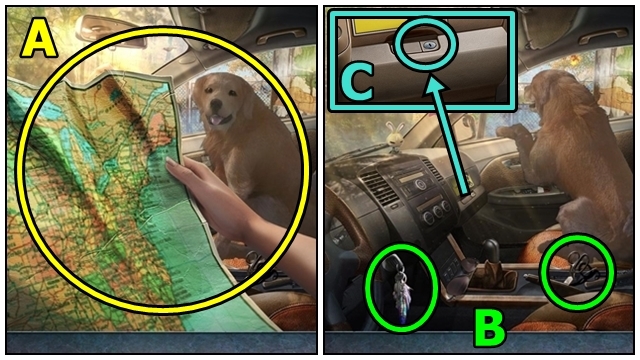
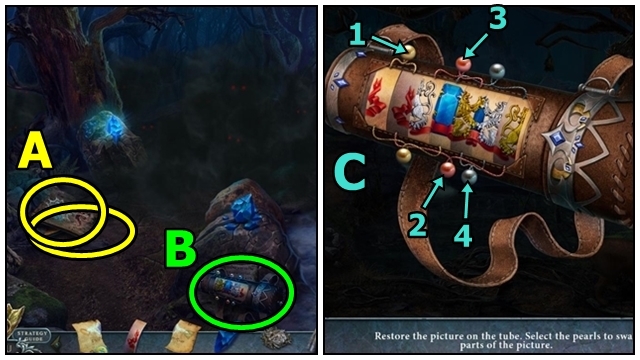
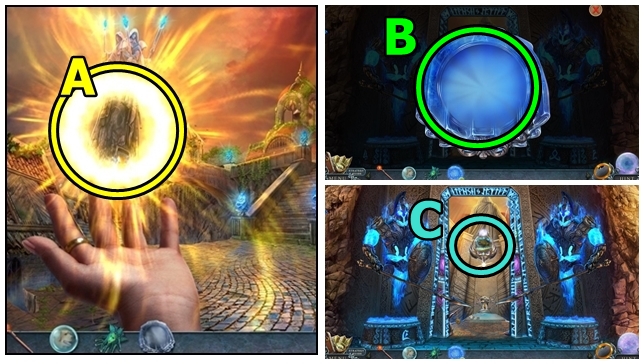
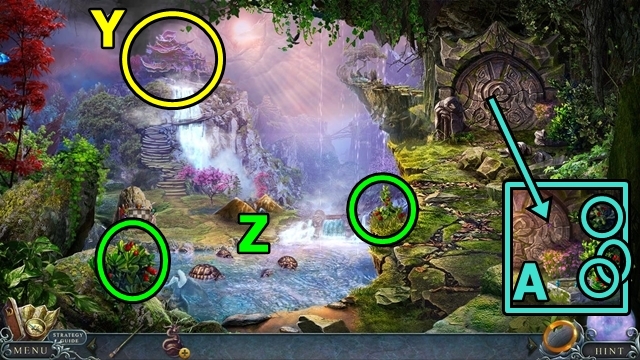
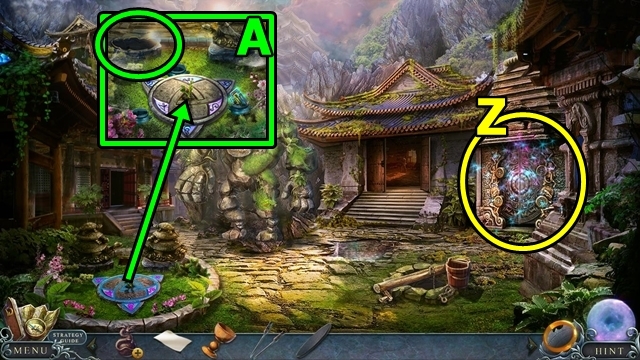
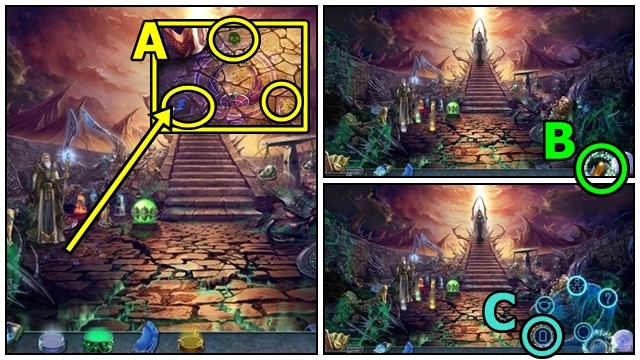
- Examine anywhere (A).
- Take the KEY (B) and SCISSORS.
- Insert and turn the KEY (C). Take the FIRST AID KIT. Open the file, take the NAME TAG. Close the file; take the PACKAGE.
- Open the PACKAGE (inventory) using the SCISSORS; add the NAME TAG; take the COLLAR.
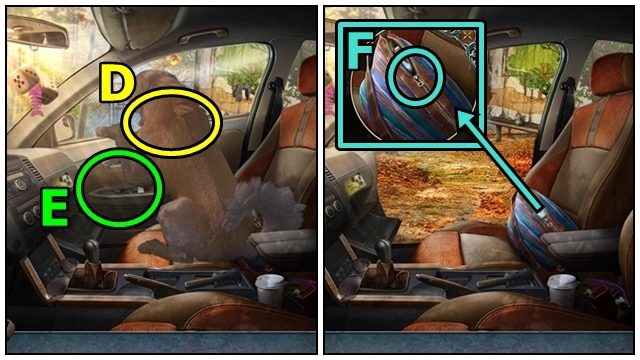
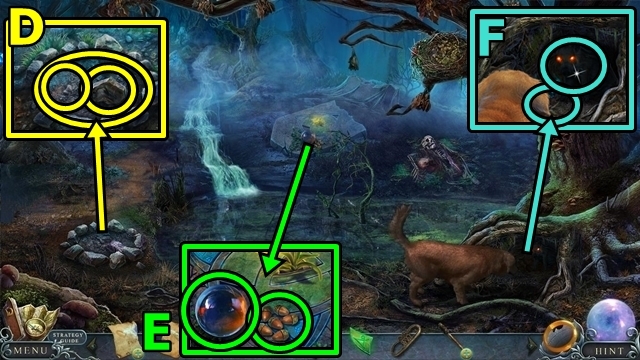
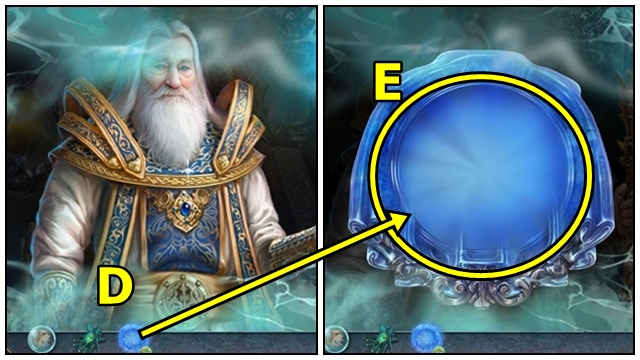
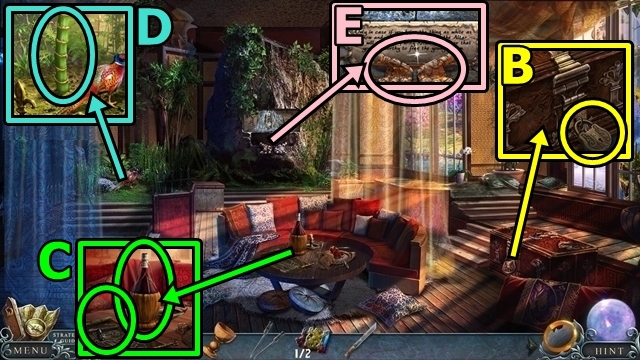
- Place the COLLAR (D).
- Open the door (E).
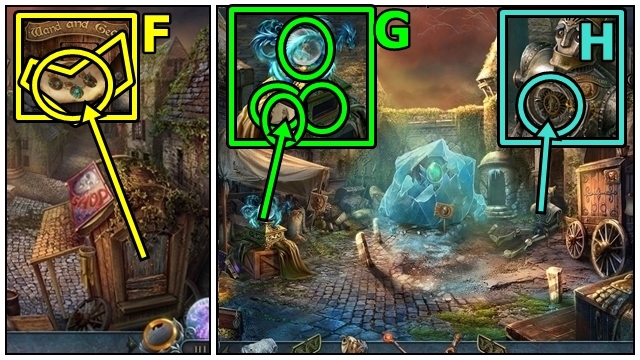
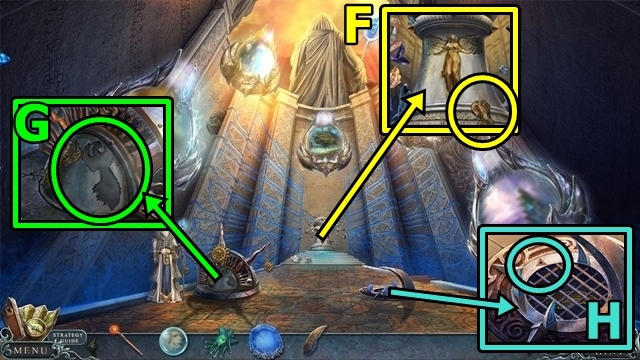
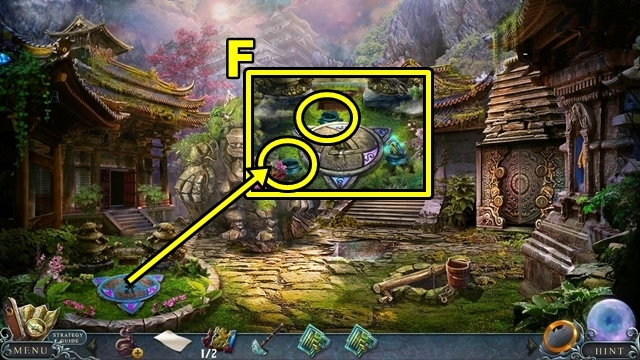
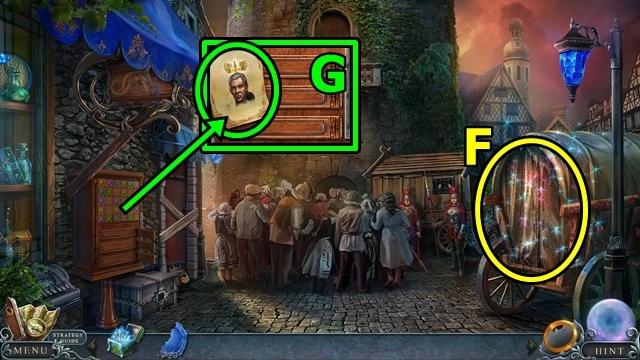
- Open the bag (F); check the phone. Take the COOKIE and NAIL POLISH.
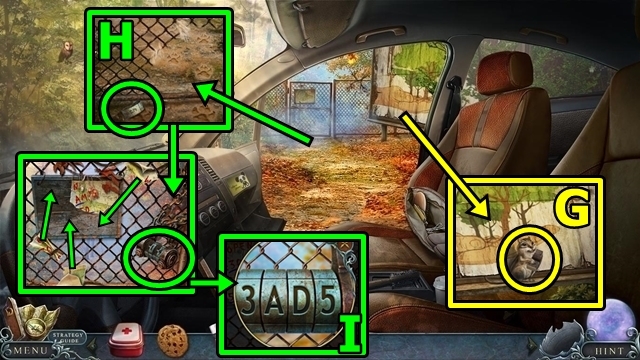
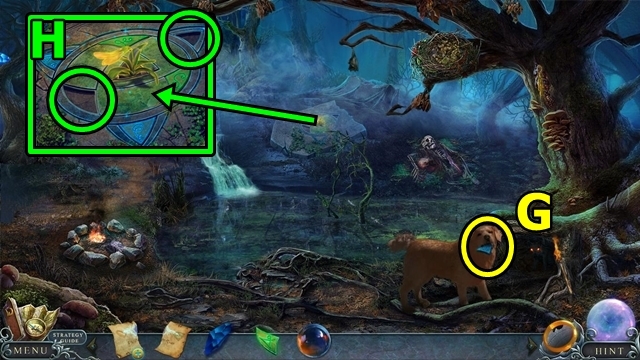
- Offer the COOKIE (G); take the LOCK PART.
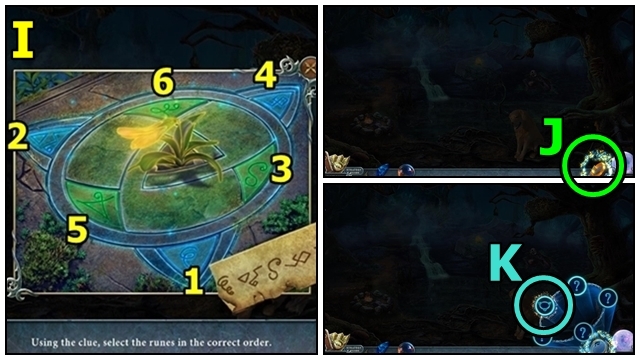
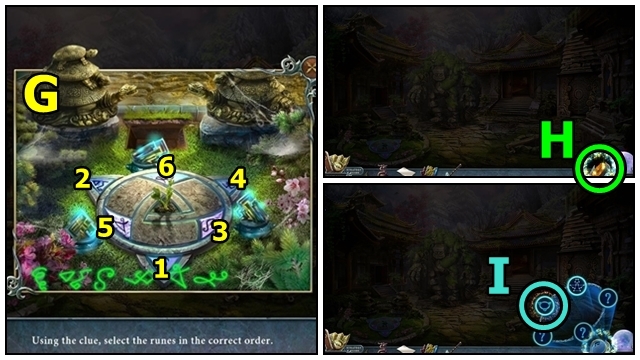
- Take the LOCK PART (H). Use the NAIL POLISH; reassemble the poster. Add the LOCK PARTS. Examine the lock; play the mini-game.
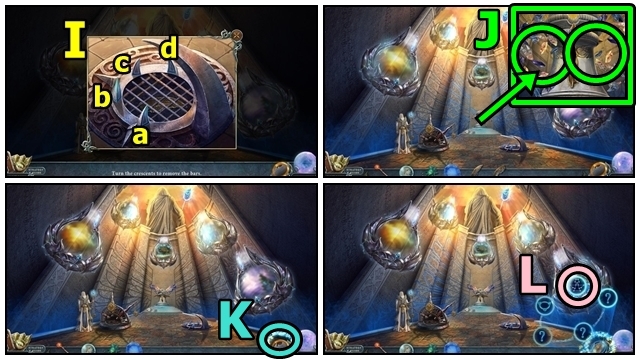
- Solution: (I).
- Move forward.
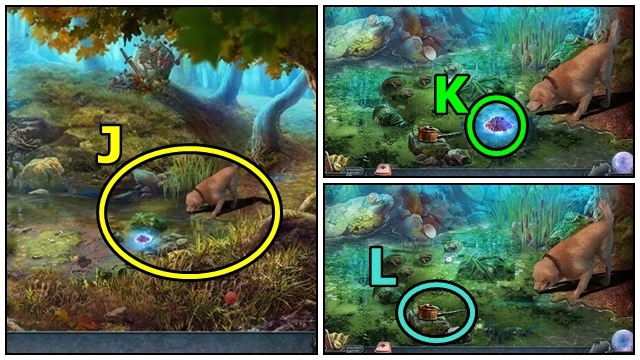
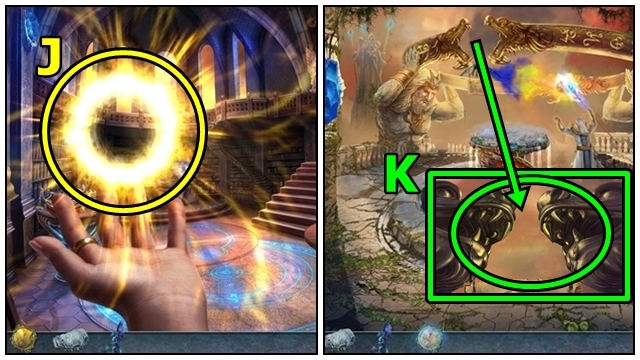
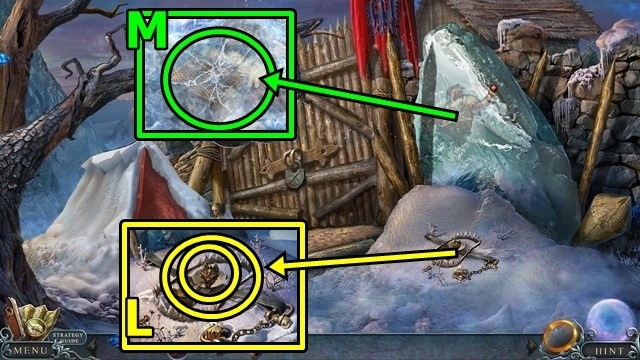
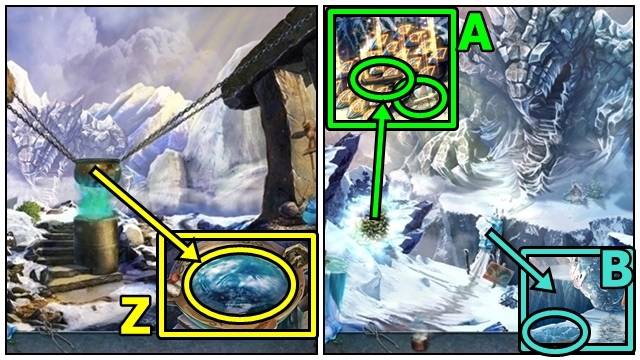
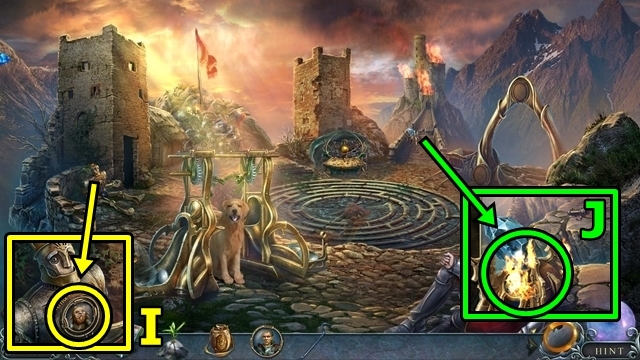
- Examine Ice (J).
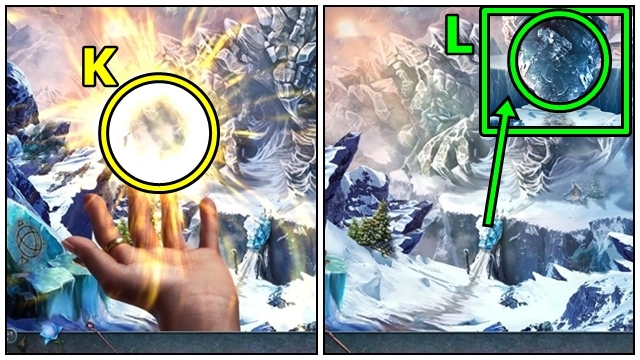
- Examine the water (K).
- Take the OIL (L).
- Move down.
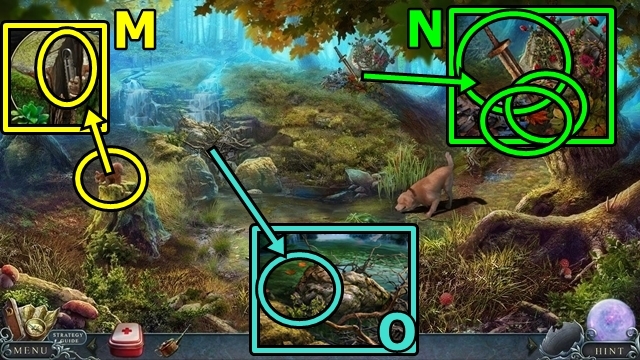
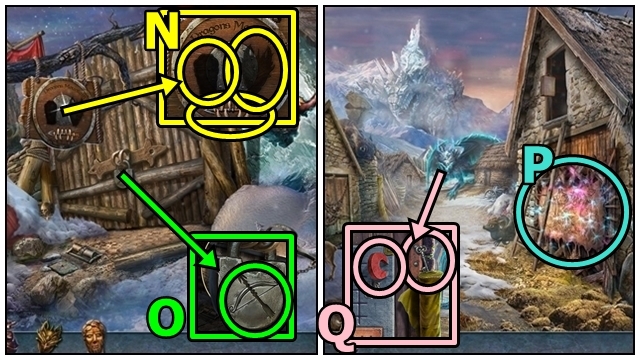
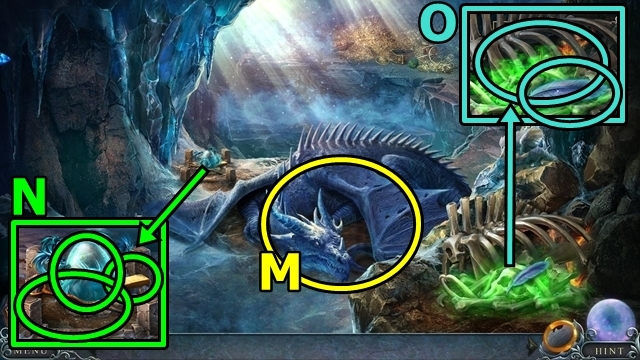
- Shoo the squirrel (M). Take the KNIFE.
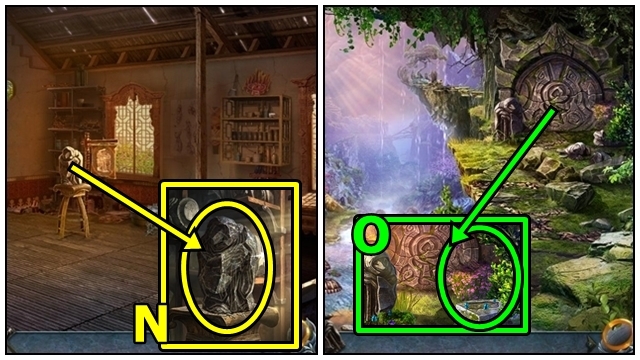
- Move the leaves (N); use the KNIFE, then OIL. Take the SWORD.
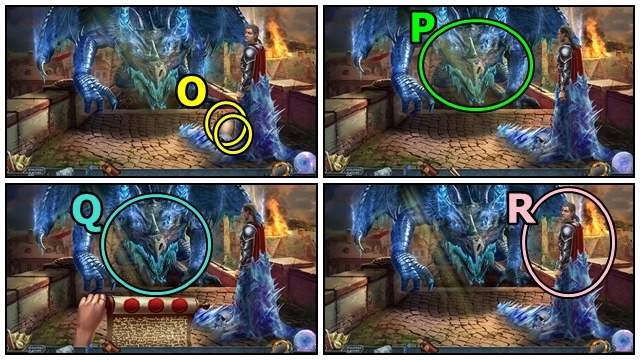
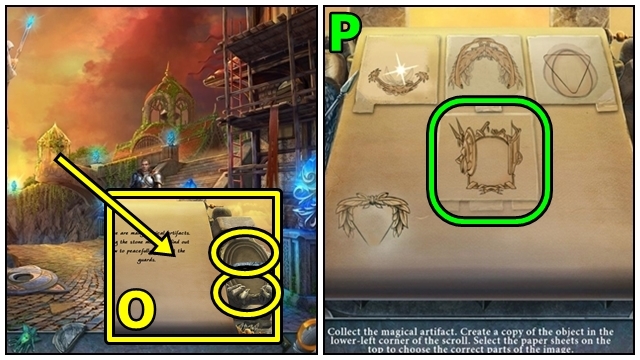
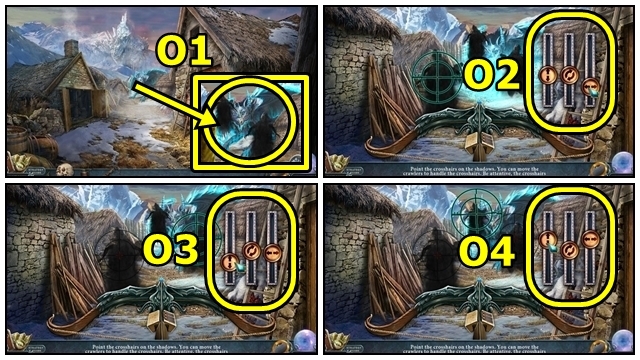
- Use the SWORD (O), then push.
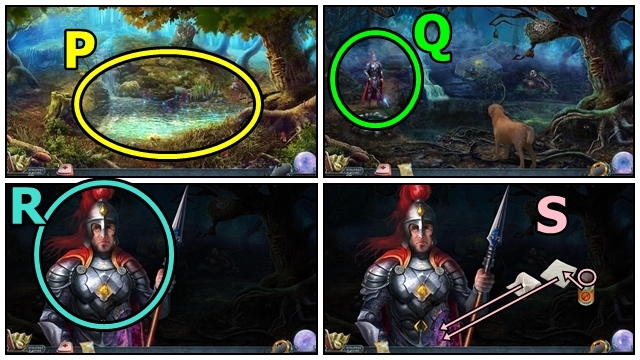
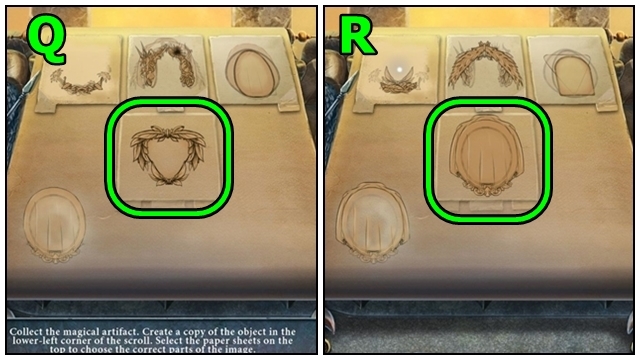
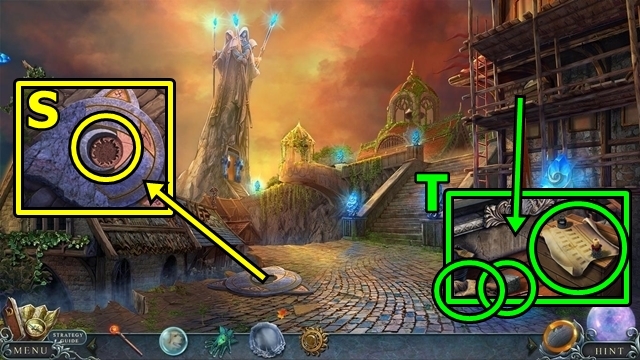
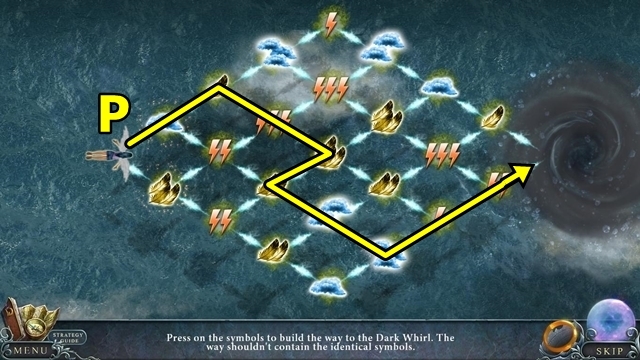
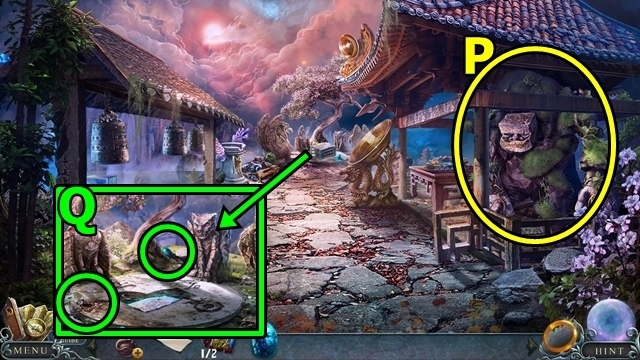
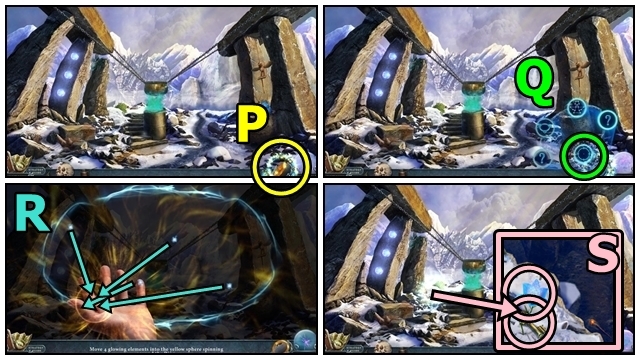
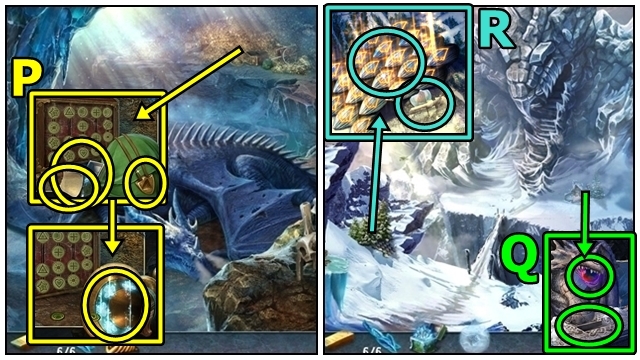
- Play the HOP (P). Open the chest; take the NOTE and RING OF DESTINY.
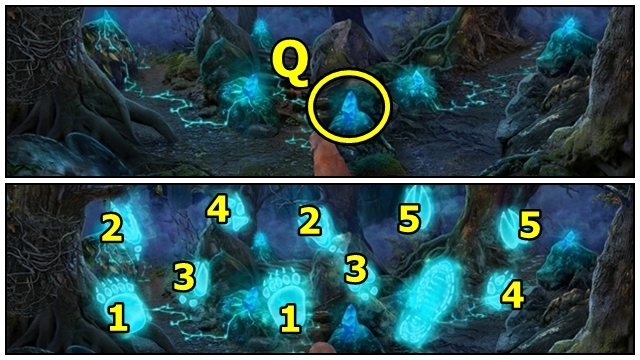
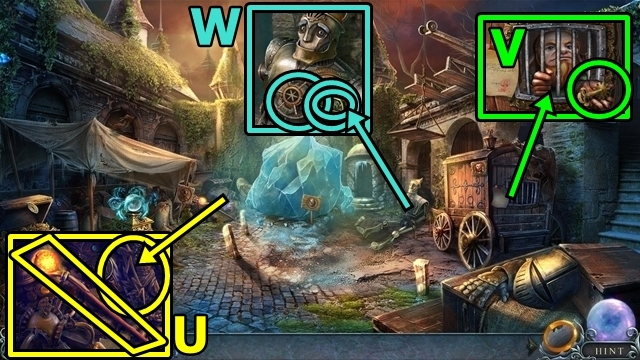
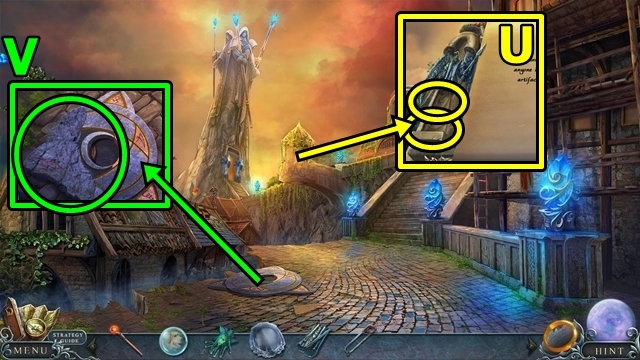
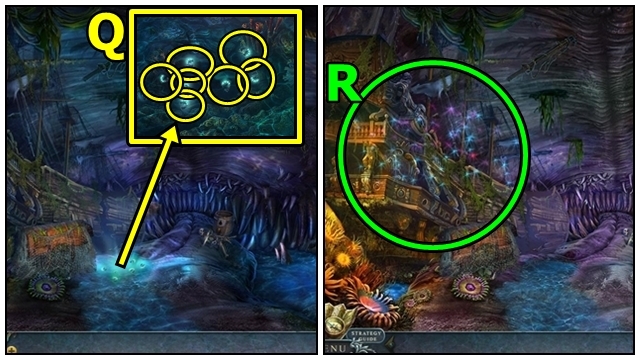
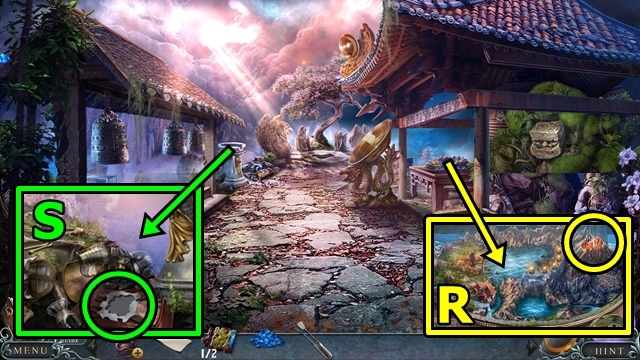
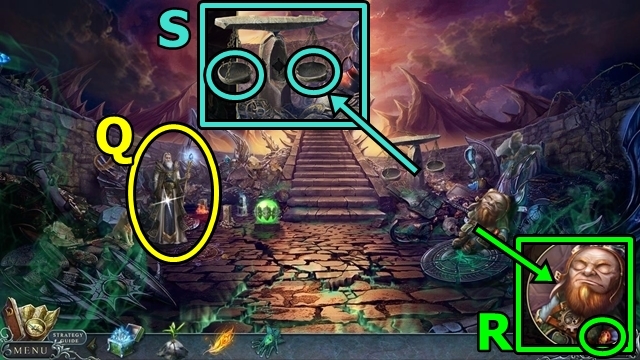
- Talk to the Guard (Q).
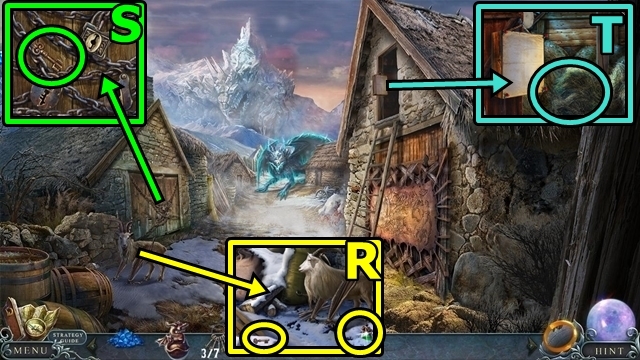
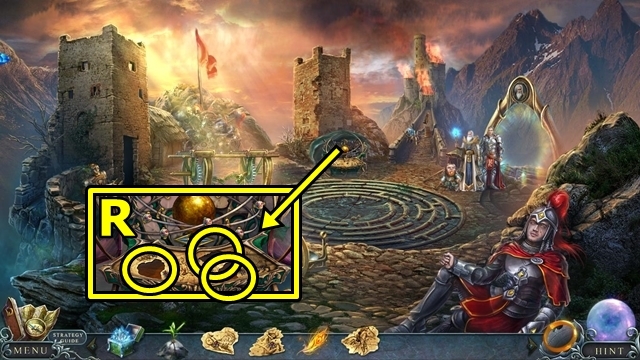
- Use the FIRST AID KIT (R), then open it.
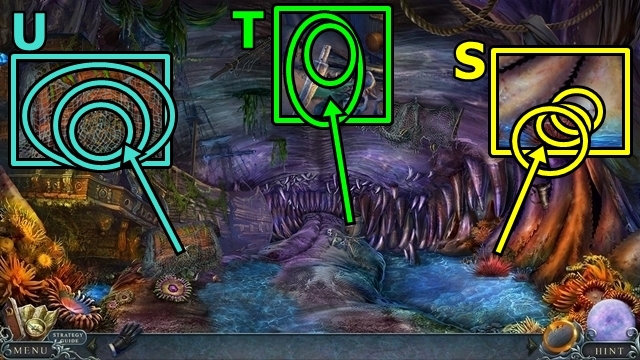
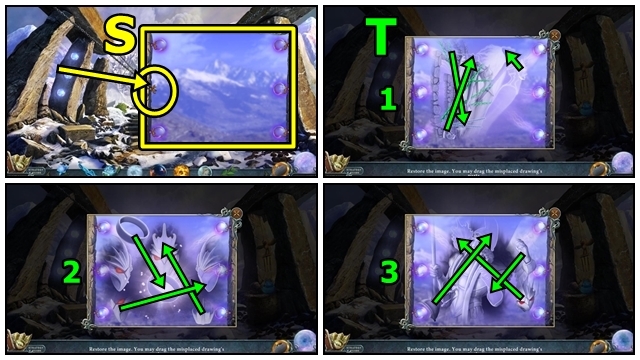
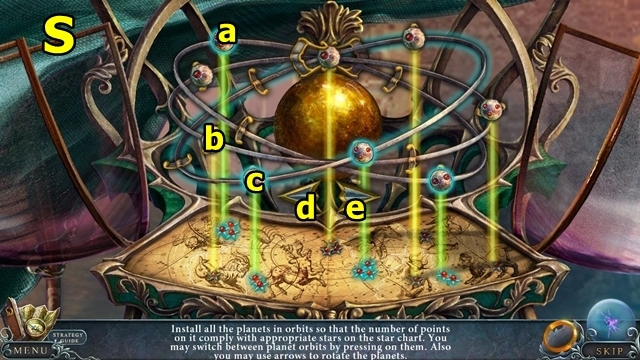
- Remove the lid (S), pour the alcohol; place the gauze on the wound; add the bandage.
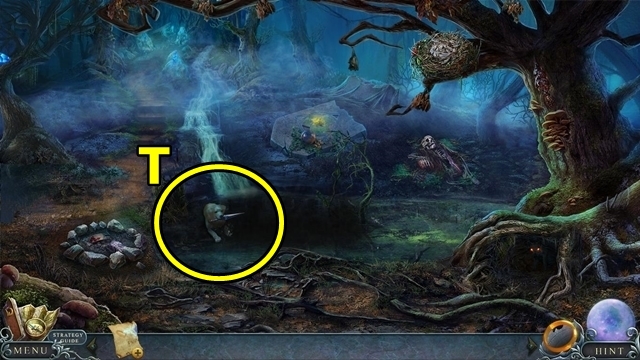
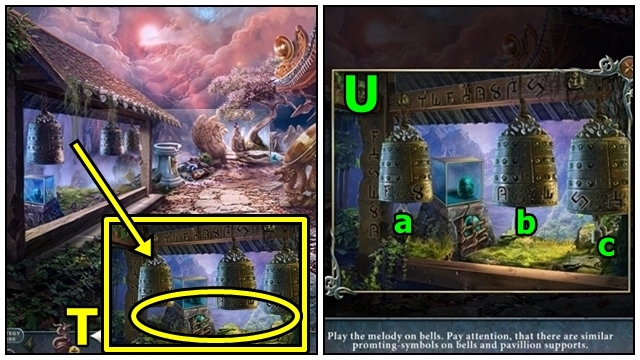
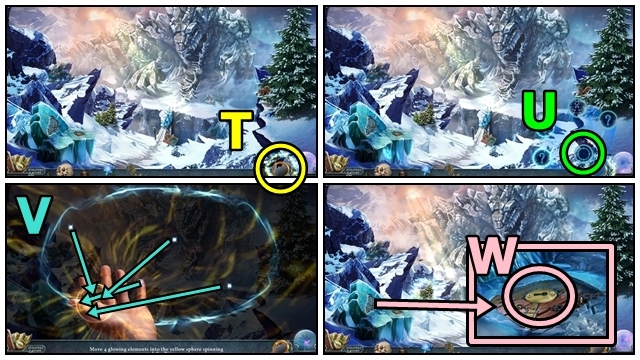
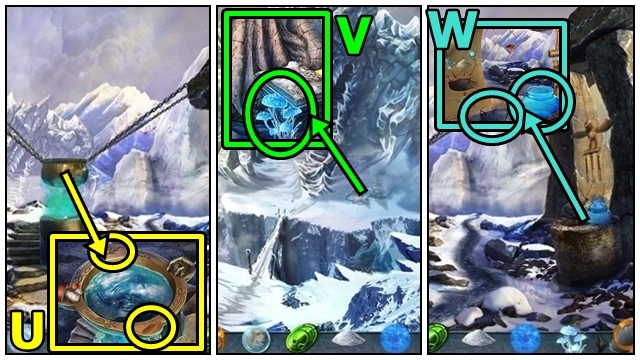
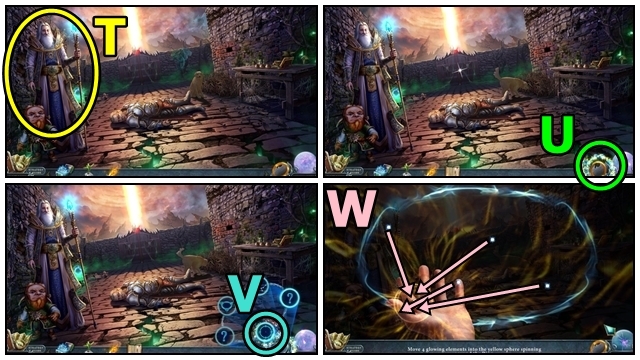
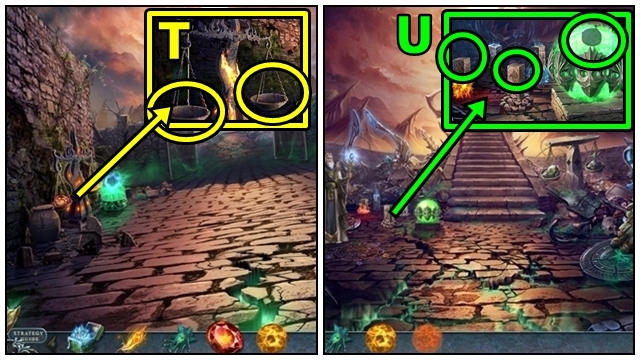
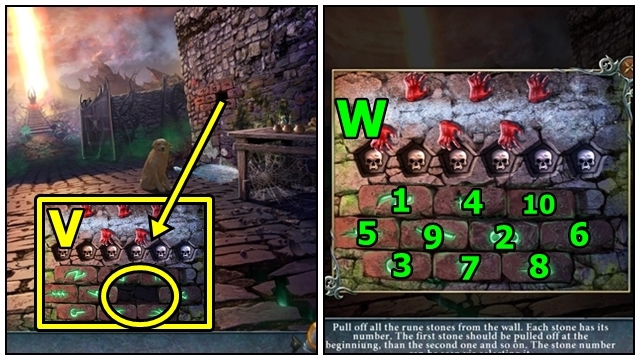
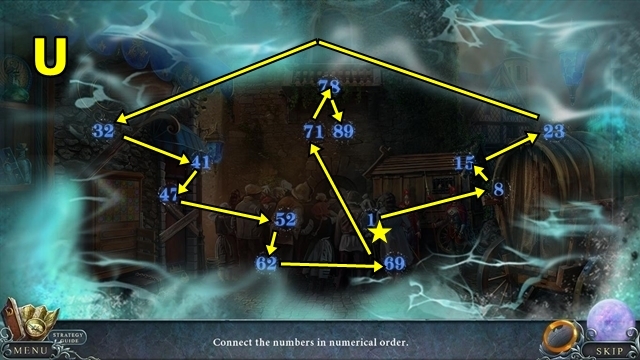
- Play the mini-game (T).
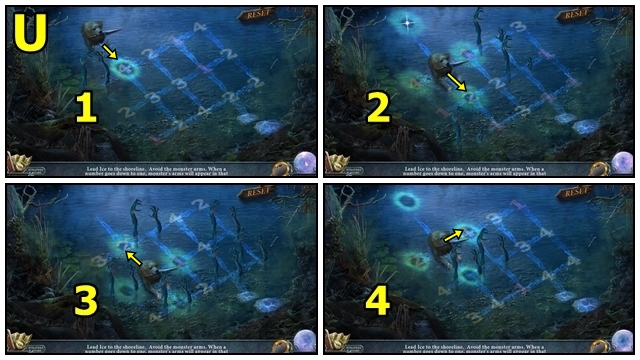
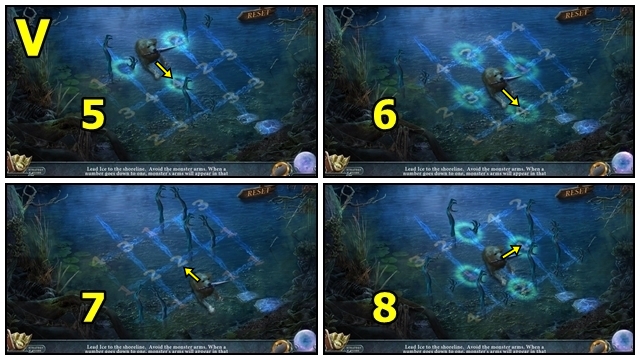
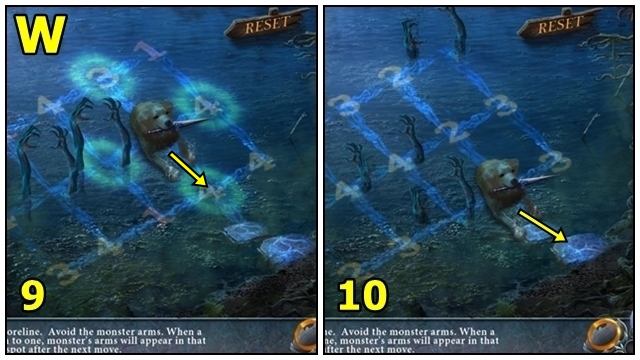
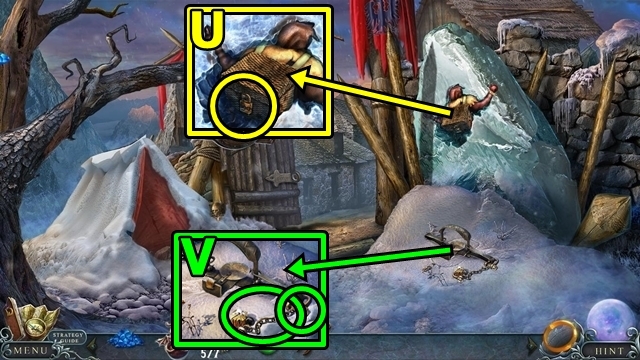
- Solution: (U-W). Receive the BROKEN SPEAR.
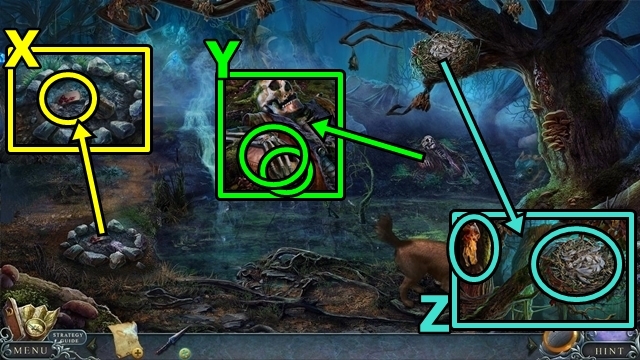
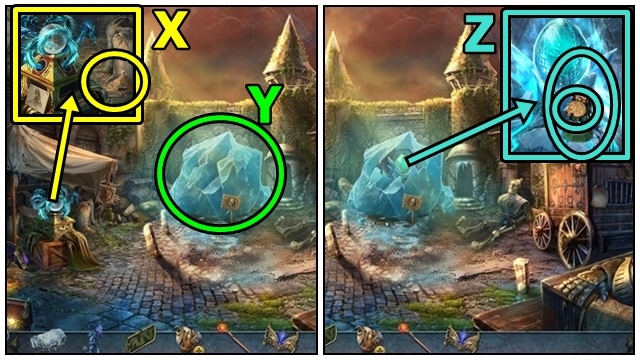
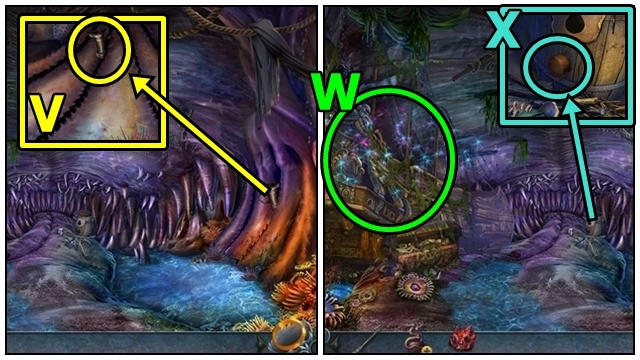
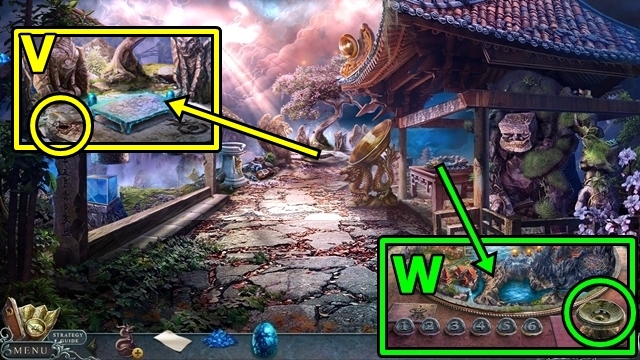
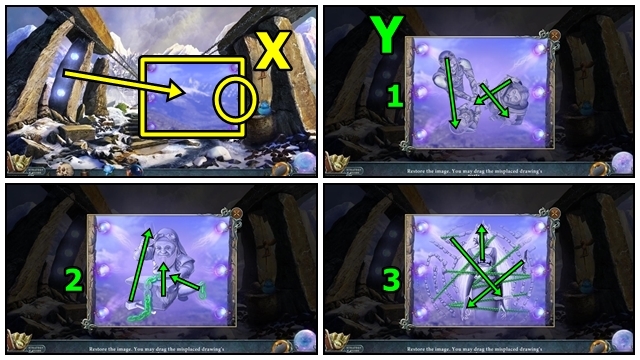
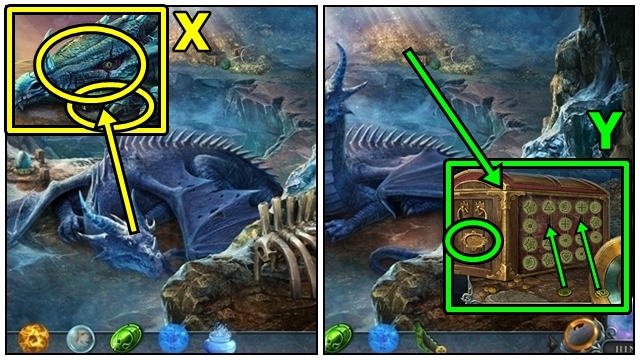
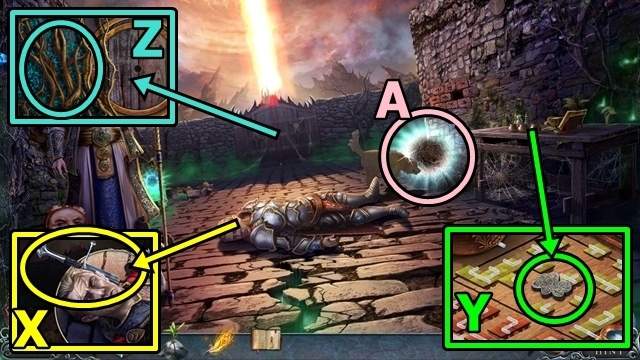
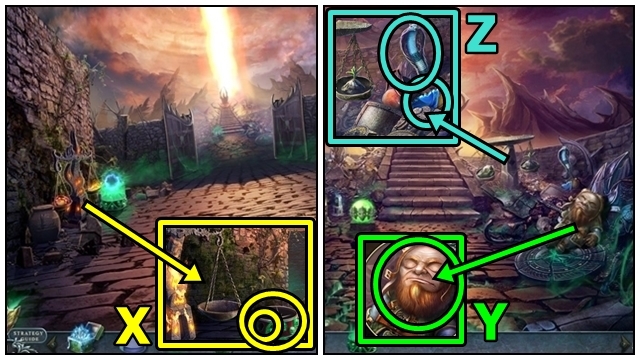
- Take the TUBE PART (X).
- Move the arm (Y); take the NOTE FRAGMENT and RAG.
- Move the BROKEN SPEAR'S (inventory) latches; take the UNCHARGED CRYSTAL and SPEARHEAD.
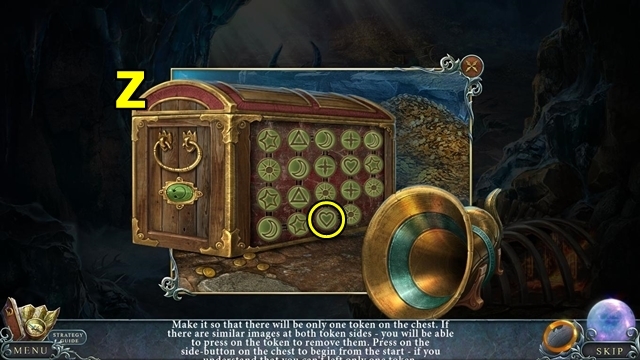
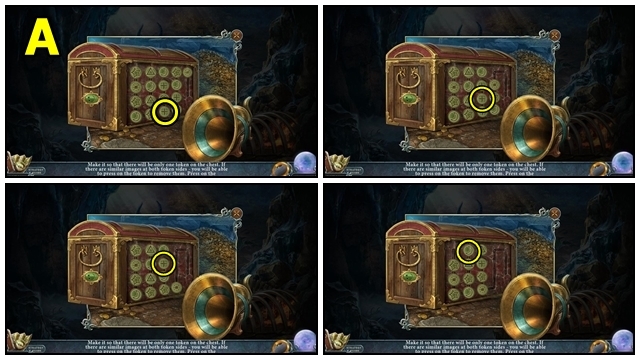
- Take the KINDLING (Z). Use the SPEARHEAD, then RAG. Receive the RAG WITH SAP.
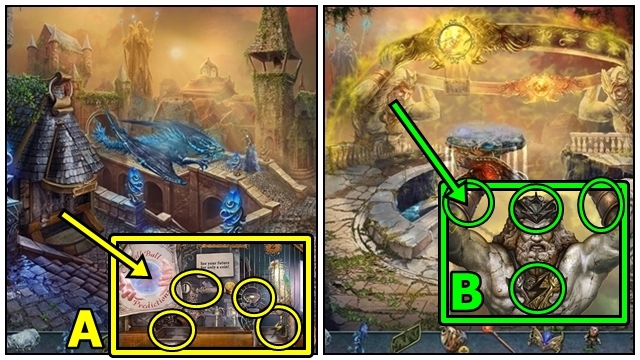
- Move forward.
- Move the board (A); take the TORCH.
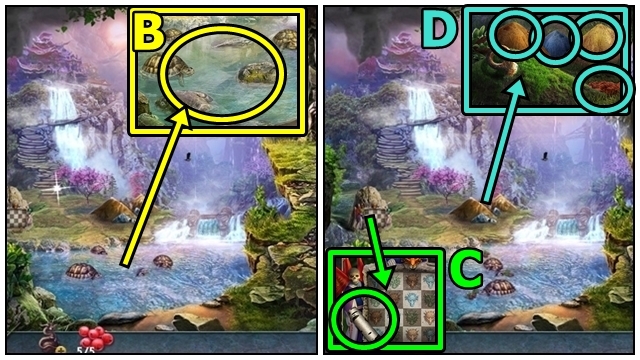
- Take the TUBE (B).
- Move down.
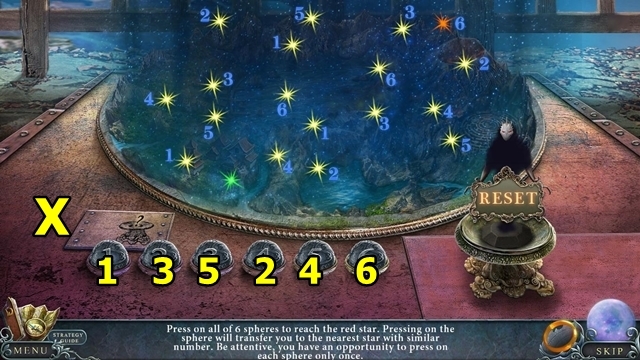
- Put the TUBE PART on the TUBE (inventory); play the mini-game.
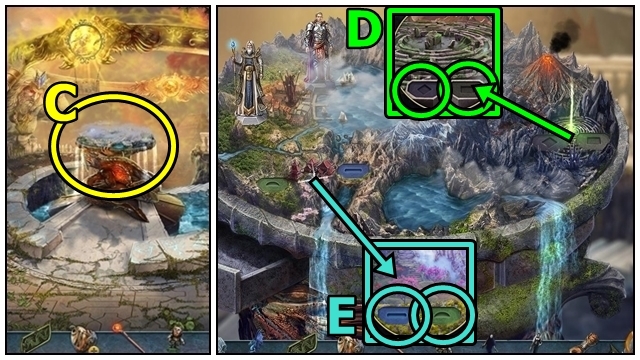
- Solution: (C). Open the tube; take the map, GLOWING RUNE and STEEL.
- Put the RAG WITH SAP on the TORCH (inventory); take the UNLIT TORCH.
- Add the KINDLING (D); use the STEEL. Add the UNLIT TORCH; receive the BURNING TORCH.
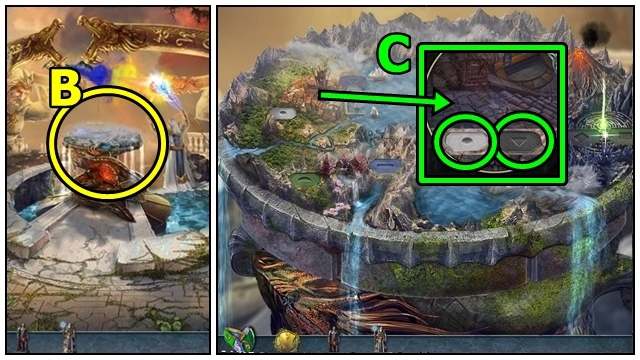
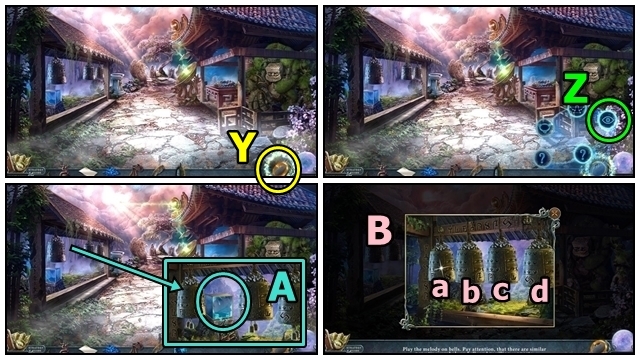
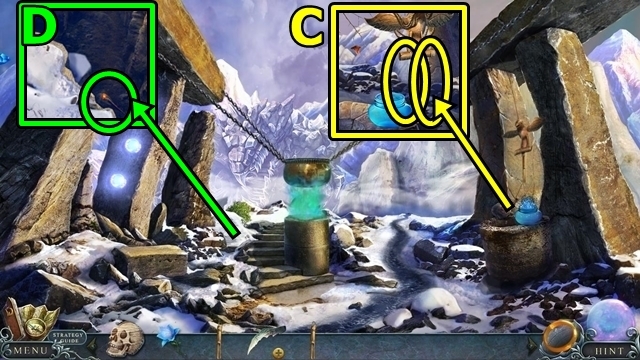
- Take the CRYSTAL BALL (E) and ACORNS.
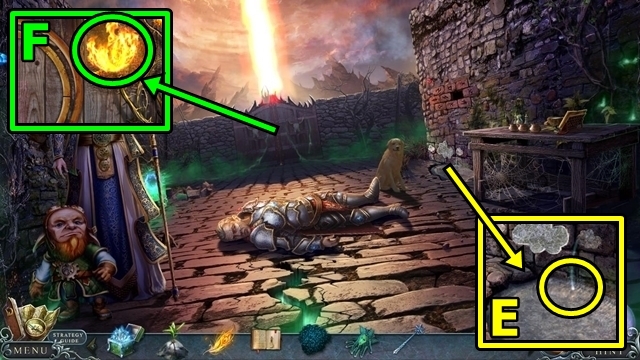
- Use the BURNING TORCH (F). Offer the ACORNS.
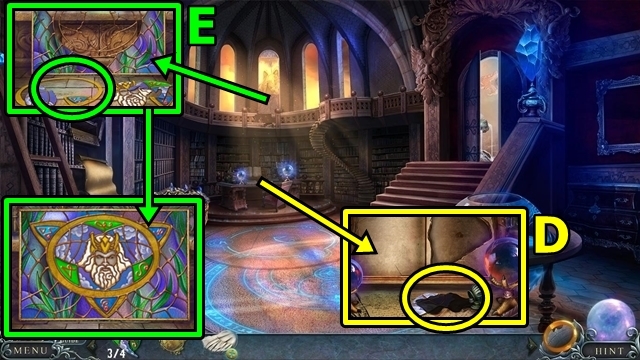
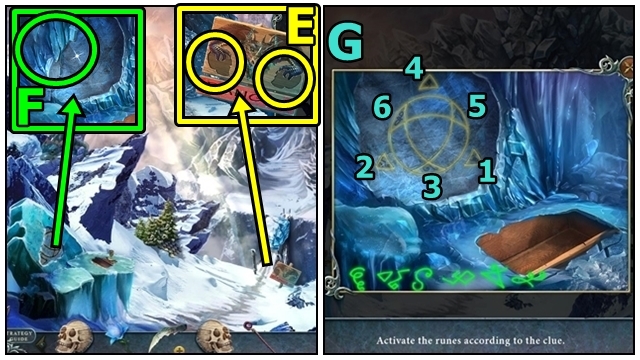
- Take the GLOWING RUNE (G).
- Add the NOTE FRAGMENT to the NOTE (inventory); take the MAGICAL CODE.
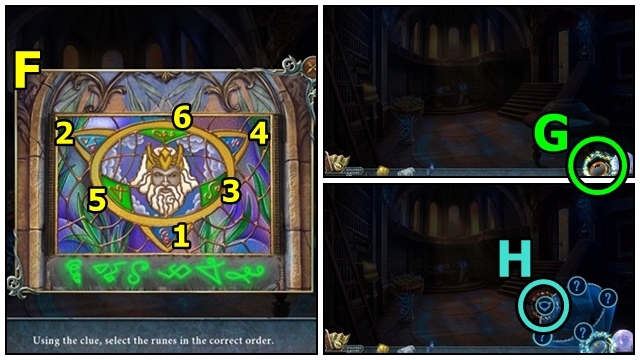
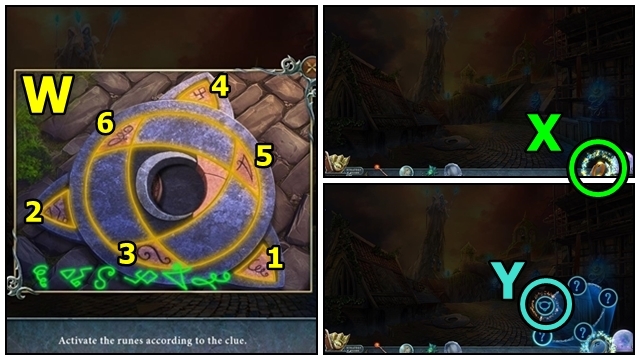
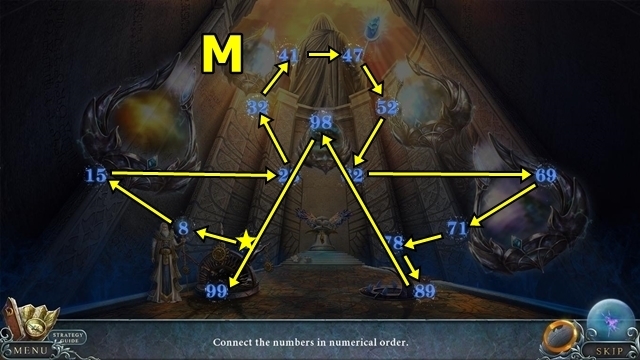
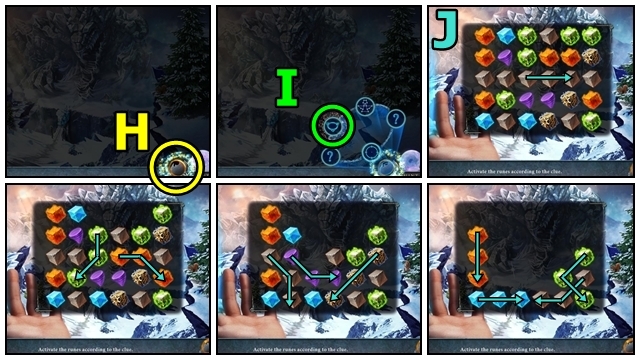
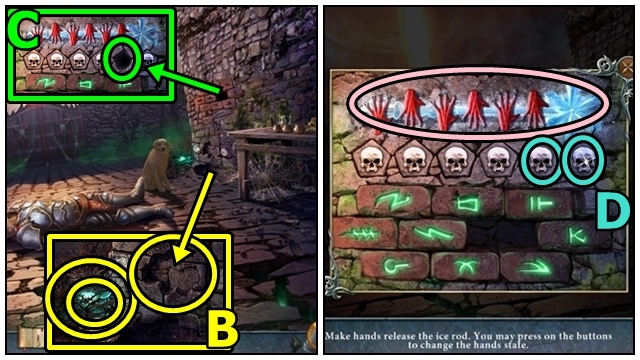
- Add the GLOWING RUNES (H) and MAGICAL CODE; play the mini-game.
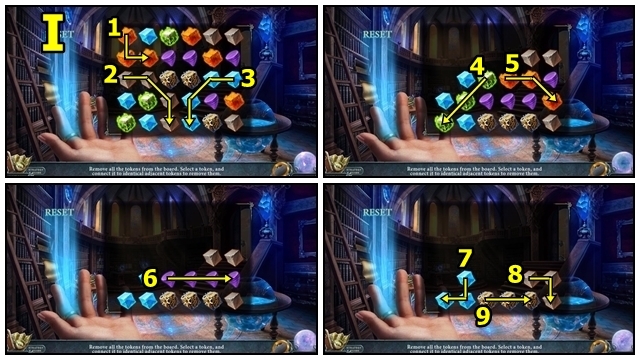
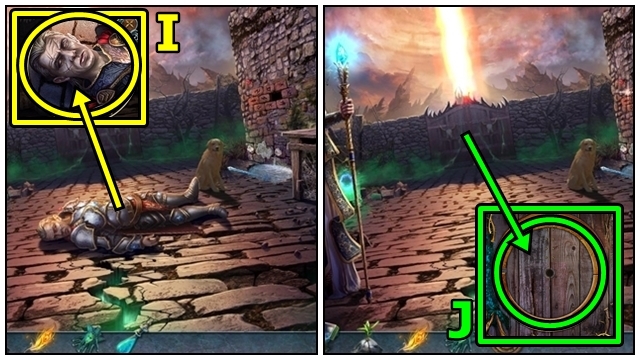
- Solution: (I).
- Examine the RING OF DESTINY (J).
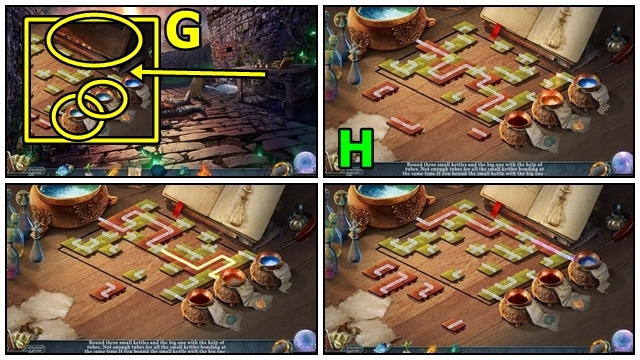
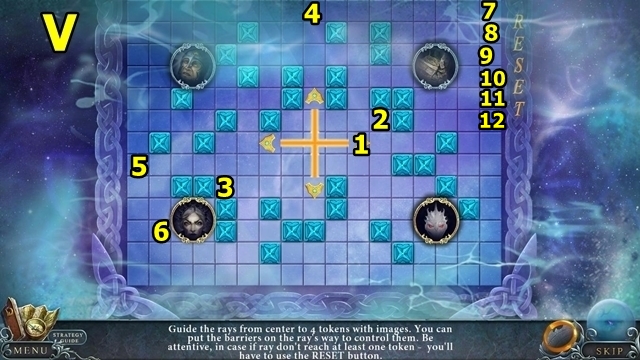
- Play the mini-game (K).
- Solution: (L-M).
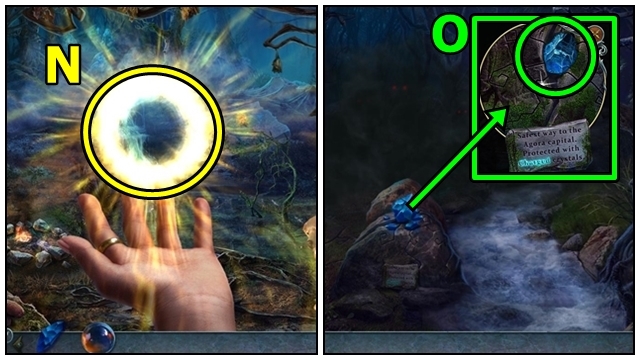
- Insert the UNCHARGED CRYSTAL (N); receive the CHARGED CRYSTAL.
- Move forward.
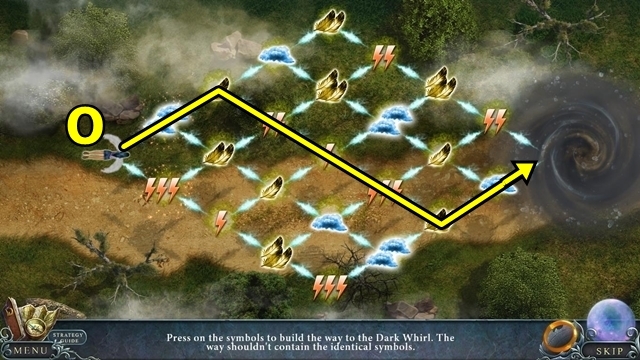
- Break the crystal (O). Add the CHARGED CRYSTAL. Play the mini-game.
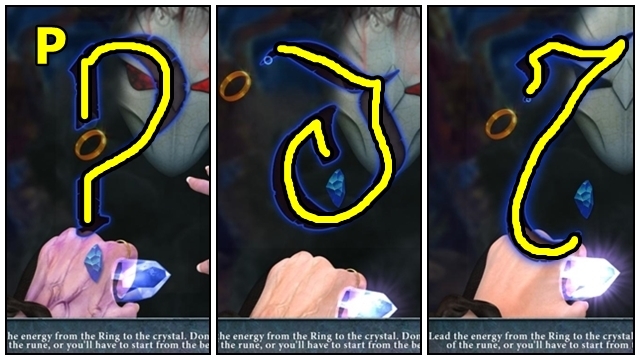
- Solution: (P).
- Move forward.
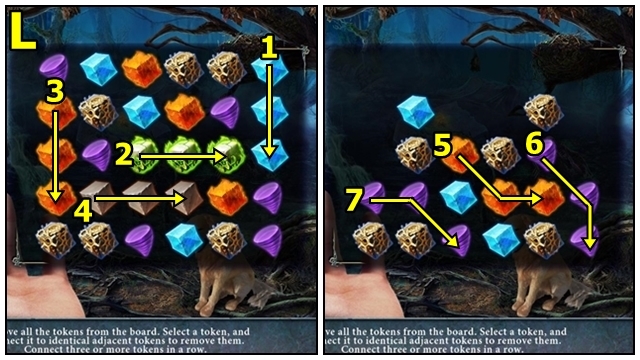
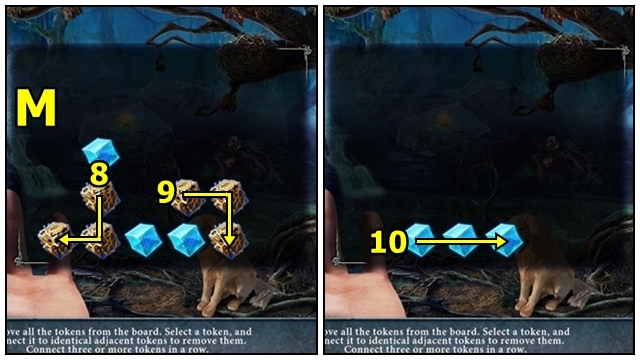
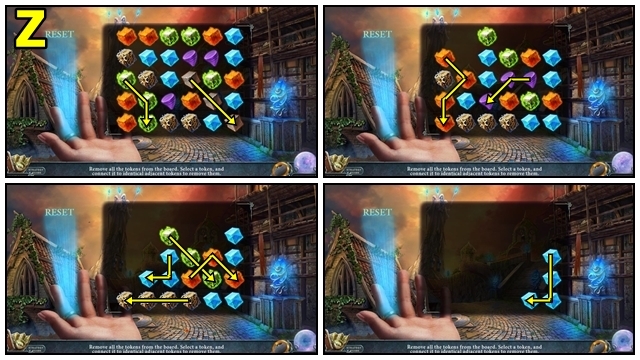
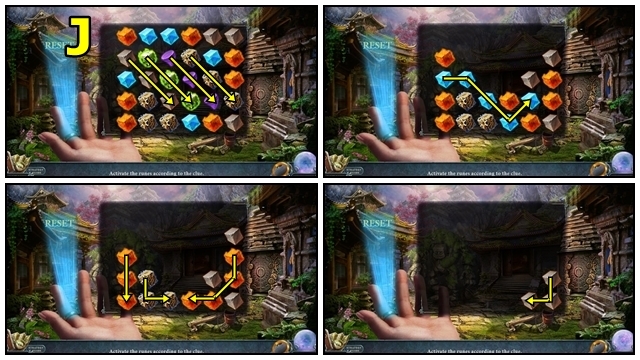
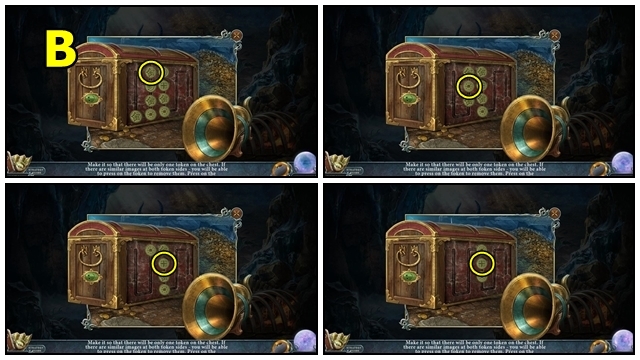
- Play the mini-game.
- Solution: Select any crystal (Q); find the matching pairs, then follow Ice. Repeat two times. These puzzles are random however the screenshot shows one possible solution.
Chapter 2: Agora
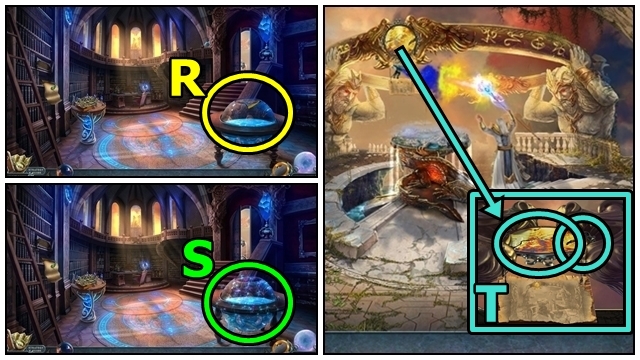
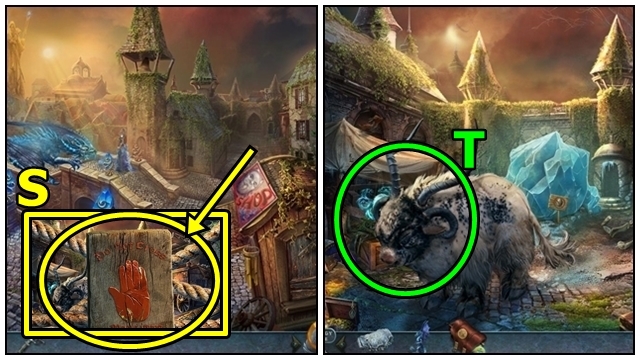
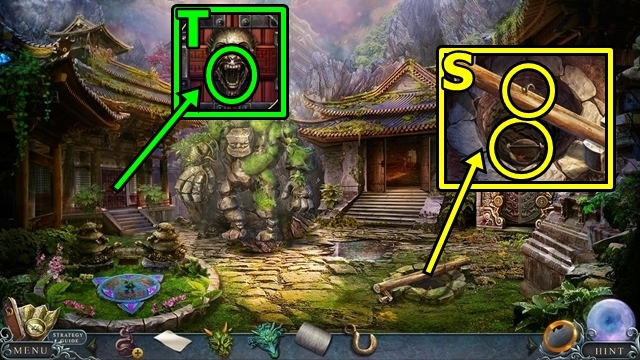
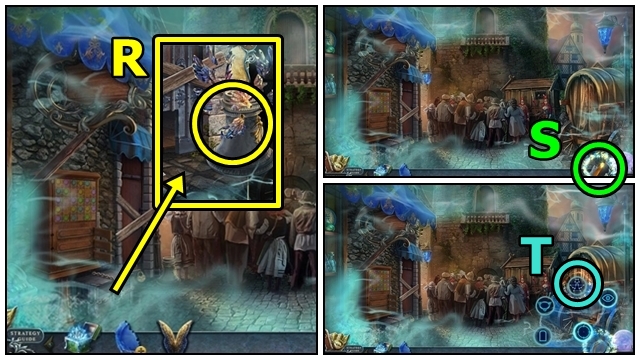
- Try to take the shard (R).
- Play the HOP (S); receive the GLASS SHARD (1/4).
- Enter the Terrace.
- Take the UNCHARGED SUN DISK (T) and LABYRINTH IMAGE.
- Move down.
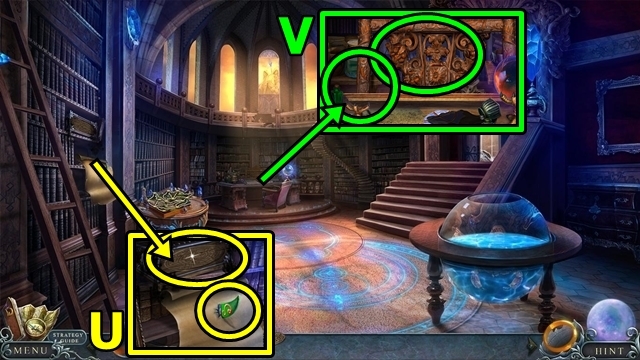
- Take the GLASS SHARDS (2/4) (U). Insert the LABYRINTH IMAGE; take the WARRIOR FIGURINE and MAGIC BOOK.
- Place the CRYSTAL BALL (V) and MAGIC BOOK.
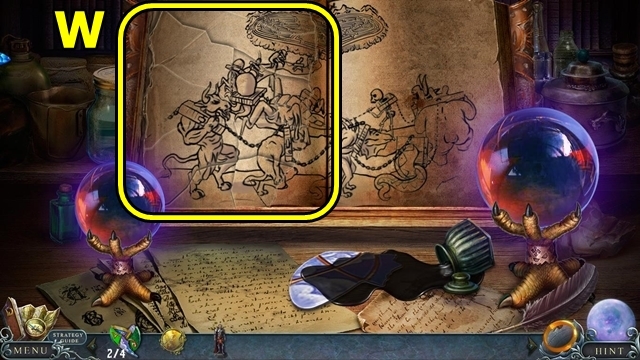
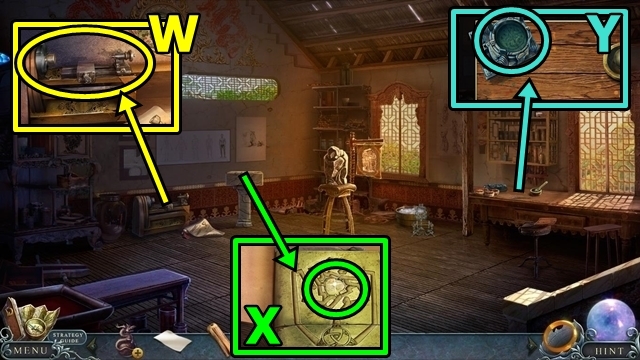
- Reassemble the drawing (W). Turn the page.
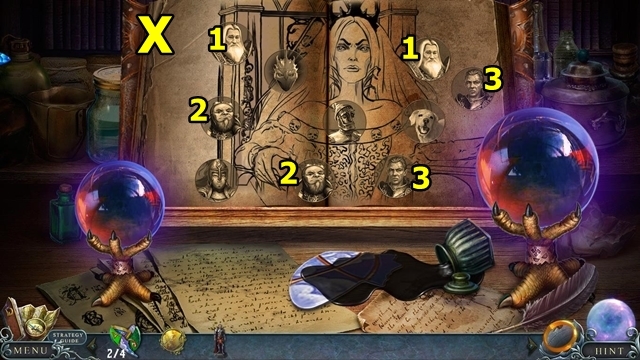
- Select the duplicates (X). Turn the page.
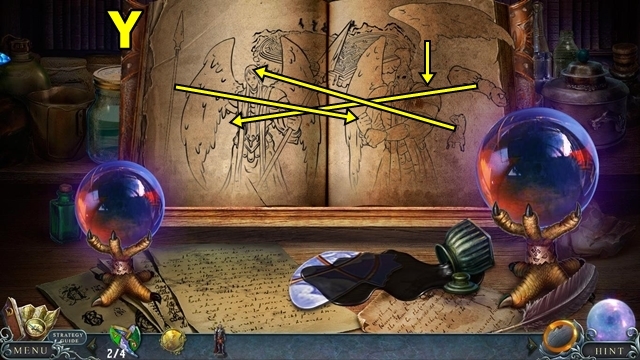
- Reassemble the drawing (Y). Turn the page. Take the MAP PIECE.
- Move down.
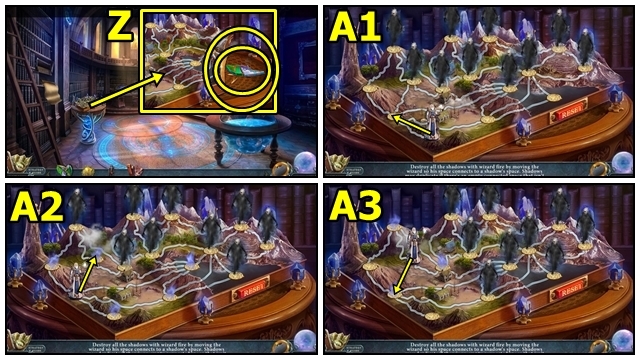
- Take the GLASS SHARDS (3/4) (Z); Insert the MAP PIECE; play the mini-game.
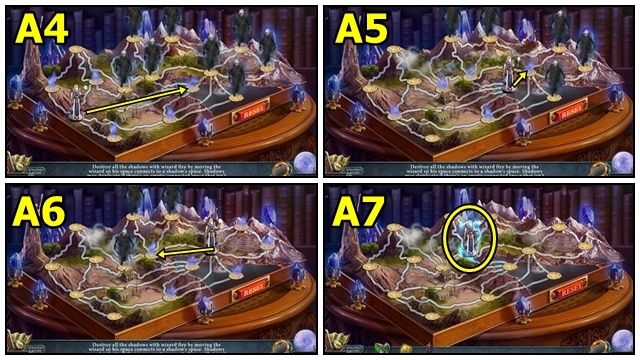
- Solution: (A1-A6). Take the MAGE FIGURINE (A7).
- Enter the Terrace.
- Examine the pedestal (B).
- Insert the MAGE FIGURINE (C) and WARRIOR FIGURINE; take the PACKAGE.
- Return to the Wizard's Tower.
- Unfold the PACKAGE (inventory); take the STONE MIRROR HALF and RAG.
- Use the RAG (D); receive the GLASS SHARDS (4/4).
- Add the GLASS SHARDS (E); reassemble the image. Take the DRAGON FIGURINE. Play the mini-game.
- Solution: (F).
- Examine the RING OF DESTINY (G).
- Play the mini-game (H).
- Solution: (I).
- Insert the UNCHARGED SUN DISK (J); receive the CHARGED SUN DISK.
- Enter the Terrace.
- Insert the CHARGED SUN DISK (K).
- Go down the stairs.
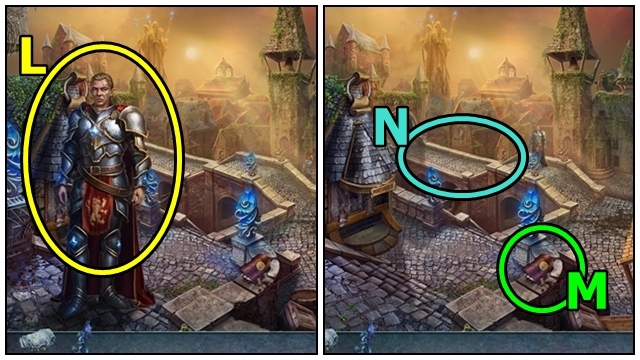
- Talk to the Regent (L).
- Take the BAG (M).
- Move left (N).
- Take the note (O) and TRANSLATOR SCROLL.
- Use the TRANSLATOR SCROLL (P); play the HOP.
- Talk to the Dragon (Q).
- Talk to the Regent (R); receive the SWORD.
- Move down, then forward. Use the SWORD (S).
- Open the BAG (inventory); read the note; take the APPLES.
- Offer the APPLES (T).
- Take the FIRE WAND (U). Move the items; take the LIGHTNING CROWN.
- Take the MECHANICAL KEY (V).
- Take the SERPENT PLATE (W). Insert the MECHANICAL KEY; take the MECHANICAL HEART.
- Take the SEEDS (X).
- Use the FIRE WAND (Y).
- Take the COIN (Z) and GNOME FIGURINE.
- Move down.
- Insert the COIN (A). Read the tag; take the SHADOW FIGURINE. Offer the SEEDS; take the LIGHTNING AMULET.
- Move down.
- Insert the LIGHTNING CROWN (B); take the DARK QUEEN FIGURINE. Insert the LIGHTNING AMULET; take the HUMAN HAND IMAGE (1/2).
- Examine the pedestal (C).
- Insert the DARK QUEEN FIGURINE (D) and SHADOW FIGURINE; take the SERPENT PLATE.
- Insert the DRAGON FIGURINE (E) and GNOME FIGURINE; take the HANDS IMAGE (2/2).
- Go down the stairs.
- Examine the drawing (F). Insert the HANDS IMAGE. Enter the shop; play the HOP. Take the HEART FUEL.
- Move forward.
- Examine the image (G); Insert the SERPENT PLATES; take the ICE'S SPHERE and LEFT GLOVE (1/2).
- Pour the HEART FUEL into the MECHANICAL HEART (inventory); take the FUELED HEART.
- Insert the FUELED HEART (H).
- Examine the cart (I); receive the GLOVES (2/2).
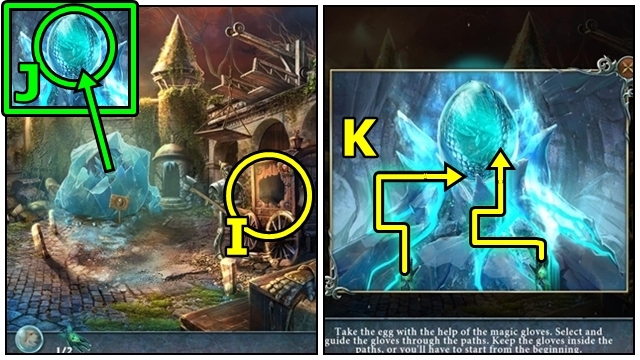
- Use the GLOVES (J); play the mini-game.
- Solution: (K). Take the DRAGON EGG.
- Move down.
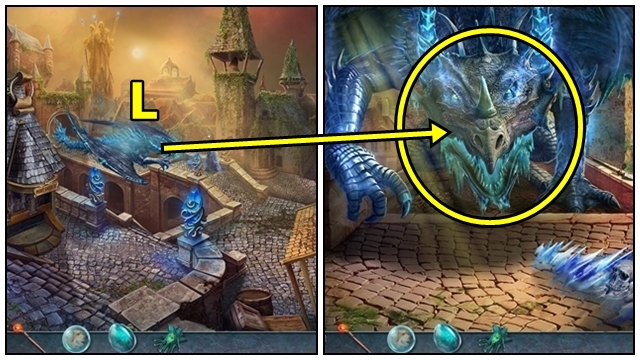
- Offer the DRAGON EGG (L).
- Move forward.
Chapter 3: The Tower
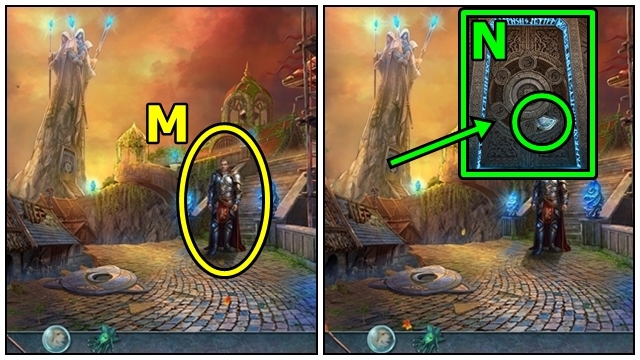
- Talk to the Regent (M).
- Take the STONE MIRROR HALF (N).
- Move down.
- Insert the STONE MIRROR HALVES (O); play the mini-game.
- Solution: (P-R). Take the UNCHARGED MIRROR and SUN SYMBOL.
- Move down.
- Insert the SUN SYMBOL (S); take the ANGEL TORSO and SAW.
- Move the cloth (T); take the CHISEL. Move the box; use the SAW; take the ANGEL LEGS.
- Insert the ANGEL TORSO (U) and ANGEL LEGS; take the TOOLS (2/2).
- Use the TOOLS (V); play the mini-game.
- Solution: (W).
- Examine the RING OF DESTINY (X).
- Play the mini-game (Y).
- Solution: (Z).
- Insert the UNCHARGED MIRROR (A); receive the CHARGED MIRROR.
- Activate the CHARGED MIRROR (B).
- Move forward (C). f
- Activate (D) the CHARGED MIRROR (inventory) (E). Receive the GOLDEN WING.
- Take the PHOENIX IMAGE (F).
- Insert the PHOENIX IMAGE (G); take the HALF CRESCENT.
- Insert the HALF CRESCENT (H); play the mini-game.
- Solution: ax3-b-c-dx3 (I). Take the GOLDEN WING.
- Insert the GOLDEN WINGS (J).
- Examine the RING OF DESTINY (K).
- Play the mini-game (L).
- Solution: (M).
- Move up.

- Take the MAGIC GLASSES (N).
- Move up.
- Play the mini-game.
- Solution: (O-P).
Chapter 4: Tempus
- Take the GLOWING SHRIMPS (7/7) (Q).
- Put the GLOWING SHRIMPS in the MAGIC GLASSES (inventory); take the glasses.
- Play the HOP (R); receive the LEATHER GLOVE.
- Use the LEATHER GLOVE (S); take the SABER HANDLE and METAL OCTOPUS.
- Insert the SABER HANDLE (T); take the SABER.
- Use the SABER (U); remove the net; insert the METAL OCTOPUS. Take the BRUSH and LASSO.
- Use the LASSO (V); take the TUBE.
- Open the TUBE (inventory); read the note; take the BROKEN LIGHTER and LAVA ROCK.
- Play the HOP (W); receive the MACE.
- Use the MACE (X). Add the LAVA ROCK.
- Examine the mountaintop (Y).
- Take the BERRIES (2/5) (Z).
- Take the BERRIES (5/5) (A).
- Use the BERRIES (B).
- Take the LOG (C).
- Take the COLORED CLAY (4/4) (D).
- Go up the mountain.

- Talk to the Golem (E); receive the BOOK GEM.
- Play the HOP (F); receive the SHOVEL HEAD.
- Take the SILK WORMS (3/6) (G).
- Enter the Workshop.
- Take the SILK WORMS (5/6) (H). Insert the LOG; take the HANDLE.
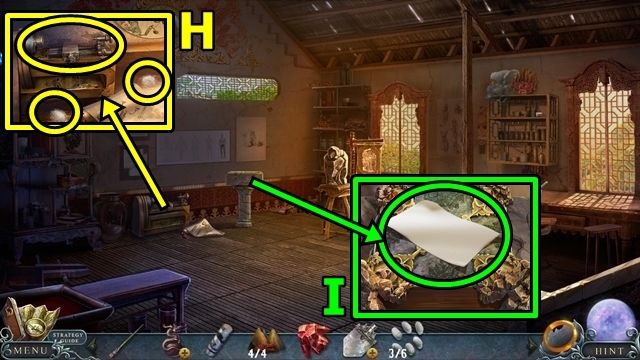
- Take the PAPER (I). Insert the BOOK GEM.
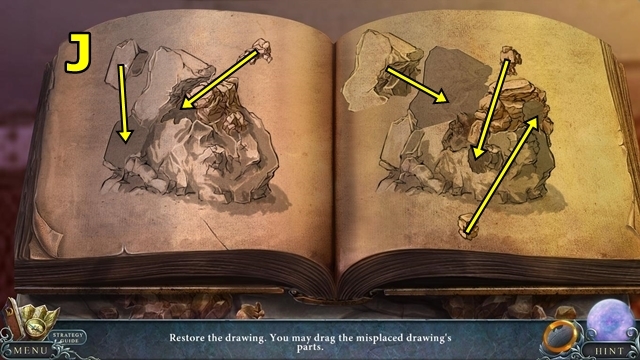
- Restore the drawing (J). Turn the page.
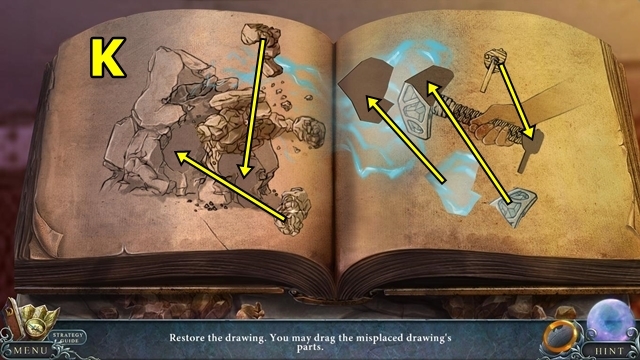
- Restore the drawing (K). Turn the page; take the MASK.
- Move down.
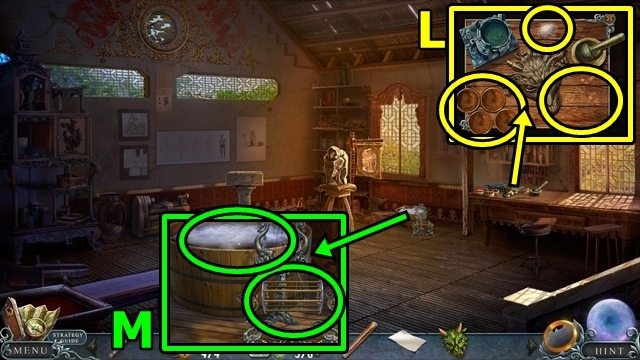
- Take the SILK WORMS (6/6) (L). Add the COLORED CLAY; then the BRUSH. Dip the brush in the paints; take the MASK.
- Add the SILK WORMS (M); press the loom; take the WHITE SILK.
- Move down twice.
- Insert the HANDLE onto the SHOVEL HEAD (inventory); take the SHOVEL.
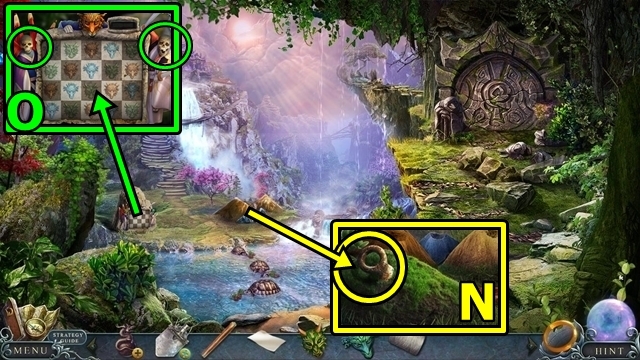
- Use the SHOVEL (N); take the HOOK.
- Add the MASKS (O); play the mini-game.
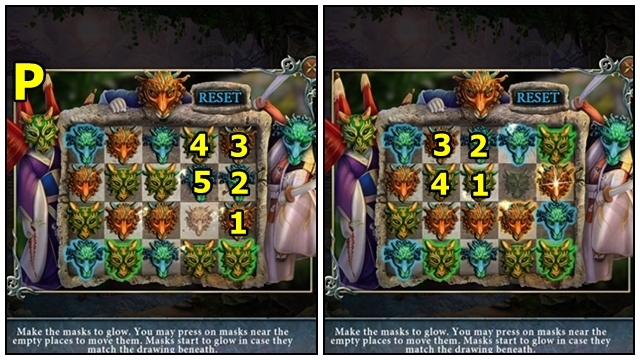
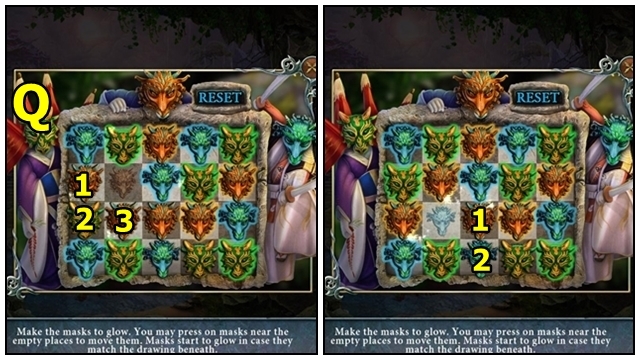
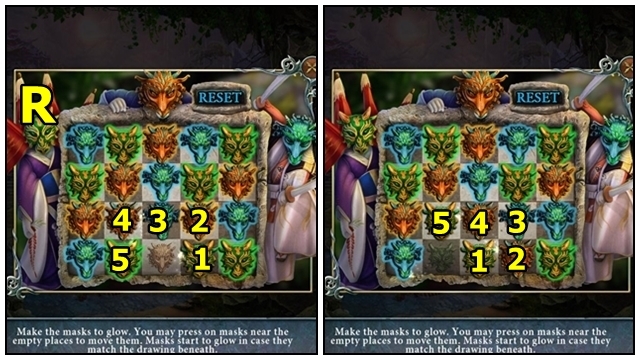
- Solution: (P-R). Take the CHAIN.
- Move up.
- Add the CHAIN (S) and HOOK; drop the hook; lift the bucket; take the PALACE KEY.
- Insert and turn the PALACE KEY (T).
- Enter the Ritual Palace.

- Take the LOG (U).
- Take the HAMMER TOKEN (V).
- Return to the Workshop.
- Add the LOG (W); take the WOODEN CUP.
- Insert the HAMMER TOKEN (X); take the METAL DISC.
- Insert the METAL DISC (Y); take the LOCK PICKS and SHARPENER.
- Move down.
- Play the HOP (Z); receive the DECORATIVE TURTLES.
- Place the DECORATIVE TURTLE (A); take the INSIGNIA HALF (1/2) and MACHETE.
- Enter the Ritual Palace.
- Use the LOCK PICKS (B); move the clothing; take the ENERGY STONE.
- Place the WOODEN CUP (C); pour the wine; take the WINE.
- Use the SHARPENER on the MACHETE (inventory); take the SHARP MACHETE.
- Use the SHARP MACHETE (D); receive the BAMBOO.
- Add the WHITE SILK (E), BAMBOO, then WINE. Take the UNCHARGED CRYSTAL HAMMER and ENERGY STONE.
- Move down.
- Place the ENERGY STONES (F); play the mini-game.
- Solution: (G).
- Examine the RING OF DESTINY (H).
- Play the mini-game (I).
- Solution: (J).

- Use the UNCHARGED CRYSTAL HAMMER (K); receive the CHARGED CRYSTAL HAMMER.
- Use the CHARGED CRYSTAL HAMMER (L).
- Take the HAMMER AND CHISEL (M).
- Enter the Workshop.
- Use the HAMMER AND CHISEL (N); take the STONE IDOL.
- Move down twice.
- Place the STONE IDOL (O). Move forward.
- Talk to the Golem (P). Take the SHINING EGG.
- Move the egg (Q). Place the SHINING EGG; take the AGORA CRYSTALS and TONGS.
- Move down.
- Use the TONGS (R) to take the INSIGNIA.
- Move down.
- Insert the BAG BADGE (S); take the BELL CLAPPERS.
- Place the BELL CLAPPERS (T); play the mini-game.
- Solution: a-c-c-b-a-b (U). Take the SHINING EGG.
- Place a SHINING EGG (V); take the LIGHTER PART and SHADOW FIGURINE.
- Move down.
- Place the SHADOW FIGURINE (W); play the mini-game.
- Solution: (X). Take the GOLDEN WING (1/2) and RUNE BELL.
- Examine the RING OF DESTINY (Y).
- Examine the power (Z).
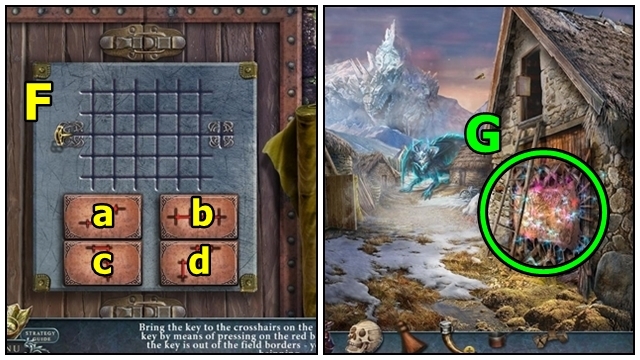
- Add the RUNE BELL (A); play the mini-game.
- Solution: b-c-a-d-c-a-b-d (B). Take the SHINING EGG.
- Place the SHINING EGG (C); take the GOLDEN WINGS.
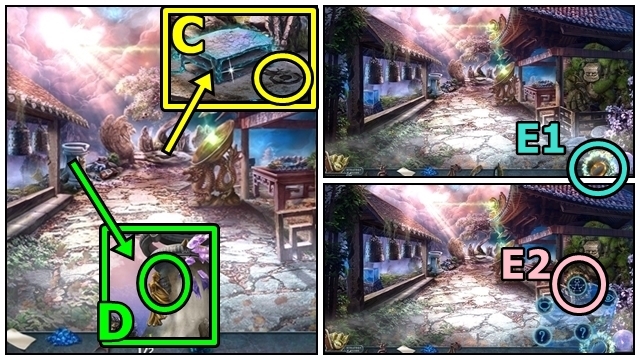
- Place the GOLDEN WINGS (D).
- Examine the RING OF DESTINY (E1).
- Play the mini-game (E2).
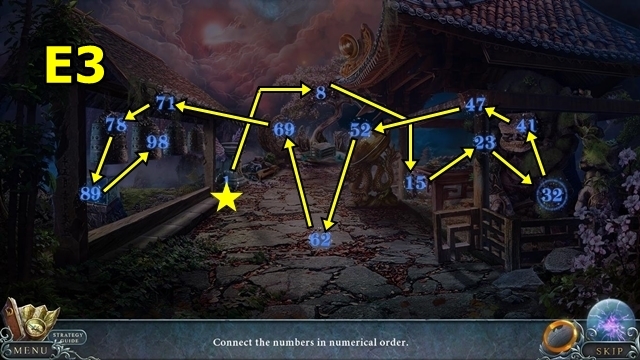
- Solution: (E3).
- Move up.
Chapter 5: The Barbaric Village
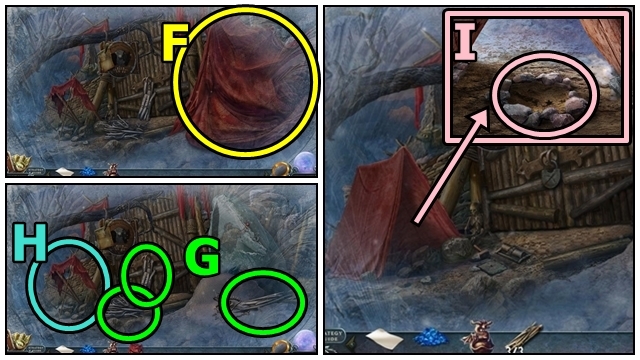
- Take the FABRIC (F).
- Take the FIREWOOD (3/3) (G). Place the FABRIC (H).
- Add the LIGHTER PART to the BROKEN LIGHTER (inventory); take the REPAIRED LIGHTER.
- Add the PAPER (I) and FIREWOOD; use the REPAIRED LIGHTER.
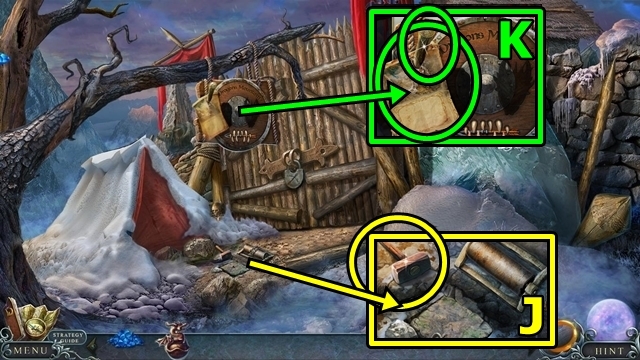
- Take the BARBARIAN HAMMER (J).
- Take the PEG (K); read the note.
- Add the PEG (L); take the DRAGON PORTRAIT.
- Use the BARBARIAN HAMMER (M); take the HUMAN PORTRAIT.
- Insert the HUMAN PORTRAIT (N) and DRAGON PORTRAIT; take the VILLAGE KEY.
- Insert the VILLAGE KEY (O).
- Move forward.
- Play the HOP (P); receive the KEY (1/7).
- Take the MAGNET (Q) and KEYS (2/7).
- Take the KEYS (3/7) (R) and ACID.
- Take the KEYS (4/7) (S).
- Use the MAGNET (T); take the WRENCH and KEYS (5/7).
- Move down.
- Use the ACID (U); open the basket; take the SKULL IMAGE and NIPPERS.
- Use the WRENCH (V); take the CHAIN.
- Move forward.
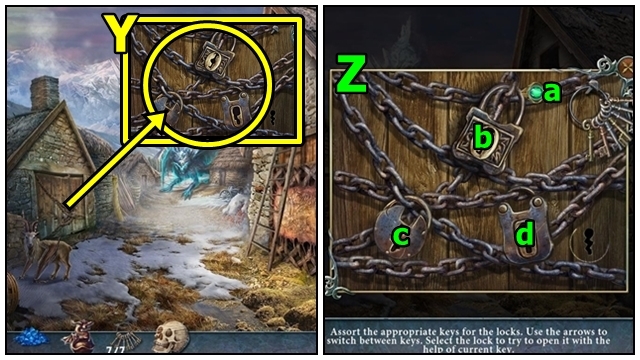
- Use the NIPPERS (W); remove the cover; take the KEYS (6/7) and WINCH HANDLE.
- Move down.
- Insert the WINCH HANDLE (X) and CHAIN; pull the chain; take the KEYS (7/7).
- Move forward.
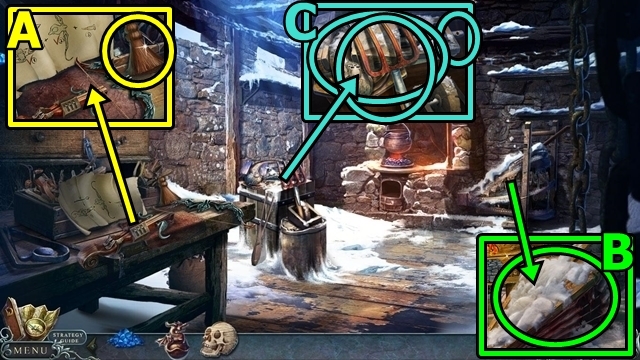
- Insert the KEYS (Y); play the mini-game.
- Solution: ax2-d-ax2-c-ax2-b (Z).
- Enter the Smithy.
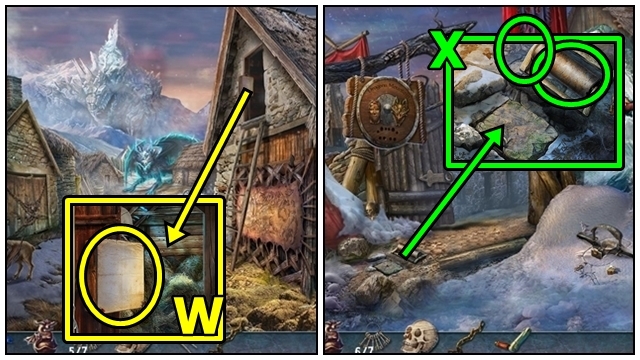
- Take the WHISK BROOK (A).
- Use the WHISK BROOM (B); take the VISE HANDLE.
- Take the PITCHFORK (C). Use the WHISK BROOM. Insert and turn the VISE HANDLE; take the SEALED HORN.
- Move down.
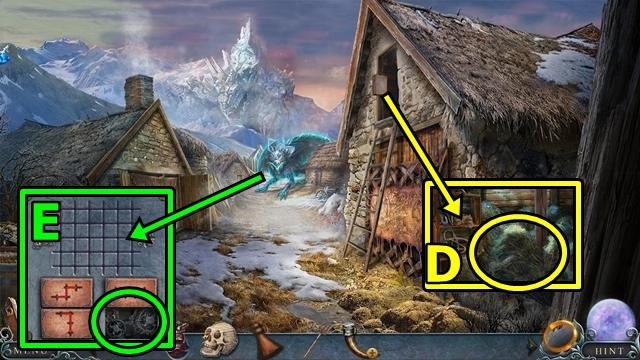
- Use the PITCHFORK (D); take the METAL PLATE.
- Insert the METAL PLATE (E); play the mini-game.
- Solution: a-a-c-c-b-a-a (F). Take the EMPTY SCOOP and WOOD.
- Move down.
- Play the HOP (G); receive the METAL ORE.
- Enter the Smithy.
- Use the WHISK BROOM (H); take the THREAD. Add the WOOD, then the REPAIRED LIGHTER. Take the METAL SKULL.
- Move down.
- Put the METAL SKULL on the SEALED HORN (inventory); take the HORN.
- Use the HORN (I); take the DULL SCISSORS and BOLT SHAFTS.
- Enter the Smithy.
- Add the DULL SCISSORS (J); receive the SCISSORS.
- Move down.
- Use the SCISSORS (K); receive the CLOTH.
- Return to the Smithy.
- Attach the CLOTH (L); then use the THREAD. Press the bellows.
- Add the METAL ORE (M); tip the cauldron; take the CROSSBOW PART.
- Put the AGORA CRYSTALS on the BOLT SHAFTS (inventory); assemble the CROSSBOW BOLTS.
- Add the CROSSBOW BOLTS (N) and CROSSBOW PART; assemble the CROSSBOW.
- Move down.
- Use the CROSSBOW (O1); play the mini-game.
- Solution: (O2-O4).
- Move forward.
- Examine the RING OF DESTINY (P).
- Play the mini-game (Q).
- Solution: (R).
- Take the MOUNTAIN FLOWER (S) and OLD KEY.
- Move forward.
Chapter 6: The Dragon Cave
- Examine the RING OF DESTINY (T).
- Play the mini-game (U).
- Solution: (V).
- Insert and turn the OLD KEY (W); read the note; take the CRYSTAL BALL.
- Move down.
- Place the CRYSTAL BALL (X); play the mini-game.
- Solution: (Y). Receive the TONGS.
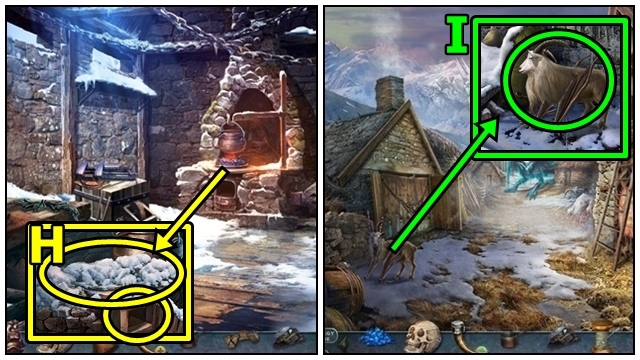
- Use the EMPTY SCOOP (Z); receive the BOILING WATER.
- Move forward.
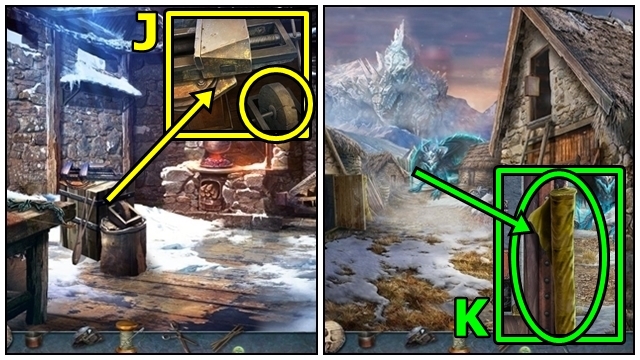
- Take the BAMBOO TUBE (A). Use the TONGS; take the SHARP DRAGON SCALE.
- Pour the BOILING WATER (B); take the BAMBOO TUBE.
- Move down.
- Hang the BAMBOO TUBES (C); take the LASSO.
- Use the LASSO (D); take the SKULL IMAGE and SPENT FIRE WAND.
- Move forward.
- Insert the SKULL IMAGES (E); take the HANDLE.
- Attach the HANDLE to the SHARP DRAGON SCALE (inventory); take the IMPROVISED BLADE.
- Use the IMPROVISED BLADE (F); play the mini-game.
- Solution: (G).
- Examine the RING OF DESTINY (H).
- Play the mini-game (I).
- Solution: (J).
- Use the SPENT FIRE WAND (K); receive the FIRE WAND.
- Use the FIRE WAND (L).
- Move forward.
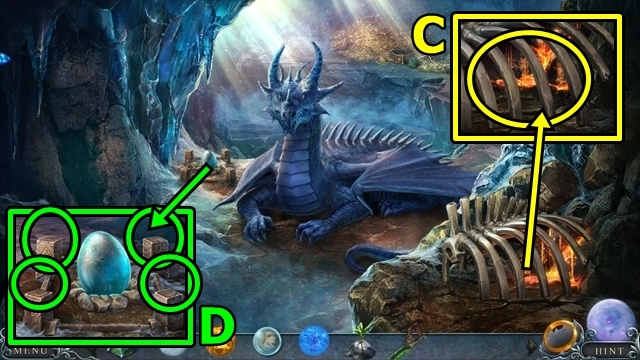
- Talk to the Dragon (M); receive the DRAGON BLOOD.
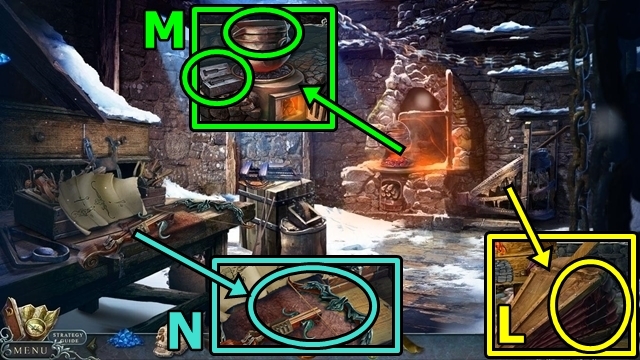
- Pour the DRAGON BLOOD (N); take the STICK and GOLD INGOT.
- Take the MAGIC FEATHER (1/6) (O). Use the STICK; take the MAGIC FEATHERS (6/6) and WHIRLWIND TOKEN.
- Read the note (P); take the DISENCHANTING CRYSTAL. Insert the WHIRLWIND TOKEN; use the DISENCHANTING CRYSTAL; take the AIR ELEMENT.
- Move down.
- Insert the GOLD INGOT (Q); take the CRYSTAL BALL.
- Place the DISENCHANTING CRYSTAL (R); take the EARTH ELEMENT, ICE'S SPHERE and GREEN LEAVES.
- Move down.
- Place the CRYSTAL BALL (S); play the mini-game.
- Solution: (T). Receive the BUTTON and GLASS POWDER.
- Place the GREEN LEAVES (U) and MAGIC FEATHERS; push everything in the pot; add the DISENCHANTING CRYSTAL; take the WATER ELEMENT and MUSHROOM KNIFE.
- Move forward.
- Use the MUSHROOM KNIFE (V); take the ICY MUSHROOMS.
- Move down.
- Add the ICY MUSHROOMS (W), GLASS POWDER and MOUNTAIN FLOWER; take the HEALING POTION.
- Return to the Dragon Cave.
- Use the HEALING POTION (X); take the SAW BLADE.
- Add the tokens (Y) and BUTTON; play the mini-game.
- Solution: (Z-B). Take the SEED OF LIFE and SAW HANDLE.
- Attach the SAW HANDLE to the SAW BLADE (inventory); take the SAW.
- Use the SAW (C); add the DISENCHANTING CRYSTAL; take the FIRE ELEMENT.
- Place the AIR ELEMENT (D); EARTH ELEMENT, WATER ELEMENT and FIRE ELEMENT.
Chapter 7: Labrion
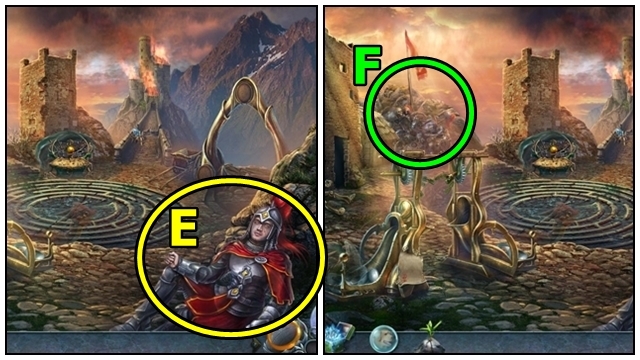
- Talk to the Knight (E); receive the WATER.
- Play the HOP (F); receive the MANIPULATOR.
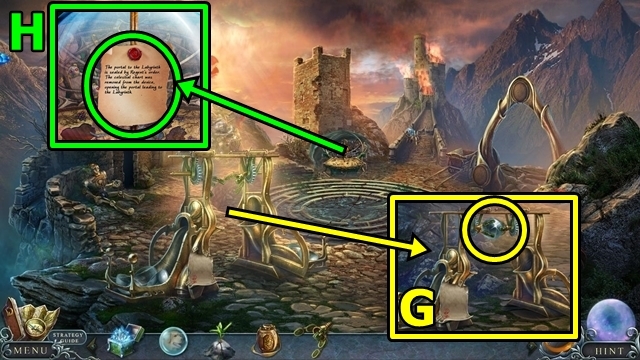
- Open the glass sphere (G); add the MANIPULATOR and ICE'S SPHERE. Read the note; take the GLASS KEY.
- Read the note (H). Insert and turn the GLASS KEY; take the REGENT PORTRAIT and SMALL CROWBAR.
- Insert the SMALL CROWBAR (I); take the GNOME PORTRAIT.
- Pour the WATER (J); take the WIZARD PORTRAIT.
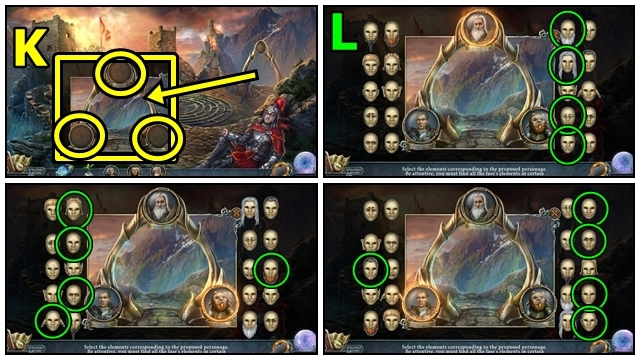
- Insert the WIZARD PORTRAIT (K), GNOME PORTRAIT and REGENT PORTRAIT; play the mini-game.
- Solution: (L).
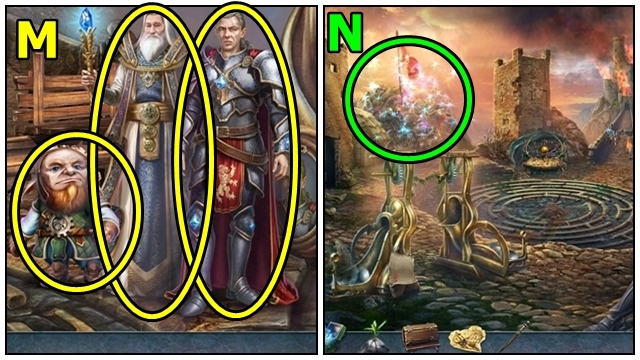
- Talk to the Gnome (M); receive the MECHANICAL BRIDGE. Talk to the Wizard; receive the ZODIAC SIGN. Talk to the Regent; receive the STILETTO.
- Play the HOP (N); receive the GAUNTLET.
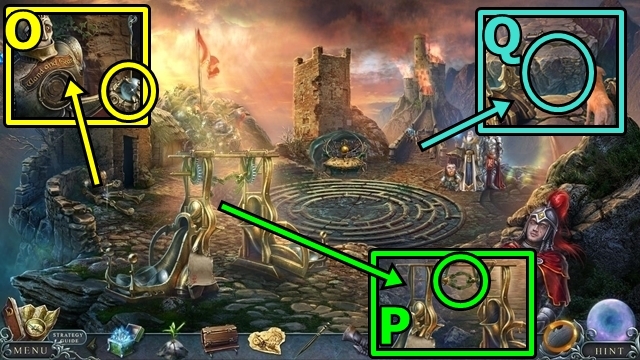
- Use the STILETTO (O); take the SPHERE.
- Place the SPHERE (P); take the ZODIAC SIGN.
- Add the MECHANICAL BRIDGE (Q); receive the TUBE.
- Use the GAUNTLET to open the TUBE (inventory); take the PHOENIX FEATHER and ZODIAC SIGN.
- Add the ZODIAC SIGNS (R); play the mini-game.
- Solution: e-b-d-d-c-d-b-e-e-c-d-b-e-e-c-e-b-d (S).
- Talk to the Wizard (T); receive the GNOME RECIPE BOOK.
- Examine the RING OF DESTINY (U).
- Play the mini-game (V).
- Solution: (W).
- Take the BROKEN SWORD (X).
- Take the CLOUD TOKEN (Y).
- Use the BROKEN SWORD (Z); take the BLUE MOSS and BUTTON.
- Examine the branches (A).
- Insert the CLOUD TOKEN (B). Move the branches; take the ANTIMAGIC GLOVES.
- Insert the BUTTON (C); play the mini-game.
- Solution: (D). Use the ANTIMAGIC GLOVES; take the ICE WAND.
- Use the ICE WAND (E); take the SNOW.
- Use the SNOW (F); take the FIRE BLOSSOM.
- Place the GNOME RECIPE BOOK, BLUE MOSS and FIRE BLOSSOM (G); play the mini-game.
- Solution: (H). Receive the REVIVING POTION.
- Use the REVIVING POTION (I). Take the LABYRINTH KEY.
- Insert the LABYRINTH KEY (J); play the mini-game.
- Solution: (K).
- Move forward.
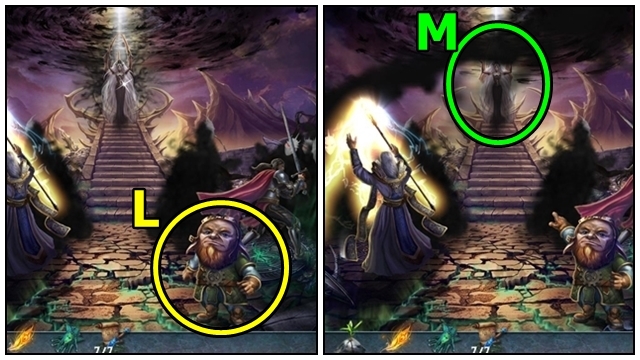
- Talk to the Gnome (L). Take the INDESTRUCTABLE CHAINS (7/7).
- Throw the INDESTRUCTABLE CHAINS (M).
- Take the INDESTRUCTABLE CHAINS (7/7) (N).
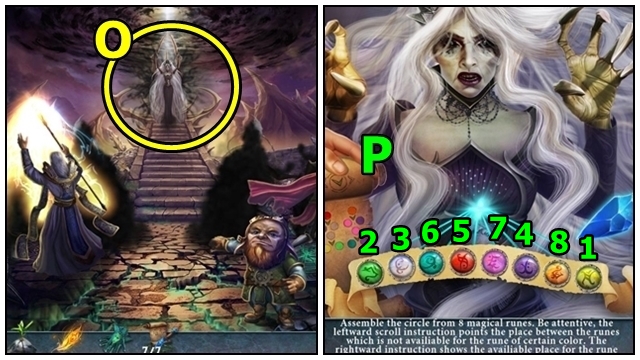
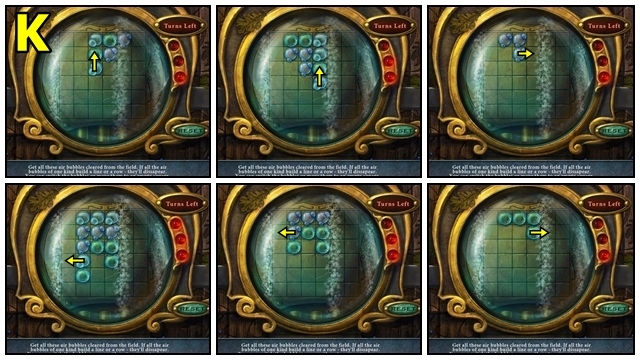
- Throw the INDESTRUCTABLE CHAINS (O); play the mini-game.
- Solution: Enter the sequence while following the scroll instructions (P).
- Talk to the Wizard (Q); receive the GIANT DIAMOND.
- Take the DRAGON'S BLOOD (R).
- Place the GIANT DIAMOND (S) and SEED OF LIFE; take the EARTH ELEMENT.
- Move down.
- Place the DRAGON'S BLOOD (T) and PHOENIX FEATHER; take the FIRE ELEMENT.
- Move forward.
- Use the ANTIMAGIC GLOVES (U); receive the TINY PORTAL. Place the FIRE ELEMENT and EARTH ELEMENT; take the RUNED STONE.
- Move down.
- Insert the RUNED STONE (V); play the mini-game.
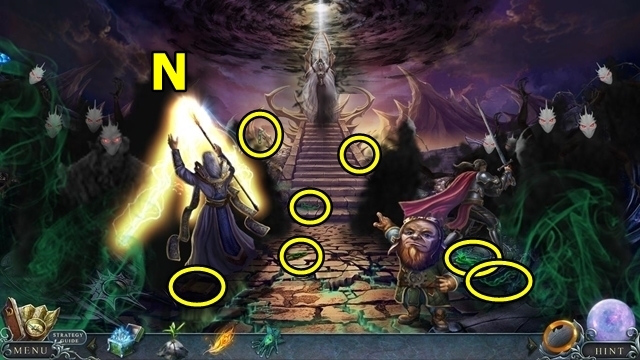
- Solution: (W). Take the GLOWING SKULL, SMELLING SALTS and INDESTRUCTABLE CHAINS.
- Insert the GLOWING SKULL (X) and INDESTRUCTABLE CHAIN; take the TINY PORTAL.
- Move forward.
- Use the SMELLING SALTS (Y); receive the FLUTE.
- Use the FLUTE (Z); take the MIRROR and TINY PORTAL.
- Place the TINY PORTALS (A).
- Examine the RING OF DESTINY (B).
- Play the mini-game (C).
- Solution: (D-E).
- Play the HOP (F); receive the MAILBOX TOKEN.
- Read the note (G); take the SHATTERED TOKEN. Add the MAILBOX TOKEN; play the mini-game.
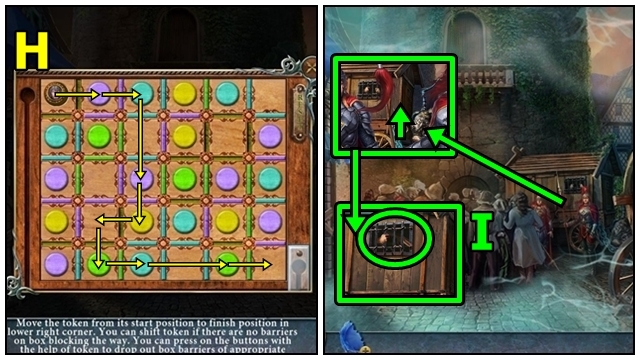
- Solution: (H). Take the MIRROR OF INVISIBILITY.
- Reattach the MIRROR to the MIRROR OF INVISIBILITY (inventory); take the MIRROR OF INVISIBILITY.
- Move forward.
- Talk to the person in the cart (I); receive the POTION TOKEN.
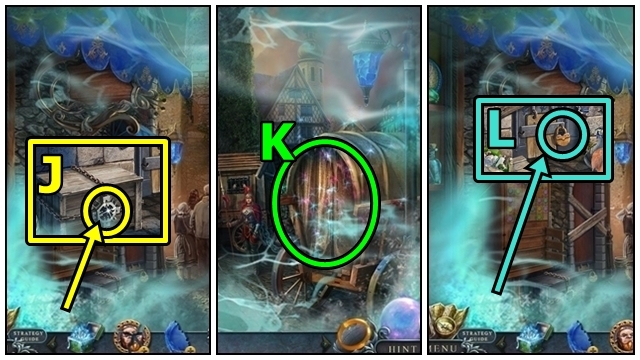
- Insert the POTION TOKEN (J). Move the bottles; take the FROST FLASK and GLUE.
- Reattach the SHATTERED TOKEN (inventory) using the GLUE; take the MAILBOX TOKEN.
- Play the HOP (K); receive the TINY HAMMER.
- Use the FROST FLASK (L) then TINY HAMMER; take the LIGHTNING DAGGER.
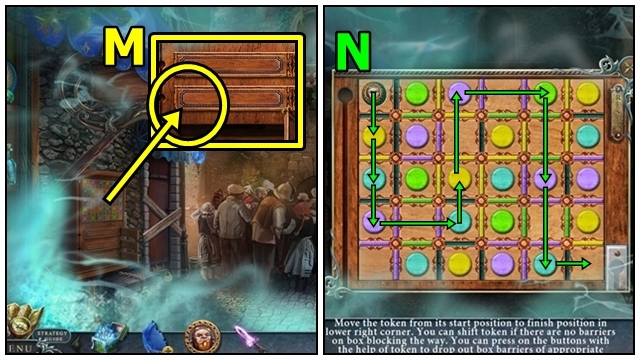
- Add the MAILBOX TOKEN (M); play the mini-game.
- Solution: (N). Take the PLIERS.
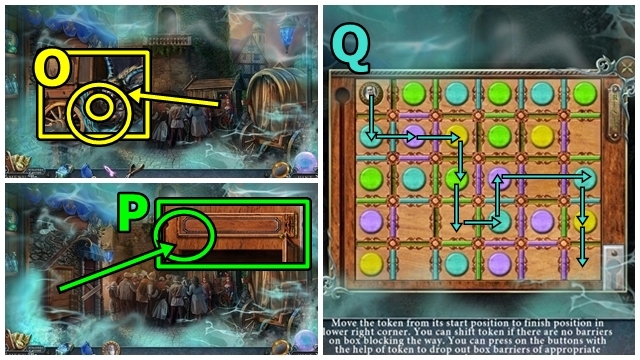
- Use the LIGHTNING DAGGER (O); then the PLIERS. Receive the MAILBOX TOKEN.
- Add the MAILBOX TOKEN (P); play the mini-game.
- Solution: (Q). Take the GOLDEN WINGS.
- Attach the GOLDEN WINGS (R).
- Examine the RING OF DESTINY (S).
- Play the mini-game (T).
- Solution: (U).
- Move up.
- Play the mini-game.
- Solution: (V).
- Congratulations! You've completed Edge of Reality: Ring of Destiny.
Created at: 2016-05-27