

Walkthrough Menu
- General Tips
- Chapter 1: The Crash
- Chapter 2: Hermit's Cabin
- Chapter 3: Village
- Chapter 4: Monastery
- Chapter 5: Camp
- Chapter 6: The Portal
General Tips
- This is the official guide for Enigmatis: The Shadow of Karkhala.
- This guide does not mention each time you have to zoom into a location; the screenshots show each zoom scene.
- Hidden-object puzzles are referred to as HOPs. This guide does not show screenshots of the HOPs, however, it is mentioned when a HOP is available and the inventory item collected.
- Use the Map to travel quickly to a location.
Chapter 1: The Crash
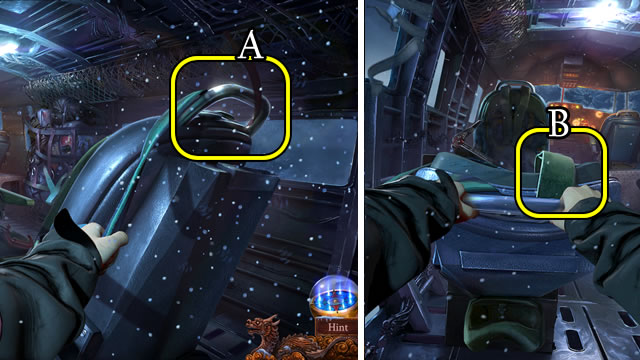
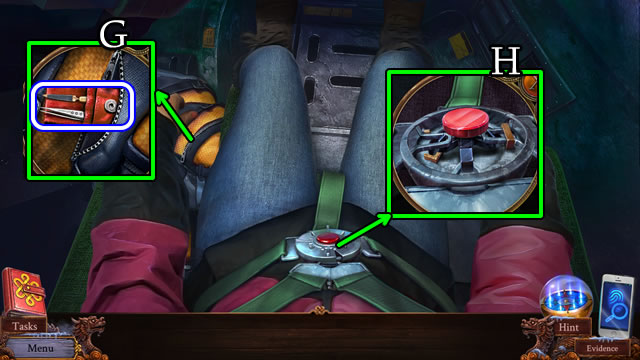
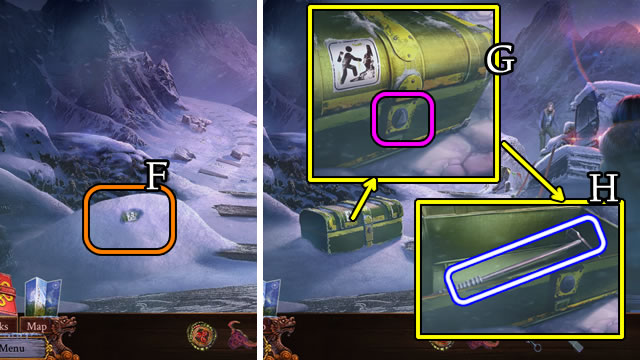
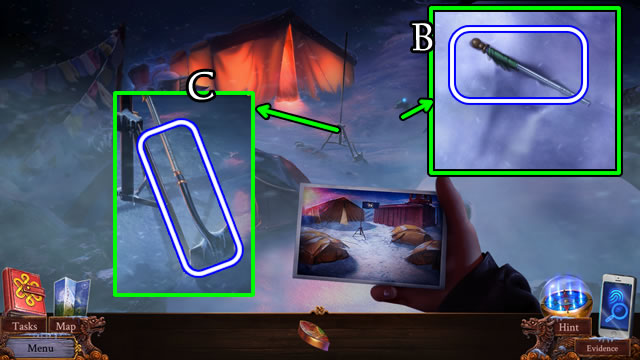
- Grab the bar (A).
- Grab the strap (B).
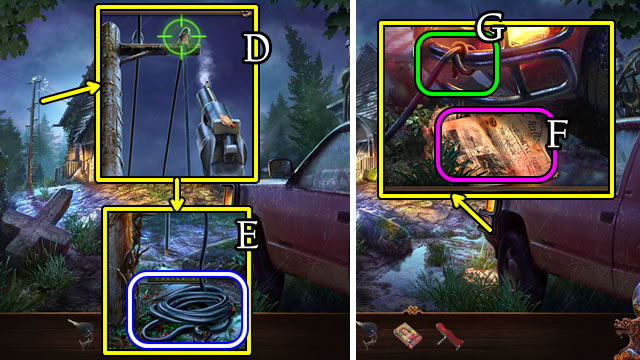
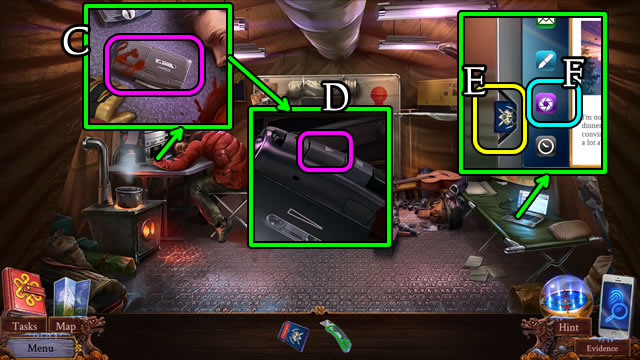
- Take the ice axe (C) and hook the strap (D).
- Grab the strap (E).
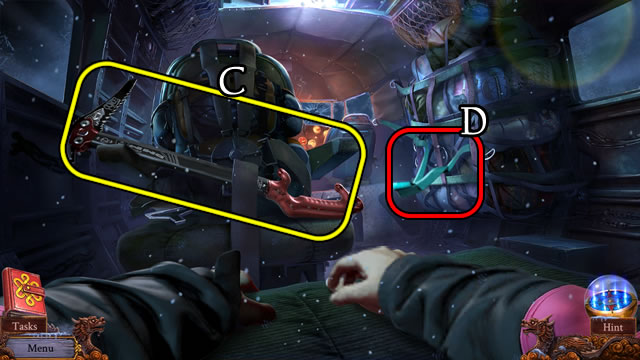
- Take and use the ski pole (F) to break the window (G).
- Select the obstruction (H).
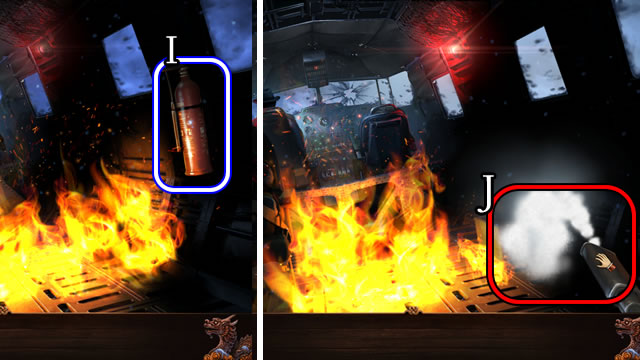
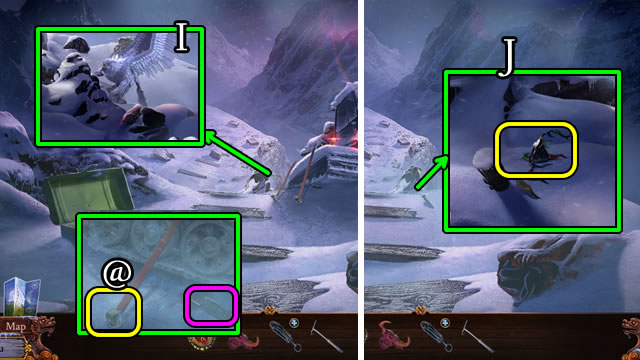
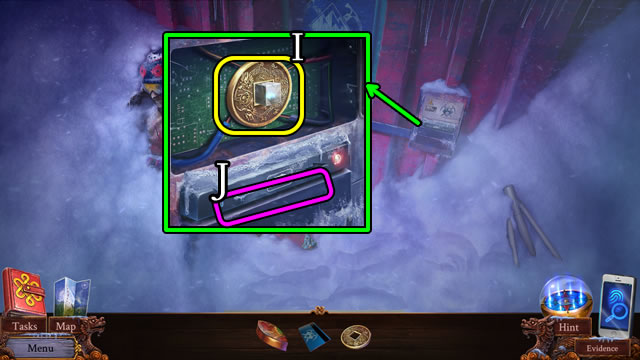
- Take the EXTINGUISHER (I).
- Use the EXTINGUISHER back and forth on the flames (J).
- Walk forward.
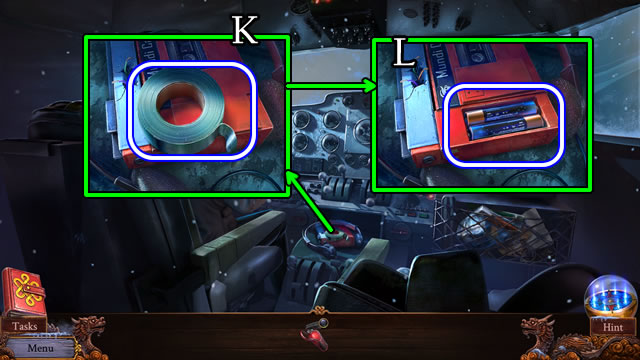
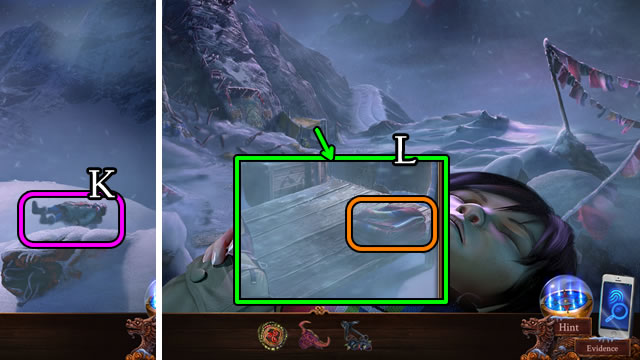
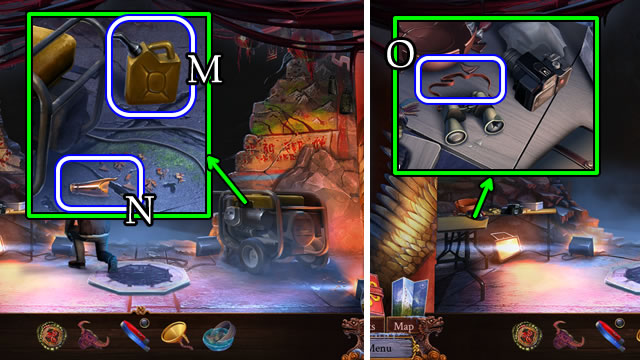
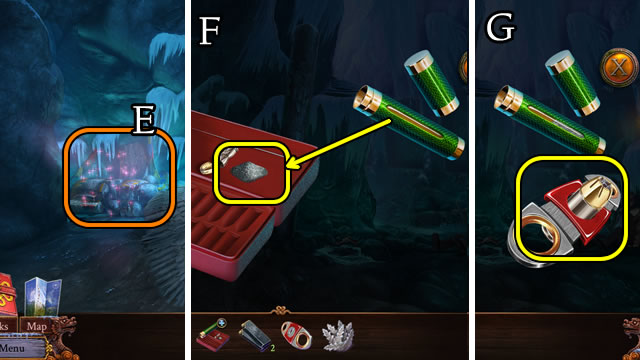
- Take the DUCT TAPE (K).
- Open and remove the BATTERIES (L).
- Take the KNIFE (M) and the bagged FLASHLIGHT (N).
- Combine the FLASHLIGHT and BATTERIES (Inventory) and turn on for a FLASHLIGHT.
- Combine the EMPTY EXTINGUISHER and KNIFE (Inventory). Take the RUBBER PIPE.
- Walk down.
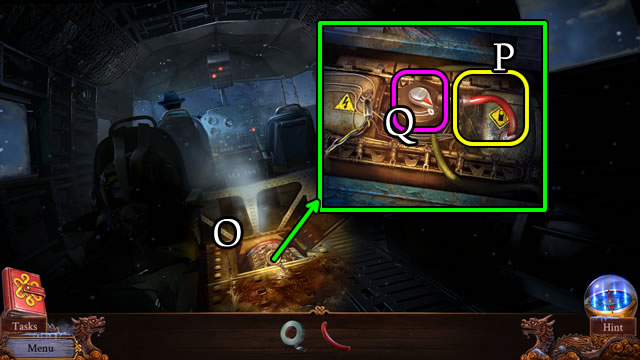
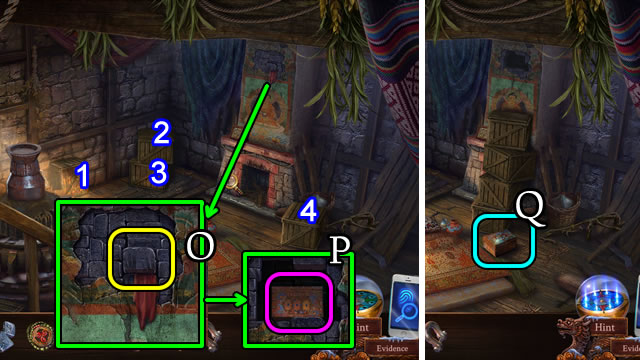
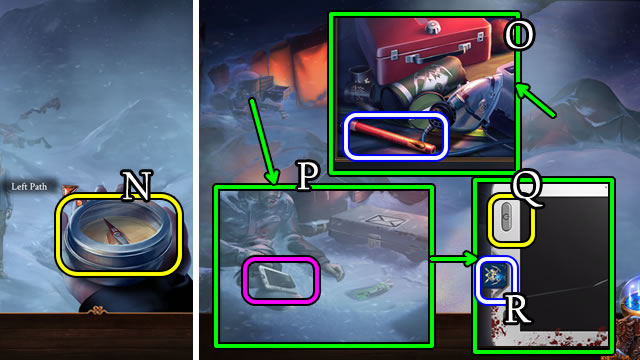
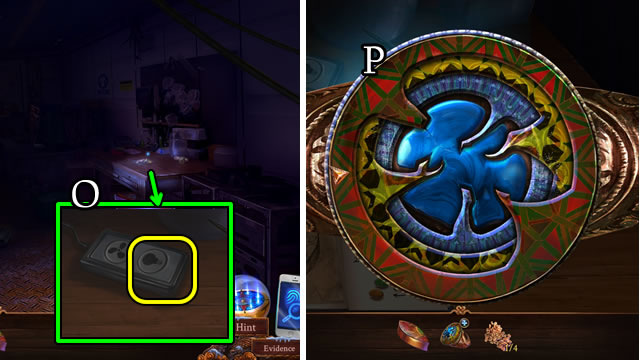
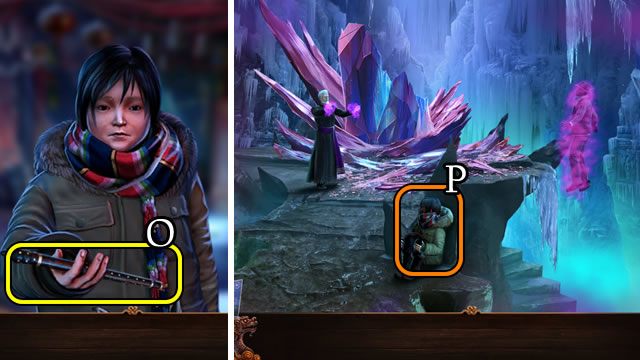
- Use the FLASHLIGHT (O).
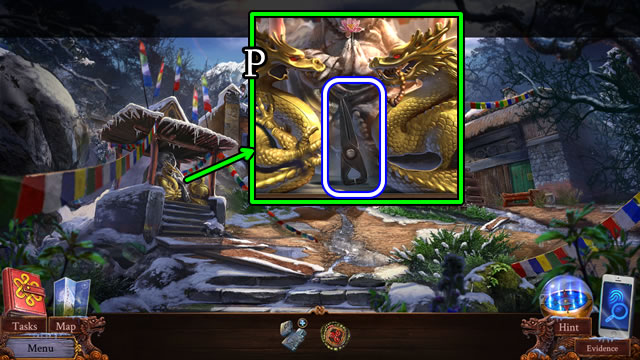
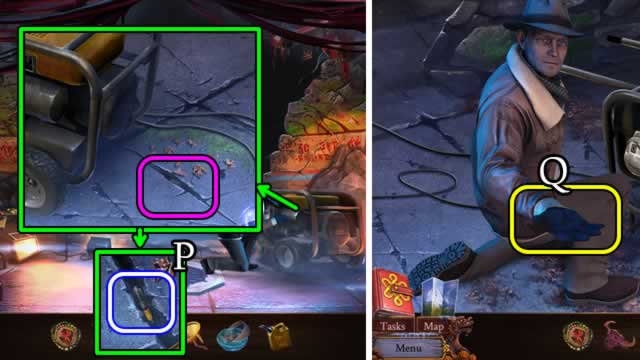
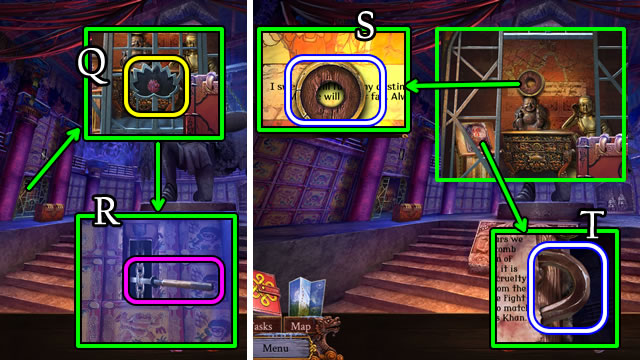
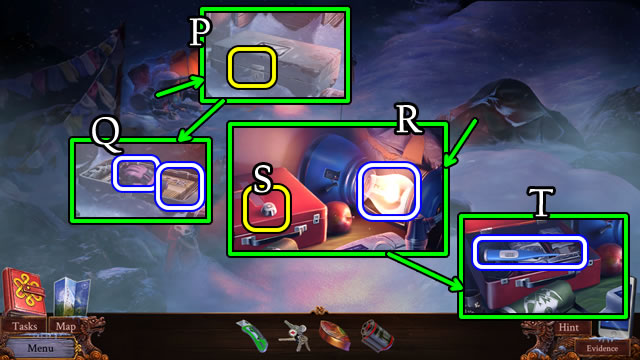
- Place the RUBBER PIPE and DUCT TAPE (P). Turn the switch (Q).
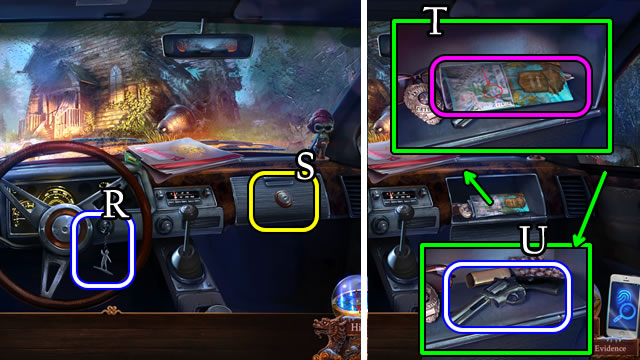
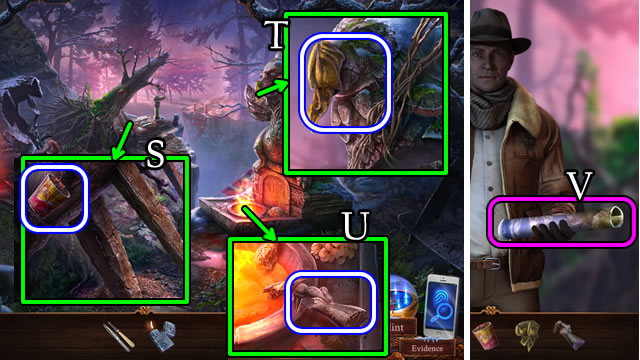
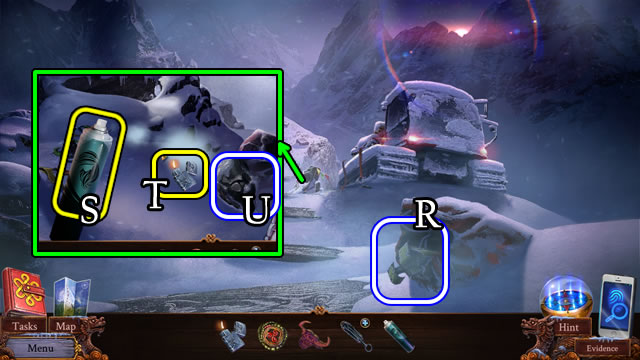
- Take the CAR KEYS (R).
- Use the CAR KEYS (S).
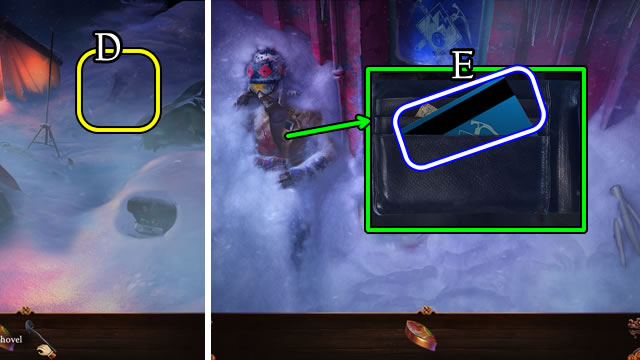
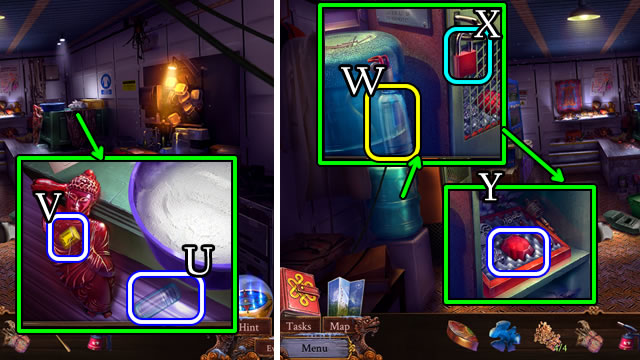
- Take the Map (T). Take the GUN (U).
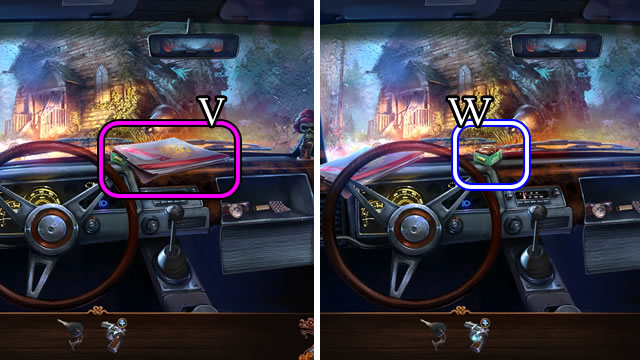
- Open and read the case file (V).
- Take the AMMO (W).
- Combine the GUN and AMMO for a LOADED GUN (Inventory).
- Walk left.
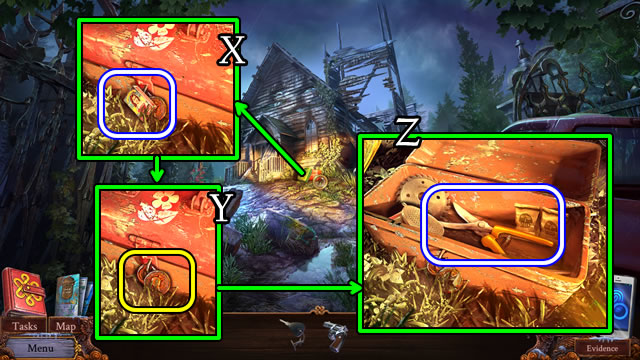
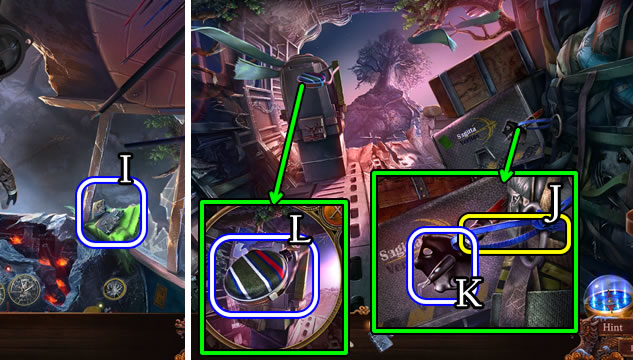
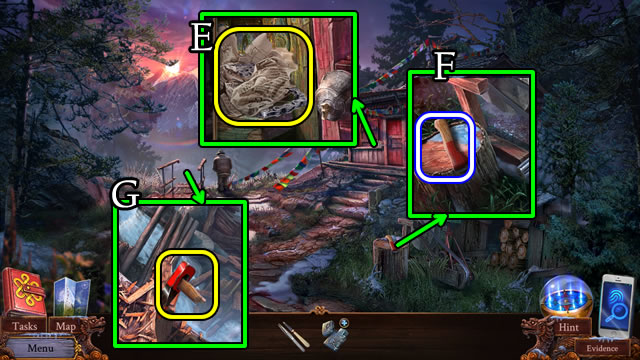
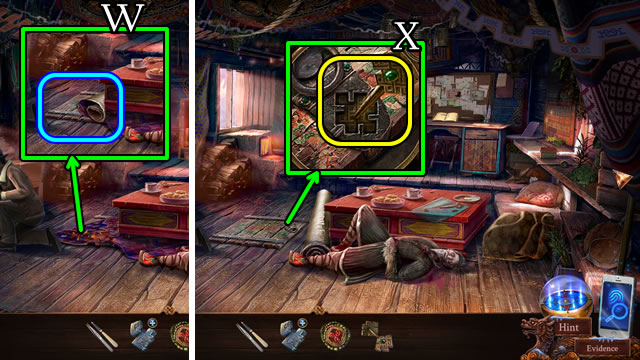
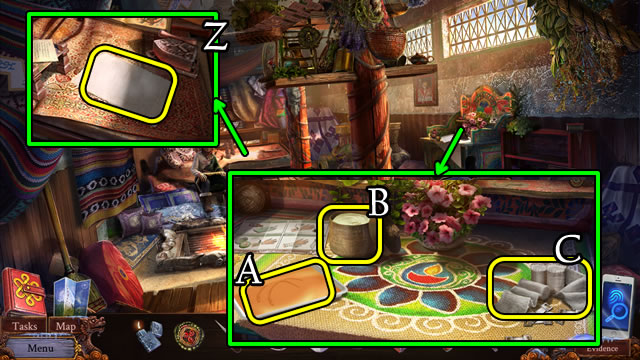
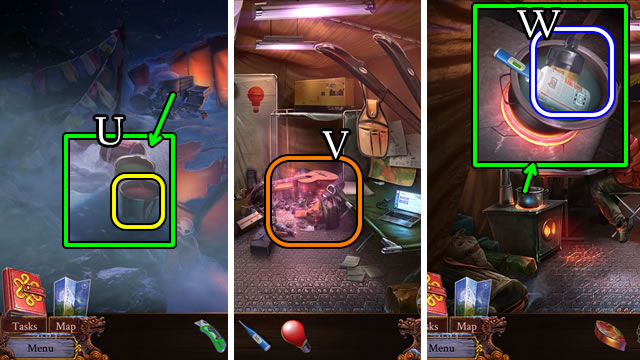
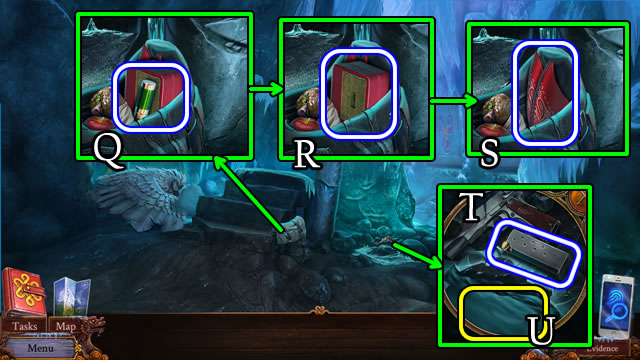
- Move the gas can; take the MATCHES (X).
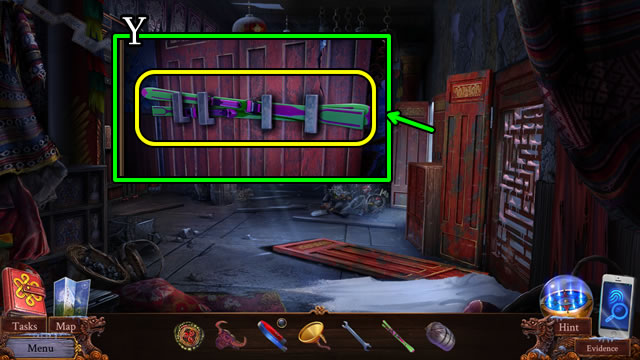
- Use the LOADED GUN (Y).
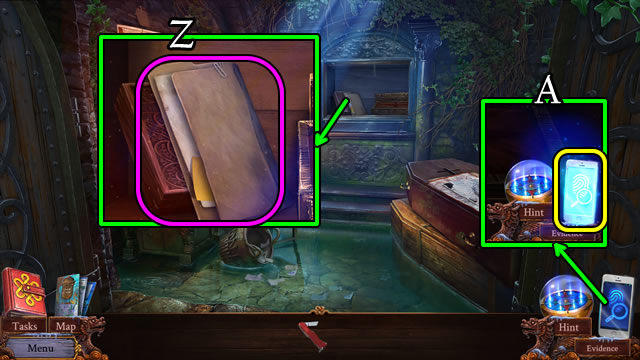
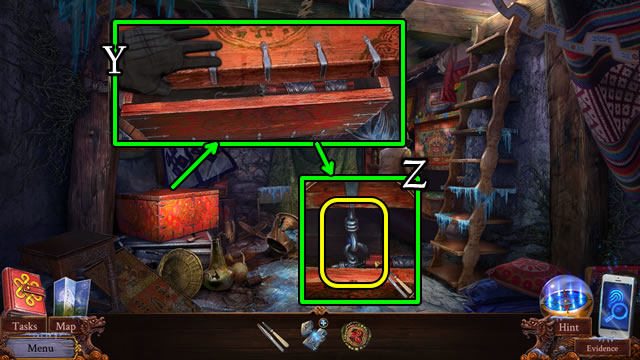
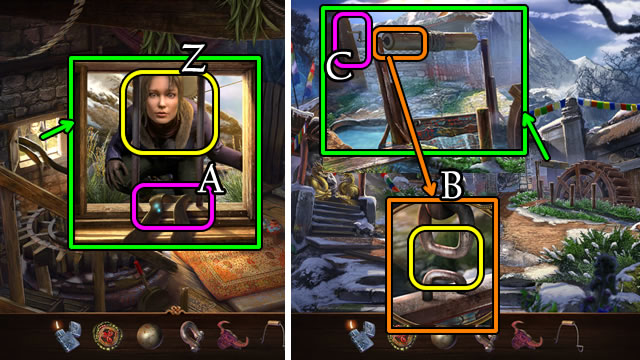
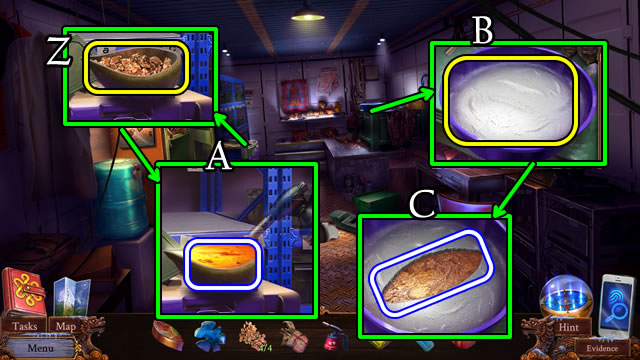
- Open, uncover and take the SHEARS (Z).
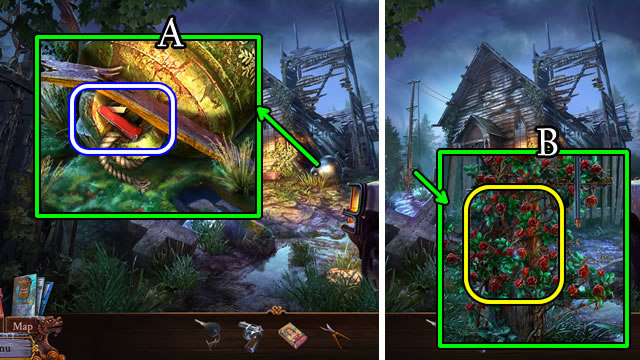
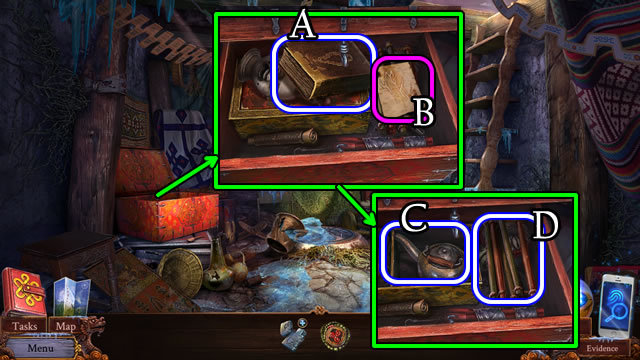
- Take the POCKET KNIFE (A).
- Select the POCKET KNIFE 3x (Inventory) for a POCKET KNIFE.
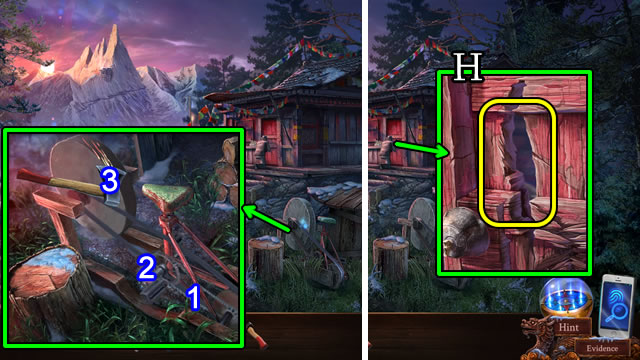
- Use the SHEARS (B).
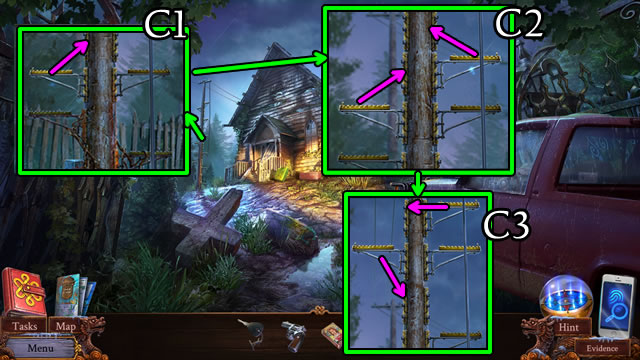
- Solution. C1-C3.
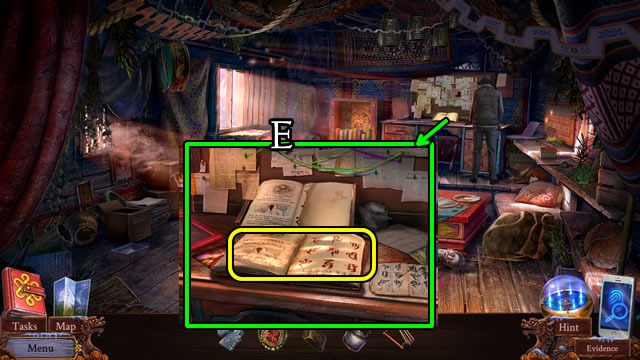
- Use the LOADED GUN (D).
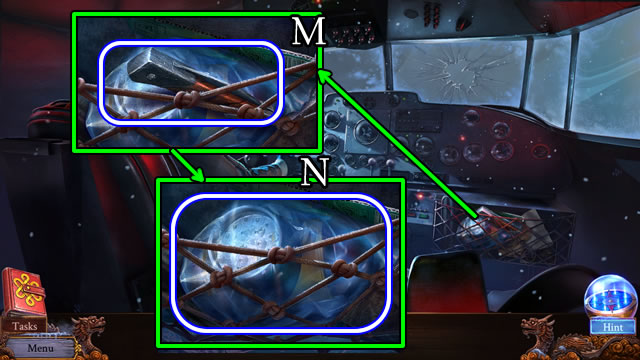
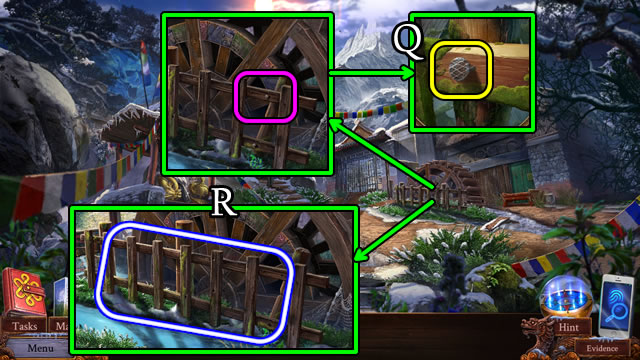
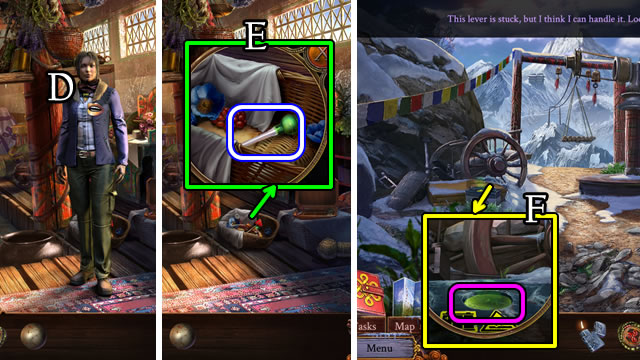
- Take the CABLE (E).
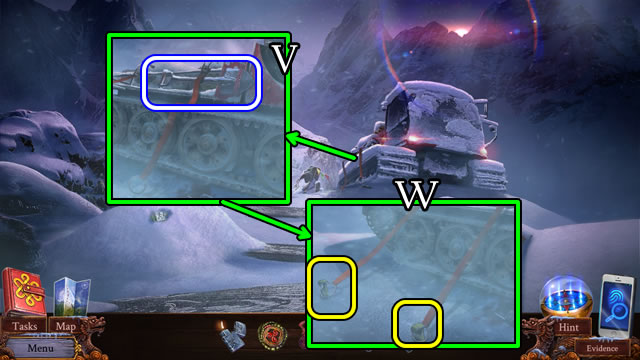
- Read the newspaper (F). Place the CABLE (G).
- Select the CABLE (H).
- Walk right.
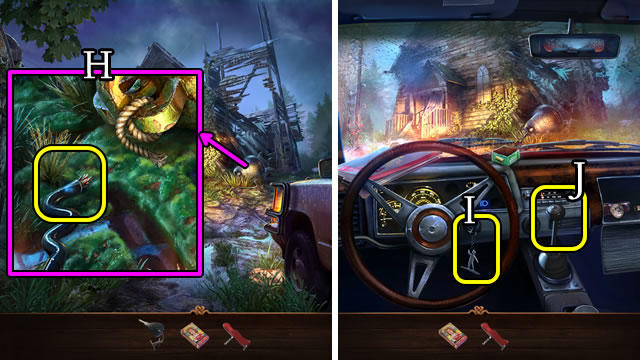
- Place and select the CAR KEYS (I); select the gearshift (J).
- Walk left.
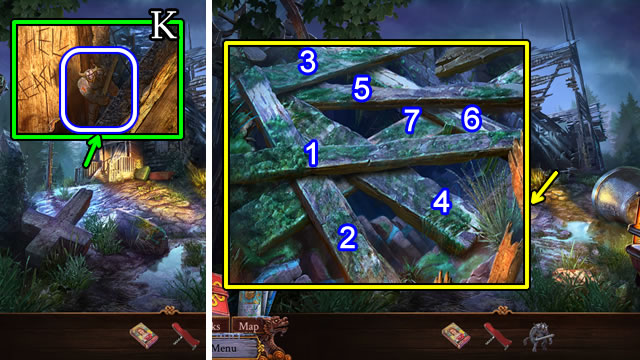
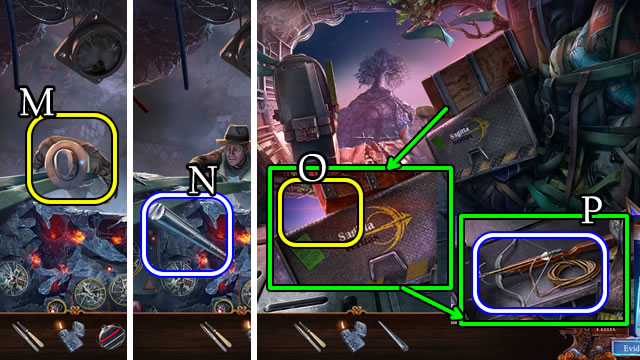
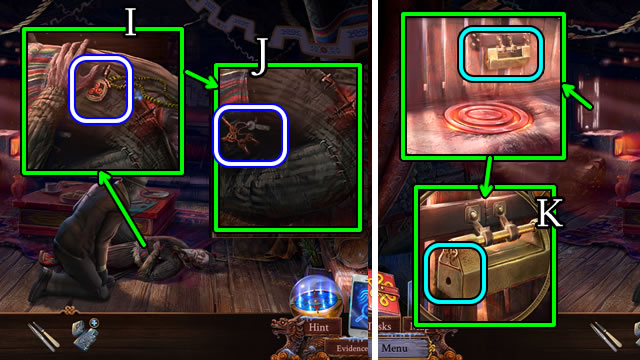
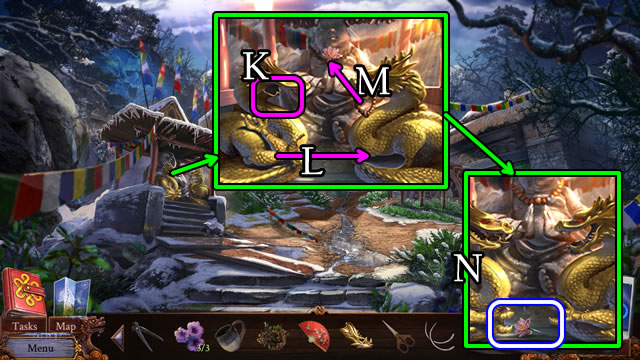
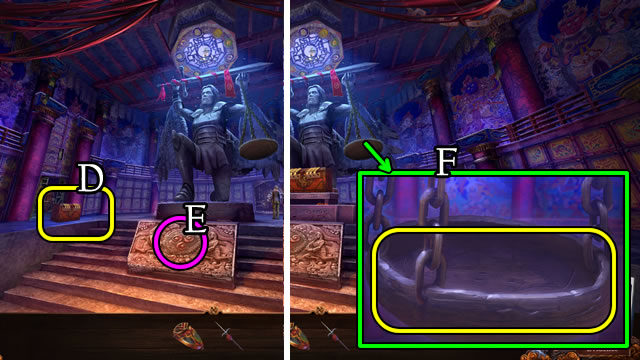
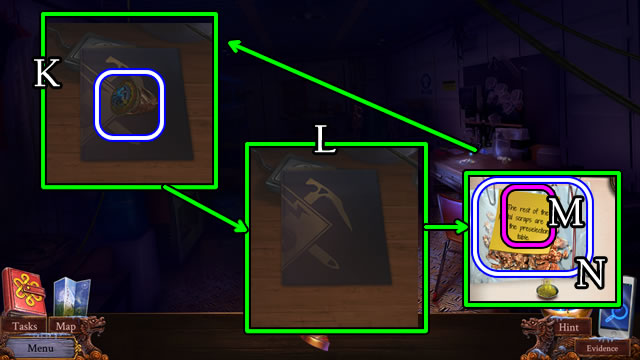
- Take the ASMODAI TOKEN (K).
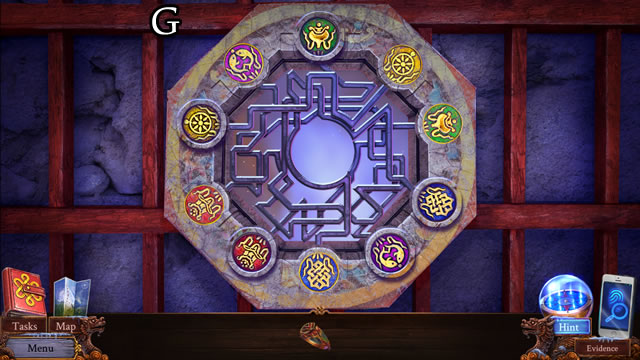
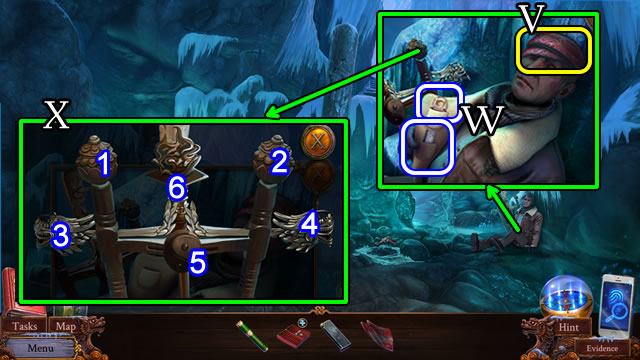
- Remove the boards (1-7).
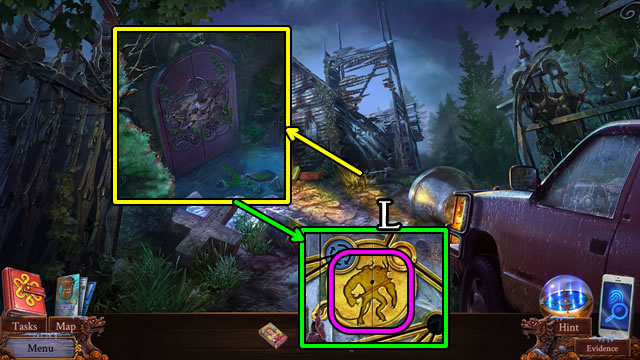
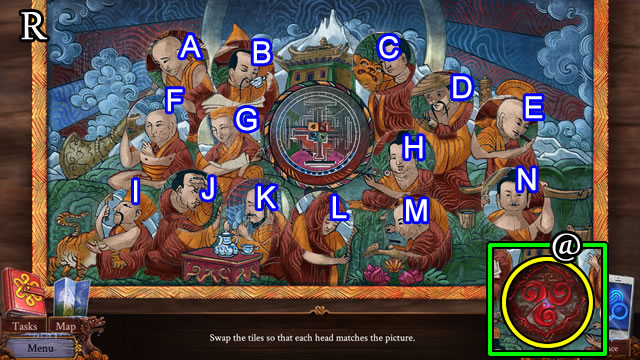
- Place and select the ASMODAI TOKEN 2x (L) for a puzzle.
- Solution (M).
- Walk left.
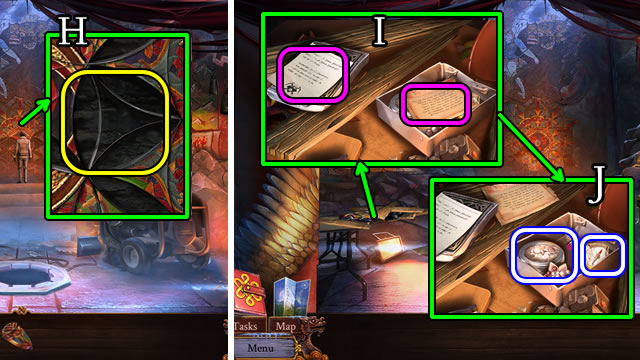
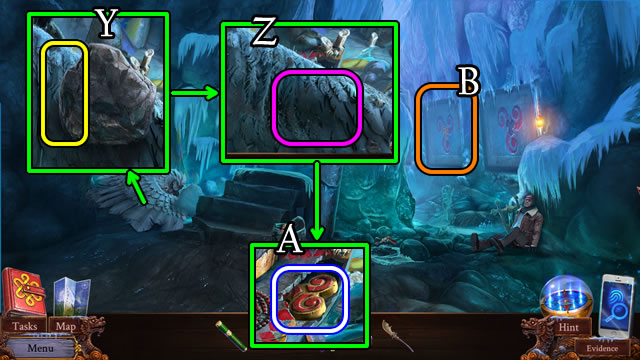
- Use the MATCHES (N). Use the POCKET KNIFE (O).
- Take and select the paper 2x (P).
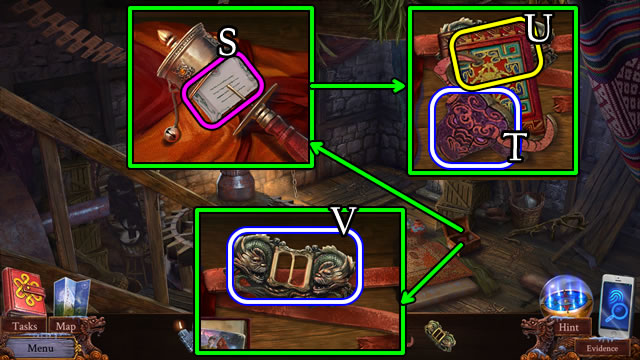
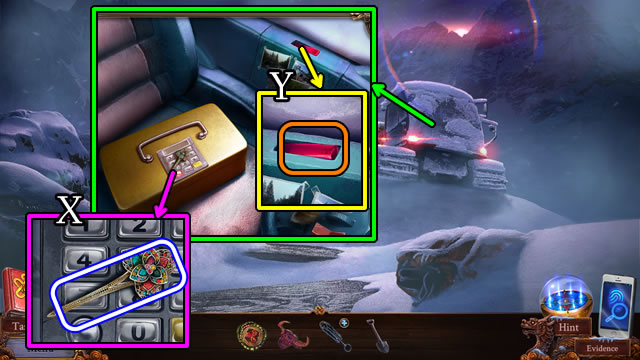
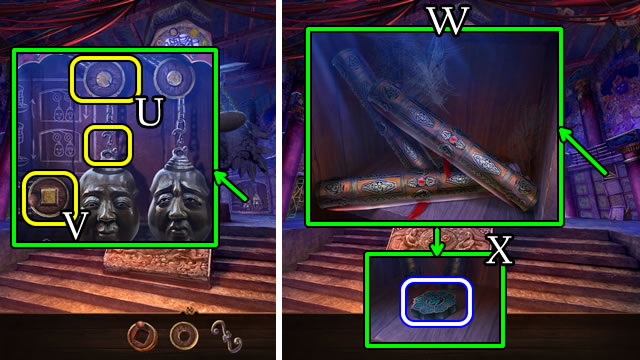
- Take the MOSAIC RING (Q).
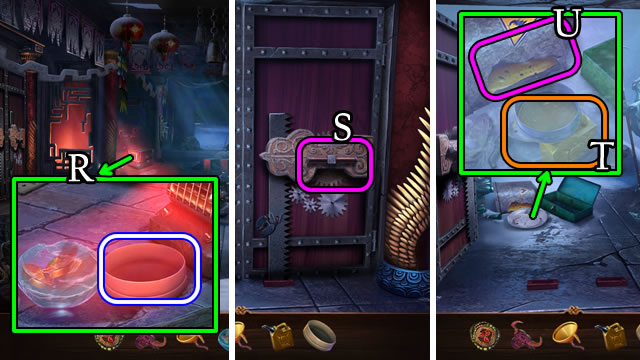
- Take the SEALING WAX (R), then place for STICKY WAX (S).
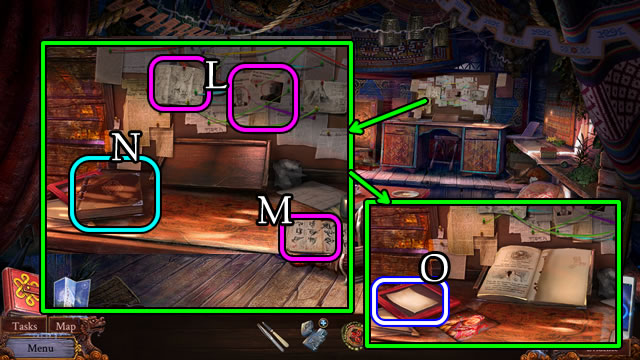
- Examine the bulletin board for evidence and take the paper (T).
- Take the CRACKED RING (U).
- Take the MOSAIC RING (V).
- Combine the CRACKED RING segments (Inventory); use the STICKY WAX for a MOSAIC RING.
- Place and arrange the 3 MOSAIC RINGS (W) to take the MOSAIC PIECE (X).
- Place the MOSAIC PIECE for a HOP (Y).
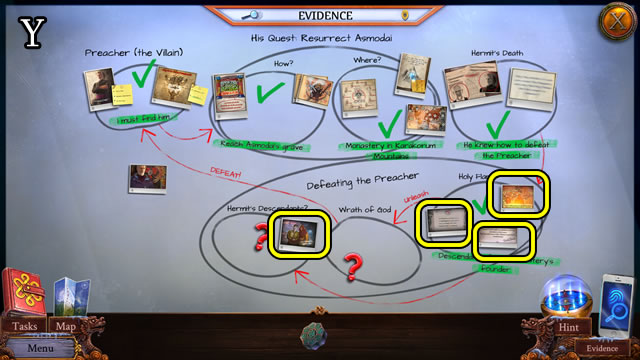
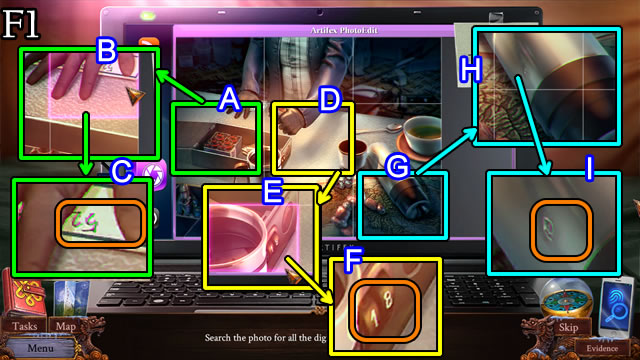
- Select the folder (Z) and assemble the Evidence (A).
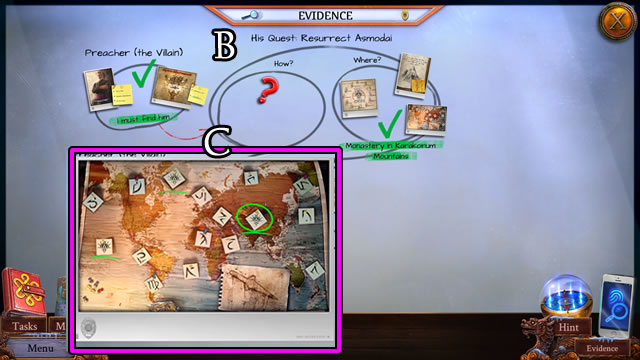
- Place the images (B).
- Solution (C).
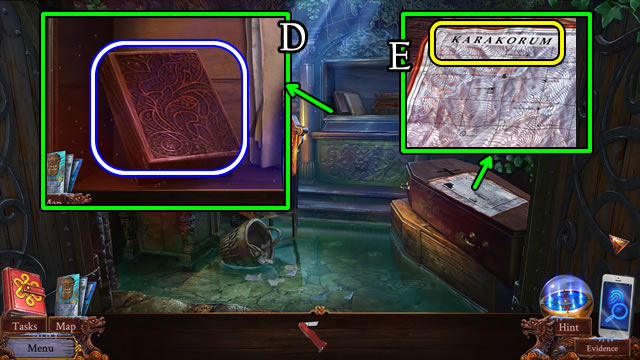
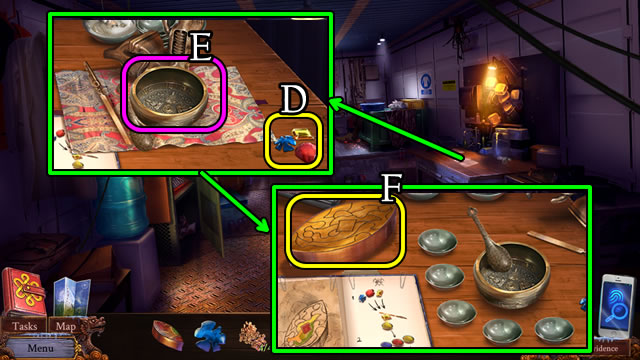
- Take the CALIPERS CASE (D).
- Open the CALIPERS CASE (Inventory). Select the pencil 2x and combine with the POCKET KNIFE. Replace the pencil for CALIPERS.
- Uncover the Karakorum map (E); place the CALIPERS.
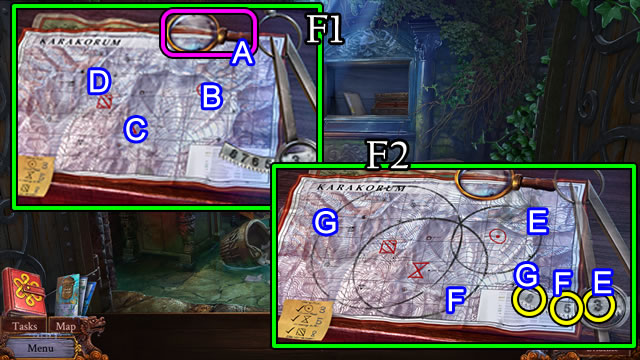
- Solution (F1). A-D.
- Solution (F2). G-F.
- Unzip, then take the NAIL FILE SET (G).
- Select the button. Use the NAIL FILE SET. Select the button (H).
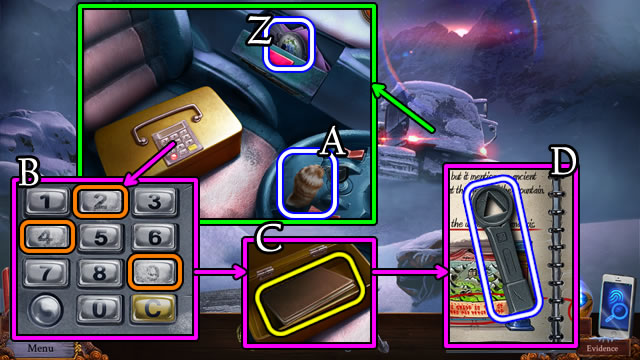
- Take the LIGHTER (I).
- Turn.
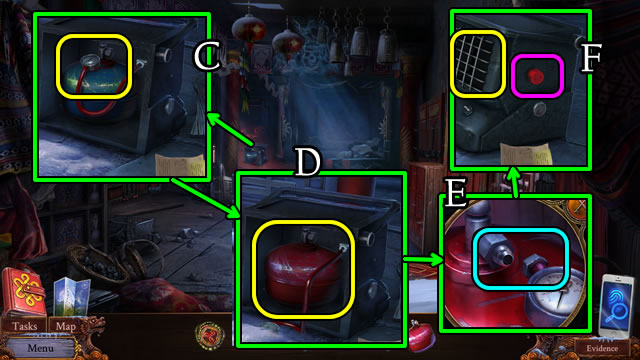
- Use the LIGHTER (J). Take the SKI STICK (K).
- Use the SKI STICK to take the CANTEEN (L).
- Unscrew the CANTEEN top (Inventory) for WATER.
- Turn.
- Place the WATER (M).
- Take the STEEL ROD (N).
- Turn.
- Use the STEEL ROD (O).
- Open, then select the bow 3x for a CROSSBOW (P).
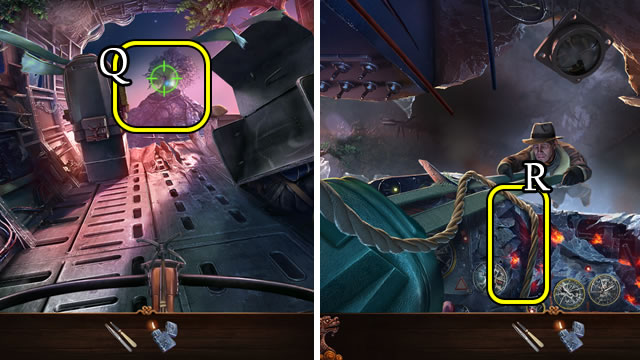
- Use the CROSSBOW (Q).
- Turn.
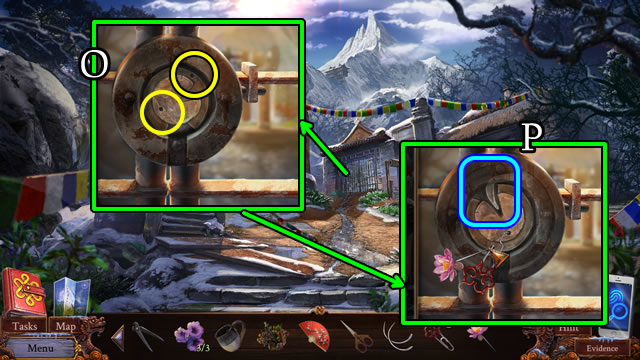
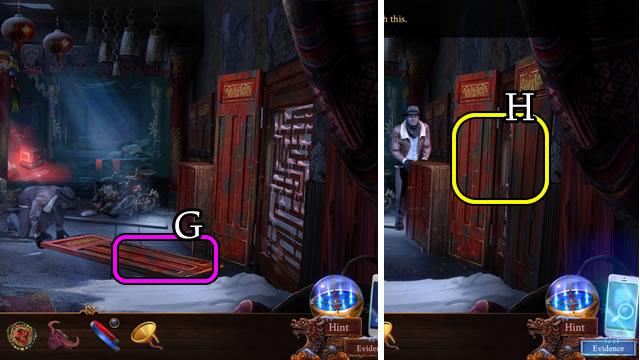
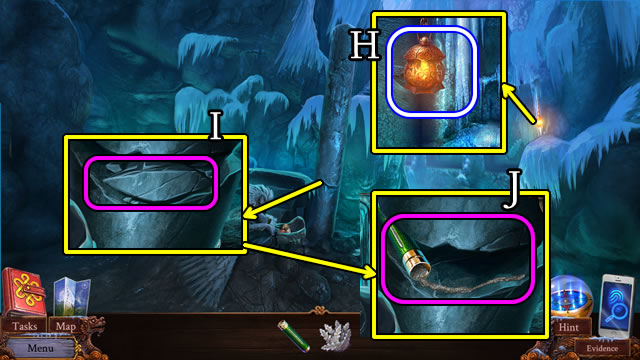
- Select the rope (R).
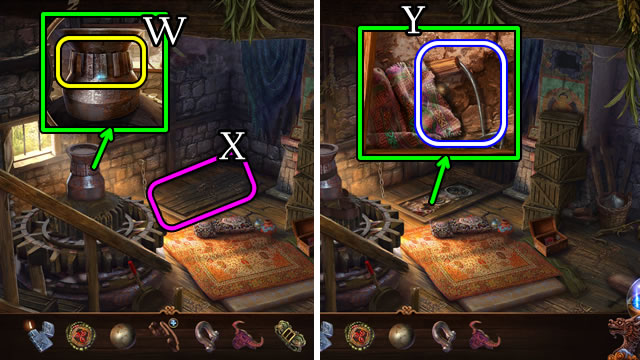
- Take the EMPTY CAN (S).
- Take the WET BURGEE (T).
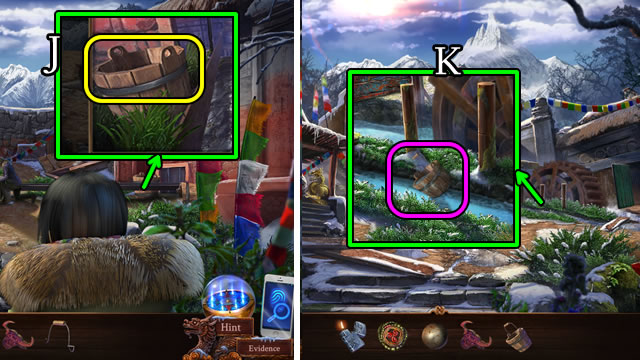
- Take the STONE CLAW (U).
- Take the Map (V).
- Use the WET BURGEE (W).
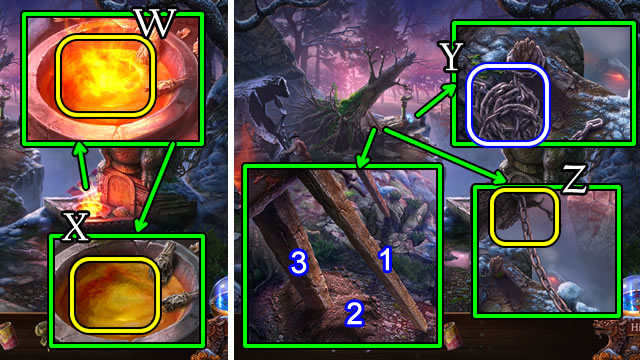
- Place the EMPTY CAN for OIL (X).
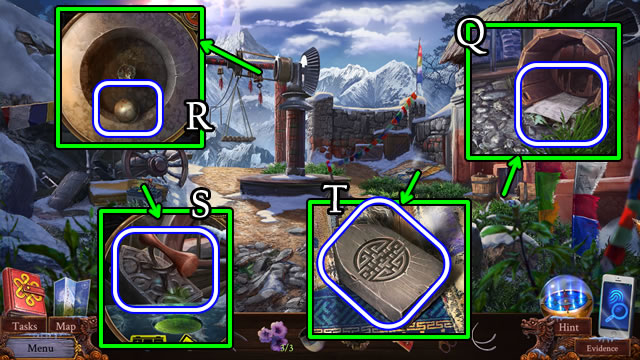
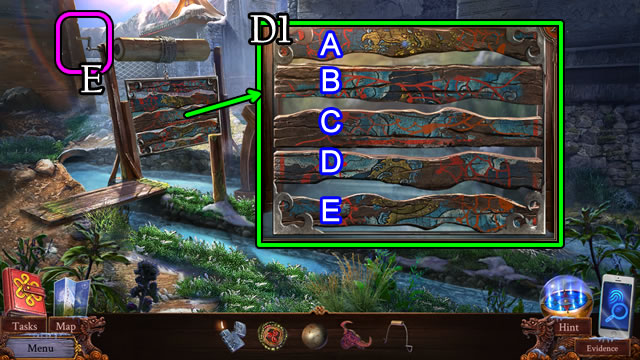
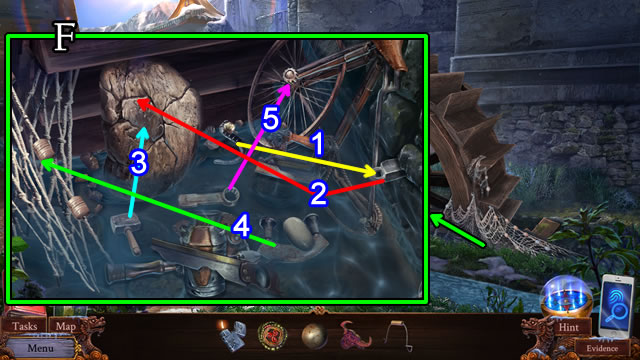
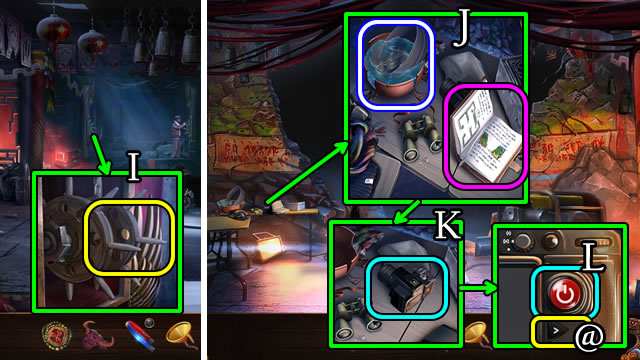
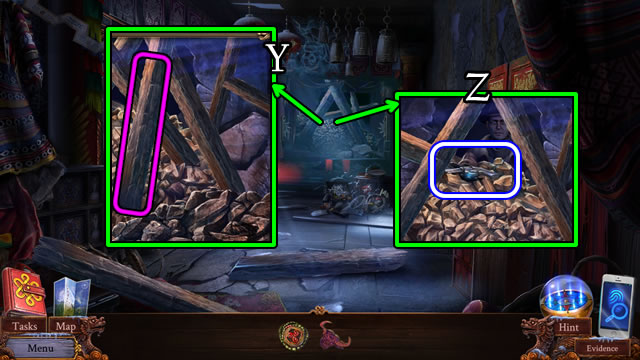
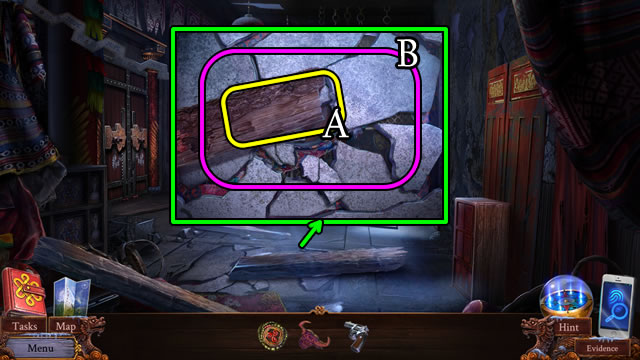
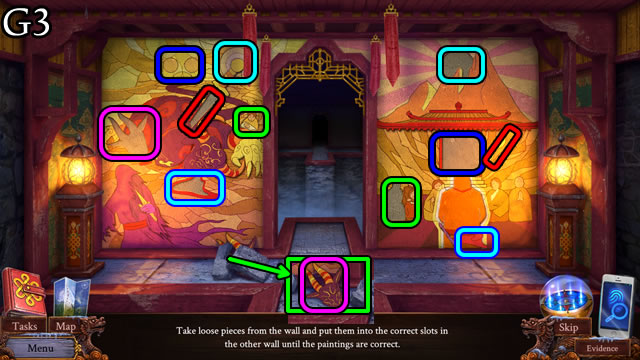
- Remove the board (1). Use the STONE CLAW (2). Remove the board (3).
- Select and take the CHAIN (Y).
- Place the CHAIN (Z).
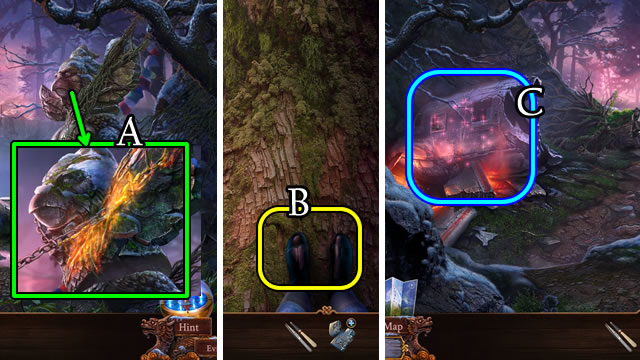
- Select and attach the chain; use the OIL; use the LIGHTER (A).
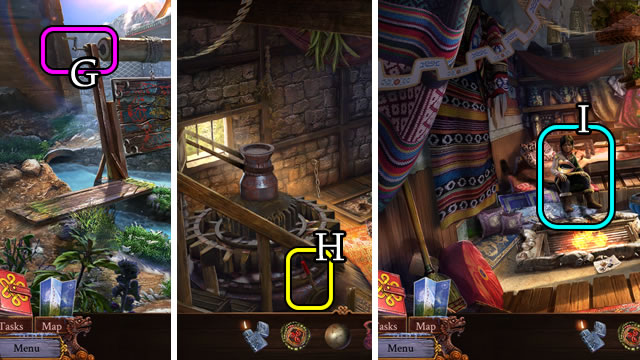
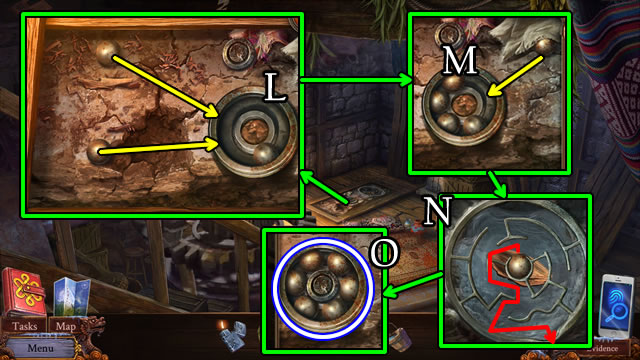
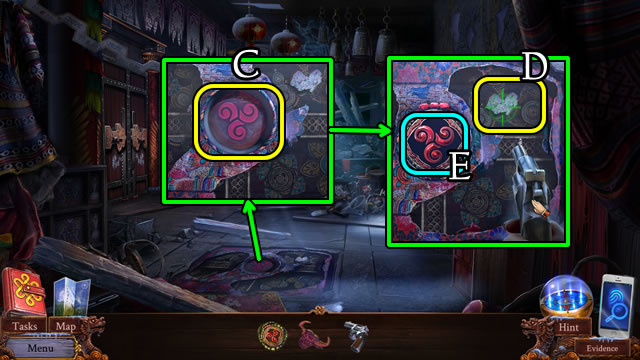
- Attempt to walk on the tree to trigger a HOP (B).
- Play the HOP for a TENT POLE (C).
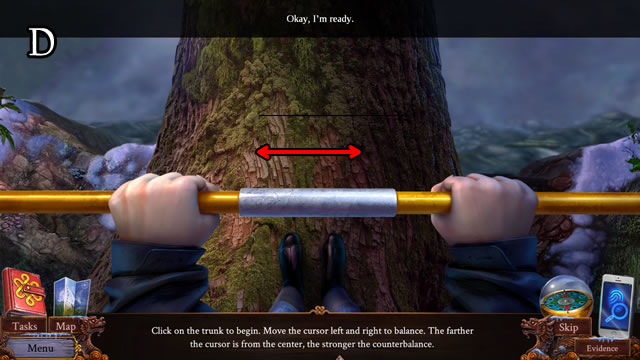
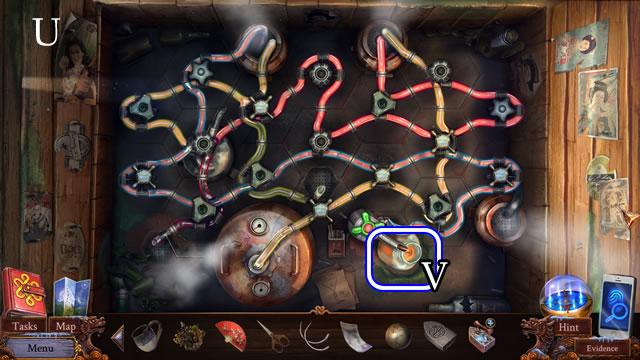
- Place the TENT POLE for a puzzle (D).
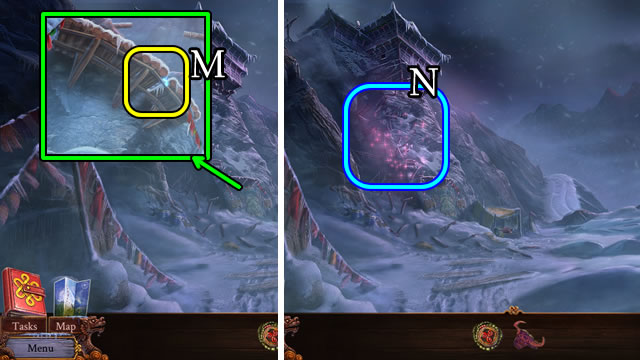
- Solutions vary.
Chapter 2: Hermit's Cabin
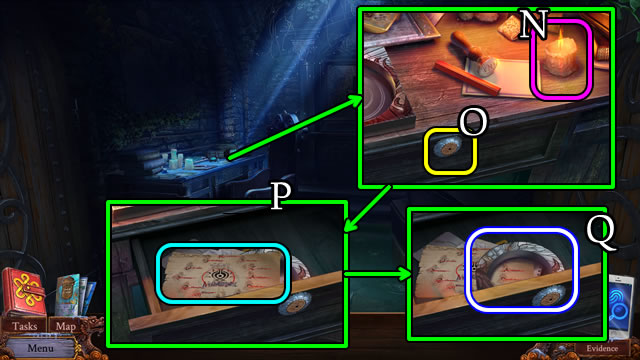
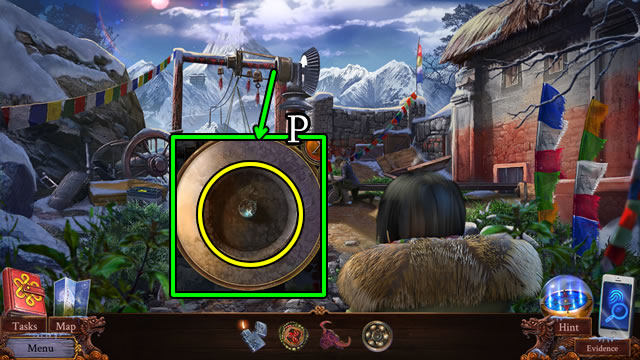
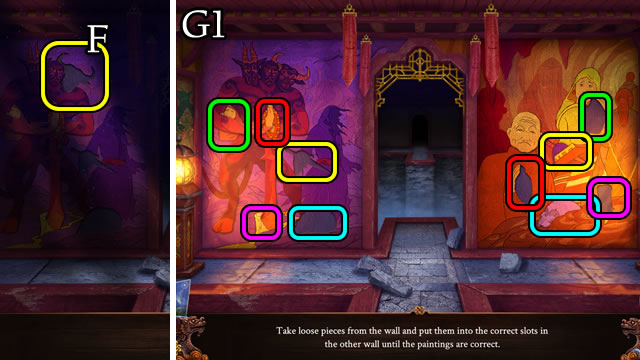
- Select the paper and take the CHAIN (E).
- Take the HATCHET HANDLE (F).
- Replace the HATCHET HANDLE to take a BLUNT HATCHET (G).
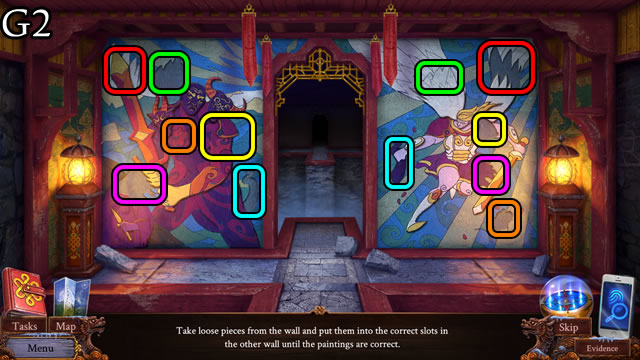
- Place the CHAIN (1), select the peddle (2). Place the BLUNT HATCHET for a HATCHET (3).
- Use the HATCHET 3x (H).
- Walk forward.
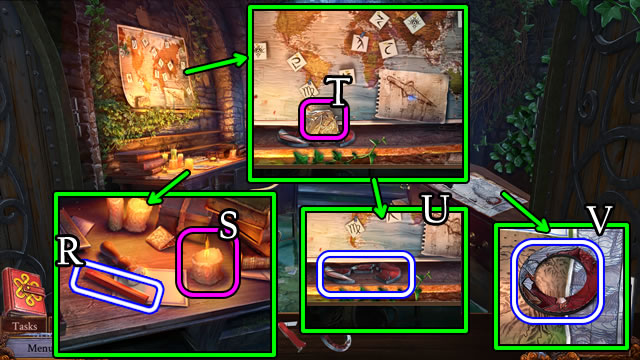
- Move the hand, take the ETERNITY CHARM (I) and BUNCH OF KEYS (J).
- Use the BUNCH OF KEYS (K).
- Look for evidence (L-M). Take the book (N).
- Remove the photo. Take the SECRET NOTE (O).
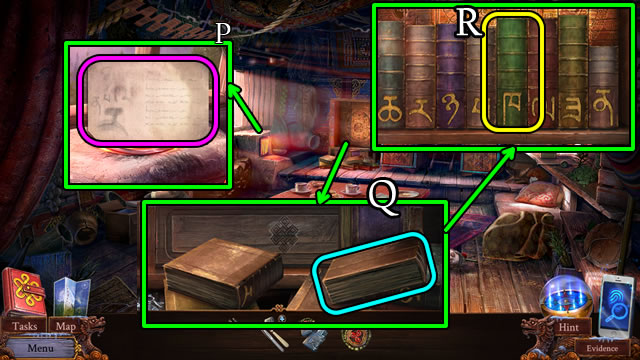
- Place, then take the SECRET NOTE (P).
- Move the book (Q).
- Select a book (R).
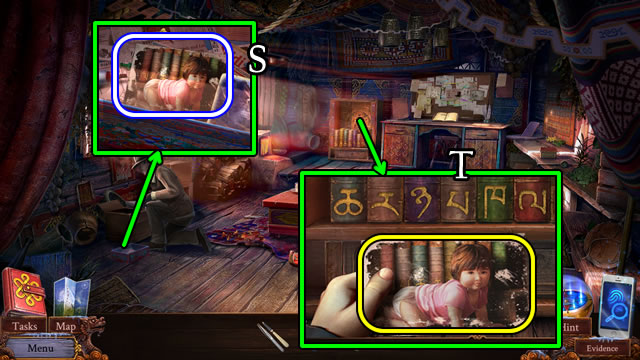
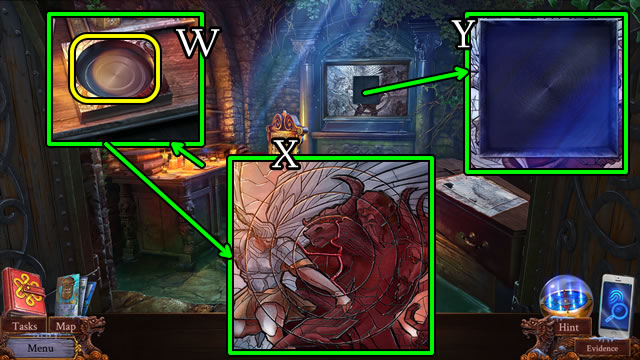
- Move the photos, take the BOOKCASE PHOTO (S).
- Place the BOOKCASE PHOTO (T).
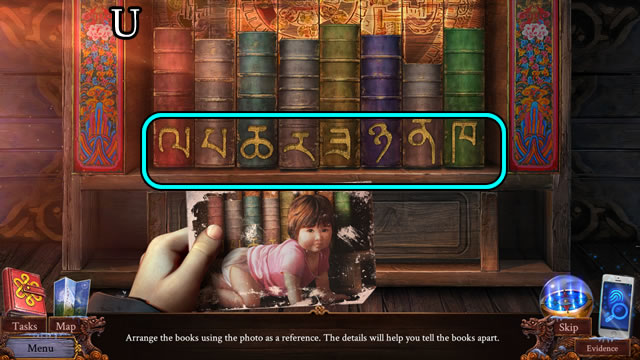
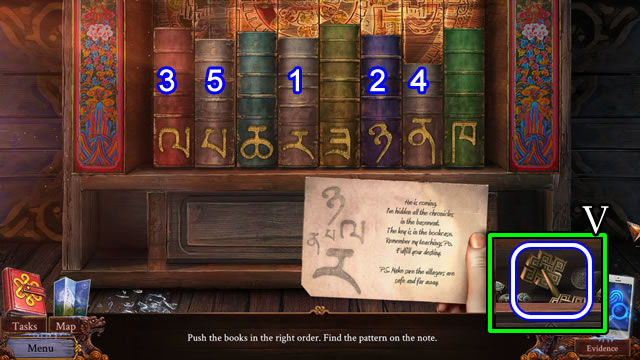
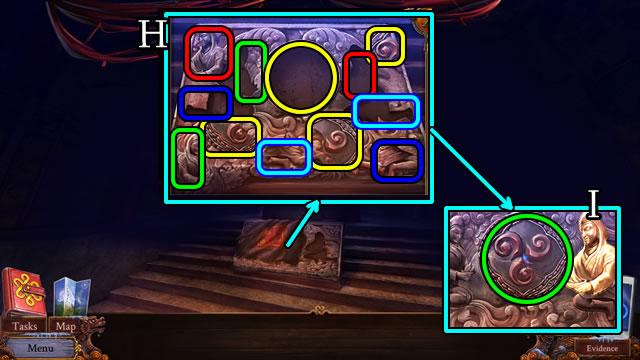
- Solution. Part 1 (U).
- Solution. Part 2 (1-5).
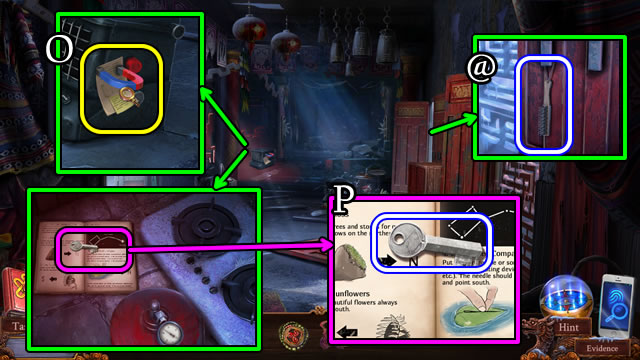
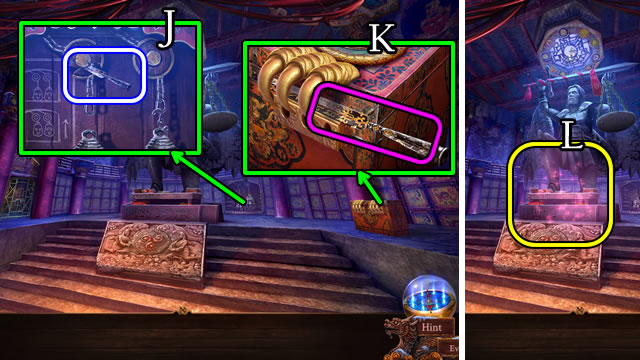
- Take the TRAPDOOR KEY (V).
- Uncover the trapdoor (W).
- Move the table. Place and select the TRAPDOOR KEY (X).
- Enter the Basement.
- Partially open the box (Y).
- Use the NAIL FILE SET and lift the lid (Z).
- Take the CHRONICLE ORIGINAL (A) and drawing (B).
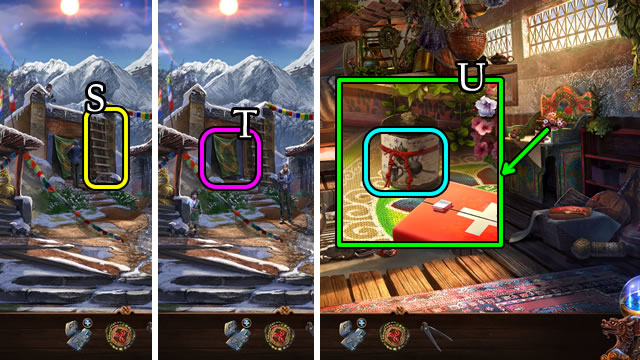
- Uncover and take the KETTLE (C) and ROPE LADDER (D).
- Climb the steps.
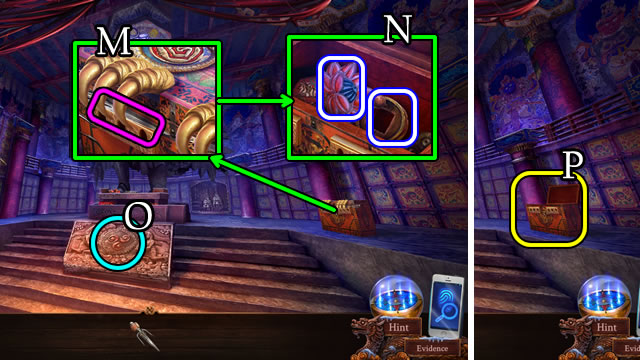
- Place and select the CHRONICLE ORIGINAL (E).

- Solution (E1).
- Take the translation.
- Assemble the Evidence (F).
- Walk down.
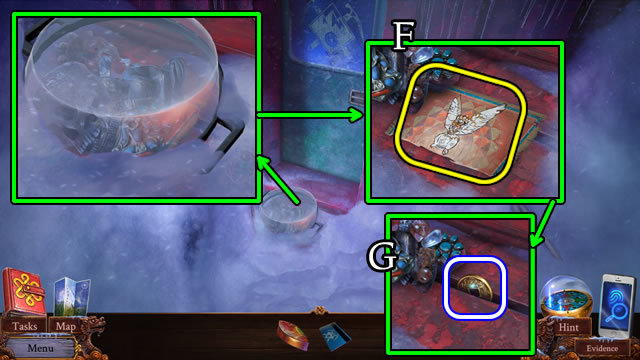
- Place the ROPE LADDER (G).
- Place the KETTLE for COLD WATER (H).
- Return to the Cabin.
- Place the COLD WATER; take HOT WATER (I).
- Play the HOP for a GRATE TOKEN (J).
- Place the HOT WATER (K). Take the ROPE (L).
- Use the GRATE TOKEN (M).
- Place, then climb down the ROPE (N).
Chapter 3: Village
- Solution (O). L-Rx2-L-R.
- Walk forward. Speak to the woman.
- Take the PINCERS (P).
- Use the PINCERS (Q).
- Take the WOODEN FENCE (R).
- Place, then climb the WOODEN FENCE (S).
- Move the drape (T); enter the Hut.
- View the recipe (U).
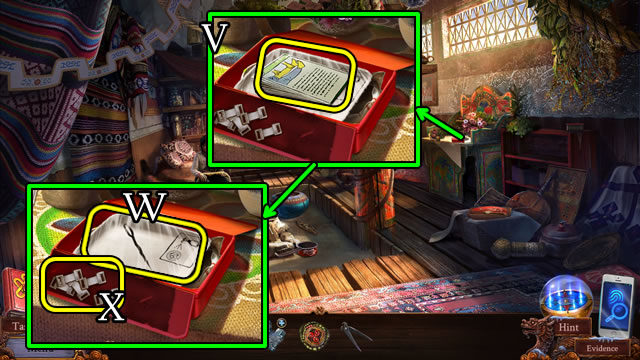
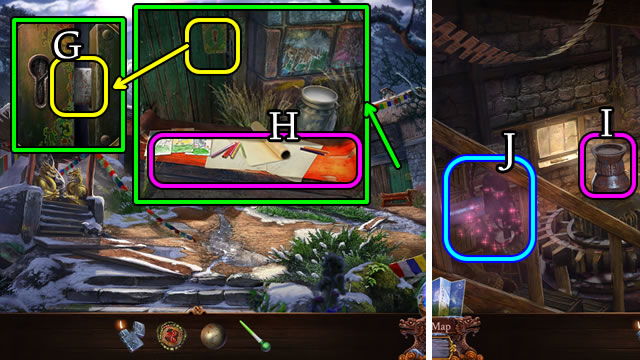
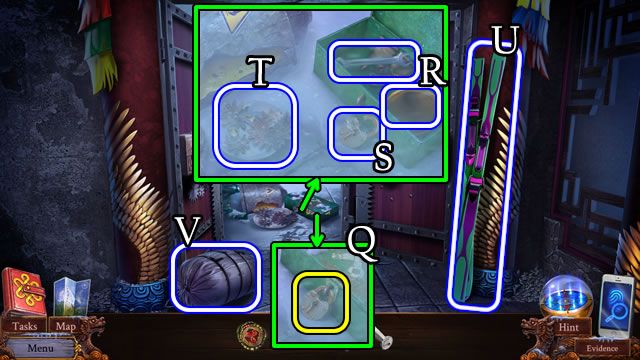
- Open the box. Take the directions (V), tray (W) and clips (X).
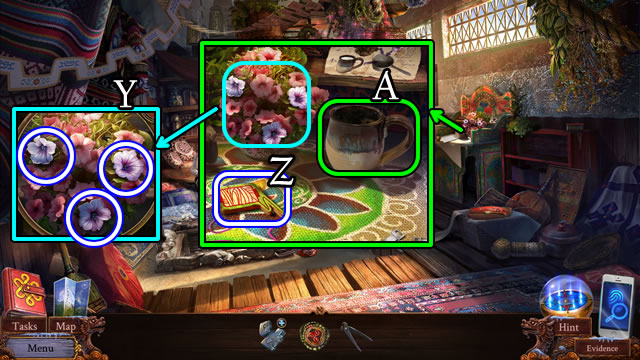
- Take the PETALS (3/3) (Y).
- Take the WOODEN SEWING TOKEN (Z) and MUG (A).
- Play the HOP to receive HERBS (B).
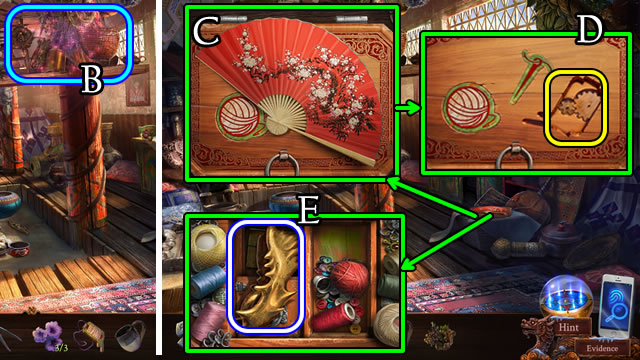
- Take the FAN (C).
- Place and select the WOODEN SEWING TOKEN (D).
- Take the DRAGON JAW (E).

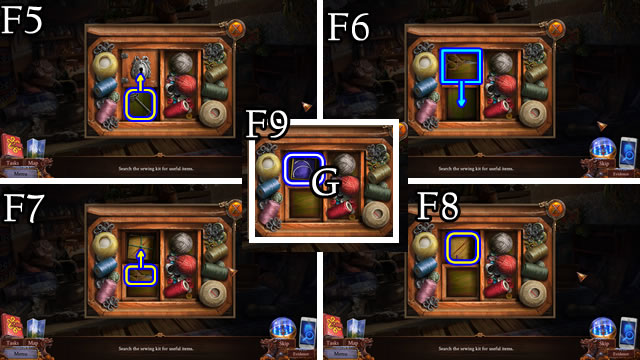
- Solution (F1-F4).
- Solution (F5-F9).
- Receive SCISSORS. Take the NEEDLES (G).
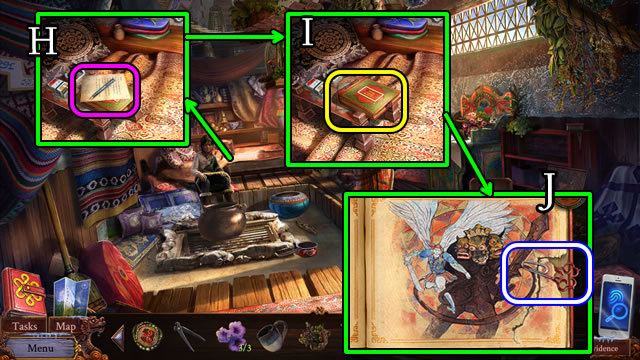
- Take the note (H).
- Open the album (I) and select 2x. Take the PAPER CLIP (J).
- Walk down.
- Place the DRAGON JAW (K). Place the leg (L); place the necklace (M); take the PIN (N).
- Select the PAPER CLIP 3x (Inventory) for a WIRE.
- Place the WIRE and PIN (O).
- Align the slots (P).
- Walk forward.
- Uncover and take the WET COTTON CLOTH (Q).
- Uncover and take the STEEL BALL (R).
- Take the BROKEN IRON (S).
- Take the COLD HEATER (T). Uncover and open the doors.
- Solution (U).
- Take the ALCOHOL (V).
- Open the EMPTY LIGHTER (Inventory) and combine with the ALCOHOL for a LIGHTER.
- Walk down.

- Remove the lid; place the MUG for MILK (W).
- Walk left.
- Move the pot; use the FAN.
- Place the PETALS (3/3), HERBS and MILK (X).
- Place the pot on the grill and take the pot of SALVE.
- Place the COLD HEATER on the flames. Use the PINCERS to take a HOT HEATER (Y).
- Combine the BROKEN IRON and HOT HEATER (Inventory) for a HOT IRON.
- Place the WET COTTON CLOTH. Use the HOT IRON to take a COTTON CLOTH (Z).
- Combine the COTTON CLOTH and SCISSORS (Inventory) for BANDAGES.
- Place the NEEDLES and ALCOHOL (A). Pour the SALVE (B). Place the BANDAGES (C).
- Talk to the woman (D).
- Uncover and take the PIPETTE (E).
- Walk down, then forward.
- Use the PIPETTE for ACID (F).
- Walk down.
- Use the ACID (G). Move the table (H).
- Enter the Sawmill.
- Select the mechanism (I) to trigger a HOP (J).
- Play the HOP to receive a BELT.
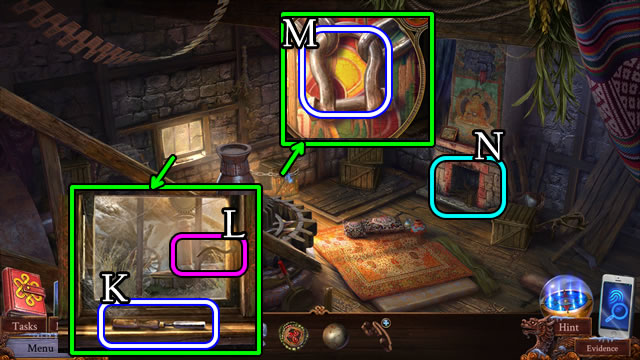
- Take the FILE (K). Open the window (L).
- Take the SHACKLE (M).
- Select (N).
- Select the boxes 1-2-3-4.
- Use the FILE (O). Uncover and select the box (P).
- Select the box for a puzzle (Q).
- Solution (R). C-I-E-G-B-J-L-D-M-H-K-A-N-F-C.
- Place the ETERNITY CHARM (@).
- Open and take the paper (S).
- Uncover the BULL'S HEAD (T).
- Open the book and turn the page for evidence (U).
- Remove and take the BUCKLE (V).
- Combine the BELT and BUCKLE (Inventory) for a TRANSMISSION BELT.
- Place the TRANSMISSION BELT (W).
- Remove (X).
- Take the BUCKET HANDLE (Y).
- Speak to the woman (Z) and select the belt (A).
- Walk down.
- Place the SHACKLE (B) and select the handle (C).
- Swap the boards (D1). (A-B)-(C-E)-(C-D)-(B-C).
- Select the handle (E).
- Select the net for a puzzle.
- Solution (F).
- Select the handle (G).
- Return to the Sawmill.
- Pull the lever (H).
- Return to the Hut.
- Speak to the child (I).
- Return to the Cableway.
- Place the BUCKET HANDLE (J).
- Take the BUCKET.
- Walk down.
- Place the BUCKET for a FULL BUCKET (K).
- Enter the Sawmill.
- Move the chip. Place the STEEL BALL and both balls (L).
- Move the cloth, place the ball (M). Use the FULL BUCKET.
- Solution (N).
- Place the ball and cover; take the BEARING (O).
- Return to the Cableway.
- Place the BEARING (P).
- Walk forward.
Chapter 4: Monastery
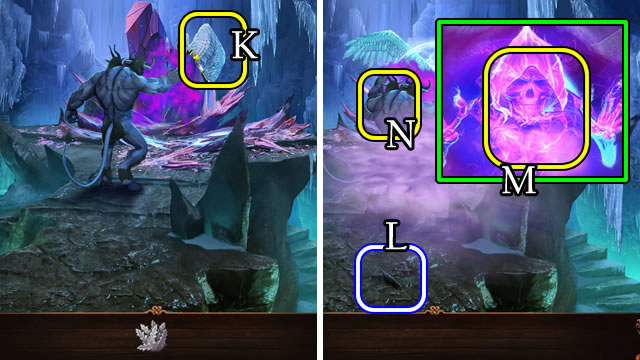
- Take the GRAPPLING HOOK and HAIR SPRAY (Q).
- Walk forward.
- Open and take the PEGS (R).
- Use the HAIR SPRAY (S) and LIGHTER (T) to take the HEAVY STONE (U).
- Take the SHOVEL (V).
- Place the PEGS. Use the HEAVY STONE. Select the ties (W).
- Take the HAIRPIN (X).
- Use the HAIRPIN (Y) and select the button.
- Take the COMPACT (Z).
- Take the FOX TAIL (A).
- Place the COMPACT. Use the FOX TAIL. Select 2-4-9 (B).
- Open the book for evidence (C).
- Take the SERVICE KEY (D).
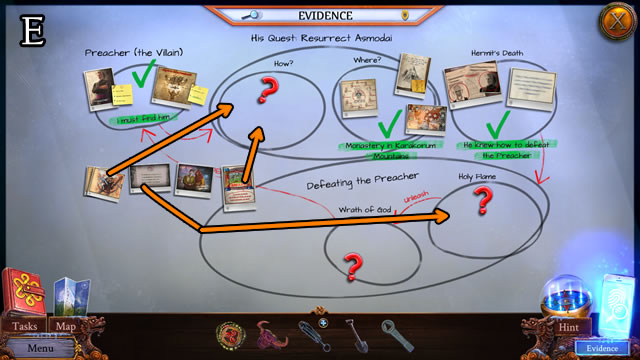
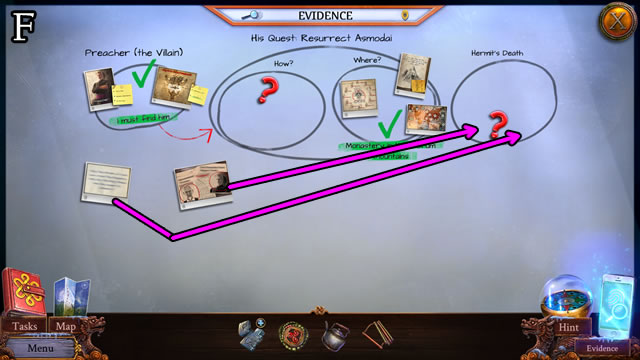
- Assemble the Evidence (E).
- Use the SHOVEL (F).
- Use the SERVICE KEY (G).
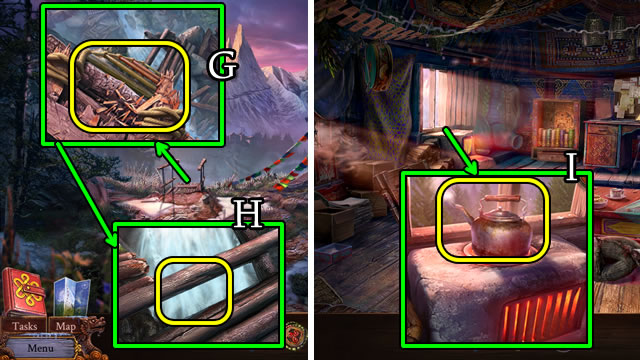
- Uncover and take the ALPENSTOCK (H).
- Look over the edge (I).
- Examine the radio (pink). Use the ALPENSTOCK (@).
- Use the ALPENSTOCK to get the ROPE (J).
- Combine the GRAPPLING HOOK and ROPE (Inventory) for a ROPE WITH HOOK.
- Pick up the child (K).
- Walk down.
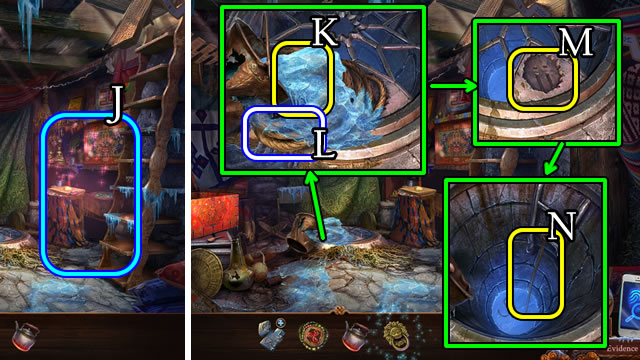
- Select the blanket (L).
- Place the ROPE WITH HOOK (M).
- Play the HOP (N) to climb the cliff.
- Take the MAGNET and note (O).
- Take the SMALL KEY (P).
- Take the WIRE BRUSH (@).
- Walk left.
- Use the SMALL KEY (Q).
- Open the box, take the FUNNEL and WRENCH (R).
- Take the PADLOCK (S).
- Take the RUSTED GEARS (T).
- Take the SKIS (U) and SLEEPING BAG (V).
- Combine the RUSTED GEARS and WIRE BRUSH (Inventory) for GEARS.
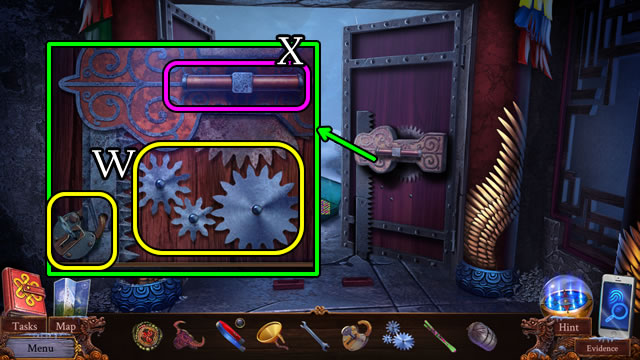
- Place the GEARS and PADLOCK (W).
- Turn the bar (X).
- Walk down.
- Close and place the SKIS (Y).

- Unroll the pad; place the SLEEPING BAG (Z).
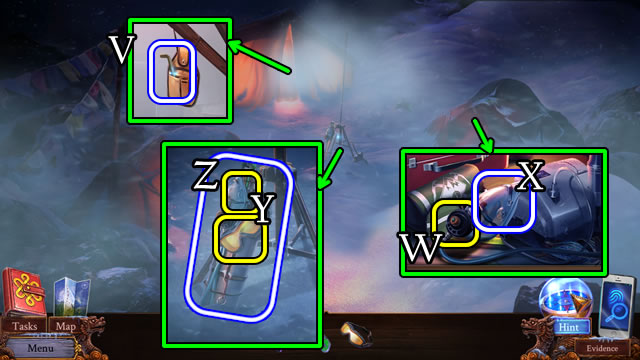
- Use the WRENCH; take the GAS BOTTLE (A).
- Push the button (B).
- Use the WRENCH; remove the gas bottle (C).
- Place the GAS BOTTLE (D).
- Connect the meter. Use the WRENCH (E).
- Close the grate. Push the button (F).
- Help lift the shutter (G).
- Close the shutters (H).
- Turn the wheel (I).
- Walk forward.
- Read the book; take the FROZEN SIEVE (J).
- Take the camera (K), press (L) and scroll 2x (@).
- Take the EMPTY CANISTER (M).
- Take the GLASS SHARD (N).
- Use the GLASS SHARD; take the STRAP (O).
- Combine the MAGNET and STRAP (Inventory) for a MAGNET ON STRAP.
- Use the MAGNET ON STRAP to take the SPARK PLUG (P).
- Give the SPARK PLUG (Q).
- Walk down.
- Place the FROZEN SIEVE. Take the SIEVE (R).
- Walk left.
- Select the bar (S).
- Place the EMPTY CANISTER, FUNNEL and SIEVE (T).
- Select the tank (U). Take the FUEL.
- Select the bar again.
- Walk down, then forward.

- Remove the cap and place the FUEL (V).
- Examine (W).
- Walk down.
- Look at the child (X).
- Move (Y).
- Take the GUN (Z).
- Move the board (A) and debris (B).
- Place, then select the ETERNITY CHARM (C).
- Use the GUN (D).
- Press the eternity charm (E).
- Walk down.
- Place the BULL'S HEAD (F).
- Solution (G1-G3).
- Walk forward.
- Remove the drape; assemble the relief (H).
- Press the relief button (I).
- Take the SPEARHEAD (J).
- Place the SPEARHEAD (K) to trigger a HOP.
- Play the HOP to receive a DAGGER (L).
- Place the DAGGER (M).
- Open the chest, uncover and take the GRATE TOKEN and WOODEN CRANK (N).
- Press the relief button (O).
- Move the chest 2x (P).
- Place and select the GRATE TOKEN (Q).
- Pull (R).
- Press the GRATE TOKEN again.
- Take the WOODEN WHEEL (S).
- Read the book; take the BRASS HOOK (T).
- Place the WOODEN WHEEL and BRASS HOOK (U).
- Place and select the WOODEN CRANK (V).
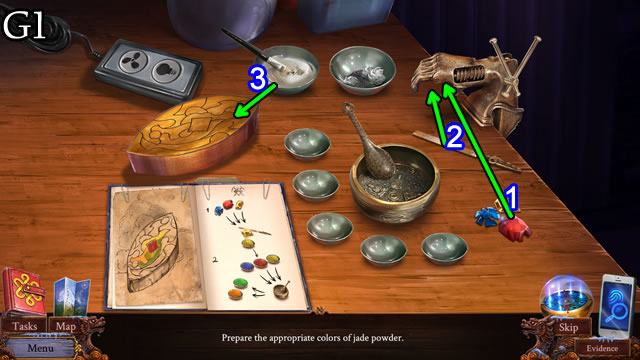
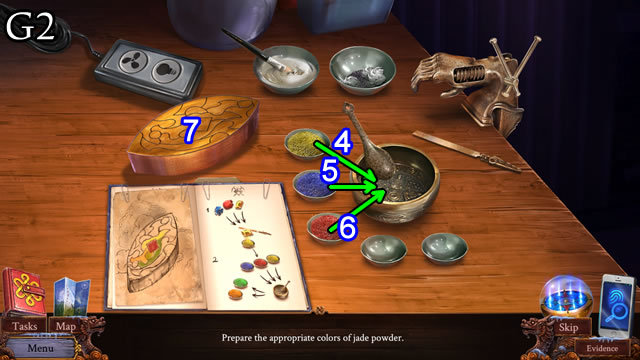
- Read the 3 scrolls (W).
- Take the JADE TOKEN (X).
- Assemble the Evidence (Y).
- Walk down.
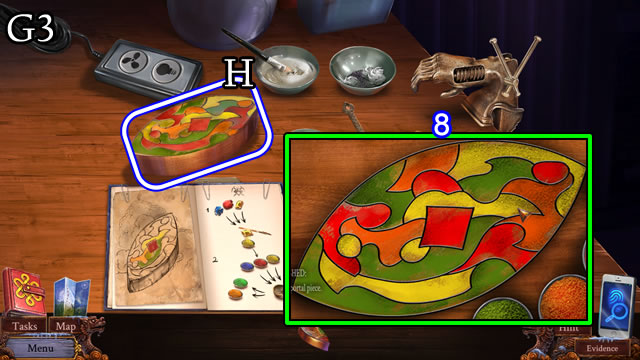
- Take the PORTAL PIECES (Z).
- Walk left.
- Turn the bar (A).
- Open the door again.
- Place the JADE TOKEN (B).
- Take the NAGINATA (C).
- Close the doors.
- Walk down 2x.
- Move the chest (D).
- Press the relief button (E).
- Climb the statue.
- Use the NAGINATA (F).
- Climb into the bowl, then climb to the top of the statue.
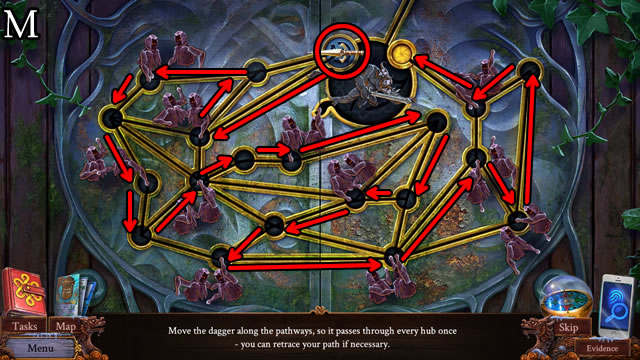
- Solution (G).
- Climb up to the portal.
- Place the PORTAL PIECES (H).
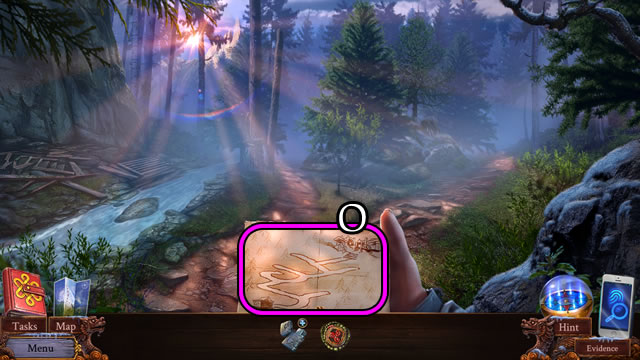
- Uncover and open the box. Take the note and evidence (I).
- Take the BROKEN COMPASS and CANDY BOWL (J).
- Walk down 2x.
- Play the HOP to receive a CORK (K).
- Walk left and open the door.
- Take the WHISKEY (L).
- Combine the needle from the BROKEN COMPASS, empty CANDY BOWL and WHISKEY (Inventory). Place the CORK, needle and lid for an IMPROVISED COMPASS (M).
- Use the Map to enter the Snowmobile scene.
- Walk forward.
Chapter 5: Camp
- Place the IMPROVISED COMPASS (N).
- Solution: L-R-L-Rx2.
- Take the FLARE (O).
- Pick up the tablet/phone (P). Press the button (Q). Select the screen 2x. Take the SD CARD (R).
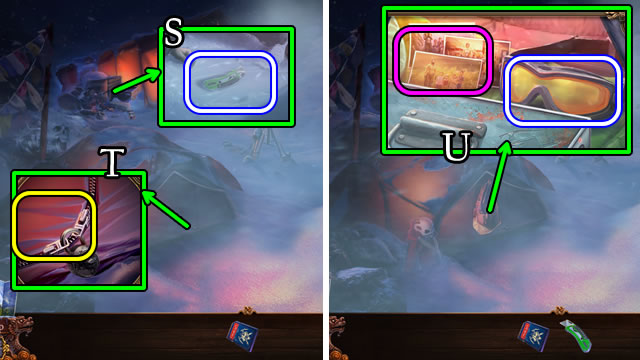
- Use the FLARE; take the UTILITY KNIFE (S).
- Use the UTILITY KNIFE (T).
- Look at the photos and take the GOGGLES (U).
- Walk forward.
- Take the SCREWDRIVER (V).
- Walk down.
- Use the SCREWDRIVER (W).
- Take the MASK (X).
- Place the MASK and GOGGLES (Y); take the OXYGEN SUPPLY (Z).
- Walk forward.
- Place the OXYGEN SUPPLY on the scene.
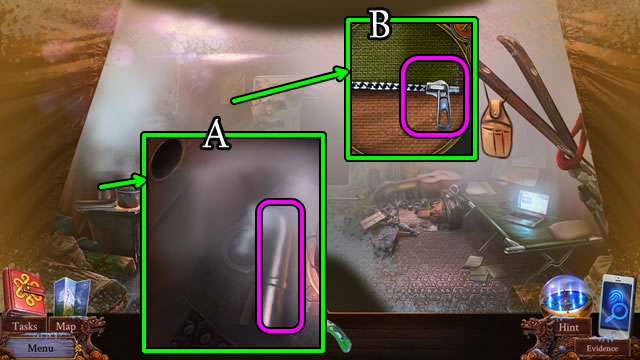
- Move the pipe (A).
- Unzip (B).
- Move the hand. Take the cassette player(C); press the button (D).
- Place the SD CARD (E); select the icon (F).
- Solution (F1). A-I.

- Take the DEAD UV FLASHLIGHT (G).
- Place the DEAD UV FLASHLIGHT. Take the UV FLASHLIGHT (H).
- Shine the UV FLASHLIGHT (I).
- Walk down.
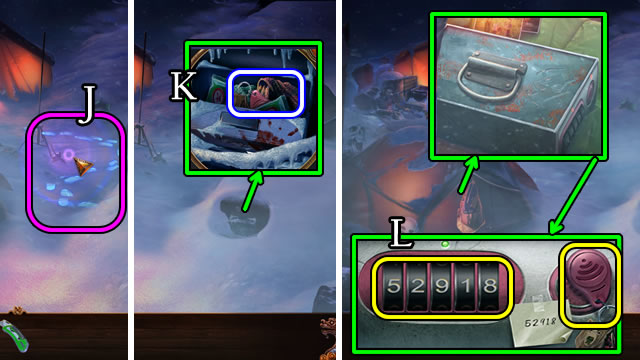
- Shine the UV FLASHLIGHT (J).
- Uncover, open and take the SAFE KEY (K).
- Enter the safe code: 5-2-9-1-8 and place the SAFE KEY (L).
- Take the note (M), CAMP BACKUP KEYS and the PORTAL PIECE (N).
- Take the FILM (O).
- Use the CAMP BACKUP KEYS (P).
- Take the WOOL GLOVES and CHEMICALS (Q).
- Use the WOOL GLOVES to take the BULB (R).
- Use the CAMP BACKUP KEYS (S).
- Take the THERMOMETER (T).
- Combine the CHEMICALS and UTILITY KNIFE (Inventory). Uncover and take the CHEMICALS.
- Open the paint. Place the BULB and for a RED BULB (U).
- Walk forward.
- Play the HOP for an ENLARGER LENS (V).
- Place the CHEMICALS and THERMOMETER. Take the WARM CHEMICALS (W).

- Replace the ENLARGER LENS and RED BULB (X).
- Place the WARM CHEMICALS and FILM (Y).
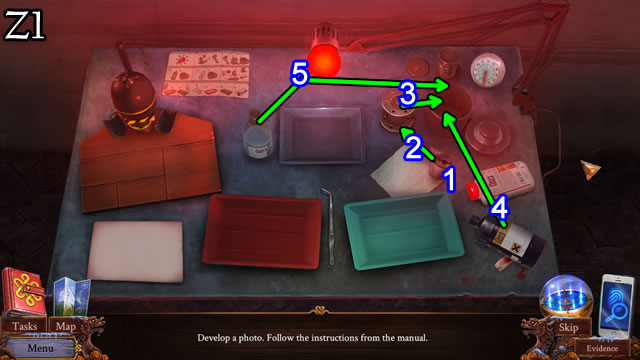
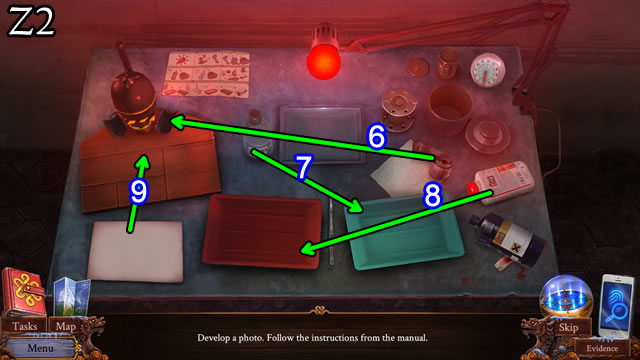

- Solution (Z1-Z3). Remove the film from the canister (1); place on (2); put into (3). Add (4) and (5). Place the film on (6); pour (7) and (8); place (9). Put in (11), then (12).
- Take the photo (A).
- Walk down.
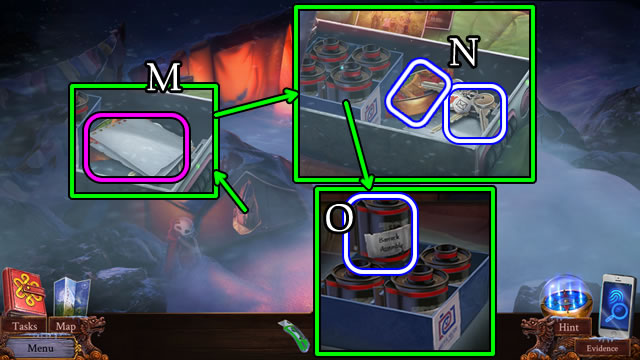
- Uncover and take the FLAGSTAFF (B).
- Place the FLAGSTAFF and take a SNOW SHOVEL (C).
- Use the SNOW SHOVEL (D).
- Uncover, open and take the SECURITY CARD (E).
- Uncover and take the drawing (F).
- Take the COPPER COIN (G).
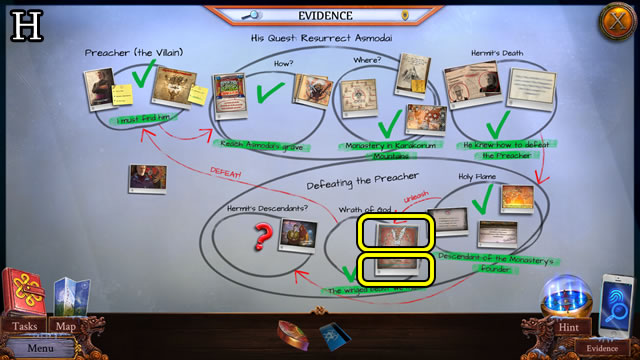
- Assemble the Evidence (H).
- Open and remove the pieces. Place the COPPER COIN (I).
- Use the SECURITY CARD (J).
- Walk forward.
- Take the JADE RING (K).
- Select and open the book (L). Turn the page.
- Take the note (M) and the PORTAL SCRAPS (1/4) (N).
- Press the button (O).
- Align the rings on the JADE RING (Inventory) to take BLUE JADE (P).

- Play the HOP to receive PORTAL SCRAPS (3/4) (Q).
- Open and take the JEWELER'S TOOLS (R).
- Take the HAMMER (S).
- Uncover and use the HAMMER to take a WELDING TORCH (T).
- Take the EMPTY BOTTLE (U).
- Use the HAMMER; take the YELLOW JADE (V).
- Place the EMPTY BOTTLE for FRESH WATER (W).
- Use the WELDING TORCH (X). Take the RED JADE (Y).
- Unwrap, then place the PORTAL SCRAPS (4/4) (Z).
- Use the WELDING TORCH. Take the LIQUID METAL (A).
- Use the FRESH WATER (B).
- Place the PORTAL PIECE.
- Place the LIQUID METAL. Use the FRESH WATER and take a CASTING (C).
- Place the BLUE, RED and YELLOW JADE (D).
- Place and open the JEWELER'S TOOLS. Select the bowl (E).
- Place the CASTING (F).
- Solution (G1-G3). Place the red jade (1), use (2). Repeat the process for blue and yellow jade. Use the brush (3). Place (4) and (5). Place (4) and (6). Select (7). Possible solution (8).
- Take the PORTAL PIECE (H).
- Take the FLUTE (I).
- Open and take the photo, note (J) and DETECTOR (K).
- Assemble the Evidence (L).

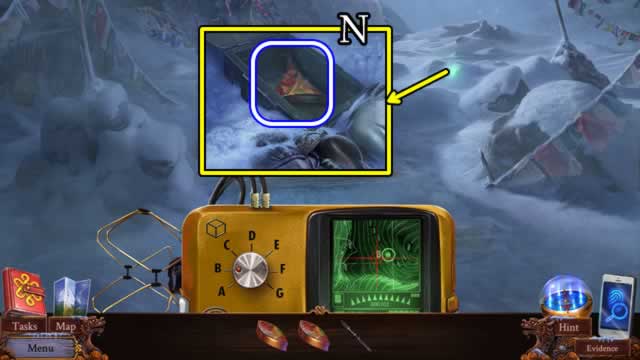
- Select the DETECTOR (Inventory). Set the frequency to 30.5 and dial to 'B' (M).
- Walk down 3x.
- Uncover and open the box. Take the PORTAL PIECE (N).
- Return to the Monastery.
Chapter 6: The Portal
- Give the FLUTE (O).
- Walk down, then forward.
- Walk forward.
- Select the child (P).
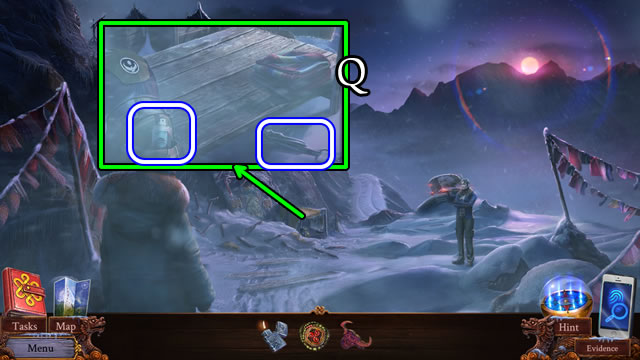
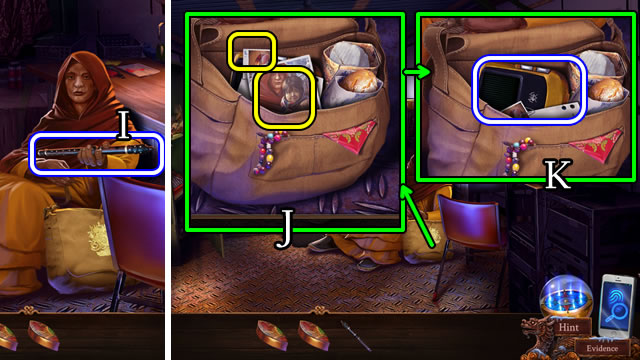
- Open and take the CIGAR TUBE (Q), BULLET BOX (R) and BANDANA (S).
- Select the pistol; take the MAGAZINE (1/2) (T).
- Place the BANDANA for a WET BANDANA (U).
- Place the WET BANDANA (V).
- Take the CIGAR CUTTER and MAGAZINES (2/2) (W).
- Select (1-6) to take the SPEAR (X).
- Use the SPEAR (Y).
- Move (Z).
- Take the STONE BUTTON (A).
- Press the button (B).
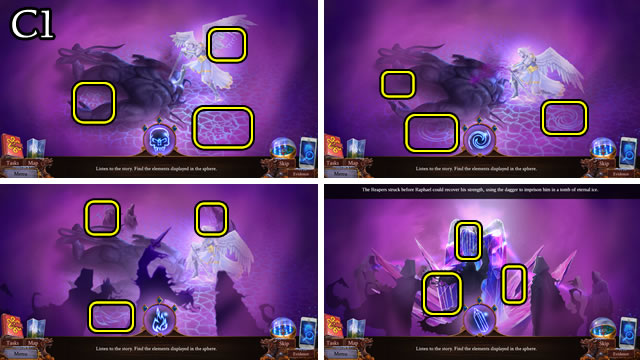
- Solution (C1).
- Solution (C2). Place and press the button (@).
- Solution (C3).
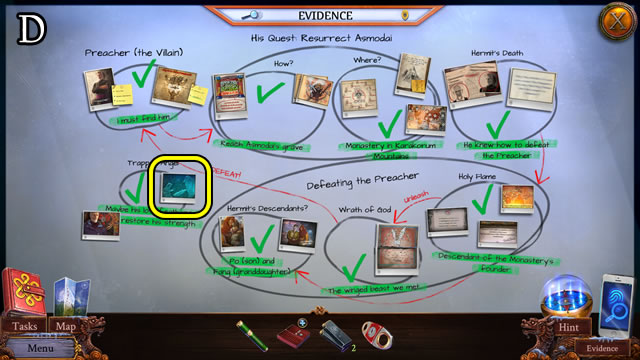
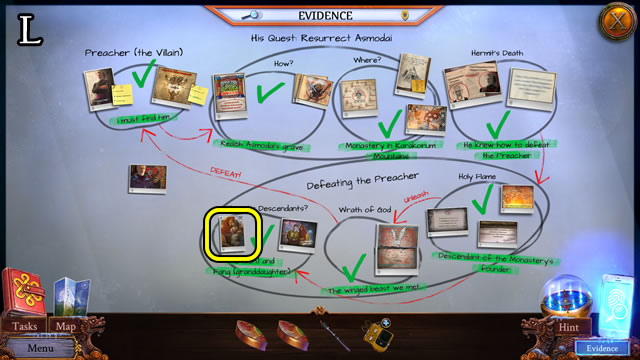
- Assemble the Evidence (D).
- Play the HOP for FEATHERS (E).
- Combine the BULLET BOX and CIGAR TUBE (Inventory) (F). Place the both MAGAZINES and use the CIGAR CUTTER (G). Fill the CIGAR TUBE for a BOMB.
- Take the LANTERN (H).
- Select (I). Place the BOMB. Use the LANTERN (J).
- Walk forward.
- Place the FEATHERS (K).
- Pick up the knife (L) and use 3x (M).
- Use the knife (N).
- Congratulations. You have completed playing Enigmatis: The Shadow of Karkhala.
Created at: 2016-08-21