Walkthrough Menu
- General Tips
- Chapter 1: The First Exorcism
- Chapter 2: The Seal of Ice
- Chapter 3: The Seals of Luck and Fire
- Chapter 4: The Seals of Water and Sun
- Chapter 5: The Final Exorcism
General Tips
- You will not need to follow the exact path of this guide; however, some actions are required before you can complete another scene.
- Zoom into the sparkling areas to trigger a Hidden Object Scene. Throughout the guide, we will use the acronym 'HOS' for Hidden Object Scenes.
- Some items require an action before they are available in the HOS.
- Some items in the HOS are random; the screenshot shows current game play.
- At the end of every HOS solve the puzzle to receive a necessary inventory item.
- Some of the solutions to puzzles are random.
Chapter 1: The First Exorcism
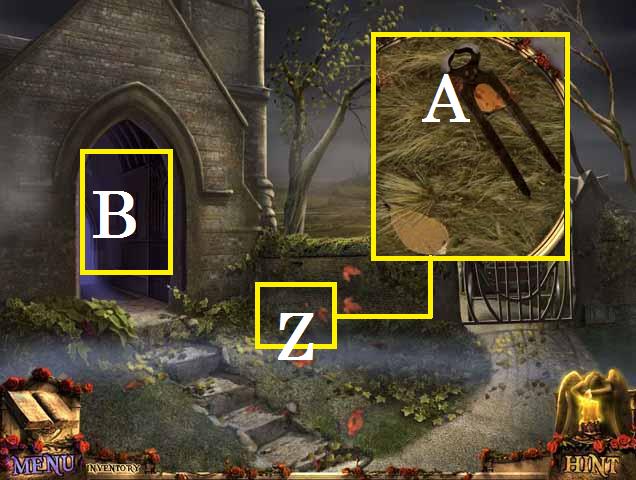
- Zoom into the ground (Z).
- Pick up the PINCERS (A).
- Enter the Chapel (B).
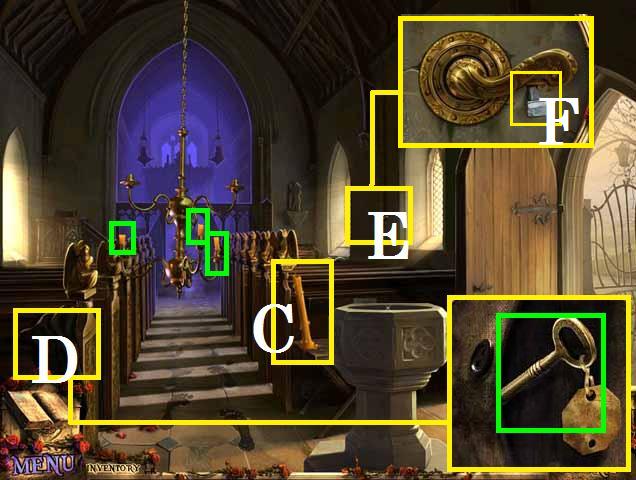
- Pick up the CANDLE (C).
- Zoom into the coat (D) and pick up the KEY (green).
- Zoom into the chandelier handle (E).
- Remove the nail (F) with the PINCERS and pull the handle.
- Pick up the three CANDLES (green).
- Pull the chandelier handle again to raise the chandelier.
- Move forward to the altar.
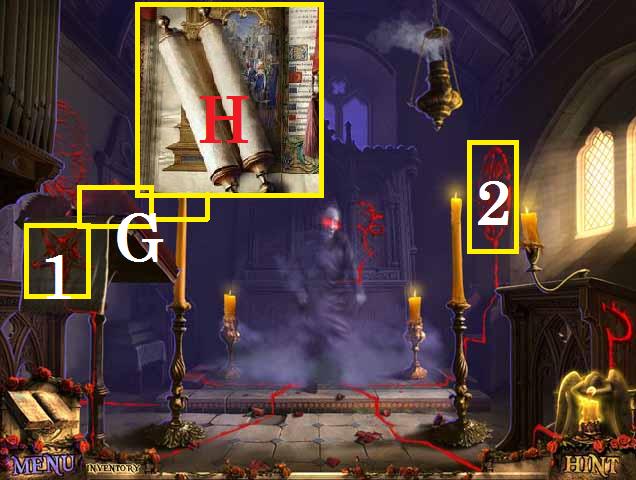
- Zoom into the book (G); flip the page and open the scroll (H).
- Place all four CANDLES as shown in the screen shot.
- Click on the symbols (1) and (2).
- Go through the now open passage to the library.
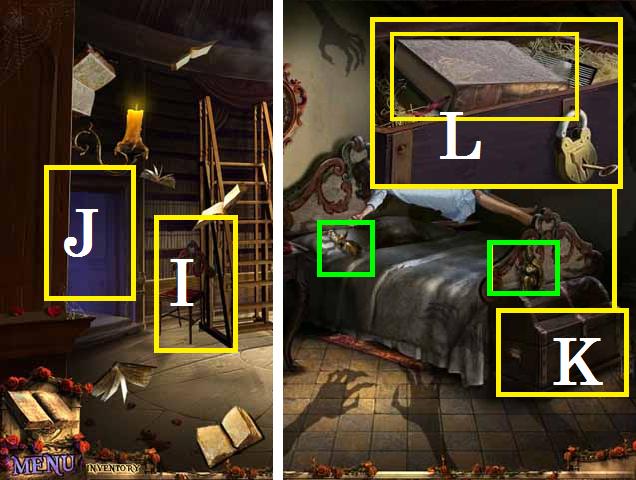
- Pick up the CHAIR (I).
- Go through the left door (J) to enter the bedroom.
- Pick up two STATUETTES (green).
- Open the chest (K) by placing the KEY in the lock and turning it twice.
- Pick up the BOOK (L).
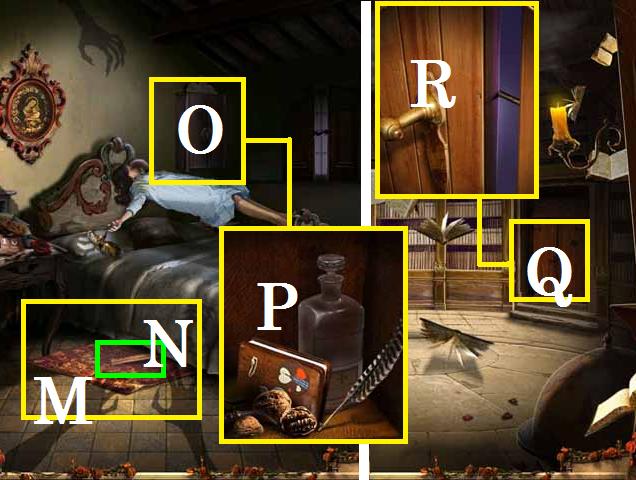
- Pull the rug (M) out from under the bed.
- Pick up the RULER (N).
- Zoom into the shelf (O).
- Pick up the EMPTY BOTTLE (P).
- Return to the library.
- Zoom into the right door (Q).
- Open the latch(R) with the RULER.
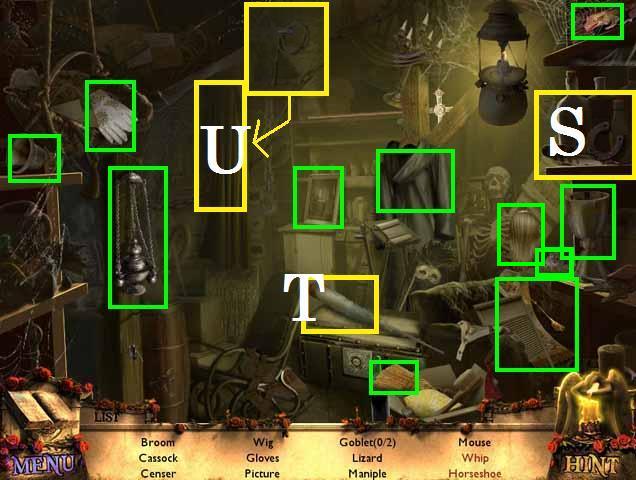
- Click on the sparkles to play a HOS.
- Remove the cobwebs (S) with the duster (T) to reveal the horseshoe.
- Move the drape (U) to reveal the whip.
- Pick up the remaining items to receive the CANDELABRA.
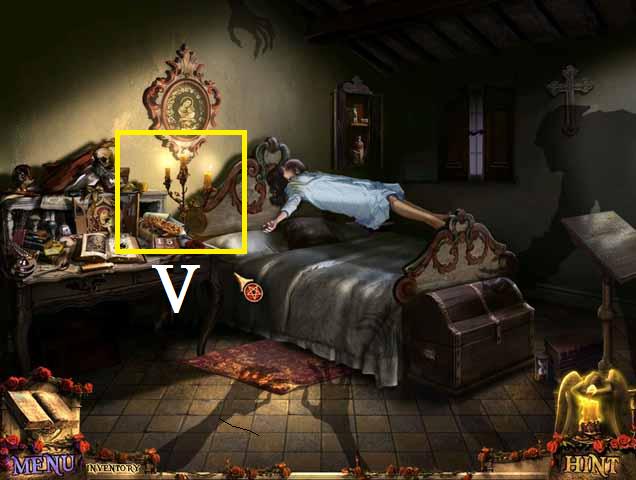
- Return to the bedroom.
- Place the CANDELABRA on the dresser (V).
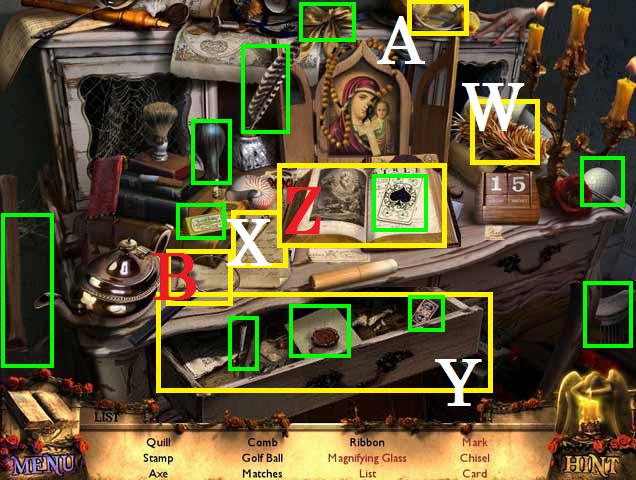
- Zoom into the sparkles to play a HOS.
- Remove the dust with the duster (W) to reveal the key (X).
- Open the drawer (Y) with the key (X) to reveal the mark, list, and chisel.
- Open the book (Z) to reveal the card.
- Place the lens (A) on the magnifying glass (B).
- Receive the CHISEL.
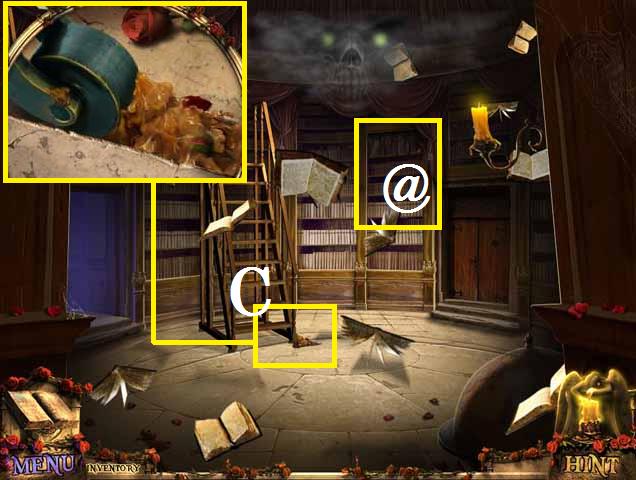
- Return to the library.
- Zoom into the ladders wheel (C).
- Remove all of the wax with the CHISEL.
- Move the ladder to the right shelf and zoom in (@).
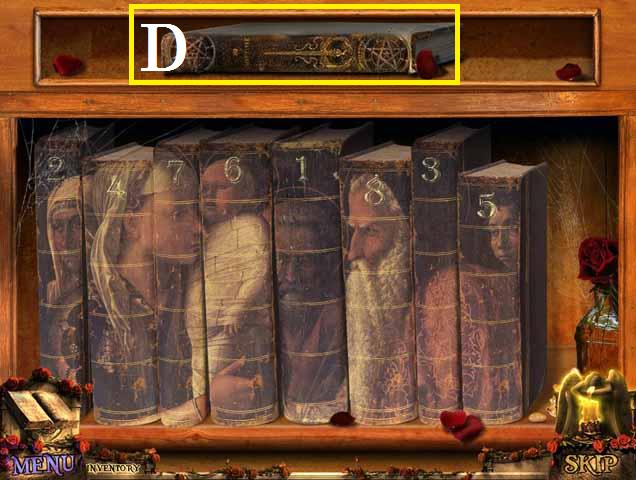
- Place the BOOK on the shelf.
- Rearrange the books to form the picture as shown in the screenshot.
- Click on the numbered books in the following order: 7, 4, 5, 2, 8, 6, 1, and 3. (Note: this is the code found in the scroll inside the book from the altar).
- Pick up the EXORCISM BOOK (D).
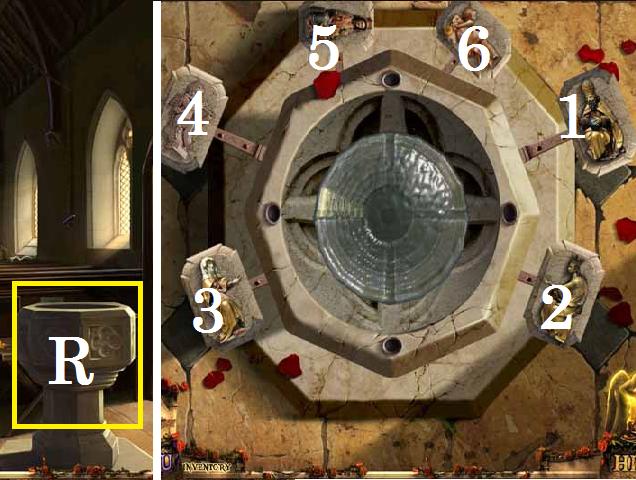
- Return to the chapel.
- Zoom into the holy water fountain (R).
- Place the two STATUETTES as shown in the screenshot.
- Click on the statuettes in sequential order 1 through 6.
- Fill the EMPTY BOTTLE with water to receive the HOLY WATER.
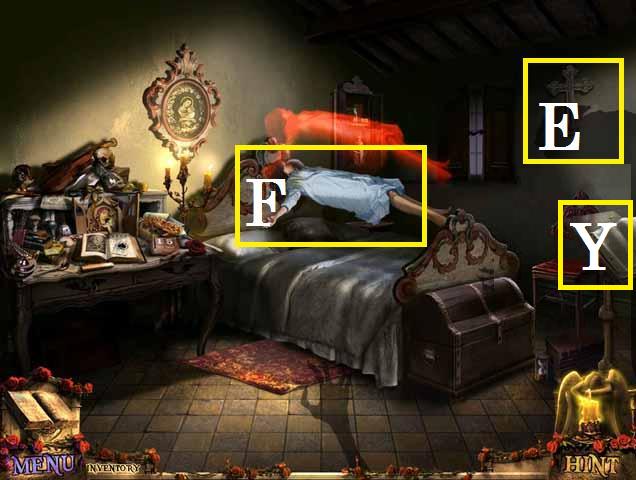
- Return to the bedroom.
- Place the EXORCISM BOOK on the stand (Y).
- Click on the EXORCISM BOOK.
- Place the CHAIR under the HOLY CROSS (E) as shown in the screenshot.
- Pick up the HOLY CROSS.
- Pour the HOLY WATER on the girl (F).
- Click the HOLY CROSS over the girl.
Chapter 2: The Seal of Ice
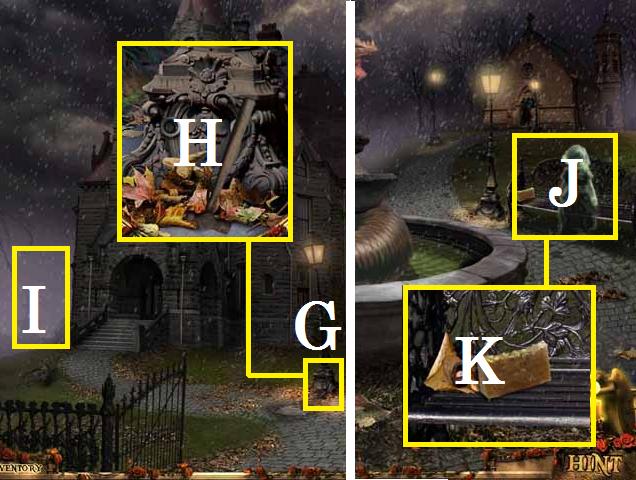
- Once the chariot has taken you to the mansion zoom into the light post base (G).
- Pick up the HAMMER (H).
- Take the path on the left (I) towards the fountain.
- Zoom into the ghost girl (J).
- Pick up the SOAP (K).
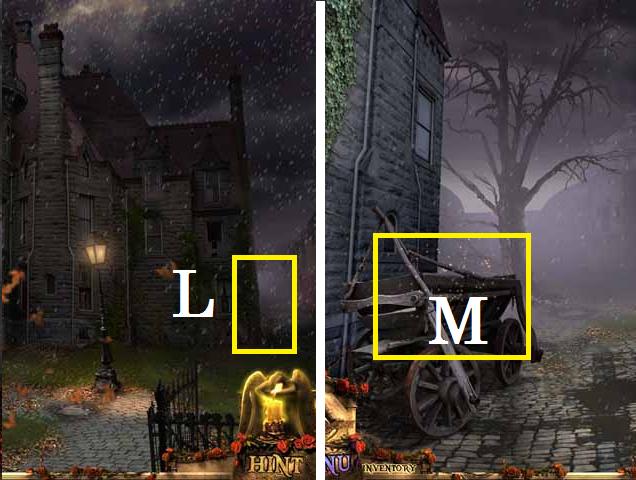
- Return to the mansions front gate.
- Take the path on the right (L) towards the barn.
- Zoom into the sparkles (M) to play a HOS.
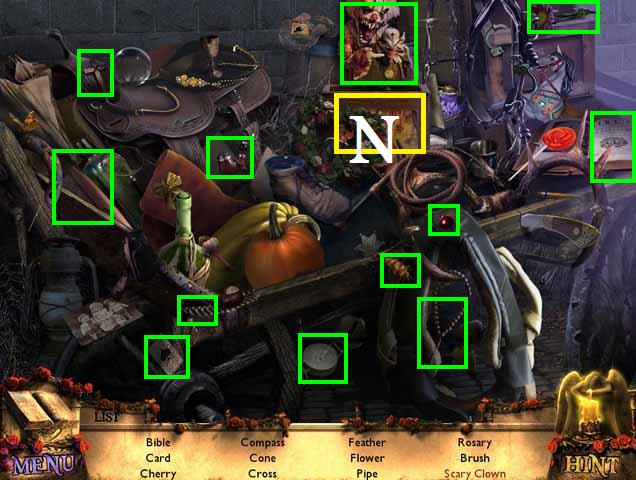
- Click on the box (N) to reveal the scary clown.
- Receive the BRUSH.
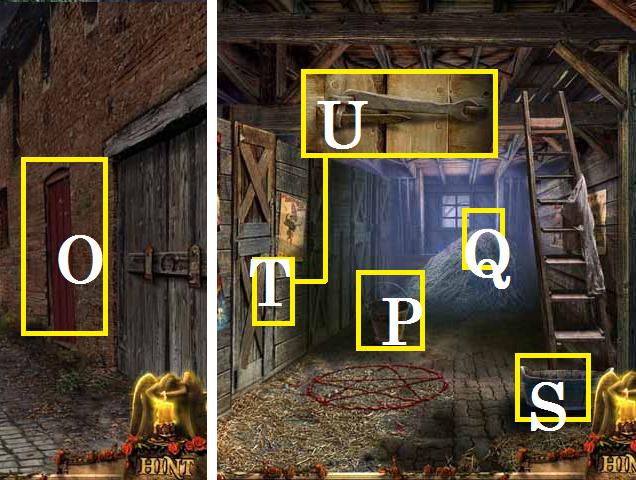
- Enter the stables (O).
- Pick up the BUCKET (P).
- Place the straw (Q) in the wooden bucket (S).
- Zoom into the stall door (T).
- Completely remove the pin (U) with the HAMMER.
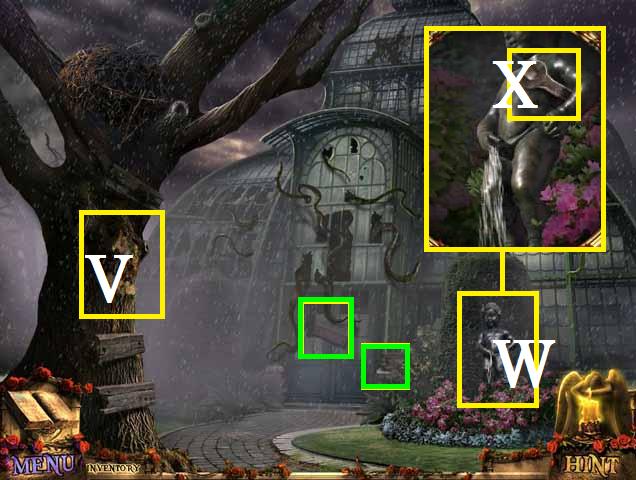
- Exit the stable and move forward down the path towards the greenhouse.
- Pick up two BOARDS (green).
- Place the BOARDS on the tree (V).
- Zoom into the fountain (W).
- Pick up the WRENCH (X).
- Fill the BUCKET with water from the fountain to receive the BUCKET OF WATER.
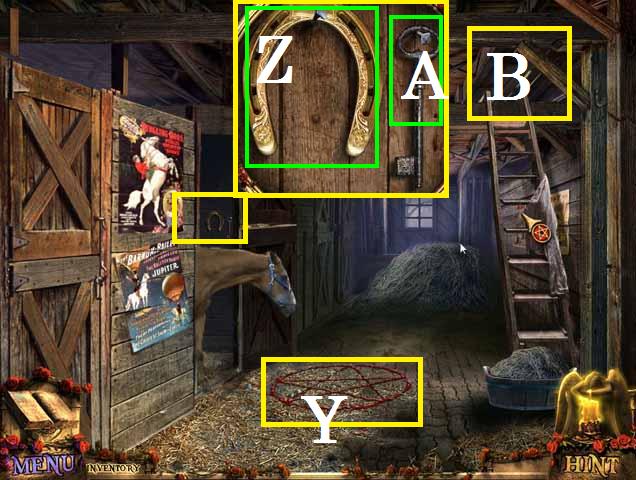
- Return to the stables.
- Pour the BUCKET OF WATER over the demonic symbol (Y), followed by the SOAP and the BRUSH.
- Pick up the HORSESHOE (Z) and the LOFT KEY (A).
- Unlock the loft door (B) with the LOFT KEY.
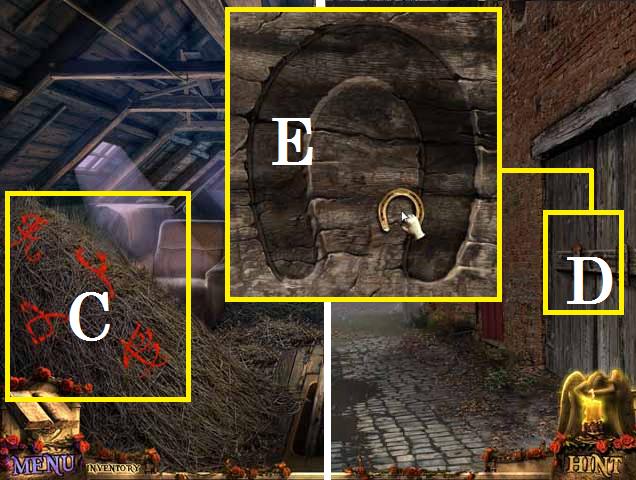
- Enter the loft.
- Click on the symbols (C) to remember them.
- Exit back outside.
- Zoom into the door (D).
- Place the HORSESHOE on the lock (E).
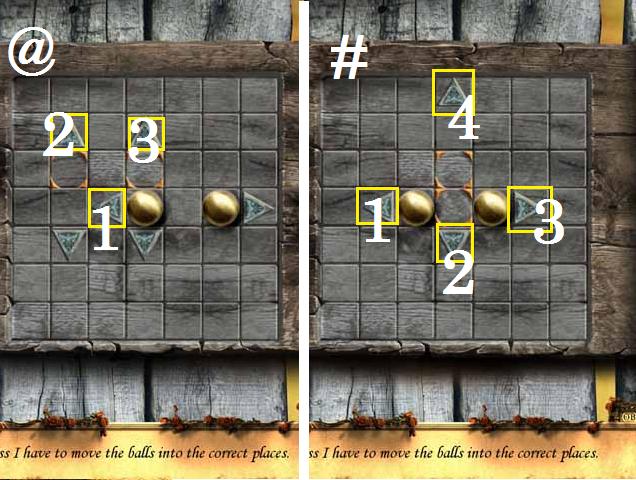
- Solve the first puzzle by clicking the arrows in the following sequence: 1, 1, 2, and 3.
- Puzzle 2/4: 1, 2, 3, 3, and 4.
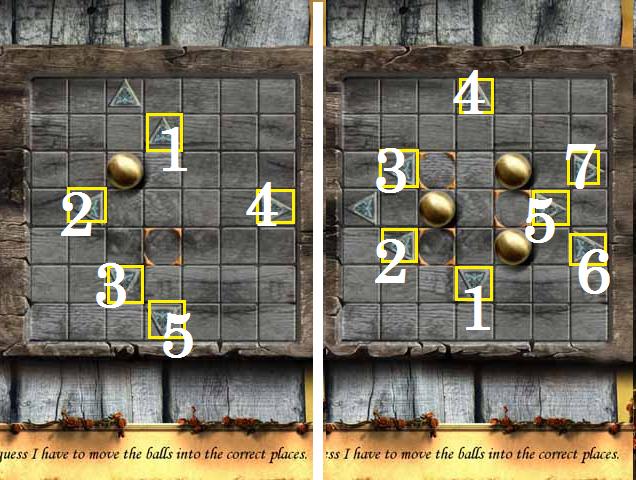
- Puzzle 3/4: 1, 2, 3, 4, and 5.
- Puzzle 4/4: 1, 2, 3, 4, 5, 6, 7, 1, 2, and 3.
- Enter the workshop.
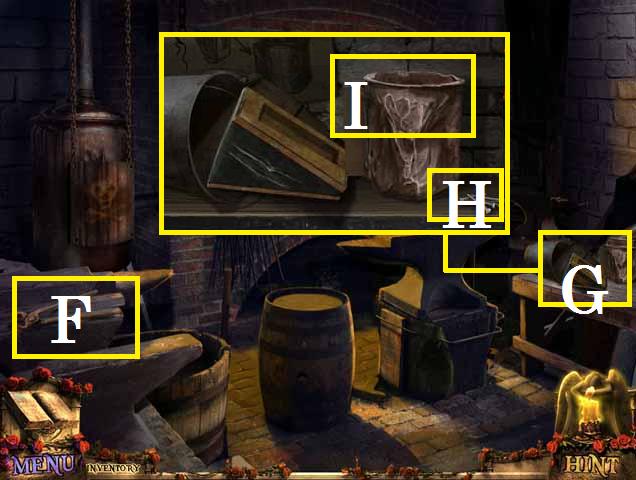
- Pick up the FIRE IRON (F).
- Zoom into the BEE SMOKER (G).
- Pick up the NAILS (H).
- Use the HAMMER on the case (I).
- Close the window and return to the greenhouse.
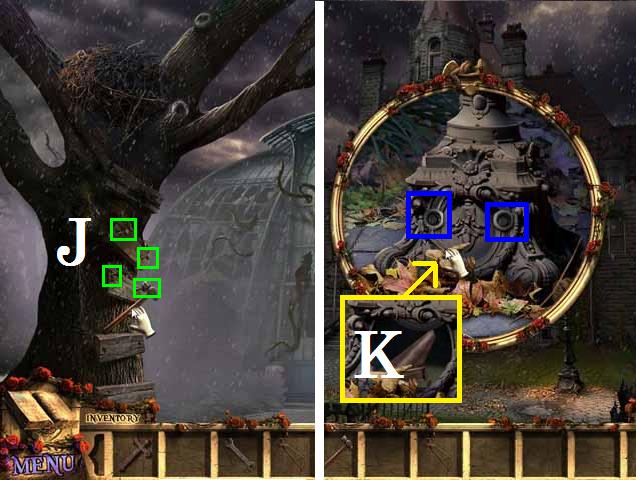
- HAMMER all four NAILS (green) on to the boards (J).
- Return to the mansions front gate.
- Zoom back into the light poles base; remove the bolts (blue) with the WRENCH.
- Pick up the PART OF BEE SMOKER (K).
- Enter the mansion.
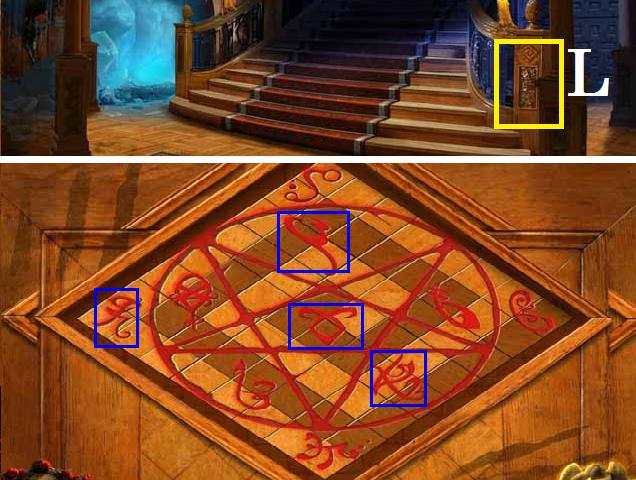
- Zoom into the right pillar (L).
- Press the four symbols (blue) that where in the loft.
- Unscramble the board as shown in the screenshot.
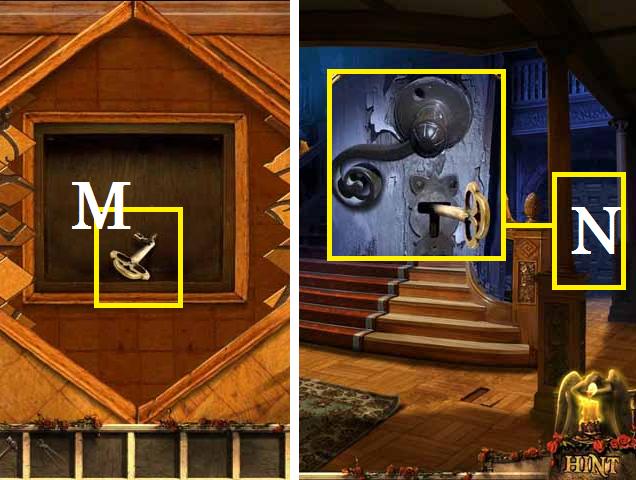
- Pick up the KITCHEN KEY (M).
- Unlock the kitchen door (N) with the KITCHEN KEY and spin the handle.
- Enter the kitchen.
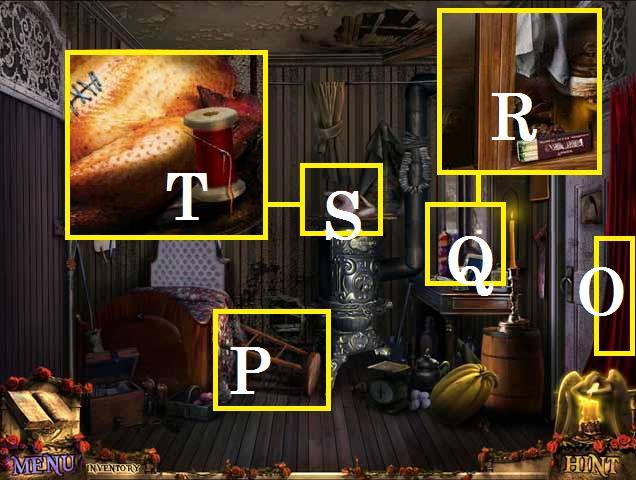
- Move the curtain (O).
- Pick up the CHAIR (P).
- Zoom into the cabinet (Q); pick up the MATCHES (R).
- Zoom into the turkey (S); pick up the NEEDLE AND THREAD (T).
- Exit back to the stairs.
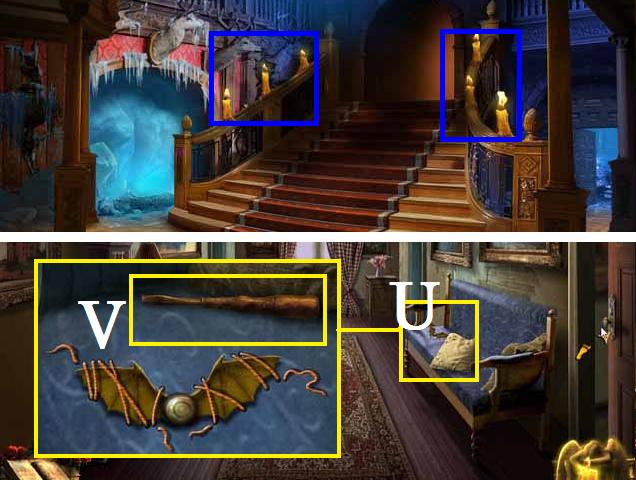
- Light the candles (blue) with the MATCHES and go upstairs.
- Move the pillow (U) and zoom in.
- Pick up the SCREWDRIVER (V).
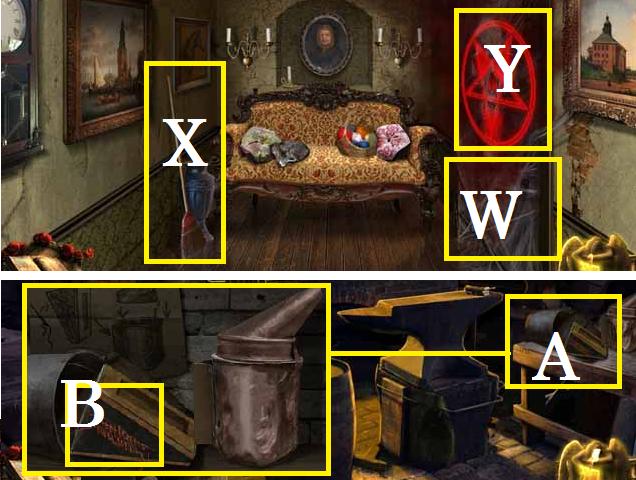
- Enter the room in the right.
- Remove the cobwebs (W) with the SWAB (X).
- Place the HOLY CROSS over the demonic symbol (Y).
- Return to the workshop.
- Zoom into the BEE SMOKER (A).
- Place the BEE SMOKER PART and sew the smoker (B) with the NEEDLE AND THREAD.
- Pick up the BEE SMOKER.
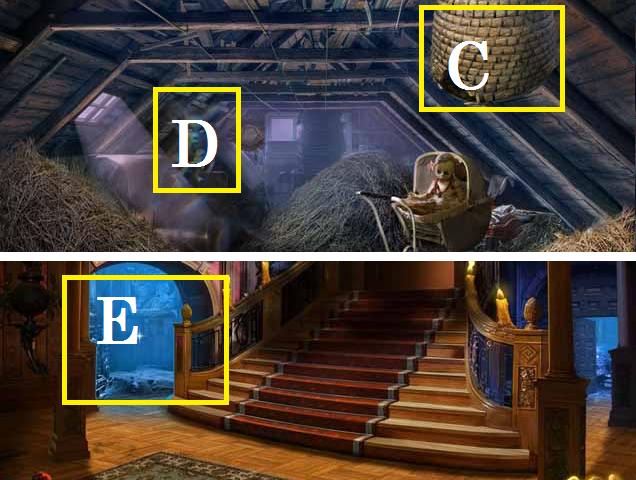
- Return to the loft in the stables.
- Drop the BEE SMOKER over the bee hive (C).
- Vanquish the demon (D) by dropping the HOLY CROSS over him several times.
- Receive the PIPE.
- Return to the mansion.
- Zoom into the entryway on the left (E).
- Break the ice with the PIPE and enter the study.
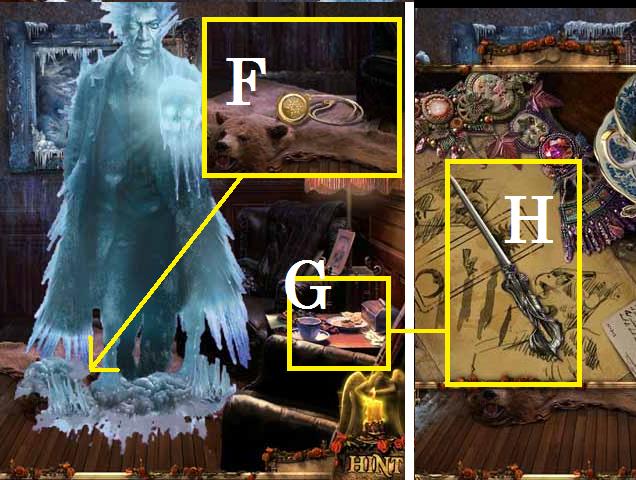
- Vanquish the demon with the HOLY CROSS.
- Pick up the SEAL OF ICE (F).
- Zoom into the table (G).
- Pick up the KNIFE (H).
Chapter 3: The Seals of Luck and Fire
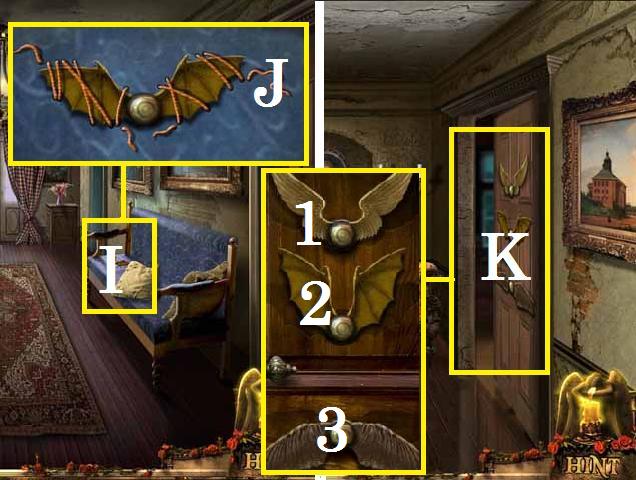
- Return to the upstairs hallway.
- Zoom back into the bench (I).
- Cut the LOCK PIECE (J) free with the KNIFE and pick it up.
- Go through the door on the right.
- Zoom into the door (K); place the LOCK PIECE.
- Click on the wings in order of (1, 2, and 3) to open the door.
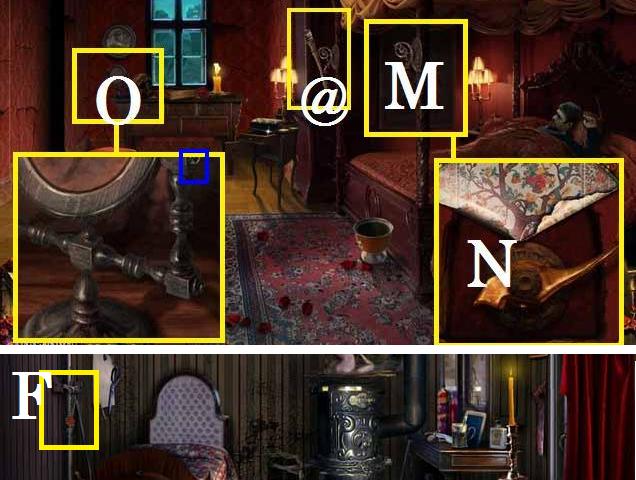
- Enter the master bedroom.
- Pick up the TORCH (@).
- Cut the tapestry (M) with the KNIFE.
- Pull the handle (N).
- Remove the screw (blue) from the mirror (O) with the SCREWDRIVER.
- Pick up the MIRROR and SCREW.
- Return to the kitchen.
- Cut the seal (F) with the KNIFE.
- Open the door.
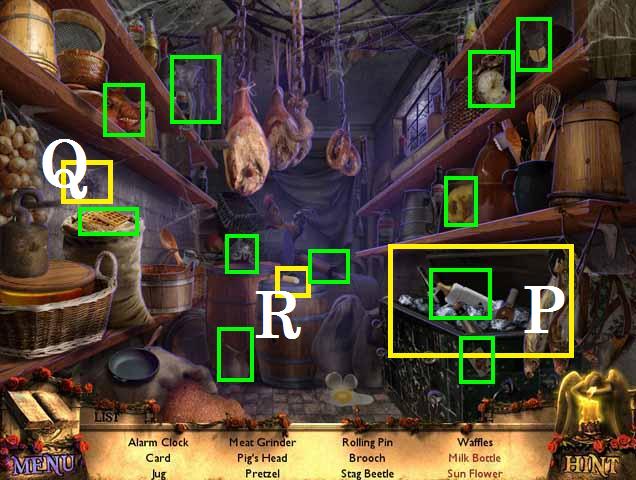
- Zoom into the sparkles to play a HOS.
- Open the chest (P) to reveal the milk bottle.
- Color the sunflower (Q) in with the chalk (R).
- Receive the MILK BOTTLE.
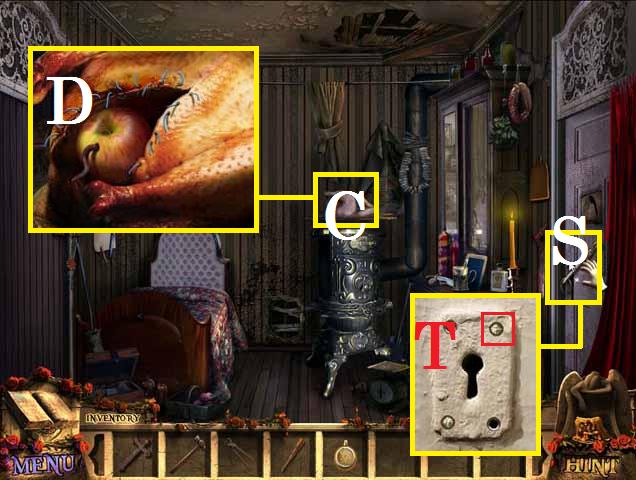
- Zoom into the door (S) and replace the SCREW (T).
- Cut the turkey (C) open with the KNIFE.
- Pick up the APPLE (D).
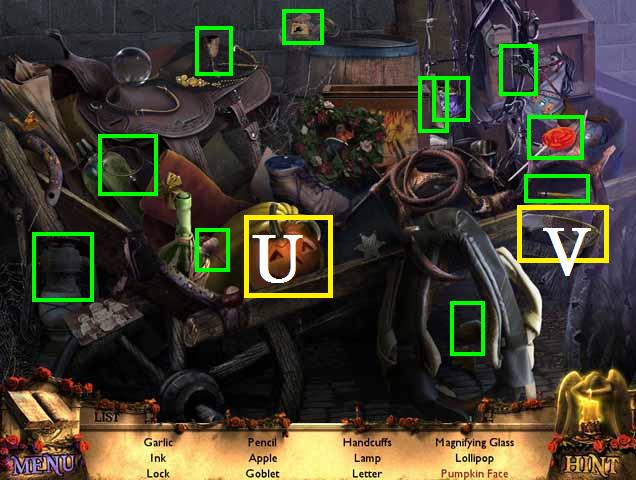
- Return to the alleyway outside the stables.
- Zoom into the sparkles to play a HOS.
- Carve the pumpkin (U) with the knife (V) for the pumpkin face.
- Receive LOLLIPOP.
- Return to the loft.
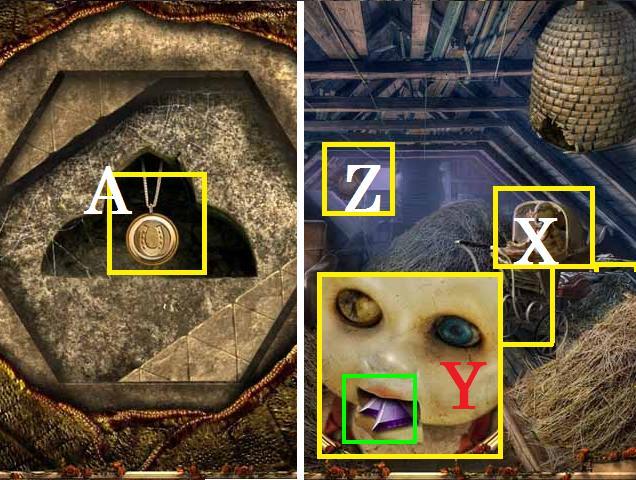
- Place the LOLLIPOP and BOTTLE OF MILK in the baby carriage (X).
- Open the dolls mouth (Y) and pick up the CRYSTAL TRIANGLES (green).
- Zoom into the puzzle (Z).
- Place the CRYSTAL TRIANGLES in the puzzle.
- Click and drag matching color pieces next to each other until the board is clear. (Note: there is no true strategy to this puzzle, I played it several times and never got stuck).
- Pick up the SEAL OF LUCK (A).
- Return to the greenhouse.
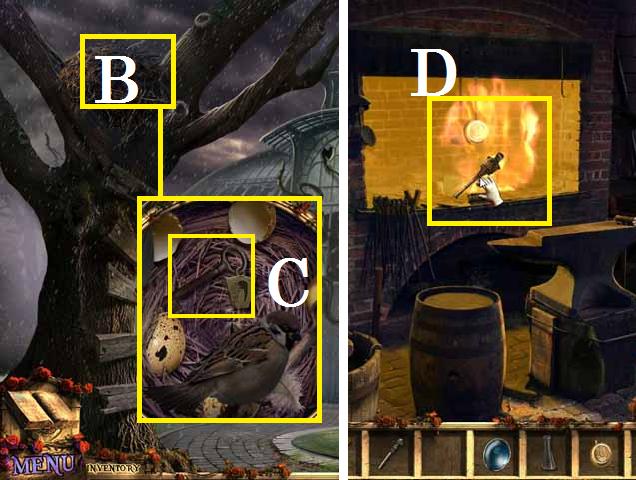
- Zoom into the nest (B).
- Place the APPLE in the nest.
- Move the shells around to reveal the SHOWER KEY (C).
- Return to the workshop.
- Light the TORCH in the fire (D) to receive the BURNING TORCH.
- Return to the kitchen.
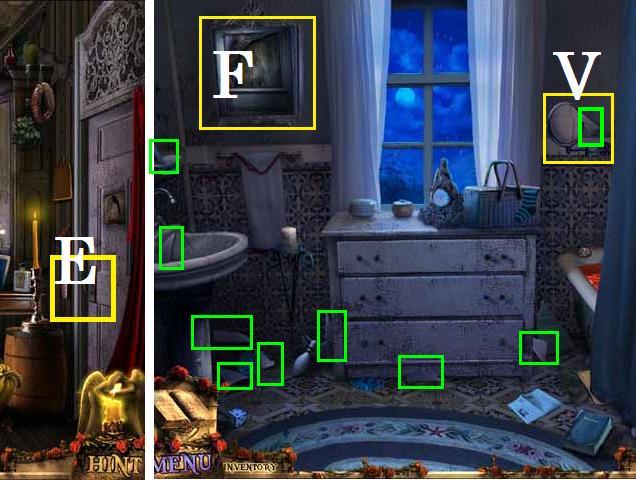
- Place the BATHROOM KEY into the lock (E) and turn it to open the door.
- Enter the bathroom.
- Unscrew the MIRROR (V) with the SCREWDRIVER.
- Pick up nine MIRROR SHARDS (green).
- Place all of the MIRROR SHARDS in the cabinet door (F).
- Click on the demonic symbols in the completed mirror to remember them.
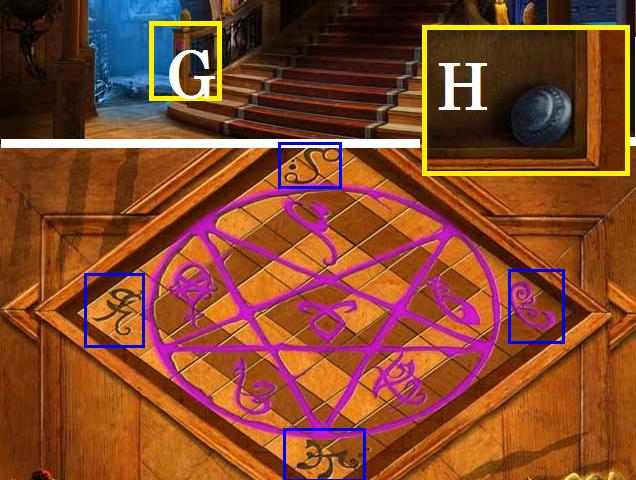
- Return to the stairway and zoom into the left pillar (G).
- Click on the four demonic symbols (blue) from the mirror.
- Unscramble the board as shown in the screenshot.
- Pick up the BATH HANDLE (H).
- Return to the bathroom.
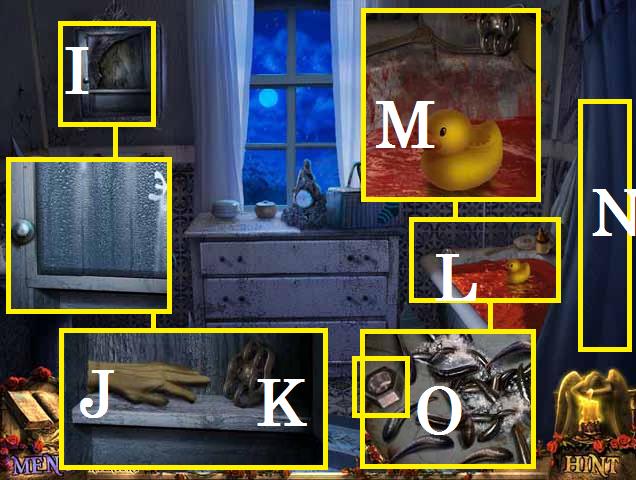
- Place the BATH HANDLE on the cabinet (I).
- Open the cabinet door; pick up the GLOVE (J) and VALVE (K).
- Open the curtain (N).
- Zoom into the bathtub (L).
- Place the VALVE.
- Using the GLOVE remove the rubber ducky plug (M).
- Close the window and zoom back into the bathtub; pick up the WASHER (O).
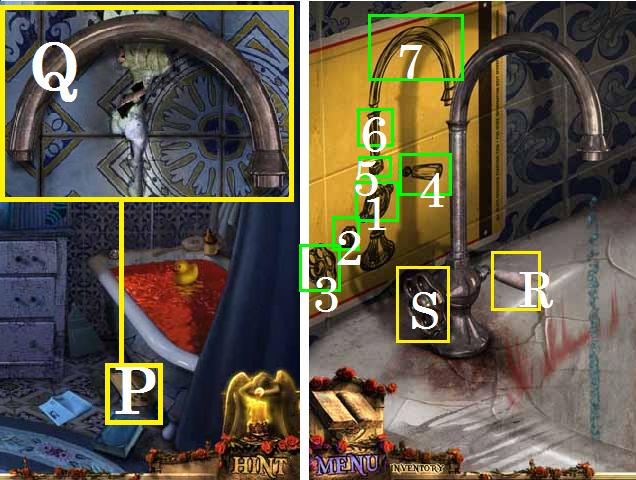
- Zoom into the directions (P).
- Move the directions to pick up the PIPE (Q).
- Break all the tiles away with the HAMMER to reveal a puzzle.
- Zoom back into the tub.
- Place the WASHER and pipe.
- Assemble the pieces in order 1-7 as shown in the screenshot.
- Pull the handle (R) and the VALVE (S).
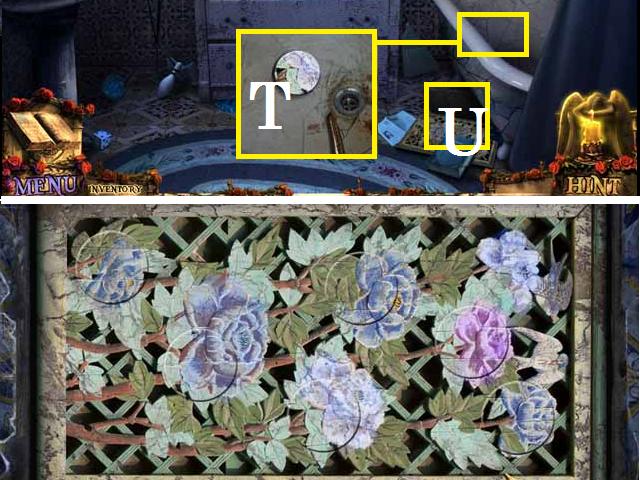
- Zoom into the drain.
- Pick up the BLOCK PART (T).
- Zoom back into the puzzle (U).
- Place the BLOCK PART and unscramble the puzzle as shown in the screenshot.
- You do not need to go down into the basement yet.
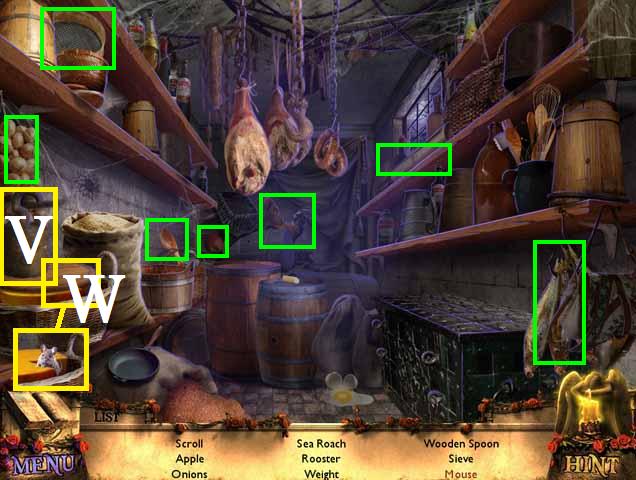
- Exit back to the kitchen.
- Zoom into the sparkles to play a HOS.
- Collect the weight (V).
- Move the board (W) to reveal the mouse.
- Receive the WEIGHT.
- Return to the study.
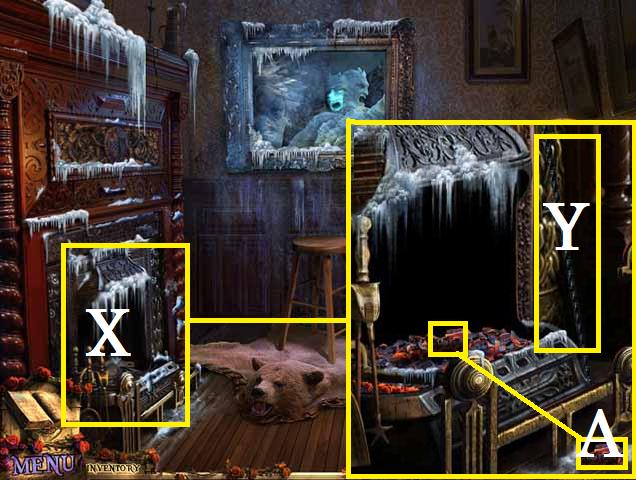
- Light the fireplace (X) with the LIT TORCH.
- Use the poker (Y) to knock out a hot coal.
- Pick up the COAL (A) with the FIRE IRON.
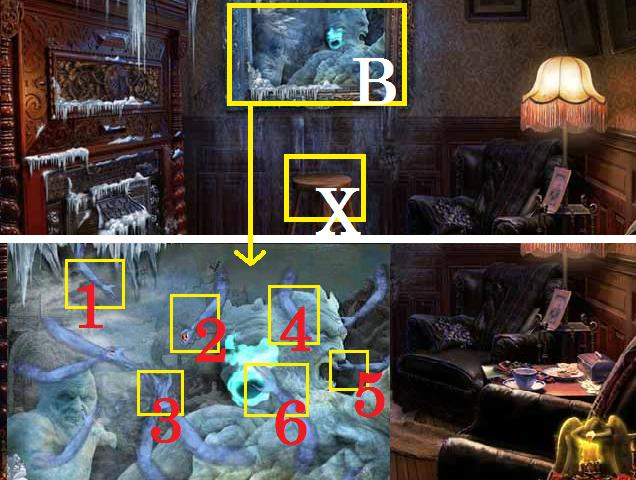
- Place the CHAIR (X) as shown in the screenshot.
- Place the COAL in the painting (B).
- Click on the arms in the sequence: 1 through 6.
- Receive the ICE.
- Return to the workshop.
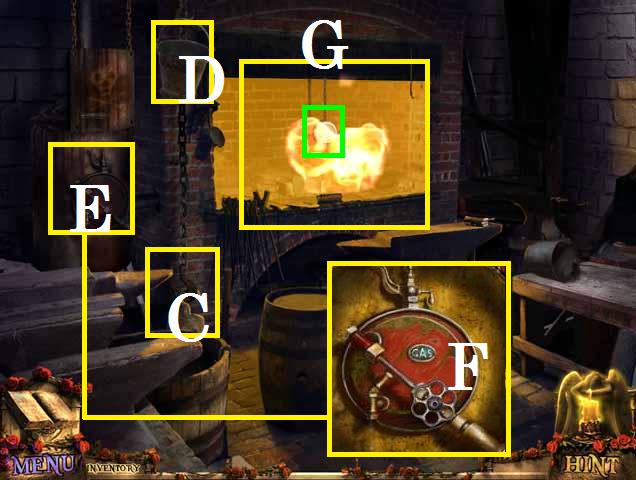
- Place the WEIGHT (C).
- Place the EMPTY BUCKET (D) under the valve (E).
- Spin the handle (F) and pick up the GAS.
- Place the ICE in the fire (G).
- Pick up the SEAL OF FIRE (green).
Chapter 4: The Seals of Water and Sun
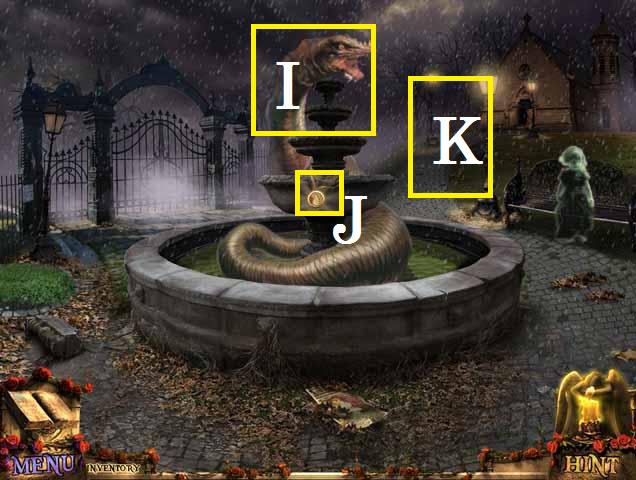
- Return to the fountain.
- Pour the GAS on the SNAKE (I) and light with the TORCH.
- Pick up the SEAL OF WATER (J).
- Move forward towards the church (K).
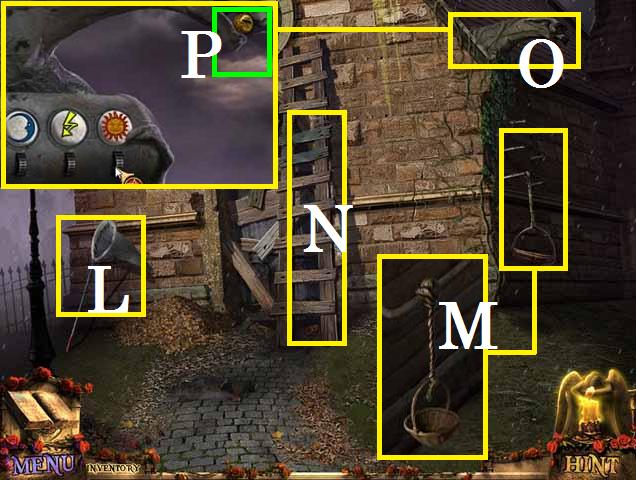
- Pick up the BUTTERFLY NET (L).
- Untie the BASKETS rope (M) and pick it up.
- Move the ladder (N) over to the gargle (O) and zoom in.
- Set the dials as shown in the screenshot. (HINT: the eyes light up when you have the right symbol.
- Pick up the TOADS EYE (P).
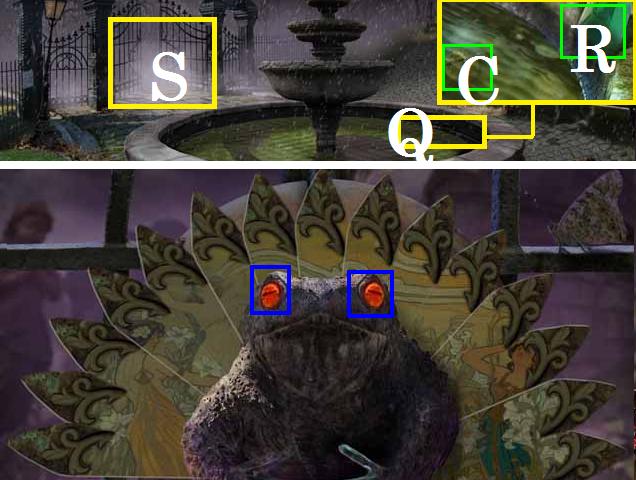
- Move back to the fountain and zoom in (Q).
- Pick up the PRISM (R).
- Using the BUTTERFLY NET, pick up the TOADS EYE (C).
- Fill the EMPTY BOTTLE with the water from the fountain to receive the POISON.
- Zoom into the gate (S).
- Place both TOADS EYES in the sockets (blue).
- Rearrange the fan pieces to create the picture shown in the screenshot. (Hint: the toads eyes flash red when a piece is placed correctly).
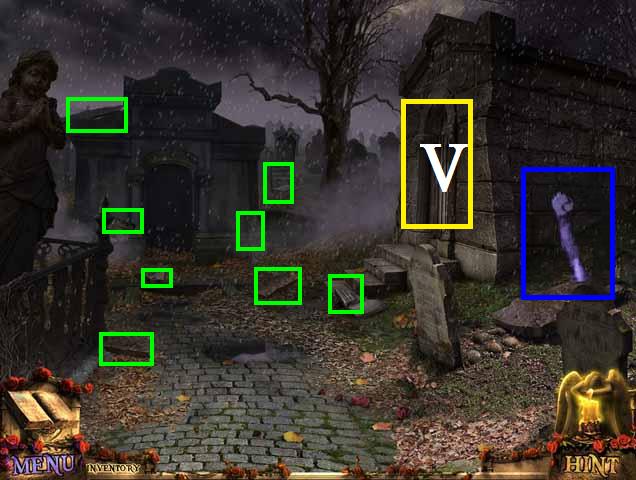
- Enter the graveyard.
- Click the HOLY CROSS over all of the ghost arms (blue) until they are all vanquished.
- Click on the right mausoleums door (V).
- Pick up the eight STONE SHARDS (green).
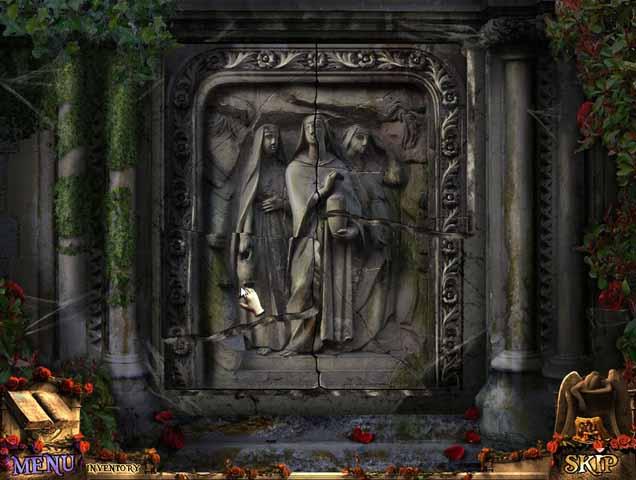
- Zoom back into the door and place all of the STONE SHARDS on the board.
- Arrange the STONE SHARDS as shown in the screenshot to play a HOS.
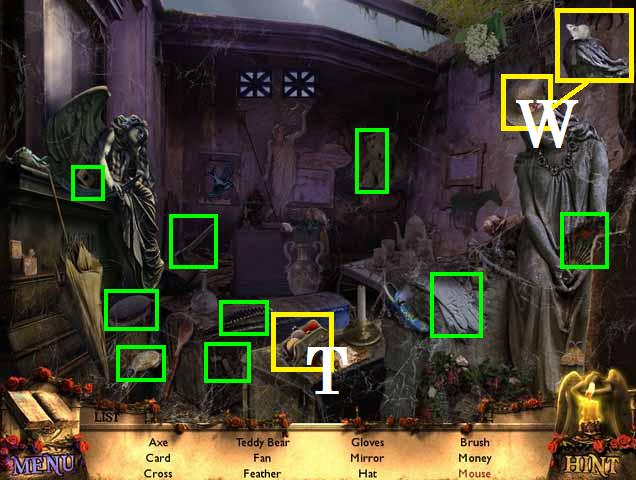
- Open the purse (T) to reveal the money.
- Pick up the hat (W) to reveal the mouse.
- Receive the SCRUB.
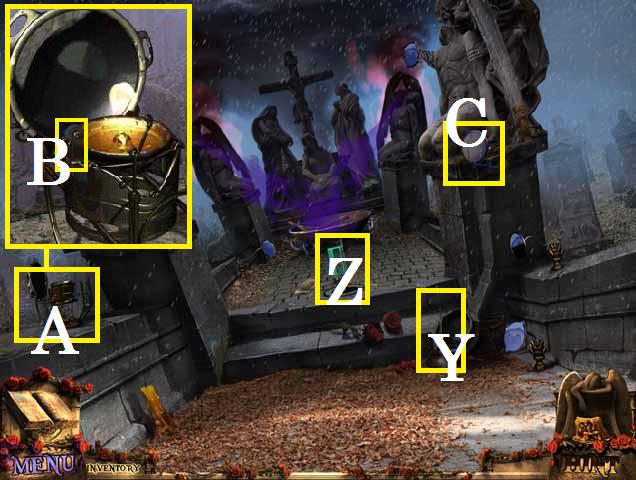
- Enter the far mausoleum.
- Pick up the OILER (Y).
- Place the PRISM (Z).
- Zoom into the reflector lamp (A).
- Place the first MIRROR and fill the lamp with the OILER.
- Click on the flint (B) to light the lamp.
- Place the MIRROR (with the arm) in the pillar (C).
- Exit back to the fountain and take the path to the church.
- Move the ladder back to the window.
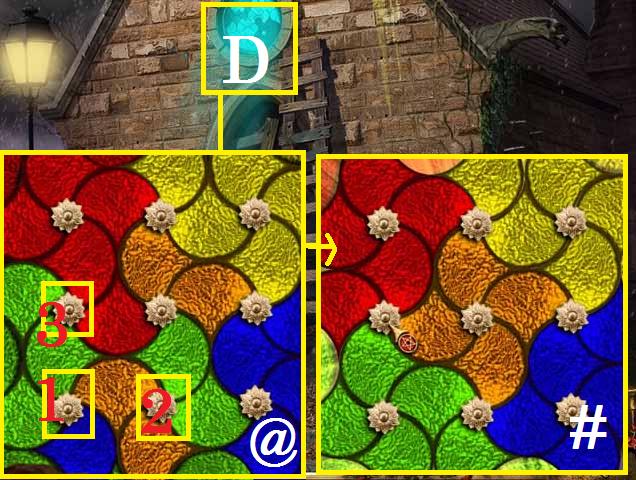
- Clean the window (D) with the SCRUB.
- The starting positions may be different.
- From the starting positions shown in the screenshot (@) hit the buttons in the following sequence (1, 1, 1, 2, 2, 3, 3, and 3) to get the arrangement shown in the screenshot (#).
- Notice the vine that the light shines on.
- Return to the graveyard.
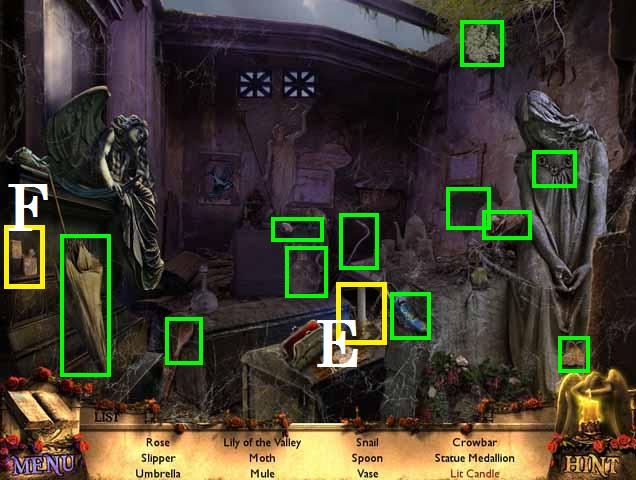
- Zoom into the sparkles to play a HOS.
- Light the candle (E) with the lighter (F).
- Receive the CROWBAR.
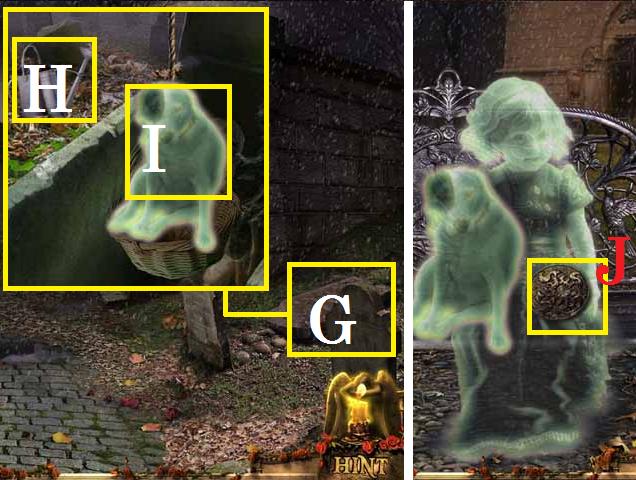
- Zoom into the grave (G).
- Pick up the WATERING CAN (H).
- Move the stone with the CROWBAR.
- Place the BASKET in the grave.
- Pick up the GHOST DOG (I).
- Exit back to the fountain.
- Give the GHOST DOG to the little girl.
- Pick up the MEDALLION (J).
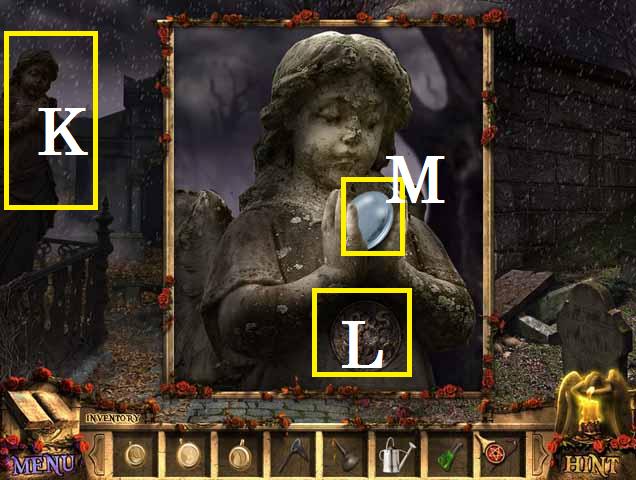
- Return to the graveyard.
- Zoom into the statue (K).
- Place the MEDALLION (L).
- Pick up the LENS (M).
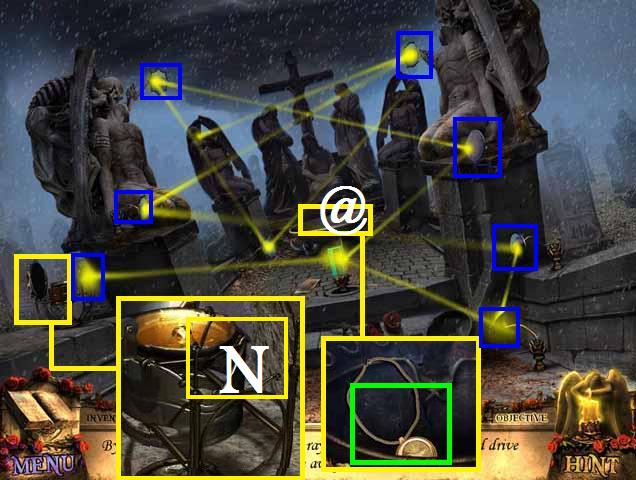
- Enter the rear mausoleum.
- Zoom back into the reflector lamp and place the LENS (N).
- Position the mirrors (blue) as shown in the screenshot.
- Zoom into the urn (@).
- Pick up the SEAL OF SUN (green).
Chapter 5: The Final Exorcism
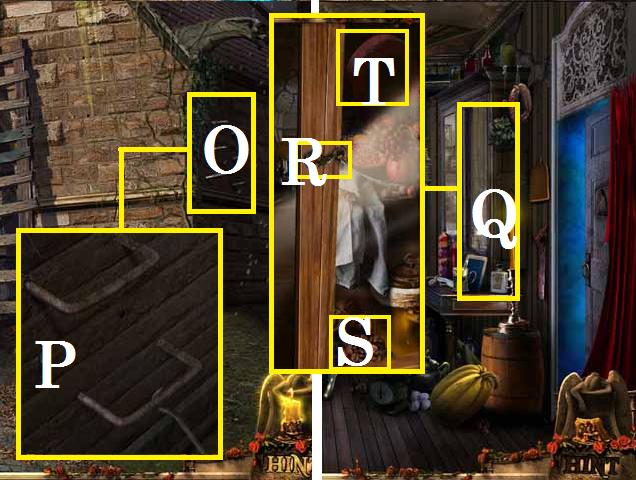
- Return to the church.
- Zoom into the side (O).
- Remove the two steps (P) with the CROWBAR.
- Return to the mansion and enter the kitchen.
- Zoom into the case (Q).
- Use the OILER on the latch (R) and open the case.
- Pick up the COFFEE BEANS (S) and the MAGNET (T).
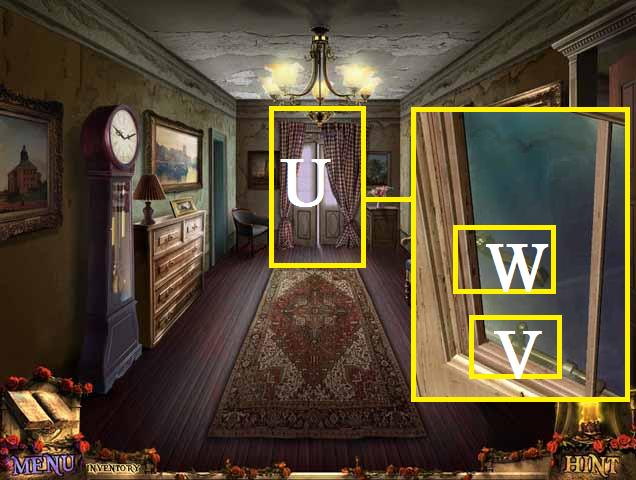
- Go back to the hallway at the top of the stairs.
- Zoom into the far door (U).
- Open the latch (V) with the MAGNET.
- Push up the glass and turn the handle (W).
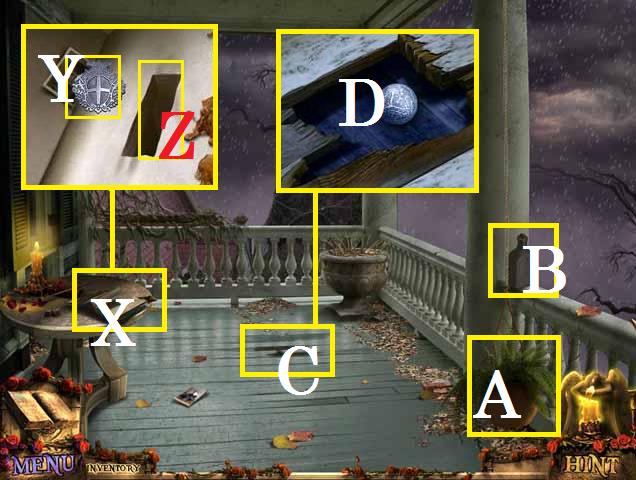
- Enter the balcony.
- Zoom into the book (X).
- Retrieve the EMBLEM (Y) using the MAGNET over the cutout (Z).
- Use the WATERING CAN on the plant (A).
- Pick up the ALCOHOL (B).
- Pry up the boards (C) with the CROWBAR.
- Pick up the METAL BALL (D).
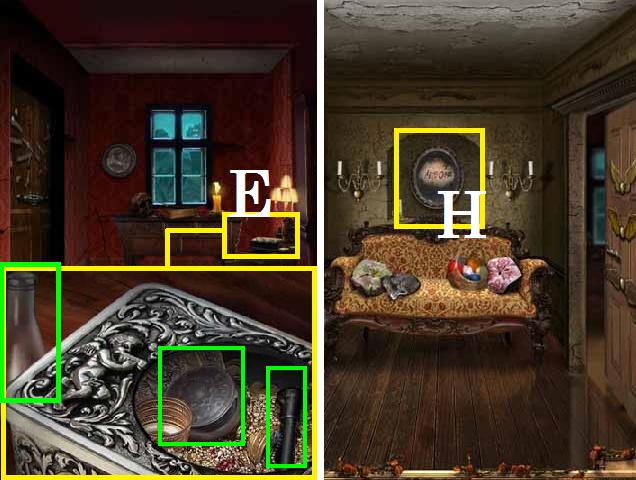
- Return to the master bedroom.
- Open the box (E) by placing the EMBLEM on its lid.
- Pick up the POWDER BOX (green), LEVER (green) and the EMPTY VIAL (green).
- Exit back one scene.
- Drop the POWDER BOX over the portrait (H).
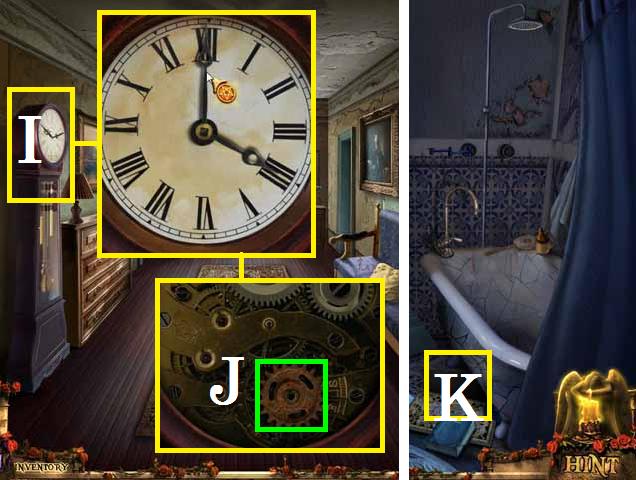
- Exit back one more scene to the hallway.
- Zoom into the clock (I).
- Set the hands to 4:00 as shown in the screenshot.
- Pick up the GEAR (J).
- Return to the bathroom.
- Go down the grate (K) to the basement.
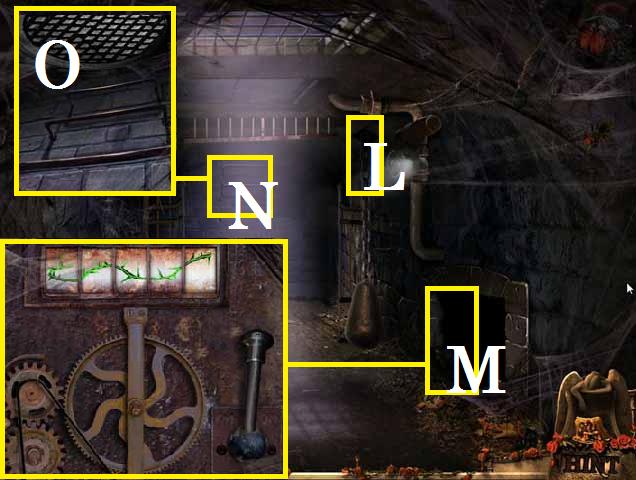
- Use the OILER on the weight (L).
- Zoom into the mechanism (M).
- Place the LEVER and GEAR as shown in the screenshot.
- Set the dials to make the vine as shown in the screenshot and pull the LEVER.
- Place the STEPS on the back wall (N).
- Open the hatch (O) with the CROWBAR.
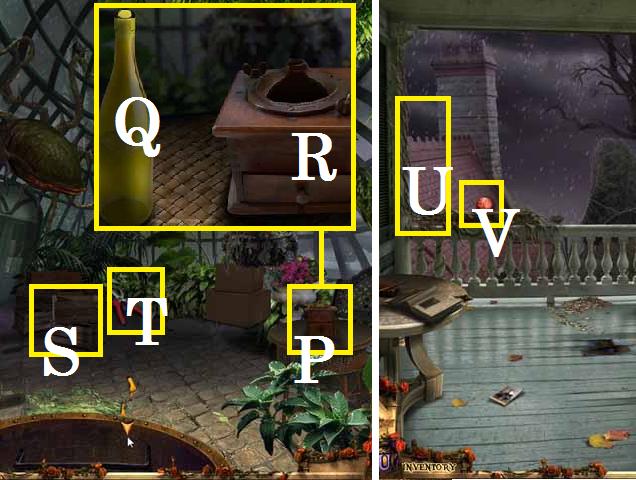
- Go through the hatch to enter the greenhouse.
- Zoom into the table (P).
- Pick up the WINE (Q) and place the COFFEE BEANS in the grinder (R).
- Move the boxes (S).
- Pick up the HEDGE SHEARS (T).
- Return to the balcony.
- Cut the old hammock (U) with the HEDGE SHEARS.
- Pick up the METAL BALL (V).
- Return to the master bedroom.
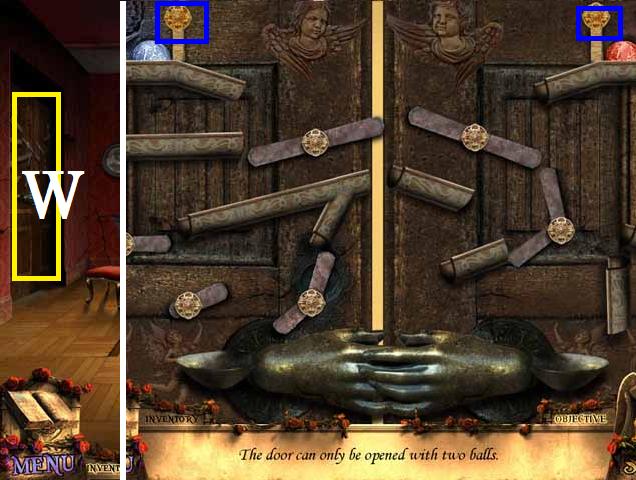
- Zoom into the door (W).
- Place both METAL BALLS as shown in the screenshot.
- Arrange all of the paddles as shown in the screenshot.
- Click on the two ball release paddles (blue) to unlock the door.
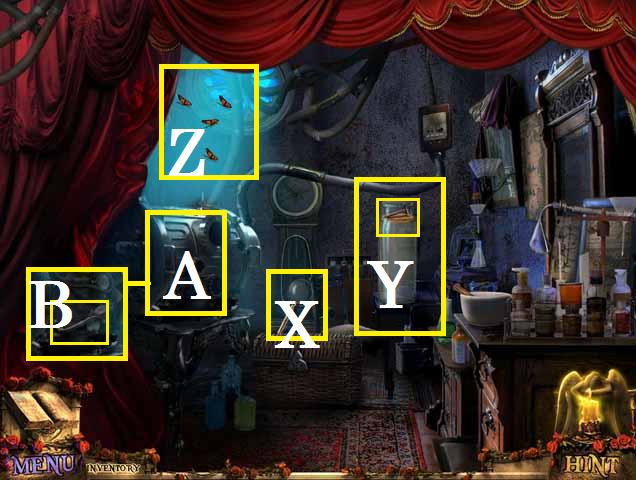
- Enter the lab.
- Pick up the MAGNIFYING GLASS (X).
- Pour the WINE in the cylinder (Y) and pick up the HATCH KEY.
- Collect the BUTTERFLIES (Z) with the BUTTERFLY NET.
- Remove the panel (A) with the crowbar.
- Pick up the COFFEE GRINDER HANDLE (B).
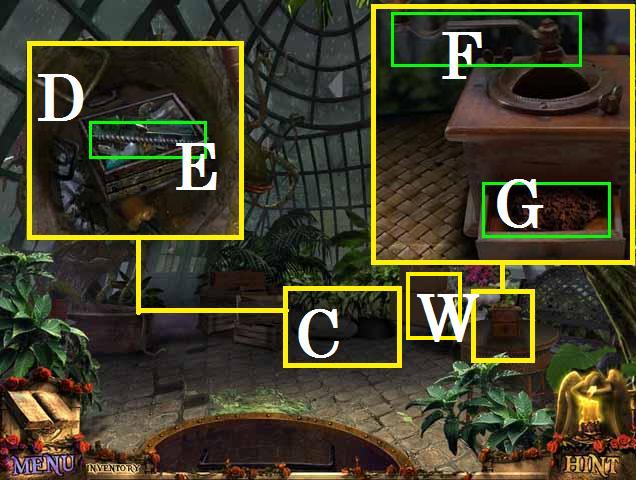
- Return to the greenhouse through the basement.
- Move the boxes (W).
- Open the hatch (C) with the HATCH KEY.
- Pry the box top (D) off with the CROWBAR.
- Pick up the DISTILLER (E).
- Place the COFFEE GRINDER HANDLE (F).
- Crank the COFFEE GRINDER HANDLE and pick up the COFFEE (G).
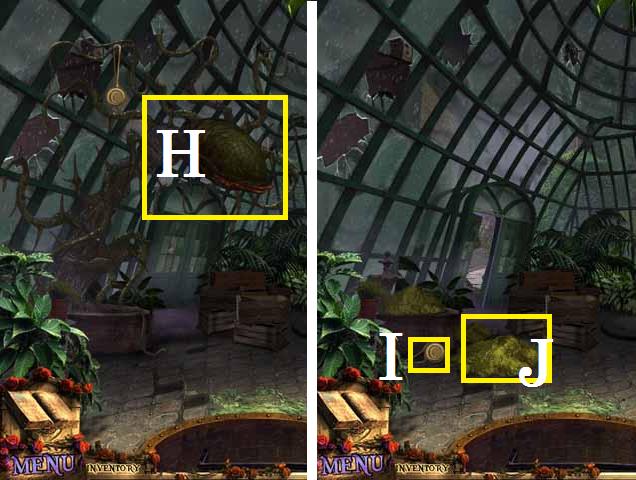
- Feed the BUTTERFLYS to the plant (H) and finish it off with the POISON.
- Pick up the SEAL OF MOON (I) and the SULFUR (J).
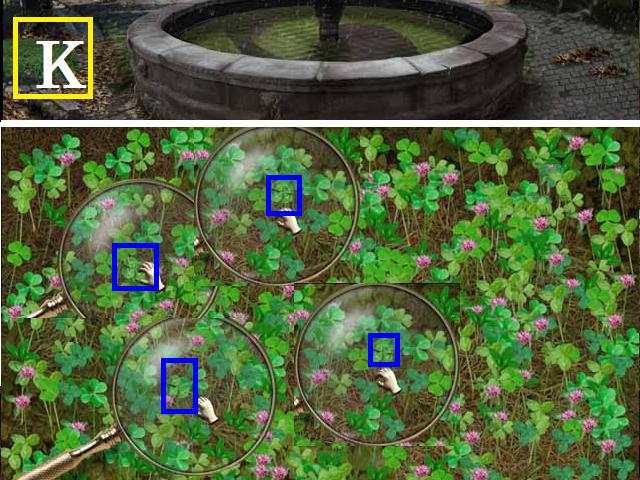
- Return to the fountain.
- Zoom into the clover patch (K).
- Using the MAGNIFYING GLASS, pick up the four (blue) four-leaf CLOVERS.
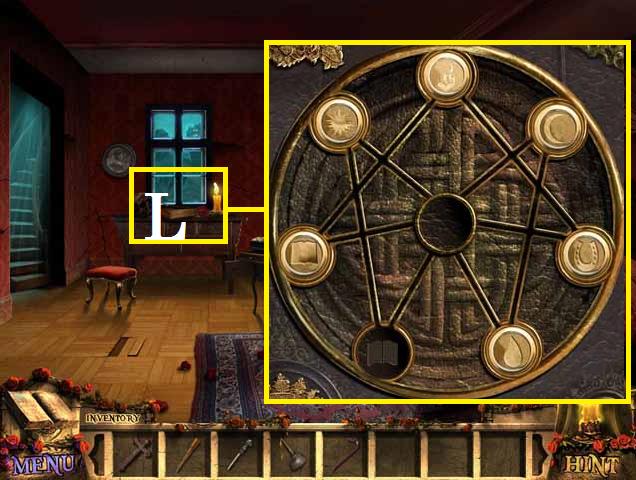
- Return to the master bedroom.
- Zoom into the seal book (L).
- Place all of the SEALS as shown in the screenshot.
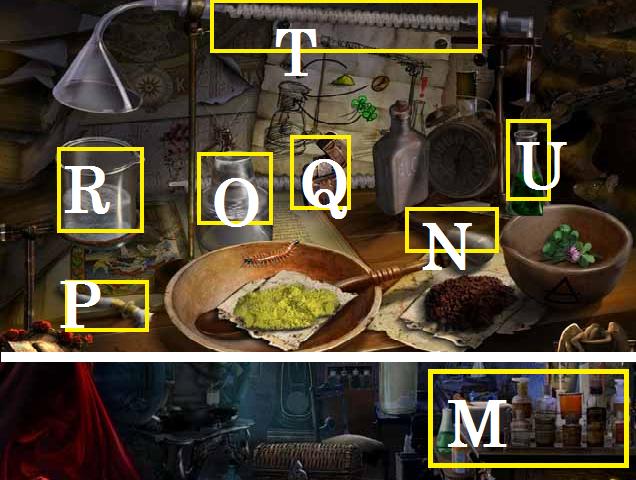
- Take the stairs to the lab.
- Zoom into the table (M).
- Place the COFFEE, SULPHUR, CLOVERS, DISTILLER, and ALCOHOL as shown in the screenshot.
- Grind the CLOVERS with the pistol (N).
- Pour the ALCOHOL in the burner (O).
- Place the wick (P) in the burner and light it with the lighter (Q).
- Pour the SULFUR, COFFEE, and ground CLOVERS in the beaker (R).
- Place the DISTILLER (T).
- Pick up the ELIXER (U).
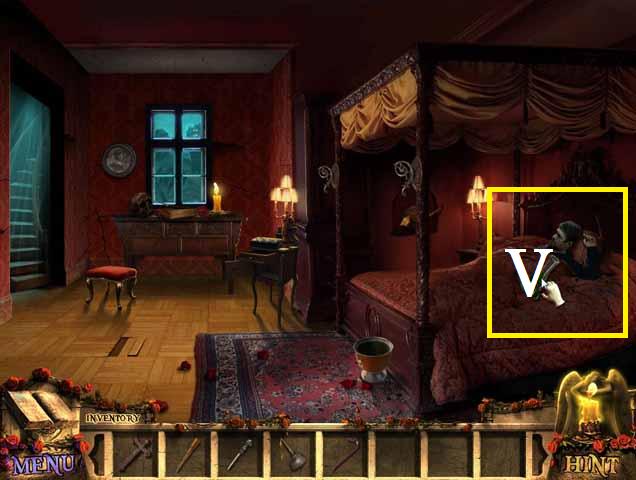
- Return to the master bedroom and give to Garret (V).
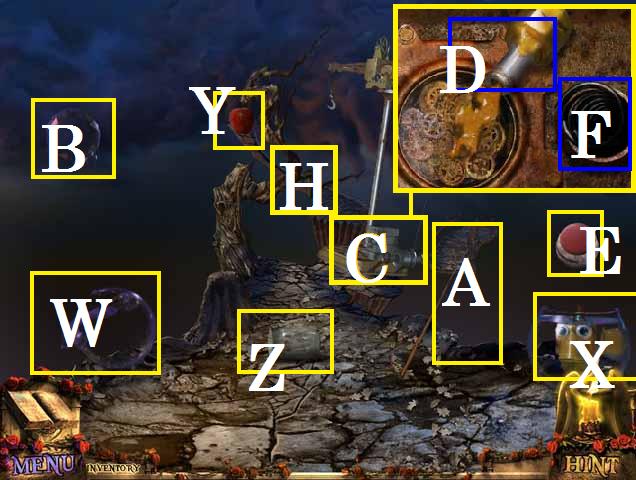
- Place the fishbowl (W) over the fish (X).
- Pick up the BUTTON (E).
- Place the apple (Y) in the jar (Z).
- Pick up the JAR OF ANTS (Z).
- Using the FISHING ROD (A) move the crystal bubble (B) closer.
- Zoom into the mechanism (C).
- Pour the BOTTLE OF ANTS on the glue (D).
- Place and push the BUTTON (F).
- Pick up the GLUE.
- Go up the ramp (H).
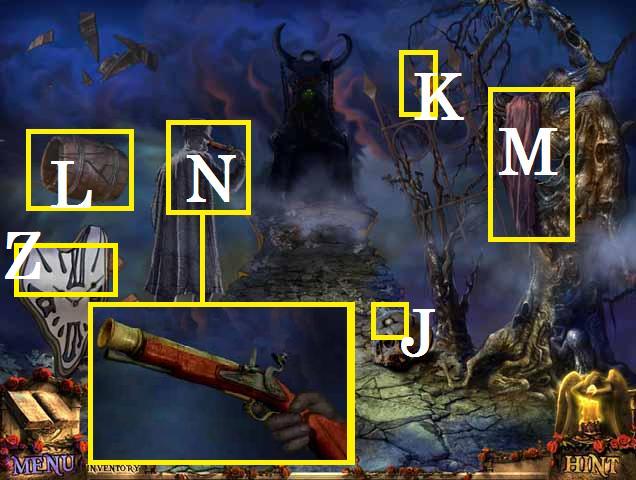
- Pry the BULLET (J) out with the SHARP SPIKE (K).
- Click on the clock (Z).
- Pick up the GUN POWDER (L).
- Pick up the RAG (M).
- Zoom into the PISTOL (N).
- Place the GUN POWDER followed by the BULLET in the PISTOL and pick it up.
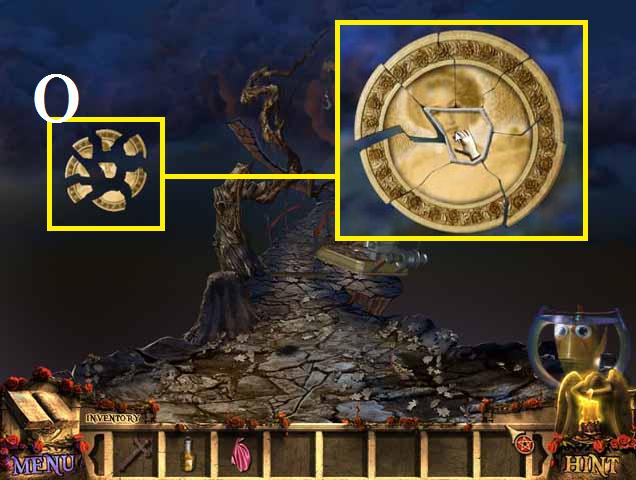
- Exit back one scene.
- Shoot the crystal bubble with the PISTOL.
- Zoom into the broken shards (O).
- Place the GLUE on the center piece and drag the other pieces together.
- Wipe the repaired plate with the RAG.
- Go back up the ramp.
- The SEAL OF KNOWLEDGE will be added to your inventory.
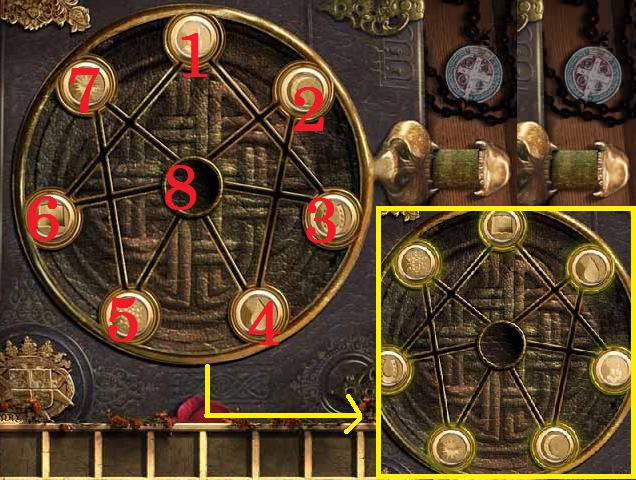
- Zoom back into the seal book and place the last SEAL.
- One solution is to click on the circles (Note: not the SEALS only the stationary location) in the following sequence: 4, 2, 8, 3, 1, 6, 8, 5, 7, and 8.
- Congratulations you have imprisoned Belphegor once again and saved your mentor!
Created at: 2011-12-21

