Walkthrough Menu
- General Tips
- Chapter 1: F.A.C.E.S
- Chapter 2: Jailbreak
- Chapter 3: Consultation Center
- Chapter 4: New Floors
- Chapter 5: Way Out
- Chapter 6: Final Stretch
General Tips
- This is an Interactive Hidden Object Game.
- Click on Options for Sound, Music, Custom Cursor, Full and Wide Screen Options.
- When starting a new game you can choose between casual or advanced mode.
- In Casual Mode you get a tutorial, the places of interest have a subtle single glint and you get fast hint and skip puzzle recharges.
- In Advanced Mode there is no tutorial, no glint in areas of interest and a slow hint and skip puzzle recharge.
- Move your cursor around each scene to find interactive areas by watching the cursor change.
- The cursor will change to an eyeball when you can look closer at something.
- The cursor will change to a hand when you can pick something up.
- Random clicking in a Hidden Object Scene will cause you to lose control of your cursor for a few seconds.
- Inventory items are marked in cyan throughout the walkthrough.
- The game has many areas to explore and is not linear. Since the Hidden Object Scenes are triggered by other actions you may or may not have access to them when the walkthrough states depending on what you have done prior.
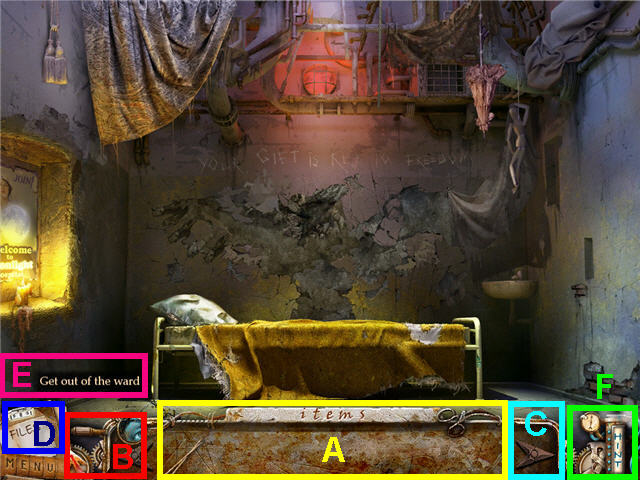
- The inventory bar (A) will hide when not in use. You can access it by moving your cursor down the bottom of the screen in the center.
- You can lock the inventory bar in place by moving the lever (B) on the upper left of the bar.
- You can scroll through your inventory by using the arrows (C) on the inside of the left and right of the inventory bar.
- Move your cursor over the Files (D) in the lower left without clicking on it to see your current tasks (E).
- Click on Files (D) in the lower left to see your journal.
- Clint on Hint (F) in the lower right to get a hint for both location of hidden objects and a nudge in the right direction in regular scenes.
- Click anywhere outside the pop-up boxes to close them.
- To exit, click on Menu in the lower right and then click on exit to main menu.
Chapter 1: F.A.C.E.S
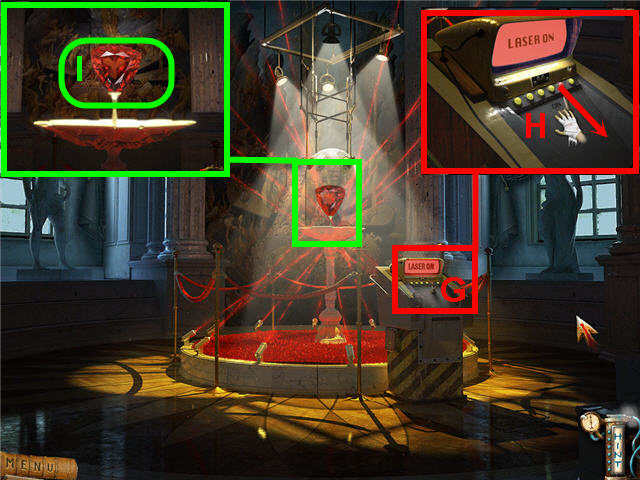
- Click on the control panel (G) to get a close-up.
- Switch the lever (H) to the off position.
- Click on the ruby to get a close-up and take the ruby (I).
- Click on the right side of the room to travel to the bed area.
- Click on the lower left corner of the blanket near the floor to move it.
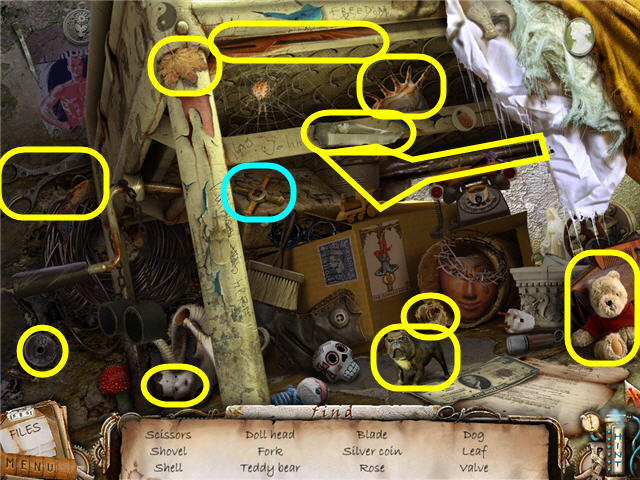
- Click on the newly exposed area under the bed to activate a Hidden Object Scene.
- Find the items listed and get a VALVE.
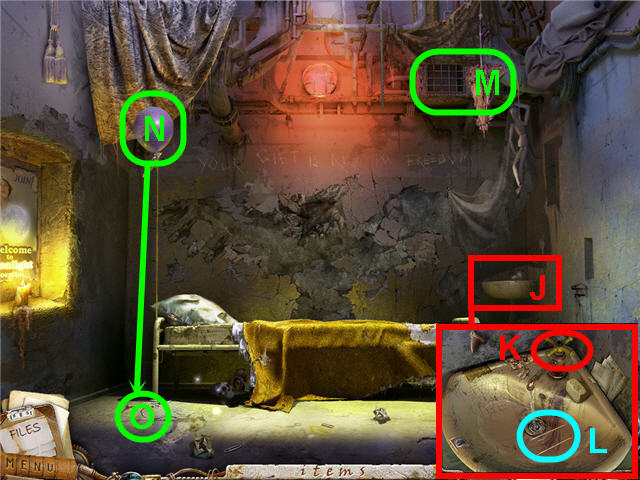
- Click on the sink (J) in the corner to get a close-up.
- Use the VALVE on the faucet (K) and take the CHOPSTICKS (L).
- Click on the vent (M) and note you need a ladder.
- Click on the balloon (N) to pop it and then click on the note (O) that falls out of it. Be sure that the inventory bar is down or you will not be able to see the note.
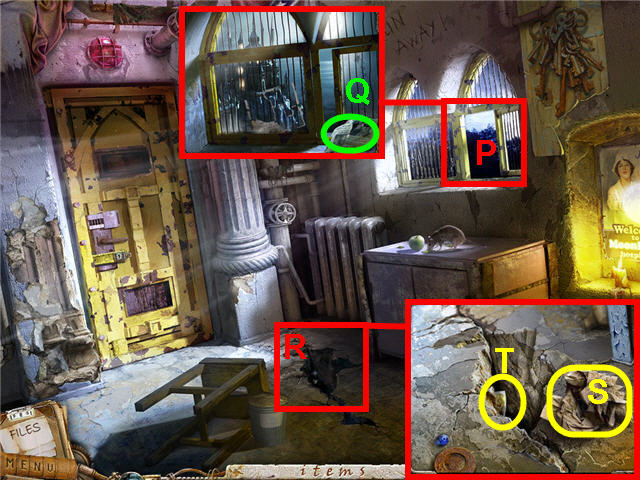
- Click on the window (P) and note the newspaper flying in the window.
- Click on the paper (Q) and read the news.
- Click on the crack (R) in the floor to get a close-up.
- Click on the crumbled papers (S) to read the note.
- Use the CHOPSTICKS on the photo (T) in the crack and automatically teleport home.
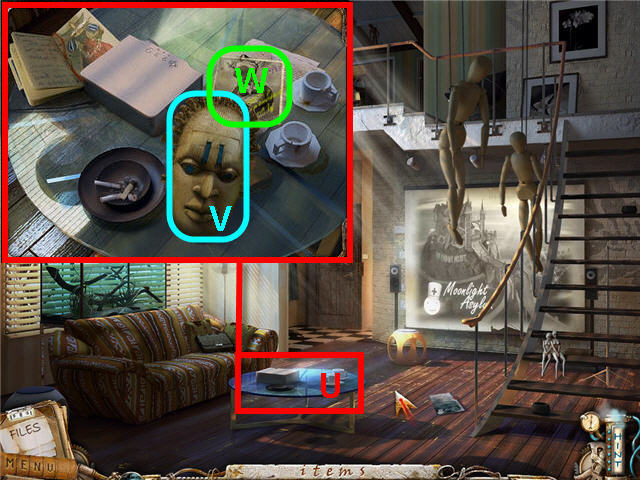
- Click on the coffee table (U) to get a close-up.
- Take the AFRICAN MASK (V).
- Click on the photo (W) and click on the numbers in the corner to add to your files.
- Note the remote needs batteries and exit the close-up.
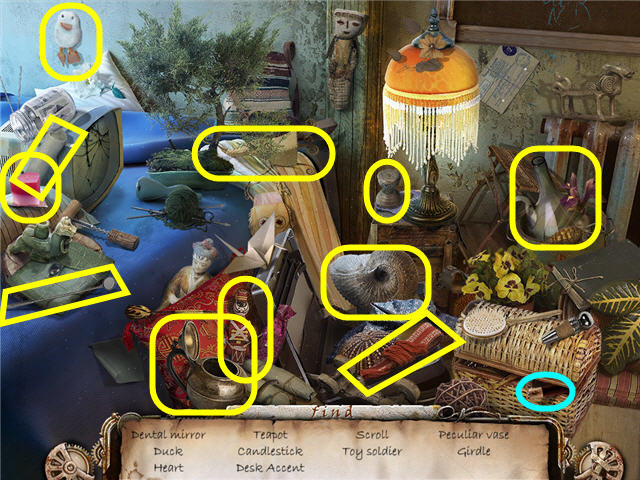
- Head up the stairs.
- Click on the bed to the left to access a Hidden Object Scene.
- Find the items listed and get BATTERY 1 of 2.
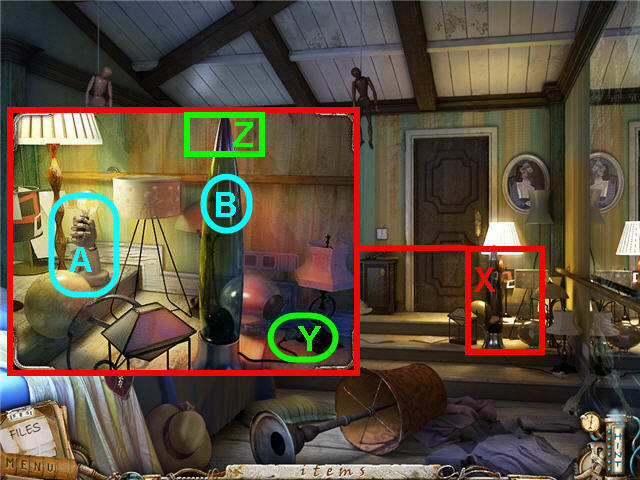
- Click on the lava lamp area (X) on the right of the room.
- Click on the plug (Y) to automatically plug in the lamp.
- Click on the metal top of the lamp (Z) to remove it and take GLASS EYE 1 of 4 (B) from inside the lamp.
- Click on the hand (A) two times to get a DUMMY'S HAND.
- Click on the door in the back of the room to enter the bathroom.
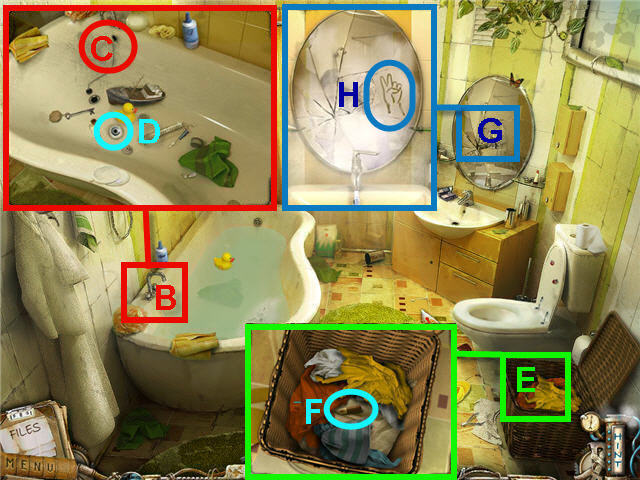
- Click on the tub (B) to get a close-up.
- Click on the chain on the plug (C) to drain the water in the tub.
- Take GLASS EYE 2 of 4 (D).
- Click on the hamper (E) on bottom right of room.
- Click in the hamper multiple times until you expose a battery.
- Take BATTERY 2 of 2 (F).
- Click on the mirror (G) to get a close-up.
- Click on the faucet to steam up the mirror and click on the hand sign (H) to add it to your files.
- Open the cabinet under the sink and click on the shelf to access a Hidden Object Scene.
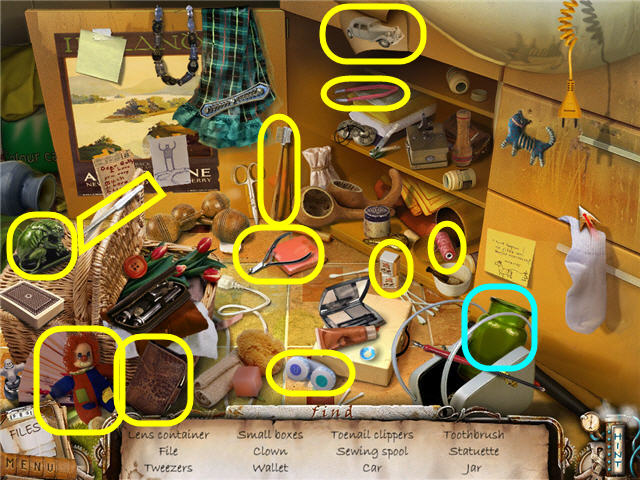
- Find the items listed and get a JAR.
- Exit the bathroom.
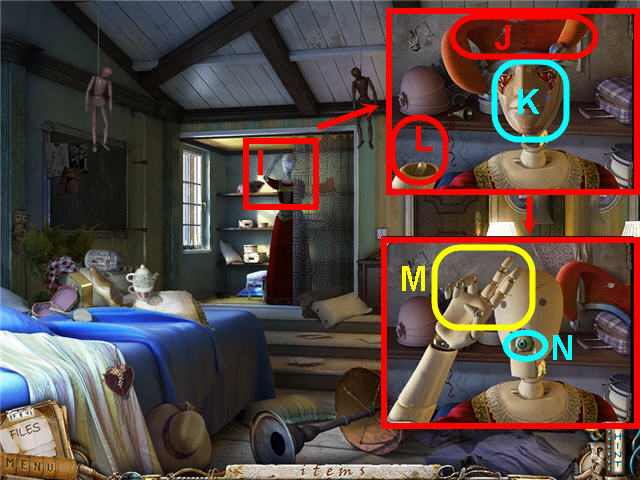
- Click on the mannequin (I) behind the curtain to get a close-up.
- Remove the jester hat (J) and take the VENETIAN MASK (K).
- Place the DUMMY'S HAND on the MANNEQUIN (L).
- Duplicate the hand symbol you found on the bathroom window by clicking on the thumb, the pinky and the ring finger to fold them over. See screenshot (M) for solution.
- Take GLASS EYE 3 of 4 (N) from the opened mouth.
- Exit the room via the bottom of the screen.
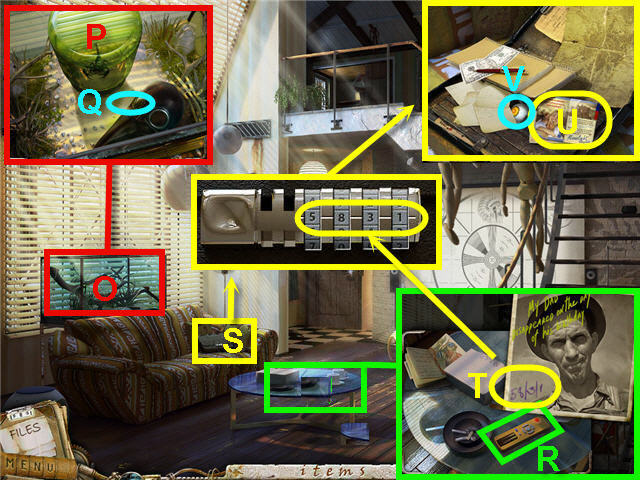
- Click on the terrarium (O) to get a close-up.
- Use the JAR on the scorpion (P) and take the MASK WITH BEAK (Q).
- Click on the coffee table to get a close-up.
- Place the 2 BATTERIES in the remote (R).
- Click on the remote to roll up the projection screen.
- Click on the briefcase (S) on the couch.
- Enter the code found on the photo from the coffee table (T); 5831.
- Click on the briefcase again after opening it and click on the moonlight asylum brochure (U).
- After the cutscene, take GLASS EYE 4 of 4 (V).
- Click on the wall behind the projector screen.
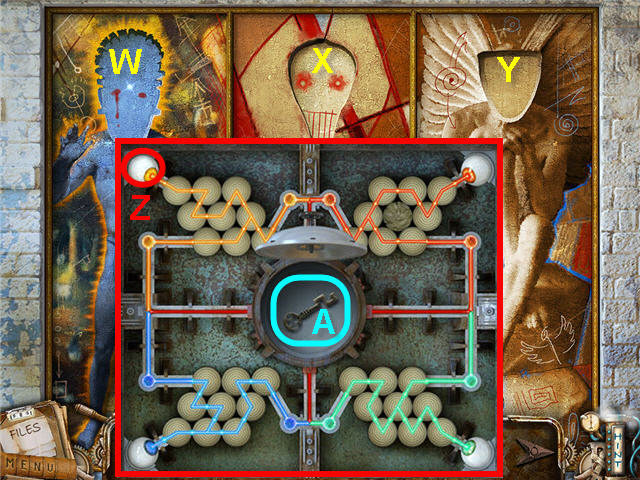
- Place the AFRICAN MASK on the left (W), the MASK WITH BEAK in the center (X), and the VENETIAN MASK on the right (Y).
- Click on the puzzle to get a close-up and place the 4 GLASS EYES anywhere on the puzzle (Z) and they will automatically place themselves.
- The goal is to create a continuous circuit in each of the 4 corners by clicking on each sphere to rotate them. See screenshot for solution.
- Take the SKELETON KEY (A) from the center when complete.
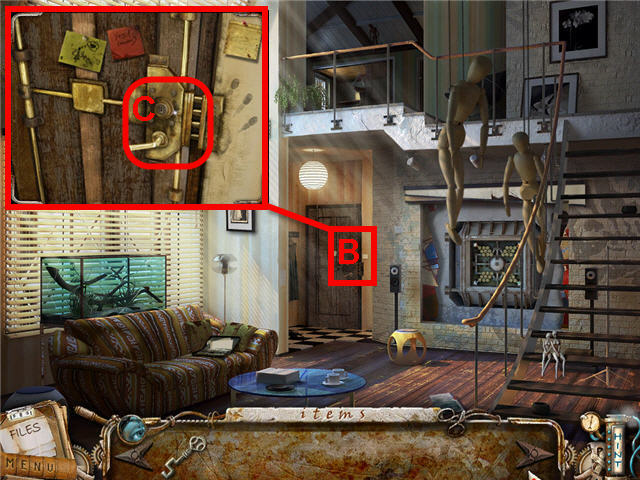
- Click on the door to the left under the stairs (B) to get a close-up.
- Use the SKELETON KEY on the lock (C) and return to the asylum.
Chapter 2: Jailbreak
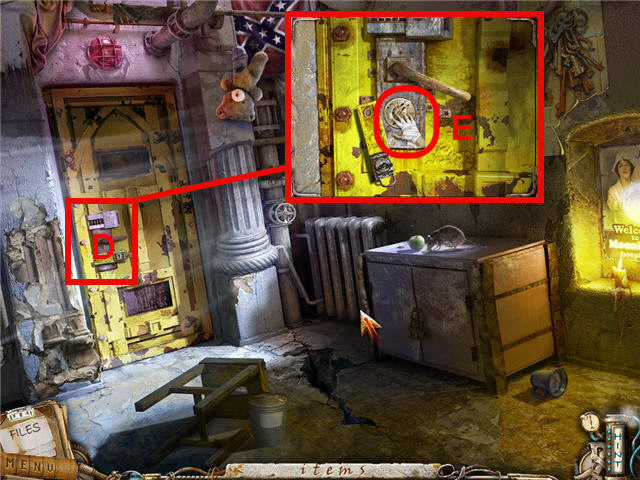
- Click on the door (D) to get a close-up.
- Use the SKELETON KEY on the lock and click on the center (E) to activate a lock puzzle.
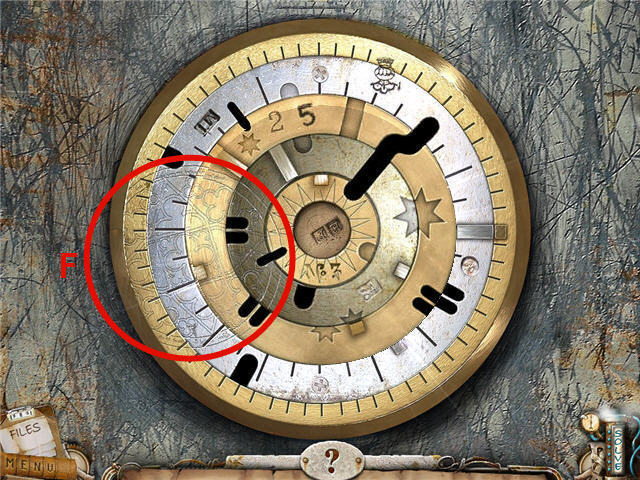
- The goal is to rotate the rings to complete the design (F) that you see started on the outer ring.
- Turning some of the rings will turn other rings.
- The solution is; turn the 1st ring from the center so that the writing is facing the bottom.
- Turn ring 2 from the center to continue on the pattern on the left.
- Turn the 3rd ring from the center to continue on the pattern on the left.
- Adjust the 2nd ring from the center again and then the 4th ring from the center to complete the pattern and the lock puzzle.
- See screenshot for solution.
- Exit the room to get to the hall.
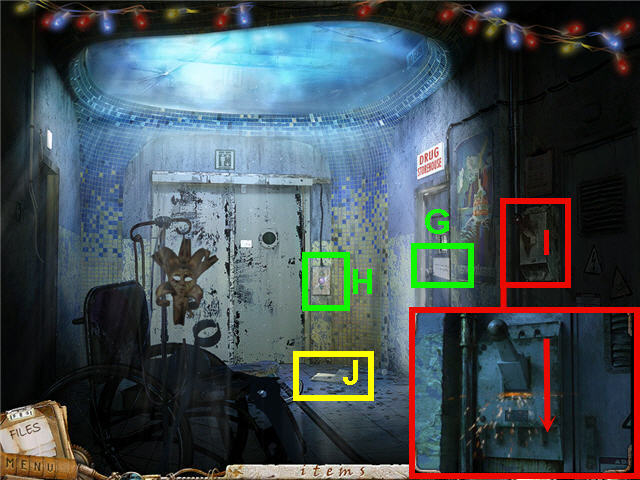
- Click on the drug storehouse door (G) to get a close-up and then again on the sign on the door to get a file update.
- Click on the elevator button (H) to get a close-up and push the button to open the door.
- Click on the lever (I) on the right to get a close-up and click the lever down.
- Click on the clipboard (J) on the floor and read it.
- Click on the wheelchair to access a Hidden Object Scene.
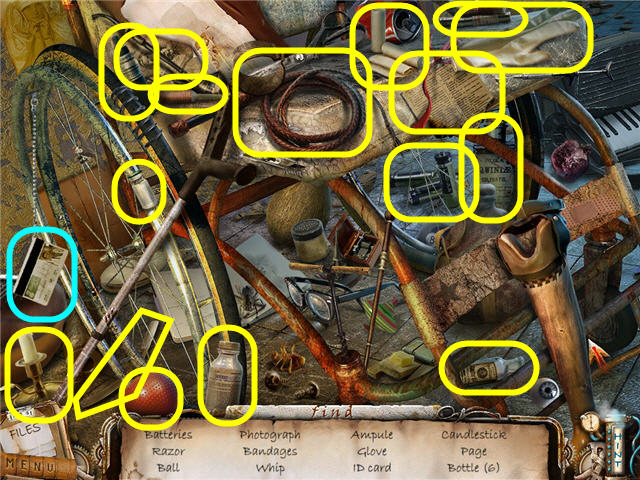
- Find the items listed and get an ID CARD.
- Enter the elevator straight ahead.
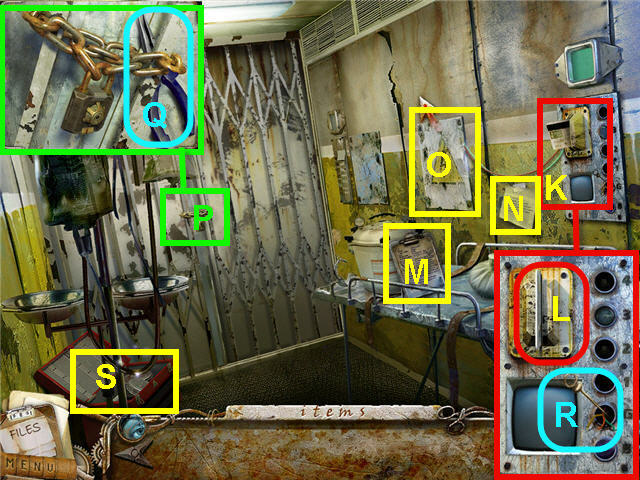
- Click on the elevator floor panel (K) on the right and use the ID card on the card swiper (L).
- Click on the clipboard (M) and read about the patient.
- Click on the note (N) taped on the wall to get a file update.
- Click on the electrical box (O) and note you need a screwdriver.
- Click on the lock (P) on the elevator gate and take the PLIERS (Q); note that you need something slender and oily.
- Click on the elevator floor panel (K) and use the PLIERS to take the PIN (R).
- Click on the tool chest (S) to access a Hidden Object Scene.
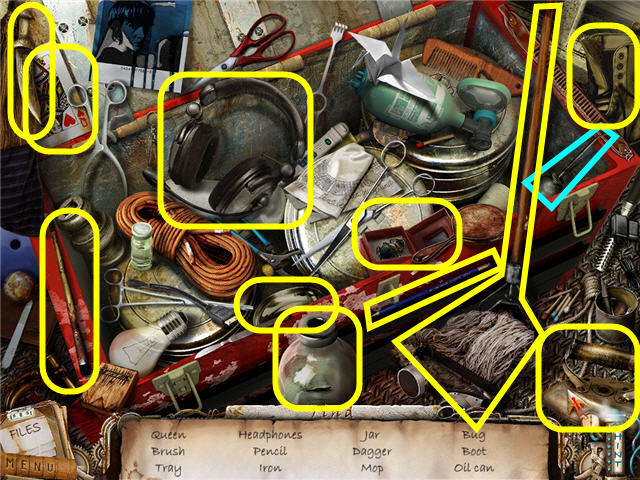
- Find the items listed and get an OIL CAN.
- Click on the lock on the elevator gate and use the OIL CAN on it and then the PIN.
- Click on the lock to open it.
- Click on the elevator floor panel and press the 3rd floor.
- Exit the elevator.
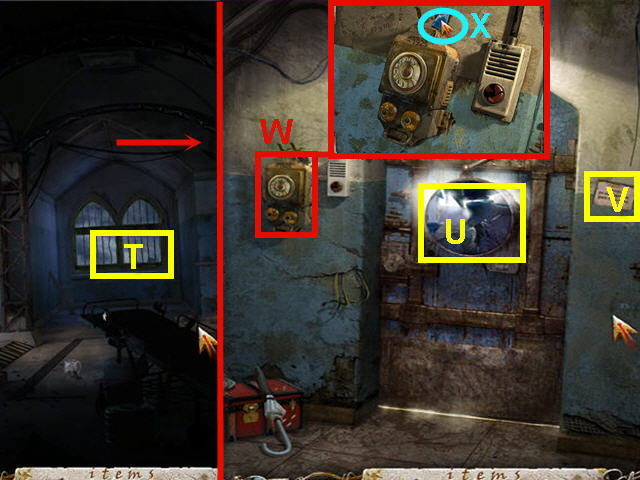
- Click on the window (T) straight ahead and note the handle is missing and there is a photo outside.
- Head down the hall to the right.
- Click on the glass (U) in the door and note there are pieces missing.
- Click on the note (V) to get a file update.
- Click on the broken phone (W) and take GLASS SHARD 1 of 4 (X).
- Click on various parts of the phone and note you need tools to remove them.
- Exit the area via the bottom of the screen one time and head into the X-Ray room to the left.
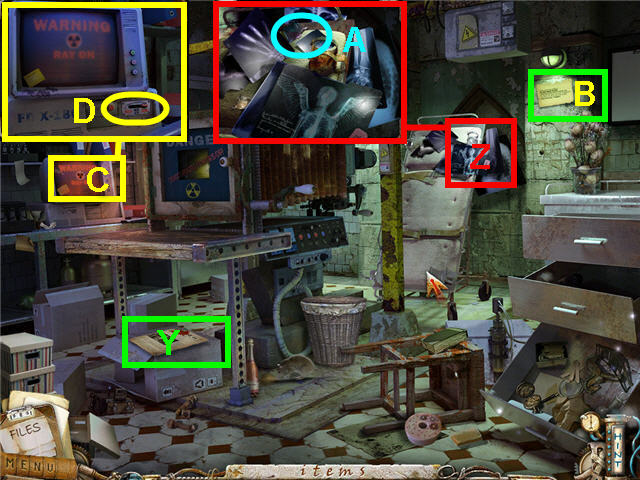
- Click on the newspaper article (Y) and read about Icarus.
- Click on the X-rays (Z) on the gurney and take GLASS SHARD 2 of 4 (A).
- Click on the note (B) on the wall.
- Click on the X-Ray monitor(C) on the left and flip the lever (D) on the bottom right to the off position to trigger a puzzle.
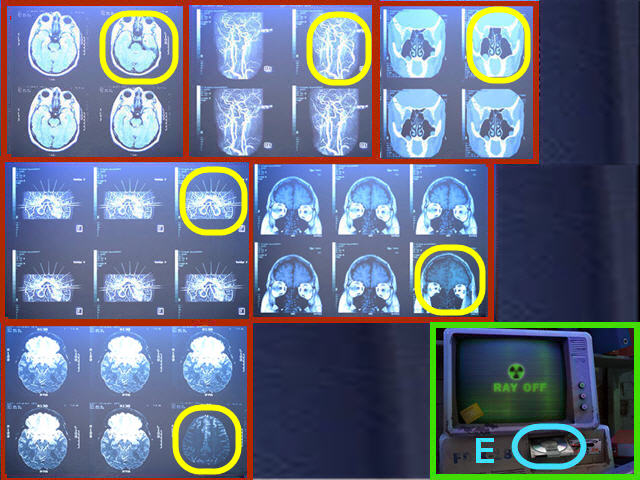
- The goal is to click on the X-ray in each set that does not belong.
- You can check your progress on the bar along the top.
- The X-Rays are random, so yours may be different from mine. See screenshot for our solution.
- Take the DATA DISK (E).
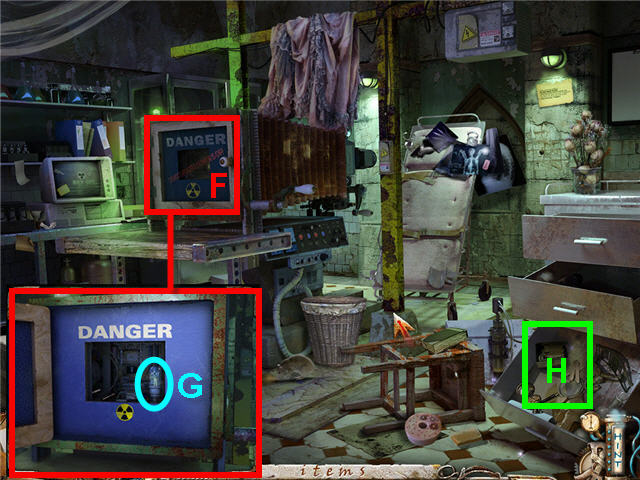
- Click on the X-Ray machine (F) to get a close-up.
- Click on the knob to open the X-Ray machine; take the 3rd FLOOR FUSE (G).
- Click on the opened drawer (H) to the right to access a Hidden Object Scene.
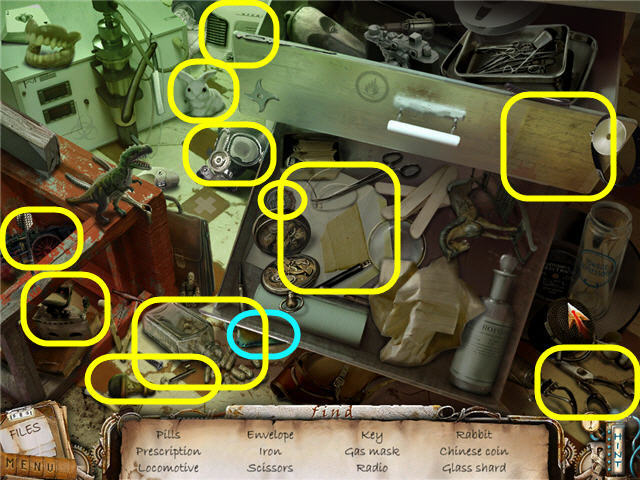
- Find the items listed and get GLASS SHARD 3 of 4.
- Exit the room to the main hallway.
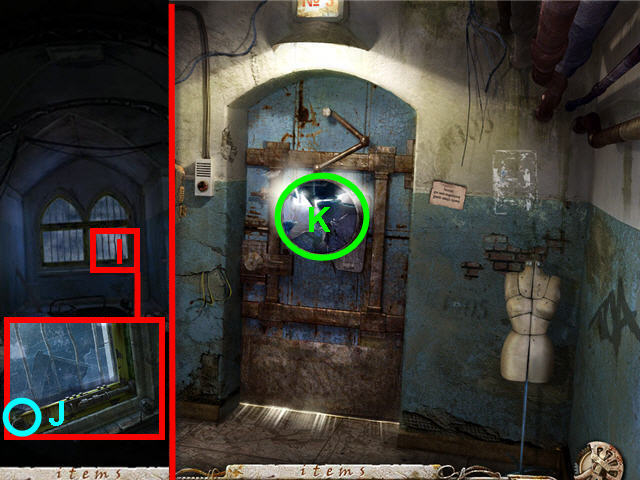
- Click on the window down the hall (I).
- Take GLASS SHARD 4 of 4 (J).
- Head down the hall to the right and click on the broken glass (K) to get a close-up.
- Use the 4 GLASS SHARDS on the broken glass.
- Click on the broken glass after you place the GLASS SHARDS to trigger a puzzle.
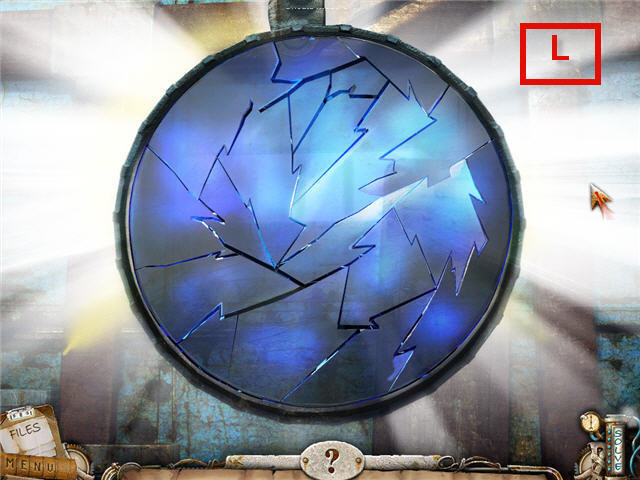
- Place the glass fragments in the center by left clicking to move and right clicking to turn them.
- Once you get a piece in the correct spot it cannot be moved, you can drop a piece by left clicking it anywhere. See screenshot for solution (L).
- Click on the assembled glass on the door after the puzzle is completed and speak to Icarusto obtain KEYBOARD BUTTONS.
- Back out of the area two times to get to the elevator.
- Click on the elevator floor panel and click on the 'B' to access the basement.
- Head forward two times to the blue lit security room.
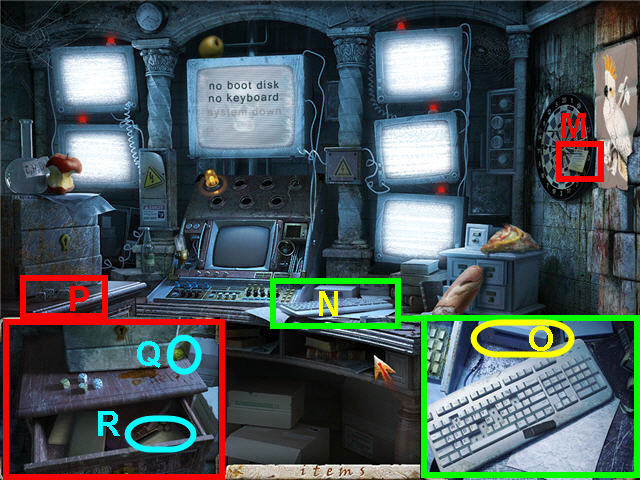
- Click on the note (M) pinned to the dart board.
- Click on the keyboard (N) and place the KEYBOARD BUTTONS on it.
- Use the DATA DISK on the disk slot (O).
- Click on the drawers (P) on the left to get a close-up and take the ELEVATOR BUTTON 1 of 3 (Q).
- Click on the closed drawer in close-up and take the KEY (R).
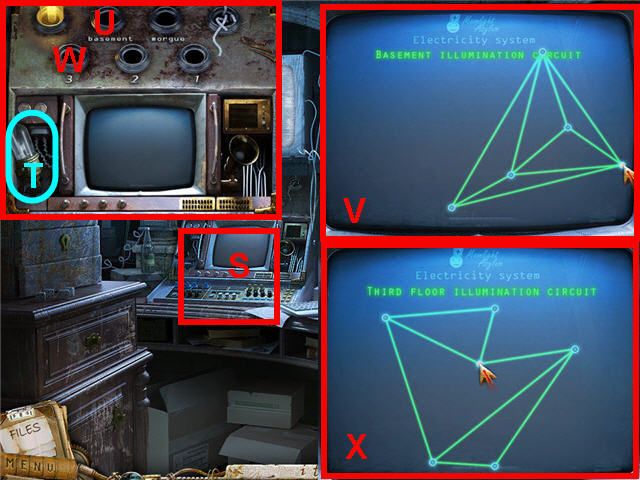
- Click on the control panel (S) and take the BASEMENT FUSE (T).
- Place the BASEMENT FUSE on the slot on the control panel labeled basement (U).
- Click on the screen to access a puzzle (V).
- The goal is to untangle the lines so that none of them cross each other. The lines will turn green when correct. See screenshot for solution.
- Click on the control panel and place the 3RD FLOOR FUSE on the slot that is labeled 3 (W).
- Click on the screen to access a puzzle (X).
- The goal is to untangle the lines so that none of them cross each other. The lines will turn green when correct. See screenshot for solution.
- Exit the room via the bottom of screen one time.
- Click on the generator under the stairs after speaking to your guardian to access a Hidden Object Scene.
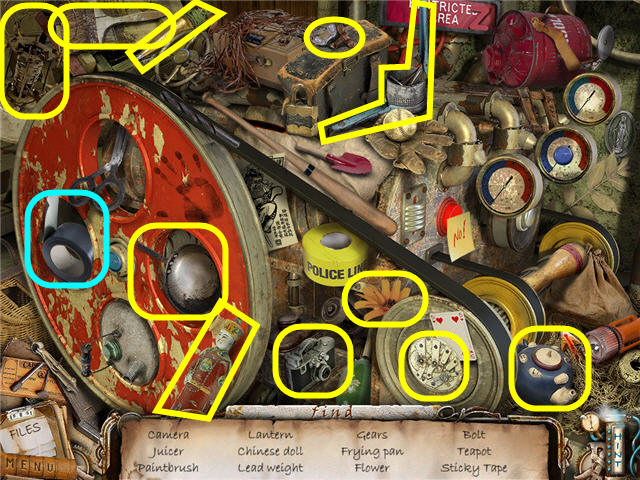
- Find the items listed to obtain ELECTRICAL TAPE.
- Exit out of the area via the bottom of the screen to return to the elevator.
- Click on the 3rd floor button on the elevator floor panel.
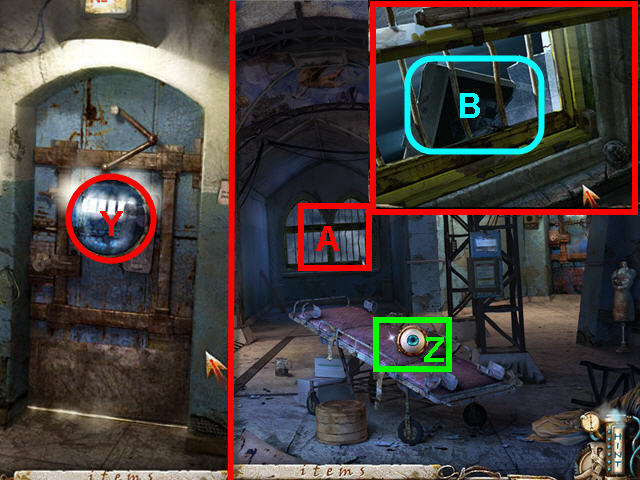
- Exit the elevator and head down the hall to the right.
- Click on the glass (Y) on the door to speak to Icarusto obtain a KNOB.
- Back out of the area one time to get to the main hall.
- Click on the gurney (Z) and click on the indentation to note you need something sharp.
- Head straight to the windows (A) and use the KNOB on the security bar.
- Click on the bar to move it to the left and click again to open the window.
- Take the PHOTO (B) and automatically transport to the consultation center.
Chapter 3: Consultation Center
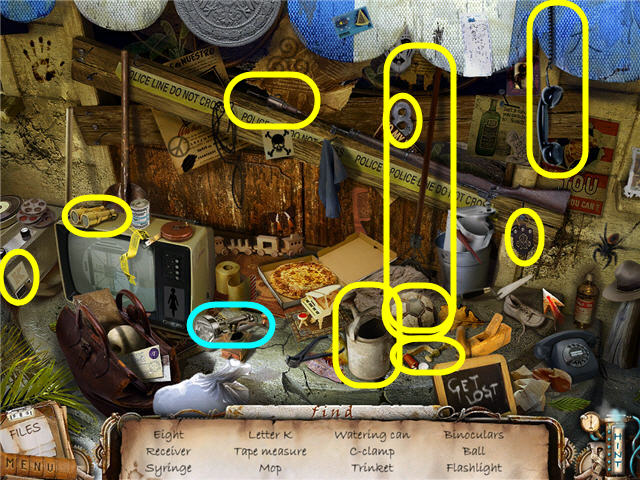
- Click on the front stairs to access a Hidden Object Scene.
- Find the items listed to obtain a FLASHLIGHT.
- Click on the swing set by the door on the right.
- Click on the sandbox to access another Hidden Object Scene.
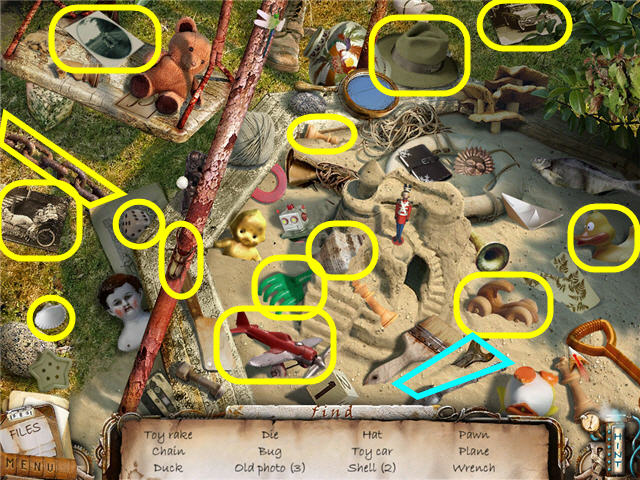
- Find the items listed to obtain a WRENCH.
- Head back to the main entrance.
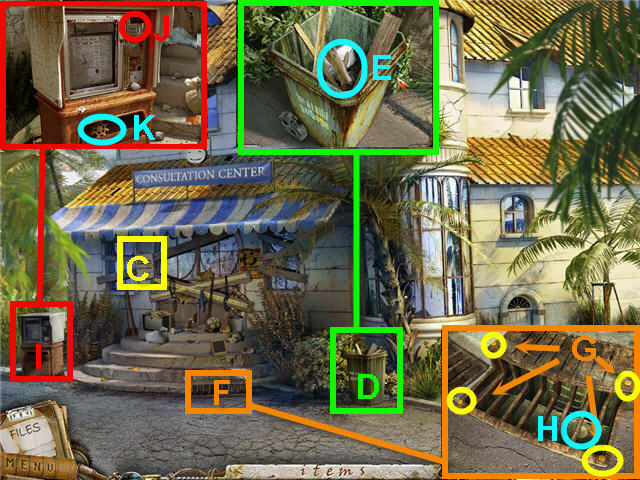
- Click on the note (C) to the left of the door.
- Click on the garbage cart (D) to get a close-up.
- Click on the wood in the cart 3 times to move them out of the way and take the RUBBER GLOVE (E).
- Click on the vent grate (F) to get a close-up.
- Use the WRENCH on the 4 bolts (G) in the corners of the grate.
- Click on the unbolted grate to remove it.
- Take the COIN (H) and exit out of the close-up.
- Click on the newspaper box (I) and use the COIN on the coin slot (J).
- Take GEAR 1 of 3 (K) from the paper dispenser.
- Click on the opened grate (F) to get a close-up; use the FLASHLIGHT and enter the shaft one time.
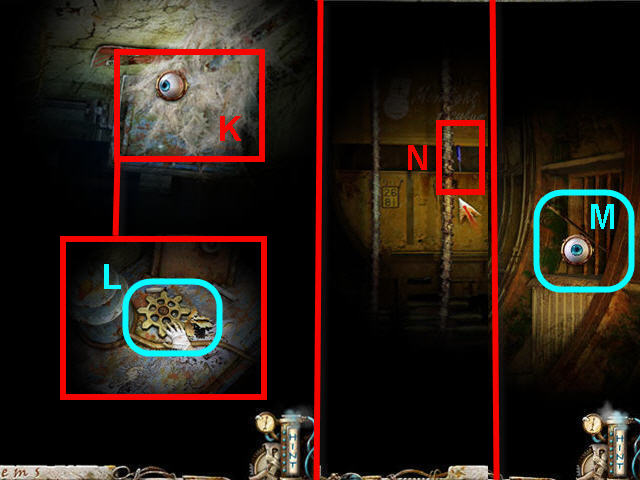
- Shine the light on the upper right of the screen and click on the cobwebs (K) 3 times.
- Take GEAR 2 of 3 (L).
- Head down further into the shaft one time by clicking on the ladder and look to the right.
- Take the CANE (M).
- Look straight ahead and click on the blue screwdriver (N) stuck in the back of the train car.
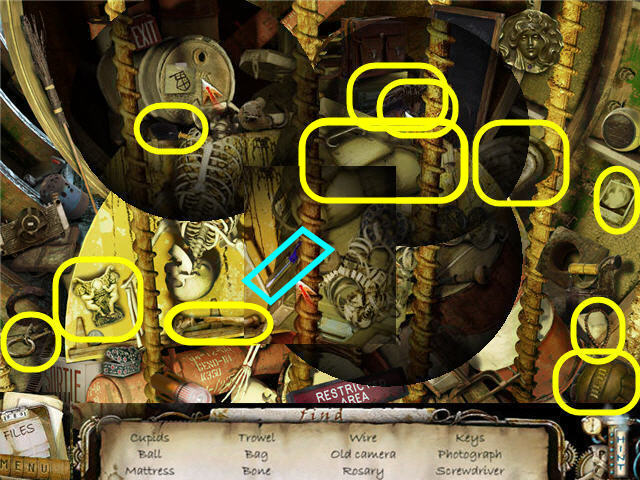
- Use the CANE on the screwdriver to trigger a Hidden Object Scene.
- Click on the area in the bottom half of the train car to access a Hidden Object Scene.
- Find the items listed to obtain a SCREWDRIVER.
- Exit out of the shaft by clicking on the bottom of the screen twice.
- Head to the right by the swing set.
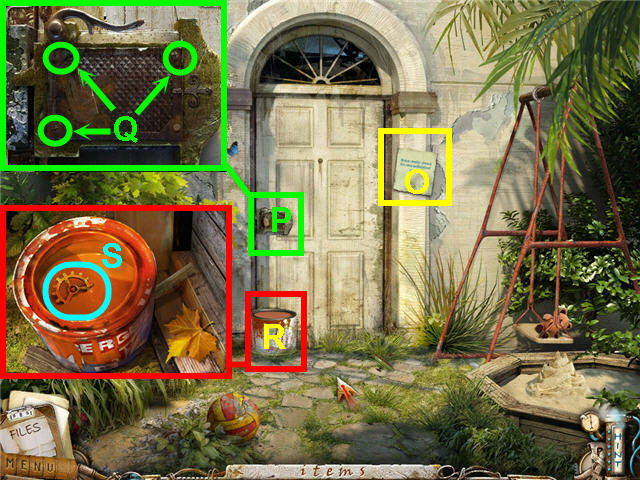
- Click on the note (O) to the right of the door.
- Click on the door lock (P) to get a close-up; use the SCREWDRIVER on the 3 screws (Q) around the lock.
- Click on the unscrewed plate to remove it.
- Notice the splash in the paint can (R).
- Click on the paint can to get a close-up; use the RUBBER GLOVE on the gear to obtain GEAR 3 of 3 (S).
- Click on the lock on the door to get a close-up; place the 3 GEARS on the lock, click on them and note you need a solvent.
- Exit out of the close-up and the area to get to the front entrance.
- Click on the front stairs to access a Hidden Object Scene.
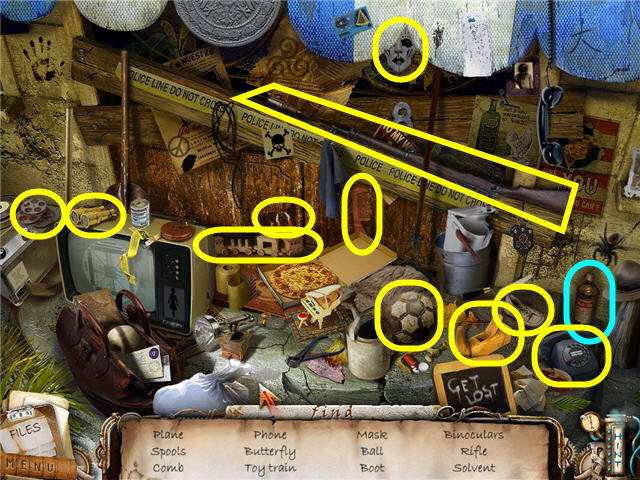
- Find the items listed to obtain a SOLVENT.
- Head to the swing set area on the right and click on the door lock.
- Use the SOLVENT on the gears.
- Click on the cleaned gears to trigger a puzzle.
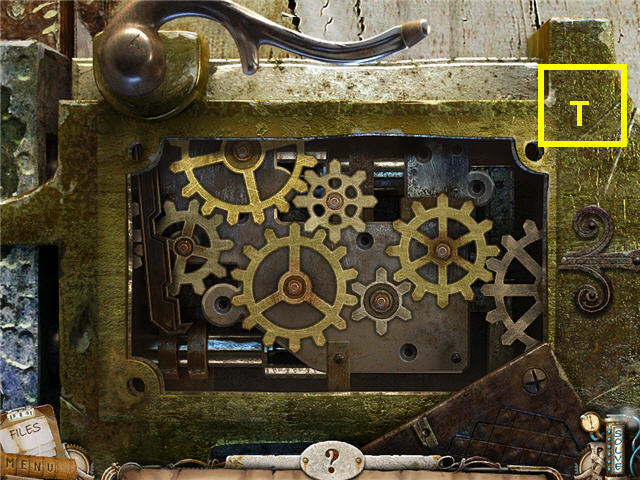
- Place the gears in the correct spot to make a continuous connection from the left to the right.
- When the gears are correctly placed click the door handle above the gears and the door will open. See screenshot for solution (T).
- Enter the door and find yourself back on the 3rd floor.
- Click on the area to the left of the gurney to access a Hidden Object Scene.
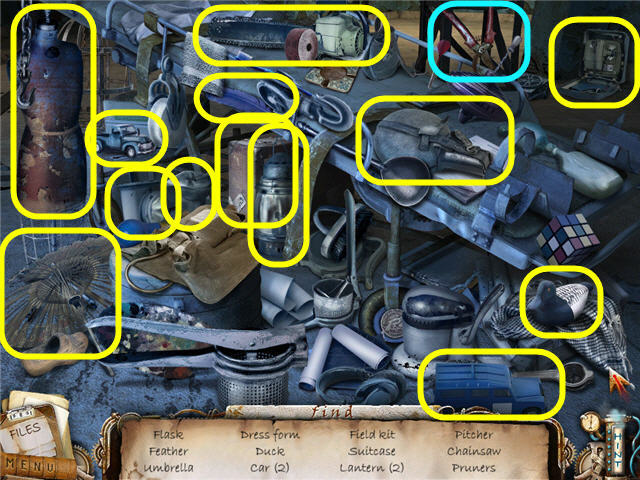
- Find the items listed and get a PRUNER.
- Head down the hall to the right.
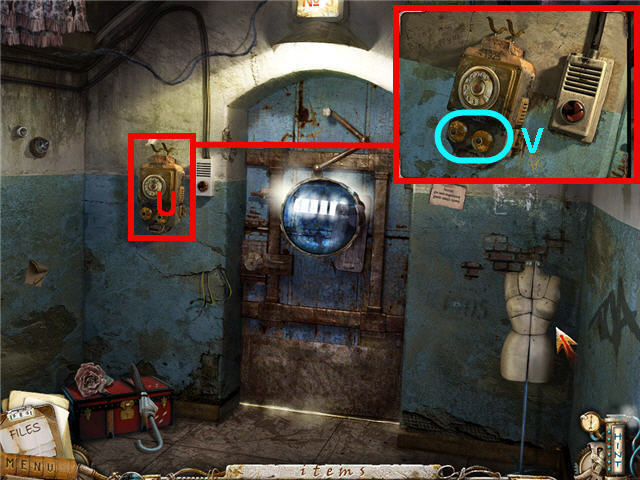
- Click on the phone to the left of the door to get a close-up.
- Use the SCREWDRIVER on the two bells (U) and take them to get a PHONE BELL (V).
- Exit the area via the bottom of the screen two times to get back to the elevator.
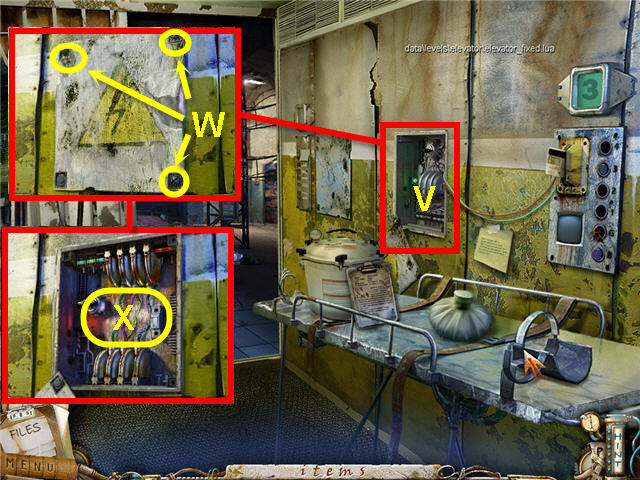
- Click on the electrical panel (V) on the right.
- Use the SCREWDRIVER on the 3 screws (W).
- Use the ELECTRICAL TAPE on the wires (X).
- Click on the 'B' button to go to the basement.
- Exit the elevator and head into the morgue on the right.
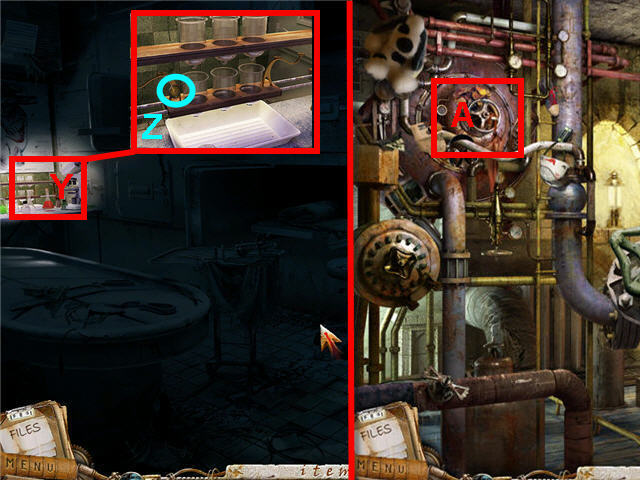
- Click on the lit lab area (Y) on the left to get a close-up.
- Take ELEVATOR BUTTON 2 of 3 (Z).
- Click on the tray and note it is for photo developing.
- Exit the area one time and head into the boiler room under the stairs.
- Click on the area in the upper left (A) to access a Hidden Object Scene.
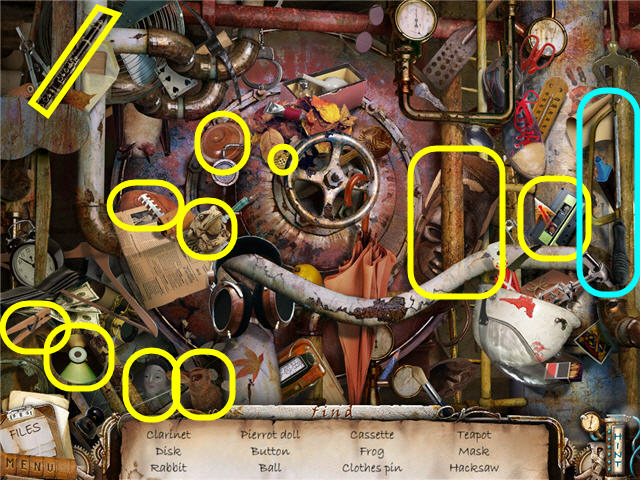
- Find the items listed and get a HAND SAW.
- Exit out of the room to the hall.
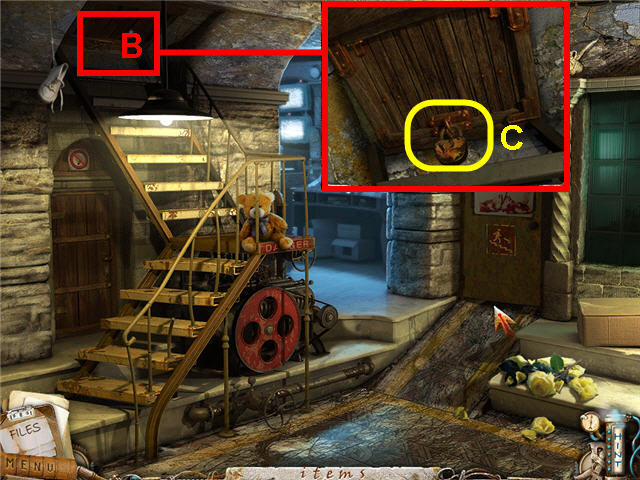
- Click on the hatch (B) to get a close-up.
- Use the HAND SAW on the lock (C).
- Click on the lock after cutting it to open the hatch.
- Enter into the open hatch above the stairs.
- Click on the left of the reception desk to access a Hidden Object Scene.
Chapter 4: New Floors
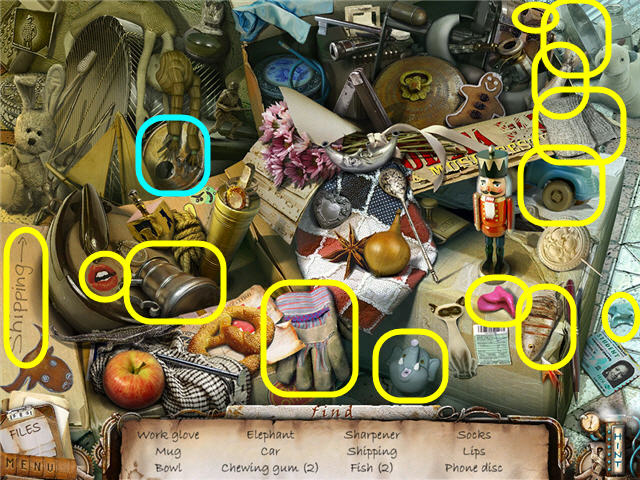
- Find the items listed.
- The PHONE DISK will be added to inventory.
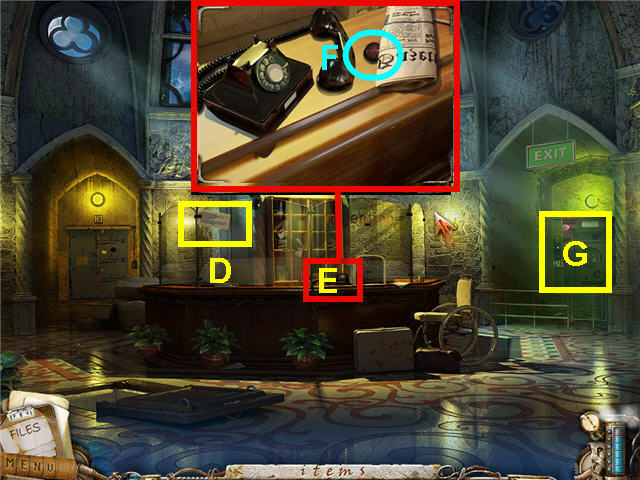
- Click on the note (D) on the glass to read it.
- Click on the phone (E) to get a close-up.
- Click on the newspaper to move it and take ELEVATOR BUTTON 3 of 3 (F).
- Click on the exit (G) to the right and check out the handprint scanner, code panel and door.
- Exit the area via the bottom of the screen three times to get back in the elevator.
- Click on the elevator floor panel to get a close-up.
- Place the 3 ELEVATOR BUTTONS on the panel.
- Click on the elevator floor panel and push the 4th floor button.
- Exit the elevator and back out of the area via the bottom of the scene to return to your room.
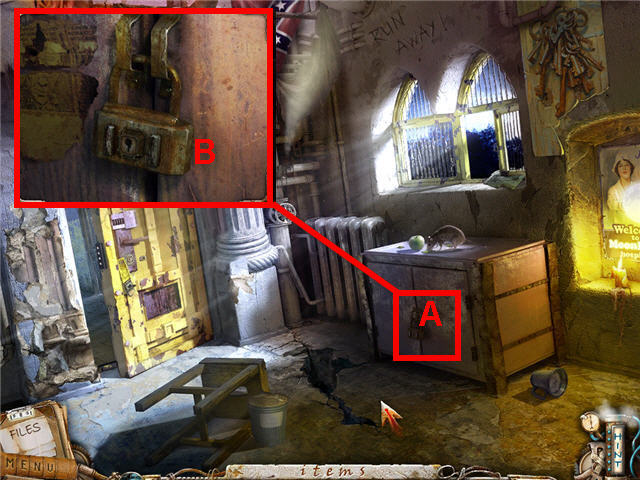
- Click on the cabinet (A) to get a close-up of the lock.
- Use the KEY on the lock (B).
- Click on the opened cabinet to access a Hidden Object Scene.
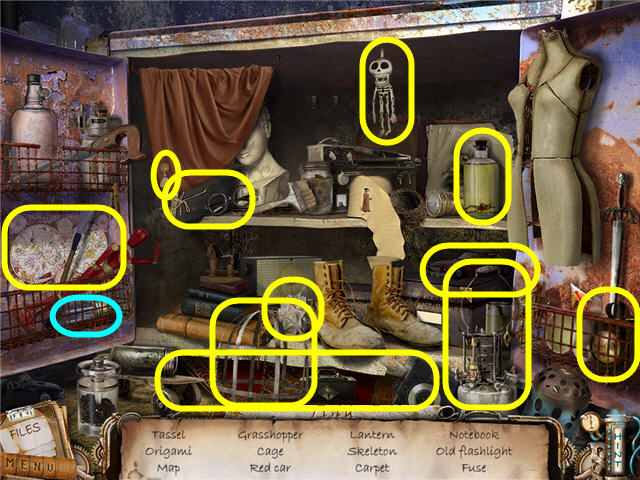
- Find the items listed and get a 2nd FLOOR FUSE.
- Exit the room and enter the elevator.
- Click on the elevator floor panel and click on 'B' for the basement.
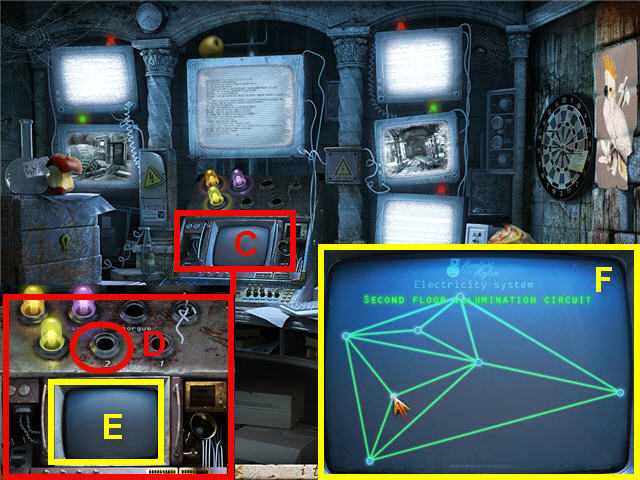
- Enter the security room.
- Click on the control panel (C) to get a close-up.
- Place the 2nd FLOOR FUSE on the #2 slot (D).
- Click on the monitor screen (E) to activate a puzzle.
- The goal is to untangle the lines so that none of them cross each other. The lines will turn green when correct. See screenshot for solution (F).
- Exit via the bottom of the screen 2x to get back to the elevator.
- Click on the elevator floor panel and push the 2nd floor button.
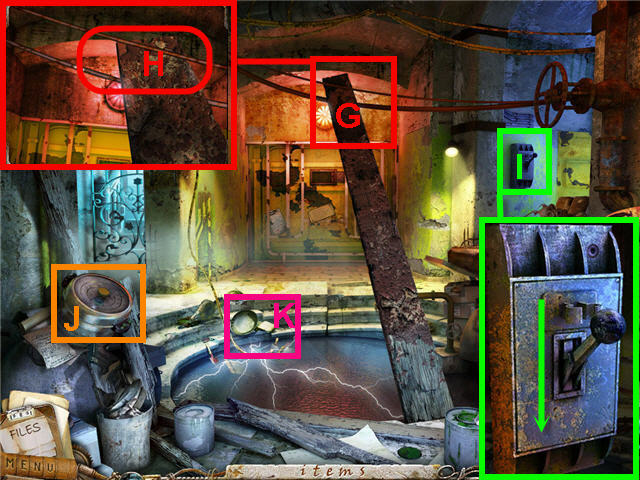
- Exit the elevator.
- Click on the plank (G) to get a close-up.
- Use the PRUNER on the cables (H) holding up the plank.
- Click on the lever (I) to get a close-up and click again to lower it.
- Click on the sterilizer (J) on the left and note it is missing a handle.
- Click on the area to the left of the plank (K) to access a Hidden Object Scene.
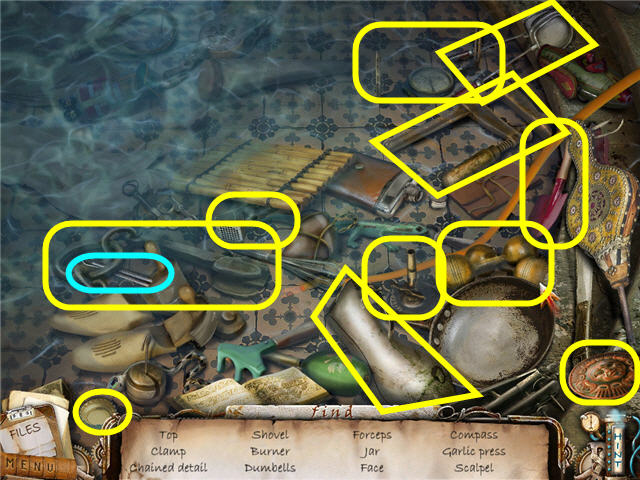
- Find the items listed and get a SCALPEL.
- Exit the area via the bottom of the screen 1x.
- Click on the elevator floor panel and click on the 3rd floor.
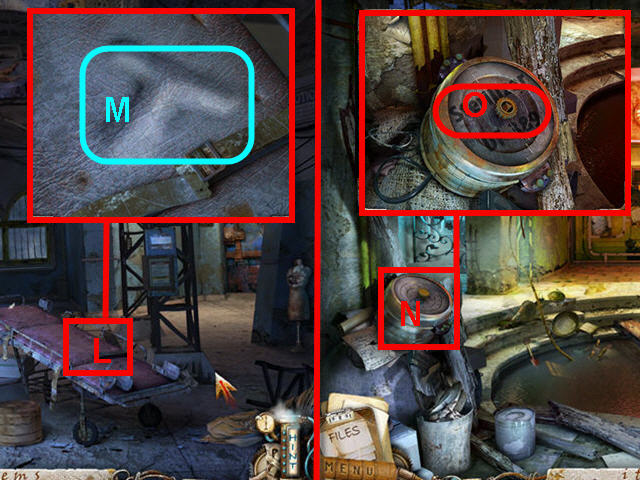
- Exit the elevator and click on the gurney (L) to get a close-up.
- Use the SCALPEL on the indentation (M) two times and take the STERILIZER KEY.
- Exit via the bottom of the screen and click on the second floor button on the elevator panel.
- Exit the elevator.
- Click on the sterilizer (N) on the left to get a close-up.
- Use the STERILIZER KEY on the lid (O) and click to trigger a puzzle.
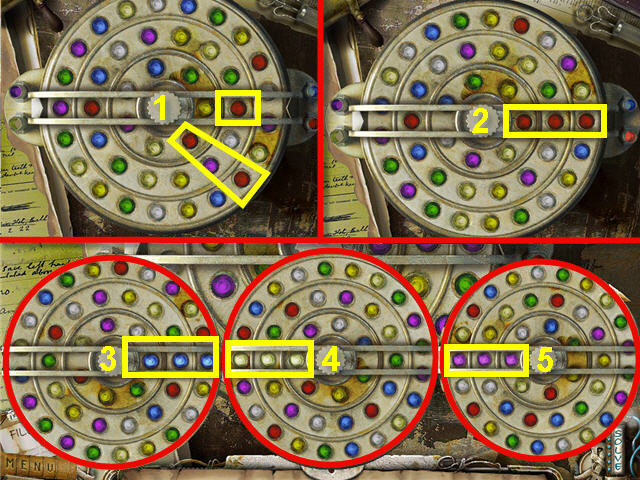
- The goal is to get 3 balls of the same color in between the double bars on the handle matching one of the colors on the handles on the side.
- You need to rotate the rings by clicking and dragging them. Rotating one ring will rotate others.
- The starting point is random.
- The easiest way to solve the puzzle is to rotate the middle ring so that the color you want is in the middle, then move the inner ring to match up with the same color on the outer ring.
- Move the middle ring back in place and click on the outer ring to move the inner and outer together. You can tweak them a bit once you get them close. See sections 1 and 2 on the screenshot for an example.
- When correct, they will light up. Repeat this for all 4 colors on the handle. See sections 2, 3, 4 and 5 on the screenshot.
- Take the DEVELOPER FLUID.
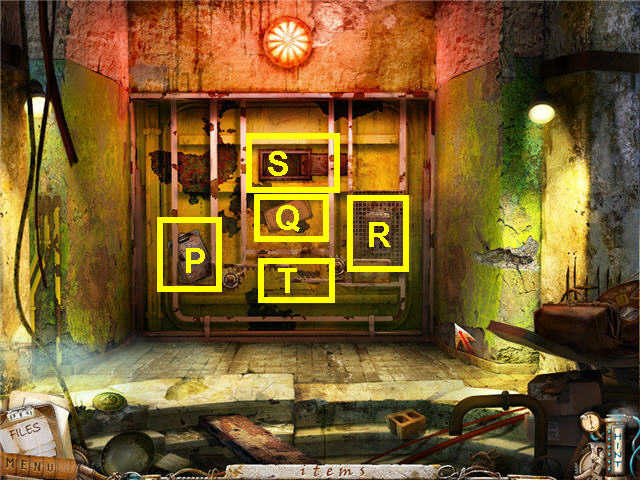
- Head straight to the big yellow locked cell.
- Click on the clipboard (P) on the door and read.
- Click on the note (Q); make note that the ladder is in the boiler room.
- Click on the lock on the cage (R) over the phone; note it needs parts and it is rusted.
- Click on the window (S) and the slot (T).
- Exit out of the area via the bottom of the screen two times.
- Click on the elevator floor panel and push 'B' for basement.
- Exit the elevator and enter the boiler room under the stairs.
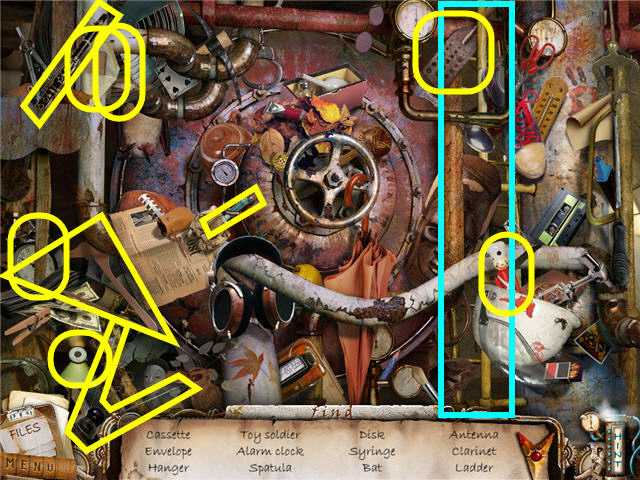
- Click on the boiler area in the upper left to access a Hidden Object Scene.
- Find the items listed and get a LADDER.
- Back out of the room and head up the stairs to the reception area.
Chapter 5: Way Out
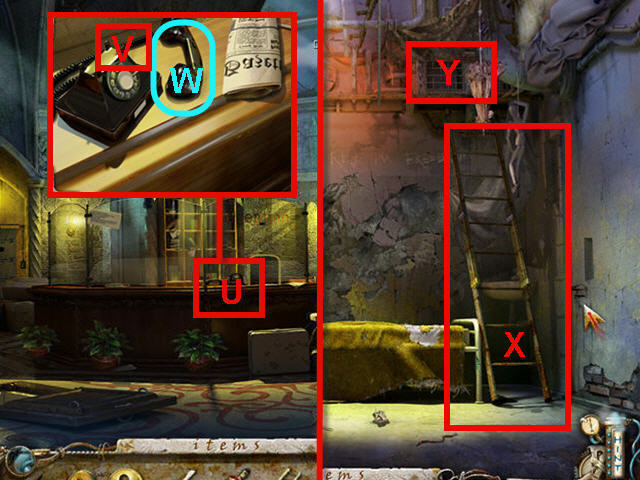
- Click on the phone (U) to get a close-up.
- Use the SCALPEL on the phone cord (V) to get a HANDSET (W).
- Exit the area via the bottom of the screen two times to get back in the elevator.
- Click on the elevator floor panel and push the 4th floor button.
- Exit the elevator.
- Back out of the hallway via the bottom of the screen to get to your room.
- Head to the right to get to the bed area.
- Use the LADDER (X) on the grate (Y) in the upper right.
- Click on the grate to access a Hidden Object Scene.
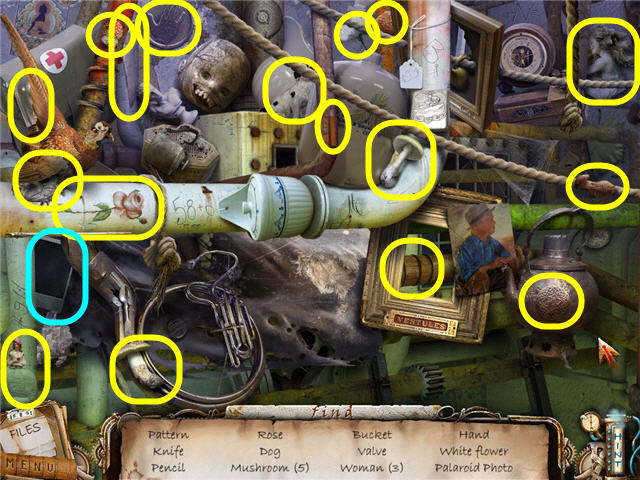
- Find the items listed to obtain an UNDEVELOPED PHOTO.
- Exit the room and head into the elevator.
- Click on the 'B' button to head to the basement.
- Exit the elevator and head into the morgue on the right.
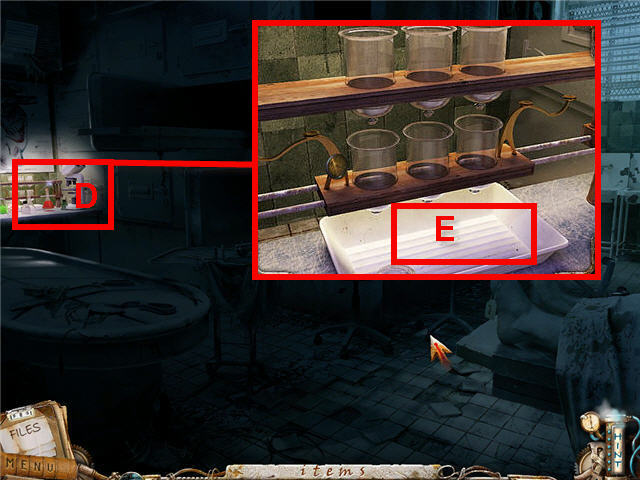
- Click on the lab bench (D) in the lighted area to the right.
- Place the DEVELOPER FLUID in the tray (E).
- Place the UNDEVELOPED PHOTOGRAPH in the tray (E) to trigger a puzzle.
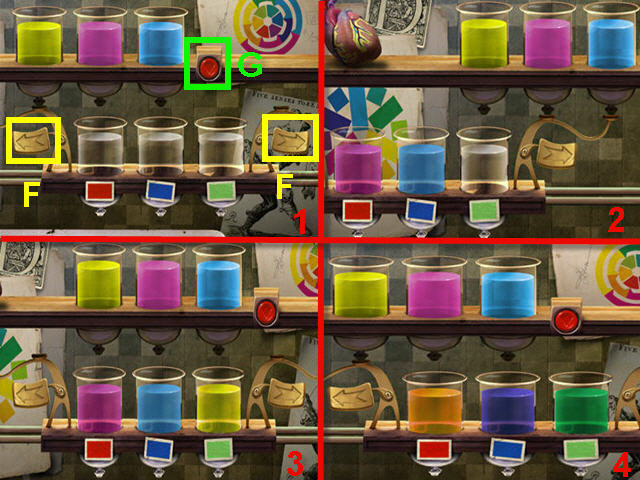
- Mix the right combination of colors from the top row together in the bottom containers to obtain the colors indicated.
- You can move the bottom row by clicking on the arrows (F) on either side.
- Clicking the red button (G) on the right of the top row will release all the colors in the top row into whatever container is below it.
- If one of the containers turns black it will automatically reset. See sections 1-4 for solution of where the bottom row should be when pushing the red button.
- Automatically get transported to the inside of the consultation center.
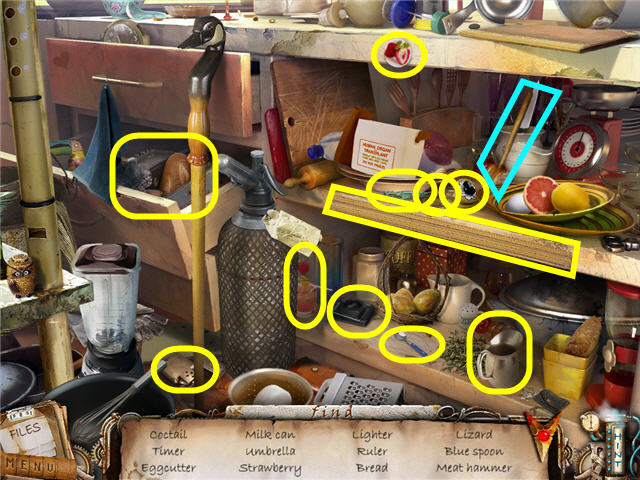
- Click on the shelves under the counter to access a Hidden Object Scene.
- Find the items listed to obtain a MALLET.
- Head to the left two times.
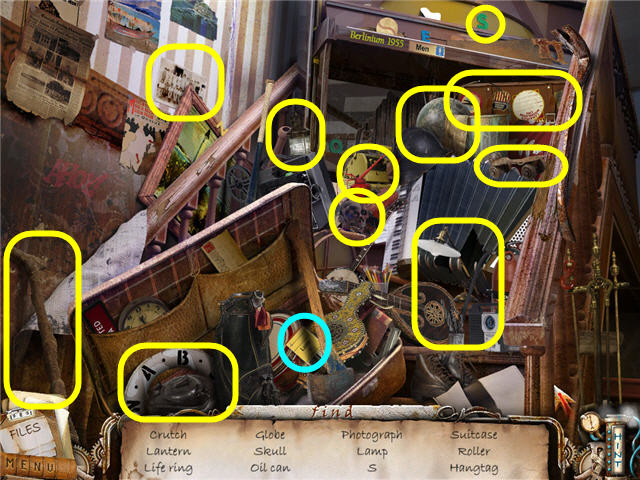
- Click on the bottom of the staircase to access a Hidden Object Scene.
- Find the items listed and get a LEMON PIE PRICE.
- Check out the room and then head to the right one time.
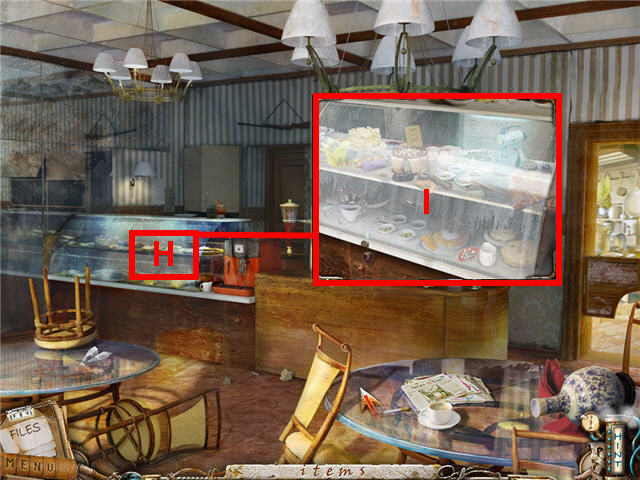
- Click on the glass case (H) on the left to get a close-up.
- Use the MALLET on the case (I) until the glass breaks.
- Click on the broken glass case to access a Hidden Object Scene.
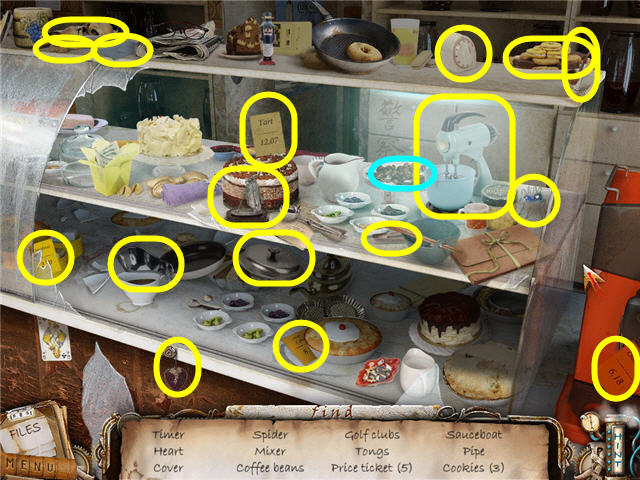
- Find the items listed and get COFFEE BEANS.
- Head into the room on the right.
- Click on the shelves below the counter to access a Hidden Object Scene.
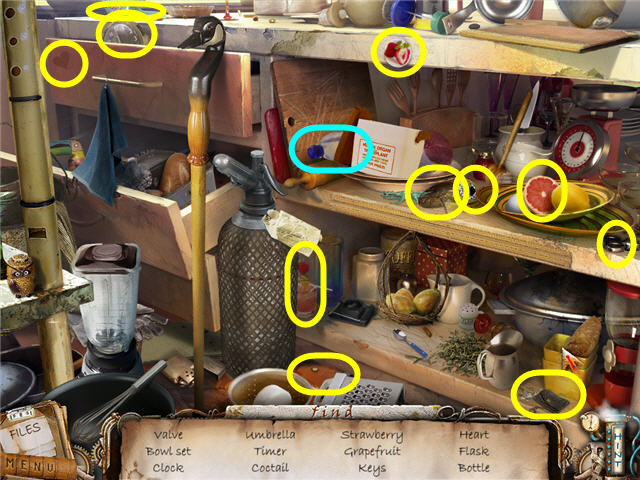
- Find the items listed.
- The WATER BOTTLE will be added to inventory.
- Head to the room on the left.
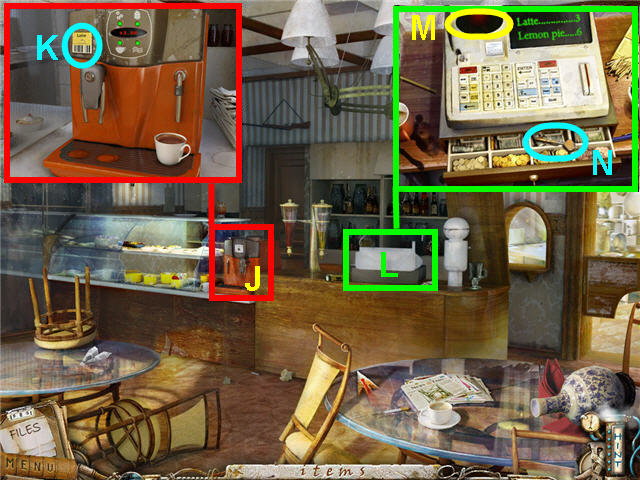
- Click on the coffee maker (J) to the right of the broken glass display case.
- Click the COFFEE BEANS on the maker.
- Click the WATER BOTTLE on the coffee maker.
- Take the LATTE PRICE (K) from the corner of the coffee maker.
- Click on the cash register (L) to get a close-up.
- Click the LATTE PRICE and the LEMON PIE PRICE on the red scanner (M) on the upper left of the cash register.
- Take the KEY (N) from the opened drawer.
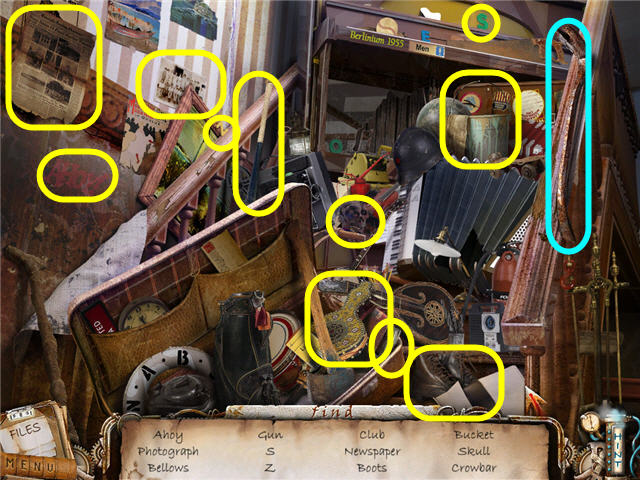
- Head back to the room on the left.
- Click on the area on the front of the stairs to access a Hidden Object Scene.
- Find the items listed and get a CROWBAR.
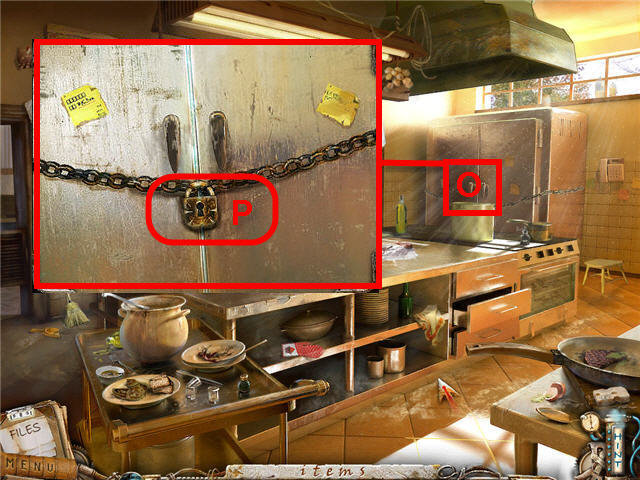
- Exit the room via the right of the screen two times to get back to the kitchen.
- Click on the freezer (O) to get a close-up.
- Use the KEY on the lock.
- Use the CROWBAR on the frozen ice a few times to break it and access a puzzle.
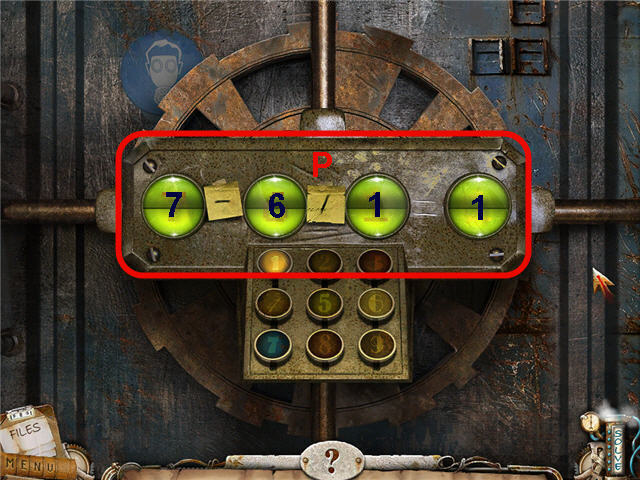
- The goal of the puzzle is to finish the equation ?-?÷?=1.
- Key in the numbers on the pad to enter them in.
- One solution is; 7-6÷1=1. See screenshot (P) for solution.
- Enter into the secret passageway and you will find yourself back in the morgue.
- Exit the morgue via the bottom of the screen two times to be back in the elevator.
- Click on the elevator floor panel and press '2'.
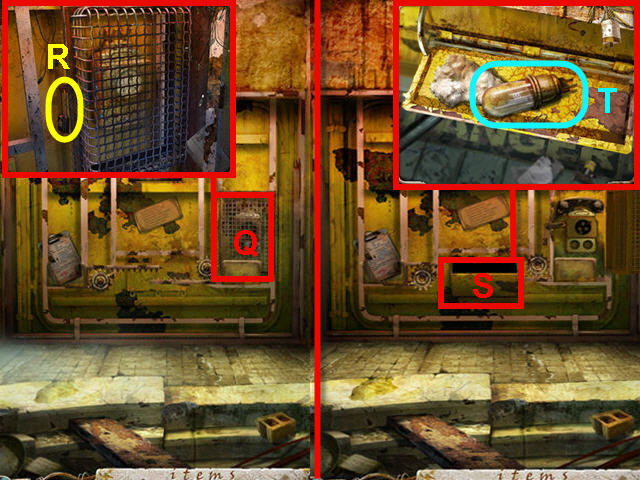
- Head forward two times and click on the phone cage (Q).
- Use the CROWBAR on the lock (R) to break it.
- Click on the cage after the lock is broken to open it.
- Place the PHONE DISK, PHONE BELL and HANDSET in their appropriate spots on the phone.
- Click on the assembled phone to speak to Mage.
- Click on the drawer (S) that is now open on the door and take the 1st FLOOR FUSE (T).
- Back out of the area two times to return to the elevator.
- Click on the elevator floor panel and press B.
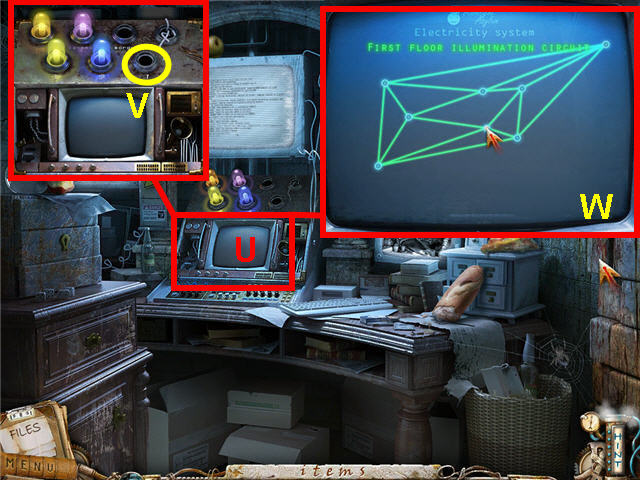
- Head forward two times and enter the security room.
- Click on the control panel (U) to get a close-up.
- Place the 1st FLOOR FUSE on the slot with a '1' (V).
- Click on the monitor screen to activate a puzzle.
- The goal is to untangle the lines so that none of them cross each other. The lines will turn green when correct. See screenshot for solution (W).
- Exit via the bottom of the screen 2x to get back to the elevator.
- Click on the elevator floor panel and push the 1st floor button.
- Exit the elevator.
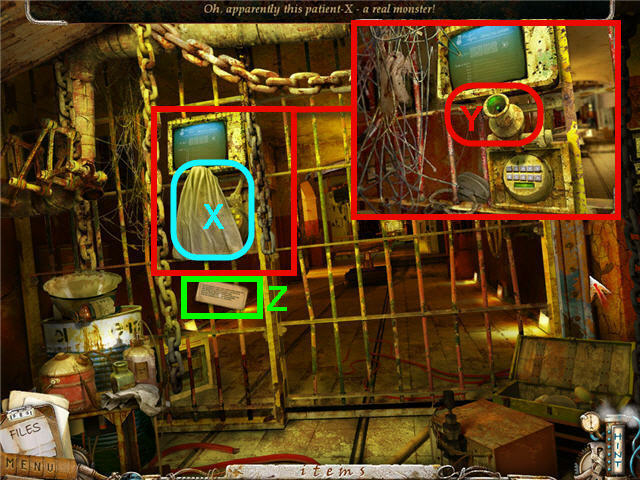
- Click on the rag (X) to get a close-up and click on it again to remove it and get a CLOTH.
- Click on the security camera (Y) and note you need an eye.
- Click on the note (Z) and read it.
- Exit the area and click on the 4th floor on the elevator panel.
- Exit the elevator and click on the wheelchair in the hall to access a Hidden Object Scene.
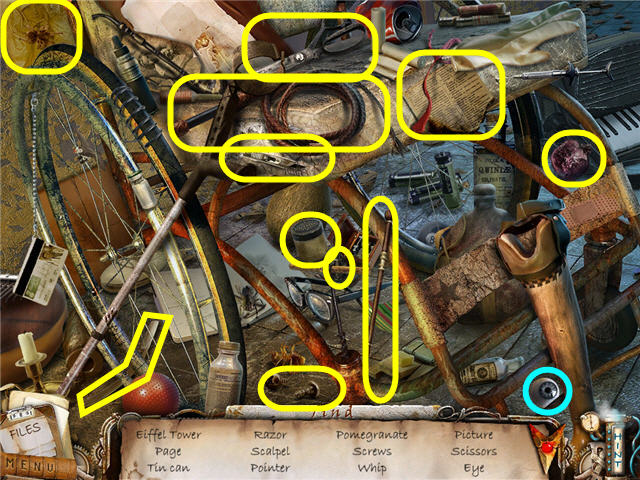
- Find the items listed and get a GLASS EYE.
- Enter the elevator and click on the elevator floor panel.
- Click on the 1st floor.
- Exit the elevator.
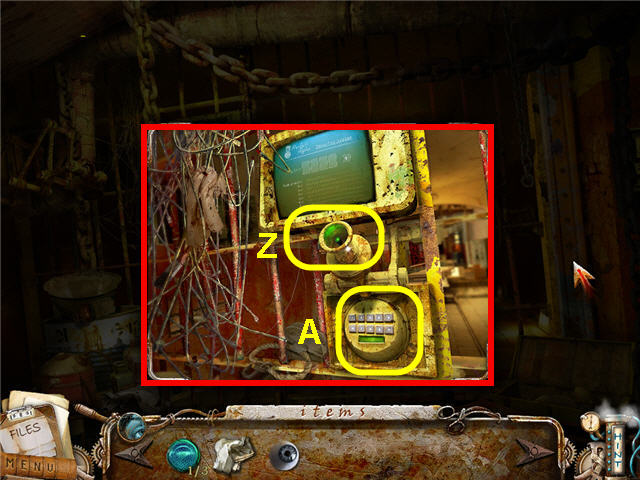
- Click on the monitor on the left to get a close-up.
- Place the GLASS EYE on the security camera (Z).
- Click the keypad (A) underneath to trigger a puzzle.
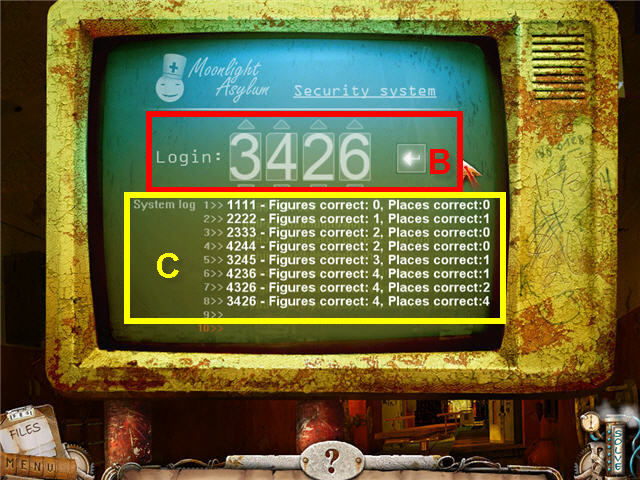
- The goal of the puzzle is to figure out the code by process of elimination.
- Place the numbers you wish to choose in the 4 slots by using the up/down arrows and click on the arrow to the right to enter them (B).
- The system log (C) under the numbers will let you know if you have any correct numbers and if they are in the correct spots.
- The results are random, see screenshot for my solution.
- Head forward one time and click on the gurney in the hall to access a Hidden Object Scene.
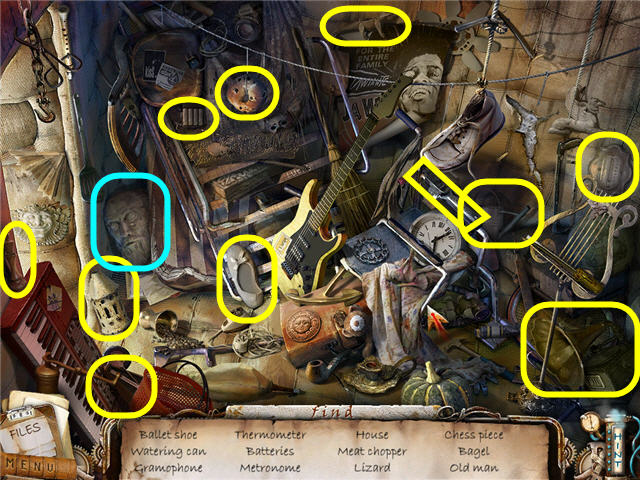
- Find the items listed and get a STATUE HEAD.
- Head forward down the hall one time.
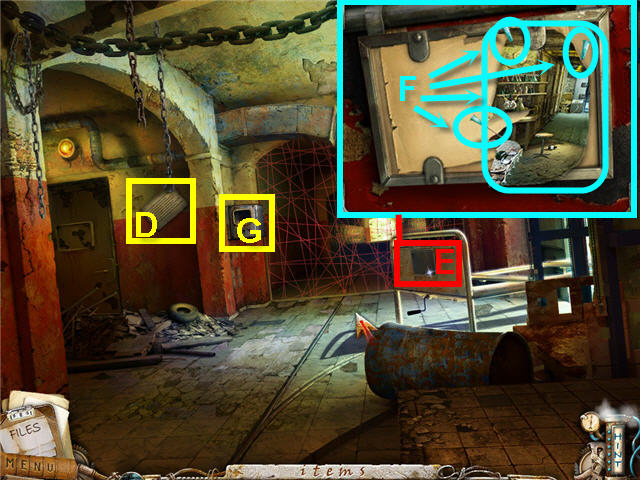
- Click on the sign (D) on the wall.
- Click on the end of the gurney (E); take the 3 PINS (1 through 3 of 6) and PHOTO PART 1 of 2 (F).
- Click on the laser control panel (G) and note you need mirrors.
- Exit the area via the bottom of the screen 3 times to get back to the elevator.
- Click on the elevator floor panel and click on 2.
- Exit the elevator one time and click on the right side of the pool to access a Hidden Object Scene.
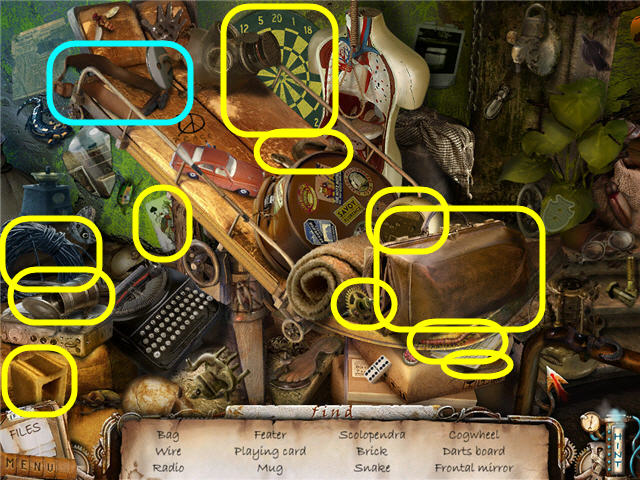
- Find the items listed.
- HEAD LAMP MIRROR 1 of 3 will be added to inventory.
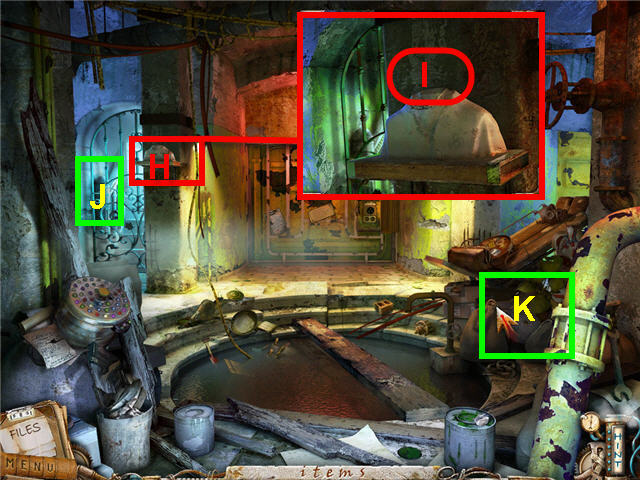
- Click on the headless bust (H) to get a close-up.
- Place the STATUE HEAD on the bust (I).
- Head into the newly opened room (J) to the left and note you need two pieces of Photo.
- Exit out of the area via the bottom of the screen one time.
- Click on the area to the right of the pool (K) to access a Hidden Object Scene.
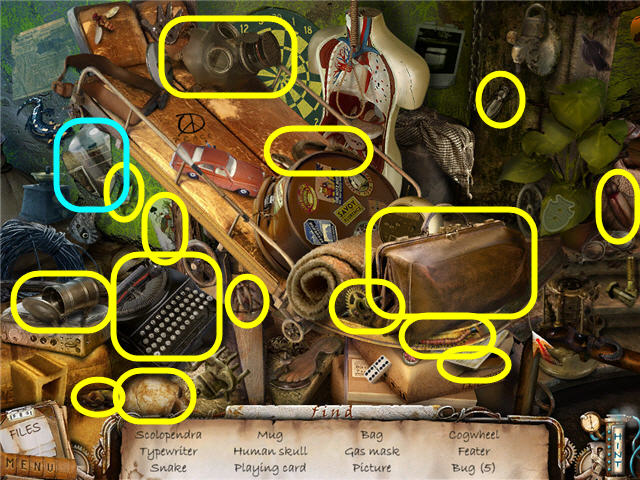
- Find the items listed and get PHOTO PART 2 of 2.
- Head into the room on the left of the bust.
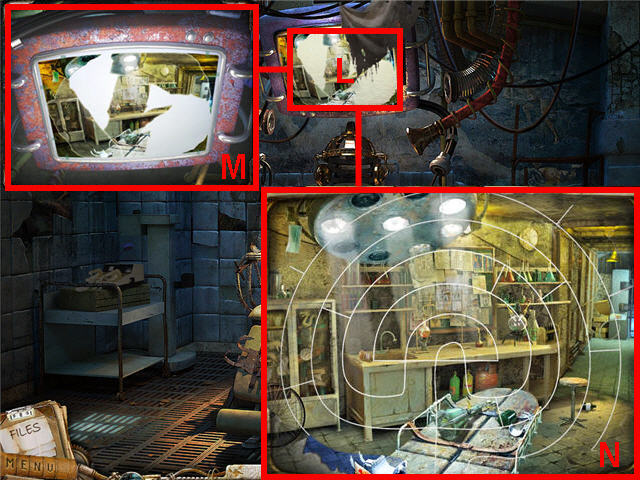
- Click on the monitor (L) above the chair for a close-up.
- Place the 2 PHOTO PARTS on the monitor (M).
- Click on the assembled photo to trigger a puzzle.
- Before you start assembling the pieces, place the center piece where it needs to be (it will turn tan in color) and then place the others around it. See screenshot (N) for solution.
- Click on the completed photo to transport to a new location.
Chapter 6: Final Stretch
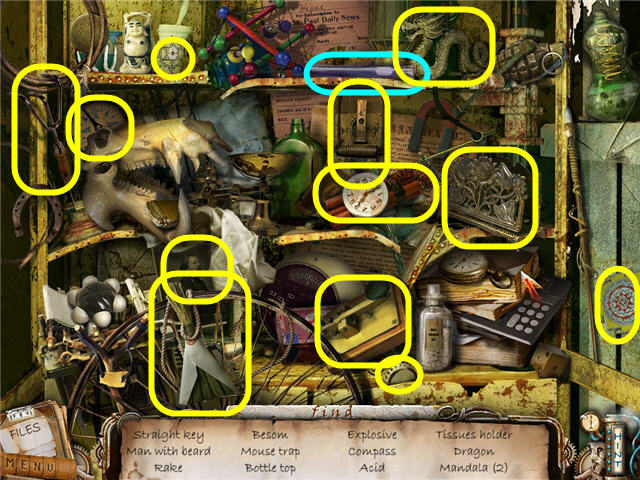
- Click on the cabinet on the left to access a Hidden Object Scene.
- Find the items listed to obtain a CHEMICAL FLASK.
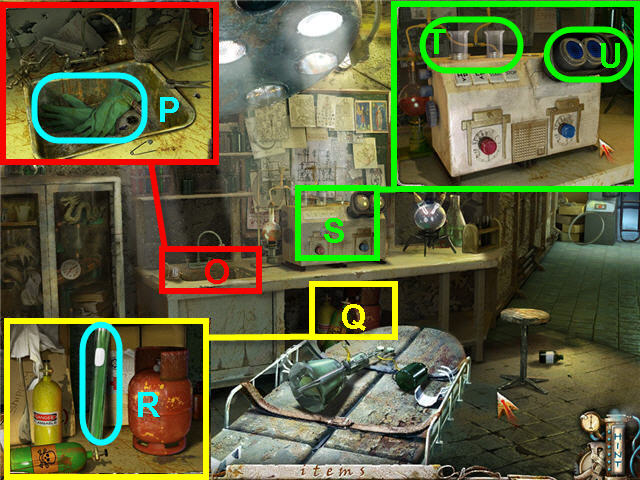
- Click on the sink (O) and take the THICK GLOVES (P).
- Click under the counter (Q) to get a close-up.
- Click on the 3 tanks to move them out of the way; take the CHEMICAL FLASK (R).
- Click on the lab equipment (S) to get a close-up.
- Place the 2 CHEMICAL FLASKS in the glass tubes (T); purple on the right, green on the left.
- Click on the viewer (U) on the right to trigger a puzzle.
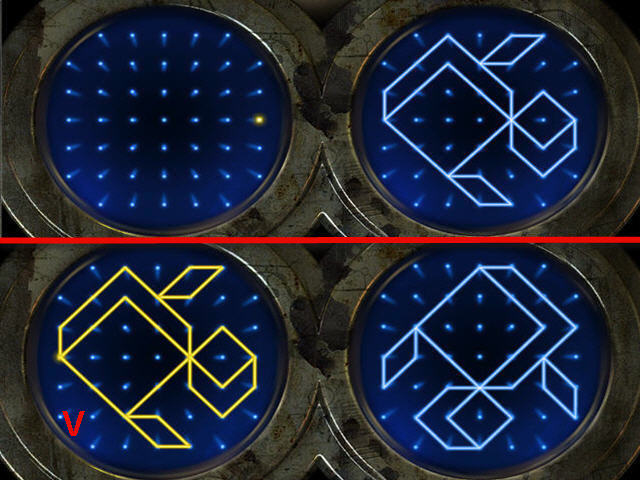
- The goal of the puzzle is to duplicate the image from the right onto the area on the left.
- The picture on the right will rotate in regular intervals making it more difficult to follow the pattern since you still need to complete it as it was originally pictured.
- Your next moves will be shown in the way of lit dots on the grid.
- The image needs to be completed in one continuous stretch; you cannot go back over an area. See screenshot (V) for solution.
- You will get a bottle of ACID when completed.
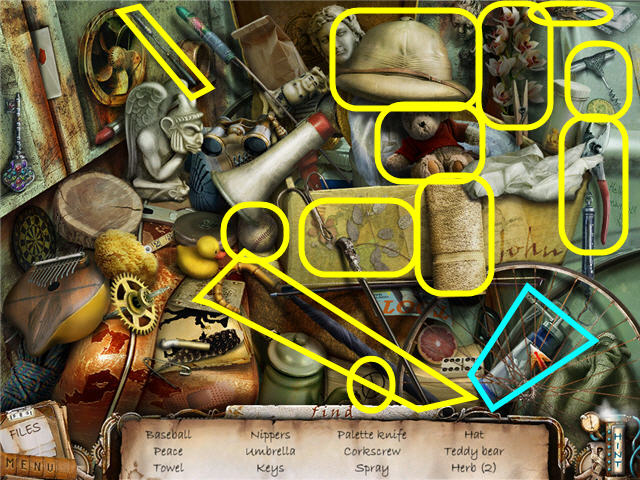
- Head to the area on the right.
- Click on the area on the left of the doorway to access a Hidden Object Scene.
- Find the items listed and get LIQUID NITROGEN.
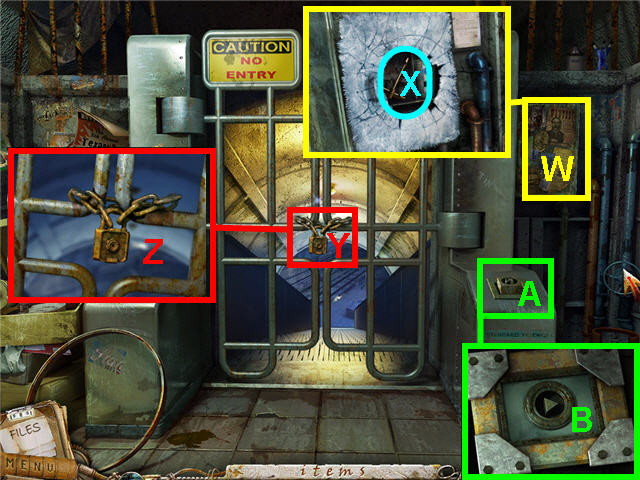
- Click on the cabinet (W) on the right of the doorway.
- Use the LIQUID NITROGEN on the cabinet door.
- Use the THICK GLOVES on the frozen door multiple times until broken.
- Take the MECHANICAL KEY (X).
- Click on the lock (Y) to get a close-up.
- Use the ACID on the lock (Z).
- Click on the pedestal (A) on the right to get a close-up.
- Place the MECHANIC KEY on the slot (B) and click on it so it turns.
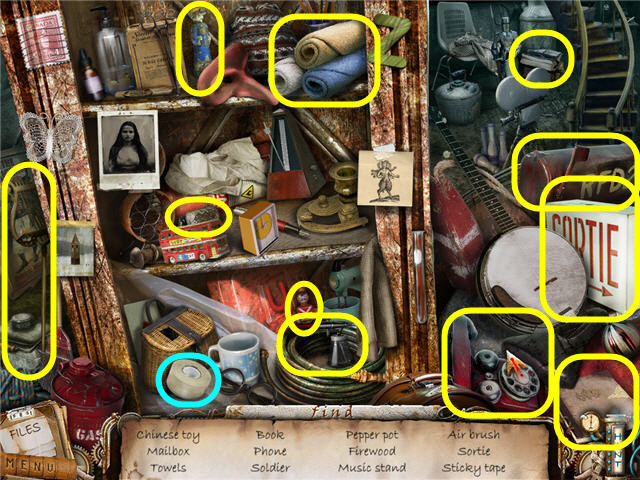
- Head down the opened passage to the train station.
- Click under the platform on the staircase on the right to access a Hidden Object Scene.
- Find the items listed and get STICKY TAPE.
- Click on the door on the top of the stairs to access the control room.
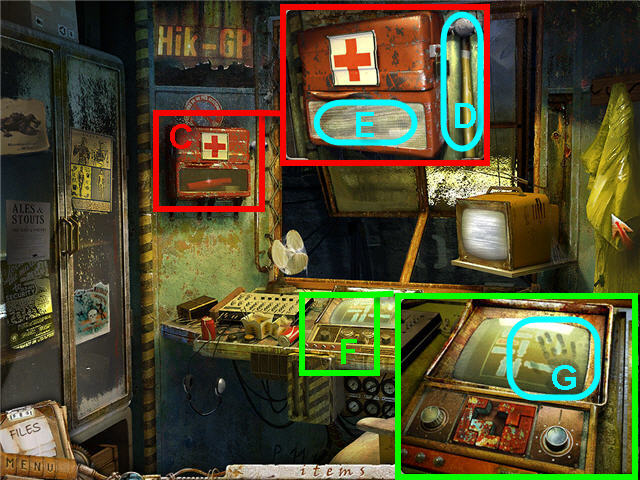
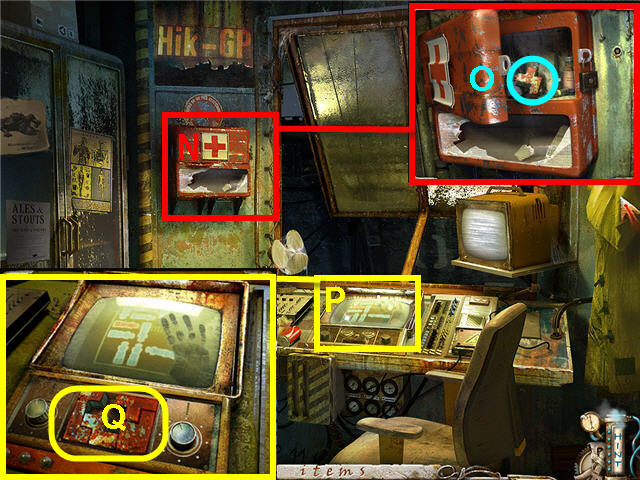
- Click on the first aid kit (C) on the left wall.
- Take the HAMMER (D).
- Use the HAMMER on the glass on the bottom half of the first aid kit multiple times to break the glass; get the EMERGENCY FLARE (E).
- Click on the console (F) and get a close-up.
- Click on the bottom part of the console with the red shapes and note that one is missing.
- Use the sticky tape on the handprint and then take the tape to get a FINGERPRINT (G).
- Exit the room via the bottom of the screen.
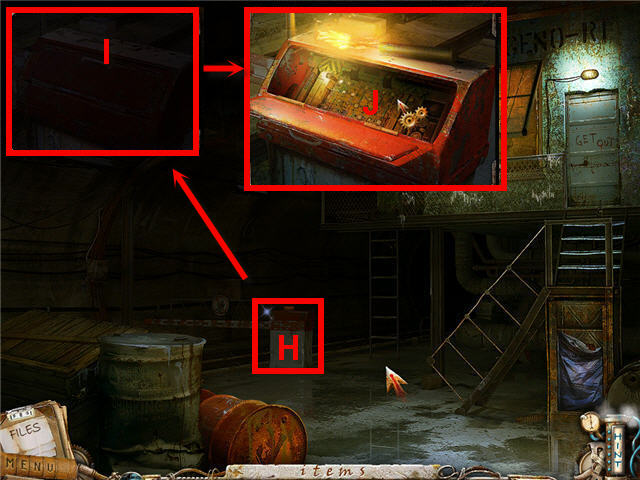
- Click on the gate control box (H) to get a close-up.
- Use the EMERGENCY FLARE on the box (I) and it automatically lights.
- Click on the panel of the control box to open it.
- Click on the circuit board (J) to trigger a puzzle.
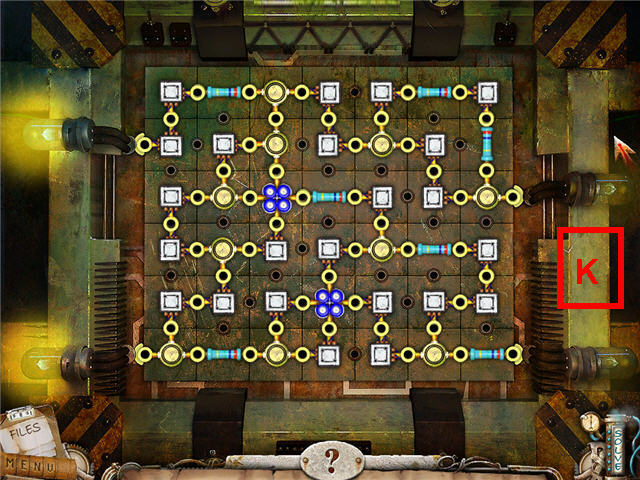
- The goal of the puzzle is to make a continuous connection to the four fuses in the corners without a loose end.
- There is a slight delay when you have it correct.
- See screenshot (K) for solution.
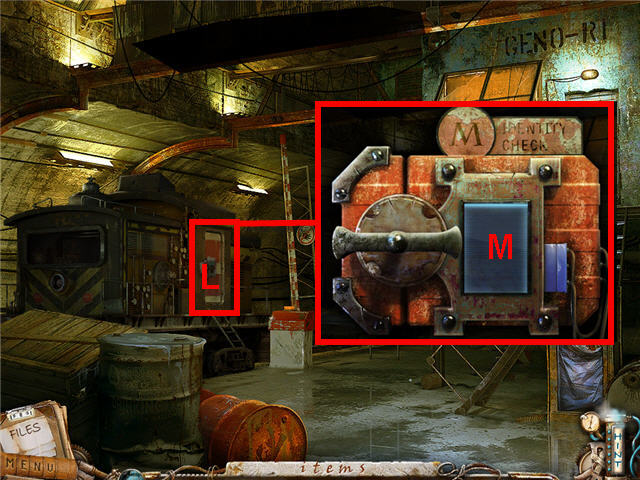
- Click on the train door (L) to get a close-up.
- Use the FINGERPRINT on the identity check panel (M).
- Enter the train and click on the skeleton on the right to access a Hidden Object Scene.
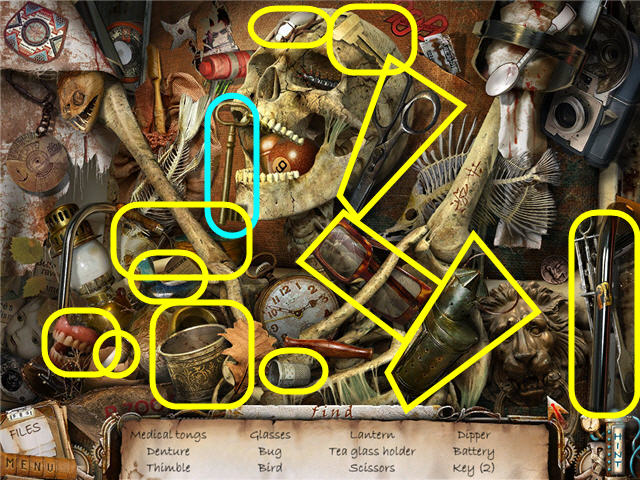
- Find the items listed and get a CABINET KEY.
- Exit the train via the bottom of the screen.
- Head up the stairs to the control room.
- Click on the first aid kit (N) to get a close-up.
- Use the CABINET KEY on the first aid kit lock.
- Click on the cabinet door to open it and take the CONTROL PANEL PART (O).
- Click on the control panel (P) to get a close-up.
- Use the CONTROL PANEL PART on the red shapes (Q) to trigger a puzzle.
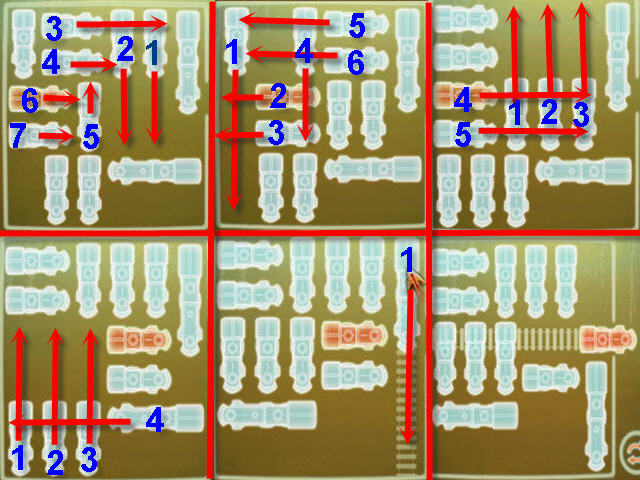
- The goal is to move the blue trains out of the way of the red one so that it can pass out the opening on the right.
- See screenshot for solution.
- Exit the room and head into the train.
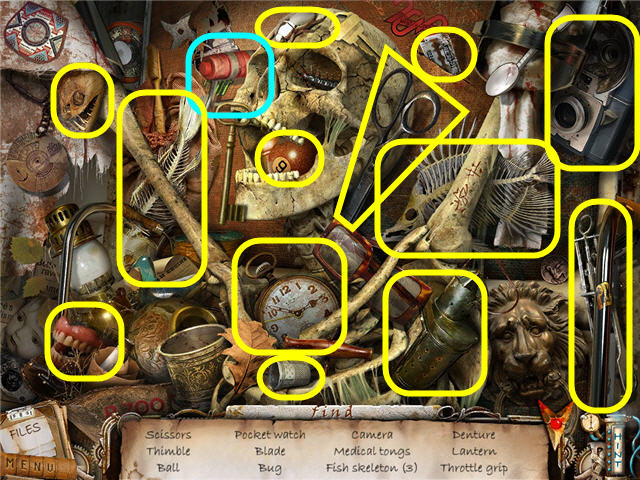
- Click on the skeleton on the right to access a Hidden Object Scene.
- Find the items listed and get a THROTTLE GRIP.
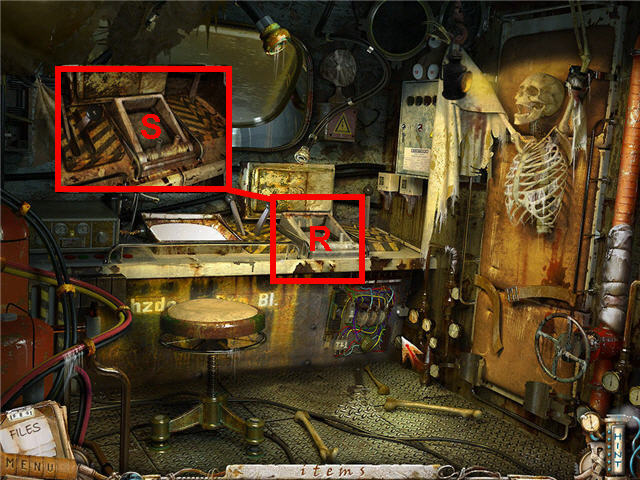
- Click on the throttle panel (R) for a close-up.
- Place the THROTTLE GRIP on the panel (S).
- Click on the throttle to move the train.
- Note the code that is being entered during the cutscene.
- Exit the area via the bottom of the screen two times to get back to the elevator.
- Click on the elevator panel and click on the 3rd floor.
- Exit the elevator and head into the X-ray room on the left.
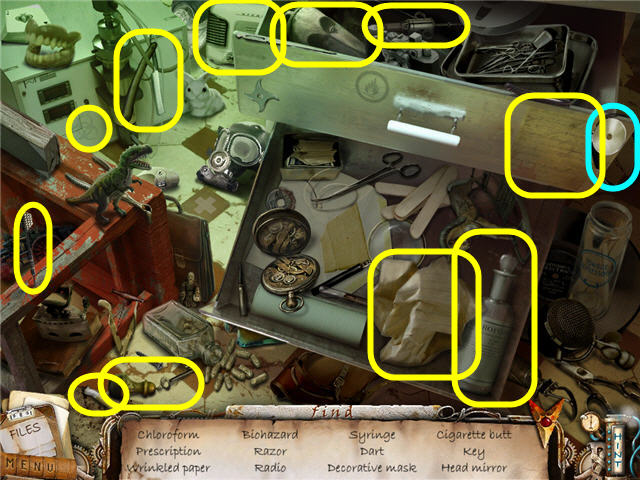
- Click on the bottom drawer on the right to access a Hidden Object Scene.
- Find the items listed to obtain HEAD LAMP MIRROR 2 of 3.
- Exit the area via the bottom of the screen two times to get to the elevator.
- Click on the elevator floor panel and choose 'B' for basement.
- Exit the elevator and go up the stairs through the hatch to the reception area.
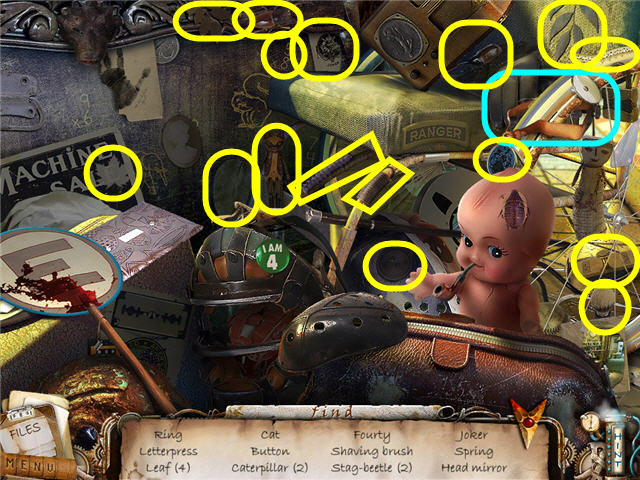
- Click on the suitcase in front of the reception desk to access a Hidden Object Scene.
- Find the items listed to obtain HEAD LAMP MIRROR 3 of 3.
- Exit out of the area two times via the bottom of the screen to get into the elevator.
- Click on the elevator floor panel and push the 1st floor button.
- Exit the elevator and go forward 3 more times.
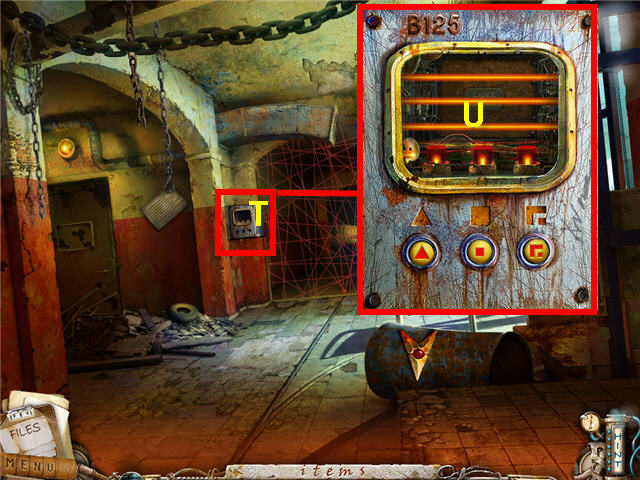
- Click on the laser control panel (T) on the left.
- Place the 3 HEAD LAMP MIRRORS on the lasers (U) to trigger a puzzle.
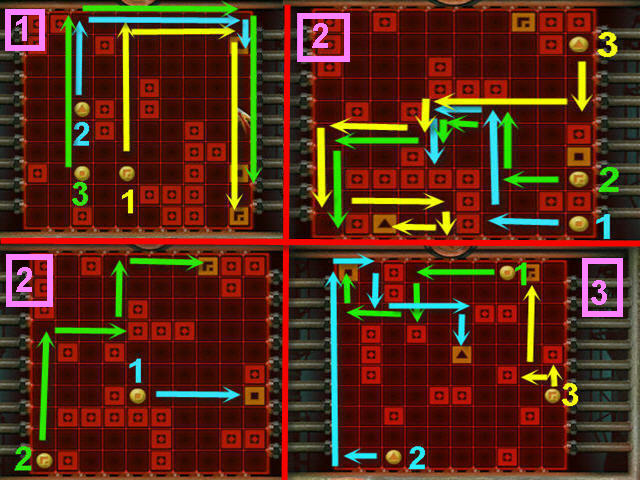
- The object is to move the gold balls into the square with the matching symbol.
- Click on a gold ball to get arrows to move them.
- Click on the arrow pointing the direction you wish to go.
- The balls will move until they hit a solid square, border or fall into their square.
- See screenshot for solution; note that the second one is divided in two sections. The balls must be moved in the order numbered.
- Head straight down the hall.
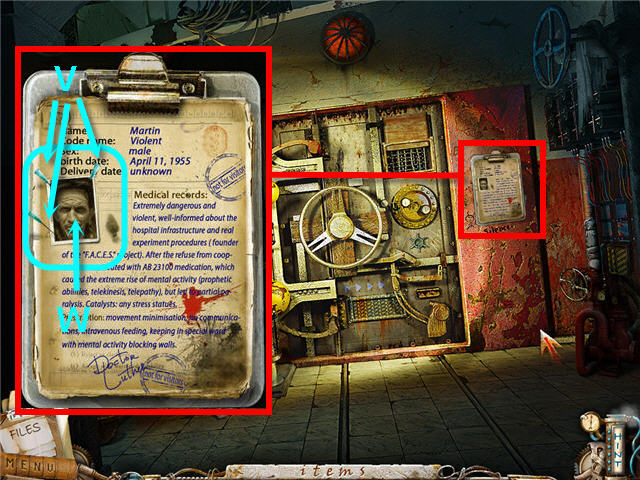
- Click on the clipboard on the right of the door and read it.
- Take the 3 PINS (V) to obtain PINS 6 of 6.
- Take the PATIENT X PHOTO (W) that was held up by the PINS.
- Click on the door and note it is steam controlled.
- Exit via the bottom of the screen 4x to return to the elevator.
- Click on the elevator floor panel and press the 2nd floor button.
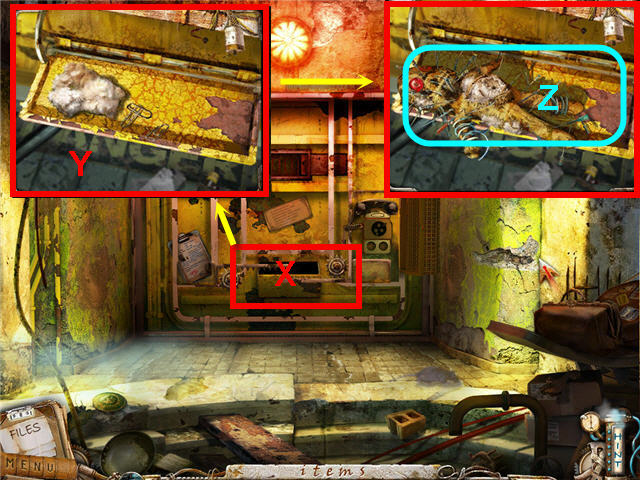
- Head forward two times.
- Click on the tray (X) for a close-up.
- Place the 6 PINS, the CLOTH and the PATIENT X PHOTO in the tray (Y).
- Click on the tray after you have provided all the items to get a VOODOO DOLL (Z).
- Exit out of the area via the bottom of the screen two times to get to the elevator.
- Click on the elevator floor panel and press 'B' for basement.
- Exit the elevator and head into the boiler room under the stairs.
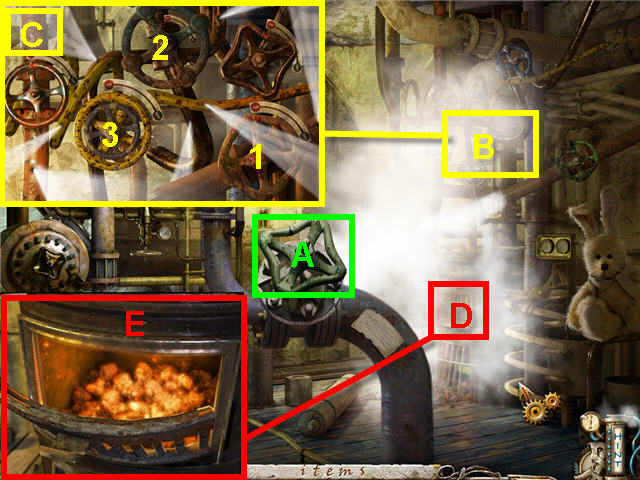
- Click on the green valve (A) to get a close-up.
- Use the THICK GLOVES on the green valve.
- Click on the valves (B) on the right to trigger a puzzle.
- The goal is to rotate the valves to shut off the steam.
- The steam being shut off is not based on whether or not the valves say they are off or on.
- See screenshot (C) for the order to shut off the valves.
- Click on the oven (D) in the corner and place the VOODOO DOLL inside (E).
- Exit the area two times to enter the elevator.
- Click on the elevator floor panel and press the 1st floor button.
- Head forward 4x to the door.
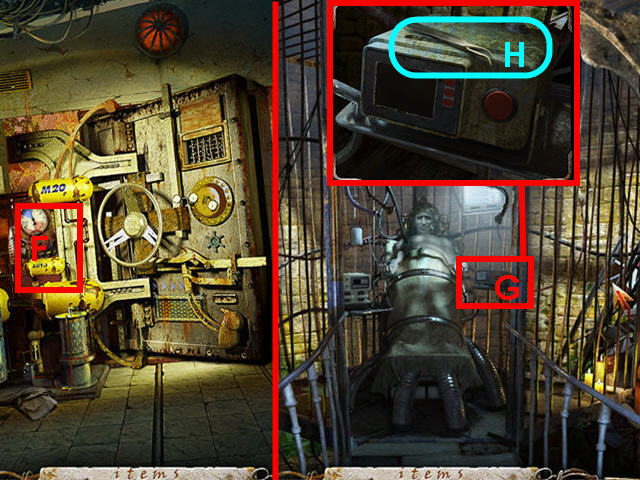
- Click on the valve (F) to get a close-up and click again to open the door.
- Enter the room and speak to your father.
- Click on the box (G) to his right and take the TWEEZERS (H).
- Exit the area via the bottom of the screen 5x to return to the elevator.
- Click on the elevator floor panel and press 'B' for basement.
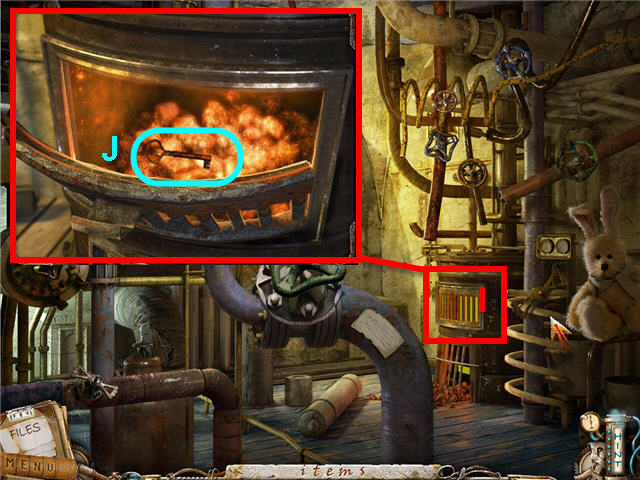
- Exit the elevator and head into the boiler room under the stairs.
- Click on the oven (I) in the right corner to get a close-up.
- Use the TWEEZERS on the key to get a DRUGSTORE KEY (J).
- Exit the area via the bottom of the screen two times to get to the elevator.
- Click on the elevator floor panel and press the 4th floor.
- Exit the elevator.
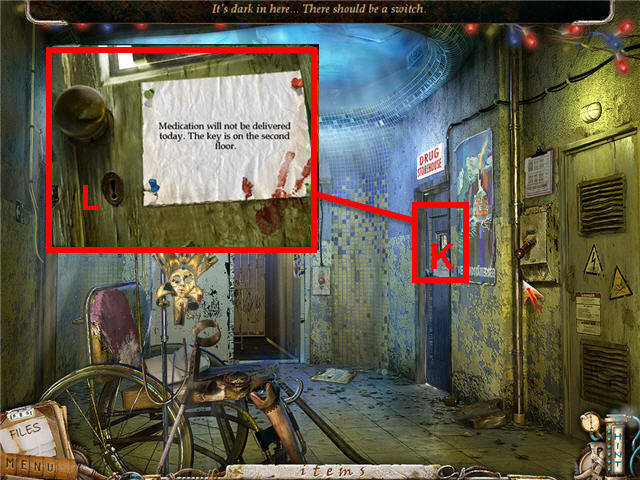
- Click on the door on the right to the drug storehouse (K) to get a close-up.
- Use the DRUGSTORE KEY on the keyhole (L) and click to turn.
- Enter the drug storeroom and click on the shelves in the middle to access a Hidden Object Scene.
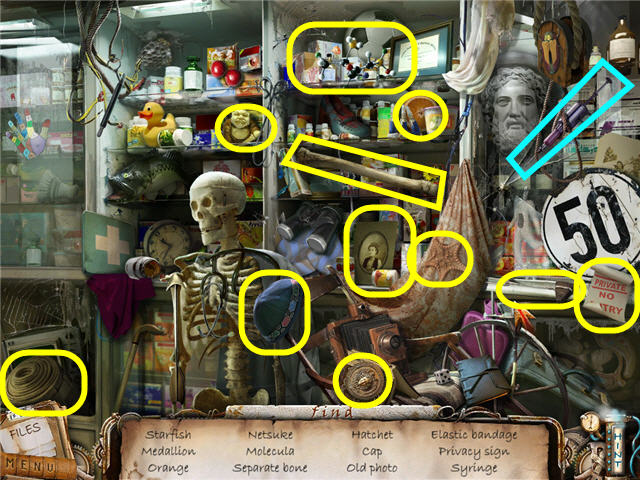
- Find the items listed.
- The CURE FOR ICARUS will be added to inventory.
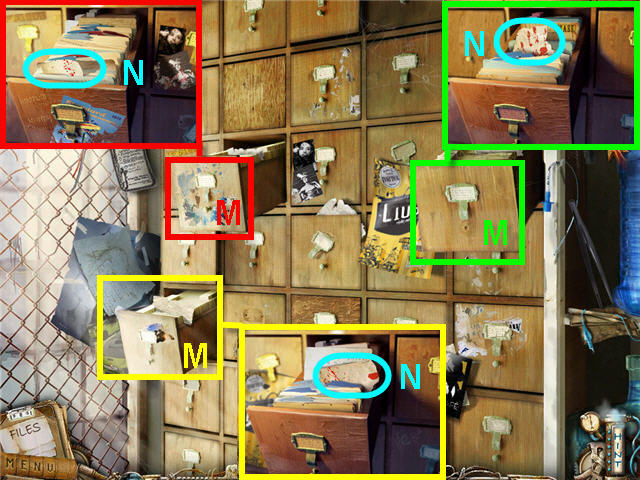
- Click on the file drawers on the left to get a close-up.
- Open the drawers (M) that contain a bloody note.
- Click on the opened drawers; take BLOODY NOTES 1, 2, and 3 of 3 (N).
- Exit the storeroom and go forward into the elevator.
- Click on the elevator floor panel and press the 3rd floor.
- Exit the elevator and head to the right.
- Use the CURE FOR ICARUS on the glass on Angel's door.
- Enter the open door to access a Hidden Object Scene.
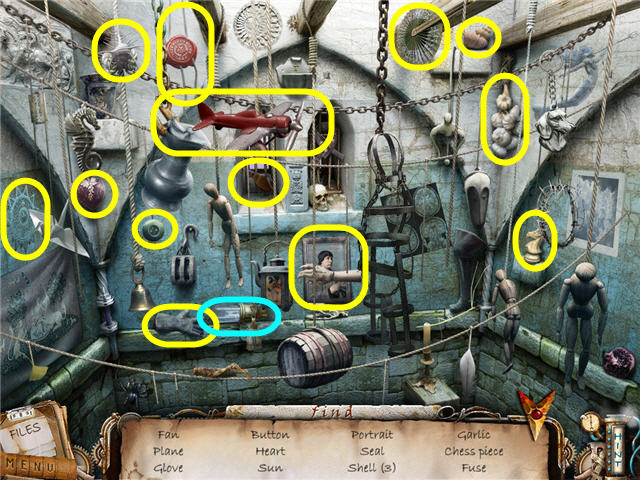
- Find the items listed to obtain a MORGUE FUSE.
- Exit the area via the bottom of the screen two times to get to the elevator.
- Click on the elevator floor panel and press 'B' for basement.
- Exit the elevator and head into the control room.
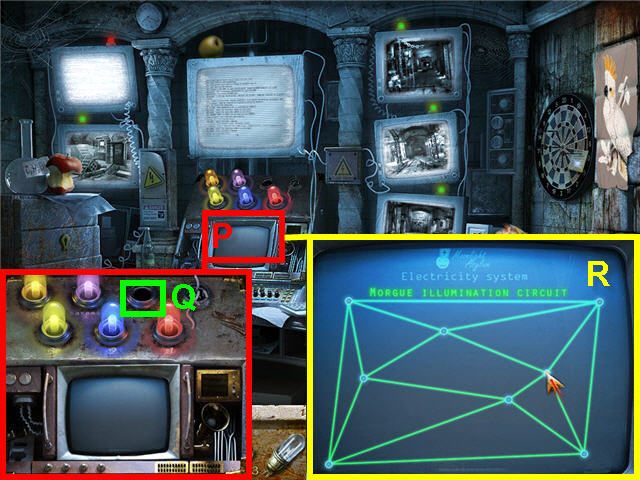
- Click on the control panel (O) to get a close-up.
- Place the MORGUE FUSE on the slot (P) that states morgue.
- Click on the monitor screen (Q) to activate the light puzzle.
- The goal is to untangle the lines so that none of them cross each other. The lines will turn green when correct. See screenshot for solution (R).
- Exit the room one time and enter the morgue on the right.
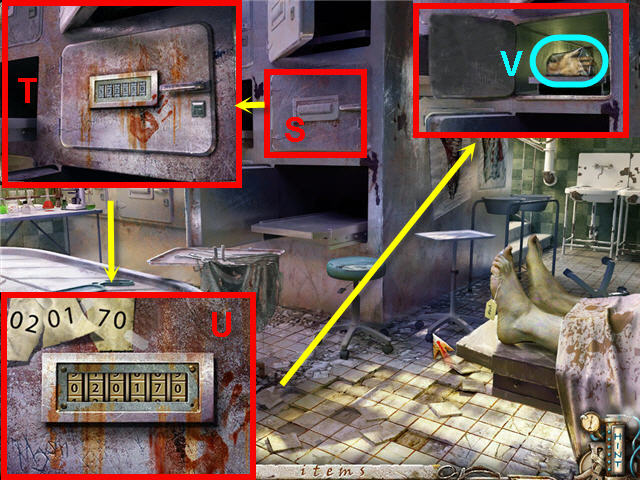
- Click on the middle right vault (S) to get a close-up.
- Use the 3 BLOODY NOTES on the vault door (T).
- Put the code from the upper left, 020170 into the panel by clicking on the dials to turn them.
- You can go up or down on the dials depending on where you place your cursor. See screenshot for solution (U).
- Take the FROZEN HAND (V) from the opened vault.
- Exit the morgue and head up the stairs through the hatch to the reception area.
- Head to the exit door on the right.
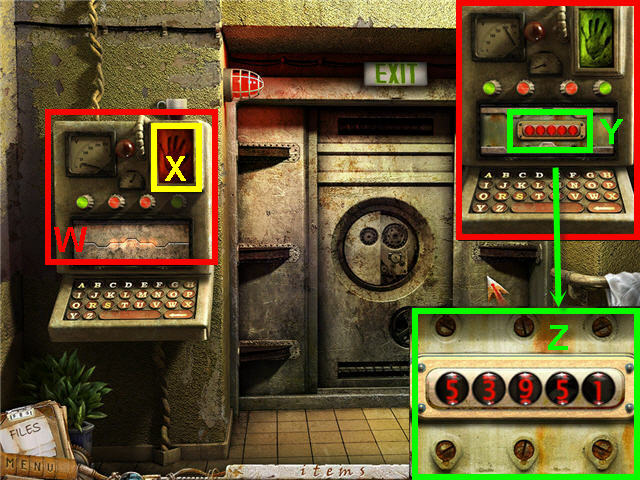
- Click on the panel (W) on the left to get a close-up; use the FROZEN HAND on the handprint scanner (X).
- Click on the keyboard to get a close-up of the code panel.
- Enter the code by clicking on the white dots above or below the numbers.
- Use the code you received from the vision you had when you activated the train in the opened panel (Y). It can be found in your files; the code is 53951 (Z).
- Exit the area two times via the bottom the screen.
- Click on the generator under the stairs in the hall to access a Hidden Object Scene.
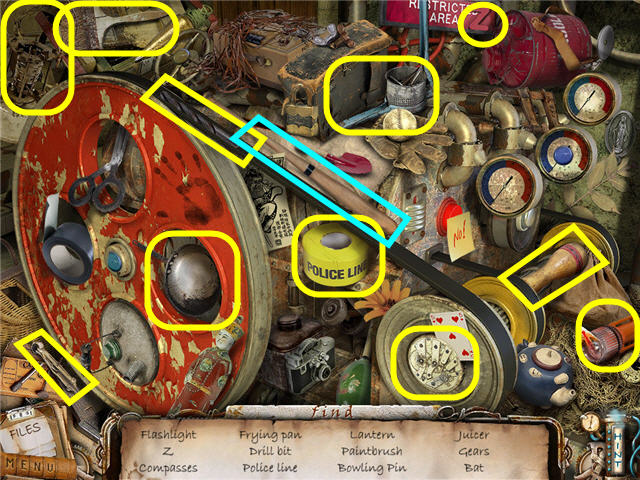
- Find the items listed and get a BAT.
- Enter into the control room and click on the control panel.
- Use the BAT on the fuses until they are all broken.
- Exit the room and head up the stairs to the hatch to the reception area.
- Head to the right to the exit door and it should open automatically.
- Enter into the opened doorway.
- Congratulations! You have successfully completed F.A.C.E.S.!
Created at: 2011-08-19

